

Page 1

PIX-28
Time Clock
Operation Manual
Page 2

Proprietary Notice
This document contains proprietary information and such information
may not be reproduced in whole or part without the written permission
from:
Amano Cincinnati, Inc.
140 Harrison Ave.,
Roseland, New Jersey 07068.
Amano Cincinnati, Inc. reserves the right to make equipment changes
and improvements, which may not be reflected in this document.
Portions of this document may have been updated to include the latest
hardware or firmware version, if applicable.
We recommend that this document be read in its entirety before any
attempt is made to operate the equipment.
Page 3

Table of Contents
Chapter 1: Overview ...........................................................1
Specifications.............................................................................1
External View.............................................................................1
Rear Panel.................................................................................2
LCD Display...............................................................................2
Chapter 2: Getting Started .................................................5
Removing the Cover & Packing Material ...................................5
Mounting ....................................................................................6
Wall Mounting......................................................................... 6
Desktop Mounting................................................................... 7
Make a Test Print.......................................................................7
Ink Capacity Gauge....................................................................7
Chapter 3: Program Mode..................................................9
Entering the Program Mode.....................................................10
Date (Month, Day and Year) Setting........................................10
Time (Clock) Setting.................................................................11
Daylight Saving Time Disable/Enable......................................11
Quick Set-Up Code..................................................................12
Other Options Menu.................................................................13
Print Style Using Symbol or Print Style Codes..................... 14
Print Style Codes ..............................................................14
Symbol Printing.................................................................15
Setting the Language............................................................18
Print Direction.......................................................................19
Setting the Auto Print............................................................ 20
Leading Zero.........................................................................21
Begin Daylight Saving Time..................................................21
End Daylight Saving Time ....................................................22
Diagnostics...........................................................................23
Chapter 4: Maintenance and Troubleshooting...............25
Ribbon Cartridge Replacement................................................25
Error Messages........................................................................26
Amano PIX-28 i
Page 4

ii Amano PIX-28
Page 5

Chapter 1: Overview
W
Specifications
Power Requirements: PIX-28 Input: 16.5 VAC, 60Hz, 0.6A (Max.)
AC Adapter: 120 VAC ± 10%, 60Hz
230 VAC ± 10%, 50Hz
240 VAC ± 10%, 50Hz
Ambient Temperature: -10°C~45°C (14°F~113°F)
Ambient Humidity: 10%~90% (no condensation)
Dimensions: 140mm x 150mm x 165mm
5.5in x 5.9in x 6.5
Weight: 1.8kg (4.2lbs.)
Environment:
External View
Digital
Clock
Print
Slot
Indoor use only; dust-free environment
Keep out of direct sunlight
Keyhole
Print
indow
Print
Margin
Print
Buttons
Amano PIX-28 1
Reset Switch
(on bottom)
Page 6
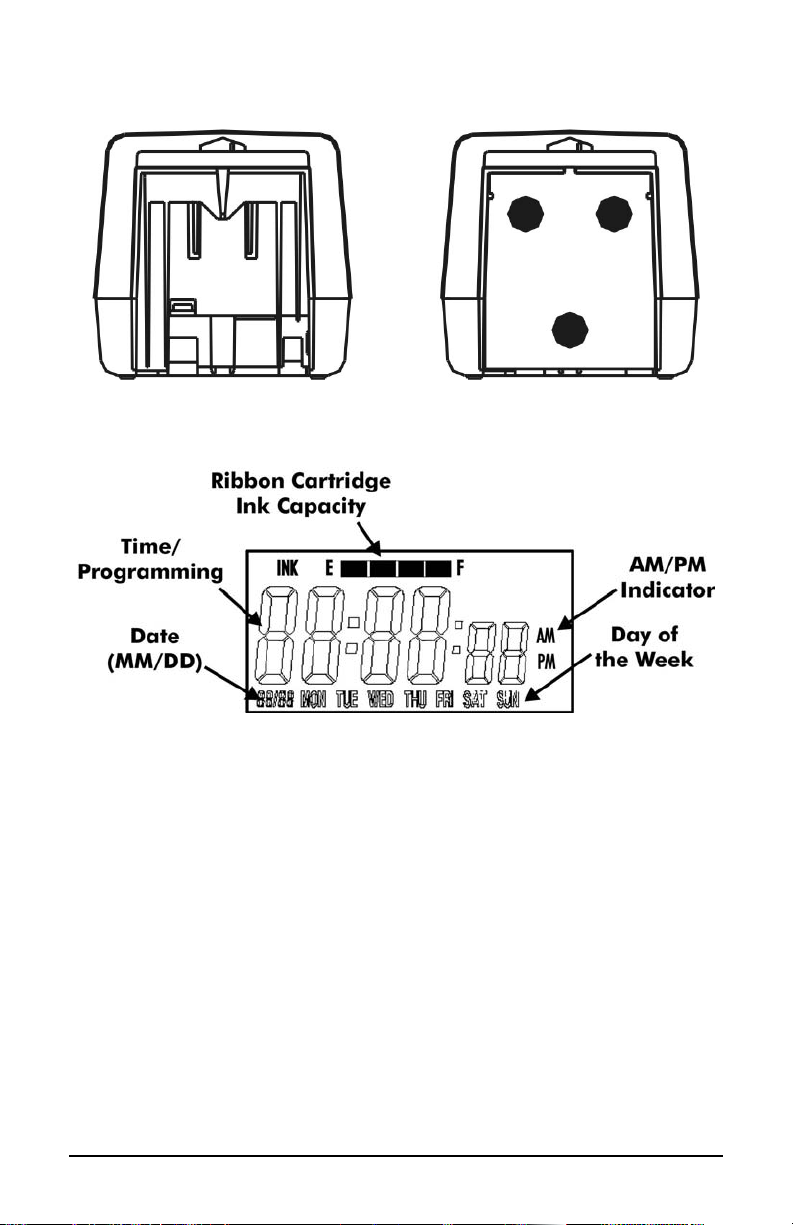
Rear Panel
LCD Display
2 Amano PIX-28
Page 7
Description of Controls
Normally, the Display Window shows the date and time. When you
use the Quick Set or Program Mode to change the settings of the PIX28, the instructions to change the clock are shown in this window.
The buttons underneath the cover are used to navigate through the
Quick Set and Program Mode to change the clock’s settings.
CHANGE Button. Use this button to change the information shown on
the display when you are in the Quick Set or Program Mode.
ENTER Button. When you are in the Quick Set or Program Mode, use
this button to enter the setting shown on the display into memory.
The RESET Button
The RESET Button is located on the
bottom of the clock.
Amano PIX-28 3
Page 8

4 Amano PIX-28
Page 9
Chapter 2: Getting Started
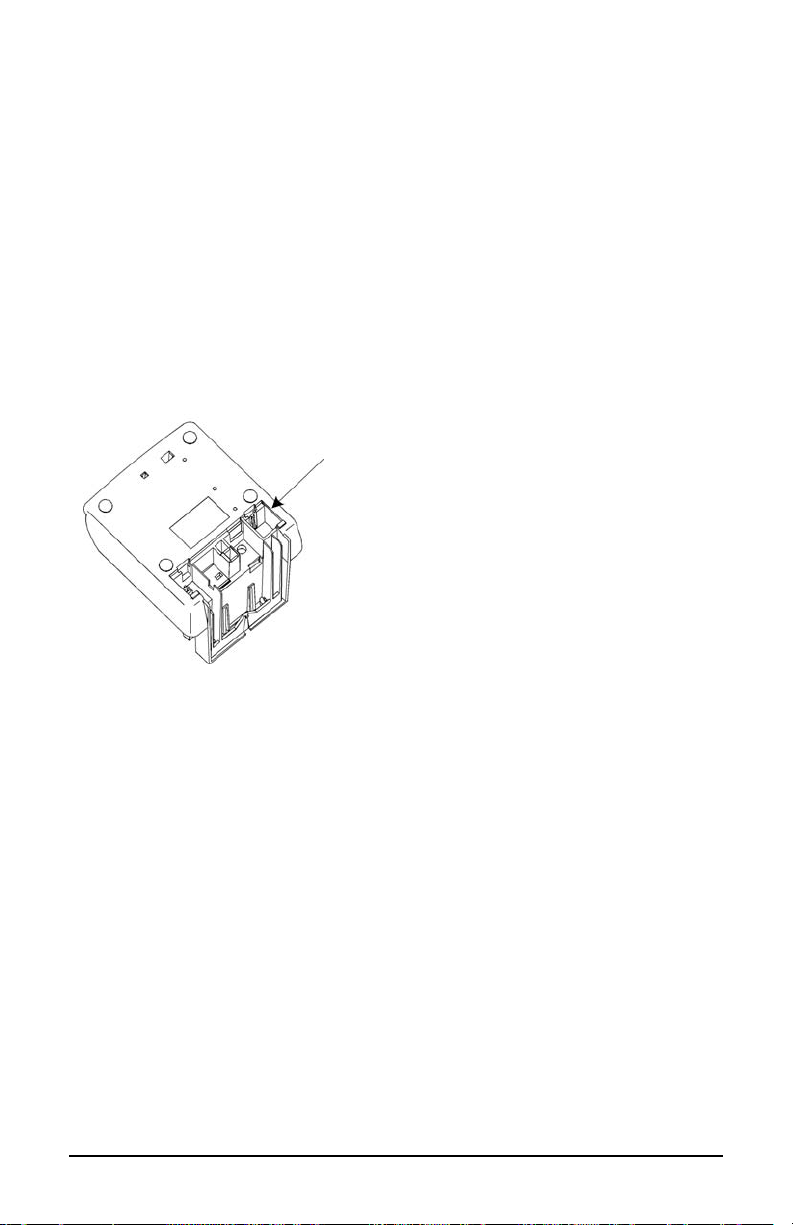
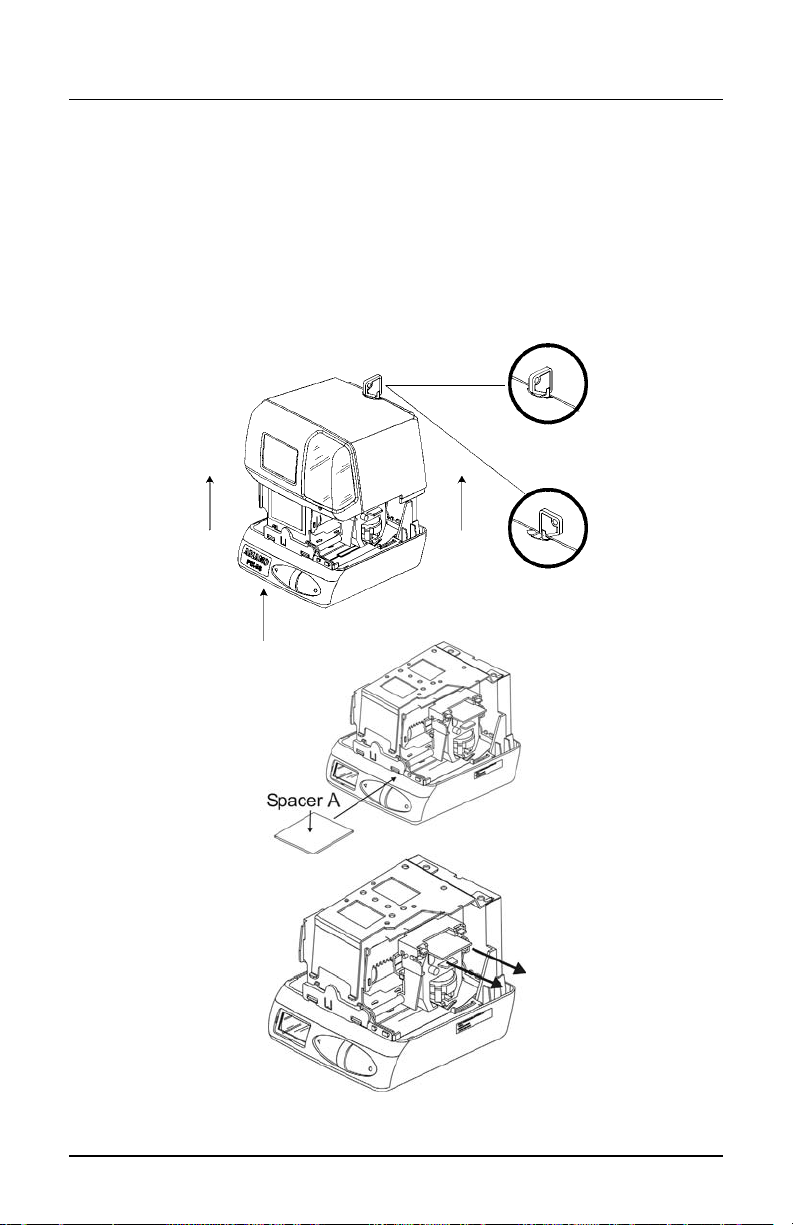
Removing the Cover & Packing Material
You must remove the packaging spacers from the printer block and the
Printer Carriage before attempting to use your PIX-28.
1. Insert the key provided and turn clockwise to open the case. Lift the
cover to remove.
2. Lift the printer packing material and remove the Spacer A.
3. Remove Spacer B between the Ribbon Cartridge and the Printer
Carriage.
Open
Locked
Remove
Remove
Spacer B
Amano PIX-28 5
Page 10
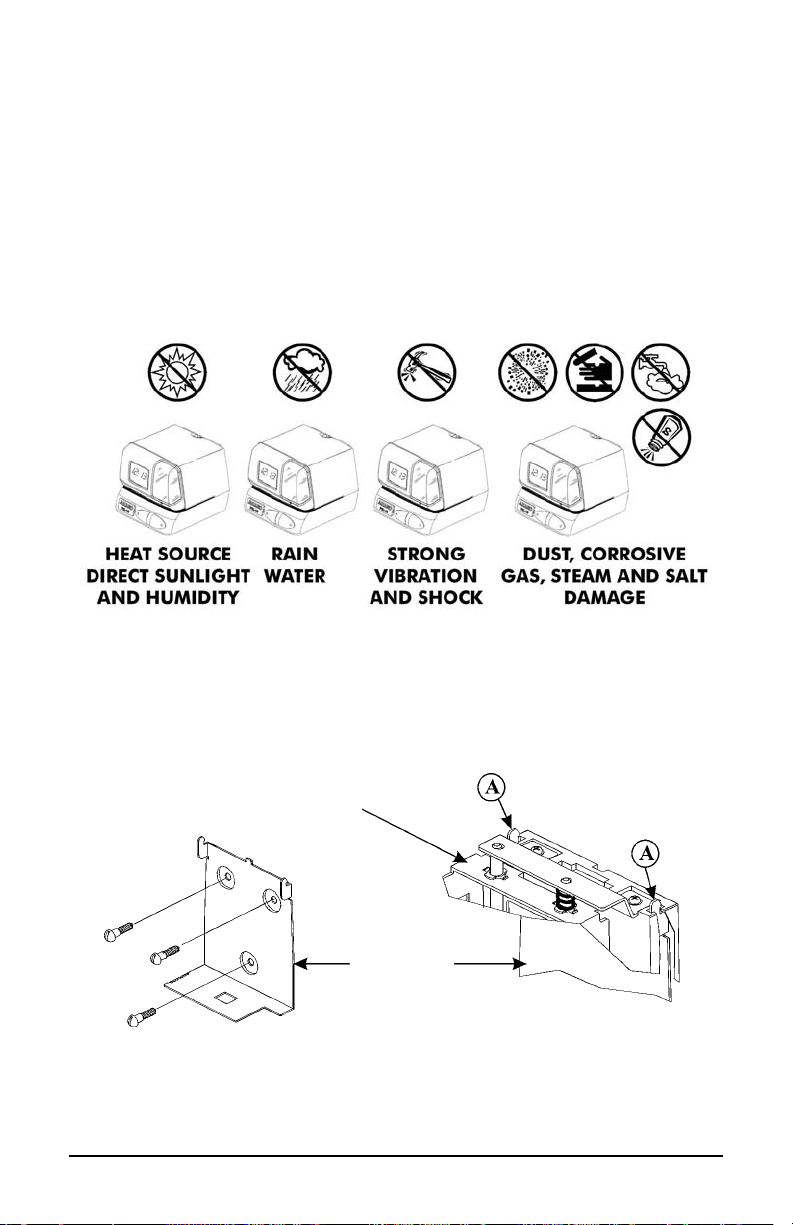
Mounting
When choosing a mounting location for your PIX-28, you should consider
the following:
• The mounting surface or hardware must be capable of supporting the
unit’s weight, 2.5 kg (5.5 lbs).
• The area must be within the specified operating temperature range:
-10°C~45°C (14°F~113°F), 10% ~90% Rh.
• The unit should be in close proximity to a power source or wall outlet.
• The following conditions should not exist:
Wall Mounting
1. Remove the cover.
2. With the clock facing you, remove the mounting bracket by pulling
the top tabs (A) towards you, and then pushing the tabs down (see
below).
Printer
Frame
Wall Mounting
Bracket
3. Securely mount the PIX mounting bracket on the wall using three
#10 wood screws or equivalent.
6 Amano PIX-28
Page 11

4. Place the PIX-28 on the mounting bracket by sliding the top tabs into
the slots on each side of the case. Push the PIX-28 back and down
against the mounting bracket until the PIX-28 snaps into place. Be
careful not to pinch the power cord with the bracket. Installing the
cover will secure the PIX-28 to the mounting bracket.
Desktop Mounting
The PIX-28 should be placed on a level surface with adequate
ventilation.
Make a Test Print
1. Make sure that there is power to the PIX-28.
2. Insert a piece of paper or time card into the PIX-28. The clock will
automatically print YEAR, MONTH, DATE and TIME with AM or PM.
3. If the imprint is satisfactory, the PIX-28 is ready for use.
4. If you wish to change the time and/or print style on the PIX-28, enter
into Program Mode. The next page gives instructions on
programming the PIX-28 to fit your needs.
Ink Capacity Gauge
The LCD Display contains an Ink Capacity gauge. This gauge indicates
the amount of ink remaining in the ribbon cartridge using four bar
segments, from E (Empty) to F (Full).
The PIX-28 calculates the ink capacity of the ribbon cartridge from the
number of imprints made. As the ink capacity decreases, the bars in the
gauge will disappear. If the ribbon reaches below 25% capacity, the “E”,
“F” and “INK” characters will blink until the ink counter is reset.
Amano PIX-28 7
Page 12

8 Amano PIX-28
Page 13

Chapter 3: Program Mode
Unlock and remove the cover. Locate the PROGRAM, CHANGE,
ENTER, HOUR, and MINUTE buttons on top of the clock.
The PROGRAM button is used to enter and exit the Program Mode. If a
program step is in the process of being changed when this button is
pushed, the new information will not be saved.
The CHANGE button is used to change the information on the display.
The ENTER button is used to accept the information shown on the
display and save it in memory or to enter a program mode.
The HOUR button is used to advance the hour in the display by
increments of 1.
The MINUTE button is used to advance the minutes in the display by
increments of 1.
The RESET button is located on the rear of the clock, underneath the
unit. Pressing this button will clear any jams or errors.
Amano PIX-28 9
Page 14

Entering the Program Mode
1. To start the Program Mode, unlock and remove the cover.
2. Press and hold the PROGRAM button to access the Main
Programming Menu, which consists of the following items:
Code Menu Function
PI dA E
P2 CIoc
P3 dLS
P4 Prn
P5 O hr
3. When
Note: To exit the Program Mode at any time, press the Program button.
dA E PI flashes in the display, release the
PROGRAM button.
Year, Month, and Date settings
Clock settings
Daylight Saving Time Enable/Disable
Quick Print Setup Codes
Other Options Menu
Date (Month, Day and Year) Setting
1. Enter the Program Mode. When dA E PI flashes in
the display, press the ENTER button.
2. Press the CHANGE button until the correct year
appears, then press the ENTER button.
3. Press the CHANGE button until the correct day
appears, then press the ENTER button.
4. Press the CHANGE button until the correct month
appears, then press the ENTER button.
5. When the display flashes the correct month, date
and year, press the ENTER button.
6. When the display flashes
CHANGE button to move to Clock Settings, or
press the PROGRAM button to exit the Program
Mode.
10 Amano PIX-28
dA E PI , press the
Page 15

Time (Clock) Setting
1. Enter the Program Mode and press the CHANGE
button. When
the ENTER button.
Note: Seconds are fixed at 00 and cannot be
changed. The seconds will start incrementing from
00 when the ENTER button is pressed.
2. Press the CHANGE button until the correct minute
appears, then press the ENTER button.
3. Press the CHANGE button until the correct hour
and time of day appears, then press the ENTER
button.
4. When the display flashes the correct time, press
the ENTER button.
Cioc P2, flashes in the display, press
5. When the display flashes
CHANGE button to move to the Daylight Saving
Time Setting or press the PROGRAM button to
exit the Program Mode.
Cioc P2, press the
Daylight Saving Time Disable/Enable
Note: When this setting is set to ON, the clock’s time will automatically
change for DST. When this setting is set to OFF, the clock’s time will
not change for DST. The dates to begin and end DST are set in the
Other Options Menu (See Page 13).
1. Enter the Program Mode and press the CHANGE
button until
the ENTER button.
2. Press the CHANGE button to alternate between
On and Off.
3. When the display flashes the correct setting,
press the ENTER button.
4. When the display flashes
CHANGE button to move to the Quick Set-Up
Code setting or press the PROGRAM button to
exit the Program Mode.
dLS P3 flashes in the display. Press
dLS P3, press the
Amano PIX-28 11
Page 16

Quick Set-Up Code
Note: If you do not wish to use one of the Quick Set-Up Code settings,
you may set an alternate style on the following page.
1. Enter the Program Mode and press the CHANGE
button until
ENTER button.
2. The display will flash the current setting. Press the
CHANGE button to scroll through each of the
Quick Set-Up Code Settings.
Code Print Style
Pr-I
Pr-2
Pr-3
Pr-4
Pr-5
Pr-6
Pr-7
Pr-8
Pr-9
Pr-0
3. When the display flashes the correct setting, press
the ENTER button.
Prn P4 flashes in the display. Press the
Year, Month, Date, 12 Hr, 60th
Year, Month, Date, 24 Hr, 60th
Year, Month, Date, 24 Hr, 100th
Year, Month, Date, 24 Hr, 10th
Day, 24 Hr, 100th
2-Digit Year, Month, Date, 24Hr, 60th, Seconds
4-Digit Year, Month, Date, 24Hr, 60th, Seconds
Count, Month, Date, Year
Count, Date, Month, Year
Count, Date, Month, 24-Hr:60
th
4. When the display flashes
CHANGE button to move to the Other Options
menu, or press the PROGRAM button to exit the
Program Mode.
12 Amano PIX-28
Prn P4, press the
Page 17

Other Options Menu
Note: If you do not wish to use one of the Quick Set-Up Code settings,
you may set an alternate style on the following page.
1. Enter the Program Mode and press the CHANGE
button until
ENTER button.
2. The display will flash the first programming step in
the Other Options Menu. Press the CHANGE
button to advance through the menu selections.
Item Print Direction
Prn
LAn9
Prdr
A Pr
2Er 0
bdL
EdL
3. When the display flashes the correct selection,
4. After programming the selection, press the
DIA9
press the ENTER button.
CHANGE button to return to the Other Options
menu or press the PROGRAM button to exit the
Program Mode.
0 hr P5 flashes in the display. Press the
Print style using Symbol or Print Style Codes
Language of the print out
Print Direction (left or right hand)
Disable/Enable/Configure Auto Print option
Disable/Enable Leading Zero in print out
Daylight Saving Time Begin Date
Daylight Saving Time End Date
Diagnostics Menu
Amano PIX-28 13
Page 18

Print Style Using Symbol or Print Style Codes
Note: The following options are to be used if you do not wish to use one
of the Quick Set-Up Code settings on page 12.
Print Style Codes
Print Style Codes allow you to create an imprint based on a preset code
for each of the four digits in the display.
The codes and their meanings are as follows:
Digit 1 Digit 2 Digit 3 Digit 4*
0 0 = year, month, date 0 = Julian 0 = FILE
0 1 = 12Hr, 10ths 1 = day 1 = RCV'D
0 2 = 24Hr, 10ths 2 = date 2 = SENT
0 3 = 12Hr, 20ths 3 = month, date 3 = FAX'D
4 = count 4 = 24Hr, 20ths 4 = date, month 4 = VOID
5 = left side printing 5 = 12Hr, 60ths 5 = day, date 5 = PAID
6 = right side printing 6 = 24Hr, 60ths 6 = date, day 6 = CFM'D
0 7 = 12Hr, 100ths 7 = year, month, date 7 = APR'D
8 = seconds 8 = 24Hr, 100ths 8 = date, month, year 8 = CMPL'D
0 9 = 4 digit year 9 = month, date, year 9 = ORIGN
*Digit 4 becomes active when digit 2 = 0 and digit 3 = 7.
If you cannot locate the desired print style from the Quick Set-Up Code
list, refer to the instructions for programming the imprint using Symbol
Printing on page 15.
14 Amano PIX-28
Page 19

To create an imprint using Print Codes:
1. Enter the Program Mode and press the CHANGE
button until
ENTER button. When
display, press the ENTER button.
0 hr P5 flashes in the display. Press the
Prn P11 appears in the
2. Press the CHANGE button until
the display, then press the ENTER button.
3. Press the CHANGE button until the desired
number appears in the fourth position. Press the
ENTER button.
4. Press the CHANGE button until the desired
number appears in the third position. Press the
ENTER button.
5. Press the CHANGE button until the desired
number appears in the second position. Press the
ENTER button.
6. Press the CHANGE button until the desired
number appears in the first position. Press the
ENTER button.
7. When the display flashes all four correct numbers,
press the ENTER button.
8. When the display flashes
CHANGE button to move to the Language Setting
or press the PROGRAM button to exit the Program
Mode.
CodE Pr appears in
Prn P11 , press the
Symbol Printing
Symbol Printing allows you to create a custom imprint using Symbol
Codes. Symbol Codes can be set in any order provided that the total
length of the imprint does not exceed 150 dots or 99% of the maximum
displacement (print length) of the print head. The print length of the print
head is 152 dots or 35 mm (1.4”).
To Create an Imprint Using Symbol Codes:
1. Enter the Program Mode and press the CHANGE
button until
ENTER button. When
display, press the ENTER button.
Amano PIX-28 15
0 hr P5 flashes in the display. Press the
Prn P11 appears in the
Page 20

2. When CodE Pr appears in the display, press the
CHANGE button.
3. When
SYbL P r appears in the display, press the
ENTER button.
4. Press the CHANGE button until the character
symbol you want to print appears, then press the
ENTER button. The Symbol Codes are as follows:
Code Character Length
YEAr 2d
nn on h
dA E
dAY
JLAN
l0 h l2
60 h l2
100 h l2
10 h 24
60 h 24
100 h 24
SLSh
dASh
SPCE
YEAr 4d
bLoc
SY-1
SY-2
SY -3
SY-4
SY-5
SY-6
SY-7
SY-8
SY-9
SY-0
End
2-Digit Year 25 = 16.45%
Month 30 = 19.74%
Date 20 = 13.16%
Day 20 = 13.16%
Julian Date 30 = 19.74%
12 Hr. and 10th/Hr. 49 = 32.24%
12 Hr. and 60th/Hr. 59 = 38.82%
12 Hr. and 100th/Hr. 59 = 38.82%
24 Hr. and 10th/Hr. 35 = 23.03%
24 Hr. and 60th/Hr. 45 = 29.61%
24 Hr. and 100th/Hr. 5 = 29.61%
Slash ( / ) 10 = 6.58%
Dash ( - ) 07 = 4.61%
Space ( ) 03 = 1.97%
4-Digit Year 28 = 14.00%
Block (Q) delimiter
use between fields.
RCV’D 43 = 28.29%
SENT 40 = 26.32%
FAX’D 43 = 28.29%
VOID 40 = 26.32%
PAID 40 = 26.32%
FM’D 43 = 28.29%
APR’D 43 = 28.29%
CMPL’D 53 = 34.87%
ORIGN 50 = 32.89%
FILE 40 = 26.32%
End of File -
10 = 6.58%
16 Amano PIX-28
Page 21

Code Character Length
Add
dEL
Add a Character Delete a Character -
The table lists examples of the many imprints that can be created using
Symbol Printing:
Print Style Example Code to Enter
DAY,12Hr,60th/Hr FRI PM 1:45
DAY,24Hr,60th/Hr FRI 13:45
DAY,24Hr,10th/Hr FRI 13.7
DAY,24Hr,100th/Hr FRI 13.75
DATE,12Hr,60th/Hr 13 PM 1:45
DATE,24Hr,60th/Hr 13 13:45
DATE,24Hr,10th/Hr 13 13.7
DATE,24Hr,100th/Hr 13 13.75
MONTH,DATE,12Hr,60th/Hr APR13 PM 1:45
MONTH,DATE,24Hr,60th/Hr APR13 13:45
MONTH,DATE,24Hr,10th/Hr APR13 13.7
MONTH,DATE,24Hr,100th/Hr APR13 13.75
YEAR,MONTH,DATE,12Hr,60th/Hr 95 APR13 PM 1:45
YEAR,MONTH,DATE,24Hr,60th/Hr 95 APR13 13:45
YEAR,MONTH,DATE,24Hr,10th/Hr 95 APR13 13.7
YEAR,MONTH,DATE,24Hr,100th/Hr 95 APR13 13.75
YEAR,MONTH,DATE,SYMBOL1 95 APR13 RCV’D
YEAR,MONTH,DATE,SYMBOL2 95 APR13 SENT
YEAR,MONTH,DATE,SYMBOL3 95 APR13 FAX’D
YEAR,MONTH,DATE,SYMBOL4 95 APR13 PAID
dAY•SPCE•60 h12
dAY•SPCE•60 h 24
dAY•SPCE•10 h 24
dAY•SPCE•100 h 24
dA E•SPCE•60 h12
dA E•SPCE•60 h 24
dA E•SPCE•10 h 24
dA E•SPCE•100 h 24
mon h•SPCE•dA E•SPCE•60 h12
mon h•SPCE•dA E•SPCE•60 h 24
mon h•SPCE•dA E•SPCE•10 h 24
mon h•SPCE•dA E•SPCE•100 h 24
YEAr2d•SPCE•mon h•SPCE•dA E•SPCE•60 h12
YEAr2d•SPCE•mon h•SPCE•dA E•SPCE•60 h 24
YEAr2d•SPCE•mon h•SPCE•dA E•SPCE•10 h 24
YEAr2d•SPCE•mon h•SPCE•dA E•SPCE•100 h 24
YEAr2d•SPCE•mon h•SPCE•dA E•SPCE•SY-1
YEAr2d•SPCE•mon h•SPCE•dA E•SPCE•SY-2
YEAr2d•SPCE•mon h•SPCE•dA E•SPCE•SY-3
YEAr2d•SPCE•mon h•SPCE•dA E•SPCE•SY-4
5. Continue to assign codes until you have finished.
6. Press the CHANGE button until the End code
flashes, then press the ENTER button.
7. When the display flashes
Prn P11 , press the
CHANGE button to move to the Language Setting
or press the PROGRAM button to exit the Program
Mode.
Amano PIX-28 17
Page 22

Setting the Language
The PIX-28 can be set to print months, days of the week, and certain
keywords in one of the following (6) languages: English (Default),
Spanish, French, Portuguese, Italian, German and Common (Numeric
with Julian Calendar). The language imprints are as follows:
Imprint English Spanish French Portuguese Italian German
Monday
Tuesday
Wednesday
Thursday
Friday
Saturday
Sunday
January
February
March
April
May
June
July
August
September
October
November
December
received
sent
faxed
void
paid
confirmed
approved
completed
origin
file
MO LU LU SG LU
TU MA MA TR MA
WE MI ME QU ME
TH JU JE QI GI
FR VI VE SX VE
SA SA SA SB SA
SU DO DI DO DO
JAN ENE JAN JAN GEN
FEB FEB FEV FEV FEB
MAR MAR MAR MAR MAR
APR ABR AVR ABR APR
MAY MAY MAI MAI MAG
JUN JUN JUN JUN GIU
JUL JUL JUL JUL LUG
AUG AGO AOU AGO AGO
SEP SEP SEP SET SET
OCT OCT OCT OUT OTT
NOV NOV NOV NOV NOV
DEC DIC DEC DEZ DIC
RCV'D RCBDO RECU RCBDO RICEV
SENT ENVDO ENV ENVDO SPED
FAX'D FAX FAXE FAX FAX
VOID ANLDO ANNUL ANUL ANNUL
PAID PGADO PAYE PAGO PAGA
CFM'D CONFDO CONF CONF CONF
APR'D APBDO APPR APRV APPR
CMPL'D TRMDO TERM TERM COMPL
ORIGN ORIGN ORIG ORIG ORIG
FILE ARCH FICH ARQV FILE
AUSG
LAGER
EMPF
ABGES
MO
DI
MI
DO
FR
SA
SO
JAN
FEB
MAR
APR
MAI
JUN
JUL
AUG
SEP
OKT
NOV
DEZ
EING
FAX
BEZ
BEST
ORIG
AKTE
18 Amano PIX-28
Page 23

To Set the Language:
1. Enter the Program Mode and press the CHANGE
button until
ENTER button.
2. Press the CHANGE button until
the display. Press the ENTER button. The
language codes are as follows:
3. Press the CHANGE button to advance through the
list of languages. Press the ENTER button to make
a selection.
4. When the display flashes
CHANGE button to move to the Print Direction
Setting, or press the PROGRAM button to exit the
Program Mode.
0 hr P5 flashes in the display. Press the
LAn9 I2, flashes in
Language Code
English
Spanish
French
German
Italian
Portuguese
Common
En9 LI
SPn L2
Frn L3
9Er L4
I
P
Conn L7
Y L5
g L6
LAn9 I2, press the
Print Direction
Printing orientation can be programmed for Right or Left Side (Edge)
(time) card printing. The default setting is Left Side Printing. If you wish
to change this setting, perform the following:
1. Enter the Program Mode and press the CHANGE
button until
ENTER button.
0 hr P5 flashes in the display. Press the
2. Press the CHANGE button until
the display. Press the ENTER button.
3. Press the CHANGE button until the correct print
direction
flashes in the display, then press the ENTER
button.
4. When the display flashes
CHANGE button to move to the Auto Print Setting,
or press the PROGRAM button to exit the Program
Mode.
Amano PIX-28 19
r9h (Right Side) or LEf (Left Side)
Prdr I 3 flashes in
Prdr I 3, press the
Page 24

Setting the Auto Print
Media (time cards, etc.) are manually inserted into the PIX-28 and
aligned. The PIX-28 can be set to print the imprint on media manually
using the Print button (single prints or multiple prints) or automatically. To
do so, perform the following:
1. Enter the Program Mode and press the CHANGE
button until
ENTER button.
2. Press the CHANGE button until
the display. Press the ENTER button.
3. Press the CHANGE button until the desired code
appears on the display, and then press the Enter
button. The Auto Print codes are as follows:
Code Mode Description
P on
OFF
P:5 on
0 hr P 5 flashes in the display. Press the
A Pr I 4 flashes in
Auto Print
Manual Print
Precision Print
Will automatically print a single print
when media are inserted.
Requires you to use the PRINT
button when printing.
Enables you to print multiple or
consecutive prints when holding
down the PRINT button.
4. When the display flashes
CHANGE button to move to the Leading Zero
Setting, or press the PROGRAM button to exit the
Program Mode.
A Pr I 4 , press the
20 Amano PIX-28
Page 25

Leading Zero
The PIX-28 can include a leading zero on the imprint before single digit
times and dates. (For example, DEC.
is disabled, but can be enabled for your application. To enable/disable
this feature, perform the following:
1. Enter the Program Mode and press the CHANGE
button until
ENTER button.
0 hr P5 flashes in the display. Press the
06, 08:00). As shipped, this feature
2. Press the CHANGE button until
the display. Press the ENTER button.
3. Press the CHANGE button until the desired setting
2Er 0 I 5 flashes in
OFF (Disable) or ON (Enable) flashes in the display,
then press the ENTER button.
4. When the display flashes
CHANGE button to move to the Begin Daylight
Saving Time Date Setting, or press the PROGRAM
button to exit the Program Mode.
2Er 0 I 5, press the
Begin Daylight Saving Time
This setting defines the start or beginning date of Daylight Saving Time.
Once set, it will automatically adjust every year. You will only need to
program it once. Daylight Saving Time is enabled/disabled in the Main
Programming Menu.
1. Enter the Program Mode and press the CHANGE
button until
ENTER button.
2. Press the CHANGE button until
the display. Press the ENTER button.
3. Press the CHANGE button until the correct year
that Daylight Saving Time is set to begin appears
in the display, then press the ENTER button.
0 hr P5 flashes in the display. Press the
bdL I 6 flashes in
4. Press the CHANGE button until the correct day
that Daylight Saving Time is set to begin appears
in the display, then press the ENTER button.
5. Press the CHANGE button until the correct month
that Daylight Saving Time is set to begin appears
in the display, then press the ENTER button.
Amano PIX-28 21
Page 26

6. When the display flashes the correct year, month
and date, press the ENTER button.
7. When the display flashes
CHANGE button to move to the End Daylight
Saving Time Date Setting, or press the PROGRAM
button to exit the Program Mode.
bdL I 6, press the
End Daylight Saving Time
This setting defines the end date of Daylight Saving Time. You will only
need to program it once. Once set, it will automatically adjust every year.
Daylight Saving Time is enabled/disabled in the Main Programming
Menu.
1. Enter the Program Mode and press the CHANGE
button until
ENTER button.
2. Press the CHANGE button until
the display. Press the ENTER button.
3. Press the CHANGE button until the correct year
that Daylight Saving Time is set to end appears in
the display, then press the ENTER button.
4. Press the CHANGE button until the correct day
that Daylight Saving Time is set to end appears in
the display, then press the ENTER button.
0 hr P5 flashes in the display. Press the
EdL I 7 flashes in
5. Press the CHANGE button until the correct month
that Daylight Saving Time is set to end appears in
the display, then press the ENTER button.
6. When the display flashes the correct year, month
and date, press the ENTER button.
7. When the display flashes
CHANGE button to move to Diagnostics, or press
the PROGRAM button to exit the Program Mode.
22 Amano PIX-28
EdL I 7, press the
Page 27

Diagnostics
The Diagnostics menu contains the following options:
Sof d I
LCd d 2
nPr d 3
Clr d 4
To Use the Diagnostics Menu:
1. Enter the Program Mode and press the CHANGE
Displays the firmware version of your PIX-28.
Turns all segments of the display on to verify proper LCD
operation.
Displays the number of prints. Maximum memory 999,999
print counts. Can be reset using the
Clear Menu
Code 13: Resets cumulative number of punches printed by
preset Pr-8.
Code 22: Resets ribbon capacity gauge.
Code 32: Clears memory (except cumulative number of
punches).
button until
ENTER button.
0 hr P5 flashes in the display. Press the
Clr d 4 item.
2. Press the CHANGE button until
the display. Press the ENTER button.
3.
Sof d I will flash in the display. To advance to the
next Diagnostics menu selection, press the
CHANGE button. If you wish to check the firmware
version of your PIX-28, press the ENTER button.
The version number will appear in the display. To
clear the display, press the ENTER button. The
display will advance to the LCD Test item.
4. To test the LCD, press the CHANGE button until
DIA9 I 8 flashes in
LCd d 2 flashes in the display. Press the ENTER
button. All the segments of the LCD will turn on. To
clear the display, press the ENTER button. The
display will advance to the Print Counter.
5. To check the number of prints performed, press the
CHANGE button until
Press the ENTER button. The number of prints will
appear in the display. To clear the display, press
the ENTER button.
nPr d 3 flashes in the display.
Amano PIX-28 23
Page 28

6. To enter the clear menu, press the CHANGE
button until
ENTER button.
7. Choose the Clear Menu code you wish to modify
from the table above. Press the CHANGE button to
enter the last digit of the code and ENTER to
accept it. Press the CHANGE button to enter the
first digit of the code and ENTER to accept it.
When the display flashes the correct code, press
ENTER.
Clr d 4 flashes in the display. Press the
8. If the code is incorrect, the display will flash
Press the ENTER button to try again.
9. If the code is correct, the display will flash
Press the CHANGE button until
the display, or press the PROGRAM button to exit
the Program Mode.
0 hr P5 flashes in
Clr d 4.
DIA9 I 8 .
24 Amano PIX-28
Page 29

Chapter 4: Maintenance and Troubleshooting
Ribbon Cartridge Replacement
1. Remove the cover.
2. Pull the two release tabs upward.
3. While holding the release tabs in an
upward position, pull the ribbon cassette
out of the cradle.
If the print mechanism is down and a piece of paper cannot be
Note:
inserted, press the RESET button to move the carriage up. This
will make the ribbon installation easier.
4. Insert a new ribbon between the ribbon
guide and the printer head as shown. Be
sure to mount the ribbon between the
printer head and ribbon guide as arrows
illustrate.
5. Turn the knob on the cassette clockwise
one turn to take up any slack in the
ribbon.
6. Replace the cover.
7. Reset the INK indicator by pressing the
CHANGE and ENTER buttons at the
same time.
8. Check the printing quality to confirm that you have installed the
ribbon properly.
Amano PIX-28 25
Page 30

Error Messages
Error Code Cause
Pr E I
Pr E 2
Pr E 3
Pr E 4
Pr E r
dL
For error messages
checking to see that the carriage is not stuck or jammed. Also, check to
see that the ribbon cables are in good condition. After clearing any jams,
restore the power and press the RESET button. Contact your Amano
Cincinnati representative for assistance.
The
dL error message signifies that an attempt was made to get into the
Program mode during the Daylight Saving Time changeover one-hour
lockout. Wait one hour and you will be able to program the clock.
Home sensor, motor carriage stuck
Timing sensor, carriage stuck
Home sensor
Carriage stuck
General print error
Daylight Saving Time Program
Pr E I through Pr E r, turn off the power before
26 Amano PIX-28
Page 31

Page 32

AJR-223001 Copyright © 2005 Amano Cincinnati, Inc. Printed in USA 1/05/0
 Loading...