

TM
MTX-15
Data Collection Terminal
Installation Guide

Proprietary Notice
This document contains proprietary information and such information
may not be reproduced in whole or in part without written permission
from:
Amano Cincinnati, Inc.
140 Harrison Avenue
Roseland, New Jersey, 07068
Amano Cincinnati, Inc. reserves the right to make equipment changes
and improvements, which may not be reflected in this document.
Portions of this document may have been updated to include the latest
hardware or firmware version, if applicable.
We recommend that this document be read in its entirety before any
attempt is made to operate the equipment.
For more information about Amano’s complete line of products, visit our
web site at:
www.amano.com
About This Manual
This manual covers the following Terminals with Index No.’s:
• A201: Serial Version - Magnetic Reader
• A204: Serial Version - Barcode Reader
• A207: Serial Version - Proximity Reader
• A203: Modem Version - Magnetic Reader
• A206: Modem Version - Barcode Reader
• A209: Modem Version - Proximity Reader
• A202: Ethernet Version - Magnetic Reader
• A205: Ethernet Version - Barcode Reader
• A208: Ethernet Version - Proximity Reader
Unpacking Your MTX-15
In addition to this guide, your package should include the following:
• Data Collection Terminal
• AC Adapter
• Keys (2)
*Batteries not Included
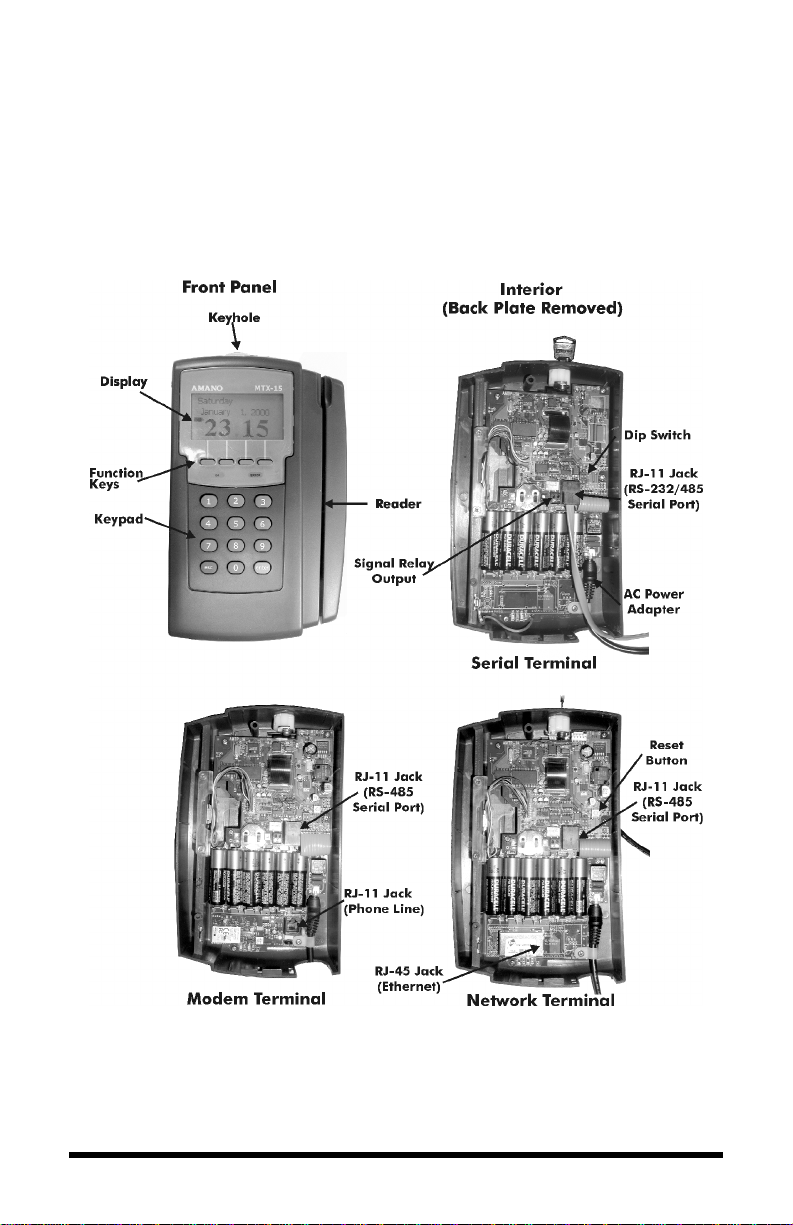
Note: The Dip Switch, Signal Relay Output and AC Power Adapter are
the same on all models.
Note: The Rest Slots on the terminal slip over the Rest Hooks on the
Back Plate to hold the terminal in the open position for wiring and
configuration.
MTX-15 Page 1

Dip Switches
The Dip Switches on the PCB are set as follows:
• Switch 1: Enables the termination resistor (ON position). When RS-
485 serial communications are used and the terminal is located at
the end of the serial chain, this switch should be ON. It should also
be ON for RS-232, Modem and Network terminals. For all RS-485
terminals except the last one, this switch should be OFF.
• Switch 2: Disables RS-485 communications (OFF position) in order
to permit firmware upgrades via RS-232 (serial models only). For
normal operation, this switch should always be in the ON position.
Note: Firmware upgrades should never be attempted without consulting
Amano Technical Support for detailed instructions.
Page 2 MTX-15

Mounting Location
nWarning! Before selecting a mounting location for your MTX-15,
you must consider the following:
• The mounting surface and hardware must be able to support the
unit’s weight, 6 lbs. (2.7 kg).
• The area must be within the specified operating temperature range.
• Close proximity to a power source or wall outlet.
• The area or wall can accommodate signal and/or power conduits.
Note: Wiring can be routed through either cable feed.
Note: If you are using rigid (1/2” EMT) conduit, secure the conduit to the
bottom cable feed using two nuts, making sure the pipe doesn’t
extend beyond the thickness of the nut. Do not bend the cable
feed.
Once a mounting location has been chosen, perform the following:
1. Insert the key into the keyhole, turn clockwise, and remove the back
plate as shown. Set the terminal face up on a flat surface. Do not
remove the key.
2. Using the back plate as a template, mark the location of the upper
mounting hole on the wall. Mark a vertical line on the wall as a guide
to align the lower mounting hole.
3. Install a screw or anchor at the mark and hang the back plate from the
top-mounting hole. Level the back plate by centering the vertical line
in the bottom hole.
4. Mark the location of the bottom hole.
5. If using the square Cable Feed in the Backing Plate for power or
communications, mark this location.
6. Install another screw or anchor for the bottom-mounting hole and
secure the back plate to the wall.
MTX-15 Page 3
Relay Circuits
nWarning! All connections to the relay contacts must be Class 2
wiring with a maximum of 24 VDC, 1A.
Your MTX-15 is equipped with one relay NORMALLY OPEN (NO)
contact that can be used to control external equipment such as a bell or
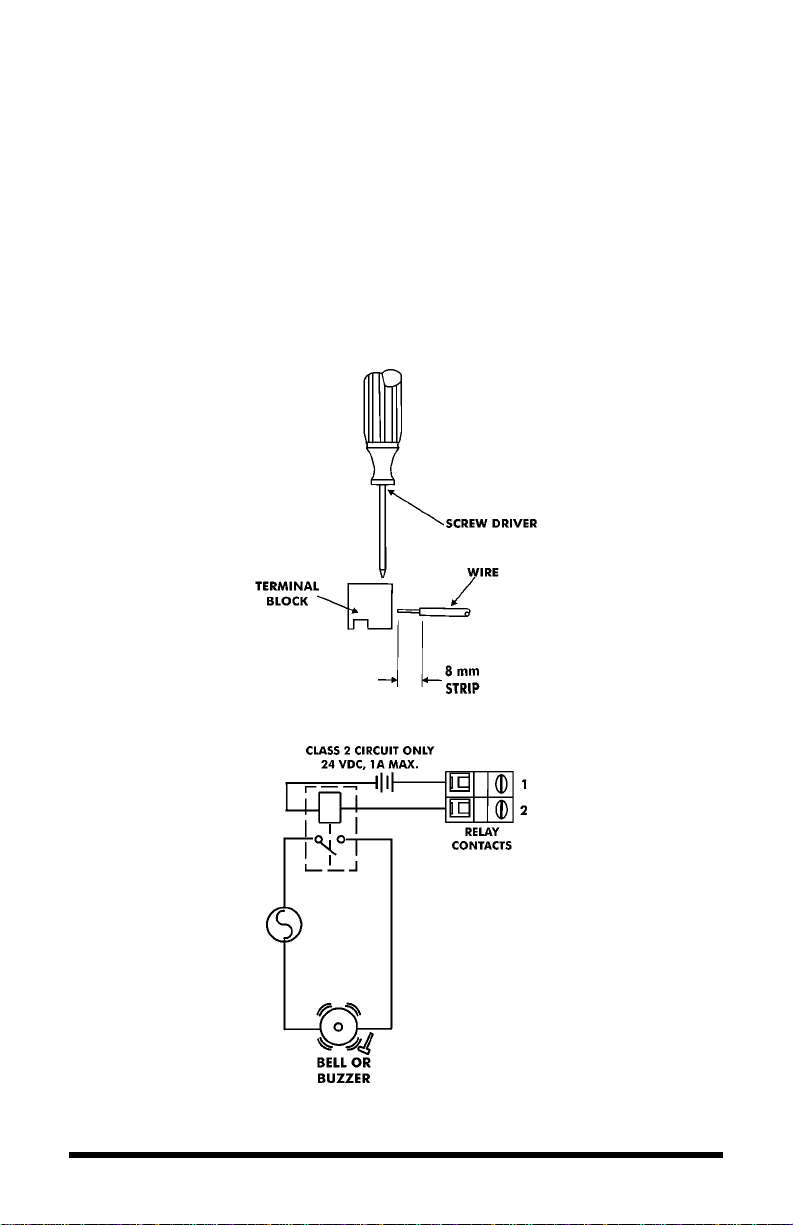
buzzer. Connection to the contacts is via the screw terminal block on the
back panel PCB. The terminal block can be removed from the PCB to
facilitate wiring. The connections to the relay contacts must be Class 2
wiring with a maximum of 24 VDC, 1A.
Connections to the relay contacts are made as follows:
A typical wiring diagram for a bell circuit is shown below:
Page 4 MTX-15

Communications
Connections between your Host PC and terminal(s) are based upon your
application and the model of the MTX-15 you have purchased.
Serial Version
RS-232
RS-232 communications can only be used when there is only one
terminal in the system and the length of wire running to the host PC is
less than 50 feet.
You will require the following accessories:
• AMX-201500: Communications Cable – 50 ft., 6 conductor RJ-11
• AMX-203650: Communications Adapter – DB9F to RJ-11
Connect one end of the Communications Cable to the RJ-11 connector
on the back of the MTX-15 terminal. Connect the other end of the cable
to an available Com Port of your PC using the Communications Adapter.
If the COM Port of your PC is 25-pin, you must use a 25-pin to 9-pin
adapter.
For distances of greater than 50ft, RS-485 communications must be
used.
MTX-15 Page 5

RS-485
RS-485 communications must be used when the wire run to the host PC
is greater than 50 feet or there is more than one terminal in the system.
You will require an AMX-204053 TC Converter Kit for the host PC, which
includes:
• TC Converter
• DB25M to DB9 F serial “modem” cable
You will require the following accessories for each additional RS-485
terminal:
• AMX-206950: Communications Cable – 10’, 6 conductor RJ-11
• AMX-206700: Junction Box
Note that when there is only one RS-485 terminal in the system, DIP
Switch 1 must be in the ON position to enable the termination resistor.
nWarning! Please note that terminal #3 (used for the RS-485 cable
Shield) is disconnected from the internal RJ-11
receptacle of the junction box. This is deliberate; the
shield connection is NOT fed through to the MTX
Terminal.
Page 6 MTX-15

Multi-terminal (maximum of 31) applications require the DIP Switches to
be OFF in all but the last terminal on the communications line. Dip Switch
1 of the last terminal must be set to ON to enable the termination resistor
so that all the terminals can properly communicate with the Host PC.
The terminal settings and connections between the PC and terminals for
this application are as follows:
* The maximum number of terminals is dependent upon the distance
and the quality of cabling used. It is recommended that Belden Low
Voltage Computer Cable, P/N 9841 or equivalent be used for this
application.
nWarning! Please note that terminal #3 (used for the RS-485 cable
Shield) is disconnected from the internal RJ-11
receptacle of the junction box. This is deliberate; the
shield connection is NOT fed through to the MTX
Terminal.
MTX-15 Page 7

Modem Version
Dial-up modem communication is generally used when the host PC is
located at a different facility from the terminal(s). This configuration can
consist of a single Modem Terminal, or a Modem Terminal networked
(via RS-485) with a group of up to (29) Serial Terminals.
The Modem Terminal is connected to a standard telephone line. The
terminal settings and connections between the Modem Terminal and
Serial Terminals for this application are as follows:
Note that the serial connections depicted here are the same as for the
RS-485 wiring described previously.
Page 8 MTX-15

Network Version
Network Terminals can be connected to a standard 10BaseT or 100
BaseTx computer network. In addition, each Network Terminal can have
a group of up to 29 Serial Terminals networked via RS-485 (in the same
manner described previously for a Modem Terminal).
Note that the serial connections for the RS-485 branch network are the
same as for the RS-485 wiring described previously.
MTX-15 Page 9

Wall Mounting and Initialization
Once connections have been made the terminal can be mounted and
initialized. To do so perform the following:
1. Holding the terminal face down, pull and remove the green paper
insulating strip from under the battery.
2. Re-install the terminal on the back plate by placing the notch on the
bottom of the Back Plate (see page 3) over the plastic tab in the
bottom of the terminal cabinet. Pivot the terminal up so the locating
pin on the Back Plate aligns with its corresponding hole in the cabinet.
Rotate the key counterclockwise to lock the terminal in place. Remove
the key.
3. Plug in the AC Power Adapter into an outlet. The terminal will do the
following after displaying opening splash screens:
• Test memory banks “0” through “6” and report the results.
• Report the serial number of this terminal.
• Report the communication type of this terminal: serial
(RS232/RS485), Modem or Ethernet.
• Test the keypad and if OK, report the keypad version.
• Display the version of firmware installed.
• Display the Terminal Number (always “0” until re-assigned by
Time Guardian software).
• Display the opening screen.
Note: The time and date cannot be set from the keypad; it must
be downloaded to the terminal from the host PC. Pressing any
numeric key will display “E04 Keypad Lock”. All features and
functions must be enabled from the host.
Page 10 MTX-15

4. Once the default time is displayed, swipe a badge. The badge number
will be displayed at the top of the screen.
5. Please insert the Time Guardian or Time Guardian Pro Software CD
into the CD-ROM drive of your PC to install the software.
Troubleshooting and Configuration
In addition to a system diagnostic that runs during power up, the MTX-15
has an internal diagnostic utility for verifying the correct operation of the
terminal, adjusting the display contrast and configuring network
communications (Ethernet terminals only). To access diagnostics, press
the Enter key when the Memory Bank test appears. After the terminal
initializes, the Diagnostic screen will appear:
Use the Function keys (as indicated at the bottom of the display) to
highlight the desired test and press Enter on the keyboard to advance to
the test screen. Use the left function key to exit diagnostics.
Relay, Keypad, LED and Buzzer Test
Use the Function keys to highlight the desired test and press Enter to
begin.
• Keypad Test: Pressing any numeric key will display the number on
the Keypad Test line. ESC will indicate “C” and ENTER will display
“E”. The function keys (from left to right) will display “L”,”M”,”N” and
“O”, respectively. Press the “
• Relay: Pressing Enter will display “ON” and energize the signal relay
(closing the contacts). Pressing enter a second time will display
“OFF” and deactivate the relay.
• Buzzer: This will display “ON” and sound the internal buzzer for
approximately one second.
• Red LED: Pressing Enter will display “ON” and turn the red
“ERROR” LED on for one second, then deactivate the LED and
display “OFF”.
• Green LED: Pressing Enter will display “ON” and turn the green
“OK” LED on for one second, then deactivate the LED and display
“OFF”.
MTX-15 Page 11
” function key twice to exit this test.

Press the left Function key to return to the Diagnostic menu.
Reader Test
This test will display the type of reader installed in the MTX-15 terminal
and indicate the functional status of the reader.
Swipe a badge to initiate the test. If the display advances to the following
screen, the reader is functioning normally:
If “FAIL” is displayed instead of a number it indicates an unreadable
card.
The test can be repeated by re-swiping a card.
Press the left Function key to return to the Diagnostic menu.
Screen Test
This diagnostic tests the display by turning on all the pixels. Any spots
would indicate a defective pixel.
Press the left Function key to return to the Diagnostic menu.
Network Configuration
This selection will only function on an Ethernet Terminal and is used to
configure network communications.
Automatic IP is the default, which will obtain the settings automatically
when the terminal is connected to the network. If this is acceptable,
press the right Function key to save the setting and reboot the terminal.
“Please Wait” and “Rebooting” will flash along the bottom of the display
for a few minutes while the terminal reboots. The left Function key or Esc
will exit without saving your setting or rebooting the terminal.
Page 12 MTX-15

To view the IP address set by the network, highlight Specify IP and
press Enter. Copy down the settings displayed in order to configure your
time and attendance software. Press the left function key or Esc to exit
the screen to maintain the automatic setting.
Note: It is important to exit this screen without saving. If save is pressed,
the terminal will reboot with the displayed address in manual mode
(see below); automatic IP setting will be disabled.
If you need to set the IP Address manually, highlight Specify IP and
press Enter to advance to the IP Address window.
You need to obtain the appropriate settings from your network
administrator.
Enter the IP Address, Subnet Mask and Gateway settings using the
numeric keypad. The Up and Down Function keys allow you to move
between the three fields.
Press the right Function key to save the setting. This will automatically
reboot the terminal. “Please Wait” and “Rebooting” will flash along the
bottom of the display for a few minutes while the terminal reboots. The
new settings will be in effect after the terminal reboots. The left Function
key will exit without saving your setting or rebooting the terminal.
Contrast
This function adjusts the contrast of the LCD display.
Use the Up and Down Function keys to darken or lighten the contrast.
Press the right Function key to save the setting and return to the
Diagnostic menu. The left Function key will exit without saving your
setting.
MTX-15 Page 13

Service Parts
Page 14 MTX-15

Part Number QTY Description Comments
1 ACC-300840 1 Serial # Label
2 AMX-300102 1 Keypad-MTX-15
3 AMX-300252 1 Back Assembly MTX-15
4 AMX-300390 1 Case Assembly MTX-15
5 AMX-300500 1 Pawl
6 AMX-300601 1 Bracket Reader MTX-15 Mag Reader
7 AMX-303450 1 MTX-15 PCB Assembly Serial Serial Terminal
AMX-303550 1 MTX-15 PCB Assembly Modem Modem Terminal
AMX-303650 1 MTX-15 PCB Assembly Ethernet Ethernet Terminal
8 C-435401 1 Lock
9 C-502700 2 Standoff M3x13.5
10 AMX-303350 1 LCD display assembly
11 EHL-201400 1 Clamp, cable
12 EOE-108370 1 Wall Mount Transformer, 120V
13 EOE-111080 1 Magnetic Stripe Reader Mag Reader
ATE-007130 1 Barcode Sensor, visible Barcode Reader
AMX-302900 1 Reader, Prox-44 bit Wiegand Prox Reader
14 SRG-3005 2 Screw, 3mm flat head
15 STG-3005 2 Screw, D-3mm L-5mm
16 UFJ-3006 3 Tap screw, D-3mm L-6mm
17 UFG-3008 1 Screw, D-3mm L-8mm
18 UFJ-40062V 1 Screw
19 WIB-300499 4 External toothed lock washer
20 C-459150 1 Key Assembly (#700 key)*
21 UFJ-2005 2 Screw, D-3mm L-5mm Barcode Reader
22 UFJ-3006 1 Tap screw, D-3mm L-6mm Prox Reader
23 STG-3005 1 Screw, D-3mm L-5mm Prox Reader
*Not Shown
Barcode Reader
MTX-15 Page 15

Specifications
Operating Environment:
AC Adapter Power Input:
Power Consumption:
Dimensions:
Weight:
Daylight Saving Time
(DST):
Employee Badges:
Readers:
Memory Backup:
Battery Backup:
(Optional)
Battery Backup Time
(Range dependant on
reader type)
Display:
Keypad:
External Signal
Capability:
32°F to 113°F (0°C to 45°C) 10 - 90%
relative humidity, non-condensing
105 - 130 VAC, 50-60 Hz
1.5 Watts (Serial version)
2.1 Watts (Modem version)
3.0 Watts (Network version)
8.86" L X 5.5" W X 1.9" D
(225 mm L X 140 mm W X 49 mm D)
6 lbs. (2.7 kg)
Settings are programmable through Time
Guardian software.
3.375" L X 2.215" W X 0.030" D
(86 mm L X 54 mm W X 0.76 mm D)
Magnetic stripe card badges conform to
Amano proprietary standard.
Barcode badges are Amano standard
code 39.
Proximity devices have embedded chip
with Amano format.
Index No.’s A201, A202 and A203: Magstripe reader that accepts Amano
proprietary standard mag-stripe
encoding.
Index No.’s A204, A205 and A206:
Equipped with visible barcode reader
that accepts Amano standard code 39
barcode card.
Index No.’s A207, A208 and A209:
Proximity reader, ACI format
Provides up to 1 year of continuous
memory backup without AC power.
(6) AA size alkaline (non-rechargeable)
batteries.
Serial Version: 14 to 24 hours
Modem Version: 7 to 10 hours
Ethernet Version: 5 to 6 hours
2.8” diagonal, 128 x 64 dots resolution
LCD reflective (no backlight)
3x4 keypad (0~9, ENT, ESC)
+ 4 function keys (used for Cost Center
/Job costing feature).
1 Dry contact: 1A, 24V, Class 2 circuit,
Normally Open
Page 16 MTX-15


AMX-302201 ● Copyright © 2005 Amano Cincinnati, Inc. ● Printed in U.S.A. ● 7/05/0
 Loading...