

MTX-15
Software Development Kit (SDK)
Installation and Operation Guide
Version 1.1

Thank you…
for purchasing another fine product from
Amano Cincinnati, Inc.
Proprietary Notice
This document contains proprietary information and such information may not be reproduced in
whole or in part without written permission from:
Amano Cincinnati, Inc.
140 Harrison Avenue
Roseland, New Jersey, 07068
Amano Cincinnati, Inc. reserves the right to make equipment changes and improvements that
may not be reflected in this document. Portions of this document may have been updated to
include the latest hardware or firmware version, if applicable.
We recommend that this document be read in its entirety before any attempt is made to operate
the equipment.
For more information about Amano’s complete line of products, visit our web site at:
www.amano.com

Table of Contents
Chapter 1: Introduction & Installation....................................................................................1-1
How This Manual is Organized...............................................................................................1-1
Introduction – What is MTX-15 SDK?.....................................................................................1-1
MTX-15 SDK Installation Guide .............................................................................................1-1
Chapter 2: MTX-15 SDK General Operation ..........................................................................2-1
General Information................................................................................................................2-1
MTX-15 SDK Main View.....................................................................................................2-1
File Dropdown Menu...........................................................................................................2-1
Common Buttons................................................................................................................2-2
Chapter 3: Locations ...............................................................................................................3-1
Defining a New Location ........................................................................................................3-1
Deleting And Editing Locations ..............................................................................................3-4
How to Delete A Location ...................................................................................................3-4
How To Edit a Location.......................................................................................................3-4
How To Define Terminal Information .................................................................................. 3-5
Chapter 4: Employees .............................................................................................................4-1
Creating Employees ...............................................................................................................4-1
Deleting And Editing Employees ............................................................................................4-2
How to Delete an Employee ...............................................................................................4-2
How To Edit an Employee ..................................................................................................4-2
Chapter 5: Labor Levels ..........................................................................................................5-1
Defining a New Labor Id.........................................................................................................5-1
Deleting And Editing Labor Ids...............................................................................................5-2
How to Delete a Labor Id From a Labor Level....................................................................5-2
How To Edit a Labor Level Id .............................................................................................5-2
Chapter 6: Bell Schedules.......................................................................................................6-1
Defining a New Bell Schedule ................................................................................................6-1
Deleting And Editing Bell Schedules ......................................................................................6-1
How to Delete a Bell Schedule ...........................................................................................6-1
How To Edit a Bell Schedule ..............................................................................................6-2
How To Create or Edit an Event for a Bell Schedule..........................................................6-2
Chapter 7: Validation ...............................................................................................................7-1
Defining a New Validation ......................................................................................................7-1
Deleting And Editing Validations ............................................................................................7-3
How to Delete a Validation .................................................................................................7-3
How To Edit a Validation ....................................................................................................7-3
Chapter 8: MTX-15 IP Address................................................................................................8-1
How To Find The MTX-15 IP Address....................................................................................8-1
Chapter 9: MTX-15 Import CSV Specification .......................................................................9-1
Employee Import Record Format ...........................................................................................9-1
Labor Level Import Record Format.........................................................................................9-1
MTX-15 SDK v1.1 Installation and Operation Guide i

Chapter 10: Running from the Command Line ...................................................................10-1
Command Line Options Summary .......................................................................................10-1
Using the Command Line Options .......................................................................................10-1
Setting the Time................................................................................................................10-1
Polling terminal .................................................................................................................10-1
Downloading To The Terminal..........................................................................................10-2
Using a Command File.........................................................................................................10-2
ii MTX-15 SDK v1.1 Installation and Operation Guide

Chapter 1: Introduction & Installation
This manual [AMX-40430X] covers only the installation and operation of the Amano Software
Development Kit (SDK) for the Amano MTX-15 Data Collection Terminal. For more detailed
information about the actual installation and operation of the Amano MTX-15 Terminal please
see Amano MTX-15 Installation Guide (AMX-30220X).
How This Manual is Organized
The installation and operation procedures in this manual are provided for user assistance.
Chapter 1 – Introduction & Installation: provides a brief overview of features and benefits of
this application. Also described is the general installation guideline.
Chapter 2 – MTX-15 SDK General Operation: provides step-by-step procedures for general
operation.
Chapter 3 – Locations: provides step-by-step procedures for general creation of new locations
and/or modification.
Chapter 4 – Employees: provides step-by-step procedures for general creation of new
employees and/or modification.
Chapter 5- Labor Levels: provides step-by-step procedures for general creation of labor levels
and/or modification.
Chapter 6 – Bell Schedule: provides step-by-step procedures for general creation of new bell
schedules and/or modification.
Chapter 7- Validation: provides step-by-step procedures for general creation of new validation
templates and/or modification.
Chapter 8- MTX-15 IP Address: provides step-by-step procedure for using the diagnostics in
the MTX-15 to dynamically obtain the network IP Address.
Chapter 9- MTX-15 CSV Import Specification: provides file CSV format for MTX-15 interface.
Chapter 10- Running From The Command Line: provides procedures (commands) for
running MTX-15 SDK from the command line.
Introduction – What is MTX-15 SDK?
The Amano MTX-15 Software Development Kit (SDK) provides the end-user compatibility with
other vendors’ time and attendance systems and the Amano MTX-15. The Amano MTX-15 is a
full-feature, scalable, menu-driven terminal that can be utilized for many applications, from basic
time & attendance to job costing.
MTX-15 SDK Installation Guide
1. Turn on the Host PC and let Windows start up.
2. Be certain the operating system is running by itself with no additional applications running.
3. Insert the MTX-15 SDK disk in the CD-ROM drive.
4. The MTX-15 SDK install script will automatically start, and the following screen will appear.
Clicking on the Cancel
installation.
MTX-15 SDK v1.1 Installation and Operation Guide 1-1
button anytime during the installation will abort the

Figure – InstallAnywhere Screen
5. The following Introduction screen will automatically appear.
Figure – MTX-15 SDK Introduction Screen
6. Click Next to continue the installation, and the Software License Agreement will appear to
advise customers of their legal responsibilities. To continue the installation you must click
the radio button to accept the terms of this agreement.
Figure – License Agreement Screen
7. Click Next to continue, and the following Choose Install Set screen will appear to choose
between Server, or Client. It is recommended to select Server
for standard installations.
1-2 MTX-15 SDK v1.1 Installation and Operation Guide
Figure – Choose Install Set Screen
8. Enter the MTX-15 SDK serial number. Then click Next to continue with the setup, and the
Destination Location screen will appear as shown in the following figure.
Figure – Enter Serial Number
9. When asked to Choose Destination Location, use the suggested Destination Folder (MTX15 SDK). If the drive is not applicable to your system, click the Choose button to select a
drive. Then click Next to continue, and the Select Program Folder screen will appear:
Figure – Choose Install Folder
10. When performing a server installation, the IP Address for the PC that the MTX-15 SDK is
installed on will automatically appear. Click on Next to continue.
MTX-15 SDK v1.1 Installation and Operation Guide 1-3
Figure – IP Address for Server
11. Before installation, the MTX-15 SDK install script will check and display installation
parameters, and the following screen will appear. Click Install to continue with the
installation.
Figure – Pre-Installation Summary
12. Next an installation screen will appear showing a progress status bar for the MTX-15 SDK
installation as shown in the following figure.
Figure – Installing MTX-15 SDK Screen
13. During installation, if desired, click Cancel to terminate the installation process for MTX-15
SDK, and the following Dialog will appear:
1-4 MTX-15 SDK v1.1 Installation and Operation Guide

Figure – Desktop Icon Dialog
14. While the InstallShield Wizard is installing MTX-15 SDK the following screens will appear:
Figure – Executing Installer, Etc.
15. After the MTX-15 SDK program has been successfully installed the following screen will
appear. Click Done to finish the installation process.
Figure – Installation Complete
MTX-15 SDK v1.1 Installation and Operation Guide 1-5
16. The MTX-15 SDK program will go through a brief configuration process, and the following
screen will appear. Once complete, this screen will disappear. Click on the
start the application (see Chapter 2).
Figure – Configuring MTX-15 SDK
icon to
1-6 MTX-15 SDK v1.1 Installation and Operation Guide

Chapter 2: MTX-15 SDK General Operation
General Information
After MTX-15 SDK has been initially installed on a PC, click on the
icon to start the
application and main screen will appear (see the following figure).
To setup the application:
• Define locations (MTX-15 terminals).
• Import or enter employees, and labor levels.
• Setup bell schedules and validation.
MTX-15 SDK Main View
The following screenshot displays the default main view of MTX-15 SDK and identifies its
sections. This view can be changed based upon the selection made from the common buttons,
and/or the tree view selections on the left-hand side of the screen.
Menu Selections
Common Buttons
Tree
Status Display
Figure – MTX-15 SDK Main Screen
File Dropdown Menu
The File menu allows the user to: "Im
port Employees", "Import Labor Levels" (see Chapter 9
for additional information), get program information with "About", "Activate" the software,
"Register" a new customer, and "Launch Manual" (open the PDF version of the included
Installation and Operation Guide, while the "Exit" selection allows the user to quit the
application.
The "About" selection will provide the user with the version of MTX-15 SDK that is running. This
information is required when placing a support call. The Info tab on the About screen will display
more detailed program information.
MTX-15 SDK v1.1 Installation and Operation Guide 2-1

Figure – File Menu Figure – About
Common Buttons
Certain common functions are performed using buttons. These buttons are shown below. In the
text, the names shown are used to describe these buttons.
Button Description Button Description
Edit
Cancel
Clear status
Validation for clock &
bell schedules
Find terminal
New item
Poll terminals for
Delete item
received punch/transfer
records
Push time to terminal
from PC
Browse
To Communicate with
Terminals
Save
Create events
2-2 MTX-15 SDK v1.1 Installation and Operation Guide

Chapter 3: Locations
Defining a New Location
1. Click on the Locations icon in the tree view (see the following figure), and any previously
defined locations will appear.
Figure – Locations Main Screen
2. To create a new location, click on the New
shown in the following figure.
Figure – New Location Screen
button, and the screen will appear as
3. Enter the location Name [16 character limit].
4. Select a Time Zone Offset in hours from the dropdown list. Select 0 to use the time from
your time zone.
5. Select the Type of location from the dropdown list. The choices are: Ethernet, Modem, and
Serial. If selecting Ethernet the following Ethernet fields will appear:
MTX-15 SDK v1.1 Installation and Operation Guide 3-1

Figure – Ethernet Fields
For Ethernet enter the IP address and port [2101 is the default]. See the Chapter 8 for
instructions on how to find the IP address of an MTX-15 terminal. Also, consult Amano MTX15 Installation Guide.
If selecting Modem the following modem fields will appear:
Figure – Modem Fields
For Modem select the Com Port from the dropdown list [all available Com Ports are
dynamically shown]; select the Baud Rate from the dropdown list [choices are 1200, 2400,
or 9600], select Modem Name from the dropdown list, and enter the dialup phone number.
If selecting Serial the following serial fields will appear:
Figure – Serial Fields
For Serial, select the Com Port from the dropdown list [all available Com Ports are
dynamically shown]; and select the Baud Rate from the dropdown list [choices are 1200,
2400, or 9600].
6. Define Daylight Saving Time (DST) start, end, and time fields utilizing the pop-up
"DatePicker" calendar (see the following example figure).
3-2 MTX-15 SDK v1.1 Installation and Operation Guide

Figure – DST Fields
7. Define output for the new location by selecting the output file Location (destination folder)
using the Browse
button. Enter a file name, and check the box for Generate XML if
XML output format is desired (see the following figure).
Figure – Output Fields
If desired, XML format can be used to parse the transfer punches file from the MTX-15 terminal.
The following is an example for one employee with MTX-15 Terminal transfer punch information
polled to a file in XML format:
Example of Output File in XML Format
<punch>
-
<badge>1001</badge>
<date>04-03-2007</date>
<time>09:03</time>
<laborlevel1>0000</laborlevel1>
<laborlevel2>0000</laborlevel2>
<laborlevel3>0000</laborlevel3>
<laborlevel4>0000</laborlevel4>
<laborlevel5>0000</laborlevel5>
<laborlevel6>0000</laborlevel6>
<location>NJ HQ Bldg 1
</location>
<terminal>01</terminal>
</punch>
MTX-15 SDK v1.1 Installation and Operation Guide 3-3

8. When finished with the location, click on the Ok button to save the location settings
and return to the Locations main screen, or click on the Cancel
button to quit
without saving and return to Locations.
Deleting And Editing Locations
How to Delete A Location
1. To delete a location in the MTX-15 SDK, click on Locations in the tree view (see figure for
an example).
Figure – Select Locations From Tree View
Note: Click on the Clear button to clear any displayed status information.
2. Select the desired location from the list (displayed in alpha order), and click on the Delete
button. The deleted location will be removed from the locations list.
How To Edit a Location
1. Select a Location from the list, and double-click on it, or click on the Edit
button, and
the Editing location screen will appear. See the following figure for an example.
Figure – Editing Locations
3-4 MTX-15 SDK v1.1 Installation and Operation Guide

2. Select and/or enter the revised information for the location. Then click on the Ok button
to save the modifications. The edited location will be displayed in the tree view list. Click on
the Cancel
button to quit without saving.
How To Define Terminal Information
1. Select a Location from the list, and double-click on it, or click on the Edit
the Editing location screen will appear.
2. Click on the Terminals
button to edit terminals, and the following type of screen
will appear:
Figure – Terminals Screen
3. To Find a terminal, click on the
button to search for connected terminal(s). The Find
Terminals progress screen will temporarily appear (see the following figure).
button, and
4. If a terminal is not found the action will time out. Skip this step if not necessary.
Note: This command will find and recognize all terminals currently connected to the system to
dynamically update the list of terminals. Also, when a terminal is first recognized with the
Find command, the name will automatically be replaced with the serial numbe
r of the
found terminal. If desired, after a terminal is found change the terminal name.
Figure – Find Terminals
5. To Poll a Terminal, click on a terminal from the list. Then click on the
button to poll a
connected terminal. The Poll Terminals progress screen will temporarily appear. If a terminal
is not found the action will time out. Skip this step if not necessary. The Poll command will
pull punch transfer information from the selected terminal and automatically append it to the
output file. If Generate XML is active (checked), then an output XML file will be
simultaneously updated.
MTX-15 SDK v1.1 Installation and Operation Guide 3-5
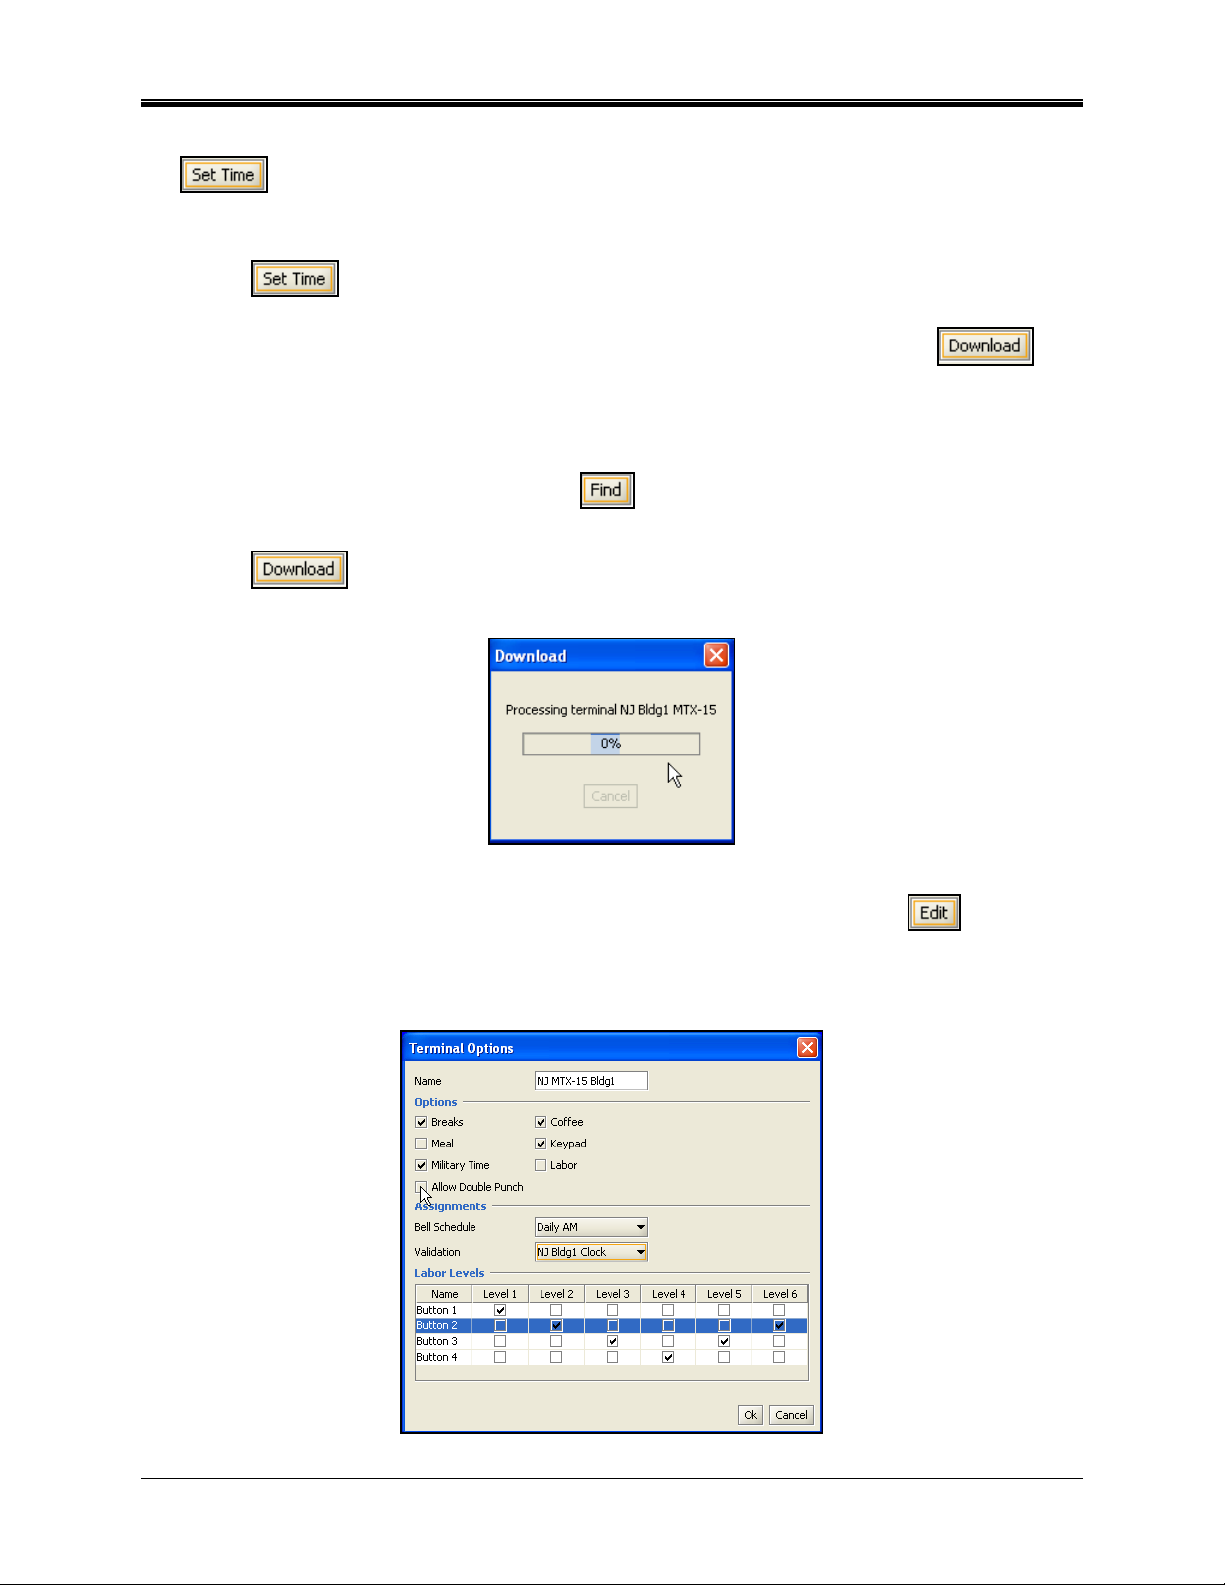
6. To Set Time (the time of a terminal), click on a terminal from the list. Then click on the
button to set the time of a connected terminal. The Set Time progress screen will
temporarily appear. If the terminal is not found the action will time out. Skip this step if not
necessary.
Note: The
command will set the time of the MTX-15 terminal that is selected to the
time of the connected PC. It will also use any Time Zone Offset settings.
7. To Download to a terminal, click on a terminal from the list. Then click on the
button to download information [i.e., employees] to a connected terminal. The Download
progress screen will temporarily appear (see the following figure). If a terminal is not found
the action will time out. Skip this step if not necessary. The Download command will transfer
the information down to the terminal, and should be used every time you need to update the
MTX-15 terminal(s). Also, every time the
button is pressed the terminal name and
schedule is reset so it must be configured and downloaded.
Note: The
command will transfer all Terminal Options, Labor Levels, and Employee
information to the selected MTX-15 terminal.
Figure – Terminal Download
8. To Edit terminal options, click on a terminal from the list. Then click on the
button to
edit terminal option information [i.e., employees] to a connected terminal. The Terminal
Options screen will appear (see the following figure). Skip this step if not necessary. The
Download command will transfer the information down to the terminal.
Figure – Terminal Options
3-6 MTX-15 SDK v1.1 Installation and Operation Guide

• Enter desired terminal name. This name will be replaced by the serial number if the
button is pressed.
• Select desired terminal options by clicking on them. The choices are: Breaks, Meal,
Military Time, Allow Double Punch, Coffee, Keypad, and Labor. If Keypad is selected all
other options will be inactive.
• Select the assignments for Bell Schedule and Validation from their dropdown lists
[previously user defined]. If the
button is pressed all assignments will be reset.
• Select the labor levels [1 – 6] to be assigned to terminal buttons 1 thru 4 (to be
prompted).
9. Select and/or enter the terminal options information. Then click on the Ok
save and return to the Terminals screen. Click on the Cancel
button to quit without
button to
saving, and return to the Terminals screen.
10. To save terminal edits, click on the Ok
location will be displayed in the tree view list. Click on the Cancel
button to save the modifications. The edited
button to quit
without saving.
Note: Activity of commands such as polling, set time, and download will be displayed in the
status section of the locations main screen. See figure below for an example.
Figure – Terminal Activity Status
MTX-15 SDK v1.1 Installation and Operation Guide 3-7

This page intentionally left blank.
3-8 MTX-15 SDK v1.1 Installation and Operation Guide

Chapter 4: Employees
Creating Employees
1. Click on the Employees icon in the tree view (see the following figure), and any previously
defined employees will appear.
Figure – Employees Main Screen
2. To create a new employee, click on the New
button, and the screen will appear as
shown in the following figure.
Figure – Adding New Employee Screen
3. Enter the Badge Number [4 digit numeric limit].
4. Enter a First Name [16 character limit] and Last Name [16 character limit].
Note: Employees must be enrolled in the SDK as they cannot
be enrolled at the MTX-15
terminal.
5. When finished with the employee, click on the Ok
and return to the Employees main screen. Click on the Cancel
button to save the new employee
button to quit without
saving.
MTX-15 SDK v1.1 Installation and Operation Guide 4-1

Deleting And Editing Employees
How to Delete an Employee
1. To delete an employee in the MTX-15 SDK, click on Employees in the tree view (see figure
for an example).
Figure – Select Employees From Tree View
Note: Click on the Clear button to clear any displayed status information.
2. Select the desired employee from the list, and click on the Delete
button. A
confirmation dialog will appear; "Delete selected Employee(s)". Click Yes to continue and
the deleted employee will be removed from the Employees list.
How To Edit an Employee
1. Select an employee from the list, and double-click on it, or click on the Edit
button,
and the Editing employee screen will appear. See the following figure for an example.
2. Select and/or enter the revised information for the employee. Then click on the Ok
button to save the modifications. The edited employee will be displayed in the Employees
list. Click on the Cancel
button to quit without saving.
Figure – Editing Employee Example
4-2 MTX-15 SDK v1.1 Installation and Operation Guide

Chapter 5: Labor Levels
Defining a New Labor Id
1. Click on the Labor Levels icon in the tree view, and click on the desired Labor Level (1 thru
6) (see the following figure), and any previously defined Labor Id for that level will appear.
Figure – Labor Levels Main Screen
2. After Labor Level 1 thru 6 is selected, click on the New button, and the screen will
appear as shown in the following figure.
Figure – Adding Labor Level
3. Enter the Labor Level Id [4 numeric limit].
4. Enter a Description [16 character limit].
5. When finished with the labor level, click on the Ok
button to save the new labor Id and
return to the Labor Levels screen. Click on the Cancel
button to quit without saving.
MTX-15 SDK v1.1 Installation and Operation Guide 5-1

Deleting And Editing Labor Ids
How to Delete a Labor Id From a Labor Level
1. To delete a Labor Level in the MTX-15 SDK, click on Labor Levels in the tree view, and click
on the desired Labor Level (1 thru 6) (see the following figure).
Figure – Select a Labor Id From Tree View
Note: Click on the Clear button to clear any displayed status information.
2. Select the desired Labor Id from the list, and click on the Delete
button. A
confirmation dialog will appear; "Delete selected Labor Level(s)". Click Yes to continue and
the deleted labor level will be removed from the Labor Level list.
How To Edit a Labor Level Id
1. Select a Labor Level Id from the list, and double-click on it, or click on the Edit
button,
and the Editing Labor level screen will appear. See the following figure for an example.
2. Select and/or enter the revised information for the Labor Level Id. Then click on the Ok
button to save the modifications. The edited Labor Level Id will be displayed in the tree view
list. Click on the Cancel
button to quit without saving.
Figure – Editing Labor Id Example
5-2 MTX-15 SDK v1.1 Installation and Operation Guide

Chapter 6: Bell Schedules
The MTX-15 Terminal can ring bells by using a built-in relay. However, to do so, a Bell Schedule
must first be set up in the MTX-15 SDK.
Defining a New Bell Schedule
1. Click on the Bell Schedules icon in the tree view (see the following figure), and any
previously defined Bell Schedules will appear.
Figure – Bell Schedules Main Screen
2. Click on the New
button, and the screen will appear as shown in the following figure.
Figure – Adding New Bell Schedule
3. Enter the Name [16 character limit].
4. Enter a Description [16 character limit].
5. When finished with the bell schedule, click on the Ok
button to save the new bell
schedule and return to the Bell Schedules main screen. Click on the Cancel
to quit without saving.
Deleting And Editing Bell Schedules
How to Delete a Bell Schedule
button
1. To delete a Bell Schedule in the MTX-15 SDK, click on Bell Schedules in the tree view, and
click on the desired Bell Schedule from the list (see the following figure).
MTX-15 SDK v1.1 Installation and Operation Guide 6-1

Figure – Select a Bell Schedule
Note: Click on the Clear button to clear any displayed status information.
2. With the desired Bell Schedule selected from the list, click on the Delete
button. A
confirmation dialog will appear; "Delete selected Bell Schedule(s)". Click Yes to continue
and the deleted bell schedule will be removed from the Bell Schedules list.
How To Edit a Bell Schedule
1. Select a Bell Schedule from the list, and double-click on it, or click on the Edit
and the Editing Bell Schedule screen will appear. See the following figure for an example.
Figure – Editing Bell Schedule Example
2. Select and/or enter the revised information for the Name and Description fields.
3. Then click on the Ok
displayed in the tree view list. Click on the Cancel
button to save the modifications. The edited Bell Schedule will be
button to quit without saving.
button,
How To Create or Edit an Event for a Bell Schedule
1. Select a Bell Schedule from the list, and double-click on it, or click on the Edit
button,
and the Editing Bell Schedule screen will appear. See the following figure for an example.
6-2 MTX-15 SDK v1.1 Installation and Operation Guide

2. To define and/or edit events, click on the Events button and the Events screen will
appear which lists all defined events.
Note: A maximum of 32 events are allowed.
Figure – Editing Bell Schedule Example
Figure – Bell Schedule Events Example
3. To delete an event, click on the desired event in the list, and click on the Delete
button.
4. To edit an event, click on the desired event in the list, and click on the Edit
See the following figure for an example of an existing Event to edit.
Figure – Edit Existing Event Example
button.
MTX-15 SDK v1.1 Installation and Operation Guide 6-3

5. To add an Event, click on the New button, and the blank "Add New Event" screen will
appear (see the following figure). Click on the desired days/door, set the duration in ms, and
time in military 24-hour format for the event.
Figure – Edit New Event
Note: Door is a special case – when this is selected the bell will occur on every swipe, and the
Bell Schedule will be disabled.
6. Then click on the Ok button to save the event and/or modifications. The new and/or
edited event will be displayed in the Events list. Click on the Cancel
button to quit
without saving.
6-4 MTX-15 SDK v1.1 Installation and Operation Guide
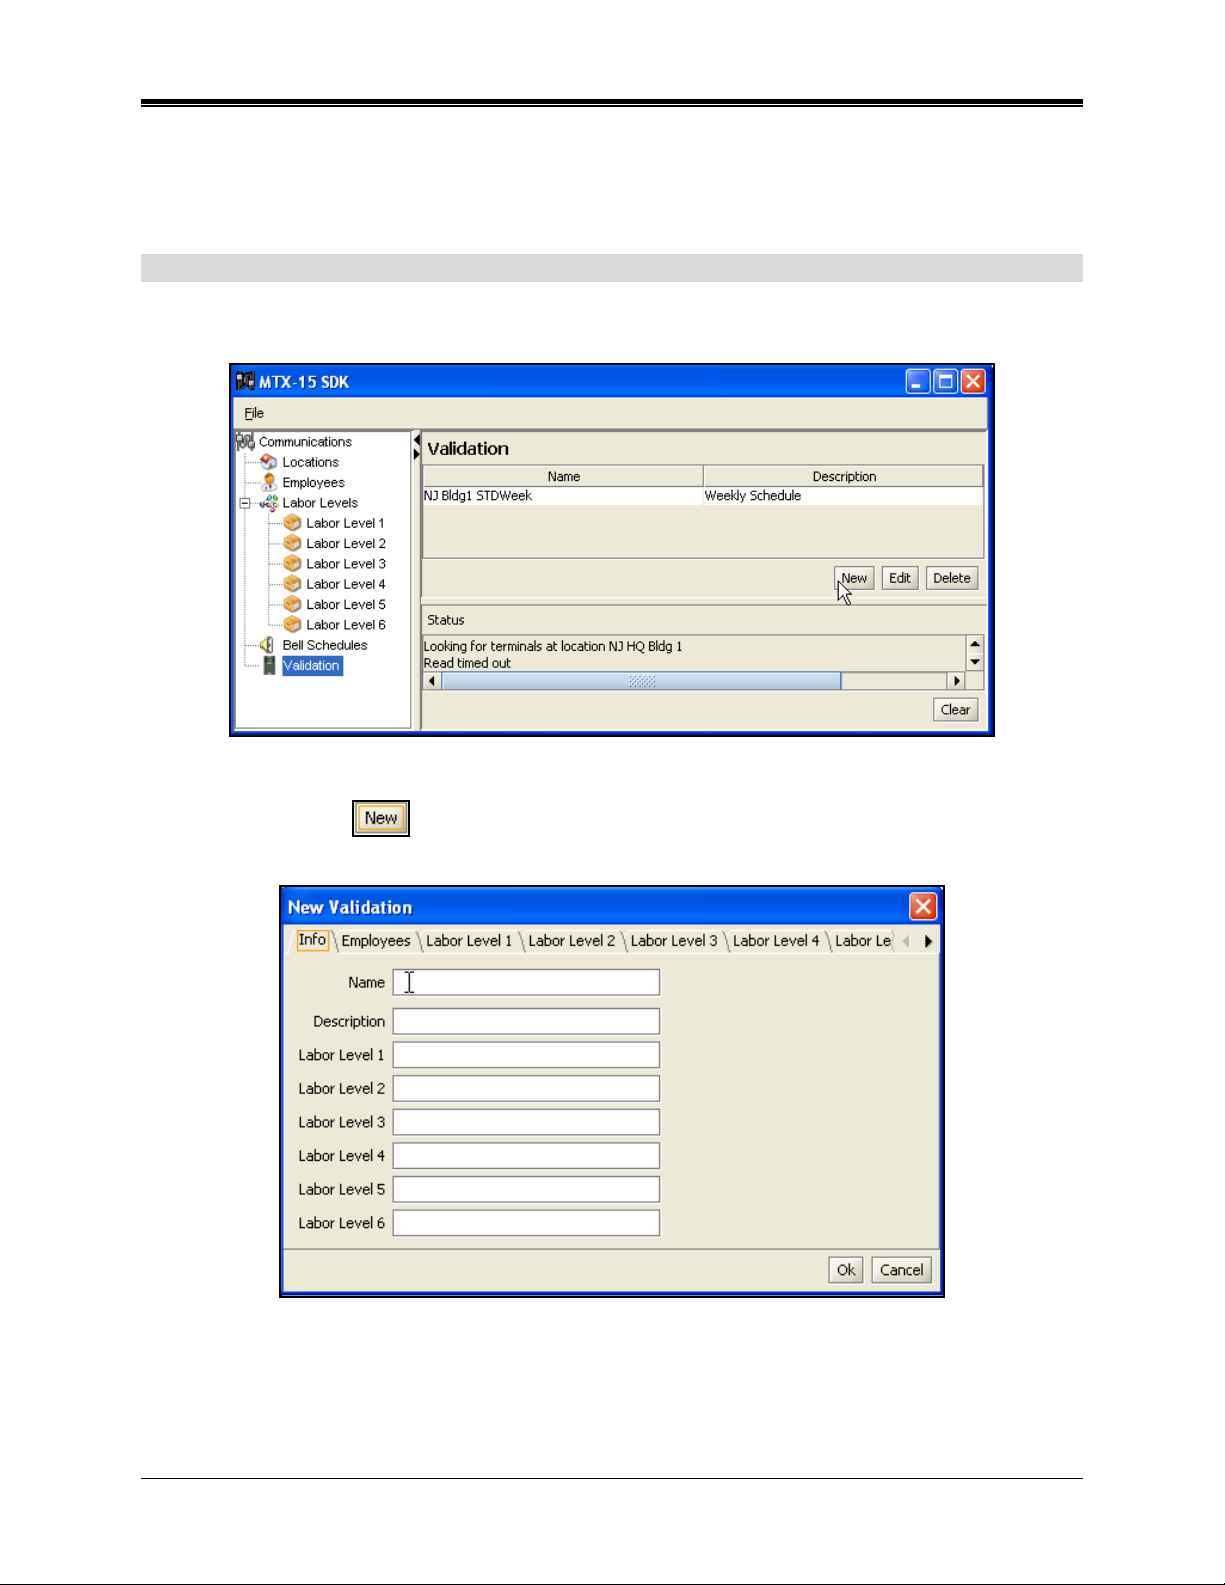
Chapter 7: Validation
This function creates validation templates for employees punch activity. Also, allows up to 6
labor levels to be sent to the MTX-15.
Defining a New Validation
1. Click on the Validation icon in the tree view (see the following figure), and any previously
defined Validations will appear.
2. Click on the New
following figure.
Figure – Validation Main Screen
button, and the New Validation screen will appear as shown in the
Figure – New Validation
3. Enter the Name [16 character limit].
4. Enter a Description [16 character limit].
5. Enter a description [16 character limit] for each labor level (1 thru 6).
MTX-15 SDK v1.1 Installation and Operation Guide 7-1

6. Click on the Employees tab to associate employees with a Labor Level. The following type
of screen will appear:
Figure – Validation Employees Tab
Use the single or double right arrows to move employees to the "Assigned"
list from the "Available" list (left-side).
Use the single
or double left arrows to move employees to the "Available"
list from the "Assigned" list (right-side).
7. Click on a Labor Level [1 thru 6] tab to associate labor categories with a labor Level. The
following type of screen will appear:
Figure – Validation Labor Levels Tab
Use the single or double right arrows to move labor categories to the
"Assigned" list from the "Available" list (left-side).
Use the single
or double left arrows to move labor levels to the "Available"
list from the "Assigned" list (right-side).
7-2 MTX-15 SDK v1.1 Installation and Operation Guide

8. When finished with the labor level, click on the Ok button to save and return to the
Validation main screen. Click on the Cancel
button to quit without saving.
Deleting And Editing Validations
How to Delete a Validation
1. To delete a Validation in the MTX-15 SDK, click on Validation in the tree view, and click on
the desired Validation from the list (see the following figure).
Figure – Select a Validation
Note: Click on the Clear button to clear any displayed status information.
2. Select the desired Validation from the list, and click on the Delete
button. A
confirmation dialog will appear; "Delete selected Validation(s)". Click Yes to continue and
the deleted validation will be removed from the Validation list.
How To Edit a Validation
1. Select a Validation from the list, and double-click on it, or click on the Edit
button, and
the selected Validation will appear. See the following figure for an example.
Figure – Editing Validation Example
MTX-15 SDK v1.1 Installation and Operation Guide 7-3

2. Select and/or enter the revised information for the Name and Description fields.
3. Select and/or enter the revised information for the Labor Level 1 - 6 fields.
4. Click on the Employees tab to modify association of employees with a Labor Level. The
following type of screen will appear:
Figure – Editing Validation Employees Tab
Use the single
or double left arrows to move employees to the "Assigned"
list from the "Available" list (left-side).
Use the single
or double left arrows to move employees to the "Available"
list from the "Assigned" list (right-side).
5. Click on a Labor Level [1 thru 6] tab to modify association of labor categories with a labor
Level. The following type of screen will appear:
Figure – Validation Labor Levels Tab
Use the single or double left arrows to move labor categories to the
selected list from the Available list (right-side).
Use the single
or double right arrows to move labor categories to the
Available list from the Selected list (left-side).
6. Then click on the Ok
displayed in the tree view list. Click on the Cancel
button to save the modifications. The edited labor Id will be
button to quit without saving.
7-4 MTX-15 SDK v1.1 Installation and Operation Guide

Chapter 8: MTX-15 IP Address
The MTX-15 has an internal diagnostic utility that can be used for configuring network
communications (Ethernet MTX-15 terminals only).
How To Find The MTX-15 IP Address
1. To access the diagnostics, power up the MTX-15 terminal. When the "MEMORY BANK =
OK" (see the following example figure), press the green enter button on the keypad. The
enter button must be pressed before this screen disappears (within approximately 2 secs).
Figure – MTX-15 Memory Bank Test Screen
2. When the Diagnostic screen appears (see the following example figure), press the Down
Arrow function key on keypad to scroll down to "Network".
Figure – MTX-15 Diagnostic Screen
3. With "Network" highlighted (see example figure), press the enter button on keypad.
Figure – MTX-15 Network Diagnostic Screen
4. When the IP ADDRESS screen appears, and with Automatic highlighted (see example
figure), press the enter button.
MTX-15 SDK v1.0 Installation and Operation Guide 8-1

Figure – MTX-15 Automatic IP Address Screen
5. Wait while the MTX-15 dynamically obtains the IP address. After the wait message stops
flashing, scroll down to "Specify" using the down arrow function on the keypad.
Figure – MTX-15 Specify IP Address Screen
6. With "Specify" highlighted, press the enter button on the keypad. Wait while the IP Address
is retrieved and it will appear in the display. See the following figure for an example.
Figure – MTX-15 IP Address Screen
7. To exit MTX-15 Terminal diagnostics, keep pressing the left-hand function key on the
keypad (under an open door
icon), until the main screen with time appears.
8-2 MTX-15 SDK v1.1 Installation and Operation Guide

Chapter 9: MTX-15 Import CSV Specification
The MTX-15 Communications Manager supports importing employees and labor levels. Each
of these files must be in Comma Separated Values format (CSV format).
Note: Each of the field names for the import files must be in the same order as shown.
The specifications for each of these files are defined below:
Employee Import Record Format
Field Name
Description Validation Rules
Badge Number
The number of the badge card
that the employee will swipe at
the terminal
First Name
Last Name
The first name of the employee 16 character maximum
The last name of the employee 16 character maximum
Labor Level Import Record Format
Field Name
Labor Level
Labor Level ID
Labor Level
Description
Description Validation Rules
The labor level that this record
corresponds to
This is the unique identifier for
the labor level that will be entered
at the terminal
This is the description of the labor
level
4-digit numeric. Must not duplicate
any existing badge in the system
Single digit numeric value – must be
between 1 and 6 inclusive
4-digit numeric. Must not duplicate
any existing labor level ld in the
system
16 character maximum
MTX-15 SDK v1.1 Installation and Operation Guide 9-1

This page intentionally left blank.
9-2 MTX-15 SDK v1.1 Installation and Operation Guide

Chapter 10: Running from the Command Line
The MTX-15 communications module provides functionality to poll, set time, and download
through a command line interface. This functionality is primarily designed to facilitate integration
with existing software and scheduling applications (i.e., Windows Scheduler). All settings must
be made in the MTX-15 Manager application prior to execution via command line.
Command Line Options Summary
usage: MTX15SDK [options]
-cmdfile <cmdfile> Use command file to communicate with terminals
-download Download validation/settings to the terminal provided
-enddls <enddls> End of daylight savings
-location <location> The location of the clock
-offset <offset> Time zone offset
-poll Poll specified terminal and location
-settime Set the terminals time
-startdls <startdls> Start of daylight savings
-terminal <terminal> The name of the terminal
Using the Command Line Options
Following are examples on how to use the command line parameters to perform the main
operations of the clock. Configuration, validation assignments, etc. must be made in the
software prior to running Mtx15mgr from the command line.
Setting the Time
The command line to set the time on the MTX-15 clock takes to following form:
MTX15SDK –settime –location <location> -terminal <terminal name>
-startdls <dls start date> -enddls <dls end date>
-offset <time zone offset>
Note: The start of day light savings and end of daylight savings MUST be in the format “MM-
Example
The following example sets the date and time for the terminal at location “TestLocation” called
“Main Entrance”.
DD-YYYY”.
MTX15SDK –settime –location “TestLocation” –terminal “Main Entrance”
–startdls “04-1-2007” –enddls “10-31-2007” –offset –5
Polling terminal
The command line poll the Mtx-15 clock takes to following form:
MTX15SDK –poll –location “TestLocation” –terminal “Main Entrance”
-datafile autopoll.bat
MTX-15 SDK v1.1 Installation and Operation Guide 10-1

Example
This following command line will poll the terminal named “Main Entrance” located at “Test
Location”. The output file to generate must be defined in the location setup of the application.
MTX15SDK –poll –location “TestLocation” –terminal “Main Entrance”
-datafile autopoll.bat
Downloading To The Terminal
The command line poll the MTX-15 clock takes to following form:
MTX15SDK –download –location “TestLocation” –terminal “Main
Entrance”
Example
The following command line will download the terminal named “Main Entrance” located at “Test
Location”. All employee assignments, labor level assignments and terminal options must be set
in the application prior to executing this command line.
MTX15SDK –poll –location “TestLocation” –terminal “Main Entrance”
-datafile autopoll.bat
Using a Command File
In a system where you have multiple clocks, there will be a need want to execute multiple
commands in sequence. For example, you would like to poll the three clocks at “Location1” and
three clocks at “Location2”, followed by setting the time on each of them. It can be tedious to
execute each of these commands individually, but the MTX-15 communications manager
provides a batch command file capability to do this efficiently.
The application can process a command file that has all the options on a single command line
as one line in this file. The application will process each of these commands in the order they
appear. The format for these options is as follows:
MTX15SDK –cmdfile <command file>
Where <command file> is the full path to the name of the text file which contains the commands.
Example
For example, you wish to poll the three terminals at location 1 and then set the time on each of
them. The command file, called “commands.cmd”, contents would be as follows:
-poll -location “Location1” -terminal “0362118427” -datafile
autopoll.bat
-poll -location “Location1” -terminal “0362118428” -datafile
autopoll.bat
-poll -location “Location1” -terminal “0362118429” -datafile
autopoll.bat
-settime -location “Location1” -terminal “0362118427” -startdls
"04-01-2007" -enddls "10-31-2007" -offset –5
-settime -location “Location1” -terminal “0362118428” -startdls
"04-01-2007" -enddls "10-31-2007" -offset -5
10-2 MTX-15 SDK v1.1 Installation and Operation Guide

-settime -location “Location1” -terminal “0362118429” -startdls
"04-01-2007" -enddls "10-31-2007" -offset -5
The following command line will process the command file called “commands.cmd”
MTX15SDK –cmdfile commands.cmd
This will cause the application to execute each command line in the sequence specified. In the
above example, the order of operations would be as follows:
1. poll terminal “0362118427” at location “Location1”
2. poll terminal “0362118428” at location “Location1”
3. poll terminal “0362118429” at location “Location1”
4. set the time of “0362118427” at location “Location1”
5. set the time of “0362118428” at location “Location1”
6. set the time of “0362118429” at location “Location1”
MTX-15 SDK v1.1 Installation and Operation Guide 10-3

This page intentionally left blank.
10-4 MTX-15 SDK v1.1 Installation and Operation Guide


AMX-404301 z Copyright © 2007 Amano Cincinnati, Inc. z 10/07/0
 Loading...