


Amana ADW662EAB, ADW662EAC, ADW662EAS, ADW662EAW, ADW862EAB Owner's Manual
...Owner's Manual
Dishwasher
Keep instructions for future reference. Be sure manual stays with dishwasher.
Contents |
|
Important Safety Information ...................... |
3 |
Washing the Dishes ................................... |
4 |
Custom Features ........................................ |
6 |
Water, Detergents and Rinse Aids .............. |
7 |
Dishwashing Recommendations ................. |
8 |
Care and Cleaning ....................................... |
9 |
Troubleshooting......................................... |
10 |
Warranty ................................................... |
12 |
Manual del propietario ............................... |
13 |
Manuel du propriétaire ............................... |
25 |
Part No. 6 917312 B

Thank you for buying an Amana® dishwasher!
Please take the time to complete the registration card and return promptly. If registration card is missing, call Amana Consumer Affairs Department. When contacting Amana, provide product information from serial plate found on the inside right edge of the dishwasher:
Model Number _____________________________________________
Manufacturing (P) Number ____________________________________
Serial Number (S/N) _________________________________________
Purchase Date _____________________________________________
Dealer Name ______________________________________________
Dealer Address ____________________________________________
Dealer Phone ______________________________________________
Keep this manual and your sales receipt together in a safe place for future reference or if warranty service is required.
For answers to questions or to locate an authorized servicer, call 1-800-843-0304. Warranty service must be performed by an authorized servicer. Amana Appliances also recommends contacting an authorized servicer if service is required after warranty expires.
Questions on cleaning or usage?
Refer to
Product Assistance at www.amana.com
or
call Consumer Affairs at 1-800-843-0304
Asure™ Extended Service Plan
Amana Appliances offers long-term service protection for this new dishwasher. Asure™ Extended Service Plan, covering functional parts, labor, and travel charges, is specially designed to supplement a strong warranty.
Call 1-800-528-2682 for information.
Parts and Accessories
Purchase replacement parts and additional accessories by phone.
To order accessories for your Amana product, call 1-800-843-0304.
Save Time and Money
If something seems unusual, please check Troubleshooting section, which is designed to help you solve
problems before calling service. If you have a question, write or call us (include model number and daytime phone number) at:
Consumer Affairs Department
Amana Appliances
2800 - 220th Trail
Amana, Iowa 52204
Ph# 1-800-843-0304
What You Need to Know about Safety Instructions
Warning and Important Safety Instructions appearing in this manual are not meant to cover all possible conditions and situations that may occur. Common sense, caution, and care must be exercised when installing, maintaining, or operating dishwasher.
Always contact your dealer, distributor, service agent, or manufacturer about problems or conditions you do not understand.
Recognize Safety Symbols, Words, Labels
!DANGER
DANGER—Immediate hazards which WILL result in severe personal injury or death
!WARNING
WARNING—Hazards or unsafe practices which COULD result in severe personal injury or death.
!CAUTION
CAUTION—Hazards or unsafe practices which COULD result in minor personal injury or product or property damage.
2

IMPORTANT SAFETY INFORMATION
!WARNING
To avoid risk of fire, electric shock, serious injury, or death when using your dishwasher, follow these basic precautions:
1.Read all instructions before using the dishwasher.
2.Use the dishwasher only for its intended function.
3.Disconnect electrical power to dishwasher before attempting to service.
4.To avoid electrical shock hazard, the sides and back must be enclosed and the front panels must be attached before electrical power is applied to the dishwasher. Refer to the installation instructions for proper grounding procedures.
5.Connect to a properly rated, protected and sized power supply circuit to avoid electrical overload.
6.Children should never be permitted to operate, or play in, with, or around this dishwasher.
7.To reduce the risk of injury when loading items to be washed, sharp or pointed items should be located with the handles up. Also, load sharp items so they are not likely to damage the door seal.
8.Be careful not to touch the heating element on the bottom of the tub during or at the completion of a cycle. It may be hot.
9.Use only detergents and rinse additives designed for an automatic dishwasher. Never use soap, laundry detergent, or hand washing detergent in your dishwasher. Keep these products out of reach of children.
10.Do not sit, stand on or abuse the door or dish racks of the dishwasher.
11.Under certain conditions, hydrogen gas may be produced in a hot-water system that has not been used for two weeks or more. HYDROGEN GAS IS EXPLOSIVE. If the hot-water system has not been used for such a period, before using the dishwasher turn on all hot-water faucets and let the water flow from each for several minutes. This will release any accumulated hydrogen gas. As the gas is flammable, do not smoke or use an open flame during this time.
12.Do not wash plastic items unless marked "dishwasher safe" or the equivalent. For plastic items not so marked, check the manufacturer's recommendations.
13.Do not tamper with controls.
14.To prevent accidental child entrapment and suffocation risk, always remove the door to the washing compartment when removing an old dishwasher from service or discarding it.
15.Use caution when unloading the dishwasher. Dishes will be hot if unloaded shortly after a cycle has completed.
Proper disposal of your appliance:
Important: Child entrapment and suffocation are not problems of the past. Junked or abandoned appliances are still dangerous—even if they sit "just for a few days". If you are getting rid of your old appliance:
•Remove dishwasher door completely from unit.
•Keep shelves or racks in place so that children may not easily climb inside.
SAVE THESE INSTRUCTIONS
3

Washing the Dishes
1. Prepare dishes for washing
•Scrape off bones or large food particles. Remove excessive quantities of greasy/oily substances.
•Scrape or soak items with burnt on foods as they require more energy than the rest of the load to clean.
•Scrape off tomato based food soils.
•If connected to a food waste disposer, make certain the disposer is
empty before starting the dishwasher. This allows proper draining.
• Mustard, mayonnaise, vinegar, lemon and other acidic foods can cause rust or discoloration on stainless steel. Rinse these pieces as soon as possible.
•Starch from foods like potatoes, pasta, rice and oatmeal require more energy to clean than the rest of the load.
2. Load lower rack
To ensure best cleaning:
• Place all items in the racks so they are separated and facing the center of the racks.
• Wedge flat, lightweight items next to the silverware basket or along the sides and back of the racks.
• Load items so they do not rest over the wash tower located in the center of the lower rack.
• Avoid blocking the upper and lower spray arms by not allowing items to extend beyond the racks.
• Large items may be placed in any convenient location in this rack.
• Keep soiled surfaces facing the center of the rack.
• The back of this rack accommodates a row of dinner plates or two rows of smaller plates. Serving bowls and large pans fit across the front of the rack or on the left side.
•Folding tines (some models) located on the right side, provide loading flexibility for large-shaped items.
3. Load upper rack
• This rack is designed to hold glasses, cups, small plates, bowls, cookware, etc.
• Small plates or bowls should be loaded with soiled surfaces facing the center of the rack.
• The twin shelf (select models) on the right side of the upper rack folds up or down. Fold it down to hold longhandled knives, spatulas and spoons or short items like cups or juice glasses. Fold it up for taller items like bowls, plates, etc.
• Place glasses in any row of the upper rack for proper cleaning and rinsing. Do not load glasses over tines.
• Upper rack can be removed when tall or oversized items need to be loaded into the lower rack.
4
Washing the Dishes (cont'd)
4. Load Silverware Basket
• For best cleaning results, prevent items from nesting together by placing some items in the basket with handles up and some with handles down.
• Load knives, handles up, through the slots in the covered section when closed (select models).
• Be sure that thin, finely pointed items do not extend through the basket. This could block the lower wash arm.
• Small, lightweight items like baby spoons and plastic measuring spoons should be placed in the covered section (select models) of the basket for washing.
5. Check rinse aid dispenser
Regular use of a rinse aid improves drying, reduces spotting and filming, and reduces moisture left on the dishwasher interior.
6. Add dishwashing detergent
Use detergent designed specifically for use in an automatic dishwasher. Be sure it is fresh and stored in a cool, dry place (not under the sink).
7. Run hot water & check food disposer
Before starting the dishwasher, turn on the hot water faucet and let it run until the water is hot. This assures that the initial fill of water is hot.
If connected to a food waste disposer, make certain the disposer is empty before starting the dishwasher.
8. Close door
After loading the dishwasher and adding detergent, close the dishwasher by pressing the door until the latch clicks.
9. Select wash cycle
To start the dishwasher, firmly press the desired cycle and options pads. After a pause, the fill will begin. To prevent unplanned cycle or option changes, these selections are 'locked in' after 1 minute. The indicator lights for the selected cycle and options will glow. To cancel an option, press the pad again, to cancel a cycle, press the DRAIN/OFF pad.
Forget something?
For best cleaning, the forgotten item should be added early in the cycle.
1.Press the Delay/Resume pad or unlatch the door.
2.Wait for the water circulation to stop.
3.Open the door and add the item.
4.Close and latch the door.
5.If Delay/Resume was pushed, push it again to restart the dishwasher
6.After five seconds, the cycle resumes automatically at the point of interruption.
! CAUTION
To avoid risk of personal injury when opening dishwasher door during a cycle, wait a few seconds to allow cold air to slowly expand inside dishwasher. Dishwasher may be hot.
5

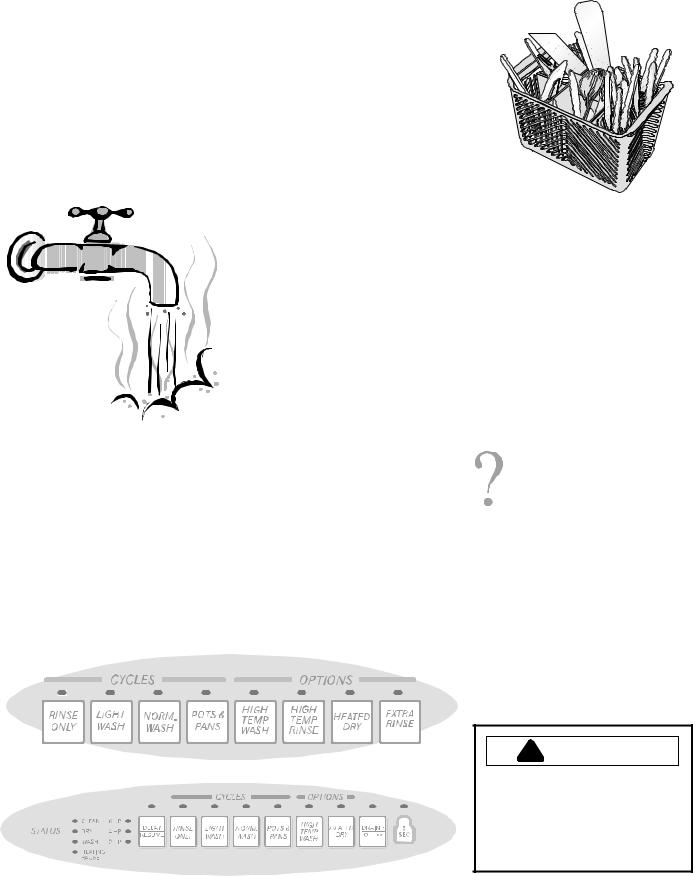
Custom Features
If These Features are Different from Yours
These features are intended to show the variety that is available
in the product line. If your dishwasher does not have all the options that are shown, it is not a mistake. The information provided applies to several of the models in the product line.
Indicator
Lights
The CLEAN light illuminates at the end of the cycle and remains lit until the door has been open for 30 seconds continuously.
The DRY light illuminates during the entire dry period and goes out when the cycle is completed.
The WASH light illuminates during all rinse and wash portions of the cycle.
The HEATING PAUSE light illuminates when the cycle is being extended to heat the water.
Sensor Clean
Amana recommended cycle choice for all day-to-day soil types.
Normal dishloads vary from day to day. Sensor clean is recommended because it selects the number of fills and wash time best suited for the soil level of each load. Depending on the number of fills required water usage ranges from 4 to 10 gallons.
Delay/Resume
The Delay/Resume option can be used to automatically start the cycle at a later time, such as during off-peak hours for reduced energy cost or to reduce daytime heat buildup in the home.
To set up a delay:
1.Select the appropriate cycle and options for the load.
2.Press the Delay/Resume pad until the desired amount of delay time is selected. The delay time will begin counting down when the pad is released.
3.The Delay/Resume indicator light will remain lit until the delay time has counted down.
4.The cycle will automatically start as soon as the delay time expires.
NOTE: If Delay/Resume is chosen without selecting a cycle and/or options, the dishwasher will select the last cycle used. (It will not remember the Rinse Only cycle.)
Control Lock Option
The control touchpads can be locked to prevent unwanted use. If this feature is activated between cycles, the dishwasher cannot be operated until the controls are unlocked. If desired, the controls can be locked after a cycle or delay has started.
NOTE: This option does not lock the door, only the dishwasher controls.
Setting the control lock:
1.Press the pad for three seconds.
2.An indicator light above the pad will illuminate when the controls are locked.
To cancel:
1.Press the pad for three seconds. 2.The indicator light will go off.
NOTE: If a cycle or option pad is pressed after the controls have been locked, the indicator light above the Control Lock pad will flash five times.
High Temp Wash
Use High Temp Wash when washing loads with hard-to-remove food
soils. High Temp Wash can be selected with any cycle, except Rinse Only. Depending on which cycle is being used, selecting
High Temp Wash adds fills, heat and/or wash time to the wash cycle.
For baked-on, dried-on soils, select Pots and Pans along with High Temp Wash option. The use of an enzyme detergent is recommended
Drain/Off
To drain the dishwasher
and then turn it off, press Drain/Off once. Press
Drain/Off twice to turn the dishwasher off without draining.
High Temp Rinse
High Temp Rinse provides a water temperature check in the main
wash and also in the final rinse cycle. If necessary, the heating element will turn on and the cycle will be extended to heat water to
the proper temperature.
Select High Temp Rinse with any cycle (except Rinse Only) to assure proper hot water temperature and to enhance drying results.
6

Water, Detergents and Rinse Aids
How Much Detergent to Use
Too little detergent results in poor cleaning, hard water filming/spotting and poor drying. Too much detergent can cause permanent etching/cloudiness.
Use a detergent designed specifically for use in an automatic dishwasher. Other types (laundry, hand soap, etc.,) will cause oversudsing. Be sure to use fresh detergent and store it in a cool, dry place (not under the sink). The amount of detergent to use depends on the water hardness measured in grains per gallon* (gpg) and the amount of soil on the dishes. Generally detergent amounts should be increased for harder water and heavier soil. Refer to the following chart for detergent usage recommendations.
If the water hardness is 13 gpg or harder, it is difficult to achieve good results with any dishwasher. The solution is a mechanical water softener to improve water quality, detergent effectiveness, and to protect the dishwasher parts from the damage that hard water deposits may cause.
Water Hardness* |
Soil Residue |
Detergent amount** |
|
(teaspoons) |
|||
|
|
||
|
|
|
|
|
Light Soil |
5 |
|
Soft |
Normal Soil |
6 |
|
(0-4 gpg) |
|||
|
Heavy Soil |
8 |
|
|
|||
|
|
|
|
|
Light Soil |
7 |
|
Medium |
|
|
|
Normal Soil |
8 |
||
(5-9 gpg) |
|||
|
|
||
|
Heavy Soil |
10 |
|
|
|
|
|
|
Light Soil |
9 |
|
Hard |
|
|
|
Normal Soil |
10 |
||
(10-12 gpg) |
|||
|
|
||
|
Heavy Soil |
12 |
|
|
|
|
*Your local water utility or state university extension service can tell you the degree of water hardness in your area.
**Add recommended amount of detergent to both compartments for Pots and Pans or Normal wash cycles, and to the main cup only for the Light wash cycle.
Rinse Aids
Regular use of a rinse aid improves drying, reduces spotting and filming, and reduces moisture left on the dishwasher interior.
Your dishwasher features an automatic rinse aid dispenser located near the detergent cups in the door.
The clear window in the center of the dispenser cap allows you to see if there is rinse aid in the reservoir. When the window is colored, there is rinse aid in the dispenser. When the window becomes clear, it is time to refill the dispenser. Check the dispenser monthly.
To add rinse aid to the dispenser, turn the cap counterclockwise to open. Remove the cap and pour liquid rinse aid into the opening. Replace the cap and turn it clockwise.
Hot Water
For best results, the
incoming water
temperature should be 120–140°F.
Check the water temperature by turning on the hot water faucet nearest the dishwasher and letting it run into a glass in the sink. Place a candy thermometer in the glass and check the temperature once it has stopped rising. If it is below 120°F have a qualified person raise the water heater setting.
If the outside temperature is unusually low, or if your water travels a long distance from the water heater to the dishwasher, you may want to turn on the hot water faucet at the sink and allow it to run until the water is hot. This assures that the initial fill of water is hot.
7

Dishwashing Recommendations
Most tableware, cookware and flatware can safely be washed in your dishwasher. If you have any doubts about an item, check with the manufacturer.
|
|
|
'LVKZDVKHU 6DIH ,WHPV |
|
|
|
Usually |
|
|
Material |
Safe |
|
Special Instructions |
|
|
|
|
|
|
Aluminum |
|
Yes, except anodized |
|
High water temperature and detergents may affect finish. |
|
|
|
|
|
Cast Iron |
|
No |
|
Seasoning will be removed, iron will rust. |
|
|
|
|
|
China or |
|
No, if antique or |
|
Always check manufacturer’s recommendation before washing. Antique, |
Stoneware |
|
hand-painted |
|
hand-painted or over-the-glaze patterns may fade. Gold leaf may discolor. |
|
|
|
|
|
Crystal |
|
No, if antique or |
|
Always check manufacturer’s recommendation before washing. Some types of |
|
delicate crystal |
|
leaded crystal may etch with repeated washings. |
|
|
|
|
||
|
|
|
|
|
Furnace Filters |
|
Not recommended |
|
May leave a dingy deposit or stain on dishwasher interior. |
|
|
|
|
|
Glass |
|
Yes |
|
Milkglass can yellow with repeated dishwasher washings. |
|
|
|
|
|
Gold-Plated |
|
No |
|
Will discolor. |
Flatware |
|
|
||
|
|
|
|
|
|
|
|
|
|
Pewter, Tin |
|
No |
|
Not considered dishwasher safe. |
|
|
|
|
|
Plastics |
|
|
|
Always check manufacturer’s recommendation before washing. Plastics vary in |
|
Yes, top rack |
|
their capacity to withstand high water temperatures and detergents. Disposable |
|
|
|
|
|
plastic items are not dishwasher safe for this reason. |
|
|
|
|
|
Stainless Steel |
|
Yes |
|
Run a Rinse Only cycle if not washing immediately. Prolonged contact with foods |
|
|
containing salt, vinegar, milk products or juice could damage finish. |
||
|
|
|
|
|
|
|
|
|
|
Sterling silver |
|
|
|
Always check manufacturer’s recommendation before washing. Run a Rinse Only |
|
No, if has commercial |
|
cycle if not washing immediately. Prolonged contact with food containing salt, acid |
|
Silver plate |
|
‘darkening’ |
|
or sulfide (eggs, mayonnaise and seafood) could damage finish. Commercial |
|
|
|
|
‘darkening’ may be removed by detergent. |
|
|
|
|
|
Wooden Item |
|
No |
|
Wood may warp, crack or discolor. |
|
|
|
|
|
Removing the Upper Rack
The upper rack can be removed when tall or oversized items need to be loaded into the lower rack.
NOTE: Avoid resting items over the center wash tower.
To remove:
• Roll the upper rack 1/3 to 1/2 of the way out.
• Remove the plastic rack stop from the end of each track. To remove each plastic rack stop, push inward (toward the rack) on the ridged area of the rack stop. The rack stop will snap open and can be easily removed by pulling straight out. Take care to support the track while removing rack stops.
•Roll the rack all the way out of the track and remove from the dishwasher.
•Reverse the above procedure to replace the upper rack into the dishwasher.
8

Care and Cleaning
General Dishwasher Care:
The dishwasher interior is normally self-cleaning. Periodically check the bottom of the dishwasher tub to see if any large particles have not gone through the strainer portion of the module.
Wipe the edge of the inner door liner to remove any food soil splashes which occurred during loading.
The color from some tomato-based food soils has been known to occasionally adhere to today's dishwasher tubs, causing a temporary discoloration. To help prevent this, when washing a load of dishes soiled with tomato sauce:
•Scrape excess tomato-based food soils off of dishes, prior to loading. Do not prewash the dishes, however.
•Run the Pots and Pans cycle.
The front of the dishwasher can be cleaned with a soft damp cloth and liquid spray cleaner. Do not use abrasive powders or cleaning pads.
For a strong odor try placing baking soda in both sides of the detergent cup. Select Light Wash and allow the water to circulate for about 10 minutes. Interrupt the cycle by
unlatching the door and let it stand overnight. Restart the dishwasher by latching the door and allow it to complete the
cycle. You can also try a citric acid containing dishwasher cleaning product such as Glisten (Part No. R0131566) or a commercially available dishwasher cleaning product.
! WARNING
To avoid risk of burns, allow heating element to cool before cleaning the interior.
Storage
Fill both detergent cups with a fresh-scented dishwasher detergent
or baking soda and select the Normal Wash cycle. Allow the dishwasher to complete the cycle. Then turn the water supply off and drain the dishwasher. To drain:
1.Press the Drain/Off pad once.
2.Operate the drain twice to ensure most of the water is removed.
3.Last, disconnect the electrical supply and prop open the door.
Cleaning Stainless Steel (some models)
Stainless steel appliances have been factory finished for high shine and luster. To maintain this quality appearance:
DO USE: |
DO NOT USE: |
|
• Warm soapy water for routine |
• Abrasive powders or liquids |
|
cleaning. |
• |
Citrus based cleaners |
• Dry with soft, clean cloth. |
• |
Ammonia |
• For heavy soil, ONLY a stainless |
• |
Steel wool pads |
steel cleaner designed for |
• |
Abrasive cloths |
kitchen appliance use. |
• |
Oven cleansers |
• Acidic or vinegar based cleaners
Damage to stainless steel finish due to improper use of cleaning products, or using non-recommended cleaning products, is not covered under warranty. For stainless steel cleaner, call our Consumer Affairs division at (800) 843-0304 and request part number 31960801.
 Citric Acid
To prevent damage to the
finish of your stainless steel appliance, do not
allow mustard, tomato juice, marinara sauce, or other citrus based sauces or products to remain on stainless steel surface. Citric acid permanently discolors stainless steel.
9
Troubleshooting
You may save time and money by checking items below before calling for service. List includes common concerns that are not the result of defective workmanship or materials. If your question is not explained below, contact Amana Consumer Affairs Department at 800-843-0304 or at www.amana.com.
723,& |
3266,%/( &$86( |
62/87,21 |
|
NOISE |
|
|
|
|
|
|
|
|
|
Water valve hiss during fill |
Normal. |
|
|
|
|
|
|
Water circulation |
Normal. |
|
|
|
|
|
|
Ticking sound |
Normal. From timer. |
|
|
|
|
|
|
Thumping sound |
Normal. May be a wash arm bumping an item that extends |
|
|
beyond the rack. Rearrange. |
|
|
|
|
|
Dishwasher seems noisy |
|
|
|
|
Chopping or grinding sounds |
Normal. May be heard as the internal food disposer chops up |
|
|
|
||
|
|
hard items like fruit seeds, nuts, etc. |
|
|
|
|
|
|
|
|
|
|
|
Humming |
Normal. Occurs during the drain. |
|
|
|
|
|
|
Snap noise |
Normal. Noise is the detergent cup lid hitting the door liner when |
|
|
the dishwasher door is opened at the end of a cycle. |
|
|
|
|
|
|
|
|
|
|
|
Improper installation |
Verify dishwasher installation is correct. |
|
|
|
|
OPERATION |
|
|
|
|
|
|
|
|
|
Incomplete cycle |
Allow cycle to complete. |
Detergent cup is not empty |
|
Dispenser is blocked by a utensil |
Move utensil. |
|
|
Stale, old detergent |
Use fresh detergent stored in a cool, dry place. |
|
|
|
|
Cycle takes too long |
|
Low water temperature |
Verify incoming water temperature is 120–140°F (49–60°C) |
|
|
|
|
|
|
Dishes being held in dishwasher |
Run dishes through a Rinse Only cycle. |
|
|
New smell |
Normal. Will dissipate with use. |
|
|
Improper draining |
See Troubleshooting-Water. |
Dishwasher has an odor |
|
|
Use baking soda in both detergent cups and run through a |
|
|
Light Wash cycle. Interrupt 10 minutes into wash cycle and |
|
|
|
|
|
|
|
Lingering scent |
allow water to stand overnight. Restart the dishwasher by |
|
|
latching the door and allow cycle to complete. You can also try a |
|
|
|
|
citric acid containing dishwasher cleaning product such as |
|
|
|
Glisten (part no R0131566) or a commercially available |
|
|
|
dishwasher cleaning product. |
|
|
|
|
|
|
|
Check water temperature. Water temperature needs to be at |
|
|
Low water temperature |
least 120°F (49°C). |
|
|
Run hot water at sink before starting dishwasher. |
|
|
|
|
|
|
|
|
Select High Temp Wash if available. |
|
|
|
|
|
|
High water hardness |
Check water hardness and adjust detergent amount accordingly. |
|
|
|
|
|
|
Stale, old detergent |
Use fresh detergent stored in a cool, dry place. |
Food soil remains on dishes |
|
Improper cycle |
Select proper cycle for the soil level. |
|
|
|
Load items so they do not block the wash arms or center tower. |
|
|
Improper loading |
Load the utensil basket with some handles up and some down |
|
|
to prevent nesting. |
|
|
|
|
|
|
|
|
Do not place glasses over tines. |
|
|
|
|
|
|
Burnt on residue |
Prior to loading, scrape off burnt on foods and wipe the starchy |
|
|
film from utensils used with pasta, rice and oatmeal. These soils |
|
|
|
|
require more energy than the rest of the load to clean. |
|
|
|
|
|
|
No rinse aid |
Use a rinse aid. |
|
|
|
|
Glasses are cloudy/spotted |
|
Low water temperature |
Verify incoming water temperature is 120–140°F (49–60°C). |
|
Hard water |
See Stains and Films. |
|
|
|
||
|
|
Etching |
See Stains and Films. |
10
|
|
|
|
|
|
Troubleshooting (cont'd) |
|
OPERATION (cont’d) |
|
|
|
|
|||
Stains |
|
|
Multiple causes |
|
See Stains and Films. |
||
|
|
|
|
|
|
|
|
WATER |
|
|
|
|
|
|
|
|
|
|
|
Not level |
|
Check that the dishwasher is level. Refer to Installation Instructions. |
|
Dishwasher leaks |
|
|
Too much detergent |
|
Suds can cause the dishwasher to overflow. |
||
|
|
|
See Water, Detergents and Rinse Aids. |
|
|||
|
|
|
|
||||
|
|
|
|
Too much rinse aid. |
|
Be sure the rinse aid lid is securely attached and is not leaking. |
|
|
|
|
|
|
See Water, Detergents and Rinse Aids. |
|
|
|
|
|
|
|
|
||
|
|
|
|
Food waste disposer |
|
Check for food obstruction in the drain or disposer. |
|
Dishwasher will not drain |
|
Knock-out plug |
|
Be sure the knock-out is removed from disposer inlet. |
|||
|
|
||||||
|
|
Refer to Installation Instructions. |
|
||||
|
|
|
|||||
Water in tub bottom |
|
|
Siphoning |
|
Be sure the drain hose is elevated at least 32” so water cannot siphon |
||
|
|
|
|
|
back into the tub. |
||
|
|
|
|
|
|
||
|
|
|
|
Kinked drain hose |
|
Make sure drain hose is straight. |
|
|
|
|
|
|
|||
|
|
|
|
Water supply |
|
Be sure the water is turned on. |
|
Dishwasher won’t fill |
|
|
Unlatched door |
|
Be sure door is latched securely. |
|
|
|
|
Kinked inlet hose |
|
Check inlet hose for a kink. |
|
||
|
|
|
|
|
|||
|
|
|
|
Clogged water valve |
|
Check water valve inlet for sediment and clean if necessary. |
|
|
|
|
|
|
|
Check water temperature. |
|
|
|
|
|
Low water temperature |
|
Water temperature needs to be at least 120°F (49°C). |
|
|
|
|
|
|
Run hot water at sink before starting dishwasher. |
||
|
|
|
|
|
|
||
|
|
|
|
|
|
Select High Temp Wash if available. |
|
Items not properly dried |
|
|
|
|
Water droplets may form on the interior as a part of the drying process. |
||
|
|
|
|
Normal function |
|
Plastic and Teflon items are difficult to dry because the porous surface |
|
Moisture is present on |
|
|
|
tends to collect water droplets. Towel drying may be necessary. |
|||
|
|
|
|
||||
the interior after the dry |
|
|
|
|
Glasses with concave bottoms hold water and require towel drying. |
|
|
cycle |
|
|
No rinse aid |
|
Always use a rinse aid. |
|
|
|
|
|
|
Heated Dry is not selected |
|
Select Heated Dry |
|
|
|
|
|
Not enough detergent |
|
Increase detergent amount to match the water hardness. |
|
|
|
|
|
|
See Water, Detergent and Rinse Aids section. |
||
|
|
|
|
|
|
||
|
|
|
|
|
|
|
|
|
|
|
|
Improper loading |
|
Load dishwasher properly. See Washing the Dishes. |
|
|
|
|
|
Stains and Films |
|||
Stain |
|
Removal or Prevention |
|
|
|
||
|
|
|
|
||||
|
|
|
|||||
Iron deposits |
|
RoVer Rust Remover (part no. R0131565) can be used to remove rust. Do not use RoVer along with dishwasher |
|||||
(yellow, brown or |
|
detergent. Fill both cups with RoVer and complete a Normal Wash cycle. Follow with a short wash cycle using a |
|||||
orange film) |
|
dishwasher detergent. |
|
|
|
||
|
|
|
|||||
Aluminum marks |
|
Aluminum utensils or pans can leave marks when they rub against other items. Leave a slight space between |
|||||
(gray or black marks) |
|
items. |
|
|
|
||
|
|
|
|||||
Discoloration of plastics |
|
Color from tomato sauces may adhere to the tub. If light staining has occurred, leave the door open to oxidize |
|||||
|
the stain away. For removal of heavier stains, try a citric acid containing dishwasher cleaning product such as |
||||||
or dishwasher tub |
|
Glisten (part no. R0131566). Change dishwasher detergent and be sure to use a dishwasher detergent that |
|||||
|
|
contains chlorine to better fight staining. |
|||||
|
|
|
|||||
Pitting of stainless steel |
|
No treatment. Avoid mixing stainless steel and silver utensils. Remove food soils as quickly as possible. From |
|||||
|
the stainless steel. Prolonged adhesion, especially with an acid based food, can cause discoloration or pitting. |
||||||
|
|
||||||
|
|
|
|||||
|
|
Confirm the cloudiness is removable by soaking the item in white vinegar for approximately 5 minutes. If |
|||||
|
|
removed, the problem is due to hard water. Adjust detergent amount being used to match water hardness. Be |
|||||
|
|
sure detergent is fresh, stored properly and is a high quality brand. |
|||||
Cloudy/Spotted |
|
If cloudiness is not removable, it is etching. This is an erosion of the surface of the glassware and can be caused |
|||||
|
|
by water that is too hot, from using too much detergent or by prewashing. Detergent needs food soil to act upon. |
|||||
|
|
If etching has occurred, the glassware is permanently damaged. To prevent further etching, adjust the detergent |
|||||
|
|
amount to match the water hardness, stop prewashing, and be sure incoming water temperature is not greater |
|||||
|
|
than 140°F (60°C). Use water heating options only when incoming water temperature is below 120°F (49°C). |
|||||
|
|
|
|
|
|
|
|
11
 Loading...