

Page 1
OPERATOR’S MANUAL
WARNING
WARNING
CT PROFORMANCE™
CTP6-10E
CTP10-10E
CTP7-20E
CTP10-20E
CTP20-10E
CTP20-20E
CTP6-10G
CTP10-10G
CTP7-20G
CTP10-20G
CTP20-10G
CTP20-20G
To prevent personal injury, death or
property damage:
Do not store or use gasoline or other
flammable vapors or liquids in the vicinity
of this or any other appliance.
Improper installation, alteration,
adjustment, service, cleaning, or
maintenance could result in property
damage, severe injury, or death.
Read and understand the installation,
operating and maintenance instructions
thoroughly before installing, servicing, or
operating this equipment.
MN-35948 Rev 14
EN
07/17
Page 2
DANGER
This manual covers the following CTP series models:
Boiler-Free Models Steam Generator Models
6-10E, 6-10G
10-10E, 10-10G
7-20E, 7-20G
10-20E, 10-20G
20-10E, 20-10G
20-20E, 20-20G
Please post the following instructions in a prominent location
in the event the user smells gas.
6-10EB
10-10EB
7-20EB
10-20EB
20-10EB
20-20EB
Before starting the appliance, make certain
you do not detect the odor ofgas.
If you smell gas:
• Shut off the gas supply immediately.
• Do not attempt to light any appliance.
• Do not touch any electrical elements.
• Extinguish any open flame.
• Evacuate the area.
• Use a telephone outside the property and
immediately contact your gas supplier.
• If unable to contact your as supplier,
contact the fire department.
Page 3

Enjoy your Alto-Shaam Combi Oven!
The combi oven combines a steam and convection oven into
one versatile unit and can serve a variety of cooking functions.
Alto-Shaam’s combi ovens allow chefs to control humidity and
temperature separately, with powerful results. The same oven
can be used to dehydrate vegetables, roast pork, steam rice,
smoke brisket and bake loaves of bread.
The PROtouch™ recipe management system with one-touch
cooking provides complete control over the oven, allowing chefs
and foodservice employees to select pre-programmed recipes
Before Use
If this is the rst time this oven is being used, or if the oven has
just been removed from storage, follow these steps for cleaning:
1. Remove all packing material from the oven,
2. Remove and wash any detachable items such as wire shelves,
side racks, pans, and drip trays with hot, soapy water. Dry
with a clean, damp lint-free cloth.
3. Remove all visible grease or oil from the oven.
4. Clean the interior and exterior of the oven with a mild soap
and water solution. Apply the solution with a clean, damp
cloth. Do not use commercial or household cleaners that
contain ammonia. Wipe with a clean, damp cloth to remove
all detergent residue. Dry with a clean, lint-free cloth.
Introduction
Introduction
for maximum consistency. To store and secure important
information, a HACCP data system pairs up with an onboard USB
port, so settings can be downloaded and saved for the future.
When it’s time to clean up, Alto-Shaam’s CombiClean Plus™
automated cleaning system saves labor previously spent
scrubbing the oven cavity. On the oven’s exterior, a PROrinse™
retractable hose gives you spray-washing power without opening
the oven door.
5. Clean the oven glass with glass cleaner or distilled vinegar.
Re-install the side racks and wire shelves – position shelves
with the curved end up and toward the rear of the oven.
When cleaning is complete, the oven must acclimate to room
temperature in the environment where it is placed.
Twenty four (24) hours is recommended.
The oven is now ready for operation.
EXTEND YOUR ORIGINAL MANUFACTURER’S WARRANTY
Register online today at www.alto-shaam.com/warranty
Register your Alto-Shaam appliance online, and you will automatically be
entered into a monthly drawing to win an additional year extended warranty!
Registering your equipment ensures prompt service in the event of a warranty
claim. You will also receive direct notifications of soware updates and additional
product information.
Your personal information will not be shared with any other company.
ALTO-SHAAM 24/7 EMERGENCY REPAIR SERVICE
Call 800-558-8744 to reach our twenty-four hour emergency service call center
for immediate access to local authorized service agencies outside standard business hours. The
emergency service access is provided exclusively for Alto-Shaam equipment and is available
throughout the United States through Alto-Shaam’s toll free number.
Emergency service access is available seven days a week, including holidays.
MN-35948 • Rev 14 • 07/17 • Combitherm® CT PROformance™ Series Operator’s Manual • 3
Page 4

4 • MN-35948 • Rev 14 • 07/17 • Combitherm® CT PROformance™ Series Operator’s Manual
Page 5

Table of Contents
Introduction .....................................3
Safety Procedures ................................6
Operation .......................................9
How to Turn On the Oven ....................................9
How to Start a Manual Calibration ............................9
How to Calibrate theTouch Screen ............................9
How to Turn O the Oven ....................................9
Control Panel Identification .................................10
Home Screen ............................................10
Utility Screen ............................................10
Upload/Download Screen ................................10
Setting Screen 1 .........................................11
Setting Screen 2 .........................................11
Preventative Maintenance Screen .........................12
Preventative Maintenance - Editing .......................12
Soware Updates ..........................................13
Cooking Screen Identification ............................14
Auxiliary Functions and Features ............................15
Power Settings ..........................................15
Multiple Fan Speeds .....................................15
Multi-Shelf Timer ........................................15
Preheat Features ........................................16
Cool-Down Feature ......................................16
Humidity Control Feature ................................17
Rapid Cool ..............................................17
Rest .....................................................17
Door ....................................................17
Factory Default Settings .....................................18
Cooking Modes - Steam .....................................19
Steam Mode Operating Tips .................................20
Cooking Modes - Combination ..............................21
Combination Mode Operating Tips ..........................22
Cooking Modes - Convection ................................23
Convection Mode Operating Tips ............................24
Cooking Modes - Retherm ...................................25
Retherm Mode Operating Tips ...............................26
Cooking Modes - Dehydration ...............................27
Dehydration Mode Operating Tips ...........................28
Cooking Modes - Delta-T Core Temperature ..................29
CombiSmoker® Procedures .................................30
Recipe Programming .......................................32
Using Programmed Recipes ..............................33
To Cook with Preprogrammed Recipes ....................33
Editing Programmed Recipes .............................34
Organizing Programmed Recipes .........................35
HACCP Access . . . . . . . . . . . . . . . . . . . . . . . . . . . . . . . . . . . . . . . . . . . . .37
HACCP Access and Download ...............................38
Options ........................................39
CombiHood PLUS™ Ventless Hood ..........................39
Connecting the Optional Grease Collection System ...........40
Connecting the Optional Liquid Cleaner. . . . . . . . . . . . . . . . . . . . . .41
How To Use the Combilatch™ Door Interlock .................42
Recipe Guidelines ...............................43
Bakery Items ...............................................43
Convenience Product Items .................................45
Fish & Seafood Items .......................................46
Meat Recipes ...............................................47
Miscellaneous Recipes ......................................49
Poultry Recipes .............................................50
Vegetable Recipes ..........................................52
Cleaning and Preventative Maintenance ............54
CombiClean® Cleaning Agents ...............................54
Preventive Maintenance ....................................55
Weekly Maintenance ........................................56
Daily Inspection ............................................57
Weekly Inspection ..........................................58
Monthly Inspection .........................................59
Yearly Inspection ...........................................60
Protecting Stainless Steel Sufaces ...........................63
Cleaning Agents ............................................63
Cleaning Materials ..........................................63
Daily Cleaning of the Oven ..................................64
Probe and Probe Prong Cleaning ............................64
Roll-In Cart/Food Trolley Cleaning ...........................64
CT PROtouch™ with CombiClean® ...........................65
CT PROtouch™ with Automatic Liquid Cleaning ...............66
Troubleshooting .................................67
Error Codes ................................................67
Touch Motor Control Error Codes ............................73
Notes ..........................................74
Limited Warranty ................................75
MN-35948 • Rev 14 • 07/17 • Combitherm® CT PROformance™ Series Operator’s Manual • 5
Page 6

Safety Procedures
• The appliance is intended to cook, hold or process foods
Knowledge of proper procedures is essential to the
for the purpose of human consumption. No other use for
this appliance is authorized and is therefore considered
dangerous. The appliance must not be used to cook
food containing ammable materials (such as food with
alcohol). Substances with a low ash point can ignite
spontaneously and cause a re.
• The appliance is intended for use in commercial
establishments where all operators are familiar with
the purpose, limitations, and associated hazards of this
appliance. Operating instructions and warnings must
be read and understood by all operators and users.
Alto-Shaam recommends regular staff training to avoid
the risk of accident or damage to the appliance. Operators
must also receive regular safety instructions.
• Any troubleshooting guides, component views, and
partslists included in this manual are for general
reference only and are intended for use by quali ed and
trained technicians.
• This manual should be considered a permanent part of
this appliance. This manual and all supplied instructions,
diagrams, schematics, parts lists, notices, and labels must
remain with the appliance if the item is sold or moved to
another location.
safe operation of electrically and/or gas energized
equipment. The following signal words and symbols
may be used throughout this manual.
DANGER
Indicates a hazardous situation that, if not avoided, will
result in death or serious injury.
WARNING
Indicates a hazardous situation that, if not avoided, could
result in death or serious injury.
CAUTION
Indicates a hazardous situation that, if not avoided, could
result in minor or moderate injury.
notICE: Indicates information considered important,
but not hazard-related (e.g., messages relating
to property damage).
notICE: For equipment delivered for use in any
location regulated by the following
directive: 2012/95/EC WEEE
Do not dispose of electrical or electronic
equipment with other municipal waste.
6 • MN-35948 • Rev 14 • 07/17 • Combitherm® CT PROformance™ Series Operator’s Manual
Page 7
Safety Procedures
• To prevent serious injury, death or property damage,
• If the gas appliance is installed under an exhaust
appliance is in use to avoid the build up of combustion
vents. Thisarea is hot and could be a potential ignition
suddentemperature change can damage the appliance
the appliance should be inspected and serviced at
least every twelve (12) months by an authorized
service partner or trained technician.
• Only allow an authorized service partner or trained
technician to service or to repair the appliance.
Installation or repairs that are not performed by an
authorized service partner or trained technician, or
the use of non-factory authorized parts will void the
warranty and relieve Alto-Shaam of all liability.
• When working on this appliance, observe precautions
in the literature, on tags, on labels attached to
or shipped with the appliance and other safety
precautions that may apply.
• If the appliance is installed on casters freedom of
movement of the appliance must be restricted so
that utility connections (including gas, water, and
electricity) cannot be damaged when the appliance
is moved. If the appliance is moved, ensure that all
utility connections are properly disconnected. If the
appliance is returned to its original position, ensure
that retention devices and utility connections are
properly connected.
• Only use the appliance when it is stationary. Mobile
appliance racks, mobile plate racks, transport trolleys,
andappliances on casters can tip over when being
moved over an uneven oor or threshold and cause
serious injury.
• Always apply caster brakes on mobile appliances or
accessories when these are not being moved. These
items could move or roll on uneven oors and cause
property damage or serious injury.
• Be extremely careful when moving appliances
because the food trays may contain hot uids that may
spill, causing serious injury.
• Always open the appliance door very slowly. Escaping
hot vapors or steam can cause serious injury or death.
hood, the hood must be switched On when the
gases. Failure to do so may result in serious injury,
death or property damage.
• Accumulations on the main burners of gas appliances
can result in ring out of normal sequence. This
delayed ignition creates an alarmingly loud sound.
If your appliance makes an especially loud noise
when starting up, shut down the appliance and call a
quali ed and trained service technician.
• NEVER place objects near the appliance exhaust
source for a re.
• Do not allow objects to block or obstruct the area
below the appliance base. This may result in re,
damage to the equipment or serious injury.
• Do not use the attached hand-held hose to
sprayanything other than the interior of the
appliancecompartment.
• Do not use the attached hand-held hose on the
surface of a hot cooking compartment. The
interior. Allow the appliance to cool to a minimum of
150°F(66°C). Failure to observe this precaution can
void the warranty.
WARNING
This appliance is not intended for use by
persons (including children) with reduced
physical, sensory or mental capabilities,
or lack of experience and knowledge,
unless they have been given supervision
concerning use of the appliance by person
responsible for their safety.
Children should be supervised to ensure
that they do not play with the appliance.
MN-35948 • Rev 14 • 07/17 • Combitherm® CT PROformance™ Series Operator’s Manual • 7
Page 8
Safety Procedures
CAUTION
CAUTION
WARNING
WARNING
WARNING
WARNING
To prevent serious personal injury, death, or
property damage:
Do not steam clean, hose down or flood the
interior or exterior with water or liquid solution
of any kind. Do not use water jet toclean. Failure
to observe this precaution will void the warranty.
To prevent SERIOUS PERSONAL INJURY or
PROPERTY DAMAGE:
DO NOT handle pans containing liquid or
semiliquid products positioned above the
eye level of the operator. Such products
may scald and cause serious injury.
DO NOT obstruct or block exhaust flues
or attach any flue extension that may
impede proper burner operation, restrict
the exhaust fumes and cause negative
backdra or the appliance to shut down.
Failure to do so may result in serious injury
or death.
To prevent serious personal injury, death,
or property damage:
The appliance must be cleaned thoroughly
to avoid deposits of grease and or food
residues inside the appliance that may
catch fire. If fat deposits and/or food waste
inside the appliance ignite, shut down
the appliance immediately and keep the
appliance door closed to extinguish the
fire. If further extinguishing is required,
disconnect the appliance from the main
power and use a fire extinguisher (do not
use water to extinguish a grease fire!).
Failure to clean the appliance properly
invalidates the warranty and relieves
Alto-Shaam of all liability.
To prevent personal injury or
propertydamage:
Always use hand protection when
operating this appliance to avoid burns.
Metal parts of this equipment become
extremely hot when in operation.
notICE: Automatic steam venting is a standard safety
feature built into all Combitherm oven models.
This feature vents all steam from the oven
compartment immediately before cooking time
expires or set probe temperature is reached.
Automatic steam venting does not function if the
oven door is opened before time expires or when
the oven has been set to continuous operation.
8 • MN-35948 • Rev 14 • 07/17 • Combitherm® CT PROformance™ Series Operator’s Manual
To prevent INJURY or PROPERTY DAMAGE,
make certain the area around the appliance
is kept clear of combustible items.
notICE: Use authorized Combitherm oven cleaner only.
Unauthorized cleaning agents may discolor or
harm interior surfaces of the oven. Read and
understand label and material safety data sheet
before using the oven cleaner.
Page 9
How to Turn On the Oven
Prerequisites
1. Turn on the exhaust hood.
2. Make sure that the water supply to the oven is turned on.
3. Make sure that the electrical power supply to the oven is
turned on.
4. For gas ovens, make sure the gas supply valve is in the open
position.
Steps
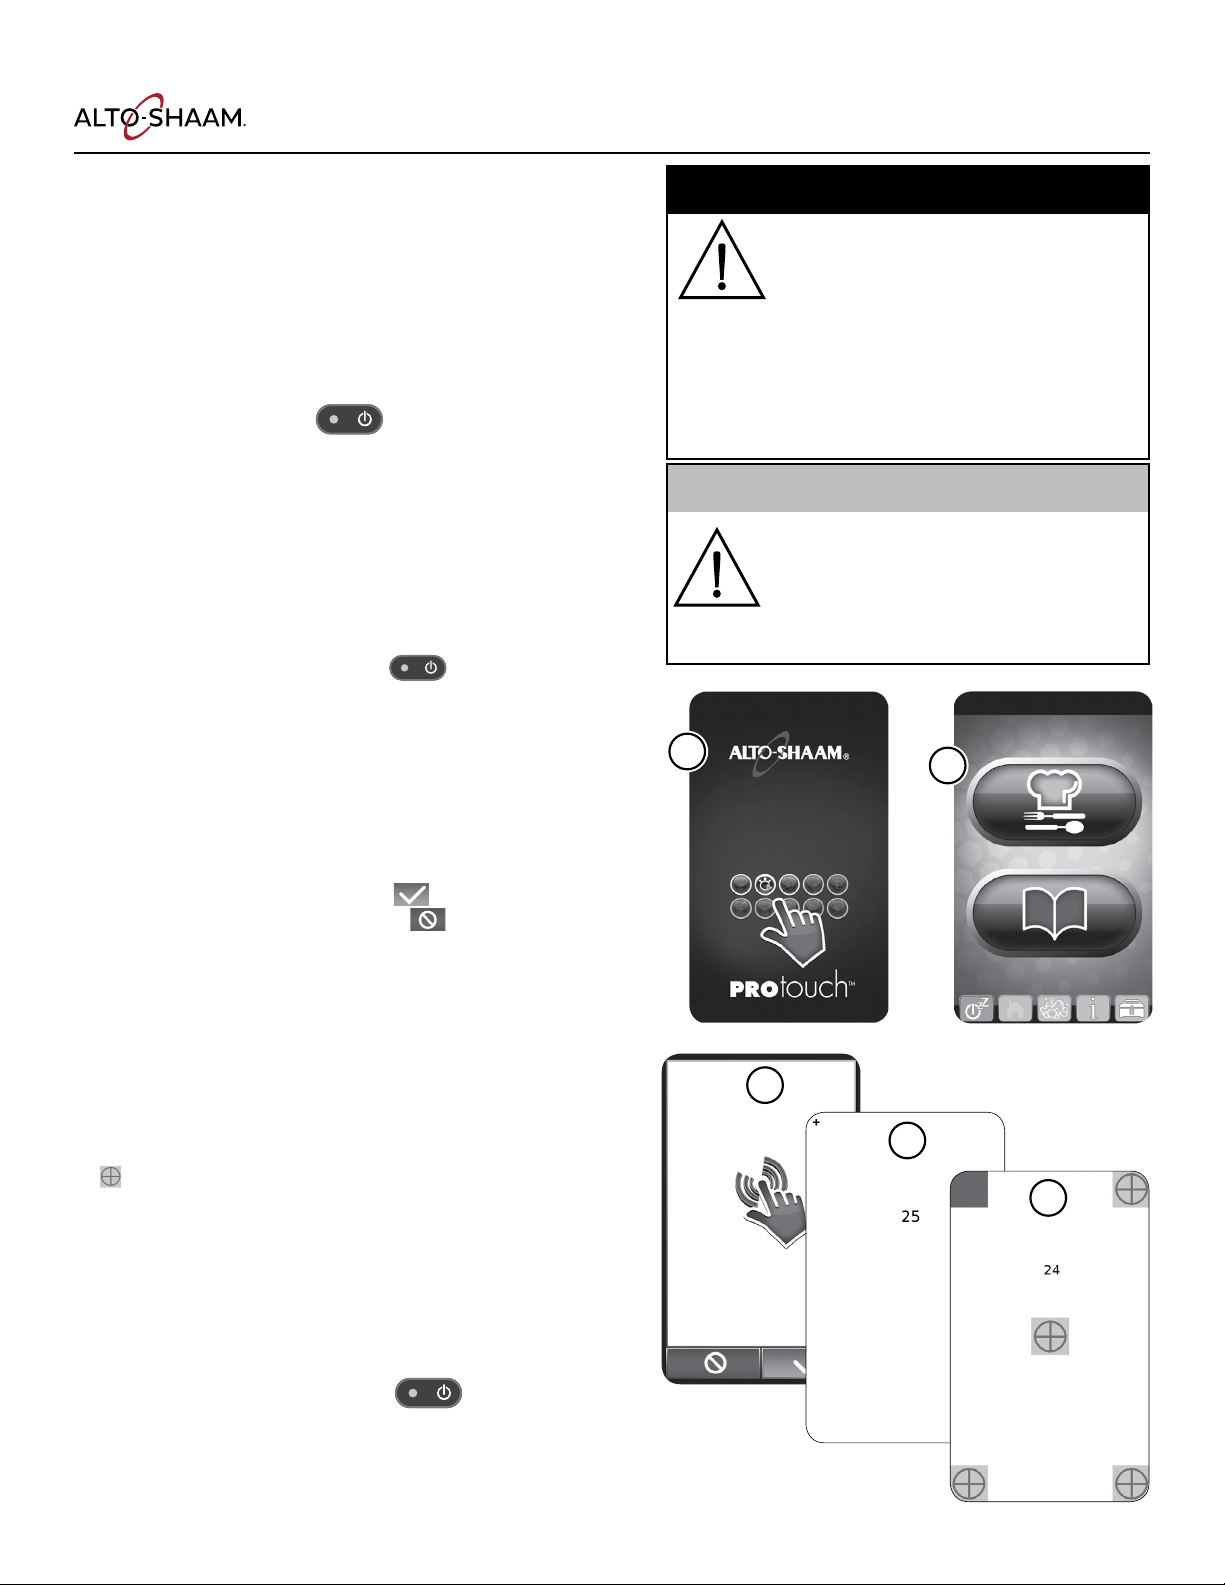
1. Press the ON/OFF button
The ON/OFF indicator glows green and the loading screen
displays while the controller soware loads. When the
soware is 100% loaded, the home screen b displays.
notE: If the oven has a steam generator, the steam generator
lls with water and the oven heats the water to an initial
temperature of 188°F (77°C).
.
a
How to Start a Manual Calibration
1. Make sure the oven is off.
2. Press and hold the ON/OFF button for eight (8) seconds.
The ON/OFF indicator glows red and the calibration prompt c
displays.
The prompt moves from the center to all four corners of
the screen. This sequence repeats three (3) times. Then the
calibration screen
notE: The rst time the oven is turned on, or if the oven loses
power during startup, the touchscreen calibration prompt
displays at the end of the next startup.
notE: Touch the check mark icon to start the calibration
immediately. Touch the cancel icon to cancel the
calibration.
d
displays.
c
Operation
DANGER
Before starting the appliance, make certain you do
not detect the odor ofgas.
If you smell gas:
• Shut o the gas supply immediately.
• Do not attempt to light any appliance.
• Do not touch any electrical elements.
• Extinguish any open flame.
• Evacuate the area.
• Use a telephone outside the property and
immediately contact your gas supplier.
• If unable to contact your as supplier, contact the
fire department.
CAUTION
Accumulations on the main burners of gas
appliances can result in firing out of normal
sequence. This delayed ignition creates an
alarmingly loud sound. If your appliance makes
an especially loud noise when starting up, shut
down the appliance and call a qualified and
trained service technician.
1
2
How to Calibrate the Touchscreen
1. Touch the target icon (+) each time it appears on screen. The
icon appears in all four corners, then the center of the screen.
notE: If the controller soware has not been updated to
the current version (11/16 update), the calibration stops
when this step is complete. Download the current controller
soware from the Alto-Shaam website and install it.
2. The verication screen e displays. Touch all ve target icons
. The icons change to green boxes when they are touched.
notE: The calibration screen and verication screen both
display a 30-second countdown. If you do not touch all ve
icons before the countdown is complete, the controller stops
the calibration. If you do not see the countdown, download
the current controller soware from the Alto-Shaam website
and install it.
How to Turn Off the Oven
1. Press and hold the ON/OFF button for ve to
ten (5-10) seconds.
MN-35948 • Rev 14 • 07/17 • Combitherm® CT PROformance™ Series Operator’s Manual • 9
3
4
5
Page 10

Operation
Control Panel Identi cation
Control Panel Identication
Professional
Cooking Mode
Cookbook with
Saved Recipes
CleaningSleep Mode
Information
Call outs
Utility Screen
So ware Version
Utilities
Upload/Download
Settings
Download Recipes from
USB stick — overwrites
any existing recipes
Add all recipes on a
USB stick to the list of
recipes on the oven
leaving all other recipes
on the oven untouched
*Download new
so ware from a
USBstick
Upload odometer
info to USB stick
Return to
previous screen
Upload/Download Screen
(password protected)
Upload all recipes
from control to a
USB stick
Upload HACCP
info to USB stick
Upload audit trail
info to USB stick
Service Mode
Return to
previous screen
Return to
home screen
* The PROtouch control plays an
important part in our continuous
improvement process. New features
and abilities can be loaded to your
oven as they become available.
So ware for your oven can be
accessed from the Alto-Shaam
website, under the Downloads tab.
10 • MN-35948 • Rev 14 • 07/17 • Combitherm® CT PROformance™ Series Operator’s Manual
Page 11

Control Panel Identi cation
recipe display with text, and recipes are not
Operation
Settings Screen 1
Fahrenheit /Celsius
Keep last user setting
Handle LED on
Recipe display
names on
Unlock recipes
Beeper volume
& alarm clips
Screen brightness
Return to
previous screen
Screen 1 of 2
Settings Screen 2
Use factory
default settings
Handle LED off
Recipe display
names off
Lock recipes
Advance to next
setting screen
When a setting has been selected, the
graphic will be vibrant in color while the
alternate choice will appear faded and
gray. In the illustration above, Fahrenheit,
factory default setting, handle LED on,
locked have been chosen.
notE: A password is required to lock
and unlock the recipes. Simply
call an Alto-Shaam Culinary
Chef for assistance.
Language Choices
Date/Time
Future Feature
(not yet available)
Calibrate product probe
Preventative
Maintenance Actions
Run diagnostics
Force Boiler Flush
Return to previous
setting screen
Return to
utility screen
Language choices available:
English, French, German, Korean,
Mandarin, Russian, or Spanish.
Time format available:
12-hour clock
24-hour clock
Different date
formats available:
YYYY/MM/DD
MM/DD/YYYY
DD/MM/YYYY
Screen 2 of 2
MN-35948 • Rev 14 • 07/17 • Combitherm® CT PROformance™ Series Operator’s Manual • 11
Page 12

Operation
Control Panel Identi cation
Preventative Maintenance Screen
Cleaning Timer
Gasket Inspection
Ventless Hood
Filter Replacement
Return to
previous screen
Water Filter
Replacement
Boiler De-Liming
Utilities
Return to
home screen
Preventative Maintenance - Editing
Alarm in home screen indicates that a
maintenance interval has elapsed.
Return to
previous
screen
Increase or decrease
alarm setting to
match your preferred
timelines.
A er the task has
been completed, set
elapsed time to 0 to
begin countdown
process again.
Utilities
Return to
home screen
12 • MN-35948 • Rev 14 • 07/17 • Combitherm® CT PROformance™ Series Operator’s Manual
Page 13

Operation
So ware Updates
Soware Updates
The PROtouch controller plays an important part in our continuous improvement process. New features and abilities
can be loaded to your oven as they become available. So ware for your oven can be accessed from the Alto-Shaam
website, under the Resource Library Tab, then So ware Center. http://www.alto-shaam.com/en/so ware-download-center
Use a USB stick to copy the PROtouch so ware from the website to the USB stick.
Press the ON button to power the oven on.
Touch the utilities icon.
Touch the download icon.
Touch the download new so ware icon.
Most so ware updates will require the full oven update
as shown below. Additional options are available in the
event a special need arises. Call our Service Department
for assistance with these special circumstances.
Remove the cover of the USB port on the oven.
Insert the USB stick. If the USB stick is not recognized
by the Combitherm, a question mark will appear on
screen. Try again with another ash drive device or call
Alto-Shaam Service.
So ware Upload Screen
Full oven update:
IB, CB, and OB
Update the CB
(control board) only
Update the OB
(option board) only
Update the IB
(interface board) only
Return to
previous screen
When the data has made a
successful transfer to the USB
drive, the screen will change.
Touch the green check mark
icon to complete the process.
Remove the USB stick and
replace the cover on the USB
port on the oven.
NOTICE: A er the so ware update has
been completed, the oven may
automatically initiate a shut down
and reboot sequence if required.
MN-35948 • Rev 14 • 07/17 • Combitherm® CT PROformance™ Series Operator’s Manual • 13
Page 14

Operation
Cooking Screen Identi cation
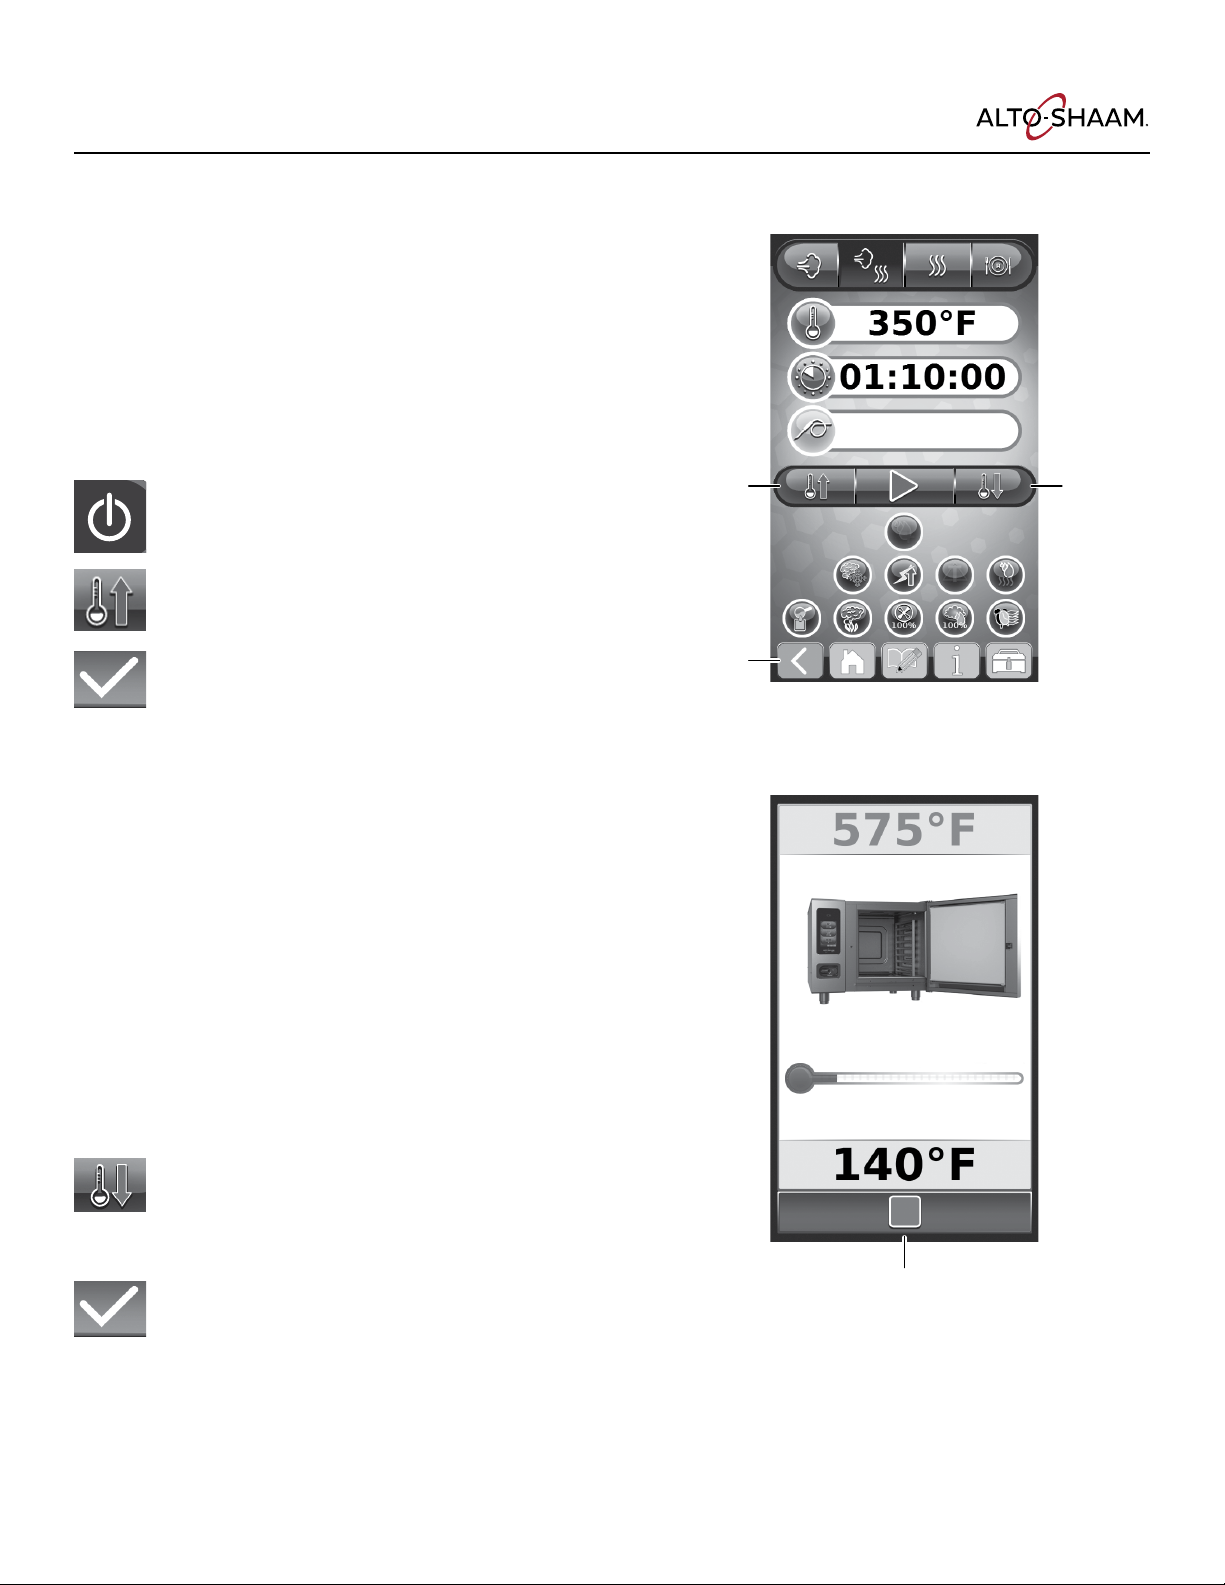
Cooking Screen Identication
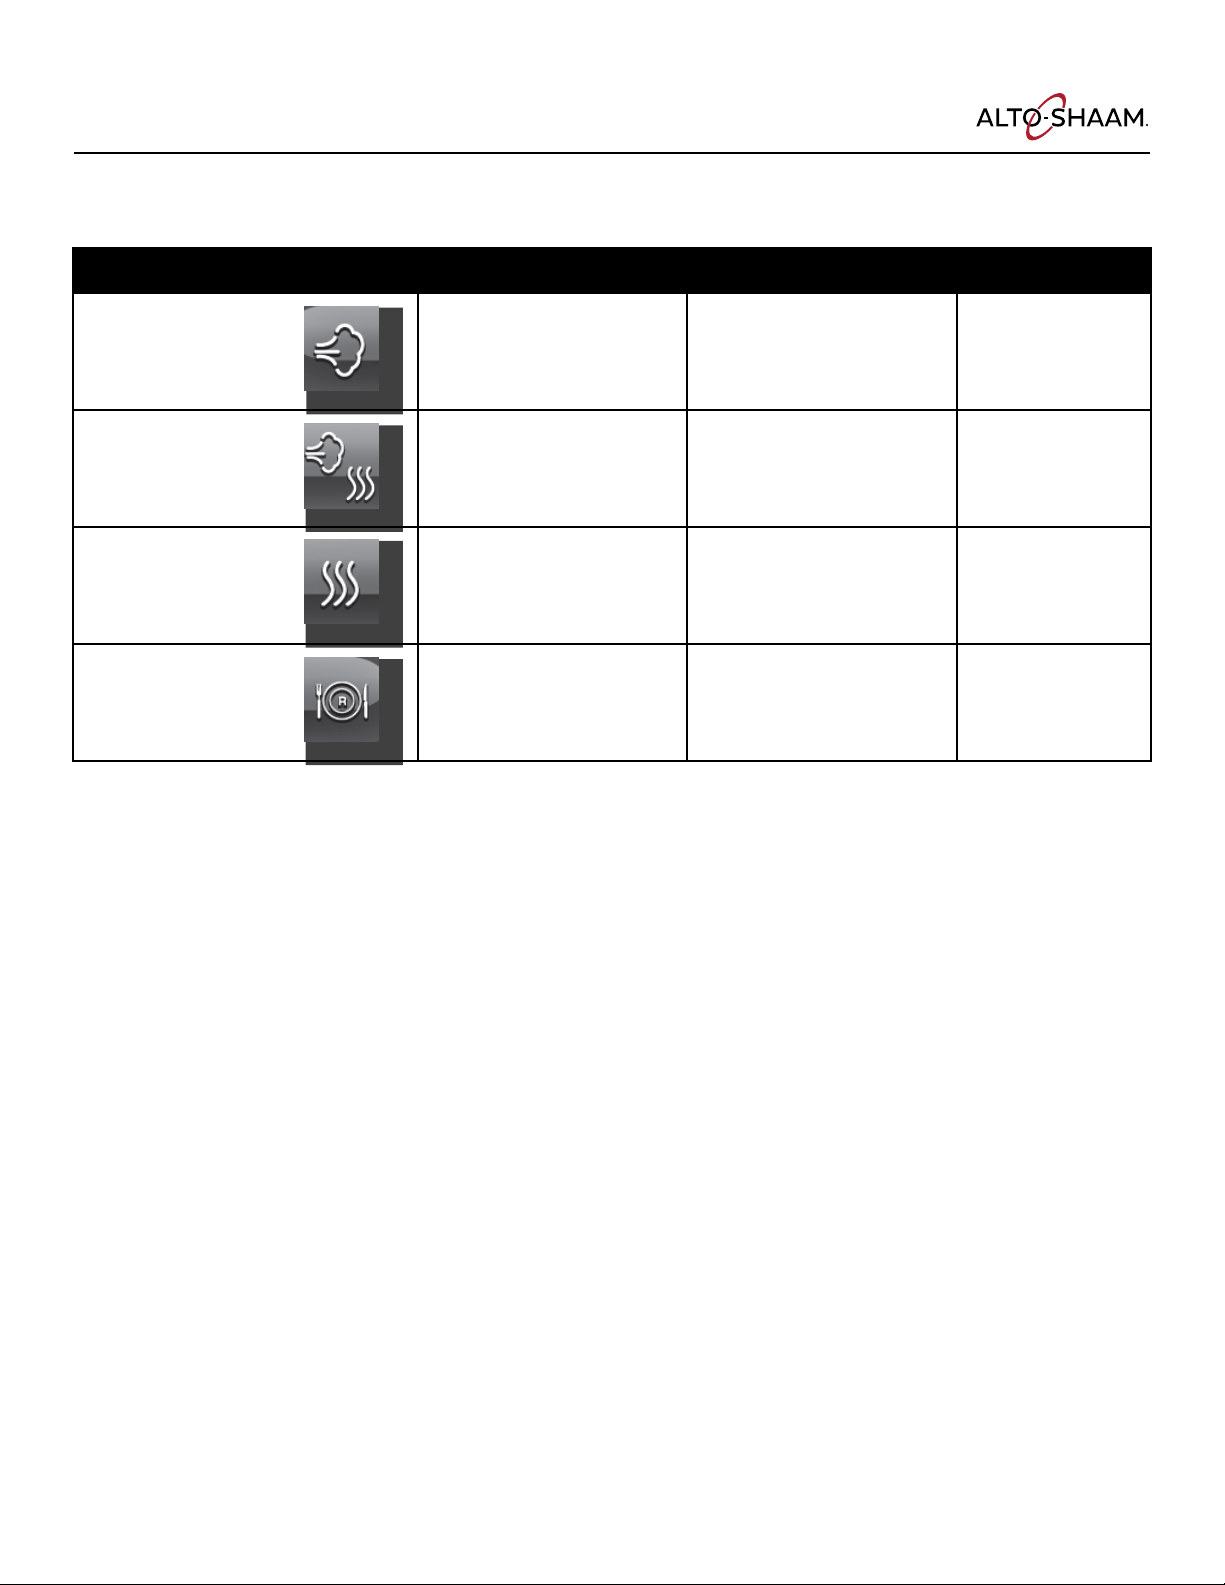
Steam
Mode
Oven Temperature
Cook Time
Probe Temperature
Preheat
Start
Return to
previous screen
Combi
Mode
Return to
Home Page
Convection
Recipe
Mode
Retherm
Mode
Cook Time is displayed as
hours : minutes : seconds
Cool Down
UtilitiesWrite
Chosen
Cooking
Mode
Return to
previous screen
Chosen
Entry
Field
Allowable
Temperature
Range
Entry Keypad
Enter
notE: When a cooking mode has been selected, it will appear darker
blue. When the cooking mode is calling for heat, it will appear red.
When the cooking mode is calling for moisture, it will appear light
blue. In the illustration above, Combi Mode has been chosen and is
calling for heat. Also, the PROpower™ level has been chosen, and
the fan speed has been set at 100%.
14 • MN-35948 • Rev 14 • 07/17 • Combitherm® CT PROformance™ Series Operator’s Manual
Page 15

Auxiliary Functions and Features
Power Settings
Auxiliary Functions and Features
Operation
Two power levels: reduced power to manage kitchen
power peaks, and eco power for optimal oven ef ciency.
A third choice is optional on electric models, but
standard on gas models. PROpower™ is an accelerated
turbo power for an instant boost of heat or quick heat
recovery [patent pending].
notE: Reduced power will result in longer cooking
times and PROpower will decrease your cooking
time by several minutes.
Multiple Fan Speeds
The PROtouch™ control includes ve different fan
speeds. The reduced fan speed function is useful for
ow-sensitive products such as souf és and meringues,
or any products affected by a high velocity of air
movement.
notE: Fan speed choices are based upon the power
level you have chosen.
PROpower
Eco Power
Reduced Power
Return to previous screen to
set the remaining auxiliary
functions for full functionality
Power level icon appears
during operation
Fan speed choices
Reduced Power Level
Eco Power Level
PROpower™ Power Level
Multi-Shelf Timer
The multi-shelf timer allows the operator to program
alarm times for the oven shelves. This can be one
common time for corresponding oven shelves or by
food item that is cooking. The multi-shelf timer can
be edited when in a recipe mode.
Touch shelf number to
enter a recipe identifier
(text or number)
previous screen
MN-35948 • Rev 14 • 07/17 • Combitherm® CT PROformance™ Series Operator’s Manual • 15
Return to
Chosen
Cooking
Mode
Chosen
Temperature
Timer ready, touch
green arrow to begin
Time value, touch this area
to change the time value
Timer countdown in process,
Touch red square to stop
Page 16
Operation
Auxiliary Functions and Features
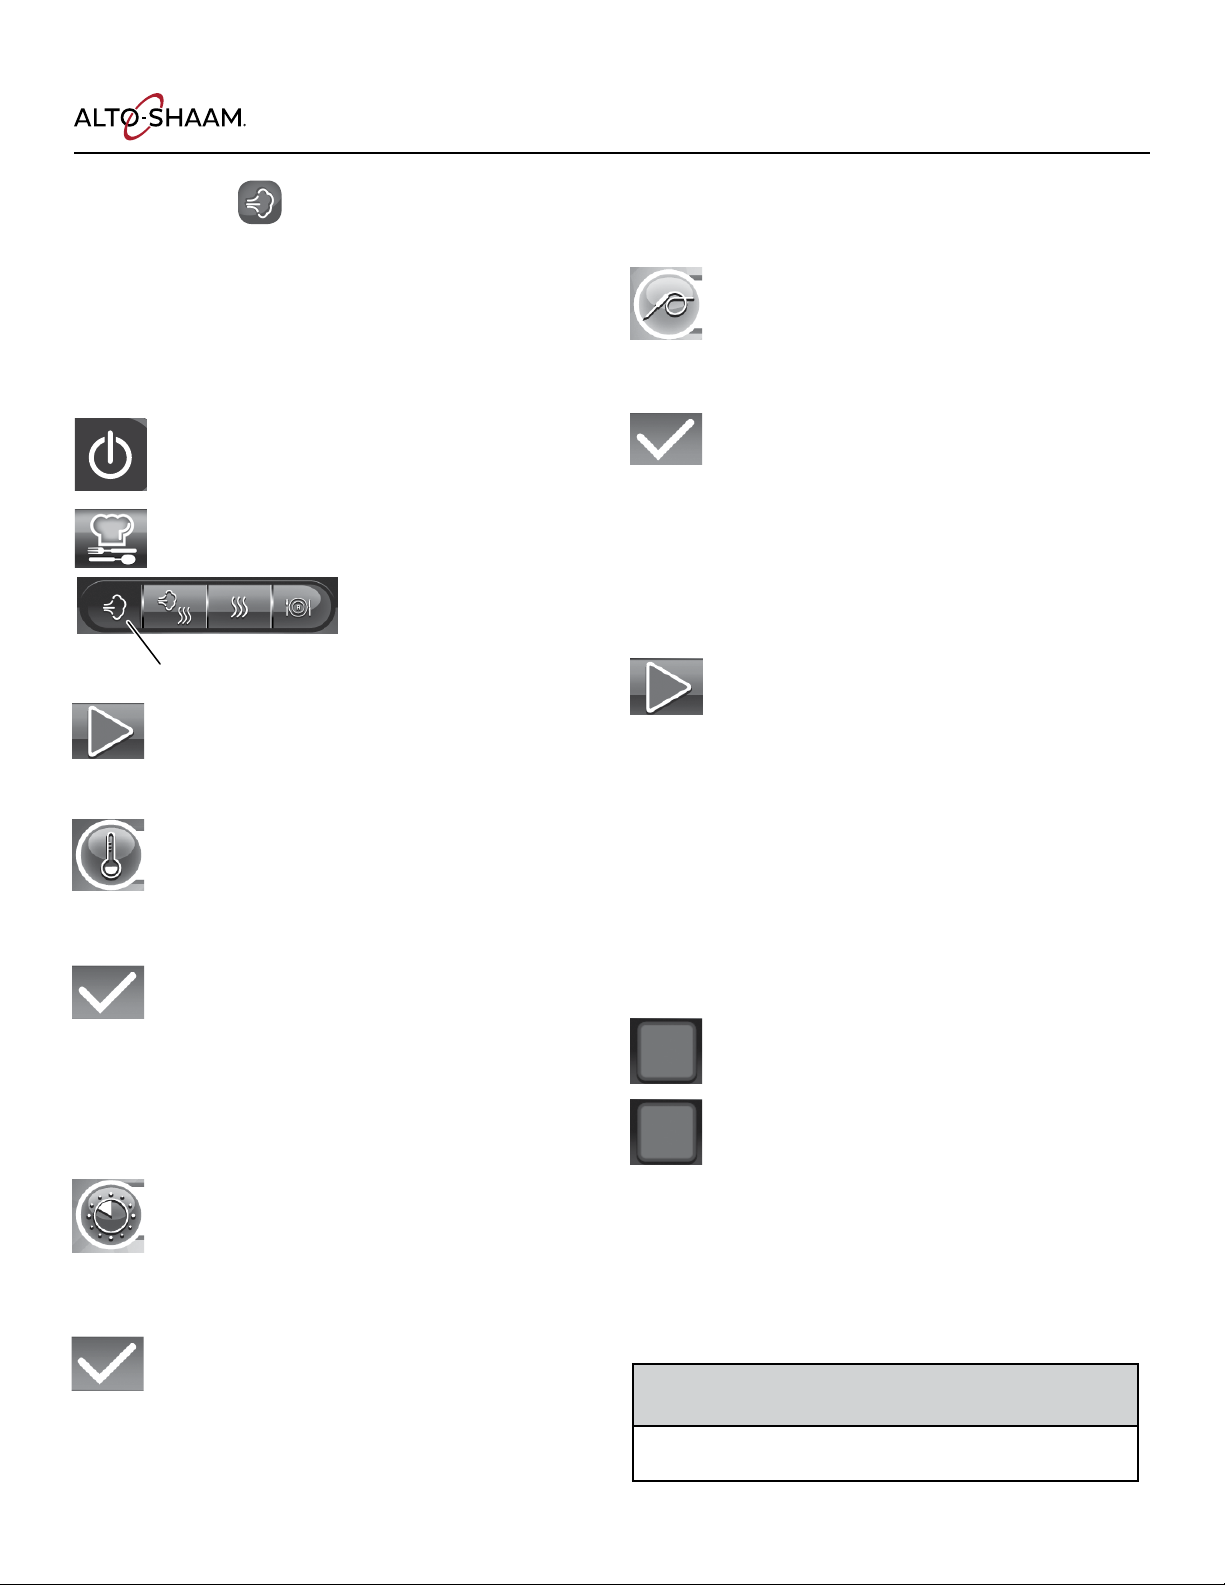
Preheat Feature
The oven should be preheated before most cooking
functions. When cooking full loads, use a temperature
50°F (10°C) greater than the cook temperature in order
to recover from heat loss when the door is opened
to add food to the oven. For items that use the Steam
mode, it is necessary to use a preheat temperature
lower than the cook temperature in order to create the
proper amount ofsteam.
Press the On button to power oven on.
Touch the Preheat icon.
Type in desired temperature.
Touch the green Check Mark icon to
startpreheating.
Cool Down Feature
The cool-down feature provides the operator with
the ability to lower the temperature of the oven
compartment at an accelerated pace. This function
is useful when it is necessary to immediately change
from a high temperature cooking function to a lower
temperature function or to the steam program.
This function is also useful to help cool the oven
compartment in preparation for cleaning.
TIP: Always allow the oven walls to cool to a minimum
of 140°F (60°C) before spraying the compartment
with oven cleaner.
Preheat
Return to previous
screen
Cool Down
Open the oven door.
Touch the Cool Down icon.
Type in desired temperature.
Touch the green Check Mark icon to beginthe
Cool Down process.
The target oven temperature chosen will appear
just above the red Stop button.
The current oven temperature will appear at the
top of the screen.
16 • MN-35948 • Rev 14 • 07/17 • Combitherm® CT PROformance™ Series Operator’s Manual
Touch to
Stop
Page 17

Auxiliary Functions and Features
Humidity Control Feature
The humidity control feature is an automatic
function designed to regulate humidity to provide
additional color to food as needed. This feature
is particularly useful for adding color to high
moisture products such as chicken and other
poultry, or for additional browning of full loads
and other moist products. In addition, this feature
may be used to add texture to fried items such
as french fries or breaded chicken. Humidity
control can be used in any cooking mode and can
be programmed into a cooking procedure.
Touch the nearest 10% increment on the le side
of the screen, and then adjust up or down using
the + or – icons.
0% humidity is the driest cooking environment
available. The percentage level chosen will
appear on the icon. In the illustration at right,
72% is shown.
Humidity level choices
in increments of 10%
Return to
previous screen
Operation
Adjust humidity level up or
down in increments of 1%
Touch the check mark to
approve the value entered.
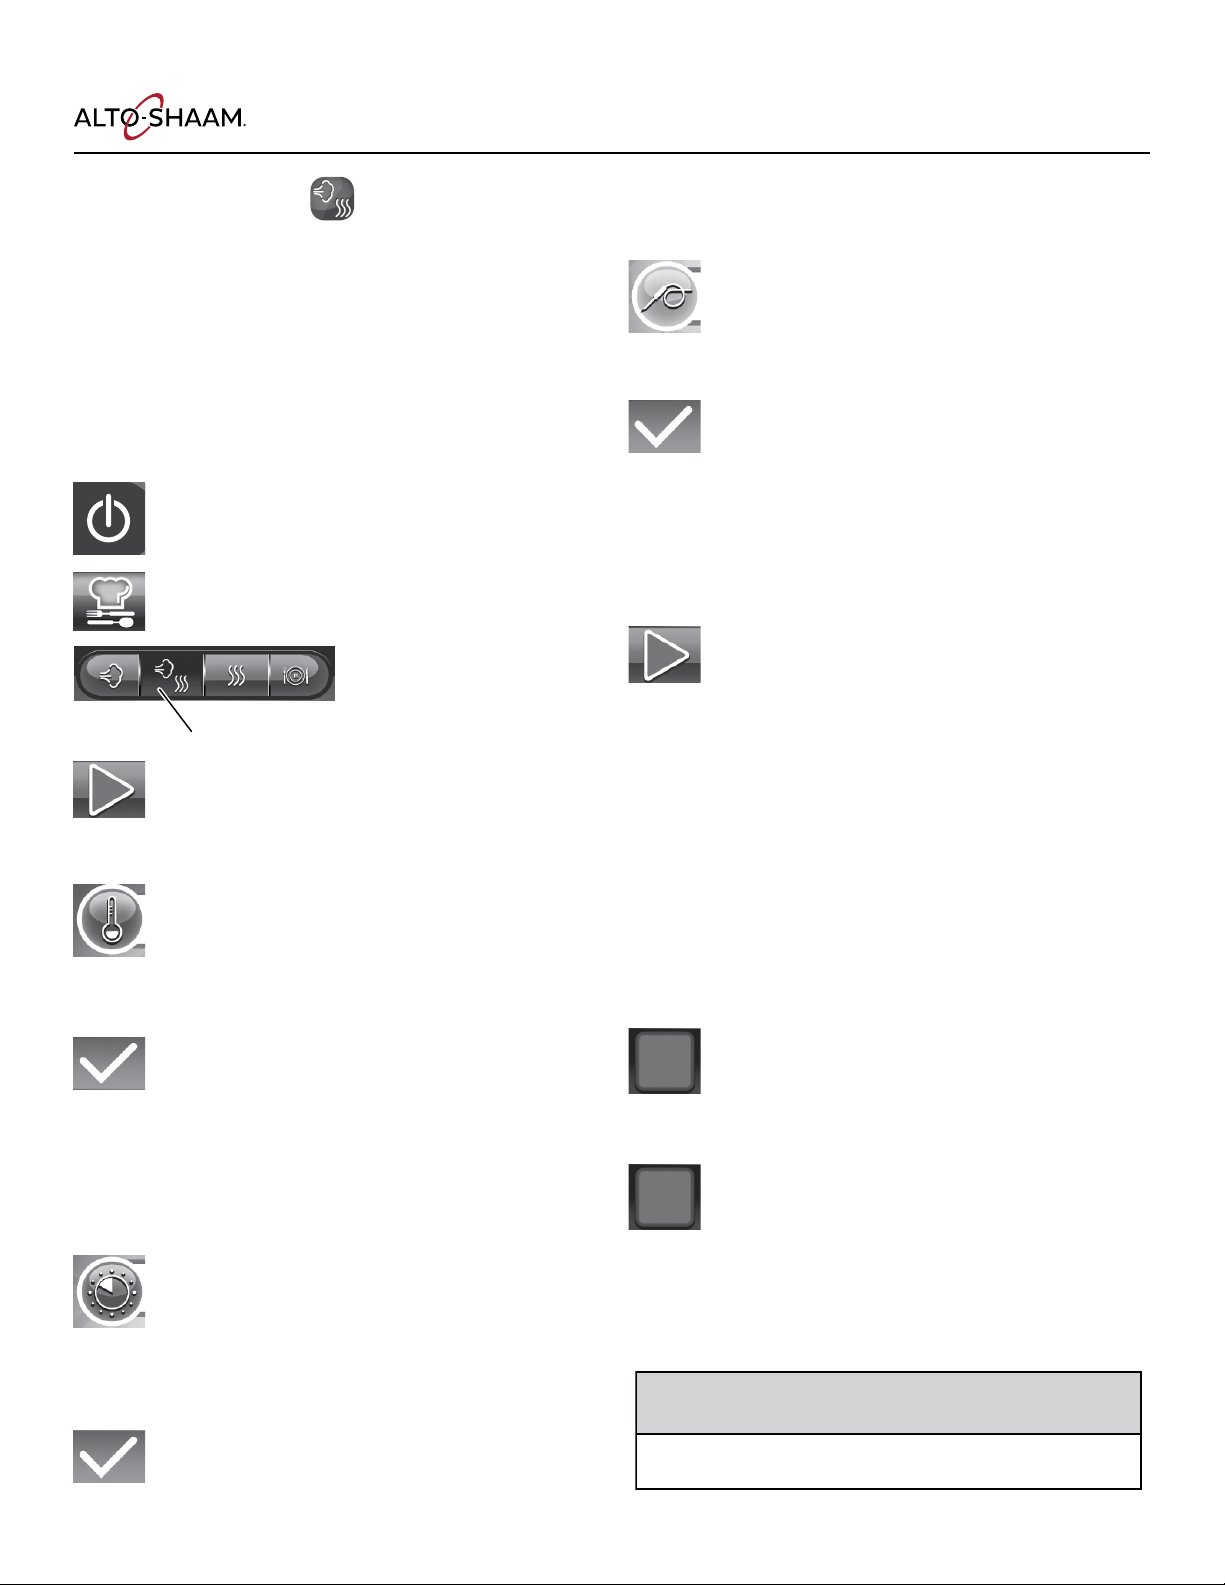
Rapid Cool (available on boiler-free models only)
This function, when used with a program, rapidly
removes heat from the oven cavity. Swi ly move
from a high cooking temperature to a lower
temperature without overcooking your food.
Rest
This step allows you to pause the oven during a
program. The rest step is ideal for cold smoking
or automatic cleaning. Infuse your food with
smoke avor a er the actual smoking step has
stopped.
Door
The door function allows the user to program
a reminder—in the form of an animated door
opening and closing—that it is time to open the
door. This reminder may be programmed at the
end of a programmed segment or at the end of
the program.
Return to
previous screen
Rapid Cool
(boiler-free models)
Chosen Humidity
Level % shown
Door
Rest
MN-35948 • Rev 14 • 07/17 • Combitherm® CT PROformance™ Series Operator’s Manual • 17
Page 18
Operation
CT PROformance™ Factory Default Settings
Cooking Mode Oven Temperature Core Temperature Cooking Time
Steam
Combination Steam
Convection
Retherm
212°F
(100°C)
350°F
(175C)
350°F
(175C)
275°F
(135°C)
160°F
(70°C)
160°F
(70°C)
160°F
(70°C)
160°F
(70°C)
25 minutes
70 minutes
30 minutes
5 minutes
18 • MN-35948 • Rev 14 • 07/17 • Combitherm® CT PROformance™ Series Operator’s Manual
Page 19
CAUTION HOT
Steam Mode
Operation
The Steam mode provides the operator with the
ability to steam, poach, or blanch. This mode will
automaticallysteam at the boiling point of water; quicksteam above the boiling point for faster cooking results;
or low temperature steam, below the boiling point, for
more delicate products such as pâté, mousse, seafood,
orcustard.
Press the On button to power oven on.
Touch the Professional Cooking mode icon.
Touch the Steam mode icon.
Touch the Start icon to steam at the
displayedsettings.
To Change the Displayed Settings:
Touch the area to the right of the
temperatureicon.
Type in desired temperature.
Touch the green Check Mark icon to
conrmchange.
• Automatic Steaming 212°F (100°C)
• Quick Steaming 213°F to 250°F (101°C to 120°C)
• Low Temperature Steaming 85°F to 211°F (30°C to 99°C)
To Cook by Time:
To Cook by Product Core Temperature:
Touch the area to the right of the probeicon.
Type in desired temperature.
Touch the green Check Mark icon to
conrmchange.
Insert probe into product.
Set available auxiliary functions as desired,
such as energy level, fan speed, multi-shelf
timer, etc.
Touch the Start icon to begin cooking in the
Steam mode.
• The cavity set-temperature will appear in the display.
• If cooking by probe, the actual internal product
temperature will appear next to the probe icon during
operation. To change the set value for core temperature,
touch the temperature next to the probe icon and make
changes as required.
When the cooking time has expired or the desired core
temperature has been reached, an alarm will sound and
handle light will ash several times indicating the end of
the operating mode.
Touch the red Stop icon to stop the buzzer or
open the oven door.
To stop cooking program at any time, touch the
red Stop icon.
Touch the area to the right of the timeicon.
Type in desired time or set continuous time by
touching --:--.
Touch the green Check Mark icon to
conrmchange.
MN-35948 • Rev 14 • 07/17 • Combitherm® CT PROformance™ Series Operator’s Manual • 19
Use caution when opening the oven door when the
cooking chamber is hot to avoid possible burns.
Page 20

Operation
Steam Mode Chef Operating Tips
This mode will steam a full or partial load of a single
product, or multiple products without transfer of avors.
When steaming multiple products, however, individual
product cooking times must be taken into consideration.
Steam
Perforated, 2-1/2" (65mm) deep pans
are particularly suitable for use in
this program mode. These pans will
provide a shorter cooking time and
will prevent product over-cooking at
the bottom of the pan.
Separate ice-encrusted vegetables
before steaming to ensure
evencooking.
A variety of products can be steamed
at the same time but attention must
be paid to the different cooking times
required for each food product.
When cooking by probe, the probe
must be inserted so that the tip is
positioned in the center of the food
mass. For liquid or semi-liquid foods,
suspend the probe in the center of
the product and secure the probe
wire to the edge of the container.
High Temp Steam
High temperature steaming is
suitable for hearty, root-type
vegetables such as potatoes, turnips,
carrots, and cabbage.
High temperature steaming
provides a cooking time which is
approximately 10% shorter than the
regular steam mode temperature of
212°F (100°C).
The non-pressurized atmosphere of the Combitherm
also provides the ability to open the door during the
steam mode in order to monitor products more closely
throughout the steaming process.
Low Temp Steam
The low temperature steam mode
will function whenever the oven
compartment temperature is below
212°F (100°C).
It will take longer to steam
products using the low temperature
steammode.
Steaming sausages in low
temperature steam prevents cracked
or peeling skins.
Use low temperature steam for
delicate foods such as shrimp,
sh,seafood, crème caramel, and
sous vide.
For best results, low temperature
steam all delicate food items at a
temperature of 210°F (99°C) or below.
20 • MN-35948 • Rev 14 • 07/17 • Combitherm® CT PROformance™ Series Operator’s Manual
Page 21
Combination Mode
CAUTION HOT
Operation
The Combination mode will prove to be the most versatile
and widely used mode the Combitherm oven has to offer.
It will produce the best possible results on the widest
variety of products — all within the shortest period of
time. The unique control function of this mode enables
the operator to roast or bake with a combination of steam
and convection heat. In addition to shorter cooking times,
this combination of steam and heat offers less product
shrinkage and more moisture retention than obtained in a
convection oven.
Press On button to power oven on.
Touch the Professional Cooking mode icon.
Touch the Combination mode icon.
Touch the Start icon to cook at the displayed
settings.
To Change the Displayed Settings:
Touch the area to the right of the
Temperatureicon.
Type in desired temperature.
To Cook by Product Core Temperature:
Touch the area to the right of the Probe icon.
Type in desired temperature.
Touch the green Check Mark icon to
conrmchange.
Insert probe into product.
Set available auxiliary functions as desired,
such as energy level, fan speed, multi-shelf
timer, steam injection, etc.
Touch the Start icon to begin cooking in the
Steam mode.
• The cavity set-temperature will appear in the display.
• If cooking by probe, the actual internal product
temperature will appear next to the PROBE icon during
operation. To change the set value for core temperature,
touch the temperature next to the PROBE icon and make
changes as required.
When the cooking time has expired or the desired core
temperature has been reached, an alarm will sound and
handle light will ash several times indicating the end of
the operating mode.
Touch the green Check Mark icon to
conrmchange.
• Cooking temperature range:
85°F to 575°F (30°C to 301°C)
To Cook by Time:
Touch the area to the right of the timeicon.
Type in desired time or set continuous time by
touching --:--.
Touch the green Check Mark icon to
conrmchange.
MN-35948 • Rev 14 • 07/17 • Combitherm® CT PROformance™ Series Operator’s Manual • 21
Touch the red Stop icon to stop the buzzer or
open the oven door.
To stop cooking program at any time, touch the
red Stop icon.
Use caution when opening the oven door when the
cooking chamber is hot to avoid possible burns.
Page 22

Operation
Combination Mode Chef Operating Tips
The Combination mode injects the optimum amount of
steam automatically. There is no need to select humidity
levels. Foods do not dry out. Flavors are retained with no
transfer of avors when mixing product loads.
Due to automatic steam adjustment, the door can be
opened at any time during a cooking operation. Be
certainto observe the safety warning when opening the
oven door.
The Combination mode is particularly efcient when
used for baking, broiling, grilling, stewing, braising,
androasting.
When using the Combination mode, cooking
temperatures can be reduced 10%–20% below the
temperatures used for conventional cooking methods.
Cooking time will be reduced approximately 40% when
cooking at the same temperature used for convection
oven cooking and up to 50%60% less time when cooking
at the same temperature used for a conventional oven.
Food browning in the Combitherm begins at a cooking
temperature of approximately 250°F (120°C).
A higher cooking temperature results in heavier browning
but also results in greater product weight loss. To achieve
additional browning set humidity control into the product
procedure. Humidity control is particularly useful for
adding color to high moisture products such as chicken
and other poultry items or for additional browning of full
loads and other moist products.
The Combination mode provides even browning without
the necessity to turn the pans.
For more even cooking, do not cook in pans deeper than
4"(100mm).
When cooking by probe, the probe must be inserted so
that the tip is positioned in the center of the food mass.
For liquid or semi-liquid foods, suspend the probe in the
center of the product and secure the probe wire to the
edge of the container.
22 • MN-35948 • Rev 14 • 07/17 • Combitherm® CT PROformance™ Series Operator’s Manual
Page 23
Convection Mode
CAUTION HOT
Operation
The Convection mode operates with hot circulated air
within a temperature range of 85°F to 575°F (30°C to
300°C). For many applications, better results may be
achieved with the Combination mode; therefore, the
operator may want to consider using the Convection mode
on a more limited basis. The use of high temperatures
(500°F to 575°F) are not intended for continuoususe.
Press On button to power oven on.
Touch the Professional Cooking mode icon.
Touch the Convection mode icon.
Touch the Start icon to cook at the
displayedsettings.
To Change the Displayed Settings:
Touch the area to the right of the
temperatureicon.
To Cook by Product Core Temperature:
Touch the area to the right of the Probeicon.
Type in desired temperature.
Touch the green check mark key to conrm
change.
Insert probe into product.
Set available auxiliary functions as desired, such
as energy level, fan speed, multi-shelf timer,
steam injection, etc.
Touch the Start icon to begin cooking in the
Steam mode.
• The cavity set-temperature will appear in the display.
• If cooking by probe, the actual internal product
temperature will appear next to the probe icon during
operation. To change the set value for core temperature,
touch the temperature next to the probe icon and make
changes as required.
Type in desired temperature.
Touch the green Check Mark icon to
conrmchange.
• Cooking temperature range: 85°F to 575°F (30°C to 300°C)
To Cook by Time:
Touch the area to the right of the Timeicon.
Type in desired time or use up and down arrows
to adjust temperature or set continuous time by
Touching --:--.
Touch the green check mark key to
conrmchange.
MN-35948 • Rev 14 • 07/17 • Combitherm® CT PROformance™ Series Operator’s Manual • 23
Touch steam Injection at any time during
cooking. Steam will inject into the cavity as long
as the icon is touched.
When the cooking time has expired or the desired core
temperature has been reached, an alarm will sound and
handle light will ash several times indicating the end of
the operating mode.
Touch the red Stop icon to stop the buzzer or
open the oven door.
To stop cooking program at any time, touch the
red Stop icon.
Use caution when opening the oven door when the
cooking chamber is hot to avoid possible burns.
Page 24

Operation
Convection Mode Chef Operating Tips
The Convection Mode can be used to roast or bake
products needing very short cooking times or for high
moisture products such as mufns, cakes, and cookies, or
for browning the surface of the food.
The Convection mode works best with low moisture
foodsor for very moist food which require a dryer
nished product.
For baking, preheat the Combitherm at a temperature of
325°F to 375°F (163°C to 191°C). Once preheated, reset the
temperature as required.
A higher cooking temperature results in heavier
browning but also results in greater product weight loss.
To achieve additional browning set the Humidity control
into the product procedure.
When cooking by probe, the probe must be inserted so
that the tip is positioned in the center of the food mass.
For liquid or semi-liquid foods, suspend the probe in the
center of the product and secure the probe wire to the
edge of the container.
24 • MN-35948 • Rev 14 • 07/17 • Combitherm® CT PROformance™ Series Operator’s Manual
Page 25

Retherm Mode
CAUTION HOT
Operation
The Retherm mode operates with hot circulated air within
a temperature range of 245°F to 320°F (120°C to 160°C).
Press On button to power oven on.
Touch the Professional Cooking mode icon.
Touch the Retherm mode icon.
Touch the Start icon to retherm at the
displayedsettings.
To Change the Displayed Settings:
Touch the area to the right of the
Temperatureicon.
Type in desired temperature.
To Cook by Product Core Temperature:
Touch the area to the right of the Probeicon.
Type in desired temperature.
Touch the green Check Mark icon to
conrmchange.
Insert probe into product.
Set available auxiliary functions as desired,
such as energy level, fan speed, multi-shelf
timer, steam injection, etc.
Touch the Start icon to begin cooking in
Steammode.
• The cavity set-temperature will appear in the display.
• If cooking or retherming by probe, the actual internal
product temperature will appear next to the PROBE
icon during operation. To change the set value for core
temperature, touch the temperature next to the PROBE
icon and make changes as required.
Touch the green Check Mark icon to
conrmchange.
• Cooking or retherming temperature range:
245°F to 320°F (120°C to 160°C)
To Cook by Time:
Touch the area to the right of the
Time icon.
Type in desired time or set continuous time by
touching --:--.
Touch the green Check Mark icon to
conrmchange.
Touch Steam Injection at any time during
cooking. Steam will inject into the cavity as
long as the icon is touched.
When the cooking time has expired or the desired core
temperature has been reached, an alarm will sound and
handle light will ash several times indicating the end of
the operating mode.
Touch the red Stop icon to stop the buzzer or
open the oven door.
To stop cooking program at any time, touch the
red Stop icon.
Use caution when opening the oven door when the
cooking chamber is hot to avoid possible burns.
MN-35948 • Rev 14 • 07/17 • Combitherm® CT PROformance™ Series Operator’s Manual • 25
Page 26

Operation
Retherm Mode Chef Operating Tips
Since plated meals consist of dissimilar products, there
are several important factors to consider in order to
produce the nest results. Product density (compactness),
thickness, quantity of product on each plate, and quantity
of plates all relate to the length of time necessary to
reheat. Again, experience is the best method to determine
reheating time. Once the time has been determined and
recorded for a specic meal, the results will be consistent
for future reheating times.
Helpful Hints For Reheating On The Plate
• All food components on the plate should be of similar
densities and thickness.
• Arrange all food components evenly on the plate.
• Avoid excessive overlapping of product.
• Sauces must be heated and added to product aer
reheating.
• A mixed variety of meals can be reheated at the same
time.
À La Carte Rethermalization
À la carte rethermalization is designed to take a single
plate from a refrigerated temperature to serving
temperature for immediate service. Plates are prepared
in advance, covered, and refrigerated. Preheat the
Combitherm oven. Remove plate from refrigeration and
place in the oven at 275°F (135°C) for an uncovered plate
or 300°F (150°C) for a covered plate. Plates with meat
components will take more time than plates containing
all vegetable components. Follow internal temperature
requirements for reheating and allow for override time.
Aer reheating, remove the plate from the oven, add any
sauces, garnish, and serve. This process can be repeated
as required.
For the most efcient continuous service, it is suggested
that the Combitherm oven be dedicated to the
rethermalization process during serving hours.
Banquet Rethermalization
Banquet rethermalization is designed for high volume,
full or partial load (multiple plate) reheating.
Plates are assembled in advance, covered, and
refrigerated or loaded on the roll-in cart and refrigerated.
Preheat the Combitherm oven at 275°F (135°C) for
uncovered plates or 300°F (150°C) for covered plates.
Remove plates or the roll-in cart from refrigeration, load
in the oven and set timer as required. Follow internal
temperature requirements for reheating and allow for
override time. Remove the plates or roll-in cart from the
Combitherm.
Placing our thermal blanket cover over the roll-in cart
keeps food hot for 20 to 40 minutes, depending on the
type of food, retherm temperature, and environmental
factors. For longer holding times, roll the cart into the
CombiMate® companion holding cabinet.
Rethermalizing Prefabricated and
Vacuum-Packed Frozen Foods
For bulk product rethermalization, completely defrost
product bags in walk-in cooler. DO NOT REMOVE
PRODUCT FROM THE BAG. Load thawed bags in
preheated oven and rethermalize in the Low Temperature
Steam mode until the required internal temperature is
reached. Place rethermalized bags in a preheated holding
cabinet set at 140° to 165°F (60° to 74°C) until ready
forservice.
For large volume on-the-plate regeneration, defrost
bags in walk-in cooler. Open bags and plate per menu
requirements in a (maximum) 55°F (13°C) refrigerated
room. Place on Alto-Shaam roll-in cart (trolley), and roll
into Combitherm oven preheated at 275°F (135°C).
Regenerate in the Convection mode for 3 to 5 minutes.
Switch to the Retherm mode for an additional 3 minutes
or more if required. Placing our thermal blanket cover
over the roll-in cart keeps food hot for 20 to 40 minutes,
depending on the type of food, retherm temperature, and
environmental factors. For longer holding times, roll the
cart into the CombiMate® companion holding cabinet.
Plate covers must be used for on-the-plate regeneration.
26 • MN-35948 • Rev 14 • 07/17 • Combitherm® CT PROformance™ Series Operator’s Manual
Page 27

Dehydration Mode
Dehydration is a long, slow process that takes place at low
heat and zero humidity. It changes the physical properties
of food items and intensies avors. Dehydrated items
can be combined and presented in new and unexpected
ways, from pliable leathers to crispy chips to powders.
Dehydration is also an effective way to preserve food
items for long-term storage with minimal impact on
avor.
How To Cook Using Dehydration Mode
1. Touch the dehydrate icon e. The controller does the
following:
Operation
1
2
3
• Sets the cooking mode a to convection.
• Sets the power mode f to ECO.
• Sets the cooking temperature b to 140°F (60°C).
• Sets the cooking time c to continuous (--:--).
• Sets the fan speed h to 60%.
• Sets the humidity level i to 0%.
• Turns off the smoker
they have been selected.
notE: These functions should remain off during
dehydration
2. To change the cooking temperature, touch the displayed
temperature b. The touchpad screen displays.
3. Use the number keys k to enter the cooking
temperature, then touch the check mark icon l.
4. To set a cooking time, instead of having the dehydration
run continuously, touch the displayed time 3. The
touchpad screen displays.
5. Use the number keys k to enter the cooking time
(hh:mm:ss), then touch the check mark icon l.
g
and Delta-T j functions, if
4
5
6
7
8 9
10
11
notICE: Changing any of the default settings other than
temperature and time is not recommended.
6. Load food into the oven.
7. Touch the start icon d. The start icon changes to a red
square (stop icon) and the oven begins cooking.
notE: If the cooking time is continuous, cooking continues
until the stop icon is touched. If the cooking time is set, the
controller sounds an alarm and cooking stops when the
cooking time has elapsed.
MN-35948 • Rev 14 • 07/17 • Combitherm® CT PROformance™ Series Operator’s Manual • 27
12
Page 28

Operation
Dehydration Mode Chef Operating Tips
• Place a silpat or other silicon liner on each cooking tray.
Do not use liners made of parchment or paper.
• All food items should be well spaced and placed at on
the cooking tray.
• Allow dehydrated food items to cool fully before
removing them from the cooking tray.
• Many food items benet from processing before
dehydration. Examples include:
Puree vegetables, then dehydrate in an even, thin
layer to create papers and powders.
Cut fruit into thin slices and dip in a simple syrup
prior to dehydration.
Mix pureed items prior to dehydration to create new
avor proles.
Pre-cook vegetables such as carrots before pureeing
and dehydrating.
28 • MN-35948 • Rev 14 • 07/17 • Combitherm® CT PROformance™ Series Operator’s Manual
Page 29

Delta-T Core Temperature Cooking Mode
CAUTION HOT
Operation
This special program function cooks by internal product
temperature with the use of the probe. The Delta-T
cooking program increases the oven temperature in
direct proportion to the internal temperature of the
product, in contrast to the traditionally constant oven
temperature. For example, the oven temperature will
always be 100°F higher than the product itself. This slow
cooking allows more time for enzymes to tenderize the
meat. The Delta-T mode can be used with both convection
and combination modes, providing a more gentle method
of cooking. Browning occurs toward the end of the
cooking cycle.
Press On button to power oven on.
Touch the professional cooking mode.
Available in convection mode or combination
mode, touch the desired Cooking Mode icon.
Touch the area to the right of the probe icon.
• The actual internal product temperature will appear
next to the probe icon during operation. To change the
set value for core temperature, touch the temperature
next to the probe icon and make changes as required.
Touch steam Injection at Any Time During
Cooking. Steam will inject into the cavity as long
as the icon is touched.
When the operator-set internal temperature has been
reached, an alarm will sound and handle light will ash
several times indicating the end of the operating mode.
Touch the red Stop icon to stop the buzzer or
open the oven door.
To stop cooking program at any time, touch the
red stop icon
Use caution when opening the oven door when the
cooking chamber is hot to avoid possible burns.
Type in desired nal internal
producttemperature.
Touch the green check mark key to conrm
change.
Insert probe into product.
Touch auxiliary function Delta-T icon.
Type in desired Delta-T temperature.
Touch the Start icon to begin cooking.
Calibrate the Touch Oven Probe
Fill a pitcher with blended ice and water and place
inside the combi oven.
Snap probe in place at top of oven and insert probe
into the pitcher of blended ice water.
With the CT PROformance oven “ON”, touch the
“Utilities” icon on the home page.
Touch the “Settings” icon.
Touch the “>” icon to advance to page 2 of the
Settings screen.
Touch the “probe” icon on the Settings screen.
Once the temperature reading has stabilized, adjust
setting to 32°F (0°C) using the + or - icons. Touch the
“Home” icon to return to the home screen.
The control has now been calibrated to use the
probe at appropriate temperatures.
MN-35948 • Rev 14 • 07/17 • Combitherm® CT PROformance™ Series Operator’s Manual • 29
Page 30

Operation
CombiSmoker® Procedures
Loading Wood Chips
• Measure one container full of dry wood chips.
• Soak dry chips in water for 5 minutes.
• Shake excess water off wood chips.
• Place moistened chips back into the container and
position the container securely on the two prongs
located on the interior side panel of the oven.
A full container of wood chips will produce smoke for an
approximate period of one to two hours depending on the
cooking temperature being used for the selected product.
The recommended Touch recipes have been tested to
ensure complete product smoke penetration and full
smoke avor.
Chef Operating Tip
Products such as ribs that require heavier smoke
penetration to reach full smoke avor should remain in
the oven aer cooking has been completed. Do not open
the oven door.
Set the oven in the Low Temperature Steam Mode at 140°
to 160°F (60° to 71°C) and allow the product to remain in
the oven for a period of one hour.
If you would like assistance, you are invited to contact an
Alto-Shaam corporate chef for recommendations.
notICE: Always keep the oven door closed whenever
operating the smoking function.
The CT PROformance CombiSmoker can be operated
without using the smoking function. Aer using the
oven as a smoker, however, it is necessary to clean the
oven in order to prevent a transfer of smoke avor to
non-smokedproducts. Cleaning instructions are provided
in this manual.
WARNING
When smoking is completed, remove smoker box
from oven. Dispose of wood chips in a re proof
waste receptacle to prevent the risk of re.
Available From Alto-Shaam
Wood Chips 20 pound bulk packs
The total weight of wood
chip bulk packs may vary
due to high moisture
content when packaged.
Apple WC-22543
Hickory WC-2829
Cherry WC-22541
Sugar Maple WC-22545
CAUTION
DO NOT open the oven door during the smoking function. The
introduction of outside air into the oven compartment may
cause the wood chips to flame. Use the hand held sprayer hose
to extinguish the flames.
30 • MN-35948 • Rev 14 • 07/17 • Combitherm® CT PROformance™ Series Operator’s Manual
To prevent personal injury or property damage:
DO NOT use improper materials, sawdust, or woodchips
smaller than thumbnail size for the smoking function.
Page 31

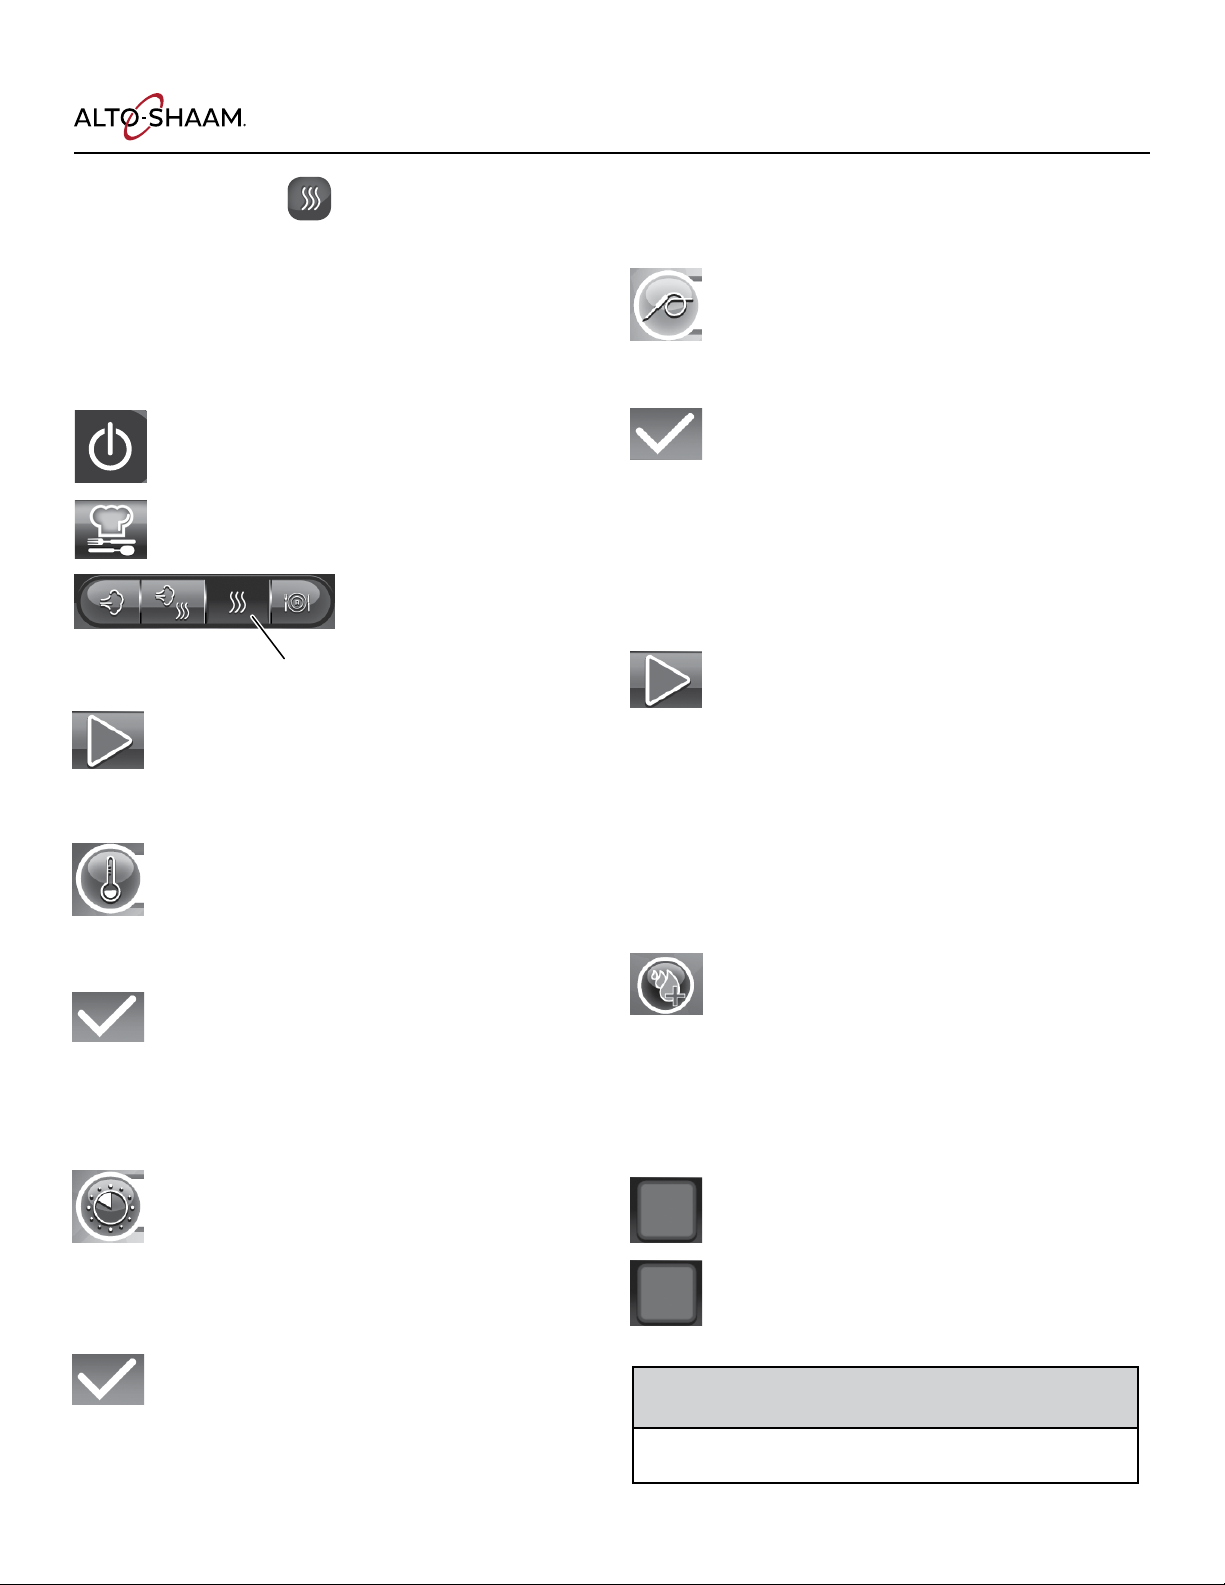
CombiSmoker® Procedures
CAUTION
CAUTION HOT
The ability to smoke product, hot or cold, is offered on
all CTP models. The smoking function can be engaged in
either the Combination mode or the Convection mode of
operation. The smoking function cannot be operated when
the oven is operating in the steam mode or the retherm
mode.
Press on button to power oven on.
Touch the professional cooking mode.
Touch the desired cooking MODE icon,
convection or combination.
Operation
To prevent personal injury or
propertydamage:
Always use hand protection when
operating this appliance to avoid burns.
Metal parts of this equipment become
extremely hot when in operation.
Cold Smoking Procedures
Touch convection cooking MODE icon.
To Change the Displayed Settings:
Touch the area to the right of the
temperature icon.
Type in desired temperature.
Touch the green check mark key to
conrm change.
To Cook by Time:
Touch the area to the right of the
time icon.
Type in desired time.
Touch the green check mark key to
conrm change.
To Activate CombiSmoke:
To Change The Displayed Settings:
Touch the cold smoking icon.
The temperature will display ------°.
To Cook by Time:
Touch the area to the right of the timeicon.
Type in desired time.
Touch the green check mark key to
conrmchange.
Place a pan of ice on a shelf immediately
below the product.
Touch THE START icon TO begin smoking.
Touch auxiliary function smoking icon.
Touch the Start icon to begin smoking.
MN-35948 • Rev 14 • 07/17 • Combitherm® CT PROformance™ Series Operator’s Manual • 31
Use caution when opening the oven door when the
cooking chamber is hot to avoid possible burns.
Page 32

Operation
Recipe Programming
Oven Temperature
Cook Time
Probe Temperature
Preheat
Step
Append
Save
Return to
previous screen
Steam
Mode
Combi
Mode
Return to
Home Page
Convection
Mode
Retherm
Mode
Utilities
1. While on the cooking mode screen, touch the Write a
Recipe icon.
2. Enter the desired cooking mode, cooking temperature,
and cooking time.
3. Add any desired special functions. For example:
• If the recipe requires a reminder to open the door at the
end of the segment, touch the Door icon.
• If the recipe requires a rest period, touch the Rest icon.
• If the recipe requires rapid remomal of heat, touch the
Rapid Cool icon.
4. If the recipe is complete, go to step 6. If the recipe calls
for additional segments, touch the Append icon.
5. Enter the desired cooking mode, cooking temperature,
and cooking time. If required, add a special function—see
step 3. Then, touch the Append icon. Repeat for each
additional cooking segment.
6. Touch the Save icon when all segments have been
written. A touch pad will appear.
7. Choose a photo or input the name of the recipe, then
touch the Check Mark icon.
notE: Each recipe can have up to 10 segments.
32 • MN-35948 • Rev 14 • 07/17 • Combitherm® CT PROformance™ Series Operator’s Manual
Page 33

Using Programmed Recipes
Cookbook with
Saved Recipes
Operation
Sort Recipes Favorites
Recipe Favorite
Saved Recipe
Le Arrow Right Arrow
Cleaning
To Cook with Preprogrammed Recipes
• Touch the cookbook with saved recipes icon in the
home screen. The recipe screen displays.
• Locate the recipe by doing one of the following:
Touch the favorites icon to display favorite recipes.
Touch the sort recipes icon to sort recipes, then
select frequency, alphabetic order, or last modied
date as the sort criteria.
Touch the recipe search icon to open the search
screen, then use the touch pad keys to enter the
recipe name.
Touch the le arrow icon or the right arrow icon to
navigate between recipe pages.
• Load food into the oven.
notE: Some recipes include the preheat function.
Make sure the desired preheat temperature
has been reached before loading food into the
oven.
• Touch the icon for the selected recipe. The oven
begins cooking.
notE: To stop cooking program at any time, touch
the red stop icon .
SORT CHOICES
Frequency
Alphabetically
Last Modified
Recipe
Search
Recipe
Utility
MN-35948 • Rev 14 • 07/17 • Combitherm® CT PROformance™ Series Operator’s Manual • 33
Page 34

Operation
Editing Programmed Recipes
The CT PROformance™ recipes that have been programmed
can be edited, saved as a favorite recipe, and organized
in folders or by time day they are used to help speed the
search for specic recipes.
To Change Saved Recipes:
Touch Recipe Utility icon located at the bottom of
the recipe page.
The recipe utility screen is bright red to indicate
that the user is now in edit mode.
Touch the edit recipe icon.
Touch the icon of the recipe to be edited.
The rst cooking step of the recipe will be displayed.
Change cooking mode, temperature, time, probe
temperature, and /or any of the auxiliary functions.
If an additional step needs to be added, touch
Quick
return to
professional
cooking mode
Recipe
favorite
Saved
recipe
Return to
previous
recipe menu
Recipe search
by name
View
recipes
saved in
folders
View
recipes
marked as
favorites
Advance
to next
menu
screen
Recipe
utility
Append to add next step
Change the previous step
Insert a step
Edit as necessary. When there are no further
changes to be made, touch the Save icon.
Enter the name of the recipe if it is to be changed.
Touch the green check mark key to conrm
change.
To Delete Saved Recipes:
Touch Recipe Utility icon located at the bottom of
the recipe page.
The recipe utility screen is bright red to indicate that the
user is now in Edit Mode.
Touch the Delete Recipe icon.
Touch the icon of the recipe to be deleted.
Edit recipe
Delete recipe
Saved
recipes
Recipe
favorite
Return to
previous
recipe screen
notICE: Each recipe can have up to 10
Recipe search
by name
sequential steps.
Organize
recipes in
folders
Lock
selected
recipes
Mark
recipes as
favorites
Advance
to next
menu
screen
Recipe
utility
The recipe will be removed from the screen.
34 • MN-35948 • Rev 14 • 07/17 • Combitherm® CT PROformance™ Series Operator’s Manual
(continued on next page)
Page 35

Organizing Programmed Recipes
The CT PROformance™ recipes that have been programmed
can be organized in folders to help your kitchen staff be
more productive.
To Create A Recipe Folder:
Operation
Recipe
favorite
Touch the folder icon located at the top of the
recipe page.
The recipe utility screen is bright red to indicate that the
user is now in edit mode.
Touch the add folder icon.
The keyboard will appear - allowing you to enter in a name
for the recipe folder.
Touch the green check mark to conrm the folder
name.
Continue to add recipe folders as necessary.
Touch the recipe utility icon to add programmed
recipes to the folder.
Touch the folder icon on the red background.
Touch the named folder icon to reveal the
programmed recipe choices available.
Saved
recipes
Add folder
Named
folder
Recipe
folder
Recipe
folder
Touch each of the programmed recipes to be
added to the folder.
A small blue folder will appear on the lower le of the
recipe icon, indicating that it has been selected to be added
to the recipe folder.
Touch the return to previous screen icon when
your choices have been completed.
Return to
previous screen
MN-35948 • Rev 14 • 07/17 • Combitherm® CT PROformance™ Series Operator’s Manual • 35
Folder search
by name
Recipe
utility
Page 36

Operation
Organizing Programmed Recipes (Continued From Previous Page)
To Mark Saved Recipes as a Favorite:
Touch the Favorites recipe icon.
Touch the icon of the recipe to be marked.
A gold star will appear at the top le of the recipe icon. All
favorites can be viewed when you touch the gold star while
viewing the list of saved recipes.
To Lock Saved Recipes:
Touch the lock recipe icon.
Touch a single icon of the recipe or a group of
icons to be locked.
A red lock will appear at the top right of the recipe icon.
Sort Recipes
Recipe
Favorite
Saved
Recipe
Recipe
Search
Recipe
Utility
36 • MN-35948 • Rev 14 • 07/17 • Combitherm® CT PROformance™ Series Operator’s Manual
Page 37

HACCP Access
HACCP Access
The Combitherm CT PROformance™ oven meets
the requirements of established HACCP criteria by
providing automated sampling, record keeping, setpoint validation, recipe used, dates and time. Data is
captured when Core Temperature Probe cooking method
is chosen. The information can be viewed on screen for
veri cation or troubleshooting. The HACCP preview
page will be displayed in LIFO (last in, rst out) order.
This data is retained inde nitely - until the information
is downloaded. Once downloaded, the information is
removed from the ovens memory. Best practice would be
to download the information every 30 days to a USB stick.
This information can then be copied to your computer.
The le format is text (.txt).
CAUtIon: The CombiOven USB port is not recommended
Operation
for use with personal hand held devices.
To Access the Data Collected:
Touch the utilities icon located on the
homepage.
Touch the upload/download icon.
Touch the HaCCP USB icon.
The HACCP screen can help diagnose a problem or error
code if limited information is available.
(next steps continued on next page)
Start time
Stop time
Utilities
Highest
probe
temperature
Lowest
probe
temperature
Download
MN-35948 • Rev 14 • 07/17 • Combitherm® CT PROformance™ Series Operator’s Manual • 37
Page 38

Operation
To Download the Data Collected:
Pull back the cap of the USB port on the oven.
Insert the USB stick. The USB stick, if recognized, will
automatically take the user to the download page. If the
USB stick is not recognized by the Combitherm oven,
a question mark will appear on screen. Try again with
another ash drive device or call Alto-ShaamService.
When the data has made a successful transfer to the USB
drive, the screen will change. See below.
Touch the green Check Mark icon to complete the process.
Remove the USB stick and close the cap on the USB port
on the oven.
(steps continued from previous page)
HACCP Access And Download
The download process will automatically create a folder
on the USB stick titled “haccp”. Each text le contains
cooking program speci cs and each function the oven
performed.
Confirm
38 • MN-35948 • Rev 14 • 07/17 • Combitherm® CT PROformance™ Series Operator’s Manual
Page 39

Remove the grease lter by pulling it straight out of
The air ow arrow on the lter casing should point toward
CombiHood Plus Charcoal Filter with paper housing, Class II
FRONT OF HOOD
ALIGNS WITH FRONT
OF COMBI DOOR
Test the drain for proper drainage
CombiHood PLUS™ Ventless Hood
The CombiHood PLUS option is factory installed directly
on the top of the Alto-Shaam Combitherm CTP or CTC
series oven.
• Using EPA method 202 testing, grease laden vapors
emitted by the Combi Ventless hood are 0.58 mg/m
far less than U.L.’s established standard of 5 mg/m
• A high-powered fan captures all steam and fumes from
the oven cavity into the hood intake and out the back
surface exhaust vent, trapping grease as the air moves
through the lter system.
• As fumes and vapors are circulated through the hood,
condensed steam drains from a drain at the rear of the
hood.
• An activated charcoal lter cleans the air before
venting it out the top of the hood.
• CombiHood PLUS™ performance is “smart”; engaging
the fan during the last minute of the cook mode which
provides quiet operation and consumes less power.
3
–
3
.
Options
Condensate Drain
A condensate drain line to the
oor drain must be installed.
The 1/2" barbed connection is
found at the back of the hood.
The drain line must always be a
positive gradient away from the
Combitherm oven.
and signs of leaking on a monthly
basis.
1
CombiHood Plus Washable Grease Filter with metal housing
(5017362)
Washing frequency should be based on oven usage with a
maximum of two weeks between cleaning if the oven is used
for non-grease laden products or steam applications only.
Grease laden products require cleaning frequency of at least
once a week.
the housing. Place the lter in the dishwasher or wash
separately by placing in hot, soapy water until all grease and
particles have been removed. Rinse thoroughly. Allow the
lter to air dry before reinstalling.
the hood fan when the lter is reinstalled.
MN-35948 • Rev 14 • 07/17 • Combitherm® CT PROformance™ Series Operator’s Manual • 39
Quarter Turn Release
(access to filters)
2
21
Quarter Turn Release
(access to filters)
(FI-25866)
CombiHood Plus Charcoal Filter with metal housing, Class I
required for New York City and Los Angeles
The charcoal lter should be inspected once a month for
contaminants. Replacement must be made at a minimum of
three month intervals — more o en if heavy contaminants
are visible or if the lter no longer controls odors.
To remove the lter, pull and slide out while holding the
bottom housing. When replacing the lter, make certain
the air ow arrow(s) point toward the hood fan, and that the
lter is replaced in the three-sided metal frame provided
with the hood.
notICE: A pressure switch is used to detect when the air ow
through the charcoal lter is reduced by 25% - indicating
a possible blockage. This will generate an E101 error
message on the oven control display. The lters will need
to cleaned or replaced.
If the lters are not seated properly, an error code E102
will appear on the oven control display at the end of a
cooking cycle.
(FI-36620)
Page 40

Options
How To Use the Combilatch™ Door Interlock
The Combilatch™ door interlock is typically installed as
an add-on to ovens that feature the CombiHood PLUS™
ventless hood. The interlock activates when the door
handle is turned, and holds the oven door in a latched,
partially open position. The default delay is 20 seconds.
This allows the CombiHood to fully capture and remove the
steam, fumes and vapors from the oven cavity before the
door opens fully.
The Combilatch is installed at the factory. The latch a is
located on the bottom of the oven.
notE: The delay time can be set to a value lower than 20
seconds during installation.
To open the oven door
1. Turn the door handle clockwise a quarter turn. The oven
door opens to the latched position.
2. Wait until the latch delay is complete. The oven door opens
fully.
notE: The pull ring b, which is mounted below the right
side panel of the oven, can be used to open the oven door
before the latch delay is complete.
1
2
40 • MN-35948 • Rev 14 • 07/17 • Combitherm® CT PROformance™ Series Operator’s Manual
Page 41

Connecting the Optional Grease Collection System
Connecting the Optional Grease Collection System
Options
• Grease Collection Hose Assembly is attached to the
oven in the back.
• The hose guide bracket can be attached on either the
le side or the right side toward the back. Placement
on the le side is recommended whenever possible.
Thumb screws are in position for this purpose.
Remove thumb screws, position hose guide bracket
and secure screws (photo a). Thread grease hose
through the guide.
• The hose hanger bracket can be attached on either
the le side or the right side toward the front of the
oven. Placement on the le side is recommended
whenever possible. Philips screws are in position
beneath the oven for this purpose. Remove Philips
screws, position hose hanger bracket and secure
screws (photo b). The hanger bracket is used to
secure the grease collection hose while changing
grease collection containers.
• Place Grease Collection Containers inside the tray
of the Mobile Grease Collection Cart. Roll into place
next to the oven and apply the caster brake.
• Loosen vent cap on container. Pull out the Grease
Collection Hose Assembly from the back of the unit.
Remove collection container ll cap (photo c).
• Screw Grease Collection Hose Assembly on to
collection container until snug.
• Turn ball valve handle to the ON position.
• If this auxiliary function has been chosen while
setting your cooking mode, the automatic grease
collection system is electronically activated during
the cooking process [u.s. patent 8,997,730 b2]. It is
designed to save labor and provide greater employee
safety by eliminating the need to handle hot grease
in shallow pans.
• Grease Collection container has a 5 gallon (19 liter)
capacity and holds approximately 3 full loads of
poultry grease.
• At a minimum, empty and clean the container when
material reaches the ll line on the bottle or at 4
gallons to avoid hot grease over ow.
• Turn the ball valve handle to the OFF position.
• The ball valve handle must be in the OFF position
when changing the collection container.
• Unscrew the container ll cap.
• Using a new container, screw Grease Collection
Hose Assembly on to collection container until snug.
• Turn ball valve handle to the ONposition.
Thumb screw Hose guide bracket Hose hanger bracket
B
A
Grease Collection Hose
On/Off Ball Valve
C
Vent
Cap
Grease
Collection
Container
Recommended
Capacity
Container
Fill Cap
WARNING
To prevent SERIOUS INJURY or PROPERTY DAMAGE:
ALWAYS apply caster brakes on mobile carts,
appliances, or accessories when stationary. Equipment
on casters can move or roll on uneven oors.
Check grease collection connections and replace the
containers when lled to the recommended capacity.
MN-35948 • Rev 14 • 07/17 • Combitherm® CT PROformance™ Series Operator’s Manual • 41
Page 42

Options
Wearing protective rubber gloves and
WARNING
Connecting the Optional Liquid Cleaner
Cleaner Cap and
Tubing Assembly
Support Tray
Slotted Opening and
Mounting Studs
Support Tray
• Removable, cleaner support tray
can be mounted on the le or right
exterior wall of the oven. Slide
slotted openings on the tray over the
mounting studs.
• Support tray holds a 2-1/2-gallon
(9,5liter) bottle and measures
10-1/2"x 7-3/4" (267mm x 194mm).
• Place liquid oven cleaner bottle
inside tray.
•
eye wear, remove cap from liquid
oven cleaner bottle. Pull out the
Cleaner Cap and Tubing Assembly
from the back of the unit screw on to
liquid oven cleaner bottle.
• Position cap to ensure the hose is not
kinked a er tightening.
• Combitherm liquid oven cleaner jugs
are quickly and easily replaced.
• Combitherm liquid oven cleaner
is automatically pumped through
the system, saving labor and
providing greater employee safety
by eliminating the need to handle
caustic cleaning liquids each day.
WARNING
ALWAYS wear protective eye wear and rubber gloves
when using liquid oven cleaner to prevent eye, skin, and
respiratory tract irritation.
Keep out of reach of children.
See Safety Data Sheet for additional information.
WARNING
To prevent SERIOUS INJURY or DEATH,
NEVER operate this appliance in a cleaning
mode without the liquid cleaner connected,
with a kink in the cleaning hose line, or with
an empty liquid cleaner container. Failure
to do so may result in poor oven cleaning,
grease and/or carbon accumulating inside
the oven cavity and increased risk of fire.
42 • MN-35948 • Rev 14 • 07/17 • Combitherm® CT PROformance™ Series Operator’s Manual
To prevent serious personal injury, death,
or property damage:
The appliance must be cleaned thoroughly
to avoid deposits of grease and or food
residues inside the appliance that may
catch fire. If fat deposits and/or food waste
inside the appliance ignite, shut down
the appliance immediately and keep the
appliance door closed to extinguish the
fire. If further extinguishing is required,
disconnect the appliance from the main
power and use a fire extinguisher (do not
use water to extinguish a grease fire!).
Failure to clean the appliance properly
invalidates the warranty and relieves
Alto-Shaam of all liability.
Page 43

Bakery Items
Recipe Guidelines
RECIPE STEP
Bakery
(retherm)
Brownies
Cinnamon
Rolls
Cookies (not
frozen)
Croissants
Step 1
Step 2
275°F
135°C
325°F
163°C
350°F
177°C
325°F
163°C
340°F
171°C
COOKING
MODE
COOK
TEMP
275°F
135°C4 minutes
325°F
163°C
350°F
177°C6 minutes
325°F
163°C
340°F
171°C
340°F
171°C
TIME /
PROBE
25
minutes
12
minutes
20
seconds
11
minutes
FAN
SPEED
SMOKE
HUMIDITY
LEVEL
POWER
LEVEL
Danish
Pastry
Dinner Rolls
French Bread
Fruit Pie
Muffins
340°F
171°C
350°F
177°C
350°F
177°C
350°F
177°C
325°F
163°C
340°F
171°C
350°F
177°C
350°F
177°C
350°F
177°C
325°F
163°C
11
minutes
10
minutes
16
minutes
50
minutes
20
minutes
MN-35948 • Rev 14 • 07/17 • Combitherm® CT PROformance™ Series Operator’s Manual • 43
Page 44

Recipe Guidelines
Bakery Items (Continued)
RECIPE STEP
Step 1
Par-baked
Baguette
(Frozen)
Par-baked
Bread
Par-baked
Rolls
Proofing --
Step 2 --
Step 3 --
450°F
(232°C)
350°F
177°C
350°F
177°C
COOKING
MODE
COOK
TEMP
400°F
204°C2 minutes
400°F
204°C
400°F
204°C7 minutes
350°F
177°C
350°F
177°C
90°F
32°C
TIME /
PROBE
20
seconds
10
minutes
10
minutes
30
minutes
FAN
SPEED
SMOKE
HUMIDITY
LEVEL
POWER
LEVEL
Puff Pastry
Sheet Cake
375°F
191°C
325°F
163°C
375°F
191°C
325°F
163°C
14
minutes
20
minutes
44 • MN-35948 • Rev 14 • 07/17 • Combitherm® CT PROformance™ Series Operator’s Manual
Page 45

Convenience Product Items
Recipe Guidelines
RECIPE STEP
Chicken
Wings Thawed
Corn Dogs Frozen
Egg Rolls
Entrée
(4 lb frozen)
Entrée
(4 lb
refrigerated)
French Fries
- Frozen 1/2" crinkle
cut
Step 1
Step 2 --
400°F
204°C
300°F
149°C
375°F
191°C
350°F
177°C
350°F
177°C
475°F
246°C
COOKING
MODE
COOK
TEMP
400°F
204°C
300°F
149°C9 minutes
375°F
191°C
300°F
149°C
350°F
177°C
375°F
191°C
375°F
191°C9 minutes
TIME /
PROBE
10
minutes
15
minutes
50
minutes
Probe
165°F
(74°C)
1 minute
FAN
SPEED
SMOKE
HUMIDITY
LEVEL
POWER
LEVEL
Hamburger
Patties Frozen
Hamburger
Patties Precooked &
Grilled
Hamburger
Patties Thawed
Mini Pizza
5"
Pizza - Fresh
MN-35948 • Rev 14 • 07/17 • Combitherm® CT PROformance™ Series Operator’s Manual • 45
350°F
177°C
350°F
177°C
350°F
177°C
350°F
177°C
575°F
(301°C)
350°F
177°C
350°F
177°C6 minutes
350°F
177°C5 minutes
350°F
177°C
550°F
288°C
12
minutes
10
minutes
3
minutes
30
seconds
Page 46

Recipe Guidelines
Convenience Product Items (Continued)
RECIPE STEP
Spring Rolls Frozen
Tater Tots
Fish & Seafood Items
RECIPE STEP
Baked Fish Fresh
Lobster Whole
350°F
177°C
375°F
191°C
575°F
(301°C)
135°F
57°C
COOKING
MODE
COOKING
MODE
COOK
TEMP
350°F
177°C
375°F
191°C
COOK
TEMP
TIME /
PROBE
15
minutes
10
minutes
TIME /
PROBE
550°F
288°C4 minutes
195°F
91°C
13
minutes
FAN
SPEED
FAN
SPEED
SMOKE
SMOKE
HUMIDITY
LEVEL
HUMIDITY
LEVEL
POWER
LEVEL
POWER
LEVEL
Salmon Cold Smoked
Salmon
Filets
Salmon
Steaks
Cold Smoked
Shrimp Pre-cooked
Shrimp Frozen
Step 1 --
Rest -- STANDBY
105°F
41°C
105°F
41°C
145°F
63°C7 minutes
145°F
63°C8 minutes
--
118°F
(48°C)
158°F
70°C
15
minutes
30
minutes
10
minutes
12
minutes
OFF OFF OFF
46 • MN-35948 • Rev 14 • 07/17 • Combitherm® CT PROformance™ Series Operator’s Manual
Page 47

Meat Recipes
Recipe Guidelines
RECIPE STEP
Bacon
Beef Brisket Smoked
Beef Roasted
(Prime Rib,
Top Round,
Tri-Tips, etc)
Breakfast
Sausage
Links
Ham by
Core Temp
--
--
318°F
(159°C)
250°F
121°C
350°F
177°C
COOKING
MODE
Combi
Delta-T
Combi
Delta-T
COOK
TEMP
318°F
(159°C)
250°F
121°C
125°F
(52°C)
350°F
177°C
125°F
(52°C)
TIME /
PROBE
15 minutes
Probe
180°F
(82°C)
Probe
125°F
(52°C)
8
minutes
Probe
150°F
(66°C)
FAN
SPEED
SMOKE
HUMIDITY
LEVEL
POWER
LEVEL
Leg of Lamb
by Core
Temp
Meat Loaf by
Core Temp
Pork - Back
Ribs - Raw
Pork - Back
Ribs Smoked
Pork - Loin
- by Core
Temp
--
Step 1
Step 2 --
275°F
(135°C)
250°F
121°C
250°F
121°C
300°F
(149°C)
Combi
Delta-T
125°F
(52°C)
275°F
135°C
250°F
121°C
250°F
121°C
160°F
71°C
300°F
149°C
Probe
130°F
(54°C)
Probe
155°F
(68°C)
1 hour 15
minutes
1 hour 15
minutes
Continuous OFF
Probe
150°F
(66°C)
MN-35948 • Rev 14 • 07/17 • Combitherm® CT PROformance™ Series Operator’s Manual • 47
Page 48

Recipe Guidelines
Meat Recipes (Continued)
RECIPE STEP
Pork Ribs
Reheat
Pork
Shoulder Smoked
Rack of
Lamb - by
Core Temp
Sausage Fresh
Step 1
Step 2 --
--
400°F
204°C
225°F
107°C
120°F
49°C
COOKING
MODE
Combi
Delta-T
COOK
TEMP
400°F
204°C7 minutes
225°F
107°C
225°F
107°C
122°F
50°C
160°F
71°C
TIME /
PROBE
90
minutes
Probe
180°F
(82°C)
Probe
130°F
54°C
15
minutes
FAN
SPEED
SMOKE
OFF
HUMIDITY
LEVEL
POWER
LEVEL
48 • MN-35948 • Rev 14 • 07/17 • Combitherm® CT PROformance™ Series Operator’s Manual
Page 49

Miscellaneous Recipes
Recipe Guidelines
RECIPE STEP
Crème
Brûlée
Eggs Hardboiled
Eggs Poached in
Poaching Pan
Eggs Scrambled in
bag: shake at
18 minutes
Eggs Scrambled in
pan
Eggs -
Sous Vide
190°F
(88°C)
212°F
100°C
130°F
(54°C)
212°F
100°C
212°F
100°C
COOKING
MODE
COOK
TEMP
190°F
(88°C)
212°F
100°C
170°F
(77°C)
212°F
100°C
212°F
100°C
148°F
64°C
TIME /
PROBE
55
minutes
12
minutes
10
minutes
25
minutes
15
minutes
60
minutes
FAN
SPEED
SMOKE
HUMIDITY
LEVEL
POWER
LEVEL
Pasta Linguine or
Spaghetti
Rice
Tamales
212°F
100°C
212°F
100°C
212°F
100°C
212°F
100°C
212°F
100°C
212°F
100°C
20
minutes
23
minutes
30
minutes
MN-35948 • Rev 14 • 07/17 • Combitherm® CT PROformance™ Series Operator’s Manual • 49
Page 50

Recipe Guidelines
Poultry Recipes
RECIPE STEP
Step 1
Chicken Patties
Step 2 --
Chicken Pieces
Chicken Oven Fried
Pieces
Chicken
Pieces - MRB
Chicken
- Whole
Roasted (full
load)
Chicken
- Whole
Roasted (half
load)
350°F
(177°C)
350°F
(177°C)
450°F
232°C
350°F
(177°C)
575°F
(301°C)
400°F
(204°C)
COOKING
MODE
COOK
TEMP
350°F
(177°C)4 minutes
350°F
(177°C)5 minutes
350°F
(177°C)
450°F
232°C
350°F
(177°C)
400°F
204°C
400°F
204°C
TIME /
PROBE
35
minutes
18
minutes
28
minutes
Probe
175°F
(79°C)
Probe
175°F
(79°C)
FAN
SPEED
SMOKE
HUMIDITY
LEVEL
POWER
LEVEL
Chicken -
Whole
Smoked
Duck Whole
- by Core
Temp
Step 1 --
Step 2 --
Step 1
Step 2 --
Step 3 --
50 • MN-35948 • Rev 14 • 07/17 • Combitherm® CT PROformance™ Series Operator’s Manual
250°F
121°C
34°F
1°C
400°F
204°C
250°F
121°C
300°F
149°C
300°F
149°C
15
minutes
Probe
175°F
(79°C)
15
minutes
10
minutes
Probe
175°F
(79°C)
OFF
Page 51

Poultry Recipes (Continued)
Recipe Guidelines
RECIPE STEP
Grilled
Chicken
Breasts
Step 1
Turkey
Breast
Step 2 --
Step 1
Turkey
Breast Smoked
Step 2 --
575°F
(301°C)
350°F
177°C
275°F
135°C
COOKING
MODE
COOK
TEMP
465°F
240°C4 minutes
250
350°F
135
177°C
250
350°F
135
177°C
275°F
135°C
275°F
135°C
TIME /
PROBE
5
minutes
Probe
165°F
(74°C)
60
minutes
Probe
155°F
(68°C)
FAN
SPEED
SMOKE
OFF
HUMIDITY
LEVEL
POWER
LEVEL
MN-35948 • Rev 14 • 07/17 • Combitherm® CT PROformance™ Series Operator’s Manual • 51
Page 52

Recipe Guidelines
Vegetable Recipes
RECIPE STEP
Asparagus Fresh
Asparagus Roasted
Broccoli,
Cauliflower,
Squash,
Zucchini Fresh
Cabbage,
Green Beans,
- Fresh
Carrots Fresh
150°F
66°C
575°F
301°C
212°F
100°C
212°F
100°C
225°F
107°C
COOKING
MODE
COOK
TEMP
190°F
88°C3 minutes
575°F
301°C5 minutes
212°F
100°C
212°F
100°C
225°F
107°C
TIME /
PROBE
3 - 6
minutes
8 -10
minutes
10
minutes
FAN
SPEED
SMOKE
HUMIDITY
LEVEL
POWER
LEVEL
Cauliflower Roasted
Corn-on-theCob - Fresh
Frozen
Vegetables
Mushrooms
- button roasted
Step 1
Step 2
Toss with
oil - place
on sheet
pan
575°F
301°C
212°F
100°C
300°F
(149°C)
575°F
301°C
475°F
246°C4 minutes
430°F
221°C5 minutes
212°F
100°C
220°F
104°C8minutes
550°F
288°C
14
minutes
10
minutes
52 • MN-35948 • Rev 14 • 07/17 • Combitherm® CT PROformance™ Series Operator’s Manual
Page 53

Vegetable Recipes (Continued)
Recipe Guidelines
RECIPE STEP
Potatoes, for
mashed
Potatoes, Red
or Salad
Potatoes,
Roasted
225°F
(107°C)
212°F
100°C
500°F
(260°C)
COOKING
MODE
COOK
TEMP
225°F
107°C
212°F
100°C
450°F
232°C
TIME /
PROBE
30
minutes
30
minutes
18
minutes
FAN
SPEED
SMOKE
HUMIDITY
LEVEL
POWER
LEVEL
MN-35948 • Rev 14 • 07/17 • Combitherm® CT PROformance™ Series Operator’s Manual • 53
Page 54

Cleaning and Preventative Maintenance
CombiClean® Cleaning Agents
DANGER
ALWAYS wear rubber gloves when using
CombiClean tablets or spray oven cleaner.
DANGER
ALWAYS wear protective eye wear
when using spray oven cleaner.
Danger
• May be harmful if swallowed.
• May be harmful in contact with skin. Always wear rubber gloves when handling.
• Causes severe skin burns and eye damage.
• Tablet will begin to dissolve onto skin if handled with damp or wet hands.
• May cause respiratory irritation. May cause drowsiness or dizziness.
• Harmful to aquatic life with long lasting effects. Do not mix with anything but water.
• Do not breathe dust/fumes/gas/mist/vapors/spray. Wash face, hands and any exposed skin thoroughly aer
handling. Wear protective gloves/protective clothing/eye protection/face protection.
• Use only outdoors or in a well-ventilated area. Avoid release to the environment. Store in a locked and well
ventilated place. Keep container tightly closed. Dispose of contents/container to an approved waste disposal plant.
First Aid
Immediately call a POISON CENTER or doctor/physician. Specic treatment (See section 4 on the SDS).
• IF IN EYES: Rinse cautiously with water for several minutes. Remove contact lenses, if present and easy to do.
Continue rinsing. Immediately call a POISON CENTER or doctor/physician.
• IF ON SKIN (or hair): Remove/Take off immediately all contaminated clothing. Rinse skin with water/shower.
Wash contaminated clothing before reuse.
• IF INHALED: Move victim to fresh air and keep at rest in a position comfortable for breathing. Immediately call a
POISON CENTER or doctor/physician if you feel unwell.
• IF SWALLOWED: Rinse mouth. DO NOT induce vomiting. Drink 2-3 glasses of water or milk. Immediately call a
POISON CENTER or doctor/physician.
54 • MN-35948 • Rev 14 • 07/17 • Combitherm® CT PROformance™ Series Operator’s Manual
Page 55

Cleaning and Preventative Maintenance
Preventative Maintenance
In addition to the routine cleaning and maintenance
procedures, there are several additional steps to be
taken for both sanitation and to keep the oven running
ef ciently. Refer to the following inspection checklists
for a comprehensive approach to longevity and
equipment ef ciency. These additional safeguards will
help prevent down time and costly repairs.
Do not dispose of grease, fat, wood chips or solid waste
down the oven drain.
Fats and solids will eventually coagulate in the drain
system, causing blockage. Consequently, water
will back-up into the condenser and interior oven
compartment, resulting in an oven that is inoperable.
Make certain the drain screen is always in place.
Remove any solid waste material from the oven
bottom and drain screen before it enters the drain
system.
The routine removal of solids from the drain screen will
help prevent blockage.
Use the authorized combitherm oven cleaner only.
The use of unauthorized cleaning agents may discolor or
harm the interior surfaces of the oven.
WARNING
Preventative Maintenance
WARNING
When smoking is completed, remove the smoker
box. Dispose of wood chips in a fire proof waste
receptacle to prevent the risk of fire.
To prevent serious personal injury, death, or
property damage:
Do not steam clean, hose down or flood the
interior or exterior with water or liquid solution
of any kind. Do not use water jet toclean. Failure
to observe this precaution will void the warranty.
To prolong the life of the door gasket, clean this
itemdaily.
The acids and related compounds found in fat,
particularly chicken fat, will weaken the composition of
the gasket unless cleaned on a daily basis. Wipe with a
hot, soapy cloth.
To additionally protect gasket life, allow oven door to
remain slightly open at the end of the production day.
An open door will relieve the pressure on the door gasket.
Routinely clean door hinges.
Open oven door to relieve tension. Clean all parts of
thehinge.
On a monthly basis, decalcify or
descale theoven.
Using the Scale Free cleaner,
CE-27889, place 7 ounces of
the product in the drain. Run a
heavy-duty cleaning cycle. A er
the cleaning cycle has been
completed, use the hand shower
to spray down the oven interior.
Swing open the interior fan guard
and spray down the area behind
the panel. Direct a stream of
water down the interior drain
cover to thoroughly rinse the
cleaner out of the oven. A er the
oven interior has been sprayed
down, run a rinse cleaning cycle.
MN-35948 • Rev 14 • 07/17 • Combitherm® CT PROformance™ Series Operator’s Manual • 55
Page 56

Cleaning and Preventative Maintenance
Weekly Maintenance
On a weekly basis, the heat exchanger on gas
models and convection elements on electric models
must be inspected.
•
•
•
•
•
•
D
Weekly Maintenance
Remove all wire shelves from inside the
appliance.
Remove le side rack from the oven cavity.
Flip the tabs or loosen the thumb screws on the
fan panel to the open position and swing the fan
guard cover plate toward the back of the oven.
Inspect the heat exchanger on gas models for
signs of grease and/or carbon buildup, scale
buildup, and any signs of major deformation.
Refer to images A and B.
Inspect that the ue pipe seal is tight and intact.
Refer to image C.
Inspect the convection elements for signs of
cracking, grease and/or carbon buildup, scale
buildup, and any signs of major deformation.
Refer to image D.
A
B
C
56 • MN-35948 • Rev 14 • 07/17 • Combitherm® CT PROformance™ Series Operator’s Manual
Page 57

Cleaning and Preventative Maintenance
Daily Inspection
Unit Information
Business Name: _______________________________________
Model Number: _______________________________________
Daily Inspection Checklist
Serial Number: __________________________________
Daily Inspection Start Date: __________________________________
Inspect and clean:
Product probe (thermometer)
Door gasket (inner door seal)
Inner door glass
Front drip tray
Screen and overlay
(inspect for cracks, peeling, moisture, etc.)
Execute automatic wash cycle
(with approved cleaning chemical ONLY)
Employee initials
Component Failure and Replacement
List details of the failure(s) next to the day they occurred. Leave blank if components are working properly.
Monday
Tuesday
Monday
Tuesday
Wednesday
Thursday
Friday
Saturday
Sunday
Wednesday
Thursday
Friday
Saturday
Sunday
MN-35948 • Rev 14 • 07/17 • Combitherm® CT PROformance™ Series Operator’s Manual • 57
Page 58

Cleaning and Preventative Maintenance
Weekly Inspection
Unit Information
Business Name: ________________________________________
Model Number: ________________________________________
Weekly Inspection Checklist
Inspect - Oven cavity lamp
Inspect - Oven cavity for signs of grease/carbon buildup
Inspect - Loosen thumb screws to inspect behind the fan panel inside the oven cavity for signs of grease/carbon buildup
Inspect - Loosen thumb screws to inspect behind the fan panel inside the oven cavity for signs of scale buildup
Inspect - The heat exchanger for any signs of major deformation. If yes, immediately remove from service and take corrective
G
action steps.
Inspect - The heat exchanger for any loose/disconnected pipes or flanges. If yes, immediately remove from service and take
G
corrective action steps.
Inspect - Convection elements for signs of cracking, deformation, or damage
E
Clean ventless hood grease filters
Employee initials
Serial Number: _________________________________
Weekly Inspection Start Date: _________________________________
EG Gas units only Electric units only
Component Failure and Replacement
List details of the failure(s) next to the day they occurred. Leave blank if components are working properly.
Week 1
Week 2
Week 3
Week 4
58 • MN-35948 • Rev 14 • 07/17 • Combitherm® CT PROformance™ Series Operator’s Manual
Page 59

Cleaning and Preventative Maintenance
Monthly Inspection
Unit Information
Business Name: ______________________________________
Model Number: ______________________________________
Monthly Inspection Checklist
Inspect/Test - Proper draining of the oven cavity
Inspect - All drain lines for leaks or clogs
EB Descale the steam generator
Inspect - Oven cavity for any signs of scale buildup
Descale the oven interior
Inspect ventless hood paper filter (replace as needed)
Serial Number: _______________________________
Monthly Inspection Start Date: _______________________________
Test ventless hood drain for proper drainage and signs of leaking
Employee initials
EB Electric boiler units only
Component Failure & Replacement
Summarize any component failure(s) that may have occurred during this month.
MN-35948 • Rev 14 • 07/17 • Combitherm® CT PROformance™ Series Operator’s Manual • 59
Page 60

Cleaning and Preventative Maintenance
Yearly Inspection
Unit Information
Business Name: _______________________________________
Model Number: _______________________________________
12-Month Inspection Checklist
Replace - Steam bypass hose
Inspect - Cleaning pump hose
Inspect/Test - Proper draining of the oven cavity
Inspect - All drain lines for leaks or clogs
Inspect - All solenoid hoses (both ends)
Inspect - Upper browning valve hose
Inspect - Low pressure relief valve & hose
E Inspect - Convection element seal (from the electrical compartment)
G Inspect - Gas heat exchanger seal (from the electrical compartment)
Inspect - N6 oven temperature probe seal
Serial Number: ______________________________
12-Month Inspection Start Date: ______________________________
EB Descale the steam generator
EB Remove & Inspect - Steam generator elements
Inspect - Hand shower hose
Inspect - Hand shower handle
Inspect - Product probe
Inspect - Water injection tube
Inspect - Oven cavity for any signs of scale buildup
Inspect - Oven cavity lamp
Inspect - Oven cavity for signs of grease/carbon buildup
Inspect - Behind the fan panel inside the oven cavity for signs of grease/carbon buildup
Inspect - Behind the fan panel inside the oven cavity for signs of scale buildup
EB Electric boiler units only EG Gas units only Electric units only
60 • MN-35948 • Rev 14 • 07/17 • Combitherm® CT PROformance™ Series Operator’s Manual
Page 61

Unit Information
Cleaning and Preventative Maintenance
Business Name: _______________________________________
Model Number: _______________________________________
12-Month Inspection Checklist
Inspect - The heat exchanger for any signs of major deformation. If yes, immediately remove from service and take corrective
G
action steps.
Inspect - The heat exchanger for any loose/disconnected pipes or flanges. If yes, immediately remove from service and take
G
corrective action steps.
G Inspect and Ensure - Exhaust pipes are exiting the oven cavity
G Inspect - Heat exchanger flange gasket (replace as needed)
G Inspect and Tighten - Heat exchanger flange bolts
G Inspect and Tighten - Heat exchanger burner flange hardware & gasket (replace as needed)
G Inspect and Tighten - Heat exchanger igniter flange hardware & gasket (replace as needed)
G Inspect - Heat exchanger exhaust pipes (ensure they are exiting out past the oven cavity ceiling flange) - ESG models only
G Inspect - Oven cavity ceiling flange & flange gasket - ESG models only
G Tighten - Burner flange bolts
Serial Number: ______________________________
12-Month Inspection Start Date: ______________________________
G Tighten - Igniter flange bolts
Inspect - Heat exchanger weep holes to ensure they are free of obstructions (if the hole is obstructed, immediately remove oven
from service and replace the heat exchanger) - Not applicable to CTP/CTC models
E Inspect - Convection elements for signs of cracking, deformation, or damage
Replace - Oven lamp cover(s) & gasket(s)
Descale the oven interior
Inspect - Door gasket (replace as needed)
Wipe the inner door glass
Inspect - Front drip tray (clean as needed)
Inspect - Front drip tray hose
Inspect - Control overlay
Inspect and Tighten - All electrical connections
Inspect and Tighten - All cooling fans for proper operation
EB Electric boiler units only EG Gas units only Electric units only
MN-35948 • Rev 14 • 07/17 • Combitherm® CT PROformance™ Series Operator’s Manual • 61
Page 62

Cleaning and Preventative Maintenance
Unit Information
Business Name: _______________________________________
Model Number: _______________________________________
12-Month Inspection Checklist
Inspect and Tighten - Door hinges and lower hinge pin bolt
Inspect and Tighten - Door handle
If there is a smoker, inspect the smoke element for visual signs of deformation, cracks or breaks (replace as needed)
Review - Error code history
Note the so ware version (update if not current)
Record - Water pressure (static & dynamic)
Record - Line voltage across all lines
Record - Line voltage to ground on each line
Record - Amperage across all three legs (when heating)
Serial Number: ______________________________
12-Month Inspection Start Date: ______________________________
Function test all components (list components)
For ovens shipped to New Zealand or Australia, inspect the backflow preventer check valve per AS/NZ3500.1 and AS/NZ3500.2
Component Failure and Replacement
Summarize any component failure(s) that may have occurred during this month.
Customer Signature: ___________________________________________________
Technician Signature: ___________________________________________________
62 • MN-35948 • Rev 14 • 07/17 • Combitherm® CT PROformance™ Series Operator’s Manual
Page 63

Protecting Stainless Steel Surfaces
Cleaning Agents
NOTICE
WARNING
To prevent serious personal injury, death,
or property damage:
The appliance must be cleaned thoroughly
to avoid deposits of grease and or food
residue inside the appliance that may
catch fire. If fat deposits and/or food waste
inside the appliance ignite, shut down
the appliance immediately and keep the
appliance door closed to extinguish the
fire. If further extinguishing is required,
disconnect the appliance from the main
power and use a fire extinguisher (do not
use water to extinguish a grease fire!).
Failure to clean the appliance properly
invalidates the warranty and relieves
Alto-Shaam of all liability.
Protecting Stainless Steel Surfaces
Cleaning and Preventative Maintenance
It is important to guard against corrosion
in the care of stainless steel
surfaces. Harsh, corrosive,
or inappropriate chemicals
can completely destroy the
protective surface layer of
stainless steel. Abrasive pads,
steel wool, or metal implements
will abrade surfaces causing damage to this protective
coating and will eventually result in areas of corrosion.
Even water, particularly hard water that contains high
to moderate concentrations of chloride, will cause
oxidation and pitting that result in rust and corrosion.
In addition, many acidic foods spilled and le to
remain on metal surfaces are contributing factors that
will corrode surfaces.
Proper cleaning agents, materials, and methods are
vital to maintaining the appearance and life of this
appliance. Spilled foods should be removed and the
area wiped as soon as possible but at the very least,
a minimum of once per day. Always thoroughly
rinse surfaces a er using a cleaning agent and wipe
standing water as quickly as possible a er rinsing.
Use non-abrasive cleaning products designed for
use on stainless steel surfaces. Cleaning agents must
be chloride-free compounds and must not contain
quaternary salts. Never use hydrochloric acid (muriatic
acid) on stainless steel surfaces. Failure to observe
this precaution will void the warranty. Always use
the proper cleaning agent at the manufacturer's
recommended strength. Contact your local cleaning
supplier for productrecommendations.
Cleaning Materials
Cleaning can usually be accomplished with the
proper cleaning agent and a so , clean cloth. When
more aggressive methods are needed, use a nonabrasive scouring pad on dif cult areas and make
certain to scrub with the visible grain of surface metal
to avoid surface scratches. Never use wire brushes,
metal scouring pads, or scrapers to remove food
residue. Failure to observe this precaution will void
the warranty.
a
r
p
c
s
e
o
N
To protect stainless steel surfaces,
r
s
completely avoid the use of abrasive
cleaning compounds, chloride based
cleaners, or cleaners containing
b
e
r
r
u
i
w
o
N
quaternary salts. Never use hydrochloric
s
h
e
acid (muriatic acid) on stainless steel.
s
Never use wire brushes, metal scouring
e
l
e
p
t
a
s
o
N
pads or scrapers.
d
s
MN-35948 • Rev 14 • 07/17 • Combitherm® CT PROformance™ Series Operator’s Manual • 63
Page 64

Cleaning and Preventative Maintenance
Cleaning the Probe
and at the end of each production shi . Wipe the entire
WARNING
Probe and Probe Prong Cleaning
1. Remove all food debris from the probe between loads
To prevent serious personal injury, death, or
property damage:
Do not steam clean, hose down or flood the
interior or exterior with water or liquid solution
of any kind. Do not use water jet toclean. Failure
to observe this precaution will void the warranty.
Daily Cleaning of the Oven
Cleaning the Oven
Cleaning is to be performed at the end of the production
day or between production shi s.
1. Allow the oven to cool.
2. Remove the optional grill grate from the oven interior
and wash separately in hot, soapy water to preserve the
special non-stick coating.
3. Release the hinged inner glass on the CoolTouch3™
triple pane window door. Clean both sides of each pane
of glass with a window cleaner or vinegar.
4. Wipe the control panel and door handle thoroughly.
5. Use the optional Drip Tray
Clean-out Brush [5021126] to
remove grease and food debris
from the drip tray drain line.
Insert brush rst, and push into
the drip tray drain opening until
6" (152mm) or less remains of the
wire handle. Remove the brush
and repeat as necessary.
6. Clean the door gasket. Wipe the gasket and crevices
with a clean cloth soaked in non-abrasive cleaning
agent. Wipe again with a cloth and clean rinse water.
Certain conditions will accelerate the wear of the door
seal and routine cleaning will prolong the life of the
doorgasket:
• continuous operation at high cooking temperatures
• use of low humidity levels
• production with predominantly high-fat foods
Do not attempt to remove the gasket or place in the
dishwasher.
7. To help maintain the protective lm coating on
polished stainless steel, clean the exterior of the
appliance with a cleaner recommended for stainless
steel surfaces. Spray the cleaning agent on a clean lintfree cloth and wipe with the grain of the stainless steel.
probe, probe cable assembly, probe prongs, and probe
holding bracket with a clean cloth and warm detergent
solution.
2. Remove detergent by wiping the probe, cable, probe
prongs, and bracket with a cloth and clean rinse water.
3. Wipe the probe and probe bracket with a disposable
alcohol pad or sanitizing solution recommended for
food contactsurfaces.
4. Allow the probe, probe prongs, and cable to air dry in
the probe holding bracket.
5. Wipe the probe with a disposable alcohol pad prior to
inserting into a new food product.
Roll-In Cart/Food Trolley Cleaning
Cleaning the Roll-In Cart/Food Trolley
1. Move the food trolley to a cart wash area. Clean
the food trolley with a mild, non-abrasive cleaning
detergent and warm water.
2. Hand wipe all framing, slides, drip pan, and base.
Thoroughly clean debris from the casters. A spray hose
can be used to clean the food trolley.
3. Remove detergent solution with warm water.
4. Wipe or spray with a sanitizing solution designed for
use on metal and vinyl food contact surfaces.
5. Allow the food trolley to air dry.
As an alternative, food trolleys can be cleaned while
inside the oven. Allow the trolley to remain in the oven
through the heavy-duty cleaning cycle, followed by steps
2 through5.
Monthly Cleaning
• spray head
• water intake lters
• drain pipe
• decalcify (descale) oven
64 • MN-35948 • Rev 14 • 07/17 • Combitherm® CT PROformance™ Series Operator’s Manual
Page 65

CT PROtouch™ with CombiClean®
CT PROtouch™ with CombiClean®
Five (5) cleaning levels are offered: rinse (20 minutes), light (30
minutes), normal (1 hour 20 minutes), heavy-duty (2 hours 6
minutes), and heavy-duty PLUS (3 hours 30 minutes) cleaning.
CombiClean® 18 gram CombiTabs™ (CE-36354) or Combitherm®
liquid spray cleaner (CE-24750) may be used. Side racks and
shelves may remain inside oven during cleaning. Remove the
optional Grill Grate from the oven interior and wash separately
in hot, soapy water to preserve the special non-stick coating.
Remove the smoker tray and any solid wastes from the drain
screen and oven interior to prevent blockage.
notICE: If a power outage were to occur during any of the
cleaning cycles, the oven will begin a six (6) minute
forced-rinse cycle.
Be sure the water is turned on.
Cleaning and Preventative Maintenance
Number
of tablets
to use
Touch the Cleaning icon found on the home screen.
If oven is too hot to proceed, the Oven Too Hot warning
screen will appear. Open the oven door to allow the oven to
cool below 150°F (66°C). When the oven is nished cooling,
begin the cleaning procedure again.
Rinse Light Normal Heavy-duty Heavy-duty PLUS
Select Rinse, Light, Normal, Heavy-duty, or Heavy-duty
PLUS cleaning level.
• Wear rubber gloves to remove oven interior drain
cover screen.
• Tear open or cut open the plastic wrap surrounding the
cleaning tablets.
• Remove tablets from the packaging. Discard packaging.
Insert the appropriate number of CombiClean®
CombiTabs™ directly into the oven cavity drain or spray
CombiClean liquid cleaner inside the oven.
• The number of tablets to be used can be increased
depending upon how dirty the interior is.
• Close oven door.
Touch the green check mark key to begin the
cleaning cycle.
Oven shuts down when the cleaning cycle is
complete. Leave door slightly ajar when nished.
Cleaning
Return to
previous
screen
notICE: If the oven is equipped with the
time
needed
Begin
cleaning
cycle
optional grease collection system,
3 cleaning levels are available.
Wear rubber
gloves
Drain
opening
notICE: All tablets should be placed inside the drain as best
as possible and drain screen re-installed before
starting the cleaning cycle. Tablets placed on top
of the drain cover or placed on the bottom of the
oven will not dissolve properly and will cause the
oven interior to deteriorate.
MN-35948 • Rev 14 • 07/17 • Combitherm® CT PROformance™ Series Operator’s Manual • 65
Page 66

Cleaning and Preventative Maintenance
CT PROtouch™ with Automatic Liquid Cleaning
There are ve (5) cleaning levels for liquid cleaning.
Use liquid cleaning solution (CE-36457) or Combitherm® liquid
spray cleaner (CE-24750).
Side racks and shelves can remain inside the oven.
notICE:
notICE:
Steps
1.
2.
3.
4.
5.
6.
7.
CT PROtouch™ with Automatic Liquid Cleaning
• Rinse (20 minutes)
• Light (30 minutes)
• Normal (1 hour 20 minutes)
• Heavy-duty (2 hours 6minutes)
• Heavy-duty PLUS (3 hours 30 minutes)
If a power outage happens during a cleaning cycle, the
oven will begin a six (6) minute forced-rinse cycle the
next time it starts.
Make sure the water is turned on and that enough
liquid cleaner is available for the cleaning cycle.
Remove the optional grill grate from the oven interior and
wash separately in hot, soapy water to preserve the special
non-stick coating.
Remove the smoker tray
Remove all solid waste from the drain screen and oven
interior.
Touch the cleaning icon on the home screen. The
cleaning screen a displays.
1
If the cavity temperature is above 150°F (66°C), the Oven Too
Hot warning displays. Open the door and allow the oven to
cool before selecting a cleaning level.
Make sure the liquid cleaner container is lled.
Rinse Light Normal Heavy-duty Heavy-duty PLUS
Select a cleaning level.
Touch the green check mark icon .
The oven shuts down when the cleaning cycle is complete.
Leave the door open when the cleaning cycle is complete to
speed drying.
Remaining
cleaning time
66 • MN-35948 • Rev 14 • 07/17 • Combitherm® CT PROformance™ Series Operator’s Manual
Page 67

Error Codes
Error Codes
Troubleshooting
ALWAYS check the circuit breaker is turned “ON” and your unit is receiving power BEFORE calling your Authorized
Alto-Shaam Service Agent.
This section is provided for the assistance of qualified and trained service technicians only and is not intended for use
by untrained or unauthorized service personnel. Do not attempt to repair or service the oven beyond this point. Contact
Alto-Shaam for the nearest authorized service agent. Repairs made by any other service agents without prior authorization by
Alto-Shaam will void the warranty.
When the oven malfunctions, an error code will appear in the display.
Press the Start icon to acknowledge the error.
When the oven error noti cation has been acknowledged, the Combitherm will attempt to return to normal operation.
Error
Code
E01 Low Water Boiler Upper water level probe B1 is
E02 Control Temperature High Low voltage relay board
E03 Fan Motor Error Fan motor does not spin a er
E04 Lower Fan Motor Error Lower Fan motor does not spin
E05 VFD Comm Failure When VFD does not respond to a
NOTICE
Error Call Out in Display Description of Error Possible Cause(s)
— Water supply is shut off .
not satisfied within 5 minutes,
a er water solenoid valve Y1 is
activated.
temperature higher than
176°F (80°C).
60 seconds, detected by the Hall
Sensor.
Error 03 does not appear if error
E53 is detected first.
a er 60 seconds, detected by the
Hall Sensor.
Error 04 does not appear if error
E54 is detected first.
query on the CAN interface.
— Low water pressure.
— Boiler drain cap is missing.
— Boiler drain pump is defective.
— Drain pump elbow leaking.
— Water level probe has calcium build up.
— Double water solenoid valve is defective (Y1).
— Relay board, high voltage is defective.
— Check wiring to all components listed below.
— Cooling fan on relay board assembly is defective.
— Cooling fan on display board assembly is defective.
— Main cooling fan is defective.
— Cooling fan on motor drive is defective.
— Check wiring to all components listed below.
— If LED on motor control flashes, see error codes for motor
control.
— Motor or fan wheel locked.
— Hall sensor does not detect motor rotation.
— Motor Thermo Temperature protection.
— Fan wheel damaged.
— Check wiring to all components mentioned below.
— If LED on motor control flashes, see error codes for motor
control.
— Motor or fan wheel locked.
— Hall sensor does not detect motor rotation.
— Motor Thermo Temperature protection.
— Fan wheel damaged.
— Loss of power to VFD.
— VFD malfunction.
— CAN cable disconnected.
— CAN address not correct on VFD.
con tin ued on nex t pag e
MN-35948 • Rev 14 • 07/17 • Combitherm® CT PROformance™ Series Operator’s Manual • 67
Page 68

Troubleshooting
Error Codes
Error
Code
E06 Lower VFD Comm Failure When VFD does not respond to a
E07 Error Received from VFD When VFD is flashing the green
E08 Error Received from Lower VFD When VFD is flashing the green
E11 Convection Temperature High In Combination program, cavity
E13 Boiler Temperature High Boiler temperature is more than
E15 Condensor Temperature High Condensor water temperature is
E20 B11 Core Temperature Probe
E21 N6 Cavity Probe Fault Cavity temperature probe
E22 B10 Core Temperature Probe
E23 B4 Boiler Probe Fault Boiler temperature probe
E24 B5 Bypass Probe Fault Bypass steam temperature probe
E25 B3 Condensor Probe Fault Condensor water temperature
E26 B10 - Point 1 - Core Temperature
E27 B10 - Point 2 - Core Temperature
Error Call Out in Display Description of Error Possible Cause(s)
— Loss of power to VFD.
— VFD malfunction.
— CAN cable disconnected.
— CAN address not correct on VFD.
— Refer to VFD error code list and match to number of blinks
on the green LED of VFD.
— Refer to VFD error code list and match to number of blinks
on the green LED of VFD.
— Check wiring to all components mentioned below.
— Steam element contactor locked/on.
— N6 oven cavity temperature probe is defective.
— N6 oven cavity temperature probe wires connected
backwards
— Relay board, high voltage, defective.
— Calcium build up in boiler
— Check wiring to all components mentioned below.
— Steam element contactor locked/on.
— B4 boiler temperature probe is defective.
— B4 probe wires connected backwards
— Water level probe has calcium build up.
— Water supply is shut off .
— Check wiring to all components mentioned below.
— B3 condensor temperature probe is defective.
— B3 condensor probe wires connected backwards
— Single water solenoid valve defective (Y2).
— Relay board, high voltage, defective.
— Clean probe receptacle pins with sand paper.
— B11 Single Point Core Temperature probe with quick
connect defective.
— B11 Single Point Core Temperature probe wires with quick
connect disconnected.
— B11 Single Point Core Temperature probe receptacle
defective.
— B11 Single Point Core Temperature probe receptacle wires
disconnected.
— N6 oven cavity temperature probe defective.
— N6 oven cavity temperature probe wires.
— B10 multipoint core temperature probe defective.
— B10 multipoint core temperature probe wires disconnected.
— B4 boiler temperature probe defective.
— B4 probe wires connected backwards.
— B5 bypass steam temperature probe defective.
— B5 bypass steam temperature probe wires connected
backwards.
— B3 condensor temperature probe defective.
— B3 condensor probe wires connected backwards.
— B10 Multipoint Core Temperature probe defective.
— B10 Multipoint Core Temperature probe wires disconnected.
— B10 Multipoint Core Temperature probe defective.
— B10 Multipoint Core Temperature probe wires disconnected.
Single Point Fault
Multi-point Fault
Probe Multipoint Fault
Probe Multipoint Fault
query on the CAN interface.
light
light
temperature N6 is measuring
in excess of 572ºF (300ºC) for a
minimum of 25 seconds
In Convection program, cavity
temperature N6 is measuring
in excess of 572ºF (300ºC) for a
minimum of 25 seconds
248ºF (120ºC) for more than 25
seconds, detected by B4 Probe
more than 212ºF (100ºC) for more
than 180 seconds, detected by B3
probe
Single point core temperature
probe defective or disconnected
defective or disconnected
Multipoint core temperature
probe defective or disconnected
defective or disconnected
defective or disconnected
probe defective or disconnected.
Multipoint xore temperature
probe defective or disconnected.
Multipoint core temperature
probe defective or disconnected.
con tin ued on next page
68 • MN-35948 • Rev 14 • 07/17 • Combitherm® CT PROformance™ Series Operator’s Manual
Page 69

Error Codes
Troubleshooting
Error
Code
E28 B10 - Point 3 - Core Temperature
E29 B10 - Point 4 - Core Temperature
E34 Steam Generator Drain Pump
E36 Steam Temperature High In Steam program, cavity temperature
E40 B3 Fault B3 probe shorted to ground — Defective or miswired probe.
E41 B4 Fault B4 probe shorted to ground — Defective or miswired probe.
E42 B5 Fault B5 probe shorted to ground — Defective or miswired probe.
E43 N6 Fault N6 probe shorted to ground — Defective or miswired probe.
E44 N8 Fault N8 probe shorted to ground — Defective or miswired probe.
E45 B10 Fault B10 probe shorted to ground — Defective or miswired probe.
E46 B10 - Point 1 Fault B10 probe shorted to ground — Defective or miswired probe.
E47 B10 - Point 2 Fault B10 probe shorted to ground — Defective or miswired probe.
E48 B10 - Point 3 Fault B10 probe shorted to ground — Defective or miswired probe.
E49 B10 - Point 4 Fault B10 probe shorted to ground — Defective or miswired probe.
E51 No Water In Boiler Lower water level probe B2 is not
E53 Fan Motor High Temperatures Fan motor does not spin, result in over-
E54 Lower Fan Motor High
Error Call Out in Display Description of Error Possible Cause(s)
Probe Multipoint Fault
Probe Multipoint Fault
Fault
Temperature
Multipoint core temperature probe
defective or disconnected.
Multipoint core temperature probe
defective or disconnected.
If water level does not drop below lower
water level probe a er three minutes
when steam generator drain pump is
activated in cleaning program.
N6 is measuring in excess of 395ºF
(200ºC) for more than 60 seconds.
In Combination program, cavity
temperature N6 is measuring in excess of
520ºF (270ºC), for more than 60 seconds.
In Retherm program, cavity temperature
N6 is measuring in excess of 395ºF
(200ºC), for more than 60 seconds.
In Cleaning program, cavity temperature
N6 is measuring in excess of 395ºF
(200ºC), for more than 60 seconds.
satisfied within 5 minutes, a er water
solenoid valve Y1 is activated
heating, detected by motor coil safety
thermo element. Temperature more
than 320°F (160°C).
Lower fan motor does not spin, result
in over-heating, detected by motor coil
safety thermo element. Temperature
more than 320°F (160°C).
— B10 Multipoint Core Temperature probe defective.
— B10 Multipoint Core Temperature probe wires
disconnected.
— B10 Multipoint Core Temperature probe defective.
— B10 Multipoint Core Temperature probe wires
disconnected.
— Calcium build up in steam generator drain pump.
— Boiler drain pump defective.
— Relay board, high voltage, defective.
— Water level probe defective.
— Water supply is shut off .
— Low water pressure.
— Water injection pipe, calcium build up.
— Water flow valve defect or calcium build up.
— Double water solenoid valve defective (Y1).
— Relay board, high voltage, defective.
— Water supply is shut off .
— Low water pressure.
— Boiler drain cap missing.
— Boiler drain pump defective.
— Drain pump elbow leaking.
— Water level probe has calcium build up.
— Double water solenoid valve defective (Y1).
— Relay board, high voltage, defective.
— Motor high limit open or wired incorrectly.
— If LED on motor control flashes, see error codes for
motor control.
— Motor or fan wheel locked.
— Fan wheel damaged.
— Motor high limit open or wired incorrectly.
— If LED on motor control flashes, see error codes for
motor control.
— Motor or fan wheel locked.
— Fan wheel damaged.
con tin ued on next page
MN-35948 • Rev 14 • 07/17 • Combitherm® CT PROformance™ Series Operator’s Manual • 69
Page 70

Troubleshooting
Error Codes
Error
Code
E55 Vent Not Open (Lower vent on
E56 Vent 2 Not Open (Upper vent
E57 No Rinse Water Flow switch for solenoid valve Y4
E88 Lower Gas Ignition Failure
E89 Upper Gas Ignition Failure
E90 Lower Gas Combustion Blower
E91 Upper Gas Blower Not at
E92 Communication Error
E93 Interface Board (IB) and
E94 Communication Error,
Error Call Out in Display Description of Error Possible Cause(s)
dual vent system)
on dual vent system)
NOTE: If a er 2 attempts
to clear this error, the error
appears a third time, remove
the oven from service and
immediately contact an
Alto-Shaam authorized service
provider.
NOTE: If a er 2 attempts
to clear this error, the error
appears a third time, remove
the oven from service and
immediately contact an
Alto-Shaam authorized service
provider.
Not at Speed
Speed
CB does not properly respond
Control Board (CB) are in
diff erent states
TO Interface Board
70 • MN-35948 • Rev 14 • 07/17 • Combitherm® CT PROformance™ Series Operator’s Manual
60 seconds a er the venting
motor is activated the vent
motor safety switch did not
open.
60 seconds a er the venting
motor is activated the vent
motor safety switch did not
open.
does not detect any water flow
for a minimum of 60 seconds.
Reset output from Ignition
Module is ON
Reset output from Ignition
Module is ON
Speed is too slow. — Power supply cable is not connected to blower motor.
Speed is to slow. — Power supply cable is not connected to blower motor
Twelve (12) instances of noresponse from the relay board
(CB) to the display board (IB).
The IB is in a diff erent running
state than the CB for more than
20 seconds.
No signal transfer for more
than 20 seconds between the
Interface Board (IB) and the
Control Board (CB).
— Alignment issue between motor cam and vent motor safety
switch (micro switch).
— Faulty vent valve (motor).
— Faulty vent valve safety switch (micro switch).
— Alignment issue between motor cam and vent motor safety
switch (micro switch).
— Faulty vent valve (motor).
— Faulty vent valve safety switch (micro switch).
— Water supply is shut off .
— Low water pressure.
— Flow switch is dirty or defective.
— Double water solenoid valve defective (Y3).
— Relay board, high voltage, defective.
— Hot surface ignitor not functioning.
— No gas supply.
— Flame sensor not functioning.
— Faulty ignition control.
— Hot surface ignitor not functioning.
— No gas supply.
— Flame sensor not functioning.
— Faulty ignition control.
— Speed control cable is not connected to blower motor.
— Blower motor is blocked, rotation is impeded, or motor is
faulty.
— Faulty control board.
— Speed control cable is not connected to blower motor
— Blower motor is blocked, rotation is impeded, or motor is
faulty
— Faulty control board
— Check CAN cable connections.
— CAN cable defective.
— Relay board, low voltage, connector defective.
— Display board connector defective.
— Check CAN cable connections.
— CAN cable defective.
— Relay board, low voltage, connector defective.
— Display board connector defective.
— Check CAN cable connections.
— CAN cable defective.
— Relay board, low voltage, connector defective.
— Display board connector defective.
con tin ued on nex t pag e
Page 71

Troubleshooting
Error Codes
Error
Code
E100 One or more maintenance
E101 Ventless Hood Fault - No
E102 Ventless Hood Fault — Filters
E103 Option Board Doesn’t Send
E104 Option Board Not
E105 No or Low Water Pressure Water pressure switch not
E106 Boiler Drain Pump Fault Hall eff ect or rotational sensor is
E108 Cooling Fan Failure If the temperature on the control
E109 High Limit Switch
Error Call Out in Display Description of Error Possible Cause(s)
reminder has timed out.
Pressure
Not Present
Switch Setting
Communicating
NOTE: Any oven experiencing
this error should be
investigated by an authorized
Alto-Shaam service provider.
When any maintenance
reminder has expired without
action having been taken by the
operator.
If the power switch or pressure
switch is not closed.
If the air filter switches are not
closed.
OB not communicating its switch
settings to the CB.
Option board is not
communicating with CB.
activated.
not sending a signal to the relay
board
board (relay board) is greater
than 140ºF (60ºC) and less than
176ºF (80ºC). (See error code
E02)
The High Limit Switch input to
the CB (N7) is “open”
— Enter maintenance reminder screen and address the item
that has timed out and reset
— Check power switch is on.
— Check vent motor is turning in the proper direction.
— Pressure switch is miss wired or defective.
— Filter(s) require cleaning or replacement
— Check filters are installed and properly seated.
— Check filter switches are not damaged, defective or
dislodged.
— Check CAN cable connection between OB and CB.
— Ensure CB dip switch is set to see an OB.
— Incompatible OB and CB so ware (update so ware).
— OB defective.
— CB defective.
— Check option board CAN connection at CB and OB.
— Defective OB.
— Defective CB.
— Water supply not connected.
— Water supply is shut off .
— Water supply to unit blocked or obstructed
— Faulty or miswired pressure switch
— Drain pump motor not running or defective.
— Hall eff ect sensor broken or incorrectly wired.
— Motor improperly wired.
— Cooling fan damaged.
— Cooling fan blocked or blades have been kept from rotating.
— Incoming air temperature exceeds 100°F (38°C).
— Air inlet has become blocked.
— Unit has experienced an over heat condition.
— Convection element contactors stuck closed.
— Failed Y1 solenoid.
— Obstruction between Y1 solenoid and injection pipe.
— Improperly connected drain.
— Condensate pan clean out not closed.
— Improperly wired high limit switch at the switch or at the
CB.
— Defective high limit switch.
con tin ued on nex t pag e
MN-35948 • Rev 14 • 07/17 • Combitherm® CT PROformance™ Series Operator’s Manual • 71
Page 72

Troubleshooting
Error Codes
Error
Code
E200 The SD card has been detected
E210 VFD Under Voltage VFD has detected an under-
E211 VFD Over Voltage VFD has detected an over-voltage
E212 VFD Overheating VFD has detected an overheat
E213 Motor Over Current Motor over current detected. — Blocked fan wheel.
E214 VFD Current Peak VFD current peak detected. — Possible VFD failure.
E215 VFD EEPROM Error VFD EEPROM error detected. — Possible VFD failure.
E216 VFD Over Current VFD over current detected. — Possible VFD failure.
E217 VFD Short Circuit VFD Short Circuit detected. — Possible VFD failure.
E218 VFD Voltage Error VFD voltage does not correspond
E220 Lower VFD Under Voltage Lower VFD has detected an
E221 Lower VFD Over Voltage Lower VFD has detected an over-
E222 Lower VFD Overheating Lower VFD has detected an
E223 Lower Motor Over Current Lower Motor over current
E224 Lower VFD Current Peak Lower VFD current peak
E225 Lower VFD EEPROM Error Lower VFD EEPROM Error
E226 Lower VFD Over Current Lower VFD over current detected. — Possible Lower VFD failure.
E227 Lower VFD Short Circuit Lower VFD short circuit detected. — Possible Lower VFD failure.
E228 Lower VFD Voltage Error Lower VFD voltage does not
E289 Unknown Error from VFD VFD has provided an unknown
E290 Unknown Error from Lower
Error Call Out in Display Description of Error Possible Cause(s)
to be larger than 2GB in size.
VFD
The SD card inserted is larger
than 2GB in size.
voltage situation.
situation.
situation.
to jumper settings.
under-voltage situation.
voltage situation.
overheat situation.
detected.
detected.
detected.
correspond to jumper settings.
error.
Lower VFD has provided an
unknown error.
— SD card is larger than 2GB in size. Contact service to order
replacement SD card.
— Possible VFD failure.
— Possible VFD failure.
— Unit has experienced an over heat condition.
— Defective high limit switch.
— Defective cooling fans.
— Possible VFD failure.
— Possible VFD failure.
— VFD voltage jumper is not correct.
— Possible VFD failure.
— Possible Lower VFD failure.
— Possible Lower VFD failure.
— Unit has experienced an over heat condition.
— Defective high limit switch.
— Defective cooling fans.
— Possible Lower VFD failure.
— Possible Lower VFD failure.
— Possible Lower VFD failure.
— Possible Lower VFD failure.
— Lower VFD voltage jumper is not correct.
— Possible Lower VFD failure.
— Possible VFD failure.
— Possible Lower VFD failure.
72 • MN-35948 • Rev 14 • 07/17 • Combitherm® CT PROformance™ Series Operator’s Manual
Page 73

Troubleshooting
Touch Motor Control Error Codes
The LED is located on the variable frequency drive (VFD)
1
of the oven.
Type of Error Indication Release of Error
Undervoltage LED flashing sequence, with 1 flash per period. Voltage of intermediate circuit is less than 250V
Overvoltage LED flashing sequence, with 2 flashes per period. Voltage of intermediate circuit exceeds 445V
Excess
Temperature
Current Peak LED flashing sequence, with 4 flashes per period.
Overcurrent LED flashing sequence, with 5 flashes per period. Intermediate circuit current exceeds 4.0 A
Short-circuit LED flashing sequence, with 6 flashes per period.
Power on LED flashing sequence, with 7 flashes per period.
Watchdog LED flashing sequence, with 8 flashes per period. Watchdog of the microcontroller released, program crash
LED flashing sequence, with 3 flashes per period.
Temperature sensor in the power unit is more than 199°F
(93°C)
Blocked motor, detected by current peak monitoring from
900 rpm rotating field
Release of interrupt at intermediate circuit current larger
than 53 A
Eff ective mains voltage does not correspond to jumper setting 115V/230V
1
MN-35948 • Rev 14 • 07/17 • Combitherm® CT PROformance™ Series Operator’s Manual • 73
Page 74

Notes
74 • MN-35948 • Rev 14 • 07/17 • Combitherm® CT PROformance™ Series Operator’s Manual
Page 75

Limited Warranty
Alto-Shaam, Inc. warrants to the original purchaser that any original part that is found to be defective in material or
workmanship will, at Alto-Shaam’s option, subject to provisions hereina er stated, be replaced with a new or rebuilt
part.
The labor warranty remains in effect one (1) year from installation or een (15) months from the shipping date,
whichever occurs rst. Alto-Shaam will bear normal labor charges performed by an authorized Alto-Shaam service
agent during standard business hours, excluding overtime, holiday rates or any additional fees.
The parts warranty remains in effect for one (1) year from installation or een (15) months from the shipping date,
whichever occurs rst. An optional extended warranty is available but must be purchased with the original equipment
order. Please consult the factory for net pricing options and details.
This warranty does not apply to:
1. Replacement of wear parts, including light bulbs, door gaskets, and/or the replacement of glass due to damage of
anykind.
2. Equipment damage caused by accident, shipping and handling, improper installation or alteration of any kind.
3. Equipment chassis or component/system damage as a result of inadequate routine maintenance and cleaning.
Required maintenance and cleaning of steam generating equipment is the responsibility of the owner/operator.
4. Equipment used under conditions of abuse, neglect, misuse, carelessness or abnormal conditions including, but
not limited to, equipment subjected to non-approved or inappropriate chemicals including, but not limited to,
compounds containing chlorine, chlorides or quaternary salts, or equipment with missing or altered serial numbers.
Damage caused by use of any cleaning agent other than Alto-Shaam’s Combitherm® Oven Cleaner including, but not
limited to, damage due to chlorine, bleach, quaternary salts, souring powders or other harmful chemicals. Use of
Alto-Shaam’s Combitherm® Cleaner on Combitherm appliances is highly recommended.
5. It is the sole responsibility of the owner/operator/purchaser of this equipment to verify that the incoming water
supply is comprehensively tested and if required, a means of “water treatment” provided that would meet
compliance requirements with the published water quality standards published at right. Non-compliance with these
minimum standards will potentially damage this equipment and/or components and VOID theoriginal equipment
manufacturer’s warranty. Alto-Shaam recommends using OptiPure® products to properly treat yourwater.
6. Any losses or damage resulting from
ALTO-SHAAM WATER QUALITY MINIMUM STANDARDS
malfunction, including loss of product or
consequential or incidental damages of
anykind.
7. Equipment damage resulting from
modi cation in any manner from original
model, substitution of parts other than
factory authorized parts, removal of any parts
including legs, or addition of any parts.
Total Dissolved Solids (tds) 50-125 ppm
CONTAMINANT INLET WATER REQUIREMENTS
Free Chlorine Less than 0.1 ppm (mg\L)
Hardness 30-70 ppm
Chloride Less than 30 ppm (mg\L)
pH 7.0 to 8.5
Silica Less than 12 ppm (mg\L)
This warranty is exclusive and is in lieu of all other warranties, expressed or implied, including the implied
warranties of merchantability and fi tness for a particular purpose. In no event shall Alto-Shaam be liable for loss of
use, loss of revenue or profi t, or loss of product, or for any indirect, incidental or consequential damages.
No person except an of cer of Alto-Shaam, Inc. is authorized to modify this warranty or to incur on behalf of
Alto-Shaam any other obligation or liability in connection with Alto-Shaam equipment.
Warranty effective January 1, 2014
MN-35948 • Rev 14 • 07/17 • Combitherm® CT PROformance™ Series Operator’s Manual • 75
Page 76

Operation Limited Warranty
 Loading...