

Alto-Shaam CTP10-10E, CTP6-10E, CTP20-10E, CTP20-20E, CTP10-10G Operator's Manual
...
OPERATOR’S MANUAL
WARNING
WARNING
CT PROFORMANCE™
CTP6-10E
CTP10-10E
CTP7-20E
CTP10-20E
CTP20-10E
CTP20-20E
CTP6-10G
CTP10-10G
CTP7-20G
CTP10-20G
CTP20-10G
CTP20-20G
To prevent personal injury, death or
property damage:
Do not store or use gasoline or other
fl ammable vapors or liquids in the vicinity
of this or any other appliance.
Improper installation, alteration, adjustment, service,
cleaning, or maintenance could result in property
damage, severe injury, or death.
Read and understand the installation, operating and
maintenance instructions thoroughly before installing,
servicing, or operating this equipment.
EN
MN-35948
Rev 16 10/18
CTP Combitherm
DANGER
This manual covers the following CTP series models:
Boiler-Free Models Steam Generator Models
6-10E, 6-10G
10-10E, 10-10G
7-20E, 7-20G
10-20E, 10-20G
20-10E, 20-10G
20-20E, 20-20G
Please post the following instructions in a prominent location in
the event the user smells gas.
6-10EB
10-10EB
7-20EB
10-20EB
20-10EB
20-20EB
Before starting the appliance, make certain
you do not detect the odor ofgas.
If you smell gas:
• Shut o the gas supply immediately.
• Do not attempt to light any appliance.
• Do not touch any electrical elements.
• Extinguish any open flame.
• Evacuate the area.
• Use a telephone outside the property and
immediately contact your gas supplier.
• If unable to contact your as supplier,
contact the fire department.
2 • MN-35948 • Rev 16 • 10/18 • Combitherm® CT PROformance™ Series Operator’s Manual

Enjoy your Alto-Shaam Combi Oven!
The combi oven combines a steam and convection oven into
one versatile unit and can serve a variety of cooking functions.
Alto-Shaam’s combi ovens allow chefs to control humidity and
temperature separately, with powerful results. The same oven can be
used to dehydrate vegetables, roast pork, steam rice, smoke brisket
and bake loaves of bread.
The PROtouch™ recipe management system with one-touch
cooking provides complete control over the oven, allowing chefs
and foodservice employees to select pre-programmed recipes for
Before Use
If this is the first time this oven is being used, or if the oven has just
been removed from storage, follow these steps for cleaning:
1. Remove all packing material from the oven,
2. Remove and wash any detachable items such as wire shelves, side
racks, pans, and drip trays with hot, soapy water. Dry with a clean,
damp lint-free cloth.
3. Remove all visible grease or oil from the oven.
4. Clean the interior and exterior of the oven with a mild soap and
water solution. Apply the solution with a clean, damp cloth. Do
not use commercial or household cleaners that contain ammonia.
Wipe with a clean, damp cloth to remove all detergent residue. Dry
with a clean, lint-free cloth.
CTP Combitherm
maximum consistency. To store and secure important information,
a HACCP data system pairs up with an onboard USB port, so settings
can be downloaded and saved for the future.
When it’s time to clean up, Alto-Shaam’s CombiClean Plus™
automated cleaning system saves labor previously spent scrubbing
the oven cavity. On the oven’s exterior, a PROrinse™ retractable hose
gives you spray-washing power without opening the oven door.
5. Clean the oven glass with glass cleaner or distilled vinegar.
Re-install the side racks and wire shelves – position shelves with
the curved end up and toward the rear of the oven.
When cleaning is complete, the oven must acclimate to room
temperature in the environment where it is placed.
Twenty four (24) hours is recommended.
The oven is now ready for operation.
EXTEND YOUR ORIGINAL MANUFACTURER’S WARRANTY
Register online today at www.alto-shaam.com/warranty
Register your Alto-Shaam appliance online, and you will automatically be entered
into a monthly drawing to win an additional year extended warranty!
Registering your equipment ensures prompt service in the event of a warranty
claim. You will also receive direct notifications of soware updates and additional
product information.
Your personal information will not be shared with any other company.
ALTO-SHAAM 24/7 EMERGENCY REPAIR SERVICE
Call 800-558-8744 to reach our twenty-four hour emergency service call center
for immediate access to local authorized service agencies outside standard business hours. The
emergency service access is provided exclusively for Alto-Shaam equipment and is available
throughout the United States through Alto-Shaam’s toll free number.
Emergency service access is available seven days a week, including holidays.
MN-35948 • Rev 16 • 10/18 • Combitherm® CT PROformance™ Series Operator’s Manual • 3

4 • MN-35948 • Rev 16 • 10/18 • Combitherm® CT PROformance™ Series Operator’s Manual

CTP Combitherm
Introduction ................................ 3
Table of Contents .................................5
Safety Procedures ................................6
Labels ...........................................9
Operation ......................................16
How To Turn On the Oven ...................................16
How To Start a Manual Calibration ...........................16
How To Calibrate theTouch Screen ..........................16
How To Turn O the Oven ...................................16
Control Panel Identification .................................17
Home Screen ............................................17
Utility Screen ............................................17
Upload/Download Screen ................................17
Setting Screen 1 .........................................18
Setting Screen 2 .........................................18
Preventative Maintenance Screen .........................19
Preventative Maintenance - Editing .......................19
Soware Updates ..........................................20
Cooking Screen Identification ............................21
Auxiliary Functions and Features ............................22
Power Settings ..........................................22
Multiple Fan Speeds .....................................22
Multi-Shelf Timer ........................................22
Preheat Features ........................................23
Cool Down Feature ......................................23
Humidity Control Feature ................................24
Rapid Cool ..............................................24
Rest .....................................................24
Door ....................................................24
Factory Default Settings .....................................25
Cooking Modes - Steam .....................................26
Steam Mode Operating Tips .................................27
Cooking Modes - Combination ..............................28
Combination Mode Operating Tips ..........................29
Cooking Modes - Convection ................................30
Convection Mode Operating Tips ............................31
Cooking Modes - Retherm ...................................32
Retherm Mode Operating Tips ...............................33
Cooking Modes - Dehydration ...............................34
Dehydration Mode Operating Tips ...........................35
Cooking Modes - Delta-T Core Temperature ..................36
CombiSmoke® Procedures ..................................37
Recipe Programming .......................................39
Using Programmed Recipes ..............................40
To Cook with Preprogrammed Recipes ....................40
Editing Programmed Recipes .............................41
Organizing Programmed Recipes .........................42
HACCP Access . . . . . . . . . . . . . . . . . . . . . . . . . . . . . . . . . . . . . . . . . . . . . 44
HACCP Access and Download ...............................45
Options ........................................46
CombiHood PLUS™ Ventless Hood ..........................46
How To Use the Combilatch™ Door Interlock .................47
Special Conditions for Units Installed in the City of New York ..48
Connecting the Optional Grease Collection System ...........49
Connecting the Optional Liquid Cleaner. . . . . . . . . . . . . . . . . . . . . .50
Recipe Guidelines ...............................51
Bakery Items ...............................................51
Convenience Product Items .................................53
Fish & Seafood Items .......................................54
Meat Recipes ...............................................55
Miscellaneous Recipes ......................................57
Poultry Recipes .............................................58
Vegetable Recipes ..........................................60
Cleaning and Preventative Maintenance ............62
CombiClean® Cleaning Agents ...............................62
Preventive Maintenance ....................................63
Weekly Maintenance ........................................64
Daily Inspection ............................................65
Weekly Inspection ..........................................66
Monthly Inspection .........................................67
Yearly Inspection ...........................................68
Protecting Stainless Steel Sufaces ...........................71
Cleaning Agents ............................................71
Cleaning Materials ..........................................71
Daily Cleaning of the Over ...................................72
Probe and Probe Prong Cleaning ............................72
Roll-In Cart/Food Trolley Cleaning ...........................72
CT PROtouch™ with CombiClean® ...........................73
CT PROtouch™ with Automatic Liquid Cleaning ...............74
Troubleshooting .................................75
Error Codes ................................................75
Touch Motor Control Error Codes ............................81
Limited Warranty ................................83
MN-35948 • Rev 16 • 10/18 • Combitherm® CT PROformance™ Series Operator’s Manual • 5
CTP Combitherm
• The appliance is intended to cook, hold or process foods
Knowledge of proper procedures is essential to the
for the purpose of human consumption. No other use for
this appliance is authorized and is therefore considered
dangerous. The appliance must not be used to cook
food containing ammable materials (such as food with
alcohol). Substances with a low ash point can ignite
spontaneously and cause a re.
• The appliance is intended for use in commercial
establishments where all operators are familiar with
the purpose, limitations, and associated hazards of this
appliance. Operating instructions and warnings must
be read and understood by all operators and users.
Alto-Shaam recommends regular sta training to avoid
the risk of accident or damage to the appliance. Operators
must also receive regular safety instructions.
• Any troubleshooting guides, component views, and
partslists included in this manual are for general
reference only and are intended for use by quali ed and
trained technicians.
• This manual should be considered a permanent part of
this appliance. This manual and all supplied instructions,
diagrams, schematics, parts lists, notices, and labels must
remain with the appliance if the item is sold or moved to
another location.
safe operation of electrically and/or gas energized
equipment. The following signal words and symbols
may be used throughout this manual.
DANGER
Indicates a hazardous situation that, if not avoided, will
result in death or serious injury.
WARNING
Indicates a hazardous situation that, if not avoided, could
result in death or serious injury.
CAUTION
Indicates a hazardous situation that, if not avoided, could
result in minor or moderate injury.
NOTICE: Indicates information considered important,
but not hazard-related (e.g., messages relating
to property damage).
NOTICE: For equipment delivered for use in any
location regulated by the following
directive: 2012/95/EC WEEE
Do not dispose of electrical or electronic
equipment with other municipal waste.
6 • MN-35948 • Rev 16 • 10/18 • Combitherm® CT PROformance™ Series Operator’s Manual
CTP Combitherm
• To prevent serious injury, death or property damage,
• If the gas appliance is installed under an exhaust
appliance is in use to avoid the build up of combustion
vents. Thisarea is hot and could be a potential ignition
suddentemperature change can damage the appliance
WARNING
the appliance should be inspected and serviced at
least every twelve (12) months by an authorized
service partner or trained technician.
• Only allow an authorized service partner or trained
technician to service or to repair the appliance.
Installation or repairs that are not performed by an
authorized service partner or trained technician, or
the use of non-factory authorized parts will void the
warranty and relieve Alto-Shaam of all liability.
• When working on this appliance, observe precautions
in the literature, on tags, on labels attached to
or shipped with the appliance and other safety
precautions that may apply.
• If the appliance is installed on casters freedom of
movement of the appliance must be restricted so
that utility connections (including gas, water, and
electricity) cannot be damaged when the appliance
is moved. If the appliance is moved, ensure that all
utility connections are properly disconnected. If the
appliance is returned to its original position, ensure
that retention devices and utility connections are
properly connected.
• Only use the appliance when it is stationary. Mobile
appliance racks, mobile plate racks, transport trolleys,
andappliances on casters can tip over when being
moved over an uneven oor or threshold and cause
serious injury.
• Always apply caster brakes on mobile appliances or
accessories when these are not being moved. These
items could move or roll on uneven oors and cause
property damage or serious injury.
• Be extremely careful when moving appliances
because the food trays may contain hot uids that may
spill, causing serious injury.
• Always open the appliance door very slowly. Escaping
hot vapors or steam can cause serious injury or death.
hood, the hood must be switched On when the
gases. Failure to do so may result in serious injury,
death or property damage.
• Accumulations on the main burners of gas appliances
can result in ring out of normal sequence. This
delayed ignition creates an alarmingly loud sound.
If your appliance makes an especially loud noise
when starting up, shut down the appliance and call a
quali ed and trained service technician.
• NEVER place objects near the appliance exhaust
source for a re.
• Do not allow objects to block or obstruct the area
below the appliance base. This may result in re,
damage to the equipment or serious injury.
• Do not use the attached hand-held hose to
sprayanything other than the interior of the
appliancecompartment.
• Do not use the attached hand-held hose on the
surface of a hot cooking compartment. The
interior. Allow the appliance to cool to a minimum of
150°F(66°C). Failure to observe this precaution can
void the warranty.
This appliance is not intended for use by
persons (including children) with reduced
physical, sensory or mental capabilities,
or lack of experience and knowledge,
unless they have been given supervision
concerning use of the appliance by person
responsible for their safety.
Children should be supervised to ensure
that they do not play with the appliance.
MN-35948 • Rev 16 • 10/18 • Combitherm® CT PROformance™ Series Operator’s Manual • 7

CTP Combitherm
CAUTION
CAUTION
WARNING
WARNING
WARNING
WARNING
To prevent serious personal injury, death, or
property damage:
Do not steam clean, hose down or flood the
interior or exterior with water or liquid solution
of any kind. Do not use water jet toclean. Failure
to observe this precaution will void the warranty.
To prevent SERIOUS PERSONAL INJURY or
PROPERTY DAMAGE:
DO NOT handle pans containing liquid or
semiliquid products positioned above the
eye level of the operator. Such products
may scald and cause serious injury.
DO NOT obstruct or block exhaust flues
or attach any flue extension that may
impede proper burner operation, restrict
the exhaust fumes and cause negative
backdra or the appliance to shut down.
Failure to do so may result in serious injury
or death.
To prevent serious personal injury, death,
or property damage:
The appliance must be cleaned thoroughly
to avoid deposits of grease and or food
residues inside the appliance that may
catch fire. If fat deposits and/or food waste
inside the appliance ignite, shut down
the appliance immediately and keep the
appliance door closed to extinguish the
fire. If further extinguishing is required,
disconnect the appliance from the main
power and use a fire extinguisher (do not
use water to extinguish a grease fire!).
Failure to clean the appliance properly
invalidates the warranty and relieves
Alto-Shaam of all liability.
To prevent personal injury or
propertydamage:
Always use hand protection when
operating this appliance to avoid burns.
Metal parts of this equipment become
extremely hot when in operation.
NOTICE: Automatic steam venting is a standard safety
feature built into all Combitherm oven models.
This feature vents all steam from the oven
compartment immediately before cooking time
expires or set probe temperature is reached.
Automatic steam venting does not function if the
oven door is opened before time expires or when
the oven has been set to continuous operation.
8 • MN-35948 • Rev 16 • 10/18 • Combitherm® CT PROformance™ Series Operator’s Manual
To prevent INJURY or PROPERTY DAMAGE,
make certain the area around the appliance
is kept clear of combustible items.
NOTICE: Use authorized Combitherm oven cleaner only.
Unauthorized cleaning agents may discolor or
harm interior surfaces of the oven. Read and
understand label and material safety data sheet
before using the oven cleaner.
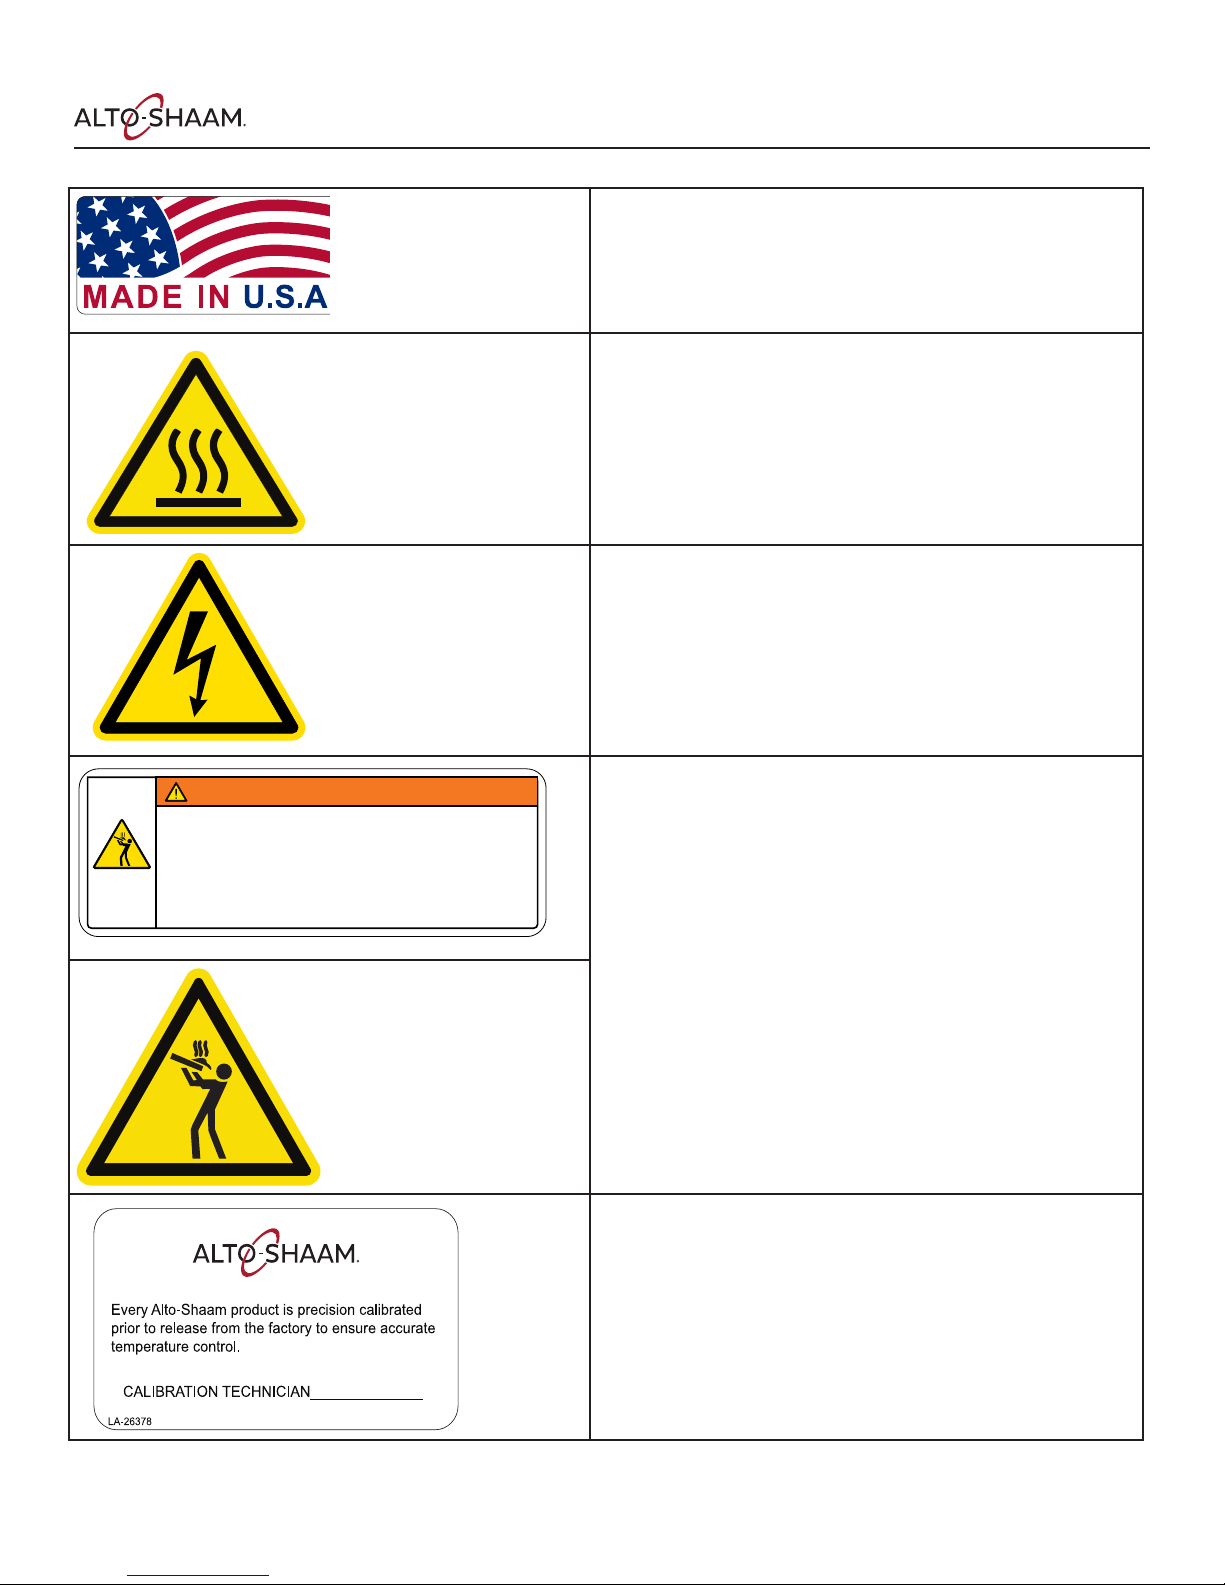
Made in U.S.A.
LA-39123
WARNING / ADVERTENCIA / AVERTISSEMENT
Burn hazard. Always load liquids, or foods that can become liquid
when heated, at an eye level where they can be seen.
Peligro de quemaduras. Siempre coloque líquidos, o alimentos que
se puedan volver líquidos cuando se calientan, a nivel de los ojos
donde se puedan ver.
Risque de brûlure. Toujours charger les liquides, ou les aliments qui
deviennent liquides au chauffage, à hauteur des yeux où ils peuvent
être vus.
LA-39155
WARNING
Hot surface
WARNING
Electric shock hazard
CTP Combitherm
WARNING
Burn hazard
Always load liquids, or foods that can become liquid when heated, at
an eye level where they can be seen.
Every Alto-Shaam product is precision calibrated prior to release from
the factory to ensure accurate temperature control.
MN-35948 • Rev 16 • 10/18 • Combitherm® CT PROformance™ Series Operator’s Manual • 9
CTP Combitherm
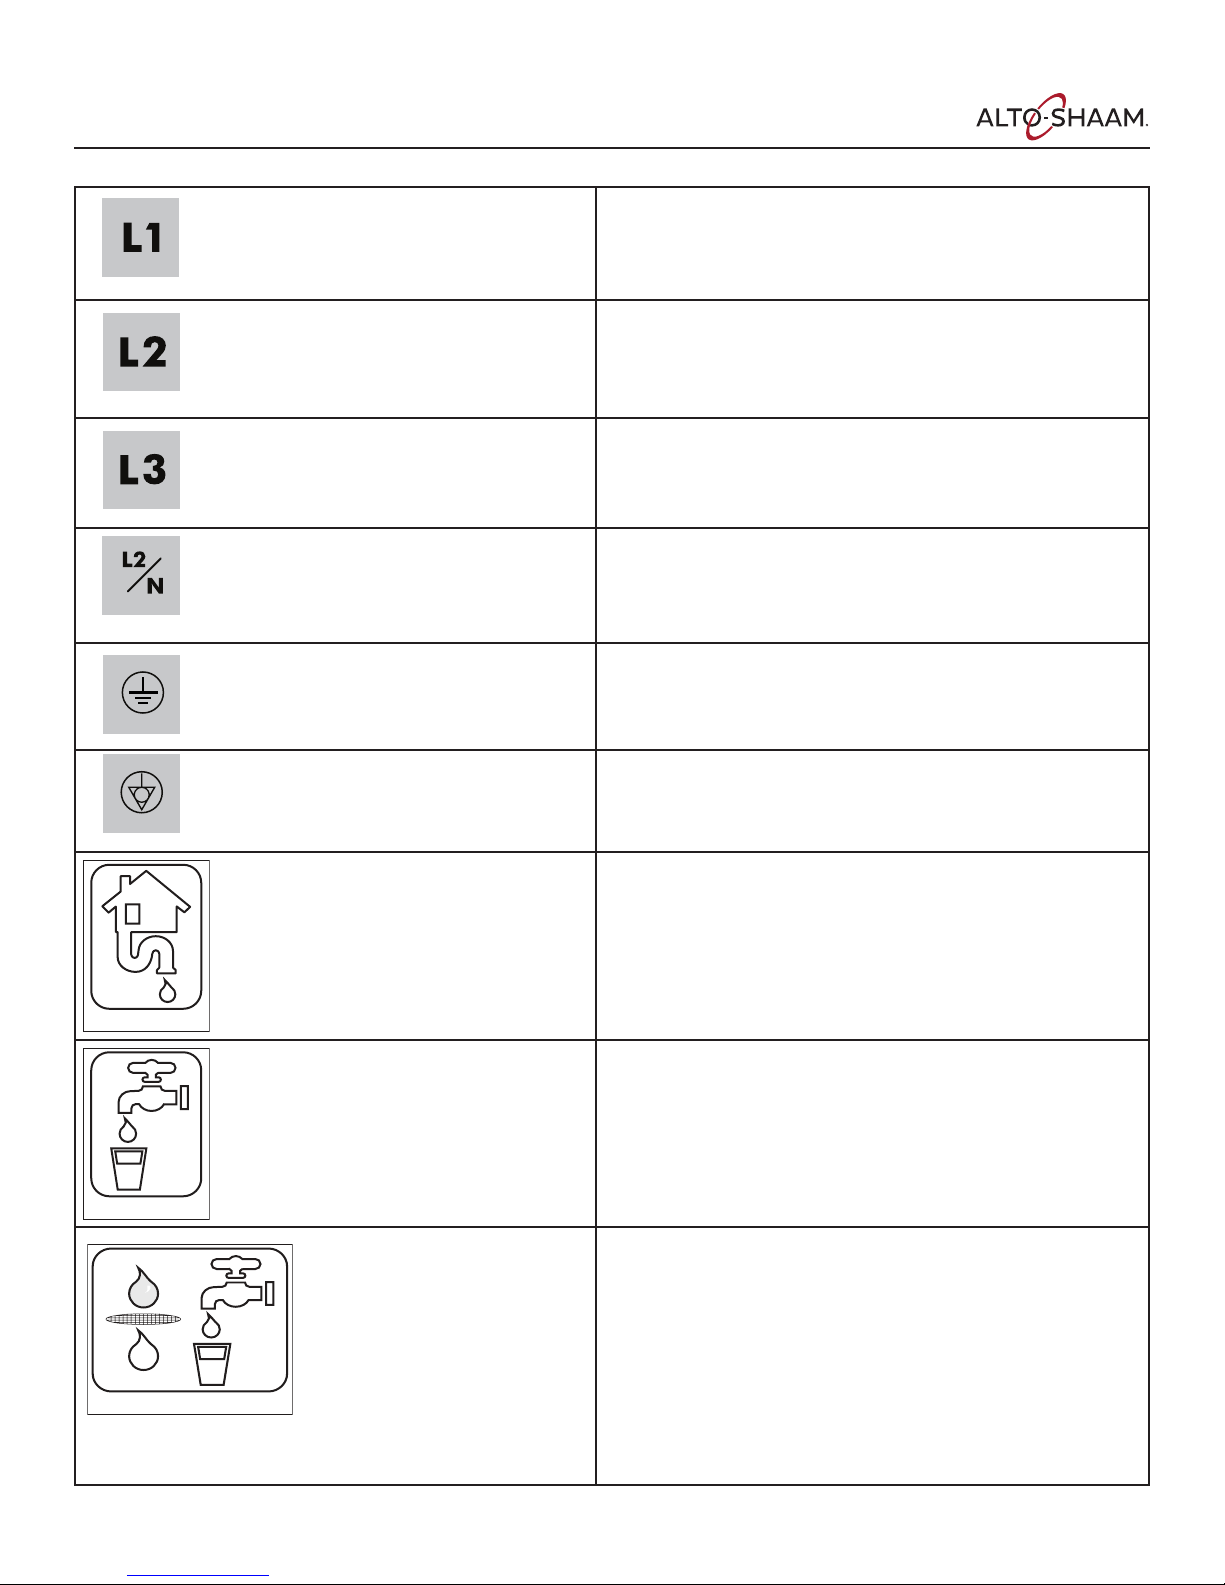
LA-36443-L1
LA-36443-L2
LA-36443-L3
LA-36443-L2/N
LA-36443-G
LA-36443-E
LA-38911
LA-38909
Line 1 supply terminal
Line 2 supply terminal
Line 3 supply terminal
Neutral
Ground terminal
LA-38910
Equipotential terminal
Drain water connection point.
Untreated, drinkable water connection point.
Treated, drinkable water connection point.
10 • MN-35948 • Rev 16 • 10/18 • Combitherm® CT PROformance™ Series Operator’s Manual
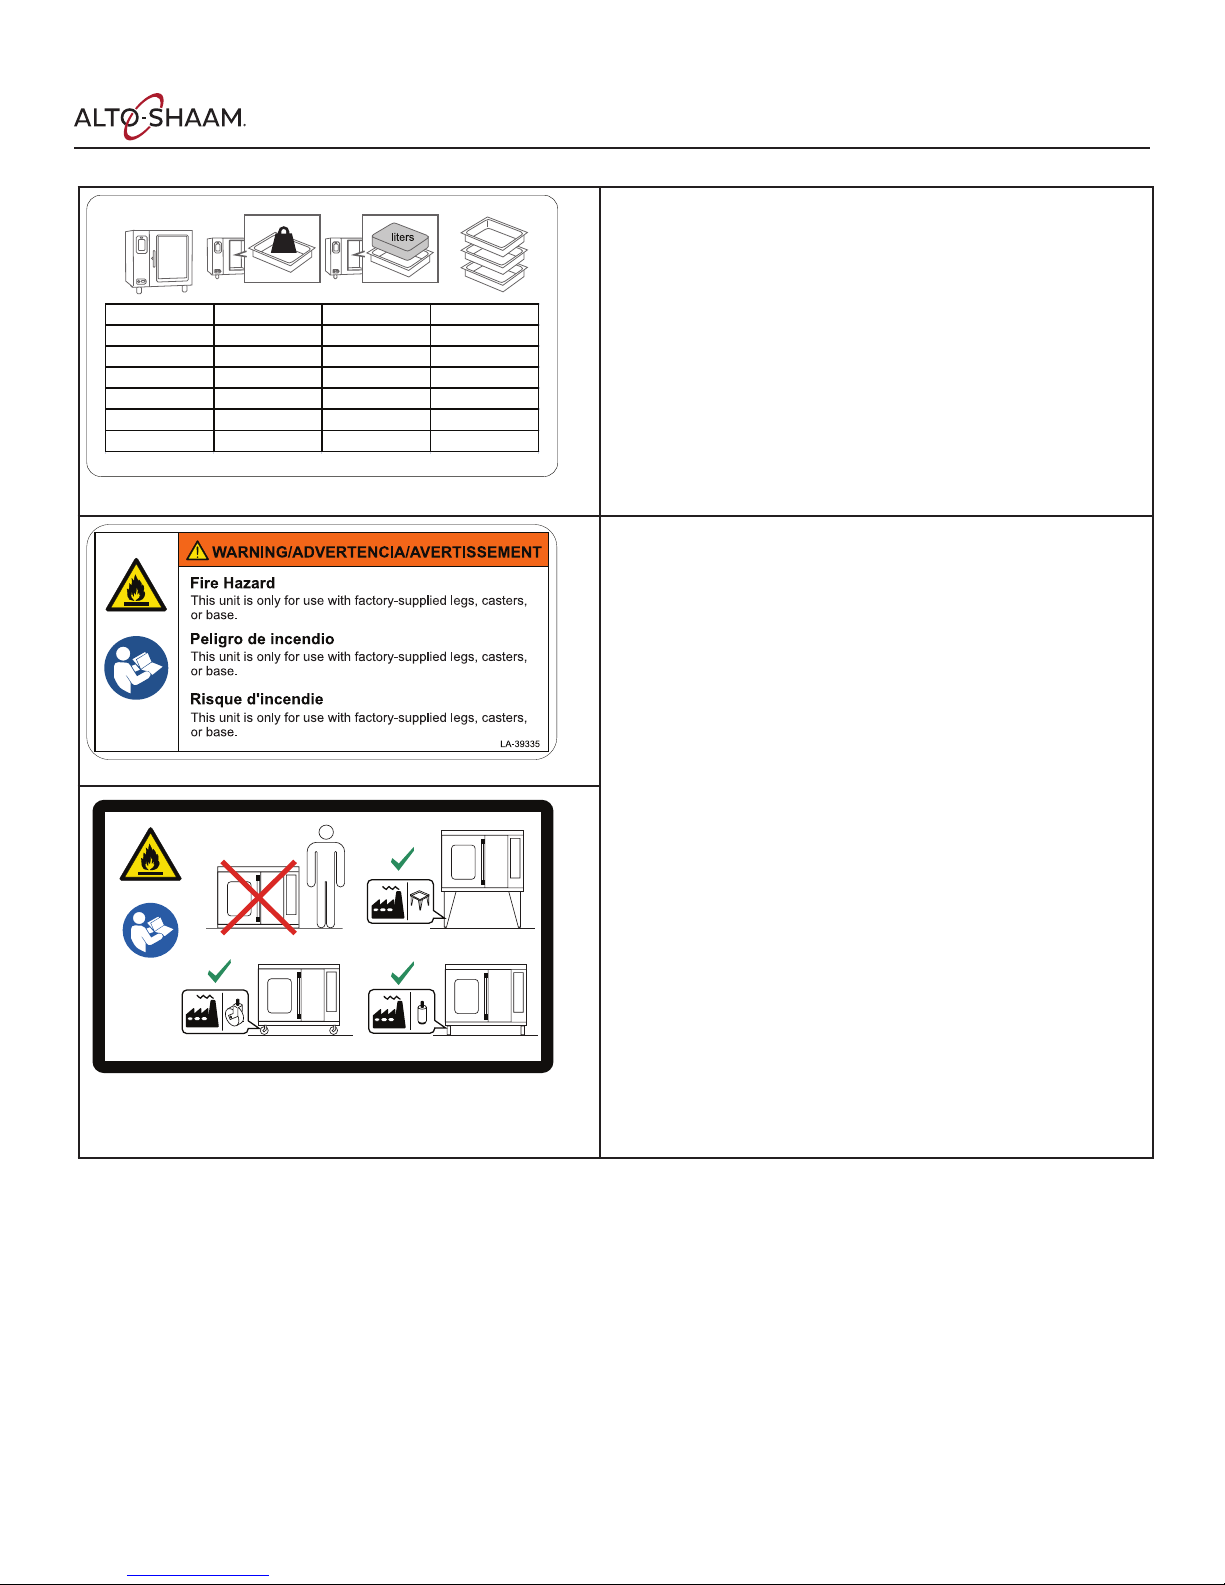
kg max. liter max. GN 1/1
31
kg
LA-39336
∑
∑
∑
6-10 33 57 6
10-10 54 95 10
7-20 76 13
10-20 109190 20
20-10 109190 20
20-20 218380 40
CTP Combitherm
Capacities
4
LA-38940
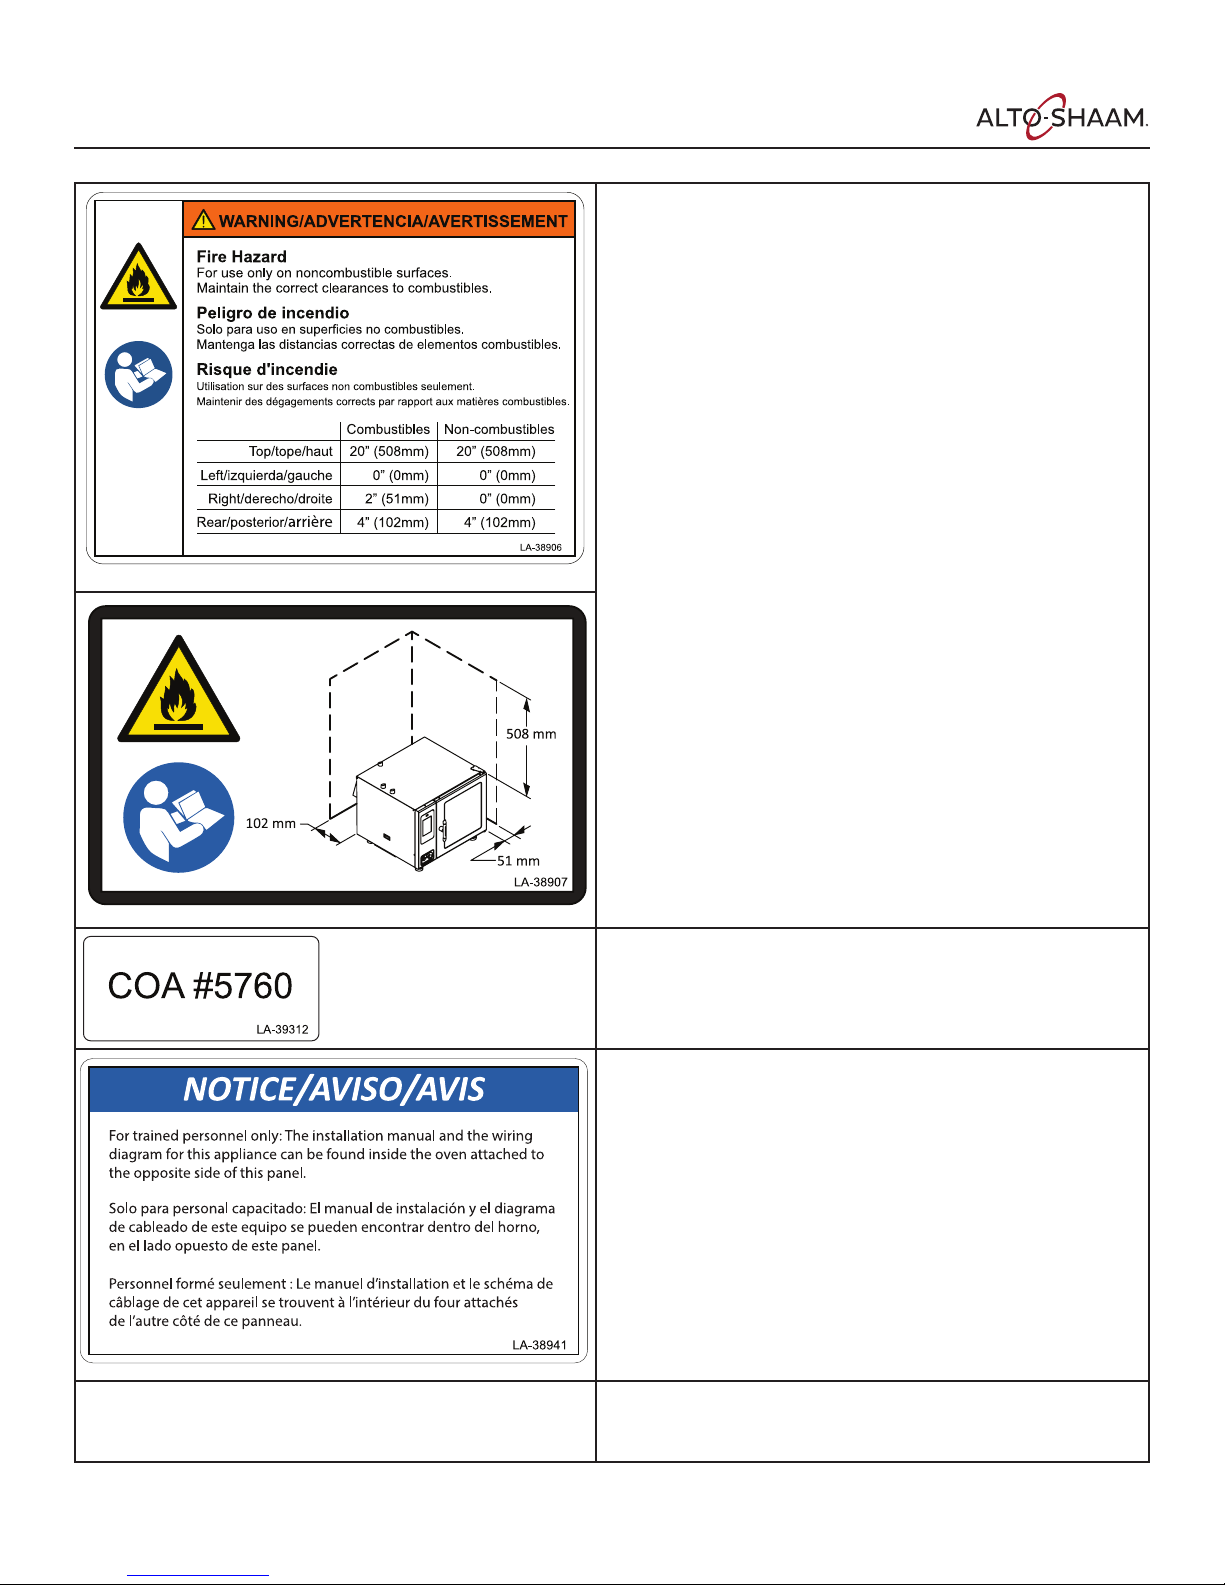
Fire hazard
This unit is only for use with factory-supplied legs, casters, or base.
Read the installation manual.
MN-35948 • Rev 16 • 10/18 • Combitherm® CT PROformance™ Series Operator’s Manual • 11
CTP Combitherm
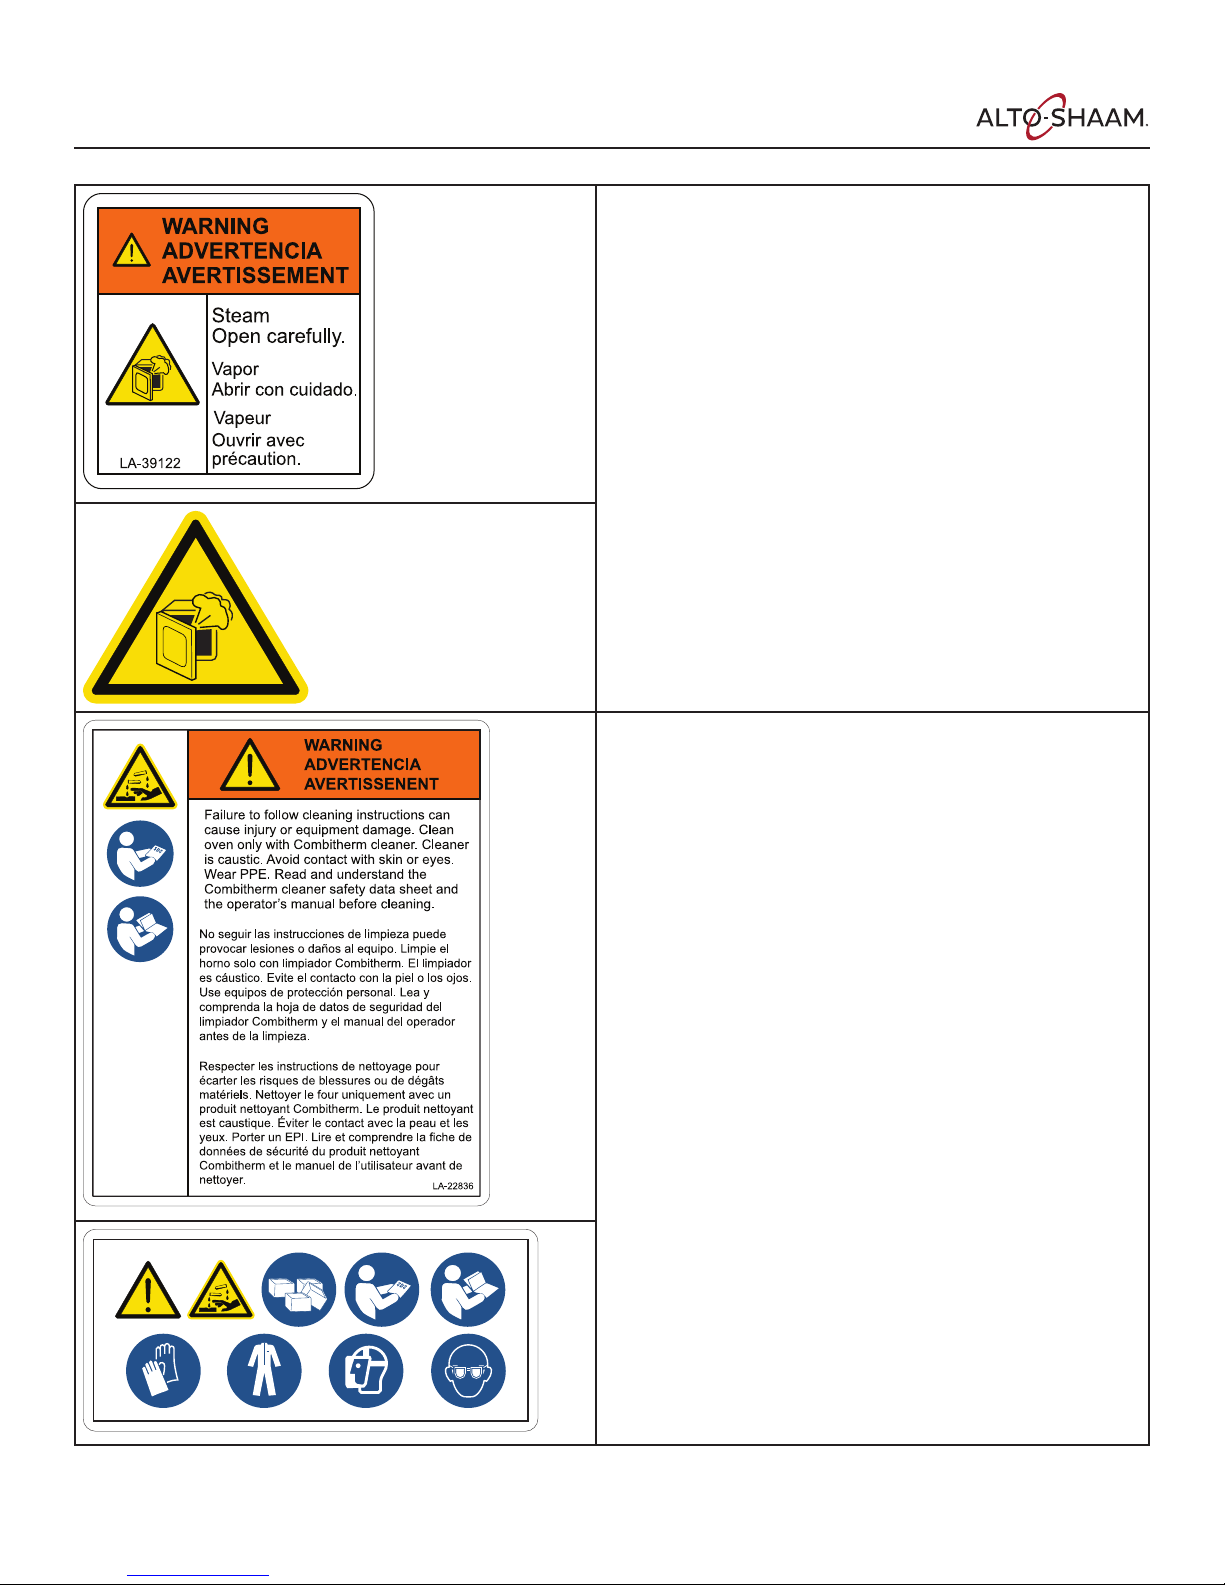
LA-39126
Warning
Steam. Open door carefully.
CombiTabs
Warning
Failure to follow cleaning instructions can cause injury or equipment
damage. Clean oven only with Combitherm cleaner. Cleaner is caustic.
Avoid contact with skin or eyes. Wear PPE. Read and understand the
Combitherm cleaner safety data sheet and the operator’s manual
before cleaning
12 • MN-35948 • Rev 16 • 10/18 • Combitherm® CT PROformance™ Series Operator’s Manual
LA-39149
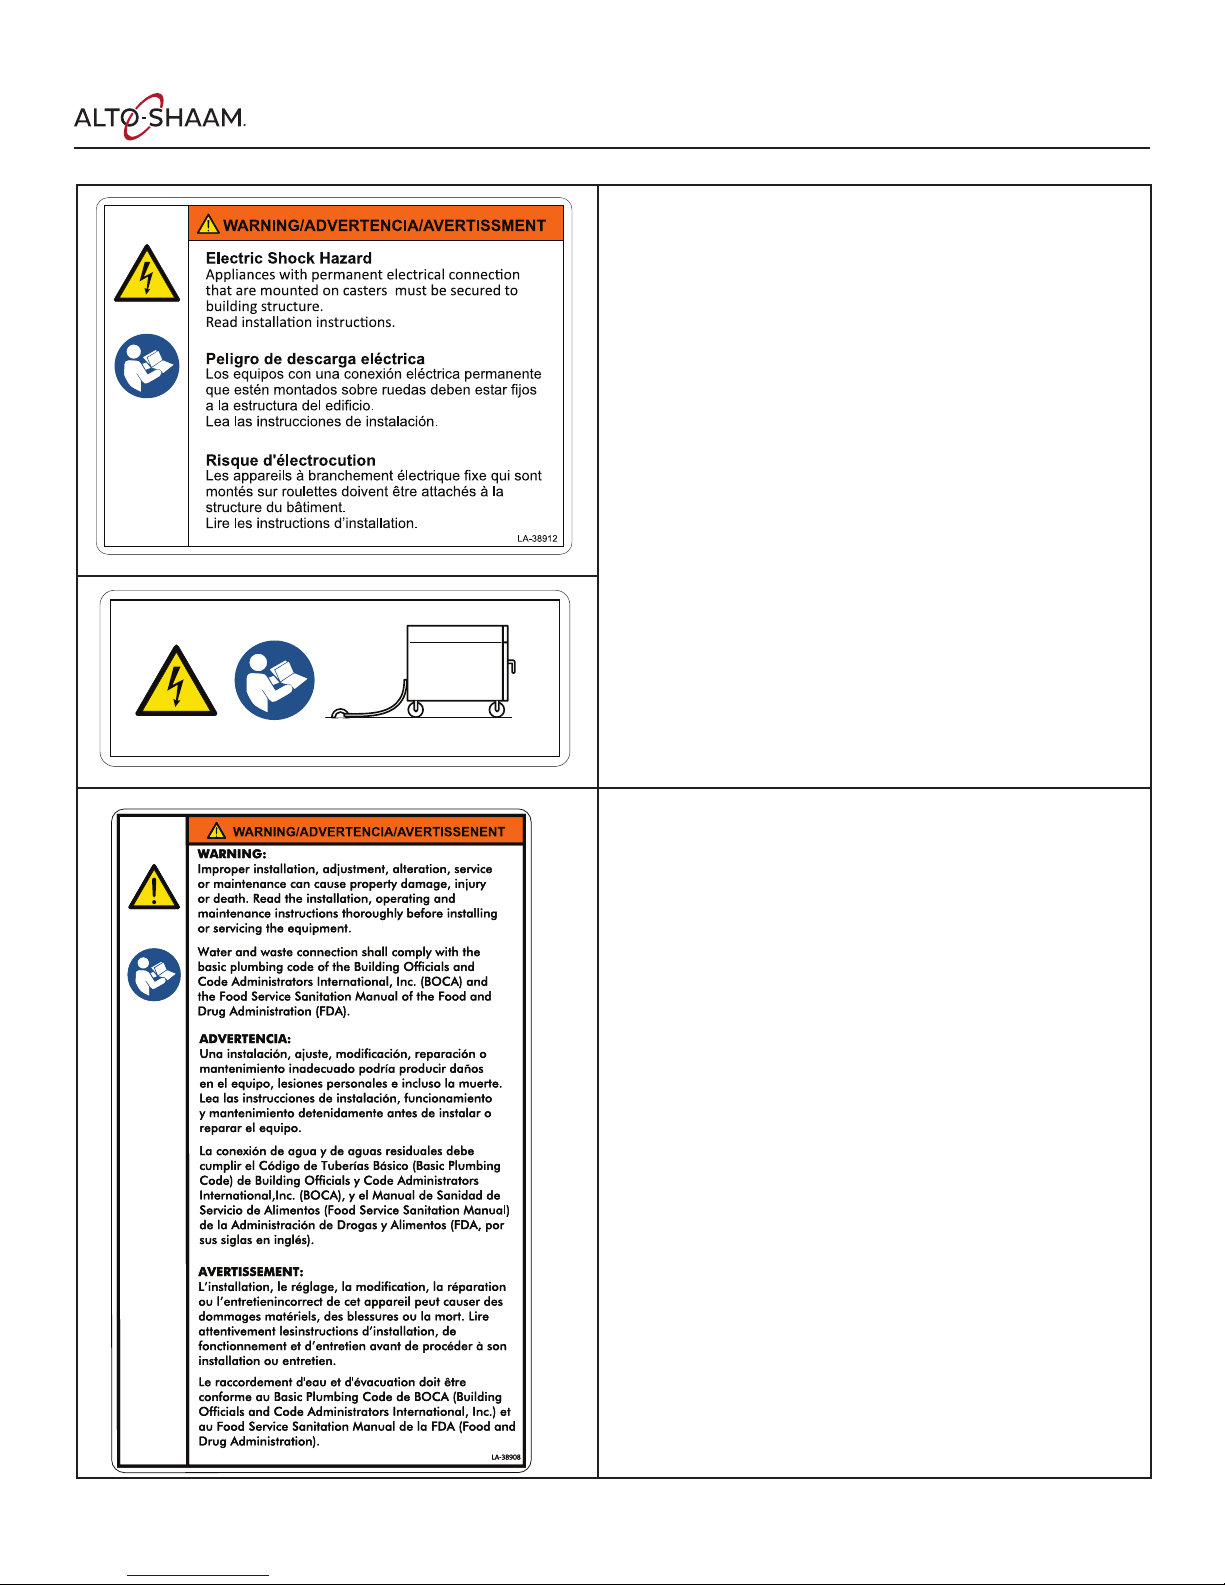
CTP Combitherm
Warning
Electric Shock Hazard
Appliances with permanent electrical connection that are mounted
on casters must be secured to building structure. Read installation
instructions.
LA-39148
Warning
Improper installation, adjustment, alteration, service or maintenance
can cause property damage, injury or death. Read the installation,
operating and maintenance instructions thoroughly before installing or
servicing the equipment.
Water and waste connection shall comply with the basic plumbing code
of the Building Officials and Code Administrators International, Inc.
(COCA) and the Food Service Sanitation Manual of the Food and Drug
Administration (FDA).
MN-35948 • Rev 16 • 10/18 • Combitherm® CT PROformance™ Series Operator’s Manual • 13
CTP Combitherm
Warning
Fire Hazard
For use only on noncombustible surfaces. Maintain the correct
clearances to combustibles.
Read the installation instructions.
City of New York Fire Department condition of acceptance number.
Notice
For trained personnel only: The installation manual and the wiring
diagram for this appliance can be found inside the oven attached to the
opposite side of this panel.
XXX
14 • MN-35948 • Rev 16 • 10/18 • Combitherm® CT PROformance™ Series Operator’s Manual
WARNING/ADVERTENCIA/AVERTISSEMENT
Electric Shock Hazard
To reduce the risk of electric shock, do not remove or
open cover. No user-serviceable parts inside.
Refer servicing to qualified personnel.
Qualified personnel: Disconnect power before servicing.
Peligro de descarga eléctrica
Para reducir el riesgo de descarga eléctrica, no retire ni
abra la cubierta. No hay piezas en el interior a la que se
les pueda realizar mantenimiento. Derive el mantenimiento
a personal calificado.
Personal calificado: Desconecte la energía antes de
realizar mantenimiento.
Danger de décharge électrique
Pour réduire le risque de décharge électrique, ne par
ouvrir ni retirer le capot. Ne contient pas de pièces
réparables par l’utilisateur. Confier les réparations à du
personnel qualifié.
Personnel qualifié : Sectionnez l’alimentation avant
toute intervention.
LA-38950
CTP Combitherm
Warning
Electric shock hazard.
To reduce the risk of electric shock, do not remove or
open cover. No user-serviceable parts inside. Refer servicing to
qualified personnel.
Qualified personnel: Disconnect power before servicing.
Use ______AWG for supply connecons.
Use only copper wires suitable for temperatures ≥ 90°C.
Do not connect to a circuit operang at
more than 150 VAC to ground.
For use on individual branch circuits only.
Use AWG ______ para las conexiones de suministro.
Use solo cables de cobre aptos para temperaturas mayores que 90 °C.
No conecte a un circuito que funcione a más de 150 V CA a erra.
Para su uso en circuitos derivados individuales solamente.
Uliser du calibre ______AWG pour les raccordements électriques.
Uliser exclusivement des conducteurs en cuivre qui conviennent à des
températures ≥ 90 °C.
Ne pas raccorder à un circuit fonconnant sous plus de
150 VCA par rapport à la terre.
Uliser exclusivement sur des circuits de dérivaon propres.
AWG
90°C
LA-38852
NOTICE: Use only factory-supplied casters when needed. When
this appliance includes casters, the following must also be installed:
• a connector complying with ANSI Z21.69 / CSA 6.16;
• a quick-disconnect device complying with ANSI Z21.41 / CSA 6.9;
• a restraining device to guard against transmission of strain to the
connector as specified in the manual.
AVISO: Solo use ruedas proporcionadas de fábrica cuando sea
necesario. Si este equipo incluye ruedas, también se debe instalar
lo siguiente:
• un conector que cumpla con las normas ANSI Z21.69 y CSA 6.16;
• un dispositivo de desconexión rápida que cumpla con las normas
ANSI Z21.41 y CSA 6.9;
• un dispositivo de sujeción para proteger contra la transmisión de
tensión al conector como se especifica en el manual.
Use ______AWG for supply connections.
Do not connect to a circuit operating at more than 150 VAC to ground.
For use on individual branch circuits only.Use only copper wires
suitable for temperatures ≥ 90°C.
NOTICE: Use only factory-supplied casters when needed. When this
appliance includes casters, the following must also be installed:
• a connector complying with ANSI Z21.69 / CSA 6.16;
• a quick-disconnect device complying with ANSI Z21.41 / CSA 6.9;
• a restraining device to guard against transmission of strain to the
connector as specified in the manual.
AVIS : S’il y a lieu, utiliser uniquement les roulettes fournies par
le fabricant. Si cet appareil comporte des roulettes, les articles
suivants doivent également être installés :
• un connecteur conforme à ANSI Z21.69 / CSA 6.16;
• un raccord découpleur rapide conforme à ANSI Z21.41 / CSA 6.9;
• un moyen de retenue pour empêcher la transmission de la
contrainte au connecteur comme indiqué dans le manuel.
MN-35948 • Rev 16 • 10/18 • Combitherm® CT PROformance™ Series Operator’s Manual • 15
LA-25784
CTP Combitherm
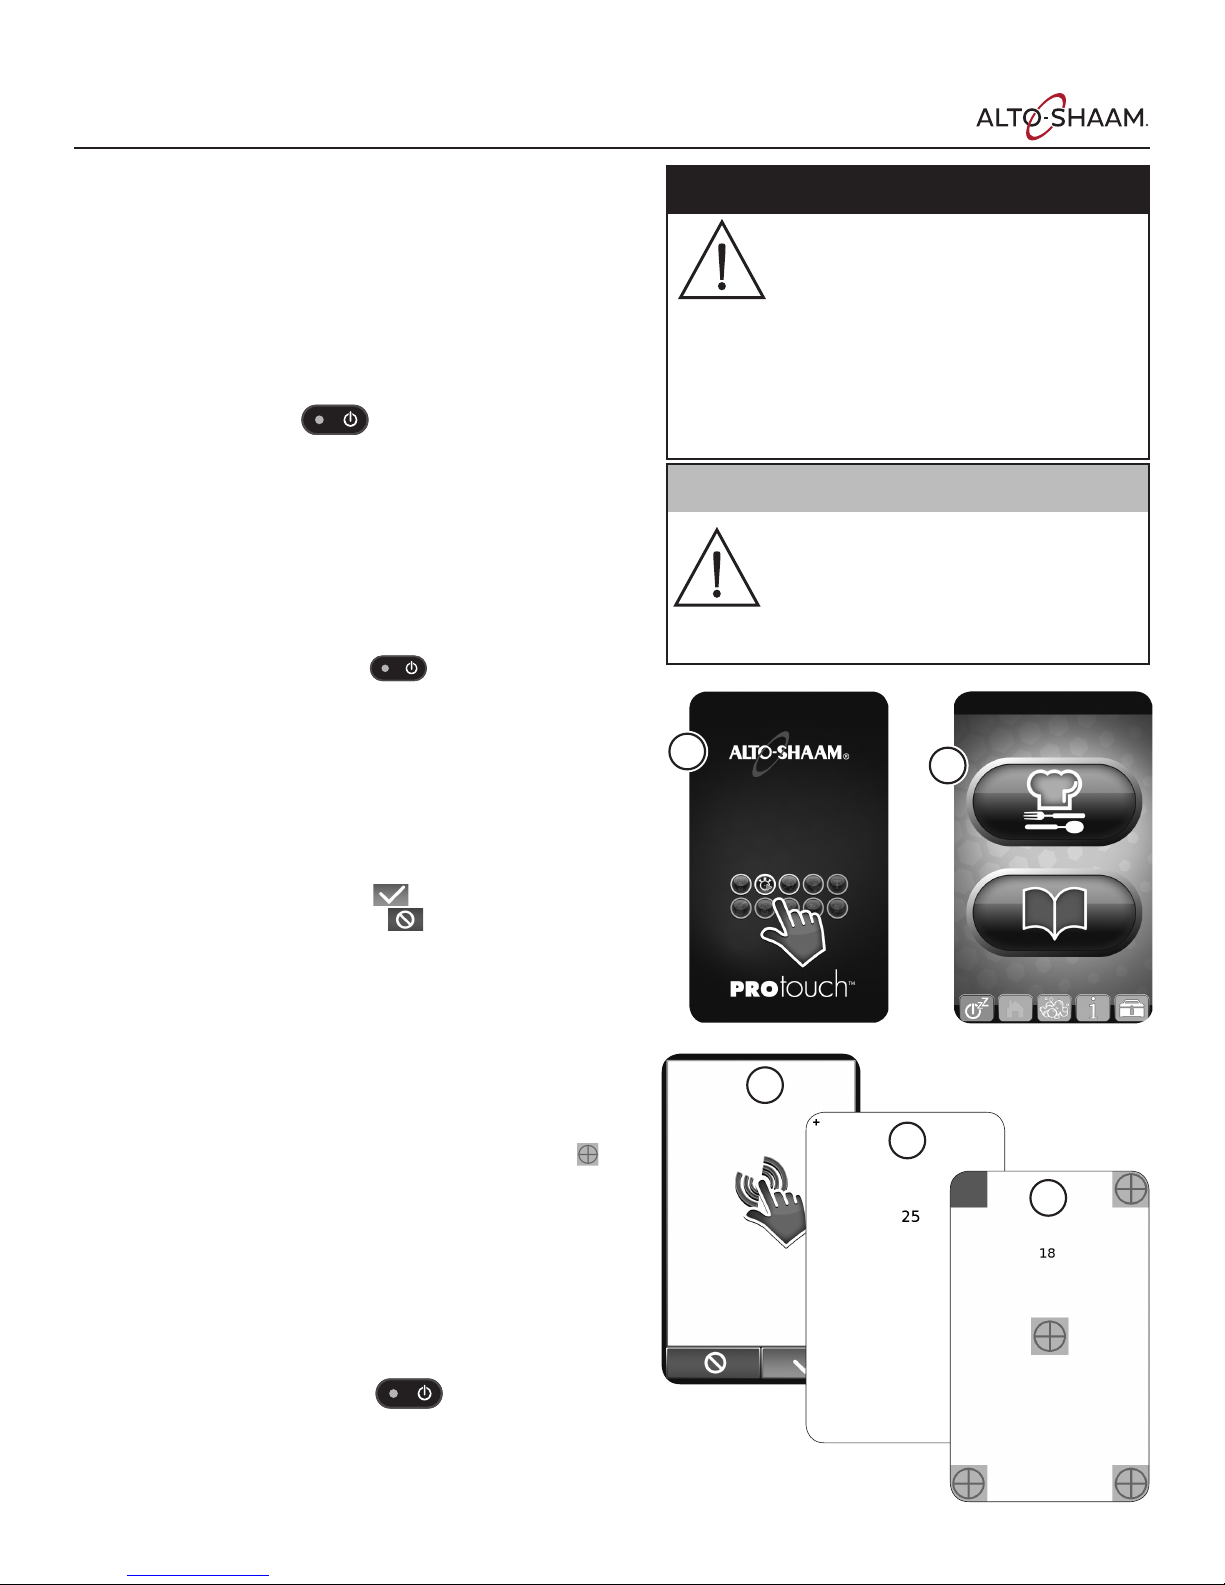
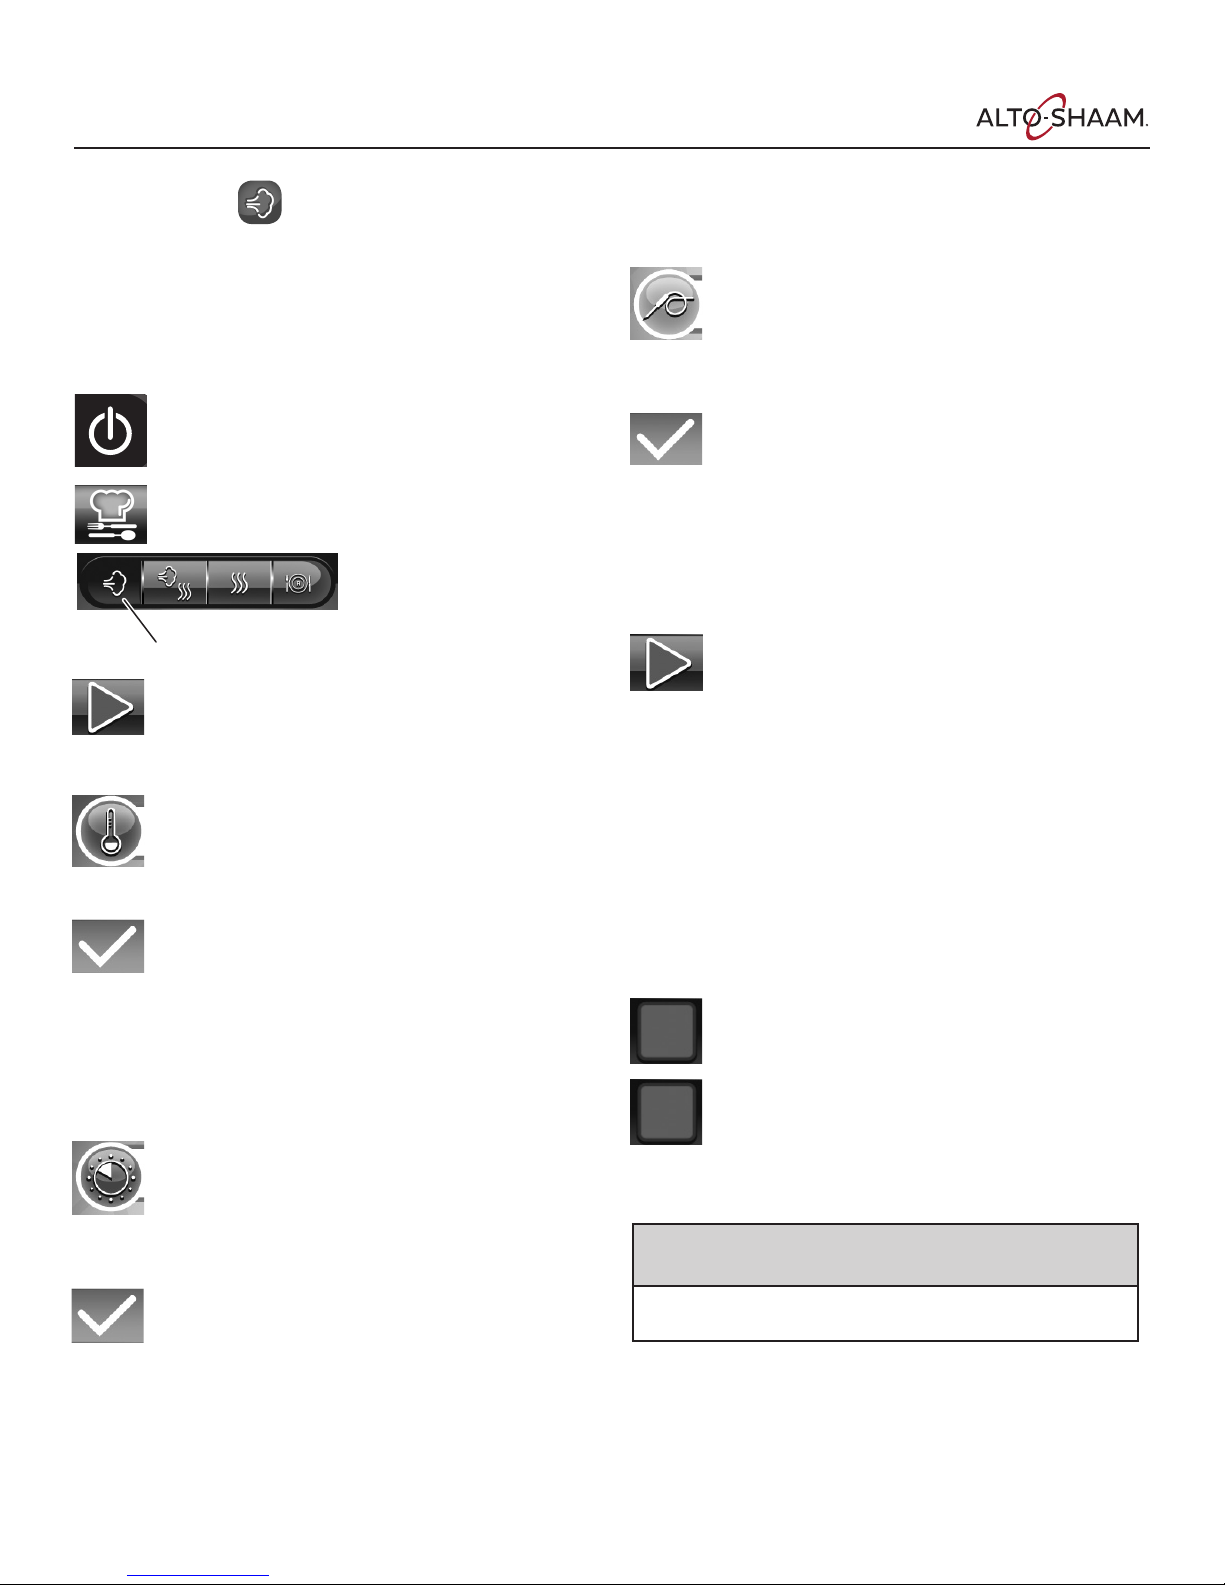
How to Turn On the Oven
Prerequisites
1. Turn on the exhaust hood.
2. Make sure that the water supply to the oven is turned on.
3. Make sure that the electrical power supply to the oven is turned
on.
4. For gas ovens, make sure the gas supply valve is in the open
position.
Steps
1. Press the ON/OFF button .
The ON/OFF indicator glows green and the loading screen a
displays while the controller soware loads. When the soware
is 100% loaded, the home screen b displays.
NOTE: If the oven has a steam generator, the steam generator
fills with water and the oven heats the water to an initial
temperature of 188°F (77°C).
How to Start a Manual Calibration
1. Make sure the oven is o.
2. Press and hold the ON/OFF button for eight (8) seconds.
The ON/OFF indicator glows red and the calibration prompt c
displays.
The prompt moves from the center to all four corners of
the screen. This sequence repeats three (3) times. Then the
calibration screen d displays.
NOTE: The first time the oven is turned on, or if the oven loses
power during startup, the touchscreen calibration prompt c
displays at the end of the next startup.
NOTE: Touch the check mark icon to start the calibration
immediately. Touch the cancel icon to cancel the
calibration.
DANGER
Before starting the appliance, make certain you do
not detect the odor ofgas.
If you smell gas:
• Shut o the gas supply immediately.
• Do not attempt to light any appliance.
• Do not touch any electrical elements.
• Extinguish any open flame.
• Evacuate the area.
• Use a telephone outside the property and
immediately contact your gas supplier.
• If unable to contact your as supplier, contact the
fire department.
CAUTION
Accumulations on the main burners of gas
appliances can result in firing out of normal
sequence. This delayed ignition creates an
alarmingly loud sound. If your appliance makes an
especially loud noise when starting up, shut down
the appliance and call a qualified and trained
service technician.
1
2
How to Calibrate the Touchscreen
1. Touch the target icon (+) each time it appears on screen. The
icon appears in all four corners, then the center of the screen.
NOTE: If the controller soware has not been updated to the
current version (11/16 update), the calibration stops when this
step is complete. Download the current controller soware
from the Alto-Shaam website and install it.
2. The verification screen e displays. Touch all five target icons
. The icons change to green boxes when they are touched.
NOTE: The calibration screen and verification screen both
display a 30-second countdown. If you do not touch all five
icons before the countdown is complete, the controller stops
the calibration. If you do not see the countdown, download the
current controller soware from the Alto-Shaam website and
install it.
How to Turn O the Oven
1. Press and hold the ON/OFF button for five to ten (5-10)
seconds.
16 • MN-35948 • Rev 16 • 10/18 • Combitherm® CT PROformance™ Series Operator’s Manual
3
4
5
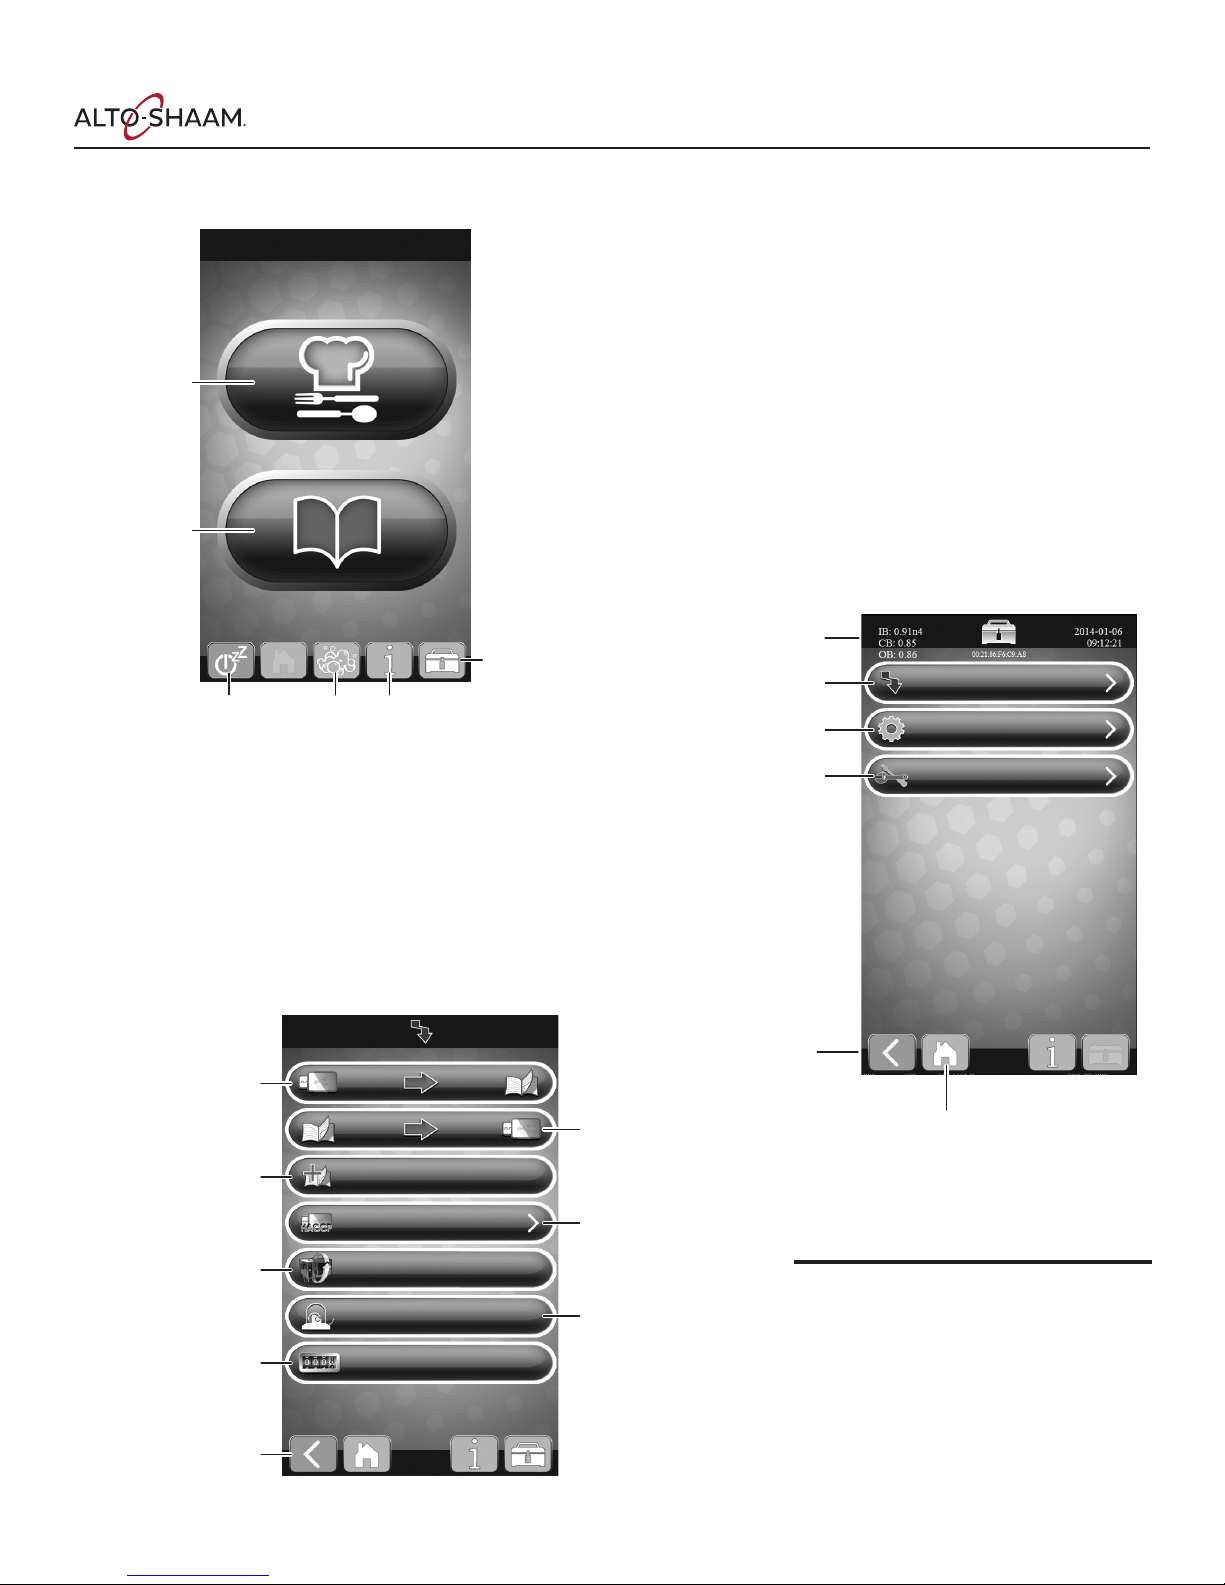
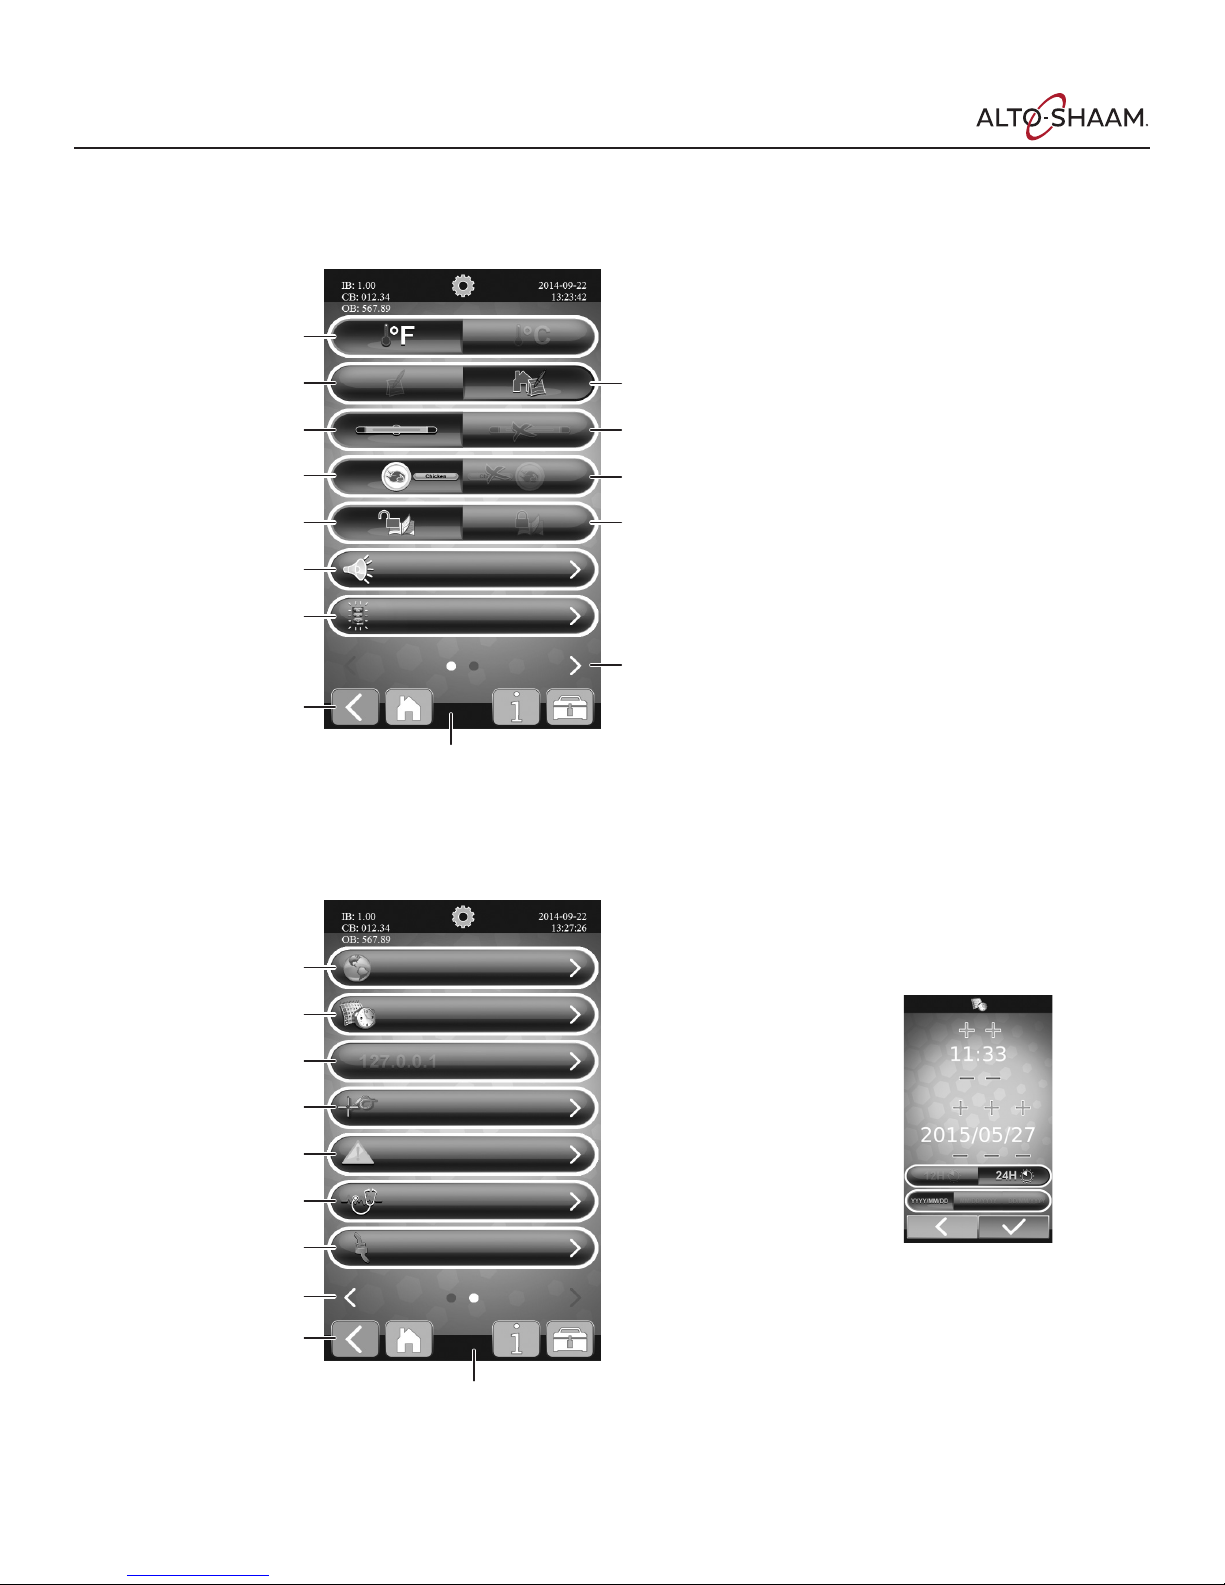
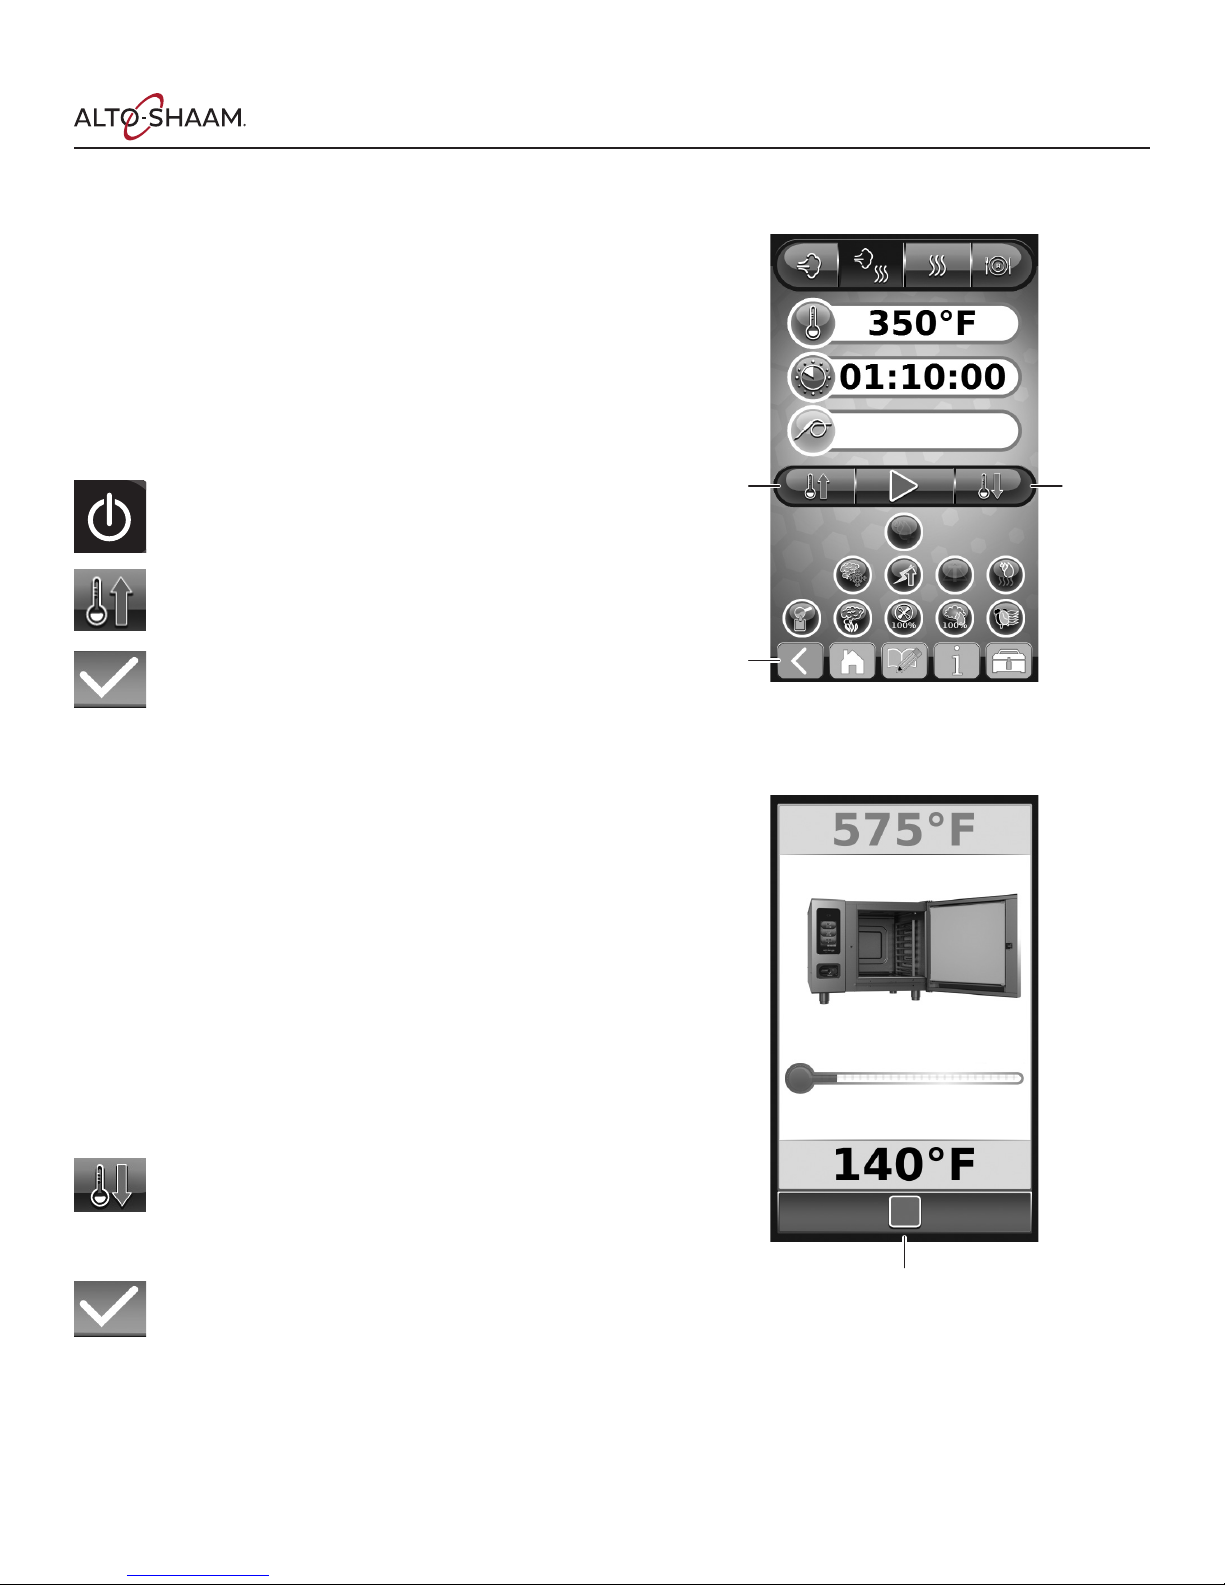
Control Panel Identi cation
Control Panel Identification
Professional
Cooking Mode
Cookbook with
Saved Recipes
CleaningSleep Mode
Information
Call outs
CTP Combitherm
Utility Screen
So ware Version
Utilities
Upload/Download
Settings
Download Recipes from
USB stick — overwrites
any existing recipes
Add all recipes on a
USB stick to the list of
recipes on the oven
leaving all other recipes
on the oven untouched
*Download new
so ware from a
USBstick
Upload odometer
info to USB stick
Return to
previous screen
Upload/Download Screen
(password protected)
Upload all recipes
from control to a
USB stick
Upload HACCP
info to USB stick
Upload audit trail
info to USB stick
Service Mode
Return to
previous screen
Return to
home screen
* The PROtouch control plays an
important part in our continuous
improvement process. New features
and abilities can be loaded to your
oven as they become available.
So ware for your oven can be
accessed from the Alto-Shaam
website, under the Downloads tab.
MN-35948 • Rev 16 • 10/18 • Combitherm® CT PROformance™ Series Operator’s Manual • 17
CTP Combitherm
Control Panel Identi cation
recipe display with text, and recipes are not
Settings Screen 1
Fahrenheit /Celsius
Keep last user setting
Handle LED on
Recipe display
names on
Unlock recipes
Beeper volume
& alarm clips
Screen brightness
Return to
previous screen
Screen 1 of 2
Settings Screen 2
Use factory
default settings
Handle LED o
Recipe display
names o
Lock recipes
Advance to next
setting screen
When a setting has been selected, the
graphic will be vibrant in color while the
alternate choice will appear faded and
gray. In the illustration above, Fahrenheit,
factory default setting, handle LED on,
locked have been chosen.
NOTE: A password is required to lock
and unlock the recipes. Simply
call an Alto-Shaam Culinary
Chef for assistance.
Language Choices
Date/Time
Future Feature
(not yet available)
Calibrate product probe
Preventative
Maintenance Actions
Run diagnostics
Force Boiler Flush
Return to previous
setting screen
Return to
utility screen
Language choices available:
English, French, German, Korean,
Mandarin, Russian, or Spanish.
Time format available:
12-hour clock
24-hour clock
Di erent date
formats available:
YYYY/MM/DD
MM/DD/YYYY
DD/MM/YYYY
Screen 2 of 2
18 • MN-35948 • Rev 16 • 10/18 • Combitherm® CT PROformance™ Series Operator’s Manual
CTP Combitherm
Control Panel Identi cation
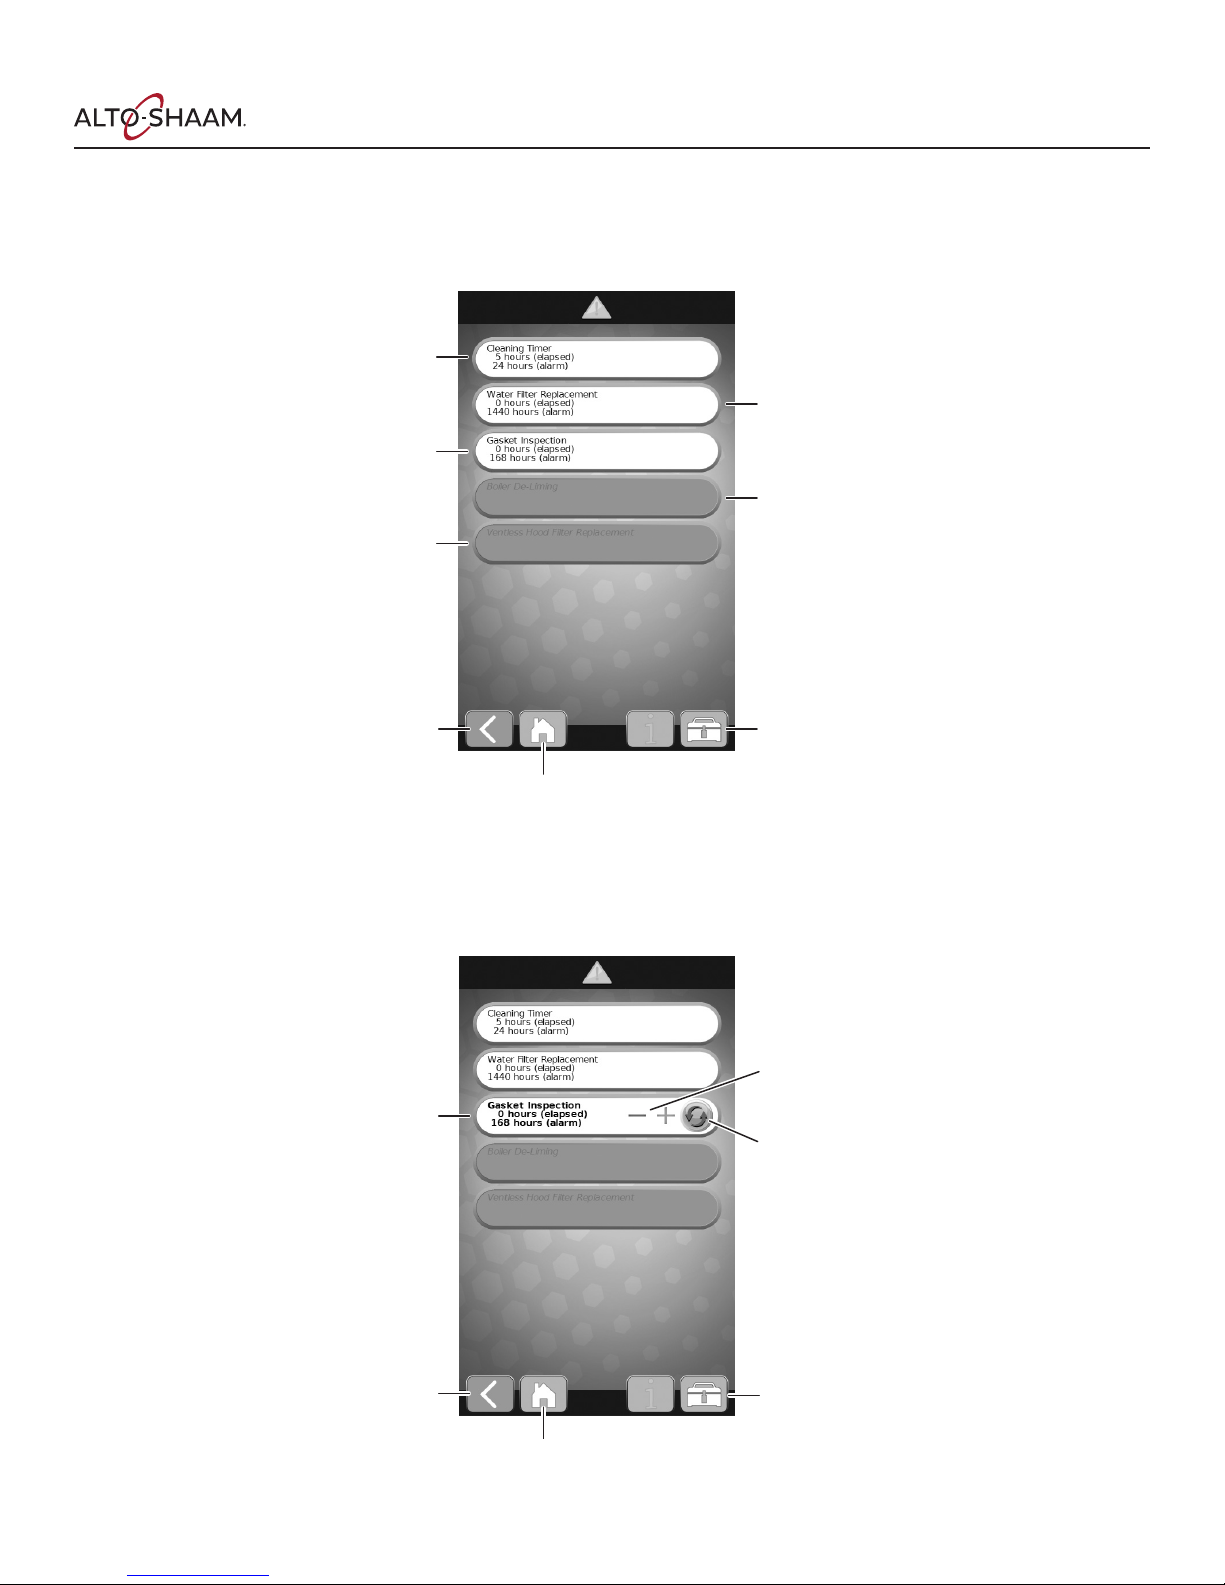
Preventative Maintenance Screen
Cleaning Timer
Gasket Inspection
Ventless Hood
Filter Replacement
Return to
previous screen
Water Filter
Replacement
Boiler De-Liming
Utilities
Return to
home screen
Preventative Maintenance - Editing
Press item to edit
Return to
previous screen
Increase or decrease alarm setting
to match your preferred timelines.
A er the task has been completed,
set elapsed time to 0 to begin
countdown process again.
Utilities
Return to
home screen
MN-35948 • Rev 16 • 10/18 • Combitherm® CT PROformance™ Series Operator’s Manual • 19
CTP Combitherm
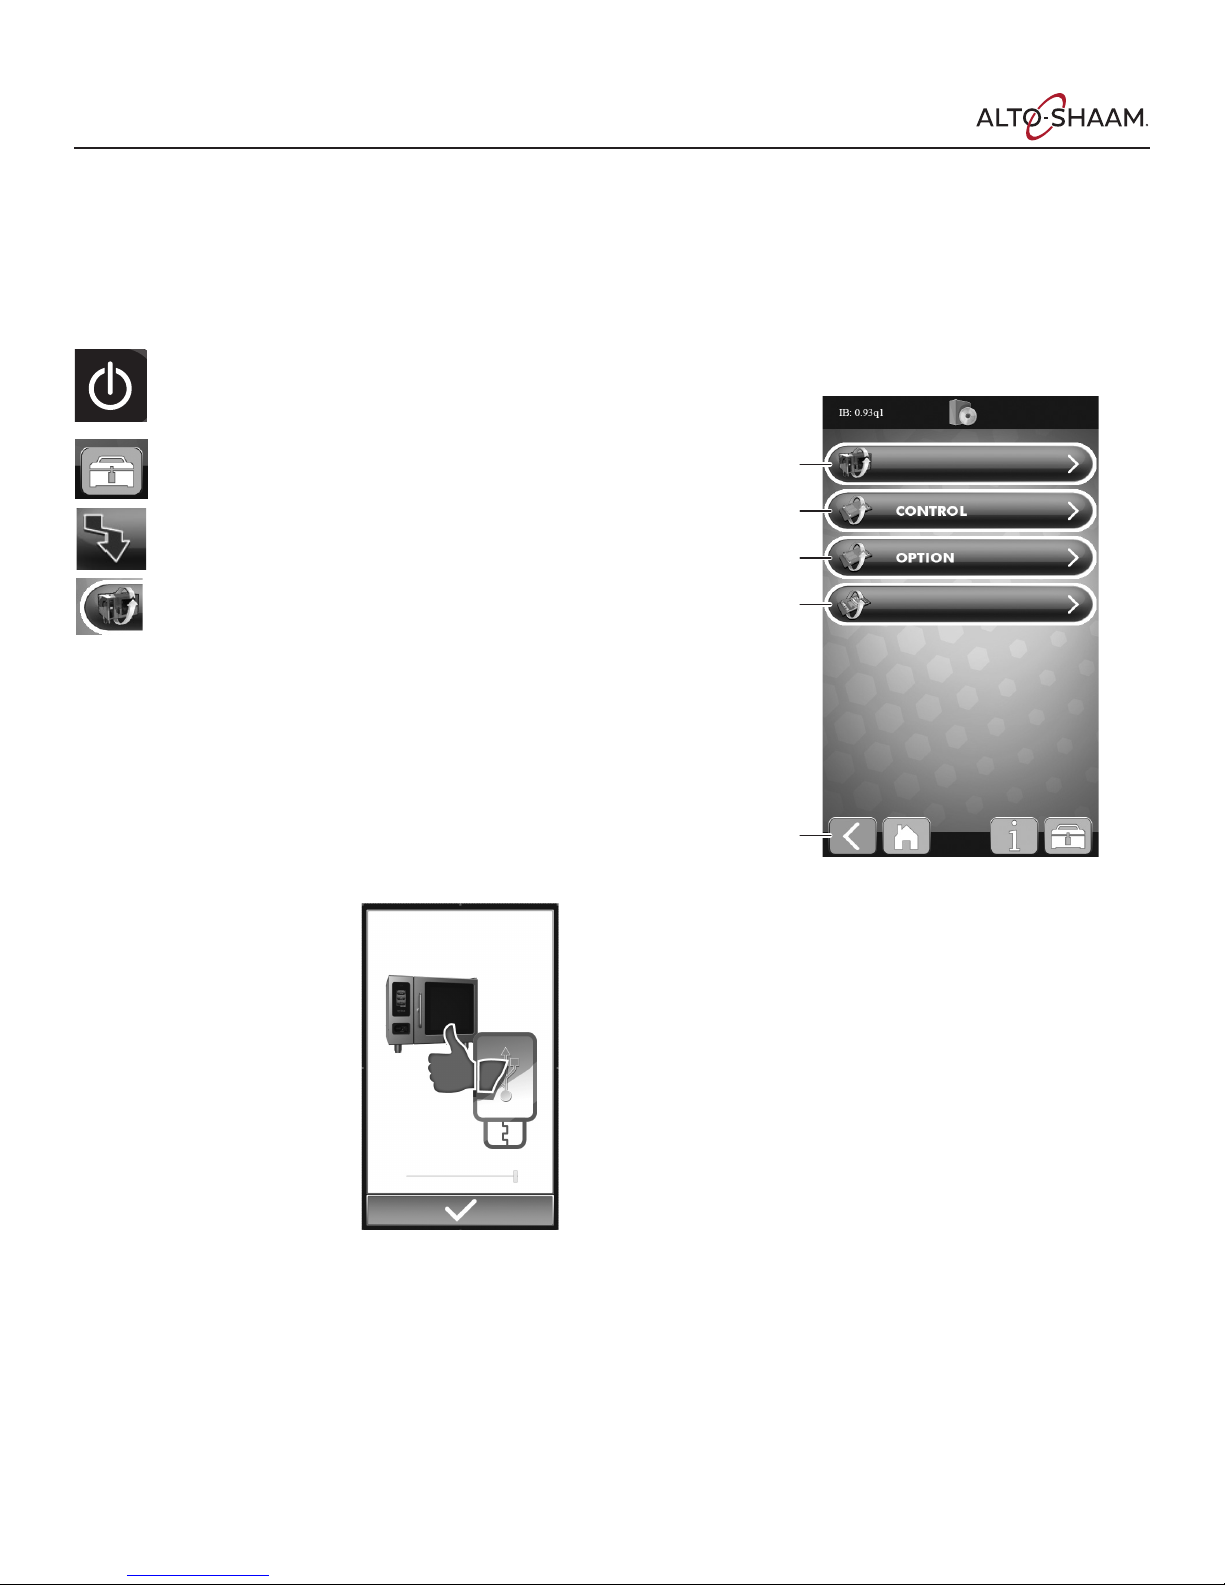
So ware Updates
The PROtouch controller plays an important part in our continuous improvement process. New features and abilities
Soware Updates
can be loaded to your oven as they become available. So ware for your oven can be accessed from the Alto-Shaam
website, under the Resource Library Tab, then So ware Center. http://www.alto-shaam.com/en/so ware-download-center
Use a USB stick to copy the PROtouch so ware from the website to the USB stick.
So ware Upload Screen
Press the ON button to power the oven on.
Touch the utilities icon.
Touch the download icon.
Touch the download new so ware icon.
Full oven update:
IB, CB, and OB
Update the CB
(control board) only
Update the OB
(option board) only
Update the IB
(interface board) only
Most so ware updates will require the full oven update
as shown below. Additional options are available in the
event a special need arises. Call our Service Department
for assistance with these special circumstances.
Remove the cover of the USB port on the oven.
Insert the USB stick. If the USB stick is not recognized
by the Combitherm, a question mark will appear on
screen. Try again with another ash drive device or call
Return to
previous screen
Alto-Shaam Service.
When the data has made a
successful transfer to the USB
drive, the screen will change.
Touch the green check mark
icon to complete the process.
Remove the USB stick and
replace the cover on the USB
port on the oven.
NOTICE: A er the so ware update has
been completed, the oven may
automatically initiate a shut down
and reboot sequence if required.
20 • MN-35948 • Rev 16 • 10/18 • Combitherm® CT PROformance™ Series Operator’s Manual

Cooking Screen Identi cation
Cooking Screen Identification
CTP Combitherm
Steam
Mode
Oven Temperature
Cook Time
Probe Temperature
Preheat
Start
Return to
previous screen
Combi
Mode
Return to
Home Page
Convection
Recipe
Mode
Retherm
Mode
Cook Time is displayed as
hours : minutes : seconds
Cool Down
UtilitiesWrite
Chosen
Cooking
Mode
Return to
previous screen
Chosen
Entry
Field
Allowable
Temperature
Range
Entry Keypad
Enter
NOTE: When a cooking mode has been selected, it will appear darker
blue. When the cooking mode is calling for heat, it will appear red.
When the cooking mode is calling for moisture, it will appear light
blue. In the illustration above, Combi Mode has been chosen and is
calling for heat. Also, the PROpower™ level has been chosen, and
the fan speed has been set at 100%.
MN-35948 • Rev 16 • 10/18 • Combitherm® CT PROformance™ Series Operator’s Manual • 21
CTP Combitherm
Auxiliary Functions and Features
Power Settings
Auxiliary Functions and Features
Two power levels: reduced power to manage kitchen
power peaks, and eco power for optimal oven e ciency.
A third choice is optional on electric models, but
standard on gas models. PROpower™ is an accelerated
turbo power for an instant boost of heat or quick heat
recovery [patent pending].
NOTE: Reduced power will result in longer cooking
times and PROpower will decrease your cooking
time by several minutes.
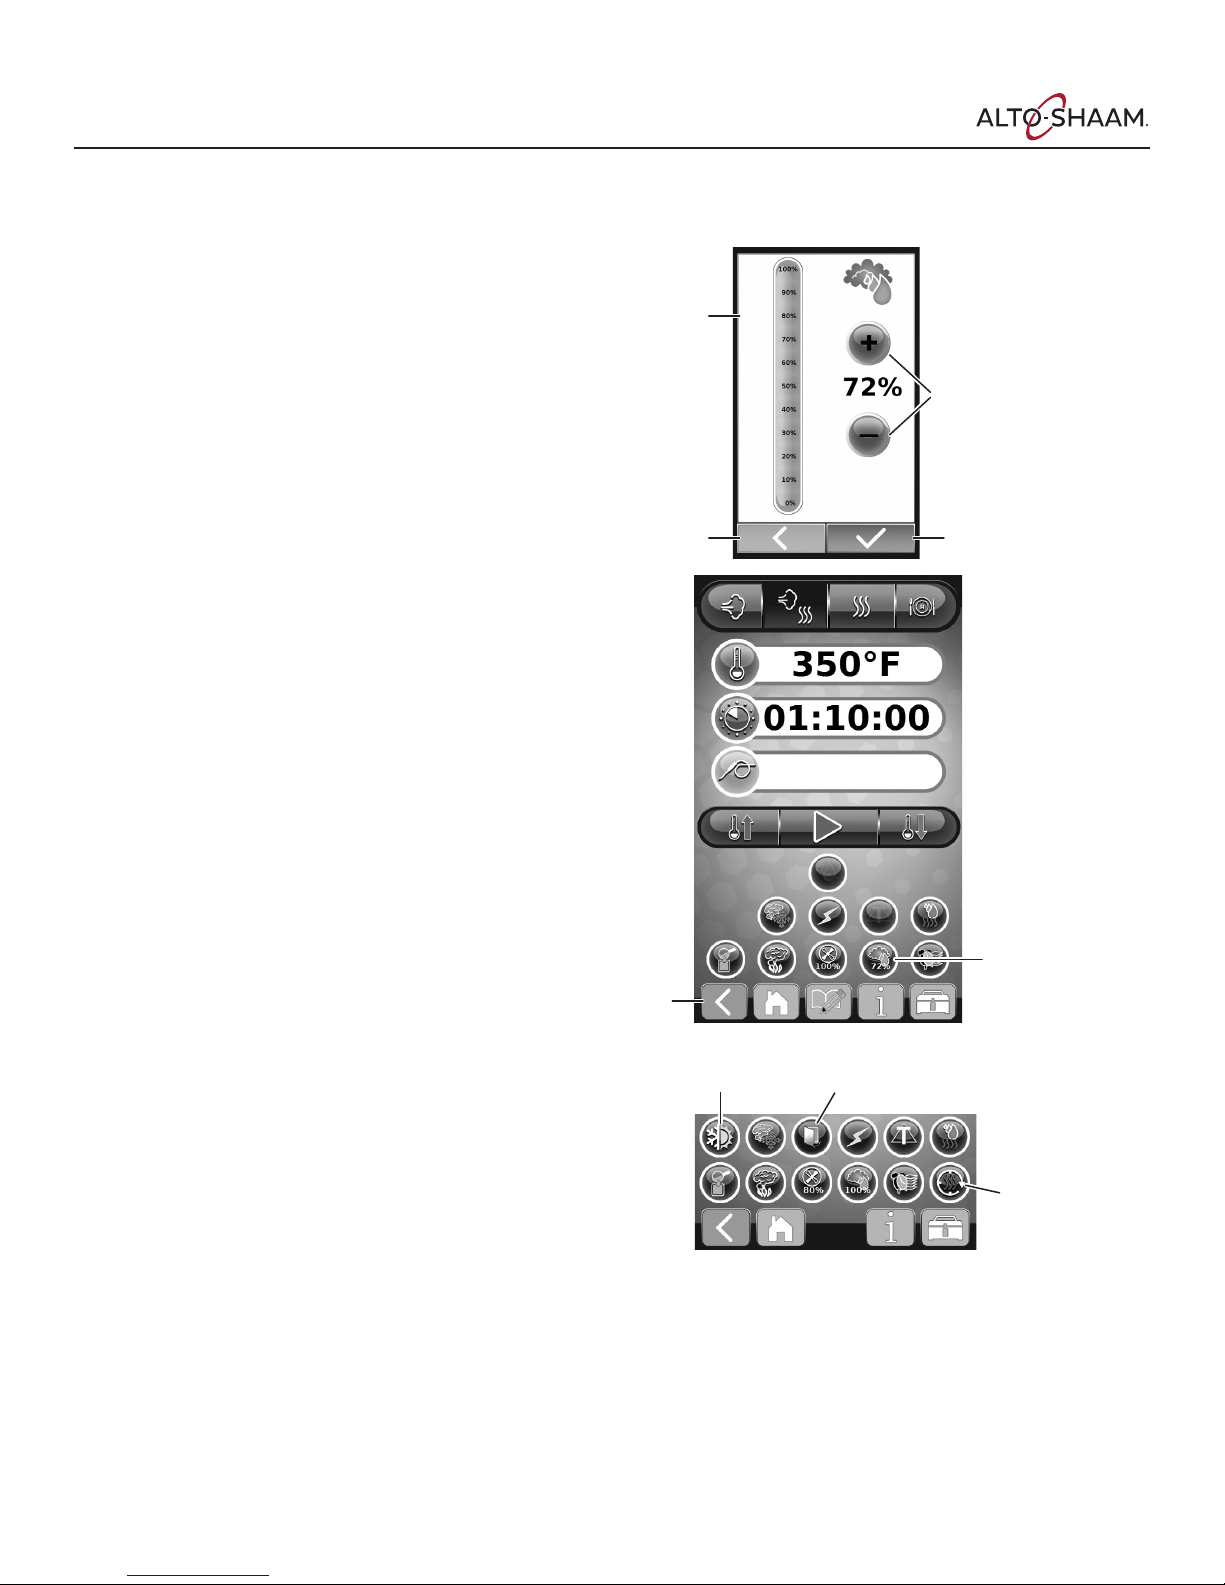
Multiple Fan Speeds
The PROtouch™ control includes ve di erent fan
speeds. The reduced fan speed function is useful for
ow-sensitive products such as sou és and meringues,
or any products a ected by a high velocity of air
movement.
NOTE: Fan speed choices are based upon the power
level you have chosen.
PROpower
Eco Power
Reduced Power
Return to previous screen to
set the remaining auxiliary
functions for full functionality
Power level icon appears
during operation
Fan speed choices
Reduced Power Level
Eco Power Level
PROpower™ Power Level
Multi-Shelf Timer
The multi-shelf timer allows the operator to program
alarm times for the oven shelves. This can be one
common time for corresponding oven shelves or by
food item that is cooking. The multi-shelf timer can
be edited when in a recipe mode.
Touch shelf number to
enter a recipe identifier
(text or number)
previous screen
22 • MN-35948 • Rev 16 • 10/18 • Combitherm® CT PROformance™ Series Operator’s Manual
Return to
Chosen
Cooking
Mode
Chosen
Temperature
Timer ready, touch
green arrow to begin
Time value, touch this area
to change the time value
Timer countdown in process,
Touch red square to stop
Auxiliary Functions and Features
Preheat Feature
The oven should be preheated before most cooking
functions. When cooking full loads, use a temperature
50°F (10°C) greater than the cook temperature in order
to recover from heat loss when the door is opened
to add food to the oven. For items that use the Steam
mode, it is necessary to use a preheat temperature
lower than the cook temperature in order to create the
proper amount ofsteam.
CTP Combitherm
Press the On button to power oven on.
Touch the Preheat icon.
Type in desired temperature.
Touch the green Check Mark icon to
startpreheating.
Cool Down Feature
The cool-down feature provides the operator with
the ability to lower the temperature of the oven
compartment at an accelerated pace. This function
is useful when it is necessary to immediately change
from a high temperature cooking function to a lower
temperature function or to the steam program.
This function is also useful to help cool the oven
compartment in preparation for cleaning.
TIP: Always allow the oven walls to cool to a minimum
of 140°F (60°C) before spraying the compartment
with oven cleaner.
Preheat
Return to previous
screen
Cool Down
Open the oven door.
Touch the Cool Down icon.
Type in desired temperature.
Touch the green Check Mark icon to beginthe
Cool Down process.
The target oven temperature chosen will appear
just above the red Stop button.
The current oven temperature will appear at the
top of the screen.
MN-35948 • Rev 16 • 10/18 • Combitherm® CT PROformance™ Series Operator’s Manual • 23
Touch to
Stop
CTP Combitherm
Auxiliary Functions and Features
Humidity Control Feature
The humidity control feature is an automatic
function designed to regulate humidity to provide
additional color to food as needed. This feature
is particularly useful for adding color to high
moisture products such as chicken and other
poultry, or for additional browning of full loads
and other moist products. In addition, this feature
may be used to add texture to fried items such
as french fries or breaded chicken. Humidity
control can be used in any cooking mode and can
be programmed into a cooking procedure.
Touch the nearest 10% increment on the le side
of the screen, and then adjust up or down using
the + or – icons.
0% humidity is the driest cooking environment
available. The percentage level chosen will
appear on the icon. In the illustration at right,
72% is shown.
Humidity level choices
in increments of 10%
Return to
previous screen
Adjust humidity level up or
down in increments of 1%
Touch the check mark to
approve the value entered.
Rapid Cool (available on boiler-free models only)
This function, when used with a program, rapidly
removes heat from the oven cavity. Swi ly move
from a high cooking temperature to a lower
temperature without overcooking your food.
Rest
This step allows you to pause the oven during a
program. The rest step is ideal for cold smoking
or automatic cleaning. Infuse your food with
smoke avor a er the actual smoking step has
stopped.
Door
The door function allows the user to program
a reminder—in the form of an animated door
opening and closing—that it is time to open the
door. This reminder may be programmed at the
end of a programmed segment or at the end of
the program.
Return to
previous screen
Rapid Cool
(boiler-free models)
Chosen Humidity
Level % shown
Door
Rest
24 • MN-35948 • Rev 16 • 10/18 • Combitherm® CT PROformance™ Series Operator’s Manual

CT PROformance™ Factory Default Settings
Cooking Mode Oven Temperature Core Temperature Cooking Time
CTP Combitherm
Steam
Combination Steam
Convection
Retherm
212°F
(100°C)
350°F
(175C)
350°F
(175C)
275°F
(135°C)
160°F
(70°C)
160°F
(70°C)
160°F
(70°C)
160°F
(70°C)
25 minutes
70 minutes
30 minutes
5 minutes
MN-35948 • Rev 16 • 10/18 • Combitherm® CT PROformance™ Series Operator’s Manual • 25
CTP Combitherm
CAUTION HOT
Steam Mode
The Steam mode provides the operator with the ability to
steam, poach, or blanch. This mode will automaticallysteam
at the boiling point of water; quick-steam above the boiling
point for faster cooking results; or low temperature steam,
below the boiling point, for more delicate products such as
pâté, mousse, seafood, orcustard.
Press the On button to power oven on.
Touch the Professional Cooking mode icon.
Touch the Steam mode icon.
Touch the Start icon to steam at the
displayedsettings.
To Change the Displayed Settings:
Touch the area to the right of the temperatureicon.
Type in desired temperature.
Touch the green Check Mark icon to
confirmchange.
To Cook by Product Core Temperature:
Touch the area to the right of the probeicon.
Type in desired temperature.
Touch the green Check Mark icon to
confirmchange.
Insert probe into product.
Set available auxiliary functions as desired, such as
energy level, fan speed, multi-shelf timer, etc.
Touch the Start icon to begin cooking in the Steam
mode.
• The cavity set-temperature will appear in the display.
• If cooking by probe, the actual internal product temperature
will appear next to the probe icon during operation. To
change the set value for core temperature, touch the
temperature next to the probe icon and make changes as
required.
When the cooking time has expired or the desired core
temperature has been reached, an alarm will sound and
handle light will flash several times indicating the end of the
operating mode.
• Automatic Steaming 212°F (100°C)
• Quick Steaming 213°F to 250°F (101°C to 120°C)
• Low Temperature Steaming 85°F to 211°F (30°C to 99°C)
To Cook by Time:
Touch the area to the right of the timeicon.
Type in desired time or set continuous time by
touching --:--.
Touch the green Check Mark icon to
confirmchange.
26 • MN-35948 • Rev 16 • 10/18 • Combitherm® CT PROformance™ Series Operator’s Manual
Touch the red Stop icon to stop the buzzer or open
the oven door.
To stop cooking program at any time, touch the red
Stop icon.
Use caution when opening the oven door when the
cooking chamber is hot to avoid possible burns.
 Loading...