

Page 1

DDR and DDR2 SDRAM Controller Compiler User
Guide
101 Innovation Drive
San Jose, CA 95134
www.altera.com
Software Version: 9.0
Document Date: March 2009
Page 2

Copyright © 2009 Altera Corporation. All rights reserved. Altera, The Programmable Solutions Company, the stylized Altera logo, specific device designations, and all other
words and logos that are identified as trademarks and/or service marks are, unless noted otherwise, the trademarks and service marks of Altera Corporation in the U.S. and other
countries. All other product or service names are the property of their respective holders. Altera products are protected under numerous U.S. and foreign patents and pending applications, maskwork rights, and copyrights. Altera warrants performance of its semiconductor products to current specifications in accordance with Altera's standard warranty,
but reserves the right to make changes to any products and services at any time without notice. Altera assumes no responsibility or liability arising out of the application or use of
any information, product, or service described herein except as expressly agreed to in writing by Altera Corporation. Altera customers are advised to obtain the latest version of
device specifications before relying on any published information and before placing orders for products or services
.
UG-DDRSDRAM-10.0
Page 3

Contents
Chapter 1. About This Compiler
Release Information . . . . . . . . . . . . . . . . . . . . . . . . . . . . . . . . . . . . . . . . . . . . . . . . . . . . . . . . . . . . . . . . . . . . . 1–1
Device Family Support . . . . . . . . . . . . . . . . . . . . . . . . . . . . . . . . . . . . . . . . . . . . . . . . . . . . . . . . . . . . . . . . . . . 1–1
Features . . . . . . . . . . . . . . . . . . . . . . . . . . . . . . . . . . . . . . . . . . . . . . . . . . . . . . . . . . . . . . . . . . . . . . . . . . . . . . . . 1–2
General Description . . . . . . . . . . . . . . . . . . . . . . . . . . . . . . . . . . . . . . . . . . . . . . . . . . . . . . . . . . . . . . . . . . . . . 1–2
Performance and Resource Utilization . . . . . . . . . . . . . . . . . . . . . . . . . . . . . . . . . . . . . . . . . . . . . . . . . . . . . . 1–4
Installation and Licensing . . . . . . . . . . . . . . . . . . . . . . . . . . . . . . . . . . . . . . . . . . . . . . . . . . . . . . . . . . . . . . . . 1–5
OpenCore Plus Evaluation . . . . . . . . . . . . . . . . . . . . . . . . . . . . . . . . . . . . . . . . . . . . . . . . . . . . . . . . . . . . . 1–6
Chapter 2. Getting Started
Design Flow . . . . . . . . . . . . . . . . . . . . . . . . . . . . . . . . . . . . . . . . . . . . . . . . . . . . . . . . . . . . . . . . . . . . . . . . . . . . 2–1
SOPC Builder Design Flow . . . . . . . . . . . . . . . . . . . . . . . . . . . . . . . . . . . . . . . . . . . . . . . . . . . . . . . . . . . . . . . 2–1
DDR & DDR2 SDRAM Controller Walkthrough . . . . . . . . . . . . . . . . . . . . . . . . . . . . . . . . . . . . . . . . . . 2–2
Create Your Top-Level Design . . . . . . . . . . . . . . . . . . . . . . . . . . . . . . . . . . . . . . . . . . . . . . . . . . . . . . . . . . 2–6
Simulate the SOPC Builder Design . . . . . . . . . . . . . . . . . . . . . . . . . . . . . . . . . . . . . . . . . . . . . . . . . . . . . . 2–6
Compile the SOPC Builder Design . . . . . . . . . . . . . . . . . . . . . . . . . . . . . . . . . . . . . . . . . . . . . . . . . . . . . . 2–6
Program a Device . . . . . . . . . . . . . . . . . . . . . . . . . . . . . . . . . . . . . . . . . . . . . . . . . . . . . . . . . . . . . . . . . . . . . 2–8
MegaWizard Plug-In Manager Design Flow . . . . . . . . . . . . . . . . . . . . . . . . . . . . . . . . . . . . . . . . . . . . . . . . 2–8
DDR & DDR2 SDRAM Controller Walkthrough . . . . . . . . . . . . . . . . . . . . . . . . . . . . . . . . . . . . . . . . . . 2–9
Simulate the Example Design . . . . . . . . . . . . . . . . . . . . . . . . . . . . . . . . . . . . . . . . . . . . . . . . . . . . . . . . . . 2–17
Compile the Example Design . . . . . . . . . . . . . . . . . . . . . . . . . . . . . . . . . . . . . . . . . . . . . . . . . . . . . . . . . . 2–22
Program a Device . . . . . . . . . . . . . . . . . . . . . . . . . . . . . . . . . . . . . . . . . . . . . . . . . . . . . . . . . . . . . . . . . . . . 2–24
Implement Your Design . . . . . . . . . . . . . . . . . . . . . . . . . . . . . . . . . . . . . . . . . . . . . . . . . . . . . . . . . . . . . . 2–24
Set Up Licensing . . . . . . . . . . . . . . . . . . . . . . . . . . . . . . . . . . . . . . . . . . . . . . . . . . . . . . . . . . . . . . . . . . . . . . . 2–25
Chapter 3. Functional Description
Block Description . . . . . . . . . . . . . . . . . . . . . . . . . . . . . . . . . . . . . . . . . . . . . . . . . . . . . . . . . . . . . . . . . . . . . . . 3–1
Control Logic . . . . . . . . . . . . . . . . . . . . . . . . . . . . . . . . . . . . . . . . . . . . . . . . . . . . . . . . . . . . . . . . . . . . . . . . . 3–1
Datapath . . . . . . . . . . . . . . . . . . . . . . . . . . . . . . . . . . . . . . . . . . . . . . . . . . . . . . . . . . . . . . . . . . . . . . . . . . . . . 3–2
OpenCore Plus Time-Out Behavior . . . . . . . . . . . . . . . . . . . . . . . . . . . . . . . . . . . . . . . . . . . . . . . . . . . . . . . . 3–3
Device-Level Description . . . . . . . . . . . . . . . . . . . . . . . . . . . . . . . . . . . . . . . . . . . . . . . . . . . . . . . . . . . . . . . . . 3–4
Datapath . . . . . . . . . . . . . . . . . . . . . . . . . . . . . . . . . . . . . . . . . . . . . . . . . . . . . . . . . . . . . . . . . . . . . . . . . . . . . 3–4
PLL Configurations . . . . . . . . . . . . . . . . . . . . . . . . . . . . . . . . . . . . . . . . . . . . . . . . . . . . . . . . . . . . . . . . . . 3–13
DLL Configurations . . . . . . . . . . . . . . . . . . . . . . . . . . . . . . . . . . . . . . . . . . . . . . . . . . . . . . . . . . . . . . . . . . 3–16
Example Design . . . . . . . . . . . . . . . . . . . . . . . . . . . . . . . . . . . . . . . . . . . . . . . . . . . . . . . . . . . . . . . . . . . . . 3–16
Constraints . . . . . . . . . . . . . . . . . . . . . . . . . . . . . . . . . . . . . . . . . . . . . . . . . . . . . . . . . . . . . . . . . . . . . . . . . . 3–18
Interfaces & Signals . . . . . . . . . . . . . . . . . . . . . . . . . . . . . . . . . . . . . . . . . . . . . . . . . . . . . . . . . . . . . . . . . . . . . 3–19
Interface Description . . . . . . . . . . . . . . . . . . . . . . . . . . . . . . . . . . . . . . . . . . . . . . . . . . . . . . . . . . . . . . . . . 3–19
Signals . . . . . . . . . . . . . . . . . . . . . . . . . . . . . . . . . . . . . . . . . . . . . . . . . . . . . . . . . . . . . . . . . . . . . . . . . . . . . 3–28
Parameters . . . . . . . . . . . . . . . . . . . . . . . . . . . . . . . . . . . . . . . . . . . . . . . . . . . . . . . . . . . . . . . . . . . . . . . . . . . . 3–31
Memory . . . . . . . . . . . . . . . . . . . . . . . . . . . . . . . . . . . . . . . . . . . . . . . . . . . . . . . . . . . . . . . . . . . . . . . . . . . . 3–32
Controller . . . . . . . . . . . . . . . . . . . . . . . . . . . . . . . . . . . . . . . . . . . . . . . . . . . . . . . . . . . . . . . . . . . . . . . . . . 3–33
Controller Timings . . . . . . . . . . . . . . . . . . . . . . . . . . . . . . . . . . . . . . . . . . . . . . . . . . . . . . . . . . . . . . . . . . . 3–37
Memory Timings . . . . . . . . . . . . . . . . . . . . . . . . . . . . . . . . . . . . . . . . . . . . . . . . . . . . . . . . . . . . . . . . . . . . 3–38
Board Timings . . . . . . . . . . . . . . . . . . . . . . . . . . . . . . . . . . . . . . . . . . . . . . . . . . . . . . . . . . . . . . . . . . . . . . . 3–39
Project Settings . . . . . . . . . . . . . . . . . . . . . . . . . . . . . . . . . . . . . . . . . . . . . . . . . . . . . . . . . . . . . . . . . . . . . . 3–40
Manual Timings . . . . . . . . . . . . . . . . . . . . . . . . . . . . . . . . . . . . . . . . . . . . . . . . . . . . . . . . . . . . . . . . . . . . . 3–41
© March 2009 Altera Corporation DDR and DDR2 SDRAM Controller Compiler User Guide
Page 4

iv
MegaCore Verification . . . . . . . . . . . . . . . . . . . . . . . . . . . . . . . . . . . . . . . . . . . . . . . . . . . . . . . . . . . . . . . . . . 3–41
Simulation Testing . . . . . . . . . . . . . . . . . . . . . . . . . . . . . . . . . . . . . . . . . . . . . . . . . . . . . . . . . . . . . . . . . . . 3–41
Hardware Testing . . . . . . . . . . . . . . . . . . . . . . . . . . . . . . . . . . . . . . . . . . . . . . . . . . . . . . . . . . . . . . . . . . . . 3–41
Appendix A. Manual Timing Settings
Parameters . . . . . . . . . . . . . . . . . . . . . . . . . . . . . . . . . . . . . . . . . . . . . . . . . . . . . . . . . . . . . . . . . . . . . . . . . . . . A–1
Resynchronization . . . . . . . . . . . . . . . . . . . . . . . . . . . . . . . . . . . . . . . . . . . . . . . . . . . . . . . . . . . . . . . . . . . . . . A–4
Resynchronization Registers . . . . . . . . . . . . . . . . . . . . . . . . . . . . . . . . . . . . . . . . . . . . . . . . . . . . . . . . . . . A–5
Intermediate Resynchronization Registers . . . . . . . . . . . . . . . . . . . . . . . . . . . . . . . . . . . . . . . . . . . . . . A–10
DQS Postamble . . . . . . . . . . . . . . . . . . . . . . . . . . . . . . . . . . . . . . . . . . . . . . . . . . . . . . . . . . . . . . . . . . . . . . . A–10
Postamble Logic . . . . . . . . . . . . . . . . . . . . . . . . . . . . . . . . . . . . . . . . . . . . . . . . . . . . . . . . . . . . . . . . . . . . A–11
Intermediate Postamble Registers . . . . . . . . . . . . . . . . . . . . . . . . . . . . . . . . . . . . . . . . . . . . . . . . . . . . . A–12
Examples . . . . . . . . . . . . . . . . . . . . . . . . . . . . . . . . . . . . . . . . . . . . . . . . . . . . . . . . . . . . . . . . . . . . . . . . . . . . . A–13
Appendix B. DDR SDRAM on the Nios Development Board, Cyclone II Edition
Appendix C. HardCopy II Design Walkthrough
Appendix D. Maximizing Performance
Device & Board Settings . . . . . . . . . . . . . . . . . . . . . . . . . . . . . . . . . . . . . . . . . . . . . . . . . . . . . . . . . . . . . . . . . D–1
Adjust the PLL Phases . . . . . . . . . . . . . . . . . . . . . . . . . . . . . . . . . . . . . . . . . . . . . . . . . . . . . . . . . . . . . . . . . . D–2
Assign Pins . . . . . . . . . . . . . . . . . . . . . . . . . . . . . . . . . . . . . . . . . . . . . . . . . . . . . . . . . . . . . . . . . . . . . . . . . . . . D–2
Place the Fedback PLL . . . . . . . . . . . . . . . . . . . . . . . . . . . . . . . . . . . . . . . . . . . . . . . . . . . . . . . . . . . . . . . . . . D–2
Update the PLL Phases . . . . . . . . . . . . . . . . . . . . . . . . . . . . . . . . . . . . . . . . . . . . . . . . . . . . . . . . . . . . . . . . . . D–3
Additional Information
Revision History . . . . . . . . . . . . . . . . . . . . . . . . . . . . . . . . . . . . . . . . . . . . . . . . . . . . . . . . . . . . . . . . . . . . . Info–i
How to Contact Altera . . . . . . . . . . . . . . . . . . . . . . . . . . . . . . . . . . . . . . . . . . . . . . . . . . . . . . . . . . . . . . . . Info–i
Typographic Conventions . . . . . . . . . . . . . . . . . . . . . . . . . . . . . . . . . . . . . . . . . . . . . . . . . . . . . . . . . . . . . Info–i
DDR and DDR2 SDRAM Controller Compiler User Guide © March 2009 Altera Corporation
Page 5
Release Information
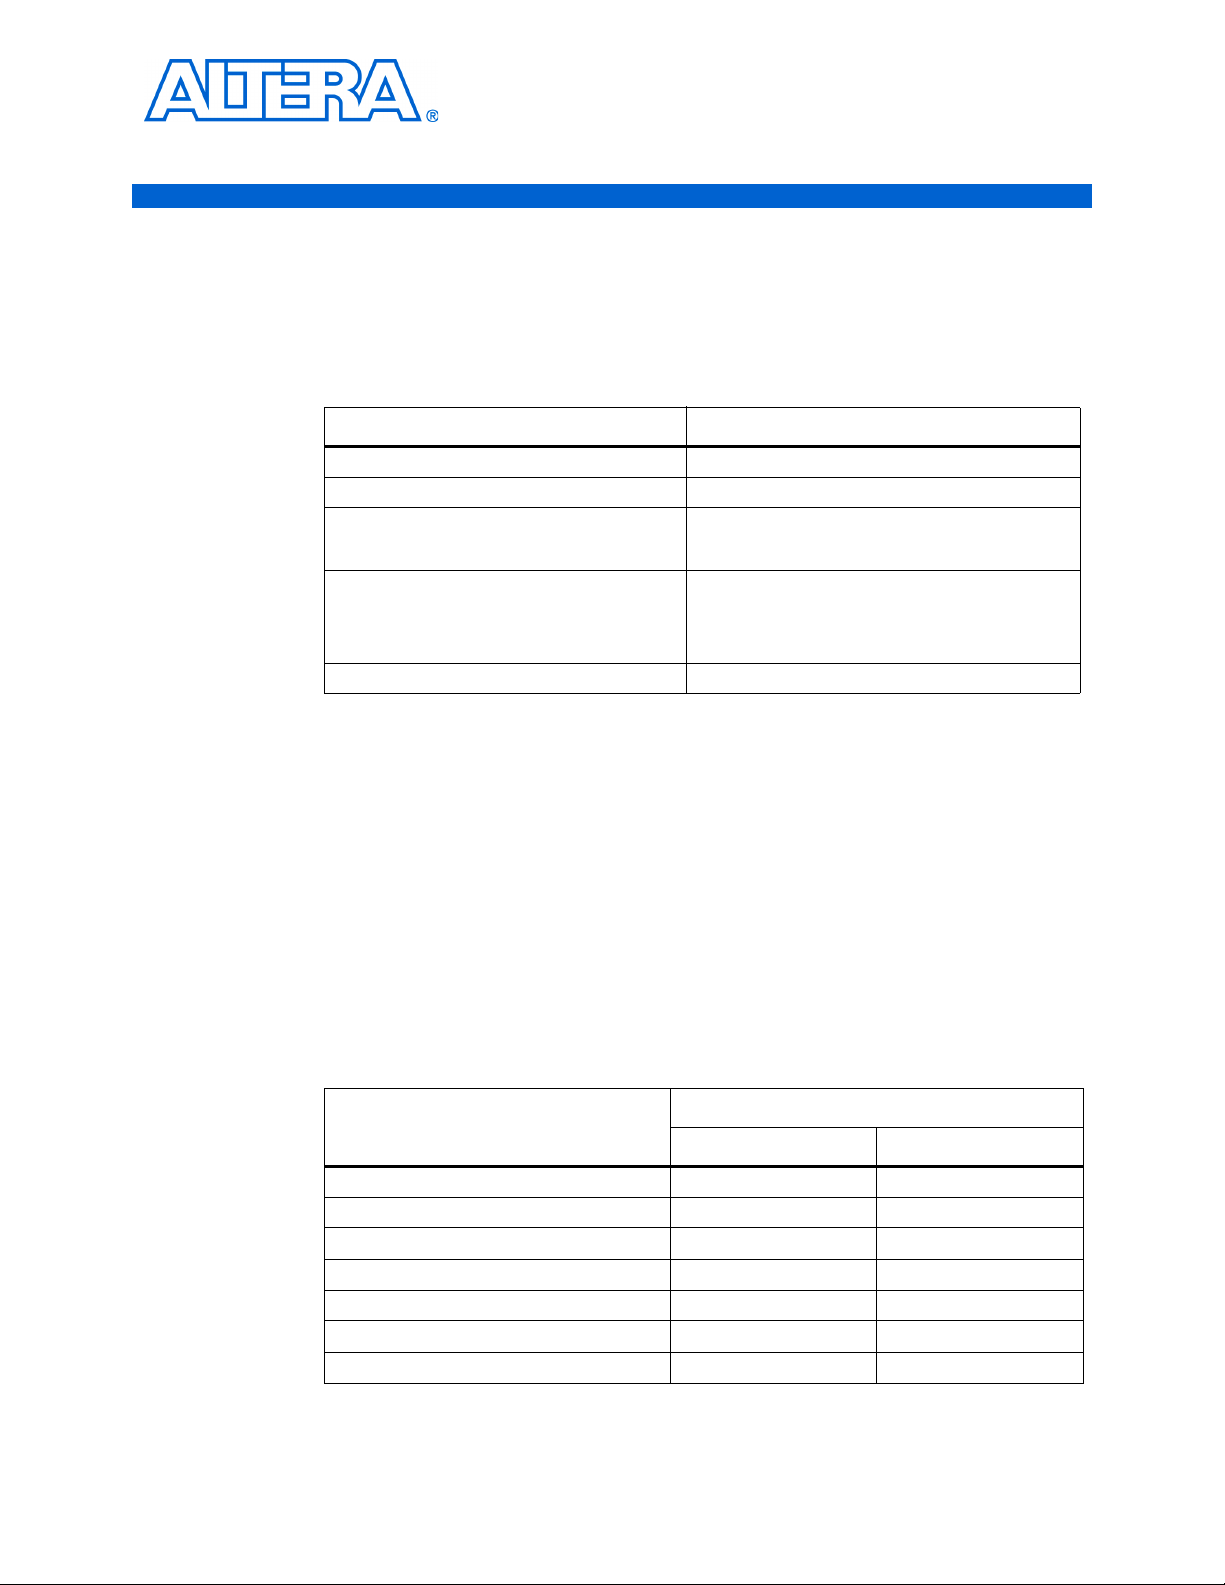
Tab le 1– 1 provides information about this release of the DDR and DDR2 SDRAM
Controller Compiler.
Table 1–1. DDR & DDR2 SDRAM Controller Release Information
Version 9.0
Release Date March 2009
Ordering Codes IP-SDRAM/DDR (DDR SDRAM)
Product IDs 0055 (DDR SDRAM)
Vendor ID 6AF7
1. About This Compiler
Item Description
IP-SDRAM/DDR2 (DDR2 SDRAM)
00A7 (DDR2 SDRAM)
00A8 (common library)
Device Family Support
MegaCore® functions provide either full or preliminary support for target Altera®
device families, as described below:
■ Full support means the MegaCore function meets all functional and timing
requirements for the device family and may be used in production designs
■ Preliminary support means the MegaCore function meets all functional
requirements, but may still be undergoing timing analysis for the device family; it
may be used in production designs with caution
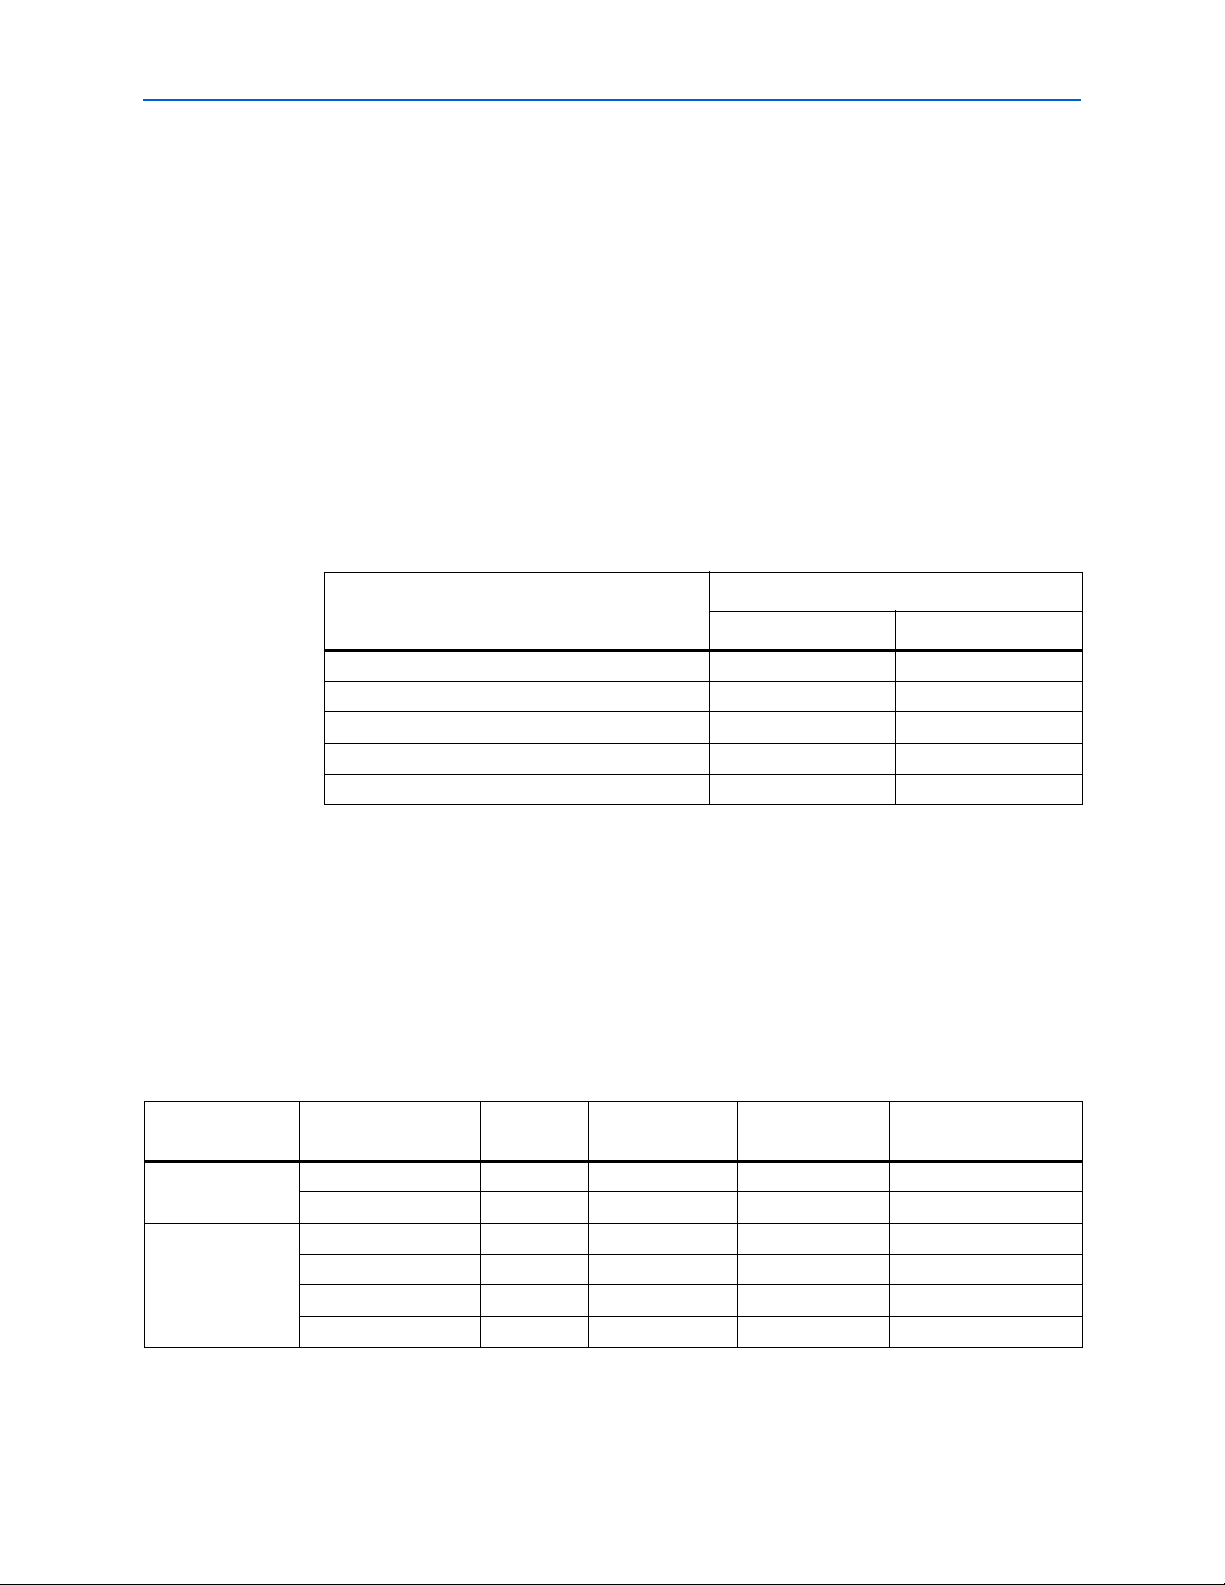
Tab le 1– 2 shows the level of support offered by the DDR and DDR2 SDRAM
Controller Compiler to each of the Altera device families.
Table 1–2. Device Family Support (Part 1 of 2)
®
Cyclone
Cyclone II Full Full
HardCopy
Stratix
Stratix GX Full No support
Stratix II (1) Full Full
Stratix II GX Full Full
®
II Preliminary Preliminary
®
Device Family
Support
DDR SDRAM DDR2 SDRAM
Full No support
Full No support
March 2009 Altera Corporation DDR and DDR2 SDRAM Controller Compiler User Guide
Page 6

1–2 Chapter 1: About This Compiler
Features
Table 1–2. Device Family Support (Part 2 of 2)
Support
Features
Device Family
DDR SDRAM DDR2 SDRAM
Other device families (2), (3) No support No support
Notes to Table 1–2:
(1) For new Stratix II designs, use the DDR and DDR2 SDRAM High-Performance Controller.
(2) For more information on support for Stratix III devices with existing designs, contact Altera.
(3) For new Stratix III or Cyclone III designs, use the DDR and DDR2 SDRAM High-Performance Controller.
■ Support for industry-standard DDR and DDR2 SDRAM devices and modules
■ 1, 2, 4, or 8 chip-select signals
■ Data mask signals for partial write operations
■ Bank management architecture, which minimizes latency
■ Configurable data width
■ DQS read postamble control logic
■ Free clear-text datapath for use with custom controller
■ Automatic or user-controlled refresh
■ Support for registered DIMMs
■ Optional non-DQS read mode for Stratix and Stratix II side banks
■ IP Toolbench-generated constraint script
■ Quick and easy implementation with example design
■ System timing analysis
■ Support for OpenCore Plus evaluation
■ SOPC Builder ready
■ IP functional simulation models for use in Altera-supported VHDL and Verilog
HDL simulators
General Description
The Altera DDR and DDR2 SDRAM Controller Compiler comprises the DDR SDRAM
Controller MegaCore function and the DDR2 SDRAM Controller MegaCore function.
The MegaCore functions provide simplified interfaces to industry-standard DDR
SDRAM and DDR2 SDRAM devices.
The DDR and DDR2 SDRAM Controllers handle the complex aspects of using DDR or
DDR2 SDRAM—initializing the memory devices, managing SDRAM banks, and
keeping the devices refreshed at appropriate intervals. The DDR and DDR2 SDRAM
Controllers translate read and write requests from the local interface into all the
necessary SDRAM command signals.
DDR and DDR2 SDRAM Controller Compiler User Guide March 2009 Altera Corporation
Page 7

Chapter 1: About This Compiler 1–3
DDR SDRAMExample Driver
PLL
DLL (1)
DDR SDRAM
Interface
Pass or Fail
Local
Interface
Example Design
Control
Logic
(Encrypted)
DDR SDRAM Controller
Data Path
(Clear Text)
General Description
The DDR SDRAM Controller is optimized for Altera Stratix and Cyclone series; the
DDR2 SDRAM Controller is optimized for Altera Stratix II and Cyclone II devices
only. The advanced features available in these devices allow you to interface directly
to DDR or DDR2 SDRAM devices and to use the DQS signal in the read and write
direction.
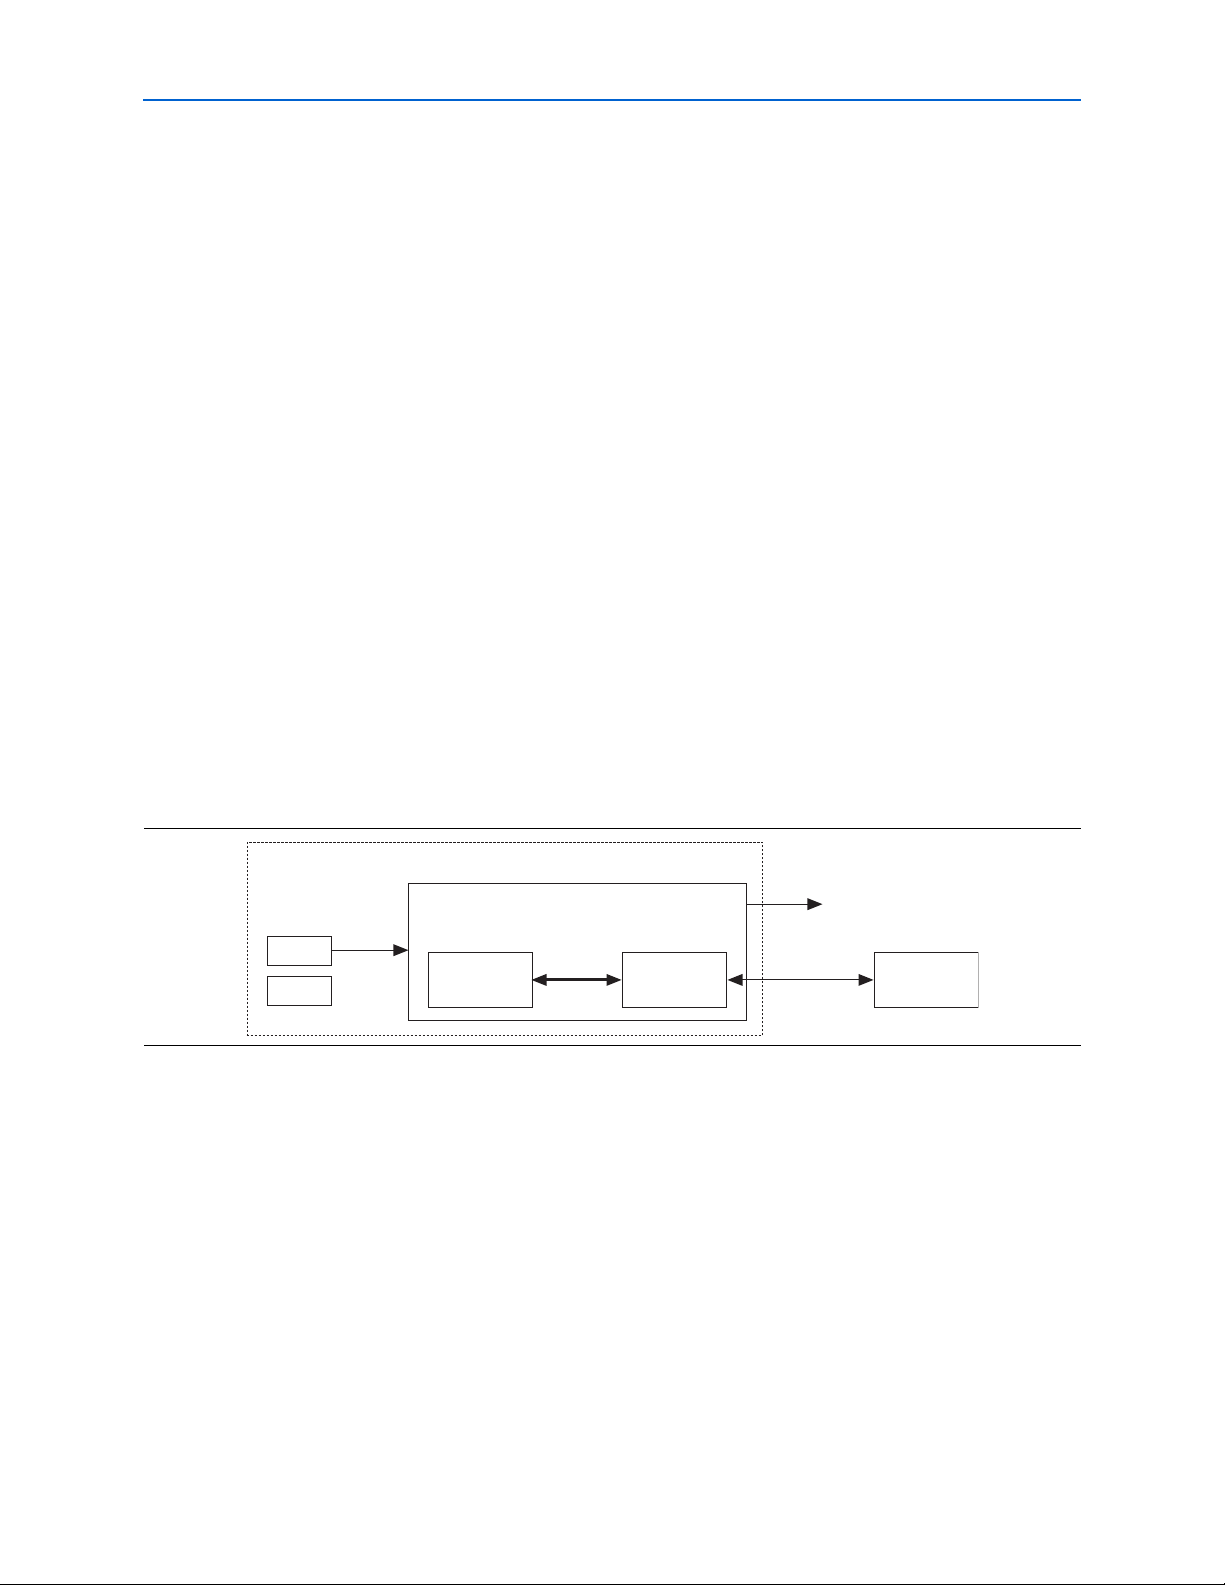
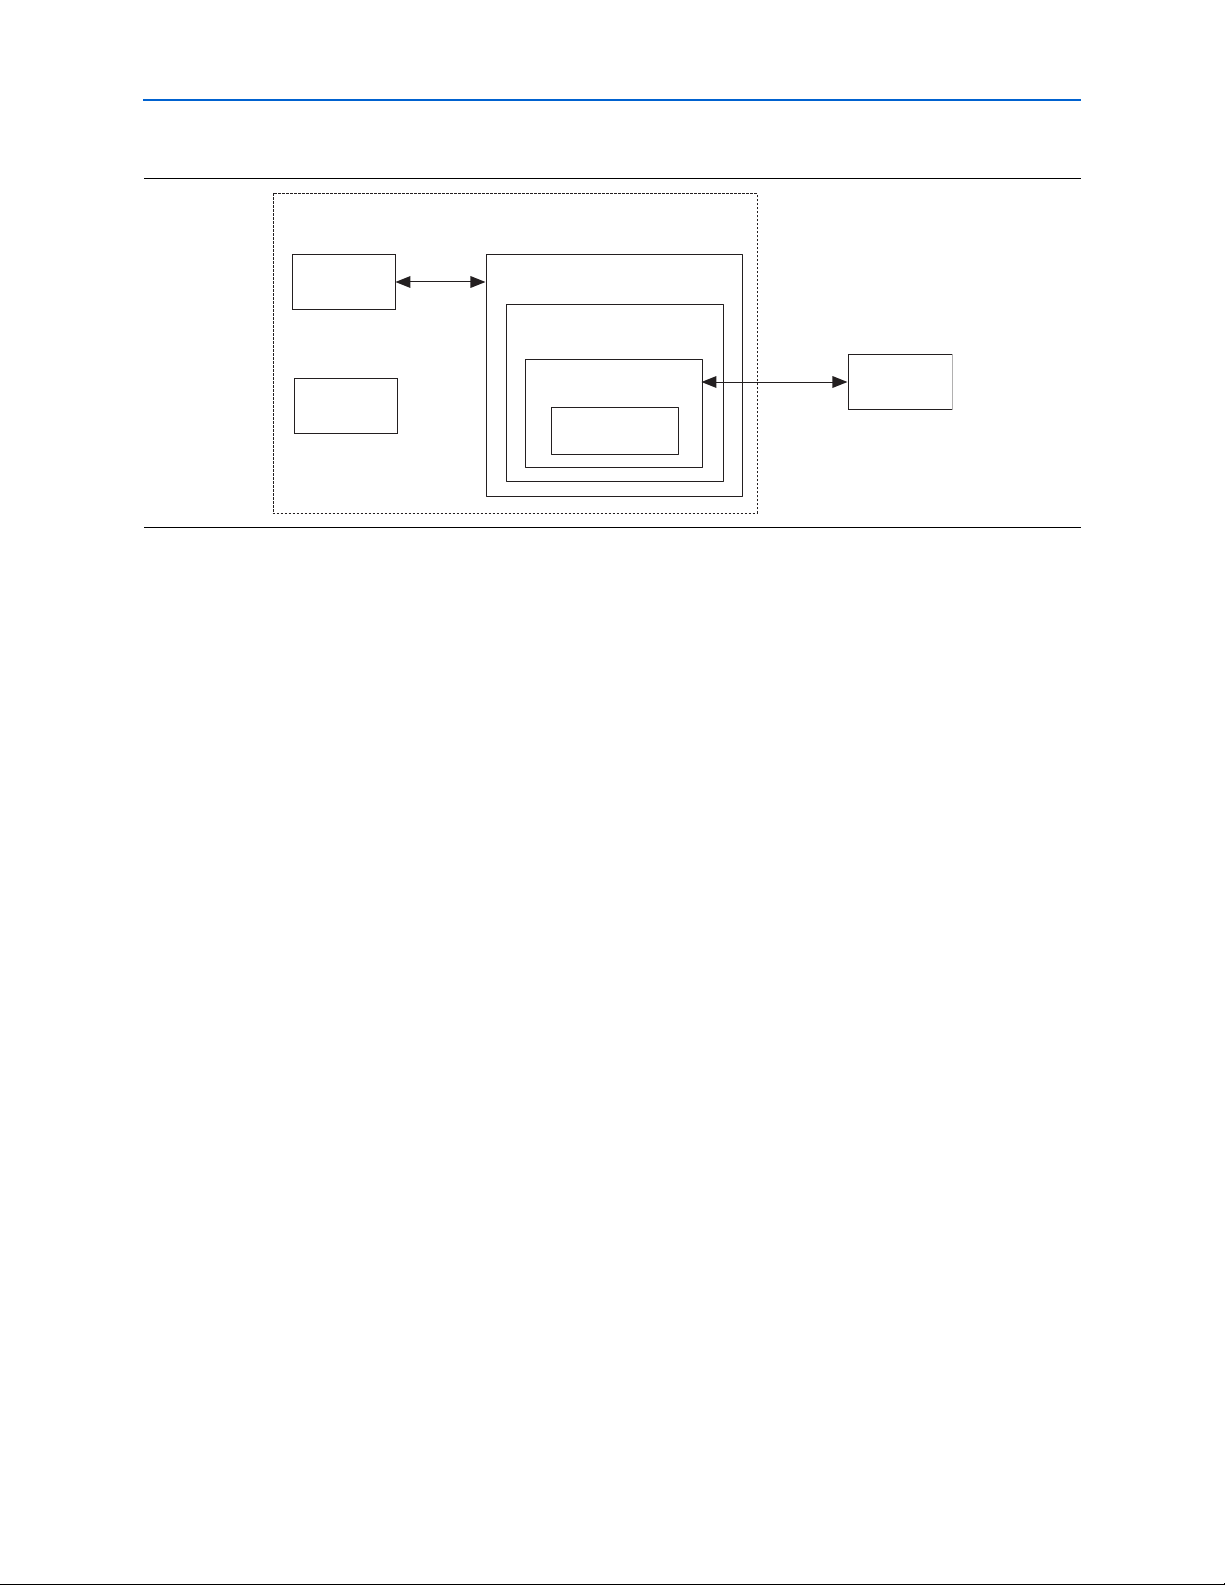
Figure 1–1 shows a system-level diagram including the example design that the DDR
or DDR2 SDRAM Controller MegaCore functions create for you.
Figure 1–1. DDR & DDR2 SDRAM Controller System-Level Diagram
Note to Figure 1–1:
(1) Optional, for Stratix series and HardCopy II devices only.
Whether you use IP Toolbench in SOPC Builder or in the Quartus II software, it
generates example design, instantiates a phase-locked loop (PLL), an example driver,
your DDR or DDR2 SDRAM controller custom variation, and an optional DLL (for
Stratix series only). The example design is a fully-functional design that can be
simulated, synthesized, and used in hardware. The example driver is a self-test
module that issues read and write commands to the controller and checks the read
data to produce the pass/fail and test complete signals.
You can replace the DDR or DDR2 SDRAM controller encrypted control logic in the
example design with your own custom logic, which allows you to use the Altera
clear-text datapath with your own control logic.
The DDR and DDR2 SDRAM Controllers are very similar. The following differences
exist:
■ Initialization timing (refer to “DDR SDRAM Initialization Timing” on page 3–25
and “DDR2 SDRAM Initialization Timing” on page 3–26)
■ CAS latency options:
■ 2.0, 2.5, or 3.0, for DDR SDRAM
■ 3, 4, or 5, for DDR2 SDRAM
March 2009 Altera Corporation DDR and DDR2 SDRAM Controller Compiler User Guide
Page 8
1–4 Chapter 1: About This Compiler
■ Burst lengths:
■ 2, 4, or 8, for DDR SDRAM
■ 4, for DDR2 SDRAM
■ Banks:
■ 4 for DDR SDRAM
■ 4 or 8 for DDR2 SDRAM
■ Support for ODT in DDR2 SDRAM
Performance and Resource Utilization
Performance and Resource Utilization
Tab le 1– 3 shows typical performance results for the DDR SDRAM controller using the
Quartus II software version 9.0.
Table 1–3. Typical Performance
System fMAX (MHz)
Device
DDR SDRAM DDR2 SDRAM
Cyclone (EP1C20F400C6) 133 –
Cyclone II (EP2C35F672C6) 167 167
Stratix (EP1S25F780C5) 200 –
Stratix II (EP2S60F1020C3) 200 267 (1)
Stratix II GX (EP2SGX30CF780C3) 200 (2) 267 (1) (2)
Note to Tab le 1– 3:
(1) For information on a solution that achieves speeds greater than 267 MHz (533 Mbps) up to 333 MHz (667 Mbps),
contact your local Altera sales representative. To achieve speeds greater than 267 MHz, a new dynamic
autocalibration circuit is required.
(2) Pending device characterization.
f For more information on device performance, refer to the relevant device handbook.
Tab le 1– 4 shows typical sizes in logic elements (LEs) or adaptive look-up tables
(ALUTs) for the DDR SDRAM controller.
Table 1–4. Typical Size (Part 1 of 2) (Note 1)
Combinational
Device Memory Width (Bits) LEs
ALUTs Logic Registers M4K RAM Blocks (2)
Cyclone 16 860 — — 1
32 1,050 — — 2
Cyclone II 16 940 — — 1
32 1,120 — — 2
64 1,500 — — 4
72 1,600 — — 5
DDR and DDR2 SDRAM Controller Compiler User Guide March 2009 Altera Corporation
Page 9

Chapter 1: About This Compiler 1–5
Installation and Licensing
Table 1–4. Typical Size (Part 2 of 2) (Note 1)
Combinational
Device Memory Width (Bits) LEs
ALUTs Logic Registers M4K RAM Blocks (2)
Stratix 16 — 750 — 1
32 — 830 — 2
64 — 1,000 — 4
72 — 1,040 — 5
Stratix II 16 — 800 — 1
32 — 960 — 2
64 — 1,250 — 4
72 — 1,320 — 5
Stratix II GX 16 — 800 — 1
32 — 960 — 2
64 — 1,250 — 4
72 — 1,320 — 5
Notes to Table 1–4:
(1) These sizes are a guide only and vary with different choices of parameters. These numbers are created with the default settings for each device
family, varying only the width of the interface. Generally, the controller uses about 700 LEs while the size of the datapath varies with width and
the amount of pipelining and clocking scheme required.
(2) The controller uses M4K RAM blocks to buffer write data from the user logic. If you select a burst length of 1 (2 on the DDR SDRAM side), this
buffer is not necessary and no memory blocks are used in your variation, regardless of data width.
The performance of the entire system and in general the DDR or DDR2 SDRAM
controller depends upon the number of masters and slaves connected to the Avalon
Memory-Mapped (Avalon-MM) interface, which degrades as the number of masters
and slaves connected to it increases. If the number of masters connected to the slave
increases, the size of the arbiter (which is part of the Avalon-MM interface) increases,
which reduces the performance of the system. The DDR or DDR2 SDRAM controller
performance is limited by the frequency of Avalon-MM interface.
There is no latency associated within the Avalon-MM interface, when it transfers the
read or write request to the controller local interface. If there are multiple masters
connected to the DDR or DDR2 SDRAM controller, there may be wait states before
the request from the master is accepted by the controller.
f For more information, refer to the System Interconnect Fabric for Memory-Mapped
Interfaces chapter in the Quartus II Handbook.
Installation and Licensing
The DDR and DDR2 SDRAM Controller Compiler is part of the MegaCore IP Library,
which is distributed with the Quartus
website, www.altera.com.
f For system requirements and installation instructions, refer to Quartus II Installation &
Licensing for Windows and Linux Workstations.
®
II software and downloadable from the Altera
®
March 2009 Altera Corporation DDR and DDR2 SDRAM Controller Compiler User Guide
Page 10
1–6 Chapter 1: About This Compiler
Installation and Licensing
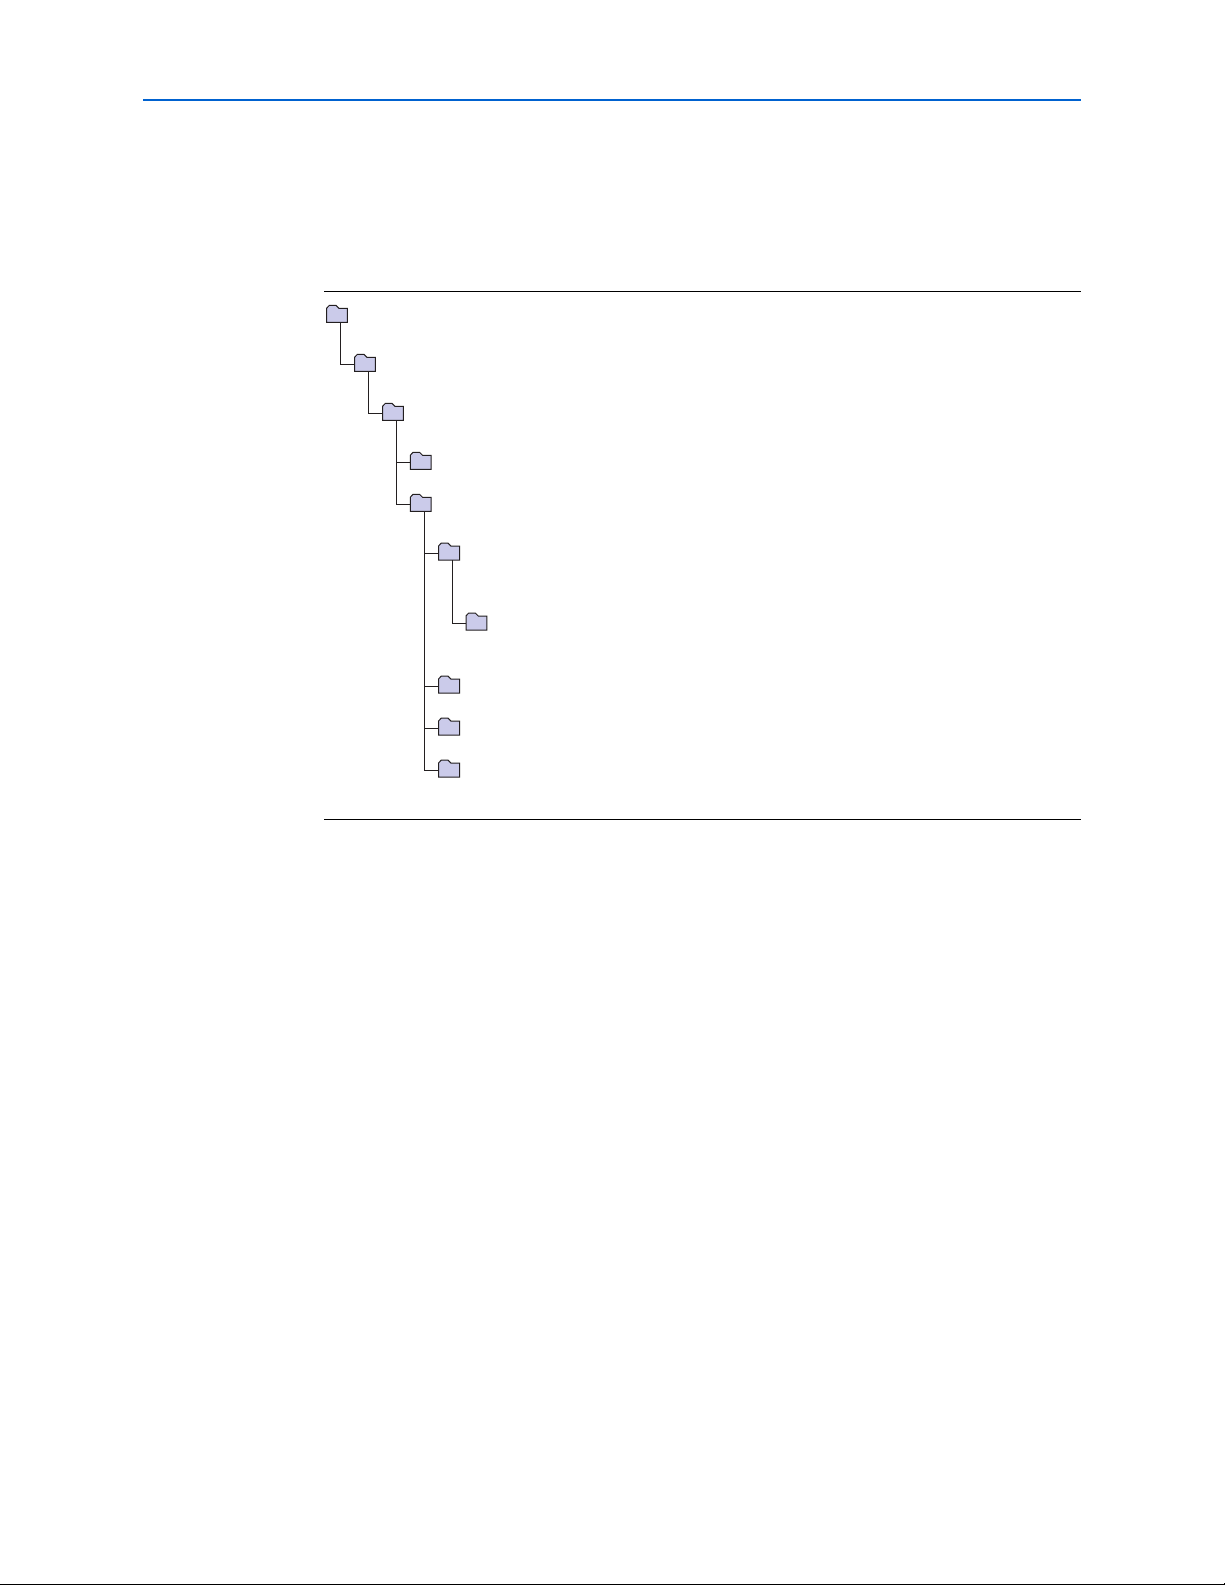
Figure 1–2 shows the directory structure after you install the DDR and DDR2 SDRAM
Controller Compiler, where <path> is the installation directory. The default
installation directory on Windows is c:\altera\<version>; on Linux it is
/opt/altera<version>.
Figure 1–2. Directory Structure
<path>
Installation directory.
ip
Contains the Altera MegaCore IP Library and third-party IP cores.
altera
Contains the Altera MegaCore IP Library.
common
Contains shared components.
ddr_ddr2_sdram
Contains the DDR and DDR2 SDRAM Controller Compiler files and documentation.
constraints
Contains scripts that generate an instance-specific Tcl script for each instance of the DDR and DDR2
SDRAM Controller Compiler in various Altera devices.
dat
Contains a data file for each Altera device combination that is used by the Tcl script to generate the
instance-specific Tcl script.
doc
Contains the documentation for the DDR and DDR2 SDRAM Controller Compiler.
lib
Contains encrypted lower-level design files and other support files.
system_timing
Contains system timing analysis scripts and associated files.
OpenCore Plus Evaluation
With Altera’s free OpenCore Plus evaluation feature, you can perform the following
actions:
■ Simulate the behavior of a megafunction (Altera MegaCore function or AMPP
megafunction) within your system
■ Verify the functionality of your design, as well as evaluate its size and speed
quickly and easily
■ Generate time-limited device programming files for designs that include
MegaCore functions
■ Program a device and verify your design in hardware
You only need to purchase a license for the megafunction when you are completely
satisfied with its functionality and performance, and want to take your design to
production.
f For more information on OpenCore Plus hardware evaluation using the DDR and
DDR2 SDRAM Controller, refer to “OpenCore Plus Time-Out Behavior” on page 3–3
and AN 320: OpenCore Plus Evaluation of Megafunctions.
SM
DDR and DDR2 SDRAM Controller Compiler User Guide March 2009 Altera Corporation
Page 11

Design Flow
2. Getting Started
The Altera DDR and DDR2 SDRAM Controller Compiler and the Quartus II software
provide many options for creating custom, high-performance DDR and DDR2
SDRAM designs.
You can parameterize the DDR and DDR2 SDRAM Controller Compiler using either
one of the following flows:
■ SOPC Builder flow
■ MegaWizard
The SOPC Builder flow creates a simpler, automatically-integrated system; the
MegaWizard Plug-In flow requires more user-customization.
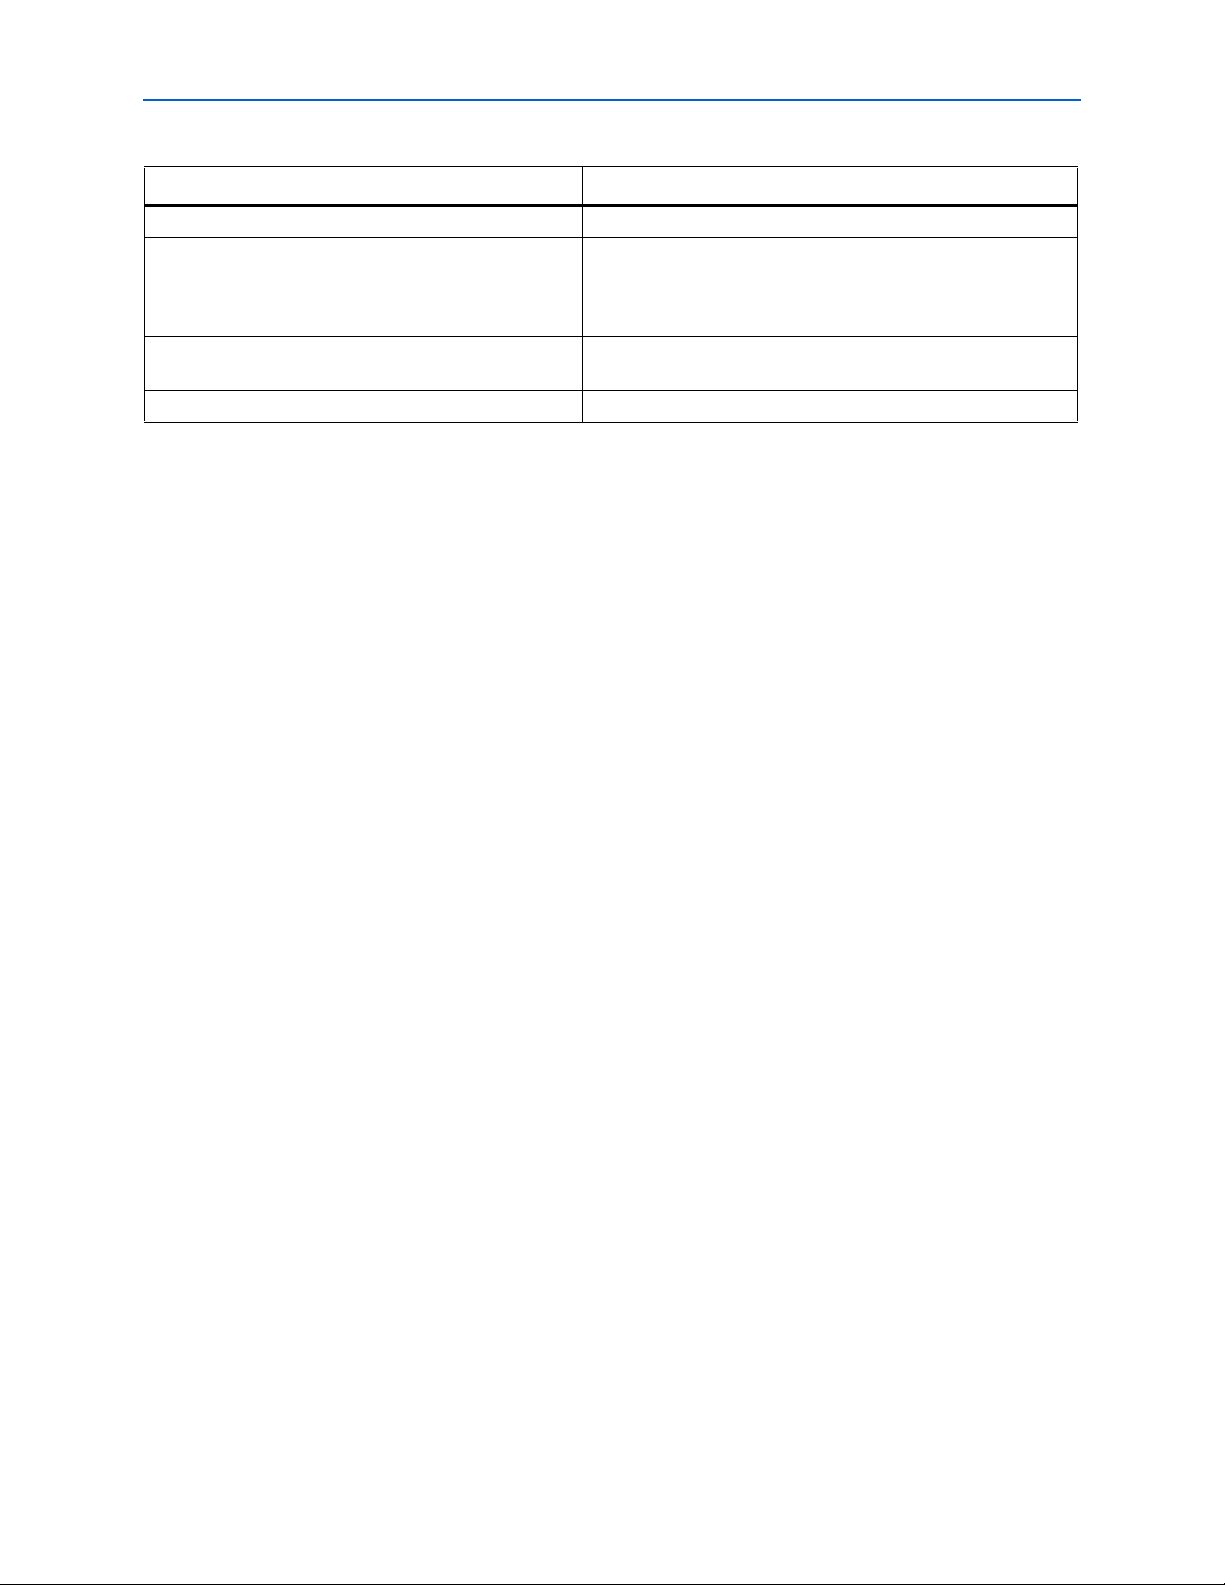
Tab le 2– 1 summarizes the advantages offered by the different parameterization flows.
Table 2–1. Advantages of the Parameterization Flows
TM
Plug-In Manager flow
SOPC Builder Flow MegaWizard Plug-In Manager Flow
■ Requires minimal DDR or DDR2 SDRAM
design expertise
■ Simple and flexible GUI to create complete
DDR or DDR2 SDRAM system within hours
■ Automatically-generated simulation
environment
■ Create custom components and integrate
them via the component wizard
■ All components are automatically
interconnected via the Avalon-MM interface
SOPC Builder Design Flow
The SOPC Builder design flow involves the following steps:
1. In SOPC Builder, use IP Toolbench to create a custom variation of the DDR or
DDR2 SDRAM controller MegaCore function and implement and generate the rest
of your SOPC Builder system.
2. Create your design, based on the DDR or DDR2 SDRAM example design.
3. Perform functional simulation with IP functional simulation models.
4. Use the Quartus II software to edit the PLL(s), add constraints, compile, and
perform post-compilation timing analysis.
■ More control of the system feature set
■ Design directly from the DDR or DDR2
SDRAM interface to peripheral device(s)
■ Achieves higher-frequency operation
5. If you have a suitable development board, you can generate an OpenCore Plus
time-limited programming file, which you can use to verify the operation of the
design in hardware.
© March 2009 Altera Corporation DDR and DDR2 SDRAM Controller Compiler User Guide
Page 12

2–2 Chapter 2: Getting Started
SOPC Builder Design Flow
The DDR and DDR2 SDRAM Controller Compiler with SOPC Builder flow option
allows you to build a complete DDR or DDR2 SDRAM system. The DDR and DDR2
SDRAM Controller Compiler with SOPC Builder flow connects the DDR or DDR2
SDRAM Controller to the Avalon-MM interface, which allows you to easily create any
system that includes one or more of the Avalon-MM peripherals.
You specify system components and choose system options from a rich set of features,
and the SOPC Builder automatically generates the interconnect logic and simulation
environment. Thus, you define and generate a complete system in dramatically less
time than manual-integration methods.
To perform burst transactions when the DDR or DDR2 SDRAM controller is
instantiated in SOPC builder, you need another master such as a DMA controller to
initiate the burst transactions.
The performance of the entire system and in general the DDR or DDR2 SDRAM
controller depends upon the number of masters and slaves connected to the
Avalon-MM interface, which degrades as the number of masters and slaves connected
to it increases. If the number of masters connected to the slave increases, the size of the
arbiter (which is part of the Avalon-MM interface) increases, which reduces the
performance of the system. The DDR or DDR2 SDRAM controller performance is
limited by the frequency of Avalon-MM interface.
There is no latency associated within the Avalon-MM interface, when it transfers the
read or write request to the controller local interface. If there are multiple masters
connected to the DDR or DDR2 SDRAM controller, there may be wait states before
the request from the master is accepted by the controller.
DDR & DDR2 SDRAM Controller Walkthrough
This walkthrough explains how to create a custom variation of the DDR or DDR2
SDRAM Controller MegaCore function in a SOPC Builder system using the Altera
DDR SDRAM controller IP Toolbench and the Quartus II software.
As you go through the wizard, each step is described in detail. The flow used in this
SOPC Builder walkthrough ensures that the PLL is properly connected to the DDR or
DDR2 SDRAM controller and that the wizard-generated constraints are correctly
applied.
f For more information on SOPC Builder, refer to volume 4 of the Quartus II Handbook.
This walkthrough involves the following steps:
■ “Create a New Quartus II Project” on page 2–3
■ “Launch SOPC Builder & IP Toolbench” on page 2–4
■ “Parameterize” on page 2–4
■ “Constraints” on page 2–5
■ “Add/Update Component” on page 2–5
DDR and DDR2 SDRAM Controller Compiler User Guide © March 2009 Altera Corporation
Page 13

Chapter 2: Getting Started 2–3
SOPC Builder Design Flow
Create a New Quartus II Project
You need to create a new Quartus II project with the New Project Wizard, which
specifies the working directory for the project, assigns the project name, and
designates the name of the top-level design entity. To create a new project follow
these steps:
1. Choose Programs > Altera > Quartus II <version> (Windows Start menu) to run
the Quartus II software. Alternatively, you can use the Quartus II Web Edition
software.
2. Choose New Project Wizard (File menu).
3. Click Next in the New Project Wizard: Introduction page (the introduction page
does not display if you turned it off previously).
4. In the New Project Wizard: Directory, Name, Top-Level Entity page, enter the
following information:
a. Specify the working directory for your project. For example, this walkthrough
uses the c:\altera\projects\ddr_project directory.
b. Specify the name of the project. This walkthrough uses project for the project
name.
1 The Quartus II software automatically specifies a top-level design entity
that has the same name as the project. Do not change it.
5. Click Next to close this page and display the New Project Wizard: Add Files page.
1 When you specify a directory that does not already exist, a message asks if
the specified directory should be created. Click Yes to create the directory.
6. If you installed the MegaCore IP Library in a different directory from where you
installed the Quartus II software, you must add the user libraries:
a. Click User Libraries.
b. Type <path>\ip into the Library name field, where <path> is the directory in
which you installed the DDR and DDR2 SDRAM Controller.
c. Click Add to add the path to the Quartus II project.
d. Click OK to save the library path in the project.
7. Click Next to close this page and display the New Project Wizard: Family &
Device Settings page.
8. On the New Project Wizard: Family & Device Settings page, choose a supported
target device family in the Family list. Select Ye s for Do you want to assign a
specific device?.
1 Ensure you select Ye s for Do you want to assign a specific device? to
choose a specific device, as IP Toolbench will not work correctly if you
select No.
1 The DDR2 SDRAM controller only supports Cyclone II, HardCopy II,
Stratix II GX, and Stratix II devices.
© March 2009 Altera Corporation DDR and DDR2 SDRAM Controller Compiler User Guide
Page 14

2–4 Chapter 2: Getting Started
SOPC Builder Design Flow
1 If you are targeting a specific Altera development board, ensure you choose
the correct target device and memory type.
9. Choose the target device in the Available devices list.
10. The remaining pages in the New Project Wizard are optional. Click Finish to
complete the Quartus II project.
Launch SOPC Builder & IP Toolbench
To launch SOPC Builder, follow these steps:
1. Choose SOPC Builder (Tools menu).
2. Enter a System Name.
1 The system name must not be the same as the Quartus II project name (and
therefore the top-level design entity name).
3. Type a value for the clk_0 (MHz). For example, 80.0.
4. Build your system from the System Contents list. Expand the Memories and
Memory Controllers folder, and click either DDR SDRAM MegaCore Function
or DDR2 SDRAM MegaCore Function in the SDRAM folder. Click Add. The
DDR SDRAM controller IP Toolbench opens.
Parameterize
To parameterize the DDR or DDR2 SDRAM Controller, follow these steps:
1. Click Step 1: Parameterize, to parameterize your custom variation.
2. In the Presets list, click a specific memory device, Altera development board, or
click Custom.
1 If you chose to target an Altera board, all the settings on the Basic Settings
tab and all Advanced Mode settings are correct for that board.
1 You cannot alter the clock speed in IP Toolbench. To alter the clock speed of
your system, close IP Toolbench and return to step 3 on page 2–4.
3. If you chose Custom, choose the appropriate Memory Interface values and enter
your Board Trace Delays.
1 You must accurately set the board trace delays for your system to work in
hardware.
4. Click Show Timing Estimates, at any time to see the results of the system timing
analysis.
5. You may turn on Advanced Mode at any time, to see all the settings you can
change on the DDR or DDR2 SDRAM Controller.
f For more information on Advanced Mode settings, refer to “Parameterize” on
page 2–11.
DDR and DDR2 SDRAM Controller Compiler User Guide © March 2009 Altera Corporation
Page 15

Chapter 2: Getting Started 2–5
SOPC Builder Design Flow
6. Turn on Advanced Mode, and click the Project Settings tab.
7. Ensure Update the example design file that instantiates the controller variation
is turned on, so that the IP Toolbench automatically updates the example design
and the testbench.
Constraints
To choose the constraints for your device, follow these steps:
1 If you chose to target an Altera board, all the constraint settings are correct for that
board.
1. Click Step 2: Constraints.
2. Select the positions on the device for each of the DDR SDRAM byte groups. To
place a byte group, select the byte group in the drop-down menu at your chosen
position.
1 The floorplan matches the orientation of the Quartus II floorplanner. The
layout represents the die as viewed from above. A byte group consists of
four or eight DQ pins, a DM pin, and a DQS pin.
1 IP Toolbench chooses the correct positions, if you are using an Altera board
preset.
Add/Update Component
To add or update the component and generate the system, follow these steps:
1. Click Step 3: Add/Update Component, to add the custom variation to SOPC
Builder.
2. SOPC Builder uses the module name (default ddr_sdram_0) for the variation
name of your DDR or DDR2 SDRAM Controller. You can change this name if you
want to.
3. In SOPC Builder, create the rest of your SOPC Builder system.
4. Optional. Click the System Generation tab and turn on Simulation. Create
project simulator files. to create simulation files for your project.
c Only use these simulation model output files for simulation purposes and expressly
not for synthesis or any other purposes. Using these models for synthesis creates a
nonfunctional design.
f For more information on the Nios II simulation flow, refer to volume 4 of the Quartus
II Handbook.
5. On the System Generation tab, click Generate.
1 Before you click Generate, you must add at least one Avalon-MM master to
your system.
© March 2009 Altera Corporation DDR and DDR2 SDRAM Controller Compiler User Guide
Page 16
2–6 Chapter 2: Getting Started
DDR SDRAM
Other
SOPC Builder
Components
SOPC Builder System
DDR SDRAM
Interface
UART, etc.
Editted Example Top-Level Design
DDR SDRAM
Controller
Avalon
Switch
Fabric
PLL
DLL (
1
)
SOPC Builder Design Flow
SOPC Builder generates the SOPC Builder system files. You must create a top-level
design that instantiates the SOPC Builder system, PLL(s) and a DLL, before you
compile the SOPC Builder project in the Quartus II software (refer to “Create Your
Top-Level Design” on page 2–6).
In addition to the SOPC Builder system files, SOPC Builder generates an example
design, <variation name>_debug_design.v or .vhd. The example design contains the
DDR or DDR2 SDRAM Controller, PLL, and the example driver; it has no SOPC
Builder components (refer to Figure 1–1 on page 1–3).
You can use the example design to test boards and simulate, to understand the DDR
or DDR2 SDRAM interface.
Create Your Top-Level Design
Use the example design, <variation name>_debug_design.v or .vhd, as a guide to
connect and instantiate the PLL, the optional fed-back PLL, and DLL, to your SOPC
Builder system. You must remove the example driver and the controller, and replace
them with the SOPC Builder-generated system (refer to Figure 2–1).
1 To ensure that the wizard-generated constraints are correctly applied, either allow the
constraints script to automatically detect your hierarchy, or ensure that the hierarchy
and pin names on the Hierarchy tab match those names in your HDL.
f For more example designs, refer to the Cyclone II reference designs in the Nios
Development Kit.
Figure 2–1. SOPC Builder System with the DDR SDRAM Controller
Simulate the SOPC Builder Design
To simulate the SOPC Builder design, either use the Nios II simulation flow or create
your own testbench instantiating the top-level design and a memory model.
f For more information on the Nios II simulation flow, refer to volume 4 of the Quartus
II Handbook.
Compile the SOPC Builder Design
®
II
DDR and DDR2 SDRAM Controller Compiler User Guide © March 2009 Altera Corporation
You can now edit the PLL(s) and use the Quartus II software to compile the example
design and perform post-compilation timing analysis.
Page 17

Chapter 2: Getting Started 2–7
SOPC Builder Design Flow
Edit the PLL
The IP Toolbench-generated example design includes a PLL, which has an input to
output clock ratio of 1:1 and a clock frequency that you entered in IP Toolbench. In
addition, IP Toolbench correctly sets all the phase offsets of all the relevant clock
outputs for your design. You can edit the PLL input clock to make it conform to your
system requirements. If you re-run IP Toolbench, it does not overwrite this PLL, if
you turn off Automatically generate the PLL, so your edits are not lost.
1 If you turn on Use fed-back clock for resynchronization, IP Toolbench generates a
second PLL—the fed-back PLL. You need not edit the fed-back PLL.
f For more information on the PLL, refer to “PLL Configurations” on page 3–13.
To edit the example PLL, follow these steps:
1. Choose MegaWizard Plug-In Manager (Tools menu).
2. Select Edit an existing custom megafunction variation and click Next.
3. In your Quartus II project directory, for VHDL choose ddr_pll_<device name>.vhd;
for Verilog HDL choose ddr_pll_<device name>.v.
4. Click Next.
5. Edit the PLL parameters in the ALTPLL MegaWizard Plug-In Manager.
f For more information on the ALTPLL megafunction, refer to the Quartus II Help or
click Documentation in the ALTPLL MegaWizard Plug-In Manager.
Compile & Perform Timing Analysis
Before the Quartus II software compiles the SOPC Builder design, it runs the IP
Toolbench-generated Tcl constraints script, auto_add_constraints.tcl.
The auto_add_constraints.tcl script calls the add_constraints_for_<variation
name>.tcl script for each variation in your design. The add_constraints_for_<variation
name>.tcl script checks for any previously added constraints specific to that variation,
removes them, and then adds constraints for that variation.
The constraints script analyzes and elaborates your design, to automatically extract
the hierarchy to your variation. To prevent the constraints script analyzing and
elaborating your design, turn on Enable hierarchy control in the wizard, and enter
the correct hierarchy path to your datapath (refer to step 24 on page 2–13).
When the constraints script runs, it creates another script,
remove_constraints_for_<variation name>.tcl, which can be used to remove the
constraints from your design.
1 Click Start Compilation (Processing menu), to run the add constraints scripts,
compile the design, and perform timing analysis.
When the compilation is complete, the Quartus II processing message tab displays the
post-compilation timing analysis results. The results are also written to the <variation
name>_post_summary.txt file in your project directory.
© March 2009 Altera Corporation DDR and DDR2 SDRAM Controller Compiler User Guide
Page 18

2–8 Chapter 2: Getting Started
c Turn ing o ff the Display entity name for node name setting prevents the
timing analysis script from completing successfully. To enable this setting,
open the Assignments menu and click Settings. On the Settings page, click
Compilation Process Settings, and then click More Settings. In the Name
list, select Display entity name for node name and in the Setting list, select
On.
The results show how much slack you have for each of the various timing
requirements—negative slack means that you are not meeting timing. The Message
window shows various timing margins for your design.
If the verify timing script reports that your design meets timing, you have
successfully generated and implemented your DDR or DDR2 SDRAM Controller.
If the timing does not reach your requirements, adjust the resynchronization and
postamble clock phases on the IP Toolbench Manual Timings tab (refer to “Manual
Timing Settings” on page A–1).
f For more information on how to achieve timing, refer to Appendix B, DDR SDRAM
on the Nios Development Board, Cyclone II Edition.
MegaWizard Plug-In Manager Design Flow
1 If you have “?” characters in the Quartus II Assignment Editor, the Quartus II
f For more information on constraints, refer to “Constraints” on page 3–18.
Program a Device
f For more information on OpenCore Plus hardware evaluation using the DDR or
To view the constraints in the Quartus II Assignment Editor, choose Assignment
Editor (Assignments menu).
software cannot find the entity to which it is applying the constraints, probably
because of a hierarchy mismatch. Either edit the constraints script, or enter the correct
hierarchy path in the Hierarchy tab (refer to step 24 on page 2–13).
After you have compiled the SOPC Builder design, you can perform gate-level
simulation (refer to “Simulate the SOPC Builder Design” on page 2–6) or program
your targeted Altera device to verify the SOPC Builder design in hardware.
With Altera's free OpenCore Plus evaluation feature, you can evaluate the DDR or
DDR2 SDRAM controller MegaCore function before you purchase a license.
OpenCore Plus evaluation allows you to produce a time-limited programming file.
DDR2 SDRAM controller MegaCore function, refer to “OpenCore Plus Evaluation”
on page 1–6, “OpenCore Plus Time-Out Behavior” on page 3–3, and the AN 320:
OpenCore Plus Evaluation of Megafunctions.
MegaWizard Plug-In Manager Design Flow
MegaWizard Plug-In Manager design flow involves the following steps:
1. Create a custom variation of the DDR or DDR2 SDRAM controller MegaCore
function using IP Toolbench from the MegaWizard Plug-In Manager.
DDR and DDR2 SDRAM Controller Compiler User Guide © March 2009 Altera Corporation
Page 19

Chapter 2: Getting Started 2–9
MegaWizard Plug-In Manager Design Flow
2. Use the IP Toolbench-generated IP functional simulation model to verify the
operation of the example design and the example driver.
3. Use the Quartus II software to edit the PLL(s), add constraints to the example
design, compile the example design, and perform post-compilation timing
analysis.
4. Perform gate-level timing simulation, or if you have a suitable development
board, you can generate an OpenCore Plus time-limited programming file, which
you can use to verify the operation of the example design in hardware.
5. Generate a programming file for the Altera device(s) on your board.
6. Program the Altera device(s) with the completed design.
The DDR and DDR2 SDRAM Controller Compiler with MegaWizard Plug-In flow
option allows you to fully specify a DDR or DDR2 SDRAM controller. With this flow,
you design to a low-level interface.
DDR & DDR2 SDRAM Controller Walkthrough
If you are not using SOPC Builder, this walkthrough explains how to create a custom
variation of the DDR or DDR2 SDRAM Controller MegaCore function using the
Altera DDR and DDR2 SDRAM Controller IP Toolbench and the Quartus II software.
As you go through the wizard, each step is described in detail.
For more information on using HardCopy II devices, refer to Appendix C, HardCopy
II Design Walkthrough.
This walkthrough requires the following steps:
■ “Create a New Quartus II Project” on page 2–9
■ “Launch IP Toolbench from the MegaWizard Plug-In Manager” on page 2–11
■ “Parameterize” on page 2–11
■ “Constraints” on page 2–15
■ “Set Up Simulation” on page 2–15
■ “Generate” on page 2–15
Create a New Quartus II Project
You need to create a new Quartus II project with the New Project Wizard, which
specifies the working directory for the project, assigns the project name, and
designates the name of the top-level design entity. To create a new project follow
these steps:
1. Choose Programs > Altera > Quartus II <version> (Windows Start menu) to run
the Quartus II software. Alternatively, you can use the Quartus II Web Edition
software.
2. Choose New Project Wizard (File menu).
3. Click Next in the New Project Wizard: Introduction page (the introduction page
does not display if you turned it off previously).
© March 2009 Altera Corporation DDR and DDR2 SDRAM Controller Compiler User Guide
Page 20

2–10 Chapter 2: Getting Started
MegaWizard Plug-In Manager Design Flow
4. In the New Project Wizard: Directory, Name, Top-Level Entity page, enter the
following information:
a. Specify the working directory for your project. For example, this walkthrough
uses the c:\altera\projects\ddr_project directory.
b. Specify the name of the project. This walkthrough uses project for the project
name.
1 The Quartus II software automatically specifies a top-level design entity
that has the same name as the project. Do not change it.
5. Click Next to close this page and display the New Project Wizard: Add Files page.
1 When you specify a directory that does not already exist, a message asks if
the specified directory should be created. Click Yes to create the directory.
6. If you installed the MegaCore IP Library in a different directory from where you
installed the Quartus II software, you must add the user libraries:
a. Click User Libraries.
b. Type <path>\ip into the Library name box, where <path> is the directory in
which you installed the DDR and DDR2 SDRAM Controller.
c. Click Add to add the path to the Quartus II project.
d. Click OK to save the library path in the project.
7. Click Next to close this page and display the New Project Wizard: Family &
Device Settings page.
8. On the New Project Wizard: Family & Device Settings page, choose the target
device family in the Family list. Select Ye s for Do you want to assign a specific
device?.
1 Ensure you select Ye s for Do you want to assign a specific device? to
choose a specific device, as IP Toolbench will not work correctly if you
select No.
1 The DDR2 SDRAM controller only supports Cyclone II, HardCopy II,
Stratix II GX, and Stratix II devices.
1 If you are targeting a specific Altera development board, ensure you choose
the correct target device and memory type.
9. Select the target device in the Available Devices list.
10. The remaining pages in the New Project Wizard are optional. Click Finish to
complete the Quartus II project.
DDR and DDR2 SDRAM Controller Compiler User Guide © March 2009 Altera Corporation
Page 21

Chapter 2: Getting Started 2–11
MegaWizard Plug-In Manager Design Flow
Launch IP Toolbench from the MegaWizard Plug-In Manager
To launch the wizard in the Quartus II software, follow these steps:
1. Start the MegaWizard Plug-In Manager by choosing the MegaWizard Plug-In
Manager command (Tools menu). The MegaWizard Plug-In Manager dialog box
displays.
1 Refer to Quartus II Help for more information on how to use the
MegaWizard Plug-In Manager.
2. Specify that you want to create a new custom megafunction variation and click
Next.
3. Expand the Interfaces > Memory Controllers directory, then click either DDR
SDRAM Controller v9.0 or DDR2 SDRAM Controller v9.0.
4. Select the output file type for your design; the wizard supports VHDL and Verilog
HDL.
5. The MegaWizard Plug-In Manager shows the project path that you specified in the
New Project Wizard. Append a variation name for the MegaCore function output
files <project path>\<variation name>.
1 The <variation name> must be a different name from the project name and
the top-level design entity name.
6. Click Next to launch IP Toolbench.
Parameterize
To parameterize your MegaCore function, follow these steps:
f For more information on the parameters, refer to “Parameters” on page 3–31.
1. Click Step 1: Parameterize in IP Toolbench.
2. In the Presets list, click a specific memory device, Altera development board, or
click Custom.
1 You can add your own memory devices to this list by editing the
memory_types.dat file in the \constraints directory.
3. Enter a Clock Speed in MHz. For example 200.0. The constraints script, timing
analysis, and the datapath use this clock speed. It must be set to the value that you
intend to use. The first time you use the DDR SDRAM controller IP Toolbench or if
you turn on Automatically generate the PLL, it uses this value for the IP
Toolbench-generated PLL’s input and output clocks (refer to “Edit the PLL” on
page 2–22).
4. Choose the memory parameters.
a. Choose your memory interface parameters.
b. Choose the memory properties.
c. Select either Registered DIMM or Unbuffered memory.
© March 2009 Altera Corporation DDR and DDR2 SDRAM Controller Compiler User Guide
Page 22

2–12 Chapter 2: Getting Started
MegaWizard Plug-In Manager Design Flow
1 Select Unbuffered memory if you are using unbuffered modules or
devices.
f For more information on memory parameters, refer to “Memory” on
page 3–32.
5. Click the Controller tab.
f For more information on controller parameters, refer to “Controller ” on
page 3–33.
6. Select Native or Avalon Memory-Mapped local interface. The Avalon-MM
interface allows you to easily connect to other Avalon-MM peripherals.
f For more information on the Avalon-MM interface, refer to the Avalon
Interface Specifications.
7. Turn on the relevant clocking options.
8. Select your memory initialization options.
9. Select your memory controller options.
10. Turn on the relevant DLL reference clock options.
11. Click the Controller Timings tab.
f For more information on controller timings, refer to “Controller Timings”
on page 3–37.
12. Enter your memory timing parameters in the Required column, so that the
controller timings meet the requirements specified on your memory’s datasheet.
The wizard picks the appropriate number of clock cycles between commands that
are needed and calculates the resulting delay in the Actual column.
1 To manually enter the number of clock cycles, turn on Manually choose
clock cycles and enter values in the Cycles column.
13. Click Memory Timings tab.
f For more information on memory timings, refer to “Memory Timings” on page 3–38.
14. If you chose Custom memory device, enter the device settings from your chosen
memory’s datasheet, otherwise your chosen memory type device settings are
entered automatically.
15. Click the Board Timings tab.
f For more information on board timings, refer to “Board Timings” on page 3–39.
16. Turn on Manual pin load control, if you want to enter the pin loading for the
FPGA pins.
DDR and DDR2 SDRAM Controller Compiler User Guide © March 2009 Altera Corporation
Page 23

Chapter 2: Getting Started 2–13
MegaWizard Plug-In Manager Design Flow
1 You must enter suitable values for the pin loading, because the values affect
timing. Unsuitable values may lead to inaccurate timing analysis.
17. Enter the board trace delays. These delays are used by the timing analysis and to
configure the datapath.
1 You must accurately set the board trace delays for your system to work in
hardware.
18. Click Show Timing Estimates, at any time in the parameterize screen ), to see the
results of the system timing analysis.
19. Click the Project Settings tab.
f For more information on project settings, refer to “Project Settings” on
page 3–40.
20. Enter the pin name of the clock driving the memory (+); enter the pin name of the
clock driving the memory (–). IP Toolbench suggests the name for the fed-back
clock input, but you can edit this name if you wish.
1 The pin names must end in [0], even if you have more than one clock pair.
1 Only change the suggested clock pin names, if you have edited the clock
pin names in the top-level design file. Changing the clock pin names
changes the names of the clock outputs and fed-back clock in the example
top-level design.
21. Ensure Update the example design file that instantiates the controller variation
is turned on, for IP Toolbench to automatically update the example design and the
testbench.
22. Altera recommends that you turn on Automatically apply datapath-specific
contraints to the Quartus II project and Automatically verify datapath-specific
timing in the Quartus II project, so that the Quartus II software automatically
runs these scripts when you compile the example design.
23. Turn off Update the example design PLLs, if you have edited the PLL and you do
not want the wizard to regenerate the PLL when you regenerate the variation.
24. The constraints script analyzes and elaborates your design to automatically extract
the hierarchy to your variation. To prevent the constraints script analyzing and
elaborating your design, turn on Enable hierarchy control, and enter the correct
hierarchy path to your variation. The hierarchy path is the path to the datapath in
your DDR SDRAM controller, without the top-level name. Figure 2–1 on
page 2–14 shows a system example.
1 The constraints apply to the datapath (rather than the controller) so that if
you replace the controller logic with your own controller, the add
constraints script is still valid. So, if you maintain the entity and instance
names, the Quartus II software will correctly add the constraints to your
design.
© March 2009 Altera Corporation DDR and DDR2 SDRAM Controller Compiler User Guide
Page 24
2–14 Chapter 2: Getting Started
DDR SDRAM
Other Logic
PLL
DDR SDRAM
Interface
example_top
Example Top-Level Design
my_ddr_sdram
DDR SDRAM Controller
Data Path
auk_ddr_sdram
my_system
System
MegaWizard Plug-In Manager Design Flow
Figure 2–1. System Naming
25. IP Toolbench uses a prefix (for example, ddr_, or ddr2_) for the names of all
memory interface pins. Enter a prefix for all memory interface pins associated
with this custom variation.
26. If you want to access the manual timing settings, click the Manual Timing tab.
Otherwise, click Finish and proceed to “Constraints” on page 2–15.
f For more information on the manual timing settings, refer to Appendix A,
Manual Timing Settings.
27. Choose Automatic, Always, or Never in the Reclock resynchronized data to the
positive edge list.
28. Turn on Manual resynchronization control, only if you want to override the
wizard-calculated values.
1 Under most circumstances, IP Toolbench calculates the correct
resynchronization settings for your custom variation.
f For more information on resynchronization, refer to “Resynchronization”
on page A–4.
29. Turn on Manual postamble control, only if you want to override the
wizard-calculated values.
1 Under most circumstances, IP Toolbench calculates the correct postamble
settings for your custom variation.
DDR and DDR2 SDRAM Controller Compiler User Guide © March 2009 Altera Corporation
f For more information on postamble, refer to “DQS Postamble” on
page A–10.
30. Turn on your timing analysis options.
31. Click Finish.
Page 25

Chapter 2: Getting Started 2–15
MegaWizard Plug-In Manager Design Flow
Constraints
To choose the constraints for your device, follow these steps:
1. Click Step 2: Constraints in IP Toolbench.
2. Choose the positions on the device for each of the DDR SDRAM byte groups. To
place a byte group, select the byte group in the drop-down box at your chosen
position.
1 The floorplan matches the orientation of the Quartus II floorplanner. The
layout represents the die as viewed from above. A byte group consists of
four or eight DQ pins, a DM pin, and a DQS pin.
1 IP Toolbench chooses the correct positions, if you are using an Altera board
preset.
Set Up Simulation
An IP functional simulation model is a cycle-accurate VHDL or Verilog HDL model
produced by the Quartus II software. The model allows for fast functional simulation
of IP using industry-standard VHDL and Verilog HDL simulators.
c You may only use these simulation model output files for simulation
purposes and expressly not for synthesis or any other purposes. Using these
models for synthesis will create a nonfunctional design.
To generate an IP functional simulation model for your MegaCore function, follow these steps:
1. Click Step 3: Set Up Simulation in IP Toolbench.
2. Turn on Generate Simulation Model.
3. Choose the language in the Language list.
1 To use the IP Toolbench-generated testbench, choose the same language
that you chose for your variation.
4. Some third-party synthesis tools can use a netlist that contains only the structure
of the MegaCore function, but not detailed logic, to optimize performance of the
design that contains the MegaCore function. If your synthesis tool supports this
feature, turn on Generate netlist.
5. Click OK.
Generate
To generate your MegaCore function, follow these steps:
1. Click Step 4: Generate in IP Toolbench.
Tab le 2– 1 describes the generated files and other files that may be in your project
directory. The names and types of files specified in the IP Toolbench report vary
based on whether you created your design with VHDL or Verilog HDL.
© March 2009 Altera Corporation DDR and DDR2 SDRAM Controller Compiler User Guide
Page 26

2–16 Chapter 2: Getting Started
MegaWizard Plug-In Manager Design Flow
Table 2–1. Generated Files (Part 1 of 2) (Note 1) (2)
Filename Description
<variation name>.bsf Quartus II symbol file for the MegaCore function variation. You
can use this file in the Quartus II block diagram editor.
<variation name>.html MegaCore function report file.
<variation name>.vo or .vho VHDL or Verilog HDL IP functional simulation model.
<variation name> .v or .vhd A MegaCore function variation file, which defines a VHDL or
Verilog HDL top-level description of the custom MegaCore
function. Instantiate the entity defined by this file inside of your
design. Include this file when compiling your design in the
Quartus II software.
<variation name>_bb.v Verilog HDL black-box file for the MegaCore function variation.
Use this file when using a third-party EDA tool to synthesize
your design.
<variation name>_auk_ddr_clk_gen.v or .vhd Design file that contains the clock output generators.
<variation name>_auk_ddr_datapath.v or .vhd Design file that instantiates the byte groups and the clock output
generators.
<variation name>_auk_ddr_datapath_pack.v or .vhd A VHDL package, which contains a component that the IP
functional simulation model uses.
<variation name>_auk_ddr_dll.v or .vhd Optional design file that instantiates the Stratix or Stratix II DLL
(Stratix series only).
<variation name>_auk_ddr_dqs_group.v or .vhd Design file that contains the datapath byte groups.
<variation name>_auk_ddr_sdram.v or .vhd Design file that instantiates the controller logic and the datapath
<variation name>_ddr_sdram_vsim.tcl The ModelSim simulation script.
<variation name>_example_driver.v or .vhd The example driver.
<variation name>_example_settings.txt The settings file for your variation, which the add constraints
and the verify timing scripts use.
<variation name>.qip Contains Quartus II project information for your MegaCore
function variations.
<variation name>.v or .vhd (1) Example design file.
add_constraints_for_<variation name>.tcl The add constraints script for the variation.
altera_vhdl_support.vhd A VHDL package that contains functions for the generated
entities. This file may be shared between MegaCore functions.
auto_add_ddr_constraints.tcl The add constraints script, which calls the variation-specific add
constraints scripts.
auto_verify_ddr_timing_constraints.tcl The auto verify timing script, which calls the variation-specific
verify timing scripts.
constraints_out.txt
Log file that IP Toolbench creates while generating the add
constraints script.
ddr_lib_path.tcl The Tcl library path file.
ddr_pll_fb_stratixii.v or .vhd Design file for the Stratix II fedback PLL.
ddr_pll_<device name>.v or .vhd Design file for the system PLL.
generic_ddr_dimm_model.vhd VHDL simulation file.
generic_ddr_sdram.vhd VHDL simulation file.
generic_ddr2_sdram.vhd VHDL simulation file.
DDR and DDR2 SDRAM Controller Compiler User Guide © March 2009 Altera Corporation
Page 27
Chapter 2: Getting Started 2–17
MegaWizard Plug-In Manager Design Flow
Table 2–1. Generated Files (Part 2 of 2) (Note 1) (2)
Filename Description
remove_constraints_for_<variation name>.tcl The remove constraints script for the variation.
top_ddr_settings.txt Critical settings file that stores the custom variation’s
parameters. IP Toolbench uses this file to generate the add
constraints script. The verify timing script and the DDR Timing
Wizard also read this file.
top_pre_compile_ddr_timing_summary.txt Log file that stores the results of the precompilation system
timing analysis.
verify_timing_for_<variation name>.tcl The verify timing script.
Notes to Table 2–1:
(1) <project name> is the name of the Quartus II project top-level entity.
(2) <variation name> is the name you give to the controller you create with the Megawizard.
2. After you review the generation report, click Exit to close IP Toolbench.
1 The Quartus II IP File (.qip) is a file generated by the MegaWizard interface or SOPC
Builder that contains information about a generated IP core. You are prompted to add
this .qip file to the current Quartus II project at the time of file generation. In most
cases, the .qip file contains all of the necessary assignments and information required
to process the core or system in the Quartus II compiler. Generally, a single .qip file is
generated for each MegaCore function and for each SOPC Builder system. However,
some more complex SOPC Builder components generate a separate .qip file, so the
system .qip file references the component .qip file.
You have finished the walkthrough. Now, simulate the example design (see
“Simulate the Example Design” on page 2–17), edit the PLL(s), and compile (refer to
“Compile the Example Design” on page 2–22).
Simulate the Example Design
You can simulate the example design with the IP Toolbench-generated IP functional
simulation models. IP Toolbench generates a VHDL or Verilog HDL testbench for
your example design, which is in the testbench directory in your project directory.
f For more information on the testbench, refer to “Example Design” on page 3–16.
You can use the IP functional simulation model with any Altera-supported VHDL or
Verilog HDL simulator. The instructions for the ModelSim simulator are different to
other simulators.
Simulating With the ModelSim Simulator
To simulate the example design with the ModelSim® simulator, follow these steps:
1. Obtain a memory model that matches your chosen parameters and save it to the
<directory name>\testbench directory. For example, you can download a Micron
memory model from the Micron web site at www.micron.com.
© March 2009 Altera Corporation DDR and DDR2 SDRAM Controller Compiler User Guide
Page 28

2–18 Chapter 2: Getting Started
MegaWizard Plug-In Manager Design Flow
2. For VHDL, edit generic_ddr_sdram.vhd to instantiate your memory model (the
file already contains three example Micron memory model instantiations).
or
For Verilog HDL, edit the memory instantiations in the testbench to match your
memory model.
3. Start the ModelSim-Altera simulator.
4. Change your working directory to your IP Toolbench-generated file directory
<directory name>\testbench\modelsim.
5. Type the following command:
set memory_model <model_name>r
where <model_name> is the filename of the downloaded memory model.
6. To simulate with an IP functional simulation model simulation, type the following
command:
source <variation name>_ddr_sdram_vsim.tclr
7. For a gate-level timing simulation (VHDL or Verilog HDL ModelSim output from
the Quartus II software), type the following commands:
set use_gate_model 1r
source <variation name>_ddr_sdram_vsim.tclr
Simulating With Other Simulators
The IP Toollbench-generated Tcl script is for the ModelSim simulator only. If you
prefer to use a different simulation tool, follow these instructions. You can also use
the generated script as a guide. You also need to download and compile an
appropriate memory model.
1 The following variables apply in this section:
■ <QUARTUS ROOTDIR> is the Quartus II installation directory
■ <simulator name> is the name of your simulation tool
■ <device name> is the Altera device family name
■ <project name> is the name of your Quartus II top-level entity or module.
■ <testbench name> is the name of your testbench entity or module
■ <MegaCore install directory> is the DDR and DDR2 SDRAM Controller
installation directory
DDR and DDR2 SDRAM Controller Compiler User Guide © March 2009 Altera Corporation
Page 29

Chapter 2: Getting Started 2–19
MegaWizard Plug-In Manager Design Flow
VHDL IP Functional Simulations
For VHDL simulations with IP functional simulation models, follow these steps:
1. Create a directory in the <project directory>\testbench directory.
2. Launch your simulation tool inside this directory and create the following
libraries:
■ altera_mf
■ lpm
■ sgate
■ <device name>
■ altera
■ auk_ddr_user_lib
3. Compile the files in Table 2–2 into the appropriate library. The files are in VHDL93
format.
Table 2–2. Files to Compile—VHDL IP Functional Simulation Models
Library Filename
altera_mf <QUARTUS ROOTDIR>/eda/sim_lib/altera_mf_components.vhd
<QUARTUS ROOTDIR>/eda/sim_lib/altera_mf.vhd
lpm <QUARTUS ROOTDIR>/eda/sim_lib/220pack.vhd
<QUARTUS ROOTDIR>/eda/sim_lib/220model.vhd
sgate <QUARTUS ROOTDIR>/eda/sim_lib/sgate_pack.vhd
<QUARTUS ROOTDIR>/eda/sim_lib/sgate.vhd
<device name><QUARTUS ROOTDIR>/eda/sim_lib/<device name>_atoms.vhd
<QUARTUS ROOTDIR>/eda/sim_lib/<device name>_components.vhd
altera <QUARTUS ROOTDIR>/libraries/vhdl/altera/altera_europa_support_lib.vhd
auk_ddr_user_lib <MegaCore install directory>/lib/auk_ddr_tb_functions.vhd
<project directory>/<variation name>_auk_ddr_dqs_group.vhd
<project directory>/<variation name>_auk_ddr_clk_gen.vhd
<project directory>/<variation name>_auk_ddr_datapath.vhd
<project directory>/<variation name>_auk_ddr_datapath_pack.vhd
<project directory>/<v>.vho
<MegaCore install directory>/lib/example_lfsr8.vhd
<project directory>
/<variation name>_example_driver.vhd
<project directory>/ddr_pll_<device name>.vhd
<project directory>/ddr_pll_fb_<device name>.vhd (1)
<project directory>/<variation name>_auk_ddr_dll.vhd (2)
<project directory>/<project name>.vhd
<project directory>/testbench/<testbench name>.vhd
Notes to Table 2–2:
(1) Fed-back clock mode only.
(2) Stratix series only.
© March 2009 Altera Corporation DDR and DDR2 SDRAM Controller Compiler User Guide
Page 30

2–20 Chapter 2: Getting Started
MegaWizard Plug-In Manager Design Flow
4. Set the Tcl variable gRTL_DELAYS to 1, which tells the testbench to model the
extra delays in the system necessary for RTL simulation
5. Load the testbench in your simulator with the timestep set to picoseconds.
VHDL Gate-Level Simulations
For VHDL simulations with gate-level models, follow these steps:
1. Create a directory in the <project directory>\testbench directory.
2. Launch your simulation tool inside this directory and create the following
libraries.
■ <device name>
■ altera
■ auk_ddr_user_lib
3. Compile the files in Table 2–3 into the appropriate library. The files are in VHDL93
format.
Table 2–3. Files to Compile—VHDL Gate-Level Simulations
Library Filename
<device name><QUARTUS ROOTDIR>/eda/sim_lib/<device name>_atoms.vhd
<QUARTUS ROOTDIR>/eda/sim_lib/<device name>_components.vhd
altera <QUARTUS ROOTDIR>/libraries/vhdl/altera/altera_europa_support_lib.vhd
auk_ddr_user_lib <MegaCore install directory>/lib/auk_ddr_tb_functions.vhd
<project directory>/simulation/<simulator name>/<project name>.vho (1)
<project directory>/testbench/<testbench name>.vhd
Notes to Table 2–3:
(1) If you are simulating the slow or fast model, the .vho file has a suffix _min or _max added to it. Compile whichever file is appropriate. The
Quartus II software creates models for the simulator you have defined in a directory simulation/<simulator name> in your <project name>
directory..
4. Set the Tcl variable gRTL_DELAYS to 0, which tells the testbench not to use the
insert extra delays in the system, because these are applied inside the gate-level
model.
5. Load the testbench in your simulator with the timestep set to picoseconds.
DDR and DDR2 SDRAM Controller Compiler User Guide © March 2009 Altera Corporation
Page 31

Chapter 2: Getting Started 2–21
MegaWizard Plug-In Manager Design Flow
Verilog HDL IP Functional Simulations
For Verilog HDL simulations with IP functional simulation models, follow these
steps:
1. Create a directory in the <project directory>\testbench directory.
2. Launch your simulation tool inside this directory and create the following
libraries.:
■ altera_mf_ver
■ lpm_ver
■ sgate_ver
■ <device name>_ver
■ auk_ddr_user_lib
3. Compile the files in Table 2–4 into the appropriate library.
Table 2–4. Files to Compile—Verilog HDL IP Functional Simulation Models
Library Filename
altera_mf_ver <QUARTUS ROOTDIR>/eda/sim_lib/altera_mf.v
lpm_ver <QUARTUS ROOTDIR>/eda/sim_lib/220model.v
sgate_ver <QUARTUS ROOTDIR>/eda/sim_lib/sgate.v
<device name>_ver <QUARTUS ROOTDIR>/eda/sim_lib/<device name>_atoms.v
auk_ddr_user_lib <project directory>/<variation name>_auk_ddr_dqs_group.v
<project directory>/<variation name>_auk_ddr_clk_gen.v
<project directory>/<variation name>_auk_ddr_datapath.v
<project directory>/<variation name>.vo
<MegaCore install directory>/lib/example_lfsr8.v
<project directory>/<variation name>_example_driver.v
<project directory>/ddr_pll_<device name>.v
<project directory>/ddr_pll_fb_<device name>.v (1)
<project directory>/<variation name>_auk_ddr_dll.v (2)
<project directory>/<project name>.v
<project directory>/testbench/<testbench name>.v
Notes to Table 2–4:
(1) Fed-back clock mode only.
(2) Stratix series only.
4. Set the Tcl variable gRTL_DELAYS to 1, which tells the testbench to model the
extra delays in the system necessary for RTL simulation.
5. Configure your simulator to use transport delays, a timestep of picoseconds and to
include the sgate_ver, lpm_ver, altera_mf_ver, and <device name>_ver libraries.
Verilog HDL Gate-Level Simulations
For Verilog HDL simulations with gate-level models, follow these steps:
1. Create a directory in the <project directory>\testbench directory.
© March 2009 Altera Corporation DDR and DDR2 SDRAM Controller Compiler User Guide
Page 32

2–22 Chapter 2: Getting Started
MegaWizard Plug-In Manager Design Flow
2. Launch your simulation tool inside this directory and create the following
libraries:
■ <device name>_ver
■ auk_ddr_user_lib
3. Compile the files in Table 2–5 into the appropriate library.
Table 2–5. Files to Compile—Verilog HDL Gate-Level Simulations
Library Filename
<device name>_ver <QUARTUS ROOTDIR>/eda/sim_lib/<device name>_atoms.v
auk_ddr_user_lib <project directory>/testbench/simulation/<simulator name>/<toplevel_name>.vo (1)
<project directory>/testbench/<testbench name>.v
Notes to Table 2–5:
(1) If you are simulating the slow or fast model., the .vho file has a suffix _min or _max added to it. Compile whichever file is appropriate. The
Quartus II software creates models for the simulator you have defined in a directory simulation/<simulator name> in your <project name>
directory..
4. Set the Tcl variable gRTL_DELAYS to 0, which tells the testbench not to use the
insert extra delays in the system, because these are applied inside the gate level
model. Configure your simulator to use transport delays, a timestep of
picoseconds, and to include the <device name>_ver library.
Compile the Example Design
You can now edit the PLL(s) and use the Quartus II software to compile the example
design and perform post-compilation timing analysis.
Edit the PLL
The IP Toolbench-generated example design includes a PLL, which has an input to
output clock ratio of 1:1 and a clock frequency that you entered in IP Toolbench. In
addition, IP Toolbench correctly sets all the phase offsets of all the relevant clock
outputs for your design. You can edit the PLL input clock to make it conform to your
system requirements. If you re-run IP Toolbench, it does not overwrite this PLL, if
you turn off Automatically generate the PLL, so your edits are not lost.
1 If you turn on Use fed-back clock, IP Toolbench generates a second PLL—the fed-back
PLL. You need not edit the fed-back PLL.
1 If you change the clock input frequency on the PLL, you must change the
REF_CLOCK_TICK_IN_PS parameter in the <project name>_tb.v or .vhd file.
f For more information on the PLL, refer to “PLL Configurations” on page 3–13.
To edit the example PLL, follow these steps:
1. Choose MegaWizard Plug-In Manager (Tools menu).
2. Select Edit an existing custom megafunction variation and click Next.
3. In your Quartus II project directory, for VHDL choose ddr_pll_<device name>.vhd;
for Verilog HDL choose ddr_pll_<device name>.v.
DDR and DDR2 SDRAM Controller Compiler User Guide © March 2009 Altera Corporation
Page 33

Chapter 2: Getting Started 2–23
MegaWizard Plug-In Manager Design Flow
4. Click Next.
5. Edit the PLL parameters in the ALTPLL MegaWizard Plug-In.
f For more information on the ALTPLL megafunction, refer to the Quartus II Help or
click Documentation in the ALTPLL MegaWizard Plug-In.
Compile & Perform Timing Analysis
When you compile a project after generating or editing and re-generating your
variation, the auto_add_ddr_constraints.tcl script automatically calls the constraints
script specific to each instance of the controller in your design. Each constraints script
performs the following procedure:
■ Checks if there is a remove_constraints.tcl script specific to this instance of the
controller, and if so, runs it to remove the previous set of constraints.
■ Analyses and elaborates the design to detect the exact hiearchy and then adds the
new set of constraints.
■ Creates a new, matching remove_constraints.tcl script, which you can use to
remove the constraints from your design, if necessary.
1 If the script successfully adds the new constraints, it does not run when you next
compile.
To prevent the constraints script from running, turn off Automatically run add
constraints script in the wizard. To manually prevent the script from running, open a
Quartus II Tcl Console window and enter the following command:
set_global_assignment -name PRE_FLOW_SCRIPT_FILE -remove
The constraints script analyzes and elaborates your design, to automatically extract
the hierarchy to your variation. To prevent the constraints script analyzing and
elaborating your design, turn on Enable Hierarchy Control in the wizard, and enter
the correct hierarchy path to your datapath (refer to step 24 on page 2–13).
1 To compile your design, choose Start Compilation (Processing menu), which runs the
add constraints scripts, compiles the example design, and performs timing analysis.
If the compilation does not reach the frequency requirements, follow these steps:
1. Choose Settings (Assignments menu).
2. Click Analysis & Synthesis Settings in the Category list.
3. In Optimization Technique, select Speed.
4. Click Fitter Settings in the Category list.
5. In Fitter effort, select Standard Fit (highest effort).
6. Click OK.
7. Recompile the example design by clicking Start Compilation (Processing menu).
1 To achieve a higher frequency, turn on the Insert extra pipeline registers in
the datapath option (refer to step 5 on page 2–12).
© March 2009 Altera Corporation DDR and DDR2 SDRAM Controller Compiler User Guide
Page 34

2–24 Chapter 2: Getting Started
MegaWizard Plug-In Manager Design Flow
Once compilation is complete, the auto_verify_ddr_timing.tcl script automatically
calls the verify timing script for each instance of the controller in your design. The
post-compilation timing analysis results are displayed in the Quartus II processing
messages tab and are written to the <variation name>_post_summary.txt file in your
project directory.
To prevent the verify timing script from running, turn off Automatically run verify
timing script in the wizard. To manually prevent the script from running, open a
Quartus II Tcl Console window and enter the following command:
set_global_assignment -name POST_FLOW_SCRIPT_FILE -remove
The results show how much slack you have for each of the various timing
requirements—negative slack means that you are not meeting timing. The Message
window shows various timing margins for your design.
If the verify timing script reports that your design meets timing, you have
successfully generated and implemented your DDR or DDR2 SDRAM Controller.
If the timing does not reach your requirements, adjust the resynchronization and
postamble clock phases on the IP Toolbench Manual Timings tab (refer to
Appendix A, Manual Timing Settings).
To view the constraints in the Quartus II Assignment Editor, click Assignment Editor
(Assignments menu).
f For more information on constraints, refer to “Constraints” on page 3–18.
Program a Device
f For more information on OpenCore Plus hardware evaluation using the DDR or
1 If you have “?” characters in the Quartus II Assignment Editor, the
Quartus II software cannot find the entity to which it is applying the
constraints, probably because of a hierarchy mismatch. Either edit the
constraints script, or enter the correct hierarchy path in the Hierarchy tab
(refer to step 24 on page 2–13).
After you have compiled the example design, you can perform gate-level simulation
(refer to “Simulate the Example Design” on page 2–17) or program your targeted
Altera device to verify the example design in hardware.
With Altera's free OpenCore Plus evaluation feature, you can evaluate the DDR or
DDR2 SDRAM controller MegaCore function before you purchase a license.
OpenCore Plus evaluation allows you to generate an IP functional simulation model,
and produce a time-limited programming file.
DDR2 SDRAM controller MegaCore function, refer to “OpenCore Plus Evaluation”
on page 1–6, “OpenCore Plus Time-Out Behavior” on page 3–3, and AN 320:
OpenCore Plus Evaluation of Megafunctions.
Implement Your Design
In the MegaWizard Plug-In flow, to implement your design based on the example
design, replace the example driver in the example design with your own logic.
DDR and DDR2 SDRAM Controller Compiler User Guide © March 2009 Altera Corporation
Page 35

Chapter 2: Getting Started 2–25
Set Up Licensing
Set Up Licensing
You need to purchase a license for the MegaCore function only when you are
completely satisfied with its functionality and performance, and want to take your
design to production.
1 If you replace the DDR or DDR2 SDRAM controller MegaCore function control logic
with your own logic, you need not purchase a license and can continue to use the
clear-text datapath logic.
After you purchase a license for DDR or DDR2 SDRAM controller MegaCore
function, you can request a license file from the Altera web site at
www.altera.com/licensing and install it on your computer. When you request a
license file, Altera emails you a license.dat file. If you do not have Internet access,
contact your local Altera representative.
© March 2009 Altera Corporation DDR and DDR2 SDRAM Controller Compiler User Guide
Page 36

2–26 Chapter 2: Getting Started
Set Up Licensing
DDR and DDR2 SDRAM Controller Compiler User Guide © March 2009 Altera Corporation
Page 37

The DDR and DDR2 SDRAM controllers instantiate an encrypted control logic and a
clear-text datapath. You can replace the control logic with your own custom logic.
Block Description
Figure 3–1 shows a block diagram of the DDR & DDR2 SDRAM controller.
Figure 3–1. DDR & DDR2 SDRAM Controller Block Diagram (Note 1)
local_addr
local_be
local_burstbegin
local_read_req
local_refresh_req
local_size
local_wdata
local_write_req
local_init_done
local_rdata
local_rdata_valid
local_rdata_valid_in_n
local_ready
local_refresh_ack
local_wdata_req
addrcmd_clk
capture_clk
clk
dqs_delay_ctrl[5:0]
dqsupdate
fedback_clock_in
postamble_clk
resynch_clk
resynch_
clk_edge_select
write_clk
3. Functional Description
DDR SDRAM Controller
ddr_a
ddr_ba
Control
Logic
(Encrypted)
Data Path
Module
(Clear Text)
ddr_cas_n
ddr_cke
ddr_cs_n
ddr_odt (
2
ddr_ras_n
ddr_we_n
clk_to_sdram
clk_to_sdram_n
ddr_dq
ddr_dqs
ddr_dm
)
dqs_ref_clk
fedback_clock_out
stratix_dll_control
Notes to Figure 3–1:
(1) You can edit the ddr prefix on the SDRAM interfaces signals.
(2) DDR2 SDRAM controller only.
Control Logic
Bus commands control SDRAM devices using combinations of the ddr_ras_n,
ddr_cas_n, and ddr_we_n signals. For example, on a clock cycle where all three
signals are high, the associated command is a no operation (NOP). A NOP command
is also indicated when the chip select signal is not asserted.
© March 2009 Altera Corporation DDR and DDR2 SDRAM Controller Compiler User Guide
Page 38

3–2 Chapter 3: Functional Description
Block Description
Tab le 3– 1 shows the standard SDRAM bus commands.
Table 3–1. Bus Commands
Command Acronym ras_n cas_n we_n
No operation NOP High High High
Active ACT Low High High
Read RD High Low High
Write WR High Low Low
Burst terminate BT High High Low
Precharge PCH Low High Low
Auto refresh ARF Low Low High
Load mode register LMR Low Low Low
The DDR and DDR2 SDRAM controllers must open SDRAM banks before they access
addresses in that bank. The row and bank to be opened are registered at the same time
as the active (ACT) command. The DDR and DDR2 SDRAM controllers close the bank
and open it again if they need to access a different row. The precharge (PCH)
command closes a bank.
Datapath
The primary commands used to access SDRAM are read (RD) and write (WR). When
the WR command is issued, the initial column address and data word is registered.
When a RD command is issued, the initial address is registered. The initial data
appears on the data bus 2 to 3 clock cycles later (3 to 5 for DDR2 SDRAM). This delay
is the column address strobe (CAS) latency and is due to the time required to read the
internal DRAM core and register the data on the bus. The CAS latency depends on the
speed of the SDRAM and the frequency of the memory clock. In general, the faster the
clock, the more cycles of CAS latency are required. After the initial RD or WR
command, sequential reads and writes continue until the burst length is reached or a
burst terminate (BT) command is issued. DDR and DDR2 SDRAM devices support
burst lengths of 2, 4, or 8 data cycles. The auto-refresh command (ARF) is issued
periodically to ensure data retention. This function is performed by the DDR or DDR2
SDRAM controller.
The load mode register command (LMR) configures the SDRAM mode register. This
register stores the CAS latency, burst length, and burst type.
f For more information, refer to the specification of the SDRAM that you are using.
The datapath provides the interface between the read and write data busses of the
local interface and the double-clocked, bidirectional data bus of the memory. The
local data busses are twice the width of the memory data bus width, because the DDR
or DDR2 SDRAM data interface transfers data on both the rising and falling edges of
the clock.
DDR and DDR2 SDRAM Controller Compiler User Guide © March 2009 Altera Corporation
Page 39

Chapter 3: Functional Description 3–3
Data Path Module
control_rdata
control_wdata
dq
clk_to_sdram
DQS
Groups
16
8
16
clk
Clock Output
Generator
clk_to_sdram_n
fedback_clock_out
OpenCore Plus Time-Out Behavior
IP Toolbench generates a clear-text VHDL or Verilog HDL datapath, which matches
your custom variation. If you are designing your own controller, Altera recommends
that you use this module as your datapath. IP Toolbench generates placement
constraints in the form of reusable scripts for all the critical registers in Cyclone series
and for the resynchronization registers in Stratix series. Altera recommends that you
also use these scripts so that your own DDR and DDR2 SDRAM designs have
consistent placement and the timing analysis script results apply to your design.
The datapath instantiates one or more data strobe (DQS) groups. The DQS group
module's control_wdata and control_rdata are fixed at 16 bits and data (DQ) is
fixed at 8 bits. To build datapaths larger than 16 bits, the datapath instantiates
multiple DQS group modules to increase the data bus width in increments of 16 bits
(8 bits for the DDR and DDR2 SDRAM side).
Figure 3–2 shows the datapath.
Figure 3–2. Datapath
Tab le 3– 2 shows the IP Toolbench-generated datapath files in your project directory.
Table 3–2. Datapath Files
Filename Description
<variation name>_auk_ddr_datapath.v or .vhd Datapath.
<variation name>_auk_ddr_clk_gen.v or .vhd Clock output generator.
<variation name>_auk_ddr_dqs_group.v or .vhd DQS groups.
f For more detail on the datapath, refer to “Datapath” on page 3–4.
OpenCore Plus Time-Out Behavior
OpenCore Plus hardware evaluation can support the following two modes of
operation:
■ Untethered—the design runs for a limited time
■ Tethered—requires a connection between your board and the host computer. If
tethered mode is supported by all megafunctions in a design, the device can
operate for a longer time or indefinitely
© March 2009 Altera Corporation DDR and DDR2 SDRAM Controller Compiler User Guide
Page 40

3–4 Chapter 3: Functional Description
Device-Level Description
All megafunctions in a device time out simultaneously when the most restrictive
evaluation time is reached. If there is more than one megafunction in a design, a
specific megafunction’s time-out behavior may be masked by the time-out behavior
of the other megafunctions.
1 For MegaCore functions, the untethered time-out is 1 hour; the tethered time-out
value is indefinite.
Your design stops working after the hardware evaluation time expires and the
local_ready output goes low.
f For more information on OpenCore Plus hardware evaluation, refer to “OpenCore
Plus Evaluation” on page 1–6 and AN 320: OpenCore Plus Evaluation of Megafunctions.
Device-Level Description
This section describes the following topics:
■ “Datapath” on page 3–4
■ “PLL Configurations” on page 3–13
Datapath
■ “DLL Configurations” on page 3–16
■ “Example Design” on page 3–16
■ “Constraints” on page 3–18
In Stratix series, the DDR and DDR2 SDRAM controllers use input-output element
(IOE) registers in the write and the read direction. In the read direction, the phase
shift reference circuit provides a process, voltage, temperature (PVT) compensated
delay on each DQS that is used to sample the DQ read data. In Cyclone series, the
DDR SDRAM controller uses carefully placed logic element (LE) registers to
guarantee consistent timing across DQS groups. An appropriate DQS delay is
produced by the Cyclone series programmable delay, the value of which is set by the
constraints script.
In the read direction, the double-rate data from the DQ pins are fed into positive and
a negative edge-triggered registers to sample data on both edges of DQS. These
signals are then passed through another set of configurable registers to return them to
the system clock domain. The IP Toolbench timing analysis configures the transition
from the DQS clock domain to the system clock domain (resynchronization). The
options range from using the positive edge of the system clock as your
resynchronization clock to more complex cases that require one or more extra sets of
registers to safely return your read data to the system clock domain.
f For more information on resynchronization, refer to “Resynchronization” on
page A–4.
DDR and DDR2 SDRAM Controller Compiler User Guide © March 2009 Altera Corporation
Page 41

Chapter 3: Functional Description 3–5
Device-Level Description
In the write direction, the wdata_valid signal acts as an enable on the
local_wdata registers. The output of these registers is clocked into registers in the
IOE where it is fed to the DQ pins. The registers in the IOE are clocked by the write
clock (which is 90° before the system clock) so that DQS, which is generated by the
datapath, appears in the center of the data on the DQ pins. The write DQS is
generated from registers clocked by the system clock so that the t
parameter is met
DQSS
at the DDR or DDR2 SDRAM device.
Tab le 3– 3 shows the interface to the datapath.
Table 3–3. Datapath Interface
Signal name Direction Description
control_doing_wr Input The control_doing_wr signal is asserted when the controller is
writing to the DDR or DDR2 SDRAM and controls the output enables on
the DQ pins.
control_wdata_valid Input The control_wdata_valid signal is a registered version of the
write data request to the local interface. It enables the write data and
byte enable registers so that they are only updated when valid data and
enables are available.
control_dqs_burst Input The control_dqs_burst signal controls the output enables of the
DQS pins. The DQS output enable must be asserted for longer than the
DQ output enable, particularly when the local burst size is shorter than
the memory burst length.
control_wdata[] Input The control_wdata signal is the write data bus and should have
valid data in the same clock cycle that control_wdata_valid is
asserted.
control_be[] Input The control_be signal is the byte enable bus and should have valid
data in the same clock cycle that control_wdata_valid is
asserted. The byte enables are converted into DDR or DDR2 SDRAM
data mask signals.
control_doing_rd Input The control_doing_rd signal is asserted when the controller is
reading from the DDR or DDR2 SDRAM and enables the DQ capture
registers. It also controls the postamble control registers to prevent the
DQ capture registers from being inadvertently clocked after the DQS
read postamble.
control_rdata[] Output The control_rdata bus is the read data bus and has valid data
some clock cycles after the read command is issued. The exact
relationship depends on the CAS latency of the memory and whether or
not registered DIMMs are being used.
© March 2009 Altera Corporation DDR and DDR2 SDRAM Controller Compiler User Guide
Page 42

3–6 Chapter 3: Functional Description
Device-Level Description
Figure 3–3 shows the datapath timing (CAS latency is 2.0).
Figure 3–3. Datapath Timing
[1] [3][2] [4]
clk
Write Interface
control_doing_wr
control_wdata_valid
control_dqs_burst
control_wdata
control_be
Read Interface
control_doing_rd
control_rdata
DDR SDRAM
Interface
DDR Command
ddr_dm
ddr_dq
ddr_dqs
NOP ACT NOP RD NOP PCH NOP ACT NOP WR NOPWR
A269 32A04671 31F531F5
1 0 3 00
AD75 D739
D31D3A503A50
1. The controller asserts control_doing_rd to enable the DQ input registers so
that the read data is captured (the datapath delays this signal to match the CAS
latency). In this case, it is expecting four cycles of read data, so it holds the signal
asserted for four clock cycles. At the end of the burst, the signal is deasserted to
disable the DQ capture registers, which avoids them being clocked unnecessarily
after the DQS read postamble.
2. The controller state machine asserts the control_wdata_valid signal as soon
as it knows that it is doing a write. The signal does not need to be asserted this
early. However, in this example it simplifies the controller design. The write data
is only valid in that clock cycle and is held in the wdata registers until the write
happens.
3. The controller asserts control_doing_wr for the length of the burst (four beats)
to indicate that it is doing a write. This signal controls the output enables of the
DQ signals.
4. The controller reasserts control_wdata_valid to request the next write data
once it knows it is now writing to the memory
1 If you use DDR2 SDRAM and design your own controller, you need to take
the variable write latency into account when generating the
control_doing_wr signal.
DDR and DDR2 SDRAM Controller Compiler User Guide © March 2009 Altera Corporation
Page 43

Chapter 3: Functional Description 3–7
Device-Level Description
Designing Your Own Controller
The state machine that issues the read commands generates control_doing_rd
and it starts when the read command is issued to the memory and stays asserted for
the length of the burst. It is delayed inside the controller to cope with the following
options:
■ Insert pipeline registers on address and command outputs
■ Registered DIMM
■ Insert extra pipeline registers in the datapath
The datapath is generated with a pipeline to cope with CAS latency in each DQS
group rather than inside the controller. Duplicating this pipeline across the
bytegroups makes timing easier to meet on the critical postamble logic—the last
register in this pipeline feeds the postamble control register. If you design you own
controller, you need to generate the datapath for the right CAS latency, otherwise this
pipeline is the wrong length.
The enabling and disabling of the capture registers (controlled by the
control_doing_rd signal) is disabled in RTL simulation because it relies so heavily
on timing in the system to work. So in RTL simulation, the capture registers are
always enabled and varying the timing of the control_doing_rd signal does not
change the behavior of the datapath.You should use gate-level simulations to test the
exact timings of this signal if you design your own controller.
The same source that generates control_doing_rd generates the
local_rdata_valid signal and it is delayed inside the controller by the same
amount. In addition, it is delayed to take the following datapath options into account:
■ Reclock resynchronized data to the positive edge
■ Insert intermediate resynchronization registers
The local_rdata_valid signal is also delayed by 4 + R cycles, where R is the
resynchronization cycle as predicted by the wizard. For example, if the
resynchronization cycle is 2, Reclock resynchronized data to the positive edge is
turned on, and Insert intermediate resynchronization registers is turned off, the
local_rdata_valid signal should be seven cycles later than the
control_doing_rd signal (4 + 2 + 1 + 0 = 7).
The control_doing_wr signal controls the output enables on the DQ and DQS
pins. The state machine that issues the write commands generates it and it is delayed
inside the controller to cope with the following options:
■ Insert pipeline registers on address and command outputs
■ Registered DIMM
■ Insert extra pipeline registers in the datapath
For DDR SDRAM, the write latency is fixed at 1 clock cycle. You should issue the
control_doing_wr signal so that it starts when you issue the write command to the
memory and ensure it stays asserted for the length of the burst.
For DDR2 SDRAM, the write latency varies with the CAS latency, which the
controller takes into account and it delays the control_doing_wr signal to match.
You should issue the control_doing_wr signal (CAS latency – 2) clock cycles after
the write command and ensure it stays asserted for the length of the burst.
© March 2009 Altera Corporation DDR and DDR2 SDRAM Controller Compiler User Guide
Page 44

3–8 Chapter 3: Functional Description
Device-Level Description
The control_doing_wr and control_wdata_valid signals are completely
identical outputs from the controller when it is in DDR2 SDRAM mode. If the
controller is issuing full size write bursts, the control_dqs_burst signal should be
issued for one clock cycle longer than control_doing_wr. If the controller is not
writing for the full length of the memory burst length, the control_dqs_burst
signal should be kept asserted so that the DQS toggles for the full length of the burst.
DQS Group Block Diagrams
Figure 3–4 on page 3–9 shows the Stratix II DQS group block diagram; Figure 3–5 on
page 3–10 shows the Stratix DQS group block diagram; Figure 3–6 on page 3–11
shows the Cyclone II DQS group block diagram; and Figure 3–7 on page 3–12 shows
the Cyclone DQS group block diagram.
DDR and DDR2 SDRAM Controller Compiler User Guide © March 2009 Altera Corporation
Page 45

Chapter 3: Functional Description 3–9
DQ D
write_clk
DQS
DM
dqs_oe
1
DQS Delay
Ao
Bo
Q
0
1
DQ
DQ
0
1
DQS IOEs
DM altddio Megafunction
DQ
DQ
Q
Q
D
D
be
doing_wr
dqs_burst
Q
D
2
Q
D
Q
D
QD QD
QDQD
QD
D
Q
Q Q
DQ
DDQ
DQ
wdata
DQ
write_clk
doing_wr
rdata
doing_rd
(pipelined)
postamble_clk
resynched_data
dq_capture_clk
resynch_clk
dq_oe
16
0
1
16
8
8
8
D
EN
EN
doing_wr
EN
EN
wdata_valid
DQ IOEs
dq_enable_reset
Preset (asynchronous)
(Note 3)
Optional Inverter (Note 4)
Optional Inverters (Note 4)
Device-Level Description
Figure 3–4. Stratix II DQS Group Block Diagram (Note 1) (2)
Notes to Figure 3–4:
(1) This figure shows the logic for one DQ output only. A complete byte group consists of eight times the DQ logic with the DQS and DM logic.
(2) All clocks are clk, unless marked otherwise.
(3) Invert combout of the I/O element (IOE) for the dqs pin before feeding in to inclock of the IOE for the DQ pin. This inversion is automatic if
you use an ALTDQ megafunction for the DQ pins.
(4) The optional inverters are controlled by the resynchronization edge and postamble edge settings on the Manual Timings tab, refer to “Manual
Timing Settings” on page A–1
© March 2009 Altera Corporation DDR and DDR2 SDRAM Controller Compiler User Guide
Page 46

3–10 Chapter 3: Functional Description
DQ D
write_clk
DQS
DM
(Note 3)
dqs_oe
1
Delay
Ao
Bo
Compensated
Delay
Q
0
1
DQ
DQ
0
1
DQ
DQ
(Note 4)
Q
Q
D
D
be
doing_wr
dqs_burst
Q
D
2
Q
D
Q
D
QD QD
QDQD
QD
D
Q
Q Q
DQ
DDQ
DQ
wdata
DQ
write_clk
doing_wr
rdata
postamble_clk
resynched_data
dq_enable
dq_capture_clk
resynch_clk
dq_oe
16
0
1
16
8
8
8
D
EN
EN
EN
EN
EN
doing_wr
EN
EN
wdata_valid
dq_enable_reset
Preset (asynchronous)
DQS IOEs
DM IOEs
DQ IOEs
Optional Inverter (Note 5)
Optional Inverters (Note 5)
Device-Level Description
Figure 3–5. Stratix DQS Group Block Diagram (Note 1) (2)
Notes to Figure 3–5:
(1) This figure shows the logic for one DQ output only. A complete byte group consists of eight times the DQ logic with the DQS and DM logic.
(2) All clocks are clk, unless marked otherwise.
(3) Invert combout of the IOE for the dqs pin before feeding in to inclock of the IOE for the DQ pin. This inversion is automatic if you use an
ALTDQ megafunction for the DQ pins.
Optional DQS delay matching buffers controlled by the settings on the Manual Timing tab, refer to “Manual Timing Settings” on page A–1.
(4)
(5) The optional inverters are controlled by the resynchronization edge and postamble edge settings on the Manual Timing tab, refer to “Manual
Timing Settings” on page A–1
DDR and DDR2 SDRAM Controller Compiler User Guide © March 2009 Altera Corporation
Page 47

Chapter 3: Functional Description 3–11
D Q D
write_clk
altddio Megafunctions
dqs
dm
(Note 3)
dqs_oe
1
Delay
Ao
Bo
DQS_A
OE
B
OE
Clock Delay
Control Circuit
Clock Control Block
Q
0
1
D Q
D Q
0
1
D Q
D Q
Q
Q
D
D
be
doing_wr
dqs_burst
Q
D
2
Q
D
Q
D
Q D Q D
Q D Q D
Q D
D
Q
Q Q
D Q
D D Q
D Q
wdata
dq
write_clk
doing_wr
rdata
dq_enable_reset
postamble_clk
resynched_data
dq_enable
dq_capture_clk
resynch_clk
dq_oe
16
DQ_A
OE
Ao
C
A
B
Bo
0
1
16
8
8
8
D
EN
EN
doing_wr
EN
EN
wdata_valid
Preset (asynchronous)
I
I
I
IOEs
FPGA LEs
Optional Inverter (Note 4)
Optional Inverters (Note 4)
EN
EN
Device-Level Description
Figure 3–6. Cyclone II DQS Group Block Diagram (Note 1) (2)
Notes to Figure 3–6:
(1) This figure shows the logic for one dq output only. A complete byte group consists of eight times the DQ logic with the DQS and DM logic.
(2) All clocks are clk, unless marked otherwise.
(3) Each DQS requires a global clock resource. Invert combout of the ALTDDIO_BIDIR megafunction for the DQS pin before feeding in to inclock
of the ALTDDIO_BIDIR megafunction for the DQ pin.
(4) The optional inverters are controlled by the resynchronization edge and postamble edge settings on the Manual Timing tab, refer to “Manual
Timing Settings” on page A–1.
© March 2009 Altera Corporation DDR and DDR2 SDRAM Controller Compiler User Guide
Page 48

3–12 Chapter 3: Functional Description
DQ D
write_clk
altddio Megafunctions
dqs
dm
(Note 3)
dqs_oe
1
Delay
Ao
Bo
DQS_A
OE
B
OE
Programmable
Delay
Q
0
1
DQ
DQ
0
1
DQ
DQ
Q
Q
D
D
be
doing_wr
dqs_burst
Q
D
2
Q
D
Q
D
QD QD
QDQD
QD
D
Q
Q Q
DQ
DDQ
DQ
wdata
dq
write_clk
doing_wr
rdata
dq_enable_reset
postamble_clk
resynched_data
dq_enable
dq_capture_clk
resynch_clk
dq_oe
16
DQ_A
OE
Ao
C
A
B
Bo
0
1
16
8
8
8
D
EN
EN
EN
EN
EN
doing_wr
EN
EN
wdata_valid
Preset (asynchronous)
I
I
I
IOEs
FPGA LEs
Optional Inverter (Note 4)
Optional Inverters (Note 4)
Device-Level Description
Figure 3–7. Cyclone DQS Group Block Diagram (Note 1) (2)
Notes to Figure 3–7:
(1) This figure shows the logic for one dq output only. A complete byte group consists of eight times the DQ logic with the DQS and DM logic.
(2) All clocks are clk, unless marked otherwise.
(3) Each DQS requires a global clock resource. Invert combout of the ALTDDIO_BIDIR megafunction for the DQS pin before feeding in to inclock
of the ALTDDIO_BIDIR megafunction for the DQ pin.
(4) The optional inverters are controlled by the resynchronization edge and postamble edge settings on the Manual Timing tab, refer to “Manual
Timing Settings” on page A–1.
DDR and DDR2 SDRAM Controller Compiler User Guide © March 2009 Altera Corporation
Page 49

Chapter 3: Functional Description 3–13
Device-Level Description
PLL Configurations
IP Toolbench creates up to two example PLLs in your project directory, which you can
parameterize to meet your exact requirements. IP Toolbench generates the example
PLLs with an input to output clock ratio of 1:1 and a clock frequency you entered in IP
Toolbench. In addition IP Toolbench sets the correct phase outputs on the PLLs’
clocks. You can edit the PLLs to meet your requirements with the ALTPLL
MegaWizard Plug-In. IP Toolbench overwrites your PLLs in your project directory
unless you turn off the Automatically generate the PLL option.
The external clocks are generated using standard I/O pins in DDR or DDR2 SDRAM
output mode (using the ALTDDIO_OUT megafunction). This generation matches the
way in which the write DQS is generated and allows better control of the skew
between the DDR or DDR2 SDRAM clock and the DQS to meet the t
of the SDRAM.
The PLL has the following outputs:
■ Output c0 drives the system clock that clocks most of the controller including the
state machine and the local interface. If the controller is being used in SOPC
Builder, this clock should drive the SOPC Builder generated module clock.
■ Output c1 drives the write data clock that lags the system clock by 270° and clocks
the write data and write data mask registers to offset them from the data strobe
signal.
requirements
DQSS
The PLL configuration differs for Stratix and Cyclone series.
The recommended configuration for implementing the DDR SDRAM controller in a
Stratix or Cyclone series is to use a single enhanced PLL to produce all the required
clock signals. No external clock buffer is required as the Altera device can generate
clk and clk# signals for DDR or DDR2 SDRAM devices.
The main difference between clock configurations is that Cyclone series do not have
the DQS phase shift reference circuit. Thus Cyclone series (and Stratix II devices) do
not need the additional dqs_ref_clk clock input, which drives this circuit.
In Cyclone II devices, an additional optional output (c2) is available. This output is
not normally required, unless IP Toolbench reports that a separate resynchronization
or postamble clock is required.
In Stratix series, the PLL has two other optional outputs. In most cases, these outputs
are not required. If you have chosen not to use DQS to capture your read data or if IP
Toolbench reports that a separate resynchronization or postamble clock is required,
the PLL includes the following IP Toolbench-recommended outputs:
■ Output c2 drives either the optional capture clock in non-DQS mode or an
optional separate resynchronization clock.
■ Output c3 drives the optional separate postamble clock.
These clocks are connected to the DDR or DDR2 SDRAM controller in the example
design file. If separate resynchronization or postamble clocks are not required, IP
Toolbench connects the resynchronization and postamble clock inputs on the
variation to the system or write clock as appropriate.
© March 2009 Altera Corporation DDR and DDR2 SDRAM Controller Compiler User Guide
Page 50

3–14 Chapter 3: Functional Description
Optional
Fed-Back Clock
PLL
Note 1
Stratix II Device
DDR SDRAM
clk_to_sdram_n
clk_to_sdram
fedback_clock_out
DDR SDRAM
Controller
altddio
altddio
altddio
clock_source
Enhanced PLL
clk
write_clk
resynch_clk or
capture_clk
postamble_clk
C0
C1
C2
C3
Stratix II DLL
Device-Level Description
For Stratix II devices, if you turn on the Use fed-back clock option and the Enable
DQS mode option, you enable fed-back resynchronization, which uses a fed-back
clock to resynchronize the data captured by the DQS signal (refer to Figure A–2 on
page A–6). An additional resynchronization phase created by the main PLL transfers
the data back to the system clock.
Turn i ng o f f Enable DQS mode enables fed-back capture mode. This mode uses a
fed-back clock to capture the read data and does not use the DQS strobe for capture
(refer to Figure A–4 on page A–8). A resynchronization phase from the system PLL is
required to safely transfer the captured data to system clock phase. This mode offers
lower performance than fed-back resynchronization, but allows greater flexibility in
your choice of pins for DQ and DQS.
Figure 3–8 on page 3–14 shows the recommended configuration for Stratix II devices.
f For more information on non-DQS mode, refer to Figure A–2 on page A–6 and
Figure A–4 on page A–8.
Figure 3–8. Stratix II PLL Configuration (Note 1)
Note to Figure 3–8:
(1) In most cases, clk or write_clk are used as the resynchronization and postamble clocks, therefore you need not use a separate clock output
from the PLL.
Figure 3–9 on page 3–15 shows the recommended configuration for Stratix and
Stratix GX devices.
1 The dqs_ref_clk input for Stratix or Stratix GX devices can be either fed-back from
DDR and DDR2 SDRAM Controller Compiler User Guide © March 2009 Altera Corporation
the clock output driving the SDRAM or a separate clock output from the PLL. The
phase of dqs_ref_clk relative to the other clocks in the system is unimportant. The
controller switches off this input during reads, if you turn on Switch off Stratix DLL
reference clock during reads (refer to “Manual Timing Settings” on page A–1).
Page 51

Chapter 3: Functional Description 3–15
Stratix Device
clk_to_sdram
clk_to_sdram_n
DDR SDRAM
Controller
Stratix DLL
dqs_ref_clk
altddio
altddio
altddio
Note 1
clock_source
Enhanced PLL
clk
write_clk
resynch_clk or
capture_clk
postamble_clk
C0
C1
C2
C3
DDR SDRAM
Cyclone II Device
clock_source
clk_to_sdram
clk_to_sdram_n
DDR SDRAM
Controller
PLL
clk
write_clk
resynch_clk
altddio
altddio
C0
C1
C2
DDR SDRAM
Cyclone Device
clock_source
clk_to_sdram
clk_to_sdram_n
DDR SDRAM
Controller
PLL
clk
write_clk
altddio
altddio
C0
C1
DDR SDRAM
Device-Level Description
Figure 3–9. Stratix PLL Configuration (Note 1)
Note to Figure 3–9:
(1) In most cases, clk or write_clk are used as the resynchronization and postamble clocks, therefore you need not use a separate clock output
from the PLL.
Figure 3–10 shows the Cyclone II configuration for use with any PLL multiply or
divide ratios including a ratio of one.
Figure 3–10. Cyclone II PLL Configuration
Figure 3–11 on page 3–15 shows the Cyclone configuration.
Figure 3–11. Cyclone PLL Configuration
© March 2009 Altera Corporation DDR and DDR2 SDRAM Controller Compiler User Guide
Page 52

3–16 Chapter 3: Functional Description
Device-Level Description
DLL Configurations
For Stratix series designs, IP Toolbench creates an instance of a DLL, which is
configured to match your controller. The DLL generates the 90° phase shift on the
DQS edges that capture the read data.
On Stratix devices, the reference clock is driven off the device and fed back into the
DLL reference clock inputs (refer to Figure 3–9 on page 3–15). If you turn on Insert
logic to allow the DLL to update only during the memory refresh period, the
controller generates a control signal, stratix_dll_control, which can enable the
DLL reference clock only while the controller is issuing refresh commands to the
memory.
On Stratix II devices, the DLL reference clock is fed directly from an enhanced PLL.
For an interface that is only on one side of the Stratix II device, the DLL automatically
generates a control signal, dqsupdate, to the DQS pins on the same side telling them
when it is safe to update their delay value. If your interface spans two sides of the
device, the controller can generate a control signal, stratix_dll_control, to only
allow the 6-bit control signal to each DQS pin to update only while the controller is
issuing refresh commands to the memory. Turning on Insert logic to allow the DLL
to update only during the memory refresh period causes the extra logic to be
inserted and should only be turned on if your interface spans two sides of the device.
Turning on this feature on a single sided interface is not required, because the DLL
controls the updates.
Tab le 3– 4 shows the DLL signals.
Table 3–4. DLL Signals
Signal Description
clk The reference clock, which comes either from an external pin in Stratix devices or
from an enhanced PLL output in Stratix II devices.
reset_n The reset input.
delayctrlout The 6-bit output, which controls the value of the delay chain on the DQS inputs.
stratix_dll_control (1) The control signal from the controller, which is available if you turn on Insert
logic to allow the DLL to update only during the memory refresh period. It
controls when the 6-bit control value to DQS pins updates. On Stratix devices
stratix_dll_control disables the clock output.
dqsupdate (1) A DLL-generated control signal that controls when the 6-bit control value to DQS
pins updates, if the interface is only on one side of the device.
Note to Table 3–4:
(1) Stratix II devices only.
Example Design
IP Toolbench creates an example design that shows you how to instantiate and
connect up the DDR or DDR2 SDRAM controller. The example design consists of the
DDR or DDR2 SDRAM controller, some driver logic to issue read and write requests
to the controller, up to two PLLs to create the necessary clocks and a DLL (Stratix
series only). The example design is a working system that can be compiled and used
for both static timing checks and board tests.
DDR and DDR2 SDRAM Controller Compiler User Guide © March 2009 Altera Corporation
Page 53

Chapter 3: Functional Description 3–17
Example Driver
PLLclock_source
test_complete
pnf
Example Design
Testbench
DDR SDRAM Controller
DDR SDRAM
DIMM Model
Bidrectional Board
Delay Model
DLL
Device-Level Description
Figure 3–12 shows the testbench and the example design.
1 Ensure that the example driver is not optimized away in your example design, by
preserving the pnf output. Either attach it to a pin or assign it as a virtual pin in your
Quartus II project.
Figure 3–12. Testbench & Example Design
Tab le 3– 5 describes the files that are associated with the example design and the
testbench.
Table 3–5. Example Design & Testbench Files
Filename Description
<project name>_tb.v or .vhd (1) Testbench for the example design.
<project name>.v or .vhd (1) Example design.
ddr_pll_<device family>.v or .vhd (2) Example PLL.
ddr_fb_pll_stratixii.v or .vhd Optional fed-back PLL (Stratix II devices only).
<variation name>_example_driver.v or .vhd Example driver.
<variation name> .v or .vhd Top-level description of the custom MegaCore function.
Notes to Table 3–5:
(1) <project name> is the name of the IP Toolbench-generated example design.
(2) Replace <device family> with stratix for Stratix series, or cyclone for Cyclone series.
The example driver is a self-checking test generator for the DDR or DDR2 SDRAM
controller. It uses a state machine to write data patterns to a range of column
addresses, within a range of row addresses in all memory banks. It then reads back
the data from the same locations, and checks that the data matches. The pass not fail
(pnf) output transitions low if any read data fails the comparison. There is also a
pnf_per_byte output, which shows the comparison on a per byte basis. The
test_complete output transitions high for a clock cycle at the end of the write or
read sequence. After this transition the test restarts from the beginning.
The data patterns used are generated using an 8-bit LFSR per byte, with each LFSR
having a different initialization seed.
© March 2009 Altera Corporation DDR and DDR2 SDRAM Controller Compiler User Guide
Page 54

3–18 Chapter 3: Functional Description
Device-Level Description
The testbench instantiates a DDR or DDR2 SDRAM DIMM model, a reference clock
for the PLL, and model for the system board memory trace delays. When
test_complete is detected high, a test finished message is printed out, which
shows whether the test has passed.
1 Altera does not provide a memory simulation model. You must obtain one from your
memory vendor.
f For more details on how to run the simulation script, refer to “Simulate the Example
Design” on page 2–17.
Constraints
IP Toolbench generates a constraints script, add_constraints_for_<variation name>.tcl,
which is a set of Quartus II assignments that are required to successfully compile the
example design.
1 When the constraints script runs, it creates another script,
remove_constraints_for_<variation name>.tcl, which you may use to remove the
constraints from your design.
The constraints script implements the following types of assignments:
■ Capacitance loading for SDRAM interface pins
■ I/O standard to SSTL-2 class II for DDR SDRAM interface pins (SSTL-18 class II
for DDR2 SDRAM)
■ Current strength set to “min” for Stratix devices
■ DM, DQ, and DQS pin placement (except for non-DQS mode on Stratix devices)
■ Resynchronization and postamble registers placement
■ I/O register placement for Cyclone series
■ Synthesis “Don’t Optimize” set for the datapath logic
■ Address and control fast output register constraints
■ DQS frequency and delay settings for Cyclone devices
1 As the static timing analysis performed after the design compiles requires that the all
the clocks in the datapath are global, you must ensure you do not use regional clocks
for the datapath logic.
Tab le 3– 8 shows the methods that achieve the logic placement constraints.
Table 3–6. Methods for Logic Placement Constraints
Device Family Capture Registers Resynchronization Registers
Stratix II/Stratix II GX — LAB placement
Stratix/Stratix GX — LogicLock region constraints
Cyclone II LAB placement LAB placement
Cyclone LE placement LE placement
DDR and DDR2 SDRAM Controller Compiler User Guide © March 2009 Altera Corporation
Page 55

Chapter 3: Functional Description 3–19
Interfaces & Signals
For Stratix II devices, you have the following three options for the constraints:
■ Dedicated top and bottom I/O pins, which gives the highest performance.
■ Migratable DM, DQ, and DQS pin constraints on all sides of the device, which
allows you to migrate your design to a migration device at a later stage, and gives
less pins.
■ Non-migratable pin constraints, which give much greater flexibility and a greater
number of available pins on all sides of the device.
Interfaces & Signals
This section describes the following topics:
■ “Interface Description” on page 3–19
■ “Signals” on page 3–28
Interface Description
This section describes the following local-side interface requests:
■ “Writes” on page 3–20
■ “Reads” on page 3–21
■ “Read-Write-Read-Write” on page 3–23
■ “Read-Write-Read-Write” on page 3–23
■ “DDR SDRAM Initialization Timing” on page 3–25
■ “DDR2 SDRAM Initialization Timing” on page 3–26
1 These interface requests are for the native interface. For information on the
Avalon-MM interface, refer to the Avalon Interface Specifications.
The native interface is a superset of the Avalon-MM interface. The native interface has
the following additional signals. These signals, which are not part of the Avalon-MM
interface, provide extra information and control for the native interface:
■ local_rdvalid_in_n
■ local_init_done
■ local_refresh_req
■ local_refresh_ack
■ local_wdata_req
f For information on the datapath interface, refer to “Datapath” on page 3–4.
© March 2009 Altera Corporation DDR and DDR2 SDRAM Controller Compiler User Guide
Page 56

3–20 Chapter 3: Functional Description
Interfaces & Signals
Writes
Figure 3–13 on page 3–20 shows three write requests of different sizes, the first two to
sequential addresses and the third to a new row and bank. The controller allows you
to use any burst length up to the maximum burst length set on the memory device.
For example, if you select burst length of 8 for your DDR SDRAM memory, the
controller allows bursts of length 1, 2, 3, and 4 (2, 4, 6, and 8 on the DDR SDRAM
side).
1 The concept is similar for DDR2 SDRAM although only burst lengths 1 and 2 (2 and 4
on the DDR2 SDRAM side) are available.
Figure 3–13. Writes
[3]
[1]
[2] [5][4] [6]
clk
Local Interface
local_read_req
local_write_req
local_ready
local_size
local_cs_addr
local_row_addr (
local_bank_addr (
local_col_addr (
local_wdata_req
local_wdata
local_be
(1)
1
)
1
)
1
)
1 2 44
1 3 03
010 210 000210
1 3 03
020 021 030 000030
9275FF45 1A27C510 A84BD259 A04AD259
2 1 3 23
DDR SDRAM
Interface
ddr_cs_n
ddr_cke
ddr_a
ddr_ba
DDR Command (2)
ddr_ras_n
ddr_cas_n
ddr_we_n
ddr_dm(0)
ddr_dq
ddr_dqs(0)
F
000
0
NOP
D F D F 7 F 7 F7
F
010 000 040 042 0000 210 000 060 000060
1 0 1 0 3 0 3 03
ACT NOP WR NOP ACT NOP WR NOPWR
Notes to Figure 3–13:
(1) The local_cs_addr, local_row_addr, local_bank_addr, and local_col_addr signals are a representation of the
local_addr signal.
(2) DDR Command shows the command that the command signals (ddr_ras_n, ddr_cas_n and ddr_we_n) are issuing.
DDR and DDR2 SDRAM Controller Compiler User Guide © March 2009 Altera Corporation
Page 57

Chapter 3: Functional Description 3–21
Interfaces & Signals
1. The user logic requests the first write, by asserting the local_write_req signal,
and the size and address for this write. In this example, the request is a burst of
length 1 (2 on the DDR SDRAM side) to chip select 1. The local_ready signal is
asserted, which indicates that the controller has accepted this request, and the user
logic can request another read or write in the following clock cycle. If the
local_ready signal was not asserted, the user logic must keep the write request,
size, and address signals asserted.
2. The user logic requests a second write to a sequential address, this time of size 2 (4
on the DDR SDRAM side). The local_ready signal remains asserted, which
indicates that the controller has accepted the request.
3. The controller requests the write data and byte enables for the first write from the
user logic. The write data and byte enables must be presented in the clock cycle
after the request. In this example, the controller also continues to request write
data for the subsequent writes. The user logic must be able to supply the write
data for the entire burst when it requests a write.
4. The user logic requests the third write to a different chip select. The controller is
able to buffer up to four requests so the local_ready signal stays high and the
request is accepted.
5. When it has issued the necessary bank activation command, the controller issues
the first two write requests sequentially to the memory device.
6. Even though no data is being written to memory, the ddr_dqs signal must
continue toggling for the entire length of the memory device's burst length (8 in
this example).
For the Avalon-MM interface you should present the address (local_addr), the
write data (local_wdtata), and the write request (local_write_req) signal to
the controller with reference to the memory clock (clk_to_sdram). The Avalon-MM
interface does not use local_wdata_req.
Reads
Figure 3–14 on page 3–22 shows three read requests of different sizes. The controller
allows you to use any burst length up to the maximum burst length set on the
memory device. For example, if you select burst length of 8 for your DDR SDRAM
memory, the controller allows bursts of length 1, 2, 3, and 4 (2, 4, 6, and 8 on the DDR
SDRAM side).
1 The concept is similar for DDR2 SDRAM although only burst lengths 1 and 2 (2 and 4
on the DDR2 SDRAM side) are available.
© March 2009 Altera Corporation DDR and DDR2 SDRAM Controller Compiler User Guide
Page 58

3–22 Chapter 3: Functional Description
clk
local_read_req
local_write_req
local_ready
local_size
local_cs_addr
(1)
local_row_addr (
1
)
local_bank_addr (
1
)
local_col_addr (
1
)
local_rdata_valid
local_rdata
ddr_cs_n
ddr_cke
ddr_a
ddr_ba
DDR Command (
2
)
ddr_ras_n
ddr_cas_n
ddr_we_n
ddr_dm
ddr_dq
ddr_dqs
0 4 2 1 00
0
1 01
170 040 000040
0
1 01
050 055 057 000057
5348
86F4 D310
77F4
0479
54B0
CB48
54B0
F
E F E F D F D F D FD
F
000 170 000 0A0 000 040 000 0AA 000 0AE 0000AE
0
1 0 1 01
NOP
ACT
NOP
RD NOP ACT
NOPRDNOP
BT RD BT NOPBT
DDR SDRAM
Interface
Local Interface
[1] [3][2] [5][4]
Interfaces & Signals
Figure 3–14. Reads
Notes to Figure 3–14:
(1) The local_cs_addr, local_row_addr, local_bank_addr, and local_col_addr signals are a representation of the
local_addr signal.
(2) DDR Command shows the command that the command signals are issuing.
1. The user logic requests the first read by asserting the local_read_req signal,
and the size and address for this read. In this example, the request is a burst of
length 4 (8 on the DDR SDRAM side). The local_ready signal is asserted, which
indicates that the controller has accepted this request, and the user logic can
request another read or write in the following clock cycle. If the local_ready
signal was not asserted, the user logic must keep the read request, size, and
address signals asserted.
2. The user logic requests a second read to a different address, this time of size 2 (4
DDR and DDR2 SDRAM Controller Compiler User Guide © March 2009 Altera Corporation
on the DDR SDRAM side). The local_ready signal remains asserted, which
indicates that the controller has accepted the request.
3. The user logic requests a third read to a different address, this time of size 1 (2 on
the DDR SDRAM side). The local_ready signal remains asserted, which
indicates that the controller has accepted the request.
Page 59

Chapter 3: Functional Description 3–23
clk
local_read_req
local_write_req
local_ready
local_size
local_cs_addr (
1
)
local_row_addr (
1
)
local_bank_addr (
1
)
local_col_addr (
1
)
local_rdvalid_in_n
local_rdata_valid
local_rdata
local_wdata_req
local_wdata
ddr_cs_n
ddr_cke
ddr_a
ddr_ba
DDR Command (
2
)
ddr_ras_n
ddr_cas_n
ddr_we_n
ddr_dm
ddr_dq
ddr_dqs
0 01
0
2 0 2 02
0000
0143 00210143 00000021
0
1 2 1 02
000
019 086 01A 000085
FFD0 9A38
DF08 D5CD 14D9D5CD
FF
FB FF FB FE FF FE FF FB FF FE FFFE
FF
0000
0143 0000 00320021 0000 010C0000 0034 0000 010A 0000010A
0
1 0 1 2 0 2 0 1 0 2 02
NOP
ACT NOP RD ACT NOP WR NOP RD NOP WR NOPWR
DDR SDRAM
Interface
Local Interface
[1] [2] [3] [4] [6][5]
Interfaces & Signals
4. The controller returns the read data for the first request by asserting the
local_rdata_valid signal. The exact number of clock cycles between the
controller accepting the request and returning the data depends on the number of
other requests pending in the controller, the state the memory is in, and the timing
requirements of the memory (e.g., the CAS latency).
5. The controller returns the read data for the subsequent read requests.
Read-Write-Read-Write
Figure 3–15 on page 3–23 shows a sequence of interleaved reads and writes.
Figure 3–15. Read-Write-Read-Write
Notes to Figure 3–15:
(1) The local_cs_addr, local_row_addr, local_bank_addr, and local_col_addr signals are a representation of the
local_addr signal.
(2) DDR Command shows the command that the command signals are issuing.
1. The user logic requests a read request by asserting the local_read_req signal
along with the size and address for that read. Because the local_ready signal is
high, that request can be considered accepted.
© March 2009 Altera Corporation DDR and DDR2 SDRAM Controller Compiler User Guide
Page 60

3–24 Chapter 3: Functional Description
clk
reset_n
local_refresh_req
local_refresh_ack
ddr_cs_n
ddr_cke
ddr_a
ddr_ba
DDR Command
ddr_ras_n
ddr_cas_n
ddr_we_n
FF 00 FF 00 FF 00 FF00
FF
0000
0400 00000400
0
NOP
PCH NOP ARF NOP ARF NOPARF
DDR SDRAM Interface
Local Interface
[1] [2] [4][3]
Interfaces & Signals
2. The user logic requests a write, a read, and another write request, which are
accepted.
3. The controller asserts the write data request signal to ask the user logic to present
valid write data and byte enables on the next clock edge.
4. The read data from the first read request is returned and marked as valid by the
read data valid signal.
5. The controller again asserts the write data request for the second write request.
6. The read data from the second read request is returned.
User Refresh Control
Figure 3–16 shows the user refresh control interface. This feature allows you to control
when the controller issues refreshes to the memory. This feature allows better control
of worst case latency and allows refreshes to be issued in bursts to take advantage of
idle periods.
Figure 3–16. User Refresh Control
Note to Figure 3–16:
(1) DDR Command shows the command that the command signals are issuing.
1. The user logic asserts the refresh request signal to indicate to the controller that it
should perform a refresh. The state of the read and write requests signal does not
matter as the controller gives priority to the refresh request (although it completes
any currently active reads or writes).
2. The controller asserts the refresh acknowledge signal to indicate that it has issued
a refresh. This signal is still available even if the user refresh control option is not
switched on, allowing the user logic to keep track of when the controller is issuing
refreshes.
3. The user logic keeps the refresh request signal asserted to indicate that it wishes to
perform another refresh request.
The controller again asserts the refresh acknowledge signal to indicate that it has
issued a refresh. At this point the user logic deasserts the refresh request signal and
DDR and DDR2 SDRAM Controller Compiler User Guide © March 2009 Altera Corporation
the controller continues with the reads and writes in its buffers.
Page 61

Chapter 3: Functional Description 3–25
clk
ddr_cke
ddr_a
ddr_ba
ddr_cs_n
ddr_ras_n
ddr_cas_n
ddr_we_n
local_init_done
0 0
0 1 01
0 0 0 0 0 0 00
[1] [2] [3] [4] [6][5][5]
200 clock cycles
Key:
P = PCH
L = LMR
A = ARF
DDR Command P L L P A A LL
Interfaces & Signals
DDR SDRAM Initialization Timing
f DDR SDRAM and DDR2 SDRAM initialization timing is different. For DDR2 SDRAM
initialization timing, refer to “DDR2 SDRAM Initialization Timing” on page 3–26.
The DDR SDRAM controller initializes the SDRAM devices by issuing the following
memory command sequence:
■ NOP (for 200 ms, programmable)
■ PCH
■ Extended LMR (ELMR)
■ LMR
■ NOP (for 200 clock cycles, fixed)
■ PCH
■ ARF
■ ARF
■ LMR
Figure 3–17 on page 3–25 shows a typical initialization timing sequence, which is
described below. The length of time between the reset and the first PCH command
should be 200 ms. This time can be reduced for simulation testing by setting the startup timer parameter in IP Toolbench.
Figure 3–17. DDR SDRAM Device Initialization Timing
1. A PCH command is sent to all banks by setting the precharge pin, the address bit
a[10], or a[8] high.
© March 2009 Altera Corporation DDR and DDR2 SDRAM Controller Compiler User Guide
Page 62

3–26 Chapter 3: Functional Description
Interfaces & Signals
2. An ELMR command is issued to enable the internal delay-locked loop (DLL) in the
memory devices. An ELMR command is an LMR command with the bank address
bits set to address the extended mode register.
3. An LMR command sets the operating parameters of the memory such as CAS
latency and burst length. This LMR command is also used to reset the internal
memory device DLL. The DDR SDRAM controller allows 200 clock cycles to
elapse after a DLL reset and before it issues the next command to the memory.
4. A further PCH command places all the banks in their idle state.
5. Two ARF commands must follow the PCH command.
6. The final LMR command programs the operating parameters without resetting the
DLL.
The DDR SDRAM controller asserts the local_init_done signal, which shows that
it has initialized the memory devices.
DDR2 SDRAM Initialization Timing
The DDR2 SDRAM controller initializes the memory devices by issuing the following
command sequence:
■ NOP (for 200 ms, programmable)
■ PCH
■ ELMR, register 2
■ ELMR, register 3
■ ELMR, register 1
■ LMR
■ PCH
■ ARF
■ ARF
■ LMR
■ ELMR, register 1
■ ELMR, register 1
Figure 3–18 on page 3–27 shows a typical DDR2 SDRAM initialization timing
sequence, which is described below. The length of time between the reset and the
clock enable signal going high should be 200 ms. This time can be reduced for
simulation testing by setting the start-up timer parameter in IP Toolbench.
DDR and DDR2 SDRAM Controller Compiler User Guide © March 2009 Altera Corporation
Page 63

Chapter 3: Functional Description 3–27
Key:
P = PCH
L = LMR
A = ARF
clk
ddr_cke
ddr_a
ddr_ba
ddr_cs_n
ddr_ras_n
ddr_cas_n
ddr_we_n
local_init_done
DDR Command
2 0 3 0 1 0 0 1 0 1 11
0 0 0 0 0 0 0
P L L L L P A A L N L LL
200 clock cycles
[1] [2] [3] [3] [4] [7][6][5] [7] [8] [9]
Interfaces & Signals
Figure 3–18. DDR2 SDRAM Device Initialization Timing
1. The clock enable signal (CKE) is asserted 200 μs after coming out of reset.
2. The controller then waits 400 ns and then issues the first PCH command by setting
the precharge pin, the address bit a[10] or a[8] high. The 400 ns is calculated by
taking the number of clock cycles calculated by the wizard for the 200 μs delay and
dividing this by 500. If a small initialization time is selected for simulation
purposes, this delay is always at least 1 clock cycle.
3. Two ELMR commands are issued to load extend mode registers 2 and 3 with
zeros.
4. An ELMR command is issued to extend mode register 1 to enable the internal DLL
in the memory devices.
5. An LMR command is issued to set the operating parameters of the memory such
as CAS latency and burst length. This LMR command is also used to reset the
internal memory device DLL.
6. A further PCH command places all the banks in their idle state.
7. Two ARF commands must follow the PCH command.
8. A final LMR command is issued to program the operating parameters without
resetting the DLL.
9. 200 clock cycles after step 5, two ELMR commands are issued to set the memory
device off-chip driver (OCD) impedance to the default setting.
The DDR2 SDRAM controller asserts the local_init_done signal, which shows
that it has initialized the memory devices.
© March 2009 Altera Corporation DDR and DDR2 SDRAM Controller Compiler User Guide
Page 64
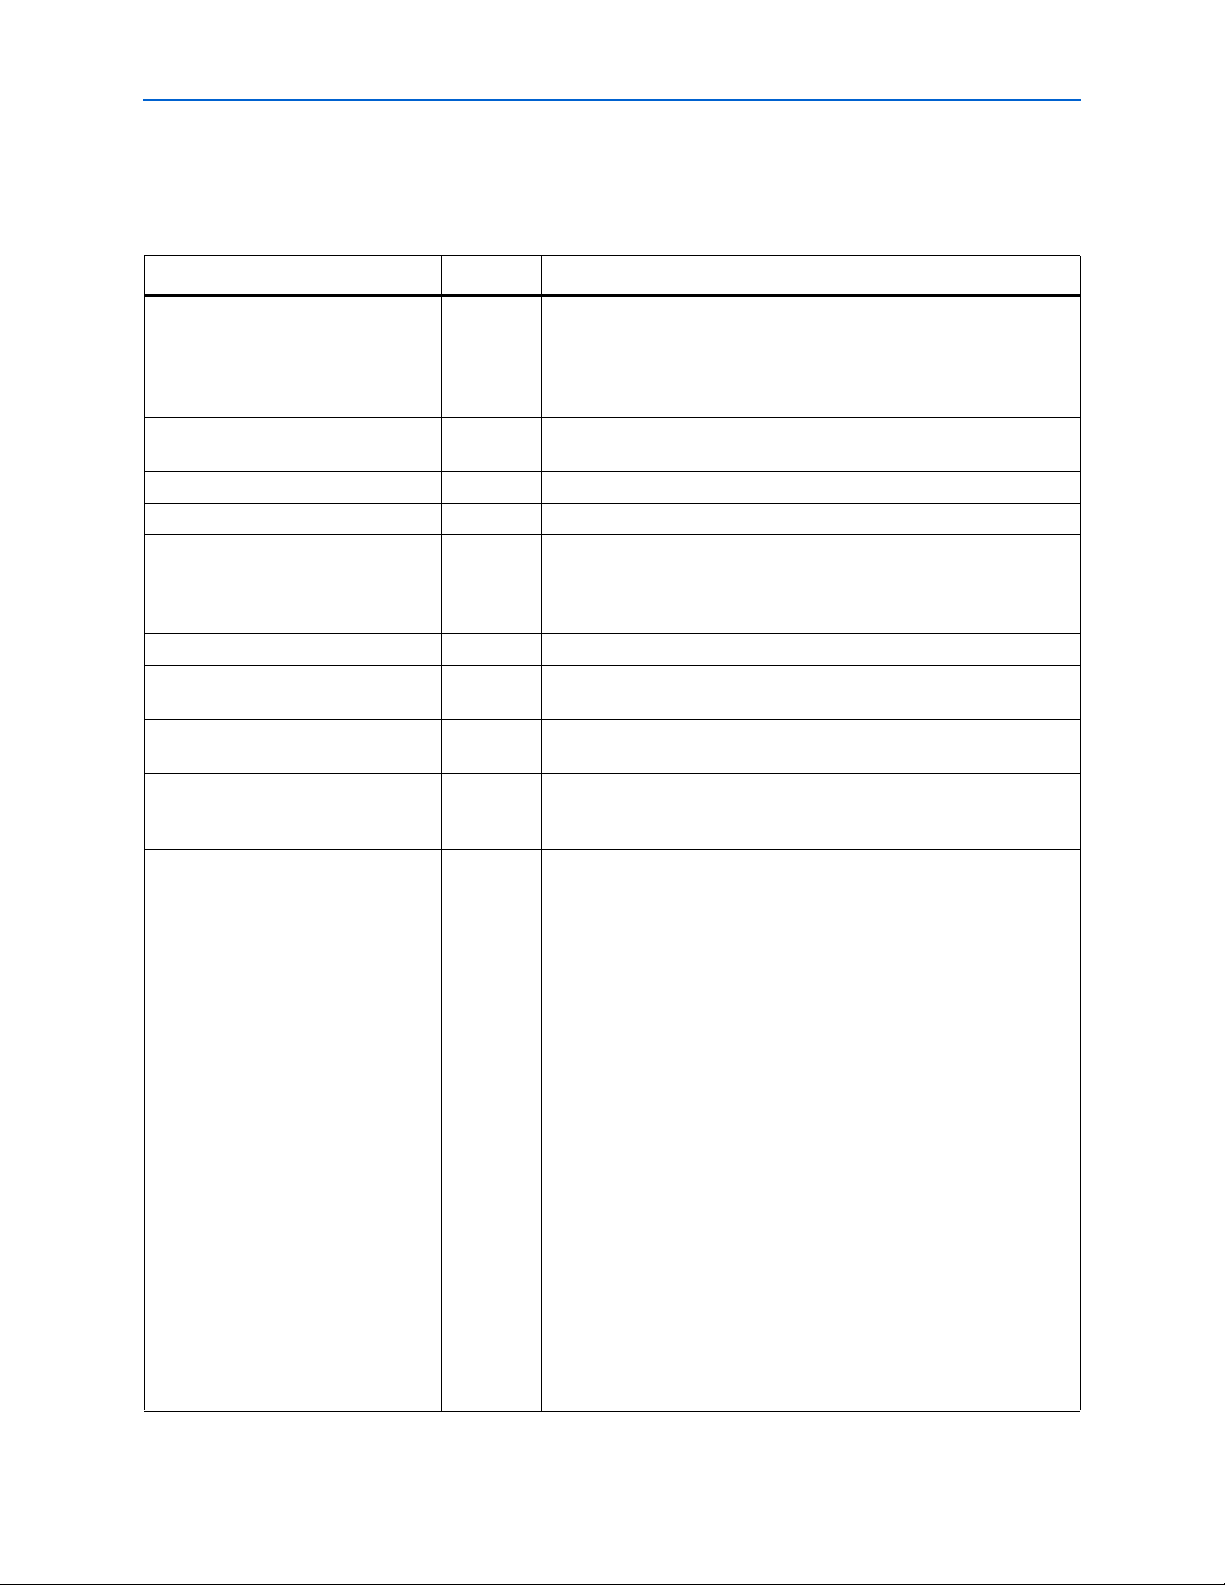
3–28 Chapter 3: Functional Description
Interfaces & Signals
Signals
Tab le 3– 7 shows the DDR and DDR2 SDRAM controller system signals.
Table 3–7. System Signals (Part 1 of 2)
Signal Name Direction Description
addrcmd_clk Input The clock to the address and command output registers. Only
available if Insert extra pipeline registers in the datapath is on. The
addrcmd_clk signal allows you to adjust the address and
command output timing, if required. The addrcmd_clk signal is
connected to the system clock by default.
capture_clk Input Optional clock that can be used instead of DQS to capture read data,
for example in the Stratix side banks.
clk Input System clock.
dqs_delay_ctrl[5:0] Input Control bus from the DLL to the DQS pins.
dqsupdate The Stratix II DLL generates the dqsupdate signal for the DQS pins to
control when the DQS delay chain value can update. Only available if
the interface is on a single side of the device and Insert logic to allow
the DLL to update during the memory refresh period is off.
fedback_clock_in Input Fed-back clock input.
postamble_clk (1) Input The postamble logic clock, which disables the capture registers before
the end of the DQS read postamble period.
reset_n Input System reset, which can be asserted asynchronously but must be
deasserted synchronous to the rising edge of the system clock.
resynch_clk (1) Input Clock that resynchronizes read data from the DQS clock domain to the
system clock domain. Typically, you can use the system clock as the
resynchronization clock.
resynch_clk_edge_select Input Allows you to switch on a second pair of registers, clocked on the
negative edge of the resynchronization clock, immediately after the
resynchronization registers. This feature allows safer transfer of your
resynchronized read data back to the system clock domain, if your
resynchronization clock phase is variable. It is only available in
designs targetting a HardCopy II device or if a HardCopy II device is
specified as a companion device in your project. By default, the
example design connects the signal to logic zero, which disables the
extra set of registers.
The resynch_clk_edge_select is added to HardCopy II
designs to allow you to safely adjust the resynchronization clock while
still maintaining a safe transfer back to the system clock domain. An
extra set of resynchronization registers are inserted on the opposite
edge and a multiplexer to select which register's output to pass on to
the system clock register (refer to Figure 3–19).
The output of the capture register goes to the resynchronization
register, which may be clocked on the rising edge of a dedicated PLL
output. The extra logic (a falling edge register and a multiplexer) gets
inserted before the system clock register.
You should keep this select signal programmable if your
resynchronization clock phase can be tuned by the PLL
reconfiguration block. If you tie it off to a fixed value, you may limit the
range across which you can adjust your resynchronization clock.
DDR and DDR2 SDRAM Controller Compiler User Guide © March 2009 Altera Corporation
Page 65

Chapter 3: Functional Description 3–29
Capture
Register
Multiplex
local_rdata
Pipeline
Register
Extra
Resynchronization
Register
Resynchronization
Register
Interfaces & Signals
Table 3–7. System Signals (Part 2 of 2)
Signal Name Direction Description
write_clk Input Shifted clock that center aligns write data to the memory.
dqs_ref_clk Output Stratix DLL reference clock output.
fedback_clock_out Output Fed-back clock output.
stratix_dll_control Output Disables the Stratix DLL reference clock during reads.
Note to Table 3–7:
(1) This signal only exists on the custom variation when a dedicated clock phase is required, otherwise the connection is made inside the custom
variation.
Figure 3–19. Circuit for resynch_clk_edge_select
Tab le 3– 8 shows the DDR and DDR2 SDRAM controller local interface signals.
Table 3–8. Local Interface Signals (Part 1 of 2)
Signal Name Direction Description
local_addr[] Input Memory address at which the burst should start. The width of this bus is sized
using the following equation:
For one chip select:
width = bank bits + row bits + column bits – 1
For multiple chip selects:
width = chip bits + bank bits + row bits + column bits – 1
The least significant bit (LSB) of the column address on the memory side is
ignored, because the local data width is twice that of the memory data bus
width.
The order of the address bits is set in the clear text part of the MegaCore
function (auk_ddr_sdram.vhd). The order is chips, bank, row, column, but
you can change it if required.
local_be[] Input Byte enable signal, which you use to mask off individual bytes during writes.
local_burstbegin Input Avalon-MM burst begin strobe, which indicates the beginning of an Avalon-
MM burst. This signal is only available when the local interface is an AvalonMM interface and the memory burst length is greater than 2.
local_read_req Input Read request signal.
local_refresh_req Input User controlled refresh request. If User Controlled Refresh is turned on,
local_refresh_req becomes available and you are responsible for
issuing sufficient refresh requests to meet the memory requirements. This
option allows complete control over when refreshes are issued to the memory
including ganging together multiple refresh commands. Refresh requests take
priority over read and write requests unless they are already being processed.
© March 2009 Altera Corporation DDR and DDR2 SDRAM Controller Compiler User Guide
Page 66

3–30 Chapter 3: Functional Description
Interfaces & Signals
Table 3–8. Local Interface Signals (Part 2 of 2)
Signal Name Direction Description
local_size[] Input The burst size of the requested access, which is encoded as a binary number.
The controller supports maximum local burst lengths of 1, 2, or 4, for DDR
SDRAM; and 2 for DDR2 SDRAM.
You may request any size up to the maximum burst length, so for example if
you chose a memory burst length of 8, the local burst size is 4 and you may
request local bursts of length 1, 2, 3 or 4. Similarly, if you chose a memory
burst length of 4, the local burst length is 2 and you may request local bursts
of length 1 or 2.
If you chose a memory burst length of 2 (local burst length of 1), the
local_size[] port is tied to 1 and is not visible on the controller interface.
For all other memory burst lengths, local_size is available.
local_wdata[] Input Write data bus. The width of local_wdata is twice that of the memory data
bus.
local_write_req Input Write request signal.
local_init_done Output Memory initialization complete signal, which is asserted once the controller
has completed its initialization of the memory. Read and write requests are still
accepted before local_init_done is asserted, however they are not
issued to the memory until it is safe to do so.
local_rdata[] Output Read data bus. The width of local_rdata is twice that of the memory data
bus.
local_rdata_valid Output Read data valid signal. The local_rdata_valid signal indicates that
valid data is present on the read data bus. The timing of
local_rdata_valid is automatically adjusted to cope with your choice
of resynchronization and pipelining options.
local_rdvalid_in_n Output An early version of the read data valid signal which appears three cycles before
it. Not present in Avalon-MM mode.
local_ready Output The local_ready signal indicates that the DDR or DDR2 SDRAM
controller is ready to accept request signals. If local_ready is asserted in
the clock cycle that a read or write request is asserted, that request has been
accepted. The local_ready signal is deasserted to indicate that the DDR
or DDR2 SDRAM controller cannot accept any more requests.
local_refresh_ack Output Refresh request acknowledge, which is asserted for one clock cycle every time
a refresh is issued. Even if the User Controlled Refresh option is not selected,
local_refresh_ack still indicates to the local interface that the
controller has just issued a refresh command.
local_wdata_req Output Write data request signal, which indicates to the local interface that it should
present valid write data on the next clock edge. Not present in Avalon-MM
mode.
Tab le 3– 9 shows the DDR and DDR2 SDRAM interface signals.
Table 3–9. DDR & DDR2 SDRAM Interface Signals (Part 1 of 2) (Note 1)
Signal Name Direction Description
ddr_dq[] Bidirectional Memory data bus. This bus is half the width of the local read and write data
busses.
ddr_dqs[] Bidirectional Memory data strobe signal, which writes data into the DDR or DDR2 SDRAM and
captures read data into the Altera device.
DDR and DDR2 SDRAM Controller Compiler User Guide © March 2009 Altera Corporation
Page 67

Chapter 3: Functional Description 3–31
Parameters
Table 3–9. DDR & DDR2 SDRAM Interface Signals (Part 2 of 2) (Note 1)
Signal Name Direction Description
clk_to_sdram Output Clock for the memory device.
clk_to_sdram_n Output Inverted clock for the memory device.
ddr_a[] Output Memory address bus.
ddr_ba[] Output Memory bank address bus.
ddr_cas_n Output Memory column address strobe signal.
ddr_cke[] Output Memory clock enable signals.
ddr_cs_n[] Output Memory chip select signals.
ddr_dm[] Output Memory data mask signal, which masks individual bytes during writes.
ddr_odt Output Memory on-die termination control signal (DDR2 SDRAM only).
ddr_ras_n Output Memory row address strobe signal.
ddr_we_n Output Memory write enable signal.
Note to Table 3–9:
(1) You can change the ddr_ signal name prefix in IP Toolbench.
Parameters
The parameters can be set only in IP Toolbench (refer to “DDR & DDR2 SDRAM
Controller Walkthrough” on page 2–9). Table 3–10 shows the global parameters.
Table 3–10. Global Parameters
Parameter Value Units Description
Presets Part
number or
custom
Clock speed > 75 (1) MHz The clock frequency used by the memory controller. Because the controller
Note to Table 3–10:
(1) Depends on the FPGA and the memory device that you choose.
— A part number for a particular memory device, module, or the name of an
Altera development board. Choosing an entry other than Custom sets many of
the parameters in the wizard to the correct value for the specified part. If any
such parameter is changed to a value that is not supported by the specified
device, the preset automatically changes to custom. You can add your own
devices or boards to this list by editing the memory_types.dat file in the
\constraints directory.
uses double data rate, the data rate is twice the clock frequency.
© March 2009 Altera Corporation DDR and DDR2 SDRAM Controller Compiler User Guide
Page 68

3–32 Chapter 3: Functional Description
Parameters
Memory
Tab le 3– 11 shows the memory interface parameters.
Table 3–11. Memory Interface Parameters
Parameter Value Units Description
Data bus width ≥ 8 Bits The width of your DDR or DDR2 SDRAM data interface. Your local
interface is twice the width of the memory interface. This value
depends on:
■ The memory
■ Bandwidth requirement
■ Number of DDIO pins available on the selected FPGA device
Number of chip selects 1, 2, 4, or 8 — The number of chip selects in your memory interface. This is
equivalent to the depth of your memory in terms of number of
chips. This value depends on the type of memory DIMM selected.
If there are two DIMMs and the memory modules on both DIMMs
have two ranks, the number of chip selects is 4.
Number of chip selects
per DIMM
Use dedicated PLL
outputs
Number of clock pairs
from FPGA to memory
1 or 2 — The number of chip selects on each DIMM in your memory
system. This option is completely dependent on the type of
external SDRAM that you are using. SDRAMs may come in two
memory chips (called rank) connected in parallel, with only a
unique chip enable signal. This configuration allows the two ranks
to share address and data lines. Selectively asserting only one
chip enable signal at a time, allows twice the memory depth
compared with only a single chip.
If there are two memory chips in the memory module, select 2,
otherwise select 1.
On or off — Turn on to use dedicated PLL outputs to generate the clocks,
which is recommended for HardCopy II devices.
HardCopy II designs use dedicated PLL outputs for noise
immunity, better signal integrity, and minimal variation over
process, temperature, and voltage.
When turned off, the ALTDDIO megafunction generates the clock
outputs.
1 to 6 — The number of differential clock pairs driven from the FPGA to the
memory. More clock pairs reduce the loading of each output.
Tab le 3– 12 shows the memory property parameters.
Table 3–12. Memory Property Parameters (Part 1 of 2) (Note 1)
Parameter Range Units Description
Row address bits 10 to 14 Bits The number of row address bits for your memory.
Column address bits 8 to 13 Bits The number of column address bits for your memory.
Bank address bits 2 or 3 Bits The number of bank address bits for your memory.
Precharge address bit 8 or 10 – The address bit to use as the precharge pin.
DDR and DDR2 SDRAM Controller Compiler User Guide © March 2009 Altera Corporation
Page 69

Chapter 3: Functional Description 3–33
Parameters
Table 3–12. Memory Property Parameters (Part 2 of 2) (Note 1)
Parameter Range Units Description
DQ bits per DQS pin 8 Bits The number of data (DQ) bits for each data strobe (DQS) pin. This
option depend on the type of memory selected. Memories either
support ×4 or ×8 mode. Stratix II and Stratix III devices support
both modes. Cyclone III devices do not support the DQS mode, as
the devices do not have the DQS-related circuitry.
Use ×4 floorplan files that
include DM pins
— — Two sets of recommended pins are provided for use with ×4
mode (four DQ per DQS) on the sides of Stratix II devices. If you
do not intend to use the memory DM pins, turn off this control to
give more available pins for your DDR SDRAM interface.
Registered DIMM /
Unbuffered memory
— — This option depends on the type of memory selected.
Select Registered DIMM for higher performance systems such as
servers, workstations, routers, and switches. To assure data
integrity, Registered DIMM uses additional devices: one to two
registers to latch address and command signals, and one PLL
clock buffer to adjust timing.
Registered DIMMs have their address and control lines buffered
on the DIMM to reduce signal loading. Because the registered
DIMM requires a buffer, they are more expensive than unbuffered
DIMMs. Unbuffered DIMMs do not buffer the address lines and
control lines, so they cost less and may be limited in the amount
the system may have installed because of system loading.
However an unbuffered DDR DIMM is able to operate one clock
cycle faster than a registered DIMM.
Note to Table 3–12:
(1) These are set by the device that you choose in the Presets list.
Controller
Tab le 3– 13 shows the local interface options.
Table 3–13. Local Interface
Parameter Range Description
Local Interface Native or Avalon Specifies the local side interface between the user logic and the memory
controller, refer to “Interface Description” on page 3–19.
This interface refers to the connection of the user logic (driver) to the
controller. There are few differences between the two interfaces in
performing read and write transactions. The Avalon-MM interface is
supported by SOPC builder (refer to the Avalon Interface Specifications).
For non-SOPC builder designs, you can build the driver logic to interface
to the controller with either the native interface (refer to “Interface
Description” on page 3–19) or the Avalon-MM interface.
© March 2009 Altera Corporation DDR and DDR2 SDRAM Controller Compiler User Guide
Page 70

3–34 Chapter 3: Functional Description
Parameters
Tab le 3– 14 shows the memory initialization options.
Table 3–14. Memory Initialization Options
Parameter Range Units Description
ODT setting Disabled, 50, 75,
or 150
Ω Enables on-die termination (ODT) resistance in the DDR2
SDRAM and enables dynamic control of it by the controller.
Choosing Disabled disable the on-die termination
resistance in the DDR2 SDRAM. The ddr2_odt control
signals are driven with a fixed value of zero.
Choosing 50, 75, or 150 Ω enables a 50-, 75-, or 150-Ω
ODT in the DDR2 SDRAM. The ddr2_odt signals enable
and disable the ODT as required.
CAS latency 2.0, 2.5, or 3.0
(for DDR
Cycles The delay in clock cycles from the read command to the
first output data from the memory.
SDRAM);
3, 4, or 5
(for DDR2
SDRAM)
Burst length 2, 4, or 8 (for
DDR SDRAM);
4 (for DDR2
— The number of data transfers between the FPGA and the
memory in each read or write transaction. The number of
transactions on the local interface is half this value.
SDRAM)
Burst type Sequential or
Interleaved
— This parameter is a memory Initialization option. Refer to
the memory vendor data sheet for the type of read and
writes transactions that it supports.
Controls the order in which data is transferred between
FPGA and memory during a read or write transaction.
Drive strength Normal or
Reduced
— Controls the drive strength of the memory device’s output
buffers. Reduced drive strength is not supported on all
memory devices.
Memory device DLL enable On or off — When turned on, the DLL within the memory device is
enabled. This parameter is a memory Initialization option
and by default turn on this option. Memory vendors do
provide the option of not using the DLL within the memory,
but it is too difficult to perform memory transactions
without the DLL.
DDR and DDR2 SDRAM Controller Compiler User Guide © March 2009 Altera Corporation
Page 71

Chapter 3: Functional Description 3–35
Parameters
Tab le 3– 15 shows the clocking options.
Table 3–15. Clocking Options
Parameter Description
Enable DQS mode When turned on, the registers that capture data from the DQ pins during
reads are clocked by a delayed version of DQS. Otherwise, a PLLgenerated clock captures the data (Stratix series only).
DQS mode provides higher performance than non-DQS mode. (refer to
AN 328: Interfacing DDR2 SDRAM with Stratix II Devices).
Only top and bottom banks support DQS circuitry, but non-DQS mode
uses side banks too. (1)
Use non-migratable DQ, DQS, and DM pins Only Stratix II devices support this option.
When the option is turned off, there are pins that are common across
the devices in the same family. For example, the pins that are available in
EP2S130F1020C3 is also available in EP2S90F1020C3. If you compile a
DDR or DDR2 SDRAM design to an EP2S130F1020C3 device, later you
can easily migrate it to an EP2S90F1020C3 device.
When turned on, the wizard allows much greater flexibility in the
placement of DQ, DQS, and DM pins, but you lose the ability to migrate
the design to a migration device.
Use fedback clock When turned on, the wizard uses the fedback clock for
resynchronization or capture. This clock eases resynchronization for the
read data for interface speeds > 200 MHz. When you use this clock, the
design uses an additional feedback PLL.
When you turn on both DQS mode and fedback clock mode, IP
Toolbench issues a warning Resynchronization and Postamble settings
must be chosen manually in the Manual Timings pane when using
DQS Fedback Clock mode. Manual control allows you flexibility to
adjust the phase of both the resynchronization clock and postamble
clock. If you do not turn on Manual control, the postamble clock and the
resynchronization clocks are derived from either the system clock or the
write clock.
For more information on fedback clock usage for improving the
performance, refer to Appendix D, Maximizing Performance. (1)
Note to Table 3–15:
(1) For block diagram of the registers, refer to Figure A–2 and Figure A–4 on page A–6.
© March 2009 Altera Corporation DDR and DDR2 SDRAM Controller Compiler User Guide
Page 72

3–36 Chapter 3: Functional Description
addrcmd_clk
Positive Edge
Address and Command
Output
B
clk
FSM
A
Parameters
Tab le 3– 16 shows the memory controller options.
Table 3–16. Memory Controller Options
Parameter Description
Insert pipeline registers on address and
command outputs
This register helps to achieve the required performance at frequencies >
200 MHz. When turned on, the wizard inserts a pipeline register stage
between the memory controller and the command and address outputs.
When this option is turned on an extra cycle (clk_to_sdram) of
latency is added between the time at which local_ready signal is
asserted at the local interface and the time the address or command
appears at the memory interface. Refer to Figure 3–20.
Insert extra pipeline registers in the datapath This option is available only if you turn on Insert pipeline registers on
address and command outputs.
When turned on, the wizard inserts a second pipeline register stage
between the memory controller and the address and command outputs,
which results in an additional cycle (clk_to_sdram) of latency.
These registers are inserted in the clear-text datapath and the clock to
these registers is available as an input on your variation. These registers
help your design to meet higher internal clock frequency. The clock can
be adjusted if necessary. By default, it is connected to the system clock
and its edge is set by the Clock address/command output registers
on the negative edge option. Refer to Figure 3–20 and Figure 3–21.
Clock address/command output registers on the
negative edge
When turned on, this option helps in meeting the setup and hold
requirements of the memory device for command and address with
respect to clock. However, you should perform your own timing
analysis of address/command timing. Generally, turn on this option,
except for Stratix II designs operating at 200 MHz or higher. Refer to
Figure 3–22
User controlled refresh When turned on, you specify when auto-refresh commands are issued.
Otherwise, the controller issues regular auto-refresh commands at an
interval specified by tREFI, refer to “User Refresh Control” on
page 3–24.
Figure 3–20 to Figure 3–22 show the additional registers that you can specify with the
following memory controller options:
■ A = Insert pipeline registers on address and command outputs
■ B = Insert extra pipeline registers in the datapath
■ C = Clock address/command output registers on the negative edge
Figure 3–20. Additional Pipeline Registers—A = On, B = On, C= Off
DDR and DDR2 SDRAM Controller Compiler User Guide © March 2009 Altera Corporation
Page 73

Chapter 3: Functional Description 3–37
Negative Edge
Address and Command
Output
B
clk
FSM
A
Negative Edge
Address and Command
Output
addrcmd_clkclk
FSM
A B
Parameters
Figure 3–21. Additional Pipeline Registers—A = On, B = Off, C= On
Figure 3–22. Additional Pipeline Registers—A = On, B = On, C= On
Tab le 3– 17 shows the DLL reference clock options.
Table 3–17. DLL Reference Clock Options
Parameter Range Description
Insert logic to allow the DLL
to update only during the
memory refresh period
Controller Timings
The memory timing parameters on the controller timings tab adjust the controller’s
timing to meet the timing parameters specified in the datasheet for the memory
devices. The Controller Timings tab shows the following three columns of
information:
■ Required
■ Cycles
■ Actual
The Required column specifies the timing requirements from the memory device
datasheet; these requirements can be minimum or maximum times. The values in the
required column are automatically set by your chosen memory device from the
Memory Device list.
The Cycles column specifies the number of cycles that the controller uses to meet
these timing requirements.
On or off For Stratix devices, Altera recommends you turn on this option to switch
off the DLL during read operations and so reduce jitter. For Stratix II
devices, Altera recommends you turn on this option only if your memory
interface spans two sides of the device or if you intend to share a DLL
between two or more interfaces on two sides of the device. Refer to “DLL
Configurations” on page 3–16.
The Actual column reports the actual time that the controller uses, based on the
values in the cycles column and the clock speed.
© March 2009 Altera Corporation DDR and DDR2 SDRAM Controller Compiler User Guide
Page 74

3–38 Chapter 3: Functional Description
Parameters
For minimum timing requirements, the values in the actual column must be greater
than or equal to the requirement; for maximum timing requirements, the figure in the
actual column must be less than or equal to the requirement. You can choose whether
to set the values in the cycle column or allow the wizard to choose the most
appropriate values.
Tab le 3– 18 shows the memory timing parameters.
Table 3–18. Memory Timing Parameters
Parameter Range Description
Manually choose
clock cycles
t
REFI
On or Off Turn on, to enter values in the cycles column; turn off and the wizard calculates the
values in the cycles column.
≤ 65534 Interval between refresh commands (maximum). The controller performs regular
refresh at this interval unless user controlled refresh is turned on (refer to “Controller ”
on page 3–33).
t
INIT
≤ 65534 Memory initialization time (minimum). After reset, the controller does not issue any
commands to the memory during this period.
t
RP
2 to 5 Precharge command period (minimum). The controller does not access the memory
for this period after issuing a precharge command.
t
RCD
2 to 5 Active to read-write time (minimum). The controller does not issue read or write
commands to a bank during this time after issuing an active command.
t
RFC
7 to 31 Auto-refresh command period (minimum). The length of time the controller waits
before doing anything else after issuing an auto-refresh command.
t
WR
2 to 5 Write recovery time (minimum). The controller waits for this time after the end of a
write transaction before issuing a precharge command.
t
RAS
4 to 15 Active to precharge time (minimum). The controller waits for this time after issuing an
active command before issuing a precharge command to the same bank.
t
MRD
2 to 3 Load mode register command period (minimum). The controller waits for this time
after issuing a load mode register command before issuing any other commands.
t
WTR
1 to 3 Write to read command delay (minimum). The controller waits for this time after the
end of a write command before issuing a subsequent read command to the same
bank. This timing parameter is specified in clock cycles and so has no entry in the
Required column.
Memory Timings
Tab le 3– 19 shows memory device datasheet settings. IP Toolbench uses these values
to perform timing analysis.
Table 3–19. Device Datasheet Settings (Part 1 of 2)
Parameter Units Description
t
DQSQ
t
QHS
t
DQSCK
t
AC
t
CK_MAX
t
DS
t
DH
DDR and DDR2 SDRAM Controller Compiler User Guide © March 2009 Altera Corporation
ps The maximum DQS to DQ skew; DQS to last DQ valid, per group, per access.
ps The maximum data hold skew factor.
ps The access window of DQS from CK/CK#.
ps The access window of DQ from CK/CK#.
ps The maximum permitted clock cycle time.
ps The minimum DQ and DM input setup time relative to DQS.
ps The minimum DQ and DM input hold time relative to DQS.
Page 75

Chapter 3: Functional Description 3–39
Parameters
Table 3–19. Device Datasheet Settings (Part 2 of 2)
Parameter Units Description
t
cycle The minimum write command to first DQS latching transition.
DQSS
t
DQSS
cycle The maximum write command to first DQS latching transition.
Board Timings
Tab le 3– 20 shows the pin loading parameters.
Table 3–20. Pin Loading
Parameter Units Description
Manual pin load control On or off Turn on or turn off the manual pin load control.
Pin loading on FPGA DQ/DQS pins pF The default capacitive loading on the FPGA DQ/DQS pins is based
on the chosen memory type. You should update this figure if it does
not match your board and memory devices.
Pin loading on FPGA
address/command pins
Pin loading on FPGA clock pins pF The default capacitive loading on the FPGA clock pins is based on
pF The default capacitive loading on the FPGA address/command pins
is based on the chosen memory type. You should update this figure
if it does not match your board and memory devices.
the chosen memory type. You should update this figure if it does
not match your board and memory devices.
Tab le 3– 21 shows the board trace delay parameters. IP Toolbench uses these values to
perform timing analysis.
Table 3–21. Board Trace Delays
Parameter Units Description
FPGA clock output to memory chip clock
input, nominal delay
ps The nominal or average value of the delay attributable to the board
traces from the FPGA clock output pin to the memory device clock
input pin.
Memory DQ/DQS outputs to FPGA inputs,
nominal delay
ps The nominal or average value of the delay attributable to the board
traces from the memory device DQS and DQ clock output pins to the
FPGA input pins in read mode.
Fed-back clock trace, nominal delay ps The nominal or average value of the delay attributable to the board
traces from the FPGA clock output pin to the fed-back clock input
pin. This delay should match the sum of the clock and DQ/DQS trace
lengths.
Tolerance on nominal board delays ± % The tolerance on the nominal board trace delays. This tolerance
should take into account any variability between individual boards,
due to temperature or voltage, and different trace lengths to different
memory devices in your system.
Worst trace skew between DQS/DQ/DM in
any one data group
ps The worst case skew with respect to DQS and any other DQ or DM
signal in any one byte group between any one memory device and
the FPGA.
© March 2009 Altera Corporation DDR and DDR2 SDRAM Controller Compiler User Guide
Page 76

3–40 Chapter 3: Functional Description
Parameters
Project Settings
Tab le 3– 22 shows the example design options.
Table 3–22. Example Design Options
Parameter Description
Update the example design
file that instantiates the
controller variation
Automatically apply
datapath-specific contraints
to the Quartus II project
Automatically verify
datapath-specific timing in
the Quartus II project
Update the example design
PLLs
When this option is turned on, IP Toolbench parses and updates the example design file. It
only updates sections that are between the following markers:
<<START MEGAWIZARD INSERT <tagname>
<<END MEGAWIZARD INSERT <tagname>
If you edit the example design file, ensure that your changes are outside of the markers or
remove the markers. Once you remove the markers, you must keep the file updated, because
IP Toolbench can no longer update the file.
When you turn on this option, IP Toolbench updates the example testbench and the ModelSim
simulation script.
When this option is turned on, the next time you compile, the Quartus II software
automatically runs the add constraints script. Turn off this option if you do not want the script
to run automatically
When this option is turned on, after every compilation the Quartus II software automatically
runs the verify timing script. Turn off this option if you do not want the script to run
automatically.
When this option is turned on, IP Toolbench automatically overwrites the PLLs.Turn off this
option, if you do not want the wizard to overwrite the system PLL or the optional fed-back
PLL.
Tab le 3– 23 shows the variation path options.
Table 3–23. Variation Path Options
Parameter Description
Enable hierarchy control The constraints script analyzes your design, to automatically extract the hierarchy to your
variation. To prevent the constraints script analyzing your design, turn on Enable hierarchy
control, and enter the correct hierarchy path to your datapath.
Hierarchy path to your
custom variation
The hierarchy path is the path to your DDR or DDR2 SDRAM datapath, minus the top-level
name. The hierarchy entered in the wizard must match your design, because the constraints
and timing scripts rely on this path for correct operation.
Tab le 3– 24 shows the device pin prefixes and names options.
Table 3–24. Device Pin Prefixes & Names Options
Parameter Description
Pin name of the clock
driving the memory (+)
Pin name of the clock
driving the memory (–)
Pin name of fed-back clock
input
Pin prefix all pins on the
devices with
The suggested clk_to_sdram pin name, which you may edit, but must end in [0].
The suggested clk_to_sdram_n pin name, which you may edit, but must end in [0].
The suggested fedback_clock_in pin name, which you may edit.
This string is used to prefix the pin names for the FPGA pins connected to the DDR or DDR2
SDRAM.
DDR and DDR2 SDRAM Controller Compiler User Guide © March 2009 Altera Corporation
Page 77

Chapter 3: Functional Description 3–41
MegaCore Verification
Manual Timings
The manual timing settings do not need to be changed under normal circumstances.
For more information on the manual timing settings, refer to “Manual Timing
Settings” on page A–1.
MegaCore Verification
MegaCore verification involves simulation testing and hardware testing.
Simulation Testing
Altera has carried out extensive random, directed tests with functional test coverage
using industry-standard Denali models to ensure the functionality of the DDR and
DDR2 SDRAM controller. In addition, Altera has carried out a wide variety of gatelevel tests of the DDR and DDR2 SDRAM controllers to verify the post-compilation
functionality of the controllers.
Hardware Testing
Tab le 3– 25 shows the Altera development boards on which Altera hardware tested
the DDR and DDR2 SDRAM controllers.
Table 3–25. Altera Development Boards
Development Board Altera Device Memory Device
Stratix II High-Speed IO Development Board EP2S60F1020C3 Micron DDR2-533 DIMM (MT8HTF3272AG-
53EB3ES)
Stratix II PCI Development Board EP2S60F1020C3 Infineon DDR400 SO-DIMM
(HYS64D32020GDL-5-B)
Stratix PCI Development Board EP1S25F1020C5 Infineon DDR400 SO-DIMM
(HYS64D32020GDL-5-B)
Stratix PCI Development Board, Professional
Edition
Stratix GX High-Speed Development Board EP1SGX25FF1020C6ES Micron DDR400 DIMM
Internal Stratix Memory Test Board EP1S25F780C5 Micron DDR400 DIMM
Nios Development Board, Cyclone II
(EP2C35)
Cyclone II EP2C35 PCI Development Board EP2C35F672C6 Micron 256-Mbit DDR2-533 device
Cyclone II EP2C35 DSP Development Board EP2C35F672C6 Micron DDR2-533 DIMM (MT8HTF3264AY-
Cyclone Memory Board EP1C6Q240C6 Micron 128-Mbit DDR266 device
Internal Cyclone Memory Test Board EP1C20F400C6 Micron DDR266 DIMM
EP1S60F1020C6 Micron DDR333 SO-DIMM
(MT8VDDT3264HG-335C2)
(MT16VDDT3264AG-40BB5)
(MT16VDDT3264AG-40BB5)
EP2C35F672C6 Micron 128-Mbit DDR-333 device
(MT46V16M16-6T)
(MT47H16M16BG-37E)
40EB3)
(MT46V8M16-75)
(MT16VDDT3264AG-265B1)
© March 2009 Altera Corporation DDR and DDR2 SDRAM Controller Compiler User Guide
Page 78

3–42 Chapter 3: Functional Description
MegaCore Verification
Tab le 3– 26 shows the non-Altera development boards on which Altera hardware
tested the DDR and DDR2 SDRAM controllers.
Table 3–26. Non-Altera Development Boards (Note 1)
Development Board Altera Device Memory Device
Cyclone Twister Board EP1C6Q240C6 Micron 128-Mbit DDR266 device
(MT46V8M16-75Z)
Note to Table 3–26:
(1) For more information on the Cyclone Twister board, refer to www.fpga.nl.
DDR and DDR2 SDRAM Controller Compiler User Guide © March 2009 Altera Corporation
Page 79

Parameters
Tab le A– 1 shows the resynchronization options.
For more information on the resynchronization options, refer to “Resynchronization”
on page A–4).
Table A–1. Resynchronization Options (Part 1 of 2)
Parameter Range Description
Reclock resynchronized data
to the positive edge
Manual resynchronization
control
Resynchronize captured read
data in cycle
Resynchronization clock
setting
Automatic, Always, or Never When this option is set to “Always” the wizard inserts a set
On or off Turn on to specify the details of the resynchronization clock.
0 to 6 The number of cycles of delay to allow for the round trip
0 (clk, rising edge),
90 (write_clk, falling
edge),
180 (clk, falling edge)
270 (write_clk, rising
edge), or
dedicated
A. Manual Timing Settings
of positive edge system clock registers in the read data path
and delays the read data valid signal appropriately. The extra
registers are useful if you are resynchronizing with a phase
other than the positive edge of the system clock, but at the
expense of a clock cycle of latency. Choosing Never
produces lower latency. However, it is then your
responsibility to reclock the read data to the positive edge of
the system clock. When this option is set to Automatic, the
wizard decides whether or not to insert the extra set of
registers based on the choice of resynchronization edge and
system clock.
When the resynchronization clock phase is close to the
positive edge of the system clock, this option inserts an
additional set of registers, clocked on the negative edge of
system clock, between the resynchronization clock domain
and the system clock domain.
Otherwise, the details are calculated automatically based on
system timing. You must turn on this option when you turn
on the DQS mode and the fedback PLL options.
delay.
Defines which clock to use for resynchronization: the system
clock, the write clock (a 90° advanced version of the system
clock), or a dedicated resynchronization clock. Also defines
which edge of the chosen clock to use to resynchronize the
captured data. If you select falling edge, the data path
automatically inserts inverters on the clock inputs to the
resynchronization registers.
When the resynchronization clock is set to either the system
clock or the write clock, you cannot alter the phase of the
resynchronization clock. To alter the resynchronization phase
clock, select the resynchronization clock as dedicated and
set the required phase.
© March 2009 Altera Corporation DDR and DDR2 SDRAM Controller Compiler User Guide
Page 80

A–2
Parameters
Table A–1. Resynchronization Options (Part 2 of 2)
Parameter Range Description
Dedicated clock phase 0 to 359 This parameter is available only when you select Dedicated
for the Resynchronization clock setting. You can enter the
phase of the dedicated resynchronization clock for timing
analysis. IP Toolbench uses this value to set up the PLL
phase shift.
Fed-back clock phase 0 to 359 Allows you to enter the phase of the fed-back clock that is
used for timing analysis. IP Toolbench uses this value to set
up the PLL phase shift.
Insert intermediate
resynchronization registers
On or off When turned on, an extra pipeline register, clocked on the
negative edge of system clock, is inserted in the read path
after the resynchronization registers. Turn on when the
resynchronization clock is too close to the system clock for
reliable transfer between them. Refer to “Intermediate
Resynchronization Registers” on page A–10.
Tab le A– 2 shows the postamble options (DQS mode only).
f For more information on the resynchronization options, refer to “DQS Postamble” on
page A–10).
Table A–2. Postamble Options (Part 1 of 2)
Parameter Range Description
Manual postamble control On or off Turn on to specify the details of the postamble logic clock
and to set the postamble clock phase manually. Otherwise,
the details are calculated automatically based on system
timing.
This option is only available when you turn on Enable DQS
Mode in the controller settings tab.
Enable DQS postamble logic On or off When turned on, the postamble logic is used. If the
postamble logic is not used, there is a possibility of data loss
in the last transfer of each read burst.
Turn on to use the postamble logic. Turn off to remove the
postamble logic from the design (refer to Figure 3–4 on
page 3–9 to Figure 3–7 on page 3–12). When you turn off
the postamble logic you may see data loss in the last transfer
of each burst read. If you turn off this option, you must
ensure the read capture occurs correctly.
Insert intermediate
postamble registers
On or off When turned on, the doing_rd_delayed signal is
generated using the positive edge of the system clock and
when turned off, doing_rd_delayed is generated using
the negative edge of the system clock. Turn on when the
negative edge of the system clock is too close to the positive
edge of the postamble clock. Refer to “Intermediate
Postamble Registers” on page A–12.
Postamble cycle 0 to 6 The number of cycles of delay to allow for round-trip delay.
DDR and DDR2 SDRAM Controller Compiler User Guide © March 2009 Altera Corporation
Page 81

Parameters
Table A–2. Postamble Options (Part 2 of 2)
Parameter Range Description
Postamble clock setting 0 (clk, rising edge),
90 (write_clk, falling
edge),
180 (clk, falling edge)
270 (write_clk, rising
edge), or
Selects which clock to use for the postamble logic: the
system clock, the write clock (a 90° advanced version of the
system clock), or a dedicated postamble clock. Also defines
which edge of the chosen clock to use for the postamble
logic. If you select falling edge, the data path automatically
inserts inverters on the clock inputs to the postamble control
registers.
dedicated
Dedicated clock phase 0 to 359 Allows you to enter the phase of the dedicated postamble
clock that is used for timing analysis. IP Toolbench uses this
value to set up the PLL phase shift.
Number of DQS delay
matching buffers
0 to 8 Inserts the chosen number of delay buffers on the undelayed
DQS in Stratix devices. Insert delay buffers when you are
using low frequencies, to ensure that the capture registers
are not disabled too early.
Tab le A– 3 shows the capture options (non-DQS mode only).
A–3
Table A–3. Capture Options
Parameter Range Description
Manual capture control On or off Turn on to specify the details of the clock used for the
capture logic. Otherwise, the details are calculated
automatically based on system timing, “DQS Postamble” on
page A–10.
Capture setting 0 (clk, rising edge),
90 (write_clk, falling
edge),
180 (clk, falling edge)
270 (write_clk, rising
Selects which clock to use for the capture logic: the system
clock, the write clock (a 90° advanced version of the system
clock), or a dedicated capture clock. Also defines which edge
of the chosen clock to use for the capture logic. If you select
falling edge, the data path automatically inserts inverters on
the clock inputs to the capture registers.
edge), or
dedicated
Dedicated clock phase 0 to 359 Allows you to enter the phase of the dedicated capture clock
that is used for timing analysis. IP Toolbench uses this value
to set up the PLL phase shift.
© March 2009 Altera Corporation DDR and DDR2 SDRAM Controller Compiler User Guide
Page 82

A–4
Tab le A– 4 shows the timing analysis options.
Table A–4. Timing Analysis Options
Parameter Description
Use the results of the last compile to estimate the setup and
hold margins
Resynchronization
Resynchronization is the process of transferring data from the read DQS clock domain
back to the system clock domain. The phase relationship of DQS to the system clock
can be calculated for your specific hardware setup and depends on the round trip
delay. The round trip delay is the time it takes for the read command to reach the
memory and for the read data to return to and be captured into the Altera device.
Resynchronization
Turn on to achieve a better estimate of the setup and hold
margins your design is likely to achieve. It also allows the
wizard to pick more accurate phases for the
resynchronization, postamble, and capture clocks. You must
successfully compile your design and run the verify timing
script to generate the necessary updated estimates file,
before you can use this option.
The DDR and DDR2 SDRAM Controller Compiler provides a variety of
resynchronization clocking schemes. The wizard automatically chooses the best
scheme for your system based on the parameters that you enter. The data is
transferred from the read DQS clock domain to a resynchronization clock domain
before final transfer to the system clock domain. The resynchronization clock can be
the positive or negative edge of either the system clock or the write clock. If safe
resynchronization cannot be guaranteed using one of these four phases, a separate
output of the phase-locked loop (PLL) is used as the resynchronization clock. If the
resynchronization clock phase is close to the positive edge of the system clock, an
additional set of registers, clocked on the negative edge of system clock, is inserted
between the resynchronization clock domain and the system clock domain.
You can choose to have the read data at the output of the DDR or DDR2 SDRAM
controller (local_rdata) reclocked to the positive edge of the system clock domain
by turning on Reclock resynchronized data to the positive edge on the Manual
Timing tab of the wizard. If you do not turn it on, the output data is clocked by the
resynchronization clock and it is your responsibility to transfer it to the system clock
domain.
If you wish to specify your own resynchronization clock instead of using the
automatically selected one, you can do so on the Manual Timing tab of the wizard. If
you require more control than is available on the Manual Timing tab, you can modify
the example design created by the wizard to connect the resynchronization clock to
any clock source.
DDR and DDR2 SDRAM Controller Compiler User Guide © March 2009 Altera Corporation
Page 83

Resynchronization
clkPLL
DQS
Clocked by delayed DQS Clock
DQ
local_rdata
resynch_clk
Reclock resynchronized data
to rising edge registers
(see Note 2)
90
o
Intermediate resynchronization registers
(see Note 1)
Resynchronization registers
Capture registers
Clocked by Resynchronization Clock
Clocked by System Clock
Resynchronization Registers
Figure A–1 shows the resynchronization registers.
Figure A–1. Resynchronization Registers
A–5
Notes to Figure A–1:
(1) IP Toolbench automatically inserts the intermediate resynchronization registers, depending on your choice of resynchronization phase.
(2) IP Toolbench automatically inserts these registers if the design needs them.
© March 2009 Altera Corporation DDR and DDR2 SDRAM Controller Compiler User Guide
Page 84

A–6
clkPLL
DQS
Clocked by delayed DQS Clock
DQ
local_rdata
resynch_clk
Reclock resynchronized data
to rising edge registers
(see Note 2)
Fed-back PLL
(Optional)
fedback_
resynch_clk
90
o
Intermediate resynchronization registers
(see Note 1)
Resynchronization registers
Capture registers
Clocked by Fed-back Clock
Clocked by Resynchronization Clock
Clocked by System Clock
Figure A–2 shows the resynchronization registers for Stratix II devices with DQS
capture and optional fed-back clock (refer to Table 3–15 on page 3–35).
Figure A–2. Resynchronization Registers—Stratix II Devices with Fed-back Resynchronization
Resynchronization
Notes to Figure A–2:
(1) IP Toolbench automatically inserts the intermediate resynchronization registers, depending on your choice of resynchronization phase.
(2) IP Toolbench automatically inserts these registers if the design needs them.
DDR and DDR2 SDRAM Controller Compiler User Guide © March 2009 Altera Corporation
Page 85

Resynchronization
clkPLL
Clocked by Capture Clock
DQ
local_rdata
resynch_clk
Reclock resynchronized data
to rising edge registers
(see Note 2)
Intermediate resynchronization registers
(see Note 1)
Resynchronization registers
Capture registers
Clocked by Resynchronization Clock
Clocked by System Clock
capture_clk
Figure A–4 shows the resynchronization registers for Stratix II series (non-DQS
mode).
Figure A–3. Resynchronization Registers—Stratix Series, Non-DQS Mode
A–7
Notes to Figure A–3:
(1) IP Toolbench automatically inserts the intermediate resynchronization registers, depending on your choice of resynchronization phase.
(2) IP Toolbench automatically inserts these registers if the design needs them.
© March 2009 Altera Corporation DDR and DDR2 SDRAM Controller Compiler User Guide
Page 86

A–8
clkPLL
Clocked by Capture Clock
DQ
local_rdata
resynch_clk
Reclock resynchronized data
to rising edge registers
(see Note 2)
Intermediate resynchronization registers
(see Note 1)
Resynchronization registers
Capture registers
Clocked by Resynchronization Clock
Clocked by System Clock
Fed-back PLL
(Optional)
capture_clk
Figure A–4 shows the resynchronization registers for Stratix II devices with fed-back
capture (refer to Table 3–15 on page 3–35).
Figure A–4. Resynchronization Registers—Stratix II Devices with Fed-back Capture
Resynchronization
Notes to Figure A–4:
(1) IP Toolbench automatically inserts the intermediate resynchronization registers, depending on your choice of resynchronization phase.
(2) IP Toolbench automatically inserts these registers if the design needs them.
DDR and DDR2 SDRAM Controller Compiler User Guide © March 2009 Altera Corporation
Page 87

Resynchronization
clk
HL
0
012
270 0 180
write_clk
Theoretical Q Output
of DQ Capture Register
(see
Note 1
)
Actual Data Valid at
D Input of Resynchronization
Register (see
Note 1
)
dq
dqs (90 shifted)
Resynchronization
Phase
Resynchronization
Cycle
o
H/L
H/L
Theoretical Round Trip Delay
Safe Resynchronization Window
Best Resynchronization Phase
A–9
Tab le A– 5 shows the manual resynchronization parameters.
Table A–5. Manual Resynchronization Parameters
Cycle Clock Edge Phase (° )
0, 1, 2, 3, 4, 5, 6 clk Rising 0 (1)
write_clk Falling 90
clk Falling 180
write_clk Rising (2) 270
Notes to Table A–5:
(1) Resynchronization cycle 0 phase 0 is defined as the first rising edge of clk capable of
resynchronizing the read data for CAS latency = 2.
(2) Use the intermediate resynchronization option to guarantee timing between the
resynchronization registers and registers on the system clock.
Figure A–5 on page A–9 shows an example of how to choose the best manual
resynchronization phase. In this example the best resynchronization phase is cycle =
0, phase = 270° , and the rising edge of write_clk.
This example is for CAS latency = 2. For CAS latency = 2.5, add 180° to the
resynchronization phase; for CAS latency = 3, add 1 cycle to the resynchronization
cycle.
Figure A–5. Choosing the Best Resynchronization Phase
Note to Figure A–5:
(1) Figure 3–4, Figure 3–5, and Figure 3–6 on page 3–9 show these registers.
© March 2009 Altera Corporation DDR and DDR2 SDRAM Controller Compiler User Guide
Page 88

A–10
System Clock
Intermediate
Register
Resynchronization
Clock
System Clock
Resynchronization
Clock
Intermediate Resynchronization Registers
Figure A–6 shows the time available to latch the data from the resynchronization
registers, T1. This time T1 may not be sufficient to latch the data properly. If the
negative edge of the system clock latches data, there is time T2 to latch the
resynchronized data. To latch the data with the negative system clock edge, turn on
Insert an intermediate resynchronization register (refer to Figure A–7).
Figure A–6. Time Between Resynchronization and System Clock
DQS Postamble
Resynchronization
Clock
System Clock
T1
Figure A–7. Inserting an Intermediate Resynchronization Register
T2
DQS Postamble
The DDR and DDR2 SDRAM DQ and DQS pins use the SSTL I/O standard. When
neither the FPGA nor the SDRAM device are driving the DQ and DQS pins, the
signals go to a high-impedance state. Because a pull-up resistor terminates both DQ
and DQS to V
the specification for the SSTL I/O standard, this state is an intermediate logic level
and the input buffer may interpret it as either a logic high or logic low. If there is any
noise on the DQS line, the input buffer may interpret the noise as strobe edges.
When the DQS signal transitions to a high-impedance state after a read postamble,
you must disable the DQS capture registers. This action ensures the captured data is
DDR and DDR2 SDRAM Controller Compiler User Guide © March 2009 Altera Corporation
not corrupted before it is successfully resynchronized.
the effective voltage on the high-impedance line is VTT. According to
TT
Page 89

DQS Postamble
Postamble Logic
A–11
The DDR and DDR2 SDRAM Controller Compiler provides this DQS postamble logic.
IP Toolbench automatically chooses the best postamble logic clocking scheme for your
system based on the parameters that you enter. The postamble clock can be the
positive or negative edge of either the system clock or the write clock. If a safe
postamble cannot be guaranteed using one of these four phases, a separate output of
the PLL is used as the postamble clock. If the postamble clock phase is close (<90° ) to
the positive edge of the system clock, an alternative postamble control
synchronization scheme is used.
Figure 3–4 through Figure 3–6 on page 3–11 show the postamble logic. For Stratix
devices, the dq_enable register clocked by the DQS signal is placed in an LE close to
the associated DQ group to drive their input clock enables. The data input to the
dq_enable register is set to GND, and the preset is connected to logic generated by
the controller. The postamble logic ensures that the register is released from preset
prior to the last active negative edge of DQS, so that the dq_enable signal goes low
with the last active negative edge of DQS. The input clock enable is therefore disabled
before DQS transitions to high-impedance at the end of the DQS read postamble.
You can specify your own postamble clock instead of using the automatically selected
one, on the Manual Timing tab of the wizard. Also, you can disable the DQS
postamble logic completely, on the Manual Timing tab of the wizard.
DQS postamble logic is not required for DDR and DDR2 SDRAM if you are using a
dedicated read data capture clock (non-DQS mode). As such, in non-DQS mode the
wizard disables the DQS postamble logic.
Tab le A– 6 shows the manual postamble parameters.
Table A–6. Manual Postamble Parameters
Cycle Clock Edge Phase (° )
0, 1, 2, 3, 4, 5, 6 clk Rising 0 (1)
write_clk Falling 90
clk Falling 180
write_clk Rising (2) 270
Notes to Table A–6:
(1) Postamble cycle 0 phase 0 is defined as the first rising edge of clk capable of generating the postamble enable
preset signal for CAS latency = 2.
(2) Use the intermediate postamble option to guarantee timing
© March 2009 Altera Corporation DDR and DDR2 SDRAM Controller Compiler User Guide
Page 90

A–12
clk
HL
0
012
1800 180
write_clk
HL
Theoretical Postamble
Preset Enable Window
Actual Postamble
Preset Enable Window
dq
dqs (90 shifted)
Postamble
Phase
Postamble
Cycle
o
Theoretical Round Trip Delay
Safe Postamble Window
Best Postamble Phase
Figure A–8 shows an example of how to choose the best postamble phase. In this
example the best postamble phase is cycle = 0, phase = 270°, and the rising edge of
write_clk.
This example is for CAS latency = 2. For CAS latency = 2.5, add 180° to the
calculation; for CAS latency = 3, add 1 cycle.
Figure A–8. Choosing the Best Postamble Phase
DQS Postamble
Intermediate Postamble Registers
Figure A–8 shows the postamble clock phase close to the negative edge of the system
clock and the time available for the register to latch the doing_rd_delayed signal is
T1. If the time T1 is not sufficient to latch the data properly, clock the register that
outputs doing_rd_delayed signal with the positive edge of the system clock,
which is time T2 to latch the doing_rd_delayed data and is larger than T1. To latch
the data with the positive edge of the system clock, turn on Insert an intermediate
postamble register (refer to Figure A–9).
DDR and DDR2 SDRAM Controller Compiler User Guide © March 2009 Altera Corporation
Figure A–9. Time Between Postamble and System Clock
Postamble
Clock
System Clock
T1
T2
Page 91

Examples
DQ
QD QD QD
DQ DQ DQ DQ
Fedback
PLL
dq_capture inter_rdata
resynched_data
fedback_resynched_data
inter_rdata
dq
dqs
postamble_clk
resynch_clk
clk
Fedback
Clock Input
System
PLL
Present when
Intermediate Postamble
Register is On
Figure A–10. Inserting an Intermediate Postamble Register
Examples
A–13
Example A–1 and Example A–2 show the generated PLLs and the PLL outputs for the
following options:
■ Use fedback clock = On
■ Manual resynchronization control = On
■ Resynchronization clock setting = Dedicated
■ Manual postamble control = On
■ Postamble clock setting = Dedicated
Example A–1. System PLL and Clock Outputs
ddr_pll_stratixii g_stratixpll_ddr_pll_inst
(
.c0 (clk),
.c1 (write_clk),
.c2 (dedicated_resynch_or_capture_clk),
.inclk0 (clock_source)
);
Example A–2. Fedback PLL and Clock Outputs
ddr_pll_fb_stratixii g_stratixpll_ddr_fedback_pll_inst
(
.c0 (fedback_resynch_clk),
.c1 (dedicated_postamble_clk),
.inclk0 (fedback_clk_in)
);
© March 2009 Altera Corporation DDR and DDR2 SDRAM Controller Compiler User Guide
Page 92

A–14
Examples
Example A–3 and Example A–4 show the top-level design files with a dedicated
resynchronization clock and a derived clock from either the write clock or the system
clock.
1 In Example A–3, the top-level design includes the resync_clk.
Example A–3. Top-Level Design File (Dedicated Resynchronization Clock)
ddr2_top ddr2_top_ddr_sdram
(
.clk (clk),
.clk_to_sdram (unused_clk),
.clk_to_sdram_n (unused_clk_n),
.ddr2_a (ddr2_a),
.ddr2_ba (ddr2_ba),
.ddr2_cas_n (ddr2_cas_n),
.ddr2_cke (ddr2_cke),
.ddr2_cs_n (ddr2_cs_n),
.ddr2_dm (ddr2_dm[3 : 0]),
.ddr2_dq (ddr2_dq),
.ddr2_dqs (ddr2_dqs[3 : 0]),
.ddr2_odt (ddr2_odt),
.ddr2_ras_n (ddr2_ras_n),
.ddr2_we_n (ddr2_we_n),
.dqs_delay_ctrl (dqs_delay_ctrl),
.dqsupdate (dqsupdate),
.fedback_clk_out (fedback_clk_out),
.fedback_resynch_clk (fedback_resynch_clk),
.local_addr (ddr2_local_addr),
.local_be (ddr2_local_be),
.local_init_done (),
.local_rdata (ddr2_local_rdata),
.local_rdata_valid (ddr2_local_rdata_valid),
.local_rdvalid_in_n (),
.local_read_req (ddr2_local_read_req),
.local_ready (ddr2_local_ready),
.local_refresh_ack (),
.local_size (ddr2_local_size),
.local_wdata (ddr2_local_wdata),
.local_wdata_req (ddr2_local_wdata_req),
.local_write_req (ddr2_local_write_req),
.postamble_clk (dedicated_postamble_clk),
.reset_n (reset_n),
.resynch_clk (dedicated_resynch_or_capture_clk),
.stratix_dll_control (stratix_dll_control),
.write_clk (write_clk)
);
DDR and DDR2 SDRAM Controller Compiler User Guide © March 2009 Altera Corporation
Page 93

Examples
A–15
Example A–4 shows the top-level example design file with the resynchronization
clock derived from either the write clock or the system clock.
1 The top-level design does not contain the resync_clk
.
Example A–4. Top-Level Design File (Derived Resynchronization Clock)
ddr2_top ddr2_top_ddr_sdram
(
.clk (clk),
.clk_to_sdram (unused_clk),
.clk_to_sdram_n (unused_clk_n),
.ddr2_a (ddr2_a),
.ddr2_ba (ddr2_ba),
.ddr2_cas_n (ddr2_cas_n),
.ddr2_cke (ddr2_cke),
.ddr2_cs_n (ddr2_cs_n),
.ddr2_dm (ddr2_dm[3 : 0]),
.ddr2_dq (ddr2_dq),
.ddr2_dqs (ddr2_dqs[3 : 0]),
.ddr2_odt (ddr2_odt),
.ddr2_ras_n (ddr2_ras_n),
.ddr2_we_n (ddr2_we_n),
.dqs_delay_ctrl (dqs_delay_ctrl),
.dqsupdate (dqsupdate),
.fedback_clk_out (fedback_clk_out),
.fedback_resynch_clk (fedback_resynch_clk),
.local_addr (ddr2_local_addr),
.local_be (ddr2_local_be),
.local_init_done (),
.local_rdata (ddr2_local_rdata),
.local_rdata_valid (ddr2_local_rdata_valid),
.local_rdvalid_in_n (),
.local_read_req (ddr2_local_read_req),
.local_ready (ddr2_local_ready),
.local_refresh_ack (),
.local_size (ddr2_local_size),
.local_wdata (ddr2_local_wdata),
.local_wdata_req (ddr2_local_wdata_req),
.local_write_req (ddr2_local_write_req),
.postamble_clk (dedicated_postamble_clk),
.reset_n (reset_n),
.stratix_dll_control (stratix_dll_control),
.write_clk (write_clk)
);
© March 2009 Altera Corporation DDR and DDR2 SDRAM Controller Compiler User Guide
Page 94

A–16
Examples
DDR and DDR2 SDRAM Controller Compiler User Guide © March 2009 Altera Corporation
Page 95

B. DDR SDRAM on the Nios Development
Board, Cyclone II Edition
This appendix walks you through the procedure for using the Altera DDR SDRAM
Controller MegaCore function with the Nios
ensure that you create a reliable working system, follow these steps:
1. In SOPC Builder, when adding a DDR SDRAM component for a system with the
Nios Development Board, Cyclone
preset. All other wizard settings are then correct.
1 You may have to change some signal names (refer to step 6).
2. During the generation of an SOPC Builder system that contains a DDR SDRAM
controller component, SOPC Builder creates a PLL source file (.v or .vhd) and a
symbol file (.bsf) to synthesize the DDR SDRAM clocks. The PLL source and
symbol file names are ddr_pll_cycloneii. This PLL must be instantiated at the top
level of the design and should drive the DDR write_clk signal and the main
system clock. The c1 output of the PLL has a 270º phase shift and is the PLL
output that you should connect to the DDR SDRAM controller’s write_clk.
®
II processor and SOPC Builder. To
™
II Edition, use the specific IP Toolbench
1 Use the same PLL to drive both the DDR SDRAM write clock and the system clock, to
reduce clock skew between the two clocks. Figure B–1 shows an example of how you
should connect the PLL in a top-level schematic for an SOPC Builder system that
contains a DDR SDRAM controller and two system clocks.
Figure B–1. Example of DDR SDRAM PLL Connections
© March 2009 Altera Corporation DDR and DDR2 SDRAM Controller Compiler User Guide
Page 96

B–2
3. The DDR SDRAM device on the Nios Development Board, Cyclone II Edition, has
a minimum operating frequency of 77 MHz. So your design must have an f
MAX
greater than or equal to 77 MHz to use the DDR SDRAM. If a Quartus II
compilation of your system results in an f
following Quartus II optimizations to increase the f
less than 77 MHz, turn on some of the
MAX
:
MAX
a. Change the optimization technique to speed:
■ Choose Settings (Assignments menu).
■ Choose Analysis & Synthesis Settings.
■ In Optimization Technique, select Speed.
b. Turn on one-hot state machine processing:
■ Choose Settings (Assignments menu).
■ Choose Analysis & Synthesis Settings.
■ For State Machine Processing, choose One-Hot.
c. Turn off multiplexer restructuring:
■ Choose Settings (Assignments menu).
■ Choose Analysis & Synthesis Settings.
■ For Restructure Multiplexers, choose Off.
d. Turn on physical synthesis in the fitter:
■ Choose Settings (Assignments menu).
■ Expand Fitter Settings by clicking the + symbol.
■ Choose Physical Synthesis Optimizations.
■ Turn o n Perform physical synthesis for combinational logic.
■ Turn o n Perform register duplication.
■ Turn o n Perform register retiming.
■ For Physical synthesis effort, select Normal.
4. When you have made these settings, save the project and recompile the design in
the Quartus II software.
1 These settings significantly increase the time required to compile the design in the
Quartus II software, but are likely to increase the f
MAX
.
5. On the Nios Development Board Cyclone II Edition (rev00 only), the DDR
SDRAM pins ras and cas are accidentally switched on the PCB schematic. So to
maintain consistency between the PCB schematic and Quartus II pin assignments,
these two pins must also be switched in your Quartus II top-level design when
targeting the Nios Development Board, Cyclone II Edition (rev00 only).
f For the correct connection of the ras and cas pins, refer to the Cyclone II 2C35
standard example design shipped with the Nios II Development Kit.
DDR and DDR2 SDRAM Controller Compiler User Guide © March 2009 Altera Corporation
Page 97

6. The DDR SDRAM wizard automatically creates constraint scripts for the highspeed DDR SDRAM signals in the top-level design. Therefore, the DDR SDRAM
controller top-level pin names must match what the DDR SDRAM controller
wizard expects. Otherwise, the proper constraints are not made. The following
three settings in the DDR wizard define the pin names to which constraints are
made:
■ Pin name of clock driving memory (+)
■ Pin name of clock driving memory (-)
■ Prefix all DDR SDRAM pins with
Ensure that the DDR SDRAM controller pins at the top-level design adhere to the
naming conventions defined in these settings.
7. For the constraint scripts to work correctly, you must name some 1-bit DDR
SDRAM signals using bus notation at the top-level design, if the top-level design is
a BDF schematic file, which means they require a suffix of [0]. Locate the following
example pins and rename with a [0] suffix:
■ clk_to_sdram_p
■ clk_to_sdram_n
B–3
■ sdram_cs_n
■ sdram_cke
The pins now have the following names:
■ clk_to_sdram_p[0]
■ clk_to_sdram_n[0]
■ sdram_cs_n[0]
■ sdram_cke[0]
1 The pin names can change depending on the settings made in step 6, but they must
have the [0] suffix in the top-level schematic.
© March 2009 Altera Corporation DDR and DDR2 SDRAM Controller Compiler User Guide
Page 98

B–4
DDR and DDR2 SDRAM Controller Compiler User Guide © March 2009 Altera Corporation
Page 99

C. HardCopy II Design Walkthrough
This walkthrough explains the additional steps that are needed to use the DDR or
DDR2 SDRAM Controller MegaCore function in a HardCopy II design.
f For details of a complete walkthrough, refer to “DDR & DDR2 SDRAM Controller
Walkthrough” on page 2–9.
You can create a HardCopy II design either with the main target set to a HardCopy II
device and a Stratix II migration device, or with the main revision targeting a Stratix II
device and a companion revision targeting HardCopy II device.
To create a HardCopy II design, follow these steps:
1. Create a new Quartus II project and choose a family, a device, and a companion
device.
1 Altera recommends you choose a –4 speed grade device.
2. Launch IP Toolbench from the MegaWizard Plug-In Manager
3. Parameterize your custom variation.
4. Choose the constraints.
1 HardCopy II devices do not have dedicated hardware for DDR or DDR2
SDRAM capture on as many pins as the Stratix II companion, so there are
less DQS groups available.
5. Generate the variation.
6. Compile the design, which adds placement constraints for critical registers in the
read part of the datapath, and produces a report of the predicted timing margins.
7. The timing report that appears automatically is not available to the HardCopy
Design Centre, therefore add a set of timing constraints to help timing closure, by
running the DDR and DDR2 SDRAM timing wizard (DTW)—choose Tcl scripts
(Tools menu) and choose dtw.
f For more information on the HardCopy II design flow, refer to Back-End Design Flow
for HardCopy Series Devices chapter in volume 2 of the Hardcopy II Device Handbook.
8. To save time re-entering the parameters of the DDR or DDR2 SDRAM Controller
MegaCore function, import the parameters from the <variation
name>_ddr_setting.txt file, by clicking Import… on the third page of the wizard.
9. The DTW also needs an estimate of the t
DDR or DDR2 SDRAM. When the design has been compiled extract these
automatically in the relevant pane of the wizard.
10. Click Finish. The DTW adds timing constraints to the project, which are preserved
when migrating to HardCopy II devices.
© March 2009 Altera Corporation DDR and DDR2 SDRAM Controller Compiler User Guide
on the pins that drive the clock to the
CO
Page 100

C–2
1 Some of these constraints may conflict with constraints added by the
MegaCore function. These conflicts are detected, and you should click Yes ,
to let the DTW override these conflicts.
The timing assignments that are set are visible in the assignments editor.
11. If you are using the PLL reset circuit included in the example design created for
you, add the following false path assignment to your top-level .sdc file:
set_false_path -from [get_registers soft_reset_reg2_n] -to *
12. Choose Start > Timing Analyzer (Processing menu) to run timing analysis on the
design. The results appear in the timing analyzer section of the compilation report.
13. Create a HardCopy II companion revision that targets the HardCopy device, using
the Quartus II revisions feature that allows multiple variations within one project.
f For more information on revisions, refer to the Quartus II Help.
a. Choose HardCopy II Utilities > Create/Overwrite HardCopy II Companion
Revision (Project menu), to create another revision in your project, which
allows you to use one project to target both the Stratix II and HardCopy II
devices.
b. Choose Revisions (Project menu) and set the HardCopy II revision to be
current. You may now compile the design.
DDR and DDR2 SDRAM Controller Compiler User Guide © March 2009 Altera Corporation
 Loading...