

Page 1

101 Innovation Drive
San Jose, CA 95134
www.altera.com
Cyclone III FPGA Starter Board
Reference Manual
Document Version: 1.4
Document Date: April 2012
Page 2

© 2012 Altera Corporation. All rights reserved. ALTERA, ARRIA, CYCLONE, HARDCOPY, MAX, MEGACORE, NIOS, QUARTUS and STRATIX are
Reg. U.S. Pat. & Tm. Off. and/or trademarks of Altera Corporation in the U.S. and other countries. All other trademarks and service marks are the
property of their respective holders as described at www.altera.com/common/legal.html. Altera warrants performance of its semiconductor produc ts
to current specifications in accordance with Altera's standard warranty, but reserves the right to make changes to any products and services at any
time without notice. Altera assumes no responsibility or liability arising out of the application or use of any information, product, or service described
herein except as expressly agreed to in writing by Altera. Altera customers are advised to obtain the latest version of device
specifications before relying on any published information and before placing orders for products or services.
Part Number MNL-01016-1.4
ii 0 Altera Corporation
Cyclone III FPGA Starter Board Reference Manual April 2012
Page 3

Contents
Chapter 1. Introduction
General Description ............................................................................................................................... 1–1
Board Component Blocks ................................................................................................................ 1–2
Block Diagram .................................................................................................................................. 1–3
Handling the Board ............................................................................................................................... 1–3
Chapter 2. Board Components and Interfaces
Board Overview ..................................................................................................................................... 2–1
Featured Device ..................................................................................................................................... 2–5
Clocking Circuitry ................................................................................................................................. 2–6
Jumpers ................................................................................................................................................... 2–7
Interfaces ................................................................................................................................................. 2–8
USB Interface ..................................................................................................................................... 2–8
HSMC Expansion Connector .......................................................................................................... 2–9
General User Interfaces ................................................................................................................. 2–10
Push-Buttons .............................................................................................................................. 2–11
LEDs ............................................................................................................................................ 2–12
Memory ................................................................................................................................................. 2–13
Parallel Flash ................................................................................................................................... 2–13
DDR SDRAM .................................................................................................................................. 2–15
SSRAM ............................................................................................................................................. 2–17
Power Supply ....................................................................................................................................... 2–19
Statement of China-RoHS Compliance ............................................................................................ 2–20
Additional Information
Revision History ............................................................................................................................... Info–i
How to Contact Altera ..................................................................................................................... Info–i
Typographic Conventions .............................................................................................................. Info–ii
Altera Corporation iii
April 2012 Preliminary
Page 4

Contents Stratix Device Handbook, Volume 1
iv Altera Corporation
Preliminary April 2012
Page 5

1. Introduction
General Description
The Cyclone®III starter board provides a hardware platform that offers a
unique opportunity to customize your development environment via
expansion connectors and daughtercards, as well as evaluate the
®
feature-rich, low-power Altera
Cyclone III device.
For more functionality, you can expand the starter board through
®
daughtercards connected to the Altera
High Speed Mezzanine Card
(HSMC) connector.
f For the latest information about available HMSC daughtercards, go to
www.altera.com/products/devkits/kit-index.html.
The main features of the Cyclone III starter board are:
■ Low-power consumption Altera Cyclone III EP3C25 chip in a
324-pin FineLine BGA (FBGA) package
■ Expandable through HSMC connector
■ 32-megabyte (MB) DDR SDRAM
■ 16-MB parallel flash device for configuration and storage
■ 1-MB high-speed SSRAM memory
■ Four user push-button switches
■ Four user LEDs
The main advantages of the Cyclone III starter board are:
■ Facilitates a fast and successful FPGA design experience with
example designs and demonstrations.
■ Directly configure and communicate with the Cyclone III device via
the on-board USB-Blaster
■ Active parallel flash configuration
■ Low power consumption
■ Cost-effective modular design
™
circuitry and JTAG header
Altera Corporation 1–1
April 2012 Preliminary
Page 6

General Description
Board Component Blocks
■ Altera Cyclone III EP3C25F324 FPGA
● 25K logic elements (LEs)
● 66 M9K memory blocks (0.6 Mb)
● 16 18x18 multiplier blocks
● Four PLLs
● 214 I/Os
■ Clock management system
● One 50-MHz clock oscillator to support a variety of protocols
● The Cyclone III device distributes the following clocks from its
on-board PLLs:
• DDR clock
• SSRAM clock
• Flash clock
■ HSMC connector
● Provides 12 V and 3.3 V interface for installed daughtercards
● Provides up to 84 I/O pins for communicating with HSMC
daughtercards
■ General user-interface
● Four user LEDs
● Two board-specific LEDs
● Push-buttons:
• System reset
• User reset
• Four general user push-buttons
■ Memory subsystem
● Synchronous SRAM device
• 1-MB standard synchronous SRAM
• 167-MHz
• Shares bus with parallel flash device
● Parallel flash device
• 16-MB device for active parallel configuration and storage
• Shares bus with SRAM device
● DDR SDRAM device
• 56-pin, 32-MB DDR SDRAM
• 167-MHz
• Connected to FPGA via dedicated 16-bit bus
■ Built-in USB-Blaster interface
● With the Altera EPM3128A CPLD
● For external configuration of Cyclone III device
● For system debugging with the SignalTap
debugging console
● Communications port for Board Diagnostic graphical user
interface (GUI)
®
and Nios®
1–2 Altera Corporation
Cyclone III FPGA Starter Board Reference Manual April 2012
Page 7
Introduction
Block Diagram
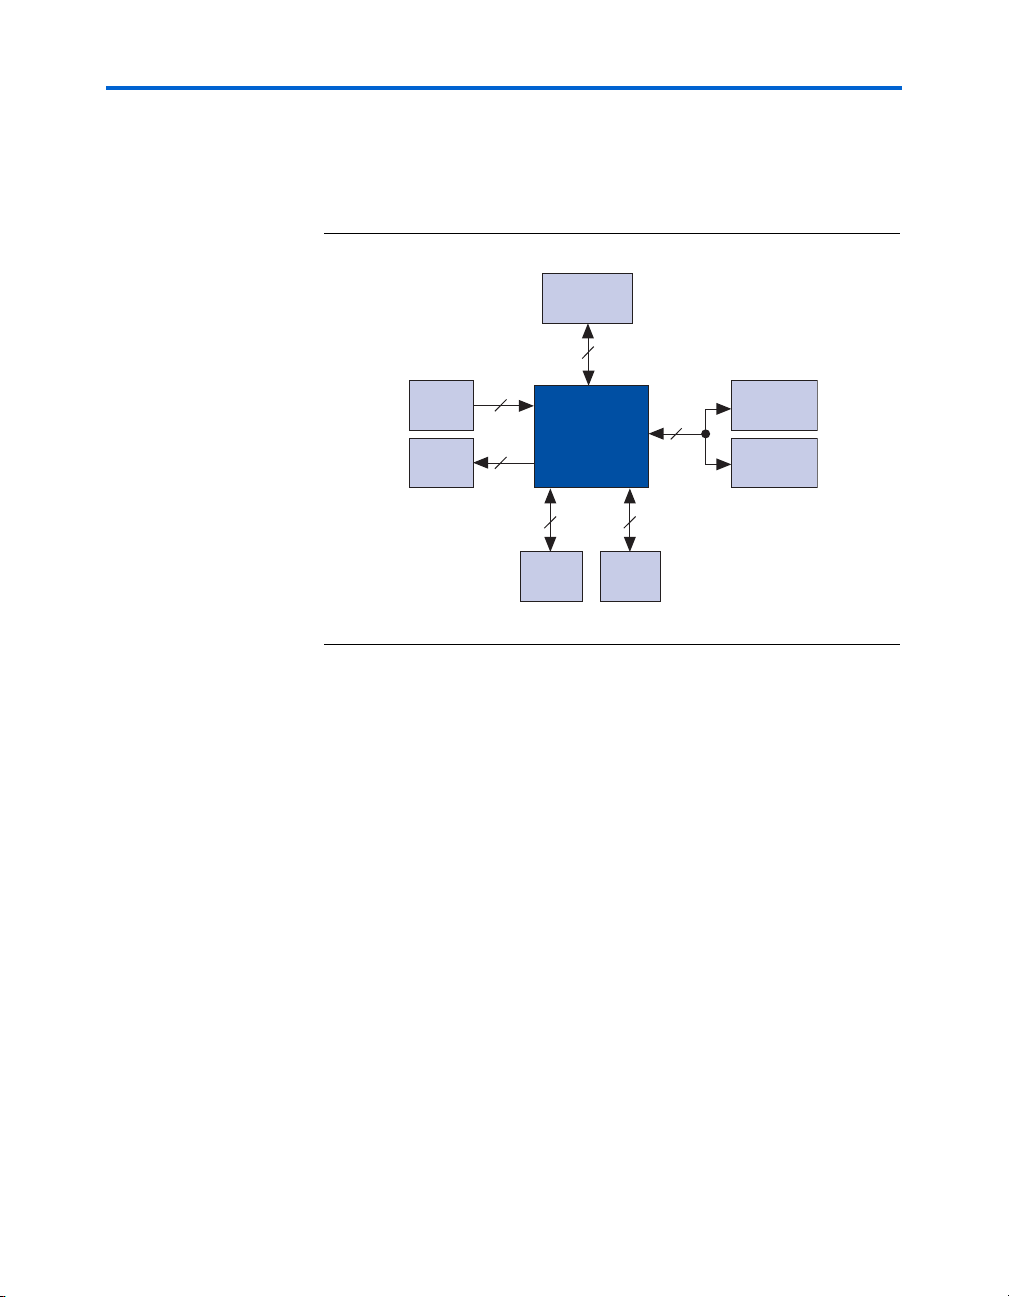
Figure 1–1 shows a functional block diagram of the Cyclone III FPGA
starter board.
Figure 1–1. Cyclone III FPGA Starter Board
HSMC
84
Handling the Board
Switches
4
LEDs
4
4
4
Cyclone III
EP3C25F324
4
USB
Blaster
DDR
32MB
Parallel Flash
72
42
16MB
SSRAM
1MB
When handling the board, it is important to observe the following
precaution:
c Static Discharge Precaution—Without proper anti-static handling,
the board can be damaged. Therefore, use anti-static handling
precautions when touching the board.
Altera Corporation 1–3
April 2012 Cyclone III FPGA Starter Board Reference Manual
Page 8

Handling the Board
1–4 Altera Corporation
Cyclone III FPGA Starter Board Reference Manual April 2012
Page 9

2. Board Components and Interfaces
Board Overview
f For information on powering-up the Cyclone III FPGA starter board and
This chapter provides operational and connectivity detail for the board’s
major components and interfaces and is divided into the following major
blocks:
■ Featured device
■ Clocking circuitry
■ Jumpers
■ Interfaces
● USB interface
● Altera
● General user interfaces
■ Memory
■ Power supply
■ Statement of China-RoHS compliance
®
HSMC expansion connector
1 The board schematics, physical layout database, and
®
manufacturing files for the Cyclone
III FPGA starter board are
included in the Cyclone III FPGA Starter Kit in the following
directory:
<install path>\cycloneIII_3c25_start\board_design_files
installing the demonstration software, refer to the Cyclone III FPGA
Starter Kit User Guide.
Altera Corporation 2–1
April 2012 Preliminary
Page 10
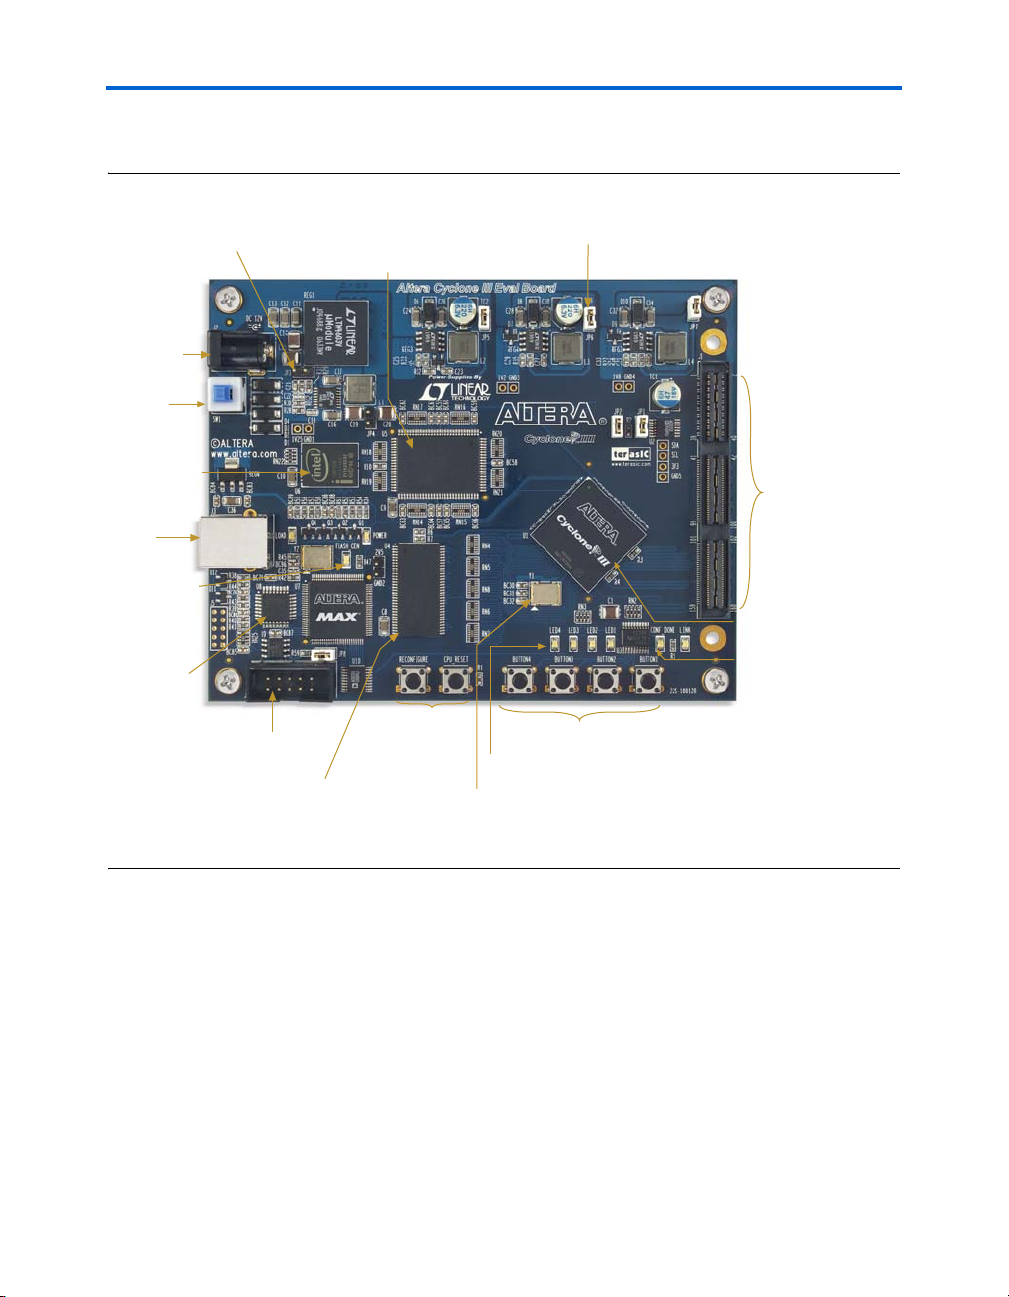
Board Overview
Cyclone III Device (U1)
User Push Button Switches
User LEDs
USB
UART (U8)
HSMC
Connector (J1)
DC Power
Input (J2)
Power Switch
(SW1)
USB
Connector
(J3)
Configuration Done LED
32-MB
DDR SDRAM (U4)
Flash LED
1-MB SSRAM (U5)
50-MHz
System Clock
Reconfigure
and Reset
Push Buttons
16-MB
Parallel
Flash (U6)
JTAG Header (J4)
2.5 V I/O Power
Measurement (JP3)
FPGA Core Power
Measurement (JP6)
Figure 2–1 shows the top view of the Cyclone III FPGA starter board.
Figure 2–1. Top View of the Cyclone III FPGA Starter Board
2–2 Altera Corporation
Cyclone III FPGA Starter Board Reference Manual April 2012
Page 11

Figure 2–2 shows the diagonal view of the Cyclone III FPGA starter
board.
Figure 2–2. Diagonal View of the Cyclone III FPGA Starter Board
Board Components and Interfaces
Altera Corporation 2–3
April 2012 Cyclone III FPGA Starter Board Reference Manual
Page 12

Board Overview
Table 2–1 describes the components and lists their corresponding board
references.
Table 2–1. Cyclone III FPGA Starter Board (Part 1 of 2)
Typ e
Featured Device
FPGA Cyclone III
User Interfaces
I/O Push-button
I/O LEDs LED1–LED4,
Connections & Interfaces
I/O USB UART U8 USB interface to the Cyclone III device for
InputHSMC
Configuration & Reset
Input JTAG header J4 Jumper header to select which JTAG source
Input USB
Display Configuration
Memory
Flash 16-MB
Display Flash LED LED that illuminates when the flash is being
SSRAM 1-MB
DDR SDRAM 32-MB DDR
Component/
Interface
device
switches
Connector
connector
done LED
parallel flash
memory
high-speed
SSRAM
SDRAM
Board Reference Description Page
U1 EP3C25F324-C8, 324-pin FBGA package 2–5
Button1–Button4, CPU
Reset, Reconfigure
Conf_Done, Link,
Power, Flash_CEN,
Load
J1 Header for connecting the HSMC interface. 2–9
J3 Type B USB Connector that allows for
Conf_Done LED that illuminates when FPGA is
U6 16 MB of non-volatile memory. 2–13
U5 256K x 32 synchronous SRAM 2–17
U4 4M x16 x 4 DDR SDRAM 2–15
Four push-button switches for user-defined,
logic inputs.
Four user-defined LEDs 2–12
external FPGA configuration and
communication with applications running on
the FPGA.
the board uses, for example, the JTAG
header configuration or the USB JTAG
configuration.
connecting a Type A-B USB cable between a
PC and the board.
successfully configured.
accessed.
2–11
2–8
2–8
2–8
2–12
N/A
2–4 Altera Corporation
Cyclone III FPGA Starter Board Reference Manual April 2012
Page 13

Table 2–1. Cyclone III FPGA Starter Board (Part 2 of 2)
Board Components and Interfaces
Typ e
Clock Circuitry
Oscillator Clock Y1 50-MHz clock oscillator used for the system
Powe r Supply
InputDC power
InputPower switch SW1Switches the board’s power on and off. 2–19
Probe point Current sense
Probe point Current sense
Featured Device
Component/
Interface
jack
resistor
resistor
Board Reference Description Page
2–6
clock.
J2 12-V DC unregulated power source. 2–19
JP6 Measure FPGA core power with current
sense resistor.
JP3 Measure 2.5-V I/O power (shared between
devices) with current sense resistor.
N/A
N/A
The Cyclone III FPGA Starter Kit features the EP3C25F324 device (U1) in
a 324-pin FineLine BGA (FBGA) package. Table 2–2 lists Cyclone III
device features.
Table 2–2. Cyclone III Device Features
Architectural
Feature
Altera’s
third-generation of
low-cost FPGAs
Lowest power
consumption
FPGA available
Increased system
integration
● Lowest overall FPGA system cost available
● Staggered I/O ring to decrease die area
● Wide range of low-cost packages
● Support for low-cost serial and parallel flash for configuration options
● Based on the TSMC’s low-power 65nm process
● Supports hot-socketing
● Unused I/O banks can be powered down
● Extends battery life for portable or hand-held applications
● Eliminates or reduces cooling system costs
● Densities up to 119,088 logic elements
● High memory-to-logic ratio
● Highest multiplier-to-logic ratio in the industry
● Up to four dynamically reconfigurable, cascadable phase-locked-loops (PLLs), each
with up to five outputs
● Multi-value on-chip termination (OCT) support with calibration feature.
Results
Altera Corporation 2–5
April 2012 Cyclone III FPGA Starter Board Reference Manual
Page 14

Clocking Circuitry
Table 2–3 lists the Cyclone III EP3C25F324 device pin count.
Table 2–3. Cyclone III Device Pin Count
Board Component Pins
SRAM/flash (shared bus) 72
SDRAM (DDR) 42 (1) (2)
Push-buttons 4
LEDs 4 (1)
USB-Blaster/configuration 4
HSMC 84 (1)
Total Pins Used 210
Total EP3C25F324 pins 214
Unused pins 4
Notes to Ta b l e 2 – 3 :
(1) The Cyclone III EP3C25F324 only supports one I/O standard in an I/O bank. I/O
banks 3 and 4 are shared among the DDR, HSMC and LEDs.
(2) In several DDR designs, some of the I/O pins that share the same banks with the
DDR are unavailable for use due to different I/O standards. Therefore, if you
have added DDR to your system, I/O banks 3 and 4 is to be configured as SSTL-2
only while the HSMC and LEDs pins which are not using SSTL-2, should be
removed.
™
You can configure the Cyclone III device via the on-board USB-Blaster
or
through the JTAG interface using an external programming cable (sold
separately).
f For additional information about Altera devices, go to
www.altera.com/products/devices.
Clocking
Circuitry
2–6 Altera Corporation
Cyclone III FPGA Starter Board Reference Manual April 2012
The Cyclone III FPGA starter board’s clocking circuitry is designed to be
simple and easy to use. A single 50-MHz clock input is used and all other
clocks are generated using the Cyclone III device’s phase-locked loops
(PLLs). The dedicated PLLs are used to distribute the flash, SSRAM, and
HSMC clocks.
Table 2–4 shows the clock pinout.
Table 2–4. Clock Pinout
Signal Name FPGA Pin Direction Type
50 MHz B9, V9Input2.5 V
Page 15

Board Components and Interfaces
Figure 2–3 shows the simplest clocking scheme with a single clock input;
however, much more complex clocking schemes can be implemented
with CycloneIII FPGAs.
Figure 2–3. Cyclone III FPGA Starter Board’s Clocking Scheme
16 MB
Parallel Flash
H4
50 MHz
Oscillator
Note: Reference numbers are FPGA pin numbers.
B9, V9
Cyclone III
EP3C25F324
A2
U2, V2
Out:
A1,
C14,
D14,
V18,
U18
SSRAM
32 MB DDR
In:
A9
F18,
F17
N18,
N17
HSMC
Jumpers
Table 2–5 lists board jumpers and jumper operational descriptions.
Table 2–5. Board Jumpers (Part 1 of 2)
Jumper Board
Reference
JP1 and JP2 Removing both shunts adds the HSMC connector to the JTAG
chain. If the shunts are in place on both jumpers, then the HSMC
connector is removed from the JTAG chain.
JP3 Sense resistor for measuring the power consumed by the 2.5 V
supply to V
JP4 1.25 V termination supply for DDR2. To supply an external
voltage, remove the jumper and connect the external supply to
pin 2. (Pin 2 has a rounded shape on the bottom of the board.)
Altera Corporation 2–7
April 2012 Cyclone III FPGA Starter Board Reference Manual
Jumper Operational Descriptions
the DDR, the flash I/O, and the SSRAM.
CCIO,
Page 16

Interfaces
Table 2–5. Board Jumpers (Part 2 of 2)
Interfaces
Jumper Board
Reference
JP5 3.3 V supply for the MAX device and HSMC. To supply an
JP6 Sense resistor for measuring the power consumed by the 1.2 V
JP7 1.8V power supply to flash device. To supply an external
JP8 Removing the shunt enables the embedded USB-Blaster
external voltage, remove the jumper and connect the external
supply to pin 2. (Pin 2 has a rounded shape on the bottom of the
board.)
V
supply to the Cyclone III device.
CCINT
voltage, remove the jumper and connect the external supply to
pin 2. (Pin 2 has a rounded shape on the bottom of the board.)
circuitry. When the shunt is in place, use any external cable such
as the ByteBlaster II, EthernetBlaster, or USB-Blaster cable to
configure the Cyclone III device. (The board ships without the
JTAG header populated.)
Jumper Operational Descriptions
This section describes the following Cyclone III FPGA starter board’s
interface blocks:
■ USB interface
■ HSMC expansion connector
■ General user interfaces
USB Interface
The USB-Blaster circuitry is built onto the board. Plug the USB cable
(provided with the kit) into USB connector J3 on the board and the other
end to a USB port on your computer to program and communicate with
the Cyclone III device via the JTAG port.
A USB physical connection is used to enable computers to communicate
with the starter board. To simplify the USB interface, the board contains a
FTDI FT245 FIFO circuit. The data from the FTDI chip is translated into a
JTAG stream using the Altera EMP3128A CPLD connected to the Cyclone
III device’s dedicated JTAG port.
The 5 V supply for the FTDI device is drawn from the USB connection.
The rest of the circuit operates on 3.3 V supply with a maximum of
100 mA and 1.8 V supply with a maximum of 900 mA voltage.
2–8 Altera Corporation
Cyclone III FPGA Starter Board Reference Manual April 2012
Page 17

Board Components and Interfaces
HSMC Expansion Connector
The board provides one HSMC connector. The HSMC connector is a
modified version of standard high-speed Samtec connectors. To provide
better signal integrity between the host boards and daughtercards when
using high-speed transceivers, the standard high-speed Samtec connector
is modified by removing every third pin in bank -1.
1 CMOS utilization of the HSMC pins is assumed and no options
for supporting other differential signaling is provided with the
board. The eight clock-data-recovery high-speed transceiver
channels are not connected.
Table 2–6 lists the ordering codes and shows the relationship between the
standard Samtec Q-series connectors and the modified parts’ ordering
codes.
Table 2–6. Altera-Specific & Standard Samtec Part Numbers
Altera-Specific Samtec
Part Number
Daughtercards ASP-122952-01 QTH-090-01-L-D-A
Host boards ASP-122953-01 QTH-090-01-L-D-A
Standard Samtec Part
Number
The board provides both 12 V unregulated and 3.3 V regulated power
supply to the HSMC connector for any installed daughtercards.
f For more information about the HSMC, refer to the High Speed Mezzanine
Card (HSMC) Specification.
Table 2–7 lists the guaranteed minimum on-board power supply levels.
Designated pins on the HSMC connector deliver the power rails.
Table 2–7. HSMC Power Requirements
Voltage Current Rating Maximum Power
12 V 1.0 A 12.0 W
3.3 V 2.0 A 6.6 W
Altera Corporation 2–9
April 2012 Cyclone III FPGA Starter Board Reference Manual
Page 18

Interfaces
2.413
((90 POS / 30 x .7875) + .050)
.78 REF
.626 REF
.036 REF .006 REF
.245 REF
.150 REF
01
02
.285 REF
DP Bank
.571
(29 EQ Spaces @ .0197)
Table 2–8 lists the HSMC A connector board reference and manufacturing
information.
Table 2–8. HSMC A Connector Manufacturing Information
Board Reference Description Manufacturer
J1 High speed
The HSMC uses the Samtec connector’s header provided on the board.
Figure 2–4 shows the outline of the Samtec header.
Figure 2–4. Samtec Connector’s Header
General User Interfaces
Manufacturer
Part Number
Samtec ASP-12953-01
Mezzanine card
connector
To allow you to fully use the I/O capabilities of the Cyclone III device, the
following user interfaces are available on the board (remaining I/Os are
connected to additional board resources):
■ Push-buttons: System and user reset, and user-defined push-buttons
■ LEDs: Board-specific and user-defined LEDs
Some of the board’s buttons and LEDs have a specific board function
while others are user-defined and are provided to control FPGA designs.
2–10 Altera Corporation
Cyclone III FPGA Starter Board Reference Manual April 2012
Page 19

Figure 2–5. Push-Buttons
Board Components and Interfaces
Push-Buttons
The board has system reset, user reset, and user push-buttons. Table 2–9
lists the pinout for all push-buttons. The push-buttons are in logic “1”
until depressed.
Table 2–9. Push-Button Pinout
Signal Name FPGA Pin Direction Type
KEY0 F1 Input2.5 V
KEY1 F2 Input2.5 V
KEY2 A10 Input2.5 V
KEY3 B10 Input2.5 V
CPU_RESET_N N2 Input2.5 V
RECONFIGURE H5 (nConfig) Input2.5 V
Figure 2–5 shows the push-buttons.
System Reset Push-Buttons
The system reset push-button starts a reconfiguration of the FPGA from
flash memory.
User Reset Push-Buttons
The user reset push-button is an input to the Cyclone III device. This
push-button is intended to be the master reset signal for the FPGA
designs loaded into the Cyclone III device. The user reset push-button is
connected to the DEV_CLRn pin on the FPGA. The DEV_CLRn setting is a
pin option in the Quartus II software that you must enable to function as
DEV_CLRn instead of a standard I/O.
Altera Corporation 2–11
April 2012 Cyclone III FPGA Starter Board Reference Manual
Page 20

Interfaces
User Push-Buttons
The four user push-buttons are intended for use in controlling FPGA
designs loaded into the Cyclone III device. There is no board-specific
function for these four push-buttons.
LEDs
The board has user LEDs and board-specific LEDs. Table 2–10 lists both
user and board-specific LED pinout. A logic “0” illuminate the LEDs.
Table 2–10. Board LED Pinout
Signal Name FPGA Pin Name Direction Type
LED0 P13 Output2.5 V
LED1 P12 Output2.5 V
LED2 N12 Output2.5 V
LED3 N9 Output2.5 V
Power LED ———
MAX Load LED ———
conf done LED ———
Flash LED ———
HSMC Present LED ———
Figure 2–6 shows the LEDs.
Figure 2–6. LEDs
User LEDs
Status and debugging signals are driven to the user LEDs from FPGA
designs loaded into the Cyclone III device. There is no board-specific
function for the user LEDs.
2–12 Altera Corporation
Cyclone III FPGA Starter Board Reference Manual April 2012
Page 21

Board Components and Interfaces
Board Specific LEDs
The power LED illuminates when the board’s power is on and working.
The configuration done LED illuminates when the FPGA is configured.
1 Because of the Quartus II software pin placement rules in
various memory banks, you may only be able to use one or two
of the LEDs with DDR designs.
■ Configuration done LED: The Conf_Done LED illuminates when
the FPGA is configured with any design.
■ Flash signal LED: The flash_CE_n LED illuminates when the CE_n
signal to the flash is asserted indicating the flash is being accessed.
■ Power LED: The power LED illuminates when power is applied to
the board.
Memory
The Cyclone III FPGA starter board includes the following memories:
■ Parallel flash
■ DDR SDRAM
■ SSRAM
Parallel Flash
The Cyclone III starter board has a 8M x 16 low voltage parallel flash.
Table 2–11 lists the parallel flash board reference and manufacturing
information.
Table 2–11. Parallel Flash Manufacturing Information
Board Reference Description Manufacturer Manufacturer Part Number
U6 8M x16 low voltage parallel flash Intel PC28F128P30BF65
Table 2–12 shows the parallel flash signal name, corresponding FPGA
pin, signal direction, type, and board reference U6 flash pin.
Table 2–12. Parallel Flash Memory Pinout (Part 1 of 3)
Signal Name FPGA Pin Direction Type U6 (Flash) Pin
flash_sram_a1 E12 Output2.5 V A1
flash_sram_a2 A16 Output2.5 V B1
flash_sram_a3 B16 Output2.5 V C1
flash_sram_a4 A15 Output2.5 V D1
Altera Corporation 2–13
April 2012 Cyclone III FPGA Starter Board Reference Manual
Page 22

Memory
Table 2–12. Parallel Flash Memory Pinout (Part 2 of 3)
Signal Name FPGA Pin Direction Type U6 (Flash) Pin
flash_sram_a5 B15 Output2.5 V D2
flash_sram_a6 A14 Output2.5 V A2
flash_sram_a7 B14 Output2.5 V C2
flash_sram_a8 A13 Output2.5 V A3
flash_sram_a9 B13 Output2.5 V B3
flash_sram_a10 A12 Output2.5 V C3
flash_sram_a11 B12 Output2.5 V D3
flash_sram_a12 A11 Output2.5 V C4
flash_sram_a13 B11 Output2.5 V A5
flash_sram_a14 C10 Output2.5 V B5
flash_sram_a15 D10 Output2.5 V C5
flash_sram_a16 E10 Output2.5 V D7
flash_sram_a17 C9 Outpu
flash_sram_a18 D9 Output2.5 V A7
flash_sram_a19 A7 Output2.5 V B7
flash_sram_a20 A6 Output2.5 V C7
flash_sram_a21 B18 Output2.5 V C8
flash_sram_a22 C17 Output2.5 V A8
flash_sram_a23 C18 Output2.5 V G1
flash_sram_a24 G14 Output2.5 V H8
flash_sram_a25 B17 Output2.5 V B6
flash_sram_dq0 H3 Bidirectional 2.5 V F2
flash_sram_dq1 D1 Bidirectional 2.5 V E2
flash_sram_dq2 A8 Bidirectional 2.5 V G3
flash_sram_dq3 B8 Bidirectional 2.5 V E4
flash_sram_dq4 B7 Bidirectional 2.5 V E5
flash_sram_dq5 C5 Bidirectional 2.5
flash_sram_dq6 E8 Bidirectional 2.5 V G6
flash_sram_dq7 A4 Bidirectional 2.5 V H7
flash_sram_dq8 B4 Bidirectional 2.5 V E1
flash_sram_dq9 E7 Bidirectional 2.5 V E3
flash_sram_dq10 A3 Bidirectional 2.5 V F3
flash_sram_dq11 B3 Bidirectional 2.5 V F4
flash_sram_dq12 D5 Bidirectional 2.5 V F5
t2.5 V D8
V G5
2–14 Altera Corporation
Cyclone III FPGA Starter Board Reference Manual April 2012
Page 23

Board Components and Interfaces
Table 2–12. Parallel Flash Memory Pinout (Part 3 of 3)
Signal Name FPGA Pin Direction Type U6 (Flash) Pin
flash_sram_dq13 B5 Bidirectional 2.5 V H5
flash_sram_dq14 A5 Bidirectional 2.5 V G7
flash_sram_dq15 B6 Bidirectional 2.5 V E7
flash_we_n D18 Output2.5 V G8
flash_ce_n E2 Output2.5 V B4
flash_oe_n D17 Output2.5 V F8
flash_reset_n C3 Output2.5 V D4
flash_adv_n H14 Output2.5 V F6
flash_clk (dclk) H4 Output2.5 V E6
flash_wait H13 Output2.5 V F7
DDR SDRAM
The Cyclone III FPGA starter board has a 4M x 16 x 4 DDR SDRAM.
Table 2–13 lists DDR SDRAM board reference and manufacturing
information.
Table 2–13. DDR SDRAM Manufacturing Information
Board Reference Description Manufacturer Manufacturer Part Number
U4 4M x16 x 4 DDR SDRAM PowerChip
Semiconductor
A2S56D40CTP-G5PP
Table 2–14 shows the DDR SDRAM signal name, corresponding FPGA
pin, signal direction, type, and board reference U4 DDR pin.
Table 2–14. DDR SDRAM Pinout (Part 1 of 3) Note (1)
Signal Name FPGA Pin Direction Type U4 (DDR) Pin
ddr_dqs0 U3 Bidirectional SSTL-2 16
ddr_dqs1 T8 Bidirectional SSTL-2 51
ddr_dm0 V3 Output SSTL-2 47
ddr_dm1 V8 Output SSTL-2 20
ddr_ba0 V11 Output SSTL-2 26
ddr_ba1 V12 Output SSTL-2 27
ddr_cas_n T4 Output SSTL-2 22
Altera Corporation 2–15
April 2012 Cyclone III FPGA Starter Board Reference Manual
Page 24

Memory
Table 2–14. DDR SDRAM Pinout (Part 2 of 3) Note (1)
Signal Name FPGA Pin Direction Type U4 (DDR) Pin
ddr_cke R13 Output SSTL-2 44
ddr_cs_n V1 Output SSTL-2 24
ddr_ras_n V16 Output SSTL-2 23
ddr_we_n U15 Output SSTL-2 21
ddr_clk U2 Bidirectional SSTL-2 45
ddr_clk_n V2 Bidirectional SSTL-2 46
ddr_a0 U1 Output SSTL-2 29
ddr_a1 U5 Output SSTL-2 30
ddr_a2 U7 Output SSTL-2 31
ddr_a3 U8 Output SSTL-2 32
ddr_a4 P8 Output SSTL-2 35
ddr_a5 P7 Output SSTL-2 36
ddr_a6 P6 Output SSTL-2 37
ddr_a7 T14 Output SSTL-2 38
ddr_a8 T13 Output SSTL-2 39
ddr_a9 V13 Output SSTL-2 40
ddr_a10 U17 Outp
ddr_a11 V17 Output SSTL-2 41
ddr_a12 U16 Output SSTL-2 42
ddr_dq0 U4 Bidirectional SSTL-2 2
ddr_dq1 V4 Bidirectional SSTL-2 4
ddr_dq2 R8 Bidirectional SSTL-2 5
ddr_dq3 V5 Bidirectional SSTL-2 7
ddr_dq4 P9 Bidirectional SSTL-2 8
ddr_dq5 U6 Bidirectional SSTL-2 10
ddr_dq6 V6 Bidirectional SSTL-2 11
ddr_dq7 V7 Bidirectional SSTL-2 13
ddr_dq8 U13 Bidirectional SSTL-2 54
ddr_dq9 U12 Bidirectional SSTL-2 56
ddr_dq10 U11 Bidirectional SSTL-2 57
ddr_dq11 V15 Bidirectional SSTL-2 59
ddr_dq12 U14 Bidirectional SSTL-2 60
ddr_dq13 R11 Bidirectional SSTL-2 62
ddr_dq14 P10 Bidirectional SSTL-2 63
ut SSTL-2 28
2–16 Altera Corporation
Cyclone III FPGA Starter Board Reference Manual April 2012
Page 25

Board Components and Interfaces
Table 2–14. DDR SDRAM Pinout (Part 3 of 3) Note (1)
Signal Name FPGA Pin Direction Type U4 (DDR) Pin
ddr_dq15 V14 Bidirectional SSTL-2 65
Note to Table 2–14:
(1) The Cyclone III EP3C25F324 only supports one I/O standard in an I/O bank. I/O banks 3 and 4 are shared among
the DDR, HSMC and LEDs. In several DDR designs, some of the I/O pins that share the same banks with the DDR
are unavailable for use due to different I/O standards. Therefore, if you have added DDR to your system, I/O
banks 3 and 4 is to be configured as SSTL-2 only while the HSMC and LEDs pins which are not using SSTL-2,
should be removed.
SSRAM
The Cyclone III FPGA starter board has a 256K x 32 synchronous SRAM.
Table 2–15 lists SSRAM board reference and manufacturing
information.
Table 2–15. SSRAM Manufacturing Information
Board Reference Description Manufacturer Manufacturer Part Number
U5 256K x 32 synchronous SRAM Integrated Silicon
Solutions, Inc.
IS61LPS25636A-200TQL1
Table 2–16 shows the SSRAM signal name, corresponding FPGA pin,
signal direction, type, and board reference U5 SSRAM pin.
Table 2–16. SSRAM Pinout (Part 1 of 3)
Signal Name FPGA Pin Direction Type U5 (SSRAM) Pin
flash_sram_a2 A16 Output2.5 V 37
flash_sram_a3 B16 Output2.5 V 36
flash_sram_a4 A15 Output2.5 V 35
flash_sram_a5 B15 Output2.5 V 34
flash_sram_a6 A14 Output2.5 V 33
flash_sram_a7 B14 Output2.5 V 32
flash_sram_a8 A13 Output2.5 V 44
flash_sram_a9 B13 Output2.5 V 45
flash_sram_a10 A12 Output2.5 V 46
flash_sram_a11 B12 Output2.5 V 47
flash_sram_a12 A11 Output2.5 V 48
flash_sram_a13 B11 Output2.5 V 49
Altera Corporation 2–17
April 2012 Cyclone III FPGA Starter Board Reference Manual
Page 26

Memory
Table 2–16. SSRAM Pinout (Part 2 of 3)
Signal Name FPGA Pin Direction Type U5 (SSRAM) Pin
flash_sram_a14 C10 Output2.5 V 50
flash_sram_a15 D10 Output2.5 V81
flash_sram_a16 E10 Output2.5 V82
flash_sram_a17 C9 Output2.5 V 99
flash_sram_a18 D9 Output2.5 V 100
flash_sram_a19 A7 Output2.5 V 43
flash_sram_a20 A6 Output2.5 V 42
flash_sram_a21 B18 Output2.5 V 39
flash_sram_a22 C17 Output2.5 V 38
flash_sram_dq0 H3 Bidirectional 2.5 V 52
flash_sram_dq1 D1 Bidirectional 2.5 V 53
flash_sram_dq2 A8 Bidirectional 2.5 V 56
flash_sram_dq3 B8 Bidirectional 2.5 V 57
flash_sram_dq4 B7 Bidirectional 2.5 V 58
flash_sram_dq5
flash_sram_dq6 E8 Bidirectional 2.5 V 62
flash_sram_dq7 A4 Bidirectional 2.5 V 63
flash_sram_dq8 B4 Bidirectional 2.5 V 68
flash_sram_dq9 E7 Bidirectional 2.5 V 69
flash_sram_dq10 A3 Bidirectional 2.5 V 72
flash_sram_dq11 B3 Bidirectional 2.5 V 73
flash_sram_dq12 D5 Bidirectional 2.5 V 74
flash_sram_dq13 B5 Bidirectional 2.5 V 75
flash_sram_dq14 A5 Bidirectional 2.5 V 78
flash_sram_dq15 B6 Bidirectional 2.5 V 79
flash_sram_dq16 C16 Bidirectional 2.5 V 2
flash_sram_dq17 D12 Bidirectional 2.5 V 3
flash_sram_dq18 E11 Bidirectional 2.5 V 6
flash_sram_dq19 D2 Bidirectional 2.5 V 7
flash_sram_dq20 E13 Bidirectional 2.5 V8
flash_sram_dq21 E14 Bidirectional 2.5 V 9
flash_sram_dq22 A17 Bidirectional 2.5 V 12
flash_sram_dq23 D16 Bidirectional 2.5 V 13
flash_sram_dq24 C12 Bidirectional 2.5 V 18
C5 Bidirectional 2.5 V 59
2–18 Altera Corporation
Cyclone III FPGA Starter Board Reference Manual April 2012
Page 27

Board Components and Interfaces
Table 2–16. SSRAM Pinout (Part 3 of 3)
Signal Name FPGA Pin Direction Type U5 (SSRAM) Pin
flash_sram_dq25 A18 Bidirectional 2.5 V 19
flash_sram_dq26 F8 Bidirectional 2.5 V 22
flash_sram_dq27 D7 Bidirectional 2.5 V 23
flash_sram_dq28 F6 Bidirectional 2.5 V 24
flash_sram_dq29 E6 Bidirectional 2.5 V 25
flash_sram_dq30 G6 Bidirectional 2.5 V 28
flash_sram_dq31 C7 Bidirectional 2.5 V 29
sram_oe_n E9 Output2.5 V86
sram_ce1_n F9 Output2.5 V 98
sram_we_n G13 Output2.5 V87
sram_be_n0 F10 Output2.5 V 93
sram_be_n1 F11 Output2.5 V 94
sram_be_n2 F12 Output2.5 V 95
sram_be_n3 F13 Output2.5 V 96
sram_adsc_n F7 Output2.5 V85
sram_clk A2 Ou
tput2.5 V89
Power Supply
The power supply block distributes clean power from the 12 V input
supply to the Cyclone III device through on-board regulators.
To provide various voltage options, the board uses several Linear
Technologies’ regulators. Switching regulators are used for digital circuits
and linear regulators are used for analog circuits. Board regulators are
used to generate the voltages listed in Table 2–17.
Table 2–17. Board Regulators
Output
Voltage
1.20 50 3.0 JP6 (1) REG4 LT1959CS8 Cyclone III Core voltage
1.25 50 1.0 JP4 REG2 LTC3413 DDR termination voltage
2.50 50 6.0 JP3 (1) REG1 LTM4603EV DDR, SRAM, Flash, PLLs, other
1.80 80 1.5 JP7 REG5 LT1959CS8 Parallel flash interface, USB buffers
Altera Corporation 2–19
April 2012 Cyclone III FPGA Starter Board Reference Manual
(V)
Variance
(+/- mV)
MAX
Current
(A)
Board
Access
Point
Regulator
Board
Reference
Linear
Technologies
Part #
Where Used
bias voltages
and other I/O
Page 28

Statement of China-RoHS Compliance
Table 2–17. Board Regulators
Output
Voltage
3.30 100 2.0 JP5 REG3 LT1959CS8 I/O voltage and power for most
12.00 200 1.0 SW1N/A N/A Input supply voltage. All other
Note to Table 2–17:
(1) A 0.01 current sense resistor is added to select jumper points for FPGA core power and I/O power measurement.
(V)
Variance
(+/- mV)
MAX
Current
(A)
Board
Access
Point
Regulator
Board
Reference
Linear
Technologies
Part #
Where Used
components including HSMC
voltages (including HSMC voltage)
are derive from this regulator.
f You can measure the core and I/O voltage with a current meter while the
Cyclone III device is in standby mode. For more information on this
circuit, refer to the Cyclone III FPGA Starter Kit User Guide.
Table 2–18 lists hazardous substances included with the kit.
Statement
of China-RoHS
Compliance
Table 2–18. Table of Hazardous Substances’ Name and Concentration, Notes (1),(2)
Part Name
Cyclone III
FPGA starter
board
12-V power
supply
Type A-B
USB cable
User guide 0 0 0 0 0 0
Notes to Table 2–18:
(1) 0 indicates that the concentration of the hazardous substance in all homogeneous materials in the parts is below
the relevant threshold of the SJ/T11363-2006 standard.
(2) X* indicates that the concentration of the hazardous substance of at least one of all homogeneous materials in the
parts is above the relevant threshold of the SJ/T11363-2006 standard, but it is exempted by EU RoHS.
2–20 Altera Corporation
Cyclone III FPGA Starter Board Reference Manual April 2012
Lead
(Pb)
X* 0 0 0 0 0
00 0 0 0 0
00 0 0 0 0
Cadmium
(Cd)
Hexavalent
Chromium
(Cr6+)
Mercury
(Hg)
Polybrominated
biphenyls (PBB)
Polybrominated
diphenyl Ethers
(PBDE)
Page 29

Board Components and Interfaces
Altera Corporation 2–21
April 2012 Cyclone III FPGA Starter Board Reference Manual
Page 30

Statement of China-RoHS Compliance
2–22 Altera Corporation
Cyclone III FPGA Starter Board Reference Manual April 2012
Page 31

Additional Information
Revision History
The table below displays the revision history for the chapters in this
reference manual.
Chapter Date Version Changes Made
2 April 2012 1.4 ● Updated description for JP8 board jumper in Table 2–5.
2July 2010 1.3
All March 2010 1.2
All June 2008 1.1
All April 2007 1.0
How to Contact Altera
For the most up-to-date information about Altera products, refer to the
following table.
● Updated manufacturer part number for Table 2–11.
● Updated DDR notes description in the board-specific
LED and DDR SRAM pinout tables.
● Corrected jumper operational descriptions for JP8 in
Table 2–5.
● Corrected column heading to “Maximum Power” in
Table 2–7.
● Updated parallel flash manufacturing information in
memory section.
● Moved front matter to back.
● Updated starter kit install path directory.
● Updated FPGA pins in clock pinout table and figure.
● Updated FTDI part number in USB interface section.
● Added DDR notes in the board-specific LED and DDR
SRAM pinout sections.
● First publication.
Contact
Contact Note (1)
Tec h n ic a l support Website www.altera.com/support
Technical training Website www.altera.com/training
Product literature Website www.altera.com/literature
Non-technical support (General) Email nacomp@altera.com
(Software Licensing) Email authorization@altera.com
Note to Table:
(1) You can also contact your local Altera sales office or sales representative.
Altera Corporation Info-i
April 2012 Preliminary
Method Address
Email custrain@altera.com
Page 32

How to Contact Altera Cyclone FPGA Device Handbook
Typographic
This document uses the typographic conventions shown below.
Conventions
Visual Cue Meaning
Bold Type with Initial
Capital Letters
bold type External timing parameters, directory names, project names, disk drive names,
Italic Type with Initial Capital
Letters
Italic type Internal timing parameters and variables are shown in italic type.
Initial Capital Letters Keyboard keys and menu names are shown with initial capital letters. Examples:
“Subheading Title” References to sections within a document and titles of on-line help topics are
Courier type Signal and port names are shown in lowercase Courier type. Examples: data1,
1., 2., 3., and
a., b., c., etc.
● • Bullets are used in a list of items when the sequence of the items is not important.
■
v The checkmark indicates a procedure that consists of one step only.
1 The hand points to information that requires special attention.
c
w
r The angled arrow indicates you should press the Enter key.
f The feet direct you to more information on a particular topic.
Command names, dialog box titles, checkbox options, and dialog box options are
shown in bold, initial capital letters. Example: Save As dialog box.
filenames, filename extensions, and software utility names are shown in bold
type. Examples: f
Document titles are shown in italic type with initial capital letters. Example: AN 75:
High-Speed Board Design.
Examples: t
Variable names are enclosed in angle brackets (< >) and shown in italic type.
Example: <file name>, <project name>.pof file.
Delete key, the Options menu.
shown in quotation marks. Example: “Typographic Conventions.”
PIA
, \qdesigns directory, d: drive, chiptrip.gdf file.
MAX
, n + 1.
tdi, input. Active-low signals are denoted by suffix n, e.g., resetn.
Anything that must be typed exactly as it appears is shown in Courier type. For
example:
actual file, such as a Report File, references to parts of files (e.g., the AHDL
keyword
Courier.
Numbered steps are used in a list of items when the sequence of the items is
important, such as the steps listed in a procedure.
A caution calls attention to a condition or possible situation that can damage or
destroy the product or the user’s work.
A warning calls attention to a condition or possible situation that can cause injury
to the user.
c:\qdesigns\tutorial\chiptrip.gdf. Also, sections of an
SUBDESIGN), as well as logic function names (e.g., TRI) are shown in
Info-ii Altera Corporation
Preliminary April 2012
 Loading...