

Measure what you see.
Conductivity Meter LC 2
Leitfähigkeitsmessgerät LC 2
Operating Instructions
Betriebsanleitung
Istruzioni d’uso
A member of
Additives & Instruments

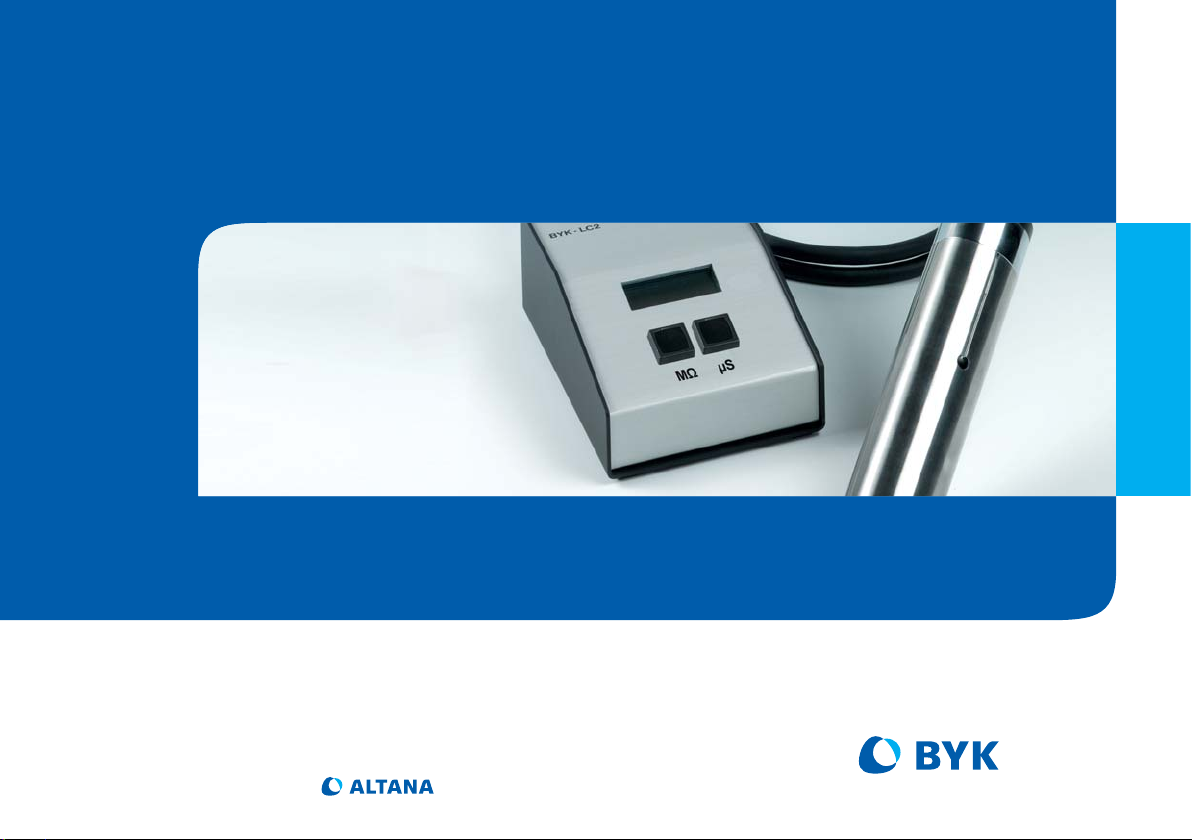
Conductivity Meter LC 2
Cat. No.
PW-1722, PW-1710, PW-1712
Leitfähigkeitsmessgerät
LC 2
Best.-Nr.
PW-1722, PW-1710, PW-1712
198 013 256 EDI 0806
Condutti vim e tr o LC 2
N° di cat.
PW-1722, PW-1710, PW-1712


Conductivity Meter
LC 2
Cat.No.
PW-1722, PW-1710, PW-1712
Table of Contents
• Safety Information
• System Description
• Start-Up /
Measuring Procedure
• Evaluation
• Calibration
• Trouble Shooting
• Ordering Guide /
Technical Specifications
Technical Data are Subject to
Alterations


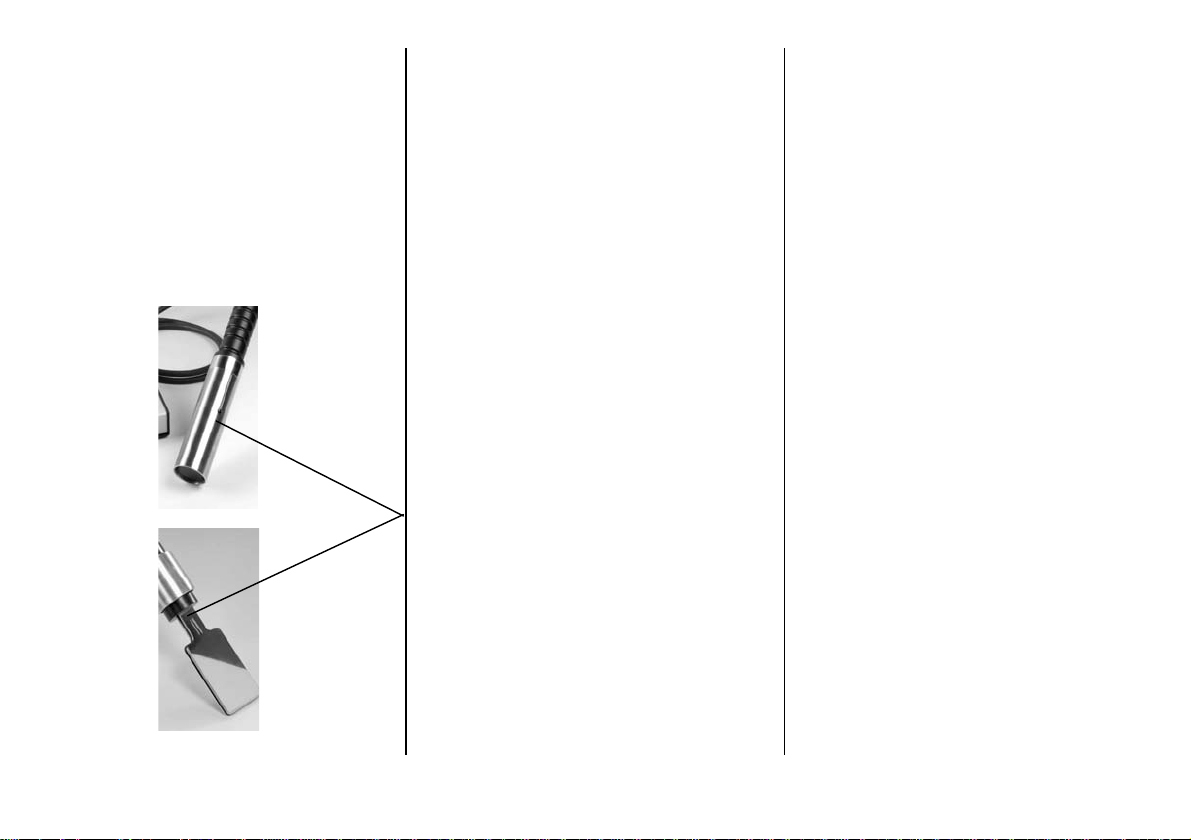
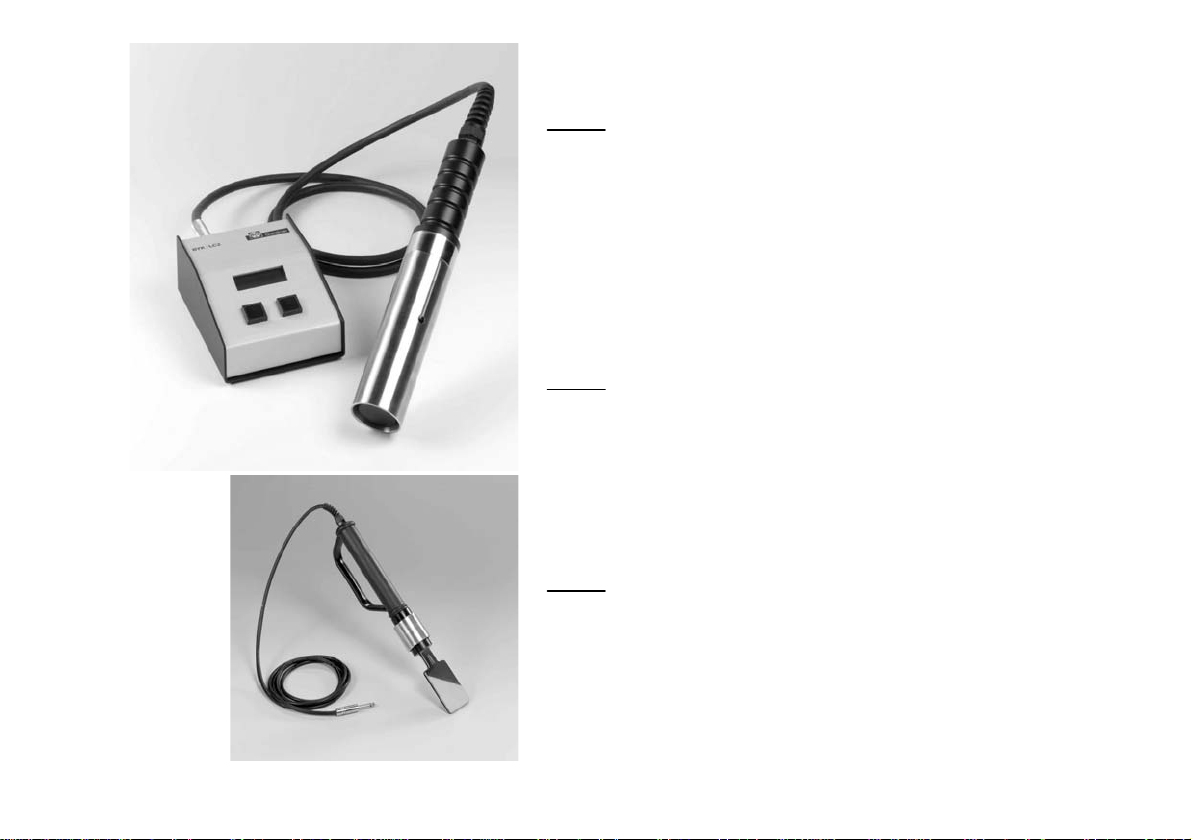
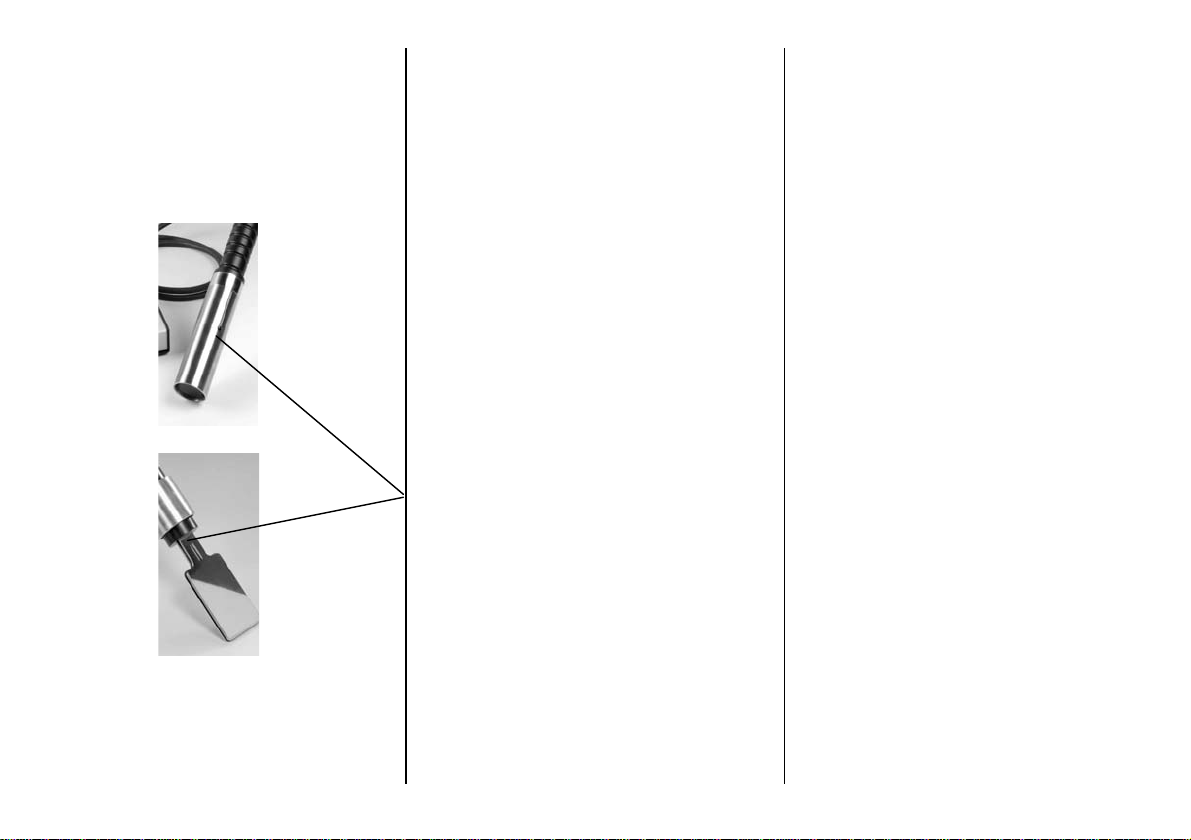
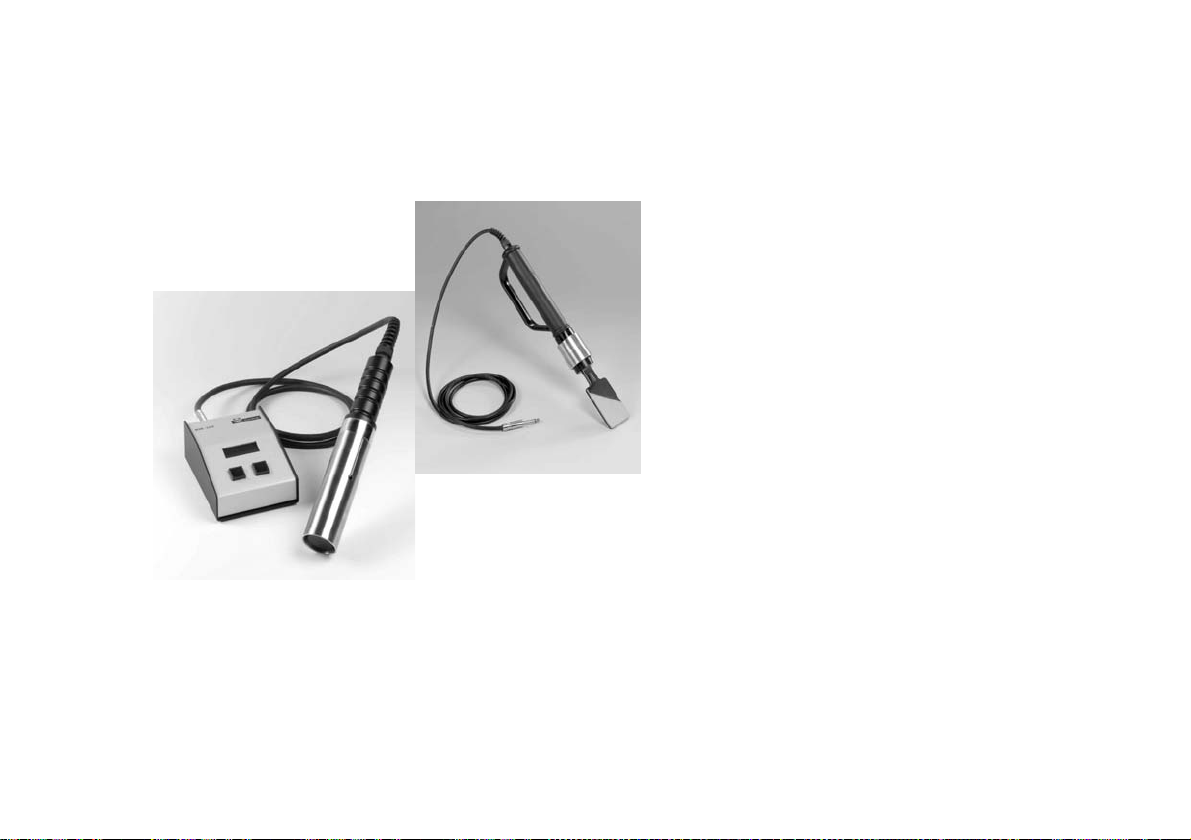
Conductivity Tup Electrode
Cat.No. PW-1710
Conductivity Meter BYK LC 2
Cat.No. PW-1722
Conductivity Plate Electrode
Cat.No. PW-1712
1. Safety Instructions
• The instrument must not be
used in explosion-proof areas!
• Only use leak-proof batteries
and accumulators.
• Do not attempt to repair the
instrument yourself. If your
instrument should experience
a malfunction, our customer
service will be glad to help you
as quickly as possible.

2. System Description
The Conductivity Meter LC 2,
ASTM D 5682, is used for the
analysis of liquids of low
conductivity, such as paint
systems. The elect rical resistance
or the conductivity are measured
by means of an immersion
measuring cell. Depending on the
selected function, the specific
resistance or the specific
conductivity are automatically
calculated and displayed.
The BYK LC 2 has been designed
with special emphasis on simple
operation and reliability. The
measuring instrument is
independent of mains energy
(battery or accumulator
operation).The measuring cell
consists of two concentrically
arranged electrodes. The size and
shape of the sampler will generally
not influence the result of the
measurement.
The 3 1/2 digit display shows
values from 0.05 to 19.99 M or
from 19.99 to 0.05 S. An arrow
on the top left of the display
indicates that the measured value
is assigned to the left M key.
Values >19.99 are displayed as
-.-, values < 0.05 are displayed as
0.0.
Housing and measuring cell are
largely resistant to solvents but
should not be exposed to such
liquids for too long.
The housing parts are glued
together (detachable) and the
screws are secured in the same
manner. Please do not open the
housing as otherwise the
guarantee for the instrument is
extinguished!
3. Start-up/
Measuring Porcedure
• Check measuring cell for
clean condition; assemble.
The solid design ensures the firm
seating of the outer electrode.
Accumulation of material on the
contact surface or on the
electrode surfaces – even a very
thin film – will impair the
measurement result in that such
accumulation would simulate an
excessive hig h resista n ce or lo w
conductivity value respectively.
• Connect the measuring cable
to the instrument . Th e sock e t
is on the instrument rear.
• Dip the measuring cell into the
liquid. The liquid level should
reach the two holes or rather
the long hole.
• Press the M or the S
button. After 4 sec. the
"overflow" symbol appears on
the display. Then the
appropriate measurement
value is displayed .
Repeated Measurements
A new measurement can be
started at any time, even when the
last result is still displayed.
If you start a new measurement
while the last result is still
displayed, the display test is
shown during the measurement to
indicate that a new measurement
is running.
The display duration is 2.5 min.
and is not restarted with a new
measurement. If a new measurement is start ed at the end o f the
interv a l it is pos s ible that the re s u lt
is displayed fo r a very short time
only or not at all.
• Remove the measuring cable
from the instrument and clean
the measu rin g cell. For this
purpose, pull the outer
electrode (stainless steel)
from the holder. Rinse with
suitable solvent and wipe
clean with dry cloth.

Please note
An automatic self-test is
carried out with every
measurement. During the
measurement all segments
are displayed and the
battery voltage is checked.
A critical battery voltage is
indicated on the display.
8.21 V < U < 8.46 is
indicated on the display. If
U > 8.21 V, the message
Io.bA, appears on the
display. No more
measurements are
possible.
Plate Electrode
immersion depht

4. Evaluation
The measured value constitutes
the resistance R [M] of th e liqu id
between the electrodes (in the
annular gap). The cell constant
which depends on the design and
dimensions of the measuring cell
is 7.55 10
-3cm-1
.
The specific resistance, , and the
specific conductivity are
calculated from the following
equation:
= R • 132,5 cm
or [M • cm] =
7,55 • 10-3cm
[S • cm
R [M]
with 1 = 1S
1S
-1
] = 7,55 • 10-3cm
-1
= 1
R [M]
-1
-1
If the measurement result is
required for internal quality control
only, e.g. f o r entri e s in a che ckcard, conversion is not necessary.

5. Calibration
The instrument is preset to a
factor of 1.000 (i.e.1 M or 1.00
S).
For calibration, a resisto r of 1 M
± 1 % or a probe and a calibration
liquid are required. If the
calibration is carried out with a
probe, the calibration liquid has to
be set to a range of 1 M ± 10 %
or 1.0 S ± 10 %.
Attention
When calibrating with a probe
please make sure that the inner
and outer probe surfaces are
perfectly clean and free of any
insulating residues.
If the measured value is not within
the expected range, the calibration
is stopped and the message Err
appears on the display.
• For starting the calibration,
both buttons have to be
pressed simultaneously until
the end of the measurement.
The measurement takes about 4
seconds. During the
measurement, the "overflow"
symbol and a colon are displayed.
After the measurement L1 is
displayed.
• Release both buttons. The
readout jumps automatically to
L2, L3 and L 4 .
• Press the M button again.
Only now the calibration factor
is displayed. After releasing
the M button, the factor can
be changed.
The value displa yed can be
reduced in steps of 0.005 by
pressing the M button or
increased in steps of 0.005 by
pressing the S button.

If a button is pressed
constantly, the value is
automatically reduced or
increased.
A measurement range
between 0.900 and 1.100 is
possible. It corresponds
with a deviation of the
calibration liquid of ± 10 %
of the set value 1 M.
(Thus a resolution of 0.5 %)
If none of the two buttons is
actuated for more than 5 s,
the set calib rat i on factor is
saved together with the
instrument parameters. This
is confirmed by L5 in the
display.
This calibration procedure
requires some practice but
avoids unintentional
overwriting of the calibration
values.

6. Trouble Shooting
Symptom
On starting the measurement
(pressing the measuring button)
the display shows "Io.bA".
Possible Cause and Remedy
• Charge accumulator when in
the accumulator mode. If
unsuccessful, insert new
accumulator or replace by
battery. Check charging unit, if
necessary.
• When in the battery mode:
insert new battery.
For this purpose, lift the (rearsided) cover of the battery
compartment and withdraw the
battery holder. Replace battery
and observe correct polarity (as
indicated on the battery holder).
Symptom
On starting the measurement
(pressing the measuring button)
the display remains dark.
Possible Cause and Remed y
• Check battery or accumulator
as described above.
Completely discharged
accumulators will require a
minimum charging time of 14
hours

Symptom
After completion of the 10 sec.
preparation time, the
displaycontinues to show
"overflow"
.
Possible Cause and Remedy
• Check connection of
measuring cable. If
unsuccessful, the
resistance of the sample
may be too h igh (>19,99
M).
Symptom
Fluctuating, unstable values are
displayed or considerable errors of
measurement occur.
Possible Cause and Remedy
• Electric field effects can cause
this proble m. A shielde d low capacitance probe cable is
required.
Repair Work
Please contact the BYK-Gardner
Service Department.

7. Ordering Guide /
Technical
Specification
Cat.No. PW-1710
Conductivity Tub Electrode
with connection cable
ASTM D 5682
Dimensions: Diameter:
approx. 42 mm
Length:
approx. 250 mm
Connection
Cable: Length: 1.5 m
Cell Constant: 7.55 x 10
Material: Stainless steel
electrodes,
polished, holder
and electrical
insulation:
polyamide
-3
cm-1
Cat.No. PW-1712
Conductivity Plate Electrode
with connection cable
ASTM D 5682
The Plate Electrode can be used
alternativ to the Tube Electrode. The
Electrodes are constructed as an
interchangeable sheet pair. The
Plate Electrode makes it possible,
that the probe change is very simple
and the cleaning is very easy with
all known solvents.
Dimensions: Width:
approx. 50 mm
Length:
approx. 380 mm
Connection
Cable: Length: 1.5 m
Cell Constant: 7.55 x 10
Material: Stainless steel
electrodes,
polished, holder
and electrical
insulation:
-3
cm-1

Cat.No. PW-1722
Conductivity Meter
BYK LC 2 with digital display
ASTM D 5682
Measuring 0.05 -19.99 M
Range: 19.99 - 0.05 S
Resolution: 0.01 M or
0.01 S
Accuracy: < ± 5 %
Preparation
Time: 4 sec.
Holding Time:2.5 min.
Display: digital,
digit height 11mm
Display 0.01 to19.99 M
Range: 19.99 to 0.05S
Power 9 V battery or
supply: 9 V accumulator
Tr. 7/8
Power 35 mA (typ.)
Consumption: during the
preparation time
2 mA (typ.)
during the
holding time
Measuring
Voltag e: 8 V AC
Housing H x W x D
Dimensions:
55 x 105 x 145 mm
Weight
(w/o battery): approx. 450 g
Housing
Material: aluminum

Leitfähigkeitsmessgerät
LC 2
Best.-Nr.
PW-1722, PW-1710, PW-1712
198 013 256 EDI 0806


Leitfähigkeitsmessgerät
LC 2
Best.Nr.
PW-1722, PW-1710, PW-1712
Inhaltsverzeichnis
• Sicherheitshinweise
• Systembeschreibung
• Inbetriebnahme/
Durchführung einer Messung
• Auswertung
• Kalibrierung
• Störungen und Störungs-
behebung
• Lieferhinweise /Technische
Daten
Technische Änderungen
vorbehalten

Leitfähigkeits-Messzelle
Beste ll- Nr. PW - 1 710
Leitfähigkeits-Messgerät LC 2
Beste ll- Nr. PW - 1 722
Leitfähigkeits-Plattensonde
Beste ll- Nr. PW - 1 712

1.Sicherheitshinweise
• Das Instrument darf nicht in
ex-geschützten
Betriebsstätten verwendet
werden!
• Verwenden Sie nur
auslauffeste Batterien und
Akkus.
• Keine eigenständigen
Reparaturversuche
vornehmen. Sollte eine
Störung an Ihrem Messgerät
auftreten, so wird Ihnen unser
Kundendienst gerne
schnellstens weiterhelfen.

2. Systembeschreibung
Das Leitfähigkeitsmessgerät
LC 2, ASTM D 5682, dient zur
Prüfung von Flüssigkeiten mit
geringer Leitfähigkeit wie z.B.
Lacksystemen. Mittels einer
Eintauchmesszelle werden der
elektrische Widerstand oder die
Leitfähigkeit gemessen. Je nach
Tastenbetätigung werden der
spezifische Widerstand oder die
spezifische Leitfähigkeit automatisch berechnet und angezeigt.
Beim BYK LC 2 wurde
besonderer Wert auf einfache
Bedienung und Störungsfreiheit
gelegt. Das Messgerät arbeitet
netzunabhängig (Batterie- oder
Akkubetrieb ) . Die Messzelle
besteht aus zwei konzentrisch
angeordneten Elektroden. Größe
und Form des Probengefäßes
sind grundsätzlich ohne Einfluss
auf den Messwert.
Die 3 1/2 stellige Digitalanzeige
zeigt Messwerte von 0.05 bis
19.99 M bzw. von 19.99 bis 0.05
S an. Ein Pfeil oben links im
Display zeigt an, dass de r
Messwert der lin ke n Taste M
zugeordnet wird. Werte >19.99
werden mit -.- und Werte < 0.05
werden mit 0.0 dargestellt.
Gerätegehäuse und Messzelle
sind weitgehend gegen
Lösungsmitt e l re sistent. Eine
längere Verweilzeit im Lösungsmittel ist jedoch nicht gestattet.
Die Gehäuseteile sind (lösbar)
miteinander verklebt und die
Schrauben in gleicher Weise
gesichert. Gehäuse daher nicht
öffnen . Beim Ö ffnen des
Gehäuses erlischt die Garantie!
3. Inbetriebnahme/
Durchführung einer
Messung
• Messzelle auf Sauberkeit
prüfen und zusammenstecken.
Durch die massive Ausführung ist
ein guter Sitz der äußeren
Elektrode gewährleistet. Ablagerungen an der Kontaktfläche oder
den Elektrodenoberflächen, selbst
dünne Filme, beeinträchtigen das
Messergebnis, d.h. können einen
zu hohen Widerstand bzw. zu
niedrigen Leitwert vortäuschen.
• Messkabel am Gerät an-
schließe n. Die Bu chse befindet sich an der Rückseite.
• Messzelle in die Flüssigkeit
eintauchen. Die Flüssigkeit
soll bis an die beiden
Bohrungen (Langloch)
reichen.
• Messtaste M oder S
drücken.
Nach 4 sec. wird das
"Überlauf"-Symbol (= alle
Segmente) angezeigt. Danach
erscheint der entsprechende
Messwert.
Wiederholungsmessung
Eine neue Messung kann jederzeit
gestartet werden, auch dann,
wenn das Ergebnis noch
angezeigt wird.
Wird eine neue Messung
gestartet, während das Display
noch das letzte Ergebnis zeigt,
wird für die Dauer dieser Messung
der Displaytest gezeigt, damit
erkennbar ist, dass eine Messung
läuft.
Das Anzeigeintervall beträgt 2,5
min. und wird bei einer Wiederholungsmessung nicht neu
gestartet. Wird eine neue
Messung gegen Ende des
Intervalls ausgelöst, kann es
vorkommen, dass das Ergebnis
nur kurz oder gar nicht mehr
angezeigt wird.
• Messkabel vom Gerät lö se n
und Messzelle reinigen. Dazu
wird die äußere Elektrode
(Edelstahl) von der Halterung
gezogen. Mit geeignetem
Lösungsmittel spülen und mit
sauberem Tuch abwischen.

Bitte beachten
Bei jeder Messung wird
automatisch ein Selb sttest
durchgeführt. Hierbei
werden für die Dauer der
Messung alle Segmente
eingeschaltet und die
Batteriespannung wird
überprüft.
Liegt die Batteriespannung
in einem kritischen Bereich,
wird sie im Display
angezeigt!
8,21 V < U < 8,46 wird im
Display angezeigt!
Wenn U > 8,21 V erscheint
im Display Io.bA, es kann
keine Messung mehr
durchgeführt werden
Plattensonde
Eintauchtiefe
4. Auswertung
Der abgelesene Messwert stellt
den Widerstand R [M] der
Flüssigkeit zwischen den
Elektroden (im Ringspalt) dar.
Die Zellkonstante, die durch die
Bauform und die Abmessungen
der Messzell e bes ti mmt ist,
beträgt 7,55 10
Der spezifische Widerstand, und
die spezifische Leitfähigkeit,
errechnen sich zu:
-3
cm-1.
= R • 132,5 cm
[M • cm] =
7,55 • 10-3cm
[S • cm
R [M]
wobei 1 = 1S
1S
-1
] = 7,55 • 10-3cm
-1
R [M]
-1
-1
= 1
Soll das Messergebnis nur zur
internen Qualitätskontrolle
herangezogen werden, z.B. zum
Ei ntrag in ei ne Kontrol lkarte, kann
die Umrechnung unterbleiben.

5. Kalibrierung
Das Gerät ist auf den Faktor 1.000
(d.h.1 M bzw. 1.00 S)
eingestellt.
Für die Kalibrierung ist ein Messwiderstand von 1 M ± 1 % oder
eine Sonde mit Kalibrierflüssigkeit
erforderlich. Wird die Kalibrierung
mit einer Sonde vorgenommen,
muss die verwendete Kali b r i e r flüssigkeit auf einen Bereich von
1 M ± 10 % oder 1.0 S ± 10 %
eingestellt sein.
Achtung
Bei der Kalibrierung mit einer
Sonde ist darauf zu achten, dass
die Sondenflächen innen und
außen restlos sauber sind. Es
dürfen keinerlei isolierende Beläge
vorhanden sein.
Liegt der gemessene Wert
außerhalb des zu erwartenden
Bereichs, wird die Kalibrierung mit
der Anzeige Err abgebrochen.
• Zum Aufruf der Kalibr ie r ung
müssen beide Tasten
gleichzeitig bis zum Ende der
Messung gedrückt werden.
Die Messung dauert etwa 4
Sekunden. Während der Messung
wird das "Überlauf"-Muster mit
zusätzlichem Doppelpunkt
angezeigt. Nach Ablauf der
Messung wird im Display L1
gezeigt.
• Beide Tasten freigeben. Die
Anzeige spri ngt automa tisch
aud L2, L3 und L4.
• Nochmals die M Taste
drücken. Erst dann wird der
Labroeerfaktor angezeigt.
Nach Loslassen der M Taste
kann er dann verändert
werden.

Der angezeigte Wert kann
mit der M-Taste in
Schritten von 0.005
verkleinert und mit der S-
Tas te in Schri tten v on 0. 005
vergrößert werden. Wird
eine Taste ständig
gedrückt, läuft der Wert
automat isch i n die
entsprechende Richtung.
Der einstellbare Bereich ist
0.900 bis 1.100 und
entspricht einer Abweichung
der verwendeten Eichlösung
um ± 10 % vom Sollwert
1 M. (Die Auflösung beträgt
also 0.5 %).
Wird für mehr als 5 s keine
der beiden Tasten mehr
betätigt, wird der eingestellte Kalibrierfaktor
zusammen mit den
Geräteparametern
abgespeichert. Als Quittung
für das Speichern wird L5
angezeigt.
Diese Bedienfolge erfordert eine
gewisse Übung, verhindert aber
unbeabsichtigtes Überschreiben
der Kalibrierwerte.

6. Störungen und
Störungsbehebung
Störung
Beim Auslösen der Messung
(Drücken der Messtaste) erscheint
"Io.bA" in der Anzeige.
Störungsbehebung
• Bei Akkubetrieb Akku
aufladen: falls kein Erfolg,
Akku wechseln oder gegen
Batterie austauschen. Evtl.
Ladegerät überprüfen.
• Bei Batteriebetrieb: Neue
Batterie einsetzen.
Dazu Deckel des Batteriefaches
(rückseitig) leicht anheben und
Fach herausziehen. Batterie
wechseln und dabei auf die
richtige Polung (wie im Fach
gekennzeichnet) achten.
Störung
Beim Auslösen der Messung
(Drücken der Messtaste) erscheint
keine Anzeige.
Störungsbehebung
• Batterie oder Akku überprüfen
wie oben beschrieben. Bei
völlig entladenem Akku ist
eine Ladezeit von min. 14
Stunden erforderlich.

Störung
Nach Abschluss der 4 sec.
Vorbereitungszeit bleibt die
Anzeige weiterhin auf
"Überlauf":
Störungsbehebung
• Anschluss des
Messkabels überprüfen.
Falls kein Erfolg, ist
möglicherweise der
Widerstand der Probe
zu hoch (>19,99 M).
Störung
Schwankende Anzeigewerte oder
große Messfehler:
Störungsbehebung
• Elektrische Feldeinflüsse
können den Fehler
verursachen. Die Sonde
erfordert dann eine
kapazitätsarme, abgeschirmte
Leitung.
Reparaturen
Für Reparaturen wenden Sie sich
bitte an den Technischen
Kundendienst der BYK-Gardner
GmbH.

7. Lieferhinweise/
Technische Daten
Best.Nr. PW-1710
Leitfähigkeits-Messzelle mit
Verbindungskabel
ASTM D 5682
Abmessungen: Durchmesser:
ca. 42 mm
Anschlusskabel: 1,5 m Länge
Zellkonstante: 7,55 x 10
Material: Elektroden in
Edelstahl,
poliert,
Halterungen und
el. Isolation in
Polyamid
Länge: ca. 250 mm
-3
-1
cm
Best.Nr. PW-1712
Plattensonde mit Verbindungskabel
ASTM D 5682
Die Plattensonde kann alternativ zur
Messzelle eingesetzt werden. Die
Elektroden sind als austauschbare
Plattenparre konstruiert. Die
Plattensonde ermöglicht einen
leichten Sondenwechsel und eine
einfache Reinigung mit allen
bekannten Lösungsmittel.
Abmessungen: Breite:
ca. 50 mm
Länge:
ca. 380 mm
Anschlusskabel: 1,5 m Länge
Zellkonstante: 7,55 x 10
Material: Elektroden in
Edelstahl, poliert,
Halterungen und
el. Isolation in
Polyamid
-3
cm-1

Best.Nr. PW-1722
Leitfähigkeitsmessgerät
BYK-LC 2 mit Digitalanzeige
ASTM D 5682
Messbereich: 0.05 -19.99 M
9.99 - 0.05 S
Auflösung: 0.01 M bzw.
0.01 S
Genauigkeit: < ± 5 %
Vorbereit-
ungszeit: 4 sec.
Haltezeit: 2,5 min.
Anzeige: digital,
Ziffernhöhe
11mm
Anzeige- 0.01 -19.99M
bereich: 19.99 - 0.05 S
Stom- 9 V Batter ie
versorgung: oder 9 V Akku
Tr 7/8
Strom- 35 mA(typ.)
aufnahme: während der
Vorbereitungszeit
2 mA (typ.)
während der
Haltezeit
Mess-Spannung: 8 V AC
Gehäuse-
abmessung
(H x B x T): 55 x 105 x 145
mm
Gewicht
(Ohne Blatt): ca. 450 g
Gehäusematerial : Aluminium
Condutti vim e tr o LC 2
N° di cat.
PW-1722, PW-1710, PW-1712
198 013 256 EDI 0806


Conduttivimetro
LC 2
N° di cat
PW-1722, PW-1710, PW-1712
Indice
• Informazioni di si cu re zza
• Descrizione del sistema
• Start-up/
Procedura di misurazione
• Valutazione
• Calibrazione
• Ricerca die problemi
• Guida per l’ordinazione/
Specifiche tecniche
I dati tecnici sono soggetti a
modifiche


Conduttivimetro LC 2
N° di cat. PW-1710
Conduttivimetro LC 2
N° di cat. PW-1722
Conduttivimetro LC 2
N° di cat. PW-1712
1. Informazioni di
sicurezza
• Lo strumento non deve
essere usato in aree a prova
di esplosione!
• Usare solo batterie e
accumulatori a prova di
fuoriuscita di liquido.
• Non tentare di riparare lo
strumento da soli. Se il vostro
strumento dovesse mo stra r e
un malfunzionamento, il
nostro servizio clienti sarà
pronto ad aiutarvi il più
rapidamente possibile.

2. Descrizione del
sistema
Il Conduttivimetro LC 2, ASTM D
5682, è usato per l’analisi di liquidi
a bassa conducibilità, come i
sistemi vernicia nti. La resistenza
elettrica o la conducibilità sono
misurati mediante una cella di
misurazione ad immersione. A
seconda della funzione
selezionata , la resistenza
specifica o la conducibilità
specifica sono automaticamente
calcolat e e mostrate sul displ a y.
Il Byk LC 2 è stato progettato con
particolare attenzione per le
operazioni semplici e per
l’affidabilità. Il sistema di
misurazione è indipendente
dall’alimentazione (operazioni con
batteria o con accumulatore). La
cella di misurazione consiste in
due elettrodi disposti
concentricamente. La dimensione
e la forma del campione
generalmente non influenza il
risultato della misurazione.
Il display a caratteri da 3 mostra
valori da 0.05 a 19.99 M o da
19.99 a 0.05 S. Una freccia in
alto a sinistra del display indica
che il valore misur a to è asseg n ato
al tasto di sinistra M. Val ori
maggiori di 19.99 sono mostrati
come -.-, valori inferiori a 0.05
sono mostrati come 0.00.
La cassa e la cella di misurazione
sono molto resistenti ai solventi
ma non dovrebbero essere
esposti a tali liquidi per troppo
tempo.
Le parti della cassa sono incollate
insieme (staccabili) e le viti sono
assicurate allo stesso modo. Per
favore non aprite la cassa,
altrimenti la garanzia per lo
strumento finisce!

3. Start up/
procedura di
misurazione
• Controllare che la cella di
misurazi one si a puli ta;
assemblare.
Il solido design assi cu ra un saldo
alloggiamento dell’elettrodo esterno. L’accumulazione di materiale
sulla superfi cie di cont atto o sulle
superfici dell’elettrodo, anche un
film molto sottile, pregiudicherà il
risultato della misurazione in quanto tale accumul a zion e simul e r e b be
una resistenza eccessivamente
alta o un valore di conducibilità
baso, rispettivamente.
• Connettere il cavo di misura-
zione allo strumento. La presa
è sul retro dello strumento.
• Immergere la sonda nel
liquido. Il livello del liquido
dovrebbe raggiungere i due
buchi.
• Premere il tasto M o S.
Dopo 4 secondi il simbolo
“overflow” appare sul display.
Quindi appare il valore della
misurazione appropriata.
Misurazioni ripetute
Si può partire con una nuova
misurazi o ne in qualsiasi momento,
anche quando l’ultimo risultato è
ancora sul display.
In questo caso il testo del display
indica che si sta eff ett u a n d o una
nuova misurazione.
La durata del display è di 2,5
minuti e non riparte con una
nuova misurazione. Se si parte
con una nuova misurazione alla
fine di questo periodo, è possibile
che il risultato ve nga mostra to
solo per un periodo molto breve o
per niente affatto.
• Rimuovere il cavo dallo
strumento e pulire la sonda di
misurazione. A tal fine, tirare
l’elettrodo esterno (acciaio
inox) dal supporto. Sciacquare
con solvente adatto e
asciugare con un panno
asciutto.

Nota
Ogni volta che si effettua
una misurazione, viene
effettuato anche un autotest. Durante la misurazione
tutti i segmenti vengono
mostrati sul display e viene
controllato il voltaggio della
batteria.
Se il voltaggio della batteria
è critico, questo viene
visualizza to sul display.
Sul display è visuali zza to
8.21 V < U < 8.46.
Se U < 8.21 V, appare il
messaggio lo.bA. Non
saranno più possibili altre
misurazioni.
Sonda piat ta
Profondità di immersione

4. Valutazione
Il valore misurato è la resiste n za
R [M] del liquido tra gli elettrodi
(nello spazio tra gli anelli).
La costante di cella che dipende
dal design e dalle dimensioni
della cella di misurazione è
7.55x10
La resistenza specifica, e la
conducibilità specifica sono calcolate con le seguenti equazioni:
-3
cm-1.
= R • 132,5 cm
[M • cm] =
7,55 • 10-3cm
[S • cm
R [M]
wobei 1 = 1S
1S
-1
] = 7,55 • 10-3cm
-1
R [M]
-1
-1
= 1
Se la misura è richiesta solo per
controllo interno di qualità, per
esempio per una carta di controllo,
la conversione non è necessaria.

5. Calibrazione
Lo strumento è presettato
ad un fattore di 1.000 (cioè1 M o
1.00 S).
Per la calibrazione servono un
resistore di 1 M ± 1% o una
sonda e un liquido di calibrazione.
Se la calibrazione viene effettuata
con una sonda, il liquido di calibrazione deve essere assettato ad un
range di 1 M ± 10% o 1.0 S ±
10%.
Attenzione
Quando si calibra con una sonda,
assicurarsi ch e le superfici esterna
e interna della sonda siano
perfettamente pulite e prive di ogni
residuo isolante.
Se il valore misurato non è entro il
range atteso, la calibrazione si
ferma e appare il messaggio Err
sul display.
• Per partire con la calibrazione,
entrambi i pulsanti devono
essere premuti simultaneamente fino alla fine della
misura.
La misura dura circa 4 secondi.
Durante la misura, appare sul
display il simbolo “overf l ow” e un
trattino. Dopo la lettura appare L1.
• Lasciare entrambi i pulsanti.
La lettura salta automaticamente a L2, L3 e L4.
• Premere il tasto M di nuovo.
Solo ora il fattore di calibrazione viene mostrato. Dopo
aver rilasciato il tasto M, il
fattor e può esser e cambia to.

Il valore sul display può
essere diminuito di 0.005
premendo il tasto M o
aumentato di 0.005 con il
tasto S. Se un tasto viene
premuto a lungo, il valore si
riduce o aumenta
automaticamente.
E’ possibile un range di
misurazione tra 0.900 e
1.100. Questo corrisponde
ad una deviazione del
liquido di calibrazione di ±
10% dal valore di settaggio
1 M (quindi una
risoluzione di 0.5%).
Se non si usa nessuno dei
due tasti per più di 5
secondi, il fattore di
calibrazione di settaggio
viene salvato insieme con i
parametri dello strumento.
Ciò viene confermato da L5
sul display.
Questa procedura di calibrazione
richiede un po’ di pratica ma evita
sovrascrittu r e non intenzionali dei
valori di calibrazi o ni.

6. Ricerca dei
problemi
Sintomo
All’inizio della misurazione
(premendo il tasto per la
misurazione) appare sul display
“lo.bA”.
Possibile causa e rim edio
• Ricaricare l’accumulatore se si
lavora con un accumulatore.
Se non si ha nessun ri sult ato,
inserire un nuovo accumulatore o sostituire la batteria.
Controllare il ricaricatore, se
necessario.
• Se si lavora con la batteria:
inserire una nuova batteria.
A tal fine, sollevare il coperchio
(posteriore) del compartimento
della batteria e tirare il supporto
della batteria. Sostituire la batteria
e osservare la corretta polarità
(come indicato sul supporto).
Sintomo
All’inizio della misurazione
(premendo il tasto per la misurazione) il displ a y rim ane vuot o.
Possibile causa e rimedio
• Controllare la batteria o
l’accumula to re come descritto
in precedenza. Accumulatori
completamente sca ri chi
richiedono un tempo minimo
di ricarica di 14 ore.

Sintomo
Dopo il termine dei 10
secondi del tempo di
preparazione, il display
continua a mos trare
“overflow”:
Possibile causa e rim edio
• Controllare la connessi-
one del cavo. Se senza
successo, la resiste n za
del campione può
essere troppo alta
(>19,99 M).
Sintomo
Vengono mostrati valori fluttuanti,
instabili o considerevoli errori di
misura:
Possibile causa e rim edio
• Questo problema può essere
causato dagli effetti del campo
elettrico. Sarà necessario un
cavo di sonda a bassa
capacità protetto.
Riparazione
Contattare il fornitore.

7. Guida per
l’ordinazione /
Specifiche
tecniche
N° di cat. PW-1710
Elettrodo a tubo per conducibilità
con cavo di connessione
ASTM D 5682
Dimensioni: Diametro:
circa 42 mm
Lunghezza:
circa. 250 mm
Cavo di connessione Lunghezza:
1,5 m
Costante di cella:
7,55 x 10
Materiali: Elettrodi in acciaio
inox, lucidato
Manico e isola mento el ettr ico in
poliammide
-3
cm
-1
N° di cat. PW-1712
Elettrodo piatto per conducibilità con
cavo di connessio ne
ASTM D 5682
L’elettrodo piatto può essere usato
in alternativa a quello a tubo. Gli
elettrodi sono costruiti per essere
intercambiabili. L’elettrodo piatto è
molto semplice da connettere e da
pulire con tutti i tipi di solvente
conosciuti.
Dimensioni: Larghezza:
circa 50 mm
Lunghezza:
circa 380 mm
Cavo di connessione Lunghezza:
1,5 m
Costante di cella:
7,55 x 10
Materiali: Elettrodi in acciaio
inox, lucidato
Manico e isola mento elettrico in
poliammide
-3
cm-1

N° di cat. PW-1722
Conduttivimetro BYK L C 2
con display digitale
ASTM D 5682
Range di misura:
0.05 - 19.99 M
9.99 - 0.05 S
Risoluzione: 0.01 M o
0.01 S
Esattezza: < ± 5 %
Tempo die pre parazione:
4 sec.
Tempo die durata:
2,5 min.
Display: Digitale,
altezza cifre
11mm
Range del Da 0 . 01 - 1 9. 9 9 M
display: Da 19. 99 - 0.0 5 S
Alimenta- Batteria da 9 V
zione: o accumulatore
9V Tr. 7/8
Consumo di 35 mA, durante il
energia: tempo di
preparazione
2 mA, durante il
funzionamento
del display
Voltag gio: 8 V AC
Dimensioni
cassa (H x L x P):
55 x 105 x 145 mm
Peso
(senza batteria): circa 450 g
Materiale
cassa: Alluminio
EG - Konformitätserklärung
EC - Declaration of Conformity
Wir / We, BYK-Gardner GmbH, Lausitzer Straße 8, D - 82538 Geretsried
erklären im Sinne der EG-Richtlinie(n): / declare in accordance with the EC Directive(s):
• Elektromagnetische Verträglichkeit 89/336/EWG / Electromagnetic Compatibility 89/336/EEC
• Niederspannung 73/23/EWG / Low Voltage 73/23/EEC
Die Bauart des Produktes: / The construction of the product:
Leitfähigkeitsmessgerät LC 2 / Conductivity Meter LC 2
ist entwickelt, konstruiert und gefertigt in Übereinstimmung mit vorgenannter(n) EG-Richtlinie(n). / was
developed, constructed and produced in accordance with a.m. EC Directive(s).
Weitere entsprechende sicherheitsrelevante Normen wurden berücksichtigt. / Further safety relevant
standards were observed.
Eine Technische Dokumentation ist vorhanden. / A Technical Documentation is available.
BYK-Gardner GmbH
Dr. Georg Schroeder
Geschäftsführer / Managing Director

Déclaration de conformité - Nous, BYK-Gardner GmbH, déclarons que les produits / instruments ci-dessus
´ ´ s
F
mentionnés ont été développés, produits et construits en conformité avec les directives CEE établies.
Konformitetserklæring - Vi, BYK-Gardner GmbH, erklærer herved, at ovennævnte produkter / instrumenter
DK
er udviklet, konstrueret og produceret i overensstemmelse med de angivne EU Direktiver.
Declaración de Conformidad - Nosotros, BYK-Gardner GmbH, declaramos que los productos / aparatos
E
arriba mencionados, han sido desarrollados, construídos y fabricados en consonancia con las directrices de
la CEE indicadas.
EU-yhteensopivuusvakuutus - Me, BYK-Gardner GmbH, vakuuttaa, että yllämainitut tuotteet / laitteet on
SF
kehitetty, rakennettu ja valmistettu asetettujen EU-direktiivien mukaisesti.
Dichiarazione di conformità - Noi, BYK-Gardner GmbH, dichiariamo che i suddetti prodotti / strumenti sono
I
stati sviluppati, construiti et prodotti in conformità con le Direttive EC stabilite.
Overeenkomstigheidsverklaring - Wij, BYK-Gardner GmbH, verklaren hierbij dat bovengenoemd produkten
NL
/ apparaten zijn ontworpen, gekonstrueerd en vervaardigd overeenkomstig de genoemde EG-richtlijnen.
Declaração de Conformidade - Nós, BYK-Gardner GmbH, declaramos pela presente, que os produtos /
P
aparelhos acima indicados são desenvolvidos, construídos e produzidos de acordo com as Directivas CE
mencionadas.
GR
´ ´´ / ´s ´ ´ ´ ´
´s, BYK-Gardner GmbH, ´ ´ ´ s ´
s ´´s ´s .
Deklaration av överenstämmelse - Vi, BYK-Gardner GmbH, deklarerar härmed att ovanstående produkter /
S
instrument har blivit utvecklade och tillverkade i enlighet med de gällande EU direktiven.

BYK-Gardner GmbH
Lausitzer Str. 8
D-82538 Geretsried
Germany
Tel. 0-800-gardner
(0-800-4273637)
+49-8171-3493-0
Fax: +49-8171-3493-140
www.byk.com/instruments/
BYK-Gardner USA
9104 Guilford Road
Columbia, MD 21046
USA
Phone: 800-343-7721
301-483-6500
Fax: 800-394-8215
301-483-6555


198 013 256 EDI 0806
 Loading...