


Measure what you see.
BYK-mac i
BYK-mac i COLOR
Manual
A member of |
Additives & Instruments |
BYK-mac i
BYK-mac i COLOR
Manual
|
|
|
|
|
|
|
|
|
|
|
|
|
|
|
|
|
|
|
|
|
Patent pending |
|
300 000 891 E 1306 |
||||
BYK-Gardner GmbH |
BYK - Gardner USA |
|||||
Lausitzer Str. 8 |
9104 Guilford Road |
|||||
D-82538 Geretsried |
Columbia, MD 21046 |
|||||
Germany |
USA |
|||||
Tel. 0-800-gardner |
Phone 800-343-7721 |
|||||
(0-800-4273637) |
301-483-6500 |
|
|
|
||
+49-8171-3493-0 |
Fax 800-394-8215 |
|||||
Fax +49-8171-3493-140 |
301-483-6555 |
|
|
|
||
www.byk.com/instruments |
|
|
|
|
||
1

Dear customer,
thank you for having decided for a BYK-Gardner product. BYK-Gardner is committed to providing you with quality products and services. We offer complete system solutions to solve your problems in areas of color, appearance and physical properties. As the basis of our worldwide business, we strongly believe in total customer satisfaction. Therefore, in addition to our products, we offer many VALUE-ADDED services:
-Technical Sales Force
-Technical & Application Support
-Application and Technical Seminars
-Repair & Certification Service
BYK-Gardner is part of the Additives and Instrument Division of ALTANA AG, a leading supplier of additives for coatings and plastics. Together, we offer complete and unique solutions for you, our customer.
Thank you for your trust and confidence. If there is anything we can do better to serve your needs, do not hesitate to let us know.
Your BYK-Gardner Team
2

|
|
|
Table of contents |
Table of contents |
|
||
1. |
Safety instructions ............................................................................. |
5 |
|
2. |
System description and Delivery notes ........................................... |
10 |
|
3. |
Power supply .................................................................................... |
12 |
|
4. |
Controls ............................................................................................. |
15 |
|
5. |
Getting started .................................................................................. |
16 |
|
6. |
Calibrate ........................................................................................... |
18 |
|
|
6.1 |
Cyan Check ................................................................................................ |
20 |
|
6.2 |
Calibrate ..................................................................................................... |
21 |
|
6.3 |
Effect Check ............................................................................................... |
23 |
7. |
Measurement techniques ................................................................. |
24 |
|
8. |
Measure ............................................................................................ |
25 |
|
|
8.1 |
Continue last series .................................................................................. |
25 |
|
8.2 |
Absolute ...................................................................................................... |
26 |
|
8.3 |
Difference ................................................................................................... |
26 |
|
8.4 |
Organizer .................................................................................................... |
30 |
9. |
Delete ................................................................................................ |
33 |
|
|
9.1 |
Last Measurement .................................................................................... |
33 |
|
9.2 |
Checkzone .................................................................................................. |
34 |
|
9.3 |
Test series .................................................................................................. |
34 |
|
9.4 |
Standard ..................................................................................................... |
35 |
10. |
Data View ......................................................................................... |
36 |
|
|
10.1 |
Test series .................................................................................................. |
36 |
|
10.2 |
Standard ..................................................................................................... |
38 |
11. |
Setup ................................................................................................. |
39 |
|
|
11.1 |
Measurement parameters ....................................................................... |
39 |
|
11.2 |
Instrument .................................................................................................. |
44 |
|
11.3 |
Calibrate ..................................................................................................... |
48 |
3

12. |
Interface ............................................................................................ |
49 |
13. |
Standards .......................................................................................... |
50 |
14. |
Technical Data .................................................................................. |
51 |
15. |
Errors and Warning Messages ......................................................... |
53 |
16. |
Cleaning and Maintenance .............................................................. |
55 |
17. |
Service and Certification ................................................................ |
57 |
18. |
Copyright .......................................................................................... |
59 |
4

Safety instructions
1.Safety instructions
•Before operating the instrument the first time, please read the operating instructions and take particular notice of the safety instructions.
•If you use the unit and accessories properly, there are no hazards to fear.
•This product is equipped with safety features. Nevertheless, read the safety warnings carefully and use the product only as described in these instructions to avoid accidental injury or damage.
•No claims of product liability or warranty can be honored if the device is not operated in accordance with the operating instructions.
•Keep these instructions for future reference.
•If you pass this instrument to somebody else, make sure to include these instructions.
5

Safety instructions
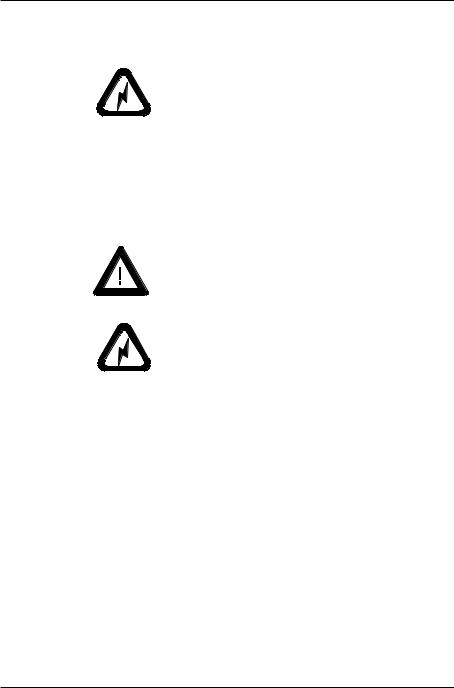
The following symbols and terms are used.
This symbol warns of the danger of injury.
This symbol warns of the danger of injury caused by electricity.
This sign points out additional information.
DANGER
The term DANGER warns of possible severe injuries and danger to life.
WARNING
The term WARNING warns of injuries and severe material damage.
CAUTION
The term CAUTION warns of slight injuries or damage.
6
Safety instructions
DANGER injuries possible
•Defects and extraordinary loads
If safe operation can no longer be presumed, shut down the device and secure it against unintended operation.
The device must be presumed unsafe to operate:
•if visible damage is evident
•if the instrument is no longer working
•if it has been stored for long periods under adverse conditions
•after harsh treatment during shipping.
•Safety advices for batteries and rechargeable battery pack: Do not crush or dismantle, do not heat or incinerate, do not immerse in any liquid. This may cause explosion or release harmful substances.
•For operation with the external power supply, care should be taken to ensure the nominal voltage of the power supply unit (see the manufacturer’s plate on the power supply unit) matchesthe voltage supplied by the power outlet.
•Do not perform any repairs on the unit yourself. The unit must be opened by trained professionals only. Please contact our customer service department in such cases.
•The measurement device and accessories may be disconnected from the power supply as follows:
Instrument:
a)by removing the battery compartment or
b)by removing the rechargeable battery pack or
c)by removing the measurement unit from the docking station
Docking station:
a)by disconnecting the plug from the power supply unit on the docking station
7

Safety instructions
b)by disconnecting the power supply unit plug from the socket
The power supply unit can be disconnect from the power supply by disconnecting the power connection line plug from the socket. Make certain that the power supply unit plug is easily accessible. Use only the power supply connection line included with delivery.
•When working with the batteries and the rechargeable battery pack, make certain there is no short circuit on the contacts (e.g. due to damaged insulation). Metallic objects must not come in contact with the bare contacts.
WARNING severe material damage
•The measurement unit consists of sensitive optical and electronic precision parts. Prevent it from being dropped, bumped or shaken!
•Avoid exposure to continuous humidity and condensation. Avoid splashing with water, chemicals or other liquids.
•Please use only accessories that are available for the unit.
•Only devices that meet the requirements for lowvoltage safety may be connected to the USB interface.
CAUTION material damage
•Do not allow any foreign objects to get into the measurement opening.
•Do not expose the unit to direct sunlight for extended periods of time. Do not store it in a hot or dusty environment. Use the instrument case for storage.
8

Safety instructions
•Align the protection cap when the instrument is not in use.
•Avoid prolonged high relative humidity and do not allow condensation water.
•Do not use any acetone for cleaning the unit! The unit housing is resistant to many solvents. For cleaning you should use a soft, moist cloth. Excessive dirt and dust can be removed with ethanol or cleaning alcohol.
•In case you intend not to use the instrument for a longer period of time, take out the rechargeable batteries.
•Never use different types of batteries.
Additonal information on use:
•You will find the technical data for all system components such as the measurement unit and battery compartment on the respective manufacturer’s plates and in the section Technical Data
•Batteries and rechargeable batteries are special waste and must therefore not be disposed of with household trash. Make certain to observe the disposal instructions of the battery or rechargeable battery manufacturer.
9
System description and Delivery notes
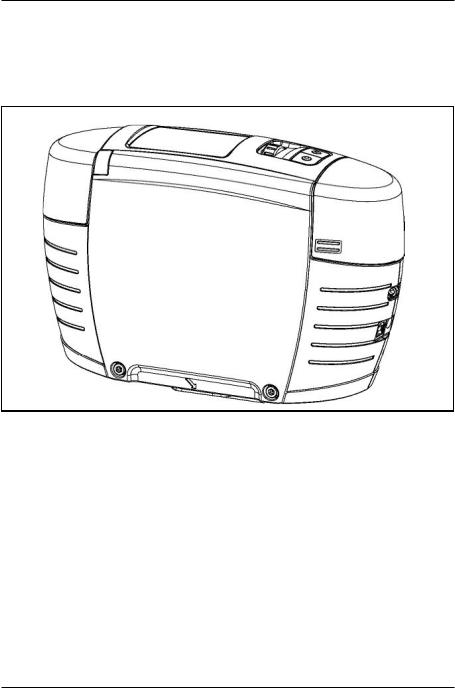
2. System description and Delivery notes
BYK-mac i COLOR measures color traditionally at five aspecular angles (15°/25°/45°/75°/110°) with a 45° illumination. Additional color measurement ”behind” the gloss for color travel of interference pigments is implemented at -15°. Besides color, the BYK-mac i uses additional illuminations to simulate sparkle under 15° /45° and 75°. Diffused illumination for graininess evaluation is created by two white coated hemispheres. Detection is performed by a high resolution camera situated perpendicular to the surface.
Additonal out-of-plane sensors detect fluorescent light excited in the visible range and quantify it by the Intensity Emisssion Value.
The instrument is operated by the operate button and the mode-scroll wheel. Functions described in this manual in regards to effect measurement are only available with BYK-mac i.
The instrument complies with the following standards: DIN 5033, 5036, 6174, 6175-2, DIN EN ISO 11664, SO 7724; ASTM D2244, E308, E2194, E 1164, SAE J1545.
BYK - mac i 23mm* |
7030 |
BYK - mac i 12mm* |
7034 |
BYK - mac i Sensor 23mm |
7031 |
BYK - mac i Sensor 12mm |
7035 |
Comes complete with:
Multi-angle spectrophotometer, black calibration standard, white calibration standard with certificate, cyan and effect checking reference, protective cap, cleaning set for bottom plate, two light protection covers, seal replacement kit, *BYKWARE smartchart software, docking station with USB cable for memory transfer, instrument interface cable for online data transfer, 2 rechargeable Li-ion battery packs, battery holder, 4 AA batteries, short instructions, operating manual on CD, carrying case, training.
10

System description and Delivery notes
BYK - mac i COLOR* |
7032 |
BYK - mac i COLOR Sensor |
7033 |
Comes complete with:
Multi-angle spectrophotometer, black calibration standard, white calibration standard with certificate, cyan checking reference, protective cap, cleaning set for bottom plate, two light protection covers, seal replacement kit, *BYKWARE smart-chart software, docking station with USB cable for memory transfer, instrument interface cable for online data transfer,
2 rechargeable Li-ion battery packs, battery holder,
4 AA batteries, short instructions, operating manual on CD, carrying case, training.
Note: smart-process is automatically included. If smart-lab is required instead, please specify at time of order.
Accessories and spare parts |
|
Black calibration standard |
7044 |
Protective cap 23mm Ø aperture |
6336 |
Protective cap 12mm Ø aperture |
6399 |
Docking station |
6360 |
USB interface cable |
6337 |
Instrument interface cable, online |
6413 |
Battery pack |
6359 |
Cleaning set for Bottom Plate |
6364 |
Seal Replacement Set |
6348 |
Light Protection Cover |
6414 |
BYKWARE smart-process |
4831 |
BYKWARE smart-lab |
4862 |
11
Power supply
3. Power supply
Rechargeable battery pack
Before operating the instrument for the first time, please read the operating manual and take particular notice of the Safety Instructions.
Powering the instrument
The measurement unit can be operated either with a rechargeable battery pack or with AA (LR6) alkaline batteries.
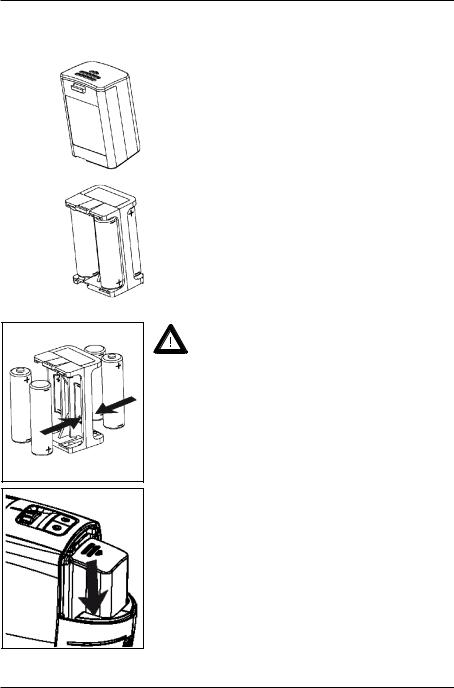
Battery compartment
Battery:
To operate the instrument using batteries, the battery compartment must be fitted with four 1.5-V AA(LR6) batteries
Ensure that the batteries are correctly
oriented in the compartment according to the
(+) and (-) marks.
Use only alkaline batteries (AA /LR6)!
When the battery voltage falls below the required operating voltage, the following message appears on the display:
“Battery Low !”
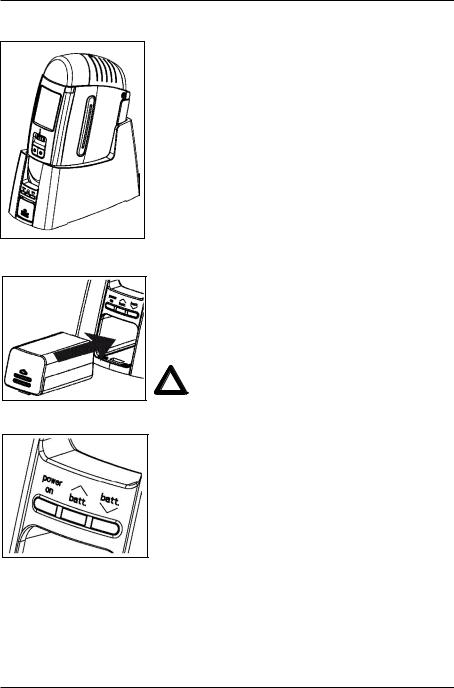
Insert the battery box into the battery compartment and press it down so that the strap moves into the cut-out of the housing.
Set the battery compartment cover in the slot again. Lock the cover by sliding it downwards until it snaps.
12
Power supply
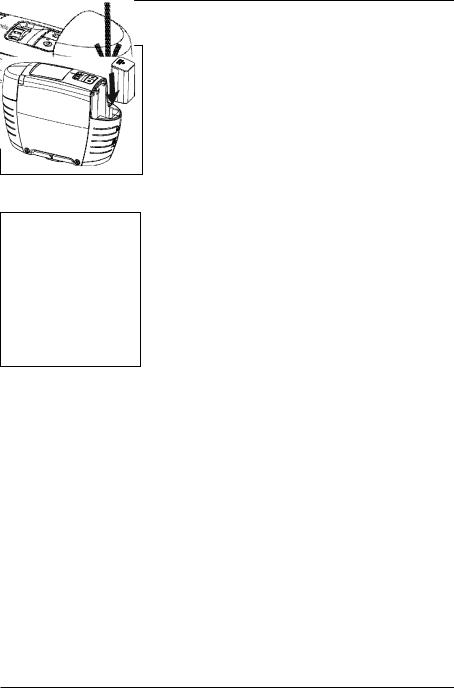
Rechargeable battery pack
To operate the instrument with the rechargeable battery pack, make sure it is inserted until it locks in place.
When inserting the rechargeable battery pack, ensure that its contacts are aligned with those of the instrument. See adjacent figure.
The capacity of the rechargeable battery pack included with delivery is sufficient for about 1000 measurements. When the voltage of the rechargeable battery pack falls below the required operating voltage the following message appears on the display:
“Battery Low !”
Set the battery compartment cover in the slot again. Lock the cover by sliding it downwards until it snaps.
Note: To ensure uniform utilization, the rechargeble battery packs should be exchanged regularly between instrument and docking station (weekly recommended).
Docking station power supply
Power is supplied to the docking station through the external power supply unit. Connect the external power supply unit to the docking station. Connect the appropriate end of the power connection line to the power supply unit and the plug end of the power connection line to the power outlet. Please verify that the specifications of the power supply unit match the power source in terms of current and voltage.
13
Power supply
2
1
Charging the rechargeable battery pack
The rechargeable battery pack is charged in the docking station. Charging time is approx. 2 hours.
1. Battery pack in the instrument:
The lithium ion rechargeable battery will begin charging immediately upon insertion of the instrument into the docking station. To do this, power must be supplied to the docking station through the corresponding power supply unit.
Insert the measurement unit into the docking station as shown in the illustration.
2. Battery pack in docking station:
A second charging shaft is located below the shaft for the instrument. Insert the second battery pack here for charging, so it will be handy at any time to replace the other battery when it is discharged.
The compartment for AA
 batteries may not be inserted into the charging shaft.
Charging indicator for:
1:additional battery pack
2:instrument
Indication light: green: ready red: charging.
14

Controls
4. Controls
3 |
2 |
|
|
|
|
|
1 |
4 |
|
|
|
|
|
||||
|
|
|
|
|
|
|||
|
|
|
|
|
|
|||
|
|
|
|
|||||
|
|
|
|
|
||||
5
6
7
8
9
Measurement unit
1Mode scroll wheel: switch on and menu selection
2esc button: changes between main menu and measurement mode
3std button: short-cut to difference mode
4Display for user guidance and measurement values
5Signal lamps
6Operate button (measurement button): switch on and measure
7Docking station and online cable connector
8Pins to detect correct placement on sample surface
9Protective cap
15

Getting started
5. Getting started
Turning on the unit
To turn on the unit, press the mode scroll wheel or the operate button.
The main menu appears.
For the first steps select ”Absolute” from the ”Measure” menu.
Place the instrument on the sample and press ”operate”. While the reading is in progress, the light diodes are green and ”Measuring” is displayed. Keep the instrument stable as long as the green lights are on. According to the preselected number of measurements to be averaged, the instrument is waiting for additional readings.
Having finished all readings the result is displayed.
To see all measurement data you can switch between the different displays with the scroll wheel. The small black rectangle in the lower left indicates the number of pages.
Sparkle and Graininess data is only available when using the BYK-mac i.
The Intensity Emission value quantifies fluorescent light excited in the visible range.
The amount of fluorescent light is determined for daylight D65 illumination.
16
Getting started
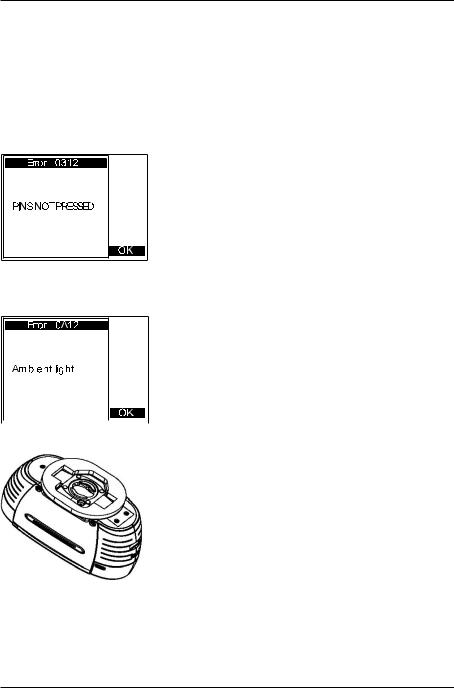
The following error messages might appear during measurement.
A warning signal is heard and the light diodes flash red. At the same time, a message appears in the display indicating the type of error.
”Pins not pressed”
Not all of the pins have been pressed thoroughly on the sample surface (e.g. curvature too high, instrument has been moved during measurement). Confirm the message by pressing the scroll wheel or the operate button and repeat the reading.
”Ambient light”
Appears when ambient light enters the measurement aperture. Confirm the message by
pressing the scroll wheel or the operate button and repeat the reading.
This warning can also appear when measuring bright  colors (white and light silver) in direct sunlight. Very
bright light adds to the internal reflection of the coating.
In that case please use the light protection cover which is supplied with the instrument. It is a black, flexible foam attachment that snaps on the bottom plate of the instrument. You will find it in the carrying case under the black trap.
17
Calibrate
6. Calibrate
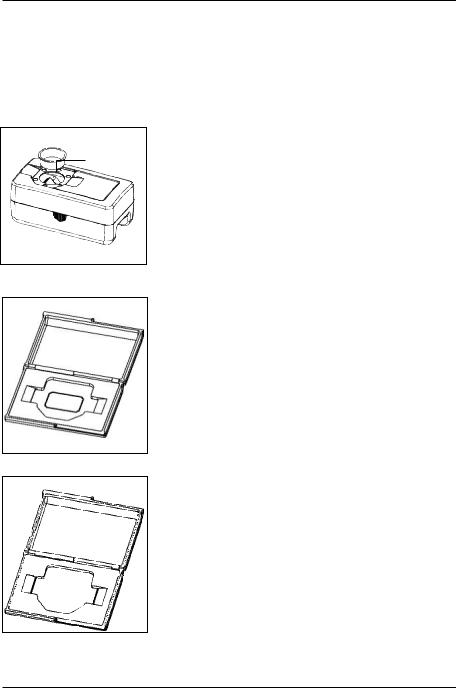
Calibration Information
Standards

 Protection
Measurement
Black trap
The instrument comes with 2 calibration standards.
The black trap is used to perform the zero reflectance calibration (black calibration). Always store the black trap with the protection cover in place when not in use.
The white standard is fixed in a case that has a hinged cover. It is used to perform the 100% reflectance calibration and to calibrate the camera.
Additionally two checking standards are supplied to audit instrument performance:
A cyan standard for color and an effect standard for sparkle and graininess (only with BYK-mac i).
When calibration is required, the device will display a message.
White Standard
The cyan check must be accomplished every 30 days. Black and white calibration must be accomplished every 3 months.
It is recommended to perform the effect check also once per month.
Cyan standard, effect standard
18
 Loading...