

Alpine Electronics X901D-DU Guía de Referencia Rápida [es]

FOR CAR USE ONLY/NUR FÜR AUTOMOBIL GEBRAUCH/POUR APPLICATION AUTOMOBILE UNIQUEMENT/
PARA USO EN AUTOMÓVILES/SOLO PER L’UTILIZZO IN AUTOMOBILE/ENDAST FÖR BILBRUK/ALLEEN VOOR
GEBRUIK IN DE AUTO/ТОЛЬКО ДЛЯ ИСПОЛЬЗОВАНИЯ В АВТОМОБИЛЯХ/DO UŻYCIA TYLKO W
SAMOCHODZIE
9-INCH ADVANCED NAVI STATION
X901D
QUICK REFERENCE GUIDE
Kurzanleitung
GUIDE DE RÉFÉRENCE RAPIDE
GUÍA DE REFERENCIA RÁPIDA
GUIDA RAPIDA
SNABBGUIDE
SNELSTARTGIDS
КРАТКОЕ СПРАВОЧНОЕ РУКОВОДСТВО
SKRÓCONA INSTRUKCJA DLA UŻYTKOWNIKA
EN
DE
FR
ES
IT
SE
NL
RU
PL


Contents
WARNING ................................................................................................................................................................2
CAUTION .................................................................................................................................................................3
Getting Started .....................................................................................................................................................4
Favourite Function ............................................................................................................................................... 6
Registering Items .................................................................................................................................................6
Radio/RDS Operation .........................................................................................................................................7
DAB/DAB+/DMB Operation .............................................................................................................................8
USB Flash drive Operation (Optional) ...........................................................................................................9
HDMI Device (DVD Player) Operation (Optional) ...................................................................................10
iPod/iPhone Operation (Optional) ...............................................................................................................11
Hands-Free Phone Control .............................................................................................................................12
Map Functions.....................................................................................................................................................13
Navigation Menu ................................................................................................................................................14
Setting a Destination ........................................................................................................................................15
Specifications ......................................................................................................................................................16
IMPORTANT
Please record the serial number of your unit in the space provided below and keep it as a permanent
record.
SERIAL NUMBER:
ISO SERIAL NUMBER: AL
INSTALLATION DATE:
INSTALLATION TECHNICIAN:
PLACE OF PURCHASE:
For details on all functions, refer to the Owner’s Manual stored in the supplied CD-ROM. (As it is
data CD, the CD cannot be used for playing back music and images on the player.) If required, an
ALPINE dealer will readily provide you with a print out of the Owner’s Manual contained in the
CD-ROM.
1-EN
WARNING
WARNING
This symbol means important instructions. Failure
to heed them can result in serious injury or death.
INSTALL THE PRODUCT CORRECTLY SO THAT THE DRIVER
CANNOT WATCH TV/VIDEO UNLESS THE VEHICLE IS STOPPED
AND THE EMERGENCY BRAKE IS APPLIED.
It is dangerous for the driver to watch TV/Video while driving a vehicle.
Installing this product incorrectly enables the driver to watch TV/Video
while driving. This may cause a distraction, preventing the driver from
looking ahead, thus causing an accident. The driver or other people
could be severely injured.
DO NOT WATCH VIDEO WHILE DRIVING.
Watching the video may distract the driver from looking ahead of the
vehicle and cause an accident.
DO NOT OPERATE ANY FUNCTION THAT TAKES YOUR
ATTENTION AWAY FROM SAFELY DRIVING YOUR VEHICLE.
Any function that requires your prolonged attention should only be
performed after coming to a complete stop. Always stop the vehicle in a
safe location before performing these functions. Failure to do so may
result in an accident.
DO NOT FOLLOW ROUTE SUGGESTIONS IF THE NAVIGATION
SYSTEM INSTRUCTS YOU TO PERFORM AN UNSAFE OR
ILLEGAL MANEUVER, OR PLACES YOU IN AN UNSAFE
SITUATION OR AREA.
This product is not a substitute for your personal judgement. Any route
suggestions by this system should never supersede any local traffic
regulations or your personal judgement or knowledge of safe driving
practice.
KEEP THE VOLUME AT A LEVEL WHERE YOU CAN STILL HEAR
OUTSIDE NOISES WHILE DRIVING.
Excessive volume levels that obscure sounds such as emergency vehicle
sirens or road warning signals (train crossings, etc.) can be dangerous
and may result in an accident. LISTENING AT LOUD VOLUME
LEVELS IN A CAR MAY ALSO CAUSE HEARING DAMAGE.
MINIMIZE DISPLAY VIEWING WHILE DRIVING.
Viewing the display may distract the driver from looking ahead of the
vehicle and cause an accident.
DO NOT DISASSEMBLE OR ALTER.
Doing so may result in an accident, fire or electric shock.
USE ONLY IN CARS WITH A 12 VOLT NEGATIVE GROUND.
(Check with your dealer if you are not sure.) Failure to do so may result
in fire, etc.
KEEP SMALL OBJECTS SUCH AS SCREWS OUT OF THE REACH
OF CHILDREN.
Swallowing them may result in serious injury. If swallowed, consult a
physician immediately.
USE THE CORRECT AMPERE RATING WHEN REPLACING
FUSES.
Failure to do so may result in fire or electric shock.
DO NOT BLOCK VENTS OR RADIATOR PANELS.
Doing so may cause heat to build up inside and may result in fire.
USE THIS PRODUCT FOR MOBILE 12V APPLICATIONS.
Use for other than its designed application may result in fire, electric
shock or other injury.
MAKE THE CORRECT CONNECTIONS.
Failure to make the proper connections may result in fire or product
damage.
BEFORE WIRING, DISCONNECT THE CABLE FROM THE
NEGATIVE BATTERY TERMINAL.
Failure to do so may result in electric shock or injury due to electrical
shorts.
DO NOT ALLOW CABLES TO BECOME ENTANGLED IN
SURROUNDING OBJECTS.
Arrange wiring and cables in compliance with the manual to prevent
obstructions when driving. Cables or wiring that obstruct or hang up on
places such as the steering wheel, gear lever, brake pedals, etc. can be
extremely hazardous.
DO NOT SPLICE INTO ELECTRICAL CABLES.
Never cut away cable insulation to supply power to other equipment.
Doing so will exceed the current carrying capacity of the wire and result
in fire or electric shock.
DO NOT DAMAGE PIPE OR WIRING WHEN DRILLING HOLES.
When drilling holes in the chassis for installation, take precautions so as
not to contact, damage or obstruct pipes, fuel lines, tanks or electrical
wiring. Failure to take such precautions may result in fire.
DO NOT USE BOLTS OR NUTS IN THE BRAKE OR STEERING
SYSTEMS TO MAKE GROUND CONNECTIONS.
Bolts or nuts used for the brake or steering systems (or any other
safety-related system), or tanks should NEVER be used for installations
or ground connections. Using such parts could disable control of the
vehicle and cause fire etc.
DO NOT INSTALL IN LOCATIONS WHICH MIGHT HINDER
VEHICLE OPERATION, SUCH AS THE STEERING WHEEL OR
SHIFT LEVER.
Doing so may obstruct forward vision or hamper movement etc. and
results in serious accident.
2-EN

CAUTION
This symbol means important instructions. Failure
to heed them can result in injury or material
property damage.
HALT USE IMMEDIATELY IF A PROBLEM APPEARS.
Failure to do so may cause personal injury or damage to the product.
Return it to your authorized Alpine dealer or the nearest Alpine Service
Center for repairing.
HAVE THE WIRING AND INSTALLATION DONE BY EXPERTS.
The wiring and installation of this unit requires special technical skill
and experience. To ensure safety, always contact the dealer where you
purchased this product to have the work done.
USE SPECIFIED ACCESSORY PARTS AND INSTALL THEM
SECURELY.
Be sure to use only the specified accessory parts. Use of other than
designated parts may damage this unit internally or may not securely
install the unit in place. This may cause parts to become loose resulting
in hazards or product failure.
ARRANGE THE WIRING SO IT IS NOT CRIMPED OR PINCHED
BY A SHARP METAL EDGE.
Route the cables and wiring away from moving parts (like the seat rails)
or sharp or pointed edges. This will prevent crimping and damage to the
wiring. If wiring passes through a hole in metal, use a rubber grommet
to prevent the wire’s insulation from being cut by the metal edge of the
hole.
DO NOT INSTALL IN LOCATIONS WITH HIGH MOISTURE OR
DUST.
Avoid installing the unit in locations with high incidence of moisture or
dust. Moisture or dust that penetrates into this unit may result in
product failure.
3-EN
Owner’s manual Location of Controls, Turning Power On or Off
Getting Started
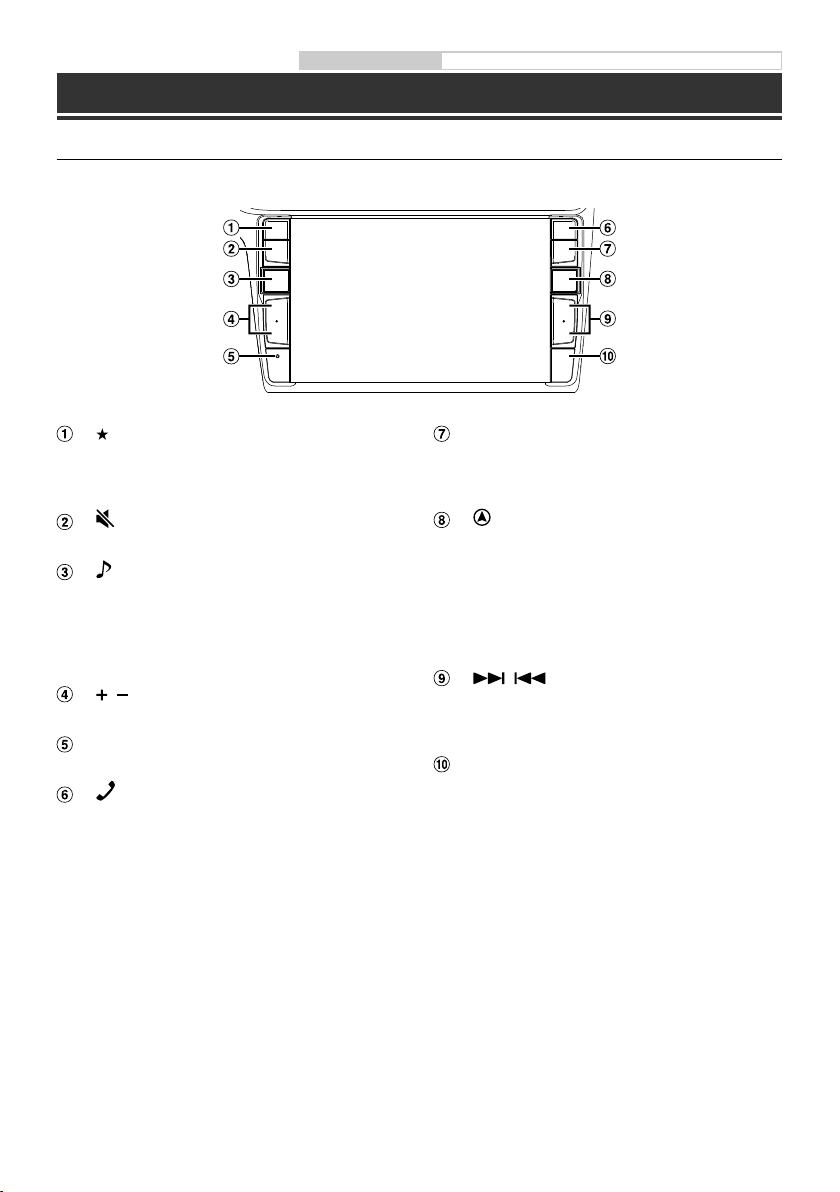
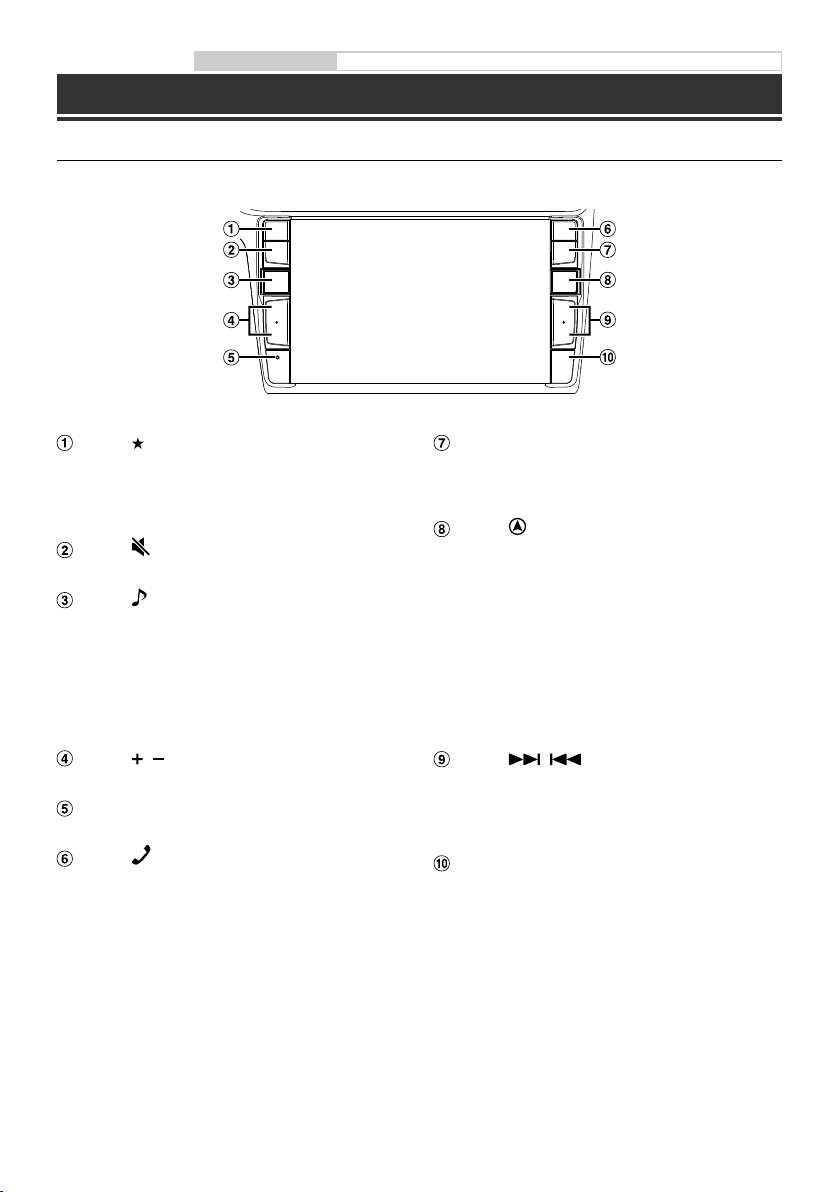
Location of Controls
The screen design used in the Owner’s Manual may differ from the actual screen.
(Favourite) button
Recalls the Favourite screen.
• Press and hold this button for at least 2 seconds
to switch to Vehicle info mode.
(MUTE) button
Press to activate/deactivate the mute mode.
(AUDIO)/ (Voice Recognition mode) button
Displays the Audio/Visual screen. If the Audio/Visual
screen is already displayed, changes the source.
When a hands-free phone with Voice Recognition is
connected, press and hold for at least 2 seconds to
switch to the Voice Recognition mode.
/ (UP/DOWN) button
Press to adjust the volume.
RESET switch
The system of this unit is reset.
(PHONE) button
Recalls the Phone Menu screen.
Press to start a conversation when a call is incoming.
MENU/ (Power Off) button
Recalls the Menu screen.
Press and hold this button for at least 5 seconds to turn
the power off.
(NAV) button
Recalls the navigation map screen.
Press again to switch to Navigation menu screen.
Press and hold this button for at least 2 seconds to
change to Go Home route screen. (If Home is not set
yet, it will change to the Home setting screen.)
For details of navigation operations, refer to “Navigation
System OM” in the CD-ROM.
/ button
Press to seek up/down a station in radio mode or up/
down a track, chapter, etc., in other audio/visual
sources.
Remote Sensor
Point the remote control transmitter towards the
remote sensor within a range of 2 meters.
4-EN

Turning Power On or Off
1 Turn the ignition key to the ACC or ON position.
The system is turned on.
2 Press and hold the MENU button for at least 5 seconds to turn the power off.
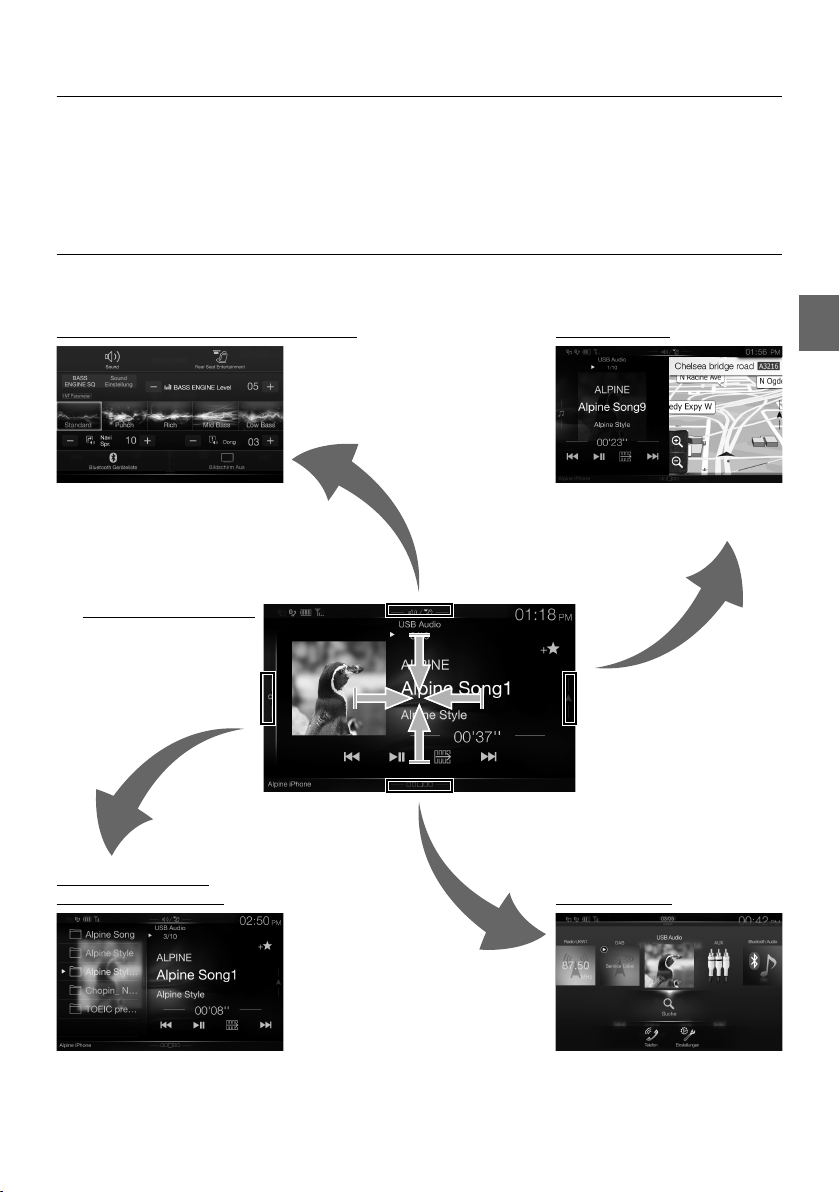
Switching the Audio Sources Screen to a Dedicated Screen
You can switch the Audio Sources screen to a dedicated screen by touching the icon on one of the four edges of
the screen, or by swiping vertically or horizontally.
Shortcut Setup Screen
Dual Screen
You can set the Sound Setup or Rear
Seat Entertainment System.
Audio Sources Screen
(USB Audio)
Preset button or Quick Search
mode Screen*
The Search mode differs depending on the audio source. For details, see the operating instructions of the audio source.
You can switch between the
displayed screens on the Dual Screen.
Menu Screen
You can make settings on the Menu
Screen.
5-EN
Owner’s manual Favourite Function
Favourite Function
This unit enables you to recall functions easily by registering frequently used items such as the Audio source, the
navigation search function, etc. to the Favourite screen. You can recall any of these items easily.
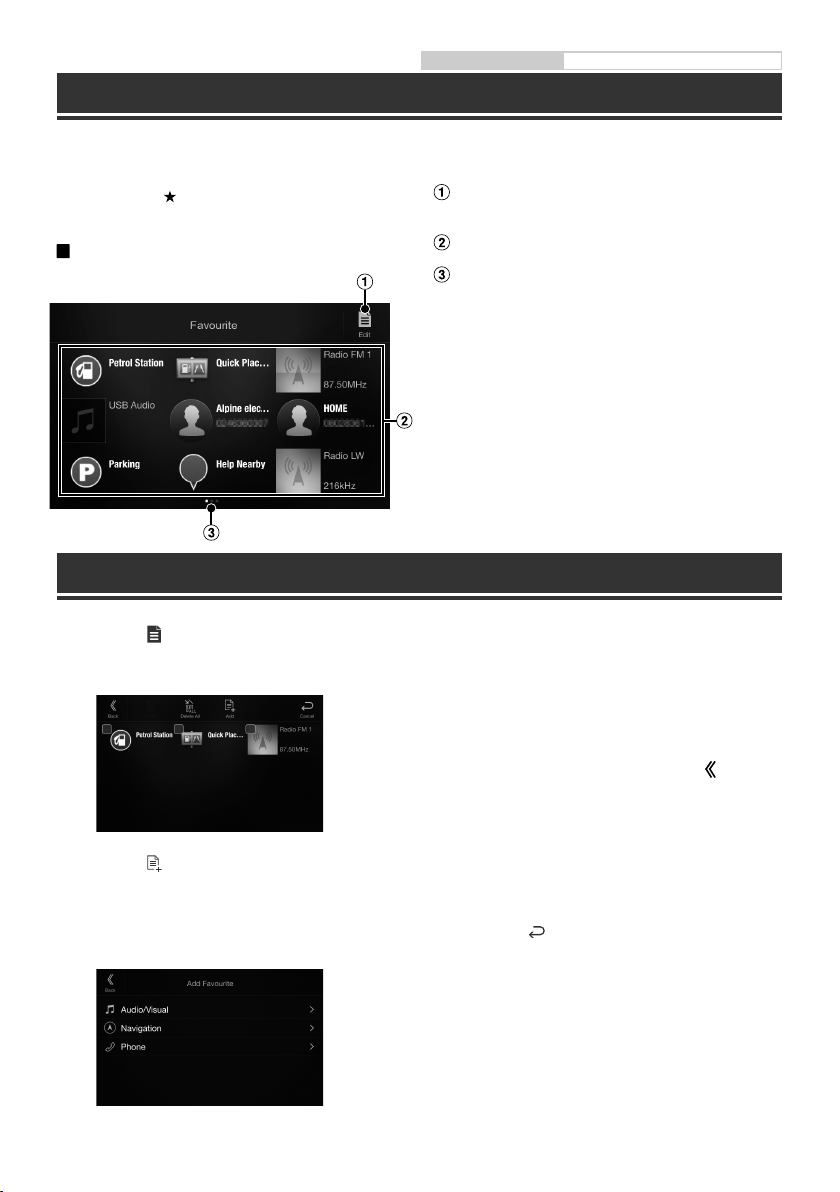
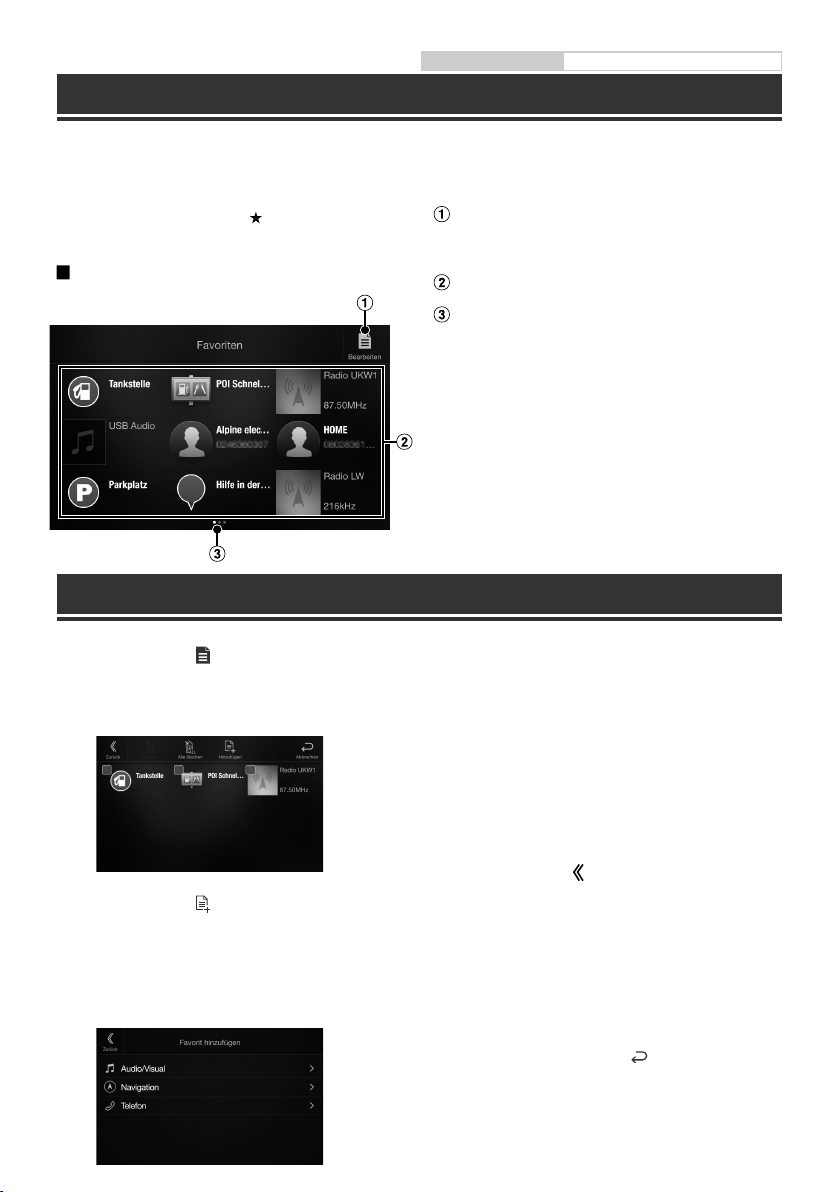
1 Press the (Favourite) button.
The Favourite screen is displayed.
Favourite screen example
Changes to the Edit screen used for registering
items or changing names.
Favourite registration item
Indicates the location of the currently displayed
Favourite screen.
Swipe to the left and right to change the pages. You
can add up to 6 pages.
Registering Items
1 Touch [ ] (Edit).
A checkbox is displayed on the upper left area of
the registration icon and it changes to Edit mode.
2 Touch [ ] (Add).
The items to be added (categories) are displayed.
3 Touch the desired item to be added
(category).
6-EN
4 Choose the desired item to be added.
For details on the items to be added, refer to
“Editing the Favourite Screen” in the Owner’s
Manual.
• You can add up to 54 items.
• You cannot register an item more than once.
5 After editing is complete, touch [ ] (Back).
6 After the caption for the confirmation is
displayed, touch [OK].
7 Editing is complete and the screen switches
to the Favourite screen.
• If you touch [ ] (Cancel) while editing, the screen
switches to the previous Favourite Edit screen.
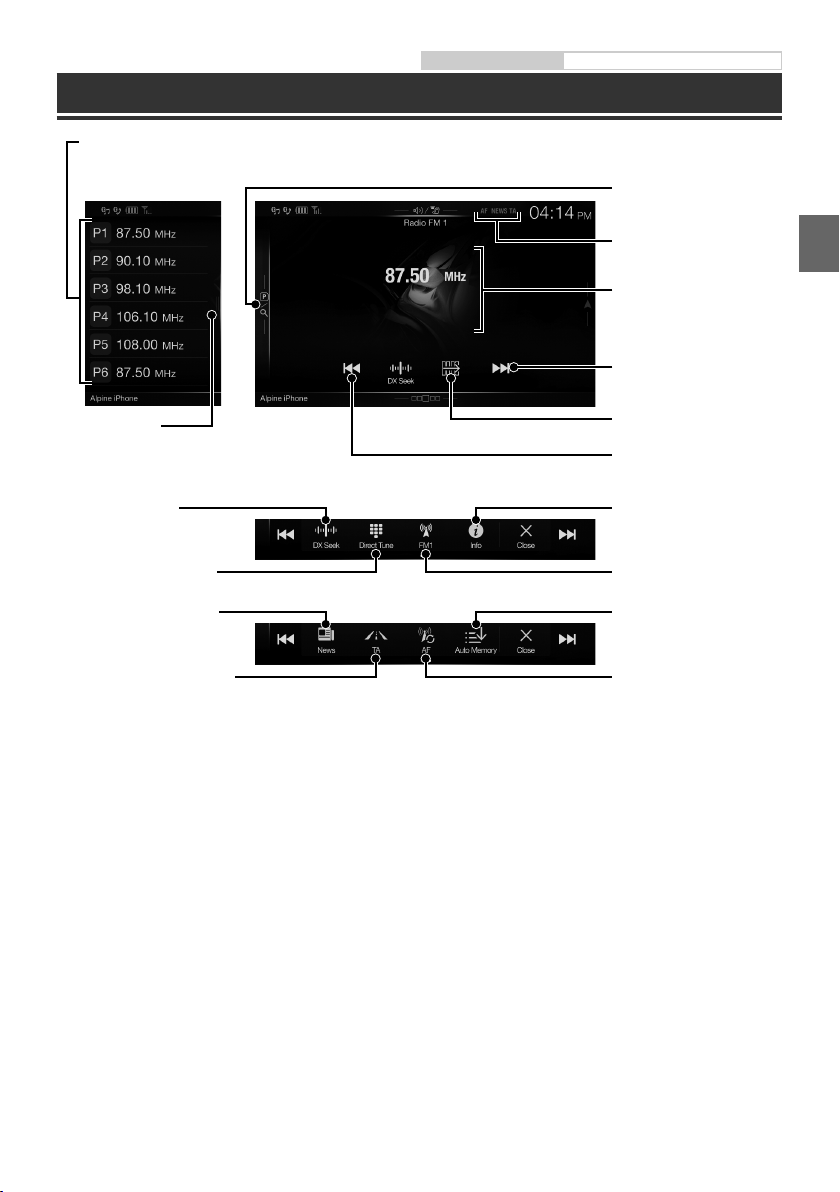
Radio/RDS Operation
Preset button
Displays the preset stations with a short touch.
Touch for at least 2 seconds to memorise the current station as a preset station.
Preset mode screen
Owner’s manual Radio/RDS
Preset mode button
Touch or swipe to the right when
you use the Preset mode screen.
RDS indicator
Information display
Increases frequency
PTY Search button
Swipe to the right when you use
the PTY list screen.
PRIORITY NEWS mode On/Off
Switches Function button
Decreases frequency
Changes text informationChanges tuning mode
Switches bandInputting Frequency Directly
Memorises stations
automatically
AF mode On/OffTraffic Information mode On/Off
7-EN
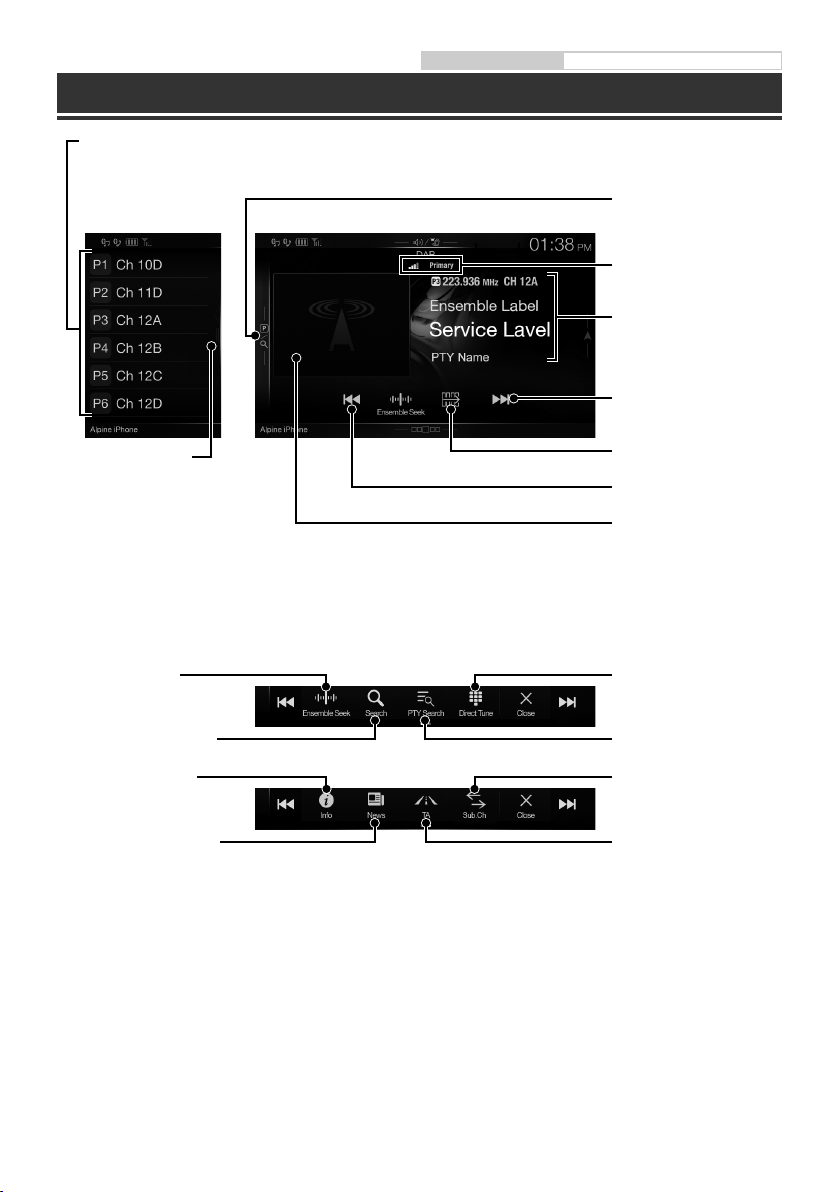
DAB/DAB+/DMB Operation
Preset button
Displays the preset service with a short touch.
Touch for at least 2 seconds to memorise the current service as a preset station.
Preset mode screen
Owner’s manual DAB/DAB+/DMB
Preset mode button
Touch or swipe to the right when
you use the Preset mode screen.
DAB indicator
Information display
Increases frequency
Full Search mode button
Swipe to the right when you use the All
Service list screen.
(All Service list, Current Ensemble list or
PTY list is displayed)
Changes text information
PRIORITY NEWS mode On/Off
They may not be displayed, depending on the Service component currently being received.
Switches Function button
Decreases frequency
Slide Show
Displays the programme
information, artist photos, and
advertisements that are
synchronised with the Service
component currently being
received.*
Inputting Frequency DirectlyChanges tuning mode
Displays Select PTY screenDisplays select service screen
Changes Primary/Secondary
Service
Traffic Information mode On/
Off
8-EN
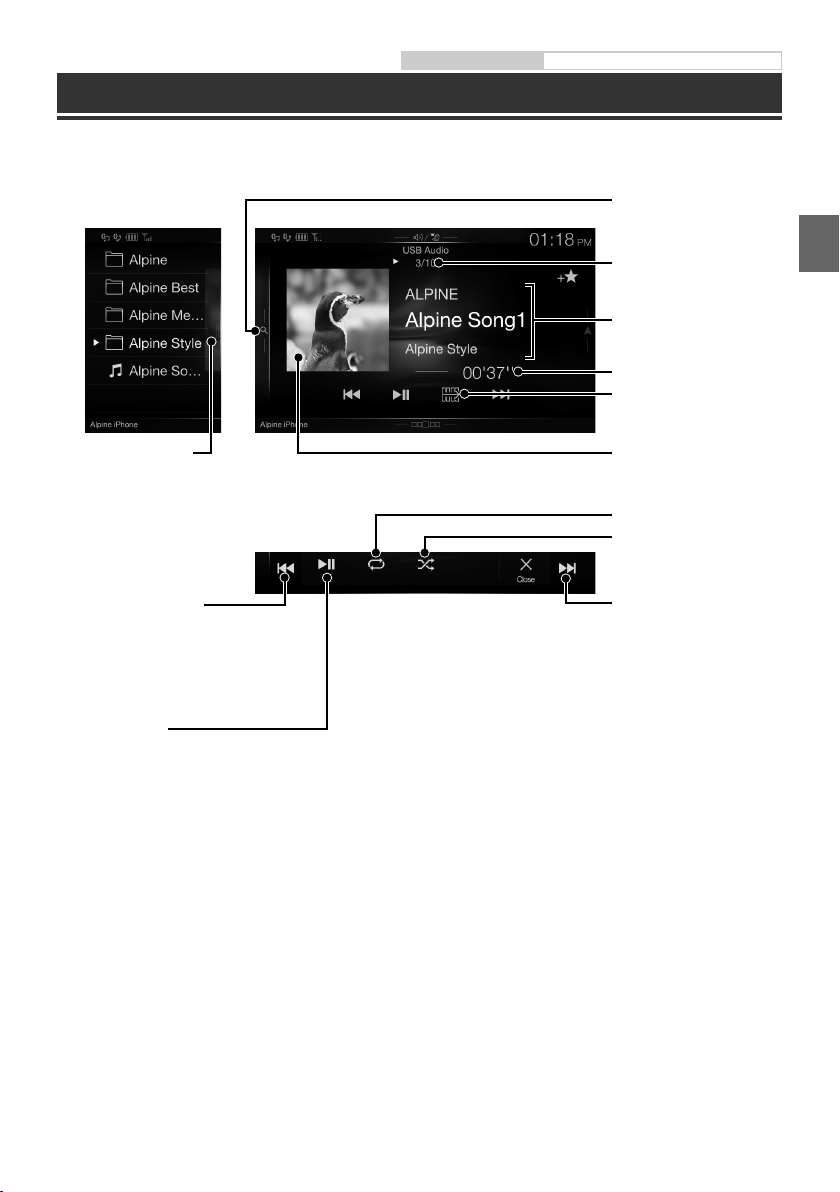
Owner’s manual USB Flash drive Operation (Optional)
USB Flash drive Operation (Optional)
You can play back music files (MP3/WMA/AAC/FLAC) stored in a USB flash drive on the internal player of this
system
Quick Search button
Quick Search mode screen
Touch or swipe to the right to use
the Quick Search mode.
Current song no./Total song no.
Information display
Elapsed time
Switches Function button
Full Search mode button
Swipe to the right when you use
the Full Search mode screen.
Finds the beginning of the
current file/Finds a previous file
within 1 second after playback
starts/Fast-reverses when
touched for at least 1 second
Pause and Playback
Artwork display
Repeat Playback
Random Play
Finds the beginning of the
next file/Fast-forwards when
touched for at least 1 second
9-EN
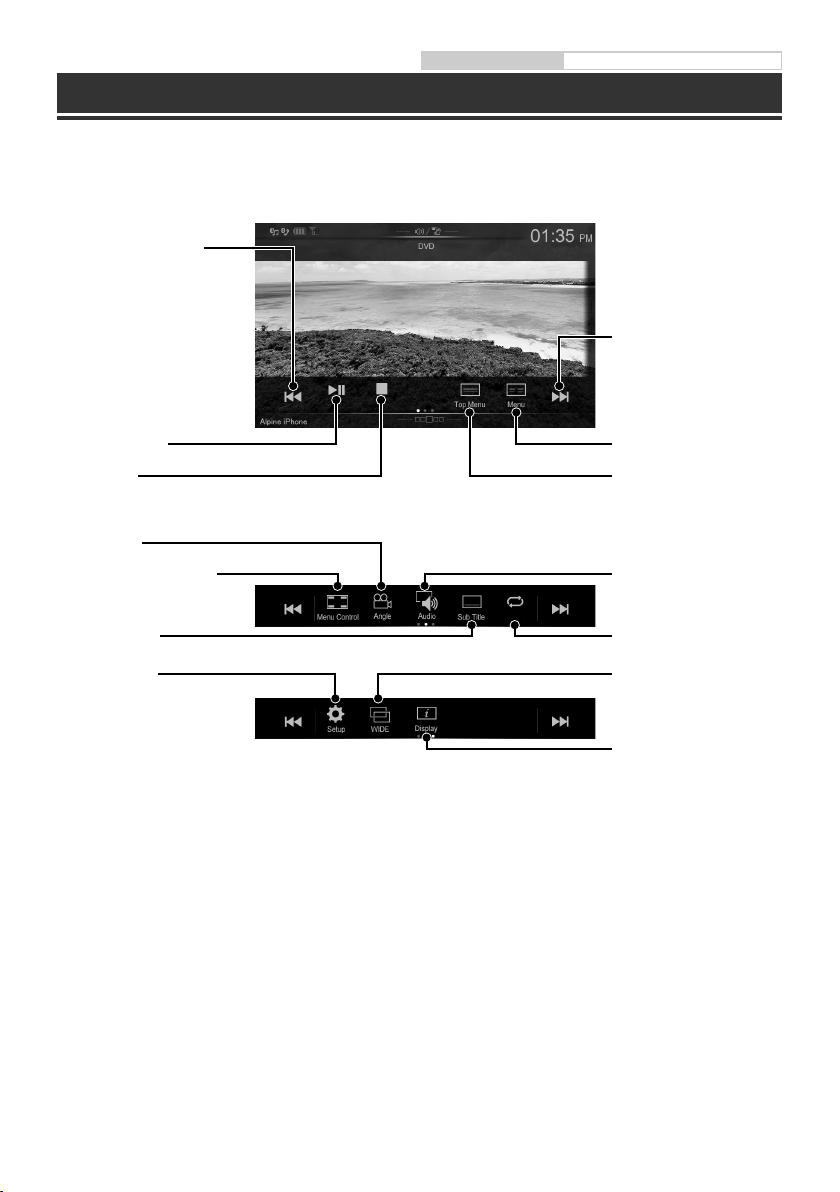
Owner’s manual HDMI (Option) DVD
HDMI Device (DVD Player) Operation (Optional)
When you connect an optional DVE-5300 (DVD Player), you can operate it from the unit.
Finds the beginning of the
current chapter/Finds a
previous chapter within one
second after playback starts/
Fast-reverses when touched
for at least 1 second
Finds the beginning of next
chapter/Fast-forwards when
touched for at least 1 second
Pause and Playback
Stop Playback
Switches Angle
Displays Menu control screen
DVD Setup screen
Displays Menu screen
Displays Top Menu screen
Switches Audio Tracks
Repeat PlaybackSwitches Subtitles
Switching Display Modes
Changes text information
10-EN
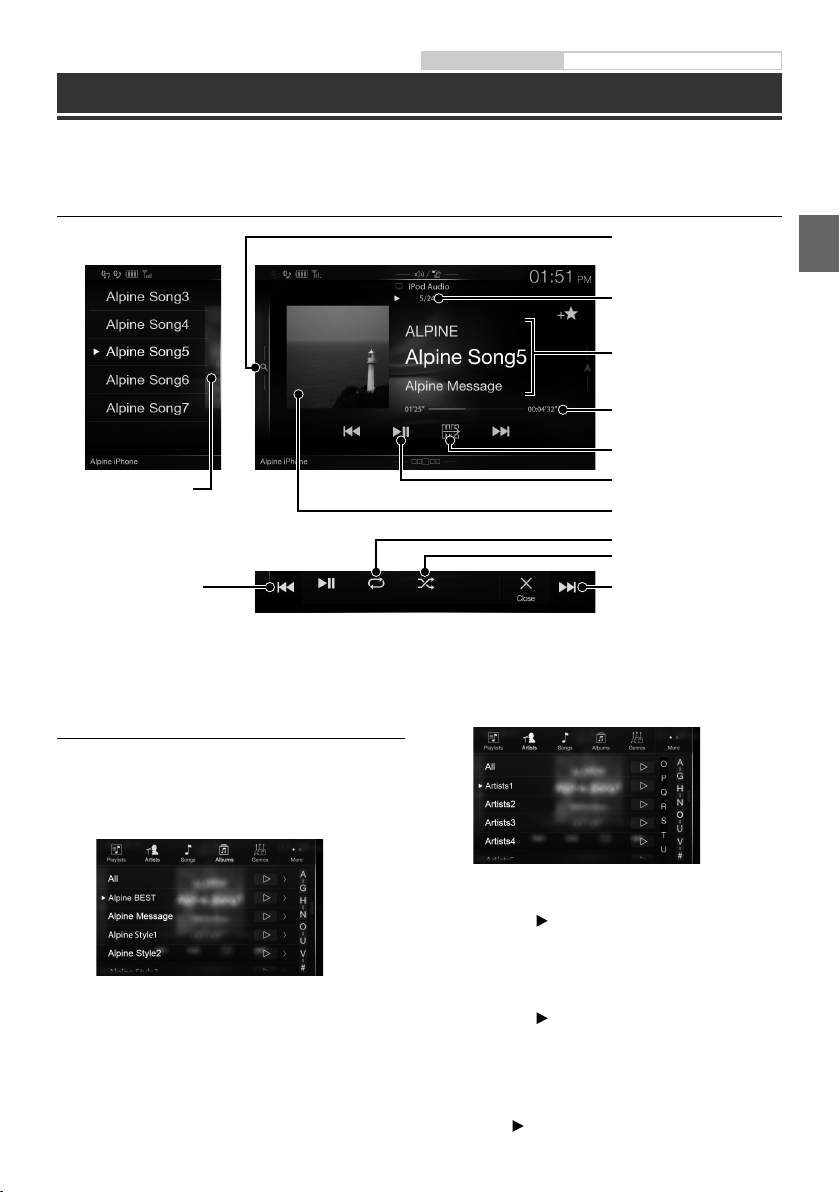
Owner’s manual iPod/iPhone (Optional)
iPod/iPhone Operation (Optional)
A separately sold USB iPod/iPhone AV cable (KCU-461iV) or a separately sold Lightning to USB cable (KCU-471i) is
required depending on the type of iPod/iPhone.
Audio mode
Quick Search button
Quick Search mode screen
Full Search mode button
Swipe to the right when you use
the Full Search mode screen.
Finds the beginning of the
current file/Finds a previous file
within one second after
playback starts/Fast-reverses
when touched for at least 1
second
Touch or swipe to the right to use
the Quick Search mode.
Current song no./Total song no.
Information display
Playing time
Switches Function button
Pause and Playback
Artwork display
Repeat Playback
Random Play
Finds the beginning of the
next file/Fast-forwards when
touched for at least 1 second
Searching for a Music File (Full Search
Mode)
For example: Searching by Artist name
1 Touch [Artists] in the Full Search mode
screen.
2 Touch the desired artist’s name.
The Albums search screen of the selected artist is
displayed.
Touching [
songs of the selected artist.
] of the desired artist will play back all
3 Touch the desired album’s name.
All songs of the selected album are displayed.
Touching [
songs of the selected album.
] of the desired album will play back all
4 Touch the desired song’s name.
The selected song is played back.
• Touching [
] of “All” will play back all songs in the list.
11-EN
Owner’s manual Bluetooth Setup, Bluetooth Operation
Hands-Free Phone Control
Hands-free calls are possible when using an HFP (Hands-Free Profile) compatible mobile phone with this unit.
How to connect to a Bluetooth
compatible device (Pairing)
The Bluetooth function is always available on this unit.
You can, therefore, search for a Bluetooth device for pairing at any
time.
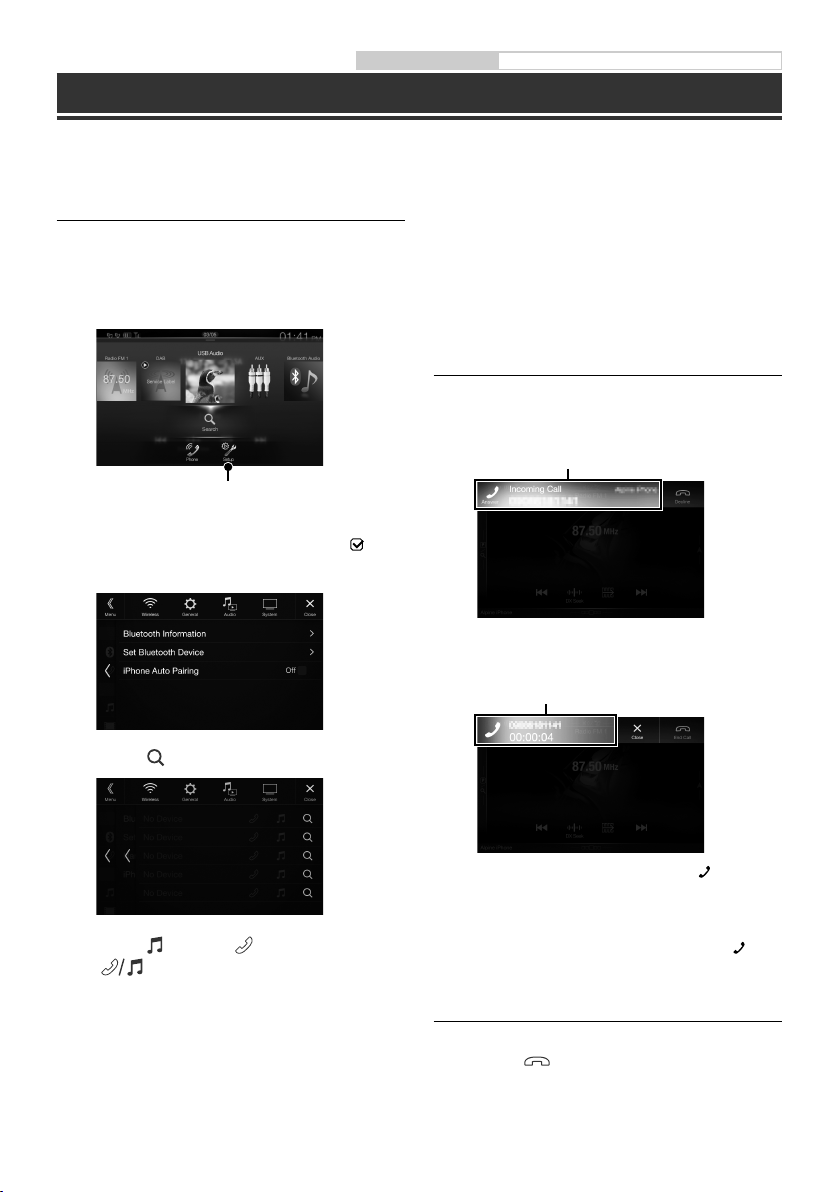
1 Touch [Setup] button on the Menu screen.
[Setup] button
2 Touch [Bluetooth].
• Make sure the “Bluetooth” setting is “On” ( ).
3 Touch [Set Bluetooth Device].
• You can register up to 5 Bluetooth compatible mobile
phones.
• The Bluetooth registration process differs depending on
the device version and SSP (Simple Secure Pairing). If a 4
or 6 character Passcode appears on this device, enter the
Passcode using the Bluetooth compatible device.
If a 6 character Passkey appears on this device, make
sure the same passkey is displayed on the Bluetooth
compatible device and touch “Yes.”
Answering a Call
1 An incoming call triggers the ringtone and
an incoming call display.
Incoming call notification screen
2 Touch incoming call notification screen.
The call starts.
Call info area
4 Touch [ ] (Search) of “No Device.”
5 Touch [ ] (Audio), [ ] (Hands-free) or
[ ] (Both) of the device you want to
connect from the list.
Audio: Sets for use as an Audio device.
Hands-free: Sets for use as a Hands Free Device.
Both: Sets for use as both an Audio device
and Hands Free Device.
6 When the device registration is complete, a
message appears and the device returns to
12-EN
normal mode.
• Touch the call info area or press the (PHONE)
button during a phone call to switch to the
Phone Operation screen. Then you can adjust the
speech volume, etc.
• You can also start the call by pressing the
(PHONE) button.
Hanging up the Telephone
1 Touch [ ] (End Call).
The call finishes.
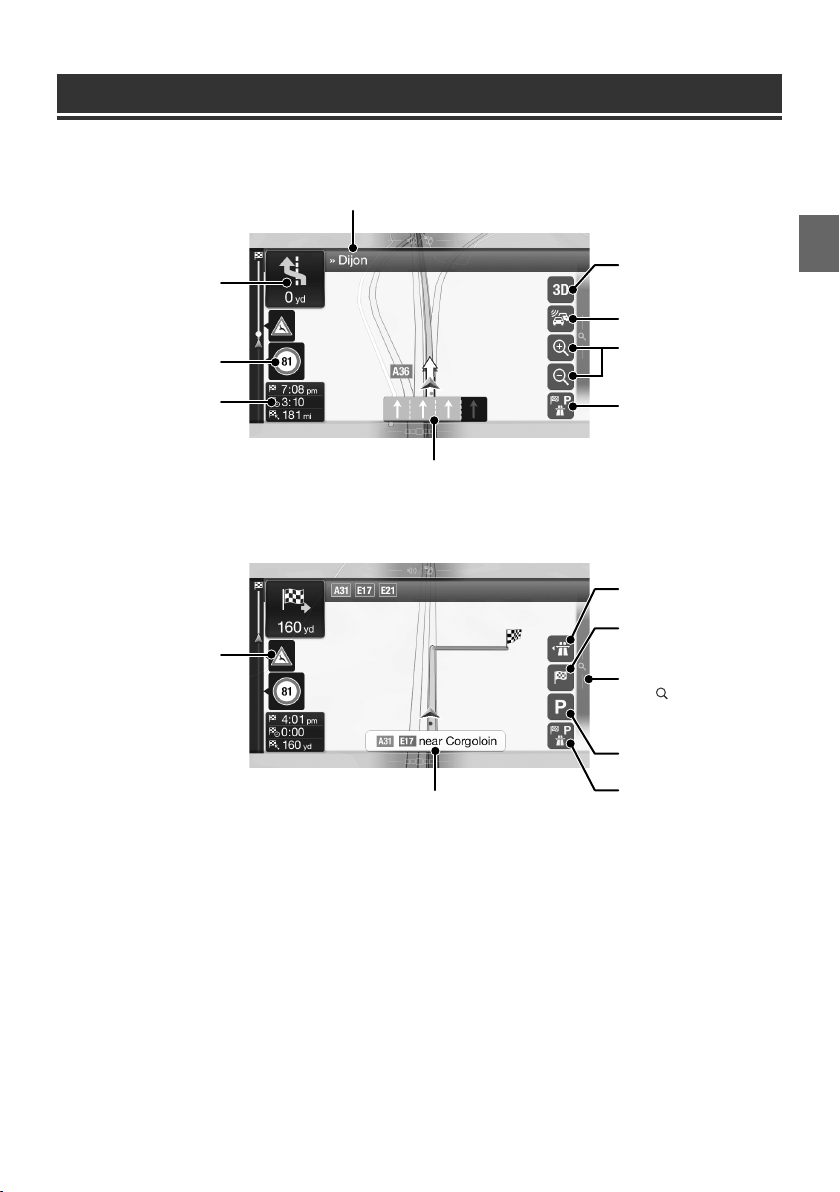
Map Functions
Below is an overview of different buttons and icons on the map display. For more detailed information about this
screen, please see the Owner’s Manual.
Next street
Next turn preview
Speed limit warning
Data fields
Warning road sign
Lane information
Street name
2D/2D North up/3D views
Traffic
Zoom
Additional information
Motorway services
Destination menu
Access the menu
Touch [
], or swipe to the left.
Parking around destination
Additional information
13-EN
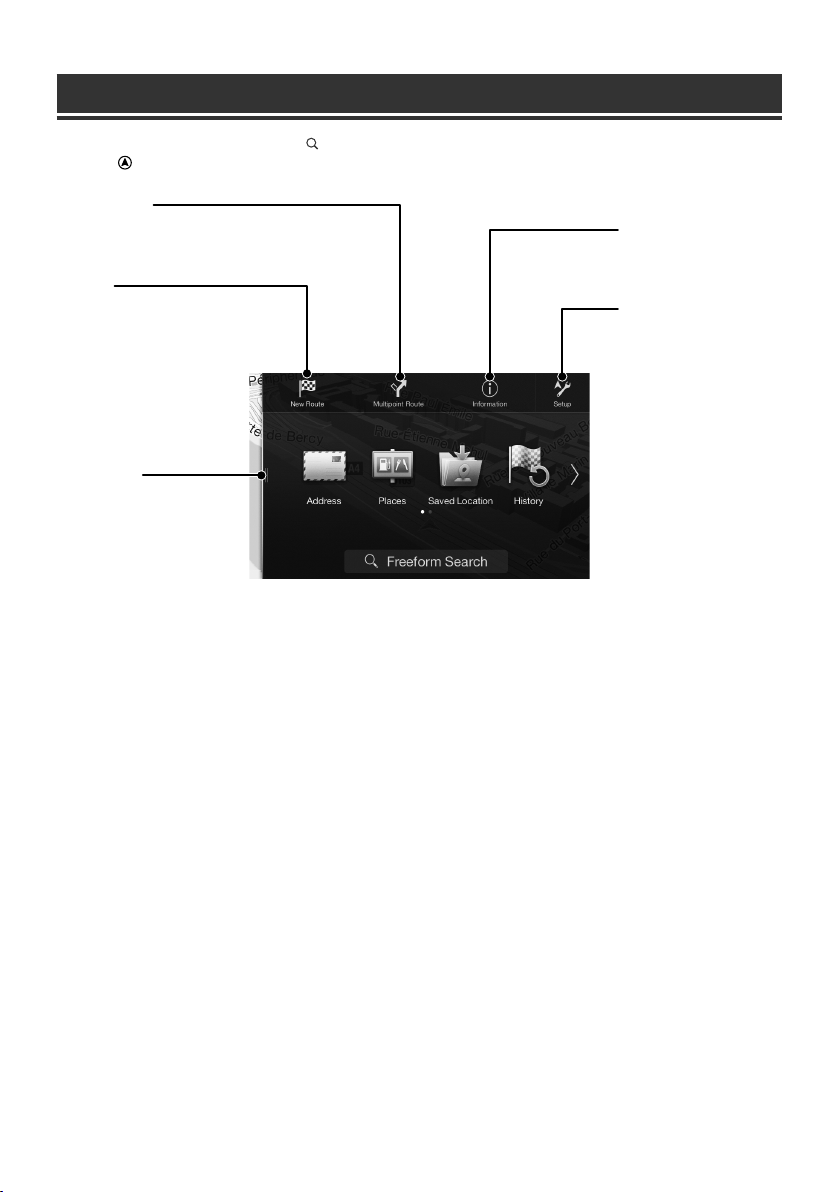
Navigation Menu
To access the Navigation Menu, touch [ ] on the right edge of the map screen or swipe to the left. Alternatively,
press the button.
Multipoint Route
Build your route from one or more route points. You can also
plan a route independently of your current GPS position by
setting a new starting point.
New Rout
Select your destination by entering an
address or its coordinate, or by
selecting a Place, a Saved Location, or a
Saved Route. You can also look up your
recent destinations from the History.
When Internet connection is available,
the Online Search option can be a
further help to find your destination.
Access the Map
Touch or swipe to the right.
Information
Access additional options and
check navigation-related
information.
Setup
Customise the way the
navigation software works.
14-EN

Setting a Destination
The following example describes how to search for a destination when choosing [Town/Postcode] from [Address].
• You can search and narrow down the Country/State by starting from [Country/State].
1 Touch [New Route] from the Navigation
Menu.
2 Touch [Address].
3 Touch [Town/Postcode].
4 Enter the town name or postcode.
• Touch to display the candidate list.
5 Enter the desired street name.
• Touch to display the candidate list.
6 Enter the house number or crossing street.
7 Touch [More] to modify the route
parameters, or touch [Start Navigation] to
start your journey.
The route is calculated, and a map appears,
showing the entire route. Here you can check route
information and route alternatives.
15-EN

Specifications
Owner’s manual Specifications
MONITOR SECTION
Screen Size 9”
LCD Type Transparent type TN LCD
Operation System TFT active matrix
Number of Picture Elements 1,152,000 pcs.
Effective Number of Picture Elements
99% or more
Illumination System LED
(800 × 480 × 3 (RGB))
FM TUNER SECTION
Tuning Range 87.5 – 108.0 MHz
Mono Usable Sensitivity 8.1 dBf (0.7 µV/75 ohms)
50 dB Quieting Sensitivity 12 dBf (1.1 µV/75 ohms)
Alternate Channel Selectivity 80 dB
Signal-to-Noise Ratio 65 dB
Stereo Separation 35 dB
Capture Ratio 2.0 dB
MW TUNER SECTION
Tuning Range 531 – 1,602 kHz
Usable Sensitivity 25.1 V/28 dBf
LW TUNER SECTION
Tuning Range 153 – 281 kHz
Sensitivity (IEC Standard) 31.6 V/30 dBf
USB SECTION
USB requirements USB 2.0
Max. Power Consumption 1,500 mA (CDP Support)
USB Class USB (Play From Device)/
File System FAT16/32
Number of Channels 2-Channels (Stereo)
Frequency Response
Total Harmonic Distortion 0.008% (at 1 kHz)
Dynamic Range 95 dB (at 1 kHz)
Signal-to-Noise Ratio 100 dB
Channel Separation 85 dB (at 1 kHz)
1 Frequency response may differ depending on the encoder
software/bit rate.
USB (Mass Storage Class)
1
5 – 20,000 Hz (±1 dB)
Bluetooth SECTION
Bluetooth Specification Bluetooth V3.0
Output Power -2 dBm Ave. (Power class 2)
Profile HFP (Hands-Free Profile)
OPP (Object Push Profile)
PBAP (Phone Book Access Profile)
A2DP (Advanced Audio
Distribution Profile)
AVRCP (Audio/Video Remote
Control Profile)
SPP (Serial Port Profile)
GENERAL
Power Requirement 14.4 V DC
(11–16 V allowable)
Operating temperature -4°F to +140°F
(-20°C to + 60°C)
Maximum Power Output 50 W × 4
Audio output level
Preout (Front, Rear): 4V/10k ohms (max.)
Preout (Subwoofer): 4V/10k ohms (max.)
• Due to continuous product improvement, specifications
and design are subject to change without notice.
• The LCD panel is manufactured using an extremely high
precision manufacturing technology. Its effective pixel
ratio is over 99.99%. This means that there is a
possibility that 0.01% of the pixels could be either always
ON or OFF.
HDMI SECTION
Input Format 480p/VGA
Output Format 480p
GPS SECTION
GPS Reception frequency 1,575.42 ±1 MHz
GPS Reception sensitivity -130 dB max.
16-EN

• Windows Media, and the Windows logo are trademarks,
or registered trademarks of Microsoft Corporation in
the United States and/or other countries.
• iPhone, iPod, iPod classic, iPod nano and iPod touch are
trademarks of Apple Inc., registered in the U.S. and
other countries.
• “Made for iPod,” and “Made for iPhone,” mean that an
electronic accessory has been designed to connect
specifically to iPod, or iPhone, respectively, and has
been certified by the developer to meet Apple
performance standards. Apple is not responsible for the
operation of this device or its compliance with safety
and regulatory standards. Please note that the use of
this accessory with iPod, or iPhone may affect wireless
performance.
• Android is a trademark of Google Inc.
• The Android robot is reproduced or modified from
work created and shared by Google and used
according to terms described in the Creative Commons
3.0 Attribution License.
• The Bluetooth® word mark and logos are registered
trademarks owned by the Bluetooth SIG, Inc. and any
use of such marks by Alpine Electronics, Inc. is under
license.
• The terms HDMI and HDMI High-Definition Multimedia
Interface, and the HDMI Logo are trademarks or
registered trademarks of HDMI Licensing, LLC in the
United States and other countries.
• MPEG Layer-3 audio coding technology licensed from
Fraunhofer IIS and Thomson. Supply of this product
only conveys a license for private,non-commercial use
and does not convey a license nor imply any right to
use this product in any commercial (i.e. revenuegeneration) real time broadcasting (terrestrial, satellite,
cable and/or any other media), broadcasting/streaming
via internet, intranets and/or other networks or in other
electronic content distribution systems, such as
pay-audio or audio-on-demand applications. An
independent license for such use is required. For
details, please visit
http://www.mp3licensing.com
• ©1987-2014 HERE. All rights reserved.
17-EN


Inhalt
WARNUNG ..............................................................................................................................................................2
VORSICHT ................................................................................................................................................................3
Erste Schritte .......................................................................................................................................................... 4
Favoritenfunktion ................................................................................................................................................6
Registrieren von Funktionen............................................................................................................................6
Radio/RDS-Betrieb ...............................................................................................................................................7
DAB/DAB+/DMB-Betrieb ...................................................................................................................................8
USB-Flash-Laufwerksbetrieb (Option) .......................................................................................................... 9
HDMI-Betrieb (DVD-Player) (Option) ..........................................................................................................10
iPod/iPhone-Betrieb (Option)........................................................................................................................11
Steuerung der Freisprechfunktion ...............................................................................................................12
Kartenfunktionen ...............................................................................................................................................13
Navigationsmenü ...............................................................................................................................................14
Eingeben von Zielorten ...................................................................................................................................15
Technische Daten ...............................................................................................................................................16
WICHTIG!
Notieren Sie sich die Seriennummer des Geräts bitte an der unten angegebenen Stelle und bewahren
Sie die Notiz auf.
SERIENNUMMER:
ISO-SERIENNUMMER: AL
EINBAUDATUM:
EINGEBAUT VON:
GEKAUFT BEI:
Detaillierte Erläuterungen zu allen Funktionen finden Sie in der Bedienungsanleitung auf der
mitgelieferten CD-ROM. (Bei dieser CD handelt es sich um eine Daten-CD. Daher kann sie nicht
zum Abspielen von Musik oder zum Anzeigen von Bildern auf dem Player verwendet werden.) Bei
Bedarf erhalten Sie bei Ihrem ALPINE-Händler einen Ausdruck der Bedienungsanleitung auf der
CD-ROM.
1-DE
WARNUNG
WARNUNG
Dieses Symbol weist auf wichtige Anweisungen
hin. Bei Nichtbeachtung besteht die Gefahr von
schweren Verletzungen oder Todesfällen.
DAS GERÄT SO EINBAUEN, DASS DER FAHRER DIE TV-/
VIDEOANZEIGE WÄHREND DER FAHRT NICHT SEHEN KANN,
BIS DAS FAHRZEUG STEHT UND DIE HANDBREMSE
ANGEZOGEN WIRD.
Es ist gefährlich, während der Fahrt fernzusehen oder Videos
anzuschauen. Sie können dadurch vom Verkehr abgelenkt werden und
einen Unfall verursachen. Wenn das Gerät nicht richtig eingebaut wird,
kann der Fahrer beim Fahren die TV-/ Videoanzeige sehen und dadurch
vom Verkehr abgelenkt werden. In diesem Fall besteht hohe
Unfallgefahr. Der Fahrer und andere Personen können dabei schwer
verletzt werden.
BEIM FAHREN DIE VIDEOANZEIGE AUSSCHALTEN.
Sie können dadurch vom Verkehr abgelenkt werden und einen Unfall
verursachen.
KEINE BEDIENUNG AUSFÜHREN, DIE VOM SICHEREN LENKEN
DES FAHRZEUGS ABLENKEN KÖNNTE.
Führen Sie Bedienungen, die Ihre Aufmerksamkeit längere Zeit in
Anspruch nehmen, erst aus, nachdem das Fahrzeug zum Stillstand
gekommen ist. Halten Sie das Fahrzeug immer an einer sicheren Stelle
an, bevor Sie solche Bedienungen ausführen. Andernfalls besteht
Unfallgefahr.
ROUTENVORSCHLÄGE DES NAVIGATIONSSYSTEMS NICHT
BEFOLGEN, WENN SIE DABEI GEFÄHRLICHE ODER
VERBOTENE FAHRMANÖVER AUSFÜHREN MÜSSTEN ODER
DADURCH IN EINE GEFÄHRLICHE SITUATION ODER GEGEND
GERATEN KÖNNTEN.
Dieses Gerät kann Ihr eigenes Urteilsvermögen nicht ersetzen. Aufgrund
von Routenvorschlägen dieses Systems dürfen Sie nie die örtlichen
Verkehrsregeln oder Ihr eigenes Urteilsvermögen bezüglich der
Vermeidung von Gefahrensituationen im Straßenverkehr missachten.
DIE LAUTSTÄRKE NUR SO HOCH STELLEN, DASS SIE
WÄHREND DER FAHRT NOCH AUSSENGERÄUSCHE
WAHRNEHMEN KÖNNEN.
Übermäßige Lautstärkepegel, die Geräusche wie die Sirenen von
Notarztwagen oder Warnsignale (an einem Bahnübergang usw.)
übertönen, können gefährlich sein und zu einem Unfall führen. HOHE
LAUTSTÄRKEPEGEL IN EINEM AUTO KÖNNEN AUSSERDEM
GEHÖRSCHÄDEN VERURSACHEN.
WÄHREND DER FAHRT MÖGLICHST WENIG AUF DEN
BILDSCHIRM SCHAUEN.
Sie können dadurch vom Verkehr abgelenkt werden und einen Unfall
verursachen.
GERÄT NICHT ÖFFNEN.
Andernfalls besteht Unfallgefahr, Feuergefahr oder die Gefahr eines
elektrischen Schlages.
NUR IN FAHRZEUGEN MIT 12-VOLT-BORDNETZ UND MINUS
AN MASSE VERWENDEN.
Fragen Sie im Zweifelsfall Ihren Händler. Andernfalls besteht
Feuergefahr usw.
KLEINE GEGENSTÄNDE WIE SCHRAUBEN VON KINDERN
FERNHALTEN.
Werden solche Gegenstände verschluckt, besteht die Gefahr
schwerwiegender Verletzungen. Suchen Sie unverzüglich einen Arzt auf,
wenn ein Kind einen solchen Gegenstand verschluckt.
SICHERUNGEN IMMER DURCH SOLCHE MIT DER RICHTIGEN
AMPEREZAHL ERSETZEN.
Andernfalls besteht Feuergefahr oder die Gefahr eines elektrischen
Schlages.
LÜFTUNGSÖFFNUNGEN UND KÜHLKÖRPER NICHT
ABDECKEN.
Andernfalls kann es zu einem Wärmestau im Gerät kommen und es
besteht Feuergefahr.
DAS GERÄT NUR AN EIN 12-V-BORDNETZ IN EINEM
FAHRZEUG ANSCHLIESSEN.
Andernfalls besteht Feuergefahr, die Gefahr eines elektrischen Schlages
oder anderer Verletzungen.
AUF KORREKTE ANSCHLÜSSE ACHTEN.
Bei fehlerhaften Anschlüssen besteht Feuergefahr und es kann zu
Schäden am Gerät kommen.
VOR DEM ANSCHLUSS DAS KABEL VOM MINUSPOL DER
BATTERIE ABKLEMMEN.
Andernfalls besteht die Gefahr eines elektrischen Schlages oder
Verletzungsgefahr durch einen Kurzschluss.
DAFÜR SORGEN, DASS SICH DIE KABEL NICHT IN
GEGENSTÄNDEN IN DER NÄHE VERFANGEN.
Verlegen Sie die Kabel wie im Handbuch beschrieben, damit sie beim
Fahren nicht hinderlich sind. Kabel, die sich im Lenkrad, im Schalthebel,
im Bremspedal usw. verfangen, können zu äußerst gefährlichen
Situationen führen.
ELEKTRISCHE KABEL NICHT SPLEISSEN.
Kabel dürfen nicht abisoliert werden, um andere Geräte mit Strom zu
versorgen. Andernfalls wird die Strombelastbarkeit des Kabels
überschritten und es besteht Feuergefahr oder die Gefahr eines
elektrischen Schlages.
BEIM BOHREN VON LÖCHERN LEITUNGEN UND KABEL NICHT
BESCHÄDIGEN.
Wenn Sie beim Einbauen Löcher in das Fahrzeugchassis bohren, achten
Sie unbedingt darauf, die Kraftstoffleitungen und andere Leitungen, den
Benzintank und elektrische Kabel nicht zu berühren, zu beschädigen
oder zu blockieren. Andernfalls besteht Feuergefahr.
BOLZEN UND MUTTERN DER BREMSANLAGE NICHT ALS
MASSEPUNKTE VERWENDEN.
Verwenden Sie für Einbau oder Masseanschluß NIEMALS Bolzen oder
Muttern der Brems- bzw. Lenkanlage oder eines anderen
sicherheitsrelevanten Systems oder des Benzintanks. Andernfalls besteht
die Gefahr, dass Sie die Kontrolle über das Fahrzeug verlieren oder ein
Feuer ausbricht.
DAS GERÄT NICHT AN EINER STELLE EINBAUEN, AN DER ES
BEIM FAHREN HINDERLICH SEIN KÖNNTE, WEIL ES Z. B. DAS
LENKRAD ODER DEN SCHALTHEBEL BLOCKIERT.
Andernfalls ist möglicherweise keine freie Sicht nach vorne gegeben,
oder die Bewegungen des Fahrers sind so eingeschränkt, dass
Unfallgefahr besteht.
2-DE
VORSICHT
Dieses Symbol weist auf wichtige Anweisungen
hin. Bei Nichtbeachtung besteht die Gefahr von
Verletzungen bzw. Sachschäden.
DAS GERÄT NICHT WEITERBENUTZEN, WENN EIN PROBLEM
AUFTRITT.
Andernfalls kann es zu Verletzungen oder Schäden am Gerät kommen.
Geben Sie das Gerät zu Reparaturzwecken an einen autorisierten AlpineHändler oder den nächsten Alpine-Kundendienst.
VERKABELUNG UND EINBAU VON FACHPERSONAL
AUSFÜHREN LASSEN.
Die Verkabelung und der Einbau dieses Geräts erfordern technisches
Geschick und Erfahrung. Zu Ihrer eigenen Sicherheit sollten Sie
Verkabelung und Einbau dem Händler überlassen, bei dem Sie das Gerät
erworben haben.
NUR DAS VORGESCHRIEBENE ZUBEHÖR VERWENDEN UND
DIESES SICHER EINBAUEN.
Verwenden Sie ausschließlich das vorgeschriebene Zubehör. Andernfalls
wird das Gerät möglicherweise beschädigt oder es lässt sich nicht sicher
einbauen. Wenn sich Teile lösen, stellen diese eine Gefahrenquelle dar
und es kann zu Betriebsstörungen kommen.
DIE KABEL SO VERLEGEN, DASS SIE NICHT GEKNICKT ODER
DURCH SCHARFE KANTEN GEQUETSCHT WERDEN.
Verlegen Sie die Kabel so, dass sie sich nicht in beweglichen Teilen wie
den Sitzschienen verfangen oder an scharfen Kanten oder spitzen Ecken
beschädigt werden können. So verhindern Sie eine Beschädigung der
Kabel. Wenn Sie ein Kabel durch eine Bohrung in einer Metallplatte
führen, schützen Sie die Kabelisolierung mit einer Gummitülle vor
Beschädigung durch die Metallkanten der Bohrung.
DAS GERÄT NICHT AN STELLEN EINBAUEN, AN DENEN ES
HOHER FEUCHTIGKEIT ODER STAUB AUSGESETZT IST.
Bauen Sie das Gerät so ein, dass es vor hoher Feuchtigkeit und Staub
geschützt ist. Wenn Feuchtigkeit oder Staub in das Gerät gelangen, kann
es zu Betriebsstörungen kommen.
3-DE
Bedienungsanleitung Lage und Funktion der Teile und Bedienelemente, Ein- (On) und Ausschalten (Off)
Erste Schritte
Lage und Funktion der Teile und Bedienelemente
Die Bildschirmabbildungen in der Bedienungsanleitung können von den tatsächlichen Bildschirmen abweichen.
Taste (Favoriten)
Zum Aufrufen des Favoritenbildschirms.
• Halten Sie diese Taste mindestens 2 Sekunden
lang gedrückt, um zu den Fahrzeuginformationen
zu wechseln.
Taste (STUMMSCHALTEN)
Zum Aktivieren/Deaktivieren des Stummschaltmodus.
Taste (AUDIO)/(Spracherkennungsmodus)
Ruft den Audio-/Video-Bildschirm auf. Wenn der
Audio-/Video-Bildschirm bereits angezeigt wird, wird
die Signalquelle gewechselt.
Wenn ein Telefon mit Freisprecheinrichtung und
Spracherkennung angeschlossen ist, halten Sie diese
Taste mindestens 2 Sekunden lang gedrückt, um den
Spracherkennungsmodus aufzurufen.
Taste / (AUF/AB)
Zum Regeln der Lautstärke.
RESET-Schalter
Das Gerätesystem wird zurückgesetzt.
Taste (PHONE)
Ruft den Telefon-Menübildschirm auf.
Drücken Sie diese Taste, um ein Gespräch zu beginnen,
wenn ein Anruf eingeht.
Taste MENU/(Ausschalten)
Ruft den Menübildschirm auf.
Halten Sie diese Taste mindestens 5 Sekunden
gedrückt, um das Gerät auszuschalten.
Taste (NAV)
Ruft den Navigationskartenbildschirm auf.
Drücken Sie die Taste erneut, um zum NavigationsMenübildschirm zu wechseln.
Halten Sie diese Taste mindestens 2 Sekunden lang
gedrückt, um zum Heimatadressen-Routenbildschirm
zu wechseln. (Ist noch keine Heimatadresse eingestellt,
erscheint der Bildschirm zum Einstellen der
Heimatadresse.)
Einzelheiten zu den Navigationsfunktionen finden Sie
in der „Anleitung zum Navigationssystem“ auf der
CD-ROM.
Taste /
Drücken Sie diese Taste, um im Radiomodus vorwärts/
rückwärts nach einem Sender zu suchen bzw. in einer
anderen Audio-/Videoquelle ein Stück, ein Kapitel usw.
vorwärts/rückwärts zu suchen.
Fernbedienungssensor
Richten Sie die Fernbedienung in einem Abstand von
maximal 2 Metern auf diesen Sensor.
4-DE
Ein- (On) und Ausschalten (Off)
1 Drehen Sie den Zündschlüssel in die Stellung ACC oder EIN.
Das System schaltet sich ein.
2 Halten Sie die Taste MENU mindestens 5 Sekunden gedrückt, um das Gerät auszuschalten.
Umschalten zwischen Audioquellenbildschirm und Funktionsbildschirmen
Sie können zwischen dem Audioquellenbildschirm und einem der Funktionsbildschirme umschalten, indem Sie
das Symbol an einem der vier Bildschirmränder berühren oder vertikal bzw. horizontal wischen.
Bildschirm für Direktzugriffseinstellungen
Dual-Bildschirm
Hier können Sie Klangeinstellungen
vornehmen und das Rear Seat
Entertainment-System konfigurieren.
Audioquellenbildschirm
(USB Audio)
Speichertasten- oder
Schnellsuchbildschirm*
Der Suchmodus variiert je nach Audioquelle. Erläuterungen dazu finden Sie in der Bedienungsanleitung zur Audioquelle.
Auf dem Dual-Bildschirm können Sie
zwischen den angezeigten
Bildschirmen wechseln.
Menübildschirm
Auf dem Menübildschirm können Sie
Einstellungen vornehmen.
5-DE
Bedienungsanleitung Favoritenfunktion
Favoritenfunktion
An diesem Gerät können Sie häufig benutzte Funktionen wie die Audioquelle, die Navigationssuche usw. mühelos
aufrufen, indem Sie sie auf dem Favoritenbildschirm registrieren. Danach können Sie die entsprechenden
Funktionen direkt aufrufen.
1 Drücken Sie die Taste (Favoriten).
Der Favoritenbildschirm wird angezeigt.
Beispiel für den Favoritenbildschirm
Wechselt zum Bearbeitungsbildschirm, auf dem
Funktionen registriert oder Namen geändert
werden können.
Registrierte Favoriten
Gibt die Position des gerade angezeigten
Favoritenbildschirms an.
Durch Wischen nach links oder rechts können Sie
zwischen den Seiten wechseln. Bis zu 6 Seiten sind
möglich.
Registrieren von Funktionen
1 Berühren Sie [ ] (Bearbeiten).
Ein Kontrollkästchen erscheint oben links neben
dem Registrierungssymbol und dieses wechselt in
den Bearbeitungsmodus.
2 Berühren Sie [ ] (Hinzufügen).
Die Funktionen (Kategorien), die hinzugefügt
werden können, werden angezeigt.
3 Berühren Sie die Funktion (Kategorie), die
hinzugefügt werden soll.
6-DE
4 Wählen Sie die Funktion, die hinzugefügt
werden soll.
Erläuterungen zu den Funktionen, die Sie
hinzufügen können, finden Sie unter „Bearbeiten
des Favoritenbildschirms“ in der
Bedienungsanleitung.
• Bis zu 54 Funktionen sind möglich.
• Sie können ein und dieselbe Funktion nicht
mehrfach registrieren.
5 Wenn die Bearbeitung abgeschlossen ist,
berühren Sie [ ] (Zurück).
6 Wenn die Bestätigungsmeldung angezeigt
wird, berühren Sie [OK].
7 Damit ist die Bearbeitung abgeschlossen
und der Favoritenbildschirm wird
angezeigt.
• Wenn Sie bei der Bearbeitung [ ] (Abbrechen)
berühren, wird wieder der vorhergehende
Bearbeitungsbildschirm für die Favoriten angezeigt.
Bedienungsanleitung Radio/RDS
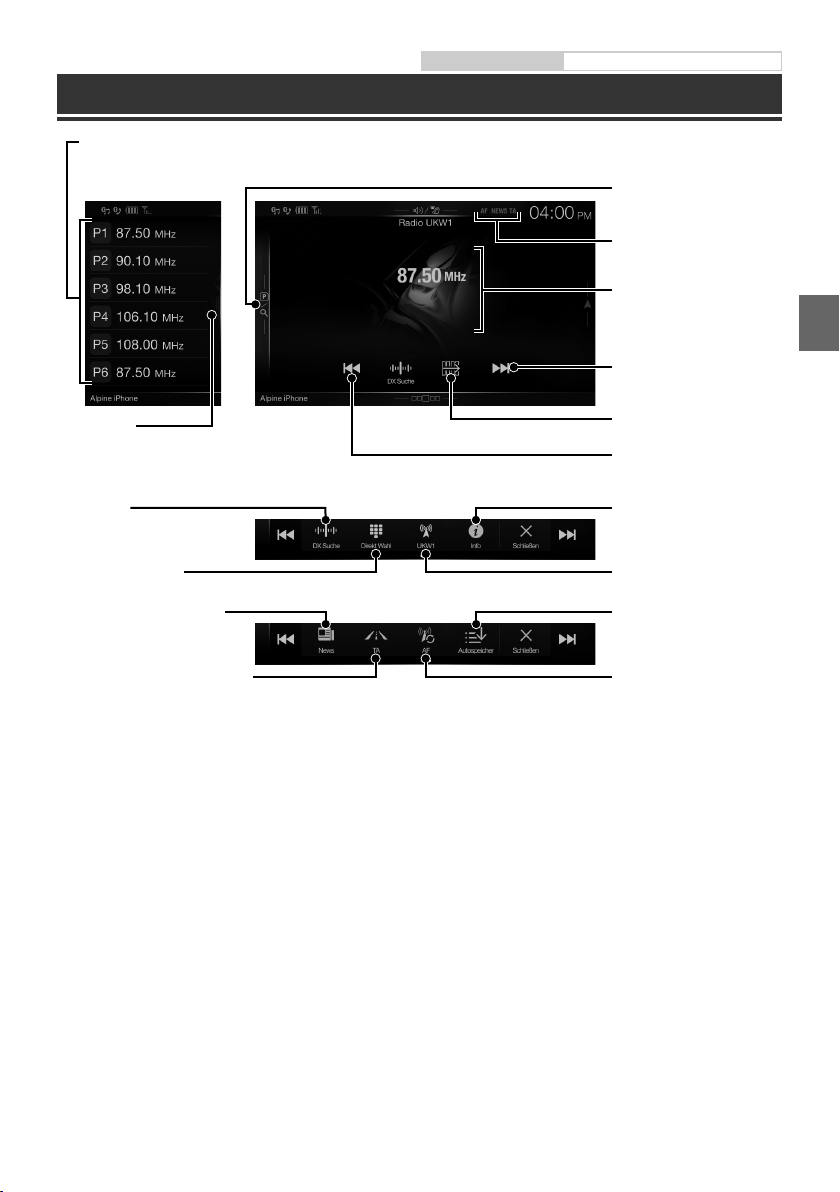
Radio/RDS-Betrieb
Speichertaste
Durch kurzes Antippen wird der entsprechende Festsender eingestellt.
Wenn Sie den momentan eingestellten Sender als Festsender speichern möchten, berühren Sie diese Taste mindestens 2 Sekunden lang.
Speichermodusbildschirm
Speichermodustaste
Berühren Sie diese Stelle oder wischen
Sie nach rechts, um den
Speichermodusbildschirm aufzurufen.
RDS-Anzeige
Informationsanzeige
Erhöht die Frequenz
PTY-Suchtaste
Wischen Sie nach rechts, um den
PTY-Listenbildschirm aufzurufen.
Wechselt den
Senderabstimmmodus
Frequenzdirekteingabe
PRIORITY NEWS-Modus ein/aus
Verkehrsinformationsmodus ein/aus
Umschalttaste
Verringert die Frequenz
Wechselt die
Textinformationen
Wechselt das Frequenzband
Automatisches Speichern von
Sendern
AF-Modus ein/aus
7-DE
Bedienungsanleitung DAB/DAB+/DMB
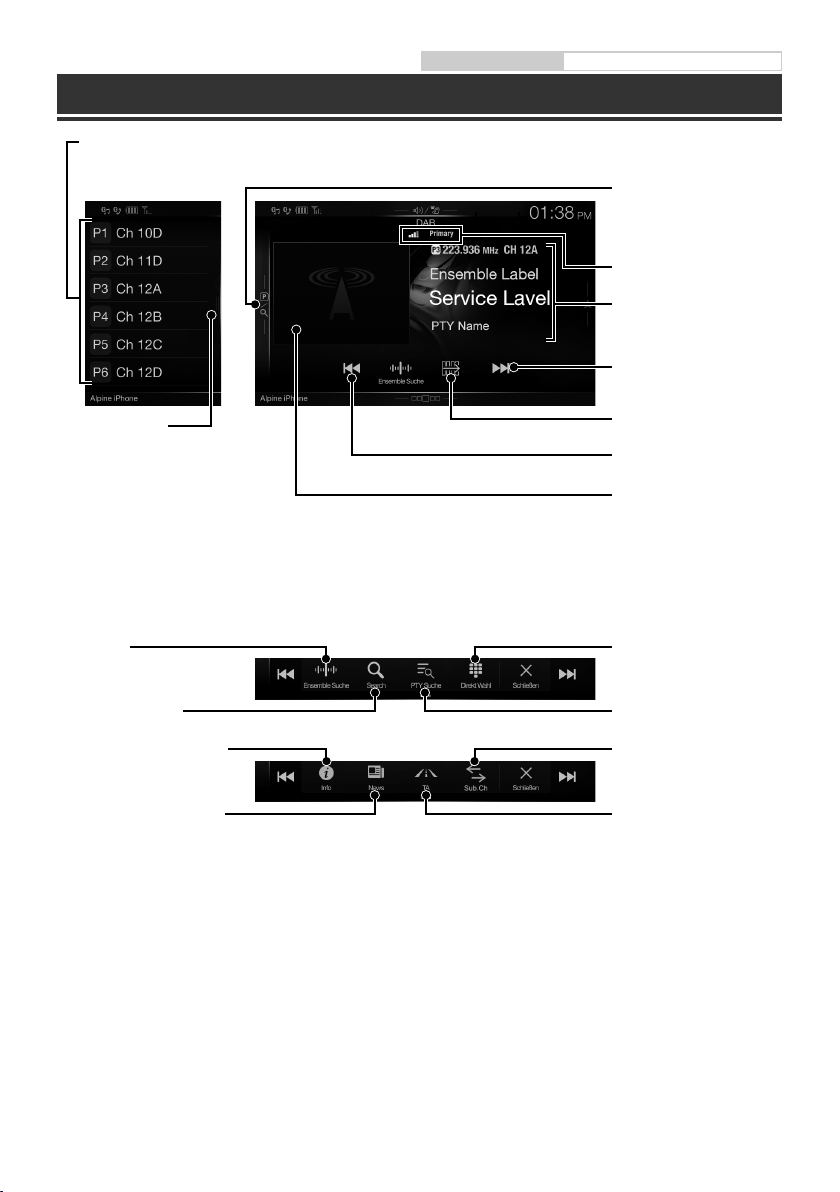
DAB/DAB+/DMB-Betrieb
Speichertaste
Durch kurzes Antippen wird der entsprechende Festdienst eingestellt.
Wenn Sie den momentan eingestellten Dienst als Festsender speichern möchten, berühren Sie diese Taste mindestens 2 Sekunden lang.
Speichermodusbildschirm
Speichermodustaste
Berühren Sie diese Stelle oder
wischen Sie nach rechts, um den
Speichermodusbildschirm
aufzurufen.
DAB-Anzeige
Informationsanzeige
Erhöht die Frequenz
Vollsuchmodustaste
Wischen Sie nach rechts, um den
Listenbildschirm für alle Dienste aufzurufen.
(Die Liste aller Dienste, die aktuelle
Ensembleliste oder die PTY-Liste wird
angezeigt)
Wechselt den
Senderabstimmmodus
Ruft den Bildschirm zur
Dienstauswahl auf
Wechselt die Textinformationen
PRIORITY NEWS-Modus ein/aus
Umschalttaste
Verringert die Frequenz
Diashow
Hier werden auf die derzeit
empfangene Dienstkomponente
abgestimmte
Programminformationen, Fotos
des Interpreten und
Werbeeinblendungen angezeigt.*
Frequenzdirekteingabe
Ruft den Bildschirm zur
PTY-Auswahl auf
Wechselt zwischen primärem/
sekundärem Dienst
Verkehrsinformationsmodus
ein/aus
Je nach der derzeit empfangenen Dienstkomponente werden diese Informationen eventuell nicht angezeigt.
8-DE
Bedienungsanleitung USB-Flash-Laufwerksbetrieb (Option)
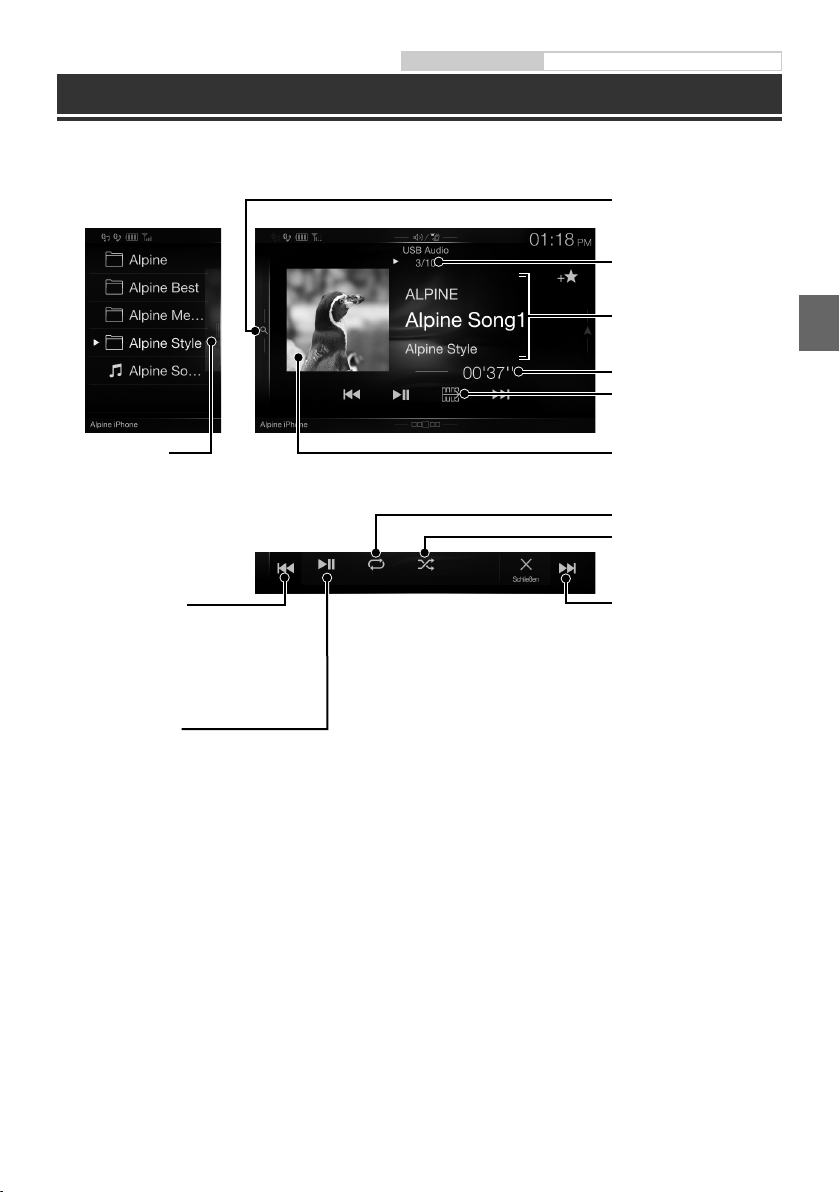
USB-Flash-Laufwerksbetrieb (Option)
Sie können Musikdateien (MP3/WMA/AAC/FLAC), die auf einem USB-Flash-Laufwerk gespeichert sind, mit dem
internen Player dieses Systems wiedergeben.
Schnellsuchtaste
Schnellsuchbildschirm
Berühren Sie diese Stelle oder
wischen Sie nach rechts, um den
Schnellsuchmodus aufzurufen.
Nr. des aktuellen Titels/
Gesamtzahl der Titel
Informationsanzeige
Abgelaufene Zeit
Umschalttaste
Vollsuchmodustaste
Wischen Sie nach rechts, um den
Vollsuchmodusbildschirm
aufzurufen.
Springt zum Anfang der
aktuellen Datei/Springt zum
Anfang der vorhergehenden
Datei, wenn innerhalb der 1
Sekunde nach Wiedergabebeginn
angetippt/Startet den schnellen
Rücklauf, wenn mindestens 1
Sekunde lang berührt
Pause und Wiedergabe
Anzeige des Coverbilds
Wiederholfunktion
Zufallswiedergabe
Springt zum Anfang der
nächsten Datei/Startet den
schnellen Vorlauf, wenn
mindestens 1 Sekunde lang
berührt
9-DE
Bedienungsanleitung HDMI-/DVD-Betrieb (Option)
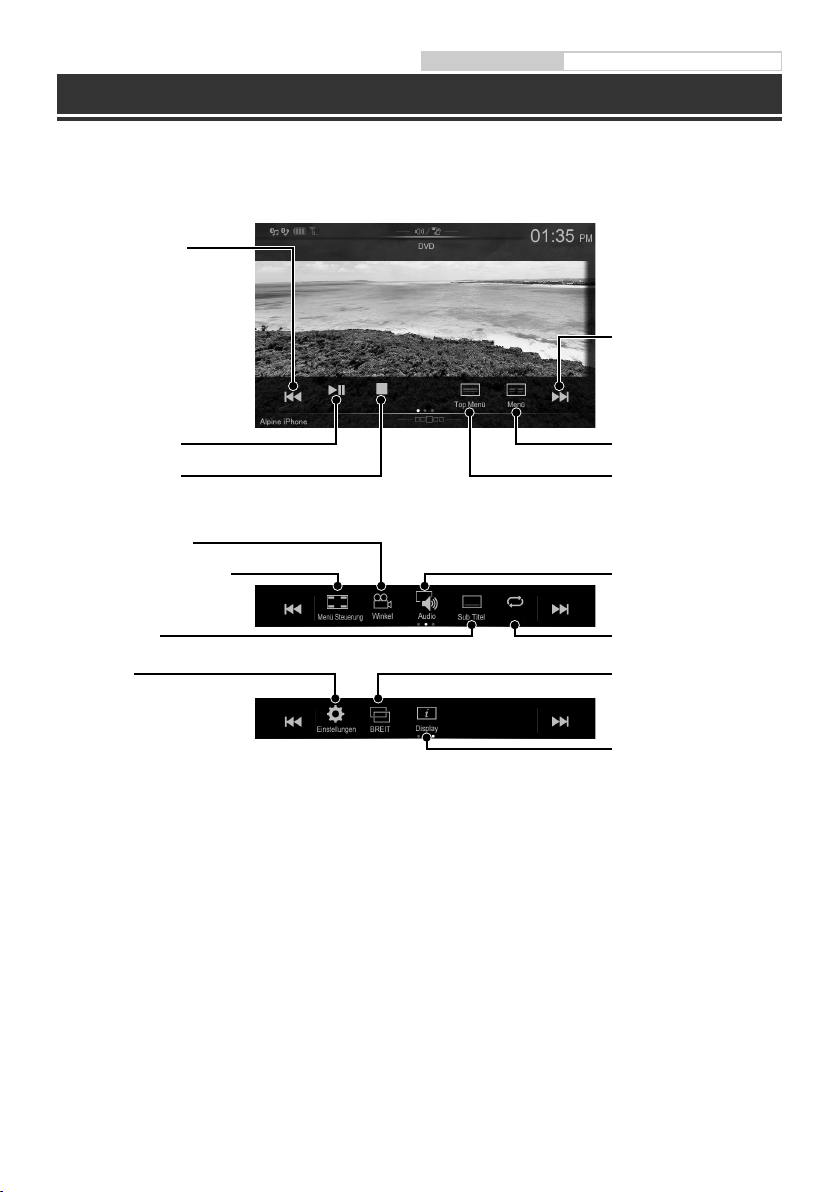
HDMI-Betrieb (DVD-Player) (Option)
Wenn Sie einen optionalen DVE-5300 (DVD-Player) anschließen, kann dieser über das Gerät bedient werden.
Springt zum Anfang des
aktuellen Kapitels/Springt zum
Anfang des vorhergehenden
Kapitels, wenn innerhalb der
ersten Sekunde nach
Wiedergabebeginn angetippt/
Startet den schnellen Rücklauf,
wenn mindestens 1 Sekunde lang
berührt
Springt zum Anfang des
nächsten Kapitels/Startet den
schnellen Vorlauf, wenn
mindestens 1 Sekunde lang
berührt
Pause und Wiedergabe
Stoppt die Wiedergabe
Wechselt den Blickwinkel
Ruft den Menübedienbildschirm
auf
Wechselt zwischen
den Untertiteln
Bildschirm für
DVD-Einstellungen
Ruft den Menübildschirm auf
Ruft den Top-Menübildschirm
auf
Wechselt zwischen den
Tonspuren
Wiederholfunktion
Wechselt zwischen den
Display-Modi
Wechselt die
Textinformationen
10-DE
 Loading...