

1
PMD-B100P
Owner’s Manual

PRECAUTIONS
■ Important Information
Please Read Carefully Before Using This Product.
This product is intended to safely provide turn by
turn instruction to get you to a desired destination. Please read the following precautions to
ensure that you use your navigation system correctly.
■ This product is not a substitute for your personal
judgment. Any route suggestions made by the nav
igation system may never supersede any local traf
fic regulations or your personal judgment and/or
knowledge of safe driving practices. Do not follow
route suggestions if the navigation system instructs
you to perform an unsafe or illegal maneuver, plac
es you in an unsafe situ ation, or routes you into an
area which you consider unsafe.
■ Glance at the monitor screen only when neces-
sary and safe to do so. If prolonged viewing of the
screen is necessary, stop the vehicle in a safe and
legal manner and location.
■ Do not input destinations, change settings, or
access any functions requiring a prolonged view of
the monitor and/or remote control while you are
driving. Stop the vehicle in a safe and legal manner
and location before attempting to access the sys
tem.
■ Do not use the navigation system to route you to
emergency services. Not all locations of emergency
service providers such as police and fire stations,
hospitals, and clinics are contained in the database.
Please use your own judgment and your ability to
ask for directions in these situations.
■ The map database contained within the media in
which it is stored is the most recent map data avail
able at the time of production. Because of changes
in streets and neighbourhoods, there may be situa
tions where the navigation system may not be able
to route you to your desired destination. In these
cases, use your own personal judgment.
■ The map database is designed to provide you with
route suggestions, it does not take account of the
relative safety of a suggested route, or of factors
which may affect the time required to reach your
destination. The database does not reflect road
closures or construction, road characteristics (i.e.
type of road surface, slope or grade, weight or
-
height restrictions, etc.), traffic congestion, weather
-
conditions, or any other factors which may affect
the safety or timing of your driving experience. Use
your personal judgment if the navigation system is
unable to provide you with an alternate route.
-
■ There may be situations where the navigation sys-
tem may display the vehicle’s location erroneously.
Use your own driving judgment in this situation,
taking into account current driving conditions.
Please be aware that in this situation, the naviga
tion system should correct the vehicle’s position
automatically; however, there may be times where
you may have to correct the position yourself. If
this is the case, stop the vehicle in a safe and legal
manner and location before attempting operation.
■ Make certain that the volume level of the monitor
-
is set to a level which still allows you to hear out
side traffic and emergency vehicles. Driving while
unable to hear outside sounds could cause an acci
dent.
■ Please make certain that any other person who
intends on using the navigation system reads these
precautions and the following instructions care
fully.
■ If there is anything in the manual which you do not
-
understand, or are uncertain about the operation
of the navigation system, please contact an author
-
ized Alpine representative before using the naviga
tion system.
-
-
-
-
-
-
Correct Disposal of This Product
The product purchased by you is provided in accordance with the European directive 2002/96 EC
on WEEE - Waste Electrical and Electronic Equipment. A symbol of the crossed out trash can has
therefore been printed on the product. This applies to all member states of the EC and indicates
the fact that the product may not to be disposed in the normal domestic waste. The product must
be disposed in accordance with the local regulations at separate collection points. A disposal in the
normal domestic waste harms the environment. Please contact the responsible authorities of waste
administration or your local dealer, where you purchased the product, for further information.
2
WARNINGS
Points to Observe for Safe Usage
● Read the manuals for this device and the sys-
tem components carefully before using your
navigation system. They contain instructions
on how to use the system in a safe and effective manner. Alpine cannot be responsible for
problems resulting from failure to observe the
instructions in these manuals.
■ Meaning of displays
Warning
Caution
This symbol means important instructions. Failure to heed them
can result in serious injury or death.
This symbol means important instructions. Failure to heed them
can result in injury or material property damage.
Warning
DO NOT OPERATE ANY FUNCTION THAT TAKES YOUR
ATTENTION AWAY FROM SAFELY DRIVING YOUR VEHICLE.
Any function that requires your prolonged attention should only be
performed after coming to a complete stop. Always stop the vehicle
in a safe location before performing these functions. Failure to do
so may result in an accident.
DO NOT DISASSEMBLE OR ALTER.
Doing so may result in an accident, fire or electric shock.
KEEP SMALL OBJECTS SUCH AS BATTERIES OUT OF THE REACH
OF CHILDREN.
Swallowing them may result in serious injury. If swallowed, consult
a physician immediately.
USE THIS PRODUCT AS SPECIFIED.
Use for other than its designed application may result in fire, electric shock or other injur y.
● This manual uses various pictorial displays to
show you how to use this product safely and
to alert you to potential dangers resulting
from improper connections and operation.
Following are the meanings of these pictorial
displays. It is important to fully understand the
meanings of these pictorial displays in order to
use this manual and the system properly.
MINIMIZE DISPLAY VIEWING WHILE DRIVING.
Viewing the display may distract the driver from looking ahead of
the vehicle and cause an accident.
DO NOT FOLLOW ROUTE SUGGESTIONS IF THE NAVIGATION
SYSTEM INSTRUCTS YOU TO PERFORM AN UNSAFE OR ILLEGAL
MANOEUVRE, OR PLACES YOU IN AN UNSAFE SITUATION OR
AREA.
This product is not a substitute for your personal judgment. Any
route suggestions by this system should never supersede any local
traffic regulations or your personal judgment or knowledge of safe
driving practice.
Caution
HALT USE IMMEDIATELY IF A PROBLEM APPEARS.
Failure to do so may cause personal injury or damage to the product. Return it to your authorized Alpine dealer or the nearest Alpine
Service Centre for repairing.
DO NOT PLACE HANDS, FINGERS OR FOREIGN OBJECTS IN
INSERTION SLOTS OR GAPS.
Doing so may result in personal injur y or damage to the product.
KEEP FINGERS AWAY WHILE THE MOTORIZED FRONT PANEL
OR MOVING MONITOR IS IN MOTION.
Failure to do so may result in personal injury or damage to the
product.
3

USER AGREEMENT
In using this Blackbird Portable Navigation System (hereinafter referred to as “System”), which includes Alpine
Electronics, Inc. (“Alpine”) Specifications, Space Machine, Inc. (“Space Machine”) Software and NAVTEQ B.V.
(“NAVTEQ”) Database, you are bound by the terms and conditions set forth below. By breaking the seal on the
System and using your copy of the System, you have demonstrated your agreement to the terms and condi
tions of this Agreement. You should, therefore, make sure that you read and understand the following provi
sions.
The System may not be copied, duplicated or otherwise modified, in whole or in part, without the express
written permission of Alpine, Space Machine and NAVTEQ.
The System may not be transferred or sublicensed to any third party for profit, rent or loan or licensed for
reuse in any manner.
The System may not be decompiled, reverse engineered or otherwise disassembled, in whole or in part.
The System may not be used in a network or by any other manner of simultaneous use in multiple systems.
The System is intended solely for personal use (or internal use where the end-user is a business) by the con
sumer.
The System is not to be used for commercial purposes.
Neither Alpine, Space Machine nor NAVTEQ guarantees to the customer that the System meet the specific
objectives of the user.
Neither Alpine, Space Machine nor NAVTEQ shall be responsible for any damages caused by the use of the
System to the actual user and to any third party.
The warranty on the System shall not extend to an exchange or refund due to misspelling, omission of letters,
or any other cosmetic discrepancy in layout found in the System.
The right to use the System shall expire either when the user destroys this software, or when any of the terms
for use is violated and Alpine, Space Machine and/or NAVTEQ exercise the option to revoke the license to use
this software.
The terms and conditions hereof apply to all subsequent users and owners as well as to the original purchaser.
-
-
-
NAVTEQ END USER LICENSE AGREEMENT
PLEASE READ THIS END USER LICENSE AGREEMENT CAREFULLY BEFORE USING THE NAVTEQ DATABASE
NOTICE TO THE USER
THIS IS A LICENSE AGREEMENT – AND NOT AN AGREEMENT FOR SALE – BETWEEN YOU AND NAVTEQ B.V. FOR
YOUR COPY OF THE NAVTEQ NAVIGABLE MAP DATABASE, INCLUDING ASSOCIATED COMPUTER SOFTWARE,
MEDIA AND EXPLANATORY PRINTED DOCUMENTATION PUBLISHED BY NAVTEQ (JOINTLY “THE DATABASE”). BY
USING THE DATABASE, YOU ACCEPT AND AGREE TO ALL TERMS AND CONDITIONS OF THIS END USER LICENSE
AGREEMENT (“AGREEMENT”). IF YOU DO NOT AGREE TO THE TERMS OF THIS AGREEMENT, PROMPTLY RETURN
THE DATABASE, ALONG WITH ALL OTHER ACCOMPANYING ITEMS, TO YOUR SUPPLIER FOR A REFUND.
OWNERSHIP
The Database and the copyrights and intellectual property or neighboring rights therein are owned by
NAVTEQ or its licensors. Ownership of the media on which the Database is contained is retained by NAVTEQ
and/or your supplier until after you have paid in full any amounts due to NAVTEQ and/or your supplier pursu
ant to this Agreement or similar agreement(s) under which goods are provided to you.
LICENSE GRANT
NAVTEQ grants you a non-exclusive license to use the Database for your personal use or, if applicable, for use
in your business’ internal operations. This license does not include the right to grant sub-licenses.
LIMITATIONS ON USE
The Database is restricted for use in the specific system for which it was created. Except to the extent explicitly
permitted by mandatory laws (e.g. national laws based on the European Software Directive (91/250) and the
Database Directive (96/9)), you may not extract or reutilize substantial parts of the contents of the Database
nor reproduce, copy, modify, adapt, translate, disassemble, decompile, reverse engineer any portion of the
Database. If you wish to obtain interoperability information as meant in (the national laws based on) the
European Software Directive, you shall grant NAVTEQ reasonable opportunity to provide said information on
reasonable terms, including costs, to be determined by NAVTEQ.
4
-

TRANSFER OF LICENSE
You may not transfer the Database to third parties, except when installed in the system for which it was cre
ated or when you do not retain any copy of the Database, and provided that the transferee agrees to all terms
and conditions of this Agreement and confirms this in writing to NAVTEQ. Multi-disc sets may only be trans
ferred or sold as a complete set as provided by NAVTEQ and not as subset thereof.
LIMITED WARRANTY
NAVTEQ warrants that, subject to the warnings set out below, for a period of 12 months after acquisition of
your copy of the Database, it will perform substantially in accordance with NAVTEQ’s Criteria for Accuracy
and Completeness existing on the date you acquired the Database; these criteria are available from NAVTEQ
at your request. If the Database does not perform in accordance with this limited warranty, NAVTEQ will use
reasonable efforts to repair or replace your non-conforming copy of the Database. If these efforts do not lead
to performance of the Database in accordance with the warranties set out herein, you will have the option to
either receive a reasonable refund of the price you paid for the Database or to rescind this Agreement. This
shall be NAVTEQ’s entire liability and your sole remedy against NAVTEQ. Except as expressly provided in this
section, NAVTEQ does not warrant nor make any representations regarding the use of results of the use of
the Database in terms of its correctness, accuracy, reliability, or otherwise. NAVTEQ does not warrant that the
Database is or will be error free. No oral or written information or advice provided by NAVTEQ, your supplier
or any other person shall create a warranty or in any way increase the scope of the limited warranty described
above. The limited warranty set forth in this Agreement does not affect or prejudice any statutory legal rights
that you may have under the legal warranty against hidden defects.
If you did not acquire the Database from NAVTEQ directly, you may have statutory rights against the person
from whom you have acquired the Database in addition to the rights granted by NAVTEQ hereunder accord
ing to the law of your jurisdiction. The above warranty of NAVTEQ shall not affect such statutory rights and
you may assert such rights in addition to the warranty rights granted herein.LIMITATIONS ON USE
LIMITATION OF LIABILITY
The price of the Database does not include any consideration for assumption of risk of consequential, indirect
or unlimited direct damages which may arise in connection with your use of the Database. Accordingly, in
no event shall NAVTEQ be liable for any consequential or indirect damages, including without limitation, loss
of revenue, data, or use, incurred by you or any third party arising out of your use of the Database, whether
in an action in contract or tort or based on a warranty, even if NAVTEQ has been advised of the possibility of
such damages. In any event NAVTEQ’s liability for direct damages is limited to the price of your copy of the
Database.
THE LIMITED WARRANTY AND LIMITATION OF LIABILITY, SET FORTH IN THIS AGREEMENT, DO NOT
AFFECT OR PREJUDICE YOUR STATUTORY RIGHTS WHERE YOU HAVE ACQUIRED THE DATABASE
OTHERWISE THAN IN THE COURSE OF A BUSINESS.
WARNINGS
The Database may contain inaccurate or incomplete information due to the passage of time, changing circum
stances, sources used and the nature of collecting comprehensive geographic data, any of which may lead to
incorrect results. The Database does not include or reflect information on – inter alia – neighborhood safety;
law enforcement; emergency assistance; construction work; road or lane closures; vehicle or speed restric
tions; road slope or grade; bridge height, weight or other limits; road or traffic conditions; special events; traf
fic congestion; or travel time.
GOVERNING LAW
This Agreement shall be governed by the laws of the jurisdiction, in which you reside at the date of acquisi
tion of the Database. Should you at that moment reside outside the European Union or Switzerland, the
law of the jurisdiction within the European Union or Switzerland where you acquired the Database shall
apply. In all other cases, or if the jurisdiction where you acquired the Database cannot be defined, the laws
of the Netherlands shall apply. The courts competent at your place of residence at the time you acquired the
Database shall have jurisdiction over any dispute arising out of, or relating to this Agreement, without preju
dice to NAVTEQ’ right to bring claims at your then current place of residence.
-
-
-
-
-
-
-
-
5

TABLE OF CONTENTS
Precautions. . . . . . . . . . . . . . . . . . . . . . . . . . . . . . . . . . . . .2
Warnings
. . . . . . . . . . . . . . . . . . . . . . . . . . . . . . . . . . . . . . .3
User Agreement
NAVTEQ end user license agreement . . . . . . . . . . . . . . .
Table of Contents
Installation
How to Fit Blackbird ...........................................
To Remove the Navigation System from the
Cradle ................................................................8
Battery Installation ...........................................
How to Reset Blackbird ......................................
System Features
Basic Operation . . . . . . . . . . . . . . . . . . . . . . . . . . . . . . .
To Turn On Power .............................................
To Turn Off .......................................................
Set a Destination and Go! .................................
Setting Estimate Time Display ..........................
Setting the Map Orientation ............................
Traffic Information ...........................................
Map Function
Repeating the Announcement .........................
Zoom In/Out Map .............................................
GPS Status .......................................................
Battery Status .................................................
Setting a Destination Directly from
Map Display .....................................................
Split Arrow/ .....................................................
Arrow Mode .....................................................
Setting a Destination by Address ......................
Destination
Confirm Destination Screen ..............................
Setting a Destination by POI ............................
Setting a Destination from the Address Book ....
Setting a Destination by Recently Entered
Destination ......................................................
Setting a Destination by Postal Code ................
Setting a Destination by Intersection ...............
Setting a Destination in the City Centre ............
Setting a Destination from the Personal POI .....
Setting a Destination by Coordinates ................
Find Local POI ..................................................
Options . . . . . . . . . . . . . . . . . . . . . . . . . . . . . . . . . . . . . .
Saving a Destination into the Address Book ......
Setting Waypoints ...........................................
Finding a Way Home ........................................
One-Touch Go Home .........................................
Home
. . . . . . . . . . . . . . . . . . . . . . . . . . . . . . . . . . . . . . . . 26
Finding Alternate Way to Go Home ...................
Recalling the Manoeuvre List during Guidance .
. . . . . . . . . . . . . . . . . . . . . . . . . . . . . . . . .4
. . . . . . . . . . . . . . . . . . . . . . . . . . . . . . . .6
. . . . . . . . . . . . . . . . . . . . . . . . . . . . . . . . . . . . .8
. . . . . . . . . . . . . . . . . . . . . . . . . . . . . . . 10
. . . . . . . . . . . . . . . . . . . . . . . . . . . . . . . . . 14
. . . . . . . . . . . . . . . . . . . . . . . . . . . . . . . . . . . 16
Route
. . . . . . . . . . . . . . . . . . . . . . . . . . . . . . . . . . . . . . . . 27
Finding Alternate Route ..................................
4
8
9
9
12
12
12
12
14
14
14
14
14
14
14
15
15
15
16
16
18
18
20
20
21
22
22
23
24
24
24
25
26
26
26
27
Delete Route ...................................................
Avoid a Street ..................................................
Edit
. . . . . . . . . . . . . . . . . . . . . . . . . . . . . . . . . . . . . . . . . 28
Editing Home ...................................................
Editing Address Book .......................................
Deleting Previously Saved Destinations ............
Setup
. . . . . . . . . . . . . . . . . . . . . . . . . . . . . . . . . . . . . . . . 31
Customizing Display .........................................
Setting the Map Colour . . . . . . . . . . . . . . . .
Displaying and Editing Icons on the Map .
Setting the Map Style . . . . . . . . . . . . . . . . .
Background Colour . . . . . . . . . . . . . . . . . . . .
Trail
. . . . . . . . . . . . . . . . . . . . . . . . . . . . . . . . . 31
Brightness . . . . . . . . . . . . . . . . . . . . . . . . . . .
Customizing Guidance ......................................
Turning Voice On and Off . . . . . . . . . . . . . .
Changing Navi Mix Volume . . . . . . . . . . . . .
Setting Estimate Time Display . . . . . . . . . .
Setting up the Clock .........................................
Switching the Measuring Unit and
the Keyboard ...................................................
Configuring System Settings ............................
FM Transmitter Setup / Frequency
Remote Control
Beep . . . . . . . . . . . . . . . . . . . . . . . . . . . . . . . .
Reset All Settings . . . . . . . . . . . . . . . . . . . . .
Configuring Traffic Info Settings .......................
Selecting the Country . . . . . . . . . . . . . . . . .
Selecting the Radio Station
Traffic Reroute
Show Icons
Simulating Navigation .................................... 34
To Start a Demonstration . . . . . . . . . . . . . .
To Stop a Demonstration . . . . . . . . . . . . . .
Information . . . . . . . . . . . . . . . . . . . . . . . . . . . . . . . . . .
Viewing Trip Information .................................
Viewing GPS Status ..........................................
Viewing System Information ............................
Checking the Traffic Condition ..........................
Traffic Information . . . . . . . . . . . . . . . . . . . . . . . . . . . .
Getting more Information on a
Traffic Incident ................................................
Map. . . . . . . . . . . . . . . . . . . . . . . . . . . . . . . . . 37
Detail . . . . . . . . . . . . . . . . . . . . . . . . . . . . . . .
To Improve Traffic Signal Reception, Please
Follow These Instructions .................................
Entertainment . . . . . . . . . . . . . . . . . . . . . . . . . . . . . . . .
. . . . . . . . . . . . . . . . . . . . . . . 32
. . . . . . . . . . . . . . . . . . . . . . . . 33
. . . . . . . . . . . . . . . . . . . . . . . . . . . 33
27
27
27
28
29
29
31
31
31
31
31
31
32
32
32
32
32
32
32
. . . . . . . 32
32
32
33
33
. . . . . . . . . . . . . 33
34
34
34
34
35
35
36
36
37
37
38
39
6

Listening to Audio ........................................... 39
Playing Music on Your Blackbird .......................
How to Listen to Guidance and Music from Your
Car Stereo ........................................................
OTHER USEFUL FEATURES . . . . . . . . . . . . . . . . . . . . . . .
How to Update the New Software and Map
Database .........................................................
In Case of Difficulty
. . . . . . . . . . . . . . . . . . . . . . . . . . . . 41
IN THE BOX . . . . . . . . . . . . . . . . . . . . . . . . . . . . . . . . . . .
Accessories ......................................................
Optional Accessories ........................................
Specifications
. . . . . . . . . . . . . . . . . . . . . . . . . . . . . . . . . 43
Index . . . . . . . . . . . . . . . . . . . . . . . . . . . . . . . . . . . . . . . .
39
40
40
40
42
42
42
44
Austria : © Bundesamt für Eich- und Vermessungswesen
France : source: Géoroute® IGN France & BD Carto® IGN France
Germany : Die Grundlagendaten wurden mit Genehmigung der zuständigen
Great Britain : © Based upon Crown Copyright material.
Greece : Copyright Geomatics Ltd.
Italy : La Banca Dati Italiana è stata prodotta usando quale riferimento anche
Norway : Copyright © 2000; Norwegian Mapping Authority
Portugal : Source: IgeoE – Portugal
Spain : Información geográfica propiedad del CNIG
Sweden : Based upon electronic data © National Land Survey Sweden
Switzerland : Topografische Grundlage: © Bundesamt für Landestopographie
Behörden entnommen
cartografia numerica ed al tratto prodotta e fornita dalla Regione
Toscana
7
INSTALLATION
2
3
5
4
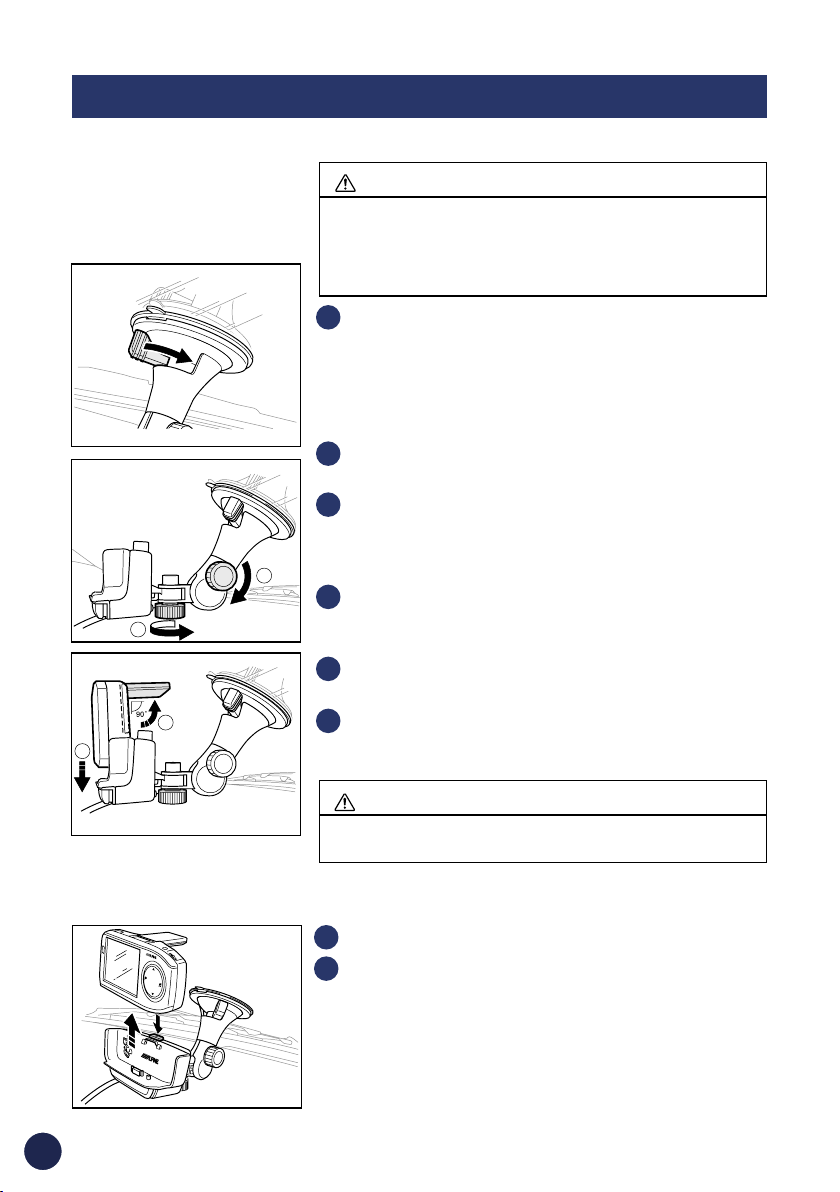
■ How to Fit Blackbird
WARNING
Incorrect installation may cause the navigation system
to fall out of the cradle while driving. Please make sure
all locks and knobs are turned tight.
Do not install the navigation while driving.
1
Find a suitable spot for the navigation system.
Ensure that both the suction cup and windscreen area
are clean and free of dirt and grease before attaching it.
Stick the suction cup mount against the windscreen.
Turn the knob to activate the vacuum to lock the posi
tion.
Turn the knob counter-clockwise to adjust up/down
2
position. Then turn clockwise to set the position.
Turn the knob clockwise to adjust right/left position.
3
Then turn counter-clockwise to set the position.
DEVICE SHOULD NOT BE INSTALLED SO THAT IT
OBSTRUCTS THE DRIVER’S VIEW.
Open the antenna before inserting the navigation
4
system into the cradle. For best reception, position the
antenna 90 degrees to the main unit.
Slide the navigation system into the cradle until you
5
hear a “click”.
Plug the cigarette lighter charger into the cigarette
6
lighter socket.
-
CAUTION
Remove the navigation system when you are away
from the vehicle to prevent theft.
■ To Remove the Navigation System from the Cradle
Press and hold the eject button on the cradle.
1
Take hold of the navigation system behind the antenna
2
and remove by sliding up and out of the cradle.
8
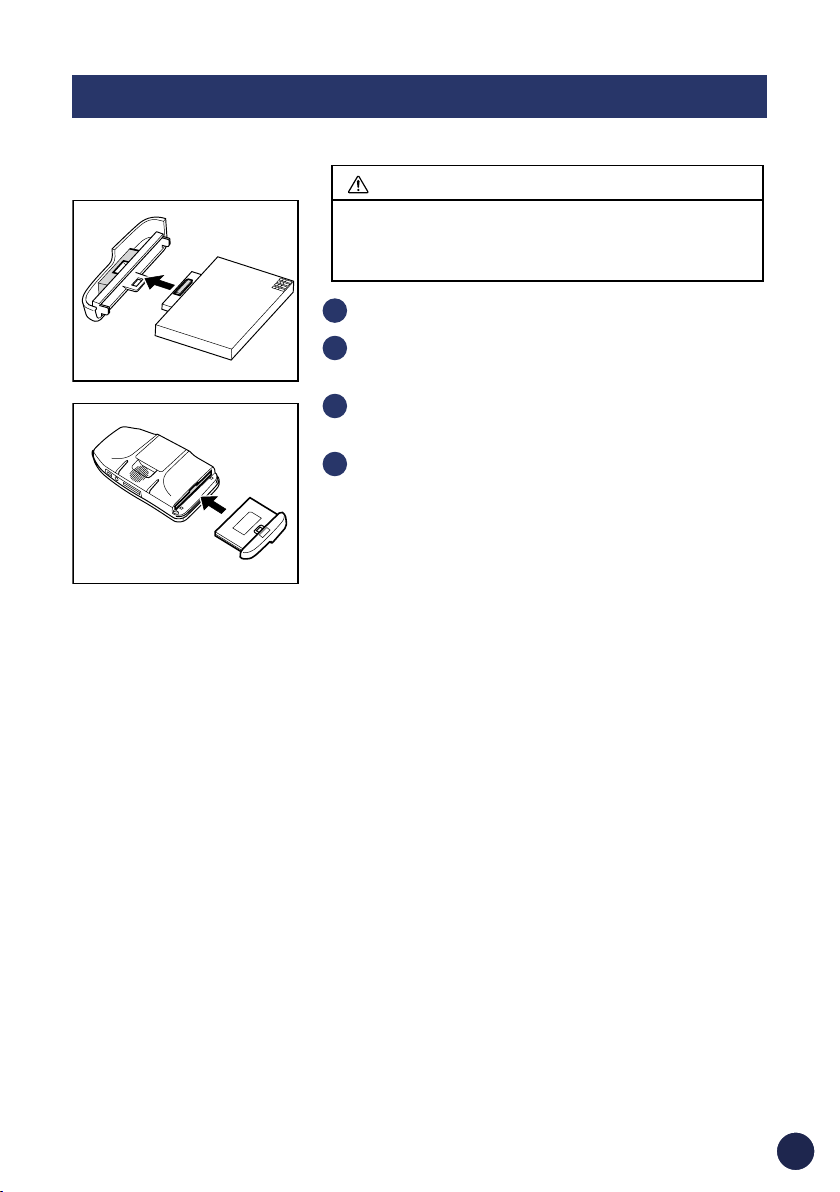
■ Battery Installation
■ How to Reset Blackbird
WARNING
Always turn off power to the system before installing or removing the battery. Failure to do so will
result in damage to your system.
1
Place Blackbird face down on a flat surface.
Press the battery door and pull away from the main
2
unit body.
A “click” will be heard as the battery is attached to the
3
battery door.
Insert and slide the battery assembly back into the
4
main unit until a click sound is heard.
Note: It is recommended that the battery be charged
using the supplied AC adapter for 8 hours before using the
system. Avoid removing this rechargeable battery. If the
battery needs to be replaced, dispose of it in accordance
with local hazardous materials requirements.
In the event the system requires a reset, pull over in a safe and legal manner before doing
so. Insert a paper clip or similar object into the reset hole (located under the GPS antenna
in the upper left hand corner of the recessed area) and depress the reset button for at least
1 second. Then, to restart the system, press and hold the power button for 2 seconds. The
system will re-start.
9
SYSTEM FEATURES
Blackbird Portable Navigation System
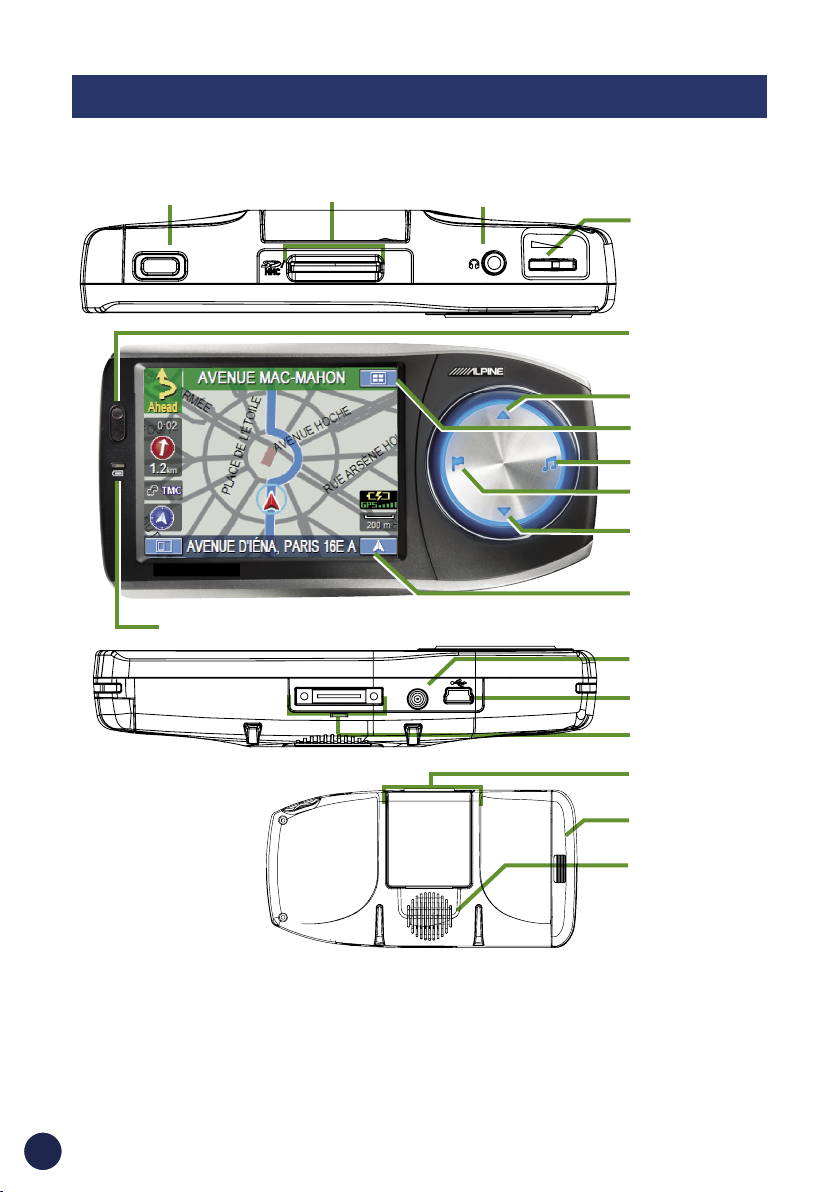
Power Button
Battery Charging Status Indicator
SD/MMC Card Slot
Headphone Jack
Volume
Control
Remote Sensor
and Ambient
Light Sensor
Map Zoom Out
Main Menu Button
Music
Destination
Map Zoom In
Current Position
Button Function,
See Page 14
External GPS
Antenna Connector
Mini USB Connector
Cradle Connector
Battery Charging Status Indicator
This illuminates when the system is being charged or requires charging. The battery will
typically charge to full from empty in about three hours.
GREEN Battery is fully charged. RED Battery needs charging.
AMBER Battery is charging.
10
GPS Antenna
Battery Slot
Speaker
Main Menu
Set and save
Destinations.
Page 16
➔
Get back home from
anywhere.
Page 26
➔
View Navigation
Demonstration and
system information.
Page 34
➔
Traffic feature allows
you to receive realtime traffic informa
tion.
Page 36
➔
-
Cradle with Cigarette Lighter Charger
•
Optional External GPS Antenna Accessory Available (Model # PMD-ANT1)
Play music.
Page 38
➔
Modify or choose
alternate routes to a
destination.
Page 27
➔
Edit Home and
Address Book.
Page 28
➔
Customize the nav
igation system.
Page 31
➔
Cradle Eject Lockout Screw
-
Optional
Mounting Holes
(x 4)
Amplified External
Speaker
External GPS Antenna
Connector
Windshield Mount Slot
User Registration
Please register your Blackbird on our web site, www.alpine-europe.com. You can receive
information about a software update, new Alpine products, etc. from us.
11
BASIC OPERATION
To Turn On Power
Power Button
1
Press and hold Power
Button for 2 seconds.
2
Opening screen appears.
3
Select a language and
read the caution carefully.
Touch
I Agree to display
map.
Set a Destination and Go!
1
Touch Main Menu.
Select Destination from Main
Menu, or press Destination but
ton.
4
Scroll the list.
Select desired place list.
(In this example, ATTRACTIONS
is selected.)
-
4
The last-known current
location is indicated on
the map.
To Turn Off
Press and hold Power Button
for 2 seconds.
12
7
Select the place with cor-
rect address.
For Map Function, see page 14.
The following example briefly describes how to input a destination.
2
Select desired method.
(In this example, POI is select-
ed.)
5
Select the search method.
(In this example, By POI Name is
selected.)
Select a search method.
3
(In this example, By POI
Category is selected.)
6
Type name of a place.
If more than one place with the
same name exist, sort method
screen appears.
Select OK to Proceed to set
8
the destination.
To Go Home, see page 26.
9
Map is displayed. Follow
the navigation.
To Find other routes, see page 27.
13
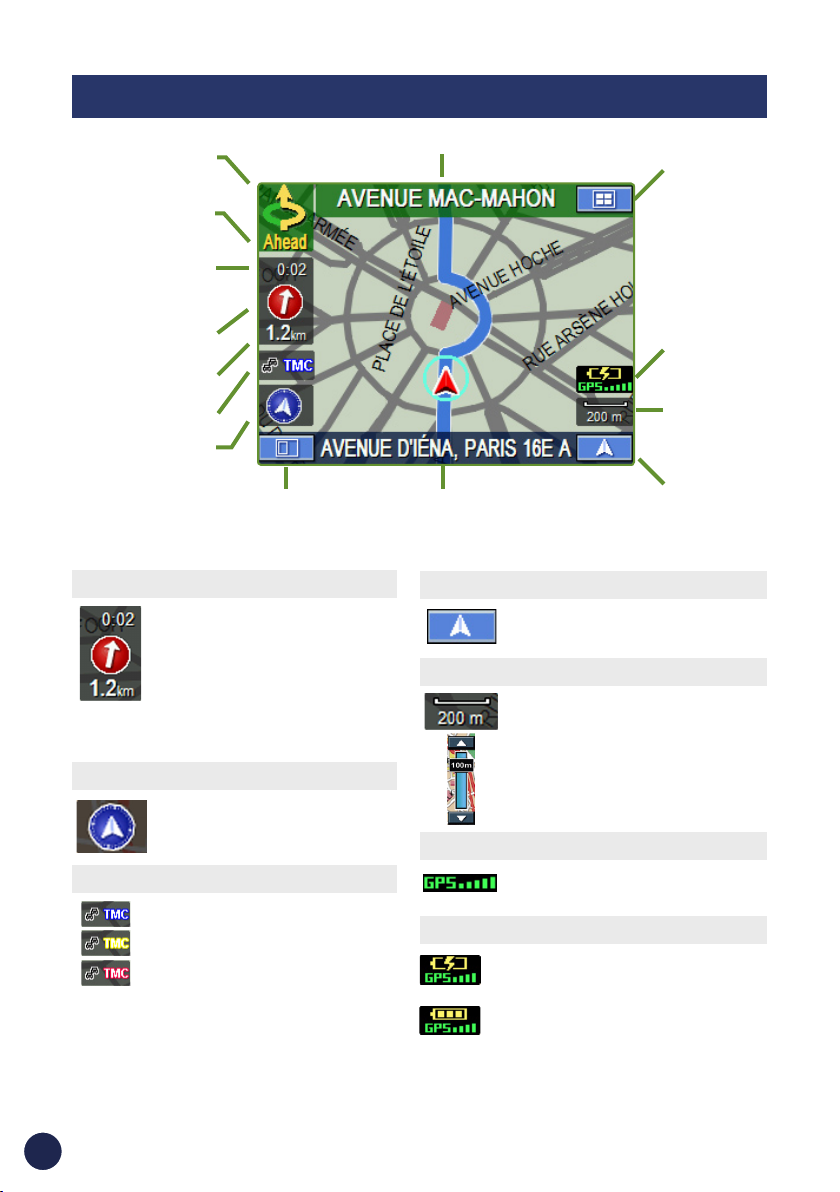
MAP FUNCTION
Next Manoeuvre
Arrow
Distance to next
manoeuvre
Estimated Time
Remaining (ETR) /
Estimated Time of
Arrival (ETA)
Direction to
Destination
Distance to
Destination
Traffic Information
Map Orientation
Display Mode
Button
Setting Estimate Time Display
Click this icon to switch between
Estimated Time Remaining and
Estimated Time of Arrival.
Note: The time estimates are based on
the average speed. The estimate time
will vary depending on vehicle speed.
The arrow always points toward the
destination.
Setting the Map Orientation
Click icon to switch between North
Up, Heading Up, and 3D views..
Traffic Information
Click icon to see traffic information.
Icon colour changes to blue (good),
yellow, or red (bad) according to the
traffic condition on route.
Next Street Name
Current Street
Name
Repeating the Announcement
Click icon to repeat the guide
announcement.
Zoom In/Out Map
Click icon to display scroll bar.
Touch
map in or out.
The scroll bar disappears automatically
after 2 seconds.
GPS Status
Click icon to view GPS receiving condition information from satellite.
Battery Status
Shows status of the battery.
(Lightning bolt) being charged.
(3 bars) more than 60% charge.
(2 bars) more than 40% charge.
(1 bar) about 10% charge remaining.
Main Menu
Button
GPS Status bar
Battery Status
Indicator
Map Scale Bar
Current
Position /
Voice Prompt
Repeat Button
▲▼ or blue bar to zoom the
14

■ Setting a Destination Directly from Map Display
1
Touch anywhere on map screen.
The crosshair cursor appears.
2
Move the cursor to the new desired street.
Note: Use Map Scale Bar to zoom out the map if the
destination is far from the current location.
3
Touch Select.
Select Set as Destination.
4
Touch OK to Proceed on the confirma-
5
tion screen.
Note: To use other functions on the confirmation screen,
see page 16 for details.
Switching Map Display
Touch the to switch among Map, Split, and Arrow modes.
Map Mode
Shows a full-screen map
of the area while providing turn-by-turn guidance prompts.
To cancel,
touch Previous Screen
icon.
Split Arrow/
Map Mode
Displays a large
arrow and larger
next-street-name
font along side a
map screen while
providing turnby-turn guidance
prompts.
Arrow Mode
Displays threesuccessive arrow
manoeuvres all the
way to your destination while providing turn-by-turn
guidance prompts.
15

DESTINATION
■ Setting a Destination by Address
Go to Main Menu.
1
Destination ➔ Address
➔
Finding a Destination by Street Name First
Select
2
Type the first characters of the street name.
3
If there are unique matches, the system will automatically
display a short list of street names. Touch
The list of applicable street names appears.
Select the desired street name from the list.
4
5
Type the address number and touch OK.
6
Select the desired city.
If there are multiple matches, the system will list cities
containing the street name and address number that you
keyed in.
Confirmation screen appears.
7
See below for details.
Input Street Name.
OK.
■ Confirm Destination Screen
OK to Proceed
Set the destination and display a map.
Change Method
Find an alternative way.
(Refer to page 26.)
16

Change Country
If you want to choose a different
country from the one shown on the
screen, touch
different country.
Change to switch to a
Selecting Letters
Selected
characters are
displayed.
Deleting one letter
Adding one space
Going to number screen
Finding a Destination by City Name First
Select Input City Name.
2
3
Type the first few characters of the city name
and press
If there are unique matches, the system will automatically
display a short list of city names. Select the desired city.
4
Type the first characters of the street name.
Touch OK.
The list of applicable street names appears. Select the
desired street.
5
Enter the address number.
OK.
6
Confirmation screen appears.
See below for details.
Option
Find Local POI
Set as Waypoint
Add to Address Book
P24
➔
➔ P25
➔ P24
Map
Check the destination on the map.
Touch
mation screen
to go back to the confir
.
-
17

DESTINATION
■ Setting a Destination by POI
You can select from over 1 Million Point-of-Interest (POI) locations stored inside your
Blackbird Portable Navigation System. These destinations are sorted by POI Name or by POI
Category and are listed in order of distance from your current location.
1
Go to Main Menu
Finding a Destination by POI Name
A list of place names appears.
Destination
➔
POI
➔
2
Select By POI Name.
3
Type the desired POI name. Touch
OK.
Note:
Select the POI with correct address.
4
For emergency locations such as Police Stations, Hospitals,
5
Confirmation screen appears. Touch OK to
Use the arrows to the right of the list to move the yellow highlight. This will show detailed address information and
phone number (if available) for each entry in the POI data
base.
etc., please verify availability before proceeding to such
locations.
Proceed
to set the destination and start guid-
-
ance.
■ Setting a Destination from the Address Book
1
Go to Main Menu
2
3
Touch OK to Proceed to set your destination and start guid-
To save an address in the address book, see page 24.
Destination
➔
Address Book
➔
Select the desired destination.
Confirmation screen appears.
ance.
18

Finding a Destination by POI Category
2
Select By POI Category.
3
Select a desired POI Category.
4
Select Search Method.
Near Here
5
The list of POI names appears in order of distance
from the current vehicle position.
6
Select the POI ➔ OK to Proceed
By POI Name
Follow 3 to 5 in “Finding a Destination by POI Name” on Page 18.
5
Within a City
5
Type the city name and select a city.
The list of POI appears in order of the distance
6
from the selected city. Select the desired POI.
Select the place ➔ OK to Proceed
7
Near Destination
5
The list of POI names appears in order of distance from the destination.
6
Select the place ➔ OK to Proceed
19

DESTINATION
■ Setting a Destination by Recently Entered Destination
1
Go to Main Menu
Select the destination.
Touch
Note: To use other functions on the confirmation screen, see page 16 for details.
■ Setting a Destination by Postal Code
The list of postal codes appears. Select the desired code.
Destination
➔
Last Dest
➔
The list of recent destinations appears.
2
Confirmation screen appears.
3
OK to Proceed to set the destination and start guidance.
1
Go to Main Menu.
Destination
➔
Postal Code
➔
Type the desired postal code and touch OK.
2
Type the first characters of the street name.Touch OK.
3
The list of applicable street names appears. Select the desired street.
4
Enter the address number.
Touch
Note: 3 to 4 are not necessary in UK.
20
OK to Proceed on the confirmation screen.

■ Setting a Destination by Intersection■ Setting a Destination by Recently Entered Destination
1
Go to Main Menu.
Finding a Destination by Street Name
Touch OK.
The list of applicable street names appears.
Select the desired street.
If there is only one street crossing with the first street,
Touch
Note: To use other functions on the confirmation screen, see
the bottom of page 16 for details.
Destination
➔
Intersection
➔
2
Select Input Street Name.
3
Type in the street name.
Input the second street name.
4
the name of the street automatically appears.
5
Confirmation screen appears.
OK to Proceed.
Finding a Destination by City Name
If you know the city name of the intersection you are searching,
select Input City Name. The choice of the street is narrowed down automatically. This saves
time in entering the street information.
2
Select Input City Name.
3
Type the city name, then select the city from the list.
Input the first street name.
4
5
Input the second street name.
Touch
6
OK to Proceed on the confirmation screen.
21

DESTINATION
■ Setting a Destination in the City Centre
1
Go to Main Menu.
If there are unique matches, the system will automati-
Destination
➔
City Centre
➔
Select Input City Name.
2
Type the first characters of the city name and
3
press OK.
cally display a short list of city names. Select the desired
city.
Touch OK to Proceed on the confirmation
4
screen.
22

■ Setting a Destination by Coordinates
1
Go to Main Menu.
Touch
Touch OK.
Touch
Destination
➔
Coordinate
➔
Enter the Latitude of your destination.
2
OK.
Enter the Longitude of your destination.
3
4
Confirmation screen appears.
OK to Proceed to set the destination
and start guidance.
23

OPTIONS
■ Find Local POI
The navigation system can display Points of Interest (POI) around the cursor position, when
you scroll the map.
How to Find Local POI Directly from the Map
1
Touch anywhere on map screen.
The crosshair cursor appears.
2
Touch Select.
Select
3
Find Local POI.
Select the desired category.
4
Select the desired POI.
5
Touch
Note: To use other functions on the confirmation screen, see page 16 for details.
OK to Proceed on the confirmation screen.
How to Find Local POI from the Destination Menu
You can also find local POI from the Destination Menu.
1
Set a destination first from Destination.
2
On the confirmation screen, touch
Follow steps 3 to 5 above in “How to Find Local POI Directly from the
3
Option.
Map”.
■ Saving a Destination into the Address Book
Any destination can be saved into the Address Book.
1
Select a destination using any method.
24
2
From the confirmation screen, select
3
Touch
Save in Address Book.
Option.

■ Setting Waypoints
You can set up to 10 waypoints between your current location and your destination. The final
destination must be set before entering any waypoints.
How to Set a Waypoint Directly from Map
1
Touch anywhere on map screen.
The crosshair cursor appears.
2
Move the cursor to the desired waypoint.
Touch
3
Select
4
Select.
Set as Waypoint and select
Re-calculate.
When the route search is complete, the current
5
location is displayed. The system navigates you
to the first waypoint.
How to Set a Waypoint from the Destination Menu
You can also set a waypoint from Destination Menu.
1
Enter a destination by using the method on pages 16 through 23 from
Destination Menu.
On the confirmation screen, select Option.
2
3
Select
4
“Input Name” screen appears.
Type the desired name and touch
Note: For the details of selecting letters, see page 17.
Set as Waypoint and select Re-calculate.
OK.
5
System returns to the Main Menu screen.
Note: see also page 18, “Setting a Destination from the
Address Book”.
25

HOME
■ Finding a Way Home
You can get home from anywhere once the home address is set from Edit Menu.
Go to Main Menu.
1
Note: To edit the Home Address, see page 28.
■ Finding Alternate Way to Go Home
Home
➔
2
Touch OK to Proceed on the confirmation screen.
Follow the map to go home.
3
Go to Main Menu
· Quickest Route
· Shortest Route
· Maximise/Minimise Motorway
· With/Without Toll Road
· With/Without Ferry
· With/Without Car Train
· With/Without Congestion
Charge Zone
➔
Home
Change Method
➔
■ One-Touch Go Home
For an even easier way to immediately get guidance instructions to your home, you can press
and hold the flag
confirmation screen and guide you to your home location.
on the circle key for 2 seconds. This will instantly display the destination
26

ROUTE
■ Recalling the Manoeuvre List during Guidance
You can view a list of street names and upcoming turns and streets.
Go to Main Menu.
1
To preview a specific point, select
a street name/manoeuvre on the list.
To go back to Route List,
Go to Main Menu.
➔
Route
➔
Touch Manoeuvre List.
2
List of upcoming streets and
3
turns appears on the screen.
Route
■ Finding Alternate Route
Touch Main Menu.
Route
➔
Change Method
➔
You can choose and re-calculate a different route
based on Quickest Route, Shortest Route, maxim
ise/minimise Motorway, with/without Toll Road,
etc.
-
■ Delete Route
Go to Main Menu ➔ Route
Delete Destination ➔ Yes
➔
Note: After deleting the destination, you can not select
Route Menu until the next destination is set. To set up
the destination, see Destination Menu on Page 16.
■ Avoid a Street
Touch Main Menu.
Route
➔
Avoid
➔
You can avoid the current street,
another street on the calculated
route, or a traffic incident.
27

EDIT
Locations and addresses saved in the Address Book can be edited for quick recall. Also information including phone numbers and icons can be modified.
■ Editing Home
1
Go to Main Menu.
➔
Edit
2
3
See below for details.
Name Touch Name to change the
display name of the stored
location.
Touch
Edit Home.
“Edit Home” screen appears.
28
Note: For the details of selecting letters, see page
17.
Input Name Screen

■ Editing Address Book
1
Go to Main Menu.
Edit
➔
2
Touch
The list of addresses appears.
3
Edit Address Book
■ Deleting Previously Saved
Destinations
1
Go to Main Menu.
2
Touch
Select the destination you need
to modify.
4
“Edit Address Item” screen
appears. See below for details.
Note: Select DELETE ALL to delete all
addresses saved in the address book.
3
Select destination you need to
4
Touch
Note: Select DELETE ALL to delete all
recently entered destinations.
Tel Touch Tel to change the telephone
number of the stored location.
Map Touch Map to preview the location
on the map.
To go back to Edit Menu,
Main Menu ➔ Edit
Edit
➔
Delete Previous
Destination
.
delete.
YES to delete the des-
tination on the confirmation
screen.
Edit Telephone Screen
Delete Touch Delete to delete the stored
location.
Icon Touch Icon to change the icon of the
stored location on the map.
Delete Screen
Change Icon Screen
29

30

SETUP
You can customize Display, Guidance, Clock, Measuring Unit and FM frequency settings
from the Setup Menu.
Go to Main Menu.
1
Select
2
Setup screen appears.
3
Setup.
■ Customizing Display
Setting the Map Colour
Day - a bright tone screen
Night - a dark tone screen
Auto - switches automatically between
Displaying and Editing Icons on the
Map
POI Icons, the Home Icon and Icons used in
the Address Book can be turned on and off
from the Display Setup Menu. You can also
change these icons.
Day and Night modes
Background Colour
You can choose between gray or blue
backgrounds for all menu screens.
Trail
The Trail feature allows you to turn on and
off trail dots that appear wherever the
vehicle icon traverses. This is especially
helpful for off-road enthusiasts.
Setting the Map Style
You can choose between 2 map styles.
Brightness
The brightness of the screen can be
adjusted.
31

SETUP
■ Customizing Guidance
Turning Voice On and Off
This allows you to turn ON or OFF guidance voice
prompts.
Changing Navi Mix Volume
This allows you to vary the volume of the voice
prompts with respect to the music.
Setting Estimate Time Display
Estimated Time of Arrival (ETA) or Estimated Time Remaining (ETR) can be set here.
also change between ETA and ETR directly in the map screen. See page 14.
■ Setting up the Clock
You can set the Time Zone and Daylight saving setting to fit your region.
■ Switching the Measuring Unit and the
Keyboard
You can
You can choose the unit of measure.
■ Configuring System Settings
FM Transmitter Setup / Frequency
Only for the US model.
Remote Control
This feature allows you to turn ON the ability for the system
to receive remote control signals. Turning OFF the remote
control extends battery life while the system detached
from the cradle or AC adapter.
Beep
The key touch tone (beep) can be turned OFF/ON.
Reset All Settings
This will reset all the set values to the factory defaults.
32

■ Configuring Traffic Info Settings
Note: The service may not be available in some countries or due to insufficient FM
radio reception.
Selecting the Country
Auto - the system automatically selects the coun-
try which you are in.
Manual - you can manually select a particular coun
try, especially when you have a problem
with reception near the country border.
Selecting the Radio Station
Auto - the system automatically tunes to the sta-
tion with a good reception.
Manual - you can manually select a particular station.
It will take some minutes to search all the
radio stations.
Traffic Reroute
Auto - the system automatically calculates a new
route, if there is a traffic incident on the cur
rent route.
Manual - the system asks you if you would like to
avoid the traffic incident on the current
route.
Off - the system does not take traffic incidents
into consideration.
-
-
Show Icons
You can show/hide traffic incident icons on the map.
33

INFORMATION
■ Simulating Navigation
You can watch a demonstration of the navigation system’s voice and screen guidance.
Note: Please set a destination before starting a demonstration.
To Start a Demonstration
1
Go to Main Menu.
Select
2
Select
3
Demonstration starts.
4
Information.
Start Demo.
To Stop a Demonstration
1
Go to Main Menu.
2
Select
Select
3
The demonstration will end.
4
Information.
Stop Demo.
■ Viewing Trip Information
The odometer displays the route distance and time
travelled.
1
Go to Main Menu.
Information
➔
2
Select
Here, you can see different types of information pertaining to your current trip.
Driving Average: Average speed since Trip Info was reset.
Overall Average: Average speed since start of trip.
Maximum Speed: Maximum speed reached on this trip.
Driving Time: Time vehicle has been moving since the trip was reset.
Idle Time: Time vehicle has been stopped (not moving) since the trip was reset.
Total Time: Total elapsed time on the trip which is always the driving time plus idle time.
34
Trip Information.

■ Viewing GPS Status
You can view the dynamic location information
received from satellite such as signal strength, compass
(direction information), latitude/longitude, approximate
altitude, and speed. This feature allows you to view GPS
satellite signal information. An explanation of the mes
sages is shown below.
1
Go to Main Menu.
The following messages are displayed while the GPS receiver is tracking satellites:
“Locating GPS Satellites”: Blackbird search
es the sky looking for GPS satellites.
“Acquiring GPS Signal”:
positioning information transmitted from
1 to 3 tracked satellites while searching for
more satellites (minimum 4 needed).
“Fixing GPS Position”:
continuous signals from 4 or more tracked
satellites (for 30 seconds) in order to accu
rately fix your position.
➔
2
Select
Information
GPS Status.
-
Blackbird acquires
Blackbird requires
-
-
“Poor GPS Signal, Lost Position Fix”: You
may have entered an area where consist
ently poor GPS signal (lasting 30 seconds
or more) makes it impossible to maintain a
position fix.
“No Line of Sight, Lost GPS Tracking”:
You are in an area where line of sight to GPS
satellites has been blocked.
-
“Temporary Poor GPS Coverage”:
Thunderstorms, dense foliage or surrounding
tall buildings may cause temporary loss of
position fix (acceptable if under 30 seconds).
■ Viewing System Information
You can check software application, database version, and other information in this screen. Make a
note of this information and refer to it whenever
you communicate with Alpine Customer Support
or your Alpine authorized dealer.
1
Go to Main Menu.
➔
2
Select
Information
System Information.
35

TRAFFIC INFORMATION
Traffic incident
on the calculated
route, which is
Traffic inci-
dent not on
the calcu
lated route
-
■ Checking the Traffic Condition
Note: The service may not be available in some countries or due to insufficient FM radio
reception.
1
Go to Main Menu.
Traffic Info, or touch the TMC icon on
➔
the map.
also trigger
ing reroute
(Stationary traffic,
Traffic congestion,
Closed road, etc.)
Traffic incident
on the calculated
route, which is not
triggering reroute
(Roadwork, Closed
lane, etc.)
-
2
Traffic event list appears.
By Distance/By Name
The list can be sorted by distances from your current
position or by names of streets.
On Route
You can choose to see only the traffic events on the
current route or all the traffic events by touching this
button.
36

■ Getting more Information on a Traffic Incident
You can get more information on a particular traffic
incident by touching the item in the traffic event list.
Note: The amount of information depends on the data
broadcasted by the service provider.
Map
The location of the traffic incident will be displayed on
the map.
Detail
The detail of the traffic incident will be displayed if
there is any information.
37

TRAFFIC INFORMATION
■
To Improve Traffic Signal Reception, Please Follow These
If you need any further assistance, contact your authorized Alpine dealer or Alpine
Customer Support.
Instructions
Method 1
1
Separate the RDS traffic antenna
from the power cable.
Peel away about 13 cm / 5 inches
Cut here
2
Leave the RDS traffic antenna
hanging free (picture below)
(If this does not improve traffic recep-
tion, please proceed to Method 2.)
Method 2
1
Separate the RDS traffic antenna
from the full length of the power
cable leaving this connected only
.
to the cradle.
Cut here
2
.
Move the RDS traffic antenna on
windshield using suction cups
(pictured below)
.
38
*example installation only

ENTERTAINMENT
■ Listening to Audio
Folder
Number
Displays
Song Titles
and Artist
Names
File
Number
Back
M.I.X. to shuffle songs.
Touch
M.I.X. again to cancel the shuffle.
Touch
Touch REPEAT to repeat songs.
REPEAT again to cancel the repeat.
Touch
Play/
Pause
Forward
Playing
Time
Folder
Up
Folder
Down
Folder
Search
■ Playing Music on Your Blackbird
You can play MP3 or WMA music
files* from your SD or MMC card. Your
music can be arranged in sub-fold
ers for easy retrieval when using your
Blackbird device.
*Blackbird only supports MP3 and WMA files
without DRM.
1
Insert an SD or MMC card contain
ing folders with music files in the
SD/MMC slot. The system will scan
for music.
-
-
Touch
2
Folder Search to search
the memory card.
Select a folder, then select a song
3
to play. The music will start play
ing the song you selected.
-
39

OTHER USEFUL FEATURES
■ How to Listen to Guidance and Music from Your Car Stereo
(Only for the US Model)
Turning on the Transmitter and Playing Music from Your Radio
You can setup Blackbird to broadcast music and navigation voice guidance directly to your
FM radio.
Plug the cradle into your vehicle’s cigarette lighter/power outlet.
1
Insert Blackbird into the cradle (See page 8 for details).
2
Turn on your radio. Find an FM frequency from the following that is broadcasting noth
3
ing but static: 88.1 MHz, 88.3 MHz, 88.5 MHz, 88.7 MHz, 88.9 MHz, 106.7MHz, 106.9
MHz, 107.1 MHz, 107.3 MHz, 107.5 MHz, 107.7 MHz, 107.9 MHz (do this with Blackbird
off at first).
Turn on Blackbird.
4
On Blackbird, go to
5
The default broadcast frequency is 88.1 MHz.
Turn the transmitter button ON in System Setup screen.
6
Set Blackbird to that frequency and play music files on Blackbird.
7
(Touch
Main Menu ➔ Entertainment, or simply press Music button) Blackbird
provides 12 frequencies to choose from. You may have to try a few frequencies before
you find one that works best in your vehicle.
Main Menu ➔ Setup ➔ System.
-
Turning Off the Transmitter
1
Turn off or turn down the volume of your radio first to avoid the static noise.
2
On Blackbird, go to
3
Turn the transmitter button OFF in System Setup screen.
Main Menu ➔ Setup ➔ System.
■ How to Update the New Software and Map Database
Using your home PC, Blackbird can be updated with the latest mapping and
Point of Interest information. Please refer to instructions included with the
update software on how to upgrade your Blackbird system.
40

IN CASE OF DIFFICULTY
If you encounter a problem, please review the items in the following checklist. This
guide will help you isolate the problem if the unit is at fault. Otherwise make sure the
rest of your system is properly connected, batteries are completely charged and contact
your authorized Alpine dealer or Alpine Customer Support.
The vehicle’s position
is erroneous.
No operation
· Moisture condensation
· Ambient temperature
over 45°C (113°F) below 45°C (113°F) by driving with the windows
· Blown fuse
Reset the unit and drive the vehicle in an area of
good GPS reception to allow the unit to recalibrate
itself.
Move to a location where strong GPS reception is
possible.
Allow enough time for the condensation to evapo-
➔
rate (about 1 hour).
Lower the temperature in the vehicle to
➔
open or air conditioner on.
Replace with a fuse of the prescribed rating (2A
➔
glass-type fuse located in the head of the cigarette
lighter adapter).
41

IN THE BOX
■ Accessories
Cradle with Cigarette
Lighter Charger
Wiping Cloth
AC Adapter
1200mAh Battery
USB Cable
Quick Reference
Guide
Carrying Case
PDF Manual on CD
■ Optional Accessories
The following accessories are available from your authorized Alpine dealer.
PMD-DOK1 – A Docking Station that allows you to connect and experience Blackbird
1.
navigation and music player from your Alpine Multimedia Station or stand-alone dis
play.
2. KAE-500FM – An external RDS-TMC film antenna for PMD-DOK1.
3. PMD-KIT1 – A second car kit comprised of windshield mount, cradle, and home AC
charger.
4. PMD-ANT1 – An external GPS antenna hard-wired to Blackbird used in instances
where you cannot normally receive GPS signals inside the car, due to metallic window
tint, etc.
5. PMD-BAT1 – A 1200 mAh Li-Polymer battery for extra battery power on the go.
6. RUE-4135 – A combination navigation and audio remote control that allows you to
control most of Blackbird’s navigation features wirelessly.
-
42

SPECIFICATIONS
BLACKBIRD SPECIFICATIONS
Main Unit Size 145mm x 74mm x 29mm (6.1" x 2.9" x 1.2")
Main Unit Weight
CPU Centrality Atlas II ARM9 CPU
GPS Embedded 16 channel GPS, Built-In Main Unit Antenna with
Optional External Antenna Connection
Storage Media Built-In 1” HDD with Pre-Loaded Maps of western Europe and over
Card Slot Secure Digital (SD) or Multimedia Card (MMC) for playback of MP3
Audio Integrated speaker in main unit, amplified speaker in cradle, stereo
FM Transmitter Built-in cradle, up to 12 selectable frequencies (only for the US
RDS-TMC Tuner Built-in main unit w/antenna in cradle power cable
USB Interface 2.0
Power Requirements
Handheld Mode 5V @ 1A (via 1200 mAh Li-Polymer Battery, approximately 2 hours
Cradle Mode 12 VDC @ 2A (via Cigarette Lighter Adapter)
Fuse AGC/3AG -2Amp
227 g (8 oz)
1 Million Points of Interest
or WMA music files
headphone jack, optional docking station audio output
model)
of continuous use)
Operating Temp 0° to +60° C (32° to 140° F)
Storage Temp
Display
Screen Size 3.6” diagonal
Resolution QVGA 320 x 240 pixels, 16.7M possible colors
Display Type Digital TFT display with anti-glare touch screen
Brightness 200 cd/m
-25° to +70° C (-13° to 158° F)
2
(typical)
Note: Due to continuous product improvement, specifications are subject to change with-
out notice.
43

INDEX
A
Accessories 42
B
Background Colour 31
Basic Operation
Battery Installation
Battery Status
Beep
Brightness
C
Changing Navi Mix Volume
Confirm Destination Screen
D
Destination
Setting a Destination by
Address
Setting a Destination by
Coordinates
Setting a Destination by
Intersection
Setting a Destination by POI
Setting a Destination by
Postal Code
Setting a Destination by Recently
Entered Destination
Setting a Destination from
the Address Book
Setting a Destination in
the City Centre
Displaying and Editing Icons on
the Map
E
Edit
Adding/Editing/Deleting
Your Own POI
Adding/Editing/Deleting
Your Own POI Category
Deleting Previously Saved
Destinations
Editing Address Book
Editing Home
Entertainment
Listening to Audio
Playing Music on Your Blackbird
F
Find Local POI 24
FM Transmitter Setup / Frequency
H
Home 26
Finding Alternate Way to
Go Home
Finding a Way Home
12
One-Touch Go Home
9
How to Fit Blackbird
14
How to Reset Blackbird
32
I
31
Important Information
Index
32
Information
16
Simulating Navigation
Viewing GPS Status
16
Viewing System Information
Viewing Trip Information
16
Installation
23
In Case of Difficulty
M
21
Map Function
18
GPS Status
Repeating the Announcement
20
Setting a Destination Directly
20
18
22
31
28
30
30
29
29
28
39
39
39
32
from Map Display
Setting Estimate Time Display
Setting the Map Orientation
Switching Map Display
Traffic Information
Zoom In/Out Map
N
NAVTEQ end user license
agreement
O
Other useful features 40
How to Listen to Guidance and
Music from Your Car Stereo 40
How to Update the New Software
and Map Database 40
P
Precautions 2
R
Remote Control 32
Reset All Settings
Route
Avoid a Street
Delete Route
Finding Alternate Route
Recalling the Manoeuvre List
during Guidance
S
Saving a Destination into
the Address Book
Selecting the Country
26
Selecting the Radio Station
26
Setting Estimate Time Display
26
Setting the Map Colour
8
Setting the Map Style
9
Setting Waypoints
Setup
2
Configuring System Settings
44
Configuring Traffic Info Settings
34
Customizing Display
34
Customizing Guidance
35
Setting up the Clock
35
Switching the Measuring
34
41
14
14
14
15
14
14
15
14
14
32
27
27
27
27
27
Unit and the Keyboard
8
Show Icons
Specifications
System Features
T
To Remove the Navigation System
from the Cradle
Traffic Information
Checking the Traffic Condition
Getting more Information
on a Traffic Incident
Traffic Reroute
Trail
Turning Voice On and Off
U
User Agreement
4
W
Warnings
24
33
33
32
31
31
25
32
33
31
32
32
32
33
43
10
8
36
36
37
33
31
32
4
3
44

45

ALPINE ELECTRONICS MARKETING, INC.
ALPINE ELECTRONICS OF AMERICA, INC.
ALPINE ELECTRONICS OF CANADA, INC.
ALPINE ELECTRONICS OF AUSTRALIA PTY, LTD.
ALPINE ELECTRONICS FRANCE S.A.R.L.
98, Rue de la Belle Etoile, Z.I. paris Nord II,
B.P. 50016, 95945 Roissy Charles de Gaulle
ALPINE ELECTRONICS DE ESPAÑA, S.A.
ALPINE ELECTRONICS (BENELUX) GmbH
© 2006 Alpine Electronics, Inc. All Rights Reserved
1-1-8 Nishi Gotanda
Shinagawa-ku, Tokyo 141-0031, Japan
Phone 03-5496-8231
19145 Gramercy Place, Torrance,
California 90501 U.S.A.
Phone 1-800-ALPINE-1 (1-800-257-4631)
1-888-NAV-HELP (1-888-628-4357)
777 Supertest Road, Toronto,
Ontario M3J 2M9 Canada
Phone 1-800-ALPINE-1 (1-800-257-4631)
1-888-NAV-HELP (1-888-628-4357)
161-165 Princess Highway,
Hallam Victoria 3803, Australia
Phone 03-8787-1200
ALPINE ELECTRONICS GmbH
Frankfurter Ring 117,
80807 München, Germany
Phone 089-32 42 640
ALPINE ELECTRONICS OF U.K., LTD.
Viale C. Colombo 8, 20090 Trezzano
01013 Vitoria (Alava)-APDO 133, Spain
© 2006 NAVTEQ. All Rights Reserved
ALPINE House
Fletchamstead Highway,
Coventry CCV4 9TW, U.K.
Phone 0870-33 33 763
(RCS PONTOISE B 338 101 280)
Cedex, France
Phone 01-48638989
ALPINE ITALIA S.p.A.
Sul Naviglio (MI), Italy
Phone 02-484781
Portal de Gamarra 36, Pabellón, 32
Phone 945-283588
Leuvensesteenweg 510-B6,
1930 Zaventem, Belgium
Tel.: 02-725 1315
 Loading...