

Page 1

Software Update
iLX-W650 1/4
Software Update Procedure
iLX-W650
7-Inch Mech-Less Receiver with Apple CarPlay and Android Auto with Shallow Chassis
Introduction
This installation manual is designed to take you through the step-by-step installation of the firmware version
V1.008_0405/MCU F032 update iLX-W650. Please familiarize yourself with the owners manual (found at www.
alpine-usa.com/support) and if you still have additional questions please call 1-800-TECH-101. This update
includes the following:
This firmware update corrects issues with the following:
Saving crossover settings
Steering wheel controls for Android Auto and Apple CarPlay (Prev/Next, Play/Pause, Answer/End)
Bluetooth sound quality
Subwoofer gain decreasing when adjusting the parametric EQ
Parametric EQ Q-Factor improvements for sound tuning
Caution!
Do NOT turn off vehicle’s ignition or head unit’s power switch while updating. Some modern vehicles may
shut down the ignition (ACC) if the engine is not running for some time. If you are not sure if this applies to
your car, leave the engine running while the update is in progress.
Do NOT remove the USB flash memory while updating.
Do NOT press any buttons while updating.
Do NOT update while driving.
Failing to follow any of these cautions could cause damage to the head unit.
Step 1: Format The Flash Drive
1-1 Only flash drives formatted to FAT32 can be read by the head unit. This means that your flash drive can
not be formatted to anything else including NTFS, exFAT, etc.
1-2 In Windows the drive can be formatted by right clicking on the drive in file explorer and selecting format
as shown in the pictures below.
Page 2
Software Update
iLX-W650 2/4
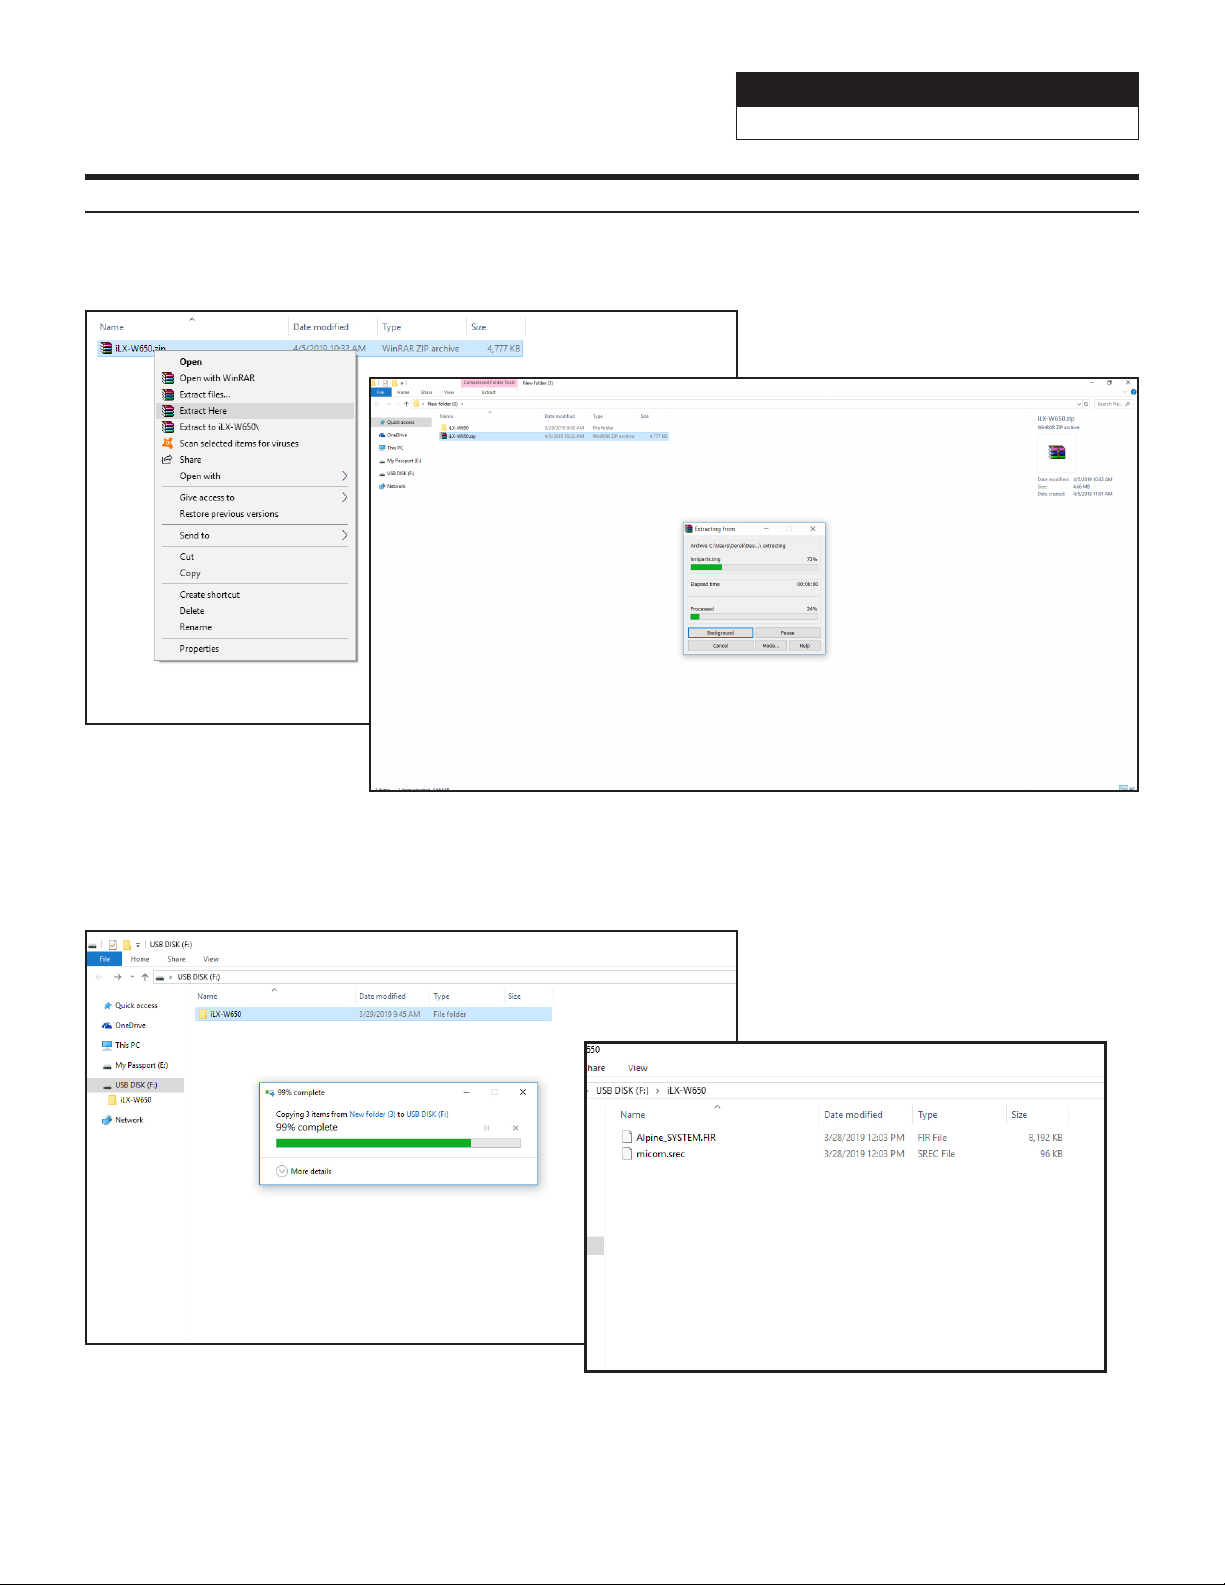
Step 2: Copy The Audio Update Files To The Flash Drive
2-1 Extract the downloaded files using a program like WinZip to your computer. If you don’t have a program
that handles zip files on your computer you will need to install one.
2-2 Once extracted you will see a folder named iLX-W650. Copy the unzipped folder to your flash drive by copy and
pasting or dragging and dropping the file. The pictures below show the folder iLX-W650 on the flash drive and the
folders in it. Note: You can NOT change the file names or folder names. The head unit will not recognize the files if
you do. DO NOT just copy the files to the drive. You need to copy the folder.
Notes:
*Do NOT store any other files on the flash drive. If there is anything on the drive besides the update folder it
will not read correctly.
*Certain manufacturer’s USB memory may not work. If so, try a different manufacturer’s USB memory.
Page 3

Software Update
iLX-W650 3/4
Step 3: Copy The Update Files To The Head Unit
3-1 Plug the flash drive into the USB connector of the head unit. The USB extension is typically ran from the
back of the head unit to either the glove box or center console areas of the vehicle depending on the
original installation.
SXM/DAB
POWER
ANTENNA
USB
SWC
MIC
PRE OUT
3-2 Turn on the vehicle’s ignition to power on the head unit. Do NOT turn off the igntion or the power of the head
unit while the system is updating!
3-3 Go to MENU/SETUP/INFORMATION/FW UPGRADE
3-4 Push FW Upgrade. This process should take about 1 minute. The head unit will reboot when the update has
finished.
3-5 Check version (V1.008_0405/MCU F032). Then do a factory reset. SETUP/SYSTEM/RESET
Page 4

Troubleshooting Guide
Symptom Possible Cause Remedy
1
The downloaded software was not
unzipped.
There are other files on the flash
drive.
Software Update
iLX-W650 4/4
Refer to Step 2. The .zip file will need to be
unzipped first using your program of choice
(for example, WinZip, WinRAR, Izarc, etc).
The flash drive should be freshly formatted
(refer to Step 1) and the only files on it
should be the downloaded files as shown in
Step 2.
Head unit will not read flash
memory.
The file folder name was changed
or put into a different folder.
The USB port was installed
incorrectly.
Make sure only the file that is shown in step
2 is copied over.
Make sure the port is working correctly by
plugging in an iPod or flash memory with a
few MP3’s on it and seeing if it will play the
music. If that’s not working then there’s no
way for the update to work. Try plugging the
flash drive directly into the tuner without the
extension cable.
 Loading...