

Page 1

9-INCH AUDIO/VIDEO RECEIVER
i209-GM
II
Ill
•
Made for
~
iPod
D
iPhone
pandora®
U
~
R
d
•
This
r1!J
a
1
0
Gspotify·
HD
®
PSD)
0
Radio receiver
HD21HD3)
Wo
rks
with
Apple
CarPiay
Bluetooth"
enables:
Dig
ital
Sound)
Artist
Experience)
m.flac
QUICK
GUIDE
GUfA
REFERENCE
DE
REFERENCE
DE REFERENCIA RAPIDA
HIGH
-
DEFINITION
MULTIMEDIA
INTERFACE
anclroldautc)"
(((Siriusxm>))
READY
{I
)
J
GUIDE
RAPID£
Please
register
Enregistrez-vous sur
Registre
compra.
su
producto
your
product
www
en
at
www.alpine-usa.com/registration
.
alpine-usa.com/registration
Ia
direcci6n
www.alpine-usa.com/registration
pour
to
proteger
protect
votre
para
your
purchase.
achat.
proteger
su
Page 2
Contents
WARNING
CAUTION
Getting Started
Favorite
Registering
Android
Apple
HD
Radio™/RBDS
USB
Pandora®
SiriusXM
HOM
................................................................................................................................................................
.................................................................................................................................................................
.....................................................................................................................................................
Function
Auto
CarP
lay
.........................
Items
.................................................................................................................................................
(Optional)
Operation
Operation
Flash
drive Operation
Satellite
I
Device
Internet
(DVD
Radio
Radio
Player)
iPod/iPhone Operation
Hands-Free
Specifications
Phone
Control
......................................................................................................................................................
2
3
4
:
.......................................................................................................................
6
6
....................................................................................................................................
(Optional)
..............................................................................................................
............................................................................................................................
(Optional)
Operation
Operation
Operation
(Optional)
...........................................................................................................
(Optional)
(Optional)
.......................................................................................
........................................................................................
.........................................................................................................
...............................................................................................................
.............................................................................................................................
7
7
8
9
1
0
11
12
13
14
15
IMPORTANT
Please record the serial
record.
SERIAL
INSTALLATION
mS~ll~IONTECHNIOAN:
PLACE OF PURCHASE:
For
http://
of
NUMBER:---------------------------
details on
the Owner's Manual published on the website.
all
www
.alpine-usa.com.
number
DATE:--------------------------
_________________________
functions, refer
of
your unit in the space provided below and keep it
______________________
to
the Owner's Manual published on
If required,
an
ALPINE
dealer will
readily
our
website at
provide you
as
a permanent
with
a print
_
_
out
l-EN
Page 3
WARNING
~WARNING
THIS PRODUCT
USE
other
for
Use
other
or
shock
MOBILE 12V APPLICATIONS.
FOR
than its designed application may result
injury.
fire, electric
in
symbol
This
to heed
INSTALL
CANNOT
THE
AND
dangerous for the driver to watch
is
It
Installing this product incorrectly enables the driver to watch TV/Video
while driving. This may cause a distraction, preventing the driver from
looking ahead, thus causing an accident. The driver
could be severely injured.
DO NOT
Watching the video may distract the driver from looking ahead
vehicle and cause an accident.
NOT
DO
ATTENTION
Any function that requires your prolonged attention should only be
performed after coming to a complete stop. Always stop the vehicle in a
safe location before performing these functions. Failure to do so may
result in an accident.
NOT
DO
SYSTEM
ILLEGAL
SITUATION
This product
suggestions by this system should never supersede any local traffic
regulations or your personal judgement
practice.
THE
KEEP
OUTSIDE
Excessive volume levels that obscure sounds such as emergency vehicle
sirens or road warning signals (train crossings, etc.) can be dangerous
may result in an accident. LISTENING
and
IN
LEVELS
means
them
PRODUCT
THE
WATCH
EMERGENCY
WATCH
OPERATE
AWAY
FOLLOW
INSTRUCTS
MANEUVER,
AREA.
OR
not a substitute for your personal judgement. Any route
is
VOLUME
NOISES
A CAR
important
result in serious injury or death.
can
CORRECTLY
NIDEO
TV
VIDEO WHILE DRIVING.
ANY FUNCTION
FROM
ROUTE
AT
WHILE DRIVING.
MAY
UNLESS
BRAKE
SAFELY
SUGGESTIONS
PERFORM
TO
YOU
PLACES
OR
LEVEL
A
ALSO CAUSE
instructions.
THAT
SO
VEHICLE
THE
APPLIED.
IS
/Video while driving a vehicle.
TV
or
TAKES
THAT
DRIVING
YOU
or
WHERE
HEARING DAMAGE.
YOUR
THE
IF
UNSAFE
AN
AN
IN
knowledge
CAN
YOU
LOUD VOLUME
AT
Failure
DRIVER
THE
STOPPED
IS
people
other
of
YOUR
VEHICLE.
NAVIGATION
OR
UNSAFE
safe driving
of
STILL
the
HEAR
CORRECT
THE
MAKE
Failure to make the proper connections may result in fire
damage.
BEFORE
NEGATIVE
Failure to do so may result
shorts.
DO NOT
WIRING, DISCONNECT
BATTERY
ALLOW
SURROUNDING
Arrange wiring
obstructions when driving. Cables
the steering wheel, gear lever, brake pedals, etc. can be
places such
extremely hazardous.
DO NOT
Never cut away cable insulation to supply power to
Doing so will exceed the
in fire
DO NOT
When
not
wiring. Failure to take such precautions may result
DO
SYSTEMS
Bolts
safety-related system),
or
vehicle
DO NOT
VEHICLE
as
SPLICE
electric shock.
or
DAMAGE
drilling holes in the chassis for installation, take precautions so
to contact, damage
USE
NOT
TO
nuts used for the brake
or
connections.
ground
cause fire etc.
and
INSTALL
OPERATION,
CONNECTIONS.
FROM
CABLE
THE
TERMINAL.
injury due to electrical
in
CABLES
electric shock
BECOME
TO
or
ENTANGLED
OBJECTS.
cables in compliance with the manual to prevent
and
wiring that obstruct
or
ELECTRICAL
INTO
current
WIRING
OR
PIPE
obstruct pipes, fuel lines, tanks
or
NUTS
OR
BOLTS
GROUND
MAKE
tanks should NEVER be used for installations
or
Using such parts could disable control
LOCATIONS
IN
SUCH
CABLES.
other
carrying capacity
of
WHEN DRILLING
in
BRAKE
THE
IN
CONNECTIONS.
steering systems (or any
or
WHICH MIGHT HINDER
STEERING
THE
AS
the wire
fire.
OR
GEARSHIFT.
movement etc.
hamper
Doing so may obstruct forward vision
results in serious accident.
or
product
or
THE
IN
hang
or
equipment.
and
HOLES.
electrical
or
STEERING
other
of
WHEEL
the
OR
and
on
up
result
as
MINIMIZE
Viewing the display may distract the driver from looking ahead
vehicle
DO NOT
Doing so may result in an accident, fire
USE
(Check with your dealer if you are not sure.) Failure to do so may result
in fire, etc.
KEEP
OF
Swallowing them may result in serious injury. If swallowed, consult a
physician immediately.
USE
DISPLAY
cause an accident.
and
DISASSEMBLE
IN
ONLY
SMALL
CHILDREN.
CORRECT
THE
VIEWING WHILE DRIVING.
ALTER.
OR
VOLT
A 12
WITH
CARS
AS
OBJECTS
SUCH
AMPERE
RATING
electric shock.
or
NEGATIVE
SCREWS
WHEN
GROUND.
OF
OUT
REPLACING
FUSES.
electric shock.
RADIATOR
OR
or
PANELS.
Failure to do so may result in fire
VENTS
BLOCK
NOT
DO
Doing so may cause heat to build up inside and may result in fire.
2-EN
THE
the
of
REACH
Page 4
~CAUTION
This
symbol
to
heed
property
means
them
can
damage.
important
result
in
instructions.
injury
or
Failure
material
HALT USE
Failure to do so may cause personal injury
Return it to your authorized Alpine dealer
Center for repairing.
HAVE THE
The
and
purchased this
USE
SECURELY.
Be
sure to use only the specified accessory parts.
designated parts may damage this unit internally
install the unit in place. This may cause parts to become loose resulting
in hazards
ARRANGE THE
BY A SHARP METAL EDGE.
Route the cables
or
sharp
wiring.
to prevent the wire's insulation from being cut by the metal edge
hole.
DO
DUST.
Avoid installing the unit in locations with high incidence
dust. Moisture
product
IMMEDIATELY IF A
WIRING
wiring
and
experience.
SPECIFIED ACCESSORY
or
or
pointed edges. This will prevent crimping
If
wiring pass
NOT
INSTALL
failure.
AND
installation
To
ensure safety, always contact the dealer where you
product
to have the work done.
product failure.
WIRING SO
and
wiring away from moving parts (like the seat rails)
es
through a hole in metal , use a
IN
LOCATIONS
or
dust that penetrates into this unit may result in
PROBLEM
INSTALLATION DONE BY EXPERTS.
of
this unit requires special technical skill
PARTS
IT
IS
APPEARS.
or
damage to the
or
the nearest Alpine Service
AND
INSTALL
Use
of
other
or
may
NOT
CRIMPED OR PINCHED
and
rubber
WITH
HIGH
MOISTURE OR
product
THEM
than
not
securely
damage to the
grommet
of
the
of
moisture
.
or
•
The
displays.
following
screen
examples
used in this manual are for reference only.
They may differ from
the
actual
screen
3-EN
Page 5
Getting Started
Controls
Location
The screen design used in
of
the
Owner's
Owne
Manual
mi\lnual
's
r
may differ from
the
Location of
actual
Control s,
screen.
Turning
Power On or
Off
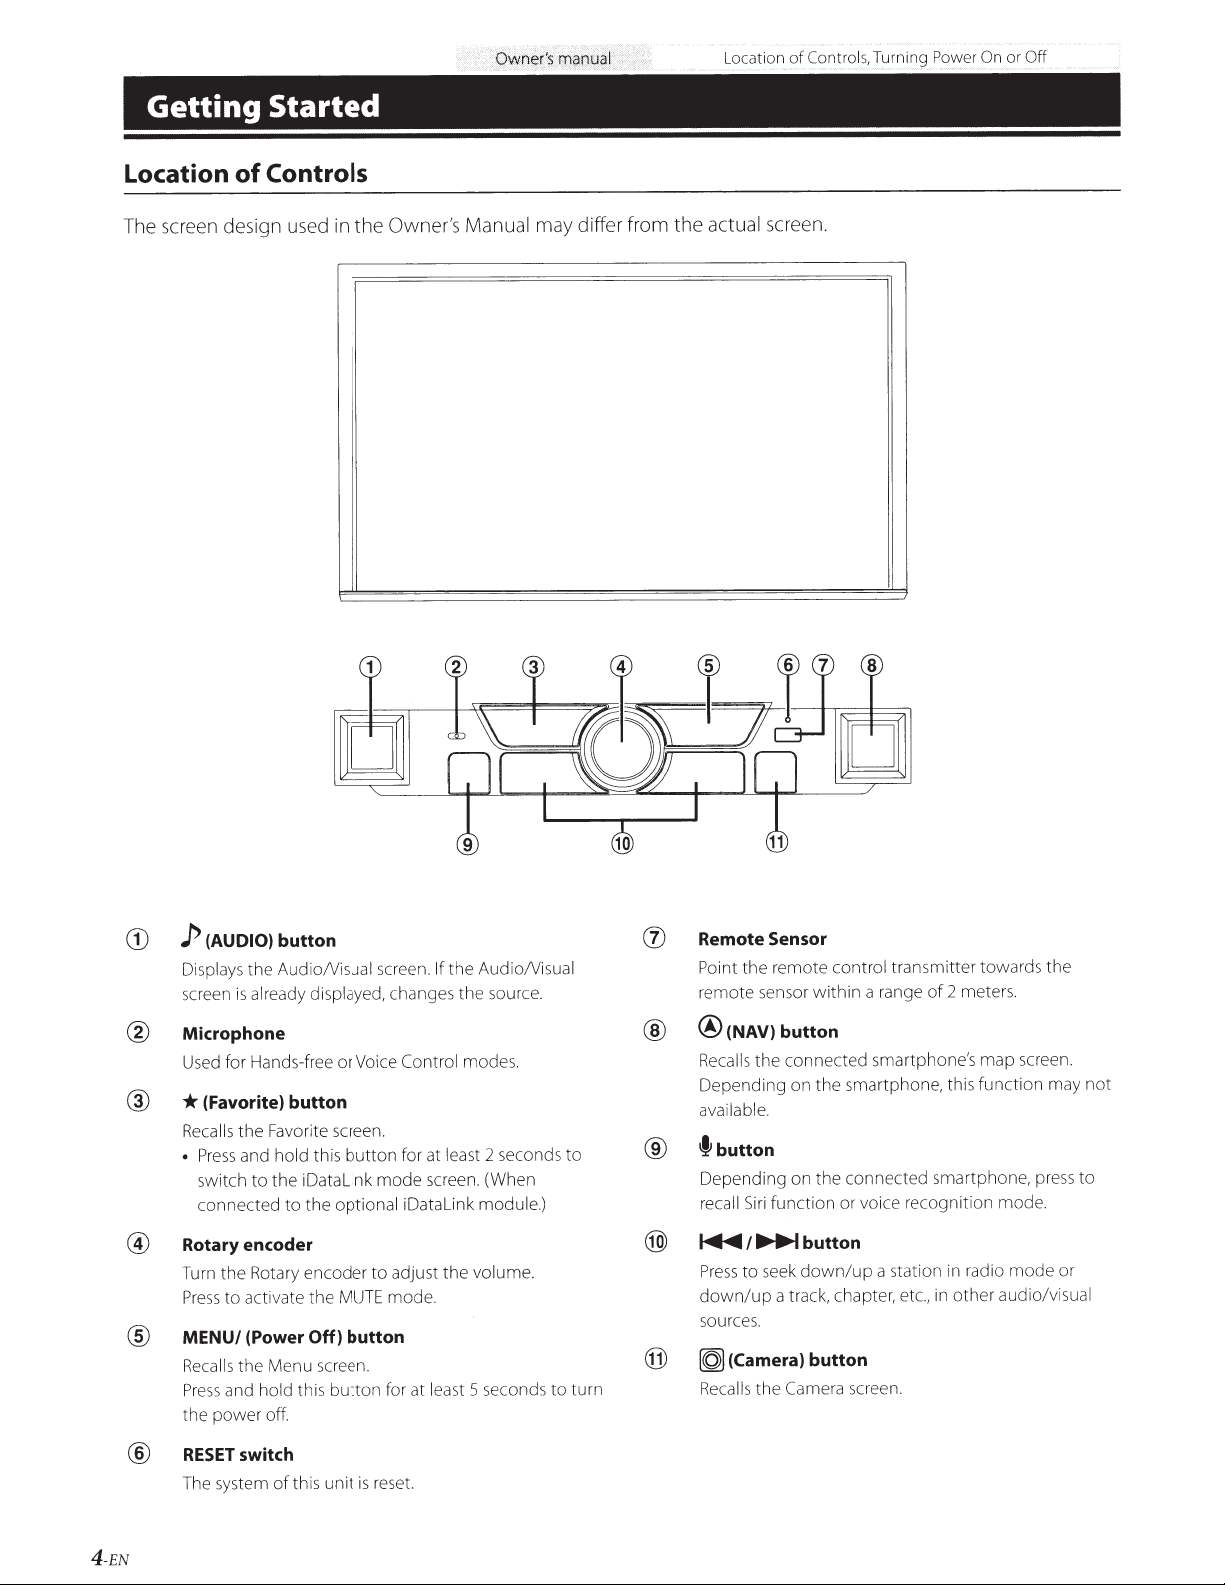
(AUDIO) button
}'
G)
AudioNisual
Displays
screen
the
already displayed,
is
Microphone
Used for Hands-free or Voice Control
*(Favorite)
@
Recalls
•
@
Rotary encoder
Turn
Press
MENU/ (Power
®
Recalls
Pre
the
RESET
@
The system
Press
switch
connected
the
to
and hold this
ss
power
button
Favorite screen.
the
this
hold
and
iDatalink
the
to
the
to
Rotary encoder
activate
the
Off)
Menu screen.
the
button
off.
switch
unit
this
of
screen.
changes the source.
for at
button
mode
to
adjust
mode
iDatalink
optional
MUTE
button
for at
reset.
is
AudioNisual
the
If
modes.
2 seconds
least
screen. (When
module
volume.
the
.
5 seconds
least
Remote Sensor
screen.
mode
mode
audio
the
may
.
/v
not
to
or
isual
transmitter towards
control
remote
the
Point
2 meters.
a range
remote sensor
®(NAV)
@
Recalls
Depending
available.
fbutton
to
.)
turn
to
®
Depending
Siri
recall
~I~
@)
to
Press
down/up
sources.
~(Camera)
@
Recalls
within
button
connected
the
smartphone, this
the
on
connected smartphone, press
the
on
function
or voice recognition
button
down/up
seek
a track, chapter, etc., in
button
the
Camera
screen.
of
smartphone's
a station in radio
map
function
other
4-EN
Page 6

Turning Power
1
Turn
the
ignition key
The
2
system
Press
and
is
turned
hold
On or
on.
the
MENU
Off
to
the
ACC
button
or
for
ON
position.
at
least 5 seconds
to
turn
the
power off.
Switching
You
can
the screen, or by swiping vertically or horizontally.
You
can
Seat
Lntertainment
Audio Sources Screen
,USB
the
Audio Sources Screen
switch the Audio
set
the
Sound
Audio)
Setup
System.
Sources
or
Rear
screen
to a dedicated
to
a Dedicated Screen
screen
by touching the icon on one
of
the three edges
of
You
can
make
settings
Screen.
•
The
Search
mode differs depending
on
the
audio
source.
For
details.
see
the operating instructions
of
on
the audio
the
Menu
source.
5
EN
Page 7
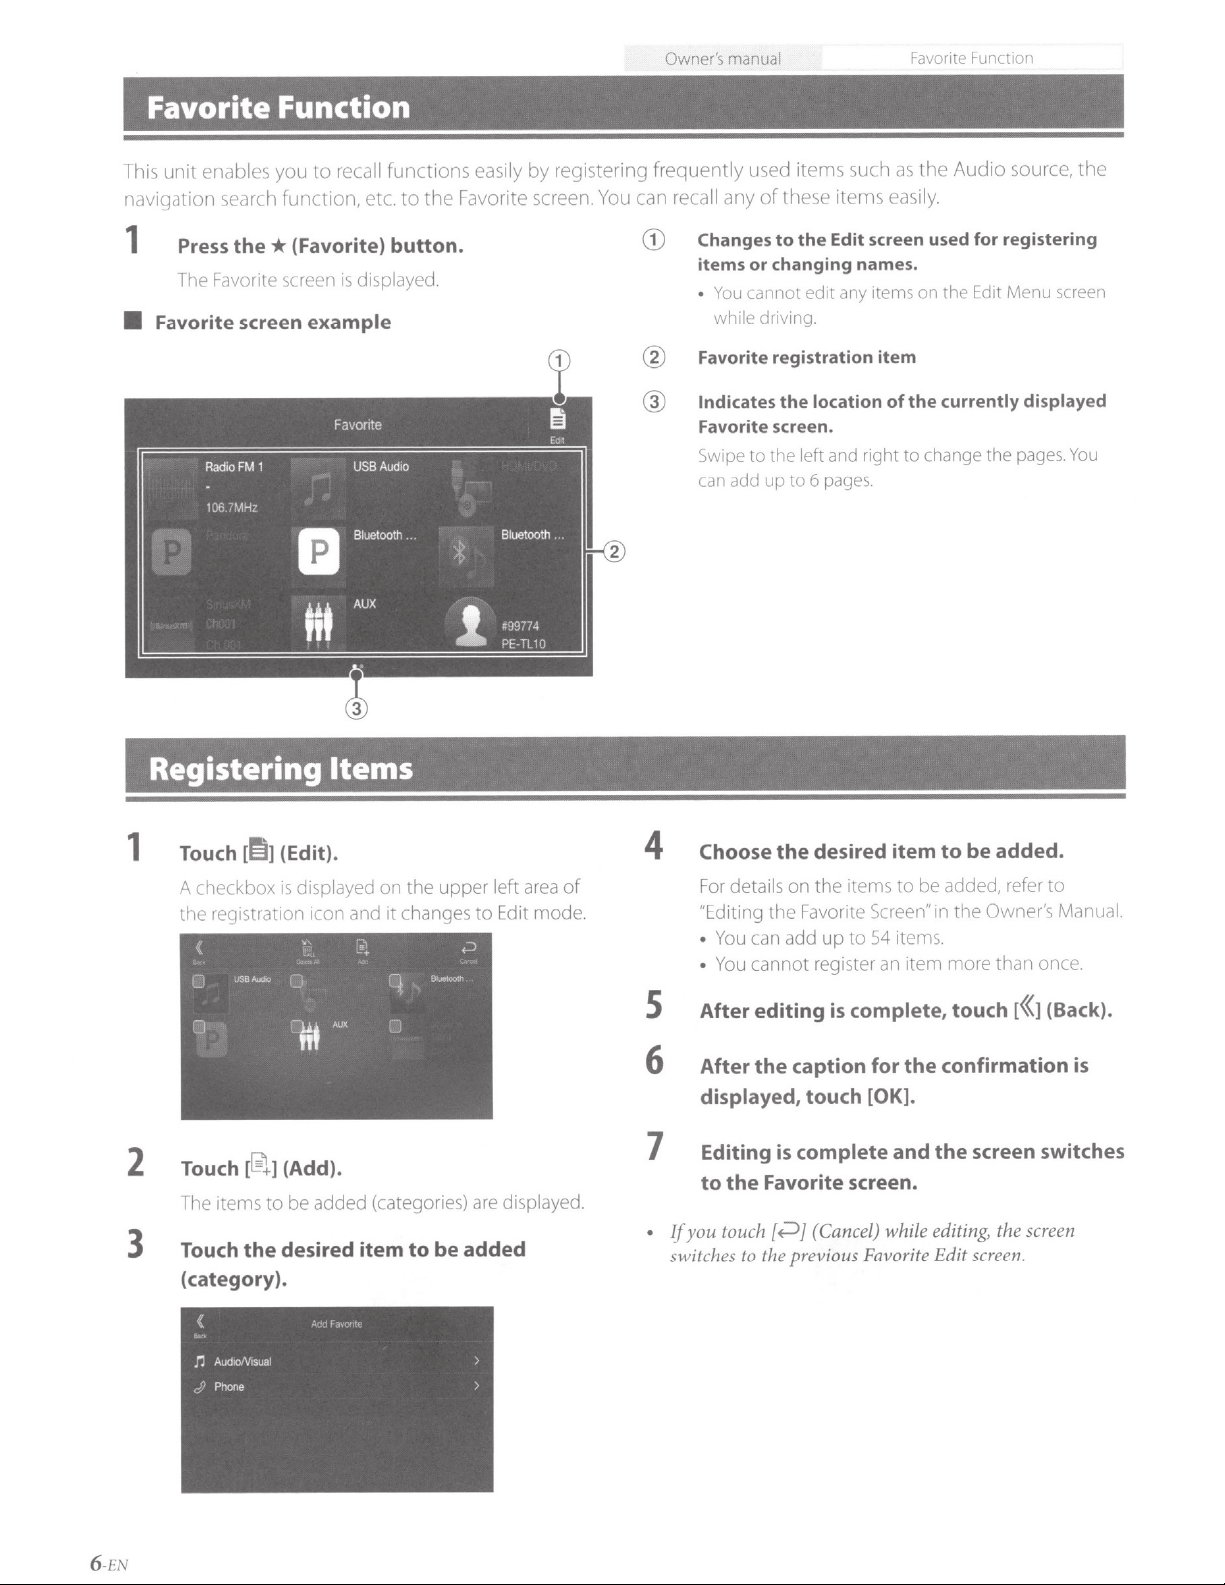
Favorite Function
recall
enables you
unit
Th1s
nilviqation
1
Favorite screen example
•
search function, etc.
the*
Press
Favc-nte
The
to
(Favorite) button.
is
screen
funct1ons
the Favorite screen.
to
displayed.
easily
Owner's
registering frequently used items such
by
can
You
CD
®
@
manual
these items
recall any
Changes
items
•
Favorite registration item
Indicates
Favorite screen.
Sw1pe
can
of
to
changing names.
or
cannot
You
dnving
while
the
th€
to
up
add
the
d1t
€
.
location
eft
6
to
pages.
Favor;te Function
the Audio source, the
as
easily.
Edit screen used
the
on
'tems
-1ny
currently displayed
the
of
change
to
right
and
registering
for
Menu
rd1t
pages.
the
screen
You
Registering Items
(Edit).
~h
1
2
3
Touch
A
tre
Touch
Touch
(category).
l
b
:~
l
,J
reg1strat1on
~
1tems
he
the
splayed
d
1s
1x
and
1con
(Add).
]
added (categories)
be
to
desired item
on the upper
changes to
1t
are
added
be
to
area
left
mode.
Edit
displayed.
of
Choose
4
details on the
For
'Editing the
You
•
You
•
After editing
s
After
6
displayed, touch
Editing
7
the
to
.
you touch
If
switches
desired
the
•tems
Favorite
up to
add
can
cannot register
complete,
is
caption for
the
complete
is
Favorite screen.
(Cancel) while editing, the
;:Jj
{
the previous
to
item
oe
tG
Screen"
54
[OK].
Favorite
in the
items.
item more than
an
the
the
and
Edit screen.
added.
be
to
to
added,
confirmation
refer
Owner's Manual
once.
(Back).
touch
[((]
screen switches
screen
is
Page 8
Android Auto (Optional)
··
·
ewner
~
s
manua
J
Android Auto
(Optional)
Android
Google Maps, listen
Download
1
2
Auto
is
Press
The
Menu
the
the
designed
Android
MENU
screen
to
playlists
Auto
is
to
make it easier
App
button.
displayed.
Touch [Android Auto].
The
Android Auto
•
For
details operation
screen
of
or
podcasts from your favorite apps, send messages via voice, and more.
from
is
displayed.
Android Auto, refer to "Android Auto"
Apple CarPiay Operation
Apple CarPiay
with
your
receive messages, and listen
iPhone
For
Press
You
You
to
details, refer
f
can make a call, play music, etc., by using
can also control Apple
is
a smarter, safer way
iPhone
this
to
while
driving and puts
unit
and go.
to
Owner's Manual for
activate Siri function
CarPiay on touchscreen .
to
music,
of
to
the
use
all
more
to
use apps from
the
Google
(Optional)
your
iPhone
them
right
in a
way
information.
iPhone.
Siri
function
your
phone
Play
store before continuing.
in
in
the
car.
Apple
on this unit.
that
allows you
of
the
You
to
iPhone.
while
you're on
the Owner's Manual for
Apple CarPiay (Optional)
CarPiay
can
get
stay focused on
takes
the
directions, make calls, send and
the
the
road. Navigate
more
information.
things
road. Just plug in your
you
want
with
to
do
7-EN
Page 9
Owner's
manual
Radio/HD
Radio"'/RBDS
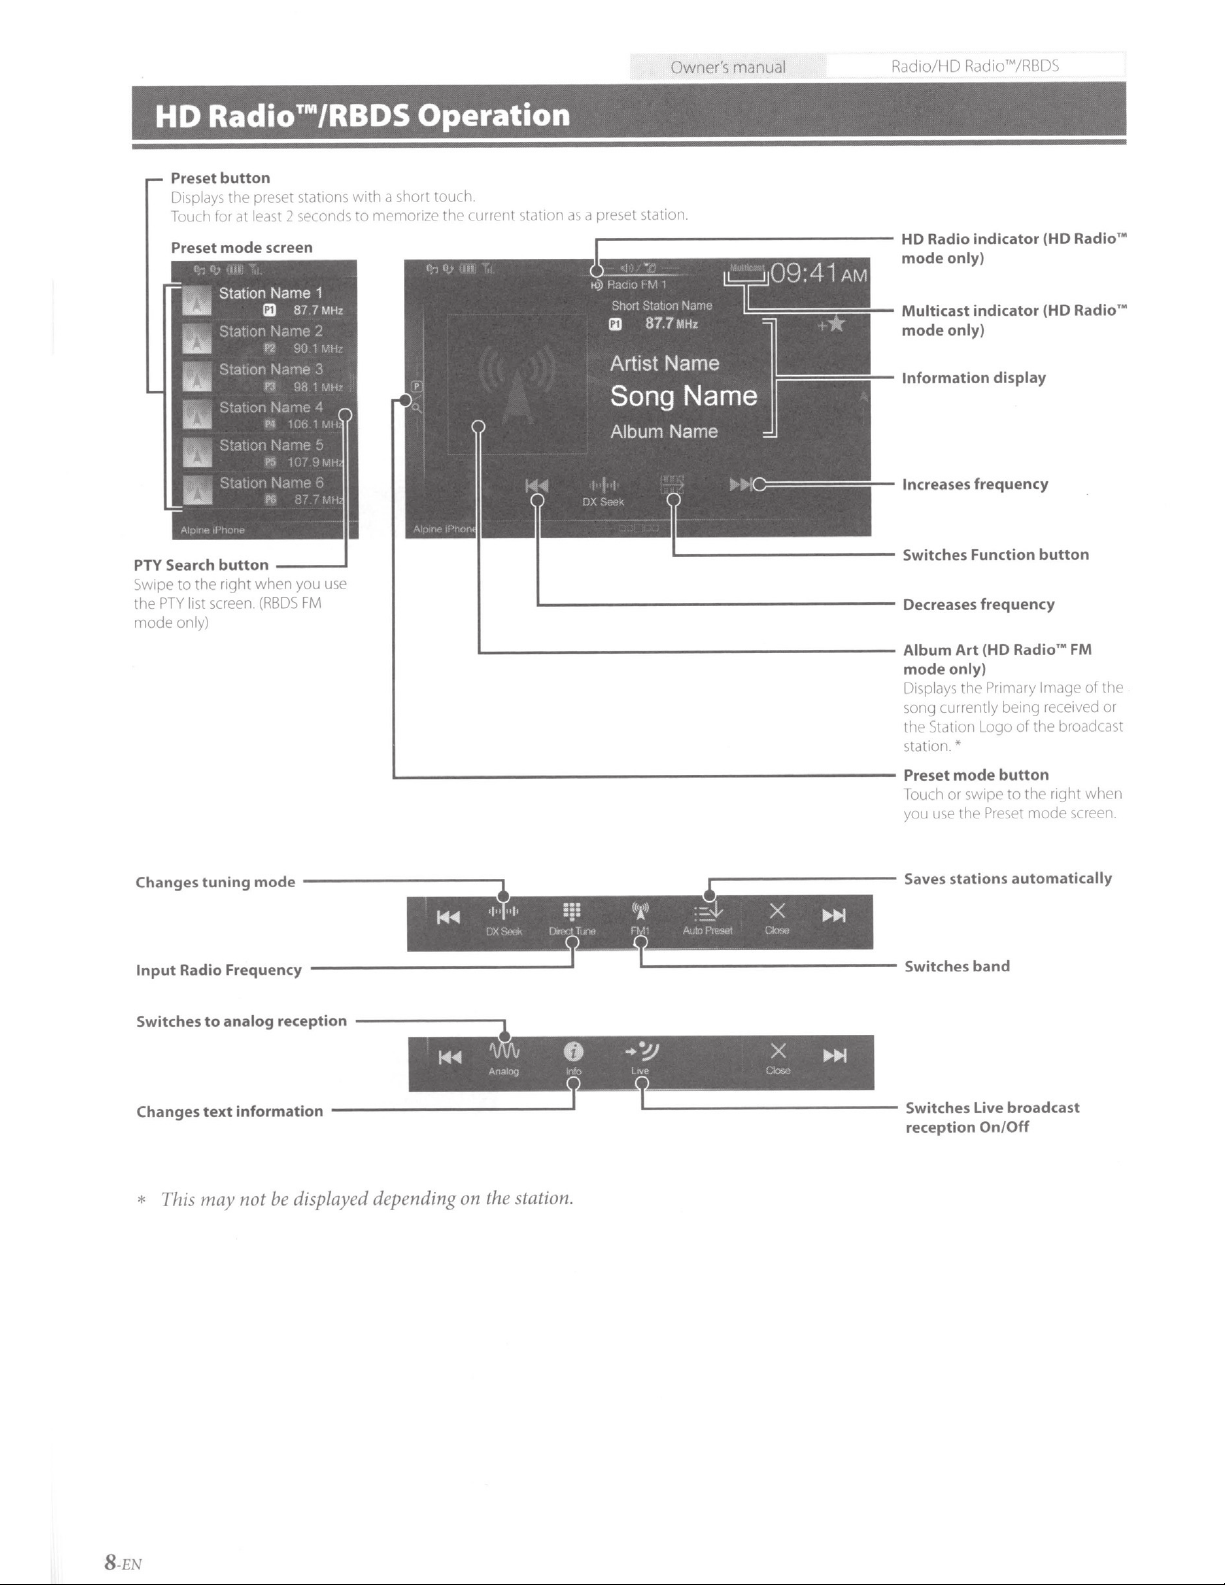
HD
Preset button
Sf'
Preset
Search button
PTY
the
mode
Ntpe
P'Y
the
to
list screen.
only)
Radio™/RBDS
d
With
Oros
Stdt
·t
prl
t
,ty•
r Jt '
t ·
mode
nght
'r-·
screen HD Radio indicator (HD Radio
---~
you
wher
FM
(RBDS
·w-:is
use
to
me
Operation
tOUch.
'hOrt
rht>
r1ortze>
._-------------------------
st.1t
<.ttrrent
L---------------------
on
station.
·t
prf
l'
Radio••
FM
the
of
or
broddcaq
when
<crer>r
..
mode only)
Art
only)
e
the
urrePtly
on
~tdt
•
;wtp•
or
~
tile
indicator (HD
frequency
Radio
(HD
Primary
bE:'tng
the
of
ogo
tt
to
mode
Preset
Multicast
mode only)
Information display
Increases
Album
mod
Displays
song c
tl•t>
tatior
Preset mode button
-')U<
yottuse
'•
ln1.19e
recetveJ
nqht
Changes
Input
Switches
Changes
*
tuning mode
Radio Frequency
may
This
-----------,~
--------------''
analog
to
information
text
reception
--------,~
____________
not be displayed depending
l+t
~--
on
I•
I
. .
.
.
'
the station.
=i=
0
T
.....
.,.---------
,._,.
.
=._:J..
X
-.
.
~
'L-------------
•!)
..
,,,
____________
T._
X
.
~
~
Saves stations automatically
Switches band
Switches Live broadcast
Off
reception
On/
8
-EN
Page 10
Owner's manual
USB
Flash
drive Operation (Optional;
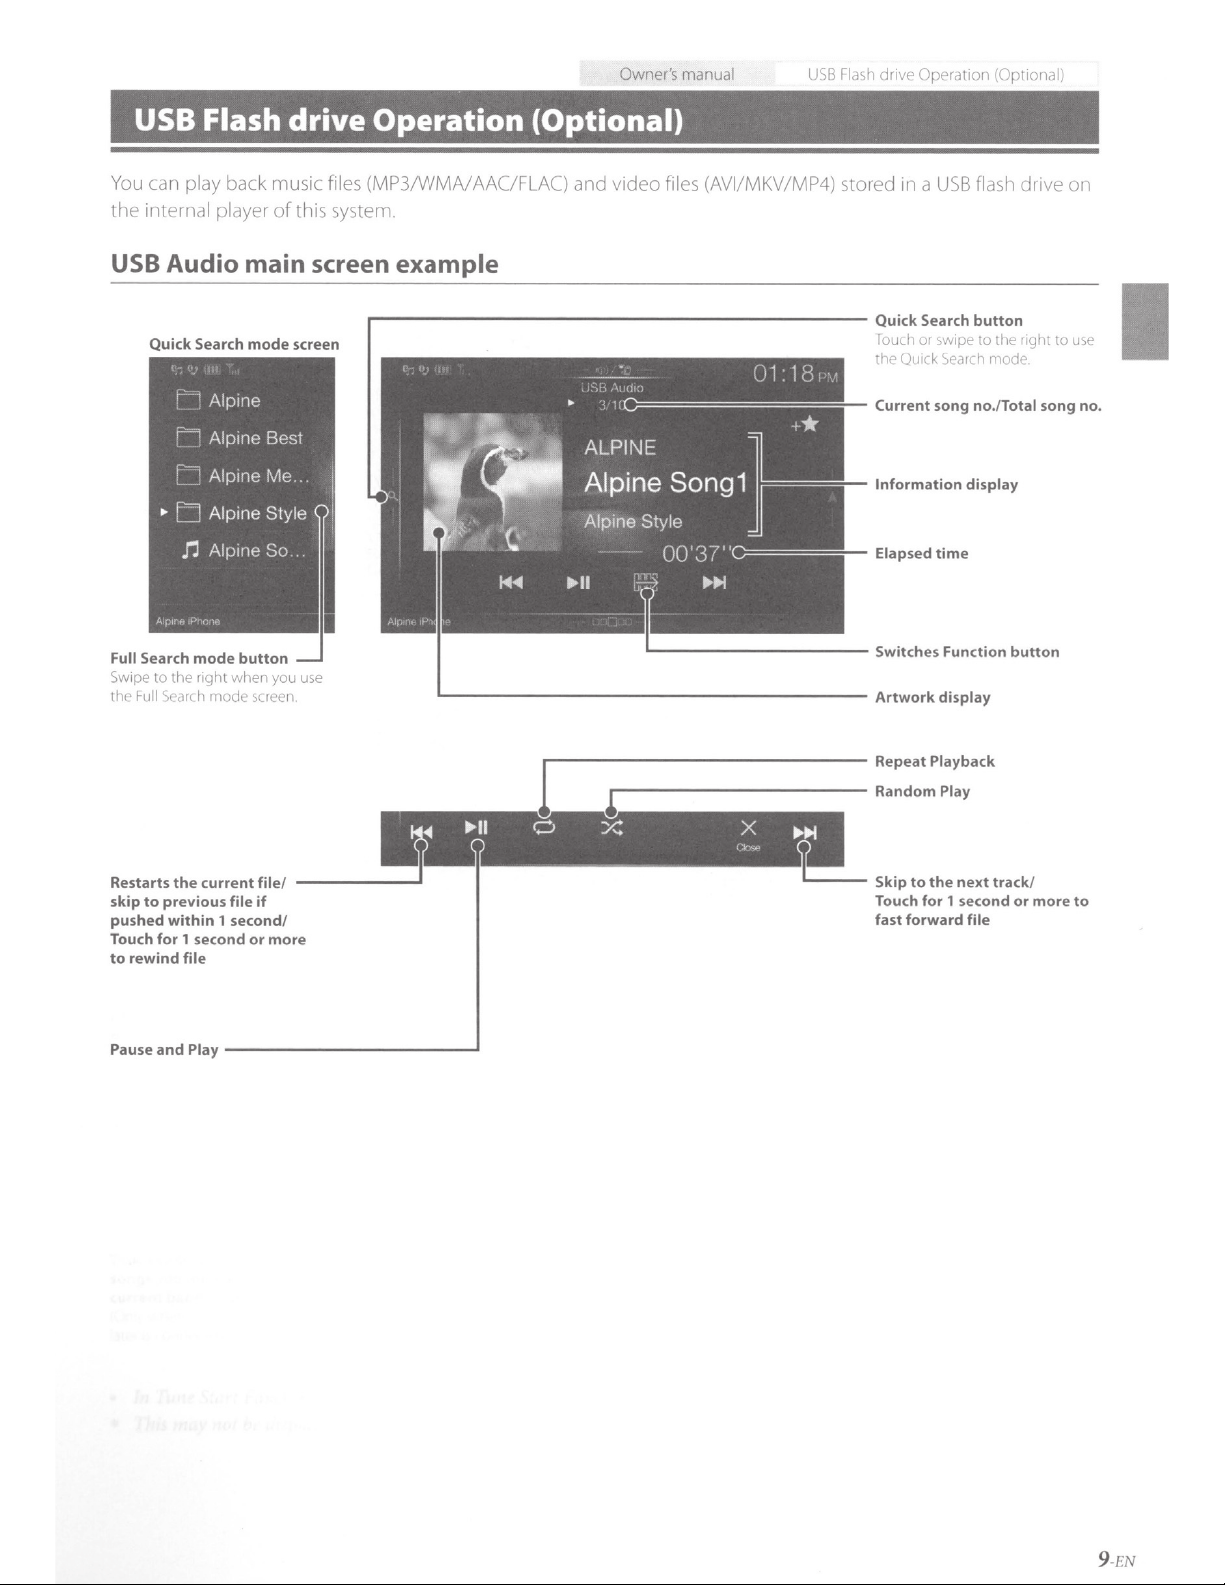
USB
Flash
drive
You can play back music fil
t
he
interna I player
USB
Audio
Quick
Full
Search
Swi
pe
to
the
the
Full Search
Search
mode
right
mode
of this system.
main
mode
screen
button
when
you
use
screen.
screen
Operation (Optional)
es
(MP3/WMA/AAC/FLAC) and vi
example
,.....-----------------------
deo
files (AVI/MKV/MP4) stored in a
USB
Quick
Search
Touch
or
tht
Current
Information
Elapsed
.wipe
QuiCk Search
song
time
flash drive
button
to
thE.
right
mode
.
no./Total
display
to
song
on
use
no.
Restarts
skip
to
pushed
Touch
for 1 second
to
rewind
Pause
and
the
current
previous
within 1 second/
file
Play-------------'
file if
or
file/
more
--------''
IJl>ll
.----------------
,.-------------
Repeat
Random
1
0 X: X
'.
11+1
~
Skip
Touch
fast
Playback
Play
to
the
next
for 1 second
forward
file
track!
or
more
to
9-EN
Page 11
Owner's manual
Par>dora•Jnterllet
io Operarron (Opnonal)
Had
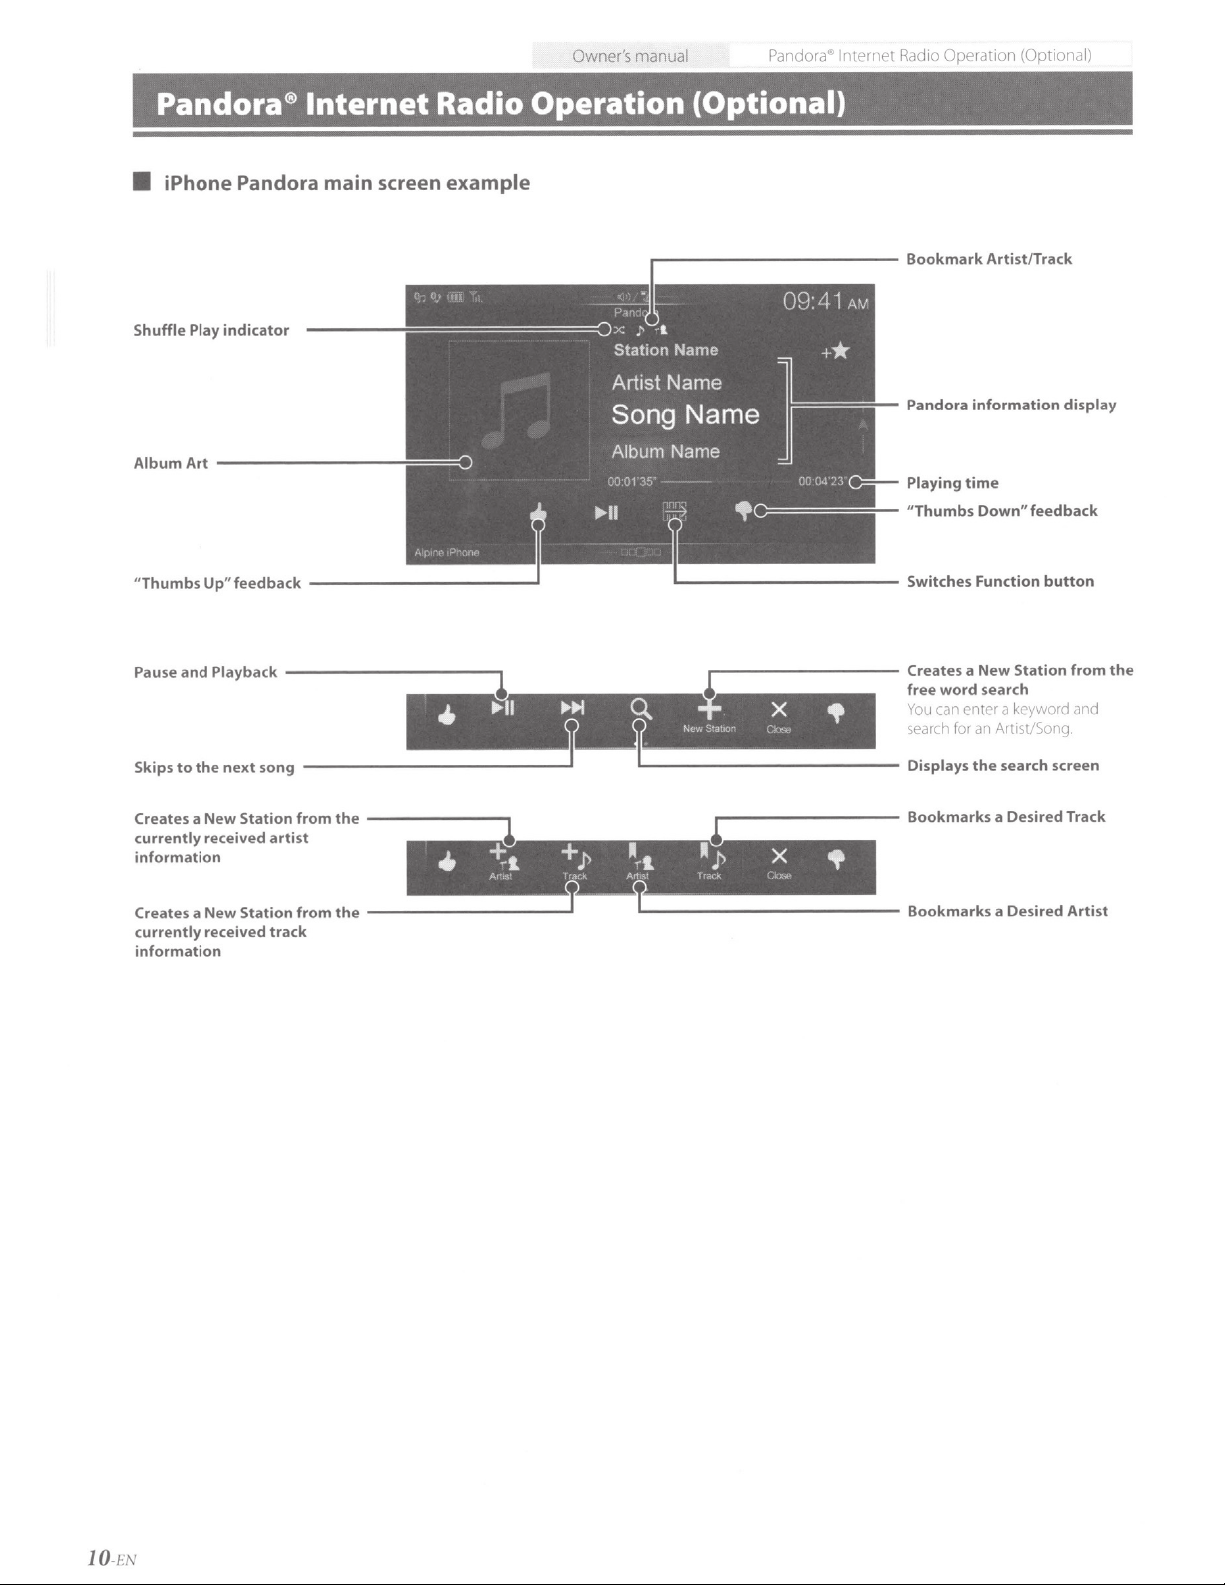
Pandora®
iPhone Pandora main screen
•
and
indicator
---------
Playback
Shuffle Play
Album Art
Pause
Internet
-----------,1
Radio Operation
example
.-------------
~
(Optional)
r----------
1
•
Bookmark
Pandora
Playing
"Thumbs
Creates
free
You
<<>.1rd'
information
time
a New
word
enter a keyw
)n
f0r
Artist/Track
display
feedback
Down"
from
Station
search
'lP
>rrl
~t/''1f"J
Art
the
anrl
the
to
Skips
a New
Creates
currently
information
Creates
currently
information
received
a New
received
next
Station
Station
search screen
--------------'~
song
--------.,
the
from
artist
from
track
•
------------J'
the
"t
•
+
t
'
L-------------
l •
·-
!'
t>•
'L-------------
,,..---------
]'
•
X
if
Displays
Bookmarks
Bookmarks
the
a Desired Track
a Desired Artist
10
-r\
Page 12

Owner's manual SiriusXM
Satellite
Radio Operation
(Optional)
SiriusXM
When
an
optional
Search
mode
Sw1pe
you
use
screen
Preset button
Swipe
list
button
to the
nght
the
search
Preset mode screen
vert1cally
to change
Satellite Radio Operation
SiriusXM Tuner
----,
when
mode
in
the
pages.
is
connected
L----------------------
to
this
unit, the
(Optional)
following
operations may be performed.
Signal
Indicator
SiriusXM
information display
Changes
Expands function menu
Album Art
Displays
channel currently
Satellite
to
next channel
the Album
Radio
Art,
etc
being received
of
I
the
•
SmartFavorites
When
a preset
it
will
be
channel
Touch
this button to
SmartFavorites
displayed.
Play/Pause
Touch
to
Touch
again
playing.
Changes
mode
Touch and
seconds
Tune Start function
Use
Tune
preset stations.
from
its
beginning on programme_d
(Only
when
later
is
connected.)
Touch
to
songs you missed
current
(Only
when Siriu
lat
er
is
connected.)
(*)
channel
designated
and the
*
channel
button
pause
playing.
to
resume
to
Category browsing
hold
for
to
activate/deactivate
Start
to
play
SiriusXM
scan through
band
of
preset channels.
sXM
button
is
stored,
as
a
SmartFavorites
button
lights
the
i::f
up.
is
cancel
and
--------------.1
-----------''
at least
2
---------.
music content
the
your
_________
or
or
T
uner-SXV200
all
from
Tuner-SXV200
~------------------------
..
---------
1
•
S::
~
l~'
X
Tt
!l•
c
I ,
~
•
IJI>II
•
(
111
0
,
I)
II
'c
'L------------
1 !
.----------
___.l
JL------------
..,_
Presetmodebutton
Touch
or swipe
to
you
use
the
Select channel number
directly
Changes
Jump
Memory
Touch
and hold for at
seconds
to
channel
with a short touch.
Recall
Stores a desired Song/ Artist
Preset
text
information
/Jump Recall
store
a Jump memory
the
the right when
mode
screen.
least
2
Jump
channel
•
In Tune
*
This
may
Start
Function mode
not
be displayed depending on the station.
and
Replay Function mode, the Function buttons change.
11
-EN
Page 13
Owner'5
flla"lual
HDMIDVD
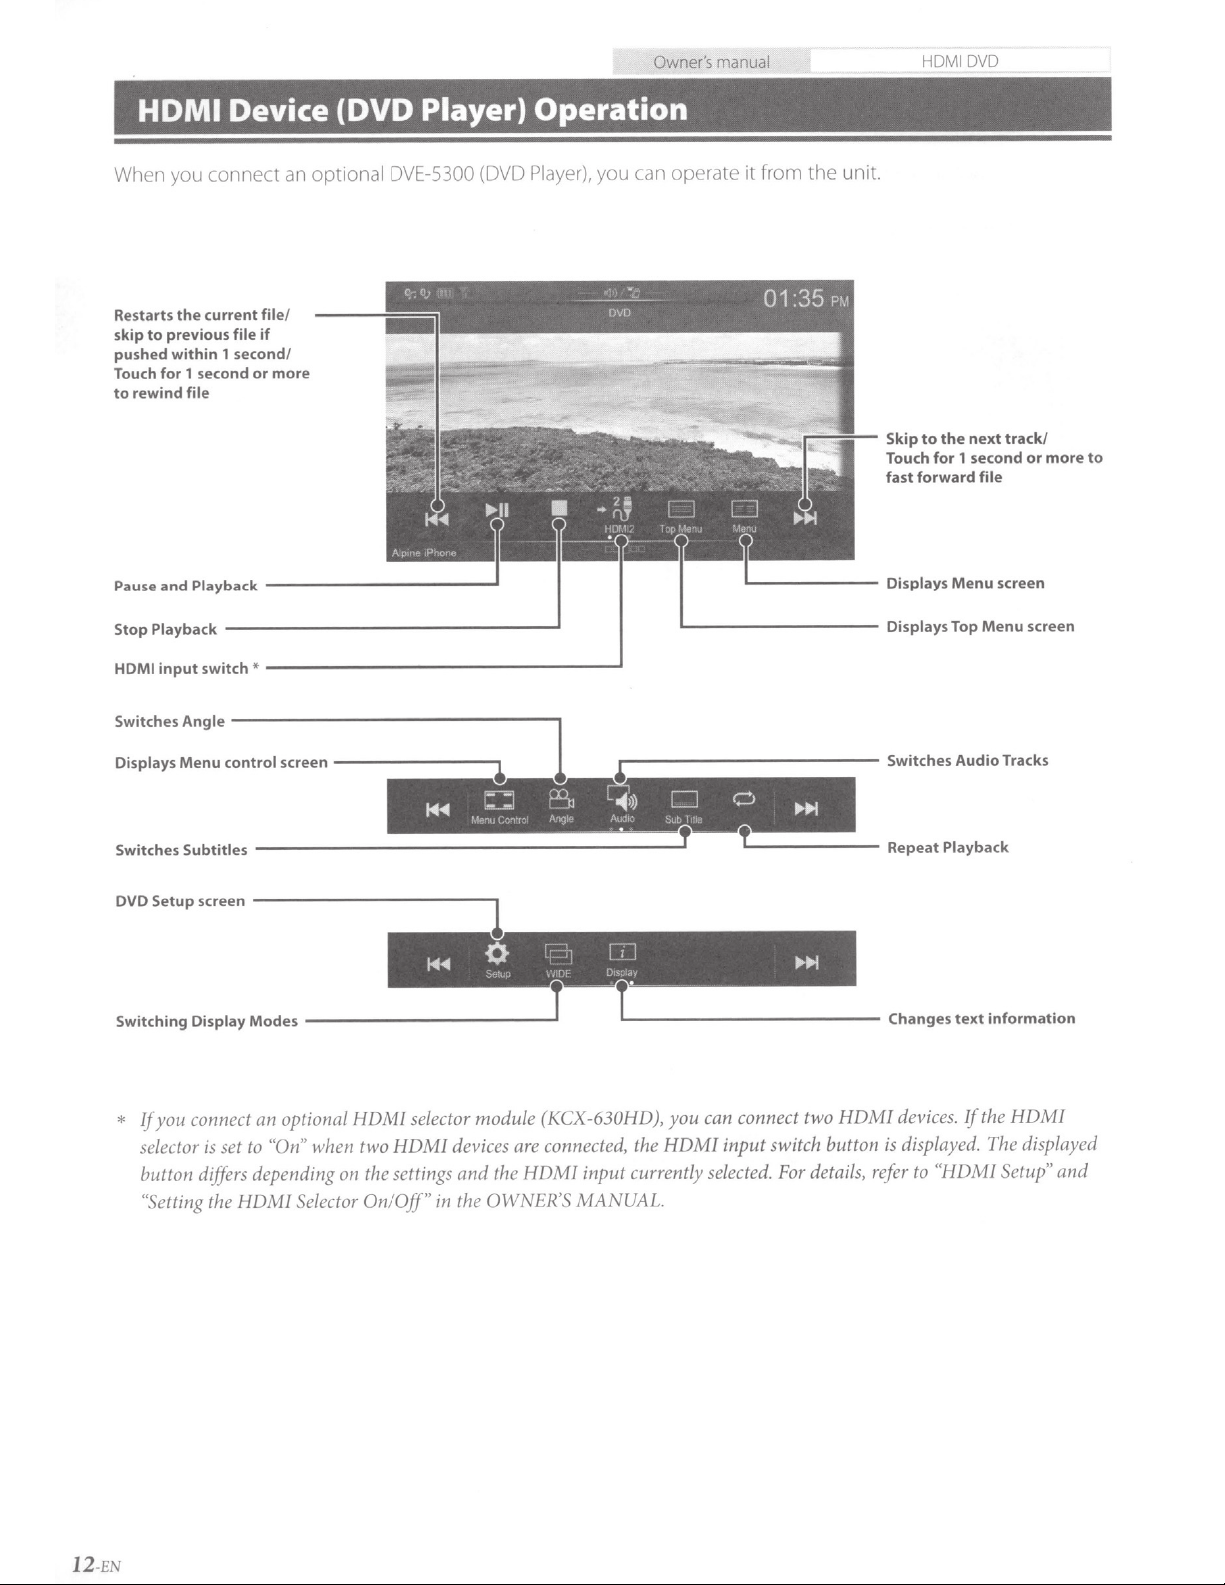
HDMI
When you connect an
Restarts
previous file if
to
skip
pushed
Touch for 1
rewind file
to
and
Pause
Playback
Stop
input
HDMI
Device (DVD
file/
current
the
/
within 1
second
or
second
Playback
-----------------'
switch *
more
----------....1
------------------'
optional
Player) Operation
DVE-5300 (DVD
Player),
you can operate
________
.__
it
.__
from
_____
unit.
the
.----::;...-
·
track!
next
the
to
Skip
forward
Menu
second
file
screen
Touch for 1
fast
Displays
Displays Top Menu
more
or
screen
to
----------------,
Switches
Displays Menu control
Switches
DVD
Switching Display
*
Angle
Subtitles
creen
s
Setup
you connect
If
set
selector
is
button differs
"Setting
the
--------------------'
-------------,1
Modes
an
to
depending
HOM/
-------...,.
screen
-----------...IT
selector module
optional
"On"
HOM/
when two HOM!
the settings and the
on
Selector
On/Off" in
1
(KCX-630HO),
.-------------
,._
___________
T.__
connect two
can
you
______
devices are connected, the HDMI input swit
For
ected.
l
se
OWNER'S
the
HOMT
input current ly
MANUAL.
butt
ch
details,
Switches Audio Tracks
Repeat
es
Chang
HOM/
devices.
displayed. The displayed
is
on
"HDMI Setup"
to
refer
Playba
text
If
ck
information
HOM/
the
and
12
EN
Page 14
Owner's
maroual
1Pod/iPhone
(Optional)
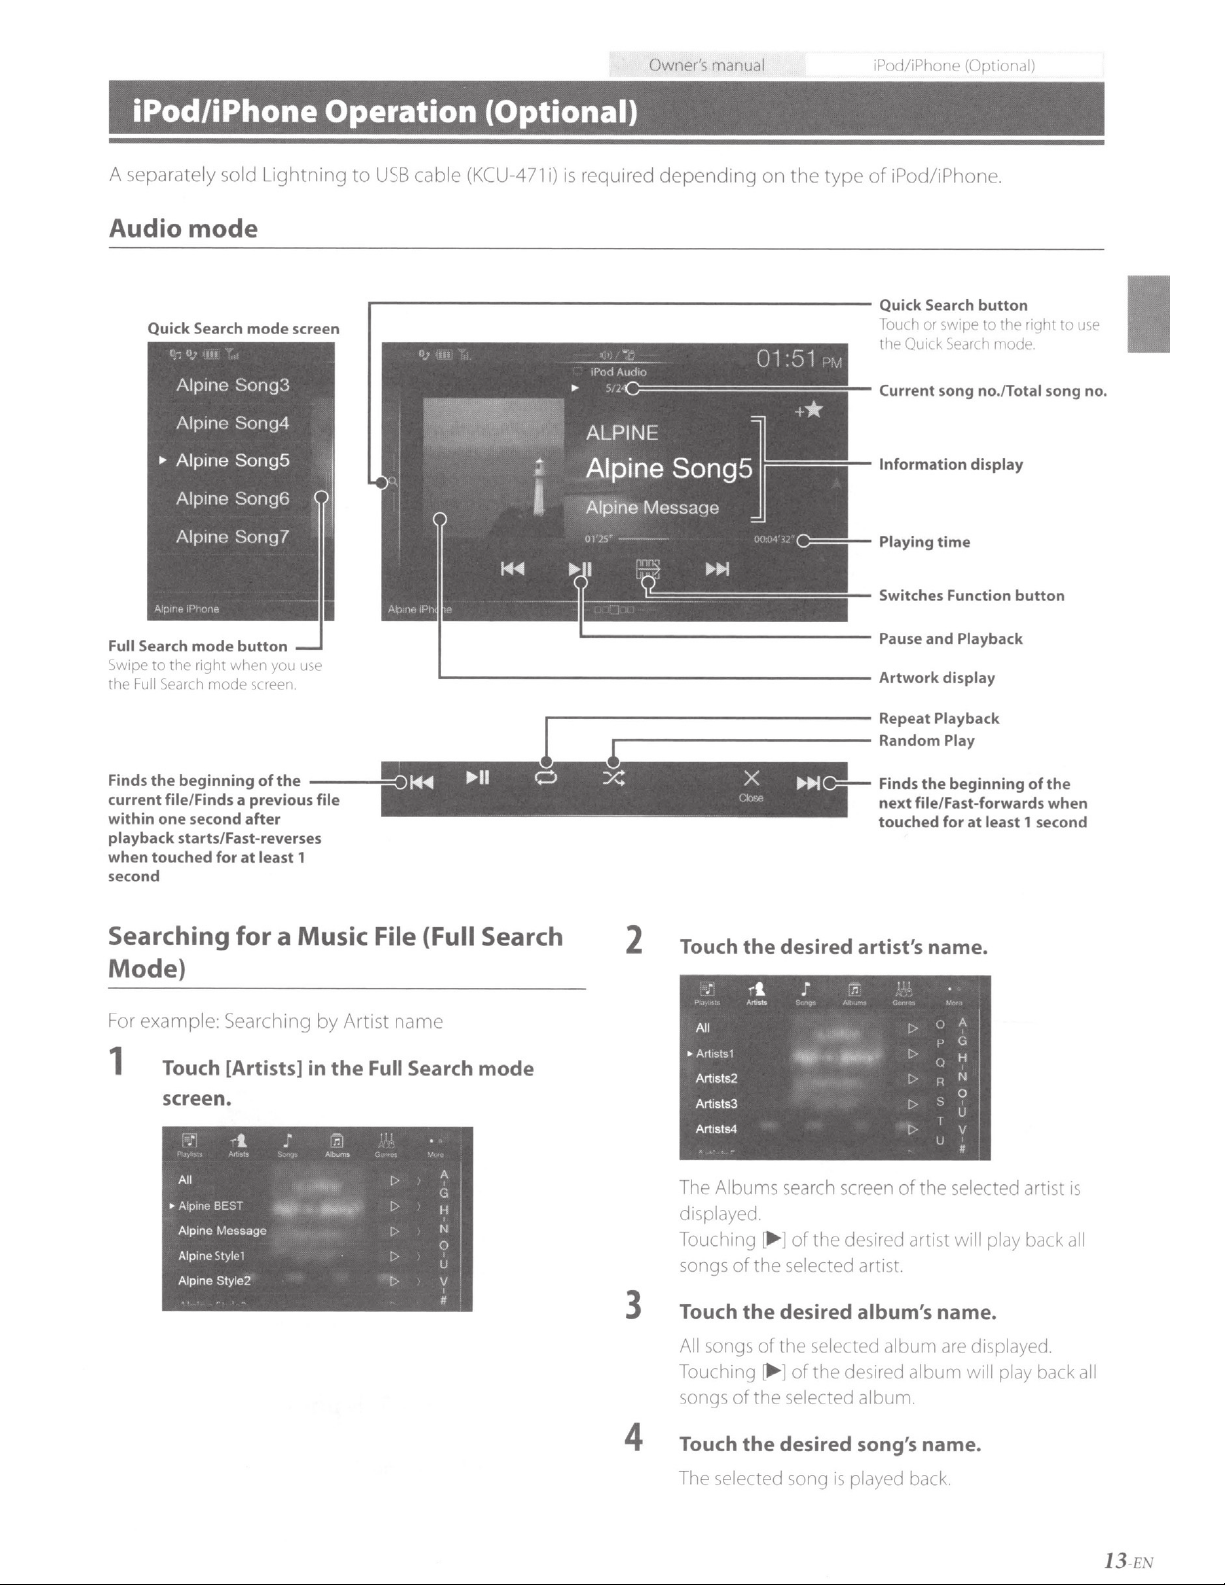
iPod/iPhone Operation
A
separately sold
Audio
Full
'>wire
the
Finds
current file/Finds
within
playback
when
second
mode
Quick Search
I
''.'''I
Alpine
Alpine
.. Al
pine
Alp1ne
Alp1ne
;....:
..
'
Search
mode
to
the
Full ')('Jrch
right
the
beginning
one
second
starts/Fast-reverses
touched
Song3
Song4
SongS
Song6
Song?
button
when
rnode
a previous
for
at
Lightning
mode
screen
you
screen
of
the
after
least
1
use
---
to
USB
....----------------------
file
cable
(Optional)
(KCU-471 i)
is
required
r---------------
l
...
-----------
depending
on
the
type
of
iPod/iPhone.
Quick Search
loU<
the
Current song
Information display
Playing
Switches Function
Repeat
RandomPiay
.:---
Finds
next
touched for
I
OuiLk 'learch
file/Fast-forwards
button
Jr
-w1pe
no./Total song no.
time
Playback
the
beginning
at
to
the
rnode
least
right
button
of
the
when
1 second
to
IJSE'
Searching for a Music
Mode}
F
or
example:
1
Touch [Artists] in
screen.
All
•
A
l
p1n~
BE:.~
Alpine
Message
Alponc
Style·
Alpine Style2
Searchi
-l
I
ng
by
-·
Artist
the
"
-
File (Full Search
name
Full Search
[··
A
G
II
N
()
u
v
mode
Touch
2
a.
The
displayed.
Touching
songs
3
Touch
All
Touching[
songs
4
Touch
The
the
~
t
All
A1t1~1::>1
Artisls2
Artisls3
Artisls4
Albums
~
of
the selected
the
songs
of
of
the
the
seleded
desired artist's name.
..
I.
...
..
search
screen
]
of
ti'e
des1red
desired album's
the selected album
~
)
of
the
des1red
selected album.
desired song's name.
s-.~ng
s
!·
(J
of
the selected artiSt
art
st
art1st.
name.
album will play
pli!yed back.
are
A
G
H
N
0
u
v
will
play
displayed
back
back
IS
al
all
13
EN
Page 15
Owner's
manual
Bluetooth Setup,
Bluetooth Operation
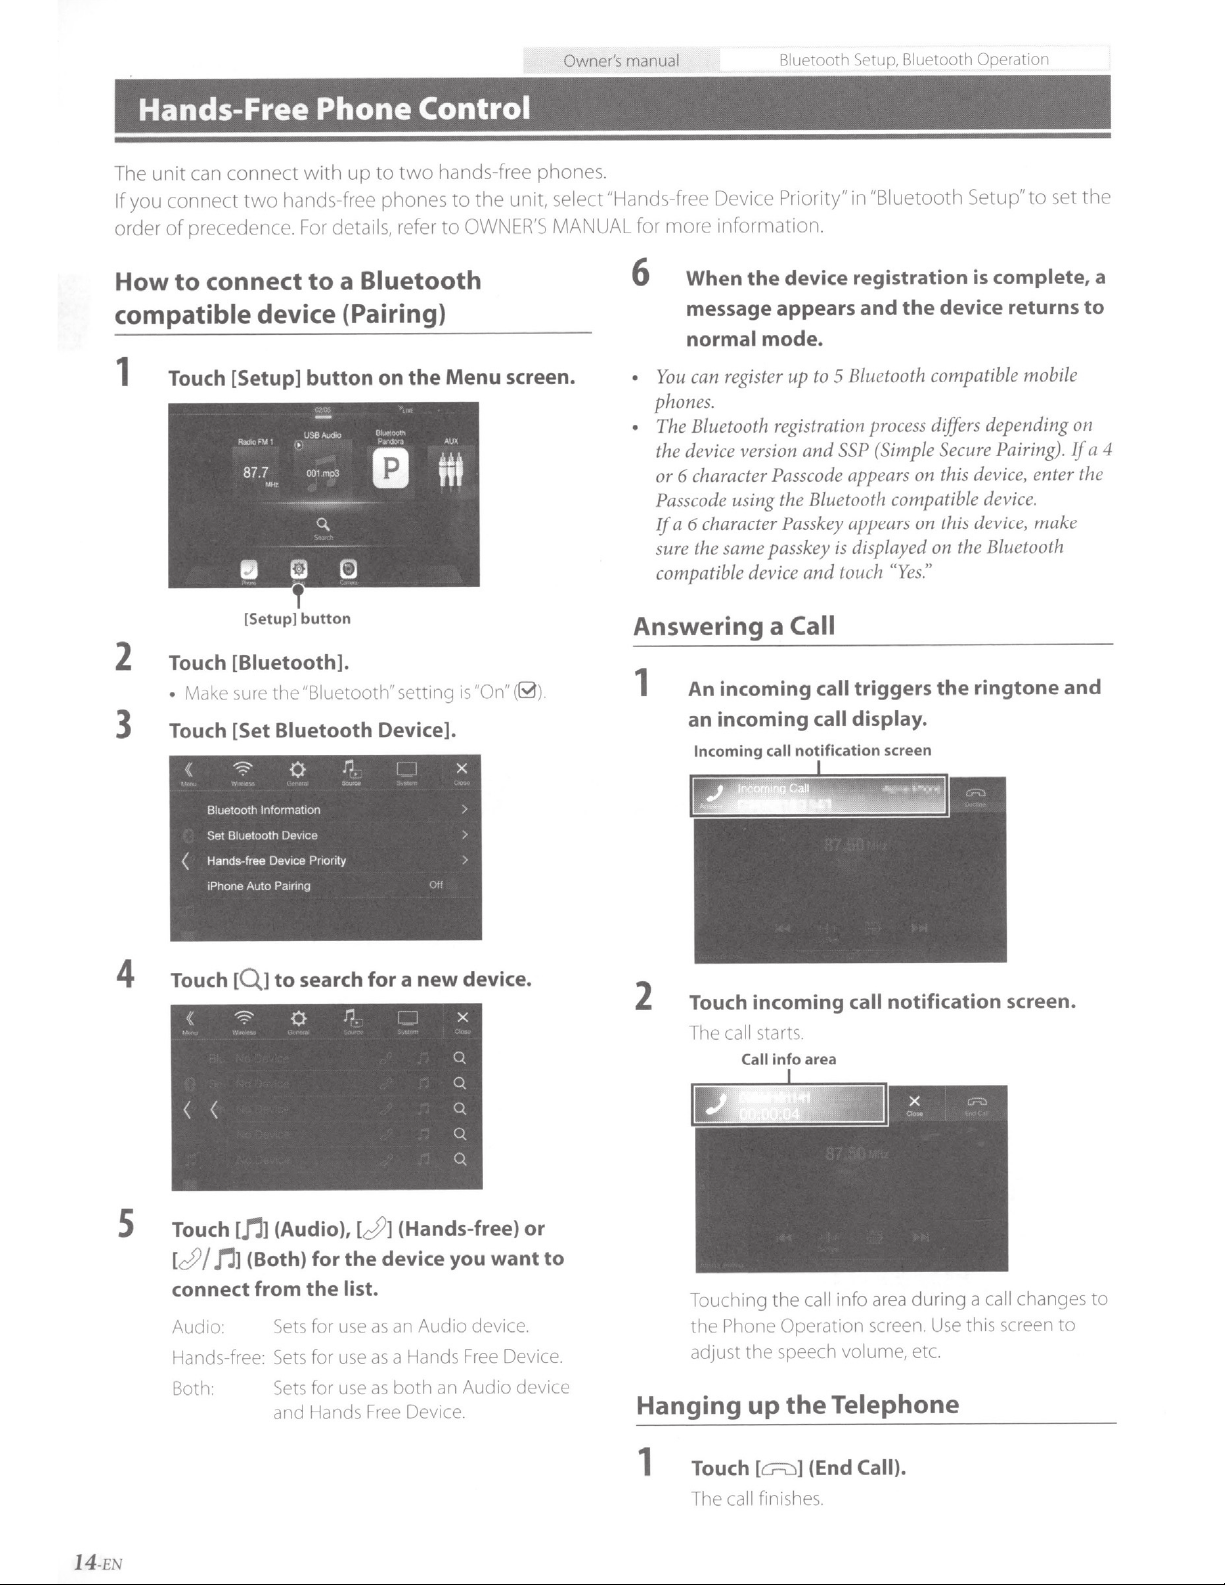
Hands-Free
connect with
The unit
you connect
If
order
How
compatible
1
2
3
can
precedence.
of
connect
to
Make
[Setup]
[Biuetooth]
sure
[Set
Touch
Touch
•
Touch
two
[S
Phone
to
up
hands-free phones
details.
For
Bluetooth
a
to
button
butto
)
(Pairing)
on
n
.
Device].
device
up
et
the "Biuetooth"
Bluetooth
Control
hands-free phones.
two
the unit.
to
OWNFR'S
to
refer
IS
screen.
"On"
the
setting
Menu
select "Hands-free
MANlJAI
@)
Device
more mformat1on.
for
When
6
message
normal
can
You
•
phones.
The Bluetooth registration
•
the device version and
or 6 character
Passcode
a 6 character Passkey appears
If
sure the same passkey
compatible device and touch
Answering
An
1
incoming
an
Incoming
Priority"
device
the
appears
mode.
to
register
incoming
up
Passcode
using the Bluetooth compatible
Call
a
call
call
notificatio
all
c
"Biuetooth Setup"
in
registration
device
the
and
Bluetooth compatible mobile
5
differs depending
process
(Simple
SSP
appears
displayed on the
is
triggers
display
n scre
Secure
this
on
this device, make
on
"Yes."
the
.
en
to
complete,
is
returns
Pairing).
enter the
device,
device.
Bluetooth
ringtone
set
the
to
on
a
If
and
a
4
4
S
Touch
[Q ]
!(
'9'
< <
Touch
Jj
[cf}/
connect
Aud1o:
free:
Hands
Both·
to
(Audio),
]
Jj
[
(Both)
]
from
Sets
Sets
Sets
al'd
search
0
for
the
for
for
for
Hands
...
..
[
the
list
use
use
use
for
J
J/
device
.
an
as
a
as
both
as
Free
new
a
q
;::;_
Q
Q
Q
(Hands-
you
Audio
Hands
an
Dev1ce
device.
X
free)
want
device.
Device.
Free
Audio
.
or
to
devic.e
Touch
2
call
The
Touching the
Phone
the
adjust the
Hanging
Touch
1
he
I
incoming
starts
info
Call
speech
up
G=W
[
fin1shes.
c.all
call
area
info
call
Operat1on
volume,
Telephone
the
(End
]
notification
during a
area
screen
etc.
Call).
Use
call
this
screen.
changes
screen
to
to
14
-EN
Page 16

Specifications
Owner's
manual
Specifications
MONITOR SECTION
Screen
Size
LCD
Type
Operation
Number
Effective
Illumination
FM TUNER
Tuning Range
Mono
50
Alternate Channel Selectivity
Signal-to-Noise
Stereo Separation
Capture
AM
Tuning
Usable
USB
USB
M
ax.
U
SB
File System
Number
Frequency Response*
Total
Dynamic
Signal-to-Noise
Channel
*
1 Frequency response may differ depending on the encoder
System
of
Picture Elements
Number
System
Usable
dB
Quieting
Ratio
TUNER
Range
Sensitivity
SECTION
requirements
Power
Consumption
C
lass
of
Channels
Harmoni
Range
Separation
of
Picture Elements
SECTION
Sensitivity
Sensitivity
Ratio
SECTION
1
c
Distortion
Ratio
software/bit rate.
9"
Transpare
TFT
1,152,000
(800
99%
LED
87.7-
9.3
13.5
80
65
35
2.0
530 - 1,710
25.1
USB
1,500
USB
USB
FAT16/
2-Channels
5-
0.008%
95
100
85 dB (at 1 kHz)
nt
typ
active
matrix
pes.
X
480
X
or
more
107.9 MH z
dBf
(0.8
!JV
dBf
(1.3
!JV/75
dB
dB
dB
dB
kHz
!JV/28
dBf
2
.0
mA
(COP
(Play
From
(Mass Storage
32
(Stereo)
20,000
Hz(±
(at 1
kH
dB (at
1
kHz)
dB
e
TN
3
(RGB))
/75
ohms)
Support)
Device)/
1 dB)
z)
LCD
ohm
C
lass)
s)
Bluetooth
Bluetooth
Outp
ut
Profile
SECTION
Specification
Power
GENERAL
Power
Requirement
Operating
Power
*2
Audio
•
•
temperature
Output
Primary
•
• SIN:
Preout (Front,
Preout (Subwoofer):
Due
and
amplifier ratings
Power output:
80
output
to
design
measured
dBA
(reference: 1 W into 4
level
Rear):
continuous product improvement, specifications
are
subject
The LCD panel
is
precision manufacturing
ratio
is
over
99.99%.
possibility that
ON
or
OFF.
0.01%
Bluetooth
+4
HFP
OPP
PBAP
A2DP
Distribution
AVRCP
Control Profile)
SPP
14.4
(11-16
-4°F
(-2ooc
16
per
CEA-2006 Standard
at
4
4
V/
4V/1
to
change without notice.
V3.0
dBm
Ave.
(Hands-Free
(Object Push Profile)
(Phone
(Advanced
Profile)
(Aud
ioNideo
(Serial Port Profile)
V
DC
V
allowable)
to +
140
°F
to+
60°
w
RMS
X
4
Ohms
and::;
Ohms)
1
Ok
ohms
Ok
ohms
manufactured using
technology.
This means that there
of
the pixels could
(Power class
Profile)
Book Access
Audio
Remote
C)
2
*
1%
THD+N
(max.)
(max.)
an
extremely
Its
effective pixel
is
a
be
either always
2)
Profile)
high
HDMI
SECTION
Input
Format
Ou
tput
Format
GPSSECTION
GPS
Reception
GPS
Reception sensitivity
frequency
480pNGA
480p
1,5
75.42 ± 1
-130
dB ma
MHz
x.
15-EN
Page 17

Note
When
HDMI
1
2
on
using
Term1~a1s
Slide
(A).
Secure
using
connecnon
HDMI
w1th
the
it
HDMI
suppl
tre
HDMI
with
Connection
cable\
H[lMI
eci
Bracket
screw (B).
the
Terminal
I
HOM
(B)
the cables to the
sPcure
Brar..ket.
the
into
main
for
(included)
Cables
grooves
unit
HOM
pay attention that the HDMI
Please
•
main unit and
Bracket
I
Terminal
I
HOM
DVD&Display
for
DVD&Display unit
the
--
(included)
unit
Bracket
-
are
•
--
the
s for
different.
16-t N
Page 18

•
Windows
or registered trademarks
the
•
Apple, iPhone, iPod, and iPod
Apple
Apple
•
"Made for iPod" and "Made for iPhone" mean
electronic accessory
specifically
been certified by
performance standards.
•
Use
user interface meets Apple performance standards.
Apple
vehicle or its
standards. Please
iPhone,
•
Pandora,
are
Media,
available in
•
HD Radio Technology manufactured
from iBiquity Digital Corporation.
Patents.
Radio and
registered trademarks
Corporation
countries.
•
Sirius,
trademarks
•
Google, Android, Android Auto, Google Play and
marks
•
SPOTIFY
trademarks
•
The Bluetooth®
trademarks
use
license.
• The terms
Interface,
registered trademarks
United States and
Media and
United States
Inc.,
registered in
CarPiay
to
of
the
Apple
is
not
responsible for
compliance
or
iPod may affect wireless performance.
the
Pandora logo, and
trademarks or registered trademarks
Inc.,
used
the
For
patents
the
in
XM
and all related marks and logos are
of
are
trademarks
and
the
of
owned
of
such marks
HDMI
and
the
Windows
of
Microsoft Corporation in
and/or
other
the
is
a trademark
has
been designed
iPod,
or
iPhone, respectively, and
the
developer
CarP
lay
logo
the
with
note
that
the
with
permission. Pandora
U.S.,
Australia and
see
http://patents.dts.com/. HD
HD,
HD Radio, and
or
trademarks
the
United States
Sirius XM Radio
of
Google
Spotify
Spotify
word
and
the
logo
AB.
mark and logos are registered
by
the
Bluetooth
by
Alpine Electronics, Inc.
HDMI
High-Definition
HDMI
Logo
of
HDMI
other
countries.
logo
countries.
touch
are trademarks
U.S.
and
other
of
Apple
Inc.
to
meet
means
that
operation
safety and regulatory
use
of
this
the
Pandora trade dress
New
under
U.S
.
and Foreign
"ARC"
of
and/or
Inc.
All rights reserved.
Inc.
are
among
SIG,
are
trademarks
Licensing,
are trademarks,
countries.
to
connect
Apple
a vehicle
of
product
of
Pandora
is
Zealand.
license
logos
iBiquity Digital
other
registered
Inc.
Multimedia
LLC
that
an
has
this
with
currently
are
other
and any
is
under
or
in
the
of
•
MPEG
Layer-3 audio
Fraunhofer
only
and does
use this
generation)
cable and/ or any
via internet, intra nets
electronic
pay-audio or
independent
details, please visit
http://www.mp31icensing.com
liS
conveys a license for private,non-commercial
not
product
real
content
audio-on-demand
coding
and Thomson. Supply
convey a license nor
in any commercial
time
broadcasting (terrestrial, satellite,
other
media), broadcasting/streaming
and/or
distribution
license for such use
technology
of
imply
(i.e.
other
networks or in
systems, such
applications.
is
required.
licensed from
this
product
any right
revenue-
other
as
An
For
use
to
I
17-EN
Page 19

About
the
USA/Canada
Rules
of
Bluetooth Electromagnetic Radiation Regulation
FCC/IC CAUTION
This device
subject
(1)
This device may
(2)
This device
undesired operation
Changes
compliance could
This
equipment
uncontrolled
Guidelines
has
very
permissive exposure
and operated keeping
Le
present
appareils radio exempts de
L:exploitation
(1)
l'appareil
(2)
l'utilisateur
si
Cet
equipement
pour
de
Ia
radioelectriques
qui est
(MPE).
distance de
complies
to
the
or modifications
and
low
appareil
le
brouillage
un
environnement
FCC
I
ignes directrices d'exposition
consideree
Cependant,
with
Industry Canada's licence-exempt
following
must
complies
environment
RSS-1
levels
est autorisee aux deux conditions suivantes:
ne
doit
de
est
(RF)
20
em ou
two
conditions:
not
cause interference; and
accept any interference,
of
the
device.
not
expressly approved by
void
the
user's
authority
with
FCC/IC
and meets
02
of
the
IC
radio frequency
of
RF
energy
evaluation
the
est
conforme
pas
produire de
l'appareil
est susceptible
conforme
non
CNR-1
conforme
il
est
souhaitable qu'il
plus
that
(MPE).
radiator at
aux
licence.
doit
accepter
d'en
aux
limites
contr61e
02
de
I'IC.
sans
evaluation de !'exposition maxi
entre
le
radiateur
it
least
CNR
brouillage;
Cet
including
the
to
operate
radiation exposure
the
FCC
radio frequency
(RF)
deemed
But it
compromettre
et respecte
et
to
comply
is
desirable
20
em
or
more away from person's body.
d'lndustrie Canada applicables aux
tout
brouillage radioelectrique
le
d'exposition aux rayonnements
les
regles
d'exposition aux frequences
equipement
devrait
etre installe
et
le
corps humain.
RSSs.
Operation
interference
party
responsible
the
equipment.
limits
set forth for
(RF)
Exposure rules.
without
that
fonctionnement.
les
emet
maximum
it
should
radioelectriques
une energie
male
et
utilise
is
that
may cause
for
an
Exposure
This
equipment
be
installed
subi,
meme
enoncees
RF
tres faible
autorisee
en gardant une
(RF)
Page 20

Fidele a
son
offrir cette garantie. Nous vous suggerons
concessionnaires
e
PRODUITS
Cette
connexes
ou ils
e
DUREE
Cette garantie est en
premier achat
e
PERSONNES
Seull'acheteur original
Rico ou au
e
CE
Cette
(pieces
e
CE
Cette
CD
®
@
@
®
@
0
®
®
e
COMMENT
CD
engagement
COUVERTS
garantie couvre les
(«
le
QUI
et
produit
ete
achetes.
DE
du
Canada,
EST
main
LA
COUVERT
d'ceuvre)
ont
garantie couvre
QUI N'EST
garantie ne couvre pas ce
Les
dommages
renvoyes
adressees au transporteur);
Les
utilisation, y compris des bobines acoustiques
a
de l'amplificateur jusqu'a
ou d'ecretage), une
(perforations, dechirures
endommages, disques durs
chute.
Tout
mauvaise utilisation
indiquees dans le manuel
Les
tremblements
aux autres cataclysmes naturels;
Les
reinstallation
Les
autorisee;
Les
retire;
Les
consentement d'Aipine;
Les
a Porto
Les
concessionnaire Alpine autorise;
a
Alpine
degats
provoques par
une surexcitation des enceintes
degat
provoque
dommages
frais
ou
les depenses relatifs
services rendus par une personne, physique
produits
produits
produits
Rico
ou
produits
SE
II
vous
faut
sans
incombe
remettre le
de
ou
frais
et
a
Alpine, le
un centre
assumer les frais
le
produit
tout
Ia
garantie
Alpine ou
produit
de
ne
fournir
ou
appeler
directement
PAR
produits
»).Ellene
LA
audio
couvre
GARANTIE
vigueur
client.
pendant
PROTEGEES
du
produit,
peut
se
prevaloir
tous
les defauts
du
produit.
PAS
COUVERT
survenus
dus
de
du
dont
qui
ont
qui
ne sont pas distribues par
au
qui
n'ont pas
durant
pour
etre repares
atteindre
defaillance
ou
par negligence, usage
ou
par le non-respect des instructions
a
Ia
force majeure,
terre,
au
produit;
le
numero
ete
adaptes
Canada;
PREVALOIR
service autorise
le rem placer par
si
produit
de
transport. Alpine a le choix entre reparer
pour
vous.
le
Si
produit
paiement
Alpine.
un
PAR
s'il resisde aux Etats-Unis,
de
de
qui
suit:
le
un
accident
(augmentation
mecanique
fentes},
endommages
de
l'utilisateur.
feu, aux inondations, aux
a
l'enlevement
de
serie
ou
ete
achetes par l'entremise
DE
LA
necessitant des reparations
Alpine
un
produit
les reparations sont couvertes par
a
ete
envoye a
des frais
GARANTIE LIMITEE
que
des
produits
dele
lire
Alpine
GARANTIE
de
les
an
LA
Ia
garantie.
materiaux
transport
(les reclamations
un
panneaux
a
modifies sans le
GARANTIE
ou
attentivement
aux numeros
voiture
et
produits
a
partir
que
de
GARANTIE
et
des
produits
ou
une
mauvaise
grillees
effet
de
distorsion
des enceintes
LCD
ou
ayant subi une
inapproprie,
notamment
ou
ou
ete
efface,
Alpine
a
Alpine
meme
neuf
ou
un centre
de
reexpedition
de
qualite,
listes
les accessoires
dans le pays
Ia
date
du
a Porto
de
fabrication
doivent
etre
suite
du
niveau
fissures
ou
aux
tempetes
a
Ia
morale
non
modifie
ou
aux Etats-Unis,
d'un
a
et
en
revise,
le
de
service
du
ALPINE
et
en entier.
ci-dessous.
ou
ELECTRONIQUE
Si
vous avez
®
Vous devez
sont
@
Vous devez
@
Vous devez
dommage
est
suivi des envois.
e
LIMITATION
LA
DUREE
GARANTIE
QUALITE
GARANTIE
AUTORISE
VERTU
DE
e
EXCLUSIONS
ALPINE
DES
DOMMAGES-INTERtTS
PAR
LE
PRODUIT.
TRANSPORT
PERTE
DE
DU
PRODUIT,
TOUS
LES
LES
DOMMAGES INDIRECT$ SONT
REMPLACEMENT
FONCTIONNEMENT
LES
RECOURS
REMPLACENTTOUTE
e
LIEN
La
garantie vous
jouir
d'autres droits,
En
outre, certains etats
Ia
duree des garanties tacites
ou
indirects. Dans ce
peuvent
e
CLAUSE
Pour
que
autorise ait
et
qu'il ait ensuite appose son cachet sur
e
NUMEROS
Si
vous avez besoin
numeros ci-dessous
proche.
AUDIO
NAVIGATION
Ou visitez
DE
L'AMERIQUE,
Ia
moindre
donner
a
l'origine
de
votre
joindre
Ia
emballer
durant
conseille
DE
TOUTES
D'ADAPTATION
LOY
ALE
EXPRESSE
A
ENGAGER
LA
VENTE
STIPULE
DU
TEMPS
LES
AUTRES
PREVUS
ENTRE
ne pas s'appliquer
son transport.
de
choisir
DES
GARANTIES
LES
ET
MARCHANDE,
DtTERMINEE
AUTREMENT
D'UN
DE
LA
EXPRESStMENT
LES
DOMMAGES-INTERETS
PRODUIT
DE
L'ACHETEUR
BILLETS
FRAIS
D'AUTRES
DU
PRODUIT.
PAR
AUTRE
LA
GARANTIE
donne
des
qui
varient
et
cas,
APPLICABLE
Ia
garantie soit valable, il
install€
le systeme
D'APPEL
de
nos services, veuillez appeler Alpine aux
pour
DE
VOITURE
notre
site Web
INC.(«
question, veuillez contacter
une
description
demande
preuve
soigneusement
un
transporteur
GARANTIES
A
L'UTILISATION
PRODUIT.
GARANTIE
QU'ELLE
ET
DOMMAGES INDIRECT$
VERS
UN
ORIGINAL,
D'AUTOBUS,
LIES
A
LA
BIENS
LES
PRESENTES
FORME
droits
d'un
certaines provinces
ou
d'exclure les
les limites
a
vous.
AU
audio
DU
SERVICE
le centre
1-800-ALPINE-1
1-888-NAV-HELP
a
l'adresse
de
Alpine»)
de
votre
Pour
est heureuse
detaillee
reparation.
achat
le
produit
eviter
qui
propose
l'un
de
des problemes
du
produit.
pour
perte
eviter
de
un
!'envoi, il
service
Ia
de
nos
vous
qui
tout
TACITES
TACITE$,
EST
CI-DESSUS.
LA
CENTRE
GARDE
LES
ENDOMMAGES
DE
ET
specifiques, mais vous pouvez aussi
etat
et
les exclusions
CANADA
faut
pour
de
service autorise Alpine le
http://www.alpine-usa.com
Y
COMPRIS
ET
LA
A
PERSONNE
N'EST
PAS
SONT
DE
SERVICE
LA
PERTE
LOCATION
DU
PRODUIT.
DE
REPARATION
EXCLUENT
LOI
ou
d'une
interdisent
dommages
GARANTIE
CELLE
RESPONSABLE
LES
SUITE
province
de
LIMITEE
RESPONSABILITE
LA
FRAIS
RECOURS.
LA
SEULEMENT
qu'un
centre d'installation
l'auto
dans
Ia
garantie.
A
LA
CLIENTELE
(1-800-257-4631)
(1-888-628-4357)
LA
DE
DE
LA
N'EST
D'ALPINE
PROVOQUES
FRAIS
DE
ALPINE,
VOITURES
OU
AU
MAUVAIS
a
l'autre.
de
limiter
accessoires
Ia
garantie
vehicule
LA
plus
D'UTILISATION
DE
ET
votre
DE
de
EN
ET
ALPINE ELECTRONIQUE
N'envoyez aucun
Appelez
notre
produit
numero
gratuit
DE
L'AMERIQUE, INC., 19145 Gramercy
aces
adresses.
ou
visitez
notre
site Web
si
Place, Torrance,
vous recherchez
un
centre
California 90501,
de
service.
U.S.A.
Page 21

ALPINE
ELECTRONICS
you
read
it
below.
e
This Warranty covers
("the
in
the
the
e
This Warranty
consumer
e
This Warranty
must
e
This Warranty covers defects in materials
labor) in
e
This Warranty does
CD
®
@
@
®
®
(f)
®
®
thoroughly.
PRODUCTS COVERED:
product").
Canada. Products
U.S.A.
LENGTH
purchase.
WHO
IS
COVERED:
reside in
WHAT
IS COVERED:
the
product.
WHAT
IS
Damage
repair
Damage caused
coils caused
up
failure (e.g. punctures, tears
panels.
Damage caused
failure
Damage caused
earthquake, fire, flood, storms
Any cost
the
Service
association.
Any
removed.
Any
without
Any
Puerto
Any
occurring
(claims
and
driven
Dropped
to
or
product.
performed
product
product
Alpine's consent.
product
Rico
product
OF
Should you have any questions, please
Car
Products
purchased in
OF
WARRANTY:
is
in
effect
for
only
covers
the
United
NOT
COVERED:
not
cover
during
must
be presented
by
accident
by
over-driving
into
distortion
or
damaged
by
follow
negligence, misuse,
instructions
by
act
expense related
by
which
has
which
has been adjusted, altered
not
distributed
or
Canada.
not
purchased
AMERICA,
Audio
purchased in
the
States,
an
INC.
Products
one
year
from
original purchaser
Puerto
the
following:
shipment
or
abuse,
the
speaker
or
clipping).
or
rips).
hard drives.
contained
of
God,
including
or
other
to
the
unauthorized
the
serial
by
Alpine
from
the
to
number
an
LIMITED
("Alpine"),
and Related Accessories
the
U.S.A.
Rico
or
of
the
Cracked
removal
Authorized
is
dedicated
Canada
are covered
are covered
the
date
of
the
of
the
or
workmanship
the
carrier).
including
(amplifier
improper
in
the
without
acts
person,
defaced, altered
within
product,
Canada.
product
to
burned
Speaker mechanical
level
or
damaged
operation
Owner's
limitation,
of
nature.
or
reinstallation
company
or
modified
the
United
Alpine
first
(parts and
Alpine
manual.
Dealer.
contact
only
only
voice
is
turned
LCD
or
or
States,
WARRANTY
to
quality
craftsmanship and are pleased
your
Dealer
e
HOW
ANY
IMPLIED
MERCHANTABILITY
THE
in
who
for
or
of
EXPRESS
AUTHORIZED
CONNECTION WITH
e
HOW
ALPINE
CONSEQUENTIAL
"INCIDENTAL
THE
PRODUCT
ORIGINAL
BUS
FARES,
AND
CUSTODY
DAMAGES"
PROPERTY
WORK
ARE
EXCLUSIVE
e
HOW
WARRANTY:
This Warranty gives you specific
other
In
addition,
long
an
or
limitation
limitations
e
IN
This Warranty
been
installed
and this
e
HOW
Should
for
your
CAR
NAVIGATION
Or visit
to
offer
or
contact
Alpine
WE
LIMIT
IMPLIED
WARRANTIES
ARE
ASSUME
THE
LIMITED
SALE
WARRANTY
TO
WE EXCLUDE
EXPRESSLY
PURCHASER'S
PROPERLY.
DISCLAIMS LIABILITY
DAMAGES
DAMAGES"
TO
THE
CAR
RENTALS
OF
THE
REFERS
TO
WHICH
IS
DAMAGED WHEN
THE
AND
IN
ALPINE
TIME,
PRODUCT.
THE
REMEDIES
LIEU
STATE/PROVINCIAL
rights
which
vary
some states/provinces
implied
of
as
to
CANADA
is
in
warranty
from
warranty
incidental
these matters
ONLY:
not
valid unless
your
vehicle
stamped
at
one
INCLUDING
SET
FOR
CERTAIN DAMAGES:
REFERS
OR
COST
lasts, and some
or
upon
this Warranty.
of
the
telephone
WARRANTIES:
FITNESS
IN
DURATION
FORTH
ABOVE
ALPINE
ANY
OF
THE
PRODUCT.
CAUSED
SERVICE
LOSS
OTHERS
OF
ALL
BY
THE
TO
EXPENSES
CENTER,
OF
THE
COSTS
THE
TERM
OF
REPAIRING
THIS
PROVIDED
OTHERS.
FOR
LAW RELATES
legal
rights, and you may also
state
to
state and province
do
not
allow
consequential damages. Accordingly,
contained
your
by
an Authorized
do
herein
Alpine car
installation
TO CONTACT CUSTOMER SERVICE:
the
product
nearest
AUDIO
our
website
require service, please
Authorized
Alpine
1-800-ALPINE-1
1-888-NAV-HELP (1-888-628-4357)
at;
http://www.alpine-usa.com
Service
call
Center.
We
suggest
numbers
FOR
TO
AND NO
OTHER
INCIDENTAL
PRODUCT.
OF
TRANSPORTING
LOSS
USE
OF
RELATING
"CONSEQUENTIAL
OR
PRODUCT
UNDER
limitations
not
allow
may
audio
Installation Center,
by
the
the
(1-800-257-4631)
listed
USE
AND
THE
PERIOD
PERSON
LIABILITY
AND
THE
OF
THE
THE
PRODUCT,
TO
THE
REPLACING
DOES
THIS
WARRANTY
TO
THE
to
province.
on
the
exclusion
not
apply
product
installation center.
following
that
OF
IS
IN
TERM
CARE
OTHER
NOT
have
how
to
you
has
number
.
e
HOW
TO
CD
You are responsible
Alpine
initial
the
charge.
product
Alpine,
®
You
which
@
You
@
You
shipment.
carrier
ALPINE ELECTRONICS
Do
not
Call
the
Service
shipping
product
If
Alpine
should
service
must
must
that
send
toll
free
OBTAIN
Center
charges.
with
the
repairs are covered
was shipped
will
provide
is
required.
supply
package
To
prevent
provides a
products
telephone
WARRANTY
for
delivery
or
Alpine
Alpine
a
new
or
reconditioned
to
an
Authorized
pay
the
return
a
detailed
proof
of
your
the
product
lost packages
tracking
OF
AMERICA, INC.,
to
this address.
number
SERVICE:
of
the
product
for
repair and
will,
at
its
by
the
Alpine
shipping
description
purchase
securely
it
is
recommended
service.
19145 Gramercy Place,
or
visit
the
to
an
for
payment
option,
repair
product
Service
charges.
of
the
the
product.
avoid
website
without
problem(s)
damage
to
warranty, and
of
to
Authorized
of
any
or
replace
if
the
Center
or
for
during
to
use a
Torrance,
locate a service center.
California 90501,
U.S.A.
Page 22

ALPINE
ALPINE
ALPINE
ELECTRONICS
1-7,
Yukigaya-Otsukamachi, Ota-ku,
Tokyo
Phone:
ELECTRONICS
19145 Gramercy
California 90501,
Phone 1-800-ALPINE-1
ELECTRONICS
161-165 Princes
Hallam
Victoria
Phone 03-8787-1200
ALPINE
Wilhelm-Wagenfeld-Str. 1-3,
80807
Phone 089-32
MARKETING,
145-0067,
03-5499-4531
ELECTRONICS
Munchen, Germany
JAPAN
OF
AMERICA,
Place,
Torrance,
U.S.A.
(1-800-257-4631)
OF
AUSTRALIA
Highway,
3803,
Australia
GmbH
42
640
INC.
INC.
PTY.
LTD.
ALPINE
Alpine House Fletchamstead Highway,
ALPINE
20090
ALPINE
01013
ELECTRONICS
Coventry
ELECTRONICS
184
CS
95
Phone
ALPINE
Viale
Trezza
Phone
ELECTRONICS
Portal
de Gamarra 36, Pabell6n,
Vitoria
CV4
www.alpine.co.uk
allee
des Erables
52016-
945 Roissy
FRANCE
: +
33(0)
ITALIA
Cristofaro Colombo,
no
sui
+39
(Aiava)-APDO
Phone
945-283588
OF
U.K.
9TW,
U.K.
France S.A.R.l.
Villepinte
COG
cedex
1 48
63
89 89
S.p.A.
Naviglio Ml,
02
484781
DE
ESPANA,
133,
LTD.
8
Italy
S.A.
32
Spain
Take
a
moment
com/registration.
to
protect your purchase by registering your
You
will also
be updated on
product
product
now
information, special
at
www
.alpine-usa.
promotions, Alpine
news.
Prenez
registration. Vous recevrez en outre des mises
le
temps de proteger votre achat en enregistrant votre
a
jours sur des informations de produits, des offres
produit
sur
www
.alpine-usa.com/
promotionnelles et des nouvelles concernant Alpine.
Le
recomendamos
que
proteja
su
adquisici6n registrando
su
producto
lo
antes
posible
direcci6n www.alpine-usa .com/registration. Asimismo, recibira informacion sobre productos,
promociones
Yamagata
2-6-34, Takashima,
Kanagawa,
Printing
Japan
especiales
Co., Ltd.
Nishi-ku,
Yokohama,
y noticias de
Alpine.
Designed
68-34732Z52-A
en
Ia
by
ALPINE
Printed
Japan
in
Japan
(Y _AS).
Page 23

Chevrolet/GMC
FULL SIZE TRUCK z 1/20
CHEVROLET/GMC
i209-GM
Installation Manual
z
Model: Full Size Truck
z
Model Year: 2014-2018
(BOSE® Sound System requires KCX-BOSE-GM which is sold separately)
Model Year
CHEVROLET SILVERADO
GMC SIERRA
* The specified vehicles have been tested and have met compatibility specs at the time of testing. Compatibility is
not guaranteed if the manufacturer has made production changes to the listed vehicles above.
WT, LS, LT, LT Z71, LTZ, LTZ Z71 2014-2018
SIERRA, SLE, SLT 2014-2018
Warning: Before you begin wiring, remove the ground wire from the negative
terminal of the battery. Failing to do so could lead to electric shock, injury or
improper product operation.
Introduction
zCongratulations on purchasing the i209-GM. This installation manual is designed to take you through the
step-by-step installation of the i209-GM into a 2014-2018 Chevrolet Silverado / GMC Sierra. Please familiarize
yourself with the owners manual and if you still have additional questions please call 1-800-TECH-101.
Note
zDesign and specifications are subject to change without notice for improvement.
To Ensure Safe Use, Always Follow These Precautions
zThe installation of this product requires specialized skills and experience. We recommend that you have the
product installed by the store that you purchased it from.
zBefore you use this product, be sure to carefully read this installation manual and the separate user's manual
so that you can use the product correctly. Alpine Electronics bears no responsibility for problems that arise as
a result of failure to follow the instructions in the manuals.
zThis manual includes a number of symbols that are intended to help you use the product safely, to prevent
harm to you and others, and to protect against damage to property. These symbols and their meanings are
listed below. Make sure you fully understand these symbols before you begin reading the main text.
Explanations of Injury and Damage That May Result from Incorrect Use
Warning
Caution
Ignoring the content marked by this indication and using the product incorrectly is
expected to lead to death or serious injury.
Ignoring the content marked by this indication and using the product incorrectly is only
expected to lead to injury or property damage.
Page 24

Types of Precautions
Chevrolet/GMC
FULL SIZE TRUCK z 2/20
Forbidden
Forbidden
Indicates actions that are forbidden
(must not be performed)
Mandatory
Indicates that disassembly is
forbidden.
Indicates actions that are
mandatory (must be performed)
Marks content that should receive
your full attention.
Warning
Do not disassemble or modify the product. Doing so could lead to an accident, fire,
or electric shock.
Forbidden
Store screws and other small objects where small children cannot reach them. If one of these
small objects is swallowed, consult with a doctor immediately.
When replacing fuses, be sure to use fuses with the specified current rating. Failing to do so could
lead to an accident or fire.
Forbidden
Mandatory
Only connect the product to a 12 VDC negative ground car. Failing to do so could lead to
an accident or fire.
Before you begin wiring, remove the ground wire from the negative terminal of the battery.
Failing to do so could lead to electric shock or injury.
Do not cut the insulation on a cord and take power from another device. Doing so could
lead to fire or electric shock.
Do not install the product in a location where it will obstruct the driver’s forward view;
interfere with the operation of the steering wheel, gearshift, or the like; or pose a
threat to passengers. Doing so could lead to an accident or injury.
Mandatory
Forbidden
Forbidden
Page 25

Chevrolet/GMC
FULL SIZE TRUCK z 3/20
When making a hole in the vehicle body, be careful to avoid damaging pipes, the fuel tank,
electrical wiring, and the like. This kind of damage could lead to an accident or fire.
When installing and grounding the product, do not use any of the bolts or nuts of the
steering wheel, brakes, fuel tank, or the like. Doing so could make the brakes stop working
or lead to fire.
Do not install the product near the passenger-side airbag. Doing so could interfere with the
operation of the airbag and lead to an accident or injury.
Bundle cords so that they don’t interfere with driving. Wrapping cords around the steering
wheel, gearshift, brake pedal, or the like, could lead to an accident or damage equipment.
Forbidden
Forbidden
Caution
Connect the product properly according to the instructions. Failing to do so could lead
to fire or an accident.
Do not sandwich cords between the seat railing or allow them to touch protrusions.
Resulting breaks or shorts could lead to electric shock or fire.
Do not block vents or heat sinks. Doing so could lead to fire or damage equipment.
Use the accessories according to the instructions, and attach them securely.
Failing to do so could lead to an accident or damage equipment.
Do not install the product where it may be exposed to water or in a place with high levels
of humidity or dust. Doing so could lead to fire or damage equipment.
Forbidden
Forbidden
Forbidden
The installation and wiring of this product requires specialized skills and experience.
Have the product installed and wired by the store that you purchased it from.
Page 26

Tools Required
Panel Removing Tool Pliers T15 Torx Screwdriver
#2 Phillips Screwdriver 7mm Screwdriver Wire Cutters
10mm Socket Extension Ratchet
Chevrolet/GMC
FULL SIZE TRUCK z 4/20
7mm
Accessory List
Source Unit Box Parts (i209-G)
i209-G Source Unit Display Cable HDMI Cable Bracket
8mm x 4 Screws GPS Antenna USB Extension Cable
Pre Out Harness Direct Camera Adapter Bluetooth Microphone
Page 27

Installation Kit Parts (G-KTX-i209-GM)
Chevrolet/GMC
FULL SIZE TRUCK z 5/20
Radio Dash Bezel With Monitor Key Harness (With Optional Add-
on Microphone Interface)
iDatalink Maestro Parts (ALP-MRR V3.0/ALP-HRN-GM4)
Main Harness Antenna Adapter Factory Camera Harness
Source Unit Mounting Brackets
SiriusXM Radio Antenna Adapter Maestro USB Update Cable OBDII T-Harness
Chime Speaker Adapter Harness Work Truck Adapter Harness
BACK UP CAMERA
BACK UP CAMERA
iDatalink Maestro Module
Page 28

Programming the iDatalink Maestro Module
Chevrolet/GMC
FULL SIZE TRUCK z 6/20
1 INSTALL THE WEBLINK PLUG-IN
Go to:
idatalinkmaestro.com/plugin and follow the installation steps.
7KH0DHVWURPRGXOHPXVWEHSURJUDPPHGVSHFL¿FDOO\IRU
each vehicle and radio. Take care to enter the correct vehicle
LQIRUPDWLRQIDFWRU\RSWLRQVKHDGXQLWPRGHODQGKHDGXQLW
serial number. The head units serial number is an alphanumeric
value which is found on the head units label, underneath the bar
code.
5HYLHZWKH6\VWHP5HTXLUHPHQWVEHIRUHLQVWDOOLQJ
,IWKHSOXJLQLVDOUHDG\LQVWDOOHGWKHFDXWLRQ³7KHSOXJLQLVDOUHDG\
installed” appears. Please skip to step 2.
2 REGISTER A WEBLINK ACCOUNT
Go to:
idatalinkmaestro.com/register and complete the registration process.
$FRQ¿UPDWLRQHPDLOZLOOEHVHQWWR\RXUHTXLULQJYDOLGDWLRQ
For existing customers, click log in.
3 CONNECT YOUR MAESTRO MODULE
8VH\RXU0DHVWURPRGXOHWRFRQQHFWWR\RXU3&
5 PROGRAM YOUR MODULE
)ROORZWKHSURJUDPPLQJVWHSVIRU\RXUYHKLFOH
4 LOG INTO WEBLINK
Go to:
idatalinkmaestro.com/login.
(QWHU\RXUXVHUQDPHDQGSDVVZRUGWKHQFOLFN2.
6 Once Programing is complete “FLASHING
COMPLETED!” will be displayed.
Proceed to the next page to complete installation.
NOTE: If serial number is invalid, Call ADS at
1-866-427-2999 with the serial number.
Page 29

Factory Radio Removal Procedure
Chevrolet/GMC
FULL SIZE TRUCK z 7/20
1 Disconnect the ground wire from the negative
terminal of the battery.
2 Using panel removing tool, unsnap and remove
center dash trim piece from around the radio and
climate controls.
RADIO
MEDIA
A/C
MENU
BACK
TEMP
5 Remove the climate control module by carefully
unclipping it from factory panel. (This will later be
installed into the restyle bezel).
6 Extract (2) T15 Torx screws and unsnap the knee
cover on the driver side.
3 Remove (4) 7mm screws from the radio and climate
control bezel.
RADIO
MENU
MEDIA
BACK
A/C
TEMP
4 Disconnect and remove the radio tuner by lifting
the center tab. Use a pair of pliers to remove the
FM and SXM antenna connectors. Remove the CD
player by extracting (2) 7mm factory screws.
7 Unsnap the steering wheel lever and remove the
lower cover from the steering wheel column.
Page 30

Chevrolet/GMC
FULL SIZE TRUCK z 8/20
USB Port Integration Overview
1 Vehicles that have the USB port in the glove box can use the included adapter to integrate that one USB port
to the head unit.
2 Vehicles that have the factory Bose audio system will have a pair of USB ports in the dash. Use the USB
case that is included with the KCX-BOSE-GM module to replace the OEM USB ports with the aftermarket
case and extension that plugs into the back of the head unit.
3 For all other vehicles, run the included USB extension to either the center console or glove box (which
ever is the preferred location). Using a 3rd party piece (sold separately) like the PAC HDMI-USB-CBL is
recommended. https://pac-audio.com/catalog/radio-replacement/hdmi-usb-cbl
4 The OEM USB ports in the center console will have no connectivity to the head unit. They will only be able to
charge devices.
USB Port Integration For Glove Box
1 Remove the passenger’s side top and bottom
glove box compartments by extracting (6) T15 Torx
screws.
2 Unclip the USB cable from the metal bar support
and disconnect the green connector from the HMI
box (may not be available on the center console
equipped truck)
3 For trucks equipped with glove box USB, the
included adapter can be plugged into the USB that
is connected to the HMI box.
Glove box USB
4 Remove the bottom tab on the green USB
connector using a razor blade. (This will allow the
OEM USB adapter to connect properly.)
Page 31

Component Locations
GPS Antenna
Chevrolet/GMC
FULL SIZE TRUCK z 9/20
Optional Bluetooth Microphone
i209-G Source Unit
OBDII Connector
Steering Wheel
Harness
Sirius XM Tuner
(sold separately)
OEM Camera
Connector
GPS Antenna Installation
IMPORTANT: Follow the GPS installation procedure shown below. Failure to do so, will result in poor
GPS performance for CarPlay and Android Auto.
Keep the GPS antenna cable away from
the FPD(Display),Maestro module and
Place the GPS antenna
on the center of the self
adhesive 45mm X 45mm
metal plate.
SXM Tuner
SXM tuner as these generate interference
and will decrease GPS performance.
IMPORTANT: The excess GPS antenna
cable needs to be bundled and secured to
the left side of the dash
Place the Maestro module
parallel to the Right side vent.
Maestro
SXM tuner location (SXM Tuner sold
separately) Note: Always mount SXM
tuner away from the i209-G and GPS
antenna cable. Route the cable along the
right side vent to reduce interference.
Tape the GPS
antenna cable
along the
steering wheel
column cover.
Route the GPS antenna cable down
to the knee cover area through the
opening below left side air vent.
Page 32

Installation Instructions
Chevrolet/GMC
FULL SIZE TRUCK z 10/20
1 Connect the steering wheel T-harness/OBDII
connector extension and route the cable to the
radio location.
SW T-Harness
OBDII Connector
2 Slide the i209-G radio tuner into the factory tuner
location and connect it to the main harness. The
unit must be installed in the orientation indicated in
the illustration.
4 Connect the HVAC controller T-harness (which is
part of the main harness). Refer to wiring diagram
on page 12 for detailed connections.
5 Connect the i209-G to the main harness and
antenna connections. Refer to wiring diagram on
pages 12 and 13 for detailed connections.
3 Attached the updated Maestro module to the main
harness and plug the main harness to the vehicle.
The Maestro module should be mounted parallel to
the right vent as shown on page 9.
maestro
6 Attach the factory HVAC controller by clipping it to
the i209-G Restyle bezel.
Page 33

Installation Instructions
Chevrolet/GMC
FULL SIZE TRUCK z 11/20
7 Connect the i209-G display, power, and climate
cables and snap into place. Also, choose desired
button illumination to better match that of your
factory illumination by selecting either red or blue
by sliding the switch.
Display Cable
Power
Button Color
Climate Control
Key Harness
8 Secure the i209-G restyle bezel using (4) 7mm
factory screws and the 2 clips on the sides.
9 Attach the factory side vents cover by snapping in
the 10 clips on the back.
A/C
10 Connect the battery terminal and begin the i209-GM
setup. After i209-GM is powered on refer to page 19
for setup procedures.
Exploded-View Diagram
OEM Bezel
MENU
A/C
T
EMP
OEM Climate Controller
Page 34

i209-GM Wiring Diagram
Chevrolet/GMC
FULL SIZE TRUCK z 12/20
To Vehicle Connectors
Steering Wheel
T-Harness
10-pin Black
Connector
Chime
Adapter
Connector
10-pin Black
iDatalink MAESTRO Module
3-Pin 4-Pin
To Steering
Wheel
18-PinChime10-Pin
10-Pin
Connector
18-pin Black
Used
3-Pin 4-Pin
To OBDII Connector
Reset
Button
Red
Not
Power
Speaker
20-pin Tan
Connector
OEM Audio
20-pin Gray
Connector
There’s two harnesses
included. One for the
work truck and one for
the standard truck.
Only one is used for the
installation.
Back Up Camera
16-pin Green
Connector
AUX Power Connector
Power
Speaker
OEM Audio
20-pin Gray
Connector
External Display Power
Back Up Camera
Red - Acc 12V+
HVAC Control
T-Harness
To Climate
Controller
10-pin Gray
Connector
Black - Ground
Yellow -12V+
OEM Camera Adapter
12-pin Gray Connector
Blue
Not
Used
(Audio)
Connector
3-pin Black
10-pin Green
Connector
(Power)
Connector
3-pin Black
(Vehicle signals)
Chime Speaker
Wires Not In Plugs
Blue Power Antenna
Blue/White Amp Turn-on
Brown Rear Mon. Remote Out
Brown/White Rear Mon. Remote In
Brown Remote Out
Red/White DVD Status
Brown/White Rear Mon. Remote In
*
(Data)
Connector
4-pin Black
If using
KAC-001
see page 17
Main Harness
i209-G
ANTENNA
Remote Harness
Power Harness
AUX Power Connector
Direct Camera
Plug
USB
CAN I/F
GPS
SXM/DAB
PRE OUT
Red - Acc 12V+
**See page 16
Direct Camera Adapter
DISP. OUT
HDMI IN HDMI OUT
EXT. KEY W.REMOTE POWER
Key Harness
Black - Ground
Yellow -12V+
Optional: Leave
connected to
use built-in mic.
Disconnect,
plug in mini-jack,
and run cable
to use external
mic for better
External Microphone
performance.
Mic Input Integrated Mic
Page 35

Chevrolet/GMC
FULL SIZE TRUCK z 13/20
DISPLAY MONITOR
To select red or blue button
illumination move this switch to
the left or right. In the setup
menu the background color
of the screen can be changed.
HARD KEY BUTTONS
CLIMATE CONTROLLER
This is shown on page 19, step #7.
KCX-630HD
HDMI/USB
Extension Cable
PAC HDMI-USB-CBL
Recommended (Sold Seperately)
(Optional) HDMI Selector Interface
HDMI IN 1 HDMI IN 2HDMI OUT
USB POWER
DVE-5300 DVD PLAYER
POWER
Cut loop when connecting
HDMI interface box.
Android phones do not have HDMI adapters.
The easiest way to connect is with a Miracast adapter
(for example a Roku Stick or Amazon Firestick).
For Android users most
HDMI OutOpt. Out
For iPhone the
Lightning to HDMI adapter
is required
power source to be installed
this into the head unit’s USB.
Remote In
For all phones the USB
power source needs to
be a 2A source. This will
require a separate USB
in the vehicle. Do not plug
Page 36

i209-GM Wiring Diagram
Chevrolet/GMC
FULL SIZE TRUCK z 14/20
To SiriusXM Tuner
Vehicle Antenna
GPS Antenna (Included)
PRE OUT cable
Interface cabl e
Power cable
W.R EMOT E c abl e
DVD REMOTE
(Brown)
MON REMOTE
(Brown)
REMOTE IN
(Brown/White)
REMOTE OUT
(Brown)
DVD STATUS IN
(Red/Whit
SPEED SENSOR
(Gre en/Whi te)
CAMERA
IDATALINK I/F
AUX I NPUT
REMO
(Blue/White)
REVERSE
(Orange/White)
P. AN T
(Blue)
PAR KING BRA KE
(Yellow/Blue)
ACC
(Red)
BATT
(Yellow)
GND
(Black)
(Gre en)
(Green/Black)
(White)
(White/Black)
(Gray /Blac k)
(Gray )
(Violet/Black)
(Violet)
e)
To the vehicle speed pulse line
To Front, Rear or Side camera
To iDataLink module
To A UX ou tp u
t device or iDataLink
module
To amplier or equalizer
To plus side of the back lamp signal
lead of the car
To power antenna
To the parking brake signal lead
Ignition key
Battery
Rear Left
Front Left
Speakers
Front Right
Rear Right
To remote control input lead of
DVE-5300
To remote control input lead of Rear
Monitor
To remote control output lead
To remote control input lead
To remote control output lead of
DVE-5300
To steering remote control interface
box
SUBW
FRONT OUT
REAR OUT
Microphone (Included)
To input terminal of amplier when
adding an external amplier
Page 37

Wire Harness Pin Outs
Chevrolet/GMC
FULL SIZE TRUCK z 15/20
Radio Main
8
16
7
15
6
14
13
5
4
12
3
11
10
2
1
9
Display Power
8
7
6
5
4
3
2
1
AUX Power
3
2
1
Audio Out
Data SWC
1
2
3
4
5
6
7
8
9
10
11
12
13
14
15
16
17
18
GM Harness Green
8
16
15
7
14
6
5
13
12
4
11
3
2
10
9
1
10
20
19
9
8
18
17
7
16
6
15
5
4
14
3
13
2
12
1
11
Blue 22AWG
Red 20AWG
Blue/White 22AWG
Orange/White 22AWG
Yellow/Blue 22AWG
Purple 20AWG
Gray 20AWG
Purple/Black 20AWG
Gray/Black 20AWG
Green 20AWG
White 20AWG
Green/Black 20AWG
White/Black 20AWG
Yellow 18AWG
Black 18AWG
Black/Silver 22AWG
Brown/Silver 22AWG
Black/Silver 22AWG
Yellow 22AWG
Pink 22AWG
Yellow 18AWG
Red 18AWG
Black 18AWG
1
2
3
Brown/Red 22AWG
Brown/Yellow 22AWG
Red/Brown 22AWG
Yellow/Brown 22AWG
Yellow/Black 22AWG
Yellow 18AWG
Black 18AWG
Purple 20AWG
Purple/Black 20AWG
Green 20AWG
Green/Black 20AWG
Gray 20AWG
Gray/Black 20AWG
White 20AWG
White/Black 20AWG
Tan/Red 22AWG
Gray Red 22AWG
Tan/Brown 22AWG
White/Red 22AWG
White/Brown 22AWG
Black/Yellow 22AWG
Black 22AWG
Yellow 22AWG
Green/White 22AWG
Black 22AWG
Red 22AWG
White 22AWG
Black 22AWG
Remote Harness
12
11
10
9
7
8
6
5
4
3
2
1
White 22AWG
Black 22AWG
Red/White 22AWG
Brown 22AWG
Camera Harness
12
6
5
11
4
10
3
9
8
2
7
1
Direct Camera
6
5
4
3
2
1
Radio I/O (Green)
12
4
3
5
6
87
910
Orange/White 22AWG
Green/White 22AWG
Yellow/Blue 22AWG
Yellow/Black 22AWG
Blue/White 22AWG
Black/Yellow 22AWG
iDatalink
1
2
3
4
Blue 22AWG
White 22AWG
Black 22AWG
Red 22AWG
Speaker Harness Rear
1
2
3
4
Purple 20AWG
Purple/Black 20AWG
Green 20AWG
Green/Black 20AWG
Speaker Harness Front
1
2
3
4
Gray 20AWG
Gray/Black 20AWG
White 20AWG
White/Black 20AWG
Adapter Harness
Black 20AWG
5
10
9
4
3
8
2
7
1
6
Yellow 20AWG
Tan/Red 22AWG
Tan/Brown 22AWG
White/Red 22AWG
White/Brown 22AWG
Gray/Red 22AWG
Black/Yellow 22AWG
Green/White 22AWG
White/Green 22AWG
White/Red 22AWG
White/Red 22AWG
White/Green 22AWG
Yellow 22AWG
Black 22AWG
Black 22AWG
Black 22AWG
Red 22AWG
Blue 22AWG
Black 22AWG
White 22AWG
Cam Aux Data
17
18
15
16
13
14
12
11
10
9
8
576
4
3
12
OBD/SWC
1
2
3
Back Up Camera
6
5
4
3
2
1
Power/ACC
3
2
1
Audio In
12
43
5
6
87
910
GM Harness Yellow
20
10
9
19
18
8
17
7
16
6
5
15
14
4
3
13
12
2
1
11
20
10
19
9
18
8
7
17
16
6
15
5
14
4
13
3
12
2
1
11
Red 22AWG
Blue 22AWG
Black 22AWG
White 22AWG
White 22AWG
Blue 22AWG
Black 22AWG
Red 22AWG
Black 22AWG
Black 22AWG
White 22AWG
Green/White 22AWG
Red 22AWG
Brown/Red 22AWG
Brown/Yellow 22AWG
Green/Black 22AWG
Black 22AWG
Yellow 22AWG
Yellow 18AWG
Red 18AWG
Black 18AWG
Tan/Red 22AWG
Tan/Brown 22AWG
White/Red 22AWG
White/Brown 22AWG
Grey/Red 22AWG
White/Brown 22AWG
Black 20AWG
Yellow 20AWG
White 20AWG
White/Black 20AWG
Gray 20AWG
Gray/Black 20AWG
Green/Black 20AWG
Green 20AWG
Purple/Black 20AWG
Purple 20AWG
Gray/Red 22AWG
Tan/Red 22AWG
White/Red 22AWG
Tan/Brown 22AWG
White/Brown 22AWG
Black/Yellow 22AWG
Yellow 22AWG
Black 22AWG
Green/White 22AWG
Yellow 20AWG
Black 20AWG
Page 38

OEM Camera Retention
Chevrolet/GMC
FULL SIZE TRUCK z 16/20
1 For trucks equipped with OEM camera, disconnect the
Gray 12-pin connector from the HMI box and connect
it to the OEM Camera adapter.
OEM
Camera
2 Work trucks and trucks with the IO3 OEM
system do not have the HMI box behind the
glove box. Instead the camera connection is
in the adapter harness as shown on page 12.
Plug that harness into the direct camera input
coming off the main harness.
Work TruckIO3 Truck
TanGreen Gray Gray
BACK UP CAMERA
BACK UP CAMERA
OEM Camera Retention When Not In Reverse
1 Alpine aftermarket head units provide the ability to monitor your cargo while towing via the Direct
Camera hard key. On the 2014-2018 Silverado/Sierra, the OEM camera will only turn ON while the
vehicle is running and in REVERSE. This means when pushing the Direct Camera hard key it will not
display the camera video. Follow the steps below to solve the issue.
2 Locate the camera connector under the rear bumper electrical block.
3 Cut the WHITE wire in pin 3.
4 Tape or heat shrink the vehicle side of the wire.
5 The side going to the camera needs to be tapped onto the RED wire in pin 1.
1. Red
1. Red
13
2. Yellow
14
3. White
46
4. Black
58
5. Black
6. Brown
2014-2015 2016-2017
2. Yellow
3. White
4. White
5. Black
6. Black
7. Brown
8. Black
Page 39

Connection Of KAC-001
Chevrolet/GMC
FULL SIZE TRUCK z 17/20
KAC-001 Side View
POWER RESET HEADUNIT CAN OUTPUT UPDATE
Reset
Button
Power Harness
(3-pin White)
BATT* (Yellow)
ACC (Red)
GND (Black)
*Fuse Rating: 7A
Connect to IDATALINK I/F
cable from head unit. This is
the 4 pin data connector
shown on page 12 in the
installation diagram that
comes directly off of the
main harness
3 Pin
Black
Interface Cable (4-pin)
Interface Harness (4-pin White)
(included with ADS module)
8ch Output Harness
Maestro Module Side View
4 Pin
10 Pin
Blue
Green
USB port
(Firmware
updates only)
Output 1 (Purple)
Output 2 (White/Red)
Output 3 (Brown)
(24-pin White)
Output 4 (Blue)
Output 5 (Green)
Output 6 (Pink)
Output 7 (White)
Output 8 (Gray)
Connect to Relay/output to
accessories (Sold separately)
To 4 Pin Black Data
4 Pin
3 Pin
Black Data
Black
Main Harness
To Head Unit
Not
Used
Page 40

Connection Of An External Amplifier
Chevrolet/GMC
FULL SIZE TRUCK z 18/20
i209-G Source Unit
GPS
ANTENNA
CAN I/F
SXM/DAB
PRE OUT
USB
HDMI IN HDMI OUT
SUBW
FRONT OUT
REAR OUT
W.REMOTE POWER
(Blue/White)
(Red)
(White)
(Red)
(White)
(Red)
(White)
REMOTE
RCA Extension Cable (sold separately)
Remote Turn-On Lead (Blue/White)
Subwoofer RCA Connectors
Front Output RCA Connectors
Rear Output RCA Connectors
REMOTE ON
(Blue/White)
Amplier for subwoofer
(sold separately)
To subwoofer input terminal
To front input terminal
Amplier 4 ch
(sold separately)
To rear input terminal
REMOTE ON
(Blue/White)
Subwoofer
Front speaker
Rear speaker
Connection Of A SiriusXM Module (Sold Separately)
CAN I/F
GPS
SXM/DAB
USB
HDMI IN HDMI OUT
POWERW. REMOTEPRE OUT
For vehicles with factory SiriusXM connect
the adapter to the factory SiriusXM antenna in
the radio cavity. For vehicles without factory
SiriusXM use the antenna that is included with
the SXV300 SiriusXM Tuner. Please note, as
stated in the title this tuner is sold separately.
Please visit you local authorized Alpine dealer
to make the purchase https://alpine-usa.com/
stores
SiriusXm
connect
Page 41

Chevrolet/GMC
FULL SIZE TRUCK z 19/20
Set Up Guide
1 Turn the vehicle’s Ignition switch to ACC.
2 Turn ON the i209-GM by pressing any key.
3 Select the user language and press OK.
4 With the vehicle parked, engage the parking brake, release the parking brake and engage the parking brake
again.
5 If a camera is present, turn it ON in the system menu. (MENU/SETUP/SYSTEM/CAMERA/CAMERA SELECT)
6 AUDIO MUTE ON REVERSE- By default, when the vehicle is shifted into reverse the AUDIO will MUTE. If this
feature is not desired turn it off in the AUDIO MENU (MENU/SETUP/SOUND/MUTE WHILE BACKING UP)
7 Select the desired screen color to match the button illumination. (MENU/ SYSTEM/GENERAL/DISPLAY/KEY/
SCREEN COLOR)
8 When the KCX-630HD (HDMI SELECTOR) is present be sure to turn it ON in the SETUP MENU. (MENU/
SYSTEM/EXTERNAL ACCESSORIES/HDMI SELECTOR)
9 Set the DVD player (if optional DVD player is installed). (MENU/SETUP/SOURCE/HDMI).
10 When the KAC-001 (External Accessory Control Module) is present be sure to turn it ON in the SETUP MENU.
(MENU/SYSTEM/EXTERNAL ACCESSORIES/EXTERNAL ACCESSORY CTRL)
11 Vehicle information- Set the desired gauge information. (MENU/VEHICLE INFO/GAUGES/CAR SETTINGS)
Troubleshooting Guide
Symptom Possible Cause Remedy
Drivers Information Center in
1
instrument cluster does not
show music or navigation
information.
2
Hub Not Supported message
on the screen.
3
iPhone not working with
HDMI.
The i209-GM can’t push data to a
factory screen.
The i209-GM does not support USB
Hubs.
Not using Apple HDMI to Lightning
adapter.
Didn’t plug USB power into a 2A
source.
The screen will still work for other vehicle
related functions (like mileage, etc) but there
is no way to push audio information to an
OEM screen.
Use the included USB extension and run that
to the glove box or center console.
If the vehicle has the factory Bose system
the USB insert can be used in the dash
that comes with the KCX-BOSE-GM (sold
separately).
If the vehicle has the glove box USB from
the OEM system that can be integrated as
shown in the manual.
Purchase the HDMI to Lightning adapter
directly from Apple. Not all 3rd party
adapters work the same.
Do not plug into the USB from the Alpine
head unit. A third party USB adapter will
need to be used that is 2A.
4
Android phone is not working
with HDMI.
Using incorrect HDMI adapter.
Miracast adapter isn’t plugged into
a 2A source.
Miracast adapter has resolution
settings that are too high.
If the phone has the feature to use an HDMI
adapter it must be the one purchased from
the manufacturer of the phone, not a third
party adapter.
Do not plug into the USB from the Alpine
head unit. A third party USB adapter will
need to be used that is 2A.
Plug the adapter into another monitor (for
example a television in the home) and reduce
the resolution settings.
Page 42

Troubleshooting Guide Continued
Symptom Possible Cause Remedy
5
iDatalink website says serial
number is invalid.
6
Headunit will not turn on.
7
Cannot enter SETTINGS
MENU.
8
The Factory Onstar Voice
Recognition system is too
sensitive.
On the climate screen, the
9
power, recirculate, Rear
Defroster, Front Defroster and
AC buttons do nothing when
pressed.
10
Cannot control the DVD
Player properly.
Sound mutes when vehicle is
11
shifted into reverse.
Only the front speakers are on
12
for SXM Radio.
The vehicle is incorrectly
13
positioned on the Navigation
display.
CarPlay/ Android Auto map
14
positioning issues.
Chevrolet/GMC
FULL SIZE TRUCK z 20/20
Incorrect serial number is being
used.
Serial number may not be in
iDatalink database.
Incorrect serial number was used
when flashing maestro.
4 pin Maestro data cable is
disconnected or damaged.
OBD2 cable is not plugged in. Connect OBD2 connector to the OBD2 port.
Monitor, key-harness or main
harness are not connected.
Vehicle is in motion or parking
brake is not engaged.
When you press the Onstar button
on the mirror, noises in the vehicle
may be recognized as voice
commands. In addition radio key
presses may also be recognized as
voice commands while the Onstar
is active.
This is normal.
DVD has not been set on the
SETUP menu.
HDMI box has not been set on the
SETUP menu.
Mute on reverse is turned on in the
SOUND menu.
SXM Tuner has not been activated. Activate SXM Tuner.
Poor GPS signal.
GPS antenna is positioned
incorrectly.
In the i209-GM settings confirm the serial
number. MENU/SETUP/GENERAL/ABOUT.
Call ADS at 1-866-427-2999 and verify.
Flash Maestro with correct serial number.
Check for proper connection or
disconnected pins.
Check for proper connection or
disconnected pins.
With vehicle in (P)PARK engage the parking
brake. Release the parking brake and
engage the parking brake a second time.
Set the KEY BEEP TO “0” in radio settings
menu.
These are only status icons. They are not
buttons. They will turn yellow when selected.
Ensure DVD is ON in HDMI SETUP menu.
Ensure DVD is ON in HDMI SETUP menu and
remote loop was cut on the wire harness.
Change Mute on reverse to off.
Ensure the recommeded GPS antenna route
was used. See page 11.
GPS antenna is obstructed and doesn’t have
line of sight to the sky. Perform a factory
reset. The unit will automatically recalibrate.
iPhone or Android phone is not
recognized
15
when connected to the
USB cable.
Loose or disconnected USB cable.
Non-compatible cable.
Dirty charging port on phone. Clean charging port.
Check the USB connection behind
the headunit.
Use the cable supplied with the
iPhone or Android phone. Third party adapters
and long extensions may not work. Only use
USB extension that came with the head unit.
Page 43

customers/Hinweis an Kunden/A
To
l'utilisateur/lnformacion
de
lnformazioni per i
clienti/Till kunder/ Aan
para
los clientes/
klanten/AnR KnllleHToa/Do klientow
~WARNING
l'attention
English
Fran~ais
INSTALL
Only install
automobiles.
Failure
the
to
it
-
ONLY
this
install according
to
product.
ATTENTION
INSTALLER
N'installer
recommandees.
Tout
mortelle
ce
manquement
endommager
ou
SPECIFIED
INTO
product
according to the specific
to
UNIQUEMENT
produit
que dans
recommandations peut
aces
le
CAR
installation
these instructions may result
VOITURES
DANS
installations
les
produit.
LES
prevues a cet effet et
resulter
recommended
instructions and only
fire, accident, serious injury or death or damage
in
into
INDIQUEES
voitures
les
uniquement
en un accident, incendie,
dans
blessure
grave voire
Italiano
ATTENZIONE
it
lnstallare
lnstallare
raccomandate.
La
prodotto.
questo
mancata
installazione
soltanto
prodotto
vettura indicata
nella
soltanto secondo
istruzioni
secondo
le
istruzioni
le
originali
d'installazione specifiche
provocare incendi,
pub
soltanto sulle
e
lesioni
gravi o
vetture
o danni
morte
68-29530Z49-A (Y-A4)
al
Page 44

Thank
produce
you
the
for
expectations
choosing
best
audio/video/navigation
are
met.
Alpine
for
your
car
audio
products
equipment
in
the
world
needs.
and
Our
hope
goal
your
is
to
Please
the
product
Alpine.
chance
take a moment
following
and
Also,
to
system.
We
look
forward
Sincerely,
The
Alpine
address:
software
by
registering
win
various
to
Team
French
to
protect
your
purchase
by
www.alpine-usa.com/registration.
updates
prizes
continue
(if
your
product,
such
serving
applicable),
you
as
gift
cards,
you
in
the
special
will
Alpine
future.
registering
You
will
promotions,
automatically
products,
Spanish
your
be
and
be
entered
product
informed
news
now
of
about
for
and/or a complete
at
a
Nous vous remercions d'avoir porte votre choix sur
equipement audio automobile Alpine. Notre principal
objectif est de fabriquer les meilleurs produits audio,
video et de navigation au monde afin de repondre aux
exigences de nos clients.
Veuillez prendre quelques instants pour securiser
votre achat en enregistrant votre produit
suivante : www.alpine-usa.com/registration. Vous
serez tenu informe des nouveaux produits, des mises
a l'adresse
un
a jour logicielles (le cas echeant), des promotions
speciales et des informations concernant Alpine.
L'enregistrement de votre produit vous donne par
ailleurs Ia possibilite de gagner des dizaines de
cadeaux, tels que cheques-cadeaux et articles Alpine,
ainsi qu'un systeme complet.
Nous esperons que nos produits vous donneront
entierement satisfaction.
Cordialement,
L'equipe Alpine
Gracias por elegir Alpine para las necesidades de
equipamiento de audio de su vehfculo. Nuestro
objetivo es fabricar los mejores productos de audio/
vfdeo/navegaci6n del mundo y esperamos poder
cumplir sus expectativas.
Dedique unos mementos a proteger su compra :
registre ahara su producto en Ia siguiente direcci6n:
www.alpine-usa.com/registration. Recibira
informacion de novedades sobre
actualizaciones de software (si se producen),
promociones especiales y noticias de ultima hora de
Alpine. Asimismo, si registra su producto, entrara
automaticamente en
como tarjetas de regale, productos de Alpine y/o un
sistema complete.
Esperamos poder seguir ofreciendole el mejor
servicio en
Atentamente,
El
equipo de Alpine
el
futuro.
el
sorteo de diversos premios,
el
producto y
PA
RT NO. 68-21627Z32-A
Page 45

Page 46

Page 47

READ
BEFORE
INSTALLATION
Our goal
achieve that, we are here for you. For
assistance, questions about using your new
Restyle System or if you're having
Alpine
methods
We
your
using your
are here to
Alpine Restyle
is to improve your in-vehicle
product, we can help. Please
below
Alpine Restyle
for
resolution
to any issues you may have.
TECHNICAL
help
with any questions you have about
product. For any questions about
System and installation
get
in
touch with us:
SUPPORT
experience.
installation
problems
choose one of the
with your
To
Alpine
support,
supportalpineusa.custhelp.com
SHARE YOUR
Alpine Restyle
yours with us today using
800-TECH-101
Monday
7
AM-
Online
Owner's
alpine-usa.com/support
Support
-
Friday
5
PM
Manuals
PST
Center
#ALPINERESTYLE
is not just a product, it's a
#AipineRestyle.
lifestyle. Share
IJ~fm~
@AipineUSA
www.alpine-usa.com
Page 48

LPINE®
Notification
Congratulations
covered under a 3-year Manufacturer's
purchase.
read and understand
the
owner's manual
We
encourage you
usa.com/registration at
We are here
questions, please
We appreciate your support
PLEASE
to
on
your
NOTE
to
help
contact
purchase
THAT
the
Limited Warranty, please
and
also
register this product on
the
with
may
time
any questions you have
us
at
of
of
an
THIS
Alpine
PACKAGE
be
found at alpine-usa.com/support.
it
is
purchased and
1-800-832-4101,
Electronics.
Alpine Restyle
limited
warranty
INSERT
see
Alpine's website at www.alpine-
installed.
about
Monday-
System!
from
IS
NOT
the
Limited Warranty which
your
Friday,
Alpine Restyle products are
the
date
THE
Alpine Restyle product. For any
LIMITED
7 AM -
of
the
first consumer
WARRANTY
5
PM
PST.
ITSELF.
is
printed in
To
 Loading...