

R
R
CDM-7857RB
CDE-7855RB
CDE-7854RM
CDE-7854R
CDE-7853R
FM/MW/LW/RDS CD Receiver
• OWNER'S MANUAL
Please read before using this equipment.
• BEDIENUNGSANLEITUNG
Lesen Sie diese Bedienungsanleitung bitte vor
Gebrauch des Gerätes.
• MODE D'EMPLOI
Veuillez lire avant d’utiliser cet appareil.
• MANUAL DE OPERACIÓN
Léalo antes de utilizar este equipo.
EN
DE
FR
ES
• ISTRUZIONI PER L’USO
Si prega di leggere prima di utilizzare il
attrezzatura.
• ANVÄNDARHANDLEDNING
Innan du använder utrustningen bör du läsa
igenom denna användarhandledning.
ALPINE ELECTRONICS, INC.
Tokyo office: 1-1-8 Nishi Gotanda,
Shinagawa-ku,
Tokyo 141-8501, Japan
Tel.: (03) 3494-1101
ALPINE ELECTRONICS OF AMERICA, INC.
19145 Gramercy Place, Torrance,
California 90501, U.S.A.
Tel.: 1-800-ALPINE-1 (1-800-257-4631)
ALPINE ELECTRONICS OF CANADA, INC.
Suite 203, 7300 Warden Ave. Markham,
Ontario L3R 9Z6, Canada
Tel.: 1-800-ALPINE-1 (1-800-257-4631)
Meiyi Printing Factory, Dalian, China
No. 28 Chang Qing Street, Xi Gang District, Dalian, China
ALPINE ELECTRONICS OF AUSTRALIA PTY. LTD.
6-8 Fiveways Boulevarde Keysborough,
Victoria 3173, Australia
Tel.: (03) 9769-0000
ALPINE ELECTRONICS GmbH
Kreuzerkamp 7-11 40878 Ratingen, Germany
Via C. Colombo 8, 20090 Trezzano Sul Naviglio
Tel.: 02102-45 50
ALPINE ITALIA S.p.A.
MI, Italy
Tel.: 02-48 47 81
ALPINE ELECTRONICS FRANCE S.A.R.L.
(RCS PONTOISE B 338 101 280)
98, Rue De La Belle Etoile, Z.I. Paris Nord Il
B.P. 50016 F-95945, Roissy, Charles De Gaulle
13 Tanners Drive, Blakelands, Milton Keynes
ALPINE ELECTRONICS DE ESPAÑA, S.A.
01013 Vitoria (Alava)-Apdo. 133, Spain
Cedex, France
Tel.: 01-48 63 89 89
ALPINE ELECTRONICS OF U.K., LTD.
MK14 5BU, U.K.
Tel.: 01908-61 15 56
Portal De Gamarra 36, Pabellón 32
Tel.: 34-45-283588
Designed by ALPINE Japan
Printed in China (Y)
68P01149K43-A
IT
SE
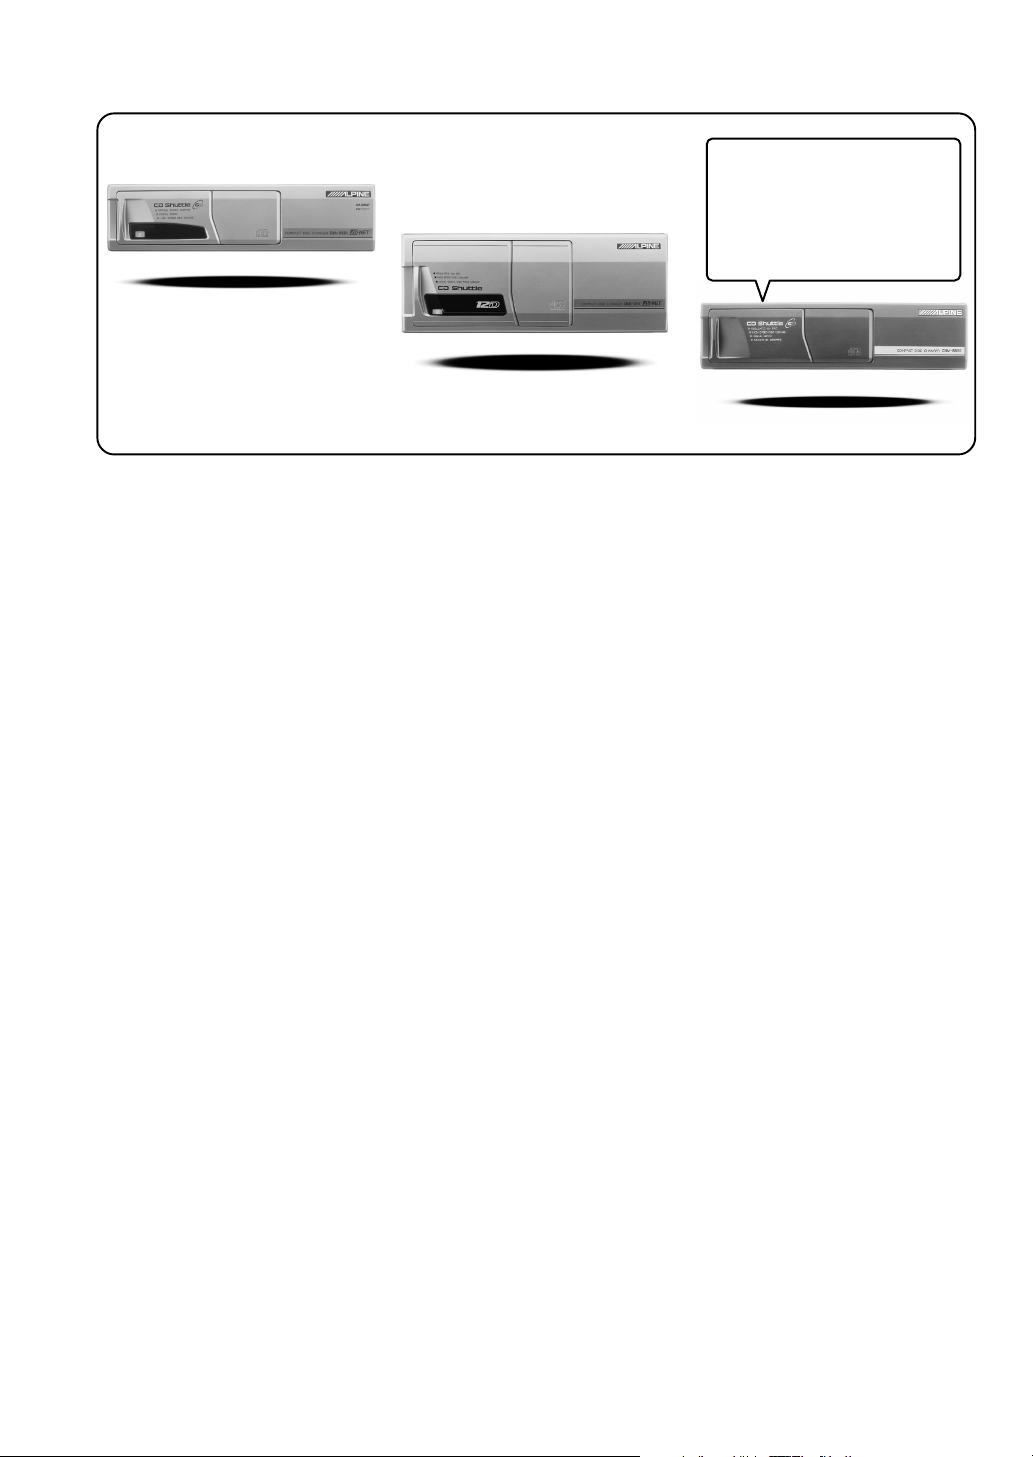
CD changer for CDM-7857RB
CD-Wechsler für CDM-7857RB
Changeur CD pour CDM-7857RB
Cambiador de CD para
CDM-7857RB
Cambia CD per CDM-7857RB
CD-växlare för CDM-7857RB
CHA-S624
CHA-1214
CHM-S620
Alpine CD Changers Give You More!
More musical selections, more versatility, more convenience.
An Alpine CD Changer adds more musical choices to your sound system. All models can be controlled from Alpine head units and
deliver excellent sound quality. The CHA-S624 is a high-performance 6-disc changer with a new M DAC, Ai-NET compatibility, Optical
Digital Output, 150 Disc Title Memory and CD TEXT. The CHA-1214 Ai-NET model holds 12 discs, and the CHM-S620 M-Bus model
is a super-compact 6-disc changer.
Von Alpine CD-Wechslern haben Sie mehr!
Mehr Musikauswahl, mehr Vielseitigkeit, mehr Komfort.
Mit einem Alpine CD-Wechsler erweitern Sie die Musikauswahl Ihres Systems. Sämtliche Modelle lassen sich von einer AlpineBedieneinheit aus steuern und liefern hervorragende Klangqualität. Der CHA-S624 ist ein Ai-NET-kompatibler Hochleistungs-Wechsler
für 6 CDs mit dem neuen M-DAC, Digitalausgang für Glasfaserkabel, CD-Titelspeicher für 150 Titel und CD-TEXT. Das Ai-NETModell CHA-1214 nimmt 12 CDs auf, und der M-Bus-kompatible CHM-S620 ist ein superkompakter Wechsler für 6 CDs.
Changeurs de CD Alpine : vous avez le choix!
Plus de sélections musicales, plus de souplesse, plus de confort.
Un changeur de CD Alpine permet d'augmenter la plage des sélections musicales de votre système embarqué. Tous les modèles peuvent
être contrôlés à partir des autoradios Alpine et offrent une excellente qualité audio. Le modèle CHA-S624 est un changeur 6 disques
ultra performant compatible Ai-NET et équipé d'un convertisseur N/A standard, d'une sortie optique numérique, d'une mémoire d'une
capacité de 150 titres et de la fonction CD TEXT. Le modèle CHA-1214 Ai-NET peut contenir 12 disques. Le modèle CHM-S620 MBus est un changeur 6 disques super compact.
¡Los cambiadores Alpine de CD le ofrecen más!
Más selecciones musicales, más versatilidad y más ventajas.
Un cambiador Alpine de CD añade más opciones musicales a su equipo de sonido. Todos los modelos pueden controlarse desde las
unidades principales de Alpine y proporcionar un sonido de calidad excepcional. El modelo CHA-S624 es un cambiador de 6 discos de
alto rendimiento con el nuevo DAC "M" y compatibilidad con Ai-NET, salida digital óptica, memoria de títulos de 150 discos y TEXTO
CD. El modelo CHA-1214 Ai-NET admite 12 discos y el modelo CHM-S620 Bus-M es un cambiador de 6 discos y tamaño reducido.
I caricatori CD Alpine danno di più!
Più scelta, più versatilità, più comodità.
Un caricatore CD Alpine offre maggiore scelta. Tutti i modelli possono essere controllati tramite le unità di controllo Alpine e producono
un suono di qualità eccellente. CHA-S624 è un caricatore a 6 dischi Ai NET compatibile e dotato di un nuovo M DAC, di un'uscita
ottica digitale, memorizzazione dei titoli di 150 dischi e CD TEXT. Il modello CHA-1214 Ai NET può contenere un massimo di 12
dischi, mentre il modello CHM-S620 M-Bus è un caricatore a 6 dischi ultra compatto.
Alpines CD-växlare ger mer!
Fler musikval, mer variation, större bekvämlighet.
Med Alpines CD-växlare i systemet får du större musikalisk valfrihet. Alla modeller kan styras från Alpines huvudenheter och ger
enastående ljudkvalitet. CHA-S624 är en högpresterande växlare för 6 skivor med en ny M D/A-omvandlare, kompatibel med Ai-NET,
optisk digitalutgång, titelminne för 150 skivor och CD-TEXT. Modellen CHA-1214 Ai-NET rymmer 12 skivor och modellen CHMS620 M-Bus är en superkompakt växlare för 6 skivor.
Contents
ENGLISH
Operating Instructions
WARNING
WARNING.................................................. 2
CAUTION ................................................... 2
PRECAUTION ........................................... 2
Basic Operations
Detaching the Front Panel.................................. 4
Attaching the Front Panel .................................. 4
Initial System Start-Up ...................................... 4
Turning Power On and Off ................................4
Non Fading Pre-Out (N.F.P.) On and Off
(CDM-7857RB only) .....................................5
Turning Loudness On/Off .................................. 5
Adjusting Source Signal Levels ......................... 5
Adjusting Volume/Bass/Treble/Balance
(Between Left and Right)/Fader
(Between Front and Rear) .............................. 5
CD Player Operation
Inserting/Ejecting Disc .................................... 11
Normal Play and Pause ....................................11
Music Sensor (Skip)......................................... 11
Fast Forward and Backward ............................ 11
Repeat Play ...................................................... 12
M.I.X. (Random Play) ..................................... 12
Scanning Programmes ..................................... 12
Controlling CD Changer (Optional)
(CDM-7857RB only) ................................... 12
Informations
In Case of Difficulty ........................................ 13
Specifications ................................................... 15
Installation and Connections
Precautions ....................................................... 16
Installation ....................................................... 17
Connections ..................................................... 18
Radio Operation
Manual Tuning ................................................... 6
Automatic Seek Tuning ..................................... 6
Mono/Stereo Switching ..................................... 6
Manual Storing of Station Presets ..................... 7
Automatic Memory of Station Presets ............... 7
Tuning to Preset Stations ................................... 7
RDS Operation
Setting RDS Reception Mode and Receiving
RDS Stations .................................................. 8
Recalling Preset RDS Stations ........................... 8
Receiving RDS Regional (Local) Stations ........ 9
Receiving Traffic Information ............................ 9
PTY (Programme Type) Tuning ........................ 9
Receiving Traffic Information While Playing
CD or Radio .................................................... 9
Priority News ................................................... 10
1-EN
WARNING
WARNING
The exclamation point within an equilateral
triangle and "WARNING" are intended to alert
the user to the presence of important
operating instructions.
Failure to heed the instructions will result in
severe injury or death.
DO NOT OPERATE ANY FUNCTION THAT TAKES YOUR
ATTENTION AWAY FROM SAFELY DRIVING YOUR
VEHICLE.
Any function that requires your prolonged attention
should only be performed after coming to a complete stop.
Always stop the vehicle in a safe location before
performing these functions. Failure to do so may result in
an accident.
KEEP THE VOLUME AT A LEVEL WHERE YOU CAN
STILL HEAR OUTSIDE NOISE WHILE DRIVING.
Failure to do so may result in an accident.
DO NOT PLACE HANDS, FINGERS OR FOREIGN
OBJECTS IN INSERTION SLOTS OR GAPS.
Doing so may result in personal injury or damage to the
product.
CAUTION
The exclamation point within an equilateral
triangle and "CAUTION" are intended to alert
the user to the presence of important
operating instructions.
Failure to heed the instructions can result in
injury or material damage.
HALT USE IMMEDIATELY IF A PROBLEM APPEARS.
Failure to do so may cause personal injury or damage to
the product. Return it to your authorized Alpine dealer or
the nearest Alpine Service Centre for repairing.
PRECAUTIONS
MINIMIZE DISPLAY VIEWING WHILE DRIVING.
Viewing the display may distract the driver from looking
ahead of the vehicle and cause an accident.
DO NOT DISASSEMBLE OR ALTER.
Doing so may result in an accident, fire or electric shock.
USE ONLY IN CARS WITH A 12 VOLT NEGATIVE
GROUND.
(Check with your dealer if you are not sure.) Failure to do
so may result in fire, etc.
KEEP SMALL OBJECTS SUCH AS BATTERIES OUT
OF THE REACH OF CHILDREN.
Swallowing them may result in serious injury. If
swallowed, consult a physician immediately.
USE THE CORRECT AMPERE RATING WHEN
REPLACING FUSES.
Failure to do so may result in fire or electric shock.
DO NOT BLOCK VENTS OR RADIATOR PANELS.
Doing so may cause heat to build up inside and may result
in fire.
Temperature
Be sure the temperature inside the vehicle is between
+60°C (+140°F) and –10°C (+14°F) before turning your
unit on.
Moisture Condensation
You may notice the CD playback sound wavering due to
condensation. If this happens, remove the disc from the
player and wait about an hour for the moisture to
evaporate.
Damaged Disc
Do not attempt to play cracked, warped, or damaged
discs. Playing a bad disc could severely damage the
playback mechanism.
Maintenance
If you have problems, do not attempt to repair the unit
yourself. Return it to your Alpine dealer or the nearest
Alpine Service Station for servicing.
USE THIS PRODUCT FOR MOBILE 12V APPLICATIONS.
Use for other than its designed application may result in
fire, electric shock or other injury.
2-EN
Never Attempt the Following
Do not grip or pull out the disc while it is being pulled
back into the player by the automatic reloading
mechanism.
Do not attempt to insert a disc into the unit when the unit
power is off.
Inserting Discs
Your player accepts only one disc at a time for playback.
Do not attempt to load more than one disc.
Make sure the label side is facing up when you insert the
disc. Your player will automatically eject any disc that is
inserted incorrectly. If the player continues to eject a
correctly inserted disc, push the Reset switch (located
behind the detachable front panel) with a pointed object
such as a ball-point pen.
Playing a disc while driving on a very bumpy road may
result in skips, but this will not scratch the disc or damage
the player.
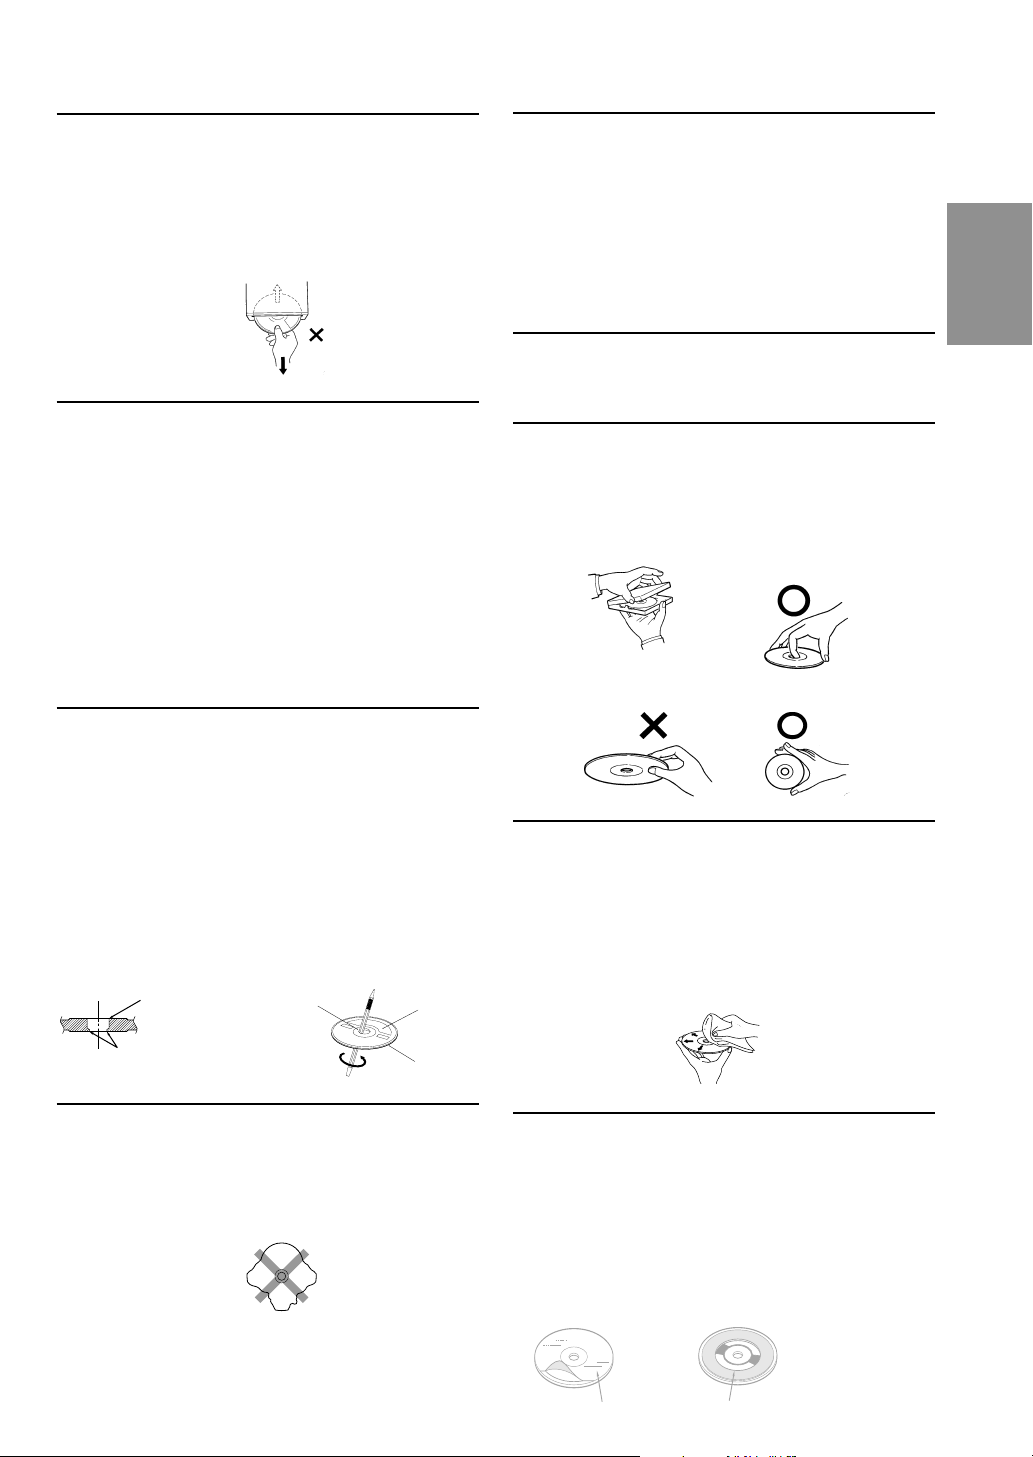
New Discs
As a protective measure to prevent the CD from jamming,
the CD player will automatically eject discs with irregular
surfaces or inserted incorrectly. When a new disc is
inserted into the player and ejected after initial loading,
using your finger, feel around the inside of the centre hole
and outside edge of the disc. If you feel any small bumps
or irregularities, this could inhibit proper loading of the
disc. To remove the bumps, rub the inside edge of the hole
and outside edge of the disc with a ball-point pen or other
such instrument, then insert the disc again.
Centre
Hole
Bumps
Centre
Hole
New
Disc
Outside
(Bumps)
Irregular Shaped Discs
Be sure to use round shape discs only for this unit and
never use any special shape discs.
Use of special shape discs may cause damage to the
mechanism.
Installation Location
Make sure the CDM-7857RB/CDE-7855RB/CDE7854RM/CDE-7854R/CDE-7853R will not be installed in
a location subjected to:
• Direct sun and heat
• High humidity and water
• Excessive dust
• Excessive vibrations
Handling the Detachable Front Panel
• Do not expose to rain or water.
• Do not drop or apply shock.
Correct Handling
Do not drop the disc while handling. Hold the disc by its
edge so that no fingerprints are left on the surface. Do not
affix tape, paper, or gummed labels to the disc. Do not
write on the disc.
CORRECT
INCORRECT CORRECT
Disc Cleaning
Fingerprints, dust, or soil on the surface of the disc could
cause the CD player to skip. For routine cleaning, wipe
the playing surface with a clean, soft cloth from the centre
of the disc to the outer edge. If the surface is heavily
soiled, dampen a clean, soft cloth in a solution of mild
neutral detergent before cleaning the disc.
Disc Accessories
There are various accessories available on the market for
protecting the disc surface and improving sound quality.
However, most of them will influence the thickness and/or
diameter of the disc. Using such accessories can cause the
disc to be out of standard specifications and may create
operational problems. We recommend not using these
accessories on discs played in Alpine CD players.
FR
ES
DE
IT
SE
Transparent Sheet Disc Stabilizer
3-EN
Basic Operations
1
2
1
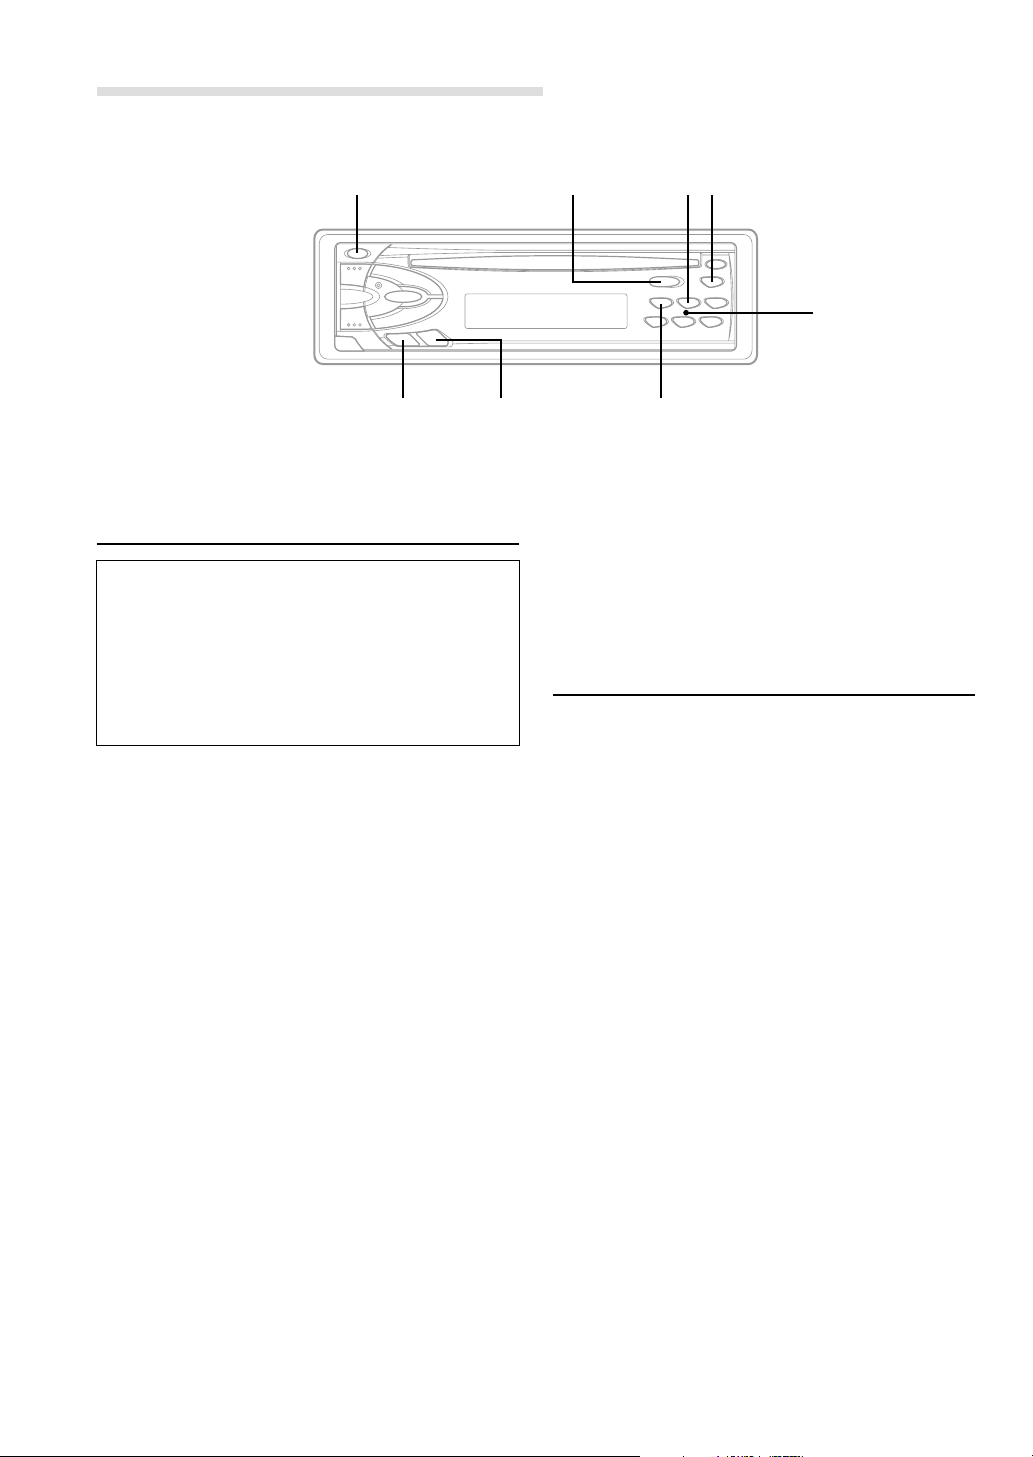
PWR / INTLZ
MODE / LOUD
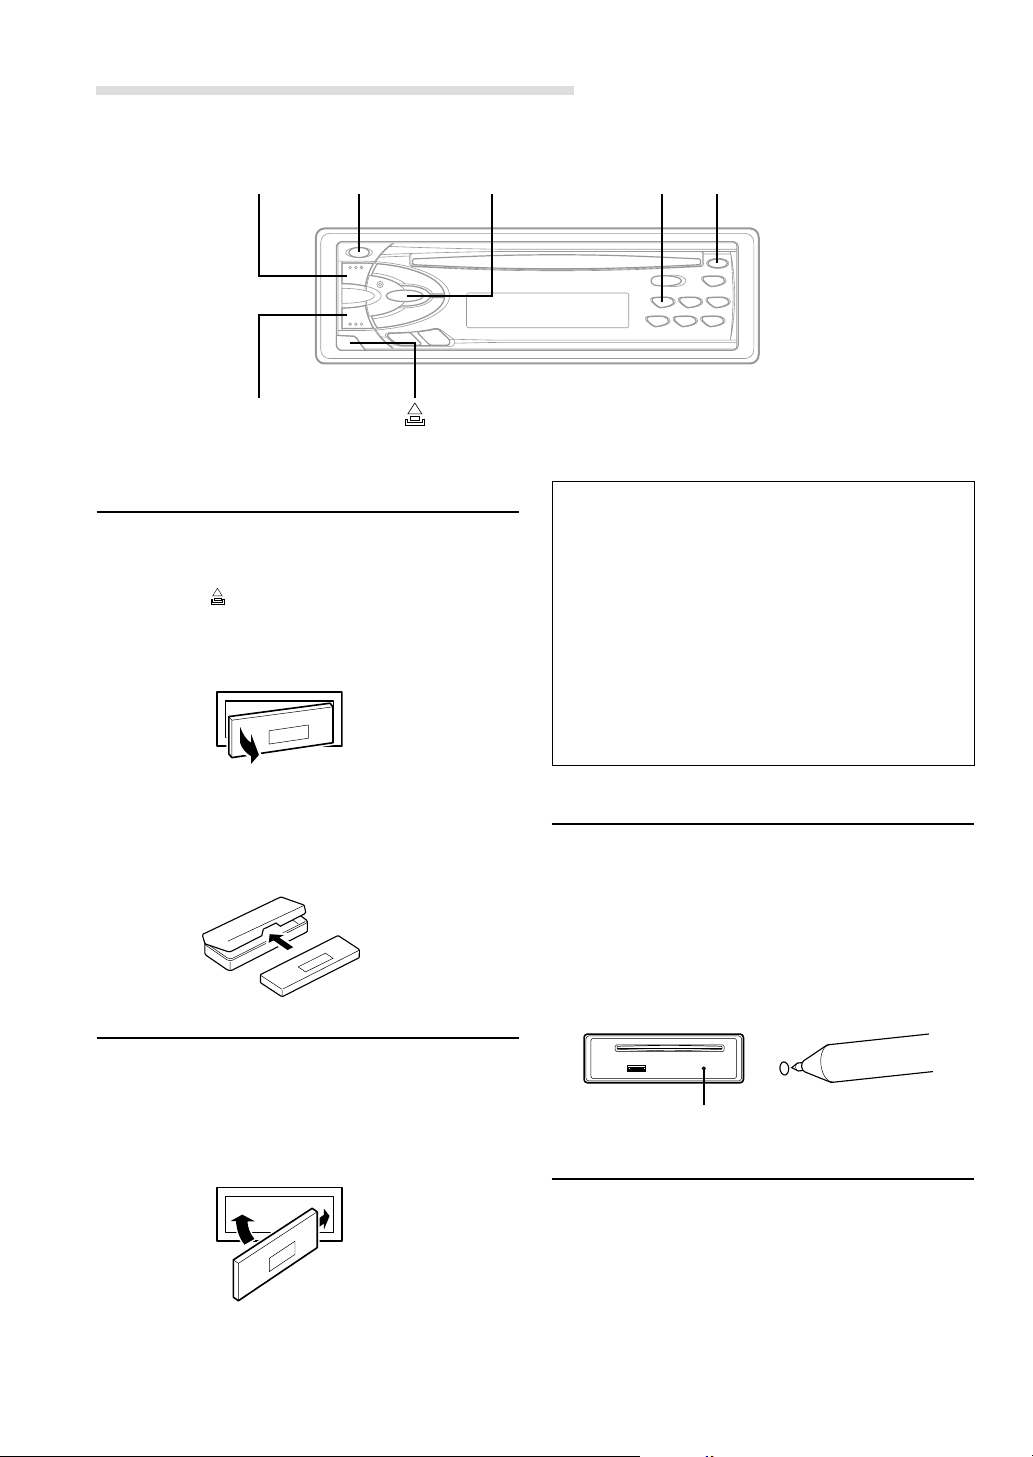
Detaching the Front Panel
1 Press the PWR (Power) button to turn off the
power.
2 Press the (Release) button at lower left corner
until the front panel pops out.
3 Grasp the left side of the front panel and pull it
out.
1
c
• Controlable with Remote Control (CDM-7857RB
only)
This unit can be controlled with an optional
Alpine remote control. For details, consult your
Alpine dealer.
• Connectable to Remote Control Interface Box
(CDM-7857RB only)
You can operate this unit from the vehicle's
control unit when an Alpine Remote Control
Interface Box (optional) is connected. For
details, contact your Alpine dealer.
NOTES
• The front panel may become hot in normal usage
(especially the connector terminals), this is not
malfunction.
• To protect the front panel, place it in the supplied
carrying case.
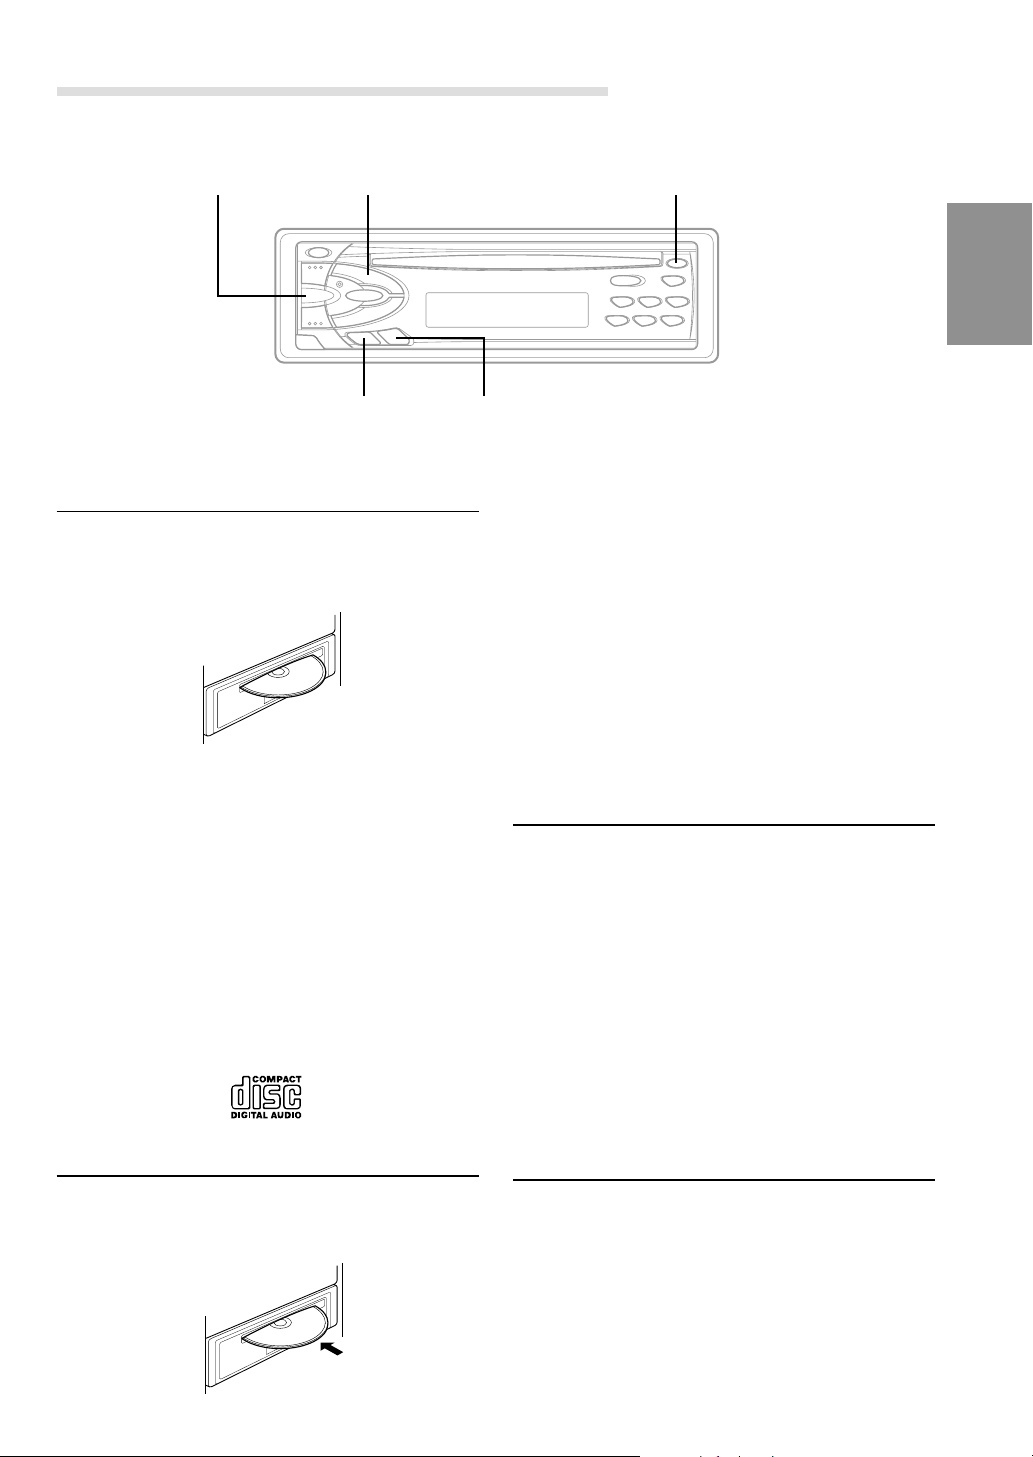
Attaching the Front Panel
1 First, insert the right side of the front panel into
the main unit. Align the groove on the front panel
with the projection on the main unit.
2 Push the left side of the front panel until it locks
firmly into the main unit.
2
1
NOTE
Before attaching the front panel, make sure that there is
no dirt or dust on the connector terminals and no
foreign object between the front panel and the main unit.
4-EN
Initial System Start-Up
1 When operating the unit for the first time after
installation or after the vehicle's battery has been
disconnected and reconnected, set the volume
level to its minimum, then remove the detachable
front panel.
There is a small hole behind the front panel.
Press the Reset switch mounted behind the
small hole with a ball-point pen or any other
pointed object.
1
Reset switch
Turning Power On and Off
1 Press the PWR (Power) button to turn on the
unit.
NOTE
The unit can be turned on by pressing any other button
except the eject c button.
The volume level gradually increases to the
previous level you were listening to before the unit
was turned off.
Press the PWR button again to turn off the unit.
Non Fading Pre-Out (N.F.P.) On
and Off (CDM-7857RB only)
Use the N.F.P. On mode when a non-fading
signal would be most effective. For example, to
drive an amplifier with a low-pass filter for the
subwoofer.
1 Press and hold the Eject (c) button for at least 3
seconds with the unit turned on.
With each press, N.F.P. is toggled On or Off.
N.F.P. ON:
In this position, the Front Pre-Output will not be
affected by the fader. This is ideal for driving a
subwoofer amplifier.
N.F.P. OFF:
Returns to normal fader mode.
NOTES
• Initial mode is "N.F.P. OFF."
• Set the N.F.P. to OFF unless the subwoofer is used.
Adjusting Volume/Bass/Treble/
Balance (Between Left and Right)/
Fader (Between Front and Rear)
1 Press the MODE button repeatedly to choose
the desired mode.
Each press changes the modes as follows:
→ VOL → BAS →TRE
FAD ← BAL ←
NOTE
If the 5 or 6 button is not pressed in 5 seconds after
selecting the BASS, TREBLE, BALANCE and FADER
modes, the unit automatically sets in the VOLUME
mode.
2 Press the 5 and 6 buttons until the desired
sound is obtained in each mode.
NOTE
The BASS and TREBLE settings for each source (FM,
MW (LW) and CD) will be automatically memorized
whenever the settings are changed.
FR
Turning Loudness On/Off
Loudness introduces a special low- and highfrequency emphasis at low listening levels. This
compensates for the ear's decreased sensitivity
to bass and treble sound.
1 Press and hold the LOUD button for at least
2 seconds to activate or deactivate the loudness
mode. The display shows "LOUD" when the
loudness mode is activated.
Adjusting Source Signal Levels
If the difference in volume level between the CD
player and FM radio is too great, adjust the FM
signal level as follows.
1 Press and hold the INTLZ button for at least 3
seconds.
2 Press the Preset 1 button to select the FM signal
level HI (High) or LO (Low) to make the signal
levels between the FM band and CD player
closer.
ES
DE
IT
SE
3 Press the INTLZ button to cancel the adjusting
mode.
5-EN
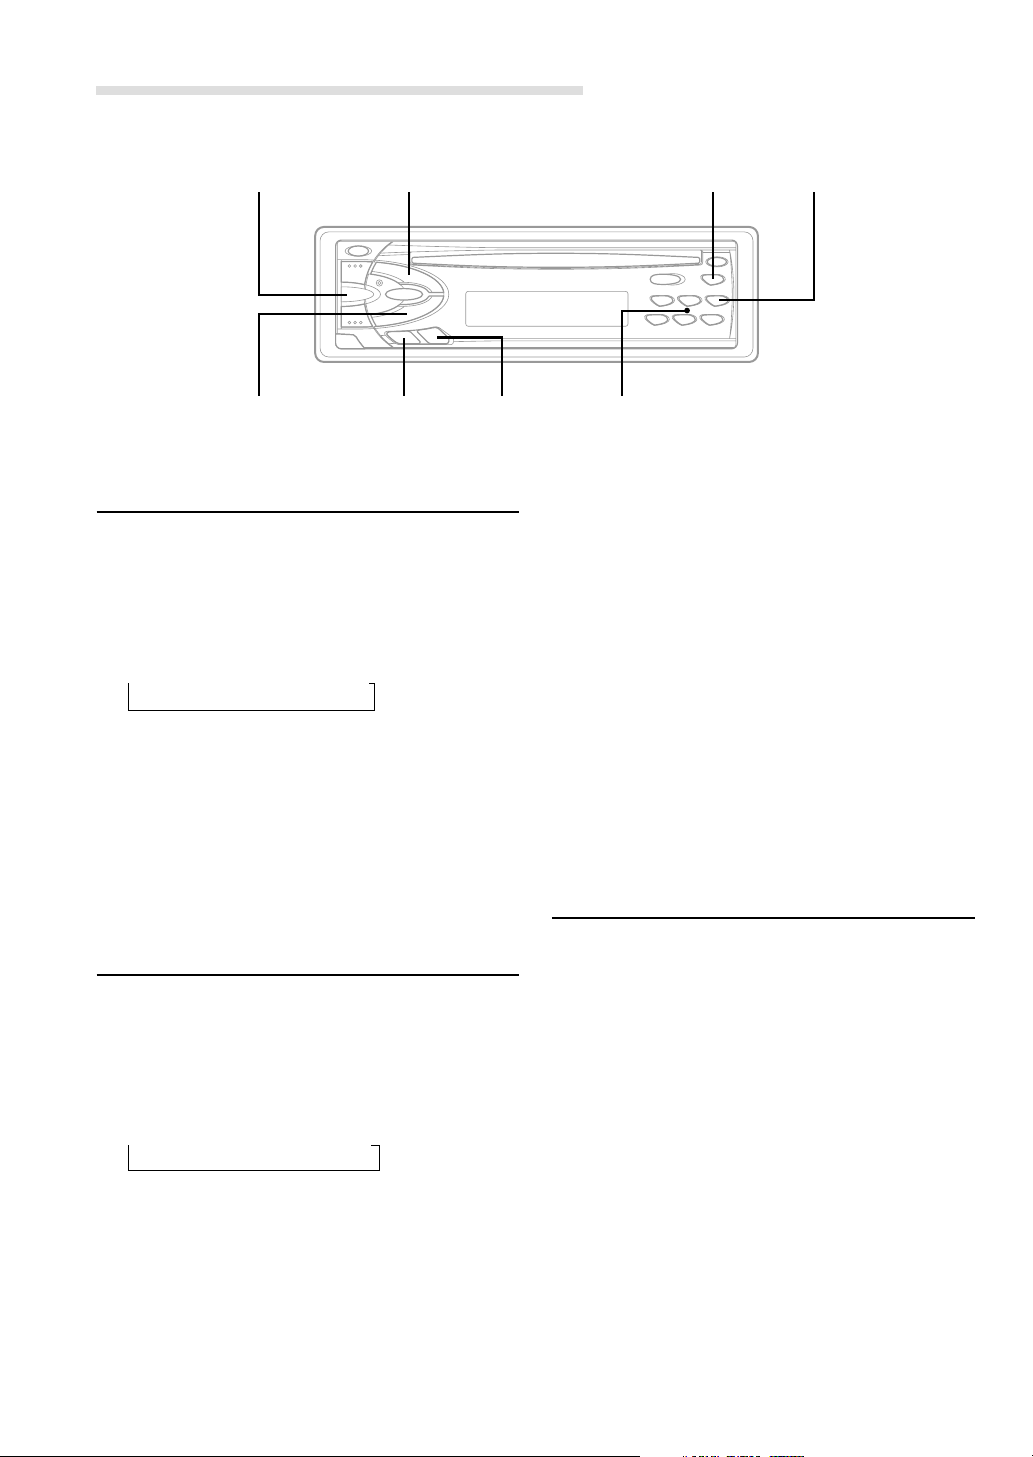
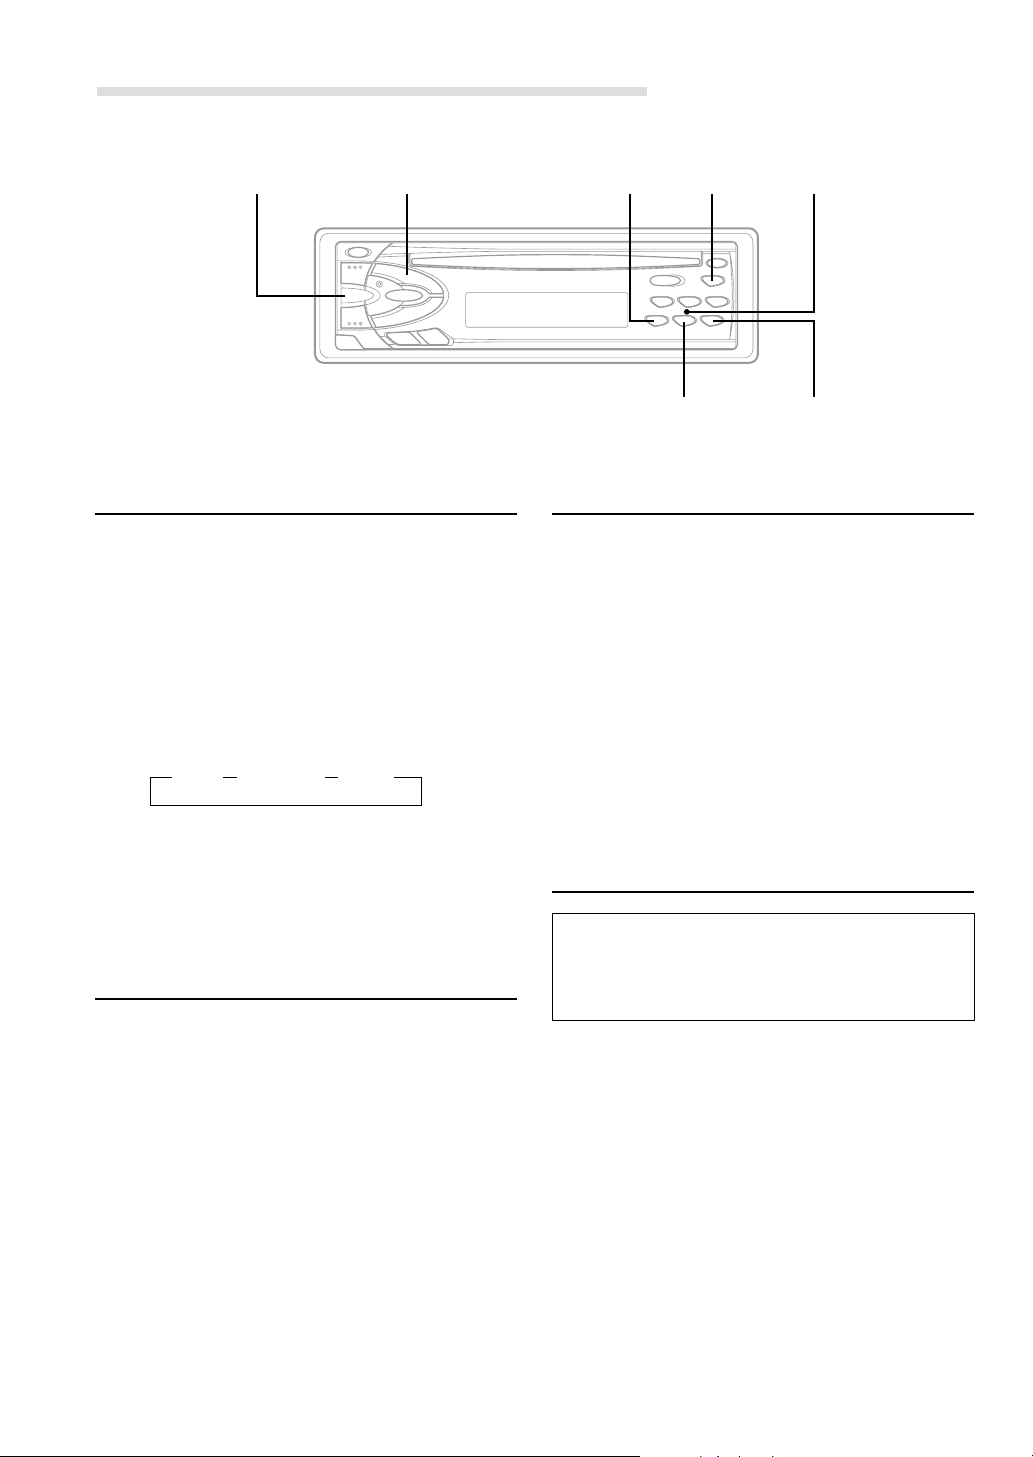
Radio Operations
TUNE / A.ME
BAND
SOURCE
DN g
Manual Tuning
1 Press the SOURCE button to select the radio
mode.
2 Press the BAND button repeatedly until the
desired radio band is displayed.
Each press changes the band:
→ FM1 → FM2 → MW → LW
3 Press the TUNE button repeatedly until "DX
SEEK" and "SEEK" disappear from the display.
NOTE
The initial mode is DX SEEK.
4 Press the DN g or f UP button to move
downward or upward one step respectively until
the desired station frequency is displayed.
f UP
F
Preset (1 through 6)
MONO
3 Press the TUNE button to illuminate the DX and
SEEK indicators in the display.
The SEEK indicator illuminates only for a few
seconds. With the DX mode activated, both
strong and weak stations will be tuned in the
Auto-Seek operation.
Press again to return to the local mode. The DX
indicator will turn off and the SEEK indicator will
illuminate for a few seconds. Now, only strong
stations will be tuned.
4 Press the DN g or f UP button to
automatically seek a station downward or
upward respectively.
The unit will stop at the next station it finds.
Press the same button again to seek the next
station.
Mono/Stereo Switching
Automatic Seek Tuning
1 Press the SOURCE button to select the radio
mode.
2 Press the BAND button repeatedly until the
desired radio band is displayed.
Each press changes the band:
→ FM1 → FM2 → MW → LW
6-EN
1 Press the F button.
The F button changes to green (CDM-7857RB/
CDE-7855RB/CDE-7854R/CDE-7853R), orange
(CDE-7854RM).
2 "ST" indicator appears when a stereo FM station
is tuned in.
Press the MONO button to switch from stereo to
monaural FM reception. This will help in
reducing the noise of weak FM Stereo
broadcasts. In the monaural mode, the MO
indicator appears. Press the MONO button
again to return to the stereo mode.
3 Press the F button to activate the normal mode.
The F button returns to red.

Manual Storing of Station Presets
Tuning to Preset Stations
1 Select the radio band and tune in a desired radio
station you wish to store in the preset memory.
2 Make sure that the F button lights red, then
press and hold any one of the preset buttons
(1 through 6) for at least 2 seconds until the
station frequency on the display blinks.
3 Press the Preset button into which you wish to
store the station while the frequency display is
blinking (within 5 seconds).
The display stops blinking once the station has
been memorized. The display shows the band,
preset No. with a triangle (9) and station
frequency memorized.
4 Repeat the procedure to store up to 5 other
stations onto the same band.
To use this procedure for other bands, simply
select the band desired and repeat the
procedure.
A total of 24 stations can be stored in the preset
memory (6 stations for each band; FM1, FM2,
MW and LW).
NOTE
If you store a station in a preset memory which already
has a station, the current station will be cleared and
replaced with the new station.
1 Press the BAND button repeatedly until the
desired band is displayed.
Each press changes the band:
→ FM1 → FM2 → MW → LW
2 Make sure that the F button lights red, then
press the station preset button that has your
desired radio station in memory.
The display shows the band, preset number with
a triangle and frequency of the station selected.
Automatic Memory of Station
Presets
1 Press the BAND button repeatedly until the
desired radio band is displayed.
Each press changes the band:
→ FM1 → FM2 → MW → LW
2 Press and hold the A.ME button for at least 2
seconds.
The tuner will automatically seek and store 6
strong stations in the selected band in order of
signal strength.
The frequency on the display continues to
change while the automatic memory is in
progress.
When the automatic memory has been
completed, the tuner goes to the station stored
in the preset location No. 1.
NOTE
If no stations are stored, the tuner will return to the
original station you were listening to before the auto
memory procedure began.
7-EN
RDS Operations
INTLZ
DN g
f UP
Setting RDS Reception Mode and
Receiving RDS Stations
The RDS (Radio Data System) is a radio
information system using the 57 kHz subcarrier
of regular FM broadcast. The RDS allows you to
receive a variety of information such as traffic
information, station names, and to automatically
re-tune to a stronger transmitter that is
broadcasting the same programme.
1 Press the F button.
The F button changes to green (CDM-7857RB/
CDE-7855RB/CDE-7854R/CDE-7853R), orange
(CDE-7854RM).
2 Press the AF button to activate the RDS mode.
3 Press the DN g or f UP button to tune in
the desired RDS station.
NOTE
When the BAND button is pressed and held for more
than 2 seconds while a station name is displayed, the
display shows the station frequency for 5 seconds.
When the RDS station signal received has
become weak:
• AF seek mode, press and hold the AF button
for at least 2 seconds to have the unit
automatically seek a stronger station in the AF
(Alternative frequencies) list.
If there is no AF station, the display shows
"SEEK END."
4 Press the AF button again to deactivate the RDS
mode.
5 Press the F button to activate the normal mode.
The F button returns to red.
2
T.INFO / PTY
Tips
The RDS digital data includes the followings:
PI Programme Identification
PS Programme Service Name
AF List of Alternative Frequecncies
TP Traffic Programme
TA Traffic Announcement
PTY Programme Type
EON Enhanced Other Networks
F
Preset (1 through 6)
AF
Recalling Preset RDS Stations
1 Press the F button.
The F button changes to green (CDM-7857RB/
CDE-7855RB/CDE-7854R/CDE-7853R), orange
(CDE-7854RM).
2 Press the AF button to activate the RDS mode.
The display shows "AF" when the RDS mode is
activated.
3 Press the F button to activate the normal mode.
The F button returns to red.
4 Make sure that the F button lights red, then
press the preset location button in which your
desired RDS station is preset.
If the preset station's signal is weak, the unit
automatically searches and tunes to a stronger
station in the AF (Alternative Frequencies) list.
5 If the preset station and the stations in the AF list
cannot be received:
The unit searches again for a station in the PI
(Programme Identification) list.
If there are still no stations receivable in the area,
the unit displays the frequency of the preset
station and the preset indicator disappears.
If the signal level of the Regional (Local) station
being tuned becomes too weak to receive, press
the same preset location button to tune in a
Regional station in other district.
NOTE
For presetting the RDS stations, refer to the Radio
Operation section. The RDS stations can be preset in
the F1 and F2 bands only.
8-EN

Receiving RDS Regional (Local) Stations
1 Press and hold the INTLZ button for at least 3
seconds to activate the setting mode.
2 Press the Preset 2 button to turn on or off the
REG (Regional) mode.
In the REG OFF mode, the unit automatically
keeps receiving the related local RDS station.
3 Press the INTLZ button to deactivate the setting
mode.
Receiving Traffic Information
1 Press the T.INFO button repeatedly until the
T.INFO indicator appears in the display.
2 Press the DN g or f UP button to select
your desired traffic information station. When a
traffic information station is tuned in, the TP
indicator lights up.
Traffic information is heard only when it is being
broadcast. If traffic information is not being
broadcast, the unit is set in the standby mode.
When a traffic information broadcast begins, the
unit automatically receives it and the display
shows "TRF-INFO" for a few seconds and
returns to the PS display.
When the traffic information broadcast is over, the
unit will automatically set in the standby mode.
NOTES
• If the traffic information broadcast signal falls below a
certain level, the unit remains in the receiving mode
for 1 minute. If the signal remains below a certain
level for over 1 minute, the "T.INFO" indicator blinks.
• If you do not want to listen to the traffic information
being received, lightly press the T.INFO button to
skip that traffic information message. The T. INFO
mode will remain in the ON position to receive the
next traffic information message.
• If the volume level is changed while receiving traffic
information, the changed volume level will be
memorized. When traffic information is received next
time, the volume level will be automatically adjusted
to the level memorized.
PTY (Programme Type) Tuning
1 Press and hold the PTY button for at least 2
seconds to activate the PTY mode.
The Programme Type of the station being
currently received will be displayed for 5 seconds.
• If there is no receivable PTY broadcast, "NO
PTY" will be displayed for 5 seconds.
• If no RDS station can be received, the display
shows "NO RDS."
NOTE
If no button is pressed within 5 seconds after pressing
the PTY button, the PTY mode will be automatically
cancelled.
2 Press the DN g and f UP buttons within 5
seconds after activating the PTY mode to
choose the desired programme type while the
PTY (programme type) is being displayed. Each
press scrolls the programme type by one.
LIGHT M ← CLASSICS → OTHER M
3 Press the PTY button within 5 seconds after
selecting the programme type to start searching
for a station in the selected programme type.
The chosen programme type indicator blinks during
searching and lights when a station is found.
If no PTY station is found, "NO PTY" will be
displayed for 2 seconds.
Receiving Traffic Information While
Playing CD or Radio
1 Press the T.INFO button repeatedly until the
T.INFO indicator appears in the display.
2 Press the DN g and f UP buttons to
select a traffic information station if necessary.
• When a traffic information broadcast starts,
the unit automatically mutes the CD player/
changer or the regular FM broadcast.
• When the traffic information broadcast
finishes, the unit automatically returns to the
original source play before the traffic
information broadcast began.
When traffic information stations cannot be
received:
In the tuner mode:
When the TP signal can no longer be received
for over 1 minute, the "T.INFO" indicator blinks.
In the CD mode:
When the TP signal can no longer be received,
the traffic information station of another
frequency will be selected automatically.
NOTE
The receiver is equipped with the EON (Enhanced
Other Networks) function in order to keep track of
additional alternate frequencies to the AF list. The EON
indicator appears while an RDS EON station is being
received. If the station being received does not
broadcast the traffic information, the receiver
automatically tunes in the related station that
broadcasts the traffic information when it occurs.
3 Press the T.INFO button to deactivate the Traffic
Information mode.
The T.INFO indicator disappears.
9-EN

RDS Operations
Priority News
This function allows you to preset to give priority
to the News programme. You will never miss the
News programme as the unit automatically gives
priority to the News programme whenever it
begins broadcasting, and interrupts the
programme you are currently listening. This
feature is functional when your unit is set to a
mode other than the LW and MW modes.
NEWS
F
1 Press the F button.
The F button changes to green (CDM-7857RB/
CDE-7855RB/CDE-7854R/CDE-7853R), orange
(CDE-7854RM).
2 Press the NEWS button to activate the
PRIORITY NEWS mode.
"NEWS" lights up in the display.
• To disable the PRIORITY NEWS function,
press the NEWS button.
NOTE
In the PRIORITY NEWS function, unlike in the T.INFO
function, the volume does not increase automatically.
3 Press the F button to activate the normal mode.
The F button returns to red.
10-EN
CD Player Operation
- / J
SOURCE
DN g
Inserting/Ejecting Disc
1 Insert a CD half way into the slot with the label
side facing up. The player automatically draws
the disc into the disc compartment.
The Disc indicator appears to show that a disc
is loaded.
NOTE
Three-inch (8cm) CD's cannot be used (CDM-7857RB
only).
2 Press the Eject c button when you want to eject
the CD.
NOTES
• If the CD is not removed for several seconds after it
has been ejected, the player automatically draws the
CD into the compartment to protect the CD.
• Only compact discs containing the mark shown can
be used.
c
f UP
The display shows the track number and elapsed
time of the track being played. When the last
track is played back the player returns to the first
track and begins playback from that point.
2 If a disc is already loaded in the CD player, press
the SOURCE button to select the CD mode.
3 Press the -/J button to start CD play.
4 Press the -/J button to temporarily stop CD
playback.
To resume playback, press the -/J button again.
Music Sensor (Skip)
1 Momentarily press the DN g button once
during CD play to return to the beginning of the
current track. If you wish to access a track further
back, repeatedly press until you reach the
desired track.
Press the f UP button once to advance to the
beginning of the next track. If you wish to access
a track further ahead, press repeatedly until the
desired track is reached.
NOTE
The music sensor feature is functional in the play or
pause mode.
Normal Play and Pause
1 Insert a CD. The CD player begins playback from
the first track on the disc.
Fast Forward and Backward
1 Press and hold the DN g or f UP button to
quickly move backward or forward until you
reach the desired section of the track.
11-EN
CD Player Operation
- / J
SOURCE
Repeat Play
1 Press the RPT button to play back repeatedly the
track being played.
The RPT indicator appears and the track will be
played repeatedly.
Press the RPT button again to deactivate the
repeat play.
NOTE
If a CD Changer is connected and the RPT ALL mode is
selected, the unit repeatedly plays back all tracks on the
disc selected.
→
→
RPT RPT ALL OFF
→
M.I.X.
RPT SCAN
F
Preset (1 through 6)
Scanning Programmes
1 Press the SCAN button to activate the Scan
mode.
The first 10 seconds of each track will be played
back in succession.
To stop scanning, press the SCAN button to
deactivate the Scan mode.
NOTE
In case a 6-disc CD changer is connected (CDM7857RB only):
Press the F button to change to green, then go to step 1.
Press the F button to return to the normal mode.
The F button returns to red.
NOTE
In case a 6-disc CD changer is connected (CDM7857RB only):
Press the F button to change to green, then go to step 1.
Press the F button to return to the normal mode.
The F button returns to red.
M.I.X. (Random Play)
1 Press the M.I.X. button in the play or pause mode.
The M.I.X. indicator will illuminate and the
tracks on the disc will be played back in a
random sequence. After all the tracks on the
disc have been played back once, the player
will begin a new random sequence play until the
M.I.X. mode is cancelled.
To cancel M.I.X. play, press the M.I.X. button again.
NOTE
In case a 6-disc CD changer is connected
(CDM-7857RB only):
Press the F button to change to green, then go to step 1.
Press the F button to return to the normal mode.
The F button returns to red.
Controlling CD Changer (Optional)
(CDM-7857RB only)
If an optional Alpine 6-disc CD Changer is
connected to the 8-pin DIN connector (M-Bus) of
the CDM-7857RB, you can control the CD
Changer using the CDM-7857RB.
NOTE
The CD controls on the CDM-7857RB for the CD
Changer operation are functional only when the CD
Changer is interconnected with the CDM-7857RB.
1 Press the SOURCE button to activate the CD
Changer.
The display shows "Shuttle", the disc number
and track number.
NOTE
To start play or pause play, press the :/J button.
2 Make sure that the F button lights red, then
press the Preset buttons to select the desired
disc loaded in the CD Changer.
12-EN

Informations
In Case of Difficulty
If you encounter a problem, please review the
items in the following checklist. This guide will
help you isolate the problem if the unit is at fault.
Otherwise, make sure the rest of your system is
properly connected or consult your authorized
Alpine dealer.
Basic
No function or display.
• Vehicle's ignition is off.
- If connected following instructions, the unit will not
operate with the vehicle's ignition off.
• Improper power lead connections.
- Check power lead connections.
• Blown fuse.
- Check the fuse on the battery lead of the unit; replace
with the proper value if necessary.
• Internal micro-computer malfunctioned due to
interference noise etc.
- Press the Reset button with a ball-point pen or other
pointed article.
Radio
Unable to receive stations.
• No antenna or open connection in cable.
- Make sure the antenna is properly connected;
replace the antenna or cable if necessary.
Unable to tune stations in the seek mode.
• You are in a weak signal area.
- Make sure the tuner is in the DX mode.
• If the area you are in is a primary signal area, the
antenna may not be grounded and connected properly.
- Check your antenna connections; make sure the
antenna is properly grounded at its mounting
location.
• The antenna may not be the proper length.
- Make sure the antenna is fully extended; if
broken, replace the antenna with a new one.
Broadcast is noisy.
• The antenna is not the proper length.
- Extend the antenna fully; replace it if it is broken.
• The antenna is poorly grounded.
- Make sure the antenna is grounded properly at its
mounting location.
CD
CD Player/Changer not functioning.
• Out of operating temperature range +50˚C (+120˚F) for
CD.
- Allow the vehicle's interior (or trunk) temperature to
cool.
CD playback sound is wavering.
• Moisture condensation in the CD Module.
- Allow enough time for the condensation to evaporate
(about 1 hour).
CD insertion not possible.
• The CD is already in the CD player.
- Eject the CD and remove it.
• The CD is being improperly inserted.
- Make sure the CD is being inserted following
instructions in the Owner's Manual.
Unable to fast forward or backward the CD.
• The CD has been damaged.
- Eject the CD and discard it; using a damaged CD in
your unit can cause damage to the mechanism.
CD playback sound skips due to vibration.
• Improper mounting of the unit.
- Securely re-mount the unit.
• Disc is very dirty.
- Clean the disc.
• Disc has scratches.
- Change the disc.
CD playback sound skips without vibration.
• Dirty or scratched disc.
- Clean the disc; damaged disc should be replaced.
Error displays (built-in CD player only)
• Mechanical error
- Press the c button. After the error indication
disappears, insert the disc again. If the above-
mentioned solution does not solve the problem,
consult your nearest ALPINE dealer.
13-EN

Informations
Indication for CD Changer
HI TEMP
• Protective circuit is activated due to high temperature.
- The indicator will disappear when the temperature
returns to within operation range.
ERROR - 01
• Malfunction in the CD Changer.
- Consult your Alpine dealer. Press the magazine eject
button and pull out the magazine.
Check the indication. Insert the magazine again.
If the magazine cannot be pulled out, consult your
Alpine dealer.
• Magazine ejection not possible.
- Press the magazine eject button. If the magazine does
not eject, consult your Alpine dealer.
ERROR - 02
• A disc is left inside the CD Changer.
- Press the Eject button to activate the eject function.
When the CD Changer finishes the eject function,
insert an empty CD magazine into the CD Changer to
receive the disc left inside the CD Changer.
NO MAGZN
• No magazine is loaded into the CD Changer.
- Insert a magazine.
NO DISC
• No indicated disc.
- Choose another disc.
14-EN

Specifications
FM TUNER SECTION
Tuning Range 87.5 – 108.0 MHz
Mono Usable Sensitivity 0.7 µV
Alternate Channel Selectivity 80 dB
Signal-to-Noise Ratio 65 dB
Stereo Separation 35 dB
MW TUNER SECTION
Tuning Range 531 – 1,602 kHz
Sensitivity (IEC Standard) 25.1 µV/28 dB
LW TUNER SECTION
Tuning Range 153 – 281 kHz
Sensitivity (IEC Standard) 31.6 µV/30 dB
CD SECTION
Frequency Response 5 – 20,000 Hz (±1 dB)
Wow & Flutter (% WRMS) Below measurable limits
Total Harmonic Distortion 0.008% (at 1 kHz)
Dynamic Range 95 dB (at 1 kHz)
Signal-to-Noise Ratio 95 dB
Channel Separation 85 dB (at 1 kHz)
GENERAL
Power Requirement 14.4 V DC
(11–16 V allowable)
Maximum Power Output
CDM-7857RB 44 W × 4
CDE-7855RB/CDE-7854RM/
CDE-7854R/CDE-7853R 40 W × 4
Output Voltage 2 V/10k ohms
Bass ±15 dB at 30 Hz
Treble ±10 dB at 10 kHz
Weight 1.5 kg (3 lbs. 5 oz)
CHASSIS SIZE
Width 178 mm (7")
Height 50 mm (2")
Depth 155 mm (6-1/8")
NOSEPIECE SIZE
Width 170 mm (6–3/4")
Height 46 mm (1-13/16")
Depth 18 mm (11/16")
Due to continuous product improvement, specifications and
design are subject to change without notice.
15-EN

Installation and Connections
Before installing or connecting the unit, please
read the following and pages 2 and 3 of this
manual thoroughly for proper use.
Warning
MAKE THE CORRECT CONNECTIONS.
Failure to make the proper connections may result in fire
or product damage.
USE ONLY IN CARS WITH A 12 VOLT NEGATIVE
GROUND.
(Check with your dealer if you are not sure.) Failure to do
so may result in fire, etc.
BEFORE WIRING, DISCONNECT THE CABLE FROM
THE NEGATIVE BATTERY TERMINAL.
Failure to do so may result in electric shock or injury due
to electrical shorts.
DO NOT ALLOW CABLES TO BECOME ENTANGLED
IN SURROUNDING OBJECTS.
Arrange wiring and cables in compliance with the manual
to prevent obstructions when driving. Cables or wiring
that obstruct or hang up on places such as the steering
wheel, gear lever, brake pedals, etc. can be extremely
hazardous.
DO NOT SPLICE INTO ELECTRICAL CABLES.
Never cut away cable insulation to supply power to other
equipment. Doing so will exceed the current carrying
capacity of the wire and result in fire or electric shock.
DO NOT DAMAGE PIPE OR WIRING WHEN
DRILLING HOLES.
When drilling holes in the chassis for installation, take
precautions so as not to contact, damage or obstruct pipes,
fuel lines, tanks or electrical wiring. Failure to take such
precautions may result in fire.
DO NOT USE BOLTS OR NUTS IN THE BRAKE OR
STEERING SYSTEMS TO MAKE GROUND
CONNECTIONS.
Bolts or nuts used for the brake or steering systems (or
any other safety-related system), or tanks should NEVER
be used for installations or ground connections. Using
such parts could disable control of the vehicle and cause
fire etc.
KEEP SMALL OBJECTS SUCH AS BATTERIES OUT
OF THE REACH OF CHILDREN.
Swallowing them may result in serious injury. If
swallowed, consult a physician immediately.
DO NOT INSTALL IN LOCATIONS WHICH MIGHT
HINDER VEHICLE OPERATION, SUCH AS THE
STEERING WHEEL OR GEARSHIFT.
Doing so may obstruct forward vision or hamper
movement etc. and results in serious accident.
16-EN
Caution
HAVE THE WIRING AND INSTALLATION DONE BY
EXPERTS.
The wiring and installation of this unit requires special
technical skill and experience. To ensure safety, always
contact the dealer where you purchased this product to
have the work done.
USE SPECIFIED ACCESSORY PARTS AND INSTALL
THEM SECURELY.
Be sure to use only the specified accessory parts. Use of
other than designated parts may damage this unit internally
or may not securely install the unit in place. This may cause
parts to become loose resulting in hazards or product failure.
ARRANGE THE WIRING SO IT IS NOT CRIMPED OR
PINCHED BY A SHARP METAL EDGE.
Route the cables and wiring away from moving parts (like
the seat rails) or sharp or pointed edges. This will prevent
crimping and damage to the wiring. If wiring passes through
a hole in metal, use a rubber grommet to prevent the wire's
insulation from being cut by the metal edge of the hole.
DO NOT INSTALL IN LOCATIONS WITH HIGH
MOISTURE OR DUST.
Avoid installing the unit in locations with high incidence
of moisture or dust. Moisture or dust that penetrates into
this unit may result in product failure.
Precautions
• Be sure to disconnect the cable from the (–) battery post
before installing your CDM-7857RB/CDE-7855RB/CDE7854RM/CDE-7854R/CDE-7853R. This will reduce any
chance of damage to the unit in case of a short-circuit.
• Be sure to connect the colour coded leads according to the
diagram. Incorrect connections may cause the unit to
malfunction or damage to the vehicle's electrical system.
• When making connections to the vehicle's electrical
system, be aware of the factory installed components (e.g.
on-board computer). Do not tap into these leads to provide
power for this unit. When connecting the CDM-7857RB/
CDE-7855RB/CDE-7854RM/CDE-7854R/CDE-7853R to
the fuse box, make sure the fuse for the intended circuit of
the CDM-7857RB/CDE-7855RB/CDE-7854RM/CDE7854R/CDE-7853R has the appropriate amperage. Failure
to do so may result in damage to the unit and/or the
vehicle. When in doubt, consult your ALPINE dealer.
• The CDM-7857RB/CDE-7855RB/CDE-7854RM/CDE7854R/CDE-7853R uses female RCA-type jacks for
connection to other units (e.g. amplifier) having RCA
connectors. You may need an adaptor to connect other
units. If so, please contact your authorized ALPINE dealer
for assistance.
• Be sure to connect the speaker (–) leads to the speaker (–)
terminal. Never connect left and right channel speaker
cables to each other or to the vehicle body.
IMPORTANT
Please record the serial number of your unit in the
space provided below and keep it as a permanent
record. The serial number plate is located on the
bottom of the unit.
SERIAL NUMBER:
INSTALLATION DATE:
INSTALLATION TECHNICIAN:
PLACE OF PURCHASE:

Installation
1
Bracket
Dashboard
Mounting sleeve
(Included)
Remove the Detachable Front Panel (refer to
page 4). Slide mounting sleeve from main unit
(see Removal Procedure below). Slide the
mounting sleeve into the dashboard.
2
Metal Mounting Strap
Hex Nut (M5)
Rubber Cap
(Included)
CDM-7857RB/CDE-7855RB/
CDE-7854RM/CDE-7854R/
CDE-7853R
Screw
Bolt Stud
∗
Hex Bolt
(Included)
3 Slide the CDM-7857RB/CDE-7855RB/CDE-
7854RM/CDE-7854R/CDE-7853R into the
dashboard. When the unit is in place, make sure
the locking pins are fully seated in the down
position. This can be done by pressing firmly in on
the unit while pushing the locking pin down with a
small screwdriver. This ensures that the unit is
properly locked and will not accidentally come out
from the dashboard. Install the Detachable Front
Panel.
Lock pin
Removal
1 Remove the detachable front panel.
2 Use a small screwdriver (or similar tool) to
push the locking pins to the “up” position (see
Fig. 3). As each pin is unlocked, gently pull out
on the unit to make sure it does not re-lock
before unlocking the second pin.
3 Pull the unit out, keeping it unlocked as you do so.
<JAPANESE CAR>
Front frame
CDM-7857RB/CDE-7855RB/
CDE-7854RM/CDE-7854R/
CDE-7853R
When your vehicle has the Bracket, mount the
long hex bolt onto the rear panel of the CDM7857RB/CDE-7855RB/CDE-7854RM/CDE7854R/CDE-7853R and put the Rubber Cap on
the hex bolt. If your vehicle does not have the
Mounting Support, reinforce the head unit with
the metal mounting strap (not supplied). Connect
all the leads of the CDM-7857RB/CDE-7855RB/
CDE-7854RM/CDE-7854R/CDE-7853R
according to details described in the
CONNECTIONS section.
NOTE
For the screw ∗, provide a proper screw to the chassis
installing location.
CDM-7857RB/CDE-7855RB/
CDE-7854RM/CDE-7854R/
CDE-7853R
Screws (M5 × 8)
(Included)
Mounting Bracket
17-EN

Installation and Connections
Connection
Antenna
<
ISO Antenna Plug
To vehicle phone
To amplifier or equalizer
(Pink/Black)
(Blue/White)
AUDIO INTERRUPT IN
REMOTE TURN-ON
2
3
(Red)
(Black)
(Yellow)
1
%
IGNITION
6
BATTERY
9
7
GND
POWER ANT(Blue)
CD changer
(Sold
separately)
4
5
To power antenna
Ignition Key
8
Battery
A
!
"
#
$
A
&
)
~
+
,
-
.
(
/
:
DIN Connector PIN Configuration
(CDM-7857RB only).
lgnition
Data Ground
Lch
Sig Gnd
Shield Ground
Power Supply Ground
B
a
tte
ry
Data Bus
Rch
Speakers
Green
Green/Black
White
White/Black
Grey/Black
Grey
Violet/Black
Violet
Rear Left
Front Left
Front Right
Rear Right
Speakers
Front Right
No.
OUTPUT
"
"
#
18-EN
Front
Rear
;
(Sold Separately)
;
MODEL
CDM-7857RB
CDE-7855RB/CDE-7854RM/CDE-7854R/CDE-7853R
CDM-7857RB
Not Iinked with volume operation.
(Refer to Operating Instructions, page 5)
Linked with volume operation.
Amplifier
Front Left
Rear Right
Rear Left
OUTPUT SPECIFICATION

1 Antenna Receptacle
Connect to the supplied ISO antenna convertor
plug.
2 Audio Interrupt In Lead (Pink/Black)
Connect this lead to the Audio Interface output of
a cellular phone which provides ground shorting
when a call is received.
If a device having the interrupt feature is
connected, audio will be automatically muted
whenever the interrupt signal is received from
the device.
3 Remote Turn-On Lead (Blue/White)
Connect this lead to the remote turn-on lead of
your amplifier or signal processor.
4 Switched Power Lead (Ignition) (Red)
Connect this lead to an open terminal on the
vehicle’s fuse box or another unused power
source which provides (+) 12V only when the
ignition is turned on or in the accessory position.
5 Power Antenna Lead (Blue)
Connect this lead to the +B terminal of your
power antenna, if applicable.
NOTE
This lead should be used only for controlling the
vehicle's power antenna. Do not use this lead to turn on
an amplifier or a signal processor, etc.
6 Fuse Holder (15A)
7 Battery Lead (Yellow)
Connect this lead to the positive (+) post of the
vehicle’s battery.
8 ISO Power Supply Connector
9 Ground Lead (Black)
Connect this lead to a good chassis ground on
the vehicle. Make sure the connection is made to
bare metal and is securely fastened using the
sheet metal screw provided.
! Remote Control Interface Connector (CDM-
7857RB only)
To remote control interface box.
" Front Output/NFP RCA Connectors (CDM-
7857RB only)
RED is right and WHITE is left.
" Rear Output RCA Connectors (CDE-7855RB/
CDE-7854RM/CDE-7854R/CDE-7853R only)
RED is right and WHITE is left.
# Rear Output RCA Connectors (CDM-7857RB
only)
RED is right and WHITE is left.
$ DIN Connector (CDM-7857RB only)
Connect this to the DIN connector on the CD
changer.
% DIN Extension Cable
NOTE
Older Alpine CD changer came with standard, straight
type DIN connectors. In installations where an L-type
connector would simplify installation, the Alpine 4910
Adaptor can be used (sold separately).
& Power Supply Connector
( ISO Connector (Speaker Output)
) Left Rear (+) Speaker Output Lead (Green)
~ Left Rear (–) Speaker Output Lead (Green/
Black)
+ Left Front (+) Speaker Output Lead (White)
, Left Front (–) Speaker Output Lead (White/
Black)
- Right Front (–) Speaker Output Lead (Grey/
Black)
. Right Front (+) Speaker Output Lead (Grey)
/ Right Rear (–) Speaker Output Lead (Violet/
Black)
: Right Rear (+) Speaker Output Lead (Violet)
; RCA Extension Cable (sold separately)
< ISO Antenna Convertor Plug
02
To prevent external noise from entering the audio system.
Locate the unit and route the leads at least 10cm away from the car harness.
• Keep the battery power leads as far away from other leads as possible.
• Connect the ground lead securely to a bare metal spot (remove the coating if necessary) of the car
chassis.
• If you add an optional noise suppressor, connect it as far away from the unit as possible. Your Alpine
dealer carries various Alpine noise suppressors, contact them for further information.
• Your Alpine dealer knows best about noise prevention measures so consult your dealer for further
information.
19-EN

20-EN

Händlerstemple
Tips der Polizei:
[ Stellen Sie Ihr Fahrzeug stets gut sichtbar ab.
[
Verschließen Sie Türen, Fenster, Schiebedach und Kofferraum immer, auch bei nur kurzer Abwesenheit.
[ Lassen Sie keine Wertsachen sichtbar im Auto liegen.
[ Wird Ihr Fahrzeug aufgebrochen, wenden Sie sich sofort an die nächste Polizeidienststelle.
[ Belassen Sie Ihr Fahrzeug nach einem Aufbruch im Originalzustand.
[ Informieren Sie sich über technische Sicherungsmöglichkeiten bei einer Kriminalpolizeilichen
Beratungsstelle.
Gerät 1
Modell-Nr.:
Hersteller:
Seriennummer:
AL
Kaufdatum: Preis:

R
Car Audio and Navigation Systems
GERÄTE-PASS
AUDIO SYSTEME
Fahrzeugmarke: Typ:
Amtl. Kennzeichen:
Name des Halters:
Straße:
Wohnort:
Bitte füllen Sie diesen Pass vollständig aus und bewahren Sie ihn
außerhalb des Fahrzeugs auf:
Im Falle eines Diebstahls wird für Sie die Schadensabwicklung mit der
Versicherung einfacher, und Sie erleichtern der Polizei die Fahndung
nach den Tätern.

Indice
ITALIANO
Istruzioni Per L'uso
AVVERTIMENTO
AVVERTIMENTO ....................................... 2
ATTENZIONE ............................................ 2
PRECAUZIONI .......................................... 2
Funzionamento di base
Rimozione del pannello anteriore ......................4
Applicazione del pannello anteriore .................. 4
Avvio iniziale del sistema .................................. 4
Accensione e spegnimento ................................. 4
Attivazione e disattivazione dell'uscita di
preamplificazione senza attenuazione
(N.F.P.) (solo CDM-7857RB) ........................ 5
Attivazione e disattivazione del modo di
sonorità ........................................................... 5
Regolazione del livello di segnale della fonte .... 5
Regolazione di volume/bassi/acuti/equilibratura
(tra i canali sinistro e destro)/fader (tra i
diffusori anteriori e posteriori) ....................... 5
Funzionamento della radio
Sintonia manuale ................................................ 6
Sintonia a ricerca automatica .............................6
Commutazione stereo/mono .............................. 6
Memorizzazione manuale di stazioni
preselezionate ................................................. 7
Memorizzazione automatica di stazioni
preselezionate ................................................. 7
Sintonia delle stazioni preselezionate ................7
Funzionamento RDS
Impostazione del modo di ricezione RDS e
ricezione di stazioni RDS ...............................8
Richiamo delle stazioni RDS preselezionate .....8
Ricezione di stazioni RDS regionali (locali) ..... 9
Ricezione di notiziari sul traffico ....................... 9
Sintonizzazione PTY (tipo di programma) ........9
Ricezione di notiziari sul traffico durante
l'ascolto CD o della radio ............................... 9
Priorità notiziari ............................................... 10
Uso del lettore CD
Inserimento/estrazione del disco ...................... 11
Riproduzione normale e pausa ......................... 11
Sensore musicale (salto) .................................. 11
Avanzamento e ritorno rapido .......................... 11
Riproduzione a ripetizione ............................... 12
M.I.X. (riproduzione casuale) .......................... 12
Scorrimento di programmi ............................... 12
Controllo del cambia CD (opzionale)
(solo CDM-7857RB) ....................................12
Informazione
In caso di difficoltà .......................................... 13
Caratteristiche tecniche .................................... 15
Installazione e
collegamenti
Precauzioni ....................................................... 16
Installazione .....................................................17
Collegamenti ....................................................18
1-IT

AVVERTIMENTO
AVVERTIMENTO
Il punto esclamativo all'interno di un triangolo
equilatero e la scritta "AVVERTIMENTO"
indicano all'utilizzatore la presenza di
importanti istruzioni per l'uso.
Se si manca di osservare queste istruzioni ne
possono risultare serie lesioni o morte.
NON EFFETTUARE ALCUNA OPERAZIONE CHE
POSSA DISTOGLIERE L'ATTENZIONE DALLA GUIDA
DEL VEICOLO.
Qualsiasi operazione che necessita di attenzione
prolungata deve essere effettuata solo dopo il completo
arresto del veicolo. Arrestare sempre il veicolo in un luogo
sicuro prima di effettuare queste operazioni. In caso
contrario si potrebbero causare incidenti.
TENERE IL VOLUME AD UN LIVELLO CHE
PERMETTA DI UDIRE I RUMORI ESTERNI DURANTE
LA GUIDA.
In caso contrario si potrebbero causare incidenti.
DURANTE LA GUIDA EVITARE DI GUARDARE A
LUNGO IL MONITOR.
Ciò potrebbe distogliere l'attenzione del conducente dalla
guida e causare incidenti.
NON SMONTARE O MODIFICARE.
Tale azione potrebbe causare incidenti, incendi o scosse
elettriche.
UTILIZZARE SOLO IN VEICOLI CON TERRA
NEGATIVA A 12 VOLT.
(se non si è sicuri, controllare con il proprio rivenditore)
Diversamente si potrebbero causare incendi o altri danni.
TENERE LE PARTI PICCOLE QUALI LE BATTERIE
FUORI DALLA PORTATA DEI BAMBINI.
Se ingeriti potrebbero causare gravi danni. In caso di
ingerimento, consultare immediatamente un medico.
USARE FUSIBILI DI RICAMBIO DELL'AMPERAGGIO
CORRETTO.
Altrimenti potrebbero derivarne incendi o scosse
elettriche.
NON BLOCCARE LE FESSURE O I PANNELLI DI
IRRADIAZIONE.
Bloccandoli si potrebbe causare un surriscaldamento
interno dell'apparecchio che potrebbe dare luogo a
incendi.
UTILIZZARE IL PRODOTTO IN VEICOLI CON
BATTERIA DA 12 V.
Un utilizzo diverso da quello indicato potrebbe causare
incendi, scosse elettriche o altri incidenti.
NON INSERIRE LE MANI, LE DITA O OGGETTI
ESTRANEI NELLE FESSURE O NELLE APERTURE.
Diversamente si potrebbero causare danni alla persona o
al prodotto.
ATTENZIONE
Il punto esclamativo all'interno di un triangolo
equilatero e la scritta "ATTENZIONE" indicano
all'utilizzatore la presenza di importanti
istruzioni per l'uso.
Se si manca di osservare queste istruzioni ne
possono risultare lesioni o danni materiali.
INTERROMPERE IMMEDIATAMENTE L'USO IN CASO
DI PROBLEMI.
Diversamente si potrebbero causare danni alla persona o
al prodotto. Per riparazioni, rivolgersi ad un rivenditore
autorizzato Alpine o al più vicino centro di assistenza
Alpine.
PRECAUZIONI
Temperatura
Assicurarsi che la temperatura all'inter no del veicolo sia
compresa fra +60°C e –10°C prima di accendere
l'apparecchio.
Condensazione di umidità
Si possono notare incertezze nel suono di riproduzione del
disco dovute alla presenza di condensazione. In questo
caso rimuovere il disco dal lettore e attendere circa un'ora
che l'umidità evapori.
Disco danneggiato
Non tentare di riprodurre dischi incrinati, deformati o
danneggiati. La riproduzione di un disco in cattive
condizioni può danneggiare severamente il meccanismo di
riproduzione.
Manutenzione
In caso di problemi, non tentare di riparare l'apparecchio
personalmente. Riportarlo al proprio rivenditore Alpine o
al più vicino centro assistenza Alpine per riparazioni.
2-IT

Non tentare mai quanto segue
Non afferrare o tirare il disco mentre viene tirato dentro il
lettore dal meccanismo di caricamento automatico.
Non tentare di inserire il disco nell'apparecchio quando
questo è spento.
Inserimento dei dischi
Il lettore accetta solo un disco per volta per la
riproduzione. Non tentare di inserire più di un disco.
Assicurarsi che la facciata con l'etichetta sia rivolta verso
l'alto quando si inserisce il disco. Il lettore espelle
automaticamente i dischi inseriti scorrettamente. Se il
lettore tenta di espellere un disco correttamente inserito,
premere l'interruttore di ripristino (situato dietro il
frontalino staccabile) con un oggetto appuntito come una
penna a sfera.
La riproduzione del disco mentre si guida su strade
accidentate può causare salti di suono, ma questo non
causa graffi sul disco o danni al lettore.
Luogo di installazione
Assicurarsi che il CDM-7857RB/CDE-7855RB/CDE7854RM/CDE-7854R/CDE-7853R non sia esposto a:
• Luce del sole diretta e calore
• Alta umidità
• Polvere eccessiva
• Vibrazioni eccessive
Cura del pannello anteriore staccabile
• Non esporlo a pioggia o acqua.
• Non farlo cadere o sottoporlo a scosse.
Uso corretto
Non lasciare cadere i dischi. Tenere i dischi dai bordi in
modo da non lasciare impronte sulla superficie. Non
attaccare nastro adesivo, carta o etichette adesive al disco.
Non scrivere sul disco.
CORRETTO
SCORRETTO
CORRETTO
Dischi nuovi
Come misura preventiva per evitare inceppamenti del
disco, il lettore CD espelle automaticamente i dischi con
superfici irregolari o inseriti scorrettamente. Quando un
disco nuovo viene inserito nel lettore e viene espulso dopo
essere stato caricato, controllare i bordi interno ed esterno
del disco passandovi un dito. Se si sentono sporgenze o
irregolarità, queste potrebbero essere la causa dell'errato
caricamento del disco. Per eliminare le sporgenze, passare
i bordi interno ed esterno del disco con una penna a sfera
o un altro oggetto simile e quindi inserire di nuovo il
disco.
Foro
centrale
Sporgenze
Foro
centrale
Disco
nuovo
Esterno
(sporgenze)
Dischi di forma irregolare
Assicurarsi di impiegare solo dischi rotondi per questo
apparecchio e non usare mai dischi di forma speciale.
L'uso di dischi di forma speciale può danneggiare il
meccanismo.
Pulizia dei dischi
Impronte digitali, polvere o sporcizia sulla superficie del
disco possono causare salti di suono. Per la pulizia
normale, passare la superficie di riproduzione con un
panno morbido pulito dal centro del disco verso il bordo
esterno. Se la superficie è molto sporca, inumidire un
panno morbido pulito con una soluzione di detergente
neutro delicato prima di pulire il disco.
Accessori disco
Esistono vari accessori reperibili in commercio per la
protezione della superficie del disco e il miglioramento
della qualità sonora. Tuttavia, la maggior parte di essi altera
lo spessore e/o il diametro del disco. L'uso di tali accessori
può causare l'eccedimento delle specifiche disco e problemi
di funzionamento. Consigliamo di non impiegare tali
accessori per i dischi riprodotti in lettori CD Alpine.
Foglio trasparente
stabilizzatore disco
3-IT

1
Funzionamento di base
2
1
PWR / INTLZ
MODE / LOUD
Rimozione del pannello anteriore
1 Premere il tasto PWR (alimentazione) per
spegnere l'apparecchio.
2
Premere il tasto di (Rilascio) sull'angolo inferiore
sinistro fino a che il pannello anteriore fuoriesce.
3 Afferrare il lato sinistro del pannello anteriore e
tirarlo fuori.
1
c
• Possibilità di controllo con telecomando (solo
CDM-7857RB)
È possibile controllare questo apparecchio con
un telecomando opzionale Alpine. Per ulteriori
informazioni, consultare un rivenditore Alpine.
• Collegabile a scatola interfaccia comando a
distanza (solo CDM-7857RB)
È possibile controllare questo apparecchio
dall'unità di controllo del veicolo quando è
collegata una scatola interfaccia comando a
distanza Alpine (opzionale). Per dettagli,
contattare il proprio concessionario Alpine.
NOTE
• Il pannello anteriore può riscaldarsi durante l'uso
normale (particolarmente i terminali del connettore),
ma questo non è indice di problemi di funzionamento.
• Per proteggere il pannello anteriore inserirlo nella
custodia di trasporto in dotazione.
Applicazione del pannello anteriore
1 Innanzitutto inserire il lato destro del pannello
anteriore nell'apparecchio principale. Allineare la
scanalatura del pannello anteriore con la
sporgenza sull'apparecchio principale.
2 Premere il lato sinistro del pannello anteriore fino
a che scatta in posizione sull'apparecchio.
2
1
NOTA
Prima di applicare il pannello anteriore, verificare che
non ci siano sporco o polvere sui terminali del connettore
o oggetti estranei tra il pannello anteriore e l'apparecchio.
4-IT
Avvio iniziale del sistema
1 Quando si usa l'apparecchio per la prima volta
dopo l'installazione o dopo che la batteria
dell'auto è stata scollegata e ricollegata, regolare
il livello del volume sul minimo, quindi staccare il
pannello anteriore staccabile.
Dietro il pannello anteriore è presente un piccolo
foro. Premere il pulsante di ripristino situato dietro
il piccolo foro con una penna a sfera o un altro
oggetto appuntito.
1
Interruttore di ripristino
Accensione e spegnimento
1 Premere il tasto PWR (alimentazione) per
accendere l'apparecchio.
NOTA
L'apparecchio può essere acceso premendo qualsiasi
altro tasto tranne quelli di espulsione c.
Il livello del volume aumenta gradualmente fino al
volume con cui si stava ascoltando prima che
l'apparecchio fosse spento.
Premere di nuovo il tasto PWR per spegnere
l'apparecchio.

Attivazione e disattivazione
dell'uscita di preamplificazione
senza attenuazione (N.F.P.) (solo
CDM-7857RB)
Usare il modo di N.F.P. attivato quando un segnale
senza attenuazione risulta più efficace. Per
esempio per pilotare un amplificatore con filtro
passabasso per il subwoofer.
1 Tenere premuto il tasto Espulsione (c) per
almeno 3 secondi ad apparecchio acceso.
A ciascuna pressione lo N.F.P. viene attivato o
disattivato alternatamente.
N.F.P. ON:
In questa posizione l'uscita di preamplificazione
anteriore non è influenzata dal fader. Questo è
l'ideale per pilotare un amplificatore subwoofer.
N.F.P. OFF:
Ritorno al normale modo fader.
NOTE
• Il modo iniziale è "N.F.P. OFF".
• Regolare lo N.F.P. su OFF se non si usa un subwoofer.
Attivazione e disattivazione del
modo di sonorità
Il modo di sonorità introduce una speciale enfasi
delle basse e alte frequenze a bassi livelli di
ascolto. Questo compensa la minore sensibilità
dell'orecchio umano per i suoni dei bassi e degli
acuti.
1 Premere il tasto di LOUD e tenerla premuta per
almeno 2 secondi per attivare o disattivare il
modo di sonorità. Il display visualizza "LOUD"
quando è attivato il modo di sonorità.
Regolazione del livello di segnale
della fonte
Se la differenza nel livello di volume tra la piastra
a CD e la radio FM é eccessiva, regolare il livello
del segnale FM come segue.
1 Tenere premuto il tasto INTLZ per almeno 3
secondi.
2 Premere il tasto di preselezione 1 per
selezionare il livello di segnale FM HI (alto) o LO
(basso) in modo da avvicinare i livelli del segnale
FM e della piastra a CD.
3 Premere il tasto INTLZ per disattivare il modo di
regolazione.
Regolazione di volume/bassi/acuti/
equilibratura (tra i canali sinistro e
destro)/fader (tra i diffusori
anteriori e posteriori)
1 Premere ripetutamente il tasto MODE per
selezionare il modo desiderato.
Ciascuna pressione cambia il modo come
segue:
→ VOL → BAS →TRE
FAD ← BAL ←
NOTA
Se il tasto 5 o 6 non viene premuta entro 5 secondi dalla
selezione del modo BASS, TREBLE, BALANCE o
FADER, l'apparecchio passa automaticamente al modo
VOLUME.
2 Premere i tasti 5 e 6 fino a quando si ottiene il
suono desiderato in ogni modo.
NOTA
Le regolazioni di BASS e TREBLE per ciascuna fonte
(FM, MW (LW) e CD) sono memorizzate
automaticamente ogni volta che sono modificate.
5-IT

Funzionamento della radio
TUNE / A.ME
SOURCE
DN g
f UP
Sintonia manuale
1 Premere il tasto SOURCE per selezionare il
modo radio.
2 Premere ripetutamente il tasto BAND fino a che
viene visualizzata la banda radio desiderata.
A ciascuna pressione la banda cambia:
→ FM1 → FM2 → MW → LW
3 Premere ripetutamente il tasto TUNE fino a
quando "DX SEEK" e "SEEK" scompaiono dal
display.
NOTA
Il modo iniziale è "DX-SEEK".
4 Premere il tasto DN g o f UP
rispettivamente per scendere o salire di un
passo, fino a che viene visualizzata la frequenza
della stazione desiderata.
Sintonia a ricerca automatica
1 Premere il tasto SOURCE per selezionare il
modo radio.
2 Premere ripetutamente il tasto BAND fino a che
viene visualizzata la banda radio desiderata.
A ciascuna pressione la banda cambia:
→ FM1 → FM2 → MW → LW
F
preselezione (da 1 a 6)BAND
MONO
3 Premere il tasto TUNE in modo da far illuminare
gli indicatori DX e SEEK sul display.
L'indicatore SEEK si illumina solo per alcuni
secondi. Quando il modo DX è attivato, sia le
stazioni forti che quelle deboli sono sintonizzate
dall'operazione di ricerca automatica.
Premere di nuovo per tornare al modo locale.
L'indicatore DX si spegne e l'indicatore SEEK si
illumina per alcuni secondi. Ora sono
sintonizzate solo le stazioni dal segnale forte.
4 Premere il tasto DN g o f UP per cercare
automaticamente una stazione rispettivamente a
scendere o a salire.
Quando l'apparecchio trova una stazione, la
ricerca si ferma a quella stazione.
Premere di nuovo lo stesso tasto per cercare la
stazione successiva.
Commutazione stereo/mono
1 Premere il tasto F.
Il tasto F passa al colore verde (CDM-7857RB/
CDE-7855RB/CDE-7854R/CDE-7853R) o al
colore arancio (CDE-7854RM).
2 Appare l'indicatore "ST" quando viene
sintonizzata una stazione FM stereo.
Premere il tasto MONO per passare dalla
ricezione FM stereo a quella monoaurale.
Questo contribuisce a ridurre i disturbi per le
trasmissioni FM stereo deboli. Nel modo
monoaurale appare l'indicatore "MO". Premere di
nuovo il tasto MONO per tornare al modo stereo.
6-IT
3 Premere il tasto F per attivare il modo normale.
Il tasto F si illumina di nuovo nel colore rosso.

Memorizzazione manuale di
stazioni preselezionate
Sintonia delle stazioni
preselezionate
1 Selezionare la banda radio e sintonizzare la
stazione radio desiderata da memorizzare nella
memoria di preselezione.
2 Assicurarsi che il tasto F si illumini nel colore
rosso, quindi premere e tenere premuto uno dei
tasti di preselezione (da 1 a 6) per almeno 2
secondi finché la frequenza della stazione sul
display non lampeggia.
3
Premere il tasto di preselezione su cui si desidera
memorizzare la stazione mentre l'indicazione della
frequenza lampeggia (entro 5 secondi).
L'indicazione cessa di lampeggiare e si illumina
stabilmente indicando che quella stazione è
stata memorizzata. Il display visualizza la banda,
il numero dip preselezione con un triangolo (9)
e la frequenza della stazione memorizzata.
4 Ripetere questo procedimento per memorizzare
fino a 5 altre stazioni della stessa banda.
Per usare questo procedimento per altre bande,
basta selezionare la banda desiderata e ripetere
il procedimento.
È possibile memorizzare un totale di 24 stazioni
nella memoria di preselezione (6 stazioni per
ciascuna banda: FM1, FM2 , MW e LW).
NOTA
Se una stazione è già stata memorizzata su un numero di
preselezione, viene cancellata quando viene memorizzata
un'altra stazione sullo stesso numero.
1 Premere ripetutamente il tasto BAND fino a che
viene visualizzata la banda radio desiderata.
A ciascuna pressione la banda cambia:
→ FM1 → FM2 → MW → LW
2 Assicurarsi che il tasto F si illumini in rosso,
quindi premere il tasto della stazione
preselezionata su cui è stata memorizzata la
stazione radio desiderata.
Il display visualizza la banda, il numero di
preselezione con un triangolo e la frequenza
della stazione selezionata.
Memorizzazione automatica di
stazioni preselezionate
1 Premere il tasto BAND fino a che viene
visualizzata la banda radio desiderata.
A ciascuna pressione la banda cambia:
→ FM1 → FM2 → MW → LW
2
Tenere premuto il tasto A.ME per almeno 2 secondi.
Il sintonizzatore cerca e memorizza
automaticamente 6 stazioni forti della banda
selezionata in ordine di forza del segnale.
La frequenza sul display continua a cambiare
mentre la memorizzazione automatica è in corso.
Quando la memorizzazione automatica è stata
completata, il sintonizzatore passa alla stazione
memorizzata sul tasto di preselezione n.1.
NOTA
Se non sono memorizzate stazioni, il sitnonizzatore
ritorna alla stazione che si stava ascoltando prima che
iniziasse l'operazione di memorizzazione automatica.
7-IT

Funzionamento RDS
INTLZ T.INFO / PTY
f UPDN g
Impostazione del modo di
ricezione RDS e ricezione di
stazioni RDS
L'RDS (sistema dati radio) è un sistema di
informazione radiofonico che impiega la
sottoportante 57 kHz delle normali trasmissioni
FM. L'RDS consente di ricevere varie informazioni
come notiziari sul traffico e nomi delle stazioni e
di risintonizzare automaticamente un'emittente
più forte che trasmette lo stesso programma.
1 Premere il tasto F.
Il tasto F passa al colore verde (CDM-7857RB/
CDE-7855RB/CDE-7854R/CDE-7853R) o al
colore arancio (CDE-7854RM).
2 Premere il tasto AF per attivare il modo RDS.
3 Premere il tasto DN g o f UP per
sintonizzare la stazione RDS desiderata.
NOTA
Se si tiene premuto il tasto BAND per più di 2 secondi
mentre è visualizzato un nome stazione, il display
visualizza la frequenza della stazione per 5 secondi.
Quando il segnale della stazione RDS ricevuto si
indebolisce:
• Nel modo di ricerca AF, tenere premuto il tasto
AF per almeno 2 secondi per far cercare
automaticamente all'apparecchio una stazione
più forte nella lista AF (frequenze alternative).
Se non esiste una stazione AF, il display
visualizza "SEEK END" (fine ricerca).
4 Premere di nuovo il tasto AF per disattivare il
modo RDS.
5 Premere il tasto F per attivare il modo normale.
Il tasto F si illumina di nuovo nel colore rosso.
8-IT
F
2
preselezione (da 1 a 6)
AF
Informazioni
I dati digitali RDS includono quanto segue:
PI Identificazione programma
PS Nome servizio programma
AF Lista frequenze alternative
TP Programma con notiziari sul traffico
TA Notiziario sul traffico
PTY Tipo di programma
EON Altre reti rinforzate
Richiamo delle stazioni RDS
preselezionate
1 Premere il tasto F.
Il tasto F passa al colore verde (CDM-7857RB/
CDE-7855RB/CDE-7854R/CDE-7853R) o al
colore arancio (CDE-7854RM).
2 Premere il tasto AF per attivare il modo.
RDS Il display visualizza "AF" quando il modo
RDS è attivato.
3 Premere il tasto F per attivare il modo normale.
Il tasto F si illumina di nuovo nel colore rosso.
4
Assicurarsi che il tasto F si illumini in rosso, quindi
premere il tasto della posizione preselezionata su
cui è stata memorizzata la stazione RDS desiderata.
S.e il segnale della stazione preselezionata è
debole, I'apparecchio cerca e sintonizza
automaticamente una
AF (frequenze alternative).
stazione più forte nella lista
5 Se la stazione preselezionata e le stazioni nella
lista AF non possono essere ricevute:
L'apparecchio cerca di nuovo una stazione nella
lista PI (identificazione programma).
Se non ci sono stazioni ricevibili nell'area anche
in questo caso, l'apparecchio visualizza la
frequenza della stazione preselezionata e
l'indicatore di preselezione scompare.
Se il livello di segnale di una stazione regionale
(locale) sintonizzata diventa troppo debole per la
ricezione, premere di nuovo lo stesso tasto di
preselezione per sintonizzare una stazione
regionale di un'altra zona.
NOTA
Per preselezionare le stazioni RDS, fare riferimento alla
sezione Funzionamento della radio. Le stazioni RDS
possono essere preselezionate solo nelle bande F1 e F2.

Ricezione di stazioni RDS regionali
(locali)
1
Tenere premuto il tasto INTLZ (inizializzare) per
almeno 3 secondi per attivare il modo di regolazione.
2 Premere il tasto di stazione 2 per attivare o
disattivare il modo REG (regionale).
Quando è selezionato il modo REG OFF,
l'apparecchio
automaticamente la stazione RDS locale
correlata.
continua a ricevere
3 Premere il tasto INTLZ per disattivare il modo di
regolazione.
Ricezione di notiziari sul traffico
1 Premere ripetutamente il tasto T.INFO fino a che
l'indicatore T.INFO appare sul display.
2
Premere il tasto DN g o f UP per selezionare
la stazione di notiziari sul traffico desiderata.
Qaudno viene sintonizzata una stazione di
notiziari sul traffico, l'indicatore "TP" si illumina.
I notiziari sul traffico sono udibili solo quando
sono trasmessi. Se non vengono trasmesse
informazioni sul traffico, l'apparecchio rimane in
modo di attesa. Quando inizia una trasmissione
di informazioni sul traffico, l'apparecchio la riceve
automaticamente e il display visualizza "TRFINFO" per qualche secondi e quindi torna alla
visualizzazione PS.
Quando la trasmissione del notiziario sul traffico è
finita, l'apparecchio torna automaticamente al
modo di attesa.
NOTE
• Se il segnale della trasmissione del notiziario sul
traffico scende al di sotto di un certo livello,
l'apparecchio rimane in modo di ricezione per 1
minuto. Se il segnale rimane al di sotto di quel livello
per più di 1 minuto, l'indicatore "T.INFO" lampeggia.
Se non si desidera ascoltare il notiziario sul traffico in
•
fase di ricezione, premere leggermente il tasto T.INFO
per saltare quel notiziario. Il modo notiziari sul
traffico rimane attivato per ricevere il notiziario
successivo.
• Se si cambia il livello del volume durante la ricezione di
notiziari sul traffico, il cambiamento di livello del volume
viene memorizzato. Quando si riceve successivamente il
notiziario sul traffico, il livello del volume viene
automaticamente regolato sul livello memorizzato.
Sintonizzazione PTY (tipo di programma)
1 Premere il tasto PTY per almeno 2 secondi per
attivare il modo PTY.
Il tipo di programma della stazione attualmente
sintonizzata viene visualizzato per 5 secondi.
• Se non esistono trasmissioni PTY ricevibili,
viene visualizzato "NO PTY" per 5 secondi.
• Se non è ricevibile alcuna stazione RDS, il
display visualizza "NO RDS".
NOTA
Se non si preme alcun tasto entro 5 secondi dalla
pressione del tasto PTY, il modo PTY viene disattivato
automaticamente.
2 Premere i tasti DN g e f UP entro 5
secondi dopo aver attivato il modo PTY per
scegliere il tipo di programma desiderato mentre
il PTY (tipo di programma) è visualizzato.
Ciascuna pressione visualizza i tipi di
programma nell'ordine uno per volta.
LIGHT M ← CLASSICS → OTHER M
3 Premere il tasto PTY entro 5 secondi dalla
selezione del tipo di programma per iniziare la
ricerca di una stazione del tipo di programma
selezionato.
L'indicatore del tipo di programma scelto
lampeggia durante la ricerca e si illumina
stabilmente quando viene trovata una stazione.
Se non PTY viene trovata alcuna stazione, "NO
PTY" viene visualizzato per 2 secondi.
Ricezione di notiziari sul traffico
durante l'ascolto CD o della radio
1 Premere ripetutamente il tasto T.INFO fino a
quando l'indicatore "T.INFO" appare sul display.
2 Premere il tasto DN g o f UP per
selezionare una stazione con notiziari sul
traffico, se necessario.
• Quando inizia la trasmissione di un notiziario
sul traffico, l'apparecchio silenzia
automaticamente il suono di CD lettore/
cambiatore o della normale trasmissione FM.
• Quando finisce la trasmissione di un notiziario
sul traffico, l'apparecchio torna
automaticamente alla fonte che si stava
ascoltando prima che iniziasse la trasmissione
del notiziario sul traffico.
Quando non è possibile ricevere stazioni con
notiziari sul traffico:
Nel modo radio:
Quando il segnale TP non può più essere
ricevuto per oltre 1 minuto, l'indicazione "T-INFO"
lampeggia.
Nel modo CD:
Quando il segnale TP non può più essere
ricevuto, viene selezionata automaticamente una
stazione con notiziari sul traffico su un'altra
frequenza.
NOTA
Il ricevitore è dotato di funzione EON (altre reti rinforzate)
per poter rintracciare addizionali frequenze alternative
nella lista AF. L'indicatore EON appare durante la
ricezione di stazioni RDS EON. Se la stazione in fase di
ricezione non trasmette notiziari sul traffico, il ricevitore
sintonizza automaticamente una stazione correlata che
trasmette notiziari sul traffico quando questo avviene.
3 Premere il tasto T.INFO per disattivare il modo di
notiziari sul traffico.
L'indicatore "T.INFO" scompare.
9-IT

Funzionamento RDS
Priorità notiziari
Questa funzione permette di predisporre la
priorità per i programmi di notizie. In questo modo
non si perde mai un giornale radio perché
l'apparecchio dà automaticamente la precedenza
ai notiziari non appena ne inizia la trasmissione,
interrompendo il programma in fase di ascolto.
Questo funzione può essere usata quando
l'apparecchio è regolato su un modo diverso da
MW o LW.
NEWS
F
1 Premere il tasto di funzione F.
Il tasto F passa al colore verde (CDM-7857RB/
CDE-7855RB/CDE-7854R/CDE-7853R) o al
colore arancio (CDE-7854RM).
2 Tenere premuto il tasto NEWS per attivare il
modo di priorità notiziari.
"NEWS" si illumina sul display.
• Per disattivare il modo di priorità notiziari,
premere il tasto NEWS.
NOTA
Nel modo di priorità notiziari, diversamente da quanto
avviene con la funzione T.INFO, il volume non viene
alzato automaticamente.
3 Premere il tasto F per attivare il modo normale.
Il tasto F si illumina di nuovo nel colore rosso.
10-IT

Uso del lettore CD
- / J
SOURCE
DN g
f UP
Inserimento/estrazione del disco
1 Inserire un disco parzialmente nella fessura co la
facciata dell'etichetta rivolta verso l'alto. Il lettore
tira automaticamente il disco nel comparto disco.
c
Il display visualizza il numero di brano e il tempo
trascorso del brano in fase di riproduzione.
Quando è stato riprodotto l'ultimo brano il lettore
torna al primo brano e riprende la riproduzione
da quel punto.
2 Se un disco è già inserito nel lettore CD,
premere il tasto SOURCE per selezionare il
modo CD.
3 Premere il tasto -/J per avviare la riproduzione
del disco.
L'indicatore Disc appare per indicare che un
disco è inserito.
NOTA
Non è possibile usare compact disc da 8 cm (solo CDM7857RB).
2 Premere il tasto di espulsione c per estrarre il
disco.
NOTE
• Se il disco non viene rimosso per vari secondi dopo
che è stato espulso, l'apparecchio fa rientrare
automaticamente il disco nel comparto per proteggere
il disco.
• Possono essere usati solo compact disc con il marchio
indicato.
Riproduzione normale e pausa
1 Inserire un disco. Il lettore CD inizia la
riproduzione dal primo brano del disco.
4 Premere il tasto -/J per sospendere
temporaneamente la riproduzione del disco.
Per riprendere la riproduzione, premere di nuovo
il tasto -/J.
Sensore musicale (salto)
1 Premere momentaneamente il tasto DN g
una volta durante la riproduzione del disco per
tornare all'inizio del brano attuale. Se si desidera
localizzare un brano più indietro, premere
ripetutamente fino a raggiungere il brano
desiderato.
Premere il tasto f UP una volta per saltare
all'inizio del brano successivo. Per localizzare
brani ancora dopo, premere ripetutamente fino a
raggiungere il brano desiderato.
NOTA
La funzione di sensore musicale agisce sia in modo di
riproduzione che in modo di pausa.
Avanzamento e ritorno rapido
1 Tenere premuto il tasto DN g o f UP per
procedere rapidamente indietro o avanti fino a
raggiungere il punto desiderato nel brano.
11-IT

Uso del lettore CD
- / J
SOURCE
Riproduzione a ripetizione
1
Premere il tasto RPT per riprodurre ripetutamente
il brano attuale.
Appare l'indicatore RPT e il brano viene
riprodotto ripetutamente.
Premere di nuovo il tasto RPT per disattivare la
riproduzione a ripetizione.
NOTA
Se è collegato un cambia CD e si seleziona il modo RPT
ALL, l'apparecchio riproduce ripetutamente tutti i brani
del disco selezionato.
→→ →
RPT RPT ALL OFF
NOTA
Se è collegato un cambia CD da 6 dischi (solo CDM7857RB):
Premere il tasto F per passare al colore verde, quindi
tornare al punto 1. Premere il tasto F per tornare al
modo normale.
Il tasto F si illumina di nuovo nel colore rosso.
M.I.X. (riproduzione casuale)
1 Premere il tasto M.I.X. in modo di riproduzione o
di pausa.
L'indicatore M.I.X. si illumina e i brani del disco
sono riprodotti in ordine casuale.
Dopo che tutti i brani del disco sono stati
riprodotti una volta, il lettore inizia una nuova
sequenza casuale fino a che il modo M.I.X. viene
disattivato.
Per disattivare la riproduzione M.I.X. premere di
nuovo il tasto M.I.X.
NOTA
Se è collegato un cambia CD da 6 dischi (solo CDM7857RB):
Premere il tasto F per passare al colore verde, quindi
tornare al punto 1. Premere il tasto F per tornare al
modo normale.
Il tasto F si illumina di nuovo nel colore rosso.
12-IT
M.I.X.
preselezione (da 1 a 6)
F
SCANRPT
Scorrimento di programmi
1 Premere il tasto SCAN per attivare il modo di
scorrimento.
I primi 10 secondi di ciascun brano sono
riprodotti in successione.
Per interrompere lo scorrimento, premere il tasto
SCAN per disattivare il modo di scorrimento.
NOTA
Se è collegato un cambia CD da 6 dischi (solo CDM7857RB):
Premere il tasto F per passare al colore verde, quindi
tornare al punto 1. Premere il tasto F per tornare al
modo normale.
Il tasto F si illumina di nuovo nel colore rosso.
Controllo del cambia CD
(opzionale) (solo CDM-7857RB)
Se un CD Shuttle Alpine per 6 dischi è collegato al
connettore DIN a 8 terminali (M-Bus) del
CDM-7857RB, è possibile controllare il cambia CD
usando il CDM-7857RB.
NOTA
I comandi CD del CDM-7857RB per il controllo di un
lettore del cambia CD sono attivabili sono quando un
CD Shuttle è intercollegato con il CDM-7857RB.
1 Premere il tasto SOURCE per attivare il cambia
CD.
Il display visualizza "Shuttle", il numero del disco
e il numero del brano.
NOTA
Per avviare la riproduzione o metterla in pausa, premere
il tasto :/J.
2 Assicurarsi che il tasto F si illumini in rosso,
quindi premere i tasti di preselezione per
selezionare il disco desiderato caricato nel
cambia CD.

Informazione
In caso di difficoltà
In caso di problemi, rivedere le voci nella
seguente lista di controllo. Questa guida aiuta ad
isolare il problema se il problema è dovuto
all'apparecchio. Altrimenti, assicurarsi che il resto
del sistema sia collegato correttamente o
consultare il proprio rivenditore autorizzato Alpine.
Base
L'apparecchio non funziona e non c'è alcuna
visualizzazione.
• La chiavetta di accensione è regolata sulla posizione di
spegnimento.
- Se collegato secondo le istruzioni, l'apparecchio non
funziona se la chiavetta di accensione è regolata sulla
posizione di spegnimento.
• Collegamenti dei cavi di alimentazione errati.
- Controllare i collegamenti del cavi di alimentazione.
• Fusibile saltato.
- Controllare il fusibile del cavo batteria dell'unità;
sostituirlo con un altro del valore appropriato se
necessario.
• Il microcomputer interno ha malfunzionato a causa di
disturbi di interferenza, ecc.
- Premere il pulsante di inizializzazione con une penna
a stera o altro oggetto appuntito.
Radio
Impossibilità di ricevere le stazioni.
• Assenza di antenna o collegamenti aperti dei cavi.
- Assicurarsi che l'antenna sia collegata correttamente;
sostituire l'antenna o il cavo se necessario.
Impossibilità di sintonizzare le stazioni nel modo
di ricerca.
• Il veicolo si trova in un'area dal segnale debole.
- Assicurarsi che il sintonizzatore sia regolato nel modo
DX.
• Se ci si trova in un'area di segnale primario, l'antenna
può non essere messa a terra e collegata correttamente.
- Controllare i collegamenti dell'antenna; assicurarsi
che l'antenna abbia una messa a terra adeguata nella
sua posizione di installazione.
• L'antenna può non essere della lunghezza appropriata.
- Assicurarsi che l'antenna sia estesa completamente; se
rotta, sostituire l'antenna con una nuova.
La trasmissione è rumorosa.
• L'antenna non è della lunghezza appropriata.
- Estendere completamente l'antenna; sostituirla se è
rotta.
• L'antenna non ha un'adeguata messa a terra.
- Assicurarsi che l'antenna abbia una messa a terra
adeguata nella sua posizione di installazione.
CD
Il CD lettore/cambia non funziona.
• È stata superata la gamma di temperatura per il
funzionamento (oltre 50°C) per il cambiatore CD.
- Attendere che l'interno dell'auto (o del bagagliaio) si
raffreddi.
Il suono della riproduzione CD è tremolante.
• Si è verificata condensazione di umidità nel modulo
CD.
- Attendere che la condensazione di umidità evapori
(circa un'ora).
Non è possibile inserire il disco.
• Un disco è già inserito nel lettore.
- Estrarre il disco.
• Il disco viene inserito scorrettamente.
- Assicurarsi di inserire il disco secondo le istruzioni
nel manuale.
Il ritorno o l'avanzamento rapido non è possibile.
• Il disco è danneggiato.
- Estrarre il disco e gettarlo; l'uso di un disco
danneggiato con l'apparecchio può causare danni al
meccanismo.
Salti di suono a causa delle vibrazioni.
• L'apparecchio non è stato installato correttamente.
- Rimontare saldamente l'apparecchio.
• Il disco è molto sporco.
- Pulire il disco.
• Il disco è graffiato.
- Cambiare il disco.
Salti di suono senza vibrazioni.
• Sporco o graffi sul disco.
- Pulire il disco; i dischi danneggiati devono essere
sostituiti.
Visualizzazione degli errori (solo per il lettore CD
incorporato)
• Errore di tipo meccanico
- Premere il tasto c. Dopo che l’indicazione dell errore
e scomparsa, inserire di nuovo il disco. Se il problema
persiste anche dopo avere tentato la soluzione
proposta sopra, consultare un rivenditore ALPINE.
13-IT

Informazione
Indicazioni per il cambiatore CD
HI TEMP
• Il circuito di protezione si è attivato a causa di alte
temperature.
- L'indicatore scompare quando la temperatura ritorna
nei limiti della gamma della temperatura di impiego.
ERROR - 01
• Malfunzionamenti nel cambiatore CD.
- Rivolgersi ad un rivenditore Alpine. Premere il tasto di
espulsione del contenitore ed estrarre il contenitore
dischi.
Controllare l'indicazione sul display. Inserire di nuovo
il contenitore.
Se non è possibile estrarre il contenitore, rivolgersi ad
un rivenditore Alpine.
• Non è possibile estrarre il contenitore CD.
- Premere il tasto di espulsione del contenitore ed
estrarlo. Se non è possibile estrarre il contenitore,
consultare il proprio rivenditore Alpine.
ERROR - 02
• Un disco è già inserito del cambiatore CD.
- Premere il tasto EJECT per attivare la funzione di
espulsione. Quando il cambiatore CD termina la
funzione di espulsione, inserire un contenitore dischi
vuoto nel cambiatore CD per estrarre il disco lasciato
all'interno del cambiatore CD.
NO MAGZN
• Nessun contenitore è inserito nel cambiatore CD.
- Inserire il contenitore.
NO DISC
• Disco indicato assente.
- Scegliere un altro disco.
14-IT

Caratteristiche tecniche
SEZIONE SINTONIZZATORE FM
Campo di sintonia 87,5 – 108,0 MHz
Sensibilità utilizzabile mono 0,7 µV
Selettività canali alternativi 80 dB
Rapporto segnale/rumore 65 dB
Separazione stereo 35 dB
SEZIONE SINTONIZZATORE OM
Campo di sintonia 531 – 1.602 kHz
Sensibilità (standard IEC) 25,1 µV/28 dB
SEZIONE SINTONIZZATORE OL
Campo di sintonia 153 – 281 kHz
Sensibilità (standard IEC) 31,6 µV/30 dB
SEZIONE CD
Risposta in frequenza 5 – 20.000 Hz (±1 dB)
Wow e flutter (% WRMS) Inferiori al limite misurabile
Distorsione armonica totale 0,008% (a 1 kHz)
Gamma dinamica 95 dB (a 1 kHz)
Rapporto segnale/rumore 95 dB
Separazione canali 85 dB (a 1 kHz)
GENERALI
Alimentazione 14,4 V DC
(11 – 16 V consenita)
Uscita di potenza massima
CDM-7857RB 44 W × 4
CDE-7855RB/CDE-7854RM/
CDE-7854R/CDE-7853R 40 W × 4
Tensione di uscita 2 V/10k ohms
Bass ±15 dB a 30 Hz
Acuti ±10 dB a 10 kHz
Peso 1,5 kg
DIMENSIONI DEL TELAIO
Larghezza 178 mm
Altezza 50 mm
Profondità 155 mm
DIMENSIONI DELLA PARTE ANTERIORE
Larghezza 170 mm
Altezza 46 mm
Profondità 18 mm
A causa di continui miglioramenti del prodotto, le
caratteristiche tecniche e il design sono soggetti a variazioni
senza preavviso.
IL PRODUTTORE ALPINE ELECTRONICS INC. DI
QUESTO APPARECCHIO MODELLO CDM-7857RB/
CDE-7855RB/CDE-7854RM/CDE-7854R DICHIARA
CHE ESSO E CONFORME AL D.M. 28.08.1995
N.548.
OTTEMPERANDO ALLE PRESCRIZIONI DI CUI AL
D.M.25.6.1985 (PRAGRAFO 3. ALL A) ED AL D.M.
27.8.1987 (PARAGRAFO 3. ALL 1)
15-IT

Installazione e collegamenti
Prima di installare o collegare l'apparecchio,
leggere attentamente quanto segue e le pagine 2
e 3 di questo manuale.
Avvertimento
ESEGUIRE CORRETTAMENTE I COLLEGAMENTI.
Altrimenti ne potrebbero derivarne incendi o danni al
prodotto.
UTILIZZARE SOLO IN VEICOLI CONTERRA
NEGATIVA A 12 VOLT
(se non si è sicuri, controllare con il proprio rivenditore).
Diversamente si potrebbero causare incendi o altri danni.
PRIMA DI ESEGUIRE I COLLEGAMENTI,
SCOLLEGARE IL CAVO DEL TERMINALE NEGATIVO
DELLA BATTERIA.
Altrimenti potrebbero derivare scosse elettriche o altre
lesioni dovute a cortocircuiti.
EVITARE CHE I CAVI SI IMPIGLINO AGLI OGGETTI
CIRCOSTANTI.
Effettuare i collegamenti seguendo le istruzioni in modo
che i cavi non interferiscano con la guida. I cavi o i fili che
interferiscono o si impigliano in parti quali lo sterzo, la leva
del cambio, i pedali, ecc. potrebbero essere pericolosi.
NON UTILIZZARE I CAVI PER EFFETTUARE ALTRI
COLLEGAMENTI.
Non eliminare mai le parti isolanti dei cavi per alimentare
altri apparecchi. Diversamente la capacità di trasporto di
corrente del cavo in questione viene superata causando
incendi o scosse elettriche.
NELL'EFFETTUARE I FORI, NON DANNEGGIARE I
TUBI O I CAVI.
Nell'effettuare i fori nel telaio per l'installazione, fare
attenzione a non entrare in contatto, danneggiare o
ostruire i tubi, i condotti della benzina, i serbatoi o i cavi
elettrici. La non osservanza di queste precauzioni potrebbe
causare incendi.
PER ESEGUIRE I COLLEGAMENTI DI TERRA, NON
UTILIZZARE BULLONI O DADI DEI SISTEMI DI
FRENATA O DI STERZO.
Non utilizzare MAI bulloni o dadi dei sistemi di frenata e
di sterzo (o di qualsiasi altro sistema di sicurezza), o dei
serbatoi per eseguire l'installazione o per i collegamenti di
terra. L'utilizzo di queste parti potrebbe inibire il controllo
del veicolo e causare incendi o altro.
TENERE LE PARTI PICCOLE QUALI LE BATTERIE
FUORI DALLA PORTATA DEI BAMBINI.
Se ingeriti potrebbero causare gravi danni. In caso di
ingerimento, consultare immediatamente un medico.
NON INSTALLARE IN LUOGHI CHE POTREBBERO
INTERFERIRE CON LE OPERAZIONI DI GUIDA
QUALILO STERZO O LA LEVA DEL CAMBIO.
Diversamente si potrebbe ostruire la visuale della strada o
interferire con i movimenti del conducente e causare gravi
incidenti.
Attenzione
I COLLEGAMENTI E L’INSTALLAZIONE DEVONO
ESSERE EFFETTUATI DA PERSONALE QUALIFICATO.
I collegamenti e l’installazione dell’apparecchio richiedono
conoscenze tecniche ed esperienza particolari. Per ragioni di
sicurezza, contattare sempre il rivenditore presso il quale è
stato acquistato il prodotto per eseguire l’installazione.
16-IT
UTILIZZARE LE PARTI ACCESSORIE SPECIFICATE E
INSTALLARLE IN MODO CORRETTO.
Assicurarsi di utilizzare solo parti accessorie specificate.
L'utilizzo di altri componenti potrebbe danneggiare
l'apparecchio all'interno o determinare in un'installazione
non corretta. I componenti potrebbero non rimanere
collegati in modo saldo e provocare problemi di
funzionamento o pericoli.
SISTEMARE I CAVI IN MODO CHE NON VENGANO
PIEGATI O COMPRESSI DA PARTI METALLICHE
TAGLIENTI.
Per evitare che vengano danneggiati o piegati, sistemare i
cavi e i fili lontano da parti mobili (quali le guide dei
sedili) o da parti taglienti o aguzze. Se i cavi vengono fatti
passare attraverso un foro metallico, utilizzare un anello di
gomma per evitare che l'isolante dei cavi venga tagliato
dal bordo metallico del foro.
NON INSTALLARE IN LUOGHI ECCESSIVAMENTE
UMIDI O POLVEROSI.
Evitare di installare l'apparecchio in luoghi
eccessivamente umidi o polverosi. La presenza di umidità
o polvere all'interno del prodotto potrebbe causare
problemi di funzionamento.
Precauzioni
• Assicurarsi di scollegare il cavo dal polo negativo (–) della
batteria prima di installare il lettore CDM-7857RB/CDE7855RB/CDE-7854RM/CDE-7854R/CDE-7853R. Così
facendo, il rischio di danni all'apparecchio in caso di
cortocircuiti viene ridotto.
• Assicurarsi di collegare i cavi differenziati in base al colore
in base al diagramma. Collegamenti errati potrebbero
causare problemi di funzionamento o danneggiare il sistema
elettrico dell'automobile.
• Nell'effettuare i collegamenti al sistema elettrico
dell'automobile, tenere conto dei componenti installati in
fabbrica (ad esempio, computer di bordo). Non utilizzare
questi cavi per fornire alimentazione all'apparecchio.
Quando il lettore CDM-7857RB/CDE-7855RB/CDE7854RM/CDE-7854R/CDE-7853R viene collegato alla
scatola dei fusibili, assicurarsi che il fusibile preposto al
collegamento con il circuito del lettore CDM-7857RB/CDE7855RB/CDE-7854RM/CDE-7854R/CDE-7853R sia
dell'amperaggio corretto. Diversamente, l'apparecchio e/o
l'automobile potrebbero venire danneggiati. Se non si è certi
dell'amperaggio, contattare un rivenditore ALPINE.
• Il CDM-7857RB/CDE-7855RB/CDE-7854RM/CDE7854R/CDE-7853R impiega prese femmina di tipo RCA
per il collegamento ad altri apparecchi (p.es. amplificatore)
con collegamenti RCA. Può essere necessario un adattatore
per il collegamento ad altri apparecchi. In questo caso
rivolgersi per assistenza al proprio rivenditore autorizzato
ALPINE.
• Assicurarsi di collegare i fili negativi degli altoparlanti (–) al
terminale (–). Non collegare mai i cavi destro e sinistro degli
altoparlanti l'uno con l'altro o all chassis dell'automobile.
IMPORTANTE
Riportare il numero di serie del vostro apparecchio
nell'apposito spazio sottostante e conservarlo per
riferimenti futuri. La piastrina indicante il numero di
serie è collocata sul fondo dell'apparecchio.
NUMERO DI SERIE:
DATA DI INSTALLAZIONE:
TECNICO DI INSTALLAZIONE:
POSTO DI ACQUISTO:

installazione
1
Supporto
Cruscotto
Copertura di
montaggio
(In dotazione)
Rimuovere il pannello anteriore estraibile (fare
riferimento a pagina 4). Sfilare l'apparecchio
principale dal manicotto di montaggio (vedere
"Procedimento di rimozione" sotto). Far scorrere
il manicotto di montaggio dentro il cruscotto.
2
Copertura di montaggio
in metallo
Cappuccio di gomma
(In dotazione)
Bullone
esagonale
(In dotazione)
CDM-7857RB/CDE-7855RB/
CDE-7854RM/CDE-7854R/
CDE-7853R
Vite
Vite prigioniera
∗
3 Far entrare il CDM-7857RB/CDE-7855RB/CDE-
7854RM/CDE-7854R/CDE-7853R il più possibile
nella plancia di montaggio. Quando l'apparecchio
è inserito, verificare che i perni di blocco siano
ben assestati nella posizione abbassata. Questo
può essere ottenuto premendo fermamente
sull'apparecchio mentre si spinge in giù il perno
con un piccolo cacciavite. Questo assicura che
l'apparecchio sia correttamente bloccato e non
fuoriesca accidentalmente dal cruscotto.
Installare il pannello anteriore staccabile.
Perno di blocco
Rimozione
1 Rimuovere il pannello anteriore estraibile.
2 Usare un piccolo cacciavite (o un oggetto simile)
per spingere i perni di blocco nella posizione
sollevata (vedere la fig. 3). Dopo avere sbloccato
un perno, alzare delicatamente l'apparecchio per
controllare che non si riblocchi prima di sbloccare
il secondo perno.
3 Estrarre l'apparecchio assicurandosi che sia
sbloccato.
Dado esagonale
(M5)
CDM-7857RB/CDE-7855RB/
CDE-7854RM/CDE-7854R/
CDE-7853R
Quando il veicolo è dotato di staffa, montare il
lungo bullone esagonale sul pannello posteriore
del CDM-7857RB/CDE-7855RB/CDE-7854RM/
CDE-7854R/CDE-7853R e applicare il
cappuccio di gomma al bullone esagonale. Se
l'auto non è dotata del supporto di montaggio,
rinforzare l'unità principale con la banda di
montaggio di metallo (non in dotazione).
Collegare tutti i cavi del CDM-7857RB/CDE7855RB/CDE-7854RM/CDE-7854R/CDE-7853R
secondo i dettagli descritti nella sezione
COLLEGAMENTI.
NOTA
Per la vite ∗, provvederai di una vite adatta al vano di
installazione dello chassis.
<AUTOMOBILE GIAPPONESE>
Cornice frontalino
CDM-7857RB/CDE-7855RB/
CDE-7854RM/CDE-7854R/
CDE-7853R
Staffa di montaggio
Viti (M5 × 8)
(In dotazione)
17-IT

Installazione e collegamenti
Collegamenti
Antena
<
Spina antenna ISO
al telefono del veicolo
all'amplificatore o
equalizzatore
all'antenna automatica
(Pink/Black)
(Blue/White)
IGNITION
(Red)
AUDIO INTERRUPT IN
REMOTE TURN-ON
4
2
3
(Black)
GND
POWER ANT(Blue)
(Yellow)
1
%
CD cambiatore
(Venduto
separatamente)
6
BATTERY
9
7
5
Chiavetta
ignizione
8
Batterie
A
!
"
#
$
A
&
)
~
+
,
-
.
(
/
:
;
;
Configurazione terminali del connettore DIN
(solo CDM-7857RB)
lgnition
Data Ground
Lch
Sig Gnd
Shield Ground
Power Supply Ground
B
a
tte
ry
Data Bus
Rch
Altopalanti
Green
Green/Black
White
White/Black
Grey/Black
Grey
Violet/Black
Violet
Posteriore sinistro
Anteriore sinistro
Anteriore destro
Posteriore destro
Altopalanti
Anteriore
destro
Anteriore
Amplificatore
(Venduto
separatamente)
sinistro
Posteriore
destro
Posteriore
sinistro
No.
"
"
#
18-IT
USCITA
Anteriore
Posteriore
MODELLO
CDM-7857RB
CDE-7855RB/CDE-7854RM/CDE-7854R/CDE-7853R
CDM-7857RB
SPECIFICAZIONI DI USCITA
Non connesso all'operazione del volume.
(Fate riferimento al manuale delle instruzioni, pagina 5)
Connesso all'operazione del volume.

1 Presa antenna
Collegarla alla spina convertitore antenna ISO in
dotazione.
2 Cavo di ingresso interruzione audio (rosa/nero)
Collegare questo cavo all'uscita interfaccia audio
di un telefono cellulare, che fornisce
cortocircuitazione a massa quando viene
ricevuta una telefonata.
Se viene collegato un apparecchio dotato della
funzione di interruzione, quando l’apparecchio
riceve il segnale di interruzione, l’audio viene
automaticamente disattivato.
3 Cavo di accensione controllata a distanza
(blu/bianco)
Collegare questo cavo al cavo di accensione
controllata a distanza dell'amplificatore o
processore di segnali.
4 Cavo di alimentazione asservita (ignizione)
(rosso)
Collegare questo cavo ad un terminale aperto
sulla scatola fusibili del veicolo o un'altra fonte di
alimentazione inutilizzata che fornisce (+) 12 V
solo quando l'ignizione * accesa o nella
posizione accessoria.
5 Cavo antenna automatica (blu)
Collegare questo cavo al terminale +B
dell'antenna automatica, se applicabile.
NOTA
Questo cavo deve essere utilizzato soltanto per
controllare l'antenna elettrica dell'auto. Non utilizzare
questo cavo per attivare un amplificatore, un elaboratore
di segnali, ecc.
6 Portafusibile (15 A)
7 Cavo batteria (giallo)
Collegare questo cavo al terminale positivo (+)
della batteria del veicolo.
8 Connettore alimentazione ISO
9 Cavo di massa (nero)
Collegare questo cavo ad una buona massa
telaio del veicolo. Assicurarsi che il collegamento
sia eseguito a metallo nudo e che sia fissato
saldamente con la vite per lamiere in dotazione.
! Connettore interfaccia comando a distanza
(solo CDM-7857RB)
Alla scatola interfaccia di comando a distanza.
" Connettori RCA uscita diffusori anteriori/NFP
(solo CDM-7857RB)
ROSSO è destra e BIANCO è sinistra.
" Connettori RCA uscita diffusori posteriori
(solo CDE-7855RB/CDE-7854RM/CDE-7854R/
CDE-7853R)
ROSSO è destra e BIANCO è sinistra.
# Connettori RCA di uscita canale posteriore
(solo CDM-7857RB)
ROSSO è destra e BIANCO è sinistra.
$ Connettore DIN (solo CDM-7857RB)
Collegarlo al connettore DIN sul cambia CD.
% Cavo di prolunga DIN
NOTA
I modelli passati di cambia CD erano dotati connettori
DIN standard di tipo diritto. In installazioni in cui un
connettore a L può semplificare l'installazione, si può
usare l'adattatore Alpine 4910
separatamente).
& Connettore alimentazione
( Connettore ISO (uscita diffusore)
) Cavo di uscita diffusore (+) posteriore
sinistro (verde)
~ Cavo di uscita diffusore (–) posteriore
sinistro (verde/nero)
+ Cavo di uscita diffusore (+) anteriore sinistro
(bianco)
, Cavo di uscita diffusore (–) anteriore sinistro
(bianco/nero)
- Cavo di uscita diffusore (–) anteriore destro
(grigio/nero)
. Cavo di uscita diffusore (+) anteriore destro
(grigio)
/ Cavo di uscita diffusore (–) posteriore destro
(viola/nero)
: Cavo di uscita diffusore (+) posteriore destro
(viola)
; Cavo prolunga RCA (in vendita separatamente)
< Spina convertitore antenna ISO
02 (in vendita
Per evitare la penetrazione di disturbi esterni nel sistema audio.
Collocare l'apparecchio e disporre i cavi ad almeno 10 cm di distanza dai fili dell'auto.
• Tenere i cavi elettrici della batteria il più lontano possibile dagli altri cavi.
• Collegare il cavo di massa saldamente ad un punto metallico nudo (togliere il rivestimento, se
necessario) del telaio dell'auto.
• Se si aggiunge un dispositivo antidisturbi opzionale, collegarlo il più lontano possibile dall'apparecchio.
Presso i rivenditori Alpine sono disponibili vari dispositivi antidisturbi Alpine. Rivolgersi al proprio
rivenditore per ulteriori informazioni.
• Il proprio rivenditore Alpine conosce i rimedi migliori per la prevenzione dei disturbi. Rivolgersi al proprio
rivenditore per ulteriori informazioni.
19-IT

20-IT
 Loading...