

R
R
CDM-7857RB
CDE-7855RB
CDE-7854RM
CDE-7854R
CDE-7853R
FM/MW/LW/RDS CD Receiver
• OWNER'S MANUAL
Please read before using this equipment.
• BEDIENUNGSANLEITUNG
Lesen Sie diese Bedienungsanleitung bitte vor
Gebrauch des Gerätes.
• MODE D'EMPLOI
Veuillez lire avant d’utiliser cet appareil.
• MANUAL DE OPERACIÓN
Léalo antes de utilizar este equipo.
EN
DE
FR
ES
• ISTRUZIONI PER L’USO
Si prega di leggere prima di utilizzare il
attrezzatura.
• ANVÄNDARHANDLEDNING
Innan du använder utrustningen bör du läsa
igenom denna användarhandledning.
ALPINE ELECTRONICS, INC.
Tokyo office: 1-1-8 Nishi Gotanda,
Shinagawa-ku,
Tokyo 141-8501, Japan
Tel.: (03) 3494-1101
ALPINE ELECTRONICS OF AMERICA, INC.
19145 Gramercy Place, Torrance,
California 90501, U.S.A.
Tel.: 1-800-ALPINE-1 (1-800-257-4631)
ALPINE ELECTRONICS OF CANADA, INC.
Suite 203, 7300 Warden Ave. Markham,
Ontario L3R 9Z6, Canada
Tel.: 1-800-ALPINE-1 (1-800-257-4631)
Meiyi Printing Factory, Dalian, China
No. 28 Chang Qing Street, Xi Gang District, Dalian, China
ALPINE ELECTRONICS OF AUSTRALIA PTY. LTD.
6-8 Fiveways Boulevarde Keysborough,
Victoria 3173, Australia
Tel.: (03) 9769-0000
ALPINE ELECTRONICS GmbH
Kreuzerkamp 7-11 40878 Ratingen, Germany
Via C. Colombo 8, 20090 Trezzano Sul Naviglio
Tel.: 02102-45 50
ALPINE ITALIA S.p.A.
MI, Italy
Tel.: 02-48 47 81
ALPINE ELECTRONICS FRANCE S.A.R.L.
(RCS PONTOISE B 338 101 280)
98, Rue De La Belle Etoile, Z.I. Paris Nord Il
B.P. 50016 F-95945, Roissy, Charles De Gaulle
13 Tanners Drive, Blakelands, Milton Keynes
ALPINE ELECTRONICS DE ESPAÑA, S.A.
01013 Vitoria (Alava)-Apdo. 133, Spain
Cedex, France
Tel.: 01-48 63 89 89
ALPINE ELECTRONICS OF U.K., LTD.
MK14 5BU, U.K.
Tel.: 01908-61 15 56
Portal De Gamarra 36, Pabellón 32
Tel.: 34-45-283588
Designed by ALPINE Japan
Printed in China (Y)
68P01149K43-A
IT
SE
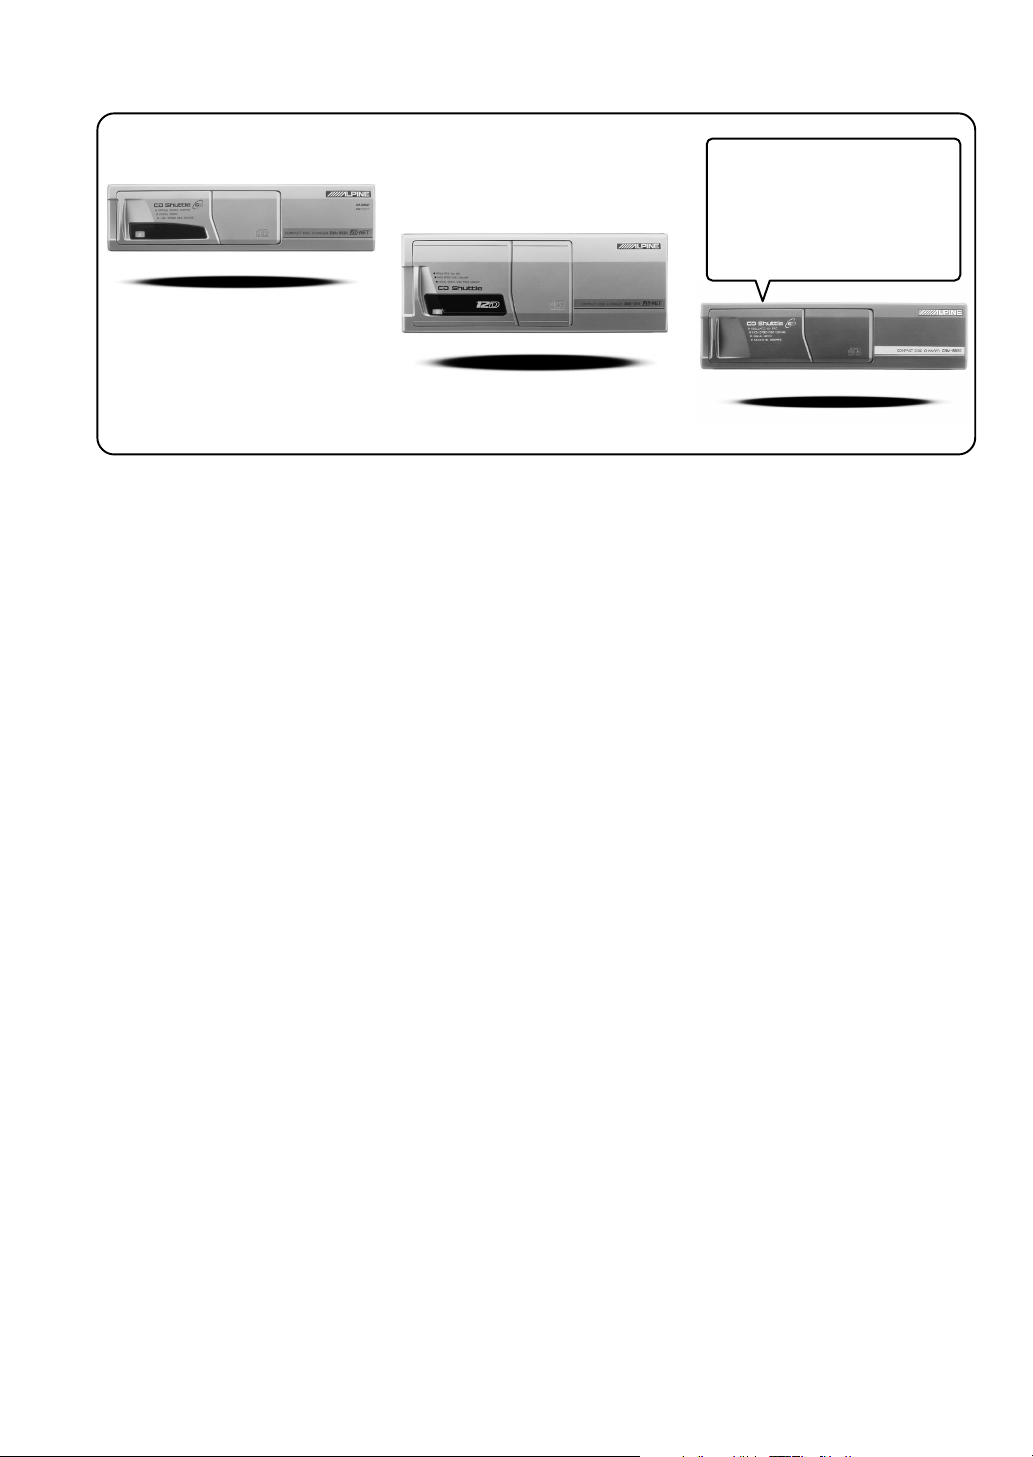
CD changer for CDM-7857RB
CD-Wechsler für CDM-7857RB
Changeur CD pour CDM-7857RB
Cambiador de CD para
CDM-7857RB
Cambia CD per CDM-7857RB
CD-växlare för CDM-7857RB
CHA-S624
CHA-1214
CHM-S620
Alpine CD Changers Give You More!
More musical selections, more versatility, more convenience.
An Alpine CD Changer adds more musical choices to your sound system. All models can be controlled from Alpine head units and
deliver excellent sound quality. The CHA-S624 is a high-performance 6-disc changer with a new M DAC, Ai-NET compatibility, Optical
Digital Output, 150 Disc Title Memory and CD TEXT. The CHA-1214 Ai-NET model holds 12 discs, and the CHM-S620 M-Bus model
is a super-compact 6-disc changer.
Von Alpine CD-Wechslern haben Sie mehr!
Mehr Musikauswahl, mehr Vielseitigkeit, mehr Komfort.
Mit einem Alpine CD-Wechsler erweitern Sie die Musikauswahl Ihres Systems. Sämtliche Modelle lassen sich von einer AlpineBedieneinheit aus steuern und liefern hervorragende Klangqualität. Der CHA-S624 ist ein Ai-NET-kompatibler Hochleistungs-Wechsler
für 6 CDs mit dem neuen M-DAC, Digitalausgang für Glasfaserkabel, CD-Titelspeicher für 150 Titel und CD-TEXT. Das Ai-NETModell CHA-1214 nimmt 12 CDs auf, und der M-Bus-kompatible CHM-S620 ist ein superkompakter Wechsler für 6 CDs.
Changeurs de CD Alpine : vous avez le choix!
Plus de sélections musicales, plus de souplesse, plus de confort.
Un changeur de CD Alpine permet d'augmenter la plage des sélections musicales de votre système embarqué. Tous les modèles peuvent
être contrôlés à partir des autoradios Alpine et offrent une excellente qualité audio. Le modèle CHA-S624 est un changeur 6 disques
ultra performant compatible Ai-NET et équipé d'un convertisseur N/A standard, d'une sortie optique numérique, d'une mémoire d'une
capacité de 150 titres et de la fonction CD TEXT. Le modèle CHA-1214 Ai-NET peut contenir 12 disques. Le modèle CHM-S620 MBus est un changeur 6 disques super compact.
¡Los cambiadores Alpine de CD le ofrecen más!
Más selecciones musicales, más versatilidad y más ventajas.
Un cambiador Alpine de CD añade más opciones musicales a su equipo de sonido. Todos los modelos pueden controlarse desde las
unidades principales de Alpine y proporcionar un sonido de calidad excepcional. El modelo CHA-S624 es un cambiador de 6 discos de
alto rendimiento con el nuevo DAC "M" y compatibilidad con Ai-NET, salida digital óptica, memoria de títulos de 150 discos y TEXTO
CD. El modelo CHA-1214 Ai-NET admite 12 discos y el modelo CHM-S620 Bus-M es un cambiador de 6 discos y tamaño reducido.
I caricatori CD Alpine danno di più!
Più scelta, più versatilità, più comodità.
Un caricatore CD Alpine offre maggiore scelta. Tutti i modelli possono essere controllati tramite le unità di controllo Alpine e producono
un suono di qualità eccellente. CHA-S624 è un caricatore a 6 dischi Ai NET compatibile e dotato di un nuovo M DAC, di un'uscita
ottica digitale, memorizzazione dei titoli di 150 dischi e CD TEXT. Il modello CHA-1214 Ai NET può contenere un massimo di 12
dischi, mentre il modello CHM-S620 M-Bus è un caricatore a 6 dischi ultra compatto.
Alpines CD-växlare ger mer!
Fler musikval, mer variation, större bekvämlighet.
Med Alpines CD-växlare i systemet får du större musikalisk valfrihet. Alla modeller kan styras från Alpines huvudenheter och ger
enastående ljudkvalitet. CHA-S624 är en högpresterande växlare för 6 skivor med en ny M D/A-omvandlare, kompatibel med Ai-NET,
optisk digitalutgång, titelminne för 150 skivor och CD-TEXT. Modellen CHA-1214 Ai-NET rymmer 12 skivor och modellen CHMS620 M-Bus är en superkompakt växlare för 6 skivor.
Contents
ENGLISH
Operating Instructions
WARNING
WARNING.................................................. 2
CAUTION ................................................... 2
PRECAUTION ........................................... 2
Basic Operations
Detaching the Front Panel.................................. 4
Attaching the Front Panel .................................. 4
Initial System Start-Up ...................................... 4
Turning Power On and Off ................................4
Non Fading Pre-Out (N.F.P.) On and Off
(CDM-7857RB only) .....................................5
Turning Loudness On/Off .................................. 5
Adjusting Source Signal Levels ......................... 5
Adjusting Volume/Bass/Treble/Balance
(Between Left and Right)/Fader
(Between Front and Rear) .............................. 5
CD Player Operation
Inserting/Ejecting Disc .................................... 11
Normal Play and Pause ....................................11
Music Sensor (Skip)......................................... 11
Fast Forward and Backward ............................ 11
Repeat Play ...................................................... 12
M.I.X. (Random Play) ..................................... 12
Scanning Programmes ..................................... 12
Controlling CD Changer (Optional)
(CDM-7857RB only) ................................... 12
Informations
In Case of Difficulty ........................................ 13
Specifications ................................................... 15
Installation and Connections
Precautions ....................................................... 16
Installation ....................................................... 17
Connections ..................................................... 18
Radio Operation
Manual Tuning ................................................... 6
Automatic Seek Tuning ..................................... 6
Mono/Stereo Switching ..................................... 6
Manual Storing of Station Presets ..................... 7
Automatic Memory of Station Presets ............... 7
Tuning to Preset Stations ................................... 7
RDS Operation
Setting RDS Reception Mode and Receiving
RDS Stations .................................................. 8
Recalling Preset RDS Stations ........................... 8
Receiving RDS Regional (Local) Stations ........ 9
Receiving Traffic Information ............................ 9
PTY (Programme Type) Tuning ........................ 9
Receiving Traffic Information While Playing
CD or Radio .................................................... 9
Priority News ................................................... 10
1-EN
WARNING
WARNING
The exclamation point within an equilateral
triangle and "WARNING" are intended to alert
the user to the presence of important
operating instructions.
Failure to heed the instructions will result in
severe injury or death.
DO NOT OPERATE ANY FUNCTION THAT TAKES YOUR
ATTENTION AWAY FROM SAFELY DRIVING YOUR
VEHICLE.
Any function that requires your prolonged attention
should only be performed after coming to a complete stop.
Always stop the vehicle in a safe location before
performing these functions. Failure to do so may result in
an accident.
KEEP THE VOLUME AT A LEVEL WHERE YOU CAN
STILL HEAR OUTSIDE NOISE WHILE DRIVING.
Failure to do so may result in an accident.
DO NOT PLACE HANDS, FINGERS OR FOREIGN
OBJECTS IN INSERTION SLOTS OR GAPS.
Doing so may result in personal injury or damage to the
product.
CAUTION
The exclamation point within an equilateral
triangle and "CAUTION" are intended to alert
the user to the presence of important
operating instructions.
Failure to heed the instructions can result in
injury or material damage.
HALT USE IMMEDIATELY IF A PROBLEM APPEARS.
Failure to do so may cause personal injury or damage to
the product. Return it to your authorized Alpine dealer or
the nearest Alpine Service Centre for repairing.
PRECAUTIONS
MINIMIZE DISPLAY VIEWING WHILE DRIVING.
Viewing the display may distract the driver from looking
ahead of the vehicle and cause an accident.
DO NOT DISASSEMBLE OR ALTER.
Doing so may result in an accident, fire or electric shock.
USE ONLY IN CARS WITH A 12 VOLT NEGATIVE
GROUND.
(Check with your dealer if you are not sure.) Failure to do
so may result in fire, etc.
KEEP SMALL OBJECTS SUCH AS BATTERIES OUT
OF THE REACH OF CHILDREN.
Swallowing them may result in serious injury. If
swallowed, consult a physician immediately.
USE THE CORRECT AMPERE RATING WHEN
REPLACING FUSES.
Failure to do so may result in fire or electric shock.
DO NOT BLOCK VENTS OR RADIATOR PANELS.
Doing so may cause heat to build up inside and may result
in fire.
Temperature
Be sure the temperature inside the vehicle is between
+60°C (+140°F) and –10°C (+14°F) before turning your
unit on.
Moisture Condensation
You may notice the CD playback sound wavering due to
condensation. If this happens, remove the disc from the
player and wait about an hour for the moisture to
evaporate.
Damaged Disc
Do not attempt to play cracked, warped, or damaged
discs. Playing a bad disc could severely damage the
playback mechanism.
Maintenance
If you have problems, do not attempt to repair the unit
yourself. Return it to your Alpine dealer or the nearest
Alpine Service Station for servicing.
USE THIS PRODUCT FOR MOBILE 12V APPLICATIONS.
Use for other than its designed application may result in
fire, electric shock or other injury.
2-EN
Never Attempt the Following
Do not grip or pull out the disc while it is being pulled
back into the player by the automatic reloading
mechanism.
Do not attempt to insert a disc into the unit when the unit
power is off.
Inserting Discs
Your player accepts only one disc at a time for playback.
Do not attempt to load more than one disc.
Make sure the label side is facing up when you insert the
disc. Your player will automatically eject any disc that is
inserted incorrectly. If the player continues to eject a
correctly inserted disc, push the Reset switch (located
behind the detachable front panel) with a pointed object
such as a ball-point pen.
Playing a disc while driving on a very bumpy road may
result in skips, but this will not scratch the disc or damage
the player.
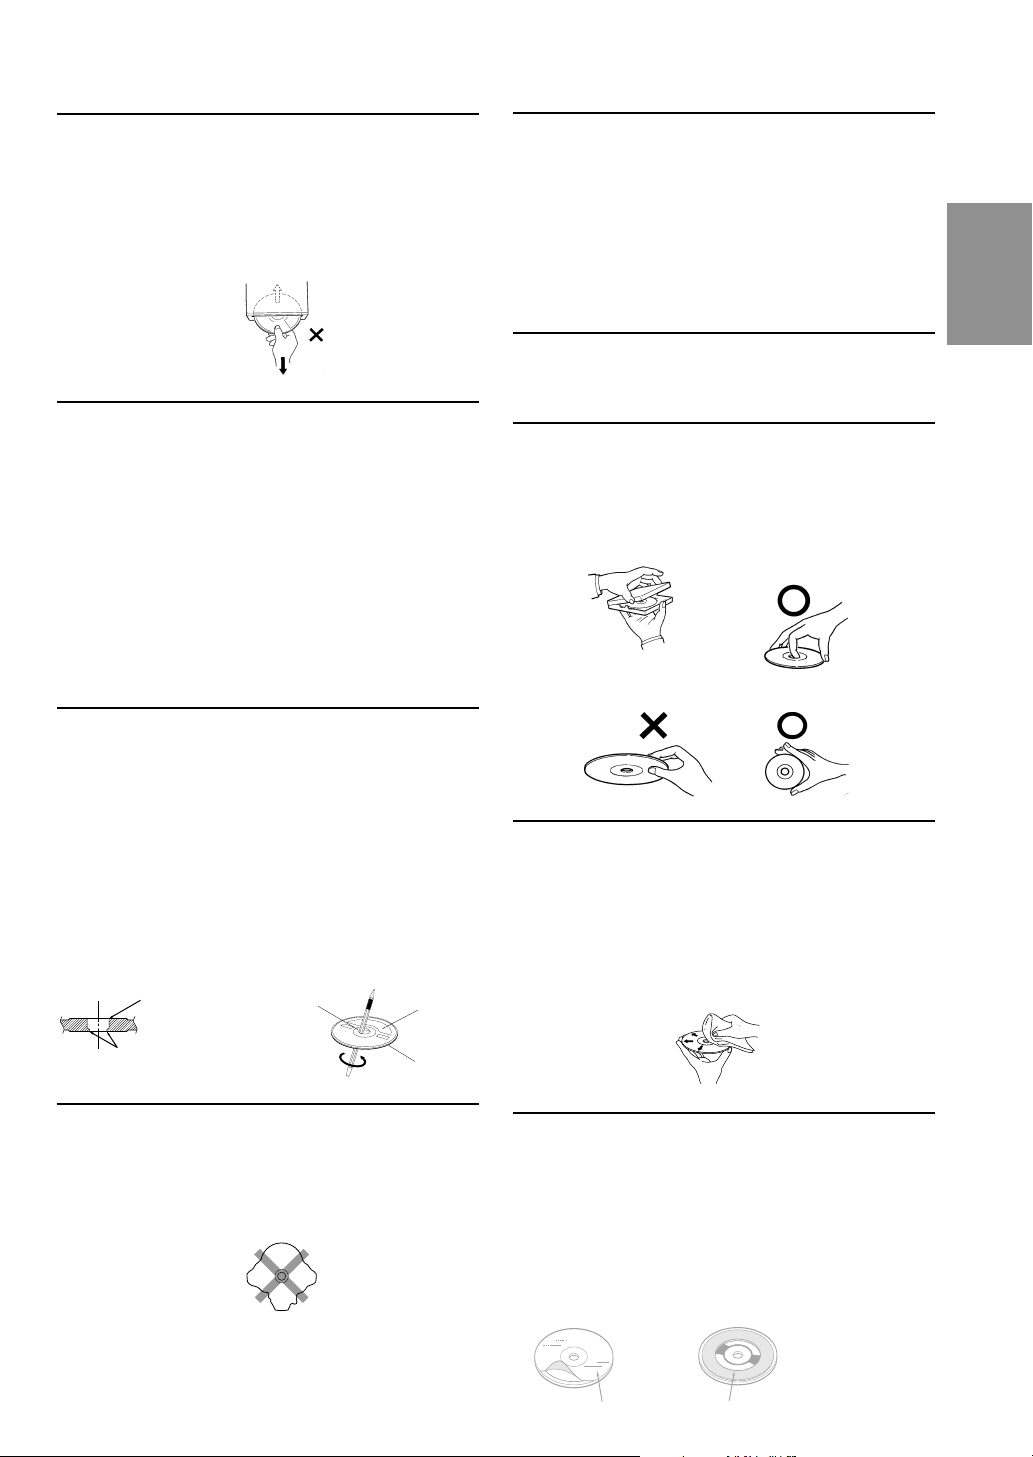
New Discs
As a protective measure to prevent the CD from jamming,
the CD player will automatically eject discs with irregular
surfaces or inserted incorrectly. When a new disc is
inserted into the player and ejected after initial loading,
using your finger, feel around the inside of the centre hole
and outside edge of the disc. If you feel any small bumps
or irregularities, this could inhibit proper loading of the
disc. To remove the bumps, rub the inside edge of the hole
and outside edge of the disc with a ball-point pen or other
such instrument, then insert the disc again.
Centre
Hole
Bumps
Centre
Hole
New
Disc
Outside
(Bumps)
Irregular Shaped Discs
Be sure to use round shape discs only for this unit and
never use any special shape discs.
Use of special shape discs may cause damage to the
mechanism.
Installation Location
Make sure the CDM-7857RB/CDE-7855RB/CDE7854RM/CDE-7854R/CDE-7853R will not be installed in
a location subjected to:
• Direct sun and heat
• High humidity and water
• Excessive dust
• Excessive vibrations
Handling the Detachable Front Panel
• Do not expose to rain or water.
• Do not drop or apply shock.
Correct Handling
Do not drop the disc while handling. Hold the disc by its
edge so that no fingerprints are left on the surface. Do not
affix tape, paper, or gummed labels to the disc. Do not
write on the disc.
CORRECT
INCORRECT CORRECT
Disc Cleaning
Fingerprints, dust, or soil on the surface of the disc could
cause the CD player to skip. For routine cleaning, wipe
the playing surface with a clean, soft cloth from the centre
of the disc to the outer edge. If the surface is heavily
soiled, dampen a clean, soft cloth in a solution of mild
neutral detergent before cleaning the disc.
Disc Accessories
There are various accessories available on the market for
protecting the disc surface and improving sound quality.
However, most of them will influence the thickness and/or
diameter of the disc. Using such accessories can cause the
disc to be out of standard specifications and may create
operational problems. We recommend not using these
accessories on discs played in Alpine CD players.
FR
ES
DE
IT
SE
Transparent Sheet Disc Stabilizer
3-EN
Basic Operations
1
2
1
PWR / INTLZ
MODE / LOUD
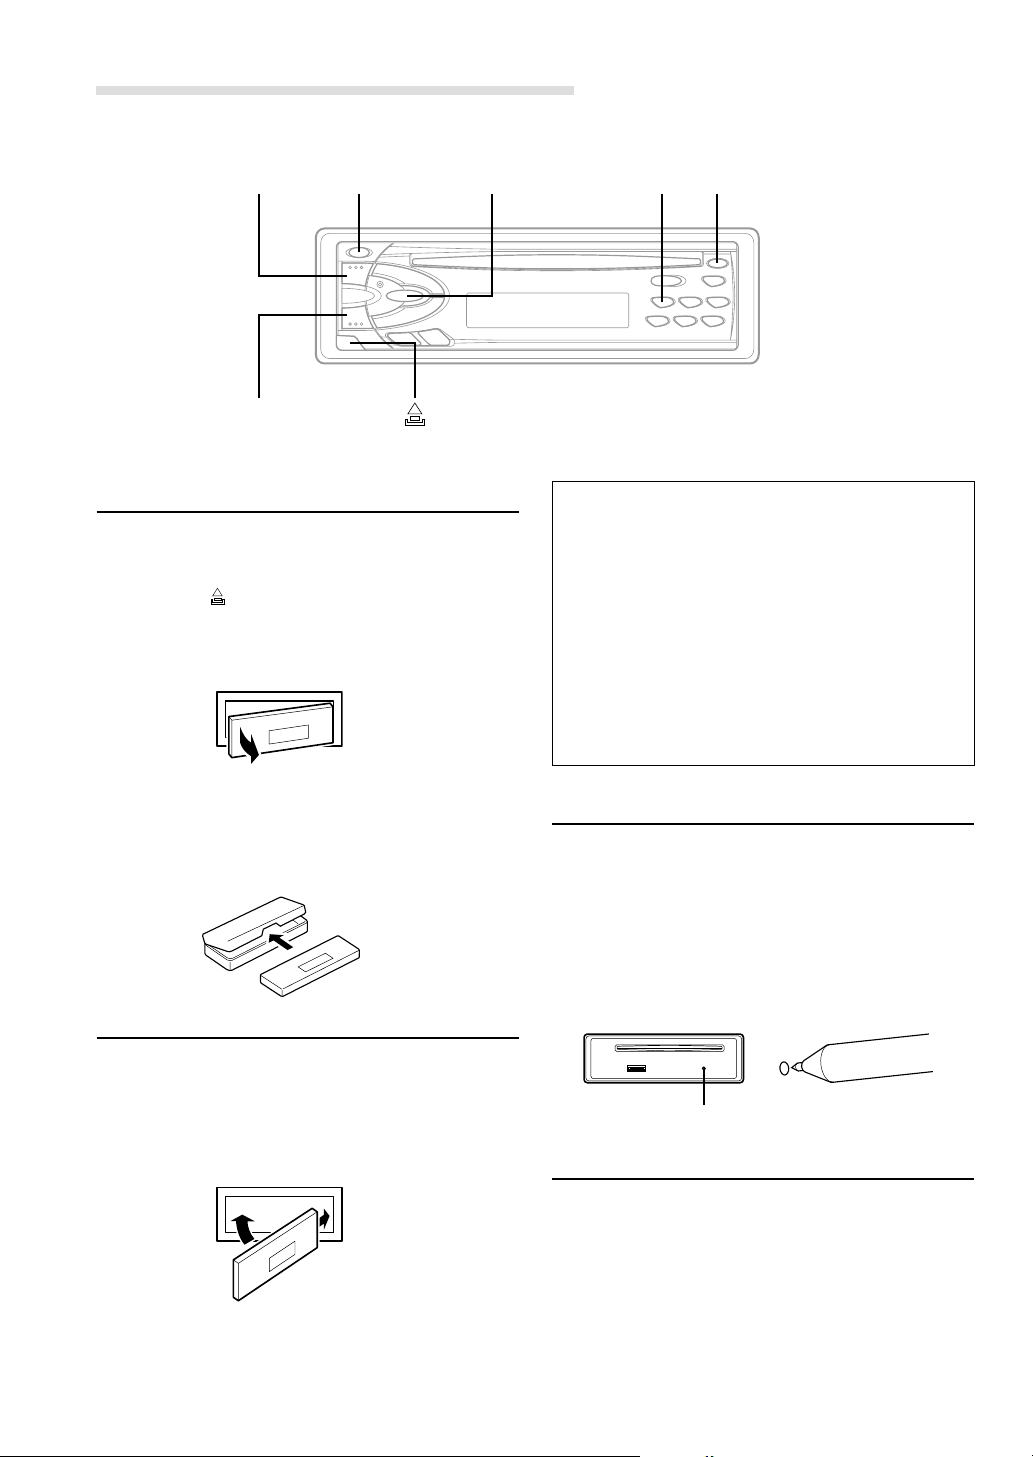
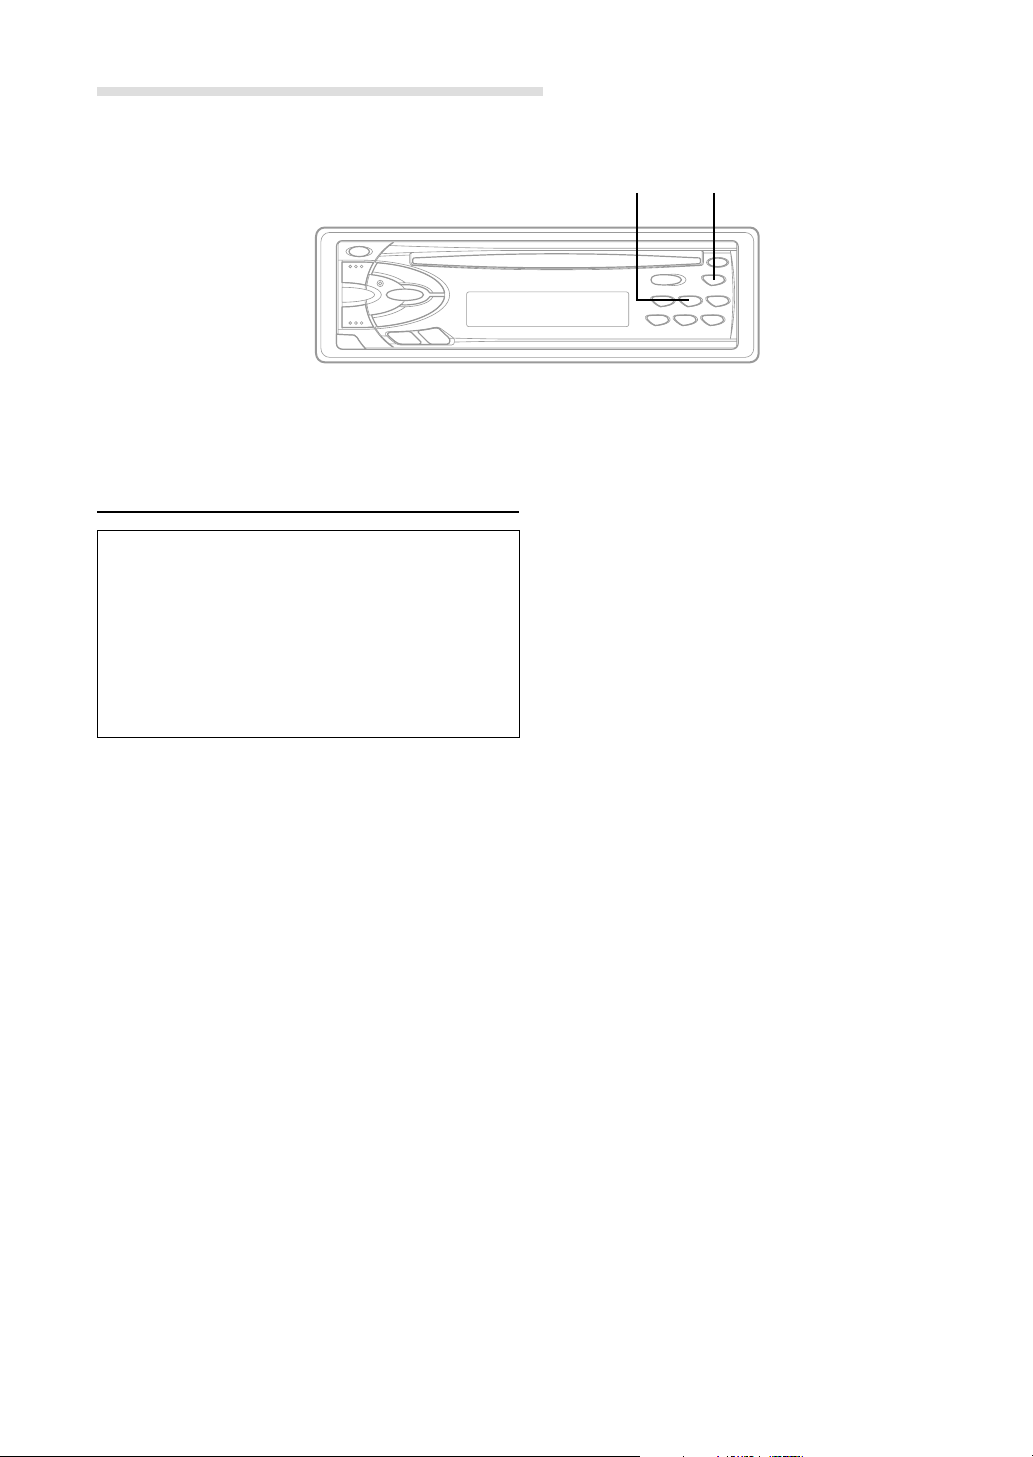
Detaching the Front Panel
1 Press the PWR (Power) button to turn off the
power.
2 Press the (Release) button at lower left corner
until the front panel pops out.
3 Grasp the left side of the front panel and pull it
out.
1
c
• Controlable with Remote Control (CDM-7857RB
only)
This unit can be controlled with an optional
Alpine remote control. For details, consult your
Alpine dealer.
• Connectable to Remote Control Interface Box
(CDM-7857RB only)
You can operate this unit from the vehicle's
control unit when an Alpine Remote Control
Interface Box (optional) is connected. For
details, contact your Alpine dealer.
NOTES
• The front panel may become hot in normal usage
(especially the connector terminals), this is not
malfunction.
• To protect the front panel, place it in the supplied
carrying case.
Attaching the Front Panel
1 First, insert the right side of the front panel into
the main unit. Align the groove on the front panel
with the projection on the main unit.
2 Push the left side of the front panel until it locks
firmly into the main unit.
2
1
NOTE
Before attaching the front panel, make sure that there is
no dirt or dust on the connector terminals and no
foreign object between the front panel and the main unit.
4-EN
Initial System Start-Up
1 When operating the unit for the first time after
installation or after the vehicle's battery has been
disconnected and reconnected, set the volume
level to its minimum, then remove the detachable
front panel.
There is a small hole behind the front panel.
Press the Reset switch mounted behind the
small hole with a ball-point pen or any other
pointed object.
1
Reset switch
Turning Power On and Off
1 Press the PWR (Power) button to turn on the
unit.
NOTE
The unit can be turned on by pressing any other button
except the eject c button.
The volume level gradually increases to the
previous level you were listening to before the unit
was turned off.
Press the PWR button again to turn off the unit.

Non Fading Pre-Out (N.F.P.) On
and Off (CDM-7857RB only)
Use the N.F.P. On mode when a non-fading
signal would be most effective. For example, to
drive an amplifier with a low-pass filter for the
subwoofer.
1 Press and hold the Eject (c) button for at least 3
seconds with the unit turned on.
With each press, N.F.P. is toggled On or Off.
N.F.P. ON:
In this position, the Front Pre-Output will not be
affected by the fader. This is ideal for driving a
subwoofer amplifier.
N.F.P. OFF:
Returns to normal fader mode.
NOTES
• Initial mode is "N.F.P. OFF."
• Set the N.F.P. to OFF unless the subwoofer is used.
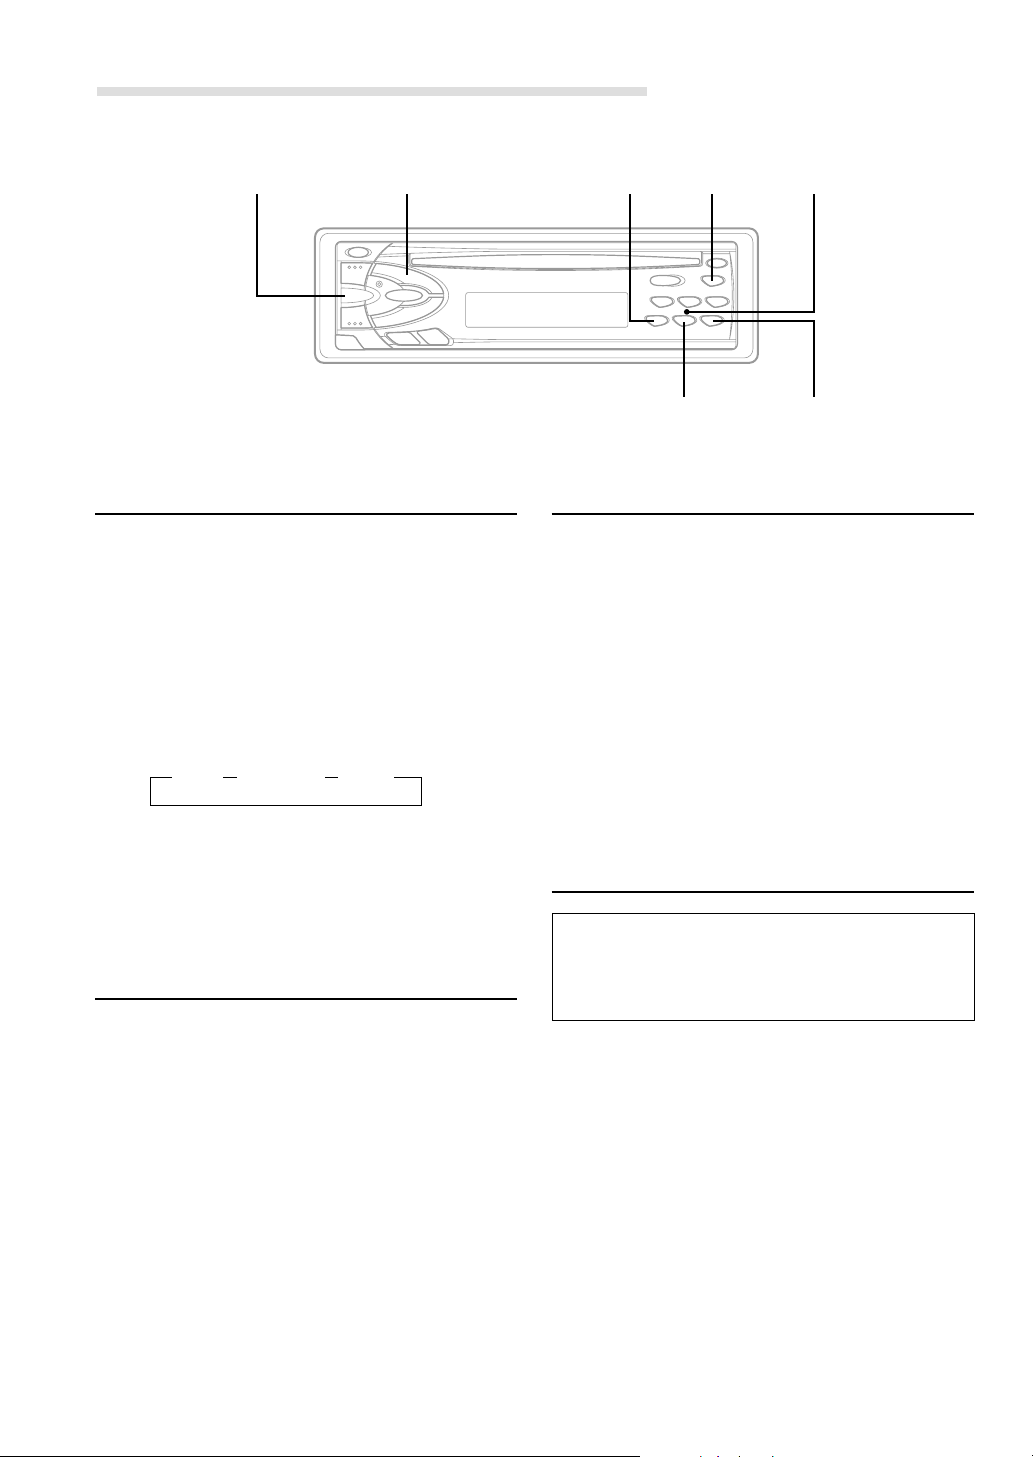
Adjusting Volume/Bass/Treble/
Balance (Between Left and Right)/
Fader (Between Front and Rear)
1 Press the MODE button repeatedly to choose
the desired mode.
Each press changes the modes as follows:
→ VOL → BAS →TRE
FAD ← BAL ←
NOTE
If the 5 or 6 button is not pressed in 5 seconds after
selecting the BASS, TREBLE, BALANCE and FADER
modes, the unit automatically sets in the VOLUME
mode.
2 Press the 5 and 6 buttons until the desired
sound is obtained in each mode.
NOTE
The BASS and TREBLE settings for each source (FM,
MW (LW) and CD) will be automatically memorized
whenever the settings are changed.
FR
Turning Loudness On/Off
Loudness introduces a special low- and highfrequency emphasis at low listening levels. This
compensates for the ear's decreased sensitivity
to bass and treble sound.
1 Press and hold the LOUD button for at least
2 seconds to activate or deactivate the loudness
mode. The display shows "LOUD" when the
loudness mode is activated.
Adjusting Source Signal Levels
If the difference in volume level between the CD
player and FM radio is too great, adjust the FM
signal level as follows.
1 Press and hold the INTLZ button for at least 3
seconds.
2 Press the Preset 1 button to select the FM signal
level HI (High) or LO (Low) to make the signal
levels between the FM band and CD player
closer.
ES
DE
IT
SE
3 Press the INTLZ button to cancel the adjusting
mode.
5-EN
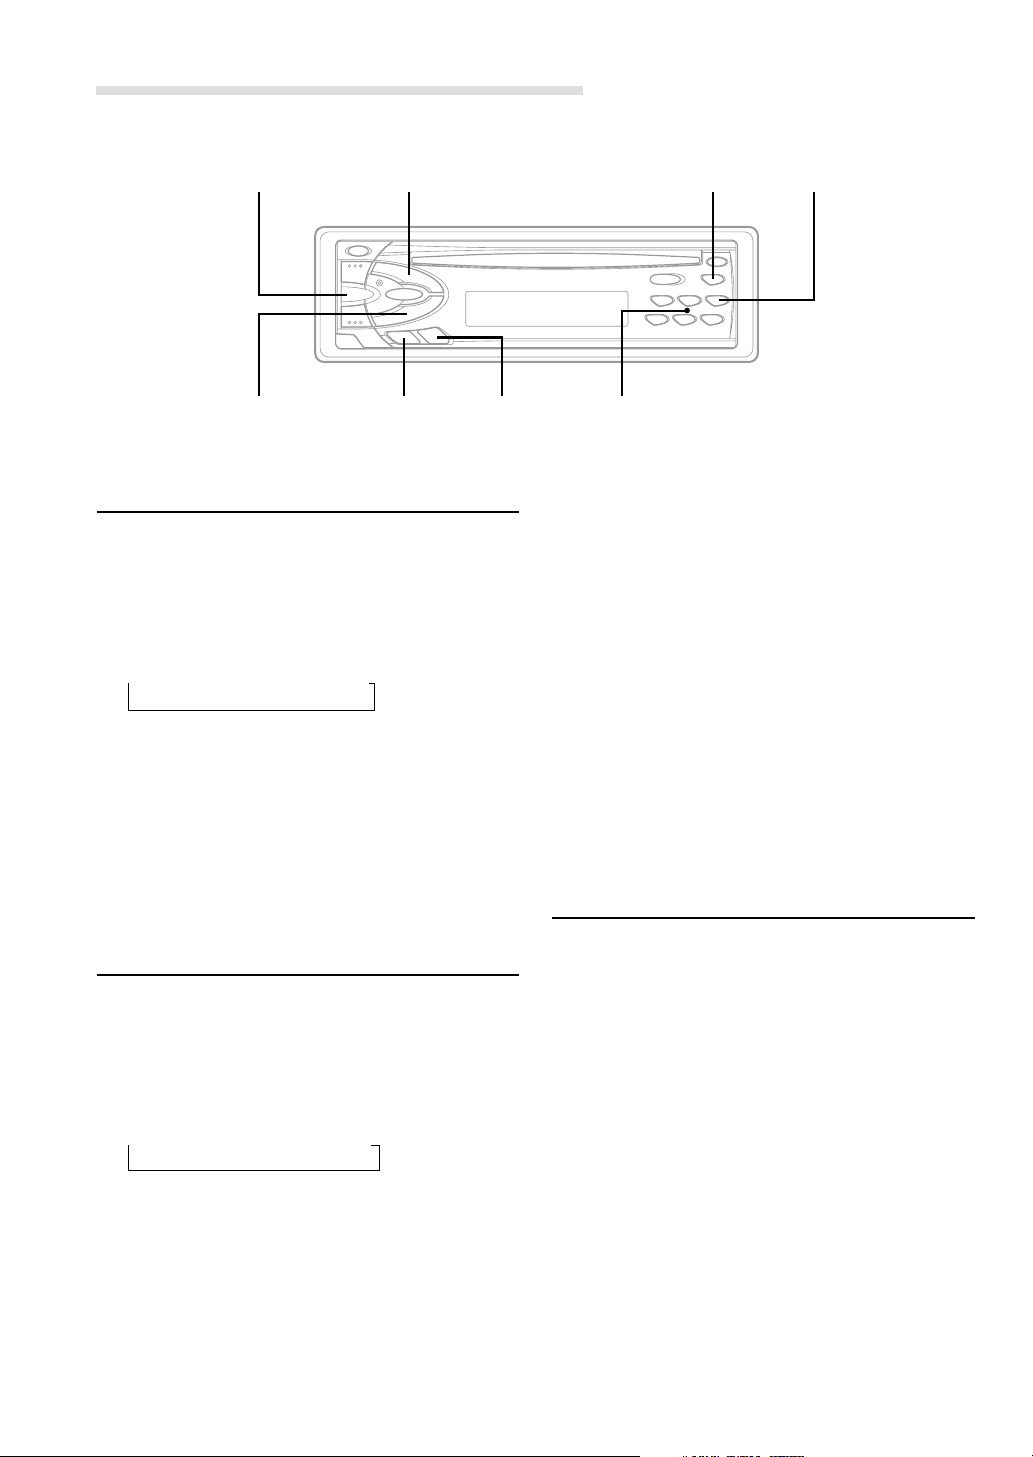
Radio Operations
TUNE / A.ME
BAND
SOURCE
DN g
Manual Tuning
1 Press the SOURCE button to select the radio
mode.
2 Press the BAND button repeatedly until the
desired radio band is displayed.
Each press changes the band:
→ FM1 → FM2 → MW → LW
3 Press the TUNE button repeatedly until "DX
SEEK" and "SEEK" disappear from the display.
NOTE
The initial mode is DX SEEK.
4 Press the DN g or f UP button to move
downward or upward one step respectively until
the desired station frequency is displayed.
f UP
F
Preset (1 through 6)
MONO
3 Press the TUNE button to illuminate the DX and
SEEK indicators in the display.
The SEEK indicator illuminates only for a few
seconds. With the DX mode activated, both
strong and weak stations will be tuned in the
Auto-Seek operation.
Press again to return to the local mode. The DX
indicator will turn off and the SEEK indicator will
illuminate for a few seconds. Now, only strong
stations will be tuned.
4 Press the DN g or f UP button to
automatically seek a station downward or
upward respectively.
The unit will stop at the next station it finds.
Press the same button again to seek the next
station.
Mono/Stereo Switching
Automatic Seek Tuning
1 Press the SOURCE button to select the radio
mode.
2 Press the BAND button repeatedly until the
desired radio band is displayed.
Each press changes the band:
→ FM1 → FM2 → MW → LW
6-EN
1 Press the F button.
The F button changes to green (CDM-7857RB/
CDE-7855RB/CDE-7854R/CDE-7853R), orange
(CDE-7854RM).
2 "ST" indicator appears when a stereo FM station
is tuned in.
Press the MONO button to switch from stereo to
monaural FM reception. This will help in
reducing the noise of weak FM Stereo
broadcasts. In the monaural mode, the MO
indicator appears. Press the MONO button
again to return to the stereo mode.
3 Press the F button to activate the normal mode.
The F button returns to red.

Manual Storing of Station Presets
Tuning to Preset Stations
1 Select the radio band and tune in a desired radio
station you wish to store in the preset memory.
2 Make sure that the F button lights red, then
press and hold any one of the preset buttons
(1 through 6) for at least 2 seconds until the
station frequency on the display blinks.
3 Press the Preset button into which you wish to
store the station while the frequency display is
blinking (within 5 seconds).
The display stops blinking once the station has
been memorized. The display shows the band,
preset No. with a triangle (9) and station
frequency memorized.
4 Repeat the procedure to store up to 5 other
stations onto the same band.
To use this procedure for other bands, simply
select the band desired and repeat the
procedure.
A total of 24 stations can be stored in the preset
memory (6 stations for each band; FM1, FM2,
MW and LW).
NOTE
If you store a station in a preset memory which already
has a station, the current station will be cleared and
replaced with the new station.
1 Press the BAND button repeatedly until the
desired band is displayed.
Each press changes the band:
→ FM1 → FM2 → MW → LW
2 Make sure that the F button lights red, then
press the station preset button that has your
desired radio station in memory.
The display shows the band, preset number with
a triangle and frequency of the station selected.
Automatic Memory of Station
Presets
1 Press the BAND button repeatedly until the
desired radio band is displayed.
Each press changes the band:
→ FM1 → FM2 → MW → LW
2 Press and hold the A.ME button for at least 2
seconds.
The tuner will automatically seek and store 6
strong stations in the selected band in order of
signal strength.
The frequency on the display continues to
change while the automatic memory is in
progress.
When the automatic memory has been
completed, the tuner goes to the station stored
in the preset location No. 1.
NOTE
If no stations are stored, the tuner will return to the
original station you were listening to before the auto
memory procedure began.
7-EN
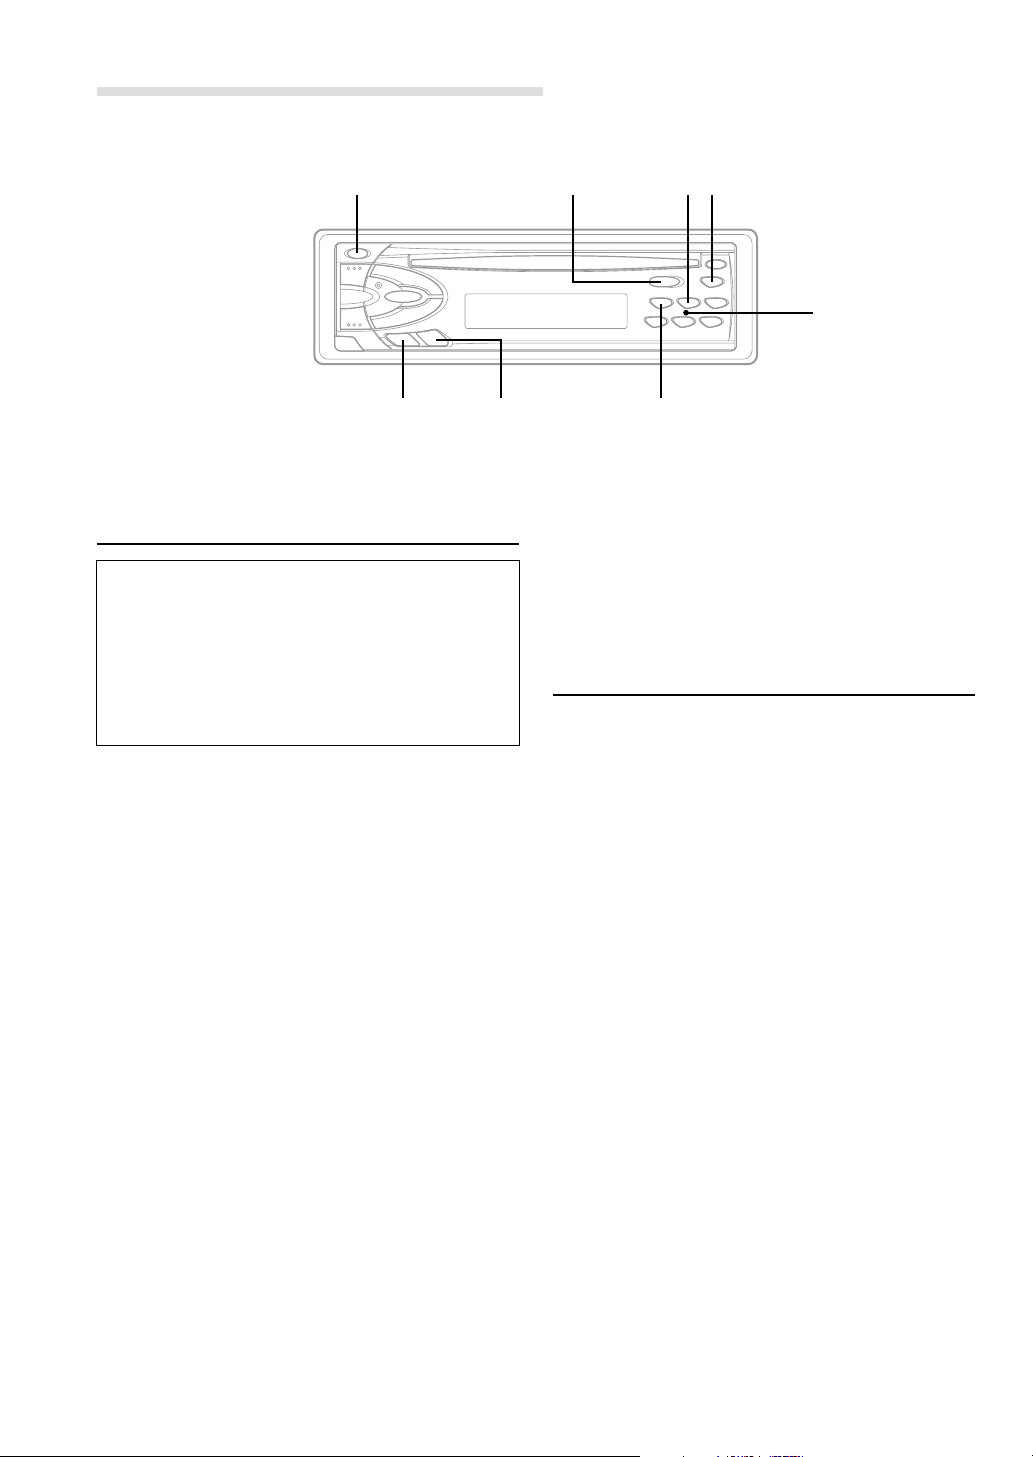
RDS Operations
INTLZ
DN g
f UP
Setting RDS Reception Mode and
Receiving RDS Stations
The RDS (Radio Data System) is a radio
information system using the 57 kHz subcarrier
of regular FM broadcast. The RDS allows you to
receive a variety of information such as traffic
information, station names, and to automatically
re-tune to a stronger transmitter that is
broadcasting the same programme.
1 Press the F button.
The F button changes to green (CDM-7857RB/
CDE-7855RB/CDE-7854R/CDE-7853R), orange
(CDE-7854RM).
2 Press the AF button to activate the RDS mode.
3 Press the DN g or f UP button to tune in
the desired RDS station.
NOTE
When the BAND button is pressed and held for more
than 2 seconds while a station name is displayed, the
display shows the station frequency for 5 seconds.
When the RDS station signal received has
become weak:
• AF seek mode, press and hold the AF button
for at least 2 seconds to have the unit
automatically seek a stronger station in the AF
(Alternative frequencies) list.
If there is no AF station, the display shows
"SEEK END."
4 Press the AF button again to deactivate the RDS
mode.
5 Press the F button to activate the normal mode.
The F button returns to red.
2
T.INFO / PTY
Tips
The RDS digital data includes the followings:
PI Programme Identification
PS Programme Service Name
AF List of Alternative Frequecncies
TP Traffic Programme
TA Traffic Announcement
PTY Programme Type
EON Enhanced Other Networks
F
Preset (1 through 6)
AF
Recalling Preset RDS Stations
1 Press the F button.
The F button changes to green (CDM-7857RB/
CDE-7855RB/CDE-7854R/CDE-7853R), orange
(CDE-7854RM).
2 Press the AF button to activate the RDS mode.
The display shows "AF" when the RDS mode is
activated.
3 Press the F button to activate the normal mode.
The F button returns to red.
4 Make sure that the F button lights red, then
press the preset location button in which your
desired RDS station is preset.
If the preset station's signal is weak, the unit
automatically searches and tunes to a stronger
station in the AF (Alternative Frequencies) list.
5 If the preset station and the stations in the AF list
cannot be received:
The unit searches again for a station in the PI
(Programme Identification) list.
If there are still no stations receivable in the area,
the unit displays the frequency of the preset
station and the preset indicator disappears.
If the signal level of the Regional (Local) station
being tuned becomes too weak to receive, press
the same preset location button to tune in a
Regional station in other district.
NOTE
For presetting the RDS stations, refer to the Radio
Operation section. The RDS stations can be preset in
the F1 and F2 bands only.
8-EN

Receiving RDS Regional (Local) Stations
1 Press and hold the INTLZ button for at least 3
seconds to activate the setting mode.
2 Press the Preset 2 button to turn on or off the
REG (Regional) mode.
In the REG OFF mode, the unit automatically
keeps receiving the related local RDS station.
3 Press the INTLZ button to deactivate the setting
mode.
Receiving Traffic Information
1 Press the T.INFO button repeatedly until the
T.INFO indicator appears in the display.
2 Press the DN g or f UP button to select
your desired traffic information station. When a
traffic information station is tuned in, the TP
indicator lights up.
Traffic information is heard only when it is being
broadcast. If traffic information is not being
broadcast, the unit is set in the standby mode.
When a traffic information broadcast begins, the
unit automatically receives it and the display
shows "TRF-INFO" for a few seconds and
returns to the PS display.
When the traffic information broadcast is over, the
unit will automatically set in the standby mode.
NOTES
• If the traffic information broadcast signal falls below a
certain level, the unit remains in the receiving mode
for 1 minute. If the signal remains below a certain
level for over 1 minute, the "T.INFO" indicator blinks.
• If you do not want to listen to the traffic information
being received, lightly press the T.INFO button to
skip that traffic information message. The T. INFO
mode will remain in the ON position to receive the
next traffic information message.
• If the volume level is changed while receiving traffic
information, the changed volume level will be
memorized. When traffic information is received next
time, the volume level will be automatically adjusted
to the level memorized.
PTY (Programme Type) Tuning
1 Press and hold the PTY button for at least 2
seconds to activate the PTY mode.
The Programme Type of the station being
currently received will be displayed for 5 seconds.
• If there is no receivable PTY broadcast, "NO
PTY" will be displayed for 5 seconds.
• If no RDS station can be received, the display
shows "NO RDS."
NOTE
If no button is pressed within 5 seconds after pressing
the PTY button, the PTY mode will be automatically
cancelled.
2 Press the DN g and f UP buttons within 5
seconds after activating the PTY mode to
choose the desired programme type while the
PTY (programme type) is being displayed. Each
press scrolls the programme type by one.
LIGHT M ← CLASSICS → OTHER M
3 Press the PTY button within 5 seconds after
selecting the programme type to start searching
for a station in the selected programme type.
The chosen programme type indicator blinks during
searching and lights when a station is found.
If no PTY station is found, "NO PTY" will be
displayed for 2 seconds.
Receiving Traffic Information While
Playing CD or Radio
1 Press the T.INFO button repeatedly until the
T.INFO indicator appears in the display.
2 Press the DN g and f UP buttons to
select a traffic information station if necessary.
• When a traffic information broadcast starts,
the unit automatically mutes the CD player/
changer or the regular FM broadcast.
• When the traffic information broadcast
finishes, the unit automatically returns to the
original source play before the traffic
information broadcast began.
When traffic information stations cannot be
received:
In the tuner mode:
When the TP signal can no longer be received
for over 1 minute, the "T.INFO" indicator blinks.
In the CD mode:
When the TP signal can no longer be received,
the traffic information station of another
frequency will be selected automatically.
NOTE
The receiver is equipped with the EON (Enhanced
Other Networks) function in order to keep track of
additional alternate frequencies to the AF list. The EON
indicator appears while an RDS EON station is being
received. If the station being received does not
broadcast the traffic information, the receiver
automatically tunes in the related station that
broadcasts the traffic information when it occurs.
3 Press the T.INFO button to deactivate the Traffic
Information mode.
The T.INFO indicator disappears.
9-EN
RDS Operations
Priority News
This function allows you to preset to give priority
to the News programme. You will never miss the
News programme as the unit automatically gives
priority to the News programme whenever it
begins broadcasting, and interrupts the
programme you are currently listening. This
feature is functional when your unit is set to a
mode other than the LW and MW modes.
NEWS
F
1 Press the F button.
The F button changes to green (CDM-7857RB/
CDE-7855RB/CDE-7854R/CDE-7853R), orange
(CDE-7854RM).
2 Press the NEWS button to activate the
PRIORITY NEWS mode.
"NEWS" lights up in the display.
• To disable the PRIORITY NEWS function,
press the NEWS button.
NOTE
In the PRIORITY NEWS function, unlike in the T.INFO
function, the volume does not increase automatically.
3 Press the F button to activate the normal mode.
The F button returns to red.
10-EN

CD Player Operation
- / J
SOURCE
DN g
Inserting/Ejecting Disc
1 Insert a CD half way into the slot with the label
side facing up. The player automatically draws
the disc into the disc compartment.
The Disc indicator appears to show that a disc
is loaded.
NOTE
Three-inch (8cm) CD's cannot be used (CDM-7857RB
only).
2 Press the Eject c button when you want to eject
the CD.
NOTES
• If the CD is not removed for several seconds after it
has been ejected, the player automatically draws the
CD into the compartment to protect the CD.
• Only compact discs containing the mark shown can
be used.
c
f UP
The display shows the track number and elapsed
time of the track being played. When the last
track is played back the player returns to the first
track and begins playback from that point.
2 If a disc is already loaded in the CD player, press
the SOURCE button to select the CD mode.
3 Press the -/J button to start CD play.
4 Press the -/J button to temporarily stop CD
playback.
To resume playback, press the -/J button again.
Music Sensor (Skip)
1 Momentarily press the DN g button once
during CD play to return to the beginning of the
current track. If you wish to access a track further
back, repeatedly press until you reach the
desired track.
Press the f UP button once to advance to the
beginning of the next track. If you wish to access
a track further ahead, press repeatedly until the
desired track is reached.
NOTE
The music sensor feature is functional in the play or
pause mode.
Normal Play and Pause
1 Insert a CD. The CD player begins playback from
the first track on the disc.
Fast Forward and Backward
1 Press and hold the DN g or f UP button to
quickly move backward or forward until you
reach the desired section of the track.
11-EN
CD Player Operation
- / J
SOURCE
Repeat Play
1 Press the RPT button to play back repeatedly the
track being played.
The RPT indicator appears and the track will be
played repeatedly.
Press the RPT button again to deactivate the
repeat play.
NOTE
If a CD Changer is connected and the RPT ALL mode is
selected, the unit repeatedly plays back all tracks on the
disc selected.
→
→
RPT RPT ALL OFF
→
M.I.X.
RPT SCAN
F
Preset (1 through 6)
Scanning Programmes
1 Press the SCAN button to activate the Scan
mode.
The first 10 seconds of each track will be played
back in succession.
To stop scanning, press the SCAN button to
deactivate the Scan mode.
NOTE
In case a 6-disc CD changer is connected (CDM7857RB only):
Press the F button to change to green, then go to step 1.
Press the F button to return to the normal mode.
The F button returns to red.
NOTE
In case a 6-disc CD changer is connected (CDM7857RB only):
Press the F button to change to green, then go to step 1.
Press the F button to return to the normal mode.
The F button returns to red.
M.I.X. (Random Play)
1 Press the M.I.X. button in the play or pause mode.
The M.I.X. indicator will illuminate and the
tracks on the disc will be played back in a
random sequence. After all the tracks on the
disc have been played back once, the player
will begin a new random sequence play until the
M.I.X. mode is cancelled.
To cancel M.I.X. play, press the M.I.X. button again.
NOTE
In case a 6-disc CD changer is connected
(CDM-7857RB only):
Press the F button to change to green, then go to step 1.
Press the F button to return to the normal mode.
The F button returns to red.
Controlling CD Changer (Optional)
(CDM-7857RB only)
If an optional Alpine 6-disc CD Changer is
connected to the 8-pin DIN connector (M-Bus) of
the CDM-7857RB, you can control the CD
Changer using the CDM-7857RB.
NOTE
The CD controls on the CDM-7857RB for the CD
Changer operation are functional only when the CD
Changer is interconnected with the CDM-7857RB.
1 Press the SOURCE button to activate the CD
Changer.
The display shows "Shuttle", the disc number
and track number.
NOTE
To start play or pause play, press the :/J button.
2 Make sure that the F button lights red, then
press the Preset buttons to select the desired
disc loaded in the CD Changer.
12-EN

Informations
In Case of Difficulty
If you encounter a problem, please review the
items in the following checklist. This guide will
help you isolate the problem if the unit is at fault.
Otherwise, make sure the rest of your system is
properly connected or consult your authorized
Alpine dealer.
Basic
No function or display.
• Vehicle's ignition is off.
- If connected following instructions, the unit will not
operate with the vehicle's ignition off.
• Improper power lead connections.
- Check power lead connections.
• Blown fuse.
- Check the fuse on the battery lead of the unit; replace
with the proper value if necessary.
• Internal micro-computer malfunctioned due to
interference noise etc.
- Press the Reset button with a ball-point pen or other
pointed article.
Radio
Unable to receive stations.
• No antenna or open connection in cable.
- Make sure the antenna is properly connected;
replace the antenna or cable if necessary.
Unable to tune stations in the seek mode.
• You are in a weak signal area.
- Make sure the tuner is in the DX mode.
• If the area you are in is a primary signal area, the
antenna may not be grounded and connected properly.
- Check your antenna connections; make sure the
antenna is properly grounded at its mounting
location.
• The antenna may not be the proper length.
- Make sure the antenna is fully extended; if
broken, replace the antenna with a new one.
Broadcast is noisy.
• The antenna is not the proper length.
- Extend the antenna fully; replace it if it is broken.
• The antenna is poorly grounded.
- Make sure the antenna is grounded properly at its
mounting location.
CD
CD Player/Changer not functioning.
• Out of operating temperature range +50˚C (+120˚F) for
CD.
- Allow the vehicle's interior (or trunk) temperature to
cool.
CD playback sound is wavering.
• Moisture condensation in the CD Module.
- Allow enough time for the condensation to evaporate
(about 1 hour).
CD insertion not possible.
• The CD is already in the CD player.
- Eject the CD and remove it.
• The CD is being improperly inserted.
- Make sure the CD is being inserted following
instructions in the Owner's Manual.
Unable to fast forward or backward the CD.
• The CD has been damaged.
- Eject the CD and discard it; using a damaged CD in
your unit can cause damage to the mechanism.
CD playback sound skips due to vibration.
• Improper mounting of the unit.
- Securely re-mount the unit.
• Disc is very dirty.
- Clean the disc.
• Disc has scratches.
- Change the disc.
CD playback sound skips without vibration.
• Dirty or scratched disc.
- Clean the disc; damaged disc should be replaced.
Error displays (built-in CD player only)
• Mechanical error
- Press the c button. After the error indication
disappears, insert the disc again. If the above-
mentioned solution does not solve the problem,
consult your nearest ALPINE dealer.
13-EN

Informations
Indication for CD Changer
HI TEMP
• Protective circuit is activated due to high temperature.
- The indicator will disappear when the temperature
returns to within operation range.
ERROR - 01
• Malfunction in the CD Changer.
- Consult your Alpine dealer. Press the magazine eject
button and pull out the magazine.
Check the indication. Insert the magazine again.
If the magazine cannot be pulled out, consult your
Alpine dealer.
• Magazine ejection not possible.
- Press the magazine eject button. If the magazine does
not eject, consult your Alpine dealer.
ERROR - 02
• A disc is left inside the CD Changer.
- Press the Eject button to activate the eject function.
When the CD Changer finishes the eject function,
insert an empty CD magazine into the CD Changer to
receive the disc left inside the CD Changer.
NO MAGZN
• No magazine is loaded into the CD Changer.
- Insert a magazine.
NO DISC
• No indicated disc.
- Choose another disc.
14-EN

Specifications
FM TUNER SECTION
Tuning Range 87.5 – 108.0 MHz
Mono Usable Sensitivity 0.7 µV
Alternate Channel Selectivity 80 dB
Signal-to-Noise Ratio 65 dB
Stereo Separation 35 dB
MW TUNER SECTION
Tuning Range 531 – 1,602 kHz
Sensitivity (IEC Standard) 25.1 µV/28 dB
LW TUNER SECTION
Tuning Range 153 – 281 kHz
Sensitivity (IEC Standard) 31.6 µV/30 dB
CD SECTION
Frequency Response 5 – 20,000 Hz (±1 dB)
Wow & Flutter (% WRMS) Below measurable limits
Total Harmonic Distortion 0.008% (at 1 kHz)
Dynamic Range 95 dB (at 1 kHz)
Signal-to-Noise Ratio 95 dB
Channel Separation 85 dB (at 1 kHz)
GENERAL
Power Requirement 14.4 V DC
(11–16 V allowable)
Maximum Power Output
CDM-7857RB 44 W × 4
CDE-7855RB/CDE-7854RM/
CDE-7854R/CDE-7853R 40 W × 4
Output Voltage 2 V/10k ohms
Bass ±15 dB at 30 Hz
Treble ±10 dB at 10 kHz
Weight 1.5 kg (3 lbs. 5 oz)
CHASSIS SIZE
Width 178 mm (7")
Height 50 mm (2")
Depth 155 mm (6-1/8")
NOSEPIECE SIZE
Width 170 mm (6–3/4")
Height 46 mm (1-13/16")
Depth 18 mm (11/16")
Due to continuous product improvement, specifications and
design are subject to change without notice.
15-EN

Installation and Connections
Before installing or connecting the unit, please
read the following and pages 2 and 3 of this
manual thoroughly for proper use.
Warning
MAKE THE CORRECT CONNECTIONS.
Failure to make the proper connections may result in fire
or product damage.
USE ONLY IN CARS WITH A 12 VOLT NEGATIVE
GROUND.
(Check with your dealer if you are not sure.) Failure to do
so may result in fire, etc.
BEFORE WIRING, DISCONNECT THE CABLE FROM
THE NEGATIVE BATTERY TERMINAL.
Failure to do so may result in electric shock or injury due
to electrical shorts.
DO NOT ALLOW CABLES TO BECOME ENTANGLED
IN SURROUNDING OBJECTS.
Arrange wiring and cables in compliance with the manual
to prevent obstructions when driving. Cables or wiring
that obstruct or hang up on places such as the steering
wheel, gear lever, brake pedals, etc. can be extremely
hazardous.
DO NOT SPLICE INTO ELECTRICAL CABLES.
Never cut away cable insulation to supply power to other
equipment. Doing so will exceed the current carrying
capacity of the wire and result in fire or electric shock.
DO NOT DAMAGE PIPE OR WIRING WHEN
DRILLING HOLES.
When drilling holes in the chassis for installation, take
precautions so as not to contact, damage or obstruct pipes,
fuel lines, tanks or electrical wiring. Failure to take such
precautions may result in fire.
DO NOT USE BOLTS OR NUTS IN THE BRAKE OR
STEERING SYSTEMS TO MAKE GROUND
CONNECTIONS.
Bolts or nuts used for the brake or steering systems (or
any other safety-related system), or tanks should NEVER
be used for installations or ground connections. Using
such parts could disable control of the vehicle and cause
fire etc.
KEEP SMALL OBJECTS SUCH AS BATTERIES OUT
OF THE REACH OF CHILDREN.
Swallowing them may result in serious injury. If
swallowed, consult a physician immediately.
DO NOT INSTALL IN LOCATIONS WHICH MIGHT
HINDER VEHICLE OPERATION, SUCH AS THE
STEERING WHEEL OR GEARSHIFT.
Doing so may obstruct forward vision or hamper
movement etc. and results in serious accident.
16-EN
Caution
HAVE THE WIRING AND INSTALLATION DONE BY
EXPERTS.
The wiring and installation of this unit requires special
technical skill and experience. To ensure safety, always
contact the dealer where you purchased this product to
have the work done.
USE SPECIFIED ACCESSORY PARTS AND INSTALL
THEM SECURELY.
Be sure to use only the specified accessory parts. Use of
other than designated parts may damage this unit internally
or may not securely install the unit in place. This may cause
parts to become loose resulting in hazards or product failure.
ARRANGE THE WIRING SO IT IS NOT CRIMPED OR
PINCHED BY A SHARP METAL EDGE.
Route the cables and wiring away from moving parts (like
the seat rails) or sharp or pointed edges. This will prevent
crimping and damage to the wiring. If wiring passes through
a hole in metal, use a rubber grommet to prevent the wire's
insulation from being cut by the metal edge of the hole.
DO NOT INSTALL IN LOCATIONS WITH HIGH
MOISTURE OR DUST.
Avoid installing the unit in locations with high incidence
of moisture or dust. Moisture or dust that penetrates into
this unit may result in product failure.
Precautions
• Be sure to disconnect the cable from the (–) battery post
before installing your CDM-7857RB/CDE-7855RB/CDE7854RM/CDE-7854R/CDE-7853R. This will reduce any
chance of damage to the unit in case of a short-circuit.
• Be sure to connect the colour coded leads according to the
diagram. Incorrect connections may cause the unit to
malfunction or damage to the vehicle's electrical system.
• When making connections to the vehicle's electrical
system, be aware of the factory installed components (e.g.
on-board computer). Do not tap into these leads to provide
power for this unit. When connecting the CDM-7857RB/
CDE-7855RB/CDE-7854RM/CDE-7854R/CDE-7853R to
the fuse box, make sure the fuse for the intended circuit of
the CDM-7857RB/CDE-7855RB/CDE-7854RM/CDE7854R/CDE-7853R has the appropriate amperage. Failure
to do so may result in damage to the unit and/or the
vehicle. When in doubt, consult your ALPINE dealer.
• The CDM-7857RB/CDE-7855RB/CDE-7854RM/CDE7854R/CDE-7853R uses female RCA-type jacks for
connection to other units (e.g. amplifier) having RCA
connectors. You may need an adaptor to connect other
units. If so, please contact your authorized ALPINE dealer
for assistance.
• Be sure to connect the speaker (–) leads to the speaker (–)
terminal. Never connect left and right channel speaker
cables to each other or to the vehicle body.
IMPORTANT
Please record the serial number of your unit in the
space provided below and keep it as a permanent
record. The serial number plate is located on the
bottom of the unit.
SERIAL NUMBER:
INSTALLATION DATE:
INSTALLATION TECHNICIAN:
PLACE OF PURCHASE:

Installation
1
Bracket
Dashboard
Mounting sleeve
(Included)
Remove the Detachable Front Panel (refer to
page 4). Slide mounting sleeve from main unit
(see Removal Procedure below). Slide the
mounting sleeve into the dashboard.
2
Metal Mounting Strap
Hex Nut (M5)
Rubber Cap
(Included)
CDM-7857RB/CDE-7855RB/
CDE-7854RM/CDE-7854R/
CDE-7853R
Screw
Bolt Stud
∗
Hex Bolt
(Included)
3 Slide the CDM-7857RB/CDE-7855RB/CDE-
7854RM/CDE-7854R/CDE-7853R into the
dashboard. When the unit is in place, make sure
the locking pins are fully seated in the down
position. This can be done by pressing firmly in on
the unit while pushing the locking pin down with a
small screwdriver. This ensures that the unit is
properly locked and will not accidentally come out
from the dashboard. Install the Detachable Front
Panel.
Lock pin
Removal
1 Remove the detachable front panel.
2 Use a small screwdriver (or similar tool) to
push the locking pins to the “up” position (see
Fig. 3). As each pin is unlocked, gently pull out
on the unit to make sure it does not re-lock
before unlocking the second pin.
3 Pull the unit out, keeping it unlocked as you do so.
<JAPANESE CAR>
Front frame
CDM-7857RB/CDE-7855RB/
CDE-7854RM/CDE-7854R/
CDE-7853R
When your vehicle has the Bracket, mount the
long hex bolt onto the rear panel of the CDM7857RB/CDE-7855RB/CDE-7854RM/CDE7854R/CDE-7853R and put the Rubber Cap on
the hex bolt. If your vehicle does not have the
Mounting Support, reinforce the head unit with
the metal mounting strap (not supplied). Connect
all the leads of the CDM-7857RB/CDE-7855RB/
CDE-7854RM/CDE-7854R/CDE-7853R
according to details described in the
CONNECTIONS section.
NOTE
For the screw ∗, provide a proper screw to the chassis
installing location.
CDM-7857RB/CDE-7855RB/
CDE-7854RM/CDE-7854R/
CDE-7853R
Screws (M5 × 8)
(Included)
Mounting Bracket
17-EN

Installation and Connections
Connection
Antenna
<
ISO Antenna Plug
To vehicle phone
To amplifier or equalizer
(Pink/Black)
(Blue/White)
AUDIO INTERRUPT IN
REMOTE TURN-ON
2
3
(Red)
(Black)
(Yellow)
1
%
IGNITION
6
BATTERY
9
7
GND
POWER ANT(Blue)
CD changer
(Sold
separately)
4
5
To power antenna
Ignition Key
8
Battery
A
!
"
#
$
A
&
)
~
+
,
-
.
(
/
:
DIN Connector PIN Configuration
(CDM-7857RB only).
lgnition
Data Ground
Lch
Sig Gnd
Shield Ground
Power Supply Ground
B
a
tte
ry
Data Bus
Rch
Speakers
Green
Green/Black
White
White/Black
Grey/Black
Grey
Violet/Black
Violet
Rear Left
Front Left
Front Right
Rear Right
Speakers
Front Right
No.
OUTPUT
"
"
#
18-EN
Front
Rear
;
(Sold Separately)
;
MODEL
CDM-7857RB
CDE-7855RB/CDE-7854RM/CDE-7854R/CDE-7853R
CDM-7857RB
Not Iinked with volume operation.
(Refer to Operating Instructions, page 5)
Linked with volume operation.
Amplifier
Front Left
Rear Right
Rear Left
OUTPUT SPECIFICATION

1 Antenna Receptacle
Connect to the supplied ISO antenna convertor
plug.
2 Audio Interrupt In Lead (Pink/Black)
Connect this lead to the Audio Interface output of
a cellular phone which provides ground shorting
when a call is received.
If a device having the interrupt feature is
connected, audio will be automatically muted
whenever the interrupt signal is received from
the device.
3 Remote Turn-On Lead (Blue/White)
Connect this lead to the remote turn-on lead of
your amplifier or signal processor.
4 Switched Power Lead (Ignition) (Red)
Connect this lead to an open terminal on the
vehicle’s fuse box or another unused power
source which provides (+) 12V only when the
ignition is turned on or in the accessory position.
5 Power Antenna Lead (Blue)
Connect this lead to the +B terminal of your
power antenna, if applicable.
NOTE
This lead should be used only for controlling the
vehicle's power antenna. Do not use this lead to turn on
an amplifier or a signal processor, etc.
6 Fuse Holder (15A)
7 Battery Lead (Yellow)
Connect this lead to the positive (+) post of the
vehicle’s battery.
8 ISO Power Supply Connector
9 Ground Lead (Black)
Connect this lead to a good chassis ground on
the vehicle. Make sure the connection is made to
bare metal and is securely fastened using the
sheet metal screw provided.
! Remote Control Interface Connector (CDM-
7857RB only)
To remote control interface box.
" Front Output/NFP RCA Connectors (CDM-
7857RB only)
RED is right and WHITE is left.
" Rear Output RCA Connectors (CDE-7855RB/
CDE-7854RM/CDE-7854R/CDE-7853R only)
RED is right and WHITE is left.
# Rear Output RCA Connectors (CDM-7857RB
only)
RED is right and WHITE is left.
$ DIN Connector (CDM-7857RB only)
Connect this to the DIN connector on the CD
changer.
% DIN Extension Cable
NOTE
Older Alpine CD changer came with standard, straight
type DIN connectors. In installations where an L-type
connector would simplify installation, the Alpine 4910
Adaptor can be used (sold separately).
& Power Supply Connector
( ISO Connector (Speaker Output)
) Left Rear (+) Speaker Output Lead (Green)
~ Left Rear (–) Speaker Output Lead (Green/
Black)
+ Left Front (+) Speaker Output Lead (White)
, Left Front (–) Speaker Output Lead (White/
Black)
- Right Front (–) Speaker Output Lead (Grey/
Black)
. Right Front (+) Speaker Output Lead (Grey)
/ Right Rear (–) Speaker Output Lead (Violet/
Black)
: Right Rear (+) Speaker Output Lead (Violet)
; RCA Extension Cable (sold separately)
< ISO Antenna Convertor Plug
02
To prevent external noise from entering the audio system.
Locate the unit and route the leads at least 10cm away from the car harness.
• Keep the battery power leads as far away from other leads as possible.
• Connect the ground lead securely to a bare metal spot (remove the coating if necessary) of the car
chassis.
• If you add an optional noise suppressor, connect it as far away from the unit as possible. Your Alpine
dealer carries various Alpine noise suppressors, contact them for further information.
• Your Alpine dealer knows best about noise prevention measures so consult your dealer for further
information.
19-EN

20-EN

Händlerstemple
Tips der Polizei:
[ Stellen Sie Ihr Fahrzeug stets gut sichtbar ab.
[
Verschließen Sie Türen, Fenster, Schiebedach und Kofferraum immer, auch bei nur kurzer Abwesenheit.
[ Lassen Sie keine Wertsachen sichtbar im Auto liegen.
[ Wird Ihr Fahrzeug aufgebrochen, wenden Sie sich sofort an die nächste Polizeidienststelle.
[ Belassen Sie Ihr Fahrzeug nach einem Aufbruch im Originalzustand.
[ Informieren Sie sich über technische Sicherungsmöglichkeiten bei einer Kriminalpolizeilichen
Beratungsstelle.
Gerät 1
Modell-Nr.:
Hersteller:
Seriennummer:
AL
Kaufdatum: Preis:

R
Car Audio and Navigation Systems
GERÄTE-PASS
AUDIO SYSTEME
Fahrzeugmarke: Typ:
Amtl. Kennzeichen:
Name des Halters:
Straße:
Wohnort:
Bitte füllen Sie diesen Pass vollständig aus und bewahren Sie ihn
außerhalb des Fahrzeugs auf:
Im Falle eines Diebstahls wird für Sie die Schadensabwicklung mit der
Versicherung einfacher, und Sie erleichtern der Polizei die Fahndung
nach den Tätern.

Indice
ESPAÑOL
Manual de instrucciones
ADVERTENCIA
ADVERTENCIA ......................................... 2
PRUDENCIA .............................................. 2
PRECAUCIONES ...................................... 2
Operación básica
Extracción del panel frontal ...............................4
Fijación del panel frontal ................................... 4
Puesta en funcionamiento inicial del sistema .... 4
Conexión y desconexión de la alimentación ...... 4
Activación y desactivación de la no
difuminación en la salida de
preamplificación (N.F.P.)
(CDM-7857RB solamente) ............................ 5
Activación/desactivación del efecto de
sonoridad ........................................................ 5
Ajuste de los niveles de señal de las fuentes...... 5
Ajuste del volumen/los graves/los agudos/el
equilibrio entre los altavoces derechos e
izquierdos/el equilibrio entre los altavoces
delanteros y traseros ....................................... 5
Operación del reproductor de discos
compactos
Inserción/expulsión de discos .......................... 11
Reproducción y pausa normales ...................... 11
Sensor de música (Salto).................................. 11
Avance rápido o retroceso ................................ 11
Reproducción con repetición ........................... 12
M.I.X. (Reproducción aleatoria) ...................... 12
Escaneo de programas ..................................... 12
Control de un cambiador de discos
compactos (opcional)
(CDM-7857RB solamente) ..........................12
Informacións
En caso de dificultad ........................................ 13
Especificaciones............................................... 15
Ubicación y Coneccións
Precauciones .................................................... 16
Ubicación .........................................................17
Coneccións ....................................................... 18
Operación de la radio
Sintonía manual ................................................. 6
Sintonía con búsqueda automática ..................... 6
Cambio entre monoaural/estéreo ....................... 6
Almacenamiento manual de emisoras ............... 7
Almacenamiento automático de emisoras ......... 7
Sintonía de emisoras memorizadas .................... 7
Operación RDS
Establecimiento del modo del sistema RDS y
recepción de emisoras RDS ............................ 8
Invocación de emisoras de RDS memorizadas .... 8
Recepción de emisoras de RDS regionales
(locales) .......................................................... 9
Recepción de información sobre el tráfico ........ 9
Sintonía por tipo de programa (PTY) ................ 9
Recepción de información sobre el tráfico
durante la reproducción de un discos
compactos o le escucha de la radio ................ 9
Prioridad del tipo niticias .................................10
1-ES

ADVERTENCIA
ADVERTENCIA
El símbolo de exclamación dentro del
triángulo y "ADVERTENCIA", tienen como fin
alertar al usuario de la presencia de
instrucciones de operación importantes.
El hacer caso omiso de las instrucciones
podría resultar en heridas graves o la muerte.
NO REALICE NINGUNA OPERACIÓN QUE PUEDA
DISTRAER SU ATENCIÓN Y COMPROMETER LA
SEGURIDAD DURANTE LA CONDUCCIÓN DEL
VEHÍCULO.
Las operaciones que requieren su atención durante más
tiempo sólo deben realizarse después de detener
completamente el vehículo. Estacione el vehículo en un
lugar seguro antes de realizar dichas operaciones. De lo
contrario, podría ocasionar un accidente.
MANTENGA EL VOLUMEN A UN NIVEL QUE NO LE
IMPIDA ESCUCHAR LOS SONIDOS DEL EXTERIOR
MIENTRAS CONDUCE.
De no ser así, podría ocasionar un accidente.
REDUZCA AL MÁXIMO LA VISUALIZACIÓN DE LA
PANTALLA MIENTRAS CONDUCE.
El conductor puede distraer su atención de la carretera
mientras mira la pantalla y ocasionar un accidente.
UTILICE ESTE PRODUCTO CON APLICACIONES
MÓVILES DE 12 V.
Si se emplea para otra aplicación distinta de la prevista,
podría producirse un incendio, una descarga eléctrica u
otras lesiones.
NO INTRODUZCA LAS MANOS, LOS DEDOS NI
OTROS OBJETOS EXTRAÑOS EN LAS RANURAS DE
INSERCIÓN O EN LAS ABERTURAS.
Si lo hiciera, podría sufrir heridas u ocasionar daños al
equipo.
PRUDENCIA
El símbolo de exclamación dentro del
triángulo y "PRUDENCIA", tienen como fin
alertar al usuario de la presencia de
instrucciones de operación importantes.
El hacer caso omiso de las instrucciones
podría ocasionar heridas o daños materiales.
DEJE DE USAR LA UNIDAD INMEDIATAMENTE SI
APARECE ALGÚN PROBLEMA.
Su uso en estas condiciones podría ocasionar lesiones
personales o daños al producto. Lleve la unidad a un
distribuidor Alpine autorizado o al Centro de servicio
Alpine más próximo para repararla.
NO DESMONTE NI ALTERE LA UNIDAD.
Si lo hace, podrá ocasionar un accidente, un incendio o
una descarga eléctrica.
UTILICE LA UNIDAD SOLAMENTE EN VEHÍCULOS
QUE TENGAN 12 VOLTIOS CON NEGATIVO A MASA.
(Consulte a su distribuidor en caso de duda.) De no ser
así, podría ocasionar un incendio, etc.
MANTENGA LOS OBJETOS PEQUEÑOS, COMO LAS
PILAS, FUERA DEL ALCANCE DE LOS NIÑOS.
La ingestión de estos objetos puede provocar lesiones graves.
Si esto ocurre, consulte con un médico inmediatamente.
UTILICE EL AMPERAJE CORRECTO CUANDO
CAMBIE FUSIBLES.
De lo contrario, puede producirse un incendio o una
descarga eléctrica.
NO OBSTRUYA LOS ORIFICIOS DE VENTILACIÓN O
LOS PANELES DEL RADIADOR.
Si los bloquea, el calor podría acumularse en el interior y
producir un incendio.
PRECAUCIONES
Temperatura
Cerciórese de que la temperatura del interior de vehículo
esté entre +60°C (+140°F) y –10°C (+14°F) antes de
conectar la alimentación de la unidad.
Condensación de humedad
Usted puede oír fluctuaciones en el sonido de
reproducción de un disco compacto debido a la
condensación de humedad. Cuando suceda esto, extraiga
el disco del reproductor y espere aproximadamente una
hora hasta que se evapore la humedad.
Disco dañado
No intente reproducir discos rayados, alabeados, o
dañados. La reproducción de un disco en malas
condiciones podría dañar el mecanismo de reproducción.
Mantenimiento
Si tiene problemas, no intente reparar la unidad por sí
mismo. Devuélvala a su proveedor Alpine o a la estación
de servicio Alpine para que se la reparen.
2-ES

No intente realizar nunca lo siguiente
No tome ni tire del disco mientras esté insertándose en el
reproductor mediante el mecanismo de carga automática.
No intente insertar un disco en el reproductor mientras la
alimentación del mismo esté desconectada.
Inserción de los discos
Su reproductor solamente aceptará un disco cada vez para
reproducción. No intente cargar más de un disco.
Cerciórese de que la cara de la etiqueta esté hacia arriba
cuando inserte el disco. Su reproductor expulsará
automáticamente cualquier disco incorrectamente
insertado. Si el reproductor continúa expulsando un disco
correctamente insertado, presione el interruptor de
reposición (situado detrás del panel frontal desmontable)
con un objeto puntiagudo, como un bolígrafo.
La reproducción de un disco al conducir por una carretera
muy accidentada puede resultar en salto del sonido, pero
el disco no se rayará ni se dañará el reproductor.
Ubicación de instalación
Cerciórese de no instalar el CDM-7857RB/CDE-7855RB/
CDE-7854RM/CDE-7854R/CDE-7853R en un lugar
sometido a:
• La luz solar directa ni el calor
• Gran humedad y agua
• Polvo excesivo
• Vibraciones excesivas
Manejo del panel frontal desmontable
• No lo exponga a la lluvia ni al agua.
• No lo deje caer ni lo golpee.
Manejo correcto
No deje caer los discos mientras los maneje. Sujete el disco
por el borde de forma que no queden huellas dactilares en su
superficie. No pegue cintas, papeles, ni etiquetas engomadas
en los discos. No escriba sobre los discos.
CORRECTO
INCORRECTO
CORRECTO
EN
FR
ES
Discos nuevos
Como medida de protección, el reproductor de discos
compactos expulsará automáticamente los discos cuando
hayan sido incorrectamente insertados o tengan
superficies irregulares. Cuando inserte un disco nuevo en
el reproductor y salga expulsado, utilice un dedo para
comprobar los bordes del orificio central y de la periferia.
Si nota abultamientos o irregularidades, es posible que el
disco no pueda cargarse apropiadamente. Para eliminar los
abultamientos, frote el borde interior del orificio central y
de la periferia con un bolígrafo u otro objeto similar, y
después inserte de nuevo el disco.
Orificio
central
Abultamientos
Orificio
central
Disco
nuevo
Borde exterior
(abultamientos)
Discos de forma irregular
Asegúrese de utilizar solamente discos de forma redonda
en esta unidad y nunca utilice ningún otro disco de forma
especial.
El uso de discos de forma especial podrá causar daños al
mecanismo.
Limpieza de los discos
Las huellas dactilares, el polvo, o la suciedad de la
superficie de los discos podría hacer que el reproductor
saltase sus pistas. Para la limpieza rutinaria, frote la
superficie de reproducción con un paño suave y limpio del
centro hacia los bordes. Si la superficie está muy
manchada, humedezca un paño suave y limpio en una
solución de detergente neutro y frote el disco.
Accesorios para discos
Existen varios accesorios disponibles en el mercado para
proteger la superficie de los discos y mejorar la cualidad
acústica. Sin embargo, la mayoría de ellos influirá en el
grosor y/o el diámetro de dichos discos. La utilización de
tales accesorios podría cambiar las especificaciones
estándar de los discos y provocar problemas
operacionales. No se recomienda utilizar estos accesorios
con discos reproducidos en reproductores de discos
compactos Alpine.
IT
SE
Hoja transparente
Estabilizador del disco
3-ES

Operación básica
1
2
PWR / INTLZ
1
MODE / LOUD
Extracción del panel frontal
1 Presione el botón PWR (alimentación) para
desconectar la alimentación.
2 Presione el botón de (liberación) situado en la
esquina inferior izquierda hasta que el panel
frontal salga hacia fuera.
3 Sujete la parte izquierda del panel frontal y tire
de él hacia afuera.
NOTAS
• El panel frontal podrá calentarse durante la operación
normal (especialmente los terminales del conector),
esto no se deberá a un mal funcionamiento.
• Para proteger el panel frontal, métalo en la caja de
transporte suministrada.
c
1
• Controlable con control remoto
(CDM-7857RB solamente)
Esta unidad puede controlarse con un control
remoto opcional Alpine. Para más detalles,
consulte a su distribuidor Alpine.
• Controlable con la caja del conector interface de
control remoto (CDM-7857RB solamente)
Cuando tenga conectada una caja de conector
interface de control remoto (opcional), usted
podrá operar esta unidad con la unidad de
control del vehículo. Para más detalles,
consulte a su distribuidor Alpine.
Puesta en funcionamiento inicial
del sistema
1 Antes de poner en funcionamiento por primera vez
la unidad después de su instalación, o después de
haber desconectado y vuelto a conectar la batería
del automóvil, ajuste el volumen al mínimo, y luego
extraiga el panel frontal desmontable.
Fijación del panel frontal
1 Inserte primero la parte derecha del panel frontal
en la unidad principal. Alinee el saliente del
panel frontal con la ranura de la unidad principal.
2 Empuje la parte izquierda del panel frontal hasta
que se bloquee firmemente en la unidad
principal.
2
1
NOTA
Antes de fijar el panel frontal, cerciórese de que no haya
suciedad ni polvo en los terminales del conector, y de
que no existan objetos extraños entre el panel frontal y la
unidad principal.
4-ES
Detré de la placa hay un panel frontal. Presione
el interruptor de reposición que hay por detré del
pequeño orificio con la punta de un bolígrafo o
cualquier otro objeto puntiagudo.
1
Interruptor de restauración
Conexión y desconexión de la
alimentación
1 Para conectar la alimentación de la unidad,
presione el botón PWR (alimentación).
NOTA
La alimentación de la unidad podrá conectarse
presionando cualquier botón, excepto el de extracción c.
El nivel del volumen aumentará gradualmente hasta el
existente antes de haber desconectado la
alimentación de la unidad.
Para desconectar la alimentación de la unidad,
vuelva a presionar el botón PWR.

Activación y desactivación de la
no difuminación en la salida de
preamplificación (N.F.P.) (CDM-
7857RB solamente)
Utilice el modo N.F.P. activado cuando lo más
efectivo sea una señal sin desvanecimiento. Por
ejemplo, para accionar un amplificador con filtro de
pasabajos para el altavoz de subgraves.
1 Mantenga presionado el botón de expulsión (c)
durante 3 segundos por lo menos con la
alimentación de la unidad desconectada.
Cada vez que lo presione, N.F.P. se activará
(ON) o desactivará (OFF).
N.F.P. ON:
En esta posición, la salida de preamplificación
delantera no se verá afectada por el difuminador.
Esto será ideal a fin de excitar un amplificador para
subgraves.
N.F.P. OFF:
Retorna al modo normal con difuminador.
NOTAS
• El modo inicial es "N.F.P. OFF".
• Ponga N.F.P. en OFF a menos que esté utilizando un
altavoz de subgraves.
Ajuste del volumen/los graves/los
agudos/el equilibrio entre los
altavoces derechos e izquierdos/el
equilibrio entre los altavoces
delanteros y traseros
1 Presione repetidamente el botón MODE para
elegir el modo deseado.
Cada vez que presione los modos cambiarán
como sigue:
→ VOL → BAS → TRE
FAD ← BAL ←
NOTA
Si no presiona el botón 5 o 6 antes de 5 segundos de
haber seleccionado los modos BASS, TREBLE,
BALANCE, y FADER, la unidad pasará automáticamente
al modo VOLUME.
2 Presione los botones 5 y 6 hasta obtener el
sonido deseado en cada modo.
NOTA
Los ajustes de BASS y TREBLE para cada fuente (FM,
MW (LW) y CD) se memorizarán automáticamente
siempre que sean cambiados.
EN
FR
ES
Activación/desactivación del
efecto de sonoridad
La sonoridad introduce una acentuación especial
de bajas y altas frecuencias a bajos niveles de
escucha para compensar la sensibilidad reducida
del oído humano al sonido de graves y agudos.
1 Para activar o desactivar el modo de sonoridad,
mantenga presionado el botón LOUD durante 2
segundos por lo menos. Cuando active el modo
de sonoridad, el visualizador mostrará "LOUD".
Ajuste de los niveles de señal de
las fuentes
Si la diferencia de volumen entre el reproductor de
discos compactos y el sintonizador de FM es
demasiado grande, ajuste el nivel de la señal de
FM de la forma siguiente.
1 Mantenga presionado el botón INTLZ durante 3
segundos por lo menos.
2 Presione el botón de preadjuste 1 para
seleccionar el nivel de la señal HI (alto) o LO
(bajo) a fin tratar de igualar los niveles entre la
banda de FM y el reproductor de discos
compactos.
3 Para cancelar el modo de ajuste, presione el
botón INTLZ.
IT
SE
5-ES

Operación de la radio
TUNE / A.ME
SOURCE
DN gBAND
f UP
Sintonía manual
1 Presione el botón SOURCE para seleccionar el
modo de radio.
2 Presione repetidamente el botón BAND hasta
que se visualice la banda deseada.
Cada vez que presione el botón la banda de
radio cambiara como sigue:
→ FM1 → FM2 → MW → LW
3 Presione repetidamente el botón TUNE hasta
que "DX SEEK" y "SEEK" desaparezcan del
visualizador.
NOTA
El modo inicial es DX SEEK.
4 Presione el botón DN g o f UP para
moverse, respectivamente, un paso hacia
adelante o hacia atrás, hasta que se visualice la
frecuencia de la emisora deseada.
Sintonía con búsqueda automática
1 Presione el botón SOURCE para seleccionar el
modo de radio.
2 Presione repetidamente el botón BAND hasta
que se visualice la banda deseada.
Cada vez que presione el botón la banda de
radio cambiara como sigue:
→ FM1 → FM2 → MW → LW
MONOF
memorización (1 a 6)
3 Presione el botón TUNE para que en el
visualizador aparezcan los indicadores DX y
SEEK.
El indicador SEEK solamente aparecerá durante
algunos segundos. Como el modo DX activado,
con la operación de búsqueda automática podrán
sintonizarse emisoras de señal intensa y débil.
Vuelva a presionarlo para regresar al modo local.
El indicador DX desaparecerá y aparecerá el
indicador SEEK durante algunos segundos.
Ahora solamente se sintonizarán las emisoras
de señal intensa.
4 Presione el botón DN g o f UP para
buscar automática y progresiva o
regresivamente una emisora, respectivamente.
La unidad se parará en la siguiente emisora que
encuentre. Para buscar la emisora siguiente,
vuelva a presionar el mismo botón.
Cambio entre monoaural/estéreo
1 Presione el botón F (Función).
El color del botón F cambiará a verde (CDM7857RB/CDE-7855RB/CDE-7854R/CDE7853R), naranja (CDE-7854RM).
2 Cuando se sintonice una emisora estéreo,
aparecerá el indicador "ST".
Para cambiar de recepción de FM estéreo a
monoaural, presione el botón MONO. Esto le
ayudará a reducir el ruido de emisiones de FM
de señal débil. En el modo monoaural,
aparecerá el indicador MO. Para volver al modo
estéreo, presione de nuevo el botón MONO.
3 Para activar el modo normal, presione el botón F.
El color del botón F volverá a ser rojo.
6-ES

Almacenamiento manual de
emisoras
1 Seleccione la banda y sintonice la emisora que
desee almacenar en la memoria.
2 Asegúrese de que el botón F se ilumina en rojo,
y luego mantenga presionado cualquiera de los
botones de memorización (1 a 6) durante al
menos 2 segundos hasta que parpadee la
frecuencia de la emisora en el visualizador.
3 Presione el botón de memorización en el que
desee almacenar la emisora mientras esté
parpadeando la indicación de la frecuencia
(antes de 5 segundos).
Después de haberse memorizado la emisora, la
visualización dejará de parpadear. El
visualizador mostrará la banda, el número de
memorización con un triángulo (9), y la
frecuencia de la emisora almacenada.
4 Repita el procedimiento para almacenar hasta
otras 5 emisoras de la misma banda.
Para utilizar este procedimiento en otras bandas,
seleccione simplemente la banda deseada y
repita el procedimiento.
En la memoria podrá almacenar un total de 24
emisoras (6 de cada banda, FM1, FM2, MW y
LW).
NOTA
Si almacena una emisora en un número de memorización
en el que ya exista una emisora, la emisora anterior será
reemplazada por la nueva.
Sintonía de emisoras memorizadas
1 Presione repetidamente el botón BAND hasta
que se visualice la banda deseada.
Cada vez que presione el botón la banda de
radio cambiara como sigue:
→ FM1 → FM2 → MW → LW
2 Asegúrese de que el botón F se ilumina en rojo,
y después presione el botón de memorización
de la emisora en el que esté almacenada la
emisora de radio deseada.
El visualizador mostrará la banda, el número de
memorización con un triángulo y la frecuencia
de la emisora seleccionada.
Almacenamiento automático de
emisoras
1 Presione repetidamente el botón BAND hasta
que se visualice la banda deseada.
Cada vez que presione el botón la banda de
radio cambiara como sigue:
→ FM1 → FM2 → MW → LW
2 Mantenga presionado el botón A.ME durante 2
segundos por lo menos.
El sintonizador buscará y almacenará
automáticamente 6 emisoras de señal intensa
de la banda seleccionada por el orden de
intensidad de su señal.
Durante el proceso de almacenamiento
automático, la frecuencia del visualizador
cambiará continuamente.
Cuando finalice el almacenamiento automático,
el sintonizador volverá a la emisora almacenada
en la ubicación de memorización número 1.
NOTA
Si no hay emisoras almacenadas, el sintonizador volverá a
la emisora original que estaba escuchando antes de haber
iniciado el procedimiento de almacenamiento automático.
7-ES

Operación RDS
DN g
Establecimiento del modo del
sistema RDS y recepción de
emisoras RDS
El sistema de datos radiofónicos (RDS) es un
sistema de radioinformación que utiliza la
subportadora de 57 kHz de la emisión normal de
FM. El sistema RDS le permitirá recibir gran
variedad de datos, como información sobre el
tráfico y nombres de las emisoras, y resintonizar
automáticamente una emisora de señal más
intensa que esté transmitiendo el mismo programa.
1 Presione el botón F (Función).
El color del botón F cambiará a verde (CDM7857RB/CDE-7855RB/CDE-7854R/CDE-7853R),
naranja (CDE-7854RM).
2 Presione el botón AF para activar el modo RDS.
3 Presione el botón DN g o f UP para
sintonizar la emisora de RDS deseada.
NOTA
Si mantiene presionado el botón BAND durante más de
dos segundos estando visualizado el nombre de una
emisora, el visualizador mostrará la frecuencia de la
emisora durante 5 segundos.
Cuando la señal de la emisora de RDS se
debilite:
• En el modo de búsqueda de AF, mantenga
presionado el botón AF durante 2 segundos
por lo menos para hacer que la unidad busque
automáticamente una emisora de señal más
intensa de la lista de AF (frecuencias
alternativas).
Si no hay emisora de AF, el visualizador
mostrará "SEEK END."
4 Para desactivar el modo de AF, vuelva a
presionar el botón RDS.
5 Para activar el modo normal, presione el botón F.
El color del botón F volverá a ser rojo.
8-ES
T.INFO / PTYINTLZ
Sugerencias
Los datos de señal digital de RDS incluyen lo siguiente:
2F
memorización (1 a 6)
AF f UP
PI Identificación de programa
PS Nombre de servicio de programa
AF Lista de frecuencias alternativas
TP Programa de tráfico
TA Anuncios sobre el tráfico
PTY Tipo de programa
EON Otras redes mejoradas
Invocación de emisoras de RDS
memorizadas
1 Presione el botón F (Función).
El color del botón F cambiará a verde (CDM7857RB/CDE-7855RB/CDE-7854R/CDE7853R), naranja (CDE-7854RM).
2 Para activar el modo de RDS, presione el botón AF.
Cuando active el modo de RDS, el visualizador
mostrará "AF."
3 Para activar el modo normal, presione el botón F.
El color del botón F volverá a ser rojo.
4 Asegúrese de que el botón F se ilumina en rojo, y
después presione el botón de memorización en el
que esté almacenada la emisora RDS deseada.
Si la señal de la emisora memorizada es débil, la
unidad buscará y sintonizará automáticamente
una emisora de señal más intensa de la lista AF
(Frecuencias alternativas).
5 Si no es posible recibir la emisora memorizada
ni las de la lista de AF:
La unidad buscará de nuevo una emisora de la
lista de identificación de programa (PI).
Si todavía no pueden recibirse emisoras en la zona,
la unidad visualizará la frecuencia de la emisora y
el indicador de memorización desaparecerá.
Si el nivel de la señal de la emisora regional
(local) sintonizada se debilita hasta el punto en
el que no pueda recibirse, presione el mismo
botón de memorización para sintonizar la
emisora regional de otro distrito.
NOTA
Para memorizar las emisoras de RDS, consulte la
sección de Operación de la radio. Las emisoras de RDS
solamente podrán memorizarse en las bandas F1 y F2.

Recepción de emisoras de RDS
2 Presione los botones DN g y f UP antes
regionales (locales)
1 Mantenga presionado el botón INTLZ durante 3
segundos por lo menos para activar el modo de
establecimiento.
2 Para activar o desactivar el modo regional (REG
ON o REG OFF), presione el botón de
memorización 2.
En el modo REG OFF, la unidad continuará
recibiendo automáticamente la emisora de RDS
local relacionada.
3 Para comenzar la búsqueda de una emisora del
3 Para desactivar el modo de establecimiento,
presione el botón INTLZ.
Recepción de información sobre el tráfico
1
Presione repetidamente el botón T. INFO hasta que
"
en el visualizador aparezca el indicador
2
Presione el botón DN g o f UP para seleccionar
la emisora de información sobre el tráfico deseada.
Cuando se sintonice una emisora de información
sobre el tráfico, se encenderá el indicador TP.
La información sobre el tráfico solamente se oirá
cuando se esté emitiendo. Si no se está emitiendo
información sobre el tráfico, la unidad permanecerá
en el modo de espera. Cuando comience la
emisión de la información sobre el tráfico, la unidad
la recibirá automáticamente y en el visualizador
aparecerá "TRF-INFO" durante unos cuantos
segundos y luego volverá a la visualización PS.
Cuando finalice la transmisión de información sobre el
tráfico, la unidad pasará automáticamente al modo de
espera.
NOTAS
• Si la señal de emisión de información sobre el tráfico
desciende por debajo de cierto nivel, la unidad
permanecerá en el modo de recepción durante 1 minuto.
Si la señal se mantiene por debajo de cierto nivel durante
más de 1 minuto, la indicación "T.INFO" parpadeará.
• Si no desea escuchar la información sobre el tráfico
que esté recibiendo, presione ligeramente el botón
T.INFO para saltar tal información. El modo T.INFO
permanecerá activado para recibir la siguiente
emisión de información sobre el tráfico.
• Si cambia el volumen cuando esté recibiendo
información sobre el tráfico, la unidad memorizará el
nuevo volumen ajustado. La próxima vez que reciba
información sobre el tráfico, la recibirá
automáticamente al nivel de volumen memorizado.
T.INFO".
Recepción de información sobre el tráfico
durante la reproducción de un discos
compactos o le escucha de la radio
1 Presione repetidamente el botón T.INFO hasta
2 Presione los botones DN g y f UP para
• Cuando comience la emisión de información
• Cuando finalice la emisión de información
Cuando no puedan recibirse emisoras de
información sobre el tráfico:
En el modo de sintonizador:
En el modo de discos compactos:
Sintonía por tipo de programa (PTY)
1 Mantenga presionado el botón PTY durante 2
segundos por lo menos para activar el modo PTY.
El tipo de programa de la emisora que esté
recibiéndose se visualizará durante 5 segundos.
• Si no hay ninguna emisión de PTY, se
visualizará "NO PTY" durante 5 segundos.
• Si no puede recibirse ninguna emisora de
RDS, el visualizador mostrará "NO RDS".
NOTA
Si una vez presionado el botón PTY no presiona ningún
botón antes de 5 segundos, el modo PTY se cancelará
automáticamente.
3 Para desactivar el modo de información sobre el
de 5 segundos de haber activado el modo PTY
para elegir el tipo de programa deseado
mientras esté visualizándose PTY (tipo de
programa). Con cada presión, el tipo de
programa se desplazará en uno.
LIGHT M ← CLASSICS → OTHER M
tipo de programa seleccionado, después de
haber seleccionado el tipo de programa
mantenga presionado el botón PTY por lo
menos antes de que transcurran 5 segundos.
El indicador de tipo de programa elegido
parpadeará durante la búsqueda y permanecerá
encendido cuando se encuentre una emisora.
Si no se encuentra ninguna emisora, se
visualizará "NO PTY" durante 2 segundos.
que en el visualizador aparezca el indicador
"T.INFO".
seleccionar una emisora de información sobre el
tráfico, si es necesario.
sobre el tráfico, la unidad silenciará el
reproducir/cambiador de discos compatos o la
emisora de FM normal.
sobre el tráfico, la unidad volverá
automáticamente a la reproducción de la
fuente que estaba escuchándose antes de
comenzar dicha emisión.
Cuando la señal TP deje de recibirse durante
más de 1 minuto, la indicación "T.INFO"
parpadeará.
Cuando ya no se pueda recibir señal de TP, se
seleccionará automáticamente la emisora de
información sobre el tráfico de otra frecuencia.
NOTA
El receptor dispone de la función de otras redes
mejoradas (EON) para seguir la pista de frecuencias
alternativas adicionales a la lista de AF. El indicador
EON aparece durante la recepción de una emisora RDS
EON. Si la emisora que esté recibiéndose no emite
información sobre el tráfico, el receptor sintonizará
automáticamente la emisora relacionada que emita
información sobre el tráfico cuando inicie la emisión.
tráfico, presione el botón T.INFO.
El indicador T.INFO desaparecerá.
9-ES

Operación RDS
Prioridad del tipo noticias
Esta función le permite preajustar el programa de
noticias al que quiera dar prioridad. De esta
manera nunca se perderá el programa de
noticias, porque la unidad dará automáticamente
prioridad al programa de noticias preajustado
cuando comience su emisión, e interrumpirá el
que esté escuchando actualmente. Esta función
sólo trabaja en un modo que no sea LW ni MW.
NEWS F
1 Presione el botón F (Función).
El color del botón F cambiará a verde (CDM7857RB/CDE-7855RB/CDE-7854R/CDE7853R), naranja (CDE-7854RM).
2 Presione el botón NEWS para activar el modo
de prioridad del tipo de noticias (PRIORITY
NEWS).
En el visualizador se encenderá "NEWS."
• Para desactivar la función de prioridad del tipo
de noticias (PRIORITY NEWS), vuelva a
presionar el botón NEWS.
NOTA
En la función de prioridad del tipo de noticias
(PRIORITY NEWS), a diferencia de la función T.INFO,
el volumen no aumenta automáticamente.
3 Para activar el modo normal, presione el botón F.
El color del botón F volverá a ser rojo.
10-ES

Operación del reproductor de discos compactos
- / J
DN g f UP
Inserción/Expulsión de discos
1 Inserte un disco hasta la mitad dentro de la
ranura y con la etiqueta hacia arriba. El
reproductor automáticamente introducirá el disco
dentro del compartimiento del disco.
cSOURCE
El visualizador mostrará el número de canción y el
tiempo transcurrido de la canción que se reproduce.
Cuando se reproduce la última canción, el
reproductor retorna a la primera canción y comienza
a reproducir el disco a partir de ese punto.
2 Si en el reproductor de discos compactos ya hay
un disco, presione el botón SOURCE para
seleccionar el mode de disco (CD).
3 Presione el botón -/J para iniciar la
reproducción.
Aparecerá el indicador de disco para mostrar
que se ha cargado un disco.
NOTA
Los discos de 3 pulgadas (8 cm) no se pueden utilizar en
este reproductor (CDM-7857RB solamente).
2 Presione el botón de expulsión c cuando
desee expulsar el disco.
NOTAS
• Si no retira el disco tras unos segundos después de
haber sido expulsado, el reproductor volverá a
meterlo automáticamente en el compartimiento para
protegerlo.
• Sólo se pueden usar discos compactos provistos de la
marca que se muestra en la ilustración.
Reproducción y pausa normales
1 Inserte un disco. El reproductor comenzará a
reproducir el disco por la su primera canción.
4 Presione el botón -/J para parar
temporalmente la reproducción del disco.
Para reanudar la reproducción, vuelva a
presionar el botón -/J.
Sensor de música (Salto)
1 Presione momentáneamente una vez el botón
DN g durante la reproducción del disco para
volver al principio de la canción reproduciéndose
actualmente. Si desea acceder a una canción
previa, presione dicho botón repetidamente
hasta que dé con la canción deseada.
Presione el botón f UP una vez para avanzar
al principio de la siguiente canción. Si desea
acceder a una canción posterior, presione dicho
botón repetidamente hasta que dé con la
canción deseada.
NOTA
La función del sensor de música puede utilizarse en el
modo de reproducción o pausa.
Avance rápido o retroceso
1 Mantenga presionado el botón DN g o
f UP para retroceder o avanzar rápidamente
hasta alcanzar la parte deseada de la canción.
11-ES

Operación del reproductor de discos compactos
- / J
SOURCE
Reproducción con repetición
1 Presione el botón RPT para reproducir de forma
repetida la canción que esté reproduciéndose.
El indicador RPT aparecerá y la canción se
reproducirá repetidamente.
Presione el botón RPT de nuevo para desactivar
el modo de repetición.
NOTA
Si se ha conectado un cambiador de discos compactos y
se selecciona el modo RPT ALL, el reproductor
reproducirá de forma repetida todas las canciones del
desco seleccionado.
→
NOTA
Si conecta un cambiador de discos compactos de 6
discos (CDM-7857RB solamente):
Presione el botón F para que se encienda en verde, y
después vaya al paso 1. Para activar el modo normal,
presione el botón F.
El color del botón F volverá a ser rojo.
→
RPT RPT ALL OFF
→
M.I.X. (Reproducción aleatoria)
1 Presione el botón M.I.X. en el modo de
reproducción o pausa.
El indicador M.I.X. se iluminará y las canciones
del disco se reproducirán en secuencia
aleatoria. Cuando se hayan reproducido todas
las canciones del disco una vez, el reproductor
repetirá la reproducción aleatoria hasta que se
cancele el modo M.I.X.
Para cancelar la reproducción M.I.X., presione el
botón M.I.X. de nuevo.
NOTA
Si conecta un cambiador de discos compactos de 6
discos (CDM-7857RB solamente):
Presione el botón F para que se encienda en verde, y
después vaya al paso 1. Para activar el modo normal,
presione el botón F.
El color del botón F volverá a ser rojo.
12-ES
M.I.X.
F
memorización (1 a 6)
SCANRPT
Escaneo de programas
1 Presione el botón SCAN para activar el modo
escáner.
Se reproducirán los primeros 10 segundos de
cada canción en sucesión.
Para parar el escáner, presione el botón SCAN
para desactivar el modo escáner.
NOTA
Si conecta un cambiador de discos compactos de 6
discos (CDM-7857RB solamente):
Presione el botón F para que se encienda en verde, y
después vaya al paso 1. Para activar el modo normal,
presione el botón F.
El color del botón F volverá a ser rojo.
Control de un cambiador de discos
compactos (opcional) (CDM-7857RB
solamente)
Si ha conectado un cambiador de 6 discos
compactos Alpine opcional al conector DIN de 8
contactos (M-Bus) del CDM-7857RB, podrá
controlarlo utilizando el CDM-7857RB.
NOTA
Los controles del reproductor de discos compactos del
CDM-7857RB solamente funcionarán cuando el
cambiador de discos compactos se halle interconectado
con el CDM-7857RB.
1 Para activar el cambiador de discos compactos,
presione el botón SOURCE.
El visualizador mostrará "Shuttle", el número de
disco y el número de canción.
NOTA
Para comenzar la reproducción o hacer una pausa en la
reproducción, presione el botón :/J.
2 Compruebe que el botón F se ilumina en rojo, y
luego presione los botones de memorización
para seleccionar el disco deseado que esté
cargado en el cambiador de discos compactos.

Informacións
En caso de dificultad
Cuando se presente algún problema, consulte los
ítemes de la lista de comprobaciones siguiente.
Esta lista le ayudará a resolver los problemas de
su unidad. Si el problema persiste, compruebe si
el resto de su sistema está adecuadamente
conectado o consulte a un proveedor autorizado
por Alpine.
Básico
La unidad no funciona ni hay visualización.
• La llave de encendido del automóvil está en OFF.
- Si ha realizado las conexiones de acuerdo con las
instrucciones, la unidad no funcionará con la llave de
encendido en OFF.
• Las conexiones de los conductores de alimentación no
son adecuadas.
- Compruebe las conexiones de los conductores de
alimentación.
• Fusible quemado.
- Compruebe el fusible de cable de la unidad a la
batería. Si fuera necesario cámbielo por otro del
valor apropiado.
• El microordenador interno funciona mal a causa de
interferencias, ruido, etc.
- Presione el botón de reposición con un bolígrafo u
otro objeto puntiagudo.
Radio
Es imposible recibir emisoras.
• La antena no está conectada o el cable está desconectado.
- Compruebe si la antena está adecuadamente
conectada y, si es necesario, reemplace la antena o el
cable.
Es imposible sintonizar emisoras en el modo de
búsqueda.
• Usted se encuentra en un área de recepción débil.
- Compruebe si el sintonizador está en el modo DX.
• Si usted se encuentra en una zona de señal intensa, es
posible que la antena no esté puesta a tierra o conectada
adecuadamente.
- Compruebe las conexiones de la antena, si está bien
conectada a tierra, y si la ubicación de montaje es
correcta.
• Es posible que la longitud de la antena no sea adecuada.
- Compruebe si la antena está completamente
desplegada. Si está rota, reemplácela por otra nueva.
La recepción es ruidosa.
• Es posible que la longitud de la antena no sea adecuada.
- Extienda completamente la antena. Si está rota,
reemplácela por otra.
• La antena está mal conectada a tierra.
- Compruebe si la antena está bien conectada a tierra y
si la ubicación de montaje es correcta.
Disco compacto
El reproducir/cambiador de discos compactos
no funciona.
• Se encuentra a más de +50°C (+120°F) de temperatura.
- Deje que se enfríe la temperatura en el interior
(o en el portaequipajes) del vehículo.
El sonido de reproducción de un disco
compacto oscila.
• Se ha condensado humedad en el módulo de discos
compactos.
- Espere el tiempo necesario para que se evapore la
humedad (aproximadamente 1 hora).
La inserción de un disco compacto es imposible.
• El disco ya está en el reproductor de discos.
- Expulse el disco y retírelo.
• El disco está siendo introducido incorrectamente.
- Asegúrese de que está introduciendo el disco de
acuerdo a como se explica en las instrucciones del
Manual del propietario.
El disco no avanza ni retrocede.
• El disco compacto está dañado.
- Extraiga el disco compacto y tírelo. La utilización de
un disco compacto dañado en su unidad podría averiar
el mecanismo.
El sonido salta debido a las vibraciones.
• Montaje inadecuado de la unidad.
- Vuelva a montar la unidad firmemente.
• El disco está muy sucio.
- Límpie el disco.
• El disco posee rayaduras.
- Cambie el disco.
El sonido salta sin haber vibraciones.
• El disco está sucio o rayado.
- Límpie el disco. Los discos dañados deberán
reemplazarse.
Indicaciones de error (reproductor de discos
compactos incorporado solamente).
• Error mecanico
- Presione el boton c. Una vez desaparezca la
indicacion de error, vuelva a insertar el disco. Si el
problema no desaparece mediante la solucion
mencionada, consulte con el proveedor ALPINE mas
proximo.
13-ES

Informacións
Indicaciones para el cambiador de
discos compactos
HI TEMP
• Se ha activado el circuito protector debido a la alta
temperatura.
- El indicador desaparecerá cuando la temperatura
vuelva a la gama de operación.
ERROR - 01
• Mal funcionamiento del cambiador de discos
compactos.
- Consulte a su proveedor Alpine. Presione el botón de
expulsión del cargador y extraiga éste. Compruebe la
indicación. Vuelva a insertar el cargador.
Si no puede extraer el cargador, consulte a su
proveedor Alpine.
• No es posible extraer el cargador.
- Presione el botón de extracción del cargador. Si no
puede extraer el cargador, consulte a su proveedor
Alpine.
ERROR - 02
• En el interior del cambiador de CD ha quedado un
disco.
- Presione el botón EJECT para activar la función de
expulsión. Cuando el cambiador de discos compactos
finalice la función de expulsión, inserte un cargador
de discos compactos vacío en el cambiador de discos
compactos para recibir el disco que ha quedado en el
interior del cambiador de discos compactos.
NO MAGZN
• No hay cargador insertado en el cambiador de discos
compactos.
- Inserte un cargador.
NO DISC
• El disco indicado no existe.
- Elija otro disco.
14-ES

Especificaciones
SECCIÓN DEL SINTONIZADOR DE FM
Gama de sintonía 87,5 – 108,0 MHz
Sensibilidad útil en modo
monoaural 0,7 µV
Selectividad de canal
alternativo 80 dB
Relación señal-ruido 65 dB
Separación estéreo 35 dB
SECCIÓN DEL SINTONIZADOR DE MW
Gama de sintonía 531 – 1.602 kHz
Sensibilidad
(normas de la IEC) 25,1 µV/28 dB
SECCIÓN DEL SINTONIZADOR DE LW
Gama de sintonía 153 – 281 kHz
Sensibilidad
(normas de la IEC) 31,6 µV/30 dB
SECCIÓN DEL REPRODUCTOR DE DISCOS
COMPACTOS
Frecuencia de respuesta 5 – 20.000 Hz (±1 dB)
Fluctuación y trémolo
medibles Por debajo de los límites
medibles
Distorsión armónica total 0,008% (a 1 kHz)
Gama dinámica 95 dB (a 1 kHz)
Relación entre señal y ruido 95 dB
Separación de canales 85 dB (a 1 kHz)
GENERALES
Alimentación 14,4 V DC
(11–16 V permisible)
Salida máx. de alimentación
CDM-7857RB 44 W × 4
CDE-7855RB/CDE-7854RM/
CDE-7854R/CDE-7853R 40 W × 4
Tensión de salida 2 V/10k ohms
Graves ±15 dB/30 Hz
Agudos ±10 dB/10 kHz
Peso 1,5 kg
TAMAÑO DEL CHASIS
An 178 mm
Al 50 mm
Prf 155 mm
TAMAÑO DE LA PIEZA FRONTAL
An 170 mm
Al 46 mm
Prf 18 mm
Debido a la mejora continua del producto, las
especificaciones y el diseño están sujetos a cambio sin previo
aviso.
15-ES

Ubicación y conexiones
Antes de instalar o conectar la unidad, lea
atentamente lo siguiente y las páginas 2 y 3 de
este manual para emplearla adecuadamente.
Advertencia
REALICE LAS CONEXIONES CORRECTAMENTE.
Una conexión incorrecta puede producir un incendio o
dañar el equipo.
UTILICE LA UNIDAD SOLAMENTE EN VEHÍCULOS
QUE TENGAN 12 VOLTIOS CON NEGATIVO A MASA.
(Consulte a su distribuidor en caso de duda.) De no ser
así, podría ocasionar un incendio, etc.
ANTES DE EFECTUAR EL CABLEADO, DESCONECTE
EL CABLE DEL TERMINAL NEGATIVO DE LA BATERÍA.
De no hacerlo así, podría ocasionar una descarga eléctrica
o heridas debido a cortocircuitos eléctricos.
IMPIDA QUE LOS CABLES SE ENREDEN CON LOS
OBJETOS SITUADOS ALREDEDOR.
Disponga la instalación eléctrica y los cables conforme a
lo descrito en el manual para evitar obstáculos durante la
conducción. Los cables que obstaculizan la conducción o
que cuelgan de partes del vehículo como el volante de
dirección, la palanca de cambios, los pedales de freno,
etc., se consideran extremadamente peligrosos.
NO EMPALME CABLES ELÉCTRICOS.
Nunca corte el aislamiento de un cable para suministrar
energía a otro equipo. Esto hace que la capacidad
portadora del cable se supere y puede ser la causa de
incendios o descargas eléctricas.
EVITE DAÑAR LOS TUBOS Y EL CABLEADO CUANDO
TALADRE AGUJEROS.
Si taladra agujeros en el chasis durante la instalación, tome
las precauciones necesarias para no rozar, dañar u obstruir los
tubos, las tuberías de combustible, los depósitos o el cableado
eléctrico. De lo contrario, podría provocar un incendio.
NO UTILICE TUERCAS O PERNOS EN EL SISTEMA
DE FRENOS O DE DIRECCIÓN PARA REALIZAR LAS
CONEXIONES A MASA.
Los pernos o tuercas empleados en los sistemas de freno o
de dirección (o en cualquier otro sistema relacionado con
la seguridad del vehículo), o los depósitos, NUNCA deben
utilizarse para instalaciones de cableado o conexión a
masa. Si utiliza tales partes podrá incapacitar el control
del vehículo y provocar un incendio, etc.
MANTENGA LOS OBJETOS PEQUEÑOS, COMO LAS
PILAS, FUERA DEL ALCANCE DE LOS NIÑOS.
La ingestión de estos objetos puede provocar lesiones graves.
Si esto ocurre, consulte con un médico inmediatamente.
NO INSTALE EL EQUIPO EN LUGARES QUE PUEDAN
INTERFERIR CON LA OPERACIÓN DEL VEHÍCULO,
COMO EL VOLANTE DE DIRECCIÓN O LA CAJA DE
CAMBIOS DE VELOCIDAD.
Esto podría obstaculizar la visibilidad y dificultar el
movimiento, etc. y provocar accidentes graves.
Prudencia
CONFÍE EL CABLEADO Y LA INSTALACIÓN A
PROFESIONALES.
El cableado y la instalación de este equipo requieren una
competencia y experiencia técnica confirmada. Para garantizar
la seguridad, póngase siempre en contacto con el distribuidor
al que ha comprado el equipo para confiarle estas tareas.
16-ES
UTILICE LOS ACCESORIOS ESPECIFICADOS E
INSTÁLELOS CORRECTAMENTE.
Asegúrese de utilizar los accesorios especificados
solamente. La utilización de otras piezas no designadas
puede ser la causa de daños en el interior de la unidad o de
una instalación incorrecta. Las piezas pueden aflojarse, lo
que, además de ser peligroso, puede provocar averías.
DISPONGA EL CABLEADO DE FORMA QUE LOS
CABLES NO SE DOBLEN, NO SE CONTRAIGAN NI
ROCEN UN BORDE METÁLICO AFILADO.
Aleje los cables y el cableado de piezas móviles (como los
raíles de los asientos) o de bordes puntiagudos o afilados.
De esta forma evitará dobleces y daños en el cableado. Si
los cables se introducen por un orificio de metal, utilice
una arandela de goma para evitar que el borde metálico
del orificio corte el aislamiento del cable.
NO INSTALE LA UNIDAD EN LUGARES MUY
HÚMEDOS O LLENOS DE POLVO.
Evite instalar la unidad en lugares con altos índices de
humedad o polvo. Si entra polvo o humedad, el equipo
puede averiarse.
Precauciones
• Asegúrese de desconectar el cable del terminal (–) de la
batería antes de instalar el CDM-7857RB/CDE-7855RB/
CDE-7854RM/CDE-7854R/CDE-7853R. De esta forma se
reducirá la posibilidad de dañar la unidad en caso de
cortocircuitos.
• Asegúrese de conectar los cables codificados con colores
según el diagrama. Las conexiones incorrectas pueden
producir fallos de funcionamiento de la unidad o daños al
sistema eléctrico del automóvil.
• Cuando realice conexiones al sistema eléctrico del
automóvil, tenga en cuenta los componentes instalados en
fábrica (p.ej. la computadora de a bordo). No realice
conexiones derivadas a estos cables para proporcionar
alimentación a esta unidad. Cuando conecte el CDM7857RB/CDE-7855RB/CDE-7854RM/CDE-7854R/CDE7853R a la caja de fusibles, compruebe que el fusible del
circuito correspondiente al CDM-7857RB/CDE-7855RB/
CDE-7854RM/CDE-7854R/CDE-7853R tenga el
amperaje apropiado. En caso contrario, la unidad y/o el
automóvil podrían dañarse. En caso de dudas, consulte con
el proveedor ALPINE.
• El CDM-7857RB/CDE-7855RB/CDE-7854RM/CDE7854R/CDE-7853R utiliza tomas RCA hembra para la
conexión a otras unidades (p. ej. un amplificador) que
posea tomas RCA. Es posible que usted necesite un
adaptador para conectar otras unidades. En tal caso,
póngase en contacto con su proveedor ALPINE para
solicitarle ayuda.
• Asegúrese de conectar los cables negativos (–) de altavoces
al terminal de altavoces (–). Nunca conecte los cables de
altavoces de los canales derecho e izquierdo uno a otro, ni
tampoco a la carrocería del vehículo.
IMPORTANTE
Anote el número de serie de la unidad en el espacio
proporcionado a continuación y consérvelo como
registro permanente. La placa del número de serie se
encuentra en la base de la unidad.
NÚMERO DE SERIE:
FECHA DE INSTALACIÓN:
INSTALADOR:
LUGAR DE ADQUISICIÓN:

Ubicación
1
Soporte
Tablero de
instrumentos
Manguito de
montaje
(Incluído)
Extraiga el panel extraíble frontal (consulte la
pàgina 4). Deslice el manguito de montaje desde
la unidad principal (vea el procedimiento de
extracción de abajo). Deslice el manguito de
montaje al tablero de instrumentos.
Tapón de caucho
(Incluído)
Perno
Hexagonal
(Incluído)
CDM-7857RB/CDE-7855RB/
CDE-7854RM/CDE-7854R/
CDE-7853R
3 Deslice el CDM-7857RB/CDE-7855RB/CDE-
7854RM/CDE-7854R/CDE-7853R dentro del
panel de instrumentos. Cuando la unidad esté
en su lugar, cerciórese de que los pasadores
hayan quedado completamente asentados hacia
adajo. Esto podrá realizarse empujando
firmemente la unidad manteniendo presionado el
pasador de bloqueo hacia abajo con un
destornillador pequeño. Esto asegurará el que la
unidad quede adecuadamente bloqueada y que
no se salga accidentalmente del panel de
instrumentos. Instale el panel frontal
desmontable.
Pasador
2
Tuerca hexagonal
(M5)
Si su vehículo posee soporte, instale el perno
hexagonal largo en el panel posterior del CDM7857RB/CDE-7855RB/CDE-7854RM/CDE7854R/CDE-7853R y coloque el tapón de
caucho sobre dicho perno. Si el vehículo no
dispone de soporte de montaje, refuerce la
unidad principal con la cinta de soporte metálica
(no suministrada). Conecte todos los
conductores del CDM-7857RB/CDE-7855RB/
CDE-7854RM/CDE-7854R/CDE-7853R de
acuerdo con los detalles descritos en la sección
CONEXIONES.
NOTA
A propósito del tornillo ∗, prepare un tornillo apropiado
al lugar de instalación del chasis.
Abrazadera metálica
de montaje
Tornillo
Perno
∗
CDM-7857RB/CDE-7855RB/
CDE-7854RM/CDE-7854R/
CDE-7853R
Extracción
1 Retire el panel delantero desmontable.
2 Utilice un pequeño destornillador (u otra
herramienta similar) para empujar los pasadores
de fijación (consulte la Fig.3). Cuando
desbloquee un pasador, tire suavemente de la
unidad hacia afuera para asegurarse de que no
se vuelva a bloquear antes de desbloquear el
otro.
3 Tire la unidad hacia fuera, manteniéndola
destrabada mientras lo hace.
<VEHíCULO JAPONÉS>
Marco Frontal
Tornillos (M5 × 8)
(Incluído)
CDM-7857RB/CDE-7855RB/
CDE-7854RM/CDE-7854R/
CDE-7853R
Soporte de montaje
17-ES

Ubicación y Coneccións
Coneccións
Antenna
<
Enchufe de antena ISO
Al teléfono del
vehículo
Al amplificador o
ecualizador
A la antena eléctrica
(Pink/Black)
(Blue/White)
IGNITION
(Red)
AUDIO INTERRUPT IN
REMOTE TURN-ON
4
2
3
(Black)
GND
POWER ANT(Blue)
6
(Yellow)
BATTERY
1
%
Cambiador de
discos compactos
(Vendido
separadamente)
9
7
5
Llave de
contacto
8
Batería
A
!
"
#
$
A
&
)
~
+
,
-
.
(
/
:
;
;
Configuración de polos del conector DIN
(CDM-7857RB solamente).
lgnition
Data Ground
Lch
Sig Gnd
Shield Ground
Power Supply Ground
B
a
tte
ry
Data Bus
Rch
Altavoces
Green
Green/Black
White
White/Black
Grey/Black
Grey
Violet/Black
Violet
Trasero izquierdo
Delantero izquierdo
Delantero derecho
Trasero derecho
Altavoces
Delantero
derecho
Delantero
Amplificador
(Vendido
separadamente)
izquierdo
Trasero
derecho
Trasero
izquierdo
No.
"
"
#
18-ES
SALIDA
Delantere
Trasera
MODELO
CDM-7857RB
CDE-7855RB/CDE-7854RM/CDE-7854R/CDE-7853R
CDM-7857RB
No enlazada con la operación de volumen.
(Refiérase el maunal de operación página 5)
Enlazada con la operación de volumen.
ESPECIFICACIONES DE SALIDA

1 Receptáculo de la antena
Conéctelo al convertidor de enchufe de antena
ISO suministrado.
2 Cable de entrada de interrupción audio
(Rosa/Negro)
Conecte este conector a la salida de interconexión
de audio de un teléfono celular que ofrezca
cortocircuitación a tierra al recibir una llamada.
Si se conecta un dispositivo que disponga de la
función de interrupción, el audio se silenciará
automáticamente cada vez que se reciba la
señal de interrupción procedente del dispositivo.
3 Cable de activación automática (Azul/Blanco)
Conecte este cable al cable de activación
automática de su amplificador o procesador de
señales.
4 Cable de alimentación con interruptor
(Encendido) (Rojo)
Conecte este cable a un terminal abierto de la
caja de fusibles del automóvil, o a otra fuente de
alimentación disponible que proporcione (+) 12V
sólo cuando el encendido sea activado o cuando
la llave de encendido se encuentre en la
posición accessoria.
5 Cable para antena eléctrica (Azul)
Conecte este cable al terminal +B de su antena
eléctrica, si aplicable.
NOTA
Este cable sólo debe utilizarse para controlar la antena
eléctrica del automóvil. No lo utilice para activar un
amplificador o un procesador de señales, etc.
6 Portafusibles (15A)
7 Cable de la batería (Amarillo)
Conecte este cable al terminal positivo (+) de la
batería del vehículo.
8 Conector ISO de suministro de alimentación
9 Cable de tierra (Negro)
Conecte este cable a una buena tierra del chasis
del vehículo. Asegúrese de conectarlo a una parte
metálica despejada y de fijarlo firmemente usando
el tornillo para plancha metálica proporcionado.
! Conector de interconexión del mando a
distancia (sólo para CDM-7857RB)
A la caja de interconexión del control remoto.
" Conectores RCA de salida para altavoces
delanteros/NFP (CDM-7857RB solamente)
El ROJO es derecho y el BLANCO izquierdo.
" Conectores RCA de salida para altavoces
traseros (CDE-7855RB/CDE-7854RM/CDE7854R/CDE-7853R solamente)
El ROJO es derecho y el BLANCO izquierdo.
# Conectores RCA de salida trasera (sólo para
CDM-7857RB)
ROJO es derecho y BLANCO izquierdo.
$ Conector DIN (CDM-7857RB solamente)
Conéctelo al conector DIN del cambiador CD.
% Cable de extensión DIN
NOTA
Los antiguos cambiadors CD de Alpine están equipados
con conectores rectos de tipo DIN estándar. El
adaptador 4910
puede ser usado en instalaciones simplificadas por el
uso de un conector en "L". (vendido separadamente)
& Conector de alimentación
( Conector ISO (Salida de altavoz)
) Cable de salida de altavoz izquierdo trasero
(+) (Verde)
~ Cable de salida de altavoz izquierdo trasero
(–) (Verde/Negro)
+ Cable de salida de altavoz izquierdo
delantero (+)(Blanco)
, Cable de salida de altavoz izquierdo
delantero (–) (Blanco/Negro)
- Cable de salida de altavoz derecho delantero
(–) (Gris/Negro)
. Cable de salida de altavoz derecho delantero
(+) (Gris)
/ Cable de salida de altavoz derecho trasero (–)
(Violeta/Negro)
: Cable de salida de altavoz derecho trasero (+)
(Violeta)
; Cable de extensión RCA (vendido
separadamente)
< Enchufe convertidor de antena ISO
02 (vendido separadamente) de Alpine
Para evitar que entre ruido externo en el sistema de audio.
Coloque la unidad y pase los cables a 10 cm por lo menos del conjunto de cables del automóvil.
• Mantenga los conductores de la batería lo más alejados posible de otros cables.
• Conecte el conductor de puesta a masa con seguridad a un punto metálico desnudo (si es necesario,
elimine el revestimiento) del chasis del automóvil.
• Si añade un supresor de ruido opcional, conéctelo lo más lejos posible de la unidad. Su proveedor
Alpine dispone de varios supresores de ruido Alpine. Solicítele más información.
• Su proveedor Alpine conoce la mejor forma de evitar el ruido. Solictele más información.
19-ES

20-ES
 Loading...