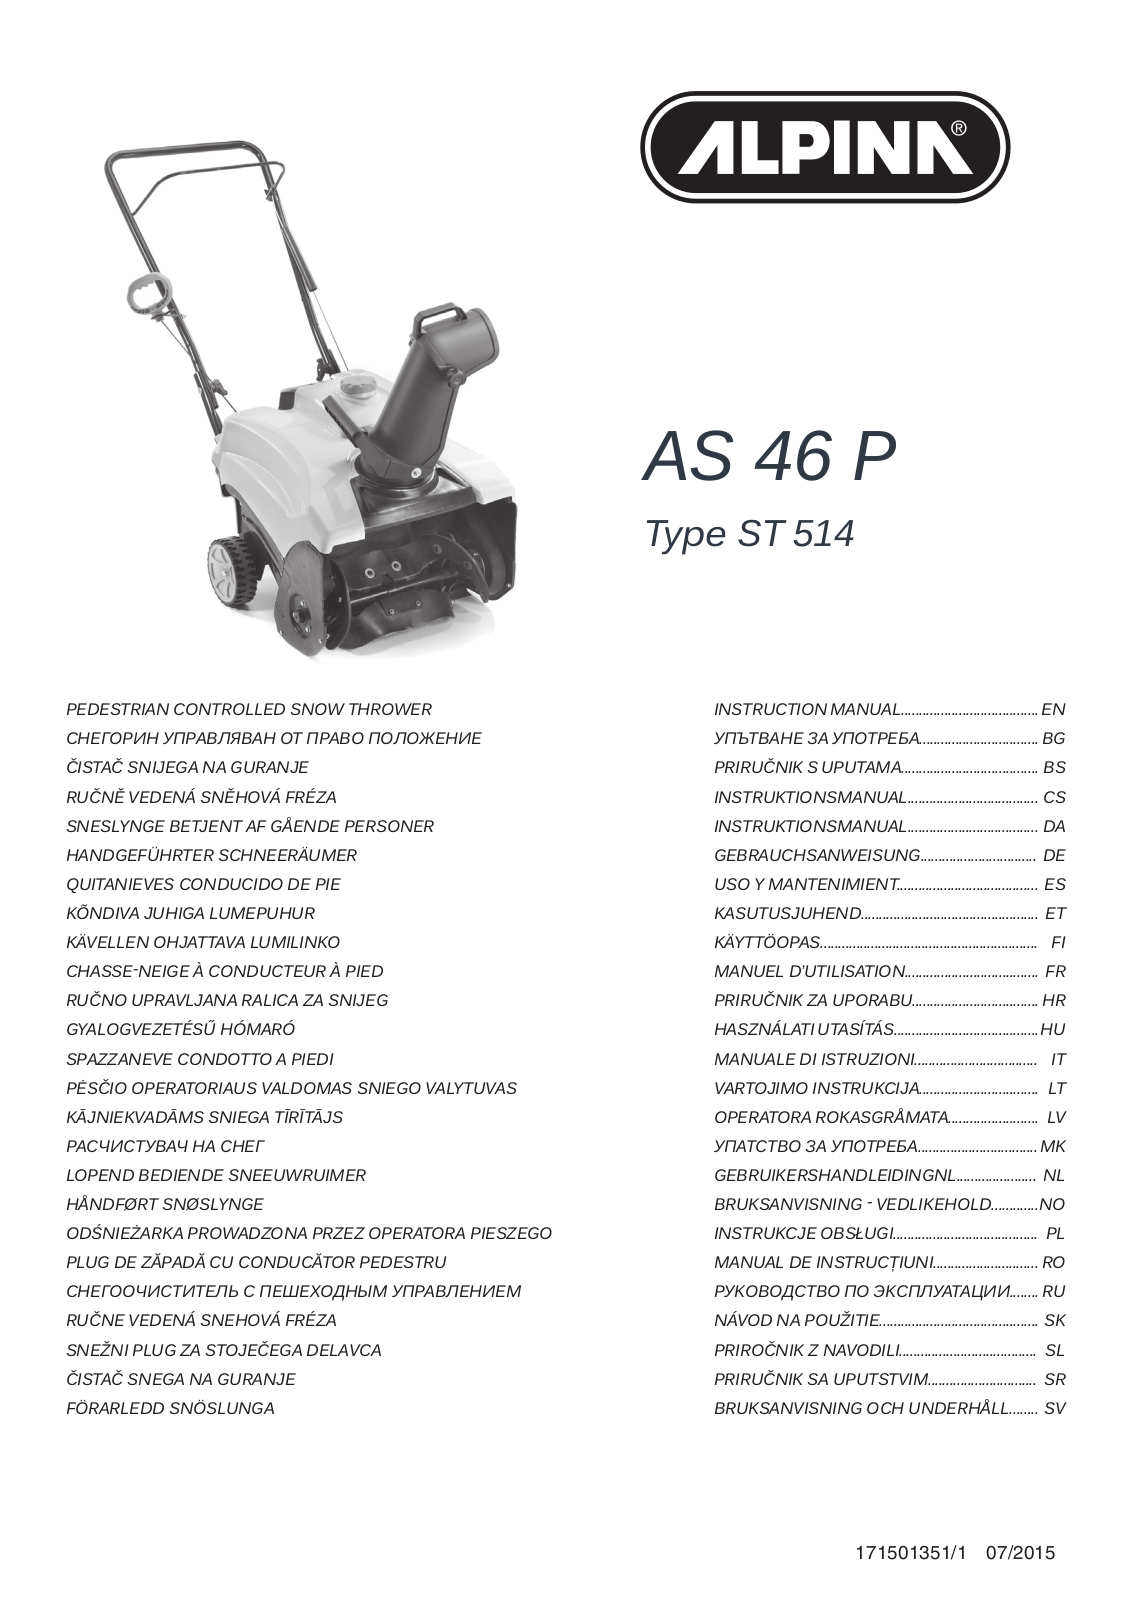
ALPINA AS 46 P INSTRUCTION MANUAL [ml]

PEDESTRIAN CONTROLLED SNOW THROWER СНЕГОРИН УПРАВЛЯВАН ОТ ПРАВО ПОЛОЖЕНИЕ ČISTAČ SNIJEGA NA GURANJE

RUČNĚ VEDENÁ SNĚHOVÁ FRÉZA SNESLYNGE BETJENT AF GÅENDE PERSONER HANDGEFÜHRTER SCHNEERÄUMER QUITANIEVES CONDUCIDO DE PIE

KÕNDIVA JUHIGA LUMEPUHUR KÄVELLEN OHJATTAVA LUMILINKO CHASSE-NEIGE À CONDUCTEUR À PIED RUČNO UPRAVLJANA RALICA ZA SNIJEG GYALOGVEZETÉSŰ HÓMARÓ SPAZZANEVE CONDOTTO A PIEDI

PĖSČIO OPERATORIAUS VALDOMAS SNIEGO VALYTUVAS KĀJNIEKVADĀMS SNIEGA TĪRĪTĀJS

РАСЧИСТУВАЧ НА СНЕГ

LOPEND BEDIENDE SNEEUWRUIMER HÅNDFØRT SNØSLYNGE

ODŚNIEŻARKA PROWADZONA PRZEZ OPERATORA PIESZEGO PLUG DE ZĂPADĂ CU CONDUCĂTOR PEDESTRU СНЕГООЧИСТИТЕЛЬ С ПЕШЕХОДНЫМ УПРАВЛЕНИЕМ RUČNE VEDENÁ SNEHOVÁ FRÉZA

SNEŽNI PLUG ZA STOJEČEGA DELAVCA ČISTAČ SNEGA NA GURANJE FÖRARLEDD SNÖSLUNGA

AS 46 P

Type ST 514

INSTRUCTION MANUAL......................................

EN

УПЪТВАНЕ ЗА УПОТРЕБА.................................

BG

PRIRUČNIK S UPUTAMA......................................

BS

INSTRUKTIONSMANUAL....................................

CS

INSTRUKTIONSMANUAL....................................

DA

GEBRAUCHSANWEISUNG................................

DE

USO Y MANTENIMIENT.......................................

ES

KASUTUSJUHEND.................................................

ET

KÄYTTÖOPAS............................................................

FI

MANUEL D’UTILISATION.....................................

FR

PRIRUČNIK ZA UPORABU...................................

HR

HASZNÁLATI UTASÍTÁS........................................

HU

MANUALE DI ISTRUZIONI..................................

IT

VARTOJIMO INSTRUKCIJA.................................

LT

OPERATORA ROKASGRÅMATA.........................

LV

УПАТСТВО ЗА УПОТРЕБА.................................

MK

GEBRUIKERSHANDLEIDINGNL......................

NL

BRUKSANVISNING - VEDLIKEHOLD.............

NO

INSTRUKCJE OBSŁUGI........................................

PL

MANUAL DE INSTRUCŢIUNI.............................

RO

РУKОВОДСТВО ПО ЭKСПЛУАТАЦИИ........

RU

NÁVOD NA POUŽITIE............................................

SK

PRIROČNIK Z NAVODILI......................................

SL

PRIRUČNIK SA UPUTSTVIM..............................

SR

BRUKSANVISNING OCH UNDERHÅLL........

SV

171501351/1  07/2015

ENGLISH - Translation of the original instruction  ...........................................................................

БЪЛГАРСКИ - Инструкция за експлоатация  ............................................................................

BOSANSKI - Prijevod originalnih uputa  .........................................................................................

ČESKY - Překlad původního návodu k používání  ..........................................................................

DANSK - Oversættelse af den originale brugsanvisning  ...............................................................

DEUTSCH - Übersetzung der Originalbetriebsanleitung  ...............................................................

ESPAÑOL - Traducción del Manual Original  .................................................................................

EESTI - Algupärase kasutusjuhendi tõlge  ......................................................................................

SUOMI - Alkuperäisten ohjeiden käännös  .....................................................................................

FRANÇAIS - Traduction de la notice originale  ...............................................................................

HRVATSKI - Prijevod originalnih uputa  ..........................................................................................

MAGYAR - Eredeti használati utasítás fordítása  ............................................................................

ITALIANO - Istruzioni Originali  ...................................................................................................

LIETUVIŠKAI - Originalių instrukcijų vertimas  ................................................................................

LATVIEŠU - Instrukciju tulkojums no oriģināl valodas  ....................................................................

МАКЕДОНСКИ - Превод на оригиналните упатства  ................................................................

NEDERLANDS - Vertaling van de oorspronkelijke gebruiksaanwijzing  ....................................................

NORSK - Oversettelse av den originale bruksanvisningen  ............................................................

POLSKI - Tłumaczenie instrukcji oryginalnej  .................................................................................

ROMÂN - Traducerea manualului fabricantului  .............................................................................

РУССКИЙ - Перевод оригинальных инструкций  ......................................................................

SLOVENSKY - Preklad pôvodného návodu na použitie  ................................................................

SLOVENŠČINA - Prevod izvirnih navodil  ......................................................................................

SRPSKI - Prevod originalnih uputstva  ...........................................................................................

SVENSKA - Översättning av bruksanvisning i original  ...................................................................

EN

BG

BS

CS

DA

DE

ES

ET

FI

FR

HR

HU

IT

LT

LV

MK

NL

NO

PL

RO

RU

SK

SL

SR

SV

1


13


3

2

1


A

B


Snow thrower

5


Model:


Type:


kW

cc

/min


kg


C


- s/n


- Art.N.


10

11

6 8 9

7

12

4

D

I

P

Q


E


K


H


J


F


G


N


M


O

L


2


A


C


B


3

C

A

D

B

J

F

E

G

4

A

B

ALPINA AS 46 P INSTRUCTION MANUAL

5

A

7

MAX

MIN

9

A

6

A

8

A

10


K


A


C


F


E


B


D

H

I

G

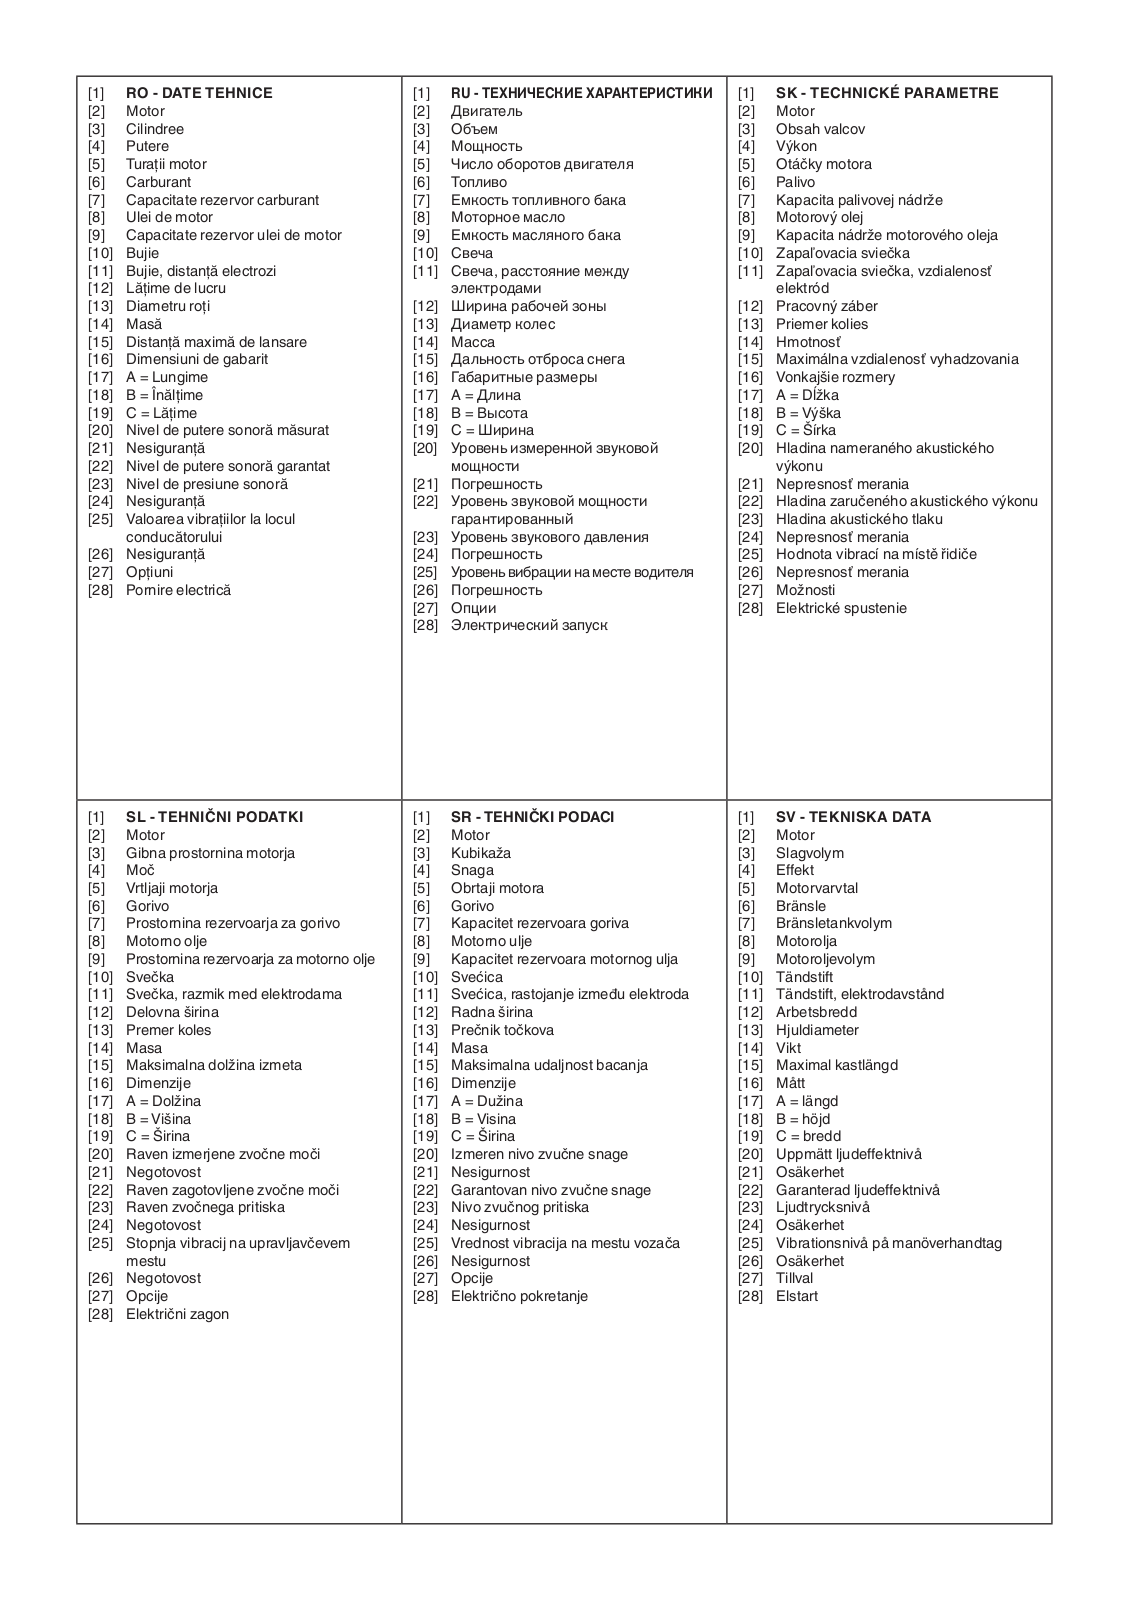
[1]

TECHNICAL DATA

type

ST 514

model

AS 46 P


[2]

Engine


LC154FS

[3]

Displacement

cm3

87

[4]

Power

kW

1,65

[5]

Engine rotations

min-1

3600

[6]

Fuel

type

gasoline

[7]

Fuel tank capacity

l

1,6

[8]

Engine oil

type

SAE 5W-30

[9]

Engine oil tank capacity

l

0,35

[10]

Spark plug

type

E7RTC

[11]

Spark plug, electrodes distance

mm

0.76

[12]

Working width

cm

46

[13]

Wheel diameter

in

5

[14]

Weight

kg

27

[15]

Maximum launch distance

m

6

[16]

Dimensions

fig.2


[17]

A = Length

mm

1170

[18]

B = Height

mm

772

[19]

C = Width

mm

475

[20]

Measured sound power level

dB (A)

100

[21]

Uncertainty

dB (A)

2.5

[22]

Guaranteed sound power level

dB (A)

103

[23]

Sound pressure level

dB (A)

87

[24]

Uncertainty

dB (A)

2.5

[25]

Operator position vibration value

m / s ²

7.610

[26]

Uncertainty

m / s ²

1,5

[27]

OPTIONS


[28]

Electric start-up


[1]

BG - ТЕХНИЧЕСКИ ДАННИ

[1]

BS - TEHNIČKI PODACI

[1]

CS - TECHNICKÉ PARAMETRY

[2]

Двигател

[2]

Motor

[2]

Motor

[3]

Кубатура

[3]

Kubikaža

[3]

Obsah válců

[4]

Мощност

[4]

Snaga

[4]

Výkon

[5]

Обороти на двигателя

[5]

Okretaji motora

[5]

Otáčky motoru

[6]

Гориво

[6]

Gorivo

[6]

Palivo

[7]

Вместимост на резервоара за гориво

[7]

Kapacitet rezervoara za gorivo

[7]

Kapacita palivové nádrže

[8]

Моторно масло

[8]

Motorno ulje

[8]

Motorový olej

[9]

Вместимост на резервоара за

[9]

Kapacitet rezervoara za motorno ulje

[9]

Kapacita nádrže na motorový olej

[10]

моторно масло

[10]

Svjećica

[10]

Zapalovací svíčka

Свещ

[11]

Svjećica, udaljenost između elektroda

[11]

Zapalovací svíčka, vzdálenost elektrod

[11]

Свещ, разстояние електроди

[12]

Radna širina

[12]

Pracovní záběr

[12]

Работна ширина

[13]

Promjer točkova

[13]

Průměr kol

[13]

Диаметър на колело

[14]

Masa

[14]

Hmotnost

[14]

Маса

[15]

Maksimalna udaljenost bacanja

[15]

Maximální vzdálenost odhazování

[15]

Максимално разстояние на

[16]

Dimenzije

[16]

Vnější rozměry

[16]

изхвърляне

[17]

A = Dužina

[17]

A = Délka

Максимални размери

[18]

B = Visina

[18]

B = Výška

[17]

A = Дължина

[19]

C = Širina

[19]

C = Šířka

[18]

B = Височина

[20]

Izmjerena razina zvučne snage

[20]

Naměřenáhladinaakustickéhovýkonu

[19]

C = Ширина

[21]

Nesigurnost

[21]

Nepřesnost měření

[20]

Ниво на измерената звукова мощност

[22]

Garantirana razina zvučne snage

[22]

Garantovaná hladina akustického výkonu

[21]

Несигурност

[23]

Nivo zvučnog pritiska

[23]

Hladina akustického tlaku

[22]

Гарантирано ниво на звукова

[24]

Nesigurnost

[24]

Nepřesnost měření

[23]

мощност

[25]

Razina vibracija na mjestu vozača

[25]

Hodnota vibrací na místě řidiče

Ниво на звуковотоналягане

[26]

Nesigurnost

[26]

Nepřesnost měření

[24]

Несигурност

[27]

Opcije

[27]

Možnosti

[25]

Стойност на вибрации в мястото за

[28]

Električno startanje

[28]

Elektrické spuštění


управление


[26]Несигурност

[27]Опции

[28]Електрическо задействане

[1]

DA - TEKNISKE DATA

[1]

DE - TECHNISCHE DATEN

[1]

ES - DATOS TÉCNICOS

[2]

Motor

[2]

Motor

[2]

Motor

[3]

Slagvolumen

[3]

Hubraum

[3]

Cilindrada

[4]

Effekt

[4]

Leistung

[4]

Potencia

[5]

Motoromdrejninger

[5]

Motordrehzahl

[5]

Revoluciones motor

[6]

Brændstof

[6]

Kraftstoff

[6]

Carburante

[7]

Brændstoftankens kapacitet

[7]

Fassungsvermögen des Kraftstofftanks

[7]

Capacidad depósito carburante

[8]

Motorolie

[8]

Motoröl

[8]

Aceite motor

[9]

Motorolietankens kapacitet

[9]

Fassungsvermögen des Motoröls

[9]

Capacidad depósito aceite motor

[10]

Tændrør

[10]

Zündkerze

[10]

Bujía

[11]

Tændrør, elektrodernes afstand

[11]

Zündkerze, Elektrodenabstand

[11]

Bujía, distancia electrodos

[12]

Arbejdsbredde

[12]

Arbeitsbreite

[12]

Ancho de trabajo

[13]

Hjuldiameter

[13]

Durchmesser Räder

[13]

Diámetro ruedas

[14]

Vægt

[14]

Masse

[14]

Masa

[15]

Maks.slyngningsafstand

[15]

Maximaler Wurfabstand

[15]

Distancia de lanzamiento máxima

[16]

Maskinmål

[16]

Abmessungen des Platzbedarfs

[16]

Dimensiones totales

[17]

A = Længde

[17]

A = Länge

[17]

A = Longitud

[18]

B = Højde

[18]

B = Höhe

[18]

B = Altura

[19]

C = Bredde

[19]

C = Breite

[19]

C = Anchura

[20]

Målt lydeffektniveau

[20]

Gemessener Schallleistungspegel

[20]

Nivel de potencia sonora medido

[21]

Usikkerhed

[21]

Messungenauigkeit

[21]

Incertidumbre

[22]

Garanteret lydeffektniveau

[22]

Garantierter Schallleistungspegel

[22]

Nivel de potencia sonora garantizado

[23]

Lydtryksniveau

[23]

Schalldruckpegel

[23]

Nivel de presión sonora

[24]

Usikkerhed

[24]

Messungenauigkeit

[24]

Incertidumbre

[25]

Vibrationsniveau på førersædet

[25]

Vibrationswert am Fahrerplatz

[25]

Valor de las vibraciones en el puesto de

[26]

Usikkerhed

[26]

Messungenauigkeit

conducción

[27]

Ekstraudstyr

[27]

Optionen

[26]

Incertidumbre

[28]

Elektrisk start

[28]

Elektrostart

[27]

Opciones


[28]

Arranque eléctrico

[1]

ET - TEHNILISED ANDMED

[1]

FI - TEKNISET TIEDOT

[1]

FR - CARACTÉRISTIQUES TECHNIQUES

[2]

Mootor

[2]

Moottori

[2]

Moteur

[3]

Mootorimaht

[3]

Sylinterin tilavuus

[3]

Cylindrée

[4]

Võimsus

[4]

Teho

[4]

Puissance

[5]

Mootoripöörded

[5]

Moottorin kierrosluku

[5]

Tours moteur

[6]

Kütus

[6]

Polttoaine

[6]

Carburant

[7]

Kütuse paagi maht

[7]

Polttoainesäiliön tilavuus

[7]

Capacité du réservoir de carburant

[8]

Mootoriõli

[8]

Moottoriöljy

[8]

Huile moteur

[9]

Mootoriõli paagi suurus

[9]

Moottoriöljyn säiliön tilavuus

[9]

Capacité du réservoir d’huile moteur

[10]

Süüteküünal

[10]

Sytytystulppa

[10]

Bougie

[11]

Süüteküünal, elektroodide vahemaa

[11]

Sytytystulppa, elektrodien välinen

[11]

Bougie, distance électrodes

[12]

Töölaius

etäisyys

[12]

Largeur de travail

[13]

Rataste diameeter

[12]

Työstöleveys

[13]

Diamètre roues

[14]

Mass

[13]

Pyörien halkaisija

[14]

Masse

[15]

Maksimaalne heitekaugus

[14]

Massa

[15]

Distance de projection maximale

[16]

Mõõtmed

[15]

Maksimi linkoamisetäisyys

[16]

Dimensions d’encombrement

[17]

A = Pikkus

[16]

Mitat

[17]

A = Longueur

[18]

B = Kõrgus

[17]

A = Pituus

[18]

B = Hauteur

[19]

C = Laius

[18]

B = Korkeus

[19]

C = Largeur

[20]

Helivõimsuse mõõdetav tase

[19]

C = Leveys

[20]

Niveau de puissance sonore mesuré

[21]

Ebakindlus

[20]

Mitattu äänitehotaso

[21]

Incertitude

[22]

Helivõimsuse kindel tase

[21]

Epätarkkuus

[22]

Niveau de puissance sonore garanti

[23]

Helirõhu tase

[22]

Taattu äänitehotaso

[23]

Niveau de pression sonore

[24]

Ebakindlus

[23]

Äänenpaineen taso

[24]

Incertitude

[25]

Vibratsiooni suurus juhikohal

[24]

Epätarkkuus

[25]

Valeur des vibrations au poste de

[26]

Ebakindlus

[25]

Tärinäarvo kuljettajan paikalla

[26]

conduite

[27]

Valikud

[26]

Epätarkkuus

Incertitude

[28]

Elektriline käivitamine

[27]

Valinnat

[27]

Options


[28]

Sähkökäynnistys

[28]

Démarrage électrique

[1]

HR - TEHNIČKI PODACI

[1]

HU - MŰSZAKI ADATOK

[1]

IT - DATI TECNICI

[2]

Motor

[2]

Motor

[2]

Motore

[3]

Radni obujam

[3]

Hengerűrtartalom

[3]

Cilindrata

[4]

Snaga

[4]

Teljesítmény

[4]

Potenza

[5]

Broj okretaja motora

[5]

Motor fordulatszáma

[5]

Giri motore

[6]

Gorivo

[6]

Üzemanyag

[6]

Carburante

[7]

Zapremina spremnika goriva

[7]

Üzemanyagtartály kapacitása

[7]

Capacità serbatoio carburante

[8]

Motorno ulje

[8]

Motorolaj

[8]

Olio motore

[9]

Zapremina spremnika motornog ulja

[9]

Motorolaj-tartály kapacitása

[9]

Capacità serbatoio olio motore

[10]

Svjećica

[10]

Gyertya

[10]

Candela

[11]

Svjećica, razmak elektroda

[11]

Gyertya, elektródok távolsága

[11]

Candela, distanza elettrodi

[12]

Radna širina

[12]

Munkavégzési szélesség

[12]

Larghezza di lavoro

[13]

Promjer kotača

[13]

Kerekek átmérője

[13]

Diametro ruote

[14]

Masa

[14]

Tömeg

[14]

Massa

[15]

Maksimalna udaljenost izbacivanja

[15]

Max.kidobási távolság

[15]

Distanza di lancio massima

[16]

Gabaritne dimenzije

[16]

Befoglaló méretek

[16]

Dimensioni di ingombro

[17]

A = Dužina

[17]

A = Hosszúság

[17]

A = Lunghezza

[18]

B = Visina

[18]

B = Magasság

[18]

B = Altezza

[19]

C = Širina

[19]

C = Szélesség

[19]

C = Larghezza

[20]

Izmjerena razina zvučne snage

[20]

Mért zajteljesítmény szint

[20]

Livello di potenza sonora misurato

[21]

Mjerna nesigurnost

[21]

Mérési bizonytalanság

[21]

Incertezza

[22]

Zajamčena razina zvučne snage

[22]

Garantált zajteljesítmény szint

[22]

Livello di potenza sonora garantito

[23]

Razina zvučnog tlaka

[23]

Hangnyomásszint

[23]

Livello di pressione sonora

[24]

Mjerna nesigurnost

[24]

Mérési bizonytalanság

[24]

Incertezza

[25]

Vrijednostvibracijanavozačkommjestu

[25]

A vezetőállásnál mért vibrációszint

[25]

Valore delle vibrazioni al posto di guida

[26]

Mjerna nesigurnost

[26]

Mérési bizonytalanság

[26]

Incertezza

[27]

Opcije

[27]

Opciók

[27]

Opzioni

[28]

Električno pokretanje

[28]

Elektromos indítás

[28]

Avviamento elettrico

[1]

LT - TECHNINIAI DUOMENYS

[1]

LV - TEHNISKIE DATI

[1]

MK - ТЕХНИЧКИ ПОДАТОЦИ

[2]

Variklis

[2]

Dzinējs

[2]

Мотор

[3]

Variklio tūris

[3]

Cilindru tilpums

[3]

Капацитет

[4]

Galia

[4]

Jauda

[4]

Моќност

[5]

Variklio apsukos

[5]

Dzinēja apgriezieni

[5]

Вртежи на моторот

[6]

Kuras

[6]

Degviela

[6]

Гориво

[7]

Kuro bako talpa

[7]

Degvielas tvertnes tilpums

[7]

Капацитет на резервоарот за гориво

[8]

Variklio alyva

[8]

Motoreļļa

[8]

Масло за моторот

[9]

Variklio alyvos bako talpa

[9]

Motoreļļas tvertnes tilpums

[9]

Капацитет на резервоарот за

[10]

Žvakė

[10]

Svece

[10]

масло за моторот

[11]

Žvakė, atstumas tarp elektrodų

[11]

Svece, attālums starp elektrodiem

Свеќичка

[12]

Darbo plotis

[12]

Darba platums

[11]

Свеќичка, растојаниемеѓуелектродите

[13]

Ratų skersmuo

[13]

Riteņu diametrs

[12]

Ширина на работа

[14]

Svoris

[14]

Masa

[13]

Дијаметар на тркалата

[15]

Maksimalus metimo tolis

[15]

Maksimālais izmešanas attālums

[14]

Тежина

[16]

Matmenys

[16]

Gabarīti

[15]

Далечина за максимално отфрлање

[17]

A = Ilgis

[17]

A = Garums

[16]

Димензии на пречка

[18]

B = Aukštis

[18]

B = Augstums

[17]

A = Должина

[19]

C = Plotis

[19]

C = Platums

[18]

B = Висина

[20]

Išmatuotas garso galios lygis

[20]

Mērītās skaņas jaudas līmenis

[19]

C = Ширина

[21]

Paklaida

[21]

Kļūda

[20]

Измерено ниво на бучава

[22]

Garantuotas garso galios lygis

[22]

Garantētās skaņas jaudas līmenis

[21]

Отстапување

[23]

Garso slėgio lygis

[23]

Skaņas spiediena līmenis

[22]

Гарантирано ниво на бучава

[24]

Paklaida

[24]

Kļūda

[23]

Ниво на звучен притисок

[25]

Vibracijų lygis, sėdynė

[25]

Vibrāciju līmenis vadītāja vietā

[24]

Отстапување

[26]

Paklaida

[26]

Kļūda

[25]

Вредност на вибрации на местото на

[27]

Pasirenkami priedai

[27]

Papildaprīkojums

[26]

управување

[28]

Elektrinis paleidimas

[28]

Elektriskā iedarbināšana

Отстапување


[27]

Опции


[28]

Електрично палење

[1]

NL - TECHNISCHE GEGEVENS

[1]

NO - TEKNISKE DATA

[1]

PL - DANE TECHNICZNE

[2]

Motor

[2]

Motor

[2]

Silnik

[3]

Cilinderhoud

[3]

Slagvolum

[3]

Pojemność skokowa silnika

[4]

Vermogen

[4]

Ytelse

[4]

Moc

[5]

Toeren motor

[5]

Motoromdreininger

[5]

Obroty silnika

[6]

Brandstof

[6]

Drivstoff

[6]

Paliwo

[7]

Vermogen brandstofreservoir

[7]

Drivstofftankens volum

[7]

Pojemność zbiornika paliwa

[8]

Motorolie

[8]

Motorolje

[8]

Olej silnikowy

[9]

Vermogen reservoir motorolie

[9]

Oljetankens volum

[9]

Pojemność zbiornika oleju silnikowego

[10]

Bougie

[10]

Tennplugg

[10]

Świeca zapłonowa

[11]

Bougie, afstand electroden

[11]

Tennplugg, avstand elektroder

[11]

Świeca zapłonowa, odległość elektrod

[12]

Werkbreedte

[12]

Arbeidsbredde

[12]

Zasięg prac

[13]

Doorsnede wielen

[13]

Hjulenes diameter

[13]

Średnica kół

[14]

Massa

[14]

Vekt

[14]

Masa

[15]

Maximale schietafstand

[15]

Maks.rekkevidde for utkast

[15]

Odległość maksymalna odrzutu

[16]

Afmetingen

[16]

Totale mål

[16]

Wymiary ogólne

[17]

A = Lengte

[17]

A = Lengde

[17]

A = Długość

[18]

B = Hoogte

[18]

B = Høyde

[18]

B = Wysokość

[19]

C = Breedte

[19]

C = Bredde

[19]

C = Szerokość

[20]

Gemeten geluidsvermogenniveau

[20]

Målt lydstyrkenivå

[20]

Mierzony poziom mocy akustycznej

[21]

Onzekerheid

[21]

Usikkerhet

[21]

Niepewność pomiaru

[22]

Gegarandeerd geluidsvermogenniveau

[22]

Garantert lydstyrkenivå

[22]

Gwarantowany poziom mocy

[23]

Geluidsdrukniveau

[23]

Lydtrykknivå

[23]

akustycznej

[24]

Onzekerheid

[24]

Usikkerhet

Poziom ciśnienia akustycznego

[25]

Niveau trillingen op de

[25]

Vibrasjonsnivå ved førerplassen

[24]

Niepewność pomiaru

[26]

bestuurdersplaats

[26]

Usikkerhet

[25]

Poziom drgań na stanowisku kierowcy

Onzekerheid

[27]

Ekstrautstyr

[26]

Niepewność pomiaru

[27]

Opties

[28]

Elektrisk oppstart

[27]

Opcje

[28]

Elektrisch starten


[28]

Uruchamianie elektryczne

[1]

RO - DATE TEHNICE

[1]

RU - ТЕХНИЧЕСКИЕ ХАРАКТЕРИСТИКИ

[1]

SK - TECHNICKÉ PARAMETRE

[2]

Motor

[2]

Двигатель

[2]

Motor

[3]

Cilindree

[3]

Объем

[3]

Obsah valcov

[4]

Putere

[4]

Мощность

[4]

Výkon

[5]

Turații motor

[5]

Число оборотов двигателя

[5]

Otáčky motora

[6]

Carburant

[6]

Топливо

[6]

Palivo

[7]

Capacitate rezervor carburant

[7]

Емкость топливного бака

[7]

Kapacita palivovej nádrže

[8]

Ulei de motor

[8]

Моторное масло

[8]

Motorový olej

[9]

Capacitate rezervor ulei de motor

[9]

Емкость масляного бака

[9]

Kapacita nádrže motorového oleja

[10]

Bujie

[10]

Свеча

[10]

Zapaľovacia sviečka

[11]

Bujie, distanță electrozi

[11]

Свеча, расстояние между

[11]

Zapaľovacia sviečka, vzdialenosť

[12]

Lățime de lucru

[12]

электродами

[12]

elektród

[13]

Diametru roți

Ширина рабочей зоны

Pracovný záber

[14]

Masă

[13]

Диаметр колес

[13]

Priemer kolies

[15]

Distanță maximă de lansare

[14]

Масса

[14]

Hmotnosť

[16]

Dimensiuni de gabarit

[15]

Дальность отброса снега

[15]

Maximálna vzdialenosť vyhadzovania

[17]

A = Lungime

[16]

Габаритные размеры

[16]

Vonkajšie rozmery

[18]

B = Înălțime

[17]

A = Длина

[17]

A = Dĺžka

[19]

C = Lățime

[18]

B = Высота

[18]

B = Výška

[20]

Nivel de putere sonoră măsurat

[19]

C = Ширина

[19]

C = Šírka

[21]

Nesiguranță

[20]

Уровень измеренной звуковой

[20]

Hladina nameraného akustického

[22]

Nivel de putere sonoră garantat

[21]

мощности

[21]

výkonu

[23]

Nivel de presiune sonoră

Погрешность

Nepresnosť merania

[24]

Nesiguranță

[22]

Уровень звуковой мощности

[22]

Hladina zaručeného akustického výkonu

[25]

Valoarea vibrațiilor la locul

гарантированный

[23]

Hladina akustického tlaku

[26]

conducătorului

[23]

Уровень звукового давления

[24]

Nepresnosť merania

Nesiguranță

[24]

Погрешность

[25]

Hodnota vibrací na místě řidiče

[27]

Opțiuni

[25]

Уровеньвибрациинаместеводителя

[26]

Nepresnosť merania

[28]

Pornire electrică

[26]

Погрешность

[27]

Možnosti


[27]

Опции

[28]

Elektrické spustenie


[28]

Электрический запуск


[1]

SL - TEHNIČNI PODATKI

[1]

SR - TEHNIČKI PODACI

[1]

SV - TEKNISKA DATA

[2]

Motor

[2]

Motor

[2]

Motor

[3]

Gibna prostornina motorja

[3]

Kubikaža

[3]

Slagvolym

[4]

Moč

[4]

Snaga

[4]

Effekt

[5]

Vrtljaji motorja

[5]

Obrtaji motora

[5]

Motorvarvtal

[6]

Gorivo

[6]

Gorivo

[6]

Bränsle

[7]

Prostornina rezervoarja za gorivo

[7]

Kapacitet rezervoara goriva

[7]

Bränsletankvolym

[8]

Motorno olje

[8]

Motorno ulje

[8]

Motorolja

[9]

Prostornina rezervoarja za motorno olje

[9]

Kapacitet rezervoara motornog ulja

[9]

Motoroljevolym

[10]

Svečka

[10]

Svećica

[10]

Tändstift

[11]

Svečka, razmik med elektrodama

[11]

Svećica, rastojanje između elektroda

[11]

Tändstift, elektrodavstånd

[12]

Delovna širina

[12]

Radna širina

[12]

Arbetsbredd

[13]

Premer koles

[13]

Prečnik točkova

[13]

Hjuldiameter

[14]

Masa

[14]

Masa

[14]

Vikt

[15]

Maksimalna dolžina izmeta

[15]

Maksimalna udaljnost bacanja

[15]

Maximal kastlängd

[16]

Dimenzije

[16]

Dimenzije

[16]

Mått

[17]

A = Dolžina

[17]

A = Dužina

[17]

A = längd

[18]

B = Višina

[18]

B = Visina

[18]

B = höjd

[19]

C = Širina

[19]

C = Širina

[19]

C = bredd

[20]

Raven izmerjene zvočne moči

[20]

Izmeren nivo zvučne snage

[20]

Uppmätt ljudeffektnivå

[21]

Negotovost

[21]

Nesigurnost

[21]

Osäkerhet

[22]

Raven zagotovljene zvočne moči

[22]

Garantovan nivo zvučne snage

[22]

Garanterad ljudeffektnivå

[23]

Raven zvočnega pritiska

[23]

Nivo zvučnog pritiska

[23]

Ljudtrycksnivå

[24]

Negotovost

[24]

Nesigurnost

[24]

Osäkerhet

[25]

Stopnja vibracij na upravljavčevem

[25]

Vrednost vibracija na mestu vozača

[25]

Vibrationsnivå på manöverhandtag

[26]

mestu

[26]

Nesigurnost

[26]

Osäkerhet

Negotovost

[27]

Opcije

[27]

Tillval

[27]

Opcije

[28]

Električno pokretanje

[28]

Elstart

[28]

Električni zagon


EN

WARNING!: READ THOROUGHLY THE INSTRUCTION BOOKLET BEFORE USING THE MACHINE. Keep for future reference

INDEX


1. GENERAL INFORMATION

1

  1.1 How to read the manual

1

  1.2

References

1

2. SAFETY REGULATIONS

2

  2.1

Training

2

  2.2

Preparation

2

  2.3

During operation

2

  2.4 Maintenance, storage and transport

3

  2.5

Environmental protection

3

3. GETTING TO KNOW THE MACHINE

4

  3.1 Description of the machine and planned


use

4

  3.2

Safety signs

4

  3.3

Identification label

4

  3.4

Main components

5

4. ASSEMBLY

5

  4.1

Assembly components

5

  4.2

Handle assembly

5

  4.3 Discharge chute assembly

5

5. CONTROLS

5

  5.1

Ignition key

5

  5.2

Choke control

5

  5.3

Primer

6

  5.4 Handle for manual start

6

  5.5 Electric starter control (optional)

6

  5.6

Auger control

6

  5.7

Chute and deflector adjustment control 6

6. USING THE MACHINE

6

  6.1

Preparation

6

  6.2

Safety checks

6

  6.3 Engine and auger operation testing

6

  6.4 Start-Up / Operation

6

  6.5 Advice for operation

7

  6.6

After operation

7

7. MAINTENANCE

7

  7.1

General information

7

  7.2

Refuelling

8

  7.3 Check/top-up engine oil

8

  7.4

Cleaning

9

  7.5

Spark plug

9

  7.6

Carburettor

9

  7.7 Nuts and bolts

9

8. STORAGE

9

9. ASSISTANCE AND REPAIRS

9

10.WARRANTY COVERAGE

9

11.MAINTENANCE TABLE

10

12.PROBLEM IDENTIFICATION

10

1.GENERAL INFORMATION

1.1 HOW TO READ THE MANUAL

Some paragraphs in the manual contain important information regarding safety and operation and are emphasized in this manner:

  NOTE    or    IMPORTANT    these give details or further information on what has already been said, and aim to prevent damage to the machine.

The symbol highlights danger. Noncompliance with the warning could lead to personal or third party injury and/or damage.

The paragraphs highlighted in a square with grey spots indicate the optional characteristics not on all models documented in this manual. Check if the characteristic is on this model.

Whenever reference is made to a position on the machine "front”, "back”, "left” or "right” hand side, this is determined from where the operator is driving.

  1.2 REFERENCES

  1.2.1 Figures

The figures in these instructions for use are numbered 1, 2, 3, etc.

Components shown in the figures are marked A,

B, C, etc.

A reference to component C in figure 2 is written: “See fig.2.C” or simply “(Fig.2.C)”.

The figures are given as a guide only. The actual parts may vary from those shown.

  1.2.2 Titles

The manual is divided into chapters and paragraphs. The title of paragraph “2.1 Training” is a sub-title of “2.Safety regulations".References to titles or paragraphs are marked with the abbreviationchap.orpar.andtherelevantnumber. Example:“chap.2” o “par.2.1”.

EN - 1

2.SAFETY REGULATIONS

2.1 TRAINING

Read these instructions carefully before using the machine.

Become acquainted with the controls and the proper use of the machine. Learn how to stop the engine quickly. Failure to follow the warnings and instructions may result in fire and/or serious injury. Save all warnings and instructions for future reference.

•  Never allow children or persons unfamiliar with these instructions to use the machine. Local regulations may restrict the age of the operator.

•  Never use the machine if the user is tired or unwell, or has taken medicine, drugs, alcohol or any substances which may slow his reflexes and compromise his judgement.

•  Bear in mind that the operator or user is responsible for accidents or unexpected events occurring to other people or their property. It is the user’s responsibility to assess the potential risk of the area where work is to be carried out, and to take all the necessary precautions to ensure his own safety and that of others, particularly on slopes or rough, slippery and unstable ground.

  2.2 PREPARATION

Individual Protection Devices (IPD)

•  Do not use the snow thrower without wearing adequate clothing.

•  Wear footwear that enables good grip on slippery surfaces.

•  Always wear protective goggles or a visor during use, maintenance or repairs. The operation of any powered machine can result in foreign objects being thrown into the eyes

•  Always use noise-proof hearing protectors.

Work area/Machine

•  Check the area to clean well and remove any obvious foreign bodies.E.g.all doormats, sleds, boards, wires, etc.

•  Before starting the engine, check you have disconnected all the commands activating the moving units.

•  Adjust the collector housing height to clear gravel or crushed rock surface.

•  Let engine and the snow thrower adjust to outdoor temperatures before starting to clear snow.

Internal combustion engines: fuel

•  Warning: the fuel is highly flammable.Handle with care!

•  Always keep the fuel in approved fuel containers.

•  Refuel or top-up using a funnel, only outdoors. Do not smoke during these operations.

•  Refuel before starting the engine. Do not open the cap on the tank or refuel when the engine is on or still warm.

•  If fuel is spilt, do not start the engine until the machine has been moved away from the

spillage.Clean up all traces of any fuel spilt on the machine and/or on the ground immediately.

•  Tightly screw the cap on the tank and the fuel containers.

•  If fuel is spilt on clothing, change clothing before starting the engine.

  2.3 DURING OPERATION

Work Area

•  Do not use the machine in environments at risk of explosion, in the presence of flammable liquids, gas or powder. Electrical contacts and mechanical friction can generate sparks that can ignite the powder or vapours.

•  Do not operate the engine in a confined space where dangerous carbon monoxide fumes can develop. All starting operations have to be effected in an open or well ventilated area! Always remember that exhaust gases are toxic!

•  Work only in daylight or with good artificial light in good visibility conditions.

•  Keep persons, children and animals away from the working area. Get another adult to keep the children under supervision.

•  Exercise extreme caution when operating on or crossing gravel drives, walks or roads.Stay alert for hidden hazards.

•  Look out for traffic when using the machine near the road.

Behaviour

•  Do not place the discharge chute against the wind, or at people, animals, vehicles, houses and anything else that could be damaged by the snow or by objects hidden in the snow. Never allow anyone in front of the unit.

•  Never use the snow thrower near fences, cars, windows, glass enclosures, etc. without having first adjusted the deflector on the discharge chute.

•  Keep hands and feet away from rotating parts. Always keep your distance from the snow discharge chute. Keep clear the discharge opening at all times.

•  If the snow thrower strikes foreign bodies or displays anomalous vibrations, switch off the engine, remove the key, wait the moving

EN - 2

parts stop, and carefully inspect the machine to check there is no damage. Vibrations are normally synonymous with a problem. Repair any damage before re-using the machine.

•  Before leaving the machine, disconnect all the commands and remove the ignition key from its slot on the machine.

•  Before carrying out repairs, cleaning, inspections or adjustments, switch off the engine, remove the key and wait the moving parts stop (unless otherwise indicated in the instructions). Disconnect the cable on electric motors.(Optional).

•  Do not touch the engine parts which heat up during use. Burns hazard.

•  Never operate the snow thrower at high transport speeds on slippery surfaces. Use care when reversing. Look behind you to make sure there are no obstacles before and during operations in reverse gear.

•  Disengage power to the auger when snow thrower is transported or not in use.

•  Always be sure of your footing, and keep a firm hold on the handle.Walk never run.

Use limitations

•  Do not use the machine sideways on a slope. Always move from top to bottom, then from bottom to top. Exercise caution when changing direction on a slope. Avoid steep slopes.

•  Do not use the machine if the guards are insufficient or if the safety devices are not correctly positioned.

•  Never disengage or tamper with the safety systems.

•  Do not alter the engine adjustments, nor overrun it. If the engine is forced to work with an excessive number of rotations, the risk of personal injury increases.

•  Do not overload the machine by driving it too fast.

•  Do not place hands inside the chute or the auger without firstly switching off the engine and removing the key.

2.4 MAINTENANCE, STORAGE AND TRANSPORT

Ensure regular maintenance and correct storage maintain machine safety.

Faulty or worn-out parts must always be replaced and never repaired. Only use original spare parts: the use of non-original and/ or incorrectly fitted parts will compromise the safety of the machine, may cause accidents or personal injuries for which the Manufacturer is under no circumstance liable or responsible.

Maintenance

•  If the fuel tank has to be drained, this should be done outdoors and when the engine is cool.

•  To reduce the risk of fire, regularly check the machine for oil and/or fuel leaks.

Storage

•  Do not leave fuel in the tank if the machine is stored in a building where fuel vapours come in contact with the open flame, sparks or heat sources.

•  Let the engine cool down before storing the snow thrower indoors.

•  Always refer to owner’s guide instructions for important details if the snow thrower is to be stored for an extended period.

Transport

•  If the machine must be transported on a truck or trailer, use ramps with suitable resistance, width and length.

•  Load the machine with the engine switched off and pushed by an adequate number of people.

•  During transport, close the fuel cock (if there is one) and adequately secure the machine to the means of transport using cables or chains.

  2.5 ENVIRONMENTAL PROTECTION

Safeguarding the environment must be a relevant and priority aspect of machine use, of benefit to the community and the environment we live in.

•  Avoid being a disturbance to the neighbourhood. •  Adhere strictly to the local regulations governing the disposal of packaging, oil, fuel, filters, damaged parts or any other element which may have an impact on the environment; this waste should not be disposed of along with standard household waste, but must be disposed of separately and sent to special waste disposal

facilities for handling and recycling.

•  When the machine is withdrawn from service, do not dump it in the environment, but take it to a waste disposal facility in accordance with the local regulations in force.

EN - 3

3.GETTING TO KNOW THE MACHINE

3.1 DESCRIPTION OF THE MACHINE AND PLANNED USE

This machine is a snow thrower.

The machine is equipped with a clearance auger, protected by a guard, that sends the snow to a discharge chute. The auger is moved by the engine that also drives the machine.

The machine is run using the controls located on the dashboard.

The operator can run the machine and activate all the main controls while staying upright in the operator's position, behind the machine.

  3.1.1 Intended use

This machine has been designed and built to remove and clear away snow from pavements, gardens, drives and other ground-level surfaces.

The snow thrower must only be used to remove snow.

  3.1.2 Improper use

Any other usage not in keeping with the abovementioned ones may be hazardous and harm persons and/or damage things. Examples of improper use may include, but are not limited to: •  use of the machine on surfaces above ground

level, such as roofs on houses, garages, porticoes or other structures or buildings.

•  Activate the auger in the presence of materials other than snow (e.g.soil, grass, pebbles, etc.),

•  Pulling or pushing loads.

IMPORTANT    Improper use of the machine will invalidate the warranty, relieve the Manufacturer from all liabilities, and the user will consequently be liable for all and any damage or injury to himself or others.

3.1.3 User types

This machine is intended for use by consumers, i.e. non-professional operators. The machine is intended for "DIY" use only.

  IMPORTANT    The machine must be used by one operator.

  3.2 SAFETY SIGNS

The machine has various symbols on it (fig. 3). They are used to remind the operator of the behaviour to follow to use it with the necessary and caution.Meaning of symbols:

WARNING!

WARNING! Read the instructions before operating the machine.

DANGER! Keep hands and feet away from rotating parts.

DANGER! Ejected objects. Do not turn the discharge chute towards onlookers or animals.

DANGER! Keep people, children and animals away from the work area.

DANGER! Do not smoke, do not use open flames or ignition.Fire and explosion hazard. sources.

DANGER! Never put your hands inside the discharge chute when the auger is in motion. Stop the engine before unclogging the discharge chute.

DANGER! Always use hearing protectors.

DANGER! Wear eye protections.

IMPORTANT    Any damaged or illegible decals must be replaced. Order replacement decals from an authorised assistance centre.

3.3 IDENTIFICATION LABEL

The identification label holds the following data (fig.1):

1.Manufacturer's address

2.Model

3.Type of machine

4.Sound power level

5.CE conformity marking

6.Weight in kg

7.Engine operating revolutions

8.Engine power

9.Engine displacement

10.Year of manufacture

11.Serial number

12.Article code

13.Machine description

EN - 4

Write the identification data of the machine in the specific space on the label on the back of the cover page.

  IMPORTANT    Use the identification names on the identification label of the product.

  IMPORTANT    Usethesemeansofidentification whenever you contact an authorized service workshop.

  IMPORTANT    The example of the declaration of conformity can be found on the last pages of the manual.

  3.4 MAIN COMPONENTS

The machine is made up of the following main components (fig.1):

A.Handle

B.Auger control

C.Auger command cable

D.Handle for manual start

E.Handle closure screws

F.Lower part of handle

G.Power plug

H.Machine casing

I.Fuel plug

J.Exhaust chute

K.Deflector

L.Auger

M.Auger safety guard

N.Wheel

O.Lower blade

P.Chute adjustment handle

Q.Deflector adjustment handle

4. ASSEMBLY

For storage and transport purposes, some components of the machine are not installed in the factory and have to be assembled after unpacking.Follow the instructions below.

  4.1 ASSEMBLY COMPONENTS

The packaging holds the components needed for assembly (fig.3) listed in the following table:

Component

Pos.

Q.ty

Snow thrower

G

3

Handle

C

3

Exhaust chute

J

3

Handle assembly screws

A, B

3

Chute assembly screws

F, E

3

Instructions

/

/

  4.1.1 Unpacking

1.Cautiously open the packaging, paying attention not to lose components.

2.Consult the documentation in the box, including these instructions.

3.Remove all the unassembled parts from the box.

4.Remove the snow thrower from the box.

5.Dispose of the box and packaging in compliance with local regulations.

  4.2 HANDLE ASSEMBLY

1.Connect the auger command cable to the handle (fig.5.A)

2.Insert the handle tubes (fig. 3.C) on the lower one

3.Fasten the parts of the handle using the specific screws (fig. 3.A) and the knobs (fig. 3.B), paying attention to position the specific spacer (fig.3.D)

4.Adequately tighten the knobs (fig.3.B)

4.3 DISCHARGE CHUTE ASSEMBLY

1.The 3 screws (fig.3.E) and the knobs (fig.3.F) are pre-assembled on the fastening ring on the chute (fig.3.G).

2.Position the discharge chute (fig. 3.J) on the snow thrower.

3.Insert the three screws (fig. 3.E) and the nuts (fig.3.F) as shown in figure 3.

4.Tighten the screws with the knobs.

5.CONTROLS

5.1 IGNITION KEY

Used to start and stop the engine.The ignition key has two positions (fig.10.B):

1.Key removed - OFF - the engine stops and cannot be restarted.

2.Key inserted - ON - the engine can start and run.

IMPORTANT    The engine cannot be started unless the safety key is fully inserted.

5.2 CHOKE CONTROL

Used to turn on the engine when cold.The choke control has two positions (fig.10.G):

EN - 5

On the right - the choke is engaged (to cold start)

On the left - the choke is not engaged (normal warm start)

  6.2 SAFETY CHECKS

Ensure you have understood the contents before proceeding. Run the following safety checks and check the results correspond to those outlined in the tables.

  5.3 PRIMER

Press the primer bulb to inject fuel into the carburettor intake manifold to facilitate start-up when the engine is cold (fig.10.F).

  5.4 HANDLE FOR MANUAL START

Enables manual starting of the engine (fig.10.C).

5.5 ELECTRIC STARTER

CONTROL (OPTIONAL)

Enableselectricstartingoftheengine(fig.10.E) when the machine is connected to the electric mains using the specific plug (fig.10.D).

  5.6 AUGER CONTROL

Activates auger rotation.

•  To activate auger rotation, lift the control

(fig.6.A) until it meets the handle.

•  When the clutch is released, auger rotation stops and the lever automatically returns to the start position.

  5.7

CHUTE

AND

DEFLECTOR


ADJUSTMENT CONTROL


Rotation of the discharge chute is adjusted using the handle so that snow discharge can be aimed in the required direction.

•  Turn the knob (fig.8.A) to adjust the chute.

•  Turn the deflector handle (fig. 9.A) to adjust the direction.

6.USING THE MACHINE

The safety regulations to follow during machine use are described in chap. 2. Strictly comply with these instructions to avoid serious risks or hazards.

6.1 PREPARATION

Before using the machine check for fuel and the oil level.For refuelling and oil top-up methods and precautions (see par. 7.2 and par. 7.3).

use.Always carry out the safety checks before

Object

Result

Fuel lines and

No leaks.

connections.


Electrical cables.

All insulation intact.


No mechanical damage.

Oil lines

No leaks.


No damage.

Test driving

No abnormal vibrations.


No abnormal sound.

6.3 ENGINE AND AUGER OPERATION TESTING

Action

Result

Start the machine

The auger stays stopped.

(par. 6.3)


Press the auger

The auger starts to rotate.

control (fig.6.A)


Release the auger control.

The auger stops.

If any of the results fails to match the indications provided in the following table, do not use the machine!Take it to a service centre to be checked and repaired if necessary.

6.4 START-UP / OPERATION

1. Insert the safety key (fig.10.B).

6.4.1 Cold start

1.Engage the choke (fig.10.G).

2.Press the primer bulb (fig.10.F) twice or three times. Make sure that the hole is covered by your finger when pressing the bulb.

3.Start, using the electric control (par. 6.4.4) or manual control (par.6.4.3).

4.Disconnect the choke (fig.10.G).

IMPORTANT    Before starting work with the machine, wait a few minutes for the oil to warm up.

6.4.2 Warm start

1.Check the choke is disconnected (fig.10.G).

2.Start the machine electrically or manually (see below).

EN - 6

IMPORTANT    During the warm start, do not press the primer bulb.

6.4.3 Manual start-up

To manually start the engine, slowly pull the handle (fig. 10.C) outwards until resistance is felt. Then pull sharply and accompany the handle as you release it.

Repeat the operation until the engine starts.

  NOTE    Do not make more than 3/4 attempts, otherwise you risk flooding the engine. Check the possible causes for a non-start in the "Problems identification table".

  6.4.4 Electric start-up

Make sure that the electricity supply is duly earthed and fitted with an automatic circuit breaker.

1.Insert the plug (fig.10.D) into a 230 V power supply socket.

2.Press the start button (fig.

10.E) to start the engine.

3.Once the engine is running, remove the plug from the socket.

6.4.5 Operation

Tooperatewiththemachineproceedasdescribed below:

•  Using the specific control, adjust the chute (fig.8.A) and the deflector (fig.9.A).

•  To increase the length of the snow jet, position the deflector upwards.

•  To decrease the length of the snow jet, position the deflector downwards.

•  Pull the auger clutch lever (fig. 6.A) to activate auger rotation forward.

  6.4.6 Steering

Steering helps drive the machine in the desired direction.

  6.4.7 Stop

To stop the machine, release the auger control (fig.6.A) .

To switch off the machine, remove the safety key (fig.10.B).

The engine may be very warm immediately after it is shut off.Do not touch the exhaust or adjacent parts. This can cause burn injuries.

IMPORTANT    If you need to leave the machine unattended, always remove the safety key.

6.5 ADVICE FOR OPERATION

•  Snow is removed more easily when it is still fresh.Pass back over the already cleared zones to remove snow residue.

•  If possible, clear the snow in the direction of the wind. Check the distance and the direction of the removed snow jet.

•  In strong winds, lower the deflector to direct the discharged snow towards the ground, reducing the likelihood of the wind transporting the snow to the wrong areas.

•  Onceyou have finished work,leave the machine running for a few minutes to prevent ice from forming in the discharge chute.

•  Always maintain a suitable speed for the snow conditions, adjusting it so the snow is removed in a constant flow.

  6.6 AFTER OPERATION

•  Clean (par. 7.4).

•  Move all the controls forward and back a few times.

•  Check there are no loose or damaged components.Ifnecessary,replacethedamaged components and tighten any screws and loose bolts.

  Do not cover the machine when the engine and the exhaust are still warm.

7.MAINTENANCE

7.1 GENERAL INFORMATION

IMPORTANT    The safety regulations to follow during machine use are described in par. 2.4.

All service and all maintenance checks must be carried out on a stationary machine with the engine switched off. Before cleaning or doing maintenance work, take out the ignition key and read the relevant instructions.

  Wear adequate clothing, gloves and goggles before carrying out any maintenance.

EN - 7

•  The frequency and types of maintenance are summarised in the "Maintenance Table". The table will help you maintain your machine’s safety and performance. It summarises the main interventions to be made and the frequency applicable to each of them.Carry out the relevant intervention according to the first deadline.

•  The use of non-genuine spare parts and accessories could adversely affect machine operation and safety. The manufacturer shall decline all liability in the event of injuries or damages caused by such parts.

•  Genuine spare parts are supplied by authorized assistance workshops and dealers.

  IMPORTANT    All the maintenance and adjustment operations not described herein must be carried out by your dealer or Authorised

Service Centre.

  7.2 REFUELLING

To refuel:

•  Unscrew the tank closure cap and remove it (fig.10.K).

•  Refuel.

•  Close the fuel cap securely after refuelling and clean away any spills (fig.10.K).

NOTE    Do not fill the fuel tank right to the top.

NOTE    Only use the fuel indicated in the data table. Do not use other types of fuel. It is possible to use ecological fuels, i.e. alkylate petrol. The composition of this petrol is less harmful to people and the environment. No negative effects linked to use of the same have been reported. However, there are types of alkylate-based petrol available on the market for which it is not possible to give precise indications regarding their use. For further information it is advisable to consult the instructions and data provided by the producer of the alkylate-based petrol.

NOTE    Fuel is perishable and should not remain in the tank for more than 30 days. Before storing for a long period, fill the tank with a sufficient amount of fuel to reach final destination (chap.8).

7.3 CHECK/TOP-UP ENGINE OIL

Always check the oil level before use.

NOTE    The machine is delivered to the client without engine oil.

7.3.1 Check/top-up

Procedure:

•  Position the machine on a level surface for the check.

•  Wipe around the dipstick. Unscrew it and pull it out.Clean the dipstick (fig.10.H).

•  Push the dipstick down completely without screwing it into place.

•  Now pull the dipstick up again. Read off the oil level.

•  Unscrew the oil loading plug (fig.10.H).

•  Top up if the level is lower than the “MAX” mark (fig.7)

•  For the correct replacement procedure, see par. 7.2

Do not overfill as this could cause the engine to overheat.If the oil level exceeds the

“MAX” mark, the oil must be drained until the correct level is achieved.

NOTE    For the type of oil to use, see the "Technical Data Table”.

7.3.2 Replacement

The oil may be very hot if removed just after the engine has been switched off.

Consequently allow the engine to cool down for a few minutes before proceeding to drain off the oil.

Replace the engine oil based on the frequency indicated in the "Maintenance Table". Change the oil more frequently if the engine has to operate in demanding conditions.

Proceed as follows:

1. Place the machine on a flat surface.

2. Place a suitable container under the drain plug.

3. Remove the top-up cap (fig.10.H)

4. Remove the drain cap (fig.10.I)

5. Collect the oil in a suitable vessel.

6. Screw the oil drain plug back in.

7. Clean up any spills.

8. Fill with fresh oil. For the quantity of oil to use, see the “Technical Data Table”.

9. After filling up the oil, start the engine and leave it to idle for 30 seconds.

10. Check there are no oil leaks.

EN - 8

11.Stop the engine. Wait 30 seconds and check the oil level again. If necessary, also see “check/top-up” (par.7.3.1).

  IMPORTANT    Hand the spent oil over to a disposal facility in accordance with local provisions.

  7.4 CLEANING

  Carry out cleaning operations with the machine switched off. Do not try to remove snow from the discharge without firstly:

•  Releasing the auger control. •  Turning off the engine.

•  Removing the ignition key.

Always clean the machine after use. To clean the machine adhere to the instructions provided below:

•  Remove the snow residue from the discharge chute and from the machine, using brushes or compressed air.

•  Clean the engine with a brush and/or compressed air.

•  Do not spray water directly onto the engine.

•  After cleaning using water, start the machine and auger to remove any water which may otherwise end up in the bearings and cause damage.

IMPORTANT    Never use high-pressure water jets. It could damage the electrical components.

7.5 SPARK PLUG

For spark plug operations, contact the Dealer or Authorised Assistance Centre. Consult the

MaintenanceTableandtheProblemsIdentification Table for any intervention on the spark plug.

  7.6 CARBURETTOR

The carburettor is pre-tuned by the manufacturer. Consult the Problems IdentificationTable to check when intervention is required on the carburettor

(chap. 12).

  7.7 NUTS AND BOLTS

•  Keep all nuts, bolts and screws tight to be sure the equipment is in safe working condition.

•  At frequent intervals check all fasteners on the discharge chute to ensure they are securely tightened.

8. STORAGE

When you intend to put your machine away for more than 30 days:

1.Empty the fuel supply circuit:

––Start the machine’s engine and leave it running until it runs out of fuel.

2.Change the engine oil if this operation has not been done in the last three months.

3.Clean the snow thrower thoroughly.

4.Check for any damage. If necessary, see to the necessary repairs.

5.If the paintwork is damaged, touch it up to prevent rust.

6.Protect any exposed metal surfaces from rust.

7.Store the snow thrower indoors if possible

9.ASSISTANCE AND REPAIRS

This manual provides all the necessary information to run the machine and for correct basic maintenance operations which can be performed by the user. Any regulations and maintenance operations not described herein must be carried out by your Dealer or Authorized Service Centre, which have the necessary knowledge and equipment to ensure that the work is carried out correctly, maintaining the correct degree of safety and the original operating conditions of the machine.

Anyoperationsperformedinunauthorizedcentres or by unqualified persons will totally invalidate the Warranty and all obligations and responsibilities of the Manufacturer.

•  Only authorized service workshops can carry out guaranteed repairs and maintenance.

•  The authorized service workshops only use genuine spare parts. Genuine spare parts and accessories have been designed specifically for machines.

•  Non-genuine spare parts and accessories are not approved. Use of non-genuine spare parts and accessories cause the warranty to expire.

•  It is advisable to send your machine once a year to an authorized service workshop for servicing, assistance and safety device inspection.

10. WARRANTY COVERAGE

Thewarrantycoversallmaterialandmanufacturing defects. The user must follow all the instructions provided in the accompanying documentation.

The warranty does not cover damages caused by: •  Failure to become familiar with the documentation accompanying the machine.

EN - 9

•  Carelessness.

•  Incorrect or prohibited use or assembly.

•  Use of non-genuine spare parts.

•  Use of accessories not supplied or approved by the manufacturer.

The warranty does not cover:

•  Normal wear and tear of consumables, such as drive belts, drills, headlights, wheels, bolts and wires.

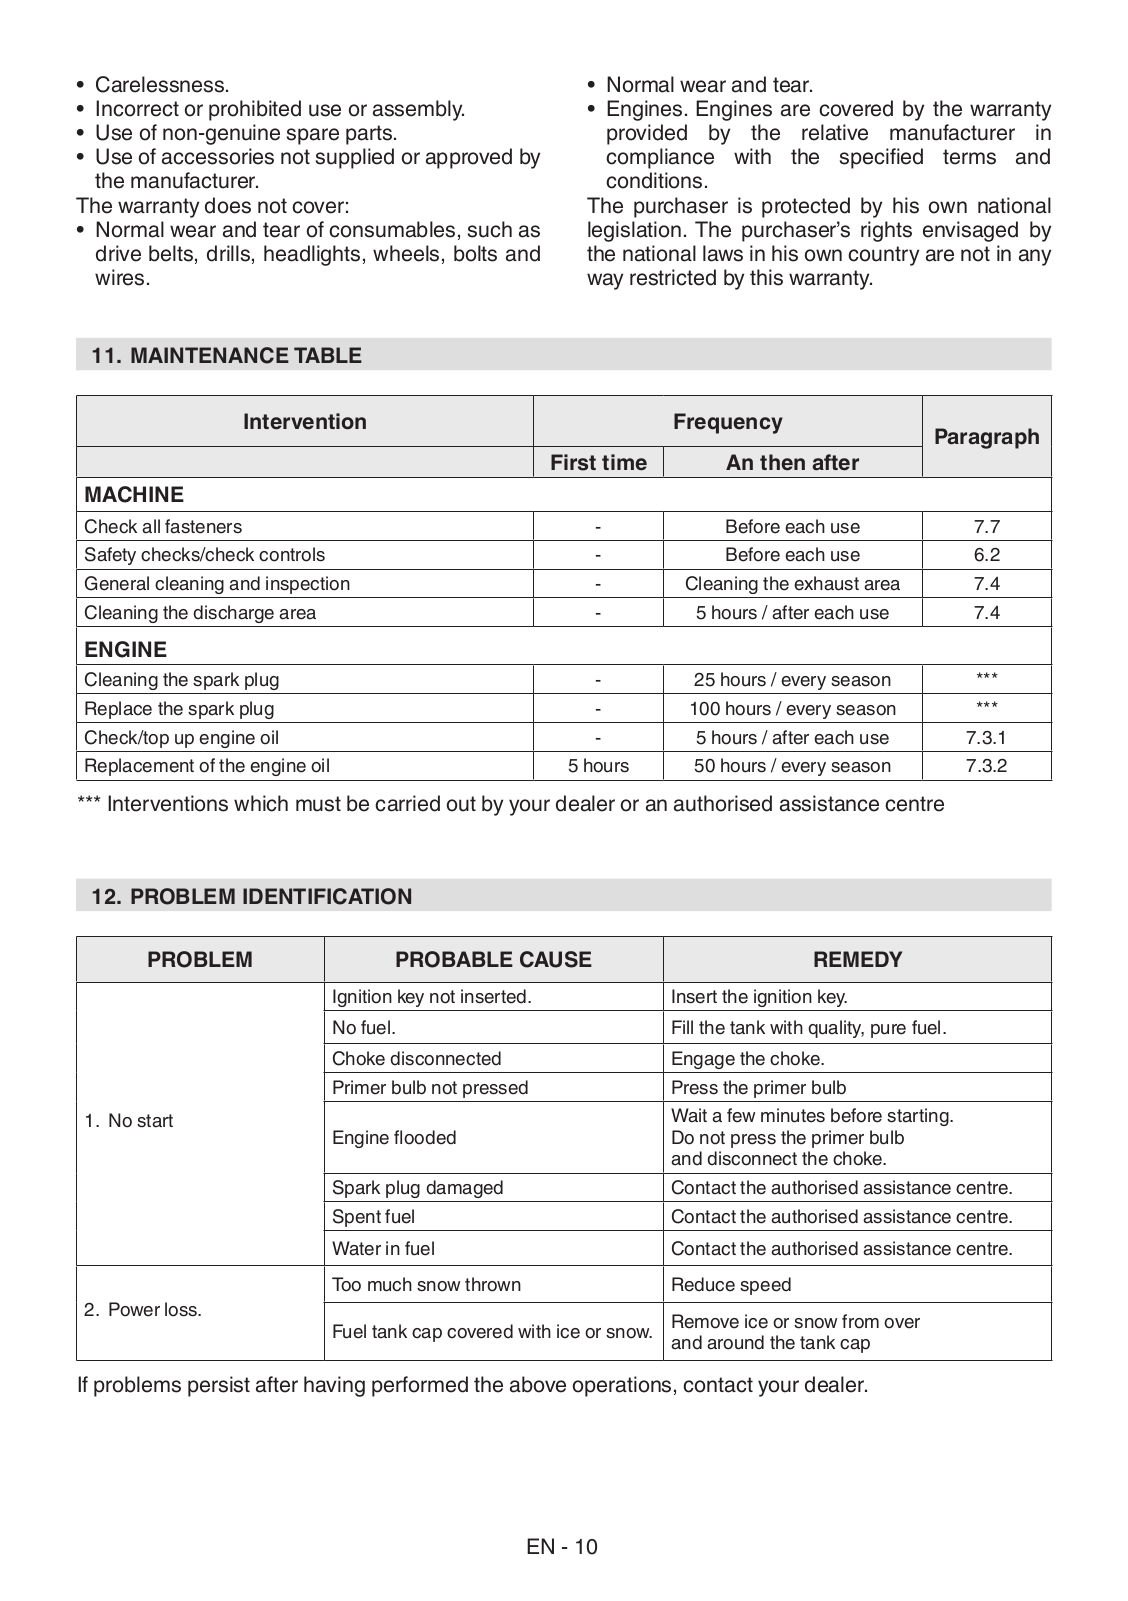
11. MAINTENANCE TABLE

•  Normal wear and tear.

•  Engines. Engines are covered by the warranty provided by the relative manufacturer in compliance with the specified terms and conditions.

The purchaser is protected by his own national legislation. The purchaser’s rights envisaged by the national laws in his own country are not in any way restricted by this warranty.

Intervention


Frequency

Paragraph


First time

An then after


MACHINE


Check all fasteners

-

Before each use

7.7

Safety checks/check controls

-

Before each use

6.2

General cleaning and inspection

-

Cleaning the exhaust area

7.4

Cleaning the discharge area

-

5 hours / after each use

7.4

ENGINE


Cleaning the spark plug

-

25 hours / every season

***

Replace the spark plug

-

100 hours / every season

***

Check/top up engine oil

-

5 hours / after each use

7.3.1

Replacement of the engine oil

5 hours

50 hours / every season

7.3.2

***Interventions which must be carried out by your dealer or an authorised assistance centre

12.PROBLEM IDENTIFICATION

PROBLEM

PROBABLE CAUSE

REMEDY


Ignition key not inserted.

Insert the ignition key.


No fuel.

Fill the tank with quality, pure fuel.


Choke disconnected

Engage the choke.


Primer bulb not pressed

Press the primer bulb

1.  No start

Engine flooded

Wait a few minutes before starting.


Do not press the primer bulb


and disconnect the choke.


Spark plug damaged

Contact the authorised assistance centre.


Spent fuel

Contact the authorised assistance centre.


Water in fuel

Contact the authorised assistance centre.

2.  Power loss.

Too much snow thrown

Reduce speed

Fuel tank cap covered with ice or snow.

Remove ice or snow from over


and around the tank cap

If problems persist after having performed the above operations, contact your dealer.

EN - 10

PROBLEM

PROBABLE CAUSE

REMEDY

3.  Engine working

The choke is engaged

Disconnect the choke.

Spent fuel

Contact the authorised assistance centre.

irregularly


Water in fuel

Contact the authorised assistance centre.


Carburettor needs replacing

Contact the authorised assistance centre.


Loose parts or auger or rotor damaged.

Tighten all the fastening devices.

4.  Excessive vibrations

Replace the damaged parts in the


authorised assistance centre.


Handle not correctly positioned.

Ensure the handle is fastened in its position.

5.  Loss or slowing of

Blocked discharge chute.

Clean the discharge chute.

thrown snow

Auger blocked.

Remove any dirt or foreign


bodies from the auger.

6.  Traction not working.

Traction drive command cable

Contact the authorised assistance centre.


not correctly adjusted.


If problems persist after having performed the above operations, contact your dealer.

EN - 11

BG

ВНИМАНИЕ!: ПРЕДИ ДА ИЗПОЛЗВАТЕ МАШИНАТА ПРОЧЕТЕТЕ ВНИМАТЕЛНО НАСТОЯЩАТА КНИЖКА. Запазете за бъдеща справка.

СЪДЪРЖАНИЕ

1. ИНФОРМАЦИЯ ОТ ОБЩ ХАРАКТЕР 1   1.1 Как да се чете ръководството 1

  1.2 Справки 1 2. ПРАВИЛА ЗА БЕЗОПАСНОСТ 2   2.1 Обучение 2   2.2 Предварителни операции 2   2.3 По време на използване 3

  2.4 Поддръжка, прибиране за съхранение и транспортиране 3

  2.5 Опазване на околната среда 4

3. ЗАПОЗНАВАНЕ С МАШИНАТА 4

  3.1 Описание на машината и предвидено използване 4

  3.2 Знаци за безопасност 5   3.3 Идентификационен етикет 5   3.4 Основни компоненти 5

4. МОНТИРАНЕ 6   4.1 Компоненти за монтиране 6   4.2 Монтаж на дръжката 6

  4.3 Монтаж на улея за разтоварване 6

5. КОМАНДИ ЗА УПРАВЛЕНИЕ 6   5.1 Ключ на запалването 6

  5.2 Команда на въздушната клапа (choke) 6   5.3 Приспособление за заливане преди

пускане в действие 6

  5.4 Ръкохватка за ръчно задействане 7   5.5 Команда за електрическо задействане

(Опционална) 7   5.6 Команда на шнека 7

  5.7 Команда за ориентиране на улея за разтоварване и дефлектора 7

6. ИЗПОЛЗВАНЕ НА МАШИНАТА 7   6.1 Предварителни операции 7   6.2 Правила за безопасност 7

  6.3 Тест за функциониране на двигателя и шнека 7

  6.4 Задействане / работа 7   6.5 Съвети за използването 8   6.6 След употреба 9

7. ПОДДРЪЖКА 9

  7.1 Информация от общ характер 9

  7.2 Зареждане на гориво 9

  7.3 Проверка / доливане на моторно масло 9

  7.4 Почистване 10   7.5 Свещ 10   7.6 Карбуратор 11

  7.7 Фиксиращи гайки и винтове 11

8. ПРИБИРАНЕ ЗА СЪХРАНЕНИЕ 11

9. ТЕХНИЧЕСКО ОБСЛУЖВАНЕ И ПОПРАВКИ

11 10.ГАРАНЦИОННО ПОКРИТИЕ 11

11.ТАБЛИЦА НА ОПЕРАЦИИТЕ ПО ПОДДРЪЖКАТА 12

12. ИДЕНТИФИЦИРАНЕ НА НЕИЗПРАВНОСТИ

13

1.ИНФОРМАЦИЯ ОТ ОБЩ ХАРАКТЕР

1.1 КАК ДА СЕ ЧЕТЕ РЪКОВОДСТВОТО

В текста на ръководството, някои параграфи, които съдържат особено важна информация за безопасността или функционирането, са отбелязани по различен начин според следния критерий:

  БЕЛЕЖКА  или   ВАЖНО  предоставя уточнения или други елементи по отношение на цитираното по-горе, с цел да се избегне повреждане на машината или нанасяне на щети.

Символът показва опасност. Неспазването на предупреждението води до възможността от лични наранявания или наранявания на трети лица и/или нанасяне на щети.

Параграфите отбелязани с квадрат със сив точков контур, указват

опционални характеристики, които не са предвидени за всички модели, описани в това ръководство.Проверете дали съответната техническа характеристика е предвидена за Вашия модел.

Всички указания “преден”, “заден”, “десен” и “ляв” се отнасят за оператор в положение за управление на машината.

  1.2 СПРАВКИ

  1.2.1 Фигури

Фигурите в тези инструкции за експлоатация са номерирани 1, 2, 3, и т.н..

Компонентите посочени на фигурите са отбелязани с буквите A, B, C и т.н. Справката за компонента C на

фигура 2 се посочва с надписа:“Вж. фиг.2.C” или просто “(фиг.2.C)”.

Фигурите са индикативни.Действителните части може да се различават от тези, които са показани на фигурата.

BG - 1

  1.2.2 Заглавия

Ръководството е разделено на глави и параграфи.Заглавието на параграф “2.1 Обучение” е подзаглавие на “2.Правила за безопасност”.Отнасянията до заглавия или параграфи са отбелязани със съкращението "гл." или "пар." и съответния номер.Например:“гл.2” или “пар.2.1”.

2. ПРАВИЛА ЗА БЕЗОПАСНОСТ

  2.1 ОБУЧЕНИЕ

Прочетете внимателно настоящите инструкции преди да използвате машината.

Разучете и свикнете с командите

ис подходящото използване на машината. Научете се да изключвате бързо двигателя. Неспазването на предупрежденията и инструкциите може да причини инциденти и/или сериозни наранявания. Запазете всички упътвания

иинструкции за бъдещи справки.

•  Никога не позволявайте машината да бъде използвана от деца или от хора, които не са запознати достатъчно с инструкциите. Местните закони може да предвиждат минимална възраст за право на използване.

•  Да не се използва никога машината, ако потребителя е уморен или неразположен, или е приел лекарства, наркотици, алкохол или вредни за рефлексите и вниманието му вещества.

•  Не забравяйте, че операторът или този, който използва машината е отговорен за инциденти и непредвидени ситуации, които могат да се случат на други хора или на тяхна собственост. Част от отговорността на потребителя е преценката на възможните рискове на терена, по който трябва да се работи, както и вземането на всички предпазни мерки, необходими за гарантиране на неговата безопасност и тази на другите хора, особено, когато се работи по наклони, неравни, хлъзгави или нестабилни терени.

  2.2 ПРЕДВАРИТЕЛНИ ОПЕРАЦИИ

Лични предпазни средства (ЛПС)

•  Да не се използва снегорина, ако не се носи подходящо работно облекло.

•  Да се носят обувки, които позволяват добро захващане върху хлъзгави повърхности.

•  Да се носят винаги предпазни очила или предпазна маска по време на използването, поддръжката и извършването на поправки.

Функционирането на моторизирани машини може да предизвика изхвърляне на чужди тела, които могат да попаднат в очите.

•  Да се насят слушалки против шум.

Работна зона / Машина

•  Проверявайте добре зоната и я почистете и отстранете евентуални видими чужди тела. Например изтривалки, шейни, маси, кабели и т.н.

•  Преди да включите двигателят, проверете дали са изключени всички команди, които задействат подвижните части на машината.

•  Регулирайте височината на защитния капак на шнека за почистване на настилки от чакъл или скални настилки.

•  Преди да започнете да ринете снега, оставете двигателят и машината де се приспособят към външната температура.

Двигатели с вътрешно горене: гориво

•  Предупреждение: горивото е силно възпламенимо. Работете старателно!

•  Съхранявайте винаги горивото в подходящи съдове.

•  Извършвайте зареждането с гориво или доливането на гориво като използвате фуния, само на открито място и не пушете по време на тези операции.

•  Извършете зареждането преди да включите двигателя. Не отваряйте пробката на резервоара и не зареждайте машината, когато двигателят е включен или все още топъл.

•  Ако изтече гориво, не задействайте двигателят, а отдалечете машината от мястото, където е разлято гориво и почистете незабавно всякаква следа от гориво по машината или земята.

•  Завийте добре пробката на резервоара и на съдовете, в които се съхранява гориво.

•  Избягвайте контакт на горивото с работното облекло и, в такъв случай се преоблечете, преди за задействате двигателят.

BG - 2

  2.3 ПО ВРЕМЕ НА ИЗПОЛЗВАНЕ

Работна зона

•  Не използвайте машината във взривоопасна среда и в присъствие на запалими течности, газове или прах. Електрически контакти или механични триения могат да породят искри, които могат за запалят прах или пари.

•  Не задействайте двигателят в затворени пространства, където може да се акумулират опасни пари на въглероден оксид. Задействането на двигателя трябва да се извършва на открито или добре проветриво място. Не забравяйте, че изгорелите газове са токсични.

•  Работете само на дневна светлина или при добро изкуствено осветление и условия на добра видимост.

•  Отдалечете хора, деца и животни от работната зона. Необходимо е децата да се наблюдават от друг възрастен.

•  Обърнете особено внимание, когато се използва машината по алеи от чакъл, бордюри и улици или когато тези последните се пресичат. Внимавайте за скрити опасности.

•  Когато машината се използва близко до пътя, обърнете внимание на движението по пътя.

Поведение

•  Да не се ориентира отвора на улея за разтоварване срещу вятъра или срещу хора, животни, превозни средства, жилища и всичко друго, което може да претърпи вреди от снега или от предмети скрити в снега. Не позволявайте на хора да се застояват пред машината.

•  Никога не използвайте снегорина в близост до огради, автомобили,

прозорци, стъклени огради и т.н., без да сте регулирали по подходящ начин дефлектора на улея за разтоварване.

•  Не приближавайте ръцете и краката до въртящите се органи. Стойте винаги

далеч от отвора на улея за разтоварване на сняг. Поддържайте винаги чист улеят за разтоварване на сняг.

•  Ако снегорина удари чужди тела или генерира ненормални вибрации,

изключете двигателят, свалете ключът на запалването, изчакайте подвижните части да спрат да се движат и прегледайте внимателно машината за евентуално повреждане. Обикновено вибрациите са знак за наличие на проблем. Преди да използвате отново машината, отстранете евентуални повреди.

•  Преди да се отдалечите от машината, изключете всички команди, свалете ключът на запалването от неговото място на машината.

•  Преди извършването на поправки, почистване, проверки, регулирания, изключете двигателят, свалете ключът на запалването и и изчакайте, докато подвижните части не престанат да се движат (с изключение на различни указания, посочени в ръководството). Разкачете кабелите на електрическия двигател. (Опционален)

•  Не пипайте части на двигателя, които по време на работа се загряват. Риск от изгаряния.

•  Не използвайте машината при висока скорост на транспортиране по хлъзгави повърхности. Внимавайте, когато карате на заден ход. Погледнете зад Вас, преди и по време на движение назад, за да се убедите, че няма препятствия.

•  Деактивирайте шнека, когато машината се транспортира или не се използва.

•  Винаги се уверявайте, че се намирате в добро равновесно състояние и хванете здраво ръкохватката. Ходете, никога не тичайте.

Ограничения при използването

•  Не използвайте машината напречно по наклон. Движете се винаги от високото към ниското място и от ниското към високото място. Обърнете внимание, когато променяте посоката по наклон. Да се избягват стръмни наклони.

•  Да не се използва машината, ако защитите са недостатъчни или, ако предпазните устройства не са позиционирани правилно.

•  Не изключвайте или не модифицирайте системите за безопасност.

•  Не модифицирайте регулировките на двигателя и не го претоварвайте Ако двигателят работи на прекалено високи обороти, се увеличава риска от лични наранявания.

•  Не претоварвайте машината като я управлявате на твърде висока скорост.

•  Не поставяйте ръцете си в отделението за разтоварване или в шнека, преди да сте свалили ключът на запалването.

2.4 ПОДДРЪЖКА, ПРИБИРАНЕ ЗА СЪХРАНЕНИЕ И ТРАНСПОРТИРАНЕ

Извършването на правилна поддръжка и прибиране за съхранение, запазва безопасността на машината.

BG - 3

  Повредените или износени части трябва да бъдат заменени и никога да не се поправят. Използвайте само оригинални резервни части: използването на неоригинални резервни части и/или неправилно

монтирани, застрашава безопасността на машината, може да причини инциденти или лични наранявания, както и снема от Производителя всички задължения или отговорност.

Поддръжка

•  Ако трябва да се изпразни резервоара, извършете тази операция на открито и при студен двигател.

•  За да се намали опасността от пожар, проверявайте редовно за течове на масло и/или гориво.

Прибиране за съхранение

•  Не оставяйте гориво в резервоара, ако машината трябва да се прибере за съхранение в сграда, където парите на горивото могат да влязат в контакт с открит пламък, искри или източници на топлина.

•  Преди да приберете за съхранение снегорина в затворено помещение, оставете мотора да се охлади.

•  Винаги се консултирайте с ръководството за експлоатация за важни подробности, ако снегорина трябва да се съхранява без да се използва за дълъг период от време.

•  Следвайте стриктно местните норми за изхвърляне на опаковките, маслата,

горивото, филтрите, износените части или който и да е елемент, който може силно да замърси околната среда; тези отпадъци не могат да бъдат изхвърляни в боклука, а трябва да бъдат отделяни и предавани в специалните центрове, където ще се осъществи рециклиране на материалите.

•  В момента на изваждане от употреба, не захвърляйте машината в околната среда, а се обърнете към събирателен пункт, съгласно действащите местни разпоредби.

3.ЗАПОЗНАВАНЕ С МАШИНАТА

3.1 ОПИСАНИЕ НА МАШИНАТА И ПРЕДВИДЕНО ИЗПОЛЗВАНЕ

Тази машина представлява снегорин.

Машината е снабдена с шнек за ринене, защитен с капак, който насочва снега в улей за разтоварване.Шнекът се

задейства от двигателя, който предоставя теглителна сила на машината. Управлението на машината става посредством команди, които са позиционирани на таблото.

Операторът е в състояние да управлява машината и да задейства главните команди в стоящо положение, в мястото за управление, зад машината.

Транспортиране

•  Ако машината трябва да се транспортира на камион или ремарке, използвайте рампи за достъп с подходяща устойчивост, ширина и дължина.

•  Качете машината на камиона или ремаркето при изключен двигател, с избутване, като за тази операция използвайте подходящ брой хора.

•  По време на транспортирането, затворете крана на горивото (ако е предвиден такъв) и блокирайте

машината върху транспортното средство посредством въжета и вериги.

  2.5 ОПАЗВАНЕ НА ОКОЛНАТА СРЕДА

Опазването на околната среда трябва да бъде приоритет и важен аспект при употребата на машината, в полза на гражданското общество и на средата, в която живеем.

•  Избягвайте да притеснявате съседите.

  3.1.1 Предвидена употреба

Тази машина е проектирана и произведена за ринене, разчистване и изхвърляне на сняг от тротоари, бордюри или други повърхности на нивото на терена. Снегорина трябва да се използва единствено за отстраняване на снега.

  3.1.2 Неуместно използване

Всякакво друго използване, различно от това цитираното по-горе, може да се

окаже опасно и да причини щети на хора и/ или предмети.В неподходящата употреба се включват (например и не само):

•  Използване на машината по повърхности над нивото на земята като покриви на жилищни сгради, гаражи, галерии със сводове или други структури или сгради. •  Задействане на шнека в присъствието на елементи различни от сняг (напр.

земя, трева, камъни и т.н.).

•  Теглете или бутане на товари.

BG - 4


ОПАСНОСТ! Носете

  ВАЖНО 

Неуместното използване на


предпазни слушалки.

машината

води до отпадане на гаранцията


ОПАСНОСТ! Носете

и отхвърляне на каквато и да е отговорност


предпазни очила.

на Производителя, като разходите


произтичащи от нанесени щети или тези


свързани с негово нараняване или на


трети лица са за сметка на потребителя.

  ВАЖНО 

Повредените или нечетливите


стикери трябва да се заменят с нови.

  3.1.3

Тип потребител

Новите стикери могат да бъдат заявени

Тази машина е предназначена за

в оторизиран сервизен център.

използване от потребител, тоест


ИДЕНТИФИКАЦИОНЕН ЕТИКЕТ

  3.3

непрофесионални оператори.Тази машина

На идентификационния етикет са

е предназначена да се използва като хоби.


Машината трябва да се

посочени следните данни(фиг.1):

  ВАЖНО 

1.

Адрес на производителя

използва

единствено от оператора.


2.

Модел

  3.2

ЗНАЦИ ЗА БЕЗОПАСНОСТ

3.

Вид машина

На машината са поставени различни символи

4.

Ниво на акустична мощност

5.

Маркировка за съответствие CE

(фиг.3).Тяхната функция е тази, да припомнят

6.

Тегло в кг.

на оператора какво поведение трябва да

7.

Работни обороти на мотора

предприеме, за да използва снегорина

8.

Мощност на мотора

с нужното внимание и предпазливост.

9.

Кубатура на двигателя

Значение на символите:

10.

Година на производство


ВНИМАНИЕ!

11.

Сериен номер


12.

Код на артикул


ВНИМАНИЕ! Прочетете

13.

Описание на машината


Препишете идентификационните данни


внимателно инструкциите преди


да използвате машината.

на машината на съответните места


ОПАСНОСТ! Дръжте

на етикета, който се намира отзад


ръцете и краката далеч от

на корицата на ръководството.


въртящите се части.


ОПАСНОСТ! Изхвърляне на

  ВАЖНО 

Използвайте идентификационните


предмети.Да не се ориентира

имена, които са посочени на


отвора за изхвърляне

идентификационния етикет на продукта.


към намиращи се наблизо


хора или животни.

  ВАЖНО 

Използвайте идентификационните


ОПАСНОСТ! Поддържайте

имена всеки път, когато се свързвате


работната зона свободна

с оторизирана работилница.


от хора, деца и животни.


ОПАСНОСТ! Да не се пуши,

  ВАЖНО 

Пример на декларацията за


да не се използва открит

съответствие

се намира на последната


пламък или източници на

страница на ръководството.


запалване.Опасност от


пожар или експлозия.

  3.4

ОСНОВНИ КОМПОНЕНТИ


ОПАСНОСТ! Забранено е

Машината се състой от следните


поставянето на ръцете в


канала за изпразване, когато

основни компоненти(фиг.1):


се движи шнека.Спрете

A.

Ръкохватка


двигателят, преди да отпушите


улеят за разтоварване.

B.

Команда на шнека


C.

Кабел за управление на шнека


D.

Ръкохватка за ръчно задействане


E.

Винтове за затваряне на ръкохватката

BG - 5

F.

Долна част на дръжката


(Фиг.3.A) и кръглите ръчки (фиг.3.B), като

G.

Захранващ щепсел


внимавате при поставянето на съответния

H.

Корпус на машината


4.


дистанционен елемент (фиг.3.D)

I.

Пробка на горивото


Затегнете подходящо кръглите

J.

Улей за разтоварване


дръжки (фиг.3.B).

K.

Дефлектор


L.

Шнек


  4.3

МОНТАЖ НА УЛЕЯ ЗА

M.

Защитен капак за шнека


РАЗТОВАРВАНЕ

N.

Колело


1.

Трите винта (фиг.3.E) и кръглите

O.

Долно острие


P.

Ръчка за ориентиране на улея


ръчки (фиг.3.F) са предварително

Q.

Ръчка за ориентиране на дефлектора


монтирани на фиксиращия пръстен


2.


на улея за разтоварване (фиг.3.G).


Поставете улея за разтоварване

4.


МОНТИРАНЕ


(фиг.3.J) на снегорина.

Заради складирането и транспорта, някои

3.

Вкарайте трите винта (фиг.3.E) и гайките

4.


(фиг.3.F), както е показано на фигура 3.

компоненти на машината не са сглобени във


Затегнете винтовете с кръглите ръчки.

фабриката, а трябва да бъдат монтирани


след отстраняване на опаковката, като


се следват следните инструкции.


5.


КОМАНДИ ЗА УПРАВЛЕНИЕ


КОМПОНЕНТИ ЗА МОНТИРАНЕ


  4.1


КЛЮЧ НА ЗАПАЛВАНЕТО

В опаковката са включени компонентите


  5.1


Позволява спиране и задействане

за монтиране (фиг.3), които са


изброени в следващата таблица:


на мотора.Ключът на запалването

Компонент

Позиция

Количество


има две позиции (фиг.10.B):

Снегорин

G

3

1.


Изваден ключ - OFF - двигателят се

Дръжка

C

3


спира и неможе да се задейства.

Улей за разтоварване

J

3

2.


Поставен ключ - ON - двигателят може

Винтове за монтиране

A, B

3


да се включи и да функционира.

на дръжката


Винтове за монтиране на

F, E

3


Двигателят не се включва, ако


  ВАЖНО 

улея за разтоварване


предпазният ключ не е вкаран докрай.

Инструкции

/

/


КОМАНДА НА ВЪЗДУШНАТА


  5.2

  4.1.1

Разопаковане


КЛАПА (CHOKE)

1.

Отворете опаковката внимателно, като


Използва се при запалване на студен

2.

внимавате да не загубите компонентите.


двигател.За командата на въздушната

Вижте за справка документацията, която


клапа (choke) са предвидени


е поставена в кутията, включително


две положения (фиг.10.G):

3.

и настоящите инструкции.


Надясно - въздушната клапа


Извадете от кутията всички


(choke) е включена (за стартиране

4.

немонтирани компоненти.


при студен двигател).


Извадете снегорина от кутията.


Наляво - въздушната клапа (choke) е

5.

Унищожете кутията и опаковките в


изключена (нормално функциониране


съответствие с местните разпоредби.


МОНТАЖ НА ДРЪЖКАТА


и стартиране при топъл двигател ).

  4.2


1.

Свържете кабела за управление на


ПРИСПОСОБЛЕНИЕ ЗА ЗАЛИВАНЕ


  5.3

2.

шнека към дръжката (фег.5.A)


ПРЕДИ ПУСКАНЕ В ДЕЙСТВИЕ

Вкарайте тръбите на дръжката


Натискайки командата на приспособлението

3.

(фиг.3.C) върху долната дръжка.


Фиксирайте частите на дръжката


за заливане преди пускане в действие


посредством съответните винтове


се впръсква гориво във всмукателния

BG - 6

Loading...
+ 292 hidden pages