

Page 1
WARRANTY
& INSTRUCTIONS
18
83
Page 2

DEAR ALPINIST
We thank you for your choice. Your
watch has been manufactured
with the passion, watchmaking
know-how and high technology
that have distinguished Alpina –
the inventor of the modern sports
watch – since 1883.
By acquiring an Alpina watch you
are now an “Alpinist“, a member of
the Alpina family.
Page 3

CON
TENTS
4 5
ENGLSH 18
FRANÇAIS 40
DEUTSCH 62
PORTUGUÊS 84
ESPAÑOL 106
ITALIANO 128
日本語 (にほんご) 150
РУССКИЙ ЯЗЫК 172
中文, 汉语, 漢語 194
한국어 ( 韓國語) 216
01. OPERATING
INSTRUCTIONS
AL-240 05
AL-280 06
AL-372 07
AL-435 08
AL-525 09
AL-550 10
AL-650 11
AL-710 12
AL-718 13
AL-725 14
AL-750 15
AL-860 16
AL-880 17
Page 4
AL
01
OPERATING
INSTRUC
TIONS
6
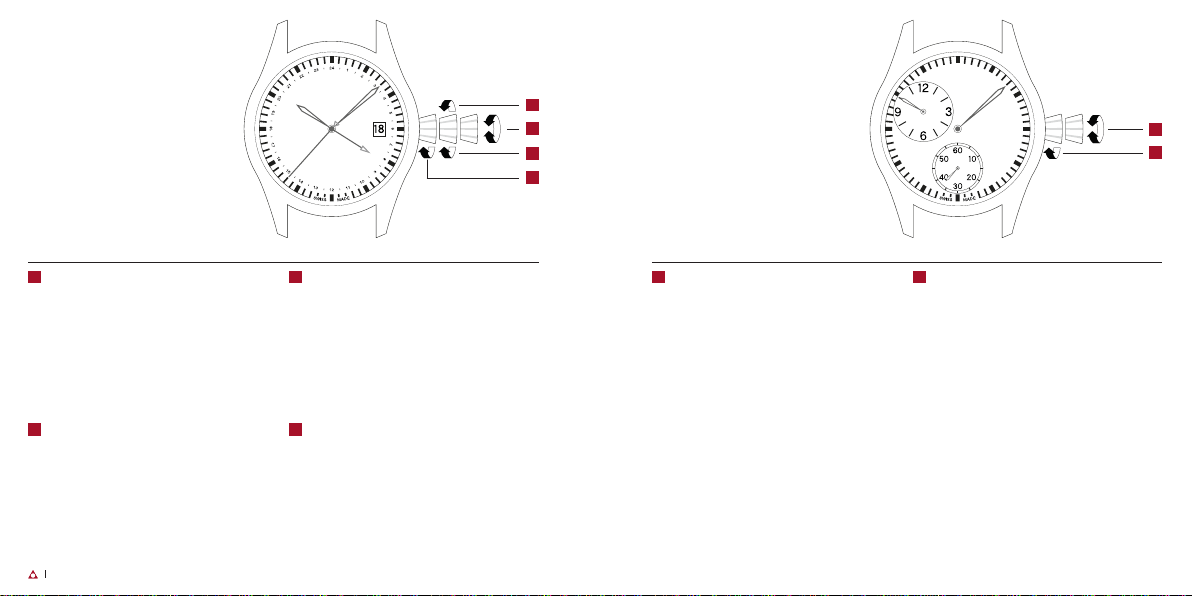
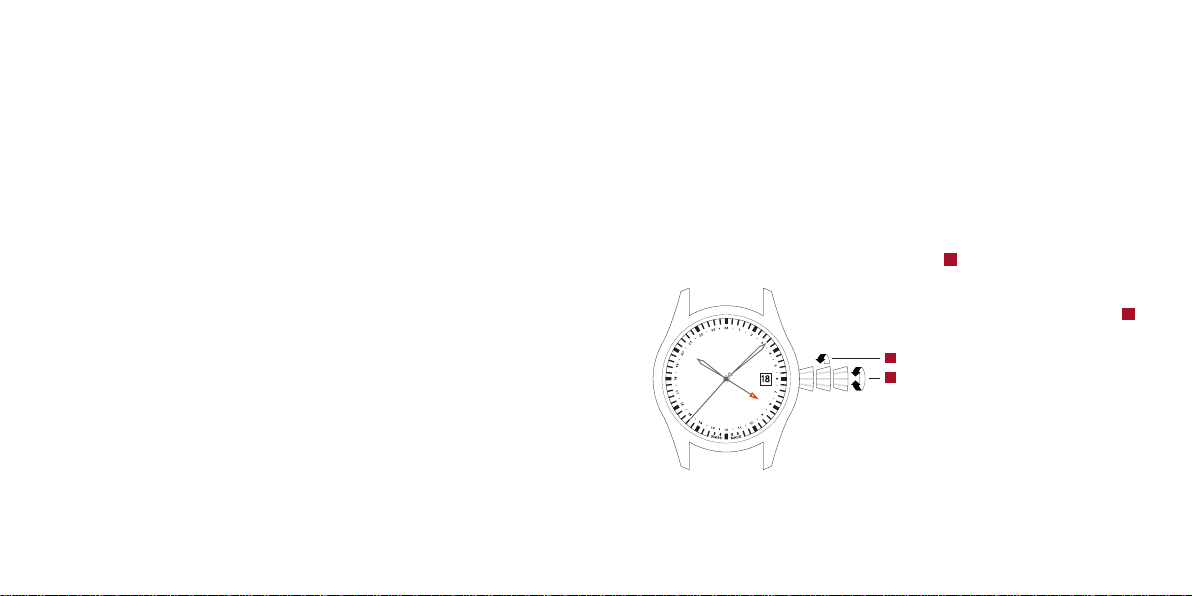
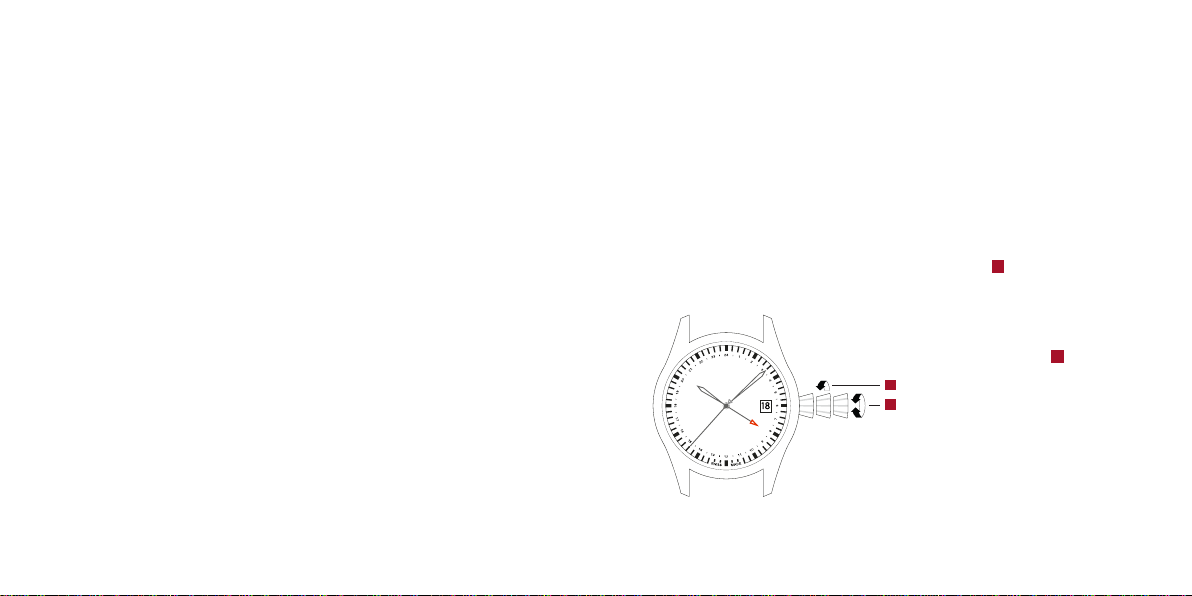
240
QUARTZ
CALIBER
WITH
DATE
• Change of time
1 2 3
• Ajustement de l’heure
• Einstellung der Zeit
• Ajuste de la hora
• Acerto da hora
• Aggiustamento dell’ora
• 時刻合わせ
• Установка даты
• 時間調校
• 시각 변경
• Change of the date
• Ajustement rapide de la date
• Einstellung des Datums
• Cambio de la fecha
• Acerto rápido da data
• Aggiustamento rapido della
data
• 日付合わせ
• Установка текущего
времени
• 日期調校
• 날짜 변경
7
• Wind up
• Remonter
• Aufzeihen
• Terminer
• Cuerda
• Carica
• 卷き上げ
• Положение для завода
механизма
• 上鍊
• 태엽 감기
1
2
3
Page 5
AL
1
AL
1
280
QUARTZ CALIBER
WITH SMALL
SECONDS
AND BIG DATE
• Change of the date
• Ajustement rapide de la date
• Einstellung des Datums
• Cambio de la fecha
• Acerto rápido da data
• Aggiustamento rapido della data
• 日付合わせ
• Установка текущего времени
• 日期調校
• 날짜 변경
• Change of time
21
• Ajustement de l’heure
• Einstellung der Zeit
• Ajuste de la hora
• Acerto da hora
• Aggiustamento dell’ora
• 時刻合わせ
• Установка даты
• 時間調校
• 시각 변경
8
1
2
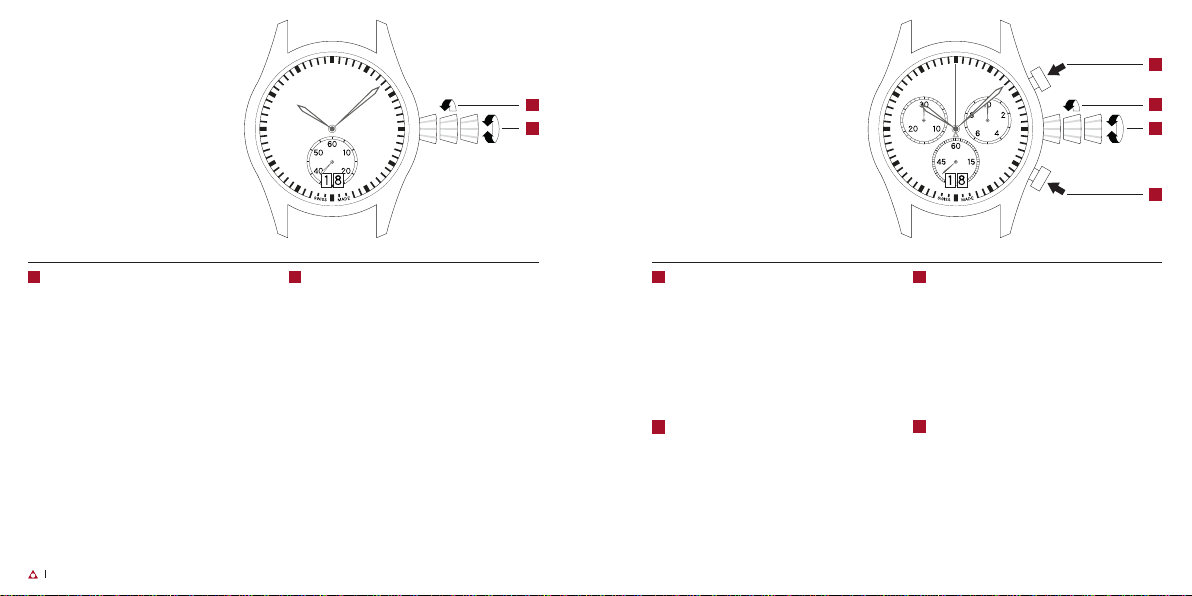
372
2
3
QUARTZ
CHRONOGRAPH
CALIBER WITH SMALL
SECONDS AND
4
BIG DATE
• Chrono: start / stop
• Chrono : start / stop
• Chrono: start / stop
• Crono: arranque / parada
• Chrono: start / stop
• Chrono: start / stop
• クロノグラフ : スタ 一ト/ストップボタソ
• Xpoнoгpaф : ctapt / ctoп
• 計時 : 開始 / 停止
• 크로노 start / stop 기능
• Change of the date
2
• Ajustement rapide de la date
• Einstellung des Datums
• Cambio de la fecha
• Acerto rápido da data
• Aggiustamento della data
• 日付合わせ
• Установка текущего времени
• 日期調校
• 날짜 변경
• Change of time
3
• Ajustement de l’heure
• Einstellung der Zeit
• Ajuste de la hora
• Acerto da hora
• Aggiustamento dell’ora
• 時刻合わせ
• Установка даты
• 時間調校
• 시각 변경
• Chrono: zero repositioning of hands
4
• Chrono : remise à zéro
• Chrono: Nullstellung der Zeiger
• Crono: reposicionamiento de las manecillas
• Chrono: retorno a zero
• Chrono: messa a zero
• クロノグラフ : ゼ ロリセットボタソ
• Xpoнoгpaф : oбнyлeниe знaчeний cтpeлoк
• 計時 : 把計時針按回到 `0' 位 置
• 크로노: 초침을 0으로 재위치하는 기능
9operating instructions
Page 6
AL
AL
435
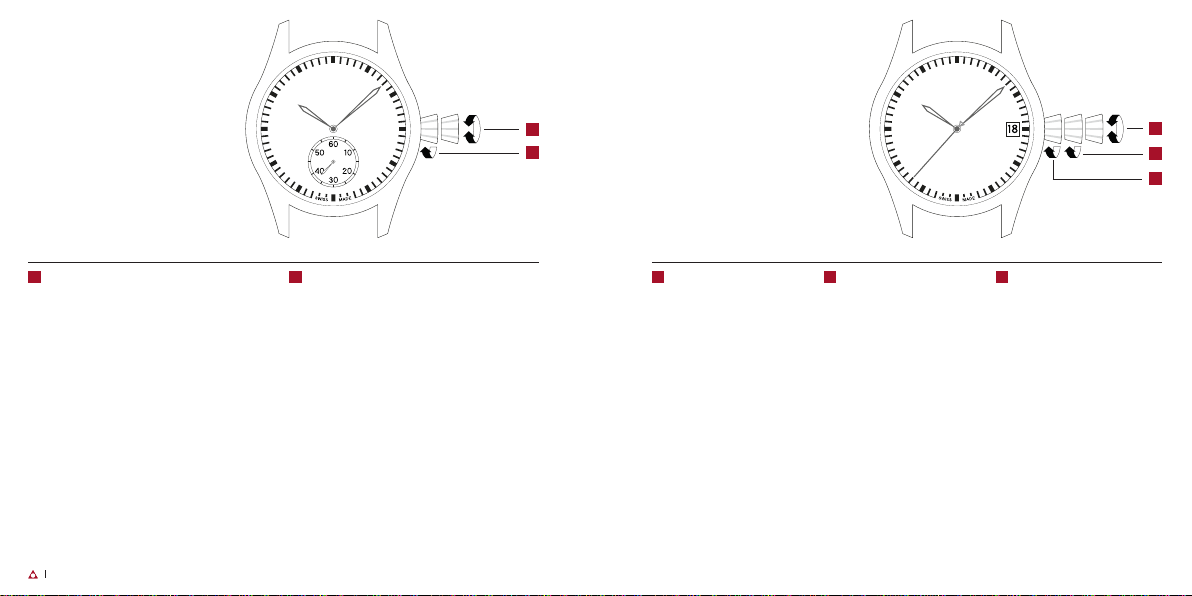
HANDWINDING
CALIBER WITH
SMALL SECONDS
• Change of time
1 2
• Ajustement de l’heure
• Einstellung der Zeit
• Ajuste de la hora
• Acerto da hora
• Aggiustamento dell’ora
• 時刻合わせ
• Установка даты
• 時間調校
• 시각 변경
• Wind up
• Remonter
• Aufzeihen
• Terminer
• Cuerda
• Carica
• 卷き上げ
• Положение для завода механизма
• 上鍊
• 태엽 감기
10
1
2
525
AUTOMATIC
CALIBER
WITH DATE
• Change of time
• Ajustement de l’heure
• Einstellung der Zeit
• Ajuste de la hora
• Acerto da hora
• Aggiustamento dell’ora
• 時刻合わせ
• Установка даты
• 時間調校
• 시각 변경
• Change of the date
2 31
• Ajustement rapide de la date
• Einstellung des Datums
• Cambio de la fecha
• Acerto rápido da data
• Aggiustamento rapido della
data
• 日付合わせ
• Установка текущего
времени
• 日期調校
• 날짜 변경
11operating instructions
• Wind up
• Remonter
• Aufzeihen
• Terminer
• Cuerda
• Carica
• 卷き上げ
• Положение для завода
механизма
• 上鍊
• 태엽 감기
1
2
3
Page 7
AL
AL
550
AUTOMATIC
CALIBER
WITH
GMT AND DATE
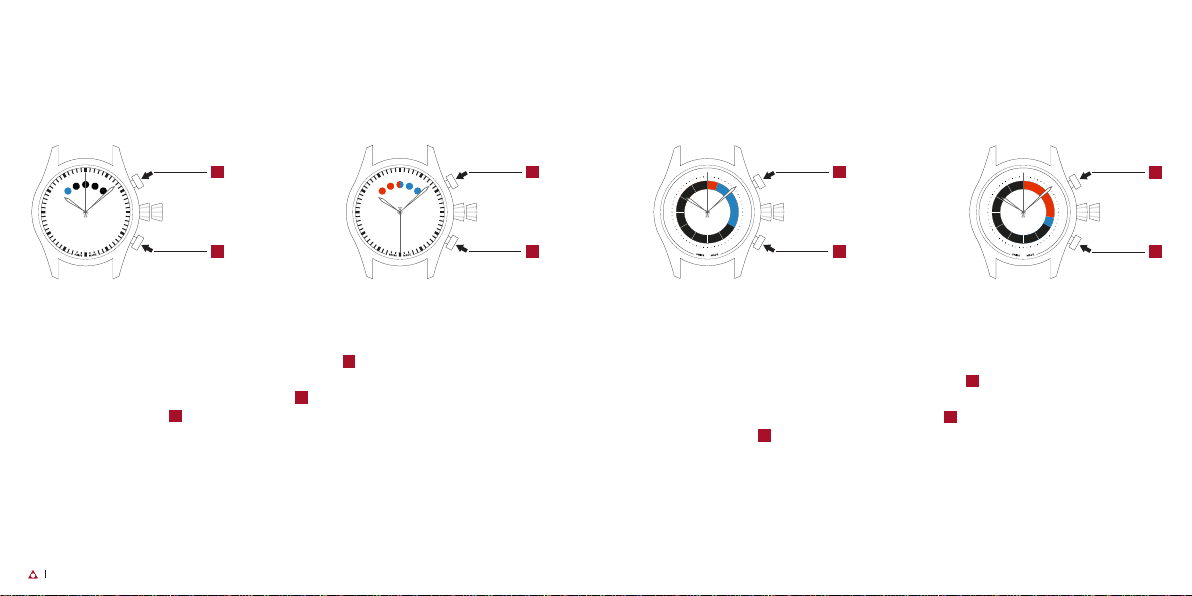
• Change of the GMT hand
1
• Ajustement du deuxième fuseau horaire (GMT)
• Einstellung der 2. Zeitzone (GMT)
• Cambio de la Zona Horaria (GMT)
• Secundo fuso horário (GMT)
• Aggiustamento dell (GMT)
• GMTせッティング
• Установка времени втopoго чаcoвoго
пoяca
• 第二時區調校
• 두 번째 시간대 변경
• Change of time
2
• Ajustement de l’heure
• Einstellung der Zeit
• Ajuste de la hora
• Acerto da hora
• Aggiustamento dell’ora
• 時刻合わせ
• Установка даты
• 時間調校
• 시각 변경
• Change of the date
3
• Ajustement rapide de la date
• Einstellung des Datums
• Cambio de la fecha
• Acerto rápido da data
• Aggiustamento rapido della data
• 日付合わせ
• Установка текущего времени
• 日期調校
• 날짜 변경
• Wind up
4
• Remonter
• Aufzeihen
• Terminer
• Cuerda
• Carica
• 卷き上げ
• Положение для завода механизма
• 上鍊
• 태엽 감기
12
1
2
3
4
650
HANDWINDING
REGULATOR
CALIBER
• Change of time
1 2
• Ajustement de l’heure
• Einstellung der Zeit
• Ajuste de la hora
• Acerto da hora
• Aggiustamento dell’ora
• 時刻合わせ
• Установка даты
• 時間調校
• 시각 변경
• Wind up
• Remonter
• Aufzeihen
• Terminer
• Cuerda
• Carica
• 卷き上げ
• Положение для завода механизма
• 上鍊
• 태엽 감기
13operating instructions
1
2
Page 8
AL
710
AUTOMATIC
MANUFACTURE
CALIBER
WITH DATE
AL
10
11
9
✷
8
7
6
1
2
3
718
AUTOMATIC
WORLDTIMER
MANUFACTURE
5
4
3
2
1
CALIBER
13
14
15
16
17
18
19
20
24
21
23
22
1
2
3
4
• Change of time
1 2 3
• Ajustement de l’heure
• Einstellung der Zeit
• Ajuste de la hora
• Acerto da hora
• Aggiustamento dell’ora
• 時刻合わせ
• Установка даты
• 時間調校
• 시각 변경
• Change of the date
• Ajustement rapide de la date
• Einstellung des Datums
• Cambio de la fecha
• Acerto rápido da data
• Aggiustamento rapido della
data
• 日付合わせ
• Установка текущего
времени
• 日期調校
• 날짜 변경
14
• Wind up
• Remonter
• Aufzeihen
• Terminer
• Cuerda
• Carica
• 卷き上げ
• Положение для завода
механизма
• 上鍊
• 태엽 감기
• Change of the city
1
• Changer la ville
• Einstellen der Stadt
• Cambio de ciudad
• Mudar a cidade
• Cambiare la città
• 都市の変更
• Смена города
• 更改城市
• 도시 변경
• Change of time
2
• Ajustement de l’heure
• Einstellung der Zeit
• Ajuste de la hora
• Acerto da hora
• Aggiustamento dell’ora
• 時刻合わせ
• Установка даты
• 時間調校
• 시각 변경
• Change of the date
3
• Ajustement rapide de la date
• Einstellung des Datums
• Cambio de la fecha
• Acerto rápido da data
• Aggiustamento rapido della data
• 日付合わせ
• Установка текущего времени
• 日期調校
• 날짜 변경
• Wind up
4
• Remonter
• Aufzeihen
• Terminer
• Cuerda
• Carica
• 卷き上げ
• Положение для завода механизма
• 上鍊
• 태엽 감기
15operating instructions
Page 9
1
1
AL
1
AL
1
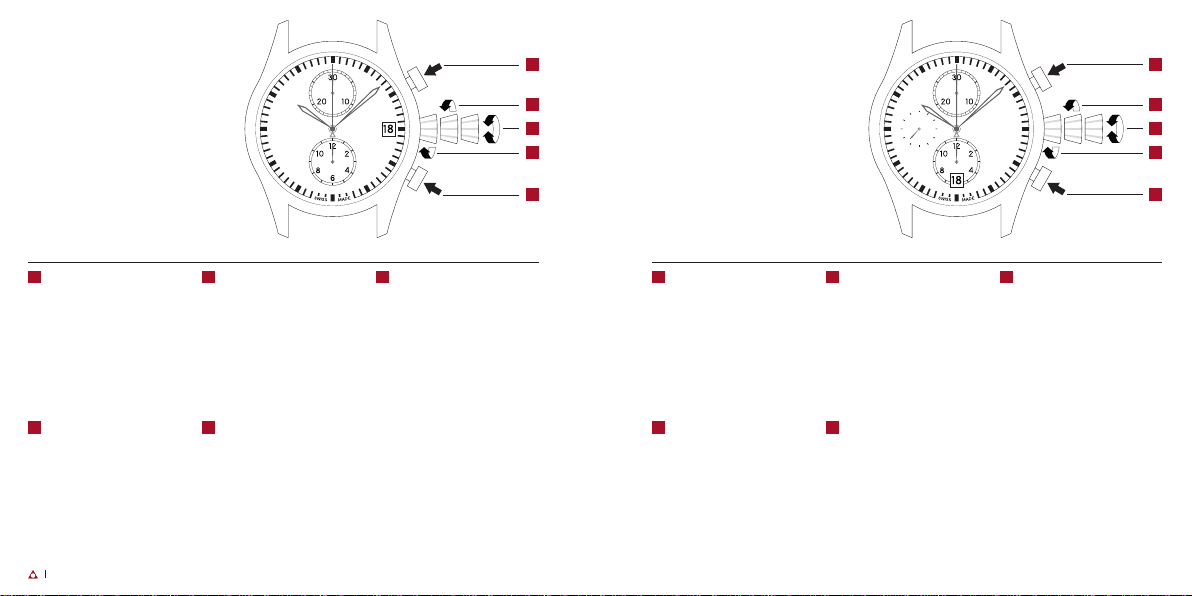
725
AUTOMATIC
CHRONOGRAPH
CALIBER
WITH DATE
• Chrono: start / stop
• Chrono : start / stop
• Chrono: start / stop
• Crono: arranque / parada
• Chrono: start / stop
• Chrono: start / stop
• クロノグラフ : スタ 一ト/スト
ップ ボタ ソ
• Xpoнoгpaф : ctapt / ctoп
• 計時 : 開始 / 停止
• 크로노 start / stop 기능
• Change of the date
2 2
• Ajustement rapide de la date
• Einstellung des Datums
• Cambio de la fecha
• Acerto rápido da data
• Aggiustamento della data
• 日付合わせ
• Установка текущего
времени
• 日期調校
• 날짜 변경
• Change of time
3 35 5
• Ajustement de l’heure
• Einstellung der Zeit
• Ajuste de la hora
• Acerto da hora
• Aggiustamento dell’ora
• 時刻合わせ
• Установка даты
• 時間調校
• 시각 변경
• Wind up
4 4
• Remonter
• Aufzeihen
• Terminer
• Cuerda
• Carica
• 卷き上げ
• Положение для завода
механизма
• 上鍊
• 태엽 감기
16
• Chrono: zero repositioning
of hands
• Chrono : remise à zéro
• Chrono: Nullstellung der
Zeiger
• Crono: reposicionamiento de
las manecillas
• Chrono: retorno a zero
• Chrono: messa a zero
• クロノグラフ : ゼ ロリセットボ
タソ
• Xpoнoгpaф : oбнyлeниe
знaчeний cтpeлoк
• 計時 : 把計時針 按回到 `0' 位置
• 크로노: 초침을 0으로 재위치
하는 기능
2
3
4
5
750
AUTOMATIC
CHRONOGRAPH
CALIBER
WITH SMALL
SECONDS AND DATE
• Chrono: start / stop
• Chrono : start / stop
• Chrono: start / stop
• Crono: arranque / parada
• Chrono: start / stop
• Chrono: start / stop
• クロノグラフ : スタ 一ト/スト
ップ ボタ ソ
• Xpoнoгpaф : ctapt / ctoп
• 計時 : 開始 / 停止
• 크로노 start / stop 기능
• Change of the date
• Ajustement rapide de la date
• Einstellung des Datums
• Cambio de la fecha
• Acerto rápido da data
• Aggiustamento della data
• 日付合わせ
• Установка текущего
времени
• 日期調校
• 날짜 변경
• Change of time
• Ajustement de l’heure
• Einstellung der Zeit
• Ajuste de la hora
• Acerto da hora
• Aggiustamento dell’ora
• 時刻合わせ
• Установка даты
• 時間調校
• 시각 변경
• Wind up
• Remonter
• Aufzeihen
• Terminer
• Cuerda
• Carica
• 卷き上げ
• Положение для завода
механизма
• 上鍊
• 태엽 감기
17operating instructions
• Chrono: zero repositioning
of hands
• Chrono : remise à zéro
• Chrono: Nullstellung der
Zeiger
• Crono: reposicionamiento de
las manecillas
• Chrono: retorno a zero
• Chrono: messa a zero
• クロノグラフ : ゼ ロリセットボ
タソ
• Xpoнoгpaф : oбнyлeниe
знaчeний cтpeлoк
• 計時 : 把計時針 按回到 `0' 位置
• 크로노: 초침을 0으로 재위치
하는 기능
2
3
4
5
Page 10
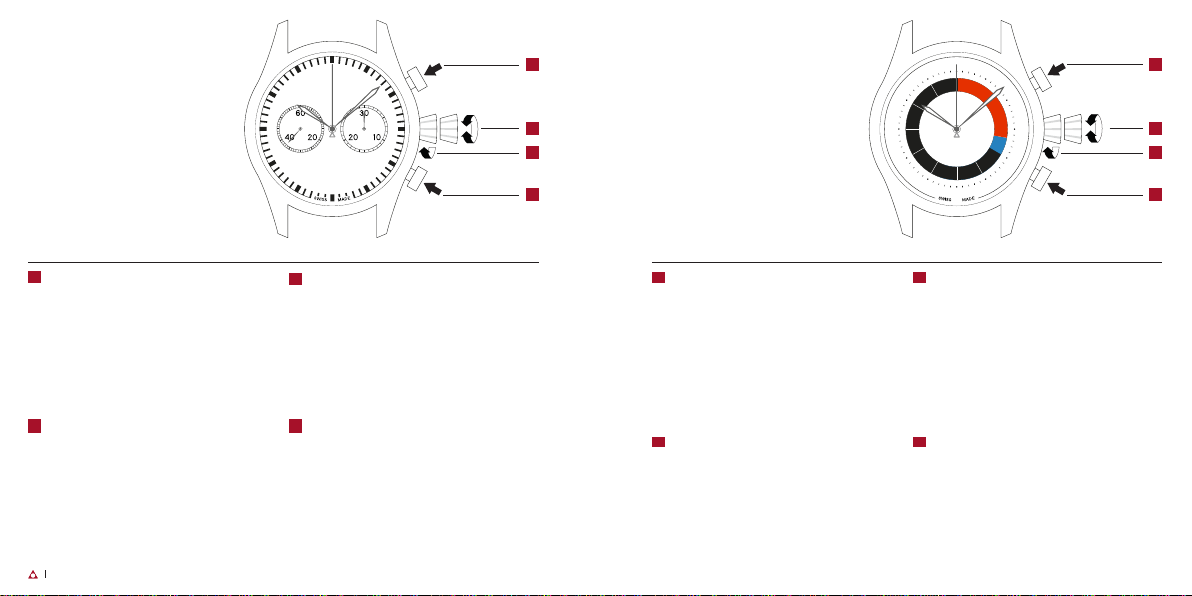
AL
860
AUTOMATIC
CHRONOGRAPH
CALIBER
“BI-COMPAX“
1
2
3
4
AL
880
AUTOMATIC
CALIBER WITH
REGATTA
COUNTDOWN
60
55
5
S
T
50
10
15
20
A
R
45
T
1
2
40
3
4
5
25
35
30
1
2
3
4
FUNCTION
• Chrono: start / stop
1
• Chrono : start / stop
• Chrono: start / stop
• Crono: arranque/parada
• Chrono: start / stop
• Chrono: start / stop
• クロノグラフ : スタ 一ト/ストップボタソ
• Xpoнoгpaф : ctapt / ctoп
• 計時 : 開始 / 停止
• 크로노 start / stop 기능
• Change of time
2
• Ajustement de l’heure
• Einstellung der Zeit
• Ajuste de la hora
• Acerto da hora
• Aggiustamento dell’ora
• 時刻合わせ
• Установка даты
• 時間調校
• 시각 변경
• Wind up
3
• Remonter
• Aufzeihen
• Terminer
• Cuerda
• Carica
• 卷き上げ
• Положение для завода механизма
• 上鍊
• 태엽 감기
• Chrono: zero repositioning
4
of hands
• Chrono : remise à zéro
• Chrono: Nullstellung der Zeiger
• Crono: reposicionamiento de las manecillas
• Chrono: retorno a zero
• Chrono: messa a zero
• クロノグラフ : ゼ ロリセットボタソ
• Xpoнoгpaф : oбнyлeниe знaчeний cтpeлoк
• 計時 : 把計時針按回到 ` 0' 位置
• 크로노: 초침을 0으로 재위치하는 기능
18
• Countdown : start / hold
1
• Compte à rebours : démarrer / arrêter
• Countdown : Start / Zwischenzeit
• La cuenta regresiva : Comenzar / regresiva
• Da contagem regressiva : Iniciar / retenção
• Conto alla rovescia : Partenza / stop
• カウントダ ウンの スタート/カ ウントダウンの 継 続
• старт обратного отсчета /
остановкаобратного отсчета
• 开始倒 计时 / 暂停倒计时
• 카운트다운 시작/카운트다운 정지
• Change of time
2 4
• Ajustement de l’heure
• Einstellung der Zeit
• Ajuste de la hora
• Acerto da hora
• Aggiustamento dell’ora
• 時刻合わせ
• Установка даты
• 時間調校
• 시각 변경
• Wind up
3
• Remonter
• Aufzeihen
• Terminer
• Cuerda
• Carica
• 卷き上げ
• Положение для завода механизма
• 上鍊
• 태엽 감기
• Reset countdown
• Remettre le compteur a zéro
• Nullsteller Countdown
• Empezar de zero
• Redefinir contagem regressiva
• Azzeramento
• カウントダウンのリセット
• обнуление обратного отсчета
• 重置倒计时
• 카 운트다운 리셋
19operating instructions
Page 11

CON
TENTS
02. SPECIAL INSTRUCTIONS
2.1 CALIBER AL-550 GMT 19
2.2 CALIBER AL-880
AUTOMATIC COUNTDOWN 20
03. OTHER FUNCTIONS
3.1 ROTATING DIVING BEZEL 24
3.2 MEASUREMENT SCALES 24
3.3 360° ROTATING COMPASS BEZEL 25
3.4 ANTI-MAGNETISM 28
04. WATCH CARE
& WARRANTY
4.1 TAKING CARE OF
YOUR ALPINA WATCH 30
4.2 SERVICE AND SERVICE
INTERVALS 31
4.3 LEATHER AND STRAP CARE 32
4.4 ANTI-REFLECTIVE TREATMENT
OF THE SAPPHIRE CRYSTAL 33
4.5 SCREW-IN CROWN 33
4.6 INTERNATIONAL WARRANTY 33
4.7 GENUINESS 35
05. SERVICE CENTERS 36
2120 | EN |
Page 12
02
SPECIALS
INSTRU
AL-550
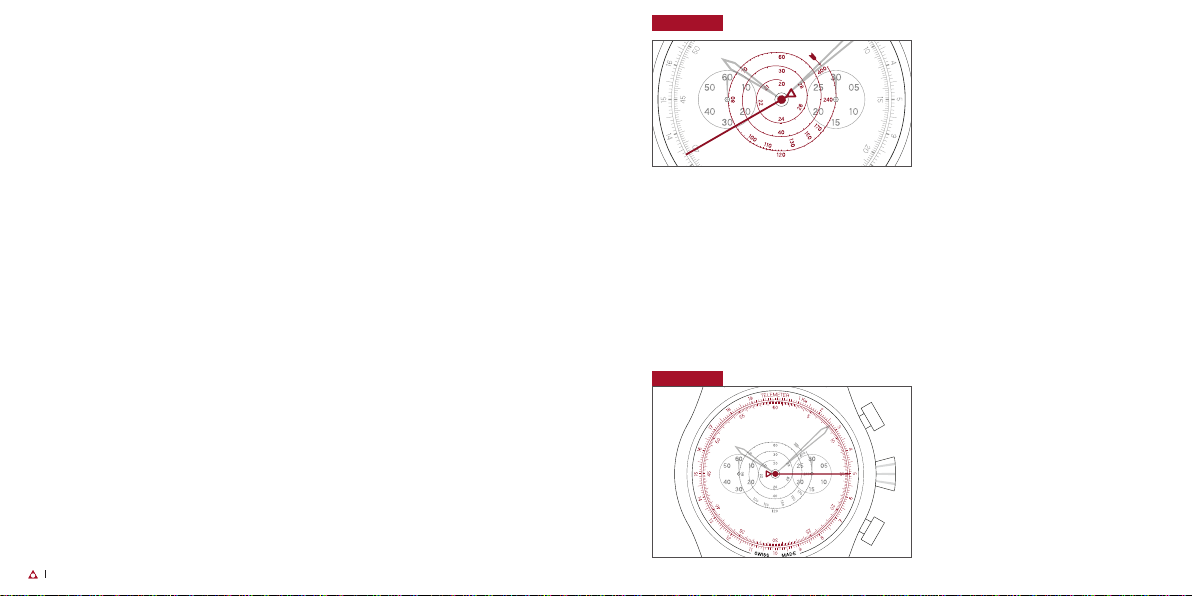
2.1
FUNCTIONS: HOURS, MINUTES,
SECONDS, DATE, GMT (2ND TIME
ZONE)
USE OF THE GMT FUNCTION:
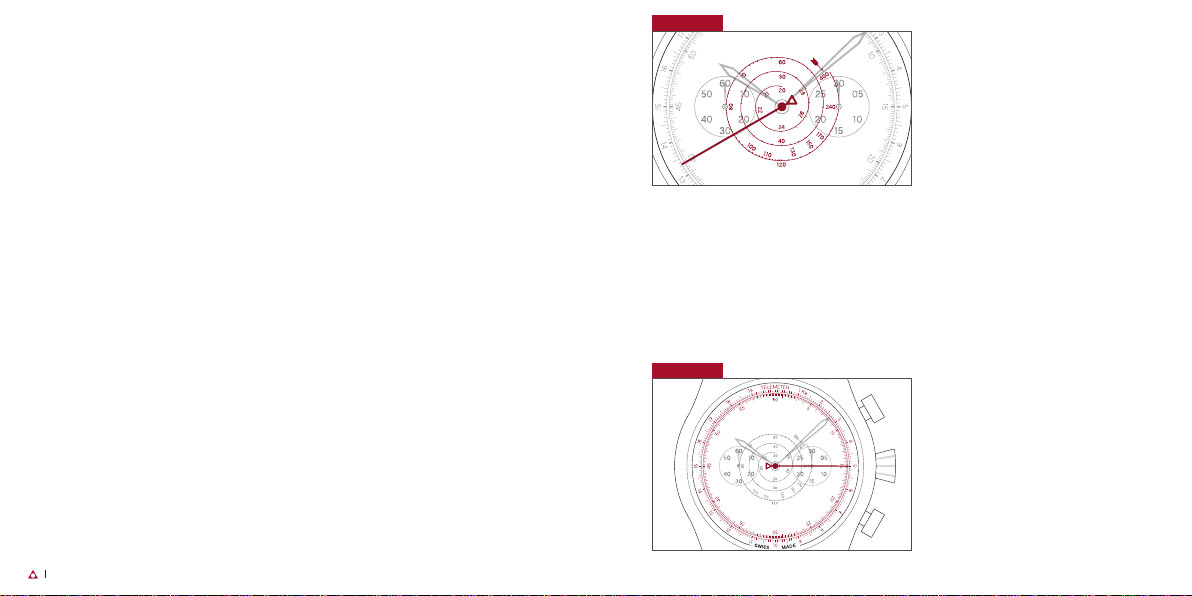
The GMT is fitted with an additional,
red-arrow hour hand, setting it instantly
apart from the main hour hand.
CALIBER
GMT
This additional hand completes a revolution of the dial in 24 hours and represents the reference time. The hour hand,
which represents local time, may be
easily set by jumping from hour to hour.
If you are travelling: pull the crown to position 2 and set your reference time, using
the graduated scale on the raised dial.
Then, push the crown to position 1 and
adjust the hour hand by one-hour jumps
in order to display the time of the country
1
you are visiting. This operation is done
2
without stopping the mechanical movement and therefore without changing the
watch’s other settings.
CTIONS
22
You can now read the time of the location
from which you have travelled, on a 24hour scale, and the time of the place where
you are currently located at a glance!
23 | EN |
Page 13
AL-880
CALIBER
AUTOMATIC
2.2
FUNCTIONS: HOURS, MINUTES, 10 MIN. COUNTDOWN
COUNTDOWN
1 1
4 4
60
55
5
T
R
1
50
A
2
10
T
3
S
15
20
45
4
5
40
35
25
30
1
4
60
55
5
S
T
50
A
10
R
45
15
T
1
2
40
3
20
4
5
35
25
30
One minute has passed. 7 minutes 30 seconds have passed.
COUNTDOWN
Before starting the countdown, the 5
apertures are the same colour as the
dial. Each aperture represents one minute. When the gun is fired, start the
counting (press button 1 ).
After 1 minute, the first aperture becomes
blue and the next 4 are still the colour
of the dial. After 5 minutes, the second
hand is at 12 o’clock and the 5 apertures
are blue. The race official fires again to
confirm the continuation of the start.
If the countdown is stopped, simply stop
specials instructions 2524 | EN |
the counting on the watch by pressing
button 4 and restarting it when the
countdown resumes, by pressing button
4
again. After 6 minutes, the first aperture becomes orange and the next 4 are
still blue. After 9 minutes, 4 apertures
are now orange and the blue of the final
aperture has started to disappear.
You should then organise the start of
your boat to pass the line when the 5
apertures are orange and the second
hand is at 12 o’clock.
COUNTDOWN
Before the countdown starts, the 10-minute revolving disc is grey and the 10 is at
the bottom between indicators 45 and 40.
The first 5 minutes are displayed (from 6 to
10). When the gun is fired, start the counting (press button 1 ). After 1 minute, the
5 appears on a blue background and the
10 disappears. After 5 minutes, the second hand is at 12 o’clock and the 5 apertures are blue. The race official fires again
to confirm the continuation of the start.
If the countdown is stopped, simply stop
the counting on the watch by pressing
button 4 and restarting it when the
countdown resumes, by pressing button 4 again. After 10 minutes, START
appears. You should then organise the
start of your boat to pass the line when
START appears with the second hand at
12 o’clock.
1
4
Page 14

2.2
TACTICAL PLANNER
The Alpina Seastrong Yacht Timer
watches are fitted with a tactical planner,
in the form of a start line drawn on the
dial. A “+“ and a “-“ indicate a favourable or unfavourable starting position at
the starting buoy.
This planner helps the sailor make decisions concerning the boat’s position on
the starting line. To determine the best
position on the starting line, use the
compass on the bezel as follows:
- measure the wind direction with your
compass (anemometer);
- turn the bezel to have the wind angle
at 12 o’clock;
- sail from the starting boat to the starting
line buoy to determine the orientation of
the starting line;
- look where the orientation of the starting line is located on the bezel of your
watch. If the angle is between 9 and 12
o’clock, it is best to start from the buoy
side. If this angle is between 6 and 9
o’clock, it is best to start from the starting boat side.
03
OTHER
FUN
CTIONS
27 | EN |specials instructions 26
Page 15
3.1
ROTATING
DIVING
BEZEL
3.2
MEASUREMENT
SCALES
Example 1
3.3
360°
ROTATING
COMPASS
BEZEL
An essential feature of all Alpina diving
watches is the unidirectional, anti-clockwise, rotating bezel, used to control
immersion time. The bezel is fitted with
a graduated scale divided into minutes.
The bezel’s working principle is both
simple and reliable. At the beginning of
each immersion, the zero on the bezel
must be aligned with the minute hand. A
simple glance at the position of the minute hand with respect to the bezel will
show the diver at any moment how much
time has elapsed since the start of the
dive (in minutes).
The unidirectional anti-clockwise rotation
of the bezel is a safety feature that ensures that any accidental movement of
the ring will always cause the remaining
diving time to reduce with respect to the
effective remaining diving time.
other functions 28 29 | EN |
Measurement scales are scales that establish a relation between elapsed time
and another variable. The desired information in terms of speed (tachymeter),
distance (telemeter) or units (pulsometer, productivity meters) is read off
between the central seconds hand of
the chronograph and the corresponding
scale, over a maximum duration of 60
seconds. For the telemeter, it is possible
to make use of the minutes counter by
adding 20 km to the distance indicated
by the central seconds hand for each
minute elapsed.
TACHYMETER SCALE USE
Example 1: calculating the speed of a car.
Measure the time it takes the car to cover a
distance of 1 km. Read off the speed indicated by the central chronograph seconds
hand on the tachymetric scale. In our example, the car is travelling at 90 km/h.
TELEMETER SCALE USE
Example 2: calculating the distance
between your position and an upcoming
storm. Start the chronograph when you see
the lightning; then stop the chronograph
when you hear the thunder. Read off the distance indicated by the central chronograph
hand on the telemetric scale. In our example
the storm is 5 km away from your position.
Example 2
Alpina watches featuring a 360° rotating compass bezel can roughly
determine directions – a particularly
useful feature for orientation sports
and other adventure or alpine sports.
COMPASS USE INSTRUCTIONS
ON ALPINER 4 CHRONOGRAPH
AND ALPINER 4 GMT*
Precautions in using a compass bezel:
- Do not use the compass in situations where accuracy is critical.
The compass only gives a rough
indication of direction.
- Use the compass where the sun is
visible or its location known.
- Your watch must be set to winter
time. If daylight savings time (summer time) is in effect in your area,
you must set your watch one hour
behind before using the compass
bezel.
Page 16

OPERATING INSTRUCTIONS
1. IN THE NORTHERN HEMISPHERE
- Set the “36” (=360°=North) on the
rotating compass bezel facing the
current time on the 24H ring.
- While keeping the dial level, point the
hour hand in the direction of the sun.
- Now the compass is activated and
you can read the directions on the
rotating compass bezel. The 36,
09,18, 27 indicate North, East, South
and West, respectively.
EXAMPLE 1: It is 8 am in your area. Set
the n° 36 facing the 8 on the 24H scale
of the dial. Now point the hour hand
(keeping the dial level) in the direction of
the sun and your compass is activated.
EXAMPLE 2: It is 6 pm in your area. Set
the n° 36 facing the 18 on the 24H scale
of the dial. Now point the hour hand
(keeping the dial level) in the direction of
the sun and your compass is activated.
2. IN THE SOUTHERN HEMISPHERE
- Set the “18” (=180°=South) on the
rotating compass bezel facing the
current time on the 24H ring.
- While keeping the dial level, point the
hour hand in the direction of the sun.
- Now the compass is activated and
you can read the directions on the
rotating compass bezel. The 36,
09,18, 27 indicate North, East, South
and West, respectively.
EXAMPLE 1: It is 8 am in your area. Set
the n° 18 facing the 8 on the 24H scale
of the dial. Now point the hour hand
(keeping the dial level) in the direction of
the sun and your compass is activated.
EXAMPLE 2: It is 6 pm in your area. Set
the n° 18 facing the 18 on the 24H scale
of the dial. Now point the hour hand
(keeping the dial level) in the direction of
the sun and your compass is activated.
* When using the Alpiner 4 GMT you can
also use the 24H hand to operate the
compass. To do this, the 24H hand must
indicate your local time.
A) In the northern hemisphere put the
“36” (=North) facing the 24H hand.
Point the hour hand (keeping the dial
level) in the direction of the sun and your
compass is activated.
B) In the southern hemisphere put the
“18” (=South) facing the 24H hand.
Point the hour hand (keeping the dial
level) in the direction of the sun and your
compass is activated.
COMPASS USE INSTRUCTIONS ON
SEASTRONG YACHT TIMER
1. IN THE NORTHERN HEMISPHERE
- Set the “S” (=South) on the rotating
compass bezel to the middle of the
arc between the “60” marker (=12
o’clock) and the hour hand.*
of the “60” marker (=12 o’clock) and
in the PM period to the right of the “60”
marker (=12 o’clock).
- While keeping the dial level, point the
hour hand in the direction of the sun.
- Now the compass is activated and
you can read the directions on the
rotating compass bezel. The triangle
at “60”, the 90 marker, the S and
the 270 marker indicate North, East,
South and West, respectively.
EXAMPLE 1: It is 10 am in your area.
Set the “S” facing the “5” on the dial
(=half way between 12 o’clock and the
hour hand). Now point the hour hand
(keeping the dial level) in the direction of
the sun and your compass is activated.
EXAMPLE 2: It is 6 pm in your area. Set
the “S” facing the “45” (=3 o’clock) on
the dial (=half way between 12 o’clock
and 6 o’clock). Now point the hour hand
(keeping the dial level) in the direction of
the sun and your compass is activated.
* in the AM period, set the “S” to the left
other functions 30 31 | EN |
Page 17

3.4
ANTIMAGNETISM
Magnetic fields can significantly impact
the precision of your watch. There are
many sources of magnetic fields, such
as mobile phones, iPads, computers,
loudspeakers, refrigerators and other
electronic devices. The more powerful
the magnetic field the higher the impact
on your watch. All Alpina watches
designated by “4”, i.e. the “Alpiner 4”,
are anti-magnetic. This means that they
have a minimal deviation when exposed
to a certain level of magnetic field.
Alpina “4” anti-magnetic watches
conform to the international ISO 764
standard which defines the resistance of
watches to magnetic fields. According to
ISO 764 a watch must resist exposition
to a direct current magnetic field of 4,800
A/m. The watch must keep its accuracy
to ± 30 seconds/day as measured
before the test in order to be recognised
as a magnetic-resistant watch.
04
WATCH
CARE &
WARRANTY
other functions 32 33 | EN |
Page 18
TAKING
CARE
OF YOUR
4.1
PLEASE FOLLOW THE BELOW RECOMMENDATIONS, TO ENSURE THAT
YOUR ALPINA WATCH WILL SERVE YOU LOYALLY AND WITH EXCELLENCE
THROUGHOUT THE YEARS.
1
Swimming in salt water: take care
to rinse your watch with fresh water
immediately after your swim.
Magnetism: avoid placing your watch
2
on iPads, computers, loudspeakers,
mobile phones or refrigerators. These
devices generate powerful magnetic
fields that can affect the precision of
your watch.
3
Shocks to the watch: different types
of shocks – whether chemical,
thermal, physical, magnetic or other
– can affect your watch. Take care to
avoid them.
watch care & warranty 34 35 | EN |
ALPINA
WATCH
4
Screw-in crown: to prevent water
or humidity from entering the case,
make sure the crown is always tightly
screwed into the case. Do not use
chronograph pushers under water.
5
Normal crown: to prevent humidity
from entering the case, make sure
the crown is always pushed back
in the wearing position. Do not use
chronograph pushers under water.
6
Care and cleaning of metal bracelets,
rubber straps and water-resistant
metal cases: clean with soapy water
and a toothbrush and dry with a soft
cloth.
Chemical products: avoid direct
7
contact with chemical cleaning
agents, solvents, detergents,
cosmetics and other chemical
products, as they may damage your
case, bracelet or rubber gaskets.
Temperature: avoid exposure to
8
temperatures greater than 60°C
(140°F), or below 0°C (32°F).
Also avoid extreme changes in
temperature, such as putting the
watch in extremely cold water after
prolonged exposure to the sun.
Water-resistance: a watch’s water-
9
resistance cannot be guaranteed in
all situations or for ever. The waterresistance can be affected by a
shock to the crown, the ageing of
gaskets (for example, due to the
action of chemical products), etc.
4.2
Like any other mechanical precision
instrument, it is important to service a
watch at regular intervals to make sure
it performs correctly in time. As a general
rule, and depending on how you use
your watch and the conditions in which
you use it, we advise you to have your
watch serviced every 4 to 5 years.
You can find the list of our Official
Retailers and Service Centres at
www.alpina-watches.com.
MECHANICAL WATCHES
The balance wheel in an automatic
Alpina watch swings 28,800 times an
hour and the gear train moves forward
691,200 times in 24 hours. In four years,
this represents over one billion impulses!
We advise you to bring your watch
every 3-4 years to an official Alpina
Retailer or Service Centre, where a
trained watchmaker will meticulously
inspect it before thoroughly cleaning and
lubricating the movement.
SERVICE
AND
SERVICE
INTERVALS
Page 19

WATER-RESISTANCE
The water-resistance rating of your watch
was determined and checked when it
was manufactured at our workshops.
It does not imply a lifetime guarantee
against water entering into the watch.
Your watch is water-resistant only when
the crown is fully pushed-in against the
case. If your watch has a screw-in crown,
it must be tightly screwed into the case.
Your watch is not water-resistant if the
crown is in the winding or time-setting
positions. Likewise, pushers should not
be operated while the watch is wet or in
water.
Ageing and normal day-to-day handling
affect the water-resistance of your watch.
Avoid temperature extremes (immersing
the watch in cold water after a prolonged
period in the hot sun) that can damage
the gaskets as well as any other shocks
– chemical, physical or other – which
might compromise the technical integrity
of the watch case.
We advise you to bring your watch to an
Official Alpina Retailer or Service Centre
for a water-resistance check every 2-3
years.
watch care & warranty 36 37 | EN |
4.3
We recommend you adhere to the
following indications to keep your leather
strap in good condition for as long as
possible:
1
Avoid contact with water and
humidity to prevent discolouration
and deformation.
Avoid prolonged exposure to the sun
2
to prevent discolouration.
Avoid contact with greasy
3
substances, cosmetic products and
any other chemical agent.
Leather is an organic and permeable
material and therefore will not last for
ever in its original condition. However, if
you adopt the steps above it will last for
many years. You can replace your leather
strap at any Official Alpina Retailer.
LEATHER
STRAP
CARE
4.4
The anti-reflective treatment of the sapphire crystal improves the visibility and
contrast of your watch’s dial. Normal
daily use and wear and tear may cause
marks to appear on the coating. These
are considered normal and are therefore
not covered by the warranty.
4.5
Some Alpina watches have a screw-in
crown, which must be unscrewed to
change the time or the date. After use,
the crown must be pressed against the
case and screwed in tightly. Failure to do
so will compromise the water-resistance
of your watch.
ANTIREFLECTIVE
TREATMENT
OF THE
SAPPHIRE
CRYSTAL
SCREW-IN
CROWN
INTERNA
TIONAL
4.6
Your Alpina watch is guaranteed for a
period of two years (24 months) starting
from the purchase date, covering all
manufacturing defects during regular use
as stated in the following terms: Alpina
Watch International S.A. will replace free
of charge any defective component due
to a manufacturing error, duly noted by
our technical services. Your watch is
under warranty for a period of two years
from the date on the Warranty Certificate,
signed and stamped by an authorised
Alpina Retailer.
WARRANTY
Page 20

THIS INTERNATIONAL WARRANTY
DOES NOT COVER:
Theft, loss or acts of God or the
1
consequences of natural disasters;
The lifetime of the battery;
2
Normal wear and tear and ageing
3
(e.g. scratched crystal; alteration of
the colour and/or material of nonmetallic straps and chains, such as
leather, textile or rubber; peeling of
the plating);
Any damage on any part of the
4
watch resulting from mistreatment
or improper use, lack of care,
negligence, accidents (knocks,
dents, crushing, broken crystal,
etc.), incorrect use of the watch and
non-observance of the operating
instructions provided by Alpina;
Indirect or consequential damages
5
of any kind resulting from use,
such as non-functioning, defects or
inaccuracy of the Alpina watch;
Defects or damage resulting from
6
any handling or tampering of the
watch by any party whatsoever other
than a service centre duly authorised
watch care & warranty 38 39 | EN |
by Alpina (such as for battery
replacement, services or repairs),
or altering of its original condition
beyond Alpina’s control;
The use of batteries other than those
7
indicated by Alpina.
This warranty is valid only for
wristwatches accompanied by the
guarantee certificate duly signed, dated
and stamped by the authorised Alpina
Retailer. Both the reference and the
individual registration numbers of the
Alpina watch must be written on the
certificate.
Any servicing or repair work to your
Alpina watch must be carried out solely
by an Alpina-approved service and repair
centre or the International Warranty is no
longer valid.
The International Warranty does not in
any way cancel, restrict or otherwise
affect any legally recognised consumer
rights or privileges in the country of
purchase of your Alpina watch.
4.7
We are often asked to check if a
Alpina watch is genuine. Official Alpina
retailers attest the genuineness of every
Alpina watch and provide expert and
dependable after-sales servicing, thanks
to their expertise and professional skills,
and to specially adapted equipment.
Alpina Watch International S.A. disclaims
any relationship to, or responsibility for,
any timepiece or other item bearing the
Alpina name, brand, logotype or symbol
offered for sale by anyone not being an
official Alpina retailer.
Purchasing such an item from an
unauthorized party is therefore at the
buyer’s sole risk, particularly in the case
of counterfeit or substandard products
and in case of products purchased on
the Internet.
GENUINESS
No explicit or implicit warranty or
servicing or any other obligation
shall ensue for Alpina or for any of its
authorized representatives for products
sold by unauthorized parties and not
accompanied by a duly stamped Alpina
international warranty certificate.
For the above reasons and in your own
interest, you are invited to acquire only
genuine Alpina timepieces available
exclusively from a legitimate Alpina
official retailer.
Page 21

05
SERVICE
CENTERS
For an updated list of our authorised service centers and official retailers please
consult our official web site www.alpina-watches.com
41 | EN |40
Page 22

SOM
MAIRE
42
02. INSTRUCTIONS
SPÉCIFIQUES
2.1 CALIBRE AL-550 GMT 43
2.2 CALIBRE AL-880
À COMPTE À REBOURS 44
03. AUTRES FONCTIONS
3.1 LUNETTE DE PLONGÉE
TOURNANTE 48
3.2 ÉCHELLES DE MESURE 48
3.3 BOUSSOLE À 360 ° 49
3.4 ANTIMAGNÉTISME 52
04. ENTRETIEN ET GARANTIE
4.1 PRENDRE SOIN DE
VOTRE MONTRE ALPINA 54
4.2 RÉVISIONS ET FRÉQUENCE
DES RÉVISIONS 55
4.3 ENTRETIEN DU CUIR
ET BRACELETS 56
4.4 TRAITEMENT ANTIREFLETS
SUR LE VERRE SAPHIR 57
4.5 COURONNE VISSÉE 57
4.6 GARANTIE INTERNATIONALE 57
4.7 AUTHENTICITÉ 59
05. CENTRES DE SERVICES 60
43 | FR |
Page 23
02
CALIBRE
2.1
FONCTIONS : HEURES, MINUTES,
SECONDES, DATE, DEUXIÈME
FUSEAU HORAIRE
UTILISATION DE LA FONCTION GMT :
Le GMT est équipé d’une aiguille des
heures supplémentaire à flèche rouge,
qui se distingue instantanément de
l’aiguille des heures principale.
AL-550
GMT
Cette aiguille supplémentaire fait un tour
de cadran en 24 heures et représente
l’heure de référence. L’aiguille des
heures, qui représente l’heure locale,
peut être facilement réglée par sauts
d’une heure.
Vous partez en voyage : tirez la couronne
en position 2, et réglez votre heure de
référence, en fonction des graduations
du réhaut du cadran.
INSTRU
CTIONS
SPÉCI
FIQUES
44
Vous poussez ensuite la couronne pour
la mettre en position 1, et ainsi ajuster
par saut d’une heure l’aiguille principale
1
afin d’afficher l’heure du pays où vous
2
vous trouvez. Cette opération s’effectue
sans arrêter le mouvement mécanique,
et donc sans dérégler la montre.
Vous pouvez maintenant lire l’heure d’où
vous venez, sur une échelle de 24h, et
l’heure où vous êtes en un coup d’œil !
45 | FR |
Page 24
CALIBRE
AL-880
À COMPTE
2.2
FONCTIONS : HEURES, MINUTES, COMPTE À REBOURS DE 10 MINUTES
À REBOURS
1 1
4 4
Une minute écoulée. 7 minutes 30 écoulées.
COMPTE À REBOURS
Avant le lancement du compte à rebours, les 5 guichets sont de la même
couleur que le cadran. Chaque guichet
représente une minute.
Au coup de feu du commissaire de
course, lancez le décompte (pression
sur le bouton 1 ). Après 1 minute, le
premier guichet est devenu bleu, et les
4 suivants sont encore de la couleur du
cadran. Après 5 minutes, la trotteuse est
à midi, et les 5 guichets sont bleus. Le
commissaire tire à nouveau pour confirmer la poursuite du départ.
En cas d’arrêt du compte à rebours, il
suffit d’arrêter le décompte en appuyant
sur le bouton 4, et de le relancer lors
de la reprise du décompte, en appuyant
de nouveau sur le bouton 4. Après 6
minutes, le premier guichet est devenu
orange, et les 4 suivants sont encore
bleus. Après 9 minutes, 4 guichets sont
maintenant orange, et le bleu du dernier
guichet commence à disparaître. À vous
d’organiser le départ de votre navire
pour passer la ligne lorsque les 5 ronds
seront orange et la trotteuse à midi.
46
60
55
5
T
R
1
50
A
2
10
T
3
S
15
20
45
4
5
40
35
25
30
1
4
COMPTE À REBOURS
Avant le lancement du compte à rebours,
le disque tournant des 10 minutes est
gris et le 10 se trouve en bas entre les
indicateurs 45 et 40. Les premières 5
minutes sont affichées (du 6 au 10). Au
coup de feu du commissaire de course,
lancez le décompte (pression sur le bouton
1
). Après 1 minute, le 5 apparaît sur fond
bleu et le 10 disparaît. Après 5 minutes, la
trotteuse est à midi, et les 5 guichets sont
bleus. Le commissaire tire à nouveau pour
60
55
5
S
T
50
A
10
R
45
15
T
1
2
40
3
20
4
5
35
25
30
confirmer la poursuite du départ. En
cas d’arrêt du compte à rebours, il suffit
d’arrêter le décompte en appuyant sur
le bouton 4 , et de le relancer lors de
la reprise du décompte, en appuyant
de nouveau sur le bouton 4. Après
10 minutes, START apparaît. À vous
d’organiser le départ de votre navire pour
passer la ligne lorsque START apparaît
avec la trotteuse à midi.
47instructions spéciales | FR |
1
4
Page 25

2.2
PLANIFICATEUR TACTIQUE
Les montres Seastrong Yacht Timer sont
équipées d’un planificateur tactique,
sous la forme d’une ligne de départ
dessinée sur le cadran. Un « + » et un
« - » indiquent une position de départ
favorable ou défavorable à la bouée
de départ.Ce planificateur permet au
navigateur de prendre ses décisions
quant à son positionnement sur la ligne
de départ. Pour déterminer la meilleure
position sur la ligne de départ, utilisez
la boussole de la lunette de la manière
suivante :
- prenez la direction du vent avec votre
compas (anémomètre) ;
- tournez la lunette pour avoir l’angle du
vent à 12h ;
- naviguez du bateau de départ jusqu’à
la bouée de la ligne de départ afin de
déterminer l’orientation de la ligne de
départ ;
- regardez sur la lunette de votre montre
où est située l’orientation de la ligne
de départ. Si l’angle est situé entre 9h
et 12h, partir du côté de la bouée de
départ est plus favorable. Si cet angle
est situé entre 6h et 9h, partir du côté
du bateau de départ est plus favorable.
03
AUTRES
FONC
TIONS
48
49instructions spéciales | FR |
Page 26
Exemple 1
LUNETTE DE
PLONGÉE
3.1
Caractéristique clé des montres de
plongée Alpina, la lunette tournante
unidirectionnelle, qui tourne dans
le sens inverse des aiguilles d’une
montre, est utilisée pour contrôler la
durée d’immersion. Elle est dotée d’une
échelle graduée des minutes.
Son principe de fonctionnement est
à la fois très simple et très fiable. Au
début de chaque plongée, le zéro de
la lunette doit être aligné avec l’aiguille
des minutes. Un simple coup d’œil au
chiffre indiqué sur la lunette par l’aiguille
des minutes informe le plongeur à tout
moment du temps écoulé depuis le
début de la plongée (en minutes).
La rotation unidirectionnelle de la lunette
dans le sens inverse des aiguilles d’une
montre est une sécurité qui fait en sorte
que tout déplacement accidentel de la
lunette ne fera que réduire le temps de
plongée restant par rapport au temps
réel restant.
TOURNANTE
ÉCHELLES
DE
3.2
Les échelles de mesure établissent une
relation entre le temps écoulé et une
autre variable. Vitesse (tachymètre),
distance (télémètre) ou unités
(pulsomètre, jauges de productivité),
la valeur à calculer est déterminée
en comparant la position de l’aiguille
centrale des secondes du chronographe
et l’échelle correspondante, sur une
durée maximale de 60 secondes.
Concernant le télémètre, il est possible
d’utiliser le compteur des minutes en
ajoutant 20 km à la distance indiquée
par l’aiguille centrale des secondes à
chaque minute écoulée.
UTILISATION DE L’ÉCHELLE
TACHYMÉTRIQUE
Exemple 1 : calcul de la vitesse d’une
voiture. Déterminez le temps que met
une voiture pour parcourir un kilomètre
puis lisez la vitesse indiquée par l’aiguille
centrale des secondes du chronographe
sur l’échelle tachymétrique. Dans notre
exemple, la voiture roule à 90 km/h.
50
MESURE
UTILISATION DE L’ÉCHELLE TÉLÉMÉTRIQUE
Exemple 2 : calcul de la distance entre votre
position et un orage en approche.Lancez le
chronographe quand vous voyez un éclair.
Stoppez-le quand vous entendez le tonnerre.
Lisez la distance indiquée par l’aiguille centrale du chronographe sur l’échelle télémétrique. Dans notre exemple, l’orage est situé
à 5 km de votre position.
Exemple 2
3.3
Les montres Alpina sont dotées d’une
lunette tournant à 360 ° faisant office
de boussole et indiquant approximativement votre direction. Il s’agit d’une
fonctionnalité particulièrement utile
pour l’alpinisme ou les sports d’orientation et d’aventure.
MODE D’EMPLOI DE LA BOUSSOLE SUR LES MODÈLES ALPINER
4 CHRONOGRAPH ET ALPINER 4
GMT*
Précautions lors de l’utilisation de la
boussole :
- Ne pas utiliser la boussole dans des
situations où la précision est primordiale. La boussole ne donne qu’une
indication approximative de votre
orientation.
- Utilisez la boussole quand le soleil est
visible ou que sa position est connue.
- Votre montre doit être réglée sur
l’heure d’hiver. Si votre région est à
l’heure d’été, vous devez reculer votre
montre d’une heure avant d’utiliser la
boussole.
51autres fonctions | FR |
À 360 °
BOUSSOLE
Page 27

MODE D’EMPLOI :
1. DANS L’HÉMISPHÈRE NORD
- Faites tourner la lunette afin que le
nombre 36 (= 360 ° = nord) soit en
face de l’heure actuelle sur l’échelle des
24 heures.
- En gardant le cadran à l’horizontale,
orientez l’aiguille des heures dans la direction du soleil.
- La boussole est maintenant activée :
vous pouvez lire la direction à prendre sur
la lunette. Les nombres 36, 09, 18 et 27
indiquent respectivement le nord, l’est, le
sud et l’ouest.
EXEMPLE 1 : il est 8 heures là où vous
vous trouvez. Faites tourner la lunette afin
que le nombre 36 soit en face du 8 sur
l’échelle des 24 heures du cadran. Orientez maintenant l’aiguille des heures (en
gardant le cadran à l’horizontale) dans la
direction du soleil, puis utilisez la boussole.
EXEMPLE 2 : il est 18 heures là où vous
vous trouvez. Faites tourner la lunette afin
que le nombre 36 soit en face du 18 sur
l’échelle des 24 heures du cadran. Orientez maintenant l’aiguille des heures (en
gardant le cadran à l’horizontale) dans la
direction du soleil, puis utilisez la boussole.
2. DANS L’HÉMISPHÈRE SUD
- Faites tourner la lunette afin que le
nombre 18 (= 180 ° = sud) soit en
face de l’heure actuelle sur l’échelle des
24 heures.
- En gardant le cadran à l’horizontale,
orientez l’aiguille des heures dans la direction du soleil.
- La boussole est maintenant activée :
vous pouvez lire la direction à prendre sur
la lunette. Les nombres 36, 09, 18 et 27
indiquent respectivement le nord, l’est, le
sud et l’ouest.
EXEMPLE 1 : il est 8 heures là où vous
vous trouvez. Faites tourner la lunette afin
que le nombre 18 soit en face du 8 sur
l’échelle des 24 heures du cadran. Orientez maintenant l’aiguille des heures (en
gardant le cadran à l’horizontale) dans la
direction du soleil, puis utilisez la boussole.
EXEMPLE 2 : il est 18 heures là où vous
vous trouvez. Faites tourner la lunette afin
que le nombre 18 soit en face du 18 sur
l’échelle des 24 heures du cadran. Orientez maintenant l’aiguille des heures (en
gardant le cadran à l’horizontale) dans la
direction du soleil, puis utilisez la boussole.
* Si vous utilisez la montre Alpiner 4
GMT, vous pouvez également vous servir
de l’aiguille des 24 heures pour utiliser
la boussole. Dans ce cas, l’aiguille des
24 heures doit indiquer l’heure locale.
A) Dans l’hémisphère nord, faites tourner la
lunette afin que le nombre 36 (= nord) soit
en face de l’aiguille des 24 heures. Orientez
maintenant l’aiguille des heures (en gardant
le cadran à l’horizontale) dans la direction
du soleil, puis utilisez la boussole.
B) Dans l’hémisphère sud, faites tourner la
lunette afin que le nombre 18 (= sud) soit
en face de l’aiguille des 24 heures. Orientez
ensuite l’aiguille des heures (en gardant le
cadran à l’horizontale) dans la direction du
soleil puis utilisez la boussole.
MODE D’EMPLOI DE LA BOUSSOLE
SUR LE MODÈLE SEASTRONG YACHT
TIMER
1. DANS L’HÉMISPHÈRE NORD
- Faites tourner la lunette afin que le « S »
(= sud) soit au milieu de l’arc imaginaire
entre l’index 60 (= 12 heures) et l’aiguille
des heures.*
* Entre minuit et midi, placez le « S » à
gauche de l’index 60 (= 12 heures) et à
droite entre midi et minuit.
- En gardant le cadran à l'horizontale,
orientez l'aiguille des heures dans la
direction du soleil.
- La boussole est maintenant activée :
vous pouvez lire la direction à prendre
sur la lunette. Le triangle de l’index 60,
l’index 90, le « S » et l’index 270 indiquent
respectivement le nord, l’est, le sud et
l’ouest.
EXEMPLE 1 : il est 10 heures là où vous
vous trouvez. Faites tourner la lunette afin
que le « S » soit en face du chiffre 5 sur le
cadran (= à mi-chemin entre 12 heures et
l’aiguille des heures). Orientez maintenant
l’aiguille des heures (en gardant le cadran à
l’horizontale) dans la direction du soleil puis
utilisez la boussole.
EXEMPLE 2 : il est 18 heures là où vous
vous trouvez. Faites tourner la lunette afin
que le « S » soit en face du nombre 45
(= 3 heures) sur le cadran (= à mi-chemin
entre 12 et 6 heures). Orientez maintenant
l’aiguille des heures (en gardant le cadran à
l’horizontale) dans la direction du soleil puis
utilisez la boussole.
52
53autres fonctions | FR |
Page 28

3.4
ANTIMAGNÉTISME
Les champs magnétiques peuvent
avoir de lourdes conséquences sur
la précision de votre montre. Ils sont
émis par de nombreuses sources
différentes, comme les téléphones
mobiles, les iPads, les ordinateurs,
les haut-parleurs, les réfrigérateurs et
autres appareils électroniques. Plus le
champ magnétique est puissant, plus
les conséquences sont graves pour
votre montre. Toutes les montres Alpina
portant le chiffre 4 (notamment l’Alpiner
4), sont antimagnétiques. Cela signifie
qu’elles subissent une déviation minimale
quand elles sont exposées à un champ
magnétique d’une certaine intensité.
Les garde-temps antimagnétiques
Alpiner 4 sont conformes à la norme
internationale ISO 764 qui définit la
résistance des montres aux champs
magnétiques. Selon cette norme, une
montre doit résister à une exposition
directe à un champ magnétique de
4 800 A/m. Elle doit garder une précision
de ± 30 secondes/jour par rapport
aux mesures avant test afin d’être
considérée comme résistante aux
champs magnétiques.
54
04
ENTRETIEN
ET
GARANTIE
55autres fonctions | FR |
Page 29
PRENDRE
SOIN DE
VOTRE
4.1
NOUS VOUS INVITONS À SUIVRE LES RECOMMANDATIONS CI-DESSOUS
POUR VOUS ASSURER QUE VOTRE MONTRE ALPINA VOUS ACCOMPAGNE
FIDÈLEMENT ET AVEC EXCELLENCE PENDANT PLUSIEURS ANNÉES.
1
Baignade en mer : veillez à bien rincer
votre montre à l’eau claire immédiatement après chaque baignade.
Magnétisme : évitez de placer votre
2
montre sur un iPad, un ordinateur,
un haut-parleur, un téléphone mobile
ou un réfrigérateur. Ces appareils génèrent de puissants champs magnétiques pouvant affecter la précision de
votre montre.
3
Chocs : plusieurs types de chocs
(chimique, thermique, physique, magnétique, etc.) peuvent affecter votre
montre. Veillez à les éviter.
MONTRE
ALPINA
4
Couronnes vissées : pour empêcher
l’eau ou l’humidité de pénétrer dans le
boîtier, veillez à bien visser la couronne
à fond contre le boîtier. N’utilisez pas
les boutons poussoirs du chronographe sous l’eau.
5
Couronnes normales : pour empêcher
l’eau ou l’humidité de pénétrer dans
le boîtier, assurez-vous de bien repousser la couronne contre le boîtier.
N’utilisez pas les boutons poussoirs du
chronographe sous l’eau.
6
Entretien et nettoyage des bracelets
en métal, en caoutchouc et des boîtiers étanches en métal : nettoyez-les
avec de l’eau savonneuse et une
brosse à dents. Séchez avec un chiffon doux.
56
Produits chimiques : évitez tout contact
7
direct avec des agents nettoyants
chimiques, des solvants, des détergents, des cosmétiques et autres
produits chimiques pouvant endommager le boîtier, le bracelet ou les
joints en caoutchouc.
Température : évitez toute exposition à
8
des températures supérieures à 60 °C
ou inférieures à 0 °C. Évitez également
les variations extrêmes de température
(par exemple : plonger votre montre
dans l’eau glacée après l’avoir longuement exposée au soleil).
Étanchéité : l’étanchéité d’une montre
9
ne peut être garantie dans toutes les
situations ou indéfiniment. Elle peut
être affectée par un choc au niveau de
la couronne, le vieillissement des joints
(dû, par exemple, à l’action de produits
chimiques), etc.
RÉVISIONS
ET
FRÉQUENCE
4.2
Comme pour tout instrument mécanique
de précision, il est important de faire réviser régulièrement votre montre afin de
garantir son bon fonctionnement. En général, et selon la façon et les conditions
dans lesquelles vous utilisez votre montre,
nous vous conseillons de procéder à cette
opération tous les 4 à 5 ans.
Vous trouverez une liste de nos revendeurs
officiels et de nos Centres de services sur
www.alpina-watches.com.
MONTRES MÉCANIQUES
Le balancier d’une montre Alpina possède
une fréquence de 28 800 alternances par
heure et le train d’engrenage se déplace
691 200 fois en 24 heures. Sur quatre ans,
cela représente un total de plus d’un milliard d’impulsions ! Nous vous conseillons
de déposer votre montre tous les 3 à 4 ans
chez un revendeur ou dans un Centre de
services officiel Alpina, où un horloger
qualifié inspectera avec soin votre gardetemps avant de nettoyer minutieusement
et de lubrifier le mouvement.
57entretien et garantie | FR |
DES RÉVISIONS
Page 30

ÉTANCHÉITÉ
L’étanchéité de votre montre a été déterminée et vérifiée lors de sa fabrication
dans nos ateliers. Ceci ne garantit pas
une protection à vie contre l’infiltration
d’eau dans le boîtier. Votre montre n’est
étanche que quand la couronne est complètement repoussée contre le boîtier. S’il
s’agit d’une couronne vissée, elle doit
être vissée à fond contre le boîtier. Votre
montre n’est pas étanche si la couronne
est en position de réglage ou de remontage. De même, les boutons poussoirs ne
doivent pas être utilisés quand la montre
est mouillée ou immergée dans l’eau.
Le vieillissement et les manipulations
quotidiennes habituelles de votre montre
affectent son étanchéité. Évitez les températures extrêmes (immerger la montre
dans l’eau froide après une période d’exposition prolongée au soleil) pouvant endommager les joints, ainsi que les autres
chocs (chimiques, physiques, etc.) pouvant compromettre l’intégrité technique
du boîtier. Nous vous conseillons de déposer votre montre chez un revendeur ou
dans un Centre de services officiel Alpina
pour faire vérifier son étanchéité tous les
2 à 3 ans.
ENTRETIEN
DES BRACELETS EN
4.3
Nous vous recommandons de suivre les
conseils suivants afin que votre bracelet en
cuir dure aussi longtemps que possible :
1
Évitez tout contact avec l’eau ou l’humi-
dité pour empêcher sa décoloration et
sa déformation.
Évitez les expositions prolongées au
2
soleil pour empêcher sa décoloration.
Évitez tout contact avec des subs-
3
tances grasses, des produits cosmétiques ou tout autre agent chimique.
Le cuir est un matériau vivant et perméable qui ne conservera pas éternellement son état d’origine. Toutefois, si
vous suivez les conseils ci-dessus, il
conservera un aspect optimal durant de
nombreuses années. Vous pouvez faire
remplacer votre bracelet en cuir chez un
revendeur officiel Alpina.
CUIR
TRAITEMENT
ANTIREFLETS SUR
4.4
Le traitement antireflets sur le verre
saphir améliore la visibilité et le
contraste du cadran de votre montre.
Un usage quotidien normal, l’usure
et le vieillissement peuvent entraîner
l’apparition de marques sur le revêtement
antireflets. Il s’agit de marques normales
qui ne sont pas couvertes par la garantie.
LE VERRE
SAPHIR
COURONNE
4.5
Certaines montres Alpina possèdent une
couronne vissée qui doit être dévissée
pour régler l’heure ou la date. Après
manipulation, la couronne doit être
repoussée contre le boîtier et vissée
à fond. Dans le cas contraire, cela
compromet l’étanchéité de votre montre.
VISSÉE
GARANTIE
INTERNA-
4.6
Votre montre Alpina est garantie
pendant deux ans (24 mois) à compter
de la date d’achat. Ceci couvre tous
les défauts de fabrication apparaissant
pendant un usage normal, comme décrit
dans les conditions suivantes : Alpina
Watch International S.A. remplacera
gratuitement tous les composants
défectueux dus à une erreur de
fabrication constatée par nos services
techniques. Votre montre est sous
garantie pendant une période de deux
ans à compter de la date indiquée sur le
certificat de garantie signé et tamponné
par un revendeur agréé Alpina.
TIONALE
58
59entretien et garantie | FR |
Page 31

LA GARANTIE INTERNATIONALE
N’EST PAS APPLICABLE DANS LES
CAS SUIVANTS :
Le vol, la perte, les cas de force ma-
1
jeure ou les conséquences des catastrophes naturelles.
La durée de vie de la pile.
2
L’usure et le vieillissement normaux de
3
la montre (par exemple : verre rayé,
altération de la couleur et/ou du matériau des bracelets et chaînes non métalliques, comme le cuir, le textile ou le
caoutchouc, décollement des métaux
plaqués, etc.).
Tous les types de dommages sur toute
4
ou une partie de la montre résultant
d’une mauvaise manipulation ou d’un
mauvais usage, d’un manque d’entretien, d’une négligence, d’un accident
(chute, éraflure, écrasement, verre brisé, etc.), d’une utilisation incorrecte de
la montre ou du non respect du mode
d’emploi fourni par Alpina.
Tous les types de dommages indirec-
5
tement liés ou consécutifs à l’usure
normale de la montre, comme par
exemple le non fonctionnement, les
défauts ou les imprécisions de la
montre Alpina.
Les défauts ou les dommages résultant
6
de la manipulation ou de la modification
ou de la modification de la montre par
un tiers autre qu’un Centre de services
agréé Alpina (par exemple : remplacement de la pile, révisions ou réparations), ou d’une modification de son
état d’origine dépassant le contrôle
d’Alpina.
L’utilisation de piles non recomman-
7
dées par Alpina.
Cette garantie n’est valable que pour les
montres-bracelets accompagnées d’un
certificat de garantie dûment signé, daté
et tamponné par un revendeur agréé Alpina. Le numéro de référence et le numéro
d’immatriculation individuel de la montre
Alpina doivent être inscrits sur le certificat.
Toute révision ou réparation effectuée sur
votre montre Alpina doit être réalisée par
un Centre de réparation et de services
agréé Alpina afin que la garantie internationale reste valide. La garantie internationale n’annule, ne restreint ni n’affecte de
quelque manière que ce soit les droits et
les privilèges des consommateurs reconnus par le pays dans lequel a été achetée
la montre Alpina.
60
4.7
Il nous est souvent demandé de vérifier
si une montre Alpina est authentique.
Les revendeurs agréés Alpina attestent
de l’authenticité de toutes les montres
Alpina et fournissent des services aprèsvente fiables grâce à leur expertise
professionnelle et à un équipement
spécialement adapté.
Alpina Watch International S.A. réfute tout
lien avec ou responsabilité envers les
montres ou autres objets portant le nom,
la marque, le logo ou le symbole Alpina et
mis en vente par une personne autre qu’un
revendeur agréé Alpina.
Acheter un tel objet auprès d’un tiers non
autorisé se fait ainsi aux risques et périls
de l’acheteur uniquement, en particulier
dans le cas de produits contrefaits, de
mauvaise qualité ou achetés sur Internet.
AUTHENTICITÉ
Aucune garantie ou révision implicite
ou explicite, ni aucune autre obligation
ne sont requises d’Alpina ou de ses
représentants autorisés concernant les
produits vendus par des tiers non agréés
ou non accompagnés d’un certificat de
garantie internationale Alpina dûment
tamponné.
Pour les raisons ci-dessus et dans votre
propre intérêt, nous vous encourageons
à n’acquérir que des montres Alpina
authentiques, disponibles exclusivement
auprès de nos revendeurs agréés Alpina.
Pour obtenir une liste actualisée de nos
centres de services et revendeurs agréés,
veuillez consulter notre site officiel : www.
alpina-watches.com
61entretien et garantie | FR |
Page 32

05
CENTRES
DE
SERVICES
62 63 | FR |
Pour obtenir une liste actualisée de nos centres de services et revendeurs
agréés, veuillez consulter notre site officiel : www.alpina-watches.com
Page 33

Spezielle Bedienungshinweise
IN
HALT
64
02. SPEZIELLE
BEDIENUNGSHINWEISE
2.1 KALIBER AL-550 GMT 65
2.2 KALIBER AL-880
AUTOMATIKWERK MIT
COUNTDOWN-FUNKTION 66
03. ANDERE FUNKTIONEN
3.1 DREHBARE TAUCHERLÜNETTE 70
3.2 GRÖSSENWERTSKALA 70
3.3 360° DREHBARE KOMPASSLÜNETTE 71
3.4 ANTIMAGNETISMUS 74
04. PFLEGEHINWEISE &
GARANTIE
4.1 DIE PFLEGE IHRER ALPINA-UHR 76
4.2 WARTUNG UND
WARTUNGSZEITRÄUME 77
4.3 PFLEGE VON LEDERARMBÄNDERN 78
4.4 ENTSPIEGELUNG DES
SAPHIRGLASES 79
4.5 VERSCHRAUBTE KRONE 79
4.6 INTERNATIONALE GARANTIE 79
4.7 ECHTHEIT 81
05. KUNDENDIENSTZENTREN 82
65 | DE |
Page 34

02
SPEZIELLE
BEDIENUNG
SHINWEISE
66 67 | DE |
KALIBER
2.1
FUNKTIONEN: STUNDEN, MINUTEN,
SEKUNDEN, DATUM, GMT (ZWEITE
ZEITZONE)
VERWENDUNG DER GMT-FUNKTION:
Das GMT-Modell ist mit einem
zusätzlichen Stundenzeiger mit roter
Spitze ausgestattet, der sich deutlich
vom Hauptstundenzeiger unterscheidet.
AL-550
GMT
Dieser zusätzliche Zeiger dreht sich einmal alle 24 Stunden um das Zifferblatt und
zeigt die Heimatzeit an. Der Stundenzeiger
für die Ortszeit kann einfach durch Stundensprünge korrigiert werden.
Sie gehen auf Reisen: Ziehen Sie die Krone
in Position 2 und stellen Sie die Heimatzeit
im Einklang mit den Einteilungen auf dem
Höhenring des Zifferblatts ein.
Drücken Sie anschließend die Krone in
Position 1, um den Hauptzeiger in Stundenschritten einzustellen und die Uhrzeit
in dem Land anzuzeigen, in dem Sie sie
1
aktuell befinden. Bei diesem Vorgang wird
2
das mechanische Uhrwerk nicht angehalten und die Uhr muss nicht nachreguliert werden.
Jetzt können Sie auf einen Blick von der
24-Stundenskala die Uhrzeit in Ihrem Heimatland sowie auf dem Hauptzifferblatt die
Uhrzeit an Ihrem Aufenthaltsort ablesen.
Page 35

KALIBER
AL-880
AUTOMATIKWERK MIT
2.2
FUNKTIONEN: STUNDEN, MINUTEN, 10-MINUTEN-COUNTDOWN
COUNTDOWN-FUNKTION
1 1
4 4
Eine Minute verstrichen. 7 Minuten 30 Sekunden verstrichen.
COUNTDOWN
Vor dem Start des Countdowns haben die
fünf Zifferblattöffnungen dieselbe Farbe
wie das Zifferblatt. Jede Öffnung entspricht
einer Minute. Starten Sie den Countdown
durch eine Betätigung des Drückers
, sobald der Startschuss eines Rennens
ertönt. Nach einer Minute ist die erste Öffnung blau, die vier anderen jedoch sind
weiterhin in der Farbe des Zifferblatts.
Nach fünf Minuten zeigt der Sekundenzeiger auf 12 Uhr, und alle fünf Öffnungen
sind blau. Es folgt ein weiterer Schuss, um
zu bestätigen, dass das Rennen beginnt.
Zum Stoppen des Countdowns genügt
eine Betätigung des Drückers 4. Eine weitere Betätigung dieses Drückers 4 führt
zu einer Wiederaufnahme des Laufs. Nach
1
6 Minuten ist die erste Öffnung orange,
und die 4 anderen sind noch blau. Nach
9 Minuten sind 4 Öffnungen orange, und
das Blau der letzten Öffnung verschwindet
langsam. Jetzt können Sie den Start Ihres
Bootes durchführen, um die Linie zu überfahren, sobald die 5 Rundungen orange
sind und sich der Sekundenzeiger bei 12
befindet.
68 69Spezielle Bedienungshinweise | DE |
60
55
5
T
R
1
50
A
2
10
T
3
S
15
20
45
4
5
40
35
25
30
1
4
COUNTDOWN
Vor dem Aktivieren des Countdowns ist
die 10-Minuten-Drehscheibe grau, und die
10 befindet sich unten zwischen den Indikatoren 45 und 40. Die ersten 5 Minuten
werden angezeigt (von 6 bis 10). Aktivieren Sie den Countdown beim Startschuss,
indem Sie den Drücker 1 betätigen. Nach
1 Minute erscheint die 5 vor blauem Hintergrund, und die 10 verschwindet. Nach
5 Minuten steht der Sekundenzeiger auf
12 Uhr, und alle fünf Öffnungen sind blau.
Es folgt ein weiterer Startschuss, um den
60
55
5
S
T
50
A
10
R
45
15
T
1
2
40
3
20
4
5
35
25
30
anstehenden Start zu bestätigen. Bei einer
Unterbrechung des Countdowns genügt
es, den Drücker 4 zu betätigen, um den
Zählvorgang zu stoppen. Durch ein erneutes Betätigen des Drückers 4 wird der
Countdown wieder in Gang gesetzt. Nach
10 Minuten erscheint die Anzeige START.
Jetzt können Sie mit Ihrem Boot den Start
über die Startlinie organisieren, sobald
START zusammen mit dem Sekundenzeiger bei 12 Uhr angezeigt wird.
1
4
Page 36

2.2
TAKTISCHEN PLANER
Die Alpina Seastrong Yacht Timer ist mit
einem taktischen Planer in Form einer
Startlinie auf dem Zifferblatt ausgestattet.
Ein „+“ und ein „-“ zeigen eine günstige
oder ungünstige Startposition an der
Startboje an.Dank dieses Planers kann
der Segler Entscheidungen treffen hinsichtlich seiner Position an der Startlinie.
Um die beste Position an der Startlinie
zu bestimmen, verwenden Sie den Kompass der Lünette wie folgt:
- Bestimmen Sie mit Ihrem Kompass
(Anemometer) die Windrichtung.
- Drehen Sie die Lünette, um den Windwinkel auf 12 Uhr zu positionieren.
- Gehen Sie vom Startschiff bis zur Boje
an der Startlinie, um die Ausrichtung
der Startlinie zu bestimmen.
- Blicken Sie auf die Lünette Ihrer Uhr,
auf der die Ausrichtung der Startlinie
verzeichnet ist. Befindet sich der Winkel
zwischen 9 und 12 Uhr, empfiehlt sich
ein Start in der Nähe der Startboje. Befindet sich der Winkel jedoch zwischen
6 und 9 Uhr, ist ein Start vom Startschiff
aus günstiger.
03
ANDERE
FUNK
TIONEN
Pflegehinweise & Garantie
70
71
| DE |
Page 37

DREHBARE
TAUCHERLÜ-
3.1
Ein wesentliches Merkmal aller Alpina
Taucheruhren ist die einseitig gegen den
Uhrzeigersinn drehbare Lünette, die zur
Überwachung der Zeit unter Wasser dient.
Die Lünette ist mit einer Minutenskala ausgestattet.
Das Funktionsprinzip der Lünette ist ebenso einfach wie zuverlässig. Zu Beginn jedes
Tauchgangs muss die Null auf der Lünette
auf den Minutenzeiger abgestimmt werden.
Sobald der Taucher auf einen Blick die Position des Minutenzeigers im Verhältnis zur
Null auf der Lünette erfasst, weiß er, wie viel
Zeit vergangen ist, seit er ins Wasser eingetaucht ist (in Minuten).
Die einseitige Drehbarkeit der Lünette
entgegen dem Uhrzeigersinn ist eine Sicherheitsvorkehrung, um zu gewährleisten,
dass bei einem unbeabsichtigten Bewegen
des Rings die verbleibende Tauchzeit im
Verhältnis zur tatsächlich verbleibenden
Tauchzeit reduziert wird.
Andere Funktionen
NETTE
3.2
Mit Größenwertskala werden Verbindungen zwischen einer verstrichenen Zeit und
einer anderen Variablen hergestellt. Die
gewünschte Information bezüglich der
Geschwindigkeit (Tachymeter), Distanz
(Telemeter) oder einer Einheit (Pulsometer,
Produktivitätsmesser) lässt sich mithilfe des
zentralen Sekundenzeigers des Chronographen und der entsprechenden Skala
ablesen. Die Maximalzeit beträgt 60 Sekunden. Beim Telemeter kann zusätzlich der
Minutenzähler herangezogen werden. Hierbei werden für jede verstrichene Minute 20
km zu der vom zentralen Sekundenzeiger
angegebenen Distanz hinzugerechnet.
VERWENDUNG DER TACHYMETERSKALA
Beispiel 1: Berechnung der Geschwindig-
keit eines Autos Messen Sie die Zeit, die
das Auto benötigt, um 1 km zurückzulegen.
Lesen Sie die vom zentralen Sekundenzeiger des Chronographen angegebene
Geschwindigkeit von der Tachymeterskala
ab. In unserem Beispiel fährt das Auto mit
90 km/h.
72
WERTSKALA
GRÖSSEN-
Example 1
VERWENDUNG DER TELEMETERSKALA
Beispiel 2 : Berechnung der Distanz zwischen
Ihrer Position und einem aufziehenden Sturm
Starten Sie den Chronographen, wenn Sie
einen Blitz sehen, und stoppen Sie ihn, sobald es donnert. Lesen Sie die vom zentralen
Chronographenzeiger auf der Telemeterskala
angezeigte Distanz ab. In unserem Beispiel ist
der Sturm 5 km entfernt.
Example 2
360° DREHBARE KOMPASSLÜN-
3.3
Alpina-Uhren, die mit einer um 360° drehbaren Kompasslünette ausgestattet sind,
können ungefähre Richtungen bestimmen – eine besonders nützliche Funktion
für Orientierungssportarten, den alpinen
Sport oder andere Herausforderungen.
BEDIENUNGSANLEITUNG FÜR DEN
KOMPASS DES ALPINER 4 CHRONOGRAPHEN UND DER ALPINER 4
GMT*
Hinweise zur Verwendung einer Kompasslünette:
- Verwenden Sie den Kompass nicht in
Situationen, in denen absolute Genauigkeit lebensnotwendig ist. Der Kompass
gibt nur die ungefähre Richtung an.
- Verwenden Sie den Kompass, wenn
die Sonne zu sehen oder ihre Position
bekannt ist.
- Ihre Uhr muss auf die Winterzeit eingestellt sein. Wenn an Ihrem Aufenthaltsort
gerade Sommerzeit herrscht, müssen
Sie Ihre Uhr um eine Stunde zurückstellen, bevor Sie die Kompasslünette
benutzen.
73
ETTE
| DE |
Page 38

BEDIENUNGSANLEITUNG:
1. AUF DER NÖRDLICHEN HALBKUGEL
- Stellen Sie die „36“ (= 360° = Norden)
auf der drehbaren Kompasslünette gegenüber der aktuellen Uhrzeit auf dem
24-Stundenring ein.
- Halten Sie das Zifferblatt waagerecht und
drehen Sie den Stundenzeiger in Richtung der Sonne.
- Jetzt ist der Kompass aktiviert, und Sie
können die Richtungen von der drehbaren Kompasslünette ablesen. Die 36,
09, 18 und 27 stehen jeweils für Norden,
Osten, Süden und Westen.
BEISPIEL 1: In Ihrer Zeitzone ist es 8 Uhr
morgens. Setzen Sie die Nr. 36 gegenüber
der 8 auf der 24-Stundenskala auf dem
Zifferblatt. Lassen Sie jetzt – bei waagerechtem Zifferblatt – den Stundenzeiger in
Richtung der Sonne zeigen, und der Kompass ist aktiviert.
BEISPIEL 2: In Ihrer Zeitzone ist es 18.00
Uhr. Setzen Sie die Nr. 36 gegenüber
der 18 auf der 24-Stundenskala auf dem
Zifferblatt. Lassen Sie jetzt – bei waagerechtem Zifferblatt – den Stundenzeiger in
Richtung der Sonne zeigen, und der Kompass ist aktiviert.
Andere Funktionen
2. AUF DER SÜDLICHEN HALBKUGEL
- Stellen Sie die „18“ (= 180° = Süden)
auf der drehbaren Kompasslünette gegenüber der aktuellen Uhrzeit auf dem
24-Stundenring ein.
- Halten Sie das Zifferblatt waagerecht und
drehen Sie den Stundenzeiger in Richtung der Sonne.
- Jetzt ist der Kompass aktiviert, und Sie
können die Richtungen von der drehbaren Kompasslünette ablesen. Die 36,
09, 18 und 27 stehen jeweils für Norden,
Osten, Süden und Westen.
BEISPIEL 1: In Ihrer Zeitzone ist es 8 Uhr
morgens. Setzen Sie die Nr. 18 gegenüber
der 8 auf der 24-Stundenskala auf dem
Zifferblatt. Lassen Sie jetzt – bei waagerechtem Zifferblatt – den Stundenzeiger in
Richtung der Sonne zeigen, und der Kompass ist aktiviert.
BEISPIEL 2: In Ihrer Zeitzone ist es 18.00
Uhr. Setzen Sie die Nr. 18 gegenüber
der 18 auf der 24-Stundenskala auf dem
Zifferblatt. Lassen Sie jetzt – bei waagerechtem Zifferblatt – den Stundenzeiger in
Richtung der Sonne zeigen, und der Kompass ist aktiviert.
74
*Bei der Alpiner 4 GMT können Sie ebenfalls den 24-Stundenzeiger zur Bedienung
des Kompasses verwenden. In diesem Fall
muss der 24-Stundenzeiger die Ortszeit
anzeigen.
A) Setzen Sie auf der nördlichen Halbkugel die „36“ (= Norden) gegenüber dem
24-Stundenzeiger. Lassen Sie jetzt – bei
waagerechtem Zifferblatt – den Stundenzeiger in Richtung der Sonne zeigen, und der
Kompass ist aktiviert.
B) Setzen Sie auf der nördlichen Halbkugel die „18“ (= Süden) gegenüber dem
24-Stundenzeiger. Lassen Sie jetzt – bei
waagerechtem Zifferblatt – den Stundenzeiger in Richtung der Sonne zeigen, und der
Kompass ist aktiviert.
BEDIENUNGSANLEITUNG FÜR DEN
KOMPASS DER SEASTRONG YACHT
TIMER
1. AUF DER NÖRDLICHEN HALBKUGEL
- Setzen Sie das „S“ (= Süden) auf der
drehbaren Kompasslünette in die Mitte
des Rundbogens zwischen die „60“-Markierung (= 12 Uhr) und den Stundenzeiger.*
*Positionieren Sie das „S“ in der Zeit
zwischen Mitternacht und 12 Uhr mittags
linksseitig der „60“-Markierung (= 12 Uhr)
und in der Zeit zwischen 12 Uhr mittags
und Mitternacht rechtsseitig der „60“-Markierung (= 12 Uhr).
- Halten Sie das Zifferblatt waagerecht und
lassen Sie den Stundenzeiger in Richtung
Sonne zeigen.
- Der Kompass ist jetzt aktiviert, und Sie
können die Richtungen von der drehbaren
Kompasslünette ablesen. Das Dreieck bei
„60“, die „90“-Markierung, das S und die
„270“-Markierung stehen jeweils für Norden, Osten, Süden und Westen.
BEISPIEL 1: In Ihrer Zeitzone ist es 10.00
Uhr morgens. Positionieren Sie das „S“
gegenüber der „5“ auf dem Zifferblatt (auf
halben Weg zwischen 12 Uhr und dem
Stundenzeiger). Lassen Sie jetzt – bei waagerechtem Zifferblatt – den Stundenzeiger
in Richtung der Sonne zeigen, und der
Kompass ist aktiviert.
BEISPIEL 2: In Ihrer Zeitzone ist es 18.00
Uhr abends. Setzen Sie das „S“ gegenüber der „45“ (= 3 Uhr) auf dem Zifferblatt
(auf halben Weg zwischen 12 Uhr und 6
Uhr). Lassen Sie jetzt – bei waagerechtem
Zifferblatt – den Stundenzeiger in Richtung
der Sonne zeigen, und der Kompass ist
aktiviert.
75
| DE |
Page 39

3.4
ANTIMAGNETISMUS
Magnetfelder können die Ganggenauigkeit Ihrer Uhr deutlich beeinflussen. Zu
den häufigsten Quellen für Magnetfelder
zählen Mobiltelefone, iPads, Computer,
Lautsprecher, Kühlschränke und andere
elektronische Geräte. Je stärker das
Magnetfeld, desto höher ist der Einfluss
auf Ihre Uhr. Alle Alpina-Uhren, die die
Ziffer 4 in ihrem Namen tragen – wie
bspw. die „Alpiner 4“ – sind antimagnetisch. Das bedeutet, dass sie nur minimal abweichen, wenn sie einer bestim-
Andere Funktionen
mten Magnetfeldstärke ausgesetzt sind.
Die antimagnetischen „Alpina 4“-Uhren
erfüllen die Kriterien der ISO-Norm 764,
in der die Widerstandskraft von Uhren
gegenüber Magnetfeldern festgelegt
ist. Laut ISO 764 muss eine Uhr unempfindlich gegenüber einem direkten
Magnetfeld von 4.800 A/m sein. Um als
antimagnetische Uhr gekennzeichnet zu
werden, darf ihre Ganggenauigkeit maximal +/- 30 Sekunden zwischen vor und
nach dem Test nicht überschreiten.
76
04
PFLEGEHIN
WEISE
& GARANTIE
77
| DE |
Page 40

DIE PFLEGE
IHRER ALPI-
4.1
BITTE HALTEN SIE SICH AN DIE FOLGENDEN EMPFEHLUNGEN, UM
SICHERZUSTELLEN, DASS IHRE ALPINA-UHR SIE IM LAUFE DER JAHRE
ZUVERLÄSSIG UND PRÄZISE BEGLEITET.
1
Schwimmen in Salzwasser: Achten
Sie darauf, Ihre Uhr gleich nach dem
Schwimmen unter Leitungswasser abzuspülen.
Magnetismus: Vermeiden Sie, Ihre Uhr
2
auf iPads, Computern, Lautsprechern,
Mobiltelefonen oder Kühlschränken
abzulegen, da diese Geräte starke
Magnetfelder umgeben, die sich auf
die Ganggenauigkeit Ihrer Uhr auswirken können.
3
Schocks: Verschiedene chemische,
thermische, physikalische, magnetische oder andere Schocks können
Ihre Uhr beschädigen und sollten vermieden werden.
4
Verschraubte Krone: Um das Eindrin-
gen von Wasser oder Feuchtigkeit in
Pflegehinweise & Garantie
NA-UHR
das Gehäuse zu vermeiden, vergewissern Sie sich, dass die Krone immer
fest an das Gehäuse angeschraubt ist.
Betätigen Sie die Chronographendrücker nicht unter Wasser.
5
Klassische Krone: Um das Eindringen
von Wasser oder Feuchtigkeit in das
Gehäuse zu vermeiden, vergewissern
Sie sich, dass die Krone immer in die
Trageposition zurückgedrückt ist.
Betätigen Sie die Chronographendrücker nicht unter Wasser.
6
Pflege und Reinigung von Metall- und
Kautschukarmbändern und von wasserdichten Metallgehäusen: Reinigen
Sie sie mit Seifenwasser und einer
sanften Zahnbürste und trocknen Sie
sie anschließend mit einem weichen
Tuch.
78
Chemikalien: Vermeiden Sie direkten
7
Kontakt mit chemischen Reinigungsmitteln, Lösungsmitteln, Waschmitteln,
Kosmetika oder anderen chemischen
Produkten, da sie das Gehäuse, das
Armband oder die Dichtungsringe
beschädigen können.
Temperatur: Vermeiden Sie Tempera-
8
turen von über 60 °C und unter 0 °C
sowie extreme Temperaturschwankungen wie ein Eintauchen der Uhr in
kaltes Wasser, nachdem sie über
einen längeren Zeitraum der Sonne
ausgesetzt war.
Wasserdichtigkeit: Die Wasserdichtig-
9
keit einer Uhr kann nicht in jeder Situation und auf unbestimmte Zeit garantiert werden. Durch Erschütterungen
der Krone oder den Verschleiß der Dichtungsringe (bspw. durch chemische
Produkte) kann die Wasserdichtigkeit
beeinträchtigt werden.
WARTUNG
UND WARTUNGSZEI-
4.2
Wie jedes mechanische Präzisionsgerät
muss auch eine Uhr regelmäßig gewartet
werden, um sicherzustellen, dass sie die
Zeit korrekt anzeigt. Allgemein und je nach
Häufigkeit und Art der Verwendung Ihrer
Uhr empfiehlt es sich, diese alle 4 bis 5
Jahre warten zu lassen.
Eine Liste mit unseren offiziellen Händlern
und Kundendienstzentren finden Sie auf
www.alpina-watches.com
MECHANISCHE UHREN
Die Unruh einer automatischen Alpina-Uhr schwingt 28.800 Mal pro Stunde,
und das Räderwerk vollführt 691.200
Vorwärtsschritte innerhalb von 24 Stunden.
Daraus ergeben sich in vier Jahren über 1
Milliarde Impulse!
Wir empfehlen Ihnen, Ihre Uhr alle 3 bis
4 Jahre von einem offiziellen Alpina-Händler oder Kundendienstzentrum warten zu
lassen. Dort wird sie von einem erfahrenen
Uhrmacher mit höchster Sorgfalt untersucht, bevor er das Uhrwerk gründlich
reinigt und schmiert.
79
TRÄUME
| DE |
Page 41

WASSERDICHTIGKEIT
Die Wasserdichtigkeit Ihrer Uhr wurde bei
der Herstellung in unseren Werkstätten bestimmt und überprüft. Allerdings besteht keine
lebenslange Garantie, die die Uhr vor dem
Eindringen von Wasser schützt. Ihre Uhr
ist nur dann wasserdicht, wenn die Krone
vollständig an das Gehäuse angedrückt
ist. Bei einer verschraubten Krone muss
diese fest in das Gehäuse eingeschraubt
sein. Befindet sich die Krone in der Aufzugs- oder. Zeiteinstellungsposition, ist die
Uhr nicht wasserdicht. Dasselbe gilt für die
Drücker, die nicht betätigt werden dürfen,
wenn die Uhr feucht oder unter Wasser
ist. Durch Alterung und den alltäglichen
Verschleiß wird die Wasserdichtigkeit Ihrer
Uhr beeinträchtigt. Vermeiden Sie extreme
Temperaturschwankungen – bspw. durch
das Eintauchen der Uhr in kaltes Wasser,
nachdem sie eine längere Zeit in der heißen
Sonne lag –, da dadurch die Dichtungsringe beschädigt werden können. Dasselbe
gilt für chemische, physische oder andere
Schocks, die zu einer Beeinträchtigung der
technischen Integrität des Gehäuses führen
können. Wir empfehlen Ihnen, die Wasserdichtigkeit Ihrer Uhr alle 2 bis 3 Jahre von
einem offiziellen Alpina-Händler oder einem
Kundendienstzentrum überprüfen zu lassen.
Pflegehinweise & Garantie
PFLEGE
VON LEDERARMBÄN-
4.3
Bitte beachten Sie folgende Hinweise, um
für eine maximale Lebensdauer Ihres Lederarmbands zu sorgen:
1
Vermeiden Sie Kontakt mit Wasser
und Feuchtigkeit, damit das Armband
seine Farbe und Form nicht verliert.
Lassen Sie die Uhr nicht lange in der
2
Sonne liegen, um ein Verblassen der
Farben des Lederarmbands zu vermeiden.
Vermeiden Sie jeglichen Kontakt mit
3
fettigen Substanzen, Kosmetika oder
anderen Chemikalien.
Leder ist ein organisches und durchlässiges Material, das in seinem ursprünglichen Zustand nur über eine
eingeschränkte Lebensdauer verfügt.
Wenn Sie jedoch die o. g. Hinweise
beachten, wird Ihr Lederarmband viele Jahre lang halten. Einen Austausch
können Sie bei jedem unserer offiziellen
Alpina-Händler vornehmen lassen.
80
DERN
ENTSPIEGELUNG
DES SAPHIR-
4.4
Das Entspiegeln des Saphirglases sorgt
für eine optimierte Ablesbarkeit und
Kontrastbildung beim Zifferblatt der Uhr.
Durch den alltäglichen Gebrauch und
normalen Verschleiß können Spuren
auf der Beschichtung entstehen. Diese
gelten jedoch als normal und fallen nicht
unter die Garantie.
GLASES
VERSCHRAUBTE
4.5
Einige Alpina-Uhren sind mit einer verschraubten Krone ausgestattet, die zum
Einstellen des Datums oder der Uhrzeit
entschraubt werden muss. Nach dieser
Korrektur muss die Krone wieder an das
Gehäuse angedrückt und fest verschraubt
werden. Geschieht dies nicht, ist die Wasserdichtigkeit Ihrer Uhr nicht mehr gewährleistet.
KRONE
INTERNATIONALE
GARAN-
4.6
Die Garantie Ihrer Alpina-Uhr erstreckt
sich über einen Zeitraum von zwei Jahren (24 Monate) ab dem Kaufdatum. Sie
betrifft sämtliche Herstellungsfehler, die
im Rahmen eines normalen Gebrauchs
entstehen, wie sie in folgenden Bestimmungen festgehalten sind: Alpina Watch
International S.A. ersetzt kostenfrei alle
durch einen Herstellungsfehler bedingt
mangelhaften Einzelteile, die ordnungsgemäß von unseren technischen Services
festgestellt wurden. Die Garantiezeit Ihrer
Uhr erstreckt sich auf einen Zeitraum von
zwei Jahren ab dem Datum auf dem von
einem autorisierten Alpina-Händler unterschriebenen und mit einem Stempel
versehenen Garantiezertifikat.Die Internationale Alpina-Garantie erstreckt sich
auf jede Alpina-Armbanduhr, die überall
auf der Welt bei einem autorisierten Alpina-Händler erworben wurde, und kann
bei jedem autorisierten Alpina-Händler
geltend gemacht werden.
81
TIE
| DE |
Page 42

AUSGENOMMEN VON DER INTERNATIONALEN GARANTIE SIND:
Diebstahl, Verlust oder höhere Gewalt
1
oder die Folgen von Naturkatastrophen
die Lebensdauer der Batterie.
2
normaler Verschleiß und gewöhnliche
3
Alterung (bspw. Kratzer auf dem Glas;
Veränderungen der Farbe und/oder
des Materials von nichtmetallischen
Armbändern und Ketten aus Leder,
Textil oder Kautschuk; Abblättern der
Metallüberzüge)
sämtliche Schäden an allen Bauteilen
4
der Uhr, die durch falschen oder unsachgemäßen Gebrauch, fehlende
Vorsicht, Fahrlässigkeit, Unfälle (Stöße,
Beulen, Brüche, zerbrochenes Glas
usw.), ungeeigneten Gebrauch oder
die Missachtung der von Alpina herausgegebenen Bedienungsanleitung
entstehen.
indirekte oder Folgeschäden jeder Art,
5
die aus dem Gebrauch resultieren, darunter Stillstand, Mängel oder ein ungenaues Funktionieren der Alpina-Uhr
6
Mängel oder Schäden, die vom Um-
gang mit oder durch Eingriffe an der
Uhr durch Unbefugte entstehen, die
nicht zu den ausdrücklich von Alpina
Pflegehinweise & Garantie
autorisierten Servicezentren gehören
(bspw. Austauschen der Batterie, Wartung und Reparaturen), oder die Veränderung des Originalzustands aufgrund
von höherer Gewalt
die Verwendung von anderen als von
7
Alpina empfohlenen Batterien
Diese Garantie gilt für alle Uhren, die über
ein ordnungsgemäß unterzeichnetes,
datiertes und mit dem Stempel des autorisierten Alpina-Händlers versehenes
Garantiezertifikat verfügen. Sowohl die
Seriennummer als auch die individuelle
Registriernummer der Alpina-Uhr müssen
auf dem Zertifikat stehen. Sämtliche Wartungs- oder Reparaturarbeiten an Ihrer Alpina-Uhr dürfen ausschließlich von einem
von Alpina autorisierten Wartungs- oder
Reparaturzentrum durchgeführt werden,
damit die Internationale Garantie ihre Gültigkeit behält. Die Internationale Garantie
sorgt weder für eine Aufhebung noch für
eine Einschränkung oder jedwede andere
Beeinträchtigung gesetzlicher Verbraucherrechte in dem jeweiligen Land des
Erwerbs Ihrer Alpina-Uhr.
82
4.7
Wir werden oft gebeten zu überprüfen,
ob eine Alpina-Uhr echt ist. Offizielle Alpina-Händler garantieren die Echtheit jeder
Alpina-Uhr und bieten dank ihrer Kompetenz, Sachkenntnis und ihrer Spezialausrüstung einen fachgerechten und zuverlässigen Kundendienst.
Alpina Watch International S.A. hat keinen
Bezug zu und haftet nicht für Uhren oder
andere Produkte mit dem Namen, Warenzeichen, Schriftzug, oder Symbol von
Alpina, die von anderen als offiziellen Alpina-Händlern zum Verkauf angeboten
werden.
Der Kauf eines solchen Produktes von einem nicht autorisierten Anbieter geschieht
deshalb ausschließlich auf Risiko des
Käufers, insbesondere im Hinblick auf
Fälschungen oder minderwertige Produkte oder Produkte, die im Internet erstanden werden.
ECHTHEIT
Für Produkte, die von nicht autorisierten
Dritten verkauft wurden und nicht ordnungsgemäß mit einem von Alpina abgestempelten internationalen Garantiezertifikat
versehen sind, ergibt sich weder für Alpina
noch für einen ihrer autorisierten Vertreter
eine explizite oder implizite Verpflichtung
zu Garantie-, Service- oder anderen Leistungen.
Im Hinblick auf die oben aufgeführten
Gründe und in Ihrem eigenen Interesse
empfehlen wir Ihnen, ausschließlich echte
Alpina-Uhren zu erwerben, die Sie exklusiv
bei einem autorisierten und offiziellen Alpina-Händler erhalten.
83
| DE |
Page 43

05
KUNDEN
DIENSTZEN
TREN
84
Eine aktuelle Liste mit unseren autorisierten Kundendienstzentren und offiziellen
Händlern finden Sie auf unserer offiziellen Website www.alpina-watches.com
85 | DE |
Page 44

RE
SUMO
86
02. INSTRUÇÕES
ESPECIAIS
2.1 CALIBRE AL-550 GMT 87
2.2 CALIBRE AL-880
AUTOMÁTICO CONTAGEM
DECRESCENTE 88
03. OUTRAS FUNÇÕES
3.1 BISEL DE MERGULHO ROTATIVO 92
3.2 ESCALAS DE MEDIÇÃO 92
3.3 BISEL ROTATIVO DE
BÚSSOLA DE 360° 93
3.4 ANTI-MAGNETISMO 96
04. MANUTENÇÃO &
GARANTIA DO RELÓGIO
4.1 CUIDADOS COM O SEU
RELÓGIO ALPINA 98
4.2 MANUTENÇÃO E INTERVALOS DE
MANUTENÇÃO 99
4.3 CUIDADOS COM A
BRACELETE EM PELE 100
4.4 TRATAMENTO ANTI-REFLEXO
DO VIDRO DE SAFIRA 101
4.5 COROA DE ROSCA 101
4.6 GARANTIA INTERNACIONAL 101
4.7 AUTENTICIDADE 103
05. CENTROS DE ASSISTÊNCIA 104
87
| PT |
Page 45

02
2
CALIBRE
AL-550
2.1
FUNÇÕES: HORAS, MINUTOS,
SEGUNDOS, DATA, GMT (SEGUNDO
FUSO HORÁRIO)
USO DA FUNÇÃO GMT:
A função GMT está dotada de um
ponteiro adicional de horas, com uma
seta vermelha, que se destaca imedia-
tamente do ponteiro principal das horas.
GMT
Esse ponteiro adicional realiza uma rotação do mostrador em 24 horas e representa a hora de referência. O ponteiro
das horas, que indica a hora local, pode
ser facilmente ajustado em saltos de
uma hora.
Em viagem: puxe a coroa para a posição
e acerte a sua hora de referência de
acordo com as graduações do realce do
mostrador.
INSTRU
ÇÕES
ESPECIAIS
88
Em seguida, empurre a coroa para a colocar na posição 1 e ajuste em saltos
1
de uma hora o ponteiro principal para
2
indicar a hora do país onde se encontra.
Esta operação é efetuada sem parar o
movimento mecânico e portanto sem
desacertar o relógio.
Desta forma, pode ler num relance a hora
do local de onde vem numa escala de 24
horas e a hora do local onde se encontra!
89 | PT |
Page 46

CALIBRE
AL-880
AUTOMÁTICO
2.2
FUNÇÕES: HORAS, MINUTOS, CONTAGEM DECRESCENTE DE 10 MIN.
CONTAGEMDECRESCENTE
1 1
4 4
Decorreu um minuto. Decorreram 7 minutos e 30 segundos.
CONTAGEM DECRESCENTE
Antes do início da contagem decrescente, as 5 janelas apresentam a mesma cor do mostrador. Cada janela representa um minuto.
Com o tiro, inicie a contagem (prima o
botão 1 ). Decorrido 1 minuto, a primeira janela passa a azul e as restantes 4
mantêm a cor do mostrador. Decorridos
5 minutos, o segundo ponteiro está nas
12 horas e as 5 janelas estão azuis. O
comissário dispara de novo para confirmar a continuação da partida.
Se a contagem decrescente for inter
instruções especiais
rompida, basta parar a contagem no
relógio premindo o botão 4 e reiniciá-la
quando a contagem decrescente recomeçar, premindo de novo o botão 4.
Decorridos 6 minutos, a primeira janela
passa a laranja e as restantes 4 mantêm
a cor azul. Decorridos 9 minutos, 4 janelas têm a cor laranja e o azul da última
janela começa a desaparecer. Deve
então organizar a partida do seu barco
para passar a meta quando as 5 janelas
estiverem laranja e o segundo ponteiro
estiver nas 12 horas.
90
60
55
5
T
R
1
50
A
2
10
T
3
S
15
20
45
4
5
40
35
25
30
1
4
CONTAGEM DECRESCENTE
Antes do início da contagem decrescente,
as cinco janelas têm a mesma cor do mostrador. Cada janela representa um minuto.
No momento do tiro do comissário da corrida, inicie a contagem premindo o botão
1
. Após um minuto, a primeira janela
passa a azul e as quatro janelas seguintes
mantêm-se da cor do mostrador. Após
cinco minutos, o ponteiro dos segundos
fica posicionado às 12h00 e as cinco janelas ficam azuis. O comissário dispara
novamente para confirmar a continuação
da partida. Se a contagem decrescente
60
55
5
S
T
50
A
10
R
45
15
T
1
2
40
3
20
4
5
35
25
30
parar, basta premir o botão 4 e reiniciá-la
premindo novamente o botão 4. Após
seis minutos, a primeira janela passa a
laranja e as quatro janelas seguintes mantêm-se azuis. Após nove minutos, quatro
janelas passam a laranja e o azul da última
janela começa a desaparecer.
Cabe-lhe a si organizar a partida do seu
barco para cortar a meta quando as cinco
janelas estiverem laranja e o ponteiro dos
segundos estiver posicionado às 12h00.
91
1
4
| PT |
Page 47

2.2
PLANIFICADOR TÁTICO
O Alpina Extreme 40 está equipado
com um planificador tático, sob a forma
de uma linha de partida desenhada no
mostrador. Os símbolos “+” e “- ” indicam uma posição de partida favorável
ou desfavorável à boia de partida.
Este planificador permite ao navegador
tomar decisões em relação à sua posição na linha de partida. Para determinar
a melhor posição na linha de partida,
utilize a bússola da luneta da seguinte
forma:
- determine a direção do vento com a
bússola (anemómetro);
- rode a luneta para colocar o ângulo do
vento às 12h00;
- navegue do barco de partida até à boia
da linha de partida para determinar a
orientação da linha de partida;
- veja na luneta do seu relógio onde está
situada a orientação da linha de partida. Se o ângulo estiver situado entre
as 9h00 e as 12h00, é melhor partir do
lado da boia. Se esse ângulo estiver
situado entre as 6h00 e as 9h00, é melhor partir do lado do barco de partida.
03
OUTRAS
FUN
ÇÕES
instruções especiais
92
93
| PT |
Page 48

BISEL DE
MERGULHO
3.1
Uma funcionalidade importante de todos os relógios de mergulho Alpina é o
bisel rotativo unidirecional e de sentido
contrário ao dos ponteiros do relógio que
é utilizado para controlar o tempo de mergulho. Este bisel está equipado com uma
escala graduada dividida em minutos.
O princípio de funcionamento do bisel é
simples e fiável. No início de cada mergulho, o zero do bisel deve estar alinhado
com o ponteiro dos minutos. Deste modo,
o mergulhador tem apenas de dar uma
simples olhadela à posição do ponteiro
dos minutos em relação ao bisel para saber o tempo em minutos decorrido desde
o início do mergulho.
A rotação unidirecional e de sentido
contrário ao dos ponteiros do relógio do
bisel é uma funcionalidade de segurança que garante que qualquer movimento
acidental do anel faz com que o tempo de
mergulho restante seja reduzido em relação ao restante tempo de mergulho efetivo.
outras funções
ROTATIVO
ESCALAS
DE
3.2
As escalas de medição são escalas que
estabelecem uma relação entre o tempo
decorrido e outra variável. As informações
pretendidas sobre velocidade
(taquímetro), distância (telémetro) ou
unidades (pulsómetro, medidores de
produtividade) figuram entre o ponteiro
central dos segundos do cronógrafo e
a escala correspondente durante um
período máximo de 60 segundos. Para
o telémetro é possível utilizar o contador
dos minutos acrescentando 20 km à
distância indicada pelo ponteiro central
dos segundos por cada minuto decorrido.
UTILIZAÇÃO DA ESCALA TAQUIMÉTRICA
Exemplo 1: calcular a velocidade de
um automóvel. Meça o tempo que o
automóvel demora para percorrer uma
distância de 1 km. Leia a velocidade indicada pelo ponteiro central dos segundos
do cronógrafo na escala taquimétrica. No
nosso exemplo, o automóvel desloca-se a
uma velocidade de 90 km/h.
94
MEDIÇÃO
Exemplo 1
UTILIZAÇÃO DA ESCALA TELEMÉTRICA
Exemplo 2: calcular a distância entre a sua
posição e uma tempestade iminente. Inicie o
cronógrafo quando vir o relâmpago. Em seguida, pare o cronógrafo quando ouvir o trovão.
Leia a distância indicada pelo ponteiro central
do cronógrafo da escala telemétrica. No nosso
exemplo, a tempestade está a 5 km de distância da sua posição.
Exemplo 2
BISEL ROTATIVO DE
BÚSSOLA
3.3
Os relógios Alpina estão equipados com
um bisel rotativo de bússola de 360° que
pode determinar de forma aproximada
as direções. Esta é uma funcionalidade
particularmente útil para desportos de
orientação e outros desportos de aventura ou alpinos
INSTRUÇÕES DE UTILIZAÇÃO DA
BÚSSOLA DO ALPINER 4 CHRONOGRAPH E DO ALPINER 4 GMT*
Precauções na utilização de um bisel
de bússola:
- Não utilize a bússola em situações em
que a exatidão é essencial. A bússola
dá apenas uma indicação aproximada da direção;
- Utilize a bússola onde o Sol seja visível
ou a sua localização seja conhecida;
- O seu relógio deve ser acertado para
a hora de inverno. Se o horário de
verão (hora de verão) estiver em vigor
na sua área, deve atrasar o seu relógio uma hora antes de utilizar o bisel
da bússola.
95
DE 360°
| PT |
Page 49

INSTRUÇÕES DE FUNCIONAMENTO:
1. NO HEMISFÉRIO NORTE
- Ajuste o “36” (=360°=Norte) no bisel
rotativo de bússola para a hora atual no
anel de 24h00.
- Enquanto mantém o nível do mostrador,
aponte o ponteiro das horas na direção
do Sol.
- A bússola é então ativada e pode ler as
direções no bisel rotativo de bússola. O
36, 09, 18 e 27 indicam Norte, Este, Sul e
Oeste, respetivamente.
EXEMPLO 1: são 8h00 na sua área.
Ajuste o n.º 36 para o 8 na escala de
24h00 do mostrador. Em seguida, aponte
o ponteiro das horas (mantendo o nível do
mostrador) na direção do Sol e a bússola
será ativada.
EXEMPLO 2: são 18h00 na sua área.
Ajuste o n.º 36 para o 18 na escala de
24h00 do mostrador. Em seguida, aponte
o ponteiro das horas (mantendo o nível do
mostrador) na direção do Sol e a bússola
será ativada.
2. NO HEMISFÉRIO SUL
- Ajuste o “18” (=180°=Sul) no bisel rotativo de bússola para a hora atual no anel
de 24h00.
- Enquanto mantém o nível do mostrador,
aponte o ponteiro das horas na direção
do Sol.
- A bússola é então ativada e pode ler as
direções no bisel rotativo de bússola. O
36, 09, 18 e 27 indicam Norte, Este, Sul e
Oeste, respetivamente.
EXEMPLO 1: são 8h00 na sua área.
Ajuste o n.º 18 para o 8 na escala de
24h00 do mostrador. Em seguida, aponte
o ponteiro das horas (mantendo o nível do
mostrador) na direção do Sol e a bússola
será ativada.
EXEMPLO 2: são 18h00 na sua área.
Ajuste o n.º 18 para o 18 na escala de
24h00 do mostrador. Em seguida, aponte
o ponteiro das horas (mantendo o nível do
mostrador) na direção do Sol e a bússola
será ativada
* Quando utilizar o Alpiner 4 GMT também
pode usar o ponteiro das 24h00 para fazer
funcionar a bússola. Para tal, o ponteiro
das 24h00 deve indicar a sua hora local.
A) No hemisfério norte, vire o “36”
(=Norte) para o ponteiro das 24h00.
Aponte o ponteiro das horas (mantendo o
nível do mostrador) na direção do Sol e a
bússola será ativada.
B) No hemisfério sul, vire o “18” (=Sul)
para o ponteiro das 24h00. Aponte o
ponteiro das horas (mantendo o nível do
mostrador) na direção do Sol e a bússola
será ativada
INSTRUÇÕES DE UTILIZAÇÃO DA BÚSSOLA DO SEASTRONG YACHT TIMER
1. NO HEMISFÉRIO NORTE
- Ajuste o “S” (=Sul) do bisel rotativo de
bússola para o centro do arco entre o indicador “60” (=12h00) e o ponteiro das
horas.*
* No período da manhã, ajuste o “S” para
a esquerda do indicador “60”(=12h00) e
no período da tarde para a direita do indicador “60”(=12h00).
- Enquanto mantém o nível do mostrador,
aponte o ponteiro das horas na direção
do Sol.
- A bússola é então ativada e pode ler as
direções no bisel rotativo de bússola. O
triângulo em “60”, o indicador 90, o “S” e
o indicador 270 mostram Norte, Este, Sul
e Oeste, respetivamente
EXEMPLO 1: são 10h00 na sua área.
Ajuste o “S” para o “5” no mostrador (= a
meio entre as 12h00 e o ponteiro das horas). Em seguida, aponte o ponteiro das
horas (mantendo o nível do mostrador) na
direção do Sol e a bússola será ativada.
EXEMPLO 2: são 18h00 na sua área.
Ajuste o “S” para o “45” (= 15h00) no
mostrador (= a meio entre as 12h00 e as
18h00). Em seguida, aponte o ponteiro
das horas (mantendo o nível do mostrador) na direção do Sol e a bússola será
ativada.
outras funções
96
97
| PT |
Page 50

3.4
ANTIMAGNETISMO
Os campos magnéticos podem afetar
de forma significativa a precisão do
seu relógio. Existem muitas fontes de
campos magnéticos, como telemóveis,
iPads, computadores, colunas de som,
frigoríficos e outros dispositivos eletrónicos. Quanto mais forte for o campo
magnético, maior será o impacto no seu
relógio. Todos os relógios Alpina designados por “4”, isto é, o Alpiner 4, são
antimagnéticos. Isto significa que têm
um desvio mínimo quando expostos a
um determinado nível de campos ma-
outras funções
gnéticos. Os relógios antimagnéticos
Alpina “4” estão em conformidade com
a norma internacional ISO 764 que define a resistência dos relógios a campos
magnéticos. De acordo com a norma
internacional ISO 764, um relógio deve
ser resistente à exposição a um campo magnético de corrente contínua de
4800 A/m. O relógio deve manter a sua
precisão a ±30 segundos/dia, medido
antes do teste, para ser considerado um
relógio resistente ao magnetismo.
98
04
MANUTENÇÃO
& GARANTIA
DO RELÓGIO
99
| PT |
Page 51

CUIDADOS A
TER COM O
SEU RELÓ-
4.1
SIGA AS RECOMENDAÇÕES ABAIXO PARA GARANTIR QUE O SEU RELÓGIO
ALPINA FUNCIONARÁ COM EXATIDÃO E EXCELÊNCIA AO LONGO DOS ANOS.
1
Nadar em água salgada: assegure-se
de que enxagua o seu relógio com
água limpa imediatamente após ter
nadado.
Magnetismo: evite colocar o seu reló-
2
gio em cima de iPads, computadores,
colunas de som, telemóveis e frigoríficos. Estes dispositivos geram campos
magnéticos poderosos que podem
afetar a precisão do seu relógio.
3
Choques: diferentes tipos de choques,
sejam químicos, térmicos, físicos,
magnéticos ou outros, podem afetar
o seu relógio. Tome cuidado para os
evitar.
manutenção & garantia do relógio
GIO ALPINA
4
Coroa de rosca: para evitar a entra-
da de água ou de humidade na caixa, assegure-se de que a coroa está
sempre firmemente apertada na caixa.
Não utilize os botões do cronógrafo
debaixo de água.
5
Coroa normal: para evitar a entrada
de humidade na caixa, certifique-se
de que a coroa está sempre empurrada na posição de uso. Não utilize
os botões do cronógrafo debaixo de
água.
6
Cuidado e limpeza das braceletes de
metal, correias de borracha e caixas
de metal resistentes à água: limpe
com água ensaboada e uma escova
de dentes e seque com um pano
macio.
100
Produtos químicos: evite o contacto
7
direto com detergentes químicos,
solventes, detergentes, cosméticos e
outros produtos químicos uma vez que
podem danificar a caixa, a bracelete e
as juntas de borracha.
Temperatura: evite a exposição a tem-
8
peraturas superiores a 60°C (140°F)
ou inferiores a 0°C (32°F). Evite igualmente mudanças extremas de temperatura como colocar o relógio em água
extremamente fria após uma exposição prolongada ao Sol.
9
Resistência à água: não é possível
garantir em qualquer situação ou
permanentemente a estanquidade
de um relógio. Esta pode ser afetada
por choques na coroa, envelhecimento das juntas (por exemplo, devido à
ação de produtos químicos), etc.
MANUTENÇÃO E
INTERVALOS
4.2
Tal como qualquer outro instrumento
mecânico de precisão, é importante que a
manutenção de um relógio seja realizada
em intervalos regulares para garantir o seu
funcionamento correto. Como regra geral,
e dependendo da forma e das condições
nas quais o usa, recomendamos que a
manutenção do seu relógio seja efetuada
com uma periodicidade de quatro a cinco
anos. Pode consultar a lista dos nossos
revendedores e Centros de Assistência
autorizados em www.alpina-watches.com.
RELÓGIOS MECÂNICOS
A roda de balanço de um relógio automático Alpina oscila 28 800 vezes por hora e
a roda dentada avança 691 200 vezes em
24 horas. Em quatro anos, isto representa
mais de mil milhões de impulsos! Recomendamos que leve o seu relógio com
uma periodicidade de três a quatro anos a
um revendedor ou Centro de Assistência
autorizado Alpina onde um relojoeiro qualificado o inspecionará meticulosamente
antes de limpar e lubrificar devidamente o
movimento.
101
DE MANUTENÇÃO
| PT |
Page 52

ESTANQUIDADE
A estanquidade do seu relógio foi definida e verificada aquando do fabrico do
mesmo nos nossos ateliês. No entanto,
não implica uma garantia vitalícia contra
a entrada de água no relógio.
O seu relógio é estanque apenas quando
a coroa está completamente empurrada
contra a caixa. Se o seu relógio tiver uma
coroa de rosca, esta deve estar firmemente apertada na caixa.
O seu relógio não é estanque se a coroa
estiver na posição de corda ou de acerto
da hora. Os botões também não devem
ser utilizados enquanto o relógio estiver
molhado ou na água.
O envelhecimento e o manuseamento
diário normal do relógio afetam a sua estanquidade. Evite temperaturas extremas
(mergulhar o relógio em água fria após
uma exposição prolongada ao Sol) que
podem danificar as juntas assim como
outros choques químicos, físicos ou
outros que podem comprometer a integridade técnica da caixa do relógio.
Recomendamos que leve o seu relógio a
um revendedor ou Centro de Assistência
autorizado Alpina para verificar a estanquidade do mesmo com uma periodicidade de dois a três anos
manutenção & garantia do relógio
CUIDADOS
A TER COM
A BRACE-
4.3
Recomendamos que siga as seguintes
indicações para manter a sua bracelete
em pele em bom estado durante o máximo de tempo possível:
1
evite o contacto com a água e a hu-
midade para prevenir descoloração e
deformação;
2
evite a exposição prolongada ao Sol
para prevenir descoloração;
3
evite o contacto com substâncias
gordurosas, cosméticos e quaisquer
outros produtos químicos.
A pele é um material orgânico e permeável, pelo que não durará para
sempre no seu estado original. No entanto, se adotar os passos acima, durará
muitos anos. Pode substituir a sua bracelete em pele em qualquer revendedor
autorizado Alpina.
102
LETE EM
PELE
TRATAMENTO ANTI-REFLEXO DO
4.4
O tratamento antirreflexo do vidro de safira melhora a visibilidade e o contraste
do mostrador do seu relógio. O uso
diário normal e o desgaste podem provocar o aparecimento de marcas no
revestimento. Estas são consideradas
normais, pelo que não estão abrangidas
pela garantia.
VIDRO DE
SAFIRA
COROA DE
4.5
Alguns relógios Alpina têm uma coroa
de rosca que pode ser desapertada
para mudar a hora ou a data. Após o
uso da coroa, esta deve ser pressionada
contra a caixa e apertada firmemente.
Se não o fizer, comprometerá a estanquidade do seu relógio.
ROSCA
GARANTIA
INTERNA-
4.6
O seu relógio Alpina tem uma garantia
durante um período de dois anos (24
meses) a contar da data de aquisição
e abrange todos os defeitos de fabrico
durante o uso regular conforme indicado nas seguintes condições: a Alpina Watch International S.A. substituirá
gratuitamente qualquer componente
defeituoso devido a um erro de fabrico
que seja devidamente assinalado pelos
nossos serviços técnicos. O seu relógio
tem uma garantia durante um período
de dois anos a contar da data em que
o Certificado de Garantia foi assinado e
carimbado por um revendedor autorizado Alpina. A Garantia Internacional Alpina abrange todos os relógios de pulso
Alpina adquiridos em qualquer parte do
mundo num revendedor autorizado Alpina e será aceite por qualquer revendedor autorizado Alpina.
103
CIONAL
| PT |
Page 53

ESTA GARANTIA INTERNACIONAL
NÃO ABRANGE:
roubo, perda, força maior ou conse-
1
quências de desastres naturais;
a vida útil da pilha;
2
o desgaste e envelhecimento normais
3
(por exemplo, vidro riscado, mudança
da cor e/ou do material das braceletes
e correias não metálicas, como pele,
tecido ou borracha e descasque do
revestimento);
quaisquer danos em quaisquer peças
4
do relógio que resultem do tratamento
inadequado ou uso indevido, falta de
cuidado, negligência, acidentes (pancadas, amolgadelas, esmagamento,
vidro partido, etc.), uso incorreto do
relógio e incumprimento das instruções de funcionamento fornecidas
pela Alpina;
danos indiretos ou consequenciais
5
de qualquer tipo resultantes do uso,
como não funcionamento, defeitos ou
inexatidão do relógio Alpina;
6
defeitos ou danos resultantes do ma-
nuseamento ou adulteração do relógio por terceiros exceto um centro de
assistência devidamente autorizado
pela Alpina (como substituição da
manutenção & garantia do relógio
pilha, manutenção ou reparação) ou
alteração do seu estado original sem a
supervisão da Alpina; e
utilização de pilhas diferentes das re-
7
comendadas pela Alpina.
Esta garantia é válida apenas para os relógios de pulso acompanhados pelo certificado de garantia devidamente assinado,
datado e carimbado pelo revendedor autorizado Alpina. Os números de referência
e de registo individuais do relógio Alpina
devem estar escritos no certificado.
Qualquer trabalho de manutenção ou de
reparação realizado no seu relógio Alpina
deve ser efetuado apenas por um centro
de manutenção e reparação autorizado
pela Alpina, caso contrário a Garantia Internacional deixará de ser válida.
A Garantia Internacional não anula, restringe ou afeta os direitos ou privilégios do
consumidor legalmente reconhecidos no
país de aquisição do relógio Alpina.
104
4.7
Com frequência, solicitam-nos para verificar se um relógio Alpina é genuíno. Os
revendedores oficiais Alpina comprovam
a autenticidade de qualquer relógio Alpina
e prestam assistência pós-venda especializada e de confiança, graças aos
seus conhecimentos e às competências
profissionais, e ao equipamento especialmente adaptado.
A Alpina Watch International S.A. declina
qualquer relação com, ou responsabilidade por, qualquer relógio ou outro artigo
que exiba o nome, a marca, o logótipo ou
o símbolo Alpina e colocado à venda por
alguém que não seja um revendedor oficial Alpina.
Por conseguinte, a aquisição de um tal
produto a uma entidade não autorizada é
da exclusiva responsabilidade do compra-
DADE
AUTENTICI-
dor, em particular no caso de artigos de
contrafação ou de qualidade inferior e de
artigos adquiridos na Internet.
A Alpina e os seus representantes autorizados estão isentos de qualquer obrigação explícita ou implícita de garantia,
manutenção ou qualquer outra
em relação a artigos vendidos por entidades não autorizadas que não estejam
acompanhados por um Certificado de
Garantia Internacional Alpina devidamente
carimbado.
Pelas razões acima e no seu próprio interesse, recomendamos que adquira apenas relógios Alpina genuínos, exclusivamente disponíveis junto de revendedores
oficiais autorizados Alpina.
105
| PT |
Page 54

05
CENTROS
DE
ASSISTÊNCIA
Se necessitar de uma lista atualizada dos nossos centros de assistência autorizados e revendedores oficiais, consulte o nosso sítio web oficial
www.alpina-watches.com
106
107 | PT |
Page 55

ÍN
DICE
02. INSTRUCCIONES
ESPECIALES
2.1 CALIBRE AL-550 GMT 109
2.2 CALIBRE AL-880
CUENTA ATRÁS AUTOMÁTICA 110
03. OTRAS FUNCIONES
3.1 BISEL DE INMERSIÓN GIRATORIO 114
3.2 ESCALAS DE MEDICIÓN 114
3.3 BISEL TIPO BRÚJULA CON
ROTACIÓN DE 360° 115
3.4 ANTIMAGNETISMO 118
04. CUIDADO DEL RELOJ
Y GARANTÍA
4.1 CÓMO CUIDAR SU RELOJ ALPINA 120
4.2 MANTENIMIENTO E INTERVALOS
DE MANTENIMIENTO 121
4.3 CUIDADO DE LA PIEL Y LA CORREA 122
4.4 TRATAMIENTO ANTIRREFLECTANTE
DEL CRISTAL DE ZAFIRO 123
4.5 CORONA ROSCADA 123
4.6 GARANTÍA INTERNACIONAL 123
4.7 AUTENTICIDAD 125
05. CENTROS DE SERVICIO 126
108
109
| ES |
Page 56

02
INSTRUC
CIONES
ESPECIALES
2.1
FUNCIONES: HORAS, MINUTOS,
SEGUNDOS, FECHA, SEGUNDO
HUSO HORARIO
USO DE LA FUNCIÓN GMT:
El GMT cuenta con una aguja de las
horas adicional en forma de flecha roja
que la distingue a simple vista de la aguja principal de las horas..
CALIBRE
AL-550 GMT
Esta aguja adicional describe una revolución en 24 horas y representa la hora
de referencia. La aguja de las horas, que
indica la hora local, se puede ajustar fácilmente en saltos de una hora.
Si sale de viaje, tire de la corona para colocarla en la posición 2 y ajuste la hora
de referencia en función de las graduaciones del bisel de la esfera.
A continuación, apriete la corona para
colocarla en la posición 1 y ajuste, mediante saltos de una hora, la aguja prin-
1
cipal para indicar la hora del país donde
2
se encuentra. Esta operación se lleva a
cabo sin detener el movimiento mecánico y, por lo tanto, sin desajustar el reloj.
De este modo, puede consultar tanto la
hora del lugar de donde viene en una escala de 24 horas como la hora del lugar
donde se encuentra de un solo vistazo.
110
111 | ES |
Page 57

CALIBRE AL-880
CUENTA ATRÁS
2.2
FUNCIONES: HORAS, MINUTOS, CUENTA ATRÁS DE 10 MINUTOS
AUTOMÁTICA
1 1
4 4
Ha pasado un minuto. Han transcurrido 7 minutos y 30 segundos.
CUENTA ATRÁS
Antes de que se inicie la cuenta atrás, las
cinco aberturas son del mismo color que
la esfera. Cada abertura representa un minuto. Cuando se dispare la pistola, inicie
la cuenta atrás (apretando el pulsador 1
). Transcurrido 1 minuto, la primera abertura se vuelve de color azul y las cuatro
aberturas siguientes permanecen del
mismo color que la esfera. Transcurridos
5 minutos, la segunda aguja se encuentra
a las 12 horas y las cinco aberturas son de
color azul. El árbitro de la carrera dispara
de nuevo para confirmar la salida.
Si la cuenta atrás se detiene, deténgala
también en el reloj apretando el pulsador
4
. Para ponerla de nuevo en marcha,
vuelva a apretar el pulsador 4. Transcurridos 6 minutos, la primera abertura se
vuelve de color naranja y las cuatro aberturas siguientes permanecen de color azul.
Transcurridos 9 minutos, cuatro aberturas
son de color naranja y el azul de la última
abertura empieza a desaparecer. En este
momento, tiene que organizar la salida de
su embarcación de tal manera que atraviese la línea cuando las cinco aberturas
sean de color naranja y la segunda aguja
se encuentre situada a las 12 horas.
112
60
55
5
T
R
1
50
A
2
10
T
3
S
15
20
45
4
5
40
35
25
30
1
4
CUENTA ATRÁS
Antes de que se inicie la cuenta atrás, el
disco giratorio de 10 minutos es de color
gris y el 10 se encuentra en la parte inferior, entre los indicadores 45 y 40. Los
primeros 5 minutos se muestran (de 6 a
10): cuando se dispare la pistola, inicie la
cuenta atrás (apretando el pulsador 1 ).
Transcurrido 1 minuto, el 5 aparece sobre
un fondo azul y el 10 desaparece. Transcurridos 5 minutos, la segunda aguja se
encuentra a las 12 horas y las cinco aber
turas son de color azul. El árbitro de la
60
55
5
S
T
50
A
10
R
45
15
T
1
2
40
3
20
4
5
35
25
30
carrera dispara de nuevo para confirmar
la salida. Si la cuenta atrás se detiene,
deténgala también en el reloj apretando
el pulsador 4. Para ponerla de nuevo en
marcha, vuelva a apretar el pulsador 4.
Transcurridos 10 minutos, aparece la indicación START. En este momento, tiene
que organizar la salida de su embarcación de tal manera que atraviese la línea
cuando la indicación START aparezca
con la segunda aguja a las 12 horas.
113instrucciones especiales | ES |
1
4
Page 58

2.2
PLANIFICADOR TÁCTICO
Los relojes Alpina Seastrong Yacht Timer
cuentan con un planificador táctico que
adopta la forma de una línea de salida
dibujada en la esfera. Las indicaciones
"+" y "-" indican si la posición de salida
en la boya de salida es favorable o desfavorable.Gracias a este planificador,
el navegante puede tomar decisiones
sobre su posicionamiento en la línea de
salida. Para determinar la mejor posición
en la línea de salida, utilice el bisel tipo
brújula de la manera siguiente:
- Determine la dirección del viento utilizando su brújula (anemómetro).
- Haga girar el bisel para colocar el ángulo del viento a las 12 horas.
- Navegue desde el barco de salida
hasta la boya de la línea de salida para
determinar la orientación de la línea de
salida.
- En el bisel del reloj, observe dónde se
encuentra situada la orientación de la
línea de salida. Si el ángulo se encuentra situado entre las 9 y las 12 horas, es
mejor salir por el lado de la boya de salida. Si el ángulo se encuentra situado
entre las 6 y las 9 horas, es mejor salir
por el lado del barco de salida.
03
OTRAS
FUN
CIONES
114
115instrucciones especiales | ES |
Page 59

Ejemplo 1
BISEL DE
INMERSIÓN
3.1
Una característica básica de los relojes
de submarinismo de Alpina es su bisel giratorio unidireccional en sentido contrario
a las agujas del reloj, que se utiliza para
controlar la duración de la inmersión.
Este bisel cuenta con una escala graduada dividida en minutos.
El principio de funcionamiento del bisel
es a la vez sencillo y fiable. Al inicio de
cada inmersión, el cero del bisel debe estar alineado con la aguja de los minutos.
De este modo, el submarinista solo tiene
que observar la posición de la aguja de
los minutos respecto al bisel para saber
el tiempo (en minutos) que ha transcurrido desde el inicio de la inmersión.
La rotación unidireccional en sentido
contrario a las agujas del reloj del bisel
es una característica de seguridad por la
que cualquier movimiento accidental del
anillo hace que el tiempo de inmersión
restante se reduzca respecto al tiempo
de inmersión efectivo restante.
otras functiones 116 117 | ES |
GIRATORIO
3.2
Las escalas de medición establecen una
relación entre el tiempo transcurrido y
otra variable. La información sobre velocidad (taquímetro), distancia (telémetro)
o unidades (pulsómetro, medidores de
productividad) figura entre el segundero
central del cronógrafo y la escala correspondiente, con una duración máxima
de 60 segundos. Para la función de telémetro, se puede utilizar el contador de
minutos añadiendo 20 km a la distancia
indicada por el segundero central por
cada minuto transcurrido.
USO DE LA ESCALA TAQUIMÉTRICA
Ejemplo 1: cómo calcular la velocidad
de un coche.Mida el tiempo que tarda
un coche en recorrer una distancia de 1
km. Observe la velocidad que indica el
segundero central del cronógrafo en la
escala taquimétrica. En nuestro ejemplo,
el coche se desplaza a 90 km/h.
ESCALAS
DE
MEDICIÓN
USO DE LA ESCALA TELEMÉTRICA
Ejemplo 2: cómo calcular la distancia
entre el lugar donde se encuentra y una
tormenta que se acerca.Ponga en marcha
el cronógrafo cuando vea el relámpago y
deténgalo cuando oiga el trueno. Observe
la distancia indicada por la aguja central
del cronógrafo en la escala telemétrica. En
nuestro ejemplo, la tormenta se encuentra a
5 km de distancia respecto a su posición.
Ejemplo 2
3.3
Los relojes Alpina cuentan con un bisel tipo brújula con rotación de 360°
que puede determinar direcciones, si
bien solo de manera aproximada. Esta
función resulta especialmente útil para
los deportes de orientación y otros deportes alpinos o de aventura.
INSTRUCCIONES DE USO DE LA
BRÚJULA EN LOS MODELOS ALPINER 4 CHRONOGRAPH Y ALPINER
4 GMT*
Precauciones a la hora de utilizar un
bisel tipo brújula:
- No utilice la brújula en situaciones en
las que la precisión resulte vital. La
brújula solo proporciona una indicación aproximada de la dirección.
- Utilice la brújula en lugares donde se
vea el sol o donde sepa su ubicación.
- El reloj debe estar ajustado al horario
de invierno Si en su zona se aplica el
horario de verano, antes de utilizar el
bisel tipo brújula debe atrasar su reloj
una hora.
BISEL TIPO
BRÚJULA
CON ROTACIÓN DE
360°
Page 60

INSTRUCCIONES DE USO:
1. EN EL HEMISFERIO NORTE
- En el bisel tipo brújula giratorio si-
tuado frente a la hora actual en el
anillo de 24 horas, seleccione "36"
(=360°=norte).
- Manteniendo el nivel de la esfera, coloque la aguja de las horas apuntando
en la dirección del sol.
- La brújula está activada y ya puede
controlar las direcciones utilizando el
bisel tipo brújula giratorio. Los números
36, 09, 18 y 27 indican el norte, el este,
el sur y el oeste, respectivamente.
EJEMPLO 1: en su zona son las 8:00
horas. Coloque el n° 36 frente al número
8 en la escala de 24 horas de la esfera.
Manteniendo la esfera en horizontal, coloque la aguja de las horas en dirección
al sol para activar la brújula.
EJEMPLO 2: en su zona son las 18:00
horas. Coloque el n° 36 frente al número
18 en la escala de 24 horas de la esfera.
Manteniendo la esfera en horizontal, coloque la aguja de las horas en dirección
2. EN EL HEMISFERIO SUR
- En el bisel tipo brújula giratorio situado
frente a la hora actual en el anillo de
24 horas, seleccione "18" (=180°=sur)
- Manteniendo el nivel de la esfera, coloque la aguja de las horas apuntando
en la dirección del sol.
- La brújula está activada y ya puede
controlar las direcciones utilizando el
bisel tipo brújula giratorio. Los números
36, 09, 18 y 27 indican el norte, el este,
el sur y el oeste, respectivamente.
EJEMPLO 1: en su zona son las 8:00
horas. Coloque el n° 18 frente al número
8 en la escala de 24 horas de la esfera.
Manteniendo la esfera en horizontal, coloque la aguja de las horas en dirección
al sol para activar la brújula.
EJEMPLO 2: en su zona son las 18:00
horas. Coloque el n° 18 frente al número
18 en la escala de 24 horas de la esfera.
Manteniendo la esfera en horizontal, coloque la aguja de las horas en dirección
al sol para activar la brújula.
al sol para activar la brújula.
otras functiones 118 119 | ES |
*Con el Alpiner 4 GMT, también puede
utilizar la aguja de 24 horas para la brújula. En ese caso, la aguja de 24 horas
debe indicar la hora local.
A) En el hemisferio norte, coloque el número "36" (=norte) frente a la aguja de
24 horas Manteniendo la esfera en horizontal, coloque la aguja de las horas en
dirección al sol para activar la brújula.
B) En el hemisferio sur, coloque el número "18" (=sur) frente a la aguja de 24
horas Manteniendo la esfera en horizontal, coloque la aguja de las horas en dirección al sol para activar la brújula
INSTRUCCIONES DE USO DE LA
BRÚJULA EN EL SEASTRONG YACHT
TIMER
1. EN EL HEMISFERIO NORTE
- En el bisel tipo brújula giratorio, coloque la "S" (=sur) en el centro del arco
que va de la indicación "60" (=12 horas) a la aguja de las horas.*
*En las horas AM, coloque la "S” a la
izquierda de la indicación "60" (=12 horas) y, en las horas PM, a la derecha de
la indicación "60" (=12 horas).
- Manteniendo el nivel de la esfera, coloque la aguja de las horas apuntando
en la dirección del sol.
- La brújula está activada y ya puede
controlar las direcciones utilizando el
bisel tipo brújula giratorio. El triángulo
en el número "60", la indicación "90", la
"S" y la indicación "270" indican el norte,
el este, el sur y el oeste, respectivamente.
EJEMPLO 1: en su zona son las 10:00.
Coloque la "S" frente al número "5" en la
esfera (=a medio camino entre las 12
horas y la aguja de las horas). Manteniendo la esfera en horizontal, coloque
la aguja de las horas en dirección al sol
para activar la brújula.
EJEMPLO 2: en su zona son las 18:00
horas. Coloque la "S" frente al número
"45" (=3 horas) en la esfera (=a medio
camino entre las 12 horas y las 6 horas).
Manteniendo la esfera en horizontal, coloque la aguja de las horas en dirección
al sol para activar la brújula.
Page 61

3.4
ANTIMAGNETISMO
Los campos magnéticos pueden afectar considerablemente a la precisión de
su reloj. Pueden proceder de muchas
fuentes, por ejemplo teléfonos móviles,
iPads, ordenadores, altavoces, neveras u otros dispositivos electrónicos.
Cuanto más poderoso es un campo
magnético, mayor impacto tiene en su
reloj. Todos los modelos Alpina con un
"4" en el nombre, como por ejemplo el
Alpiner 4, son antimagnéticos, es decir,
aunque estén expuestos hasta un deter-
minado nivel a un campo magnético, su
desviación es mínima. Los relojes antimagnéticos Alpina "4" cumplen el estándar internacional ISO 764, que define la
resistencia de los relojes a los campos
magnéticos. De conformidad con el ISO
764, un reloj debe resistir la exposición a
un campo magnético con una corriente
directa de 4,800 A/m. Para ser reconocido como antimagnético, el reloj debe
mantener en ±30 segundos/día la precisión indicada antes de la prueba.
04
CUIDADO
DEL RELOJ
Y GARANTÍA
otras functiones 120 121 | ES |
Page 62

4.1
CÓMO CUIDAR SU RELOJ ALPINA
4.2
MANTENIMIENTO E
INTERVALOS
DE MANTENIMIENTO
SIGA LAS RECOMENDACIONES QUE FIGURAN A CONTINUACIÓN PARA
ASEGURARSE DE QUE SU RELOJ ALPINA FUNCIONA DE MANERA FIABLE Y
EXCELENTE A LO LARGO DE LOS AÑOS.
1
Si nada en agua salada: enjuague su
reloj con agua dulce después de nadar.
Magnetismo: no coloque su reloj Alpina
2
sobre iPads, ordenadores, altavoces,
teléfonos móviles o neveras, ya que generan campos magnéticos poderosos
que pueden afectar a la precisión del
reloj
3
Choques: su reloj puede verse afecta-
do por distintos tipos de choques químicos, térmicos, físicos, magnéticos u
otros. Evítelos.
4
Corona atornillada: para evitar que el
agua y la humedad entren en la caja,
asegúrese de que la corona esté
siempre bien atornillada. No utilice los
pulsadores del cronógrafo debajo del
agua.
5
Corona normal: para evitar que la hu-
medad entre en la caja, asegúrese de
que la corona esté siempre bien apretada en la posición de funcionamiento
normal. No utilice los pulsadores del
cronógrafo debajo del agua.
6
Cuidado y limpieza de los brazaletes
metálicos, las correas de caucho y las
cajas metálicas estancas: limpie con
agua enjabonada y un cepillo y seque
con un paño seco.
122
Productos químicos: evite el contacto
7
directo con productos químicos de
limpieza, disolventes, detergentes, cosméticos y otros productos químicos, ya
que pueden causar daños en la caja, el
brazalete o las juntas de caucho.
Temperatura: evite la exposición a tem-
8
peraturas superiores a los 60 °C (140
°F) o inferiores a los 0 °C (32 °F). Asimismo, evite los cambios extremos de
temperatura. Por ejemplo, no sumerja el
reloj en agua extremadamente fría si ha
estado expuesto al sol durante un periodo prolongado.
Estanqueidad: la estanqueidad de
9
un reloj no puede garantizarse para
siempre en todas las situaciones. En
concreto, puede verse afectada por
factores como choques en la corona o
el desgaste de las juntas (por ejemplo,
a causa de la acción de productos químicos), entre otros.
Como ocurre con cualquier otro instrumento mecánico de precisión, es importante
someter periódicamente el reloj a operaciones de mantenimiento para comprobar
que funciona de manera correcta y precisa.
Como norma general, en función de la forma y las condiciones en las que utiliza su
reloj, le recomendamos someterlo a operaciones de mantenimiento cada 4-5 años.
Encontrará una lista de nuestros Distribuidores y Centros de Servicio Oficiales en
www.alpina-watches.com.
RELOJES MECÁNICOS
En los relojes automáticos Alpina, la rueda
de volante oscila 28.800 veces por hora y el
engranaje principal avanza 691.200 veces
en 24 horas. En cuatro años, esto representa más de 1.000 millones de impulsos.
Le recomendamos que cada tres o cuatro
años lleve su reloj a un Distribuidor o Centro
de Servicio Oficial de Alpina para que un relojero experto lo examine meticulosamente
y limpie y lubrique el movimiento de manera
exhaustiva
123o del reloj y garantìa | ES |
Page 63

ESTANQUEIDAD
El grado de estanqueidad de su reloj se
determinó y comprobó al fabricarlo en
nuestros talleres. No obstante, esta indicación no constituye una garantía permanente de que el agua no vaya entrar
en su reloj.
Su reloj solo es estanco cuando la corona está totalmente apretada contra la
caja. Si su reloj tiene una corona atornillada, hay que atornillarla bien fuerte.
Su reloj no será estanco si la corona se
encuentra en la posición de dar cuerda o
ajustar la hora. Asimismo, no se pueden
utilizar los pulsadores mientras el reloj
está mojado o se encuentre en el agua.
El envejecimiento y el manejo cotidiano
del reloj también afectan a su estanqueidad. Evite los cambios bruscos de temperatura (por ejemplo, sumergir el reloj
en agua fría tras estar expuesto al sol
durante un periodo prolongado), puesto
que pueden causar daños a las juntas,
así como otros choques –químicos, físicos, etc.– que pueden poner en riesgo
la integridad técnica de la caja del reloj.
Le recomendamos que lleve su reloj
cada 2-3 años a un Distribuidor o Centro
de Servicio Oficial de Alpina para comprobar su estanqueidad.
CONSERVACIÓN DE LA
CORREA DE
4.3
Para conservar su correa de piel, en
buen estado durante el mayor tiempo
posible, le recomendamos que siga las
indicaciones que enumeramos a continuación:
1
Evite el contacto con el agua y la hu-
medad para evitar que pierda el color
o se deforme.
Evite la exposición prolongada al sol
2
para evitar que pierda el color.
Evite el contacto con sustancias
3
grasientas, productos cosméticos y
cualquier otro agente químico.
La piel es un material orgánico y permeable y, por lo tanto, no conserva
eternamente su estado original. No obstante, si sigue los pasos que le hemos
indicado durará mucho tiempo. Puede
sustituir su correa de piel en cualquier
Distribuidor Oficial de Alpina.
124
PIEL
TRATAMIEN
TO ANTIRREFLECTANTE
4.4
El tratamiento antirreflectante del cristal de zafiro mejora la visibilidad y el
contraste de la esfera de su reloj. El uso
y el desgaste cotidianos pueden hacer
que aparezcan marcas en el revestimiento. Esto se considera normal y, por
lo tanto, las marcas no están cubiertas
por la garantía
DEL CRISTAL
DE ZAFIRO
CORONA
ATORNILLA-
4.5
Algunos relojes Alpina cuentan con una
corona atornillada que hay que desatornillar para cambiar la hora o la fecha.
Tras utilizar la corona, hay que apretarla contra la caja y atornillarla fuerte. En
caso contrario, ello puede afectar a la
estanqueidad de su reloj
DA
GARANTÍA
INTER-
4.6
Su reloj Alpina está garantizado por un
periodo de dos años (24 meses) a partir
de la fecha de compra contra todos los
defectos de fabricación aparecidos durante su uso normal, tal como se indica a
continuación: Alpina Watch International
S.A. sustituirá gratuitamente cualquier
componente defectuoso a causa de un
error de fabricación debidamente señalado por nuestros servicios técnicos. Su
reloj está cubierto por una garantía de
dos años a partir de la fecha en que el
Certificado de Garantía sea firmado y
sellado por un distribuidor autorizado de
Alpina.
125o del reloj y garantìa | ES |
NACIONAL
Page 64

LA GARANTÍA INTERNACIONAL NO
CUBRE LOS SIGUIENTES SUPUESTOS:
Robo, pérdida, casos fortuitos o
1
consecuencias de catástrofes naturales.
Duración de la pila.
2
Desgaste normal del reloj (por ejem-
3
plo, rayas en el cristal, alteración del
color y/o el material de las correas y
cadenas no metálicas, como por ejemplo de piel, tejido o caucho, o peladuras en el chapado).
Cualquier daño en alguna parte del re-
4
loj a causa del tratamiento o uso inadecuados, la falta de cuidado, negligencias, accidentes (golpes, abolladuras,
aplastamientos, cristal roto, etc.), el
uso incorrecto o el incumplimiento de
las instrucciones de uso proporcionadas por Alpina.
Daños indirectos o resultantes de
5
cualquier tipo derivados del uso del
reloj Alpina, como por ejemplo no funcionamiento, defectos o falta de precisión.
Defectos o daños derivados de
6
cualquier manipulación o alteración
delreloj por alguien que no sea un
centro de servicio debidamente auto
rizado por Alpina (por ejemplo, sustitución
de pilas, servicios o reparaciones) o de la
alteración de su estado original sin la supervisión de Alpina.
Uso de pilas distintas de las indicadas
7
por Alpina.
Esta garantía solo resulta válida para los
relojes de pulsera acompañados del certificado de garantía debidamente firmado,
fechado y sellado por un distribuidor autorizado de Alpina. En el certificado deben
figurar los números tanto de referencia
como de registro individual del reloj Alpina.
Cualquier operación de mantenimiento
o reparación de su reloj Alpina debe ser
realizada por un centro de servicio y reparación aprobado por Alpina. En caso
contrario, la Garantía Internacional quedará anulada.
Esta Garantía Internacional no anula, restringe ni afecta de ningún otro modo a
cualquier derecho o privilegio del consumidor legalmente reconocido en el país de
compra de su reloj Alpina.
126
4.7
Con frecuencia se nos solicita que comprobemos que un reloj Alpina es auténtico. Los distribuidores de Alpina certifican la autenticidad de cada reloj de la
marca y ofrecen un servicio posventa experto y fiable gracias a sus conocimientos y habilidades profesionales y al uso
de un equipo especialmente adaptado.
Alpina Watch International S.A. excluye
cualquier relación o responsabilidad en
cuanto a cualquier reloj o artículo que
lleve el nombre, la marca, el logotipo
o el símbolo de Alpina y que haya sido
comercializado por un distribuidor no
autorizado de Alpina.
Por lo tanto, el comprador asumirá el
riesgo exclusivo en caso de compra de
este tipo de artículo a un distribuidor no
autorizado, en particular en el caso de
AUTENTICIDAD
falsificaciones o productos de calidad
inferior y en el caso de la compra de artículos por Internet.
Alpina y sus representantes autorizados
quedan exentos de cualquier obligación
de garantía explícita o implícita, mantenimiento o cualquier otra obligación en
relación con productos vendidos por
terceros no autorizados que no vayan
acompañados de un certificado de garantía internacional de Alpina debidamente sellado.
Por los motivos expuestos y por su
propio interés, le recomendamos que
compre únicamente auténticos relojes
Alpina, que se pueden obtener exclusivamente a través de los distribuidores
de Alpina.
127o del reloj y garantìa | ES |
Page 65

05
CENTROS
DE
SERVICIO
128
Si desea obtener una lista actualizada de nuestros centros de servicio
autorizados o distribuidores oficiales, consulte nuestro sitio web oficial
www.alpina-watches.com
129 | ES |
Page 66

IN
DICE
02. ISTRUZIONI SPECIALI
PER L'USO
2.1 CALIBRO AL-550 GMT 131
2.2 CALIBRO AL-880
COUNTDOWN AUTOMATICO 132
03. ALTRE FUNZIONI
3.1 LUNETTA GIREVOLE SUBACQUEA 136
3.2 SCALE DI MISURAZIONE 136
3.3 LUNETTA A COMPASSO
GIREVOLE A 360° 137
3.4 ANTI-MAGNETISMO 140
04. CURA DELL'OROLOGIO
E GARANZIA
4.1 CURA DEL TUO OROLOGIO ALPINA 142
4.2 SERVIZIO E INTERVALLI
DI MANUTENZIONE 143
4.3 CURA DEL CINTURINO IN PELLE 144
4.4 TRATTAMENTO ANTI-RIFLESSO
DEL VETRO ZAFFIRO 145
4.5 CORONA AVVITATA 145
4.6 GARANZIA INTERNAZIONALE 145
4.7 AUTENTICITÀ 146
05. CENTRI ASSISTENZA 147
instruzioni speciali per l'uso
130
131
| IT |
Page 67

02
2.1
FUNZIONI: ORE, MINUTI, SECONDI,
DATA, GMT (SECONDO FUSO
ORARIO)
USO DELLA FUNZIONE GMT:
Il GMT è dotato di una lancetta delle
ore supplementare, rossa e a forma di
freccia, che si distingue al primo colpo
d’occhio dalla lancetta delle ore principale.
CALIBRO
AL-550 GMT
Questa lancetta delle ore supplementare
compie un giro del quadrante in 24 ore
e rappresenta l’ora di riferimento. La
lancetta delle ore, che rappresenta l’ora
locale, può facilmente essere regolata
mediante salti di un’ora.
Se parti per un viaggio estrai la corona
portandola in posizione 2 e regola l’ora
di riferimento, in base alla gradazione del
réhaut del quadrante.
INSTRUZIONI
SPECIALI
PER L'USO
132
Spingi poi la corona per portarla in posizione 1 e poter così regolare per salti
di un’ora la lancetta principale, in modo
che essa indichi l’ora del paese in cui ti
1
trovi. Questa operazione non comporta
2
l’arresto del movimento meccanico, cosicché è possibile regolare l’ora senza
sregolare l’orologio.
Ora puoi leggere con un solo colpo
d'occhio l'ora del paese di provenienza
e l'ora del paese in cui ti trovi!
133 | IT |
Page 68

CALIBRO
AL-880
COUNTDOWN
2.2
FUNZIONI: ORE, MINUTI, COUNTDOWN 10 MIN.
AUTOMATICO
1 1
4 4
È trascorso un minuto. Sono trascorsi 7 minuti e 30 secondi.
COUNTDOWN
Prima che inizi il conto alla rovescia, le
5 finestrelle sono dello stesso colore del
quadrante. Ogni finestrella rappresenta
un minuto. Al via del commissario di
gara, attiva il conto alla rovescia (premendo sul pulsante 1). Dopo 1 minuto,
la prima finestrella sarà diventata blu e le
4 successive saranno ancora dello stesso colore del quadrante. Dopo 5 minuti
la lancetta trotteuse sarà a ore 12 e le
5 finestrelle saranno blu. A questo punto
il commissario di gara sparerà di nuovo
per confermare il seguito della partenza.
Se il countdown si ferma, basta interrompere il conto alla rovescia sull'orologio
premendo sul pulsante 4 e rilanciarlo
quando il countdown riprenderà premendo di nuovo sul pulsante 4. Dopo
6 minuti, la prima finestrella sarà diventata arancione e le 4 successive saranno
ancora blu. Dopo 9 minuti, 4 finestrelle
saranno arancioni e il blu dell’ultima comincerà a scomparire. Sta a te ora organizzare la partenza della tua imbarcazione per passare la linea nell’istante in
cui le 5 finestrelle saranno arancioni e la
lancetta trotteuse sarà a ore 12.
134
60
55
5
T
R
1
50
A
2
10
T
3
S
15
20
45
4
5
40
35
25
30
1
4
COUNTDOWN
Prima dell’inizio del conto alla rovescia,
il disco rotante dei 10 minuti è grigio e il
10 si trova in basso tra gli indici 45 e 40.
Vengono visualizzati i primi 5 minuti (dal
6 al 10). Al via del commissario di gara,
attiva il conto alla rovescia (premendo
sul pulsante 1). Dopo 1 minuto, il 5 apparirà su un fondo blu e il 10 scomparirà.
Dopo 5 minuti la lancetta trotteuse sarà
a ore 12 e le 5 finestrelle saranno blu. Il
commissario di gara sparerà di nuovo
60
55
5
S
T
50
A
10
R
45
15
T
1
2
40
3
20
4
5
35
25
30
per confermare il seguito della partenza.
Se il countdown si ferma, basta interrompere il conto alla rovescia sull'orologio
premendo sul pulsante 4 e rilanciarlo
quando il countdown riprenderà premendo di nuovo sul pulsante 4. Dopo
10 minuti apparirà il messaggio START.
Sta a te ora organizzare la partenza della tua imbarcazione per passare la linea
nell’istante in cui apparirà il messaggio
START e la lancetta trotteuse sarà a ore
12.
135instruzioni speciali per l'uso | IT |
1
4
Page 69

2.2
PIANIFICATORE TATTICO
L’Alpina Extreme 40 è dotato di un pianificatore tattico, sotto forma di linea di
partenza disegnata sul quadrante. Un
“+” e un “-“ indicano una posizione di
partenza favorevole o sfavorevole rispetto alla boa di partenza.Il pianificatore
permette ai naviganti prendere le decisioni necessarie in merito al loro posizionamento sulla linea di partenza. Per
determinare la posizione migliore, usa la
bussola della lunetta come segue:
- determina la direzione del vento con il
compasso (anemometro);
- gira la lunetta per avere l’angolo del
vento a ore 12; - naviga dall’imbarcazione di partenza fino alla boa della linea di partenza per determinare l’orientamento della linea di partenza;
- guarda la lunetta dell’orologio per comprendere qual è l’orientamento della
linea di partenza. Se l'angolo si trova
tra le ore 9 e le ore 12, sarà meglio partire dal lato della boa di partenza. Se
l’angolo si trova tra le ore 6 e le ore 9,
conviene partire dal lato dell’imbarcazione di partenza.
03
ALTRE
FUN
ZIONI
136
137instruzioni speciali per l'uso | IT |
Page 70

3.1
LUNETTA
GIREVOLE
SUBACQUEA
3.2
SCALE DI
MISURAZIONE
Esempio 1
3.3
LUNETTA A
COMPASSO
GIREVOLE A
360°
Impiegata per tenere sotto controllo i
tempi di immersione, la lancetta girevole
unidirezionale antioraria è una caratteristica essenziale di tutti gli orologi subacquei Alpina. La lunetta è dotata di una
scala graduata suddivisa in minuti.
Il suo funzionamento è semplice e affidabile. All'inizio di ogni immersione, lo
zero sulla lunetta deve essere allineato
con la lancetta dei minuti. Un semplice
sguardo alla posizione della lancetta
dei minuti rispetto alla lunetta permette
al sub di comprendere in qualsiasi momento quanto tempo è passato (in minuti) dall'inizio dell'immersione.
La rotazione unidirezionale antioraria è
un sistema di sicurezza che garantisce,
in seguito a un eventuale movimento
accidentale della lunetta, che il tempo
di immersione residuo segnalato sia
sempre inferiore a quello effettivo.
Le scale di misurazione instaurano una
relazione tra il tempo trascorso e un'altra
variabile. L'informazione desiderata, sia
essa la velocità (tachimetro), la distanza
(telemetro) o il numero di unità (pulsometro, misuratori di produttività) si legge
tra la lancetta dei secondi centrali del
cronografo e la scala corrispondente, su
una durata massima di 60 secondi. Per
il telemetro è possibile usare il contatore
dei minuti aggiungendo 20 km alla distanza indicata dalla lancetta dei secondi
centrali per ogni minuto trascorso.
USO DELLA SCALA TACHIMETRICA
Esempio 1: calcolo della velocità di
un'automobile.Misura il tempo che l'automobile impiega a percorrere la distanza
di 1 km. Rileva la velocità indicata dalla
lancetta dei secondi centrali del cronografo sulla scala tachimetrica. Nel nostro
esempio l'automobile viaggia a 90 km/h.
138
Esempio 2: calcolo della distanza tra la
tua posizione e una tempesta. Attiva il cronografo quando vedi il lampo e arrestalo
quando senti il tuono. Rileva la distanza
indicata dalla lancetta centrale del cronografo sulla scala telemetrica. Nel nostro
esempio la tempesta è a 5 km di distanza
dalla tua posizione.
Esempio 1
139instruzioni speciali per l'uso | IT |
Gli orologi Alpina che presentano
una lunetta a compasso, girevole a
360°, sono in grado di determinare
la direzione in maniera approssimativa. Un'utile funzionalità per gli sport
d'orientamento o per altri sport alpini o
d'avventura.
ISTRUZIONI PER L'USO DEL COMPASSO SULL'ALPINER 4 CHRONOGRAPH E SULL'ALPINER 4 GMT*
Precauzioni d'uso relative alla lunetta a
compasso:
- Non usare il compasso in situazioni in
cui è richiesta la massima accuratezza. Il compasso fornisce solo indicazioni approssimative sulle direzioni.
- Usa il compasso quando il sole è visibile o la sua posizione è nota.
- L'orologio deve essere regolato
sull'ora solare. Se nella regione in cui
ti trovi vige l'ora legale, devi spostare
le lancette un'ora indietro prima di
usare la lunetta a compasso.
Page 71

ISTRUZIONI PER L'USO
1. NELL'EMISFERO NORD
- Posiziona il numero 36 (= 360° = nord)
sulla lunetta girevole a compasso di
fronte all'ora attuale sul cerchio delle
24 ore.
- Mantenendo il quadrante in posizione
orizzontale, punta la lancetta delle ore
nella direzione del sole.
- Ora il compasso è attivo e puoi leggere le direzioni sulla lunetta girevole
a compasso. I numeri 36, 09, 18 e 27
indicano rispettivamente il nord, l'est, il
sud e l'ovest.
ESEMPIO 1: sono le 08:00 del mattino
nella regione in cui ti trovi. Posiziona il
numero 36 di fronte all'8 sulla scala 24
ore del quadrante. Ora (mantenendo il
quadrante in posizione orizzontale) punta il quadrante in posizione del sole per
attivare il compasso.
ESEMPIO 2: sono le 18:00 nella regione
in cui ti trovi. Posiziona il numero 36 di
fronte all'18 sulla scala 24 ore del quadrante. Ora (mantenendo il quadrante in
posizione orizzontale) punta il quadrante
in posizione del sole per attivare il compasso
2. NELL'EMISFERO SUD
- Posiziona il numero 18 (= 180° = sud)
sulla lunetta girevole a compasso di
fronte all'ora attuale sul cerchio delle
24 ore.
- Mantenendo il quadrante in posizione
orizzontale, punta la lancetta delle ore
nella direzione del sole.
- Ora il compasso è attivo e puoi leggere le direzioni sulla lunetta girevole
a compasso. I numeri 36, 09, 18 e 27
indicano rispettivamente il nord, l'est, il
sud e l'ovest.
ESEMPIO 1: sono le 08:00 del mattino
nella regione in cui ti trovi. Posiziona il
numero 18 di fronte all'8 sulla scala 24
ore del quadrante. Ora (mantenendo il
quadrante in posizione orizzontale) punta il quadrante in posizione del sole per
attivare il compasso.
ESEMPIO 2: sono le 18:00 nella regione
in cui ti trovi. Posiziona il numero 18 di
fronte all'18 sulla scala 24 ore del quadrante. Ora (mantenendo il quadrante in
posizione orizzontale) punta il quadrante
in posizione del sole per attivare il compasso.
* Sull'Alpiner 4 GMT puoi anche usale la
lancetta 24 ore per attivare il compasso.
Per far ciò assicurati che la lancetta 24 ore
indichi l'ora locale.
A) Nell'emisfero nord metti il numero 36
(= nord) di fronte alla lancetta delle 24
ore. Poi (mantenendo il quadrante in posizione orizzontale) punta il quadrante in
direzione del sole per attivare il compasso.
B) Nell'emisfero sud metti il numero 18 (=
sud) di fronte alla lancetta delle 24 ore.
Poi (mantenendo il quadrante in posizione orizzontale) punta il quadrante in direzione del sole per attivare il compasso.
ISTRUZIONI PER L'USO DEL COMPASSO SUL SEASTRONG YACHT TIMER
1. NELL'EMISFERO NORD
- Posiziona la "S" (= sud) della lunetta
girevole a compasso alla metà dell'arco tra l'indice 60 (= ore 12) e la lancetta
delle ore*.
* Nelle ore antimeridiane posiziona la "S"
a sinistra dell'indice 60 (= ore 12), nelle
ore pomeridiane posiziona la "S" a destra dell'indice 60 (= ore 12).
- Mantenendo il quadrante in posizione
orizzontale, punta la lancetta delle ore
nella direzione del sole.
- Ora il compasso è attivo e puoi leggere
le direzioni sulla lunetta girevole a compasso. Il triangolo sull'indice 60, l'indice
90, la "S" e l'indice 270 indicano rispettivamente il nord, l'est, il sud e l'ovest.
ESEMPIO 1: sono le 10:00 del mattino
nella regione in cui ti trovi. Posiziona la
"S" di fronte al 5 sul quadrante (= a metà
strada tra le ore 12 e la lancetta delle ore).
Ora (mantenendo il quadrante in posizione orizzontale) punta il quadrante in direzione del sole per attivare il compasso.
ESEMPIO 2: sono le 18:00 nella regione
in cui ti trovi. Posiziona la "S" di fronte al 45
(= ore 3) sul quadrante (= a metà strada
tra le ore 12 e le ore 6). Ora (mantenendo
il quadrante in posizione orizzontale) punta il quadrante in direzione del sole per
attivare il compasso.
140
141instruzioni speciali per l'uso | IT |
Page 72

3.4
ANTIMAGNETISMO
I campi magnetici possono avere un
impatto significativo sulla precisione
del tuo orologio. Esistono molte fonti di
campi magnetici, tra cui i telefoni cellulari, gli iPad, i computer, gli amplificatori,
i frigoriferi e altri apparecchi elettronici. Più il campo magnetico è forte, più
l'impatto sull'orologio è elevato. Tutti gli
orologi Alpina il cui nome è contraddistinto da un 4, come per esempio l'Alpiner
4 sono anti-magnetici. Ciò significa che
subiscono solo una minima deviazione
quando sono esposti a un certo livello di
magnetismo. I segnatempo anti magnetici Alpina "4" sono conformi alla norma
internazionale ISO 764 che definisce la
resistenza degli orologi ai campi magnetici. Tale norma impone che, per essere
definito anti magnetico, un orologio debba resistere all'esposizione diretta a un
campo magnetico di 4.800 A/m, mantenendo una precisione di ± 30 secondi/
giorno rispetto a quella misurata prima
dell'esposizione.
142
04
CURA
DELL'ORO
LOGIO E
GARANZIA
143instruzioni speciali per l'uso | IT |
Page 73

4.1
CURA DI UN
OROLOGIO
ALPINA
4.2
SERVIZIO E
INTERVALLI
DI MANUTENZIONE
PER FARE IN MODO CHE IL TUO OROLOGIO ALPINA RESTI UN COMPAGNO
FEDELE E TI GARANTISCA PRESTAZIONI ECCELLENTI NEL CORSO DEGLI
ANNI, TIENI SEMPRE PRESENTI LE SEGUENTI RACCOMANDAZIONI.
1
Uso in acqua salata: dopo aver nuo-
tato in mare ricorda sempre di risciacquare subito l'orologio con acqua
dolce.
Magnetismo: evita di adagiare l'orolo-
2
gio su iPad, computer, amplificatori,
telefoni cellulari o frigoriferi. Questi
apparecchi generano potenti campi
magnetici che possono danneggiare
la precisione dell'orologio.
3
Shock: shock chimici, termici, fisici,
magnetici o di altro tipo possono
danneggiare l'orologio. Cerca di evitarli.
cura dell'orologio garanzia
4
Corona avvitata: per evitare la pene-
trazione di acqua o umidità all'interno
della cassa, assicurati che la corona
sia sempre ben avvitata. Non usare i
pulsanti del cronografo sott'acqua.
5
Corona normale: per evitare la pe-
netrazione di umidità all'interno della
cassa, assicurati che la corona sia
sempre ben spinta all'indietro, nella
posizione consigliata per indossare
l'orologio, Non usare i pulsanti del
cronografo sott'acqua.
6
Cura e pulizia dei bracciali in metallo,
dei cinturini in caucciù e delle casse
impermeabili in metallo: pulisci con
acqua, sapone e spazzolino, poi asciuga con un panno morbido.
144
Prodotti chimici: evita il contatto di-
7
retto con detersivi chimici, solventi,
detergenti, cosmetici e altri prodotti
chimici che potrebbero danneggiare
la cassa, il bracciale o le giunture.
Temperatura: evita l'esposizione a
8
temperature superiori a 60°C (140°F)
o inferiori a 0°C (32°F). Proteggi
inoltre l'orologio da escursioni termiche eccessive, evitando per esempio
di immergerlo in acqua molto fredda
dopo una lunga esposizione al sole.
9
Impermeabilità: l'impermeabilità di
un orologio non può essere garantita in tutte le situazioni e per sempre.
L'invecchiamento delle giunture (dovuto per esempio all'azione di prodotti chimici), uno shock subito dalla
corona o altri fattori possono ridurre
l'impermeabilità.
Come ogni altro strumento di precisione,
l'orologio necessita regolari controlli volti
a garantire il suo corretto funzionamento
nel tempo. In linea di massima, e a seconda della frequenza e delle condizioni
d'uso dell'orologio, ti consigliamo di far
controllare il tuo orologio ogni 4-5 anni.
Puoi trovare la lista dei nostri rivenditori
autorizzati e dei nostri centri assistenza
su www.alpina-watches.com.
OROLOGI MECCANICI
Negli orologi automatici Alpina la ruota
del bilanciere effettua 28.800 oscillazioni orarie e l'ingranaggio avanza 691.200
volte in 24 ore. In quattro anni si producono in totale un miliardo di impulsi!
Ti consigliamo quindi di far controllare
il tuo orologio ogni 3-4 anni presso un
rivenditore autorizzato Alpina o uno dei
nostri centri servizi. Un orologiaio esperto effettuerà dapprima una meticolosa
ispezione, poi pulirà e lubrificherà i movimenti.
145
| IT |
Page 74

IMPERMEABILITÀ
Il livello di impermeabilità del tuo orologio è stato determinato e verificato al
momento della fabbricazione nei nostri
atelier. Queste procedure non implicano
una garanzia a vita contro la penetrazione
dell'acqua all'interno dell'orologio.
L'orologio è completamente impermeabile solo quando la corona è ben spinta
all'interno della cassa. Se il tuo modello
presenta una corona avvitata, questa
deve essere ben avvitata all'interno della
cassa. Nelle posizioni di carica e di regolazione dell'ora l'orologio non è impermeabile. Per lo stesso principio, i pulsanti
non devono essere attivati quando l'orologio è umido o immerso nell'acqua.
L'invecchiamento e il normale uso quotidiano danneggiano la resistenza dell'orologio. Proteggi il tuo orologio da escursioni termiche eccessive (come l'immersione
in acqua dopo un'esposizione prolungata
al sole) che possono danneggiare le
giunture e da qualsiasi shock - chimico,
fisico o di altra natura - che possa compromettere l'integrità tecnica della cassa.
Ti consigliamo di far verificare l'impermeabilità del tuo orologio presso un rivenditore autorizzato o un centro assistenza
Alpina ogni 2-3 anni.
cura dell'orologio garanzia
CURA DEL
CINTURINO
4.3
Per mantenere il tuo cinturino in pelle in
buone condizioni il più a lungo possibile,
tieni sempre presenti le seguenti raccomandazioni.
1
Proteggi il cinturino dal contatto con
acqua e umidità per evitare deformazioni e decolorazioni.
Evita l'esposizione prolungata al sole,
2
che può causare la decolorazione.
Evita il contatto con sostanze grasse,
3
prodotti cosmetici e prodotti chimici
di ogni tipo.
La pelle è un materiale organico e permeabile. Di conseguenza essa non
conserva per sempre le sue condizioni
originarie. Grazie agli accorgimenti sopra citati, il tuo cinturino potrà tuttavia
conservarsi in buone condizioni per molti anni. Puoi far sostituire il cinturino del
tuo orologio presso qualsiasi rivenditore
autorizzato Alpina.
146
IN PELLE
TRATTAMENTO ANTIRIFLESSO
4.4
Il trattamento antiriflesso del vetro zaffiro
migliora la visibilità e il contrasto cromatico del quadrante del tuo orologio. Il normale uso quotidiano può causare segni
sul rivestimento. Queste escoriazioni
sono considerate normali e non vengono
pertanto coperte dalla garanzia.
DEL VETRO
ZAFFIRO
CORONA
4.5
Alcuni orologi Alpina sono dotati di una
corona avvitata, che va di tanto in tanto svitata per regolare l'ora. Dopo l'uso
la corona deve di nuovo essere spinta
verso la cassa e ben avvitata. In caso
contrario l'impermeabilità dell'orologio
risulterà compromessa.
AVVITATA
GARANZIA
INTER-
4.6
Il tuo orologio Alpina è garantito per un
periodo di due anni (24 mesi) a partire
dalla data di acquisto. La garanzia copre
i difetti di manifattura che emergono in
caso di uso regolare dell'orologio secondo le seguenti condizioni: Alpina
Watch International S.A. sostituirà gratuitamente i componenti che presentano
difetti di manifattura rilevati e certificati
dai nostri servizi tecnici. Il tuo orologio
è sotto garanzia per un periodo di due
anni dalla data indicata sul Certficato di
Garanzia firmato e timbrato da un rivenditore autorizzato Alpina. La Garanzia
Internazionale Alpina copre gli orologi
da polso Alpina acquistati ovunque nel
mondo presso un rivenditore autorizzato
Alpina ed è riconosciuta e rispettata da
tutti i rivenditori autorizzati Alpina.
147
NAZIONALE
| IT |
Page 75

LA GARANZIA INTERNAZIONALE ALPINA NON COPRE:
Il furto, lo smarrimento e le
1
conseguenze di calamità naturali;
La durata di vita della batteria;
2
I normali danni dovuti all'uso e all'in-
3
vecchiamento (es. graffi sul vetro,
alterazione del colore e/o dei materiali per bracciali e maglie in pelle,
tessuto o caucciù, escoriazioni della
placcatura);
Danni a qualsiasi componente
4
dell'orologio dovuti a maltrattamento,
uso improprio, mancanza di cura,
negligenza o incidenti (urti, battiture,
schiacciature), uso scorretto dell'orologio e non rispetto delle istruzioni
per l'uso fornite da Alpina;
Danni diretti o indiretti dovuti all'uso,
5
quali non funzionamento, difetti o imprecisione dell'orologio Alpina;
Difetti o danni dovuti a manipolazioni
6
o modifiche dell'orologio non eseguite da un centro assistenza autorizzato da Alpina (sostituzione della
batteria, manutenzione, riparazioni),
o all'alterazione delle sue condizioni
originali al di fuori del controllo di Alpi-
na;
L'uso di batterie diverse da quelle in-
7
dicate da Alpina.
Questa garanzia è valida solo per gli
orologi da polso accompagnati dal Certificato di Garanzia debitamente firmato, datato e timbrato da un rivenditore
autorizzato Alpina. Il Certificato deve
presentare sia il numero di referenza
che il codice di registrazione individuale
dell'orologio Alpina.
La manutenzione ed eventuali riparazioni del tuo orologio Alpina devono
essere effettuate solo da un centro di
manutenzione e riparazione autorizzato
da Alpina, pena l'invalidità della Garanzia
Internazionale.
4.7
Spesso ci viene chiesto di controllare
l'autenticità di un orologio Alpina. I rivenditori autorizzati Alpina attestano l'autenticità di ogni singolo orologio Alpina e
forniscono servizi di assistenza esperti
e affidabili grazie al loro know-how, alla
loro professionalità e ad una strumentazione particolarmente adeguata.
Alpina Watch International S.A. declina
ogni coinvolgimento e ogni responsabilità nella vendita di orologi o altri prodotti
recanti il nome, il marchio, il logotipo o il
simbolo Alpina al di fuori del circuito dei
rivenditori autorizzati Alpina.
L'acquirente assume pertanto ogni
rischio per l'acquisto di tali prodotti
presso un rivenditore non autorizzato, in
particolare in caso di contraffazione o di
prodotti non standard e in caso di prodotti acquistati su internet.
AUTENTICITÀ
Alpina e i suoi rappresentanti autorizzati
non sono tenuti a fornire alcuna garanzia
esplicita o implicita per i prodotti commercializzati da rivenditori non autorizzati e non accompagnati da un Certificato
di Garanzia Internazionale Alpina debitamente timbrato.
Per le suddette ragioni e nel tuo proprio
interesse, ti invitiamo ad acquistare solo
autentici segnatempo Alpina, disponibili
esclusivamente presso i rivenditori autorizzati Alpina.
cura dell'orologio garanzia
148
149
| IT |
Page 76

05
CENTROS
DE
SERVICIO
150
La lista completa e aggiornata dei centri assistenza e dei rivenditori autorizzati è
disponibile sul nostro sito internet ufficiale www.alpina-watches.com
151 | IT |
Page 77

コンテ
ンツ
02. 特殊な使用方法
2.1 キャリバーAL-550GMT 153
2.2 キャリバーAL-880
オートマチックカウントダウン 154
03. その他の機能
3.1 回転ダイビングベゼル 158
3.2 計測スケール 158
3.3 360°回転コンパスベゼル 159
3.4 耐磁性 162
04. ウォッチの取扱い&保証
4.1 アル ピナウォッチの取扱
いについて 164
4.2 サービスおよびサービス期間 165
4.3 レザーおよびストラップの
お手入れ 166
4.4 サ ファイアクリスタ ル の 反
射防止加工について 167
4.5ねじ込み式リューズ 167
4.6国際保証 167
4.7真正性について 169
05. サービスセンター 170
153152 | JA |
Page 78

1
2.1
キャリバー
AL-550 GMT
機能:時、分、秒、日付、GMT(第二時間帯)
GMT機能の使用方法:
GMT機能には、メインの時針と瞬時に見
分けがつくよう、赤い矢印の別の時針が
備えられています。
この時針は、24時間表示のダイヤルを1
周し、参照時刻を示します。現地時刻を
示す針は、1時間単位で簡単に調整する
ことができます。
旅先では、リューズをポジション2に引
き出して、フランジの目 盛りに 沿って参 照
時刻に合わせます。
02
次にリューズを押し込んでポジション
にセットして、メインの時針を1時間単位
で調整し、今いる国の時間を表示させま
特殊な使用
方法
154
す。この操作は、機械式ムーブメントを止
1
めることなく行われるため、時計が狂うこ
2
とはありません。
これで、24時間計で出発地の時刻を知る
ことができ、また現在いる場所の時刻は
一目で確認することができます。
155 | JA |
Page 79

キャリバー
AL-880
オートマ チッ
2.2
機能:時、分、10分カウントダウン
ク カウントダ
ウン
1 1
4 4
経過時間1分 経過時間7分30秒
カウントダウン,
カウントダウンの開始前は、5つの小窓
の色はダイヤルと同じです。小窓1つ
が1分を意味します。スタートの合図で
カウントダウンを 開 始します( ボタン 1 を
押 し ま す )。
1分後、最初の小窓がブルーになり、残り
4つはダイヤルと同じ色のままです。5分
後、秒針が正午を指すと、5つの小窓すべ
てがブ ル ー に なります。再 び 、ス タ ートの
続行を知らせるための合図が鳴ります。
カウントダウンを停止する場合は、ボタ
ン4を 押します。再開 するときは もう一
度ボタン 4を押してください。6分後、最
初の小窓がオレンジになり、残り4つはブ
ルーのままです。9分経つと、4つの小窓
がオレンジとなり、残りの小窓のブルー
が消え始めます。
5つの丸窓すべてがオレンジになり秒針
が正午を指したら、今度はあなたが船を
動 かしてスタ ートラ イン を 超 える 番 で す。
156
60
55
5
T
R
1
50
A
2
10
T
3
S
15
20
45
4
5
40
35
25
30
1
4
カウントダウン
カウントダウンの開始前は、10分計の回
転ディスクはグレーで、「10」の数字は45
と40の間に位置します。最初の5分(6か
ら10)は表示されています。スタートの合
図で カウントダウンを開 始しま す( ボタン
1
を押します)。1分後、ブルーの背景に
「5」が現れ「10」が消えます。5分後、秒針
が正午を指すと、5つの小窓すべてがブ
ルーになります。再び、スタートの続行を
知らせるための合図が鳴ります。
60
55
5
S
T
50
A
10
R
45
15
T
1
2
40
3
20
4
5
35
25
30
カウントダウンを停止する場合は、ボタ
ン4を押し
ます。再開するときはもう一度ボタン
4
を押してください。10分経つと、START
と表示されます。STARTの文字が表示さ
れ秒針が正午を指したら、今度はあな
たが船を動かしてスタートラインを超え
る番 で す。
157特殊な使用方法 | JA |
1
4
Page 80

2.2
戦 略プランナー
アルピナエクストリーム40 では、ダイヤ
ル上に描かれたスタートラインが戦略
プランナーの役割を果たします。« + » と
« - » は、スタートブイに対して有利また
は不利なスタートポジションを示します。
この戦略プランナー機能を使用すること
で、セーラー は、スタートラインに対する
自艇の位置を決定することができます。
スタートラインに対して最適なポジショ
ンを決定するには、以下の方法でベゼル
のコンパスを使用します。
-コンパス(風速計)で風向きを確認しま
す。-ベゼルを回して12時位置に風向き
を合わせます。
-スタートラインの方位を特定するため、
スタートラインのブイまでスタート艇を
移動させます。
-ベゼル上で、スタートラインの方位がど
こに位置するかを確認します。9時から
12時の間にある場合、スタートブイ側か
らのスタートが有利となり、6時から9時
の間にある場合は、自艇側からのスター
トが 有 利となります。
158
03
その他の
機能
159特殊な使用方法 | JA |
Page 81

例1
360°回転
3.1
すべてのアルピナダイビングウォッチに
備わっている基本的特徴が、潜水時間を
管理するための逆回転防止の反時計回
りの回転ベゼルです。このベゼルには、
分数の目盛りが 備わってい ま す。
ベゼルの作動原理は、シンプルかつ高い
信頼性です。潜水開始時に、ベゼルのゼ
ロを分針に合わせます。分針が指すベゼ
ルの位置を一目で確認することができる
ため、潜水開始から何分経過したかが瞬
時にわかります。
ベゼルが逆回転防止で反時計回りとなっ
ているのは、安全を考慮した設計です。リ
ングが偶発的に動いてしまった場合、残
りの潜水時間は実際の残りの潜水時間
よりも必ず 短くなります。
その他の機能 160 161 | JA |
ベゼル
3.2
計測スケールは、経過時間と別の尺度と
が関連したスケールです。速度(タキメー
タ ー )、距 離( テ レ メ ー タ ー )、単 位( 脈 拍
計、生産性メーター)に関する必要な情
報を、最大60秒間にわたって、中央のク
ロノグラフ秒針と該 当 するスケールで読
み取ることができます。テレメーターの
場合、中央の秒針が示す経過分数に対す
る距離に20kmをプラスすることで、分カ
ウンターとして使うことができま す。
タキメータースケ ールの 使用
例 1: 車の速度を計測する場合車が1km
走るのにかかる時間を計測します。中央
のクロノグラフ秒針がタキメーターの目
盛りで指し示す速度を読み取ります。こ
の例では、車の速度は時速90kmとなり
ます。
計測スケール
テレメータースケールの 使用
例2 :現在自分のいる場所と近づいてくる嵐
の距離を計測する場合稲妻が光ったときに
クロノグラフを 開 始し、雷 鳴 が 聞こえたとき
に停止します。中央のクロノグラフ秒針がテ
レメータースケールの目盛りで指し示す距
離を読み取ります。この例では、嵐はあなた
の位置から5kmの場所にあります。
例2
3.3
アルピナウォッチの特徴的な360°回
転コンパスベゼルは、大まかに方位
を特定することができます。特に、オリ
エンテーリング スポーツやその他の
冒険、高山でのスポーツなどに役立
ちます。
アル ピナ 4 クロノグラフとアル ピナ 4
GMT でのコンパスの使用*
コンパスベゼルの使用上の注意:
-確かな精度が必要な場合には、コン
パスを使用しないでください。この
コンパスが示すのはおおよその方
位のみです。
-太陽が見える場所や太陽がどこにあ
るかわかる場合 にコンパスを使用し
てください。
-お客様のウォッチは冬時間に設定さ
れています。お住まいの地域でサマ
ータイムが実施されている場合は、
コンパスベゼルを使用する前に1時
間遅らせる必要 があります。
回転ダイビング
コンパスベ
ゼル
Page 82

使用方法:
1.北半球の場合
- 回転コンパスベゼル上の「36」(=
360°= 北)を、24時間リングの現在時刻
に合わせます。
- ダイヤル上の操作は行わずに、時針を
太陽の方向に向けます。
- これでコンパスが 作動し、回転コンパ
スベゼルで方向を読み取ることができ
ます。36、09、18、27がそれぞれ、北、東、
南、西を示します。
例 1:現在、午前8時です。「36」をダイヤ
ルの24時間スケール上で8を指すように
合わせます。ダイヤルでは何も操作しな
いまま時針を太陽の方向へ向けると、ウ
ォッチ をコ ンパ スとして使うことが で き
ます。
例 2:現在、午後6時です。「36」をダイヤ
ルの24時間スケール上で18を指すよう
に合わせます。ダイヤルでは何も操作し
ないまま時針を太陽の方向へ向けると、
ウォッチ をコン パスとして 使うこと がで
きます。
その他の機能 162 163 | JA |
2.南半球の場合
- 回転コンパスベゼルの「18」(= 180°=
南)を、24時間リングの現在時刻に合わ
せます。
- ダイヤル上の操作は行わずに、時針を
太陽の方向に向けます。
- これでコンパスが 作動し、回転コンパ
スベゼルで方向を読み取ることができ
ます。36、09、18、27がそれぞれ、北、東、
南、西を示します。
例 1:現在、午前8時です。「18」をダイヤ
ルの24時間スケール上で8を指すように
合わせます。ダイヤルでは何も操作しな
いまま時針を太陽の方向へ向けると、ウ
ォッチ をコ ンパ スとして使うことが で き
ます。
例 2:現在、午後6時です。「18」をダイヤ
ルの24時間スケール上で18を指すよう
に合わせます。ダイヤルでは何も操作し
ないまま時針を太陽の方向へ向けると、
ウォッチ をコン パスとして 使うこと がで
きます。
* アルピナ 4 GMT をご使用の場合は、24
時間針を使用してもコンパス機能を使
用することができます。この場合は、24時
間針が現地時刻を表示している必要が
ありま す。
A) 北半球では、24時間針を「36」(北)に
合わせます。ダイヤルでは何も操作しな
いまま時針を太陽の方向へ向けると、ウ
ォッチ をコ ンパ スとして使うことがで きま
す。
B) 南半球では、24時間針を「18」(南)に
合わせます。ダイヤルでは何も操作しな
いまま時針を太陽の方向へ向けると、ウ
ォッチ をコ ンパ スとして使うことがで きま
す。
シーストロング ヨット タイマーで のコンパ
スの使用
1.北半球の場合
- 回転コンパスベゼル上の「S」(=南)を、
「60」のマーク(=12時)と時針の間の
アーチの内側に合わせます。*
* 午前中は、「S」を「60」 のマーク(=12
時)の左側に合わせ、午後は、「60」のマ
ーク(=12時)の右側に合わせます。
- ダイヤル上の操作は行わずに、時針を
太陽の方向に向けます。
- これでコンパスが作動し、回転コンパス
ベゼルで方向を読み取ることができま
す。「60」の三角、90のマーク、S、そして
270のマークが、北、東、南、西をそれぞ
れ示します。
例 1:現在、午前10時です。ダイヤルの「5」
に「S」を合わせます(12時と時針の中間)
。ダイヤルでは何も操作しないまま時針
を太陽の方向へ向けると、ウォッチをコ
ンパスとして使うことができます。
例 2:現在、午後6時です。ダイヤルの「45」
(=3時)に「S」を合わせます(12時と6時
の中間)。ダイヤルでは何も操作しない
まま時針を太陽の方向へ向けると、ウォ
ッチをコンパスとして使うことができま
す。
Page 83

3.4
耐磁性
磁場はウォッチの精度に大きな影響を
及ぼす可能性があります。磁場を発生さ
せる原因は、携帯電話やiPad、コンピュー
ター、スピーカー、冷蔵庫、その他電気機
器など、数多く存在します。磁場が強力で
あるほど、ウォッチへ の影響も高くなりま
す。「アルピナ 4」など、名前に「4」が付い
ているすべてのアルピナウォッチは、耐
磁性を備えています。これは、特定の磁場
に晒された場合も最小限の誤差しか生
じな いことを意 味します。
アルピナ「4」の耐磁性ウォッチは、磁場
に対するウォッチの耐性を定義した国際
規格ISO 764に一致しています。ISO 764
に従い、ウォッチは、4,800A/mの直流磁
場に晒される耐性を帯びています。当該
のウォッチは、耐磁性を備えたウォッチと
して認められるために、検査前の測定で
1日30秒前後の誤差でその精度を維持し
なければなりません。
04
ウォッチ の 取
扱い&保証
その他の機能 164 165 | JA |
Page 84

4.1
アル ピナウォッ
チの取扱
いについて
4.2
サービスおよ
びサービス
期間
お手持ちのアルピナウォッチを長期間、正常な状態でお使いいただくために、以下
の推奨事項を守ってください。
1
海水浴:海で泳いだ後は、すぐに真水
でウォッチを洗ってください。
磁気:ウォッチをiPadやコンピュータ
2
ー、スピーカー、携帯電話、冷蔵庫の
上に置かないでください。これらの装
置は強力な磁場を発生させるため、
ウォッチの精度に影響を及ぼす恐れ
がありま す。
3
ウォッチへの衝撃:化学物質や熱との
接触、物理的衝撃や磁場に晒すなど
といった 衝撃がウォッチに 加わると、
ウォッチに悪影響を及ぼす可能性が
あります。こうした衝撃を受けないよ
うご注意ください。
ウォッチの取扱い&保証
4
ねじ込み式リューズ:ケース内に水分
や湿気が侵入するのを防ぐため、リュ
ーズは常にしっかりとケースにねじ込
んでください。水 中ではクロノグラフ
のプッシャーを使 用しないでくださ
い。
5
ノーマルリューズ:ケース内に湿気が
侵入するのを防ぐため、リューズは常
に装着した姿勢で押し込んでくださ
い。水中ではクロノグラフのプッシャ
ーを使用しないでください。
6
メタルブレスレット、ラバーストラッ
プ、防水メタルケースのお手入れとお
掃除:石けん水や歯ブラシを使って汚
れを取り除き、柔らかな布で水分を拭
き取ってください 。
166 167 | JA |
化学物質:洗浄剤や溶剤、洗剤、化粧
7
品などの化学物質は、ケースやブレス
レット、ラバーガスケットを破 損する
恐れがあるため、直接ウォッチと触れ
ないようにしてください。
温度:摂氏60°C(華氏140°F)以上、摂
8
氏0°C(華氏32°F)以下の温度に晒さ
ないでください。また、ウォッチを長
時間日の当たるところに置いた後で
冷水に浸すなど、急激な温度変化に
も晒さないでください。
防水:ウォッチの防水性は、あらゆる
9
状況に対して、または永久に保証さ
れるものではありません。リューズが
衝撃を受けたり、化学物質の作用を
受けるなどしてガスケットが劣化する
と、防水性に影響する恐れがありま
す 。
ウォッチが正しく作動を続けるために
は、その他の精密機械同様、定期的に点
検することが大切です。一般的に、そし
て、ウォッチの使用頻度や使用状況に応
じて、アルピナでは4~5年ごとにウォッ
チを点検することをお勧めします。
アルピナの正規取扱店およびサー
ビスセンターの一覧は、www.alpina-watches.comでご覧いただけます。
機械式ウォッチ
アルピナの自動巻ウォッチのテンプは1
時間に28,800回振動し、輪列は24時間
で691,200回進みます。つまり、4年間で
は10億回もの振動を刻んでいるのです。
このため、3~4年ごとにアルピナの正規
取扱店またはサービスセンターにウォ
ッチをお持ちいただくことをお薦めしま
す。熟練の時計職人がウォッチを綿密に
点検し、ムーブメントのクリーニングと注
油を行います。
Page 85

防水
お客様のウォッチは、アルピナの工房で
製造される際に、その防水等級が確認さ
れます。これは、ウォッチの浸水に対して
寿命を保証するものではありません。
お客様のウォッチは、リューズがケース
に対してしっかりと押し込まれている場
合にのみ防水性を発揮します。リューズ
がねじ込み式である場合は、ケースにリ
ューズをしっかりとねじ込 んでください。
リューズが巻き上げ中であったり、時刻
設定のポジションにある場合は、防水機
能は作動しません。また、ウォッチが濡れ
ていたり水中にある場合は、プッシャー
を作動させないでください。
経年劣化や毎日の通常使用によって、ウ
ォッチの防水性に影響が出る場合があり
ます。長時間日の当たる場所にウォッチ
を置いた後で冷水に浸すなど、ガスケッ
トを破損する恐れのある急激な温度変
化や、ケースの技術的整合性を損なう恐
れのある化学的、物理的衝撃を含むすべ
ての衝撃は避けてください。
防水機能に関しては、2~3年ごとにアル
ピナ正規取扱店またはサービスセンタ
ーにウォッチをお持ちいただくことをお
勧めします。
レ ザー ストラ
ップ のお 手
4.3
お客様のレザーストラップをできるだけ
長く良好な状態でお使いいただくため
に、以下の注意事項に従ってください。
1
変色や変形が生じないよう、水分や
湿気に触れないようにしてください。
変色を避けるため、長時間太陽に晒
2
さないでください。
脂性のある物質や化粧品、その他の
3
化学物質に触れないようにしてくださ
い。
レザーは有機物質で透水性のある物質
です。このため、永遠に元の状態が保た
れることはありません。しかし、上記の注
意事項に従っていただくことで、長期間
保つことができます。また、アルピナ正 規
取扱店では、レザーストラップの交換も
承っております。
入れ
サファイアクリ
スタル の 反射
防止加工につ
4.4
サファイアクリスタルに反射防止加工を
施すことで、ダイヤルの視認性やコント
ラストが向上します。日常的な通常使用
による損傷により、コーティング上に跡
が残る場合がありますが、これらは異常
ではないため、保証の対象には含まれま
せん。
4.5
一部のアルピナウォッチはねじ込み式リ
ューズを使用しています。ねじ込み式リュ
ーズは、時間または日付の変更はねじを
回して行います。使用後は、リューズをケ
ースに対してしっかりと押し込んでくださ
い。リューズがケースに押し込まれない
場合、ウォッチの防水性が損なわれます。
いて
ねじ込み式リ
ューズ
4.6
お客様のアルピナウォッチは、お買い上
げの日から2年間(24か月)、以下の条項
で述べられているような通常使用中のす
べての製造上の欠陥を対象とした保証
が付されています。Alpina Watch International S.A.社のテクニカルサービスが
正式に指摘した製造誤差による欠陥部
品を、Alpina Watch International S.A.社
が無償で交換いたします。お客様のウォ
ッチは、アルピナ公認の正規取扱店によ
って署名・押印された保証書に記載され
ている日付より2年間保証されます。アル
ピナ国際保証は、世界各地のアルピナ正
規取扱店で購入されたアルピナウォッチ
を対象とし、すべてのアルピナ公認正規
取扱店で保証を受けることができます。
国際保証
ウォッチの取扱い&保証
168 169 | JA |
Page 86

本国際保証の対象とならない事項:
窃盗、損失、天災、または自然災害に
1
よる影響
電池寿命
2
通常使用による損傷、経年劣化(クリ
3
スタルの傷、レザ ーやテキスタイル、
ラバーなど非メタルストラップやチェ
ーンの色や素材の変化、プレートの
剥離 など)
ウォッチの誤使用または不正使用、
4
手入れの欠如、怠慢、事故(殴打、くぼ
み、圧搾、クリスタルの破損など)、不
適切な使用、およびアルピナが提示
した操作方法を順守しなかったこと
に起因するウォッチの部分的損傷
アルピナウォッチの非機能性、欠陥、
5
不正確さなど、使用に起因するあらゆ
る種類の間接または必然の損傷
アルピナが正規に認定したサービス
6
センター以外のあらゆる第三者によ
るウォッチの取扱いまたは不正使用(
バッテリー交換や修理など)に起因す
る欠陥や損傷、またはアルピナが制
御できないほどの元の状態からの変
化
7
アルピナが指定した以外でのバッテ
リーの使用
本保証は、アルピナ公認正規取扱店によ
って正式に署名・押印された保証書が付
されている腕時計に対してのみ有効で
す。証明書には、アルピナウォッチの商品
番号および個別登録番号の両方が記載
されている必要があります。
お客様のアルピナウォッチに対するいか
なるアフターサービスまたは修理作業
は、アルピナが承認したサービスおよび
修理センターによってのみ行われるもの
とし、それ以外の場合は本国際保証は無
効となります。
本国際保証は、お客様がアルピナウォッ
チを購入された国で合法的に認められ
ている消費者の権利を、決して取り消し
たり、制限したり、影響を及ぼすものでは
ありませ ん。
4.7
アルピナでは、アルピナウォッチが本 物
であるかどうかの確認依頼が頻繁にあ
ります。アルピナ正規取扱店は、すべて
のアル ピナ ウォッチ が本 物で ある ことを
証明し、卓越した技術と専門スキル、そ
して特に適切な装置により、専門家およ
び信頼できるアフターサービスを提供し
ます。
Alpina Watch International S.A.社は、ア
ルピナ正規取扱店以外の第三者により
販売提供された、アルピナ名、ブランド、
ロゴ、商標を冠したタイムピースやその
他製品に対して、その関連または責任を
持ちません。
このため、未承認の第三者より提供され
たこうした製品、特に偽造品や低水準標
品を購入したり、インターネット上で販売
されている製品を購入することは、購入
者側のみのリスクとなります。
いて
真正性につ
未承認の第三者から購入した製品や、正
式に押印されたアルピナ国際保証書の
ない製品に対しては、明示的にも暗示的
にも、アルピナまたはアルピナが公認し
た代理者が保証またはアフターサービ
ス、あるいはその他すべての義務を果た
すことはありません。
上記の理由から、そしてお客様ご自身の
ためにも、合法的なアルピナ正規取扱店
でのみ取り扱われている本物のアルピナ
ウォッチをお買い上げください。
ウォッチの取扱い&保証
170 171 | JA |
Page 87

05
サービスセン
ター
アルピナの正規サービスセンターおよび正規取扱店一覧の最新版は、アルピナ
の公式ウェブサイト www.alpina-watches.comをご覧ください。
172
173 | JA |
Page 88

Оглав
ление
02. ИНСТРУКЦИИ ПО ЭКСПЛУАТАЦИИ
2.1 КАЛИБР AL-550 GMT 175
2.2. КАЛИБР AL-880
АВТОМАТИЧЕСКИЙ ОТСЧЕТ 176
03. ДОПОЛНИТЕЛЬНЫЕ ФУНКЦИИ
3.1. ВРАЩАЮЩИЙСЯ ДАЙВЕРСКИЙ
БЕЗЕЛЬ 180
3.2. ИЗМЕРИТЕЛЬНЫЕ ШКАЛЫ 180
3.3. ВРАЩАЮЩИЙСЯ
БЕЗЕЛЬ-КОМПАС НА 360° 181
3.4. АНТИМАГНИТНЫЕ СВОЙСТВА 184
04. УХОД ЗА ЧАСАМИ И ГАРАНТИЯ
4.1. УХОД ЗА ЧАСАМИ ALPINA 186
4.2. ТЕХНИЧЕСКОЕ ОБСЛУЖИВАНИЕ
И ЕГО ПЕРИОДИЧНОСТЬ 187
4.3. УХОД ЗА КОЖАНЫМ
РЕМЕШКОМ 188
4.4. АНТИБЛИКОВАЯ ОБРАБОТКА
САПФИРОВОГО СТЕКЛА 185
4.5. ЗАВИНЧИВАЮЩАЯСЯ ГОЛОВКА 185
4.6. МЕЖДУНАРОДНАЯ ГАРАНТИЯ 185
4.7. ПОДЛИННОСТЬ 191
05. СЕРВИСНЫЕ ЦЕНТРЫ 192
175174 | RU |
Page 89

02
2
ИНСТРУКЦИИ
ПО
ЭКСПЛУАТАЦИИ
2.1
ФУНКЦИИ: ЧАСЫ, МИНУТЫ, СЕКУНДЫ,
ДАТА, ВТОРОЙ ЧАСОВОЙ ПОЯ
ИСПОЛЬЗОВАНИЕ ФУНКЦИИ GMT:
Модели с функцией GMT имеют дополнительную часовую стрелку красного
цвета, который отличает ее от главной
часовой стрелки.
КАЛИБР
AL-550 GMT
Эта стрелка совершает полный круг по
циферблату за 24 часа и отображает
основное («домашнее») время. Стрелка,
указывающая часы местного времени,
легко настраивается с шагом в один
час.
Если Вы находитесь в путешествии, выдвиньте заводную головку в положение
и установите на часах основное время, ориентируясь по разметке на ободке циферблата.
Затем переместите головку в положение 1 и, с шагом в один час, переве-
1
дите главную стрелку в соответствии с
2
местным временем. Данная операция
выполняется без остановки часового
механизма и, следовательно, без нарушения настройки часов.
Теперь Вы можете считывать «домашнее» и местное время в 24-часовом
формате
177176 | RU |
Page 90

КАЛИБР AL-880
АВТОМАТИЧЕСКИЙ
2.2
ФУНКЦИИ: ЧАСЫ, МИНУТЫ, СЧЕТЧИК ОБРАТНОГО ОТСЧЕТА НА 10 МИНУТ
ОТСЧЕТ
1
4
Прошла одна минута. Прошло 7 минут 30 секунд.
ОБРАТНЫЙ ОТСЧЕТ
До запуска обратного отсчета 5 окошек имеют такой же цвет, как и циферблат. Каждое окошко соответствует
одной минуте. При звуке стартового
выстрела запустите отсчет (нажатием
на кнопку 1). По истечении одной минуты первое окошко становится синим,
в то время как 4 других сохраняют цвет
циферблата. По истечении 5 минут секундная стрелка указывает на отметку
12 часов, а все 5 окошек становятся
синего цвета. Арбитр производит еще
один выстрел, обозначающий продолжение стартов. В случае приостановления обратного отсчета можно
инструкции по эксплуатации
остановить счетчик, нажав на кнопку
. Возобновление отсчета осуществляется повторным нажатием на кнопку 4. По
истечении 6 минут первое окошко становится оранжевым, в то время как 4
других сохраняют синий цвет. По истечении 9 минут 4 окошка поменяли цвет
на оранжевый, а синий цвет последнего
окошка начинает исчезать.
Вам остается лишь рассчитать время
отплытия таким образом, чтобы Ваша
яхта пересекла линию старта в тот
момент, когда 5 окошек станут оранжевыми, а секундная стрелка укажет на
отметку 12 часов.
1
4
4
60
55
5
T
R
1
50
A
2
10
T
3
S
15
20
45
4
5
40
35
25
30
ОБРАТНЫЙ ОТСЧЕТ
Перед запуском обратного отсчета
вращающийся 10-минутный диск имеет
серый цвет, а отметка 10 находится внизу, между индексами 45 и 40. На указателе отображаются первые 5 минут (с 6
до 10). При звуке стартового выстрела
запустите отсчет (нажатием на кнопку
1
). По истечении одной минуты на синем фоне появится цифра 5, а цифра 10
исчезнет. По истечении 5 минут секундная стрелка указывает на отметку 12 часов, а все 5 окошек становятся синего
цвета. Арбитр
1
4
производит еще один выстрел, обозначающий продолжение стартов. В случае
приостановления обратного отсчета
можно остановить счетчик, нажав на
кнопку 4. Возобновление отсчета осуществляется
повторным нажатием на кнопку 4. По
истечении 10 минут на указателе появится слово START. Вам остается лишь
организовать отплытие так, чтобы Ваша
яхта пересекла стартовую черту в тот
момент, когда на указателе появится
слово START, а секундная стрелка ука-
60
55
5
S
T
50
A
10
R
45
15
T
1
2
40
3
20
4
5
35
25
30
1
4
жет на отметку 12 часов.
179178 | RU |
Page 91

2.2
ТАКТИЧЕСКИЙ ПЛАНИРОВЩИК
В модели Alpina Seastrong Yacht Timer
предусмотрена функция помощи в
тактическом планировании. На циферблат часов нанесена стартовая
линия. Символы «+» и «-» служат для
определения более или менее выгодного положения яхты относительно
стартового знака.Данная функция
помогает выбрать оптимальную стартовую позицию яхты. Определение
наиболее выгодного положения на
линии старта
производится при помощи компасной шкалы безеля следующим образом:
инструкции по эксплуатации
- определите направлении ветра при
помощи компаса (анемометра);
- поверните безель таким образом,
чтобы направление ветра проходило через отметку 12 часов;
- пройдите вдоль стартовой линии
от стартового судна до стартового
знака и отметьте этот курс;
- сопоставьте данный курс с разметкой на безеле. Если курс проходит
между отметками 9 часов и 12 часов,
лучше стартовать в сторону знака.
Если угол проходит между отметками 6 часов и 9 часов, лучше стартовать в сторону стартового судна.
03
ДОПОЛНИ
ТЕЛЬНЫЕ
ФУНКЦИИ
181180 | RU |
Page 92

ВРАЩАЮЩИЙСЯ ДАЙВЕРСКИЙ
3.1
Ключевой особенностью всех дайверских часов Alpina является безель,
вращающийся в одном направлении
(против часовой стрелки), предназначенный для контроля за временем погружения. На безель нанесена шкала,
градуированная в минутах.
Его принцип функционирования отличается простотой и надежностью. В
начале погружения нулевую отметку
безеля необходимо совместить с минутной шкалой. Дайвер может в любой
момент узнать, сколько минут прошло
с момента начала погружения, взглянув на положение минутной стрелки
относительно безеля.
Безель вращается только в одну сторону (против часовой стрелки), поэтому случайное его смещение приведет
лишь к тому, что он будет показывать
заниженное по отношению к реальному оставшееся время погружения, но
ни в коем случае не завышенное.
дополнительные функции
БЕЗЕЛЬ
Пример 1
ИЗМЕРИТЕЛЬНЫЕ
3.2
Измерительные шкалы – это шкалы,
которые позволяют установить соответствие между прошедшим временем
и какой-либо переменной. Данные
относительно скорости (тахиметр),
дистанции (телеметр) или некоторых
единиц измерения (пульсометр, замер
производительности) определяются
по положению центральной секундной
стрелки хронографа на соответствующей шкале, максимальное время измерения составляет 60 секунд. В случае
телеметрических измерений можно
использовать минутный счетчик, добавляя 20 км к дистанции, отображаемой центральной секундной стрелкой,
для каждой истекшей минуты.
ИСПОЛЬЗОВАНИЕ ТАХИМЕТРИЧЕСКОЙ ШКАЛЫ
Пример 1: расчет скорости автомо-
биля. Замерьте время, за которое машина преодолевает дистанцию в один
километр. Скорость определяется по
положению центральной секундной
стрелки хронографа на тахиметрической шкале. В нашем примере машина
движется со скоростью 90 км/ч.
182 183 | RU |
ШКАЛЫ
ИСПОЛЬЗОВАНИЕ ТАХИМЕТРИЧЕСКОЙ
ШКАЛЫ
Пример 2: определение расстояния меж-
ду своим положением и приближающейся грозой.Запустите хронограф в тот момент, когда увидите молнию, и выключите
его, как только услышите раскаты грома.
Расстояние до грозы будет указано на
телеметрической шкале центральной
стрелкой хронографа. В нашем примере
гроза находится на расстоянии 5 км.
Пример 2:
3.3
Часы Alpina с вращающимся безелем-компасом на 360° позволяют
приблизительно определить свое положение относительно сторон света
– функция, особенно полезная в таких
видах спорта, как спортивное ориен-
тирование или альпинизм.
ИНСТРУКЦИИ ПО ИСПОЛЬЗОВАНИЮ ЧАСОВ ALPINER 4
CHRONOGRAPH И ALPINER 4 GMT В
КАЧЕСТВЕ КОМПАСА*
Важные примечания к использованию безеля:
- Не следует пользоваться данным
компасом в тех ситуациях, в которых
точность имеет ключевое значение.
Этот компас позволяет определить
направление лишь приблизительно.
- Используйте функцию компаса, когда солнце видно на небе или его
положение Вам известно.
- На Ваших часах должно быть выставлено зимнее время. Если на данный
момент в Вашем регионе действует
летнее время, перед тем как воспользоваться безелем-компасом,
переведите часы на один час назад
ВРАЩАЮЩИЙСЯ
БЕЗЕЛЬ-КОМПАС НА 360°
Page 93

ИНСТРУКЦИИ ПО ЭКСПЛУАТАЦИИ:
1. В СЕВЕРНОМ ПОЛУШАРИИ
- Совместите отметку 36 (=360°=Север)
вращающегося безеля-компаса с часовой стрелкой на 24-часовой шкале.
- Удерживая циферблат на одном уровне, разверните его часовой стрелкой
в направлении солнца.
- Компас настроен, теперь Вы можете
ориентироваться по меткам на безеле-компасе. Отметки 36, 09, 18 и 27
указывают север, восток, юг и запад
соответственно.
ПРИМЕР 1: Текущее местное время
– 08:00. Вращая безель, переместите
отметку 36 напротив цифры 8 на 24-часовой шкале. Теперь поверните часы
(удерживая циферблат на одном уровне) так, чтобы их часовая стрелка указывала в направлении солнца. Компас
настроен.
ПРИМЕР 2: Текущее местное время
– 18:00. Вращая безель, переместите отметку 36 напротив цифры 18 на
24-часовой шкале. Теперь поверните
часы (удерживая циферблат на одном
уровне) так, чтобы их часовая стрелка
указывала в направлении солнца. Компас настроен.
2. В ЮЖНОМ ПОЛУШАРИИ
- Совместите отметку 18 (=180°=Юг)
вращающегося безеля-компаса с часовой стрелкой на 24-часовой шкале.
- Удерживая циферблат на одном уровне, разверните его часовой стрелкой
в направлении солнца.
- Компас настроен, теперь Вы можете
ориентироваться по меткам на безеле-компасе. Отметки 36, 09, 18 и 27
указывают север, восток, юг и запад
соответственно.
ПРИМЕР 1: Текущее местное время
– 08:00. Вращая безель, переместите
отметку 18 напротив цифры 8 на 24-часовой шкале. Теперь поверните часы
(удерживая циферблат на одном уровне) так, чтобы их часовая стрелка указывала в направлении солнца. Компас
настроен.
ПРИМЕР 2: Текущее местное время
– 18:00. Вращая безель, переместите
отметку 18 напротив цифры 18 на 24-часовой шкале. Теперь поверните часы
(удерживая циферблат на одном уровне) так, чтобы их часовая стрелка указывала в направлении солнца. Компас
настроен.
* В модели Alpiner 4 GMT Вы также
можете использовать 24-стрелку для
функции компаса. Для этого 24-часовая стрелка должна указывать местное
время.
A) В Северном полушарии перемести-
те отметку 36 (= Север) напротив 24-часовой стрелки. Поверните часы (удерживая циферблат на одном уровне) так,
чтобы их часовая стрелка указывала в
направлении солнца. Компас настро-
ен.
B) Южном полушарии переместите
отметку 18 (= Юг) напротив 24-часовой
стрелки. Поверните часы (удерживая
циферблат на одном уровне) так, чтобы их часовая стрелка указывала в направлении солнца. Компас настроен.
ИНСТРУКЦИИ ПО ИСПОЛЬЗОВАНИЮ
ФУНКЦИИ КОМПАСА В МОДЕЛИ
SEASTRONG YACHT TIMER
1. В СЕВЕРНОМ ПОЛУШАРИИ
- Переместите литеру S (= South - Юг)
вращающегося безеля-компаса на
середину сектора между отметкой 60
(= 12 часов) и часовой стрелкой.*
* В период до полудня поместите литеру S слева от отметки 60 (= 12 часов), а
в период после полудня поместите ее
справа от отметки 60 (= 12 часов).
- Удерживая циферблат на одном уровне, разверните его часовой стрелкой
в направлении солнца.
- Компас настроен, теперь Вы можете
ориентироваться по меткам на безеле-компасе. Треугольник на отметке
60, отметка 90, литера S и отметка 270
указывают север, восток, юг и запад
соответственно.
ПРИМЕР 1: Текущее местное время –
10:00. Переместите литеру S напротив
отметки 5 на циферблате (= середина
сектора между отметкой 12 часов и
часовой стрелкой). Теперь поверните
часы (удерживая циферблат на одном
уровне) так, чтобы их часовая стрелка
указывала в направлении солнца. Компас настроен.
ПРИМЕР 2: Текущее местное время –
18:00. Переместите литеру S напротив
отметки 45 (= 3 часа) на циферблате
(= середина сектора между отметкой
12 часов и часовой стрелкой). Теперь
поверните часы (удерживая циферблат
на одном уровне) так, чтобы их часовая стрелка указывала в направлении
солнца. Компас настроен.
дополнительные функции
184 185 | RU |
Page 94

3.4
АНТИМАГНИТНЫЕ
СВОЙСТВА
Магнитные поля могут оказывать значительное негативное воздействие на
точность Ваших часов. Нас окружает
множество источников магнитных полей: мобильные телефоны, планшеты,
компьютеры, динамики, холодильники
и другие электронные устройства.
Чем мощнее магнитное поле, тем значительнее окажется его воздействие
на работу часов. Все модели Alpina
линии Alpiner 4 являются антимагнитными. Это значит, что при воздействии
магнитного поля, по величине не превосходящего определенный уровень,
отклонение в их точности хода будет
минимальным.
дополнительные функции
Антимагнитные часы Alpina серии 4
соответствуют международному стандарту ISO 764, фиксирующему нормы в
отношении часов, минимально подверженных действию магнитных полей. Согласно критериям ISO 764, такие часы
должны выдерживать воздействие магнитного поля постоянного тока напряженностью 4800 А/м. Для того чтобы
часы можно было отнести в разряд антимагнитных, отклонения в их точности
хода до и после испытания не должны
превышать ± 30 секунд в сутки.
04
УХОД ЗА
ЧАСАМИ И
ГАРАНТИЯ
186 187 | RU |
Page 95

УХОД ЗА
ЧАСАМИ
4.1
ВЫПОЛНЯЙТЕ НИЖЕСЛЕДУЮЩИЕ РЕКОМЕНДАЦИИ, И ВАШИ ЧАСЫ ALPINA
ПРОСЛУЖАТ ВАМ ДОЛГИЕ ГОДЫ.
1
При контакте часов с соленой во-
дой: сразу после купания промойте
их проточной водой.
Магнетизм: старайтесь держать
2
часы подальше от планшетов, компьютеров, динамиков, мобильных
телефонов и холодильников – они
являются источниками сильных
магнитных полей, которые могут
оказать негативное воздействие на
точность Ваших часов.
3
Агрессивные действия – химиче-
ские, термические, физические,
магнитные или любые другие – могут отрицательно сказаться на точности хода Ваших часов. Старайтесь их избегать.
уход за часами и гарантия
ALPINA
4
Завинчивающаяся заводная голов-
ка: для того чтобы избежать проникновения в корпус влаги или воды,
не забывайте завинчивать головку
до упора. Не манипулируйте кнопками хронографа под водой.
5
Обычная заводная головка: для того
чтобы избежать проникновения в
корпус влаги или воды, при ношении часов заводная головка должна
быть прижата к корпуса. Не манипулируйте кнопками хронографа под
водой.
6
Чистка и уход за металлическими
браслетами, каучуковыми ремешками и водонепроницаемыми металлическими корпусами: после
чистки при помощи зубной щетки
и мыльной воды, вытрите их насухо
мягкой тканью.
188 189 | RU |
Химические вещества: избегайте
7
прямого контакта часов с химическими чистящими средствами,
растворителями, моющими и косметическими средствами, а также
другими химически активными
субстанциями, так как они могут
повредить корпус, браслет и каучу-
ковые прокладки.
8
Температура: предохраняйте часы
от воздействия температур выше
60°C и ниже 0°C. Кроме того, старайтесь избегать резких перепадов температуры – например, погружения часов в очень холодную
воду после долгого пребывания на
солнце.
Водонепроницаемость: водоне-
9
проницаемость часов не является свойством, гарантированным
навсегда и во всех ситуациях. Водонепроницаемость может быть
нарушена в результате удара по
заводной головке, износа прокладок (например, под воздействием
химических средств) и т.д.
ТЕХНИЧЕСКОЕ ОБСЛУЖИВА-
4.2
НИЕ И ЕГО
ПЕРИОДИЧНОСТЬ
Как и в случае любого высокоточного
механического инструмента, следует
регулярно проводить техобслуживание часов, с тем чтобы гарантировать
их безупречное функционирование.
Согласно общему правилу, а также
в зависимости от того, как и в каких
условиях Вы пользуетесь своими часами, рекомендуется отдавать их на
техническое обслуживание каждые 4-5
лет. Вы найдете перечень официальных
дистрибьюторов и сервисных центров
на сайте www.alpina-watches.com.
МЕХАНИЧЕСКИЕ ЧАСЫ
В автоматических часах Alpina балансовое колесо выполняет 28 800 полуколебаний в час, а за сутки колеса
трансмиссии совершают 691 200 движений. За четыре года эксплуатации
часов этот показатель превысит один
миллиард! Рекомендуем раз в 3-4 года
отдавать часы официальному дистрибьютору Alpina или в официальный сервисный центр, где квалифицированные
мастера тщательно осмотрят часы, почистят их и заменят смазку.
Page 96

ВОДОНЕПРОНИЦАЕМОСТЬ
Водонепроницаемость Ваших часов
прошла проверку в ходе производственного процесса. Однако речь не
идет о бессрочной гарантии от проникновения воды в корпус. Ваши часы
сохраняют водонепроницаемость только в том случае, если заводная головка
плотно прижата к корпусу. Если у Ваших часов завинчивающаяся заводная
головка, она должна быть тщательно
завинчена. Ваши часы не являются водонепроницаемыми в тот момент, когда
головка находится в положении завода
или установки времени. Кроме того, не
следует манипулировать кнопками в то
время, когда часы намочены или находятся в воде. Старение материала и
естественный износ в ходе регулярного использования негативно сказываются на водонепроницаемости Ваших
часов. Берегите часы от резкого перепада температуры (например, от погружения в холодную воду после долгого
пребывания на солнце), который может
нарушить герметичность прокладок,
равно как и от любых других негативных
воздействий, будь то химические, физические или какие-либо другие, способные повредить корпус часов. Советуем
каждые 2-3 года отдавать часы официальному дистрибьютору Alpina или в
официальный сервисный центр для проверки водонепроницаемости.
уход за часами и гарантия
АНТИБЛИКО-
УХОД ЗА
КОЖАНЫМ
4.3
Рекомендуем Вам выполнять нижеследующие рекомендации, для того чтобы
максимально долго сохранить ремешок часов в хорошем состоянии.
1
Для предотвращения обесцвечива-
ния и деформации ремешка берегите его от сырости и контакта с
водой.
Избегайте продолжительного на-
2
хождения ремешка на солнце, с тем
чтобы предотвратить его обесцвечивание.
Избегайте контакта ремешка с жи-
3
ровыми веществами, косметическими средствами и другими химическими субстанциями.
Кожа – это органический водопроницаемый материал, в силу чего ее внешний
вид со временем ухудшается. Однако
если следовать рекомендациям, кожаный ремешок прослужит много лет.
Заменить ремешок Ваших часов Вы
можете у официального дистрибьютора
Alpina.
190 191 | RU |
РЕМЕШКОМ
4.4
Антибликовая обработка сапфирового
стекла улучшает видимость и контрастность циферблата. Обычная эксплуатация и износ часов могут привести к
появлению на стекле дефектов. Такие
дефекты считаются естественными и не
покрываются гарантией.
4.5
У некоторых часов Alpina имеется завинчивающаяся головка. Для установки
времени и даты ее необходимо вывинтить. По окончании операции головку
необходимо прижать к корпусу и завинтить до упора. В противном случае это
может привести к нарушению водонепроницаемости часов.
ВАЯ ОБРАБОТКА САПФИРОВОГО
СТЕКЛА
ЗАВИНЧИВАЮЩАЯСЯ
ГОЛОВКА
4.6
На Ваши часы Alpina предоставляется
Международная гарантия от любых
производственных дефектов, выявленных в ходе правильного пользования
часами, действительная в течение двух
лет (24 месяца) с момента их покупки
на следующих условиях. Alpina Watch
International S.A. обязуется бесплатно
заменить любую деталь с производственным дефектом, выявленным нашей технической службой. Гарантия
на Ваши часы действительна в течение
двух лет начиная с даты, указанной в
гарантийном сертификате с печатью
и подписью официального дилера
Alpina. Международная гарантия Alpina
распространяется на наручные часы
Alpina, приобретенные у авторизованного дистрибьютора Alpina в любой
стране мира, и принимается любым авторизованным дистрибьютором.
МЕЖДУНАРОДНАЯ ГАРАНТИЯ
Page 97

НАСТОЯЩАЯ МЕЖДУНАРОДНАЯ ГАРАНТИЯ НЕ РАСПРОСТРАНЯЕТСЯ НА:
Кражу или утерю часов или послед-
1
ствия несчастного случая стихийного характера;
Срок годности элемента питания;
2
Последствия естественного изно-
3
са (например, царапины на стекле;
изменения цвета и/или материала
неметаллических браслетов и цепочек, таких как кожа, ткань или каучук;
отслаивание декоративного покры-
тия);
Повреждения любой детали часов,
4
возникшие по причине случайного
или преднамеренного нарушения
условий эксплуатации, в результате
небрежности, несчастного случая
(последствия ударов, раздавливание, вмятины, разбитое стекло
циферблата и т.д.), неправильного
пользования часами и несоблюдения инструкций по эксплуатации,
предоставляемых Alpina;
Косвенный ущерб любого рода, воз-
5
никший в процессе использования
часов Alpina, такой как нарушение
их функционирования, неисправ-
ность или нарушение точности хода;
Ущерб, возникший в результате
6
действий с часами, совершенными
уход за часами и гарантия
третьей стороной, за исключением
авторизованного сервисного центра Alpina (например, замена элемента питания, ремонт или техобслуживание), а также в результате
ремонта или внесения изменений в
конструкцию, проведенного не под
контролем Alpina;
Применение элементов питания,
7
отличных от рекомендованных компанией Alpina.
Настоящая гарантия действительна
только в том случае, если к часам прилагается датированный гарантийный
сертификат, должным образом заполненный, с подписью и штампом авторизованного дистрибьютора Alpina.
В сертификате должны быть указаны
как артикул, так и индивидуальные регистрационные номера данных часов.
Любые работы по техническому обслуживанию или ремонту Ваших часов
Alpina должны быть выполнены только в
сервисных центрах Alpina, в противном
случае Международная гарантия теряет свою силу. Международная гарантия
не отменяет, не ограничивает и ни в
коем случае не затрагивает права и
привилегии покупателя, закрепленные
законодательством страны, в которой
были приобретены часы Alpina.
192 193 | RU |
4.7
Нас часто просят проверить подлинность часов Alpina. Официальные дистрибьюторы Alpina гарантируют подлинность каждой модели часов Alpina и
обеспечивают качественное послепродажное обслуживание благодаря
наличию специально обученного персонала и необходимого оборудования.
Alpina Watch International S.A. отрицает свою причастность к часам или
каким-либо другим изделиям с фирменной символикой Alpina (название
бренда, лототип и т.д.), если таковые
продаются не официальным дистрибьютором Alpina.
Приобретая подобное изделие у неавторизованного дистрибьютора, покупатель действует на свой страх и риск,
особенно в том, что касается подделок
или некачественной продукции, а также
изделий, купленных через Интернет.
ПОДЛИННОСТЬ
Alpina и авторизованные представители компании не дают никаких явно
выраженных или подразумеваемых
гарантий и не берут на себя никакие
обязательства
в отношении обслуживания изделий,
приобретенных у неавторизованного
продавца и не имеющих заполненного
должным образом сертификата Международной гарантии Alpina.
Page 98

05
СЕРВИС
НЫЕ
ЦЕНТРЫ
194 195 | RU |
С действующим перечнем наших официальных дистрибьюторов и авторизованных сервисных центров можно ознакомиться на нашем сайте
www.alpina-watches.com.
Page 99

目录
02. 特殊说明
2.1 AL-550 GMT机芯 197
2.2 AL-880全自动
倒计时机芯 198
03. 其它功能
3.1 旋转潜水表圈 202
3.2 测量刻度 202
3.3 360度旋转指南针表圈 203
3.4 防磁性 206
04. 腕表保养与联保
4.1 保养您的ALPINA腕表 208
4.2 腕表保养与保养周期 209
4.3 皮革表带保养 210
4.4 蓝宝石水晶表镜的防反光处理 211
4.5 旋入式表冠 211
4.6 国际联保服务 211
4.7 真品保证 213
05. 服务中心 214
197196 | ZH |
Page 100

AL-550
2.1
功能:时、分、秒、日期、GMT功能
(第二时区)
GMT
机芯
这一额外时针在24小时表盘上旋转,
可代表参照时间。主时针则指示本地时
间,可通过跳时功能来轻松调节。
02
特殊说明
使用GMT功能:
为了与主时针相区别,GMT功能中还额
外搭载了一个红色时针。
您即将前往另一个国家:将表冠拉至位
置2,依照表盘凸缘上的刻度调节参照
时间。
请将表冠重新推回位置1,并通过跳时
来调节主时针,以显示您所在国家的当
地时间。这项操作可在不停止机芯机制
和不干扰腕表设定的情况下进行。
1
2
现在,您可通过24小时刻度,轻松读取
您的原居地时间,以及您所在地的当地
时间!
199 | ZH |198
 Loading...