

Page 1

Rhein Tech Laboratories, Inc. Client: Alinco, Inc.
360 Herndon Parkway Model: DR-235TMkIII
Suite 1400 Standards: FCC 15.121
Herndon, VA 20170 & IC RSS-215
http://www.rheintech.com
Report: 2006179
Appendix J: Manual
Please see the following pages.
Page 23 of 41
Page 2

Page 3
Page 4

Contents
Warning............................................................................... 3
Before operating the transceiver...................................... 7
Introduction ........................................................................ 8
1. New and Innovative Features........................................ 9
2. Standard Accessories.................................................. 10
3. Initial Installation .......................................................... 11
For a base station set up ..................................................................... 11
For a mobile station set up .................................................................. 12
External power supply control & Power lamp functions....................... 13
Power supply voltage display function................................................. 13
4. Part Names and Functions .......................................... 14
Front Panel .......................................................................................... 14
Rear Panel........................................................................................... 15
Display ................................................................................................. 16
Microphone .......................................................................................... 17
5. Basic Operations.......................................................... 18
Turning the unit on and off................................................................... 18
Audio Volume level setting .................................................................. 18
Squelch level setting............................................................................ 18
VFO mode ........................................................................................... 19
[Change frequency by the channel step] ................................ 19
[Change frequency by 1 MHz step] ........................................ 19
Changing the channel step .................................................................. 20
REPEATER (DUPLEX) Operation....................................................... 20
CTCSS / DCS setting .......................................................................... 21
Memory Mode...................................................................................... 22
[Memory programming]........................................................... 22
[Programmable data in the memory channel] ......................... 26
CALL mode .......................................................................................... 24
To receive signals ................................................................................ 24
To transmit ........................................................................................... 25
6. Parameter Setting Mode .............................................. 26
Channel Step setting ........................................................................... 27
Scan Type............................................................................................ 27
Beep Sound ......................................................................................... 27
Time-Out-Timer.................................................................................... 28
TOT Penalty......................................................................................... 28
APO - Auto Power OFF ....................................................................... 29
Tone-Burst-Frequency ......................................................................... 29
Busy-Channel-Lock-Out ...................................................................... 29
Theft Alarm .......................................................................................... 29
1
Page 5

Contents
Alphanumeric Tag ................................................................................ 30
Dimmer ................................................................................................ 30
7. Advanced Operations .................................................. 31
SCANNING FUNCTION ...................................................................... 31
[VFO Scan] ............................................................................. 31
[Memory scan] ........................................................................ 31
• Program scan ....................................................................... 32
• Tone Scan............................................................................. 32
• DCS scan ............................................................................. 33
KEY-LOCK FUNCTION ....................................................................... 33
TONE BURST...................................................................................... 33
Digital voice communication ................................................................ 34
WIDE / NARROW (Reduction of the Mic Gain/Deviation) ................... 34
AUTO-DIALER..................................................................................... 35
THEFT ALARM .................................................................................... 36
AM Mode Reception (DR235TMk only)............................................. 37
CABLE CLONE ................................................................................... 38
8. PACKET OPERATION................................................... 39
[To operate packet using EJ-41U]........................................... 39
[To operate packet using an external TNC]............................. 41
[To operate APRS®] ................................................................ 42
[SET UP] ................................................................................. 43
[APRS Operation] ................................................................... 43
9. Remote Control Operation .......................................... 44
[List of Remote Control Keys] ................................................ 44
[Entering a frequency directly] ................................................ 45
[Entry method depending on tuning step] ............................... 45
10. Maintenance / Reference ........................................... 46
Reset ................................................................................................... 46
Trouble Shooting ................................................................................. 47
11. Optional accessories ................................................. 48
12. Specifications ............................................................. 49
Appendix........................................................................... 50
TNC Commands List ........................................................................... 50
2
Page 6
Warning
To prevent any hazard during operation of Alinco's radio product, in this manual and on the product you
may find symbols shown below. Please read and understand the meanings of these symbols before
starting to use the product.
Danger
Alert
Caution
This symbol is intended to alert the user to an immediate danger that may
cause loss of life and property if the user disregards the warning.
This symbol is intended to alert the user to a possible hazard that may
cause loss of life and property if the user disregards the warning.
This symbol is intended to alert the user a possible hazard that may cause
loss of property or injure the user if the warning is disregarded.
Alert symbol. An explanation is given.
Warning symbol. An explanation is given.
Instruction symbol. An explanation is given.
Alert
Environment and condition of use:
Do not drive while handling the radio for your safety. It is recommended that you
check local traffic regulations regarding the use of radio equipment while driving.
Some countries prohibit the operation of transceiver while driving.
Do not use this product in close proximity to other electronics devices, especially
medical ones. It may cause interference to those devices.
Keep the radio out of the reach of children.
In case a liquid leaks from the product, do not touch it. It may damage your skin.
Rinse with plenty of cold water if the liquid contacted your skin.
Never operate this product in facilities where radio products are prohibited for use
such as aboard aircraft, in airports, in ports, within or near the operating area of
business wireless stations or their relay stations.
Use of this product may be prohibited or illegal outside of your country. Be informed
in advance when you travel.
The manufacturer declines any responsibilities against loss of life and/or property due
to a failure of this product when used to perform important tasks like life-guarding,
surveillance, and rescue.
Do not use multiple radios in very close proximity. It may cause interference and/or
damage to the product(s).
3
Page 7

Warning
Risk of explosion if battery is replaced with an incorrect type.
Dispose of, or recycle used batteries according to your local regulations.
The manufacturer declines any responsibilities against loss of life and property due to
a failure of this product when used with or as a part of a device made by third parties.
Use of third party accessory may result in damage to this product. It will void our
warranty for repair.
Handling this product:
Be sure to reduce the audio output level to minimum before using an earphone or a
headset. Excessive audio may damage hearing.
Do not open the unit without permission or instruction from the manufacturer.
Unauthorized modification or repair may result in electric shock, fire and/or
malfunction.
Do not operate this product in a wet place such as shower room. It may result in
electric shock, fire and/or malfunction.
Do not place the product in a container carrying conductive materials, such as water or
metal in close proximity to the product. A short-circuit to the product may result in
electric shock, fire and/or malfunction.
Do not touch the heatsink (on/around the unit mostly found on mobile-base units) as it
may become very hot during/after the operation that may risk burn your skin.
About power-supply:
Use only appropriate, reliable power supply of correct voltage and capacity.
Do not connect cables in reverse polarity. It may result in electric shock, fire and/or
malfunction.
Do not plug multiple devices including the power-supply into a single wall outlet. It
may result in overheating and/or fire.
Do not handle a power-supply with a wet hand. It may result in electric shock.
Securely plug the power-supply to the wall outlet. Insecure installation may
result in short-circuit, electronic shock and/or fire.
Do not plug the power-supply into the wall socket if the contacts are dirty. Shortcircuiting and/or overheating may result in fire, electric shock and/or damage to the
product.
Do not modify or remove fuse-assembly from the DC-cable. It may result in fire,
electric shock and/or damage to the product.
4
Page 8
Warning
Cigar-lighter cable (for optional Igunition-key ON/OFF operation):
Do not use the cable at any other than the specified ones. It may result in electric
shock, fire and/or malfunction.
Do not handle cigar-cable with a wet hand. It may result in electric shock.
In case of emergency:
In case of the following situation(s), please turn off the product, switch off the source of
power, then remove or unplug the power-cord. Please contact your local dealer of this
product for service and assistance. Do not use the product until the trouble is resolved. Do
not try to troubleshoot the problem by yourself.
• When a strange sound, smoke and or strange odor comes out of the product.
• When the product is dropped or the case is broken or cracked.
• When a liquid penetrated inside.
• When a power-cord ( including DC-cables, AC-cables and adapters) is damaged.
For your safety, turn off then remove all related AC-lines to the product and its
accessories from the wall outlet if a thunderstorm is likely.
Turn off the unit, remove the mobile antenna from its base and keep it in the vehicle if
a thunderstorm is likely.
Please read cautions regarding the lightning-protection on page 7 also.
Maintenance
Do not open the unit and its accessories. Please consult with your local dealer of this
product for service and assistance.
CAUTION
Environment and condition of use:
Do not use the product in proximity to a TV or a radio. It may cause interference or
receive interference.
Do not install in a humid, dusty or insufficiently ventilated place. It may result in
electric shock, fire and/or malfunction.
Do not install in an unstable or vibrating position. It may result in electric shock, fire
and/or malfunction when/if the product falls to the ground.
Do not install the product in proximity to a source of heat and humidity such as a
heater or a stove. Avoid placing the unit in direct sunlight.
Do not modify, dismantle, incinerate, or immerse the batteries.
Please check your local regulations for details on recycling option or disposal of the
batteries in your area.
5
Page 9

Warning
About transceiver
Do not connect devices other than specified ones to the jacks and ports on the product.
It may result in damage to the devices.
Turn off and remove the power-source (AC cable, DC cable, battery, cigar-cable,
charger adapter etc) from the product when the product is not in use for extended
period of time or in case of maintenance.
Never pull the cord alone when you unplug AC cable from the wall outlet.
Use a clean, dry cloth to wipe off dirt and condensation from the surface of the
product. Never use thinner or benzene for cleaning.
About power-supply
Use only reliable power supply of specific DC output range and be mindful of the
polarity of the cables and DC jack.
Always turn off the power supply when connecting or disconnecting the cables.
When using an external antenna, make sure that the antenna ground is not common
with the ground of the power supply.
European users: When a transceiver is powered from an external DC power source
(adapter, power supply, cigar-plug etc), make sure that this power supply has approval
to the level of IEC/EN 60950-1.
6
Page 10

Before operating the transceiver
Attention
• Do not remove the case or touch the interior components.
Tampering can cause equipment trouble.
•Do not use or keep the transceiver where it is exposed to direct sunlight, dusty
places, or near sources of heat.
•Keep the transceiver away from TV's or other equipment
when it interferes with reception.
•When transmitting for long periods of time at high power,
the transceiver might overheat.
•Turn the power off immediately if the transceiver emits
smoke or strange odors. Ensure the transceiver is safe,
then bring it to the nearest Alinco service center.
•An operator's license is required for this device.
Notice to California resident users
The product that comes with this manual is free from dangerous material such as lead
and cadmium as per RoHS order of EU.
The transceiver has no protection against lightning.
The user is responsible for providing adequate protection if he uses the device at
home and installs the antenna outdoor. Be aware that any outdoor antenna creates a
direct path for lighting current (more than 10kA) to the transceiver. This path exists
whether the device is turned ON or OFF.
Any vehicle does not present a safe environment during lightning. This environment
becomes much moe dangerous if an outdoor antenna is installed on the car. Move the
antenna and its cable into the car at the first sight of forthcoming thunderstorm and
lightning.
7
Page 11

Introduction
Thank you very much for purchasing this excellent Alinco transceiver. Our products
are ranked among the finest in the world. This radio has been manufactured with state
of the art technology and it has been tested carefully at our factory. It is designed to
operate to your satisfaction for many years under normal use.
PLEASE READ THIS MANUAL COMPLETELY TO LEARN ALL THE
FUNCTIONS THE PRODUCT OFFERS. WE MADE EVERY ATTEMPT TO
WRITE THIS MANUAL TO BE AS COMPREHENSIVE AND EASY TO
UNDERSTAND AS POSSIBLE. IT IS IMPORTANT TO NOTE THAT SOME OF
THE OPERATIONS MAY BE EXPLAINED IN RELATION TO INFORMATION IN
PREVIOUS CHAPTERS. BY READING JUST ONE PART OF THE MANUAL,
YOU RISK NOT UNDERSTANDING THE COMPLETE EXPLANATION OF THE
FUNCTION.
8
Page 12

1. New and Innovative Features
Your new radio features some of the most advanced functions and reliable engineering
available anywhere. The ALINCO design philosophy is focused on developing innovative usable features, including the following:
•Three different styles of display are available on a large LCD panel including frequency, channel number or 7 digit alphanumeric label.
The dimmer (bright/dim) makes it easier to read the display at night. (T/E models only)
•Simple, clean layout of keys and knobs ensure convenient operation.
• High-quality materials are used throughout the product and a huge heat sink around the
chassis ensures stable and durable operation.
•Conventional or narrow FM mode can be selected.
• AM Air-band reception capability. (available on DR135TMk / 235TMk only)
• 100 fully programmable memory channels with alphanumeric memory channel labels.
•A DATA port is located on the front panel for easy access to external accessory connections. A DSUB9 port is available on the rear to connect a PC for 1200/9600bps packet
operation. (T/E models only)
• CTCSS, DCS and 4 different Tone-Bursts are standard for selective calling and repeater access worldwide.
• The Theft Alarm feature gives an extra measure of security for mobile installation.
• The transceiver has a cable clone capability.
• The optional EJ-41U board is available for data communications such as APRS® or
packet, without an external TNC. (T/E models only)
DR-135/235/435MkIII series / feature comparison chart
Feature
DR-135TMkIII
DR-235TMkIII
DR-435TMkIII
DR-135/435EMkIII
DR-135FXE
DR-435FXE
Feature
DR-135/435TMkIII
DR-235TMkIII
DR-135/435EMkIII
DR-135/435FXE
* The specifications on page49 are valid only within the amateur radio frequencies.
Microphone
EMS-57 DTMF
EMS-57 DTMF
EMS-57 DTMF
EMS-53 Plain
EMS-53 Plain
EMS-53 Plain
TNC/Packet
operation
Optional EJ-41U
Optional EJ-41U
Optional EJ-41U
N/A
TX frequency
USA Amateur
USA Amateur
USA Amateur
European Amateur
European Amateur
European Amateur
Digital V oice
Modem
Optional EJ-47U
Optional EJ-47U
Optional EJ-47U
N/A
RX frequency*
136-174MHz + airband in AM
216-280MHz (include AM)
350-511.995MHz
European Amateur
European Amateur
European Amateur
Car-key ON/OFF port
Standard
Standard
Standard
N/A
Freq. Stability
+/-2.5ppm
+/-2.5ppm
+/-2.5ppm
+/-2.5ppm
+/-5ppm
+/-2.5ppm
LCD
brightness
Bright/Dim
Bright/Dim
Bright/Dim
N/A
DATA port(DSUB9)
Standard
Standard
Standard
Standard
N/A
N/A
DC voltage
display
Standard
Standard
Standard
N/A
9
Page 13
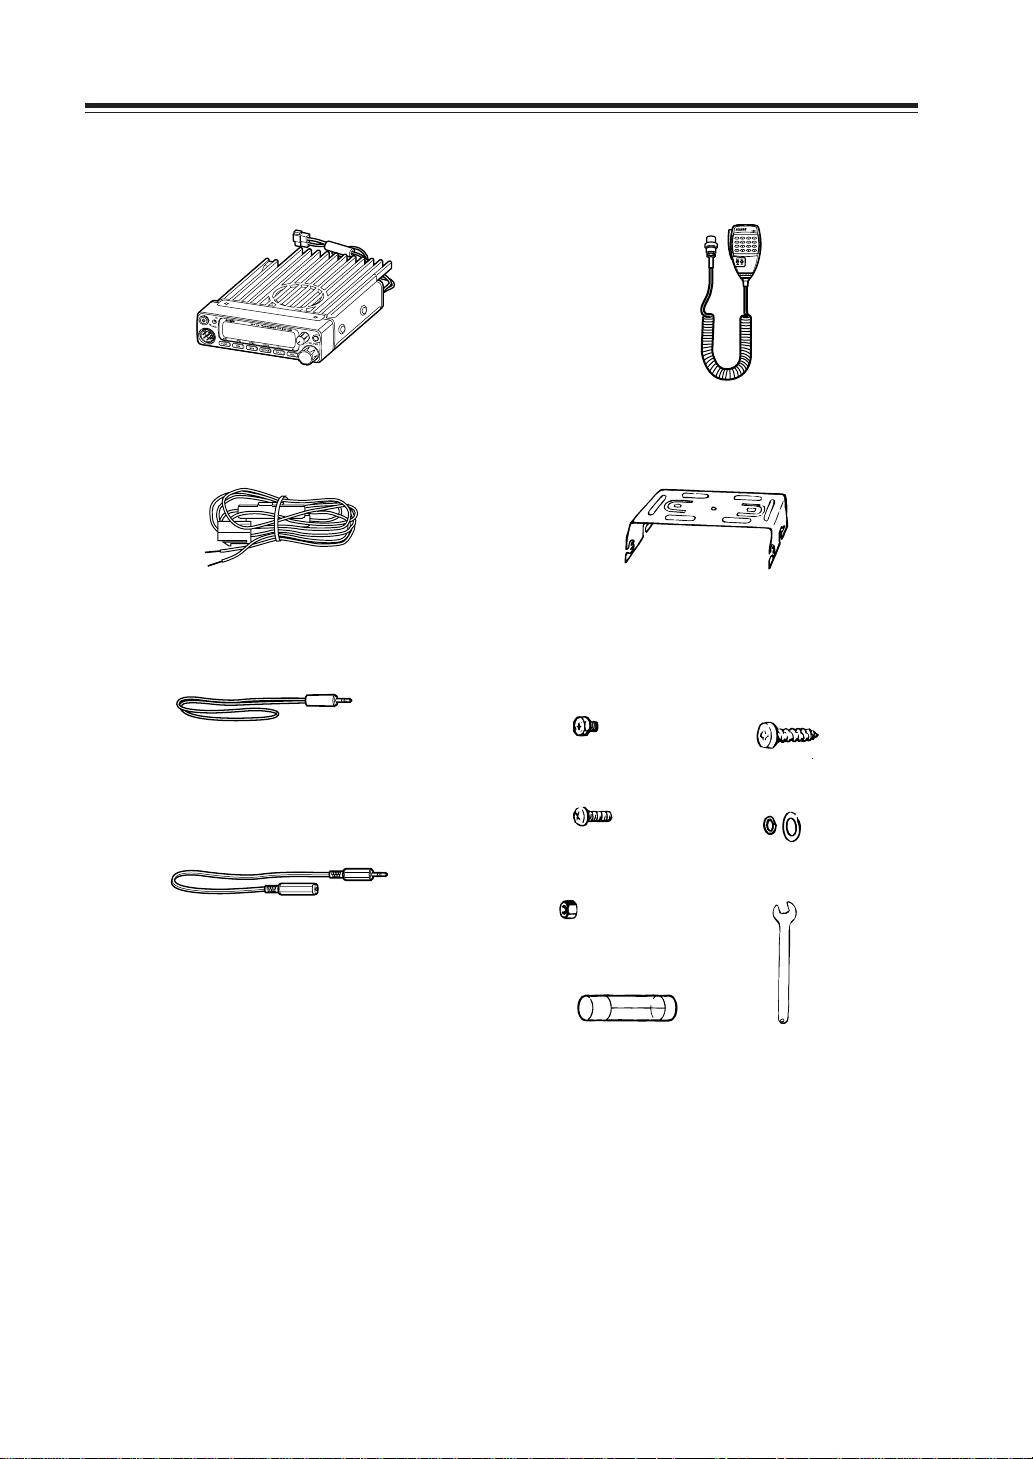
2. Standard Accessories
Carefully unpack to make sure the following items are found in the package in addition to this manual:
•Transceiver
• DC power cable with fuse holder (UA0038)
•Alarm cable A (with wire) (UX1259)
(T/E models only)
•
Alarm cable B (extension use) (UX1260)
(T/E models only)
• Microphone EMS-53 or EMS-57 (with
DTMF keypad)
• Mobile mounting bracket. (FM0078Z)
• Hardware kit for bracket
Black screws (M4*8mm)
4pcs. (AE0012)
Screws (M5*20mm)
4pcs. (AA0013)
Tapping screws
(M5*20mm) 4pcs. (AJ0003)
Washer (AZ0010)
S-washer (AZ0009)
Small (spanner) wrench.
(FM0079)
•Theft Alarm stickers 2pcs. (PR0454)
Hexagonal nut (M5) 4pcs.
(AN0002)
Spare fuses (a pair)
2pcs. (EF0005)
(T/E models only)
• Instruction manual (PS0513B)
(15A)
The standard accessories may vary slightly depending on the version you have purchased. Please contact
your local authorized Alinco dealer should you have any questions. ALINCO and authorized dealers are
not responsible for any typographical errors there may be in this manual. Standard accessories may
change without notice.
Warranty Policy:
Please refer to any enclosed warranty information or contact your authorized Alinco dealer / distributor
for the warranty policy before purchase.
10
Page 14
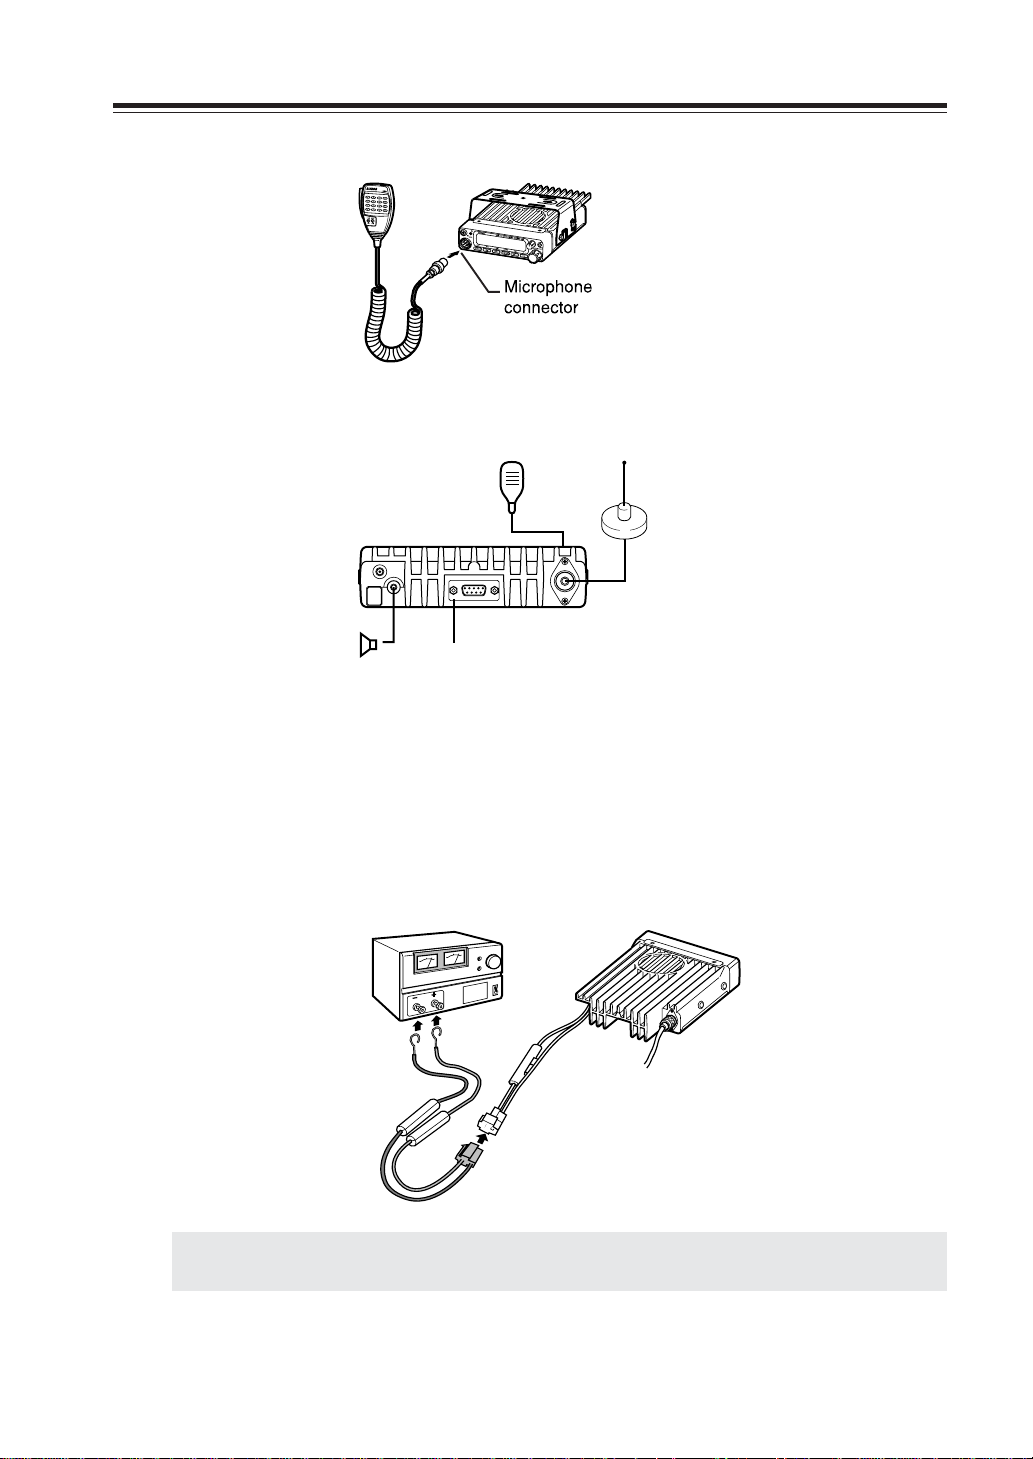
3. Initial Installation
Connect the microphone to the front panel of the transceiver.
Connect antenna port to a 50 ohm antenna that is tuned to the band, using good quality 50 ohm
coaxial cable.
Microphone
Antenna
External speaker
(if used)
(T/E models only)
rear panel
For a base station set up
The Transceiver requires a 12-13.8VDC negative grounded power source.
Use a regulated power supply capable of providing continuous current of 12A or more.
Power supplies that do not meet those specifications may cause malfunction and/or damage to the
radio and will void the warranty. Alinco offers excellent communication-grade power supplies as
optional accessories. Please contact your local authorized Alinco dealer.
*
DC
power supply
Black lead
2
Red lead
DC power cable
1
CAUTION: The body (heatsink) of this product may become very hot during/after the operation.
Never touch the unit until it cools down.
* When a transceiver is powered from an external DC power source (adapter, power supply, cigarplug etc), make sure that this power supply has approval to the level of IEC/EN 60950-1.
11
Page 15
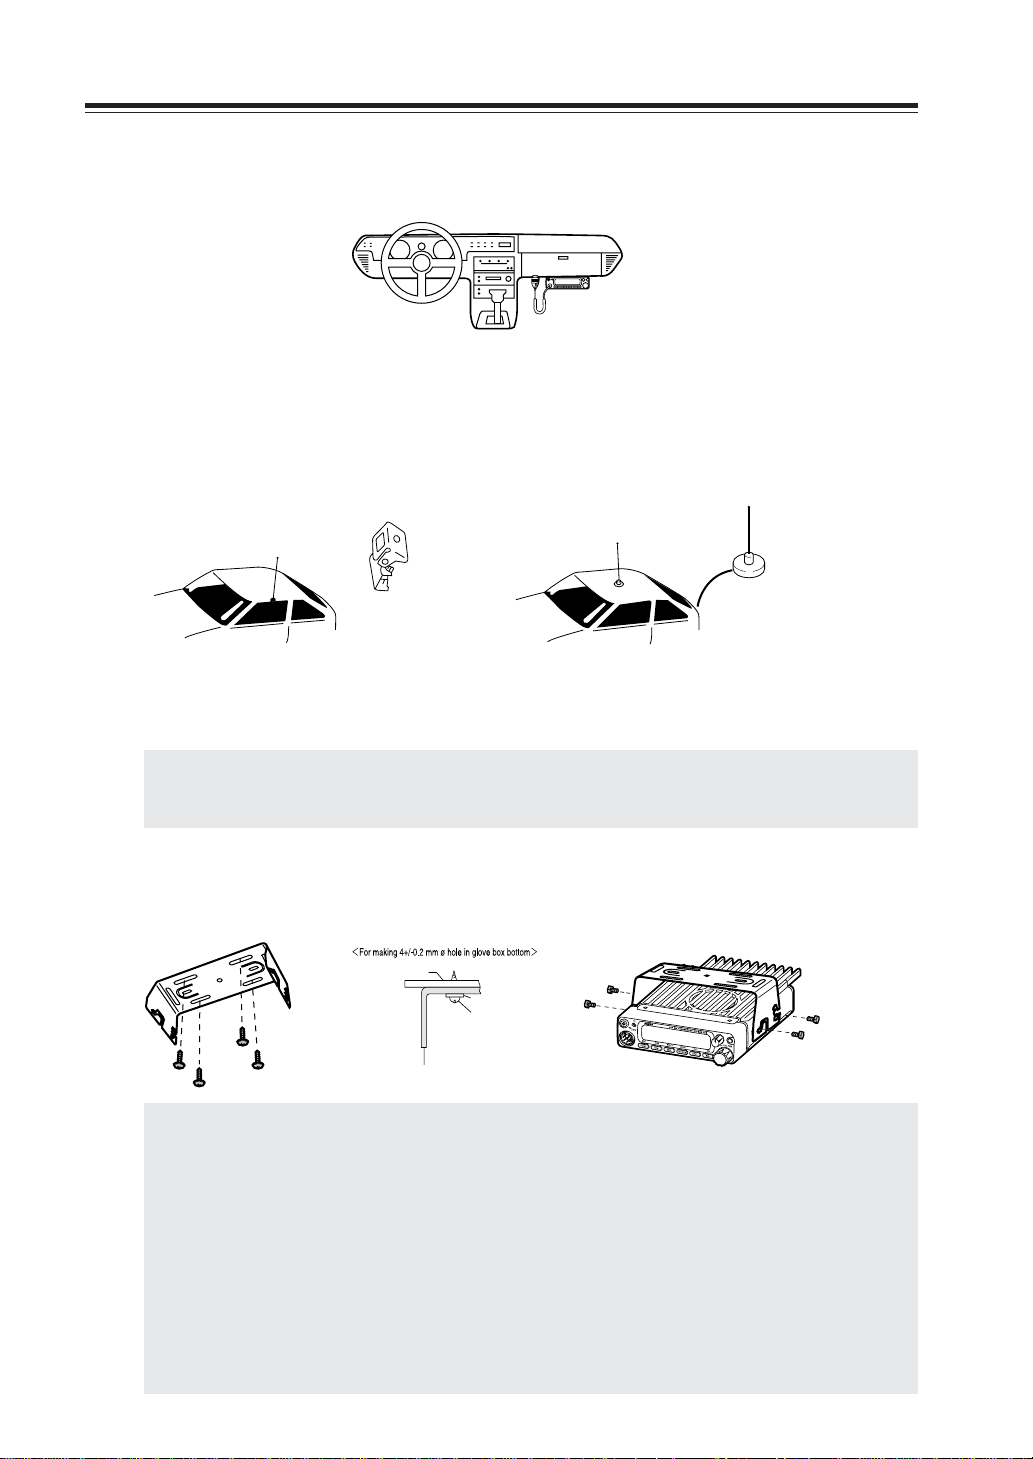
3. Initial Installation
For a mobile station set up
Location
The transceiver may be installed in any position in your car, where the controls and microphone are easily accessible and it
does not interfere with the safe operation of the vehicle or the performance of the set. If your vehicle is equipped with air
bags, be certain your radio will not interfere with their deployment. If you are uncertain about where to mount the unit,
contact your vehicle's manufacturer. While installing the unit in less ventilated place, please be aware that DC cables never
touch the heatsink of the unit. The heatsink may become excessively hot if proper ventilation is not availble while transmitting at, or similar to 100% duty-cycle, therefore there is risk of melting insulation of the DC cables and the consequent
short-circuiting of them.
Installing a Mobile Antenna
Screw-fixed
base
Magnet base
Use a 50 ohm coaxial cable to connect the antenna. Mobile antennas require an appropriate mounting base for proper installation and operation. For more information, see the documentation for
your antenna.
CAUTION: After installing your antenna, ensure that you have the best possible SWR reading.
High RF environments can cause severe damage to your unit. Ensure that you are not
in a high RF environment when operating the transceiver.
Installing the Transceiver
See the figure on the below.
Car body
Washer (M5)
Tapping screw
(M5 x 20 mm)
Mounting bracket
CAUTION: RF Hazard Warning
The electro-magnetic (radio Frequency) exposure level of this device may exceed the
European standards of the hazard level when transmitting at the high-power setting
while connected to a unity gain antenna at a distance of 63cm or less from the operator. Furthermore, the hazardous RF exposure level depends on the conditions of the
combination of the antenna gain, distance from the operator, output setting and installation environment, therefore the operator may be exposed to stronger RF even at a
distance of more than 63cm. For safety purpose, it is recommended that the antenna
be installed outside of, and as far as possible fr om, the operator's area. Av oid using an
excessively high-gained antenna in case the distance between the operator and the
antenna is very limited. Always use the minim um necessary output po wer f or comm unications.
12
Page 16
3. Initial Installation
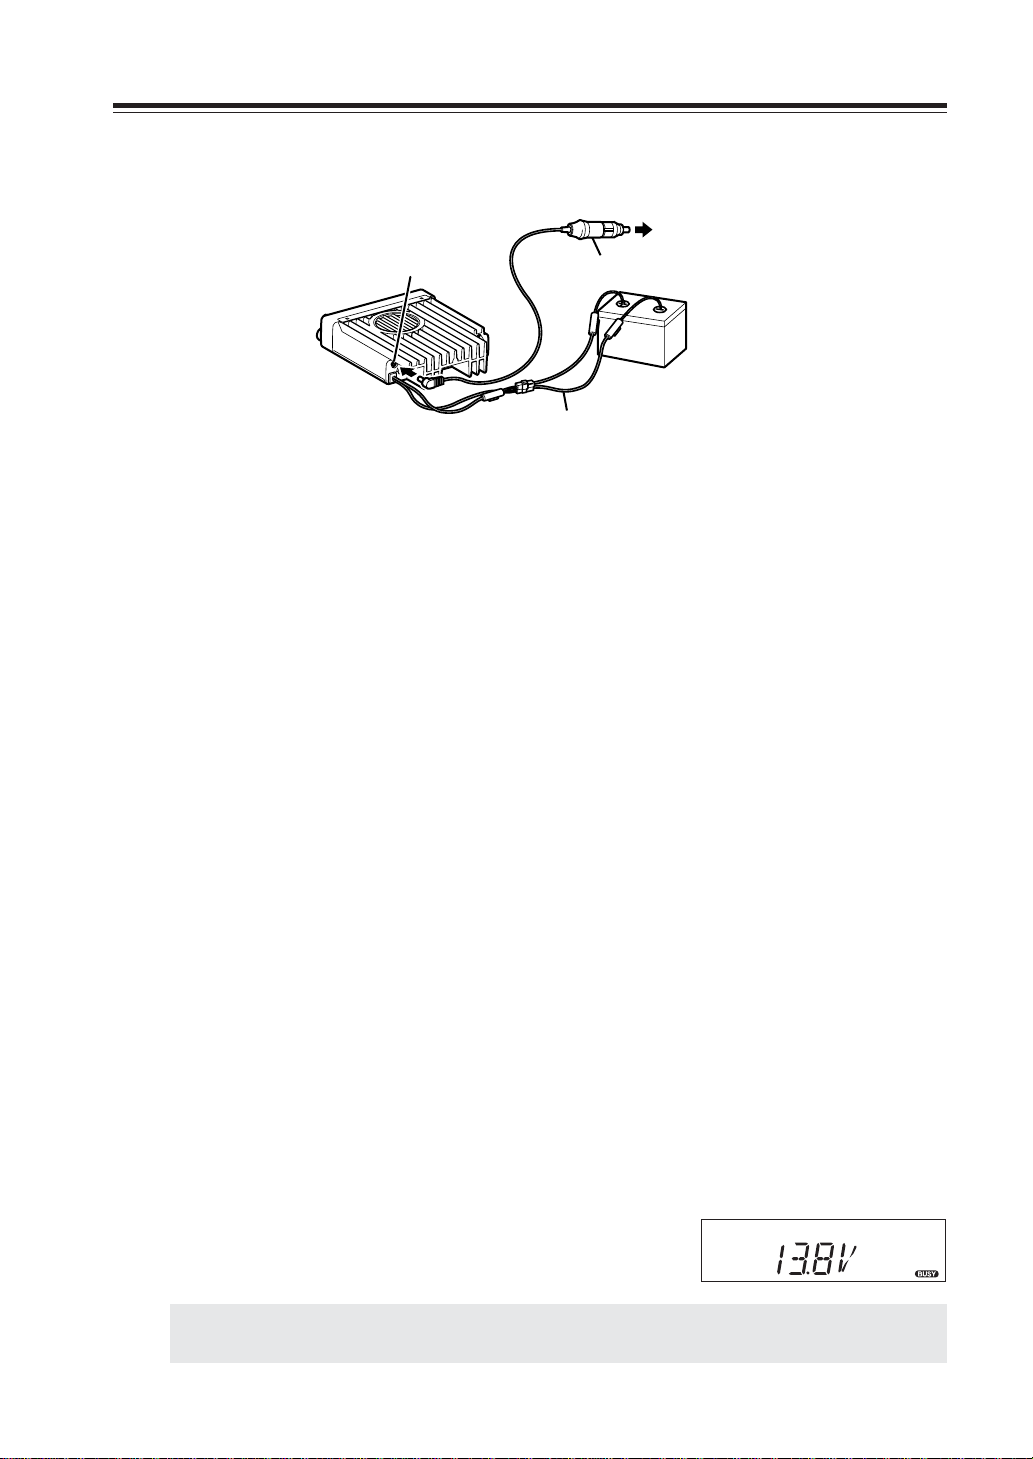
External power supply control & power lamp functions
ACC terminal
Ext. Power jack
DC cable
Be sure the vehicle has a negative-ground, 12VDC electric system before installation. Connect the
provided DC cable directly to the battery as shown below to minimize any possible ignition noise.
Be sure the vehicle has a large capacity battery as the use of the transceiver may overload the
electric system of the vehicle.
If the ignition-key on/off feature is desired (optional feature), use the optional EDC-37 (For direct
connection to the circuit on the vehicle) or EDC-36 (for a Cigar-Plug connection) cable. Connect
one of the cables between the ACC terminal or a Cigar-Plug that operates with the vehicle ignition
or ACC switch on the vehicle and EXT POWER jack on the rear side of the unit. (Note: In many
cars, the cigar-lighter plug is always powered. If this is the case, you cannot use it for the ignition
key on/off function.) If this option is selected, the unit can be turned on/off either manually or
automatically in accordance with the ignition key position:
Cigar-Plug connection
Battery
1. When the ignition key is turned to ACC or ON (Start) position with the radio turned
off, the power switch illuminates. The illumination will be turned off when the ignition key is turned to the off position. To turn on the unit, press the power switch
manually while it is illuminated (while ignition key is at ACC or ON position).
2. When the ignition key is turned to ACC or ON position with the radio's power switch
on, the unit turns on automatically and the power switch will be lit. Turn the ignition
key to OFF position or manually turn the power switch off to shut down the radio.
The power consumption when using the additional cable is 5mA.
For operation without this option, use the power switch to turn the unit on/off.
Power supply voltage display function
After connecting the transceiver to the power supply, the supply voltage can be confirmed by
pressing the SQL key together with the FUNC key. The supply voltage to the transceiver is then
seen on the display.
The transceiver will return to its normal operation when the power is switched OFF.
The display immediately changes as the voltage supply changes.
It also displays voltage during transmission. (T/E models only)
IMPORTANT:
The range of the displayed voltage is only from 7V - 16VDC. Because the displa y ed v alue
is approximate, please use a voltmeter when a more precise reading is desired.
13
Page 17
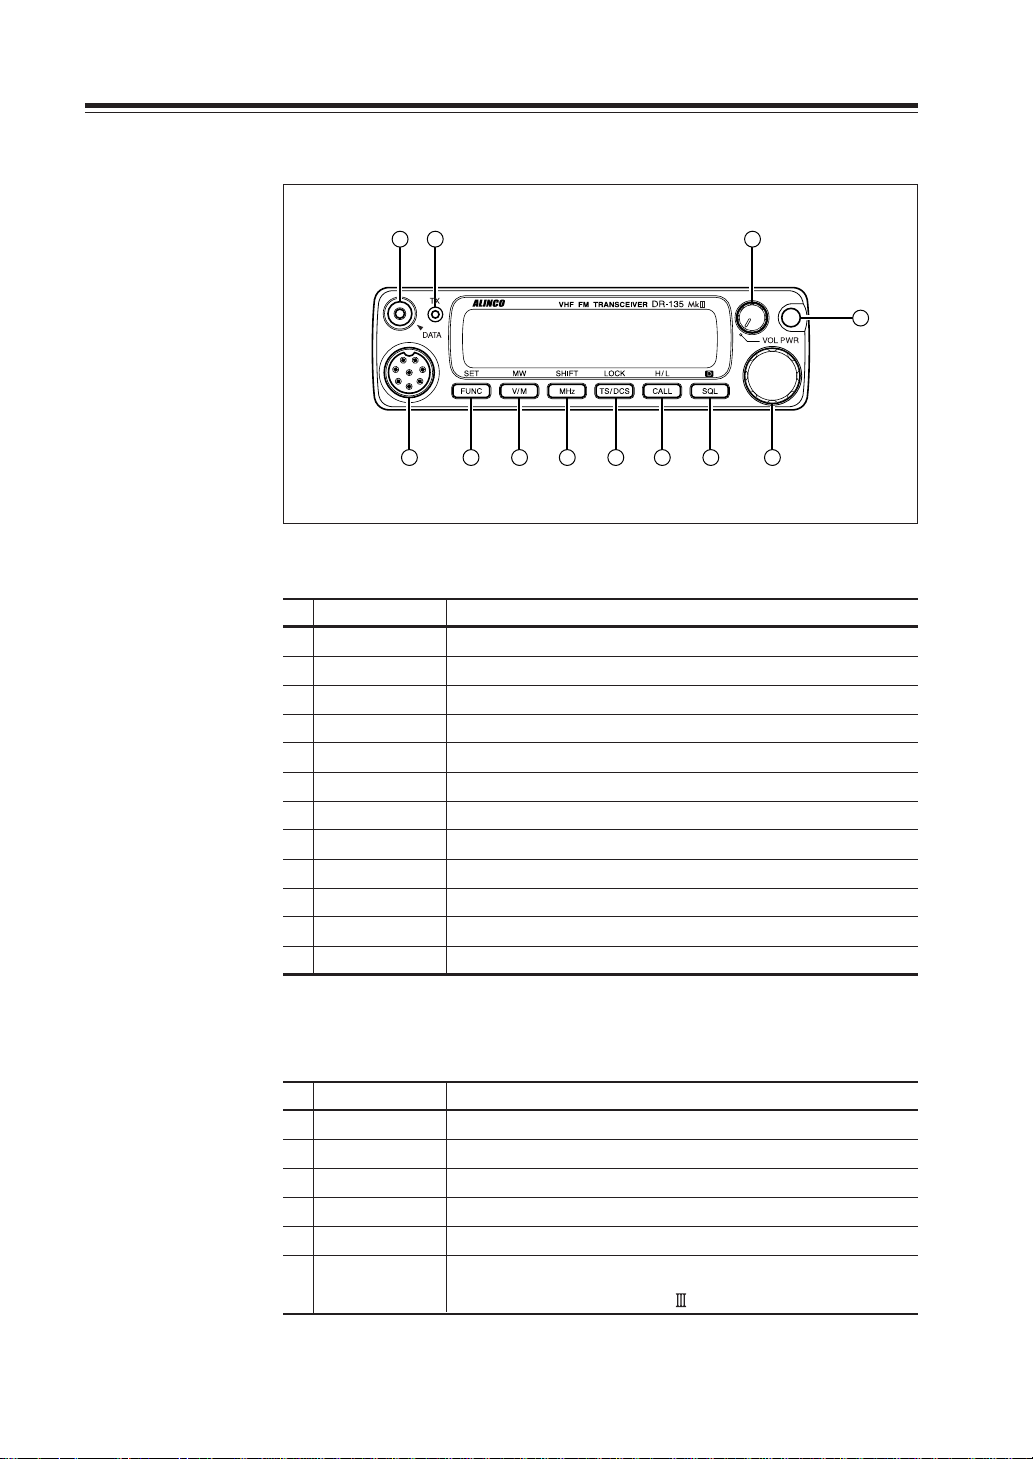
4. Part Names and Functions
Front Panel
10
11
12
4 5
6
8
7
2
9
3
•Primary Functions
No.
KeyFunction
1PWR Power turns ON / OFF whenever the key is pressed.
2Volume knob Adjusts the AF audio level.
3Dial
4 FUNC/SET Sets the function mode to access additional settings.
5 V/M/MW Switches between VFO mode and memory mode.
6 MHZ/SHIFT Changes the frequency in 1 MHz steps.
7
TS/DCS/LOCK
8 CALL/H/L Switches to CALL mode.
9 SQL/D Sets the squelch level
10
DA TA Terminal
11
TX Light indicator
12
Mic. Connector
Changes the frequency, memory channel and scan direction.
Sets the tone squelch and DCS setting.
Used in clone and theft alarm functions.
Lights during transmission.
Connection port for supplied microphone.
1
14
•Functions which can be activated while F appears, after
pressing the FUCN Key.
No.
KeyFunction
4 FUNC/SET
5 V/M/MW Programs the data in to memory channel.
6 MHZ/SHIFT Sets the shift direction and the offset frequency.
7
TSDCS/LOCK
8 CALL/H/L Switches between HI, MID, and LOW power transmission.
9 SQL/D Accesses the packet communication mode. (T/E models only)
Confirms selection of other functions and exits the function mode.
Sets the key lock function.
AM reception(DR-235TMk only)
Page 18

4. Part Name of Functions
•
Functions that can be activated while pressing the FUNC Ke y
No.
KeyFunction
1PWR Reset to factory default settings.
5 V/M/MW Erase the memory.
6 MHZ/SHIFT Switches to wide / narrow mode.
7
TSDCS/LOCK
8 CALL/H/L Accesses the clone function mode.
9 SQL/D Accesses the power supply voltage indication mode. (T/E
Sets the auto dialer.
models only)
• Functions that require continuous pressing to be activated.
No.
KeyFunction
4 FUNC/SET When pressed for 2 seconds, accesses the set mode.
6 MHZ/SHIFT When pressed, within 1 second the scan start.
9 SQL/D
When pressed, within 1 second the monitor function is on.
Rear Panel
21 4
No.
KeyFunction
1 Ext. Power jack Terminal for connecting optional EDC-37 for
2 External Speaker Port For optional external speaker
3 DSUB-9 Connector Terminal where external TNC may be con-
4Antenna Connector Connection for 50 ohm coaxial cable and
3
use with ignition key on/off function. (T/E
models only)
nected for packet use. With optional EJ-41U,
connects internal TNC to the computer. (T/E
models only)
antenna.
15
Page 19

4. Part Names and Functions
Display
12131416 15171819
11
10
1
2
3
No.
KeyFunction
1
SQL Appears when setting the squelch level.
2
M Appears when in memory mode.
3
4
.Decimal point
5
.Decimal point
6
.Decimal point
7
8
9 S-meter
Indicates the memory channel number in memory mode.
Appears when setting the theft alarm function.
Appears when setting the skip level.
Indicates the decimal point of frequency and the scanning function.
Indicates the frequency or memory name.
Appears when a signal is being received.
Indicates the relative signal strength level of transmission / reception.
5 6 7
4
9
8
16
10 Appears when in packet mode and digital voice mode.
11 Appears when setting the key lock.
12 DCS Appears when setting the DCS.
13 Appears when setting the tone squelch.
14 +- Appears when setting the shift.
15 A Appears during AM reception.(135TMk /235TMk only)
16 Nar Appears when in narrow band reception mode.
17 Lo Appears when transmission power is set to LOW.
18 Mi Appears when transmission power is set to MID.
19 Appears when FUNC Key is pressed.
Page 20

Microphone
4. Part Name of Functions
T version E version
No.
KeyFunction
1UP
2 DOWN
Increase the frequency, memory channel number, or setting value.
Decrease the frequency, memory channel number, or setting value.
3 PTT Press the PTT(Push-To-Talk)key to transmit.
4 DTMF DTMF tone keys
DTMF / REMOTE
5
Set to DTMF when you don’t want to operate remote con-
trol functions. So that DTMF keys do not function except
Switch
during transmit to send DTMF codes manually.
6 Lock Switch Locks out the UP and DOWN keys.
7MIC Speak here during transmission.
Mic. Connector Diagram (While looking in the fr ont view of the connector)
GND
MIC
PTT
DOWN
1
7
2
3
6
8
5
4
MIC GND
Remote control
DC 5V
UP
17
Page 21

5. Basic Operations
PWR key
Turning the unit on and off
Press the power switch or turn the ignition key to ACC or ON
position according to the option selected during installation.
Press the power switch again or turn the ignition key to OFF
position to turn off.
Audio Volume level setting
Rotate the VOL knob clockwise to increase the audio level,
counterclockwise to decrease. Set it at the desired level.
Squelch level setting
A squelch eliminates white-noise (the background noise when
a signal is not received).
Higher level settings will keep the squelch “closed” more
tightly for quieter monitoring, but weak signals will not be
heard. Lower settings allow weaker signals to “open” the
squelch but noise may also cause it to open.
1. Press SQL key. SQL icon appears on the dis-
play and the squelch level will be shown at the
position where the memory number is displayed. 21 levels, between 0 and 20, are available. “0” is the lowest setting.
2. By rotating the main dial or by using the UP/
DOWN keys on the microphone, adjust the
squelch to the desired level. To return to normal use, press PTT or any key on the front
panel; or if there are no operations within 5
seconds, the unit will store the setting and will
return to its original status.
Minimum
volume
Squelch level
Maximum
VOL knob
volume
The new squelch level will be stored in the CPU until another
adjustment is done.
IMPORTANT: All figures showing the frequencies and values in this manual are based on DR135(144MHz
band).
18
Page 22

VFO mode
VFO tuning is set as a default mode at the factory. VFO (variable frequency oscillator) allows you to change the frequency
in accordance with the selected channel step as you rotate the
main dial or by using the UP/DOWN keys on the microphone.
VFO mode is also used to program the data to be stored in the
memory channels or to change the parameter settings of the
transceiver.
1. Identify the current mode by checking the dis-
play. If “M” or “C” icon is NOT displayed on
it, the unit is already in the VFO mode.
2. Otherwise press “V/M” keys until those icons
are gone.
[Change frequency by the channel step]
Rotate the main dial clockwise to increase the frequency, counterclockwise to decrease. The UP/DOWN keys on the microphone act in the same way.
Frequency
decrease
5. Basic Operation
VFO mode
Frequency
increase
[Change frequency by 1 MHz step]
This will enable a quick change of frequency in 1 MHz steps:
1. Press MHz key. The digits after 100 kHz will
disappear from the display.
2. Follow the same sequence as above to change
the value.
Dial
19
Page 23

5. Basic Operation
Changing the channel step
1. Be sure the unit is in VFO mode. Refer to P.26
to enter into the Parameter Setting(SET) mode.
2. Select the channel step setting (P.26) using the
tuning knob. The current channel step will be
displayed as below.
3. Press PTT or any one of the keys except SQL
on the front panel to enter the desired step into
the transceiver’s memory . The display will then
return to the original status.
Please note that settings below 10 kHz may be automatically
corrected according to the selected step.
REPEATER (DUPLEX) Operation
Shift Direction and Offset frequency setting
Conventional repeaters are operated in the DUPLEX mode.
It receives an incoming signal (UP-LINK) on one frequency
and re-transmits on another (DOWN-LINK). The difference
between these two frequencies is called the offset frequency.
If the UP-LINK frequency is higher than the DOWN-LINK
frequency, the direction is positive, and if it is lower, the shift
direction is negative. The offset is variable between 0 to 99.995
MHz on this unit. If the offset value is set beyond the TX
range, OFF appears on the display when PTT is pressed.
Display for channel step
at-600 kHz
*The default value of DR235TMk is
1.600(1.6MHz) in the negative direction.
*The default value of DR435Mk /FXE
is 5.000(5MHz) in the negative direction.
Press the F key. While the F icon stays on the display, press
MHz key. The display shows the current status of shift direction and offset frequency. The default value of DR135Mk /
FXE is 0.60 MHz (600 kHz) in the negative direction. Press
MHz key until the desired offset direction is set. If SIMPLEX
mode (without changing transmit and receive frequency) is desired, select the position where both - and + icons disappeared.
1. Rotate the dial or use UP/DOWN keys on the microphone to change the shift fre-
quency. It changes in accordance with the channel step setting.
2. In this mode, if the F key is pressed again, the offset frequency can be changed in
1 MHz steps for faster setting.
3. Press PTT or any key except F or MHz on the front panel to return to the original
status.
20
Page 24

5. Basic Operation
NOTE: It is practical to use the memory mode to operate repeaters by programming the shift and offset settings
into the memory channels (P.22).
CTCSS / DCS setting
Many repeaters require a CTCSS tone or a DCS code encode setting as a “key” to access the
system, so-called “selective-calling”. Sometimes, CTCSS or DCS decode features are used on the
output of a repeater so they can be used as a squelch. In this mode, regardless of the main squelch
status, the audio can be heard ONLY when the matching tone/code signal is received. The combination of CTCSS squelch and DCS function is not available; only one or the other may be used for
a given memory channel.
1. Press TS/DCS key. The current setting will be
displayed with T/SQ/DCS icons and relative
frequency/code. Press the same key to select
T
88.5
The original status
T/SQ
88.5
DCS
023
T/SQ/DCS setting.
2. The numbers (such as 88.5) represent the CTCSS frequency in Hz. When it is dis-
played with the T icon only, the unit transmits the sub-audible tone while the PTT is
pressed (encode) and the repeater access is enabled (assuming the repeater is using
88.5).
3. Press the same key again so that the SQ icon shows up on the display. This is the
CTCSS decode frequency. This enables CTCSS squelch (or Tone Squelch, TSQ).
4. Press it again so that the 3-digit number and DCS icon is displayed. This is the DCS
code, and it enables DCS encoding and decoding.
For 2 - 4, rotate the main dial or press the UP/DOWN keys to change tone or code. Press any key
(Except TS/DCS, UP/DOWN keys) to enter the setting and return to original status. The T/SQ/
DCS icon will remain on the display to show the current status. To exit, simply use the TS/DCS key
and press it until the relative status icon T/SQ/DCS disappears.
The CTCSS encoding and decoding frequencies may be set differently. The encode setting frequency automatically relates to the decode setting, but decode setting does not affect encode. The
standard set of 39 different CTCSS tones are available as shown on the chart below. DCS encode/
decode cannot be separated and are selectable from 104 codes as shown below.
67.0 69.3 71.9 74.4 77.0 79.7
82.5 85.4 88.5 91.5 94.8 97.4
100.0 103.5 107.2 110.9 114.8 118.8
123.0 127.3 131.8 136.5 141.3 146.2
151.4 156.7 162.2 167.9 173.8 179.9
186.2 192.8 203.5 210.7 218.1 225.7
233.6 241.8 250.3
CTCSS Tone Frequency(Hz)
023 025 026 031 032 036 043 047 051 053 054
065 071 072 073 074 114 115 116 122 125 131
132 134 143 145 152 155 156 162 165 172 174
205 212 223 225 226 243 244 245 246 251 252
255 261 263 265 266 271 274 306 311 315 325
331 332 343 346 351 356 364 365 371 411 412
413 423 431 432 445 446 452 454 455 462 464
465 466 503 506 516 523 526 532 546 565 606
612 624 627 631 632 654 662 664 703 712 723
731 732 734 743 754
DCS Codes
21
Page 25

5. Basic Operation
NOTE: Depending on the deviation level of the incoming DCS coded-signal, your radio may not open the DCS
squelch. If this occurs, return to DCS setting mode and press the CALL key. A decimal point appears on
the 10 MHz order; then set the desired code. This setting can also be stored in a memory channel.
Memory Mode
The memory mode on this transceiver provides up to 100 channels (0-99), 1 call (quick recall ch)
and a pair of program-scan “edge memory” channels for quick, easy access to the preprogrammed
frequencies with different parameter settings.
1. Press V/M key. M icon appears on the display
to indicate that the unit is in the memory mode.
Repeat to switch the mode between VFO and
memory.
2. In memory mode, rotate the main dial or press
UP/DOWN keys to change the memory channel number.
Memory channel
Memory mode
[Memory programming]
1. Return to VFO mode by pressing V/M key. Re-
ferring to the list below for the programmable
parameters, program in the VFO mode to the
desired frequency and settings to be stored later
in the memory.
2. When all the settings are complete, press FUNC
key . The F, and M icons appear and a memory
channel number will be indicated on the
display.
3. Rotate the main dial or press the UP/DOWN
keys to select the desired memory channel number into which the current VFO settings will be
copied. An empty channel is shown with a flashing M icon. It may be a good practice to “allocate” memory channels in order, such as 0-9
for local repeaters, 10-19 local simplex, 20-49
repeaters within the area, 50-79 for repeater reserve, 80-98 simplex reserve. It makes references easier for the operation and future modifications of the memory channels.
during the unregistered channel
22
Page 26

4. While F icon is on the display, press MW key.
The VFO settings are copied to the memory
channel and a beep will sound. The memory
channel can be over-written if a previously programmed channel is selected (the memory
channels shown with a stable M icon).
5. To program the CALL channel (quick recall)
select the channel shown with CH-C on the display. Save Ch99 to store the setting used for
the Alarm operation, which will be explained
later. Use PL and PH for Program scan setting,
which will be explained in the advanced operations chapter.
6. To delete a programmed channel, select it in
memory mode, press FUNC key then press the
MW key while F icon is on. The memory is deleted and a beep sounds. The M icon starts flashing showing that this channel is now empty.
5. Basic Operation
7. To undo delete, repeat 6. However, the Undo
function becomes impossible once the channel
or the mode is changed.
[Programmable data in the memory channel]
Some features will be explained later, so please read this instruction manual thoroughly prior to
programming memories.
Memory channels including 0 - 99 and CALL can store following:
• Frequency
• Shift frequency
• Shift direction
• CTCSS tone both encode and decode
• Tone Squelch setting
• DCS code both encode and decode
• DCS squelch setting
• Scan skip channel
• Busy Channel Lock Out setting
• Priority monitoring frequency (PC programming required)
• Normal/Narrow FM width
• AM air-band receive (available on DR135TMk /235TMk only)
NOTE: Only the frequency can be stored in PH and PL channels to determine the edges of the program
scan range.
23
Page 27

5. Basic Operation
CALL mode
This is a memory mode that allows the transceiver to quickly recall the assigned memory channel
by simply pressing the CALL key, regardless of the current status of the unit.
1. Press CALL key. The C icon appears on the
display and the transceiver enters the CALL
mode. In this mode, the main dial or the UP/
DOWN keys cannot change the frequency or
memory channels.
2. Press CALL key again or press V/M key to exit
CALL mode.
3. No scan functions are available in CALL mode.
To store a desired setting in the CALL channel, follow the memory mode programming instructions and assign your selected settings to memory channel C. The call channel can be modified but
cannot be eliminated or hidden.
*Please refer to P.46 for default CALL
frequency of DR235TMk /
DR435Mk /FXE.
To receive signals
• Be sure to have the unit connected to the appropriate antenna, powered on, set the audio volume and
squelch level properly.
• Select the desired receiving frequency or browse frequencies to listen to ongoing communications. The
S-meter shows relative signal strength between BUSY and FULL when the transceiver detects an incoming
signal.
• If the S-meter indicates an incoming signal but nothing is heard from a speaker, check audio level, squelch
level, and CTCSS/DCS decoding status, which are explained elsewhere in this manual.
•A Monitor function is available to receive weaker signals. Press and hold SQL key for more than 1 second.
Regardless of the level setting of the squelch, it will be opened and the BUSY icon turns on the display.
Press any key on the front panel to exit.
24
Page 28

To transmit
1. Select the desired frequency. Be sure that you
2. Select the output power. Press FUNC key and
3. Default setting is High power. Press the PTT
are authorized to operate on the selected frequency. Check the system and monitor the fre-
quency to make sure that you are not going to
disturb any ongoing communications.
then press CALL key while F icon is on the
display. As the CALL key is pressed, the output power changes among 3 levels. The Lo icon
stands for LOW power setting, Mi for MEDIUM power. When the transceiver is set at
HIGH power, no icon will appear. The output
power level cannot be changed during transmission.
key on the microphone to transmit, release it to
receive. During transmission, the relative power
output is shown on the RF meter as:
LOW power = 2 segments
MID power = 3 segments
HIGH power = 5 segments.
5. Basic Operation
LOW power
MID power
HIGH power
4. If operating from a vehicle, do not transmit for
extended periods without running the engine,
to avoid battery drainage. Check the battery
voltage often. The lights, windshield wipers,
stereo system, air-conditioner, defogger and
other accessories drain the battery’s power considerably. When those accessories are turned
on, reduce the output power or turn off one or
more accessories to avoid the battery becoming overloaded. Watch the road when driv-
ing. Check local regulations that may pertain to the use of a transceiver when driving.
Overheating Protection
In case the internal temperature is raised over approximately 80ºC(176F), the power is automatically reduced by
20% until the unit is cooled down. The display does not show any warning during this status.
25
Page 29

6. Parameter Setting Mode
IMPORTANT: Please read the following pages thoroughly prior to the change of any parameters.
THE PARAMETERS CANNOT BE SET WITHOUT ENTERING THE SET MODE.
By entering the Parameter Setting mode, some of the radio’s operating parameters can be changed
to suit your application. The following is the Selectable Parameters’ Menu.
Note: The Alphanumeric Channel Tag setting will not appear in the menu until memories have been programmed
first!
To use the Parameter Setting mode
1. Press FUNC key for more than 2 seconds to
enter the Parameter Setting mode.
Use SQL key or UP/DOWN keys to select
menu.
2. Rotate the main dial to select the desired set-
ting.
3. Press SQL or UP/DOWN keys again to enter
the selected setting into the radio’s memory . The
transceiver is now ready for additional Parameter adjustments.
Default setting
4. Press any key OTHER than SQL/UP/DOWN
to exit the Parameter mode. The only exception is the Channel Tag setting which accepts
only PTT, FUNC, MHz and TS/DCS keys to
exit.
Details of the features in Menu
Please refer to “Parameter Setting Mode” for setting operations. The operation procedures of some of the features are explained later in detail.
Parameters Setting Mode
STP-5 Channel Step setting
TIMER Scan type (time scan/busy scan)
BEEP-ON Beep sound ON/OFF
TOT-OFF Time-Out-Timer ON/OFF
TP-OFF TOT penalty ON/OFF
APO-OFF Auto-Power-Off ON/OFF
TB-1750 Tone-Burst Frequency setting
BCLO-OF Busy-Channel-Lock-Out ON/OFF
SCR-OFF Theft Alarm ON/OFF
Alphanumeric Channel Tag setting
A
LAMP-H
Dimmer (LCD illumination) High/Low
26
Page 30

6. Parameters Setting Mode
Channel Step setting
This is to select the channel step to be used in the VFO mode.
Refer to the chart below for the relation of the actual step
frequency and how it is displayed.
Note: Be sure to set the kHz order of the frequency at even-number such as .000, prior to change this parameter
in VFO mode.
Scan Type
This is to select the scan resume condition. TIMER setting
allows the radio to resume scanning after 5 seconds, regardless of the signal receiving status. BUSY setting resumes scanning when the received signal is gone. The scan mode is explained later.
Beep Sound
BEEP-ON setting enables a beep that sounds after certain keys
are touched and/or setting is done. BEEP-OF shows that the
beep function is off.
27
Page 31

6. Parameters Setting Mode
Time-Out-Timer
The TOT feature is popular in repeater systems. It prohibits the users from transmitting on the
repeater after a certain period of time has elapsed. By setting this function and activating it according to the repeaters’ requirement, the radio alerts the user by a beep 5 seconds prior to time-out.
When the time is expired, transmitting stops and the transceiver automatically returns to receiving
mode. This avoids the repeater going into its TOT mode. Until the PTT is released once and pressed
again, the transceiver will not transmit.
1. In this Menu the default display shows TOT-
OFF.
2. Rotate the main dial to select time-out time.
The display should change as shown. The number followed by TOT is the time-out time in
seconds.
3. The TOT feature is selectable up to 450 sec-
onds (7.5 minutes).
during the setting time of 60 seconds
TOT Penalty
When the transmission is shut down in the TOT mode, this function prohibits another transmission
for a selected time period.
1. During the TOT penalty period, the beep sounds
when the PTT is pressed but the radio does not
transmit.
2. If the PTT is continuously pressed over both
TOT and the TOT penalty period, this function
will be automatically cancelled.
3. Default setting is TP-OFF . Rotate the main dial
to select the penalty time, up to 15 seconds.
during the setting time of 5 seconds
28
Page 32

6. Parameters Setting Mode
APO-Auto Power OFF
This feature will automatically shut off the transceiver. It is useful for mobile operation to avoid
draining the car battery. If there is no activity or use of the radio, it will turn off automatically after
30 minutes followed by a beep sound.
1. Default is APO-OFF.
2. Rotate dial to select APO-ON to activate the
function.
during the ON setting
Tone-Burst Frequency
This is to access Tone-Burst repeaters which require a certain pitch of audible tone to activate
“sleeping” repeaters. Usually, a repeater system does not require the tone once the repeater is
activated.
1. The default is TB-1750, which is 1750 Hz tone.
2. It is selectable from 1750, 2100, 1000, 1450 Hz.
during the 1750 Hz frequency
See ADVANCED OPERATION chapter (P.33) for operation.
Busy-Channel-Lock-Out
This function prohibits transmission as long as there is a signal on the receiving frequency.
The default is BCLO-OF, which is the off position. By activating this function, the radio transmits
only when:
1. No signal is received (BUSY icon is gone) on
the receiving frequency.
2. Tone-squelch is opened by the corresponding
CTCSS tone of the receiving signal.
3. As above, with DCS code.
Otherwise a beep sounds but the unit does not transmit even
when the PTT is pressed.
during the ON setting
Theft Alarm
Default is SCR-OFF. Select ON or DLY to activate the function. When the SCR-ON is selected, 100 MHz and 100 kHz
order decimal points will appear on the display.
The operation of this transceiver feature is explained later
(P.36).
lights up lights up
29
Page 33

6. Parameters Setting Mode
Alphanumeric Tag
The memory channels stored in the memory-mode can be displayed with an alphanumeric tag
instead of the default frequency display. Program the memory channel first.
There are 67 characters available including A-Z, 0-9.
1. Enter the set mode while the unit is in memory
mode.
2. Select alphanumeric tag setting by rotating the
main dial or pressing the UP/DOWN keys. The
display shows [A] flashing.
3. Rotate the main dial to select a character. Press
the V/M key. The character stops flashing and
is entered.
4.
The same flashing character appears next to it,
ready for the next character to be entered. Repeat the same sequence, up to seven characters.
5. To delete all characters during programming
press [CALL] key.
6. To exit after setting is done, press one of the
following keys: PTT, FUNC, TS / DCS.
After programming, the alphanumeric tag will be displayed on the designated channels, instead of
the frequency, when in memory mode. The memory channel number and other status icons will
also be displayed. If you wish to see the programmed frequency, press FUNC and it will be displayed for 5 seconds. To return to the alphanumeric display, wait 5 seconds or press any key.
Pressing any key followed by FUNC returns to normal operation, regardless of the display status.
IMPORTANT: This function cannot be enabled without programming the memories.
Dimmer
The display illumination can be dimmed.
1. [LAMP-H] is displayed as default.
2. Rotate the dial to choose the brighter (H) or
darker (L) position.
(T/E models only)
30
Page 34

7. Advanced Operations
Your transceiver offers different features for advanced operations.
SCANNING FUNCTION
Use this function to automatically search for signals. 6 different scan types are available in the unit.
In parameter setting mode, choose Timer mode or Busy mode to determine the desired resuming
condition. If the CTCSS(TSQ) squelch or DCS squelch is set, the audio can be heard only when the
tone/code matches the incoming signal. Otherwise, scanning stops but no audio will be heard. The
direction of scan, upward or downward, can be changed during the scan by rotating the main dial
or pressing UP or DOWN keys in the desired direction.
[VFO Scan]
Scans all VFO channels in regard to the preset tuning step.
1. Enter VFO mode.
2. Press UP (to go upward) Down (to go down-
ward) key or MHz key for more than 1 second
but less than 2 seconds.
3. The scan starts. It stops at the frequency where
the incoming signal is detected, and resumes
the scan according to the resume setting.
4. Press any key (other than UP/DOWN keys) to
exit.
[Memory Scan]
Scans all memory channels unless Memory skip feature is
selected for a given memory.
1. Enter Memory mode.
2. Sequence is the same as in VFO scan. Use UP/
DOWN keys or MHz key for commands.
NOTE: Memory Skip feature
This feature allows determined memory channels to be skipped during the scan.
The skip channel can be set even after the memory is programmed.
1. In Memory mode, select the channel to be skipped. Press FUNC key. While F
icon is visible on the display, press V/M key. Repeat the sequence to delete the
setting.
2. When the memory channel is set to Skip,
the 10 MHz order decimal point will be
displayed.
3. CALL, PL, PH, and ch.99 are always
skipped during Memory scan.
lights up
31
Page 35

7. Advanced Operations
•Program Scan
This is a type of VFO scan, but by setting the frequency range
of the VFO into PH and PL channels, it only scans between
those frequencies. With setting the PH and PL properly, up to
3 Program scan ranges will be available.
1. Enter the VFO mode and set the PL and PH
frequency into the designated memory channels. Refer to Memory setting for the proper
sequence.
2. Return to VFO mode by pressing V/M key. Set
the VFO to the frequency within the range to
be program-scanned.
3. Press MHz key for more than 1 second to start
scanning. During this scan mode, “P” flashes
after memory channel display.
4. Use main dial or UP/DOWN keys to change
the direction. Press any key (other than the UP/
DOWN keys) to exit.
The Highest band edge
Range (a)
The Lowest band edge
(b)
(c)
PH
PL
•Tone Scan
This function automatically searches for the CTCSS tone an
incoming signal might carry. This feature is useful to search
the encoding tone of a repeater, or to communicate with a
station operating in TSQ (CTCSS squelch) mode.
1. Press TS/DCS key to enter CTCSS decode set-
ting mode.
2. Press UP/DOWN key for more than 1 second
but less than 2 seconds to start scanning. It scans
39 tones in order.
3. The decimal point on the tone frequency will
flash, and it stops when the matching tone is
detected.
4. The scan won’t resume until the operation is
repeated.
5. Press any key (other than UP/DOWN keys) to
exit.
32
Page 36

•DCS scan
Same as previous, but for DCS code search.
1. Press TS/DCS key to enter DCS setting mode.
2. Press UP/DOWN key for more than 1 second
but less than 2 seconds to start. It searches the
104 DCS codes in order.
3. The 10 MHz order decimal point will flash.
4. The scan stops when the matching code is de-
tected.
5. The scan won’t resume until the operation is
repeated.
6. Press any key (other than UP/DOWN keys) to
exit.
7. Advanced Operations
KEY-LOCK FUNCTION
This will lock the keys to avoid unintentional changes.
1. Press FUNC key and press TS/DCS key while
F icon is on the display.
2. The [ ] icon appears.
3. With this function activated, only the follow-
ing commands can be accessed:
• PTT
• FUNC+TS/DCS to cancel this function
• Monitor function (to release squelch for weak
signal reception)
• Squelch setting
• UP/DOWN keys
TONE BURST
Press the DOWN key while PTT is pressed. The tone burst will be transmitted as long as both keys
are pressed together. Usually just a few seconds of burst is enough to activate the repeater.
33
Page 37

7. Advanced Operations
Digital voice communication
By installing an optional digital unit EJ-47U, digital voice communication becomes possible.
1. Install EJ-47U to the connecter CN105 of the
unit. See the instruction that comes with EJ47U for assembling details.
2. Press the FUNC key, and then press the SQL
key while the [F] icon is displayed.
[ ] is shown on the display.
3. Press the FUNC key or the PTT key to enter
the digital communication mode.
When digital setting is made
4. To cancel the digital communication mode,
press the SQL key while the display shows
codes in step 2.
IMPORTANT: When activating this setting, a code is displayed and switched by rotating the
dial, but it does not affect the function of EJ-47U. Please disregard this setting
sequence. Digital voice operation on certain amateur radio frequencies may
be prohibited, restricted or subject to a special station license. Please be sure
to consult with your local authority prior to operating in this mode.
(T/E models only)
WIDE / NARROW (Reduction of the Mic. Gain / Deviation)
Switching to the NARROW mode:
1. Press MHz key while keeping FUNC key
pressed. [Nar] appears on the LCD display and
the transceiver enters the NARROW mode.
2. Repeat the same sequence to switch between
the WIDE / NARROW modes. When the transceiver is in the WIDE mode, which is the normal operation, no indication appears on the
LCD display.
3. In the NARROW mode, the microphone gain
and modulation during transmission and the demodulation range during reception will be
lower.
34
Page 38

7. Advanced Operations
AUTO-DIALER
This will automatically transmit pre-programmed DTMF tones. DTMF (Dual-Tone-Multi-Frequency) are the same tones used in the telephone system, and they are often used to remote control
electronic devices or AUTOPATCH phone systems available on some repeaters.
To program tones in the A uto-dialer memory:
1. Press FUNC key and TS/DCS key at the same
time to enter the setting mode. Default display
is 0 on the right end of the display. Memory
channel icon displays which of the ten autodial memories (0~9) is in use.
2. Use UP/DOWN keys to select the desired chan-
nel.
3. Rotate the main dial to select the first digit, then
press TS/DCS key to enter. The Cursor moves
toward right. Repeat sequence to complete.
4. Use [-] for pause. The display scrolls when the
7th digit is entered. The numbers 0 to 9, pause,
* and # can be stored up to a total of 16 digits.
(Ex. Dialer set mode)
5. To check the entered digits, press FUNC then
rotate the main dial while F icon is on.
6. To delete, press CALL key. Press PTT, V/M,
MHz or SQL keys to exit and return to original
status.
To transmit tones in the Auto-dialer memory:
1. Press PTT then press the “UP” key on the mi-
crophone while transmitting. The last programmed code will be transmitted.
2. To change the Auto-dialer memory channel,
press FUNC and TS/DCS keys then select the
desired channel by pressing the UP/DOWN
keys on the microphone.
35
Page 39

7. Advanced Operations
THEFT ALARM (Optional ADALM135 required for FXE models)
This alert uses a beep sound when the unit is about to be removed in an improper manner. This
function is useful when the unit is installed in a vehicle.
DC power cable
(ADALM135)
Alarm cable A
Steering-wheel etc.
Transceiver
Alarm cable B
NOTE: Remove wire from steering wheel before attempting to drive vehicle.
Battery
[Operation 1]
Setting: Connect the DC cable direct to the battery.
1. Connect the provided alarm cable to the DATA jack on the front panel as shown.
Secure the other end of the cable to an object that stays fixed in the vehicle.
2. Enter the Parameter Setting mode by pressing FUNC key for more than 2 seconds.
Use SQL or UP/DOWN keys to select menu and rotate the dial to set SCR-ON.
Press any key other than SQL/UP/DOWN key to enter the setting and exit.
3. Turn off the unit with main power switch. The TX LED will be lit.
To turn off the alarm function, turn on the unit, enter the Parameter setting mode again, and select
SCR-OF. When alarm is activated, the decimal points on 100 MHz and 100 kHz order will flash on
display.
36
NOTE: 1. The alarm functions only when the unit is turned off.
2.
When the alarm is activated (SCR-ON or DLY), the Ignition key function does not work.
Function:
1. When the alarm cable is removed from the DATA jack or cut without using the
proper sequence, the alarm sounds for 10 minutes. During the alarm, the unit goes to
receive on memory channel 99, according to its pre-programmed setting (TSQ/DCS
accepted).
2. When a signal is received on ch.99 the alarm stops.
3. Turning on the unit with SQL key pressed also cancels the alarm.
4. Turn the unit off again with the alarm cable connected properly. It returns to the
alarm mode.
Page 40

7. Advanced Operations
[Operation 2]
Choose this operation when a delay period is desired.
1. Enter the Parameter setting mode as described previously and select SCR-DLY.
Follow the previous instruction to set.
2. Turn off the unit. Display will disappear but the LCD illumination stays on. After 20
seconds TX LED lights up, illumination dims, and alarm functions. The system won’t
work during the 20 second “DELAY” period.
3. The alarm sounds under the same condition as described previously. There is a 20
second delay until the alarm sounds. During the 20 second period, only the display
illumination is lit. Turn ON the unit during “DELAY” period to cancel the alarm
function.
Please set the parameter at SCR-OF during normal operation.
AM Mode Reception (DR235TMk only)
For reception, switch the reception mode to AM. For transmission, the transceiver enters the FM
mode.
Selecting the AM mode:
1. Press FUNC key, and while F icon is ON, press
SQL key. [ ] appears on the LCD display
and the transceiver enters the PACKET mode.
2. Press FUNC key again, and while F icon is ON,
press SQL key. [A] appears on the LCD display and the transceiver enters the AM recep-
tion mode.
3. Repeat the same sequence to switch the modes
in the following order : NORMAL > PACKET
> AM > NORMAL.
Reference:
On the DR135TMk , the transceiver automatically enters the AM reception mode in the frequency range.
(Packet mode)
(AM mode)
37
Page 41

7. Advanced Operations
CABLE CLONE
This feature will copy the programmed data and parameters in the master unit to slave units. It
copies the parameters and memory program settings.
Connection
Make a cable using 3.5 mm stereo-mini plugs as shown below. Make a master unit by setting and
programming it as desired. Turn off both units. Connect the cable between the DATA jacks on both
master and slave. Turn both radios on after the connection is made.
Master Slave stereo plug 3.5plug process
DATA
GND
3.5 mm stereo-mini plug
TX/RX
Master side Slave side
[Setting: Slave side]
1. Go to receive mode (VFO or Memory). Avoid using 9600bps data reception.
2. When it receives the clone data, LD*** shows up on the display.
3. When the transmission is successfully finished, the display will show [PASS].
4. Turn off the power. Disconnect the cable and repeat the sequence to clone the next
slave unit.
[Setting: Master side]
1. Press CALL key with FUNC key pressed. CLONE will be displayed and the radio
enters the clone mode.
2. Press PTT . SD*** will be displayed and it starts sending the data into the slave unit.
3. [PASS] will appear on the display when the data is successfully transmitted.
4.
The master radio may stay turned on for the next clone. Turn off the unit to exit from the
clone mode.
If the data is not successfully transmitted, turn off both units, make sure the cable connection is
correct and repeat the entire operation from the beginning. If you quit the operation in condition
that the clone is incompleted please reset the slave unit by refering to P.46.
38
Page 42

8. PACKET OPERATION
Packet mode is high-speed data communication using a personal computer. The use of a Digital
repeater network (Digi-peaters), including satellites, offers communications with distant stations.
In order to operate in the packet mode, it is essential that the station is equipped with a personal
computer with appropriate packet software, 9 pin RS-232C cable, optional EJ-41U TNC unit or
external TNC (terminal node controller). For the operation of the EJ-41U unit or external TNC,
please refer to its respective instruction manual. (T/E models only)
[To operate packet using EJ-41U]
Configure the radio to a known packet operation frequency.
Install the EJ-41U unit in the transceiver following the instructions below. Use an RS-232C cable
and connect it to the DSUB-9 connector on the back of transceiver and the PC.
RS-232C
Personal computer
1. Remove the cover. Locate W1 cable on the back of DSUB-9 connector in the unit.
Disconnect it and re-connect it to CN1 on the EJ-41U unit.
DSUB-9
Bottom side
CN107
W1
A
T
A
D
X
T
VCO case
2. Locate W2 cable on the EJ-41U. Connect it to CN107 on the trasnceiver circuit
board.
39
Page 43

8. PACKET OPERATION
3. Place the cushion sticker on the VCO shield case (a metal housing on the circuit
Packet Mode Setting
1. Press FUNC key. While F icon is on, press SQL key. [ ] appears on the LCD
board).
W1
DSUB-9
W2
A
T
A
CN107
D
X
T
VCO case
Bottom side
display and the transceiver enters packet mode. Repeat the same sequence to exit
from packet mode.
2. Use the computer keyboard to send designated commands from your PC to enter the
packet network and start operation. Refer to the chart for TNC commands. Use the
commands to select between 1200/9600 bps data speed.
Reference:
The configuration of EJ-41U is as follows. Please use PC commands to program.
• Data Speed (Transfer Rate) 9600bps (to computer)
• Data Length 8 bit
• Parity Bit none
• Stop bit 1 bit
• Flow Control Xon/Xoff
Once the EJ-41U is programmed, the settings are stored in memory even if the unit
is removed from the transceiver. Some EJ-41U functions may be limited as compared to those found in an external TNC.
CAUTION:
In order to replace a lithium-Ion battery installed on EJ-41U, please be mindful to the
polarity of the battery. If it is replaced in wrong way, it may cause damages to the EJ41U and/or the radio risking even the explotion of components. A soldering iron is
required for the task and if you are not confident, please consult with your local
Alinco dealer for the replacement.
EJ-41U (option)
40
Page 44

8. PACKET OPERATION
[To operate packet using an external TNC]
Use the DSUB-9 connector to connect the radio and the PC. The pin allocation for the DSUB-9 on
the back of the unit is as follows:
Transceiver
Packet RX OUT
1200 bps
Transceiver
Packet RX OUT 9600 bps
1200 bps
FM Packet TNC
DATAINDATA
GND
GND
Packet TX IN
1200 bps
EXT. PTT Input
9600 bps
FM Packet TNC
DATAINDATA
GND
GND
Packet TX IN 9600 bps
EXT. PTT Input
OUT
OUT
PTT
RS-232C
Personal Computer
PTT
RS-232C
Personal Computer
1. SQC squelch signal output. Carrier in: closed. Open collector output.
2. Packet reception DATA output (9600bps) output level 500mVrms/10Kohm
3. Packet transmission DATA input (9600bps) input level 300mV/600ohm Max input level 600mV.
4. Packet reception DATA output (1200bps) output level 100mV/600ohm
5. Ground
6. No Connection
7. PTT signal input : Low (GND) : TX, Open: RX
8. 5.0Vdc output: Max current less than 50mA
9. Packet transmission DATA input (1200bps): input level 100mV/600ohm
1
2345
Pin numbering
6789
looking at rear of radio
41
Page 45

8. PACKET OPERATION
•1200bps
Connect Pins 4, 5, 7, 9, and 1 and 8 also depending on the requirement. It enables a conventional
1200bps packet mode.
•9600bps
Connect Pins 2, 3, 5, 7, and 1 and 8 also depending on the requirement.
Press FUNC key, while F icon is on, press SQL. [ ] appears on LCD and enables 9600bps
packet mode.
NOTE: • Never connect a PC directly to the DSUB-9 connector if EJ-41U is not installed. It may
cause the unit to malfunction.
• The local system, transmission and reception environment may easily cause troubles in 9600bps
packet mode. A connection error may frequently occur unless the communication is established
at very high signal strength.
• When the DATA input level is far off from the specification (1200bps=100mVrms/600ohm,
9600bps=400mV/600ohm), it causes poor S/N ratio and distortion, as such the data will not be
exchanged properly.
• When the radio is in the data mode (packet/APRS®), selective calling tones such as DCS and
CTCSS won’t be transmitted.
[To operate APRS®]
APRS® is a trademark of Mr. Bob Bruninga, WB4APR. Using the designated APRS frequency in
your area, and a system composed of the transceiver, EJ-41U (or TNC) a computer and/or a GPS
receiver, you may monitor and exchange various geolocating information on the PC and on the
internet. Details are available from Internet sites.
The radio is capable of being connected to an EJ-41U (or TNC), PC and GPS receiver. To enjoy
APRS operation, a GPS receiver, computer and APRS software are required in addition to the
packet (data) operation system previously mentioned. Purchase a NMEA (National Marine Electronics Association) compatible GPS receiver with a data output port.
• Specifications required for the GPS receiver: NMEA-0183, 4800bps/without parity bit/data length
8 bit/ stop bit 1bit
42
Page 46

8. PACKET OPERATION
[SET UP]
Please refer to the previous chapter for the set up and installation of the EJ-41U unit, TNC and PC.
See below for the connection of a GPS receiver. It requires a 3.5mm stereo plug to connect to the
DATA Terminal on the radio's front panel. See the chart for plug connections. Program the EJ-41U
by using commands from the PC in the same way as in the packet mode.
The PC can be removed from the transceiver once the EJ-41U is configured. EJ-41U will hold the
settings in memory. Repeat configuration only when it is necessary.
GPS receiver
3.5 mm
3-conductor plug
DATA IN
terminal
RXD (To TXD of GPS receiver)
+
B (To power of GPS receiver) Note (1)
DSUB-9 cable
Personal Computer
Note 1: When the transceiver is set to the PACKET mode, a power output of +4.5V (max. 200mA) is
supplied by the transceiver, which can be used to power the GPS receiver.
[APRS Operation]
Boot up the PC and open the APRS software. Tune to the APRS system frequency.
Press FUNC key and while F icon is on press SQL key to enter to the data (APRS) mode. Repeat
the same sequence to exit.
[ ] appears on the LCD display when the unit is in data (APRS) mode
The PC monitor will display the initial menu of TNC when it enters the APRS mode.
•
Set the packet speed in command mode (cmd:). I.e.
cmd:HB 1200 and 9600
•Register your call sign cmd:MY xxxxxx
• Set the speed on GPS port cmd:GB4800
• Set the automatic transmission time separation cmd:LOC E 3
• Set the monitoring header option OFF cmd:LTMH OFF
• The transceiver will start transmitting automatically when data is received from the GPS receiver. Refer to the command chart and EJ-41U instruction manual for more details.
Note: Set the transceiver and GPS receiver as far away from each other as possible to minimize pos-
sible interference.
IMPORTANT: Please always turn off the GPS receiver or disconnect the GPS cable from the DA TA IN
terminal before turning off the radio. Otherwise y ou ma y risk resetting the CPU on the
EJ-41U.
43
Page 47

9. Remote Control Operation
With using an EMS 57 microphone (may be optioned), the transceiver can be controlled remotely
by operating the DTMF keys on the microphone. Frequencies can also be entered directly from the
microphone.
1
DTMF
LOCK
2
OFF
OFF
1. Enter the remote command or the frequency.
2. Press LOCK to prevent the transceiver from accepting remote control inputs from
the microphone.
3. To operate remote control, press REMOTE.
3
[List of Remote Control Keys]
Key
0-9 – Direct frequency input –
A V/M Memory channel access 22
B CALL Call channel access 24
C SET mode SET mode access (Note 1) 26
D
*
#– – –
0H/L Switching transmission output 25
Note 1: To change the set mode menu, press the UP and DOWN keys at the top. To change its
Note 2: To change the auto dialer memory, press the UP and DOWN keys at the top. The numbers
Transceiver corresponding key
FUNC+TS / DCS Auto dialer memory registration (Note 2)
Function Page
35
Press and hold SQL Monitor function 24
contents, press the * and # keys. Press any key other than the * or # key to return to the
frequency display.
can be entered directly by pressing the numerical keys; the numbers or symbols can also
be selected by pressing the * and # keys and entered by pressing the A key. Press C to clear,
and the B, D, or PTT key to return to the frequency display.
44
Page 48

9. Remote Control Operation
[Entering a frequency directly]
Frequencies can be entered directly by pressing the numerical (1~0) keys.
Only valid numbers will be accepted and entered to the display.
1. Set the microphone REMOTE / DTMF switch to the REMOTE position.
2. DTMF keys can be used to enter ftom the 100 MHz digit.
(Ex.) When setting 144.20 MHz with the tuning step set to 5 kHz.
Enter
After entering the sixth digit a slightly longer beep is emitted and the entry is complete.
3. Cancelling an entry before it is completed. Press PTT, or any key other than the
numerical keys.
[Entry method depending on tuning step]
Depending on the set tuning step, digit entry may be necessary to the 1 kHz digit. In some cases
entry to the 10 kHz digit is sufficient. For cases in which digit entry is only necessary to the 10 kHz
digit some digit keys wre not accepted.
The relationshop between the tuning step and input method is as follows.
Tuning step
5.0 kHz
8.33 kHz
10.0 kHz 10 kHz Completion after input of the 10 kHz digit.
12.5 kHz 10 kHz 0···00.0, 1···12.5, 2···25.0, 3···37.5, 4···invalid
15.0 kHz 10 kHz Completion after input of the 10 kHz digit.
20.0 kHz 10 kHz Completion after input of the 10 kHz digit.
25 kHz 10 kHz 0···00.0, 2···25.0, 5···50.0, 7···75.0,
30 kHz 10 kHz When you input the 10 kHz digit, the 1 kHz digit set as follows.
50 kHz 10 kHz
Entry
completion digit
1 kHz Completion after input of the 1 kHz digit.
When you input the 10 kHz digit, the 1 kHz digit set as follows.
5···50.0, 6···62.5, 7···75.0, 8···87.5, 9···invalid
When you input the 10 kHz digit, the 1 kHz digit set as follows.
Other entries are invalid.
When you input the 10 kHz digit, the 1 kHz digit set as follows.
0···00.0, 5···50.0
Final digit selection
45
Page 49

10. Maintenance / Reference
Reset
Resetting the transceiver returns all programmed contents to their factory default setting.
If any problems persist, resetting may overcome them and return the transceiver to normal operation.
Reset Procedure
While holding the FUNC key down, turn the power on.
All segments of the LCD will be displayed, then default settings are displayed.
All LCD segments
Note: Take special care when resetting because all settings are initialized.
Factory Default Settings
VFO frequency
CALL frequency
Memory channel 0-99
Offset direction
Offset frequency
Channel step
Tone setting
Tone frequency
DCS setting
DCS code
Output power
Keylock setting
TOT
APO
Squelch setting
145.000 MHz
145.000 MHz
DR-135
TMkIII
-
-
600 kHz
5 kHz
-
88.5 Hz
-
023
HI
OFF
OFF
OFF
2
DR-135
EMkIII/FXE
145.000 MHz
145.000 MHz
-
-
600 kHz
12.5 kHz
-
88.5 Hz
-
023
HI
OFF
OFF
OFF
2
DR-235
TMkIII
223.500 MHz
223.500 MHz
-
-
1.6 MHz
5 kHz
-
88.5 Hz
-
023
HI
OFF
OFF
OFF
2
DR-435
TMkIII
445.000 MHz
445.000 MHz
-
-
5.0 MHz
5 kHz
-
88.5 Hz
-
023
HI
OFF
OFF
OFF
2
DR-435
EMkIII/FXE
435.000 MHz
435.000 MHz
-
-
5.0 MHz
12.5 kHz
-
88.5 Hz
-
023
HI
OFF
OFF
OFF
2
46
Page 50

10. Maintenance / Reference
Trouble Shooting
Please check the list below before concluding that the transceiver is faulty.
If a problem persists, reset the transceiver. This can sometimes correct erroneous operation.
Problem
(a) Power is on nothing
appears on Display.
(b) Fuse is blown.
(c) Display is too dim.
(d) No sound comes from
speaker.
(e) Key and Dial do not
function.
(f) Rotating Dial will not
change memory channel.
(g)
PTT key is pressed but
transmission does not occur.
(h) The unit does not transmit
and cannot be reset.
(i) The unit does not work in
the packet mode.
Possible Causes and Potential Solutions
+ and - polarities of power connection are reversed. Connect red lead to plus
terminal and black lead to minus terminal of DC power supply.
Check and solve problem resulting in blown fuse and replace fuse with new fuse.
Dimmer setting is "LAMP-L". Please make the dimmer setting "LAMP-H".
• Squelch is muted. Decrease squelch level.
•Tone or DCS squelch is active. Turn CTCSS or DCS squelch off.
Key-lock function is activated. Cancel Key-lock function.
Transceiver is in CALL mode. Press the VFO or memory mode.
•Microphone connection is poor. Connect microphone properly.
• Antenna connection is poor. Connect antenna properly.
The DSUB-9 port has been connected to a PC without installing the EJ-41U.
Disconnect the cable and install EJ-41U properly.
• EJ-41U/TNC is not set properly. Make sure the connections and
configurations are properly set.
• The unit is not in the data mode. Follow the instruction, configure and retry.
• The squelch is open. Adjust squelch level properly.
• The data transmission speed is not configured. Use command to configure the
speed.
• The cable is not straight type. Use straight RS-232C cable.
(j) The unit does not work in
the APRS mode.
• The unit is not in the data mode. Make sure the connections and parameters
are configured properly.
• The unit is not configured for automatic transmission. Use PC to configure
the TNC.
• The squelch is open. Adjust squelch level properly.
• GPS receiver is not receiving the data from the satellites. Wait until GPS
receiver receives data from satellites.
47
Page 51

11. Optional accessories
• EMS-57 DTMF microphone
• EDC-36 Cigar-plug cable with filter
(for Cigar-plug connection. Recommended in case
other Alinco handheld transceivers may be used
in the vehicle, as this cable can also power the
handheld units. See its manual for compatibility)
• EDC-37 DC cable
(for ignition key ON/OFF system: for direct connection to ACC terminal circuit)
• EMS-53 Microphone
•EJ-41U TNC unit
•EJ-47U Digital unit
•ADALM135 Alarm cable kit
(“Theft Alarm” stickers included)
(DR135FXE/435FXE only)
cable A
cable B
48
Page 52

12. Specifications
DR-135EMk / FXE: VHF FM MOBILE TRANSCEIVER 144.000-145.995MHz
DR-435EMk / FXE: UHF FM MOBILE TRANSCEIVER 430.000-439.995MHz
CE0336
This device is authorized for use in all EU and EFTA member states.
An operator's license is required for this device.
!
49
Page 53

Appendix
TNC Commands List
The commands supported by the built-in TNC are list below. You must enter a space between a
command name (or short-form) and a parameter, or between two parameters; ex.AU OFF.
Command form
Name Short
AUTOLF AU ON ON/OFF When ON, sends a line feed (LF) to the PC after each
BEACON B EVERY 0 EVERY/ If set to EVERY, sends a beacon packet at intervals of the
BTEXT BT - 0 - 159 Specifies the content of the data portion of a beacon
CALIBRAT CAL - - Sends a space/mark square wave (50/50 ratio). Enter
CHCAK CH 30 0 - 250 Specifies the interval from signal drop-out until execution
CONNECT C - Call1 (VIA Sends a connect request. Call 1 is the call sign of the station
CONVERSE
CPACTIME CP OFF ON/OFF When ON and in Converse mode, sends a packet at inter-
CR CR ON ON/OFF When ON, appends a carriage return (CR) to all packets to
DISCONNE D - - Sends a disconnect request.
DISPLAY DISP - -
DWAIT DW 30 30 Specifies the interval from no carrier detection until execu-
ECHO E ON ON/OFF When ON, causes the TNC to echo received characters to
CONV - - Causes the TNC to enter Converse mode. Press [Ctrl]+[C]
or K to restore the Command mode.
Default Parameters Description
carriage return (CR).
AFTER n specified period (n). If set to AFTER, sends a beacon packet
( n=0 - 250 ) only once after the specified period (n). The unit of n is 10
seconds.
characters packet.
Q to exit Calibrate mode and restore the Command mode.
of disconnection. The unit of the parameter is 10 seconds.
call1, call3, to be connected to. Calls 2 to call 9 are call signs of stations
....call9) to be digipeated through.
vals of the period determine by PACTIME
be sent.
Causes the TNC to display the current status of all the commands. You can also specify a class identifier A, C, H, I, L,
M, or T to display the status of only the desired command
class. Enter a space between the command name and a class
identifier; ex. DISPLAY H.
A (ASYNC): RS-232C port parameters.
C (CHAR) : Special TNC characters.
H (HEALTH): Counter parameters.
I (ID): ID parameters.
L (LINK): TNC-to -TNC link status.
M (MONITOR): Monitor parameters.
T (TIMING): Timing parameters.
tion of transmission. The unit of the parameter is 10 milliseconds.
the computer.
50
Page 54

Appendix
Command form
Name Short
FIRMRNR FIR OFF ON/OFF The other station sends a notice (packet) to you if it is not
FLOW F ON ON/OFF
FRACK FR 3 0 - 250 Specifies the interval from one transmission until retry
GBAUD GB 4800 4800/9600 Selects 4800 or 9600 bps as the transfer rate between
GPSSEND GPSS - 0 - 159 Specifies the content of the data to be output to the GPS
GPSTEXT GPST $PNTS 0 - 6 Specifies the type of a message to be determined by
HBAUD HB 1200 1200/9600 Selects 1200 or 9600 bps as the transfer rate between
LOCATION
LPATH LPA GPS Call1 ( VIA Specifies calls signs to send GPS data. Call 1 is the call sign
LTEXT LT - 0 - 159 Specifies the content of a message to be included in GPS
LT MON LTM 0 0 - 250 Specifies the interval for displaying a message determined
MCOM MCOM OFF ON/OFF When ON, causes the TNC to also monitor control packets.
MCON MC OFF ON/OFF When ON, causes the TNC to monitor other stations
MONITOR M ON ON/OFF When ON, causes the TNC to monitor packets.
MRPT MR ON ON/OFF When ON, causes the TNC to display the entire digipeat
MYCALL MY NOCALL 6 characters Specifies your call sign.
PACLEN P 128 0 - 255 Specifies the maximum length of the data portion of a
PACTIME PACT AFTER 10 EVERY/ If set to EVERY, sends a packet at intervals of the specified
PERSIST PE 128 128 Specifies a parameter to calculate probability for the
PPERSIST PP ON ON Causes the TNC to use the PERSIST/SLOTTIME method
LOC EVERY 0 EVERY/ If set to EVERY, sends GPS data at intervals of the speci-
Default Parameters Description
ready to receive data. When ON, receiving such a notice
causes the TNC to suspend transmission until it receives a
“ready” notice.
When ON, starting key entry causes the computer to stop
displaying received packets.
of transmission. The unit of the parameter is 1 second.
the TNC and the GPS receiver.
characters receiver; this data is used to pro gram the default settings on
the receiver. The output data is not stored in memory.
characters LTEXT.
packet stations.
AFTER n fied period (n). If set to AFTER, sends GPS data only once
( n = 0 - 250 ) after the specified period (n). The unit of n is 10 seconds.
call2, call3, ... of the destination. Call2 to call9 are call signs of stations to
call9 ) be digipeated through.
characters data.
by LTEXT on the screen; a message appears like a received
beacon packet. The unit of the parameter is 1 second.
When OFF, causes it to monitor only information packets.
while in connection with the target station.
list for monitored packets.
+SSID
packet.
AFTER n period (n). If set to AFTER, sends a packet only once after
( n = 0 - 250 ) the specified period of (n). The unit of n is 100 milliseconds.
PERSIST/SLOTTIME method.
when ON, or the DWAIT method when OFF.
51
Page 55

Appendix
Command form
Name Short
RESET RESET - - Restores the default status for all the commands.
RESPTIME RES 5 5 Specifies the acknowledgement packet transmission delay.
RESTART
RETRY RE 10 10 Specifies the number of transmission retries. If packets are
SENDPAC SE $0D $0D Specifies a character that forces a packet to be sent.
SLOTTIME SL 3 3 Specifies the period of random number generation intervals
TRACE TRAC OFF OFF When ON, causes the TNC to display all received packets
TRIES TRI 0 0 Specifies the number of transmission retries programmed
TXDELAY TX 50 50
UNPROTO U CQ CQ Specifies call signs to send a packet in Unprotocol mode.
XFLOW X ON ON Causes the TNC to perform software flow control when
RESTART
Default Parameters Description
The unit of the parameter is 100 milliseconds.
-- Causes the TNC function as if it is switched OFF then ON.
not correctly accepted while connected, a connect request
is sent again after the specified number of retries.
for the PERSIST/SLOTTIME method. The unit of the parameter is 10 milliseconds.
in their entirety.
in the retry counter.
Specifies the time delay between PTT ON and start of
transmission. The unit of the parameter is 10 milliseconds.
Call 1 is the call sign of the destination. Call2 to call9 are
call signs of stations to be digipeated through.
ON, or hardware flow control when OFF.
52
 Loading...