

Page 1
DM PRO
BASIC USER GUIDE
Here is a quick reference guide to some of the most commonly used
functions of the DM Pro. Refer to the DM Pro Reference Manual for
complete descriptions of the following procedures.
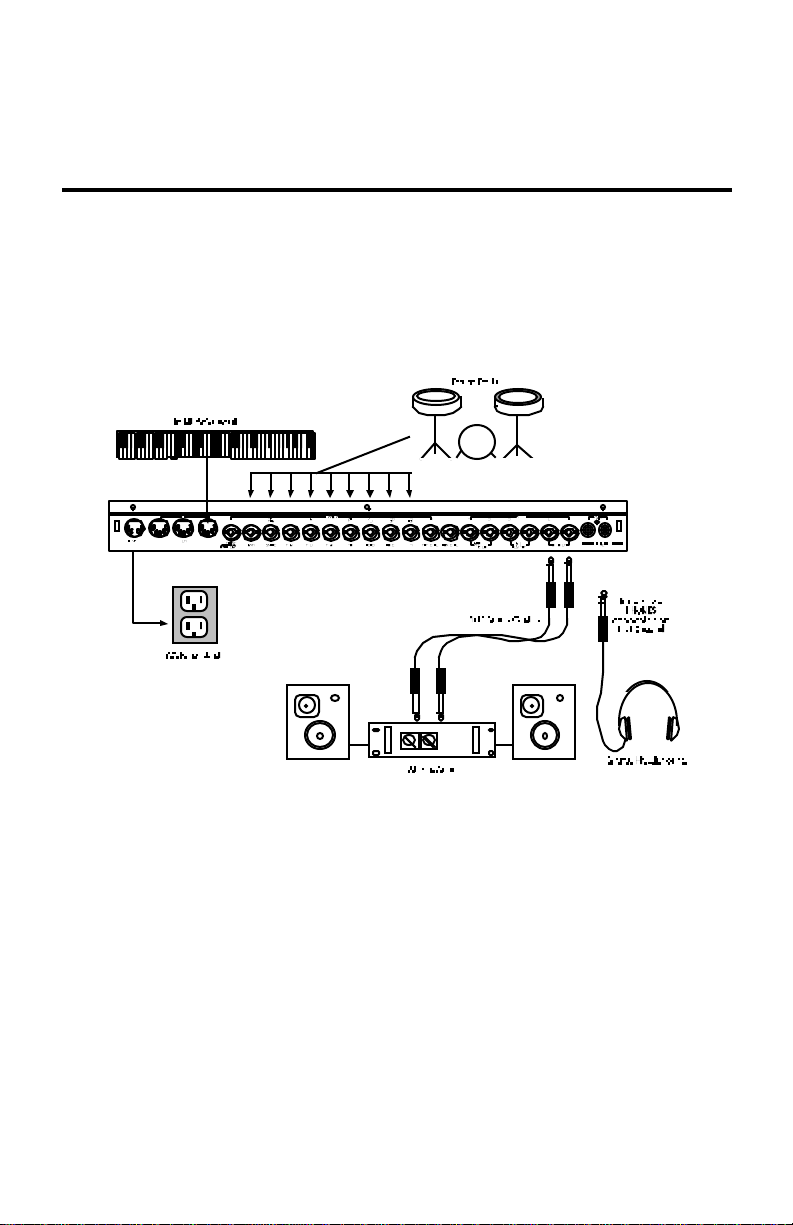
CONNECTIONS DIAGRAM
MIDI CONNECTIONS
If you are using a MIDI keyboard or sequencer, connect its [MIDI OUT] to
the [MIDI IN] of the DM Pro. If you have another device that you wish to
control from the same keyboard or sequencer, connect the [MIDI THRU] of
the DM Pro to the [MIDI IN] of the other device.
If you wish to store your edited Drums and Drumkits to a computer or
other data storage device or use an external editor, connect the [MIDI
OUT] of the DM Pro to the [MIDI IN] of the computer or other data
storage device. If you’re using Emagic’s SoundDiver, it requires a
handshake from the DM Pro, so you must also connect the [MIDI OUT] of
the computer to the [MIDI IN] of the DMPro.
1
Page 2

EXTERNAL TRIGGER CONNECTIONS
• The DM Pro’s Drums can be triggered (played) from two sources:
analog triggers and MIDI triggers.
• Typical analog triggers are drum pads available from numerous
manufacturers that connect to the 1/4” jacks on the DM Pro’s rear
panel.
• Because of the wide variety of pads available, setting up external
triggers takes a little time and experimentation. The procedures,
therefore, are not really appropriate here and we recommend that you
go straight to “Chapter 7: Triggers” and “Appendix B: Advanced
Trigger Information” in the DM Pro Reference Manual to get set up
right away.
MIDI TRIGGER SETUPS
MIDI triggers, on the other hand, are a little more straightforward to set
up. Whether you are using a multi-pad device with a MIDI jack built in
or some other type of MIDI device, simply plug a cable from the MIDI
Output jack of that device to the MIDI Input jack of the DM Pro.
Each Drumkit in the DM Pro has 64 consecutive MIDI Note Numbers
available, which can be thought of as locations or slots where Drums
reside. To assign the Drums you want to the MIDI Note numbers you’re
sending from your controller, first call up a Drumkit to edit by following
the procedure described on the next page in the topic “How to Select a
Drumkit.” Then follow the steps on page 4 in the topic “How to Change a
Drum Within a Drumkit.”
2
Page 3

PLAYING THE AUTO DEMOS
To give you an idea of the kind of musical power the DM Pro contains, we
have included four “Auto Demos”. These compositions cover a variety of
musical styles, and illustrate how the DM Pro lends itself to many
different environments.
Here’s how to select and play one of the Auto demos:
1. Press and hold the [KIT] button.
2. While still holding the [KIT] button, press the [< CURSOR]
button. You will see a screen that looks like this:
3. Using the VALUE wheel, select a number between 1 and 4.
4. Press [STORE]. The screen will indicate that the DM Pro is
playing the Auto demo you selected. You can stop the Auto demo
at any time by pressing the [KIT] button.
Play Auto demo 1
<STORE>
HOW TO SELECT A DRUMKIT
• To select a Drumkit, press the [KIT] button to jump to the top level of
Drumkit Mode.
• The top level of Drumkit Mode displays the name of the Drumkit in
quotation marks on the top line of the display and nothing on the
bottom line:
“RealProKit”
• Play notes between A0 (MIDI Note # 33) and C6 (MIDI Note # 96) from
your controller to hear the current Drumkit.
• Turn the VALUE encoder to select any of the 64 different Drumkits,
and then press the [KIT] button again to “Load” the Drumkit of your
choice into the “Play Memory” of the DM Pro. Because Drumkits
contain so much information, they must be individually loaded into
the Play Memory after selecting them rather than simply just
selected.
• If the Drumkit number and the [KIT] button are flashing, the Drumkit
currently shown on the display has not yet been loaded – the
3
Page 4

previously loaded Drumkit still resides in the Play Memory and will
sound until you press [KIT] to load the new Drumkit.
4
Page 5

HOW TO CHANGE A DRUM WITHIN A DRUMKIT
Background Info
• Individual drum and percussion sounds are all called “Drums” in the
DM Pro.
• Each of the 64 Drumkits in turn contain 64 Drums.
• A Drum is assigned to each of the 64 MIDI Notes across the most
commonly used controller range: A0 (MIDI Note # 33) through C6
(MIDI Note # 96), which just slightly exceeds the range of a 5 octave
keyboard.
Procedure #1 - Using the CHASE Function
1. To change Drums, press the DRUM button.
2. Now press the CHASE button so that it lights, and then play a note
from your controller. The display will show the MIDI Note Number of
the note you just played along with the Drum that is currently
assigned to that MIDI Note.
Procedure #2 - Using the Cursor and Value Encoder
1. Alternatively, if you do not wish to use the CHASE Function, press
DRUM, and then move the CURSOR beneath the MIDI Note Number.
Now you can select the MIDI Note with the VALUE encoder:
AKk:005 PwrShoes
Drums are displayed with their three character “Drum Group”
followed by the “Drum Number” followed by the “Drum Name”:
Note:36 C1
5
Page 6

• There are 13 Internal Drum Groups from which to choose. Some
abbreviations are obvious and others are less obvious. Here is a listing
of the 13 Internal Drum Groups:
AKk Acoustic Kicks
EKk Electronic Kicks
ASn Acoustic Snares
ESn Electronic Snares
Tom Toms
Hat Hi-hats
Cym Cymbals
AP1 Acoustic Percussion 1
AP2 Acoustic Percussion 2
EPc Electronic Percussion
SFx Sound Effects
Chr Chromatic (pitched percussion)
USR User Bank
• The final “User” Drum Group contains 128 Drums of varying types that
may be overwritten in order to store your own original or edited Drums.
• Once you have selected your desired Drum Group, move the cursor
beneath the Drum Number.
• Using the Value encoder, scroll through the contents of the Drum
Group to find the Drum of your choice.
• To select the Drum for another MIDI Note Number, move the cursor to
the bottom line of the display and turn the Value encoder to select the
desired MIDI Note Number.
• Repeat the process of selecting the Drum Group and Drum Number.
6
Page 7

MIDI FUNCTIONS
How to Select MIDI Channels
MIDI Channels are set in the DM Pro for both individual Drums and for
the DM Pro globally (settings that affect the DM Pro regardless of the
mode it’s in).
Primarily, when you set the DM Pro’s Global MIDI settings, you are
making MIDI settings for the unit upon which the other MIDI settings are
based.
P1 The BASIC MIDI CHANNEL Parameter
• This Parameter sets the Basic Channel to which Drums and Drumkits
will respond and on which Triggers will transmit. (Note that the DM
Pro cannot be set to MIDI Omni Mode On as this would create a
confusing situation with the DM Pro’s multichannel, multitimbral
capabilities.)
• Individual DM Pro Drums will respond to the Basic MIDI Channel
unless their MIDI Channel assignments are overridden with the Drum
Channel Override Parameter within the Drumkit MIDI Function. See
the next topic for this procedure.
• To set the Basic MIDI Channel, press the [MIDI] button. The DM Pro
can be in any mode when you do this.
• If the words Basic Channel don’t appear on the top line of the display,
move the cursor to that area of the screen and turn the VALUE encoder
counter-clockwise until the proper page has been selected.
• Move the cursor beneath the Parameter Value.
• Turn the Value encoder to make your selection:
• Remember that this is a Global setting. It affects all Drumkits within
the DM Pro so that all Drums which have their Drum Channel
Override parameter set to BASIC will respond on this
MIDI Channel.
Basic Channel:01
Global Edit
P1
7
Page 8

8
Page 9

P2 The DRUM CHANNEL OVERRIDE Parameter
• This Parameter allows the DM Pro to respond to or transmit on up to
sixteen MIDI Channels simultaneously. The Parameter is called
“Drum Channel Override” because it has the ability to override the
Basic MIDI Channel setting (described in the previous topic) for each
Drum within the Drumkit. This is the parameter to use if you want
independent control of Volume, Panning, Pitch Bend, and Program
Changes for up to sixteen Drums or sets of Drums via MIDI.
• Be sure that the Drumkit on which you want to do your MIDI edits is
the currently selected Drumkit. To do this, follow the procedure on
page 2 of the Basic User Guide for calling up Drumkits.
• Once you have selected the proper Drumkit, press the [MIDI] button.
• To set a Drum to respond to a Channel other than the Basic MIDI
Channel, first select the desired Drum by using one of the two
procedures described in the section called “How to Change a Drum
Within a Drumkit.” Then move the cursor beneath the word BASIC and
turn the Value encoder to select the desired MIDI Channel for that
Drum:
Drum Chan: 01
Note:72 C4
P14
MIDI Program Change Commands
Drumkits
Each of the 64 Drumkits in the DM Pro is considered a “Program” in MIDI.
To change from one Drumkit to another via MIDI, send a Program Change
command on the DM Pro’s Basic Channel (see “P1 The Basic MIDI
Channel Parameter” on the previous page).
Since there are 64 “Programs” (Drumkits) in the DM Pro (00 through 63)
and MIDI allows for 128 Program numbers (00 through 127), the DM Pro
will ignore Program Change commands 64 through 127 on the Basic
Channel.
Drums
Any Drum within a Drumkit which has its Drum Channel Override
parameter set to something other than BASIC can respond to both MIDI
Bank Select and Program Change messages. Each Drum Group has 128
Drums, so the Program Change response range is 0-127. Bank Select
messages of 0 will call up the Acoustic Kicks Drum Group, followed by a
9
Page 10

Bank Select message of 1 calling up the Electronic Kicks Drum Group and
so on. A Bank Select message of 13 will call up the User Drum Group.
10
Page 11

MIX FUNCTIONS: VOLUME, PANNING, OUTPUT
ASSIGNMENTS AND EFFECTS
Pressing the [MIX] button puts the DM Pro into Mix Edit mode which
allows you to adjust drum volumes, pan positions, output assignments and
effects levels.
• Be sure that the Drumkit for which you want to do your MIX edits is
the currently selected Drumkit. To do this, follow the procedure on
page 2 of the Basic User Guide for calling up Drumkits.
• Once you have done this, press the [MIX] button.
• Make sure the Cursor is in the upper left portion of the top line of the
display. Then turn the Value encoder to select the following
parameters to edit:
How to Adjust the Volume of a Drum
P1: Drum Volume
• To set Drum Volume manually, move the cursor beneath the Drum
Volume Parameter Value and use the Value encoder to change the
volume:
Drum Volume: 99
Note:83 B4
P1
11
Page 12

How to Adjust the Panning of a Drum
P2: Drum Pan
• To adjust the pan position of a Drum assigned to a MIDI Note, move
the cursor beneath the Drum Pan Parameter Value:
Drum Pan: PROG
Note:83 B4
P2
• Now turn the Value encoder to change the MIDI Note’s pan position.
There are eight possible Values for the Drum Pan Parameter:
<3 Hard left
<2 Moderately left
<1 Slightly left
<> Center
1> Slightly right
2> Moderately right
3> Hard right
PROG Pan position determined by the Drum
• In the final position, PROG, the Drum’s pan position as it was
programmed in Drum Edit Mode determines the Pan position.
Note that MIDI Pan controller has 128 increments (0 - 127) and the DM
Pro only has seven positions. The following chart shows the MIDI-toDM Pro value equivalents:
DM Pro Value Pan Position MIDI CC #10 Value
<3 Hard left 00
<2 Moderately left 21
<1 Slightly left 42
<> Center 63
1> Slightly right 84
2> Moderately right 106
3> Hard right 127
Remember, if you send MIDI Panning commands to the DM Pro’s Basic
MIDI Channel, the pan position of the entire Drumkit will change. For
individual Pan control over certain Drums, use the Drum Channel
Override parameter as discussed on page 7 of the Basic User Guide.
12
Page 13

How to Assign Drums to the Outputs
P3: Output
This Parameter determines to which of the six outputs a Drum assigned to
a MIDI Note will be sent. The six outputs are configured as two stereo
pairs (Main L/R and Aux 1/2) and two mono outputs (Aux 3 & Aux 4).
• To assign a Drum to a specific output or output pair, move the cursor
beneath the Output Assignment Parameter Value:
Output: MAIN L/R
Note:83 B4
P3
• Move the Value encoder to change the Output Assignment.
• There are five possible Values for the Output Assignment Parameter:
Main L/R (stereo)
Aux L/R (stereo)
Aux 3 (mono)
Aux 4 (mono)
FX Only
The FX Only setting removes the dry signal of a Drum from all outputs,
but the Drum still sends to the assigned Effects Buss. The result is an
“effect only” Drum that can be used as a musical effect or as a layer
with another Drum using the Drum Link Parameter.
• If a stereo Drum is assigned to Aux 3 or Aux 4, it will be automatically
summed to mono. This summation can be desirable in some
applications, but if you want to preserve the image of a stereo Drum,
then only assign it to Main L/R or Aux 1/2.
How to Adjust the Effects Levels
P4: FX Level
This Parameter allows you to set the amount of Drum signal that is sent
to the Effects processor for each MIDI Note of the DM Pro. Higher
Values will make the Drum sound more wet, and lower Values will
make the Drum sound less wet. A Value of 00 will leave the Drum
completely dry (no effects).
• To set the Effects Send Level, move the cursor beneath the Parameter
Value and adjust the send amount to taste with the Value encoder:
FX Level: 70
13
Page 14

Note:83 B4
P4
14
Page 15

Alesis Corporation 1633 26th Street Santa Monica CA 90404
15
Page 16

© 1999 Alesis Corporation
Specifications Subject To Change Without Notice
7-52-0030 5/99
16
 Loading...