

Page 1
REFERENCE
MANUAL
Spring 1999
Page 2

Page 3

Your shipping carton should contain the
following items:
1. DG8 piano
2. Sustain pedal
3. Music stand
4. AC power cable
5. Warranty Registration card
6. Reference Manual
7. QuickStart Guide
If anything is missing, please contact your dealer or Alesis immediately.
Optional accessories available from your Alesis reseller:
Alesis GS-1 Digital Piano stand w/3-pedal assembly for sustain, sostenuto and soft
pedal functions
Alesis QCard
NOTE: Completing and returning the Warranty Registration card is important.
TM
sound-expansion card library
ALESIS CONTACT INFORMATION
Alesis Corporation
1633 26
Santa Monica, CA 90404
USA
Telephone: 800-5-ALESIS (800-525-3747)
E-Mail: alecorp@alesis1.usa.com
Website: http://www.alesis.com
DG8TM Reference Manual
Revision 1.0
by David M. Bertovic
© Copyright 1999, Alesis Corporation. All rights reserved. Reproduction in whole or in part is
prohibited. “DG8”, “QS8.1”, QSR”, “NanoSynth”, “DMPro”, “QCard” and “SoundBridge” are
trademarks of Alesis Studio Electronics, Inc.
th
Street
4 DG8 REFERENCE MANUAL
Page 4

Contents
CONTENTS
Alesis Contact Information ..........................................................................4
Important Safety Instructions ......................................................................7
Instructions de Sécurité Importantes (French)...........................................................................9
Beim Benutzen dieses Produktes beachten Sie bitte die folgenden
Sicherheitshinweise: (German)......................................................................................................11
Instructions to the User...................................................................................................................12
CE Declaration of Conformity.......................................................................................................13
Introduction................................................................................................15
Typographic Conventions...............................................................................................16
Getting Started ...........................................................................................17
What You’ll Need ............................................................................................................................17
Using the DG8 with Other Equipment.........................................................................17
Unpack It ...........................................................................................................................................17
Set It Up .............................................................................................................................................17
Attaching the Music Stand..............................................................................................18
Setting up the DG8 in a Home .......................................................................................19
Hook It Up ........................................................................................................................................19
Power ..................................................................................................................................19
Sustain Pedal......................................................................................................................19
The DG8 as a Stand-alone Instrument ..........................................................................19
The DG8 in a Music System............................................................................................20
Turn It On and Play It.....................................................................................................................23
How the Sounds are Organized.....................................................................................23
How the Sounds are Selected .........................................................................................25
Using the Controls............................................................................................................27
Playing the DG8 ..........................................................................................31
Overview ...........................................................................................................................................31
How the Sounds are Organized....................................................................................................31
Using the Display and Sound Selection Buttons ........................................................33
Selecting Internal Sounds................................................................................................35
Using the External Card Sounds....................................................................................40
DG8 Sound Chart..............................................................................................................43
Front Panel Controls .......................................................................................................................44
Tune.....................................................................................................................................44
Transpose ...........................................................................................................................44
Effects..................................................................................................................................45
Graphic EQ.........................................................................................................................45
MIDI Functions ................................................................................................................................46
Pedals .................................................................................................................................................48
Background........................................................................................................................48
Sustain.................................................................................................................................48
Sostenuto ............................................................................................................................49
Soft Pedal............................................................................................................................49
Pedal Connections ............................................................................................................49
Audio Inputs and Outputs.............................................................................................................51
Initializing the DG8 .........................................................................................................................52
Factory Defaults ................................................................................................................52
Power-Up Resetting .........................................................................................................52
DG8 REFERENCE MANUAL 5
Page 5

Contents
MIDI Functions............................................................................................53
MIDI Basics .......................................................................................................................................53
MIDI Hardware................................................................................................................................54
MIDI Messages.................................................................................................................................54
Channel Messages: Voice Messages..............................................................................54
Channel Messages: Mode Messages .............................................................................57
MIDI and the DG8 ...........................................................................................................................58
Channel Messages ............................................................................................................58
Glossary......................................................................................................61
DG8 Terms ........................................................................................................................................61
MIDI Terms.......................................................................................................................................62
Troubleshooting..........................................................................................63
Cleaning and Maintenance ............................................................................................................65
Specifications..............................................................................................67
MIDI Implementation Chart..........................................................................................................67
Specifications ....................................................................................................................................68
Warranty ....................................................................................................69
Index ..........................................................................................................71
6 DG8 REFERENCE MANUAL
Page 6
Important Safety Instructions
IMPORTANT SAFETY
INSTRUCTIONS
SAFETY SYMBOLS USED IN THIS
PRODUCT
This symbol alerts the user that there are important operating and
maintenance instructions in the literature accompanying this unit.
This symbol warns the user of uninsulated voltage within the unit
that can cause dangerous electric shocks.
PLEASE FOLLOW THESE PRECAUTIONS
WHEN USING THIS PRODUCT:
1. Read these instructions.
2. Keep these instructions.
3. Heed all warnings.
4. Follow all instructions.
5. Do not use this apparatus near water.
6. Clean only with a damp cloth. Do not spray any liquid cleaner onto the
faceplate, as this may damage the front panel controls or cause a dangerous
condition.
7. Install in accordance with the manufacturer’s instructions.
8. Do not install near any heat sources such as radiators, heat registers, stoves,
or other apparatus (including amplifiers) that produce heat.
9. Do not defeat the safety purpose of the polarized plug on the AC power
adapter. A polarized plug has two blades with one wider than the other. The
wide blade is provided for your safety. When the provided plug does not fit
into your outlet, consult an electrician for replacement of the obsolete outlet.
10. Protect the power cord from being walked on or pinched, particularly at
plugs, convenience receptacles, and the point where they exit from the
apparatus.
11. Use only attachments or accessories specified by the manufacturer.
DG8 REFERENCE MANUAL 7
Page 7
Important Safety Instructions
12. Do not place this product on an unstable cart, stand, or table. The product
may fall, causing serious personal injury and serious damage to the product.
Use only with cart, stand, or table recommended by the manufacturer or sold
with the product. The combination of the product and stand should be
moved carefully. Quick movements, excessive force on uneven surfaces may
overturn the combination which may damage the product and stand
combination. Follow the manufacturers instructions when installing the
product and use mounting accessories recommended by the manufacturer.
13. Unplug this apparatus during lightning storms or when unused for long
periods of time.
14. Refer all servicing to qualified service personnel. Servicing is required when
the apparatus has been damaged in any way, such as when the powersupply cord or plug is damaged, liquid has been spilled or objects have fallen
into the apparatus, the apparatus has been exposed to rain or moisture, does
not operate normally, or has been dropped.
15. This unit produces heat when operated normally. Operate in a wellventilated area.
16. This product, in combination with an amplifier and headphones or speakers,
may be capable of producing sound levels that could cause permanent
hearing loss. Do not operate for a long period of time at a high volume level
or at a level that is uncomfortable. If you experience any hearing loss or
ringing in the ears, you should consult an audiologist.
8 DG8 REFERENCE MANUAL
Page 8
Important Safety Instructions
INSTRUCTIONS DE SÉCURITÉ IMPORTANTES
(FRENCH)
SYMBOLES UTILISÉS DANS CE PRODUIT
Ce symbole alèrte l’utilisateur qu’il existe des instructions de
fonctionnement et de maintenance dans la documentation jointe
avec ce produit.
Ce symbole avertit l’utilisateur de la présence d’une tension non
isolée à l’intérieur de l’appareil pouvant engendrer des chocs
électriques.
VEUILLEZ SUIVRE CES PRÉCAUTIONS LORS DE
L’UTILISATION DE L’APPAREIL:
1. Lisez ces instructions.
2. Gardez ces instructions.
3. Tenez compte de tous les avertissements.
4. Suivez toutes les instructions.
5. N’utilisez pas cet allareil à proximité de l’eau.
6. Ne nettoyez qu’avec un chiffon humide. Ne pas vaporiser de liquide nettoyant
sur l’appareil, cela pourrait abîmer les contrôles de la face avant ou engendrer
des conditions dangeureuses.
7. Installez selon les recommandations du constructeur.
8. Ne pas installer à proximilé de sources de chaleur comme radiateurs, cuisinière
ou autre appareils (don’t les amplificateurs) produisant de la chaleur.
9. Ne pas enlever la prise de terre du cordon secteur. Une prise murale avec terre
deux broches et une troisièrme reliée à la terre. Cette dernière est présente pour
votre sécurité. Si le cordon secteur ne rentre pas dans la prise de courant,
demandez à un électricien qualifié de remplacer la prise.
10. Evitez de marcher sur le cordon secteur ou de le pincer, en particulier au niveau
de la prise, et aux endroits où il sor de l’appareil.
11. N’utilisez que des accessoires spécifiés par le constructeur.
12. N’utilisez qu’avec un stand, ou table conçus pour l’utilisation d’audio
professionnel ou instruments de musique. Dans toute installation, veillez de ne
rien endommager à cause de câbles qui tirent sur des appareils et leur support.
13. Débranchez l’appareil lors d’un orage ou lorsqu’il n’est pas utilisé pendant
longtemps.
DG8 REFERENCE MANUAL 9
Page 9

Important Safety Instructions
14. Faites réparer par un personnel qualifié. Une réparation est nécessaire lorsque
l’appareil a été endommagé de quelque sorte que ce soit, par exemple losrque le
cordon secteur ou la prise sont endommagés, si du liquide a coulé ou des objets
se sont introduits dans l’appareil, si celui-ci a été exposé à la pluie ou à
l’humidité, ne fonctionne pas normalement ou est tombé.
15. Cet appareil produit de la chaleur en fonctionnement normal.
16. Ce produit, utilisé avec un amplificateur et un casque ou des enceintes, est
capable de produite des niveaux sonores pouvant engendrer une perte
permanente de l’ouïe. Ne l’utilisez pas pendant longtemps à un niveau sonore
élevé ou à un niveau non confortable. Si vous remarquez une perte de l’ouïe ou
un bourdonnement dans les oreilles, consultez un spécialiste.
10 DG8 REFERENCE MANUAL
Page 10

Important Safety Instructions
BEIM BENUTZEN DIESES PRODUKTES BEACHTEN
SIE BITTE DIE FOLGENDEN SICHERHEITSHINWEISE:
ERMAN)
(G
1. Lesen Sie die Hinweise.
2. Halten Sie sich an die Anleitung.
3. Beachten Sie alle Warnungen.
4. Beachten Sie alle Hinweise.
5. Bringen Sie das Gerät nie mit Wasser in Berührung.
6. Verwenden Sie zur Reinigung nur ein weiches Tuch. Sprühen Sie keine flüssiger
Reiniger auf die Oberfläche, dies könnte zur Beschädigung der Vorderseite
führen und auch weitere Schäden verursachen.
7. Halten Sie sich beim Aufbau des Gerätes an die Angaben des Herstellers.
8. Stellen Sie das Gerät nich in der Nähe von Heizkörpern, Heizungsklappen oder
anderen Wärmequellen (einschließlich Verstärkern) auf.
9. Verlegen Sie das Netzkabel des Gerätes niemals so, daß man darüber stolpern
kann oder daß es gequetscht wird.
10. Benutzen Sie nur das vom Hersteller empfohlene Zubehör.
11. Verwenden Sie ausschließlich Wagen, Ständer, oder Tische, die speziell für
professionelle Audio- und Musikinstrumente geeignet sind. Achten Sie immer
darauf, daß die jeweiligen Geräte sicher installiert sind, um Schäden und
Verletzungen zu vermeiden. Wenn Sie einen Rollwagen benutzen, achten Sie
darauf, das dieser nicht umkippt, um Verletzungen auszuschließen.
12. Ziehen Sie während eines Gewitters oder wenn Sie das Gerät über einen
längeren Zeitraum nicht benutzen den Netzstecher aus der Steckdose.
13. Die Wartung sollte nur durch qualifiziertes Fachpersonal erfolgen. Die Wartung
wird notwendig, wenn das Gerät beschädigt wurde oder aber das Stromkabel
oder der Stecker, Gegenstände oder Flüssigkeit in das Gerät gelangt sind, das
Gerät dem Regen oder Feuchtigkeit ausgesetzt war und deshalb nicht mehr
normal arbeitet oder heruntergefallen ist.
14. Bei normalem Betrieb des Gerätes kommt es zu Wärmeentwicklungen.
15. Dieses Produkt kann in Verbindung mit einem Verstärker und Kopfhörern oder
Lautsprechern Lautstärkepegel erzeugen, die anhaltende Gehörschäden
verursachen. Betreiben Sie es nicht über längere Zeit mit hoher Lautstärke oder
einem Pegel, der Ihnen unangenehm is. Wenn Sie ein Nachlassen des Gehörs
oder ein Klingeln in den Ohren feststellen, sollten Sie einen Ohrenarzt aufsuchen.
DG8 REFERENCE MANUAL 11
Page 11

Important Safety Instructions
INSTRUCTIONS TO THE USER
This equipment has been tested and found to comply with the limits for a class B
digital device, pursuant to Part 15 of the FCC Rules. These limits are designed to
provide reasonable protection against harmful interference in a residential
installation. This equipment generates, uses, and can radiate radio frequency energy
and, if not installed and used in accordance with the instructions, may cause harmful
interference to radio communications. However, there is no guarantee that
interference will not occur in a particular installation. If this equipment does cause
harmful interference to radio or television reception, which can be determined by
turning the equipment off and on, the user is encouraged to try and correct the
interference by one or more of the following measures:
• Reorient or relocate the receiving antenna.
• Increase the separation between the equipment and receiver.
• Connect the equipment into an outlet on a circuit different from that to which
the receiver is connected.
• Consult the dealer or an experienced radio/TV technician for help.
This equipment has been verified to comply with the limits for a class B computing
device, pursuant to FCC Rules. In order to maintain compliance with FCC
regulations, shielded cables must be used with this equipment. Operation with nonapproved equipment or unshielded cables is likely to result in interference to radio
and TV reception. The user is cautioned that changes and modifications made to the
equipment without the approval of manufacturer could void the user’s authority to
operate this equipment.
12 DG8 REFERENCE MANUAL
Page 12

Important Safety Instructions
CE DECLARATION OF CONFORMITY
Manufacturer’s Name: Alesis Corporation
Manufacturer’s Address: 1633 26
Santa Monica, CA 90404
USA
declares, that the product:
Product Name: DG8
Model Type: Digital Grand Piano
conforms to the following Standards:
EMC: EN55103: 1997 Class B
Safety: EN 60065
European Contact: Sound Technology
17 Letchworth Point, Letchworth,
Hertfordshire, SG6 1ND, England.
Phone: +44.1462.480000
Fax: +44.1462.480800
June, 1999
th
Street
DG8 REFERENCE MANUAL 13
Page 13

Important Safety Instructions
14 DG8 REFERENCE MANUAL
Page 14
Introduction
INTRODUCTION
In the years since electronic musical instruments made their debut in the early 1970s,
the quest for a transportable piano that had the sound and feel of a true acoustic
instrument seemed to elude every manufacturer. They tried everything, including a
rather ingenious re-design of the grand piano that you could take apart into two
pieces when travelling. The trade-off? It was still bulky, rather expensive, and
because it had strings (just like a real piano) it needed to be tuned periodically. If you
moved it often, you had to tune it often.
Even as digital sampling technology began to mature in the early 1990s and piano
products started popping up all over, something always seemed to be missing: the
sound was thin or the keys didn’t feel right or the pedals didn’t respond like you’d
expect or... well, you get the point.
But no matter how big my music rig gets – no matter how many gadgets and boxes
and toys I accumulate – the one sound that I have always insisted upon is a great
piano. The Alesis DG8 is a great piano. And more.
The DG8 sounds like a piano and feels like a piano. Its 88-key, fully-weighted,
hammer-action keyboard is an advanced design that provides the response you’d
expect from, well, a real piano. Complementing its piano realism are four pedal
inputs: sustain/sostenuto and soft pedal expression plus an AUX jack for
volume/modulation. Factor in the DG8’s 64-voice polyphony, and you have an
instrument that faithfully reproduces all the nuances of a fine acoustic piano.
But we wouldn’t be satisfied with just a standard piano. We’ve tailored our selection
of pianos to be ideally suited for classical, jazz, rock and pop, and included an entire
suite of electric pianos, pipe and electric organs, synthesizers, strings, choirs, basses,
clavinets, vibes and harpsichord. In addition to its 88 preset programs, the DG8’s
24MB of sound ROM is expandable to 32MB via a PCMCIA expansion card slot,
ideally suited for any Alesis QCard
The DG8’s velocity-sensitive keyboard can be layered and split, of course. The split
point can be set to any point on the keyboard you want, and the Transpose feature
puts the DG8 into any key.
And to further enhance the DG8’s sound capability, the Alesis QS Parallel Matrix
TM
Effects
electric organ programs substitute a rotary speaker effect for chorus). Add to that a
5-band analog graphic equalizer and a built-in 100-watt-per-channel, discrete stereo
bi-amped amplifier and speakers, and the DG8 is a fully-integrated powerhouse
instrument.
We’ve just touched on the some of the highlights of this product; there’s much more
to be explored. After you’ve read through this brief document, and experienced the
sound and feel of the DG8, I’m confident that you will be every bit as excited about it
as I am.
Dave Bertovic
Spring 1999
provide reverb and chorus on nearly all internal Keyboard Programs (the
TM
expansion module.
DG8 REFERENCE MANUAL 15
Page 15
Introduction
TYPOGRAPHIC CONVENTIONS
In this manual, we attempt to make the reading as easy as possible by using fonts
and symbols that are easy to identify. The following list describes the conventions we
use in the manual for special or important information.
Slider, button and back panel labels are in
Words or phrases that appear in the display are
resembles the display characters
SMALL BOLD CAPITALS.
printed using type that
.
A new or important term is in italics followed by its definition or contextual meaning.
Paragraphs in italics provide additional information on a topic that might be helpful in
understanding certain important concepts.
Tip: A hint or special example called a Tip is set off from the main text by a box with
a light-gray fill.
Important instructions or emphasis on a word or phrase are printed in boldface
type.
When something
extremely important appears in the manual, an
icon like the one on the left will appear in the left margin. This
indicates that this information is vital when operating the DG8.
16 DG8 REFERENCE MANUAL
Page 16

GETTING STARTED
WHAT YOU’LL NEED
The DG8 is a completely self-contained instrument that needs nothing more than a
standard AC electrical outlet and a stand to put it on. Before placing the DG8 on a
stand, see the topic
USING THE DG8 WITH OTHER EQUIPMENT
If you plan to use the DG8 with other equipment, such as other MIDI devices, a
sound system or in recording environment, you’ll need:
1. Standard MIDI cables that connect your DG8 to other MIDI devices in your
system. See the topic
2. A standard AC outlet where you can plug the unit in.
3. A basic working knowledge of MIDI. If you’re new to all of this, read our
brief MIDI tutorial in Chapter 3.
Set It Up at the bottom of this page for specifics.
Chapter 1: Getting Started
CHAPTER 1
Hook It Up on page 19 for more information.
4. Audio cables to connect your DG8 to a sound system.
UNPACK IT
The DG8 is packaged in a cardboard container with molded styrofoam inserts. After
you remove your DG8, its AC power cord, the Warranty card and this manual, we
suggest you keep all packing materials in a safe place. You’ll need the box and
styrofoam in case the unit needs to be transported or shipped.
SET IT UP
You can place the DG8 just about anywhere that’s convenient. For tips on setting up
the DG8 in your home, see the topic on page 19.
Before placing the DG8 on a stand, be certain that is capable of securely holding an
object that weighs 80 lbs. (36.3kg). Also take in to consideration how aggressive a
player you are: the harder you pound the keys, the stronger a stand you’ll need. If
the stand collapses under the DG8’s weight (or your playing), the unit could suffer
permanent damage, and you could be injured. Don’t take chances; take the time right
now to make sure that your stand is adequate.
You might also want to consider the optional Alesis GS-1 Digital Piano stand. This
attractive accessory is ideal for the home or studio where the DG8 has a permanent
place of residence.
DG8 REFERENCE MANUAL 17
Page 17
Chapter 1: Getting Started
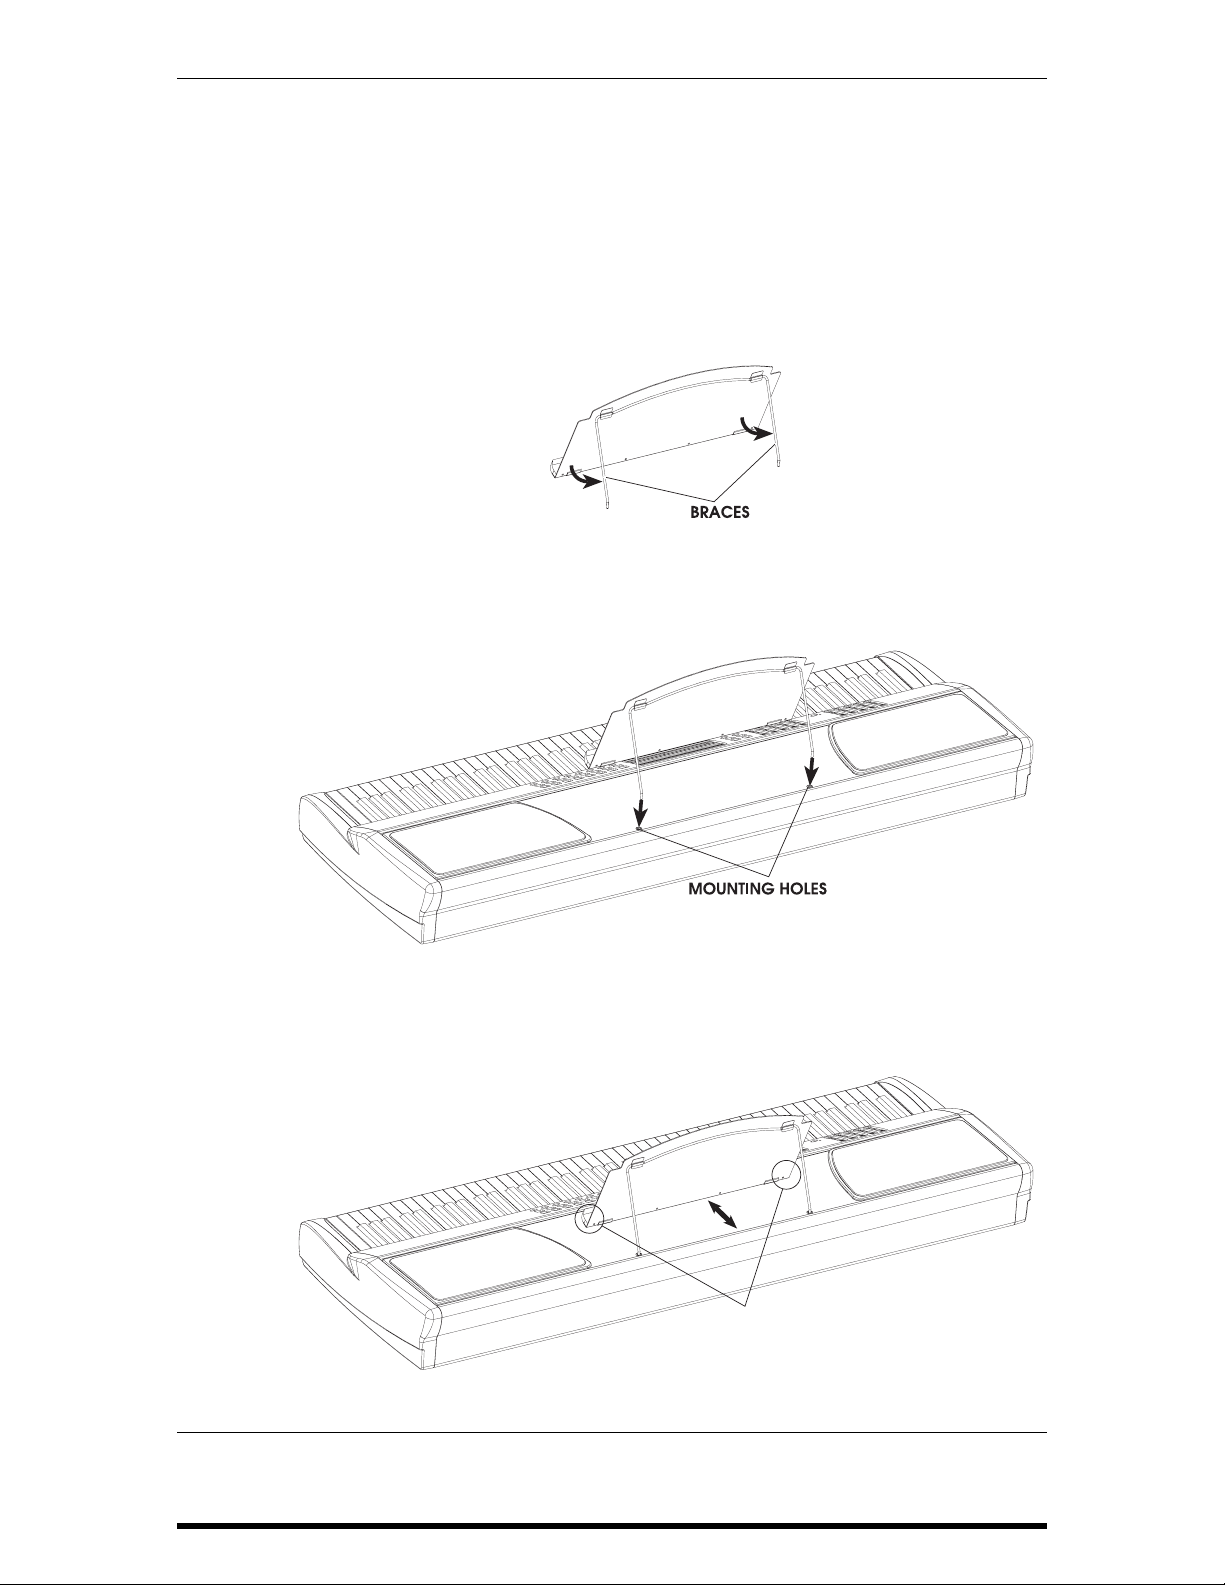
ATTACHING THE MUSIC STAND
The DG8 is shipped with a music stand that attaches easily to the top of the
instrument:
1. Remove the music stand from its plastic wrapping and extend the braces
away from the front of the stand approximately 5 - 6 inches. The braces swing
out from the front of the stand on a pair of hinges.
2. Insert the ends of the braces into the two mounting holes located along the
rear edge of the DG8’s top.
3. You can adjust the angle of the stand once it is in place. Grip the front of the
stand at the bottom corners and gently pull towards you or push away from
you to adjust the angle.
PUSH or PULL THE
STAND FROM HERE
18 DG8 REFERENCE MANUAL
Page 18

Chapter 1: Getting Started
SETTING UP THE DG8 IN A HOME
Placement of your DG8 in the room can have a great effect on its overall tonal
balance. Placing the DG8 is like placing loudspeakers in a room – placing the unit
right up against a wall will accentuate the bass and if the wall has thick draperies,
they will also cut the treble producing a dark, boomy sound.
The most accurate sound is usually achieved when the DG8 is placed on an
appropriate stand and positioned out and away from highly reflective or highly
absorptive wall surfaces. But when the DG8 must be situated close to a wall, as in a
home, here are some recommendations:
• If the wall is hard and smooth (a “reflective” surface), try positioning the
keyboard at least 6” away. Too close and the tweeter frequencies will bounce
back at you and cause a blurred and “splashy” high frequency effect. Also in
this position, the wall may give a “boomy” character to the lower octaves. This
is called bass coupling where bass sounds get a boost from the nearby wall.
• If the nearby wall is curtained or otherwise presents a highly absorptive
environment, the DG8 should be positioned out at least 12”. As mentioned
earlier, thick draperies will cut treble and the result will be a dark, muffled
sound.
HOOK IT UP
POWER
Use the AC power cord (or equivalent) that is included with the DG8. Make sure that
the unit is turned off before you plug the power cord into the rear panel receptacle
and the wall outlet. The unit has a universal power supply that should work with
local AC power in most countries. If in doubt, check with your power company
before plugging it in. In the U.S., the DG8 must be plugged into a standard 117 VAC,
50 - 60 Hz outlet.
SUSTAIN PEDAL
Before powering on the DG8, plug the included sustain pedal into the SUSTAIN/SOST
jack on the back panel.
THE DG8 AS A STAND-ALONE INSTRUMENT
After you’ve set up the DG8 and plugged it into an AC outlet, you can go right ahead
and dig in. If you plan to play the DG8 by itself, skip ahead to the topic
and Play It
If you plan to use the DG8 with other MIDI instruments and devices in a music
system, use the examples on the next few pages to connect it to your rig.
Turn It On
on page 23.
DG8 REFERENCE MANUAL 19
Page 19
Chapter 1: Getting Started
THE DG8 IN A MUSIC SYSTEM
If you plan to use the DG8 with other MIDI instruments and devices in a music
system, you’ll need to integrate it into your system. Here’s a list of items you’re likely
to need:
1. standard MIDI cables: refer to the following examples for possible
connection schemes.
2. a basic working knowledge of MIDI. If you’re new to all of this, read our
brief MIDI tutorial in Chapter 3.
3. two 2-conductor (unbalanced) audio cables if you plan to route the DG8’s
audio to your sound system or audio mixer.
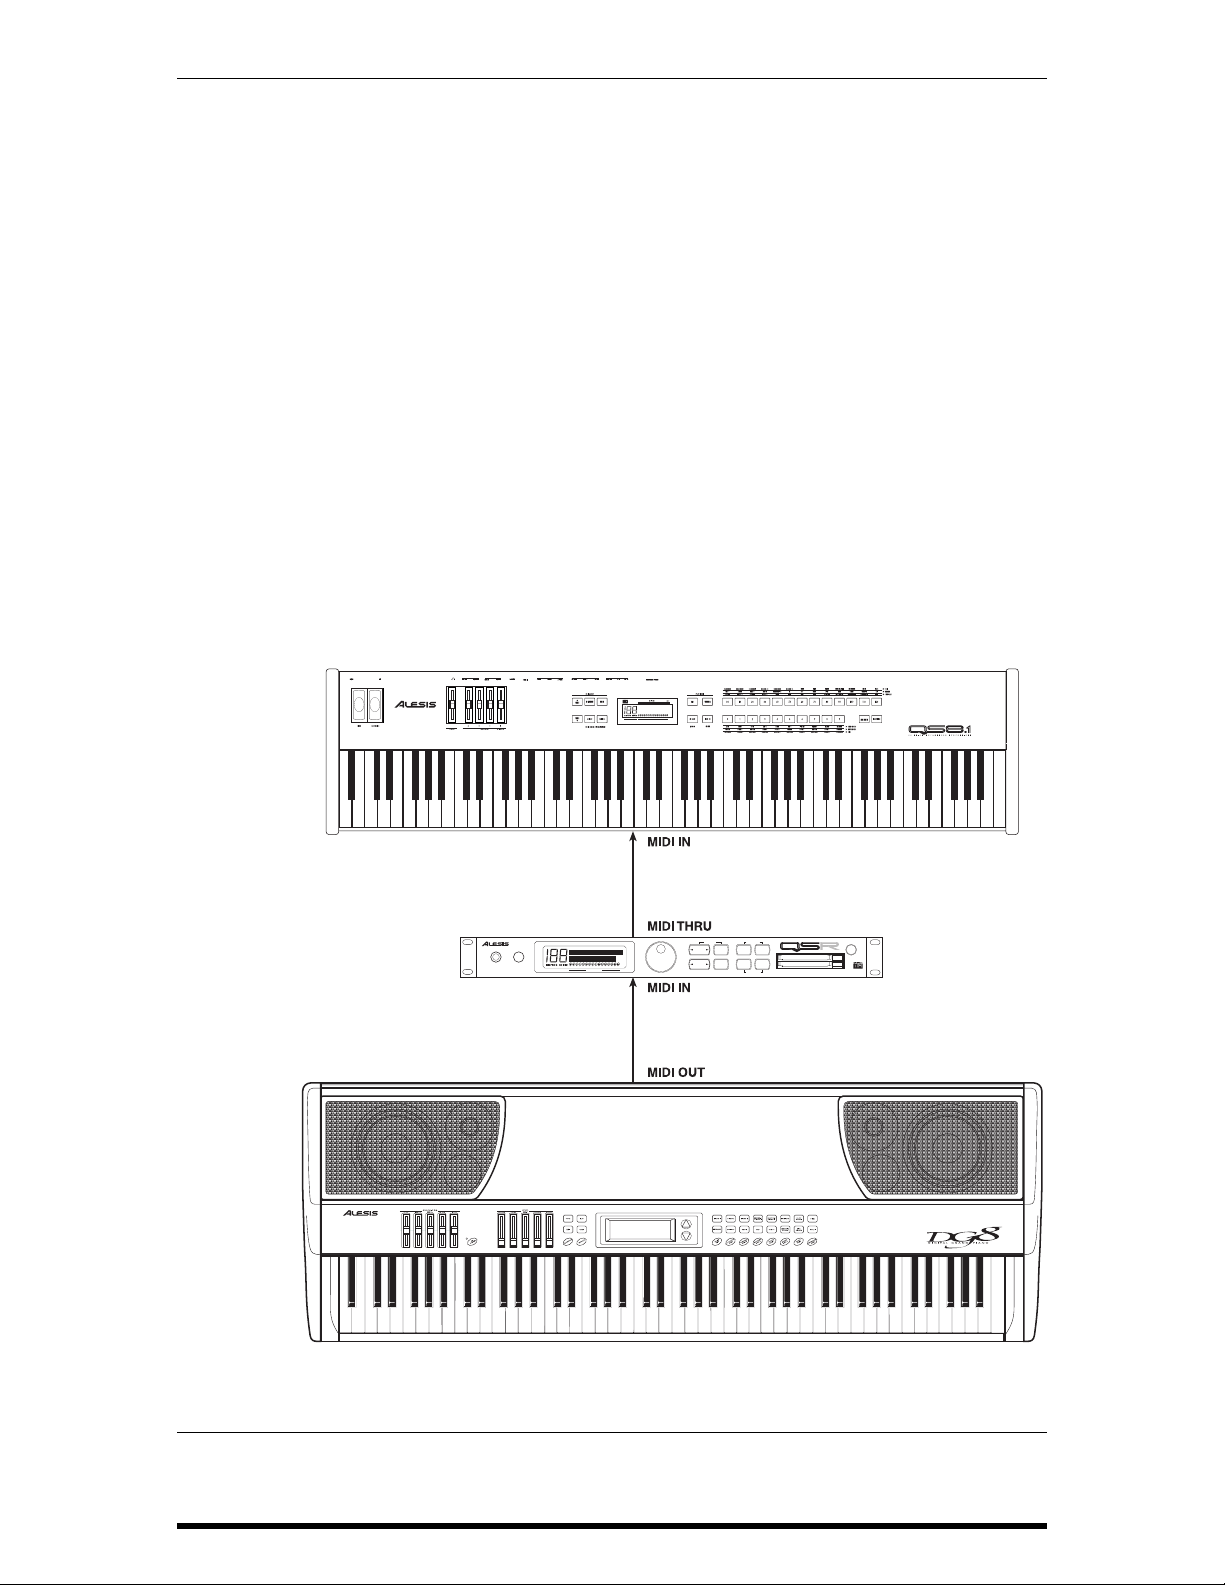
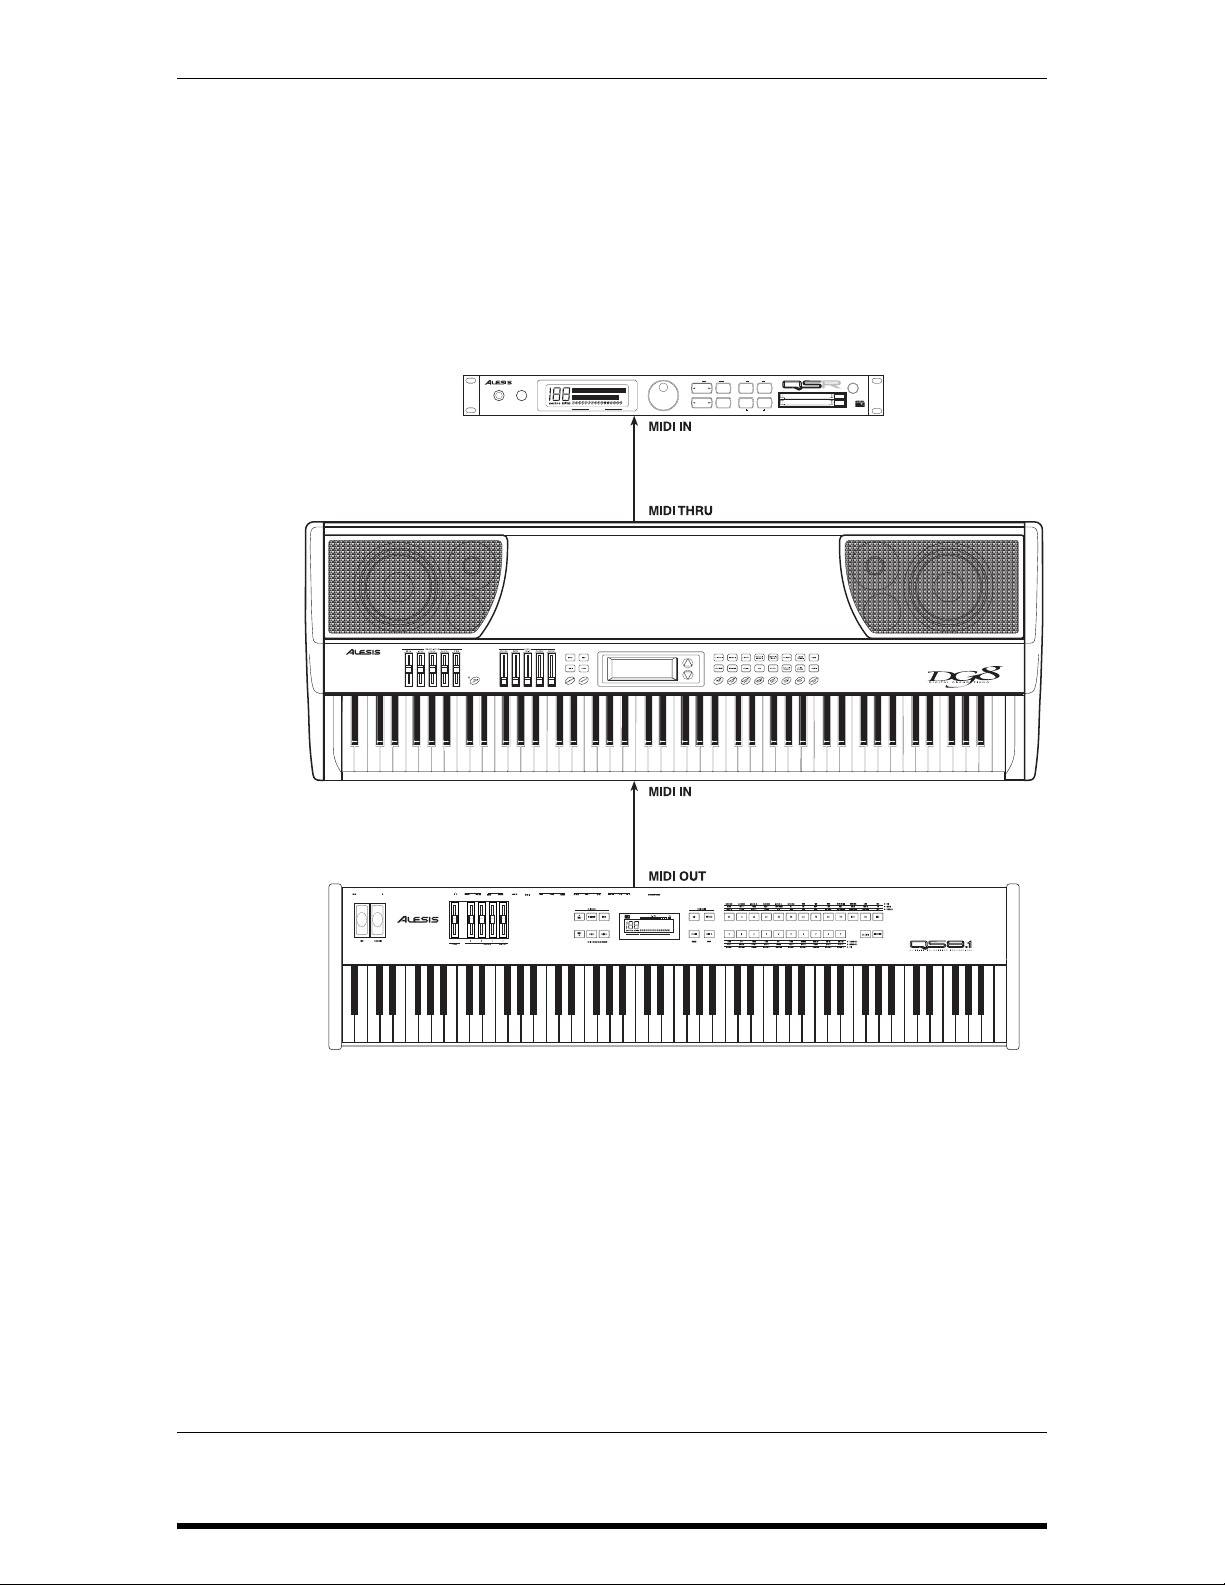
As a Master: If you intend to use the DG8 as the master controller in your
MIDI rig, plug a standard MIDI cable into the DG8’s
MIDI OUT
port. The other end of this cable should plug into the MIDI IN of
the first slave in the system. If there are several MIDI
instruments in your setup, connect
MIDI IN of the second device and so forth to create a
to the
MIDI THRU from the first slave
“chain”.
PHONES VOLUME
64 VOICE EXPANDABLE SYNTHESIZER MODULE
EDIT MODE
VALUE
MIDI CHANNEL
PLAY MODE
CURSOR
PROGMIXEDIT
DOWN UPSTOREMIDI CH
GLOBAL
COMPARE
BANK SELECT
PCMCIA EXPANSION CARDS
POWER
A
B
20 DG8 REFERENCE MANUAL
Page 20
Chapter 1: Getting Started
As a Slave: If you plan to control the DG8 from another MIDI device, you’ll
need a MIDI cable connected to its
MIDI IN port.
You will also need a MIDI cable connected to the DG8’s
if you plan to pass MIDI data from the master through the
THRU
MIDI
DG8 to other MIDI devices in your rig. Connect one end of a
MIDI cable to the DG8’s
cable to the
PHONES VOLUME
MIDI IN of the next device in the system.
64 VOICE EXPANDABLE SYNTHESIZER MODULE
MIDI CHANNEL
MIDI THRU. Plug the other end of the
PCMCIA EXPANSION CARDS
POWER
A
B
EDIT MODE
VALUE
PLAY MODE
CURSOR
PROGMIXEDIT
DOWN UPSTOREMIDI CH
GLOBAL
COMPARE
BANK SELECT
DG8 REFERENCE MANUAL 21
Page 21
Chapter 1: Getting Started
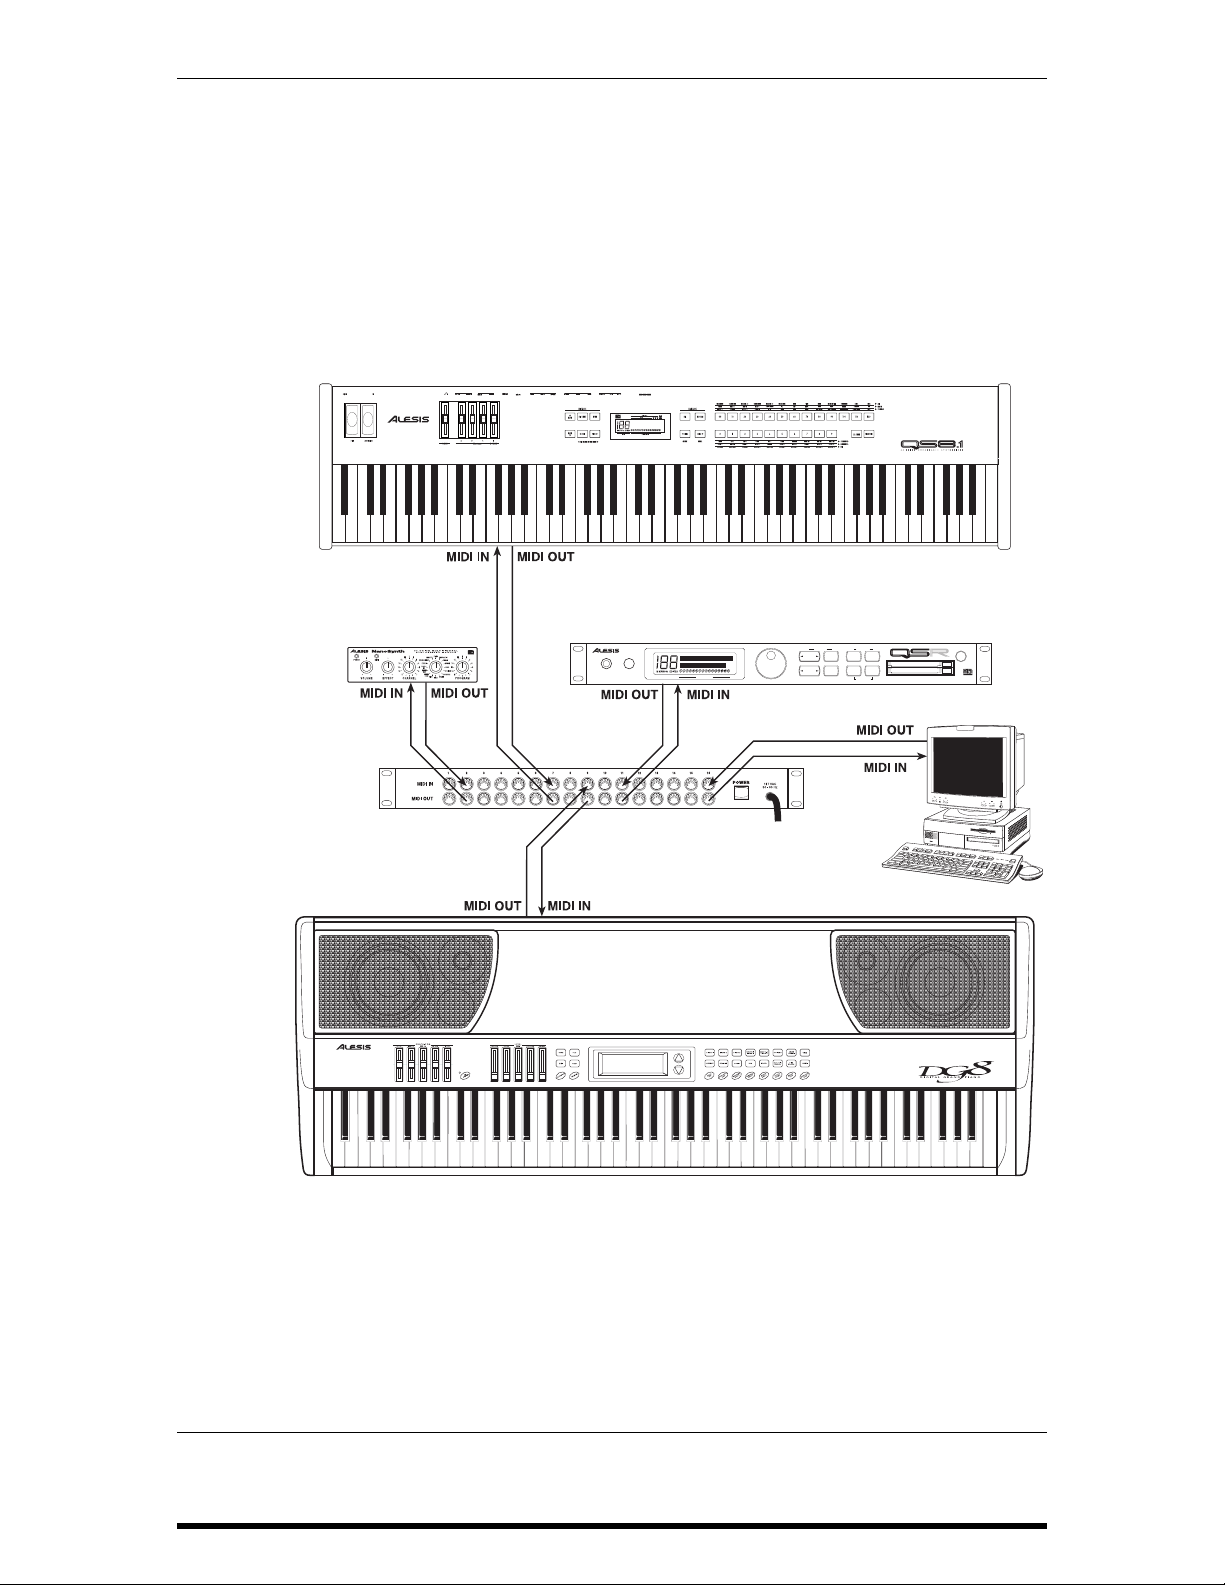
With a MIDI Patchbay: If you’re using a MIDI patchbay or “patcher” to connect all of
your MIDI devices centrally, it’s likely that the patcher’s back
panel will have a series of paired
MIDI OUT and MIDI IN ports for
each device in your rig (the DG8 being one of them).
Connect the DG8’s
same pair’s
MIDI OUT connects to the MIDI IN of the DG8. Consult
MIDI OUT to the MIDI IN of one of the pairs. The
the patcher’s Owner’s Manual to find out how it routes MIDI
data among the devices connected to it.
EDIT MODE
PHONES VOLUME
64 VOICE EXPANDABLE SYNTHESIZER MODULE
VALUE
MIDI CHANNEL
PLAY MODE
CURSOR
PROGMIXEDIT
DOWN UPSTOREMIDI CH
GLOBAL
COMPARE
BANK SELECT
PCMCIA EXPANSION CARDS
POWER
A
B
22 DG8 REFERENCE MANUAL
Page 22

TURN IT ON AND PLAY IT
Flip the power switch on the DG8’s rear panel. The front panel display will
illuminate and, if this is the first time you’ve used the DG8, it will recall
Keyboard Program
heading.
SOUND
1. AutoDemos
Press and hold the
mode. The display will prompt you to select one of three demonstration songs
to play by pressing the
listen to any demo in its entirety, or press the
is playing.
HOW THE SOUNDS ARE ORGANIZED
2. Keyboard Banks
The Keyboard Banks contain the main polyphonic sound programs in the
DG8’s internal memory.
Each of the 15 Keyboard Banks contains four Keyboard Programs. Thus, each
Bank represents a sound category – a group of related sounds – and the name
of the category is printed on each button.
Pno1A:True Grand and display it under the PRIMARY
PLAY button, then press the TUNE button to enter Demo
PIANO 1, PIANO 2 or PIANO 3 Bank buttons. You can
Chapter 1: Getting Started
PLAY button to end a demo that
The Keyboard Bank buttons are used in conjunction with the
▲ and ▼ arrows
to access the Keyboard Programs in each Bank:
• Press a Keyboard Bank button to select a Keyboard category. The name
of a Keyboard Program from the selected Bank will appear in the
PRIMARY SOUND segment of the display.
• Use the ▲ arrow on the right side of the display to scroll forward through
the four Keyboard Programs in the Bank. If you continue to scroll
forward with the
▲ arrow, when the last Program in the bank is reached,
the display will “wrap” to the first Program.
• Use the ▼ arrow to scroll backward through the four Keyboard Programs
in each Bank. If you continue to scroll backward with the
▼ arrow, when
the first Program in the Bank is reached, the display will wrap to the last
Program.
Keyboard Programs can be played by themselves, layered together (or
layered with a Card Program) or split with a Bass or Card Program. See topics
4, 5 and 6 on the next few pages for information on these Play modes.
3. Bass Banks
Similar to the Keyboard Banks, the Bass Banks contain the main bass sound
programs in the DG8’s internal memory. And, like the Keyboard Banks, each
of the seven Bass Banks contains four Bass Programs. Each Bank represents a
category of related bass sounds and the name of the category is printed on
each button.
Note that the DG8’s internal Bass Programs are programmed without
modulation – they will not respond to the modulation setting for the AUX
pedal, nor modulation commands received over MIDI. Also, there is a
minimal amount of Reverb and Chorus effects programmed into the Bass
Programs.
DG8 REFERENCE MANUAL 23
Page 23

Chapter 1: Getting Started
The Bass Bank buttons are used in conjunction with the ▲ and ▼ arrows to
access the Bass Programs in each Bank:
• Press a Bass Bank button to select a Bass category. Bass Programs are
always played as the Split sounds on the lower range of the keyboard,
and the selected Bass Program’s label will appear in the
of the display.
• Use the ▲ arrow on the right side of the display to scroll forward through
the four Bass Programs in the Bank. If you continue to scroll forward
with the
display will “wrap” to the first Program.
• Use the ▼ arrow to scroll backward through the four Bass Programs in
each Bank. If you continue to scroll backward with the
the first Program in the Bank is reached, the display will wrap to the last
Program.
4. The Card Bank
You can take advantage of the DG8’s expandability by acquiring an Alesis
QCard or other compatible PCMCIA Type I sound card. This card provides
an additional library of new sounds you can play on the DG8 and is inserted
into the
EXPANSION CARD slot on the DG8’s back panel.
SPLIT segment
▲ arrow, when the last Program in the bank is reached, the
▼ arrow, when
• Once selected, these external sounds act just like the internal DG8
programs, except that there are 128 of them on a QCard. Press the
CARD
button: the last card sound that was selected will load and its name will
appear in the display.
Tip: Card sounds can be used in Layers and Splits. They can be combined with the
DG8’s internal sounds or can be layered and split among the other programs in
the Card Bank. See topics 6 and 7 in the following pages.
• Use the ▲ arrow on the right side of the display to scroll forward through
the Card Programs. If you continue to forward scroll with the
▲ arrow,
when the last Program in the bank is reached, the display will “wrap” to
the first Program.
• Use the ▼ arrow to scroll backward through the card programs. If you
continue to scroll backward with the
▼ arrow, when the first Program in
the Bank is reached, the display will wrap to the last Program.
Tip: If you press and hold either arrow button, the display will accelerate its
scrolling through the available programs. Also, pressing both arrows together
resets the Card Program to 000.
Do not physically remove the card from the rear slot while any Card
Program is active. This holds true for Primary, Layer or Split sounds.
If a Card Program is the Primary Sound, simply switch the Card
Program to an internal Keyboard Program. If a Card Program is the
Layer or Split Sound, simply turn off the Layer or Split.
Also note that the effects programmed into QCard sounds may act
unpredictably when used with the DG8.
24 DG8 REFERENCE MANUAL
Page 24

HOW THE SOUNDS ARE SELECTED
5. Single Mode
The DG8 is in Single mode when a Keyboard or Card Program is played alone
– the DG8 is not in a Layer or Split. The Program’s name and label appears in
the top line of the display under the
or Card Program that is displayed here will be appropriately called the
Primary sound or simply “the Primary” throughout the manual.
The important concept to understand here is that a Primary sound is
always active, whether it is an internal Keyboard Program or a Card
Program.
With this principle in mind, you can think of a Layer as “adding another
Keyboard or Card Program to be played on top of the current Primary”.
Likewise, a Split is created when “a Bass or Card Program is played on the
lower range of keys with the Primary on the upper range”. The Layer and
Split play modes are described in the following two topics:
6. Layers
A Layer is simply two Keyboard or Card Programs (or one of each) stacked
one on top of the other. Selecting a Layer causes the keys to play the two
Programs simultaneously. There are two methods you can use to create a
Layer:
PRIMARY SOUND heading. The Keyboard
Chapter 1: Getting Started
• Press and hold the LAYER/OFF button then press a Keyboard Bank button
CARD button. The current Program in the PRIMARY display will be
or the
layered with a second Keyboard Program (or a Card Program) that
appears in the
OR
• Press a Keyboard Bank button to select the Primary sound. While you
LAYER segment of the display.
are still pressing the Keyboard Bank button, press another Keyboard
Bank or the
• In either case, use the ▲ and ▼ arrows, if necessary, to select the desired
Keyboard Program or Card Program of the
CARD button to select the Layer sound.
LAYER sound.
Variations:
• You can layer two Programs from the same Keyboard Bank. After
selecting the desired Primary program, press and hold the
LAYER/OFF
button and press the same Keyboard Bank button. Use the ▲ and ▼
arrows to select the desired Keyboard Program in that Bank. Please note
that this method is the only way you can layer two Keyboard Programs
from the same Bank.
• If a Card Program is the Primary, pressing and holding LAYER/OFF then
pressing
this method – using the
CARD causes two Card Programs to be layered. Please note that
LAYER/OFF button to create the Layer – is the only
way you can layer two Card Programs.
• Use the LAYER LEVEL slider to adjust the volume of the LAYER sound
relative to the
• To exit this mode, press the LAYER/OFF button.
PRIMARY.
DG8 REFERENCE MANUAL 25
Page 25

Chapter 1: Getting Started
7. Splits
A Split is simply a Bass or Card Program played on the lower range of keys
with a Primary sound played from the upper range. (Remember that the
Primary can be selected from the Keyboard Banks or the Card Bank.)
• To set up a Split, press any Bass Bank button. To select a Card Program
as the split sound, press and hold
and ▼ arrows to select the desired Split sound from within the selected
Bass Bank or the Card Bank.
• In either case, the Bass Program or Card Program will be recalled from
memory as the sound on the lower (left-hand) range of keys and its label
will appear in the
• The default split-point is key “C2”, the C that is one octave below Middle
C. To change the split point, press the
prompt you to press a key on the DG8’s keyboard. This key will be the
highest note of the lower range.
Note that if you don’t press a key within two seconds, the display will
revert back to the program display, leaving the current split point
unchanged.
• To change the lower sound, use the ▲ and ▼ arrows to select another
program in the current Bass Bank or Card Bank, or press another Bass
Bank button.
• To change the upper sound, press another Keyboard Bank button; to
switch the upper sound to the Card Bank, press
arrows to select the desired Program in the Keyboard/Card Banks.
• To exit this mode, press the SPLIT/OFF button.
SPLIT/OFF then press CARD. Use the ▲
SPLIT segment of the display.
SET SPLIT button. The display will
CARD. Use the ▲ and ▼
8. Split-with-Layer
When the DG8 is playing a Split: press and hold the
press another Keyboard Bank button or the Card Button to add a
LAYER/OFF button and
LAYER
sound to the upper range of the keyboard.
If the DG8 is playing a Layer: press any Bass Bank button to split the layered
keyboard with an internal Bass Program on the lower range of the keyboard.
To split a layered keyboard with a Card Program, press and hold
SPLIT/OFF
and press CARD.
Tip: For Primaries, Layers and Splits, the DG8’s memory independently keeps track
of the most recently selected programs for each Bank button. This principle is
true for the Keyboard, Bass and Card Banks.
26 DG8 REFERENCE MANUAL
Page 26

Chapter 1: Getting Started
9. Using the Cursor and the ▲ and ▼ Arrows
When interacting with the display, the sound that is underlined by the
cursor is the one that will be affected by the
▲ and ▼ arrows. You can always
keep track of where the cursor is because during normal operation, the last
sound that you select has the cursor. But if necessary, you can move the
cursor to another active segment of the display by pressing the
PLAY button.
Repeated pressing of the
PLAY button moves the cursor among the active
fields in the display. Just keep in mind that you can’t move the cursor to a
blank field. For example, in a Layer, the cursor will only move between the
PRIMARY and the LAYER sounds. In a Split, the cursor will only move between
PRIMARY and the SPLIT sounds. In a Split-with-Layer, the cursor will move
the
among all three
PRIMARY, SPLIT and LAYER sounds.
Tip: You can perform a quick reset when certain parameters are being displayed.
Pressing the ▲ and ▼ arrows together will reset the following parameters:
SET SPLIT split point resets to C2
TRANSPOSE transpose value resets to Middle C
TUNE Master Tune resets to 00
MIDI Page 4: Keyboard Scaling resets to 50
When the display is in its normal mode of displaying selected Sound Programs,
pressing the ▲ and ▼ arrows together will reset Keyboard Bank and Bass Bank
programs to “A”. Card Bank programs reset to 000.
USING THE CONTROLS
10. Level Controls
Raise or lower the
listening volume. The
Primary sounds, Layers, Splits and Effects. But you can also use the
sliders to make further adjustments to the sound balance:
VOLUME slider to adjust the output level to a comfortable
VOLUME slider adjusts the overall level for everything:
LEVEL
• Adjusting the LAYER slider changes the output of the Layer sound
relative to the Primary sound. The output level of the Primary Sound
stays constant when playing a Layer.
• Adjusting the SPLIT slider changes the output of the Bass Program or the
Card Program assigned to the lower keyboard range relative to the
Primary. The output level of the Primary Sound stays constant when
playing a Split.
• Reverb and Chorus have been pre-programmed in nearly all of the
sounds. You can raise or lower the amount of effects with the
REVERB
and CHORUS sliders.
The exception to this is the
rotating speaker effect instead of chorus. The
ELECTRIC ORGAN Bank which substitutes a
CHORUS LEVEL slider acts as
a speed control for the rotating speaker.
• Remember also that the DG8’s built-in speakers can be turned off by
using the
SPEAKER ON/OFF switch on the back panel.
DG8 REFERENCE MANUAL 27
Page 27

Chapter 1: Getting Started
11. Transpose
You can transpose the DG8 ± 1 octave. Using Middle C (key “C3”) as your
reference, press and hold the
keyboard. Pressing a key above Middle C will transpose the DG8 up by the
interval and pressing a key below Middle C will transpose the DG8 down by
that interval.
The selected key will be the new key for the DG8 in any Play mode (Primary,
Layer, Split or Split-with-Layer) until the transpose amount is changed or the
instrument is initialized.
Also, if you attempt a transpose value more than the one octave limit, the
DG8 will keep the pitch the same but the key selected will be the nearest one
within the one octave range. For example, if you try to transpose up to key E5
(the highest E on the keyboard), the DG8 will transpose the keyboard up to
E3, the E above C3 (Middle C). Also, transposing the keyboard will not affect
the Split Point’s physical location on the keyboard.
The Transpose display will exit as soon as you press a key on the DG8’s
keyboard. To exit this mode without transposing, press
12.
TUNE Button
Page 1: Master Tune
The DG8 can be tuned to other instruments, a tuning device or your CD
player, cassette player, etc. Press the
the pitch of the DG8 and the
and each press of an arrow key changes the tuning by 1 cent (100 cents = 1
half step) up or down.
TRANSPOSE button and press a key on the
PLAY.
TUNE button and use the ▲ button to raise
▼ button to lower it. The range is ± 1 half step,
Pressing both
To exit this mode, press the
▲ and ▼ arrows together resets Master Tune to 00.
PLAY button.
Page 2: Stretch Tuning
Pressing the
TUNE button a second time enters Stretch Tuning mode which
employs the tuning method that is actually used to tune real acoustic pianos.
With Stretch Tuning, the low strings are tuned increasingly flat, and the high
strings are tuned increasingly sharp compared to the equally-tempered scale.
This function defaults to
PIANO 1, PIANO 2 and PIANO 3. This feature of the DG8 was not just designed as
ON, and is only active on the three piano groups
an esoteric function, but provides an unusual level of realism to the piano
Programs.
While this mode is desirable when playing a piano program alone, it can
cause problems when used with Layers or other MIDI instruments. To
partially avert this, the DG8 automatically turns off this function when you
enter Layer mode so as to avoid tuning conflicts with other internal DG8
Programs. However, when playing the DG8 with other instruments via MIDI,
you may need to defeat Stretch Tuning because the high and low ends of the
DG8 may sound out of tune with other MIDI instruments. Use the
turn this function
OFF. When Stretch Tuning is off, the piano programs will
▼ arrow to
always be tuned to the equally-tempered scale whether used as a Primary
Program or as a Layer.
Note that, like other settings in the DG8, if turning Stretch Tuning is set to
OFF
it will remain off until you change it or re-initialize the instrument.
To exit this mode, press the
PLAY button.
28 DG8 REFERENCE MANUAL
Page 28

Chapter 1: Getting Started
13. Graphic EQ
The 5-band analog graphic equalizer on the left side of the control panel
allows you to make tonal adjustments to the sound. Press the
EQ ON/OFF
button (its LED will light) to activate the equalizer and raise or lower the
frequency sliders to adjust the tone. Every time you power on the DG8, the
EQ will be off.
The equalizer affects the final output of the DG8 for all Primary, Layer and
Split setups for both internal and Card Programs. The equalizer also affects
Reverb and Chorus, the inputs and all outputs: the rear panel audio outs plus
the two headphone jacks.
14. MIDI Channel Function
MIDI button accesses the six MIDI functions of the DG8. For this section of
The
manual, we will cover only the Channel function. For a complete description
of the other MIDI Functions, turn to page 46.
Pressing the
other utility functions. Press the
MIDI button will step between six different pages of MIDI and
MIDI button until the display reads:
BASIC
MIDI Channel = X
... where
X is one of the 16 MIDI Channels or Off. When set to Off, the DG8
will neither transmit nor receive MIDI information.
Use the
confirm your selection and exit this mode, press
▲ and ▼ arrows to select the new Basic MIDI Channel, or Off. To
PLAY.
How the Basic MIDI Channel Works on the DG8
When you first power on the DG8, the Basic Channel defaults to Channel 1.
So that the DG8 will communicate effectively with other MIDI devices, the
DG8 treats Primary Sounds, Layers and Splits differently:
• The MIDI Channel displayed is the Basic Channel for all messages
affecting Primary Sounds. In addition, the Basic MIDI Channel affects all
messages for the Layer sound, except Program Change commands.
• The MIDI Channel assignment for just the Layer Program Changes
follows sequentially: Layer Program Changes = Basic Channel + 1.
• The MIDI Channel assignment for all messages for Splits again follows
sequentially: Splits = Basic Channel + 2.
Here’s a summary of these functions using the MIDI Channel default as an
example:
MIDI Channel 1 Primary Sounds all supported Channel Messages
Layer Programs all supported Channel Messages except
Program Change commands
MIDI Channel 2 Program Change commands (only) for the Layer sound
MIDI Channel 3 Split Programs all supported Channel Messages
Program Change commands only affect
the Bass Program.
DG8 REFERENCE MANUAL 29
Page 29

Chapter 1: Getting Started
30 DG8 REFERENCE MANUAL
Page 30

OVERVIEW
The DG8 contains a total of 88 sound programs in its internal memory. 60 of these are
called Keyboard Programs and represent a selection of pianos and other keyboard
instruments such as harpsichord, electric piano, clavinet, pipe and electric organs. In
addition, popular electronic keyboard sounds such as traditional synthesizer and
“pad” sounds, strings (orchestral or ensemble type), choir and vibes are included.
For Splits – where the DG8 plays a sound on the lower range and another sound on
the upper range of the keyboard – a selection of 28 popular Bass Programs are
included for left hand accompaniment on the lower keyboard range.
Each of the DG8’s sound programs is a digital sample – an electronic recording of an
audible sound – that is stored in the instrument’s memory. The DG8’s memory is a
type of memory used in a wide variety of electronic instruments and computers
called ROM (“Read-Only Memory”) which cannot be erased or altered.
Chapter 2: Playing the DG8
CHAPTER 2
PLAYING THE DG8
Sound programs in the DG8 may be constructed of only one instrument or, as in the
case of
A composite sound is a sound that was constructed from one or more synthesizers and/or
samplers. When playing one of these DG8 sounds, you may hear what appears to be several
sounds mixed together. In this case, that’s exactly what we did. The resulting program in the
DG8 is a rich and full sound, but only takes up a single location in memory.
PAD, SYNTH or MULTI sounds (to name a few), a composite sound.
HOW THE SOUNDS ARE ORGANIZED
The DG8 divides its sound memory into two categories, internal and external
sounds. Internal sounds are accessed from the Keyboard Banks and the Bass Banks.
External sounds are called Card Bank programs and are accessed from a sound card
inserted in the back panel’s
Keyboard Banks
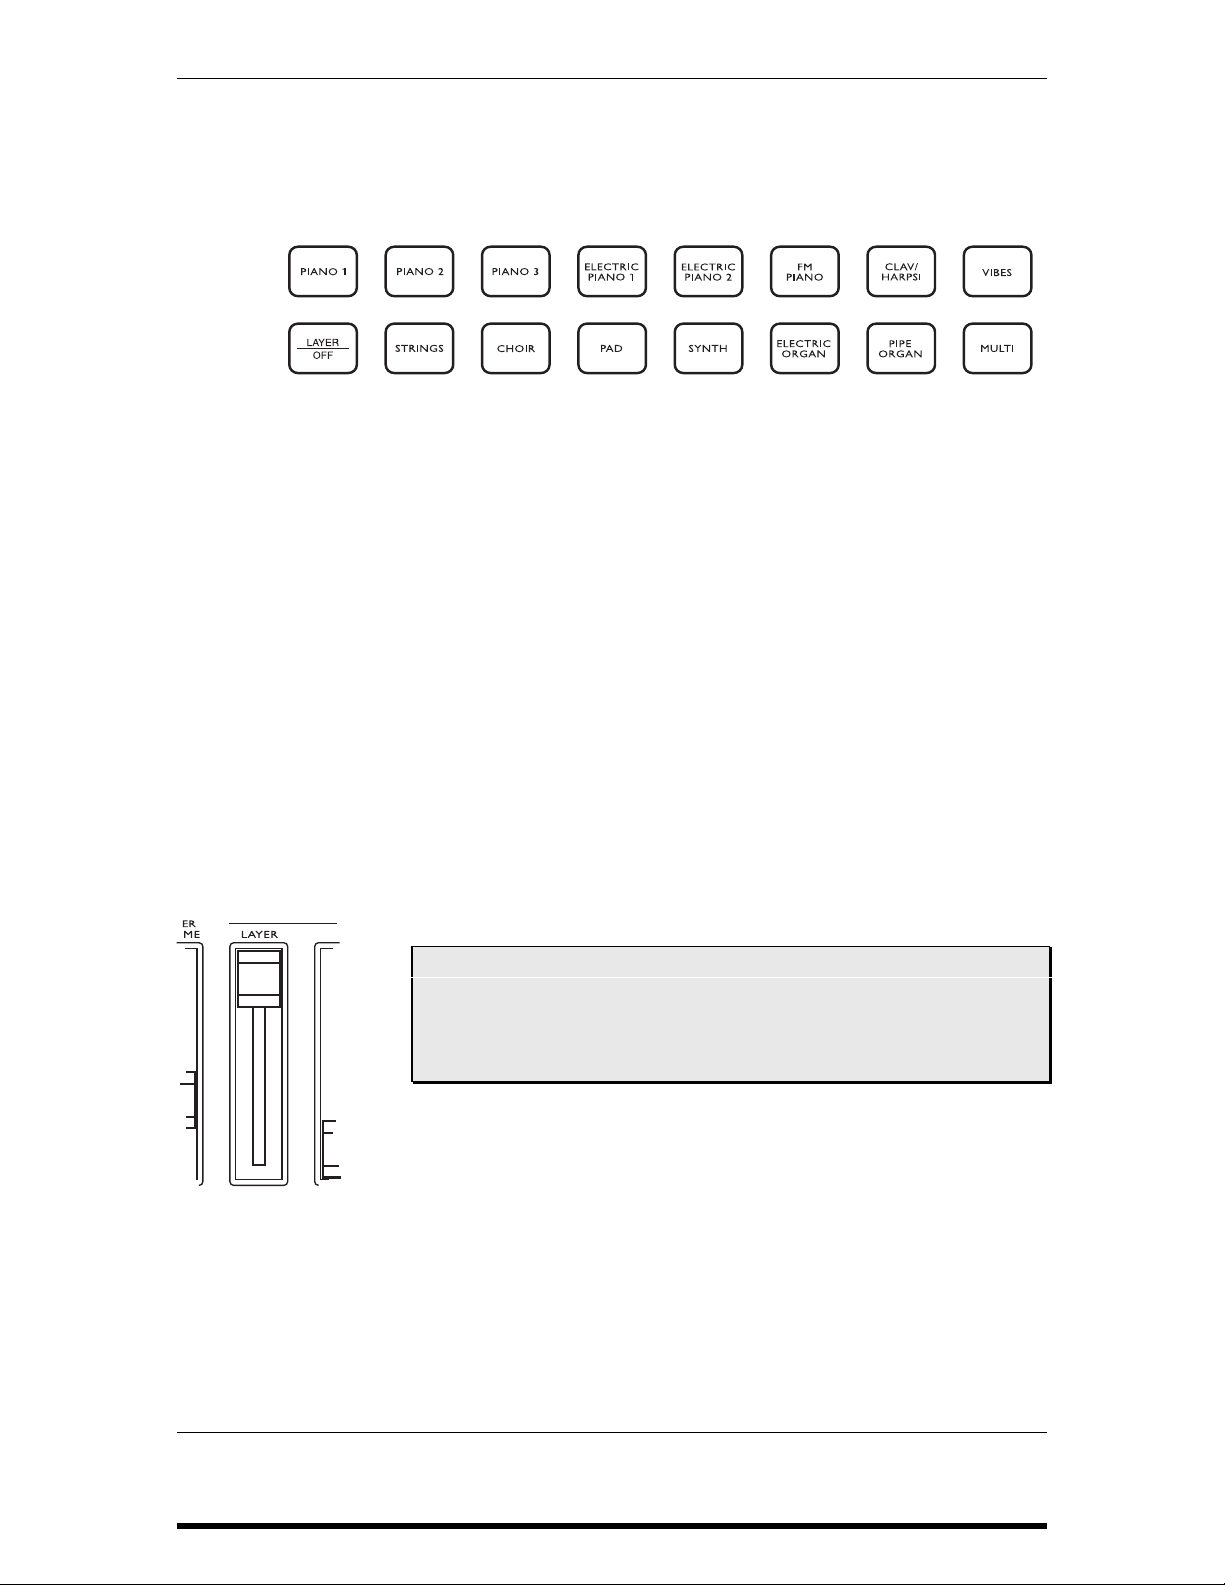
The DG8 has 60 Keyboard Programs in its internal memory. These 60 sounds are
arranged into 15 Banks that correspond to the 15 rectangular buttons on the right
side of the control panel.
Each Bank contains four variations of the sound that is printed on the button label.
For example,
PIPE ORGAN contains four variations of pipe organ ensembles usually associated with
church or cathedral organs.
FM PIANO contains four well-known FM-type electronic piano sounds;
EXPANSION CARD slot.
DG8 REFERENCE MANUAL 31
Page 31

Chapter 2: Playing the DG8
The Keyboard Bank buttons are used in conjunction with the ▲ and ▼ arrows to
access the Keyboard Programs in each Bank:
• Press a Keyboard Bank button to select a Keyboard category. The name and
label of a Keyboard Program from the selected Bank will appear in the
segment of the display.
SOUND
• Use the ▲ arrow on the right side of the display to scroll forward through the
four Keyboard Programs in the Bank. If you continue to scroll forward with
▲ arrow, when the last Program in the bank is reached, the display will
the
“wrap” to the first Program.
• Use the ▼ arrow to scroll backward through the four Keyboard Programs in
each Bank. If you continue to scroll backward with the
Program in the Bank is reached, the display will wrap to the last Program.
A Keyboard Program can be played by itself as single program, layered with another
Keyboard Program or Card Program, or split with a Bass (or Card) Program. See the
topics on Layers and Splits starting on page 36 for information on these Play Modes.
Bass Banks
Similar to the Keyboard Banks, the Bass Banks contain the main bass sound
programs in the DG8’s internal memory. And, like the Keyboard Banks, each of the
seven Bass Banks contains four Bass Programs. Each Bank represents a category of
related bass sounds and the name of the category is printed on each button.
PRIMARY
▼ arrow, when the first
Note that the DG8’s internal Bass Programs are programmed without modulation –
they will not respond to a mod pedal plugged into its back panel or to received MIDI
modulation commands. Also, there is a minimal amount of Reverb and Chorus
effects programmed into the Bass Programs.
The Bass Bank buttons are used in conjunction with the
▲ and ▼ arrows to access the
Bass Programs in each Bank:
Press a Bass Bank button to select a Bass category. Bass Programs are always played
as the Split sounds on the lower range of keys, and the selected Bass Program’s
label will appear in the
SPLIT segment of the display.
Use the ▲ and ▼ arrows to step forward or backward through the four Bass Programs
in the Bank.
The Card Bank
You can take advantage of the DG8’s expandability by acquiring an Alesis QCard or
other compatible PCMCIA Type I sound card. The QCard provides an additional
library of 128 new sounds you can play on the DG8. Just be aware that the effects
programmed into each card sound may act unpredictably.
The card’s sounds act just like the internal DG8 programs. You can use Card
Programs for Primaries, Layers and Splits by pressing the
CARD button instead of a
Bank button when selecting a sound. The last card sound that was selected will load
and its name and/or label will appear in the appropriate segment of the display. Use
▲ and ▼ arrows to step forward or backward through the Card Programs in the
the
Card Bank to select another program.
Card sounds can be combined with the DG8’s internal sounds or can be layered
and/or split within the Card Bank. A complete tutorial on using Card Programs is
provided in the section
Using the External Card Sounds starting on page 40.
32 DG8 REFERENCE MANUAL
Page 32

Chapter 2: Playing the DG8
USING THE DISPLAY AND SOUND SELECTION BUTTONS
In Play mode, the display shows the name(s) of the selected sound(s) – all three if a
Split-with-Layer is selected. The most recently selected sound is underlined by the
cursor. In our first example, a Split-with-Layer is shown:
In this next example, an internal Primary Sound is layered with an optional external
Card Program. Notice that the Split display segment is blank
keyboard mode is not active:
indicating that Split
How Sound Programs are Named
Primary Sounds are displayed with a 10-character name and a 5-character label – a
combination of the name of the Bank Button plus
A, B, C or D representing the four
sound variations in each Keyboard Bank. Card Programs substitute a 3-digit number
for the
A, B, C or D because each Alesis QCard has 128 sound programs.
Layer and Split sound programs use only labels in the display. For the complete list
of DG8 sound labels, see the
Using the Cursor and the
DG8 Sound Chart on page 43.
▲ and ▼ Arrows
When interacting with the display, one of the key concepts is to keep track of where
the cursor is located. Notice in the first diagram above that the cursor is an underline
of the first character in the Program Label. The sound that is underlined by the
cursor is the one that will be affected by the
▲ and ▼ arrows. Keeping track of the
cursor will not be an issue when playing Primary Sounds only, or if you’re in the
process of setting up a Layer or Split. But it will be a real time-saver when you’re
selecting new sounds for an existing Layer, Split or Split-with-Layer.
To move the cursor when a Layer, Split or Split-with-Layer is active, press the
PLAY
button. Repeated presses of the PLAY button move the cursor around the display.
When the cursor is at the
LAYER sound, for example, pressing the ▲ and ▼ arrows will
DG8 REFERENCE MANUAL 33
Page 33

Chapter 2: Playing the DG8
select another Program within the current Keyboard or Card Bank for the Layer
sound. When the cursor is at the
another Program within the current Bass Bank or Card Bank for the Split sound.
SPLIT sound, pressing the ▲ and ▼ arrows will select
A complete tutorial on using the
programs and setting up Layers and Splits is provided in the section
Internal Sounds
Other
The
the
▲ and ▼ Arrow Functions
▲ and ▼ arrows are also used to select parameters and change numeric values in
TUNE and MIDI modes.
on the next page.
▲ and ▼ arrows and cursor to select sound
Selecting
Acceleration
Note that when selecting Programs and changing numeric values in the display,
pressing and holding an arrow will accelerate the scrolling. This is most noticeable
(and most handy) when selecting Card Sounds. Because there are 128 sounds on an
Alesis QCard, this feature is another time-saver.
Display Wrap
Also, when selecting Programs (internal or card), pressing an arrow repeatedly (or
holding it down) will wrap the display: pressing or holding the
▲ button when
selecting any internal sound will display all four sounds in that Bank in succession.
When the fourth sound is reached, continued pressing of the
▲ button will wrap the
display to the first sound in the Bank and continue on. By the same token, scrolling
backward with the
▼ arrow wraps the display back to the fourth sound after the first
sound is reached.
Wrapping is also especially handy with Card Sounds as it solves the problem of
scrolling through 128 programs just to get to the first (or last) sound on the card.
Wrapping also occurs when selecting MIDI Channels.
Reset
The last feature of the arrows is the Reset function. When selecting numeric values
for Master Tune or Keyboard Scaling, for example, pressing both arrows
simultaneously resets the function to its default value, which is usually 0 or a value
that represents a mid-point in the function’s range. When displayed, pressing the
▲
and ▼ arrows together will reset the following parameters:
SET SPLIT split point resets to C2
TRANSPOSE transpose value resets to Middle C
TUNE Master Tune resets to 00
Page 4: Keyboard Scaling resets to 50
MIDI
When the display is in its normal mode of displaying selected Programs, pressing the
▲ and ▼ arrows together will reset Keyboard Bank or Bass Bank programs to "A".
Card Bank programs reset to
cursor to the sound you want to reset with the
000. When resetting a displayed Program, move the
PLAY button.
34 DG8 REFERENCE MANUAL
Page 34

Chapter 2: Playing the DG8
SELECTING INTERNAL SOUNDS
The DG8’s internal sounds can be selected and arranged in any of four Play Modes or
keyboard setups: Single, Layer, Split and Split-with-Layer.
To make things a little more interesting – and flexible – these modes can also be used
with an external set of sounds provided on an optional PCMCIA Type I-compatible
ROM card such as an Alesis QCard. This Card Bank contains additional sounds that
can be played as Primary sounds but can also be played in a Layer, Split or Splitwith-Layer. Things really get interesting when you combine internal programs with
the external sounds on the QCard.
But for now, we will limit our discussion of selecting sounds and creating Layers
and Splits to the DG8’s
incorporating external Card Programs will be provided starting on page 40.
internal Programs, for simplicity. A section dealing with
Tip: Before proceeding with auditioning sounds in the DG8, raise
the REVERB slider to its middle position. Each internal Sound
Program contains an appropriate reverb setting and using the
mid-point for the slider is a good place to start. You can
always raise or lower a slider at any time to get the reverb
level you like, or pull the slider all the way down to turn it
completely off.
Also, we’d like to suggest that you keep the CHORUS slider at
its off position – all the way down – for now. Most of the
internal Sound Programs also contain an amount of chorus,
but when listening to the DG8’s sounds for the first time,
Chorus should be off. This will give you the most practical
demo of the DG8’s sounds. You can always raise the slider at
any time to get the chorus level you like.
Single Mode
The DG8 is in Single mode when a Keyboard or Card Program is played alone – the
DG8 is not in a Layer or Split. The Program’s name and label appear in the top line of
the display under the
is displayed here will be appropriately called the Primary Sound or simply “the
Primary” throughout the manual.
The important concept to understand here is that a Primary Sound is
always active, even when the DG8 is playing a Layer or a Split.
In addition, the Primary Sound is always a Keyboard or a Card
Program, and internal Keyboard Programs can never be the Split
sound.
PRIMARY SOUND heading. The Keyboard or Card Program that
DG8 REFERENCE MANUAL 35
Page 35
Chapter 2: Playing the DG8
Press any one of the Keyboard Bank buttons to select a Keyboard Bank. The last
Keyboard Program that was selected from this Bank will be recalled from memory
and displayed under the
Press the ▲ arrow to scroll through the other three Keyboard Programs in the Bank.
Use the
▼ arrow to scroll backward through the Programs.
You can think of a Layer as “adding another Keyboard Program to be played
simultaneously with the current Primary”. The Keyboard Program that creates the
Layer appears in the
Likewise, a Split is created when “a Bass or Card Program is played with a Primary”.
The Bass Program appears in the display as the
lower range of keys. (The Layer and Split play modes are described in the following
two topics.)
PRIMARY SOUND heading.
LAYER segment of the display.
SPLIT sound and is played from the
For Primaries, Layers and Splits, the DG8’s memory independently keeps track of
the most recently selected programs for each Bank button. This principle is true
for the Keyboard, Bass and Card Banks.
Layer Mode
Layer mode takes two Keyboard Programs and puts “one on top of the other” so that
notes played on the keyboard – or received MIDI notes – play both sounds at once.
Both sounds are layered across the entire keyboard. A Layer can be comprised of two
Keyboard Programs from different Keyboard Banks, the same Bank, or even the
same Keyboard Program layered with itself.
Tip: Before proceeding, raise the LAYER slider all the way to the top.
At this position, the output level of the Layer sound is
approximately equal to the Primary Sound. You can then lower
the level of the Layer sound relative to the Primary Sound if
necessary.
Bear in mind that if the LAYER slider is all the way off (at the bottom),
the Layer sound will not be heard when a Layer is created.
36 DG8 REFERENCE MANUAL
Page 36

There are two methods you can use to create a Layer:
Chapter 2: Playing the DG8
• Press and hold the
Keyboard Program from this Bank will appear in the
with the current Program in the
LAYER/OFF button then press a Keyboard Bank button. A
LAYER display, layered
PRIMARY display. Use the ▲ and ▼ arrows, if
necessary, to select the desired Keyboard Program from the Bank.
OR
• Press a Keyboard Bank button to select the Primary Sound. While you are still
pressing the Keyboard Bank button, press another Keyboard Bank to select
the Layer sound.
• You can layer two Programs from the same Keyboard Bank. After selecting the
desired Primary program, press and hold the
same Keyboard Bank button. Use the
▲ and ▼ arrows to select the desired
LAYER/OFF button and press the
Keyboard Program in that Bank. Please note that this method is the only way
you can layer two Keyboard Programs from the same Bank.
• Once a Layer has been set up, you can change the Primary or the Layer sounds:
- To change the Primary sound to another Program in the same Bank, press
PLAY button to move the cursor to the PRIMARY SOUND display. Then use
the
▲ or ▼ arrows to select another Program in the Bank.
the the
- If you want to change the Primary sound to another Bank, simply press
another Keyboard Bank button (in this case it doesn’t matter where the
cursor is; pressing a Keyboard Bank button automatically changes the
Primary).
- To change the Layer sound to another Program in the same Bank, press the
PLAY button to move the cursor to the LAYER display, then use the the ▲ or ▼
arrows to select another Program in the Bank.
- If you want to change the Layer sound to another Bank, press and hold
LAYER/OFF. While LAYER/OFF is still being pressed, press another Keyboard
Bank button, then use the the
▲ or ▼ arrows (if necessary) to select another
Program in the Bank.
To exit this mode, press the
LAYER/OFF button. The DG8 will remove the Layer sound
and keep the Primary Sound. The cursor will move to the Primary Sound display.
DG8 REFERENCE MANUAL 37
Page 37

Chapter 2: Playing the DG8
Split Mode
A Split is simply a Bass Program played with a Primary Sound: the Bass Program
will be played from the lower range of keys and the Primary Sound will play from
the upper range.
As with Primary Sounds, each Bass Bank button represents a group of four related
Bass Programs that are selected with the
Tip: Before proceeding, raise the SPLIT slider all the way to the top.
▲ and ▼ arrows:
At this position, the output level of the Bass Program – the SPLIT
sound – is approximately equal to the Primary Sound. You can
then use the slider to lower the level of the Split sound relative to
the Primary Sound (which remains constant) if necessary.
Bear in mind that if the SPLIT slider is all the way off (at the
bottom), the Bass Program will not be heard when a Split is
selected.
• To create a Split, just press any of the Bass Bank buttons. The last Bass Program
that was used in that Bank will be recalled and its label will appear in the
SPLIT
segment of the display. Use the ▲ and ▼ arrows, if necessary, to select the
desired Bass Program in the Bank. The current Primary Sound will be used as
the sound in the upper range of keys.
• After you set up a Split, you can change the sounds in the Split:
- To change the Split sound to another Program in the same Bank, press the
PLAY button to move the cursor to the SPLIT display, then use the the ▲ or ▼
arrows to select another Bass Program in the Bank.
- If you want to change the Split sound to another Bank, just press another
Bass Bank button. Use the the
▲ or ▼ arrows (if necessary) to select another
Program in the Bank.
- To change the Primary sound to another Program in the same Bank, press
PLAY button to move the cursor to the PRIMARY SOUND display. Then use
the
▲ or ▼ arrows to select another Program in the Bank.
the the
- If you want to change the Primary sound to another Bank, simply press
another Keyboard Bank button (in this case it doesn’t matter where the
cursor is; pressing a Keyboard Bank button automatically changes the
Primary).
38 DG8 REFERENCE MANUAL
Page 38

Chapter 2: Playing the DG8
• The default split-point is key “C2”, the C that is one octave below Middle C:
• To change the split point press the SET SPLIT button, then press any key on the
DG8’s keyboard. This key will be the highest note of the bass range. This will
also be the Split Point for all Splits until it is changed. And remember: you
have two seconds to set your new split point when you press the
SET SPLIT
button. After two seconds, the display reverts back to the program display,
leaving the current split point unchanged.
Tip: You can also use the ▲ or ▼ arrows to set the split point. To reset the split point
back to C2, press the ▲ and ▼ arrows together while this display is being shown.
• To exit Split mode, press the SPLIT/OFF button. The DG8 will keep the Primary
Sound used in the Split, and the cursor will move to the Primary Sound name.
Split-with-Layer
When a Split is being played, you can set up a Layer to be played from the upper key
range instead of just a single Primary sound.
• Set up a Split following the procedure for Splits on the previous page.
• Press and hold the LAYER/OFF button and press any of the Keyboard Bank
buttons. Use the
▲ and ▼ arrows to select the desired Keyboard Program in the
Bank to be the Layer for the upper key range (this procedure is the same as
selecting a Layer for the whole keyboard).
• To exit the Split (and keep the Layer), press SPLIT/OFF.
To exit the Layer (and keep the Split), press
LAYER/OFF.
To exit both Layer and Split modes to return the DG8 to Single mode, press
LAYER/OFF and SPLIT/OFF.
Tip: Note that you don’t have to create a Split first to play a Layer. If the DG8 is
already playing a Layer, just press a Bass Bank and you’re there. (We could
have easily called this “Layer-with-Split”.)
DG8 REFERENCE MANUAL 39
Page 39

Chapter 2: Playing the DG8
USING THE EXTERNAL CARD SOUNDS
You can take advantage of the DG8’s expandability by acquiring an Alesis QCard™
or other compatible PCMCIA Type I sound card. The Alesis QCard is a credit-cardsized memory module that is pre-programmed with 128 additional sounds for
Alesis-compatible instruments. This PCMCIA Type I card is inserted into the DG8’s
EXPANSION CARD slot on the rear panel.
Each QCard contains a library of new sounds that complement and expand upon the
internal sounds in the DG8’s memory, complete with reverb, chorus and other
effects. But please note that when used with the DG8, some effects may act
unpredictably.
Card Programs in Single Mode
You can access sounds on the QCard just like the DG8’s internal Keyboard Programs:
1. Make sure that the DG8 is in Single mode by pressing the
and/or the
2. Press the
LAYER/OFF button, if necessary.
CARD button just to the left of the display. The first sound in the
SPLIT/OFF button
Card Bank loads into the DG8 and its name and label appear in the top line of
the display. Use the
QCard Programs numbered
▲ or ▼ arrows to advance or reverse through the 128
000 through 127.
3. Pressing any of the Keyboard Bank buttons exits the Card Bank.
Tip: If you press and hold either arrow button, the display will accelerate its
scrolling through the available programs. Also, pressing both arrows together
resets the Card Program to 000.
Card Programs in a Layer
You can layer a QCard Program with a DG8 Primary Sound. There are three ways of
using this feature: the QCard as the Layer sound, the QCard as the Primary Sound or
the QCard as both Primary and Layer.
QCard as Layer sound:
1. Make sure that the DG8 is not in a Split or Layer.
2. Select an internal Keyboard Program in the DG8 by pressing any of the
Keyboard Bank buttons. Use the
▲ and ▼ arrows, if necessary, to select the
desired Program in the Bank.
3. To add a QCard Program as the Layer sound, press and hold the
LAYER/OFF
button. While you are pressing LAYER/OFF, press CARD. The last Program used
from the card as a Layer sound is recalled so you can use the
▲ and ▼ arrows,
if necessary, to select the desired QCard Program.
4. You can also select a Card Program for the Layer sound as you are selecting a
Keyboard Bank: press and hold a Keyboard Bank button (to select the
Keyboard Bank for the Primary) and while you are still holding the Keyboard
Bank button down, press
LAYER/OFF button.)
5. To exit this mode, press the
CARD. (This speeds things up by bypassing the
LAYER/OFF button. The DG8 will turn off the Layer
and keep the Primary Sound you selected in Step 2.
40 DG8 REFERENCE MANUAL
Page 40

QCard as Primary:
Chapter 2: Playing the DG8
1. Select a QCard Program to be the Primary by pressing the
▲ and ▼ arrows, if necessary, to select the desired QCard Program.
the
2. Press and hold the
▲ and ▼ arrows, if necessary, to select the desired Layer sound.
the
LAYER/OFF button, then press a Keyboard Bank button. Use
CARD button. Use
QCard as Both Primary and Layer:
1. Select a QCard Program to be the Primary by pressing the
▲ and ▼ arrows, if necessary, to select the desired QCard Program.
the
2. Press and hold the
LAYER/OFF button, then press the CARD button again. This
selects another QCard Program to be the Layer sound. Use the
CARD button. Use
▲ and ▼
arrows, if necessary, to select the desired QCard Program. Please note that
this method – using the
LAYER/OFF button to create the Layer – is the only way
you can layer two Card Programs.
QCard Programs in a Split
You can select a QCard Program to be the Split sound in the lower range:
1. Press and hold the
CARD. The QCard becomes the Split sound on the lower range of the
keyboard. Use the
SPLIT/OFF button. While you are pressing SPLIT/OFF, press
▲ and ▼ arrows, if necessary, to select the desired QCard
Program.
2. The DG8 will keep the current Primary Sound selected as the sound for the
upper range of the keyboard. If necessary, press any of the Keyboard Bank
buttons to select a new Primary Sound; use the
▲ and ▼ arrows, if necessary,
to select the desired Keyboard Program.
You can select a QCard program to be the Primary Sound in the upper range of a
Split setup:
1. Press a Bass Bank button to set up a standard split.
2. Press the
range. Use the
CARD button. This selects the QCard as the Primary for the upper
▲ and ▼ arrows, if necessary, to select the desired QCard
Program.
You can select two QCard Programs in a Split setup, one for the Split sound in the
lower range of the keyboard and one for the Primary Sound in the upper:
1. Press and hold the
CARD. The QCard Program becomes the Split sound on the lower range of the
keyboard. Use the
SPLIT/OFF button. While you are pressing SPLIT/OFF, press
▲ and ▼ arrows, if necessary, to select the desired QCard
Program for the lower range.
2. Press the
CARD button (without holding any other buttons). The QCard
becomes the Primary sound on the upper range of the keyboard. Use the
and ▼ arrows, if necessary, to select the desired QCard Program for the upper
range.
▲
DG8 REFERENCE MANUAL 41
Page 41

Chapter 2: Playing the DG8
QCard Programs In a Split-with-Layer
In the following examples, a Split is created first, then the Layer sound is added to
complete the Split-with-Layer. Note that you don’t have to create the Split first; you
can create a Layer first if you like, then add the Split sound. We’ll use the “Split first,
then add the Layer” approach as just one way of accomplishing these setups:
You can select a QCard Program to be the Layer sound of a Split-with-Layer:
Create the Split
1. Start off with the DG8 in Single mode, with an internal Keyboard Program as
the Primary.
2. Press a Bass Bank button to set up the Split; use the
necessary, to select the desired Bass Program.
Add the Layer
3. Press and hold the
if necessary, to select the desired Card Program for the Layer sound.
Note that you can select a Card Program in Step 1 as the Primary Sound, and a
Keyboard Program as the Layer in Step 3 if you like.
You can select a QCard Program to be both sounds in the Layer range of a Split-with-
Layer:
▲ and ▼ arrows, if
LAYER/OFF button and press CARD; use the ▲ and ▼ arrows,
Create the Split
1. Start off with the DG8 in Single mode, but this time with an external Card
Program as the Primary: press
CARD and use the arrows to select the Card
Program.
2. Press a Bass Bank button to set up the Split; use the
▲ and ▼ arrows, if
necessary, to select the desired Bass Program for the lower range.
Add the Layer
3. Press and hold the
LAYER/OFF button and press CARD again; use the ▲ and ▼
arrows, if necessary, to select the desired Card Program.
Last, but not least, you can use the QCard for all three sounds in a Split-with-Layer:
Create the Split
1. Start off with the DG8 in Single mode with an external Card Program as the
Primary: press
2. Press and hold
Card Program that will be used for the
CARD and use the arrows to select the Card Program.
SPLIT/OFF then press CARD again; use the arrows to select the
SPLIT sound.
Add the Layer
3. Press and hold the
▲ and ▼ arrows, if necessary, to select the desired Card Program.
the
Do
not physically remove the card from the rear slot while any Card
LAYER/OFF button and press CARD for the third time; use
Program is active. This holds true for Primary, Layer or Split.
If a Card Program is the Primary Sound, simply switch the Card
Program to an internal Keyboard Program. If a Card Program is the
Layer or Split Sound, simply turn off the Layer or Split.
42 DG8 REFERENCE MANUAL
Page 42

Chapter 2: Playing the DG8
DG8 SOUND CHART
GROUP NAME PRIMARY SOUND LABELS LAYER/SPLIT SOUND LABELS
PIANO 1 Pno1A, Pno1B, Pno1C, Pno1D Piano1A, Piano1B, Piano1C, Piano1D
PIANO 2 Pno2A, Pno2B, Pno2C, Pno2D Piano2A, Piano2B, Piano2C, Piano2D
PIANO 3 Pno3A, Pno3B, Pno3C, Pno3D Piano3A, Piano3B, Piano3C, Piano3D
ELECTRIC PIANO 1 EP1 A, EP1 B, EP1 C, EP1 D ElPno1A, ElPno1B, ElPno1C, ElPno1D
ELECTRIC PIANO 2 EP2 A, EP2 B, EP2 C, EP2 D ElPno2A, ElPno2B, ElPno2C, ElPno2D
FM PIANO FMPnA, FMPnB, FMPnC, FMPnD FMPno A, FMPno B, FMPno C, FMPno D
HARPSI/CLAV HClvA, HClvB, HClvC, HClvD HrpClvA, HrpClvB, HrpClvC, HrpClvD
VIBES VibeA, VibeB, VibeC, VibeD Vibes A, Vibes B, Vibes C, Vibes D
STRINGS StrgA, StrgB, StrgC, StrgD StringA, StringB, StringC, StringD
CHOIR ChorA, ChorB, ChorC, ChorD Choir A, Choir B, Choir C, Choir D
PAD Pad A, Pad B, Pad C, Pad D Pad A, Pad B, Pad C, Pad D
SYNTH SyntA, SyntB, SyntC, SyntD Synth A, Synth B, Synth C, Synth D
ELECTRIC ORGAN EOrgA, EOrgB, EOrgC, EOrgD EOrganA, EOrganB, EOrganC, EOrganD
PIPE ORGAN POrgA, POrgB, POrgC, POrgD POrganA, POrganB, POrganC, POrganD
MULTI MultA, MultB, MultC, MultD Multi A, Multi B, Multi C, Multi D
ACOUSTIC BASS N/A AcBassA, AcBassB, AcBassC, AcBassD
ELECTRIC BASS 1 N/A EBass1A, EBass1B, EBass1C, EBass1D
ELECTRIC BASS 2 N/A EBass2A, EBass2B, EBass2C, EBass2D
SYNTH BASS 1 N/A SBass1A, SBass1B, SBass1C, SBass1D
SYNTH BASS 2 N/A SBass2A, SBass2B, SBass2C, SBass2D
PIANO BASS N/A PnoBasA, PnoBasB, PnoBasC, PnoBasD
KEYBOARD BASS N/A KeyBasA, KeyBasB, KeyBasC, KeyBasD
CARD SOUND Cd000 through Cd127 Card000 through Card127
DG8 REFERENCE MANUAL 43
Page 43

Chapter 2: Playing the DG8
FRONT PANEL CONTROLS
TUNE
Page 1: Master Tune
The DG8 can be globally tuned to another instrument or tuning device, and this
operation can be performed in any Play Mode. Press the
button to raise the pitch of the DG8 and the ▼ button to lower it. The range is ± 1 half
step: each press of an arrow key changes the tuning by 1 cent (100 cents = 1 half step).
Tip: Remember that if you want to do a quick reset, press the ▲ and ▼ arrows
together. The display will reset the tuning to 00.
Also, holding either arrow down will accelerate the scrolling of the tuning
values.
To exit this mode, press the PLAY button.
Page 2: Stretch Tuning
Pressing the
the tuning method that is actually used to tune real acoustic pianos. With Stretch
Tuning, the low strings are tuned increasingly flat, and the high strings are tuned
increasingly sharp compared to the equally-tempered scale.
TUNE button a second time enters Stretch Tuning mode which employs
TUNE button and use the ▲
This function defaults to
PIANO 2 and PIANO 3. This feature of the DG8 was not just designed as an esoteric
function, but provides an unusual level of realism to the piano Programs.
While this mode is desirable when playing a piano program alone, it can cause
problems when used with Layers or other MIDI instruments. To partially avert this,
the DG8 automatically turns off this function when you enter Layer mode so as to
avoid tuning conflicts with other internal DG8 Programs. However, when playing
the DG8 with other instruments via MIDI, you may need to defeat Stretch Tuning
because the high and low ends of the DG8 may sound out of tune with other MIDI
instruments. Use the
the piano programs will always be tuned to the equally-tempered scale whether used
as a Primary sound or as a Layer sound.
Note that, like other settings in the DG8, if turning Stretch Tuning is set to
remain off until you change it or re-initialize the instrument.
To exit this mode, press the
ON, and is only active on the three piano groups PIANO 1,
▼ arrow to turn this function OFF. When Stretch Tuning is off,
OFF it will
PLAY button.
TRANSPOSE
You can transpose the DG8 ± 1 octave. Using Middle C (key “C3”) as your reference,
press and hold the
key above Middle C will transpose the DG8 up by the interval and pressing a key
below Middle C will transpose the DG8 down by that interval.
TRANSPOSE button and press a key on the keyboard. Pressing a
Tip: You can also use the ▲ or ▼ arrows to transpose. To reset the transpose to
Middle C, press the ▲ and ▼ arrows together while this display is being shown.
The selected key will be the new key for the DG8 in any Play mode until it is
changed. The Transpose function actually changes the MIDI Note Number sent by
44 DG8 REFERENCE MANUAL
Page 44

Chapter 2: Playing the DG8
the keyboard globally (affects all modes), whether to an external MIDI device or to the
internal DG8 sounds or card sounds. Once the keyboard is transposed, all Primaries,
Layers and Splits are transposed by the same interval until you change the transpose
(even if the DG8 is turned off) or re-initialize the instrument.
Also, if you attempt a transpose value more than the one-octave limit, the DG8 will
keep the pitch the same but the key selected will be the nearest one within the one
octave range. For example, if you try to transpose up to key E5 (the highest E on the
keyboard), the DG8 will transpose the keyboard up to E3, the E above Middle C.
Also, transposing the keyboard will not effect the Split Point’s physical location on
the keyboard.
The Transpose display will exit as soon as you press a key on the DG8’s keyboard. To
exit this mode without transposing, press
PLAY.
EFFECTS
Reverb and Chorus have been pre-programmed into nearly all* of the DG8’s sounds.
You adjust the level of the effects by moving the appropriate
in mind that the Reverb and Chorus amounts are determined by the sliders’
positions, so if a slider is all the way down, that effect will not be heard at all.
* The exception to this is the ELECTRIC ORGAN Bank which substitutes a rotating speaker effect
instead of chorus. The
CHORUS LEVEL slider acts as a speed control for the rotating speaker.
LEVEL slider. Just keep
Note that Bass Programs have a minimal amount of Reverb and Chorus.
GRAPHIC EQ
The DG8’s stereo 5-band graphic equalizer provides the tone controls for shaping the
overall sound output of the instrument. Press the
equalizer. Each slider provides 6dB of boost or cut around each frequency.
The settings made on the EQ affect all sounds in all Play Modes – Primary, Layer,
Spilt and Split-with-Layer – and affect all inputs and outputs including the DG8’s
built-in speakers and headphones. The EQ is also “post-effects” so that reverb,
chorus and rotary speaker effects are equalized as well. The EQ settings are not
changed at power-up or if the DG8 is initialized, but every time you power on the
DG8, the EQ will be off.
EQ ON button to activate the
DG8 REFERENCE MANUAL 45
Page 45

Chapter 2: Playing the DG8
MIDI FUNCTIONS
Pressing the MIDI button puts the DG8 into MIDI Edit mode.
Pressing the
DG8’s MIDI functions.
Press the
Page 1: Basic MIDI Channel
This is the MIDI Channel for Primary Sounds and Layers. The MIDI Channel
assignments for Layer Program Changes and Split channels follow sequentially:
Layer Program Changes = Basic Channel + 1, Splits = Basic Channel + 2.
The DG8 operates in MIDI “Mode 3: Omni Off/Poly” only, and defaults to MIDI
Channel 1. To set the DG8 to transmit and receive on another MIDI Channel:
MIDI button repeatedly will step through the six different pages of the
PLAY button to exit any of the pages in this mode.
1. Press the
MIDI button. The last MIDI function display that was accessed will be
shown. Press the MIDI button repeatedly until the display reads:
BASIC
MIDI Channel = X
... where X is one of the 16 MIDI Channels or
Off. When set to Off, the DG8
will neither transmit nor receive MIDI information.
2. Use the
3. To confirm your selection and exit this mode, press
▲ and ▼ arrows to select the new Basic MIDI Channel or Off.
PLAY.
The DG8 transmits and receives the following MIDI data. Exceptions are noted in
parentheses:
Channel Messages
Pitch Bend (receive only)
Velocity
Release Velocity (receive only)
Program Changes
Controller Name MIDI Controller #
Bank Select (for QCard access) 0
Modulation 1
Volume 7
Pan (receive only) 10
Expression (receive only) 11
Sustain Pedal 64
Sostenuto Pedal 66
Soft Pedal 67
Reverb Level 91
Chorus Level 93
46 DG8 REFERENCE MANUAL
Page 46

Chapter 2: Playing the DG8
Page 2: Local Control
It is possible to use the DG8 as a MIDI controller in a MIDI system without playing
its own internal or card sounds by turning Local Control off. In this situation, the
DG8’s keyboard becomes a MIDI transmitter only and does not affect the voices.
This feature is particularly useful when playing the DG8 with a sequencer. The
sequencer controls the DG8 while the DG8’s keyboard can be used to play another
MIDI instrument. Just be sure that the sequencer (or any device controlling the DG8)
is not “echoing” MIDI notes from the DG8’s keyboard back into the DG8 (unless
that’s what you want to do).
When this display is shown, pressing the
default setting: the keyboard plays the DG8 normally) or
plays to
MIDI OUT only).
▲ and ▼ arrows turns Local Control ON (the
OFF (the DG8’s keyboard
Page 3: AUX Pedal Assignment
This page allows you to determine how the rear panel
to a pedal input, either modulation – rotating speaker for the
FOOT PEDAL AUX jack responds
ELECTRIC ORGAN Bank –
or volume control. This means that you can tell the DG8 that if a pedal is plugged
into the
AUX jack, it be either a modulation pedal or a volume control pedal.
When this display is shown, pressing the ▲ and ▼ arrows toggles between
Modulation and Volume. The default setting is Volume.
Page 4: Keyboard Scaling
This function is a sensitivity control for the DG8’s velocity response. This function
tells the DG8 how to respond to changes in how hard or how soft you play the keys.
When this page is displayed, you will have a choice of values between
00 and 99
with the default setting at 50. It’s harder to play loudly and easy to play softly when
Keyboard Scaling is set to
00.
At the other extreme, a setting of 99 makes it very easy to play loudly and difficult to
play softly.
Use the
displayed. Pressing
▲ and ▼ arrows to scroll through the range until the desired scaling value is
▲ and ▼ together resets the display to the default value of 50.
Page 5: Bass Sustain
When using the sustain pedal in Split mode, it is usually not desirable to have the
left-hand bass sustain when the pedal is stepped on. This parameter defaults to
OFF
so that only the sound on the upper key range sustains. Use the ▲ and ▼ arrows to
turn this function
ON if you want the Bass Programs to sustain with the pedal.
Page 6: Sustain Catching
There may be circumstances where the DG8’s Sustain Pedal Catching function is not
especially useful for what you’re playing. Use the
turn the Sustain Catching feature of the DG8
function does, see the description on the next page. Its default setting is
▲ and ▼ arrows on this page to
ON or OFF. For details on what this
ON.
DG8 REFERENCE MANUAL 47
Page 47

Chapter 2: Playing the DG8
PEDALS
BACKGROUND
Understanding the keyboard mechanism of an acoustic piano will help in understanding how the pedals operate on the DG8. Before a piano is played, a series of
dampers – small blocks of a felt-like material – rest on each string to prevent them
from vibrating. When a key is played, the damper for that note lifts up and a hammer
strikes the string (and immediately falls back allowing the string to vibrate). As long
as you are holding down that key, the damper stays lifted allowing the string to
vibrate freely. When the key is released, the damper falls back on the string and stops
it from vibrating.
The pedals of an acoustic piano are used to modify the action of the dampers. The
DG8’s pedals emulate the action of an acoustic piano’s pedals electronically. The
following descriptions illustrate how each pedal works on the DG8.
SUSTAIN
The DG8’s Sustain pedal provides the digital equivalent of the traditional sustain
capability of an acoustic piano:
sustain as long as the pedal is held down. This provides the rich sound we associate
with an acoustic piano. Releasing the pedal causes all vibrating strings to mute due
to the action of the dampers. If the pedal is kept down long enough, the sustained
notes will fade to silence.
all dampers are lifted allowing all played keys to
On the DG8, keys played while the Sustain pedal is down will sustain and fade until
the pedal is released. There are, however, many variations on the way you can use
the Sustain pedal. An great amount of flexibility in musical expression can be
achieved in the way the Sustain pedal is used while playing. Here are a few things
we built into the DG8:
a) Sustain Pedal “Catching”: If a key or keys are played quickly and the sustain
pedal is pressed after the keys are released, the sustain of the notes can be
“caught” before it fades out completely. The notes will then sustain and fade
from the point where the Sustain Pedal is pressed.
b) Re-Entering Sustain: If the pedal is sustaining a note or notes and the pedal is
released and then suddenly stepped on again, the DG8 will resume the
sustained note(s) but at a lower volume. This imitates the tendency of the
mechanical damping action of an acoustic piano to take some amount of time
to stop played strings from vibrating. If a damper isn’t given enough time to
fully stop the strings, they will continue to vibrate, although with less energy.
This can be repeated several times until the sound has completely faded out.
Although these two features correctly emulate the behavior of a real piano, they can
rob the DG8 of voices and/or make sequences which were recorded on a MIDI
device without a sustain catching feature sound a bit muddy. Conversely, if a prerecorded sequence sounds a bit “choppy”, try turning Sustain Catching to
Sustain Pedal Catching and Re-entering Sustain features can both be defeated by
setting Sustain Catching to
OFF.
ON. The
48 DG8 REFERENCE MANUAL
Page 48

Chapter 2: Playing the DG8
SOSTENUTO
This pedal on an acoustic grand piano* causes only the dampers on played keys to
lift until the pedal is released. In other words, if you play a chord, step on the
Sostenuto pedal, and then release the keys, the notes you were playing continue to
ring. What makes this different from a sustain pedal is that you can play every other
note on the keyboard and they won’t sustain, but if you play the notes you were
holding when you stepped on the sostenuto pedal, they will still sustain. Try a
glissando down the keys and you’ll hear the chord you played spelled out as you
pass those notes!
On the DG8, this pedal produces the digital equivalent of “lifting dampers” only on
the played keys.
* NOTE: The DG8 emulates the sostenuto pedal of a grand piano, not an upright, and we want
to make that distinction clear. On upright pianos, what the “middle pedal” does varies from
brand to brand.
SOFT PEDAL
This pedal on an acoustic piano is so named because it produces a quieter
performance. The way acoustic pianos accomplish this varies. In some pianos, the
soft pedal causes all dampers to be lifted but not as high as the sustain pedal lifts
them, so that the brightness and loudness of the notes are “softened”. In others, the
soft pedal accomplishes its task by shifting the position of the keybed so the
hammers strike the strings in a different way.
This last option takes two different forms. For example, all acoustic pianos have
many notes for which there are two or more strings per key. On a concert grand
piano, the soft pedal physically moves the keybed sideways so the hammers strike
fewer strings per key.
Other pianos employ a third method that lowers the entire set of keys into the
keybed a little. This reduces the distance the keys are able to travel, which in turn
limits the amount of kinetic energy which can be transferred from the hammers into
the strings, thereby resulting in a quieter performance.
On the DG8, this pedal achieves a similar “softening” of the brightness and loudness
by reducing the keyboard’s response to velocity, which therefore makes the sound
somewhat lower in volume and brightness.
PEDAL CONNECTIONS
Momentary footswitches are used for the Sustain, Sostenuto and Soft Pedal features of
the DG8. “Momentary” means that it is a spring-loaded switch that operates by
“pressing and releasing”.
Pedals are plugged into the DG8’s rear panel jacks. Each jack is labeled so that you’ll
know which pedal performs which function.
These pedals – they’re actually electrical switches, but we’ll refer to them as pedals to
keep consistent with piano terms – are designed to reproduce the same response as
their acoustic counterparts. But since we’re dealing with an electronic instrument, the
concept here is that when a switch like this is pressed, it is in its on position; when
you release it, it’s off.
DG8 REFERENCE MANUAL 49
Page 49

Chapter 2: Playing the DG8
A momentary foot switch with a 2-conductor 1/4” connector is used for the Soft Pedal
function of the DG8. A momentary footswitch with a 3-conductor 1/4” connector is
used for the Sustain/Sostenuto functions of the DG8. “Momentary” means that it is a
spring-loaded switch that operates by “pressing and releasing” for on (press) or off
(release) signals.
If you use a footswitch with a 2-conductor connector for Sustain/
Sostenuto, the Sostenuto function will NOT operate.
Potentiometer foot pedals with 2-conductor connectors are used for volume and
modulation. “Potentiometer” means that the pedal mechanically operates an internal
knob (technically known as a potentiometer) giving you “more” or “less” rather than
“on” or “off” like a switch. These pedals are often referred to as “rocker pedals”.
The diagram below shows what the right kind of connector looks if you want to
purchase footpedals, or if you need a pedal that is different from the one shipped
with the DG8.
Plug the pedals into the DG8’s back panel jacks. Each jack is labeled so that you’ll
know which pedal or switch performs which function.
For the volume or modulation pedal, use the
AUX jack. Note that the DG8 must be set
to perform either volume control or modulation, not both. To select the operation of
the pedal, press the
MIDI button on the front panel repeatedly until AUX Pedal
appears the in the display. Use the ▲ or ▼ arrows to select between Modulation or
Volume. Press the PLAY button to confirm your choice and return the DG8 back to
Play mode.
50 DG8 REFERENCE MANUAL
Page 50
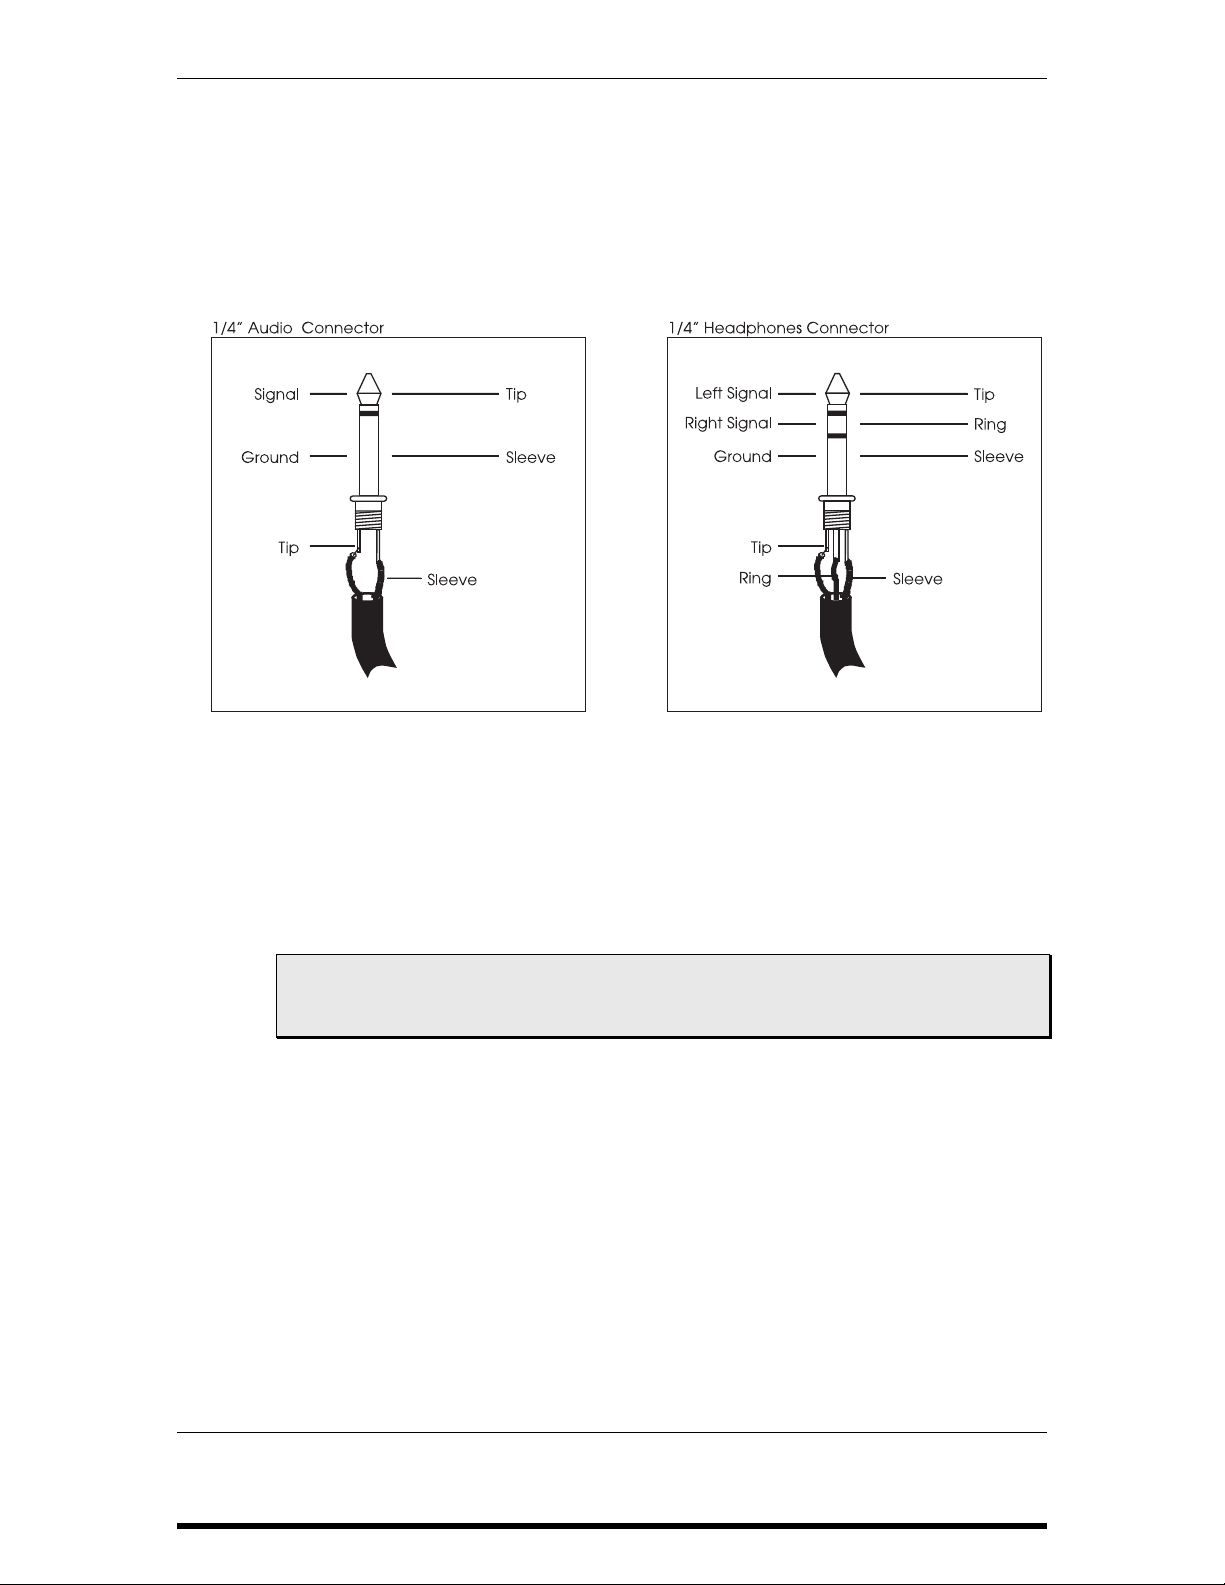
AUDIO INPUTS AND OUTPUTS
The DG8 uses standard 2-conductor 1/4” tip-sleeve unbalanced connectors for back
panel audio connections and a 3-conductor 1/4” tip-ring-sleeve connector for the two
headphone outputs on the front. The diagram below shows what the right kind of
connector looks like when purchasing audio cables and headphones.
Chapter 2: Playing the DG8
Outputs
To connect your DG8 to a sound system in stereo, connect two 2-conductor
unbalanced audio cables from the unit’s
OUTPUTS section to two inputs on your sound system. If you are connecting the DG8
R and L/MONO jacks on the back panel
to a mixer, pan the channels hard left and right to obtain a full stereo image.
To connect your DG8 to a sound system in mono, connect a 2-conductor unbalanced
audio cable from the unit’s
L/MONO jack on the back panel OUTPUTS section to an
input on your sound system.
Tip: If necessary, you can turn the DG8’s internal sound system off. There’s a slide
switch on the back panel adjacent to the stereo outputs that turns the speakers
on or off.
Inputs
The DG8 accommodates audio inputs from such sources as a stereo cassette or audio
CD player. These signals are mixed with the DG8’s internal sound system and output
to the speakers. The DG8’s
VOLUME slider adjusts the volume level of the composite
mix of the DG8’s internal sounds, external card sounds and signals coming into the
INPUTS jacks. The level of the cassette or CD player must be set on the cassette or CD
player itself in order to control it separately from the DG8’s internal sounds.
To connect an external audio source in stereo, connect two 2-conductor unbalanced
audio cables from the source to the DG8’s
INPUTS section. To connect an external audio source in mono, use one 2-conductor
unbalanced cable from the source to the
to both speakers. Plugging the cable into the
R and L/MONO jacks on the back panel
L/MONO jack. This will route the mono signal
R jack will route the sound to the right
speaker only.
DG8 REFERENCE MANUAL 51
Page 51

Chapter 2: Playing the DG8
INITIALIZING THE DG8
FACTORY DEFAULTS
When the DG8 is shipped from the factory, its user parameters are set to certain
values so that the unit will perform its most basic functions right out of the box.
These are called defaults – values that are set at the factory as the most useful and/or
logical starting points for the various functions within the unit. You may have
noticed this as you explored the DG8’s functions, and this manual refers to these
default values from time to time.
If for any reason you want to return the DG8 to the state it was in when it shipped,
you can initialize (perform a complete reset) of the DG8 and return it to its default
state. This feature is particularly useful in the event a power problem causes the DG8
to behave strangely, or if certain functions do not seem to be operating as expected.
To initialize the DG8:
• Turn it off.
• Press and hold the ▲ and ▼ arrows.
• While the arrows are being held down, turn the DG8 back on.
This simple procedure resets the following parameters:
• MIDI volume is reset to the maximum of 127 for the Primary Sound,
Layer and Split
• EQ is turned off
• modulation is reset to 0
• Program Piano1A is selected with no Layers or Splits
• all Primary Sound and Bass Program sound banks are reset to the A program.
Selecting a Card Program will recall program
000 whether used as Primary
Layer or Split.
• tuning is reset to A440; the Master Tune display resets to 00
• default Split Point is reset to key “C2”, the C one octave below Middle C
• the AUX pedal is reset to Volume
• Keyboard Scaling is reset to the mid-point value of 50
• Stretch Tuning is turned on
• Sustain Catch is turned on
• Local Control is turned on
• Basic MIDI Channel is set to 1
• Bass Sustain is turned off
POWER-UP RESETTING
There are two parameters and one function which reset every time you turn the DG8
on. Modulation and volume values are reset upon power up, and the
button is turned off.
EQ ON/OFF
52 DG8 REFERENCE MANUAL
Page 52

MIDI BASICS
Before we delve into the specific MIDI functions of the DG8, we’d like to provide a
brief background on MIDI for those who may not be familiar with this technology.
MIDI (pronounced “MID-ee”) is the acronym for Musical Instrument Digital
Interface. It was developed and adopted by electronic musical instrument
manufacturers in the early 1980s as a common system of connecting electronic
musical instruments and devices so that they could share music data as well as other
digital information.
Just about any device that has a microprocessor (synthesizers, samplers, sequencers
and drum machines, analog and digital recorders and mixers, effects devices and
computers) can share music data (notes and chords) and various digital information
such as pitch bend and vibrato, sustain and volume pedal, keyboard velocity,
pressure and aftertouch, patch change commands, timing data (called “MIDI Clock”)
and a wide variety other types of data.
Chapter 3: MIDI Functions
CHAPTER 3
MIDI FUNCTIONS
Thus, virtually any musical expression that is generated by an electronic musical
device could be shared in a system of MIDI devices. But we are not limited to
musical applications alone. With the addition of MIDI Time Code for example, the
ability to interface a music system with video production was realized. There are
even stage lighting systems that use MIDI for programming light control and data
storage.
A document called the MIDI Specification describes all possible MIDI functions and
how they should work. Manufacturers use this spec when designing products so that
a fairly high level of compatibility among different brands can be reasonably
expected.
Generally, a manufacturer will also include a MIDI Implementation chart with each
product so that you can know how MIDI was designed into that particular model.
This is usually helpful to know because not every MIDI function needs to be
included in every musical product. For example, certain MIDI functions that are
unique to keyboard instruments are unnecessary on, say, digital effects devices.
Manufacturers have the option of including whatever MIDI functions are
appropriate to the product. You can find the MIDI Implementation chart for the DG8
on page 67.
DG8 REFERENCE MANUAL 53
Page 53

Chapter 3: MIDI Functions
MIDI HARDWARE
MIDI instruments and devices are connected by a fairly simple system of cables. The
MIDI OUT port transmits data from one device one-way through the cable to the
receiving instrument’s
respond to MIDI commands in a certain way. For example, you can tell a keyboard
or guitar synth to send everything in MIDI except for Program Change commands.
By the same token, you can tell your sound module to respond to any MIDI
command sent to it but ignore Velocity data.
MIDI THRU simply passes data received by MIDI IN right back out to another device
connected to it. This makes “chaining” possible in a MIDI system. For some examples
in connecting MIDI devices together, see our illustrations in the section entitled
DG8 in a Music System
Also of importance in discussing MIDI hardware is the term voice. An instrument’s
voice is the most basic unit of sound generation. It can be an integrated circuit chip
(or chips) or can be a sampled sound in the instrument’s memory, like the DG8.
MIDI MESSAGES
MIDI IN. You can setup each device in the system to send and
The
starting on page 20.
The are two types of MIDI messages that are communicated through your network
of MIDI cables: Channel and System.
Channel Messages are typically the messages you’ll be most concerned with for
routine MIDI operations and can originate (be transmitted) from virtually any device
in the system. MIDI provides 16 “Channels” through which certain MIDI data is
shared among devices in the system. The communication of certain messages along
Channels makes it possible to connect many devices together but allows you to
specify which devices communicate directly with each other. For example, you
could have seven MIDI devices that are all connected to each other. Two of the
devices can be communicating on Channel 2, two others on Channel 9 and the
remaining three on Channel 4, as one possible setup.
Channel messages are further divided into two groups: Voice messages and Mode
messages. Because these messages are channelized – they are communicated on a
designated Channel number – they are only recognized by instruments that have
been set to receive on that Channel.
System messages, on the other hand, do not have a channel number and can be
received by any device in a system. This permits devices in a MIDI system to share
certain data without having to be set to a particular Channel. System messages, like
Channel messages, can originate from just about any MIDI device in the system. The
three types of System messages are called Real Time messages, Common messages and
Exclusive messages. Because none of these types of messages are implemented on the
DG8, we will not be covering them in this manual.
CHANNEL MESSAGES: VOICE MESSAGES
Each MIDI device is assigned a Basic MIDI Channel. This is the MIDI Channel that the
instrument will use to transmit MIDI data and can be set to any Channel # 1 - 16.
This is also the MIDI Channel that the instrument will receive on.
This principle is not set in concrete, however. For many MIDI instruments, the ability
to communicate – both transmit and receive – on several Channels at once is quite
54 DG8 REFERENCE MANUAL
Page 54

Chapter 3: MIDI Functions
common. For example, certain instruments are designed such that you can set a
Voice or group of voices to MIDI Channels other than the Basic Channel. This
provides enormous flexibility in the way that the instrument can control other
instruments in the system, or be controlled by another MIDI device. You might want
to think of a device’s Basic Channel as the one on which other Channels can be based
– hence the word “basic”. A good place to start is a setup that instructs the unit to
transmit and receive on the Basic Channel, then build from there if you need to.
The DG8 is a prime example of a multiple MIDI Channel instrument in that three
successive MIDI Channels are designated to communicate data: Primary Sounds and
Layers transmit and receive on the Basic Channel except Program Change
commands for Layers, which happen on the next higher Channel (Basic Channel +1);
Splits transmit and receive on the next higher Channel (Basic Channel + 2). For an indepth look at how this is implemented on the DG8, see page 58.
MIDI messages that affect your instrument’s voices include:
Note On. This message communicates that a particular note is being played and
corresponds to a key being pressed down; values range from 000 (the lowest possible
note) to 127 (the highest possible note). Middle C is MIDI Note #60.
Note Off. Where a Note On message communicates when a note is to be played, this
message tells when the key has been released. This may appear a little like overkill,
but remember that we’re dealing with computers here: every action requires a
corresponding message to be communicated.
Velocity. A Velocity message corresponds to the dynamics of your playing by telling
the receiving device how quickly (or slowly) a note was played. Typically, Velocity
affects the loudness and brightness of the sound – playing harder makes the sound
louder and brighter; playing softly makes the sound quieter and less bright. In the
more elaborate products, this data can be routed to other aspects of the sound as well
for some very interesting results. Velocity values range from 001 (minimum velocity)
to 127 (maximum velocity). A velocity of 000 is equivalent to a Note Off message.
Program Change. Sending a Program Change command from a sequencer or another
MIDI keyboard can change synth patches automatically. There are 128 Program
Change command numbers.
Also note that not all instruments and devices number programs consistently. Some
number them as 000-127, others as 001-128, and still others arrange programs in
banks of eight programs (such as A1-A8, B1-B8, C1-C8, etc.) or, as in the case of the
DG8, Banks of four programs designated A, B, C and D.
Pitch Bend. This “bends” a note from its standard pitch.
Continuous Controllers. This term is sometimes abbreviated “CC” and is followed
by a number sign and a number, as in “CC #7”. If you look at the chart on the next
page, you’ll see that “Continuous Controller # 7” controls MIDI (or Main) Volume.
What we mean by “continuous” is that the controller is able “to go from 0 to 127 in
increments of 1”. Although this might first appear as a rough stepping from one
value to the next, the resolution of 128 increments is small enough to provide a
smooth transition through this range. If this resolution is not fine enough, the
manufacturer can opt to add more resolution by using a second byte to define the
range. Controller #’s 32 through 63 are used for this purpose.
Footpedals, breath controllers, and modulation wheels can vary sounds as you play,
thus adding expressiveness. MIDI allows for 32 continuous controllers and 58
DG8 REFERENCE MANUAL 55
Page 55

Chapter 3: MIDI Functions
continuous/switch controllers (which can act like continuous controllers, but some
are assumed to choose between two possible states, such as on and off).
Each type of controller is stamped with its own controller identification number. Not
all controller numbers have been standardized for specific functions, but the
following indicates the current list of assigned controllers.
CONTROLLER # FUNCTION DATA RANGE
0 Bank Select 0 - 127
1 Modulation Wheel 0 - 127
2 Breath Controller 0 - 127
3 Early DX7 Aftertouch 0 - 127
4 Foot Controller 0 - 127
5 Portamento Time 0 - 127
6 Data Slider 0 - 127
7 Main Volume 0 - 127
8 Balance 0 - 127
10 Pan 0 - 127
11 Expression 0 - 127
16 General Purpose #1 0 - 127
17 General Purpose #2 0 - 127
18 General Purpose #3 0 - 127
19 General Purpose #4 0 - 127
32-63 Least Significant Bytes (LSB), Controllers 0-31 0 - 127
64 Sustain Pedal 0 or 127
65 Portamento On/Off 0 or 127
66 Sostenuto Pedal 0 or 127
67 Soft Pedal 0 or 127
69 Hold 2 0 or 127
80 General Purpose #5 0 or 127
81 General Purpose #6 0 or 127
82 General Purpose #7 0 or 127
83 General Purpose #8 0 or 127
91 Reverb Depth 0 - 127
92 Tremolo Depth 0 - 127
93 Chorus Depth 0 - 127
94 Celeste Depth 0 - 127
95 Phase Depth 0 - 127
96 Data Increment 0 or 127
97 Data Decrement 0 or 127
98 Non-Registered Parameter MSB 0 - 127
99 Non-Registered Parameter LSB 0 - 127
100 Registered Parameter MSB 0 - 127
101 Registered Parameter LSB 0 - 127
121 Reset All Controllers 0
122 Local Control On/Off 0 or 127
123 All Notes Off 0
124 Omni Off 0
125 Omni On 0
126 Mono On 0-16; 0 = Omni Off
127 Poly On 0
56 DG8 REFERENCE MANUAL
Page 56

Chapter 3: MIDI Functions
CHANNEL MESSAGES: MODE MESSAGES
There are four types of messages that determine the MIDI Mode of the instrument.
The “mode” of a device refers to how it will respond to incoming MIDI data. The
MIDI Specification outlines four possible modes and the DG8 implements a modified
version of one of these four modes called “Mode 3: Omni Off/Poly”.
Mode 3 describes how polyphonic instruments in general receive notes on one
Channel only. But as we discovered on page 55, the DG8 uses multiple MIDI
Channels when communicating with other devices. Three successive MIDI Channels
are designated to communicate data: Primary Sounds and Layers transmit and
receive on the Basic Channel except Program Change commands for Layers, which
happen on the next higher Channel (Basic Channel +1); Splits transmit and receive on
the next higher Channel (Basic Channel + 2). For an in-depth look at how this is
implemented on the DG8, see page 58.
Portions of this Chapter are abridged versions of material from Power Sequencing with Master Tracks Pro/Pro
4 and The Complete Guide to the Alesis HR-16 and MMT-8, copyright 1990 and 1989 respectively by AMSCO
Publications, and are adapted with permission.
DG8 REFERENCE MANUAL 57
Page 57

Chapter 3: MIDI Functions
MIDI AND THE DG8
With the previous description of MIDI basics in mind, let’s continue with a few more
details concerning the MIDI functions that are present in the DG8. A
Implementation Chart
supported by the DG8.
CHANNEL MESSAGES
As we mentioned in the “Voice Messages” section of this Chapter, certain
instruments are designed such that you can set a voice or group of voices to MIDI
Channels other than the Basic Channel the instrument has been set to. This is an
important concept to understand when setting up the DG8 as a master (transmitting
MIDI to other instruments) or as a slave (receiving MIDI from other instruments) in a
MIDI music system.
In the case of the DG8, a “group of voices” would be the two Programs in a Layer, as
one example – the Primary Sound plus the Layer sound. Some of the DG8’s voices
are allocated to the Primary Sound and some to the Layer sound. For a Split, voices
are grouped for the Bass Program played from the lower range of the keyboard and
the Primary Sound played from the upper range, as another example of voice
grouping.
is provided in Appendix C that lists the MIDI functions
MIDI
A key point to consider when using MIDI on the DG8 is that three successive MIDI
Channels are designated to transmit and/or receive data: the Primary Sound and
Layer transmit and receive on the Basic Channel with one exception which is
Program Change commands for the Layer which happens on the next higher
Channel (Basic Channel + 1). A Split transmits and receives on the next higher
Channel (Basic Channel + 2). Note that Program Change commands for the Bass
Program only occur on the Basic Channel +2.
Therefore, if you set the DG8’s Basic MIDI Channel to, say, Channel 6, the Primary
Sound and Layer transmit and receive on Channel 6 (the Basic Channel), Program
Change commands for the Layer occur on Channel 7 (Basic Channel + 1) and the
Split transmits and receives on Channel 8 (Basic Channel + 2).
When you first power on the DG8, it defaults to the following MIDI settings:
MIDI Basic Channel: Channel 1
Receive – Mode 3: OMNI Mode off/Poly.
MIDI Channel 1 Primary Sound all supported Channel Messages
MIDI Channel 2 Program Change commands (only) for the Layer sound
MIDI Channel 3 Split all supported Channel Messages
Layer all supported Channel Messages except Program
Change commands
Program Change commands only affect the
Bass Program.
58 DG8 REFERENCE MANUAL
Page 58

Chapter 3: MIDI Functions
Program Changes
The way the DG8 sends and responds to MIDI Program Change commands was
designed to imitate the way Programs – whether Primary, Layer or Split – are
selected from the front panel buttons. This is an important concept to understand
and the following examples will help to illustrate how this works in the real world.
Specific MIDI operations are explained with these examples:
1. When the DG8 is playing Primary Sounds only (not in a Layer or Split) and
you press a Keyboard Bank button, the DG8 recalls the last Keyboard
Program that was used in that Bank and transmits its MIDI Program Number
on the Basic Channel.
If you use the
▲ or ▼ arrows to select another Keyboard Program in that Bank,
the MIDI Program Number that corresponds to each Keyboard Program as it
comes up in the display is also sent on the Basic Channel.
MIDI Program Numbers 000 through 003 correspond to DG8 Keyboard
Programs Piano 1 “A” through “D”; MIDI Program Numbers 004 through 007
correspond to DG8 Keyboard Programs Piano 2 “A” through “D” and so on
up to MIDI Program 059.
Card Programs are easier to keep track of since they correspond with MIDI
Program Numbers exactly: Card Program 000 = MIDI Program Number 000,
Card Program 001 = MIDI Program Number 001, and so forth on up to 127.
2. Since the Layer sound comes from the same sound banks as the Primary
Sounds (either the Keyboard Banks or a Card), the same MIDI Program
Change rules apply as in the examples above. Just remember that when
changing the Layer sound from the DG8’s front panel, the MIDI Program
Change number is transmitted from the DG8 on the Basic Channel + 1. When
sending the DG8 a Program Change command from another device in your
rig with the intent of changing the Layer sound, be sure to send it to the DG8
on this Channel.
3. When a Bass Bank button is pressed, the DG8 recalls the last Bass Program
that was used in that Bank and transmits its MIDI Program Number on the
Basic Channel + 2.
If you use the
▲ or ▼ arrows to select another Bass Program in that Bank, the
MIDI Program Number that corresponds to each Bass Program as it comes up
in the display is also sent on the Basic Channel + 2.
MIDI Program Numbers 000 through 003 correspond to DG8 Bass Programs
Acoustic Bass “A” through “D”; MIDI Program Numbers 004 through 007
correspond to DG8 Bass Programs Electric Bass 1 “A” through “D” and so on
up to MIDI Program 027. Notice that the same range of MIDI Program
Numbers are used for the Bass Programs as for the Keyboard and Card
Programs. But not to worry: since Program Change messages are
communicated on different MIDI Channels for Primaries, Layers and Splits,
no conflicts should occur.
DG8 REFERENCE MANUAL 59
Page 59

Chapter 3: MIDI Functions
The following chart summarizes the DG8’s handling of transmitting and
receiving MIDI Program Change commands:
MIDI Program # Primary/Layer Primary Layer Bass Split
000 Pno1A Basic Basic + 1 ABasA Basic + 2
001 Pno1B Basic Basic + 1 ABasB Basic + 2
002 Pno1C Basic Basic + 1 ABasC Basic + 2
003 Pno1D Basic Basic + 1 ABasD Basic + 2
↓↓ ↓
024 HClvA Basic Basic + 1 KBasA Basic + 2
025 HClvB Basic Basic + 1 KBasB Basic + 2
026 HClvC Basic Basic + 1 KBasC Basic + 2
027 HClvD Basic Basic + 1 KBasD Basic + 2
↓↓
056 MultA Basic Basic + 1 — —
057 MultB Basic Basic + 1 — —
058 MultC Basic Basic + 1 — —
059 MultD Basic Basic + 1 — —
Program Channel Channel Program Channel
4. When using MIDI Bank Select commands to remotely change banks on the
DG8, internal Primary and Layer sounds are MIDI Bank 1, Bass sounds are
MIDI Bank 2 and Card sounds are MIDI Bank 3. Card sounds are always
MIDI Bank 3 regardless of whether they are used as a Primary, Layer or Split.
Pedals
The DG8 transmits and receives pedal messages in accordance with the MIDI
Specification: Sustain Pedal is assigned Controller #64, Sostenuto Pedal is assigned
Controller #66 and Soft Pedal is assigned Controller #67.
Care must be taken when you are sending the DG8 MIDI Pedal messages. If you are
playing the DG8 from a MIDI master that only has a sustain pedal, it will most likely
be sending Controller #64. So if you intend to use the Soft Pedal function, for
example, you will need to change your master to transmit the Soft Pedal message
(MIDI Controller #67) instead of Sustain Pedal (MIDI Controller #64).
60 DG8 REFERENCE MANUAL
Page 60

DG8 TERMS
Bass Program a sound Program selected from one of the Bass Banks
Card Program a sound Program selected from the “Card Bank”, an external
Defaults settings or display values that are set at the factory as the most
Graphic EQ short for “graphic equalizer”, the five sliders on the left side of
Initialize to perform a complete reset of the DG8’s functions to its defaults;
Keyboard Program a sound Program selected from one of the Keyboard Banks
Layer a combination of two Keyboard or Card Programs in which
Primary Sound the sound program shown in the display selected from the
Split the keyboard of the DG8 is divided into two play ranges: one of
Split Point the key that determines where the two ranges of a split are
Split-with-Layer a keyboard setup where the Split function (a Bass Program on
Soft Pedal pressing this pedal reduces the loudness and brightness of the
Sostenuto Pedal similar to Sustain Pedal, except that notes which are held when
Stretch Tuning a common acoustic piano tuning method where low strings are
Sustain Pedal pressing this pedal causes played notes to continue sounding
Transpose changes the key of the DG8 ± 1 octave in half-step increments
Appendix A: Glossary
GLOSSARY
sound card inserted into the DG8’s back panel
useful and/or logical starting points for the various functions
within the unit
the DG8’s control panel that are used to adjust the tone of the
sound output; the audio spectrum of the DG8 is divided into five
“frequency bands” or ranges that can be boost or cut ± 6 dB.
see “Defaults”
playing the DG8 plays both sounds at once; this term also refers
to the selected
Keyboard Banks or the Card Bank; the Primary Sound is active
in all Play Modes: Single, Layer, Split and Split-with-Layer
the 28 Bass Programs is assigned to the lower range of the
keyboard (normally played with the left hand) and one of the 60
Primary Sounds assigned to the upper range of the keyboard
(normally played with the right hand); see also “Split Point”
divided; the Split Point is the highest key of the “lower” range
the lower range of keys) is used with the Primary Sound and a
Layer on the upper key range
sound
the sostenuto pedal is pressed are sustained while any new notes
played after the pedal has been pressed are not sustained
tuned increasingly flat and high strings are tuned increasingly
sharp
after the key is released. They will fade or "decay" in a manner
consistent with the selected instrument
LAYER sound shown in the display
DG8 REFERENCE MANUAL 61
Page 61

Appendix A: Glossary
MIDI TERMS
All Notes Off a command that is transmitted to all devices in a MIDI system
Channel one of sixteen separate “paths” that Voice and Mode data can
Channel Messages data that communicates Voice and Mode messages on a specific,
Controllers commands that are used for musical expression (volume,
MIDI “Musical Instrument Digital Interface”; refers to the system of
MIDI IN the port on a device that receives MIDI data
MIDI OUT the port on a device that transmits the MIDI data generated by
MIDI THRU the port on a device that passes received MIDI data to the next
Mode a particular state that an instrument or device is currently in;
Program Change a command that instructs the receiving instrument to recall a
that prevents notes from becoming stuck on
travel on
user-selected Channel
sustain, vibrato, etc.) or remote control of other devices in the
MIDI system (reverb depth, bank select, etc.)
connecting microprocessor-controlled instruments and devices
for sharing information
the device
device in the chain
in MIDI, “mode” refers to the unit’s receive state that determines
1. how MIDI messages are received, and 2. how voices will be
assigned to handle MIDI notes
specific sound program from memory
62 DG8 REFERENCE MANUAL
Page 62

Appendix B: Troubleshooting
TROUBLESHOOTING
If you experience problems while operating your DG8, please use the following table
to check for possible causes and solutions before contacting Alesis customer service
for assistance. Some of them may seem rather obvious, but you’d be amazed at how
easy it can be to overlook the basics.
Please note that many problems can be solved simply by re-initializing the DG8 – see
page 52.
SYMPTOM CAUSE SOLUTION
The display does not light
up when the
is turned on.
No sound.
Layer sound cannot be
heard.
Split sound cannot be
heard.
Notes are stuck on. MIDI sequencer or
I can hear Reverb and/or
Chorus, but their sliders
are down.
Non-layered piano
programs are out of tune
with external MIDI devices
or other instruments.
ON/OFF switch
No power. Check that the power cable
Volume is turned down
or the volume pedal is at
minimum.
Speakers are turned off. Turn speakers on using the
MIDI Volume on master
controller is set to 0.
Local Control is set to
off.
Layer LEVEL slider is
down.
Split LEVEL slider is
down.
controller sent an
incomplete MIDI
message.
MIDI sequencer or
controller sent a message
to increase these levels.
Stretch Tuning is on.
is plugged in properly.
Raise the
volume pedal if one is
being used.
switch on the back panel.
Check MIDI Volume level
on master MIDI device.
Turn Local Control on
– see page 47.
Raise the LAYER slider.
Raise the SPLIT slider.
Step on the sustain pedal
and release.
Or select the Basic MIDI
Channel page and set MIDI
to off – see page 46.
Move the REVERB or
CHORUS slider a little to re-
activate it, then set the
amount as desired.
Select the Stretch Tuning
page and turn it off
– see page 44.
VOLUME slider or
DG8 REFERENCE MANUAL 63
Page 63

Appendix B: Troubleshooting
SYMPTOM CAUSE SOLUTION
All programs are out of
tune with external MIDI
devices or other
instruments.
DG8 is not playing at
concert pitch.
DG8 sounds chorused or
tinny even when chorus
fader is down.
The AUX pedal is not
controlling the volume.
The AUX pedal is not
controlling modulation or
the rotary speaker effect on
Electric Organ programs.
The sustain pedal is
controlling the volume or
brightness.
Soft pedal causes notes to
sustain.
Master Tune has been
changed.
Keyboard has been
transposed.
MIDI Echo turned on in
a MIDI sequencer, or
DG8’s Local Control is
still on while using a
MIDI sequencer.
AUX pedal has been set
to control modulation.
AUX pedal has been set
to control volume.
Sustain pedal is plugged
into the
SOFT pedal jack.
Soft pedal is plugged
into the
SUSTAIN/SOST
jack.
Adjust Master Tune
– see page 44.
Press the TRANSPOSE
button, then play Middle C
to set transpose to
+00
– see page 44.
Turn Local Control off in
the DG8 (see page 47) or
turn MIDI Echo off in the
sequencer or computer.
Set AUX pedal to Volume
– see page 47.
Set AUX pedal to
Modulation – see page 47.
Plug the sustain pedal into
the SUSTAIN/SOST jack.
Plug the soft pedal into the
SOFT jack.
64 DG8 REFERENCE MANUAL
Page 64

CLEANING AND MAINTENANCE
While your DG8 should not need much attention, here are some tips for preventive
maintenance:
• Disconnect the AC power Adapter, then use a damp cloth to clean the DG8’s
metal and plastic surfaces. For heavy dirt, use a non-abrasive household
cleaner such as Formula 409
CLEANER DIRECTLY ONTO THE FRONT OR BACK OF THE UNIT AS IT
MAY CONTAMINATE THE INTERNAL CARD SLOT CONTACTS, THE
DISPLAY OR THE FRONT PANEL BUTTONS! Spray onto a cloth, then use
the cloth to clean the unit.
• Periodically check the power adapter for signs of fraying or damage.
• Unplug the DG8’s AC power adapter when not in use for extended periods
of time.
• Place a dust cover over the unit when it is not in use.
• Vacuum around the RAM card slot to keep dust from falling into it. DO NOT
SPRAY ANY KIND OF CLEANER OR LUBRICANT into the card slot.
• The one place where contact cleaner may be useful is on the three 1/4” back
panel jacks and cables. Periodically disconnect the DG8 from AC power and
all cables, and clean the 1/4” cable ends with rubbing alcohol or electronic
contact cleaner, then work the plug into the jack repeatedly. DO NOT SPRAY
CONTACT CLEANER DIRECTLY INTO THE JACKS. It’s better to use a
damp plug to clean the jacks, or use a cotton or foam swab (but be careful not
to get cotton or foam stuck in the unit). While Alesis does not endorse the use
of any specific product, certain contact enhancers (such as Cramolin™) may
be used to keep the connections from corroding in the future.
®
or Fantastik®. DO NOT SPRAY THE
Appendix B: Troubleshooting
DG8 REFERENCE MANUAL 65
Page 65

Appendix B: Troubleshooting
66 DG8 REFERENCE MANUAL
Page 66

SPECIFICATIONS
MIDI IMPLEMENTATION CHART
Function Transmitted Recognized Remarks
Basic
Channel
Mode
Note
Number True Voice
Velocity Note On
After
Touch
Pitch Bender
Control
Change
Prog
Change True #
System
Exclusive
System
Common
System
Realtime
Aux
Messages
Notes:
Default
Changed
Default
Messages
Altered
Note Off
Keys
Ch’s
0
1
7
11
64
66
67
91
93
Song Position
Song Select
Tune Request
Clock
Commands
Local On/Off
All Notes Off
Active Sense
System Reset
1
Layer Channel sends/receives Program Change/Bank Select only.
2
Some card programs may respond to Channel Aftertouch/Note Off value.
3
0 - 27 for internal Split Programs.
4
0 - 127 for Card Programs.
1
1 - 3
1 - 16
Mode 3
X
1 - 3
1 - 16
Mode 3
X
* * * * * * * *
9 - 120
* * * * * * * *
O
O
X
X
XO
O
O
O
X
O
O
O
O
O
3, 4
0 - 59
* * * * * * * *
XX
X
X
X
X
X
X
X
X
X
0 - 127
0 - 127
O
2
X
X
2
X
O
O
O
O
O
O
O
O
O
0 - 59
0 - 59
X
X
X
X
X
X
X
X
O CC #121
Appendix C: Specifications
1
3, 4
Any three
consecutive
Channels.
Bank Select
From AUX pedal
“ “ “
Sustain
Sostenuto
Soft Pedal
Reverb Depth
Chorus Depth
Mode 1: OMNI ON, POLY Mode 3: OMNI OFF, POLY O : Yes
Mode 2: OMNI ON, MONO Mode 4: OMNI OFF, MONO X : No
DG8 REFERENCE MANUAL 67
Page 67

Appendix C: Specifications
SPECIFICATIONS
Sound Generation Method:
16 Bit Linear 48kHz Sample ROM with sweepable lowpass filter per voice
Polyphonic Voices:
64
Keyboard Section:
88 weighted keys, velocity sensitive
Sound ROM:
24 MB, expandable to 32 MB via PCMCIA Expansion Card Slot
Program Memory:
88 internal preset Programs
Effects:
QS Parallel Matrix Effects
Expansion Slot:
PCMCIA card slot, will play QCards and cards created with Alesis
SoundBridge™ software
Pedal Jacks:
sustain, sostenuto/soft pedal and AUX (modulation or volume)
MIDI Jacks:
In, Out, Thru
Audio Outputs:
Stereo (L/R) outputs on 1/4” jacks, 2 headphone outputs on 1/4” TRS jacks
Audio Inputs:
Stereo (L/R) inputs on 1/4” jacks
Dimensions (WxHxD):
54” x 5.25” x 18.5”
(1370mm x 133mm x 471mm)
Weight:
80 lbs. (36.3kg)
TM
(4 independent stereo multieffect processing busses)
68 DG8 REFERENCE MANUAL
Page 68

Appendix D: Warranty
WARRANTY
This product is warranted by Alesis to the original purchaser against defects in
material and workmanship for a period of 1 year for parts and labor from the date of
purchase. Complete terms of the Limited Warranty are stated on the Warranty Card
packed with the product. Please retain a copy of your dated sales receipt for proof of
warranty status should repairs be necessary.
REFER ALL SERVICING TO ALESIS
We believe that the DG8 should provide years of trouble-free use. However, should
problems occur, DO NOT attempt to service the unit yourself. Service on this product
should be performed only by qualified technicians. THERE ARE NO USERSERVICEABLE PARTS INSIDE.
OBTAINING REPAIR SERVICE
Before contacting Alesis, check over all your connections, and make sure you’ve read
the manual. Your Alesis dealer may be able to offer further assistance.
Customers in the USA:
If the problem persists, copy down the serial number of your DG8 and call Alesis
USA at 1-800-5-ALESIS and request the Technical Support Department. Talk the
problem over with one of our technicians; if necessary, you will be given a return
authorization (RA) number and instructions on how to return the unit to Alesis or
the nearest authorized service center. All units must be shipped prepaid and COD
shipments will not be accepted.
You must indicate the RA number on the shipping label or the shipment will not be
accepted. If you do not have the original packing, ship the DG8 in a sturdy carton
with shock-absorbing materials such as foam or “bubble-pack” surrounding the unit.
Shipping damage caused by inadequate packing is not covered by the Alesis
warranty. Ship the unit with insurance via a carrier that provides a tracking system.
Tape a note to the top of the unit describing the problem, include your name and a
phone number where Alesis can contact you if necessary, as well as instructions on
where you want the product returned. Alesis will pay for standard one-way shipping
back to you on any repair covered under the terms of this warranty.
Field repairs are not authorized during the warranty period, and repair attempts by
unqualified personnel may invalidate the warranty.
Customers outside the USA:
Contact your local Alesis dealer for warranty assistance. Do not return products to
the factory unless you have been given specific instructions to do so. Your warranty
is valid only in the country of purchase.
Internet Addresses:
Important information and advice is available on our web site:
http://www.alesis.com
E-mail may be addressed to: alecorp@alesis1.usa.com
DG8 REFERENCE MANUAL 69
Page 69

Appendix D: Warranty
70 DG8 REFERENCE MANUAL
Page 70

Index
INDEX
A
AC power .......................................................... 19
Alesis contact information ............................... 4
arrow buttons ...................................................27
tutorial .....................................................33–34
audio outputs.................................................... 51
AutoDemos ....................................................... 23
B
Bass Banks, defined ................................... 23, 32
C
Card Bank, defined.................................... 24, 32
Card sounds
as Primary Programs................................... 40
in a Layer
as both Primary and Layer .................... 41
as the Layer sound .................................. 40
as the Primary Program ......................... 41
in a Split
as both Primary and Split sound .......... 41
as the Primary Program ......................... 41
as the Split sound..................................... 41
in a Split-with-Layer ...................................42
using the Alesis QCard............................... 40
CE Declaration of Conformity....................... 13
Chorus.................................................. See effects
Cleaning and maintenance............................. 65
connections........................................................ 19
DG8 as MIDI master.................................... 20
DG8 as MIDI slave....................................... 21
DG8 with MIDI patchbay........................... 22
pedals............................................................. 49
Continuous Controllers .................................. 55
cursor............................................................ 27, 33
D
DG8 setup
AC power...................................................... 19
basics .............................................................. 17
music stand................................................... 18
setting up in the home ................................ 19
sustain pedal................................................. 19
unpacking...................................................... 17
using in a music system.............................. 20
using with other equipment ...................... 17
DG8 sound chart .............................................. 43
display................................................................ 33
E
effects.................................................................. 45
F
factory defaults................................................. 52
FCC information...............................................12
G
graphic equalizer........................................29, 45
I
initializing..........................................................52
K
Keyboard Banks, defined..........................23, 31
Keyboard Scaling function .............................47
L
LAYER LEVEL slider.......................................27
LAYER/OFF button................ 25, 37, 39, 40, 41
Layers
defined .............................................. 25, 36, 61
tutorial......................................................36–37
M
Master Tune............................See TUNE button
MIDI
Channel function..........................................29
Channel Mode Messages ............................57
Channel Voice Messages.............................54
DG8 functions
Bass Sustain...............................................47
Channel messages
Basic Channel .................................29, 46
Program Change commands .............59
Local Control.............................................47
Sustain Catching.......................................47
list of controller numbers............................56
MIDI defined...........................................53, 62
MIDI Implementation chart
defined ...........................................................53
DG8 MIDI chart............................................67
P
pedals
AUX Pedal assignment ...............................47
connections....................................................49
rocker pedals.................................................50
sostenuto pedal.............................................49
sustain pedal .................................................48
tutorial............................................................48
volume and modulation pedals ................50
PLAY button......................................................27
power-up reset function..................................52
Primary Programs, defined ............... 25, 32, 35
R
Reverb...................................................See effects
DG8 REFERENCE MANUAL 71
Page 71

Index
S
Safety Instructions
English ............................................................. 7
French .............................................................. 9
German .......................................................... 11
selecting sounds ............................................... 35
SET SPLIT button....................................... 26, 39
Single mode, defined................................. 25, 35
Sound Slection buttons ................................... 33
specifications..................................................... 68
SPLIT LEVEL slider......................................... 27
SPLIT/OFF button.........................26, 39, 40, 41
Splits
defined..................................................... 26, 36
tutorial .....................................................36–39
Split-with-Layer
defined ...........................................................26
tutorial............................................................39
sustain pedal .....................................................19
Sustain Pedal Catching....................................48
T
TRANSPOSE button ..................................28, 44
Troubleshooting................................................63
TUNE button........................................ 23, 28, 44
U
unpacking ..........................................................17
V
VOLUME LEVEL slider ..................................27
W
Warranty information .....................................69
72 DG8 REFERENCE MANUAL
 Loading...