

Page 1
IMPORTANT INSTALLATION INFORMATION
CAUTION: Disconnect the phone cord from the wall outlet before installing
or replacing the batteries.
Never install telephone wiring during a lightning storm.
Never touch non-insulated telephone wires or terminals, unless the
telephone line has been disconnected at the network interface.
Use caution when installing or modifying telephone lines.
Never install telephone jacks in wet locations unless the jack is specically designed
for wet locations.
•
•
•
•
INSTALLING THE BATTERIES
IMPORTANT: You will have approximately 60 seconds to replace the batteries before the
memories stored in the handset are lost. Please read the instructions before replacing
the batteries and have the batteries ready to be inserted beforehand. As a precaution,
you may want to write down any stored information you do not want erased.
Your Caller ID phone uses 3 AA-size alkaline batteries for receiving and storing
Caller ID records and for the numbers you use for memory dialing.
If both the straight and coiled line cords are already connected, disconnect them
from the base unit. Place the handset aside.
Use a ballpoint pen or other tool to open the battery compartment door.
Insert 3 AA-size alkaline batteries (not included) as shown on the diagram inside
the compartment.
Replace the battery compartment door.
Re-attach the line cords to the unit and check your memory locations. If
installation takes longer than 60 seconds, you should re-set your memory
locations.
IMPORTANT: If you’re not going to use the telephone for more than 30 days, remove
the batteries because they can leak and damage the unit.
1.
2.
3.
4.
5.
CONNECTING THE TELEPHONE LINE
Plug the coiled cord into the jack on the handset.
Plug the long straight line cord into a modular wall telephone jack.
Set the RINGER switch on the base to HI.
Place the handset in the cradle.
NOTE: The unit is properly installed if you pick up the handset and hear the dial tone.
Otherwise, recheck all the installation steps.
WALLMOUNTING THE PHONE
Your telephone may also be mounted on the wall (wall plate not included).
Push the handset hook up and out with your thumb,
turn it over, and replace it in the slot on the base.
Feed the line cord through the groove and wrap the
cord around the track on the bottom of the base.
Feed the line cord through the groove on the opposite
side of the track, and plug the end into the modular
telephone jack.
Slip the mounting holes (on the bottom of the base)
over the wall plate posts and rmly slide the unit down
into place.
1.
2.
3.
4.
1.
2.
3.
4.
INSTALLING THE PHONE
Choose the best location to install your telephone. Your telephone should be placed on a
level surface, such as a desk or table top, or you may mount it on the wall.
= HI - Sound will be loudest.
= LOW - Sound will be lower.
= OFF - Telephone will not ring.
HANDSET LAYOUT
SETTING UP THE CALLER ID MENU
IMPORTANT: Do not plug the telephone into the wall jack while setting up the
Caller ID menu because an incoming call may invalidate the information not yet
saved.
Place the handset in the cradle on the base.
Press the options button. SET 1 DATE appears in the display.
Press either ▲(+) or ▼(-) button to scroll among the 5 menu screens, which are:
SET 1 DATE
SET 2 CODE (default is ----)
SET 3 T-P
SET 4 FLASH (default is 600)
SET 5 LCD (default is 3)
1.
2.
3.
NOTE: You may press delete button anytime to exit the Set Up menu. If no
buttons are pressed within 20 seconds, the phone automatically exists the Set
Up menu and returns to the NO CALLS summary screen.
SETTING DATE/TIME
This adjustment the Caller ID date/time.
To enter the options menu, press the options button. SET 1 DATE appears.
Press the options key to show the current setting of year.
Press the ▲(+) or ▼(-) keys to adjust the 1st digit, then press options to advance
to next digit.
After set year, press the options key to set the month.
If you are adjusting 1 st to 9 th month straightaway press options key after year
adjustment. If you are adjusting 10 th to 12 th month (two digit month), rst press
▼(-) key (after the adjustment of year setting) and sudden rst digit of 10 th to 12
th
month will appear and ashing, then adjust the second digit of month with ▲(+)
or ▼(-) key.
Repeat step 3 and 4 to set the day, hour and minute.
Press options button again to store the value.
The date and time will be updated, every time a FSK Caller ID message has
been received
If a DTMF Caller ID has been received, then it will get the date and time from
the system clock of the phone.
1.
2.
3.
4.
5.
6.
7.
NOTE: The phone return idle mode if no key has been pressed for 20 seconds or
press DELETE before the completion of the current operation, the phone will time
out and return to the idle mode without changing the current time.
SETTING THE LOCAL AREA CODE
The Caller ID unit uses the programmed area code to determine the number
format to display when a valid Caller ID signal is received.
To enter the options menu, press the options button. SET 1 DATE appears.
Press the ▲(+) or ▼(-) arrow button until SET 2 CODE appears.
Press the options button to show the current local area code. The default is----.
The rst digit ashes, indicating it is ready to accept the area code entry.
Press ▲(+) or ▼(-) arrow button to choose 0-9 for the rst digit.
When the desired number is ashing, press the option button to advance to the
next digit.
Repeat steps 4 and 5 until all the digits for your area code are correct.
Press options again to store the local area code.
1.
2.
3.
4.
5.
6.
7.
NOTE: If you make a mistake, you can simply repeat the previous steps until your
area code is set.
SETTING THE DIALING MODE
To enter the options menu, press the option button SET 1 DATE appears.
Press ▲(+) and ▼(-) arrow button until SET 3 T-P
Press the option button to show ( )
Press the ▲(+) and ▼(-) arrow button to change PULSE mode.
Press options button again to store the value.
1.
2.
3.
4.
5.
TO SET THE FLASH TIME
You can set the FLASH time from: 100ms / 300ms / 600ms .
It allows to adjust the ash time. The default setting is 600ms.
To enter the options menu, press the options button, SET 1 DATE appears.
Press the ▲(+) or ▼(-) arrow button until SET 4 FLASH appears.
Press the options button to show FLASH 600(Default Selng).
Press the ▲(+) or ▼(-) arrow button to change the value (600ms, 300ms or
100ms).
Press options button again to store the value.
1.
2.
3.
4.
5.
SETTING THE LCD CONTRAST
This adjustment allows you to adjust the contrast and viewing angle of the display.
To enter the options menu, press the options button. SET 1 DATE appears.
Press the ▲(+) or ▼(-) arrow button until SET 5 LCD appears.
Press the options button to show the current contrast setting. There are 5 levels of
contrast, with the default set to 3.
To decrease the contrast, press the ▼(-) arrow button. To increase, press the ▲(+)
arrow button.
Press options again to store the contrast setting.
1.
2.
3.
4.
5.
TELEPHONE BASICS
ADJUSTING THE VOLUME
You may control the listening level with the VOLUME switch, which has three levels (HI,
MI,LO). It remains at the last level set until you change it.
REDIALING A NUMBER
If you want to call the last number you dialed again (up to 32 digits), use the
redial feature.
Pick up the handset.
Press the redial button.
The last number called is automatically redialed.
1.
2.
3.
MEMORY
Before you store a telephone number in memory, make sure the dialing mode is
correctly set for the type of service you have. The default dialing mode is tone
(touch-tone), so if you have pulse (rotary) service, you must rst change the dialing
mode. See “To Set the Dial Mode.” The following buttons can be stored into any memory
location: 0-9.
STORING FREQUENTLY CALLED NUMBERS
Pick up the handset.
Press the store button.
Use the handset number keys to enter the telephone number (up to 16 digits).
Press the store button.
Push the desired memory location button and press the store button.
Hang up the handset.
1.
2.
3.
4.
5.
6.
NOTE: If you make a mistake, use the delete button to delete wrong digits.
CHANGING A STORED NUMBER
Repeat the storage sequence above. The new number replaces the old number at the
memory location.
ERASING A STORED NUMBER
Press the Dial Button.
Press ▲(+) or ▼(-) button to choose the memory location to be erased.
Press delete key and LCD show “DELETE”. Press DELETE to conrm.
DIALING FREQUENTLY CALLED NUMBERS
Pick up the handset and press the mem button or press the dial button.
Press 0-9 for the memory location. The number dials automatically.
OR
Press dial button while the handset is still in the cradle.
Press the review button for the desired memory location, lift the handset and the
number dials automatically.
REVIEWING NUMBERS STORED IN MEMORY
Press the dial button.
Press ▲(+) or ▼(-) for the memory location. The number shows on the display.
COPY CALLER ID MEMORY TO USER MEMORY
Pickup the handset.
Press the store button.
Press either ▲(+) or ▼(-) to display the number you want to copy.
Press the store button.
Press 0-9 for the memory location. The display ashes if the memory location is
occupied.
Press store to save.
Press the hook switch to exit.
1.
2.
3.
1.
2.
1.
2.
1.
2.
1.
2.
3.
4.
5.
6.
7.
STORING A PAUSE IN MEMORY
The redial button has dual functionality. It becomes a pause button if the store button is
pressed rst. It is valid only when storing a number into memory. Use the redial button
to insert a pause when a delay is needed in an automatic dialing sequence.
For example, when you must dial a 9 to get an outside line, or when you enter codes to
access your long distance company.
You may need to adjust the length of the pause. It can be adjusted from 1 to 9 seconds.
The default setting is 4 seconds.
Pickup the handset.
Press the store button.
Press the redial button.
Press 1-9 (1 = 1 second, 2 = 2 seconds, etc.)
Press store again.
Press the ash button or the hook switch to exit.
USING FLASH
This feature is used to activate customer calling services available through your local
phone company, such as Call Waiting. If you subscribe to any of these services, please
refer to the phone company’s instructions on how to use ash.
To answer an incoming call while having a conversation:
After you hear the Call Waiting tone, press and release the ash button. The rst
call is placed on hold while the second call can be answered.
To return to your rst call and put the second call on hold:
Press and release ash again. The rst call can continue while the second call is
put on hold.
USING TEMPORARY TONE DIALING
If you have pulse service, you can temporarily change from pulse to tone service. After
dialing the telephone number, press and release the *TONE button on the telephone. This
allows access to phone services that require a tone, such as banking and long-distance
services. After you hang up the handset, the telephone automatically returns to pulse
service.
1.
2.
3.
4.
5.
6.
•
•
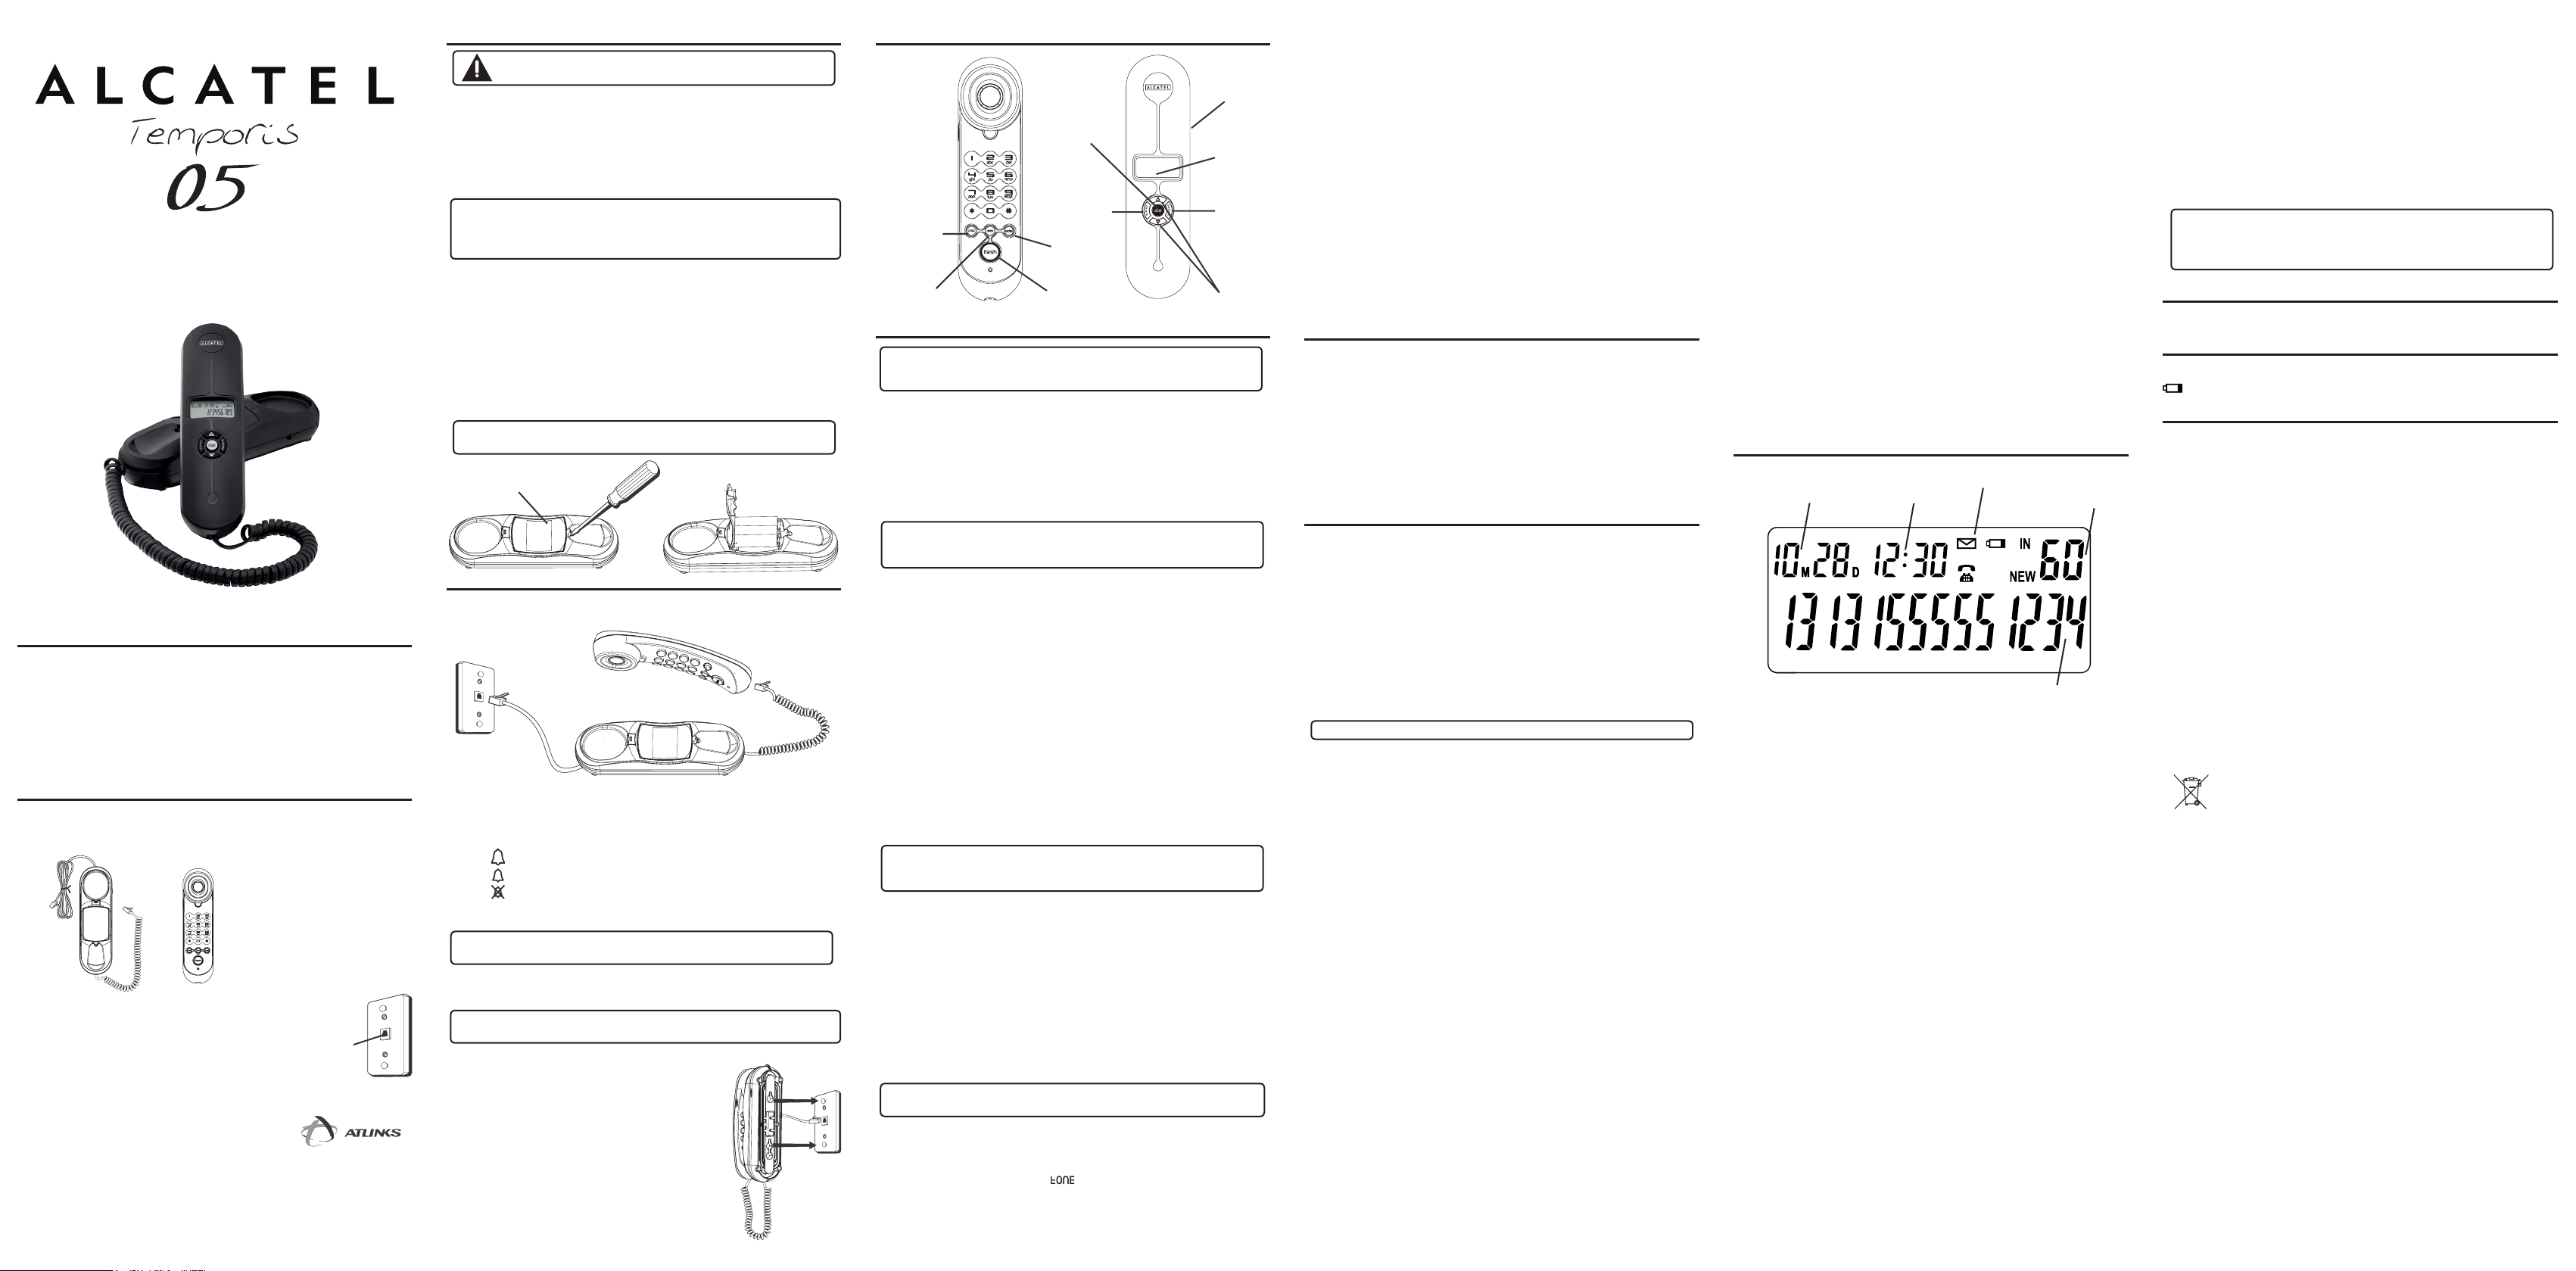
CALLER ID (CID) FEATURES
SUMMARY SCREEN
The Summary Screen shows the current time, current date, and number of new calls to
be reviewed. It displays until any button is pressed. Within 60 seconds of receiving a new
call, the Summary Screen displays.
RECEIVING AND STORING CID RECORDS
This unit receives and displays CID information transmitted by your local phone company. This information can include the phone number, date, and time. The unit stores up
to call records for later review. When the memory is full, a new call record automatically
replaces the oldest call record in memory. NEW shows in the display for call records
received which have not been reviewed.
REVIEWING CID RECORDS
Press either the ▲(+) or ▼(-) down button to view the newest call record.
Press the ▼(-) button to scroll through the call records from the most recent to the
oldest.
Press the ▲(+) button to scroll through the call records from the oldest to the
newest.
When all of the messages have been viewed, appears --End-- in the display.
DELETING CALL RECORDS TO DELETE AN INDIVIDUAL CALL
When reviewing calls, you may delete an individual call by pressing the delete button
once. The display will show “DEL ONE” Press delete button again fo conrm the delete.
TO DELETE ALL CALLS
When reviewing calls, you may delete all calls by pressing and holding the delete
button for more than 4 seconds. DEL ALL? appears in the display.
Press delete again to conrm.
DIALING BACK
When reviewing Caller ID records, you may dialback the phone numbers shown on the
display by pressing the dial button.
IF YOU PROGRAMMED YOUR LOCAL AREA CODE IN THE SETUP MENU
Use the ▲(+) and ▼(-) buttons to scroll to the number you want to dial.
If you see a number with 7 digits (i.e. 555-1234), then the call was received from
within your area code. However, this does not guarantee the call is a local call.
If you see a number with 11 digits (i.e. 1-234-555-1234), then the call received was
•
•
•
•
1.
2.
1.
•
•
not from your area code.
Press the dial button, a 10 second timer also starts in the upper right side of the
display, letting you know the time remaining until the unit returns to the Summary
Screen. If you adjust the number to be dialed, the timer automatically resets itself.
To adjust the phone number.
To dial the displayed number, pick up the handset before the timer reaches 0.
2.
3.
4.
IF YOU DID NOT PROGRAM YOUR LOCAL AREA CODE IN THE SETUP MENU
Use the ▲(+) and ▼(-) buttons to display the number you want to dial. You will only
see digit numbers (i.e. 234-555-1234).
See steps 2 through 4 in the above section to complete the dialback sequence.
NOTE: IF PICKUP PHONE shows on the display, no other changes to the number can
be made. The information sent from the telephone company is known to be a valid
number to dial back (available only in limited areas). Once you pickup the phone, the
number is automatically dialed.
VISUAL MESSAGE WAITING INDICATOR
When you have a message in the centralized voice mail system, this indicator will be lit.
you need to contact your services provider for more details.
CALLER ID DISPLAY MESSAGES
The following special messages indicate the status of a message or the unit:
Battery power level is low. Please replace the batteries as soon as
possible in order to maintain Caller ID operation.
TROUBLESHOOTING TIPS
NO DIAL TONE
Check all cabling to make sure that all connections are secure and not damaged.
Check the hook switch: Does it fully extend when handset is lifted from cradle?
NO DISPLAY
Replace batteries.
Make sure the batteries are properly installed.
NO INFORMATION IS SHOWN AFTER THE PHONE RINGS
In order to receive Caller ID records, you must subscribe to the standard name and
number Caller ID service available through your local telephone company.
Be sure to wait until the second ring before answering.
PHONE DOES NOT RING
Make sure ringer switch is set to HI.
You may have too many extension phones on your line. Unplug some extension
phones.
Check for a dial tone. If there is no dial tone see solutions for “No dial tone.”
OTHER PARTY CANNOT HEAR YOU
Make sure phone cord is securely plugged in.
Make sure extension phones are on the hook at the same time you’re using the
phone. It is normal for the volume to drop when additional extension phones are
used at the same time.
CANNOT DIAL OUT
Make sure the T/P dialing mode is set to the type of phone service you are
subscribed to.
Used equipment must be disposed of in compliance with current
environmental protection regulations. You should return it to your
reseller or dispose of it in an approved recycling centre.
1.
2.
•
•
•
•
•
•
•
•
•
•
•
•
INTRODUCTION
Your Caller ID phone stores and displays specic information, provided by your local
telephone company, to subscribers of Caller ID or similar caller identication services.
Your Caller ID phone enables you to:
Identify callers before you answer the phone.
View the time and date of each incoming call.
Record up to 60 Caller ID messages sequentially.
Know who called while you were away.
To get the most from your new phone, we suggest that you take a few minutes right now
to read through this user’s guide.
BEFORE YOU BEGIN
PARTS CHECKLIST
Make sure your package includes the following items:
•
•
•
•
TELEPHONE JACK REQUIREMENTS
To use this phone, you need an RJ11C type modular
telephone jack, which might look like the one pictured
here, installed in your home. If you don’t have a modular jack,
call your local phone company to nd out how to get one
installed.
NOTE: To prevent the handset from falling out of the cradle while the phone is
hanging on the wall, you must reverse the handset hook (located on the base).
Telephone
User’s Guide
Alcatel logo and Alcatel name are trademarks of Alcatel and used under license by Thomson Telecom.
ATLINKS
22 quai Gallieni
92150 Suresnes
France
www.atlinks.com
Base Handset
Wall plate
Telephone
line jack
Battery compartment
options
button
store button
display
dial button
volume
switch
delete button
arrow buttons
redial button
ash button
mem button
Caller ID number
New calls
Current date
Current time
Visual message waiting indicator
Model Temporis 05-EX
00030413 (Rev.2 E/S)
12-29
Printed in China
Page 2
IMPORTANTE INFORMACIÓN DE INSTALACIÓN
PRECAUCIÓN: Desconecte el cable del teléfono de la salida de la pared
antes de instalar o reemplazar las pilas.
No instale el cableado telefónico durante una tormenta eléctrica.
No toque los cables y terminales no aislados a menos que la línea telefónica esté
desconectada de la interfaz de red.
Tenga cuidado al instalar o modicar las líneas telefónicas.
No instale los tomas de teléfono en lugares húmedos a menos que el toma esté
diseñado para lugares húmedos.
•
•
•
•
= HI – El sonido estará alto.
= LOW – El sonido estará bajo.
= OFF – El teléfono no sonará.
DESCRIPCIÓN DEL MICROTELÉFONO
CONFIGURAR EL MENÚ DEL IDENTIFICADOR DE
LLAMADAS
IMPORTANTE: No enchufe el teléfono en el toma de la pared mientras congure el
menú del Identicador de Llamadas ya que una llamada entrante podría invalidar
la información que no haya guardado todavía.
Coloque el microteléfono en la base.
Pulse el botón OPTIONS. Se mostrará SET 1 DATE en el visor.
Pulse el botón ▲(+) o ▼(-) para desplazarse a través de las 5 pantallas del menú,
que son las siguientes:
SET 1 DATE
SET 2 CODE (el predeterminado es ----)
SET 3 T-P
SET 4 FLASH (el predeterminado es 600)
SET 5 LCD (el predeterminado es 3)
1.
2.
3.
NOTA: Puede pulsar el botón DELETE en cualquier momento para salir del menú de
conguración. Si no pulsa ningún botón durante 20 segundos, el teléfono saldrá
automáticamente del menú de conguración y regresará a la pantalla de resumen
que lee NO CALLS.
NOTA: El teléfono regresará al modo inactivo si no pulsa ningún botón durante 20
segundos o si pulsa el botón DELETE antes de nalizar la operación actual y no
cambiará la hora actual.
CONFIGURAR EL CÓDIGO DE ÁREA LOCAL
La unidad de Identicador de Llamadas utiliza el código de área programado para
determinar el formato de número para mostrar cuando se recibe una señal válida de
Identicador de Llamadas.
Para ingresar al menú de opciones, pulse el botón OPTIONS. Se mostrará SET 1
DATE en el visor.
Pulse el botón ▲(+) o ▼(-) hasta que se muestre SET 2 CODE en el visor.
Pulse el botón OPTIONS para mostrar el código de área local actual. El código
predeterminado es ----. El primer dígito parpadeará, indicando que está listo para
aceptar el ingreso del código de área.
Pulse el botón ▲(+) o ▼(-) para seleccionar 0-9 para el primer dígito.
Cuando el número deseado parpadee, pulse el botón OPTIONS para pasar al
siguiente dígito.
Repita los pasos 4 y 5 hasta que haya ingresado todos los dígitos correctos de su
código de área.
Pulse el botón OPTIONS otra vez para guardar el código de área local.
1.
2.
3.
4.
5.
6.
7.
NOTA: Si cometió un error, puede repetir simplemente los pesos anteriores hasta que
el código de área quede congurado.
CONFIGURAR EL MODO DE MARCADO
Para ingresar al menú de opciones, pulse el botón OPTIONS. Se mostrará SET 1
DATE en el visor.
Pulse el botón ▲(+) o ▼(-) hasta que se muestre SET 3 T-P en el visor.
Pulse el botón OPTIONS para mostrar (TONE).
Pulse el botón ▲(+) y ▼(-) para cambiar al modo de pulsos (PULSE).
Pulse el botón OPTIONS otra vez para guardar la conguración.
1.
2.
3.
4.
5.
CONFIGURAR EL TIEMPO DE FLASH
Puede congurar el tiempo de FLASH desde 100ms / 300ms / 600ms.
Le permitirá ajustar el tiempo de ash. La conguración predeterminada es de 600ms.
Para ingresar al menú de opciones, pulse el botón OPTIONS. Se mostrará SET 1
DATE en el visor.
Pulse el botón ▲(+) o ▼(-) hasta que se muestre SET 4 FLASH en el visor.
Pulse el botón OPTIONS para mostrar FLASH 600 (conguración predeterminada).
Pulse el botón ▲(+) o ▼(-) para cambiar el valor (600ms, 300ms o 100ms).
Pulse el botón OPTIONS para guardar el valor seleccionado.
1.
2.
3.
4.
5.
CONFIGURAR EL CONTRASTE DEL VISOR LCD
Este ajuste le permitirá congurar el contraste y el ángulo de visión del visor.
Para ingresar al menú de opciones, pulse el botón OPTIONS. Se mostrará SET 1
DATE en el visor.
Pulse el botón ▲(+) o ▼(-) hasta que se muestre SET 5 LCD en el visor.
Pulse el botón OPTIONS para mostrar la conguración actual de contraste. Hay
cinco niveles de contraste y el valor predeterminado es 3.
Para disminuir el contraste, pulse el botón ▼(-). Para incrementar el contraste,
pulse el botón ▲(+).
Pulse el botón OPTIONS otra vez para guardar la conguración de contraste.
1.
2.
3.
4.
5.
INFORMACIÓN BÁSICA DEL TELÉFONO
AJUSTAR EL VOLUMEN
Puede controlar el nivel de audición con el interruptor VOLUME, que tiene tres niveles (HI,
MI,LO). Permanecerá en el último nivel congurado hasta que usted lo modique.
RELLAMAR A UN NÚMERO
Si desea llamar al último número que marcó (hasta 32 dígitos), utilice la función de
rellamada (REDIAL).
1. Tome el microteléfono.
2. Pulse el botón REDIAL.
3. Se marcará automáticamente el último número al que llamó.
MEMORIA
Antes de guardar un número de teléfono en la memoria, asegúrese de que el modo
de marcado esté correctamente congurado con el tipo de servicio que usted posee.
El modo de marcado predeterminado es por tonos (digital), por lo tanto, si posee
servicio por pulsos (rotativo), primero cambie el modo de marcado. Consulte la sección
“Congurar el modo de marcado”. Los siguientes botones se pueden almacenar en
cualquier ubicación de la memoria: 0-9.
ALMACENAR NÚMEROS A LOS QUE LLAMA
FRECUENTEMENTE
Tome el microteléfono.
Pulse el botón STORE.
Utilice los botones numéricos del microteléfono para ingresar el número de
teléfono (hasta 16 dígitos).
Pulse el botón STORE.
Pulse el botón de la ubicación deseada en la memoria y pulse el botón STORE.
Cuelgue el microteléfono.
1.
2.
3.
4.
5.
6.
NOTA: Si comete un error, utilice el botón DELETE para borrar los dígitos incorrectos.
CAMBIAR UN NÚMERO ALMACENADO
Repita la secuencia de almacenamiento anterior. Los nuevos números reemplazarán los
números viejos en la ubicación de la memoria.
BORRAR UN NÚMERO ALMACENADO
Pulse el botón DIAL.
Pulse el botón ▲(+) o ▼(-) para seleccionar la ubicación en la memoria que desea
borrar.
Pulse el botón DELETE y el visor mostrará la leyenda “DELETE”. Pulse el botón
DELETE para conrmar.
MARCAR NÚMEROS A LOS QUE LLAMA FRECUENTEMENTE
Tome el microteléfono y pulse el botón MEM o pulse el botón DIAL.
Pulse un botón del 0 al 9 para la ubicación en la memoria. El número se marcará
automáticamente.
O
Pulse el botón DIAL con el microteléfono en la base.
Pulse el botón REVIEW para la ubicación deseada de la memoria, tome el
microteléfono y el número se marcará automáticamente.
REVISAR NÚMEROS ALMACENADOS EN LA MEMORIA
Pulse el botón DIAL.
Pulse el botón ▲(+) o ▼(-) para la ubicación de la memoria. El número se mostrará
en el visor.
COPIAR LA MEMORIA DEL IDENTIFICADOR DE LAMADAS A
LA MEMORIA DEL USUARIO
Tome el microteléfono.
Pulse el botón STORE.
Pulse el botón ▲(+) o ▼(-) para mostrar el número que desea copiar.
Pulse el botón STORE.
Pulse un botón de 0 a 9 para la ubicación en la memoria. El visor parpadeará si la
ubicación de la memoria está ocupada.
Pulse el botón STORE para guardar.
Pulse el interruptor para colgar para salir.
1.
2.
3.
1.
2.
1.
2.
1.
2.
1.
2.
3.
4.
5.
6.
7.
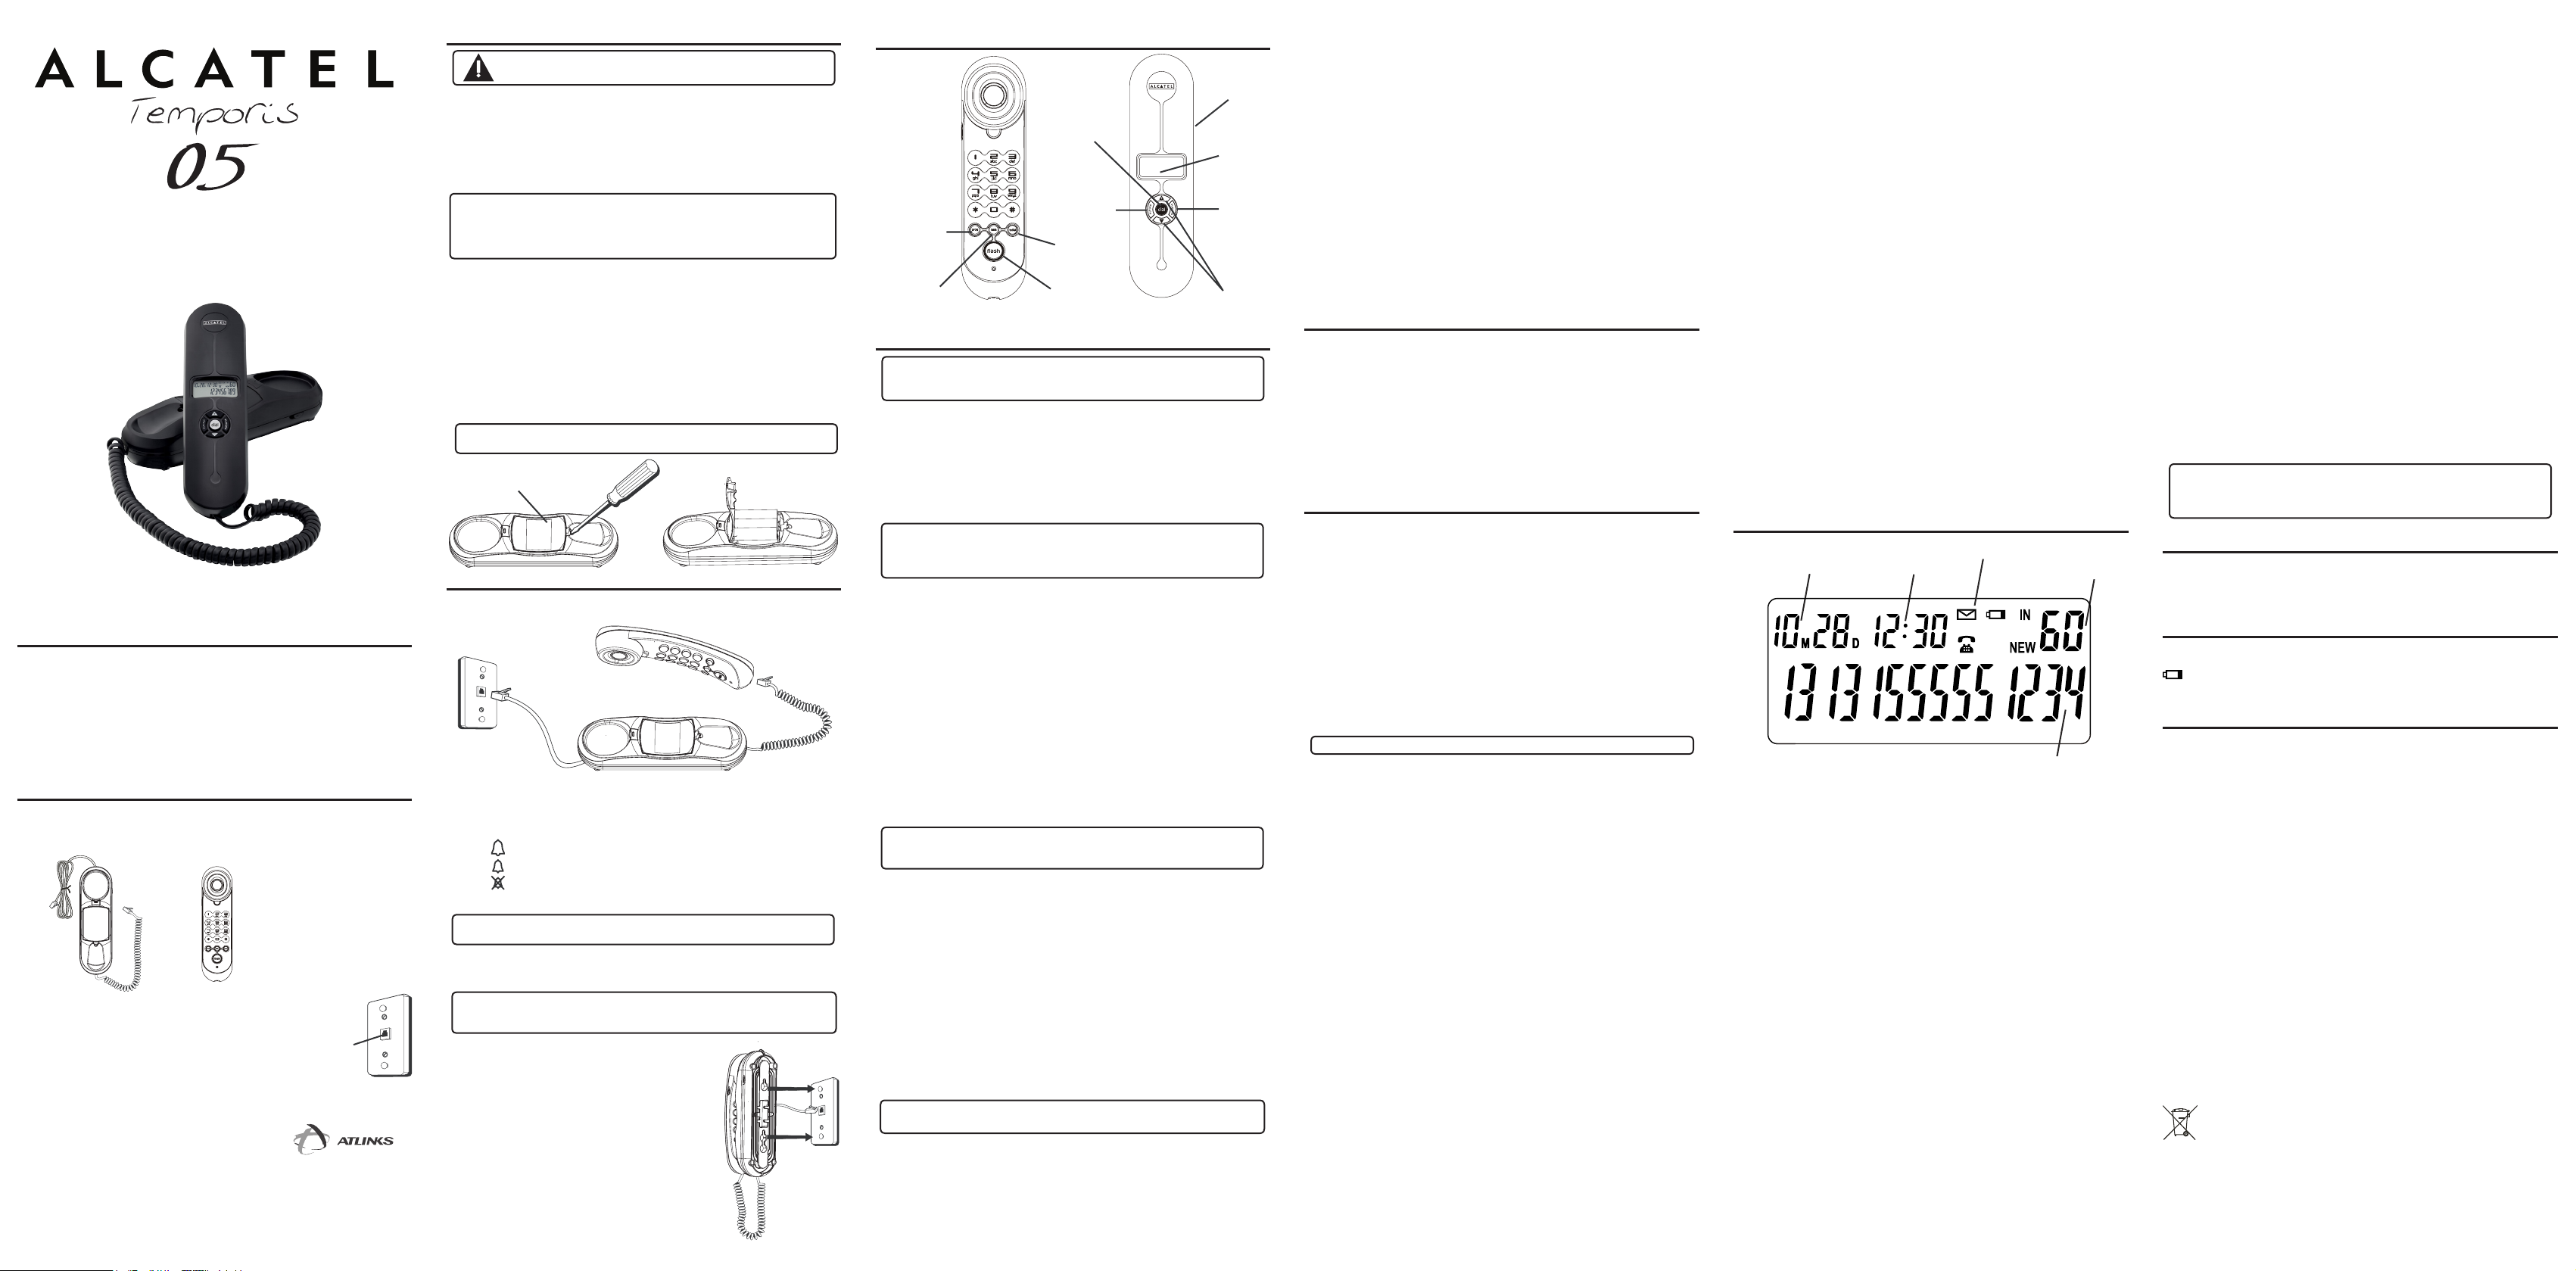
CARÁCTERÍSTICAS DEL IDENTIFICADOR DE LLAMADAS
(CID)
PANTALLA DE RESUMEN
La pantalla de resumen muestra la hora actual, la fecha actual, la cantidad de nuevas
llamadas para revisar. Se muestra hasta que pulsa cualquier botón. Dentro de los
siguientes 60 segundos de recibida una llamada, se mostrará la pantalla de resumen.
RECIBIR Y ALMACENAR REGISTROS DEL IDENTIFICADOR DE
LLAMADAS
Esta unidad reciba y muestra información del Identicador de Llamadas transmitida por
su empresa de teléfonos local. Esta información puede incluir el número de teléfono, la
fecha y la hora. La unidad almacena registros de llamadas para una revisión posterior.
Cuando la memoria está llena, un nuevo registro de llamada automáticamente reemplaza al registro más antiguo. Se mostrará NEW en el visor para los registros recibidos que
no han sido revisados.
REVISAR LOS REGISTROS DEL IDENTIFICADOR DE LLAMADAS
Pulse el botón ▲(+) o ▼(-) para ver el registro de llamada más nuevo.
Pulse el botón ▼(-) para desplazarse a través del os registros de llamada desde la
más reciente hasta la más antigua.
Pulse el botón ▲(+) para desplazarse a través de los registros de llamada desde el
más antiguo hasta el más nuevo.
Cuando se han revisado todos los mensajes del registro del Identicador de
llamadas, se mostrará --End—en el visor.
BORRAR REGISTROS DE LLAMADAS
BORRAR UNA SOLA LLAMADA
Cuando revisa las llamadas, puede borrar una sola llamada pulsando el botón DELETE
una vez. El visor mostrará “DEL ONE”. Pulse el botón DELETE otra vez para conrmar el
borrado.
•
•
•
•
INTRODUCCIÓN
Su teléfono con Identicador de Llamadas almacena y muestra información especíca,
provista por su empresa de teléfonos local, a los subscriptores del servicio de Identicación
de Llamadas o un servicio similar. Su teléfono con Identicador de Llamadas le permite:
identicar a la persona que llama antes de contestar el teléfono;
ver la hora y la fecha de cada llamada entrante;
saber quién llamó mientras estaba ausente;
almacenar hasta 60 mensajes del Identicador de Llamadas en secuencia.
Para obtener lo máximo de tu teléfono, le sugerimos que se tome unos minutos para leer
esta guía de usuario.
ANTES DE COMENZAR
LISTA DE PARTES
Asegúrese de que su embalaje contenga lo siguiente:
•
•
•
•
REQUISITOS DE TOMA DE TELÉFONOS
Para utilizar este teléfono, necesitará tener instalado en su
hogar un toma de teléfonos modular tipo RJ11C, que puede
verse similar al de la gura. Si no posee un toma de teléfonos
modular, comuníquese con su empresa de teléfonos local para
averiguar cómo instalar uno.
Base Microteléfono
Placa de
pared
Toma de
teléfonos
Compartimiento de
las pilas
Número del identicador
de llamadas
Nuevas llamadas
Fecha actual
Hora actual
Indicador visual de mensaje en espera
INSTALAR LAS PILAS
IMPORTANTE: Tendrá aproximadamente 60 segundos para reemplazar las pilas
antes de que se pierdan todas las memorias almacenadas en el microteléfono. Por
favor, lea las instrucciones antes de reemplazar las pilas y tenga las pilas listas para
colocarlas. Como precaución, puede anotar toda la información almacenada que no
desee borrar.
Su teléfono con Identicador de Llamadas utiliza 3 pilas AA alcalinas para recibir y
almacenar los registros del Identicador de Llamadas y los números que utiliza para
marcar desde la memoria.
Si ambos cables, el plano y el enroscado, ya están conectados, desconéctelos de
la unidad base. Aparte el microteléfono.
Utilice un bolígrafo de punta u otra herramienta para abrir la tapa del
compartimiento de las pilas.
Inserte 3 pilas AA alcalinas (no incluidas) según se muestra en el diagrama
dentro del compartimiento.
Vuelva a colocar la tapa del compartimiento de las pilas.
Vuelva a conectar los cables de línea a la unidad y verique las ubicaciones
de la memoria. Si la instalación de las pilas tarda más de 60 segundos, deberá
recongurar las ubicaciones de la memoria.
1.
2.
3.
4.
5.
IMPORTANTE: Si no utilizará el teléfono por más de 30 días, retire las pilas ya que
podrían tener pérdidas y así dañar la unidad.
INSTALAR EL TELÉFONO
Elija la mejor ubicación para instalar su teléfono. Deberá colocarlo sobre una supercie
nivelada, tal como un escritorio o una mesada o puede colocarlo en la pared.
Enchufe el cable enroscado en el toma del microteléfono.
Enchufe el cable plano largo en un toma de teléfonos modular de la pared.
Coloque el interruptor RINGER de la base en la posición HI.
Coloque el microteléfono en la base.
1.
2.
3.
4.
CONECTAR LA LÍNEA TELEFÓNICA
NOTA: La unidad estará correctamente instalada si toma el microteléfono y oye el
tono de marcado. Si no es así, verique los pasos de instalación.
COLOCAR EL TELÉFONO EN LA PARED
Puede colocar su teléfono en la pared (placa de pared no incluida).
NOTA: Para evitar que el microteléfono se caiga de la base mientras el teléfono está
colgando en la pared, deberá revertir la posición del interruptor para colgar (ubicado
en la base).
Presione el interruptor para colgar hacia arriba y
hacia afuera con su dedo, gírelo y vuelva a colocar
en la ranura de la base.
Inserte el cable a través de la guía que se encuentra
en la parte inferior de la base.
Inserte el cable de línea telefónica en la guía
opuesta y enchufe el extremo en el toma de
teléfonos modular.
Deslice los oricios para colgar (en la parte inferior
de la base) sobre los ganchos de la placa de pared
y deslice la unidad hacia abajo hasta que encastre
por completo.
1.
2.
3.
4.
Botón STORE
Botón MEM
Botón FLASH
Botón REDIAL
Botón DELETE
Botón DIAL
Botones de echas
Botón
OPTIONS
Visor
Interruptor
VOLUME
CONFIGURAR FECHA / HORA
Esto ajustará la fecha / hora del Identicador de Llamadas.
Para ingresar al menú de opciones, pulse el botón OPTIONS. Se mostrará SET 1
DATE en el visor
Pulse el botón OPTIONS para mostrar la conguración actual del año.
Pulse el botón ▲(+) o ▼(-) para ajustar el primer dígito y luego pulse el botón
OPTIONS para pasar al siguiente dígito.
Después de determinar el año, pulse el botón OPTIONS para determinar el mes.
Si está congurando el mes 1 al 9, pulse el botón OPTIONS después del ajuste del
año. Si está congurando el mes del 10 al 12 (dos dígitos), primero pulse el botón
▼(-) (después del ajuste del año) y el primer dígito del mes 10 o 12 se mostrará
parpadeando. Luego, congure el segundo dígito con el botón ▲(+) o ▼(-).
Repita los pasos 3 y 4 para congurar el día, la hora y los minutos.
Pulse el botón OPTIONS otra vez para guardar el valor.
Se actualizarán la fecha y la hora cada vez que se reciba un mensaje del Identicador
de Llamadas FSK.
Si se recibe un mensaje del Identicador de Llamadas DTMF, obtendrá la fecha y la hora
del reloj del sistema del teléfono.
1.
2.
3.
4.
5.
6.
7.
ALMACENAR UNA PAUSA EN LA MEMORIA
El botón REDIAL tiene doble función. Se convierte en un botón de pausa so se pulsa
primero el botón STORE. Solo es válido cuando está almacenando un número en la
memoria. Utilice el botón REDIAL para insertar una pausa cuando necesita un espacio
en una secuencia de marcado automático. Por ejemplo, cuando debe marcar 9 para
obtener línea externa o cuando tiene que ingresar códigos para acceder a su empresa
de larga distancia.
Es posible que necesite ajustar la duración de la pausa. Puede ser de 1 a 9 segundos. La
conguración predeterminada es 4 segundos.
Tome el microteléfono Pickup the handset.
Pulse el botón STORE.
Pulse el botón REDIAL.
Pulse un botón del 1 al 9 (1 = 1 segundo, 2 = 2 segundos, etc.).
Pulse el botón STORE otra vez.
Pulse el botón FLASH o el interruptor para colgar para salir.
UTILIZAR LA FUNCIÓN FLASH
Esta función se utiliza para activar los servicios de llamadas del cliente disponibles a
través de su empresa de teléfonos local, tales como Llamada en espera. Si se subscribe
a alguno de estos servicios, por favor consulte las instrucciones de su empresa de
teléfonos acerca de cómo utilizar la función FLASH.
Para contestar una llamada entrante mientras está manteniendo una conversación:
Después de oír el tono de Llamada en espera, pulse el botón FLASH. La primera
llamada se colocará en espera mientras contesta la segunda llamada.
Para regresar a su primera llamada y colocar la segunda llamada en espera:
Pulse el botón FLASH otra vez. Podrá continuar con la primera llamada mientras
coloca la segunda llamada en espera.
UTILIZAR EL TONO TEMPORARIO
Si posee servicio por pulsos, puede cambiar temporariamente de pulsos a tonos.
Después de marcar el número de teléfono, pulse el botón TONE en el teléfono. Esto
le permitirá acceder a los servicios que requieren de servicio por tonos, tales como
servicios bancarios y de larga distancia. Después de colgar el microteléfono, el teléfono
regresará automáticamente al servicio por pulsos.
1.
2.
3.
4.
5.
6.
•
•
BORRAR TODAS LAS LLAMADAS
Cuando revisa las llamadas, puede borrar todas las llamadas pulsando y 1.
SI PROGRAMÓ EL CÓDIGO DE ÁREA LOCAL EN EL MENÚ DE
CONFIGURACIÓN
Utilice el botón ▲(+) y ▼(-) para desplazarse a través de los números que desea
marcar.
Si ve un número con 7 dígitos, (por ejemplo, 555-1234), entonces la llamada fue
realizada desde su código de área. Sin embargo, esto no garantiza que la llamada
haya sido una llamada local.
Si ve un número con 11 dígitos, (por ejemplo, 1-234-555-1234), entonces la
llamada no fue realizada desde su código de área.
Pulse el botón DIAL. Comenzará un cronómetro de 10 segundos en el
extreme superior derecho del visor para permitirle saber el tiempo restante
antes de que la unidad regrese a la pantalla de resumen. Si ajusta el
número que desea marcar, el cronómetro se reiniciará automáticamente.
Para ajustar el número de teléfono.
Para marcar el número que se muestra, tome el microteléfono antes de
que el cronómetro llegue a 0.
SI NO PROGRAMÓ SU CÓDIGO DE ÁREA LOCA EN EL MENÚ
DE CONFIGURACIÓN
Utilice el botón ▲(+) y ▼(-) para desplazarse a través de los números que desea
marcar. Solo verá los números de los dígitos (por ejemplo, 234-555-1234).
Consulte los pasos 2 a 4 de la sección anterior para completar la secuencia de
devolución de llamadas.
1.
•
•
2.
3.
4.
1.
2.
NOTA: Si se muestra la leyenda PICKUP PHONE en el visor, no se pueden realizar
más cambios al número de teléfono. La información enviada desde su empresa de
teléfonos local es un número válido para llamar (disponible solo en áreas limitadas).
Una vez que tome el microteléfono, el número se marcará automáticamente.
INDICADOR VISUAL DE MENSAJE EN ESPERA
Cuando tiene un mensaje en el sistema de correo de voz centralizado, este indicador se
iluminará. Necesitará contactar al proveedor del servicio para obtener más detalles.
MENSAJES DEL VISOR DEL IDENTIFICADOR DE
LLAMADAS
Los siguientes mensajes especiales indican e estado de un mensaje o de la unidad.
El nivel de batería está bajo. Por favor, reemplace las pilas tan pronto sea posible
para mantener el funcionamiento del Identicador de Llamadas.
SOLUCIÓN DE PROBLEMAS
NO HAY TONO DE MARCADO
Verique el cableado para asegurarse de que todas las conexiones son correctas
y no están dañadas.
Verique el interruptor para colgar. ¿Se extiende por completo cuando se toma el
microteléfono?
NO SE MEUSTRA NADA EN EL VISOR
Reemplace las pilas.
Asegúrese de que las pilas están correctamente instaladas.
NO SE MUESTRA NINGUNA INFORMACIÓN DESPUÉS DE QUE SUENA EL TELÉFONO
Para recibir registros del Identicador de Llamadas, deberá subscribirse al servicio
estándar de Identicación de Llamadas de número y nombre, disponible a través
de su empresa de teléfonos local.
Asegúrese de esperar hasta que suene por segunda vez antes de contestar la
llamada.
EL TELÉFONO NO SUENA
Asegúrese de que el interruptor RINGER esté en la posición HI.
Es posible que tenga demasiadas extensiones en su línea. Desenchufe algunas de
las extensiones.
Verique el tono de marcado. Si no hay tono de marcado, consulte las soluciones
para “No hay tono de marcado”.
LA OTRA PERSONA NO ME ESCUCHA
Asegúrese de que el cable del teléfono esté bien enchufado.
Asegúrese de que las extensiones están colgadas al mismo tiempo que usted está
utilizando el teléfono. Es normal que baje el volumen cuando se están utilizando
teléfonos adicionales al mismo tiempo.
NO SE PUEDE MARCAR
Asegúrese de que el modo de marcado T/P esté de acuerdo con el tipo de servicio
telefónico al que usted está suscripto.
•
•
•
•
•
•
•
•
•
•
•
•
El equipo usado deberá eliminarse de acuerdo con las reglamentaciones de
protección ambiental actuales. Deberá regresar la unidad al revendedor o
desecharlo en un centro de reciclado aprobado.
manteniendo pulsado el botón DELETE por más de 4 segundos. El visor mostrará
DEL ALL?.
Pulse el botón DELETE otra vez para conrmar.
DEVOL VER UNA LLAMADA
Cuando revisa las llamadas, puede llamar a los números de teléfono que se muestran
en el visor pulsando el botón DIAL.
2.
Teléfono
Guía de usuario
Alcatel logo and Alcatel name are trademarks of Alcatel and used under license by Thomson Telecom.
Modelo Temporis 05-EX
00030413 (Rev.2 E/S)
12-29
Impreso en China
ATLINKS
22 quai Gallieni
92150 Suresnes
France
www.atlinks.com
 Loading...