

Page 1

ALCATEL STREAK
User Guide
TM
Page 2

Some of the contents in this manual may differ from your phone depending on the
software of the phone. Actual color may vary.
Your phone is designed to make it easy for you to access a wide variety of content. For your
protection, we want you to be aware that some applications that you enable may involve
the location of your phone being shared. For applications available through Cricket, we
offer privacy controls that let you decide how an application may use the location of your
phone and other phones on your account. However, the Cricket privacy tools do not apply
to applications available outside of Cricket. Please review the terms and conditions and the
associated privacy policy for each location-based service to learn how location information
will be used and protected. In addition, your Cricket phone may be used to access the
internet and to download, and/or purchase goods, applications, and services from Cricket
or elsewhere from third parties. Cricket provides tools for you to control access to the Internet
and certain Internet content. These controls may not be available for certain devices which
bypass Cricket controls.
© 2016 Cricket Wireless LLC. All rights reserved. Cricket and the Cricket logo are
registered trademarks under license to Cricket Wireless LLC. Other marks are the
property of their respective owners.
ALCATEL is a trademark of Alcatel-Lucent used under license by TCL Communication
LTD. ONETOUCH and Flint are trademarks of TCL Communication LTD.
© 2016 TCT Mobile Limited. All rights reserved.
TCL Communication Ltd. reserves the right to alter material or technical specification
without prior notice.
All "Signature" ringtones embedded in this phone have been composed, arranged and
mixed by NU TROPIC (Amar Kabouche).
Table of contents
Getting started ............................................................................................ 6
Phone setup ............................................................................................................. 6
Extending the battery life.........................................................................................9
Powering your phone on/off ................................................................................... 9
Getting around ...................................................................................................... 11
Getting to know your phone ................................................................................. 13
Key functions .......................................................................................................... 15
Phone calls ............................................................................................... 25
Making calls ........................................................................................................... 25
Receiving calls ....................................................................................................... 27
Adjusting your call settings ................................................................................... 30
Contacts .................................................................................................... 31
Importing and exporting contacts ....................................................................... 31
Sharing contact information ................................................................................. 32
Creating a contact ................................................................................................ 32
Adding a contact to Favorites .............................................................................. 32
Searching for a contact ........................................................................................ 33
Joining contacts .................................................................................................... 33
Separating contact information ........................................................................... 34
Entering text .............................................................................................. 35
Using Onscreen Keyboard .................................................................................... 35
Google keyboard ................................................................................................... 35
Text editing ............................................................................................................. 36
1
Page 3

Messaging ................................................................................................. 37
Opening the messaging screen ...........................................................................37
Sending a message .............................................................................................. 37
Replying to a message..........................................................................................38
Forwarding a message ..........................................................................................38
Copying a message .............................................................................................. 39
Changing message settings ................................................................................. 39
Email .......................................................................................................... 40
Setting up the first email account ........................................................................ 40
Checking your emails ............................................................................................ 40
Responding to an email ........................................................................................ 41
Writing and sending an email .............................................................................. 42
Adding and editing email accounts ................................................................... 43
Changing general email settings .........................................................................43
Connecting to the Internet ....................................................................... 44
Adding a new mobile data connection .............................................................. 44
Turning on Wi-Fi ...................................................................................................... 44
Connecting to a Wi-Fi network .............................................................................. 45
Adding a Wi-Fi network .......................................................................................... 45
Checking the Wi-Fi network status ........................................................................ 46
Connecting to a WPS network .............................................................................. 46
Connecting to virtual private networks ................................................................ 47
Browsing the Internet ................................................................................ 49
Using the Browser ................................................................................................... 49
Opening a web page or searching the web ...................................................... 49
Using multiple browser tabs .................................................................................. 50
Switching between tabs ........................................................................................ 50
Setting the home page ......................................................................................... 50
Downloading files ..................................................................................................51
Changing browser settings ................................................................................... 51
Mobile Hotspot and tethering .................................................................. 52
To share your phone's data connection via USB ................................................52
To share your phone's data connection as a portable Wi-Fi hotspot ............... 52
To rename or secure your portable hotspot ........................................................ 52
Using Wi-Fi Direct ...................................................................................... 53
Connecting to another device via Wi-Fi Direct .................................................... 53
Bluetooth ................................................................................................... 54
Turning Bluetooth on/off ........................................................................................54
Changing the device name ................................................................................. 54
Pairing with another Bluetooth device ................................................................. 55
Unpairing from a Bluetooth device ...................................................................... 55
Sending data via Bluetooth .................................................................................. 56
Receiving data via Bluetooth ................................................................................ 56
Entertainment ............................................................................................ 57
Capturing a photo ............................................................................................... 57
2 3
Page 4

Adjusting camera settings .................................................................................... 58
Recording a video ................................................................................................. 59
Polaroid Features.................................................................................................... 60
Using your gallery .................................................................................................. 61
Making memorable memos ................................................................................. 63
Google applications ................................................................................. 65
Gmail ...................................................................................................................... 65
Google Calendar .................................................................................................. 66
Google Chrome ..................................................................................................... 66
Google+.................................................................................................................. 66
Google Maps ......................................................................................................... 67
Google Search ....................................................................................................... 70
Google Music ......................................................................................................... 71
Google Play Store ..................................................................................................74
Creating a Google Wallet account ...................................................................... 75
Applications .............................................................................................. 77
Calculator ............................................................................................................... 77
Clock ....................................................................................................................... 77
Downloads ............................................................................................................. 78
Files ......................................................................................................................... 78
YouTube .................................................................................................................. 78
Phone settings ........................................................................................... 79
WIRELESS & NETWORKS........................................................................................... 79
DEVICE .................................................................................................................... 80
PERSONAL ............................................................................................................... 84
System ..................................................................................................................... 87
Upgrading the phone software ................................................................ 89
Troubleshooting .........................................................................................90
For your safety ........................................................................................... 93
General safety ........................................................................................................ 93
FCC RF Exposure Information (SAR) .....................................................................94
FCC compliance ................................................................................................... 95
Hearing Aid Compatibility (HAC) regulations for mobile phones ...................... 97
CTIA ........................................................................................................................ 98
Distraction ...............................................................................................................99
Product handling ................................................................................................. 100
Electrical safety .................................................................................................... 103
Interference .......................................................................................................... 103
Explosive environments........................................................................................ 105
Specifications ......................................................................................... 106
12 MONTH LIMITED WARRANTY ............................................................... 107
Electronic Recycling ............................................................................... 110
Notes ....................................................................................................... 111
4 5
Page 5
Getting started
Phone setup
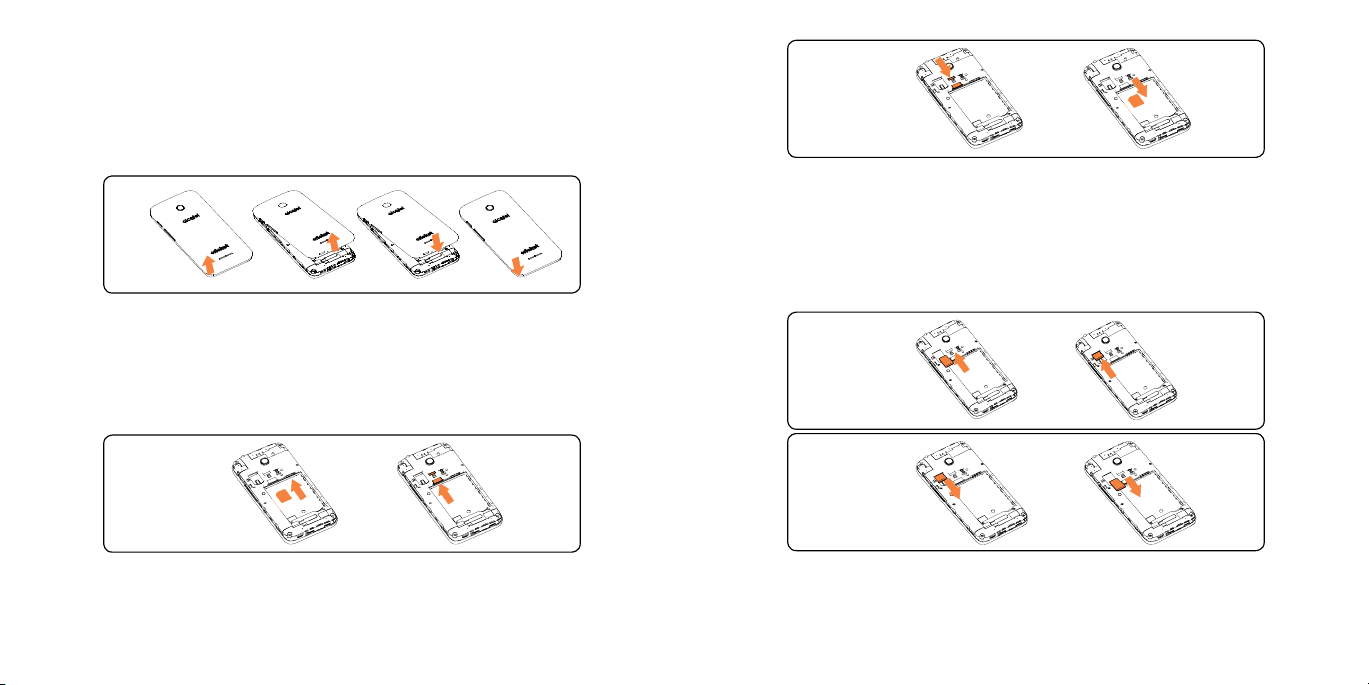
Removing or installing the back cover
Important: To avoid damage to the phone, please use the standard microSIM card included in the box.
Installing a microSD card (not included)
Place the microSD card with the gold contacts facing downwards and
slide it into its housing. Make sure that it is correctly inserted. To remove the
microSD card, press and slide it out.
Installing the micro-SIM card
You must insert your SIM card to make phone calls.
Place the SIM card with the gold contacts facing downwards and slide it into
its housing. Make sure that it is correctly inserted. To remove the SIM card,
press and slide it out.
Note: Some applications may require a microSD card to work normally or
to store data. Therefore, it is recommended that you keep a microSD card
installed and not remove or replace it randomly.
6 7
Page 6
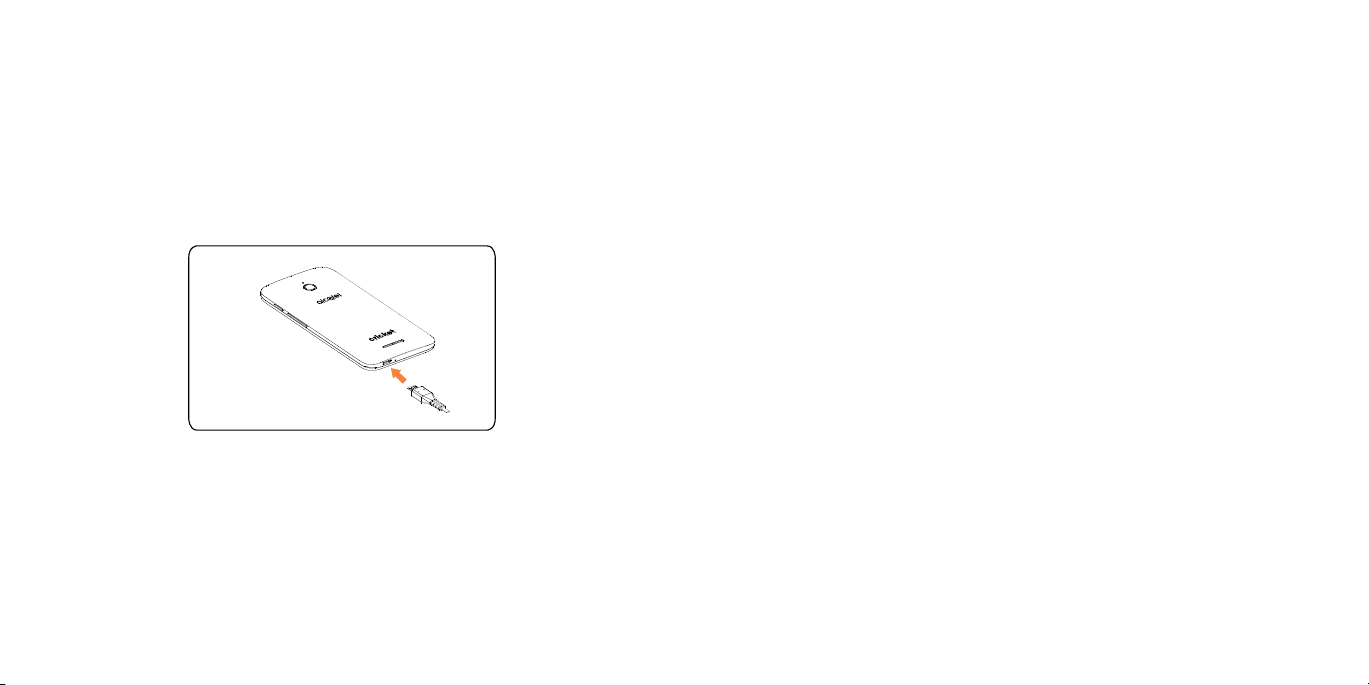
Charging the battery
Your phone’s battery should have enough power for the phone to turn on,
find a signal, and make a few calls. You should fully charge the battery as
soon as possible.
When the battery is low, the low-battery warning icon will pop-up on the
screen.
If the battery is extremely low, you may be unable to power on the phone
even when it is being charged. In this case, try again after charging the
phone for at least 10 minutes.
Warning! Use only Alcatel-approved chargers and cables. The use of
unapproved accessories could damage your phone.
Attempting to remove the battery could result in injury and will void your
warranty.
Do not attempt to disassemble, damage, alter or remove battery from device.
Extending the battery life
Active applications, screen brightness levels, Bluetooth and Wi-Fi usage, and
GPS functionality can drain your battery. You can follow the helpful tips below
to conserve your battery power:
• Reduce the screen backlight time.
• Lower the screen brightness.
• Turn auto-sync, Wi-Fi, and Bluetooth off when not in use.
• Disable the GPS function when not in use. Most applications using this
function will periodically query the GPS satellites for your current location;
each query drains your battery.
1. Insert the charger’s connector into the charging port. Be sure to insert the
connector in the correct orientation. Do not force the connector into the
port.
Plug the charger into a standard AC wall outlet.
2.
3.
When the battery is fully charged, unplug the charger and disconnect it
from the phone.
8 9
Powering your phone on/off
Make sure the micro-SIM card is in your phone and the battery is charged.
• Press and hold the Power key to power on your phone.
• To power it off, press and hold the Power key to open the options menu.
Tap Power off.
Page 7

Setting up your phone for the first time
Follow the steps below to set up your phone for the first time or after factory
reset:
1.
Tap the language field to select the language you want to use and then
tap .
2.
Tap SKIP to set up Wi-Fi connections later or tap a network. If the network is
secured, enter the password and tap CONNECT > NEXT.
3.
Set up Date & time, then touch NEXT.
4.
Enter your first and last name to allow your phone to personalize some
apps, then touch NEXT.
5.
Protect your phone option will be displayed next, select Protect this
device check box and choose screen lock: Pattern, PIN or Password, to
prevent other from using your device. Then select screen lock notifications
preference and touch NEXT.
You will be prompted to read the terms of Google service. Tap to learn
6.
more about Google Services, then touch NEXT.
7.
Your phone will then display Setup completed screen and tap FINISH to
access home screen.
8.
You will be prompted to read the terms of Cricket Wi-Fi Manager. Tap I
AGREE to continue.
Switching to Sleep Mode
To save battery power, Sleep Mode suspends your phone in a low-powerconsumption state while the display is off. Your phone also goes into Sleep
Mode by itself when the display is automatically turned off after a certain
period of time, which you can set by tapping
> Settings > Display >
Sleep from the home screen.
Press the Power key to switch to Sleep Mode.
Waking up your phone
Press the Power key to activate your screen display.
Note: If you have set an unlock pattern, PIN, or password for your phone (see
Settings – Lock screen – Screen lock) you’ll need to draw the pattern or enter
the PIN/password to unlock your screen.
Getting around
Touch control
Your phone’s touch screen lets you control actions through a variety of touch
gestures.
• Tap: Tap the buttons, icons, or applications to select items or to open
applications.
• Press and hold: To open the available options for an item (such as a
message or link in a web page), press and hold the item.
• Swipe or slide: To swipe or slide means to quickly drag your finger
vertically or horizontally across the screen.
10 11
Page 8

• Drag: To drag, press and hold your finger with some pressure before you
start to move your finger. While dragging, do not release your finger until
you have reached the target position.
• Pinch: In some apps (such as Maps, Browser, and Gallery), you can zoom
in and out by placing two fingers on the screen and pinching them
together (to zoom out) or spreading them apart (to zoom in).
• Rotate the screen: For most screens, you can automatically change
the screen orientation from portrait to landscape by turning the phone
sideways.
Getting to know your phone
Receiver
Camera lens
Indicator light
Status and notification bar
Touch screen
Recent apps key
Home key
Back key
12 13
Page 9
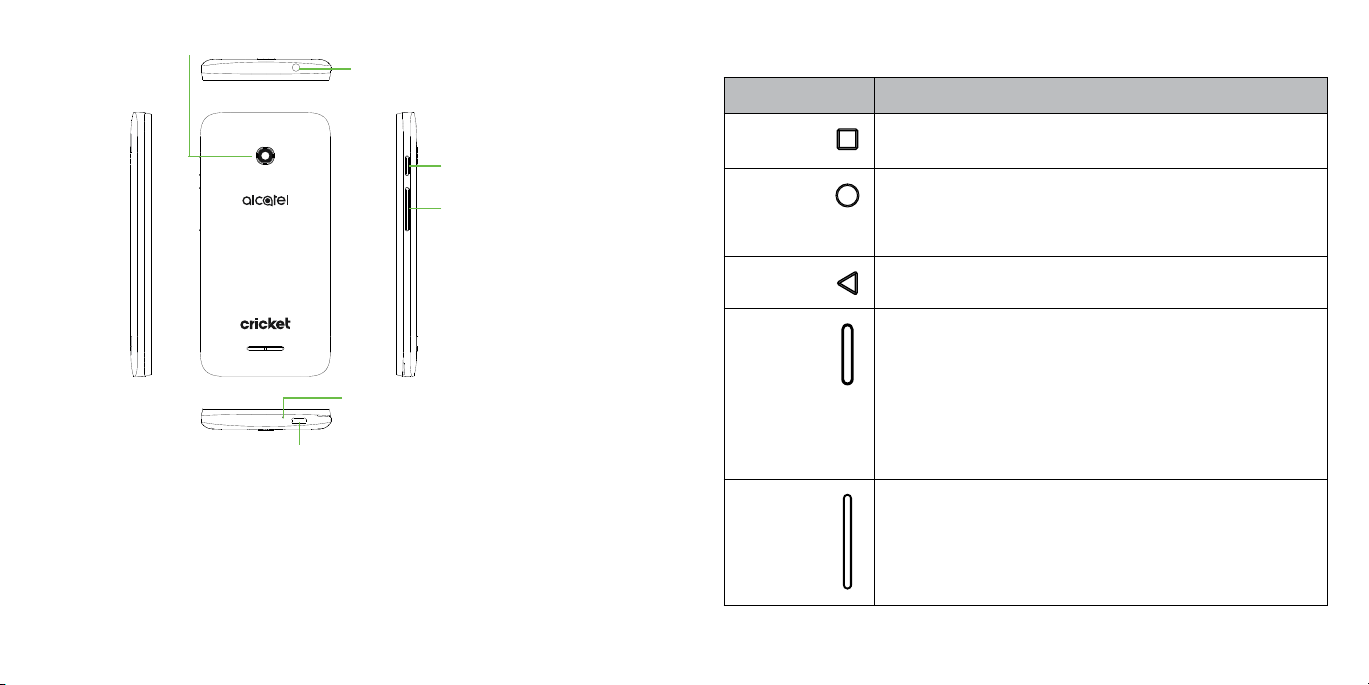
Camera
Headset port
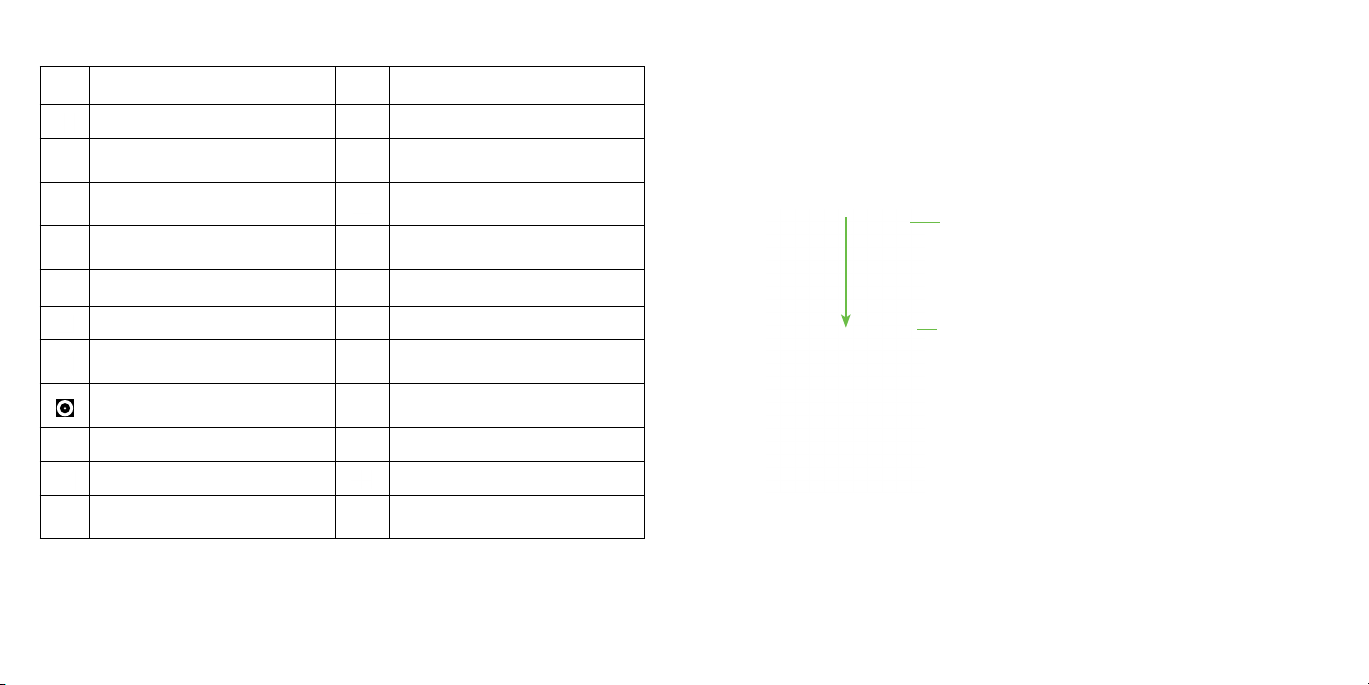
Key functions
Key Function
Recent
Power key
Volume keys
Speaker
Charging/data port
14 15
apps key
Home key
Back key
Power key
Volume
Keys
Tap to see recently used applications.
From any application or screen, touch to return to the
Home screen.
Touch and hold to pop up Google search icon. Slide
your finger to the icon to open Google search.
Touch to go back to the previous screen, or to close a
dialog box, options menu, the notification panel, etc.
Press and hold to turn phone on/off, restart the phone,
or to set to Airplane mode.
Press to switch your phone to Sleep Mode.
Press to wake up your phone.
Press and hold the Power key and Volume down key to
capture a screenshot.
Press and hold the power key for 8 seconds to power off
or hold it for 10 seconds or more to force reboot.
Press the Volume Key to increase or decrease the volume.
Press the Volume key to take photo.
Press the Volume key to adjust the ringtone volume or
mute the ringtone of an incoming call.
Press Volume key to adjust the media volume in Music/
Video/Streaming mode.
Page 10

Customize your Home screen by adding application shortcuts,
widgets, folders, and using wallpapers.
Status and notification bar
Adding items to your home screen
• To add an app to your home screen, tap
app, and drag it to the home screen.
, press and hold the desired
• To add a widget to your home screen, press and hold on a blank area of
the screen and tap WIDGETS. Press and hold the desired widget and drag
it to the home screen.
Widget
Adjusting widget size
1.
Press and hold a widget on the home screen and then release it.
2.
Long press again and released the widget, then an outline will appear
around the widget. You can adjust its size.
Note: Not all widgets can be resized.
Shortcuts
Favorite shortcuts
Extended home screen
In addition to the main home screen, your phone has one extended home
screens to provide more space for adding icons, widgets, and more. Simply
swipe your finger to the left or right to see the extended home screen panels.
Choosing your wallpaper
1.
Press and hold an empty place on the home screen and tap WALLPAPERS.
2.
Tap a wallpaper and tap Set wallpaper. You can also tap Pick image to
select additional options.
Organizing icons with a folder
1.
Hold and drag an application over the other to create folders.
2.
To add more shortcuts into the folder, press and hold each shortcut and
drag it over the folder before releasing it.
Removing items from your home screen
Press and hold the item you want to delete until Remove appears on
1.
the screen.
2.
Drag the item to Remove and release your finger when the item turns
red.
Viewing your apps
From the home screen, tap
to access all the applications on the phone.
You can add apps to your home screen and uninstall or disable them.
16 17
Page 11
Uninstall or Disable an application
From the home screen, tap .
1.
2.
Press and hold an application.
3.
To uninstall an app, drag it to Uninstall and release it.
To find the disabled applications, tap > Settings > Apps. Tap an
4.
application and tap ENABLE to enable it.
5.
Tap OK.
Note: Not all applications can be uninstalled or disabled.
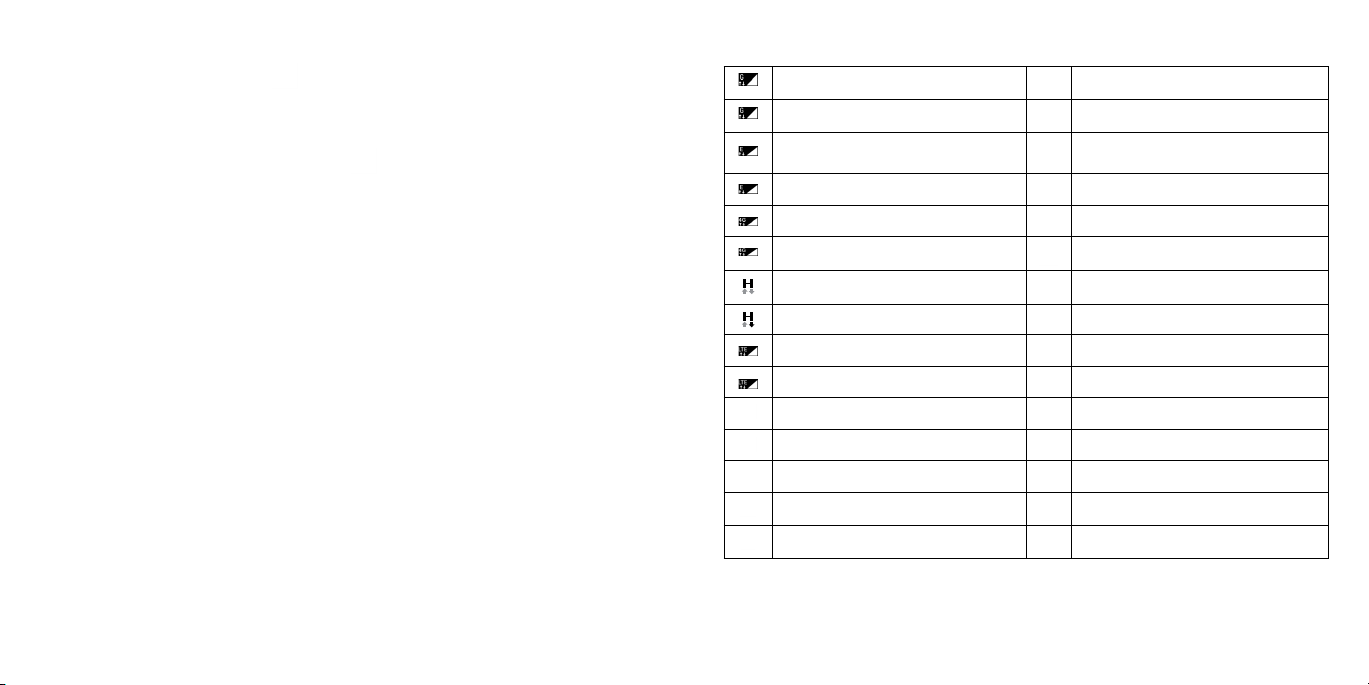
Status and notification icons
Your phone will tell you exactly what’s going on by showing you simple icons.
Here’s what they mean.
Status icons
GPRS connected Alarm is set
GPRS in use Bluetooth is on
EDGE connected
Connected to a Bluetooth
device
EDGE in use Speakerphone is on
4G connected Phone microphone is mute
4G in use Roaming
HSPA (3G+) connected No SIM card installed
HSPA (3G+) in use Vibrate mode
LTE connected Battery is very low
LTE in use Battery is low
Wi-Fi is on Battery is partially drained
Connected to a Wi-Fi network Battery is full
Airplane mode Battery is charging
Signal strength GPS is on
No signal
18 19
Page 12
Notification icons
New Gmail message Missed call
New Email message Call forwarding is on
New text or multimedia
message
Problem with SMS or MMS
delivery
New Google Hangouts
message
New voicemail Download finished
Upcoming event Select input method
Screenshot captured
Both USB tethering and
portable hotspot are on
USB tethering is on System update available
Portable Wi-Fi hotspot is on More notifications are hidden
Carrier data use threshold
approaching or exceeded
Connected to VPN
Radio is on
Uploading data
An open Wi-Fi network is
available
Phone is connected via USB
cable
Using the Notifications panel
Touch and drag down the Status bar to open the Quick setting panel
or Notification panel. Touch and drag up to close it. When there are
notifications, you can touch them to access notifications directly.
Notification panel
When there are notifications, touch and drag down the Status bar to open
the Notification panel to read more detailed information.
Switch to the quick setting panel.
Clear all event–based notifications (other
ongoing notifications will remain).
20 21
Page 13

Quick setting panel
Touch and drag down the Notification panel or touch
setting panel. Get quick access to commonly used settings like Wi-Fi, screen
brightness, airplane mode, and others, using the Quick Settings panel. You
can open this panel from anywhere on your device, including your lock
screen.
Enter user screen.
Access Settings, where you can set more
items.
to open the Quick
Protecting your phone with a screen unlock pattern
You can protect your phone by creating a screen lock. When enabled, you
need to swipe the screen, draw a pattern or enter a numeric PIN or password
to unlock the phone’s screen and keys.
1. From the home screen, tap
2. Tap Screen lock.
3. Tap Swipe, Pattern, PIN, or Password.
• Tap None to disable screen lock.
• Tap Swipe to enable screen lock.
• Tap Pattern to create a pattern you must draw to unlock the screen.
• Tap PIN or Password to set a numeric PIN or a password that you must
enter to unlock your screen.
> Settings > Lock screen.
Protecting your phone with encryption
You can encrypt all of the data on your phone: Google Accounts,
application data, music and other media, downloaded information, and
so on. If you do, you must enter a numeric PIN or password each time you
power on your phone.
Warning! Encryption is irreversible. The only way to revert to an unencrypted
phone is to perform a factory data reset, which erases all your data.
Encryption provides additional protection in case your phone is stolen, and
may be required or recommended in some organizations.
Before turning on encryption, prepare as follows:
• Set a lock screen PIN or password.
22 23
Page 14

• Charge the battery.
• Keep the phone connected to the charger.
• Schedule an hour or more for the encryption process: you must not
interrupt it or you will lose some or all of your data.
When you’re ready to turn on encryption:
1. From the home screen, tap
2. Read the information about encryption carefully.
The ENCRYPT PHONE button is dimmed if your battery’s not charged or
your phone’s not plugged in.
If you change your mind about encrypting your phone, tap
3. Tap ENCRYPT PHONE.
The encryption process starts and displays its progress. Encryption can take
an hour or more, during which time your phone may restart several times.
When encryption is completed, you’re prompted to enter your PIN or password.
Subsequently, you must enter your PIN or password each time you power on
your phone, to decrypt it.
> Settings > Security > Encrypt phone.
.
Phone calls
Making calls
There are many ways to make a call with your phone, and they’re all easy to
do.
Calling from the dialer
1. From the home screen, tap .
2. Tap
to open the dialer.
24 25
Page 15

3.
Enter the phone number with the on-screen keypad. Tap to delete
incorrect digits.
Note: As you enter digits, your phone searches for contacts that match.
If you see the number you want to dial, touch it to place the call
immediately without entering the rest of the number.
4. Tap
Tip: To make an international call, press and hold the 0 key to enter the plus
(+) symbol. Next, enter the country code, followed by the city/area code,
and then the phone number.
to place the call.
Dial a Recent Number
1. From the home screen, tap > .
2. Flick the screen up or down and tap the contact you want to call .
Tip: You can search for a contact by tapping the search field above the
contacts list.
Tap the icon before the number then tap to call, or tap the number to
3.
call.
Calling from your contacts
1. From the home screen, tap .
2.
Swipe your finger up or down to scroll through the contacts list, tap the
contact you want to call, then tap
Tip: You can search for a contact by tapping the search field above the
Contact lists.
to call.
Dial from text message
If a text message contains a phone number that you want to call, you can
make the call while viewing the text message.
1. From the home screen, tap
Tap the conversation and then tap .
2.
.
Receiving calls
Answering a call
When you receive a phone call, swipe right to answer the call.
Note: To silence the ringer before answering the call, press either end of the
Volume key.
Rejecting a call
When you receive a phone call, swipe left to reject the call.
You can also swipe
message or write your own to send to the caller.
Tip: To edit a preset text response, tap
up to reject the call and select a preset text
> > Settings > Quick responses.
26 27
Page 16
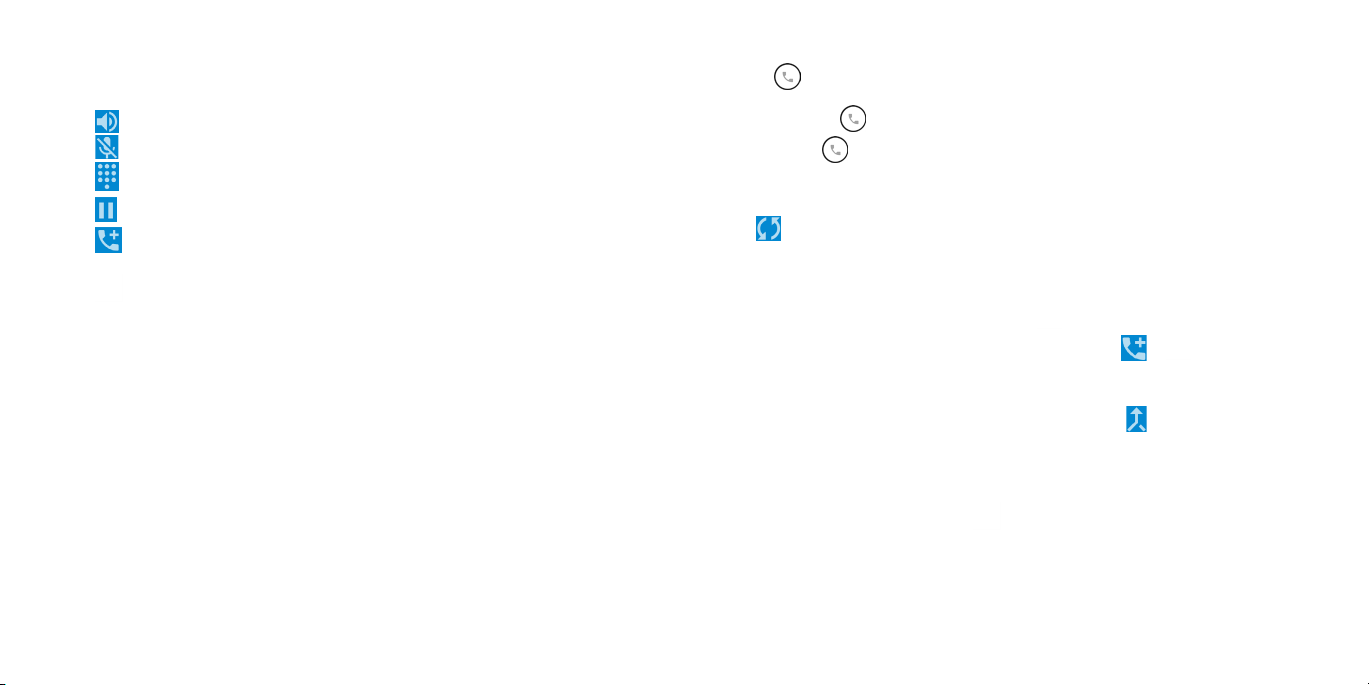
Using options during a call
During a call, you will see a number of on-screen options. Tap an option to
select it.
• Tap
• Tap
• Tap
• Tap
• Tap
to turn the speaker on or off.
to mute or unmute your microphone.
to switch to the dialer.
to put the call on hold.
to make another call separately from the first call, which is put on
hold.
• Tap
to end the current call.
Warning! Because of higher volume levels, do not place the phone near
your ear during speakerphone use.
Managing multi-party calls
When call waiting and three-way call features are available, you can switch
between two calls or set up a conference call.
Note: Call waiting and three-way call features require network support and
may result in additional charges. Please contact your service provider for
more information.
Switching between current calls
When you’re on a call, your phone screen informs you that another call is
coming in and displays the caller ID.
To respond to an incoming call while you’re on a call:
Swipe
right to answer the call. This puts the first caller on hold and
answers the second call. Slide down to answer the second call and end the
first call. Swipe
Note: Swipe
left to reject the second call.
up to reject the second call and select a preset text
message to the caller.
To switch between two calls:
Tap
or On hold on the screen.
Setting up a conference call
You can make another call while a call is in progress.
1.
In the dialer, enter a number and tap .
2.
Once you have established the connection, tap > and dial the
second number. This puts the first caller on hold and dials the second
number.
3.
When you’re connected to the second party, tap .
If one of the people you called hangs up during your call, you and the
remaining caller stay connected. If you initiated the call and are the first to
hang up, all callers are disconnected.
To end the conference call, tap
.
28 29
Page 17

Adjusting your call settings
From the home screen, tap > > Settings to configure the call options.
Display options
Touch to sort the list by first or last name. You can also view contact names
by last name first.
Sounds and vibrate
Touch Phone ringtone to set incoming call ringtone. Mark the corresponding
checkbox to enable dial pad tones or vibrate for calls.
Quick Responses
Touch to edit quick responses which will be used when you reject a call with
messages.
Accessibility
TTY mode
TTY mode enables people who are deaf, hard of hearing, or speechimpaired to use the telephone to communicate. After connecting the phone
and TTY devices that includes a keyboard and a text display mechanism,
calls are linked to a relay service, which converts incoming speech to text
and converts outgoing text to a spoken voice.
Hearing aids
Mark the checkbox to enable hearing aid compatibility.
Contacts
You can add contacts on your phone and synchronize them with the
contacts in your Google account or other accounts that support contact
syncing.
To see your contacts, tap
the tabs on the top to quickly switch to FAVORITES or ALL CONTACTS.
Importing and exporting contacts
You can import/export contacts from/to your micro-SIM card, phone storage,
or microSDHC card. This is especially useful when you need to transfer
contacts between different devices. You can also quickly share your contacts
using Bluetooth, Email, Messaging, etc.
If you have added contact accounts in locations other than your phone,
select an account in which to save the contacts.
1.
From the home screen, tap .
Tap > Import/Export, then tap Import from SIM card, Export to SIM
2.
card, Import from SD storage/phone storage, Export to SD storage/
phone storage.
To import/export a single contact from/to your SIM card, select the contact
you want to import/export, and touch the
To import/export all contacts from/to your SIM card, mark the check box of
icon
into and then the / icon to confirm.
on the home screen. From there, you can tap
/ icon to confirm.
30 31
Page 18

Sharing contact information
You can share a single contact or contacts with others by sending the
contact's vCard to them via Bluetooth, Gmail, etc.
1.
From the Contacts screen, tap > Share contact.
2.
This menu allows you to choose how you would like to share the contacts.
Available options will depend on the applications and services installed.
Creating a contact
1. From the Contacts screen, tap to add a new contact.
2.
Tap the account field near the top of the screen to choose where to save
the contact. If a sync account is selected, the contacts will be synced
automatically with your account online.
Enter the contact name, phone numbers, email addresses, and other
3.
information.
4.
Tap to save the contact.
Adding a contact to Favorites
You can add the contacts you use frequently to Favorites so that you can
find them quickly.
1. From the Contacts screen, tap the contact you want to add to Favorites.
2. Tap
.
Searching for a contact
1. Tap above the contacts list.
2.
Enter the contact name you want to search for. Matching contacts will be
listed.
Joining contacts
As your phone synchronizes with multiple online accounts, you may see
duplicate entries for the same contact. You can merge all the separate
information of a contact into one entry in the Contacts list.
1. From the home screen, tap
2. Tap a contact to display the contact’s details.
3. Tap
4. Tap the contact whose information you want to join with the first entry.
5. Tap
The information from the second contact is added to the first, and the
second contact is no longer displayed in the contacts list.
You can repeat these steps to join another contact to the main contact.
> Edit > > Join.
.
.
32 33
Page 19

Separating contact information
If contact information from different sources was joined in error, you can
separate the information back into individual contacts on your phone.
1. From the home screen, tap
2. Tap a contact you have merged and want to separate.
3. Tap
4. Tap OK to confirm.
> Edit > > Separate.
.
Entering text
Using Onscreen Keyboard
Onscreen Keyboard settings
Touch Settings > Language & Input, touch the keyboard you want to set up
and a series of settings will become available for your selection.
Adjust the Onscreen Keyboard orientation
Turn the phone sideways or upright to adjust the Onscreen Keyboard
orientation. You can adjust this in the phone display settings. (Touch Settings
> Display > Auto-rotate screen).
Google keyboard
Switch "abc/Abc"
mode; Touch & hold
to switch "abc/ABC"
Switch between
symbol and numeric
mode.
keyboard.
Touch & hold to
select symbols.
Input comma.
Touch & hold to show input options.
34 35
Page 20
Text editing
You can edit the text you have entered.
• Touch and hold or double-tap within the text you would like to edit.
• Drag the tabs to change the highlighted selection.
• The following options will show: To edit text, choose from: SELECT ALL, CUT,
COPY, SHARE.
• Touch the
You can also insert new text if preferred
• Touch where you want to type, or touch and hold the blank, the cursor will
blink and the tab will show. Drag the tab to move the cursor.
• If you have selected any text, touch the tab to show the PASTE icon which
allows you to complete pasting immediately.
icon to go back without any action.
Messaging
You can use Messaging to exchange text messages (SMS) and multimedia
messages (MMS).
Opening the messaging screen
From the home screen, tap .
The Messaging screen opens, where you can create a new message, search
for messages, or open an ongoing message thread.
• Tap
• Tap
• Tap an existing message thread to open the conversation you’ve had with
Sending a message
1. From the Messaging screen, tap at the bottom.
2.
Add recipients by one of the following ways:
• Tap the To field and manually enter the recipient’s number or the contact
• Select recipients from your contacts by tapping
3.
Tap the Type message field and enter the content of your text message.
to write a new text or multimedia message.
to search for a message with keywords.
a certain number.
name. If the phone presents a few suggestions, tap the one you want to
add.
.
36 37
Page 21

If you want to send a multimedia message, tap the paper clip icon
4.
to attach a file or a slideshow to the message.
5. Tap
to send your message.
Notes:
• You can also include email addresses as recipients for multimedia
messages.
Replying to a message
Messages you receive are appended to existing threads of the same
number. If the new message comes from a new number, a new thread is
created.
From the Messaging screen, tap the thread that has the message you
1.
want to reply to.
2.
Type your reply in the text box at the bottom. You can tap if you want
to reply with an MMS.
3.
Tap to send your message.
Forwarding a message
1. From the Messaging screen, touch and hold the thread you want to
forward.
2.
Tap .
3.
Enter a recipient for the message and edit the content if you want.
4.
Tap to send your message.
Copying a message
To copy a text message from the phone to the SIM card, from the Messaging
screen, touch and hold the thread you want to save, then tap
> Save
message to SIM card.
Changing message settings
The phone’s message settings are pre-configured for you to use immediately.
To change them, tap
> Settings from the Messaging screen.
38 39
Page 22

From the home screen, tap > Email. You can receive and send emails
from your webmail or other accounts using POP3 or IMAP, or access your
Exchange ActiveSync account for your corporate email needs.
Setting up the first email account
1. When you open Email for the first time, enter your email address and
password, then select an account type.
2.
Tap Next to let the phone retrieve the network parameters automatically.
Note: You can also enter these details manually by tapping Manual setup
or when automatic setup fails.
Follow the on-screen instructions to finish the setup.
3.
Your phone will show the inbox of the email account and start to download
email messages.
Checking your emails
Your phone can automatically check for new emails at the interval you set
when setting up the account.
When you are in an email account, swipe down on the screen to download
new emails. Tap Load more at the bottom of the email list to download
earlier messages.
Responding to an email
You can reply to or forward a message that you receive . You can also delete
messages and manage them in other ways.
Replying to or forwarding an email
1. Open the email you want to reply to or forward.
2. Choose from the following:
• To reply to the sender, tap
• To reply to the sender and all recipients of the original email, tap
Reply all.
• To forward the email to someone else, tap
your phone screen is reversible.
3. Edit your message and tap
Marking an email as unread
You can return a read email to the unread state—for example, to remind
yourself to read it again later. You can also mark a batch of emails as
unread.
• While in an email list (for instance, the Inbox), tap the checkboxes before
the messages and then tap
.
>
> Forward or when
.
.
40 41
Page 23
Deleting an email
You can delete an email from its folder. You can also delete a batch of
emails.
• While reading a message, tap
> OK.
• While in an email list (for instance, the Inbox), tap the checkboxes before
the messages and then tap
> OK.
Writing and sending an email
1. Open your email Inbox and tap .
Note: If you have more than one email account added on the phone,
tap the sender line to select the account you want to use for sending the
message.
2.
Enter a contact name or email address in the To field. Separate each
recipient with a comma. You can also tap
your contacts, contact groups, or history.
Note: Tap
3.
Enter the email subject and compose the email text.
4.
Tap to add audio files, images, videos, and other types of files as an
> Cc/Bcc to send a cc or bcc to other recipients.
attachment.
5.
Tap to send the message.
to select recipients from
Adding and editing email accounts
Adding an email account
After setting up your first email account (see Email – Setting up the first email
account), you can add more email accounts and manage them separately.
1.
Open Email to get to the Inbox screen.
2.
Tap > Settings and tap ADD ACCOUNT at the top right of the screen.
3.
Follow the prompts to set up the account as you did with the first one.
Editing an email account
You can change a number of settings for an account, including how often
you check for email, how you’re notified of new mails, your email signature,
and details about the servers the account uses to send and receive mail.
1. Open Email to access your inbox.
2. Tap
3. Make the changes and tap
> Settings and tap the account you want to change.
when you’re finished.
Changing general email settings
1. General settings apply to all email accounts you add .
2. Open Email to get the Inbox screen.
3. Tap
4. Make the changes and tap
> Settings > General.
when you’re finished.
42 43
Page 24

Connecting to the Internet
Your phone’s impressive networking capabilities allow you to access the
Internet or your corporate network with ease. You can use default connection
settings to connect to the Web via your mobile network or Wi-Fi. The mobile
data connection can be enable/disable manually. From the home screen,
> Settings > More > Mobile networks and check or uncheck Mobile
tap
data.
Adding a new mobile data connection
To connect to the Internet you can use the default Access Point Names
(APN). If you want to add a new APN, please contact your service provider to
get the necessary information.
1.
From the home screen, tap > Settings > More > Mobile networks >
Access Point Names >
2.
Tap each item to enter the information you received from your service
provider.
Tap > Save.
3.
Tip: To set the APN to default settings, tap
Turning on Wi-Fi
Wi-Fi is a wireless networking technology that can provide Internet access
at distances of up to 100 meters, depending on the Wi-Fi router and your
surroundings.
.
> Reset to default.
1.
From the home screen, tap > Settings > Wi-Fi.
Slide the Wi-Fi switch to the position to turn on Wi-Fi.
2.
Connecting to a Wi-Fi network
1. From the home screen, tap > Settings > Wi-Fi. The Wi-Fi access points,
or “hotspots,” that your phone has detected are displayed with their
names and security settings.
2.
Tap an access point to connect to it. If security features are implemented,
you’ll need to enter a password.
Note: Your phone automatically connects to previously used Wi-Fi networks
when they are in range.
Adding a Wi-Fi network
You can add a Wi-Fi network if the network does not broadcast its name
(SSID), or to add a Wi-Fi network when you are out of range.
To connect to a secured network, you first need to get the security details
from the network’s administrator.
1. From the home screen, tap
2. Slide the Wi-Fi switch to the position.
Tap > Add network.
3.
4. Enter the network SSID (name). If necessary, enter security or other network
configuration details.
5.
Tap SAVE.
> Settings > Wi-Fi.
44 45
Page 25

Checking the Wi-Fi network status
You can check the Wi-Fi network by looking at the icon in the status bar.
Or tap the access point that the phone is currently connected to in the Wi-Fi
screen. You can then check the network status from the pop-up window.
Connecting to a WPS network
Wi-Fi Protected Setup (WPS) is a feature that makes it easy to add your
phone to the access points which supply WPS.
You can use one of the following methods to connect your phone to a
wireless network using WPS.
Method one: WPS button (Recommended)
1.
From the home screen, tap > Settings > Wi-Fi.
Slide the Wi-Fi switch to the position.
2.
Tap > Advanced > WPS Push Button.
3.
4.
Press the WPS push button on the phone, and then press the WPS button
on the wireless router and the access point will recognize your phone and
add it to the network.
Method two: PIN
From the home screen, tap > Settings > Wi-Fi.
1.
2.
Slide the Wi-Fi switch to the position.
Tap > Advanced > WPS Pin Entry.
3.
4.
The WPS PIN displays on the screen. Enter the PIN into the access point’s
setup page.
After entering the PIN, your phone automatically finds the access point and
configures the connection.
Note: For detailed information about the WPS feature of access point, please
refer to its documentation.
Connecting to virtual private networks
Virtual private networks (VPNs) allow you to connect to the resources inside
a secured local network. VPNs are commonly deployed by corporations,
schools, and other institutions to let people access local network resources
when not on campus, or when connected to a wireless network.
Depending on the type of VPN you are using, you may be required to enter
your login credentials or install security certificates before you can connect
to your VPN. You can get this information from your network administrator.
Adding a VPN
1. From the home screen, tap > Settings > More > VPN.
Tap and fill in the information provided by your network administrator.
2.
Note: You need to set a lock screen pattern, PIN, or password before you
can use credential storage.
3.
Tap SAVE.
The VPN is added to the list on the VPN screen.
46 47
Page 26

Connecting to a VPN
1. From the home screen, tap > Settings > More > VPN.
2.
Tap the VPN that you want to connect to .
3.
When prompted, enter any requested credentials, and then tap
CONNECT.
When you are connected, the VPN connected icon appears in the Status bar.
Modifying a VPN
1. From the home screen, tap > Settings > More > VPN settings.
2.
Press and hold the VPN that you want to modify.
3.
Tap Edit profile and edit the VPN settings you want.
4.
Tap SAVE.
Browsing the Internet
Use Browser to view web pages and search for information.
Using the Browser
From the home screen, tap Browser .
Browser also opens when you tap a web link.
Opening a web page or searching the web
1. Open the Browser app .
2.
Tap the address box at the top of the web page. If the address box isn’t
visible, scroll to the top of the web page.
3.
Enter the address (URL) of a web page. Or, enter terms you want to search for.
4.
Tap a URL or search suggestion, or tap Go to open the web page or
search results.
To go back a page, tap Back key. To go forward, tap > .
5.
Tips:
• Tap
• Tap
• To bookmark a web page, open it and tap
> if you want to stop opening the page.
> if you want to refresh the page.
> Bookmarks > ADD
BOOKMARK. Give the bookmark a name and enter the address, then
touch OK. You can also tap to add bookmark.
48 49
Page 27

Using multiple browser tabs
You can open several web pages at the same time (one page in each tab)
and switch between them freely.
Opening a new browser tab
Tap > . A new browser window opens and the homepage is loaded.
Downloading files
1. Press and hold an image or a link to a file or to another web page.
2.
In the menu that opens, tap Save image or Save link, enter the name
then OK.
The downloaded files are saved to your phone or the microSDHC card. You
can view or open the downloaded files by tapping
> Downloads.
Switching between tabs
Tap > tap the tabs to switch between tabs.
Tip: Tap
on a tab to close it.
Changing browser settings
You can configure a number of browser settings to customize the way you
browse the web, including several you can use to control your privacy.
To open the browser settings screen, tap
> Settings in the web page screen.
Setting the home page
Your home page opens whenever you launch your browser or open a new
browser tab.
1. Open the page you want to set as your home page.
2. Tap
3. Tap Current page.
4. Or tap Other then enter a web page, and press OK.
50 51
> Settings > Homepage.
Page 28

Mobile Hotspot and tethering
Using Wi-Fi Direct
You can share your phone's mobile data connection with a single computer
via a USB cable (USB tethering) or with up to eight devices at once by
turning your phone into a portable Wi-Fi hotspot.
Warning: The functions below may incur additional network charges from
your network operator. Extra fees may also be charged in roaming areas.
To share your phone's data connection via USB
Use the USB cable that came with your phone to connect the phone to a
USB port on your computer.
Tap Settings > More > Mobile Hotspot and Tethering.
1.
2. Toggle the USB tethering switch to activate/deactivate this function.
To share your phone's data connection as a portable Wi-Fi hotspot
1. Tap Settings > More > Mobile Hotspot and Tethering.
2. Toggle the Mobile Hotspot switch to enable/ disable this function.
Wi-Fi Direct allows two devices to establish a direct, peer-to-peer Wi-Fi
connection without requiring a wireless router.
Connecting to another device via Wi-Fi Direct
1. From the home screen, tap > Settings > Wi-Fi.
2.
If Wi-Fi is off, slide the Wi-Fi switch to the position.
3.
Tap > Advanced > Wi-Fi Direct. Your phone will search for other devices
enabled with Wi-Fi Direct connections.
4.
Tap a device name under Peer Devices to connect with it. The other
device will receive a Wi-Fi Direct connection prompt and need to accept
the request for connection. If prompted, tap ACCEPT.
Once connected, the device is displayed as “Connected”.
5.
To rename or secure your portable hotspot
When Mobile Hotspot is activated, you can change the name of your
phone's Wi-Fi network (SSID) and secure its Wi-Fi network.
• Tap Settings > More > Mobile Hotspot and Tethering.
• Tap Mobile Hotspot settings->Configure Mobile Hotspot to change the
network SSID or set your network security.
• Tap SAVE.
52 53
Page 29

Bluetooth
Bluetooth is a short-range wireless communication technology. Phones
or other devices with Bluetooth capabilities can exchange information
wirelessly within a distance of about 32 feet (10 meters). The Bluetooth
devices must be paired before the communication is performed.
Turning Bluetooth on/off
1. From the home screen, tap > Settings > Bluetooth.
2.
Slide the Bluetooth switch to the or position.
When Bluetooth is on, the
will be visible to nearby devices while Bluetooth Settings is open.
icon will appear in the status bar. Your phone
Pairing with another Bluetooth device
1. From the home screen, tap > Settings > Bluetooth.
Slide the Bluetooth switch to the position if Bluetooth is off.
2.
Your phone automatically scans for and displays the IDs of all available
Bluetooth devices in range. You could tap
again.
3.
Tap the device you want to pair with.
4.
Confirm that the Bluetooth passkeys are the same between the two devices
and tap PAIR. Alternately, enter a Bluetooth passkey and tap PAIR.
Pairing is successfully completed when the other device accepts the
connection or the same passkey is entered.
> Refresh if you want to scan
Note: The Bluetooth passkey may be fixed for certain devices, such as
Changing the device name
headsets and hands-free car kits. You can try entering 0000 or 1234 (the
most common passkeys), or refer to the documents for that device.
1. From the home screen, tap > Settings > Bluetooth.
2.
Slide the Bluetooth switch to the position if Bluetooth is off.
3.
Tap > Rename this device.
4.
Edit the name and tap RENAME.
Unpairing from a Bluetooth device
You can make your phone forget its pairing connection with another
Bluetooth device. To connect to the device again, you may need to enter or
confirm a passkey again.
From the home screen, tap > Settings > Bluetooth and make sure
1.
Bluetooth is turned on.
2.
In the list of paired devices, tap beside the Bluetooth device you want
to unpair.
3.
Tap FORGET.
54 55
Page 30

Sending data via Bluetooth
1. Open the appropriate application and select the file or item you want to
share.
2.
Select the option for sharing via Bluetooth. The method may vary by
application and data type.
3.
Tap a Bluetooth device the phone has paired with or wait for it to search
for new devices and tap one of them.
Receiving data via Bluetooth
1. Turn Bluetooth on before trying to receive data via Bluetooth.
Note: If the phone has not been paired with the sending device, you may
need to tap your phone’s device name in the Bluetooth menu in Settings
to keep the phone detectable through Bluetooth.
2.
Swipe down on the status bar and tap .
3.
Tap ACCEPT to start receiving the data.
Depending on whether a microSDHC card is installed, received files are
stored automatically in a dedicated folder (Bluetooth, for instance) in the
phone storage or microSDHC directory. You can access them in the File
Manager. Touch the received Vcard files, the received contacts (vCard files)
will be imported to your contact list.
Entertainment
You can use your phone to take photos and record videos. Photos and
videos are stored to the phone’s microSDHC card or the phone’s internal
storage. You can copy them to your computer or access them in the Gallery.
Capturing a photo
1. From the home screen, tap > Camera .
2.
Aim the camera at the subject and make any necessary adjustments.
56 57
Page 31

Number Function
1 Tap to select modes and settings.
2 Double-tap then drag or pinch/spread two fingers together to
zoom in/out.
3 Tap to take a picture.
4 Tap to switch between front/back camera.
5 Tap to switch to Video mode and record a video.
Tip: You can pinch or spread on the screen to zoom in or zoom out.
Tap to take the photo.
3.
Warning! Keep a safe distance when using the flash. Do not point the flash
toward people’s or animals’ eyes.
Adjusting camera settings
Before taking a photo, touch icon to adjust a range of settings in framing
mode.
• Auto mode: Enable Auto mode.
• Polaroid: In default, Polaroid will stitch two shots into one picture. Touch
to display more options. Then touch to only include one shot in a
picture, or
• HDR: HDR (high-dynamic range) photos can better reflect the visual
effects people have in the real environment by synthesizing images under
different exposure time.
to stitch four shots into one picture, or to close options.
• Pano: Turn on the panorama function. Touch the shutter button to start
taking panoramic photo and move the phone steadily along the direction
indicated by the onscreen line. Once the preview frame is filled, the phone
will automatically save the photo.
Tap the
icon to access Camera settings:
• GPS tagging: Turn on/off the GPS tagging.
• Shutter sound: Turn on/off the shutter sound.
• Video quality: Set video quality.
• Sound recording: Turn on/off sound recording.
Recording a video
1. From the home screen, tap > Camera .
2.
Aim the camera at the subject.
Tip: Pinch or spread on the screen to zoom in or zoom out.
3.
Tap to start recording.
Tap to stop recording.
4.
Tip: While the recording is in progress, you can tap
separate photo.
to save the frame as a
58 59
Page 32

Polaroid Features
Take a picture
1. From the home screen, tap Camera
2. Tap
3. Zoom in and out by pinching with your fingers.
4. Tap the Shutter button or press the Volume Keys to take a photo.
5. Tap the Shutter button again to take another photo. You can see 2 photos
Edit pictures with Polaroid
1. Tap
and select Polaroid.
are in one screen.
from full-screen picture view, select Polaroid editor.
.
2. You can personalize your photos by adding text, locations, borders, and
much more.
3. Tap
to save the picture.
Using your gallery
Opening your gallery
From the home screen, tap > Gallery to view albums of your pictures
and videos.
• Tap
• Tap
• Touch
to select categories: Camera roll, Albums, Time, Locations, Videos.
open Camera.
to return to the Gallery's main screen.
60 61
Page 33

Sharing albums, pictures, or videos
1. Press and hold an item to select an album, or after you open an album to
select a picture or a video.
2.
Tap and select how you want to share the items.
Deleting albums
1. Press and hold an album until it is selected.
2.
Tap more albums that you want to delete.
3.
Tap > OK.
Working with pictures
Tap a picture in an album to view the picture in full screen. Tap the screen to
view the following features.
Number Function
1 Return to the album.
2 Delete the photo.
3
Share the photo.
4 Tap to enter the photo's Edit interface.
5 Tap to access more options.
6 Save the photo.
7 Undo or redo the action.
8 Edit the photo.
Making memorable memos
Sound Recorder enables you to record voice memos and listen to them
whenever you like.
Recording a voice memo
1. From the home screen, tap > Sound Recorder .
Tap to start recording. During recording, you can do the following:
2.
• Tap
• Tap DISCARD and confirm to cancel the recording.
• Tap SAVE and name the recording to save.
/ to pause or continue the recording.
62 63
Page 34

Playing any saved memo
1. Tap at the top right of the screen to see all recordings.
2.
Tap before the memo to play it.
Note: You can also tap
to rename, delete, share, check the file information.
Google applications
Signing in to your Google account lets you synchronize Gmail, calendar
events, contacts and other data between your phone and the web. And if
you don’t have an account, you can easily create one.
From the home screen, tap > Settings > Accounts > Add account >
1.
Google.
2.
Tap Enter your email to sign in to your existing account, or CREATE A NEW
ACCOUNT to create a new account.
3.
Follow the on-screen steps to enter the information about the account
and finish the setup.
Gmail
Gmail is a web-based email service that’s configured when you sign in to your
Google account. Depending on your synchronization settings, the Gmail on
your phone can be automatically synchronized with your account on the web.
Creating and sending an email
1. From the home screen, tap .
2.
Tap .
3.
Enter a contact name or email address in the To field.
4.
Enter the email subject and compose the text.
5.
Tap to add an attachment.
6.
Tap at the top right of the screen to send the message.
64 65
Page 35

Google Calendar
From the home screen, tap > Calendar to use Google Calendar,
Google’s time management application. You can use the calendar to
schedule appointments, including meetings and other events. You can also
synchronize appointments to your Google account, which enables you to
manage your schedule online on your PC.
Google Chrome
Using the Chrome browser you can enjoy surfing the Web. Chrome on your
device can sync bookmarks, browsing history, and opened tabs from your
Google account so that you can maintain the same experience across your
phone, PC, tablet, and other devices.
• Home: Add a suggested person, or see posts people have shared with
you, a circle you are in, or everyone.
• Circles: Find people to add to your Google+ circles, create new circles,
view and organize people into circles based on your relationships. You
can also follow content posted by people you find interesting.
• Find communities: Search and join all kinds of online communities, where
people gather for the sharing and discussion of a common topic.
• Photos: View photos you uploaded, photos of you, photos from your posts
and more.
• Locations: See your friends’ locations on the map and configure your
location sharing settings.
• Events: Manage your social calendar. You can add events, invite people,
and then share photos in real time from the event.
Google+
Google+ is a social networking service offered by Google. The Google+
application on your phone enables you to manage your data, chat with online
contacts, organize them in different circles, and share your selected information.
From the home screen, tap
Note: For detailed information about Google+, open Google+ and tap
Help to view the online instructions.
Getting started with Google+
Open the Google+ app and tap Home near the top of the screen to use the
following features:
66 67
> Google+.
>
Google Maps
Activating location services
To use Google Maps and find your location, you must enable location
services on your phone.
From the home screen, tap > Settings > Location.
1.
2.
Slide the Location switch at the top to turn location access on or off.
3.
When location access is enabled, tap Mode to select the location sources
you want to use.
• High accuracy: Use GPS, Wi-Fi, and mobile networks to determine location.
Page 36

• Battery saving: Use only Wi-Fi and mobile networks to get your approximate
location. This will drain less power from your battery than using GPS.
• Device only: Use GPS to pinpoint your location.
Getting your location
1. From the home screen, tap > Maps.
Tap at the bottom.
2.
The map centers on a dot and an arrow that indicates your location and the
direction the phone is facing.
Searching for a location
1. From the home screen, tap > Maps.
2.
Tap the search box on the top.
3.
Enter the address or the type of business you’re looking for in the search
box. If suitable suggestions appear below the search box, tap one to
search for it.
Tip: You can also tap
4.
Tap the search key on the keyboard.
5.
You can slide the result up to find more information about the location as
well as options for getting directions and more.
next to the search box to use voice search.
Getting directions to your destination
Maps can provide directions for travel by car, public transportation, foot, or
bicycle.
From the home screen, tap > Maps.
1.
Tap .
2.
3.
Select the mode of transportation and then enter a start and end point. If
your location is found, it will appear in the start point field by default.
4.
Tap a suggested route to view it on the map.
You can swipe the bottom card left or right to choose other routes. Slide the
bottom card up to see the route directions in a list.
Note: Tap
to use Google Maps Navigation and get turn-by-turn voice
directions.
Searching for local places
Google Maps helps you find all kinds of businesses and establishments
around you. You can rate these places and get recommendations.
From the home screen, tap > Maps.
1.
2.
Navigate the map view to the area you’d like to explore. You can explore
nearby locations or pan the map to another location.
3.
Tap the search box at the top.
4.
Tap the Explore nearby button at the bottom right corner of your map to
get a quick look at what’s nearby.
68 69
Page 37

Tap a location to see it on the map or get directions.
5.
You can also slide up the bottom card for more information such as the
street address, website, or street view, and options for calling, saving to
your Google Account, or sharing with others.
Note: The Explore nearby feature is not available for all areas.
Google Search
You can search for information on the Web or your phone using Google
Search, or perform certain tasks by speaking.
Searching with text
You can search for information on the Internet or on the phone (such as
apps and contacts) by entering text.
1.
Press and hold the Home key > Google to open Google Search.
2.
Enter the terms you want to search for in the search box and tap the
search key on the keyboard, or tap a search suggestion that appears
below the search box.
Searching by speaking
You can also search the Web or perform certain tasks by speaking.
1.
Press and hold the Home key > Google to open Google Search.
2.
Tap the microphone icon to the right of the search box.
Note: You can also tap
from the home screen.
3.
Speak the terms you want to search for or the question you want to ask.
When you’re finished, your search terms are analyzed and the search is
initiated.
Change your Google app settings
To change your settings, touch > Google Settings, touch the setting you
want to change.
Google Music
The Play Music application ( ) works with Google Music, Google’s online
music store and streaming service. You can stream via mobile data or Wi-Fi
and listen to your favorite songs that you’ve added to your online Google
Music library. You can also play audio files you’ve copied directly to your
phone from a computer.
Note: The availability of Google Music is dependent on your region. If it’s not
available, or you don’t have a mobile data or Wi-Fi connection, you can only
play music stored on your phone.
Playing your music
From the home screen, tap > Play Music . If prompted, select an
account to access its online music library.
The app searches your online library and your phone for music and playlists
before displaying your combined music library, organized by PLAYLISTS,
ARTISTS, ALBUMS, SONGS, and GENRES, . You can tap
PLAYLISTS to view all the music and playlists. To change views of your library,
swipe left or right.
> Music library >
70 71
Page 38

Tap a song to play it. When the song is playing, tap the summary information
at the bottom to display the playback screen.
Number Function
1 Song and artist information. Tap or drag down to return to the
music library.
2 Album artwork.
3
Give the song a thumbs-up.
4 Playback control. Skip songs, pause and resume playback, use
shuffle or repeat. Drag the progress bar to jump to any part of
the song.
5 Give the song a thumbs-down.
6 Tap to see the current playlist (queue).
7 Get more options.
You can still control the music when you are not in the playback screen.
• In the music library of the Play Music app, tap the summary information at
the bottom of the screen to restore the playback screen.
• In other apps, swipe down the notification panel. Tap the song title to
restore the playback screen, pause/resume playback, or skip to the next/
previous song.
• When the screen is locked, the song information, album cover, and
playback controls are displayed on the top of the screen. You can pause/
resume playback or skip songs.
Managing playlists
Create playlists to organize your music files into sets of songs so that you can
play the songs you like in the order you prefer.
72 73
Page 39

Creating a playlist or adding a song to a playlist
Tap next to the song and select Add to playlist.
Removing songs from a playlist
1. Tap > Music library>PLAYLISTS and select a playlist.
2. Tap
3. Tap Remove from playlist.
next to the song.
Deleting a playlist
1. Tap > My Library>PLAYLISTS in the Play Music app and select a playlist.
2. Tap
3. Tap Delete > OK.
Note: Certain automatically created playlists such as Last added cannot be
deleted.
next to the playlist you want to delete.
You can also search for apps using an app’s name or description or the
developer’s name. Simply tap
and enter the search terms.
Downloading and installing apps
When you find the app you are interested in, tap it to open its details screen
where more information about the app is displayed.
1.
Tap INSTALL (free apps) or the price (paid apps). If the app is not free,
you need to sign in to your Google Wallet account and select a payment
method.
Caution: Once installed, some apps can access many functions or a
significant amount of your personal data. The Play Store will show you what
the app can access. Tap ACCEPT to proceed, or press
2.
Wait for the app to be downloaded and installed automatically. Payment
needs to be authorized before paid apps start downloading.
The app is successfully installed when the
Open the app from this notification or by locating it in Apps
icon appears in the status bar.
to cancel.
.
Google Play Store
From the home screen, tap . You can buy or rent music, books, movies,
apps, and download them to your phone.
Note: The content you can access in Google Play Store depends on your
region and your service provider.
Browsing and searching for apps
You can browse apps by category. Tap a top-level category, such as GAMES,
and tap the app from any subcategory.
74 75
Creating a Google Wallet account
You must set up a Google Wallet account to purchase items from the Play
Store.
Choose one of the following:
• On your computer, go to wallet.google.com to create a Google Wallet
account.
• The first time you use your phone to buy an item from Google Play Store,
you’re prompted to enter your billing information to set up a Google Wallet
account.
Page 40

Warning! When you’ve used Google Wallet once to purchase items from the
Play Store, the phone remembers your password so you don’t need to enter
it the next time. For this reason, you should secure your phone to prevent
others from using it without your permission.
Applications
Calculator
From the home screen, tap > Calculator to use the phone’s convenient
built-in calculator for some basic as well as advanced mathematical equations.
Clock
From the home screen, tap > Clock to use a series of timing tools.
Setting a new alarm
1. Tap in the Clock app.
Tap an existing alarm to configure it, or tap at the bottom of the
2.
screen to create a new alarm.
3.
Set up the alarm options, such as time, repeat, and alarm sound.
Note: To enable or disable existing alarms directly, just slide the switch.
Checking World time
Tap in the Clock app to check local time for cities around the world.
at the bottom to add a new city or country.
Tap
Using the Stopwatch and Countdown
Tap or in the Time app to use the stopwatch or the countdown timer.
Stopwatch allows you to record lap times, while Countdown allows you to set
a time and count down to zero.
76 77
Page 41

Downloads
The Downloads app keeps a record of the files you have downloaded using
the apps such as Browser, or Gmail.
From the home screen, tap
• Tap a file to open it with the appropriate application.
• Press and hold a file, or check the box in front of it, to delete or share it.
> Downloads.
Files
Quickly access all of your images, videos, audio clips, and other types of files
on your phone and the microSDHC card.
From the home screen, tap
category in the Categories, or tap Phone or SD card to browse folders and
files on the phone storage or the microSDHC card.
• Tap folders and files to access stored items.
• Press and hold an item to access options such as copy, cut, share, or
delete.
• To copy or cut an item, navigate to a new location and tap Paste.
> Files. You can find the file you need by
YouTube
From the home screen, tap > YouTube.
You can watch YouTube videos or upload your own.
Phone settings
From the home screen, tap > Settings. The Settings app contains most of
the tools for customizing and configuring your phone.
WIRELESS & NETWORKS
Wi-Fi
Turn Wi-Fi on or off and configure your Wi-Fi connections.
When Wi-Fi is on, tap
data between two devices via Wi-Fi Direct.
Bluetooth
Turn Bluetooth on or off and configure your Bluetooth connections.
Data usage
Tap next to Cellular data to turn mobile data on or off.
You can check how much data has been used during the time cycle you
set, set a cellular data limit, see which apps have been using data, or restrict
background data for individual apps.
Note: The data usage is measured by your phone, and your carrier’s data
usage accounting may differ.
> Advanced > Wi-Fi Direct in the Wi-Fi menu to share
78 79
Page 42

More
• Airplane mode: Swipe the On/Off switch to turn airplane mode on or off.
• Mobile Hotspot and Tethering: Enable or disable mobile hotspot, USB
tethering, enter mobile hotspot settings.
• VPN: Set up and connect to virtual private networks.
• Mobile networks: Enable or disable data service, allow data services
when roaming, select preferred network mode, or set access point names
for data access.
Important: Data roaming and always-on data may incur significant
roaming charges.
• Emergency alerts: Enable or disable the options of Emergency alerts.
DEVICE
Display
• Brightness level: Set the brightness of the display.
• Wallpaper: Select a background image for the home screen and lock
screen.
• Sleep: Set the length of time of inactivity before the screen turns off
automatically.
• Press Power key twice for Camera: Quickly open your camera by
pressing power key twice.
• Daydream: Manage the Daydream function. When Daydream is enabled,
photos or animations will be displayed as a screensaver.
• Font size: Set the font size of the text on the screen.
• Auto-rotate screen: Tap to set whether rotate the contents of the screen
or stay in portrait view.
Lock screen
Func shortcuts
After Func is activated, a couple of app shortcuts will be displayed on your
lock screen.
Screen lock
• None: Touch to disable screen unlock security.
• Swipe: Touch to enable slide unlock mode.
• Pattern: Touch to draw a pattern to unlock screen.
• PIN: Touch to enter a numeric PIN to unlock screen.
• Password: Touch to enter a password to unlock screen.
Owner info
Touch to input owner information which will display on the locked screen.
Smart Lock
You must set a screen lock first when you enable this function.
Sound & notification
Use the Sound settings to configure many aspects of call and notification
ringtones, music, and other audio settings.
• Sound: Touch to set volume for Media, Alarm, Ring and Notification.
• Headset mode: Mark the checkbox to enable headset mode. Ringtones
will only be heard from the headset if it is plugged in.
80 81
Page 43

• Also vibrate for calls: Touch to vibrate phone for incoming calls.
• Do not disturb: Touch to set whether interrupt and priority interruptions.
• Phone ringtone: Touch to set your incoming call ringtone.
• Default notification ringtone: Touch to set the default sound for
notifications.
• Other sounds: Touch to set dial pad tones, screen locking sounds,
Charging sounds, touch sounds and vibrate on touch.
• When device is locked: Touch to show all notification content or don't
show notification at all.
• App notifications: Touch to set block and priority for app notifications.
• Notification access: Touch to view the notification listeners.
• Do Not Disturb access: Request no interruptions for apps.
• Mute power on & off ringtone: Touch to enable/disable the power on &
off ringtone.
LED indicator
Touch to turn on/off the LED indicator.
Apps
See apps installed on your phone and manage them.
Tap an app in the DOWNLOADED, ON SD CARD, RUNNING, All or RESTRICTED
tab to see its information. You can stop the app, uninstall, disable or restrict
the app, or clear data and cache.
Storage & USB
Check memory information for your microSDHC card and internal storage.
to unmount the microSDHC card from your phone so that you can
Tap
safely remove the card while the phone is on.
Tap SD card >
on the microSDHC card.
Connect to PC
Select the USB connection mode between your phone and PC.
You can connect your phone to a computer with a USB cable and transfer
music, pictures, and other files in both directions. Your phone stores these files
in the internal storage or on a removable microSDHC card.
Connecting your phone to a computer via USB
Connect your phone to the PC with a USB cable.
1.
2.
Open the notification panel and tap .
3.
Choose one of the following options:
• Charge only: Charge your phone via USB.
• Transfer files (MTP): Transfer media files on Windows® or Mac.
Note: For Windows XP, please install the drivers and Media Player 11 (or
later version) when you use Media device (MTP) for the first time. If you
have a Mac, visit http://www.android.com/filetransfer to download the
necessary software.
• Transfer photos (PTP): Transfer photos using camera software.
> Settings > Format or Format as internal to delete all data
82 83
Page 44

• Drivers CD-ROM: Install the driver needed for some USB connection
modes (such as MTP). You only need to install the driver on the same PC
once.
Note: You can also install the driver on PC by running the executable file
in the new CD-ROM drive.
Battery
Check how much power remains for the battery and what has been using
the battery.
You can set the mode in order to save battery life.
Memory
Check the detailed memory status of your phone. How much storage has
been used, how much is left, and which apps have used memory recently.
PERSONAL
Location
Activate location services to determine your location (see Google
applications – Google Maps – Activating location services).
Security
• Encrypt phone: Encrypt your data on the phone to protect your privacy.
• Set up/change password: Set or change the password when reset the
factory or device data.
• Set up SIM card lock:
Lock SIM card: Activate or deactivate the PIN lock to require PIN before
accessing the micro-SIM card.
Change SIM PIN: Change the PIN used to access the micro-SIM card.
Note: Put all your confidential passwords in a safe place for future use.
If you enter the wrong SIM PIN more times than allowed, your micro-SIM
card will be locked and you cannot access the mobile phone network .
Contact your operator for a PIN Unlock Key (PUK) to restore the micro-SIM
card.
• Make passwords visible: Display/undisplay passwords as you enter them.
• Device administrators: View or deactivate apps you have authorized to
be device administrators.
• Unknown sources: Tap this option to permit installation of apps from
sources other than the Play Store.
• Storage type: Describes your storage.
• Trusted credentials: Display trusted CA certificates.
• Install from storage: Install certificates from storage.
• Clear credentials: Delete all certificates.
• Trust agents: View or deactivate trust agents.
• Screen pinning: Tap this option, when open an app and touch the recent
button and pin icon to lock the current app screen. To unpin the screen,
long press back button and recent button to unlock the app screen.
• Apps with usage access: Turn on or off some apps’ access to your phone
usage information.
84 85
Page 45

Accounts
Manage your accounts and synchronization. Tap Accounts to sign in to or
create accounts on your phone.
Tap an account type to see that type of accounts you have added and
adjust the accounts settings.
Language & input
• Language: Select a language and region for your system.
• Spell checker: Use Google spell checker to check for spelling errors when
entering text.
• Personal dictionary: Add new words to the phone’s dictionary or remove
words from the dictionary. The words you add are used for spell check
and word suggestion.
• Current keyboard: Tap to check the current, or choose other keyboards.
• Google Keyboard: Configure Google Keyboard settings.
• Google voice typing: Configure Google voice typing settings.
• Text-to-speech output:
Preferred engine: Select the speech synthesis engine you want to use or
change its settings.
Speech rate: Select how quickly you want the synthesizer to speak.
Listen to an example: Play a brief sample of the speech synthesizer, using
your current settings.
Default language status: Describes support level of default language.
• Pointer speed: Select how fast the pointer/mouse should scroll when you
connect the phone to a trackpad or mouse accessory.
Backup & reset
• Back up my data: Back up app data, Wi-Fi passwords, and other settings
to Google servers after you sign in to your Google account.
• Backup account: Set the Google account that the data is backed up to.
• Automatic restore: Restore previously backed up settings and data when
you reinstall an app.
• Network settings reset: Reset all network settings, including Wi-Fi, cellular
data, Bluetooth.
• Factory data reset: Reset your phone to factory default settings. All your
personal data from the phone’s internal storage will be erased. You can
also erase the data on the microSDHC card during the process.
• Device reset: Reset your personal settings, no data or media will be
deleted.
System
Date & time
Set date, time, time zone, and how date and time are displayed. You can
also use network-provided data.
Accessibility
Configure the system accessibility options and accessibility plug-ins on your
phone, such as using TalkBack for low-vision users.
Printing
Configure cloud printing service options, manage print jobs, and more.
86 87
Page 46

Regulatory & Safety
Check regulatory & safety information.
Cricket software update
Check and update to the latest software.
About phone
View phone status, legal information, and other information. You can also
upgrade your phone system from update packages copied to the storage
card.
Upgrading the phone software
You can use FOTA Upgrade tool to update your phone's software.
All personal information will be saved following the update process. We
recommend you backup your personal data using Smart Suite before
upgrading.
FOTA Upgrade
Using the FOTA Upgrade tool you can update your phone's software.
Tap
phone will search for the latest software. If you want to update the system,
please tap Continue, after it is done tap Install to complete the upgrade. Now
your phone's software will be the latest version.
You should turn on data connection before searching for updates. Settings
for auto-check intervals are also available once you restart the phone.
If you have chosen auto-check, when the system discovers the new version,
dialog will pop up to choose Continue or Remind me later, the notification
also will show in status bar.
> Settings > Cricket software update > Check for updates, the
88 89
Page 47
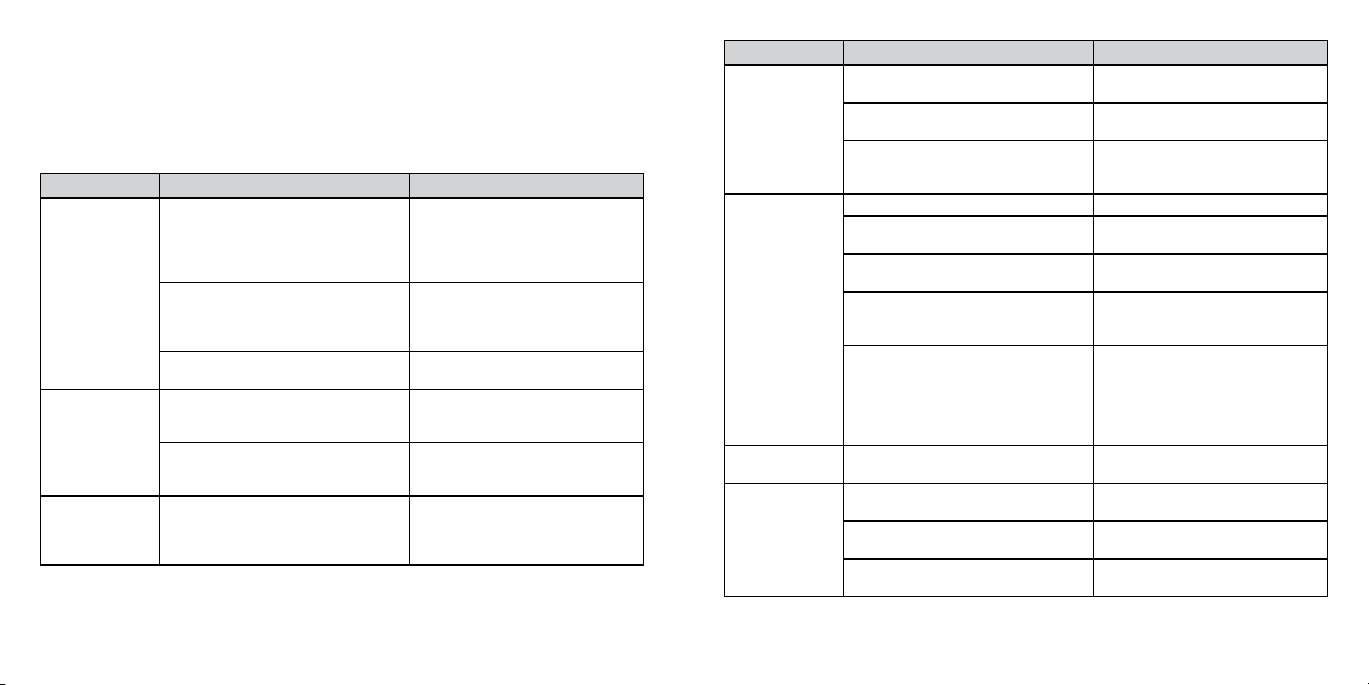
Troubleshooting
If you encounter problems while using the phone, or if it performs abnormally,
you can refer to the chart below. If your particular problem cannot be
resolved using the information in the chart, contact the dealer where you
purchased the phone.
Problem Possible causes Possible solution
Poor reception The network signal is too weak at
Echo or noise Poor network link quality on the part
Unable to select
certain features
your current location, for example, in
a basement or near a tall building,
because wireless transmissions
cannot effectively reach it.
The network is busy at the current
time (for example, during peak times,
there may be too much network
traffic to handle additional calls).
You are too far away from a base
station for your service provider.
of your service provider.
Poor local telephone line quality. End the call and dial again. You
Your service provider does not
support these features, or you have
not applied for services that provide
these features.
Move to a location where the
network signal can be properly
received.
Avoid using the phone at such
times, or try again after waiting a
short time.
You can request a service area
map from your service provider.
End the call and dial again. You
may be switched to a betterquality network link or phone line.
may be switched to a betterquality network link or phone line.
Contact your service provider.
Problem Possible causes Possible solution
Battery not
charging
Shortened
standby time
Cannot turn
your phone on
micro-SIM card
error
The battery or battery charger is
damaged.
The phone’s temperature is below
32°F or higher than 113°F.
Poor contact between the battery
and charger.
Brightness of screen is too high. Set display brightness lower.
Bluetooth, Wi-Fi or GPS activated. Deactivate Bluetooth, Wi-Fi or GPS
E-mails, news and weather
information auto-check all the time.
The battery is depleted. In high
temperature environments, battery
life will be shortened.
If you are not able to connect to
the network, the phone will continue
to send out signals as it attempts
to locate a base station. Doing so
consumes battery power and will
consequently shorten standby time.
Battery power has been depleted. Recharge the phone’s battery.
The micro-SIM card has
malfunctioned or is damaged.
The micro-SIM card is inserted
improperly.
There is debris on the micro-SIM card
contacts.
Contact the dealer.
Adjust the environment to avoid
extremes of temperature.
Check all connectors to make
sure all connections have been
properly made.
when not in use.
Increase the information auto-
check interval.
Use a new battery.
Change your location to one
where the network is accessible, or
temporarily turn off your phone.
Take the micro-SIM card to your
service provider for testing.
Insert the micro-SIM card properly.
Use a soft, dry cloth to clean the
micro-SIM card contacts.
90 91
Page 48

Problem Possible causes Possible solution
Unable to
connect to the
network
Cannot make
outgoing calls
PIN code
blocked
Unable to enter
information into
the phonebook
Phone crashes,
reboots, freezes,
or cannot be
powered on
Device slow or
sluggish
The micro-SIM card is invalid. Contact your service provider.
You are not within the network’s
service area.
Poor signal. Move to an open space, or if you
You have activated Fixed Dialing
Numbers.
You have entered an incorrect PIN
code three consecutive times.
The phonebook’s memory is already
full.
Some third-party software is not
compatible with your phone.
Too many apps running in the
background.
Check the service area with your
service provider.
are inside a building, move closer
to a window.
Go to Fixed Dialing Numbers and
disable it.
Contact your service provider. If
the service provider provides the
SIM card’s PUK code, use the PUK
code to unlock the SIM card.
Delete unnecessary data from the
contacts.
Uninstall the software that may
cause the problem.
Upgrade the phone software.
Reset the phone to factory status.
Touch the Overview key to show
your recently-used apps. Swipe it
left or right to close the app. Touch
to close all the running apps.
For your safety
General safety
Don’t make or receive handheld
calls while driving. And never text
while driving.
Keep your phone at least half an
inch (15 mm) away from your ear
or body while making calls.
Small parts may cause choking.
Your phone can produce
a loud sound.
Avoid contact with anything
magnetic.
Keep away from pacemakers and
other electronic medical devices.
Power off when asked to in
hospitals and medical facilities.
Don’t use at gas stations.
Your phone may produce
a bright or flashing light.
Don’t dispose of your phone in
a fire.
To prevent possible hearing
damage, do not listen at high
volume levels for long periods
Avoid extreme temperatures.
Avoid contact with liquids. Keep
your phone dry.
Don’t take your phone apart.
Power off when told to
in aircrafts and airports.
Power off when near explosive
materials or liquids.
Only use approved accessories.
Don’t rely on your phone as a
primary device for emergency
communications.
92 93
Page 49

FCC RF Exposure Information (SAR)
This phone is designed and manufactured not to exceed the emission
limits for exposure to radio frequency (RF) energy set by the Federal
Communications Commission of the United States.
During SAR testing, this device was set to transmit at its highest certified
power level in all tested frequency bands, and placed in positions that
simulate RF exposure in usage against the head with no separation, and
near the body with the separation of 15 mm. Although the SAR is determined
at the highest certified power level, the actual SAR level of the device while
operating can be well below the maximum value. This is because the phone
is designed to operate at multiple power levels so as to use only the power
required to reach the network. In general, the closer you are to a wireless
base station antenna, the lower the power output.
The exposure standard for wireless devices employs a unit of measurement
known as the Specific Absorption Rate, or SAR. The SAR limit set by the FCC is
1.6 W/kg.
Tests for SAR are conducted using standard operating positions accepted by
the FCC with the device transmitting at its highest certified power level in all
tested frequency bands.
The FCC has granted an Equipment Authorization for this model phone with
all reported SAR levels evaluated as in compliance with the FCC RF exposure
guidelines. SAR information on this model phone is on file with the FCC and
can be found under the Display Grant section of www.fcc.gov/oet/ea/fccid
after searching on FCC ID: 2ACCJB039.
For this device, the highest reported SAR value for usage against the head is
1.25 W/kg, for usage near the body is 1.30 W/kg.
While there may be differences between the SAR levels of various phones
and at various positions, they all meet the government requirements.
SAR compliance for body-worn operation is based on a separation distance
of 0.49 inches (15 mm) between the unit and the human body. Carry this
device at least 0.49 inches (15 mm) away from your body to ensure RF
exposure level compliant or lower to the reported level. To support body-worn
operation, choose the belt clips or holsters, which do not contain metallic
components, to maintain a separation of 0.49 inches (15 mm) between this
device and your body.
RF exposure compliance with any body-worn accessory, which contains
metal, was not tested and certified, and use such body-worn accessory
should be avoided.
FCC compliance
This mobile phone complies with part 15 of the FCC Rules. Operation is
subject to the following two conditions: (1) This device may not cause
harmful interference, and (2) this device must accept any interference
received, including interference that may cause undesired operation.
94 95
Page 50

This mobile phone has been tested and found to comply with the limits for
a Class B digital device, pursuant to Part 15 of the FCC Rules. These limits
are designed to provide reasonable protection against harmful interference
in a residential installation. This equipment generates, uses and can radiate
radio frequency energy and, if not installed and used in accordance with
the instructions, may cause harmful interference to radio communications.
However, there is no guarantee that interference will not occur in a particular
installation. If this equipment does cause harmful interference to radio or
television reception, which can be determined by turning the equipment off
and on, the user is encouraged to try to correct the interference by one or
more of the following measures:
• Reorient or relocate the receiving antenna.
• Increase the separation between the equipment and receiver.
• Connect the equipment into an outlet on a circuit different from that to
which the receiver is connected.
• Consult the dealer or an experienced radio/TV technician for help.
Caution: Changes or modifications not expressly approved by the party
responsible for compliance could void the user‘s authority to operate the
equipment.
Hearing Aid Compatibility (HAC) regulations for mobile phones
In 2003, the FCC adopted rules to make digital wireless telephones compatible
with hearing aids and cochlear implants. Although analog wireless phones do
not usually cause interference with hearing aids or cochlear implants, digital
wireless phones sometimes do because of electromagnetic energy emitted by
the phone’s antenna, backlight, or other components. Your phone is compliant
with FCC HAC regulations (ANSI C63.19- 2011). While some wireless phones are
used near some hearing devices (hearing aids and cochlear implants), users
may detect a buzzing, humming, or whining noise. Some hearing devices are
more immune than others to this interference noise and phones also vary in
the amount of interference they generate. The wireless telephone industry has
developed a rating system for wireless phones to assist hearing device users
in finding phones that may be compatible with their hearing devices. Not all
phones have been rated. Phones that are rated have the rating on their box
or a label located on the box. The ratings are not guarantees. Results will vary
depending on the user’s hearing device and hearing loss. If your hearing
device happens to be vulnerable to interference, you may not be able to use
a rated phone successfully. Trying out the phone with your hearing device is
the best way to evaluate it for your personal needs.
This phone has been tested and rated for use with hearing aids for some of
the wireless technologies that it uses. However, there may be some newer
wireless technologies used in this phone that have not been tested yet for
use with hearing aids. It is important to try the different features of this phone
thoroughly and in different locations, using your hearing aid or cochlear
implant, to determine if you hear any interfering noise. Consult your service
provider or the manufacturer of this phone for more information on hearing
aid compatibility. If you have questions about return or exchange policies,
consult your service provider or phone retailer.
96 97
Page 51

M-Ratings: Phones rated M3 or M4 meet FCC requirements and are likely
to generate less interference to hearing devices than phones that are not
labeled. M4 is the better/higher of the two ratings.
T-Ratings: Phones rated T3 or T4 meet FCC requirements and are likely to
be more usable with a hearing device’s telecoil (“T Switch” or “Telephone
Switch”) than unrated phones. T4 is the better/ higher of the two ratings.
(Note that not all hearing devices have telecoils in them.)
Your phone meets the M3/T4 level rating.
Hearing devices may also be rated. Your hearing device manufacturer
or hearing health professional may help you find this rating. For more
information about FCC Hearing Aid Compatibility, please go to
http://www.fcc.gov/cgb/dro.
Replace the battery only with another battery that has been qualified with
f)
the system per this standard, IEEE-Std-1725. Use of an unqualified battery
may present a risk of fire, explosion, leakage or other hazard.
g) Promptly dispose of used batteries in accordance with local regulations.
Battery usage by children should be supervised.
h)
i)
Avoid dropping the phone or battery. If the phone or battery is dropped,
especially on a hard surface, and the user suspects damage, take it to a
service center for inspection.
Improper battery use may result in a fire, explosion or other hazard.
j)
The phone shall only be connected to products that bear the USB-IF logo or
have completed the USB-IF compliance program.
CTIA
a) Do not disassemble or open crush, bend or deform, puncture or shred.
b)
Do not modify or remanufacture, attempt to insert foreign objects into
the battery, immerse or expose to water or other liquids, expose to fire,
explosion or other hazard.
Only use the battery for the system for which it is specified.
c)
d)
Only use the battery with a charging system that has been qualified
with the system per CTIA Certification Requirements for Battery System
Compliance to IEEE 1725. Use of an unqualified battery or charger may
present a risk of fire, explosion, leakage, or other hazard.
Do not short circuit a battery or allow metallic conductive objects to
e)
Distraction
Driving
Full attention must be given to driving at all times in order to reduce the risk
of an accident. Using a phone while driving (even with a hands-free kit) can
cause distraction and lead to an accident. You must comply with local laws
and regulations restricting the use of wireless devices while driving.
Operating machinery
Full attention must be given to operating the machinery in order to reduce
the risk of an accident.
contact battery terminals.
98 99
Page 52

Product handling
General statement on handling and use
You alone are responsible for how you use your phone and any
consequences of its use.
You must always power off your phone wherever the use of a phone is
prohibited. Use of your phone is subject to safety measures designed to
protect users and their environment.
• Always treat your phone and its accessories with care and keep it in a
clean and dust-free place.
• Do not expose your phone or its accessories to open flames or lit tobacco
products.
• Do not expose your phone or its accessories to liquid, moisture, or high
humidity.
• Do not drop, throw, or try to bend your phone or its accessories.
• Do not use harsh chemicals, cleaning solvents, or aerosols to clean the
device or its accessories.
• Do not paint your phone or its accessories.
• Do not attempt to disassemble your phone or its accessories. Only
authorized personnel can do so.
• Do not expose your phone or its accessories to extreme temperatures,
minimum 14°F and maximum 113°F (minimum –10°C and maximum +
45°C).
• Please check local regulations for disposal of electronic products.
• Do not carry your phone in your back pocket as it could break when you
sit down.
100 101
Small children
Do not leave your phone and its accessories within the reach of small
children or allow them to play with it. They could hurt themselves or others, or
could accidentally damage the phone.
Your phone contains small parts with sharp edges that may cause an injury
or may become detached and create a choking hazard.
Demagnetization
To avoid the risk of demagnetization, do not allow electronic devices or
magnetic media close to your phone for a long time.
Electrostatic discharge (ESD)
Do not touch the micro-SIM card’s metal connectors.
Antenna
Do not touch the antenna unnecessarily.
Normal use position
When placing or receiving a phone call, hold your phone to your ear, with
the bottom toward your mouth.
Air bags
Do not place a phone in the area over an air bag or in the air bag
deployment area as an airbag inflates with great force and serious injury
could result.
Store the phone safely before driving your vehicle.
Page 53

Seizures/blackouts
The phone can produce a bright or flashing light. A small percentage of people
may be susceptible to blackouts or seizures (even if they have never had one
before) when exposed to flashing lights or light patterns such as when playing
games or watching video. If you have experienced seizures or blackouts or have
a family history of such occurrences, please consult a physician.
Repetitive strain injuries
To minimize the risk of Repetitive Strain Injury (RSI) when texting or playing
games with your phone:
• Do not grip the phone too tightly.
• Press the keys lightly.
• Use the special features that are designed to minimize the times of
pressing buttons, such as Message Templates and Predictive Text.
• Take lots of breaks to stretch and relax.
Emergency calls
This phone, like any wireless phone, operates using radio signals, which
cannot guarantee connection in all conditions. Therefore, you must never rely
solely on any wireless phone for emergency communications.
Loud noise
This phone is capable of producing loud noises, which may damage your
hearing. Turn down the volume before using headphones, Bluetooth stereo
headsets or other audio devices.
Phone heating
Your phone may become warm during charging and during normal use.
102 103
Electrical safety
Accessories
Use only approved accessories.
Do not connect with incompatible products or accessories.
Take care not to touch or allow metal objects, such as coins or key rings, to
contact or short-circuit in the battery terminals.
Connection to a car
Seek professional advice when connecting a phone interface to the vehicle
electrical system.
Faulty and damaged products
Do not attempt to disassemble the phone or its accessories.
Only qualified personnel can service or repair the phone or its accessories.
If your phone (or its accessories) has been submerged in water, punctured,
or subjected to a severe fall, do not use it until you have taken it to be
checked at an authorized service center.
Interference
General statement on interference
Care must be taken when using the phone in close proximity to personal
medical devices, such as pacemakers and hearing aids.
Page 54

Pacemakers
Pacemaker manufacturers recommend that a minimum separation of
6 inches (15 cm) be maintained between a mobile phone and a
pacemaker to avoid potential interference with the pacemaker. To achieve
this, use the phone on the opposite ear to your pacemaker and do not carry
it in a breast pocket.
Hearing aids
People with hearing aids or other cochlear implants may experience
interference noise when using wireless devices or when one is nearby.
The level of interference will depend on the type of hearing device and the
distance from the interference source, increasing the separation between
them may reduce the interference. You may also consult your hearing aid
manufacturer to discuss alternatives.
Medical devices
Please consult your doctor and the device manufacturer to determine if
using your phone may interfere with the operation of your medical device.
Hospitals
Switch off your wireless device when requested to do so in hospitals, clinics,
or health care facilities. These requests are designed to prevent possible
interference with sensitive medical equipment.
Aircraft
Switch off your wireless device whenever you are instructed to do so by
airport or airline staff.
Consult the airline staff about the use of wireless devices on board the
aircraft. If your device offers a ‘flight mode’, this must be enabled prior to
boarding an aircraft.
Interference in cars
Please note that because of possible interference to electronic equipment,
some vehicle manufacturers forbid the use of mobile phones in their
vehicles unless a hands-free kit with an external antenna is included in the
installation.
Explosive environments
Gas stations and explosive atmospheres
In locations with potentially explosive atmospheres, obey all posted signs to
turn off wireless devices such as your phone or other radio equipment.
Areas with potentially explosive atmospheres include fueling areas, below
decks on boats, fuel or chemical transfer or storage facilities, and areas
where the air contains chemicals or particles, such as grain, dust, or metal
powders.
Blasting caps and areas
Power off your mobile phone or wireless device when in a blasting area or in
areas posted with power off “two-way radios” or “electronic devices” notices
to avoid interfering with blasting operations.
104 105
Page 55

Specifications
12 MONTH LIMITED WARRANTY
Handset specifications are shown in the following table.
Network frequency GSM: 850/900/1800/1900
Operating system Android™ 6.0 (Marshmallow)
Display 4.5" FWVGA
Processor Qualcomm MSM8909 (Quad Core, 1.1GHz)
Memory 1 GB RAM, 8 GB ROM
Wi-Fi 802.11 b/g/n
Camera Rear: 5 MP fixed focus
Talk time Up to 6 hours
Standby time Up to 180 hours
Dimensions 5.2 X 2.56 X 0.4 inches
Weight 4.8 oz
Battery 1780 mAh
HAC Rated for hearing aids: M3/T4
Charging solution Micro USB port
Headset solution
106 107
3G: B2 / B4 / B5, HSPA+ (21M bit/s DL)
4G: B2 / B4 / B5 / B12 MFBI
854×480
microSDHC support up to max 128GB
Front: 2 MP fixed focus
3.5 mm headphone jack
TCL Communications Ltd. warrants to the original retail purchaser of this
wireless device that should this product or part thereof during normal
consumer usage and condition be proven to be defective in material or
workmanship that results in product failure within the first twelve (12) months
from the date of purchase as shown on your original sales receipt from an
authorized sales agent. Such defect(s) will be repaired or replaced (with
new or rebuilt parts) at the company’s option without charge for parts
or labor directly related to the defect(s). Batteries, power adapters, and
other accessories sold as in box items are also warranted against defects
and workmanship that results in product failure within the first twelve (12)
month period from the date of purchase. This warranty extends to products
purchased and sold within the United States.
The limited warranty for your wireless device will be voided if any of the
following conditions occur:
• Non-compliance with the instructions for use or installation, or with
technical and safety standards applicable in the geographical area
where your phone is used;
• Connection to any equipment not supplied or not recommended by TCL
Communications Ltd.;
• Modification or repair performed by individuals not authorized by TCL
Communications Ltd. or its affiliates;
• Changes to the device operating system by the user or third party
applications;
Page 56

• Acts of god such as inclement weather, lightning, power surges, fire,
humidity, infiltration of liquids or foods, chemical products, download of
files, crash, high voltage, corrosion, oxidation;
• Removal or altering of the wireless device’s event labels or serial numbers
(IMEI);
• Damage from exposure to water or other liquids, moisture, humidity,
excessive temperatures or extreme environmental conditions, sand, excess
dust and any condition outside the operating guidelines;
• Rooted devices;
• Damage as result of physical abuse regardless of cause.
There are no express warranties, whether written, oral or implied, other than
this printed limited warranty or the mandatory warranty provided by your
jurisdiction. In no event shall TCL Communications Ltd. or any of its affiliates
be liable for incidental or consequential damages of any nature whatsoever,
including but not limited to commercial loss, to the full extent those
damages can be disclaimed by law. Some states do not allow the exclusion
or limitation of incidental or consequential damages, or limitation of the
duration of implied warranties, so the preceding limitations or exclusions may
not apply to you.
How to obtain Support: Contact the customer care center by calling (855368-0829) or going to (http://www.alcatelonetouch.us). We have placed
many self-help tools that may help you to isolate the problem and eliminate
the need to send your wireless device in for service. In the case that your
wireless device is no longer covered by this limited warranty due to time or
condition, you may utilize our out of warranty repair options.
How to obtain Hardware Service within the terms of this warranty: Create a
user profile (alcatel.finetw.com) and then create an RMA for the defective
device. Ship the device with a copy of the original proof of purchase (e.g.
original copy of the dated bill of sale, invoice) with the owner's return
address (No PO Boxes accepted), wireless carrier’s name, alternate daytime
phone number, and email address with a complete problem description.
Only ship the device. Do not ship the SIM card, memory cards, or any other
accessories such as the power adapter. You must properly package and
ship the wireless device to the repair center. TCL Communications Ltd. is
not responsible for devices that do not arrive at the service center or are
damaged in transit. Insurance is recommended with proof of delivery. Upon
receipt, the service center will verify the warranty conditions, repair, and
return your device to the address provided in the RMA.
108 109
Page 57

Electronic Recycling
For more information on Electronic Recycling, please:
1) Visit Alcatel Electronic Recycling Program website at
http://www.alcatelonetouch.us/electronic-recycling-program, or
2)
Call Alcatel US Customer Support at 1-855-368-0829.
Notes
110 111
Page 58

ALCATEL STREAK
Guía de usuario
TM
Page 59

Algunos contenidos de este manual pueden diferir en su teléfono dependiendo
del software del teléfono. El color también puede variar.
Tu teléfono está diseñado para que tengas fácil acceso a una amplia variedad
de contenidos. Para tu protección, queremos que sepas que es posible que
algunas aplicaciones que habilites compartan la ubicación de tu teléfono. En
el caso de las aplicaciones disponibles mediante Cricket, ofrecemos controles
de privacidad que te permiten decidir en qué forma una aplicación puede
usar la ubicación de tu teléfono y otros teléfonos de tu cuenta. Sin embargo, las
herramientas de privacidad de Cricket no cubren las aplicaciones disponibles
fuera de Cricket. Consulta los términos y condiciones y la respectiva norma de
privacidad de cada servicio basado en la ubicación para conocer cómo se
utilizará y protegerá la información de ubicación. Además, tu teléfono Cricket se
puede usar para acceder a Internet y hacer descargas y comprar productos,
aplicaciones y servicios de Cricket o de terceros. Cricket brinda herramientas
para que controles el acceso a Internet y ciertos tipos de contenido proveniente
de Internet. Estos controles pueden no funcionar en ciertos equipos que pasan
por alto los controles de Cricket.
© 2016 Cricket Wireless LLC. Todos los derechos reservados. Cricket y el logotipo
de Cricket son marcas comerciales registradas con licencia de Cricket Wireless
LLC. Otras marcas son propiedad de sus respectivos dueños.
ALCATEL es una marca registrada de Alcatel-Lucent y TCL Communication
LTD la utiliza bajo licencia. ONETOUCH y Flint son marcas registradas de TCL
Communication LTD.
© 2016 TCT Mobile Limited. Todos los derechos reservados.
TCL Communication Ltd se reserva el derecho a modificar las especificaciones
técnicas o materiales sin previo aviso.
Todos los tonos de "Exclusivos" incorporados en este teléfono han sido
compuestos, arreglados y mezclados por NU TROPICAL (Amar Kabouche).
Tabla de contenidos
Puesta en marcha ....................................................................................... 6
Configuración del teléfono ..................................................................................... 6
Ampliación de la duración de la batería ..............................................................9
Encendido/apagado del teléfono ......................................................................10
Información general .............................................................................................. 12
Conozca su teléfono ............................................................................................. 13
Funciones clave ..................................................................................................... 15
Llamadas de teléfono ............................................................................... 25
Realizar llamadas .................................................................................................. 25
Recibir llamadas .................................................................................................... 27
Ajustar la configuración de las llamadas ............................................................ 30
Contactos .................................................................................................. 31
Importación y exportación de contactos ............................................................ 31
Compartir información de contactos .................................................................. 32
Cómo crear un contacto ...................................................................................... 32
Añadir un contacto a Favoritos ............................................................................ 33
Búsqueda de contactos .......................................................................................33
Agrupar contactos ................................................................................................ 33
Cómo dividir información de contactos .............................................................. 34
Ingresar texto ............................................................................................ 35
Uso del teclado en pantalla ................................................................................. 35
Teclado de Google ...............................................................................................35
Edición de texto ..................................................................................................... 36
1
Page 60

Mensajes ................................................................................................... 37
Cómo abrir la pantalla Mensajes ........................................................................ 37
Envío de un mensaje ............................................................................................. 37
Respuesta a un mensaje ...................................................................................... 38
Reenvío de un mensaje ........................................................................................ 38
Cómo copiar un mensaje .................................................................................... 39
Modificación de los ajustes de mensajes ........................................................... 39
Correo electrónico .................................................................................... 40
Configuración de la primera cuenta de correo electrónico ............................. 40
Comprobación de los mensajes de correo electrónico .................................... 40
Responder a un correo electrónico ..................................................................... 41
Cómo escribir y enviar un mensaje de correo electrónico ............................... 42
Añadir y editar cuentas de correo electrónico ................................................... 43
Modificar ajustes generales del correo electrónico ...........................................44
Conexión a Internet .................................................................................. 45
Añadir una conexión de datos móviles ...............................................................45
Cómo activar la conexión Wi-Fi ............................................................................ 46
Cómo conectar a una red Wi-Fi ........................................................................... 46
Cómo añadir una red Wi-Fi ................................................................................... 46
Comprobación del estado de la red Wi-Fi ..........................................................47
Cómo conectar a una red WPS ........................................................................... 47
Conexión a redes privadas virtuales ....................................................................48
Navegar por Internet ................................................................................ 50
Uso del Navegador ................................................................................................50
Abrir una página web o buscar en Internet ....................................................... 50
Uso de varias pestañas de navegador ...............................................................51
Cómo cambiar entre pestañas ............................................................................ 51
Establecer la página de inicio ............................................................................. 51
Descarga de archivos ........................................................................................... 52
Modificación de los ajustes del navegador ........................................................ 52
Módem y punto de acceso móvil ............................................................ 53
Cómo compartir la conexión de datos del teléfono a través de USB...............53
Cómo compartir la conexión de datos del teléfono como zona Wi-Fi. ............ 53
Cómo renombrar o proteger su zona Wi-Fi .......................................................... 53
Cómo usar Wi-Fi Direct ............................................................................. 54
Cómo conectar a otro dispositivo a través de Wi-Fi Direct ................................. 54
Bluetooth ................................................................................................... 55
Activación/desactivación de Bluetooth .............................................................. 55
Modificación del nombre del dispositivo ............................................................. 55
Sincronización con otro dispositivo Bluetooth ..................................................... 56
Cancelación de la sincronización con un dispositivo Bluetooth ...................... 56
Envío de datos por Bluetooth ...............................................................................57
Recepción de datos por Bluetooth ...................................................................... 57
Entretenimiento ......................................................................................... 59
Cómo capturar una foto ...................................................................................... 59
2 3
Page 61

Configuración de ajustes de la cámara ............................................................. 60
Grabación de un video ........................................................................................ 61
Funciones de Polaroid ........................................................................................... 62
Uso de la galería ................................................................................................... 64
Cómo realizar notas .............................................................................................. 66
Aplicaciones de Google .......................................................................... 67
Gmail ...................................................................................................................... 67
Calendario de Google .......................................................................................... 68
Google Chrome ..................................................................................................... 68
Google+.................................................................................................................. 68
Google Maps ......................................................................................................... 69
Búsqueda Google ................................................................................................. 72
Google Play Music ................................................................................................. 73
Google Play Store ..................................................................................................77
Creación de una cuenta de Google Wallet .......................................................78
Aplicaciones ............................................................................................. 79
Calculadora ........................................................................................................... 79
Reloj ........................................................................................................................ 79
Descargas .............................................................................................................. 80
Archivos ..................................................................................................................80
YouTube .................................................................................................................. 81
Ajustes del teléfono .................................................................................. 82
CONEXIONES INALÁMBRICAS Y REDES .................................................................. 82
DISPOSITIVO ............................................................................................................ 83
PERSONAL ............................................................................................................... 88
Sistema ................................................................................................................... 92
Actualización del software del teléfono .................................................. 93
Solución de problemas ............................................................................. 94
Para su seguridad .................................................................................... 99
Seguridad general .................................................................................................99
Información sobre la exposición a radiofrecuencias (SAR) .............................100
Cumplimiento de la FCC .................................................................................... 102
Normativas sobre la compatibilidad con audífonos (Hearing Aid Compatibility,
HAC) para celulares ............................................................................................ 103
CTIA ...................................................................................................................... 105
Distracción............................................................................................................106
Manipulación del producto ................................................................................ 106
Seguridad eléctrica ............................................................................................. 110
Interferencias ........................................................................................................ 110
Entornos explosivos .............................................................................................. 112
Especificaciones ..................................................................................... 114
GARANTÍA LIMITADA DE 12 MESES .......................................................... 115
Reciclaje de componentes electrónicos ............................................... 116
Notas ....................................................................................................... 117
4 5
Page 62

Puesta en marcha
Configuración del teléfono
Quitar/colocar la tapa trasera
Instalar la tarjeta micro SIM
Debe insertar su tarjeta SIM para poder realizar llamadas.
Coloca la tarjeta SIM con los contactos dorados hacia abajo y deslízala en
su alojamiento. Verifica que esté correctamente insertada. Para extraer la
tarjeta SIM, presiónela y deslícela hacia afuera.
Importante: Para evitar dañar el teléfono, use la tarjeta micro SIM estándar
incluida en la caja.
Colocación de una tarjeta microSD (no incluida)
Coloca la tarjeta microSD con los contactos dorados hacia abajo y
deslízala en su alojamiento. Verifica que esté correctamente insertada. Para
extraer la tarjeta microSD, presione suavemente y deslícela hacia afuera.
6 7
Page 63

Importante: Es posible que algunas aplicaciones requieran una tarjeta
microSD para funcionar con normalidad o almacenar datos. Por
consiguiente, se recomienda que siempre tenga una tarjeta microSD
instalada y que no la retire o remplace aleatoriamente.
Cargar la batería
La batería del teléfono tiene suficiente energía para que pueda encender
el teléfono, encontrar una señal y realizar algunas llamadas. Debe cargar la
batería por completo lo antes posible.
Cuando la batería está baja, aparece el icono de aviso de batería baja en
la pantalla.
Si la batería está extremadamente baja, es posible que no pueda encender
el teléfono aunque esté cargándolo. En ese caso, vuelva a probarlo luego
de cargar el teléfono por unos 10 minutos.
1. Inserte el conector del cargador en el puerto de carga. Asegúrese de
insertar el conector con la orientación correcta. No fuerce el conector
para insertarlo en el puerto.
2. Conecte el cargador a una toma de corriente de CA estándar.
8 9
3. Cuando la batería esté totalmente cargada, desenchufe el cargador y
desconéctelo del teléfono.
Aviso. Usa solamente cargadores y cables aprobados por Alcatel. El uso de
accesorios no aprobados puede dañar su teléfono.
Si intenta desmontar la batería, puede lesionarse y deja sin validez la
garantía.
No intente desarmar, dañar, alterar ni quitar la batería del dispositivo.
Ampliación de la duración de la batería
Las aplicaciones activas, los niveles de brillo de la pantalla, el uso de
Bluetooth y Wi-Fi y el GPS pueden agotar la batería de su teléfono. Para
ahorrar batería, siga los útiles consejos que se indican a continuación:
• Reduzca el tiempo de la luz de fondo de la pantalla.
• Baje el brillo de la pantalla.
• Desactive la sincronización automática, Wi-Fi y Bluetooth cuando no los
use.
• Deshabilite la función GPS cuando no la use. La mayoría de las
aplicaciones que usan esta función hacen consultas periódicamente a
satélites GPS para conocer su ubicación; cada una de estas consultas
consume batería.
Page 64

Encendido/apagado del teléfono
Asegúrese de que el teléfono cuenta con una tarjeta micro SIM y que tenga
batería.
• Para encender el teléfono, mantenga pulsado el botón de Encendido.
• Para apagarlo, mantenga pulsado el botón de Encendido para acceder
al menú de opciones. Toca Apagar.
Primera puesta en servicio del teléfono
Siga los pasos que se indican a continuación la primera vez que configure
el teléfono o luego de reiniciar valores predeterminados de fábrica:
1. Toca el campo de idioma para seleccionar el idioma que desea usar y,
luego, toca
2.
Toca OMITIR para configurar las conexiones Wi-Fi más tarde o toca una
red. Si la red está protegida, ingrese la contraseña y toca CONECTAR >
SIGUIENTE.
3. Configure Hora y fecha y luego toca SIGUIENTE.
Ingrese su nombre y apellido para permitir que el teléfono personalice
4.
algunas aplicaciones y toca SIGUIENTE.
5. La opción Proteja su teléfono se mostrará a continuación, selecciona la
casilla Proteger este dispositivo y elige el bloqueo de pantalla entre:
Patrón, PIN o Contraseña para evitar que otros utilicen tu dispositivo. A
continuación, selecciona las preferencias de notificaciones de bloqueo
de pantalla y toca SIGUIENTE.
.
7.
A continuación, en tu teléfono aparecerá la pantalla de puesta en
servicio completada y podrás tocar FINALIZAR para acceder a la pantalla
de inicio.
8. Se le solicitará que lea los términos del Gestor de Wi-Fi de Cricket. Toca
ESTOY DE ACUERDO para continuar.
Cambiar a modo de espera
Para ahorrar batería, el modo de espera deja el teléfono en un estado de
bajo consumo de energía mientras la pantalla está inactiva. El teléfono
también queda en el modo de espera por sí mismo cuando la pantalla
se desactiva de forma automática luego de cierto tiempo, que el usuario
puede ajustar tocando
inicio.
Pulse el botón de Encendido para cambiar al modo de espera.
> Ajustes > Pantalla > Espera en la pantalla de
Activación del teléfono
Pulse el botón de Encendido para activar la pantalla.
Importante: Si configuró un patrón, un PIN o una contraseña de desbloqueo
para el teléfono (véase Ajustes – Bloquear pantalla – Bloqueo de pantalla),
tendrá que dibujar el patrón o ingresar el PIN o la contraseña para
desbloquear la pantalla.
6. Se le solicitará que lea los términos de servicio de Google. Toca
saber más acerca de los servicios de Google y, luego, toca SIGUIENTE.
10 11
para
Page 65

Información general
Conozca su teléfono
Control táctil
La pantalla táctil del teléfono le permite controlar acciones por medio de
varios gestos.
• Tocar: Toca los botones, los iconos o las aplicaciones para seleccionar
elementos o abrir aplicaciones.
• Pulsar y mantener pulsado: para abrir las opciones disponibles de un
elemento (como un mensaje o un link en una página web), toca y
mantenga pulsado el elemento.
• Deslizar: deslizar significa arrastrar rápidamente el dedo sobre la pantalla
de forma vertical u horizontal.
• Arrastrar: para arrastrar, toca con el dedo y mantén ejerciendo cierta
presión antes de empezar a moverlo. Mientras esté arrastrando, no suelte
el dedo hasta llegar a la posición deseada.
• Pellizcar: en algunas aplicaciones (como Maps, Navegador y Galería),
se pueden acercar o alejar las imágenes de la pantalla, para ello
coloque dos dedos en la pantalla y júntelos para alejar la imagen o
sepárelos para acercarla.
• Girar la pantalla: para la mayoría de las pantallas, podrá cambiar de
manera automática la orientación de la misma desde modo vertical a
modo horizontal si gira el teléfono de lado.
12 13
Lente de cámara
Audífono
Luz indicadora
Barra de estado y
notificaciones
Pantalla táctil
Tecla de aplicaciones
recientes
Tecla de inicio
Tecla Atrás
Page 66

Cámara
Puerto de auriculares
Funciones clave
Botón Función
Tecla de
aplicaciones
Tecla de encendido
Teclas de volumen
Bocina
Puerto de carga/datos
14 15
recientes
Tecla de
inicio
Tecla Atrás
Tecla de
encendido
Toca este botón para ver las aplicaciones utilizadas
recientemente.
Desde cualquier aplicación o pantalla, toca para
volver a la pantalla de Inicio.
Pulse prolongadamente para que aparezca el
icono de búsqueda de Google. Deslice el dedo
hacia el icono para abrir el buscador de Google.
Toca para volver a la pantalla anterior o para cerrar
un cuadro de diálogo, el menú de opciones, el
panel de notificaciones, etc.
Mantenga pulsado este botón para encender o
apagar el teléfono, reiniciarlo o poner en modo
vuelo.
Pulse este botón para cambiar el teléfono a modo
de espera.
Pulse este botón para activar el teléfono.
Mantenga pulsado el botón de Encendido y el de
Bajar el volumen para realizar una captura de
pantalla.
Mantenga pulsado el botón de encendido durante
8 segundos para apagarlo o manténgalo pulsado
durante 10 segundos o más para reiniciar.
Page 67

Teclas de
volumen
Pulse el botón de Volumen para subir o bajar el
volumen.
Pulse el botón de Volumen para tomar una foto.
Pulsa el botón de volumen para ajustar el volumen
del tono de llamada o silenciar el tono de una
llamada entrante.
Pulse el botón de Volumen para ajustar el volumen
multimedia en modo de música/video/transmisión.
Pantalla de inicio ampliada
Además de la pantalla de inicio principal, el teléfono cuenta con una
pantalla de inicio ampliada para proporcionarle más espacio para añadir
iconos, widgets y demás. Solo tiene que deslizar el dedo hacia la derecha o
la izquierda para ver los paneles de la pantalla de inicio ampliada.
Selección del fondo de pantalla
1.
Mantenga pulsado un espacio vacío en la pantalla de inicio y toca
FONDO DE PANTALLA.
2.
Personalice la pantalla de inicio añadiendo atajos, widgets,
carpetas y fondos de pantalla.
Barra de estado y notificaciones
Toca un fondo de pantalla y toca Establecer fondo de pantalla. También
puede tocar Seleccionar imagen para acceder a opciones adicionales.
Cómo añadir elementos a la pantalla de inicio
• Para añadir una aplicación a la pantalla de inicio, toca
, mantenga
pulsada la aplicación deseada y arrástrela a la pantalla de inicio.
Widget
• Para añadir un widget a la pantalla de inicio, mantenga pulsada un
espacio vacío de la pantalla y toca WIDGETS. Mantenga pulsado el
widget que desea y arrástrelo hasta la pantalla de inicio.
Cómo ajustar el tamaño del widget
1. Mantenga pulsado un widget en la pantalla de inicio y luego suéltelo.
2. Vuelva a mantener pulsado el widget y luego suéltelo, aparecerá un
contorno alrededor del widget. Puede ajustar su tamaño.
Atajos
Importante: No es posible cambiar los tamaños de todos los widgets.
Cómo organizar iconos con una carpeta
Atajos favoritos
1. Mantenga pulsada una aplicación por encima de otra para crear
carpetas.
16 17
Page 68

2. Para añadir más atajos a la carpeta, mantenga pulsados los atajos y
arrástrelos por encima de la carpeta antes de soltarlos.
Eliminación de elementos de la pantalla de inicio
Mantenga pulsado el elemento que desea eliminar hasta que
1.
Eliminar aparezca en la pantalla.
2.
Arrastre el elemento hasta Eliminar y suéltelo cuando aparezca de
color rojo.
Ver las aplicaciones
En la pantalla de inicio, toca
para acceder a todas las aplicaciones del
teléfono. Puede añadir aplicaciones a la pantalla de inicio y desinstalarlas o
deshabilitarlas.
Desinstalación o deshabilitación de una aplicación
1. En la pantalla de inicio, toca
2.
Mantenga pulsada una aplicación.
3.
Para desinstalar una aplicación, arrástrela hasta Desinstalar y suéltela.
Para encontrar las aplicaciones deshabilitadas, toca > Ajustes >
4.
.
Aplicaciones. Toca una aplicación y toca HABILITAR para habilitarla.
5.
Toca Aceptar.
Importante: Todas las aplicaciones no se pueden desinstalar o deshabilitar.
Iconos de estado y notificaciones
Su teléfono le indicará exactamente lo que está pasando mostrándole unos
simples iconos. A continuación, tiene su significado.
Iconos de estado
GPRS conectado Alarma configurada
GPRS en uso Bluetooth activado
EDGE conectado
Conectado a un dispositivo
Bluetooth
EDGE en uso Altavoz activado
Conectado a 4G
Micrófono del teléfono
silenciado
4G en uso Roaming
HSPA (3G+) conectado
No hay una tarjeta SIM
insertada
HSPA (3G+) en uso Modo vibrar
Conectado a 4G Nivel de batería muy bajo
4G en uso Nivel de batería bajo
Wi-Fi conectado Batería parcialmente vacía
Conectado a una red Wi-Fi Batería llena
Modo vuelo Batería en carga
Intensidad de la señal GPS activado
Sin señal
18 19
Page 69

Iconos de notificación
Nuevo mensaje de Gmail Llamada perdida
Nuevo mensaje de correo
electrónico
Nuevo mensaje de texto o
multimedia
Problemas con la entrega de
SMS o MMS
Nuevo mensaje de Google
Hangouts
Nuevo mensaje de voz Descarga de datos
Evento próximo
Captura de pantalla tomada Red Wi-Fi abierta disponible
Módem USB y Zona Wi-Fi
activados
Módem USB activado
Zona Wi-Fi activada Más notificaciones ocultas
Se han excedido los límites de
uso de datos o están a punto
de excederse
Desvío de llamada activado
Conectado a VPN
Radio encendida
Envío de datos
Seleccionar método de
entrada
Teléfono conectado mediante
cable USB
Actualización del sistema
disponible
Usar el panel de notificaciones
Toca y arrastre hacia abajo la barra de Estado para abrir el panel de ajustes
rápidos o de notificaciones. Toca y arrastre hacia arriba para cerrarlo. Si hay
notificaciones puede tocar para acceder a ellas directamente.
Panel de notificaciones
Cuando haya notificaciones, toca y arrastre hacia abajo la barra de estado
para abrir el panel de notificaciones y leer información más detallada.
Cambia al panel de ajustes rápidos.
Borra todas las notificaciones basadas
en eventos (el resto de notificaciones en
curso se conservarán).
20 21
Page 70

Panel de ajustes rápidos
Toca y arrastre hacia abajo el panel de notificaciones o toca
el panel de ajustes rápidos. Mediante el panel de ajustes rápido, puede
acceder rápidamente a los ajustes más frecuentes como Wi-Fi, brillo de la
pantalla, modo vuelo, etc. Puede abrir este panel desde cualquier parte de
su dispositivo, incluso con la pantalla bloqueada.
Accede a la pantalla del usuario.
Accede a Ajustes, donde podrá ajustar otros
elementos.
para abrir
Proteger el teléfono con un patrón de desbloqueo de pantalla
Puede proteger su teléfono si crea un bloqueo de pantalla. Cuando esté
habilitado, simplemente debe deslizar el dedo por la pantalla, dibujar un
patrón o ingresar un PIN numérico o una contraseña para desbloquear la
pantalla y los botones del teléfono.
1. En la pantalla de inicio, toca
2. Toca Bloquear pantalla.
3. Toca Deslizar, Patrón, PIN o Contraseña.
• Toca Ninguno para deshabilitar el bloqueo de pantalla.
• Toca Deslizar para habilitar el bloqueo de pantalla.
• Toca Patrón para crear un patrón que deberá dibujar para desbloquear
la pantalla.
• Toca PIN o Contraseña para definir un PIN numérico o una contraseña
que deberá ingresar para desbloquear la pantalla.
> Ajustes > Bloquear pantalla.
Cómo proteger el teléfono con encriptación
Puede encriptar todos los datos de su teléfono: cuentas de Google, datos
de aplicaciones, música y otros medios, información descargada, etc. Si
lo hace, debe ingresar un PIN numérico o una contraseña cada vez que
enciende el teléfono.
Aviso. La encriptación es irreversible. La única forma de revertir un teléfono
a desencriptado se llevara cabo un restablecimiento a los datos de fábrica,
que borrará todos sus datos.
La encriptación proporciona protección adicional si le roban el teléfono, y
en algunas organizaciones es obligatoria o recomendada.
22 23
Page 71

Antes de activar la encriptación, prepárese del modo siguiente:
• Establezca un PIN o una contraseña de bloqueo de pantalla.
• Cargue la batería.
• Mantenga el teléfono conectado al cargador.
• Programe una hora o más para el proceso de encriptación: este proceso
no debe interrumpirse o perderá parte de los datos o todos ellos.
Cuando esté preparado para activar la encriptación:
1. En la pantalla de inicio, toca
teléfono.
2. Lea la información sobre la encriptación con detenimiento.
El botón ENCRIPTAR TELÉFONO aparece atenuado si la batería no está
cargada o el teléfono no está conectado.
Si cambia de opinión acerca del encriptado del teléfono, toca
3. Toca ENCRIPTAR TELÉFONO.
Se inicia el proceso de encriptación y se muestra su progreso. La
encriptación puede tardar una hora o más; durante este tiempo es posible
que el teléfono se reinicie varias veces.
Cuando se completa la encriptación, el sistema le solicita que ingrese el PIN
o la contraseña.
A partir de ahora, debe ingresar el PIN numérico o la contraseña cada vez
que encienda el teléfono para desencriptarlo.
> Ajustes > Seguridad > Encriptar
.
Llamadas de teléfono
Realizar llamadas
Una llamada se puede hacer de muchas maneras y todas son fáciles.
Cómo llamar con el marcador
1. En la pantalla de inicio, toca .
2. Toca
para abrir el marcador.
24 25
Page 72

3. Ingrese el número de teléfono con el teclado que aparece en pantalla.
Toca
Importante: Mientras ingresa los dígitos, el teléfono busca contactos que
coincidan. Si ves el número que quieres marcar, tócalo para realizar la
llamada de inmediato sin necesidad de marcar el resto del número.
4. Toca
Consejo: Para realizar una llamada internacional, mantenga pulsada la
tecla 0 para ingresar el símbolo más (+). A continuación, ingrese el código
de país seguido del código de ciudad/área y, a continuación, el número de
teléfono.
para borrar los dígitos incorrectos.
para realizar la llamada.
Cómo marcar un número reciente
1. En la pantalla de inicio, toca > .
2. Deslice la pantalla hacia arriba o abajo y toca el contacto al que desea
llamar.
Consejo: Puede buscar un contacto tocando el campo de búsqueda de
la parte superior de la lista de contactos.
3.
Toca el icono que aparece antes del número y luego toca para
realizar la llamada o toca el número al que desea llamar.
Llamada desde la lista de contactos
1. En la pantalla de inicio, toca .
2.
Deslice el dedo hacia arriba y abajo para desplazarse por la lista de
contactos, toca el contacto al que desea llamar y luego toca
llamarlo.
para
Consejo: Puede buscar un contacto tocando el campo de búsqueda de la
parte superior de las listas de contactos.
Llamada desde un mensaje de texto
Si un mensaje de texto contiene un número de teléfono al que desea
llamar, puede realizar la llamada mientras visualiza el mensaje de texto.
1. En la pantalla de inicio, toca
Toca la conversación y, a continuación, toca .
2.
.
Recibir llamadas
Cómo contestar llamadas
Cuando reciba una llamada de teléfono, deslice hacia la derecha para
contestarla.
Importante: Para silenciar el timbre antes de responder la llamada, pulse el
botón de terminar la llamada o de volumen.
Rechazar una llamada
Cuando reciba una llamada de teléfono, deslice hacia la derecha para
rechazarla.
También puede deslizar
seleccionar un mensaje de texto predeterminado o escribir uno usted para
enviar al emisor.
Consejo: Para editar una respuesta de texto predeterminada, toca
Ajustes > Respuestas rápidas.
hacia arriba para rechazar la llamada y
> >
26 27
Page 73

Uso de opciones durante una llamada
Durante una llamada, verá diversas opciones en pantalla. Toca una opción
para seleccionarla.
• Toca
• Toca
• Toca
• Toca
• Toca
para activar o desactivar la bocina.
para silenciar o activar el micrófono.
para cambiar al marcador.
para poner la llamada en espera.
para realizar otra llamada independiente de la primera
llamada, que se pone en espera.
• Toca
para finalizar la llamada en curso.
Aviso. Puesto que el volumen es más alto, no se coloque el teléfono cerca
de la oreja cuando utilice la bocina.
Gestión de llamadas múltiples
Si están disponibles las funciones de llamada en espera y llamada a tres,
puede cambia entre dos llamadas o realizar una llamada en conferencia.
Importante: Las funciones de llamada en espera y llamada a tres
requieren compatibilidad con la red y pueden suponer costos adicionales.
Comuníquese con su proveedor de servicios para obtener más información.
Cómo cambiar entre llamadas actuales
Durante una llamada, la pantalla del teléfono le informa que hay otra
llamada entrante y le muestra el ID del emisor.
Para responder a otra llamada entrante durante una llamada:
Deslice
hacia la derecha para contestar la llamada. De este modo se
pone al primer emisor en espera y se responde a la segunda llamada.
Deslice el dedo hacia abajo para contestar la segunda llamada y terminar
la primera. Deslice
hacia la izquierda para rechazar la segunda
llamada.
Importante: Deslice
hacia arriba para rechazar la segunda llamada y
seleccionar un mensaje de texto predeterminado para el emisor.
Para cambiar entre dos llamadas:
Toca
o En espera en la pantalla.
Configuración de una llamada en conferencia
Es posible realizar otra llamada mientras está realizando una llamada.
1. En el marcado, ingrese un número y toca
2.
Una vez establecida la conexión, toca > y marque el segundo
.
número. De este modo se pone al primer emisor en espera y se marca el
segundo número.
Cuando haya establecido la conexión con el segundo interlocutor, toca
3.
.
Si una de las personas a las que llamó cuelga durante la llamada, tanto
usted como el interlocutor que queda permanecen conectados. Si usted
inició la llamada y es el primero en colgar, todos los interlocutores se
desconectarán.
Para finalizar la llamada, toca
.
28 29
Page 74

Ajustar la configuración de las llamadas
En la pantalla de inicio, toca > > Ajustes para configurar las opciones
de las llamadas.
Opciones de visualización
Toca este menú para ordenar la lista por nombre o apellido. También puede
ver los nombres de los contactos por el apellido primero.
Sonidos y vibración
Toca Tono del teléfono para ajustas el tono de las llamadas entrantes.
Marque las casillas de verificación correspondientes para habilitar los tonos
del teclado de marcado o la vibración de las llamadas.
Respuestas rápidas
Toca aquí para editar las respuestas rápidas que se utilizarán al rechazar
una llamada con mensajes.
Accesibilidad
Modo TTY
El modo TTY permite a personas sordas, con problemas de audición o habla
usar el teléfono para comunicarse. Luego de conectar el teléfono y los
dispositivos TTY que incluyen un teclado y un sistema para visualizar texto,
las llamadas se vinculan a un servicio de transmisión que convierte la voz
entrante en texto y el texto saliente en voz.
Audífonos
Marque esta casilla de verificación para habilitar la compatibilidad con
audífonos.
30 31
Contactos
Puede añadir contactos al teléfono y sincronizarlos con los contactos de su
cuenta de Google u otras cuentas compatibles con la sincronización de
contactos.
Para ver sus contactos, toca
tocar las pestañas de la parte superior para cambiar rápidamente a
FAVORITOS o TODOS LOS CONTACTOS.
Importación y exportación de contactos
Es posible importar/exportar contactos de/a su tarjeta micro SIM,
almacenamiento del teléfono o tarjeta microSDHC. Esto resulta
especialmente útil cuando se precisa transferir contactos entre diferentes
dispositivos. También puede compartir contactos rápidamente empleando
Bluetooth, Correo electrónico, Mensajes, etc.
Si añade cuentas de contactos en otros dispositivos distintos de su teléfono,
seleccione una cuenta en la que desea guardar los contactos.
1. En la pantalla de inicio, toca
Toca > Importar/Exportar, luego toca Importar desde la tarjeta SIM,
2.
Exportar a tarjeta SIM, Importar desde el almacenamiento SD/del
teléfono, Exportar al almacenamiento SD/del teléfono.
Para importar/exportar un único contacto de/a la tarjeta SIM, seleccione
el contacto que desea importar/exportar y toca el icono
confirmar.
en la pantalla de inicio. Desde esta, puede
.
/ para
Page 75

Para importar/exportar todos los contactos de/a la tarjeta SIM, marca la
casilla de verificación de el icono
confirmar la operación.
en y luego el icono / para
Compartir información de contactos
Puede compartir uno o varios contactos con otras personas enviándoles la
información de contacto a través de Bluetooth, Gmail, etc.
1. En la pantalla Contactos, toca
2.
Este menú permite elegir la forma en que desea compartir los contactos.
Las opciones disponibles dependerán de las aplicaciones y los servicios
instalados.
> Compartir contacto.
Añadir un contacto a Favoritos
Puede añadir los contactos que use con frecuencia a Favoritos de modo
que los pueda encontrar rápidamente.
1. En la pantalla Contactos, toca el contacto que desea añadir a Favoritos.
2. Toca
.
Búsqueda de contactos
1. Toca de la parte superior de la lista de contactos.
2. Ingresa el nombre del contacto que quieres buscar. Aparecerán los
contactos coincidentes.
Cómo crear un contacto
1. En la pantalla Contactos, toca para añadir un contacto nuevo.
2. Toca el campo de contacto cerca de la parte superior de la pantalla
para elegir dónde desea guardar el contacto. Si selecciona una cuenta
con sincronización, los contactos se sincronizarán en forma automática
con la cuenta conectada.
3. Ingrese el nombre, los números de teléfono, las direcciones de correo
electrónico y otra información del contacto.
4.
Toca para guardar el contacto.
32 33
Agrupar contactos
Puesto que su teléfono se sincroniza con varias cuentas conectadas, es
posible que vea entradas duplicadas para el mismo contacto. Puede
combinar todos los datos de un contacto en una sola entrada de la lista de
contactos.
1. En la pantalla de inicio, toca
2. Toca un contacto para ver sus datos.
3. Toca
4. Toca el contacto cuya información desee agrupar en la primera entrada.
5. Toca
> Editar > > Agrupar.
.
.
Page 76

La información del segundo contacto se añadirá a la del primero, y el
segundo contacto desaparecerá de la lista de contactos.
Puede repetir estos pasos para agrupar otro contacto con el contacto
principal.
Ingresar texto
Uso del teclado en pantalla
Cómo dividir información de contactos
Si se agrupó información de contactos de distintos orígenes por error, puede
volver a dividir la información en contactos individuales en su teléfono.
1. En la pantalla de inicio, toca
2. Toca un contacto que agrupó y desea dividir.
3. Toca
4. Toca Aceptar para confirmar la operación.
34 35
> Editar > > Dividir.
.
Ajustes del teclado en pantalla
Toca Ajustes > Idioma y entrada de texto, toca el teclado que desea
configurar y se activarán una serie de ajustes para su selección.
Ajuste de la orientación del teclado en pantalla
Gire el teléfono de vertical a horizontal para ajustar la orientación del
teclado en pantalla. Puede ajustarla en los ajustes de la pantalla del
teléfono. (Toca Ajustes > Pantalla > Rotación automática).
Teclado de Google
Cambia entre los modos
"abc/Abc"; toca y
mantenga para cambiar
entre los modos "abc/ABC".
Alterna entre el teclado de
símbolos y el numérico.
Ingresa una coma.
Toca y mantenga pulsado para acceder a
las opciones de entrada.
Toca y mantenga
para seleccionar
símbolos.
Page 77
Edición de texto
Es posible editar el texto ingresado.
• Toca y mantenga pulsado o toca dos veces el texto que desee editar.
• Arrastre para cambiar la selección resaltada.
• Aparecerán las siguientes opciones: Para editar texto, elija una de las
opciones siguientes: SELECCIONAR TODO, CORTAR, COPIAR, COMPARTIR.
• Toca el icono
También puede insertar texto nuevo, si lo prefiere.
• Toca donde desea escribir, o toca y mantenga pulsado en un espacio
vacío, el cursor parpadeará y se mostrará la pestaña. Arrastre la pestaña
para mover el cursor.
• Si tiene texto seleccionado, toca la pestaña para mostrar el icono PEGAR,
que le permitirá pegar inmediatamente.
para ir atrás sin realizar ninguna acción.
Mensajes
Puede usar Mensajes para intercambiar mensajes de texto (SMS) y
mensajes multimedia (MMS).
Cómo abrir la pantalla Mensajes
En la pantalla de inicio, toca .
Se abre la pantalla Mensajes, en la que puede crear un mensaje nuevo,
buscar mensajes o abrir un hilo de mensajes en curso.
• Toca
• Toca
• Toca un hilo de mensajes existente para abrir la conversación mantenida
con un número concreto.
Envío de un mensaje
1. En la pantalla Mensajes, toca de la parte inferior.
2. Añade destinatarios de una de las formas siguientes:
• Toca el campo Para e ingrese manualmente el número del destinatario o
el nombre del contacto. Si el teléfono muestras algunas sugerencias, toca
la que desea añadir.
• Seleccione destinatarios de los contactos tocando
3. Toca el campo Escribir mensaje y redacta el contenido del mensaje de
texto.
para escribir un mensaje de texto o multimedia nuevo.
para buscar un mensaje con palabras clave.
.
36 37
Page 78

4. Si quieres enviar un mensaje multimedia, toca el icono del clip de
papel
mensaje.
5. Toca
Notas:
• También puede incluir direcciones de correo electrónico como
destinatarios de mensajes multimedia.
y adjunta un archivo o una presentación de diapositivas al
para enviar el mensaje.
Respuesta a un mensaje
Los mensajes que recibe se adjuntan a los hilos existentes del mismo
número. Si el mensaje nuevo proviene de un número nuevo, se crea un
nuevo hilo.
1. En la pantalla Mensajes, toca el hilo que contenga el mensaje que
quieres contestar.
2. Ingresa la respuesta en el cuadro de texto de la parte inferior. Puede
tocar
3.
Toca para enviar el mensaje.
si desea responder con un MMS.
Cómo copiar un mensaje
Para copiar un mensaje de texto del teléfono a la tarjeta SIM, en la pantalla
Mensajes, toca y mantenga pulsado el hilo que desea guardar, luego toca
> Guardar el mensaje en la tarjeta SIM.
Modificación de los ajustes de mensajes
Los ajustes de los mensajes de sus teléfono están preconfigurados para que
pueda usarlos en forma inmediata. Para modificarlos, toca
pantalla Mensajes.
> Ajustes en la
Reenvío de un mensaje
1. En la pantalla Mensajes, toca y mantén pulsado el hilo que quieres
reenviar.
2.
Toca .
3. Ingresa un destinatario del mensaje y, si quieres, edita el contenido.
4.
Toca para enviar el mensaje.
38 39
Page 79

Correo electrónico
En la pantalla de inicio, toca > Correo electrónico. Puede enviar y recibir
correos electrónicos desde su correo web u otras cuentas mediante POP3
o IMAP, o acceder a su cuenta ActiveSync de Exchange para su correo de
trabajo.
Configuración de la primera cuenta de correo electrónico
1. Cuando abra Correo electrónico por primera vez, ingrese la dirección y
la contraseña del correo electrónico y seleccione un tipo de cuenta.
2.
Toca Siguiente para que el teléfono recupere los parámetros de la red
automáticamente.
Importante: También puede ingresar estos datos en forma manual
tocando Configuración manual o si la configuración automática falla.
3. Sigue las instrucciones en pantalla para completar la puesta en servicio.
El teléfono mostrará la bandeja de entrada de la cuenta de correo
electrónico y empezará a descargar mensajes.
Comprobación de los mensajes de correo electrónico
Su teléfono puede comprobar automáticamente la existencia de nuevos
mensajes de correo electrónico en los intervalos de tiempo que usted defina
al configurar la cuenta.
40 41
Cuando esté en una cuenta de correo electrónico, deslice el dedo hacia
abajo en la pantalla para que se descarguen los mensajes nuevos. Toca
Cargar más de la parte inferior de la lista de correos electrónicos para
descargar los mensajes más antiguos.
Responder a un correo electrónico
Puede responder a un mensaje que reciba o reenviarlo. También puede
eliminar mensajes y gestionarlos de otras maneras.
Responder a un mensaje de correo electrónico o reenviarlo
1. Abra el correo electrónico al que desea responder o que desea reenviar.
2. Elija una de las opciones siguientes:
• Para responder al remitente, toca
• Para responder al remitente y a todos los destinatarios del correo
electrónico original, toca
• Para reenviar el correo electrónico a otra persona, toca
cuando la pantalla del teléfono sea reversible.
3. Edite el mensaje y toca
> Responder a todos.
.
Marcar un mensaje de correo electrónico como no leído
Puede marcar un mensaje leído como no leído, por ejemplo, para
recordarse que debe volver a leerlo más tarde. También puede marcar a la
vez varios mensajes de correo electrónico como no leídos.
• En una lista de mensajes de correo electrónico (por ejemplo, la bandeja
de entrada), toca las casillas de verificación que aparecen delante de
los mensajes y luego toca
.
.
> Reenviar o
Page 80
Eliminar un mensaje de correo electrónico
Puede eliminar un mensaje de correo electrónico de su carpeta. También
puede eliminar varios mensajes de correo electrónico a la vez.
• Mientras lee un mensaje, toca
• En una lista de mensajes de correo electrónico (por ejemplo, la bandeja
de entrada), toca las casillas de verificación que aparecen delante de
los mensajes y luego toca
> Aceptar.
> Aceptar.
Cómo escribir y enviar un mensaje de correo electrónico
1. Abra la bandeja de entrada de su correo electrónico y toca .
Importante: Si tiene más de una cuenta de correo electrónico
configurada en el teléfono, toca la línea del remitente para seleccionar la
cuenta que desea usar para enviar el mensaje.
2. Ingresa un nombre o una dirección de correo electrónico del contacto
en el campo Para. Separe los destinatarios con una coma. También
puede tocar
de contactos o historial.
Importante: Toca
oculta a otros destinatarios.
3.
Ingrese el asunto del mensaje e ingrese el texto del correo electrónico.
4.
Toca para añadir archivos de audio, imágenes, videos, así como
otros tipos de archivos como adjuntos.
5.
Toca para enviar el mensaje.
para seleccionar destinatarios de sus contactos, grupos
> CC/CCO para enviar una copia o una copia
Añadir y editar cuentas de correo electrónico
Añadir una cuenta de correo electrónico
Luego de configurar la primera cuenta de correo electrónico (consulte
Correo electrónico – Configuración de la primera cuenta de correo
electrónico), puede añadir más cuentas de correo electrónico y
gestionarlas individualmente.
Abre Correo electrónico para acceder a la pantalla de la bandeja de
1.
entrada.
2.
Toca > Ajustes y toca AÑADIR CUENTA de la parte superior derecha de
la pantalla.
3. Sigue las indicaciones para configurar la cuenta tal como hiciste para la
primera.
Editar una cuenta de correo electrónico
Puede modificar una serie de ajustes de una cuenta, como la frecuencia
con la que se comprueba si hay mensajes nuevos, cómo se le notifica la
llegada de mensajes nuevos, la firma de su correo electrónico y datos sobre
los servidores que usa la cuenta para enviar y recibir correo.
1. Abra Correo electrónico para acceder a la bandeja de entrada.
2. Toca
3. Realice los cambios y toca
> Ajustes y toca la cuenta que desea modificar.
al terminar.
42 43
Page 81

Modificar ajustes generales del correo electrónico
1. Los ajustes generales se aplican a todas las cuentas de correo electrónico
que añade.
2. Abra Correo electrónico para acceder a la pantalla de la bandeja de
entrada.
3. Toca
4. Realice los cambios y toca
> Ajustes > General.
al terminar.
Conexión a Internet
Las impresionantes capacidades de conexión a la red de su teléfono le
permiten acceder a Internet o a la red corporativa fácilmente. Puede usar
la configuración de conexión predeterminada para conectar a Internet a
través de la red móvil o Wi-Fi. La conexión de datos móviles puede habilitarse
y deshabilitarse en forma manual. En la pantalla de inicio, toca
> Más > Redes móviles y marca o desmarca Datos móviles.
Añadir una conexión de datos móviles
Para conectar a Internet, puede usar los Nombres de puntos de acceso
(APN) predeterminados. Si desea añadir un APN nuevo, comuníquese con el
proveedor de servicios para obtener la información necesaria.
1.
En la pantalla de inicio, toca > Ajustes > Más > Redes móviles >
Nombres de puntos de acceso>
2.
Toca cada elemento para ingresar la información que recibió del
proveedor de servicios.
Toca > Guardar.
3.
Consejo: Para establecer los APN a los ajustes predeterminados, toca
Restablecer valores predeterminados.
.
> Ajustes
>
44 45
Page 82

Cómo activar la conexión Wi-Fi
Wi-Fi es una tecnología de conexión de red inalámbrica que proporciona
acceso a Internet a distancias de hasta 100 metros, dependiendo del
enrutador Wi-Fi y de su entorno.
En la pantalla de inicio, toca > Ajustes > Wi-Fi.
1.
Desliza el interruptor Wi-Fi hasta la posición para activar la conexión
2.
Wi-Fi.
Cómo conectar a una red Wi-Fi
1. En la pantalla de inicio, toca > Ajustes > Wi-Fi. Los puntos de acceso
a la conexión Wi-Fi que el teléfono detecte aparecerán con su nombre y
configuración de seguridad.
2. Toca un punto de acceso para conectarte a este. Si tiene características
de seguridad implementadas, deberá ingresar una contraseña.
Importante: Es posible que el teléfono se conecte automáticamente a redes
Wi-Fi usadas anteriormente si están a su alcance.
Cómo añadir una red Wi-Fi
Puede añadir una red Wi-Fi si la red no muestra su nombre (SSID) o para
añadir una red Wi-Fi cuando no esté al alcance.
Para conectar a una red protegida, primero tiene que obtener los datos de
seguridad del administrador de la red.
1. En la pantalla de inicio, toca
> Ajustes > Wi-Fi.
2. Desliza el interruptor Wi-Fi hasta la posición
Toca > Añadir red.
3.
4. Ingresa el SSID (nombre) de la red. Si es necesario, ingrese detalles de
seguridad u otros ajustes de la red.
5.
Toca GUARDAR.
.
Comprobación del estado de la red Wi-Fi
Puede comprobar la red Wi-Fi examinando el icono de la barra de
estado. O tocando el punto de acceso al que el teléfono está conectado
actualmente en la pantalla Wi-Fi. Entonces podrá comprobar el estado de la
red en la ventana emergente.
Cómo conectar a una red WPS
Configuración protegida de Wi-Fi (WPS) es una característica que facilita
añadir su teléfono a los puntos de acceso que proporcionan WPS.
Puede usar uno de los métodos siguientes para conectar su teléfono a una
red inalámbrica mediante WPS.
Método nº. 1: Botón WPS (recomendado)
1.
En la pantalla de inicio, toca > Ajustes > Wi-Fi.
2. Desliza el interruptor Wi-Fi hasta la posición
Toca > Ajustes avanzados > Botón WPS.
3.
.
46 47
Page 83

4. Pulsa el botón WPS del teléfono y luego el botón WPS del enrutador
inalámbrico y el punto de acceso reconocerán tu teléfono y lo añadirán
a la red.
Método n.º 2: PIN
1.
En la pantalla de inicio, toca > Ajustes > Wi-Fi.
2.
Deslice el interruptor Wi-Fi hasta la posición .
Toca > Ajustes avanzados > Introducción de PIN de WPS.
3.
4. El PIN de WPS aparecerá en la pantalla. Escriba el PIN en la página de
configuración del punto de acceso.
Luego de escribir el PIN, su teléfono encontrará en forma automática el
punto de acceso y configurará la conexión.
Importante: Para obtener más información acerca de la característica WPS
del punto de acceso, consulte su documentación.
Conexión a redes privadas virtuales
Las redes privadas virtuales (VPN) permiten conectarse a los recursos de
una red local protegida. Las empresas, escuelas y otras instituciones suelen
usar VPN para que sus usuarios puedan acceder a recursos de redes
locales cuando no están en el campus o cuando están conectados a una
red inalámbrica.
Dependiendo del tipo de VPN que use, es posible que se le requiera que
ingrese las credenciales de inicio de sesión o que instale certificados de
seguridad antes de conectar a su VPN. Puede obtener esta información del
administrador de la red.
Cómo añadir una VPN
1. En la pantalla de inicio, toca > Ajustes > Más > VPN.
Toca y rellene la información proporcionada por el administrador
2.
de la red.Nota: Deberá definir un patrón, un PIN o una contraseña
de bloqueo de pantalla para poder usar el almacenamiento de
credenciales.
Toca GUARDAR.
3.
Se añadirá la VPN a la lista de la pantalla VPN.
Cómo conectarse a una VPN
1. En la pantalla de inicio, toca > Ajustes > Más > VPN.
2. Toca la VPN a la que quieras conectarte.
3. Cuando el sistema te lo solicite, ingresa las credenciales necesarias y
luego toca CONECTAR.
Una vez conectado, el icono de VPN conectada aparece en la barra de
estado.
Modificación de una VPN
1. En la pantalla de inicio, toca > Ajustes > Más > Ajustes VPN.
2. Toca y mantén pulsada la VPN que quieres modificar.
Toca Editar perfil y edita los ajustes de la VPN que quieras.
3.
4.
Toca GUARDAR.
48 49
Page 84

Navegar por Internet
Use la aplicación Navegador para ver páginas web y buscar información.
Uso del Navegador
En la pantalla de inicio, toca Navegador .
El Navegador también se abre cuando se toca un link web.
• Para marcar una página web como favorita, ábrela y toca
> AÑADIR MARCADOR. Asigne un nombre al marcador e ingrese la
dirección, luego, toca Aceptar. También puede tocar
marcador.
> Favoritos
para añadir un
Uso de varias pestañas de navegador
Es posible abrir varias páginas web al mismo tiempo (una página en una
pestaña distinta) y cambiar entre ellas libremente.
Abrir una página web o buscar en Internet
1. Abre la aplicación Navegador .
2.
Toca el cuadro de dirección de la parte superior de la página web. Si el
cuadro de dirección no aparece, desplácese hasta la parte superior de
la página web.
3. Ingresa la dirección (URL) de una página web. O escriba las palabras
que desea buscar.
Toca una URL o una sugerencia de búsqueda o toca Ir para abrir la
4.
página web o los resultados de la búsqueda.
5. Para volver a la página anterior, toca el botón Atrás. Para ir a la página,
toca
> .
Consejos:
• Toca
• Toca
50 51
> si desea que no acabe de abrirse la página.
> si desea actualizar la página.
Cómo abrir una nueva pestaña de navegador
Toca > . Se abre una ventana de navegador nueva y se carga la
página de inicio.
Cómo cambiar entre pestañas
Toca > toca las pestañas entre las que desea cambiar.
Consejo: Toca
de una pestaña para cerrarla.
Establecer la página de inicio
La página de inicio se abre cada vez que se inicia el navegador o se abre
una pestaña de navegador nueva.
1. Abra la página que desea establecer como la página de inicio.
2. Toca
3. Toca Página actual.
> Ajustes > Página de inicio.
Page 85

4. O toca Otro para ingresar una página web y pulse Aceptar.
Módem y punto de acceso móvil
Descarga de archivos
1. Mantenga pulsada una imagen o un link a un archivo o a otra página
web.
2.
En el menú que se abre, toca Guardar imagen o Compartir link, ingrese
el nombre y luego toca Aceptar.
Los archivos descargados se habrán guardado en el teléfono o en la tarjeta
microSDHC. Puede ver o abrir los archivos descargados tocando
Descargas.
>
Puede compartir la conexión de datos móviles del teléfono con una
computadora a través de un cable USB (módem USB) o con hasta ocho
dispositivos simultáneamente al convertir el teléfono en una zona Wi-Fi
portátil.
Aviso: Estas funciones pueden incurrir cargos de red de su operador de red.
Además, también es posible que se apliquen cargos adicionales en zonas
de roaming.
Cómo compartir la conexión de datos del teléfono a través de USB
Modificación de los ajustes del navegador
Puede configurar una serie de ajustes del navegador para personalizar
la forma en que desea navegar por Internet, incluidos varios ajustes para
controlar su privacidad.
Para abrir la pantalla de ajustes del navegador, toca
pantalla de la página web.
> Ajustes en la
Utiliza el cable USB que viene con el teléfono para conectarlo a un puerto
USB de tu computadora.
Toca Ajustes > Más > Módem y punto de acceso móvil.
1.
2. Alterna el interruptor Módem USB para activar o desactivar esta función.
Cómo compartir la conexión de datos del teléfono como zona Wi-Fi.
1. Toca Ajustes > Más > Módem y punto de acceso móvil.
2. Alterna el interruptor Punto de acceso móvil para activar o desactivar
esta función.
Cómo renombrar o proteger su zona Wi-Fi
Si activa el punto de acceso móvil, puede cambiar el nombre de la red Wi-Fi
(SSID) del teléfono y protegerla.
52 53
Page 86

• Toca Ajustes > Más > Módem y punto de acceso móvil.
• Toca Ajustes de punto de acceso móvil->Configurar punto de acceso
móvil para cambiar el SSID de la red o establecer la seguridad de la red.
• Toca GUARDAR.
Cómo usar Wi-Fi Direct
Wi-Fi Direct permite que dos dispositivos establezcan una conexión Wi-Fi
punto a punto directa sin necesidad de usar un enrutador inalámbrico.
Bluetooth
Bluetooth es una tecnología de comunicación inalámbrica de corto
alcance. Los teléfonos u otros dispositivos con Bluetooth pueden
intercambiar información de forma inalámbrica dentro de una distancia de
unos 32 pies (10 metros). Los dispositivos con Bluetooth deben sincronizarse
antes de realizar la comunicación.
Activación/desactivación de Bluetooth
Cómo conectar a otro dispositivo a través de Wi-Fi Direct
1. En la pantalla de inicio, toca > Ajustes > Wi-Fi.
2.
Si la conexión Wi-Fi está desactivada, deslice el interruptor Wi-Fi hasta la
posición .
3.
Toca > Ajustes avanzados > Wi-Fi Direct. Su teléfono buscará otros
dispositivos habilitados con conexiones Wi-Fi Direct.
4. Toca el nombre de un dispositivo en Sincronizar dispositivos para
conectarlo. El otro dispositivo recibirá una solicitud de conexión Wi-Fi
Direct y debe aceptar la solicitud para conectarse. Si el sistema lo solicita,
toca ACEPTAR.
5.
Una vez conectado, el dispositivo aparece como “Conectado”.
54 55
1. En la pantalla de inicio, toca > Ajustes > Bluetooth.
2. Deslice el interruptor Bluetooth hasta la posición
Cuando Bluetooth está activado, aparece el icono
Su teléfono será visible para los dispositivos cercanos mientras Bluetooth esté
activado.
o .
en la barra de estado.
Modificación del nombre del dispositivo
1. En la pantalla de inicio, toca > Ajustes > Bluetooth.
2. Deslice el interruptor Bluetooth hasta la posición
desactivado.
3.
Toca > Renombrar este dispositivo.
4.
Edita el nombre y toca RENOMBRAR.
si Bluetooth está
Page 87

Sincronización con otro dispositivo Bluetooth
1. En la pantalla de inicio, toca > Ajustes > Bluetooth.
2. Deslice el interruptor Bluetooth hasta la posición
desactivado.
Su teléfono buscará en forma automática y mostrará los ID de los
dispositivos con Bluetooth al alcance. Puede tocar
desea volver a buscar.
3. Toca el dispositivo con el que desee sincronizarse.
4.
Confirme que las claves Bluetooth son las mismas entre los dos
dispositivos y toca SINCRONIZAR. De forma alternativa, ingrese una clave
Bluetooth y toca SINCRONIZAR.
La sincronización se completa exitosamente cuando el otro dispositivo
acepta la conexión o se ingresa la misma clave.
Importante: La clave Bluetooth puede ser fija para ciertos dispositivos, como
auriculares y kits manos libres para automóviles. Puede intentarlo con 0000 o
1234 (que son las claves más habituales) o consultar la documentación del
dispositivo.
si Bluetooth está
> Actualizar si
Cancelación de la sincronización con un dispositivo Bluetooth
Puede hacer que el teléfono borre su conexión de sincronización con otro
dispositivo Bluetooth. Para volver a conectar con el dispositivo, es posible
que deba ingresar o confirmar la clave de nuevo.
1. En la pantalla de inicio, toca > Ajustes > Bluetooth y asegúrese de
que Bluetooth esté activado.
2.
En la lista de dispositivos sincronizados, toca junto al dispositivo con
Bluetooth del que desea cancelar la sincronización.
3. Toca BORRAR.
Envío de datos por Bluetooth
1. Abra la aplicación apropiada y seleccione el archivo o el elemento que
desea compartir.
2. Seleccione la opción para compartir a través de Bluetooth. El método
puede variar según la aplicación y el tipo de datos.
Toca un dispositivo Bluetooth con el que se sincronizó el teléfono o espera
3.
a que este busque nuevos dispositivos y toca uno de ellos.
Recepción de datos por Bluetooth
1. Activa Bluetooth antes de intentar recibir datos a través de Bluetooth.
Importante: Si el teléfono no se sincronizó con el dispositivo emisor, es
posible que tenga que tocar el nombre del dispositivo de su teléfono en
el menú Bluetooth en Ajustes para que el teléfono se pueda detectar a
través de Bluetooth.
2.
Deslice el dedo hacia abajo en la barra de estado y toca .
3.
Toca ACEPTAR para empezar a recibir los datos.
56 57
Page 88

Dependiendo de si tiene una tarjeta microSDHC instalada, los archivos
recibidos se almacenan en forma automática en una carpeta dedicada
(por ejemplo, Bluetooth) en el almacenamiento del teléfono o en el
directorio de la microSDHC. Puede acceder a ellos con Gestión de archivos.
Toca los archivos de información de contacto recibidos, los contactos
recibidos (archivos de información de contacto) se importarán a la lista de
contactos.
Entretenimiento
Puede usar el teléfono tomar fotos y grabar videos. Las fotos y los videos se
almacenan en la tarjeta microSDHC o en el almacenamiento interno del
teléfono. Puede copiarlos en su computadora o acceder a ellos desde la
Galería.
Cómo capturar una foto
1. En la pantalla de inicio, toca > Cámara .
2. Enfoca la cámara hacia el sujeto y realiza los ajustes necesarios.
58 59
Page 89

Número Función
1 Toca aquí para seleccionar los modos y ajustes.
2 Toca dos veces y arrastre, o pellizque o extienda con dos dedos
para acercar o alejar el zoom.
3 Toca aquí para tomar una foto.
4 Toca aquí para alternar entre cámara frontal/trasera.
5 Toca aquí para cambiar a modo de video y grabar un video.
Consejo: Puede pellizcar o extender la pantalla para acercarla o alejarla.
Toca para tomar la foto.
3.
Aviso. Manténgase a una distancia de seguridad cuando use el flash. No
dirija el flash hacia los ojos de personas o animales.
• Pano: activa la función panorámica. Toca el botón del disparador
para empezar a tomar una fotografía panorámica y mueve el teléfono
firmemente hacia la dirección indicada en la línea que se muestra en
pantalla. Cuando el encuadre de la vista previa esté lleno, el teléfono
guardará la foto automáticamente.
Toca el icono
para acceder a los ajustes de la cámara:
• Etiquetado de GPS: permite activar o desactivar el etiquetado de GPS.
• Sonido del disparador: permite activar o desactivar el sonido del
disparador.
• Calidad de video: permite establecer la calidad del video.
• Grabadora de sonido: permite activar o desactivar la grabación de
sonido.
Configuración de ajustes de la cámara
Antes de tomar una foto o grabar un video, toca el icono para
configurar una serie de ajustes en el modo de enfoque.
• Modo automático: se habilita el modo automático.
• Polaroid: en el modo predeterminado, Polaroid unirá dos capturas en
una imagen. Toca
para incluir sólo una captura en una imagen, para unir cuatro
capturas en una imagen o
• HDR: las fotos HDR (alto rango dinámico, high-dynamic range) permiten
para ver más opciones. A continuación, toca
para cerrar las opciones.
Grabación de un video
1. En la pantalla de inicio, toca > Cámara .
2. Enfoque la cámara hacia el sujeto.
Consejo: Pellizque o extienda la pantalla para acercarla o alejarla.
3.
Toca para iniciar la grabación.
Toca para detener la grabación.
4.
Consejo: Durante la grabación, puede tocar
como una foto independiente.
para guardar el fotograma
reflejar mejor los efectos visuales que la gente tiene sobre el entorno real,
sintetizando las imágenes en tiempos de exposición distintos.
60 61
Page 90

Funciones de Polaroid
Para tomar una fotografía
1. En la pantalla de inicio, toca Cámara
2. Toca
3. Acerca o aleja la imagen pellizcándola con los dedos.
4. Toca el botón del obturador u oprime las teclas de volumen para hacer
una foto.
5. Toca de nuevo el botón del obturador para tomar otra foto. Puedes ver
que las dos fotos aparecen en una pantalla.
para seleccionar Polaroid.
.
Para editar imágenes con Polaroid
1. Toca
Polaroid.
2. Puedes personalizar tus fotografías añadiendo texto, ubicaciones, bordes y
mucho más.
3. Toca
de la vista de foto de pantalla completa y selecciona Editor de
para guardar la imagen.
62 63
Page 91

Uso de la galería
Cómo abrir la galería
En la pantalla de inicio, toca > Galería para ver álbumes de las
imágenes y los videos.
• Toca
Videos.
• Toca
• Toca
Cómo compartir álbumes, imágenes o videos
1. Mantén pulsado un elemento para seleccionar un álbum, o luego de
abrir un álbum para seleccionar una imagen o un video.
2.
Toca y selecciona cómo quieres compartir los elementos.
Eliminación de álbumes
1. Mantén pulsado un álbum hasta que quede seleccionado.
2. Toca más álbumes que quieras eliminar.
3. Toca
Editar fotos
Toca una imagen de un álbum para verlo en pantalla completa. Toca la
pantalla para ver las características siguientes.
para seleccionar categorías: Carrete, Álbumes, Duración, Ubicaciones,
para abrir la cámara.
para volver a la pantalla principal de la galería.
> Aceptar.
Número Función
1 Vuelve al álbum.
2 Elimina la foto.
3
Comparte la foto.
4 Toca aquí para acceder a la interfaz de edición de la foto.
5 Toca aquí para acceder a más opciones.
6 Guarda la foto.
7 Deshace o rehace la acción.
8 Edita la foto.
64 65
Page 92

Cómo realizar notas
El Grabador de sonido le permite grabar notas de voz y escucharlas
cuando desee.
Grabación de una nota de voz
1. En la pantalla de inicio, toca > Grabador de sonido .
Toca para iniciar la grabación. Durante la grabación, puede realizar
2.
las acciones siguientes:
• Toca
• Toca DESCARTAR y confirme la operación para cancelar la grabación.
• Toca GUARDAR y asigne un nombre a la grabación para guardarla.
Reproducción de notas guardadas
1. Toca en la parte superior derecha de la pantalla para ver todas las
grabaciones.
2.
Toca antes de una nota para reproducirla.
/ para detener o continuar la grabación.
Aplicaciones de Google
Al iniciar sesión en la cuenta de Google podrá sincronizar Gmail, eventos
del calendario, contactos y otros datos entre el teléfono y la Web. Y si no
tiene una cuenta, puede crear una fácilmente.
1.
En la pantalla de inicio, toca > Ajustes > Cuentas > Añadir cuenta >
Google.
Toca Correo electrónico para iniciar sesión en la cuenta existente o CREE
2.
UNA CUENTA NUEVA para crear una cuenta nueva.
3.
Siga los pasos que aparecen en pantalla para ingresar la información
sobre la cuenta y termine la puesta en servicio.
Gmail
Gmail es un servicio de correo electrónico basado en web que se configura
al iniciar sesión en su cuenta de Google. Dependiendo de la configuración
de sincronización, el correo de Gmail del celular se puede sincronizar
automáticamente con su cuenta online.
Creación y envío de un mensaje de correo electrónico
Importante: También puedes tocar
archivo, eliminarla, compartirla o comprobarla.
66 67
para renombrar la información de tu
1. En la pantalla de inicio, toca .
Toca .
2.
Ingresa un nombre o una dirección de correo electrónico del contacto
3.
en el campo Para.
Ingrese el asunto del mensaje y redacte el texto.
4.
Toca para añadir un adjunto.
5.
6.
Toca en la parte superior derecha de la pantalla para enviar el mensaje.
Page 93

Calendario de Google
En la pantalla de inicio, toca > Calendario para usar el Calendario de
Google, la aplicación de Google para gestionar el tiempo. Puede usar el
calendario para programar citas, incluidas las reuniones y otros eventos.
También puede sincronizar citas con la cuenta de Google, lo que le permite
gestionar los eventos online en su computadora.
Google Chrome
Con el navegador Chrome, podrás disfrutar navegando por la Web. Con
Chrome instalado en su dispositivo podrá sincronizar marcadores, el historial
de navegación y las pestañas abiertas desde su cuenta de Google para
que pueda tener la misma experiencia en el teléfono, la computadora, la
tableta y otros dispositivos.
Google+
Google+ es un servicio de red social que ofrece Google. Con la aplicación
Google+ instalada en su teléfono podrá gestionar sus datos, conversar
con contactos conectados, organizarlos en distintos círculos y compartir la
información seleccionada.
En la pantalla de inicio, toca
Importante: Para obtener más información sobre Google+, abra Google+ y
toca
> Ayuda para ver las instrucciones en línea.
> Google+.
Comenzar a usar Google+
Abra la aplicación Google+ y toca Inicio cerca de la parte superior de la
pantalla para usar las características siguientes:
• Inicio: puede añadir una persona sugerida, ver publicaciones que otros
han compartido con usted, un círculo en el que se encuentra o a todo el
mundo.
• Círculos: busque a personas para añadir a sus círculos de Google+, cree
círculos nuevos, examine y organice a las personas en círculos según
su relación con ellas. También puede seguir contenidos publicados por
personas que encuentre interesantes.
• Buscar comunidades: busque y únase a todo tipo de comunidades en
línea, donde las personas se reúnen para compartir datos sobre un tema
común y conversar sobre este.
• Fotos: podrá ver las fotos que cargue, fotos de usted, fotos de sus
publicaciones entre otras.
• Ubicaciones: podrá ver las ubicaciones de sus amistades en el mapa y
configurar su ubicación compartiendo la configuración.
• Eventos: podrá gestionar su calendario social. Puede añadir eventos,
invitar a personas y luego compartir fotos en tiempo real desde el evento.
Google Maps
Activación de los servicios de ubicación
Para usar Google Maps y encontrar su ubicación, debe habilitar los servicios
de ubicación en el teléfono.
En la pantalla de inicio, toca > Ajustes > Ubicación.
1.
68 69
Page 94

Desliza el interruptor Ubicación de la parte superior para activar o
2.
desactivar el acceso a la ubicación.
3.
Cuando el acceso a la ubicación esté habilitado, toca Modo para
seleccionar las fuentes de ubicación que quieras usar.
• Alta precisión: usa el GPS, el Wi-Fi y las redes móviles para determinar la
ubicación.
• Ahorro de batería: usa solo el Wi-Fi y las redes móviles para determinar
su ubicación aproximada. De esta forma se consume menos batería que
usando el GPS.
• Solo dispositivo: usa el GPS para determinar la ubicación.
Cómo obtener su ubicación
1. En la pantalla de inicio, toca > Maps.
Toca de la parte inferior.
2.
El mapa se centra en un punto y una flecha que indican su ubicación y la
dirección que está tomando el teléfono.
Búsqueda de una ubicación
1. En la pantalla de inicio, toca > Maps.
2.
Toca el cuadro de búsqueda de la parte superior.
3. Ingresa la dirección o el tipo de negocio que buscas en el cuadro de
búsqueda. Si aparecen sugerencias adecuadas bajo el cuadro de
búsqueda, toca una para buscarla.
Consejo: También puede tocar
usar la búsqueda por voz.
junto al cuadro de búsqueda para
4. Toca el botón de búsqueda del teclado.
5.
Puedes deslizar los resultados hacia arriba para encontrar más
información acerca de la ubicación, así como opciones para obtener
indicaciones, etc.
Cómo obtener indicaciones a su destino
Maps puede proporcionar indicaciones para llegar en automóvil, transporte
público, a pie o en bicicleta.
En la pantalla de inicio, toca > Maps.
1.
Toca .
2.
3. Selecciona el modo de transporte y luego ingresa un punto de inicio y de
fin. Si se encuentra su ubicación, esta aparecerá en el campo de punto
de inicio en forma predeterminada.
4. Toca una ruta sugerida para verla en el mapa.
Puede deslizar la parte inferior hacia la derecha o la izquierda para elegir
otras rutas. Deslice la parte inferior hacia arriba para ver las indicaciones de
la ruta en una lista.
Importante: Toca
para usar la navegación de Google Maps y obtener
indicaciones por voz paso a paso.
Cómo buscar lugares de la zona
Google Maps le ayuda a encontrar todos los tipos de negocios y
establecimientos de su zona. Puede valorar estos lugares y obtener
recomendaciones.
En la pantalla de inicio, toca > Maps.
1.
70 71
Page 95

2. Navega por la vista del mapa hasta la zona que quieres explorar.
Puede explorar las ubicaciones cercanas o ampliar el mapa hasta otra
ubicación.
3. Toca el cuadro de búsqueda de la parte superior.
4.
Toca el botón Exploración en la esquina inferior derecha del mapa para
saber rápidamente lo que hay cerca.
5. Toca una ubicación para verla en el mapa u obtener indicaciones.
También puede deslizar hacia arriba la parte inferior para obtener más
información como la dirección de la calle, el sitio web o la vista de la
calle, así como opciones para llamar, guardar en su cuenta de Google o
compartir con otros.
Importante: La característica Exploración no está disponible para todas las
zonas.
Búsqueda Google
Puede buscar información en la Web o el teléfono mediante Búsqueda de
Google o realizar ciertas tareas con la voz.
Búsquedas con texto
Puede buscar información en Internet o en el teléfono (como aplicaciones y
contactos) ingresando texto.
1.
Mantenga pulsado el botón de inicio > Google para abrir Búsqueda
de Google.
2. Ingresa los términos que quieres buscar en el cuadro de búsqueda
y toca el botón de búsqueda del teclado o toca una sugerencia de
búsqueda que aparece bajo el cuadro de búsqueda.
Búsquedas con la voz
También puede realizar búsquedas por la Web o realizar ciertas tareas
mediante la voz.
1.
Mantenga pulsado el botón de inicio > Google para abrir Búsqueda
de Google.
2. Toca el icono del micrófono de la derecha del cuadro de búsqueda.
Importante: También puede tocar
3. Di los términos que quieres buscar o la pregunta que quieres preguntar.
Cuando termine, los términos de la búsqueda se analizarán y se iniciará
la búsqueda.
en la pantalla de inicio.
Modificación de los ajustes de la aplicación Google
Para modificar los ajustes, toca > Ajustes de Google, toca el ajuste que
desea modificar.
Google Play Music
La aplicación Play Music ( ) funciona con Google Music, la tienda y
el servicio de streaming de música en línea de Google. Puede transmitir
a través de datos móviles o Wi-Fi y escuchar sus canciones favoritas que
añadió a la biblioteca en línea de Google Music. También puede reproducir
archivos de audio copiados directamente en su teléfono desde una
computadora.
Importante: La disponibilidad de Google Music depende de su zona. Si no
está disponible, o no cuenta con una conexión Wi-Fi ni datos móviles, solo
podrá reproducir la música que tenga almacenada en el teléfono.
72 73
Page 96

Reproducción de música
En la pantalla de inicio, toca > Play Music . Si el sistema lo solicita,
seleccione una cuenta para acceder a la biblioteca de música en línea.
La aplicación busca música y listas de reproducción en la biblioteca en línea
y el teléfono para mostrarte tu biblioteca de música combinada, organizada
por LISTAS DE REPRODUCCIÓN, ARTISTAS, ÁLBUMES, CANCIONES y GÉNEROS.
Puedes tocar
ver toda la música y las listas de reproducción. Para cambiar las vistas de la
biblioteca, deslice con el dedo hacia la derecha o la izquierda.
Toca una canción para reproducirla. Durante la reproducción de la
canción, toca la información resumida sobre esta en la parte inferior para
ver la pantalla de reproducción.
74 75
> Biblioteca de música > LISTAS DE REPRODUCCIÓN para
Número Función
1 Información de la canción y del artista. Toca aquí o arrastre
hacia abajo para volver a la biblioteca de música.
2 Material gráfico del álbum.
3
Para indicar que le gusta la canción.
4 Control de la reproducción. Para saltar canciones, detenerlas y
reanudar su reproducción, usa la reproducción aleatoria o la
función de repetición. Arrastre la barra de progreso para saltar
a cualquier parte de la canción.
5 Para indicar que no le gusta la canción.
6 Toca aquí para ver la lista de reproducción actual (cola).
7 Obtendrá más opciones.
Aunque no esté en la pantalla de reproducción, puede controlar la música.
• En la biblioteca de música de la aplicación Play Music, toca la
información resumida de la parte inferior de la pantalla para restaurar la
pantalla de reproducción.
• En otras aplicaciones, deslice hacia abajo el panel de notificaciones.
Toca el título de la canción para restaurar la pantalla de reproducción,
detener/reanudar la reproducción o pasar a la canción siguiente/
anterior.
• Cuando la pantalla está bloqueada, la información de la canción, la
cubierta del álbum y los controles de reproducción se muestran en la
parte superior de la pantalla. Puede detener/reanudar la reproducción o
saltar canciones.
Page 97

Gestión de las listas de reproducción
Cree listas de reproducción para organizar los archivos de música en
conjuntos de canciones de manera que pueda reproducir las canciones
que desee en el orden que prefiera.
Cómo crear una lista de reproducción o añadir una canción a
una lista de reproducción
Toca junto a la canción y seleccione Añadir a la lista de reproducción.
Eliminación de canciones de una lista de reproducción
1. Toca > Biblioteca de música > LISTAS DE REPRODUCCIÓN y
selecciona una lista de reproducción.
2. Toca
3. Toca Eliminar de lista de reproducción.
junto a la canción.
Eliminación de una lista de reproducción
1. Toca > Mi biblioteca > LISTAS DE REPRODUCCIÓN en la aplicación
Play Music y seleccione una lista de reproducción.
2. Toca
3. Toca Eliminar > Aceptar.
Importante: Algunas listas de reproducción creadas en forma automática,
como Añadidos recientemente, no se pueden eliminar.
junto a la lista de reproducción que desea eliminar.
Google Play Store
En la pantalla de inicio, toca . Puede comprar o alquilar música, libros,
películas, aplicaciones y descargarlos en su teléfono.
Importante: El contenido al que puede acceder en Google Play Store
depende de su zona y de su proveedor de servicios.
Exploración y búsqueda de aplicaciones
Puede explorar aplicaciones por categoría. Toca una categoría de nivel
superior, como JUEGOS, y toca la aplicación de cualquier subcategoría.
También puede buscar aplicaciones empleando el nombre o la descripción
de una aplicación o el nombre del desarrollador. Simplemente toca
ingrese los términos de búsqueda.
Descarga e instalación de aplicaciones
Cuando encuentre la aplicación que es de su interés, tóquela para abrir
su pantalla de datos donde encontrará más información acerca de la
aplicación.
Toca INSTALAR (en el caso de aplicaciones gratuitas) o sobre el precio
1.
(en aplicaciones de pago). Si la aplicación es de pago, deberá iniciar
sesión en su cuenta de Google Wallet y seleccionar un método de pago.
¡ATENCIÓN! Una vez instaladas, algunas aplicaciones pueden acceder
a muchas funciones o a una cantidad significativa de datos personales.
Play Store le mostrará a qué datos puede acceder la aplicación. Toca
ACEPTO para continuar o pulse
para cancelar el proceso.
e
76 77
Page 98

Espera a que la aplicación se descargue y se instale automáticamente.
2.
Para que la aplicación empiece a descargarse, antes debe haberse
autorizado el pago.
La aplicación se ha instalado exitosamente cuando aparece el icono
en la barra de estado. Abre la aplicación desde esta notificación o
localizándola en Aplicaciones
.
Creación de una cuenta de Google Wallet
Debe configurar una cuenta de Google Wallet para comprar elementos de
Play Store.
Seleccione uno de los siguientes:
• En su computadora, vaya a wallet.google.com para crear una cuenta de
Google Wallet.
• La primera vez que use el teléfono para comprar un elemento de la
Google Play Store, se le solicitará que ingrese los datos de facturación
para configurar una cuenta de Google Wallet.
Aviso. Cuando haya usado Google Wallet una vez para realizar una compra
en Play Store, el teléfono recordará su contraseña, por lo que no necesitará
ingresarla la próxima vez. Por este motivo, debe proteger su teléfono para
evitar que otros lo usen sin su permiso.
Aplicaciones
Calculadora
En la pantalla de inicio, toca > Calculadora para usar la práctica
calculadora integrada del teléfono para realizar operaciones matemáticas
básicas así como algunas avanzadas.
Reloj
En la pantalla de inicio, toca > Reloj para usar una serie de
herramientas de hora.
Establecimiento de una alarma nueva
1. Toca en la aplicación Reloj.
Toca una alarma existente para configurarla o toca de la parte
2.
inferior de la pantalla para crear una alarma nueva.
3.
Configura las opciones de la alarma, como la hora, las repeticiones y el
sonido de la alarma.
Importante: Para habilitar o deshabilitar alarmas existentes simplemente
debe deslizar el interruptor.
Comprobación de la hora mundial
Toca en la aplicación Reloj para comprobar la hora local de ciudades
de todo el mundo.
Toca
en la parte inferior para añadir una ciudad o un país nuevos.
78 79
Page 99

Uso del Cronómetro y de la Cuenta atrás
Toca o en la aplicación Hora para usar el cronómetro o la cuenta
atrás.
El cronómetro permite registrar tiempos de vuelta mientras que la cuenta
atrás permite establecer un tiempo y contar hacia atrás hasta cero.
• Toca carpetas y archivos para acceder a los elementos guardados.
• Mantenga pulsado un elemento para acceder a opciones como copiar,
cortar, compartir o eliminar.
• Para copiar o cortar un elemento, vaya hasta una ubicación nueva y
toca Pegar.
Descargas
La aplicación Descargas mantiene un registro de los archivos que descargó
usando aplicaciones como Navegador o Gmail.
En la pantalla de inicio, toca
• Toca un archivo para abrirlo con la aplicación apropiada.
• Mantenga pulsado un archivo o marque la casilla delante de este para
eliminarlo o compartirlo.
> Descargas.
YouTube
En la pantalla de inicio, toca > YouTube.
Puede ver videos de YouTube o cargar sus propios videos.
Archivos
Acceda rápidamente a todas sus imágenes, todos sus videos, clips de audio
y otros tipos de archivos de su teléfono y la tarjeta microSDHC.
En la pantalla de inicio, toca
necesita por categoría en Categorías o tocar Teléfono o Tarjeta SD para
examinar las carpetas y los archivos del almacenamiento del teléfono o la
tarjeta microSDHC.
80 81
> Archivos. Puede encontrar el archivo que
Page 100

Ajustes del teléfono
En la pantalla de inicio, toca > Ajustes. La aplicación Ajustes contiene la
mayoría de las herramientas que necesita para personalizar y configurar su
teléfono.
CONEXIONES INALÁMBRICAS Y REDES
Wi-Fi
Permite activar o desactivar el Wi-Fi y configurar sus conexiones Wi-Fi.
Cuando el Wi-Fi está activado, toca
el menú Wi-Fi para compartir datos entre dos dispositivos a través de Wi-Fi
Direct.
> Ajustes avanzados > Wi-Fi Direct en
Más
• Modo vuelo: deslice el interruptor para activar o desactivar el modo
vuelo.
• Módem y punto de acceso móvil: permite activar o desactivar el punto
de acceso móvil y el módem USB e ingresar ajustes del punto de acceso
móvil.
• VPN: configura redes privadas virtuales y conéctese a estas.
• Redes móviles: permite habilitar o deshabilitar servicios de datos,
servicios de datos en roaming, seleccionar el modo de red preferido o
establecer nombres de puntos de acceso para el acceso a datos.
Importante: Las funciones de roaming de datos y datos siempre
encendidos pueden incurrir en gastos considerables de roaming.
• Alertas de emergencia: permite habilitar o deshabilitar las opciones de
alertas de emergencia.
Bluetooth
Permite activar o desactivar Bluetooth y configurar sus conexiones de
Bluetooth.
Uso de datos
Toca junto a Datos móviles para activar o desactivar los datos móviles.
Puede comprobar la cantidad de datos usados durante el tiempo que
estableció, establecer un límite de datos móviles, ver las aplicaciones que
han usado datos o restringir los datos en segundo plano para aplicaciones
individuales.
Importante: El uso de datos lo mide su teléfono y es posible que el conteo
de uso de datos de su operador difiera.
82 83
DISPOSITIVO
Pantalla
• Nivel de brillo: permite ajustar el brillo de la pantalla.
• Fondo de pantalla: permite seleccionar una imagen de fondo de
pantalla para la pantalla de inicio y la pantalla bloqueada.
• Tiempo de espera: permite establecer el tiempo de inactividad que
debe transcurrir para que la pantalla se desactive en forma automática.
• Pulsa el botón de Encendido dos veces para activar la cámara:
la cámara se abre rápidamente pulsando dos veces el botón de
Encendido.
 Loading...