

Page 1

Speed Touch USB
Installation and User's Guide
3EC 36714 AAAA TCZZA Ed. 02
Page 2

Status
Released
2 / 48
Change Note
Short Title
BD F aa 39808
CD-UG STUSB PPP
All rights reserved. Passing on and copying of this
document, use and communication of its contents
not permitted without written authorization from Alcatel.
3EC 36714 AAAA TCZZA Ed. 02
Page 3

Contents
1 Get Acquainted to the Speed Touch USB 7. . . . . . . . . . . . . . . . . . . . . . . . . . . . . .
1.1 First Steps 8. . . . . . . . . . . . . . . . . . . . . . . . . . . . . . . . . . . . . . . . . . . . . . . . . . . . .
1.2 What You Need 9. . . . . . . . . . . . . . . . . . . . . . . . . . . . . . . . . . . . . . . . . . . . . . .
1.3 Speed Touch USB Support 10. . . . . . . . . . . . . . . . . . . . . . . . . . . . . . . . . . . . . . .
2 Speed Touch USB for Microsoft Windows 11. . . . . . . . . . . . . . . . . . . . . . . . . . . . . .
2.1 Installing the Speed Touch USB 12. . . . . . . . . . . . . . . . . . . . . . . . . . . . . . . . . .
2.2 Using the Speed Touch USB 18. . . . . . . . . . . . . . . . . . . . . . . . . . . . . . . . . . . . .
3 Speed Touch USB for MAC OS 23. . . . . . . . . . . . . . . . . . . . . . . . . . . . . . . . . . . . . . . .
3.1 Installing the Speed Touch USB 24. . . . . . . . . . . . . . . . . . . . . . . . . . . . . . . . . .
3.1.1 Installation for Mac OS8.6 and Mac OS9.x 25. . . . . . . . . . . . . .
3.1.2 Installation for Mac OS X (Mac OS10.1) 29. . . . . . . . . . . . . . . . .
3.2 Using the Speed Touch USB 35. . . . . . . . . . . . . . . . . . . . . . . . . . . . . . . . . . . . .
3.2.1 Using the STUSB in Mac OS8.6 and Mac OS9.x 36. . . . . . . . . .
3.2.2 Using the STUSB in Mac OS X (Mac OS10.x) 39. . . . . . . . . . . . .
Contents
AppendixA Troubleshooting 43. . . . . . . . . . . . . . . . . . . . . . . . . . . . . . . . . . . . . . . . .
AppendixB Safety and Agency Regulatory Notices 45. . . . . . . . . . . . . . . . . . . .
3EC 36714 AAAA TCZZA Ed. 02
3 / 48
Page 4

Contents
4 / 48
3EC 36714 AAAA TCZZA Ed. 02
Page 5

Alcatel Speed Touch USB
Introduction
Welcome to the Alcatel Speed TouchUSB ADSL modem !
With the Awardwinning Alcatel Speed TouchUSB Asymmetric Digital Subscriber Line (ADSL)
modem surfing the Internet will become a whole new experience.
With download speeds up to 8 Megabits per second (Mbps), your Alcatel Speed TouchUSB is
the ideal solution for exploring the Internet, highspeed interactive gaming and enjoying online
audio and video streaming.
With the included installation CDrom the installation of the Alcatel Speed TouchUSB is really
straightforward : surfing the Internet is only a few clicks away.
3EC 36714 AAAA TCZZA Ed. 02
5 / 48
Page 6

Terminolog
y
s
For readability, the Alcatel Speed TouchUSB will be referred to as
STUSB further in this User's Guide.
Safety instructions
CAUTION
WARNING
Trademark
Prior to connecting the Alcatel Speed TouchUSB, read the Safety
Instructions in appendix B.
The following words and symbols mark special messages throughout
this document:
WARNING: indicates that failure to follow the directions could cause
bodily harm or loss of life.
CAUTION: indicates that failure to follow the directions could result in
damage to equipment or loss of information.
The following trademarks are used in this document:
Speed Touch is a trademark of the Alcatel Company
Windows and Internet Explorer are trademarks of Microsoft
Corporation
Apple and MacOS are registered trademarks of Apple
Computer Inc.
Netscape and Netscape Navigator are registered trademarks of
Netscape Communications Corporation.
Other products may be trademarks or registered trademarks of their
respective manufacturers.
Service Provider
STUSB documentation
and software updates
6 / 48
For readability, the term Service Provider (SP) will be used to designate
all organizations which provide either DSL connectivity, Internet access
or Corporate access, for example an Internet Service Provider (ISP).
Due to the continuous evolution of Alcatel ADSL technology, existing
products are regularly upgraded.
For more information on the newest technological breakdowns,
software upgrades, and documents, please consult the Alcatel web site
at:
http://www.alcatel.com
http://www.alcateldsl.com
3EC 36714 AAAA TCZZA Ed. 02
Page 7

1 Get Acquainted to the Speed Touch USB
1 Get Acquainted to the Speed Touch USB
Introduction
This chapter will assist you in getting acquainted with the STUSB and
will guide you through the first steps in preparing the STUSB for Internet
connectivity.
3EC 36714 AAAA TCZZA Ed. 02
7 / 48
Page 8

k
1 Get Acquainted to the Speed Touch USB
1.1 First Steps
Delivery chec
Damaged or missing
items
Other materials
Your STUSB
Check your STUSB package for the following items:
The Alcatel Speed TouchUSB
2m DSL cable (RJ11/RJ11, RJ14/RJ14)
The STUSB Installation CDrom.
In the event of damaged or missing items, contact your local product
dealer for further instructions.
Your STUSB shipping carton may also include release notes, safety and
conformity declarations and other materials.
Unlike most traditional modems, the electronic circuitry of the STUSB
has been shaped into a stylish body. The input/output wiring is moulded
in an ergonomically designed pigtail.
On the rear end of the pigtail you find the USB connector. That's the
interface which connects the STUSB to your Personal Computer (PC).
The ADSL Line port is situated in the inline receptacle. This port
connects the STUSB to the ADSL highway.
Note: As you notice, there is no separate mains plug, cord, or power
adapter. This is because the STUSB is powered via the USB connection.
8 / 48
3EC 36714 AAAA TCZZA Ed. 02
Page 9
1.2 What You Need
1 Get Acquainted to the Speed Touch USB
ADSL and telephone
service
WARNING
Service Provider
ADSL service must be enabled on your telephone line.
As both telephone and ADSL service are simultaneously available from
the same copper pair, you need a central splitter or distributed filters for
decoupling ADSL and telephone signals.
Contact your Service Provider for more information.
In all cases contact your ADSL Service Provider about splitter/filter
installation !
Public telephone lines carry voltages that can cause electric shock.
Only install splitter/filters yourself if these are qualified for that purpose.
Other splitter/filters may only be installed by qualified service personnel.
You must have a user account at an Internet Service Provider (ISP) for
Internet access:
For this user account, it will provide you:
A user name (logon ID)
A password.
Note: The STUSB supports two connection services: PPPoA and PPPoE.
Depending on the preferences of your Service Provider, the connection
service suitable for your connectivity to the Service Provider, hence the
Internet will be installed by the Installation CDRom delivered with your
STUSB.
PC or computer
3EC 36714 AAAA TCZZA Ed. 02
Your PC or computer must be equipped with an USB port capable of
powering attached USB devices. You may also use an USB hub to
connect the STUSB.
Note: Make sure you are not using lowpowered USB ports to connect
the STUSB. In case you are not sure of the type of USB port, see the
User's Guide of your PC or USB port hub.
9 / 48
Page 10

s
1 Get Acquainted to the Speed Touch USB
1.3 Speed Touch USB Support
Supported Operating
System
STUSB driver software
on the Internet
This User's Guide describes the installation and use of the STUSB under
following Operating Systems (OSs):
Microsoft OSs (See chapter 2)
Microsoft Windows 98, 98SE and higher
Microsoft Windows Millennium
Microsoft Windows 2000/XP.
Mac OSs (See chapter 3)
Mac OS8.6
Mac OS9.x
Mac OS X (Mac OS10.1)
Note: Mac OS10.0 user are strongly recommended to
download the free upgrade to Mac OS10.1.
Note: The STUSB also supports Linux platforms. Refer to the Alcatel
support web pages for more information.
The Alcatel support web pages on the Internet provide STUSB software
upgrades for download.
These upgrades are regularly updated and can be found at:
http://www.alcatel.com
http://www.alcateldsl.com
Procedure
Installation procedure
10 / 48
1. Download the newest web upgrade from the Internet to a location
on your local PC or computer.
2. Browse to the location where the web upgrade resides.
3. Doubleclick it.
4. Follow all instructions.
When performing a web upgrade of the STUSB software, the
installation process could slightly differ with the initial installation
procedure.
3EC 36714 AAAA TCZZA Ed. 02
Page 11

2 Speed Touch USB for Microsoft Windows
2 Speed Touch USB for Microsoft Windows
Introduction
In this chapter
This chapter describes how to install and use the STUSB for Microsoft
Windows OSs.
Topic See
Installing the STUSB 2.1
Using the STUSB 2.2
3EC 36714 AAAA TCZZA Ed. 02
11 / 48
Page 12

2 Speed Touch USB for Microsoft Windows
2.1 Installing the Speed Touch USB
Introduction
Microsoft Windows
This section will assist you in installing the STUSB and preparing your
PC for your Internet connectivity.
One of the following OSs must be readily installed on your PC:
Microsoft Windows 98/98SE or Microsoft Windows ME
Microsoft Windows 2000 or Microsoft Windows XP
You may need the Windows installation CDrom during installation.
For Windows98/98SE/ME:
Pentium processor 166 MHz, or higher (or compatible)
32 Mega Byte (MB) of memory, or more.
For Window2000/XP :
Pentium II processor, or higher (or compatible)
64 MB of memory, or more.
30 MB of free disk space
Microsoft DialUp Networking (default installed with the OS)
A Web browser, e.g. Netscape Navigator, Internet Explorer, ... for
surfing the Internet.
Two installation
methods
As your STUSB is a true PlugandPlay device you can use two different
installation procedures:
The Alcatel Wizard Installation
By inserting the STUSB Installation CDrom, a wizard automatically
guides you through all needed installation steps.
The PlugandPlay Compliant Installation
The installation procedure is initiated by connecting the STUSB to
your PC's USB port.
It does not matter which method you use, both are equally valid.
In this section, the Alcatel wizard installation is fully described. In case
you experience problems with this installation, you can try the
PlugandPlay compliant installation, shortly described at the end of this
section.
12 / 48
3EC 36714 AAAA TCZZA Ed. 02
Page 13
2 Speed Touch USB for Microsoft Windows
Windows OS
differences
Previous STUSB
installations
The Alcatel wizard
installation
The installation procedures might be slightly different depending on the
Microsoft Windows OS you are using:
Some windows will look differently
On Windows 98/98SE no 'Digital Signature' window will pop up
For Windows 98/98SE, at the end of the installation procedure, you
may be asked to enter an area code for Dialup connections.
In case the STUSB was already installed on your system, the Alcatel
wizard allows also an upgrade, removal or repair of the existing STUSB
installation.
1. Insert the STUSB Installation CDrom in your PC's CDrom drive.
The Alcatel wizard will start automatically.
Note: In case the Alcatel wizard does not start automatically, open
a 'Run' window via Start Run from the Start menu and enter
following path:
of your CDrom drive.
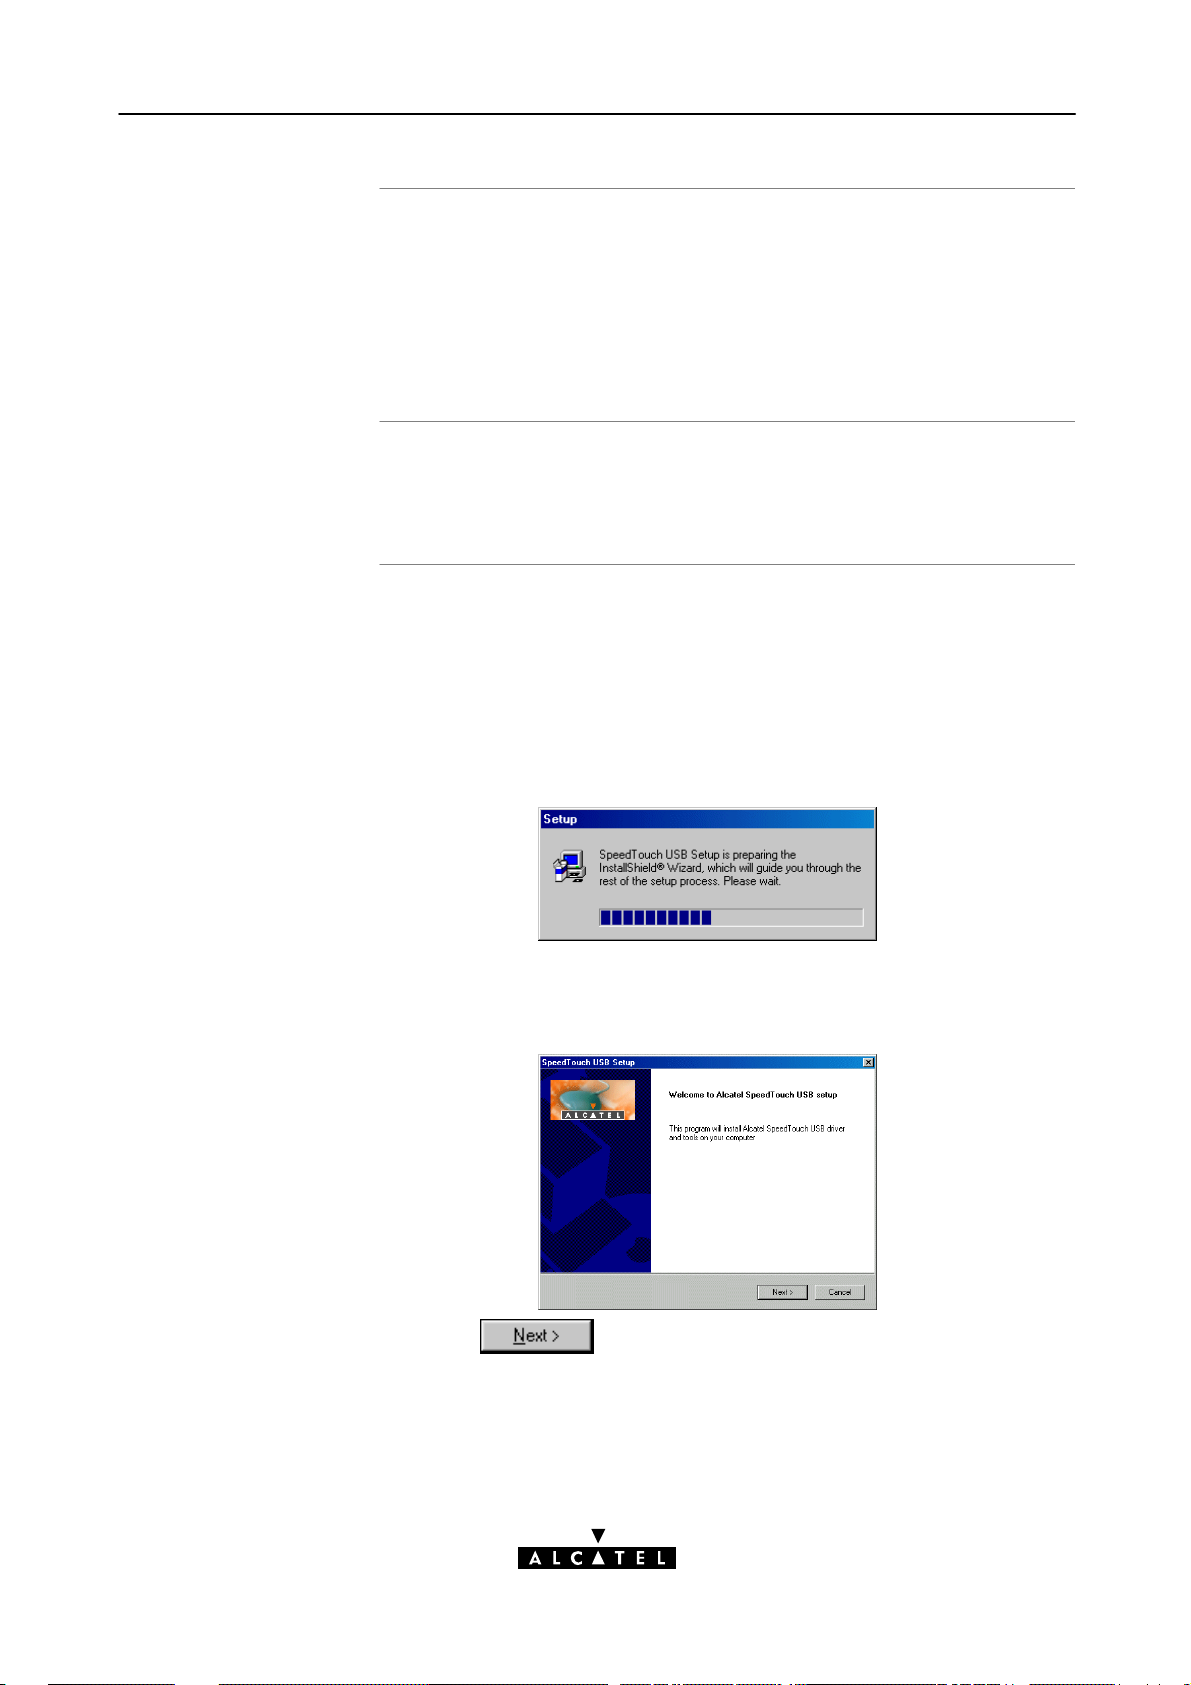
2. The STUSB Setup program prepares the Alcatel wizard:
D:\Setup.exe
, where D stands for the drive letter
As soon as the preparation is finished, the Alcatel wizard will start
automatically.
3. The 'Welcome to Alcatel Speed Touch USB setup' window pops up:
Click to proceed.
3EC 36714 AAAA TCZZA Ed. 02
13 / 48
Page 14
2 Speed Touch USB for Microsoft Windows
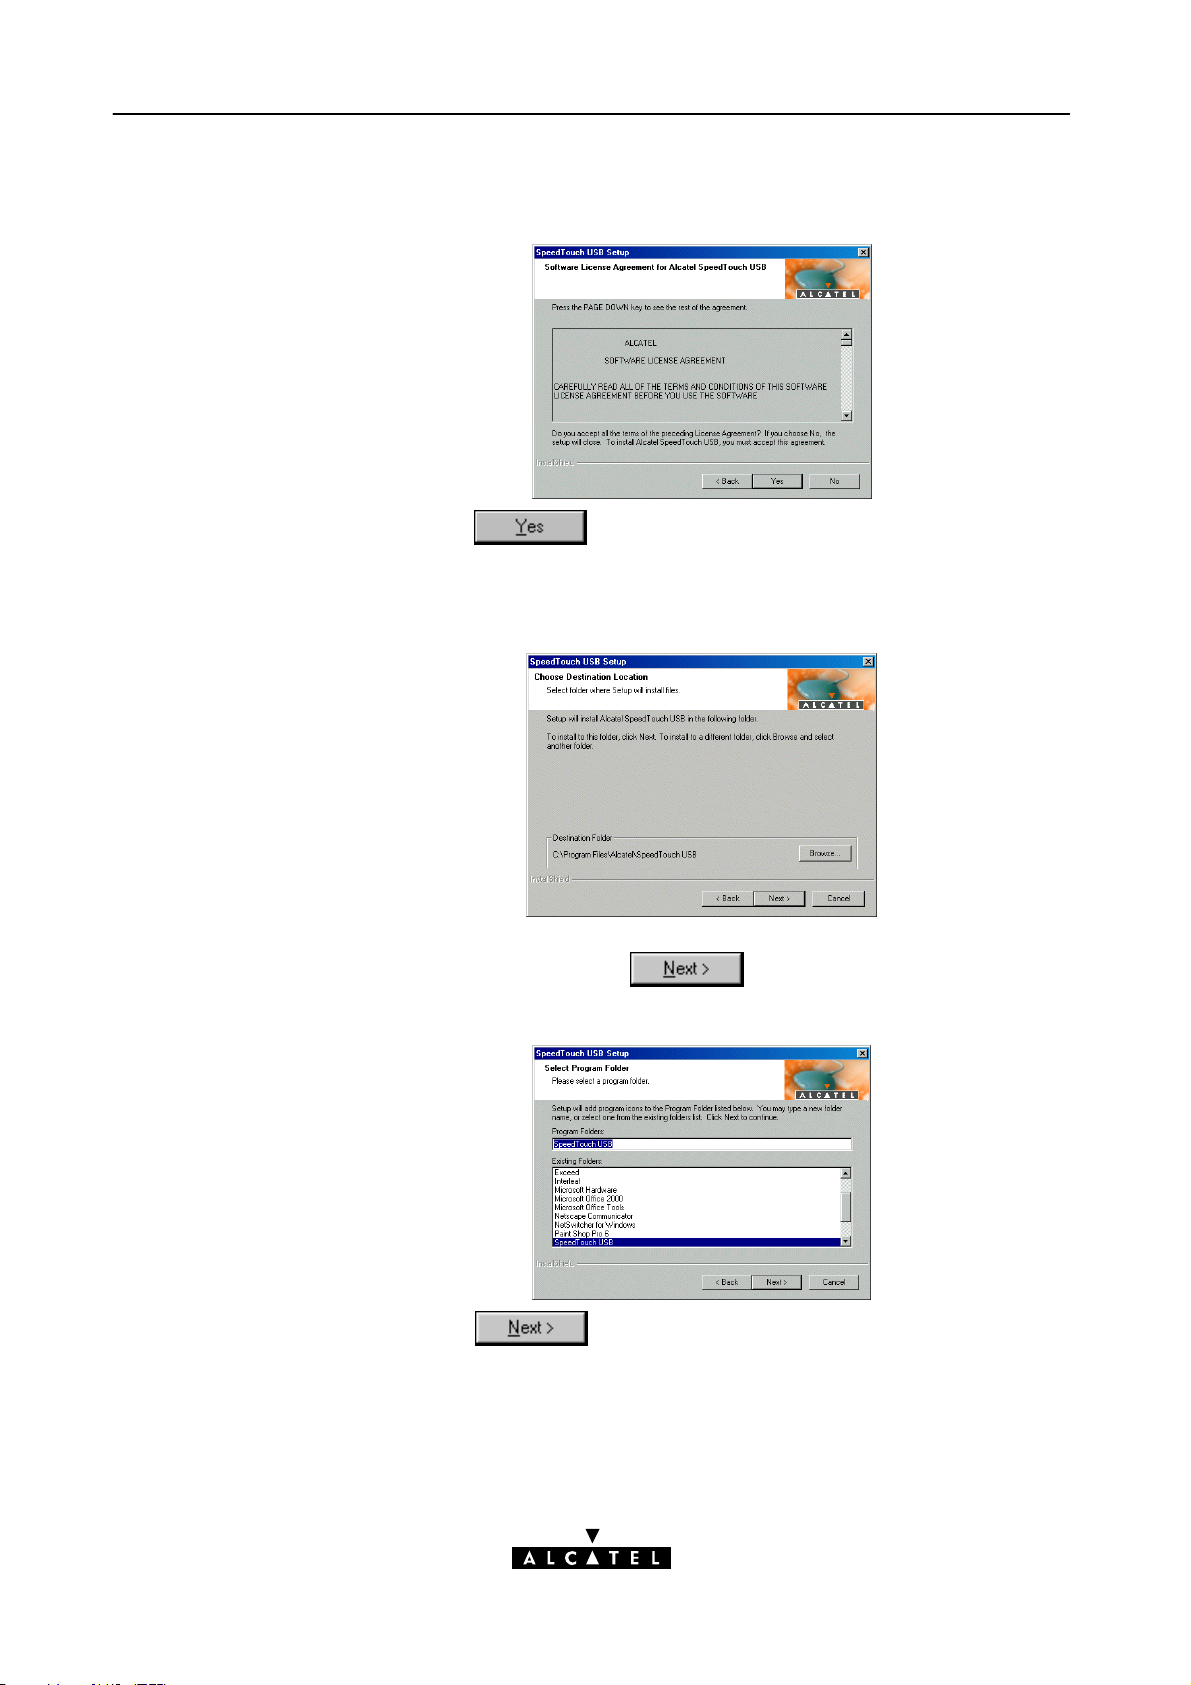
4. The 'Software License Agreement for Alcatel Speed Touch USB'
window pops up:
Click to accept the terms of the agreement and to
continue the installation.
5. The following window allows you to choose a destination folder for
the STUSB driver software:
In most cases the proposed destination is best suited for the STUSB
driver software. Click
to proceed.
6. The 'Select Program Folder' window pops up:
Click to proceed.
14 / 48
3EC 36714 AAAA TCZZA Ed. 02
Page 15
2 Speed Touch USB for Microsoft Windows
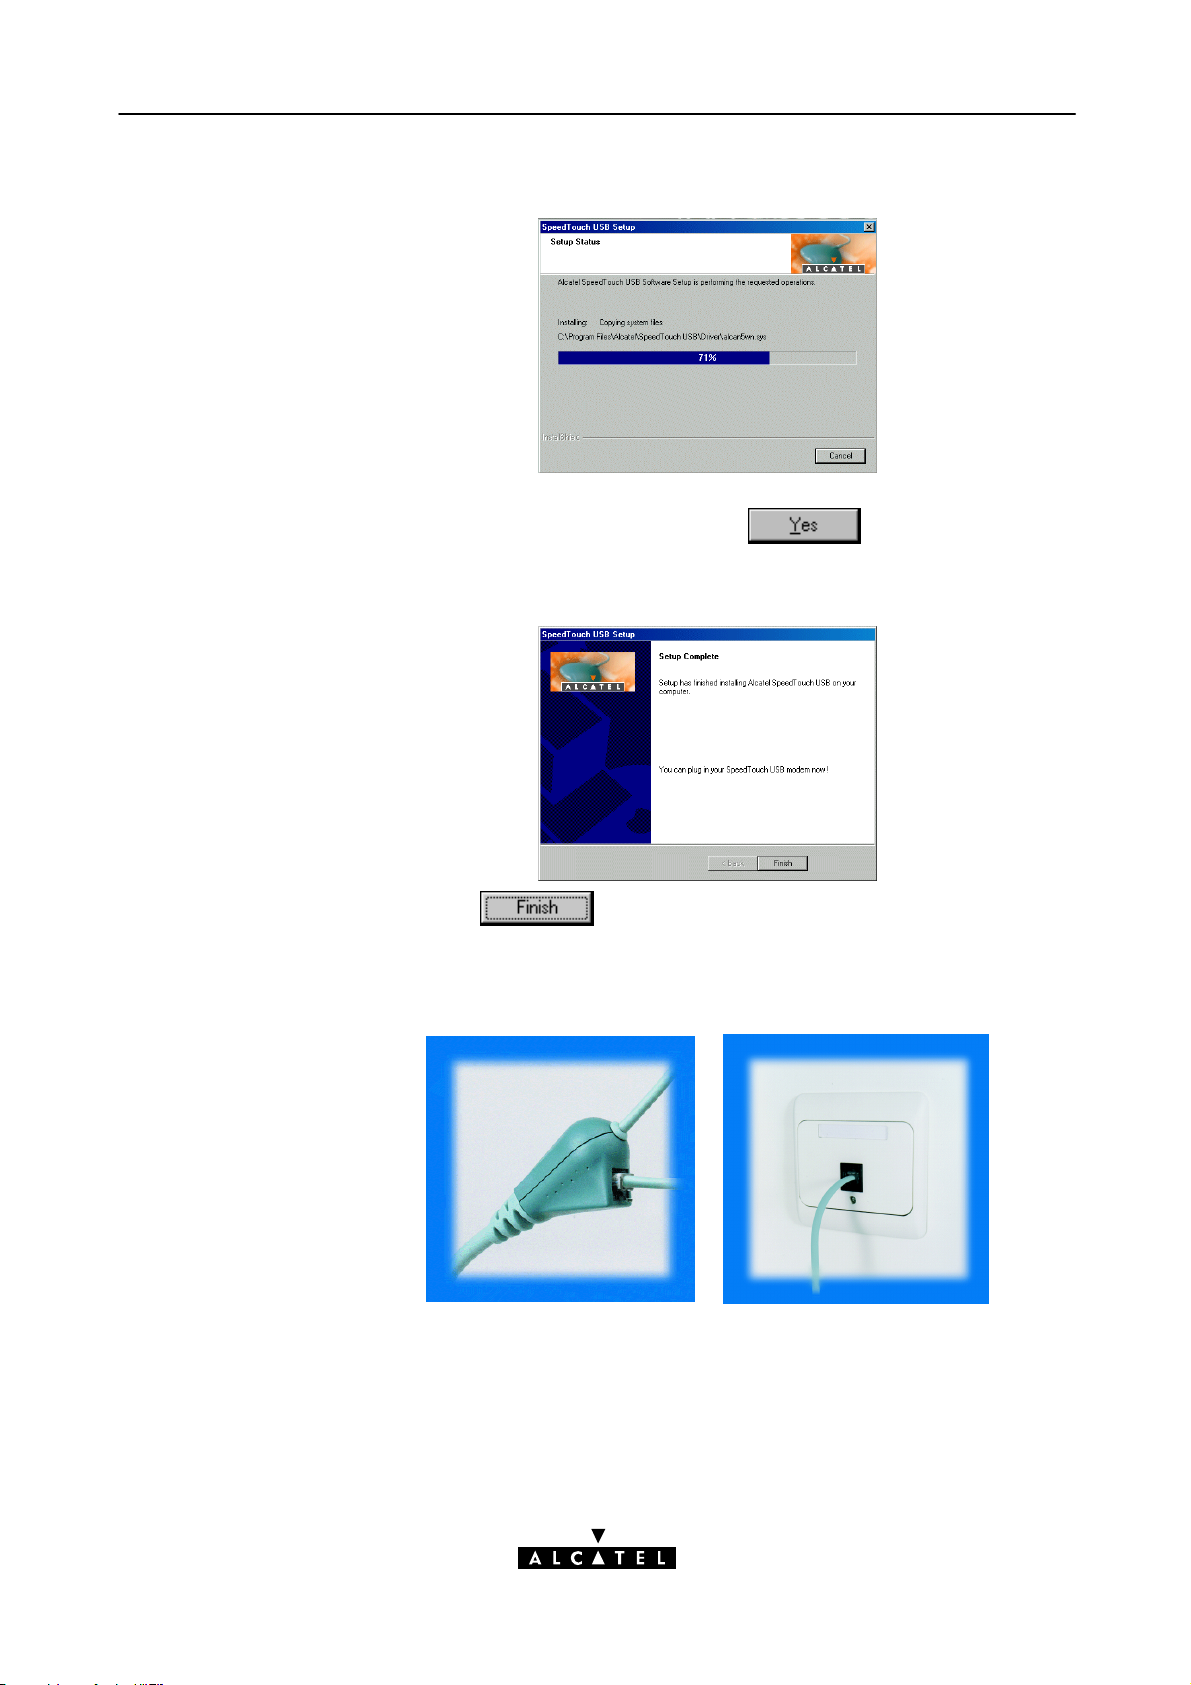
7. The wizard copies STUSB driver software to your local disk:
Note for Windows ME/2000/XP user only: If a 'Digital
Signature' window pops up, click
to continue.
8. The 'Setup Complete' window pops up to announce that installation
is finished:
Click to close the wizard.
9. Plug the ADSL cable, provided in your package, into the inline
receptacle of the STUSB. Plug the other end of the ADSL cable into
the wall socket terminating ADSL service.
Note: Depending onto which pins of the wall socket the ADSL
signals are assigned, it might be necessary to plug in an RJ11
interchanger into the wall socket prior to connect the ADSL cable.
3EC 36714 AAAA TCZZA Ed. 02
15 / 48
Page 16

2 Speed Touch USB for Microsoft Windows
10. Plug the STUSB's USB connector into the PC's USB port.
An USB port can be easily located, it is marked with the typical USB
symbol:
11. The 'Windows found New Hardware' wizard will automatically
continue with the installation of the STUSB ADSL modem device:
12. The installation continues with the creation of the appropriate PPP
DialUp Networking connections.
13. At the end of the procedure the 'Speed Touch DialUp' window pops
up, allowing you to immediately connect to the Internet (See section
2.2).
The installation of the STUSB is now finished. The STUSB is now
prepared for connecting you to the Internet.
16 / 48
3EC 36714 AAAA TCZZA Ed. 02
Page 17

y
2 Speed Touch USB for Microsoft Windows
The PlugandPla
compliant installation
As an alternative to the Alcatel wizard installation you can also install
the STUSB using the PlugandPlay compliant installation.
1. Connect the STUSB to the ADSL wall socket and the PC.
Note: ADSL must be available, as well as the appropriate central
splitter or distributed filters.
2. Windows will automatically recognize the STUSB.
The Windows 'Found new Hardware' wizard pops up. This wizard
will guide you through the installation procedure.
Follow all the instructions. In most cases you only have to click
to proceed with the installation procedure.
3. At some point the STUSB Installation CDRom will be requested. At
this point the Alcatel wizard will continue with the installation of the
STUSB software and applications.
4. The installation continues with the creation of the appropriate PPP
DialUp Networking connections.
5. At the end of the procedure the 'Speed Touch DialUp' window pops
up, allowing you to immediately connect to the Internet (See section
2.2).
The installation of the STUSB is now finished. The STUSB is now
prepared for connecting you to the Internet.
Installation results
After you have correctly followed the installation procedures, regardless
whether the Alcatel wizard installation or the PlugandPlay compliant
installation procedures was used, the following folders and icons are
added to your system:
SpeedTouch USB program folder:
The SpeedTouch USB folder is added containing two STUSB
applications:
SpeedTouch USB DialUp
SpeedTouch USB Diagnostics.
Desktop SpeedTouch Dialup icon:
A SpeedTouch Dialup icon is added to your desktop.
System tray SpeedTouch status icon:
An STUSB status icon is added to the system tray, allowing instant
status information of the STUSB.
Microsoft DialUp Networking folder:
A DialUp Networking icon is added for STUSB connectivity.
3EC 36714 AAAA TCZZA Ed. 02
17 / 48
Page 18

2 Speed Touch USB for Microsoft Windows
2.2 Using the Speed Touch USB
STUSB status icon
STUSB status icon
colors
As soon your STUSB is installed, a STUSB status icon is shown at your
desktop's system tray:
The STUSB status icon is colored, depending on the state of the STUSB
device. If you position your mouse pointer over the STUSB status icon, a
message pops up:
System tray icon Message Description
Alcatel ADSL Modem
Modem not plugged in
Alcatel ADSL Modem
Initializing ADSL line
Alcatel ADSL Modem.
Sent : X bytes
Received : Y bytes
The STUSB is not
plugged into the PC's
USB port. An ADSL
connection can not be
established.
The STUSB is plugged
in, but has not (yet)
accomplished
synchronization over the
ADSL line.
The STUSB is connected,
and synchronized, and
has, up to this moment,
sent X bytes, and
received Y bytes over the
ADSL line.
STUSB Diagnostics
18 / 48
The STUSB status icon is also a shortcut to the STUSB Diagnostics
application. This application allows you to overview some detailed
parameters and settings of your STUSB and the current connection.
Refer to the STUSB Diagnostics Guide for more information. The latest
version of the Diagnostics Guide can always be downloaded from the
Alcatel Support web pages.
3EC 36714 AAAA TCZZA Ed. 02
Page 19

2 Speed Touch USB for Microsoft Windows
How to make a
connection
Proceed as follows:
1. Doubleclick the 'SpeedTouch Dialup' icon on your desktop:
Or open the STUSB Dialup window via Start Programs
SpeedTouch USB SpeedTouch USB Dialup:
2. As a result the STUSB Dialup window pops up:
Note: The example figure shows the Dialup window in case of
PPPoE connectivity. In case of PPPoA connectivity the 'Service Name'
entry field is not available.
3. If needed, click
appropriate entry, if more than one, to connect with.
4. Enter user name and password for your user account at the Service
Provider.
in the 'Connection' field and select the
3EC 36714 AAAA TCZZA Ed. 02
19 / 48
Page 20

y
2 Speed Touch USB for Microsoft Windows
5. In case of PPPoE connectivity, you may need to choose a Service
Name, which is provided by your Service Provider.
On the Internet
6. Click
.
7. As soon the connection is made, the following message pops up:
8. Click . The message box and dialup window are
minimized into a DUN icon in the system tray:
As soon as you are connected, your web browser will open and browse
to Alcatel's consumer web page. In case your web browser does not
open automatically, you must open it manually.
DUN icon in the system
tra
While you are connected, you can find the DUN icon showing two PCs
connected to each other in the system tray:
The DUN icon itself symbolizes activity on the connection:
A flashing Front" PC symbolizes upstream (T
) link activity (from
X
your local PC towards the remote device).
A flashing Behind" PC symbolizes downstream (R
) link activity
X
(from the remote device towards your PC).
In case you position your mouse pointer over the DUN icon, a dialog
box pops up.
20 / 48
3EC 36714 AAAA TCZZA Ed. 02
Page 21

2 Speed Touch USB for Microsoft Windows
How to release a
connection
Proceed as follows:
1. Doubleclick the MSDUN icon in the system tray:
2. As a result, the 'Speed Touch USB Status' window pops up (MS
Windows 2000 example):
Configuring multiple
entries
3. Click . The connection is released. No Internet
connectivity exists anymore.
In case you have more than one account, and/or multiple STUSB
connected to your PC, you can create multiple DUN entries for the
STUSB, with specific credentials, properties and home web page.
DUN entries are controlled via the
Dialup window.
button in the STUSB
3EC 36714 AAAA TCZZA Ed. 02
21 / 48
Page 22

2 Speed Touch USB for Microsoft Windows
22 / 48
3EC 36714 AAAA TCZZA Ed. 02
Page 23

3 Speed Touch USB for MAC OS
3 Speed Touch USB for MAC OS
Introduction
In this chapter
This chapter describes how to install and use the STUSB for Mac OSs.
Topic See
Installing the STUSB 3.1
Using the STUSB 3.2
3EC 36714 AAAA TCZZA Ed. 02
23 / 48
Page 24

3 Speed Touch USB for MAC OS
3.1 Installing the Speed Touch USB
Introduction
Installation
This section will assist you in installing the STUSB and preparing your
computer for your Internet connectivity.
The installation depends on the Mac OS you are running:
In case of:
Mac OS 8.6 or Mac OS9.x
Proceed with subsection 3.1.1
Mac OS X (Mac OS10.x)
Proceed with subsection 3.1.2.
24 / 48
3EC 36714 AAAA TCZZA Ed. 02
Page 25

3 Speed Touch USB for MAC OS
3.1.1 Installation for Mac OS8.6 and Mac OS9.x
Mac OS
STUSB installation
One of the following OSs must be readily installed on your
computer:
Mac OS8.6 or Mac OS9.x
640 Kilo Byte (KB) of free disk space
A Web browser, e.g. Netscape Navigator, Internet Explorer, ... for
surfing the Internet.
1. Insert the STUSB Installation CDrom in your computer's CDrom
drive.
2. On your desktop the CDrom icon will appear:
Doubleclick the CDrom icon to proceed.
3. The CDrom contents window pops up:
3EC 36714 AAAA TCZZA Ed. 02
Select the Doubleclick to start the STUSB installer.
25 / 48
Page 26

3 Speed Touch USB for MAC OS
4. A Welcome screen appears that describes the steps in the
5. During installation a screen shows the installation progress.
installation process:
Click to proceed.
At the end of the installation procedure, the following screen
appears:
Click to proceed.
6. Plug the ADSL cable, provided in your package, into the inline
receptacle of the STUSB. Plug the other end of the ADSL cable into
the wall socket terminating ADSL service.
Note: Depending onto which pins of the wall socket the ADSL
signals are assigned, it might be necessary to plug in an RJ11
interchanger into the wall socket prior to connect the ADSL cable.
26 / 48
3EC 36714 AAAA TCZZA Ed. 02
Page 27

3 Speed Touch USB for MAC OS
7. Plug the STUSB's USB connector into the computer's USB port.
An USB port can be easily located, it is marked with the typical USB
symbol:
8. A dialog box appears to announce that the installer has finished
installation:
As no further installation is required for the STUSB, click
to leave the installer.
Installation results
After you have correctly followed the STUSB installation procedure, the
following applications and icons are added to your system:
SpeedTouch USB added in modem list:
In the list of available modems, the Alcatel SpeedTouch USB is
added
SpeedTouch USB status and Diagnostics icon:
An STUSB status icon is added to the control strip, allowing instant
status information of the STUSB.
3EC 36714 AAAA TCZZA Ed. 02
27 / 48
Page 28

3 Speed Touch USB for MAC OS
Additional
configuration
Next to the installation of the STUSB software, the STUSB must be
configured as default modem for the remote access application.
Proceed as follows:
1. Open the Modem control panel:
2. Check for the following:
In the 'Connect via' field, Alcatel SpeedTouch USB must be
selected:
In the 'Modem' field, Alcatel SpeedTouch USB must be
selected:
In case other selections are made, make the appropriate
adaptions:
3. Close the Modem control panel.
A dialog box appears asking whether you want to save the
changes you made:
Click to save your changes to the configuration.
28 / 48
3EC 36714 AAAA TCZZA Ed. 02
Page 29

3 Speed Touch USB for MAC OS
3.1.2 Installation for Mac OS X (Mac OS10.1)
Mac OS
STUSB software
installation
The following OS must be readily installed on your computer:
Mac OS X (Mac OS10.1)
Note: Mac OS10.0 user are strongly recommended to
download the free upgrade to Mac OS10.1.
100 Mega Byte (MB) of free disk space
A Web browser, e.g. Netscape Navigator, Internet Explorer, ... for
surfing the Internet.
1. Insert the STUSB Installation CDrom in your computer's CDrom
drive.
2. On your desktop the CDrom icon will appear:
Doubleclick the CDrom icon to proceed.
3. The CDrom contents window pops up:
3EC 36714 AAAA TCZZA Ed. 02
Doubleclick to open the Mac OS10.x installation folder.
4. In the Mac OS10.x folder, doubleclick
installation.
to start the
29 / 48
Page 30

3 Speed Touch USB for MAC OS
5. In case an Administrator password was set, you must provide it
6. A Welcome and Readme screen subsequently pops up. Click each
7. The Alcatel Software License Agreement screen pops up:
before the Installer is able to continue with the STUSB installation:
Provide Name and Password or Phrase and click to
proceed.
time
to proceed.
You must agree to it before you are able to continue. Click
and to proceed.
8. The following screen allows you to select a destination volume to
install the STUSB:
Select a destination. Your selection will be highlighted by a green
arrow:
. Click to proceed.
9. The Installer has now all information to continue with the
installation. Click
to start the installation.
30 / 48
3EC 36714 AAAA TCZZA Ed. 02
Page 31

3 Speed Touch USB for MAC OS
10. At the end of the installation procedure, the following screen
appears:
Click to finish the installer.
STUSB hardware
installation
1. Plug the ADSL cable, provided in your package, into the inline
receptacle of the STUSB. Plug the other end of the ADSL cable into
the wall socket terminating ADSL service.
Note: Depending onto which pins of the wall socket the ADSL
signals are assigned, it might be necessary to plug in an RJ11
interchanger into the wall socket prior to connect the ADSL cable.
2. Plug the STUSB's USB connector into the computer's USB port.
An USB port can be easily located, it is marked with the typical USB
symbol:
3EC 36714 AAAA TCZZA Ed. 02
31 / 48
Page 32

3 Speed Touch USB for MAC OS
Installation results
Additional
configuration
After you have correctly followed the STUSB installation procedure, the
following applications and icons are added to your system:
SpeedTouch USB added in network list:
In the Network panel, the Alcatel SpeedTouch USB is added in the
list of available network devices.
Dock SpeedTouch USB status icon:
An STUSB status icon is added to the Dock, allowing instant status
information of the STUSB.
SpeedTouch USB Diagnostics application:
A STUSB Diagnostics icon is added to the applications folder.
Next to the installation of the STUSB software, your must configure it for
Internet connectivity.
Proceed as follows:
1. Open your System Preferences and click
to open the network
panel.
2. Select the STUSB from the list of available network devices:
3. The first tab 'TCP/IP' of the Network panel shows the TCP/IP
settings for the STUSB network connection:
Check that the connection is configured for PPP connectivity:
32 / 48
3EC 36714 AAAA TCZZA Ed. 02
Page 33

3 Speed Touch USB for MAC OS
4. Click the 'PPP' tab. This panel shows the PPP configuration:
Enter the following information:
In the 'Account Name' field, your user name for your User
Account at the Internet Service Provider, e.g.:
In the 'Password' field the password for this user name.
Note: Tick 'Save password' () in case you want the computer to
remember your user name, and password:
Optionally you can enter a name for this connection in the 'Service
Provider' field. All other fields may stay empty.
5. Click the 'Proxies' tab. This panel shows the proxy settings. By
default all fields are empty, i.e. no proxies are used. As this suits
the required STUSB configuration, no changes are needed in this
panel.
6. Click the final tab 'Modem'. This panel shows the modem
configuration:
3EC 36714 AAAA TCZZA Ed. 02
From the list of modems select the 'Null Modem 115200':
Leave the other modem settings unchanged.
33 / 48
Page 34

3 Speed Touch USB for MAC OS
7. Run through all panels again to check whether all configurations
8. To prevent further changes you can click the lock to secure your
are correctly done as described above and click
to
apply the settings.
settings. From then on changes are only possible after providing
the Administrator password.
34 / 48
3EC 36714 AAAA TCZZA Ed. 02
Page 35

3.2 Using the Speed Touch USB
3 Speed Touch USB for MAC OS
Introduction
Installation
This section will show you how to use the STUSB to make a connection
to the Internet and how you can check the STUSB status.
The use of the STUSB depends on the Mac OS you are running:
In case of:
Mac OS 8.6 or Mac OS9.x
Proceed with subsection 3.2.1
Mac OS X (Mac OS10.1)
Proceed with subsection 3.2.2.
3EC 36714 AAAA TCZZA Ed. 02
35 / 48
Page 36

3 Speed Touch USB for MAC OS
3.2.1 Using the STUSB in Mac OS8.6 and Mac OS9.x
STUSB status icon
STUSB status icon
colors
As soon your STUSB is installed, an STUSB status icon is shown at your
desktop's control strip:
Note: In case the control strip is not visible, you must activate it via the
Apple menu Control Panels Control Strip. In case the STUSB status
icon is not visible, you can drag the control strip to enlarge it.
The STUSB status icon is colored, depending the state of the STUSB
device:
STUSB status icon color Description
The STUSB is not plugged into the
computer's USB port. An ADSL
connection can not be established.
STUSB Diagnostics
The STUSB is plugged in, but has not
(yet) accomplished synchronization
over the ADSL line.
The STUSB is connected, and
synchronized.
The STUSB driver software features a Diagnostics application. This
application allows you to overview some detailed parameters and
settings of your STUSB and the current connection.
a shortcut to the application can be found in the 'Application' folder on
your system startup disk.
Refer to the STUSB Diagnostics Guide for more information. The latest
version of the Diagnostics Guide can always be downloaded from the
Alcatel Support web pages.
36 / 48
3EC 36714 AAAA TCZZA Ed. 02
Page 37

3 Speed Touch USB for MAC OS
How to make a
connection
Proceed as follows:
1. In the control strip, click the Remote Access icon and select
'Open Remote Access':
2. As a result the 'Remote Access' window appears:
3EC 36714 AAAA TCZZA Ed. 02
3. Enter user name and password for your user account at the Service
Provider.
Note: Tick 'Save password' () in case you want the application to
remember your user name, and password.
4. In case of PPPoA connectivity you must enter a digit, e.g. 0, into the
'Number' field. In case of PPPoE connectivity you may need to enter
a Service Name, which is provided by your Service Provider.
5. Click
6. As soon the connection is made you can open your web browser
and surf the Internet.
.
37 / 48
Page 38

3 Speed Touch USB for MAC OS
Note
How to release a
connection
In case you ticked the 'Save password' box (), the next time, you can
open a connection by simply clicking the Remote Access icon in the
control strip, and selecting 'Connect':
To release a remote access connection, click the Remote Access icon in
the control strip, and select 'Disconnect':
As a result the connection is released. No Internet connectivity exists
anymore.
38 / 48
3EC 36714 AAAA TCZZA Ed. 02
Page 39

3 Speed Touch USB for MAC OS
3.2.2 Using the STUSB in Mac OS X (Mac OS10.x)
STUSB status icon
STUSB status icon
colors
As soon your STUSB is installed, an STUSB status icon is shown in the
Dock:
The STUSB status icon varies depending the state of the STUSB device:
STUSB status icon color Description
The STUSB is not plugged into the
computer's USB port. An ADSL
connection can not be established.
The STUSB is plugged in, but has not
(yet) accomplished synchronization
over the ADSL line.
The STUSB is connected, and
synchronized.
STUSB Diagnostics
The STUSB driver software features a Diagnostics application. This
application allows you to overview some detailed parameters and
settings of your STUSB and the current connection.
You can open the Diagnostics by clicking the STUSB status icon and
selecting 'Alcatel Speed Touch USB'. Alternatively, a shortcut to the
application can be found in the 'Application' folder on your system
startup disk.
Refer to the STUSB Diagnostics Guide for more information. The latest
version of the Diagnostics Guide can always be downloaded from the
Alcatel Support web pages.
3EC 36714 AAAA TCZZA Ed. 02
39 / 48
Page 40

3 Speed Touch USB for MAC OS
How to make a
connection
Proceed as follows:
1. Open the 'Applications' folder on your Mac OS10.x system startup
disk:
Doubleclick to open the Internet connect application.
2. The following screen appears:
40 / 48
If needed select the STUSB from the list of available network
devices in the 'Configuration' field:
3. Click .
4. As soon the connection is made you can open your web browser
and surf the Internet.
3EC 36714 AAAA TCZZA Ed. 02
Page 41

3 Speed Touch USB for MAC OS
How to release a
connection
Proceed as follows:
1. Doubleclick the Internet connect icon from the Dock:
2. The following screen appears:
If needed select the STUSB from the list of available network
devices in the 'Configuration' field:
3. Click .
As a result the connection is released. No Internet connectivity exists
anymore.
3EC 36714 AAAA TCZZA Ed. 02
41 / 48
Page 42

3 Speed Touch USB for MAC OS
42 / 48
3EC 36714 AAAA TCZZA Ed. 02
Page 43

AppendixA Troubleshooting
AppendixA Troubleshooting
Solving problems
STUSB LEDs
Startup phases
This appendix provides information on how to identify and correct some
common problems you may encounter when using the STUSB.
In most cases the described solutions will solve the problem.
However, if the problem keeps persistent, reinstallation of your STUSB
might solve the problem.
If reinstallation has not resolved the problem, contact the company from
which you purchased the STUSB for assistance.
Your STUSB is equipped with two Bicolored LEDs . These indicators
indicate the status of the STUSB. Checking the STUSB status may be
a first step in isolating the problem.
At startup, the STUSB passes three phases:
Phase
Attaching and
Configuring
USB LED ADSL LED
Color Timing Color Timing
Red
Flashing,
very short
time
Off
-
Description
The STUSB is
attached.
Failed POST
Green
Downloading Green
Green
Connecting to
ADSL
Green
Green
Solid,
2seconds
Flashing, 1
to 10
seconds
Solid
Solid
Solid
Green
Off
Amber
Green
Green
Solid,
2seconds
-
Solid
Flashing
Solid
Ready to
continue.
Downloading
driver software
from computer.
Download
successful.
Pending ADSL
line
synchronization
Ready for
connectivity
When a Power on Self Test (POST) failed, both LEDs are solid amber.
3EC 36714 AAAA TCZZA Ed. 02
43 / 48
Page 44

AppendixA Troubleshooting
Normal operation
during a session
USB bus congestion
Solution table
In this state the USB LED is assigned to the downstream (RX) data
channel (towards the USB connection).
The ADSL LED is assigned to the upstream (T
) data channel (towards
X
the ADSL channel).
Both LEDs stay green. When an ATM cell is processed in a channel, the
associated LED will go off for a short time.
The USB LED flashes red during a session in case of USB bus
congestion.
Indication & Problem Solution
Speed TouchUSB
does not work:
No LEDs light up.
There is no power
supplying connection.
Verify the STUSB connections.
Check if the STUSB's cord is damaged in any
way.
When using a portable computer in battery mode,
it is possible that its USB port is not powered.
Refer to the portable's User's Guide for more
information.
Speed TouchUSB
installation failed.
USB LED flashes red,
or stays solid red.
Both USB LED and
ADSL LED are solid
amber.
Check if the STUSB is not connected to a
lowpowered USB hub port. Refer to the USB
hub's User' Guide for more information.
Verify your computer is running one of the
supported OSs and that it meets the according
minimum requirements.
Check whether the STUSB is not connected to a
lowpowered USB hub port. Refer to the USB hub
User's Guide for more information.
Your USB port congests, meaning that too much
traffic is passing through the port. Avoid using
multiple high speed USB devices, e.g. scanners,
speaker, etc. during heavy duty, e.g. a data
download.
Power On Self Test (POST) failed. Check whether
the connections are correctly made.
44 / 48
3EC 36714 AAAA TCZZA Ed. 02
Page 45

x
AppendixB Safety and Agency Regulatory Notices
AppendixB Safety and Agency Regulatory Notices
Aim of this appendi
Reading all
instructions
Directive
This appendix provides basic Safety Information on your Speed Touch
product.
Prior to using the Speed Touch, read this appendix carefully.
Follow all warnings and instructions marked on the product.
Unless expressly and unambiguously approved by Alcatel, you may not:
disassemble, decompile, reverse engineer, trace or otherwise
analyse the equipment, its content, operation, or functionality, or
otherwise attempt to derive source code (or the underlying ideas,
algorithms, structure or organization) from the equipment or from
any other information provided by Alcatel, except to the extent that
this restriction is expressly prohibited by local law;
copy, rent, loan, resell, sublicense, or otherwise transfer or
distribute the equipment to others;
modify, adapt or create a derivative work of the equipment;
remove from any copies of the equipment any product
identification, copyright or other notices;
disseminate performance information or analysis (including, without
limitation, benchmarks) from any source relating to the equipment.
Such acts not expressly approved by Alcatel will result in the loss of
product warranty and will invalidate the user's authority to operate this
equipment.
3EC 36714 AAAA TCZZA Ed. 02
STORE THESE INSTRUCTIONS CAREFULLY
45 / 48
Page 46

AppendixB Safety and Agency Regulatory Notices
B.1 Safety Instructions
Climatic conditions
Cleaning
Water and moisture
Power sources
The Speed Touch equipment is intended for:
Inhouse stationary desktop use; the maximum ambient
temperature may not exceed 40ºC (104ºF).
It must not be mounted in a location exposed to direct or excessive
solar and/or heat radiation.
It must not be exposed to heat trap conditions and must not be
subjected to water or condensation.
It must be installed in a Pollution Degree 2 environment.
Unplug this product from the wall socket and PC before cleaning.
Do not use liquid cleaners or aerosol cleaners. Use a damp cloth for
cleaning.
Do not use this product near water, for example, near a bathtub, wash
bowl, kitchen sink, laundry tub, in a wet basement or near a swimming
pool.
The Speed Touch is powered via the USB connector on your
computer, or an USB hub port.
The powering of this product must adhere to the power specifications
indicated on the marking labels.
Do not allow anything to rest on the USB cord. Do not locate this
product where the cord will be subject to persons walking on it.
Pay particular attention to the cord's plug, receptacle and cabletobody
entry point; do not use the product when these points of the cord are
damaged.
46 / 48
Overloading
Servicing
Do not overload wall (mains) outlets and extension cords as this
increases the risk of fire or electric shock.
To reduce the risk of electric shock, do not disassemble this product.
None of its internal parts are userreplaceable; therefore, there is no
reason to access the interior. Opening or removing covers may expose
you to dangerous voltages. Incorrect reassembly could cause electric
shock if the appliance is subsequently used.
If service or repair work is required, take it to a qualified service dealer.
3EC 36714 AAAA TCZZA Ed. 02
Page 47

y
AppendixB Safety and Agency Regulatory Notices
Damage requiring
service
Modem/Telephone use
Unplug this product from the wall outlet and refer servicing to qualified
service personnel under the following conditions:
When the power supply cord or plug is damaged or frayed.
If liquid has been spilled into the product.
If the product has been exposed to rain or water.
If the product does not operate normally.
If the product has been dropped or damaged in any way.
If the product exhibits a distinct change in performance.
Avoid using a modem/telephone (other than a cordless type) during an
electric storm. There is a slight risk of electric shock caused by lightning.
Do not use the telephone to report a gas leak in the vicinity of the leak.
If telephone service is required on the same line, a central splitter or
distributed filter(s) must be installed for optimal ADSL performance.
Depending on your ADSL configuration and type of splitter/filters,
installation must be carried out by qualified service personnel.
Consult your telephone service company or ADSL service provider for
instructions.
Modifications
EC Declaration of
Conformit
Changes or modifications not expressly approved by Alcatel could
invalidate the users authority to operate this equipment.
Products with the marking comply with both EMC and Low Voltage
Directives issued by the Commission of the European Community.
Hereby, Alcatel, declares that this Alcatel Speed Touch product is in
compliance with the essential requirements and other relevant provisions
of Directive 1999/5/EC.
3EC 36714 AAAA TCZZA Ed. 02
47 / 48
Page 48

y
AppendixB Safety and Agency Regulatory Notices
B.2 Safety and Compliancy Statements
Radio Frequenc
Interference Statement
This device has been tested and found to comply with the limits for a Class B digital device,
pursuant to Part 15 of the FCC Rules. These limits are designed to provide reasonable protection
against such interference in a residential installation. This equipment generates, uses and can
radiate radio frequency energy. If not installed and used in accordance with the instructions, it may
cause harmful interference to radio communications. However, there is no guarantee that
interference will not occur in a particular installation. If this equipment does cause harmful
interference to radio or television reception, which can be determined by turning the equipment ON
and OFF, the user is encouraged to try correct the interference by one or more of the following
measures:
Reorient or relocate the receiving antenna
Increase the separation between the equipment and receiver
Connect the equipment into an outlet on a circuit different from that to which the receiver is
connected
Consult the dealer or an experienced radio/television technician for help.
This equipment complies with Part 68 of the FCC Rules. On the back of this equipment is a label
that contains, among other information, the FCC certification number (FCC ID) and Ringer
Equivalence number (REN) for this equipment. If requested, this information must be provided to the
telephone company.
An FCC compliant telephone cord and modular plug is provided with this equipment. This
equipment is designed to be connected to the telephone network or premises wiring using a
compatible modular jack that is Part 68 compliant.
The Ringer Equivalence Number (REN) is used to determine the quantity of devices that may be
connected to the telephone line. Excessive RENs on the telephone line may result in the devices not
ringing in response to an incoming call. Typically, the sum of RENs should not exceed five (5.0). To
be certain of the number of devices that may be connected to a line (as determined by the total
RENs) contact the local telephone company.
If this equipment causes harm to the telephone network, the telephone company will notify you in
advance that temporary discontinuance of service may be required. But if advance notice is not
practical, the telephone company will notify the customer as soon as possible. Also you will be
advised of your right to file a compliant with the FCC if you believe it is necessary.
The telephone company may make changes to its facilities, equipment, operations or procedures
that could affect the operation of the equipment. If this happens the telephone company will provide
advance notice so you can make the necessary modifications to maintain uninterrupted service.
If the equipment is causing harm to the telephone network, the telephone company may request
that you disconnect the equipment until the problem is resolved. Connection to party lines is subject
to state tariffs (contact the state public utility commission, public service commission or corporation
commission for information).
No repairs can be performed by the customer, if you experience trouble with this
equipment for repair or warranty information, please contact: (919) 850-1231 for
locations in North America.
48 / 48
Notification of
Canadian RF
Interference
Statements
This digital apparatus does not exceed the Class B limits for radio noise emissions from digital
apparatus as set out in the radio interference regulations of the Canadian Department of
Communication.
Le présent appareil numérique n'émet pas de bruits radioélectriques dépassant les limites
applicable aux appareils numérique de classe B prescrites dans le règlement sur le brouillage
radioélectrique édicté par le Ministère des Communications du Canada.
3EC 36714 AAAA TCZZA Ed. 02
 Loading...