

Page 1

ADSL-DMT Router
Quick Start Guide
P/N 3EC 16964 AAAA-AAZZA
Page 2

First Edition (October 1999)
COPYRIGHT
Alcatel provides this publication “as is” without warranty of any kind,
either express or implied, including, but not limited to, the implied warranties of merchantability or fitness for a particular purpose.
All rights reserved . No part of th is book may be r epro du ced in an y for m or
by any means without written permission from Alcatel.
Changes are periodically made to the information in this book. They will
be incorporated in su bsequent editions. Alcatel may mak e improvements
and/or changes in the product described in this publication at any time.
Requests for further information should be addressed to Alcatel.
© Copyright 1999 Alcatel
TRADEMARKS
Speed Touch is a trademark of Alcatel.
Windows, Windows NT, Windows 95, Windows 98, and Windows for
Workgroups are trademarks of Micro soft.
Macintosh is a trad emark of Apple.
All other trademarks and registered trademarks mentioned in this guide are
the sole property of their respective companies and should be noted as
such.
Page 3

CONTENTS
Introduction..................................................................................................3
Getting Started.............................................................................................5
STEP 1. Inspect Box Contents...................................... .... ..................... .... ..5
STEP 2. Connect the Router........................................................................7
STEP 3. Check TCP/IP...................................... .... ... ...................... .... .........9
STEP 4. Open Browser to Run Easy.........................................................12
STEP 5. Verify Network Service Provider Connection.............................21
1
Page 4

Other Useful Information
Router FAQs ........................................ ... .... ........................................... ....22
Glossary.....................................................................................................25
IP Address Reference Map ........................................................................35
Command Line Interface Overview ..........................................................36
Speed Touch Office Software Specifications.............................................39
Speed Touch Office Hardware Specifica tions ...........................................42
2
Page 5

INTRODUCTION
!!!!
What is Easy Setup?
Easy Setup is a web browser-based software program that allows you to
configure your router quic kl y and easily, even if you have never in st all ed a
router before.
If a qualified technician from your Network Service Provider (NSP) has
already installed your router, you don’t need to run the Easy Setup program. However, you may want t o read throug h this guide to gain a better
understanding of how your router works.
If you’re an advanced user and want to cu stomize yo ur router, a command
line interface (CLI) reference manual is available on the Installation CD.
If you do run Easy Setup, it will prompt you to select protocols and enter
all the IP addresses provided by your NSP.
Confused by all the different IP addresses? A diagram on page 35 shows
how your router ’s 2 IP addresses are rel ated to l ocal area (L AN) and wi de
area (WAN) network addresses.
Overwhelmed by networking ac rony ms an d jargon? A glossa ry at the back
of this guide explains most of the technical terms that you’re likely to
encounter. Understanding the basics, such as DHCP, NAT, DNS , and firewalls will allow you to take advantage of your router’s advanced features
to optimize your LAN while keepin g int r ud e rs out.
3
Page 6
The Easy Setup program permanentl y resides inside your router, allowing
you to configure it through a web browser on any p latform – Windows,
Macintosh, or Unix.
If you are configuring your router in Windows, you have the option of
installing the Speed Touch™ Office Manager Tools from the Installation
CD. These tools include a popular WAN Port Monitor application, a Configuration Man ager for add ing or chan ging feat ures, and Boo tP and TFTP
utilities.
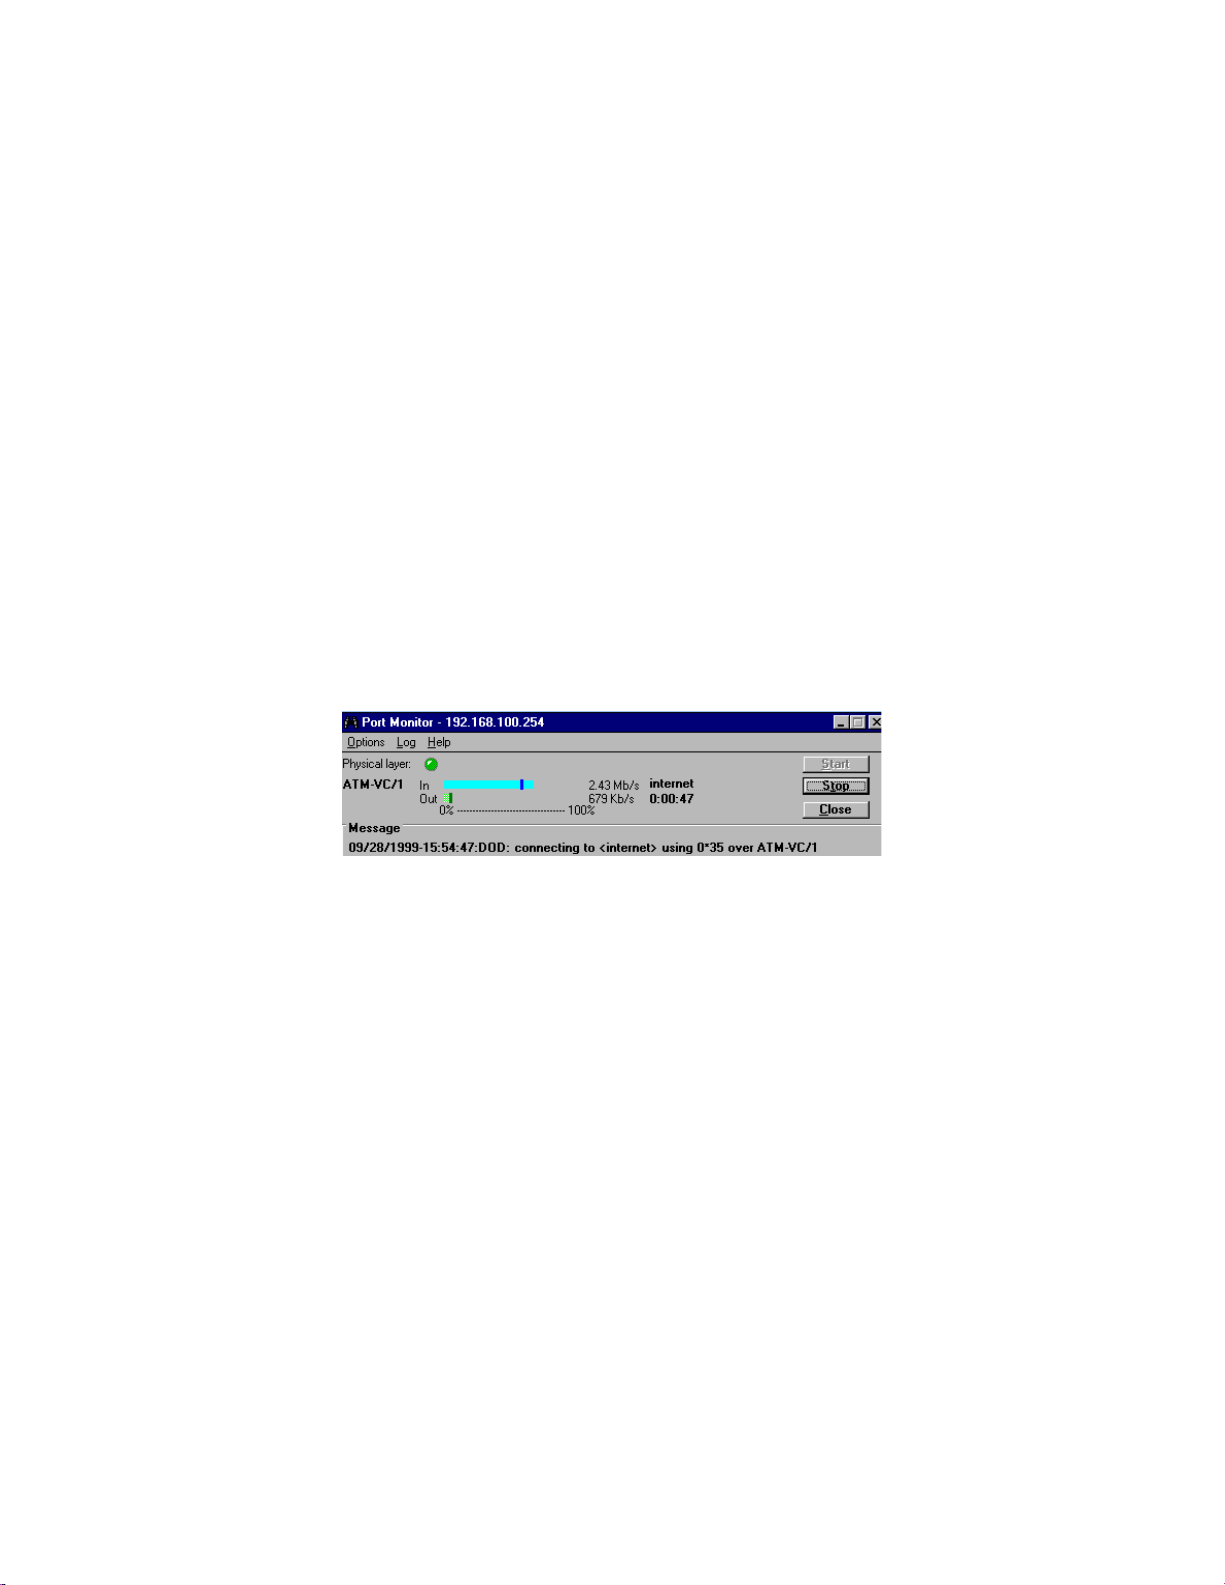
Port Monitor Utility for Windows platform
You can set up advanced features l ike Firewall by using CLI comm ands
during a Telnet session. All commands are documented in the CLI reference manual that is located on th e Insta llatio n CD. The CLI window can be
accessed via the console po rt or via a Telnet session to 192.16 8.254.254,
the default router a ddress.
4
Page 7

Getting Started
Establishing a high-speed ADSL connection with your Speed Touch Office
router should on ly take a few minutes if you follow the 5 easy steps below.
While you have m any installation options, the items that you don’t want to
overlook have been highlighted for your convenience.
STEP 1. Inspect Box Contents
Before you attempt to install your router, you should verify that the following items and information are available:
1 Speed Touch Office Router
•
Installation CD Package
•
1 Ethernet 10BaseT cable, RJ-45, red label (straight-through or
•
console)
1 Ethernet 10BaseT cable, RJ-45, yellow l ab el (crossover)
•
1 RJ-45 to DB-9 serial port adapter (console)
•
1 DSL data cable, RJ -14, purple label (straight-through)
•
1 power cord
•
Customer Release Notes with late-breaking information
•
5
Page 8

You should also have a list from your NSP with the following information:
Protocol to use:
PPP (Point-to-Po int Protoc ol, r equ ires a U ser Na me an d Pass word ) or
RFC 1483 (SNAP Encapsulation) or
RFC 1483MER (MAC Encapsulated Routing, requires a WAN
Gateway address)
Network opti on to use
Bridging and/or
IP Routing (requires a WAN IP address and Subnet Mask)
VPI/VCI
DNS address
Domain Name (optional)
1 or more LAN IP addresses and a subnet mask
Contact your NSP if any of the above items are missing.
(PVC) numbers
You will also need a workstation that has:
CD-ROM drive
Ethernet network interface card (10 Mbps NIC)
TCP/IP network driver installed
Web browser
6
Page 9

STEP 2. Connect the Router
To e xtend the lifetime of your router, place it in a location where it will be
well ventilated. Never stack it with other devices on carpet.
A diagram of the router ’s rear panel, showing a power switch and cables
ports, appears on the next page. After ensuring that the router ’s power
switch is off,
cable.
Next, you will connect the router to yo ur LAN. You can do this by
connecting your PC to any of the router’s 4 Ethernet ports usi ng a
straight-through cable (red label).
LAN devices to the router’s built-in Ethernet hub.
connect the router to the AC power outlet using the power
directly
Later you may connect 1-3 additional
7
Page 10

Alternatively, you may connect a P C via a hub t o the router us ing a cro ssover cable (yellow label). If the hub port being connected to the router happens to be a crossover or uplink port (labeled X), you will need to use the
straight-through cable (red label).
Connect the router to the ADSL jack using the RJ-14 cable.
Switch the router Power Switch on.
8
Page 11

STEP 3. Check TCP/IP
If you have connect ed your rou ter to a Windows plat form, you can verify
that TCP/IP is running by clicking the
Panel
, and finally the
The Network window now appe ars. In the
ble-click TCP/IP
Network
.
Start
icon in the Control Panel Window.
button, then
Configuration
Settings, Control
tab page,
dou-
9
Page 12
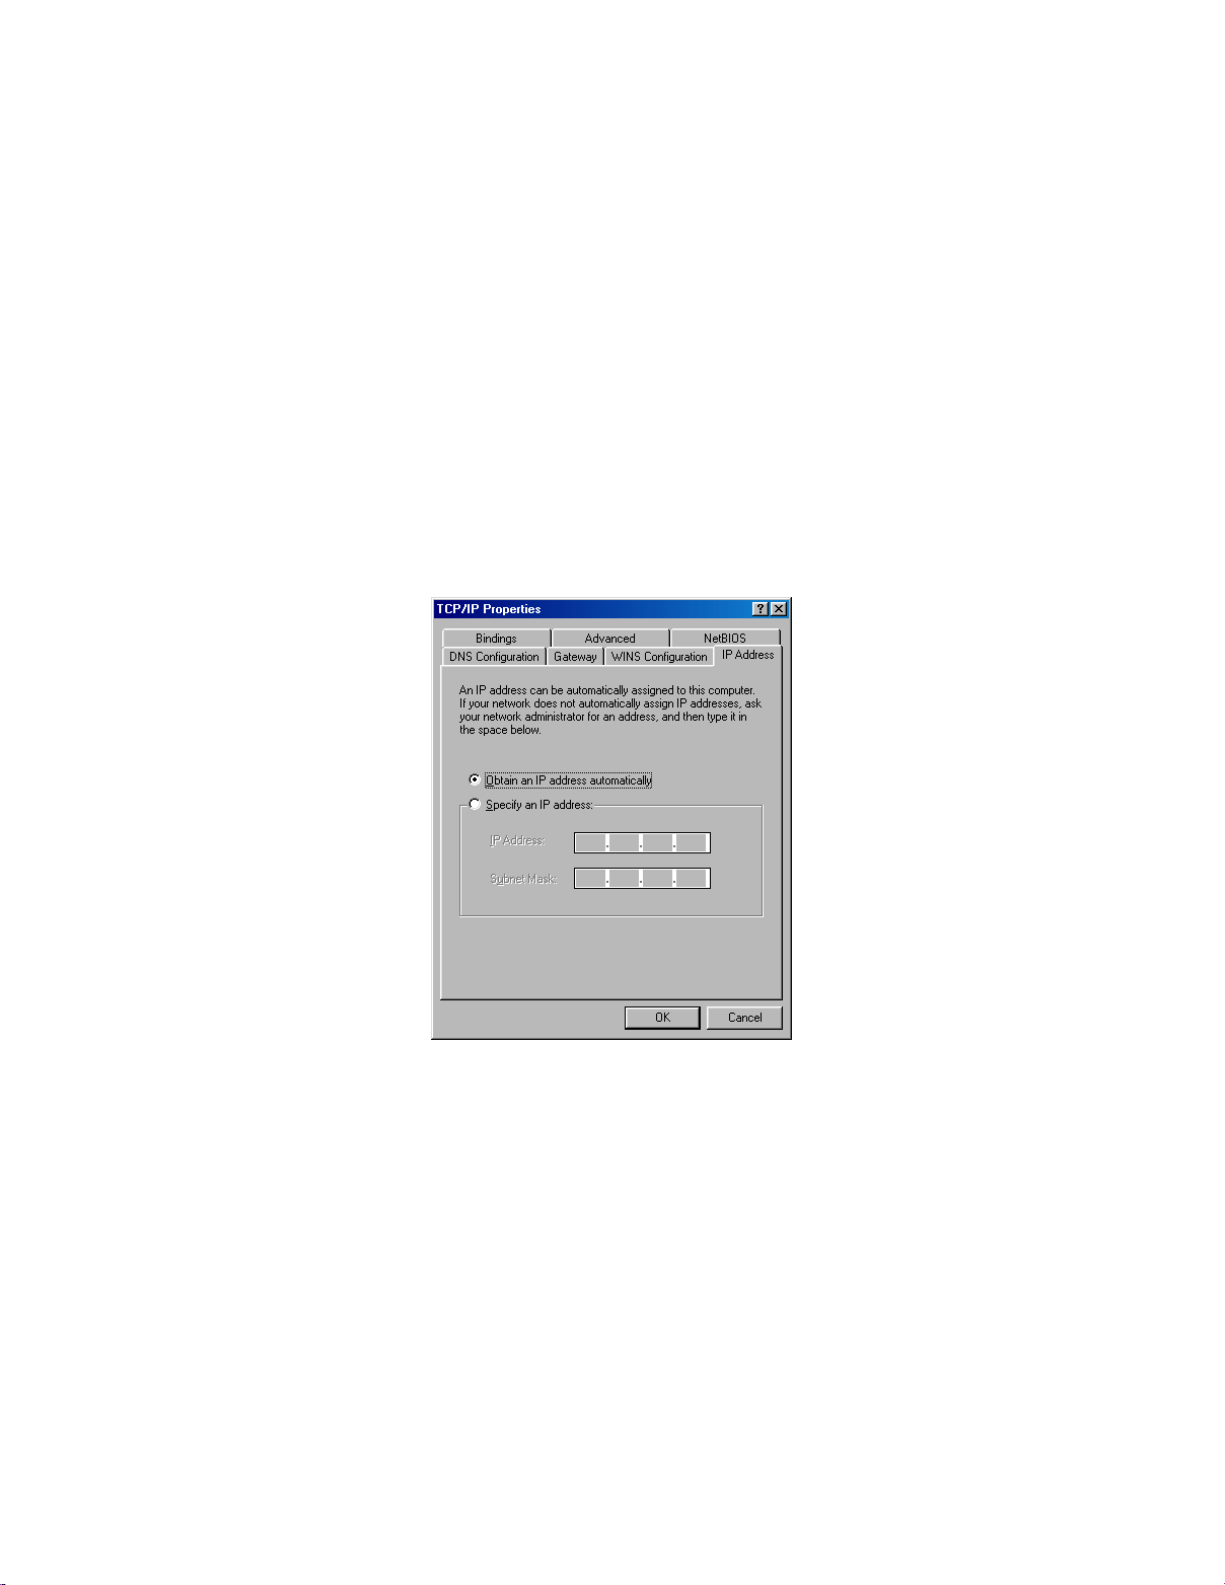
In the TCP/IP Properties window, set your PC to
automatically
to install this driver.
. If TCP/IP is missi ng, consult your wi ndows documentation
10
obtain an IP address
Page 13
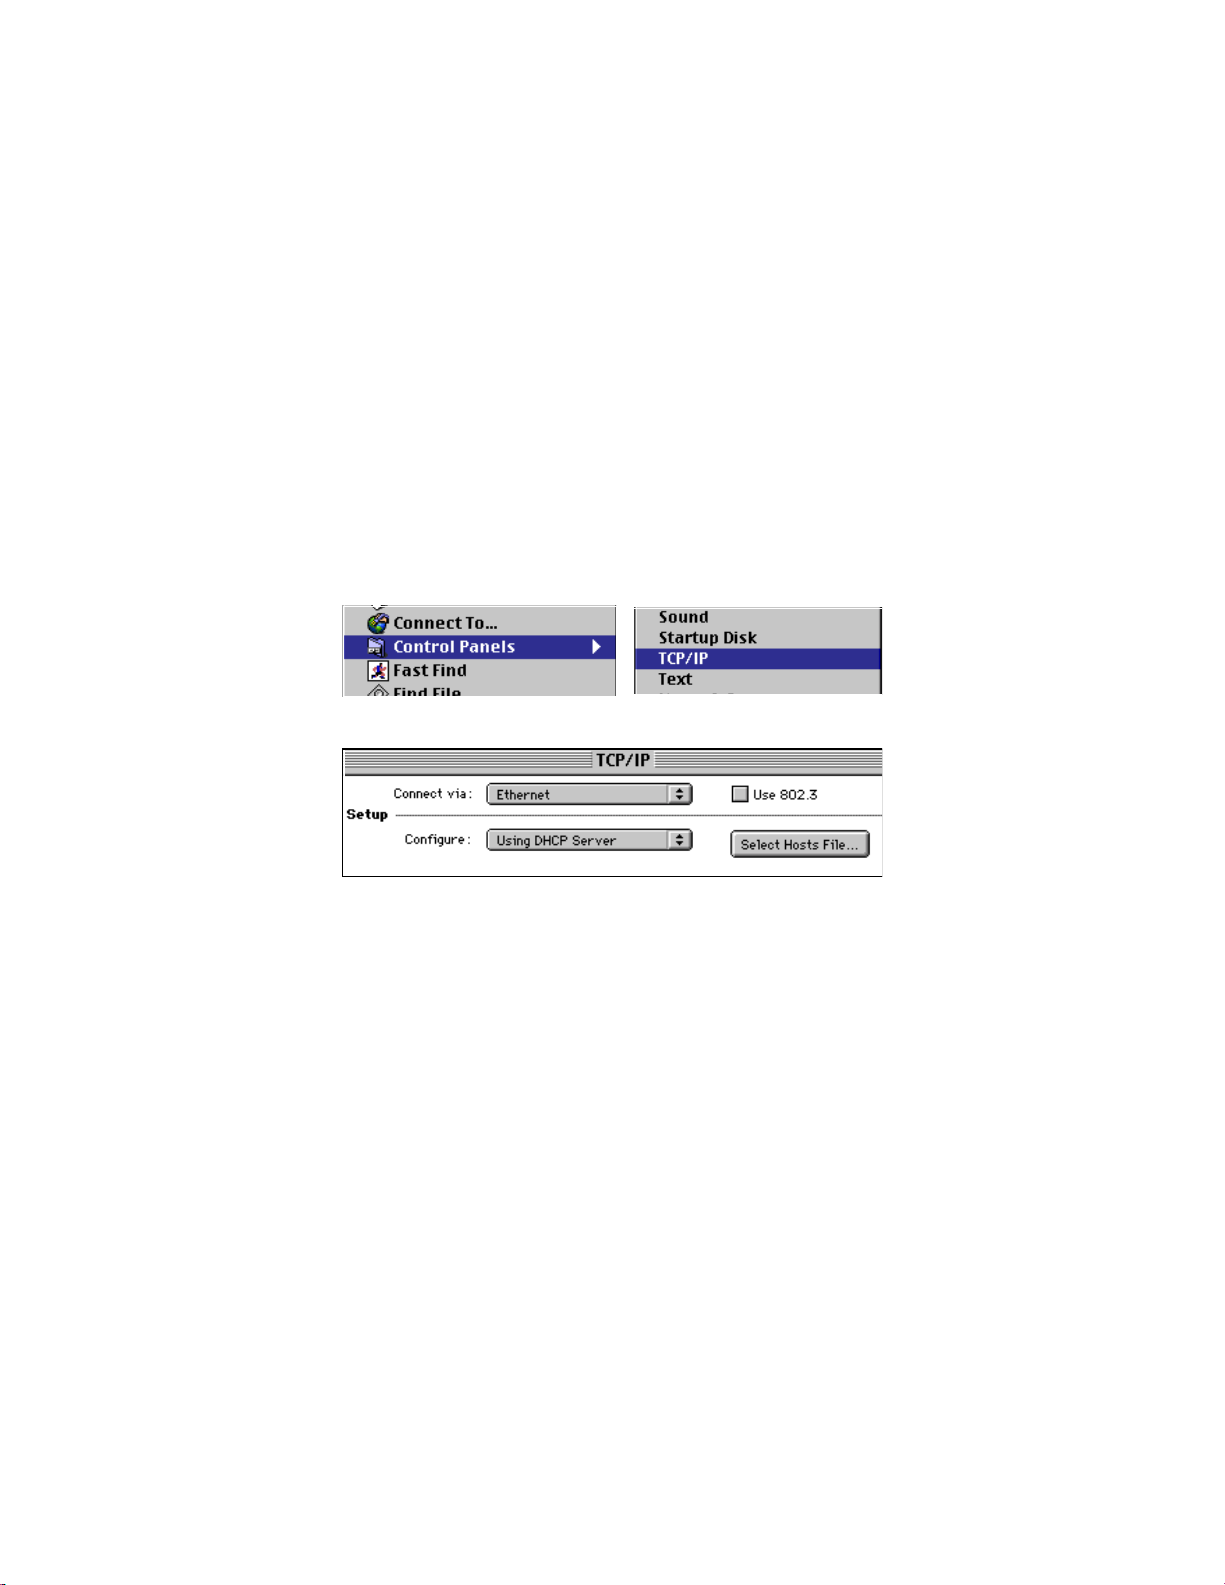
If you have connected your router to a Macintosh platform, you can verify
that TCP/IP is running by clicking the
TCP/IP.
and
Apple icon
Control Panels
, then
,
In the TCP/IP window, set your PC to
Configure Using DHCP Server
.
11
Page 14
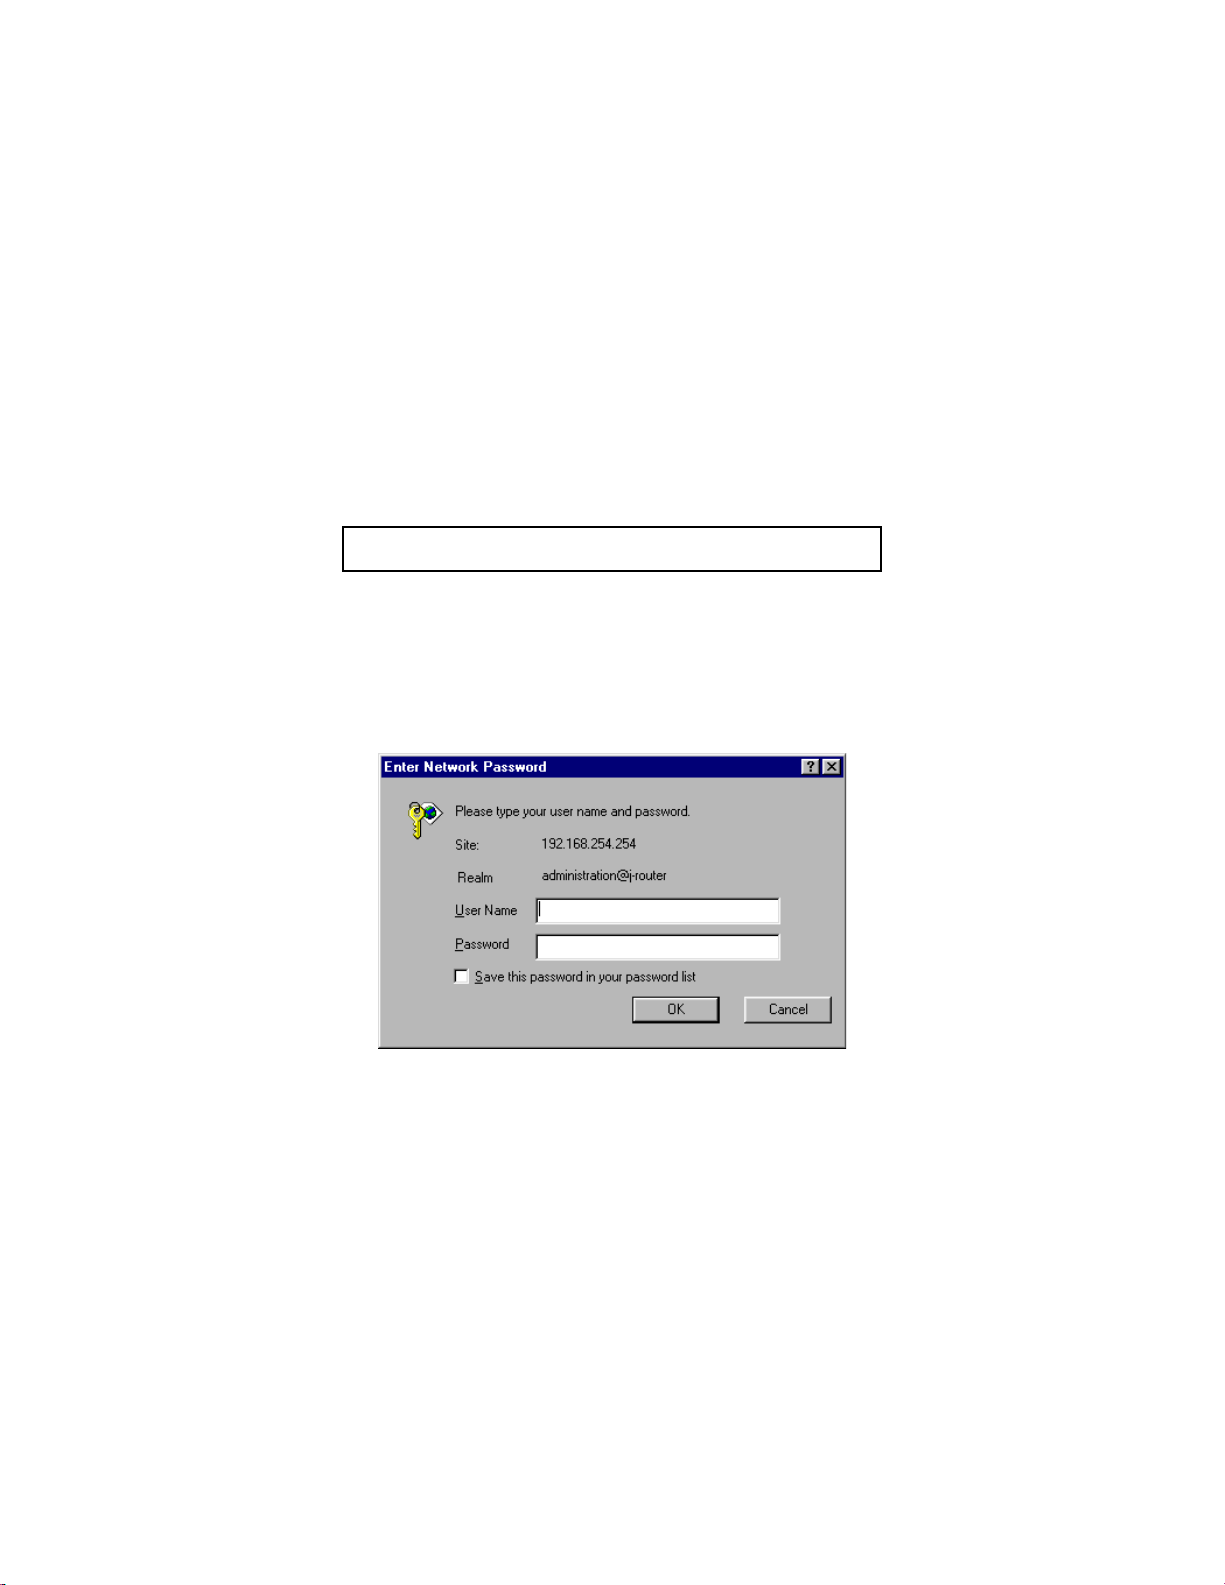
STEP 4. Open Browser to Run Easy Setup
Open your browser and en ter your router’s default Ethernet address
192.168.254.25 4 in the URL
on your keyboar d .
After a connection is mad e wit h t he rou ter, a screen wi ll app ear request ing
a User Name and Password. Enter “
as the Password. Click OK.
(“Location” or “Address” bar). Press
login
” as the User Name and “
12
Enter
admin
”
Page 15
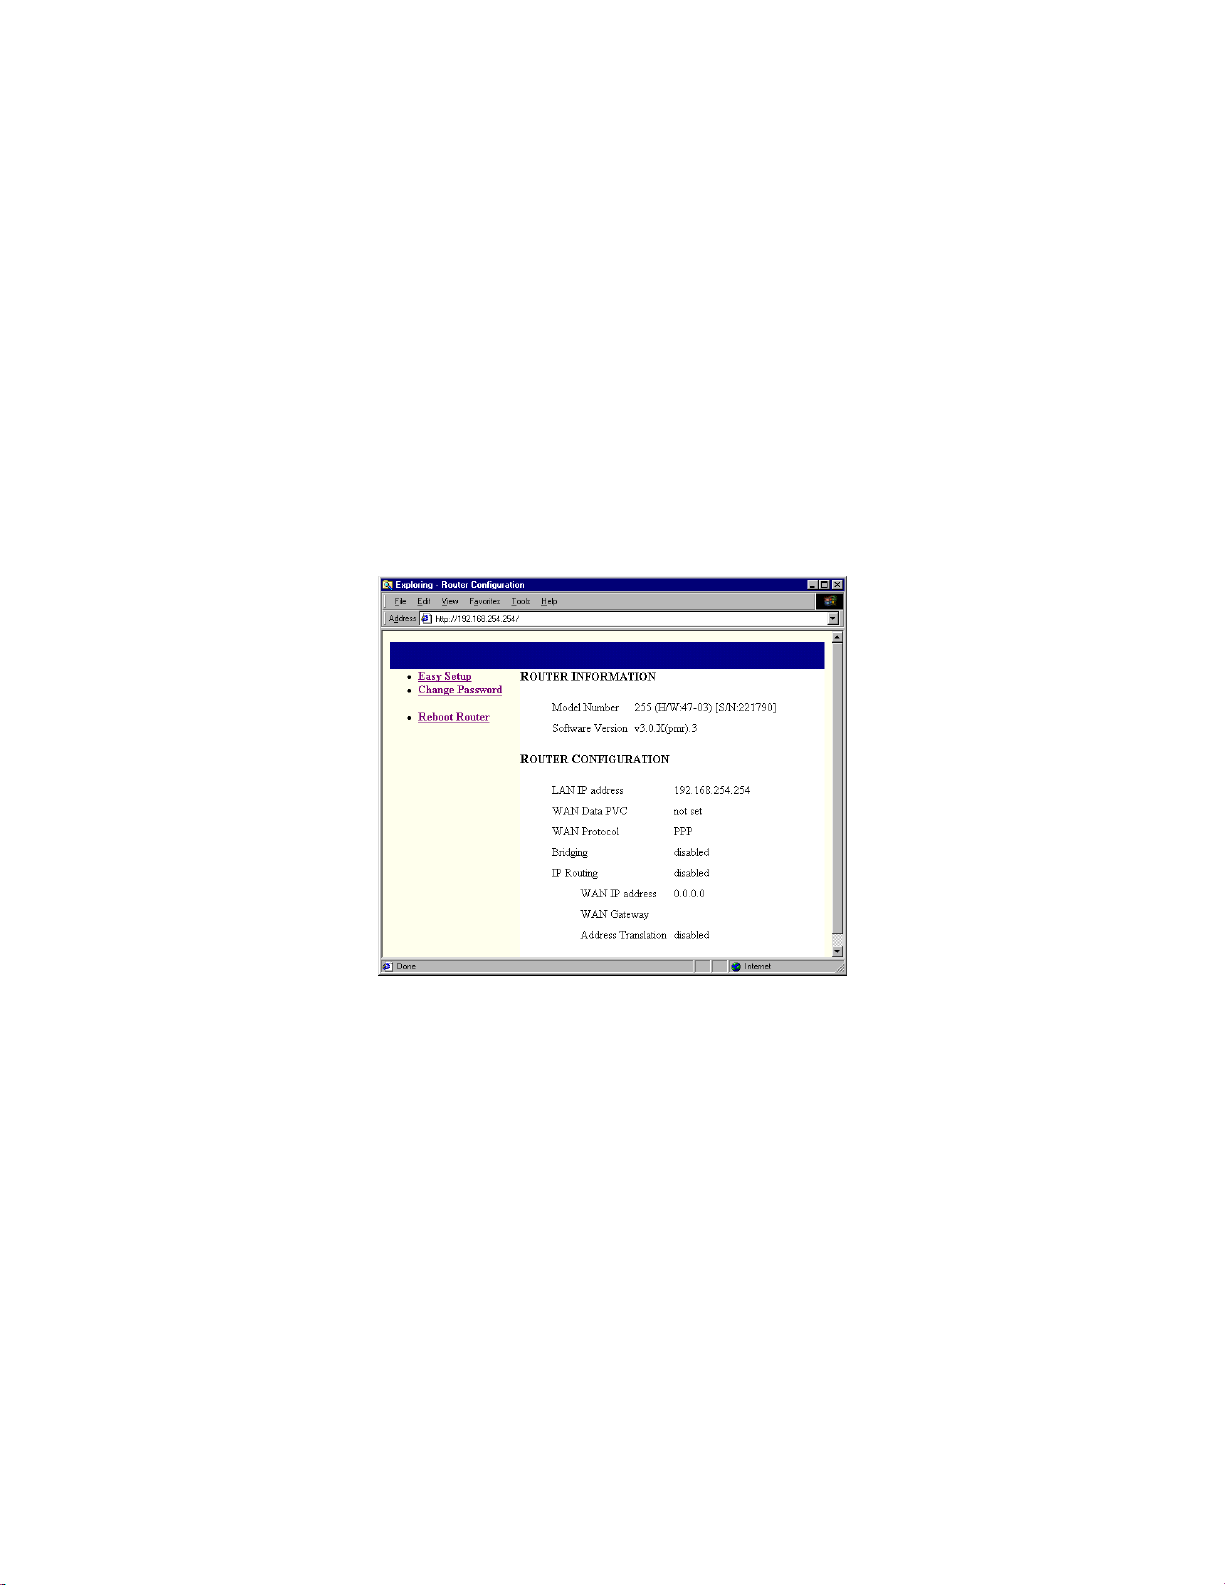
Now you will see a screen describing some of your router’s features and
settings. Click on
You will see that some basic functions and benefits are described in the left
margin of each Easy Setup window. These are provided for users who are
just getting acquainted with networking acronyms.
Easy Setup
, which will take you to the next pag e .
13
Page 16
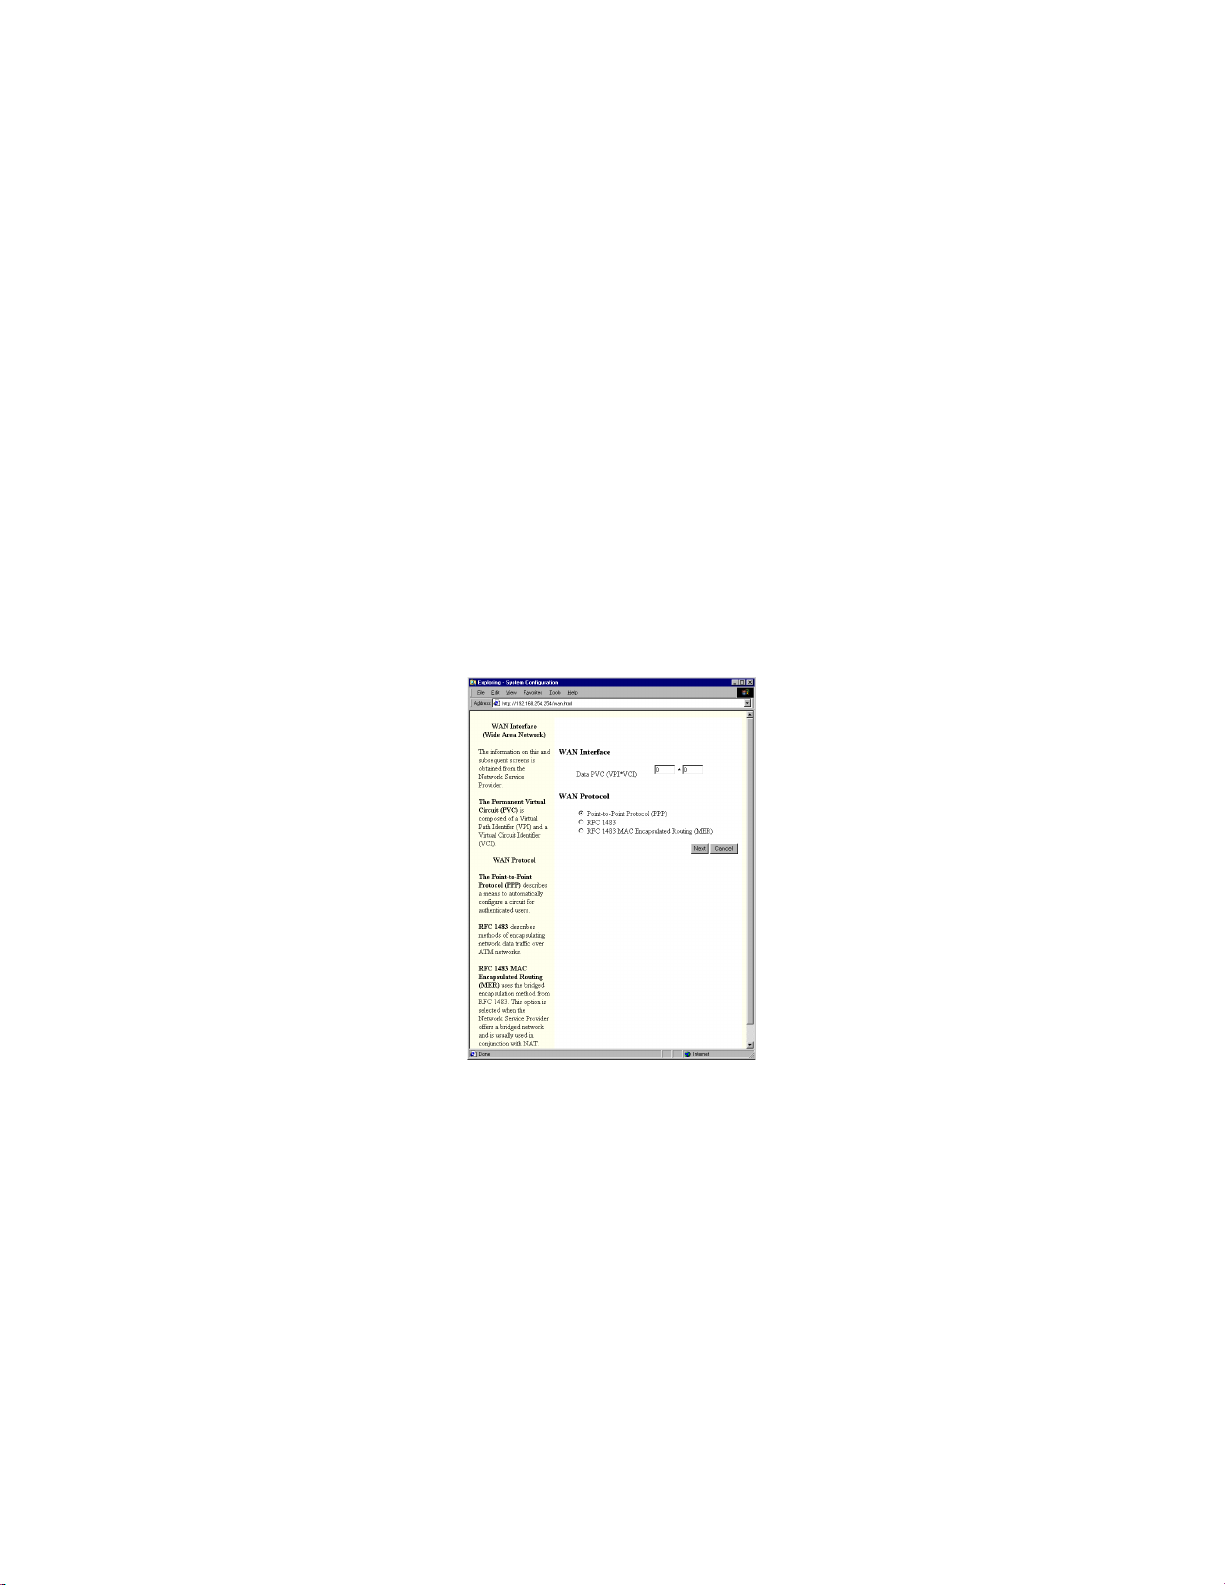
Please note that resi zing your browser window either vertically or horizontally will change the appearance of Easy Setup pages, hence it’s possible
that the Easy Setup pag es on your PC screen wil l appear to be slig htly di fferent from those in this guide.
The first Easy Setup page requests
numbers and select the protocol
continue.
WAN
information.
assigned by your NSP. Click on
Enter the VPI/VCI
Next
14
to
Page 17

and
PPP
Password
as your WAN protocol, a page requesting a
will appear. You also need to select networking
IP routing
NAT enabled
with
If you selected
Name
options. If you r NSP ha s not suggest ed spe cific para meters and you ’re n ot
sure what’s appropriate, choose
Next
to continue.
User
. Click on
15
Page 18

If you selected
working options
you’re not sure wha t ’s appropriate, choo se
tion automatically from WAN, and NAT en abled .
tinue.
RFC 1483
. If your NSP has not sugges ted specific param eters and
as your WAN protocol, you need to
IP routing, Obtain configura-
16
Click on
select net-
Next
to con-
Page 19

If you selected
networking options.
and you’re not sure what’s appropriate, choose
uration automat ically from WAN, and NAT en abled.
continue.
RFC 1483 MER
If your NSP has not suggested specific parameters
as your WAN pro tocol, you need to
IP routing, Obtain config-
Click on
select
Next
to
17
Page 20

You may enable DHCP
DNS information
ify if
manually.
address
If manually conf iguring, yo u need to
Next
. Click
to continue.
18
on the next page that appears. You must also spec should be obtai ned
automatically or configu red
enter at least 1 DNS IP
Page 21

LAN
On the
IPX configuration is another option. Click Save to return to the main Easy
Setup window.
page you must enter the
LAN IP address and subnet mask.
19
Page 22

It is strongly recommended that you
exiting this program. You must enter it twice. If you incorrectly ente r one
word, a message will appear requesting that you reenter the password.
Yo u m u s t
changes to take effect. A status wind o w will ap pea r while th e connec tio n is
being made.
click Reboot Router
change the default Password
on the Router Information page for the
before
20
Page 23

STEP 5. Verify NSP Connection
If you have connec ted all the cables properly and entered appropriate values in Easy Setup, the router’s Link LED should appear solid green now.
To verify that your DSL connection has been established, enter a web site
address in the URL bar and press Enter. Your selected web site should
appear on your screen.
Other Useful Information
Now that you have succeede d in conf igu rin g your rou ter f or a basic ADSL
connection, you may want to consider customizing its functions. When you
start to customize your router, you will probably have a lot of questions
about how to program certain changes or how to troubleshoot any less than
optimal operation on your LAN. The information that is provided in subsequent sections of this guide will hopefully expedite any customization or
troubleshooting that you attempt now or in the future.
21
Page 24

Router FAQs
Which cable do I use to connect a new LAN device to the router?
If you are directly connecting your PC to the router’s built-in Ethernet hub,
then use the straight-through (red label) cable. If you are connecting your
router to another hub, then use the crossover (yellow label) cable, unless
the LAN hub has a built-in cross ove r or up link port, in which case you
should use the straight-through (red label) cable.
What is the router password?
Your ro uter comes wit h the default pa ssword
you change the default password to your own password. If your NSP
changed the passwor d during installation, you will need to call them fo r
assistance.
Why can’t I get a connection on my PC to run the software?
Check your cables. Make sure that your Ethernet adapter has a green light.
If not, switch fr om a straight-through to a crossover cable or vice v ersa.
The router has a default Ethernet IP address of 192.168.254.254/
255.255.255.0. Your PC or Mac’s Ethernet IP address must be on the same
subnet as the router’ s, e .g ., 192 .1 68.2 54 .x . Try setting your PC’s IP addr ess
to 192.168.254.253. In Windows, you can do this by clicking on Start, Run,
entering “winipcfg”, and then clicking OK. The IP Configurat ion window
will appear on your screen and you can enter a new IP address.
22
admin.
We recommend that
Page 25

What kind of security options do I have?
NAT (Network Address Translation) with “IP masquerading” can provide a
level of “security by obscurity” that is accepta ble to many users. It can
block incoming connections to LAN workstations by hiding them be hind
the router’s single IP address. However, a determined hacker can probably
manage to gain access to your LAN services behind NAT.
To boost your LAN security, consider enabling your router’s built-in Firewall (IP Filtering) software. You must customize or use predefined scripts
for a "quick" firewall. However, Alcatel does not assume liability for any
security breaches due to a poorly configure d firewall, hence, your ro uter ’s
firewall should alway s be configured by a quali fied technical pers on.
For secure connections across the Internet, consider purchasing the VPN
(Virtu al Priv ate Net work ) soft ware o pt ion . Ad di tion a l in for matio n on NAT,
Firewall or Secure VPN functionality may be found in the CLI reference
manual.
Can I have a Web, Mail, or FTP server and use NAT?
All you have to do is access the CLI through a console port connection and
enter the system addS erver or remote addServer com mand to add a server
to your LAN that will be visible on the Internet. The system command
applies to all external traffic and the remote command applies to only one
remote route.
23
Page 26

What is MER?
MER (MAC Encapsulated Routing) allows your router to route on the
LAN side and bridge on the WAN sid e. MER is only needed when your
NSP doesn’t support routing. MER adds NAT functionality, providing
greater security and more IP addresses than your NSP provided for your
LAN workstations.
Can I connect the router to a 100Base-T hub?
Yes, if the hub has a 10/100 switch. You need to set the switch to 10 for
your router connection.
Nothing happens when I enter a web ad dress in my browser’s URL –
what’s wrong?
Try pinging the address. If you’re run ning Windows, go to the MS-DOS
prompt and type ping (web IP address) and press return. If you get a
response, then you r DNS is probably n ot working properly. Contact your
NSP for DNS assistance.
If you don’t get a response, veri fy that the r outer Link and Ethernet card
LEDs are green. Next check you r cable conn ections. If everything appe ars
correct, run winipcfg (or ipconfig if Windows NT) to make sure that the
Gateway and LAN IP addresses match. If not, obta in an IP address again
with winipcfg, then select Release All and Renew All. If you still can’t
connect with the web address, t ry pinging the WAN gateway address to
confirm that your route r is able to connect with the NSP.
24
Page 27

Glossary
This glossary covers some of th e networking te rms that you are li kely to encounte r
while learning about your high-speed ADSL connection. You may also want to
consult one of the commer cially availa ble telecom dictiona ries that provid e greater
information.
If you have technical support questions an d ca n’t find the answers in this glossary or
another section of the Quick Start Guide, please check the CLI reference manual. If
you don’t find the informat io n that you need in any of those documents, please
contact your Netw ork Service Provid er for assistance.
10Base-T -
cable connection using one unshielded twisted pair for transmitting data and the
other for receiving data.
ADSL -
Internet access over an ord inary telephone line. The fastest downstream rate is 8
Mbps, while the fastest upstream rate is 1 Mbps. ADSL connections work at
distances up to 5,488 m eters (18,000 fe et) from a CO o ver a single co pper twisted
pair in a telephone line; the ot her twisted pair can still be used for voic e servi ce .
ATM -
video, or traffic are sent across networ ks in fixed-length (53-byte) cells that can be
processed in hardware, reducin g transit d elays. ATM consolidation of traffic oc curs
in most high-speed backbones.
10 megabits per second Baseba nd Twisted pair refer s to an Ethernet
An Asymmetric Digital Subscriber Line allows you to get high-speed
Asynchronous Transfer Mode is an international stan dard in which voice,
25
Page 28

backbone -
networks are connect ed in order to minimize t raff ic bet w een them.
bandwidth -
-- the greater the bandwidth, the more information that can be sent in a given amount
of time.
bridge -
communications protocol. It forwards or keeps an incoming packet based on its
hardware (MAC) address. It does not offer the privacy of a router connection since it
allows each LAN to see all devic es on t he opposite side of the bridge.
BootP -
its Ethernet interface.
CLI -
by typing commands in a term inal emulator connec ted to the PC’s serial (console)
port. There are hundreds of commands ava ilable and they are det ailed in the CLI
reference manual.
CO -
given area connect and whe re circuit switching of subscribe r lines may occur on a
DSLAM. High-speed Internet access is usual ly only available to buildings w ithin 5
kilometers (3 miles) of a central office; the closer to the central office, the faster the
transmission options.
console -
via a serial port (RS232) connection. The Co nfiguration Manager and Com mand
Line Interface are bo th use d on the console.
A backbone describes a high bandwidth cable to which multiple
Bandwidth is the capacity to handle simultaneous data transmi s s ions
A bridge passes data packets between two or more LANs that use the same
Bootstrap Protocol is used by a network node to determine the IP address of
A Command Line Interface gi ves the user t he option of configuri ng a router
The Central Office of a local tele phone compa ny is where all l ocal loops in a
This refers to a device, such as a PC, that can be used to configure a router
26
Page 29

Dynamic Host Configuration Protocol allocates IP addresses automatically
DHCP -
to any DHCP client, t hat is, any d evice on your LA N requesting one . It eliminates
the need for manual configuration of each device. Your router can also act as a
DHCP client to collect network-addressing information from a DHCP server at
another site for your LAN.
DMT is the line modulation coding technique for your ADSL connection.
DMT -
A Domain Name Server looks up text-based Internet address in its huge
DNS -
database of registered d omain names, then convert s it into the numeric IP address
that allows you to connect to anoth er Internet site.
DSLAM -
at a telephone company CO that receives signals from multiple customer DSL
connections and puts the signa ls on a h igh-spe ed ba ckbone line . A DSL AM e nables
a NSP to offer business or home users the fastest telephone lin e technology (DSL)
with the fastest backbon e network technology (ATM).
downstream encapsulation -
packet.
encryption -
appearance of data, making it incomprehensible to those who are not authorized to
see the information.
Ethernet -
on a LAN.
Digital Subscriber Line Ac cess Multiplexe r is a network devi ce, usually
Refers to traffic sent fr om the CO to a DSL subscr ib er site.
This refers to adding on e or more layer prot ocol headers to a data
For securi ty purposes, a specific alg orithm may be used to alter the
Ethernet refers to a physical link and data link protocol that joins devices
27
Page 30

Generally this is a process or device that screens network traffic for
filter -
characteristics such as source address, destination address, or protocol, and
determines whethe r to forward or block t raffic based on the criteria that you have
programmed.
firewall -
inaccessible and invisible to the public. It prevents unauthorized and/or
unrecognized access.
frame -
control. The terms cell, datagram, message, packet, and segment are also used to
describe logical informatio n groupings at various layers of the OSI reference model.
GUI -
and simple lang uag e are u sed t o oper at e a comp ut er. It does not require t he use r to be
familiar with DOS or UNIX commands.
hub -
Hubs can repeat signals or merely split signals sent through them.
IP -
features for addres s ing, type-of-service specification, fragmentation and reassemb ly,
and security.
IP address -
Internet or IP address. T his 32-bit num ber is written in 4 decimal fi elds or “octets”
separated by periods, e.g., 192. 9. 200.1.
IPSec -
Internet. Its core components are: an authentication header (AH) to verify the user’s
This IP filtering security software can render parts of the LAN
This usually refers to headers and trailers used for synchronization and error
Graphical User Interface refers t o a use r-friendl y scre en whe re ic ons, me nus,
A hub is hardw are tha t co nt ains ind epend en t, b ut co nnec ted netw ork d ev ices.
Internet Protocol, a network laye r protocol in the TCP/IP stack that provides
Any computing device that uses the Internet must be assigned an
IP Security i s a La yer 3 p rot oc ol th at supports the creation of a VPN over the
28
Page 31

identity as well as t he integrity of dat a, encryption (ESP) to protect the privac y of
data, and access control through key exchange (IKE).
Internetwork Packet Exchange is a NetWare (Layer 3) protocol used for
IPX -
transferring data from servers to workstations. IPX is similar to IP.
Layer 2 Tunneling Protocol supports the creation of a VPN over the Internet.
L2TP -
Local Area Network is a high-speed, low-error data network covering a
LAN -
relatively small geographic area (up to a few thousand meters). LANs connect
workstations, peripherals, servers, and other devices usual ly in a single building or
campus.
The International Stand ards Organization has designed an Open System s
Layer -
Interconnection (O SI) Reference Mode l for all netwo rk developers. T he 7 “layers”
of the OSI model are: 1) physical -- electrical and mechanical functions, 2) data link
-- detecting and correct ing errors, 3) network – routing processes, 4) tra nsport –
initiating and releasing conne ctions, 5) session – handling transmission errors, 6)
presentation – formatti ng data, and 7) application – int erface with network service s .
line conditioning -
grade channels, thereby allow in g higher transmission rates.
A Media Access Control (OSI Layer 2) address is requ ired for ever y port or
MAC -
device that conn ects to a LAN . MAC addr esses allow frami ng and error de tection.
They are 6 bytes long and also known as hardware addresses and physical addresses.
This refers to M AC E nc aps ulat ed Routi ng th at cr eate s a virtu al E thern et -to -
MER -
Ethernet environmen t by encapsulating IP routed packets into RF C 1483 bridged
frames.
This can improve the analog characteristics of leased voice-
29
Page 32

metric -
sending packet s to a remote destination.
NAT -
share a single high-speed Internet connection. All outgoing traffic appears to
originate from the router’s IP address. NAT offers a certain degree of security in that
outsiders cannot see the NAT-assigned, non-routable addresses of individual devices
on your LAN.
NetBIOS -
IBM LAN to request services from lower-level network processes. It may leave
connections inadvertently open, hence, it should be blocked whenever network
service is metered.
NetWare -
remote file access and numerou s othe r di stri buted network services.
network address -
network device. Also call ed a protocol or an IP address.
node -
common to two or m ore li nes in a ne twork. No de also d escribes the last o ctet of an
IP address.
NOS -
network. NOS examples include LAN Ma nager, NetWare, NFS, and VINES.
NSP -
service.
OSI -
A metric is an algorithm used by routers to determine the best path for
Network Address Translation allows multi ple workstations on your LAN to
Network Basic Input/Output System is a bridging protocol used on a n
This popular NOS was de veloped by Novell. It provides transparent
A network layer address refers to a logi cal, rather than a physical
This refers to a network connection such as a workstation or a junction
Network Operating System is software that directs traffic throughout the
Network Service Provider refe rs to the company that provides your DSL
See “Layer” description above.
30
Page 33

It is the standard unit of data sent across networks. It contains a header with
packet -
control information and raw user data sometimes called a “payload”.
Packet INterne t Grouper is an Intern et program us ed to determ ine whet her a
ping -
specific address is accessible. To ping an address from Windows, you select Start/
Programs/MS-DOS Prompt, then after C:\ Windows> t ype "ping" followed by a
text-based (www…) Internet address. If you get an IP address reply from your target
machine, this means your computer is correctly runni ng TCP/IP and accessing IP
addresses through the router.
Point-to-Point Protocol provides router-to-router and host-to-network
PPP -
connections over synchronous and asynchronous circuits.
protocol -
network exchange information. Your router supports many different protocols,
facilitating communications between diverse networks.
PVC -
(VPI/VCI) and data link control identifiers. Your DSL connection relies on 2
different Pivots: one betwee n the DSLAM and your N SP and another betwe en the
DSLAM and your router. The latter, e.g., 0*35 is the onl y PVC number that you
need to configure your router.
relay -
systems. A data link (OSI Layer 2) relay is a bridge; a network (OSI Layer 3) relay is
a router.
This is a set of rules and conventions that govern how devices on a
A Permanent Virtual Circuit consists of originating and terminating addresses
This refers to a device that connects two or more networks or network
31
Page 34

RFC 1483 -
for encapsulating multiprotocol data into frames for A TM (OSI Layer 5) networks. It
is one of many RFC “link prot oc ols” that define how different devi ces communicate
with each other across networks and assure “interoperability”.
RIP -
traffic passes efficiently from source to destination.
RJ-11 -
only 2 are used.
RJ-14 -
its 6 pins have different wiring.
RJ-45 route r -
another based on IP addresses. Ro uters use one or more algorithms from routing
tables to determine the op timal path al ong w hich dat a shoul d be fo rwar ded. Rou ters
are occasionally called gateways, but traditional gateways do not translate IP
addresses.
SNMP -
management consoles and network devices. It provides a means to manage
configurations, statistics collection, performance, and security. SNMP2 supports
centralized as well as distributed network management strategies.
spoofing -
not actually sent. Ille gal hac ker acts of spo ofin g are de signed to foil netwo rk secu rity
mechanisms such as filters and access lists.
RFC 1483 SubNetwork Access Protocol (SNAP) is a standard metho d
Routing Information Prot ocol helps keep routing tables current so that IP
This is the com mon telephone-industry conne ctor containing 6 pins, but
This telephone-ind ustry conne ctor has t he same appe arance as a RJ-11, but
This is a telephone-industry standard connector cont aining 8 pins.
A router is a network device that forwards packets from one network to
Simple Network Management Protocol is used for communication between
This refers to a packet claiming to be from an address from which it was
32
Page 35

A stack is a set of r elat ed c omm unica tion s protoc ols th at op er ate t oget her t o
stack -
facilitate communi cati on at so me or al l of the 7 layers of a standa rd netwo rk. TCP/IP
is one example of a protoc ol stac k.
subnet mask -
supplied by your NSP. It determines the size of address grouping for LAN
management and is required for NAT.
subnetwork -
administr ator in ord er to pr ovide a mu ltilevel routing s tructure while sh ielding t he
subnetwork from the addressing com plexity of attached networks. It is sometimes
called a subnet .
TCP/IP -
developed in the 1970s to support the construction of a worldwide Internet. TCP and
IP are the two best known protocols in the suite.
Te l n e t -
stack. It enables users to log on to remote systems and use resources as if they were
connected to a local system.
TFTP -
transferring files between network nodes. For example, TFTP can be used for a
software upgrade.
tunneling -
public network using any standard poi nt- to-point encapsulation scheme.
This 32-bit address mask is requ ired in IP routing and is usually
Subnetworks are networks arbitrarily segmented by a network
Transmission Control Protocol/Internet Protocol is the suite of pro tocols
Telnet is the standard terminal em ulation protocol i n the TCP/IP protoc ol
Trivial File Transfer Protocol is built into your route r and can be used for
This metaphor refers to the creation of a temporary, secure path across a
33
Page 36

twisted pair -
copper wires arranged in a regular spiral pattern. The wires can be shielded or
unshielded. Twisted pair is common in telephony a pplications and is increasingly
common in data networks.
UNIX -
Laboratories.
upstrea m URL -
usually begins with http:// and contains a .com, .edu, .org, .net, or .gov. Every
Internet site (WW W, FTP, etc.) has a unique URL .
virtual circuits, channels, and paths -
ensure reliable communication between two network devices. In ATM, a virtual
circuit is called a virtual channel and m ay be iden tified by a VCI num ber. A bundle
of virtual chann els is called a virtual path and may be identified by a VPI number.
VPI/VCI -
combined with the VCI (Virtual Channel Identifi er, a 16-bit field in an ATM header),
is used to id entify the n ext destinat ion of a pac ket as it pas ses through a series of
ATM switches.
VPN -
TCP/IP net w ork.
WAN -
Internet is a publi c WAN .
This refers to a transmission medium consisting of two insulated
UNIX is an operating system that was developed in 1969 at Bell
Refers to data sent from a subscriber site to the CO.
A Universal Resource Locator is an address entered in Internet browsers that
These all ref er to log ical circ uits c reated t o
The VPI (Virtual Path Identifier, an 8-bit field in an ATM header),
A Virtual Private Network allows IP traffic to travel securely over a public
A Wide Area Network connects users in different geographic al areas. The
34
Page 37

IP Address Reference Map
If this is the first time you’ve set up a router, you may be wondering why
the router needs to be configur ed with so m any different IP ad dresses. An
example of how some logical I P addres ses mi ght b e assoc ia ted wit h physi cal nodes is presented below. You will notice a pattern in the logical links
in that 2 nodes with a direct, private connection have the same “subnet”
number. In contrast, a public node such as a DNS might have any subnet
number.
IP addresses
DNS Server(s)
10.10.10.9
(10.10.10.100)
Subnet
192.168.254.254--
Gateway
Mask
255.255.255.0
192.168.254.1
255.255.255.0
192.168.254.2
255.255.255.0
192.168.254.3
255.255.255.0
192.168.254.4
255.255.255.0
LAN Workstations
Node
Router
A "mask" added to the router's Ethernet IP address
can provide a unique, but non-routable IP address
for each device on the LAN. All outgoing traffic
appears to originate from the router's IP address.
Class C Mask 255.255.255.0
Class B Mask 255.255.0.0
Class A Mask 255.0.0.0
ISP or WAN
172.16.1.254
Default Gateway
DSLAM
WAN IPEthernet IP
-- 172.16.1.85
35
Page 38

Command Line Overview
The Command Line Interface reference manual covers the following
advanced configuration topics:
How to set names, passwords, PVC numbers, and link and n e twork
•
parameters
How to configure specific details within a protocol, such as IP or IPX
•
addresses and IP protocol controls
How to activate bridging and routing protocols
•
How to enable Firewall IP filtering
•
The Command Line Interface also provides the following ad vanced features:
Manage the router ' s fil e system
•
Set bridging filters
•
Issue online status commands
•
Monitor error messages
•
Set RIP options
•
Configure DHCP
•
36
Page 39

Configure NAT
•
Configure Telnet/SNMP security
•
Configure host mappi ng
•
Configure IP multicast
•
Execute script files
•
Configure encryption
•
Configure IP filtering
•
Configure L2TP filtering
•
Install software option key
•
Accessing the Command Line Interface
The console port may be used to access the Command Line Interface
(CLI). With the router powered on and the PC serial port connected to the
router console port, you are ready to access the Command Line Interface.
37
Page 40

Windows platforms:
To open the HyperTerminal emulator available in Windows, click
Start
on your desktop, select
HyperTerminal
Hypertrm.exe.
Enter a name for the connection in Connection Description
Phone Number
In the
Direct to Com 1
Com 1
In the
9600, 8, none, 1, hardware
.
window, under
(or 2) in the properties page.
Properties page
(or 2)
.
Programs, Accessories
Connect using
, enter the following port settin gs:
, select
Non-Windows platforms:
To open a terminal window emulation in a Macintosh or UNIX
environment, you will need a
Refer to your system documentation to determine which
communications programs can be used to communicate with the
router’s console interface.
Start your VT100 terminal emulator and configure it with the
following port settings:
For specific configuration information, refer to the Command Line
Interface reference manual provided on the CD-ROM.
38
VT100 terminal emul ation program
9600, 8, no, 1, har dware
.
, and
.
Choose
.
Page 41

Speed Touch™ Office ADSL-DMT Router
Software Specifications
Routing
TCP/IP with RIP 1 (RFC 105 8), RIP1-c ompati ble and RIP2 (RFC 1389 ),
or routing on th e LAN and/or WAN
Novell® IPX with RIP/SAP (RFC 1552)
DHCP Server – Automatic assignment of IP address, mask, default
gateway, and DNS servers’ addresses to workstations (RFC 2131,
RFC 2132)
DHCP Relay Agent (RFC 1542)
DNS Relay
DHCP Client (RFC 2132)
Bridging
Transparent Bridging in cluding Spanning Tree Prot ocol (IEEE 802.1D)
Bridge filters
PPP (RFC 1661)
Data compression up to 4: 1 (STAC™ LZS) (RFC 1974)
Van Jacobson header compression (RFC 1144)
39
Page 42

Spoofing and filtering (IP-RIP, IPX-RIP, SAP, Watchdog,
serialization)
Automatic IP and DNS assignment (RFC 1877)
IP Address Translation
Network renumbe ring (RFC 1631)
Network Address Translation (NAT/PAT)
LAN servers supported with NAT
Configuration Management
Easy Setup web browser-b ased GUI
Windows Quick Start program for easy setup
Administration through SNMP, Telnet, or VT100 terminal
TF TP do wnload/u pload of new softwa re, config uration file s, and scripts
Performance monitor for Windows
Dynamic event and histo ry logging
Windows configuration management via SNMP
Network boot used the B ootP server (RFC 2131, R FC 2132)
Network ping
Analog Telephone Line Support
Co-operates with external splitter
40
Page 43

ATM
Encapsulation (IP, Bridging, and Encapsulated Routing) (RFC 1483)
PPP over ATM (LCC and VC multiplexing) (RFC 2364)
Classical IP (RFC 1577)
AAL5
Multiple Virtual Cicuits (VCs)
Virtual circuit (VC) traffic shaping (UBR, VBR, CBR)
1.610 OAM F5 LoopBack
Security
User authentication (PAP/CHAP ) with PPP (RFC 1334, RFC 1994)
Password control for Configuration Manager
SNMP community name reassignment
T elnet/SNMP port management
T elnet/SNMP access control list
Firewall (IP Filtering)
Optional Alcatel Secure VPN™ software (L2TP, IPSec, IKE)
Protocol Interoperability Testing
RFC 1483 (Bay Networks™, Cabletron™, Cisco™, RedBack™)
PPP over ATM (Escal ate™, Cisco, Redback) (RFC 2364)
Supports Alcatel CO equipment
Supports full rate G. dmt (G.992.1), G. lite (G. 992.2), G. hs
(G.994.1), mgmt (G.997.1), and ANSI T1.413 Issue 2
41
Page 44

Speed Touch™ Office ADSL-DMT Router
Hardware Specifications
WAN Interface
One Asymmetrical Digital Subscriber Line (ADSL) WAN interface
(RJ-14)
RJ-14 Line A/Li ne B Pinning: 2/5 or 3/4
LAN Interface
Built-in 4-port Ethernet hub (4 RJ-45s)
LAN speed of up to 10 Mbps
ADSL Modem Specifications
Up to 8 Mbps downstream
Up to 1 Mbps upstream
Supports full rate G. dmt (G.992.1), G. lite (G. 992.2), G. hs
(G.994.1), mgmt (G.997.1), and ANSI T1.413 Issue 2
Analog telephone line support
Co-operates with external splitter
Processor
Motorola® 32 MHz MPC850
1 MB Flash Memory, 4 MB DRAM
42
Page 45

Physical Specifications
Dimensions: 8.4 W x 7.0 D x 1.7 H inches
21.3 W x 17.8 D x 4.3 H cm
Weight: 1.5 lbs. (. 68 Kg.)
Operating Environment
Temperature: 40°F to 105°F (5°C to 40°C)
Humidity: 20%- 8 0% , no n- c o nd ensing
Power Requirements
AC Voltage: 100 to 120 VAC, 220 to 240 VAC
Frequency: 50 /60 Hz
Power Consumption: 10 W maximum
Built-in power supply, On/Off switch
Agency Approvals
CE mark
Safety: UL 1950, CSA 22.2, EN60 950
Emissions: FCC Part 15 Class B,
EN55022/CISPR22 Class B
Immunity: EN50082-1
Certificatio ns per relevant ADSL standards
43
Page 46

Front Panel LEDs
Six LEDs indicating router activity appear on the front left of the router.
The table below describes what the different colors indicate.
Indicator Description
PWR
TEST
LINK
WAN
LANT
LANR
44
Green: Power is applied
Off: Power is not applied
Amber: Running router power-on self-t es t
Green: Router power-on self-test successful
Off: Router is non-operational
Amber: Establishing ADSL mode m li nk
Green: A DS L m odem link successful
Off: ADSL modem link is non-operational
Green flashing:WAN transmissions detected
Off: No WAN transmissions detected
Green flashing:LAN outgoing transm issi ons
detected
Off: No LAN outgoing transmissions detected
Green flashing:LAN incoming transmissio ns
detected
Off: No LAN incoming transmissions detected
Page 47

Rear Panel Power and Connections
The rear panel contains all DSL, Ethern et, console, and power interfaces.
From left to right:
Power
The router has an ON/OFF switch labeled I/ O and uses a standard AC
power cord.
DSL WAN Connection
Connectivi ty to a DS L ne tw or k is through a 6-pin RJ-14 port.
Ethernet LAN Connection
The router has a built-in hu b with 4 Ethernet 10Base-T ports (8-p in
RJ-45).
Console Connection
The 8-pin RJ-45 Console port provides asynchronous RS232
connectivity to a workstation or modem.
45
Page 48

Port Descriptions
ADSL-DMT Port
Model 3EC 18208AC
and 3EC 18238AC
Pin
Signal Name
Number
1 Not connected
2 Tip or Line A
3 Not connected
4 Not connected
5 Ring or Line B
6 Not connected
Ethernet 10Base-T Port
Pin
Signal Name
Number
1 Twisted pair transmit +
2 Twisted pair transmit 3 Twisted pair receive +
46
All Other Models
Pin
Signal Name
Number
1 Not connected
2 Not connected
3 Tip or Line A
4 Ring or Line B
5 Not connected
6 Not connected
4Ground
5Ground
6 Twisted pair receive 7Ground
8Ground
Page 49

Console Port
Pin
Signal Name
Number
1 Receive data
2 Request to send
3 Not connected
4 Transmit data
5Ground
6Clear to send
7 Not connected
8 Ring indicator
47
Page 50

FCC Part 15 CLASS B Statement
Section 15.105(b) of the Code of Federal Regulations:
This equipment has been tested and found to comply with the limits for a
Note:
Class B digital device, pursuant of Part 15 of the FCC Rules. These limits are
designed to provide reasonable protection against harmful interference in a
residential installation. This equipment generates, uses, and can radiate radio
frequency energy and, if n ot installed and used in acc ordance w ith the instruc tions,
may cause harmful interference to radio communications. However, there is no
guarantee that interference will not occur in a particular installation. If this
equipment does cause ha rmful interference to radio or tele vision reception, which
can be determined by turning the equipment off and on, the user is encouraged to try
to correct the interfere nce by one or more of the follow ing measures:
• Reorient or relocate the receiving antenna.
• Increase the separation between the equipm ent and receiver.
• Connect the equipment into an outlet on a circuit different from that to which
the receiver is connected.
• Consult the de aler or an experienc e d radio/TV technic ia n for help.
Caution: Any changes or modifications not expressly approved by the party
responsible for this device could void the user’s authority to operate this
equipment.
48
Page 51

Canadian D.O.C. Notice
This product conforms to Canadian Class B emissions regulations.
Ce produit se conforme au x réglements d’émission canadienne classe B.
Instructions for Trained Service Personnel Only
Caution: Danger of explosion if battery is incorrectly placed. Replace only with
the same or equivalent type recommended by the manufacturer. Dispose of used
batteries according to the manufacturer’s instructions.
If you need to contact your NSP for technical support, please have the
following information ready:
Router model number (on bot tom of router)
Router software version (displayed in the GU I)
Date of pur chase
OS Type (Windows 95, 98, NT, for Workgroups; MacOS 7.x, 8.x; or Unix)
Detailed description of the problem
49
Page 52

50
 Loading...