

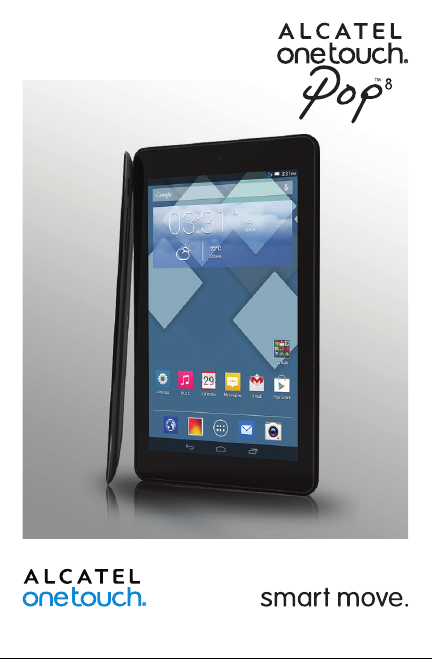
Page 1
Page 2
Table of Contents
Safety information ................................................................................... 3
General information ................................................................................ 9
1 Your tablet...................................................................................... 11
1.1 Keys and connectors ............................................................................................11
1.2 Getting started ....................................................................................................... 13
1.3 Home screen ..........................................................................................................14
2 Text input ....................................................................................... 19
2.1 Using Onscreen Keyboard ..................................................................................19
2.2 Android keyboard .................................................................................................19
2.3 Text editing ............................................................................................................. 19
3 People .............................................................................................21
3.1 Consult your contacts ..........................................................................................21
3.2 Managing contact groups .....................................................................................22
3.3 Adding a contact ....................................................................................................22
3.4 Editing your contacts ............................................................................................22
3.5 Contacts importing, exporting and sharing .....................................................23
4 Messaging, Email ............................................................................ 24
4.1 Messaging .................................................................................................................24
4.2 Gmail/Email .............................................................................................................26
5 Calendar & Time ...........................................................................................30
5.1 Calendar ..................................................................................................................30
5.2 Clock ........................................................................................................................31
6 Getting connected ......................................................................... 32
6.1 Connecting to the Internet .................................................................................32
6.2 Browser ...................................................................................................................33
6.3 Connecting to Bluetooth devices ....................................................................36
6.4 Connecting to a computer .................................................................................37
6.5 Sharing your tablet's mobile data connection ................................................38
7 Google Play Store ..........................................................................39
7.1 Locate the item you want to download and install ......................................39
7.2 Download and install ............................................................................................40
7.3 Manage your downloads ......................................................................................41
8 Multimedia applications ................................................................ 41
8.1 Camera ....................................................................................................................41
8.2 Gallery ...................................................................................................................... 43
8.3 Play Music ................................................................................................................44
8.4 Video Player ............................................................................................................46
9 Google Maps ..................................................................................46
9.1 Get My Location....................................................................................................46
9.2 Search for a location ............................................................................................47
1 2
9.3 Star a location ........................................................................................................47
9.4 Get driving, public transportation or walking directions .............................48
9.5 Arrangement of Layers ........................................................................................49
10 Others ............................................................................................. 50
10.1 Calculator ................................................................................................................50
10.2 File Manager ............................................................................................................50
10.3 Sound Recorder .....................................................................................................50
10.4 Other applications .................................................................................................51
11 Settings ........................................................................................... 51
11.1 Wireless & networks............................................................................................51
11.2 Tablet ........................................................................................................................52
11.3 Personal ...................................................................................................................53
11.4 Accounts ..................................................................................................................55
11.5 System ......................................................................................................................55
12 Making the most of your tablet ...................................................56
12.1 FOTA software update capable .......................................................................... 56
13 Accessories ..................................................................................... 56
14 Troubleshooting ............................................................................. 57
15 Limited warranty ...........................................................................60
This device meets applicable national SAR limits of 2.0 W/kg. SAR
values can be found on page 7 of this user guide. When carrying the
tablet or using it while worn on your body, either use an approved
accessory such as a holster or otherwise maintain a distance of
www.sar-tick.com
1.3 cm from the body to ensure compliance with RF exposure
requirements. Note that the product may be transmitting even if
you are not using it.
To prevent possible hearing damage, do not listen at high volume
levels for long periods. Exercise caution when holding your tablet
near your ear while the loudspeaker is in use.
The tablet contains magnets which may interfere with other
devices and items (such as credit card, pacemakers, defibrillators,
etc.). Please maintain at least 15 cm of separation between your
tablet and the devices/items mentioned above.
Page 3

Safety information ......................................
We recommend that you read this chapter carefully before using your tablet. The
manufacturer disclaims any liability for damage, which may result as a consequence of
improper use or use contrary to the instructions contained herein.
• TRAFFIC SAFETY
Given that studies show that using a tablet while driving a vehicle constitutes a real
risk, even when the hands-free kit is used (car kit, headset...), drivers are requested to
refrain from using their tablet when the vehicle is not parked.
When driving, do not use your tablet or headphone to listen to music or to the radio.
Using a headphone can be dangerous and forbidden in some areas. When switched on,
your tablet emits electromagnetic waves that can interfere with the vehicle’s electronic
systems such as ABS anti-lock brakes or airbags. To ensure that there is no problem:
- do not place your tablet on top of the dashboard or within an airbag deployment area,
- check with your car dealer or the car manufacturer to make sure that the dashboard
is adequately shielded from tablet RF energy.
• CONDITIONS OF USE
You are advised to switch off the tablet from time to time to optimize its performance.
Switch the tablet off before boarding an aircraft.
Switch the tablet off when you are in healthcare facilities, except in designated areas.
As with many other types of equipment now in regular use, these tablet can interfere
with other electrical or electronic devices, or equipment using radio frequencies.
Switch the tablet off when you are near gas or flammable liquids. Strictly obey all signs
and instructions posted in a fuel depot, petrol station, or chemical plant, or in any
potentially explosive atmosphere.
When the tablet is switched on, it should be kept at least 15 cm from any medical
device such as a pacemaker, a hearing aid or insulin pump, etc. In particular when using
the tablet, you should hold it against the ear on the opposite side to the device, if any.
To avoid hearing impairment, move the tablet away from your ear while using the
"hands-free" mode because the amplified volume might cause hearing damage.
Do not let children use the tablet and/or play with the tablet and accessories without
supervision.
Always handle your tablet with care and keep it in a clean and dust-free place.
Do not allow your tablet to be exposed to adverse weather or environmental
conditions (moisture, humidity, rain, infiltration of liquids, dust, sea air, etc.). The
manufacturer's recommended operating temperature range is -0°C to +45°C.
At over 45°C the legibility of the tablet’s display may be impaired, though this is
temporary and not serious.
3 4
Do not open, dismantle or attempt to repair your tablet yourself.
Do not drop, throw or bend your tablet.
Do not use the tablet if the glass made screen is damaged, cracked or broken to
avoid any injury.
Do not paint it.
Use only battery chargers and accessories which are recommended by TCT Mobile
Limited and its affiliates and are compatible with your tablet model. TCT Mobile
Limited and its affiliates disclaim any liability for damage caused by the use of other
chargers or accessories.
Remember to make back-up copies or keep a written record of all important
information stored in your tablet.
Some people may suffer epileptic seizures or blackouts when exposed to flashing
lights, or when playing video games. These seizures or blackouts may occur even if
a person never had a previous seizure or blackout. If you have experienced seizures
or blackouts, or if you have a family history of such occurrences, please consult your
doctor before playing video games on your tablet or enabling a flashing-lights feature
on your tablet.
Parents should monitor their children’s use of video games or other features that
incorporate flashing lights on the tablet. All persons should discontinue use and consult
a doctor if any of the following symptoms occur: convulsion, eye or muscle twitching,
loss of awareness, involuntary movements, or disorientation. To limit the likelihood of
such symptoms, please take the following safety precautions:
- Do not play or use a flashing-lights feature if you are tired or need sleep.
- Take a minimum of a 15-minute break hourly.
- Play in a room in which all lights are on.
- Play at the farthest distance possible from the screen.
- If your hands, wrists, or arms become tired or sore while playing, stop and rest for
several hours before playing again.
- If you continue to have sore hands, wrists, or arms during or after playing, stop the
game and see a doctor.
When you play games on your tablet, you may experience occasional discomfort in
your hands, arms, shoulders, neck, or other parts of your body. Follow the instructions
to avoid problems such as tendinitis, carpal tunnel syndrome, or other musculoskeletal
disorders.
• PRIVACY
Please note that you must respect the laws and regulations in force in your jurisdiction
or other jurisdiction(s) where you will use your tablet regarding taking photographs
and recording sounds with your tablet. Pursuant to such laws and regulations, it may
be strictly forbidden to take photographs and/or to record the voices of other people
or any of their personal attributes, and duplicate or distribute them, as this may be
considered to be an invasion of privacy. It is the user's sole responsibility to ensure that
Page 4

prior authorization be obtained, if necessary, in order to record private or confidential
conversations or take a photograph of another person; the manufacturer, the seller or
vendor of your tablet (including the operator) disclaim any liability which may result
from the improper use of the tablet.
• BATTERY
Observe the following precautions for battery use:
- Do not attempt to open the back cover and replace the inner rechargeable
Li-polymer battery. Please contact the dealer to replace it.
- Do not attempt to eject, replace or open the battery.
- Do not puncture the back cover of your tablet.
- Do not burn or dispose of your tablet in household rubbish or store it at temperature
above 50°C.
- Dispose of used batteries according to the instructions.
This symbol on your tablet, the battery and the accessories means that
these products must be taken to collection points at the end of their life:
- Municipal waste disposal centers with specific bins for these items of
equipment.
- Collection bins at points of sale.
They will then be recycled, preventing substances being disposed of in the
environment, so that their components can be reused.
In European Union countries:
These collection points are accessible free of charge.
All products with this sign must be brought to these collection points.
In non-European Union jurisdictions:
Items of equipment with this symbol are not to be thrown into ordinary bins if your
jurisdiction or your region has suitable recycling and collection facilities; instead they
are to be taken to collection points for them to be recycled.
• CHARGERS
Power chargers will operate within the temperature range of: 0°C to 40°C.
The chargers designed for your tablet meet with the standard for safety of information
technology equipment and office equipment use. They are also compliant to the eco
design directive 2009/125/EC. Due to different applicable electrical specifications, a
charger you purchased in one jurisdiction may not work in another jurisdiction. They
should be used for this purpose only.
The charger shall be installed near the tablet and shall be easily accessible.
• Federal Communications Commission (FCC) Declaration of Conformity
This ta blet co mplie s with p art 15 of th e FCC Rule s. Oper ation i s subje ct to the
follow ing two c onditi ons: (1) This t ablet m ay not cau se harm ful int erfe rence, a nd
5 6
(2) this t able t must acc ept any in terf erence r eceive d, incl uding i nter ferenc e that
may caus e undes ired ope ratio n.
Chang es or modi fic ations n ot expr essly a pproved b y the par ty re sponsi ble for
compl iance co uld void t he user‘s a uthor ity to o perat e the eq uipme nt.
This ta blet h as been t ested a nd foun d to comp ly with t he limi ts for a Cl ass B
digit al, pur suant t o Par t 15 of the FCC Ru les. Th ese lim its are de signe d to provi de
reaso nable p rotec tion ag ainst h armfu l inter fere nce in a res ident ial ins tall ation.
This eq uipme nt gene rates , uses an d can ra diated r adio fr equen cy ene rgy and , if
not ins talle d and use d in accord ance wi th the in stru ction s, may ca use har mful
inter feren ce to rad io comm unicat ions. H owever, the re is no gu arant ee that
inter feren ce will n ot occur i n a part icular i nsta llati on If thi s equip ment do es cau se
harmf ul inte rfere nce to r adio or te levisi on rece ption , which c an be det ermin ed
by turni ng the eq uipme nt off a nd on, th e user is e ncour aged to t ry to co rrect t he
inter feren ce by one or m ore of th e follow ing mea sures:
- Reorie nt or rel ocate t he recei ving an tenna .
- Incre ase the s epar ation be twee n the equ ipmen t and rece iver.
- Conne ct the eq uipme nt into a n outle t on a circ uit dif feren t from th at to whic h
the rec eiver is c onnec ted.
- Consul t the de aler or a n exper ience d radio/ TV t echni cian for h elp.
FCC Caution:
Chang es or modi fic ations n ot expr essly a pproved b y the par ty re sponsi ble for
compl iance co uld void t he user‘s a uthor ity to o perat e the eq uipme nt.
FCC RF Ex posu re Info rmati on (SAR) :
This ta blet is d esign ed and ma nufac tured n ot to exce ed the em issio n limit s for
expos ure to ra dio freq uency ( RF) en ergy s et by the F edera l Commu nicat ions
Commi ssion of t he Uni ted Sta tes.
Durin g SAR tes ting, t his is se t to tra nsmit a t its hig hest ce rtif ied powe r level in a ll
teste d frequ ency ba nds, a nd place d in posi tions t hat simu late RF e xposu re in usa ge
near th e body wi th the s epara tion of 1. 3 cm. Al thoug h the SAR i s deter mined a t
the hig hest ce rtif ied powe r level , the act ual SAR l evel of th e tabl et whil e opera ting
can be we ll below t he max imum v alue. T his is be cause t he tabl et is des igned t o
opera te at mul tiple p ower level s so as to u se only th e power re quired t o reach
the net work . In gene ral, t he close r you are to a w irele ss base s tatio n anten na, t he
lower the power outp ut.
The exp osure st anda rd for wir eless s e mploys a u nit of me asure ment kn own as
the Spe cifi c Absor ption R ate, or S AR. T he SAR li mit set by t he FCC is 1. 6W/kg.
Tests for SA R are cond ucte d using s tanda rd oper ating p ositio ns acce pted by th e
FCC wit h the ta blet tr ansm ittin g at its hi ghest c erti fied p ower leve l in all tes ted
frequency bands.
The FCC h as gran ted an Eq uipme nt Auth oriz ation fo r this mo del tab let wi th
all rep orte d SAR leve ls evalu ated a s in compl iance w ith the F CC RF ex posure
Page 5
guide lines . SAR info rmati on on thi s model t ablet is on fil e with t he FCC and c an be
found un der the D ispla y Grant s ectio n of HYP ERLI NK "ht tp://w ww.fcc.gov/oe t/ea /
fccid" w ww.f cc.gov/o et/ea /fcci d afte r search ing on FC C ID: RA D466 .
For thi s table t, th e highe st repo rted S AR valu e for usa ge near t he body i s:
Maximum SAR for this model and conditions under which it was recorded:
ONE TOUCH P320A (Body-worn) 1.19 W/kg
SAR com plian ce for bod y oper ation is b ased on a s epar ation di stan ce of 1.3 cm
betwe en the t ablet a nd the hu man bod y. During u se, th e actua l SAR va lues for t his
tabl et are usu ally we ll below t he valu es sta ted abov e. This i s becau se, for p urpose s
of system efficiency and to minimize interference on the network, the operating
power of yo ur tablet is au tomat ically decre ased when ful l power is no t needed. The
lower th e power ou tput of t he tab let, t he lower i ts SAR v alue.
Body- worn SAR t esti ng has be en carr ied out a t a separ ation d ista nce of 1.3 c m.
To meet RF ex posure g uideli nes dur ing bod y-worn o perat ion, th e tabl et shou ld be
posit ioned at l east t his dis tance aw ay from th e body.
If you are n ot usin g an appro ved acces sory e nsure th at what ever pro duct is u sed
is free of a ny meta l and th at it posi tions t he tab let the i ndicat ed dist ance aw ay
from th e body.
Organ izati ons suc h as the Wor ld Heal th Org aniza tion and t he US Fo od and Dr ug
Admini stration hav e sugge sted that if pe ople are c oncer ned and w ant to red uce their
expos ure they c ould use a h ands- free ac cessor y to kee p the wire less t ablet a way
from th e head or bo dy duri ng use, o r reduce t he amou nt of tim e spent o n the ta blet .
• IC Notice
This dev ice com plies wi th Ind ustr y Canad a licen se-e xempt RS S sta ndard(s).
Oper ation is s ubjec t to the fo llowin g two con ditio ns:
(1) this device m ay not ca use inte rfer ence, a nd
(2) this d evice mu st accep t any inte rfer ence, i nclud ing inte rfer ence th at may cau se
undesired operation of the device.
This Cl ass B dig ital ap para tus com plies w ith Can adian I CES -0 03.
IC: 923 8A- 0032
• IC Radiation Exposure Statement
This EU T is comp lianc e with SA R for gen eral po pulat ion/un contro lled ex posure
limit s in IC RS S-102 and h ad been t este d in accord ance wi th the m easur ement
metho ds and pro cedur es spec ified i n IEE E 1528 and IEC 62 209. Thi s equip ment
should b e inst alled a nd oper ated wi th mini mum dis tance 1. 3 cm bet ween th e
radia tor and yo ur body. Th is devic e and its a ntenn a(s) must no t be co- locat ed or
operating in conjunction with any other antenna or transmitter.
7 8
• LICENSES
microSD Logo is a trademark.
The Bluetooth word mark and logos are owned by the Bluetooth SIG,
Inc. and any use of such m arks by TCT Mobile Limited and its affiliates
is under license. Other trademarks and trade names are those of their
respective owners.
ONE TOUCH P320A Bluetooth QD ID B022117
The Wi-Fi Logo is a certification mark of the Wi-Fi Alliance.
Your tablet uses non-harmonized frequency and is intended for use
in all European countries.
The WLAN can be operated in the EU without restriction indoors,
but cannot be operated outdoors in France.
Google, the Google logo, Android, the Android logo, Google Search™, Google
Maps™, Gmail™, YouTube, Google Play Store, Google Latitude™ and Hangouts™
are trademarks of Google Inc.
The Android robot is reproduced or modified from work created and shared
by Google and used according to terms described in the Creative Commons 3.0
Attribution License (the text will show when you touch and hold Google legal in
Settings > About Tablet > Legal information)
(1)
It may not be available according to the countries.
(1)
.
Page 6

General information ...................................
• Website: www.alcatelonetouch.com
• Hot Line Number: In North America, call 877-702-3444 for technical support.
In Canada, please call 888-841-5371 prior to December 12, 2014. After
December 12, 2014, please call 855-844-6058.
Disclaimer
There m ay be cer tain di ffere nces be twee n the use r manua l descr iptio n and the
tabl et’s oper ation , depe nding on t he sof twar e relea se of your t ablet o r speci fic
operator services .
TCT Mobile shall not be held legally responsible for such differences, if any, nor for their
potential consequences, which responsibility shall be borne by the operator exclusively.
This ta blet may conta in mate rials , including ap plications a nd soft ware in execut able
or sourc e code for m, whic h is subm itte d by third p artie s for inc lusio n in this t ablet
("Third Party Materials").
All third party materials in this tablet are provided "as is", without warranty of any
kind, whether express or implied, including the implied warranties of merchantability,
fitness for a particular purpose or use/third party application, interoperability with
other materials or applications of the purchaser and non-infringement of copyright.
The purchaser undertakes that TCT Mobile has complied with all quality obligations
incumbent upon it as a manufacturer of mobile tablet and tablet in complying with
Intellectual Property rights. TCT Mobile will at no stage be responsible for the inability
or failure of the Third Party Materials to operate on this tablet or in interaction
with any other tablet of the purchaser. To the maximum extent permitted by law,
TCT Mobile disclaims all liability for any claims, demands, suits or actions, and more
specifically – but not limited to – tort law actions, under any theory of liability, arising
out of the use, by whatever means, or attempts to use, such Third Party Materials.
Moreover, the present Third Party Materials, which are provided free of charge
by TCT Mobile, may be subject to paid updates and upgrades in the future; TCT
Mobile waives any responsibility regarding such additional costs, which shall be borne
exclusively by the purchaser. The availability of the applications may vary depending
on the countries and the operators where the tablet is used; in no event shall the list
of possible applications and software provided with the tablet be considered as an
undertaking from TCT Mobile; it shall remain merely as information for the purchaser.
Therefore, TCT Mobile shall not be held responsible for the lack of availability of one
or more applications wished for by the purchaser, as its availability depends on the
country and the operator of the purchaser. TCT mobile reserves the right at any time
to add or remove Third Party Materials from its tablet without prior notice; in no
event shall TCT Mobile be held responsible by the purchaser for any consequences
that such removal may have on the purchaser regarding the use or attempt to use such
applications and Third Party Materials.
Accessory
◆ Charger, 5.0V/2.0A
◆ USB cable, 5pins micro-USB
9 10
Page 7
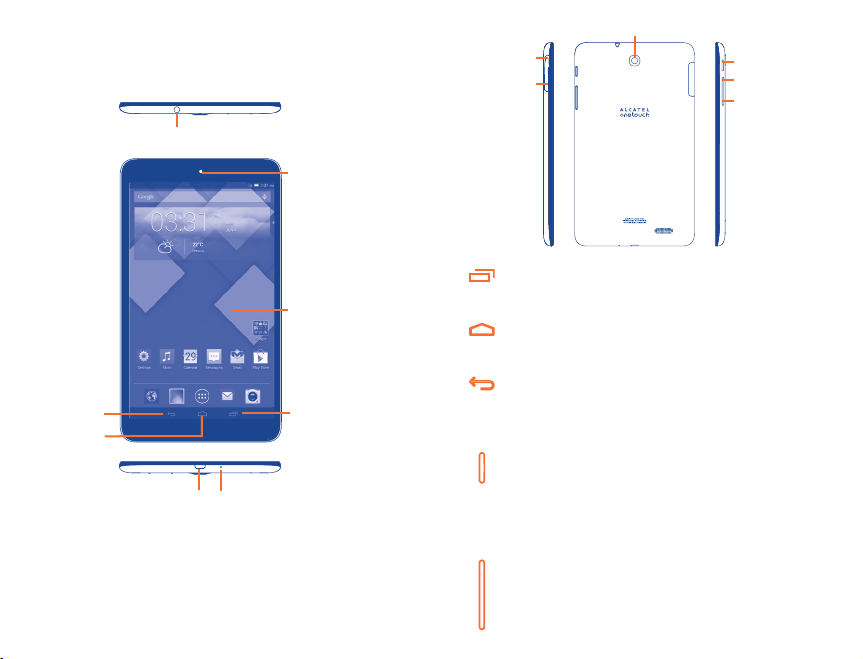
Your tablet ...........................................
1
1.1 Keys and connectors
Earphone Interface
Front camera
Touch screen
Back key
Home key
micro-USB connector/
Battery charge
Microphone
Recent Apps key
Rear camera
Micro Sim
microSD
Recent Apps key
• Touch to open a list of thumbnail images of applications you've
worked with recently.
Home key
• While on any application or screen, touch to return to the Home
screen.
Back key
• Touch to go back to the previous screen, or to close a dialog box,
options menu, the notification panel, etc.
These keys are visible when the screen lights up.
Power key
• Press: Lock the screen/Light up the screen
• Press and hold: Power on or pop up the menu to get more options,
such as Power off, Restart, Airplane mode, etc.
• Press and hold Powe r key and Volume down key to capture a
screenshot.
Volume Keys
• In Music/Video/Streaming mode, adjust the media volume.
Power key
Volume up
Volume down
11 12
Page 8
1.2 Getting started
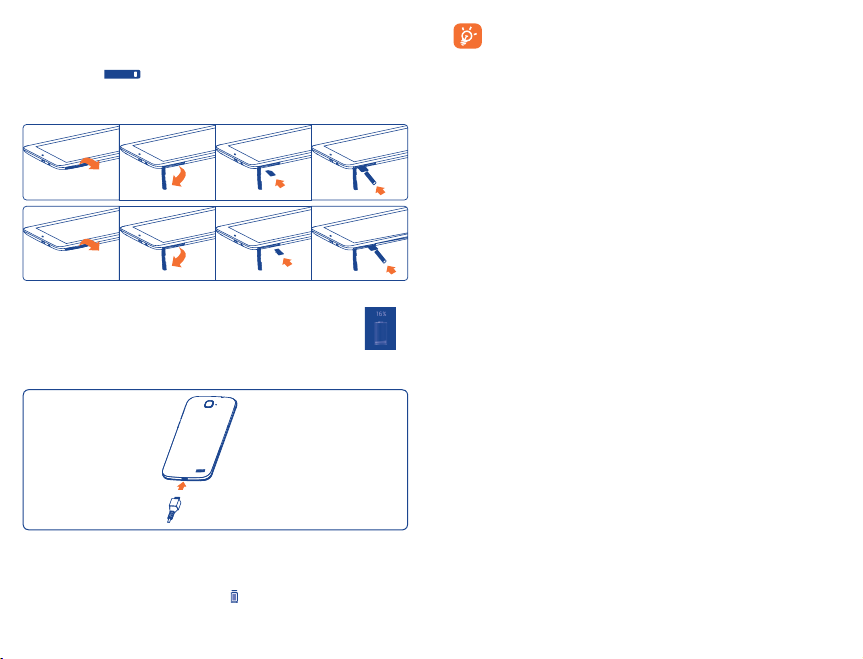
1.2.1 Set-up
An insertion tool is provided with the tablet package, please use it to install
or remove the SIM/SD card conveniently.
Inserting the micro SIM card & the microSD card
Note
Please charge before first use. Normally, pressing and holding the Power
key will power on the tablet, the Home Screen appear. A battery icon will
appear when the tablet has a very low battery level. Use only charger
recommended by TCT Mobile Limited and its affiliates.
Charging the battery
Connect the battery charger to your tablet and wall outlet.
• When using your tablet for the first time, charge the battery fully (approximately
3.5 hours).
You are advised to fully charge the battery (
percentage on screen while the tablet is powered off. The percentage increases as the
tablet is charged.
). Charging status is indicated by the
13 14
The charging status bar will not appear if your battery is extendly consumed.
To reduce power consumption and energy waste, when battery is fully charged,
disconnect your charger from the plug; switch off Wi-Fi, GPS, Bluetooth or
background-running applications when not in use; reduce the backlight time, etc.
This tablet cannot be charged through USB computer connection. Please plug in
your charger before first use.
1.2.2 Power on your tablet
Hold down the Powe r key until the tablet powers on, unlock your tablet (Slide, PIN,
Password, Pattern, Face unlock or Voice unlock) if necessary and confirm. The Home
screen is displayed.
If you do not know your PIN code or if you have forgotten it, contact your network
operator. Store the PIN Code in a safe place when not in use.
Set up your tablet for the first time
The first time you power on the tablet, you should set the following options:
• Touch Get started..., then select the tablet 's language.
• The tablet will search for service by itself. The process of activation will take a few
minutes
• Select your input keyboard, then touch Next.
• Select Mobile data connection you want to use, then touch Next.
• Set your date and timezone, you can also choose Automatic time zone, then
touch Next.
• Setup your Google account: Touch Set up now. If you have a Google Account,
touch Ye s, then enter your user name and password. If you forget your password,
you can go to http://www.google.com/ to retrieve it. Touch Next to skip to the
next step.
• Touch Next, then the Setup complete screen will display, touch Finish to confirm.
When the tablet is powered on, you can connect to a Wi-Fi network, without a SIM
card inserted (refer to section "6.1.2 Wi-Fi"), to sign into your Google account and
to use some features.
1.2.3 Power off your tablet
Hold down the Powe r key until the pop-up menu appears, select Power off to
confirm.
1.3 Home screen
You can bring all the items (applications, shortcuts, folders and widgets) you love or
use most frequently to your Home screen for quick access. Touch the Home key to
switch to Home screen.
Page 9
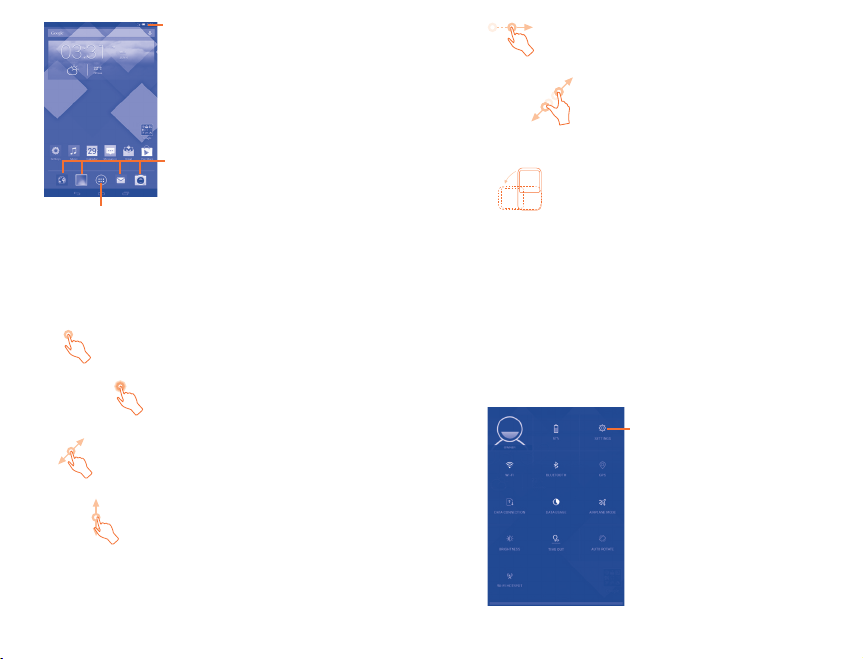
Status bar
• Status/Notification indicators.
Favorite tray applications
• Touch to open the application.
• Touch and hold to move or change
Application tab
• Touch to open main menu.
Home screen is provided in an extended format to allow more space for adding
applications, shortcuts etc. Slide the Home screen horizontally left and right to get
a complete view of the Home screen. The white short line at the lower part of the
screen indicates which screen you are viewing.
applications.
1.3.1 Using the touchscreen
Touch
To access an application, touch it with your finger.
Touch and Hold
Touch and hold the home screen to access the available options to set the wallpaper.
Drag
Place your finger on any item to drag it to another location.
Slide/Swipe
Slide the screen to scroll up and down the applications, images, web pages… at your
convenience.
Flick
Similar to swiping, but flicking transitions between screens quicker.
Pinch/Spread
Place fingers of one hand on the screen surface and draw them apart or together to
scale an element on the screen.
Rotate
Automatically change the screen orientation from portrait to landscape by turning
the tablet sideways.
1.3.2 Status bar
From status bar, you can view both tablet status (to the right side) and notification
information (to the left side).
Touch and drag down the Status bar to open the Quick setting panel or Notification
panel. Touch and drag up to close it. When there are notifications, you may touch and
drag the Status bar with two fingers to access Quick setting panel directly.
Quick setting panel
Touch and drag down the Status bar to open Quick setting panel, where you may
enable or disable functions or change modes by touching the icons.
Touch to access Settings, where you
may set more items
15 16
Page 10
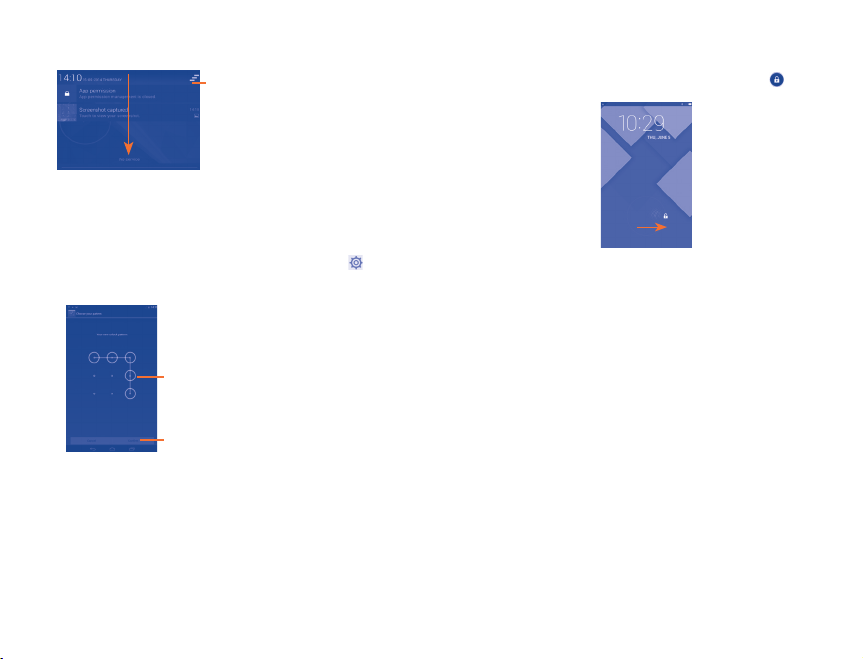
Notification panel
When there are notifications, touch and drag down the Status bar to open the
Notification panel to read the detailed information.
Touch to clear all event–based
notifications (other ongoing
notifications will remain)
1.3.3 Lock/Unlock your screen
To protect your tablet and privacy, you can lock the tablet screen by choosing slide or
creating a variety of patterns, PIN or password, etc.
To create a screen unlock pattern (refer to section "Screen lock" for detail settings)
• Drag down the Quick setting panel and touch the settings icon to enter
Settings, then touch Security\Screen lock\Pattern.
• Draw your own pattern.
Draw your unlock pattern
Touch to confirm by drawing pattern again
To create a screen unlock PIN/Password
• Touch Settings\Security\Screen lock\PIN or Password.
• Set your PIN or password.
To lock tablet screen
Press the Powe r key once to lock the screen.
To unlock tablet screen
Press the power key once to light up the screen, draw the unlock pattern you have
created or enter PIN or password, etc. to unlock the screen.
If you have chosen Slide as the screen lock, touch and drag the icon
to unlock the screen.
to the right
1.3.4 Personalize your Home screen
Add
You may touch and hold a folder, an application or a widget to activate the Move
mode, and drag the item to any Home screen as you prefer.
Reposition
Touch and hold the item to be repositioned to activate the Move mode, drag the
item to the desired position and then release. You can move items both on the Home
screen and the Favorite tray. Hold the icon on the left or right edge of the screen to
drag the item to another Home screen.
Remove
Touch and hold the item to be removed to activate the Move mode, drag the item up
to the top of Remove, and release after the item turns red.
Create folders
To improve the organization of items (shortcuts or applications) on the Home screen,
you can add them to a folder by stacking one item on top of another.
Wallpaper customization
Touch and long press the blank area in Home screen, then touch Wallpaper to
customize wallpaper.
17 18
Page 11
Text input.............................................
2
2.1 Using Onscreen Keyboard
Onscreen Keyboard settings
From the home screen, select Settings\Language&input, touch the Settings icon
on the right of Android keyboard (AOSP), a series of settings are available for
your selection.
2.2 Android keyboard
Touch to switch between "abc/
Abc" mode; Touch & hold to
switch between "abc/ABC" mode.
Touch to switch between symbol
and numeric keyboard.
Touch & hold to show input
When Wi-Fi or data connection
is on, touch to enter voice input.
options;
Touch & hold, then
select to enter symbols/
2.3 Text editing
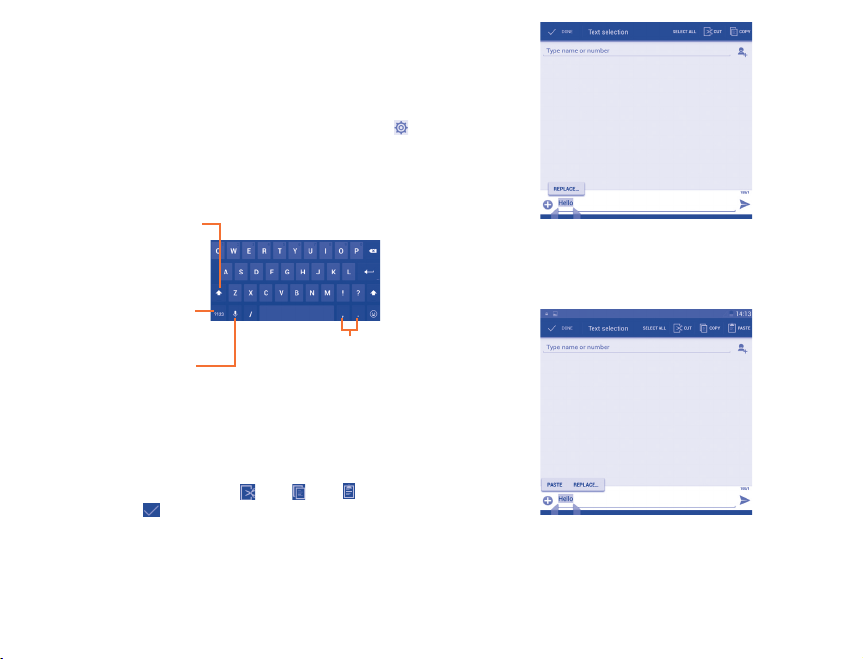
You can edit the text you have entered.
• Touch and hold or double-tap within the text you would like to edit.
• Drag the tabs to change the high-lighted selection.
• Following options will show: Select all, Cut
• Touch the icon DONE to confirm.
, Copy , Paste
19 20
emoticons.
You can also inser t new text
• Touch where you want to type, or touch and hold a blank space, the cursor will
blink and the tab will show. Drag the tab to move the cursor.
• If you have selected any text, touch the tab to show PASTE icon which allows you
to paste any text you have previously copied.
Page 12
People .............................................
3
People enables quick and easy access to the people you want to reach.
You can view and create contacts on your tablet and synchronize these with your
Gmail contacts or other applications on the web or on your tablet.
3.1 Consult your contacts
Touch to view your contact
groups and favourite
contacts.
Touch to view the
contact’s detailed
information.
Touch icon to open Quick
Contact panel.
Touch the Menu key to display contacts list option menu.
Following actions are enabled:
• Delete contact Select and delete unwanted contacts.
• Contacts to
display
• Import/Export Import or export contacts between tablet, micro SIM card,
• Accounts Manage the synchronization settings for different accounts.
• Settings Set contacts' display mode.
• Share visible
contacts
Choose contacts to display.
microSD card and tablet storage.
Share contacts with others by sending the contact's vCard
to them via Bluetooth, Email, SMS, etc.
Touch to add a new
contact.
Touch to search in
People.
3.2 Managing contact groups
The contact group helps you to improve the organization of your contacts. You can
add, remove and view groups in the Groups screen.
Touch the Groups to view local groups. To create a new group, touch the icon
enter the new name and touch Done to confirm. If you have added accounts to your
tablet, touch the Groups to view groups in accounts.
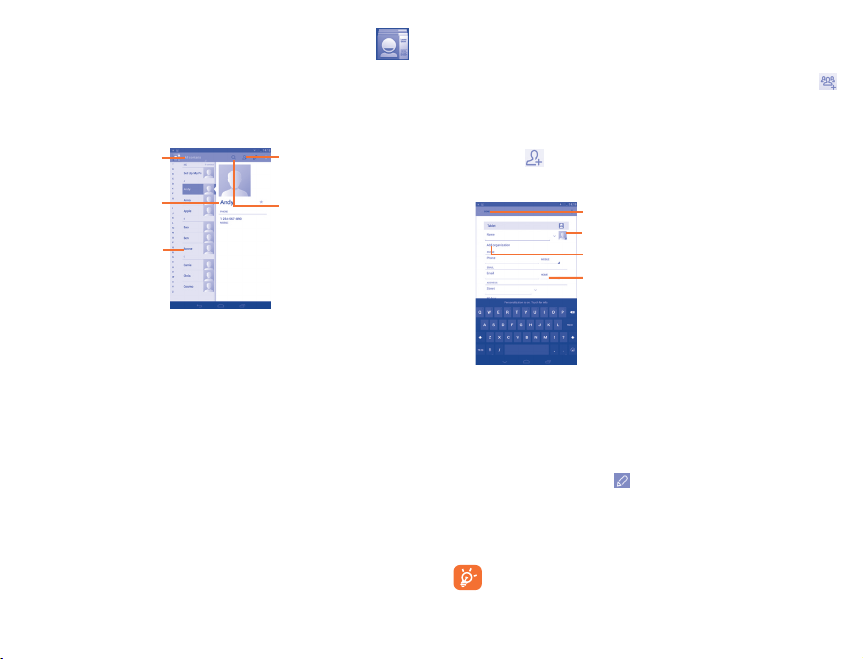
3.3 Adding a contact
Touch the icon in the contact list to create a new contact.
You are required to enter the contact's name and other contact information. By scrolling
up and down the screen, you can move from one field to another easily.
If you want to add more information, touch Add another field to add a new
category.
When finished, touch Done to save.
To exit without saving, you can touch Discard.
Touch to save.
Touch to select a picture for the contact.
Touch to add a new label.
Touch to unfold the other predefined labels of
this category.
3.4 Editing your contacts
To edit contact information, touch on the contact details screen. When finished,
touch Done.
Delete a contact
To delete a contact, touch the Menu key and select Delete from contact details
screen.
The contact you have deleted will also be removed from other applications
on the tablet or web the next time you synchronize your tablet.
,
21 22
Page 13
3.5 Contacts importing, exporting and sharing
This tablet enables you to import or export contacts between tablet, SIM card,
microSD card and tablet storage.
From Contacts screen, touch
select to import/export contacts from/to SIM card, Tablet, Tablet storage, Accounts, etc.
To impor t/export a single contact from/to SIM card, choose an account and target SIM
card, select the contact you want to impor t/export, and touch the icon
To impor t/export all contacts from/to SIM card, choose an account and target SIM card
mark Select all and touch the icon
You can share a single contact or contacts with others by sending the contact's vCard
to them via Bluetooth, Gmail, etc.
Touch a contact you want to share, touch the Menu key, and select Share from
contact details screen, then select the application to perform this action.
to open options menu, touch Import/Export, then
to confirm.
to confirm.
23 24
Messaging, Email .................................
4
4.1 Messaging ......................................................
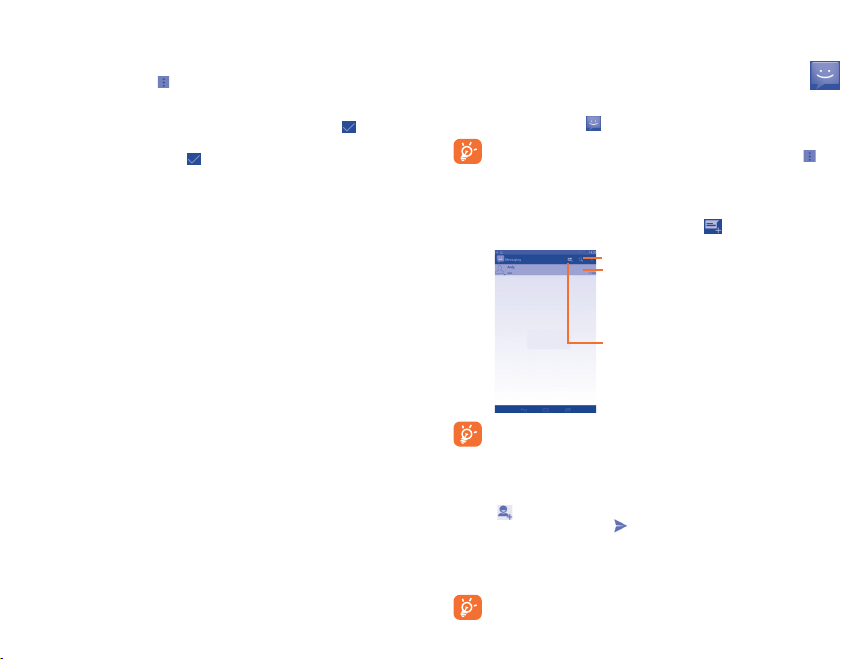
You can create, edit and receive SMS and MMS with this tablet.
To access this feature, touch
All messages you receive or send out can be saved to tablet memory or SIM
card. To consult the SMS messages stored in SIM card, touch from
Messaging screen, then touch Settings\Text message (SMS)\Manage SIM
messages.
4.1.1 Write message
On message list screen, touch the new message icon to write text/multimedia
messages.
For saved contacts, touch the photo to open the Quick Contact panel to
communicate with the contact. For unsaved contacts, touch the photo to add
the number to your People.
Sending a text message
Enter the mobile number of the recipient on Type person's name or number bar
to add recipients, touch Type text message bar to enter the text of
or touch
the message. When finished, touch to send the text message.
An SMS message of more than 160 characters will be charged as several SMS. When
the total number of characters you have entered is approaching the 160-character
limit, a counter will appear upon the Send option of the text box to remind you how
many characters are allowed to be entered in one message.
Specific letters (accent) will increase the size of the SMS, which may cause
multiple SMS to be sent to your recipient.
from the Apps menu.
Touch to search in all messages.
• Touch to view the whole message
thread.
• Touch & hold to delete message or
add shortcut.
Touch to create a new message.
Page 14

Sending a multimedia message
MMS enables you to send video clips, images, photos, animations, slides and sounds to
other compatible mobiles and e-mail addresses.
An SMS will be converted to MMS automatically when media files (image, video, audio,
slides, etc.) are attached or subject or email addresses are added.
To send a multimedia message, enter the recipient's number in the Type person's
name or number bar, touch Type text message bar to enter the text of the
message, touch the Menu key to open the option menu, select Add subject to insert
a subject, and touch
When finished, touch
Attach options:
• Pictures Access Gallery application or File manager to select a
• Capture picture Access Camera to capture a new picture for attaching.
• Videos Access Gallery application or File manager to select a video
• Capture video Access Camcorder to record a new video for attaching.
• Audio Access to select an audio file as attachment.
• Record audio Enter Sound Recorder to record a voice message for
• Slideshow Enter Edit slide show screen, touch Add slide to create
• Contact Access People application to select one or more
• Calendar Access Calendar application to select one or more
to attach picture, video, audio and so on.
to send the multimedia message.
picture as attachment.
as attachment.
attaching.
a new slide, and touch currently existing slide to edit it
(see following picture). Touch the Menu key to get more
actions, like setting the slide duration, adding music, etc.
contact(s) to attach.
event(s) to attach.
4.1.2 Manage messages
When receiving a message, an icon will appear on status bar as notification. Drag
down the status bar to open the Notification panel, touch the new message to open
and read it. You can also access the Messaging application and touch the message
to open.
Messages are displayed in conversational order.
25 26
To reply to a message, touch the current message to enter message-composing screen,
enter the text, then touch
Touch and hold an SMS in message details screen. The following message options are
available for selection.
• Copy This option displays when the message is an SMS. Copy the
• Forward Touch to forward the message to another recipient.
• Lock/Unlock
message
• Save message to
SIM card
• View message
details
• Delete message Delete the current message.
• Select text Touch to select the message text to copy, cut, add to
.
current message content. You can paste it to the enter bar
of the new message you are going to compose.
Touch to lock/unlock the message so it can't/can be deleted
if you reach maximum number of stored messages.
This option displays when the message is an SMS. Touch to
save the message to SIM card.
Touch to view details of the message.
dictionary, etc.
4.2 Gmail/Email
The first time you set up your tablet, you can select to use an existing Gmail or to
create a new Email account.
4.2.1 Gmail .......................................................................
As Google's web-based email service, Gmail is configured when you first set up your
tablet. Gmail on your tablet can be automatically synchronized with your Gmail
account on the web. Unlike other kinds of email account, each message and its replies
in Gmail are grouped in your inbox as a single conversation; all emails are organized
by labels instead of folders.
To access Gmail
Gmail displays messages and conversations from one single Gmail account at a time, if
you own more than one account, you can add a new one by touching the Menu key and
selecting Settings from Inbox screen, then touch ADD ACCOUNT. When finished,
you can switch accounts by touching the account name from Inbox screen, and touch
the account you want to view.
To create and send emails
• Touch the icon
from Inbox screen.
Page 15
• Enter recipient(s)’s email address in To field, and if necessary, touch the Menu key
and select Add Cc/Bcc to add a copy or a blind copy to the message.
• Enter the subject and the content of the message.
• Touch the icon
• Finally, touch the icon
• If you do not want to send the mail out right away, you can touch the Menu key
and select Save draft or touch Back key to save a copy. To view the draft, touch
the icon
If you do not want to send or save the mail, you can touch the Menu key and then
select Discard.
To add a signature to emails, touch the Menu key and select Settings from inbox
screen, choose an account, then touch Signature.
To receive and read your emails
When a new email arrives, you will be notified by a ringtone or vibration, and an icon
will appear on Status bar.
Touch and drag down the Status bar to display the Notification panel, touch the new
email to view it. Or you can also access the Gmail Inbox label and touch the new
mail to read it.
You can search for an email by sender, receiver, subject, etc.
• Touch the icon
• Enter the keyword you want to search for in the searching box and touch
the soft keyboard.
To reply or forward emails
• Reply
• Reply all
• Forward
Managing Gmails by Labels
To conveniently manage conversations and messages, you can organize them using
a Label.
To label a conversation when reading a conversation’s messages, touch the icon
select the label to assign to the conversation.
to add an attachment.
to send.
, then select Drafts.
from Inbox screen.
When viewing an email, touch
this mail.
to send message to all people in a mail loop.
Touch
Touch
to forward the received mail to other people.
in
to reply the sender of
and
27 28
To view conversations by labels when viewing your inbox or another conversation
list, touch the icon
To manage labels, touch MANAGE LABELS from Labels screen.
Mark the checkbox to select email to activate batch mode, and generate
the following options:
•
•
•
•
/
•
• Mark as (not)
important
• Mute To mute the entire conversation. When muted, new mails
• Report spam To report the email message/conversation as spam.
• Report phishing To report the email message/conversation as phishing.
, then touch a label to view a list of conversations with that label.
Touch to archive the email message. To display the archived
messages, you can touch in Inbox screen then touch
All mail.
Touch to delete the email message.
Touch to add or change the label of the email message or
conversation.
Touch to mark an email message as read or unread.
To assign a star or remove the star from the conversation.
To mark the email as important or not important.
related to this conversation will not be displayed in Inbox,
but archived.
4.2.2 Email ........................................................................
Besides your Gmail account, you can also set up external POP3 or IMAP email
accounts in your tablet.
To access this function, touch Email from Home screen.
An email wizard will guide you through the steps to set up an email account.
• Enter the email address and password of the account you want to set up.
Page 16
• Touch Next. If the account you entered is not provided by your service provider in
the tablet, you will be prompted to go to the email account settings screen to enter
settings manually. Or you can touch Manual setup to directly enter the incoming
and outgoing settings for the email account you are setting up.
• Enter the account name and display name in outgoing emails.
• To add another email account, you can touch Menu key
Add account on the right of the title to create.
To create and send emails
• Touch the icon
• Enter recipient(s) email address(es) in To field.
• If necessary, touch Add Cc/Bcc to add a copy or a blind copy to the message.
• Enter the subject and the content of the message.
• Touch Menu key
• Finally, touch
• If you do not want to send the mail right away, you can touch Menu key
select Save draft to save a copy.
from Inbox screen.
, touch Attach file to add an attachment.
to send.
and Settings. Touch
and
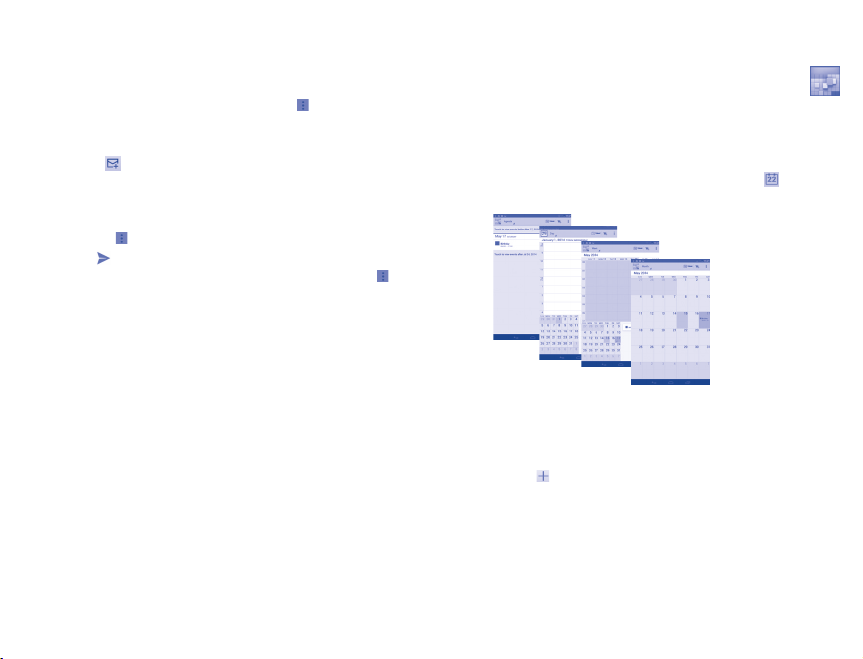
Calendar & Time ........................................
5
5.1 Calendar .......................................................
Use Calendar to keep track of important meetings, appointments, etc.
5.1.1 Multimode view
You can display the Calendar in daily, weekly, monthly, or agenda view.
Touch the month label on the top of the screen to change your Calendar view, and
a drop-down menu will display for you to choose. Touch the icon
Today's view.
Agenda view
Day view
Week view
Month view
In Agenda, Day or
Week view touch
an event to view
its details.
Touch a day in Month view
to open that day's events.
5.1.2 To create new events
You can add new events from any Calendar view.
• Touch the icon
• Fill in all required information for this new event. If it is a whole-day event, you
can select All day.
• When finished, touch DONE from the top of the screen.
To quickly create an event from Day, Week view screen, touch and hold an empty spot
or an event to open Option menu, then touch New event to enter the event details
screen of the time you have previously selected. Or you can also touch the empty spot
to select the target area which will turn blue, and tap again to create the new event.
to access new event edit screen.
to return to
29 30
Page 17

5.1.3 To delete or edit an event
To share, delete or edit an event, touch the event to enter details screen, touch the
icon to share the event to other people by Bluetooth, Email and messaging, etc.,
touch the icon to edit the event, and touch the icon to delete.
5.1.4 Event reminder
If a reminder is set for an event, the upcoming event icon will appear on Status bar
as a notification when the reminder time arrives.
Touch and drag down the status bar to open the notification panel, touch event name
to view Calendar notification list.
Touch Back key to keep the reminders pending on the status bar and the notification
panel.
Important options by touching the Menu key from Calendar main screen:
• Refresh To refresh the calendar
• Search To search in the calendar
• Settings To make a series of Calendar settings
• Clear events To clear the selected events
• Go to To jump to the date you set
5.2 Clock .............................................................
Time application includes four applications – World clock, Alarm, Timer and
Countdown.
5.2.1 To set an alarm
From Clock screen, touch to enter Alarm screen, touch and select Add
alarm to add a new alarm. Following options will show:
• Time Enter the number to set time
• Repeat Touch to select days you want alarm to work
• Ringtone Touch to select a ringtone for the alarm
• Label Touch to set a name for the alarm
When finished, touch OK to confirm.
Touch and hold on a currently existing alarm and touch Delete alarm to delete
the selected alarm.
5.2.2 To adjust alarm settings
Touch the icon from Alarm screen, then select Settings. The following options
can now be adjusted:
• Silence after Select to play alarm with sound or vibration even when the
• Snooze length Touch to set temporary turn off time of an alarm
• Alarm volume Touch to set the volume of alarms
• Volume buttons Touch to set side Volume up/down key behaviors when
Getting connected ..............................
6
To connect to the internet with this tablet, you can use GPRS/EDGE/3G/4G networks
or Wi-Fi.
tablet is in Silent mode
alarm sounds: Snooze, Dismiss or Do nothing.
6.1 Connecting to the Internet
6.1.1 GPRS/EDGE/3G/4G
The first time you turn on your tablet with SIM card inserted, it will automatically
configure network service: GPRS, EDGE, 3G or 4G. If the network is not connected,
you can touch on quick setting panel.
To check the network connection you are using, then touch Settings\More...\
Mobile networks\Access Point Names or Network operators.
To create a new access point
A new GPRS/EDGE/3G/4G network connection can be added to your tablet with
the following steps:
• Drag down the Quick setting panel and touch
• Touch More...\Mobile networks\Access Point Names
• Touch Menu key and select New APN.
• Enter the required APN information.
• When finished, touch the Menu key and select Save.
to access Settings.
31 32
Page 18
To activate/deactivate Data roaming
When roaming, you can decide to connect/disconnect to a data service.
• Drag down the Quick setting panel and touch
• Touch SIM management\Roaming\Data roaming.
• Touch to select from popup options: Once, Always and Never.
• When Data roaming is deactivated, you can still perform data exchange with a Wi-Fi
connection (refer to "6.1.2 Wi-Fi").
to access Settings.
6.1.2 Wi-Fi
Using Wi-Fi, you can connect to the Internet when your tablet is within a range of
wireless network, and also, Wi-Fi can be used on your tablet even without a SIM
card inserted.
To turn Wi-Fi on and connect to a wireless network
on quick setting panel to get to Settings.
• Touch
• Touch the switch
• Touch Wi-Fi, the detailed information of detected Wi-Fi networks is displayed in
the Wi-Fi networks section.
• Touch a Wi-Fi network to connect. If the network you selected is secured, you are
required to enter a password or other credentials (you may contact your network
operator for details). When finished, touch Connect.
To add a Wi-Fi network
When Wi-Fi is on, you may add new Wi-Fi networks according to your preference.
• Drag down the Quick setting panel and touch
• Touch Wi-Fi, and then touch
• Enter the name of the network and any required network information.
• Touch Save.
When successfully connected, your tablet will be connected automatically the next
time you are within range of this network.
beside Wi-Fi to turn on/off Wi-Fi.
to access Settings.
.
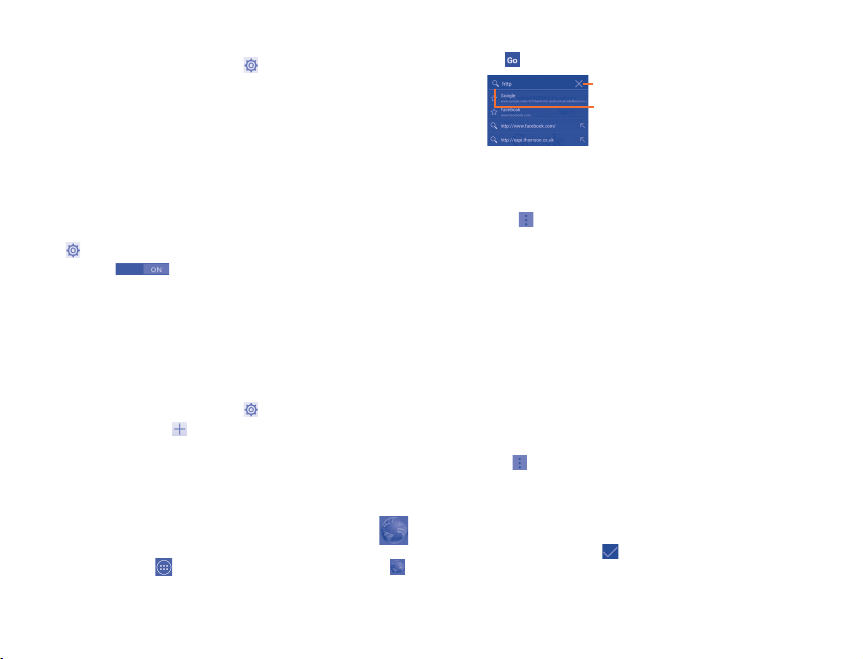
6.2 Browser .........................................................
Using Browser, you can enjoy surfing the Web.
To access this function, touch from Home screen and then touch Browser icon .
33 34
To go to a web page
On Browser screen, touch the URL box at the top, enter the address of the web page,
then touch
The URL bar will hide after a few seconds. To show the URL bar, you can touch and
slide down the screen.
To set homepage
• Touch the
• Choose a page or most visited website as your homepage.
• If you choose Other, enter the URL of the website you want to set as your
to confirm.
Touch to delete all contents
Touch to search
General\Set home page.
homepage, touch OK to confirm.
from Browser screen to display option menu, touch Settings\
6.2.1 Viewing web pages
When opening a website, you can navigate on web pages by sliding your finger on the
screen in any direction to locate the information you want to view.
To zoom in/out of a web page
Pinch/Spread your finger on the screen to zoom out/in of the web page.
To quickly zoom into a section of a web page, double-tap on the section you want to
view. To return to normal zoom level, double-tap again.
To find text on a web page
• Touch the
• Enter the text or phrase you want to find.
• The first word with matching characters will be highlighted on the screen, and
subsequent matches will be boxed.
• Touch the up or down arrow to switch to the previous or next matching items.
• When finished, you can touch
Further operations for the text on a web page
You can copy, share or search the text from a web page:
• Touch and hold the text to highlight the text.
from web page screen, then select Find on page.
or the Back key to close the search bar.
Page 19

• Move the two tabs to select the text.
• Touch SELECT ALL to select all words in this web screen.
• Touch
to copy the selected text.
• Touch
to show further actions, including find, share and search on the page
or the web.
• When finished, touch
To open new window/switch between windows
Multiple windows can be opened at the same time for your convenience.
• Touch
to open a new window.
• Touch the
• To close a window, touch
Touch the icon on the left of the URL, you can view more information about
the current page.
or the Back key to deactivate the mode.
and select New incognito tab to open a window without any trace.
on the window you want to close or slide it sideways.
6.2.2 Manage links, history and downloads
To manage a link, address displayed on a web page
• Link Touch the link to open the web page.
• Address Touch to open Google Maps and locate the address.
To view Browser history
• Touch the icon
• Touch History tab to view browser history.
• Touch Saved pages to view the pages you've saved.
To download a web application/view your downloads
Before downloading a web application, you need to enable your tablet to install web
applications (touch Settings\Security, mark the checkbox of Unknown sources,
finally touch OK to confirm).
To download an item, touch the item or the link you want to download.
To cancel a download, touch the downloaded item from the Notification panel, select
the item to be cancelled, and touch
To view items you have downloaded, touch the application Downloads.
Touch and hold the link to open options for further operation, like
open in new window, save link, copy link URL, etc.
from Browser screen.
to confirm.
35 36
6.2.3 Manage bookmarks
To bookmark a web page
• Open the web page you want to bookmark.
• Touch the star on the right of link, or from the History screen, touch the star
beside the URL.
• Enter the name and the location if needed and touch OK to confirm.
To open a bookmark
• Touch the icon
• Touch the bookmark you want to open.
• You can also touch and hold to display the options screen, then touch Open or
Open in new window.
To edit a bookmark
• Touch the icon
• Touch and hold the bookmark you want to edit.
• Touch Edit bookmark, and input your changes.
• When finished, touch OK to confirm.
to enter the Bookmarks screen.
to enter the Bookmarks screen.
6.2.4 Settings
A series of settings are available for your adjustment. To access Browser settings,
touch from Browser screen, and select Settings.
General
• Set home page Touch to set homepage.
• Form auto-fill Mark the checkbox to fill out web forms with a single touch.
• Auto-fill text Touch to set up text to auto-fill in web forms.
6.3 Connecting to Bluetooth devices
Bluetooth is a short-range wireless communication technology that you can use to
exchange data, or connect to other Bluetooth devices for various uses.
To access this function, drag down the Quick setting panel and touch
Settings. Then touch Bluetooth, your tablet and other available ones will display
on the screen.
to access
Page 20

To turn on Bluetooth
• Drag down the Quick setting panel and touch
• Touch
To make your tablet more recognizable, you can change your tablet name which is
visible to others.
• Touch
• Enter a name, and touch Rename to confirm.
To make tablet visible
• Touch
To pair/connect your tablet with a Bluetooth device
To exchange data with another device, you need to turn Bluetooth on and pair your
tablet with the Bluetooth device with which you want to exchange data.
• Drag down the Quick setting panel and touch
• Touch Bluetooth.
• Touch SEARCH FOR DEVICES.
• Touch a Bluetooth device you want to be paired with in the list.
• A dialog will popup, touch Pair to confirm.
• If the pairing is successful, your tablet connects to the device.
To disconnect/unpair from a Bluetooth device
• Touch the Settings icon
• Touch Unpair to confirm.
to activate/deactivate Bluetooth function.
and select Rename tablet.
and select Visibility timeout to select the visible time.
beside the device you want to unpair.
to access Settings.
to access Settings.
6.4 Connecting to a computer
With the USB cable, you can transfer media files and other files between microSD
card/internal storage and computer.
Before using MTP or PTP you should firstly mark USB debugging.
• To access this function, touch Settings\About tablet, then touch Build number
7 times. Now you may touch Settings\Developer options\USB debugging.
For the operating system Windows XP or lower, you should download and install
Windows Media Player 11 on your computer from the following link: http://
windows.microsoft.com/zh-CN/windows/download-windows-media-player.
37 38
To locate the data you have transferred or downloaded in the internal storage, touch
File Manager, all data you have downloaded is stored in File Manager, where you
can view media files (videos, photos, music and others), rename files, install applications
into your tablet, etc.
To format a microSD card
• Drag down the Quick setting panel and touch
• Touch Storage.
• Touch Erase SD card. On the screen a popup warns you that formatting the
microSD card will erase its contents, touch
to access Settings.
.
6.5 Sharing your tablet's mobile data connection
You can share your tablet's mobile data connection with a single computer via a USB
cable (USB tethering) or with up to eight devices at once by turning your tablet into
a portable Wi-Fi hotspot.
The functions below may incur additional network charges from your
network operator. Extra fees may also be charged in roaming areas.
To share your tablet's data connection via USB
Use the USB cable that came with your tablet to connect it to a USB port on your
computer.
• Drag down the Quick setting panel and touch
• Touch More...\Tethering & portable hotspot.
• Mark\Unmark the checkbox of USB tethering to activate/deactivate this function.
To share your tablet's data connection as a portable Wi-Fi hotspot
• Drag down the Quick setting panel and touch
• Touch More...\Tethering & portable hotspot.
• Touch the switch
To rename or secure your portable hotspot
When Portable Wi-Fi hotspot is activated, you could change the name of your tablet's
Wi-Fi network (SSID) and secure its Wi-Fi network.
• Drag down the Quick setting panel and touch
• Touch More...\Tethering & portable hotspot\Wi-Fi hotspot.
• Touch Set up Wi-Fi hotspot to change the network SSID or set your network
security.
• Touch Save.
beside Wi-Fi hotspot to activate/deactivate this function.
to access Settings.
to access Settings.
to access Settings.
Page 21

Google Play Store
7
Google Play Store is an online software store, where you can download and install
applications and games to your Android Powered Tablet.
To open Google Play Store:
• Touch Google Play Store from extended screen.
• For the first time you access Google Play Store, a screen with terms of service pops
up for your attention, touch Accept to continue.
Touch the Menu key, then select Help to enter Google Play Store help page for more
information on this function.
(1)
.....................
7.1 Locate the item you want to download and
install
Google Play Store home page provides several ways to find applications. It show
applications and games in categorized listings.
Touch the Menu key and select My apps to see all your downloads.
Touch to search in Google Play Store.
Slide up and down to see all categories.
Touch a category on Google Play Store screen to browse its contents. You can also
select a subcategory if there is any. Within each category you can select to view items
sorted by Top free, Top new free, Trending, etc.
Touch the Google Play Store icon
to return to the previous screen.
on the top left of the screen or touch Back key
7.2 Download and install
To download & install:
• Navigate to the item you want to download, and select to enter the details
screen from which you can read its description, overall rating or comments, view
developer’s information, etc.
• Touch Install to preview the functions and data the application can access on your
tablet if you install it.
• Touch Accept & download.
• The progress of the download will show on the details screen, touch
downloading the item. You can also access this screen through Notification panel.
• After download and installation have finished, you will see a notification icon
on the status bar.
Be especially cautious with applications that have access to many functions or
to a significant amount of your data. Once you accept, you are responsible for
results of using this item on your tablet.
To open the application you have downloaded:
• On Google Play Store screen, touch
• Touch the installed application in the list, then touch Open.
To buy an application
On Google Play Store, some applications are labeled as free, while some of them
are to be paid for before downloading and installing.
• Touch the application you want to buy.
• Touch the price on the up-right of the screen to preview the functions and data the
application can access on your tablet if you install it.
• Touch Continue to confirm.
• When making your first purchase, you are required to input your credit card
information and to log in to Google payment and billing service.
• If your account has multiple credit card accounts, select one to proceed.
• Select the Terms of service link and read the document. When finished, touch
Back key.
• Mark the checkbox if you agree with the terms of service.
• Touch Buy now at the bottom of the screen.
When finished, Android downloads the application.
(1)
and select My apps.
to stop
(1)
Depending on your country and operator.
39 40
(1)
Google Paid applications may not be available to users in some countries.
Page 22

7.3 Manage your downloads
After you downloaded and installed an application, the following further operations
are available for your selection.
View
On Google Play Store screen, touch the Menu key and select My apps.
Uninstall
On Google Play Store screen, touch the Menu key and select My apps. Touch the
application you want to uninstall to enter the details screen, touch Uninstall, and
finally touch OK to confirm.
Refund
On Google Play Store screen, touch the Menu key and select My apps. Touch the
application you want to uninstall for a refund, touch Refund, and finally touch OK
to confirm.
Update notification
On Google Play Store screen, touch the Menu key and select My apps. Touch the
Menu key and select Settings\Notifications to enable update notification.
Auto update
To auto update all installed applications, touch the Menu key and select My apps from
Google Play Store screen. Touch the Menu key and select Settings\Auto-update
apps to enable this function.
To auto update one specific application, mark the checkbox of Allow automatic
updating from the details screen,
Rate and review
Open the details screen for an application, touch the stars
RATE & REVIEW to award and input comments, touch OK to confirm.
Flag
You can report an inappropriate application to Google Play Store by flagging it.
Open the details screen for the application, scroll to the bottom and touch Flag as
inappropriate, enter the reason and finally touch Submit.
Multimedia applications
8
under
8.1 Camera .........................................................
Your tablet is fitted with a Camera for taking photos and shooting videos.
Before using the Camera, remove the plastic film before use to avoid it affecting your
picture quality.
41 42
Touch
from Home screen, then touch to enter the camera interface.
to select the camera mode:
Touch
Select to enter the camera mode.
Select to enter the video mode.
Select to enter the panorama mode
To take a picture
The screen acts as the viewfinder. First position the object or landscape in the
viewfinder, touch
To shoot a video
First position the object or landscape in the viewfinder, and touch
recording. Touch to finish recording and save the video.
Further operations when viewing a picture/video you have taken
• Touch the icons below the screen to share and edit the photo or video you have
taken.
• Touch the photo icon to access Gallery.
icon to take the picture which will be automatically saved.
icon to start
8.1.1 Settings in framing mode
Before taking a photo/shooting a video, touch the icon to adjust a number of
settings in framing mode.
Back camera shooting mode
Touch the icon
• Wide screen Touch to turn on/off the full screen preview mode.
• Shutter sound Touch to turn on/off the shutter sound.
• Panorama Touch to turn on/off the panorama function. Press the
to access camera settings with the following options:
Shutter button or the Volume key to start taking
panoramic photo and move the tablet towards your
capture direction and overlap the two arrows. Once the
nine slots below are fully filled, the tablet will automatically
save the photo.
Page 23

• Night Touch to turn on/off night mode.
Front camera shooting mode
Touch the icon
the icon
• Make up Touch to turn on/off the face beauty function.
• Expression
(4-shot)
to choose front/rear camera. Switch to the front camera, touch
to access camera settings with the following options:
Touch to turn on/off expression (4-shot) function and
once four photos are taken, the tablet will automatically
synthesize and save in one picture.
8.2 Gallery ..........................................................
Gallery acts as a media player to view photos and videos. In addition, a set of further
operations to pictures and videos are available for your choice.
Touch to select
categories: Albums,
Locations, Times,
People, Tags.
To view a picture/play a video
Pictures and videos are displayed by albums in Gallery.
• Touch an album and all pictures or videos will spread the screen.
• Touch the picture/video directly to view or play it.
• Slide left/right to view previous/next pictures or videos.
Working with pictures
You can work with pictures by editing them, sharing them with friends, setting them
as contact photo or wallpaper, etc.
Touch
icon and select Edit, more options will display as follows:
43 44
Touch to open camera.
Touch the album to
spread it apart.
Slide left or right to
view more albums.
Touch to go back to picture display screen.
Touch to undo the previous modification.
Touch to redo the previous modification.
Touch to save the modified picture.
Batch operation
Gallery provides a multi-select function so that pictures/videos could be worked in
batches.
Open the main Gallery window or an album, touch
or Select item to activate batch operation mode (you can also touch and hold one
album/picture), then touch albums/pictures you want to work on. Touch icon to
delete selected ones. Touch to share selected ones.
icon and select Select album
8.3 Play Music ......................................................
Using this menu, you can play music files stored on the microSD card or the tablet
storage. Music files can be downloaded from computer to tablet by using a USB cable.
You will find four categories in which all songs are classified: Artists, Albums, Songs
and Playlists. Slide left and right to view all. Touch
to shuffle all songs.
8.3.1 Playing music
Touch a song to play it.
icon and select Shuffle all
Page 24

8.4 Video Player .................................................
Video player is a small built-in video player that lists all your videos.
Touch an item from the list to play. Use Pause button to pause the video and touch a
point on the timeline to jump to the point you like.
Touch to play the current playlist in shuffle mode (tracks are played in random
order).
Touch to skip to the previous track in the album, playlist, or shuffle.
Touch to pause/resume playback.
Touch to skip to the next track in the album, playlist, or shuffle.
Touch to select repeat mode: Repeating all songs, repeating current song, or
Repeat is off.
Touch to show the playing song.
While playing songs with Play Music, the operation of pause, play or skip is
still available even if the screen is locked.
8.3.2 Working with playlists
Playlists allow you to conveniently organize all songs stored in the SD card or tablet
storage.
You can create a new playlist and add songs to it. Also, you can delete and rename
the playlist.
To create a playlist
Touch Recently added from Playlists screen, touch the
as playlist, enter the name and finally touch Save.
To delete a playlist
Touch and hold a playlist to show the menu, then touch Delete.
To rename a playlist
Touch and hold a playlist to show the menu, then touch Rename. When finished,
touch Save to confirm.
45 46
icon and then select Save
Google Maps ..................................
9
9.1 Get My Location
9.1.1 Choose a data source to decide My Location
Drag down the Quick setting panel and touch to access Settings, touch Location
access.
Mark the checkbox of Access to my location.
Turn on GPS satellites to set GPS as My Location data source.
9.1.2 Open Google Maps and view My Location
Touch Maps from the Main Menu.
Touch
icon on the map to view My Location.
The map will then center on a blue dot with a blue circle around. Your actual position
is within the blue circle.
To move the map, drag the map with your finger.
To zoom in/out, pinch or spread your fingers, or you can also zoom in by doubletapping a location on screen.
Page 25

To clear the map history, touch
then touch .
and choose Settings, and select Maps history,
9.2 Search for a location
Touch the search icon to activate search function.
In the search box, enter an address, city name or a local business name.
Touch the search icon to search, and the results will be displayed on the map as red
dots. You can touch one to show a label with more information.
Touch to show more
information
9.3 Star a location
Just like bookmarking a web address on the Internet, you can star any position on
the map for later use.
9.3.1 How to star (or unstar) a location
Touch a location on the map.
Touch the gray star at the top of the screen to star the location. (Or touch a gold
star to unstar that location.)
47 48
9.3.2 View a list of starred items
Touch the upper-left corner, and touch Saved Places.
The list of starred items and addresses will be shown.
Touch a location in the list to view it.
9.4 Get driving, public transportation or walking
directions
9.4.1 Get suggested routes for your trip
Touch icon from Maps screen.
• Touch enter, use, select a starting point on the map, select a starred item, select an
address from contacts and use search history.
• Do the same as starting point for the ending point.
• To swap starting point and ending point, touch
• A couple of suggested routes will appear in a list. Touch any routes to view their
respective detailed directions.
To get reverse directions for a route you’ve already made, simply open that route’s
directions window and touch
again.
. No need to enter your start point and end point
.
Page 26
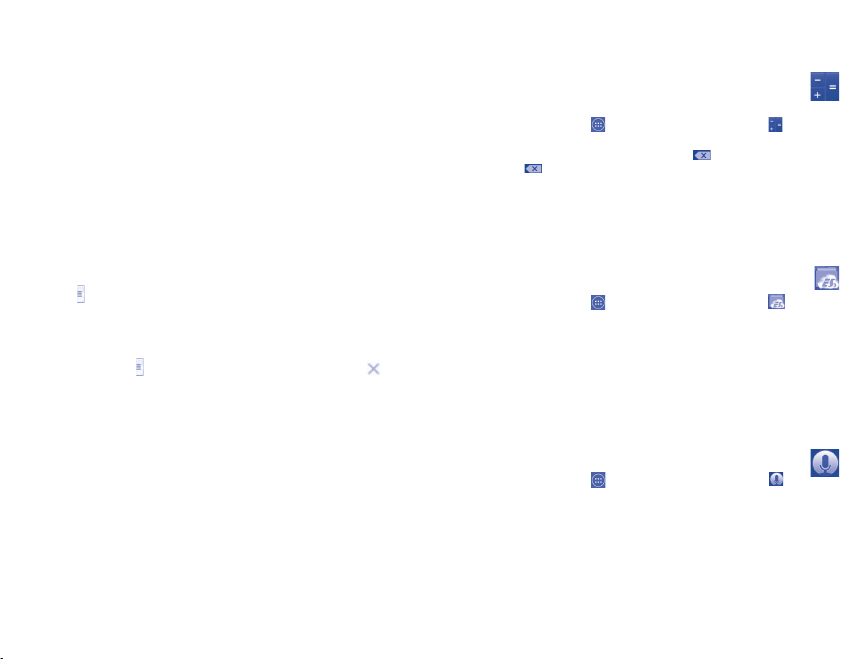
9.4.2 Preview suggested routes and decide on a route
more preferable or feasible to you
• Touch left or right arrow to preview the next or previous leg of your route.
• You can view turn-by-turn directions, estimated distance and possible arrival time
in a list by touching DIRECTIONS LIST, touch Back key or MAP VIEW to
return to previous view.
When selecting a more preferable or feasible route, distance and time will be the
two most important factors for your evaluation. Distance and estimated time will be
displayed at the top of the screen.
9.4.3 Search for locations along your route
Please refer to "9.2 Search for a location" for detailed information.
9.5 Arrangement of Layers
Layers allow you to view locations and additional information overlaid on the map.
9.5.1 To view multiple layers
Touch icon from Maps screen. All available layers are listed (such as Traffic, Public
transit, Bicycling and Satellite), and view by selected.
9.5.2 To clear the map
After getting directions or searching on a map, you can clear the markers/layers that
have been drawn: Touch
and Settings, select Maps history, then touch .
Others ..................................................
10
10.1 Calculator .....................................................
With Calculator, you can solve many mathematical problems.
To access this function, touch
Enter a number and the arithmetic operation to be performed, enter the second
number, then touch "=" to display the result. Touch
touch and hold to delete all at one time.
To cut, copy and paste texts by touching and holding the entering bar.
• Cut To cut selected text
• Copy To copy selected text
from Home screen and then touch .
to delete digits one by one,
(1)
10.2 File Manager ..................................................
To access this function, touch from Home screen and then touch .
File Manager works with both external SD card and internal storage.
File Manager displays all data stored on both microSD card and internal storage,
including applications, media files; videos, pictures or audios you have captured; other
data transferred via Bluetooth, USB cable, etc.
An application could be found on File Manager when downloading from PC to
microSD, then touch to install it.
File Manager allows you to perform the following operations: create (sub) folder, open
folder/file, view, rename, move, copy, delete, play, share, etc.
10.3 Sound Recorder ...........................................
To access this function, touch from Home screen and then touch .
Sound Recorder allows you to record voice/sound.
49 50
Page 27
10.4 Other applications
The previous applications in this section are preinstalled on your tablet. To read a
brief introduction of the preinstalled 3rd party applications, please refer to the leaflet
provided with the tablet. You can also download thousands of 3rd party applications
by going to Google Play Store on your tablet.
Settings ..........................................
11
Drag down the Quick setting panel and touch to access Settings.
(1)
.........................................
11.1 Wireless & networks
11.1.1 Wi-Fi
Using Wi-Fi you can now surf the Internet without using your SIM card whenever you
are in range of a wireless network. The only thing you have to do is to enter the Wi-Fi
screen and configure an access point to connect your tablet to the wireless network.
For more details on using Wi-Fi, please refer to "6.1.2 Wi-Fi".
11.1.2 Bluetooth
Bluetooth allows your tablet to exchange data (videos, images, music, etc.) in a small
range with another Bluetooth supported device (tablet, computer, printer, headset,
car kit, etc.).
For more information on Bluetooth, please refer to "6.3 Connecting to Bluetooth
devices".
11.1.3 Data usage
Mark the checkbox of Set mobile data limit, then you can drag the limit line and the
warning line according to your limitation. Your mobile data connection will be disabled
when the specified limit is reached. You can also choose a data usage cycle to view the
statistics and related applications of used data by your tablet.
Data usage is measured by your tablet, and your carrier may count differently.
Please consider using a conservative limit.
(1)
Application availability depends on country and operator.
51 52
11.2 Tablet
11.2.1 Sound
Use the Sound settings to configure volume and ringtones for different events and
environments.
Volume
Volume settings can make user adjust the volume of ringtone, notifications, music,
video and alarms, etc.
System
• Touch sounds Mark the checkbox to enable sounds when touching the
• Screen lock sound Mark the checkbox to enable sounds when locking and
11.2.2 Display
• Lock screen
notifications
• Wallpaper Touch to set the wallpaper.
• Auto-rotate
screen
• Brightness Touch to adjust the brightness of the screen.
• Daydream Turn Daydream on. when the phone is docked and/or
• Font size Touch to set the font size.
• Sleep Touch to set time to sleep.
• Wireless display
11.2.3 Storage
Storage is used to monitor the total and available space on your tablet and on your
microSD card; to manage your microSD card.
If a warning message comes up saying that tablet memory is limited, you are
required to free up space by deleting some unwanted applications,
downloaded files, etc.
action button.
unlocking the screen.
Mark the checkbox to show notifications on lock screen.
Touch to select whether rotate screen automatically.
sleeping, set colors, clock, Google Photos, Photo Frame or
Photo Table as remind.
Page 28

11.2.4 Battery
In battery management screen you can view the battery usage data. The screen also
shows your battery status and how long it has been used since last charging. Touch
one category, then you can learn its specific power consumption.
11.2.5 Applications
Applications is used to view details about the applications installed on your tablet, to
manage their data and force them to stop, and to set whether you want to permit
installation of applications that you obtain from web sites and emails.
11.3 Personal
11.3.1 Location access
GPS satellites
Check to use your tablet’s global positioning system (GPS) satellite receiver to pinpoint
your location within an accuracy as close as several meters ("street level"). The process
of accessing the GPS satellite and setting your tablet's precise location for the first
time will require up to 5 minutes. You will need to stand in a place with a clear view
of the sky and avoid moving. After this, GPS will only need 20-40 seconds to identify
your precise location.
11.3.2 Security
Set up screen lock
• None Touch to disable screen unlock security.
• Slide Touch to enable slide unlock mode.
• Pattern Touch to draw pattern to unlock screen.
• PIN Touch to enter a numeric PIN to unlock screen.
• Password Touch to enter a password to unlock screen.
11.3.3 Language & input
Use the Language & input settings to select the language for the text on your tablet
and for configuring the onscreen keyboard. You can also configure voice input settings
and the pointer speed.
Language
Touch to select the language and the region.
53 54
Default
Touch to select a default input method. Touch Configure input methods to show
all input methods. Touch the settings icon
Android keyboard
The Android keyboard settings apply to the onscreen keyboard that is included with
your tablet. The correction and capitalization features affect only the English version
of the keyboard.
Voice search
Touch to view settings about voice search, such as Language, Speech output, etc.
Text-to-speech output
• Preferred engine
Touch to choose a preferred text-to-speech engine, touch the settings icon
show more choices for each engine.
Speech rate
Touch to open a dialog to select a speech rate for the synthesizer.
• Listen to an example
Touch to play a brief sample of the speech by synthesizer with the current speech rate.
Pointer speed
Touch to open a dialog where you can change the pointer speed, touch OK to confirm.
to configure a certain input method.
to
11.3.4 Backup and reset
Back up my data
Mark the checkbox to back up your tablet’s settings and other application data to
Google Servers, with your Google Account. If you replace your tablet, the settings and
data you’ve backed up are restored onto the new tablet for the first time you sign in
with your Google Account. If you mark this option, a wide variety of settings and data
are backed up, including your Wi-Fi passwords, bookmarks, a list of the applications
you’ve installed, the words you’ve added to the dictionary used by the onscreen
keyboard, and most of the settings that you configure with the Settings application. If
you unmark this option, you will stop backing up your setting, and any existing backups
are deleted from Google Servers.
Back up account
Touch to back up your account.
Page 29

Automatic restore
Mark the checkbox to restore your backed up settings or other data when you
re-install an application.
Factory data reset
Tablet reset will erase all of your personal data from internal tablet storage, including
information about your Google Account, any other accounts, your system and
application settings, and any downloaded applications. Resetting the tablet does not
erase any system software updates you’ve downloaded or any files on your microSD
card, such as music or photos. If you mark the checkbox - Reserve the content of
Tablet storage before touching Reset tablet, any files stored on your tablet’s storage
will not be erased. If you reset the tablet in this way, you’re prompted to re-enter the
same kind of information as when you first started Android.
When you are unable to power on your tablet, there is another way to perform a
factory data reset by using hardware keys. Press the Volume up key and the power
key at same time until the screen lights up.
11.4 Accounts
Use the settings to add, remove, and manage your Email and other supported accounts.
You can also use these settings to control how and whether all applications send,
receive, and synchronize data on their own schedules, and whether all applications can
synchronize user data automatically.
11.5 System
11.5.1 Date & time
Use Date & Time settings to customize your preferences for how date and time are
displayed.
11.5.2 Accessibility
You use the Accessibility settings to configure any accessibility plug-ins you have
installed on your tablet.
11.5.3 Developer options
To access this function, touch Settings\About tablet, then touch Build number 7
times. Now Development is available.
The Developer options screen contains settings that are useful for developing Android
applications. For full information, including documentation of the Android applications and
development tools, see the Android developer web site (http://developer.android.com).
55 56
11.5.4 About tablet
This contains information about things ranging from Legal information, Model number,
Firmware version, Baseband version, Kernel version, Build number to those listed
below:
System updates
Touch to check for system updates.
Status
This contains the status of the Battery status, Battery level, My tablet number,
Network, Signal strength, etc.
Legal information
Touch to view legal information.
Making the most of your tablet ........
12
12.1 FOTA software update capable
Using FOTA Upgrade tool to update your tablet's software.
To access System Updates, please open Settings\About tablet\System
updates. Touch Check for updates, and the tablet will search for the latest
software. If you want to update the system, please touch the button Download,
after downloading, please touch Install to complete the upgrade. Now your tablet's
software is on the latest version.
You should turn on data connection before searching for updates. Settings for autocheck intervals and reminders about upgrades are also available once you restart
the tablet.
If you have chosen auto-check, the icon
the system discovers a new version. Touch the notification to access the System
Updates directly.
Accessories ..........................................
13
The latest generation of ALCATEL ONE TOUCH mobile tablets offers a built-in
handsfree feature that allows you to use the tablet from a distance, placed on a
table for example. For those who prefer to keep their conversations confidential, an
earpiece is also available known as the headset.
1. Charger
2. USB cable
will appear in the status bar when
Page 30

Only use your tablet with the ALCATEL ONE TOUCH, charger and
accessories in your box.
Troubleshooting ..................................
14
Before contacting the service centre, you are advised to follow the instructions below:
• You are advised to fully charge (
• Avoid storing large amounts of data in your tablet as this may affect its performance.
• Use Factory data reset and the upgrade tool to perform tablet formatting or
software upgrading. ALL User tablet data: contacts, photos, messages and files,
downloaded applications will be lost permanently. It is strongly advised to fully
backup the tablet data and profile via Android Manager before doing formatting
and upgrading.
My tablet cannot be switched on or is frozen
• When the tablet cannot be switched on, charge for at least 20 minutes to ensure the
minimum battery power needed, then try to switch on again.
• When the tablet falls into a loop during power on-off animation and the user
interface cannot be accessed, press and hold the Volume down key to enter Safe
Mode. This eliminates any abnormal OS booting issues caused by 3rd party APKs.
• If neither method is effective, please power off the tablet using the Power key and
the Volume up key, (holding both together).
My tablet has not responded for several minutes
• Restart your tablet by pressing and holding the Powe r key.
My tablet turns off by itself
• Check that your screen is locked when you are not using your tablet, and make sure
the Pow er key is not mis-contacted due to unlocked screen.
• Check the battery charge level.
My tablet cannot charge properly
• Make sure that your battery is not completely discharged; if the battery power is
empty for a long time, it may take around 20 minutes to display the battery charger
indicator on the screen.
• Make sure charging is carried out under normal conditions (0°C to +40°C).
• When abroad, check that the voltage input is compatible.
My tablet cannot connect to a network or "No service" is displayed
• Try connecting in another location.
• Verify the network coverage with your operator.
• Check with your operator that your SIM card is valid.
• Try selecting the available network(s) manually
• Try connecting at a later time if the network is overloaded.
My tablet cannot connect to the Internet
• Make sure that the internet access service of your SIM card is available.
) the battery for optimal operation.
57 58
• Check your tablet's Internet connection settings.
• Make sure you are in a place with network coverage.
• Try connecting at a later time or another location.
Invalid SIM card
• Make sure the SIM card has been correctly inserted.
• Make sure the chip on your SIM card is not damaged or scratched.
• Make sure the service of your SIM card is available.
I cannot find my contacts
• Make sure your SIM card is not broken.
• Make sure your SIM card is inserted properly.
• Import all contacts stored in SIM card to tablet.
I am unable to use the features described in the manual
• Check with your operator to make sure that your subscription includes this service.
• Make sure this feature does not require an ALCATEL ONE TOUCH accessory.
I am unable to add a contact in my contacts
• Make sure that your SIM card contacts are not full; delete some files or save the files
in the tablet contacts (i.e. your professional or personal directories).
I cannot access my voicemail
• Make sure your operator’s voicemail number is correctly entered in "Voicemail
number".
• Try later if the network is busy.
I am unable to send and receive MMS
• Check your tablet memory availability as it might be full.
• Contact your network operator to check service availability and check MMS
parameters.
• Verify the server centre number or your MMS profile with your operator.
• The server centre may be swamped, try again later.
SIM card PIN locked
• Contact your network operator to obtain the PUK code (Personal Unblocking Key).
I am unable to connect my tablet to my computer
• Install ALCATEL ONE TOUCH Center.
• Check that your USB driver is installed properly.
• Open the Notification panel to check if the Android Manager Agent has been
activated.
• Check that you have marked the checkbox of USB debugging.
To access this function, touch Settings\About tablet, then touch Build number
for 7 times. Now you may touch Settings\Development\USB debugging.
• Check that your computer meets the requirements for ALCATEL ONE TOUCH
Center Installation.
• Make sure that you’re using the right cable from the box.
I am unable to download new files
• Make sure there is sufficient tablet memory for your download.
Page 31

• Check your subscription status with your operator.
The tablet cannot be detected by others via Bluetooth
• Make sure that Bluetooth is turned on and your tablet is visible to other users (see
"6.3 Connecting to Bluetooth devices").
• Make sure that the two tablets are within Bluetooth’s detection range.
How to make your battery last longer
• Make sure you follow the complete charge time (minimum 2.5 hours).
• After a partial charge, the battery level indicator may not be exact. Wait for at least
20 minutes after removing the charger to obtain an exact indication.
• Adjust the brightness of screen as appropriate
• Extend the email auto-check interval for as long as possible.
• Update news and weather information on manual demand, or increase their auto-
check interval.
• Exit background-running applications if they are not being used for a long time.
• Deactivate Bluetooth, Wi-Fi, or GPS when not in use.
The tablet will become warm following prolonged calls, game playing,
internet surfing or running other complex applications.
• This heating is a normal consequence of the CPU handling excessive data. Ending
above actions will make your tablet return to normal temperatures.
Limited warranty ................................
15
TCT Mobile (US), Inc. warrants to the original retail purchaser of this wireless device
that should this product or part thereof during normal consumer usage and condition
be proven to be defective in material or workmanship that results in product failure
within the first twenty-four (24) months from the date of purchase as shown on your
original sales receipt from an authorized sales agent. Such defect(s) will be repaired or
replaced (with new or rebuilt parts) at the company’s option without charge for par ts
or labor directly related to the defect(s).
Batteries, power adapters, and other accessories sold as in box items are also warranted
against defects and workmanship that results in product failure within the first twelve
(12) months period from the date of purchase as shown on your original sales receipt.
Such defect(s) will be repaired or replaced (with new or rebuilt parts) at the company’s
option without charge for parts or labor directly related to the defect(s).
The limited warranty for your wireless device will be voided if any of the following
conditions occur:
• Non-compliance with the instructions for use or installation, or with technical and
safety standards applicable in the geographical area where your phone is used;
• Connection to any equipment not supplied or not recommended by TCT Mobile
(US), Inc.;
• Modification or repair performed by individuals not authorized by TCT Mobile (US),
Inc. or its affiliates;
• Acts of god such as inclement weather, lightning, power surges, fire, humidity,
infiltration of liquids or foods, chemical products, crash, high voltage, corrosion,
oxidation;
• Removal or altering of the wireless device’s event labels or serial numbers (IMEI);
• Damage from exposure to water or other liquids, moisture, humidity, excessive
temperatures or extreme environmental conditions, sand, excess dust and any
condition outside the operating guidelines;
• Defects in appearance, cosmetic, decorative or structural items such as structural
damage;
• Damage as result of physical abuse regardless of cause.
• If the device is Rooted devices.
There are no express warranties, whether written, oral or implied, other than this
printed limited warranty or the mandatory warranty provided by your jurisdiction.
In no event shall TCT Mobile (US), Inc. or any of its affiliates be liable for incidental
or consequential damages of any nature whatsoever, including but not limited to
commercial loss, to the full extent those damages can be disclaimed by law. Some
locations do not allow the exclusion or limitation of incidental or consequential
damages, or limitation of the duration of implied warranties, so the preceding
limitations or exclusions may not apply to you.
59 60
Page 32

ALCATEL is a trademark of Alcatel-Lucent
and is used under license by
TCT Mobile Limited.
© Copyright 2014 TCT Mobile Limited
All rights reserved
TCT Mobile Limited reserves
the right to alter material
or technical specification
without prior notice.
61
 Loading...