

Page 1
User manual
Page 2

Table of Contents
Safety information ...............................................................................5
General information .......................................................................... 14
Warranty.............................................................................................. 16
Troubleshooting ................................................................................ 18
1 Your device ................................................................................. 22
1.1 Keys and connectors .....................................................22
1.2 Getting started ................................................................23
1.3 Home screen ...................................................................25
2 Text input .................................................................................... 32
2.1 Using Onscreen Keyboard............................................32
2.2 Android keyboard ........................................................... 32
2.3 Text editing ......................................................................33
3 Contacts ..................................................................................... 34
3.1 Consult your contacts ...................................................34
3.2 Adding a contact ............................................................35
3.3 Editing your contacts .....................................................36
3.4 Contacts importing, exporting and sharing ..............36
3.5 Accounts ...........................................................................37
4 Gmail ........................................................................................... 38
5 Messaging .................................................................................. 41
6 Calendar & Time ........................................................................ 42
6.1 Calendar .......................................................................... 42
6.2 Clock ...............................................................................43
7 Getting connected .................................................................... 45
7.1 Connecting to the Internet ..........................................45
7.2 Connecting to Bluetooth devices ..............................46
7.3 Connecting to a computer ...........................................47
7.4 Connecting to virtual private networks ....................48
2
Page 3

8 Play Store ................................................................................. 50
8.1 Locate the item you want to download and install 50
8.2 Download and install .....................................................51
8.3 Manage your downloads ..............................................52
9 Multimedia applications .......................................................... 54
9.1 Camera ...........................................................................54
9.2 Gallery .............................................................................55
10 Maps .......................................................................................... 57
10.1 Get My Location ............................................................. 57
10.2 Search for a location ......................................................58
10.3 Star a location .................................................................59
10.4 Get driving, public transportation or walking
directions ......................................................................................60
10.5 Arrangement of Layers .................................................61
11 Others .......................................................................................... 62
11.1 File Manager .................................................................62
11.2 Other applications .........................................................62
12 Settings ...................................................................................... 63
12.1 Wireless & networks .....................................................63
12.2 Device ...............................................................................64
12.3 Personal ............................................................................66
12.4 System ...............................................................................70
13 Accessories ................................................................................. 73
3
Page 4
www.sar-tick.com
This device meets applicable national SAR limits
of 1.6 W/kg. SAR values can be found on page
8 of this user guide. When carrying the device
or using it while worn on your body, either use
an approved accessory such as a holster or
otherwise maintain a distance of 9 mm from the
body to ensure compliance with RF exposure
requirements. Note that the product may be
transmitting even if you are not using it.
To prevent possible hearing damage, do not
listen at high volume levels for long periods.
Exercise caution when holding your device near
your ear while the loudspeaker is in use.
The tablet contains magnets which may interfere
with other devices and items (such as credit card,
pacemakers, defibrillators, etc.). Please maintain
at least 15 cm of separation between your tablet
and the devices/items mentioned above.
4
Page 5

Safety information
We recommend that you read this chapter carefully before using your
device. The manufacturer disclaims any liability for damage, which
may result as a consequence of improper use or use contrary to the
instructions contained here.
•TRAFFIC SAFETY
Given that studies show that using a device while driving a vehicle
constitutes a real risk, even when the hands-free kit is used (car kit,
headset...), drivers are requested to refrain from using their device
when the vehicle is not parked.
When driving, do not use your device or headphones to listen to
music. Using a headphones can be dangerous and forbidden in some
areas. When switched on, your device emits electromagnetic waves
that can interfere with the vehicle’s electronic systems such as ABS
anti-lock brakes or airbags. To ensure that there is no problem:
- do not place your device on top of the dashboard or within an airbag
deployment area,
- check with your car dealer or the car manufacturer to make sure
that the dashboard is adequately shielded from device RF energy.
•CONDITIONS OF USE
You are advised to switch off the device from time to time to optimize
its performance.
The product shall only be connected to a USB interface of version
USB2.0 or 1.1.
Switch the device off before boarding an aircraft.
Switch the device off when you are in healthcare facilities, except
in designated areas. As with many other types of equipment now
in regular use, these devices can interfere with other electrical or
electronic devices, or equipment using radio frequencies.
Switch the device off when you are near gas or flammable liquids.
Strictly obey all signs and instructions posted in a fuel depot, petrol
station, or chemical plant, or in any potentially explosive atmosphere.
5
Page 6

When the device is switched on, it should be kept at least 15 cm
from any medical device such as a pacemaker, a hearing aid or insulin
pump, etc. In particular when using the device, you should hold it
against the ear on the opposite side to the device, if any.
To avoid hearing impairment, move the device away from your ear
while using the “hands-free” mode because the amplified volume
might cause hearing damage.
Do not let children use the device and/or play with the device and
accessories without supervision.
Please note that your device is a unibody device, the back cover
and battery are not removable. Do not attempt to disassemble your
device. If you disassemble your device the warranty will not apply.
Also, disassembling the device may damage the battery, and may
cause leakage of substances that could create an allergic reaction.
Always handle your device with care and keep it in a clean and dustfree place.
Do not allow your device to be exposed to adverse weather
or environmental conditions (moisture, humidity, rain, infiltration
of liquids, dust, sea air, etc.). The manufacturer’s recommended
operating temperature range is -0°C to +45°C.
At over 45°C the legibility of the device’s display may be impaired,
though this is temporary and not serious.
Do not open, dismantle or attempt to repair your device yourself.
Do not drop, throw or bend your device.
Do not use the device if the glass made screen is damaged, cracked
or broken to avoid any injury.
Do not paint it.
Use only batteries, chargers and accessories which are recommended
by TCL Communication Ltd. and its affiliates and are compatible
with your device model. TCL Communication Ltd. and its affiliates
disclaim any liability for damage caused by the use of other chargers
or accessories.
Remember to make back-up copies or keep a written record of all
6
Page 7

important information stored in your device.
Some people may suffer epileptic seizures or blackouts when
playing video games. These seizures or blackouts may occur even
if a person never had a previous seizure or blackout. If you have
experienced seizures or blackouts, or if you have a family history of
such occurrences, please consult your doctor before playing video
games on your device.
Parents should monitor their children’s use of video games on
the device. All persons should discontinue use and consult a
doctor if any of the following symptoms occur: convulsion, eye or
muscle twitching, loss of awareness, involuntary movements, or
disorientation. To limit the likelihood of such symptoms, please take
the following safety precautions:
- Take a minimum of a 15-minute break hourly.
- Play in a room in which all lights are on.
- Play at the farthest distance possible from the screen.
- If your hands, wrists, or arms become tired or sore while playing,
stop and rest for several hours before playing again.
- If you continue to have sore hands, wrists, or arms during or after
playing, stop the game and see a doctor.
When you play games on your device, you may experience occasional
discomfort in your hands, arms, shoulders, neck, or other parts of your
body. Follow the instructions to avoid problems such as tendinitis,
carpal tunnel syndrome, or other musculoskeletal disorders.
•PRIVACY
Please note that you must respect the laws and regulations in force in
your jurisdiction or other jurisdiction(s) where you will use your device
regarding taking photographs and recording sounds with your device.
Pursuant to such laws and regulations, it may be strictly forbidden
to take photographs and/or to record the voices of other people or
any of their personal attributes, and duplicate or distribute them, as
this may be considered to be an invasion of privacy. It is the user’s
sole responsibility to ensure that prior authorization be obtained, if
necessary, in order to record private or confidential conversations or
take a photograph of another person; the manufacturer, the seller or
vendor of your device (including the operator) disclaim any liability
7
Page 8

which may result from the improper use of the device.
Please note that by using the device some of your personal
data may be shared with the main device. It is under your own
responsibility to protect your own personal data and not share it
with any unauthorized devices or third party devices connected to
yours. For products with Wi-Fi features, only connect to trusted
Wi-Fi networks. Also, when using your product as a hotspot (where
available), use network security. These precautions will help prevent
unauthorized access to your device. Your product can store personal
information in various locations including a SIM card, memory
card, and built-in memory. Be sure to remove or clear all personal
information before you recycle, return, or give away your product.
Choose your apps and updates carefully, and install from trusted
sources only. Some apps can impact your product’s performance and/
or have access to private information including account details, call
data, location details and network resources.
Note that any data shared with TCL Communication Ltd. is stored
in accordance with applicable data protection legislation. For these
purposes, TCL Communication Ltd. implements and maintains
appropriate technical and organizational measures to protect
all personal data, for example against unauthorized or unlawful
processing and accidental loss or destruction of or damage to such
personal data whereby the measures shall provide a level of security
that is appropriate having regard to
(i) the technical possibilities available,
(ii) the costs for implementing the measures,
(iii) the risks involved with the processing of the personal data, and
(iv) the sensitivity of the personal data processed.
You can access, review, and edit your personal information at any
time by logging into your user account, visiting your user profile, or
by contacting us directly. Should you require us to edit or delete your
personal data, we may ask you to provide us with evidence of your
identity before we can act on your request.
•BATTERY
Following new air regulation, the battery of your product is not
8
Page 9
charged. Please charge it first.
Please note your tablet is a unibody device, the back cover and
battery are not removable. Observe the following precautions for
battery use:
- Do not attempt to open the back cover and replace the inner
rechargeable Li-polymer battery. Please contact the dealer to
replace it.
- Do not attempt to eject, replace, or open battery.
- Do not puncture the back cover of your device.
- Do not burn or dispose of your device in household garbage or
store it at temperature above 50°C.
- Dispose of used batteries according to the instructions
This symbol on your device, the battery, and the
accessories means that these products must be taken to
collec tion points at the end of their life:
- Municipal waste disposal centers with specific bins for
these items of equipment.
- Collection bins at points of sale.
They will then be recycled, preventing substances being disposed
of in the environment, so that their components can be reused.
In European Union countries:
These collection points are accessible free of charge.
All products with this sign must be brought to these collection
points.
In non-European Union jurisdictions:
Items of equipment with this symbol are not to be thrown into
ordinary bins if your jurisdiction or your region has suitable
recycling and collection facilities; instead they are to be taken to
collec tion points for them to be recycled.
•CHARGERS
Chargers will operate within the temperature range of: 0°C to
40°C.
9
Page 10

The chargers designed for your device meet with the standard for
safety of information technology equipment and office equipment
use. They are also compliant to the eco design directive 2009/125/
EC. Due to different applicable electrical specifications, a charger
you purchased in one jurisdiction may not work in another
jurisdiction. They should be used for this purpose only.
The charger shall be inst alled near the device and shall be easily
accessible.
•Federal Communications Commission (FCC) Declaration of
Conformity
This device complies with part 15 of the FCC Rules. Operation
is subject to the following two conditions: (1) This device may
not cause harmful interference, and (2) this device must accept
any interference received, including interference that may cause
undesired operation.
This device has been tested and found to comply with the limits
for a Class B digital , pursuant to Par t 15 of the FCC Rules. These
limits are designed to provide reasonable protection against
harmful interference in a residential installation. This equipment
generates, uses and can radiated radio frequency energy and, if
not installed and used in accordance with the instructions, may
cause harmful interference to radio communications. However,
there is no guarantee that interference will not occur in a par ticular
installation If this equipment does cause harmful interference to
radio or television reception, which can be determined by turning
the equipment off and on, the user is encouraged to try to correct
the interference by one or more of the following measures:
- Reorient or relocate the receiving antenna.
- Increase the separation bet ween the equipment and receiver.
- Connect the equipment into an outlet on a circuit different from
that to which the receiver is connected.
- Consult the dealer or an experienced radio/TV technician for
help.
10
Page 11

FCC Caution:
Changes or modifications not expressly approved by the party
responsible for compliance could void the user‘s authority to
operate the equipment.
FCC RF Exposure Information (SAR):
This device is designed and manufactured not to exceed the
emission limits for exposure to radio frequency (RF) energy set
by the Federal Communications Commission of the United States.
During SAR testing, this is set to transmit at its highest certified
power level in all tested frequency bands, and placed in positions
that simulate RF exposure in usage near the body with the
separation of 9 mm.
Although the SAR is determined at the highest cer tified power
level, the actual SAR level of the device while operating can be well
below the maximum value. This is because the device is designed
to operate at multiple power levels so as to use only the power
required to reach the net work. In general, the closer you are to a
wireless base station antenna, the lower the power output.
The exposure standard for wireless devices employs a unit of
measurement known as the Specific Absorption Rate, or SAR. The
SAR limit set by the FCC is 1.6W/kg.
Tests for SAR are conducted using standard operating positions
accepted by the FCC with the device transmitting at it s highest
certified power level in all tested frequency bands.
The FCC has granted an Equipment Authorization for this model
device with all reported SAR levels evaluated as in compliance with
the FCC RF exposure guidelines. SAR information on this model
device is on file with the FCC and can be found under the Display
Grant section of HYPERLINK “http://www.fcc.gov/oet/ea/fccid”
www.fcc.gov/oet/ea/fccid after searching on FCC ID: 2ACCJB066
11
Page 12

For this device, the highest reported SAR value for usage near
the body is:
Maximum SAR for this model and conditions under which it was
9015B (Body) 1.36 W/kg
SAR compliance for body operation is based on a separation
distance of 0.9 cm between the device and the human body.
During use, the actual SAR values for this device are usually well
below the values stated above. This is because, for purposes of
system efficiency and to minimize interference on the network,
the operating power of your device is automatically decreased
when full power is not needed. The lower the power output of the
device, the lower its SAR value.
Body SAR testing has been carried out at a separation distance
of 0.9 cm. To meet RF exposure guidelines during body-worn
operation, the device should be positioned at least this distance
away from the body.
If you are not using an approved accessory ensure that whatever
product is used is free of any metal and that it positions the device
the indicated distance away from the body.
Organizations such as the World Health Organization and the US
Food and Drug Administration have suggested that if people are
concerned and want to reduce their exposure they could use a
hands-free accessory to keep the wireless device away from the
head or body during use, or reduce the amount of time spent on
the device
•ISEDC Notice
This device complies with Innovation, Science and Economic
Development Canada (ISEDC) license-exempt RSS standard(s).
Operation is subject to the following two conditions:
(1) this device may not cause interference, and
(2) this device must accept any interference, including interference
that may cause undesired operation of the device.
IC: 9238A-0067
recorded:
12
Page 13
•ISEDC Radiation Exposure Statement
This EUT is compliance with SAR for general population/
uncontrolled exposure limits in ISEDC RSS-102 and had been
tested in accordance with the measurement methods and
procedures specified in IEEE 1528 and IEC 62209. This equipment
should be installed and operated with minimum distance 0.9 cm
between the radiator and your body. This device and it s antenna(s)
must not be co-located or operating in conjunction with any other
antenna or transmitter.
•LICENCES
microSD Logo is a trademark.
The Bluetooth word mark and logos are owned by the
Bluetooth SIG,
Inc. and any use of such marks by TCL Communication
Ltd. and its affiliates are under license. Other trademarks
and trade names are those of their respective owners.
9015B Bluetooth DID D028888
The Wi-Fi Logo is a certification mark of the Wi-Fi
Alliance.
Your device uses non-harmonized frequency and is
intended for use in all European countries.
The Wi-Fi can be operated in the EU without restriction
indoors, but cannot be operated outdoors in France.
Google, the Google logo, Android, the Android logo, Google Search™,
Google Maps™, Gmail™, YouTube, Google Play Store, Google
Latitude™ and Hangouts™ are trademarks of Google Inc.
The Android robot is reproduced or modified from work created
and shared by Google and used according to terms described in
the Creative Commons 3.0 Attribution License (the text will show
when you long press Google legal in Settings > About Tablet > Legal
information)
(1)
It may not be available according to the countries.
(1)
.
13
Page 14

General information
•Internet address: www.alcatelonetouch.ca
•Hotline Number: In United States please call, (855) 368-0829
for technical support. In Canada please call, (855) 844-6058 for
technical support.
•Manufacturer: TCL Communication Ltd.
•Address: Flat/RM 1910-12A, Block 3, China HongKong City, 33
Canton Road, Tsimshatsui, Kowloon, Hong Kong
On our website, you will find our FAQ (Frequently Asked Questions)
section. You can also contact us by e-mail to ask any questions you
may have.
An electronic version of this user guide is available in English and
other languages according to availability on our server:
www.alcatelonetouch.ca
Your device is a transceiver that operates on Wi-Fi with 2.4GHz and
5GHz, Bluetooth with 2.4GHz.
Company Address:
Room1910-12A, Tower 3, China HK City, 33 Canton Road,
Tsimshatsui, Kowloon, Hong Kong
Disclaimer
There may be certain differences between the user manual
description and the device’s operation, depending on the software
release of your device or specific operator services.
This device may contain materials, including applications and software
in executable or source code form, which is submitted by third parties
for inclusion in this device (“Third Party Materials”).
All third party materials in this device are provided “as is”, without
warranty of any kind, whether express or implied, including the
implied warranties of merchantability, fitness for a particular purpose
14
Page 15

or use/third party application, interoperability with other materials
or applications of the purchaser and non-infringement of copyright.
The purchaser undertakes that TCL Communication has complied
with all quality obligations incumbent upon it as a manufacturer of
mobile devices and devices in complying with Intellectual Property
rights. TCL Communication will at no stage be responsible for the
inability or failure of the Third Party Materials to operate on this
device or in interaction with any other devices of the purchaser.
To the maximum extent permitted by law, TCL Communication
disclaims all liability for any claims, demands, suits or actions, and
more specifically – but not limited to – tort law actions, under any
theory of liability, arising out of the use, by whatever means, or
attempts to use, such Third Party Materials. Moreover, the present
Third Party Materials, which are provided free of charge by TCL
Communication, may be subject to paid updates and upgrades in the
future; TCL Communication waives any responsibility regarding such
additional costs, which shall be borne exclusively by the purchaser.
The availability of the applications may vary depending on the
countries and the operators where the device is used; in no event
shall the list of possible applications and software provided with the
devices be considered as an undertaking from TCL Communication;
it shall remain merely as information for the purchaser. Therefore,
TCL Communication shall not be held responsible for the lack of
availability of one or more applications wished for by the purchaser,
as its availability depends on the country and the operator of the
purchaser. TCL Communication reserves the right at any time to add
or remove Third Party Materials from its devices without prior notice;
in no event shall TCL Communication be held responsible by the
purchaser for any consequences that such removal may have on the
purchaser regarding the use or attempt to use such applications and
Third Party Materials.
Accessory
• Charger,5.0VDC/2.0A
• USBcable,5pins micro-USB
15
Page 16

Warranty
Your device is warranted against any defect or malfunctioning which
may occur in conditions of normal use during the warranty period of
twelve (12) months
original invoice.
(2)
Batteries
against any defect which may occur during the first six (6) months (1)
from the date of purchase as shown on your original invoice.
In case of any defect of your device which prevents you from normal
use thereof, you must immediately inform your vendor and present
your device with your proof of purchase.
If the defect is confirmed, your device or part thereof will be either
replaced or repaired, as appropriate. Repaired device and accessories
are entitled to a 30 days warranty for the same defect. Repair or
replacement may be carried out using reconditioned components
offering equivalent functionality.
This warranty covers the cost of parts and labor but excludes any
other costs.
This warranty shall not apply to defects to your device and/or
accessory due to (without any limitation):
1) Non-compliance with the instructions for use or installation, or
with technical and safety standards applicable in the geographical
area where your device is used;
2) Connection to any equipment not supplied or not recommended
by TCL Communication Ltd. ;
(1)
The warranty period may vary depending on your country.
(2)
The life of a rechargeable mobile device battery in terms of
conversation time standby time, and total service life, will depend
on the conditions of use and network configuration. Batteries being
considered expendable supplies, the specifications state that you
should obtain optimal performance for your device during the first six
months after purchase and for approximately 200 more recharges.
(1)
from the date of purchase as shown on your
and accessories sold with your device are also warranted
16
Page 17

3) Modification or repair performed by individuals not authorized by
TCL Communication Ltd. or its affiliates or your vendor;
4) Modification, adjustment or alteration of software or hardware
performed by individuals not authorized by TCL Communication
Ltd. ;
5) Inclement weather, lightning, fire, humidity, infiltration of liquids
or foods, chemical products, download of files, crash, high voltage,
corrosion, oxidation…
Your device will not be repaired in case labels or serial numbers
(IMEI/SN)have been removed or altered.
There are no express warranties, whether written, oral or implied,
other than this printed limited warranty or the mandatory warranty
provided by your country or jurisdiction.
In no event shall TCL Communication Ltd. or any of its affiliates be
liable for indirect, incidental or consequential damages of any nature
whatsoever,including but not limited commercial or financial loss or
damage,loss of data or loss of image to the full extent those damages
can be disclaimed by law.
Some countries/states do not allow the exclusion or limitation
of indirect, incidental or consequential damages, or limitation of
the duration of implied warranties, so the preceding limitations or
exclusions may not apply to you.
Electronic Recycling:
For more information on Electronic Recycling, please:
1) Visit alcatel Electronic Recycling Program website at http://www.
alcatelonetouch.us/Electronic-Recycling-Program-Accessibilityand-Compliance/b/11522543011, or
2) Call alcatel US Customer Support at 1-855-368-0829.
17
Page 18

Troubleshooting
Before contacting the service center, you are advised to follow the
instructions below:
• You are advised to fully charge ( ) the battery for optimal
operation.
• Avoid storing large amounts of data in your tablet as this may
affect its performance.
• Use Factory data reset and the upgrade tool to perform
tablet formatting or software upgrading. All user tablet data:
contacts, photos, and files, downloaded applications will be lost
permanently after a factory data reset. It is strongly advised to
fully back up the tablet data and profile before doing formatting
and upgrading.
Please pay attention that after Factory data reset is performed you
may be requested to enter Google account credentials
used on this device before Factory reset. Otherwise you will not be
able to use the device. If you don’t remember your Google account
credentials please complete Google account recovery procedure. In
case you don’t succeed in it
• Please apply to authorized repair center, but remember that it will
not be regarded as warranty case.
My tablet cannot be switched on or is frozen
• When the tablet cannot be switched on, charge for at least 20
minutes to ensure the minimum battery power needed, then try
to switch on again.
• When the tablet falls into a loop during power on-off animation
and the user interface cannot be accessed, press the Power key
to Pop up the options, then long press “Power Off” to enter Safe
Mode. This eliminates any abnormal OS booting issues caused by
3rd party APKs.
(1)
that were
(1)
Applicable for Android OS versions starting from 5.1.
18
Page 19

My tablet has not responded for several minutes
• Restart your tablet by long pressing the Power key for about 10
seconds.
My tablet turns off by itself
• Check that your screen is locked when you are not using your
tablet, and make sure the Power key is not mis-contacted due to
unlocked screen.
• Check the battery charge level.
My tablet can’t charge properly
• Make sure that your battery is not completely discharged; if the
battery power is empty for a long time, it may take around 20
minutes to display the battery charger indicator on the screen.
• Make sure charging is carried out under normal conditions (0°C
to +40°C).
• When abroad, check that the voltage input is compatible.
My tablet can’t connect to the Internet
• Check your tablet’s Internet connection settings.
• Make sure you are in a place with network coverage.
• Try connecting at a later time or another location.
I am unable to use the features described in the manual
• Check with your operator to make sure that your subscription
includes this service.
• Make sure this feature does not require an Alcatel accessory.
I am unable to connect my tablet to my computer
• Install Alcatel Centre.
• Check that your USB driver is installed properly.
• Check that you have marked the checkbox of USB debugging.
To access this function, touch Settings\About tablet, then touch
19
Page 20

Build number for 7 times. Now you may touch Settings\
Developer options\USB debugging.
• Check that your computer meets the requirements for Alcatel
Centre Installation.
• Make sure that you’re using the right cable from the box.
I am unable to download new files
• Make sure there is sufficient tablet memory for your download.
• Check your subscription status with your operator.
The tablet cannot be detected by others via Bluetooth
• Make sure that Bluetooth is turned on and your tablet is visible
to other users.
• Make sure that the two tablets are within Bluetooth’s detection
range.
How to make your battery last longer
• Make sure you follow the complete charge time (minimum 2.5
hours).
• After a partial charge, the battery level indicator may not be
exact. Wait for at least 20 minutes after removing the charger
to obtain an exact indication.
• Adjust the brightness of screen as appropriate.
• Extend the email auto-check interval for as long as possible.
• Update news and weather information on manual demand, or
increase their auto-check interval.
• Exit background-running applications if they are not being used
for a long time.
• Deactivate Bluetooth, Wi-Fi, or GPS when not in use.
The tablet will become warm following prolonged game playing,
internet surfing or running other complex applications.
• This heating is a normal consequence of the CPU handling
excessive data such as game playing, Internet surfing or running
20
Page 21
other complex applications. Ending above actions will make your
tablet return to normal temperature.
After Factory reset is performed my device asks to enter Google
account credentials and I can’t use it avoiding this action
• After Factory reset is performed you need to enter the original
Google account credentials that were used on this device before
Factory data reset. Otherwise you will not be able to use the
device. If you don’t remember your Google account credentials
please complete Google account recovery procedure. In case you
don’t succeed in it - please apply to authorized repair center, but
remember that it will not be regarded as warranty case.
I don’t hear when somebody calls/message me, I just see missed
calls/messages notifications on display.
(1)
.
• Please check if Interruptions/Do not disturb mode is activated on
your device. If it is activated you can see a “Star” symbol (for
Android OS 5.X version) or icon (for Android OS 6.X version)
displayed on notification panel. In this case you need deactivate
Interruptions/Do not disturb mode. To do it just press volume up
or down key and select “All” (on Android 5.X) or modify
it in Settings “Sound & notifications” Interruptions ( for Android
5.X) or Do not disturb ( for Android 6.X).
My device asks me to enter some password/code/key that I don’t
remember or don’t know due to this device being used by another
person before and I can’t get this password/code/key from him/her.
• Password/code/key request could be caused by the same security
feature activated on this device. You can try to perform Factory
data reset, but remember that if it doesn’t help you need to apply
authorized repair center and it will not be regarded as warranty
case.
(1)
Applicable for Android OS versions starting from 5.1.
21
Page 22

1 Your device
1.1 Keys and connectors
Front panel
21
3
6
4
5
Number
Description
1
Micro-USB connector/Battery charge port
2
Earphone socket
3
Front camera
4
Power key
5
Volume Up/Down key
6
Microphone
22
Page 23
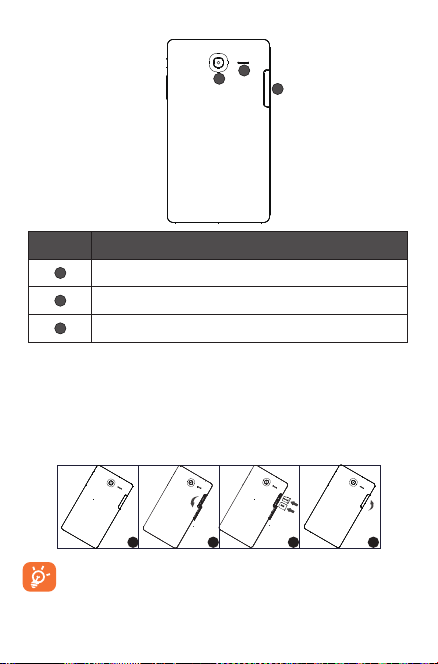
Rear panel
8
7
9
Number
Description
7
Rear Camera
8
Speaker
9
SIM card & MicroSD card socket
1.2 Getting started
1.2.1 Set-up
Inserting the microSD and micro SIM card
Insert your microSD card and micro SIM card in the right direction to
avoid damage. Please refer to the following instructions.
MicroSD
SIM
1 2 3 4
1. Before inserting/removing the microSD card and SIM
card, you should ensure the tablet is off, to protect it from
corruption or damage. In addition, regularly removing or
inserting the SD card or SIM card may cause the tablet to
restart.
23
Page 24
2. Use only micro SIM type card. Using a nano SIM with adapter may
damage the tablet or the card may become stuck in the device.
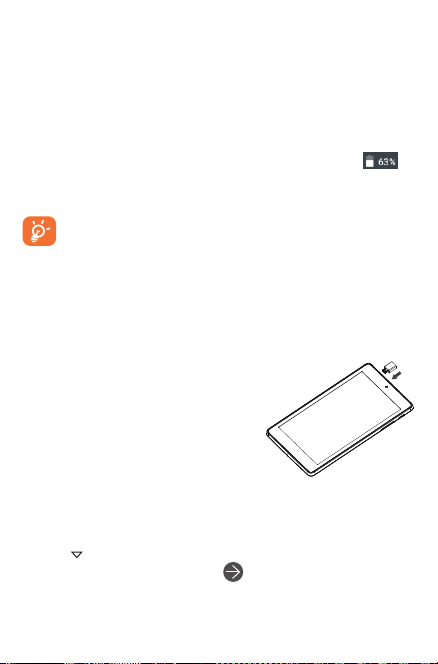
Charging the battery
To charge your tablet, connect the charger to your tablet and mains
socket.
•When using your tablet for the first time, charge the battery fully
(approximately 5 hours).
You are advised to fully charge the battery. Charging status ( ) is
indicated by the percentage on screen. The percentage increases as
the tablet is charged.
To reduce power consumption and energy waste, when battery
is fully charged, disconnect your charger from the plug; sw itch off
Wi-Fi, GPS, Bluetooth or background-running applications
when not in use; reduce the backlight time, etc.
1.2.2 Power on your tablet
Hold down the Power key until the tablet powers on, unlock your
tablet (Swipe, PIN, Password, Pattern) if necessary and confirm. The
Home screen is displayed.
If you do not know your PIN code or if you
have forgotten it, contact your network
operator. Do not leave your PIN code with
your tablet. Store this information in a safe
place when not in use.
Set up your tablet for the first time
The first time you power on the tablet, you should set the following
options:
•Touch to display the all languages list, slide up and down to select
the tablet's language, then touch to continue.
•Insert SIM card or touch SKIP to continue.
•Select a Wi-Fi to connect or touch SKIP to continue.
24
Page 25
•Set Date and time, then touch NEXT.
•Enter your name to personalize some apps on tablet.
•Select a way(Pattern, PIN, or Password) to protect your device.
•Following the instructions to finish the setup.
•When the tablet is powered on, you can connect to a Wi-Fi
network to sign into your Google account and to use some
features.
1.2.3 Power off your tablet
Hold down the Power key until the pop-up menu appears, select
Power off to confirm.
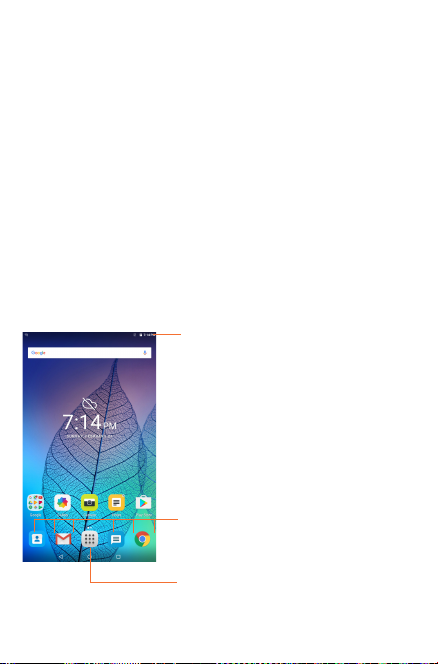
1.3 Home screen
You can bring all your favorite icons (apps, shortcuts, folders and
widgets) to your Home screen for quick access. Touch Home key to
switch to Home screen.
Status bar
•Status/Notification indicators.
Favorite tray applications
•Touch to launch apps.
•Long press to move or change apps.
Application tab
•Touch to see all applications.
25
Page 26
The Home screen extends on either side of the screen to allow
more space for adding apps, shortcuts etc. Slide the Home screen
horizontally left and right to get a complete view of the Home screen.
The page indicators above the apps tray indicate which screen you
are viewing.
Recent key
•Touch to displays a list of recently used applications.
Home key
•While on any application or screen, touch to return to the Home
screen.
Back key
•Touch to go back to the previous screen, or to close a dialogue box,
options menu, the notification panel, etc.
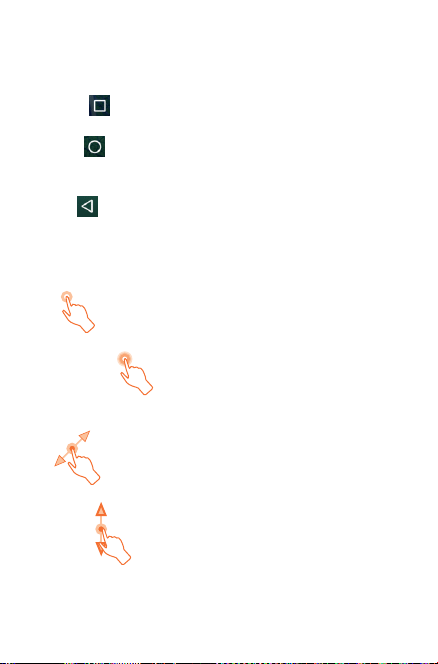
1.3.1 Using the touchscreen
Touch
To access an application, touch it with your finger.
Touch and Hold
To open the available options for an item (for example, a contact or
link in a Web page), touch and hold the item.
Drag
Place your finger on any item to drag it to another location.
Slide/Swipe
Slide the screen to scroll up and down the applications, images, web
pages… at your convenience.
26
Page 27
Flick
Similar to swiping, but flicking is quicker.
Pinch/Spread
Place your fingers of one hand on the screen surface and draw them
apart or together to scale an element on the screen.
Rotate
Automatically change the screen orientation from portrait to
landscape by turning the tablet sideways to have a better view.
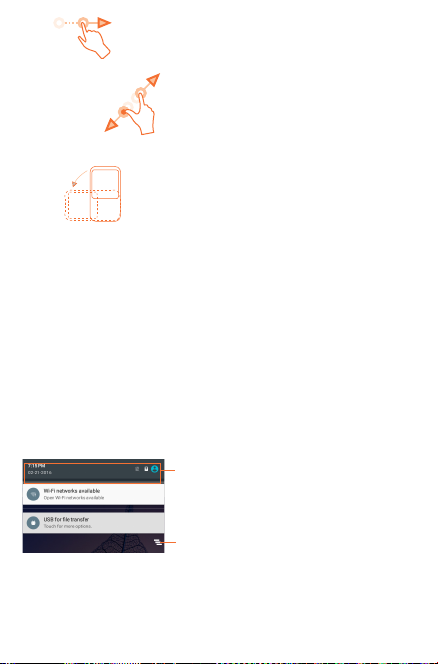
1.3.2 Status bar
From status bar, you can view both tablet status on the right side and
notification information on the left side.
Touch and drag down the Status bar to open the Quick settings panel
or the Notification panel. Touch and drag up to close it.
Notification panel
When there are notifications, touch and drag the Status bar down
to open the Notification panel and read the detailed information.
Touch to switch to the Quick settings
panel.
Touch to clear all event–based
notifications (other ongoing
notifications will remain).
Note: After opening the Notification panel, touch the status bar or
drag down it again to switch to the Quick settings panel.
27
Page 28

Quick setting panel
You can enable or disable functions or change modes by touching the
icons on the Quick settings panel.
Touch to enter the Multi-user screen,
which allows you to switch the user
mode.
Touch to access Settings, which allows
you to set more items.
Note: After opening the Quick settings panel, touch to enter the
Multi-user screen, which allows you to switch the user mode,
or add new users.
1.3.3 Search bar
The tablet provides a Search function which can be used to locate
information within applications, the tablet or the web.
Search by text
28
Page 29

• Touch the Search bar from Home screen.
•Enter the text/phrase you want to search for.
•Touch on the keyboard if you want to search on the web.
Search by voice
•Touch from Search bar to display a dialogue screen.
•Speak the word/phrase you want to search for. A list of search
results will display for you to select from.
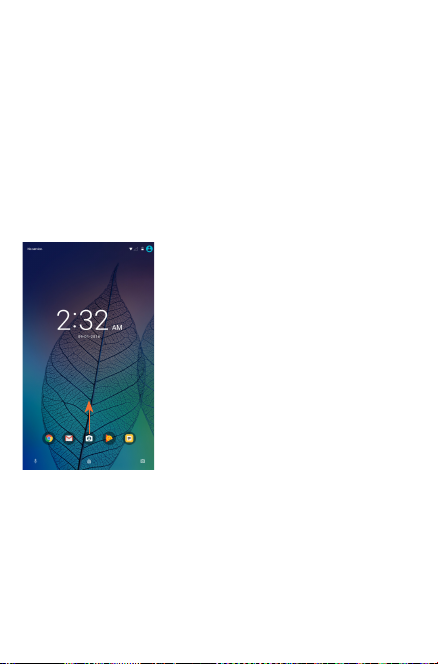
1.3.4 Lock/Unlock your screen
To protect your tablet and privacy, you can lock the tablet screen by
choosing slide or creating a variety of patterns, PIN or password, etc.
To create a screen unlock pattern (refer to the section "Screen lock"
for detail settings)
•Drag the status bar down and open the Quick settings panel
then touch the settings icon to enter Settings, then touch
Security\Select Screen lock\Pattern.
•Draw your own pattern.
Draw your unlock pattern
Touch to confirm by drawing pattern
again
29
Page 30
To create a screen unlock PIN/Password
•Touch Settings\Security\Select Screen lock\PIN or Password.
•Set your PIN or Password.
To lock tablet screen
Press the Power key once to lock the screen.
To unlock tablet screen
Press the power key once to light up the screen, draw the unlock
pattern you have created or enter PIN or password, etc. to unlock the
screen.
If you have chosen Swipe as the screen lock, swipe the lock screen up
with your finger to unlock the screen.
1.3.5 Personalize your Home screen
Add
You may long press a folder, an application or a widget to activate the
Move mode, and drag the item to any Home screen as you prefer.
Reposition
Long press the item to be repositioned to activate the Move mode,
drag the item to the desired position and then release. You can move
30
Page 31

items both on the Home screen and the Favorite tray. Hold the icon
on the left or right edge of the screen to drag the item to another
Home screen.
Remove
Long press the item to be removed to activate the Move mode, drag
the item up to the top of “ ” Remove, and release the item.
Create folders
To improve the organization of items (shortcuts or applications) on
the Home screen, you can add them to a folder by stacking one item
on top of another.
Wallpaper customized
Long press a space place on Home screen, then touch WALLPAPERS
to customize wallpaper.
1.3.6 Volume adjustment
Using volume key
Press Volume key to adjust the volume. To activate the Silent mode,
press the Volume down key until the tablet silent.
Using Settings menu
Drag the Status bar down to open the quick setting panel and touch
to enter Settings, then touch Sound & notification. Now you
can set the volume of media, notification, system and etc. to your
preference.
31
Page 32

2 Text input
2.1 Using Onscreen Keyboard
Onscreen Keyboard settings
• Touch all apps from the Home screen, select Settings\
Language&input, touch Android Keyboard, a series of settings
are available for your selection.
2.2 Android keyboard
Touch to switch between
"abc/Abc" mode; Double
touch to switch between
"abc/ABC" mode
Touch to enter symbols or
numeric keyboard.
Long press to enter input
.
Touch to enter emotions
option
32
Page 33

2.3 Text editing
You can edit the text you have entered.
•Long press or double-tap within the text you would like to edit.
•Drag the tabs to change the high-lighted selection.
•Following options will show: FORMAT, CUT, COPY, PASTE,
SHARE, SELECT ALL, REPLACE, ASSIT.
You can also insert new text
•Touch where you want to type, or long press a blank space, the
cursor will blink and the tab will show. Drag the tab to move the
cursor.
•If you have selected any text, touch the tab to show PASTE which
allows you to paste any text you have previously copied.
33
Page 34

3 Contacts
Contacts enables quick and easy access to the contact you want
to reach. You can view and create contacts on your tablet and
synchronize these with your Gmail contacts or other applications.
3.1 Consult your contacts
Touch to search in Contacts.
Touch to display contacts list option menu.
Touch to view your contact groups and
favourite contacts.
Touch to add a new contact.
Touch the Menu key to display contacts list option menu.
Following actions are enabled:
•Contacts to
display
•Import/
export
•Accounts Manage the synchronisation settings for different
•Settings Set contacts’ display mode.
Touch to display all the contacts or the customise
contacts list.
Import or export contacts between tablet, microSD
card and internal storage.
accounts.
34
Page 35

3.2 Adding a contact
Touch the icon in the contact list to create a new contact.
You are required to enter the contact's name and other contact
information. By scrolling up and down the screen, you can move from
one field to another easily.
Touch to save.
Touch to select a picture for the contact.
Touch to unfold the other predefined labels
of this category.
If you want to add more information, touch More Fields to add a
new category.
When finished, touch to save.
To exit without saving, you can touch the Back key to exit.
Add to/remove from Favorites
To add a contact to Favorites, you can touch a contact to view details
then touch to add the contact to Favorites (the star will turn
grey in color).
To remove a contact from favorites, touch the grey star on
contact details screen.
Only device contacts can be added to Favorites.
35
Page 36

3.3 Editing your contacts
To edit contact information, touch to choose the contact, then touch
on top of the screen, When finished, touch .
Delete a contact
To delete a contact, touch the Menu key and select Delete from
the contact’s detail screen.
The contact you have deleted will also be removed from
other applications on the tablet or web the next time you
synchronize your tablet.
3.4 Contacts importing, exporting and sharing
This tablet enables you to import or export contacts between tablet
and microSD card.
From Contacts screen, touch to open options menu, touch
Import/Export to import/export contacts from/to Tablet, Internal
storage or accounts.
You can import/export a single contact or multi contacts from/to
Tablet, USB storage or Accounts. Follow the instructions and tap the
checkbox beside the contact you want to import/export, and touch
OK to confirm.
You can share a single contact or contacts with others by sending the
contact's vCard to them via Bluetooth, Gmail, etc.
Touch a contact you want to share, then touch the Menu key , and
select Share from contact details screen, then select the application
to perform this action.
36
Page 37

3.5 Accounts
Contacts, data or other information can be synchronized from
multiple accounts, depending on the applications installed on your
tablet.
To add an account, tap from the notification panel to open the quick settings panel, and touch to enter Settings, then touch Accounts > Add account.
You are required to select the kind of account you are adding, like
Google, Email, etc.
As with other account set-ups, you need to enter detailed information,
like user name, password, etc.
You can remove an account to delete it and all associated information
from the tablet. Open the Settings screen, touch the account you
want to delete, touch the Menu key and select Remove account,
then confirm.
Turn on/off the sync & Auto-sync
Touch an account to enter the Sync screen, slide the switch
to turn on/off the account’s sync. When activated, all changes to
information on the tablet or online will be automatically synchronized
to each other.
Sync manually
You can also synchronize an account manually on Accounts screen,
touch an account in the list, then touch the Menu key and select
Sync now.
37
Page 38

4 Gmail
The first time you set up your tablet, you can select to use an existing
Gmail or to create a new Email account.
As Google's web-based email service, Gmail is configured when you
first set up your tablet. Gmail on your tablet can be automatically
synchronized with your Gmail account on the web. Unlike other
kinds of email accounts, each message and its replies in Gmail
are grouped in your inbox as a single conversation; all emails are
organized by labels instead of folders.
4.5.1 To create and send emails
•Touch the icon from Primary screen.
•Enter recipient(s) email address(es) in the To field.
•If necessary, touch (Cc/Bcc) to add a copy or a blind copy of
the message.
•Enter the subject and the content of the message.
•Touch to add an attachment.
•Finally, touch to send .
•If you do not want to send the mail right away, touch and then
select Save draft to save a copy.
•If you don’t want to send or save the mail, you can touch the Menu
key and then select Discard.
To add a signature to emails, touch the icon , then select Settings,
touch an account, then touch Signature. Touch OK after entering
the signature.
4.5.2 To receive and read your emails
When a new email arrives, you will be notified by a ringtone or
vibration, and an icon will appear on Status bar.
Touch and drag down the Status bar to display the Notification panel,
touch the new email to view it. Or you can also access the Gmail
Inbox label and touch the new mail to read it.
38
Page 39

You can search for an email by sender, receiver, subject, etc.
•Touch the icon from Primary screen.
•Enter the keyword you want to search for in the searching box and
touch in the soft keyboard.
4.5.3 To reply or forward emails
•Reply
•Reply all
•Forward
•
When viewing an email, touch to reply the
sender of this mail.
When viewing an email, touch to reply all the
sender of this mail.
Touch to forward the received mail to other
people.
To assign a star or remove the star from the
conversation
4.5.4 Managing Gmails by Labels
To conveniently manage conversations and messages, you can
organize them using a Label.
To label a conversation when reading a conversation’s messages,
touch the icon and select the label to assign to the conversation.
To view conversations by labels when viewing your Primary or
another conversation list, touch , then touch a label to view a list
of conversations with that label.
39
Page 40

Touch Primary to select an email to generate the following options:
Touch to archive the email message. To display the archived
messages, you can touch in Primary screen then touch All
•
mail.
Touch to delete the email message.
•
Touch to mark an email message as read or unread.
•
Touch to move an email message to another label.
•
40
Page 41

5 Messaging
You can create, edit and receive SMS and MMS messages with this
tablet.
To access this feature, touch Messaging from the Home screen.
To check messages stored in your SIM card, touch the
icon from the Messaging screen, then touch Settings >
Manage SIM card messages.
5.5.1 Write message
On the message list screen, touch the new message icon to write
text/multimedia messages.
Touch to create a new message.
Touch to view the whole message thread.
Long press to activate Delete mode.
5.5.2 Sending a text message
Enter the mobile phone number of the recipient or touch ALL
CONTACTS to select a contact and touch the Type text message
field to enter text. When you finish, touch to send the text
message.
An SMS message of more than 160 characters will be charged
as several SMS messages. Specific letters (accent) will also
increase the size of the message. This may cause multiple
SMS messages to be sent.
5.5.3 Sending a multimedia message
MMS enables you to send video clips, images, photos, animations,
slides, and sounds to other compatible phones and email addresses.
An SMS message will be converted to an MMS message automatically
when media files (image, video, audio, slides, etc.) are attached or
Subject or email addresses added.
41
Page 42

6 Calendar & Time
6.1 Calendar
Use Calendar to keep track of important meetings, appointments, etc.
6.1.1 Multi-mode view
You can display the Calendar in daily, monthly, weekly or agenda
view.
•Touch the Week label at the top left of the screen to change your
Calendar view, and a drop-down menu will display for you to
choose. Touch the icon to return to Today’s view.
6.1.2 To create new events
You can add new events from any Calendar view.
•Touch the icon to access new event edit screen.
•Fill in all required information for this new event. If it is a wholeday event, you can select All day.
•When finished, touch DONE from the top of the screen.
To quickly create an event from Week view screen, long press the
target area and enter an event name, then touch Edit to create the
new event.
6.1.3 To delete or edit an event
•To delete or edit an event, touch the event to enter details screen,
touch the icon to edit the event, and touch the icon to
delete.
•If you want to share an event, touch the icon to select an
application to perform this action.
•You can change the event color by touching the icon .
42
Page 43

6.1.4 Event reminder
If a reminder is set for an event, the upcoming event icon will
appear on Status bar as a notification when the reminder time arrives.
Touch and drag the Status bar down to open the notification panel,
touch event name to view Calendar notification list.
Touch Snooze to turn off all event reminders for 5 minutes.
Touch Back key to keep the reminders pending on the status bar and
the notification panel.
Important options by touching the Menu key from Calendar main
screen:
•Refresh To refresh the calendar
•Search To search in the calendar
•Hide/show controls To show or hide controls panel
•Settings To make a series of Calendar settings
6.2 Clock
Clock application includes four applications: World clock, Alarm,
Timer and Countdown.
Touch to add or set an alarm.
6.2.1 To set an alarm
From Clock screen, touch to enter Alarm screen, touch to
add a new alarm. Set hour and minute on the clock, and touch OK to
confirm. Following options will show:
•Repeat Touch to select days you want alarm to work.
• Platinum
•Label Touch to set a name for the alarm.
•
Touch to select a ringtone for the alarm.
Touch to delete the selected alarm.
43
Page 44

6.2.2 To adjust alarm settings
Touch the Menu from Alarm screen and touch Settings. The
following options can now be adjusted:
•Style Touch to select the clock style: Analog or
•Automatic home
clock
•Home time zone Touch to choose a home time zone.
•Silence after Touch to set the duration of alarms.
•Snooze length Touch to set temporary turn off time of an
•Alarm volume Touch to set the alarm volume.
•Volume buttons Touch to set side Volume up/down key
Digital.
Mark the checkbox to activate Automatic
home clock feature.
alarm.
behaviours when alarm sounds: Snooze,
Dismiss.
44
Page 45

7 Getting connected
To connect to the Internet with this tablet, whichever is most
convenient.
7.1 Connecting to the Internet
7.1.1 Wi-Fi
Using Wi-Fi, you can connect to the Internet when your tablet is
within range of a wireless network. Wi-Fi can be used on your tablet.
To turn Wi-Fi on and connect to a wireless network
•Touch on quick settings panel to go to Settings.
•Touch Wi-Fi, and slide the switch beside Wi-Fi to turn on/
off Wi-Fi.
•Touch Wi-Fi, the detailed information of detected Wi-Fi networks
is displayed in the Wi-Fi networks section.
•Touch a Wi-Fi network to connect. If the network you selected is
secured, you are required to enter a password or other credentials
(you may contact your network operator for details). When finished,
touch Connect.
To activate notification when a new network is detected
When Wi-Fi is on and the network notification is activated, the
will appear on the status bar whenever the tablet detects an
available wireless network within range. The following steps activate
the notification function when Wi-Fi is on:
•Drag down notification panel, and touch to switch to Quick
settings panel, then touch to access Settings.
•Touch Wi-Fi. Then touch the Menu key and select Advanced from
Wi-Fi screen.
•Slide the switch besides Network notification to activate/
deactivate this function.
45
Page 46

To add a Wi-Fi network
When Wi-Fi is on, you may add new Wi-Fi networks according to
your preference.
•Drag down notification panel, and touch to switch to Quick
settings panel, then touch to access Settings.
•Touch Wi-Fi, and then touch > Add network.
•Enter the name of the network and any required network
information, then touch Save.
When successfully connected, your tablet will be connected
automatically the next time you are within range of this network.
To forget a Wi-Fi network
The following steps prevent automatic connections to networks
which you no longer wish to use.
•Turn on Wi-Fi, if it is off.
•In the Wi-Fi screen, touch the name of the connected network.
•Touch FORGET in the dialogue.
7.2 Connecting to Bluetooth devices
Bluetooth is a short-range wireless communication technology that
you can use to exchange data, or connect to other Bluetooth devices
for various uses.
To access this function, drag down the status bar to open the
quick setting panel and touch to access Settings. Then touch
Bluetooth, your device and other available ones will display on the
screen.
To turn on Bluetooth
•Touch Settings in the home screen.
•Touch to activate/deactivate Bluetooth function.
To make your tablet more recognizable, you can change your tablet
name which is visible to others.
•Touch and select Rename this device.
46
Page 47

•Enter a name, and touch RENAME to confirm.
To make device visible
•Turn on Bluetooth.
•Touch your device to make it visible or invisible.
To pair/connect your tablet with a Bluetooth device
To exchange data with another device, you need to turn Bluetooth on
and pair your tablet with the Bluetooth device with which you want
to exchange data.
•Drag down notification panel, and touch to switch to Quick
settings panel, then touch to access Settings.
•Turn on Bluetooth, your tablet will searching the available devices
automatically.
•Touch a Bluetooth device you want to be paired with in the list.
•A dialogue will popup, touch PAIR to confirm.
•If the pairing is successful, your tablet connects to the device.
To disconnect/unpair from a Bluetooth device
•Touch the Settings icon beside the device you want to unpair.
•Touch FORGET to confirm.
7.3 Connecting to a computer
With the USB cable, you can transfer media files and other files
between microSD card/internal storage and computer.
Before using MTP or PTP you should firstly mark USB debugging.
•To access this function, touch Settings\About tablet, then touch
Build number 7 times. Now you may touch Settings\Developer
options\USB debugging.
To connect/disconnect your tablet to/from the computer:
•Use the USB cable that came with your tablet to connect the tablet
to a USB port on your computer. You will receive a notification that
the USB is connected as a media device.
47
Page 48

•Drag down status bar to open the Notification panel and touch
“File transfers“, then select Charging, File transfers, or photo
transfers(PTP).
To disconnect (from mass storage):
•Unmount the microSD card on your computer.
For the operating system Windows XP or lower, you should
download and install Windows Media Player 11 on your
computer from the following link: http://windows.microsoft.
com/zh-CN/windows/download-windows-media-player.
To locate the data you have transferred or downloaded in the internal
storage, touch File Manager, all data you have downloaded is stored
in File Manager, where you can view media files (videos, photos,
music and others), rename files, install applications into your tablet,
etc.
To format a microSD card
•Drag down status bar to open quick settings panel and touch
to access Settings.
•Touch Storage&USB.
•Touch SD card, and then touch > Settings > Format.
•Touch ERASE & FORMAT On the screen, the data in your SD card
will be formated.
7.4 Connecting to virtual private networks
Virtual private networks (VPNs) allow you to connect to the resources
inside a secured local network from outside that network. VPNs are
commonly deployed by corporations, schools, and other institutions
so that their users can access local network resources when not
inside that network, or when connected to a wireless network.
To add a VPN
•Drag the Status bar down to open quick settings panel and touch
to access Settings.
•Touch More...\VPN and then touch .
•In the screen that opens, follow the instructions from your
network administrator to configure each component of the VPN
48
Page 49

settings.
•Touch Save.
The VPN is added to the list on the VPN settings screen.
Before adding a VPN, you should set a lock screen pattern,
PIN code or password for your tablet.
To connect/disconnect to a VPN
To connect to a VPN:
•Drag down status bar to open quick settings panel and touch
to access Settings.
•Touch More...\VPN.
•VPNs you have added are listed; touch the VPN you want to
connect with.
•In the dialogue that opens, enter any requested credentials and
touch Connect.
To disconnect:
•Open the Notification panel and touch the resulting notification
for the VPN disconnection.
To edit/delete a VPN
To edit a VPN:
•Touch the Menu key from the home screen, then touch Settings.
•Touch More...\VPN.
•VPNs you have added are listed; touch & hold the VPN you want
to edit.
•Touch Edit profile.
•After finished, touch Save.
To delete:
•Long press the VPN you want to delete, in the dialogue that opens,
touch Delete profile.
49
Page 50

8 Play Store
Play Store is an online software store, where you can download and
install applications and games to your Android Powered Tablet.
To open Play Store:
•Touch Apps from home screen, then touch Play Store.
•For the first time you access Play Store, a screen with terms of
service pops up for your attention, touch Accept to continue.
Touch , then select Help & Feedback to enter Play Store help page
for more information about this function.
(1)
8.1 Locate the item you want to download and
install
Play Store provides two kinds applications. It shows APPS&GAMES,
ENTERTAINMENT in the home page.
Touch to search in Google Play store.
Slide up and down to see all categories.
Touch MORE to browser other applications.
Touch Back key to return to the previous screen.
(1)
Depending on your country and operator.
50
Page 51

8.2 Download and install
To download & install:
•Navigate to the item you want to download, and select to enter
the details screen from which you can read its description, overall
rating or comments, view developer’s information, etc.
•Touch INSTALL to preview the functions and data the application
can access on your tablet if you install it.
•Touch ACCEPT.
•The progress of the download will show on the details screen,
touch to stop downloading the item. You can also access this
screen through Notification panel.
•After download and installation have finished, you will see a
notification icon on the status bar.
Be especially cautious with applications that have access to
many functions or to a significant amount of your data. Once
you accept, you are responsible for results of using this item
on your tablet.
To open the application you have downloaded:
•On Play Store screen, touch and select My apps & games.
•Touch the installed application in the list, then touch OPEN.
To buy an application
On Play Store, some applications are labeled as free, while some of
them are to be paid for before downloading and installing.
•Touch the application you want to buy.
•Touch the price on the up-right of the screen to preview the
functions and data the application can access on your tablet if
you install it.
•Touch Continue to confirm.
•When making your first purchase, you are required to input your
credit card information and to log into Google payment and billing
(1)
Google Paid applications may not be available to users in some
countries.
(1)
51
Page 52

service.
•If your account has multiple credit card accounts, select one to
proceed.
•Select the Terms of service link and read the document. When
finished, touch Back key.
•Mark the checkbox if you agree with the terms of service.
•Touch Buy now at the bottom of the screen.
When finished, Android downloads the application.
To request a refund
If you are not satisfied with the application, you can ask for a refund
within 15 minutes of the purchase. Your credit card will not be
charged and the application will be removed. If you change your
mind, you can install the application again, but you will not be able
to request a refund.
•Touch and select My apps & games from Play Store screen.
•Touch the application that you want to uninstall and refund.
•Touch Refund to uninstall the application and refund. If the button
becomes Uninstall, your trial period has expired.
•In the survey form, select the answer that best matches your
reason, and touch OK.
8.3 Manage your downloads
After you downloaded and installed an application, the following
further operations are available for your selection.
View
On Play Store screen, touch and select My apps & games.
Uninstall
On Play Store screen, touch and select My apps & games. Touch
the application you want to uninstall to enter the details screen,
touch UNINSTALL and finally touch OK to confirm.
52
Page 53

Refund
On Play Store screen, touch and select My apps & games. Touch
the application you want to uninstall for a refund, touch Refund, and
finally touch OK to confirm.
Update notification
On Play Store screen, touch and select My apps & games. Touch
and select Settings, mark App updates available to enable update
notification.
Auto update
To auto update all installed applications, touch and select My
apps & games from Play Store screen. Touch and select Settings\
Auto-update apps to enable this function.
Reviews
Open the details screen for an application, touch the stars
Flag
You can report an inappropriate application to Play Store by flagging
it. Open the details screen for the application, scroll to the bottom
and touch Flag as inappropriate, enter the reason and finally touch
Submit.
to award and input comments, touch OK to confirm.
53
Page 54

9 Multimedia applications
9.1 Camera
Your tablet is fitted with a Camera for taking photos and shooting
videos.
Touch to display
more options for
setting.
Slide switch
camera or video
Pinch two
fingers together
or spread them
apart to zoom
in/out
• Timer capture: Touch to set a capture time.
• Grid mode: Touch to add grid in shooting screen
• Switch view mode: Switch between the back camera lens and
the front-facing camera lens (for self-portraits, video chatting,
etc.).
• HDR mode: Select HDR mode for the camera.
• Settings: Opens the camera settings menu and lets you
change additional camera settings. See Camera Settings.
To take a picture
The screen acts as the viewfinder. First position the object or
landscape in the viewfinder, touch icon to take the picture which
54
Slide left to
view pictures or
videos you have
taken.
Touch to set more
settings.
Page 55

will be automatically saved.
To shoot a video
First position the object or landscape in the viewfinder, and touch
icon to start recording. Touch to save the video.
Further operations when viewing a picture/video you have taken
•Touch the icons below the screen to share or delete the photos/
videos you have taken.
•Touch the photo icon to access Gallery.
9.2 Gallery
Gallery acts as a media player for you to view photos and playback
videos. In addition, a set of further operations to pictures and videos
are available for your choice.
Touch to select categories: Albums,
Times, Locations, Videos.
To view a picture/play a video
Pictures and videos are displayed by albums in Gallery.
•Touch an album and all pictures or videos will spread the screen.
•Touch the picture/video directly to view or play it.
•Slide left/right to view previous or next pictures/videos.
55
Page 56

Working with pictures
You can work with pictures by editing them, sharing them with
friends, setting them as contact photo or wallpaper, etc.
Touch Edit icon to enter the edit screen.
Edit tools
•Touch to save the modified picture.
•Touch to undo the previous modification.
•Touch to redo the previous modification.
Batch operation
Gallery provides a multi- select function, so that you can work with
pictures/videos in batches.
Open the main Gallery window or Albums screen, touch and
select Select item to activate batch operation mode (you can also
long press one picture), then touch pictures you want to work on.
Touch icon to delete the selected ones. Touch to share
selected ones.
56
Page 57

10 Maps
10.1 Get My Location
10.1.1 Choose a data source to decide My Location
Drag down the status bar to open quick setting panel and touch to
access Settings, touch Location.
•Touchthe switch at the title bar to enable location services.
•TouchMode>Device only to set GPS as My Location data source.
10.1.2 Open Google Maps and view My Location
Touch Apps, then touch Maps to enter Google maps screen.
Touch icon on the map to view My Location.
The map will then center on a blue dot with a blue circle around. Your
actual position is within the blue circle.
To move the map, drag the map with your finger.
To zoom in and out of a map, pinch or spread your fingers, or you can
also zoom in by double-tapping a location on screen.
To clear the map history, touch on top left of the maps screen,
then select Settings, select Maps history, then touch .
57
Page 58

10.2 Search for a location
While viewing a map, touch the Google search bar to activate search
function.
In the search bar enter an address, a city or a local business.
Touch the search icon to search, and in a while your search results will
appear on the map as red dots. You can touch one to show a label.
Touch to show more information
58
Page 59

10.3 Star a location
Just like bookmarking a web address on the Internet, you can star any
position on the map for later use.
10.3.1 How to star (or unstar) a location
Touch a location on a map.
Touch the address rectangle that opens.
Touch the blue star at the top of the screen to star the location. (Or
touch a gold star to unstar that location.)
59
Page 60

10.4 Get driving, public transportation or walking
directions
10.4.1 Get suggested routes for your trip
Touch icon from Maps screen.
To edit your start point by one of the following methods:
•Touch Your location, then enter an address as the start point.
•Choose destination directly by selecting a starred item saved
before, selecting an address from your contacts, or using search
history.
Do likewise for your end point.
To reverse directions, touch .
A couple of suggested routes will appear in a list. Touch any routes to
view their respective detailed directions.
To get reverse directions for a route you’ve already made, simply open
that route’s directions window and touch . No need to enter your
start point and end point again.
60
Page 61

10.4.2 Preview suggested routes and decide on a
route more preferable or feasible to you
You can preview each turn in your route in Navigation, Satellite, and
other views.
•Touch a left or right arrow to preview the next or previous leg of
your route.
When selecting a more preferable or feasible route, distance and time
will be the two most important factors for your evaluation. Distance
and estimated time will be displayed at the top of the directions
screen.
10.4.3 Search for locations along your route
Please refer to "9.3 Search for a location" for detailed information.
10.5 Arrangement of Layers
Layers allow you to view locations and additional information overlaid
on the map. You can add multiple layers or remove only certain layers
so you control exactly what information you want visible on the map
at one time.
10.5.1 To view multiple layers
Touch icon from Maps screen. All available layers are listed (like
Traffic, Satellite, etc.), select one to view.
10.5.2 To clear the maps history
After you get directions or search on a map, you can clear the
markers/layers that have been drawn: touch and Settings, select
Maps history, then touch .
61
Page 62

11 Others
11.1 File Manager
To access this function, touch Apps , and then touch .
File Manager works with both external SD card and internal storage. File Manager displays all data stored on both microSD card and
internal storage, including applications, media files; videos, pictures
or audios you have captured; other data transferred via Bluetooth,
USB cable, etc.
When you download an application from PC to microSD card, you
can locate the application on File Manager, then touch it to install
it in your tablet.
File Manager allows you to perform and be really efficient with the
following common operations: create (sub) folder, open folder/file,
view, rename, move, copy, delete, play, share, etc.
11.2 Other applications
The previous applications in this section are preinstalled on your
tablet. To read a brief introduction of the preinstalled 3rd party
applications, please refer to the leaflet provided with the tablet. You
can also download thousands of 3rd party applications by going to
Google Play Store on your tablet.
(1)
Application availability depends on country and operator.
(1)
62
Page 63

12 Settings
To access this function, touch from Home screen and touch
to access Settings.
12.1 Wireless & networks
12.1.1 Wi-Fi
Using Wi-Fi you can now surf the Internet whenever you are in range of a wireless network. The only thing you have to do is to enter the Wi-Fi screen and configure an access point to connect your tablet to the wireless network.
12.1.2 Bluetooth
Bluetooth allows your tablet to exchange data (videos, images, music,
etc.) in a small range with another Bluetooth supported device (tablet,
computer, printer, headset, car kit, etc.).
12.1.3 Data usage
You can choose a data usage cycle to view the statistics and related
applications of used data by your tablet.
12.1.4 Airplane mode
Slide the switch to turn off Airplane mode in "more..." menu
to simultaneously disable all wireless connections including Wi-Fi,
Bluetooth and more.
12.1.5 Tethering & portable hotspot
Use Tethering and portable hotspot to share your device’s Internet
connection with a computer that connects to your device via USB
cable, or by Bluetooth.
63
Page 64

12.1.6 VPN settings
A mobile virtual private network (mobile VPN or mVPN) provides
mobile devices with access to network resources and software
applications on their home network, when they connect via other
wireless or wired networks. Mobile VPNs are used in environments
where workers need to keep application sessions open at all times,
throughout the working day, as the user connects via various wireless
networks, encounters gaps in coverage, or suspend-and-resumes
their devices to preserve battery life. A conventional VPN cannot
survive such events because the network tunnel is disrupted, causing
applications to disconnect, time out, fail, or even the computing
device itself to crash.
12.2 Device
12.2.1 Display
•Brightness level Touch to adjust the brightness of the screen.
•Wallpaper Touch to set the wallpaper.
•Sleep Touch to set screen time out.
•Daydream Select an animation effect which shows in
•Font size Touch to set the font size.
•When device is
rotated
standby status.
Touch to set when the screen will be rotated.
64
Page 65

12.2.2 Sound & notification
Use the Sound settings to configure volume and ringtones for
different events and environments.
Sound & Notification Settings Overview
The sound settings menu allows you to configure the following
options:
•Sound
•Do not disturb
•Default notification
ringtone
•Other sounds Set a tone for dial pad, screen lock, etc.
•Notification
•When device is
locked
•App notifications Tap to see all app notifications.
•Notification access Tap to check notification access.
Set volume for ringtones, alarms, system
features, etc.
Set interruption allows and automatic rules
for your tablet.
Set a tone for default tablet notifications.
When device is locked, set to show or not
show notification content.
12.2.3 Apps
You use the Apps settings to view details about the applications
installed on your tablet, to manage their data and force them to stop,
and to set whether you want to permit installation of applications
that you obtain from web sites and emails.
12.2.4 Storage & USB
Use these settings to monitor the total and available space on your
tablet and on your microSD card; to manage your microSD card.
65
Page 66

If a warning message comes up saying that tablet memory is
limited, you are required to free up space by deleting some
unwanted applications, downloaded files, etc.
12.2.5 Battery
In battery management screen you can view the battery usage data
since you last connected the tablet to a power source. The screen
also shows your battery status and how long it has been used since
last charging. Touch one category, then you can learn its specific
power consumption.
12.2.6 Memory
You can check the memory status in Memory screen.
12.2.7 Users
You can add user or profile in User setting screen, and also you can
switch the users mode here.
12.3 Personal
12.3.1 Location
Use GPS to determine your location
Check to use your tablet’s global positioning system (GPS) satellite
receiver to pinpoint your location within an accuracy as close as
several meters (“street level”). To use Location-Based Services, you
must first enable location services on your device:
• SelectSettings > Location, touch the switch at the title bar
to enable/disable location services.
• TouchMode>Deviceonlytoenable theGPSsatellite.
The process of satellite and setting your tablet’s precise location will
require up to 5 minutes. You will need to stand clear view of the sky
and avoid moving. After this, 20-40 seconds to identify your precise
location.
66
Page 67

12.3.2 Security
Func
Slide to display shortcuts on your lock screen.
Screen lock
Touch to set a method to unlock screen.
Make pattern visible
Slide to make pattern visible or not.
Automatically lock
Set the time for automatically lock.
Power button instantly locks
Slide to enable the Power key to lock screen.
Lock screen message
Touch to set the owner information on lock screen.
Smart Lock
Touch to set smart lock.
Make passwords visible
Slide to show passwords as you type.
Device administrators
Touch to view or deactivate device administrators.
Unknown sources
Slide to permit installation of applications that you obtain from
web sites, emails, or other locations other than Google Play Store.
To protect your tablet and personal data, download applications only
from trusted sources, such as Google Play Store.
Storage type
Touch to choose a storage type.
Trusted credentials
Touch to display trusted CA certificates.
67
Page 68

Install from SD card
Touch to install certificates from SD card.
Clear credentials
Touch to remove all certificates.
Trust agents
View or deactivate trust agents.
Screen pinning
Turn on/off the screen pinning feature.
Apps with usage access
Turn Engineering Mode on to access the information of the apps
usage.
12.3.3 Accounts
Use the settings to add, remove, and manage your Email and other
supported accounts. You can also use these settings to control how
and whether all applications send, receive, and synchronize data on
their own schedules, and whether all applications can synchronize
user data automatically.
12.3.4 Google
Use the Google settings to find various options to set your google
account or google service.
12.3.5 Language & input
Use the Language & input settings to select the language for the text
on your tablet and for configuring the onscreen keyboard. You can
also configure voice input settings and the pointer speed.
Language
Touch to set the system language.
Spell checker
Mark the checkbox to enable the system to show suggested words.
68
Page 69

Personal dictionary
Touch to open a list of the words you’ve added to the dictionary.
Touch a word to edit or delete it.
Touch the add button + to add a word.
Current Keyboard
Touch to select a current input method.
Android keyboard
The Android keyboard settings apply to the onscreen keyboard that is
included with your tablet. The correction and capitalization features
affect only the English version of the keyboard. Available options
are as follows:
Text-to-speech output
•Preferred engine
Touch to choose a preferred text-to-speech engine, touch the
settings icon to show more choices for each engine.
•Speech rate
Touch to open a dialogue where you can select how quickly you want
the synthesizer to speak.
•Listen to an example
Touch to play a brief sample of the speech synthesizer, using your
current settings.
12.3.6 Backup and reset
Back up my data
Slide to back up your tablet’s settings and other application
data to Google Servers with your Google Account. If you replace your
tablet, the settings and data you’ve backed up are restored onto the
new tablet for the first time you sign in your Google Account. If you
mark this option, a wide variety of settings and data are backed up,
including your Wi-Fi passwords, bookmarks, a list of the applications
you’ve installed, the words you’ve added to the dictionary used by
69
Page 70

the onscreen keyboard, and most of the settings that you configure
with the Settings application. If you unmark this option, you stop
backing up your settings, and any existing backups are deleted from
Google Servers.
Back up account
Touch to set your backup account.
Automatic restore
Slide to restore your backed up settings or other data when
reinstalling an application.
Network settings reset
Touch to reset settings for network.
Factory data reset
Tablet reset will erase all of your personal data from internal
storage, including information about your Google Account, any other
accounts, your system and application settings, and any downloaded
applications. Resetting the tablet does not erase any system software
updates you’ve downloaded or any files on your micro SD card, such
as music or photos.
When you can’t power on your tablet, there is another way to perform
a factory data reset by using hardware keys. Press the Volume up key
and the power key at same time until the screen lights up.
12.4 System
12.4.1 Date & time
Use Date & Time settings to customize your preferences for how date
and time are displayed.
Automatic date & time
Touch to select Use network/GPS provided time or Off.
Set date
Touch to open a dialogue where allows you to set the tablet’s date
manually.
70
Page 71

Set time
Touch to open a dialogue where you can manually set the tablet’s
time.
Select time zone
Touch to open a dialogue where you can set the tablet’s time zone.
Use 24-hour format
Mark the checkbox to display the time using 24-hour format.
Choose date format
Touch to open a dialogue where allows you to select the format for
displaying dates.
12.4.2 Accessibility
You use the Accessibility settings to configure any accessibility plugins you have installed on your tablet.
12.4.3 Regulatory & Safety
Touch to display the information about Regulatory and Safety.
12.4.4 Developer options
To access this function, touch Settings\About tablet, then touch Build number 7 times. Now Developer options is available.
The Developer options screen contains settings that are useful for
developing Android applications. For full information, including
documentation of the Android applications and development tools,
see the Android developer web site (http://developer.android.com).
Note: Mark the checkbox to enable “USB debugging”, which permit
debugging tools on a computer to communicate with your tablet via
a USB connection.
12.4.5 About tablet
This contains information about things ranging from Legal information,
Model number, Firmware version, Baseband version, Kernel version,
71
Page 72

Build number to those listed below:
System updates
Touch to check for system updates.
Status
Touch to display the status of the battery, network, serial number and
other information.
Legal information
Touch to view legal information.
Regulatory & Safety
Touch to display the information about Regulatory and Safety.
72
Page 73

13 Accessories
The latest generation of Alcatel tablets offers a built-in handsfree
feature that allows you to use the tablet from a distance, placed on
a table for example.
1. Charger
2. USB cable
Only use your tablet with the Alcatel, charger and accessories
in your box.
73
Page 74

Alcatel is a trademark of Alcatel-Lucent
and is used under license by
TCL Communication Ltd.
© Copyright 2016 TCL Communication Ltd..
All rights reserved
TCL Communication Ltd. reserves
the right to alter material
or technical specification
without prior notice.
74
CJA1FDBB6AAA
Page 75

Guide de l'utilisateur
Page 76

Table des matières
Consignes de sécurité ...................................................................................5
Renseignements d’ordre général............................................................. 15
Garantie ........................................................................................................ 17
Dépannage .................................................................................................. 19
1 Touches et connecteurs ................................................................... 24
1.1 Premiers pas ............................................................................25
1.2 Écran d’accueil ........................................................................28
2 Saisie de texte .................................................................................... 36
2.1 À l’aide du clavier intégré .....................................................36
2.2 Clavier Android ....................................................................... 36
2.3 Modification du texte ........................................................... 37
3 Contacts .............................................................................................. 38
3.1 Consultation de vos contacts..............................................38
3.2 Ajout d’un contact .................................................................39
3.3 Modification des contacts ................................................... 40
3.4 Importation, exportation et partage de contacts ........... 40
3.5 Comptes ................................................................................... 41
4 Gmail ................................................................................................... 42
5 Messagerie ......................................................................................... 45
6 Calendrier et horloge ........................................................................ 47
6.1 Calendrier ............................................................................... 47
6.2 Horloge .................................................................................. 48
7 Connexion ........................................................................................... 50
7.1 Connexion à Internet ............................................................ 50
7.2 Établir une connexion avec des appareils Bluetooth ...51
7.3 Établir une connexion à un ordinateur .............................53
7.4 Établir une connexion avec des réseaux privés virtuels 54
2
Page 77

8 Play Store ......................................................................................... 56
8.1 Trouver l’article que vous voulez télécharger et installer ..
................................................................................................... 56
8.2 Télécharger et installer ......................................................... 57
8.3 Gérer vos téléchargements ................................................. 59
9 Applications multimédias ................................................................ 61
9.1 Appareil photo ..................................................................... 61
9.2 Galerie ....................................................................................62
10 Maps ................................................................................................... 65
10.1 Trouver ma position ..............................................................65
10.2 Rechercher un endroit .......................................................... 66
10.3 Marquer un emplacement ...................................................67
10.4 Trouver un itinéraire en voiture, en transport en commun
ou à pied ............................................................................................... 68
10.5 Disposition des calques ........................................................69
11 Autres ................................................................................................... 70
11.1 Mes fichiers ..........................................................................70
11.2 Autres applications ...............................................................70
12 Paramètres ........................................................................................ 71
12.1 Sans fil et réseaux ..................................................................71
12.2 Appareil .................................................................................... 72
12.3 Personnel ................................................................................. 75
12.4 Système .................................................................................... 80
13 Accessoires ......................................................................................... 82
3
Page 78

www.sar-tick.com
Cet appareil respecte les limites nationales
applicables de débit d’absorption spécifique
(DAS) qui sont de l’ordre de 1,6 W/kg. Pour
déterminer les valeurs du DAS, reportez-vous
à la page 14 du présent guide de l’utilisateur.
Lorsque vous transportez le produit ou que vous
l’utilisez en le portant sur vous, vous devez le
placer dans un accessoire homologué, comme un
étui, ou le conserver à une distance d’au moins 9
mm de votre corps pour respecter les exigences
en matière d’exposition aux radiofréquences.
N’oubliez pas que ce produit peut émettre même
lorsque vous ne l’utilisez pas.
Pour prévenir toute lésion de l’appareil auditif,
évitez d’utiliser l’appareil à un volume élevé
pendant de longues périodes. Si vous utilisez le
haut-parleur, soyez prudent quand vous tenez
l’appareil près de l’oreille.
La tablette contient des aimants qui peuvent
interférer avec d’autres appareils et diverses
autres choses (comme les cartes de crédit,
les stimulateurs cardiaques, les défibrillateurs,
etc.). Veuillez vous assurer que votre tablette se
trouve toujours à au moins 15 cm des appareils
et choses indiqués ci-dessus.
4
Page 79

Consignes de sécurité
Avant d’utiliser votre appareil, lisez attentivement ce chapitre.
Le fabricant ne pourra être tenu responsable des dommages
résultant d’une mauvaise utilisation ou d’un usage non conforme aux
instructions du présent manuel.
•AVIS AUX CONDUCTEURS
Des études ont montré qu’utiliser un appareil tout en conduisant
fait courir des risques bien réels, même si l’on se sert d’un dispositif
« mains libres » (trousse pour véhicule, casque d’écoute, etc.). L’on
demande donc au conducteur de ne pas utiliser son appareil tant que
le véhicule n’est pas stationné.
Lorsque vous conduisez, veuillez ne pas utiliser votre appareil ou
votre casque d’écoute pour écouter de la musique. Dans certaines
régions, l’utilisation d’un casque d’écoute peut être considérée
comme dangereuse et par conséquent interdite. Sous tension, votre
appareil émet des ondes électromagnétiques qui peuvent perturber
l’équipement électronique de votre véhicule, par exemple le système
de freinage antiblocage (ABS), les coussins gonflables, etc. Afin
d’éviter tout problème, veuillez prendre les précautions suivantes :
- ne posez pas votre appareil sur le tableau de bord ou dans l’espace
de déploiement des coussins gonflables;
- assurez-vous, auprès du constructeur ou du concessionnaire
automobile, que le tableau de bord est insensible aux ondes radio
émises par votre appareil.
•CONDITIONS D’UTILISATION
Pour optimiser les performances de l’appareil, il est conseillé de
l’éteindre de temps à autre.
Le produit doit seulement être relié à une interface USB de version
USB2.0 ou 1.1.
Éteignez votre appareil avant de monter à bord d’un avion.
Dans un établissement de santé, mettez votre appareil hors fonction,
à moins que vous ne vous trouviez dans une zone réservée à cet
5
Page 80

effet. Comme d’autres types d’équipements aujourd’hui courants,
ces appareils peuvent perturber le fonctionnement de dispositifs
électriques, électroniques ou radio.
Mettez l’appareil hors tension si vous vous trouvez à proximité de gaz
ou de liquides inflammables. Respectez les consignes et règlements
affichés dans les dépôts de carburant, les stations-service, les usines
chimiques et tout autre endroit où il existe des risques d’explosion.
Lorsque votre appareil est allumé, veuillez vous assurer qu’il se
trouve toujours à au moins 15 cm de tout appareil médical comme
les stimulateurs cardiaques, les appareils auditifs ou les pompes à
insuline, etc. Plus précisément, vous devriez vous assurer d’utiliser
votre appareil du côté opposé à celui de l’appareil, le cas échéant.
Sous peine de lésion de l’appareil auditif, veuillez également éloigner
l’appareil de votre oreille quand vous utilisez la fonction mains libres,
car le volume amplifié peut endommager l’ouïe.
Ne laissez pas les enfants utiliser l’appareil ou jouer avec l’appareil et
les accessoires sans supervision.
Votre appareil est un appareil monobloc : son couvercle arrière
et sa batterie ne sont pas amovibles. N’essayez pas de démonter
l’appareil. Si vous passez outre cette recommandation, la garantie
ne s’appliquera pas. Le démontage de l’appareil risque également
d’endommager la batterie et de libérer des substances allergènes.
Manipulez toujours votre appareil avec soin et gardez-le dans un
endroit propre et à l’abri de la poussière.
Assurez-vous que votre appareil ne soit pas exposé à de mauvaises
conditions atmosphériques ou environnementales (humidité, pluie,
infiltration de liquides, poussière, air marin, etc.). La plage de
température d’utilisation recommandée par le manufacturier va de
0°C à +45°C.
Au-delà de 45 °C, l’écran risque d’être moins lisible; cette altération
est toutefois temporaire et sans gravité.
N’essayez pas d’ouvrir l’appareil, de le démonter ou de tenter de le
réparer vous-même.
Évitez de laisser tomber l’appareil, de le jeter ou de le plier.
6
Page 81

Pour éviter toute blessure, n’utilisez pas votre appareil si l’écran (qui
est en verre) est abîmé, fêlé ou cassé.
Évitez de peindre l’appareil.
N’utilisez que des chargeurs de batterie ou accessoires recommandés
par TCL Communication Ltd. ou ses sociétés affiliées, et compatibles
avec votre modèle. TCL Communication Ltd. et ses sociétés affiliées
déclinent toute responsabilité en cas de dommage causé par
l’utilisation d’autres chargeurs ou accessoires que ceux préconisés.
Assurez-vous de faire une copie de sauvegarde des données
importantes mémorisées dans l’appareil, ou bien consignez-les par
écrit.
Certaines personnes peuvent être sujettes à une crise d’épilepsie ou
perdre connaissance lorsqu’elles jouent à des jeux vidéo. Ces crises
ou pertes de conscience peuvent se produire même si la personne
n’en avait encore jamais éprouvé. Si vous-même ou un membre de
votre famille y avez déjà été sujet, veuillez consulter votre médecin
avant de jouer à des jeux vidéo sur votre appareil.
Les parents devraient surveiller leurs enfants lorsqu’ils utilisent
l’appareil pour jouer à des jeux vidéo. Toute personne qui présente l’un
des symptômes suivants, soit convulsions, contractions involontaires
des muscles ou des yeux, perte de conscience, mouvements
involontaires ou désorientation, devrait arrêter d’utiliser l’appareil et
consulter un médecin. Pour prévenir l’apparition de tels symptômes,
veuillez prendre les précautions de sécurité suivantes :
- prenez une pause d’au moins 15 minutes chaque heure;
- jouez dans une pièce où toutes les lumières sont allumées;
- tenez-vous le plus loin possible de l’écran quand vous jouez;
- arrêtez de jouer si vos mains, vos poignets ou vos bras sont
fatigués ou s’engourdissent, et attendez quelques heures avant de
reprendre la partie;
- si l’engourdissement persiste pendant ou après la partie, cessez de
jouer et consultez un médecin.
Si vous jouez un certain temps à l’aide de votre appareil, il se peut
que vous ressentiez un certain inconfort au niveau des mains, des
bras, des épaules, du cou ou d’une autre partie du corps. Pour éviter
7
Page 82

tendinites, syndromes du canal carpien et autres troubles musculosquelettiques, suivez les recommandations.
•RESPECT DE LA VIE PRIVÉE
Veuillez prendre note que vous devez respecter les lois et règlements
en vigueur dans votre pays concernant la prise de clichés et
l’enregistrement de sons à l’aide de votre appareil. Certaines lois et
certains règlements interdisent formellement de prendre d’autres
personnes en photo ou d’enregistrer leur voix ou tout autre attribut
personnel, de reproduire un tel enregistrement et de le diffuser,
toutes activités pouvant être considérées comme une atteinte à la
vie privée. C’est à l’utilisateur et à lui seul qu’il incombe de veiller
à obtenir, s’il y a lieu, l’autorisation préalable d’enregistrer des
conversations privées ou confidentielles, ou de prendre d’autres
personnes en photo. Le fabricant, le distributeur et le vendeur de
votre appareil, ainsi que le fournisseur de services, déclinent toute
responsabilité en cas d’utilisation inappropriée de l’appareil.
Veuillez prendre note que l’utilisation de cet appareil peut entraîner
le partage de vos données personnelles avec l’appareil principal.
Vous êtes responsable de protéger vos renseignements personnels
et de ne pas les partager avec des appareils non autorisés ou avec
les appareils tiers connectés au vôtre. Pour les produits offrant des
fonctionnalités Wi-Fi, assurez-vous de vous connecter uniquement à
des réseaux Wi-Fi de confiance. En outre, lorsque vous utilisez votre
produit comme point d’accès (le cas échéant), assurez-vous d’utiliser
les fonctionnalités de sécurité du réseau.
Ces précautions aideront à empêcher tout accès non autorisé à
votre appareil. Votre produit peut enregistrer des renseignements
personnels dans différents emplacements, y compris sur une carte
SIM, sur une carte mémoire et dans la mémoire intégrée de l’appareil.
Assurez-vous de supprimer ou d’effacer tout renseignement
personnel avant de recycler, de remettre ou de donner le produit.
Choisissez attentivement vos applis et mises à jour et ne les installez
qu’à partir de sources de confiance. Certaines applis pourront avoir
des répercussions sur la performance du produit ou avoir accès à des
renseignements personnels comme les détails de vos comptes, les
données d’appel, les détails de votre position géographique et les
ressources réseau.
8
Page 83

Veuillez noter que toute donnée partagée avec TCL Communication
Ltd. est stockée conformément à la législation applicable sur
la protection des données. À ces fins, TCL Communication Ltd.
met en œuvre et continue à utiliser des mesures techniques et
organisationnelles appropriées pour protéger toutes vos données
personnelles, par exemple contre le traitement non autorisé ou
illégal et la perte accidentelle, ainsi que contre la destruction de ces
données ou les dommages causés à celles-ci, afin que ces mesures
puissent assurer un niveau de sécurité approprié en ce qui concerne :
(i) les possibilités techniques offertes,
(ii) les coûts de mise en œuvre de ces mesures,
(iii) les risques connexes au traitement des données personnelles, et
(iv) la sensibilité des données personnelles traitées.
Vous pouvez accéder à vos renseignements personnels, les examiner
et les modifier en tout temps en vous connectant à votre compte
d’utilisateur, en consultant votre profil utilisateur ou en communiquant
directement avec nous. Si vous voulez que nous puissions modifier ou
supprimer vos données personnelles, nous pourrions vous demander
de nous fournir une preuve d’identité avec de pouvoir répondre à
votre demande.
•BATTERIE
Conformément à la nouvelle réglementation sur le transport aérien,
la batterie de votre produit n’est pas chargée. Veuillez d’abord la
charger.
Votre appareil est un appareil monobloc. Son couvercle arrière et sa
batterie ne sont donc pas amovibles. Prenez les précautions suivantes
en ce qui concerne l’utilisation de la batterie :
- Ne tentez en aucun cas d’ouvrir le couvercle arrière de l’appareil
ou d’en remplacer la batterie au lithium polymère rechargeable.
Veuillez communiquer avec le revendeur pour qu’il la remplace.
- Ne pas tenter d’extraire, de remplacer ou d’ouvrir la batterie.
- Ne pas percer le couvercle arrière de l’appareil.
- Ne pas brûler l’appareil, le jeter aux ordures ménagères, ni l’exposer
à une température supérieure à 50 °C.
- Éliminer les batteries usagées conformément aux instructions.
9
Page 84

Le symbole ci-contre figurant sur l’appareil, la batterie et les
accessoires signifie que ces articles doivent, en fin de vie,
être déposés en des points de collecte sélective, à savoir :
- déchetteries municipales pourvues de bacs adaptés à ce
type de matériel;
- bacs prévus à cet effet dans les points de vente.
L’équipement sera ensuite recyclé, ce qui évitera de rejeter des
substances nocives dans l’environnement, tout en permettant la
réutilisation de certains matériaux.
Pays membres de l’Union européenne
L’accès aux points de collecte ci-dessus est gratuit.
Tous les produits portant le symbole ci-dessus doivent être déposés
dans les points de collecte mentionnés.
Dans les autres pays :
Il convient de ne pas jeter les équipements portant le symbole
ci-dessus dans une poubelle ordinaire s’il existe des centres de
collecte ou de recyclage adaptés dans le pays ou la région considérés.
On les déposera dans les points de collecte prévus à cet effet, en vue
de leur recyclage.
•CHARGEURS
Les chargeurs alimentés par le réseau sont prévus pour fonctionner à
une température ambiante de 0 °C à 45 °C.
Les chargeurs adaptés à votre appareil sont conformes à la norme
de sécurité régissant les équipements informatiques et de bureau.
Ils sont aussi conformes à la directive relative à l’écoconception
2009/125/CE. Compte tenu des différentes normes électriques
existantes, un chargeur acheté dans un pays peut ne pas fonctionner
dans un autre. Cet équipement ne doit être utilisé qu’aux fins
auxquelles il est destiné.
Le chargeur doit se trouver à proximité de l’appareil et être facile
d’accès.
10
Page 85

•Déclaration de conformité de la Federal Communications
Commission (FCC)
Cet équipement est conforme à l’alinéa 15 du règlement de la FCC.
Son fonctionnement est assujetti aux deux conditions suivantes : (1)
cet appareil ne doit pas causer d’interférences nuisibles, et (2) cet
appareil doit accepter toute autre interférence reçue, y compris les
interférences pouvant entraîner un fonctionnement non désiré.
Cet appareil a été mis à l’essai et trouvé conforme aux normes
relatives aux équipements numériques de catégorie B en vertu de
l’alinéa 15 du règlement de la FCC. Ces normes visent à assurer
une protection raisonnable contre les interférences nuisibles dans
une installation résidentielle. Cet équipement produit, utilise et
émet de l’énergie radioélectrique; s’il n’est pas installé ou utilisé
conformément aux présentes instructions, il peut perturber les
radiocommunications. Quoi qu’il en soit, on ne peut pas garantir que
des interférences ne se produiront pas dans certaines installations.
S’il perturbe la réception de signaux de radio ou de télévision, ce
qui peut être vérifié par sa mise hors tension puis à nouveau sous
tension, l’utilisateur est invité à essayer de corriger la situation en
prenant les mesures suivantes :
- réorienter ou déplacer l’antenne de réception;
- éloigner l’équipement du récepteur;
- brancher l’équipement dans une prise de courant faisant partie d’un
circuit différent de celui du récepteur;
- consulter le fournisseur ou un technicien en radiotélévision
expérimenté pour obtenir de l’aide.
Avertissement émis par la FCC :
tout changement ou toute modification non expressément approuvé
par l’agent autorisé en matière de conformité peut entraîner la
révocation du droit de l’utilisateur à se servir de l’équipement fourni.
Information de la FCC sur l’exposition aux radiofréquences (DAS) :
cet appareil a été conçu et fabriqué de manière à respecter les
limites recommandées par la Federal Communications Commission
des États-Unis.
11
Page 86

Pendant les essais de DAS, cet appareil est paramétré pour émettre
à son niveau de puissance certifié le plus élevé pour toutes les
bandes de fréquences testées. Ces essais sont effectués dans des
endroits qui simulent une exposition aux radiofréquences lorsque
l’appareil est en contact, sans espace, avec la tête et près du corps
à une distance de 9 mm. Bien que le DAS soit défini au plus haut
niveau de puissance certifié, le degré réel de DAS de l’appareil en
fonctionnement peut être nettement inférieur à la valeur maximale,
car il est conçu pour fonctionner à divers niveaux de puissance afin
de n’utiliser que l’énergie nécessaire pour atteindre le réseau. De
manière générale, plus l’utilisateur est près d’une antenne fixe, moins
son appareil a besoin d’émettre.
La norme observée en matière d’exposition pour les appareils sans fil
fait appel au débit d’absorption spécifique (DAS) (ou « SAR » (Specific
Absorption Rate)), une unité de mesure choisie par convention. La
limite de DAS définie par la FCC pour les appareils mobiles est de
1,6W/kg.
Lors des tests visant à déterminer le DAS, l’appareil est utilisé dans
des positions de fonctionnement standard acceptées par la FCC
et fonctionne à son niveau de puissance certifié le plus élevé dans
toutes les bandes de fréquences testées.
La FCC a accordé une autorisation d’équipement à ce modèle
d’appareil pour tous les degrés de DAS indiqués et évalués en
conformité avec les directives sur l’exposition aux RF de la FCC. Les
renseignements sur le DAS pour ce modèle ont été déposés auprès
de la FCC et peuvent être consultés dans la section intitulée Display
Grant du site HYPERLIEN «http://www.fcc.gov/oet/ea/fccid» www.
fcc.gov/oet/ea/fccid, après une recherche avec FCC ID: 2ACCJB066.
Pour cet appareil, la valeur de DAS la plus élevée indiquée lorsque
l’appareil est utilisé près du corps est la suivante :
Valeur DAS la plus élevée pour ce modèle dans les conditions dans
9015B (porté sur le corps) 1.36 W/kg
La conformité au DAS, lorsque l’appareil est allumé et porté sur le
corps, est fondée sur une distance de séparation entre l’appareil
et le corps humain de 0.9 cm. En cours d’utilisation, le niveau du
DAS réel de l’appareil est généralement nettement inférieur à la
valeur maximale indiquée ci-dessus. Cela est dû au fait qu’afin
d’améliorer l’efficacité du système et de minimiser les interférences
lesquelles elle a été enregistrée :
12
Page 87

sur le réseau, la puissance de fonctionnement de votre appareil
(2) l’utilisateur de l’appareil doit accepter tout brouillage
est automatiquement réduite lorsque toute la puissance n’est pas
requise. Plus la puissance de sortie de l’appareil est faible, plus bas
est le niveau du DAS.
Un test visant à obtenir le DAS lorsque l’appareil est porté sur le
corps a été effectué pour cet appareil, à une distance de 0.9 cm. Pour
satisfaire les directives en matière d’exposition lorsqu’il porté sur le
corps, l’appareil doit se trouver au moins à cette distance du corps.
Si vous utilisez un accessoire autre qu’un accessoire approuvé,
assurez-vous qu’il est exempt de métal et qu’il maintient la distance
indiquée entre l’appareil et le corps.
Des organisations comme l’Organisation mondiale de la santé et
la Food and Drug Administration américaine ont suggéré aux gens
préoccupés qui veulent réduire leur exposition d’utiliser un accessoire
mains libres pour garder l’appareil sans fil loin de leur tête et de leur
corps pendant l’utilisation, ou de réduire le temps d’utilisation de
l’appareil.
•Notification ISEDC
Le présent appareil est conforme aux CNR d’Innovation, Sciences
et Développement économique Canada (ISEDC) applicables aux
appareils radio exempts de licence. L’exploitation est autorisée aux
deux conditions suivantes:
(1) l’appareil ne doit pas produire de brouillage, et
radioélectrique subi, même si le brouillage est susceptible d’en
Cet appareil numérique de la classe B est conforme à la norme NMB003 du Canada.
IC: 9238A-0067
•Déclaration ISEDC d’exposition au rayonnement
Cet appareil est conforme aux limites d’exposition DAS incontrôlée
pour la population générale de la norme CNR-102 d’Innovation,
Sciences et Développement économique Canada (ISEDC) et a été
testé en conformité avec les méthodes de mesure et procédures
spécifiées dans IEEE 1528 et IEC 62209. Cet appareil doit être
installé et utilisé avec une distance minimale de 0.9 cm entre
l’émetteur et votre corps. Cet appareil et sa ou ses antennes ne
doivent pas être co-localisés ou fonctionner en conjonction avec tout
autre antenne ou transmetteur.
13
Page 88

•LICENCES
Le logo microSD est une marque de commerce.
La marque et les logos Bluetooth appartiennent à
Bluetooth SIG Inc.
et sont utilisés sous licence par TCL Communication
Ltd. et ses sociétés affiliées. Les autres marques de
commerce ou appellations commerciales appartiennent
à leurs détenteurs respectifs.
9015B Bluetooth DID D028888
Le logo Wi-Fi constitue une marque de certification de
Wi-Fi Alliance.
Votre appareil utilise une fréquence non harmonisée
et est conçu pour fonctionner dans tous les pays
européens.
Au sein de l’Union européenne, le réseau local sans fil
peut fonctionner sans restriction à l'intérieur, mais pas à
l'extérieur en France.
Google, le logo Google, Android, le logo Android, Google SearchMC,
Google MapsMC, GmailMC, YouTube, Google Play Store, Google
LatitudeMC et HangoutsMC sont des marques de commerce de
Google Inc.
Le robot Android est reproduit ou modifié à partir de l’œuvre créée
et partagée par Google. Son utilisation est conforme à la licence
d’attribution Creative Commons 3.0, dont vous pouvez afficher
le texte en appuyant de manière prolongée sur l’avis juridique de
Google, après avoir choisi Paramètres > À propos de la tablette >
Information légale)
(1)
.
(1)
Il pourrait ne pas être disponible dans certains pays.
14
Page 89

Renseignements d’ordre général
•Adresse Internet : www.alcatelonetouch.ca
•Ligne directe : Aux États-Unis s’il vous plaît appelez, (855) 368-
0829 pour le support technique. Au Canada s’il vous plaît appelez,
(855) 844-6058 pour le support technique.
•Fabricant : TCL Communication Ltd.
•Adresse: Flat/RM 1910-12A, Block 3, China HongKong City, 33
Canton Road, Tsimshatsui, Kowloon, Hong Kong
Notre site Internet contient une section regroupant les questions les
plus fréquemment posées (FAQ). Vous pouvez aussi nous soumettre
vos questions par courriel.
La version électronique du présent manuel d’utilisation est offerte en
anglais et dans d’autres langues à l’adresse
www.alcatelonetouch.ca
Votre appareil est un émetteur transmetteur qui utilise les bandes de
fréquences 2,4 GHz et 5 GHz pour le Wi-Fi et le Bluetooth.
Adresse de la société :
Room 1910-12A, Tower 3, China HK City, 33 Canton Road,
Tsimshatsui, Kowloon, Hong Kong
Avis de non-responsabilité
Selon la version du système d’exploitation de votre appareil et les
services offerts par votre fournisseur de services, il se peut que votre
appareil ne fonctionne pas exactement comme l’indique le présent
manuel d’utilisation.
L’appareil peut contenir des éléments (« Parties provenant de tiers »)
soumis par des tiers pour incorporation à l’appareil (applications
ou logiciels au format exécutable ou sous forme de code source,
notamment).
Toutes les parties provenant de tiers contenues dans l’appareil sont
fournies telles quelles, sans garantie explicite ou implicite d’aucune
sorte, ce qui englobe notamment les garanties implicites de qualité
15
Page 90

marchande, d’adaptabilité à un usage particulier ou à une application
fournie par un tiers, d’interopérabilité avec d’autres éléments ou
applications de l’acquéreur, ou encore d’absence de contrefaçon.
L’acquéreur convient que TCL Communication s’est acquittée de
toutes les obligations qui lui incombent en matière de qualité,
à titre de fabricant d’appareils mobiles et autres équipements,
en se conformant aux exigences liées aux droits de propriété
intellectuelle. TCL Communication ne pourra en aucun cas être tenue
responsable du mauvais fonctionnement des parties provenant
de tiers à l’intérieur de l’appareil ou en lien avec d’autres appareils
appartenant à l’acquéreur. Dans toute la mesure permise par la
loi, TCL Communication décline toute responsabilité en cas de
réclamations, de demandes, d’actions en justice ou de poursuites, et
plus précisément, sans s’y limiter, en ce qui concerne le droit de la
responsabilité civile délictuelle et en vertu de quelque théorie relative
à la responsabilité que ce soit, à la suite de l’utilisation, par quelque
moyen que ce soit, ou d’une tentative d’utilisation des parties
provenant de tiers. Par ailleurs, certaines parties provenant de tiers,
bien que fournies gratuitement par TCL Communication, peuvent
ensuite donner lieu à des mises à jour ou à niveau payantes. TCL
Communication décline toute responsabilité à l’égard de tels coûts
supplémentaires, que l’acquéreur s’engage à assumer en totalité.
La disponibilité des applications peut varier d’un pays à l’autre et
selon le fournisseur de services choisi. La liste des applications et
logiciels pouvant être utilisés avec l’appareil ne pourra en aucun cas
être considérée comme un engagement de TCL Communication à les
fournir. L’information n’est donnée à l’acquéreur qu’à titre indicatif.
TCL Communication ne pourra donc être tenue responsable de la
non-disponibilité d’une ou de plusieurs applications que l’acquéreur
veut obtenir, la disponibilité pouvant varier d’un pays ou d’un
fournisseur de services à l’autre. TCL Communication se réserve en
tout temps le droit d’ajouter à ses appareils des parties provenant
de tiers, ou de les en retirer, et ce, sans préavis. TCL Communication
ne pourra en aucun cas être tenue responsable par l’acquéreur des
conséquences pour ce dernier d’un tel retrait en ce qui concerne
l’utilisation ou la tentative d’utilisation des applications ou des parties
provenant de tiers visées.
Accessoire
◆ Chargeur, 5,0 Vc.c./2.0 A
◆ Câble USB, micro-USB 5 broches
16
Page 91

Garantie
Votre appareil est garanti contre tout défaut de conformité ou
mauvais fonctionnement qui pourrait apparaître, dans des conditions
normales d’utilisation pendant la durée de garantie de douze (12)
(1)
mois
à compter de la date d’achat de votre appareil, indiquée sur
votre facture originale.
Les batteries
garantis contre tout défaut de conformité qui pourrait apparaître,
dans des conditions normales d’utilisation, mais pendant la durée de
six (6) mois
sur votre facture.
En cas de constat d’un défaut de conformité de votre appareil qui en
empêche une utilisation normale, vous devez aviser immédiatement
votre revendeur et lui présenter votre appareil avec la facture
originale.
Si le défaut de conformité est confirmé, tout ou partie de votre
appareil sera remplacé ou réparé. Si votre appareil et votre accessoire
ont été réparés, ils sont couverts par une garantie de un (1) mois
pour le même défaut. La réparation ou le remplacement pourra être
effectué avec des produits remis à neuf et reconditionnés et dont les
fonctionnalités sont équivalentes à des produits neufs.
La présente garantie couvre les pièces et les frais de main-d’œuvre à
l’exclusion de tout autre coût.
La présente garantie ne s’applique pas aux défauts de votre appareil
ou de votre accessoire occasionnés par (sans s’y limiter) :
1) tout non-respect des directives d’utilisation ou d’installation, ou
(1)
La durée de cette garantie peut varier selon les pays.
(2)
L’autonomie en communication, en veille et le cycle de vie total d’une
(2)
et accessoires vendus avec votre appareil sont aussi
(1)
à compter de la date d’achat de votre appareil, indiquée
violation des normes techniques ou de sécurité en vigueur dans la
zone géographique où votre appareil est utilisé
batterie rechargeable d’un appareil mobile dépendent des conditions
d’utilisation et des configurations du réseau. Les batteries étant des
consommables, les spécifications indiquent que vous devriez obtenir un
fonctionnement optimal de votre appareil dans les six premiers mois de
l’achat et pour environ 200 charges.
17
Page 92

2) tout raccordement à tout équipement non fourni ou non
recommandé par TCL Communication Ltd. ;
3) toute modification ou réparation effectuée par des personnes non
autorisées par TCL Communication Ltd. ou ses sociétés affiliées;
4) toute modification, correction ou adaptation du logiciel ou du
matériel effectuée par des personnes non autorisées par TCL
Communication Ltd. ;
5) toutes mauvaises conditions météorologiques, toute foudre,
tout feu, humidité, infiltration de liquides ou d’aliments, produit
chimique, téléchargement de fichiers, haute tension, corrosion,
oxydation.
Votre téléphone ne sera pas réparé ou remplacé si les marques ou les
numéros de série (IMEI) ont été enlevés ou modifiés.
Nous n’accordons aucune garantie expresse ou implicite, écrite ou
orale autre que la présente garantie limitée imprimée ou la garantie
obligatoire imposée dans votre pays ou juridiction.
TCL Communication Ltd. ou ses sociétés affiliées ne seront en aucun
cas tenues responsables de quelque dommage consécutif ou indirect
que ce soit, y compris, sans s’y limiter, les pertes commerciales, les
pertes de données ou d’images, dans la pleine mesure permise par
la loi.
Certains pays/États/provinces ne permettent pas l’exclusion ou la
limitation des dommages consécutifs, accessoires ou indirects ou
la limitation de la durée des garanties implicites; par conséquent,
les limitations ou les exclusions précédentes pourraient ne pas
s’appliquer à vous.
Recyclage des produits électroniques (États-Unis seulement):
Pour obtenir plus de détails sur le recyclage des produits électroniques,
veuillez:
1) Visiter le site Web du programme de recyclage des produits
électroniques d’Alcatel à l’adresse http://www.alcatelonetouch.us/
electronic-recycling-program ou
2) Appeler le soutien à la clientèle d’Alcatel US au 1 855 368-0829.
18
Page 93

Dépannage
Avant de communiquer avec le centre de service, nous vous
conseillons de suivre les directives ci-dessous:
• Pour assurer un fonctionnement optimal, il est conseillé de
recharger complètement ( ) la batterie.
• Évitez d’enregistrer un trop grand volume de données dans la
mémoire de votre tablette pour ne pas réduire les performances
de l’appareil.
• Utilisez Rétablir configuration d’usine et l’outil de mise à niveau
pour effectuer le formatage de la tablette ou la mise à niveau
logicielle. Toutes les données utilisateur de la tablette : les
contacts, les photos, les fichiers et les applications téléchargées,
seront perdues de façon permanente. Nous vous recommandons
fortement d’effectuer une sauvegarde complète des données et
profils de la tablette avant un formatage ou une mise à niveau.
Veuillez noter qu’une fois la restauration aux valeurs d’usine
effectuée, vous pourriez devoir entrer les authentifiants de votre
compte Google
restauration aux valeurs d’usine). Si vous ne les entrez pas, vous ne
pourrez pas utiliser l’appareil. Si vous ne vous souvenez pas de vos
authentifiants, veuillez effectuer la procédure de récupération de
compte de Google. Si vous ne réussissez pas.
• Veuillez transmettre une demande à un centre de réparation
agréé; cependant, notez que ce problème ne sera pas traité dans
le cadre de la garantie.
Ma tablette ne se met pas sous tension ou se fige
• Si vous ne pouvez pas allumer votre tablette, chargez-la pendant
au moins 20 minutes pour que le niveau de charge de la batterie
soit suffisant, puis réessayez de l’allumer.
• Si votre tablette se fige lors de l’animation au moment de l’allumer
ou de l’éteindre et que vous ne pouvez pas accéder à l’interface
(1)
Pour Android, versions 5.1 et ultérieures.
(1)
(les paramètres utilisés sur cet appareil avant la
19
Page 94

utilisateur, appuyez sur la touche Marche-arrêt pour ouvrir le
menu d’options, puis maintenez enfoncée la touche « Éteindre
» pour entrer en mode sans échec. Cette opération permet
d’éliminer les problèmes de démarrage anormal du système
d’exploitation causés par des applications tierces.
Ma tablette ne répond pas depuis quelques minutes
• Redémarrez la tablette en appuyant longuement sur la touche
Marche-arrêt pendant environ 10 secondes.
Ma tablette s’éteint toute seule
• Veuillez vous assurer que votre écran est verrouillé lorsque vous
n’utilisez pas votre tablette et que la touche Marche-Arrêt n’est
pas activée en raison du déverrouillage de l’écran.
• Vérifiez le niveau de charge de la batterie.
Ma tablette ne se charge pas correctement
• Si la batterie est restée déchargée pendant une période prolongée,
20 minutes peuvent s’écouler avant que l’indicateur de charge de
la batterie ne s’affiche à l’écran.
• Assurez-vous que la recharge est effectuée dans des conditions
ambiantes normales (entre 0 et +40°C).
• Vérifiez la compatibilité des prises de courant à l’étranger.
Ma tablette ne parvient pas à se connecter à Internet
• Vérifiez les paramètres de connexion Internet de votre tablette.
• Assurez-vous que vous vous trouvez dans un endroit couvert
par le réseau.
• Essayez de vous connecter ultérieurement ou d’un autre endroit.
Je ne peux pas utiliser certaines fonctions décrites dans le manuel
• Vérifiez la disponibilité de ce service dans votre abonnement
auprès de votre opérateur de réseau.
• Vérifiez si cette fonction exige l’utilisation d’un accessoire Alcatel.
Je ne parviens pas à connecter ma tablette à mon ordinateur
• Installez Alcatel Centre.
20
Page 95

• Vérifiez que votre pilote USB est correctement installé.
• Assurez-vous que la case de débogage USB est cochée. Pour
accéder à cette fonction, appuyez sur Paramètres\À propos de la
tablette, puis appuyez à 7 reprises sur Numéro de version. Vous
pouvez maintenant appuyer sur Paramètres\Options pour les
développeurs\Débogage USB.
• Assurez-vous que votre ordinateur répond aux exigences
d’installation de Alcatel Centre.
• Assurez-vous que vous utilisez bien le câble inclus dans la boîte.
Je n’arrive pas à télécharger de nouveaux fichiers
• Assurez-vous que votre tablette dispose d’un espace mémoire
suffisant pour votre téléchargement.
• Vérifiez l’état de votre abonnement auprès de votre opérateur
de réseau.
La tablette n’est pas reconnue par d’autres appareils Bluetooth
• Assurez-vous que la fonction Bluetooth est activée et que votre
tablette peut être vue par d’autres utilisateurs.
• Assurez-vous que la distance entre les deux tablettes correspond
à la portée de détection Bluetooth.
Comment prolonger la durée de vie de votre batterie
• Vérifiez que vous avez respecté la durée de charge complète
(minimum de 2,5 heures).
• Après une charge partielle, l’indicateur de niveau de la batterie
pourrait donner une mesure erronée. Attendez au moins 20
minutes après avoir débranché le chargeur pour obtenir une
mesure exacte.
• Réglez la luminosité de l’écran.
• Sélectionnez un intervalle de consultation automatique des
courriels aussi long que possible.
• Mettez à jour manuellement les actualités et les informations
météorologiques, ou augmentez l’intervalle de consultation
automatique correspondant.
21
Page 96

• Fermez les applications qui tournent en arrière-plan si vous ne
comptez pas les utiliser pendant une période prolongée.
• Désactivez les fonctions Bluetooth, Wi-Fi et GPS lorsqu’elles ne
sont pas utilisées.
La température de la tablette augmente si vous l’utilisez de façon
prolongée pour jouer à des jeux, naviguer sur Internet ou lancer
d’autres applications complexes.
• Cette chaleur est une conséquence normale du traitement d’une
grande quantité de données par l’unité centrale, par exemple
avec des jeux, la navigation sur Internet ou l’exécution d’autres
applications complexes. Mettez fin aux activités précédentes pour
ramener la tablette à une température normale.
Après la restauration aux valeurs d’usine, mon appareil me demande
d’entrer mes identifiants Google et m’empêche de l’utiliser tant que
je n’ai pas entré ces identifiants
• Une fois la restauration aux valeurs d’usine effectuée, vous
devrez entrer les authentifiants pour votre compte Google*
(les paramètres utilisés sur cet appareil, avant la restauration
aux valeurs d’usine). Si vous ne les entrez pas, vous ne pourrez
pas utiliser l’appareil. Si vous ne vous souvenez pas de vos
authentifiants, veuillez effectuer la procédure de récupération
de compte de Google. Si vous ne réussissez pas à récupérer vos
identifiants, veuillez communiquer avec le centre de réparation
autorisé. N’oubliez cependant pas que cela ne sera pas couvert
par la garantie.
Je n’entends pas les appels ou messages entrants. Je ne vois que
les notifications indiquant des appels manqués ou messages reçus.
• Veuillez vérifier si le mode Interruptions/ne pas déranger est
activé sur votre appareil. S’il est activé, vous verrez un symbole
d’étoile (pour les versions 5.X d’Android) ou l’icône (pour les
versions 6.X d’Android) sur le panneau des notifications.
Dans un tel cas, vous devez désactiver le mode Interruptions/ne
pas déranger. Pour ce faire, appuyez simplement sur le bouton
pour augmenter ou réduire le volume, puis sélectionnez Tous
(1)
Pour Android, versions 5.1 et ultérieures.
(1)
.
22
Page 97

(pour les versions 5.X d’Android) ou modifiez cette option dans
Paramètres > Son et notifications > Interruptions (pour les
versions 5.X d’Android) ou Ne pas déranger (pour les versions 6.X
d’Android).
Mon appareil me demande d’entrer un mot de passe, un code ou une
clé que je ne connais pas parce que cet appareil a été utilisé par une
autre personne et qu’il m’est impossible d’obtenir ce mot de passe,
ce code ou cette clé.
• La demande de mot de passe, de code ou de clé peut être
associée à la même fonctionnalité de sécurité activée sur cet
appareil. Vous pouvez essayer d’effectuer une restauration aux
valeurs d’usine, mais souvenez-vous que si ça ne fonctionne pas,
vous devrez communiquer avec le centre de réparation autorisé.
N’oubliez cependant pas que cela ne sera pas couvert par la
garantie.Votre appareil
23
Page 98

1 Touches et connecteurs
Panneau frontale
21
3
4
5
6
Numéro
Description
1
Port pour connecteur micro-USB/chargeur de batterie
2
Prise pour écouteurs
3
Appareil photo/vidéo frontal
4
Bouton Marche-arrêt
5
Bouton Volume haut/bas
6
Microphone
24
Page 99

Panneau arrière
8
7
9
Numéro
Description
Appareil photo arrière
7
Haut-parleur
8
Logement de carte SIM et microSD
9
1.1 Premiers pas
1.1.1 Configuration
Insertion de la carte microSD et de la carte micro SIM
Insérez la carte microSD et la carte micro SIM dans le bon sens pour
éviter tout dommage. Reportez-vous aux instructions suivantes.
MicroSD
SIM
1 2 3 4
1. Avant d’insérer ou de retirer la carte SIM ou la carte
microSD, veillez à mettre la tablette hors tension, par
mesure de protection contre toute détérioration. De plus, le
fait de retirer et de réinsérer la carte SD ou la carte SIM de
manière répétitive peut entraîner le redémarrage de la
tablette.
25
Page 100

2. Utilisez uniquement une carte SIM de type micro SIM. L’utilisation
d’une carte SIM nano avec un adaptateur peut endommager la
tablette ou la carte pourrait se bloquer dans l’appareil.
Recharge de la batterie
Pour recharger votre tablette, branchez le chargeur à la tablette, puis
dans la prise de courant.
•La première fois que vous utilisez votre tablette, laissez la batterie
se charger complètement (cela devrait prendre environ 5 heures).
Il est conseillé de charger complètement la batterie. L’état de charge
( ) est indiqué par un pourcentage à l’écran. Le pourcentage
augmente à mesure que la batterie de la tablette se charge.
Afin de réduire la consommation d’électricité et la perte
d’énergie, lorsque la batterie est entièrement chargée,
débranchez le chargeur de la prise de courant, désactivez les
fonctions Wi-Fi, GPS et Bluetooth ainsi que les applications
exécutées en arrière-plan si vous ne les utilisez pas, réduisez
la durée du rétroéclairage, etc.
1.1.2 Mise en marche de la tablette
Appuyez sur le bouton Marche-Arrêt jusqu’à ce que la tablette
s’allume, puis déverrouillez votre tablette (par glissement, NIP, mot de
passe ou schéma) au besoin, avant de
confirmer. L’écran d’accueil apparaît.
Si vous ne connaissez pas ou avez oublié
votre NIP, communiquez avec votre
opérateur. Ne laissez pas votre NIP en
évidence près de votre tablette. Conservez
cette information en lieu sûr.
26
 Loading...