

Page 1
A Mobile multi purpose Assistant for people on the move
Congratulations on your purchase of
With this state of the art handset you will
enjoy:
• One touch dialling that makes phone
communicating as easy as ever,
• The ease of use of a sophisticated
phone, with a large touchscreen
and stylus,
• An advanced personal information
management tool, with its agenda,
address book, notepad and other
useful functions,
• A mobile access to your Internet
E-mail,
• Advanced synchronisation with your PC ,
• Over the air agenda updating through
short message service,
All in a pocket size and lightweight
terminal.
Phone function
PIM
Personal Information Management (PIM)
Schedules
Contacts
Quick Memos
Global Search
Short Message service
Internet E-mail
Real time scheduling
World Clock
Calculator
1
Page 2

Safety precautions and
conditions of use
We recommend that you read this section
carefully before use.
As with all types of radio transceivers,
your smart phone emits electromagnetic
waves unless the smart phone has been
switched on in PIM-only mode. Your smart
phone conforms to international regulations insofar as it is used under normal
conditions and in accordance with the
following instructions.
CONDITIONS OF USE
Electromagnetic waves
• Do not switch on your smart phone's
phone function aboard an aircraft (as
your smart phone may interfere with the
aircraft's electronic systems). Current
legislation forbids this use and legal
action can be taken against the user.
• Do not switch on your smart phone's
phone function in a hospital, except in
designated areas.
• Use of your smart phone's phone
function may affect the performance of
medical electronic devices (pacemakers, hearing aids, insulin pumps, etc.). If
you have a hearing aid or a pacemaker,
only use the smart phone on the other
side of your body from where the
device is located. Consult your doctor
or the device manufacturer for further
details.
• Do not switch on your smart phone's
phone function near gas or inflammable
substances.
• Observe the rules concerning the use
of mobile phones at petrol stations,
chemical plants and at all sites where a
risk of explosion exists.
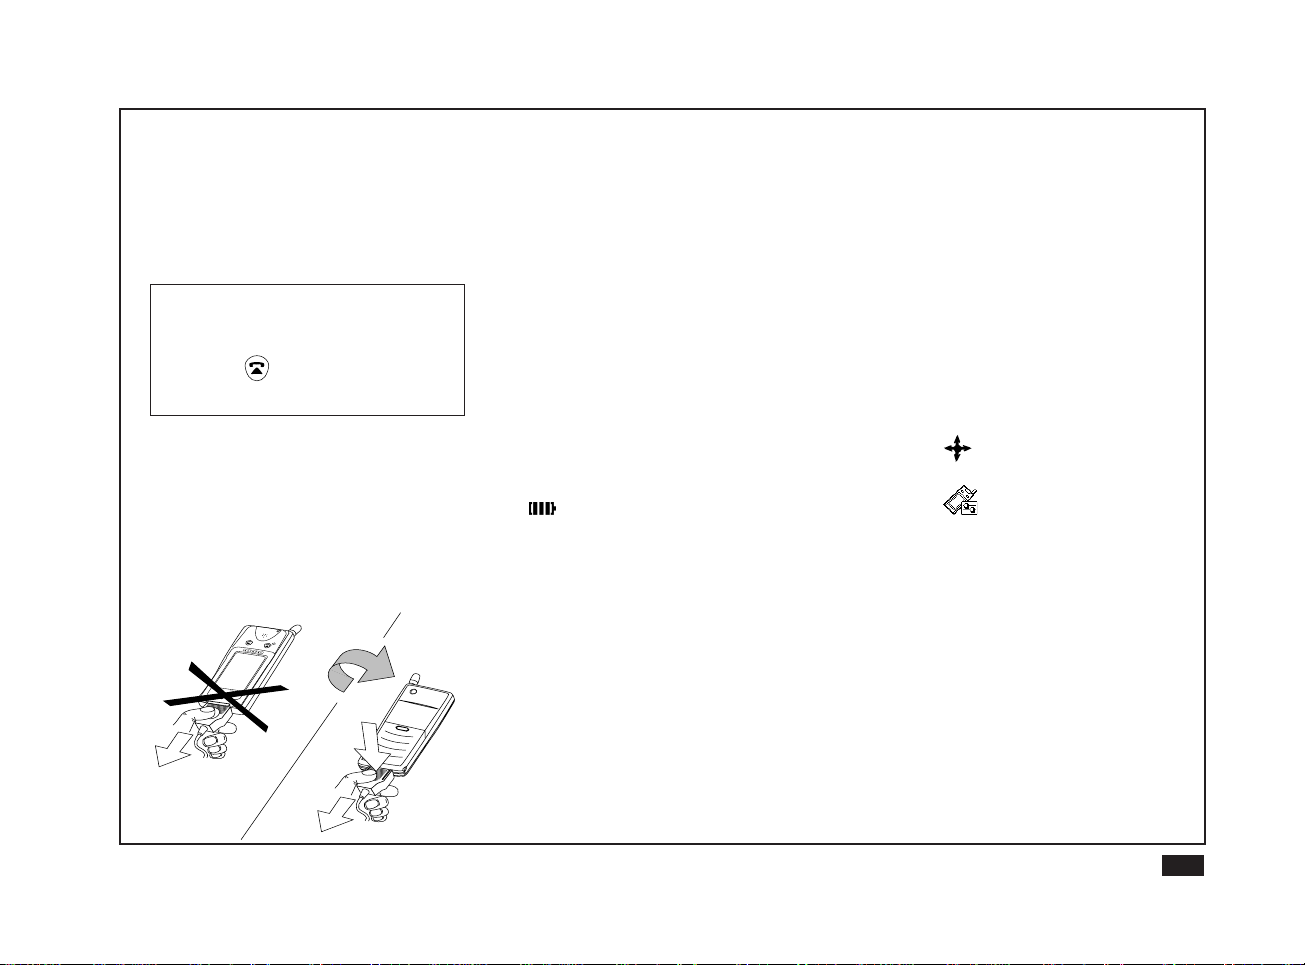
• The retractable antenna should be fully
extended during use. Avoid prolonged
contact between the antenna and your
skin when your smart phone's phone
functions are switched on.
Caring for your smart phone
• Do not allow children to use your smart
phone without supervision.
• Do not open or attempt to repair your
smart phone yourself.
• Do not drop your smart phone or
subject it to severe impacts. Bending
the body can damage the circuitry. Do
not use extreme force when pressing
the display or keys.
• Do not use sharp, pointed objects or
your fingernails to touch the display
screen. We recommend you use only
the supplied touch pen to touch or write
on the screen.
• Hard or sharp objects can scratch your
smart phone, so ensure it is closed
and/or protected when carried with
other objects.
• Do not use solvents to clean your smart
phone. Use only a soft, dry cloth.
• Do not carry your smart phone in your
back pocket as it could break when you
sit down. The display is made of glass
and is particularly fragile.
2
Page 3

• Avoid touching the external connector
on the underside of the smart phone,
since the delicate components within
can be damaged by static electricity.
Battery
• Use your smart phone only with
batteries, chargers and accessories
recommended by the manufacturer. The
manufacturer disclaims any liability for
damage caused by the use of other
chargers, batteries or accessories.
• Before removing the battery from the
smart phone, make sure the smart
phone is switched off.
• Replace or charge the batteries as
soon as they become weak. Failure to
replace weak batteries may result in
lost data or damage from battery leaks.
• Do not touch or try to bend the battery
terminals.
• Do not attempt to open the battery that
contains heavy metal. Do not throw a
used battery in the household rubbish.
Discard your used battery in compliance with the local legislation.
Others
• As with any electronic storage device,
data may be lost or corrupted under
various circumstances. We strongly
recommend that you keep separate
copies of all important data.
• Before connecting the smart phone with
a PC or a peripheral device, read the
operation manual for the other device
carefully.
• If the smart phone's battery has been
removed for some time, or if the smart
phone has been reset, the unit's clock
and calendar may be reinitialised. The
date and time should be update in this
case.
ENVIRONMENT
• The display quality may deteriorate if
used outside the manufacturer's
recommended operating temperature
range (-20°C to 55°C). However, this is
only temporary and does not indicate a
malfunction.
• Keep your smart phone away from
extreme heat. Do not leave it on the
dashboard of a car or near a heater. Do
not leave it in any place that is extremely damp or dusty.
• Since this product is not waterproof, do
not use it or store it where fluids such
as water can splash onto it. Raindrops,
water spray, juice, coffee, steam,
perspiration, etc. will also cause a
malfunction.
3
Page 4

Check the contents
PRECAUTIONS CONCERNING
VEHICLE USE
• It is the user's responsibility to verify if
local laws permit the use of a mobile
phone in a vehicle.
• In case of use in a vehicle, and to
reduce the effects of electromagnetic
waves and risk of interference with the
vehicle's electronic systems, the smart
phone must be connected to an
external antenna before being switched
on. This antenna shall be mounted and
located away from passengers or
separated by a metal screen such as
the car roof.
• To avoid losing control of your vehicle
while it is in motion, we strongly
recommend that you use your smart
phone with the optional handsfree car
kit.
• Use of your smart phone's phone
function may interfere with the vehicle's
electronic systems, such as the ABS
anti-lock brakes or the air-bag. To
ensure no such problem occurs, please
check with your dealer or car manufacturer before connecting your smart
phone.
• Only allow qualified service maintenance personnel to install the vehicle
accessories.
The manufacturer disclaims any liability
for damage which may result as a
consequence of improper use or use
contrary to the instructions contained
herein.
Please check the contents carefully. Your
smart phone should come with the
following:
• smart phone main unit
• Touch pen (installed)
• Battery pack
• Battery charger
• Operation manual
If any of these items are missing or there
are any other problems, contact your
dealer.
Note:
• The information provided in this manual
is subject to change without notice.
• All company and/or product names are
trademarks and/or registered trademarks of their respective holders.
• All screen examples (addresses, phone
numbers, names, etc.) have been
created for illustration only.
• Some of the screens illustrations, icons
and buttons, etc. in this manual may
differ from those used in your smart
phone.
4
Page 5

Contents
A Mobile multi-purpose Assistant
for people on the move................1
Safety precautions and conditions of use............. 2
Check the contents .................................................. 4
Chapter 1 Getting started 9
Getting to know your smart phone....................... 10
Part names............................................................... 10
Opening the cover..................................................11
Inserting the battery .............................................. 11
Removing the battery............................................... 12
Charging the battery .............................................. 12
Low battery .............................................................. 13
Discharging the battery ............................................ 13
Inserting the SIM card............................................ 14
Removing the SIM card ........................................... 14
Graphical User Interface........................................ 15
Switching your smart phone on ...........................16
Switching your smart phone off................................ 16
Adjusting the LCD screen .....................................17
Setting your personal information........................ 18
Setting the World Clock .........................................18
Chapter 2 Basic settings and operations
Before making a call ..............................................21
Making your first entry.............................................. 21
20
Retractable antenna................................................. 21
Checking the calling conditions................................ 21
Making a call........................................................... 22
Navigation key.......................................................... 22
Touch pen—Name dialling ....................................... 23
Touch pen—Manual dialling..................................... 23
Making an emergency call ....................................... 23
During a call............................................................ 24
Ending a call ............................................................ 24
Receiving a call ......................................................24
Sleep screen mode ................................................ 24
Short Message Service (SMS) .............................. 25
Internet e-mail.........................................................26
Chapter 3 Phone functions 27
Basic screens ......................................................... 28
Name-dialling.......................................................... 29
About name-dialling ................................................. 29
Phone Book ............................................................. 29
Name-dialling with one hand.................................... 29
Name-dialling using the Phone Book (and touch pen)....
Manual dialling .......................................................31
Making a call via manual dialling ............................. 31
Making international calls......................................... 31
Emergency calls....................................................... 31
Redialling ................................................................ 32
Redialling a number you dialled............................... 32
Calling a person who called you earlier ................... 32
30
5
Page 6

Call log ..................................................................... 32
Receiving a call ......................................................33
When not on another call ......................................... 33
Muting the ring tone for incoming calls .................... 33
Functions available during a call.......................... 33
Ending a call ............................................................ 33
Adjusting the earpiece volume................................. 33
Muting the microphone ............................................ 33
Putting a call on hold................................................ 33
Switching between two calls .................................... 34
Sending DTMF tones ............................................... 34
Making a memo ....................................................... 34
Making another call while an existing
call is in progress ................. 34
Receiving a call........................................................ 34
Using voice mail..................................................... 35
Accessing a voice mail system ................................ 35
Key Lock .................................................................35
Locking the keys ...................................................... 35
Unlocking the keys................................................... 35
Phone settings ....................................................... 36
Call Forwarding........................................................ 36
Network Search ....................................................... 37
Call Waiting .............................................................. 37
Caller ID ................................................................... 37
Conceal ID ............................................................... 37
Cost.......................................................................... 37
Security .................................................................... 38
Vehicle options ......................................................... 39
Phone number setup................................................ 39
Erase call list............................................................ 39
Setting Preferences ............................................... 40
Personal Information ................................................ 40
Memory Check......................................................... 40
Display ..................................................................... 40
Tone ......................................................................... 40
Sleep........................................................................ 40
Language ................................................................. 40
Discharge................................................................. 40
PC Synchronisation (PC Link) ................................. 40
Chapter 4 Message functions 41
Short Message Service (SMS) .............................. 42
Starting SMS............................................................ 42
Setting up SMS ........................................................ 42
Looking at your messages ....................................... 43
Icons ........................................................................ 43
Creating a new message ......................................... 44
Sending messages .................................................. 45
Incoming messages ................................................. 45
Reading another message....................................... 46
Over the air synchronisation .................................... 46
Modifying a message ............................................... 46
Deleting messages .................................................. 46
6
Page 7

Replying to a message ............................................ 47
Calling back the sender of a message..................... 47
Forwarding a message............................................. 47
Managing templates................................................. 47
Internet e-mail.........................................................48
Starting e-mail.......................................................... 48
E-mail settings ......................................................... 48
Looking at your messages ....................................... 49
Icons ........................................................................ 50
Reading a message ................................................. 50
Replying to a message ............................................ 50
Forwarding a message............................................. 50
Deleting messages .................................................. 51
Making a new e-mail message ................................ 51
Modifying a message ............................................... 52
Sending mail ............................................................ 53
Retrieving your mail ................................................. 53
Managing templates................................................. 54
Chapter 5 Main PIM functions 55
Personal Information Management (PIM)............. 56
PIM-only mode......................................................... 56
Contacts.................................................................. 56
Using Contacts......................................................... 56
Selecting a directory ................................................ 57
Making a new entry.................................................. 57
Detail and Index views ............................................. 58
Editing an entry ........................................................ 59
Deleting an entry...................................................... 59
Customizing Contacts .............................................. 59
Preferred directories ................................................ 59
SIM card directory.................................................... 60
Schedules ...............................................................61
Using Schedules ...................................................... 61
Calendar views ........................................................ 61
Making a new appointment ...................................... 62
Editing an appointment ............................................ 63
Deleting appointments ............................................. 63
Setting up Schedules ............................................... 63
Viewing a specific date ............................................ 64
Quick Memos.......................................................... 65
Making a memo ....................................................... 65
Viewing other existing memos ................................. 65
Creating a new memo.............................................. 65
Editing an existing memo......................................... 65
Deleting an existing memo....................................... 65
Chapter 6 Other PIM functions 66
Calculator................................................................67
Global Search ......................................................... 67
PC Synchronization Pack (PC Link) ..................... 68
Starting PC Synchronization (PC Link) mode .......... 68
7
Page 8

Data transfer between Communicators ...............68
Appendices 69
Appendix A: List of icons ...................................... 70
Keys ......................................................................... 70
Buttons..................................................................... 70
Icons ........................................................................ 71
Appendix B: List of status icons .......................... 72
General status icons ................................................ 72
Phone status icons................................................... 73
Appendix C: LED indicator.................................... 73
LED indication (blinking) .......................................... 73
LED indication (colour)............................................. 73
Appendix D: List of menus.................................... 74
Application index...................................................... 74
MENU ...................................................................... 74
Appendix E: Keyboards.........................................76
Appendix F: Reset................................................. 77
All Reset operation................................................... 77
Appendix G: Troubleshooting ............................... 78
Appendix H: Specifications................................... 80
smart phone main unit ............................................. 80
Battery pack ............................................................. 80
Battery charger ........................................................ 80
Appendix I: Accessories ....................................... 81
Appendix J: Over the air synchronisation........... 81
Index 82
8
Page 9

Chapter 1
Getting started
Few people enjoy reading user manuals. You may be impatient to
start using your new smart phone. However, this chapter contains
important basic information on setting up your smart phone.
Reading it now will save you a lot of time later.
9
Page 10
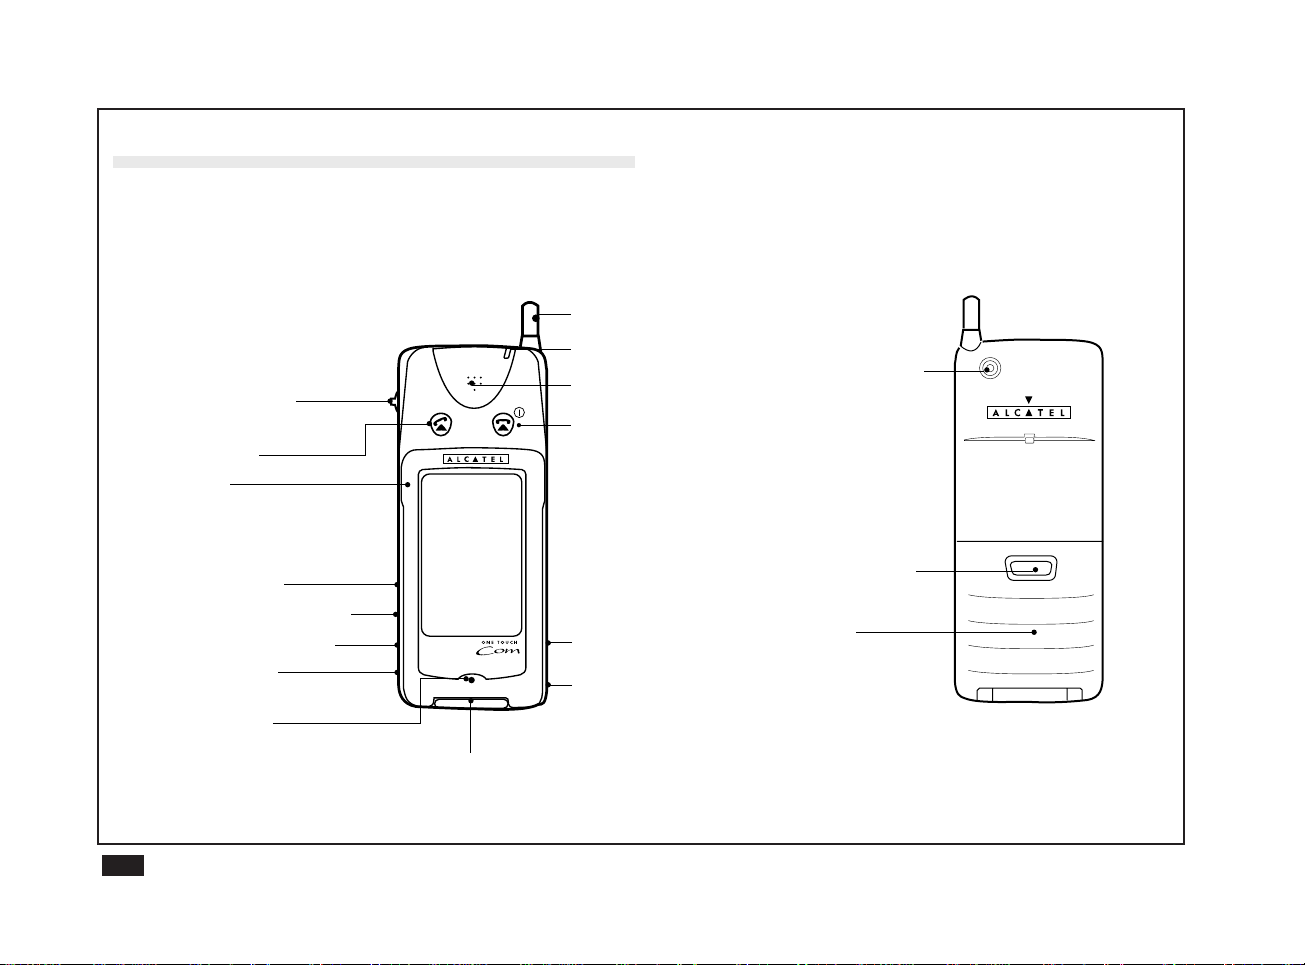
Getting to know your smart phone
Part names
Front side Rear side(with cover closed)
Navigation key
/Volume control key
Send key
Cover
SIM card slot
SIM card eject button
Battery replacement
switch
Infrared port
Microphone
Battery charger
connector and
external connector
Retractable antenna
LED indicator
Earpiece
End and power
ON/OFF key
Reset button
Touch pen/
Touch pen holder
(with battery installed)
Connector for
optional handsfree car kit
Battery release
button
Battery
10
Page 11
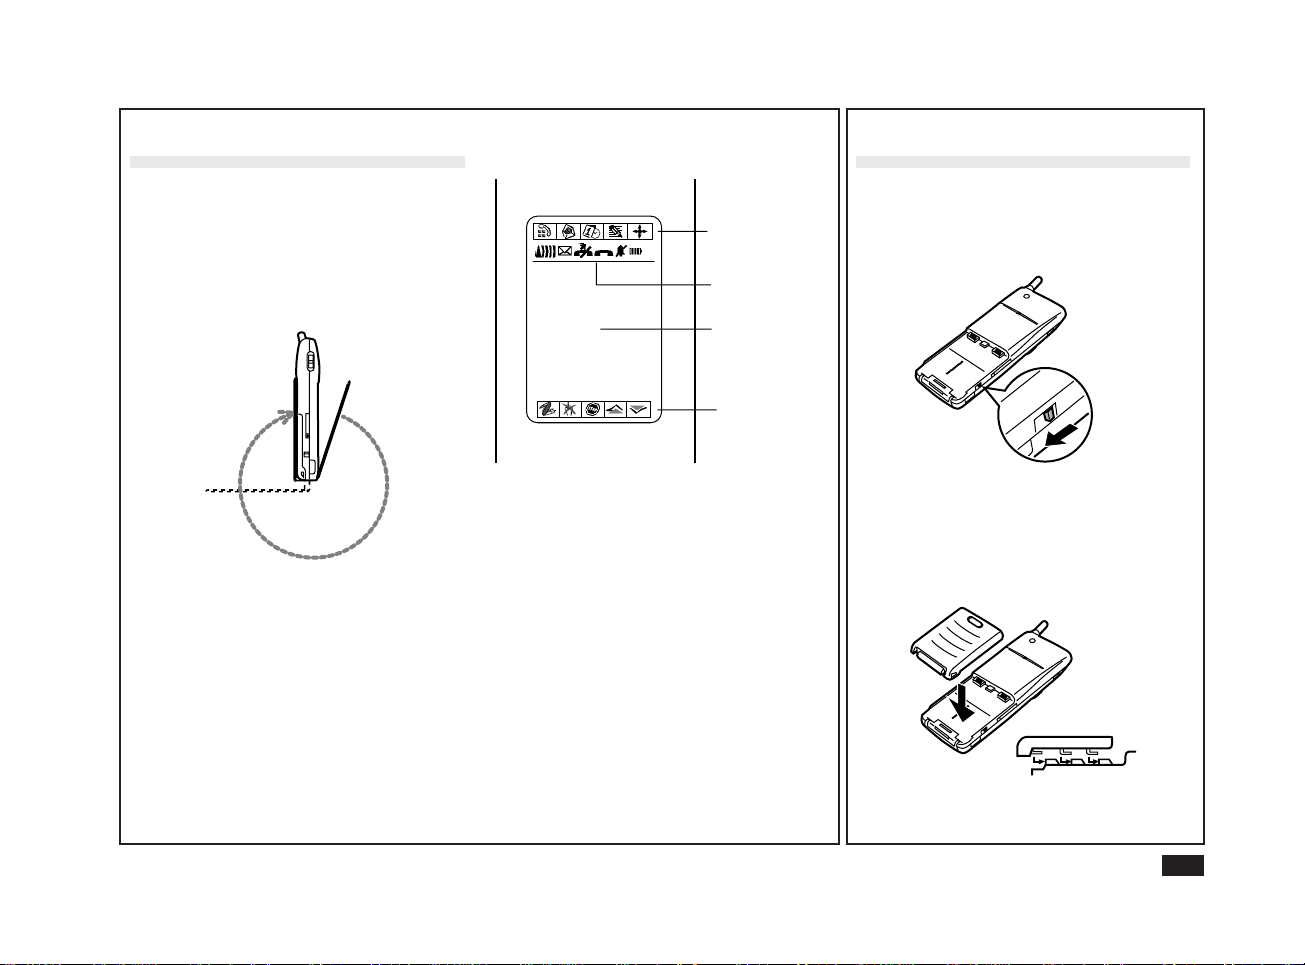
Opening the cover
Display screen
Inserting the battery
Open the cover to use the smart phone's
touch panel.
1.
Fold the cover all the way to the
back of the smart phone until it
clicks into place.
Application
buttons
Status icons
Display screen
and Touch
panel
Accessory
buttons
For a description of all buttons and icons,
see the Appendices.
1.
Make sure the battery
replacement switch is in the
RELEASE BATT. position.
2.
Holding the smart phone firmly in
your hand, align the battery tabs
with the recesses in the battery
slot.
11
Page 12
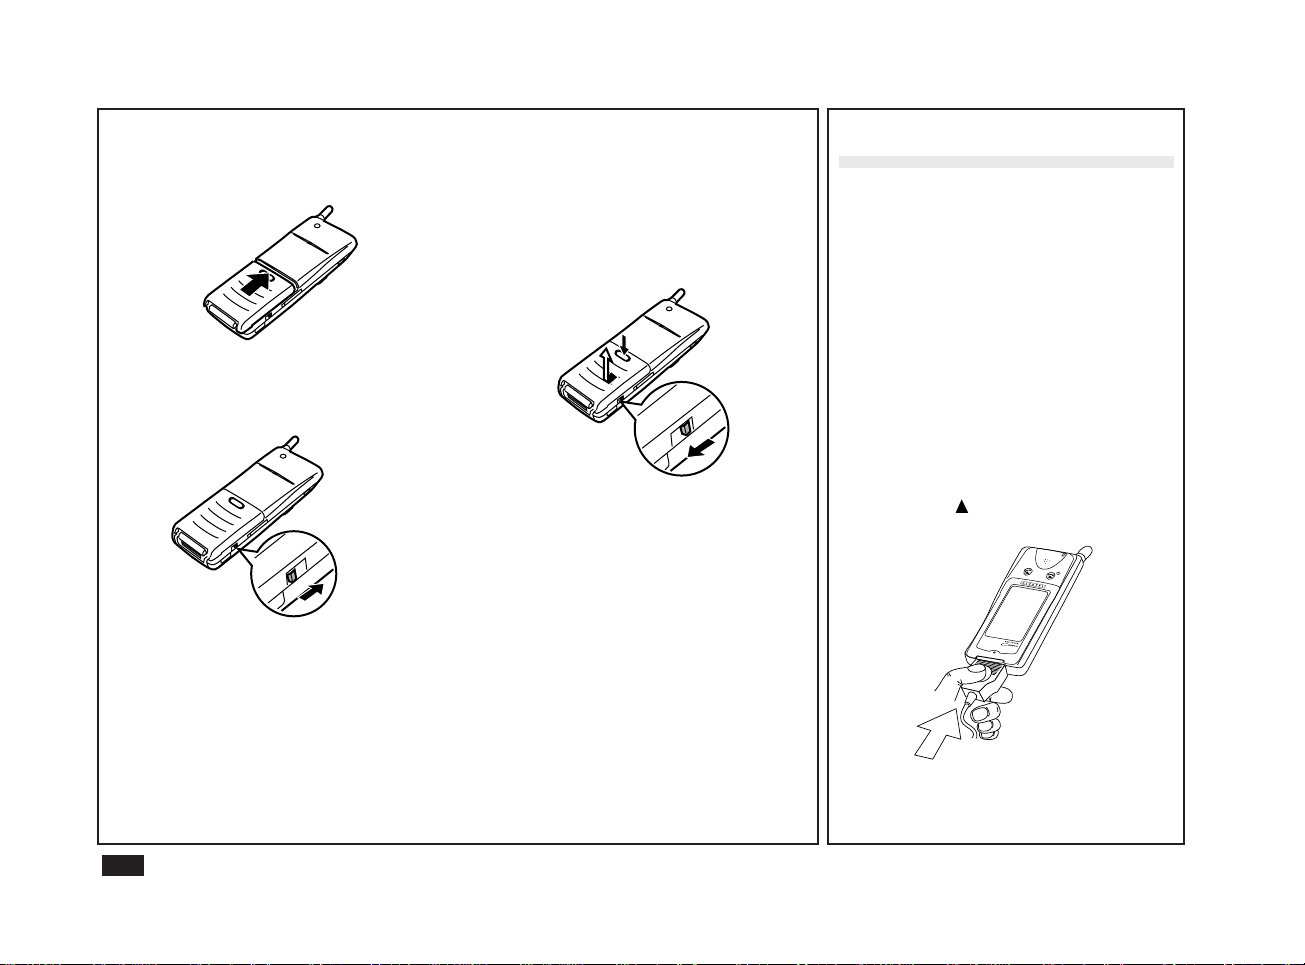
3.
Slide the battery firmly into the
smart phone until you feel a click.
4.
Move the battery replacement
switch upward to the NORMAL
position.
Caution:
Only use batteries approved by
manufacturer.
Note:
The smart phone can only be used if
the battery replacement switch is in
the NORMAL position.
Removing the battery
Move the battery replacement switch to
the RELEASE BATT. position, push the
battery release button and slide the
battery down slightly and out.
Caution:
Be sure your smart phone is switched
off before removing the battery.
Note:
The World Clock may lose time if the
battery is removed.
Charging the battery
You must charge your battery before
using your smart phone for the first time.
1.
Make sure the battery
replacement switch is in the
NORMAL position. With the
battery already installed in your
smart phone, connect the battery
charger to a power source and
connect the battery charger to the
external connector on the bottom
of the smart phone with the
charger's mark facing towards
you.
Caution: The socket shall be close to the
phone and easily accessible.
12
Page 13
2.
The battery status icon appears,
showing the charging status on
the smart phone's display screen.
The LED indicator becomes
amber.
If you are using a new (or very flat)
battery, the battery status icon may
take a few minutes to appear. Do not
switch on (
during this period.
Make sure you charge the battery
continuously for at least one hour.
3.
When the LED indicator changes
) your smart phone
from amber to green, the battery
is fully charged. Disconnect the
battery charger and unplug it from
the power outlet.
1
Caution:
Only use a battery charger approved
by manufacturer. Using any other
battery charger may damage your
smart phone and battery.
Note:
• You can recharge your battery with
the smart phone on or off.
• You can also use the optional accessories to recharge the battery.
• Average charging time is 1h20
1
.
Low battery
The icon indicates the charging status
of the battery and charge remaining in the
battery. When the battery is very low, no
bar appears, and the smart phone's
phone functions are disabled (ie, PIMonly mode). After recharging the battery,
you must turn the smart phone off and on
again in order to re-enable the phone
functions.
Discharging the battery
You should fully discharge your battery
once a month to maintain optimum
performance.
This function is only available when the
smart phone is switched on (see page 16,
Switching your smart phone on).
To discharge the battery:
1.
Connect the battery charger.
2.
Touch .
3.
Touch and select Discharge.
4.
After the battery is fully
discharged, it will begin
recharging automatically.
Note:
• Discharging may take a few hours,
although actual time will depend on
the battery charge level and capacity.
2
13
1
Non contractual information
Page 14
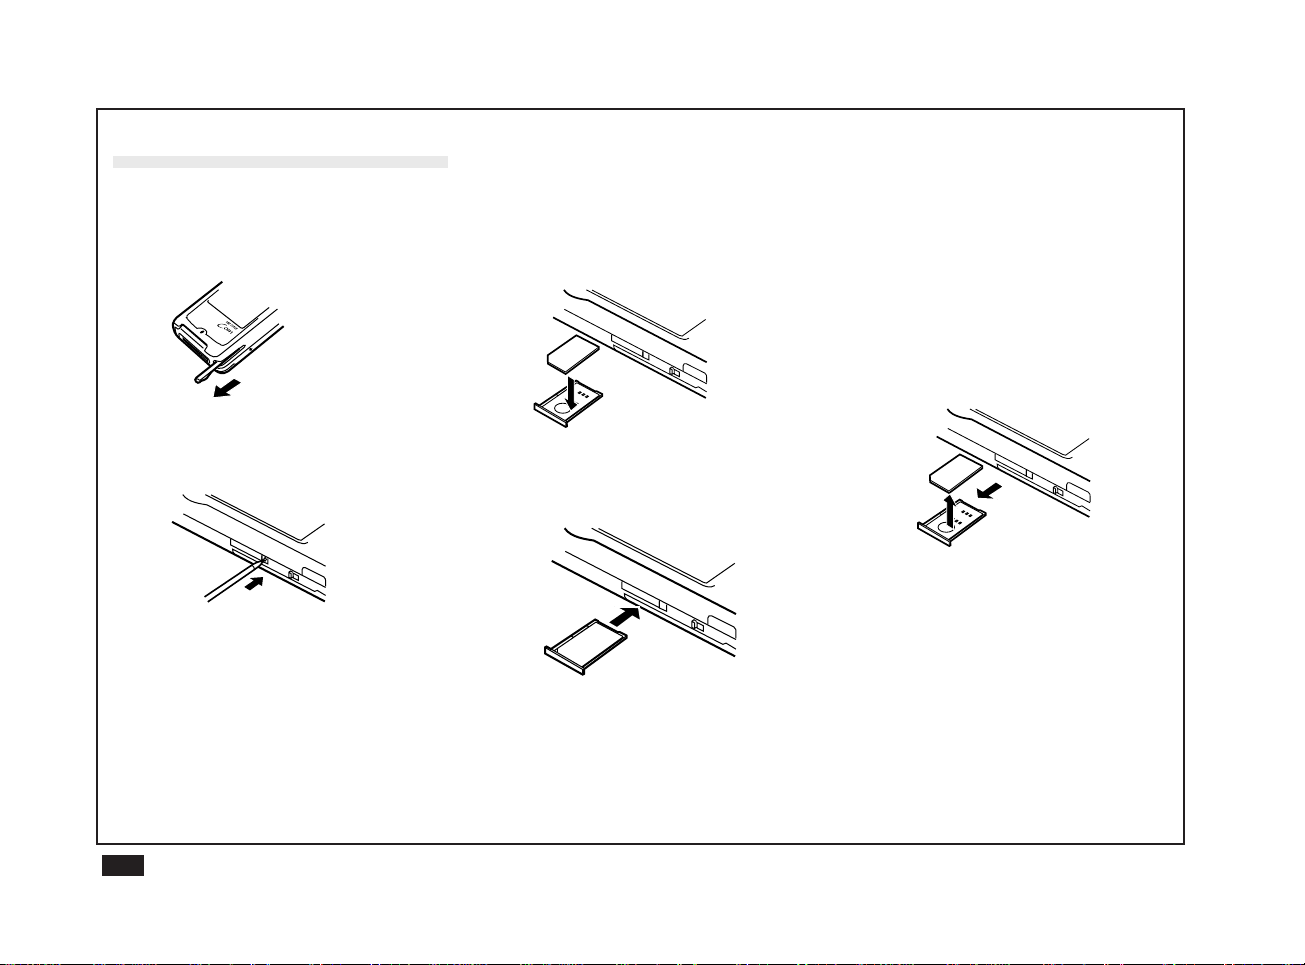
Inserting the SIM card
1.
Make sure the smart phone is
switched off before inserting the
SIM card. Remo ve the touch pen.
2.
Use the touch pen to push the
SIM card eject button on the side
of the smart phone.
SIM
NORMAL
RELEASE BATT
3.
Place the SIM card in the holder.
Make sure the SIM card's cutaway
is in the correct corner and the
card lies flush in the holder's
recess.
NORMAL
RELEASE BATT
SIM
4.
Insert the SIM card holder in the
slot.
NORMAL
RELEASE BATT
SIM
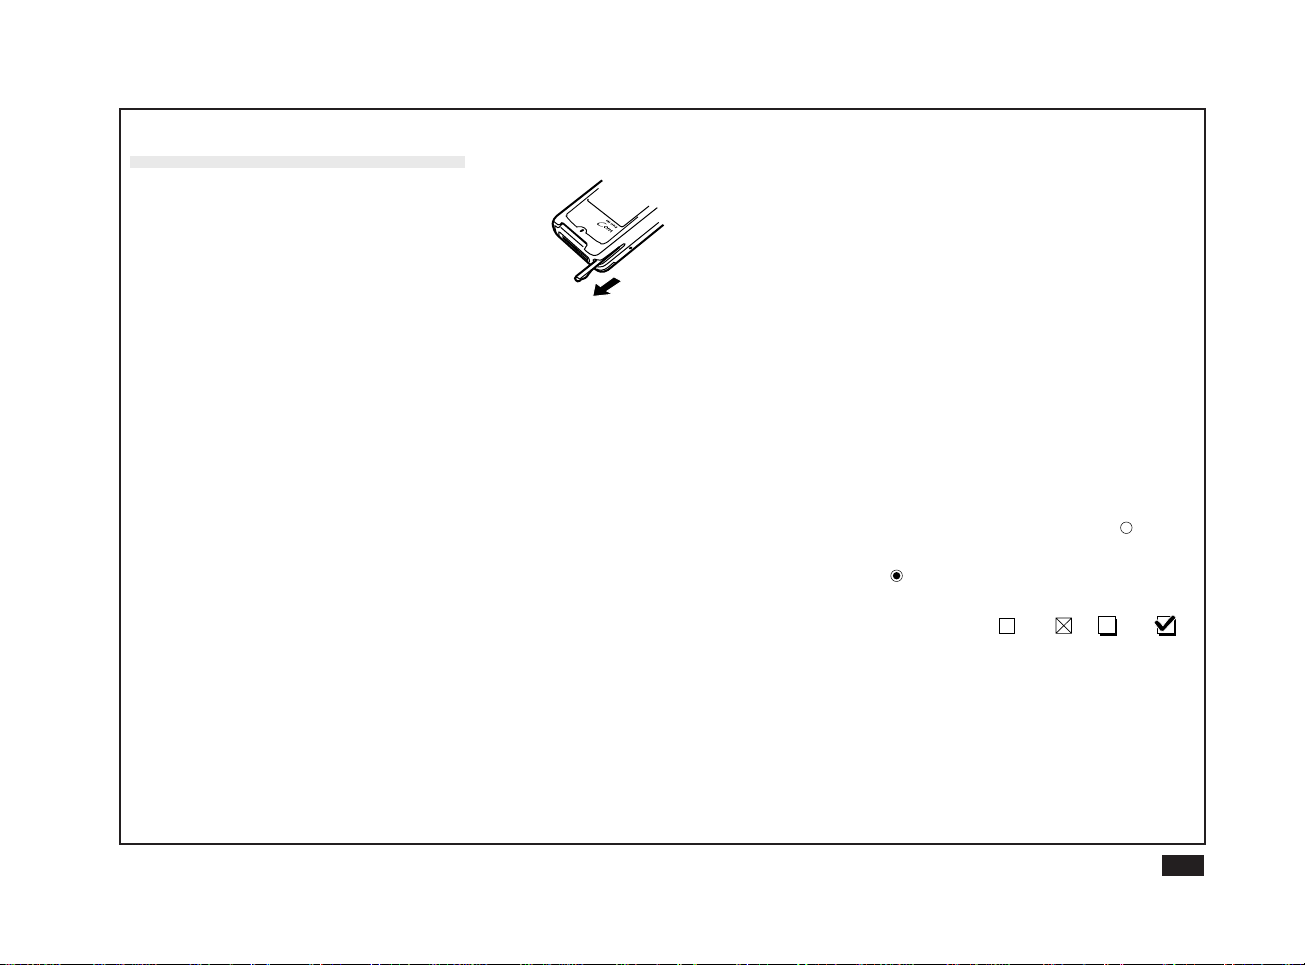
Removing the SIM card
1.
Make sure the smart phone is
switched off before removing the
SIM card. Use the touch pen to
press the SIM card eject button.
2.
Use the touch pen to push the
SIM card out from underneath the
holder.
NORMAL
RELEASE BATT
SIM
Caution:
• Be sure to use a Micro (chip-size) SIM
card only.
• Do not push the SIM card eject button
while the smart phone is turned on. If
you do so, the smart phone will turn
off immediately.
14
Page 15
Graphical User Interface
The GUI (Graphical User Interface) lets
you use your smart phone with the same
user-friendliness and flexibility as the
latest software applications. Useful and
convenient facilities include pop-up
menus, application icons, function
buttons, radio buttons and check boxes.
The touch pen
Use the touch pen to select buttons and
icons on the touch panel. Never use a
sharp metal or other instrument to avoid
damaging the delicate surface of the
touch panel.
Always replace the touch pen in the
holder inside the smart phone when not
in use.
Using the touch pen
There are various ways to use the touch
pen to select information and operate
your smart phone.
• Application buttons: Select an
application by touching its icon.
• Operation icons: Within an application, select an icon by touching it
once.
• Pop-up menus: Select an item from a
pop-up menu by touching the menu to
make the full menu appear (popup),
and then touch the desired item twice.
• Radio buttons: Select a radio button
by touching the desired item (
black dot appears in the selected item
(
). (Note that only one selection can
be made at a time.)
• Check boxes and or and :
Touch the desired items to select
them. A check mark inside a box
appears to indicate a selected item.
). A
15
Page 16
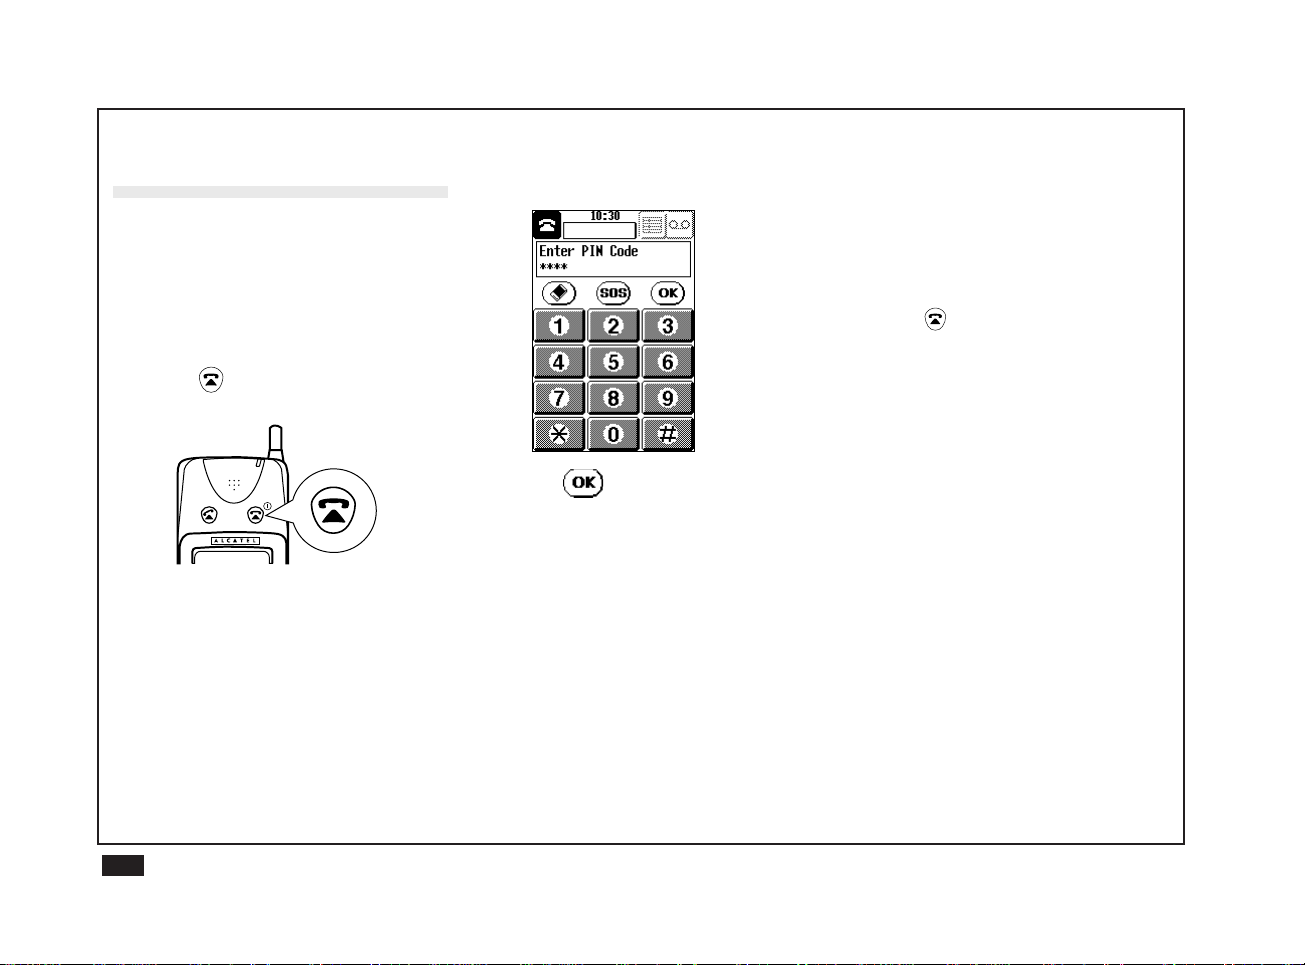
Switching your smart
phone on
You will usually be asked to enter a PIN
(personal identification number, given to
you when you subscribe) code for your
SIM card after switching your smart
phone on.
1.
Press and hold down for a few
seconds.
Long press
Entering the PIN code
1.
Enter your PIN code.
2.
Touch .
Product code
Switching your smart phone off
Always switch your smart phone off when
not in use to conserve battery power
when the smart phone is operated by the
battery.
1.
Press and hold down for a few
seconds.
Note:
When the smart phone is switched off,
you cannot receive any incoming
calls.
2.
Open the cover and remove the
touch pen.
16
The product code is an important security
feature provided to discourage theft. It
protects your information and even
prevents the phone being used. If this
security feature is enabled, you need to
enter the product code after entering the
PIN code. The default product code is
"0000".
Page 17
Adjusting the LCD screen
You may sometimes need to adjust the
LCD contrast to suit certain lighting
conditions. Also, each person holds a pen
differently. You can adjust the touch panel
to suit your own style of writing, drawing
and selecting buttons using the touch
pen.
Note:
LCD contrast changes depending on
temperature. Adjust the LCD contrast
for maximum clarity.
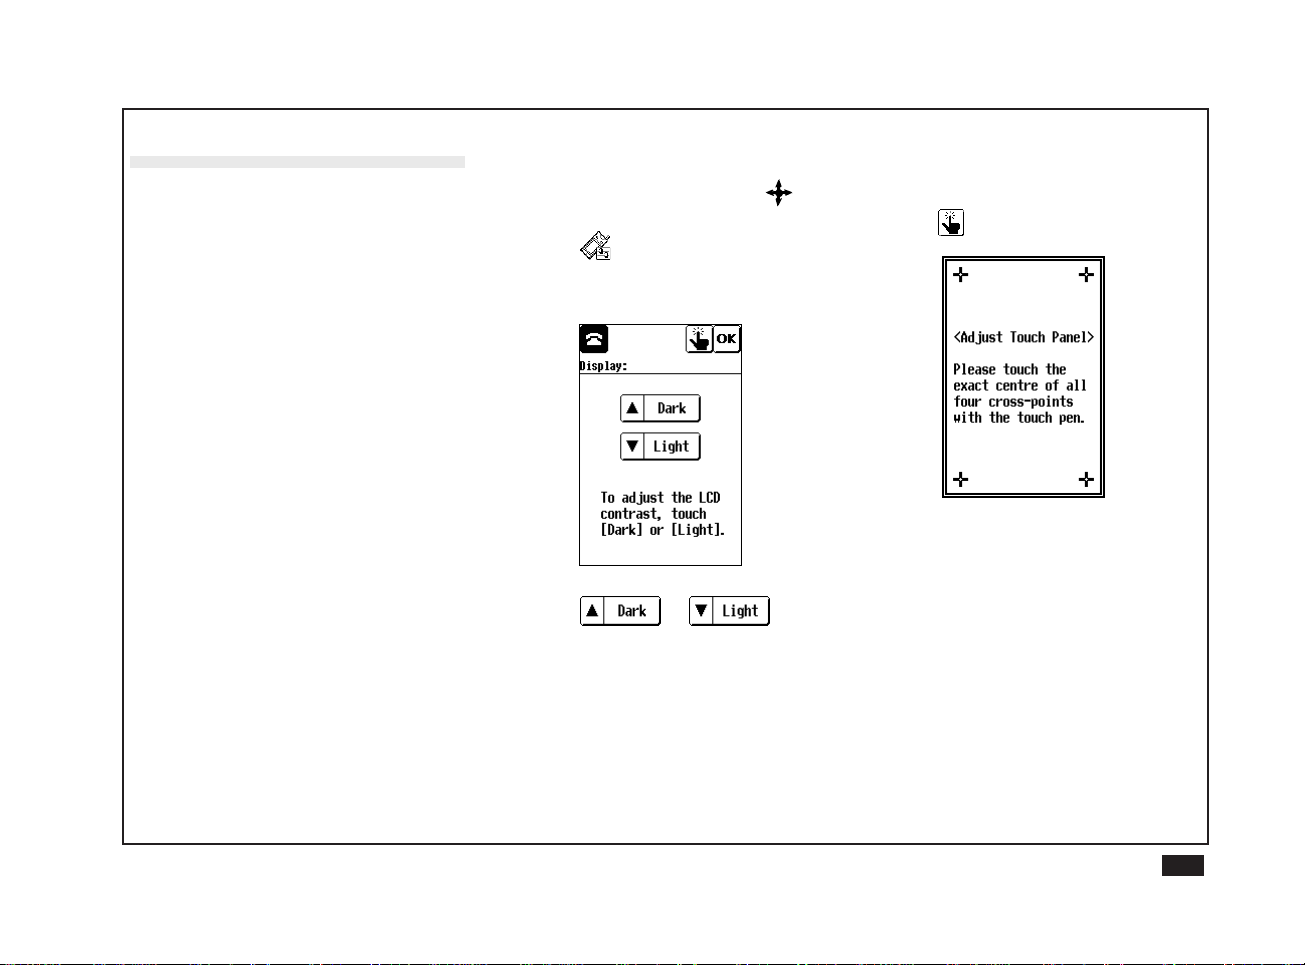
To adjust the LCD contrast
1.
Using the touch pen, touch .
2.
Touch .
3.
Touch Display twice.
4.
Touch or to
adjust the contrast for maximum
clarity.
To adjust the touch panel
1.
After adjusting the LCD contrast,
touch .
2.
To adjust the touch panel, touch
the exact centre of each of the
four cross-points using the touch
pen.
3.
When each cross-point has been
set, "Adjusted!" is displayed.
17
Page 18
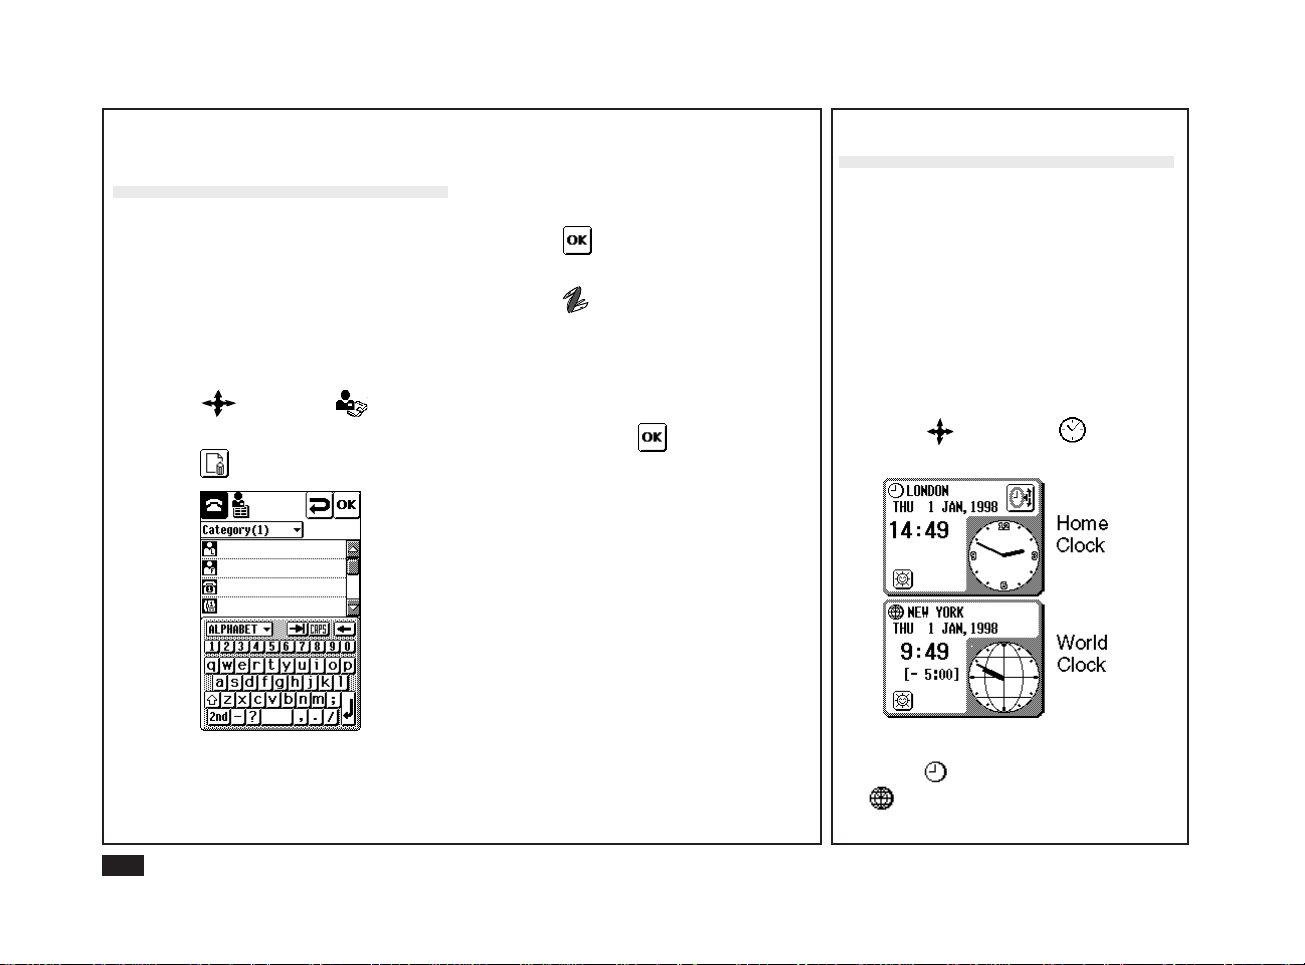
Setting your personal
information
You need to enter your personal information when using the smart phone for the
first time. The phone functions will not
operate correctly unless you do so.
To enter your personal information, use
Contacts.
1.
Touch and touch .
2.
Touch to create a new entry.
3.
Touch each field in turn and enter
the corresponding information.
4.
Touch when finished.
5.
Touch and select TOOLS.
6.
Select Copy to Per s Info.
7.
Select your country code from the
list, then touch .
Setting the World Clock
You need to set the correct time and date
and your home city in order for your smart
phone's various time-based functions to
work correctly.
Setting your home and world cities
You must select which cities to use as
your home and world cities.
1.
Touch and select .
The World Clock display appears.
18
2.
From the World Clock display,
touch to set the home city, or
to set the world city.
Page 19
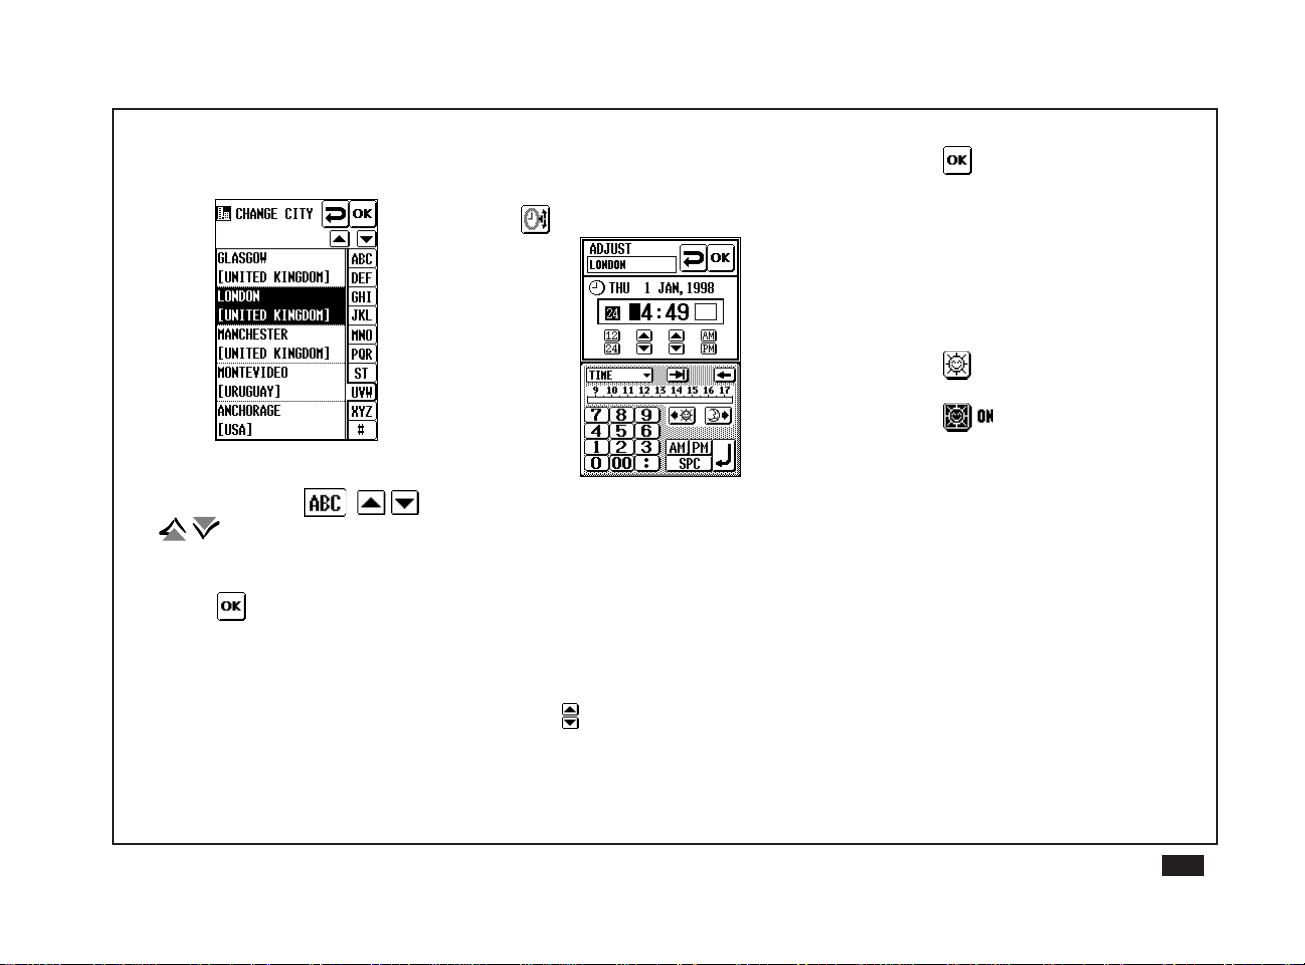
3.
Select the desired city from the
list.
Touch the corresponding
alphabetical tab , or
to see more cities in the
list.
4.
Touch .
To set the date and time
1.
To set the time and date, touch
.
2.
Touch the date.
The calendar appears.
3.
Select the date on the calendar.
4.
Select 12- or 24-hour clock
system.
5.
Use to adjust the hours and
minutes. If you selected the 12hour clock system, select AM or
PM.
6.
Touch .
Setting daylight saving time
You can switch to daylight saving time
(DST) without having to change the clock
time itself.
1.
Touch .
2.
Touch to turn off DST.
19
Page 20

Chapter 2
Basic settings and operations
This chapter describes the basic settings and operations for your
smart phone's telephone and message (Internet e-mail and Short
Message Service) functions.
20
Page 21
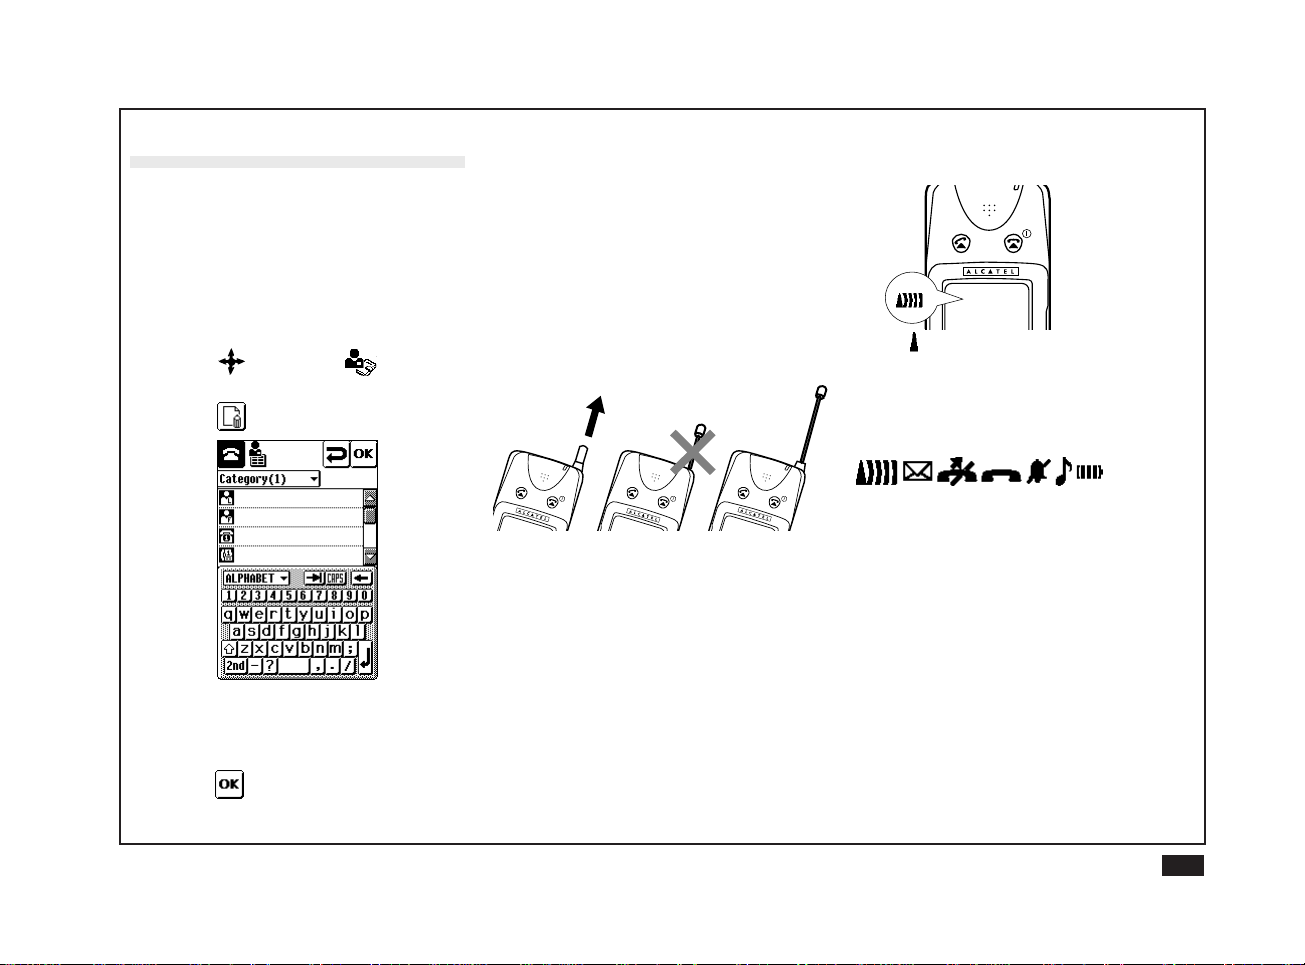
Before making a call
Making your first entry
You need to create one or more entries in
your Contacts list before you can make a
phone call from a directory or Preferred list
(ie, without dialling the number manually).
1.
Touch and touch .
2.
Touch to create a new entry.
3.
Touch each field in tur n and enter
the required information.
4.
Touch to store the new Contacts
entry .
Note:
The easiest way to make a call is using
the Phone Preferred list. For details, see
Contacts.
Retractable antenna
Ensure the retractable antenna is fully
extended in order to obtain the best signal
quality.
Note:
The antenna must be either fully
extended or fully retracted. It will not
function in a half-way position.
Checking the calling conditions
If only or one segment is displayed, the
radio signal strength may be too weak to
make or receive a call successfully.
• Status Icons
Other status icons indicate the various
conditions affecting the telephone
interface. For full details, see Appendix.
Note:
While searching for a network, "<<<>>>" appears at the top of the display.
When the normal network service is
available, the network name appears
instead of "<<<->>>". When only limited
network service is available, "<<<->>>"
appears or nothing appears.
21
Page 22
Making a call
There are three convenient ways to make
a call:
• Navigation key
• Touch pen-Name dialling
• Touch pen-Manual dialling
Navigation key
3.
Select the person or number you
wish to call by moving the key up
or down.
This is the easiest method, since you can
call with the cover closed using just one
hand.
1.
Push the Navigation key.
22
2.
Select a desired phone book or
call list from the menu by moving
the key up or down, then push the
Navigation key.
4.
Press .
Page 23
Touch pen—Name dialling
Touch pen—Manual dialling
Making an emergency call
You can call anyone in your Phone Book.
1.
Touch .
2.
Touch the pop-up menu and
select a desired phone book or
call list.
3.
Select the person or number you
wish to call.
4.
Press .
Y ou can use the Numeric Dial screen to dial
any number not in the Phone Book.
1.
Touch .
2.
Use the numeric keys to enter the
phone number to call.
3.
Press .
1.
Enter
112
.
2.
Press .
You can also make an emergency call
by touching
Note:
Emergency calls may not be possible
on all cellular phone networks when
certain network services and/or
certain phone features are in use.
Check with your local cellular service
provider.
if it is displayed.
23
Page 24
During a call
• Making a memo
To make a memo during a call,
touch
.
Receiving a call
The notification window appears when an
incoming call is detected.
• Muting
To temporarily prevent the other
correspondent hearing any sound
from your side, touch
• Holding
To put the other correspondent on
hold, touch .
• Adjusting the earpiece volume
To adjust the earpiece volume during
a call, move the Navigation key up or
down.
24
.
Note:
You can also use other applications
such as Schedules or Contacts during
a call.
Ending a call
To end a call, push or touch .
Note:
- Ends all calls
- Ends the current call or the call
on hold
• To accept the incoming call, press
or touch .
• To refuse the incoming call, press
or touch .
Sleep screen mode
T o conserve battery power , the smart phone
automatically switches to different screen
modes after a preset time.
If your smart phone is not used for a set
(see Setting Preferences) time period, it
goes into sleep screen mode automatically. It returns automatically to operation
mode when an incoming call is detected,
or when you touch the display screen or
press a key.
Page 25
Short Message Service
(SMS)
To start SMS
1.
Touch .
To send a specific message
Before you can use SMS to send a
message, you have to set up your smart
phone (see in chapter 4, Short Message
Service (SMS)).
1.
Select the desired message to send
in the Out box.
To receive a message
The smart phone informs you immediately
when an incoming message arrives, whatever application you are using (eg, Schedules, e-mail, SMS, etc.)—even during a
phone call.
To read immediately:
1.
Touch .
Note:
If you touch
message while modifying Schedules
or Contacts data, the changes you
have made will not be saved.
to read an incoming
2.
The received message is display ed.
3.
To rotate the screen for easier
viewing, touch .
To read later:
2.
Touch .
Touch .
25
Page 26
Internet e-mail
This function requires you to have an email account provided by your Internet
service provider.
For more details on Internet e-mail see
page 48.
To start e-mail
1.
Touch and select .
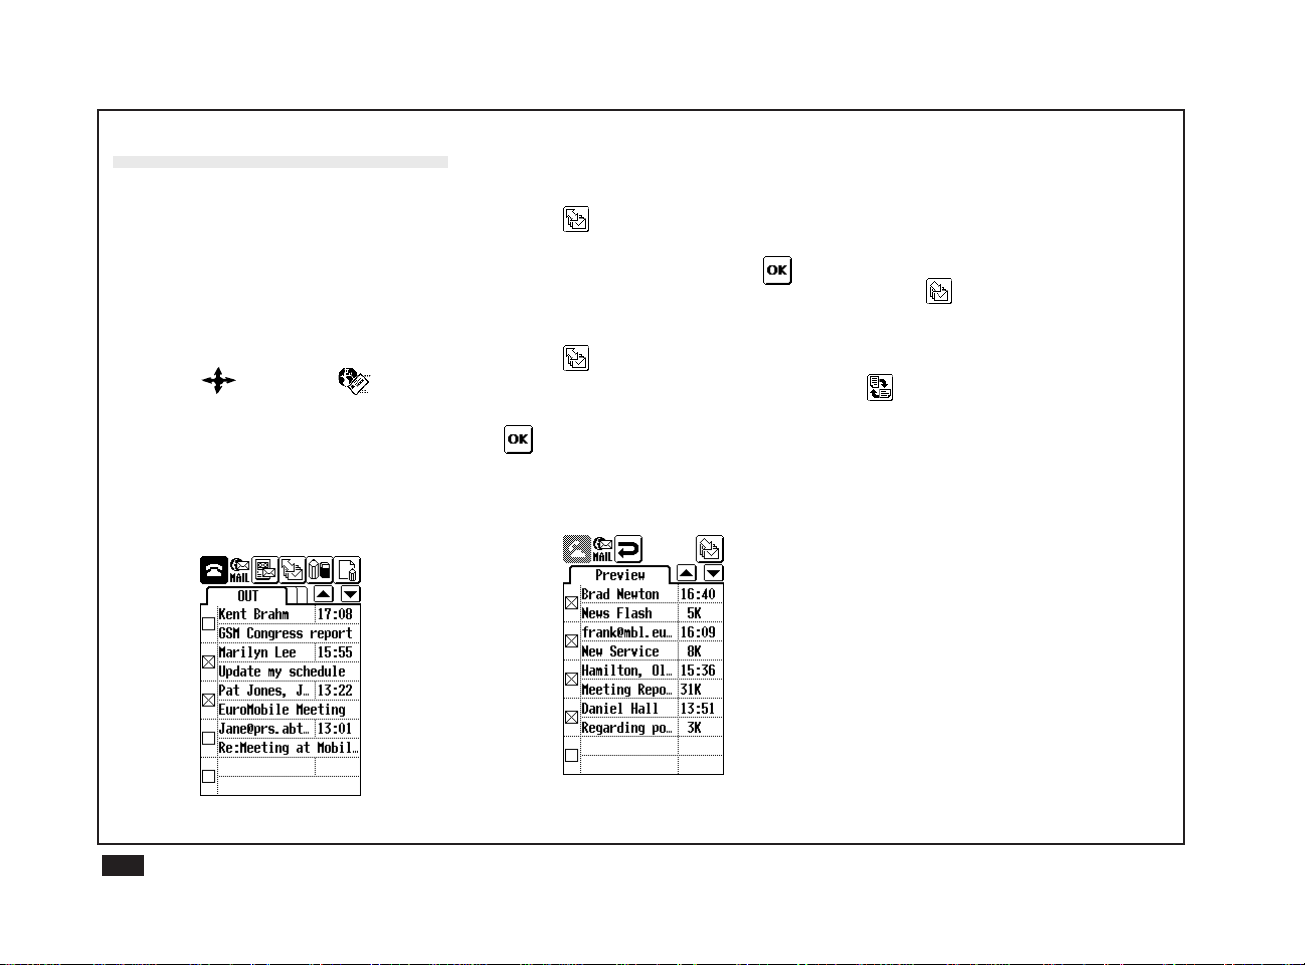
To send your mail
Any outgoing messages you create are
stored in the Out box until you send them.
1.
Display the Out box in index view.
2.
Touch the check box for each
message you wish to send.
3.
Touch .
4.
Select Send Mail then touch .
To retrieve your mail
1.
Touch .
2.
Select Receive Mail then touch
.
The Preview index appears, indicating
which messages are waiting to be
retrieved.
3.
All messages are checked by
default. Touch and clear the check
box for each message you do not
wish to retrieve.
4.
Touch .
Note:
You can rotate the screen by touching
for easier viewing when reading a
message, just as for SMS messages.
26
Page 27

Chapter 3
Phone functions
The phone functions described in this manual may not all be
available depending on your cellular phone network or service
agreement. The available functions may also be affected by your
phone settings.
27
Page 28

Basic screens
There are two basic screens used for
making phone calls: the Phone Book and
the Numeric Dial screen.
To display the Phone Book, push the
Navigation key (from the Numeric Dial
screen) or touch
or .
The most recently used screen appears
Current
phone
status
Name of
the current
Phone
Book
Display
Numeric
Dial screen
Phone Book Screen
To display the Numeric Dial screen, touch
.
Display Phone
Book screen
Numeric Dial Screen
Phone status icons
While making a call, the status icons
shown at the top of the display indicate
the calling status and other conditions.
See Appendix for full details.
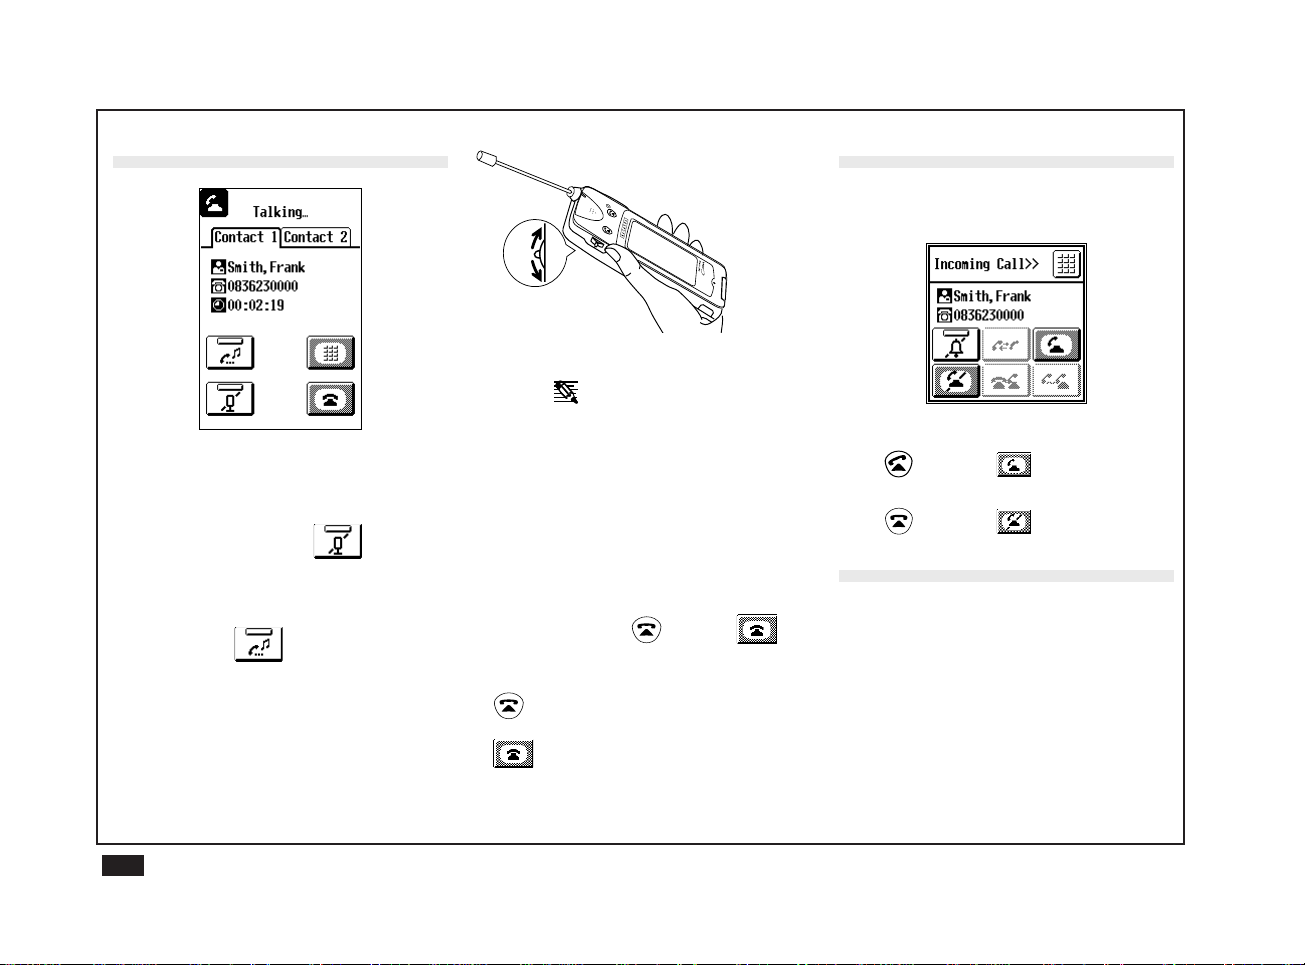
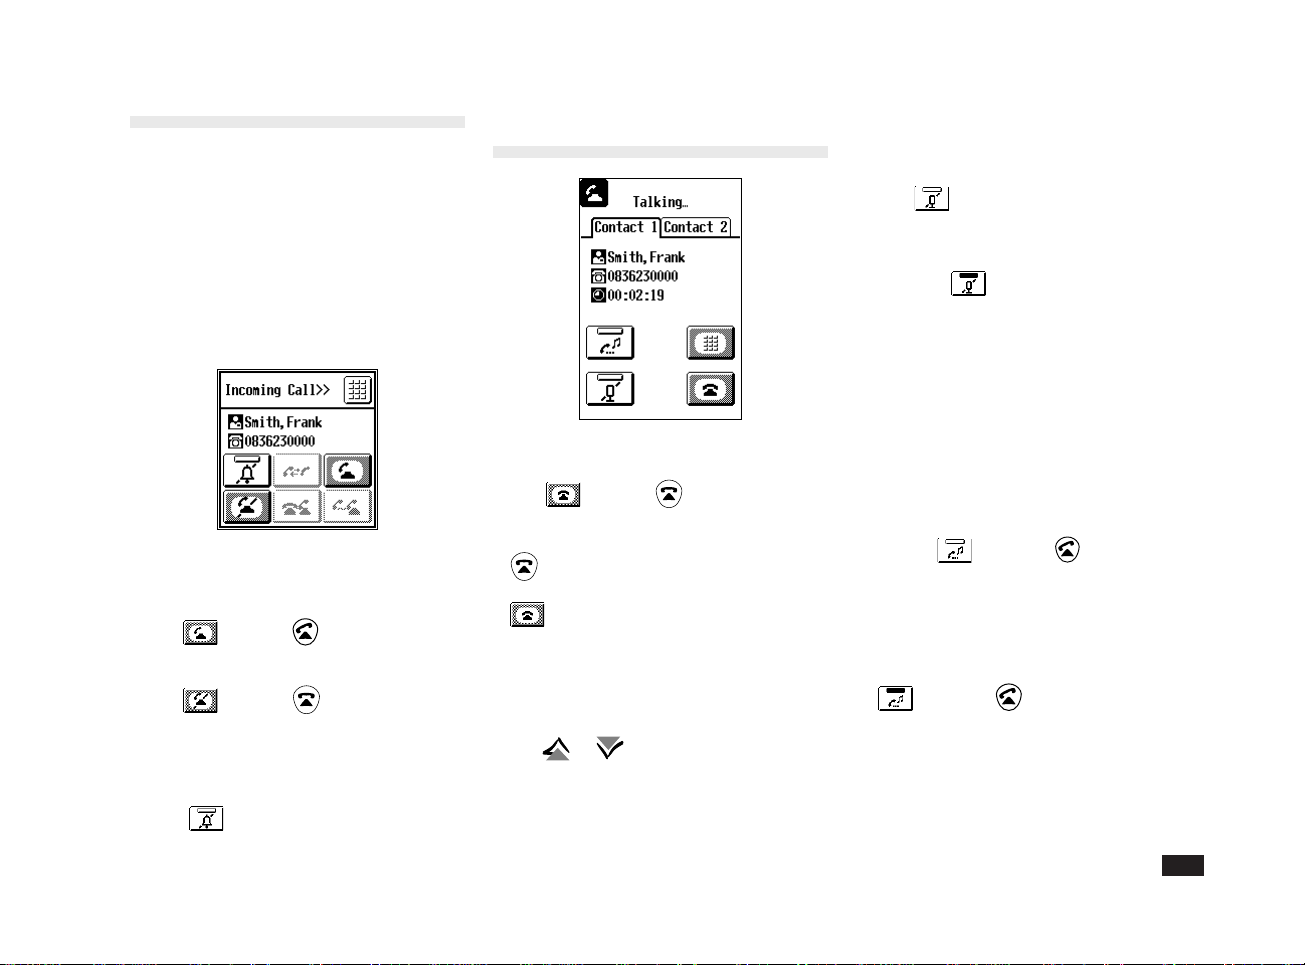
During a call, the following screen
appears:
Correspondent's
Name
Correspondent's
Phone Number
Call duration
When an incoming call is detected, the
ring melody sounds, the LED blinks and
the following screen appears.
28
Page 29

Name-dialling
About name-dialling
Your smart phone lets you name-dial
using names and telephone numbers
stored in the Phone Book (comprising five
directories and three calling lists). This
lets you make most of your calls with just
one hand—just select the desired name
from the list using the Navigation key.
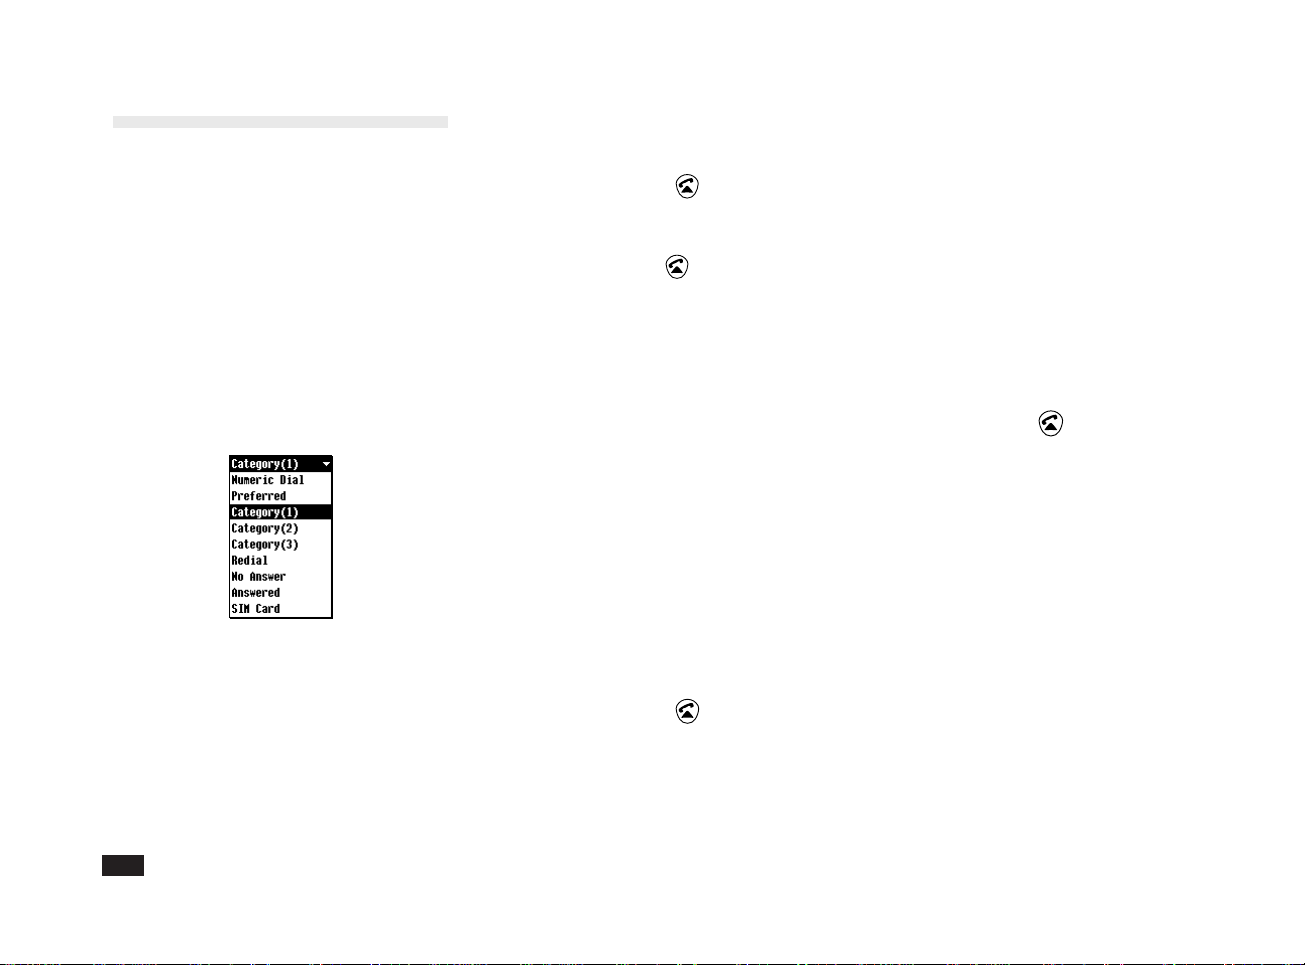
Phone Book
The Phone Book is one of your smart
phone's most convenient functions. It lets
you make most of your calls without
having to dial to phone number.
The Phone Book comprises the following
five directories and three call lists which
contain the names and telephone numbers of the people you can call.
Directories
• Preferred
• Category (1)
• Category (2)
• Category (3)
• SIM card (in the SIM card)
Note:
• You can specify your own names for
the Category 1, 2 and 3 directories.
(See Contacts.)
• Preferred can contain up to 10 of your
most frequently used numbers for
maximum convenience.
• An extra directory may appear if
supported by your network service
provider.
Also, phone numbers you try to call or
receive a call from are added to the
following lists, depending on the call
result:
Call lists
(Each list can contain up to 10 entries)
• Redial call list (call someone you
called earlier)
• No Answer call list (call back someone
who tried to call you earlier, but whose
call you did not answer)
• Answered call list (call back someone
who called and spoke with you earlier)
The Phone Book is only used for dialling.
Use Contacts to add and change the
directories' entries.
Name-dialling with one hand
To call a number using the directories or
call lists, you don't even have to open the
cover.
1.
Push the Navigation key once only
to display the most recently used
directory or call list.
2.
Push the Navigation key again if
you wish to use a different list.
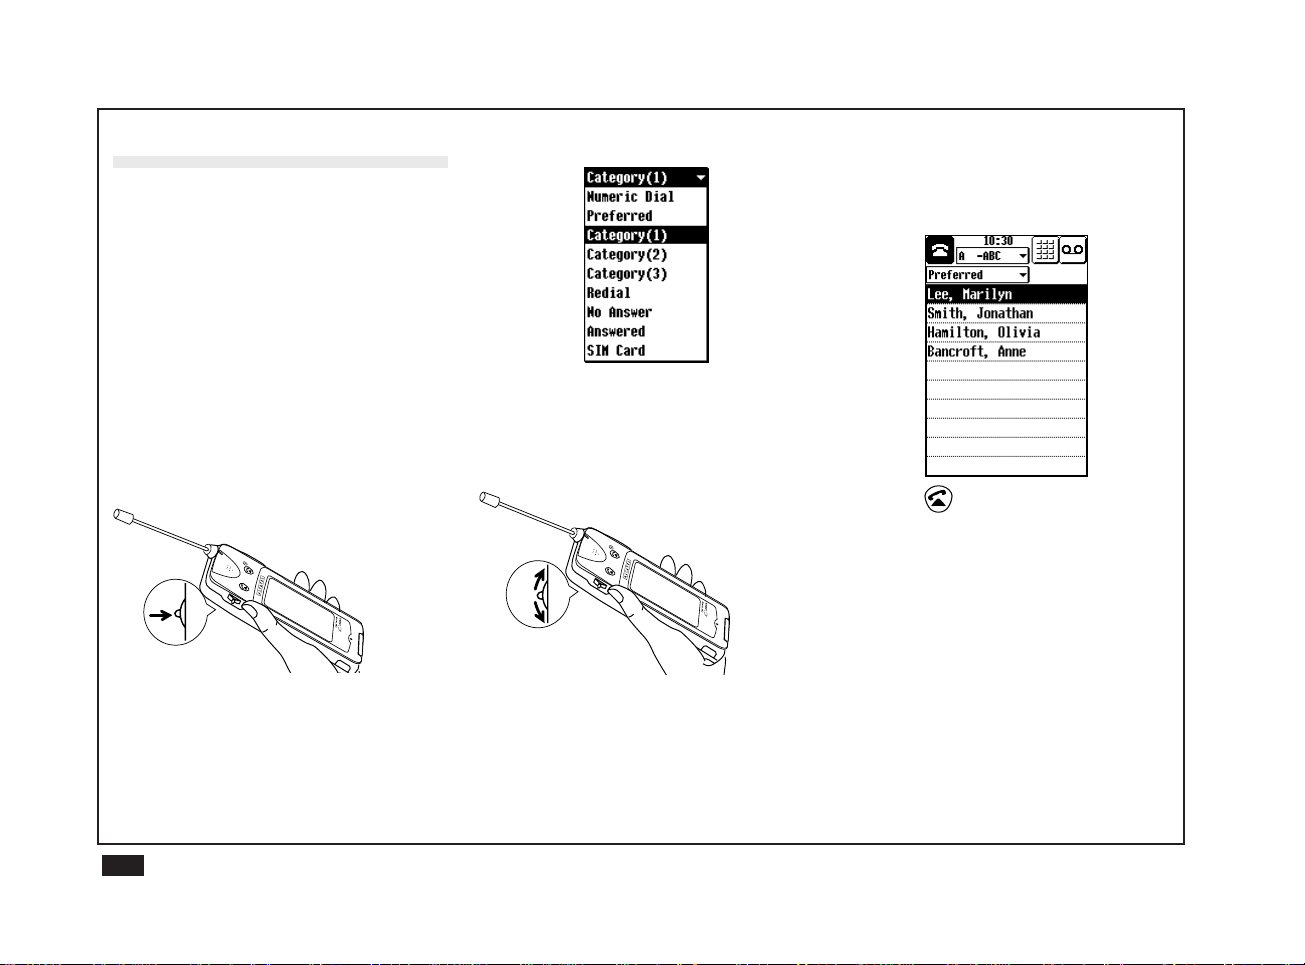
The pop-up menu appears with the
selection of directories and call lists.
29
Page 30

3.
Select the directory or calling list
you wish to call by moving the
Navigation key up or down.
4.
Push the Navigation key again
when your choice is selected.
The selected directory or list appears.
5.
Select the person or phone
number in the list by moving the
Navigation key up or down.
6.
Press .
7.
If a choice of phone numbers is
available, the list of numbers
appears. Select the desired phone
number from the list by moving the
Navigation key up or down and
press .
Name-dialling using the Phone
Book (and touch pen)
To name-dial using the Phone Book, open
the cover and use the touch pen.
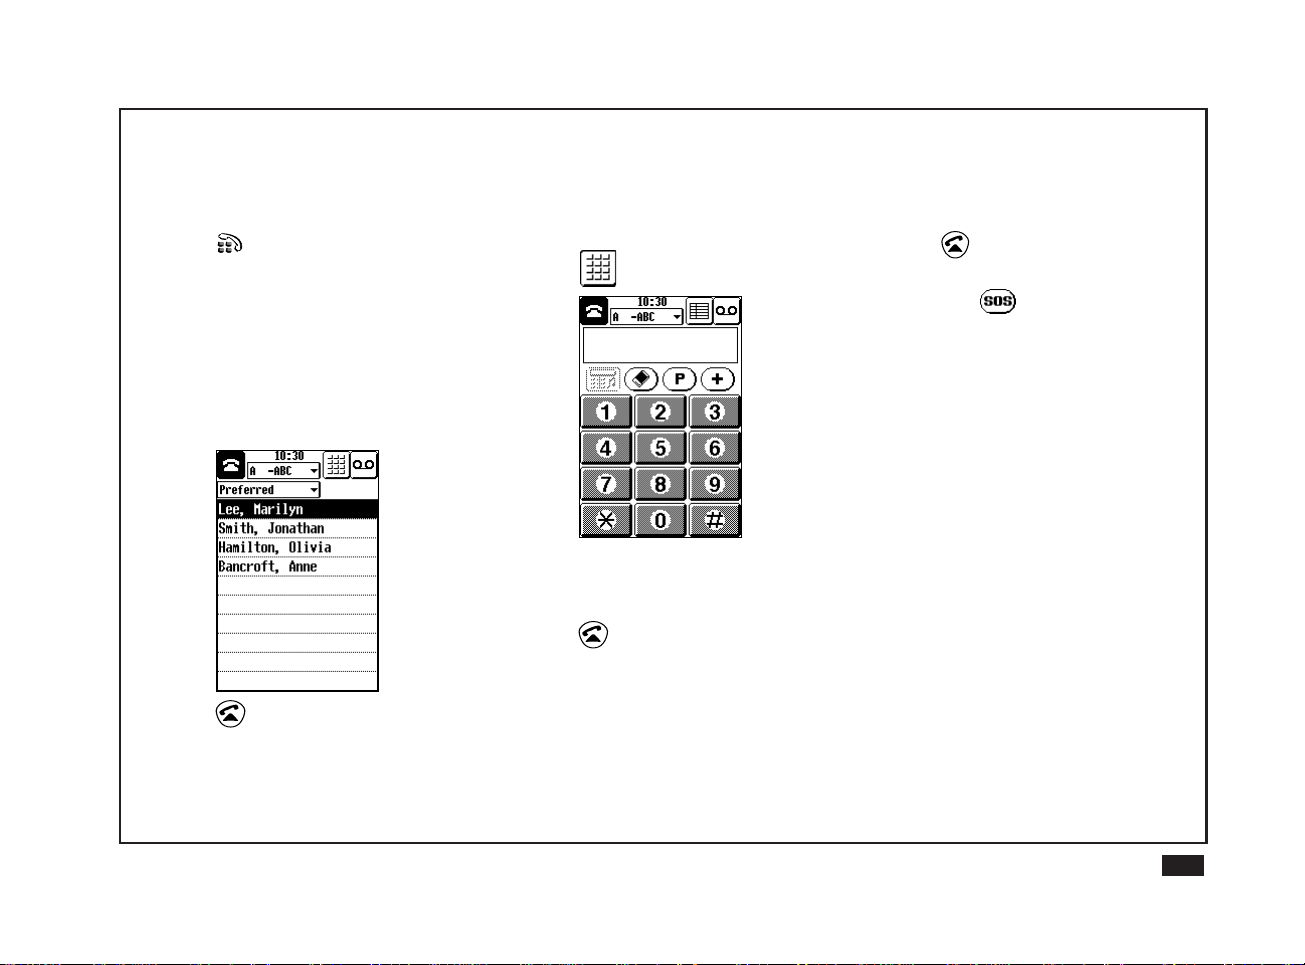
1.
Touch .
The most recently used directory or
call list appears.
2.
Select the directory or call list
containing the number you wish to
call.
3.
Touch the person or phone number
you wish to call in the list, or touch
, , , or to see
more entries.
4.
Press .
5.
If a choice of telephone numbers is
available, the list of numbers
appears. Select the desired phone
number from the list and press .
Note:
• If you touch a person twice, the entry
is displayed in the detail view of
Contacts.
• You can also make a call from
Contacts.
• For ease of access to the country code
automatic conversion
sure your personal information is set
up. Your country of origin is required by
the handset to automatically set code
of your home country contacts when
you are calling from abroad.
, make
30
Page 31

Manual dialling
For manual dialling, you need to use the
touch pen with the cover open. Enter the
phone number by touching the numeric
keys on the display.
Making a call via manual
dialling
1.
Touch and then touch .
2.
Enter the number you wish to dial.
Touch , if you make a mistake and
want to delete the character to the left
of the cursor.
3.
Press .
Making international calls
1.
Touch to insert the
international dialling prefix "+".
2.
Touch to display the country
code list.
If you already know the country code,
you can enter it directly.
3.
Select the desired country from the
list.
4.
Touch .
5.
Enter the area code and phone
number, then press .
Emergency calls
1.
Enter
112.
2.
Press .
You can make an emergency call by
touching
display.
Note:
Emergency calls may not be possible
on all cellular phone networks when
certain network services and/or phone
features are in use. Check with your
local network service provider.
if it appears on the
31
Page 32
Redialling
Every phone number you dial or receive a
call is automatically added to one of the
call lists, regardless of the result. Each list
can contain up to 10 numbers. Redialling
any number in the lists is easy.
The operations described below use the
Navigation key. However, you can also
perform the same operations using the
touch pen.
Note:
Numbers may not be stored when the
smart phone's memory is full.
Redialling a number you dialled
1.
Push the Navigation key.
The list of directories and call lists
appears.
3.
Select the person or phone
number, then press .
Note:
The last number dialled always
appears if you press
Numeric Dial screen. (This function is
not available while talking or holding,
etc.)
from the
Calling a person who called you
earlier
To call a person whose call you
answered earlier
1.
Push the Navigation key.
The list of directories and call lists
appear.
2.
Select Answered then push the
Navigation key again.
3.
Select the person or phone
number, then press .
To call a person whose call you did not
answer earlier
1.
Push the Navigation key.
The list of directories and call lists
appear.
2.
Select No Answer then push the
Navigation key again.
3.
Select the person or phone
number, then press .
Note:
• You can also use the touch pen with
the cover open.
• You can delete the contents of the call
list. For details, see Phone settings on
a later page.
Call log
Touch the entry in the call list. The phone
number, date and other call details are
briefly displayed.
2.
Select Redial, then push the
Navigation key again.
32
Page 33
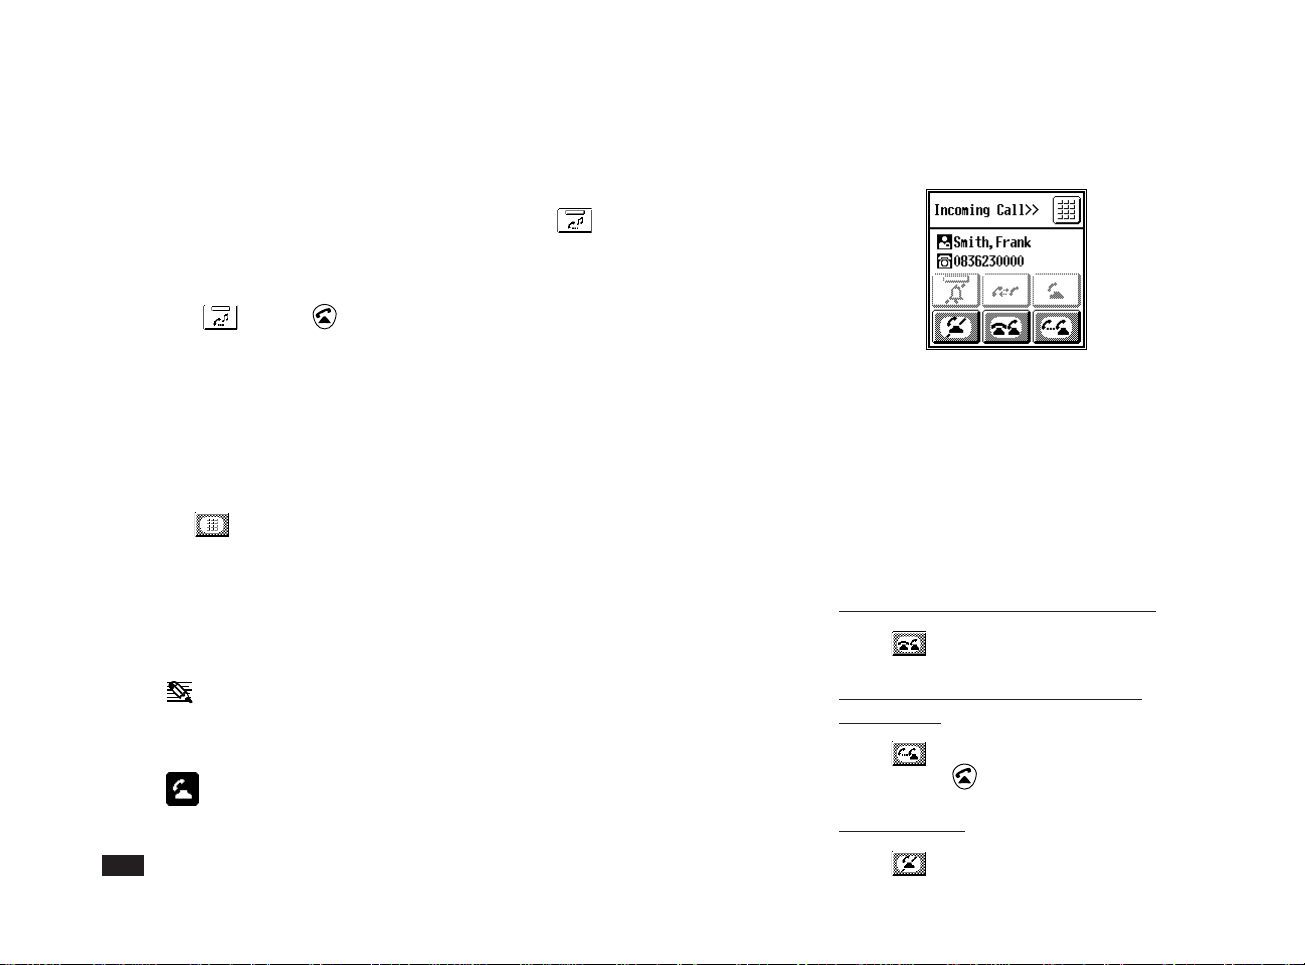
Receiving a call
When you receive an incoming call, the
ring tone sounds, the LED flashes, and
an incoming call window appears. If the
Caller ID service is available, the incoming caller's phone number is displayed. If
a Contacts entry exists for the caller
(based on the same phone number),
then the caller's name is displayed
together with the number.
When not on another call
To accept a call:
Touch
To refuse a call:
Touch or press .
Muting the ring tone for
incoming calls
Touch .
or press .
Functions available
during a call
Ending a call
Touch or press .
Note:
- Ends all calls
- Ends the current call or the
call on hold
Adjusting the earpiece volume
Move the Navigation key up or down or
touch
This function is available while talking or
displaying Numeric Dial screen.
or .
Muting the microphone
Touch
Note:
• Do not forget to cancel Mute mode by
touching
• When a function is active, the bar at
the top of the icon becomes black.
• A function cannot be activated while a
call is on hold.
again.
Putting a call on hold
Use this function if you want to view some
information stored in your smart phone or
to make another call.
1.
Touch or press .
The current call is put on hold. You can
now check information or make
another call.
2.
To return to the held call, touch
or press .
33
Page 34
Switching between two calls
If you accept two calls at one time, you
can switch between the current call and
the held call.
Making another call while an
existing call is in progress
1.
Touch to put the current call
on hold.
Receiving a call
Touch the tabs for Contact 1 or Contact
2, or touch
or press .
Sending DTMF tones
DTMF tones are usually required to
access special services such as voice
mail systems and answering machines.
1.
Touch to display the Numeric
Dial screen.
2.
Touch the desired number keys.
Making a memo
Touch .
For details, see "Quick Memos."
Note:
Touch
34
to go back to the call screen.
2.
Make the call as you would
normally.
You can receive an incoming call even if
you are already on another call. You will
hear the call waiting tone, and the incoming
call window will appear. You can answer
the new call either by ending the current
call or by putting it on hold, or you can
refuse the incoming call.
When you already have a current call
To accept a call (by finishing the current call:
Touch .
To accept a call (by putting the current
call on hold):
Touch or if the current call is already
on hold press
To refuse a call:
Touch
.
.
Page 35
When you already have a current call
and a call on hold
To accept a call:
(by finishing the current call)
Touch .
To switch between current and held calls:
Using voice mail
Voice mail is supported by many telephone networks. It serves as a virtual
answering machine, and helps to make
sure you don't miss any important calls.
You can use your smart phone to access
your voice mail messages easily.
Key Lock
As a safety precaution to prevent accidental use, you can lock your smart
phone's keys (Send, End and Navigation
key) while carrying it.
Locking the keys
Touch
To refuse a call:
Touch .
.
Accessing a voice mail system
To access a voice mail system, you first
need to set up the Voice Message Centre
number. See "Phone number setup" in a
later section.
1.
Touch .
2.
Dial automatically.
3.
Touch .
4.
Follow the voice mail guidance
messages.
Note:
To find out your voice mail system
access number, ask your operator or
customer services.
1.
Touch .
2.
Close the cover. Only the power off
function is operable.
Note:
When the cover is open, the icons,
buttons and touch panel may be used.
Unlocking the keys
1.
Touch .
If an incoming call is received, Key
Lock is cancelled automatically.
Note:
When the smart phone is turned off,
Key Lock is cancelled automatically.
35
Page 36
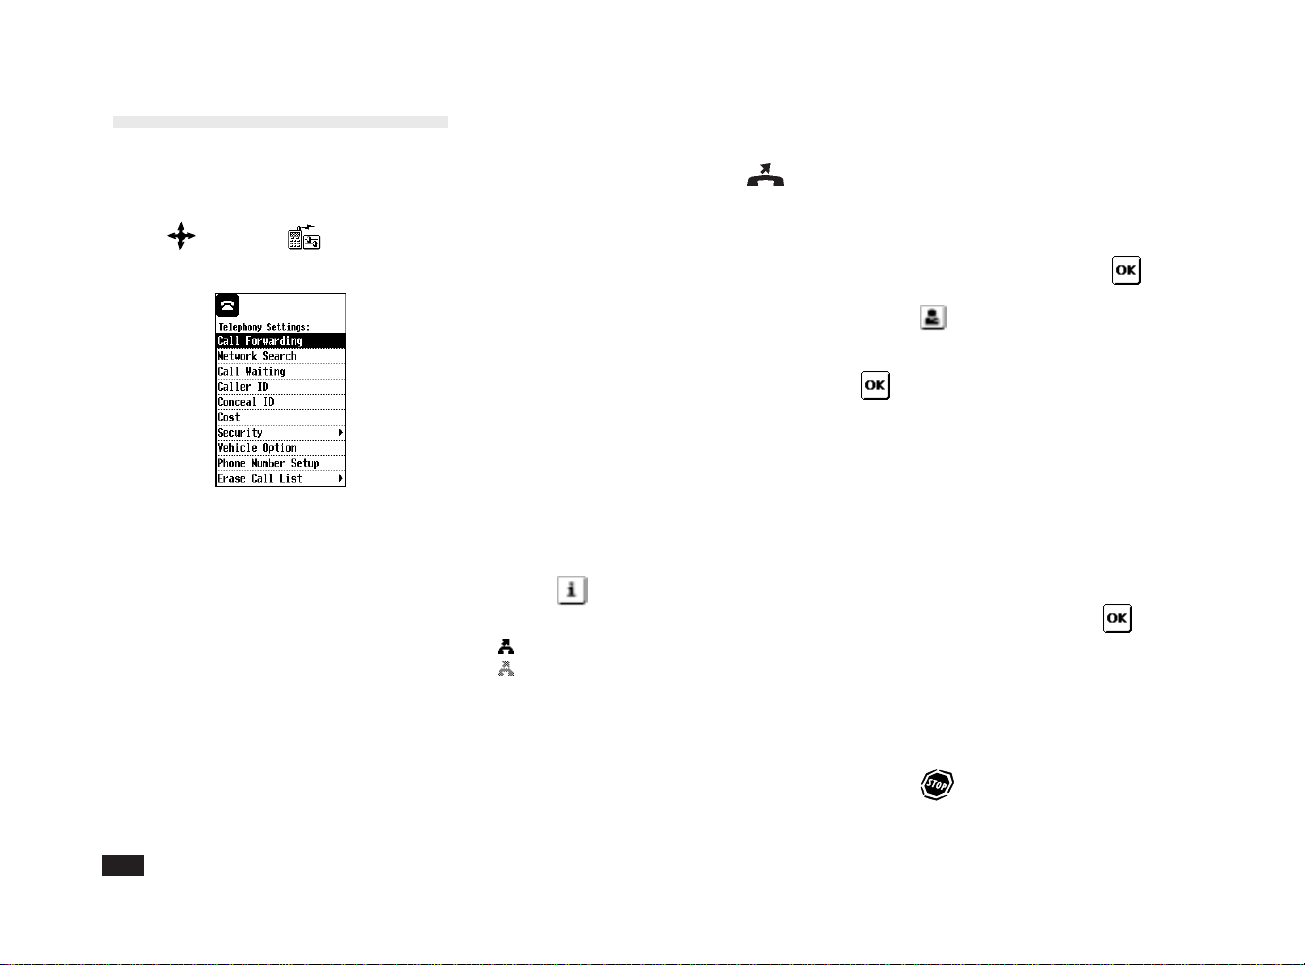
Phone settings
You can set up a variety of network
services which may be available on your
network.
Touch
Note:
• Check with your network service
• You can also use the "*" and "#" keys
Call Forwarding
This service lets you redirect incoming
calls to another number (eg, a voice mail
system to take messages while you are
unavailable).
You may use the following five options
and you may set the different forwarding
and select .
provider to find out which services are
supported.
on the numeric dial screen for commands to control these supplemental
network services.
number each by each. When one or more
options are active, the status icon
displayed.
is
Call forward options
• All Incoming Calls: All incoming calls
are forwarded.
• If Line is Busy: Incoming calls when
you are in a call are forwarded.
• If No Answer: Incoming calls are
forwarded when you do not answer
them.
• If Unreachable: Incoming calls are
forwarded when the smart phone is
turned off or outside the network
service area.
• All Incoming Fax: All incoming fax are
forwarded.
To check the status of call
forwarding service
1.
Touch .
Status icon of each option is displayed.
: Service is available.
: Service is not available.
Bank: Outside of service area, no
service, communication failure.
Note:
It is recommanded to check call
forward status when you have change
your settings on your SIM card using
another phone, or in case of doubt.
To activate an option of call
forwarding service
1.
Select a desired call forwarding
option.
2.
Select "Activate" then touch .
3.
Numerical dial screen is displayed.
4. Touch to display the phone
book, then select a desired person,
phone or fax number, and touch
.
Note:
You can also enter the phone or fax
number directly on the numerical dial
screen.
To cancel an option of call
forwarding service
1.
Select a desired call forwarding
option.
2.
Select "Cancel" then touch .
To cancel all call forwardings
1.
Select "Cancel All" then touch.
T o disconnect the communication
with your network
1.
Touch .
36
Page 37
Network Search
There are two types of network search:
Automatic and Manual.
Automatic
After you turn it on, your smart phone will
always try to connect first to the most
recently available network, then to the
subscribed network, and lastly to the
Preferred network. If none of these are
found, it will then search for any other
available GSM networks.
Touch
list or to delete the Forbidden Network
list.
Manual
After you turn it on, your smart phone will
always try to connect to the most recently
available network. If not found, it will
display the list of available networks
known to your smart phone.
to set the Preferred Network
Call Waiting
This service notifies you of another
incoming call while you are already on a
call.
Caller ID
This service allows you to see the phone
number of anyone calling you before you
answer .
Conceal ID
This lets you control whether to reveal
your phone number when calling another
party.
• Select "Conceal ID" if you do not want
to reveal your phone number.
• Select "Notify ID" if you want to reveal
your phone number.
• Select "As your subscription" to return
to the default settings used when you
subscribed to your network.
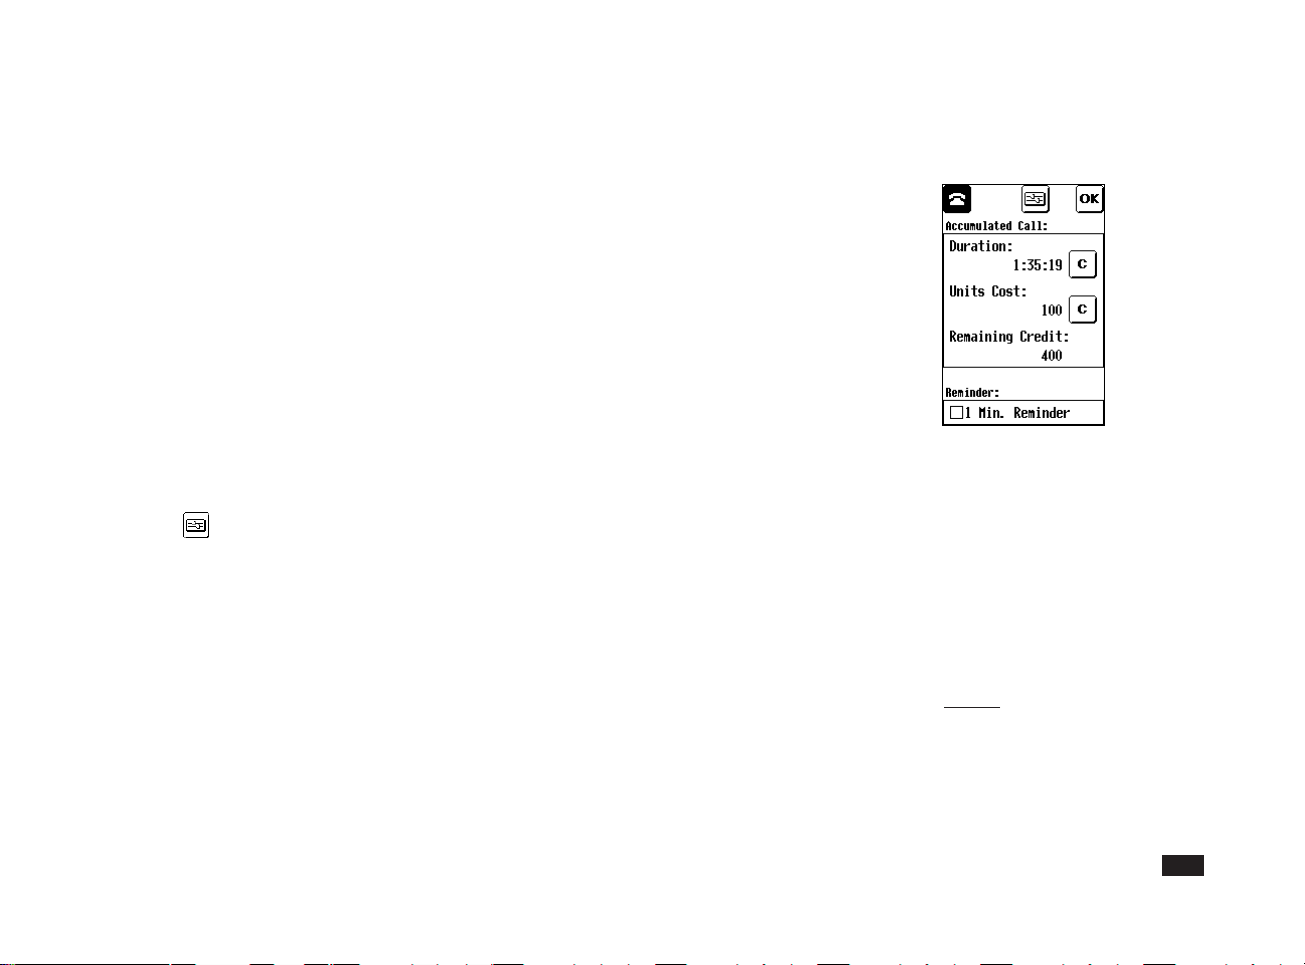
Cost
This option lets you check the duration,
cost and remaining credit for your calls. To
use this service, you must first subscribe
to the "AoC service".
When remaining credit reaches 0, you will
be unable to make any more calls
(except emergency calls) and may even
be cut off in mid-call. This is useful if you
want to make sure you do not exceed a
certain cost limit. To disable the credit
restriction,
1.
Touch C to clear.
enter 0 as the credit limit.
You can specify which network it should
try to connect to using Known Network list
or by entering the country and network
code directly.
2.
Enter PIN or PIN2 code.
37
Page 38
3.
Touch to set up the initial credit
counter.
4.
Enter PIN or PIN2.
Note:
This option is not available if your SIM
card does not support cost information.
Note:
When "1 min. reminder" is checked,
you will hear a short beep once every
minute during calls.
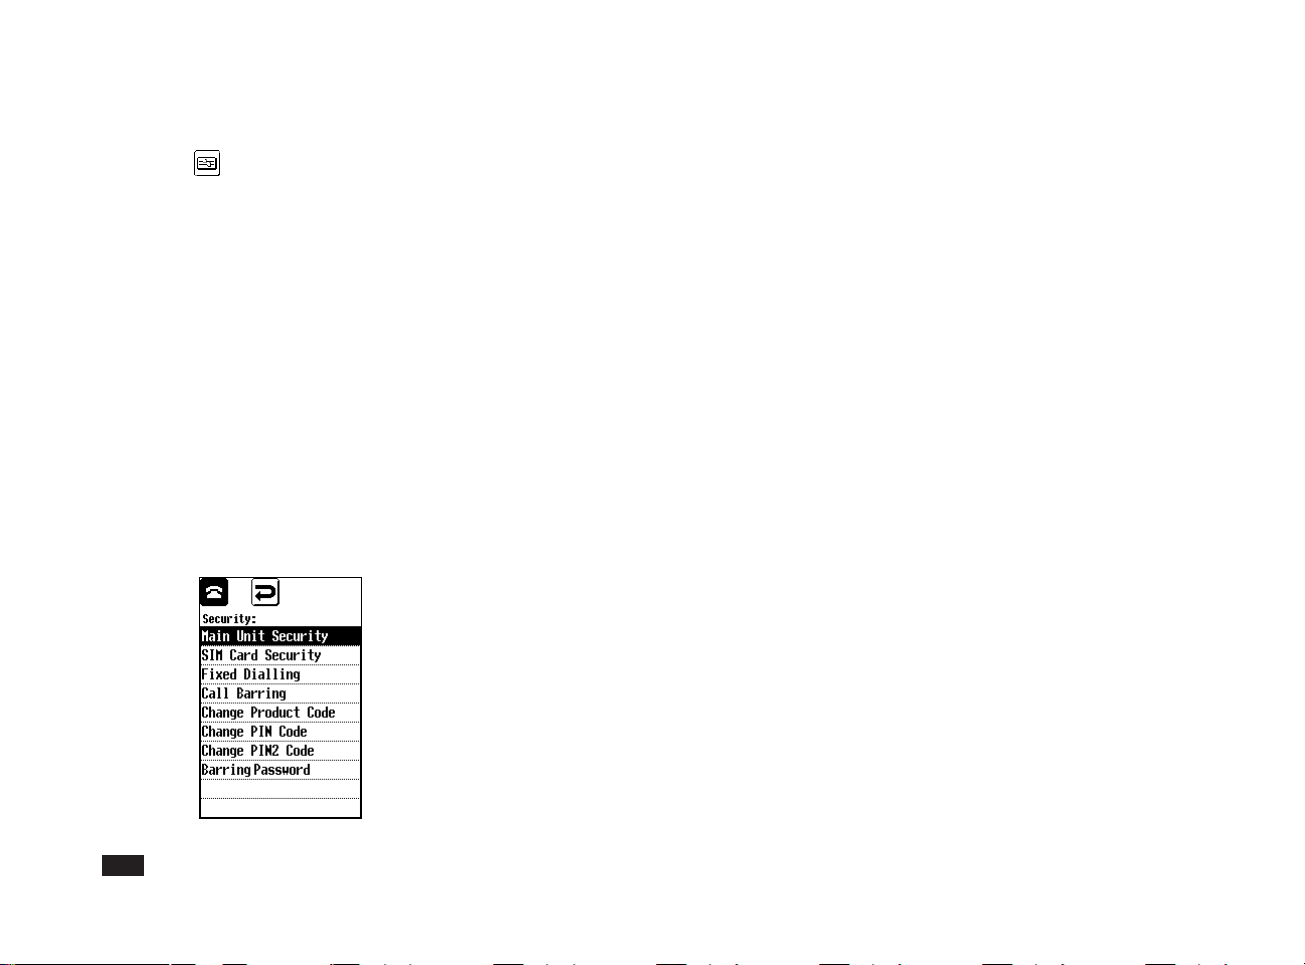
Security
There are various options allowing you to
control access to your smart phone.
38
Main unit security
Select whether to prompt for the product
code at startup. If enabled, this prevents
the phone and PIM functions being used
(except for emergency calls) unless the
correct product code is entered.
The default product code is "0000".
To change the product code, select
"Change Product Code."
SIM card security
Select whether to prompt for PIN code at
startup.
Fixed dialling
You need to enter the PIN2 code in order
to activate this function.
Select whether fixed dialling is active.
This enables calls to be restricted to
certain numbers or prefixes as entered in
a directory called a Fixed directory. This
directory (if available) is stored in your
SIM card. You can add any dialling
prefixes required when you make a call
(to limit calls to a specific geographical
area, or within a company, etc.)(to edit the
fixed directory see in chapter 5, SIM card
directory). Emergency calls are always
enabled.
Call barring
This option lets you place restrictions on
incoming and outgoing voice calls.
Change product code
The Product Code helps keep your smart
phone's information secure. It prevents
anyone else using your smart phone
without first entering the correct password
at startup. To use this function, select
Main Unit Security and check the check
box. The default product code is "0000".
Note:
If the product code is identical to the
PIN code, you will only need to enter
the PIN code at startup.
Page 39

Change PIN code
This lets you change the PIN code used
to access specific SIM card.
Change PIN2 code
This lets you change the PIN2 code used
to restrict access to protected functions,
the Fixed Dialling number and changing
the cost limit.
Barring password
This lets you set a password to prevent
anyone else changing the current call
barring settings.
Vehicle options
Select Any Key Answer or Auto Answer.
These options are only available when
the smart phone is used with the
handsfree car kit.
Phone number setup
This displays up to three numbers stored
in your SIM card. In order to use
access your voice mail, you first need to
enter your voice message centre number.
to
Erase call list
Use this function to delete all the contents
of the Redial, Answered or No Answer
call lists. This lets you maintain confidentiality and privacy by preventing other
users from knowing who you have called.
39
Page 40
Setting Preferences
You can set various preferences to tailor
your smart phone to your personal needs.
These include the smart phone's
operating language, various tones,
display options and other settings.
1.
Touch .
2.
Touch .
Personal Information
Displays your personal information. To set
up or modify the information, use Copy to
Pers Info in Contacts.
Memory Check
Displays the memory status. Touch to
reorganize your memory in order to make
more space available.
Note:
• While reorganizing the memory, the
phone functions are not available.
• Memory status is approximate.
40
Display
Adjust the LCD contrast, and adjust the
touch panel.
Tone
Set the ring tone volume (three levels)
and melody (choice of seven), the key
touch tone and Short Message Alarm.
Note:
You cannot change the volume of melodies 4 and 5.
Standby/Sleep
Set the Standby/Sleep timer.
Language
Specify the operating language.
Discharge
This lets you discharge the battery
periodically to maintain performance.
You should discharge the battery approximately once per month.
PC Link (PC Synchronisation)
Select "Deactivate" when you do not want
to use PC Synchronisation (PC Link).
Page 41

Chapter 4
Message functions
The smart phone has multi modal messaging functions which are
sending/receiving via the Short Message Service and Internet email.
To utilize the Short Message Service, you need to subscribe to
the Short Message Service in your GSM network. To utilize the
Internet e-mail, you need to subscribe to a GSM data communication service and an Internet service provider.
Note:
• Some Short Message functions may not always be available
depending on your GSM network.
• Internet e-mail connection may not be possible with some
service provider, depending on their service capabilities.
41
Page 42

Short Message Service
(SMS)
About the SMS
The Short Message Service (SMS) lets
you send and receive short text messages (of up to 1600 characters). You can
send SMS messages to other users with
GSM telephones.
Using SMS with your smart phone
Messages longer than 160 characters are
split into multiple messages, then automatically recomposed when they are
received.
One of the most useful features is the
ability to attach Schedules data to SMS
messages. For example, this lets you
send a colleague a schedule for an
appointment, which they can add to their
own schedule on receipt.
You can also use templates to make and
send SMS messages. A template can
even specify the address of the recipient,
convenient for messages you send
regularly to certain people.
An SMS message can be addressed to
up to 10 recipients.
You can send/receive SMS messages
even if you are talking on the phone.
42
Starting SMS
Touch , or touch and select
.
Setting up SMS
Before you can use SMS to send and
receive messages, you have to set up
some personal and system information.
To set up the Service Centre address
1.
Touch and select SETUP.
2.
Select Service Centre.
3.
Enter the number.
If you want to enter a country code for
an international call, touch
.
4.
Touch .
Other settings
Other settings have default values already
provided. Under most circumstances you
should not need to change them.
then
Note:
Some items may not be available
depending on your network.
1.
Touch and select SETUP.
2.
Select Message Options and
make the desired changes.
Validity Period
This indicates the number of days and
hours for which a message you send may
remain undelivered to the message
recipient. During this period, the message
service centre will continually try to
deliver the message to the recipient.
Delivery Report
Automatically issues a message to
confirm when a message you send is
received by the recipient.
Reply Path
Use this option to send your SMS
address to the recipient of your message.
3.
Touch to store the settings.
Page 43

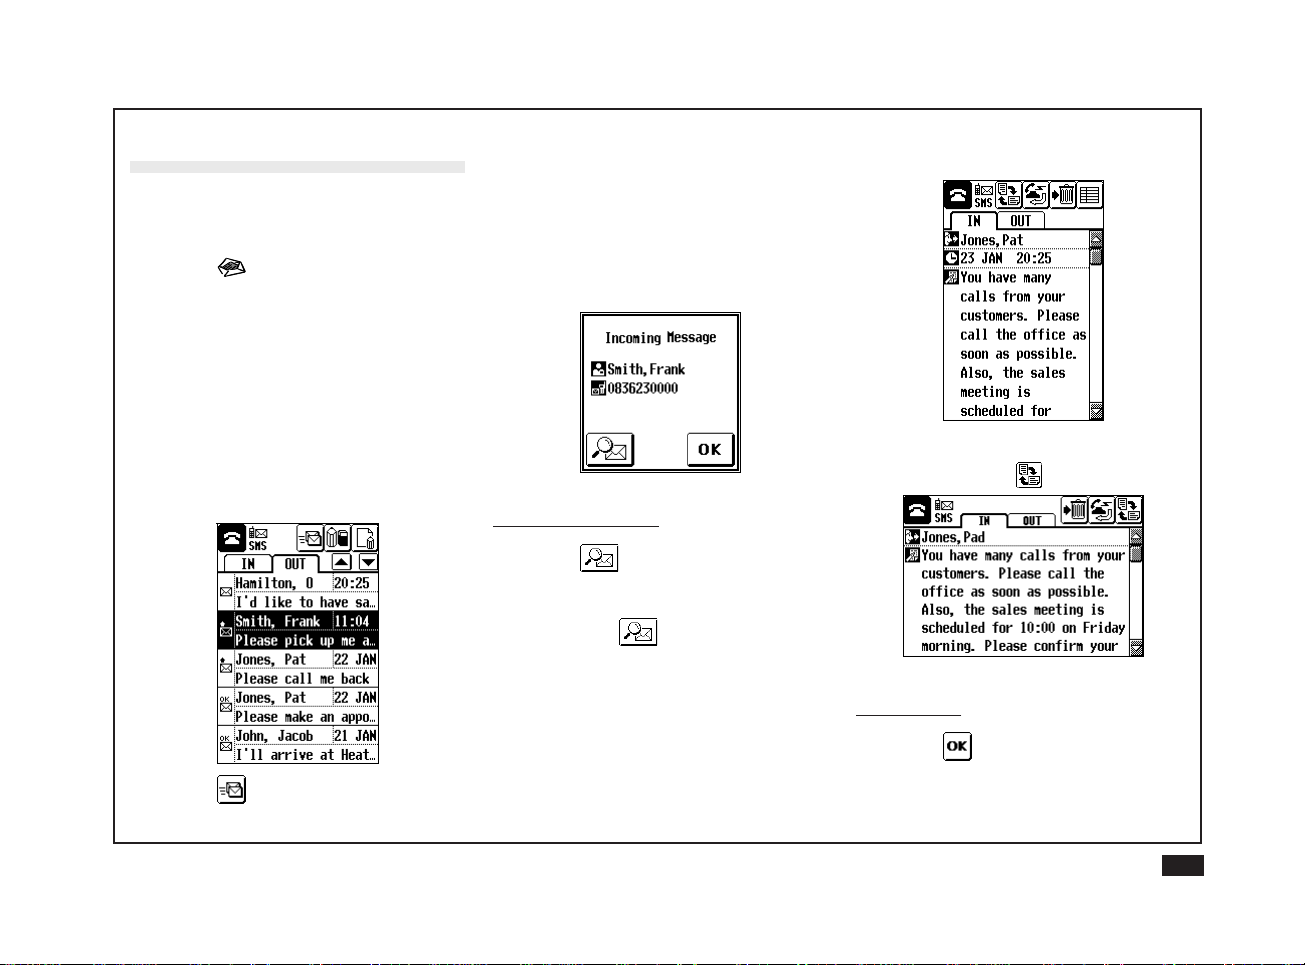
Looking at your messages
Detail view
Icons
You can look at SMS messages in index
or detail view modes. Messages you
receive are stored in the In box, and
messages you send in the Out box.
Index view
In box Out box
In box Out box
Note:
In detail view, you may find it
easier to read the message by
touching to rotate the screen.
Operating icons
(at the top of the screen)
Send a message
Reply to a message (received)
Call message sender
Create a new message using a
template
Over the air synchronisation
Paste the attached data into a PIM
application from a received message (ie, Schedules information)
For details of other general icons, see
Appendix A.
Status icons
(in the status icons area)
Incoming short message
Touch the IN or OUT tabs to
change the current box.
43
Page 44

Message status icons
(in the status column in index view)
In box
Unread
Read
One part of a long message
(automatically recomposed when
one of the parts is read)
Out box
Unsent
Phase 1: Sent
Phase 2: Sent and delivering
Phase 2: Delivered
Creating a new message
The SMS function includes various predefined message templates. You can
create a new SMS message using a
template (easier) or using the keyboard
(ie, from scratch).
Using a template and easy addressing
1.
Touch .
2.
Touch .
3.
Select the desired template from
the list and touch .
The template is copied to the message
text field.
4.
To select the message recipient,
touch and select a recipient
from the list.
5.
Touch .
6.
You can specify up to 10 recipients.
Repeat steps 4-5 for each person
you want to send this message to.
44
Page 45

7.
Touch to store the message in
the Out box.
Using the keyboard
1.
Touch each field in turn and enter
the details using the keyboard.
To specify two or more recipients,
separate the addresses using ";".
2.
Touch to store the message.
Sending messages
To send a specific message
1.
Select the desired message in the
Out box.
2.
Touch .
To send all unsent messages
1.
Touch .
Incoming messages
The smart phone will inform you immediately when an incoming message arrives,
whatever function you are using even
another phone call.
Note:
• There are several types of keyboard.
The most suitable keyboard for the
current field is selected automatically.
However, you can change the keyboard. For full details, see Appendix.
• A message will be sent to each
recipient. The more recipients you
specify, the higher your message
charges will be.
2.
Touch TOOLS and select Send
Message.
3.
Touch the pop-up menu and select
All unsent messages.
Note:
You can create and send messages
which are longer than the maximum
160-character limits. The smart phone
will inform you when such a long
message is being sent.
To read an incoming message immediately
1.
Touch .
2.
The received message is
displayed.
Note:
If you touch
message while modifying, creating
Schedules or Contacts data, the
changes you have made will not be
saved. To avoid losing your work, touch
and save your changes before
reading the incoming message.
to read an incoming
45
Page 46

To read a message later
1.
Touch .
Note:
The
incoming message screen if the Save
Selection check box in "Message
Options" is cheked.
If you want to save a message in the
SIM card, touch
"Class 0" messages are received and
displayed automatically, but are not saved.
Caution: When inserting a new SIM card
into the smart phone, all short messages
contained in SIM card will be deleted and
transfered into the smart phone memory.
Clearing the SIM card messages insures
further reception of messages and avoids
SIM card limited memory constraints.
button will appear on the
.
Reading another message
1.
Select the desired message to
read in the In box.
2.
Touch the message again.
3.
To rotate the message for easier
viewing, touch .
Over the air synchronisation
Your smart phone can receive schedules
(under a specific format) through short
messages. The schedules can be
transferred easily to the schedule application. When reading a synchronisation
message use
contained in the message to the schedule
application.
1.
Touch .
The pasted data is displayed in the
schedule application.
SMS templates are available, to help you
send schedules to other
You just have to incorporate the schedule
information while keeping the original
format (see Appendix J: Over the air
synchronisation).
to transfer the schedule
users.
Modifying a message
1.
Select the desired message to
modify in the Out box.
2.
Touch and make the desired
changes, then touch .
Deleting messages
To delete a single message
1.
Display the message you want to
delete in the detail view or select
the message in the index view.
2.
Touch , select DATA DELETION
then Selected Message.
To delete a group of messages
1.
Touch and select DATA
DELETION.
2.
Select All Sent Messages, All
Outbox Msgs., All Inbox
Messages, All Messages or All
Templates.
46
Page 47

Replying to a message
1.
Select the desired message to
reply to in the In box.
2.
Touch .
3.
Enter the text of your reply.
4.
Touch .
Calling back the sender of a
message
This function is available if the message
contain a phone number.
1.
Select the message in the In box
whose sender you want to call.
2.
Touch .
Forwarding a message
You can forward a copy of any message
you receive to another person.
1.
Select the desired message to
forward in the In box.
2.
Touch , and select TOOLS and
touch Forward.
3.
Select the recipient and touch .
Managing templates
To make a new template
1.
Touch , select VIEWS then
Templates .
2.
Touch .
1.
Select the desired message to
copy.
2.
Touch , select TOOLS then
Copy as Template.
3.
Touch .
To modify a template
1.
Touch , select VIEWS then
Templates.
2.
Select the desired template to
modify.
3.
Touch .
To delete all templates
1.
Touch .
To make a template based on an
existing message
You can also make new templates based
on copies of your own or received
messages.
2.
Touch DATA DELETION and
select All Templates .
47
Page 48

Internet e-mail
Your smart phone lets you send and
receive e-mail messages around the
world by one-touch operation. This lets
you stay in touch with colleagues and
clients, friends and family, wherever you
are.
Starting e-mail
1.
Touch and select .
E-mail settings
Before you can send and receive e-mail
messages, you have to set up your
account information.
To set up your account information
This information should be supplied by
your Internet service provider. This list
looks daunting, but once set up, it rarely
needs to be changed.
1.
Touch .
2.
Touch the desired account to set
up, then press .
3.
Touch the pop-up menu button at
the top of the display, and select
the required editing screen.
4.
Make the necessary changes, then
touch .
5.
Repeat steps 2 to 4 as necessary,
then touch .
Setup items
• Provider name Enter the name
• Phone number Enter the number of
access point
• Login ID Enter your login ID
• Login Password Enter your password
• Login protocol Select Script, PAP or
CHAP
• Connection TypeSelect one of the three
connection types.
• Script Enter a login script
• DNS Server
IP address Enter the Domain
Name Server address
• SMTP Server
IP address Enter the SMTP IP
address or host name
• POP Server
IP address Enter the POP IP
address or host name
• Mail user ID Enter your mail user ID
• Mail password
• Mail address
•
Reply To address
• Signature Enter any signature
Other settings
These settings have defaults, although
you can change them if you wish.
Preferences
• Make and select
the preview index Set this in order to
• Delete messages on the server after
receiving (Messages of 8KB or larger
and messages with attached data will
not be deleted.)
Note:
If you are using another device to access
your e-mail, we recommend you to not
activate this function.
Enter your mail password
Enter your mail address
Enter the address
text
select which
messages you want
to retrieve.
48
Page 49
• Include received
messages in reply
• Send copy
to my address
Filter 1/2
These filters let you selectively retrieve
your e-mail messages. You can retrieve
only messages smaller than a certain
size, or messages from a particular
person or regarding a particular subject.
• Only get messages
less than XX KB Specify the
maximum size of
messages you
want to retrieve.
• Include previously
read messages Set or not
• Only get messages
if field XX contains
XX. Specify the
keyword to
search for and
the field in which
to search.
1.
Touch and select SETUP.
3.
Touch to store the changed
settings.
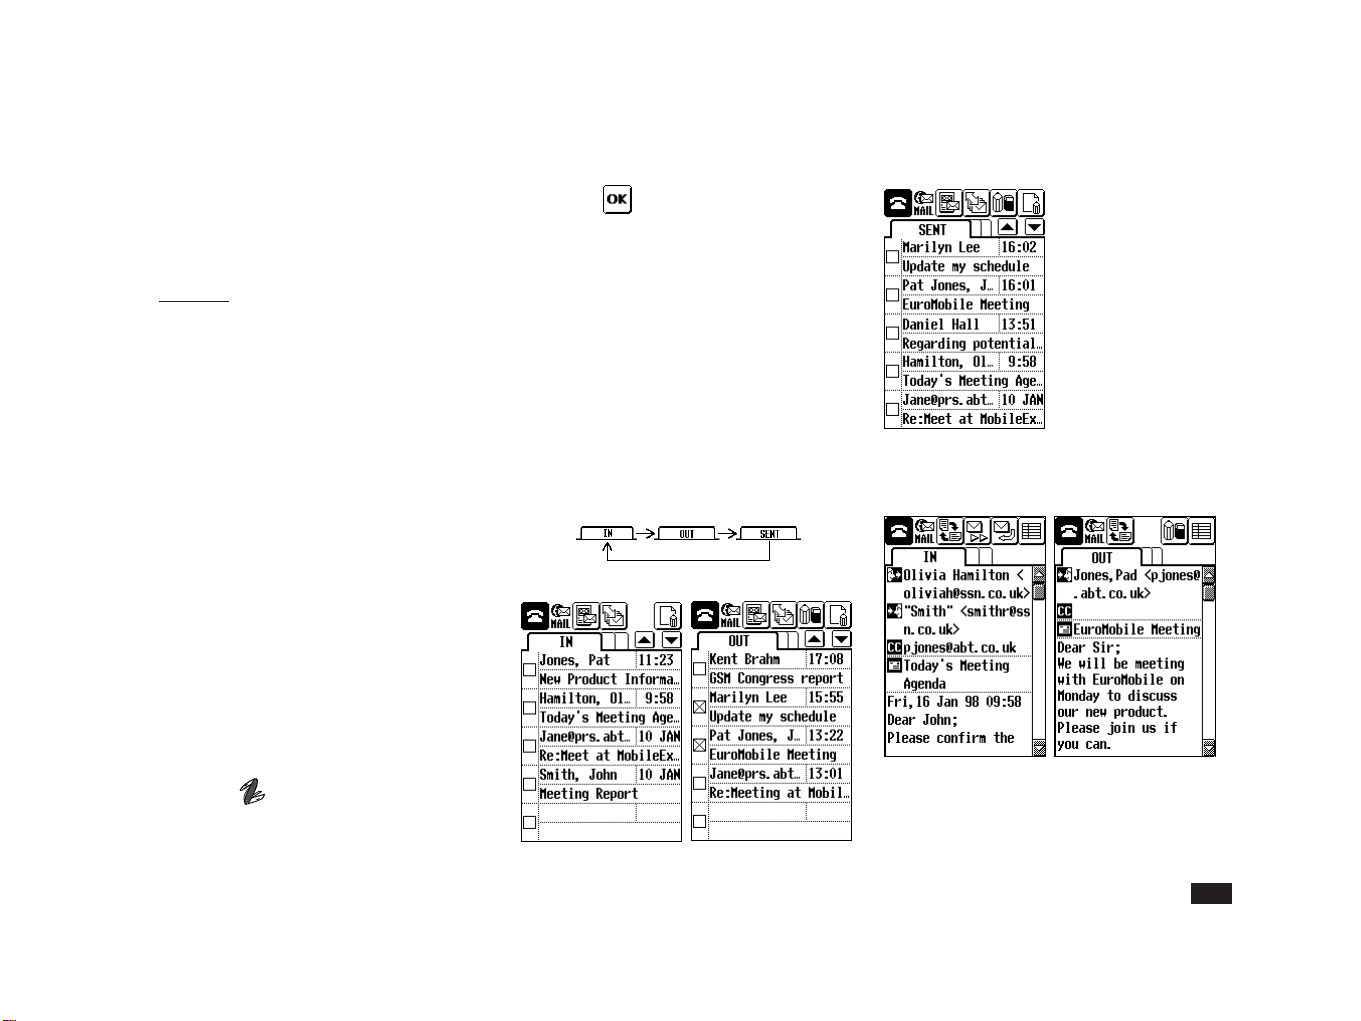
Looking at your messages
You can look at your e-mail messages in
index or detail view modes. Messages
you receive are stored in the In box, and
outgoing messages are stored in the Out
box until you send them, after which they
move to the Sent box.
Touch the box tab IN to change to the IN,
OUT and SENT boxes in turn.
Index view
Sent box
Detail view
In box Out box
2.
Select Preferences; Filter1 or
Filter2 and make the necessary
changes.
In box Out box
49
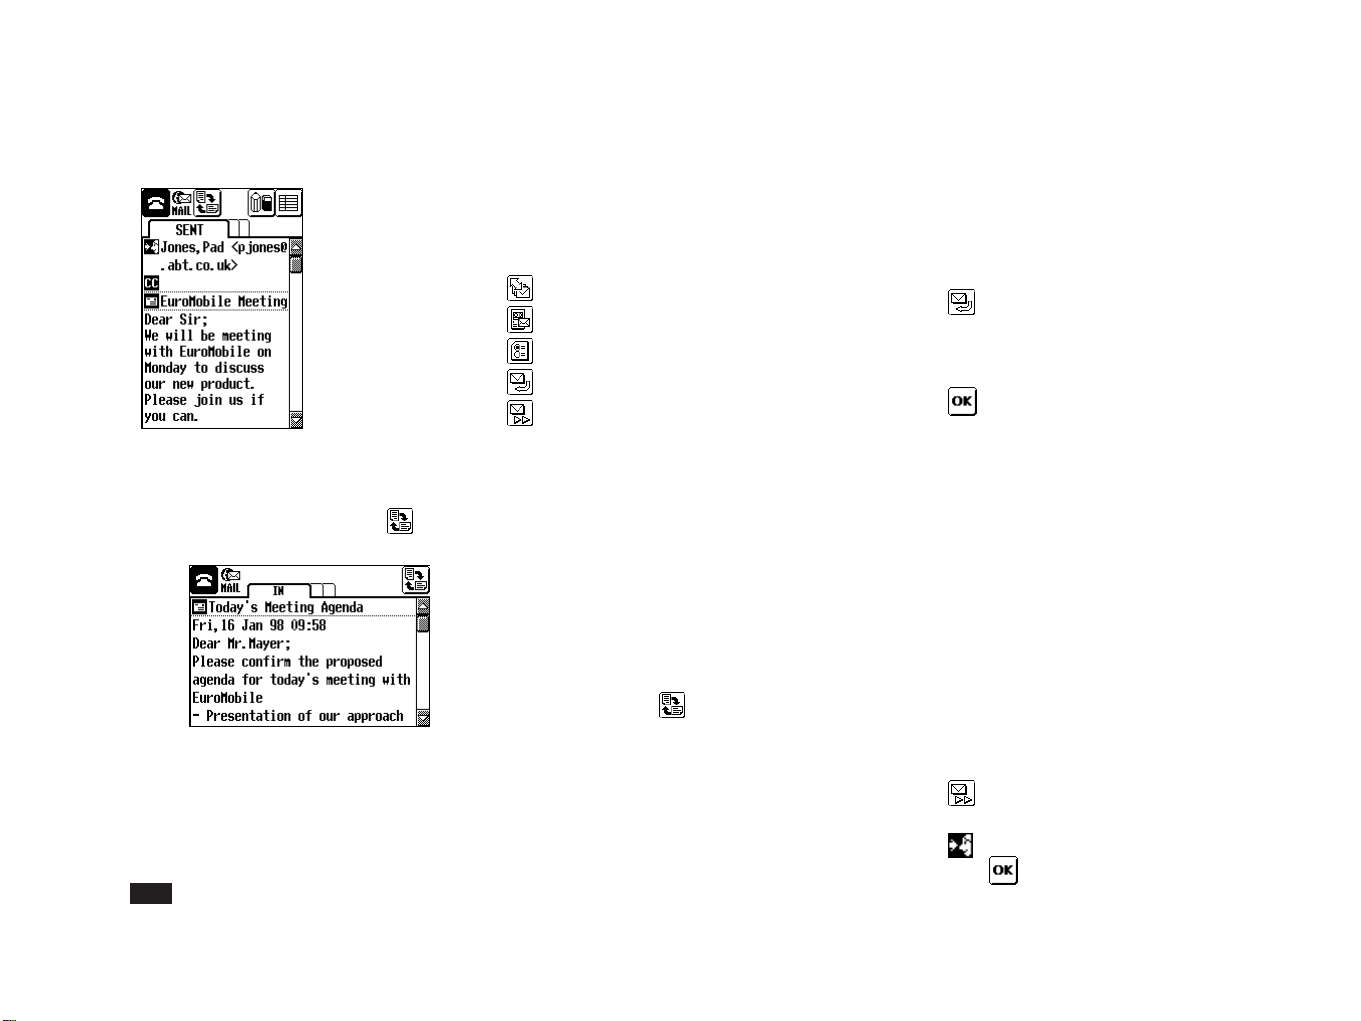
Page 50
Icons
Replying to a message
Sent box
In detail view, you may find it easier to
read the message by touching to
rotate the screen.
Operating icons
(at the top of the screen)
Access the mail server
Change the account
Set mail options
Reply to sender
Forward mail message
For details of other icons, see Appendix.
Reading a message
1.
Select the desired message to
read in the In box.
2.
Touch the message again.
3.
To rotate the screen for easier
viewing, touch .
1.
Display the message in the In box
you wish to reply to in detail view.
2.
Touch .
3.
Enter the text of your reply.
4.
Touch to store the message.
5.
To send the message see
Sending mail.
Note:
A reply will automatically be sent to all
the recipients of the original message.
Delete any unwanted addresses if
necessary.
Forwarding a message
1.
Display the message in the In box
you wish to forward in detail view.
2.
Touch .
50
3.
Touch and select the recipient,
then touch .
Page 51
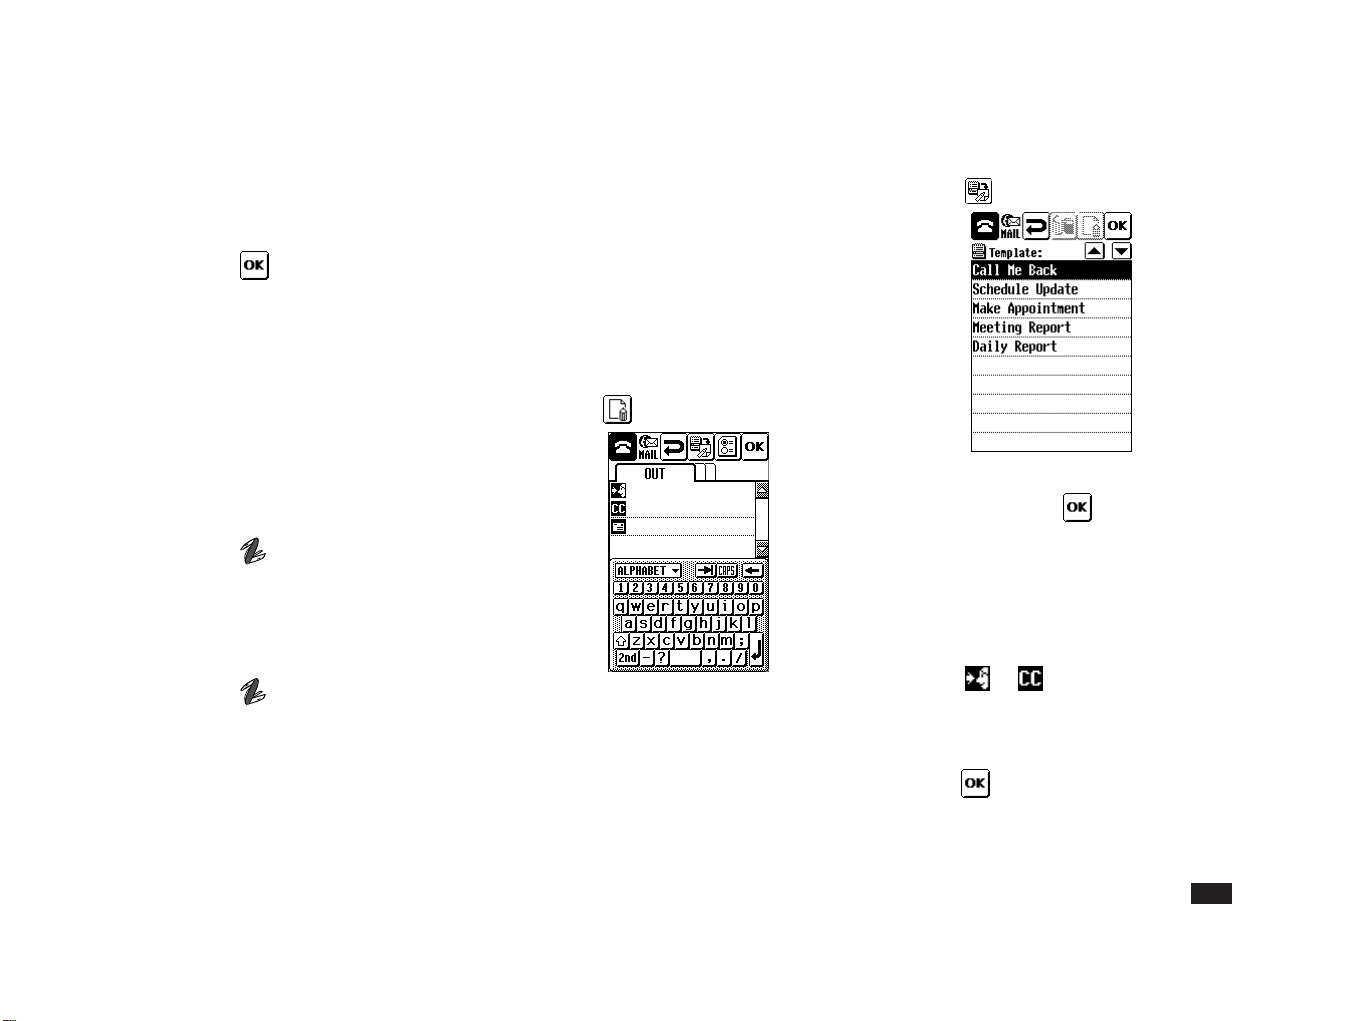
4.
Enter some new message text if
desired.
5.
Touch to store the message.
6.
To send the message see
Sending mail.
Deleting messages
To delete a single message
1.
Display the desired message to
delete in detail view.
2.
Touch and select DATA
DELETION, then Selected
Message.
To delete a group of messages
1.
Touch and select DATA
DELETION.
2.
Select from All Inbox Messages;
All Outbox Msgs.; All Sentbox
Msgs.; All Messages; or All
Templates.
Making a new e-mail message
You can create a new e-mail message
using a template (to create template see
Managing templates) or using the
keyboard (i.e., from scratch).
To make a new message using a
template and easy addressing
1.
Touch .
2.
Touch .
3.
Select the desired template from
the list and touch .
You can modify the copied template
using the keyboard. Repeating steps 2
and 3 lets you include two or more
different templates within a single
message.
4.
Touch or to select the
message recipients.
5.
Select a recipient from the list and
touch .
51
Page 52
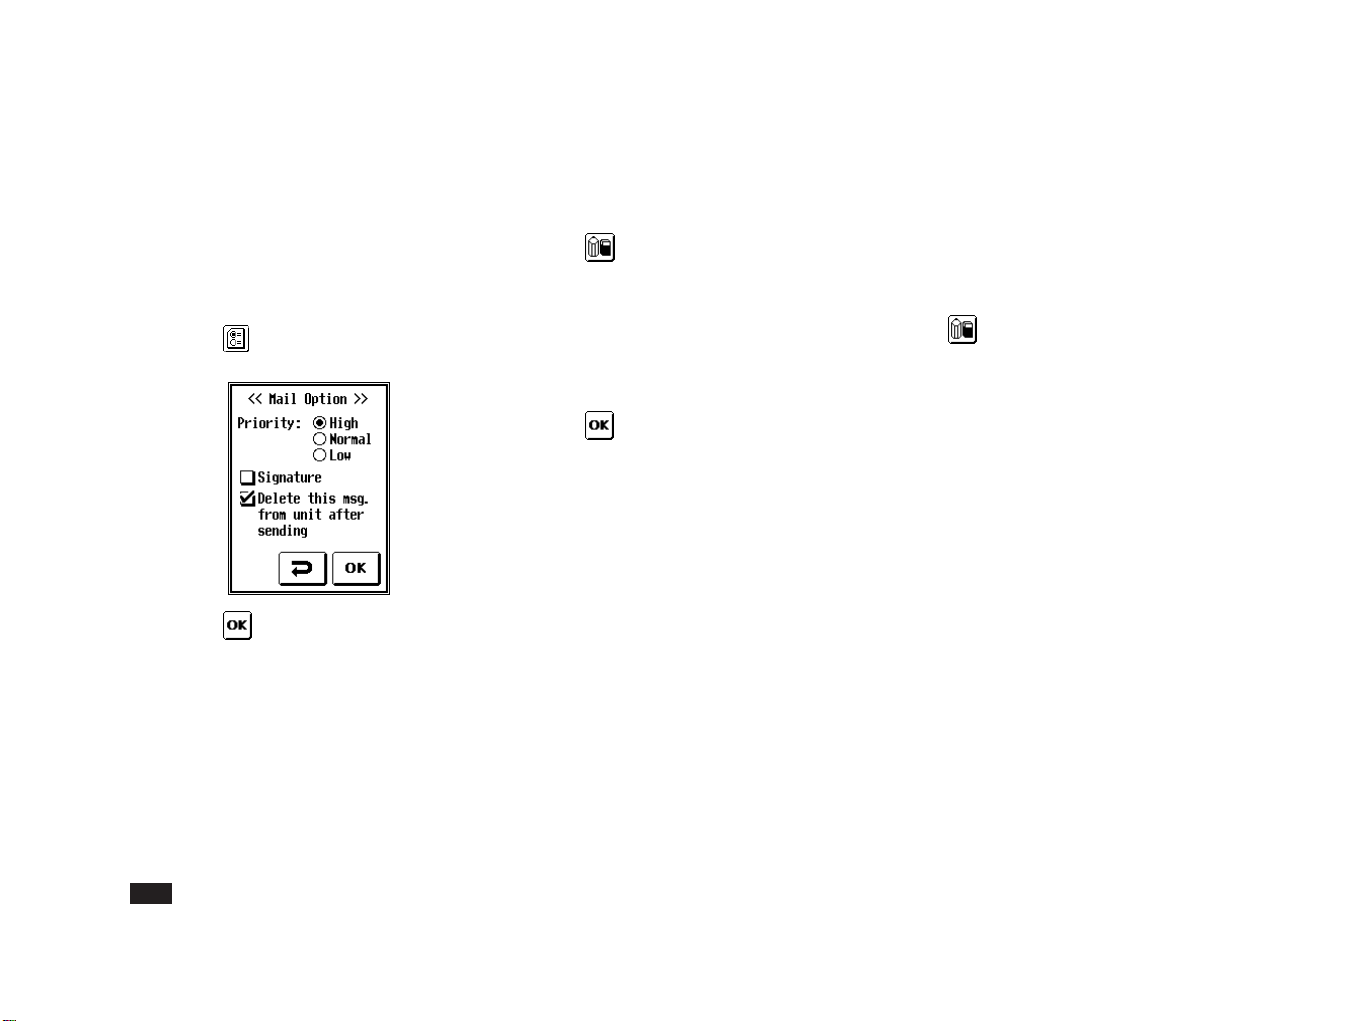
6.
Repeat steps 4 and 5, until all
recipients have been set.
You can also enter the recipients
directly using the keyboard. You can
specify up to 10 recipients.
7.
Touch if you want to change
any mail options.
8.
Touch to store the message.
To make a new message using the
keyboard
1.
Touch .
2.
Touch each field in turn and enter
the details using the keyboard.
To specify two or more recipients,
separate the addresses using ",".
3.
Touch to store the message.
Note:
There are several types of keyboard.
The most suitable keyboard for the
current field is selected automatically.
However, you can change the keyboard by touching the pop-up menu on
the upper left of the keyboard and
selecting another keyboard. For full
details of the various keyboards, see
Appendix.
Modifying a message
1.
Select the desired message in the
Out box or Sent box you want to
modify.
2.
Touch .
If you selected a message in the Sent
box, the message is copied to the Out
box.
52
Page 53
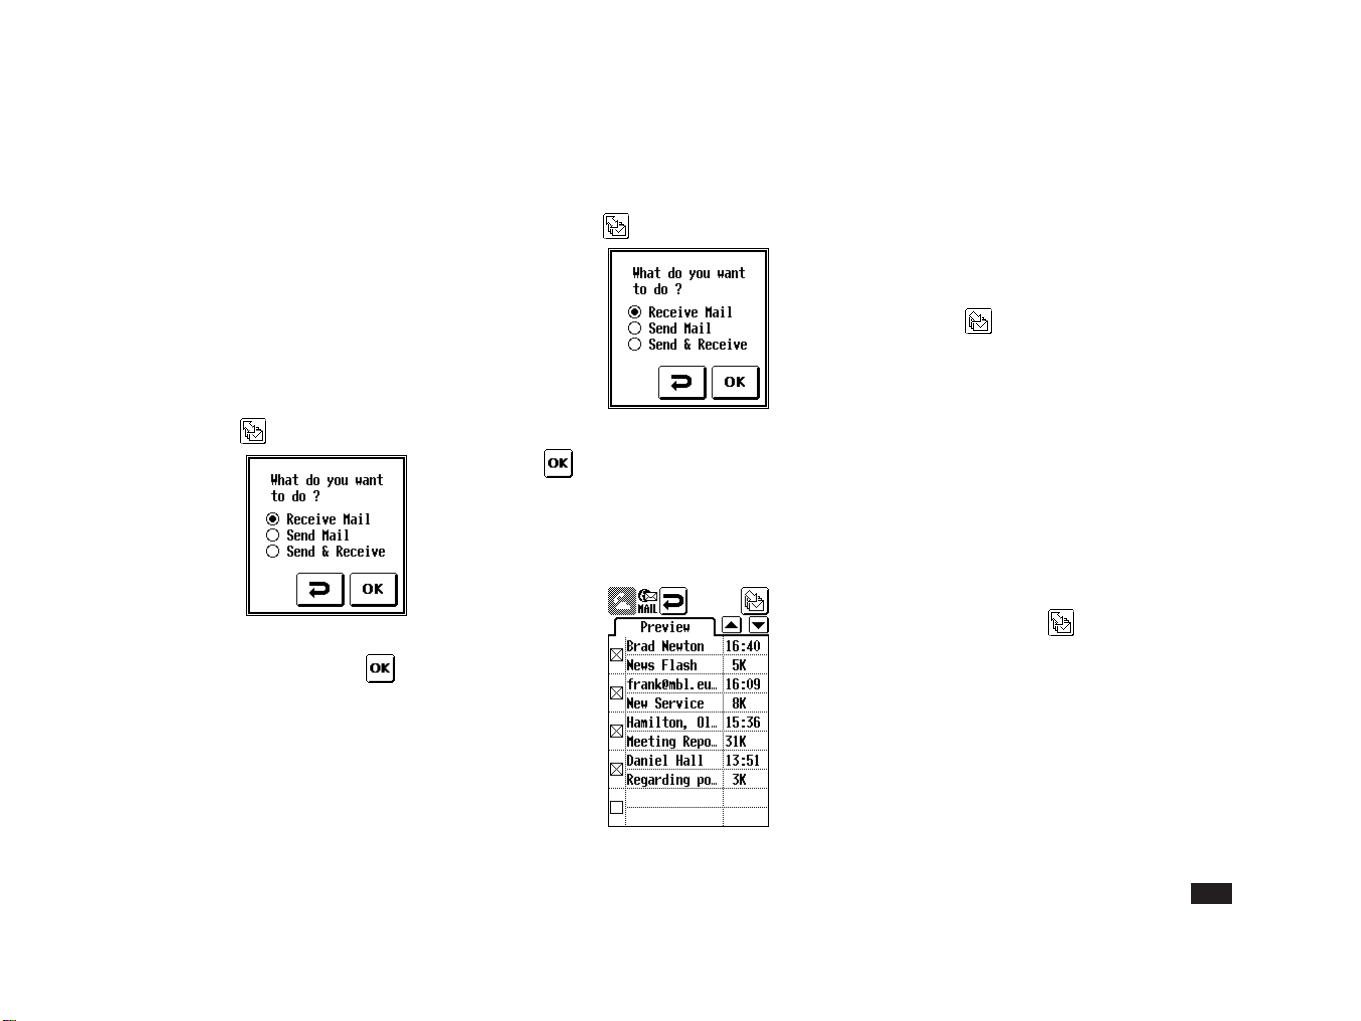
Sending mail
The outgoing messages you create will
stay in the Out box until you send them.
1.
Display the Out box in index view.
2.
Touch the check box for each
message you wish to send.
3.
Touch .
4.
Select Send Mail or Send &
Receive, then touch .
The smart phone connects to the mail
host, sends the message(s) and
disconnects automatically.
Retrieving your mail
1.
Touch .
2.
Select Receive Mail, then touch
.
3.
The Preview Index appears,
showing you which messages are
waiting to be retrieved.
4.
All messages are checked by
default. Touch and clear the check
box for each message you do not
wish to retrieve.
5.
Touch .
6.
The smart phone receives selected
message(s) in the In box and
disconnects automatically.
Note:
• If you do not set "Make and Select the
Preview Index" in Preferences, all
messages waiting in your server will be
retrieved.
• If you wish to send and receive at the
same time, touch
& Receive".
and select "Send
53
Page 54

Managing templates
To make a new template
1.
Touch , select VIEWS then
Templates.
2.
Touch and enter the new
template details using the
keyboard.
3.
Touch .
To make a template based on an
existing message
You can also make new templates based
on copies of your own messages.
To modify a template
1.
Touch , select VIEWS and touch
Template.
2.
Select the desired template to
modify.
3.
Touch .
To delete all templates
1.
Touch .
2.
Touch DATA DELETION and
select All Templates .
1.
Select the desired message to
copy.
2.
Touch , select TOOLS and
touch Copy as Template.
3.
Touch .
54
Note:
If you have to re-initialize your smart
phone, any templates you have
created will be deleted.
Page 55

Chapter 5
Main PIM functions
This chapter explains the Contacts, Schedules and Quick Memos
applications.
Other functions are explained in chapter 6.
55
Page 56
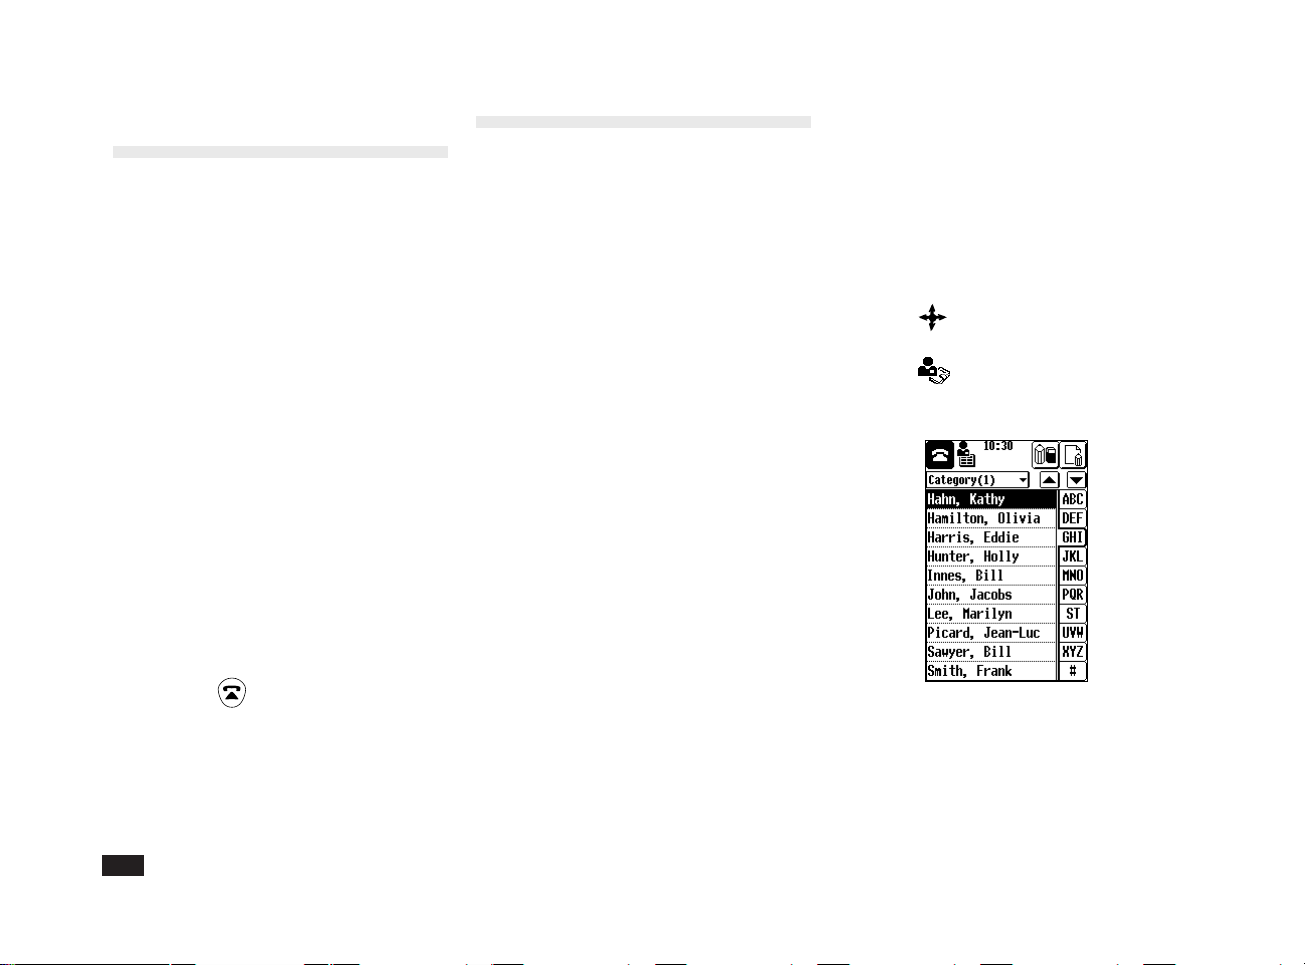
Personal Information
Management (PIM)
Your smart phone provides the following
functions to let you manage your personal
information and schedule:
• Contacts
• Schedules
• Quick Memos
• World Clock
• Calculator
• Global Search
PIM-only mode
You can use your smart phone's PIM
functions even when the phone is
switched off (ie, unable to make or
receive calls). This is useful in places
where the use of mobile phones is
forbidden, eg, in some hospitals, on
aircraft, etc.
Contacts
Contacts is a powerful function which lets
you keep a database of all your personal
and business contacts. This function is
used to create the entries which are used
by the Phone Book for dialling.
Directories
Contacts lets you organize your entries by
storing them in three directories: Category 1, Category 2 and Category 3.
SIM card
You can also store and modify entries in
the removable SIM card.
This is useful if you wish to use some of
your Phone Book entries with another
GSM phone. However, as its data storage
capacity is limited, it can only store a
small number of entries.
Note:
You can specify your own names for
Category 1, Category 2 and Category
3.
Using Contacts
1.
T ouch .
2.
T ouch .
The index of Category (1) appears in
index view.
To switch the smart phone on in PIM-only
mode, press
pushing the Navigation key.
56
for a few seconds, while
Preferred lists
The Contacts entries you call most
frequently can also be copied to the
Phone Preferred and SMS Preferred lists,
each of which can contain up to 10
entries.
Note:
You can also jump to Contacts from
the Phone Book, simply by touching an
entry twice. This is useful if you want to
update a particular entry.
Page 57
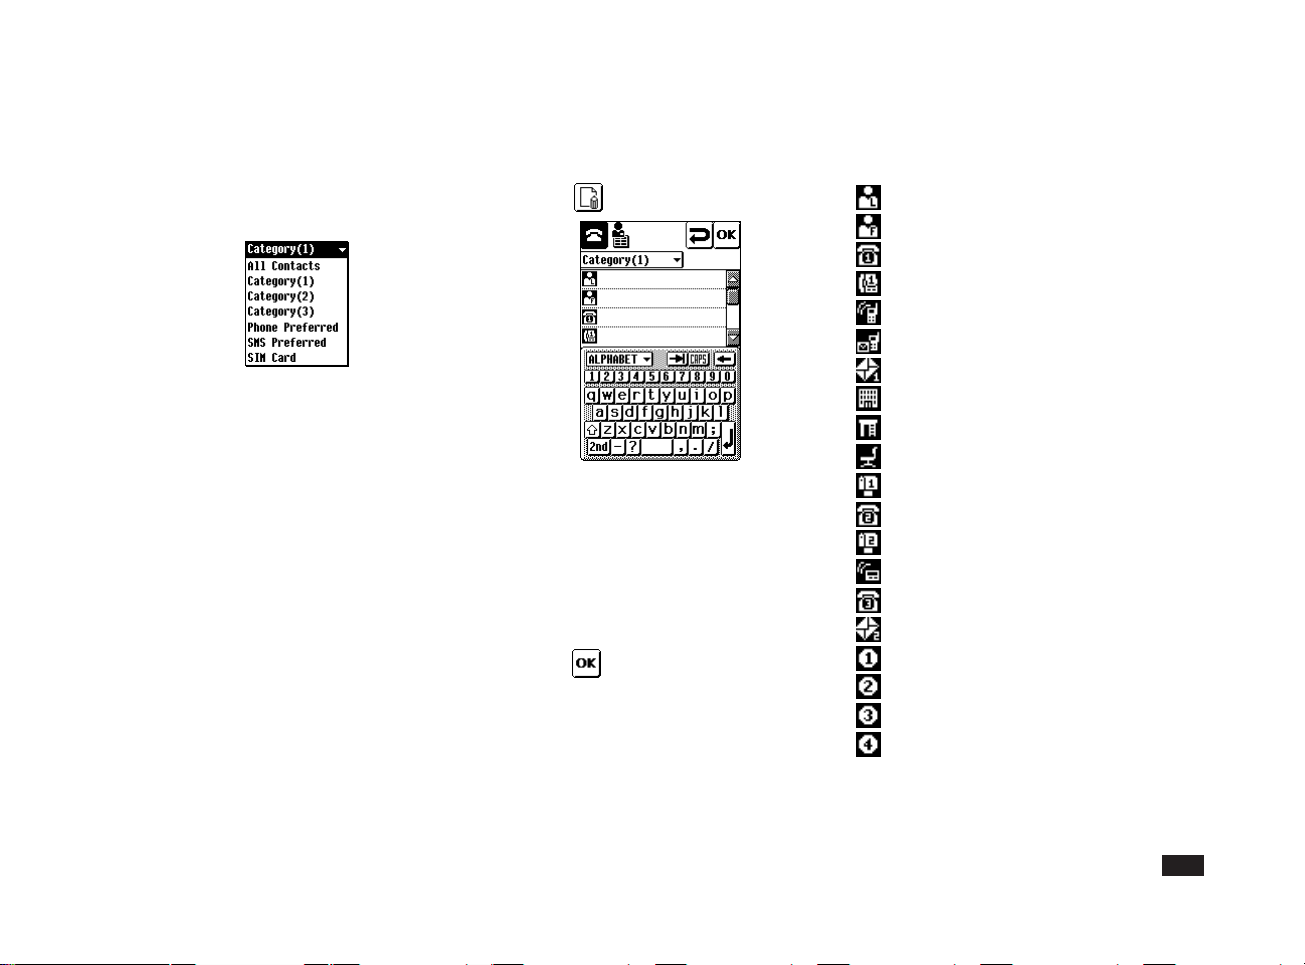
Selecting a directory
Making a new entry
Field list
1.
Touch the pop-up menu button to
open the menu.
2.
Touch the desired directory from
the list to select and open it.
Note:
The All Contacts selection shows all
entries in category (1) to (3) for viewing
only, and cannot be edited. (This function is useful if you forget whether a
particular entry is in Contacts 1, 2 or
3.)
1.
Touch .
2.
Touch the first field and use the
keyboard to enter the person's last
name.
3.
Touch the remaining fields and
enter the relevant information.
4.
T ouch to store the new entry.
Note:
The first field (last name) is the only
mandatory field.
Last name
First name
Business phone #
Business fax #
Mobile phone #
SMS address
E-mail address #1
Company
Department
Position
Business address
Home phone #
Home address
Pager #
Other #
E-mail address #2
User 1
User 2
User 3
User 4
57
Page 58

Note:
• Touch
automatically based on the Mobile
Phone # with the country code prefix
added.
• Various keyboards are displayed as
appropriate for each field. To select a
different keyboard, touch the pop-up
menu button. For details, see Appendix.
• When viewing an entry, the last name
and first name fields are combined and
appear as Name
• You can customize the Contacts entry
fields. See the later section for full
details.
and the address will appear
.
Detail and Index views
There are two ways to view your Contacts
entries:
• Detail view
• Index view
Detail view
Detail view lets you see the full details of
an entry.
To change to index view, touch .
Index view
Index view shows only the name (one
line) of each entry, making it easy to find
a particular entry.
To see other fields, touch , ,
, or .
To change to detail view, touch the
entry twice.
58
Page 59

Editing an entry
1.
Select an entry in index view, or
display an entry in detail view.
2.
Touch .
3.
Touch the desired field(s) and
make the necessary changes
using the keyboard.
4.
T ouch to store your changes.
Deleting an entry
1.
Select the entry or directory.
2.
Touch and select DATA
DELETION.
3.
Select the desired deletion from:
Selected Entry; Selected
Category; or All Contacts Data.
Customizing Contacts
You can customize Contacts by:
• Changing the Category names
• Selecting which fields to use (and
which to omit)
To change a Category name:
1.
T ouch and select SETUP.
2.
Select Category (1) Name,
Category (2) Name or Category
(3) Name.
3.
Enter the new name.
4.
T ouch to store the new name.
To specify which fields to use:
1.
T ouch and select SETUP.
2.
Select Field Setup.
3.
The chec ked boxes are active
fields. Uncheck the fields you do
not wish to use.
Use and to see more fields.
The checked boxes are active fields.
4.
T ouch to store the new field
settings.
Note:
The name fields cannot be unchecked.
Preferred directories
You can also set up the Phone Preferred
and SMS Preferred lists. These let you
store up to 10 of your most frequently
dialled numbers in each, for convenient
access.
The Preferred list is made by copying the
desired entries from Contacts directories.
Adding Preferred list entries
1.
In detail view, display the entry
containing the phone number or
SMS number you wish to copy to a
Preferred list.
59
Page 60

2.
Touch the icon (symbol) of the field
you wish to copy.
• To copy a phone number:
Touch
• To copy a SMS number:
Touch
A confirmation window appears. You
can change this number if you wish.
3.
Touch to copy the number.
The Phone Preferred list or SMS
Preferred list appears.
, , or
SIM card directory
When using the numeric dial screen, you
can call one of the first 9 entries of your
SIM card directory by touching the
number of the entry, and then touch
Due to SIM card field limitations, you can
not create or modify directly in SIM
directory. To create or modify a contact,
you need to create it in directory
Category 1, 2, or 3 and then copy it to
SIM.
Adding a SIM card entry
You can copy the name and one phone
number of a Contacts entry to the SIM
card.
60
1.
In detail view, display the entry you
wish to copy.
2.
Touch , TOOLS then Copy to
SIM.
3.
Select the phone number you wish
to copy to the SIM card.
SIM Location are numbered. You can
store the entry in a particular location
by specifying the number.
4.
To store the entry in any location,
touch .
OR To copy the entry to a specific
Copying entries from the SIM card
You can copy a single SIM card entry (or
all entries) to a Contacts directory.
1.
If copying a single entry, select the
entry from the SIM card index
screen.
2.
Touch , TOOLS then Copy
from SIM.
3.
Select This entry or All SIM data.
4.
Select the target Contacts directry
from the Copy to: pop-up menu.
location in the SIM card, enter the
desired SIM location using the
.
numeric keyboard, and touch
to store the entry.
5.
The SIM card index appears.
5.
Touch .
6.
The SIM card list appears.
Note: To view SIM contacts in alphabetical
order, we recommend you to copy SIM
directory into directory Category 1, 2 or 3.
Page 61

Schedules
The Schedules function helps you
organize and manage your busy schedule.
Using Schedules
1.
Touch .
Calendar views
You can check your schedule using four
different calendar views:
• Detail view
• Daily view
• Weekly view
• Monthly view
Detail view
This view displays full details of an
appointment.
• Touch to change to daily view
• Touch to change to monthly view
Daily view
This view displays your appointments on
the selected day.
• Touch an appointment twice to change
to detail view
• Touch
• Touch to change to monthly view
Note:
Overlapping appointments are shown
in truncated form on the same line.
to change to weekly view
61
Page 62

Weekly view
This view displays all your appointments
over a one-week period.
• Touch an appointment twice to change
to detail view
• Touch to change to daily view
• Touch to change to monthly view
• at the top of the display indicates the
number of the week in the year.
Monthly view
This view shows you the calendar for an
entire month. Appointments are indicated
on their respective dates with .
• Touch twice to change to daily view
• Touch
• The number at the left of each week
indicates the number of the week in
the year.
to change to weekly view
Making a new appointment
1.
Touch .
2.
Touch , then touch and
to select the desired month,
then touch the date of the
appointment you wish to make.
3.
Touch .
62
Enter the times by dragging the
touch pen across the time bar, or
by using the numeric keys.
Page 63

4.
Touch .
Use the keyboard to enter a
description of the appointment.
5.
Touch to store the
appointment.
Note:
If you leave the time field blank, your
entry is displayed at the top of the daily
schedule. Several notes or To do's can be
stored this way.
Editing an appointment
You may need to change an appointment
you created earlier, eg, if the appointment
is brought forward or delayed.
1.
Select the appointment in daily or
detail views.
2.
Touch .
3.
Touch the desired field and make
the necessary changes.
Deleting appointments
1.
Select the appointment(s) to delete
in daily, weekly or monthly views.
2.
Touch and select DATA
DELETION.
3.
Select the desired deletion from:
Selected entry; in Selected Day;
in Selected Week; in Selected
Month; or All Schedules .
Setting up Schedules
To Change the Calendar setup
You can change the date format and the
week format.
1.
T ouch and select SETUP.
2.
Select Screen Format.
3.
Select the desired format.
4.
T ouch .
4.
Touch to store the changes.
63
Page 64

To Set the Weekly holidays
Not all countries consider both Saturday
and Sunday to be the weekend. You can
select on which days of the week you do
not work.
1.
Touch and select SETUP.
2.
Select W eekly Holida ys.
3.
Check the box to select the
weekend days.
4.
Touch .
To Set other holidays
You can mark a particular day as a
holiday, eg, annual leave, public holidays,
etc.
1.
Select the day you wish to mark as
a holiday.
2.
Touch and select SETUP.
3.
Select Set Holida y.
Viewing a specific date
You can easily jump to any date to see
the schedule.
1.
Touch and select VIEWS.
2.
Select Today, or select Specific
Date and enter the date.
3.
Touch .
64
Page 65
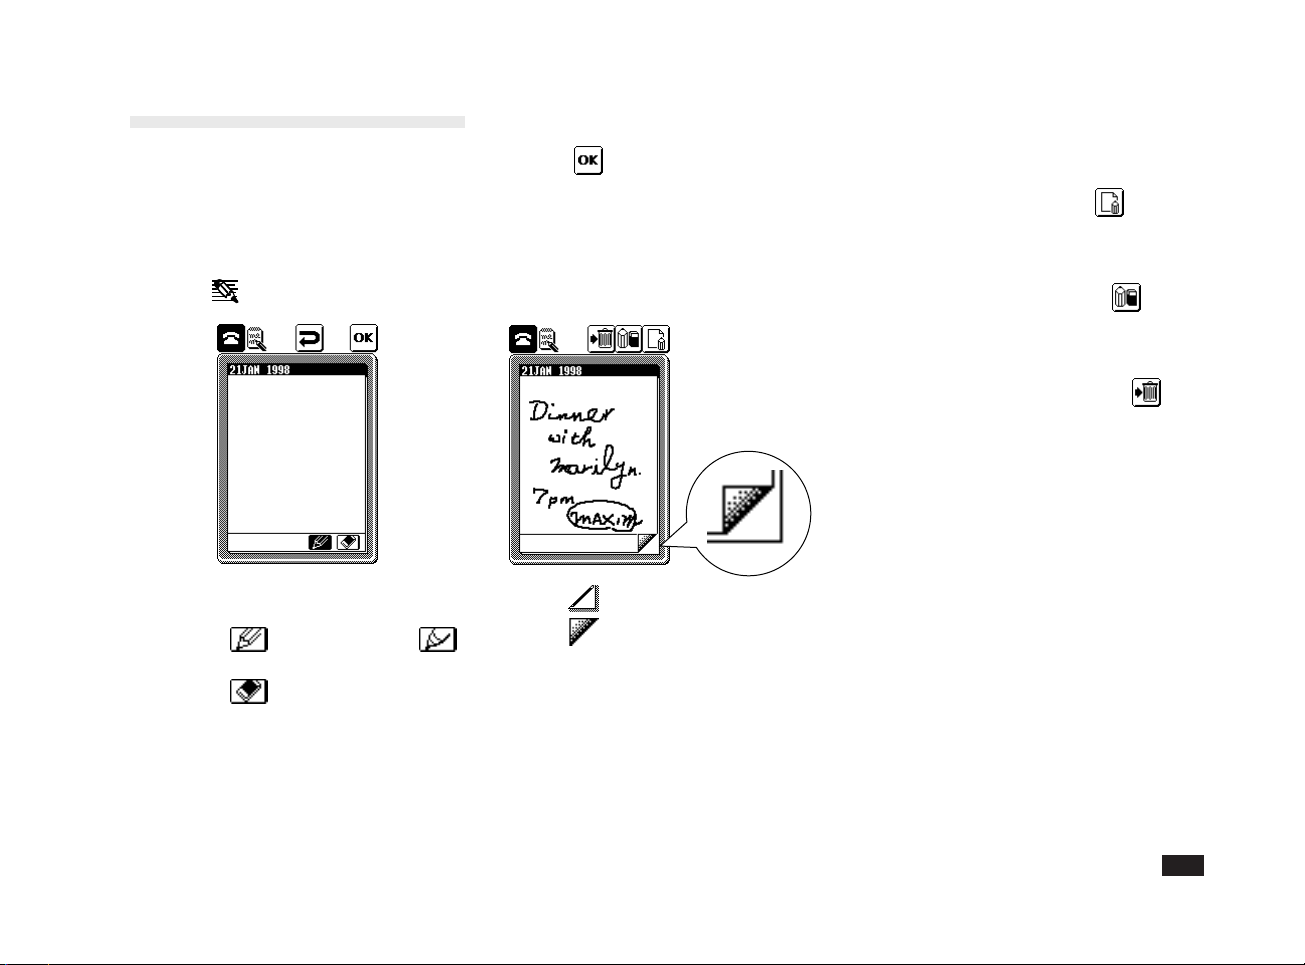
Quick Memos
Making a memo
Quick Memo lets you make a memo even
when you are in the middle of a call.
1.
Touch .
2.
Use the touch pen and the drawing
tools to write on the display.
• Select for a thin pencil or
for a thick pencil.
• Select
an eraser.
to use the touch pen as
3.
Touch to store your memo.
Viewing other existing memos
You can view other memos using the tabs
in the bottom right-hand corner of the
Quick Memo display.
• Touch to see the next memo.
• Touch
to see the previous memo.
Creating a new memo
To create a new memo, touch .
Editing an existing memo
To edit an existing memo, touch .
Deleting an existing memo
To delete an existing memo, touch .
Note:
If you frequently use this application
during a call, we recommend you to use
the headset accessory.
65
Page 66

Chapter 6
Other PIM functions
This chapter explains other useful PIM functions your smart
phone provides.
66
Page 67
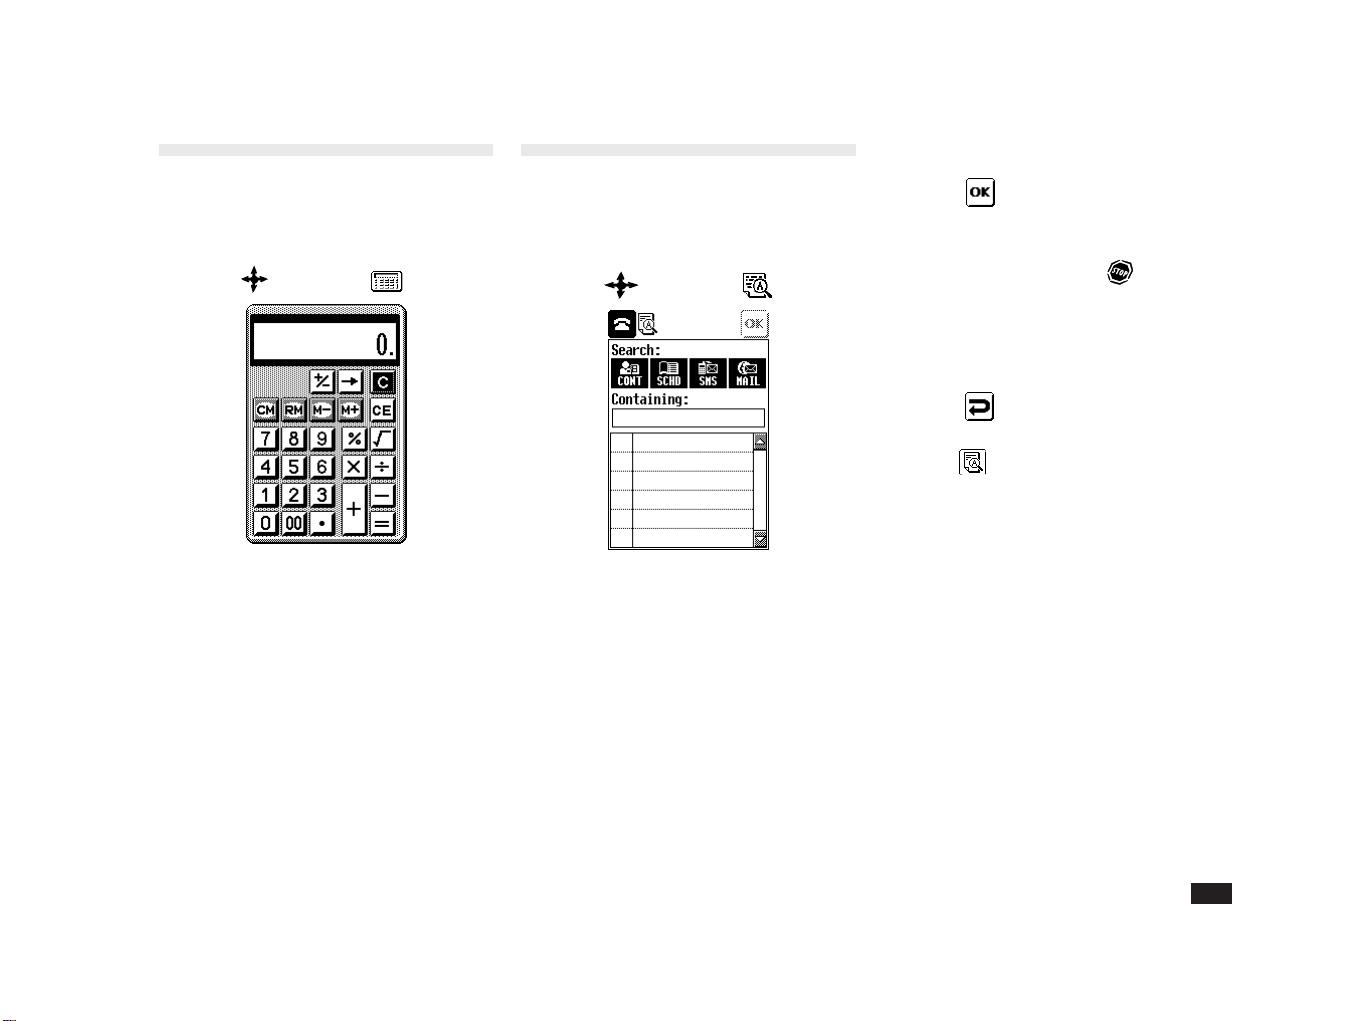
Calculator
Global Search
Your smart phone includes a calculator
with square root, percentage and memory
functions.
1.
Touch and select .
The search function lets you search for a
keyword you specify in the entries of
selected applications.
1.
Touch and select .
2.
Select the applications you want to
search. Remember that the wider
the selection, the slower the
search. The default is to search all
applications.
3.
Touch the Containing: box and
enter the keyword you wish to
search for.
4.
Touch .
All entries matching the search criteria
are displayed.
To stop searching, touch
5.
To view a particular entry, touch it
.
twice.
6.
Touch to quit the search and
view the searched entry.
Touch to return to the searched
list.
67
Page 68
PC Synchronisation
(PC Link)
This feature is used in conjunction with
optional PC Synchronization (PC Link)
software. The PC Synchronization (PC
Link) lets you save your smart phone's
information on a PC. It also lets you
synchronize data with a PIM installed on
your PC. For details, see the PC Synchronization (PC Link) software operation
manual.
Starting PC Synchronization
mode (PC Link mode)
1.
Touch and select .
2.
Touch .
To exit the PC Synchronization mode
(PC Link mode), touch
.
Data transfer between
smart phones
Your smart phone can transfer data with
another smart phone using the IR
(Infrared) port.
1.
Open the application for the entry
to be transferred on the sending
and receiving smart phones.
2.
On the receiving smart phone,
touch , select INFRARED then
Get data.
3.
On the sending smart phone,
touch , select INFRARED then
Send selected data or Send this
category.
Note:
The smart phones must be correctly
aligned so their infrared ports face
each other and are less than 50cm
apart.
Note:
While the smart phone is in PC
Synchronization mode (PC Link mode)
or during data transfer, you cannot use
the phone.
68
Page 69

Appendices
A. List of icons
B. List of status icons
C. LED indicator
D. List of menus
E. Keyboards
F. Reset
G. Troubleshooting
H. Specifications
I. Accessories
J. Over the air synchronisation
69
Page 70
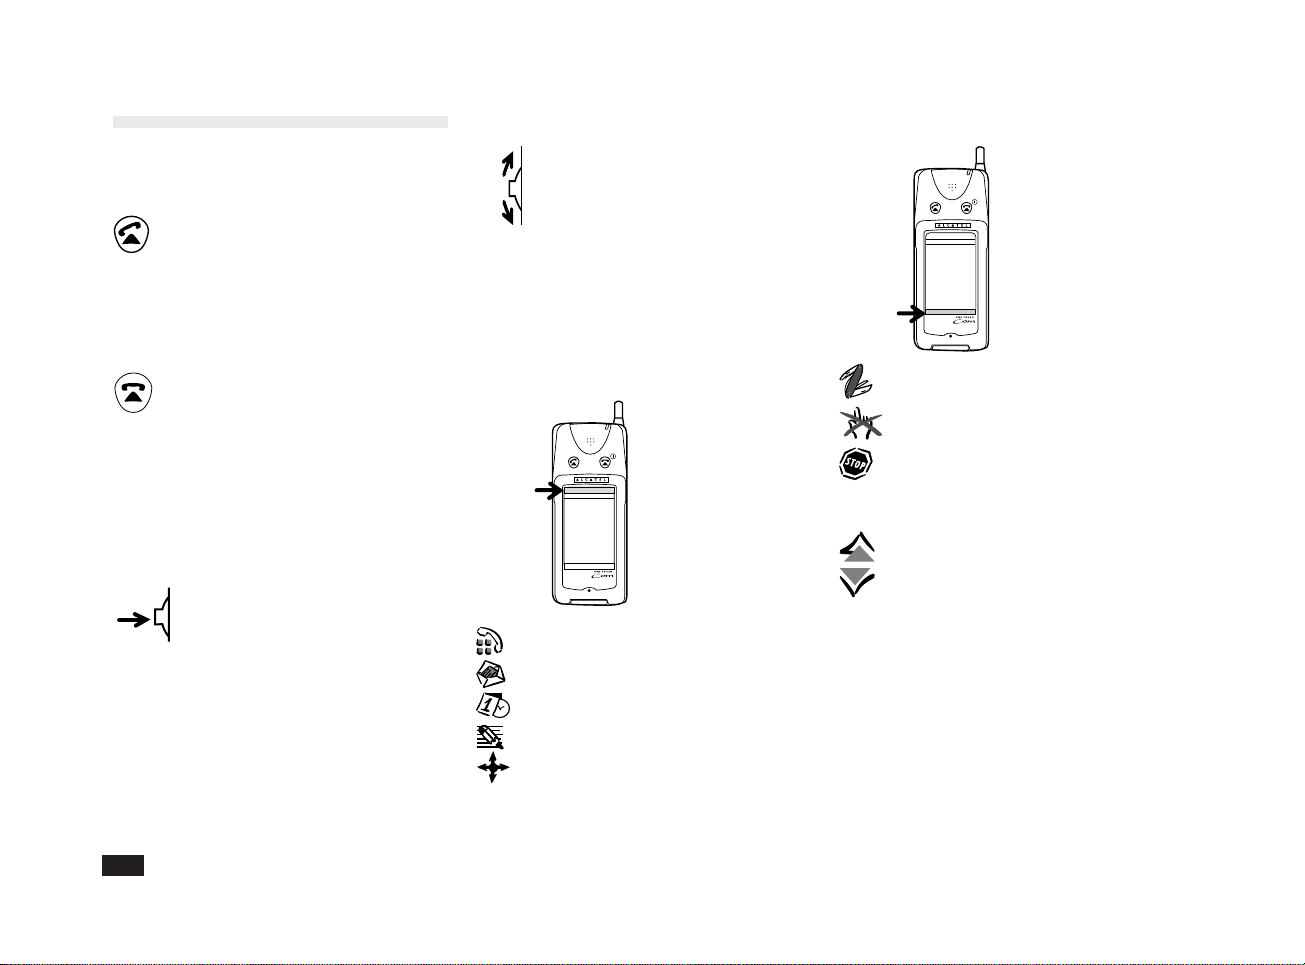
Appendix A: List of icons
Keys
• Make a call/Accept a call
• Switch between current and
held calls
• Display last number dialled
• Hold a call
• Return to a held call
• Switch on (long press)
• Switch off (long press)
• Switch on in PIM-only mode
(while pushing navigation key)
• Refuse an incoming call
• End all calls
Navigation key
Push:
• Display the Phone Book
• Display the pop-up list to change
the Phone Book
• Select the desired item from the
list
Move (up or down) :
• Select the desired item from the
list
• Hold down for 2 seconds to jump
to the next letter (A, B, C, etc.)
• Adjust the earpiece volume
Buttons
Open Phone Book
Open Short Messages
Open Schedules
Open Quick Memos
Open index of all applications
Open the Menu
Lock the keys
Stop current action (Search/IR
Communication/Sending mes-
sages)
Step up through screens
Step down through screens
70
Page 71
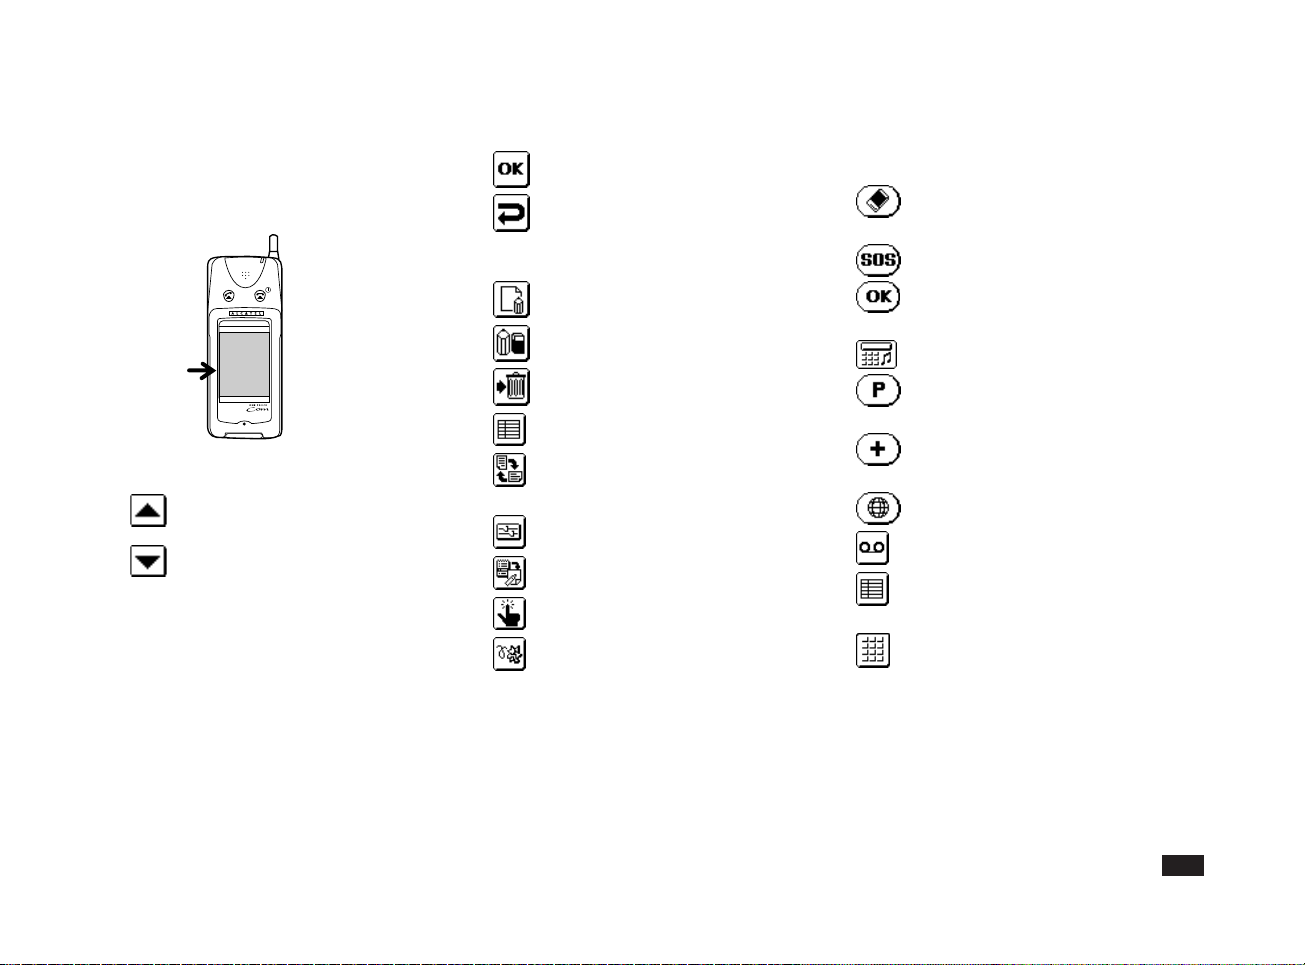
Icons
If a function is not available for a particular screen, its icon appears grey.
General icons
Move the cursor up one line (scroll
up)
Move the cursor down one line
(scroll down)
Store entries or finish an operation
Clear unstored entries; cancel a
menu, selection or operation;
return to a previous display.
Make a new entry in an application
Open an entry in edit mode
Delete an entry
Switch to index view
Rotate the display view (portrait/
landscape)
Display the setup screen
Display the Template index
Adjust the touch screen
When viewing memory status,
reorganize memory to make more
space available
Phone function icons
Delete the character to the left of
the cursor
Emergency call services
Store an entry or finish an opera-
tion
Change to DTMF tone mode
Enter a DTMF digital control
separator
Insert the international dialling
prefix
Select a country code
Access voice mail
Go to most recently used directory
or Call List screen
Go to Numeric Dial screen
71
Page 72
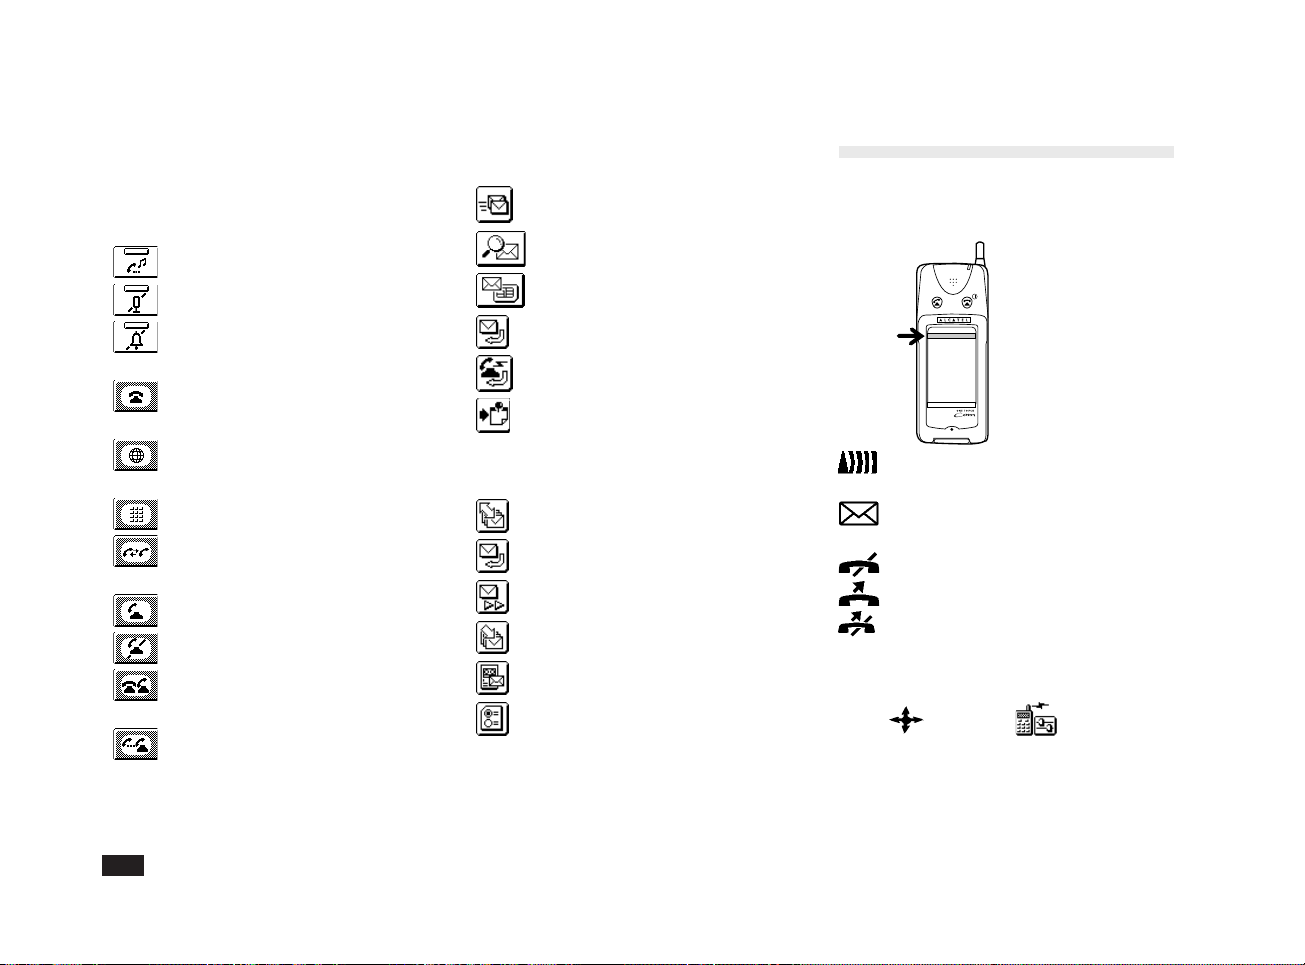
When the following functions are active,
the bar at the top of the icon appears
black. In order to deactivate a function,
touch the icon again.
Hold a call
Mute the microphone
Mute the incoming call ring
End a call (talking or holding);
cancel dialling
Convert phone number for international dialling
Use the Numeric Dial screen
SMS Icons
Send outgoing messages
Read incoming messages
Save messages in SIM card
Reply to message sender
Call sender via telephone
Over the air synchronisation.
Internet E-mail icons
Access to mail server
Appendix B: List of
status icons
General status icons
Radio signal strength indicator (5
levels)
Incoming short message
Switch between current and held
calls
Accept a call
Refuse an incoming call
Accept a call by ending the current
call
Accept a call by putting the current
call on hold
72
Reply to message sender
Forward message
Get mail from server
Change account
Set the mail options
Call barring function active
Call forwarding function active
Call forwarding and call barring
functions active
The above three icons displayed may not
be up to date. To check the current status,
touch
and select .
Page 73
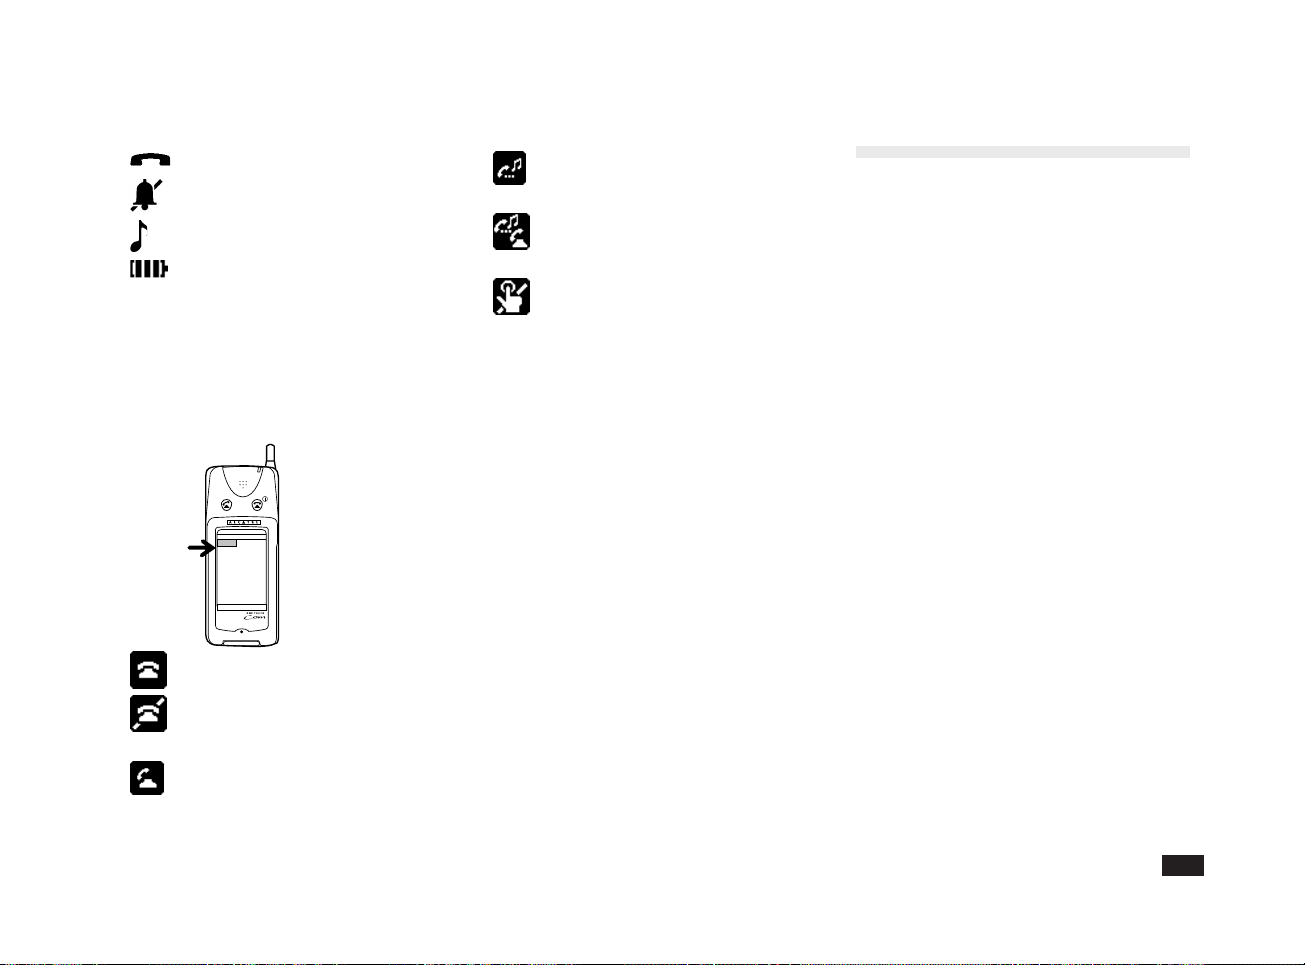
No Answer call received
Silent mode active (no ring)
Key touch tone
Battery charge (4 levels)
When no bar appears, the smart phone
automatically enters PIM-only mode, and
no phone calls can be made or received.
Phone status icons
Call on hold. Touch to return to the
call holding screen
Two-line communication. Touch to
return to the call screen
Key lock
Appendix C:
LED indicator
LED indication (blinking)
Slow blinking:
• Network detected: You can make and
receive calls.
Normal blinking:
• Receiving a call
Rapid blinking (continous):
• Incoming SMS message
Rapid blinking (3 times):
• Call remaining on hold
LED indication (colour)
Amber:
• Charging
Green
• Charged
Hang up
Phone off (due to PIM-only mode,
low battery or IR mode)
Call currently in progress. Touch to
return to the call screen
Red
• Low battery
Amber/Green cycle
• When using the discharge function
73
Page 74

Appendix D:
List of menus
Application index
This displays every application, accessory and utility together for user's convenience. It is useful if you forget where to
find a particular function or utility.
Touch
Internet e-mail
Contacts
Quick Memos
Phone Settings
Calculator
World Clock
Global Search
Preferences
PC Synchronization (PC Link)
MENU
Touch to view Menu.
Phone function
MENU is not available when the Phone
function is in use.
Contacts
74
Schedules
Short Messages
Page 75

Schedules
In monthly view Others
SMS E-Mail
75
Page 76

Appendix E: Keyboards
Quick Memos
There are five different types of k e yboard.
The correct keyboard is selected automatically for the current field. To select a
different keyboard, touch the pop-up
menu at the top of the screen.
Alphabet keyboard
Numeric keyboards
There are three different numeric keyboards. To change the numeric keyboard,
touch
Ten-key mode
.
Money key mode
Numeric Dial mode
Symbol keyboard
76
Page 77

Time keyboard
Use the keyboard or touch the time bar
and drag to enter the start and end times.
Touch the "morning" or "evening" buttons
under the time bar to view the time bar for
hours earlier or later in the day.
Date keyboard
Appendix F: Reset
Strong impacts, exposure to electrical
fields, and other unusual conditions may
render the smart phone inoperative (ie,
pressing keys and touching the display
has no effect). If this occurs, you must
press the RESET switch on the right side
using the touch pen or a similar object.
Conditions that make the smart phone
inoperative may also erase part or all of
the data stored in memory.
All Reset operation
If the smart phone still fails to function
after being reset with the procedure
above, you need to reset the smart phone
using a more complicated procedure.
Note:
• Doing so will delete all data in the
smart phone.
• To prevent a possible loss of your data
you can use the optional accessory PC
Synchronisation Pack to make a
backup of your data or transfer your
data to another smart phone.
1.
While holding down the button,
press the RESET button on the
right side of the smart phone using
the touch pen.
2.
After a message appears, release
the button.
3.
Touch Yes.
77
Page 78

Appendix G:
Troubleshooting
The display remains blank after the
smart phone is turned on
• Make sure you are using your smart
phone inside the recommended
operating temperature range (-20°C to
55°C).
• Make sure the battery is properly
installed and charged.
• Make sure the battery replacement
switch is in the NORMAL position.
PIN code/PIN2 code; PUK code/PUK2
code
PIN code or PIN2 code is rejected
Make sure you have entered the
correct code (four to eight digits).
Note:
Your SIM card/protected functions
will become locked after three
unsuccessful attempts.
• If the attempt is successful, enter
the new PIN code and confirm
your smart phone is operational
again. Otherwise contact your
dealer.
Protected functions become locked
• Touch
Security then Change PIN2 code.
Enter the PUK2 code (eight digits)
provided by your dealer when you
subscribed (if supported).
• If the attempt is successful, enter
the new PIN2 code and confirm
access to all the protected functions. Otherwise contact your
dealer.
Note:
The PUK or PUK2 code will become
invalid after ten unsuccessful
attempts. If this happens, contact
your dealer.
then , then select
If you forget your product code
Contact your dealer.
Pressing a button or touching the
display screen has no effect (or
initiates an unexpected operation)
• Press the RESET button, then press
(long press).
• Remove the battery (and the battery
charger), and after a while insert back
the battery.
• Adjust the touch panel using
Display.
The display is difficult to read
Adjust the LCD contrast using
/Display.
/ /
/
SIM card becomes locked
• Enter the PUK code (eight digits)
provided by your dealer (if supported).
78
Product code is rejected
Make sure you have entered the
correct code (four to eight digits).
(The default product code is "0000".)
Page 79

Phone functions do not work after the
smart phone is turned on
• Check the radio signal strength
indicator (in the status icons area) as
you may be outside the service area.
• Check to see if any error message is
displayed when you turn the smart
phone on. If so, contact your dealer.
• Make sure the SIM card is correctly
installed.
• Make sure the smart phone is not in
PIM-only mode.
Calls cannot be made or received
PC Synchronization Pack (PC link) or
IR port, or if it is connected to a PC via
a fax/modem card.
• Check the remaining balance if you are
using a pre-paid SIM card.
Cannot use
Message Centre
Touch
Number setup and check Voice
Message Centre number has been
entered correctly.
Call quality is poor
to access the Voice
then and select Phone
Cannot send or receive Short messages
• Make sure you are correctly subscribed for the Short Message Service,
that the network supports this service,
and that the centre number is set up
correctly. If so, contact your network
service provider.
• Check if Short messages are remaining in the card if your SIM card was
previously been used in other mobile
phone. If so, delete the messages
using the mobile phone in which your
SIM card was used.
• Phone functions are disabled, since
you started in PIM-only mode. Switch
off and on again.
• If the message "SIM Card Error!" is
displayed at start-up, you cannot use
your SIM card or SIM card is damaged.
Contact your dealer or network service
provider.
• Check your call barring, fixed dialling
setting, remaining credit, remaining
battery and call forwarding settings.
• Check if the smart phone is currently
performing data communication via the
• Your current location may not provide
better call quality (ie, in a car or train).
Move to a location where radio signal
strength is greater.
Cannot access network service
• Check the radio signal strength
indicator (in the status icons area) as
you may be outside the network area.
• Check whether your account has been
registered and whether the service is
available.
Cannot connect to e-mail (Internet)
service provider
• Check that the network and your GSM
subscription support data
transmission.
• E-mail settings and configuration may
be missing or incorrect or the network
does not support it. Check your service
provider's access point number .
Contact your service provider to
confirm the correct settings.
79
Page 80
Limited memory available
• Delete any unnecessary data.
• Reorganize your memory. This function
is in
/ /Memory Check .
Appendix H:
Specifications
smart phone main unit
Model:
Display:
DSTN type LCD (160 x 239 dots)
Indicators:
LED indicator: 1 x 3-colour LED
(green, red, amber)
Interfaces:
• Infrared Port: IrDA 1.0 (max. 115.2
kbps)
• External connector: (for handsfree
car kit, and GSM PC card cable)
• SIM connector for pIug-in type SIM
card
Applications:
• Phone function, Phone Book
• Messaging: Short Messages (send/
receive), Internet e-mail (transparent mode data)
• PIM: Contacts, Schedules, Quick
Memos, Global Search, World
Clock, Calculator
• Others: PC Synchronization (PC
Link mode)
User interfaces:
Touch panel, Operating keys (Send
key, END and power ON/OFF key,
Navigation key).
Memory capacity:
Capacity: 512 Kbytes
Calculator:
12-digit
Languages:
Four languages: English, German,
French, Italian
Supported GSM Standard:
Phase 2
Power:
Ni-MH rechargeable battery pack (880
mAh)
Dimensions:
151 (H) (without antenna) x 62 (W) x
24 (D) (at centre of unit; 26 at hinge)
mm
Weight:
240 g approx.
(including battery pack and touch pen)
Battery charger
Input voltage: According to local
voltage
Output voltage: 12V 500mA
80
Page 81

Appendix I:
Accessories
1) PC Synchronization Pack
This lets you exchange PIM data
between the smart phone and a PC. It
also recharges the smart phone's
battery.
• Docking Station
This device contains an IrDA
infrared port, and is connected to a
PC via a cable.
It can also recharge the smart
phone and a spare battery.
• PC Synchronization (PC Link)
Software
This lets you synchronize and
exchange PIM data between the
smart phone and a PC. To protect
your data, you can also backup and
restore the smart phone's data
using a PC.
2) Handsfree car kit
Use this to install the smart phone on
the dashboard in a car so you can talk
without needing to hold the smart
phone while driving. The exterior roof
antenna lets you obtain full service
reception strength. The handsfree car
kit can even recharge the battery.
3) Standard Battery
This is the same as the supplied
battery, and can be used as a spare.
4) Cigar lighter charger
This lets you charge the smart phone
from the cigarette lighter in a car.
5) Headset
This lets you use PIM applications
during a call. It also provides hands
free operation of your smart phone.
6) Carrying case
It protects your smart phone, and
provides a belt attachment. It can be
use with the headset or the battery
charger.
For details, please contact your dealer.
Appendix J:
Over the air synchronisation
Two types of messages can be used to send
schedules.
The synchronisation protocol is very simple
to use. You just have to use the SMS
templates provided, and modify the useful
information.
The structure of a synchronisation message
starts with a recognition header "THE AIR
SYNCH SDL". The different fields are
separated by the ">" character. The second
field can be used to remind the user to
update his scheduler, or to give a label. This
is followed by one or two time and date
fields. The message to be included in the
scheduler is then indicated. The last part of
the message indicates to the terminal
whether the message is a timed schedule
"<<TIM1>TIM2>MEM1>>" or an open
schedule "<<TIM1>MEM1>>".
Open schedule
To describe an appointment for a given
date at a given hour.
Example:
THE AIR SYNCH SDL
Please update your scheduler
>20.03.1998 08:00
>Management meeting
<<TIM1>MEM1>>
81
Page 82

Timed schedule
To describe an appointment for a given
date at a given time and with an end time.
Example:
THE AIR SYNCH SDL
Please update your scheduler
>20.03.1998 08:30
>20.03.1998 12:30
>Management meeting
<<TIM1>TIM2>MEM1>>
Over the air schedule cover a maximum
period of a day. Make sure the total
message is under 160 characters long, and
that the different headers, and separation
characters are properly spelled. To ensure a
good transmission avoid including carriage
returns in your synchronisation message.
Index
A
Accepting a call 24, 33, 35
Adjusting 17, 24, 33
earpiece volume 24, 33
LCD contrast 17
touch panel 17
Appointments 62, 63
creating 62
deleting 63
B
Battery 11, 12
Buttons 10, 11
End call 10, 24, 33
ON/OFF 10, 16
C
Calculator 67
Call 22, 29
accepting 24, 33, 35
during 24, 33
ending 24, 33
holding 24, 33
making 22, 29, 31, 32
refusing 24, 33
switching 34
Call list 29, 32, 39
answered 29, 32
erase 39
log list 32
no answer 29, 32
redial 29, 32
Calendar views 61
Category 31, 56, 59
Clock 18
Contacts 56
Category 1/2/3 29, 56, 57, 59
creating an entry 57
customizing 59
deleting an entry 59
detail view 58
directories 56
index view 58
setting up 59
Creating 44, 47, 51, 54, 57, 62, 65
appointments 62
contacts 57
e-mail messages 51
e-mail templates 54
memo 65
SMS messages 44
SMS templates 47
82
Page 83

D
Deleting 46, 51, 59, 63, 65
Dialling 22, 29, 31, 32
Directories 29, 56
DTMF tones 34
During a call 24, 33
E
E-mail 48
creating 51
forwarding 50
replying 50
settings 48
sending 53
retrieving 53
Emergency calls 23, 31
Ending a call 24, 33
F
Forwarding 36, 47, 50
call 36
e-mail message 50
SMS message 47
G
Global Search 67
H
Holding 24, 33
Holidays 64
I
Icons 11, 70, 72
Initializing 77
Incoming calls 24, 33, 34
accepting 24, 33, 35
refusing 24, 33, 35
K
Key Lock 36
Keyboards 76
L
LED indicator 10, 73
LCD contrast 17
M
Making a call 22, 29, 31, 32
Manual dialling 31
Memory check 40
Modifying 46, 47, 52, 54, 59, 63, 65
Muting 24, 33
N
Navigation key 10, 70
Name-dialling 22, 29
using the Navigation key 22, 29
using the touch pen 23, 30
O
Over the air synchronisation 46, 81
P
PC Synchronization (PC Link) 68
Personal Information 18, 40
Phone Book 22, 28, 29, 30
Phone number setup 39
PIN code 16, 39
PIN2 code 39
PIM-only mode 56
Preferences 40
Preferred list 29, 56, 59
Product code 16, 38
Q
Quick memos 24, 34, 65
R
Reset button 10, 77
Retrieving e-mail 26, 53
Redialling 32
Refusing a call 24, 33, 35
Receiving a call 24, 33, 34
Ring tone 40
S
Schedules 61
83
Page 84

Screen
Phone Book 23, 29
incoming call 24, 29
Numeric Dial 23, 29
talking 24, 29
Search 67
Security 38
main unit 38
SIM card 38
Sending
e-mail 26, 53
SMS 25, 45
Settings 18, 36, 40, 42, 48, 59, 63
Short messages see SMS
SIM card 14, 38
inserting/removing 14
security 38
SMS 25, 42
Status icons 11, 72
Switching between two calls 34
T
Touch panel 11
Touch pen 10, 15
V
View
daily 61
detail 43, 49, 58, 61
index 43, 49, 58
monthly 62
weekly 62
Voice mail 35
Volume 22, 33
ring tone 40
earpiece 10, 24, 33
W
World Clock 18
84
Page 85

Warranty
We would like to congratulate you for
choosing this smart phone and we hope
that the product will satisfy all your needs.
We would like to remind you that this
smart phone has been approved in
accordance with European regulations.
Notwithstanding any other applicable
statutory warranties this smart phone is
guaranteed for workmanship and material
for a period of ONE (1) year
date of purchase shown on your inv oice.
Nonetheless, if the statutory warranty in
1
, from the
force in your country exceeds twelve
months, the statutory warranty will apply
in place of the manufacturer warranty.
However, if the statutory warranty does
not exceed twelve
2
(12) months, the total
warranty period (statutory and contractual)
shall be twelve
2
(12) months.
In case of a defect, return your smart
phone to your dealer or any ALCATEL
service center.
This warranty shall not however apply in
the case of use not conforming with the
User's Manual, or in the case of defects
due to external causes, or in the case of
2
(12)
improper installation, modification or repair
performed by parties not authorized by the
manufacturer or his dealer.
EC marking in accordance with the
E.C. directive
1
With the exception of the batteries which are
guaranteed for a period of three (3) months. For
Spain and Germany this period is extended to
six months.
2
And/or three (3) months for the batteries.
Information
Internet-Address :
http://www.alcatel.com/gsm
This equipment complies with the requirements of Directives 89/336/EEC, 91/263/EEC and 73/23/EEC as amended by
93/68/EEC.
All right reserved. ALCATEL reserves the right to alter material or technical specifications without prior notice.
© 1998 ALCATEL BUSINESS SYSTEMS
85
Page 86

Notes
86
Page 87

Notes
87
Page 88

Notes
88
 Loading...