

Page 1
1 2
QUICK START GUIDE
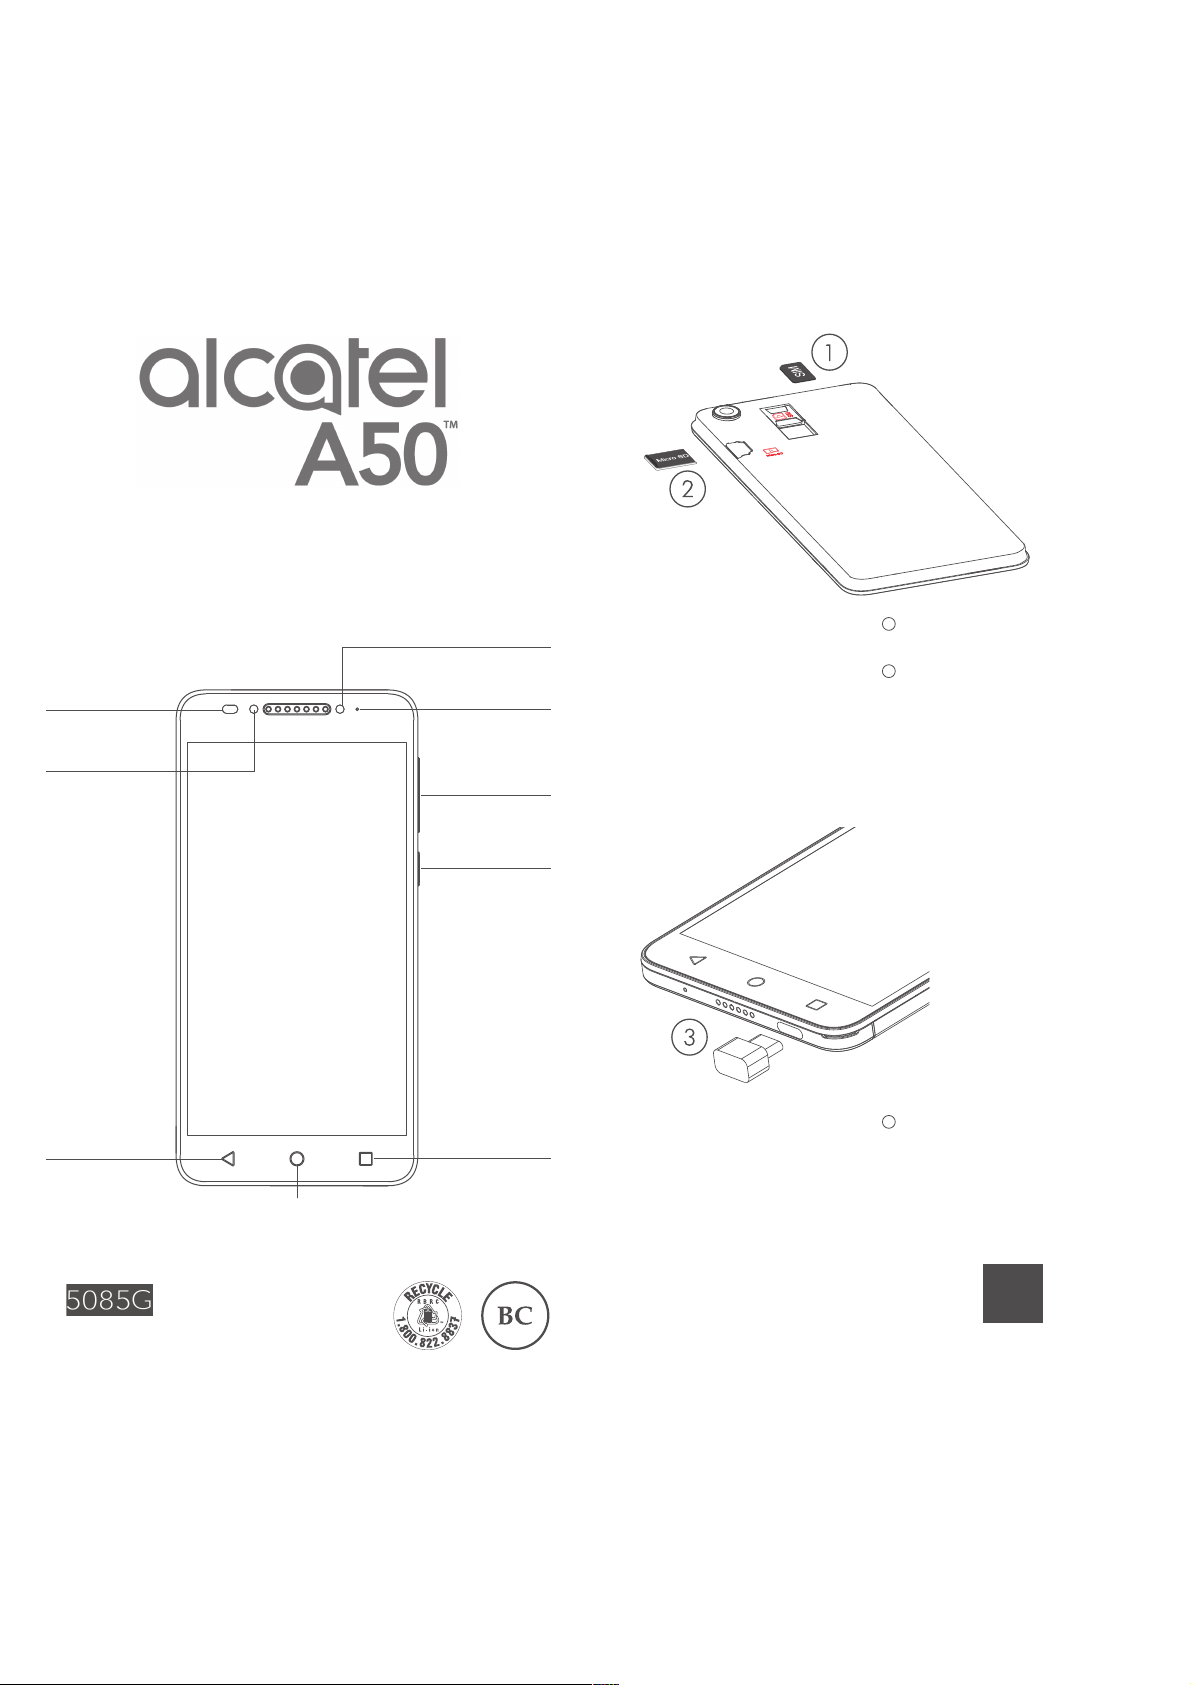
Volume
up/down
Power key
Proximity
and light
sensor
Front
camera
LED
indicator
5.2”
3
Charging the baery.
1
Inserng or removing the
SIM card.
2
Installing or removing the
microSD card.
www.alcatelonetouch.us
User guide and FAQ are available online
SAVE
PAPER
SAVE
TREES
PLEASE CONSIDER THE
ENVIRONMENT BEFORE PRINTING
Flash
Back buon
Home buon
Overview
buon
English - CJB29T002AAA
Page 2
3 4
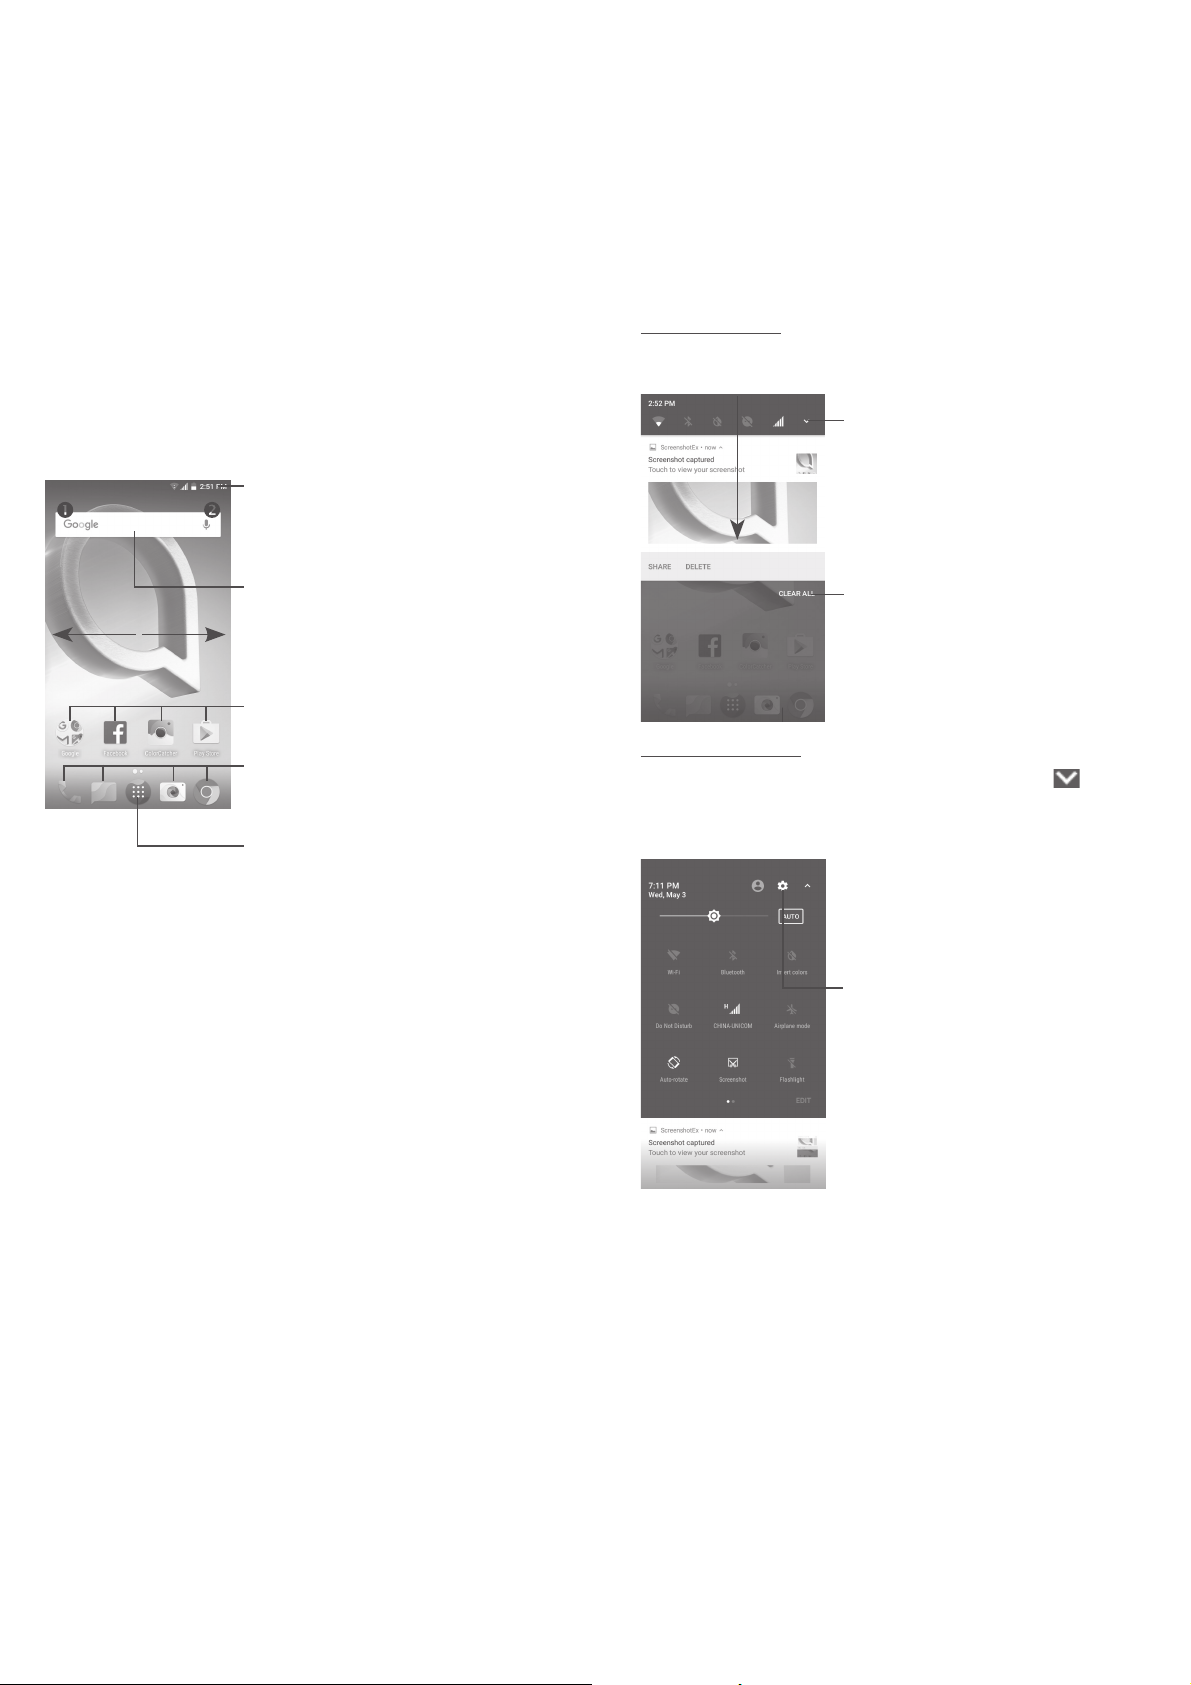
Notification panel
When there are notifications, touch and drag down the Status bar
to open the Notification panel to read more detailed information.
Touch CLEAR ALL to clear
all event–based notifications
(other ongoing notifications will
remain).
Touch to switch to the
quick settings panel.
Quick settings panel
Touch and drag down the Notification panel or touch to open
the Quick Settings panel. You can enable or disable functions or
change modes by touching the icons. Touch EDIT to customize
your Quick Settings panel.
Touch to access Settings,
where you can set more items.
1
Home screen ����������������������
You can bring all the items (applications, shortcuts, folders and
widgets) you love or use most frequently to your Home screen for
quick access. Touch the Home key to switch to the Home screen.
Touch to enter application list.
Status bar
• Status/Notification indicators
• Touch and drag down to
open the notification panel.
Touch an icon to open an application,
folder, etc.
Favorite tray applications
• Touch to enter the application.
• Long press to move or remove
applications.
Search bar
• Tou c h to enter text search screen.
• Tou c h to enter voice search screen.
The Home screen is provided in an extended format to allow
more space for adding applications, shortcuts etc. Slide the Home
screen horizontally left and right to get a complete view.
1�1 Status bar
From the status bar, you can view both phone status (to the right
side) and notification information (to the left side).
Drag the status bar down to view notifications and drag down
again to enter the Quick Settings panel.
Touch and drag up to close it. When there are notifications, you
can touch them to access notifications.
Page 3

5 6
2
Phone call ���������������������
2�1 Making a call
In either Normal or Reverse Mode, the following instructions apply
in regards to making voice calls with this device.
You can easily make a call using Call. Touch the Application tab
from the Home screen and select Call.
Touch to
call the
previewed
number.
Touch to enter the
contact details screen.
You can choose to
edit, delete, share
the contact, or send
a message to the
contact.
Slide to access
recent calls
and Contacts.
Touch to
display
keyboard.
Display the
suggested
number(s).
Long press
to access
voicemail.
Enter the desired number from the keyboard and touch to
place the call or select a contact from Contacts or Recent calls by
sliding or touching tabs, then to make the call.
The number you entered can be saved to Contacts by touching
and then touching .
If you dial a wrong number, you can delete the incorrect digits
by touching .
To hang up a call, touch .
2�2 Answering or rejecting a call
When you receive a call:
• Touch the icon to answer;
• Touch the icon to reject;
• Touch the icon to reject the call by sending a preset
message.
To mute the ringtone volume of an incoming call, press the
Volume up/down key, or turn the phone over (when the Settings\
Gestures\Turn over to mute option is activated).
2�3 Consulting your call memory
You can access your call memory from the Call screen to view
Missed calls, Outgoing calls, and Incoming calls.
Page 4

7 8
3
Contacts ������������������������
You can view and create contacts on your phone and synchronize
these with your Gmail contacts or other applications on the web
or on your phone.
3�1 Adding a contact
Touch on the Home screen, then touch the icon in the
contacts list to create a new contact.
3�2 Synchronizing contacts in multiple
accounts
Contacts, data or other information can be synchronized from
multiple accounts, depending on the applications installed on
your phone.
4
Messaging ���������������������
You can create, edit and receive SMS and MMS with this phone.
To access this feature, touch the Application tab from the Home
screen, then select Messaging.
4�1 Write message
On the message list screen, touch the new message icon to
write text/multimedia messages.
Touch to create a new message.
• Touch to view the entire message
thread.
• Long press to activate delete mode.
For saved contacts, touch the photo to open the Quick
contact panel to communicate with the contact. For
unsaved contacts, touch the photo to add the number to
your Contacts�
Sending a text message
Enter the mobile phone number of the recipient in the To bar or
touch to add recipients. Touch the Type message bar to enter
the text of the message. Touch the icon to insert emoticons.
When finished, touch to send the text message.
An SMS message of more than 160 characters will be splitted up
into several SMS. A counter display on the right of the text box
will remind you the remaining number of characters to enter in
one massage.
Specific letters (accented) will also increase the size of
the SMS, this may cause multiple SMS to be sent to your
recipient.
Sending a multimedia message
MMS enables you to send video clips, images, photos, animations,
slides and sounds to other compatible mobiles and e-mail
addresses.
An SMS will be converted to MMS automatically when media files
(image, video, audio, slides, etc.) are attached or subject or email
addresses are added.
Page 5

9 10
5
Email ������������������������������
Besides your Gmail account, you can also set-up external email
accounts on your phone.
To access this feature, touch the Application tab from the Home
screen, then select Email.
An email setup wizard will guide you through the steps to set up
an email account.
• Enter the email address and password of the account you want
to set up.
• Touch NEXT. If the account you entered is not provided by
your service provider in the phone, you will be prompted to go
to the email account settings screen to enter settings manually.
Alternatively, you can touch MANUAL SETUP to directly enter
the incoming and outgoing settings for the email account you
are setting up.
• Enter the account name and display name in outgoing emails.
• To add another email account, you can touch the icon and
Settings. Touch Add account to create.
To create and send emails
• Touch the icon from the Inbox screen.
• Enter recipient(s) email address(es) in the To field.
• If necessary, touch Cc/Bcc to add a copy or a blind carbon copy
to the message.
• Enter the subject and the content of the message.
• Touch to add an attachment.
• If you do not want to send the mail right away, you can touch
and Save draft or touch the Back key to save a copy.
• Touch to send.
6
Getting connected ������������
To connect to the Internet with this phone, you can use GPRS/
EDGE/3G/4G networks or Wi-Fi, whichever is most convenient.
6�1 Connecting to the Internet
6�1�1 GPRS/EDGE/3G/4G
The first time you turn on your phone with your SIM card inserted,
it will automatically configure your network service: GPRS, EDGE,
3G or 4G.
To check the network connection you are using, touch Settings\
Cellular networks, and touch Access Point Names or Network
carriers.
6�1�2 Wi-Fi
Using Wi-Fi, you can connect to the Internet when your phone is
within the range of a wireless network. Wi-Fi can be used on your
phone without a SIM card inserted.
To turn Wi-Fi on and connect to a wireless network
• Touch Settings\Wi-Fi.
• Touch the switch to turn on/off Wi-Fi.
• The detailed list of detected Wi-Fi networks will be displayed on
the Wi-Fi network section.
• Touch a Wi-Fi network to connect. If the network you selected
is secured, you are required to enter a password or other
credentials (you can contact the network carrier for details).
When finished, touch CONNECT.
 Loading...