

Page 1

Page 2
UK warranty text
Dear Customer,
Thanks you for purchasing this AKIRA™ product and for your confidence in our company. This
product meets applicable safety requirements and has undergone stringent testing during
manufacture.
However, should there occur a defect, the product or its defective part(s) (excluding accessories
and consumables) will be repaired free of charge (labor, parts and transportation within the
boarder of the below mentioned countries) or, at AKIRA™ discretion, exchanged for a similar item,
provided that it has been returned with 24 (twenty four) months from the date of original purchase
(date of receipt), is defective in material and/or workmanship and has been bought in any of the
following countries: France (metropolitan territory), Spain, Italy, Portugal, Belgium (territory) or in a
duty-free shop in named countries.
This guarantee will be granted only upon presentation of the original invoice or cash receipt,
indicating the date of purchase and dealer’s name, and of this guarantee card with the product
type and serial number. The benefit of this guarantee may be refused if the invoice, cash receipt or
guarantee card has been altered in any way, deleted or made illegible after the original purchase.
Online registration
To expedite warranty service, please register your AKIRA™ product within 30 days of purchase at
http://www.akiraeurope.com
This guarantee does not apply to the following:
1. Damage caused by accidents including, but not limited to, lightening, fire, water.
2. Damage to the product resulting from neglect, misuse, use against the operating manual
instructions, repair and/or install wrongly performed (non exhaustive list). Especially any
burned panel from too long still picture display such as computer inputs or channel logos,
as described in the operating manual, will not be guaranteed.
3. Modification, adaptations or alterations of the product to operate in a country other than for
which it was originally designed and manufactured, or any damage resulting from such
modifications.
4. Usage other than usual consumer home usage.
5. Defect on individual pixels when the number of defective is below the following numbers:
Dark pixel: 7 Bright or flickering pixel: 3 Total defective pixels:
8
These statements do not affect your statutory rights as a consumer under applicable national
legislation in force, nor your consumer’s rights against the dealer from whom you bought the
product.
If you need service, whether or not under guarantee, please approach the dealer who sold you the
product.
In your own interest, we advise you to read the instruction booklet for your AKIRA™ product
carefully before contacting your dealer or service center.
Should you have any questions which your dealer is unable to answer, please contact AKIRA
hotline (international free phone number: 00 800 800 25 472).
AKIRA™ is a registered trademark of TT International, Inc.
Page 3

Specifications
CONTENTS
Warning and Precautions---------------------------------------------------------------2 3
Important Safety Instructions-----------------------------------------------------------4 - 7
Accessory List -------------------------------------------------------------------------------8
Location of Plugs and Buttons----------------------------------------------------------9-10
Control Definitions---------------------------------------------------------------------11-12
Peripherals------------------------------------------------------------------------------13-15
Powering the Unit/Replacing the Fuse---------------------------------------------------16
Docking an iPod--------------------------------------------------------------------------- 17
Playing an iPod-----------------------------------------------------------------------------18
Setting the Clock / Setting the Timer / Playing a CD or DVD--------------------------19
Equalizer settings / Tuning the AM / FM Radio
/ Saving AM or FM Radio Stations to the Unit s M emory -----------------------------20
Using the Auxiliary Input / AV 1& AV 2 Inputs------------------------------------------21
HDMI Output-------------------------------------------------------------------------------22
Component Video Output / S-Video Output /
Composite Video Output ------------------------------------------------------------------23
DVD Setup Menu---------------------------------------------------------------------------24
Mounting the Unit to a Wall----------------------------------------------------------------25
Power Supply...............................................................................AC~220-240V/50Hz
Power Consumption...........................................................................................120W
Output Power........................................................................................15W X 5+40W
Speaker Impedance (Satellite)............................................................................6 Ohm
Speaker Impedance (Subwoofer)........................................................................8 Ohm
S/N................................................................................................................. 60dB
Frequency Response (Subwoofer channels) ..................................................30~250Hz
Frequency Response (Left/Right channels).................................................250~20KHz
L/R Separation (1 KHz).................................................................................... 60dB
L/R Balance (Stereo) ........................ ................................................................ 2dB
Bass ........................................................ ..........................................(100Hz) 14dB
Treble ...............................................................................................(10KHz) 14dB
DVD Player................................................................CDR/CD/DVD/DVD+R/DVD-R
DVD RW Compatibility
DVD Player...................................................................................HDMI
Video OUT Component video
S-Video
Composite video
iPod Player......................................................................................S-Video
Composite video
AUX IN ..........................................................................................................L/R IN
AV1~AV2 IN ................................................................................Composite video IN
L/R IN
FM Frequency Range.............................................................................87.5~108MHz
Specifications-------------------------------------------------------------------------------26
UK 1
AM Frequency Range............................................................................522~1620KHz
SIZE.............................................................................................942 x 200 x 138MM
NW...............................................................................................................11.45KG
GW.................................................................................................................14.3KG
UK 26
Page 4
Mounting the Unit to a Wall
Warnings and precautions
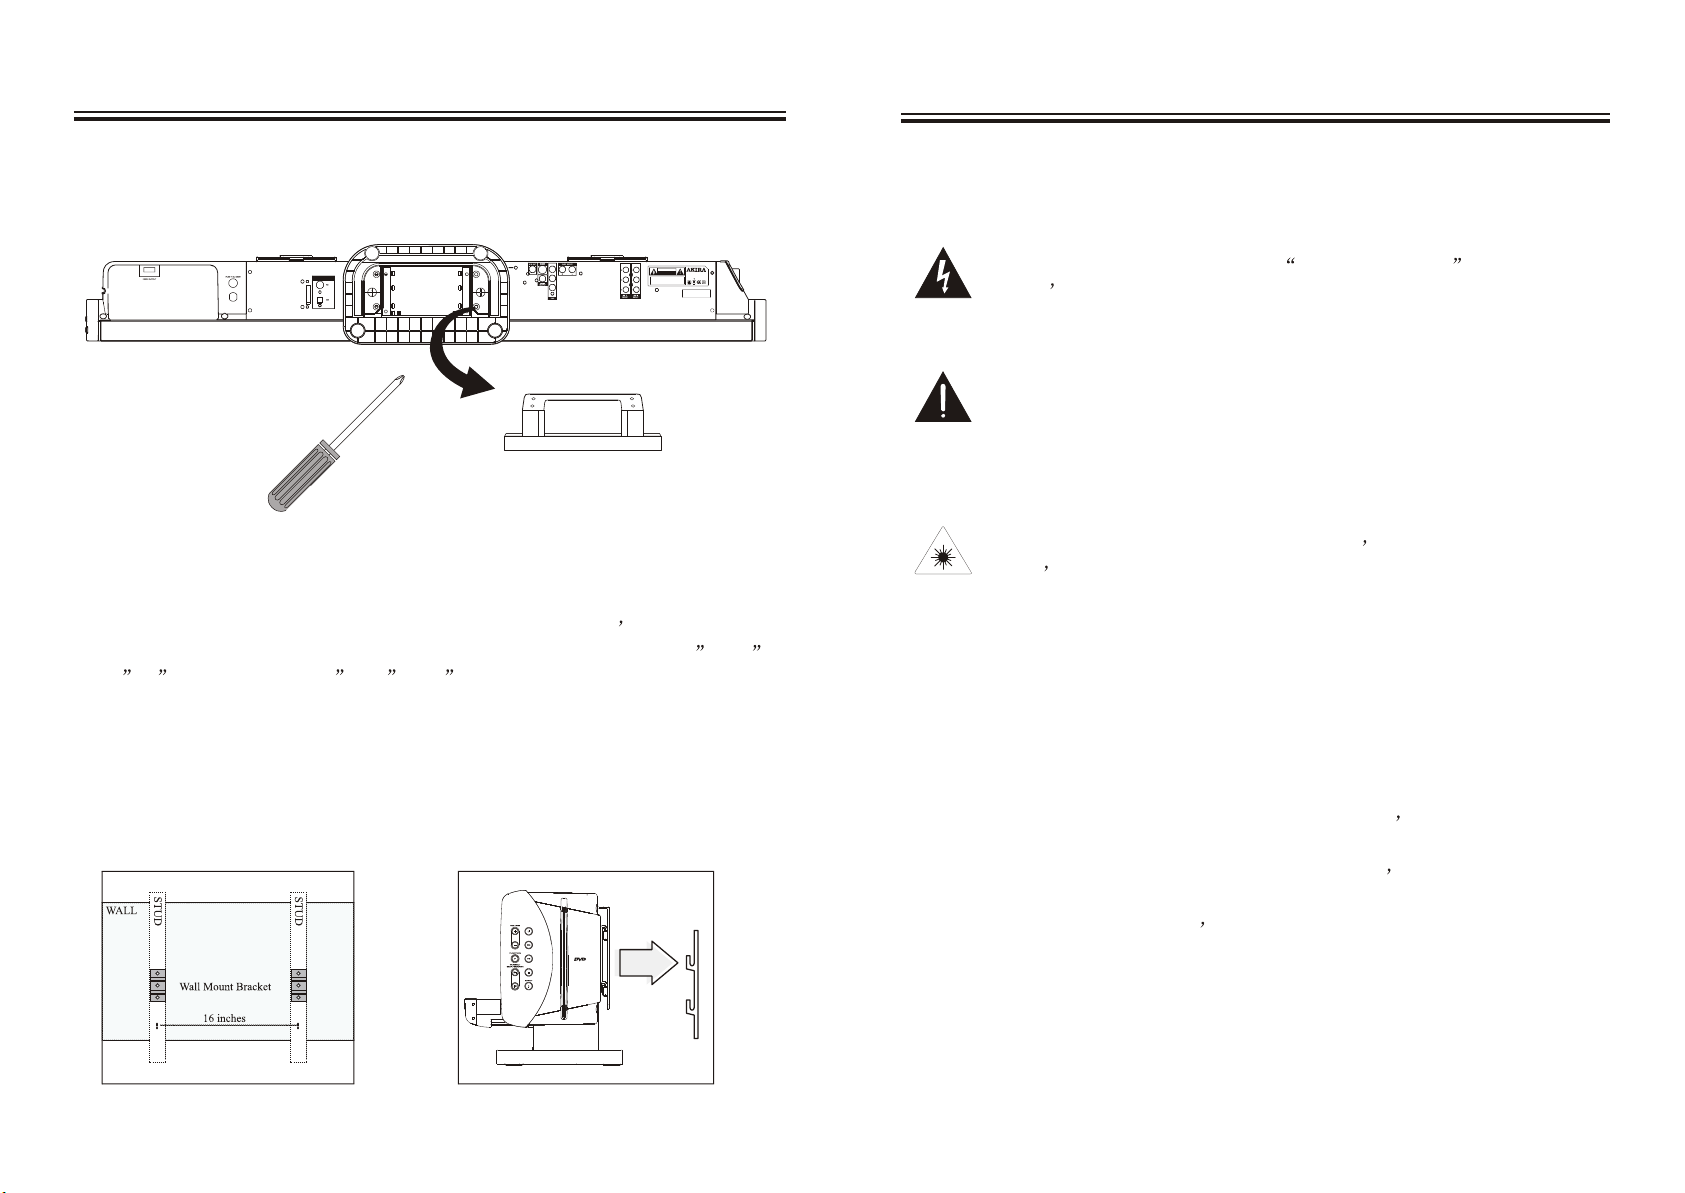
1. Use a screwdriver to remove the Table Stand by unscrewing the 4 screws which
located at the underside of the stand. The Table Stand must be removed to mount the
unit onto a wall.
AC~220-240V/50Hz
Pr/Cr
Pb/Cb
Y
CA
K OF ELECT
RI
S
D
UTI
ON
A
TO PREV
:
C
O
NOT REM
E THE CO
V
PARTS INSIDE, REFER SERVICINGT OQ UALI
SERVICE PERSON
N
TION
U
RI
C SHOCK
O NOT
N
OPE
SB-B88DIH
Model No.:
AC~220-40V/50Hz 120W
E
NT
O
CTRIC
LE
SHO
E
CK,D
Standby:
13W
U
V
R
ER. NO
SER-SE
VICEABLE
I
F
ED
EL.
MADE IN CHINA
S/N:
2. Locate 2 studs in the wall.
Most houses have the studs spaced on 16 inch centers.
3. Use the included spacers to create space between the wall and the unit. Use of the
spacers is optional, and not necessary for insuring a sturdy installation of the unit.
The included spacers can be used in combination to adjust unit s d istance from the
wall in order to match a wall mounted Flat-Panel TV. The spacer are 1/4 , 1/2 ,
3/4 ,1 when using the 1/2 ,3/4 ,or 1 spacers,longer screws must be purchased.
4. Screw the wall mount brackets into two parallel studs using three screws in each bracket.
5. Level the wall mount brackets with each other.
6. Hang the unit onto the secured wall mount brackets.
To ensure a reliable and sturdy installation, please consult a professional installer
before mounting the unit to a wall.
Bracket Placement on Wall Hanging the Unit
TO PREVENT FIRE OR SHOCK HAZARDS, DO NOT EXPOSE THIS
UNIT TO RAIN OR MOISTURE.
This symbol, located on back or bottom of the unit, is intended to alert the
user to the presence of uninsulated dangerous voltage within the
product enclosure t hat m ay b e o f s sufficient m agnitude t o c onstitute
a risk of electric shock to persons.
This symbol, located on back or bottom of the unit, is intended to alert the
user to the presence of important operating and maintenance (servicing)
instructions in the literature accompanying the appliance.
This product utilizes a Class 1 laser to read Compact Discs. This laser
Compact Disc Player is equipped with safety switches to avoid exposure
when the CD door is open and the safety interlocks are defeated. Invisible
laser radiation is present when the CD Player s l id i s o pen a nd t he
system s i nterlock h as f ailed o r b een d efeated. I t i s v ery i mportant t hat
you avoid direct exposure to the laser beam at all times. Please do not
attempt to defeat or bypass the safety switches.
To reduce the risk of electric shock, do not remove cover (or back). There are
no user-serviceable parts inside. Please refer any servicing to qualified
service personnel.
WARNING: Changes or modifications to this unit not expressly approved by
the party responsible for compliance could void the user s a uthority to o perate
the equipment.
WARNING: Danger of explosion if the remote control s b atteries a re
incorrectly installed. Replace only with the same or equivalent battery.
WARNING: The remote control s A AA b a ttery contains harmful chemical.
Do not put in the trash, instead recycle or dispose of as hazardous waste.
UK 25
UK 2
Page 5
Warnings and precautions
DVD Setup Menu
WARNING: Lithium ion batteries, like all rechargeable batteries are recyclable
and should be recycled or disposed of in normal household waste. Contact your
local government for disposal or recycling practices in your area. They should
never be incinerated since they might explode.
WARNING: Use of this unit near fluorescent lighting may cause interference
regarding use of the remote. If the unit is displaying erratic behavior move
away from any fluorescent lighting, as it may be the cause.
NOTE: This equipment has been tested and found to comply with the limits for a
Class B digital device, pursuant to Part 15 of the FCC Rules. These limits are
designed to provide reasonable protection against harmful interference in a
residential installation. This equipment generates, uses, and can radiate radio
frequency energy and, if not installed and used in accordance with the instructions,
may cause harmful interference to radio communications. However, there is no
guarantee that interference will not occur in a particular installation. If this
equipment does cause harmful interference to radio or television reception, which
can be determined by turning the equipment off and on, the user is encouraged to
try to correct the interference by one or more of the following Measures:
Reorient or relocate the receiving antenna.
Increase the separation between the equipment and receiver.
Connect the equipment into an outlet on a circuit different
from that to which the receiver is connected.
Consult the dealer or an experienced radio/TV technician for help.
* Do not mix old and new batteries
* Do not mix alkaline, standard (carbon-zinc), or rechargeable
(ni-cad, ni-mh, etc.) batteries
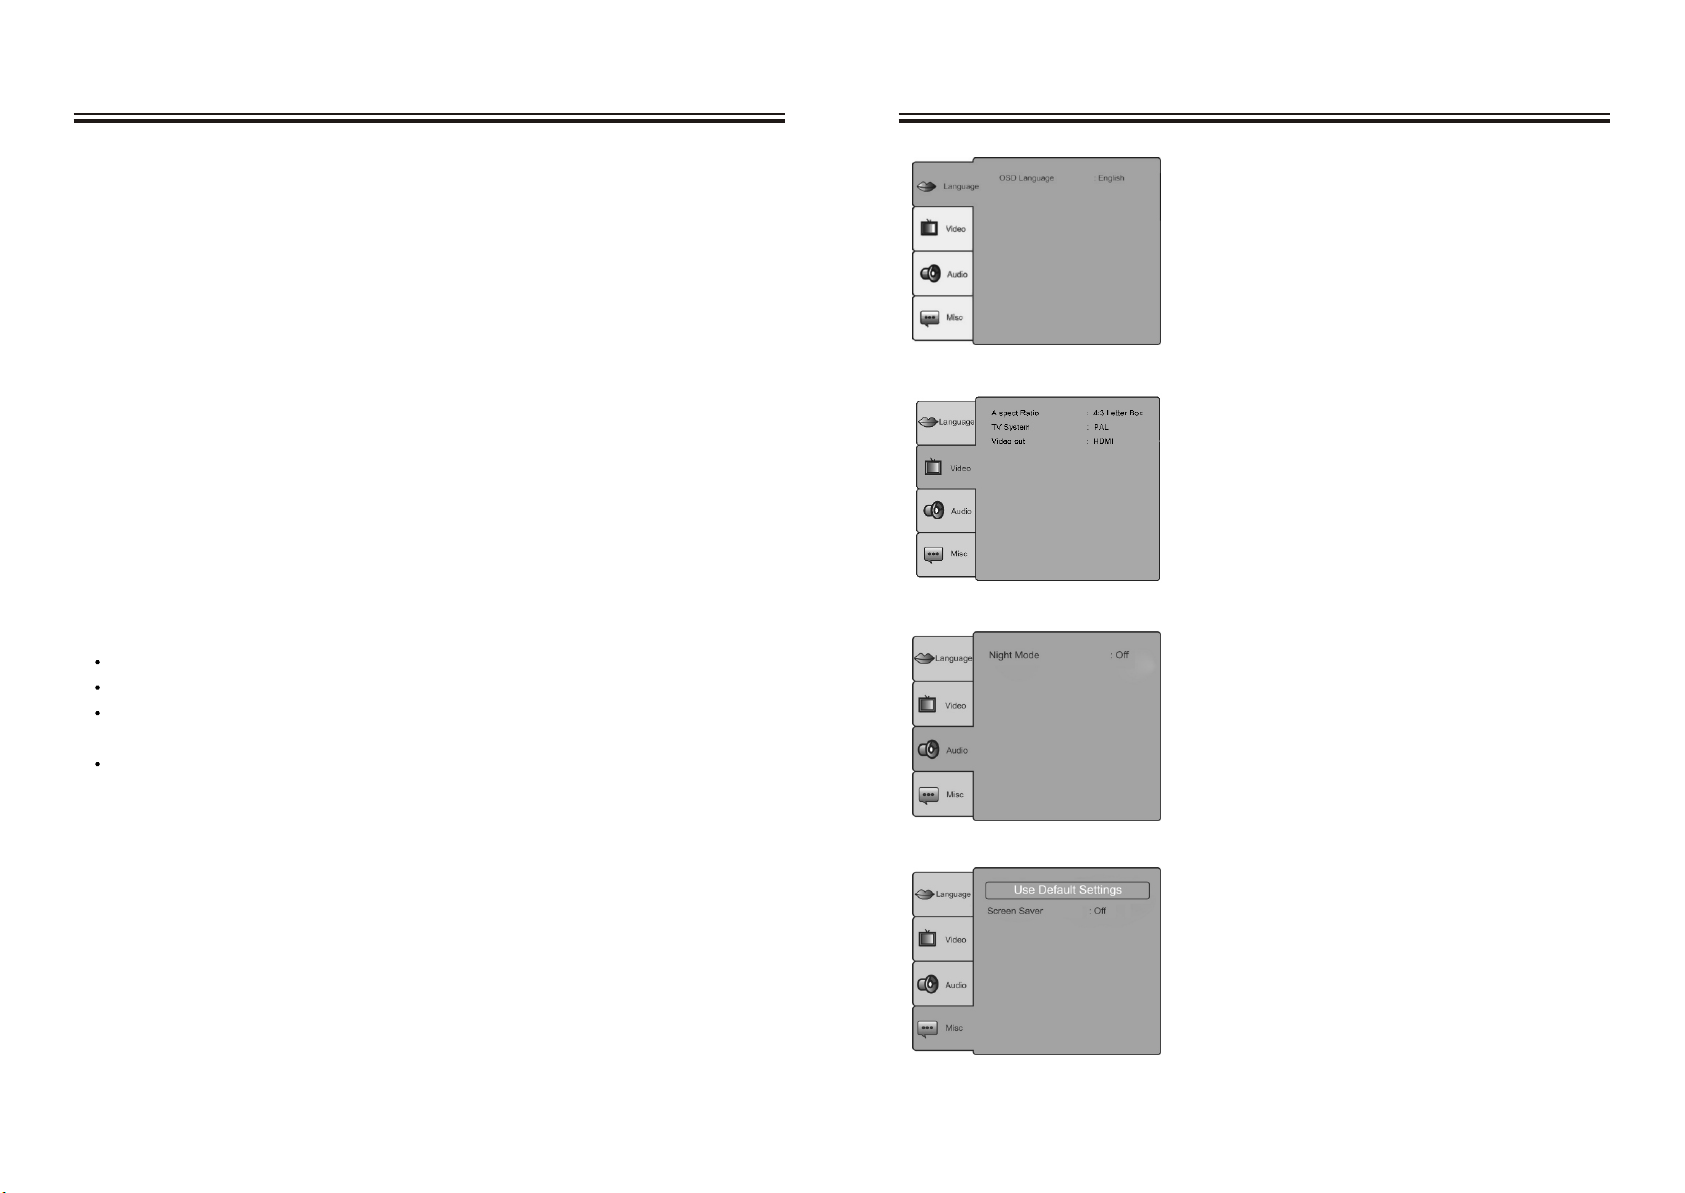
OSD Language
Use the OSD Language Setting to adjust the
language of the on-screen display and setup
menu.
Aspect Ratio
Use the Aspect Ratio Setting to switch between
4:3 Letterbox, 4:3 Panscan, and 16:9 Widescreen
aspect ratio.
TV System Use the TV System menu to select the
system that the television hooked to the player is
running.
Video Output
Use the Video Output Setting to switch between
Component and HD (HDMI) video out.
Night Mode
Turn the Night Mode on to limit the dynamic
range of audio output from the unit.
Use Default Settings
Select the Use Default Settings option to restore
the unit back to its original factory settings.
UK 3
Screen Saver
To active or deactive the screen saver.
UK 24
Page 6

Component Video Output -DVD Only-
Important Safety Instructions
Use of the Component Video Output requires a component video cable (not included).
1. Connect a component video cable to the Component Video Output on the unit.
2. Connect the other end of the same component video cable to the component input
on a display.
3. Adjust the display s i nput s ettings t o v iew v ideo f rom t he c onnected c omponent
input.
4. Video played from a loaded DVD will now show on the connected display, and the
audio from the DVD will play through the unit.
S-Video Output -DVD, iPod-
Use of the S-Video Output requires an S-Video cable.
1. Connect an S-Video cable to the S-Video Output on the unit.
2. Connect the other end of the same S-Video cable to the S-Video input on a display.
3. Adjust the display s i nput s ettings t o v iew v ideo f rom t he c onnected S -Video i nput.
4. Video played from a docked iPod/DVD will now show on the connected display,
and the audio from docked iPod / DVD will play through the unit.
Note: S-Video Output does not support HD (720p & 1080i)
Composite Video Output -DVD, iPod, or AV Inputs-
Use of the Composite Video Output requires an RCA video cable (not included).
1. Connect an RCA video cable to the Composite Video Output on the unit.
2. Connect the other end of the same RCA video cable to the composite video input
on a display.
3. Adjust the display s i nput s ettings t o v iew v ideo f rom t he c onnected c omposite
video input.
4. Video played from a docked iPod will now show on the connected display, and the
audio from docked iPod will play through the unit.
Note:
1. Composite Video Output does not support HD (720p &1080i)
2. iPod can only output video from Composite and S-Video.
1. Read Instructions - All the safety and operating instruction should be read before
the product is operated.
2. Retain Instructions - The safety and operating instruction should be retained for
future reference.
3. Follow instructions - All operating and use instructions should be followed.
4. Cleaning - Unplug this product from the wall outlet before cleaning. Do not use
liquid cleaners or aerosol cleaners. Use a damp cloth for cleaning.
5. Attachments - Do not use attachments not recommended by the product
manufacturer as they may cause hazards.
6. Water and Moisture - Do not use this product near water - for example, near a
bath tub, wash bowl, kitchen sink, or laundry tub; in a wet basement, or near a
swimming pool, etc.
7. Accessories - Do not place this product on an unstable cart, stand tripod, bracket,
or table. The product may fall, causing serious injury to a child or adult, and serious
damage to the product. Use only with a cart, stand, tripod, bracket, or table
recommended by the manufacturer, or sold with the product. Any mounting of
the product should follow the manufacturer s in structions, a nd s hould u se a
mounting accessory recommended by the manufacturer.
8. A product and cart combination should be moved with care. Quick stops,
excessive force, and uneven surfaces may cause the appliance and cart
combination to overturn.
9. Ventilation - Slots and openings in the cabinet are provided for ventilation and to
ensure reliable operation of the product and to protect it from overheating, and
these openings must not be blocked or covered. The openings should never be
blocked by placing the product on a bed, sofa, rug, or other similar surface. This
product should not be placed in a built-in installation such as a bookcase or rack
unless proper ventilation is provided or the manufacturer s i nstruction h ave
been adhered to.
UK 23
UK 4
Page 7

Important Safety Instructions
HDMI Output -DVD Only-
10. Power Sources - This product should be operated only from the type of power
source indicated on the marking label. If you are not sure of the type of power
supply to your home, consult your product dealer or local power company. For
products intended to operate from battery power, or other sources, refer to the
operating instruction.
11. Grounding or Polarization - This product may be equipped with a polarized
alternating-current line plug (a plug having one blade wider than the other). This
plug will fit into the power outlet only one way. This is a safety feature. If you are
unable to insert the power plug fully into the outlet, try reversing the plug. If the
plug should still fail to fit, contact your electrician to replace your obsolete outlet.
Do not defeat the safety purpose of the polarizes plug.
Alternate Warnings - This product is equipped with a three-wire grounding type plug, a plug having a third (grounding) pin. This plug will
only connect with
grounding-type power outlet. This is a safety feature. If you are unable to insert
the plug into the outlet, contact your electrician to replace your obsolete outlet.
Do not defeat the safety purpose of the grounding-type plug.
12. Power- Cord Protection - Power supply cords should be routed so that they are
not likely to be walked on or pinched by items placed upon or against them,
paying particular attention to cords at plugs, convenience receptacles, and point
where they exit from the product.
13. Protective Attachment Plug - The product is equipped with an attachment plug
having overload protection. This is a safety feature. See Instruction Manual for
replacement or resetting of protective device. If replacement of the plug is
required, be sure the service technician has used a replacement plug specified
by the manufacturer that has the same overload protection as the original plug.
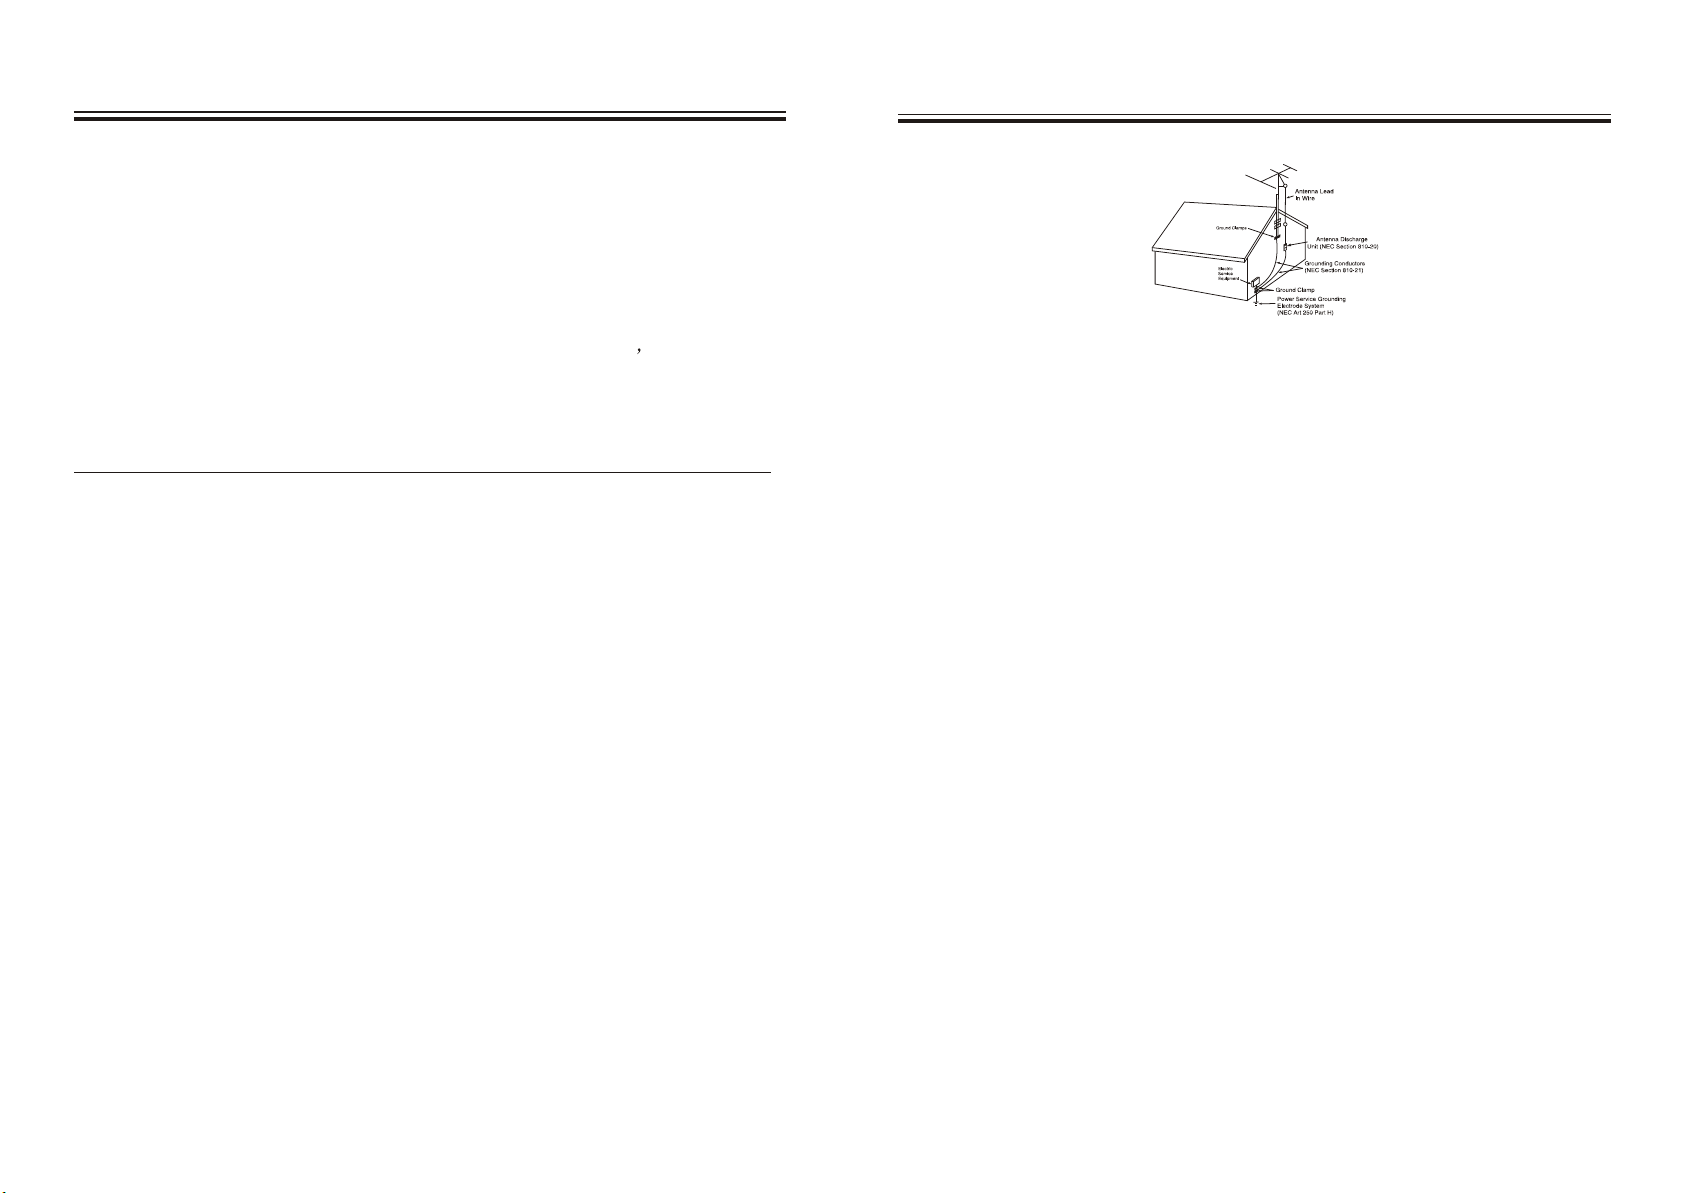
14. Outdoor Antenna Grounding - If an outside antenna is connected to the receiver,
be sure the antenna system is grounded so as to provide some protection against
voltage surges and built-up static charges. Article 810 of the National Electrical
Code, ANSI/NFPA 70, provides information with regard to proper grounding of
the mast and supporting structure, grounding of the mast and supporting structure,
grounding of the lead-in wire to an antenna-discharge unit, size of grounding
conductors, location of antenna-discharge unit, connection to grounding
electrodes, and requirements for the grounding electrode.
Use of the HDMI Output requires an HDMI cable (not included).
1. Connect an HDMI cable to the HDMI Output on the unit.
2. Connect the other end of the same HDMI cable to the HDMI input on a display.
3. Adjust the display s i nput s ettings t o v iew v ideo f rom t he c onnected H DMI i nput.
4. If the connected display has built-in speakers, go to the audio section of the
display s se ttings, an d tu rn th e b uilt-in sp eakers o ff.
5. Video played from a loaded DVD will now show on the connected display, and the
audio from the DVD will play through the unit.
Remark: NO CVBS output when the HDMI output. Set to 720p/1080i.
Resolution
480i
480p
576i
576p
720p
1080i
DVD
NTSC ONLY NTSC ONLY NTSC ONLY
PAL ONLY PAL ONLY PAL ONLY
PAL ONLY PAL ONLY PAL ONLY
VCD
XVID
UK 5
UK 22
Page 8
Using the Auxiliary Input
Important Safety Instructions
1. Plug one end of an RCA cable into the Aux Input on the unit.
2. Plug the other end of the cable into the audio output/headphone output on an MP3
Player or Other Audio Source.
3. Press the Power Button to turn the unit on.
4. Press the Function Button to switch the unit to AUX mode.
5. Audio played from the MP3 Player or Other Audio Source will now be heard on the unit.
If connecting to the headphone output of an audio source, the source s v olume
controls may need to be adjusted for optimal sound.
AV 1 & AV 2 Inputs
Use of the AV Inputs requires an RCA cable.
Note: When connecting two products using an RCA Cable, match the colored ports
with the same colored connection.(Red to Red, White to White, and Yellow to Yellow)
1. Connect an RCA cable to the AV 1 or AV 2 Inputs on the unit.
2. Connect the other end of the same RCA cable to the video and audio outputs on
a Set-Top Box or Game Unit.
3. Press the Function Button to switch the unit to AV 1 or AV 2 mode.
4. Audio and video played from the connected Set-Top Box will now play through the unit.
Video must be output from the unit to a display in order to be viewed.
See figure:
15. Lightning - For added protection for this product during a lightning storm, or
when it is left unattended and unused for long periods of time, unplug it from
the wall outlet and disconnect the antenna or cable system. This will prevent
damage to the product due to lightning and power-line surges.
16. Power Lines - An outside antenna system should not be located in the vicinity
of overhead power lines or other electric light or power circuits, or where it can
fall into such power lines or circuits. When installing an outside antenna system,
extreme care should be taken to keep from touching such power lines or circuits
as contact with them might be fatal.
17. Overloading - Do not overload wall outlets, extension cords, or integral
convenience receptacles as this can result in a risk of fire or electric shock.
18. Object and Liquid Entry - Never push objects of any kind into this product
through openings as they may touch dangerous voltage points or short-out parts
that could result in a fire or electric shock. Never spill liquid of any
kind on the product.
19. Servicing - Do not attempt to service this product yourself as opening or
removing covers may expose you to dangerous voltage or other hazards.
Refer all servicing to qualified service personnel.
20. Damage Requiring Service - Unplug this product from the wall outlet and
refer servicing to qualified service personnel under the following conditions:
a) When the power-supply cord or plug is damaged,
b) If liquid has been spilled, or objects have fallen into the product,
c) If the product has been exposed to rain or water,
d) If the product does not operate normally by following the operating
instructions. Adjust only those controls that are covered by the operating
instructions as an improper adjustment of other controls may result in
damage and will often require extensive work by a qualified technician
to restore the product to its normal operation.
e) If the product has been dropped or damaged in any way.
UK 21
UK 6
Page 9

Important Safety Instructions Equalizer settings
f) When the product exhibits a distinct change in performance - this indicates a
need for service.
21. Replacement Parts - When replacement parts are required, be sure the service
technician has used replacement parts specified by the manufacturer or have the
same characteristics as the original part. Unauthorized substitutions may result
in fire, electric shock, or other hazards.
22. Safety Check - Upon completion of any service or repairs to this product, ask
the service technician to perform safety checks to determine that the product is
in proper operating condition.
23. Wall or Ceiling Mounting - The product should be mounted to a wall or
ceiling only as recommended by the manufacturer.
24. Heat - The product should be situated away from heat sources such as
radiators, heat registers, stoves, or other products (including amplifiers) that
produce heat.
1. Flat: When EQ setting is in FLAT mode, you may press the TREBLE/BASS
button on the to create a sound effect to your preference.
2. Once you select DVD 5.1 mode you will experience a True 5.1 channel sound
effect.
Note: Make sure the DVD AUDIO output is set to 5.1. You may press the AUDIO
button on the remote control to select the audio output.
Press EQ button on the remote control to cycle through the preset Equalizer setting.
3.
4. Select JAZZ mode and you will experience a great jazz effect.
5. Select POP mode to create a great sound for pop music.
6. Select CLASSIC mode and you will experience a great classical effect.
7. Select ROCK mode and you will experience a great rock effect.
remote control
Tuning the AM/FM Radio
1. Turn the unit on by pressing the Power Button.
2. Press the Function Button to switch the unit to FM or AM radio mode.
3. Press the right and left direction button to tune the AM and FM radio.
UK 7
Saving AM or FM Radio Stations to the Unit s M emory
1. Tune the AM or FM radio to the desired station. See Tuning the AM/FM Radio
2. When the desired AM or FM radio station is reached, press the Memory Button on
the remote control.
3. Press the Preset Buttons on the remote control to select a preset memory slot.
4. Press the Memory Button to save the current AM or FM radio station to the selected
preset memory slot.
UK 20
Page 10
Setting the Clock
1. With the unit in standby mode, press the CLOCK button, the unit enter the
Clock Set Mode, the LCD Display:CLK XX(hour): XX(minute)
2. When the time begins to blink on the LCD Display, press the direction
key up or down to cycle through the hour.
3. Press the CLOCK button again to set the minute, press the direction key
up or down to cycle through the minute.
4. After the time is correctly adjusted, wait 5 seconds, and the clock will
be set with the specified time.
Setting the Timer
1. With the player in standby mode, press the Timer button on the remote control
and the LCD display: ON XX(hour): XX(minute) to set the unit ON time.
2. When the time begins on the LCD Display, press the direction key up or
down to cycle through the hour.
3. Press the Timer button again to set the minute, press the direction key up or
down to cycle through the minute. Then finished the unit ON timer setting.
4. Press the Timer button and the LCD display:
OFF XX(hour): XX(minute)
5. Repeat operation like step 2 and 3. Then finish the unit OFF timer setting.
After adjusting the OFF timer setting, press the Timer button and the LCD
6.
display: ON
To switch on timer setting, wait 5 seconds when the LCD display "ON".
7.
Else, press Timer button again and the LCD display "OFF" to switch off
timer setting.
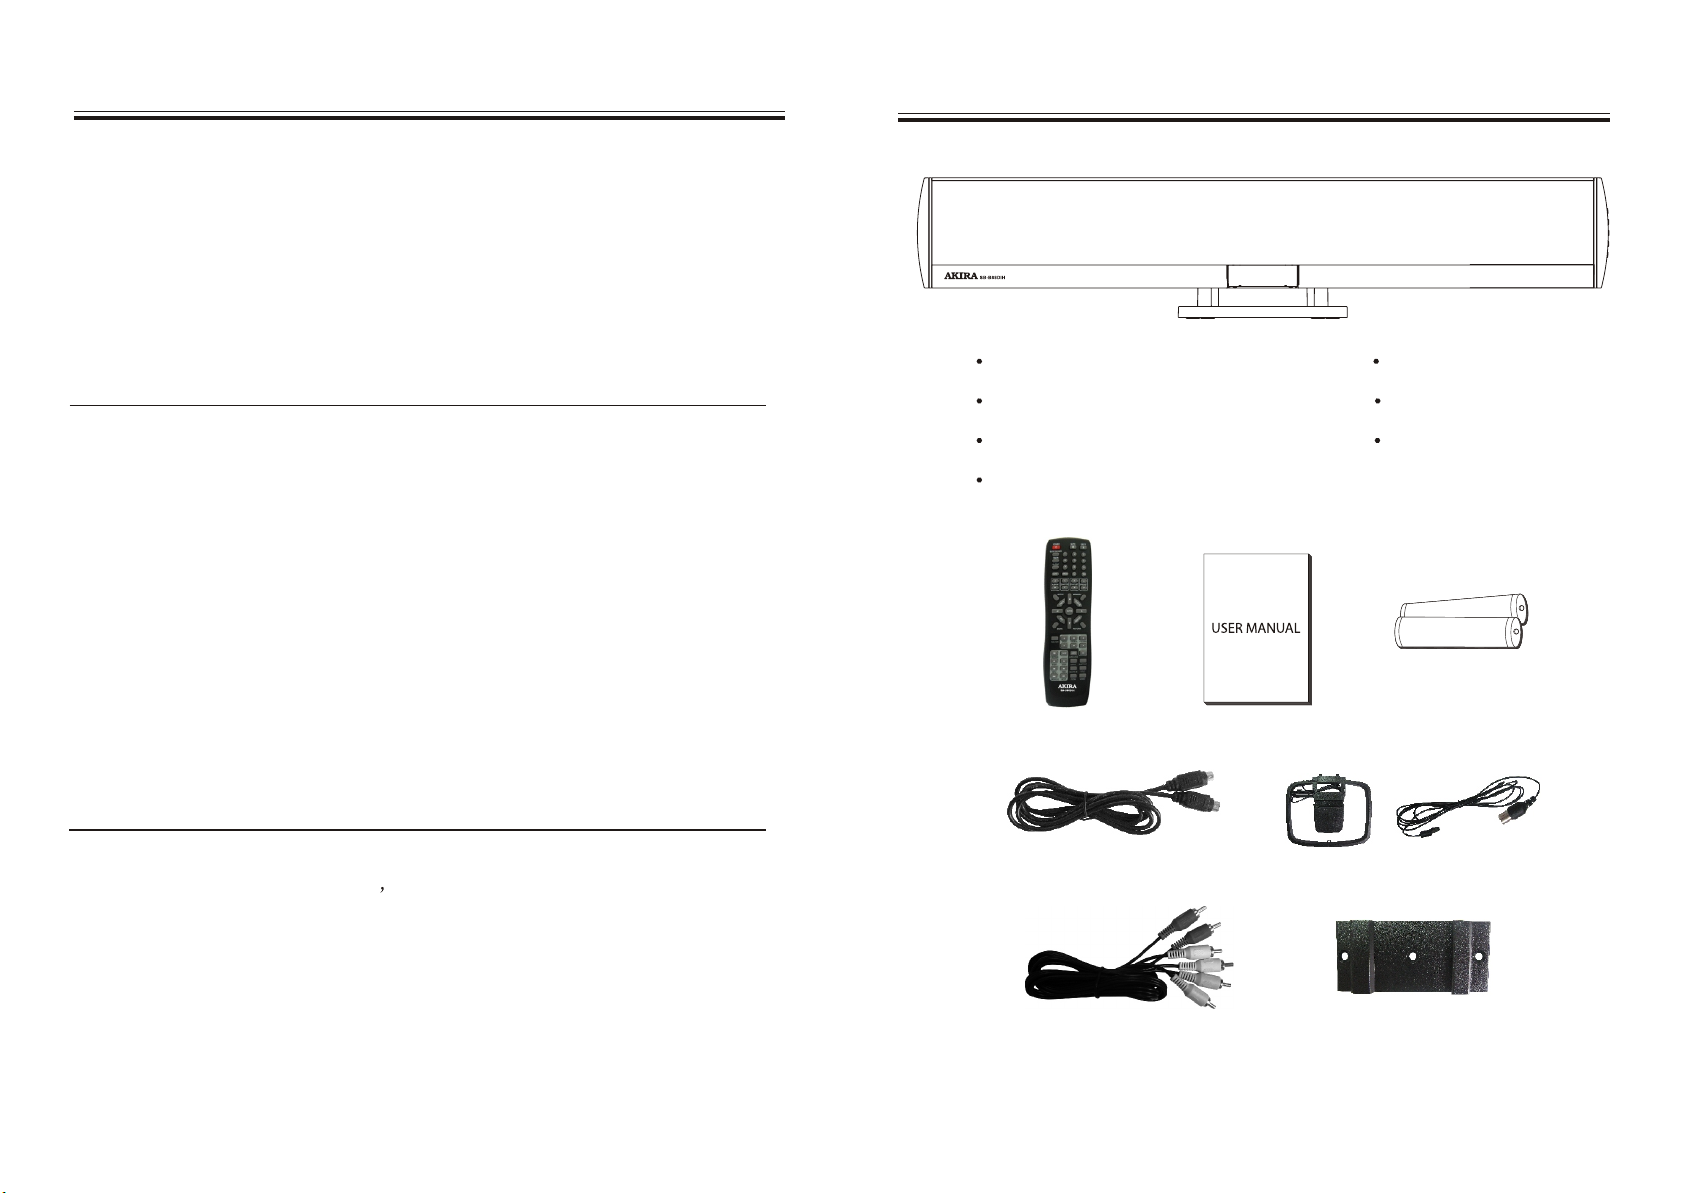
Accessory list
Remote Control User Manual
Batteries (AAA) X 2 S-Video Cable
External AM/FM Antenna AV Cable
Wall mount Bracket
Remote Control
User Manual
Batteries
Batteries
Batteries (AAA) X 2
Playing a CD or DVD
1. Turn the unit on by pressing the Power Button.
2. Press the Function Button to switch the unit to DVD/CD mode.
3. Insert a CD or DVD into the unit s s lot-load D VD/CD d rive.
4. Press the Play/Pause Button to begin playing a loaded DVD or CD.
To view video from a loaded DVD, the unit must be connected to a display.
A loaded DVD can only output video through the HDMI Output and
Component Output.
Remark: will display CD on LCD display when play MP3 / XVID.
UK 19
S-Video Cable
AV Cable
External AM/FM Antenna
Wall mount Bracket
UK 8
Page 11
Playing an iPodLocations of Plugs and Buttons
1. Dock an iPod onto the unit by following the Docking an iPod instructions.
2. Press the Power Button to turn the unit on.
3. Press the Function Button to switch the unit to iPod mode.
4. Press the Play/Pause Button to begin playing a docked iPod.
The included remote control will allow you to access and play all of the media
stored on the docked iPod from a distance.
A docked iPod can only output video through the S-Video Output and
Composite Video Output.
To watch video from a docked iPod on a connected display, the iPod s T V
Out setting must be set to on or Ask .
UK 9
UK 18
Page 12
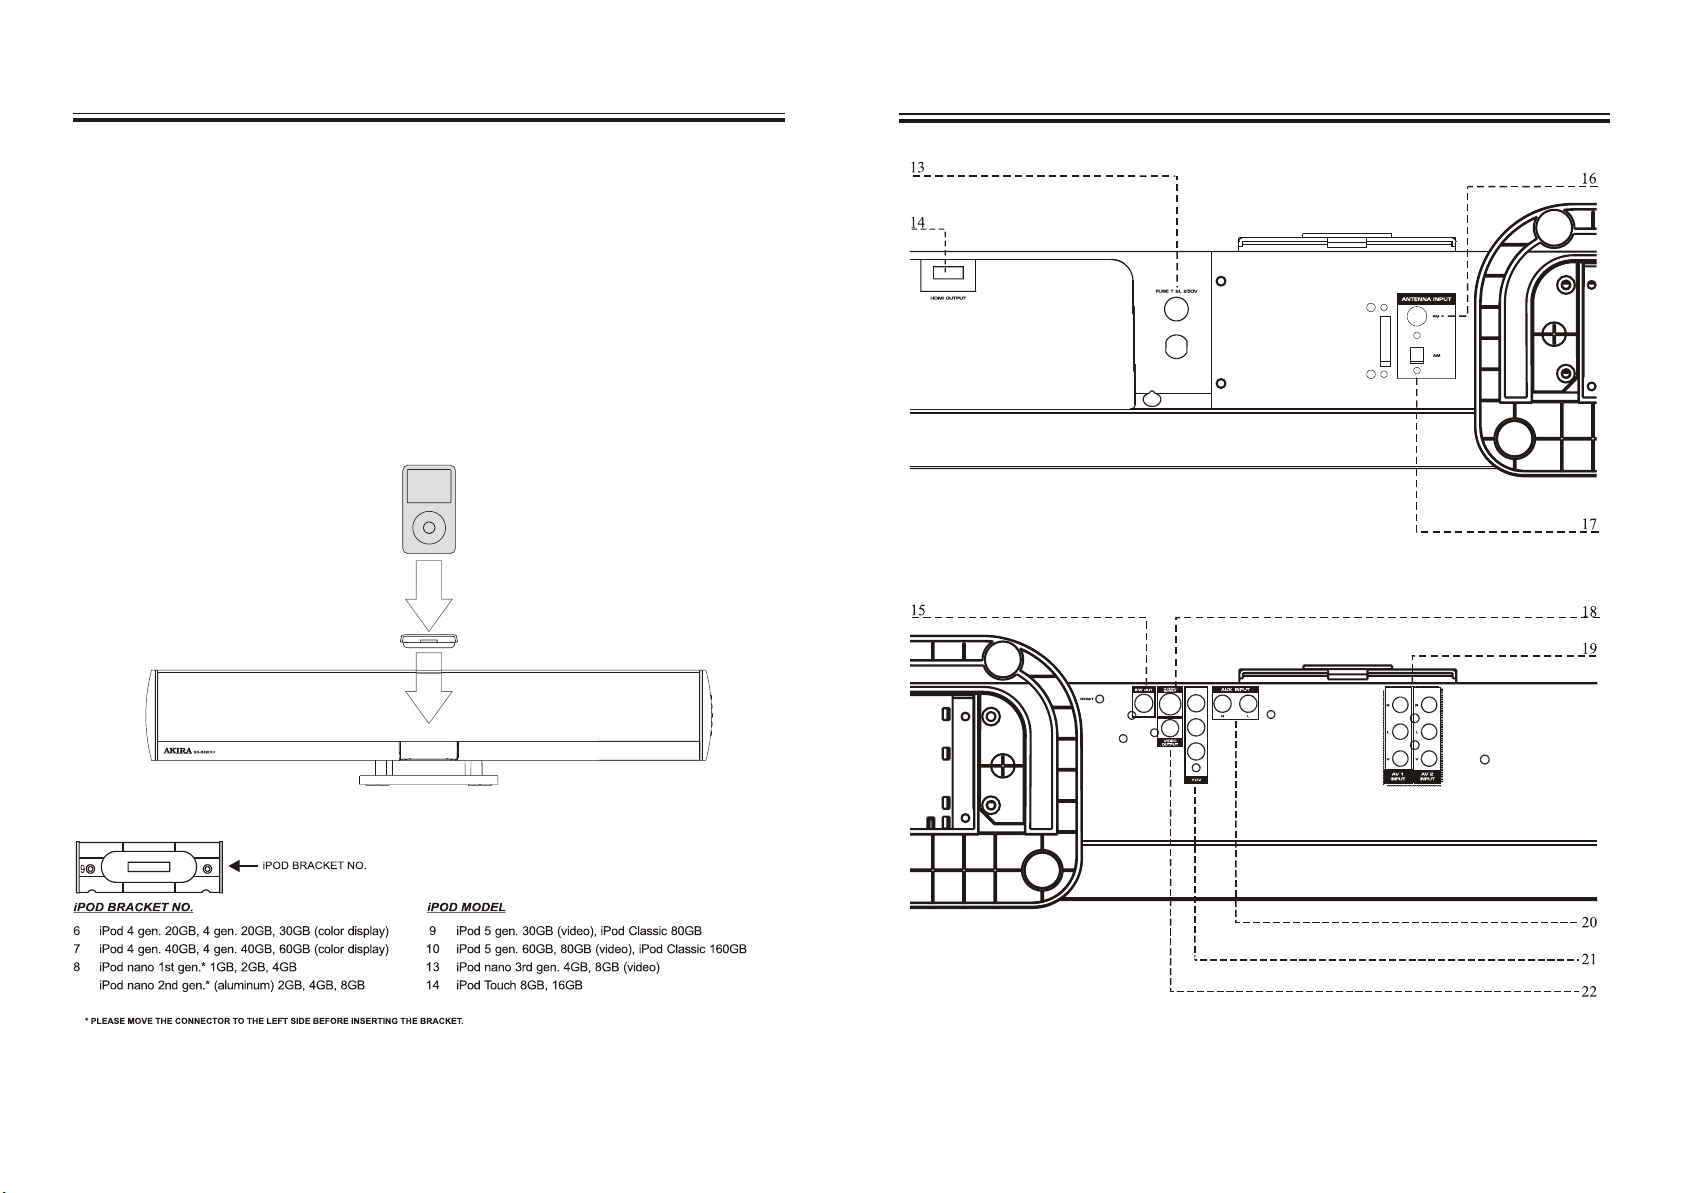
Docking an iPod
1. Locate the numbered Bracket that fits the iPod that will be docked.
Each included Bracket has a number on it, indicating which iPod model that bracket is
compatible with. see the separate bracket chart page to identify which bracket is needed.
2. Press the Power Button to turn the unit on.
3. Press the Function Button to switch the unit to iPod mode.
4. Press the Eject Button to open the iPod door on the unit.
5. Insert the bracket into the Dock for iPod.
When inserting an iPod nano (first or second generation), slide the Dock connection on
the unit so that it matches the opening on the iPod nano (first or second generation).
6. Connect the iPod to the iPod connector inside the Dock for iPod.
Once an iPod is connected to the Dock for iPod , the unit will play and charge the
docked iPod.
Locations of Plugs and Buttons
AC~220-240V/50Hz
UK 17
Pr/Cr
Pb/Cb
Y
UK 10
Page 13
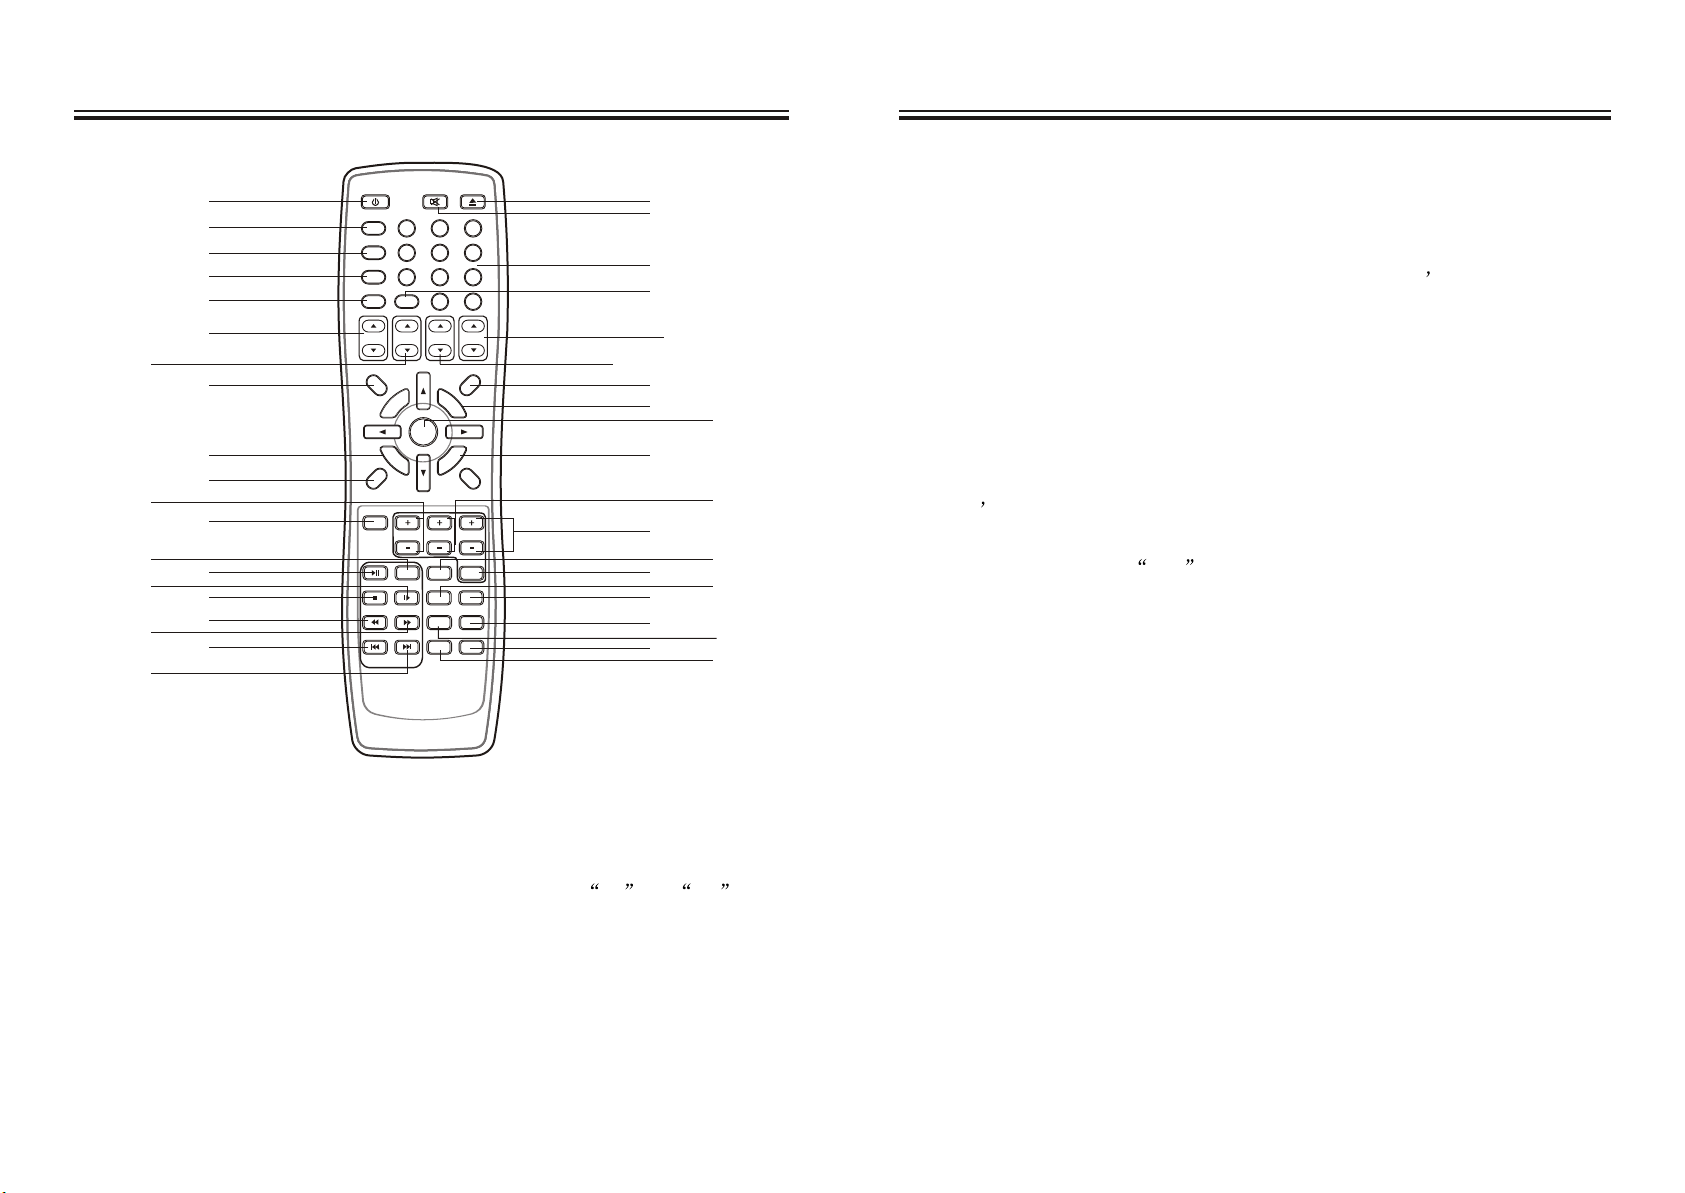
Control Definitions
Powering the Unit / Replacing the Fuse
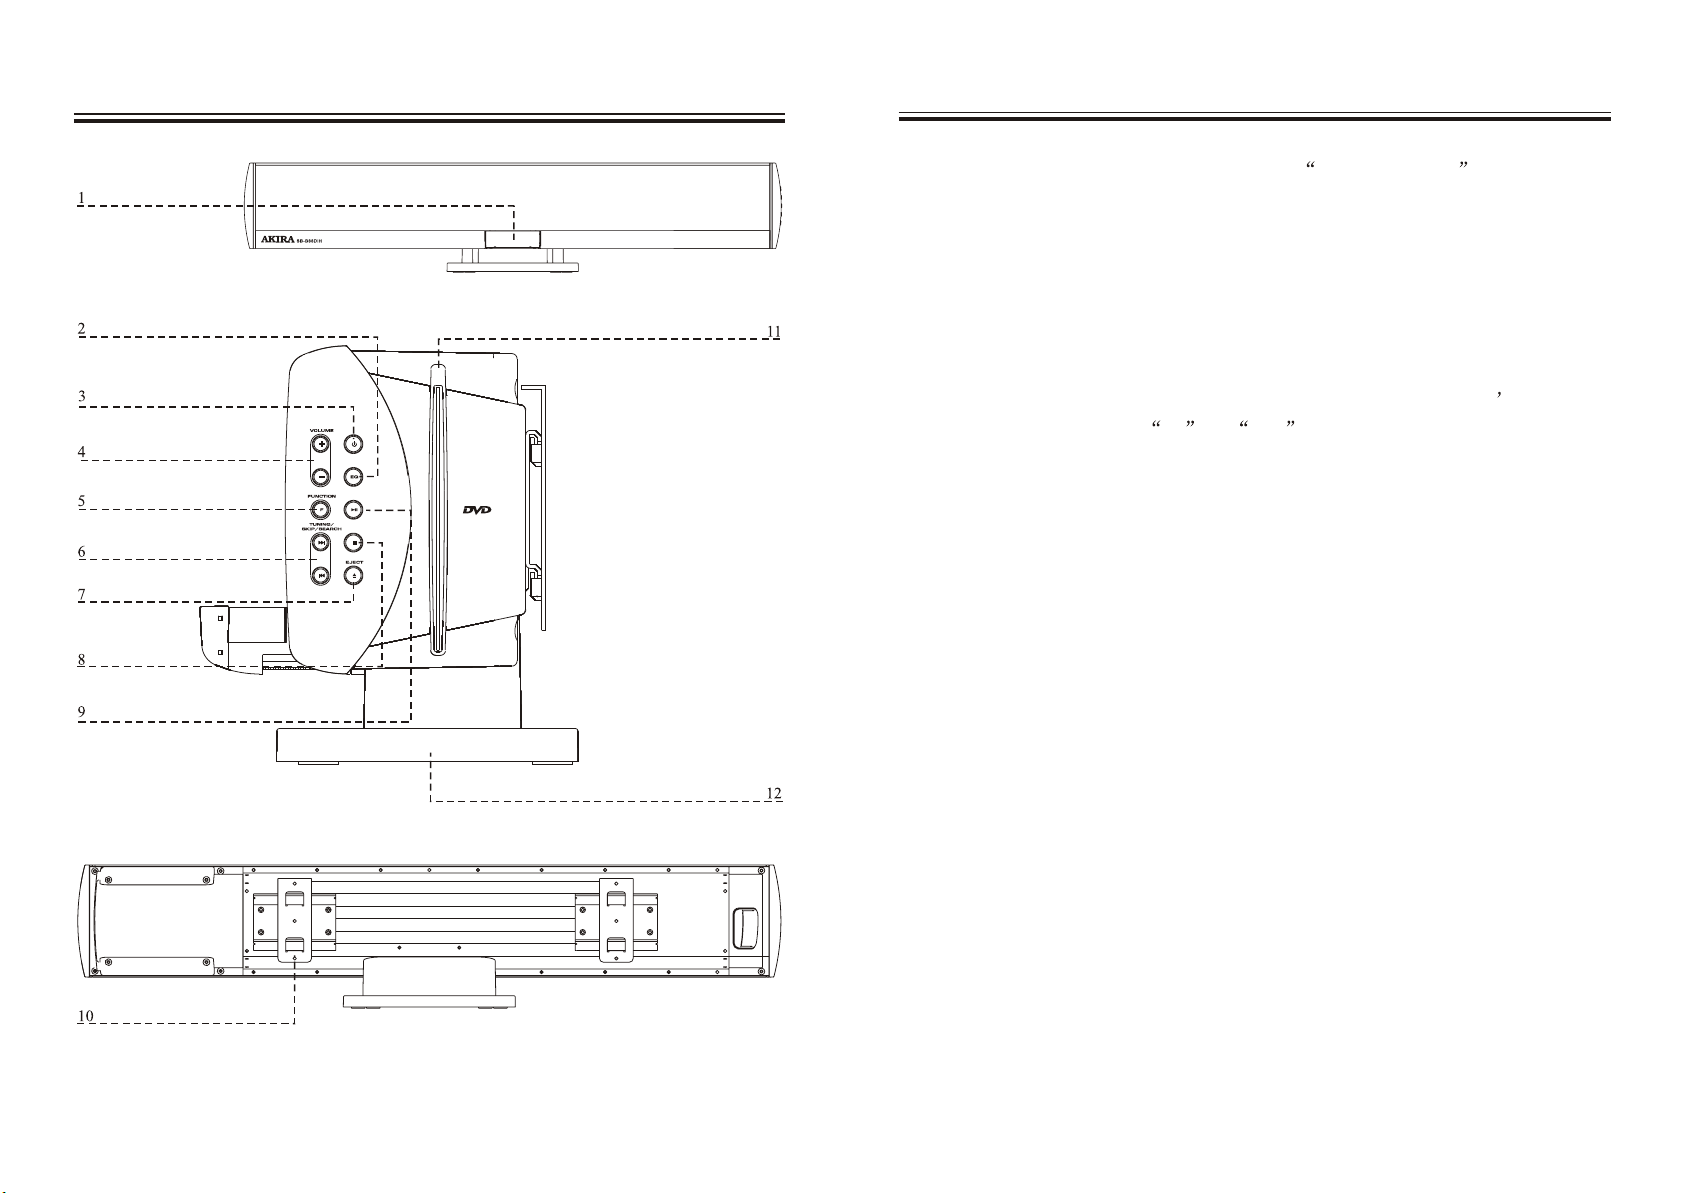
1 LCD Display
Use the LCD Display to view the time, AM or FM radio station, and the
unit s c urrent fu nction.
2 EQ Button
Press the EQ Button to adjust the unit s e qualizer s ettings t o D VD5.1,
CLASSIC, JAZZ, ROCK, FLAT.
3 Power Button
Press the Power Button to turn the unit on and off.
4 Volume Buttons
Press the Volume Buttons to adjust the volume of audio output from the unit.
5 Function Button
Press the Function Button to switch between DVD, iPod, AUX, AV1, AV2,
AM and FM mode .
6 Tuning/Skip/Search Buttons
Press the Tuning/Skip/Search Buttons to tune the AM/FM radio.
Press the Tuning/Skip/Search Buttons to skip through tracks or chapters
on a docked iPod or a loaded CD or DVD.
Press the Tuning/Skip/Search Buttons to search through an individual
track or chapter on a docked iPod or a loaded CD or DVD.
7 Eject Button
Press the Eject Button to eject a CD or DVD in DVD mode.
Press the Eject Button to open or close the motorized dock for iPod in
iPod mode.
8 Stop Button
Press the Stop Button to stop a CD or DVD during play.
9 Play/Pause Button
Press the Play/Pause Button to play or pause a docked iPod or loaded CD
or DVD.
10 Wall Mount Brackets
Use the Wall Mount Brackets to secure the unit to a wall.
11 CD/DVD Slot Load Drive
The CD/DVD Slot Load Drive will play DVD/DVD+/-R/RW, CD/CD-R/
RW & JPEG Picture Discs.
12 Table Stand
The Table Stand can detach from the unit for wall mounting, or remain
attached to serve as a stand for the unit.
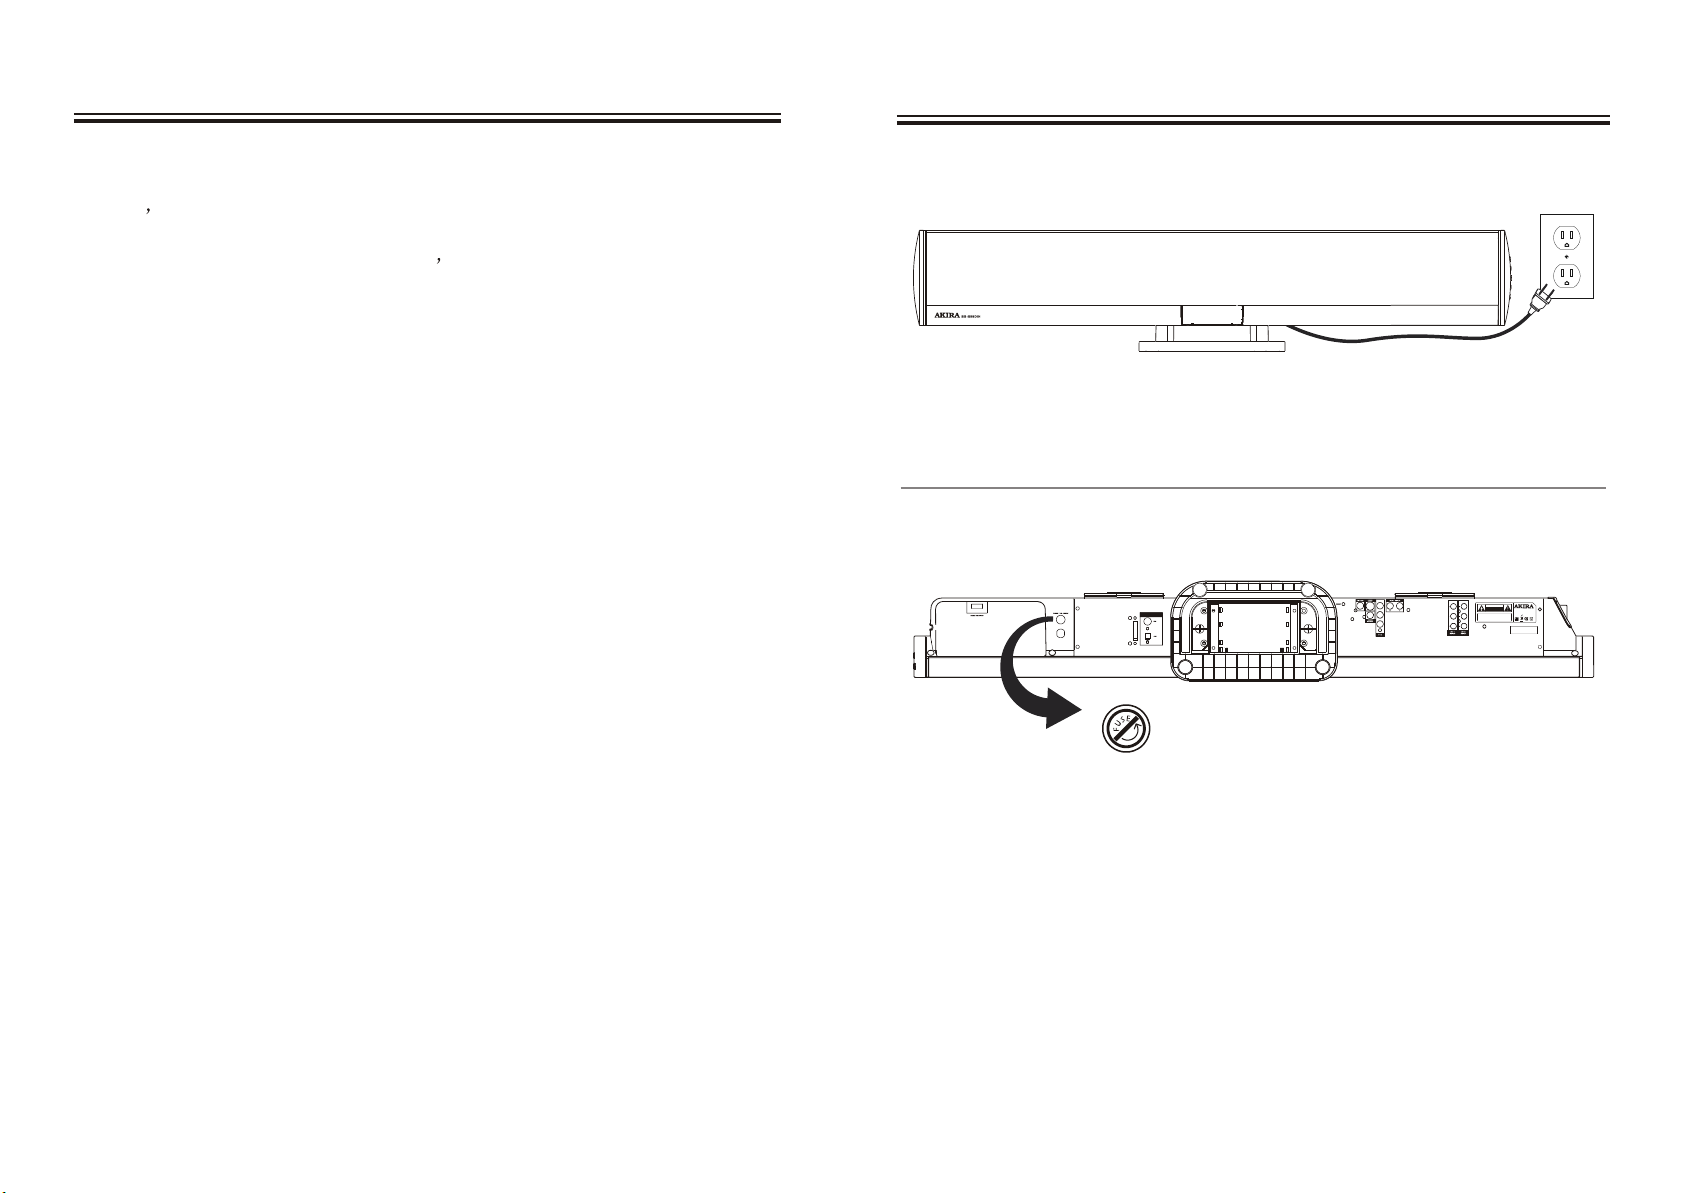
Power the unit by connecting it to a standard AC outlet (220-240V / 50Hz) via
the attached AC cord.
Replacing the Fuse
If the unit does not turn on, try replacing the fuse. A standard T2L 250V Fuse
can be purchased from most local hardware/electronic stores.
Pr/Cr
Pb/Cb
AC~220-240V/50Hz
Y
1. Unplug the unit from the AC outlet to power it off completely.
2. Use a flat-head screwdriver, coin, gently push in and turn counter clockwise
to remove the fuse casing and fuse from its slot.
3. Remove the old fuse from the plastic fuse casing, and discard it.
4. Place the new fuse (T2L 250V) into the plastic fuse casing.
5. Gently push the fuse casing back into the fuse slot while turning it clockwise.
6. Once the fuse is locked back into the unit securely, the unit can be plugged
back in and powered on.
CA
K OF ELECT
RI
S
D
UTI
ON
A
TO PREV
:
C
O
NOT REM
E THE CO
V
PARTS INSIDE, REFER SERVICINGT OQ UALI
SERVICE PERSONNEL.
TION
U
RI
C SHOCK
O NOT
N
OPE
SB-B88DIH
Model No.:
AC~220-40V/50Hz 120W
E
O
NT
CTRIC
SHO
LE
CK,D
E
Standby:
13W
V
R
ER. NO USER-SE
VICEABLE
I
F
ED
MADE IN CHINA
S/N:
UK 11
UK 16
Page 14

Peripherals
Control Definitions
24. Display Button: Press the Display Button to view the time when DVD.
25. Memory Button: Press the Memory Button to save the current radio
station to the unit s m emory.
26. CLEAR: Press to clear the number.
27. ENTER: Press to confirm your selection.
28. Repeat Button: Press the Repeat Button to repeat a song, album or
playlist from a docked iPod, a loaded CD or DVD.
29. TREBLE+/TREBLE-: Press to adjust the treble level of the unit only
workable when the EQ is set to Flat .
30. VOLUME+/VOLUME-: Press to adjust the volume of the unit.
31. AUDIO/LANGUAGE: Press to select the language function.
32. EQ: Press to switch equalizer modes between DVD5.1, CLASSIC, JAZZ,
ROCK, FLAT.
33. ANGLE: Press to set the DVD play angle.
34. SUBTITLE: Press to cycle through the available subtitle languages.
35. Title Button: Press the Title Button to return to the title screen of a
loaded DVD.
36. Video Button: Press the Video Button to adjust the video output to Auto,
480p, 576p, 720p and 1080i.
37. ZOOM: Press to enlarge a particular area of the picture.
38. Playlist Button: Press the Playlist Button to cycle through playlists on a
docked.
39. Preset Buttons: Press the Preset Buttons to cycle through saved radio
stations.
40. Shuffle Button: Press the Shuffle Button to play tracks from a CD or an
iPod in random order.
13 Fuse ( T 2L 250V )
14 HDMI Output (DVD only)
Use the HDMI Output to connect the unit to a high definition display.
15 Subwoofer Output
Use the Subwoofer Output to connect an external subwoofer to the unit.
16 FM Antenna Input
Use the FM Antenna Input to connect an FM antenna to the unit.
17 AM Antenna Input
Use the AM Antenna Input to connect an AM antenna to the unit.
18 S-Video Output (DVD or iPod)
Use the S-Video Output to connect the unit to a display using an S-Video
cable.
19 AV 1 & AV 2 Inputs
Use the AV 1 and AV 2 Inputs to connect a DVD player or Set-Top Box to
the unit.
20 Auxiliary Input
Use the Auxiliary Input to connect an MP3 player or other audio source to
the unit.
21 Component Video Output (DVD only)
Use the Component Video Output to connect the unit to a display using
component video cables.
22 Composite Video Output (DVD, iPod, or AV Inputs)
Use the Composite Video Output to connect the unit to a display using
RCA video cables.
23 Video Output (DVD or iPod)
Use the S-Video Output to connect the unit to a display using an Video
cable.
UK 15
UK 12
Page 15
7
11
13
15
18
20
1
2
3
4
5
6
8
9
10
12
14
16
17
19
POWER
SLEEP/SNOOZE
TIMER
CLOCK
ALBUM
FUNCTION
PLAY/PAUSE
PREVIOUS NEXT
MUTE EJECT
2
5
0
PLAYLIST PRESET
MEMORY
ENTER
RETURN
3
6
98
10+
C
LE
AR
T
A
EPE
R
1
4
7
DISPLAY
GOTO
CHAPTER
SETUP
G
RO
P
A
-B
MENU
38
21
22
23
24
25
26
28
39
27
29
BASS
TREBLE
VOLUME
SLOW
STEP
STOP
REV
F
WD
AUDIO
LANGUAGE
ANGLE
SHUFFLE
ZOOM
EQ
SUBTITLE
TITLE
VIDEO
30
32
34
35
36
31
33
40
37
1. Power Button: Press the Power Button to turn the unit standby or on.
2. Sleep/Snooze Button: Press the Sleep/Snooze Button consecutively to
set the sleep timer between 10-120 minutes.
3. Timer Button: Press the Timer Button to set the timer on and off
for the unit.
4. CLOCK: Press to set the specific time.
5. Go To Button: Press the Go To Button and enter a specific time using the
Number Keypad to skip automatically to that time on the loaded DVD.
PeripheralsPeripherals
6. Album Buttons: Press the Album Buttons to cycle through albums on a
docked iPod.
7. Chapter Buttons: Press the Chapter Buttons to cycle through chapters on
a docked iPod.
8. SetUp Button: Press the Set Up Button to enter the unit s s etup m enu.
9. A-B Button: Press the A-B button once to mark a starting point during
playing a DVD. Press the button a second time to mark an ending point.
After doing so the DVD will loop that section of video. Press the button
a third time to cancel this function.
10. DVD/iPod Menu: Press the DVD/iPod Menu Button to view the menu
when in DVD mode.
Press the DVD/iPod Menu Button to move backwards through a docked
iPod s m enus.
11. BASS+/BASS-: Press to adjust the bass level of the unit, only workable
when the EQ is set to Flat .
12. Function Button: Press the Function Button to switch between DVD,
iPod, AUX,
13. Slow Button: Press the Slow Button to view a DVD movie in slow motion.
14. Play/Pause Button: Press the Play/Pause Button to play and pause a
docked iPod or loaded CD/DVD.
15. Step Button: Press the Step Button consecutively to skip through a DVD
a single frame at a time.
16. STOP: Press to stop playing DVD.
17. REV: Press to skip backwards.
18. FWD: Press to skip forwards
19. PREVIOUS: Press to play the previous song.
20. NEXT: Press to play the next song.
21. Eject Button: Press the Eject Button to eject a CD or DVD in DVD mode,
or the motorized iPod dock in iPod mode.
22. MUTE: Press once to reduce the volume entirely, press again to resume.
23. 0-10+: Use the Number Keypad to select individual track.
AV1, AV2, AM and FM mode .
UK 13
UK 14
Page 16
Texte de garantie FR
Cher client,
Nous vous remercions d'avoir acheté ce produit AKIRA™ et de faire confiance à notre société. Ce
produit répond aux normes de sécurité en vigueur et a été soumis à des tests rigoureux durant sa
fabrication.
Toutefois, dans l'éventualité d'un défaut, le produit ou sa(ses) pièce(s) défectueuse(s) (excepté des
accessoires et les consommables) seront réparés gratuitement (pièces, main d'œuvre et expédition
dans les pays mentionnés ci-dessous) ou, à la discrétion de AKIRA™, remplacés par un item
similaire, à condition qu'ils aient été renvoyés dans les 24 (vingt quatre) mois qui suivent la date du
premier achat (date de réception), qu'ils présentent un défaut matériel et/ou de main d'œuvre et
qu'ils aient été achetés dans l'un des pays suivants : France (métropolitaine), Espagne, Italie,
Portugal, Belgique (territoire) ou dans une boutique détaxée
Cette garantie n'est accordée que sur présentation de la facture ou du bon de caisse original
indiquant la date d'achat et le nom du revendeur, et de la présente carte de garantie portant
mention du type de produit et de son numéro de série. Le bénéfice de cette garantie pourra être
refusé si la facture, le bon de caisse ou la carte de garantie a été modifié d'une manière
quelconque, effacé ou rendu illisible après l'achat original.
Enregistrement en ligne
Pour valider votre garantie, veuillez enregistrer votre produit AKIRA™ dans les 30 jours qui suivent
son achat sur http://www.akiraeurope.com
La présente garantie ne s'applique pas aux cas suivants :
1. Dommages d'origine accidentelle y compris, mais sans exclusive, la foudre, l'incendie,
l'eau.
2. Produit endommagé par suite d'une négligence, d'une mauvaise utilisation, d'une utilisation
contraire aux instructions du mode d'emploi, d'une réparation et/ou d'une installation mal
exécutée (liste non exhaustive). En particulier, un écran brûlé par l'affichage excessivement
prolongé d'une image fixe telle qu'un écran d'ordinateur ou des logos, comme décrit dans
le mode d'emploi, n'est pas couvert par la garantie.
3. Modifications, adaptations ou altérations du produit dans le but de l'utiliser dans un autre
pays que ceux pour lesquels il a été conçu et fabriqué, ou tout dommage résultant de telles
modifications.
4. Utilisation différente de l'usage normal par un particulier dans le cadre domestique.
5. Défectuosité des pixels individuels lorsque le nombre de pixels défectueux est inférieur aux
nombres suivants : Pixel sombre : 7 Pixel brillant ou scintillant : 3
Nombre total de pixels défectueux : 8
Si vous avez des questions auxquelles votre revendeur n'est pas en mesure de répondre, veuillez
appeler la hotline AKIRA (numéro international gratuit : 00 800 800 25 472).
AKIRA™ est une marque déposée de TT International, Inc.
Ces déclarations n'affectent pas vos droits statutaires en tant que consommateur dans le cadre de
la législation nationale en vigueur, ni vos droits de consommateur vis-à-vis du revendeur auquel
vous avez acheté le produit.
Si vous avez un problème technique, qu'il soit couvert ou non par la garantie, veuillez en parler au
revendeur qui vous a vendu le produit.
Dans votre propre intérêt, nous vous recommandons de lire attentivement le mode d'emploi de votre
produit AKIRA™ avant de prendre contact avec votre revendeur ou un centre de dépannage.
Page 17

Avertissements et précautions .................................................................................2-3
Instructions de sécurité importantes........................................................................4–7
Liste des accessoires....................................................................................................8
Emplacement des connecteurs et des boutons........................................................9-10
Définitions des commandes.................................................................... ... ... ........11-12
Périphériques........................................................................................................13-15
Alimentation de l’appareil/remplacement du fusible................................................16
Connexion d’un iPod.............................. ...................................................... .............17
Lecture d’un iPod............................... ... ... .................................................................18
Réglage de l’horloge / réglage du minuteur / lecture d’un CD ou DVD...................19
Réglages de l’égaliseur / réglage de la radio AM / FM
/ enregistrement de stations radio AM ou FM dans la mémoire de l’appareil...........20
Utilisation des entrée auxiliaire / entrées AV 1 & AV 2............................................21
sortie HDMI............................ .... ................................................... ... ... ......................22
Sortie vidéo en composantes / sortie S-Video /sortie vidéo composite.....................23
Menu de configuration DVD.....................................................................................24
Montage mural de l’appareil..........................................................................................25
Spécifications.............................................................................................................26
TABLE DES MATIÈRES
Spécifications
Alimentation électrique..........................................................C.A. ~ 220-240 V/50 Hz
Consommation électrique....................................................................................120 W
Puissance de sortie.................................................................................15W X 5+40W
Impédance haut-parleur (satellite)......................................................................6 ohms
Impédance haut-parleur (caisson de basse)........................................................8 ohms
Rapport signal/bruit (S/N)............................... .... ............................................... 60 dB
Distorsion de fréquence (canaux de caisson de basse) ...............................30~250 Hz
Distorsion de fréquence (canaux droit et gauche)......... ... ... .....................250~20 KHz
Séparation des canaux D/G (1 KHz)......................... .......................................... 60 dB
Balance D/G (stéréo)............................................................................................. 2 dB
Basse......................................................................................................(100Hz)±14dB
Aigu.......................................................................................................(10KHz)±14dB
Lecteur DVD............................................................CDR/CD/DVD/DVD+R/DVD-R
Compatibilité DVD RW
Lecteur DVD.............................. ... ... ................................................... ... ... .........HDMI
Sortie vidéo vidéo en composantes
S-vidéo
Vidéo composite
Lecteur iPod ...............................................................................................S-Video
Vidéo composite
Entrée AUX............................ .... ... ................................................... ... ... ................G/D
Entrée AV1~AV2.......................... ... ..................................................Vidéo composite
Entrée G/D
Plage de fréquence FM............................. ... ...........................................87,5~108MHz
Plage ade fréquence AM........................................................................522~1620KHz
Dimensions........................... .. .... .................................................. 942 x 200 x 138 mm
Poids nominal..................................................................................................11,45 kg
Poids total..........................................................................................................14,3 kg
FR 1 FR 26
Page 18
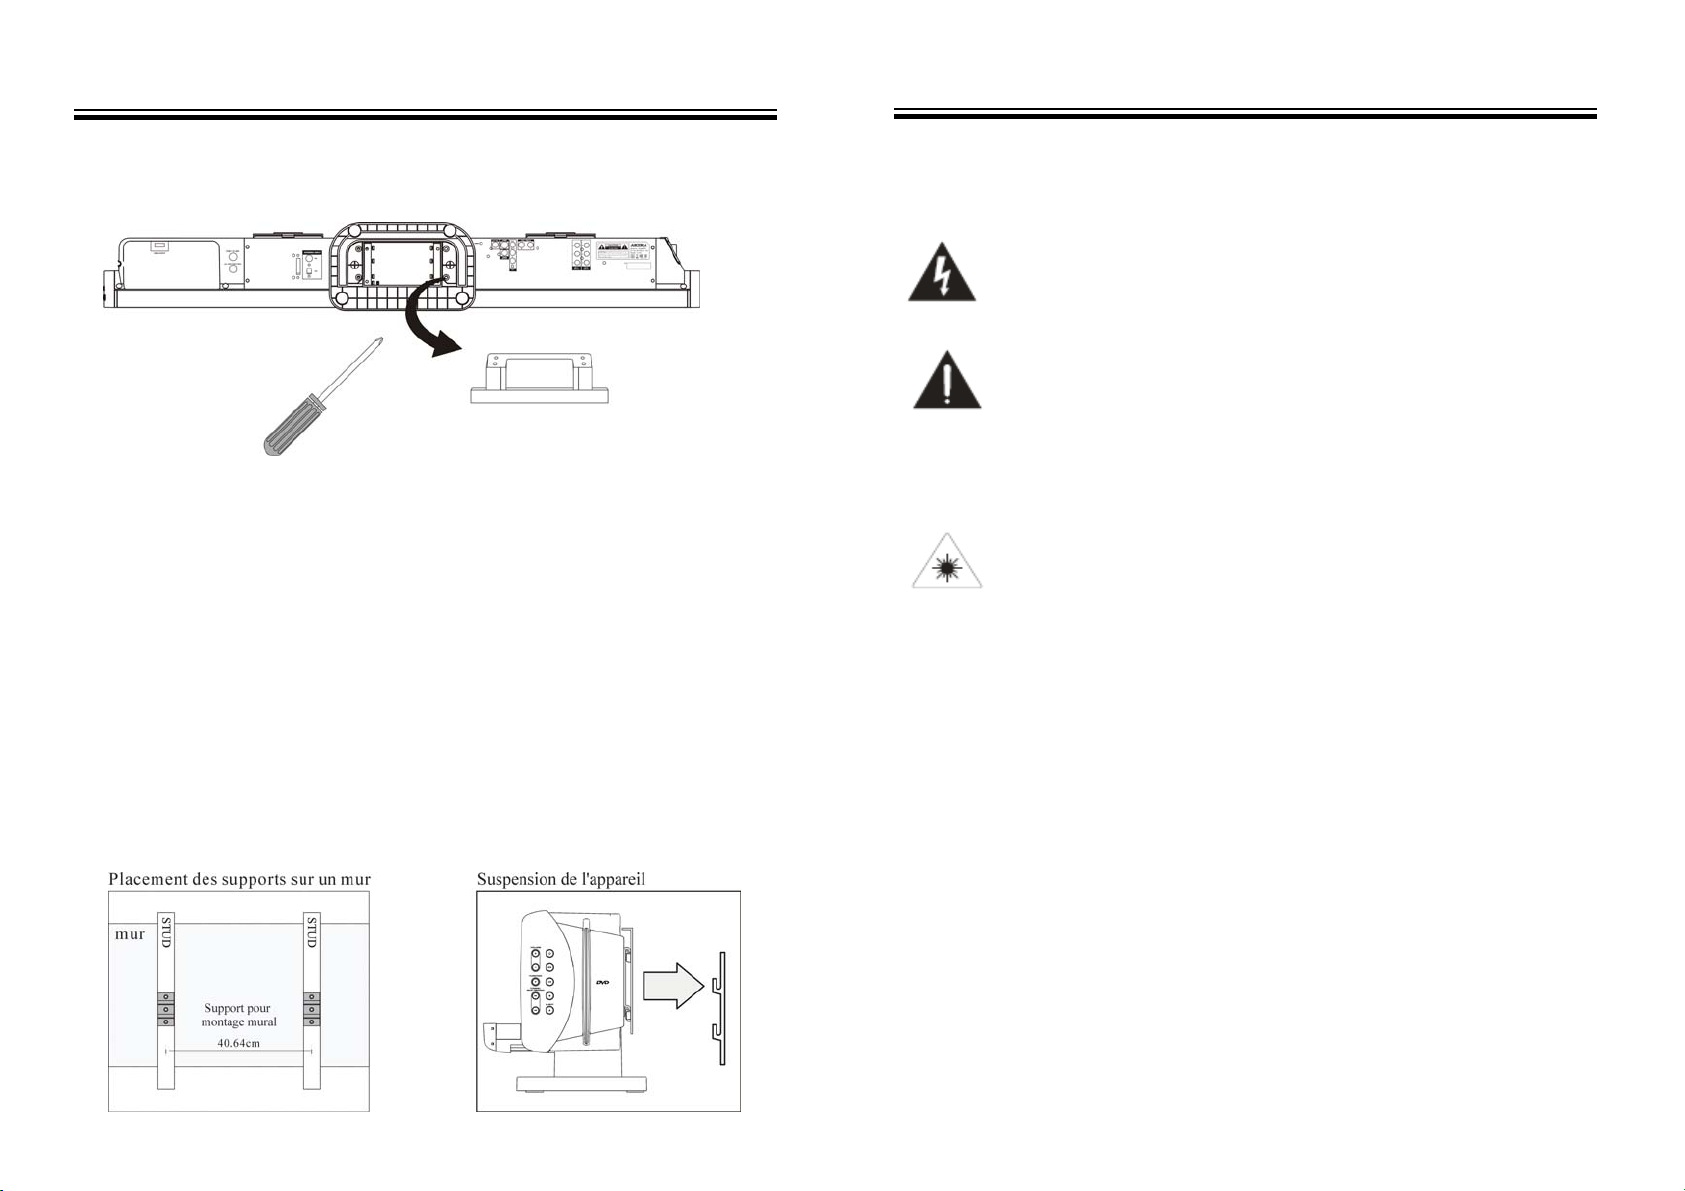
Montage mural de l’appareil
1. Utiliser un tournevis pour enlever le support pour table en dévissant les 4 vis
situées sous le support.
Le support de table doit être enlevé pour monter l’appareil sur un mur.
2. Localiser 2 tasseaux dans le mur.
La plupart des maisons comportent des tasseaux espacés de
40 centimètres. En cas de doute, contacter un installateur professionnel.
3. Utiliser les entretoises fournies pour créer un espace entre le mur et l’appareil.
L’utilisation des entretoises est facultative et n’est pas nécessaire pour garantir une
installation solide de l’appareil.
Les entretoises fournies peuvent être utilisées en combinaison pour ajuster le
projecteur sonore avec un écran plat monté au mur. Les entretoises sont de 0,635
cm, 1,27 cm, 1,905 cm ou 2,54 cm. Pour les trois plus grandes entretoises, il est
nécessaire d’acheter des vis plus longues.
4. Visser les suppo rts muraux dans deux tasseaux parallèles en utilisant trois vis
dans chaque support.
5. Mettre au même niv e au les supports muraux.
6. Suspendre 1’appareil sur les supports muraux fixés.
Pour assurer une installation solide et fiable, veuillez consulter un installateur
professionnel avant le montage mural de 1’appareil.
Avertissements et précautions
NE PAS EXPOSER L’APPAREIL À LA PLUIE OU L’HUMIDITÉ AFIN
D’ÉVITER LE RISQUE D’INCENDIE ET DE CHOC ÉLECTRIQUE.
Ce symbole, situé à l’arrière ou sous l’appareil, est destiné à avertir
l’utilisateur de la présence de « tension dangereuse » non isolée dans
le boîtier du produit, qui peut être suffisante pour présenter un risque
de choc électrique pour les personnes.
Ce symbole, situé à l’arrière ou sous l’appareil, est destiné à avertir
l’utilisateur de la présence d’instructions d’utilisation et de maintenance
(entretien) dans la documentation fournie avec l’appareil.
Ce produit utilise un laser de classe 1 pour lire des disques compacts
(CD). Ce lecteur de CD à laser est équipé d’interrupteurs de sécurité
afin d’éviter toute exposition lorsque le tiroir de CD est ouvert et les
verrouillages de sécurité sont désactivés. Un rayonnement laser
invisible est présent lorsque le capot du lecteur de CD est ouvert et le
verrouillage du système est défectueux ou désactivé. Il est très
important d’éviter une exposition directe au faisceau laser en toutes
circonstances. Ne pas tenter de désactiver ou supplanter les
interrupteurs de sécurité.
Pour réduire le risque de choc électrique, ne pas retirer le couvercle (ou l’arrière).
Aucun composant à l’intérieur du boîtier ne peut être réparé. Dans un tel cas,
contactez un technicien de maintenance qualifié.
AVERTISSEMENT : des modifications de cet appareil non expressément
approuvées par la partie responsable de la conformité peuvent annuler le droit
d’utilisation de l’appareil.
AVERTISSEMENT : danger d’explosion si les piles de la télécommande ne sont
pas correctement installées. Les piles doivent être remplacées exclusivement par
des piles de même type ou équivalent.
AVERTISSEMENT : La pile AAA de la télécommande contient des substances
chimiques dangereuses. Elle ne doit pas être jetée avec les déchets ménagers mais
recyclée ou éliminée en tant que déchet dangereux.
FR 25
FR 2
Page 19

Avertissements et précautions
AVERTISSEMENT : les piles au lithium-ion, comme toutes les batteries
rechargeables, sont recyclables et doivent être recyclées. Les piles ne doivent
jamais être éliminées dans les déchets ménagers mais soumises à une collecte
spéciale. Contacter les autorités locales pour connaître les pratiques d’élimination
ou de recyclage des piles dans votre région. Elles ne doivent pas être incinérées
étant donné qu’elles peuvent exploser.
AVERTISSEMENT : l’utilisation de cet appareil à proximité d’un éclairage
fluorescent peut causer des interférences avec l’utilisation de la
télécommande. Si l’appareil présente un comportement irrégulier,
éloignez-vous de tout éclairage fluorescent qui peut en être la cause.
REMARQUE : cet appareil génère, utilise et peut émettre de l’énergie à
radiofréquence et, s’il n’est pas installé et utilisé conformément aux instructions,
peut causer des interférences avec les radiocommunications. Cependant, il ne peut
être garanti qu’aucune interférence ne se produira dans une installation particulière.
Si cet appareil cause des interférences avec la réception de radio ou de télévision, ce
qui peut être déterminé en éteignant et en rallumant l'appareil, il est recommandé à
l’utilisateur de tenter de corriger l’interférence par une ou plusieurs des mesures
suivantes :
• Réorienter ou déplacer l’antenne de réception.
• Augmenter la distance entre l’appareil et le récepteur.
• Brancher l’appareil à une prise secteur d’un circuit
* Ne pas associer des piles anciennes et neuves.
* Ne pas associer des piles alcalines, standard (carbone-zinc) ou
différent de celui auquel le récepteur est branché.
• Pour obtenir de l’aide, contacter votre fournisseur ou un technicien de
radio/TV expérimenté.
rechargeables (ni-cad, ni-mh, etc.).
Menu de configuration DVD
OSD Language
Le paramètre OSD Language permet de
sélectionner la langue d’affichage à l’écran et
du menu de configuration.
Aspect Ratio
Le paramètre Aspect Ratio permet de
sélectionner les formats 4:3 Letterbox, 4:3
Panscan et 16:9 Widescreen.
TV System Le menu TV System permet de
sélectionner le système utilisé par le téléviseur
raccordé au lecteur.
Video Output
Le paramètre Video Output permet de
sélectionner la sortie vidéo en composantes o u
HD (HDMI).
Night Mode
Activer ce paramètre pour limiter la plage
dynamique de la sortie audio de l’appareil.
Use Default Settings
Cette option permet de restaurer les réglages
d’usine de l’appareil.
Screen Saver
Cette option permet d’activer / désactiver
l’économiseur d’écran.
FR 3
FR 24
Page 20

S-Video.
Sortie vidéo en composantes -DVD Uniquement-
L’utilisation de la sortie vidéo en composantes requiert un câble vidéo en
composantes (non fourni).
1. Raccorder un câble vidéo en composantes à la sortie vidéo en composantes
sur l’appareil.
2. Raccorder l’autre extrémité du même câble vidéo en composantes à l’entrée
vidéo en composantes sur un écran.
3. Ajuster les réglages d’entrée de l’écran pour afficher la vidéo provenant de
l’entrée en composantes connectée.
4. Le signal vidéo lu depuis un DVD chargé est alors affiché sur l’écran raccordé
et le signal audio du DVD est lu sur l’appareil.
Sortie S-Video -DVD, iPod-
L’utilisation de la sortie S-Video requiert un câble S-Video.
1. Raccorder un câble S-Video à la sortie S-Video sur l’appareil.
2. Raccorder l’autre extrémité du même câble S-Video à l’entrée S-Video sur un
écran.
3. Ajuster les réglages d’entrée de l’écran pour afficher la vidéo provenant
de l’entrée S-Video connectée.
4. Le signal vidéo lu depuis un iPod connecté ou un DVD est alors affiché sur
l’écran raccordé et le signal audio de l’iPod connecté ou du DVD est lu sur
l’appareil.
Remarque : la sortie S-Video ne prend pas en charge la haute définition (HD)
(720p et 1080i).
Sortie vidéo composite -DVD, iPod ou entrées AV-
L’utilisation de la sortie vidéo composite requiert un câble vidéo RCA (non fourni).
1. Raccorder un câble vidéo RCA à la sortie vidéo composite sur l’appareil.
2. Raccorder l’autre extrémité du même câble vidéo RCA à l’entrée vidéo
composite sur un écran.
3. Ajuster les réglages d’entrée de l’écran pour afficher la vidéo provenant de
l’entrée vidéo composite connectée.
4. Le signal vidéo lu depuis un iPod connecté est alors affiché sur l’écran raccordé
et le signal audio de l’iPod connecté est lu sur l’appareil.
Remarque :
1. La sortie vidéo composite ne prend pas en charge la haute définition (HD) (720p et
1080i).
2. Un iPod peut transmettre un signal vidéo uniquement depuis une sortie composite et
FR 23
Instructions de sécurité importantes
1. Lire les instructions - Vous devez prendre connaissance de toutes les
instructions d’utilisation avant d’utiliser l’appareil.
2. Conserver les instructions - Vous devez conserver les instructions d’utilisation
pour référence future.
3. Suivre les instructions - Respecter toutes les instructions de fonctionnement et
d’utilisation.
4. Nettoyage - Débrancher l’appareil de la prise secteur avant de le nettoyer.
Ne pas utiliser des nettoyants liquides ou des nettoyants en aérosol.
Utiliser un chiffon humide pour le nettoyage.
5. Accessoires - Ne pas utiliser des accessoires non recommandés
par le fabricant du produit ; ceux-ci peuvent présenter des risques.
6. Eau et humidité - Ne pas utiliser ce produit à proximité d’eau - par
exemple, près d’une baignoire, un lavabo, un évier ou une cuve de
lessivage dans une cave humide, ou à proximité d’une piscine, etc.
7. Accessoires - Ne pas placer ce produit sur un chariot instable, un trépied, un
support ou une table. Le produit peut tomber et causer des blessures graves à
un enfant ou un adulte et l’appareil peut être gravement endommagé. Utiliser
uniquement le chariot, le pied, le trépied, le support ou la table spécifiés par le
fabricant, ou vendus avec l’appareil. Tout montage du produit doit être
effectué conformément aux instructions du fabricant avec un accessoire de
montage recommandé par le fabricant.
8. Déplacer le produit sur un chariot avec précaution. Des arrêts
brusques, une force excessive et des surfaces irrégulières peuvent
causer la chute de l’appareil et du chariot.
FR 4
Page 21

Instructions de sécurité importantes
9. Ventilation - Des logements et des ouvertures dans le boîtier sont destinés à
permettre la ventilation et assurer un fonctionnement fiable du produit et
protéger celui-ci contre les surchauffes et ces ouvertures ne doivent pas être
bouchées ou recouvertes. Les ouvertures ne doivent jamais être bouchées en
plaçant le produit sur un lit, un canapé, un tapis ou une autre surface similaire.
Ce produit ne doit pas être placé dans une installation intégrée telle qu’une
bibliothèque ou un casier à moins qu’une ventilation appropriée soit assurée ou
que les instructions du fabricant aient été respectées.
10. Sources d’alimentation - Ce produit doit être utilisé exclusivement avec le type
de source d’alimentation indiqué sur le marquage. Si vous n’êtes pas sûr(e) du
type d’alimentation de votre domicile, consulter le fournisseur du produit ou
votre fournisseur d’électricité local. Pour les produits destinés à être alimentés
par batterie ou d’autres sources, consulter les instructions d’utilisation.
11. Mise à la terre ou polarité - Ce produit est équipé d’une prise de terre à trois
conducteurs avec une troisième broche de mise à la terre. Cette prise ne peut
être branchée que sur une prise femelle mise à la terre. Il s’agit d’une mesure de
sécurité. Si vous ne pouvez pas insérer le connecteur dans la prise femelle,
contacter votre électricien pour remplacer votre prise femelle obsolète. Ne pas
démonter le dispositif de sécurité de la prise de terre.
12. Protection du câble d’alimentation - Les câbles d’alimentation doivent être
disposés de manière à éviter de marcher dessus ou qu’ils soient pincés par des
objets placés sur ou contre ceux-ci, en particulier au niveau des connecteurs,
des prises de courant et des emplacements où ils sortent du produit.
13. Connecteur de protection - Le produit est équipé d’un connecteur accessoire
protégé contre les surtensions. Il s’agit d’une mesure de sécurité. Consulter le
manuel d’utilisation pour remplacer ou réinstaller le dispositif de protection. Si
le connecteur doit être remplacé, veiller à ce que le technicien de maintenance
utilise un connecteur de rechange spécifié par le fabricant ayant la même
protection contre les surtensions que le connecteur original.
14. Mise à la terre de l’antenne extérieure - Si une antenne extérieure est connectée
au récepteur, veiller à ce que le système d’antenne soit relié à la terre afin de le
pro téger contre les surtensions et l’accumulation d’électricité statique.
Sortie HDMI -DVD Uniquement-
L’utilisation de la sortie HDMI requiert un câble HDMI (non fourni).
1. Raccorder un câble HDMI à la sortie HDMI sur l’appareil.
2. Raccorder l’autre extrémité du même câble HDMI à l’entrée HDMI sur un écran.
3. Ajuster les réglages d’entrée de l’écran pour afficher la vidéo provenant de l’entrée
HDMI connectée.
4. Si l’écran raccordé comporte des haut-parleurs intégrés, passer à la
section audio des réglages de l’écran et désactiver les haut-parleurs
intégrés.
5. Le signal vidéo lu depuis un DVD chargé est alors affiché sur l’écran raccordé
et le signal audio du DVD est lu sur l’appareil.
Remarque : aucune sortie CVBS ou S-Video lorsque le DVD est configuré sur
la sortie HDMI
Résolution DVD VCD XVID
480i
480p NTSC uniquement NTSC uniquement NTSC uniquement
576i PAL uniquement PAL uniquement PAL uniquement
576p PAL uniquement PAL uniquement PAL uniquement
720p
1080i
× × ×
9 9 9
9 9 9
FR 5
FR 22
Page 22

Utilisation de l’entrée auxiliaire
1.Brancher une extrémité d’un câble RCA dans l’entrée Aux Input sur
l’appareil.
2.Raccorder l’autre extrémité du câble à la sortie audio/casque sur un lecteur
MP3 ou une autre source audio.
3.Appuyer sur la touche Power pour mettre l’appareil sous tension.
4.Appuyer sur la touche Function pour faire passer l’appareil en mode AUX.
5.Le signal audio lu depuis le lecteur MP3 ou l’autre source audio peut être
entendu sur l’appareil.
En cas de raccordement à la sortie casque d’une source audio, il peut être
nécessaire d’ajuster les réglages de volume de la source pour obtenir un son
optimal.
Entrées AV 1 et AV 2
L’utilisation des entrées AV requiert un câble RCA.
Remarque : lors du raccordement de deux produits à l’aide d’un câble RCA,
associez les connecteurs mâles et femelles de même couleur. (Rouge à rouge,
blanc à blanc et jaune à jaune).
1.Raccorder un câble RCA aux entrées AV1 ou AV2 sur l’appareil.
2.Raccorder l’autre extrémité du même câble RCA aux sorties vidéo et
audio sur un décodeur ou une console de jeu.
3.Appuyer sur la touche Function pour faire passer l’appareil en mode AV1 ou
AV2.
4.Les signaux audio et vidéo du décodeur raccordé sont lus sur l’appareil. Le signal
vidéo doit être transmis depuis l’appareil à un écran afin de le visualiser.
Instructions de sécurité importantes
Voir la figure :
15. Foudre - Afin de mieux protéger ce produit lors d’un orage ou lorsqu’il n’est
pas utilisé pendant de longues périodes, débrancher celui-ci de la prise secteur
et déconnecter l’antenne ou le câble. Ceci évite que le produit soit
endommagé par la foudre et les surtensions de ligne d ’al imentation.
16. Lignes d’alimentation - Ne pas placer une antenne extérieure à proximité de
lignes électriques aériennes ou d’autres circuits d’éclairage ou d’alimentation
électrique, ou à un emplacement où elle peut tomber sur ces lignes ou circuit s
d’alimentation. Lors de l’installation d’une antenne extérieure, prendre toutes
les précautions pour éviter d’entrer en contact avec de telles lignes ou circuits
étant donné que cela peut être mortel.
17. Surtension - Ne pas surcharger les prises secteur, les rallonges ou les prises
secteur intégrées étant donné que ceci peut causer un incendie ou un choc
électrique.
18. Introduction d’objets et de liquides - Ne jamais pousser des objets d’un type
quelconque dans ce produit par l’intermédiaire des ouvertures étant donné
qu’ils peuvent entrer en contact avec des points de tension dangereux o u
court-circuiter des composants et causer un incendie ou un choc électrique. Ne
jamais renverser de liquide quelconque sur le produit.
19. Entretien - Ne jamais tenter de réparer vous-même ce produit ;
l’ouverture ou le retrait des couvercles peut vous exposer à une tension
dangereuse ou à d’autres dangers. La maintenance doit être effectuée par
du personnel de maintenance qualifié.
20. Dommages nécessitant une réparation - Débrancher l’appareil de la prise
murale et contacter du personnel de maintenance qualifié dans les cas
suivants :
a) Lorsque le câble ou la prise d’alimentation est endommagé.
FR 21
FR 6
Page 23

uctions de sécurité
tes
b
Instr
) Si du liquide a été renversé ou des objets sont tombés dans le produit.
c) Si le produit a été exposé à la pluie ou à l’eau.
d) Si le produit ne fonctionne pas normalement alors que vous respectez
les instructions d’utilisation. Régler uniquement les commandes
décrites dans les instructions d’utilisation ; un réglage incorrect
d’autres commandes peut endommager l’appareil et peut nécessiter
une intervention importante d’un technicien qualifié pour restaurer le
fonctionnement normal du produit.
e) Si le produit est tombé ou a été endommagé d’une façon quelconque.
f) Lorsque le produit présente un changement de performances notable - ceci
indique qu’une opération de maintenance est nécessaire.
21. Pièces de rechange - Si des pièces de rechange sont nécessaires, veiller à ce
que le technicien de maintenance utilise des pièces de rechange spécifiées par
le fabricant ou ayant les mêmes caractéristiques que la pièce originale. Des
remplacements non autorisés peuvent causer des incendies, des chocs
électriques ou d’autres dangers.
22. Contrôle de sécurité - Après toute maintenance ou réparation de ce produit,
demander au technicien d’effectuer des contrôles de sécurité afin de
déterminer que le produit est dans un état de fonctionnement correct.
23. Montage mural ou au plafond - Le produit doit être monté sur une
paroi ou un plafond conformément aux recommandations du
fabricant.
24. Chaleur - L’appareil ne doit pas être installé à proximité de sources de
chaleur telles que des radiateurs, registres de chaleur, cuisinières ou
d’autres appareils (y compris des amplificateurs) qui génèrent de la
chaleur.
importan
Réglages de l’égaliseur
1. Flat : lorsque le paramètre EQ est en mode FLAT, vous pouvez appuyer sur
les touches TREBLE / BASS sur la télécommande pour créer un effet sonore
de votre choix.
2. Si le mode DVD 5.1 est sélectionné, vous obtenez un effet sonore True 5.1
Channel.
Remarque : veiller à ce que la sortie DVD AUDIO soit définie à 5.1.
Vous pouvez appuyer sur la touche AUDIO sur la télécommande
pour sélectionner la sortie audio.
3.Appuyer sur la touche EQ sur la télécommande pour faire défiler les
options prédéfinies de l’égaliseur.
4.Le mode JAZZ permet d’obtenir un effet sonore jazz.
5.Le mode POP produit un effet sonore adapté pour la musique pop.
6.Le mode CLASSIC permet d’obtenir un effet idéal pour la
musique classique.
7.Le mode ROCK est particulièrement adapté pour la musique rock.
Réglage de la radio AM / FM
1.Mettre l’appareil sous tension en appuyant sur la touche Power.
2.Appuyer sur la touche Function pour faire passer l’appareil en mode
radio AM ou FM.
3.Utiliser les touches directionnelles droite/gauche pour régler la radio
AM/FM.
Enregistrement de stations radio AM ou FM dans la mémoire de l’appareil
1. Régler la radio AM ou FM sur la station souhaitée. Voir « Réglage de la radio
AM / FM ».
2.Une fois que la station de radio AM ou FM est atteinte, appuyer sur la touche
Memory sur la télécommande.
3.Appuyer sur les touches Preset sur la télécommande pour sélectionner un
emplacement mémoire prédéfini.
4.Appuyer sur la touche Memory pour enregistrer la station de radio AM ou FM
actuelle dans l’emplacement mémoire prédéfini.
FR 7
FR 20
Page 24

•
Réglage de l’horloge
1. L’appareil étant en mode veille, appuyer sur la touche CLOCK ; l’appareil passe en mode
de réglage d’horloge et l’écran à cristaux liquides affiche : CLK XX(heure): XX(minute)
2. Lorsque l’heure clignote sur l’écran à cristaux liquides, appuyer sur la touche de
direction Haut ou Bas pour modifier l’heure.
3. Appuyer à nouveau sur la touche CLOCK pour régler les minutes ; appuyer sur la touche
de direction Haut ou Bas pour modifier les minutes.
4. Une fois que l’heure est correctement réglée, attendez 5 secondes et l’horloge est
réglée à l'heure spécifiée.
Réglage de la minuterie
1. L’appareil étant en mode veille, appuyer sur la touche Timer ; l’appareil passe en mode
de réglage d’horloge et l’écran à cristaux liquides affiche : ON XX(heure): XX(minute)
pour activer l’heure de réveil de l’appareil.
2. Lorsque l’heure clignote sur l’écran à cristaux liquides, appuyer sur la touche de
direction Haut ou Bas pour modifier l’heure.
3. Appuyer à nouveau sur la touche Timer pour régler les minutes ; appuyer sur la touche
de direction Haut ou Bas pour modifier les minutes. Le réglage de réveil de la minuterie
est terminé.
4. Appuyer sur la touche Timer ; l’écran à cristaux liquides affiche :
OFF XX(heure): XX(minute)
5. Répéter les étapes 2 et 3. Le réglage d’arrêt de la minuterie est terminé.
6. Une fois que le réglage d’arrêt de minuterie est terminé, appuyer sur la touche Timer ;
l’écran à cristaux liquides affiche : ON
7. Pour activer la minuterie, attendre 5 secondes lorsque l’écran à cristaux liquides
affiche « ON ». Sinon, pour désactiver le réglage de minuterie appuyer à nouveau sur la
touche Timer et l’écran affiche « OFF ».
Lecture d’un CD ou d’un DVD
1. Mettre l’appareil sous tension en appuyant sur la touche Power.
2. Appuyez sur la touche Function pour faire passer l’appareil en mode DVD/CD.
3. Insérer un CD ou un DVD dans le tiroir de lecteur de DVD/CD.
4. Appuyer sur la touche Play/Pause pour démarrer la lecture d’un CD ou DVD chargé.
Pour visualiser une vidéo depuis un DVD chargé, l’appareil doit être raccordé à un écran.
Un signal vidéo peut être transmis depuis un DVD chargé uniquement par l’intermédiaire
de la sortie HDMI (lorsque « HDMI » est sélectionné dans la configuration vidéo du
menu à l’écran) et de la sortie vidéo en composantes, vidéo composite ou S-Video
(lorsque « YUV » est sélectionné dans la configuration vidéo du menu à l’écran).
Remarque : CD est affiché sur l’écran à cristaux liquides lors de la lecture de MP3 / XVID.
Liste des accessoires
Télécommande • Manuel d’utilisation
• 2 piles type AAA • Câble S-Video
• Antenne AM/FM externe • Câble AV
• Support mural
Télécommande
Câble S-Video
Câble AV
Manuel d’utilisation
Antenne AM/FM externe
2 piles type AAA
Support mural
FR 19
FR 8
Page 25

Emplacement des connecteurs et des boutons
Lecture d’un iPod
1. Connecter un iPod sur l’appareil en suivant les instructions de co nnexion d’un
iPod.
2. Appuyer sur la touche Power pour mettre l’appareil sous tension.
3. Appuyer sur la touche Function pour configurer l’appareil en mode iPod.
4. Appuyer sur la touche Play/Pause pour démarrer la lecture d’un iPod connecté.
La télécommande fournie vous permet de consulter et lire à distance tous
les contenus de médias enregistrés sur l’iPod connecté.
Un iPod connecté peut transmettre une sortie vidéo uniquement
par l’intermédiaire de la sortie S-Video et de la sortie vidéo
composite.
Pour regarder un contenu vidéo sur un iPod connecté, le paramètre TV
Out de l’iPod doit être activé ou « Ask ».
FR 9
FR 18
Page 26

Connexion d’un iPod
1. Localiser le socle numéroté qui correspond à l'iPod à connecter.
Chaque support fourni comporte un numéro indiquant avec quel modèle d’iPod le
support est compatible ; consulter le tableau ci-après pour identifier le support
requis.
2. Appuyer sur la touche Power pour mettre l’appareil sous tension.
3. Appuyer sur la touche Function pour configurer l’appareil en mode iPod.
4. Appuyer sur la touche Eject pour ouvrir le capot d’iPod sur l’appareil.
5. Insérer le support dans le socle pour iPod.
Lors de l’insertion d’un iPod nano (première ou deuxième génération), faire
coulisser le raccord de socle sur l’appareil de sorte qu’il soit aligné avec
l’ouverture sur l’iPod nano (première ou deuxième génération).
6. Raccorder l’iPod au connecteur d’iPod à l’intérieur du socle pour iPod.
Une fois qu’un iPod est raccordé au socle pour iPod, l’appareil lit et charge
l’iPod connecté.
Emplacement des connecteurs et des boutons
FR 17
FR 10
Page 27

des co
des
Définitions
1 Affichage à cristaux liquides
Cet écran permet d’afficher l’heure, la station de radio AM ou FM et la
fonction en cours de 1’appareil.
2 Bouton EQ
Appuyer sur le bouton EQ pour sélectionner les réglages de l’égaliseur de
l’appareil : DVD5.1, CLASSIC, JAZZ, ROCK, FLAT.
3 Interrupteur d’alimentation
Appuyer sur ce bouton pour mettre l’appareil sous tension/à l’arrêt.
4 Boutons de volume
Appuyer sur les boutons de volume pour régler le volume de la sortie audio de
l’appareil.
5 Bouton Function
Appuyer sur le bouton Function pour basculer entre les modes DVD, iPod,
AUX, AV1, AV2, AM et FM.
6 Boutons de réglage/saut/recherche
Utiliser ces boutons pour régler la radio AM/FM.
Appuyer sur les boutons de réglage/saut/recherche pour accéder directement à
des pistes ou chapitres sur un iPod connecté ou un CD ou DVD chargé.
Appuyer sur les boutons de réglage/saut/recherche pour accéder
directement à des pistes ou chapitres sur un iPod connecté ou un CD ou
DVD chargé.
7 Bouton d’éjection
Appuyer sur le bouton d’éjection pour éjecter un CD ou un DVD en mode DVD.
Appuyer sur le bouton d’éjection pour ouvrir ou fermer le socle moto risé
pour iPod en mode iPod.
8 Bouton d’arrêt
Appuyer sur le bouton d’arrêt pour arrêter la lecture d’un CD ou d’ un DVD.
9 Bouton de lecture/pause
Appuyer sur le bouton de lecture/pause pour lire ou mettre en pause un iPod
connecté ou un CD ou DVD chargé.
10 Supports muraux
Utiliser les supports muraux pour fixer l’appareil à une paroi.
11 Lecteur de CD/DVD
Le lecteur de CD/DVD lit les DVD/DVD+/-R/RW, CD/CD-R/ RW et disques
d’images JPEG.
12 Support pour table
Le support pour table peut être détaché de l’appareil pour montage mural ou
rester fixé afin de servir de support pour l’appareil.
mman
Alimentation de l’appareil/remplacement du fusible
L’appareil doit être alimenté en le raccordant à une prise secteur C.A. standard
(220-240 V / 50 Hz) à l’aide du câble d’alimentation C.A.
Remplacement du fusible
Si l’appareil ne s’allume pas, tenter de remplacer le fusible. Un fusible standard
T2L 250V peut être acheté dans la plupart des commerces
d’informatique/électronique.
1. Débrancher l’appareil de la prise secteur C.A. pour le mettre totalement hors
tension.
2. Utiliser un tournevis à tête plate, une pièce de monnaie, pousser doucement et
tourner dans le sens antihoraire pour enlever le compartiment de fusible et le fusible
de leur logement.
3. Enlever le fusible usagé du compartiment de fusible en plastique et éliminer
celui-ci.
4. Placer le fusible neuf (T2L 250V) dans le compartiment de fusible en plastique.
5. Pousser doucement le compartiment de fusible dans le logement en le tournant dans
le sens horaire.
6. Une fois que le fusible est fixé en place dans l’appareil, il est possible de rebrancher
l’appareil et de le remettre sous tension.
FR 11
FR 16
Page 28

Périphériques
23. 0-10+ : Utiliser le clavier numérique pour sélectionner une piste.
24. Touche Display : appuyer sur cette touche pour afficher le temps en mode
DVD.
25. Touche Memory : appuyer sur cette touche pour enregistrer la station
radio actuelle dans la mémoire de l’appareil.
26. CLEAR : appuyer sur cette touche pour effacer un nombre.
27. ENTER : appuyer sur cette touche pour confirmer votre choix.
28. Touche Repeat : appuyer sur cette touche pour répéter une chanson
un album ou une liste de lecture sur un iPod connecté ou un CD ou
DVD chargé.
29. TREBLE+/TREBLE- : ces touches permettent d’ajuster le niveau d’aigu
de l’appareil ; cette fonction n’est utilisable que lorsque l’option Flat de la
fonction EQ est sélectionnée.
30. VOLUME+/VOLUME- : appuyer sur ces touches pour régler le volume
sonore de l’appareil.
31. AUDIO/LANGUAGE : appuyer sur cette touche pour sélectionner la fonction
de langue.
32. EQ : appuyer sur cette touche pour basculer entre les différentes options
d’égaliseur : DVD5.1, CLASSIC, JAZZ, ROCK, FLAT.
33. ANGLE : appuyer sur cette touche pour sélectionner l’angle de lecture de DVD.
34. SUBTITLE : appuyer sur cette touche pour faire défiler les langues de sous-titres
disponibles.
35. Touche Title : appuyer sur cette touche pour retourner au menu de titre d’un
DVD chargé.
36. Touche Video : appuyer sur cette touche pour sélectionner une option de sortie
vidéo : Auto, 480p, 576p, 720p et 1080i.
37. ZOOM : appuyer sur cette touche pour agrandir une zone particulière d’une
image.
38. Touche Playlist : appuyer sur cette touche pour faire défiler les listes de
lecture sur un iPod connecté.
39. Touches Preset : appuyer sur les touches Preset pour faire défiler les
stations de radio enregistrées.
40. Touche Shuffle : appuyer sur cette touche pour lire des pistes sur un CD ou un
iPod dans un ordre aléatoire.
Définitions des commandes
13 Fusible (T 2L 250V)
14 Sortie HDMI (DVD uniquement)
La sortie HDMI peut être utilisée pour raccorder l’appareil à un écran haute
définition.
15 Sortie de caisson de basse
Utiliser cette sortie pour raccorder un caisson de basse externe à l’appareil.
16 Entrée d’antenne FM
Utiliser cette entrée pour raccorder une antenne FM à l’appareil.
17 Entrée d’antenne AM
Utiliser cette entrée pour raccorder une antenne AM à l’appareil.
18 Sortie S-Video (DVD ou iPod)
La sortie S-Video peut être utilisée pour raccorder l’appareil à un écran à
l’aide d’un câble S-Video.
19 Entrées AV 1 et AV 2
Utiliser les entrées AV 1 et AV 2 pour raccorder un lecteur DVD ou un
décodeur à l’appareil.
20 Entrée auxiliaire
Utiliser l’entrée auxiliaire pour raccorder un lecteur MP3 ou une autre source
audio à l’appareil.
21 Sortie vidéo en composantes (DVD uniquement)
Utiliser la sortie vidéo en composantes pour raccorder l’appareil à un
écran à l’aide de câbles vidéo en composantes.
22 Sortie vidéo composite (DVD, iPod ou entrées AV)
Utiliser la sortie vidéo composite pour raccorder l’appareil à un écran à
l’aide de câbles vidéo RCA.
23 Sortie vidéo (DVD ou iPod)
Utiliser la sortie S-Video pour raccorder l’appareil à un écran à l’aide
d’un câble vidéo.
FR 15
FR 12
Page 29

ques
Périphéri
1. Touche Power : appuyer sur cette touche pour mettre l’appareil sous tension/à
l’arrêt.
2. Touche Sleep/Snooze : appuyer de manière répétée sur cette touche pour régler le
minuteur sommeil entre 10 et 120 minutes.
3. Touche Timer : appuyer sur la touche Timer pour activer/désactiver la
minuterie de l’appareil.
4. Clock : appuyer sur cette touche pour régler l’heure.
5. Touche Go To : appuyer sur cette touche et entrer un temps spécifique à l’aide du
clavier numérique pour accéder directement à ce temps sur le DVD chargé.
6. Touches d’album : appuyer sur les touches d’album pour faire défiler les albums
sur un iPod connecté.
FR 13
Périphériques
7. Touches Chapter : appuyer sur les touches de chapitre pour faire défiler les
chapitres sur un iPod connecté.
8. Touche SetUp : appuyer sur la touche SetUp pour ouvrir le menu de
configuration de l’appareil.
9. Touche A-B : appuyer une fois sur la touche A-B pour marquer un point initial
pendant la lecture d’un DVD. Appuyer une deuxième fois sur la touche pour
marquer un point final.
Ensuite, l’appareil lit en boucle cette section de vidéo du DVD. Appuyer sur la
touche A-B une troisième fois pour annuler cette fonction.
10 Menu DVD/iPod : appuyer sur la touche de menu DVD/iPod pour afficher le
menu en mode DVD.
Appuyer sur la touche de menu DVD/iPod pour afficher le menu précédent sur
un iPod connecté.
11. BASS+/BASS- : ces touches permettent d’ajuster le niveau de basses de
l’appareil ; cette fonction n’est utilisable que lorsque l’option Flat de la fonction
EQ est sélectionnée.
12. Touche Function : appuyer sur la touche Function pour basculer entre les
modes DVD, iPod, AUX, AV1 , AV 2, AM et FM.
13. Touche Slow : appuyer sur cette touche pour lire un DVD au ralenti.
14. Bouton de lecture/pause : Appuyer sur le bouton de lecture/pause pour lire ou
mettre en pause un iPod connecté ou un CD ou DVD chargé.
15. Touche Step : appuyer de manière répétée sur cette touche pour lire un DVD
image par image.
16. STOP : appuyer sur cette touche pour arrêter la lecture d’un DVD.
17. REV : appuyer sur cette touche pour revenir en arrière.
18. FWD : appuyer sur cette touche pour aller vers l’avant.
19. PREVIOUS : appuyer sur cette touche pour lire le titre précédent.
20. NEXT : appuyer sur cette touche pour lire le titre suivant.
21. Touche Eject : appuyer sur cette touche pour éjecter un CD ou un DVD en
mode DVD ou le socle iPod motorisé en mode iPod.
22. MUTE : appuyer une fois sur cette touche pour couper le son et appuyer à
nouveau pour réactiver le son.
FR 14
Page 30

Garantía ES
Estimado Cliente:
Le agradecemos la compra de este producto AKIRA™ y su confianza en nuestra empresa. Este
producto cumple con los requisitos aplicables de seguridad y ha sido sometido a pruebas estrictas
durante la fabricación.
Sin embargo, en caso de un posible defecto, el producto o la(s) parte(s) defectuosa(s) (excluyendo
los accesorios y artículos de consumo) serán reparados gratuitamente (mano de obra, partes y
transporte dentro de las fronteras de los países mencionados a continuación) o, a discreción de
TM
AKIRA
, cambiados por un artículo similar, siempre que se haya realizado la devolución en los
24 (veinticuatro) meses posteriores a la fecha de compra inicial (fecha de recepción), el defecto
sea en el material y/o mano de obra y se haya comprado en alguno de los siguientes países:
Francia (territorio metropolitano), España, Italia, Portugal, Bélgica (territorio) o en tiendas libres de
impuestos en los países mencionados.
Esta garantía sólo se llevará a cabo bajo la presentación de la factura original o el recibo de
pago, indicando la fecha de compra y el nombre del comerciante, y de la presente garantía con
el tipo de producto y el número de serie. La ejecución de la garantía puede ser rechazada si la
factura, el recibo o la garantía se encuentra alterada de alguna manera, borrosa o se ha vuelto
ilegible desde su compra original.
Registro online
Para agilizar el servicio de la garantía, registre su producto AKIRA™ dentro del periodo de 30
días tras la compra en http://www.akiraeurope.com
Esta garantía no se aplica a lo siguiente:
1. Daños causados por accidentes incluyendo, aunque sin limitarse exclusivamente a estos:
relámpagos, fuego o agua.
2. Daños al producto resultantes de la negligencia, el mal uso o el uso en contra de las
instrucciones del manual de funcionamiento, reparaciones y/o instalaciones llevadas a
cabo erróneamente (esta lista no es exhaustiva). En particular no se garantiza ningún panel
quemado de la visualización de imágenes inmóviles durante mucho tiempo tales como
entradas informáticas o logos de canales, como se describen en el manual de
funcionamiento.
3. Modificaciones, adaptaciones o alteraciones del producto para funcionar en otro país
para el cual no fue diseñado ni fabricado originariamente, o cualquier daño resultante de
tales modificaciones.
4. Cualquier otro uso que no sea el uso ordinario de un cliente corriente.
5. El defecto de pixeles sueltos cuando el número de píxeles defectuosos sea menor a los
siguientes:
Píxeles oscuros: 7 Píxeles brillantes o parpadeantes: 3 Total de píxeles defectuosos: 8
Si Vd. tiene alguna duda que su vendedor no pueda solventar, contacte con la línea de acceso
directo de AKIRA (teléfono internacional gratuito: 00 800 800 25 472).
AKIRA™ es una marca registrada de TT International, Inc.
Estas afirmaciones no afectan a los derechos establecidos por ley como consumidor bajo la
legislación nacional vigente aplicable, ni a los derechos como consumidor hacia el comerciante
que le vendió el producto.
En caso de necesidad de algún servicio, dentro o no del período de garantía, contacte con el
comerciante que le vendió el producto.
Para su beneficio propio, le aconsejamos que lea el folleto de instrucciones de su producto
AKIRA™ detenidamente antes de contactar con su comerciante o centro de servicios.
Page 31

Ali
Advertencias y precauciones....................................................................................2-3
Instrucciones de seguridad importantes...................................................................4–7
Lista de accesorios.......................................................................................................8
Localización de conectores y botones....................................................................9-10
Definiciones de los controles................................................................................11-12
Periféricos.............................................................................................................13-15
Conexión eléctrica de la unidad/Sustitución del fusible............................................16
Acoplamiento en la base de un iPod..........................................................................17
Reproducción desde un iPod.............................. ... ... ... ...............................................1 8
Ajuste del reloj / Ajuste del temporizador / Reproducción de un CD o DVD...........19
Ajustes del ecualizador / Sintonización de la radio AM / FM
/ Almacenamiento de emisoras de radio AM o FM en la memoria de la unidad......20
Utilización de la Entrada Auxiliar / Entradas AV 1&AV2........................................21
HDMI Output (Salida HDMI)...................... .................................................. .... ... ....22
Salida del componente de video / Salida S-Vídeo /Salida de vídeo compuesto........23
Menú de configuración del DVD...............................................................................24
Montaje de la unidad en una pared............................................................................25
Especificaciones........................................................................................................26
CONTENIDO
SP 1 SP 26
Especificaciones
mentación Eléctrica.................................................................CA~220-240V/50Hz
Consumo de potenc...............................................................................................120W
Potencia de salida................................... ... ... ..........................................15W X 5+40W
Impedancia de altavoces (Satélite) .....................................................................6 Ohm
Impedancia de altavoces (Subwoofer) .................... ............................................8 Ohm
S/N: ....................................................................................................................≥ 60dB
Respuesta de frecuencia (canales del Subwoofer) ........................................30~250Hz
Respuesta de frecuencia (Canales izquierdo/derecho) ......... .... ... ... ............250~20KHz
Separación I/D (1kHz) .......................................................................................≥ 60dB
Balance I/D (Estéreo) ..........................................................................................≤ 2dB
Bajos.................................. ................................................................. (100Hz)±14dB
Agudos.................................................................................. .. .... ........ (10KHz)±14dB
Reproductor de DVD................................Compatibilidad
Reproductor de DVD................................ ....................................HDMI
SALIDA de Vídeo Componente de íideo
Reproductor iPod..............................................................................................S-Video
AUX IN (ENTRADA AUX).................. ... ...........................L/R IN (ENTRADA I/D)
AV1~AV2 IN (ENTRADA AV1~AV2)............ ... ..Composite video IN (ENTRADA
Margen de frecuencia FM............................. .. .... ....................................87,5~108MHz
Margen de frecuencia AM............................ .. ........................................522~1620KHz
TAMAÑO............................. .. .... ... ...............................................942 x 200 x 138 MM
PESO NETO...................................................................................................11,45 KG
PESO BRUTO..................................................................................................14,3 KG
CDR/CD/DVD/DVD+R/DVD-R DVD RW
S-Video
Vídeo compuesto
L/R IN (ENTRADA I/D)
Vídeo compuesto
Vídeo compuesto)
Page 32

Montaje de la unidad en una pared
1. Utilice un destornillad or para desmontar el Soporte de mesa destornillando los
4 tornillos localizados en el lado inferior del soporte.
El Soporte de mesa se debe desmontar para montar la unidad en una pared.
Localice 2 montantes en la pared.
2.
La mayoría de las casas tienen los montantes separados a una distancia de 40,64 cms
entre centros. En caso de duda, consulte con un instalador profesional.
3. Utilice los espaciadores incl uidos para crear espacios entre la pared y la
unidad. El uso de los espaciadores es opcional, y no es necesario para asegurar
un instalación resistente de la unidad.
Los espaciadores incluidos se pueden utilizar de forma combinada para ajustar la
distancia de la unidad desde la pared para que se corresponda con un TV de Pantalla
Plana montado en la pared. Los espaciadores son de 0,635 cm, 1,27 cm, 1,905 cm,
Cuando se utilice cualquiera de los espaciadores, se deben comprar tornillos más
largos.
4. Atornille los soportes de montaje en la pared en dos montantes paralelos utilizando
tres tornillos en cada soporte.
5. Nivele los soportes de montaje en la pared, entre sí.
6. Cuelgue la unidad en los soportes fijados de montaje en la pared.
Para asegurar una instalación fiable y resistente, consulte con un instalador
profesional antes de montar la unidad en la pared.
Colocación del soporte en la pared
Fijación de la unidad
Advertencias y precauciones
PARA EVITAR PELIGRO DE INCENDIOS O SHOCK ELÉCTRICO, NO
EXPONGA ESTE APARATO A LA LLUVIA O A LA HUMEDAD
Este símbolo, situado en la parte trasera o inferior de la unidad, tiene la
finalidad de alertar al usuario de la presencia de Tensión peligrosa sin
aislar en el interior de la carcasa del producto que puede ser de la
magnitud suficiente para constituir un riesgo de descarga eléctrica para
las personas.
Este símbolo, situado en la parte trasera o inferior de la unidad,
tiene la finalidad de alertar al usuario de la presencia de
instrucciones importantes de manejo y mantenimiento (reparación)
en el folleto de instrucciones que acompaña al aparato.
Este producto utiliza un láser de Clase 1 para la lectura de Discos
Compactos. Este Reproductor de Discos Compactos está equipado
con interruptores de seguridad para evitar la exposición cuando la
puerta del CD está abierta y los bloqueos de seguridad están
neutralizados. Existe radiación láser invisible cuando la tapa del
Reproductor de CD está abierta y los bloqueos del sistema han fallado
o están neutralizados. Es muy importante que evite la exposición
directa al haz láser en todo momento. Por favor, no intente neutralizar
o puentear los interruptores de seguridad.
Para reducir el riesgo de shock eléctrico, no desmonte la tapa (ni la parte
trasera). No hay piezas reparables por el usuario en el interior. Remita las
reparaciones al servicio técnico especializado.
ADVERTENCIA: Los cambios o modificaciones que se realicen en esta unidad
y que no hayan sido expresamente autorizados por la parte responsable de ello
podrían anular la capacidad del usuario para operar el aparato.
ADVERTENCIA: Existe peligro de explosión si las pilas del mando a
distancia se instalan incorrectamente. Sustituir las pilas solamente por otras del
mismo tipo o equivalente.
SP 25
SP 2
Page 33

Advertencias y precauciones
ADVERTENCIA: La pila AAA del mando a distancia contiene componentes
químicos peligrosos. No las arroje a la basura; recíclelas o deséchelas como
residuos peligrosos.
ADVERTENCIA: Las pilas de iones de litio, como todas las pilas recargables,
son reciclables, y deben ser recicladas. En cualquier caso, las pilas no se deben
desechar junto con los residuos domésticos, sino que están sujetas a una recogida
de residuos especiales. Póngase en contacto con las autoridades locales de su
lugar de residencia para conocer las prácticas de eliminación o reciclaje.
Nunca deben ser incineradas ya que podrían explotar.
ADVERTENCIA: El uso de esta unidad cerca de sistemas de iluminación
fluorescente puede causar interferencias en el funcionamiento del mando a
distancia. Si la unidad muestra un comportamiento errático, aléjese de cualquier
luz fluorescente que pueda haber en las cercanías, puesto que esto puede ser la
causa de las anomalías.
NOTA: Este equipo genera, utiliza y puede radiar energía de radiofrecuencia y,
si no se instala y utiliza de acuerdo con las instrucciones, puede provocar
interferencias perjudiciales para las comunicaciones radio. Sin embargo, no se
garantiza que las interferencias no ocurrirán en una instalac i ón particular. Si este
equipo no causa interferencias perjudiciales para la recepción de radio o televisión,
que se puedan determinar apagando y encendiéndolo, se recomienda al usuario que
intente corregir las interferencias por medio de una o más de las medidas siguientes:
• Reorientar o reubicar la antena receptora.
• Aumentar la separación entre el equipo y el receptor.
• Conectar el equipo a una toma de corriente de un circuito
∗ No mezcle pilas antiguas con otras nuevas
∗ No mezcle pilas alcalinas, estándar (zinc-carbono) o recargables (ni-cad, ni-mh,
diferente al que está conectado el receptor.
• Consultar al vendedor o a un técnico experimentado de radio/TV.
etc.)
Menú de configuración del DVD
OSD Language (Idioma en pantalla)
Utilice OSD Language Setting (Configuración
de idioma en pantalla) para seleccionar el
idioma de presentación en la pantalla y el menú
de configuración.
Aspect Ratio (Relación de aspecto)
Utilice Aspect Ratio Setting (Configuración de
la relación de aspecto) para cambiar entre la
relación de aspecto 4:3 Letterbox (Formato
Apaisado), 4:3 Panscan (Formato pan orámico),
y 16:9 Widescreen (Pantalla ancha).
TV System (Sistema de TV) Utilice el menú
TV System para seleccionar el sistema de
funcionamiento de la televisión conectada al
reproductor.
Video Output (Salida de vídeo)
Utilice Video Output Setting (Configuración de
salida de video) para cambiar entre salida de
Componente de video y vídeo HD (HDMI).
Night Mode (Modo nocturno)
Active Night Mode (Modo nocturno) para
limitar el rango dinámico de salida de audio de
la unidad.
Use Default Settings (Utilizar configuración
predeterminada)
Seleccione la opción Use Default Settings
(Usar configuración predeterminada) par a
devolver la unidad a su configuración original
de fábrica.
Screen Saver (Salvapantallas)
Para activar o desactivar el salvapantallas.
SP 3
SP 24
Page 34

Salida de componente de vídeo -Solamente DVD-
El uso de Component Video Output (Salida de componente de vídeo) requie re un
cable de componente de vídeo (no inclui d o) .
1. Conecte un cable de componente de vídeo a Component Video Output
(Salida de componente de vídeo) de la unidad.
2. Conecte el otro extremo del mismo cable de componente de vídeo a la
entrada de componente de una pantalla.
3. Ajuste la configuración de la entrada de la pantalla para ver el vídeo de la
entrada de componente.
4. Ahora se reproducirá en la pantalla conectada el vídeo reproducido de un
DVD cargado, y el audio se reproducirá a través de la unidad.
Salida de S-Vídeo -DVD, iPod-
El uso de S-Video Output (Salida de S-Video) requiere un cable S-Video.
1. Conecte un cable S-Video a la S-Video Output (Salida de S-Video) de la
unidad.
2. Conecte el otro extremo del mismo cable S-Video a la entrada de S-Video
(S-Video Input) de una pantalla.
3. Ajuste la configuración de la entrada de la pantalla para ver el vídeo de la
entrada S-Video conectada.
4. Ahora se reproducirá en la pantalla conectada el vídeo reproducido de un
iPod/DVD acoplado a la base, y el audio se reproducirá a través de la
unidad.
Nota: La Salida S-Video no soporta HD (720p & 1080i)
Salida de vídeo compuesto -DVD, iPod, o Entradas AV-
El uso de Composite Video Output (Salida de vídeo compuesto) requiere un cable
de vídeo RCA (no incluido).
1. Conecte un cable de vídeo RCA a Component Video Output ( Salida de
componente de vídeo) de la unidad.
2. Conecte el otro extremo del mismo cable de vídeo RCA a la entrada de
vídeo compuesto (composite video input) de una pantalla.
3. Ajuste la configuración de la entrada de la pantalla para ver el vídeo de
la entrada de vídeo compuesto conectada.
4. Ahora se reproducirá en la pantalla conectada el vídeo reproducido de un
iPod acoplado a la base, y el audio se reproducirá a través de la unidad.
Nota:
1. La Salida de Video Compuesto no soporta HD (720p & 1080i)
2. El iPod solamente puede tener salida de vídeo de Vídeo compuesto y S-Video.
Instrucciones de seguridad importantes
1. Lea las Instrucciones – Todas las instrucciones de seguridad y manejo se deben
leer antes de operar el producto.
2. Conserve las Instrucciones - Las instrucciones de seguridad y manejo deben
conservarse para consultas futuras.
3. Siga las instrucciones – Se deben seguir todas las instrucciones de seguridad y
manejo.
4. Limpieza – Desenchufe este producto de la toma de corriente antes de
limpiarlo. No utilice limpiadores líquidos ni aerosoles. Utilice un paño suave
humedecido para limpiar.
5. Accesorios – No utilice accesorios no recomendados por el fabricante
del producto ya que podrían causar situaciones de peligro.
6. Agua y humedad – No utilice este producto cerca del agua – por ejemplo,
cerca de una bañera, lavabo, fregadero o recipientes para lavar la ropa; en un
sótano con humedad, o cerca de una piscina, etc.
7. Accesorios – No coloque este producto sobre un carrito, estante, trípode, soporte o
mesa inestable. El producto puede caerse, provocando lesiones graves a un niño o
adulto, así como averías graves al mismo producto. Utilice solamente el carrito,
estante, trípode, soporte o mesa especificados por el fabricante, o vendidos con el
aparato. Cualquier montaje del producto debe seguir las instrucciones del
fabricante, y se debe utilizar un accesorio de montaje recomendado por el
fabricante.
8. Se debe tener cuidado al mover una combinación formada por el producto y
un carrito. Las detenciones de repente, la fuerza excesiva y las superficies
irregulares pueden hacer que la combinación formada por el carrito y el
aparato se vuelque.
SP 4 SP 23
Page 35

Instrucciones de seguridad importantes
9. Ventilación – Las ranuras y aberturas de la carcasa sirven para la ventilación
y para asegurar un funcionamiento fiable del producto, así como para protegerlo
de sobrecalentamientos; no se deben obstruir ni tapar estas aberturas. Las
aberturas nunca deben obstruirse poniendo el producto en una cama, sofá,
alfombrilla u otra superficie similar. Este producto no debe colocarse en una
instalación compacta como un librero o un estante cerrado a menos que se
proporcione una ventilación adecuada o se hayan cumplimentado las
instrucciones del fabricante.
10. Fuentes de alimentación – Este producto se debe manejar solamente con el
11. tipo de fuente de alimentación indicada en la etiqueta con las referencias. Si no
está seguro del tipo de fuente de alimentación de su hogar, consul t e c on el
vendedor del producto o con la compañía eléctrica local. Para productos con
funcionamiento a pilas, u otras Fuentes de alimentación, consulte las
instrucciones de funcionamiento.
12. Conexión a masa o polarización – Este producto está equipado con un enchufe de
tres cables del tipo con conexión a masa, que tiene una tercera clavija (masa).
Este enchufe solamente se conectará a una toma de corriente con toma de tierra.
Ésta es una característica de seguridad. Si no puede insertar el enchufe en la toma
de corriente, póngase en contacto con un electricista para que sustituya su toma
obsoleta. No anular la finalidad de seguridad del enchufe del tipo con conexión a
tierra.
13. Protección de cable de alimentación – Los cables de alimentación deben guiarse
de forma que sea poco probable que se pisen o que sufran pellizcos provocados
objetos colocados encima o contra ellos, prestando una atención especial a los
cables en el enchufe, tomas de corriente y puntos de salida del producto.
14. Enchufe de seguridad – El producto está equipado con un enchufe de seguridad
que tiene una protección contra sobrecargas. Ésta es una característica de
seguridad. Véase el manual de Instrucciones para la sustitución o
restablecimiento del dispositivo protector. Si se necesita una sustitución del
enchufe, asegúrese de que el técnico ha utilizado un enchufe especificado por el
fabricante que tenga la misma protección contra sobrecargas que el enchufe
original.
HDMI Output (Salida HDMI) -Solamente DVD-
El uso de HDMI Output (Salida HDMI) requiere un cable HDMI (No incluido).
1. Conecte un cable HDMI a la Salida HDMI de la unidad.
2. Conecte el otro extremo del mismo cable HDMI a la entrada HDMI (HDMI input)
de una pantalla.
3. Ajuste la configuración de la entrada de la pantalla para ver el vídeo de la entrada
HDMI conectada.
4. Si la pantalla conectada tiene altavoces incorporados, vaya a la sección
de audio de los ajustes de la pantalla y desactive los altavoces
incorporados.
5. Ahora se reproducirá en la pantalla conectada el vídeo reproducido de un DVD
cargado, y el audio se reproducirá a través de la unidad.
Observaciones: NO hay salida CVBS o S-Video cuando el DVD está en salida
HDMI.
Resolución DVD VCD XVID
480i
480p SOLAMENTE NTSC SOLAMENTE NTSC SOLAMENTE NTSC
576i SOLAMENTE PAL SOLAMENTE PAL SOLAMENTE PAL
576p SOLAMENTE PAL SOLAMENTE PAL SOLAMENTE PAL
720P
1080i
× × ×
9 9 9
9 9 9
SP 5
SP 22
Page 36

Utilización de la Entrada Auxiliar
1. Enchufe un extremo de un cable RCA en la Aux Input (Entrada
Auxiliar) de la unidad.
2. Enchufe el otro extremo del cable en la salida de audio/salida de auriculares
de un Reproductor MP3 u en otro aparato de Audio.
3. Pulse el botón Power (Encendido) para encender la unidad.
4. Pulse el botón Functi on (Función) para cambiar la unidad al modo AUX.
5. Ahora se escuchará audio reproducido desde el Reproductor MP3 u otro aparato
de Audio en la unidad. Si se conecta a la salida de auriculares de una fuente de
audio, puede que sea necesario ajustar los controles de volumen de la fuente para
obtener un sonido óptimo.
Entradas AV 1 & AV 2
El uso de las Entradas AV requiere un cable RCA.
Nota: Cuando se conecten dos productos utilizando un cable RCA, haga que se
correspondan los puertos de colores con la conexión del mismo color. (Rojo con
Rojo, Blanco con Blanco y Amarillo con Amarillo)
1. Conecte un cable RCA a las Salidas AV1 y AV2 de la unidad.
2. Conecte el otro extremo del mismo cable RCA a las salidas de vídeo y
audio de un Decodificador de TV digital o a una Unidad de Juegos.
3. Pulse el botón Function (Función) para cambiar la unidad al modo AV1 o AV2.
4. Ahora se reproducirá a través de la unidad el audio y el vídeo reproducido desde
el Decodificador de TV digital. El video debe tener salida de la unidad hacia
una pantalla pqra que se pueda ver.
Instrucciones de seguridad importantes
14. 14. Conexión a tierra de antena exterior – Si se conecta una antena exterior al
receptor, asegúrese de que el sistema de la antena está conectado a masa de manera
que proporcione la misma protección contra sobretensiones y cargas estáticas
acumuladas.
Véase la figura :
15. Caída de rayos – Para una protección adicional de este producto durante una
tormenta eléctrica, o cuando se deja desatendido y sin utilizar durante largos
periodos de tiempo, desenchúfelo de la toma de corriente y desconecte el
sistema de antena o de cable. Esto evitará daños al producto debido a las
descargas eléctricas y sobretensiones en las líneas eléctricas.
16. Líneas eléctricas – No se debe colocar un sistema de antena exterior en las
proximidades de tendido aéreo de líneas eléctricas u otros circuitos eléctricos de
alumbrado o fuerza, o donde se pueda caer en dichas líneas o circuitos. Cuando
instale un sistema de antena exterior, se deben extremar las precauciones para
evitar tocar dichas líneas o circuitos eléctricos ya que el contacto podría ser fatal.
17. Sobrecarga – No sobrecargue las tomas de corriente, alargaderas de cable o
enchufes de corriente integrales ya que puede tener como consecuencia un
riesgo de incendio o descarga eléctrica.
18. Entrada de objetos y líquido – No introduzca nunca objetos de ninguna clase en el
interior de este producto a través de las abertur as ya que pueden tocar puntos con
tensión peligrosa o provocar cortocircuitos en piezas que podrían tener como
consecuencia un incendio o descarga eléctrica. No derrame nunca líquido de
ninguna clase sobre el producto.
19. Reparaciones – No intente reparar este producto por usted mismo ya que
la apertura o desmontaje de tapas puede exponerle a tensiones peligrosas u
otros peligros. Remita las reparaciones al servicio técnico especializado.
SP 21
SP 6
Page 37

Instrucciones de seguridad importantes
15. Daños que requieran una reparación - Desenchufe este producto de la toma
de corriente y remítalo a personal técnico especializado para su reparación
en las condiciones siguientes:
a) Cuando el cable o enchufe de alimentación eléctrica esté dañado,
b) Si se ha derramado líquido, o se han introducido objetos en el interior del
21. Piezas para sustitución – Cuando se necesiten piezas para sustitución,
22. Comprobación de seguridad – A la finalización de cualquier mantenimiento o
23. Montaje en paredes o paredes – Solamente se debe montar el producto
24. Fuentes de calor – El producto debe instalarse alejado de fuentes de
producto,
c) Si el producto ha sido expuesto a los efectos de la lluvia o del agua.
d) Si el producto no funciona normalmente siguiendo las instrucciones de
manejo. Ajuste solamente aquellos controles indicados en las
instrucciones de manejo ya que un ajuste inapropiado de otros controles
puede tener como consecuencia averías y a menudo será necesaria una
gran cantidad de trabajo por parte de un técnico especializado para
devolver el producto a su funcionamiento normal.
e) Si el producto se ha caído o dañado de cualquier forma.
f) Cuando el producto muestre un cambio significativo en su funcionamiento –
esto indica la necesidad de repararlo.
asegúrese de que el técnico ha utilizado piezas especificadas por el fabricante
o que tengan las mismas características que la pieza original. Las sustituciones
con piezas no autorizadas pueden provocar un fuego, descargas eléctricas u
otros peligros.
reparación de este producto, pídale al técnico que realice comprobaciones de
seguridad para determinar que el producto está en condiciones de
funcionamiento apropiadas.
en una pared o techo de la forma recomendada por el fabri cante.
calor como radiadores, rejillas de calefacción, hornos u otros aparatos
(incluyendo amplificadores) que producen calor.
Ajustes del Ecualizador
1. Flat: Cuando la configuración del EQ está en modo FLAT, puede pulsar el botón
TREBLE/BASS (AGUDOS/BAJOS) en el mando a distancia para crear el efecto
de sonido que prefiera.
2. Una vez que haya seleccionado el modo DVD 5.1, experimentará un efecto de
sonido 5.1 canales Verdaderos.
Nota: Asegúrese de que la salida DVD AUDIO está en 5.1. Puede pulsar el
botón AUDIO del mando a distancia para seleccionar la salida de audio.
3. Pulse el botón EQ del mando a distancia para presentar consecutivamente las
opciones preseleccionadas del Ecualizador.
4. Seleccione el modo JAZZ y experimentará un magnífico efecto de jazz.
5. Seleccione el modo POP para crear un magnífico sonido de música pop.
6. Seleccione el modo CLASIC y experimentará un magnífico efecto
clásico.
7. Seleccione el modo ROCK y experimentará un magnífico efecto de rock.
Sintonización de la radio AM / FM
1. Encienda la unidad pulsando el botón Power (Encendido).
2. Pulse el botón Function (Función) para cambiar al modo de radio FM
o AM.
3. Pulse los botones de dirección derecha e izquierda para si nt o ni zar la
radio AM y FM.
Almacenamiento de emisoras de radio AM o FM en la memoria de la unidad
1. Sintonice la radio AM o FM en la emisora deseada. Véase Sintonización de
la radio AM / FM
2. Cuando se alcance la emisora de radio AM o FM deseada, pulse el botón
Memory (Memoria) del mando a distancia.
3. Pulse los botones Preset (Presintonización) del mando a distancia para
seleccionar una posición de memoria.
SP 7
SP 20
Page 38

M
b
•
Ajustes del reloj
1. Con la un idad en modo standby, pulse el botón CLOCK (RELOJ); la unidad entrará
en el Modo Clock Set (Ajuste del reloj), y la pantalla LCD presentará: CLK
XX(hora): XX(minutos)
2. Cuando la hora empiece a parpadear en la Pantalla LCD, pulse la tecla de
dirección arriba o abajo hasta la hora deseada.
3. Pulse el botón CLOCK (RELOJ) de nuevo para aj ustar los minutos, pulse la tecla
de dirección arriba o abajo hasta el minuto deseado.
4. Después de ajustar correctamente el minuto, espere 5 segundos, y el reloj se
pondrá en la hora especificada.
Ajuste del temporizador
1. Con la un idad en modo standby, pulse el botón Timer (Temporizador) en el mando a
distancia y la pantalla LCD presentará: ON XX (hora): XX (minutos) para
ACTIVAR la unidad con el temporizador.
2. Cuando la hora comience a parpadear en la Pantalla LCD, pulse la tecla de
dirección arriba o abajo hasta la hora deseada.
3. Pulse el botón Timer (Temporizador) de nuevo para ajustar los minutos, pulse la
tecla de dirección arriba o abajo hasta el minuto deseado. Entonces, habrá
finalizado el ajuste de ACTIVACIÓN (ON) de la unidad con el temporizador.
4. Pulse el botón Timer (Temporizador) y la pantalla LCD presentará:OFF XX(hora):
XX(minutos)
5. Repita las operaciones indicadas en los pasos 2 y 3. Habrá finalizado el ajuste de
DESACTIVACIÓN (OFF) de la unidad con el temporizador.
6. Después del ajuste de la DESACTIVACIÓN (OFF) del temporizador, pulse el
botón Timer y la pantalla LCD presentará: ON (ACTIVAR)
7. Para activar el ajuste del temporizador, espere 5 segundos cuando la pantalla
LCD muestre “ON”·. Del mismo modo, pulse el botón Timer (Temporizador) de
nuevo y la pantalla LCD muestra “OFF” (DESACTIVAR) para desactivar el
ajuste del temporizador.
Reproducción de un CD o DVD
1. Encienda la unidad pulsando el botón Power (Encendido).
2. Pulse el botón Function (Función) para cambiar la unidad al modo DVD/CD.
3. Inserte un CD o DVD en la disquetera de carga de discos CD/DVD de la unidad.
4. Pulse el botón Play/Pause (Reproducir/Pausa) para comenzar a reproducir un
DVD o CD cargado. Para ver un video de un DVD cargado, la unidad debe estar
conectada a una pantalla. Un DVD cargado solamente puede tener salida de vídeo
a través de la Salida HDMI (cuando se haya seleccionado "HDMI" en la parte del
menú de configuración del vídeo en la pantalla).
Observaciones: la unidad mostrará CD en la pantalla LCD cuando se reproduce
MP3 / XVID.
Lista de accesorios
Mando a distancia • Manual del usuario
• Pilas (AAA) X 2 • Cable de S-Vídeo
• Antena AM/FM exerna • Cable AV
• Soporte de montaje en la pared
Mando a distancia
Cable de S-Vídeo
le AV
Ca
anual del usuario
Antena AM/FM exerna
Soporte de montaje en la pared
Pilas (AAA) X 2
SP 19
SP 8
Page 39

Localización de conectores y botones
Reproducción desde un iPod
1. Acople en la base un iPod en la unidad siguiendo las instrucciones de
Acoplamiento en la base de un iPod.
2. Pulse el botón Power (Encendido) para encender la unidad.
3. Pulse el botón Function (Función) para cambiar la unidad al modo iPod.
4. Pulse el botón Play/Pause (Reproducir/Pausa) para comenzar a reproducir
un iPod acoplado en la base.
El mando a distancia incluido le permitirá acceder y reproducir a distancia
todos los contenidos multimedia almacenados en el iPod acoplado a la base.
Un iPod acoplado a la base solamente puede tener salida de vídeo a
través de la salida S-Video y la salida de Vídeo Compuesto.
Para ver el video de un iPod acoplado a la base en una pantalla conectada, el
parámetro TV Out (Salida TV) del iPod debe ajustar en on (activar) o Ask
(Preguntar).
SP 9 SP 18
Page 40

Acoplamiento en la base de un iPod
1. Localice el Soporte numerado que se ajuste al iPod que se va a acoplar en la base.
Cada Soporte incluido tiene un número sobre él, que indica el modelo de iPod con
el que ese soporte es compatible; véase la página aparte con la tabla de soportes
para identificar el soporte que necesita.
2. Pulse el botón Power (Encendido) para encender la unidad.
3. Pulse el botón Function (Función) para cambiar la unidad al modo iPod.
4. Pulse el botón Eject (Expulsión) para abrir la puerta del iPod en la unidad.
5. Inserte el soporte en la Base para iPod.
Cuando inserte un iPod nano (de primera o segunda generación), deslice la
conexión de la Base de la unidad de manera que se corresponda con la abertura en
el iPod nano (de primera o segunda generación).
6. Conecte el iPod al conector de iPod del interior de la Base para iPod.
Una vez que se ha conectado un iPod a la Base para iPod, la unidad
reproducirá y cargará el iPod acoplado a la base.
Localización de conectores y botones
SP 17
SP 10
Page 41

Definiciones de los controles
1 Pantalla LCD
Utilice la pantalla LCD para ver la hora, la emisora de radio AM o FM y la
función actual de la unidad.
2 Botón EQ (ECUALIZADOR)
Pulse el botón EQ para establecer el ecualizador de la unidad en DVD5.1,
CLASSIC, JAZZ, ROCK, FLAT
3 Botón Power (Encendido/Apagado)
Pulse el botón Power (Encendido/Apagado) para encender o apagar la unidad.
4 Botones de Volumen
Pulse los botones de volumen para ajustar el nivel de volumen de salida de audio
de la unidad.
5 Botón Function (Función)
Pulse el botón Function para cambiar entre los modos DVD, iPod, AUX, AV 1,
AV 2, AM y FM
6 Botones Tuning/Skip/Search (Sintonía/Salto/Búsqueda)
Pulse los botones Tuning/Skip/Search (Sintonía/Salto/Búsqueda) para sintonizar
la radio AM/FM.
Pulse los botones Tuning/Skip/Search (Sintonía/Salto/Búsqueda) para saltar
de pista en pista, o de capítulo en capítulo, en un iPod acoplado a la base o un
CD o DVD cargado.
Pulse los botones Tuning/Skip/Search (Sintonía/Salto/Búsqueda) para
buscar en una pista o capítulo individual en un iPod acoplado a la base o un
CD o DVD cargado.
7 Botón Eject (Expulsión)
Pulse el botón Eject para expulsar un CD o DVD en modo DVD.
Pulse el botón Eject para abrir o cerrar la base motorizada para iPod en
modo iPod.
8 Botón Stop (Parada)
Pulse el botón Stop para detener un CD o DVD durante la reproducción.
9 Botón Play / Pause (Reproducir / Pausa)
Pulse el botón Play/Pause (Reproducción/Pausa) para reproducir o hacer una
pausa en un iPod acoplado a la base o en un CD o DVD cargado.
10 Soportes de montaje en la pared
Utilice los soportes de montaje en la pared para sujetar la unidad a una pared.
Conexión eléctrica de la unidad/Sustitución del fusible
Suministre alimentación a la unidad conectándola a una toma de corriente
estándar (220-240V / 50Hz) con el cable CA suministrado.
Sustitución del fusible
Si la unidad no se enciende, sustituya el fusible e inténtelo de nuevo. Se puede
comprar un fusible estándar T2L 250V en la mayoría de las tiendas de
componentes electrónicos y ferreterías locales.
1. Desenchufe la unidad de la toma de corriente para apagarla completamente.
2. Utilice un destornillador de cabeza plana, o una moneda, presione suavemente y gire
en sentido contrario a las agujas del reloj para extraer el portafusible y el fusible de
su ranura.
3. Extraiga el fusible antiguo del portafusible de plástico, y deséchelo.
4. Coloque el fusible nuevo (T2L 250V) en el portafusible de plástico.
5. Presione suavemente el portafusible para colocarlo de nuevo en la ranura del fusible,
girándolo en sentido de las agujas del reloj al mismo tiempo.
6. Una vez que el fusible esté encastrado de nuevo de forma segura en la unidad, ésta
se puede enchufar de nuevo y se puede encender.
SP 11
SP 16
Page 42

Periféricos
23. 0-10+: Utilice el Teclado Numérico para seleccionar una pista individual.
24. Botón Display (Presentación): Pulse el botón Display (Presentación) para
ver el tiempo en modo DVD.
25. Botón Memory (Memoria): Pulse el botón Memory (Memoria) para
guardar la emisora de radio actual en la memoria de la unidad.
26. CLEAR (BORRAR): Pulse Clear para borrar el número.
27. ENTER (INTRO): Pulse para confirmar su selección.
28. Botón Repeat (Repetir): Pulse el botón Repeat (Repetir) para repetir
una canción, un álbum o una lista de reproducción de un iPod acoplado
a la base, o en un CD o DVD cargado.
29. TREBLE+/TREBLE- (AGUDOS+/AGUDOS-): Pulse este botón para
ajustar el nivel de agudos de la unidad; funciona solamente cuado el EQ
(Ecualizador) está en Flat (Neutro).
30. VOLUME+/VOLUME- (VOLUMEN+/VOLUMEN-): Pulse para ajustar
el nivel de volumen de la unidad.
31. AUDIO/LANGUAGE (AUDIO/IDIOMA): Pulse para seleccionar la función
de idioma.
32. EQ (ECUALIZADOR): Pulse para cambiar de modo en el ecualizador entre
DVD5.1, CLASSIC, JAZZ, ROCK, FLAT.
33. ANGLE (ÁNGULO): Pulse este botón para establecer el ángulo de
reproducción del DVD.
34. SUBTITLE (SUBTÍTULOS): Pulse para presentar consecutivamente los
idiomas de subtítulos disponibles.
35. Botón Title (Títulos): Pulse el Botón Title (Títulos) para volver la
pantalla de títulos de un DVD cargado.
36. Botón Vídeo: Pulse el botón Vídeo para ajustar la salida de vídeo en Auto,
480p, 576p, 720p y 1080i.
37. ZOOM: Pulse para aumentar una zona particular de la imagen.
38. Botón Playlist (Lista de reproducción): Pulse el botón Playlist (Lista de
reproducción) para presentar consecutivamente las listas de reproducción de
un iPod acoplado a la base.
39. Botones Preset (Emisoras preseleccionadas): Pulse los botones Preset
para presentar consecutivamente las emisoras de radio almacenadas.
40. Botón Shuffle (Orden aleatorio): Pulse el botón Shuffle (Orden aleatorio)
para reproducir las pistas de un CD o iPod por orden aleatorio.
Definiciones de los controles
11 Disquetera de carga de discos CD/DVD
La Disquetera de carga de discos CD/DVD reproducirá Discos
DVD/DVD+/-R/RW, CD/CD-R/ RW & e Imágenes JPEG
12 Soporte de mesa
El soporte de mesa se puede desmontar de la unidad para su montaje en la pared,
o permanecer montado para que sirva como soporte de la unidad.
13 Fusible (T 2L 250V)
14 Salida HDMI (solamente DVD)
Utilice la Salida HDMI para conectar la unidad a una pantalla de alta definición.
15 Salida del subwoofer
Utilice la Salida del Subwoofer para conectar un subwoofer externo a la unidad.
16 Entrada de antena FM
Utilice la Entrada de antena FM para conectar una antena FM a la unidad.
17 Entrada de antena AM
Utilice la Entrada de antena AM para conectar una antena AM a la unidad.
18 Salida S-Vídeo (DVD o iPod)
Utilice la Salida S-Vídeo para conectar la unidad a una pantalla con un
cable S-Vídeo.
19 Entradas AV 1 & AV 2
Utilice las Entradas AV 1 y AV 2 para conectar un reproductor DVD o un
decodificador de televisión digital a la unidad.
20 Entrada Auxiliar
Utilice la Entrada Auxiliar para conectar un reproductor MP3 u otra fuente de
audio a la unidad.
21 Salida de Componente de Vídeo (solamente DVD)
Utilice la Salida de Componente de Vídeo para conectar la unidad a una
pantalla con cables de vídeo.
22 Salida de Vídeo Compuesto (DVD, iPod o Entradas AV)
Utilice la Salida de Vídeo Compuesta para conectar la unidad a una
pantalla con cables de vídeo RCA.
23 Salida de Vídeo (DVD o iPod)
Utilice la Salida S-Vídeo para conectar la unidad a una pantalla con un
cable de Vídeo.
SP 15
SP 12
Page 43

cos
Periféri
1. Botón Power (Encendido): Pulse el botón Power (Encendido) para encender la unidad o
ponerla en standby.
2. Botón Snooze/Sleep: Pulse el botón Snooze/Sleep de forma consecutiva para
establecer el temporizador para dormir entre 10-120 minutos.
3. Botón Timer (Temporizador): Pulse el botón Timer (Temporizador) para activar
(on) o desactivar (off) el temporizador para la unidad.
4. CLOCK (RELOJ) : Pulse para establecer una hora específica.
5. Botón Go To (Ir a): Pulse el botón Go To (Ir a) e introduzca un tiempo específico utilizando el
teclado Numérico para ir automáticamente a ese tiempo en el DVD que se encuentra cargado.
6. Botones Album: Pulse los botones Album para presentar consecutivamente los álbumes de un
iPod acoplado a la base.
7. Botones Chapter (Cápítulo): Pulse los botones Chapter para presentar consecutivamente los
capítulos de un iPod acoplado a la base.
SP 13
Periféricos
8. Botón Setup (Configuración): Pulse el botón Set Up para acceder al menú de
configuración de la unidad.
9. Botón A-B: Pulse el botón A-B una vez para marcar un punto de comienzo durante la
reproducción de un DVD. Pulse el botón por segunda vez para marcar un punto de
finalización.
Después de haber ejecutado esta operación, el DVD reproducirá continuamente la sección
determinada de vídeo entre las dos marcas. Pulse el botón por tercera vez para anular esta
función.
10. Menú DVD/iPod: Pulse el botón del Menú DVD/iPod para ver el menú en modo DVD
Pulse el botón del Menú DVD/iPod para moverse hacia atrás a través de los menús de un iPod
acoplado a la base.
11. BASS+/BASS- (BAJOS+/BAJOS-): Pulse este botón para ajustar el nivel de bajos de la
unidad; funciona solamente cuado el EQ (Ecualizador) está en Flat (Neutro).
12. Botón Function (Función): Pulse el botón Function (Function) para cambiar entre los
modos DVD, iPod, AUX, AV 1, AV 2, AM y FM.
13. Botón Slow (Lento): Pulse el botón Slow (Lento) para una película en DVD a cámara
lenta.
14. Botón Play / Pause (Reproducir / Pausa): Pulse el botón Play/Pause (Reproducir/Pausa)
para reproducir o hacer una pausa en un iPod acoplado a la base o en un CD/DVD cargado.
15. Botón Step (Fotograma a fotograma): Pulse el botón Step (Fotogram a a fotograma)
consecutivamente para avanzar a través de un DVD un fotograma cada vez que lo pulse.
16. STOP (PARADA): Pulse para detener la reproducción de un DVD.
17. REV (RETROCESO): Pulse para retroceder.
18. FWD (AVANCE): Pulse para avanzar.
19. PREVIOUS (ANTERIOR): Pulse para reproducir la canción anterior.
20. NEXT (SIGUIENTE): Pulse para reproducir la canción siguiente.
21. Botón Eject (Expulsión): Pulse el botón Eject (Expulsión) para expulsar un
CD o DVD en modo DVD, o la base motorizada para iPod en modo iPod.
22. MUTE (SILENCIO): Pulse una vez para reducir el volumen completamente,
pulse otra vez para volver al nivel de volumen anterior.
SP 14
Page 44

Garantievoorwaarden
Beste Klant,
Wij danken u hartelijk voor de aankoop van dit AKIRA™ product en voor uw vertrouwen in onze
firma. Dit product beantwoordt aan de toepasselijke veiligheidsvoorwaarden en werd tijdens het
productieproces onderworpen aan strenge controles.
Indien er zich toch een probleem voordoet, zal dit product of zullen zijn defectieve onderdelen
(exclusief accessoires en verbruiksgoederen) gratis hersteld worden (arbeid, onderdelen en transport
binnen de grenzen van onderstaande landen) of, naar AKIRA™’s goeddunken, ingeruild worden
tegen een gelijkaardig product, op voorwaarde dat het geretourneerd wordt binnen 24
(vierentwintig) maanden na de originele aankoop (datum van ontvangstbewijs), dat het materiaal
en/of de afwerking defectief is en dat het in een van de volgende landen werd aangekocht:
Frankrijk (moederland), Spanje, Italië, Portugal, België (grondgebied) of in een taxfreeshop in een
van deze landen.
De waarborg zal enkel worden toegestaan op vertoon van de originele factuur of het originele
ontvangstbewijs, waarop de aankoopdatum en de naam van de handelaar is vermeld, evenals dit
garantiebewijs met vermelding van type en serienummer. De uitkering van deze waarborg kan
worden geweigerd indien de factuur, het ontvangstbewijs of het garantiebewijs werd gewijzigd,
geschrapt of onleesbaar werd gemaakt na de oorspronkelijke aankoop.
Online registratie
Om de waarborgservice te vergemakkelijken, dient u uw AKIRA™ product binnen 30 dagen na
aankoop te registreren op http://www.akiraeurope.com
De waarborg geldt niet voor volgende bepalingen:
1. Schade aangericht door ongevallen, inclusief, maar niet gelimiteerd tot, bliksem, brand,
water.
2. Schade aan het product door verwaarlozing, misbruik, gebruik strijdig met de instructies in
de handleiding, verkeerde installatie of reparatie (niet-limitatieve lijst). Vooral het inbranden
van een stilstaand beeld zoals computer inputs of kanaallogo’s, zoals beschreven in de
handleiding, is niet gewaarborgd.
3. Wijzigingen, aanpassingen of veranderingen aan het product om werkzaam te zijn in een
ander land dan waarvoor het initieel werd ontworpen en vervaardigd, of enige schade die
voortvloeit uit zulke veranderingen.
4. Elk gebruik anders dan het gewone thuisgebruik.
5. Defect aan afzonderlijke pixels, wanneer het aantal defectieve pixels lager ligt dan
volgende aantallen: Donkere pixels: 7 Heldere of flikkerende pixels: 3
Totale aantal defectieve pixels: 8
Indien u vragen heeft waarop uw dealer het antwoord niet kent, gelieve dan de AKIRA hotline te
bellen (internationaal gratis telefoonnummer: 00 800 800 25 472).
AKIRA™ is een gedeponeerd handelsmerk van TT International, Inc.
Deze bepalingen hebben geen invloed op uw statutaire rechten als consument onder de
toepasselijke nationale wetgeving, evenals niet op uw rechten als consument tegen de handelaar
waarvan u het product hebt gekocht.
Als u service nodig heeft, of het product al dan niet nog in garantie is, neem dan contact op met
de handelaar waarvan u dit product hebt gekocht.
We raden u aan om de gebruiksaanwijzing van uw AKIRA™ product aandachtig te lezen alvorens
uw dealer of service center te contacteren.
Page 45

Voedi
220
240V/50H
Waarschuwingen en Voorzorgsmaatregelen............................................................2-3
Belangrijke veiligheidsinstructies....................... ... ... ...............................................4 –7
Lijst met toebehoren....................................................................................................8
Plaatsen van Stekkers en Knoppen.........................................................................9-10
Bedieningen..........................................................................................................11-12
Randapparatuur.....................................................................................................13-15
Het toestel aansluiten/De zekering vervangen...........................................................16
Een iPod aansluiten....................................................................................................17
Een iPod afspelen.......................................................................................................18
De Klok instellen / De Timer instellen / Een CD of DVD spelen.............................19
Instellingen equalizer / De AM / FM Radio instellen
/ AM of FM Radiozenders opslaan in het Geheugen van het Toestel.......................20
De Hulpingang gebruiken / AV 1 & AV 2 Ingangen................................................21
HDMI Uitgang (Alleen DVD)........................ .... ... ...................................................22
Composiet Video Uitgang/ S-Video uitgang/ Composiet Video Uitgang................23
DVD Instellingenmenu......................... ...................................................... ...............24
Het Toestel aan een Muur bevestigen........................................................................25
Specificaties...............................................................................................................26
INHOUDSTAFEL
Spécifications
ng........................................................................................AC~
Stroomverbruik.....................................................................................................120W
Uitgangsvermogen.................... ... ...................................................... ....15W X 5+40W
Impedantie Luidspreker (Satelliet)......................................................................6 Ohm
Impedantie Luidspreker (Subwoofer).................................................................8 Ohm
Signaal-ruisverhouding......................................................................................≥ 60dB
Reactiefrequentie (Subwooferkanalen)..........................................................30~250Hz
Reactiefrequentie (Linker/Rechter kanalen)...............................................250~20KHz
L/R scheiding (1kHz)........................................................................................≥ 60dB
L/R Balans (Stereo).............................................................................................≤ 2dB
Bass (100Hz)........................................................................................(100HZ)±14dB
Treble (10KHz)........................... ... ... ................................................. (10KHZ) ±14dB
DVD-Speler………………………………………..CDR/CD/DVD/DVD+R/DVD-R
DVD RW Compatibiliteit
DVD-Speler…………………………………………………………………….HDMI
Video OUT Component video
iPod Speler……………………………………………………...S-Video
Composiet video
AUX IN……………………………………………………………… …….…L/R IN
AV1~AV2 IN……………………………………………………Composiet video IN
L/R IN
FM Frequentiebereik...............................................................................87.5~108MHz
AM Frequentiebereik..............................................................................522~1620KHz
AFMETINGEN.............................................................................942 x 200 x 138MM
Nettogewicht………………………………………………………………....11.45KG
Brutogewicht.....................................................................................................14.3KG
-
S-Video
Composiet video
z
NL 1 NL 26
Page 46

Het Toestel aan een Muur bevestigen
1. Gebirok een xchroevendraaier om de Tafelstandaard te verwijderen door de 4
schroeven aan de onderkant van de standaard lo s te draai en.
De Tafelstandaard moet worden verwijderd om het toestel aan de muur te kunnen
bevestigen.
2. Lokaliseer 2 balken in de muur.
Bij de meeste huizen zijn de balken op een afstand van 16 inch (~40cm) geplaatst. In geval
van twijfels een professionele plaatser contacteren.
3. Gebruik de meegeleverde tussenstukken om ruimte tussen de muur en het toestel te
creëren. Het gebruik van de tussenstukken is optioneel en niet vereist voor een
stevige installatie van het toestel.
De meegeleverde tussenstukken kunnen worden gecombineerd om de afstand tussen het
toestel en de muur af te stellen zodat het toestel kan aansluiten bij een Flat-Panel TV die
aan de muur is gemonteerd. De tussenstukken zijn 0,635 cm, 1,27 cm en 1,905 cm. Bij
gebruik van de tussenstukken moet u langere schroeven gebruiken.
4. Schroef de beugels voor bevestiging aan de muur in de twee parallelle balken met behulp
van drie schroeven in elke beugel.
5. Lijn de beugels voor bevestiging aan de muur uit.
6. Bevestig het toestel aan de vastgemaakte beugels.
Om een betrouwbare en stevige installatie te verzekeren, dient u een professionele
plaatser te raadplegen alvorens u het toestel aan de muur bevestigt.
Waarschuwingen en Voorzorgsmaatregelen
OM RISICO’S OP BRAND OF SCHOKKEN TE VOORKOMEN, DIT
TOESTEL NIET BLOOTSTELLEN AAN REGEN OF VOCHT.
Dit symbool dat zich achteraan of onderaan het toestel bevindt, wijst de
gebruiker op de aanwezigheid van niet-geïsoleerde gevaarl i jke spa n ni n g
binnenin de behuizing van het product, die wellicht hoog genoeg is om
personen het risico van een elektrische schok te doen lopen.
Dit symbool dat zich achteraan of onderaan het toestel bevindt, wijst de
gebruiker op de aanwezigheid van belangrijke gebruiks- en
onderhoudsinstructies in de documentatie die bij het product wordt
geleverd.
Dit product maakt gebruik van een Klasse 1 laser om Cd’s te lezen. Deze
Cd-speler met laser is uitgerust met veiligheidsschakelaars om
blootstelling te vermijden als de Cd-lade geopend is en de
veiligheidsvergrendelingen niet werken. Er is onzichtbare laserstraling
aanwezig als de lade van de Cd-speler geopend is en de
veiligheidsvergrendelingen n iet werken of werden omzeild. Het is erg
belangrijk dat u directe blootstelling aan de laserstraal te allen tijde
vermijdt. Probeer de veiligheidsschakelaars niet uit te schakelen of te
omzeilen.
Om het risico op elektrische schokken te beperken, het deksel (of achter p a neel)
niet verwijderen. Er bevinden zich geen onderdelen in het toestel die u zelf kan
herstellen. Laat alle onderhoud door bevoe g d onderhoudspersoneel uitvoeren.
WAARSCHUWING: Veranderingen of wijzigingen aan dit toestel die niet
uitdrukkelijk werden goedgekeurd door de verantwoordelijke partij voor naleving
kunnen de bevoegdheid van de gebruiker om het toestel te gebruiken nietig
verklaren.
WAARSCHUWING: Gevaar op ontploffing als de batteri j e n van de
afstandsbediening niet correct worden geplaa t st . All een ve rv angen door
batterijen van hetzelfde of een gelijkwaardi g type.
NL 25
NL 2
Page 47

Waarschuwingen en Voorzorgsmaatregelen
WAARSCHUWING: De AAA batterij van de afstands b edi eni n g bevat
schadelijke chemische stoffen. Niet in de vuilbak gooien, maar recycleren of
bij gevaarlijk afval wegwerpen.
WAARSCHUWING: Lithium ion batterijen zijn zoals alle andere herlaadbare
batterijen recycleerbaar en moeten worden gerecycleerd. Batterijen zijn
onderworpen aan een speciaal inzamelsysteem en mogen nooit bij het gewoon
huishoudelijk afval worden weggegooid. Contacteer uw lokale overheid voor het
wergwerp- of recyclagebeleid in uw woonplaats. Ze mogen nooit worden verbrand
aangezien ze kunnen ontploffen.
WAARSCHUWING: Als u dit toestel in de buurt van fluorescerend licht
gebruikt, kan dit storingen veroorzaken met betrekking tot het gebruik van de
afstandsbediening. Als het toestel onregelmatig werkt, plaats het dan uit de
buurt van fluorescerend licht aangezien dit de oorzaak kan zijn.
OPMERKING: Deze uitrusting genereert, gebruikt en kan radio freque ntie energie
uitstralen en, indien het toestel niet volgens de instructies wordt geïnstalleerd en
gebruikt, kan het schadelijke stori n gen op de radiocommunicatie veroorzaken. Er is
echter geen garantie dat er geen storingen optreden in een bepaalde opstelling.
Indien dit toestel schadelijke storingen veroorzaakt op radi o- of televisieontvangst,
welke kunnen worden vastgesteld door het apparaat in en uit te schakelen, dan
wordt de gebruiker aangespoord om de storingen te verhelpen door één of meerdere
van onderstaande Maatregelen toe te passen:
• Richt de ontvangstantenne opnieuw of verplaats deze.
• Vergroot de afstand tussen het toestel en de ontvanger.
• Sluit het toestel aan op een stopcontact dat zich in een
∗ Gebruik geen oude en nieuwe batterijen door elkaar
∗ Gebruik geen alkaline, standaard (koolstof-zink) of herlaadbare (ni-cad, ni-mh,
ander circuit bevindt dan het stopcont act waaro p de
ontvanger is aangesloten.
• Raadpleeg de dealer of een ervaren radio/TV technicus voor hulp.
enz.) batterijen door elkaar
DVD Instellingenmenu
OSD Taal
Gebruik de “OSD Taalinstelling” om de taal
van de on-screen display en het instelmenu in te
stellen.
Beeldverhouding
Gebruik de instelling “Beeldverhouding” om te
wisselen tussen de beeldverhoudingen 4:3
Letterbox, 4:3 Panscan, en 16:9 Breedbeeld.
TV Systeem Gebruik het “TV Systeem menu”
om het systeem te selecteren waarmee de
televisie die op de speler is aangesloten werkt.
Video Uitgang
Gebruik de “Video Uitgang Instelling” om te
wisselen tussen Component en HD (HDMI)
video out.
Nachtmodus
Schakel de “Nachtmodus” in om het dynamisch
bereik van de audio output van het toestel te
beperken.
Gebruik Standaardinstellingen
Selecteer de optie “Gebruik
Standaardinstellingen” om de originele
fabrieksinstellingen van het toestel te
herstellen.
Screensaver
Om de screensaver te activeren of te
deactiveren.
NL 3
NL 24
Page 48

Component Video Uitgang -Alleen DVD-
Het gebruik van de Component Video Uitgang vereist een component videokabel (niet
meegeleverd).
1. Sluit een component videokabel aan op de Component Video Uitgang van het
toestel.
2. Sluit het andere uiteinde van diezelfde component videokabel aan op de component
ingang van een scherm.
3. Stel de ingang instellingen van het scherm af om de video vanaf de aangesloten
component ingang te kunnen bekijken.
4. Video’s die worden afgespeeld vanaf een geladen DVD zullen nu worden getoond op
het aangesloten scherm en de audio van de DVD zal via het toestel worden
uitgezonden.
S-Video uitgang -DVD, iPod-
Het gebruik van de S-Video Uitgang vereist een S-Videokabel.
1. Sluit een S-Videokabel aan op de S-Video Uitgang van het toestel.
2. Sluit het andere uiteinde van diezelfde S- Videokabel aan op de S-Video ingang van een
scherm.
3. Stel de ingang instellingen van het scherm af om de video vanaf de aangesloten S-Video
ingang te kunnen bekijken.
4. Video’s die worden afgespeeld vanaf een geladen iPod/DVD zullen nu worden
getoond op het aangesloten scherm en de audio van de iPod / DVD zal via het
toestel worden uitgezonden.
Opmerking: De S-Video Uitgang ondersteunt geen HD (720p & 1080i)
Composiet Video Uitgang -DVD, iPod, of AV Ingangen-
Het gebruik van de Composiet Video Uitgang vereist een RCA videokabel (niet
meegeleverd).
1. Sluit een RCA videokabel aan op de Composiet Video Uitgang van het toestel.
2. Sluit het andere uiteinde van diezelfde RCA videokabel aan op de composiet video
ingang van een scherm.
3. Stel de ingang instellingen van het scherm af om de video vanaf de aangesloten
composiet video ingang te kunnen bekijken.
4. Video’s die worden afgespeeld vanaf een aangesloten iPod zullen nu worden getoond
op het aangesloten scherm en de audio van de iPod z a l via het toestel worden
uitgezonden.
Opmerkingen:
1. De Composiet Video Uitgang ondersteunt geen HD (720p & 1080i)
2. De iPod kan alleen video’s vanaf Composiet en S-Video uitzenden.
Belangrijke veiligheidsinstructies
1. Lees de Instructies - U dient alle veiligheids- en bedieningsinstructies te lezen
alvorens u het toestel gebruikt.
2. Bewaar de Instructies - U dient de veiligheids- en bedieningsinstructies te
bewaren voor toekomstig gebruik.
3. Volg de Instructies op - Alle veiligheids- en bedieningsinstructies moeten
worden opgevolgd.
4. Schoonmaak - Trek de stekker van het toestel uit het stopcontact alvorens u
tot schoonmaakwerkzaamheden overgaat. Gebruik geen vloeibare
schoonmaakproducten of spuitbusse n. Gebruik een vochtige doek om het
toestel schoon te maken.
5. Accessoires - Gebruik geen accessoires die niet worden aanbevolen
door de fabrikant aangezien deze mogelijk een gevaar vormen.
6. Water en Vocht - Gebruik dit toestel niet in de buurt van water -
bijvoorbeeld in de buurt van een badkuip, wastafel, spoelbak of waskuip; in
een natte kelder, of in de buurt van een zwembad, enz.
7. Accessoires - Plaats dit toestel niet op een onstabiele trolley, standaard, statief,
beugel of tafel. Het toestel kan mogelijk vallen wat ernstige schade kan
toebrengen aan kinderen of volwassenen en aan het toestel zelf. Gebruik het
uitsluitend met een trolley, standaard, statief, beugel of tafel die door de
fabrikant is gespecificeerd of samen met het toestel wordt verkocht. Als u het
toestel bevestigt, dient u de instructies van de fabrika nt te volgen en de
bevestigingsaccessoires die de fabrikant aanraadt te gebruiken.
8. Als het toestel zich op een trolley bevindt, dient u deze voorzichtig te
verplaatsen. Snel stoppen, teveel kracht en een ongelijke ondergrond
kunnen ertoe leiden dat het toestel en de trolley omvallen.
NL 4 NL 23
Page 49

Belangrijke veiligheidsinstructies importantes
9. Ventilatie - De gleuven en openingen in de behuizing dienen voor de
ventilatie en om een betrouwbare werking van het toestel te verzekeren en
om het tegen oververhitting te beschermen, u mag deze openingen niet
blokkeren of bedekken. De openingen mogen niet worden geblokkeerd
door het toestel een op bed, zetel, tapijt of ander vergelijkbaar oppervlak te
plaatsen. Dit toestel mag niet in een gesloten ruimte, zoals een boekenkast
of een rek, worden geplaatst tenzij voldoende ventilatie wordt voorzien of
indien de instructies van de fabrikant worden nageleefd.
10. Stroombronnen - Dit toestel mag alleen worden gebruikt met het type
stroombron dat wordt vermeld op het etiket. Indien u niet zeker bent van
het type stroombron waarover u thuis beschikt, de verdeler of uw
plaatselijke elektriciteitsmaatschappij raadplegen. Voor producten die met
batterijen of andere stroombronnen gebruikt dienen te worden, de
bedieningsinstructies raadplegen.
11. Aarding of Polarisatie - Dit toestel is uitgerust met een driedradige geaarde
stekker, een stekker met een derde (geaarde) pin. Deze stekker zal enkel in
een geaard stopcontact passen. Dit is een veiligheids vo or z i eni n g. Al s u de
stekker niet in het stopcontact kan stoppen, contacteer dan uw elektricien om
uw verouderd stopcontact te laten vervangen. De geaarde stekker is voor uw
veiligheid. Knoei er niet mee.
12. Bescherming netsnoer - Het netsnoer moet zo worden gelegd dat men er niet
op kan trappen of zodat het niet gekneld kan worden door voorwerpen die
erop of tegen worden geplaatst. Let vooral op de stekkers, de aansluitpunten
en de plaats waar het snoer uit het toestel komt.
13. Stekker met ingebouwde zekering - Dit toestel is uitgerust met een stekker
met ingebouwde beveiliging tegen overbelasting. Dit is een
veiligheidsvoorziening. Zie de Instructiehandleiding voor het vervangen of
resetten van deze beveiliging. Als de stekker dient te worden vervangen,
zorg er dan voor dat de onderhoudstechnicus een nieuwe stekker gebruikt
die wordt gespecificeerd door de fabrikant en die dezelfde
overbelastingsbeveiliging heeft als de originele stekker.
HDMI Uitgang -Alleen DVD-
Het gebruik van de HMDI Uitgan g vereist een HDMI kabel (niet meegeleverd).
1. Sluit een HDMI kabel aan op de HDMI Uitgang van het toestel.
2. Sluit het andere uiteinde van diezelfde HDMI kabel aan op de HDMI ingang van
een scherm.
3. Stel de ingang instellingen van het scherm af om de video vanaf de aangesloten
HDMI ingang te kunnen bekijken.
4. Als het aangesloten scherm ingebouwde luidsprekers heeft, ga dan
naar het deel “audio” van de scherminstellingen en schakel de
ingebouwde luidsprekers uit.
5. Video’s die worden afgespeeld vanaf een geladen DVD zullen nu worden
getoond op het aangesloten scherm en de audio van de DVD zal via het
toestel worden uitgezonden.
Opmerking: Er wordt geen CVBS of S-Video uitgezonden als de DVD-speler is
ingesteld op HDMI uitgang.
Resolutie DVD VCD XVID
480i
480p ALLEEN NTSC ALLEEN NTSC ALLEEN NTSC
576i ALLEEN PAL ALLEEN PAL ALLEEN PAL
576p ALLEEN PAL ALLEEN PAL ALLEEN PAL
720p
1080i
× × ×
9 9 9
9 9 9
NL 5
NL 22
Page 50

De Hulpingang gebruiken
1. Plaats een uiteinde van een RCA kabel in de Aux Ingang van het toestel.
2. Plaats het andere uiteinde van de kabel in de audio uitgang/hoofdtelefoon
uitgang van een MP3-Speler of Andere Audiobron.
3. Druk op de Power Knop om het toestel in te schakelen.
4. Druk op de Functie Knop om het toestel in AUX modus te plaatsen.
5. De audio die vanaf de MP3-Speler of Andere Audiobron wordt afgespeeld, zal nu
via het toestel worden uitgezonden. Als u de hoof dt el efo o n uit gan g van een
audiobron aansluit, moeten de volumebedieningen mogelijk worden aangepast
voor een optimaal geluidseffect.
AV 1 & AV 2 Ingangen
Het gebruik van de AV Ingangen vereist een RCA kabel.
Opmerking: Als u twee toestellen op elkaar aansluit met behulp van een RCA
Kabel, dient u de gekleurde poorten met de aansluiting van dezelfde kleur te
combineren. (Rood met Rood, Wit met Wit, en Geel met Geel)
1. Sluit een RCA kabel aan op de AV1 of AV2 Ingangen van het toestel.
2. Sluit het andere uiteinde van diezelfde RCA kabel aan op de video en
audio uitgangen van een Set-Top Box of Game Unit.
3. Druk op de Functie Knop om te wisselen tussen de modi AV1 en AV2.
4. Audio en video’s die worden afgespeeld vanaf de aangesloten Set-Top Box zullen
nu via het toestel worden uitgezonden. Video’s moeten van het toestel naar een
scherm worden gezonden om bekeken te kunnen worden.
Instrucciones de seguridad importantes
14. Aarding buitenantenne - Als de ontvanger met een buitenantenne verbonden is,
moet de antenne geaard zijn zodat het product beschermd wordt tegen
overbelasting en opgebouwde statische elektriciteit.
Zie afbeelding:
15. Onweer – Om dit toestel tijdens een bliksemstorm extra te beveiligen, of
wanneer het onbewaakt achterblijft en voor langere tijd niet zal worden
gebruikt, de stekker uit het stopcontact trekken en de antenne of het
kabelsysteem afkoppelen. Zo voorkomt u schade aan het toestel tengevolge
van bliksem en stroomstoten in hoogspanningsleidingen.
16. Stroomlijnen - Een buitenantennesysteem mag niet in de buurt van
bovengrondse elektriciteitsleidingen of andere elektrische licht- of
stroomcircuits worden geplaatst, noch op een plaats waar het in zulke
stroomlijnen of –kringen ka n val l e n. Bij het installeren van een
buitenantennesysteem moet u er goed op letten geen stroomlijnen of –kringen
aan te raken, aangezien contact daarmee dodelijk kan zijn.
17. Overbelasting - Om het ontstaan van brand en elektrische schokken te
vermijden, mag u stopcontacten, verlengsnoeren en andere elektrische
aansluitpunten nooit overbelasten.
18. Binnendringende voorwerpen en vloeistoffen - Duw nooi t voorwerpen van
enigerlei aard in dit toestel via de openingen om te voorkomen dat deze contact
maken met gevaarlijke spanningspunten of kortsluitingen veroorzaken die tot
brand of elektrische schokken kunnen leid en. Mors nooit vloeistoffen van
enigerlei aard op het toestel.
19. Onderhoud - Probeer dit toestel nooit zelf te herstellen aangezien het
openen of verwijderen van deksels kan leiden tot blootstelling aan
gevaarlijke spanning of andere gevaren. Laat alle onderhoud door
bevoegd onderhoudspersoneel uitvoeren.
NL 21
NL 6
Page 51

ucciones de seguridad
tes
Instr
20. Defecten die herstelling vereisen - Trek de stekker van dit toestel uit het
stopcontact en laat het herstel in onderstaande omstandigheden over aan
bevoegd onderhoudspersoneel:
a) Als het stroomsnoer of de netstekker beschadigd is,
b) Als er vloeistof werd gemorst of als er voorwerpen in het toestel gevallen
22. Veiligheidscontrole - Vraag na elke onderhoudsbeurt of reparatie aan dit
zijn,
c) Als het toestel werd blootgesteld aan regen of water,
d) Als het toestel niet normaal werkt terwijl de bedieningsinstructies
werden opgevolgd. Pas enkel de bedieningen aan die bij de
bedieningsinstructies worden vermeld vermits een verkeerde
aanpassing van andere bedieningen in schade kan resulteren en extra
werkzaamheden van een gekwalificeerde technicus kan ve rgen om de
normale werking van het toestel te herstellen.
e) Als het toestel gevallen is of op een of andere manier werd beschadigd.
f) Als het product een verschil in prestaties vertoont - dit wijst erop dat het
toestel moet worden nagekeken.
21. Vervangingsdelen - Als vervangingsdelen vereist zijn, moet u zich ervan
vergewissen dat de onderhoudstechnicus vervangi n gs delen geb r ui kt di e
worden gespecificeerd door de fabrikant of die dezelfde eigenschappen
hebben als de originele delen. Niet goedgekeurde vervangi ngen kunnen leiden
tot brand, elektrische schokken of andere gevaren.
toestel aan de onderhoudstechnicus om veiligheidscontroles uit te voeren om
te bepalen of het product in goede staat van werking verkeert.
23. Montage aan de Muur of aan het Plafond - Dit toestel moet volgens de
aanbevelingen van de fabrikant aan de muur of het plafond worden
bevestigd.
24. Hitte - Plaats het toestel uit de buurt van warmtebronnen zoals
radiatoren, verwarmingsroosters, kachels of ande re ap paraten
(inclusief versterkers) die warmte afgeven.
importan
Instellingen Equalizer
1. Flat: Als de EQ instelling zich in FLAT modus bevindt, kan u op de
TREBLE/BASS knop van de afstandsbediening drukken om het geluidseffect
van uw keuze te creëren.
2. Als u de DVD 5.1 modus heeft geselecteerd, zal u een echt 5.1-kanaals
geluidseffect ervaren.
3. Opmerking: Zorg ervoor dat de DVD AUDIO output op 5.1 is ingesteld. U kan
op de AUDIO toets van de afstandsbediening drukken om de audio output te
selecteren.
4. Druk op de EQ knop van de afstandsbediening om door de
voorgeprogrammeerde Equalizer instellingen te bladeren.
5. Selecteer de JAZZ modus en u zal een geweldig jazz effect ervaren.
6. Selecteer de POP modus om een geweldig geluid voor popmuziek te creëren.
7. Selecteer de CLASSIC modus en u zal een geweldig klassiek effect ervaren.
Selecteer de ROCK modus en u zal een geweldig rock effect ervaren.
De AM/FM Radio instellen
1. Schakel het toestel in met de Power Knop.
2. Druk op de Functie Knop om het toestel in FM of AM
radiomodus te plaatsen.
3. 3. Druk op de rechter en linker bedieningstoetsen om de AM en
RM radio in te stellen.
AM of FM Radiozenders opslaan in het Geheugen van het Toestel
1. Stel de AM of FM radio op de gewenste zender in. Zie “De AM/FM Radio
instellen”
2. Als u de gewenste AM of FM radiozender heeft gevonden, op de Memory
Knop van de afstandsbediening drukken.
3. Druk op de Preset Knoppen van de afstandsbediening om een
voorgeprogrammeerde geheugenplaats te selecteren.
4. Druk op de Memory Knop om de huidige AM of FM radiozender op de
geselecteerde, voorgeprogrammeerde geheugenplaats op te slaan.
NL 7
NL 20
Page 52

r
•
De Klok instellen
1. Als het toestel zich in stand-by modus bevindt, op de knop CLOCK drukken, het toestel
geeft de Modus “Klok instellen” weer op het LCD Scherm: CLK XX(uur):
XX(minuten)
2. Als de tijd op het LCD scherm begint te knipperen, op de bedieningsknoppen
“boven” of “onder” drukken om door de uren te bladeren.
3. Druk nogmaals op de knop CLOCK om de minuten in te stellen, druk op de
bedieningsknoppen “boven” of “onder” om door de minuten te bladeren.
4. Nadat de tijd correct werd ingesteld, 5 seconden wachten en de klok zal op de
ingestelde tijd worden geplaatst.
De Timer instellen
1. Als het toestel zich in stand-by modus bevindt, op de Timer knop van de
afstandsbediening drukken om de tijd in te stellen: ON XX(uur): XX(minuten)
verschijnt op het LCD scherm.
2. Als de tijd op het LCD scherm begint te knipperen, op de bedieningsknoppen
“boven” of “onder” drukken om door de uren te bladeren.
3. Druk nogmaals op de Timer knop om de minuten in te stellen, druk op de
bedieningsknoppen “boven” of “onder” om door de minuten te bladeren. De
“ON tijd” voor de timer van het toestel is nu ingesteld.
4. Druk op de Timer knop en OFF XX(uur): XX(minuten) verschijnt op het LCD scherm.
5. Herhaal stappen 2 en 3. De “OFF tijd” van de timer van het toestel is nu ingesteld.
6. Nadat de “OFF tijd” van de timer werd ingesteld, op de Timer knop drukken en
“ON” verschijnt op het scherm.
7. Om de timer te activeren, 5 seconden wachten wanneer “ON” op het LCD
scherm verschijnt. Of druk nogmaals op de Timer knop en “OFF” verschijnt op het
LCD scherm om de timer te deactiveren.
Een CD of DVD afspelen
1. Schakel het toestel in met de Power Knop.
2. Druk op de Functie Knop om het toestel in DVD/CD modus te plaatsen.
3. Plaats een CD of DVD in de DVD/CD station.
4. Druk op de Play/Pause Knop om de geplaatste CD of DVD af te spelen. Om een
video van een geladen DVD te bekijken, moet het toestel met een scherm verbonden
zijn. Video’s van een geladen DVD kunnen enkel worden uitgezonden via de HDMI
Uitgang (als “HDMI” is geselecteerd bij het deel “Video-instelling” van het menu op
het scherm) en Component, Video composiet of S-Video Uitgang (als “YUV” is
geselecteerd bij het deel “Video-instelling” van het menu op het scherm).
Opmerking: “CD” zal op het LCD scherm verschijnen als u een MP3 / XVID afspeelt.
Lijst met toebehoren
• Afstandsbediening
• Batterijen (AAA) X 2 • S-Video Kabel
• Externe AM/FM Antenne • AV Kabel
• Beugel voor Montage aan de Muur
Afstandsbediening
S-Video Kabel
AV Kabel
Afstandsbediening
Externe AM/FM Antenne
Beugel voor Montage aan de Muu
Afstandsbediening
Batterijen (AAA)
NL 19
NL 8
Page 53

Plaatsen van Stekkers en Knoppen
Een iPod afspelen
1. Sluit een iPod op het toestel aan overeenkomstig de Aansluitinstructies voor
iPod.
2. Druk op de Power Knop om het toestel in te schakelen.
3. Druk op de Functie Knop om het toestel in iPod modus te plaatsen.
4. Druk op de Play/Pause Knop om de aangesloten iPod af te spelen.
Met de meegeleverde afstandsbediening krijgt u van op afstand toegang tot
alle mediabestanden van de aangesloten iPod en kan u deze afspelen.
Een aangesloten iPod kan alleen video’s uitzenden via de
S-Video Uitgang en de Composiet Video Uitgang.
Om een video van een aangesloten iPod op een aangesloten scherm te
bekijken, moet de instelling van de iPod “TV Out” op “On” of “Ask”
worden geplaatst.
NL 9 NL 18
Page 54

Een iPod aansluiten
1. Plaats de genummerde Beu gel die overeenstemt met de iPod die zal worden aangesloten.
Elke meegeleverde Beugel is voorzien van een nummer dat aangeeft met welk iPod model
de beugel overeenstemt (zie aparte tabel om te bepalen welke beugel u nodig heeft).
2. Druk op de Power Knop om het toestel in te schakelen.
3. Druk op de Functie Knop om het toestel in iPod modus te plaatsen.
4. Druk op de Eject Knop om de iPod toegang van het toestel te openen.
5. Plaats de beugel in het Basisstation voor iPod.
Als u een iPod nano (eerste of tweede generatie) plaatst, de aansluiting van het
Basisstation op het toestel schuiven zodat deze overeenstemt met de opening op
de iPod nano (eerste of tweede generatie).
6. Sluit de iPod aan op de iPod aansluiting binnenin het Basisstation voor iPod.
Eens de iPod werd aangesloten op het Basisstation voor iPod, zal de het toestel
de aangesloten iPod spelen en laden.
Plaatsen van Stekkers en Knoppen
NL 17
NL 10
Page 55

Bedieningen
1 LCD Scherm
Op het LCD scherm kan u de tijd, de AM of FM radioze nder en de huidige
functie van het toestel aflezen.
2 EQ Knop
Druk op de EQ Knop om de equalizer in te stellen op DVD5.1, CLASSIC,
JAZZ, ROCK, FLAT.
3 Power Knop
Druk op de Power Knop om het toestel in en uit te schakelen.
4 Volume Knoppen
Druk op de Volume Knoppen om het volume of de audio output van het
toestel in te stellen.
5 Functie Knop
Druk op de Functie Knop om te wisselen tussen de modi DVD, iPod, AUX,
AV 1, AV2, AM en FM.
6 Tuning/Skip/Search Knoppen
Druk op de Tuning/Skip/Search Knoppen om de AM/FM radio in te stellen.
Druk op de Tuning/Skip/Search Knoppen om door de nummers of
hoofdstukken van een aangesloten iPod of een geladen CD of DVD te
bladeren.
Druk op de Tuning/Skip/Search Knoppe n o m tussen de nummers of
hoofdstukken van een aangesloten iPod of een geladen CD of DVD te
zoeken.
7 Eject Knop
Druk op de Eject Knop om in DVD modus een CD of DVD uit te werpen.
Druk op de Eject Knop om in iPod modus het gemotoriseerd basisstation
voor iPod te openen of te sluiten.
8 Stop Knop
Druk op de Stop Knop om tijdens het afspelen een CD of DVD te stoppen.
9 Play/Pause Knop
Druk op de Play/Pause Knop om een aangesloten iPod of geladen CD of
DVD af te spelen of te pauzeren.
10 Beugels voor Montage aan de Muur
Gebruik de Beugels voor Montage aan de Muur om het toestel aan een muur te
bevestigen.
Het toestel aansluiten / De zekering vervangen
Sluit het toestel aan op een standaard AC stopcontact (220-240V / 50Hz) via de
meegeleverde AC kabel.
De Zekering vervangen
Als het toestel niet kan worden ingeschakeld, probeer dan de zekering te vervangen.
Een standaard T2L 250V Zekering is verkrijgbaar bij de meest e hard ware/elektronica
zaken.
1. Trek de stekker van het toestel uit het AC stopcontact om het volledig uit te
schakelen.
2. Gebruik een schroevendraaier met vlakke kop, bevestig deze voorzichtig en
draai in tegenwijzerzin om de behuizing van de zekering te verwijderen en de
zekering uit zijn gleuf te halen.
3. Verwijder de oude zekering uit de plastic behuizing en gooi deze weg.
4. Plaats de nieuwe zekering (T2L 250V) in de plastic behuizing.
5. Duw de behuizing van de zekering voorzichtig terug in de gleuf terwijl u deze in
wijzerzin draait.
6. Eens de zekering terug stevig in het toestel is geblokkeerd, kan het toestel terug
worden aangesloten en geactiveerd.
NL 11
NL 16
Page 56

Randapparatuur
22. MUTE: Druk een keer op deze knop om het volume volledig te dempen,
druk nogmaals om het vorige niveau te hervatten.
23. 0-10+: Gebruik de Nummertoetsen om individuele nummers te selecteren.
24. Display Knop: Druk in DVD modus op de Display Knop om de tijd weer te
geven.
24. Memory Knop: Druk op de Memory Knop om de huidige radiozender
in het geheugen van het toestel op te slaan.
25. CLEAR: Druk op deze knop om het nummer te wissen.
26. ENTER: Druk op deze knop om uw selectie te bevestigen.
27. Repeat Knop: Druk op de Repeat Knop om een nummer, album of
speellijst van een aangesloten iPod, een geladen CD of DVD te
herhalen.
28. TREBLE+/TREBLE-: Druk op deze knop om het treble-niveau van het
toestel in te stellen, deze knop kan enkel worden gebruikt als de EQ op
“Flat” is ingesteld.
29. VOLUME+/VOLUME-: Druk op deze knop om het volume van het
toestel in te stellen.
30. AUDIO/LANGUAGE: Druk op deze knop om de taalfunctie te selecteren.
31. EQ: Druk op deze knop om te wisselen tussen de equalizer modi DVD5.1,
CLASSIC, JAZZ, ROCK, FLAT.
32. ANGLE: Druk op deze knop om de speelhoek van de DVD in te stellen.
33. SUBTITLE: Druk op deze knop om door de beschikbaar talen voor de
ondertitels te bladeren.
34. Title Knop: Druk op de Title Knop om terug te keren naar het
titelscherm van een geladen DVD.
35. Video Knop: Druk op de Video Knop om de video output in te stellen op
Auto, 480p, 576p, 720p en 1080i.
36. ZOOM: Druk op deze knop om een bepaald deel van het beeld te vergroten.
37. Playlist Knop: Druk op de Playlist Knop om door de speellijsten van een
aangesloten iPod te bladeren.
38. Preset Knoppen: Druk op de Preset Knoppen om door de opgeslagen
radiozenders te bladeren.
40. Shuffle Knop: Druk op de Shuffle Knop om nummers van een CD of iPod
in willekeurige volgorde af te spelen.
Bedieningen
11 CD/DVD Station
Het CD/DVD Station zal DVD/DVD+/-R/RW, CD/CD-R/ RW & JPEG
Fotoschijven afspelen.
12 Tafelstandaard
De Tafelstandaard kan van het toestel worden verwijderd voor bevestiging aan
de muur, of bevestigd blijven als standaard voor het toeste l .
13 Zekering (T 2L 250V )
14 HDMI Uitgang (Alleen DVD)
Gebruik de HDMI Uitgang om het toestel op een hoge definitie scherm aan te
sluiten.
15 Subwoofer Uitgang
Gebruik de Subwoofer Uitgang om het toestel op een externe sufwoofer aan te
sluiten.
16 FM Antenne Ingang
Gebruik de FM Antenne Ingang om het toestel aan te sluiten op een FM antenne.
17 AM Antenne Ingang
Gebruik de AM Antenne Ingang om het toestel aan te sluiten op een AM antenne.
18 S-Video Uitgang (DVD of iPod)
Gebruik de S-Video Uitgang om het toestel met behulp van een S-Videokabel
op een scherm aan te sluiten.
19 AV 1 & AV 2 Ingangen
Gebruik de AV 1 en AV 2 Ingangen om het toestel aan te sluiten op een
DVD-speler of een Set-Top Box.
20 Hulpingang
Gebruik de Hulpingang om het toestel aan te sluiten op een MP3-speler of een
andere audiobron.
21 Component Video Uitgang (Alleen DVD)
Gebruik de Component Video Uitgang om het toestel met behulp van
component Videokabels op een scherm aan te sluiten.
22 Composiet Video Uitgang (DVD, iPod of AV Ingangen)
Gebruik de Composiet Video Uitgang om het toestel met behulp van RCA
videokabels op een scherm aan te sluiten.
23 Video Uitgang (DVD of iPod)
Gebruik de S-Video Uitgang om het toestel m e t behul p van een Videokabel
op een scherm aan te sluiten.
NL 15
NL 12
Page 57

Randapparatuur
1. Power Knop: Druk op de Power Knop om het toestel in de modus “aan”
of “ stand-by” te zetten.
2. Sleep/Snooze Knop: Druk herhaaldelijk op de Sleep/Snooze Knop om
de sleeptimer tussen 10-120 minuten in te stellen.
3. Timer Knop: Druk op de Timer Knop om de timer in of uit te
schakelen voor het toestel.
4. CLOCK: Druk op deze knop om de tijd in te stellen.
5. Go To Knop: Druk op de Go To Knop en voer met behulp van de
Nummertoetsen een specifiek tijdstip in om automatisch naar dat tijdstip
van de geplaatste DVD te springen.
6. Album Knoppen: Druk op de Album Knoppen om door de albums van
een aangesloten iPod te bladeren.
Randapparatuur
7. Chapter Knoppen: Druk op de Chapter Knoppen om door de hoofdstukken
van een aangesloten iPod te bladeren.
8. SetUp Knop: Druk op de Set Up Knop om het instelmenu van het toestel op
te roepen.
9. A-B Knop: Druk een keer op de A-B k nop o m tijdens het afspelen van een
DVD een startpunt te selecteren. Druk een tweede keer op de knop om een
eindpunt te selecteren.
Hierna zal de gemaakte selectie van de DVD worden afgespeeld. Druk een
derde keer op de knop om deze functie te annuleren.
10 DVD/iPod Menu: Druk in DVD modus o p de DV D/ i P o d M enu Kno p om
het menu te bekijken.
Druk op de DVD/iPod Menu Knop om achterwaarts door de menu’s van
een aangesloten iPod te bladeren.
11. BASS+/BASS-: Druk op deze knop om het bass-niveau van het toestel in te
stellen, deze knop kan enkel worden gebruikt als de EQ op “Flat” is ingesteld.
12. Functie Knop: Druk op de Functie Knop om te wisselen tussen de modi
DVD, iPod, AUX, AV 1, AV 2, AM en FM.
13. Slow Knop: Druk op de Slow Knop om een DVD film in slow motion
(vertraagd) te bekijken.
14. Play/Pause Knop: Druk op de Play/Pause Knop om een aangeslot en iPod
of geladen CD of DVD af te spelen en te pauzeren.
15. Step Knop: Druk herhaaldelijk op de Step Knop om frame per fram e
door een DVD te bladeren.
16. STOP: Druk op deze knop om het afspelen van een DVD te beëindigen.
17. REV: Druk op deze knop om terug te springen.
18. FWD: Druk op deze knop om vooruit te springen.
19. PREVIOUS: Druk op deze knop om naar het vorige nummer te gaan.
20. NEXT: Druk op deze knop om naar het volgende nummer te gaan.
21. Eject Knop: Druk in DVD modus op de Eject Knop om een CD of DVD
uit te werpen, of in iPod modus het gemotoriseerd iPod basisstation.
NL 13
NL 14
Page 58

 Loading...