

Page 1

MCC-B22IU
User Manual
Manuel d’Utilisation
Manual del Usuaro
Handkanaaling
www.akiraeurope.com
Page 2
To achieve the utmost in enjoyment and performance, please read this manual carefully before
attempting to operate the unit in order to became familiar with its features, and assure you years of
faithful, trouble free performance and listening pleasure.
* The safety and operating instructions should be retained for future reference.
* Avoid installing the unit in locations described below:
Places exposed to direct sunlight or close to heat radiating appliances such as electric heaters.
On top
places. Places subject to constant vibration. Humid or moist places.
* Make sure not to obstruct the ventilation openings.
* Before turning on the power for the first
*
The product shall not be exposed to dripping or splashing and that no objects filled with liquids,
such as vases, shall be placed on the product.
* The apparatus shall not be exposed to dripping or splashing and that no objects filled with
liquids, such as vases, shall be placed on apparatus.
* To completely disconnect the power input, the mains plug of apparatus shall be
removed from the mains.
* When the stand-by LED gives no color, the apparatus is completely disconnected from mains.
* Minimum distances10cm around the apparatus
* Attention should be drawn to the environmental aspects of battery disposal.
* The use of apparatus in moderate climates.
* The mains plug should not be obstructed or should be easily accessed during intended use.
* The ventilation should not be impeded by covering the ventilation openings with items such
as newspaper, table-clothes, curtains etc.
* No naked flame sources such as lighted candles should be placed on the apparatus.
* Battery shall not be exposed to excessive
For safety reasons, do not remove any covers or attempt to gain access to the inside of the product.
Refer any servicing to qualified personnel.
Important Notes
of other stereo equipment that radiate too much heat. Places lacking ventilation or dusty
time, make sure the power cord is properly installed.
for sufficient ventilations.
heat such as sunshine, fire or the like.
Do not attempt to remove any screws, or open the casing of the unit; there are no user serviceable
parts inside, refer all servicing to
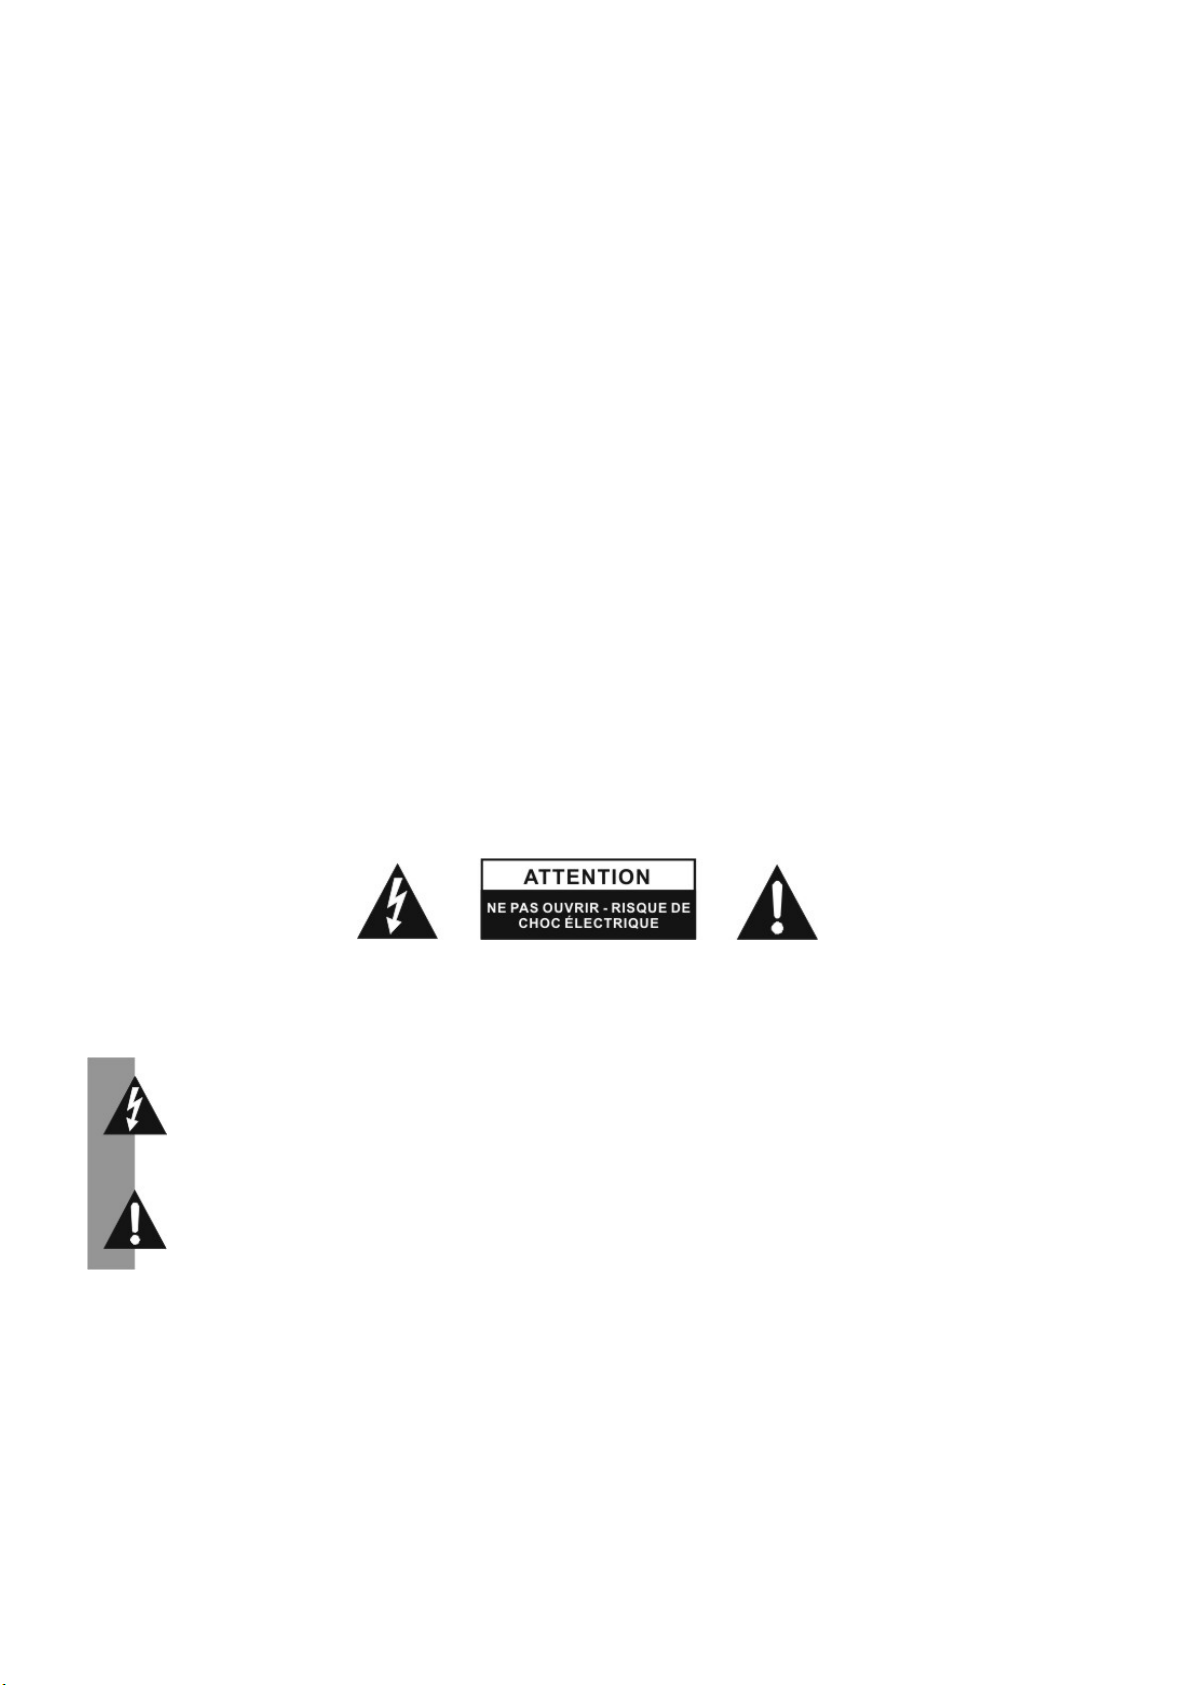
CAUTION : TO REDUCE THE RISK OF ELECTRIC SHOCK DO NOT REMOVE COVER ( OR BACK ) ,
NO USER SERVICEABLE PARTS INSIDE, REFER SERVICING TO QUALIFIED SERVICE
qualified service personnel.
PERSONNEL.
Conductor dangerous voltage, that may be of sufficient magnitude to constitute a risk
of electric shock to persons is present within this products enclosure.
ATTENTION
Th e owners manual contains important operating and maintenance instructions, for
your safety, it is necessary to refer to the manual.
WARNING : TO PREVENT FIRE OR SHOCK
DRIPPING OR SPLASHING.
Note:
- This unit will become warm when used for a long period of time. This is normal and does not indicate
a problem with the unit.
- The
CD player includes micro-processors which may malfunction as a result of external electrical
interference or noise. If the CD player is not working properly, disconnect the power source and
then reconnect it.
Excessive sound pressure from earphones and headphones can cause hearing loss.
-
- If an unusual conditions occurs in the display window or key button, switch the unit off, then turn on the
unit again.
DANGEROUS VOLTAGE
HAZARD, DO NOT EXPOSE THIS APPLIANCE TO
UK-1
Page 3
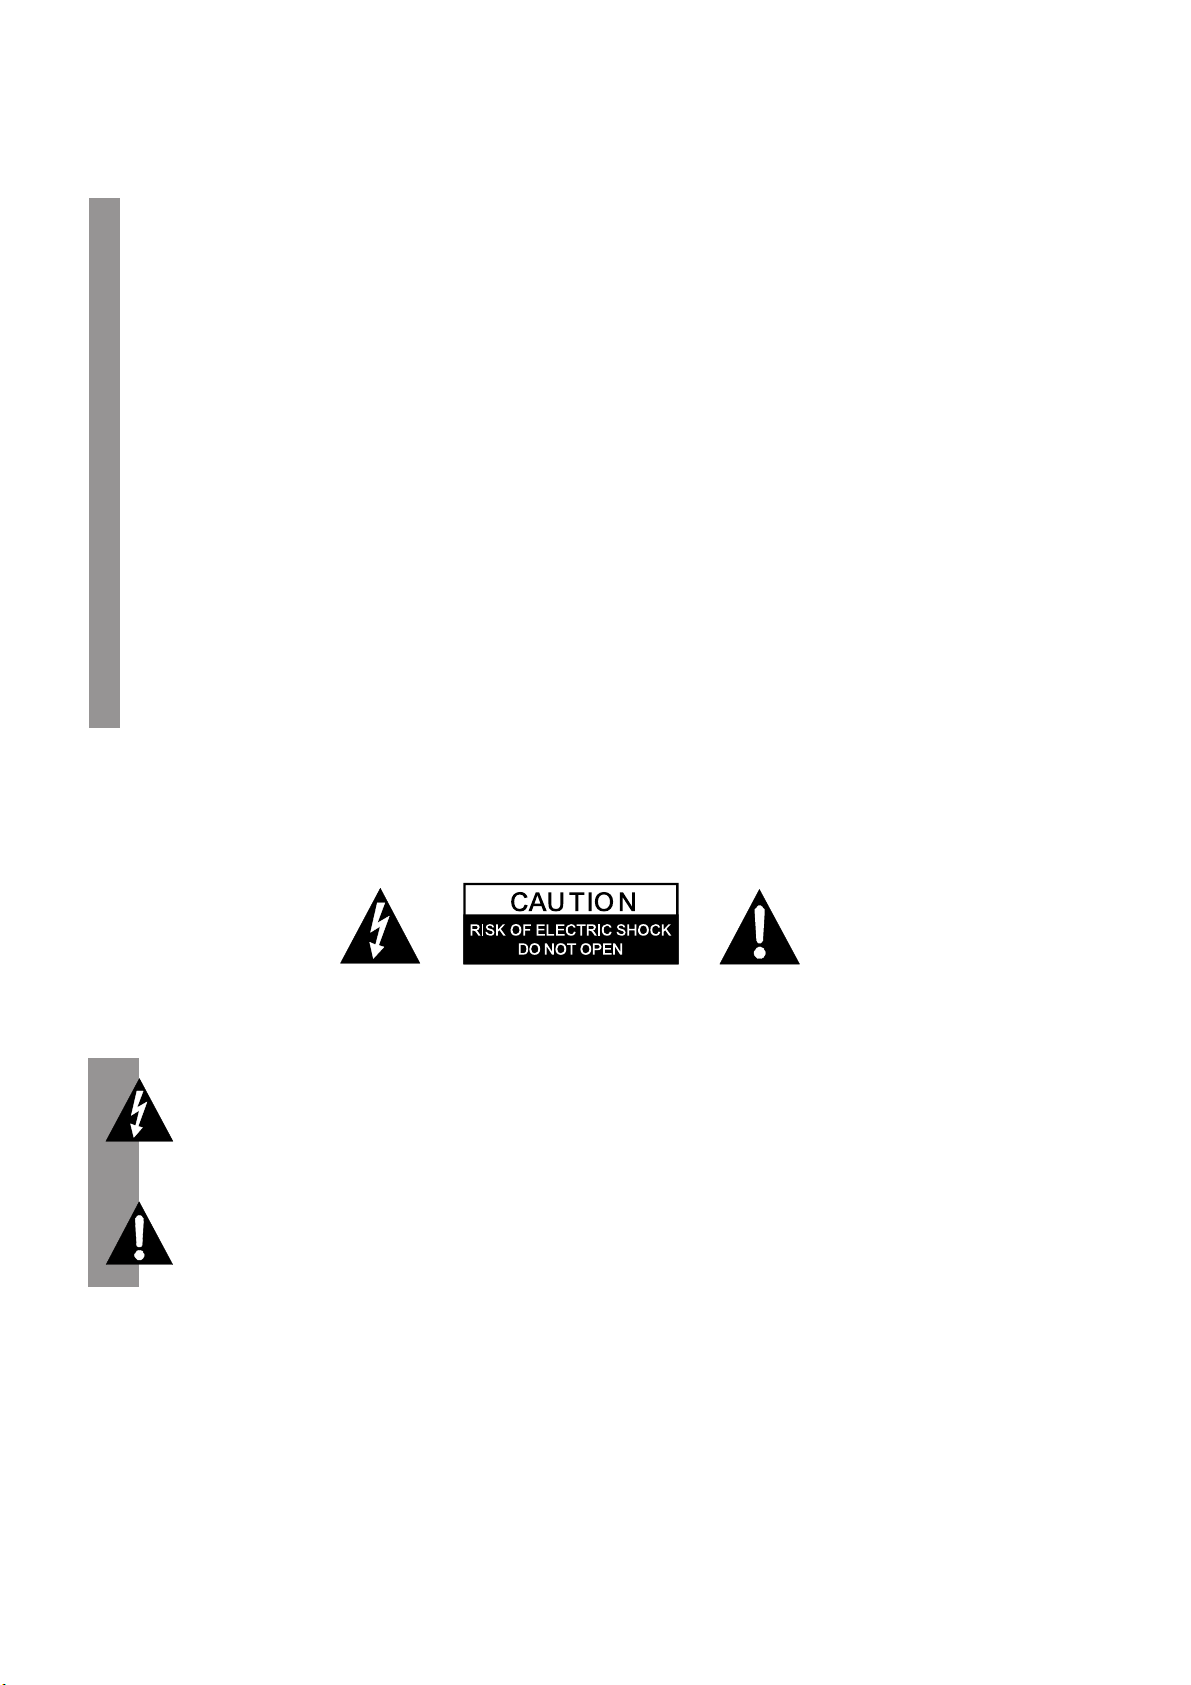
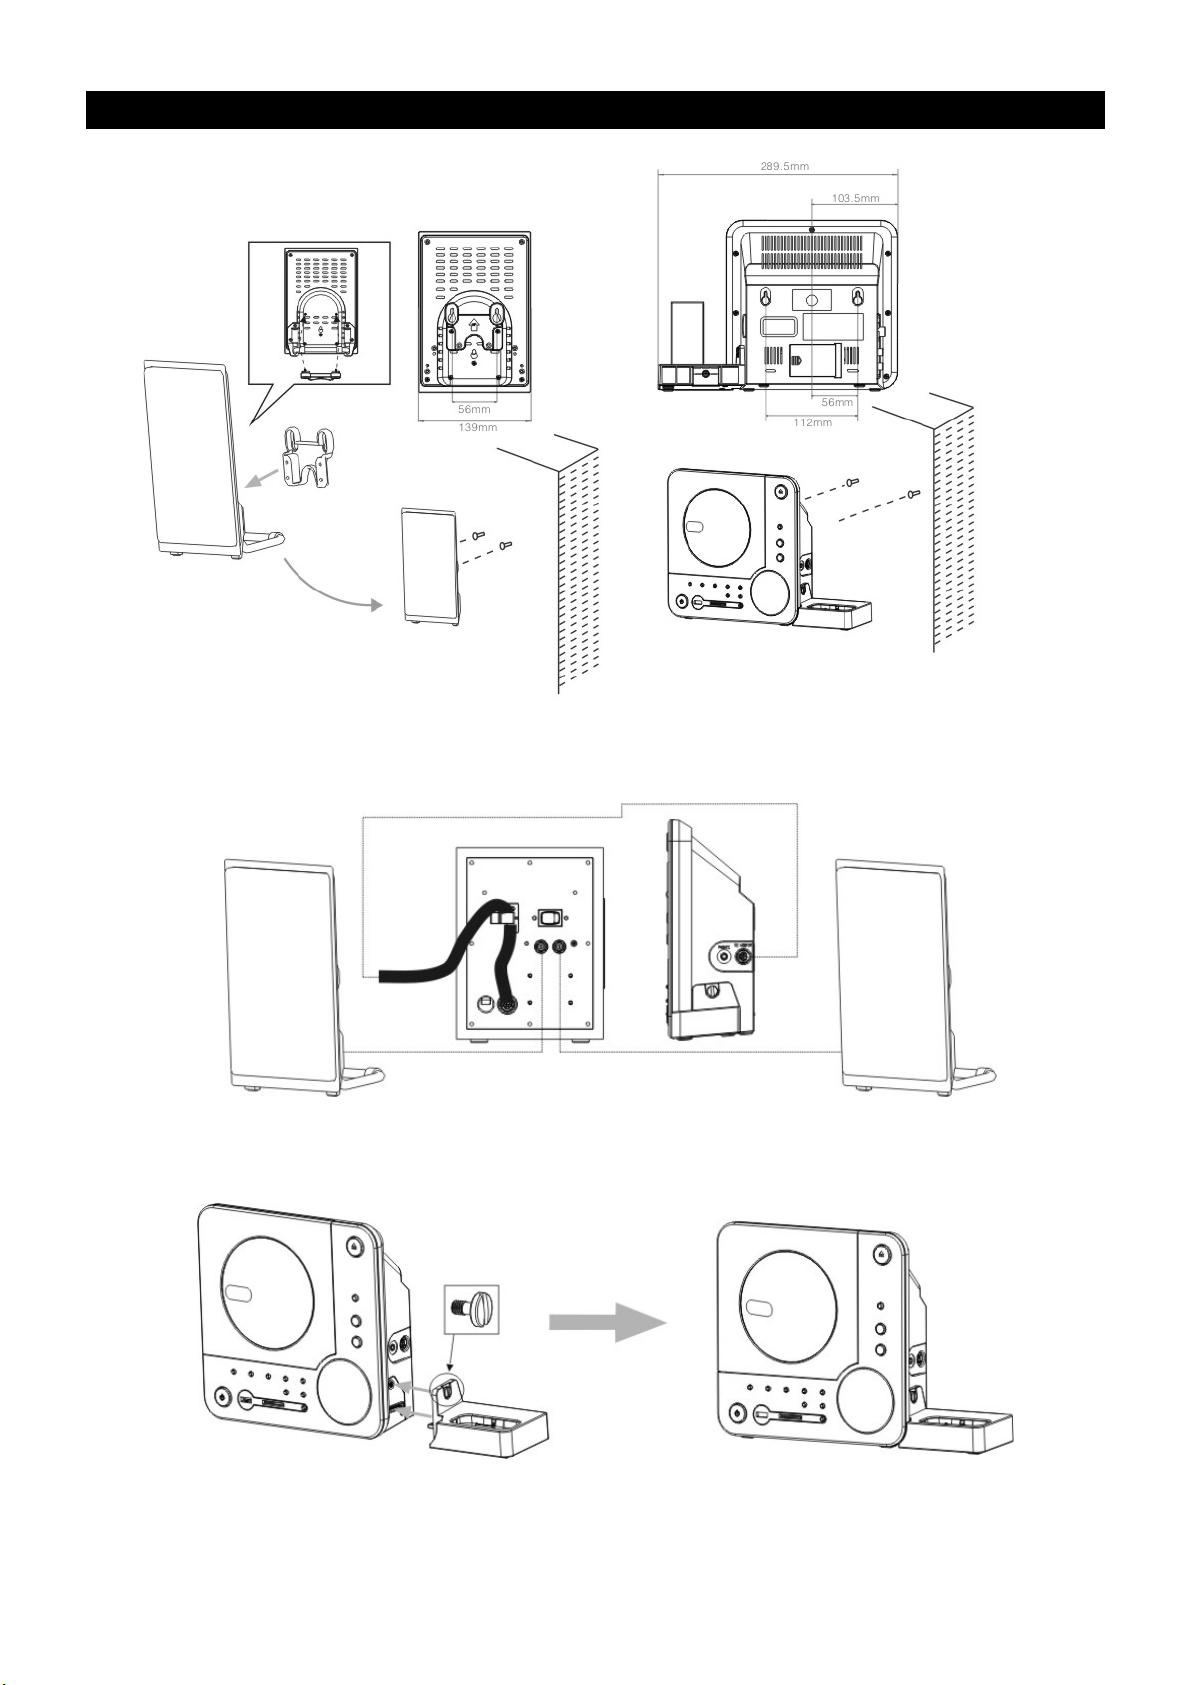
Assembly Drawing of Unit and speaker
289.5mm
103.5mm
1 fixing the board for wall mounting
289.5mm
103.5mm
56mm
139mm
Fix the two nails(Size:3.5*25BA) into the wall and
they should parallel each other. (The distance
between the two nails should be 56mm)
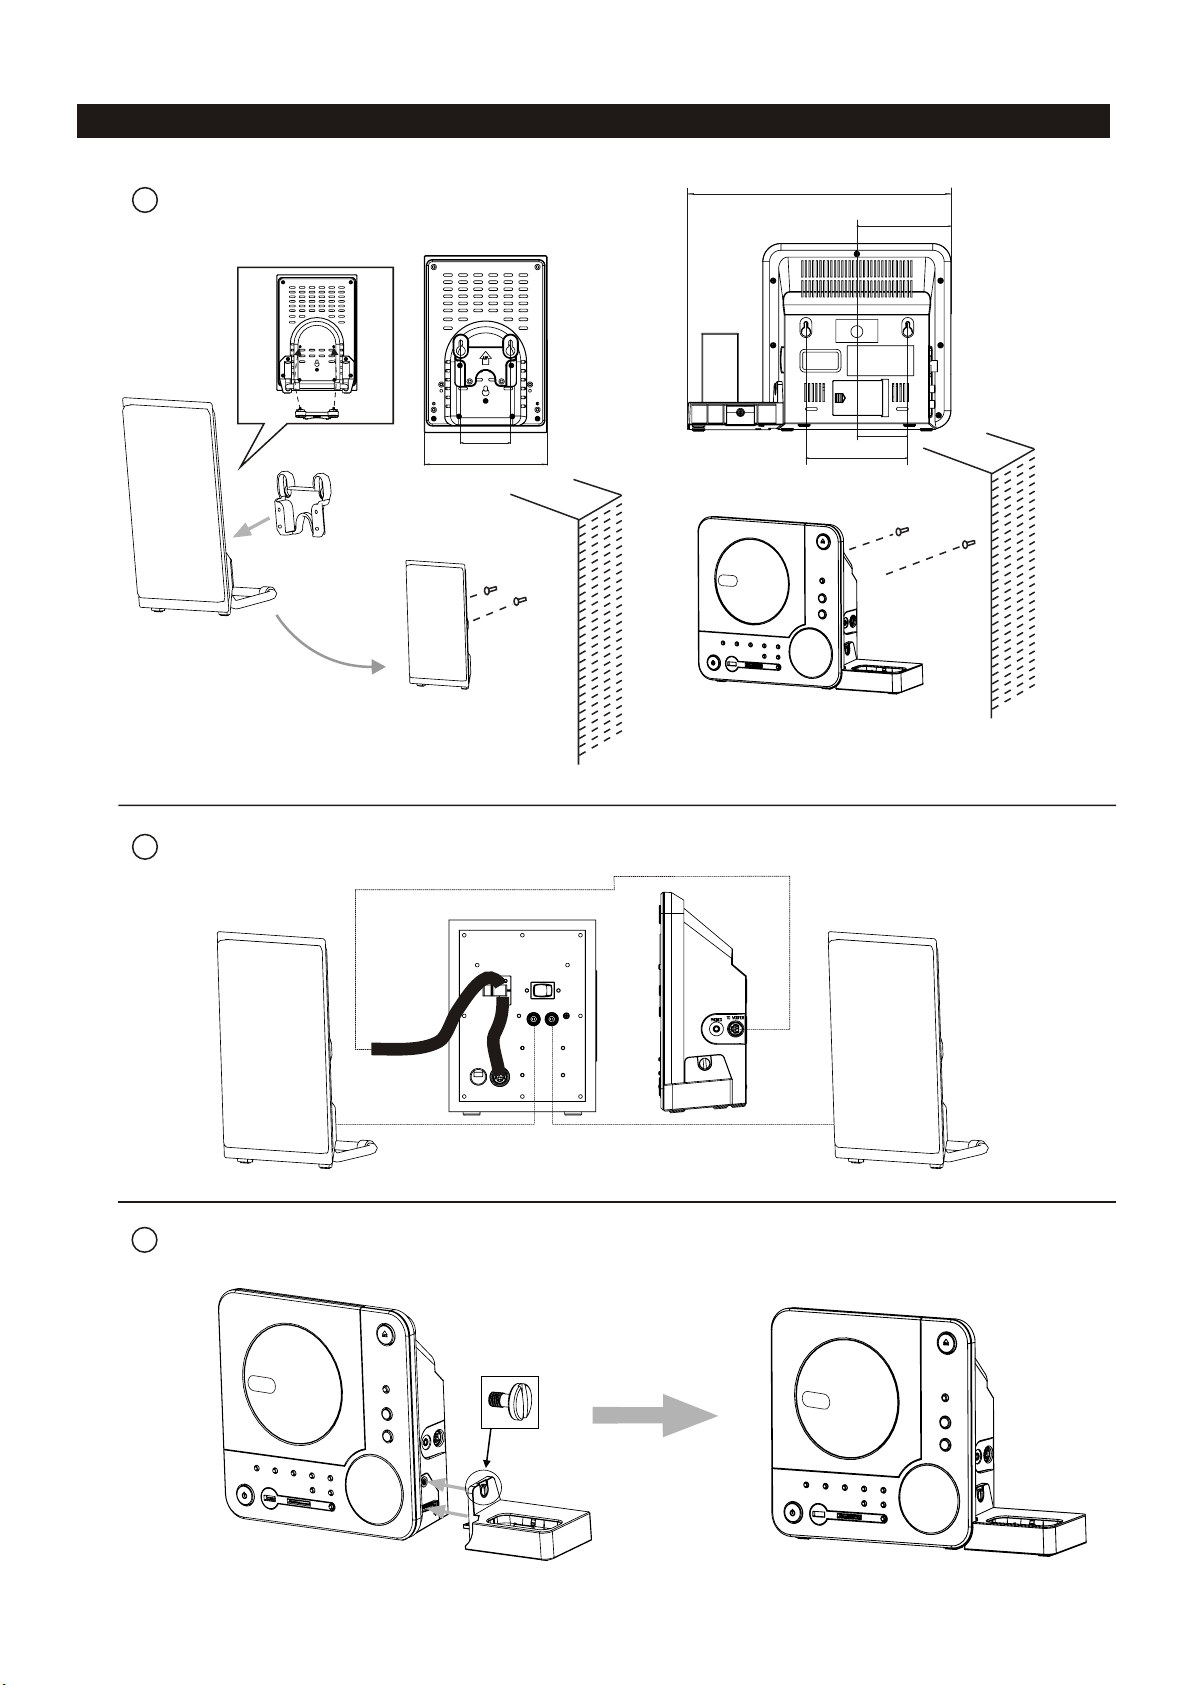
2 speakers connection
56mm
112mm
Fix the two nails(Size:3.5*25BA) into the wall and they
should parallel each other. (The distance between the
two nails should be112mm)
3 iPod docking connection
Max connection distance is 2 metres
UK-2
Page 4
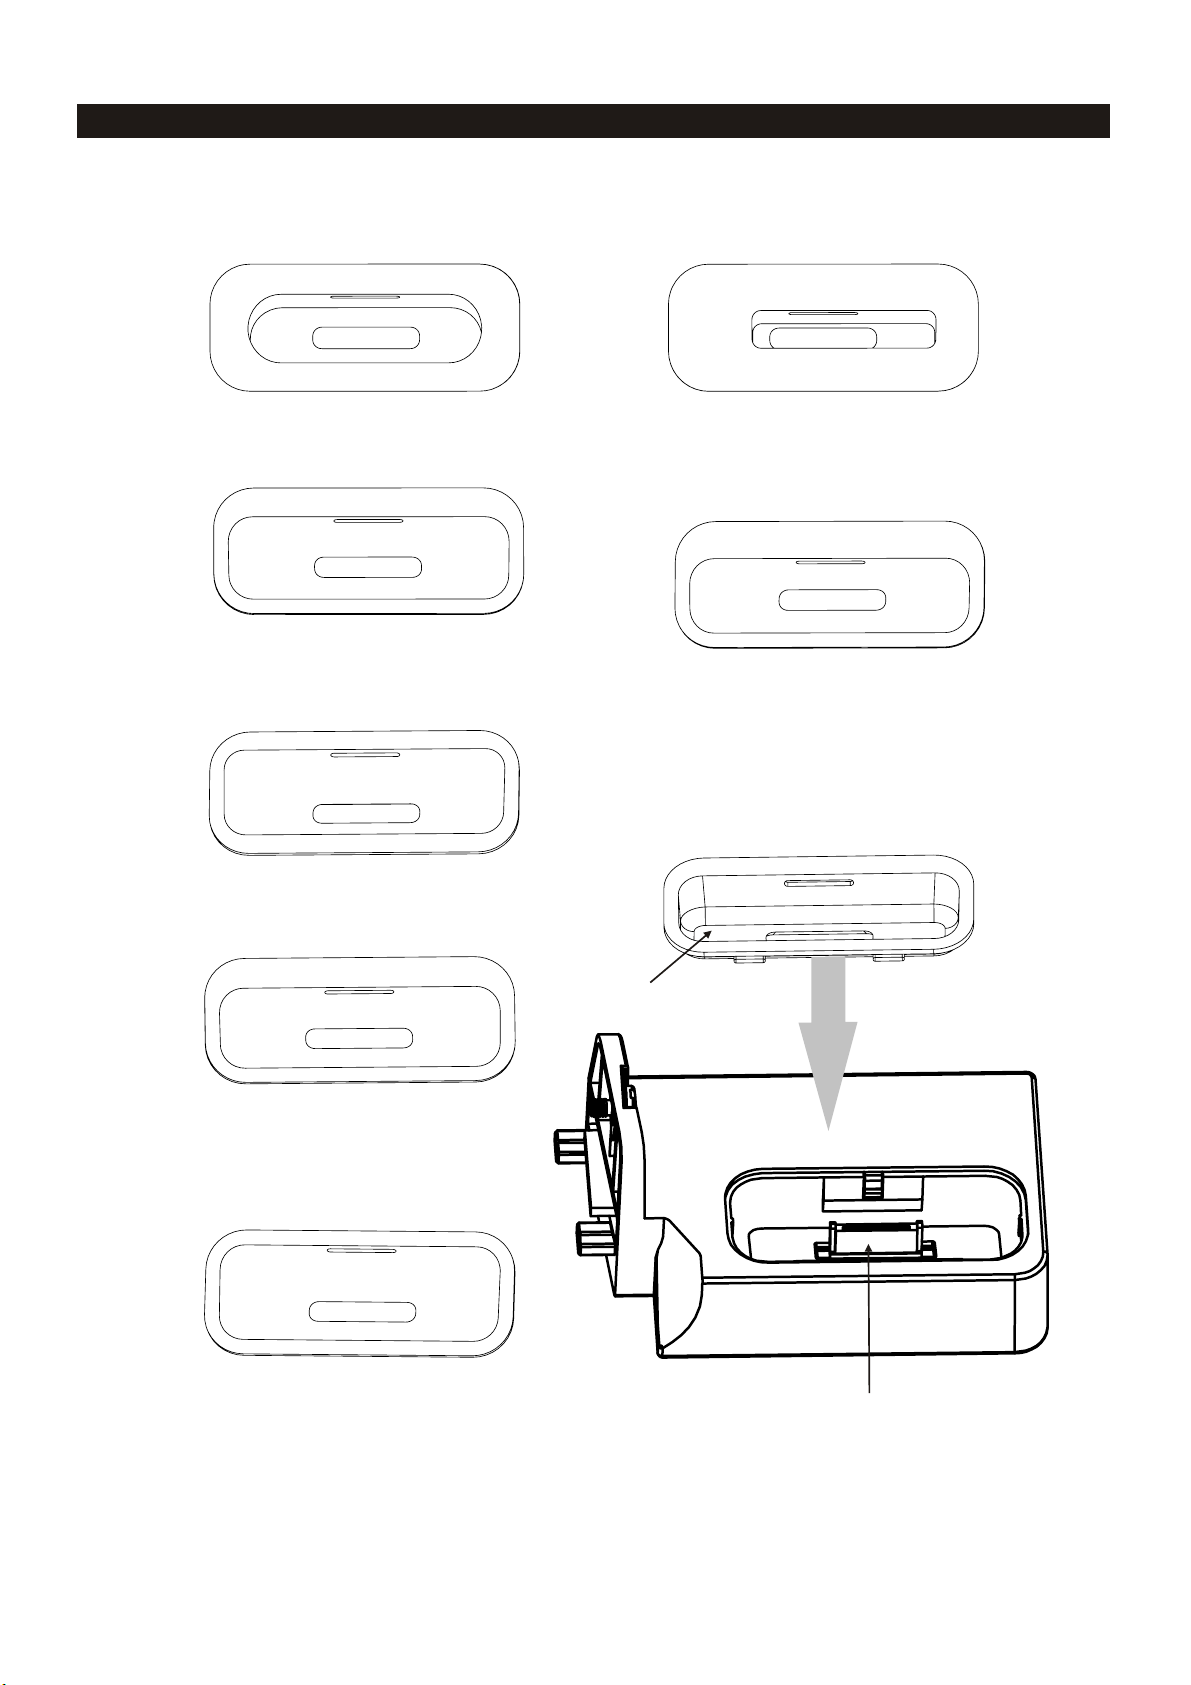
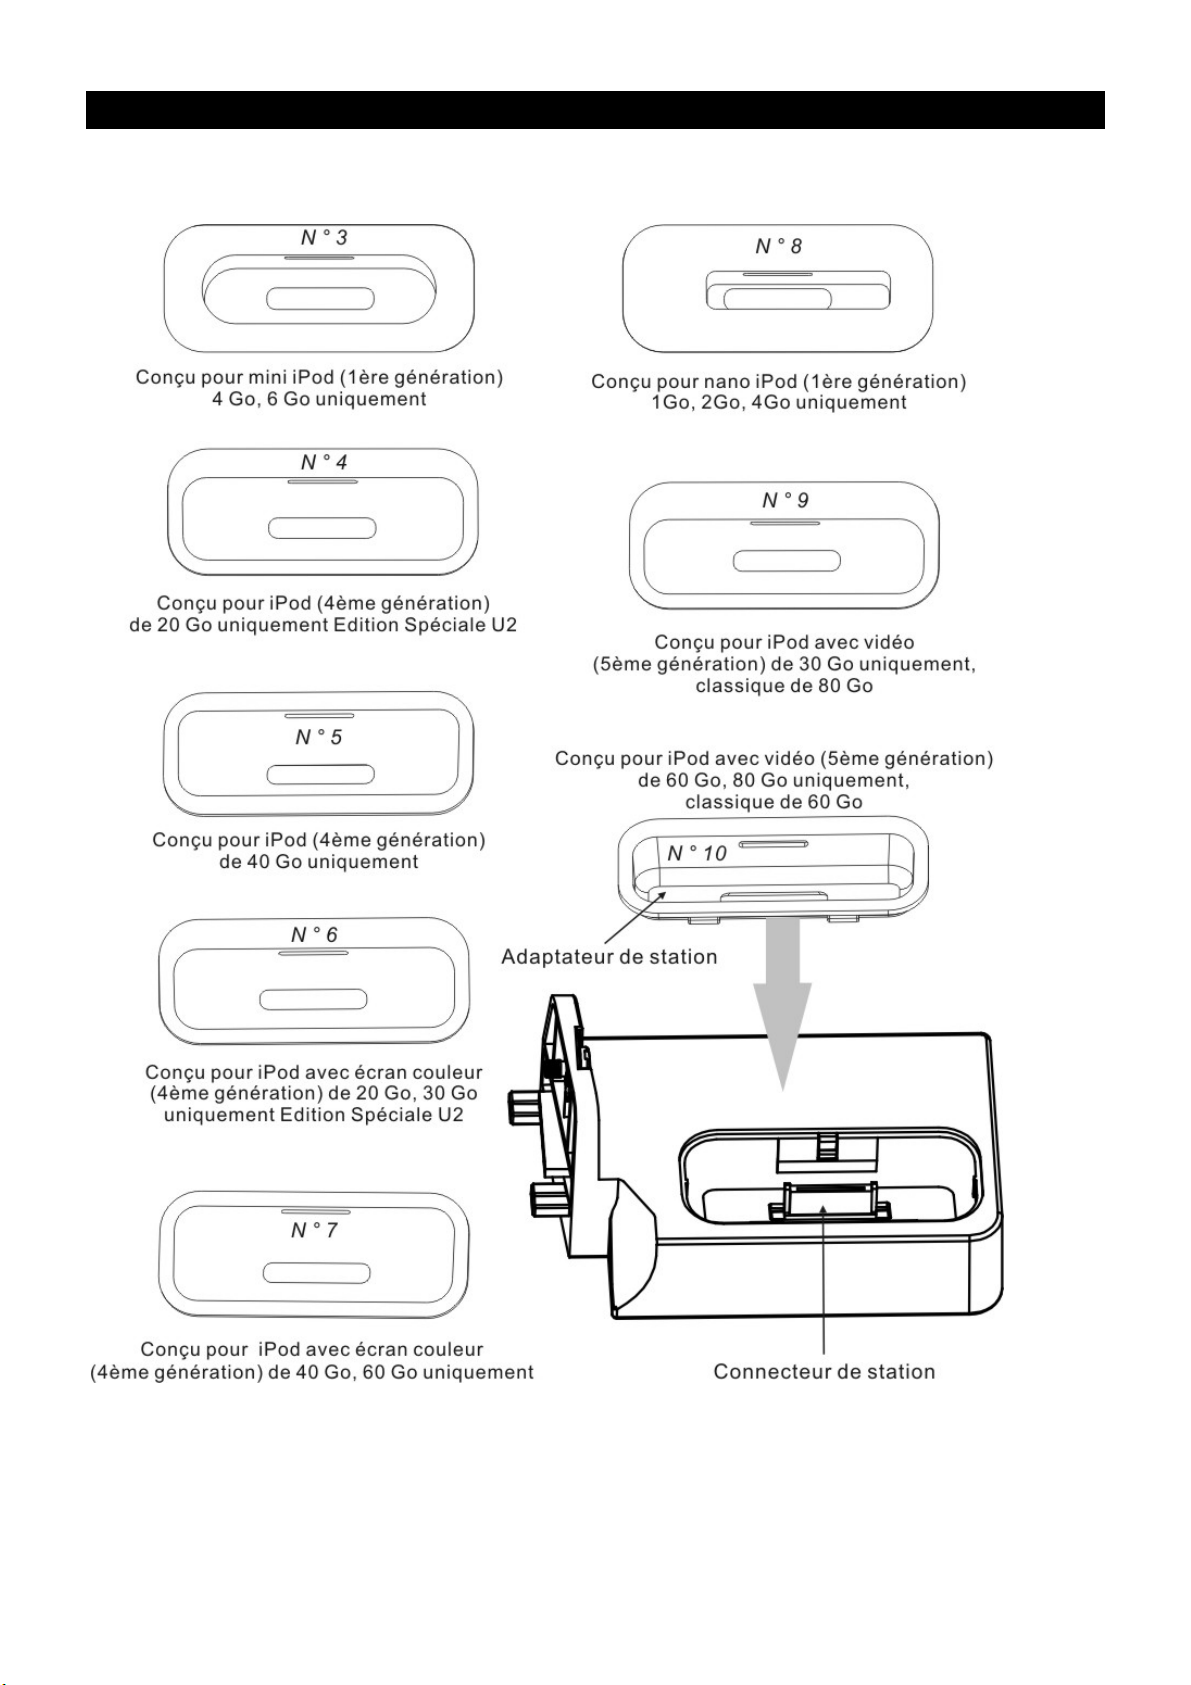
Assembly Drawing of iPod Docking
** The below iPod shown not included **
No.3
Made for iPod mini
(1st generation)4GB, 6GB only
No.4
Made for iPod
(4th generation)20GB only
U2 Special Edition
No.5
No.8
Made for iPod nano
(1st generation)1GB, 2GB, 4GB only
No.9
Made for iPod with video
(5th generation)30GB only
iPod classic 80GB
Made for iPod with video
(5th generation)60GB,80GB only
classic 160GB
iPod
Made for iPod
(4th generation)40GB only
No.6
Made for iPod with
color display
(4th generation)20GB, 30GB only
U2 Special Edition
No.7
Made for iPod with
color display
(4th generation)40GB, 60GB only
No.10
Dock adapter
Connector dock
Note: The unit also supports iPod nano 2rd, iPod nano 3rd generation (Video) 4/8GB,
iPod touch 8/16GB, but Dock adapter is not included
, please use the Dock adapter
equipped with the iPod.
UK-3
Page 5
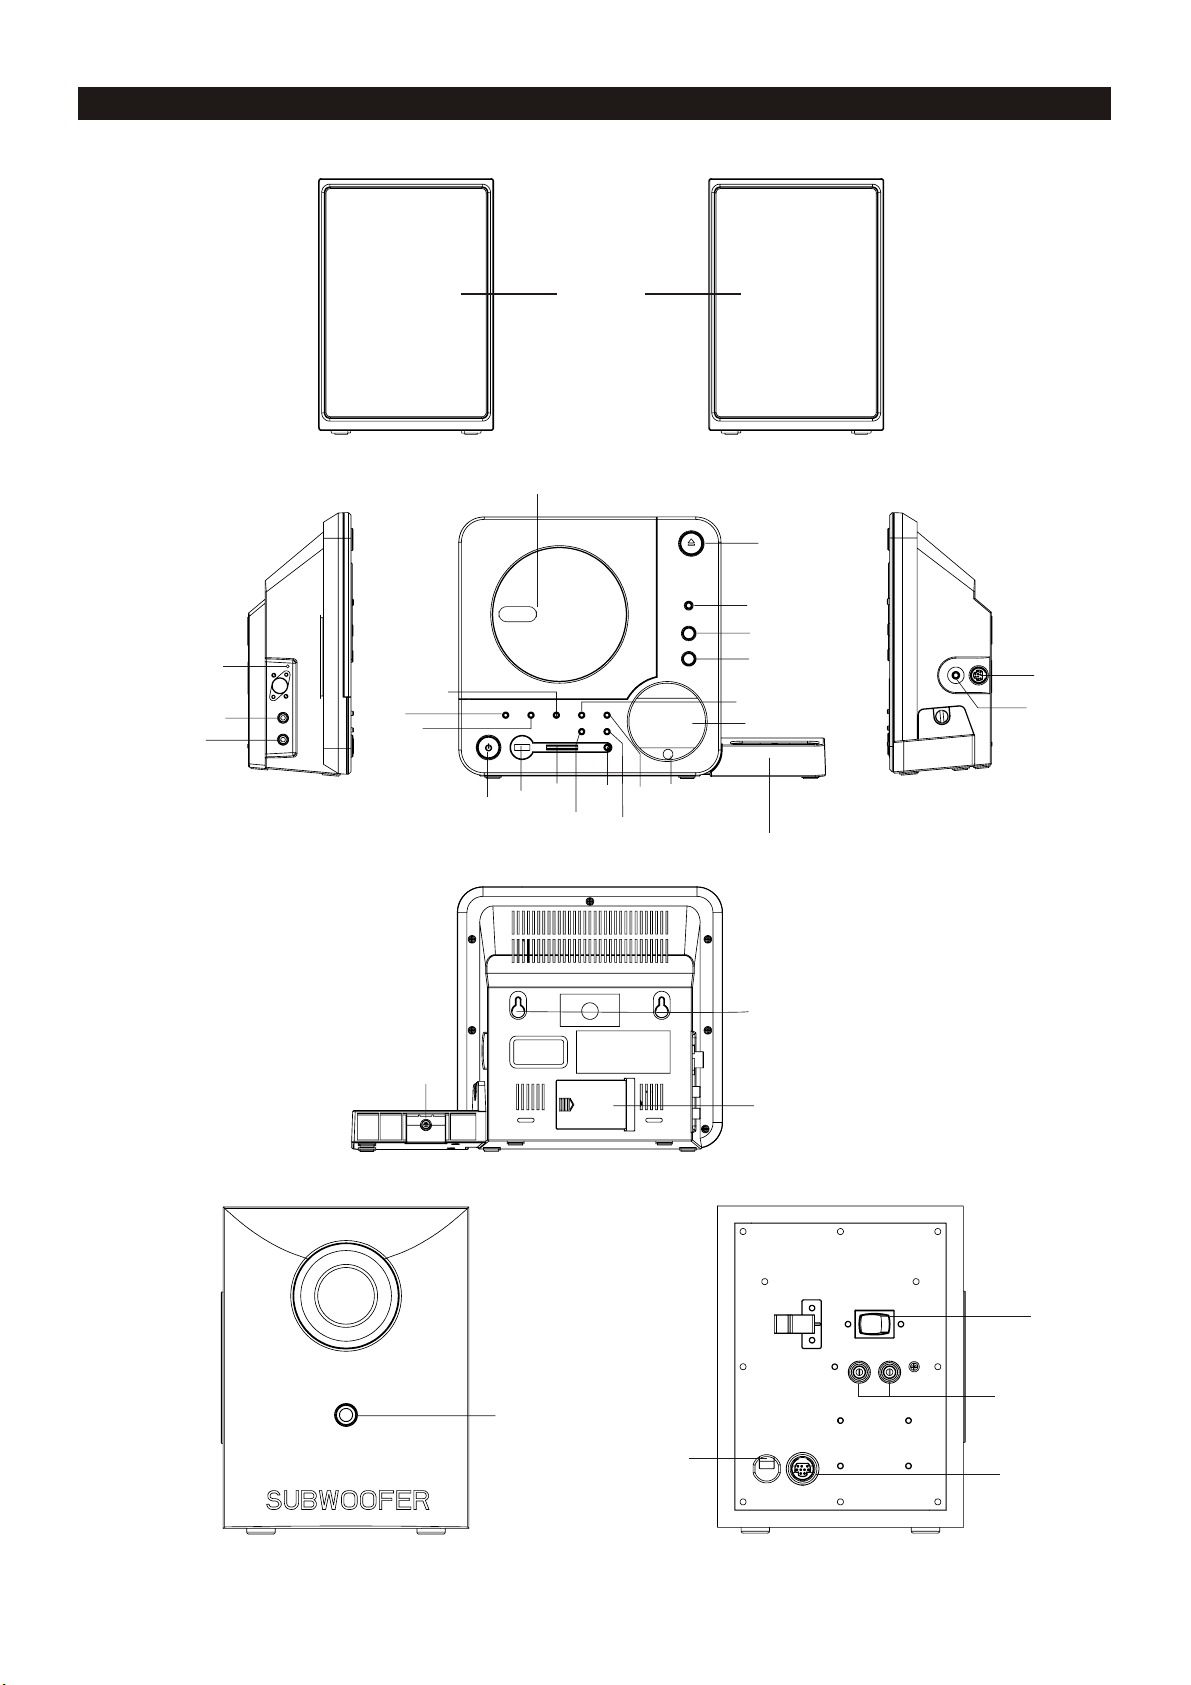
FEATURES AND CONTROLS
2
5
3
4
6
7
22
1
21
20
19
18
17
16
24
25
27
10
9
8
12
11
13
14
15
23
26
28
31
29
UK-4
30
32
33
Page 6
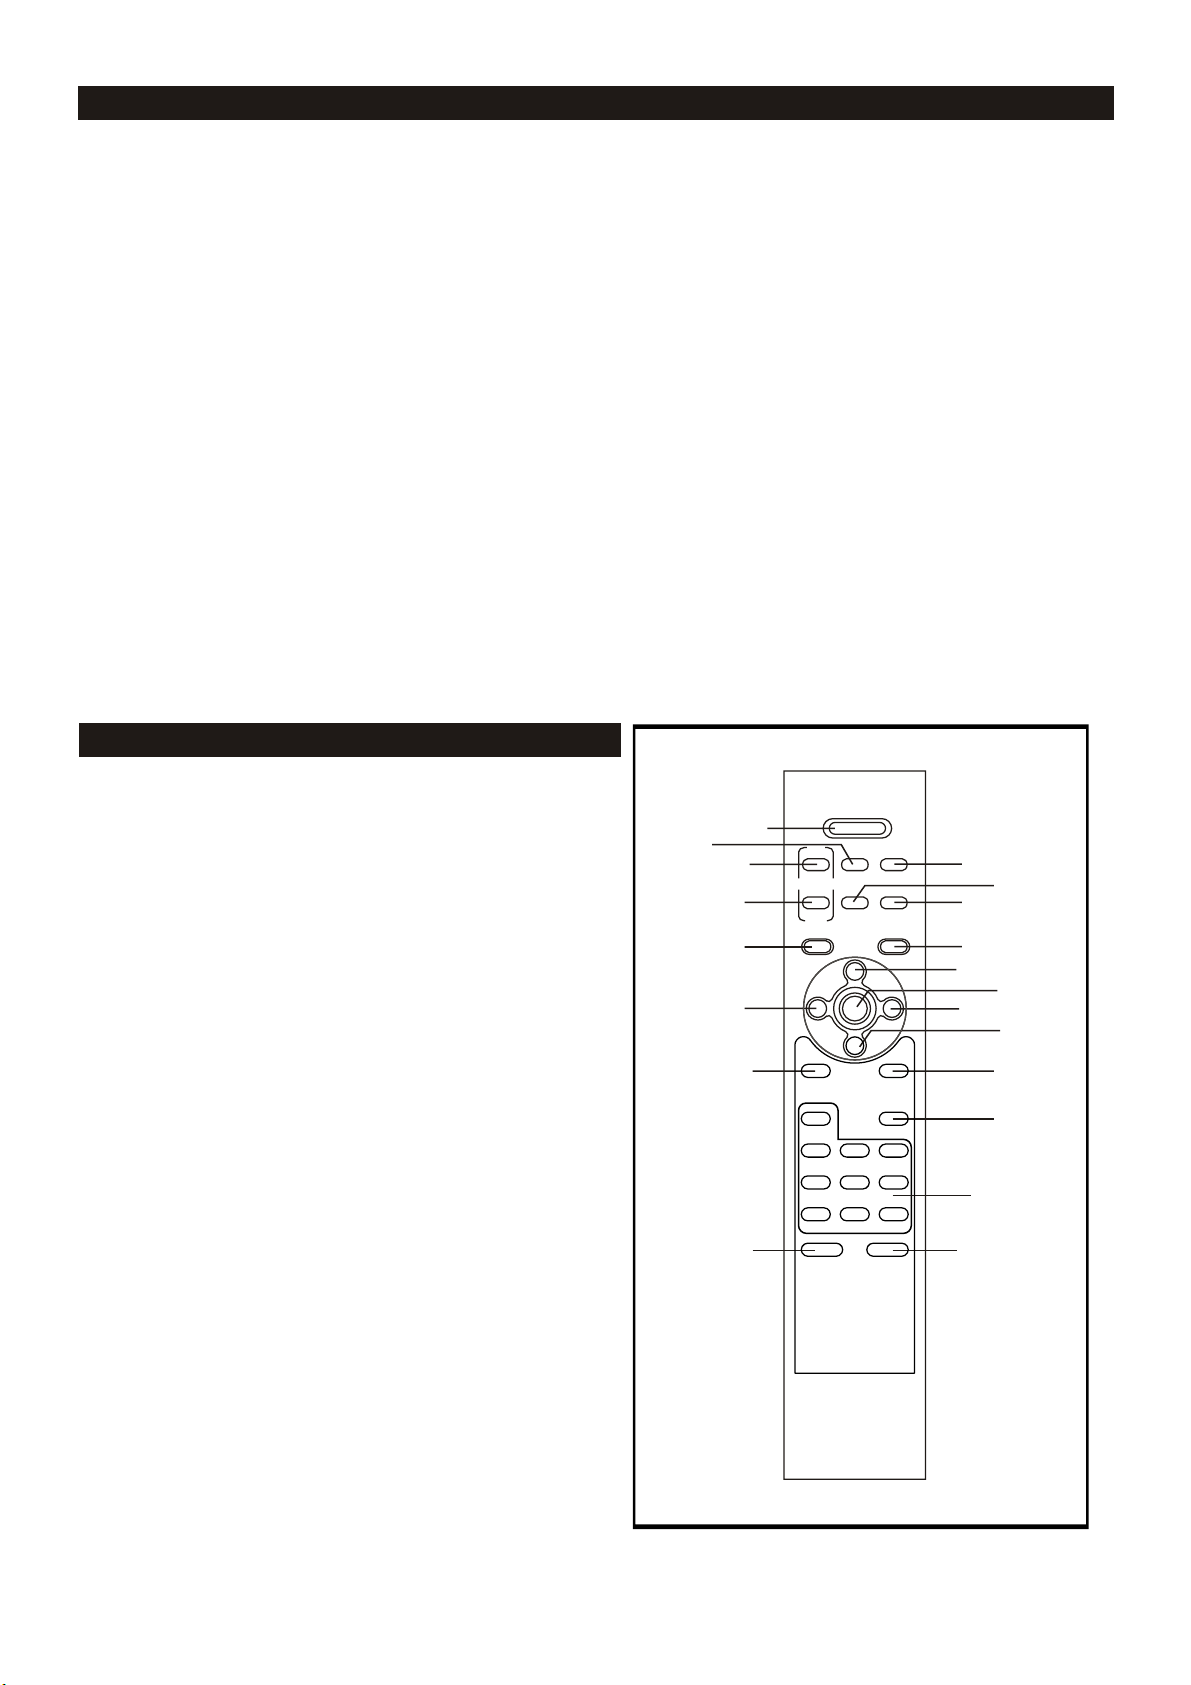
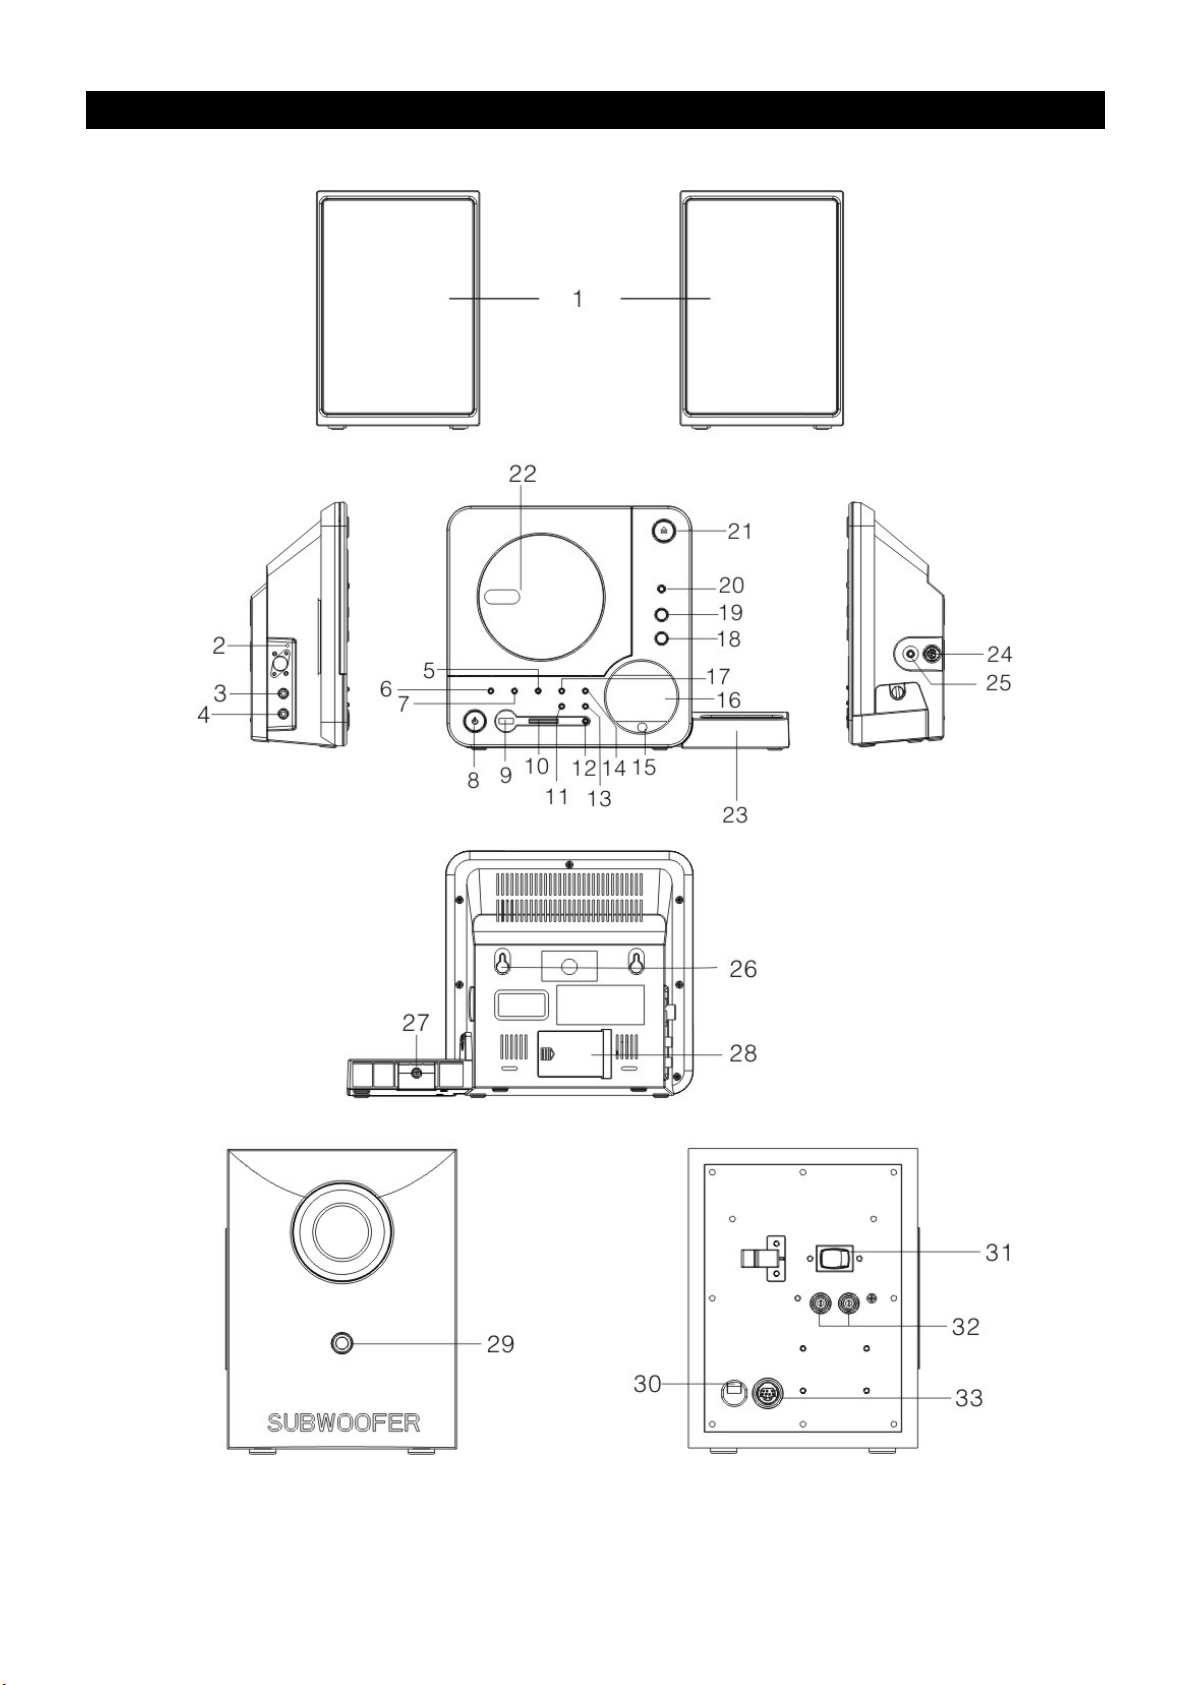
FEATURES AND CONTROLS
1. SPEAKER
2. FM ANTENNA
3. AUX JACK “R”
4. AUX JACK “L”
5. PRESET/FOLDER UP BUTTON
6. REPEAT BUTTON
7. PRESET/FOLDER DOWN BUTTON
8. STANDBY (WITH LED INDICATOR) BUTTON
9. USB DEVICE IN PORT
10. SD/MMC CARD IN SLOT
11. SEARCH/SKIP/TUNING DOWN BUTTON
12. iPod/MEM/CLOCK-ADJ. BUTTON
13. SEARCH/SKIP/TUNING UP BUTTON
14. PLAY/PAUSE/ENTER BUTTON
15. IR SENSOR
16. LCD DISPLAY WINDOW
17. STOP/MENU BUTTON
REMOTE CONTROL
18. VOLUME DOWN BUTTON
19. VOLUME UP BUTTON
20. FUNCTION BUTTON
21. CD DOOR OPEN/CLOSE BUTTON
22. CD DOOR
23. iPod DECK
24. TO WOOFER JACK
25. HEADPHONES JACK
26. HITCHING HOLE
27. VIDEO OUT JACK
MEMORY BACK-UP BATTERY DOOR
28.
29. SUBWOOFER STANDBY INDICATOR
30. AC POWER CORD
31. SUBWOOFER AC POWER SWITCH
32. OUT SPEAKERS JACK
33. FROM MAIN JACK
1. STANDBY BUTTON
2. MUTE BUTTON
3. PRESET/FOLDER UP BUTTON
4. PRESET/FOLDER DOWN BUTTON
5. RANDOM BUTTON
6. TUNING/SKIP/SEARCH DOWN BUTTON
7. TIMER BUTTON
8. VOLUME DOWN BUTTON
9. FUNCTION BUTTON
10. INTRO BUTTON
11. ID3/ESP/MONO/ST. BUTTON
12. REPEAT BUTTON
13. PLAY/PAUSE/ENTER (only in ) BUTTON
14. EQ
15. TUNING/SKIP/SEARCH UP BUTTON
16. STOP/MENU (only in ) BUTTON
17. /MEM/CLOCK- ADJ. BUTTON
18. SLEEP BUTTON
19. NUMBER SEARCH BUTTON
20. VOLUME UP BUTTON
BUTTON
iPod
iPod
iPod
1
2
3
4
5
9
10
11
12
13
14
6
15
16
7
17
18
19
8
20
UK-5
Page 7
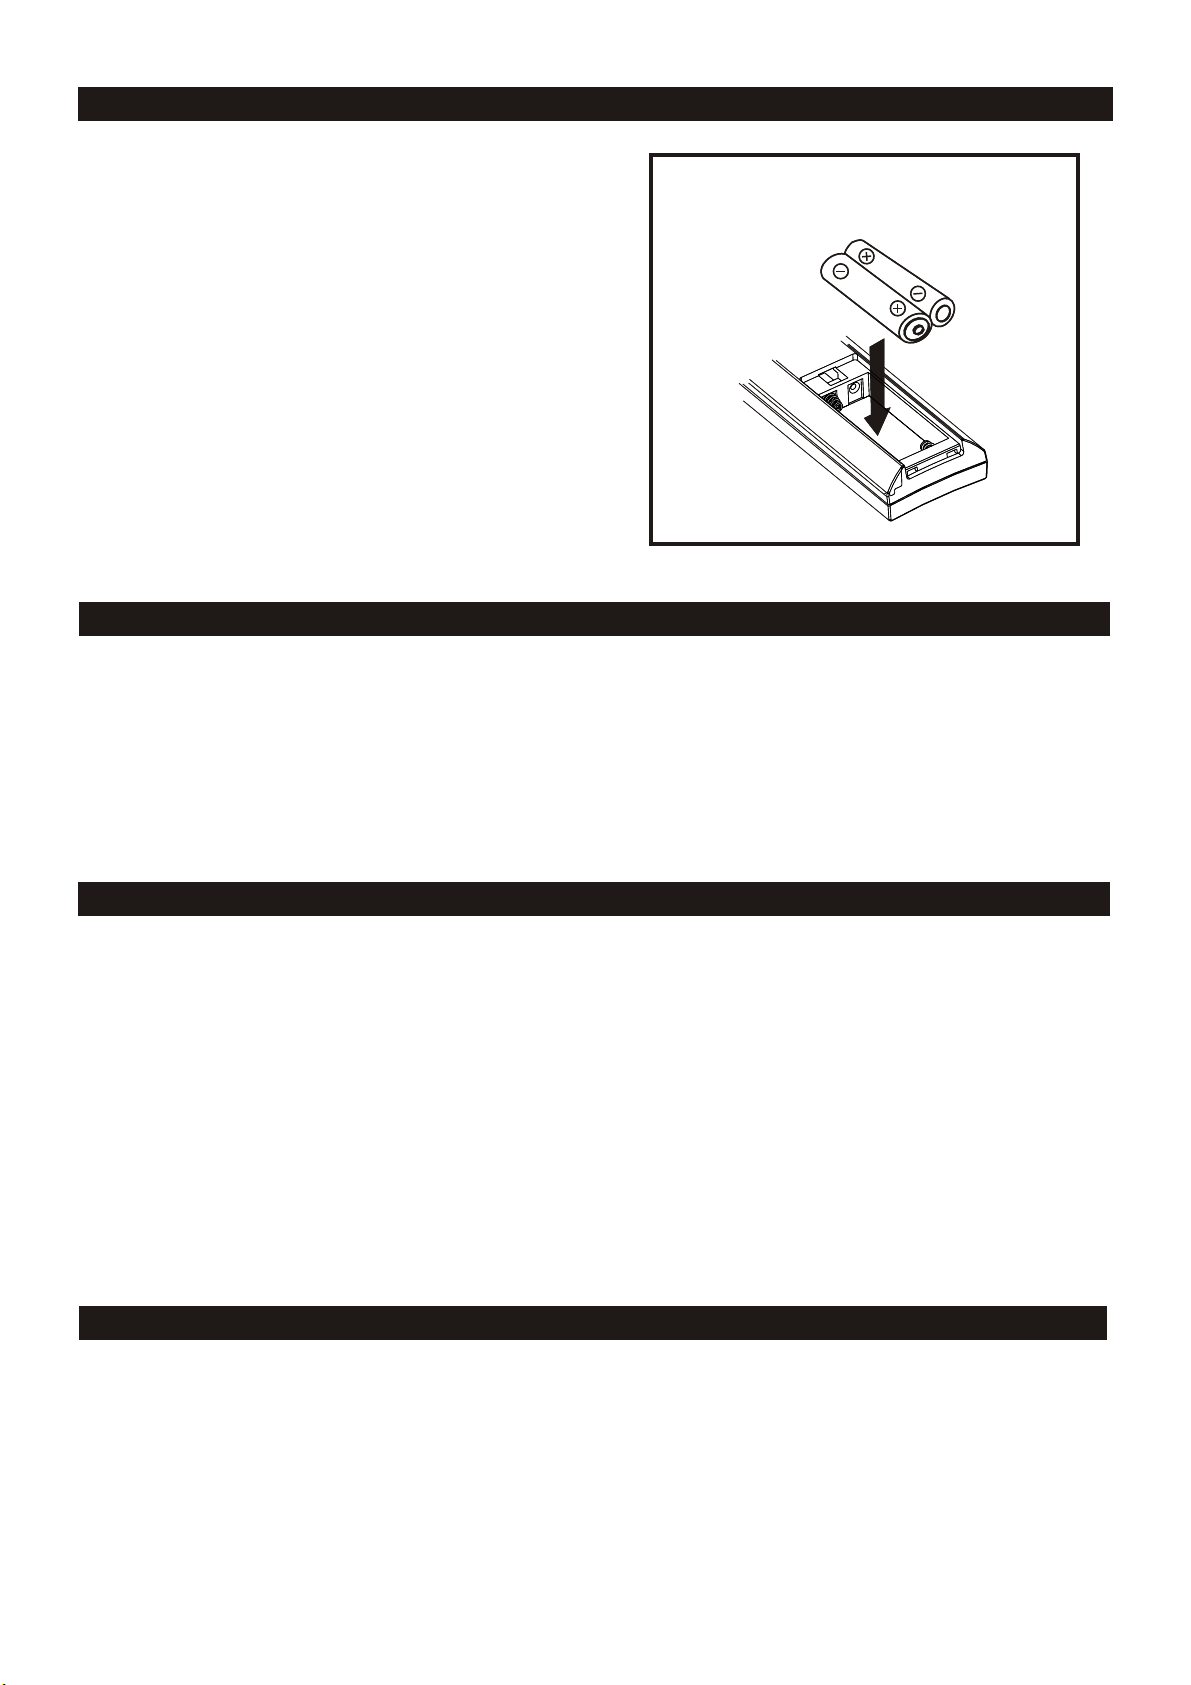
PUTTING THE BATTERIES INTO THE REMOTE CONTROL UNIT
Press down the compartment cover, and slide the
cover off to open the compartment. Place the two
(UM4), (AAA), (R03) batteries in the remote
control according to the polarity markings ("+" and
" - ") inside the compartment and on the batteries.
Place the cover over the compartment, press down
lightly,
NOTE : Remove the batteries from the remote
control if not in use for long period of the time.
Do not mix normal batteries with rechargeable
batteries, when the batteries become weak,
remote control will not function and replace with
new batteries.
and push it upward until it snaps on.
**BATTERIES NOT INCLUDED**
OPERATING THE SUBWOOFER AND MAIN UNIT
When you first put the unit electric plug into the AC outlet, and then switch the power to "ON" position
on the rear of the subwoofer.
1. The subwoofer and the main unit will be in standby mode, the both of the STANDBY indicators will
change to red color.
Press the STANDBY button on the main unit (or on the remote control) to power the main unit "ON".
2.
3. The standby indicator of the subwoofer will be changed to green color and the standby indicator of
the main unit will be change to light off.
Note: Pull the
AC plug out of the wall socket that to switch off the whole products completely.
POWER/STANDBY
1. Switch the power to "ON" position on the rear of the subwoofer firstly.
2. Press the STANDBY button on the main unit (or remote control) to power the unit "ON".
3. Select the sound source (CD, USB, SD/MMC,iPod, AUX or TUNER) by pressing the FUNCTION
button.
4. Adjust the volume with the VOLUME (UP or DOWN) button.
5. Set the preset equalizer ( PAS S, ROCK, JAZZ, CLASSIC or POP ) with the EQ button on the
remote control only.
6. Press the STANDBY button on the main
Note:
1. If there is no signal under the CD/USB DEVICES/ mode, the main unit will be switched off
within 15 minutes automatically.
2. During in the iPod mode, there is not insert the iPod Player on the
will also turn off within 15 minute automatically.
3. Please turn the main switch off to save energy, when you do not use the unit.
unit (or remote control) to turn off the main unit.
iPod
iPod deck bracket. The main unit
CLOCK SETTING
During in the STANDBY mode:
1. Press and hold the iPod/MEM/CLOCK-ADJ. button until the time displays 24-hour digit flashing.
2. Press the TUNING/SKIP/SEARCH button to adjust 12-hour or 24-hour digit.
3. Press the iPod/MEM/CLOCK-ADJ. button again , the time display HOUR digit flashes ,
press the TUNING/SKIP/SEARCH(UP or DOWN) button to adjust HOUR digit; Press the iPod/
MEM/CLOCK-ADJ.button once more, the MINUTE digit flashes, adjust it by the TUNING/SKIP/
SEARCH(UP or DOWN) button.
4. Press the iPod/MEM/CLOCK-ADJ. button again to confirm the time.
5. Each enable
state as shown above will be cleared if the key is not pushed in10 seconds.
UK-6
Page 8

TIMER SETTING (on the r emote control)
1. After adjusting clock, press the TIMER button for a few seconds, " ON" and "00:00" appears on
the display and the HOUR digit flashes.(F1)
2. Press the
3. Press the TIMER button again, the MINUTE digit will start flashing, adjust it by pressing the
TUNING/SKIP/SEARCH (UP or DOWN) button.
4. Press the TIMER button once more to confirm and order TIMER ON time.
5. After adjusting "TIMER ON", " OFF" appears on the display and the HOUR digit flashes.(F2)
6. Repeat the above steps 2 to 3, and then press the TIMER
TIMER OFF time.
7. Now the "TUNER" appears on the display with flashing, and then select the alarm mode of the
“
TUNER, CD, USB, SD/MMC or iPod" by pressing the TUNING/SKIP/SEARCH (UP or DOWN)
button.
8. Press the TIMER button again, the timer "VOL" indicator appears on the display and flashes,
adjust the timer volume high or low by pressing the
9. Each enable state as shown above will be cleared if the button is not pushed in 10 seconds.
10. After adjusting "TIMER ON" and "TIMER OFF" ,press the TIMER button, " " appears on
the display.
11. The main unit
unit will be switched off automatically at "TIMER OFF" order.
TUNING/SKIP/SEARCH (UP or DOWN) button to adjust it.
button once more to confirm and order
TUNING/SKIP/SEARCH (UP or DOWN) button.
will be switched on automatically at "TIMER ON" order and start playing, the main
EQ CONTROL(on the remote control)
Press the EQ button, the sound tone changes as below:
TO SET SLEEP FUNCTION(on the remote control)
1. If you want to fall asleep to music, press the SLEEP button .
2. You may select t the TUNER, CD/MP3, USB, SD MMC or iPod mode in sleep function to play from
90, 80, 70 up to10 minutes of music before shutting
itself off automatically.
FUNCTION SELECT
Press the FUNCTION button on the main unit (or remote control) to select the each of the sound
source mode.
UK-7
Page 9

RADIO OPERATION
1. Press the FUNCTION button on the main unit (or remote control) to select the TUNER mode that to
select the FM operation.
2. Select the desired frequency with the SEARCH/SKIP/TUNING(UP or DOWN) button on the main
unit (or remote control).
MONO/ STEREO SELECT
This unit can receive the FM mode only.
1. When you want to select FM stereo station, press the ID3/ESP/MONO/ST. button once on the
remote control only. The " " indicator will appear on the display that the reception is at its
2. When you press the ID3/ESP/MONO/ST. button once again, the FM STEREO indicator will turn
off & switch to MONO FM status.
Automatic Tuning
1. Press the SEARCH/SKIP/TUNING (UP or DOWN) button for a few seconds, then release
the button. The tuner will automatically search the first station of sufficient signal strength.
2. Repeat above procedure if you wish to select another station.
Programming preset stations
You can also preset stations of your choice and store up 30 FM stations in its memory.
1. Tune to the required station.
2.
Press the iPod/MEM/CLOCK-ADJ button.
3. Press the PRESET/FOLDER(UP or DOWN) button for your desired station number.
4. Press the iPod/MEM/CLOCK-ADJ again to confirm your selection.
5. To program more stations into memory, repeat the above steps 2 to 4.
6. To change the stored preset stations,
repeat the above steps 2 to 4.
best.
Notes:
1. Storing a new station into a preset location will erase the previously stored station in that
location.
2. Power off will not erase the memory of preset stations. Perform the stations presetting procedures
again to store the stations.
During the unit in STANDBY mode, p
3. ress
button to erase all preset memory.
Selecting the Preset Stations
1. Press the PRESET/FOLDER(UP or DOWN) button to select the desired preset station number.
2. The numeric location of that preset station is displayed along with the corresponding
frequency.
FM Antenna
the
PRESET/FOLDER UP
button and PLAY/PAUSE
Extend the FM antenna for better FM reception.
UK-8
Page 10
CD/MP3 OPERATION
Listening To Compact Disc (CD/MP3)
1. Press the FUNCTION button on the unit to select the CD mode.
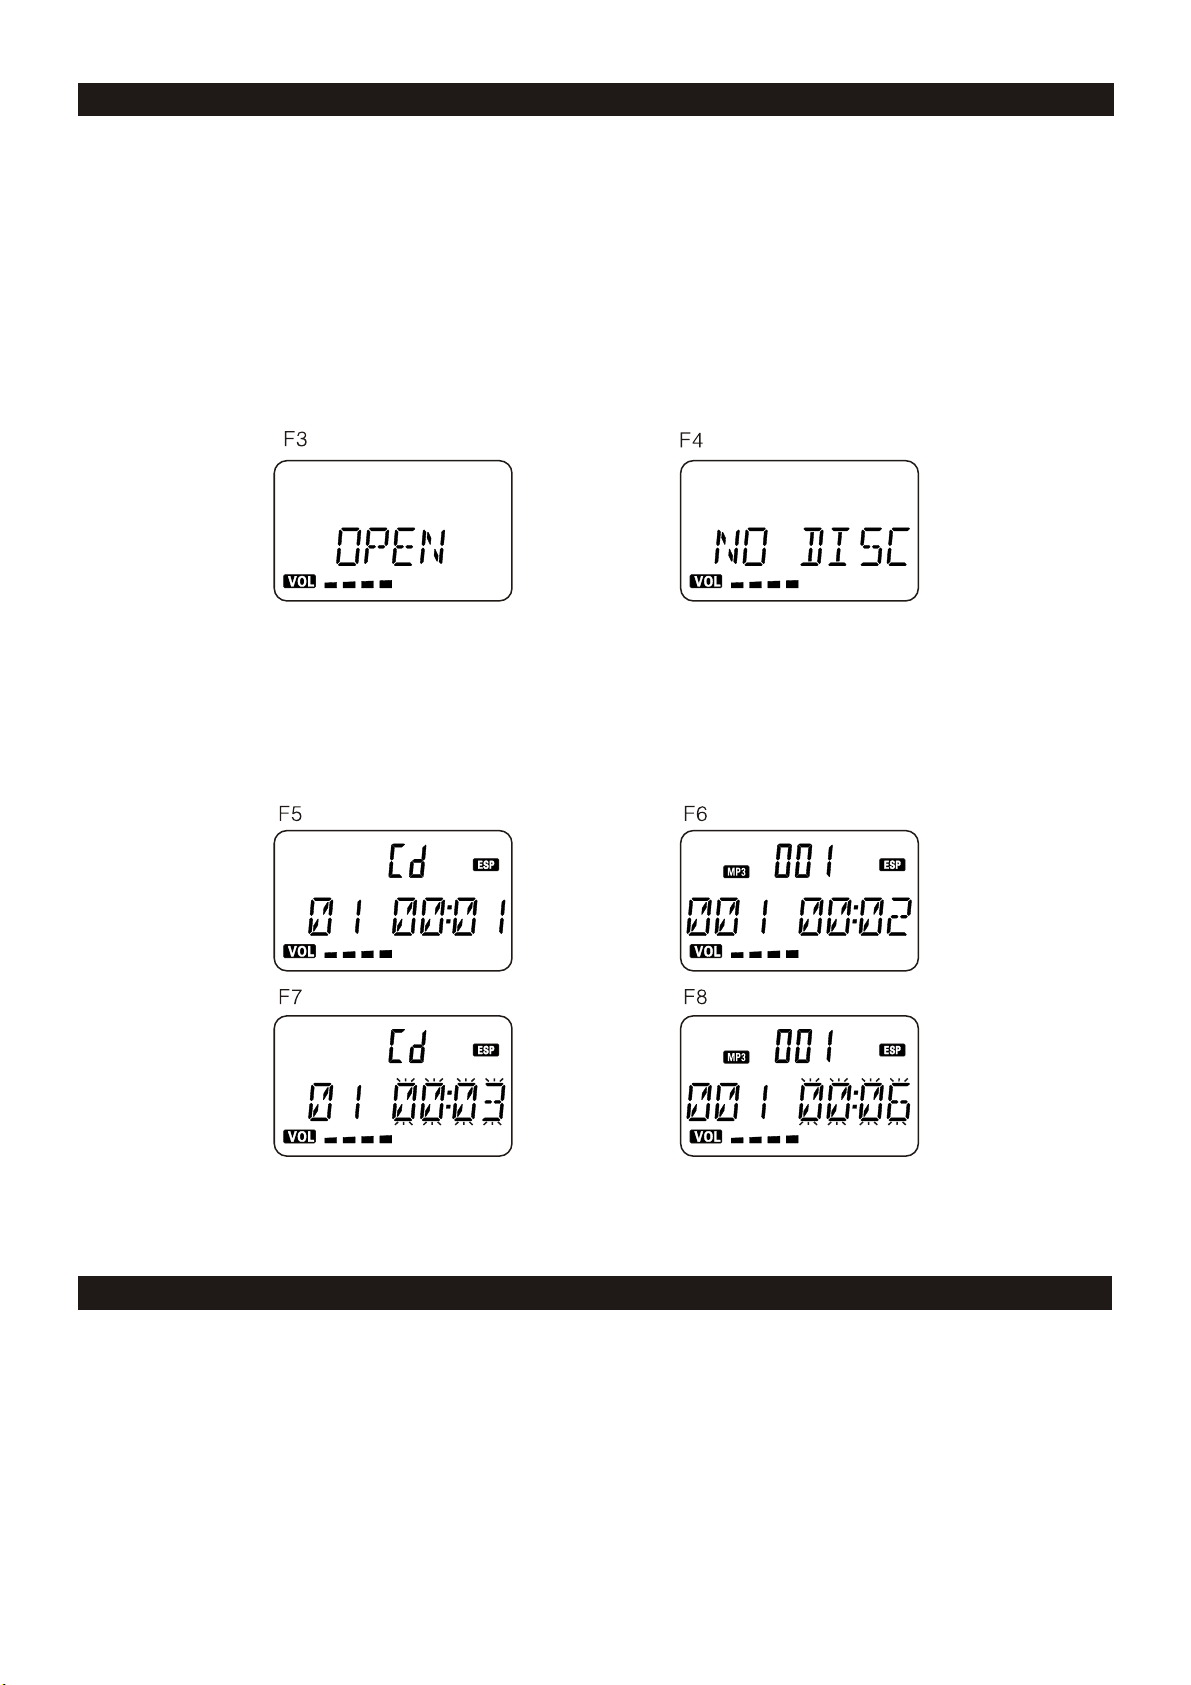
2. Press the CD DOOR OPEN/CLOSE button on the main unit only, and then the CD door will open
automatically.(F3)
3. Insert the CD/MP3 disc
again to close the CD door. The main will read the CD/MP3 disc automatically.
NOTE: (1) This unit can play CD, CD-R, CD-RW, MP3 discs.
(2) It can read
(3) The "Playback Transfer Rate" in MP3.
In MP3, transfer bit rate : 32 - 320 kbps.
(4) The "Max Readable 99 folders and 999 tracks".
(5) If no disc or can`t read TOC, NO DISC will be displayed.(F4)
Playing The Entire CD/MP3
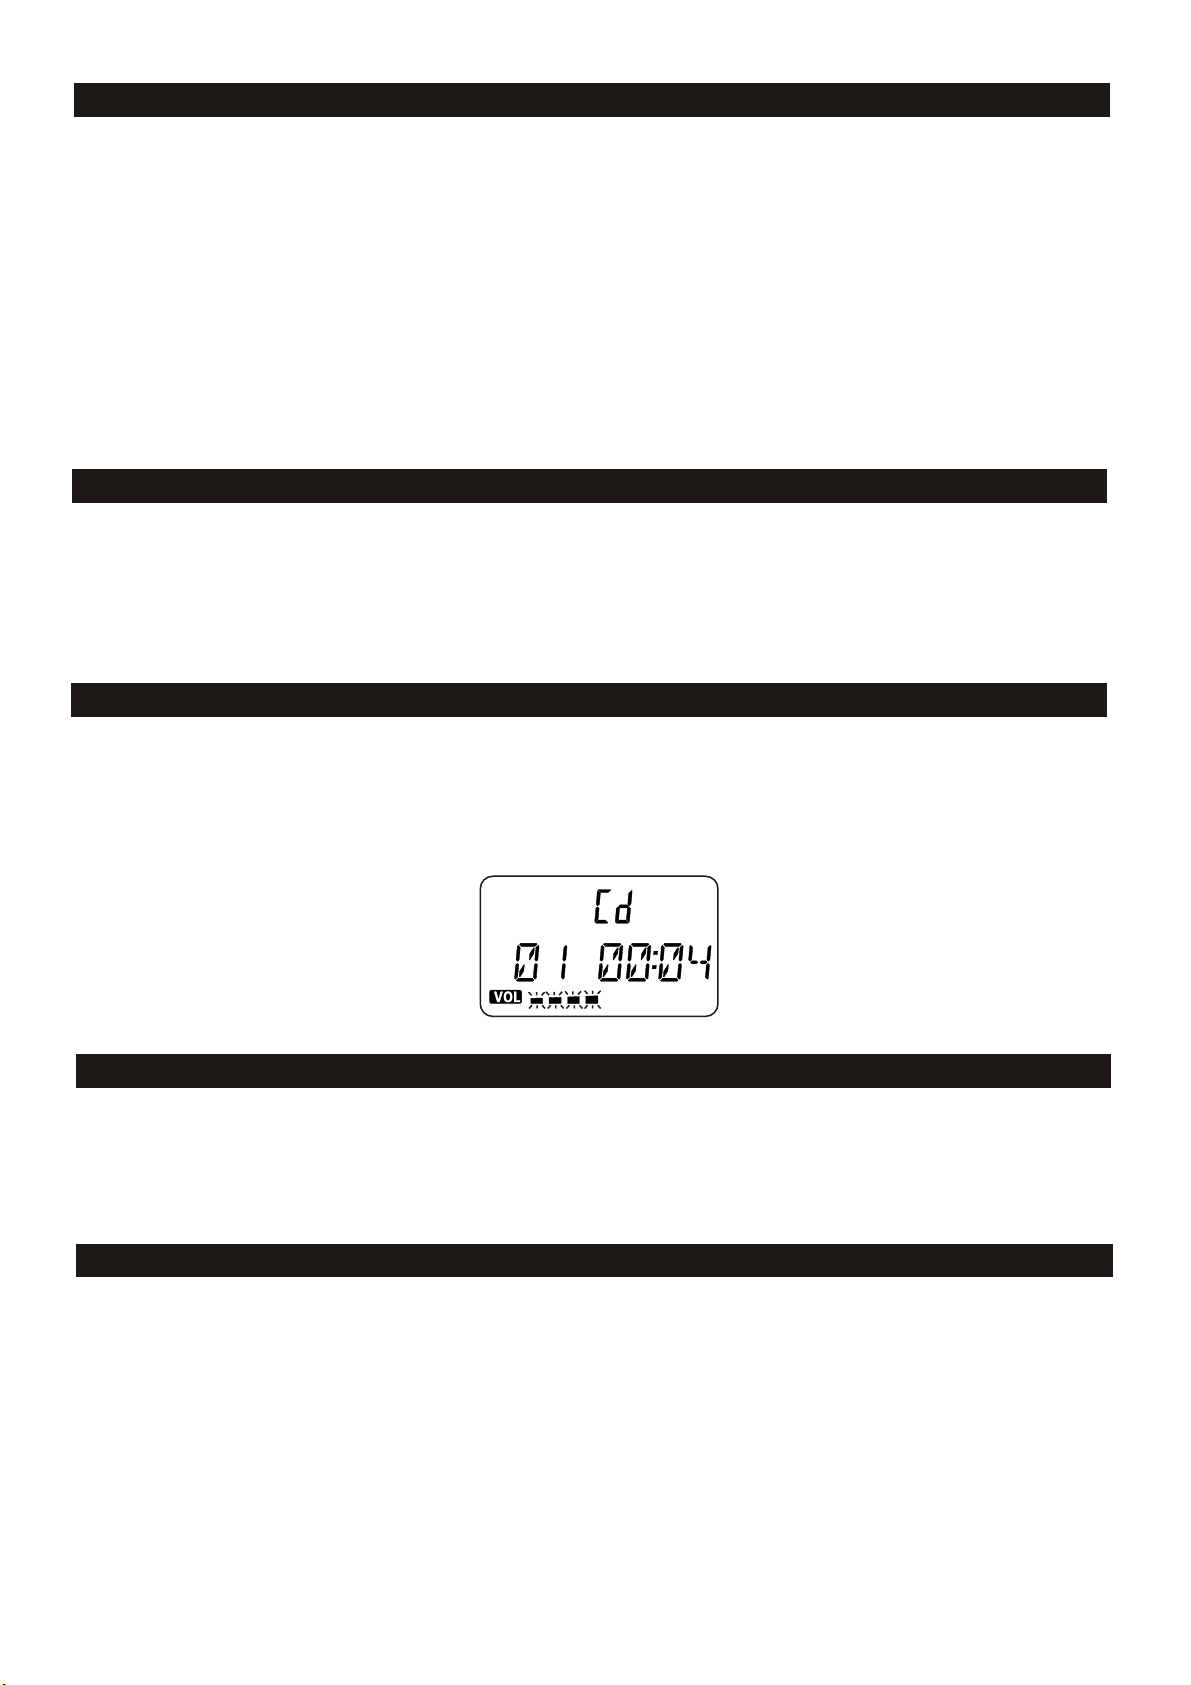
1. Playback will start by pressing the PLAY/PAUSE/ENTER. Playback starts from
the first track. The display shows the current track number and its elapsed time.(F5)(F6)
2. To interrupt playback , press the PLAY/PAUSE/ENTER button. The time elapsed
indicator will flash.(F7)(F8)
3. To resume playback, press the PLAY/PAUSE/ENTER again.
4. To stop playback, press the STOP/MENU button.
into the CD compartment, press the CD DOOR OPEN/CLOSE button
" 8 cm " and " Multi Section " of MP3 DISC.
NOTE: If an unusual conditions occurred for key buttons, please disconnect the power source,
and then reconnect it again.
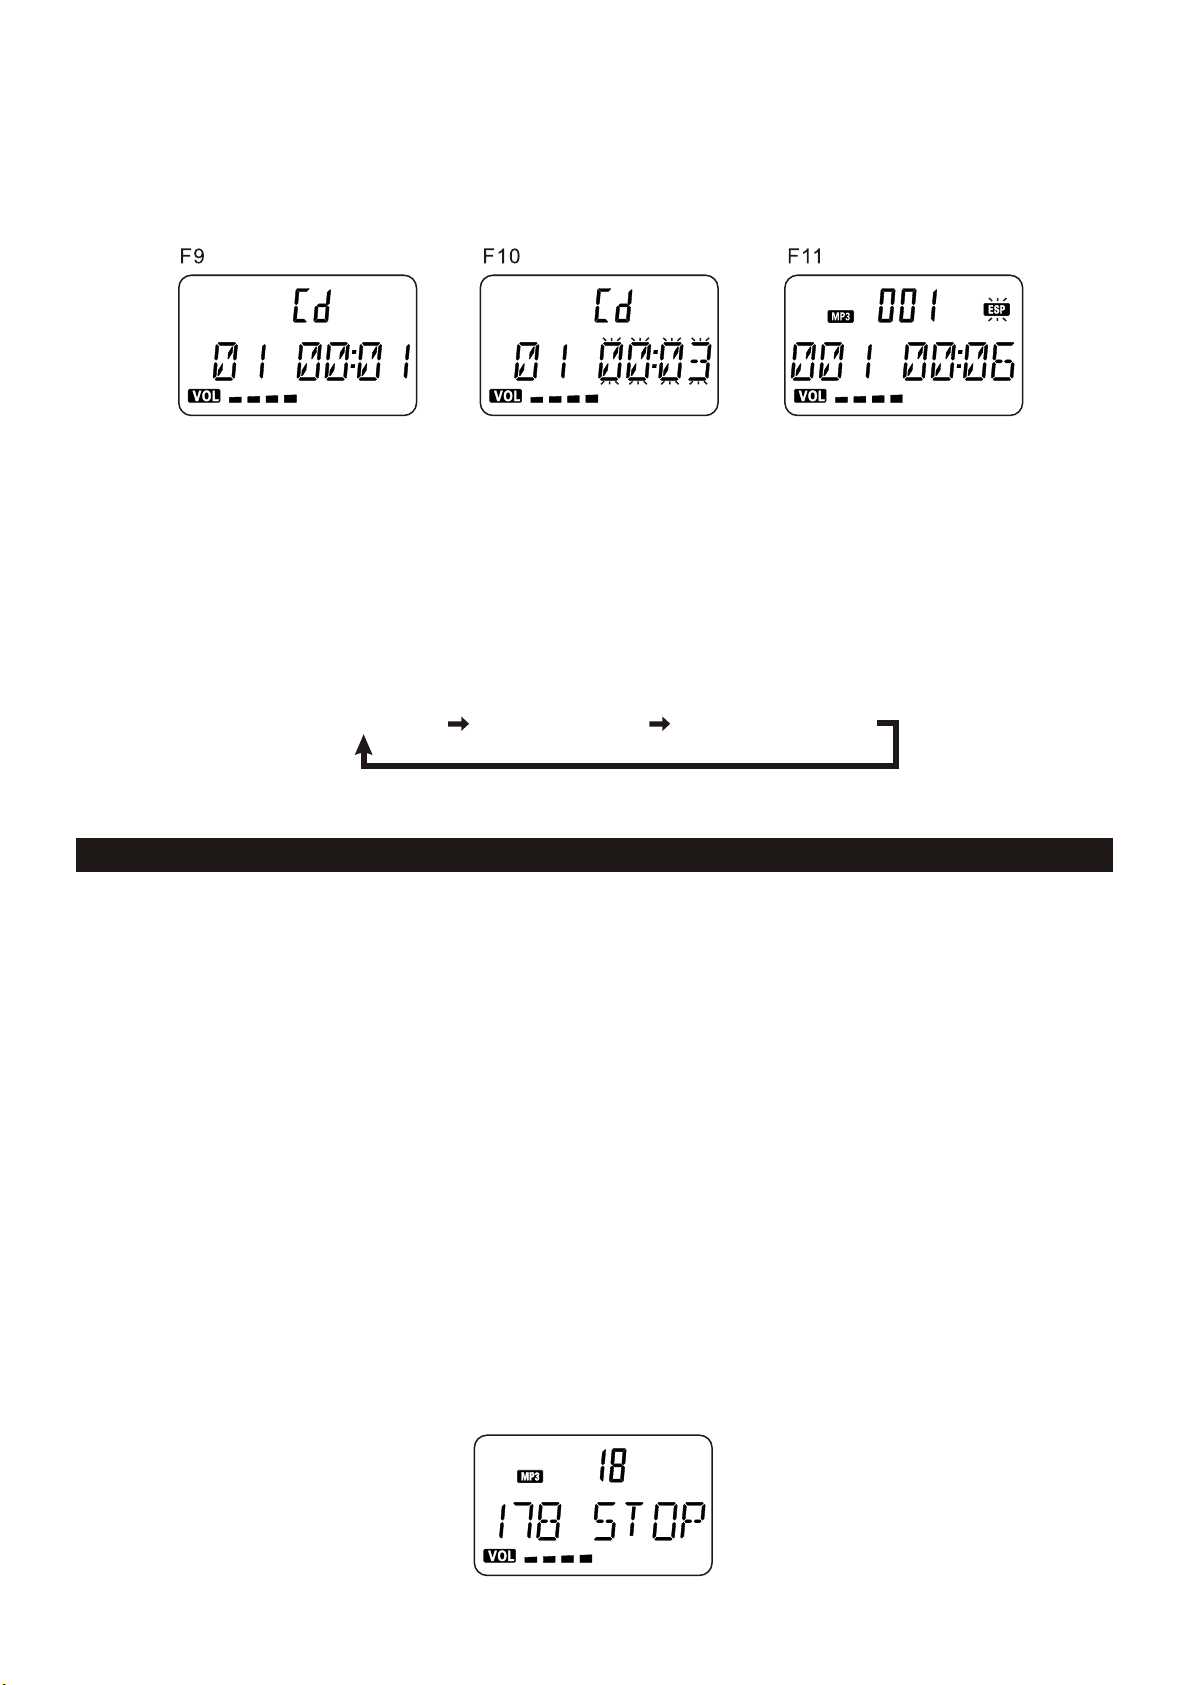
LISTEN TO THE DESIRED TRACK
- CD
1. Press the TUNING/SKIP/SEARCH (UP or DOWN) button on the main unit (or remote control)
until the required track number appears on the display, then press the PLAY/PAUSE/ENTER
(only in iPod) button to start playing.(F9)
2. During in the play mode, press the TUNING/SKIP/SEARCH (UP or
second, it will search to forward or backward track.
3. Press and hold the TUNING/ SKIP/SEARCH(UP or DOWN) button more than a few seconds, it will
fast skip to forward or backward at the same track.(F10)
UK-9
DOWN) button less than a
Page 11
4. Press the PLAY/PAUSE/ ENTER(only in iPod) button to start playing.
Note:
5. Press the ID3/ESP/MONO/ST. button once, the ESP function will turn on and the ESP indicator
flash on the display.(F11)(Shock Proof Function: CD 40sec , MP3 100sec)
6. Press the ID3/ESP/MONO/ST. button
disappears on the display.
- MP3
1. Press the PRESET/FOLDER (UP or DOWN) button, the album number will be changed;
press the TUNING/SKIP/SEARCH (UP or DOWN) button, the track number will be changed.
2. When the desired track is displayed, press the PLAY/PAUSE/ENTER(only in iPod) button to
start playing
3. If the MP3 is written in "ID3".
the track.
again, the ESP function will turn off & the ESP indicator
a. When the desired track is displayed, press the PLAY/PAUSE button to start playing the track.
The ID3 Function will be turned on automatically at the same time. It will automatically to search
more than 64 letters of “FILE NAME" "TITLE NAME" "ARTIST NAME" which move from the right
corner to the left corner on the display continuously.
FILE NAME
b. Press the ID3/ESP/MONO/ST. button, the ID3 function will be turned off.
TITLE NAME
ARTIST NAME
USB/CARD OPERATION
During in the STANDBY mode
1. Insert the USB DEVICE or SD MMC CARD, and then press the STANDBY button on the main unit
(or remote control) to power"ON" the unit.
2. Press the FUNCTION button on the main unit (or remote control) to select the USB or SD/MMC mode.
The main unit will automatically read the total number of the folders and tracks at the same time. (F12)
3. If the USB memory device more than one folder.
a. Press the PRESET/FOLDER (UP or DOWN) button to select each folder.
b. Press the TUNING/SKIP/SEARCH (UP or DOWN) button to select
4. If the MP3 is written in "ID3".
a. During the unit in the MP3 playing. Press the ID3/ESP/MONO/ST. button once. The
display will shows a "ID3 ON", and then it will automatically to search more than
"TITLE NAME", "ARTIST NAME" or "ALBUM NAME" which move from the right corner to the left
corner on the display continuously.
b. Press the ID3/ESP/MONO/ST. button once again. The display will shows a "ID3 OFF", and
the main unit will play normally.
Note:
1. The main unit can play MP3 only in this mode.
2. Most of the USB devices, SD or MMC cards are supported by this unit. In the unlikely event
of an unsupported device or card, try with a device or card of other brands.
3. This unit support USB devices, SD or MMC cards of memory size up to 2GB. It cannot
access (or take longer time to access) the memory devices over 2GB.
4. It can support USB version 1.1 and 2.0.
current track in desired folder.
64 letters of
then
F12
UK-10
Page 12

Playing The Entire flash disc
1. Playback will start by
first track. The display shows the current track number and its elapsed time.(F13)
2. To interrupt playback , press the PLAY/PAUSE/ENTER(only in ) button. The time elapsed
indicator will flash.(F14)
To resume playback, press the PLAY/PAUSE/ENTER(only in ) again.
3.
4. To stop playback, press the STOP/MENU(only in ) button.
Note : In any time, the USB DEVICE or SD CARD must be fixed well under in the STANDBY mode to
avoid the main unit and USB DEVICE or SD CARD were damaged.
pressing the PLAY/PAUSE/ENTER(only in ) . Playback starts with the
iPod
iPod
iPod
iPod
REPEAT PLAY
- CD
1. Press the REPEAT button once , REPEAT is displayed. CD will play the current track
repeatedly.(F15)
2. Press the REPEAT button twice, REPEAT ALL is displayed. CD will play all tracks repeatedly.(F16)
3. Press the REPEAT button thrice, REPEAT
function will be off.
F15 F16
- MP3
1. Press the REPEAT button once , then REPEAT is displayed. It will play the current track
Repeatedly.(F17)
2. Press the REPEAT button twice, then REPEAT ALL is displayed. It will play all tracks
repeatedly.(F18)
3. Press the REPEAT button thrice, then REPEAT ALBUM is displayed. It will play repeatedly the
current album. (F19)
4. Press the REPEAT button four times, then REPEAT function will be off.
UK-11
Page 13

PROGRAM MODE
User can make the program up to 64 tracks in any desired order. Program mode is activated while in
stop mode.
1. How to play the program
- CD
1) Press the iPod/MEM/CLOCK-ADJ button, shift to PROGRAM mode.(F20)
2) Press the TUNING/SKIP/SEARCH (UP or DOWN) button, the track number
3) Press the iPod/MEM/CLOCK-ADJ button to confirm the track number
- MP3
1) Press the iPod/MEM/CLOCK-ADJ button, shift to PROGRAM mode. The album number is
flashing. (F21)
2) Press the TUNING/SKIP/SEARCH(UP or DOWN) button, the album number will be changed.
3)
Press the iPod/MEM/CLOCK-ADJ button , the track number is flashing.(F22)
4) Press the TUNING/SKIP/SEARCH(UP or DOWN) button, the track number will be changed.
5) Press the iPod/MEM/CLOCK-ADJ button to confirm the track number.
F20 F21 F22
will be changed.
2. PROGRAM PLAY
Press the PLAY/PAUSE/ENTER(only in iPod) button on the main unit (or remote control), it will be play
starts with the first track of the program. When all tracks have been played, the main unit display will be
shows the number of tracks and the playing time of the
3. CANCEL PROGRAM
1. Press the STOP button once, or open the CD tray door and close it again that the memory will be
erased.
2. Set a new program, the existing one will be cleared.
Note : During in
1. Press the "REPEAT" button once, the "REPEAT" indicator will light on the display. Then the main
unit will repeat the current track.
2. Press the “REPEAT" button twice, the "REPEAT ALL" will l light on the display. Then the main unit
will repeat all the total number of tracks.
3. Press the “REPEAT” button once more again. The main unit will return to play the program in
normally.
the program mode.
CD/MP3 tracks.
RANDOM PLAY(on the remote control)
1. Press the RANDOM button once , and then RANDOM is displayed.(F23)
2. Press the RANDOM button once again, and then resume to normally play.
INTRO PLAY(on the r emote control)
1. Press the INTRO button once, and then INTRO is displayed. INTRO will play the first 10 seconds of
each track.(F24)
2. Press the INTRO button twice, and then resume to normally play.
F23
F24
UK-12
Page 14

Note: During the unit in iPod mode, when the partly video function of iPod without normal
working or happened with abnormal, you can update the iPod version or load up latest
version from web.
During the unit in STANDBY mode
1. Insert the iPod players in the iPod deck bracket fixedly.
2. Power on the main unit, and then press the FUNCTION button to the iPod mode, the iPod indicator
will appear on the main unit display. (F25)
During the unit in iPod mode :
1. Press the PLAY/PAUSE/ENTER (only ) button once to start the iPod playing.
Adjust the volume control by pressing the VOLUME (UP or DOWN) button. To stop the current
playing, press the STOP/MENU (only in iPod ) button once.
2. Press the
the playback, press the PLAY/PAUSE/ENTER (only in iPod) button once again.
3. To skip forwards or backwards, press the TUNING/SKIP/SEARCH (UP or DOWN) button to
select the desired track.
Press the REPEAT or RANDOM button to make the iPod playing repeatedly or randomly.
4.
Note:
During the unit in iPod MENU mode :
1. During the unit in iPod mode, press the iPod/MEM/CLOCK-ADJ. button once, the unit will enter to
the iPod
2. Press the STOP/MENU (only in iPod) button return to the iPod menu.
a. To select the current menu as belows :
Music > Extras > Photo Import (without this function display on the
Shuffle Songs > Backlight > Now Playing will shows on the iPod Player display.
b. Press the TUNING/SKIP/SEARCH (UP or DOWN) button on the unit (or remote control) to
search the current menu.
3. Press the PLAY/PAUSE/ENTER (only in
a. Press the TUNING/SKIP/SEARCH (UP or DOWN) button on the unit (or remote control) to search
the current content in the each desired menu folder.
b. If you want return to the iPod menu, press the STOP/MENU (only
4. To resume playback, press the iPod/MEM/CLOCK-ADJ. button once again, the unit will return to
iPod mode.
PLAY/PAUSE/ENTER (only in iPod) button once to pause the current track. To resume
iPod touch version 1.1.4 or abore can support REPEAT or RANDOM function.
MENU mode. The iPod MENU indicator will appear on the unit display. (F26)
:
iPod
in
iPod Mini) > Settings >
iPod) button enter to the desired menu folder.
in iPod) button again.
Charging the iPod Player battery through the main unit:
1. iPod Player has a internal nonremovable battery, the battery may need to be charged that is
not used for a while.
2. You can charge the iPod Player through the main unit automatically under the STANDBY or
POWER ON mode.
NOTE : 1. The iPod Player battery is 80-percent charged in about an hour, and fully charged in about a
few hours. If you charge it while playing music, it may take longer.
2. It is betternot better to charge under the TUNER mode. It may interfere the reception.
Note :
1. In any time,
while the unit in the "iPod" or "iPod MENU" mode.
2. In any time, the iPod player must be fixed well under in the STANDBY mode to avoid the unit and
iPod player were damaged.
you can control the iPod player on the main unit, remote control or iPod player itself
F25 F26
UK-13
Page 15
VIDEO OUT SETTING (for i-POD Video only)
1. During the unit in the STANDBY mode : Connect the TV set with a videos cable (RCA-type cables)
to the VIDEO out jack on the rear of the unit.
2. During the unit in the iPod mode : Press the "MENU" button on the iPod Click
function.
3. To set iPod to display videos on a TV :
(a) Choose Videos > Video Settings, and then set TV Out to Ask or On.
(b) If you set TV Out to Ask, iPod
time you play a video.
Note :1. If you have an iPod Video, you can watch videos on a TV connected that through the unit to
your iPod Video.
2. iPod classic 80/160GB, iPod nano 3rd generation(Video) 4/8GB, iPod touch 8/16GB, should
be inserted into iPod docking before operating the step 3.
gives you the option of showing videos on TV or on iPod while every
Wheel to set the video
AUX PLAY
1. Press the FUNCTION button until the "AUX” indicator light up on the display. This main unit can
input analog audio through these jacks.
2. Use a AUX cable to connect audio equipment.
Note: AUX IN cable not included.
MUTE SETTING(on the remote control)
1. When you press the MUTE button once on the remote control, the volume level will flash & the
audio output will be temporarily terminate.(F27)
2. Press the MUTE button once again, the volume level and the audio output will return to
F27
normal.
LISTEN TO THE MUSIC BY USING HEADPHONE
A stereo headphone jack is provided for private listening. To listen to the main unit with headphones
(not included ) insert the 3.5mm mini-stereo plug from the headphones into the PHONES jack on the
front panel. The external speakers are automatically disconnected when headphones are using.
MEMORY BACK-UP
To insert 1.5V x 3, UM-4, AAA or equivalent batteries in the battery compartment of the main unit. It is
used to back-up the memory of the main CPU.
UK-14
Page 16
COMPACT DISC
1. Always use a compact discs bearing the mark as shown.
2. Notes on handling discs
Removing the disc from its storage case and loading it.
* Do not touch the reflective recorded surface.
* Do not stick paper or write anything on the surface.
* Do not bend the disc.
3. Storage
* Store the disc in its case.
*
Do not expose discs to direct sunlight or high temperatures, high humidity or dusty
places.
4. Cleaning a disc
* Should the disc become soiled, wipe off dust, dirt and fingerprints with a soft cloth.
* The disc should be cleaned from the centre to the edge.
FROM THE CENTRE TO THE EDGE
CORRECT
INCORRECT
* Never use benzene, thinners, record cleaner fluid or anti static spray.
* Be sure to close the CD door so the
lens is not contaminated by dust.
* Do not touch the lens.
UK-15
Page 17

LCD DISPLAY WINDOW
A. TIMER INDICATOR
B. ALBUM NUMBER INDICATOR
C. STEREO INDICATOR
D. ESP INDICATOR
E. TRACK/NUMBER/TIME INDICATOR
F. VOLUME HIGH/LOW INDICATOR
SPECIFICATION
POWER SUPPLY : 230V~ 50Hz
OUTPUT POWER :
UNIT DIMENSION : 207(W) x 82(D)
SPEAKER BOX DIMENSION : 139 (W) x 72.5(D) x 200 (H) mm
SUB WOOFER
N. W. :
RADIO SECTION
FREQUENCY RANGE : FM 87.5 - 108 MHz
COMPACT DISC SECTION
OPTICAL PICKUP :
FREQUENCY RESPONSE : 100Hz - 16kHz
SPECIFICATION SUBJECT TO CHANGE WITHOUT FURTHER
Ventilation warning : " The normal ventilation of the product shall not be impeded for intended use."
DIMENSION :
4.5 Watts x 2+28W
x 206 (H) mm
131(W)x 242 (D) x 173(H) mm
7. 02 kg
3 - BEAM LASER
NOTICE.
UK-16
Page 18

Dear Customer,
Thanks you for purchasing this AKIRA™ product and for your confidence in our company.
This product meets applicable safety requirements and has undergone stringent testing during
manufacture.
However, should there occur a defect, the product or its defective part(s) (excluding accessories and
consumables) will be repaired free of charge(labor, parts
below mentioned countries) or, at AKIRA™ discretion, exchanged for a similar item, provided that it has
been re turned with 24 (twenty four) months from the date of original purchase (date of receipt), is
defective in material and/or workmanship and has been
(metropolitan territory), Spain, Italy, Portugal, Belgium (territory) or in a duty-free shop in named
countries.
This guarantee will be granted only upon presentation of the original invoice or cash receipt,
indicating the date of purchase and dealer ’s name, and of this guarantee card with
type and serial number. The benefit of this guarantee may be refused if the invoice, cash
receipt or guarantee card has been altered in any way, deleted or made illegible after the
original purchase.
Online registration
To expedite warranty service, please register your AKIRA™ product within 30 days of purchase at
http://www.akiraeurope.com
This guarantee does not apply to the following:
1. Damage caused by accidents including, but not limited to, lightening, fire, water.
2. Damage to the product resulting from neglect, misuse, use against the operating
manual instructions, repair and/or install wrongly performed (non exhaustive list).
Especially any burned panel from too long still picture display such as computer
Inputs or channel logos, as described in the operating manual, will not be guaranteed.
3. Modification, adaptations or alterations of the product to operate in a country other than for which it
was originally designed and manufactured, or any damage resulting from such modifications.
4. Usage other than usual consumer home usage.
5. Defect on individual pixels when the number of defective is below the following
numbers: Dark pixel: 7 Bright or flickering pixel: 3
and transportation within the boarder of the
bought in any of the following countries: France
the product
Tot a l defective pixels: 8
These statements do not affect your statutory rights as a consumer under applicable national
legislation in force, nor your consumer ’s rights against the dealer from whom you bought the
product.
If you need service, whether or not under guarantee, please approach the dealer who sold you
the
product.
In your own interest, we advise you to read the instruction booklet for your AKIRA™ product
carefully before contacting your dealer or service center.
Should you have any questions which your dealer is unable to answer, please contact AKIRA
hotline (international free phone number: 00 800 800 25 472).
AKIRA™ is a
registered trademark of TT International, Inc.
Note:
this product is designed and manufactured with high quality materials and components which
can be recycled and reused.
This symbol means that electrical and electronic equipment, at their end-of-life, should be
disposed of separately from your household waste.
Please, dispose of this equipment at your local community waste collection/recyling centre.
European Union there are separate collection systems for used electrical and
In the
electronic product.
Please, help us to conserve the environment we live in!
UK-17
Page 19
Pour profiter pleinement de votre appareil ainsi que de ses performances, lire attentivement le présent
manuel avant de l’utiliser et se familiariser avec ses caractéristiques de manière à vous assurer des années
d’écoute satisfaisantes sans problème.
Remarques importantes
Retenir à toutes fins utiles les instructions de sécurité et de fonctionnement.
Ne pas installer l'appareil dans les endroits décrits ci-dessous:
- Lieux exposés à la lumière directe du soleil ou près de la chaleur rayonnante des appareils tels que les
radiateurs électriques par exemple.
- Au dessus d'autres équipements stéréo qui rayonnent trop de chaleur. Les lieux manquant de ventilation ou
poussiéreux. Endroits exposés constamment à des vibrations. Les lieux humides. - S’assurer de ne pas
obstruer les ouvertures d'aération.
- Avant la première mise en service de l’appareil, s’assurer que le cordon d'alimentation est correctement
installé.
- L’appareil ne doit pas être exposé à des gouttes d’eau ou à des éclaboussures, aucun récipient rempli de
liquide, tel un vase, ne doit être placé sur l’appareil.
- Pour déconnecter complètement l'alimentation, la prise de courant de l'appareil doit être retirée de la prise
murale du réseau électrique.
- Lorsque la DEL «stand-by» (veille) n’est pas illuminée, l'appareil est complètement déconnecté du secteur.
- Un dégagement minimal de 10 cm autour de l'appareil suffit pour la ventilation.
- Une attention particulière doit être portée à propos des aspects environnementaux quant à l'élimination des
piles usagées.
- Utiliser l’appareil sous des climats tempérés.
- La prise du cordon d'alimentation secteur doit facilement accessible en cours de l'utilisation prévue.
- La ventilation ne doit pas être gênée en obstruant les ouvertures de ventilation par des journaux, du linge de
table, des rideaux etc.
- Ne pas placer de flamme nue telle des bougies allumées sur l'appareil.
- Les piles ne doivent pas être exposées à une chaleur excessive.
Pour des raisons de sécurité, ne pas démonter de couvercle ou tenter d’accéder à l'intérieur de produit. Ne
pas démonter de vis ou ouvrir le boîtier de l'appareil, aucune pièce ne peut être remplacée par l'utilisateur. Si
besoin, confier la maintenance à du personnel qualifié.
ATTENTION POUR REDUIRE LE RISQUE DE CHOC ELECTRIQUE, NE PAS DEMONTER LE
COUVERCLE (OU L’ARRIERE DE L’APPAREIL). AUCUNE PIECE N’EST REMPLACABLE PAR
L’UTILISATEUR. CONFIER LA MAINTENANCE A DU PERSONNEL QUALIFIE.
TENSION DANGEREUSE
Une tension dangereuse, dont l’amplitude peut suffire à entraîner un risque de choc électrique
pour les personnes, est présente à l’intérieur du coffret de l’appareil.
ATTENTION
Le manuel d’utilisation contient des informations importantes d'utilisation et de maintenance. Pour
des raisons de sécurité, il est nécessaire de se reporter au manuel.
ATTENTION: POUR ECARTER LES RISQUES D'INCENDIE OU DE CHOC ELECTRIQUE, NE
PAS OUVRIR L’APPAREIL OU L’EXPOSER A DES PROJECTIONS DE LIQUIDE.
Note:
-- L’appareil chauffe lors d’une utilisation de longue durée. Ceci est normal et ne révèle pas de problème
particulier.
-- Les microprocesseurs présents à l’intérieur du lecteur de CD sont susceptibles de dysfonctionner suite à
des interférences électriques ou à du bruit. Si le lecteur de CD ne fonctionne pas correctement, le
déconnecter de l’alimentation, attendre un instant, puis le connecter de nouveau.
-- Une pression acoustique excessive dans les écouteurs ou le casque est susceptible d’entraîner une perte
auditive.
-- Si un phénomène inhabituel apparaît sur l’afficheur ou lors de l’utilisation des touches, mettre l’appareil
hors tension, attendre un instant, puis le remettre en service.
FR-1
Page 20
Plan de montage de l’appareil et des haut-parleurs
1 – Fixation de la platine de montage mural
Fixer au mur les deux attaches (Taille: 3,5 *
25BA) dans le mur et s’assurer de leur
parallélisme. (l’entre axe doit être de 56mm)
2 – Raccordement des haut-parleurs
Longueur maximale du câble de
raccordement: 2 mètres
3 – Raccordement de la station d’accueil iPod
FR-2
Fixer au mur les deux attaches (Taille: 3,5 *
25BA) dans le mur et s’assurer de leur
parallélisme. (l’entre axe doit être de 112
mm)
Page 21
Plan de montage de la station d'accueil iPod
** iPod non illustré ci-dessous**
Note:
L'appareil supporte également iPod nano de deuxième génération, l’iPod nano de 3ème génération 4/8Go,
l’iPod touch 8 / 1 6 Go, toutefois l’adaptateur de station n'est pas inclus, utiliser l’adaptateur fourni avec l’iPod.
FR-3
Page 22
CARACTERISTIQUES ET COMMANDES
FR-4
Page 23

CARACTERISTIQUES ET COMMANDES
1. HAUT PARLEUR
2. ANTENNE FM
3. PRISE JACK AUXILIAIRE DROITE
4. PRISE JACK AUXILIAIRE GAUCHE
5. PREREGLAGE / TOUCHE DOSSIER PRECEDENT
6. TOUCHE REPETITION
7. PREREGLAGE / TOUCHE DOSSIER SUIVANT
8. TOUCHE VEILLE (AVEC VOYANT DEL)
9. CONNECEUR PORT USB
10. FENTE D’INSERTION CARTE SD / MMC
11. TOUCHE RECHERCHE/SAUT/REGLAGE VERS LES BASSES FREQUENCES
12. TOUCHE iPod / MEM / REGLAGE HORLOGE
13. TOUCHE RECHERCHE/SAUT/REGLAGE VERS LES HAUTES FREQUENCES
14. TOUCHE LECTURE / PAUSE / ENTREE
15. CAPTEUR INFRAROUGE
16. AFFICHEUR LCD
17. TOUCHE STOP / MENU
18 TOUCHE BAISSE DU VOLUME SONORE
19. TOUCHE AUGMENTATION DU VOLUME SONORE
20. TOUCHE DE FONCTION
21. TOUCHE OUVERTURE/FERMETURE TRAPPE LECTEUR DE CD
22. TRAPPE LECTEUR DE CD
23. PLATINE iPod
24. PRISE DE RACCORDEMENT DES HAUT PARLEURS DE BASSES
25. PRISE JACK DE RACCORDEMENT DU CASQUE D’ECOUTE
26. TROU DE FIXATION
27. PRISE JACK SORTIE VIDEO
28. TRAPPE PILE DE SAUVEGARDE MEMOIRE
29. VOYANT VEILLE CAISSON DE BASSES
30. CORDON D'ALIMENTATION
31. COMMUTEUR ALIMENTATION CAISSON DE BASSES
32. PRISE DE SORTIE HAUT-PARLEURS
33. PRISE POUR CORDON ALIMENTATION SECTEUR
FR-5
Page 24

TELECOMMANDE
1. TOUCHE STAND BY (veille)
2. TOUCHE MUTE (coupure son)
3. PRESET / FOLDER UP BUTTON (touche
préréglage/ dossier montée)
4. PRESET / FOLDER DOWN BUTTON (touche
préréglage/ dossier descente)
5. RANDOM BUTTON (touche fonctionnement
aléatoire)
6. TUNING / SKIP / SEARCH (touche réglage, saut,
recherche)
7. TIMER BUTTON (touche temporisateur)
8. VOLUME DOWN BUTTON (touche diminution
volume sonore)
9. FUNCTION BUTTON (touche de fonction)
10. INTRO BUTTON (touche intro)
11. ID3/ESP/MONO/ST. BUTTON (touche ID3,
ESP, mono, stéréo)
12. REPEAT BUTTON (touche répétition)
13. PLAY / PAUSE / ENTER (iPod uniquement)
BUTTON (lecture, pause, entrée)
14. EQ BUTTON (touche égaliseur)
15. TUNING / SKIP /SEARCH DOWN BUTTON
(touche recherche bas, saut, réglage)
16. STOP / MENU BUTTON (touche arrêt/menu,
iPod uniquement)
17. iPod/MEM/CLOCK- ADJ. BUTTON (touche
iPod, mémoire, réglage horloge)
18. SLEEP BUTTON (touche sommeil)
19. NUMBER SEARCH BUTTON (touche
recherche numéro)
20. VOLUME UP BUTTON (touche augmentation
volume sonore)
MISE EN PLACE DES PILES DANS LA TELECOMMANDE
Appuyer sur la trappe puis la faire glisser pour ouvrir le
compartiment. Placer les deux piles (UM4), (AAA), (R03)
dans la télécommande en respectant les polarités
indiquées à l’intérieur du compartiment. Remettre en
place la trappe en appuyant légèrement vers le bas puis
la pousser vers le haut jusqu'à ce qu'elle s'enclenche.
REMARQUE: Retirez les piles de la télécommande lors
d’une inutilisation prolongée de l’appareil. Ne jamais
panacher les piles ordinaires et les batteries. Lorsque les
piles s’épuisent, la télécommande ne fonctionnera plus
correctement. Mettre en place un jeu de deux piles
neuves.
FR-6
Page 25

FONCTIONNEMENT DU CAISSON DE BASSES ET DE L’APPAREIL
Lors de la première mise sous tension du caisson, placer le commutateur situé au dos de ce dernier sur ON.
1. Le caisson de basses et l'appareil doivent être en mode veille. Les deux voyants STANDBY passent au
rouge.
2. Appuyez sur la touche STANDBY (ou sur celle la télécommande) pour mettre l’appareil sous tension (ON).
3. Le voyant du caisson de basses passes au verte et le voyant STANDBY (veille) s’éteint.
Note: Tirer sur la prise secteur et non sur le cordon d’alimentation pour débrancher l’appareil.
POWER/STANDBY (alimentation/veille)
1. Placer d’abord le commutateur d’alimentation secteur à l’arrière du caisson sur ON.
2. Appuyer sur la touche STANDBY de l'appareil ou sur celle de la télécommande pour mettre l’appareil sous
tension (ON).
3. Sélectionner la source sonore CD, USB, SD / MMC, iPod, AUX ou TUNER en appuyant sur la touche
FUNCTION.
4. Régler le niveau du volume sonore au moyen des touches UP ou DOWN.
5. Fixer le préréglage de l’égaliseur PASS, ROCK, JAZZ, CLASSIC ou POP avec la touche EQ de la
télécommande uniquement..
6. Appuyer sur la touche STANDBY de l'appareil ou celle de la télécommande pour couper l’alimentation
secteur.
Note:
1. Si n'y a pas de signal en mode CD / USB/iPod l’appareil est arrêté automatiquement dans un délai de
quinze minutes.
2. Dans le mode iPod, lorsque aucun lecteur iPod n’est inséré dans le support de la station d’accueil iPod,
l'appareil est également désactivé automatiquement dans un délai de quinze minutes.
3. Lorsque l’appareil n’est pas utilisé, placer le commutateur d’alimentation sur OFF, en vue d’économiser
l’énergie..
RÉGLAGE DE L’HORLOGE
Pendant le mode veille:
1. Appuyer et maintenir la pression sur la touche iPod / MEM / CLOCK-ADJ. jusqu'à ce que la durée affichée
soit 24 heures et clignote.
2. Appuyer sur la touche TUNING / SKIP / RESEARCH pour sélectionner un cycle de fonctionnement de
l’horloge sur 12 heures ou 24 heures.
3. Appuyer de nouveau sur la touche iPod / MEM / CLOCK-ADJ, l'affichage de l’heure clignote
Appuyer sur la touche TUNING / SKIP / RESEARCH (UP ou DOWN) pour régler l’heure puis appuyer de
nouveau sur la touche iPod / MEM / CLOCK-ADJ. les chiffres des minutes clignotent, régler les minutes au
moyen de la touche TUNING / SKIP / RESEARCH (UP ou DOWN).
4. Appuyer de nouveau sur la touche iPod / MEM / CLOCK-ADJ. pour confirmer le réglage de l'heure.
5. Chacun des états ci-dessus sera désactivé lorsque les touches ne sont pas sollicitées pendant 10
secondes.
REGLAGE DU TEMPORISATEUR (uniquement sur la télécommande)
1. Après le réglage de l'horloge, appuyer sur la touche TIMER pendant quelques secondes,
apparaît sur l’afficheur, les chiffres de l’heure clignotent. (F1)
2. Appuyer sur la touche TUNING / SKIP / RESEARCH (UP ou DOWN) pour régler le temporisateur.
3. Appuyer sur la touche TIMER de nouveau, les chiffres des minutes se mettent à clignoter, régler en
appuyant sur la touche TUNING / SKIP / RESEARCH (UP ou DOWN).
4. Appuyer sur la touche TIMER de nouveau pour confirmer le réglage et activer la durée de temporisation.
5. Après le réglage TIMER ON,
6. Répéter les deux étapes ci-dessus puis appuyer de nouveau sur la touche TIMER, pour confirmer le
réglage et désactiver la durée de temporisation.
OFF apparaît sur l'afficheur et les chiffre de l’heure clignotent. (F2)
FR-7
ON et 00:00
Page 26

7. TUNER apparaît sur l’afficheur en clignotant, puis sélectionnr le mode alarme TUNER, CD, USB, SD /
MMC ou iPod en appuyant sur la touche TUNING / SKIP / RESEARCH (UP ou DOWN).
8. Appuyer de nouveau sur la touche TIMER, VOL s'affiche et clignote, régler la fourchette de temporisation
en appuyant sur la TUNING / SKIP / RESEARCH (UP ou DOWN).
9. Chacun des états ci-dessus sera désactivé lorsque les touches ne sont pas sollicitées pendant 10
secondes.
10. Après le réglage TIMER ON et TIMER OFF appuyer sur la touche TIMER, "
11. L'appareil ne peut pas être mis sous tension automatiquement par l’ordre TIMER ON et commencer la
lecture, par contre il est coupé automatiquement par l’ordre TIMER OFF (arrêt temporisation).
"apparaît sur l'afficheur.
COMMANDE DE L’EGALISEUR (sur la télécommande)
Appuyer sur la touche EQ, le son change de tonalité comme suit:
REGLAGE DE LA FONCTION SOMMEIL (sur la télécommande)
Pour s’endormir en musique, appuyer sur la touche SLEEP.
Il est possible de choisir le mode TUNER, CD/MP3, USB, SD MMC, iPod, la fonction SLEEP (sommeil)
permet de lire de 90, 80, 70 ou 10 minutes de musique avant que l’appareil ne s’arrête automatiquement.
FONCTION SELECT
Appuyer sur la touche FUNCTION de l’appareil ou sur celle de la télécommande pour sélectionner la source
sonore.
FONCTIONNEMENT DE LA RADIO
1. Appuyer sur la touche FUNCTION de l’appareil ou sur celle de la télécommande pour sélectionner le mode
TUNER (syntoniseur) à modulation de fréquence.
2. Sélectionner la fréquence souhaitée avec la touche SEARCH / SKIP / TUNING (UP ou DOWN) sur
l'appareil ou sur celle de la télécommande).
SELECTION MONO/STEREO
Cet appareil reçoit uniquement la FM (modulation de fréquence).
1. Pour sélectionner la station FM stéréo souhaitée, appuyer une fois sur la touche D3/ESP/MONO/ST de la
télécommande uniquement. ST s'affiche indiquant que la réception du signal est optimale.
2. Lors d’une pression supplémentaire sur la touche D3/ESP/MONO/ST. l'indicateur
s'éteint et l’appareil passe en mode MONO FM.
FR-8
FM stéréo
Page 27

Réglage automatique
1. Appuyer sur la touche SEARCH / SKIP / TUNING UP ou DOWN) pendant quelques secondes, puis la
relâcher. Le tuner recherche automatiquement la première station dont le signal est suffisamment fort pour
assurer une réception correcte.
2. Répéter la procédure ci-dessus pour sélectionner une autre station.
Préréglage des stations
Il est possible de prérégler 30 stations de stations de radio FM et de les mémoriser.
1. Régler sur la fréquence de la station choisie.
2. Appuyer sur la touche iPod / MEM / CLOCK- ADJ.
3. Appuyer sur la touche PRESET / FOLDER (UP ou DOWN) pour entrer un numéro de station.
4. Appuyer de nouveau sur la touche iPod / MEM / CLOCK-ADJ pour confirmer la sélection.
5. Pour programmer plus de stations dans la mémoire, répétez les étapes 2 à 4 ci-dessus.
6. Pour modifier les stations préréglées stockées en mémoire, répéter les étapes 2 à 4 ci-dessus.
Notes:
1. Stocker une nouvelle station dans un emplacement mémoire efface la station précédemment stockée dans
ledit emplacement.
2. La mise hors tension de l’appareil n’efface pas la mémoire des stations préréglées. Effectuer les
procédures de préréglage des stations pour parvenir à mémoriser les stations de radio.
3. En mode STANDBY (veille), appuyer sur la touche PRESET / FOLDER UP et sur la touche PLAY / PAUSE
pour effacer tout le contenu de la mémoire.
Sélection des stations
1. Appuyer sur la touche PRESET / FOLDER (UP ou DOWN) pour sélectionner le numéro de la station
préréglée souhaitée.
2. Le numéro de ladite station est affiché avec la fréquence correspondante.
Antenne FM
Déployer l'antenne FM pour obtenir la meilleure réception possible.
FONCTIONNEMENT CD/MP3
Ecoute des modes CD/MP3
1. Appuyer sur la touche FUNCTION de l’appareil pour sélectionner le mode CD.
2. Appuyer sur la touche CD DOOR OPEN/CLOSE uniquement sur l’appareil, la trappe du lecteur de CD
s'ouvre automatiquement. (F3)
3. Insérez le disque CD/MP3 dans le compartiment CD, appuyer sur la CD DOOR OPEN/CLOSE
(ouverture/fermeture)pour parvenir à fermer la trappe du lecteur. L’appareil lit le disque CD/MP3
automatiquement.
NOTE:
1) Cet appareil lit des disques CD, CD-R, CD-RW, MP3.
2) Il peut lire des 8 cm et des disques Multi sessions MP3.
3) Vitesse de transfert en lecture MP3:
En format MP3: vitesse de transfert: 32 à 20 kbps.
4) Le nombre maximal de dossiers lisibles est de 99 dossiers, le nombre de pistes de 999.
5) En l’absence de disque ou de lecture impossible TOC, NO DISC sont affichés. (F4)
Lecture complète des CD/MP3
1. La lecture commence en appuyant sur la touche PLAY / PAUSE / ENTER. La lecture commence à partir
de la première piste. Le numéro de la piste en cours s’affiche ainsi que la durée de lecture écoulée. (F5) (F6)
2. Pour interrompre la lecture, appuyer sur la touche PLAY / PAUSE / ENTRER.
La durée de lecture écoulée s’affiche en clignotant. (F7) (F8)
3. Pour reprendre la lecture normale, appuyer de nouveau sur la touche PLAY / PAUSE / ENTER.
4. Pour arrêter la lecture, appuyer sur la touche STOP / MENU.
FR-9
Page 28

NOTE: Si une condition inhabituelle survient en utilisant les touches de fonction débrancher l’appareil,
attendre un instant, puis reconnecter l’appareil au réseau électrique.
ECOUTE DE LA PISTE SOUHAITEE
- CD
1. Appuyer sur la touche TUNING/SKIP/SEARCH UP ou DOWN de l’appareil (ou sur celle de la
télécommande) jusqu'à ce que le numéro de piste apparaisse sur l’afficheur puis appuyer sur la touche
PLAY / PAUSE / ENTER (ou sur celle de la télécommande) pour commencer la lecture. (F9)
2. Pendant le mode lecture, appuyer sur la touche TUNING/SKIP/SEARCH UP ou DOWN moins d’une
seconde, pour que l’appareil recherche une piste en effectuant un déroulement avant ou arrière.
3. Appuyer et maintenir la pression sur la touche TUNING/SKIP/SEARCH UP ou DOWN plus de quelques
secondes, l’appareil saute en avant ou en arrière à la même piste. (F10)
4. Appuyer sur la touche PLAY / PAUSE / ENTER pour commencer la lecture.
5. Appuyer une fois sur la touche ID3/ESP/MONO/ST, la fonction ESP est activée, l’indicateur ESP clignote
sur l'afficheur (F11) (Epreuves de chocs: CD 40s, MP3100 s)
6. Appuyer de nouveau sur la touche ID3/ESP/MONO/ST, la fonction ESP est désactivée, l'indicateur ESP
disparaît de l'afficheur.
- MP3
1. Appuyer sur la touche PRESET / FILE UP ou DOWN, le numéro de l’album est modifié, appuyer sur la
touche TUNING/SKIP/SEARCH UP ou DOWN, le numéro de la piste est modifié.
2. Lorsque la piste souhaitée est affichée, appuyer sur la touche PLAY / PAUSE / ENTER (uniquement en
iPod) pour commencer la lecture de la piste.
3. Si le MP3 sont écrits en "ID3".
a. Lorsque la piste souhaitée est affichée, appuyer sur la touche PLAY / PAUSE pour commencer la lecture
de la piste. La fonction ID3 est activée automatiquement en même temps. L’appareil recherche
automatiquement les «FILE NAME» (nom du fichier) «TITLE NAME» (titre) « ARTIST NAME» (nom de
l’artiste) de plus de 64 caractères qui défilent continuellement de droite à gauche sur l’afficheur.
b. Appuyer sur la touche ID3/ESP/MONO/ST, la fonction ID3 est désactivée.
FR-10
Page 29

FONCTIONNEMENT USB / CARTE
Pendant le mode veille
1. Raccorder le périphérique USB ou insérer la carte SD ou MMC, puis appuyer sur la touche STANDBY de
l'appareil ou celle de la télécommande pour mettre l’appareil sous tension.
2. Appuyer sur la touche FUNCTION de l’appareil (ou sur celle de la télécommande) pour sélectionner le
port USB ou le mode SD / MMC. L’appareil lit automatiquement le nombre total des dossiers et de pistes en
même temps. (F12)
3. Lorsque le dispositif de mémoire USB contient plus de un dossier.
a. Appuyez sur la touche PRESET / FOLDER UP ou DOWN pour sélectionner chaque dossier.
b. Appuyer sur la touche TUNING / SKIP / SEARCH UP ou DOWN pour sélectionner un morceau en cours
dans un dossier souhaité.
4. Si le MP3 sont écrits en ID3 ".
a. Pendant la lecture MP3 Appuyer une fois ID3/ESP/MONO/ST. L'afficheur indique «ID3 ON», puis
l’appareil recherche automatiquement les «FILE NAME» (nom du fichier) «TITLE NAME» (titre) « ARTIST
NAME» (nom de l’artiste) de plus de 64 caractères qui défilent continuellement de droite à gauche sur
l’afficheur.
b. Appuyer de nouveau sur la touche ID3/ESP/MONO/ST. L'afficheur indique ID3 OFF puis l'appareil lit
normalement.
Note:
1. Dans ce mode, l’appareil lit uniquement des MP3.
2. La plupart des périphériques USB ou des cartes SD ou MMC sont supportés par l’appareil. Dans
l’hypothèse peu probable d'un périphérique ou d’une carte non supporté par l’appareil, procéder à un essai
avec du matériel d’autres marques.
3. Cet appareil supporte les périphériques USB et les cartes SD ou MMC d’une taille mémoire maximale de
2 Go.
4. L’appareil supporte les versions USB 1,1 et 2,0.
Lecture flash du disque complet
1. La lecture commence en appuyant sur la touche PLAY / PAUSE / ENTRER (uniquement en mode iPod).
La lecture commence avec l'iPod par la première piste. L’afficheur indique le numéro de la piste en cours et
la durée écoulée (F13)
2. Pour interrompre la lecture, appuyez sur la touche PLAY / PAUSE / ENTRER (uniquement en mode
iPod). L'indicateur de durée écoulée clignote. (F14)
3. Pour reprendre la lecture, appuyer de nouveau sur la touche PLAY / PAUSE / ENTER (uniquement en
mode iPod).
4. Pour arrêter la lecture, appuyer sur la touche STOP / MENU (uniquement en mode iPod).
Note A tout moment, le périphérique USB ou la carte SD doit être bien fixé en mode veille, pour éviter
d’endommager le périphérique USB ou la carte SD.
FR-11
Page 30

REPETION DE LA LECTURE
- CD
1. Appuyer une fois sur la touche REPEAT, REPEAT s'affiche. La piste en cours du CD est lue de manière
répétitive. (F15)
2. Appuyer deux fois sur la touche REPEAT, REPEAT ALL s’affiche. Toutes les pistes du CD sont relues de
manière répétitive. (F1 6)
3. Appuyer trois fois sur la touche REPEAT, la fonction de répétition est désactivée.
- MP3
1. Appuyer une fois sur la touche REPEAT, REPEAT s’affiche. La piste en cours est lue de manière
répétitive. (F17) (en boucle)
2. Appuyer deux fois sur la touche REPEAT, REPEAT ALL s’affiche. Toutes les pistes sont relues de
manière répétitive. (F18)
3. Appuyer trois fois sur la touche REPEAT, REPEAT ALBUM s’affiche. L’album en cours est relu de
manière répétitive (F19)
4. Appuyer quatre fois sur la touche REPEAT, la fonction de répétition est désactivée.
MODE PROGRAMME
L'utilisateur peut programmer plus de 64 pistes dans l’ordre de son choix. Le mode programme est activé
lors du mode arrêt.
1. Comment lire le programme
- CD
1) Appuyer sur la touche iPod / MEM / CLOCK-ADJ puis passer en mode programme. (F20)
2) Appuyer sur la touche TUNING/SKIP/RESEARCH UP ou DOWN, le numéro de la piste sera modifiée.
3) Appuyer sur la touche l'iPod / MEM / HORLOGE-ADJ pour confirmer le numéro de piste
- MP3
1) Appuyer sur la touche iPod / MEM / CLOCK-ADJ, pour passer en mode programme. Le numéro de
l’album numéro clignote sur l’afficheur (F21)
2) Appuyer sur la touche TUNING/SKIP/RESEARCH (UP ou DOWN), le numéro de l’album est modifié.
3) Appuyer sur la touche iPod / MEM / CLOCK-ADJ, le numéro de piste clignote. (F22)
4) Appuyer sur la touche TUNING/SKIP/RESEARCH UP ou DOWN, le numéro de la piste est modifié.
5) Appuyer sur la touche iPod / MEM / HORLOGE-ADJ pour confirmer le numéro de piste.
FR-12
Page 31

2. LECTURE DU PROGRAMME
Appuyer sur la touche PLAY / PAUSE / ENTER (uniquement en mode iPod) sur l’appareil ou sur celle de la
télécommande. Le lecture commence par la première piste du programme. Lorsque toutes les pistes sont
lues, l’afficheur de l’appareil indique le nombre de pistes et la durée de lecture des pistes du CD/MP3.
3. ANNULATION DU PROGRAMME
1. Appuyer une fois sur la touche STOP ou ouvrir le plateau tiroir du CD puis le fermer de nouveau de sorte
à effacer la mémoire.
2. Définir un nouveau programme, le précédent programme est alors effacé.
Note: Pendant le mode programme.
1. Appuyer une fois sur la touche REPEAT, REPEAT s’affiche, puis l’appareil lit la piste en cours.
2. Appuyer deux fois sur la touche REPEAT, REPEAT ALL s’affiche,puis l’appareil lit l’ensemble des pistes.
3. Appuyer de nouveau sur la touche REPEAT, l’appareil reprend le mode normal de lecture.
Lecture aléatoire (à partir de la télécommande)
1. Appuyer une fois sur la touche RANDOM, RANDOM s’affiche. (F23)
2. Appuyer de nouveau sur la touche RANDOM, l’appareil reprend le mode normal de lecture.
LECTURE DE L’INTRO (à partir de la télécommande)
1. Appuyer une fois sur la touche INTRO, INTRO s’affiche. L’appareil lit les dix premières secondes de
chaque piste. (F24)
2. Appuyer deux fois sur la touche INTRO, l’appareil reprend le mode normal de lecture.
FONCTIONNEMENT iPod
Note: Lors du fonctionnement en mode iPod de l’appareil, si la vidéo ne fonctionne pas ou fonctionne de
manière anormale, il est possible de mettre à jour la version de l’iPod ou de télécharger la version la plus
récente à partir du web.
Appareil en mode STANDBY
1. Insérer les lecteurs iPod dans le support de la station fixement.
2. Mettre l’appareil sous tension puis appuyer sur la touche FUNCTION du mode iPod, L’indicateur iPod
apparaît sur l’afficheur de l’appareil. (F25)
Appareil en mode iPod:
1. Appuyer une fois sur la touche PLAY / PAUSE / ENTER (uniquement en iPod) pour commencer la
lecture.
Régler le volume en appuyant sur la touche VOLUME UP ou DOWN. Pour arrêter la lecture, appuyer une
fois sur la touche STOP / MENU (uniquement en iPod).
2. Appuyer une fois sur la touche PLAY / PAUSE / ENTER (uniquement en iPod) pour mettre en pause la
piste en cours. Pour reprendre la lecture, appuyer de nouveau sur la touche PLAY / PAUSE / ENTER
(uniquement en iPod).
3. Pour sauter en avant ou en arrière, appuyer sur la touche TUNING / SKIP / SEATCH (UP ou DOWN)
pour sélectionner la plage souhaitée.
4. Appuyer sur la touche REPEAT ou RANDOM pour que l'iPod lise de façon répétitive ou aléatoire. (Note:
l’iPod Touch version .1.4 ou ultérieure supporte la fonction REPEAT (répétition) ou RANDOM (lecture
aléatoire).
FR-13
Page 32

Appareil en mode MENU iPod
1. L’appareil se trouvant en mode iPod, appuyer une fois sur la touche iPod/ MEM / CLOCK-ADJ., l'appareil
entre dans le mode MENU iPod. L'indicateur iPod MENU s’affiche. (F26)
2. Appuyer sur la touche STOP / MENU (uniquement en iPod) pour revenir au MENU iPod.
a. Sélectionner le menu courant comme suit:
Musique> Extras> Importation photo (fonction non disponible sur l'iPod Mini)> Settings (Paramètres)>
Shuffle Songs(Chansons mixées)> Backlight (Musique de fond) > Now playing (En cours de lecture)
apparaissent sur l’afficheur du lecteur iPod.
b. Appuyer sur la touche TUNING / SKIP / SEARCH (UP ou DOWN) de l'appareil ou sur celle la
télécommande pour rechercher le menu courant.
3. Appuyer sur la touche PLAY / PAUSE / ENTER (uniquement en iPod) pour entrer dans le dossier de
menu souhaité.
a. Appuyer sur la touche TUNING / SKIP / SEARCH (UP ou DOWN) de l'appareil (ou sur celle de la
télécommande) pour rechercher le contenu courant de chaque dossier du menu souhaité.
b. Pour revenir au menu de l'iPod, appuyer de nouveau sur la touche STOP / MENU (uniquement en iPod).
4. Pour reprendre la lecture, appuyer de nouveau sur la touche iPod / MEM / CLOCK-ADJ., l'appareil
reprend le mode iPod.
Charge de la batterie de l’iPod au moyen de l’appareil:
1. Le lecteur iPod comporte une batterie interne non démontable, la batterie peut devoir être rechargée
suite à une longue période d’inutilisation.
2. Il est
ossible de charger automatique la batterie de l’iPod par l’intermédiaire de l’appareil lorsqu’il se trouve en
mode STANDBY ou POWER ON.
NOTE:
1 La batterie de l’iPod est chargée à 80% au bout d’une heure environ, la charge complète intervient en
quelques heures. Charger la batterie tout en écoutant de la musique prendra plus de temps.
2 Il est préférable de ne pas charger la batterie en mode TUNER, des interférences sont susceptibles de se
produire et d’altérer la qualité de la réception FM.
Note :
1. Il est toujours possible de commander le lecteur iPod à partir de l’appareil, la télécommande ou le lecteur
iPod lui-même.
2. Le lecteur iPod doit toujours être bien fixé en mode veille, pour éviter à l'appareil et à l’iPod d’être
endommagés.
REGLAGE SORTIE VIDEO (vidéo en mode iPod uniquement)
Pendant le fonctionnement en mode STAND BY (veille) de l’appareil, raccorder le téléviseur au moyen de
câbles vidéo (de type RCA) à la prise jack VIDEO OUT située à l’arrière de l’appareil.
2. Pendant le fonctionnement en mode iPod: Appuyer sur la touche MENU de l'iPod pour régler la fonction
vidéo.
3. Configurer l'iPod pour afficher des vidéos sur un téléviseur (TV)
a) Choisir vidéos> Video settings (Paramètres vidéo), puis régler la sortie TV sur «Ask» ou «On».
b) Lorsque la sortie TV est réglée de «Out» à «Ask», l’iPod offre la possibilité de visionner des vidéos sur un
téléviseur ou sur l'iPod.
Note:
1. Avec un iPod vidéo, il est possible de visionner des vidéos sur un téléviseur connecté au moyen de
l’appareil.
2. L’iPod Classic 80/160 Go, l’iPod nano de 3e génération (vidéo) 4/8Go, l’iPod touch 8/16Go, doivent être
insérés dans la station d’accueil avant de passer au fonctionnement de l’étape 3.
FR-14
Page 33

LECTURE AUXILIAIRE
1. Appuyer sur la touche FUNCTION jusqu'à ce que l’indicateur AUX apparaisse sur l’afficheur. Cet appareil
supporte une entré audio analogique au moyen des jacks AUX.
2. AUX Utiliser un câble AUX (auxiliaire) pour connecter du matériel audio.
Note: Câbles AUX non inclus.
FONCTION MUTE (silence) - (sur la télécommande)
1.Lors d’une pression sur la touche MUTE de la télécommande, l’indicateur de niveau du volume clignote et
la sortie audio est temporairement coupée. (F27)
2. Appuyer de nouveau sur la touche MUTE, le volume et la sortie audio reprennent le fonctionnement
normal dans les conditions du réglage précédent.
ECOUTE AU CASQUE
Une prise casque stéréo est prévue pour une écoute privée. Pour écouter au casque (non fourni), insérer le
mini jack stéréo de 3,5 mm stéréo du casque dans la prise PHONES en face avant de l’appareil. Le
raccordement du casque coupe automatiquement les haut-parleurs externes.
Sauvegarde de la mémoire
Insérer 3 piles de 1,5 V, de type UM-4, AAA ou équivalent dans le compartiment à pile de l’appareil. Ces
piles sont utilisées pour sauvegarder la mémoire du processeur principal.
FR-15
Page 34

DISQUE COMPACT
1. Toujours utiliser des disques compacts portant le logo illustré ci-dessous:
2. Notes à propos de la manipulation des disques
Retirer le disque de son boîtier puis le charger dans l’appareil.
* Ne pas toucher la surface réfléchissante enregistrée.
* Ne pas coller d’étiquette ou écrire sur la surface des disques.
* Ne pas tenter plier les disques.
3. Stockage
* Stocker les disques dans leur boîtier
* Ne pas exposer les disques à la lumière directe du soleil ou à des températures élevées, ou les placer
dans des endroits poussiéreux ou très humides.
4. Nettoyage d'un disque
* Si le disque devient sale, essuyer la poussière, la crasse et les traces de doigts avec un chiffon doux.
* Le disque doit être nettoyé du centre vers le bord.
* Ne jamais utiliser de benzène, de diluants, de liquide nettoyant pour disques ou un spray anti statique.
* S’assurer de fermer la trappe du lecteur de CD pour éviter la contamination de la lentille par la poussière
extérieure.
* Ne pas toucher à la lentille.
FR-16
Page 35

AFFICHEUR LCD
A. INDICATEUR TEMPORISATEUR D INDICATEUR SP.
B. INDICATEUR NOMBRE D’ALBUM E. PISTE/NUMERO/DUREE
C. INDICATEUR STEREO F. INDICATEUR VOLUME HAUT/BAS
CARACTERISTIQUES
ALIMENTATION: 230V ~ 50Hz
PUISSANCE DE SORTIE: 2 x 4,5 W + 28 W
DIMENSIONS DE L’APPAREIL : 207 (W) x 82 (D) x 206 H) mm
DIMENSIONS ENCEINTES : 139 (W) x 72,5 (P) x 200 H) mm
DIMENSIONS DU CAISSON DE BASE: 131 (W) x 242 (P) x 173 (H) mm
POIDS NET: 7,02 kg
PARTIE RADIO
GAMME DE FREQUENCES: 87,5 MHz - 108 MHz
PARTIE DISQUE COMPACT (CD)
PHONOCAPTEUR LASER: LASER 3-FAISCEAUX
REPONSE EN FREQUENCE: 100 Hz à 6kHz
CARACTERISTIQUES SUJETTES A MODIFICATION SANS AVIS PREALABLE
Attention: la ventilation normale du produit ne doit pas être entravée pour l'utilisation prévue.
iPod xxxx est une marque déposée de Apple Computers Corporation
Trademark of New Transducers Limited.
FR-17
Page 36

Cher client,
Nous vous remercions d'avoir acheté ce produit AKIRA™ et de faire confiance à notre société. Ce produit
répond aux normes de sécurité en vigueur et a été soumis à des tests rigoureux durant sa fabrication.
Toutefois, dans l'éventualité d'un défaut, le produit ou sa(ses) pièce(s) défectueuse(s) (excepté des
accessoires et les consommables) seront réparés gratuitement (pièces, main d'œuvre et expédition dans les
pays mentionnés ci-dessous) ou, à la discrétion de AKIRA™, remplacés par un item similaire, à condition
qu'ils aient été renvoyés dans les 24 (vingt quatre) mois qui suivent la date du premier achat (date de
réception), qu'ils présentent un défaut matériel et/ou de main d'œuvre et qu'ils aient été achetés dans l'un des
pays suivants : France (métropolitaine), Espagne, Italie, Portugal, Belgique (territoire) ou dans une boutique
détaxée
Cette garantie n'est accordée que sur présentation de la facture ou du bon de caisse original indiquant la date
d'achat et le nom du revendeur, et de la présente carte de garantie portant mention du type de produit et de
son numéro de série. Le bénéfice de cette garantie pourra être refusé si la facture, le bon de caisse ou la
carte de garantie a été modifié d'une manière quelconque, effacé ou rendu illisible après l'achat original.
Enregistrement en ligne
Pour valider votre garantie, veuillez enregistrer votre produit AKIRA™ dans les 30 jours qui suivent son achat
sur http://www.akiraeurope.com
La présente garantie ne s'applique pas aux cas suivants :
1. Dommages d'origine accidentelle y compris, mais sans exclusive, la foudre, l'incendie, l'eau.
2. Produit endommagé par suite d'une négligence, d'une mauvaise utilisation, d'une utilisation
contraire aux instructions du mode d'emploi, d'une réparation et/ou d'une installation mal exécutée
(liste non exhaustive). En particulier, un écran brûlé par l'affichage excessivement prolongé d'une
image fixe telle qu'un écran d'ordinateur ou des logos, comme décrit dans le mode d'emploi, n'est
pas couvert par la garantie.
3. Modifications, adaptations ou altérations du produit dans le but de l'utiliser dans un autre pays que
ceux pour lesquels il a été conçu et fabriqué, ou tout dommage résultant de telles modifications.
4. Utilisation différente de l'usage normal par un particulier dans le cadre domestique.
5. Défectuosité des pixels individuels lorsque le nombre de pixels défectueux est inférieur aux
nombres suivants : Pixel sombre : 7 Pixel brillant ou scintillant : 3 Nombre total de pixels
défectueux : 8
Ces déclarations n'affectent pas vos droits statutaires en tant que consommateur dans le cadre de la
législation nationale en vigueur, ni vos droits de consommateur vis-à-vis du revendeur auquel vous
avez acheté le produit.
Si vous avez un problème technique, qu'il soit couvert ou non par la garantie, veuillez en parler au revendeur
qui vous a vendu le produit. Dans votre propre intérêt, nous vous recommandons de lire attentivement le
mode d'emploi de votre produit AKIRA™ avant de prendre contact avec votre revendeur ou un centre de
dépannage.
Si vous avez des questions auxquelles votre revendeur n'est pas en mesure de répondre, veuillez
appeler la hotline AKIRA (numéro international gratuit : 00 800 800 25 472).
AKIRA™ est une marque déposée de TT International, Inc.
Note:
Ce produit a été conçu et fabriqué avec des matériaux et des composants de haute qualité
pouvant être recyclés et réutilisés.
Ce symbole signifie que les appareils électriques et électroniques doivent être jetés séparément
et non avec les déchets ménagers à la fin de la péride d’utilisation.
Les appareils/machines électriques et électroniques contiennent souvent des éléments qui, bien
qu’indispensables au bon fonctionnement du système, peuvent s’avérer dangereux pour la santé
et l’environnement s’ils sont manipulés ou éliminés de manière incorrecte. Par conséquent,
veuillez ne pas jeter votre appareil/machine usagée avec les ordures ménagéres.
Veuìllez apporter cet appareil au lieu de récupératîon de votre commune ou dans votre centre
pour matiéres recyclables.
Aidez-nous à préserver l’environnement dans lequel nous vivons!
FR-18
Page 37

Para conseguir el máximo disfrute y rendimiento, lea este manual detenidamente antes de empezar a
manejar la unidad para familiarizarse con sus características, y asegurarse años de funcionamiento fiable
sin problemas y de audición placentera.
Notas importantes
Las instrucciones de seguridad y manejo deben conservarse para consultas futuras.
Evite la instalación de la unidad en los lugares descritos a continuación:
-Lugares expuestos a la luz directa del sol o cerca de aparatos que irradien calor, como calentadores
eléctricos.
-Encima de otros equipos estéreo que irradien demasiado calor. Lugares de donde no haya ventilación o
con polvo. Lugares con vibraciones constantes. Lugares húmedos.
-Asegúrese de que las aberturas de ventilación no se obstruyen.
-Antes de encender el aparato por primera vez, asegúrese de que el cable de alimentación está instalado
adecuadamente. No se expondrá el aparato a goteo o salpicaduras de líquidos, ni se colocarán objetos
llenos de líquido, como jarrones, sobre él.
-No se expondrá el aparato a goteo o salpicaduras de líquidos, ni se colocarán objetos llenos de
líquido, como jarrones, sobre él.
-Para desconectar completamente la entrada de alimentación eléctrica, se desconectará el enchufe
del aparato de la toma de corriente de la red.
-Cuando el LED de standby no esté iluminado con ningún color, el aparato está desconectado
completamente de la red eléctrica.
-Deje un espacio libre de 10 cm de distancia como mínimo alrededor del aparato para permitir una
ventilación suficiente.
-Se debe prestar atención a los aspectos medioambientales cuando se vayan a desechar pilas.
-Utilice el aparato con temperaturas moderadas.
-El enchufe de la red eléctrica no debe estar obstruido y debe ser fácilmente accesible durante el
tiempo que se vaya a utilizar el aparato. No se debe impedir la ventilación cubriendo las aberturas con
objetos, como periódicos, manteles, cortinas, etc.
-No se deben colocar fuentes de llama desnuda, como velas encendidas, encima del aparato.
-Las pilas no se expondrán a una fuente de calor excesivo como los rayos del sol, el fuego o imilar.
Por razones de seguridad, no desmonte ninguna tapa ni intente acceder al interior del producto. Remita las
reparaciones al servicio técnico o al personal especializado.
No intente quitar ningún tornillo, ni abrir la carcasa de la unidad; no hay piezas reparables por el usuario
en el interior. Remita todas las reparaciones al personal técnico especializado.
PRECAUCIÓN: PARA REDUCIR EL RIESGO DE SHOCK ELÉCTRICO, NO QUITAR LA TAPA (NI LA TAPA
TRASERA), NO HAY PEIZAS REPARABLES POR EL USUARIO EN EL INTERIOR.
REMITA LAS REPARACIONES AL PERSONAL TÉCNICO ESPECIALIZADO.
TENSIÓN PELIGROSA
Existe tensión peligrosa en los conductores de elementos de montaje del interior de la carcasa
de este producto que puede ser de la suficiente magnitud para constituir un riesgo de descarga
eléctrica para las personas.
ATENCIÓN
El manual del propietario contiene instrucciones de manejo y mantenimiento importantes; por
su seguridad, es necesario consultar el manual.
ADVERTENCIA: PARA EVITAR PELIGRO DE INCENDIOS O SHOCK ELÉCTRICO, NO EXPONGA
ESTE APARATO A RASGADURAS O A SALPICADURAS DE AGUA.
Nota:
- Esta unidad se calentará cuando se utilice durante un largo periodo de tiempo. Esto es normal y no es
indicativo de la existencia de un problema con la unidad.
- El reproductor de CDs incluye microprocesadores que pueden funcionar mal como consecuencia de una
interferencia eléctrica o ruido externo.
fuente de alimentación y vuelva a conectarla de nuevo.
- La presión de sonido excesiva de los auriculares puede causar pérdida de audición.
- Si se verifican condiciones anormales en la ventana de la pantalla o en el teclado, apague la unidad, y a
continuación vuelva a encenderla de nuevo.
Si el reproductor de CDs no funciona adecuadamente, desconecte la
ESP-1
Page 38

Esquema de montaje de la unidad y de los altavoces
1 – Instalación del tablero o montaje en la pared
Colocar los dos clavos (Tamaño: 3,5*25BA)
en la pared, de forma que estén paralelos
entre sí. La distancia entre los dos clavos
debe ser de 56 mm)
2 conexión de los altavoces
3 conexión de la base del iPod
La distancia máxima de
conexión es de 2 metros
ESP-2
Colocar los dos clavos (Tamaño: 3,5*25BA)
en la pared, de forma que estén paralelos
entre sí. La distancia entre los dos clavos
debe ser de 112 mm)
Page 39

Esquema de montaje de la Base del iPod
** El iPod que se muestra a continuación no está incluido *
Nota: La unidad también soporta iPod nano de 2ª generación, iPod nano de 3ª generación (Vídeo)
4/8 GB, iPod táctil 8/16 GB, pero el adaptador de la base no está incluido, por favor utilice el
adaptador de la Base suministrado con el iPod.
ESP-3
Page 40

CARACTERÍSTICAS Y CONTROLES
ESP-4
Page 41

CARACTERÍSTICAS Y CONTROLES
1. ALTAVOZ
2. ANTENA FM
3. CLAVIJA DE CONEXIÓN “D”
4. CLAVIJA DE CONEXIÓN “I”
5. BOTÓN DE PRESET/FOLDER UP
(PRESINTONÍA/ CARPETAS ARRIBA)
6. BOTÓN DE REPETICIÓN
7. BOTÓN DE PRESET/FOLDER DOWN
(PRESINTONÍA/ CARPETAS ABAJO)
8. BOTÓN STANDBY (CON INDICADOR LED)
9. PUERTO DE ENTRADA DE DISPOSITIVO
USB
10. RANURA DE ENTRADA DE TARJETAS SD
/ MMC
11. BOTÓN DE SEARCH/SKIP/TUNING DOWN
(BÚSQUEDA/SALTO/SINTONÍA ABAJO)
12. BOTÓN iPod/MEM/CLOCK ADJ.
13. BOTÓN DE BOTÓN DE
SEARCH/SKIP/TUNING UP
(BÚSQUEDA/SALTO/SINTONÍA ARRIBA)
14. BOTÓN PLAY / PAUSE (REPRODUCIR /
PAUSA)
15. SENSOR R
16. VENTANA DE LA PANTALLA LCD
17. BOTÓN STOP/MENU
MANDO A DISTANCIA
1. BOTÓN STANDBY
2. BOTÓN MUTE (SILENCIO)
3. BOTÓN DE PRESET/FOLDER DOWN
(PRESINTONÍA/ CARPETAS ABAJO)
4. BOTÓN DE PRESET/FOLDER UP
(PRESINTONÍA/CARPETAS ARRIBA)
5. BOTÓN RANDOM (ALEATORIO)
6. BOTÓN DE FIN DE TUNING/SKIP/SEARCH
DOWN (SINTONÍA/SALTO/BÚSQUEDA
ABAJO)
7. BOTÓN DEL TIMER (TEMPORIZADOR)
8. BOTÓN DE REDUCCIÓN DE VOLUMEN
9. BOTÓN FUNCTION (FUNCIÓN)
10. BOTÓN DE INTRO
11. BOTÓN ID3/ESP/MONO/ST. .
12. BOTÓN REPEAT (REPETIR)
13. BOTÓN PLAY/PAUSE/ENTER
(REPRODUCIR/PAUSA/INTRO) (solamente
en iPod)
14. BOTÓN DEL EQ (ECUALIZADOR)
15. BOTÓN DE COMIENZO DE
TUNING/SKIP/SEARCH UP
(SINTONÍA/SALTO/BÚSQUEDA ARRIBA)
16. BOTÓN DE STOP/MENU (solamente en iPod)
17. BOTÓN iPod/MEM/CLOCK ADJ.
18. BOTÓN SLEEP (DORMIR)
19. BOTONES NUMÉRICOS DE BÚSQUEDA
20. BOTÓN DE AUMENTO DE VOLUMEN
ESP-5
18. BOTÓN DE REDUCCIÓN DE VOLUMEN
19. BOTÓN DE AUMENTO DE VOLUMEN
20. BOTÓN DE FUNCIÓN
21. BOTÓN DE APERTURA / CIERRE DE LA
PUERTA DE CD
22. PUERTA DE CD
23. BASE de iPod
24. CLAVIJA DE CONEXIÓN PARA WOOFER
25. CLAVIJA DE CONEXIÓN DE
AURICULARES
26. ORIFICIO DE SUJECIÓN
27. CLAVIJA DE CONEXIÓN DE SALIDA DE
VÍDEO
28. PUERTA DE LA PILA DE MEMORIA
BACKUP
29. INDICADOR DE STANDBY DEL
SUBWOOFER
30. CABLE DE ALIMENTACIÓN AC
31. INTERRUPTOR DE ALIMENTACIÓN AC
DEL SUBWOOFER
32. CLAVIJA DE CONEXIÓN DE SALIDA DE
LOS ALTAVOCES
33. CLAVIJA DE LA TOMA DE RED
ELÉCTRICA
Page 42

INSTALACIÓN DE LAS PILAS EN EL MANDO A DISTANCIA
Presione hacia abajo la tapa del compartimiento y deslícela
hacia fuera para abrir el compartimiento. Inserte las dos
pilas (UM4), (AAA), (R03) en el mando a distancia teniendo
en cuenta las marcas de polaridad (“+”·y “-“) del interior del
compartimiento y en las pilas. Coloque la tapa sobre el
compartimiento, presione ligeramente, y empuje hacia
arriba hasta que encaje.
NOTA: Saque las pilas del mando a distancia si éste no se
va a usar durante un largo periodo de tiempo. No mezcle
pilas normales con pilas recargables. Cuando la carga de
las pilas se debilite, el mando a distancia no funcionará y
deberá sustituir las pilas por otras nuevas.
MANEJO DEL SUBWOOFER Y DE LA UNIDAD PRINCIPAL
En primer lugar, conecte la unidad a una toma de la red eléctrica AC, y a continuación ponga el interruptor de
encendido situado en la parte posterior del subwoofer en la posición “ON” (“ENCENDIDO”).
1. El subwoofer y la unidad principal estarán en modo standby; ambos indicadores de STANDBY cambiarán a
color rojo.
2. Pulse el botón STANDBY de la unidad principal (o del mando a distancia) para encender el equipo (“ON”).
3. El indicador de standby del subwoofer cambiará a color verde y el indicador de standby de la unidad
principal se apagará.
Nota: Desenchufe el conector AC de la toma de corriente de la pared para desconectar completamente el
producto entero.
POWER/STANDBY (ENCENDIDO/STANDBY)
1. En primer lugar, ponga el interruptor de encendido situado en la parte posterior del subwoofer en la
posición “ON” (“ENCENDIDO”).
2. Pulse el botón STANDBY de la unidad principal (o del mando a distancia) para encender el equipo (“ON”).
3. Seleccione la fuente de sonido (CD, USB, SD/MMC, iPod, AUX o TUNER (SINTONIZADOR)) pulsando el
botón FUNCTION (FUNCIÓN).
4. Ajuste el volumen con el botón VOLUME (UP o DOWN (SUBIR o BAJAR).
5. Configure el ecualizador presintonizado (PASS, ROCK, JAZZ, CLASSIC o POP) con el botón EQ del
mando a distancia solamente.
6. Pulse el botón STANDBY de la unidad principal (o del mando a distancia) para apagar el equipo.
Nota:
1. Si no hay señal en modo CD/DISPOSITIVO USB/iPod, la unidad principal se apagará en 15 minutos
automáticamente.
2. Si mientras se esté en modo iPod, no se inserta el Reproductor iPod en el soporte de la base de iPod la
unidad principal también se apagará automáticamente en 15 minutos.
3. Apague el interruptor principal para ahorrar energía cuando no utilice la unidad.
PUESTA EN HORA DEL RELOJ
Con el equipo en modo standby:
1. Pulse y mantenga pulsado el botón iPod/MEM/CLOCK-ADJ hasta que se muestre en pantalla los dígitos
de 24 horas parpadeando.
2. Pulse el botón TUNING/SKIP/SEARCH para ajustar la presentación del formato de 12 ó 24 horas.
3. Pulse el botón iPod/MEM/CLOCK-ADJ de nuevo; el dígito de las HORAS de la pantalla parpadea
Pulse el botón TUNING/SKIP/SEARCH (UP o DOWN) para ajustar el dígito de las HORAS; pulse el botón
iPod/EM/CLOCK-ADJ una vez más, el dígito de los MINUTOS parpadea. Ajústelo con el botón
ESP-6
Page 43

TUNING/SKIP/SEARCH (UP o DOWN).
4. Pulse el botón iPod/MEM/CLOCK-ADJ de nuevo para confirmar la hora.
5. Cada uno de los estados descritos anteriormente se borrará si no se pulsa ninguna tecla en 10 segundos.
AJUSTE DEL TEMPORIZADOR (solamente en el mando a distancia)
1. Después de poner en hora el reloj, pulse el botón TIMER (TEMPORIZADOR) durante unos segundos;
aparece " ¥ ON" y "00:00" en la pantalla y el dígito de las HORAS parpadea. (F1)
2. Pulse el botón TUNING/SKIP/SEARCH (UP o DOWN) para ajustarla.
3. Pulse el botón TIMER de nuevo, el dígito de los MINUTOS comenzará a parpadear; ajústelo
pulsando el botón TUNING/SKIP/SEARCH UP o DOWN).
4. Pulse el botón TIMER una vez más para confirmar y establecer la hora de activación del temporizador
(TIMER ON).
5. Después del ajuste de la ACTIVACIÓN DEL TEMPORIZADOR (“TIMER ON”), aparece “
pantalla y el dígito de las HORAS parpadea. (F2)
6. Repita los pasos 2 a 3 anteriores, y a continuación pulse el botón TIMER una vez más para confirmar y
establecer la hora de desactivación del temporizador (TIMER OFF).
7. Ahora, aparece en la pantalla “TUNER” (“SINTONIZADOR”) parpadeando, y a continuación seleccione
el modo de alarma del TUNER, CD, USB, SD/MMC o iPod pulsando el botón TUNING/SKIP/SEARCH
(UP o DOWN).
8. Pulse el botón TIMER de nuevo, el indicador “VOL” del temporizador aparece en la pantalla y parpadea;
ajuste el volumen del temporizador aumentando o reduciendo con el botón con el botón
TUNING/SKIP/SEARCH (UP o DOWN).
9. Cada uno de los estados descritos anteriormente se borrará si no se pulsa el botón en 10 segundos.
10.Después del ajuste de la ACTIVACIÓN y DESACTIVACIÓN DEL TEMPORIZADOR (“TIMER
ON”y “TIMER OFF), pulse el botón TIMER; “
11. La unidad principal se encenderá automáticamente a la hora programada en el temporizador ("TIMER
ON") y comenzará a reproducir, y se apagará automáticamente a la hora de finalización programada
(“TIMER OFF”).
”aparece en la pantalla.
CONTROL DEL ECUALIZADOR (en el mando a distancia)
Pulse el botón EQ, y el tono del sonido cambia en la secuencia siguiente:
PARA ESTABLECER LA FUNCIÓN SLEEP (DORMIR) (en el mando a
OFF” en la
distancia)
Si desea quedarse durmiendo con música, pulse el botón SLEEP.
Puede seleccionar el modo TUNER, CD/MP3, USB, SD MMC o iPod en la función “dormir” para que se inicie
la reproducción de música desde 90, 80, 70 hasta10 minutos antes de que se apague solo automáticamente.
SELECCIÓN DE FUNCIÓN
Pulse el botón FUNCTION (FUNCIÓN) en la unidad principal (o en el mando a distancia) para
seleccionar uno de los modos de las fuentes de sonido.
ESP-7
Page 44

OPERACIÓN DE LA RADIO
1 . Pulse el botón FUNCTION (FUNCIÓN) en la unidad principal (o en el mando a distancia) para
seleccionar el modo TUNER (SINTONÍA) y la banda de FM.
2. Seleccione la frecuencia deseada con el botón SEARCH/SKIP/TUNING(UP o DOWN) en la unidad
principal (o en el mando a distancia).
SELECCIÓN DE ESTÉREO/MONO
Esta unidad solamente puede recibir en modo FM.
1. Cuando desee seleccionar una emisora estéreo de FM, pulse el botón ID3/ESP/MONO/ST. una vez en
el mando a distancia solamente. Aparecerá el indicador “
obteniendo la mejor calidad de recepción.
2. Cuando pulse el botón ID3/ESP/MONO/ST. una vez más, el indicador FM STEREO se apagará y
cambiará a estado MONO FM.
Sintonización automática
1. Pulse el botón TUNING/SKIP/SEARCH (UP o DOWN) durante unos segundos, a continuación
libere el botón. El sintonizador buscará automáticamente la primera emisora con la suficiente fuerza
de la señal.
2. Repita el procedimiento anterior si desea seleccionar otra emisora.
Programación de emisoras presintonizadas
También puede presintonizar emisoras de su elección y almacenar hasta 30 emisoras FM en su memoria.
1. Sintonice la emisora deseada.
2. Pulse el botón iPod/MEM/CLOCK-ADJ
3. Pulse el botón PRESET/FOLDER (UP o DOWN) para el número de su emisora deseada.
4. Pulse el botón iPod/MEM/CLOCK-ADJ de nuevo para confirmar su selección.
5. Para programar más emisoras en la memoria, repita los pasos 2 a 4 anteriores.
6. Para cambiar las emisoras presintonizadas almacenadas, repita los pasos 2 a 4.
Notas:
1. El almacenamiento de una nueva emisora en una localización presintonizada borrará la emisora
almacenada previamente en esa localización.
2. Al apagar el aparato no se borrará la memoria de emisoras presintonizadas. Ejecute los procedimientos de
presintonización de emisoras de nuevo para almacenar las emisoras.
3. Con la unidad en modo STANDBY, pulse el botón PRESET/FOLDER UP y el botón PLAY/PAUSE para
borrar toda la memoria presintonizada.
Selección de emisoras presintonizadas
1. Pulse el botón PRESET/FOLDER (UP o DOWN) para seleccionar el número de su emisora deseada.
2. La localización numérica de esa emisora preseleccionada se muestra junto con la frecuencia
correspondiente.
Antena FM
Extienda la antena de FM para conseguir una mejor recepción.
ESP-8
” en la pantalla, lo que indica que se está
Page 45

OPERACIÓN DE CD/MP3
Audición de Discos compactos (CD/ MP3)
1. Pulse el botón FUNCTION (FUNCIÓN) de la unidad para seleccionar el modo CD.
2. Pulse el botón CD DOOR OPEN/CLOSE (ABRIR/CERRAR LA PUERTA DEL CD) solamente en la
unidad principal, y a continuación la puerta del CD se abrirá automáticamente. (f3)
3. Inserte el disco CD/MP3 en el compartimiento del CD, pulse el botón CD DOOR OPEN/CLOSE
(ABRIR/CERRAR LA PUERTA DEL CD) de nuevo para cerrar la puerta. La unidad principal leerá
automáticamente el disco CD/MP3.
NOTA:
1) Esta unidad puede reproducir discos CD, CD-R, CD-RW, MP3.
2) Puede leer “8 mm” y “Multi secciones” de DISCOS MP3.
3) La “Tasa de Transferencia de Reproducción” con MP3 es:
Con MP3, tasa de transferencia de bits: 32 - 20 kbps.
4) “Capacidad máxima de lectura: 99 carpetas y 999 pistas”.
5) Si no hay ningún disco o no se puede leer el Índice de Contenidos, se mostrará en la pantalla NO DISC.
(F4)
Reproducción de un CD/MP3 entero
1. La reproducción comenzará pulsando el botón PLAY / PAUSE /ENTER (REPRODUCIR / PAUSA /
INTRO). La reproducción comienza desde la primera pista. La pantalla muestra el número de pista actual y el
tiempo transcurrido. (F5) (F6)
2. Para interrumpir la reproducción, pulse el botón PLAY/PAUSE/ENTER
(REPRODUCIR/PAUSA/INTRO). El indicador del tiempo transcurrido parpadeará. (7) (8)
3. Para reanudar la reproducción, pulse el botón PLAY/PAUSE/ENTER (REPRODUCIR/PAUSA/INTRO)
de nuevo.
4. para detener la reproducción, pulse el botón STOP/MENU (PARADA/MENU).
NOTA: Si se verifica alguna condición inusual con los botones del teclado, desconecte la fuente de
alimentación y luego vuelva a conectarla de nuevo.
AUDICIÓN DE UNA PISTA DESEADA
- CD
1. Pulse el botón TUNING/SKIP/SEARCH (UP o DOWN) en la unidad principal (o en el mando a distancia)
hasta que aparezca el número de pista deseada en la pantalla, luego pulse el botón PLAY/PAUSE/ENTER
(solamente en el iPod) para comenzar la reproducción. (F9)
2. En modo de reproducción, pulse el botón TUNING/SKIP/SEARCH (UP o DOWN) menos de un segundo;
buscará hacia delante o atrás de la pista.
ESP-9
Page 46

3. Pulse y mantenga pulsado el botón TUNING/SKIP/SEARCH (UP o DOWN) más de unos segundos; se
desplazará rápido hacia delante o atrás en la misma la pista.
4. Pulse el botón PLAY/PAUSE/ENTER (solamente en iPod) para comenzar a reproducir.
5. Pulse el botón ID3/ESP/MONO/ST. una vez, se activará la función ESP y el indicador ESP parpadea en
la pantalla. (F11) (Función de protección anti-salto por golpes: CD 40 seg. , MP3 100 seg.)
6. Pulse el botón ID3/ESP/MONO/ST. de nuevo, se desactivará la función ESP y el indicador ESP
desaparece de la pantalla.
- MP3
1. Pulse el botón PRESET/FOLDER (UP o DOWN), el número de álbum cambiará; pulse el botón
TUNING/SKIP/SEARCH (UP o DOWN), y se cambiará el número de pista.
2. Cuando aparezca en pantalla la pista deseada, pulse el botón PLAY/PAUSE/ENTER (solamente en iPod)
para comenzar a reproducir la pista.
3. Si el MP3 están escritos en “ID3”.
a. Cuando aparezca en pantalla la pista deseada, pulse el botón PLAY/PAUSE para comenzar a reproducir
la pista. La función ID3 se activará automáticamente al mismo tiempo. Automáticamente buscará más de 64
letras del “NOMBRE DE FICHERO” “NOMBRE DEL TÍTULO”, “NOMBRE DEL ARTISTA” que se mueven de
la esquina derecha a la esquina izquierda de la pantalla continuamente.
b. Pulse el botón ID3/ESP/MONO/ST. y la función ID3 se desactivará.
OPERACIÓN DE USB/TARJETA
En modo STANDBY
1. Inserte el DISPOSITIVO USB o la TARJETA SD MMC, y a continuación pulse el botón STANDBY de la
unidad principal (o del mando a distancia) para encender el equipo (“ON”).
2. Pulse el botón FUNCTION (FUNCIÓN) en la unidad principal (o en el mando a distancia) para
seleccionar el modo USB o SD/MMC. La unidad principal leerá automáticamente el número total de carpetas
y pistas al mismo tiempo. (F12)
3. Si el dispositivo de memoria USB contiene más de una carpeta.
a. Pulse el botón PRESET/FOLDER (UP o DOWN) para seleccionar cada carpeta.
b. Pulse el botón TUNING/SKIP/SEARCH (UP o DOWN) para seleccionar la pista en la carpeta deseada.
4. Si el MP3 están escritos en “ID3”.
a. Con la unidad reproduciendo MP3. Pulse el botón ID3/ESP/MONO/ST. una vez. La pantalla mostrará
"ID3 ON", y a continuación buscará automáticamente más de 64 letras del Automáticamente buscará más de
64 letras del “NOMBRE DE FICHERO” “NOMBRE DEL TÍTULO”, “NOMBRE DEL ARTISTA” que se mueven
de la esquina derecha a la esquina izquierda de la pantalla continuamente.
b. Pulse el botón ID3/ESP/MONO/ST. una vez más. La pantalla mostrará "ID3 OFF", y a continuación la
unidad principal reproducirá normalmente.
Nota:
1. La unidad principal puede reproducir MP3 solamente en este modo.
2. Esta unidad soporta la mayoría de los dispositivos USB, las tarjetas SD o MMC. En el improbable caso
de que se encuentre con un dispositivo o tarjeta que la unidad no soporte, pruebe con un dispositivo o tarjeta
de otras marcas.
3. Esta unidad soporta dispositivos USB, tarjetas SD o MMC con una memoria de hasta 2 GB. No se
puede acceder (o el acceso tarda más tiempo) a la memoria de dispositivos de más de 2 GB.
4. Soporta la versión 1.1 y 2.0 de USB.
ESP-10
Page 47

Reproducción del dispostivo de memoria flash entero.
1. La reproducción comenzará pulsando el botón PLAY / PAUSE /ENTER (REPRODUCIR / PAUSA /
INTRO) (solamente en iPod). La reproducción comienza con el iPod desde la primera pista. La pantalla
muestra el número de pista actual y el tiempo transcurrido. (F13)
2. Para interrumpir la reproducción, pulse el botón PLAY/PAUSE/ENTER
(REPRODUCIR/PAUSA/INTRO) (solamente en iPod). El indicador del tiempo transcurrido del iPod
parpadeará. (F14)
3. Para reanudar la reproducción, pulse el botón PLAY/PAUSE/ENTER (REPRODUCIR/PAUSA/INTRO)
(solamente en iPod) de nuevo.
4. Para detener la reproducción, pulse el botón STOP/MENU (PARADA/MENU) (solamente en iPod).
Nota: En todo momento, el DISPOSITIVO USB o la TARJETA SD deben fijarse bien con el aparato en
modo STANDBY para evitar que se dañe la unidad principal y el DISPOSITIVO USB o la TARJETA SD.
REPETICIÓN DE LA REPRODUCCIÓN
- CD
1. Pulse el botón REPEAT (REPETIR) una vez; se mostrará REPEAT en la pantalla. El CD reproducirá la
pista actual de forma continua (F15)
2. Pulse el botón REPEAT dos veces; se muestra en pantalla REPEAT ALL (REPETIR TODO). El CD
reproducirá todas las pistas de forma continua (F16)
3. Pulse el botón REPEAT tres veces y se desactivará la función REPEAT (REPETIR).
- MP3
1. Pulse el botón REPEAT una vez y se muestra en pantalla REPEAT (REPETIR). Se reproducirá
la pista actual continuamente (F17)
2. Pulse el botón REPEAT dos veces; se muestra en pantalla REPEAT ALL (REPETIR TODO).
Se reproducirán todas las pistas continuamente. (F18)
3. Pulse el botón REPEAT tres veces y se muestra en pantalla REPEAT ALBUM (REPETIR ÁLBUM). Se
reproducirá el álbum actual continuamente. (F19)
4. Pulse el botón REPEAT cuatro veces y se desactivará la función REPEAT (REPETIR).
ESP-11
Page 48

MODO DE PROGAMACIÓN
El usuario puede programar hasta 64 pistas en cualquier orden que desee. El modo de programación se
activa con el equipo en modo de parade.
1. Cómo reproducir la programación
- CD
1) Pulse el botón iPod/MEM/CLOCK-ADJ para cambiar al modo PROGRAM (PROGRAMA). (F20)
2) Pulse el botón TUNING/SKIP/SEARCH (UP o DOWN); se cambiará el número de pista.
3) Pulse el botón iPod/MEM/CLOCK-ADJ para confirmar el número de pista.
- MP3
1) Pulse el botón iPod/MEM/CLOCK-ADJ para cambiar al modo PROGRAM (PROGRAMA). El
número de álbum parpadea. (F21)
2) Pulse el botón TUNING/SKIP/SEARCH (UP o DOWN); se cambiará el número de ábum.
3) Pulse el botón iPod/MEM/CLOCK-ADJ; el número de pista parpadea. (F22)
4) Pulse el botón TUNING/SKIP/SEARCH (UP o DOWN); se cambiará el número de pista.
5) Pulse el botón iPod/MEM/CLOCK-ADJ para confirmar el número de pista.
2. REPRODUCCIÓN DE LA PROGRAMACIÓ N
Pulse el botón PLAY/PAUSE/ENTER (solamente en iPod) de la unidad principal (o del mando a distancia).
La reproducción comenzará con la primera pista del programa. Cuando se hayan reproducido todas las
pistas, la unidad principal mostrará en pantalla el número de pistas y el tiempo de reproducción de las pistas
del CD/MP3.
3. ANULACIÓN DE LA PROGRAMACIÓN
1. Pulse el botón STOP una vez, o abra la puerta de la bandeja del disco y ciérrela de nuevo y la
memoria se borrará.
2. Si configure una nueva programación, el actual se borrará.
Nota: En modo program (programación)
1. Pulse el botón “REPEAT” una vez; se ilumina el indicador REPEAT (REPETIR) en la pantalla. A
continuación, la unidad principal repetirá la pista actual.
2. Pulse el botón “REPEAT” una vez; se ilumina el indicador “REPEAT ALL" (“REPETIR TODO”) en la
pantalla. A continuación, la unidad principal repetirá el número total de pistas.
3. Pulse el botón “REPEAT” una vez más. La unidad principal volverá a la reproducción normal de la
programación.
REPRODUCCIÓN ALEATORIA (en el mando a distancia)
1. Pulse el botón RANDOM (ALEATORIO) una vez y se muestra en pantalla RANDOM. (F23)
2. Pulse el botón RANDOM (ALEATORIO) una vez más y se volverá a la reproducción normal.
REPRODUCCIÓN PARCIAL (INTRO) (en el mando a distancia)
1. Pulse el botón INTRO una vez y se muestra en pantalla INTRO. La función INTRO reproducirá los
primeros 10 segundos de cada pista. (F24)
2. Pulse el botón INTRO dos veces y se volverá a la reproducción normal.
ESP-12
Page 49

OPERACIÓN DEL iPOD
Nota: Con la unidad en modo iPod, si la función de vídeo parcial del iPod no está funcionando normalmente
o se verifica alguna anormalidad, puede actualizar la versión iPod o cargar la última versión de la Web.
Con la unidad en modo STANDBY
1. Inserte los reproductores iPod en el soporte base para iPod de forma que queden sujetos.
2. Encienda la unidad principal, y a continuación pulse el botón FUNCTION (FUNCIÓN) para cambiar a
modo iPod; el indicador de iPod aparecerá en la pantalla de la unidad principal. (F25)
Con la unidad en modo iPod:
1. Pulse el botón PLAY/PAUSE/ENTER una vez (solamente iPod) en el iPod para comenzar a reproducir
desde el iPod.Ajuste el control de volumen pulsando el botón VOLUME (UP o DOWN) (SUBIR o BAJAR).
Para detener la reproducción en curso, pulse el botón STOP/MENU (PARADA/MENU) (solamente en iPod)
una vez.
2. Pulse el botón PLAY/PAUSE/ENTER (solamente en iPod) una vez para hacer una pausa en la pista
actual. Para reanudar la reproducción, pulse el botón PLAY/PAUSE/ENTER
(REPRODUCIR/PAUSA/INTRO) (solamente en iPod) una vez más.
3. Pulse el botón TUNING/SKIP/SEARCH (UP o DOWN) para seleccionar la pista en la carpeta deseada,
saltando hacia delante o hacia atrás.
4. Pulse el botón REPEAT o RANDOM para que el iPod reproduzca de forma repetida o aleatoria,
respectivamente.
(Nota: La versión de iPod Touch 1.1.4 o superior puede soportar la función REPEAT (REPETIR) o RANDOM
(ALEATORIO).
Con la unidad en modo MENU del iPod
1. Con la unidad en modo iPod, pulse el botón iPod/MEM/CLOCK-ADJ. una vez; la unidad accederá al
modo de MENU del iPod. El indicador de MENU del iPod aparecerá en la pantalla de la unidad. (F26)
2. Pulse el botón STOP/MENU (PARADA/MENU) (solamente en iPod) para volver al menú del iPod.
a. Seleccionar el menú actual como se indica a continuación:
Music (Música)> extras > Photo import (Importar foto) (sin la presentación de esta función en el iPod Mini) >
Settings (Ajustes) > shuffle Songs (Mezcla de canciones)> Backlight (Luz trasera)> Now Playing
(Reproducción actual) se mostrará en la pantalla del Reproductor iPod.
b. Pulse el botón TUNING/SKIP/SEARCH (UP o DOWN) en la unidad (o en el mando a distancia)
para explorar en el menú actual.
3. Pulse el botón PLAY/PAUSE/ENTER (solamente en iPod) para acceder a la carpeta deseada del menú.
a. Pulse el botón TUNING/SKIP/SEARCH (UP o DOWN) en la unidad (o en el mando a distancia) para
explorar en el contenido actual de cada carpeta deseada del menú..
b. Si desea volver al menú del iPod, pulse el botón STOP/MENU (PARADA/MENU) (solamente en iPod) de
nuevo.
4. Para reanudar la reproducción, pulse el botón iPod/MEM/CLOCK-ADJ. una vez más; la unidad volverá al
modo iPod.
Carga de la pila del Reproductor iPod a través de la unidad principal:
1. El Reproductor iPod tiene una pila interna no extraible. La pila puede necesitar que se cargue si no se
utiliza durante un tiempo.
2. Puede cargar el Reproductor iPod a través de la unidad principal automáticamente en modo STANBY o
ENCENDIDO.
NOTA:
1 La pila del Reproductor iPod alcanza un nivel de carga del 80% en una hora aproximadamente, y se
carga completamente en un poco más de tiempo. Si carga la pila mientras reproduce música, puede tardar
más tiempo.
2 Es major no cargar la pila en modo TUNER (SINTONIZADOR). Puede causar interferencias a la
recepción.
Nota:
1. En cualquier momento, puede controlar el Reproductor iPod con la unidad principal, el mando a
distancia o con el mismo reproductor iPod mientras que la unidad esté en modo “iPod” o “iPod MENU”.
2. Siempre se debe acoplar bien el reproductor iPod en modo STANDBY para evitar que se produzcan
daños a la unidad o al reproductor iPod.
ESP-13
Page 50

CONFIGURACIÓN DE LA SALIDA DE VÍDEO (para Vídeo iPod
solamente)
1. Con la unidad en modo STANDBY: Conecte el TV con un cable de vídeo (cable de tipo RCA) a la
clavija de conexión de salida de VIDEO situada en la parte trasera de la unidad.
2. Con la unidad en modo iPod: Seleccione “MENU” en la Rueda de Selección del iPod para configurar la
función de vídeo.
3. Para configurar el iPod para proyectar vídeos en una TV:
a) Seleccione Vídeos > Video Settings (Ajustes de video), y a continuación ponga TV Out (Salida de TV) en
Ask (Preguntar) o en On (Activar).
b) Si establece TV Out en Ask, el iPod le ofrece la opción de mostrar vídeos en la TV o en el iPod cada vez
que reproduzca un vídeo.
Nota:
1. Si tiene un Vídeo iPod, puede ver vídeos en una TV conectada a través de la unidad a su Vídeo
iPod.
2. El iPod classic 80/160GB, iPod nano de 3ª generación (Video) 4/8GB, iPod touch 8/16GB, se deben
acoplar en la base para iPod antes de ejecutar el paso 3.
REPRODUCCIÓN A TRAVÉS DE AUX
1. Pulse el botón FUNCTION (FUNCIÓN) hasta que el indicador “AUX” se ilumine en la pantalla. Esta
unidad principal puede tener entrada de audio analógico a través de estas clavijas de conexión.
2. Utilice un cable AUX para conectar equipos de audio.
Nota: Cable de ENTRADA DE AUDIO no incluido.
AJUSTE DE SILENCIO (MUTE) (en el mando a distancia)
1. Cuando pulsa el botón MUTE (SILENCIO) una vez en el mando a distancia, el nivel de volumen
parpadeará y la salida de audio se interrumpirá temporalmente. (F27)
2. Pulse el botón MUTE (SILENCIO) una vez más y el nivel de volumen y la salida de audio volverán al
modo de funcionamiento normal.
AUDICIÓN DE MÚSICA CON AURICULARES
La unidad incorpora una clavija de conexión de auriculares para audición privada. Para escuchar la unidad
principal con auriculares (no incluidos), inserte la clavija mini-estéreo de 3,5 mm de los auriculares en la
clavija de conexión PHONES situada en el panel delantero. Los altavoces externos se desconectan
automáticamente cuando se están utilizando auriculares.
BACKUP DE SEGURIDAD DE LA MEMORIA
Insertar 3 pilas de 1,5 V, UM-4, AAA o equivalentes en el compartimiento de pilas de la unidad principal. Se
utiliza para hacer un backup de seguridad de la memoria de la CPU principal.
ESP-14
Page 51

DISCO COMPACTO
1. Utilice siempre un disco compacto que tenga la marca que se indica.
2. Notas acerca del manejo de los discos
Extracción del disco de su caja y carga en la unidad.
* No toque la superficie grabada reflectante.
* No pegue papel ni escriba nada en la superficie.
* No doble el disco.
3. Almacenamiento
* Guarde el disco en su caja.
* No exponga los discos a la luz directa del sol ni a altas temperaturas, lugares con mucha humedad
o polvo.
4. Limpieza de los discos
* Si el disco se cae al suelo, limpie el polvo, la suciedad y las huellas dactilares con un paño suave.
* El disco se debe limpiar desde el centro hacia el borde.
* Nunca utilice bencina, disolventes, fluido de limpieza de discos o spray anti-estático.
* Asegúrese de que cierra la puerta del CD para que las lentes no se contaminen con polvo.
* No toque las lentes.
ESP-15
Page 52

VENTANA DE LA PANTALLA LCD
A. INDICADOR DEL TEMPORIZADOR D. INDICADOR ESP
B. INDICADOR DEL NÚMERO DE ÁLBUM E.INDICADOR DE PISTA/NÚMERO/TIEMPO
C. INDICADOR DE ESTÉREO F.INDICADOR DE VOLUMEN ALTO/BAJO
ESPECIFICACIONES
ALIMENTACIÓN ELÉCTRICA: 30V~ 50Hz
POTENCIA DE SALIDA: 5 Vatios x +28W
DIMENSIONES DE LA UNIDAD 207(A) x 82(P) x 206 (H) mm
DIMENSIONES DE LA CAJA DE ALTAVOCES 207(A) x 82(P) x 206 (H) mm
DIMENSIONES DEL SUBWOOFER: 131(A) x 242(P) x 173 (H) mm
PESO NETO: 7,02 kg
SECCIÓN DE LA RADIO
MARGEN DE FRECUENCIA: FM 87,5 - 108 MHz
SECCIÓN DEL DISCO COMPACTO
LECTURA ÓPTICA: LÁSER DE 3 HACES
RESPUESTA DE FRECUENCIA: 100 Hz – 16 kHz
LAS ESPECIFICACIONES ESTÁN SUJETAS A CAMBIOS SIN PREVIO AVISO.
Advertencia sobre la ventilación: “La ventilación normal del producto no se verá dificultada por el uso normal
previsto.”
Trademark of New Transducers Limited.
ESP-16
Page 53

Estimado Cliente:
Le agradecemos la compra de este producto AKIRA™ y su confianza en nuestra empresa.
Este producto cumple con los requisitos aplicables de seguridad y ha sido sometido a pruebas
estrictas durante la fabricación.
Sin embargo, en caso de un posible defecto, el producto o la(s) parte(s) defectuosa(s)
(excluyendo los accesorios y artículos de consumo) serán reparados gratuitamente (mano de
obra, partes y transporte dentro de las fronteras de los países mencionados a continuación) o, a discreción
de AKIRA , cambiados por un artículo similar, siempre que se haya realizado la devolución en los 24
(veinticuatro) meses posteriores a la fecha de compra inicial (fecha de recepción), el defecto sea en el
material y/o mano de obra y se haya comprado en alguno de los siguientes países: Francia (territorio
metropolitano), España, Italia, Portugal, Bélgica (territorio) o en tiendas libres de impuestos en los países
mencionados.
Esta garantía sólo se llevará a cabo bajo la presentación de la factura original o el recibo de pago,
indicando la fecha de compra y el nombre del comerciante, y de la presente garantía con el tipo de
producto y el número de serie. La ejecución de la garantía puede ser rechazada si la factura, el recibo o
la garantía se encuentra alterada de alguna manera, borrosa o se ha vuelto ilegible desde su compra
original.
Registro online Para agilizar el servicio de la garantía, registre su producto AKIRA™ dentro del periodo de
30 días tras la compra en http://www.akiraeurope.com
Esta garantía no se aplica a lo siguiente:
1. Daños causados por accidentes incluyendo, aunque sin limitarse exclusivamente a estos: relámpagos,
fuego o agua.
2. Daños al producto resultantes de la negligencia, el mal uso o el uso en contra de las instrucciones del
manual de funcionamiento, reparaciones y/o instalaciones llevadas a cabo erróneamente (esta lista
no es exhaustiva). En particular no se garantiza ningún panel quemado de la visualización de
imágenes inmóviles durante mucho tiempo tales como entradas informáticas o logos de canales,
como se describen en el manual de funcionamiento.
3. Modificaciones, adaptaciones o alteraciones del producto para funcionar en otro país para el cual no
fue diseñado ni fabricado originariamente, o cualquier daño resultante de tales modificaciones.
4. Cualquier otro uso que no sea el uso ordinario de un cliente corriente.
5 . El defecto de pixeles sueltos cuando el número de píxeles defectuosos sea menor a los
siguientes:
Píxeles oscuros: 7 Píxeles brillantes o parpadeantes: 3 Total de píxeles defectuosos: 8
Estas afirmaciones no afectan a los derechos establecidos por ley como consumidor bajo la
legislación nacional vigente aplicable, ni a los derechos como consumidor hacia el comerciante que le
vendió el producto.
En caso de necesidad de algún servicio, dentro o no del período de garantía, contacte con el comerciante
que le vendió el producto. Para su beneficio propio, le aconsejamos que lea el folleto de instrucciones de
su producto AKIRA™ detenidamente antes de contactar con su comerciante o centro de servicios.
Si Vd. tiene alguna duda que su vendedor no pueda solventar, contacte con la línea de acceso directo
de AKIRA (teléfono internacional gratuito: 00 800 800 25 472).
AKIRA™ es una marca registrada de TT International, Inc.
Nota:
Este producto ha sido diseñado y fabrîcado con materîales y componentes de prîmerísîma
calîdad que pueden reciclarse para ser usados nuevamente.
Este símbolo sîgnífica que los aparatos eléctricos y electrónicos no deben depositarse en la
basura una vez que termine su vîda útil.
Le rogamos que deseche este aparato en el punto de recogida municipal de su localidad o en
una central de reciclaje.
Ayúdenos a proteger el medio ambiente en el que vivîmos.
ESP-17
Page 54

Om de beste prestaties te bekomen, is het aangeraden deze handleiding aandachtig te lezen alvorens het
toestel te gebruiken, teneinde u met de functies vertrouwd te maken en u jarenlang getrouw en zorgeloos
luistergenot te bezorgen.
Belangrijke opmerking
De veiligheidsinstructies en de handleiding dienen voor toekomstig gebruik te worden bewaard.
Vermijd het toestel in de volgende locaties te installeren:
- Plaatsen die aan het direct zonlicht zijn blootgesteld of dicht bij toestellen die warmte uitstralen zoals
elektrische verwarmingselementen.
- Boven op andere stereo uitrustingen die veel warmte uitstralen. Plaatsen met gebrekkige ventilatie of
stofwebben. Plaatsen die permanent aan vibraties onderhevig zijn. Vochtige of natte plaatsen.
- Zorg ervoor dat de ventilatie openingen niet belemmerd worden.
- Verzeker u ervan dat het stroomsnoer correct is aangesloten alvorens het toestel voor de eerste maal
onder spanning te brengen. Zorg dat er geen druppels of spatten bij het toestel kunnen komen en zet er
geen voorwerpen op die met vloeistof gevuld zijn, zoals vazen.
- Zorg dat er geen druppels of spatten bij het toestel kunnen komen en zet er geen voorwerpen op die
met vloeistof gevuld zijn, zoals vazen.
- Om de stroomvoeding volledig af te sluiten dient de stekker van het toestel uit het
stopcontact te worden gehaald.
- Wanneer de stand-by LED geen kleur weergeeft, is het apparaat volledig van de stroom afgesloten.
- Bewaar een minimum afstand van 10cm rondom het toestel voor een voldoende ventilatie.
- Bij het wegwerpen van de batterij dienen de milieurichtlijnen te worden in acht genomen.
- Het gebruik van het toestel in gematigde klimaten.
- Bij voorzien gebruik, dient de toegang tot de stekker niet te worden belemmerd of dient deze
gemakkelijk berijkbaar te zijn. De ventilatie mag niet worden belemmerd door het bedekken van de
ventilatie openingen met voorwerpen zoals krantenpapier, tafellakens, gordijnen, enz.
- Geen enkele open vlam, zoals kaarsen, mag op het toestel worden geplaatst.
- De batterij mag niet aan een grote hitte zoals directe zonneschijn, vuur of dergelijks worden
blootgesteld.
Om veiligheidsredenen, gelieve geen enkel deksel te verwijderen of te trachten het toestel te openen.
Raadpleeg een herstellingsdienst met gekwalificeerd personeel.
Tracht geen enkele schroef te verwijderen of de omkasting van het toestel te openen, er bevinden
geen onderdelen in het toestel die u zelf kan herstellen. Raadpleeg voor elke herstelling een
hersteldienst met gekwalificeerd personeel.
OPGELET:OM HET RISICO OP ELEKTRISCHE SCHOKKEN TE BEPERKEN
ACHTERPANEEL) NIET VERWIJDEREN, ER BEVINDEN Z ICH GEEN ONDERDELEN IN HET
TOESTEL DIE U ZELF KAN HERSTELLEN. RAADPLEEG VOOR EL KE HERSTE LL ING EE N
HERSTELDIENST MET GEKWALIFICEERD PERSONEEL.
GEVAARLIJKE SPANNING
Aanwezigheid van gevaarlijke spanning binnen in de behuizing van het product, die wellicht hoog
genoeg is om personen het risico van een elektrische schok te doen lopen
OPGELET!
De gebruiksaanwijzing bevat belangrijke bedienings- en onderhoudsrichtlijnen, daarom is het
voor uw eigen veiligheid aangewezen de gebruiksaanwijzing te raadplegen.
WAARSCHUWING:OM RISICO’S OP BRAND OF SCHOKKEN TE VOORKOMEN, DIT TOESTEL
NIET BLOOTSTELLEN AAN DRUPPELS OF SPATTEN.
Opmerking:
- Dit toestel wordt warm wanneer het voor een langere tijd wordt gebruikt. Dit is normaal en wijst niet op een
probleem met het toestel.
- De CD-speler bevat micro-processoren die een slechte werking zouden kunnen hebben vanwege een
externe elektrische interferentie of ruis. Als de CD-speler niet correct zou werken dient u de stroombron los
te koppelen en deze opnieuw aan te sluiten.
- Excessieve akoestische druk veroorzaakt door headsets of koptelefoons kan gehoorverlies met zich
meebrengen.
- Indien er zich ongewone omstandigheden in het display of bij het gebruik van de toetsen voordoen, sluit het
toestel dan af en zet het opnieuw aan.
NL-1
HET DEKSEL (OF
zich
Page 55

Montageschets van het toestel en de luidsprekers
1 – Het bord of de muurbevestiging bevestigen
Bevestig de twee nagels (Afmetingen: 3.
5*25BA) in de muur, deze dienen parallel te
worden aangebracht met een tussenafstand
van 56mm.
2 – Aansluiting van de 2 luidsprekers
3 – Aansluiting Pod basisstation
De maximum aansluitingsafstand bedraagt 2 meter
Bevestig de twee nagels (Afmetingen: 3.
5*25BA) in de muur, deze dienen parallel te
worden aangebracht met een tussenafstand
van 112mm.
NL-2
Page 56

Montageschets van het iPod basisstation
** De Pod die hieronder staat afgebeeld is niet meegeleverd *
Opmerking: Het toestel ondersteunt eveneens Pod nano (2
6GB, maar de basisstation adapter is niet inbegrepen, gelieve de basisstation adapter voorzien met de Pod te
gebruiken.
de
en 3de generatie Video) 4/8GB, Pod touch 8/1
NL-3
Page 57

FUNCTIES EN BEDIENING
NL-4
Page 58

FUNCTIES EN BEDIENING
1. LUIDSPREKER
2. FM ANTENNE
3. AUX INGANG R
4. AUX INGANG L
5. RESET/FOLDER UP KNOP
6. HERHAAL KNOP
7. RESET/FOLDER DOWN KNOP
8. STANDBY MET LED INDICATOR KNOP
9. USB TOESTEL IN POORT
10. SD/MMC KAART IN SLOT
11. ZOEKEN/OVERSLAAN/TUNING DOWN KNOP
12. Pod/MEM/KLOK INSTELLING KNOP
13. ZOEKEN/OVERSLAAN/TUNING UP KNOP
14. AFSPELEN/PAUZEREN/ENTER KNOP
15. IR SENSOR
16. LCD SCHERM
17. STOP/MENU KNOP
AFSTANDSBEDIENING
1. STANDBY KNOP
2. MUTE KNOP
3. RESET/FOLDER UP KNOP
4. RESET/FOLDER DOWN KNOP
5. RANDOM KNOP
6. ZOEKEN/OVERSLAAN/TUNING DOWN KNOP
7. TIMER KNOP
8. VOLUME VERMINDEREN KNOP
9. FUNCTIE KNOP
10. INTRO KNOP
11. ID3/ESP/MONO/ST. KNOP
12. HERHAAL KNOP
13. AFSPELEN/PAUZEREN/ENTER (enkel bij IPod)
KNOP
14. EQ KNOP
15. ZOEKEN/OVERSLAAN/TUNING UP KNOP
16. STOP/MENU (enkel bij IPod) KNOP
17. Pod/MEM/KLOK INSTELLING KNOP
18. SLEEP KNOP
19. NUMMER ZOEKEN KNOP
20. VOLUME VERHOGEN KNOP
18. VOLUME VERMINDEREN KNOP
19. VOLUME VERHOGEN KNOP
20. FUNCTIE KNOP
21. CD DEUR OPEN/DICHT KNOP
22. CD DEUR
23. Pod DECK
24. NAAR WOOFER AANSLUITING
25. AANSLUITING KOPTELEFOON
26. HITCHING OPENING
27. VIDEO UIT AANSLUITING
28. GEHEUGEN BACK-UP BATTERIJ DEUR
29. SUBWOOFER STANDBY INDICATOR
30. AC STROOMSNOER.
31. SUBWOOFER AC STROOMSCHAKELAAR
32. LUIDSPREKERS UIT AANSLUITING
33. VAN HOOFDAANSLUITING
NL-5
Page 59

DE BATTERIJEN IN DE AFSTANDSBEDIENING PLAATSEN
Druk het deksel van het batterijcompartiment naar beneden
en schuif het deksel weg om het compartiment te openen.
Plaats de twee (UM4), (AAA), (R03) batterijen in de
afstandsbediening volgens de polariteit ('+' en ‘–‘)
aangegeven aan de binnenkant van het compartiment en
op de batterijen. Plaats het deksel op het compartiment,
druk dit lichtjes naar beneden en schuif het naar boven
totdat het vastklikt.
OPMERKING: Verwijder de batterijen uit de
afstandsbediening indien u deze voor lange tijd niet
gebruikt. Meng geen normale batterijen met herlaadbare
baterijen. Wanneer de batterijen zwak worden zal de
afstandsbediening niet meer werken en dient u de
batterijen door nieuwe te vervangen.
BEDIENING VAN DE SUBWOOFER EN DE HOOFDEENHEID
Wanneer u voor het eerst de stekker van het toestel in het AC-stopcontact steekt en vervolgens de
schakelaar op de achterkant van de subwoofer op ‘ON’ zet.
1. De subwoofer en de hoofdeenheid gaan in standby modus, de beide STANDBY indicatoren zullen rood
worden.
2. Druk op de STANDBY knop van de hoofdeenheid of de afstandsbediening om de hoofdeenheid “AAN” te
zetten.
3. De standby indicator van de subwoofer zal groen worden en de standby indicator van de hoofdeenheid
zal uit gaan.
Opmerking: Trek de AC stekker uit het stopcontact om het apparaat volledig uit te schakelen.
POWER/STANDBY
1. Zet eerst de schakelaar op de achterkant van de subwoofer op ‘ON’.
2. Druk op de STANDBY knop van de hoofdeenheid of de afstandsbediening om de hoofdeenheid “AAN” te
zetten.
3. Kies de geluidsbron (CD, USB, SD/MMC, iPod, AUX of TUNER) door op de FUNCTIE knop te
drukken.
4. Stel het volume in door op de VOLUME (UP of DOWN) knop te drukken.
5. Stel de vooringestelde equalizer in (PASS, ROCK, JAZZ, CLASSIC of POP) door op de EQ knop
(enkel op de afstandsbediening) te drukken.
6. Druk op de STANDBY knop van de hoofdeenheid (of de afstandsbediening) om de
hoofdeenheid uit te schakelen.
Opmerking:
1. Indien er geen signaal is in de CD/USB APPARAAT/modus, iPod zal de hoofdeenheid na 15
minuten automatisch worden uitgeschakeld.
2. Wanneer in de Pod modus geen Pod-speler in de Pod deck wordt geplaatst, zal de hoofdeenheid
eveneens na 15 minuten automatisch worden uitgeschakeld.
3. Wanneer het toestel niet wordt gebruikt, gelieve de hoofdschakelaar af te zetten om energie te besparen.
NL-6
Page 60

KLOK INSTELLING
In de STANDBY modus:
1. Druk op de Pod/MEM/KLOK INSTELLING KNOP en houd deze ingedrukt totdat de klok een 24-uurs
tijdsweergave knipperend weergeeft.
2. Druk op de TUNING/OVERSLAAN/ZOEKEN KNOP om een 12-uurs of 24-uurs tijdsweergave te
gebruiken.
3. Druk opnieuw op de iPod/MEM/KLOK INSTELLING knop, de weergave van de UREN gaat knipperen
Druk op de TUNING/OVERSLAAN/ZOEKEN (UP of DOWN) knop om de uren in te stellen; Druk nogmaals op
de iPod/MEM/KLOK INSTELLING knop, de weergave van de minuten gaat knipperen, stel deze in door op de
TUNING/OVERSLAAN/ZOEKEN (UP of DOWN) knop te drukken.
4. Druk opnieuw op de Pod/MEM/KLOK INSTELLING knop om de tijd opnieuw te bevestigen.
5. Elke geactiveerde toestand die hierboven wordt beschreven zal worden verlaten indien er binnen de 10
seconden geen knop wordt ingedrukt.
TIMER INSTELLING (enkel op de afstandsbediening)
1. Na de klok te hebben ingesteld, druk gedurende enkele seconden op de TIMER knop, " ¥ ON" en
"00:00" verschijnen op het display en de uurweergave gaat knipperen (F1)
2. Druk op de TUNING/OVERSLAAN/ZOEKEN (UP of DOWN) knop om deze in te stellen.
3. Druk opnieuw op de TIMER knop, de weergave van de minuten gaat knipperen, pas deze aan door op
TUNING/OVERSLAAN/ZOEKEN (UP of DOWN) knop te drukken.
4. Druk nogmaals op de TIMER knop om de TIMER ON tijd opnieuw te bevestigen en te bevelen.
5. Na "TIMER ON" te hebben ingesteld verschijnt "OFF" op het display en de uurweergave gaat knipperen
(F2)
6. Herhaal de stappen 2 tot 3 en druk vervolgens nogmaals op de TIMER knop om de TIMER OFF tijd te
bevestigen en te bevelen.
7. Nu verschijnt "TUNER" knipperend op het scherm, kies vervolgens de alarm modus “TUNER, CD, USB,
SD/MMC of iPod" door op de TUNING/OVERSLAAN/ZOEKEN (UP of DOWN) knop te drukken.
8.
9. Druk opnieuw op de TIMER knop, de timer “VOL” indicator verschijnt knipperend op het scherm, zet het
volume van de timer hoger of lager door op de knop TUNING/OVERSLAAN/ZOEKEN (UP of DOWN) te
drukken.
10. Elk activatie stadium dat hierboven wordt vermeld zal worden na 10 seconden worden verlaten indien er
geen knop wordt ingedrukt.
11. Na "TIMER ON" en "TIMER OFF" te hebben ingesteld, druk op de TIMER knop, " ¥"verschijnt op het
display.
11. De hoofdeenheid zal automatisch worden aangezet op de ingestelde "TIMER ON" tijd en beginnen te
spelen. De hoofdeenheid zal automatisch worden afgezet op de ingestelde "TIMER OFF" tijd.
EQ CONTROL (op de afstandsbediening)
Druk op de EQ knop, de klanktoon wordt alsvolgt gewijzigd:
OM DE SLAAP FUNCTIE IN TE STELLEN (op de afstandsbediening)
Indien u met muziek in slaap wil vallen, druk op de SLAAP knop.
In de slaap functie kan u voor de TUNER, CD/MP3, USB, SD MMC of iPod modus kiezen om 90, 80, 70 tot10
minuten muziek te spelen alvorens de eenheid automatisch wordt afgezet.
NL-7
Page 61

FUNCTIE KEUZE
Druk op de FUNCTIE knop op de hoofdeenheid (of op de afstandsbediening) om elkeen van de
geluidsbronmodi te selecteren.
BEDIENING VAN DE RADIO
1 . Druk op de FUNCTIE knop op de hoofdeenheid (of afstandsbediening) om de TUNER modus te kiezen
dewelke de FM bestuurt.
2. Kies de gewenste frequentie met de ZOEKEN/OVERSLAAN/TUNING (UP of DOWN) knop op de
hoofdeenheid (of op de afstandsbediening)
MONO/ STEREO KEUZE
Dit toestel kan uitsluitend FM ontvangen.
1. Wanneer u een FM stereo radiostation wenst te selecteren, druk enkel op de afstandsbediening een
maal op de D3/ESP/MONO/ST. Knop. De “
ontvangst optimaal is.
2. Wanneer u nogmaals op de D3/ESP/MONO/ST. knop drukt, zal de FM STEREO indicator uitgaan en
wordt naar de MONO FM status overgeschakeld.
Automatische tuning
1. Druk voor enkele seconden op de ZOEKEN/OVERSLAAN/TUNING (UP of DOWN) knop en laat de knop
vervolgens los. De tuner gaat automatisch de eerste zender met voldoende signaalsterkte opzoeken.
2. Herhaal deze procedure indien u een andere zender wenst te beluisteren.
Programmeren van de vooringestelde radiozenders
U kan eveneens de radiozenders van uw keuze voorprogrammerem en tot 30 FM zenders in het geheugen
opslaan.
1. Stem af op de gewenste radiozender.
2. Druk op de iPod/MEM/KLOK INSTELLING knop.
3. Druk op de PRESET/FOLDER(UP of DOWN) knop om het gewenste radiozendernummer in te stellen.
4. Druk opnieuw op de iPod/MEM/KLOK INSTELLING om uw keuze te bevestigen.
5. Om meer radiozenders in het geheugen te programmerem dient u de stappen 2 tot 4 te herhalen.
6. Om de opgeslagen radiozenders te wijzigen dient u de stappen 2 tot 4 te herhalen.
Opmerking:
1. Een nieuwe radiozender op een voorgeprogrammeerd nummer opslaan zal de vooraf opgeslagen
radiozender verwijderen.
2. Het geheugen van de vooringestelde radiozenders wordt niet gewist als het toestel wordt uitgeschakeld.
Voer de procedures voor het voorinstellen van de radiozenders uit om de radiozenders op te slaan.
3. Met het toestel in de STANDBY modus, druk op de PRESET/FOLDER UP knop en PLAY/PAUSE knop
om alle voorinstellingen uit het geheugen te wissen.
Kiezen van de vooringestelde radiozenders
1. Druk op de PRESET/FOLDER(UP of DOWN) knop om de gewenste vooringestelde radiozender te
kiezen.
2. Het nummer van de vooringestelde radiozender wordt weergegeven samen met de overeenkomstige
frequentie.
FM Antenne
Verleng de FM antenne om een beter ontvangst te hebben.
” indicator zal op het scherm verschijnen wanneer het
NL-8
Page 62

BEDIENING VAN DE CD/MP3
Een CD (CD/MP3) beluisteren
1. Druk op de FUNCTIE knop van het toestel om de CD modus te kiezen.
2. Druk enkel op de CD DEUR OPEN/DICHT knop van de hoofdeenheid en de CD deur zal automatisch
open gaan.(F3)
3. Steek de CD/MP3 schijf in het CD compartiment, druk opnieuw op de CD DEUR OPEN/DICHT knop
om de CD deur te sluiten. De hoofdeenheid zal automatisch de CD/MP3 schijf beginnen lezen.
OPMERKING:
1) Het toestel kan CD, CD-R, CD-RW, MP3 schijven afspelen.
2) Het kan '8 cm' en 'Multi Sectie' MP3 schijven lezen.
3) De 'Playback Transfer Rate' bij MP3.
Voor MP3, Transfer bit rate: 32 - 20 kbps.
4) Er zijn maximaal 99 folders en 999 nummers leesbaar.
5) Indien er geen schijf aanwezig is of deze kan niet worden gelezen, wordt NO DISC weergegeven.
(F4)
Afspelen van de volledige CD/MP3
1. Het afspelen start wanneer u op de AFSPELEN/PAUZE/ENTER knop drukt. Het afspelen begint vanaf
het eerste nummer. Het display toont het afgespeelde nummer en de verlopen tijd.(F5)(F6)
2. Om het afspelen te onderbreken, druk op de AFSPELEN/PAUZE/ENTER knop. De indicator van de
verlopen tijd zal beginnen te knipperen. (F7)(F8)
3. Om het afspelen te hervatten, druk opnieuw op de AFSPELEN/PAUZE/ENTER knop.
4. Om het afspelen te stoppen, druk op de STOP/MENU knop.
OPMERKING:
Indien er zich ongewone omstandigheden zouden voordoen bij het gebruik van de drukknoppen, sluit
dan het toestel af en zet het opnieuw aan.
HET GEWENSTE NUMMER BELUISTEREN
-CD
1. Druk op de TUNING/OVERSLAAN/ZOEKEN (UP of DOWN) knop van de hoofdeenheid (of
afstandsbediening) totdat het nummer van het gewenste nummer op het display verschijnt, druk
vervolgens op de AFSPELEN/PAUZE/ENTER (enkel bij iPod) knop om het te beginnen afspelen.(F9)
2. Druk tijdens het afspelen voor minder dan een seconde op de TUNING/OVERSLAAN/ZOEKEN (UP
of DOWN) knop een het eerstvolgende of voorgaande nummer wordt opgezocht.
NL-9
Page 63

3. Druk op de TUNING/ OVERSLAAN/ZOEKEN (UP of DOWN) knop en houd deze voor langer dan enkele
seconden ingedrukt, hierdoor zal in het zelfde nummer snel vooruit of achteruit worden gegaan. (F10)
4. Druk op de AFSPELEN/PAUZE/ENTER (enkel bij iPod) knop om het afspelen te starten.
5. Druk een maal op de ID3/ESP/MONO/ST. knop, de ESP functie zal worden aangezet en de ESP
indicator zal op het display beginnen te knipperen.(F11) (Shock Proof Function: CD 40sec , MP3 100sec)
6. Druk nogmaals op de ID3/ESP/MONO/ST. knop, de ESP functie zal worden uitgezet en de ESP
indicator zal van het display verdwijnen:
- MP3
1. Druk op de PRESET/FOLDER (UP of DOWN) knop, het nummer van het album zal worden
gewijzigd; druk op de TUNING/OVERSLAAN/ZOEKEN (UP of DOWN) knop, het muzieknummer zal
worden gewijzigd.
2. Wanneer het gewenste muzieknummer op het display wordt weergegeven, druk op de
AFSPELEN/PAUZE/ENTER (enkel bij iPod) knop om het nummer te beginnen afspelen .
3. Als de MP3 in "ID3" zijn geschreven.
a. Wanneer het gewenste muzieknummer op het display wordt weergegeven, druk op de
AFSPELEN/PAUZE knop om het nummer te beginnen afspelen. De ID3 Functie zal tegelijkertijd automatisch
worden ingeschakeld.. Het gaat automatisch op zoek naar meer dan 64 letters van de “BESTANDSNAAM "
"TITEL" "ARTIEST NAAM" dewelke doorlopend van rechts naar links als rolkrant op het display worden
weergegeven.
b. Druk op de ID3/ESP/MONO/ST. knop, de ID3 functie zal worden uitgeschakeld.
USB/KAART BEDIENINGEN
Bij de STANDBY modus
1. Het USB toestel of de SD MMC KAART in het toestel steken en druk vervolgens op de STANDBY
knop van de hoofdeenheid (of de afstandsbediening) om het toestel “AAN’ te zetten.
2. Druk op de FUNCTIE knop van de hoofdeenheid (of de afstandsbediening) om de USB of de SD/MMC
modus te kiezen. De hoofdeenheid zal automatisch het totaal aantal mappen en nummers tegelijk aflezen.
(F12)
3. Als het USB geheugentoestel meer dan een map bevat.
a. Druk op de PRESET/FOLDER (UP of DOWN) knop om de gewenste folder te kiezen.
b. Druk op de TUNING/OVERSLAAN/ZOEKEN (UP of DOWN) knop om het gewenste nummer in de
gewenste folder te selecteren.
4. Als de MP3 in "ID3" zijn geschreven.
a. Terwijl het toestel in MP3 afspeelmodus staat. Druk een maal op de ID3/ESP/MONO/ST
knop. Het displqy gaat "ID3 ON" weergeven en gaat dan automatisch op zoek naar meer dan 64 letters
van de “BESTANDSNAAM” “TITEL” “ARTIEST NAAM” of “ALBUM NAAM” dewelke doorlopend van rechts
naar links als rolkrant op het display worden weergegeven.
b. Druk nogmaals op de ID3/ESP/MONO/ST knop. Het display zal "ID3 OFF" vertonen en de
hoofdeenheid zal normaal afspelen.
Opmerking:
1. De hoofdeenheid kan de MP3 uitsluitend in zijn modus afspelen.
2. Het toestel ondersteunt de meeste USB toestellen, SD of MMC kaarten. In het onwaarschijnlijke
geval dat een toestel of kaart niet zou worden ondersteund, probeer een toestel of kaart van een ander
merk.
3. Dit toestel ondersteunt USB toestellen, SD of MMC kaarten met een capaciteit tot 2GB. Het kan
geen geheugentoestellen of –kaarten van meer dan 2GB lezen (of een langere tijd nemen om deze
te lezen).
4. Het kan USB versies 1.1 en 2.0 ondersteunen.
NL-10
Page 64

Afspelen van de volledige flash disc
1. Het afspelen start wanneer u op de AFSPELEN/PAUZE/ENTER (alleen bij iPod) knop drukt. Het
afspelen van de iPod begint met het eerste nummer. Het display toont het afgespeelde nummer en de
verlopen tijd. (F13)
2. Druk op de AFSPELEN/PAUZE/ENTER (enkel bij iPod) knop om het afspelen te onderbreken. De
iPod indicator van de verlopen tijd zal beginnen te knipperen. (F14)
3. Druk op de AFSPELEN/PAUZE/ENTER (enkel bij iPod) knop om het afspelen te hervatten.
4. Om het afspelen te stoppen, druk op de STOP/MENU (enkel bij iPod) knop.
Opmerking Het USB toestel of de SD kaart dient steeds in de STANDBY modus deftig te worden
aangekoppeld om beschadiging van het USB toestel of SD kaart te vermijden.
HERHALEN KNOP
-CD
1. Druk een maal op de HERHALEN knop, HERHALEN wordt op het display
weergegeven. De CD gaat het huidige nummer herhaaldelijk afspelen (F15)
2. Druk twee maal op de HERHALEN knop, ALLES HERHALEN wordt op het display weergegeven.
De CD gaat alle nummers herhaaldelijk afspelen (F16)
3. Druk drie maal op de HERHALEN knop, de HERHAAL functie zal worden uitgeschakeld.
- MP3
1. Druk een maal op de HERHALEN knop, HERHALEN wordt op het display weergegeven. het
huidige nummer zal herhaaldelijk worden afspeeld (F17)
2. Druk twee maal op de HERHALEN knop, ALLES HERHALEN wordt op het display
weergegeven. Alle nummers gaan herhaaldelijk worden afgespeeld (F18)
3. Druk drie maal op de HERHALEN knop, ALBUM HERHALEN wordt op het display weergegeven.
het huidige album zal herhaaldelijk worden afspeeld. F19)
4. Druk vier maal op de HERHALEN knop, de HERHAAL functie zal worden uitgeschakeld.
NL-11
Page 65

PROGRAMMA MODUS
De gebruiker kan een programma gaande tot 64 nummers in eender welke gewenste order opstellen. De
programma modus wordt tijdens de stop modus geactiveerd.
1. Hoe het programma afspelen
-CD
1) Druk op de iPod/MEM/KLOK INSTELLING knop om naar de PROGRAMMA modus over te
schakelen.(F20)
2) Druk op de TUNING/OVERSLAAN/ZOEKEN (UP of DOWN) knop, het nummer zal worden
gewijzigd.
3) Druk op de iPod/MEM/KLOK INSTELLING om het gekozen nummer te bevestigen.
- MP3
1) Druk op de iPod/MEM/KLOK INSTELLING knop om naar de PROGRAMMA modus over te
schakelen. Het nummer van het album gaat knipperen. F21)
2) Druk op de TUNING/OVERSLAAN/ZOEKEN (UP of DOWN) knop, het nummer zal worden gewijzigd.
3) Druk op de iPod/MEM/KLOK INSTELLING knop, het nummer gaat knipperen. (F22)
4) Druk op de TUNING/OVERSLAAN/ZOEKEN (UP of DOWN) knop, het nummer zal worden
gewijzigd.
5) Druk op de iPod/MEM/KLOK INSTELLING knop om het gekozen nummer te bevestigen.
2. AFSPELEN VAN EEN PROGRAMMA
Druk op de AFSPELEN/PAUZE/ENTER (alleen bij iPod) knop op de hoofdeenheid (of de afstandsbediening),
het programma zal worden afgespeeld beginnend met het eerste nummer. Wanneer alle nummers werden
afgespeeld zal de hoofdeenheid het aantal nummers en de afspeeltijd van de CD/MP3 nummers op het
display weergeven.
3. PROGRAMMA ANNULEREN
1. Druk een maal op de STOP knop of open de CD deur en sluit deze opnieuw. Het geheugen zal
worden gewist.
2. Stel een nieuw programma samen, het bestaande zal worden verwijderd.
Opmerking: Bij de programma modus
1. Druk een maal op de ‘HERHALEN’ knop, de ‘HERHALEN’ indicator zal op het display worden
weergegeven. De hoofdeenheid zal vervolgens het huidige nummer herhalen
2. Druk twee maal op de ‘HERHALEN’ knop, ‘ALLES HERHALEN’ zal op het display worden
weergegeven. De hoofdeenheid zal vervolgens het totaal aantal nummers herhalen.
3. Druk nogmaals op de HERHALEN knop. De hoofdeenheid zal het programma verder normaal
afspelen.
RANDOM PLAY (op de afstandsbediening)
1. Druk een maal op de RANDOM knop, RANDOM wordt op het display weergegeven. (F23)
2. Druk opnieuw op de RANDOM knop en het normale afspelen wordt hervat.
INTRO PLAY (op de afstandsbediening)
1. Druk een maal op de INTRO knop, INTRO wordt op het display weergegeven. INTRO zal de eerste
10 seconden van elk nummer afspelen. (F24)
2. Druk twee maal op de INTRO knop en het normale afspelen wordt hervat.
NL-12
Page 66

BEDIENING VAN DE iPOD
Opmerking: wanneer In de IPod modus de video functie van de iPod niet normaal of abnormaal werkt, kan u
de versie van uw iPod updaten of de laatste versie via het web downloaden.
Met het toestel in STANDBY MODUS
1. Bevestig de iPod spelers degelijk op de iPod basis.
2. Zet het toestel aan en druk vervolgens op de FUNCTIE knop om de iPod modus te activeren, de iPod
indicator zal op het display van de hoofdeenheid verschijnen. (F25)
Met het toestel in iPod modus
1. Druk een maal op de AFSPELEN/PAUZE/ENTER (enkel bij iPod) knop om het afspelen van de iPod te
starten.Stel het volume in door op de VOLUME (UP of DOWN) knop te drukken. Om het afspelen te stoppen,
druk een maal op de STOP/MENU (enkel bij iPod) knop.
2. Druk op de AFSPELEN/PAUZE/ENTER (enkel bij iPod) knop om het afspelen van het huidige nummer
te pauzeren. Druk nogmaals op de AFSPELEN/PAUZE/ENTER (enkel bij iPod) knop om het afspelen te
hervatten.
3. Om voorwaarts of achterwaarts een nummer over te slaan, druk op de TUNING/OVERSLAAN/ZOEKEN
(UP of DOWN) knop om het gewenste nummer te selecteren.
4. Druk op de HERHALEN of RANDOM knop om de iPod herhaaldelijk of random af te spelen. (Opmerking:
iPod touch versie 1.1.4 of hoger kan de HERHALEN of RANDOM functies ondersteunen.
Met het toestel in iPod MENU modus
1. Met het toestel in de iPod modus, druk een maal op de iPod/MEM/KLOK INSTELLEN knop, het toestel
zal naar de iPod MENU modus overschakelen. De iPod MENU indicator zal op het display van het toestel
worden weergegeven. (F26)
2. Om naar het iPod menu terug te keren, druk op de STOP/MENU (enkel bij iPod) knop.
a. Om het onderstaande menu te kiezen:
Muziek > extras > Foto import (deze functie wordt niet bij de iPod Mini weergegeven) > Instellingen > shuffle
nummers > Backlight > nu afspelen zullen op het display van de iPod speler worden weergegeven.
b. Druk op de TUNING/OVERSLAAN/ZOEKEN (UP of DOWN) knop van het toestel of de
afstandsbediening om het huidige menu te doorzoeken.
3. Druk op de AFSPELEN/PAUZE/ENTER (enkel bij iPod) knop om de gewenste folder te openen.
a. Druk op de TUNING/OVERSLAAN/ZOEKEN (UP of DOWN) knop van het toestel of de
afstandsbediening om het huidige inhoud in elke gewenste folder menu te doorzoeken.
b. Indien u naar de iPod menu wenst terug te keren, druk opnieuw op de STOP/MENU (enkel bij iPod)
knop.
4. Om het afspelen te hervatten, druk nogmaals op de iPod/MEM/KLOK INSTELLEN knop, het toestel zal
naar de iPod modus terugkeren.
De batterij van de iPod speler opladen via de hoofdeenheid:
1. De iPod speler heeft een interne batterij die niet kan worden verwijdert, het kan noodzakelijk zijn deze
batterij opnieuw op te laden wanneer dit voor een tijdje niet is gebeurd.
2. U kan de iPod speler via de hoofdeenheid automatisch opladen tijdens de STANDBY of POWER ON
modus.
OPMERKING:
1. De iPod batterij is na een uur voor 80 percent opgeladen en volledig opgeladen na enkele uren.
Wanneer u deze oplaadt terwijl u muziek afspeelt kan dit meer tijd in beslag nemen.
2. Het is beter niet op te laden in de TUNER modus, dit kan interferenties veroorzaken.
Opmerking
1. Wanneer het toestel in de iPod of iPod MENU modus is, kan u ten allen tijde de iPod speler via de
hoofdeenheid, de afstandsbediening of via de iPod speler zelf bedienen.
2. De iPod speler moet ten allen tijde gedurende de STANDBY modus degelijk worden bevestigd om te
vermijden dat het toestel of de iPod speler zouden worden beschadigd.
NL-13
Page 67

VIDEO OUT SETTING (alleen voor -POD Video)
1. Met de eenheid in de STANDBY modus: Sluit het TV toestel met een videokabel (kabels van het type
RCA) aan op de VIDEO OUT aansluiting op de achterkant van het toestel.
2. Met de eenheid in iPod modus: Druk op de "MENU" knop van de iPod Click Wheel om de video functie
in te schakelen.
3. Om de iPod in te stellen om videos op een TV-scherm weer te geven:
a) Kies Videos > Video Settings en zet vervolgens TV Out op Ask of On.
b) Als u TV OUT op Ask zet, geeft de iPod u de keuze om de videos op een TV of op uw iPod weer te
geven, telkens wanneer u een video afspeelt..
Opmerking:
1. Als u een iPod Video heeft kan u videos bekijken op een TV die via het toestel met uw iPod video is
verbonden.
2. iPod classic 80/160GB, iPod nano 3de generatie (Video) 4/8GB, iPod touch 8/16GB, moeten op het
basisstation worden aangebracht alvorens stap 3 wordt uitgevoerd.
AUX AFSPELEN
1. Druk op de FUNCTIE knop tot dat het display de “AUX” indicator weergeeft. Deze hoofdeenheid kan
analoge audiosignalen via deze aansluitingen ontvangen.
2. Gebruik een AUX kabel om audio uitrustingen aan te sluiten.
Opmerking: AUX N kabel niet inbegrepen.
MUTE INSTELLING (op de afstandsbediening)
1. Wanneer u een maal op de MUTE knop van de afstandsbediening drukt, zal het volume niveau
beginnen te knipperen en de audio uitgang zal tijdelijk worden stopgezet.(F27)
2. Druk nogmaals op de MUTE knop, het volume niveau en de audio uitgang zullen normaal worden hervat.
NAAR MUZIEK LUISTEREN MET EEN KOPTELEFOON
Er is een stereo koptelefoonaansluiting voorzien voor privaat beluisteren. Om de hoofdeenheid met een
koptelefoon (niet inbegrepen) te beluisteren, steek de 3.5mm mini-stereo stekker van de koptelefoon in de
PHONES aansluiting op het frontpaneel. De externe luidsprekers worden automatisch uitgeschakeld wanneer
u een koptelefoon gebruikt.
GEHEUGEN BACK-UP
Steek 1.5V x 3, UM-4, AAA of gelijkwaardige batterijen in het batterij compartiment van de hoofdeenheid.
Deze worden gebruikt om een back-up te maken van het geheugen van de hoofd CPU.
NL-14
Page 68

COMPACT DISC
1. Gebruik steeds compact discs die het aangegeven merk dragen.
2. Opmerkingen over het behandelen van de schijven
Verwijderen van de schijf uit de opslagdoos en deze in het toestel laden.
* Raak het spiegelend opname oppervlak niet aan.
* Plak geen papier of schrijf niets op het oppervlak.
* De schijf niet plooien.
3. Opslag
* Bewaar de schijf in het doosje.
* Stel de schijven niet bloot aan hoge temperaturen, hoge vochtigheid of stoffige omgeving.
4. Een schijf Schoonmaken
* Indien de schijf vuil zou worden, verwijder het stof, vuil en vingerafdrukken met een zacht doek.
* De schijf dient van het centrum naar de rand toe te worden gekuist.
*Gebruik nooit benzeen, thinners, record cleaner vloeistof of antistatische spray.
* Verzeker u ervan dat de deur van de CD-lezer is gesloten zodat de lens niet door stof zou kunnen
worden gecontamineerd.
* Raak de lens niet aan.
NL-15
Page 69

LCD SCHERM
A. TIMER INDICATOR D. SP INDICATOR
B. ALBUM NUMMER INDICATOR E. TRACK/NUMMER/TIME ON INDICATOR
C. STEREO INDICATOR F. VOLUME HOOG/LAAG INDICATOR
KARAKTERISTIEKEN
ELECTRISCHE VOEDING: 30V~ 50Hz
UITGANGSVERMOGEN. 4. 5 Watts x 2+28W
AFMETINGEN VAN HET TOESTEL 207(W) x 82(D) x 206 (H) mm
AFMETINGEN VAN DE LUIDSPREKERS 139 (W) x 72.5(D) x 200 (H) mm
AFMETINGEN VAN DE SUB WOOFER: 131(W) x 242 (D) x 173(H) mm
N. Gewicht: 7.02 kg
RADIO GEDEELTE
FREQUENTIE BEREIK: M 87.5 - 108 Hz
COMPACT DISC AFDELING
OPTICAL PICKUP: 3-BEAM LASER
RESPONS FREQUENTIE: 100Hz - 16kHz
DEZE KARAKTERISTIEKEN KUNNEN ZONDER ENIGE WAARSCHUWING WORDEN GEWIJZIGD.
Ventilatie waarschuwing: De normale ventilatie van het product mag niet worden belemmerd.
Trademark of New Transducers Limited.
NL-16
Page 70

Beste Klant,
Wij danken u hartelijk voor de aankoop van dit AKIRA™ product en voor uw vertrouwen in onze firma. Dit
product beantwoordt aan de toepasselijke veiligheidsvoorwaarden en werd tijdens het productieproces
onderworpen aan strenge controles. Indien er zich toch een probleem voordoet, zal dit product of zullen zijn
defectieve onderdelen (exclusief accessoires en verbruiksgoederen) gratis hersteld worden (arbeid,
onderdelen en transport binnen de grenzen van onderstaande landen) of, naar AKIRA™’s goeddunken,
ingeruild worden tegen een gelijkaardig product, op voorwaarde dat het geretourneerd wordt binnen 24
(vierentwintig) maanden na de originele aankoop (datum van ontvangstbewijs), dat het materiaal en/of de
afwerking defectief is en dat het in een van de volgende landen werd aangekocht: Frankrijk (moederland),
Spanje, Italië, Portugal, België (grondgebied) of in een taxfreeshop in een van deze landen.
De waarborg zal enkel worden toegestaan op vertoon van de originele factuur of het originele
ontvangstbewijs, waarop de aankoopdatum en de naam van de handelaar is vermeld, evenals dit
garantiebewijs met vermelding van type en serienummer. De uitkering van deze waarborg kan worden
geweigerd indien de factuur, het ontvangstbewijs of het garantiebewijs werd gewijzigd, geschrapt of
onleesbaar werd gemaakt na de oorspronkelijke aankoop.
Online registratie
Om de waarborgservice te vergemakkelijken, dient u uw AKIRA™ product binnen 30 dagen
na aankoop te registreren op http://www.akiraeurope.com
De waarborg geldt niet voor volgende bepalingen:
1. Schade aangericht door ongevallen, inclusief, maar niet gelimiteerd tot, bliksem, brand, water.
2. Schade aan het product door verwaarlozing, misbruik, gebruik strijdig met de instructies in de
handleiding, verkeerde installatie of reparatie (niet-limitatieve lijst). Vooral het inbranden van een
stilstaand beeld zoals computer inputs of kanaallogo’s, zoals beschreven in de handleiding, is niet
gewaarborgd.
3. Wijzigingen, aanpassingen of veranderingen aan het product om werkzaam te zijn in een ander
land dan waarvoor het initieel werd ontworpen en vervaardigd, of enige schade die voortvloeit uit
zulke veranderingen.
4. Elk gebruik anders dan het gewone thuisgebruik.
5. Defect aan afzonderlijke pixels, wanneer het aantal defectieve pixels lager ligt dan
volgende aantallen: Donkere pixels: 7 Heldere of flikkerende pixels: 3 Totale aantal
defectieve pixels: 8
Deze bepalingen hebben geen invloed op uw statutaire rechten als consument onder de toepasselijke
nationale wetgeving, evenals niet op uw rechten als consument tegen de handelaar waarvan u het
product hebt gekocht.
Als u service nodig heeft, of het product al dan niet nog in garantie is, neem dan contact op met de handelaar
waarvan u dit product hebt gekocht. We raden u aan om de gebruiksaanwijzing van uw AKIRA™ product
aandachtig te lezen alvorens uw dealer of service center te contacteren.
Indien u vragen heeft waarop uw dealer het antwoord niet kent, gelieve dan de AKIRA hotline te bellen
(internationaal gratis telefoonnummer: 00 800 800 25 472).
AKIRA™ is een gedeponeerd handelsmerk van TT International, Inc.
N.B.:
Dit product is ontworpen en geproduceerd met kwalitatief hoogwaardige materialen en
componenten, die gerecycled en hergebruikt kunnen worden.
Dit symbool betekent dat elekrîsche en elektronîsche apparaten aan het eind van hun
gebruiksduur van het huîsvuîl gescheiden dienen te worden afgevoerd.
Breng dit apparaat bij uw plaatselijke afvaldepot of naar een recyclingcentrum.
Help ons met het behoud van het milîeu vaarin wij leven!
NL-17
Page 71

Thank you
for choosing
AKIRA
Check out our web site
www.akiraeurope.com
Stick your serial number barcode here
Coller le code barre du numéro de série ici
Pegue aquí el código de barras del número
de serie
Plak hier de barcode met het serienummer
 Loading...