

Page 1
Page 2
Important Safety
Instructions
CAUTION: USE OF ANY CONTROLS, ADJUSTMENTS, OR PROCEDURES OTHER
THAN THOSE SPECIFIED HEREIN MAY RESULT IN HAZARDOUS RADIATION
EXPOSURE.
The lightning flash with arrowhead symbol, within an equilateral triangle, is
intended to alert the user to the presence of un-insulated “dangerous
voltage” within the product’s enclosure that may be of sufficient magnitude
to constitute a risk of electric to persons.
The exclamation point within an equilateral triangle is intended to alert the
user to the presence of important operating and maintenance (servicing)
instructions in the literature accompanying the appliance.
CAUTION: Laser radiation when open. Do not stare into
beam.
CAUTION
1. The product contains a low-power laser device. In order to ensure the safety of the
laser device, do not remove any cover and attempt to repair the unit. If any service
is needed, please contact the distributor or its authorized service center.
2. To reduce the risk of electric shock, do not remove the cover (or back). No userserviceable parts inside. Refer servicing to qualified service personnel. Unplug the
product from the wall outlet before servicing or when it is unused for a long period
of time.
3. The manufacturer should not hold responsibility for the damage caused by any
substitutions and modifications of the product without authorization from the
manufacturer or authorized unit.
4. Danger of explosion if battery is incorrectly replaced. Replace only with the same
or equivalent type.
WARNING
The apparatus shall not be exposed to dripping or splashing and that no objects filled
with liquids, such as vases, shall be placed on the apparatus.
The images in this manual are only for refere nce and they may be different from
the actual ones.
1
Page 3

Important Safety
Instructions
NOTES
1. Read these instructions.
2. Keep these instructions.
3. Heed all warnings.
4. Follow all instructions.
5. Do not use this apparatus
near water.
6. Clean only with dry cloth.
7. Do not block any
ventilation openings.
Maintain well ventilated
conditions around the product. Do not put product on bed, sofa or anything that
blocks ventilation. Install according to the manufacturer’s instructions.
8. Do not install near any heat sources such as radiators, heat registers, stoves or
other apparatus (including amplifiers) that produce heat.
9. Read, heed and follow all instructions to ensure correct and safe installation and
interconnection of the apparatus.
10. The apparatus shall not be exposed to dripping or splashing and that no objects
filled with liquids, such as vases, shall be placed on the apparatus.
11. The mains socket-outlet shall be installed near the apparatus and the mains plug
shall remain readily operable.
12. Protect the power cord from being walked on or pinched particularly at plugs,
convenience receptacles, and the point where they exit from the apparatus.
13. Only use attachments/accessories specified by the manufacturer.
14. Use only with the cart, stand, tripod, bracket, or table specified by the
manufacturer, or sold with the apparatus. When a cart is used, use caution when
moving the cart/apparatus combination to avoid injury from tip-over.
15. Unplug the apparatus during lightning storms or when unused for long periods of
time.
16. Refer all servicing to qualified service personnel. Servicing is required when the
apparatus has been damaged in any way, such as power-supply cord or plug is
damaged, liquid has been spilled or objects have fallen into the apparatus, the
apparatus has been exposed to rain or moisture, does not operate normally, or
has been dropped.
Note: Do not touch the color TFT LCD screen by hand directly.
IMPORTANT FOR LASER PRODUCTS
1. CLASS 1 LASER PRODUCT
2. DANGER: Visible laser radiation when
open and interlock failed or defeated.
Avoid direct exposure to beam.
3. CAUTION: Do not open the top cover.
There are no user serviceable parts inside
the unit. Leave all servicing to qualified
service personnel.
Copyright Protection
This product incorporates copyright protection technology that is protected by U.S.
patents and other intellectual property rights. Use of this copyright protection technology
must be authorized by Macrovision, and is intended for home and other limited viewing
uses only unless otherwise authorized by Macrovision. Reverse engineering or
disassembly is prohibited.
2
Page 4

Accessories
ITEM NAME QTY
Remote Control 1
Cell for Remote Control 1
AC Adapter 1
Audio/Video Cable 1
Car Adapter 1
Antenna 1
Operation Manual 1
Note:
Accessories and their parts numbers are subject to change without prior notice.
3
Page 5

Important Safety Instructions. …………………………………………………………….
Accessories…………………………………………………………………….………….….
View of Unit…………………………………………………………………..…………..…...
Remote Control………………………………………….…………………………….…….
System Connections………………………………………………………...….………....
Rechargeable Battery………………………………….……………………….…..……..
Notes on Discs………………………………………………….………………....………..
Playback Operation……………………………….……………………………..……..…..
DVD Playback. …………………………………………………………….…..…….
CD Playback..…………………………………………………………………..….…
JPEG Playback..…………………………………………………………….……….
USB and SD/MS/MMC Card Function…………………………………………..……….
DVD System Setup……………………………………….…………………..…....….…...
DVB System Setup……………………………………….…………………..…….…...….
TV/LCD Setup……………………………………….…………………..……...….………..
TV Function……………………………………….…………………..……...….………….
Troubleshooting………………………………………………………………….....……...
Specifications…………………………………………………………………….…………
4
Contents
11
14
15
16
16
18
19
21
22
26
28
29
31
33
1
3
5
8
Page 6
View of Unit
Front View
5
Page 7

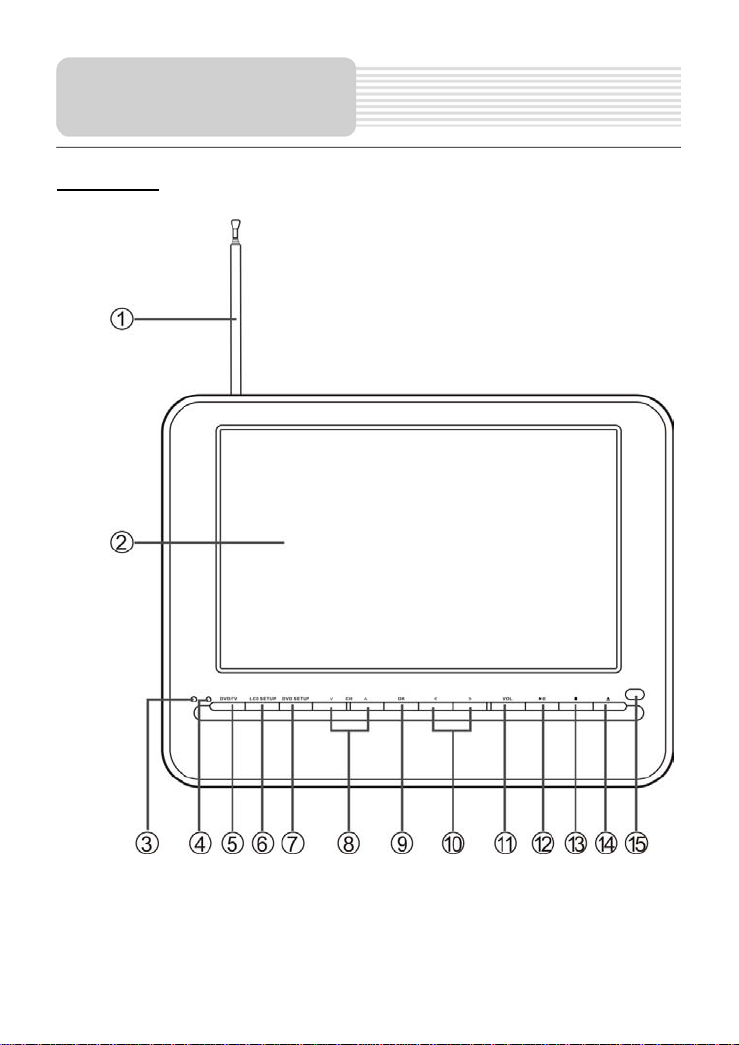
1. Antenna
2. LCD screen
3. Charge Indicator
Light is red during being charged; and is green when fully charged.
4. POWER Indicator
The light turns on in standby mode.
5. DVD/TV Button
Press it once to shift between DVD and TV mode, press and hold it for several
seconds to shift among DVD, DVB, SD and USB modes.
6. LCD SETUP Button
Press to enter or exit LCD SETUP menu.
Change the aspect ratio between 16:9 and 4:3 (Press and hold for a moment).
7. DVD SETUP Button
Press to enter or exit DVD SETUP menu.
8. ∨ CH ∧ Button
Select channel.
Used as up and down direction button to select the item;
teletext list of DVB mode.
9. OK Button
Confirm selection.
10. < > Button
Press to adjust the volume level when in volume mode.
Used as left and right direction buttons.
11. VOL Button
Press to enter the volume menu.
Button
12.
Press to start or pause playback in DVD mode.
13. Button
Stop playback and then press the
mode; press it to exit the search mode in DVB mode.
Button
14.
Eject the disc in DVD mode.
15. Remote Sensor
button to resume normal playback in DVD
View of Unit
press to switch pages in
6
Page 8
View of Unit
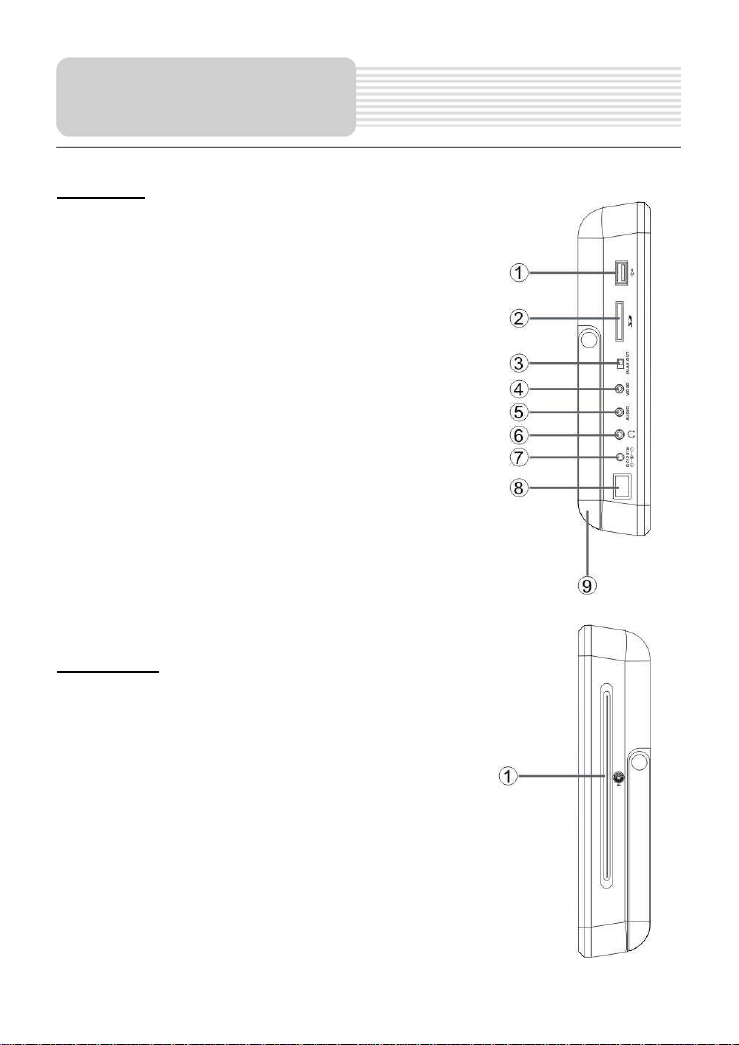
Left View
1. USB Connection Slot
Connect with the USB device.
2. SD/MS/MMC Card Slot
Used to insert SD/MS/MMC card.
3. AV IN/OUT Switch
Switch to “IN” to input external AV signal; switch to
“OUT” to play disc or output AV signal.
4. Video Input/Output Jack
Connect external video device.
5. Audio Input/Output Jack
Connect external audio device.
6. Headphone Jack
7. DC 12V Input Jack
Connect supplied adapter.
8. Power ON/OFF Switch
9. Bracket
Right View
1. Disc Tray Slot
Use for loading disc.
7
Page 9

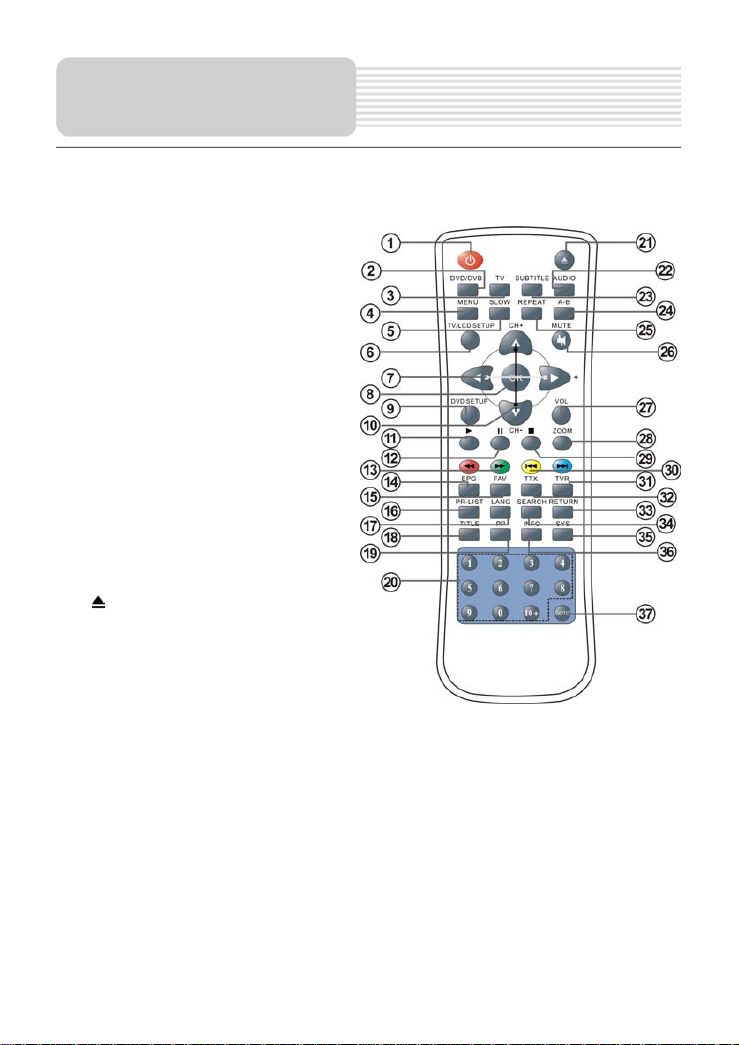
1. POWER Button
Press to enter or exit standby
mode.
2. DVD/DVB Button
Press to shift among DVD,
DVB, SD and USB mode.
3. TV Button
Press to shift to TV mode.
4. MENU Button
Press to enter disc menu.
5. SLOW Button
Press to activate slow function.
6. TV/LCD SETUP Button
Press to enter or exit the
TV/LCD SETUP menu.
7. /+ - Button
: Select item.
+ -: Adjust the value of volume.
8. OK Button
Confirm selection.
9. DVD SETUP Button
Press to enter or exit DVD
setup menu
10. /CH+ CH- Button
: Select the desired item
in the menu; press to switch pages in teletext list of DVB mode.
CH+/CH-: Select channel.
11. (PLAY) Button
Start playback.
12. Button
Pause playback.
13. / Button
Press to play fast backwardly/forwardly in DVD mode.
14. EPG Button
Press to en ter the EPG list in DVB mode.
8
Remote Control
Page 10
Remote Control
15. FAV Button
Press to shift the favorite programs in DVB mode.
16. PR-LIST Button
Press to enter the program list in
DVB mode.
17. LANG Button
Press to select audio language in
DVB mode.
18. TITLE Button
When a DVD is playing, press this
button to go to the title menu and
display disc contents.
19. PP Button
Pres to change the current picture
mode among SOFT, STANDARD,
LIGHT, and MEMORY.
20. 0-9 /10+ Buttons
Select numbers.
Button
21.
Press to eject the disc in DVD
mode.
22. AUDIO Button
Select audio language if DVD disc
includes multi-audio languages playback. When in DVB mode, press to select
audio track.
23. SUBTITLE Button
Select subtitle language if the disc contains multi-subtitle languages.
Select subtitle language if the channel contains multi-subtitle languages in DVB
mode.
24. A-B Button
Repeat a section of the playback from point A to point B.
25. REPEAT Button
Repeat a chapter, title or all in DVD mode.
9
Page 11
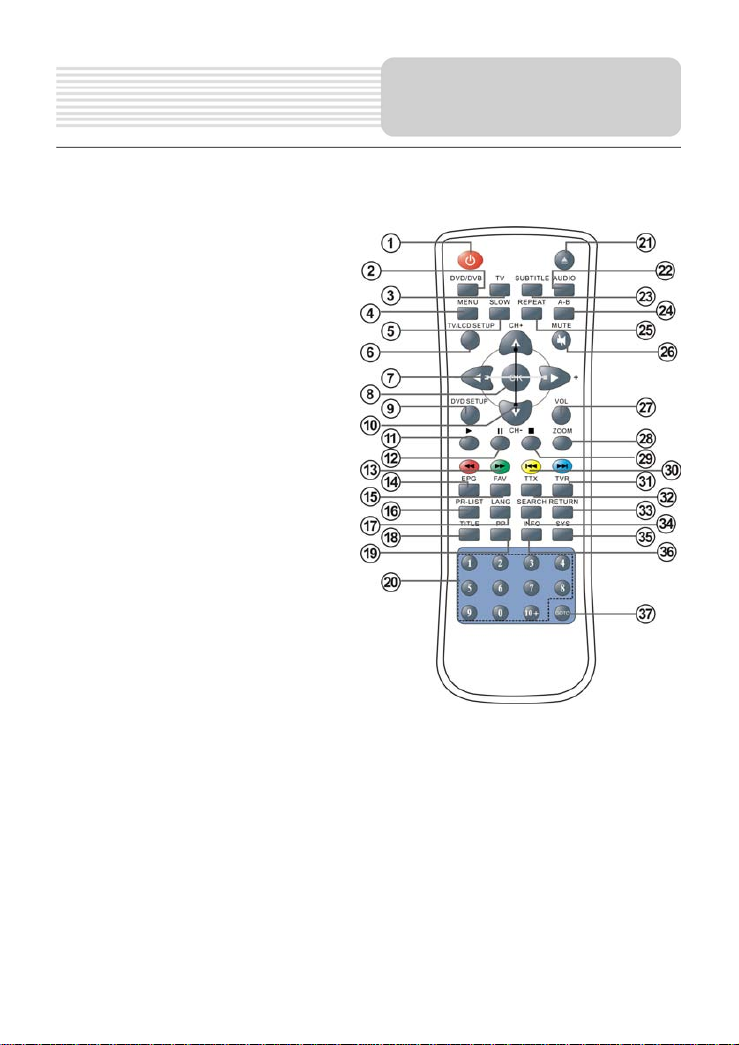
26. MUTE Button
Press to turn on or off speaker output.
27. VOL Button
Press to open VOL mode, then
press CH +/- button to increase or
decrease the volume level.
28. ZOOM Button
Zoom in/out the picture on the
screen.
29. Button
Stop playback in DVD mode; press
it to exit the search mode in DVB
mode.
30. / Button
Go to previous/next list, track or
chapter in DVD mode.
31. TVR Button
Shift between TV and radio in DVB
mode.
32. TTX Button
Display the teletext list in DVB
mode.
33. RETURN Button
Return to the last viewed channel in DVB mode.
34. SEARCH Button
Press to enter the scanning column when selecting the right Area in DVB mode.
35. SYS Button
Shift among SECAM B/G, D/K, L’/L, and PAL B/G, I, D/K in TV mode.
36. INFO Button
Display the detailed information during playback.
37. GOTO Button
Select the disc title, chapter or playback time, etc.
Remote Control
10
Page 12
Remote Control
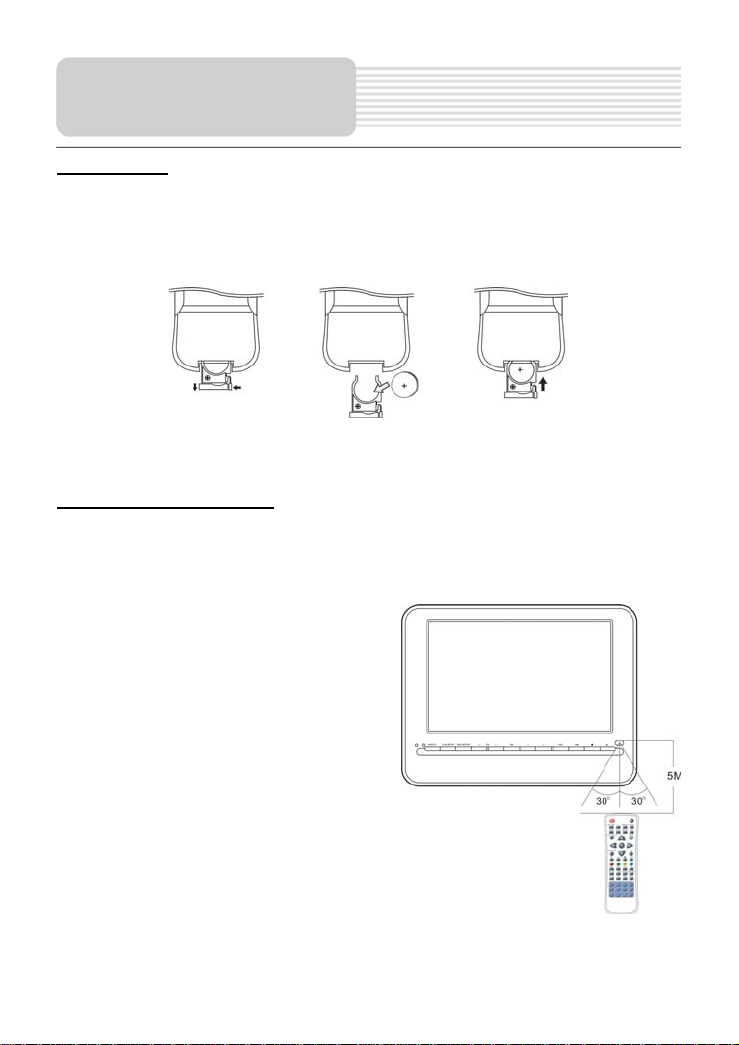
Preparation
Follow the steps below to install the battery.
1. Pull the battery holder out from the remote control in the direction of the arrow.
2. Load a new battery properly with the (+) sided up.
3. Insert the battery holder back into the remote control.
Battery type: CR2025 3V
Battery service life: approximately 1 year under normal use (at room temperature).
Use of Remote Control
Point the remote control unit to the remote sensor within the range of 5 meters and
angles of 60 degree, and without obstacles between remote control and remote sensor.
Note:
Improper use of the battery may cause
overheating, explosion or ignition, which
can result in an injury or a fire. Battery
leakage may damage the remote
control.
Do not expose the remote control unit to
direct sunlight.
Do not recharge, disassemble, deform
or heat the battery.
Do not put the battery in fire or water.
Immediately replace the exhausted
battery.
Take out battery when the remote is not
in use for a long time.
11
Page 13
r
A
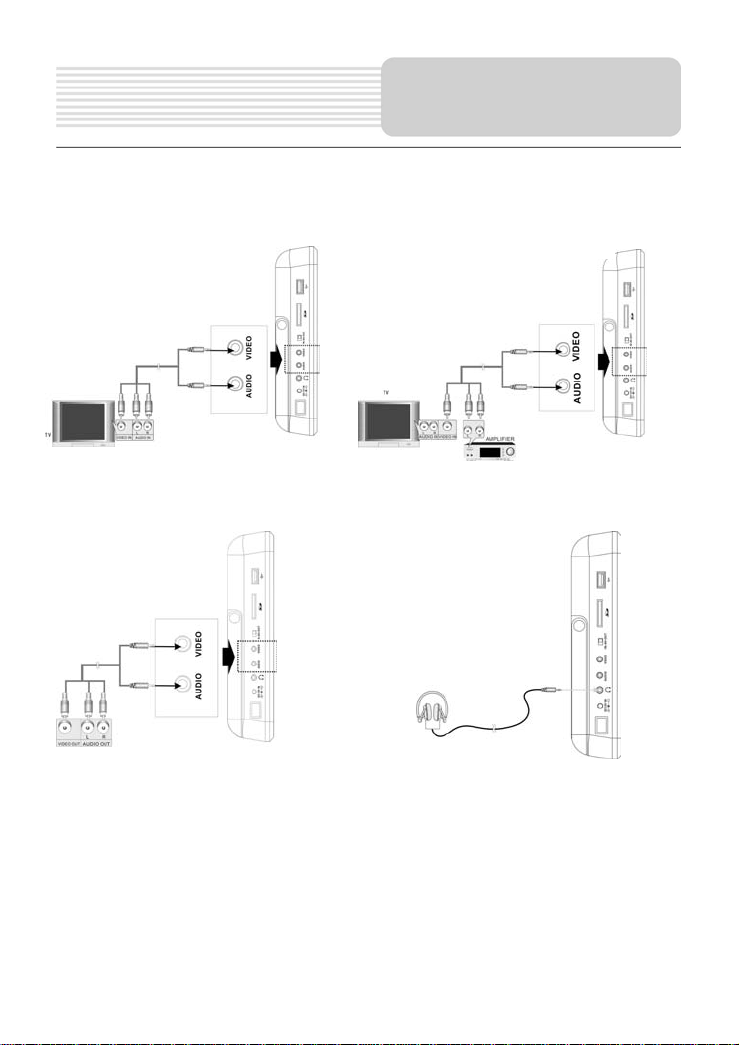
• Do not connect the power supply until all connections have been made.
• Ensure that you observe the color cables when connecting audio and video cables.
Connecting TV
System Connections
Connecting Amplifie
Connecting External AV Signal
fter connecting, switch AV IN/OUT
to AV IN.
Note: Noise may occur when there
is an external audio signal input
while playing a DVD disc. Unplug
the audio cord to clear the noise.
ConnectingHeadphone
When the headphone is connected,
the speakers will turn off automatically.
Note: Excessively loud volume could
damage your hearing. Turn down the
volume before you connect
headphone, and then raise the volume
to comfortable level.
12
Page 14
System Connections
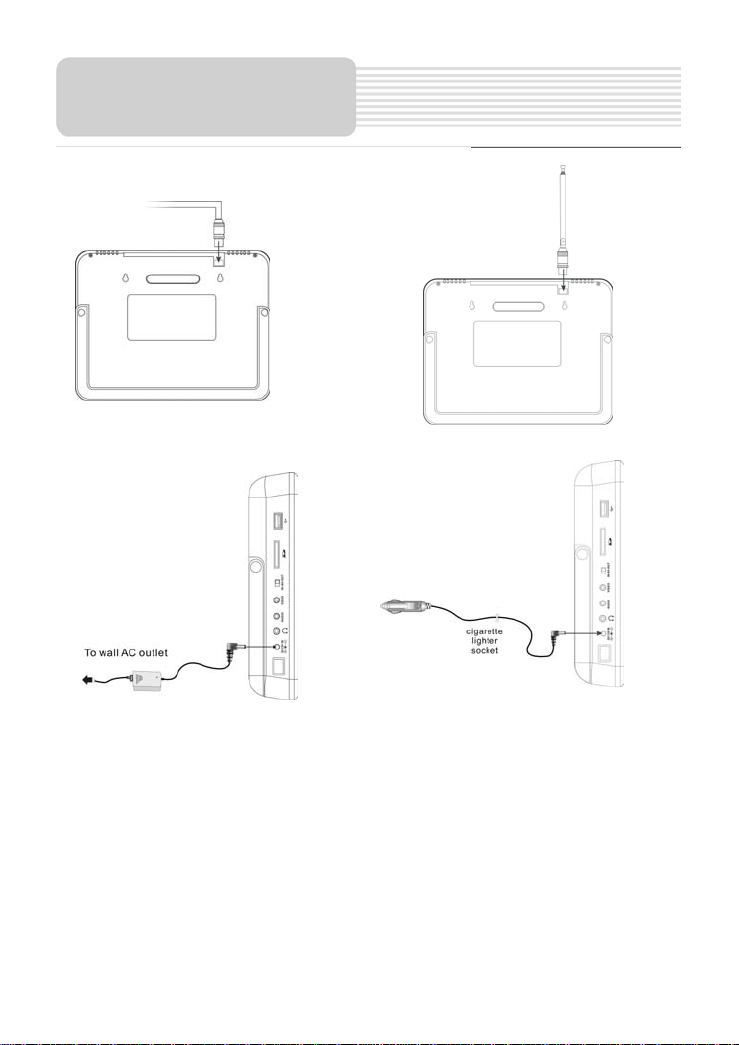
Connecting to An External Antenna
Using AC Adapter Using Car Adapter
Note:
Turn the unit's power off before
unplugging.
In the case of using the
adapter, the LCD screen will be
brighter than using the
rechargeable battery.
Note:
Disconnect the unit from the car
adapter when starting the vehicle.
Do not operate the unit or view
programs while driving a vehicle.
Detach battery pack when using
the AC or car adapter as power
source.
Place the unit in a proper position
for viewing.
Don’t detach the build-in lithium
polymer battery.
13
Page 15

About Rechargeable Battery Pack
The unit comes with a lithium polymer rechargeable battery that attaches to the unit.
Charge the battery fully before initial use. Charging time is normally about 4 hours. A
fully charged battery delivers about 2.5 hours of use but playing time varies from disc to
disc. If the battery will not be used for a long period of time, charge the battery fully
before storage.
Working conditions and precautions for the rechargeable battery:
New battery should be fully charged before initial use.
Battery should only be used and charged when temperature is between 10-40℃.
Never put the battery in fire or water.
Do not expose the battery to high temperature or store in hot, sunny place.
Maintain well-ventilated conditions around the product to avoid overheating. Don’t
put the product on a bed, sofa or anything that may block ventilation to the
product.
Do not short the battery terminals.
When the charge of the battery is weak, low power indicator will appear on the
LCD screen. The unit will turn off automatically several minutes later.
Do not make the unit to be in Standby mode for long time if you don’t use the AC
adapter to prevent consuming the power of battery.
Suggest switching the Power to “Off” if the battery will not be used for a long
period of time.
Rechargeable Battery
14
Page 16
f
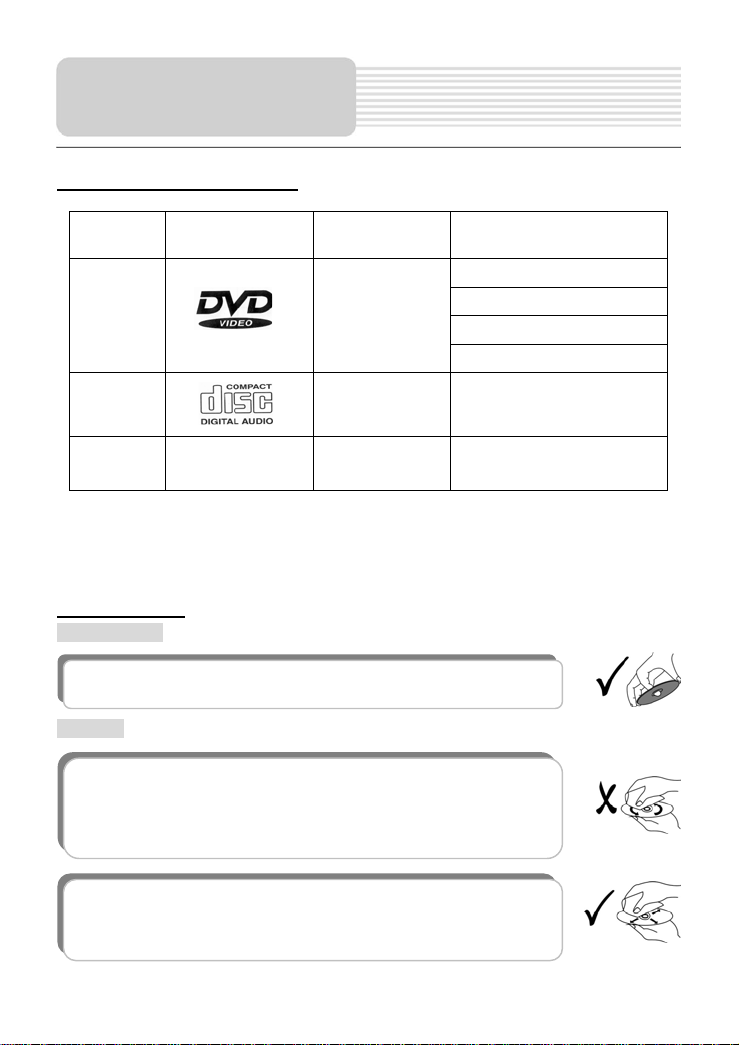
Notes on Discs
Compatible Disc Formats
DVD
CD
DISC LOGO DIAMETER
PLAYBACK TIME/
PLAYABLE SIDES
133min (SS-SL)
12cm
12cm 74min
242min (SS-DL)
266min (DS-SL)
484min (DS-DL)
JPEG 12cm
The software manufacturer specifies operation methods of some DVD discs. Please
follow the instructions of the disc.
Care of Discs
Holding Discs
When loading or removing discs, try not to touch their playing surfaces
as the right figure.
Cleaning
Fingerprints or stain on the disc may affect the quality of sound and
picture. To clean your discs, use a soft clean cloth to wipe them. I
necessary, moisten a soft cloth with diluted neutral detergent to remove
heavy dirt or fingerprints.
Do not wipe in a circular direction as the figure in the right middle
(concentric scratches on the disc groove tend to cause noise). Gently
wipe from the center of the disc to the outer edge as the right figure.
15
Page 17
PLEASE READ THE FOLLOWING INSTRUCTIONS CAREFULLY BEFORE USING
YOUR UNIT FOR THE FIRST TIME.
WARNING: Do not play poor quality discs to avoid damaging the lens.
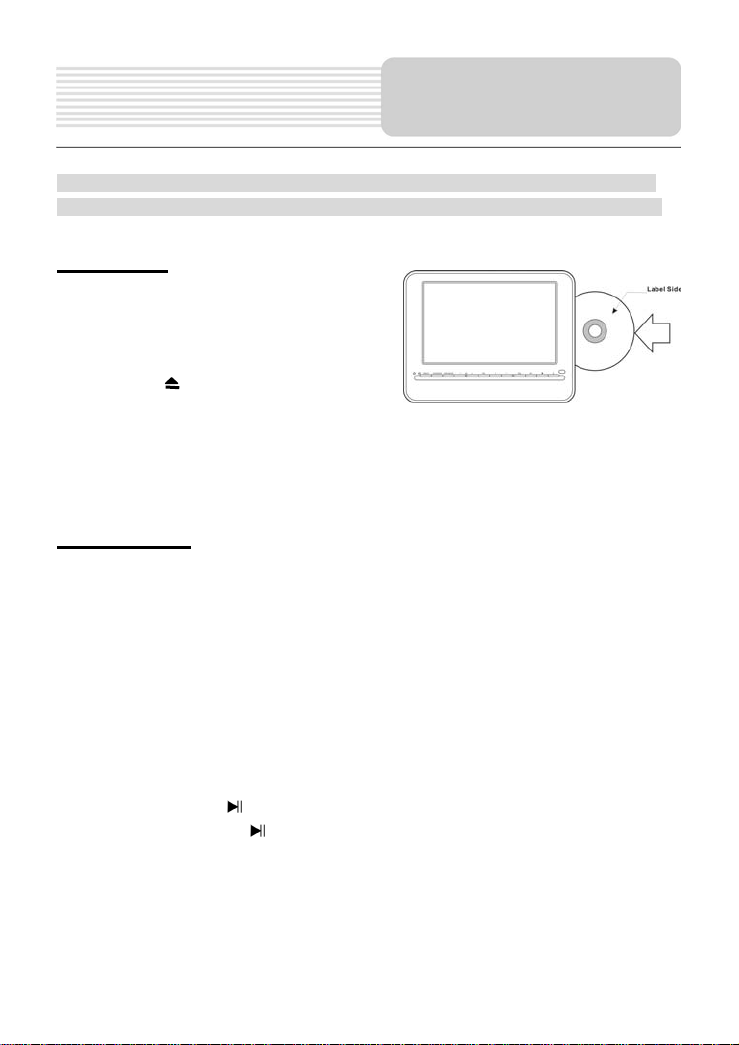
Preparation
1. Connect the unit to power supply through
the provided adapter.
2. Switch POWER ON/OFF to ON to turn
on the unit.
3. Press the EJECT button to eject the
disc.
4. The unit will search disc and enter the disc searching status.
5. Adjust the volume with the VOLUME Button to desired level.
6. To turn the unit off, switch the POWER ON/OFF to OFF.
DVD Playback
Region code
DVD units and discs are coded by region. If the region number described on the DVD
disc does not correspond to the region number of this product, this product cannot play
the disc. The region code of this unit is 2.
Play
After loading a DVD disc, the screen will display a menu and press buttons to
select the item and press OK button to play.
Pause
During playback, press
pause playback and press
Stop
During playback, press button once to stop playback and press (Play) to resume
normal playback. Press button twice repeatedly to stop playback completely.
button on the panel or button on the remote control to
button again or (Play) to resume normal playback.
16
Playback Operation
Page 18

Playback Operation
Previous and Next
During playback, press button to go to the previous chapter; press to go to next
chapter.
Fast Playback
During playback, press button (and hold it for several seconds) to start fast backward
playback; press button (and hold it for several seconds) to start fast forward playback.
Press it (and hold it for several seconds) repeatedly to fast playback at the speed of 2X,
4X, 8X, 16X, 32X and normal in sequence. Press(Play) to return to normal playback
during fast playback.
SLOW
During playback, press the SLOW button to slow forward and slow rewind playback at
the speed of 1/2 – 1/4 – 1/8 – 1/16. Press (Play) to resume normal playback during
slow playback.
ZOOM
During playback, press ZOOM button repeatedly to shift among 2x - 3x - 4x - 1/2 - 1/3 -
1/4 - normal size in sequence.
A-B
During playback, press A-B button to select the segment to repeat. Press once to select
the starting point A, press again to select the end point B and the unit will play the
segment between A-B continuously. Press A-B button the third time to cancel the repeat.
MENU
During playback, press MENU button to display the root menu on the screen. On the
menu, Press the button to select item and press the OK button to confirm. Or
press the 0-9 and +10 buttons to select the item directly.
TITLE
In general, the content of a DVD disc can be divided into several titles, and also there
are several menus in a title.
During playback, press the TITLE button to display the title menu on the screen. On the
menu, press the button to select title and press the OK button to confirm. Or
press the 0-9 and +10 buttons to select the item directly.
17
Page 19

REPEAT
Press it repeatedly to repeat a Chapter, Title, All or cancel repeat in sequence.
Some discs do not support the repeat function.
AUDIO
Press to select audio language if the disc contains multi-audio languages.
SUBTITLE
Press to select subtitle language or set subtitle off if the disc contains multi-subtitle
languages.
INFO
Press to open or close display of the detailed information of current playback.
GOTO
During playback, press the GOTO button to enter the menu to select desired title,
chapter or playback time, etc. On the menu, use the button to select the item and
press the OK button to enter. Use the number button or button to set and press the
OK button to confirm. Press the GOTO button again to exit.
Some DVD discs do not support the search function.
CD Playback
The player will play all tracks on a CD disc by default. You can use the and
buttons, or number buttons to select a track.
Pause
During playback, press
pause playback and press
button on the panel or button on the remote control to
button again or (PLAY) to resume normal playback.
Stop
During playback, press once to stop playback and press (PLAY) to resume the
normal playback. Press button twice repeatedly to stop playback completely.
Previous and Next
During playback, press button to go to the previous track; press button to go to
next track.
Playback Operation
18
Page 20

Playback Operation
Fast Playback
During playback, press button (and hold it for several seconds) to start fast backward
playback; press button (and hold it for several seconds) to start fast forward playback.
Press it (and hold it for several seconds) repeatedly to fast playback at the speed of 2X,
4X, 8X, 16X, 32X and normal in sequence. During fast playback, press (Play) button
button to return to normal playback.
or
REPEAT
Press it repeatedly to repeat a Track, All or cancel repeat in sequence.
INFO
Press INFO button to open or close display of the detailed information of current
playback.
AUDIO
Press AUDIO button repeatedly to select sound track as follows:
Mono Left
GOTO
During playback, press GOTO button repeatedly to enter desired disc playback time,
track time or track. On each menu, use the 0-9 buttons and the +10 button to input
number and the unit will skip there.
JPEG Playback
After loading a JPEG disc, the screen displays the root folder. Press to select a
folder and press OK button to enter. On the folder, press to select files and press
(Play) button to play; press to return to the previous folder.
Pause
During playback, press
pause playback and press
Stop
During playback, press button to enter picture pre-view mode. Press button
to select a picture and press OK button to play.
Mono Right Mix-Mono Stereo
button on the panel or button on the remote control to
button again or (Play) to resume normal playback.
19
Page 21
Previous and Next
During playback, press button to go to the previous picture; press button to go to
next picture.
ZOOM
During playback, press ZOOM button first and then press button to zoom in the
picture as follows: 50%-200%; press button to zoom out the picture as follows:
200%-50%.
MENU
During playback, press MENU button to return to folder mode. Press the OK button to
resume normal playback.
REPEAT
Press it repeatedly and repeat mode will shift as follows:
Shuffle
GOTO
During playback, press the GOTO button and press 0-9 buttons to select and show the
desired picture.
In folder mode, press it to highlight folder number, press 0-9 buttons to input number to
enter the desired one.
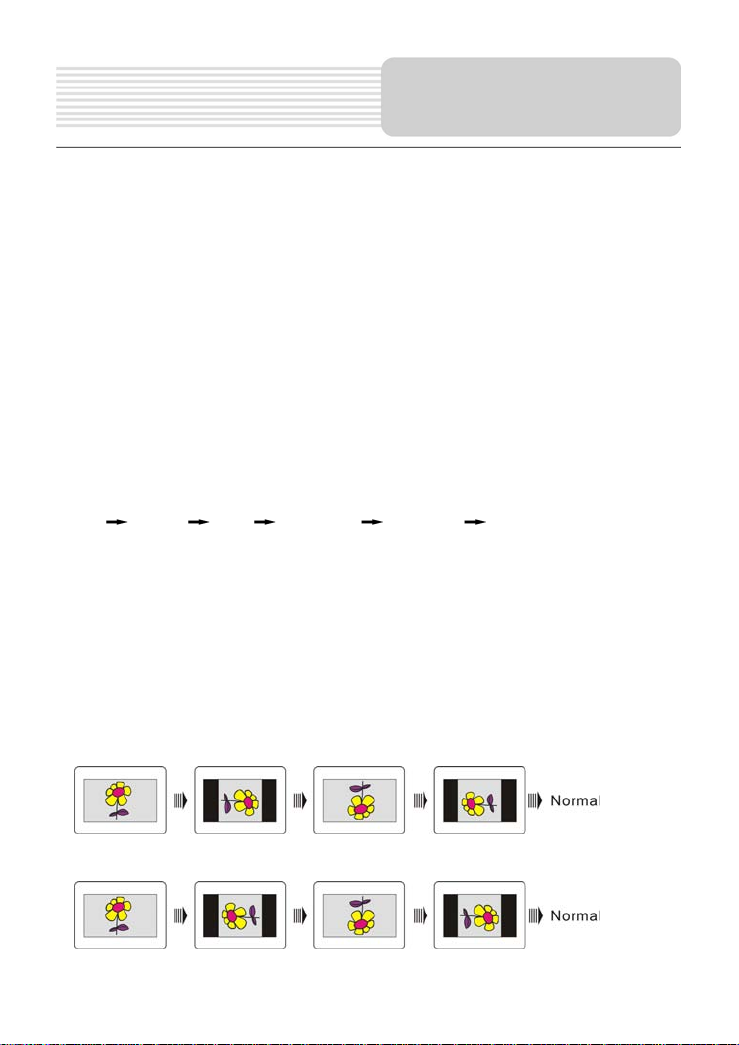
Picture Rotate
While viewing a picture, press the button to rotate the picture.
During playback, press the button to rotate the current picture clockwise:
During playback, press the button to rotate the current picture anticlockwise:
Random Single Repeat One Repeat All Repeat Off
20
Playback Operation
Page 22
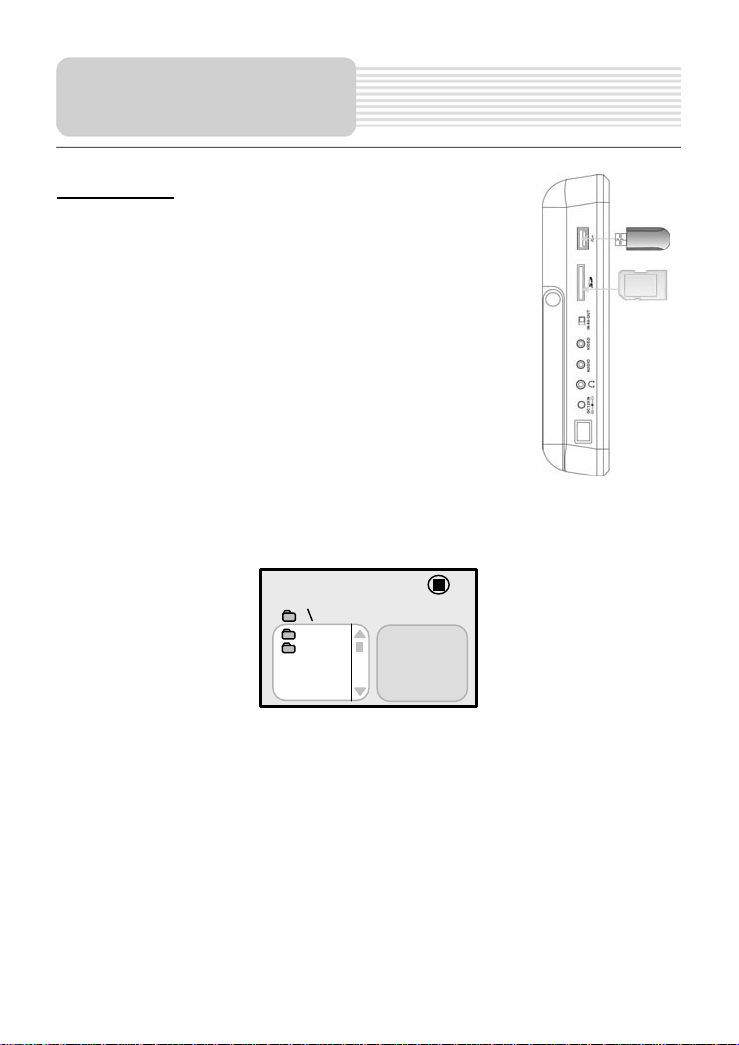
USB and SD/MS/MMC
Card Function
Preparation:
1 Connect the unit with the electrical power.
2 Switch the power to ON.
3 Press DVD/DVB button on the remote control or DVD/TV
button on the panel to shift to DVD mode.
4 Insert the USB into the unit’s USB slot, or insert the
SD/MS/MMC card into the SD/MS/MMC card slot. See the
right figure:
Make sure that files are stored in the USB and
SD/MS/MMC card before connection.
In DVD mode, press DVD/TV button on the panel for several seconds repeatedly to shift
among DVD, DVB, the SD/MS/MMC and the USB modes if the SD/MS/MMC card and
USB device are inserted. The default state is disk playback. Please see the below figure:
1 Press to select the folder, and press OK button to enter.
2 Press to select the desired track. Then press (Play) button to start playback.
3 Press to stop playback. Then press (Play) button to resume the current track.
Note:
The screen display will vary by the different disc or card.
Pull out the USB or SD/MS/MMC card directly after the files are played. Then the
unit will be in the state of disc playback again.
00:00 00:00
001/002
BAK
JPEG
21
Page 23
Follow the steps below to change the default settings of the unit if necessary.
1. In DVD mode, press the DVD SETUP button to enter setup menu mode.
2. Press the button to select a menu.
3. Press the button to select item on the menu to setup.
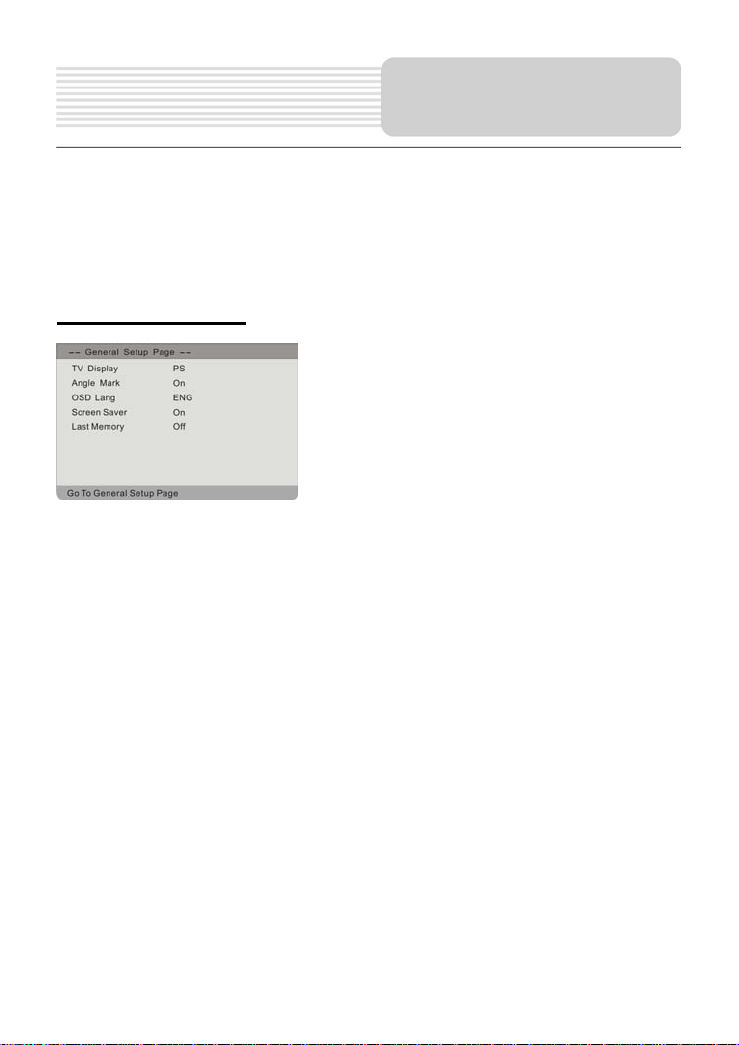
General Setup Page
The items included on this menu are shown as left.
Press to highlight this item.
Press to enter.
Press button to choose the proper selection.
Press OK button to confirm and press to exit.
TV Display
Select Normal/PS or Normal/LB when a 4:3 TV is connected.
Select WIDE when using a 16:9 wide screen on the unit.
Angle Mark
On: The screen will display angle symbols when a multi-angle DVD is running.
Off: The angle symbol will not be displayed.
OSD Lang
Used for select display language on the screen.
Screen Saver
On: The screen will display some pictures to protect the screen if the unit is not
operated in several minute later.
Off: This function is turned off.
Last Memory
Use the direction buttons to select “On” to resume playback from the point that you
stopped last time; or select “Off” to cancel the function and return.
DVD System Setup
22
Page 24
DVD System Setup
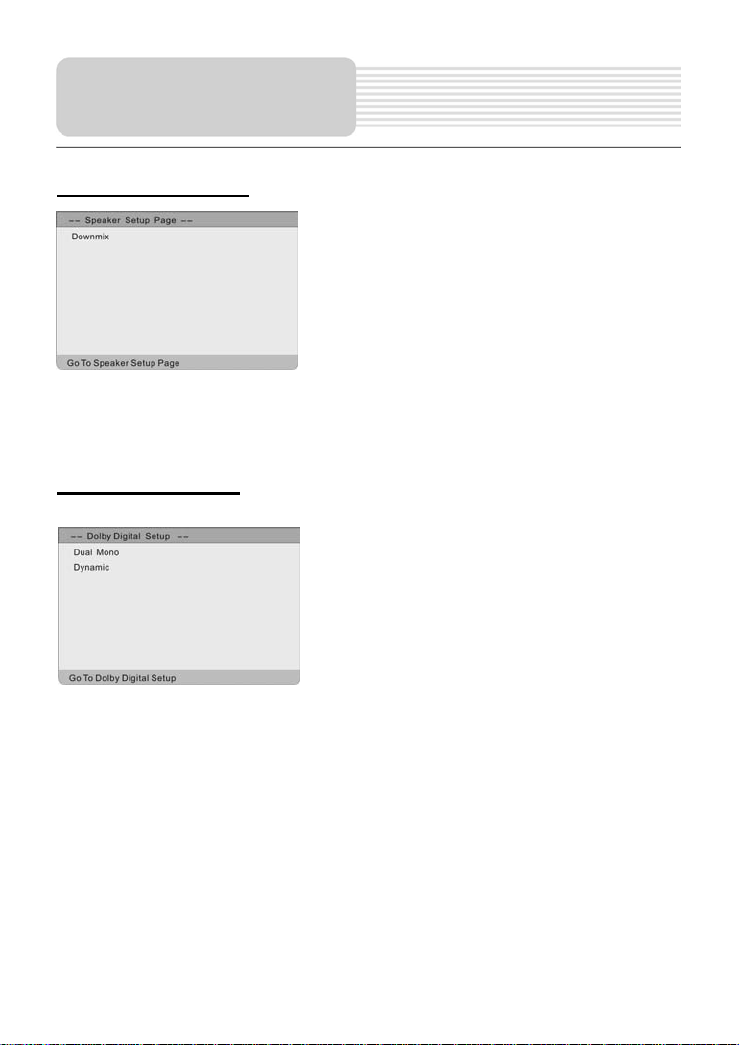
Speaker Setup Page
The items included on this menu are shown as left.
Press to highlight this item.
Press to enter.
Press button to choose the proper selection.
Press OK button to confirm and press to exit.
Downmix
LT/RT: Output mixed audio in the format provided by Dolby.
Stereo: Output stereo signal.
Dolby Digital Setup
The items included on this menu are shown as left.
Dual Mono
Stereo: Output the stereo sounds.
L-Mono: Output the sounds from the left-track (L+L).
R-Mono: Output the sounds from the right-track (R+R).
Mix-Mono: Output the sounds from the left-track and the right-track (L+R).
Dynamic
Used to adjust linear dynamic compression rate to get different signal compression
effects.
The compression rate is larger; the difference between the alt and bourdon is smaller.
It is only useful for dolly digital sounds.
Press to highlight this item.
Press to enter.
Press button to choose the proper selection.
Press ENTER to confirm and press to exit.
23
Page 25
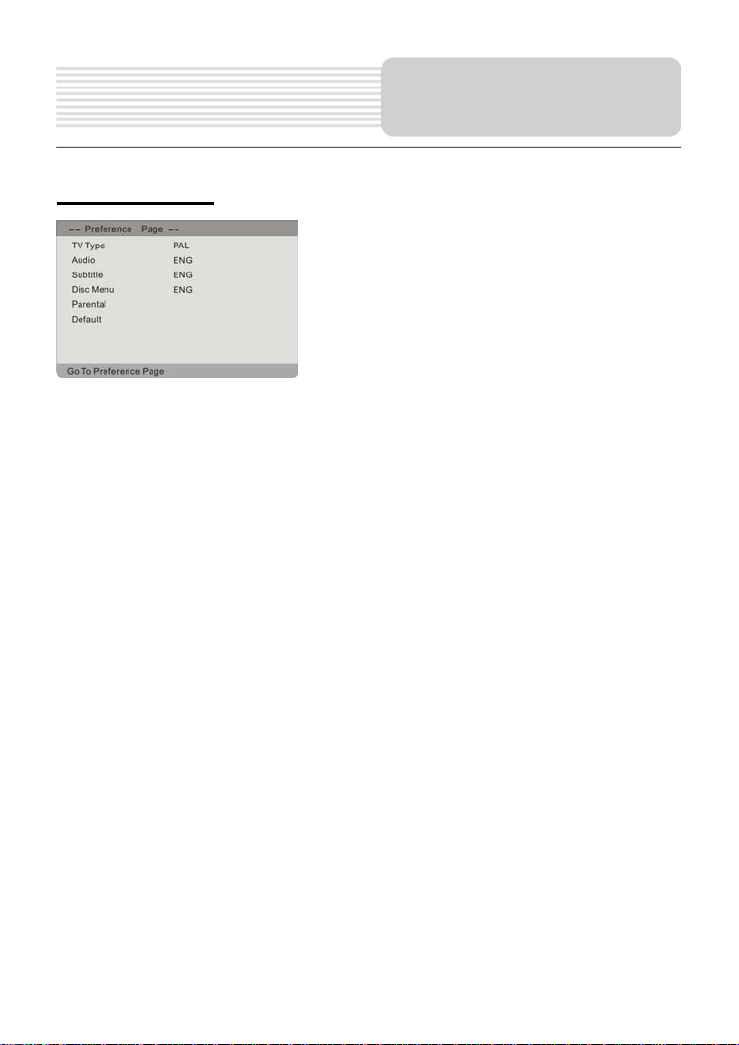
Preference Page
The items included on this menu are shown as left.
Press to highlight this item.
Press to enter.
Press button to choose the proper selection.
Press OK to confirm and press to exit.
This menu can only appear and be set when the playback is in a complete
stop position or there is no disc in the unit.
TV Type
Use for selecting the TV type.
Audio, Subtitle, Disc Menu
These settings allow you to hear or read the languages of a DVD in your choice of
English, French, Spanish, etc. if the disc contains multiple languages.
Parental
The parental function is applicable to DVD discs that are equipped with the child lock
function. By parental lock, the selected senses or playback of the disc can be locked.
To access parental control by pressing the ▲CH+ or ▼CH- direction button and then
press the OK button to enter. The Default Password is 1234.
Default
Use this function to reset all the settings.
Some disc may not support these functions.
DVD System Setup
24
Page 26
DVD System Setup
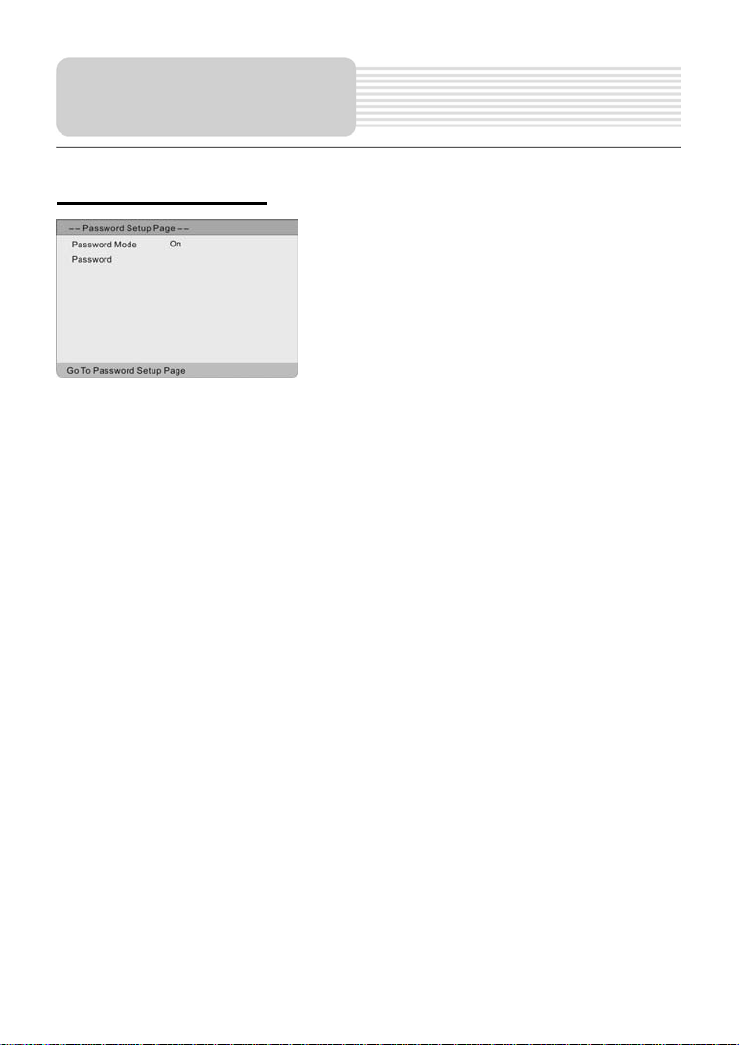
Password Setup Page
The items included on this menu are shown as left.
Press to highlight this item.
Press to enter.
Press button to choose the proper selection.
Press OK button to confirm and press to exit.
Password Mode
Select On: Active the password function.
Select Off: The password function cannot be available.
Password
Use for setting the password, the default password is 1234.
25
Page 27
1 In DVB mode, press the DVD SETUP button to open DVD setup menu.
2 Press the button to select DVB-T setup menu.
3 Press the DVD SETUP button again to exit DVB setup menu.
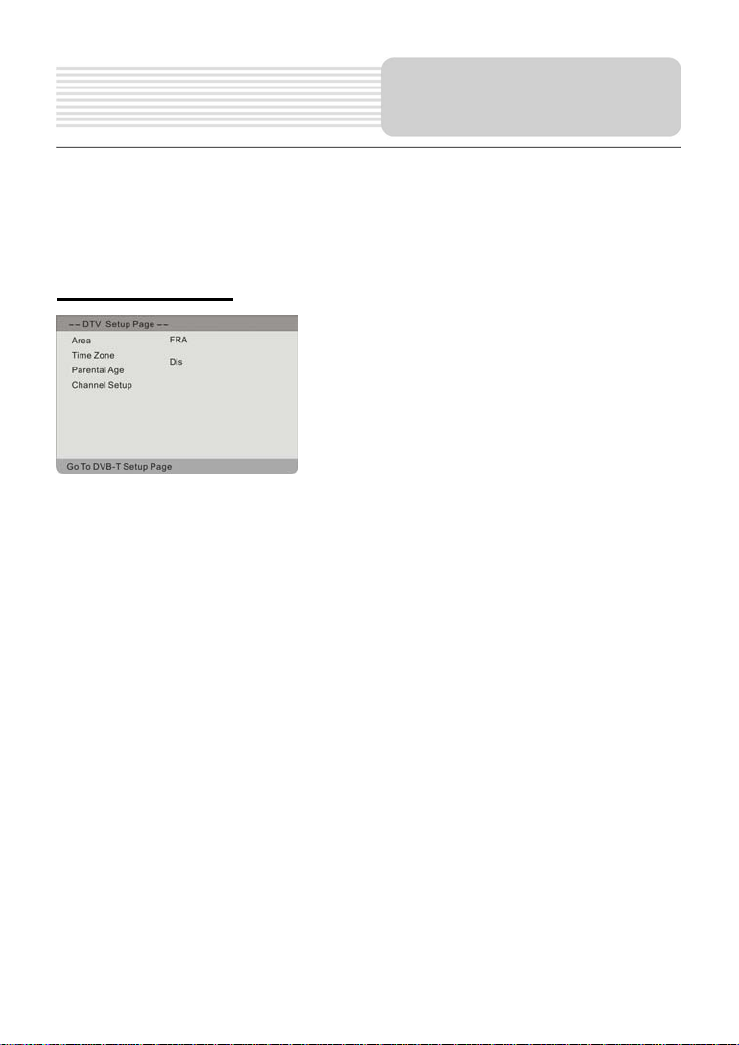
DVB-T Setup Page
Area
Use for selecting country.
The DVB channel can be found only if selects the right country in the menu.
Time Zone
Use for setting time zone.
Parental Age
DVB programs are rated according to their contents, and their settings vary from
program to program. You can lock out certain scenes of the program, or lock out the
whole program depending on the contents of the program after setting this item. Press
button to select the proper one or “Disable” to cancel the operation. Press OK
button to confirm your selection. Input the password and press OK button again to
return to the previous menu.
The default password is 1234.
The items included on this menu are shown as left.
Press to highlight this item.
Press to enter.
Press button to choose the proper selection.
Press OK button to confirm and press to exit.
DVB System Setup
26
Page 28
DVB System Setup
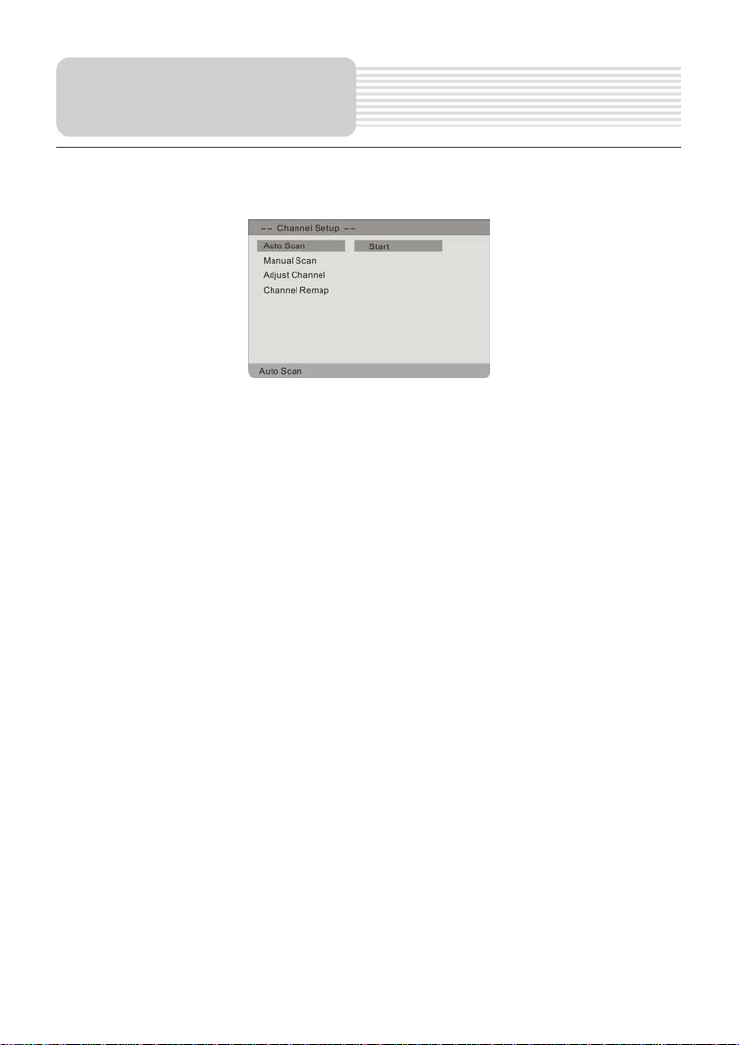
Channel Setup
Press this item to enter the Channel Setup menu shown as below:
1 Auto Scan
Press OK button to enter the menu, press buttons to select “OK” to start
scanning, or select “Cancel” to return. Auto scan will take a few minutes, when the
tuning operation finished; the unit will exit and memorize the programs by
sequence automatically.
During tuning, press the STOP button to exit the auto scan mode.
2 Manual Scan
In the menu, press button to search the desired channel. During tuning, press
the STOP button to return the previous menu.
3 Adjust Channel
Press button to select Adjust Channel and press OK button to enter the menu.
In the menu, press Number 1 button on the remote control to select the channel
from the list to be your favorite channel, press Number 2 button on the remote
control to delete the program, press Number 3 button on the remote control to
input the password to set the protected program. The default password is 123456.
Press button to select EXIT and press OK button to exit the menu.
4 Channel Remap
Press button to select Channel Remap. In the menu, press OK button to
remap the desired channel.
27
Page 29
Press the TV / LCD SETUP button to enter the setup menu. Press the button to
shift among PICTURE and FUNCTION menu. Press the TV / LCD SETUP button again
to exit.
PICTURE SETUP Menu
Press the
Press the
The PICTURE setup menu will disappear automatically if you don’t have any
button to highlight the desired item.
button to adjust the value.
operation for seconds.
Picture Setup
Bright
Contrast
Color
FUNCTION Menu
Language English
Bluescreen On
Time Off Off
Default
Function
Press the button to highlight the desired item.
Press the
Language: Used to change the language of the OSD (On Screen Display).
Bluescreen:
This function is only available when there is no input signal.
Press the
Time Off:
Select the period of waiting time to enter standby mode, the selections besides 15,30,45,
60,75, and 90,105,120 or OFF (The OFF status is off this function).
Default: After confirm this selection, the setting will go back to the original default value.
button to change the setting.
button to turn on or off the function.
LCD/TV Setup
30
30
30
28
Page 30
Basic Operation
Connect the antenna to the antenna jack on the rear panel. After connecting the
antenna, connect the power supply cord. If the player is in standby mode, press the
POWER button on the front panel to turn on the power.
Press the TV button on the remote control to shift to TV mode.
Press the direction buttons or press the number buttons on the remote control to
select the desired channel.
Some preferences can be preset:
TV System Setup
Press the TV / LCD SETUP button to enter the PICTURE setup menu, and then press
the button, the TV system setup menu will appear:
Press the
Press the
1. Channel
2. Channel Swap
TV Function
Channel 001
Channel Swap 001
Skip OFF
System PAL D/K
Fine 152.25
Auto Scan
button to highlight the desired item.
button to change the setting.
Press the button to shift channels.
Use the ▲CH+ or ▼CH- button to select SWAP, press button to select the
channel number and press OK button to swap the selected channel.
TV Setup
001
001
Off
SECAM L’/L
105.25
29
Page 31

3. Skip
Use the ▲CH+ or ▼CH- button to select Skip, press button to select On or
Off.
On: When the direction button is pressed to turn the function ON, it will skip the
current channel when using ▲CH+ or ▼CH- button to select TV channels.
Off: When the direction button is used to turn the function OFF, it will play the
channels in sequence when selecting under normal playback status.
4. SYSTEM
Use the ► or ◄ direction button to select TV system type.
5. FINE
Use the ▲CH+ or ▼CH- button to select Fine Tuning when the effect of some
channel (such as the image and voice ect.) is bad, then press the ►or◄ direction
button to fine tune the TV channel forward or backward from the current channel.
6. Auto Scan
Use the ▲CH+ or ▼CH- button to select Auto Scan, press the OK or ► button to
enter auto scan mode. The process of searching TV channels will take a few
minutes. The unit will search from the lowest channel to the highest channel in the
standard channel list.
During searching, press button to exit the scanning mode. When searching
operations are completed, the unit will memorize the searched channels by
sequence and exit auto memory mode. Use the ▲CH+ or ▼CH- button to select
the desired channel from those in memory.
If there is no signal under TV mode, “NO SIGNAL” will appear on the screen.
30
TV Function
Page 32

Troubleshooting
If you suspect something wrong with this unit, immediately turn the power off and
disconnect the power connector from the unit. Take steps described in the tables below
to solve simple problems before contacting customer service. Never try to repair the unit
yourself because it is dangerous to do so.
PROBLEM
The unit cannot play.
There may be water on the
lens.
The disc may not be put in
the right way.
There may be no discs in the
DVD drive.
The unit's region code may
not be as the same as the
region code of DVD disc.
There is no sound.
The speakers may be turned
down.
The sound setup of the DVD
disc may be not correct.
The system connection may
be not correct.
The disc may be dirty or
warped.
POSSIBLE CAUSE
POSSIBLE SOLUTION
Remove the disc and keep
the unit being powered off for
at least two hours.
Put the disc in with the label
side up.
Put a disc in to the DVD drive.
Make sure the unit's region
code is the same as the
region code of DVD disc.
Turn on the speaker.
Setup the sound of the DVD
correctly.
Connect the system correctly.
Clean or change the disc.
31
Page 33

A
A
PROBLEM
POSSIBLE CAUSE
There is no picture.
The system connection may
be not correct.
The unit may be not in correct
V mode.
The LCD may be not in
correct video mode.
The disc may be dirty or
warped.
The remote control
does not work.
There may be some
obstructions between the
remote control and the unit.
The remote control may not
be pointed at the unit.
The battery of remote control
may not be installed correctly.
The battery of remote control
may be out of power or weak.
Other possibilities:
Static or other external interference may cause the unit function abnormally. In order to
recover normal status, please unplug the power-supply cord and then plug it into the
outlet again to reset the unit. If the problems still exist, please cut off the power supply
and consult your service center or the qualified technician.
Troubleshooting
POSSIBLE SOLUTION
Connect the system correctly.
Make sure the unit in correct
V mode.
Choose the correct video
mode.
Clean or change the disc.
Remove the obstructions
between the remote control
and the unit.
Point the remote control at
the unit directly.
Make sure the polarity of
battery is correct.
Replace the battery.
32
Page 34

Specifications
TFT screen size 10.2 inches (16:9)
Screen resolution 800x480
Laser Wavelength 780/650nm
TV System
Frequency Response 20Hz-20kHz ±2.5dB
Audio Signal-to-noise Rate ≥85dB
Audio distortion + noise ≤ -70dB (1kHz)
Channel Separation ≥70dB (1kHz)
Dynamic Range ≥80dB (1kHz)
Audio Out Out Level 1.5V±
Video Out
Power AC100~240V, (50/60Hz), DC 12V
Dimensions
Weight Approximate 1.65Kg
DESIGN AND SPECIFICATIONS ARE SUBJECT TO CHANGE WITHOUT NOTICE
PAL B/G, PAL D/K, PAL I, or SECAM B/G,
SECAM D/K SECAM L’/L
0.5
, Load 10kΩ
0.3
Out Level 1V
Unbalanced Negative
286mm X 220mm X 48mm
±0.2, Load 75Ω
P-P
“Dolby” and the double-D symbol are trademarks of Dolby Laboratories.
Confidential unpublished works.
Manufactured under license from Dolby Laboratories.
© 1992 -1997 Dolby Laboratories, Inc.
All rights reserved.
33
Page 35

UK warranty text
Dear Customer,
Thanks you for purchasing this AKIRA™ product and for your confidence in our company. This
product meets applicable safety requirements and has undergone stringent testing during
manufacture.
However, should there occur a defect, the product or its defective part(s) (excluding accessories
and consumables) will be repaired free of charge (labor, parts and transportation within the
boarder of the below mentioned countries) or, at AKIRA™ discretion, exchanged for a similar item,
provided that it has been returned with 24 (twenty four) months from the date of original purchase
(date of receipt), is defective in material and/or workmanship and has been bought in any of the
following countries: France (metropolitan territory), Spain, Italy, Portugal, Belgium (territory) or in a
duty-free shop in named countries.
This guarantee will be granted only upon presentation of the original invoice or cash receipt,
indicating the date of purchase and dealer’s name, and of this guarantee card with the product
type and serial number. The benefit of this guarantee may be refused if the invoice, cash receipt or
guarantee card has been altered in any way, deleted or made illegible after the original purchase.
Online registration
To expedite warranty service, please register your AKIRA™ product within 30 days of purchase at
http://www.akiraeurope.com
This guarantee does not apply to the following:
1. Damage caused by accidents including, but not limited to, lightening, fire, water.
2. Damage to the product resulting from neglect, misuse, use against the operating manual
instructions, repair and/or install wrongly performed (non exhaustive list). Especially any
burned panel from too long still picture display such as computer inputs or channel logos,
as described in the operating manual, will not be guaranteed.
3. Modification, adaptations or alterations of the product to operate in a country other than for
which it was originally designed and manufactured, or any damage resulting from such
modifications.
4. Usage other than usual consumer home usage.
5. Defect on individual pixels when the number of defective is below the following numbers:
Dark pixel: 7 Bright or flickering pixel: 3 Total defective pixels:
8
These statements do not affect your statutory rights as a consumer under applicable national
legislation in force, nor your consumer’s rights against the dealer from whom you bought the
product.
If you need service, whether or not under guarantee, please approach the dealer who sold you the
product.
In your own interest, we advise you to read the instruction booklet for your AKIRA™ product
carefully before contacting your dealer or service center.
Should you have any questions which your dealer is unable to answer, please contact AKIRA
hotline (international free phone number: 00 800 800 25 472).
AKIRA™ is a registered trademark of TT International, Inc.
Page 36

Page 37

r
Instructions de
sécurité
L’éclair avec un symbole de flèche, dans un triangle équilatéral est destiné
à avertir l’utilisateur de la présence de « tension dangereuse » non isolée
dans le boîtier du produit, qui peut être suffisante pour présenter un risque
de choc électrique pour les personnes.
Le point d’exclamation dans un triangle équilatéral est destiné à averti
l’utilisateur de la présence d’instructions d’utilisation et de maintenance
(entretien) dans la documentation fournie avec l’appareil.
ATTENTION : Le rayonnement laser est visible lorsque
l’appareil est ouvert. Ne pas fixer le faisceau lumineux.
ATTENTION
1. L’appareil renferme un dispositif laser de faible puissance. Pour garantir la sécurité
du dispositif laser, ne pas démonter de couvercle, ni tenter de réparer l'appareil.
Lorsqu’une réparation est nécessaire, contacter le distributeur ou son centre de
maintenance agréé.
2. Pour réduire le risque de choc électrique, ne pas retirer le couvercle (ou l’arrière). Ne
pas intervenir à l’intérieur de l’appareil, aucune pièce n’est réparable ni remplaçable
par l’utilisateur. Contactez le service d’assistance pour faire appel à des réparateurs
qualifiés. Débrancher l’appareil de la prise murale avant d'effectuer l'entretien ou
lorsque l’appareil n’est pas utilisé pendant une période prolongée.
3. Le fabricant dénie toute responsabilité quant aux dommages entraînés par toute
substitution et/ou modification de l’appareil sans son autorisation préalable ou
celle de son représentant légal.
4. Un remplacement incorrect des piles peut provoquer une explosion. Les piles
doivent être remplacées exclusivement par des piles de même type ou équivalent.
AVERTISSEMENT
L'appareil ne doit pas être exposé à un écoulement d’eau ou une infiltration de liquide et
aucun récipient rempli de liquide, tel un vase, ne doit être placé sur l'appareil.
Les dessins et les illustrations figurant dans c e manuel sont donnés uniquement
à titre informatif et peuvent différer de la réalité.
1
Page 38

Instructions de
sécurité
NOTES
1. Lire les instructions.
2. Conserver ces instructions.
3. Respecter tous les
avertissements.
4. Suivre toutes les instructions.
5. Ne pas utiliser cet appareil à
proximité d’eau.
6. Nettoyer uniquement avec un
chiffon sec.
7. Ne pas obstruer les
ouvertures de ventilation.
Maintenir une bonne ventilation autour de l’appareil. Ne pas déposer l’appareil sur un
lit, un divan ou similaire susceptible de bloquer la ventilation. Installer l’appareil selon
les instructions du fabricant.
8. Ne pas placer l’appareil à proximité d'une source de chaleur telle que les radiateurs,
registres de chaleur (bouches de chauffage), poêles ou autres appareils (y compris
les amplificateurs) qui produisent de la chaleur.
9. Lire, tenir compte de et suivre toutes les instructions afin d'assurer l’installation
correcte et sûre de l'appareil et de son interconnexion.
10. L'appareil ne doit pas être exposé à un écoulement d’eau ou une infiltration de
liquide et aucun récipient rempli de liquide, tel un vase, ne doit être placé sur
l'appareil.
11. La prise de courant secteur doit être installée à proximité de l'appareil et doit rester
accessible en permanence.
12. Le cordon d’alimentation doit être installé de manière à éviter de marcher dessus ou
de le pincer, en particulier au niveau des prises d’alimentation secteur et à son point
de sortie de l’appareil.
13. Utilisez uniquement des accessoires spécifiés par le fabricant.
14. Utiliser uniquement avec le chariot, le pied, le trépied, le support ou la table spécifiés
par le fabricant, ou vendus avec l'appareil. Lors de l’utilisation d’un chariot, déplacer
l'ensemble chariot/appareil avec précaution afin d’éviter de vous blesser en cas de
basculement.
15. Débrancher l'appareil en cas d'orage ou lorsqu'il n'est pas utilisé pendant une
période prolongée.
16. La maintenance doit être effectuée par du personnel de maintenance qualifié.
L’appareil doit être réparé s’il a subi des dommages quelconques, par exemple si le
cordon ou la prise d’alimentation est endommagé, si du liquide a été renversé ou des
objets sont tombés sur l’appareil, si celui-ci a été exposé à la pluie ou l’humidité, ne
fonctionne pas normalement ou est tombé.
Remarque : Ne pas toucher l’écran couleur LCD – TFT directement avec la main.
IMPORTANT POUR LES PRODUITS LASER
1. Produit laser de classe 1
2. DANGER: Risque d’exposition au rayon laser visible
en cas d'ouverture ou de rupture du système de
verrouillage. Éviter l'exposition directe au faisceau.
3. ATTENTION : Ne pas ouvrir le couvercle supérieur.
Dans cet appareil, il n'existe pas de pièce réparable
ou remplaçable par l'utilisateur. Confier toutes les
réparations à du personnel qualifié.
Protection du copyright
Ce produit contient une technologie de protection du copyright qui est protégé par des
brevets des Etats-Unis et autres droits de propriété intellectuelle. L'utilisation de cette
technologie de protection du copyright doit être autorisée par Macrovision, elle est
destinée à l’usage familial et autres projections à usage limité sauf autorisation contraire
de Macrovision. Toute rétroconception ou désassemblage est interdit.
2
Page 39

Accessoires
ELÉMENT NOM QUANTITE
AN
Télécommande 1
Pile pour télécommande 1
Adaptateur C.A. 1
Câble audio/vidéo 1
Adaptateur allume cigare de
voiture
1
Antenne 1
Manuel de l'utilisateur 1
Note:
Les accessoires et leurs codes d'article, sont sujets à modification sans préavis.
3
Page 40

Instructions de sécurité importantes ……………………………………….……….
Accessoires………………………..………………………………………….………….
Vue de face de l’appareil……………………………………………………………..…
Télécommande …………………..…………………………………...……….…………
Raccordements à l’appareil ………………………………………………………...…
Pile rechargeable……………………….………………………………………………
Notes sur les Disques………………………………………………….………..………
Fonctionnement en lecture………………………………………………………..……
Lecture d'un DVD.…………………………………………………………………
Lecture d’un CD ..………………………………………………………….………
Lecture du format JPEG ..…………………………………………………………
USB et fonction carte SD/MS/MMC …………………………………………..……
Raccordements à l’appareil ………………………………………………………...…
Raccordements à l’appareil ……………………………………………………………
Configuration TV/LCD ……………………….…………………………………………
Configuration TV/LCD ……………………….………………………………………..
Dépannage……………………………………………………………………...……........
Caractéristiques………………………………………………………………….………
Table des matières
4
1
3
5
8
11
14
15
16
16
18
19
21
22
26
28
29
31
33
Page 41

Vue de face de
l’appareil
Vue de face
5
Page 42

1. Antenne
2. Écran LCD
3. Indicateur de charge
Le voyant est rouge pendant la charge puis passe au vert lorsque la charge est
complètement terminée.
4. Voyant POWER (alimentation)
Le voyant s'allume en mode veille.
5. Touche DVD/TV
Appuyer une fois sur cette touche pour passer du mode DVD au mode TV,
appuyer et maintenir la pression sur la touche pendant plusieurs secondes pour
passer de l’un des modes DVD, DVB, SD et USB à l’autre.
6. Touche LCD SETUP (configuration LCD)
Appuyer sur cette touche pour entrer ou quitter le menu LCD SETUP (configuration).
Appuyer sur cette touche pour passer du format 16:9 au format 4 :3 (Maintenir la
pression sur la touche pendant un instant).
7. Touche DVD SETUP (configuration DVD)
Appuyer sur cette touche pour entrer ou quitter le menu DVD SETUP (configuration).
8. Touches ∨ CH ∧
Sélection du canal.
Utilisées comme touches de direction vers le haut et vers le bas pour sélectionner
l'élément; appuyer sur ces touches pour passer d’une page à l’autre de la liste
télétexte du mode DVB.
9. Touche OK
Confirme la sélection.
10. Touche < >
Appuyer sur ces touches pour régler le niveau sonore en mode volume.
Utilisées comme touches de direction droite et gauche.
11. Touche VOL
Appuyer sur cette touche pour entrer dans le menu volume.
12. Touche
Appuyer sur cette touche pour commencer ou mettre en pause la lecture en mode DVD.
13. Touche
Arrête la lecture. Appuyer sur la touche
mode DVD; appuyer sur cette touche pour quitter le mode recherche en mode DVB.
14. Touche
Éjecte le disque en mode DVD.
15. Télécapteur
6
Vue de face de
l’appareil
pour reprendre la lecture normale en
Page 43

Vue de face de
l’appareil
Vue de gauche
1. Prise de raccordement USB
Raccordement du dispositif USB.
2. Fente carte SD/MS/MMC
Utilisée pour insérer la carte SD/MS/MMC.
3. Commutateur AV IN/OUT (audio vidéo,
entrée/sortie)
Placer le commutateur sur IN pour entrer un signal AV
extérieur; placer le commutateur sur OUT pour lire un
disque ou un signal AV de sortie.
4. Prise jack entrée/sortie vidéo
Raccordement d’un appareil vidéo extérieur.
5. Prise jack d’entrée/sortie audio
Raccordement d’un appareil audio extérieur.
6. Prise jack pour casque d'écoute
7. Prise jack pour alimentation 12 VCC
Raccordement de l’adaptateur fourni.
8. Commutateur ON/OFF (Marche/Arrêt)
9. Béquille support
Vue de droite
1. Fente plateau du disque
Utiliser pour le chargement du disque.
7
Page 44

1. Touche POWER (Alimentation)
Appuyer sur cette touche pour
entrer ou quitter le mode veille.
2. Touche DVD/DVB
Appuyer sur cette touche pour
passer du mode DVD, DVB, SD
et mode USB à un autre.
3. Touche TV
Appuyer sur cette touche pour
passer en mode TV.
4. Touche MENU
Appuyer sur cette touche pour
entrer dans le menu disque.
5. Touche SLOW
Appuyer sur cette touche pour
activer la fonction ralenti.
6. Touche TV/LCD SETUP
(configuration)
Appuyer sur cette touche pour
entrer ou quitter le menu de
configuration TV/LCD.
7. Touche +/-
: Sélection de l’élément.
+ -: Réglage du volume sonore.
8. Touche OK
Confirme la sélection.
9. Touche DVD SETUP
(configuration DVD)
Appuyer sur cette touche pour
entrer ou quitter le menu de
configuration DVD
10. Touches /CH+ CH-
Télécommande
: Sélectionne l'élément souhaité dans le menu. Appuyer sur l’une de ces
touches pour passer d’une page à l’autre dans la liste télétexte du mode DVB.
CH +/CH-: Sélectionne le canal.
11. Touche lecture (PLAY)
Appuyer sur cette touche pour démarrer la lecture.
12. Touche
Appuyer sur cette touche pour mettre en pause.
13. Touche /
Appuyer sur cette touche pour une lecture avant/arrière accélérée en mode DVD.
14. Touche EPG
Appuyer sur cette touche pour entrer dans la liste EPG en mode DVB.
8
Page 45

Télécommande
15. Touche FAV
Appuyer sur cette touche pour
lire les programmes favoris en
mode DVB.
16. Touche PR-LIST
Appuyer sur cette touche pour
entrer dans la liste de
programme en mode DVB.
17. Touche LANG
Appuyer sur cette touche pour
sélectionner la langue audio
en mode DVB.
18. Touche TITLE
Lorsqu’un DVD est en cours
de lecture, appuyer sur cette
touche pour aller au menu titre
et afficher le contenu du
disque.
19. Touche PP
Appuyer sur cette touche pour
modifier le mode courant de
l’image en SOFT, STANDARD,
LIGHT, et MEMORY.
20. Touches numériques 0 à
9/10 +
Sélectionne les numéros.
21. Touche
Appuyer sur cette touche pour
éjecter le disque en mode
DVD.
22. Touche AUDIO (audio)
Sélectionne la langue de lecture si le DVD comprend des pistes audio multilangues. En mode DVB, appuyer sur cette touche pour sélectionner la piste audio.
23. Touche SUBTITLE (sous-titre)
Sélectionne la langue des sous-titres si le disque contient des sous-titres multilangues.
Sélectionne la langue des sous-titres si le canal contient des sous-titres multilangues en mode DVB.
24. Touche A-B
Appuyer sur cette touche pour répéter une partie de la lecture du point A au point B.
25. Touche REPEAT
Appuyer sur cette touche pour répéter un chapitre, un titre ou la totalité en mode
DVD.
9
Page 46

26. Touche MUTE (silence)
Appuyer sur cette touche pour
activer ou désactiver les hautparleurs.
27. Touche VOL
Appuyer sur cette touche pour
ouvrir le mode VOL, puis
appuyer sur la touche CH +/pour augmenter ou diminuer le
niveau du volume sonore.
28. Touche ZOOM
Appuyer sur cette touche pour
agrandir/réduire la dimension
de l’image à l’écran.
29. Touche
Appuyer sur cette touche pour
arrêter la lecture en mode
DVD, appuyer sur cette touche
pour quitter le mode recherche
en mode DVB.
30. Touche /
Appuyer sur cette touche pour
aller à la liste, piste ou au
chapitre précédent/suivant
en mode DVD.
31. Touche TVR
Appuyer sur cette touche pour
passer de la télévision à la
radio en mode DVB.
32. Touche TTX
Appuyer sur cette touche pour visualiser la liste télétexte en mode DVB.
33. Touche RETURN
Appuyer sur cette touche pour revenir au dernier canal visualisé en mode DVB.
34. Touche SEARCH (recherche)
Appuyer sur cette touche pour entrer dans la colonne de balayage lors de la
sélection de la zone correcte en mode DVB.
35. Touche SYS
Appuyer sur cette touche pour passer du standard SECAM B/G, D/K, L '/L au PAL
B/G, I, D/K en mode TV.
36. Touche INFO
Appuyer sur cette touche pour afficher des informations détaillées au cours de la
lecture.
37. Touche GOTO
Appuyer sur cette touche pour sélectionner le titre du disque, le chapitre ou la
durée de lecture, etc.
10
Télécommande
Page 47

Télécommande
Préparation
Suivez les étapes suivantes pour installer la pile.
1. Tirer sur le support de pile de la télécommande dans le sens de la flèche.
2. Placer une pile neuve dans le support le (+) dirigé vers le haut.
3. Réinsérer le support de pile dans la télécommande.
Type de pile: CR2025 3V
Durée de vie de la pile: Environ 1 an dans des conditions normales d'utilisation (à
température ambiante).
Utilisation de la télécommande
Pointer la télécommande vers le télécapteur, à une distance inférieure à 5 mètres et
suivant un angle inférieur à 60 degrés. Vérifier qu'aucun obstacle ne se trouve entre la
télécommande et le télécapteur.
Remarque :
Une mauvaise utilisation de la pile peut
engendrer une surchauffe, une
explosion ou une inflammation
susceptible de provoquer des blessures
ou à un incendie. Une fuite de la pile
peut endommager la télécommande.
Ne pas exposer la télécommande à la
lumière directe du soleil.
Ne pas recharger, ouvrir ou chauffer la
pile.
Ne pas jeter la pile au feu, ni dans l’eau.
Remplacer immédiatement la pile usée.
11
Page 48

r
g
A
A
Retirer la pile lorsque la télécommande n'est pas utilisée pendant longtemps.
Raccordements
à l’appareil
• Ne pas brancher l’adaptateur secteur tant que toutes les connexions ne sont pas établies.
• Veiller à respecter les couleurs lors de la connexion des câbles audio et vidéo.
Connexion TV
Connexion source extérieure
de si
nal AV.
près avoir effectué les connexions,
placer le commutateur AV IN/OUT sur
V IN.
Remarque : Un bruit peut se produire
dans le cas d'une entrée de signal
audio extérieure, pendant la lecture
d'un DVD. Débrancher le cordon
audio cord pour supprimer le bruit.
Connexion amplificateu
Connexion casque d’écoute
Le raccordement du casque d’écoute
coupe automatiquement les hautparleurs.
Remarque : Un volume sonore
excessif est susceptible de nuire à
l’audition. Baisser le volume avant de
raccorder le casque, puis relever le
volume jusqu'à un niveau confortable.
12
Page 49

Raccordements
à l’appareil
Raccordement d'une antenne extérieure
Utilisation de l'adaptateur Utilisation de l’adaptateur
secteur (CA) d’allume cigare de voiture
Note:
Arrêter l'appareil avant de le
débrancher.
Dans le cas d'une utilisation
avec l'adaptateur, l'écran LCD
est plus brillant que lors d'une
utilisation avec la pile
rechargeable.
Note:
Débrancher l'appareil de l'adaptateur
d’allume cigare de voiture lors de la
mise en route du véhicule.
Ne jamais faire fonctionner l'appareil
ou regarder un programme pendant
la conduite du véhicule.
Retirer le boîtier de pile lors de
l'utilisation de l'adaptateur CA ou
d’allume cigare de voiture comme
source d'alimentation.
Placer l'appareil dans une position
appropriée à l'utilisation.
Ne pas détacher la pile au lithium-
13
polymère intégrée.
Page 50

A propos du bloc pile rechargeable
L'appareil est livré avec une pile au lithium-polymère rechargeable qui s’engage dans
l’appareil. Charger complètement la batterie avant la première utilisation. Le temps de
charge est normalement d'environ 4 heures. Une pile complètement chargée assure
environ 2 h 30 mn d'autonomie, toutefois la durée de lecture varie d'un disque à l'autre.
Lorsque la pile ne doit pas être utilisée pendant une période prolongée, la charger
complètement avant de la stocker.
Conditions de fonctionnement et précautions à prendre avec la pile
rechargeable :
Une pile neuve doit être complètement chargée avant la première utilisation.
La pile doit être utilisée et chargée uniquement lorsque la température ambiante
est comprise entre 10 et 40 ℃.
Ne jamais jeter la pile au feu, ni dans l’eau.
Ne pas exposer la pile à des températures élevées ou l’entreposer dans un
endroit chaud et ensoleillé.
Pile Rechargeable
Maintenir une bonne ventilation autour de l’appareil pour éviter la surchauffe. Ne
pas déposer l’appareil sur un lit, un divan ou similaire susceptible de bloquer la
ventilation.
Ne jamais court-circuiter les bornes de la pile.
Lorsque la charge de la pile est faible, l’indicateur POWER LOW apparaît sur
l'écran LCD. L'appareil s'éteint automatiquement quelques minutes plus tard.
Ne pas laisser l’appareil en mode Standby (veille) pendant longtemps lorsque
l'adaptateur secteur n’est pas utilisé pour économiser la charge de la pile.
Il est conseillé de placer le commutateur d’alimentation POWER ON/OFF sur OFF
(arrêt) lorsque la pile n’est pas utilisée pendant une période prolongée.
14
Page 51

t
Remarques concernant
Format des disques compatibles
DVD
CD
LOGO DU
DISQUE
DIAMETRE
DUREE DE LECTURE/
12cm
74min
12cm
FACES LISIBLES
133 mn (SS-SL)
242 mn (SS-DL)
266 mn (DS-SL)
484 mn (DS-DL)
JPEG
Le logiciel du fabricant spécifie les méthodes d'utilisation de certains disques DVD.
Suivre les instructions accompagnant le disque.
12cm
Précautions à prendre lors de la lecture des disques
Manipulation des disques
Ne pas toucher les faces lisibles des disques lors de leur insertion ou de
leur retrait de l'appareil, comme indiqué sur le dessin à droite.
Nettoyage
Les traces de doigts ou les taches peuvent affecter la qualité du son e
de l'image d'un disque. Pour nettoyer les disques, utiliser un chiffon
propre et doux. Le cas échéant, humidifier un tissu doux à l'aide d'un
détergent neutre dilué pour retirer de la poussière ou des traces de
doigts tenaces.
Ne pas frotter la surface du disque avec des mouvements circulaires
(voir la figure au milieu à droite) (des rayures concentriques sur le
disque ont tendance à provoquer du bruit). Passer le chiffon sans
appuyer depuis le centre du disque vers les bords extérieurs, comme le
montre la figure à droite.
15
Page 52

LIRE ATTENTIVEMENT LES INSTRUCTIONS SUIVANTES AVANT D'UTILISER
L’APPAREIL POUR LA PREMIERE FOIS.
AVERTISSEMENT : Ne pas lire des disques de mauvaise qualité pour éviter
d'endommager la lentille.
Préparation
1. Connecter l'appareil à l'alimentation au
moyen de l'adaptateur fourni.
2. Placer le commutateur POWER ON/OFF
sur ON pour mettre l’appareil en service.
3. Appuyer sur la touche EJECT pour
éjecter le disque.
4. L'appareil recherche le disque, puis effectue la localisation du disque.
5. Régler le volume sonore au niveau souhaité au moyen de la touche volume.
6. Pour arrêter l'appareil, placer le commutateur POWER ON/OFF sur OFF.
Lecture d'un DVD
Code de zone
Les lecteurs de DVD et les disques sont codés par zone. Si le numéro de zone indiqué
sur la jaquette du disque DVD ne correspond pas au numéro de zone de cet appareil, la
lecture du disque est impossible. Le code de zone de cet appareil est 2.
Lecture
Après le chargement d'un disque DVD, l'écran affiche un menu, appuyer sur les touches
pour sélectionner l'élément souhaité, puis appuyer sur la touche OK pour démarrer la lecture.
Pause
Pendant la lecture, appuyer sur la touche
télécommande pour interrompre la lecture (mode pause), puis appuyer de nouveau sur
la touche (Play) pour reprendre la lecture normale.
Arrêt
Pendant la lecture, appuyer une fois sur la touche pour arrêter la lecture, puis
appuyer sur la touche (Play) pour reprendre la lecture normale. Appuyer deux fois
sur la touche pour arrêter complètement la lecture.
de l’appareil ou la touche de la
Lecture
16
Page 53

Précédent et suivant
Pendant la lecture, appuyer sur la touche pour revenir au chapitre précédent,
appuyer sur la touche pour aller au chapitre suivant.
Lecture rapide
Pendant la lecture, appuyer sur la touche (et maintenir la pression sur cette touche
pendant plusieurs secondes) pour démarrer le retour rapide, appuyer sur la touche
(et maintenir la pression sur cette touche pendant plusieurs secondes) pour démarrer
l’avance rapide. Appuyer sur cette touche (et maintenir la pression pendant plusieurs
secondes) à plusieurs reprises pour la lecture rapide à la vitesse de 2X, 4X, 8X, 16X,
32X et normale dans cet ordre. Appuyer sur la touche (Play) pour reprendre la
lecture normale au cours de la lecture rapide.
SLOW
Pendant la lecture, appuyer sur la touche SLOW pour ralentir l'avance et le retour à la
vitesse de 1/2 - 1/4 - 1/8 - 1/16. Appuyer sur la touche (Play) pour reprendre la
lecture normale au cours de la lecture ralentie.
ZOOM
Pendant la lecture, appuyer sur le bouton ZOOM à plusieurs reprises pour passer de la
taille 2x - 3x - 4x - 1/2 - 1/3 - 1/4 – puis à la taille normale, dans cet ordre.
A-B
Pendant la lecture, appuyer sur la touche A-B pour sélectionner le segment à répéter. Appuyer
une fois sur la touche A-B pour sélectionner le point de départ A, appuyer de nouveau sur la
touche AB pour sélectionner le point final B, la lecture est effectuée en continu dans le segment
A-B. Appuyer sur la touche A-B une troisième fois pour annuler la répétition.
MENU
Pendant la lecture, appuyer sur la touche MENU pour afficher le menu racine sur l'écran.
Dans le menu, appuyer sur la touche pour sélectionner l'élément souhaité et
appuyer sur la touche OK pour confirmer. Ou appuyer sur les touches numériques 0 à 9
et +10 pour sélectionner directement l’élément.
TITLE
En général, le contenu d'un disque DVD est divisé en plusieurs titres, il existe
également plusieurs menus dans un titre.
Pendant la lecture, appuyer sur la touche TITLE pour afficher le menu du titre sur
l'écran. Dans le menu, appuyer sur la touche pour sélectionner le titre et
appuyer sur la touche OK pour confirmer. Ou appuyer sur les touches numériques 0 à 9
et +10 pour sélectionner directement l’élément.
Lecture
17
Page 54

REPEAT
Appuyer sur cette touche, à plusieurs reprises, pour répéter un chapitre, un titre, la
totalité ou annuler la répétition? dans cet ordre.
Certains disques ne supportent pas la fonction répétition.
AUDIO
Appuyer sur cette touche pour sélectionner la langue audio si le disque contient l'audio
multi-langues.
SUBTITLE
Appuyer sur cette touche pour sélectionner la langue des sous-titres ou l’ensemble des
sous-titres si le disque contient des sous-titres multi-langues.
Touche INFO
Appuyer sur cette touche pour ouvrir ou fermer l'affichage des informations détaillées
sur la lecture en cours.
GOTO
Pendant la lecture, appuyer sur la touche GOTO pour accéder au menu, puis
sélectionner le titre, le chapitre ou la durée de lecture souhaitée, etc. Dans le menu,
utiliser la touche pour sélectionner l'élément, puis appuyer sur la touche OK pour
confirmer. Utiliser la touche numérique ou la touche pour choisir, puis appuyer sur
la touche OK pour confirmer. Appuyer de nouveau sur la touche GOTO pour quitter.
Certains disques DVD ne supportent pas la fonction recherche.
Lecture d’un CD
L’appareil lit toutes les pistes d’un disque CD par défaut. Il est possible d’utiliser les
touches et ou les touches numériques pour sélectionner une piste.
Pause
Pendant la lecture, appuyer sur la touche
télécommande pour interrompre la lecture (mode pause), puis appuyer de nouveau sur
la touche (Play) pour reprendre la lecture normale.
Arrêt
Pendant la lecture, appuyer une fois sur la touche pour arrêter la lecture, puis
appuyer sur la touche (PLAY) pour reprendre la lecture normale. Appuyer deux fois
sur la touche pour arrêter complètement la lecture.
Précédent et suivant
Pendant la lecture, appuyer sur la touche pour revenir à la piste précédente, appuyer
sur la touche pour passer à la piste suivante.
de l’appareil ou la touche de la
Lecture
18
Page 55

Lecture rapide
Pendant la lecture, appuyer sur la touche (et maintenir la pression sur cette touche
pendant plusieurs secondes) pour démarrer le retour rapide, appuyer sur la touche (et
maintenir la pression sur cette touche pendant plusieurs secondes) pour démarrer
l’avance rapide. Appuyer sur cette touche (et maintenir la pression pendant plusieurs
secondes) à plusieurs reprises pour la lecture rapide à la vitesse de 2X, 4X, 8X, 16X, 32X
et normale, dans cet ordre. Pendant la lecture rapide, appuyer sur la touche (Play) de
l’appareil ou sur la touche
REPEAT
Appuyer à plusieurs reprises sur la touche PLAY, pour répéter une piste, répéter
l’ensemble ou tout annuler, dans cet ordre.
Touche INFO
Appuyer sur la touche INFO pour ouvrir ou fermer l'affichage des informations détaillées
en cours de lecture.
AUDIO
Appuyer sur la touche AUDIO à plusieurs reprises pour choisir la piste sonore comme suit:
Mono Left
GOTO
Pendant la lecture, appuyer à plusieurs reprises sur la touche GOTO pour entrer la
durée de lecture souhaitée, la durée de la piste ou le numéro de la piste. Dans chaque
menu, utiliser les touches numériques 0 à 9 et la touche +10 pour entrer le numéro,
l’appareil se cale alors sur la valeur souhaitée.
Lecture du format JPEG
Suite au chargement d'un disque JPEG, l'écran affiche le dossier racine. Appuyer sur la
touche pour sélectionner un dossier, puis appuyer sur la touche OK pour confirmer.
Dans le dossier, appuyer sur la touche pour sélectionner des fichiers, puis appuyer sur
la touche (PLAY) pour lire, appuyer sur la touche pour revenir au dossier précédent.
Pause
Pendant la lecture, appuyer sur la touche
télécommande pour interrompre la lecture (mode pause), puis appuyer de nouveau sur
la touche
Arrêt
Pendant la lecture, appuyer sur la touche pour entrer dans le mode de
prévisualisation de l’image. Appuyer sur la touche pour sélectionner une
image, puis appuyer sur la touche OK pour lire.
Lecture
de la télécommande pour reprendre la lecture normale.
Mono Right Mix-Mono Stereo
de l’appareil ou la touche de la
(Play) pour reprendre la lecture normale.
19
Page 56

Précédent et suivant
Pendant la lecture, appuyer sur la touche pour revenir à l’image précédente, appuyer
sur la touche pour passer à l’image suivante.
ZOOM
Pendant la lecture, appuyer d’abord sur la touche ZOOM, puis appuyer sur la touche
pour zoomer l'image comme suit : 50 % à 200 %; appuyer sur la touche pour
agrandir l'image de la manière suivante : 200 %-50 %.
MENU
Pendant la lecture, appuyer sur la touche MENU pour revenir au mode dossier. Appuyer
sur la touche OK pour reprendre la lecture normale.
REPEAT
Appuyer à plusieurs reprises sur la touche OK, le mode répétition passe de:
Shuffle
GOTO
Pendant la lecture, appuyer sur la touche GOTO, puis sur les touches numériques 0 à 9
pour sélectionner et afficher l'image souhaitée.
En mode dossier, appuyer sur cette touche pour mettre en surbrillance le numéro de
dossier, appuyer sur les touches numériques 0 à 9 pour entrer le numéro, puis accéder
au dossier souhaité.
Rotation de l’image
Pendant le visionnement d'une image, appuyer sur la touche pour faire pivoter l'image.
Pendant la lecture, appuyer sur la touche pour faire pivoter l'image affichée vers la droite:
Pendant la lecture, appuyer sur la touche pour faire pivoter l'image affichée vers la gauche:
Random Single Repeat One Repeat All Repeat Off
20
Lecture
Page 57

Fonction USB et Carte
SD/MS/MMC
Préparation:
1 Connecter l'appareil à l'alimentation électrique.
2 Placer le commutateur POWER ON/OFF sur ON.
3 Appuyer sur la touche DVD/DVB de la télécommande ou sur la
touche DVD/TV de l’appareil pour passer en mode DVD.
4 Insérer le connecteur USB dans la prise USB de l’appareil, ou
insérer la carte SD/MS/MMC dans la fente du lecteur de carte
SD/MS/MMC de l’appareil. Voir la figure de droite :
S’assurer que les fichiers sont stockés dans l e dispositif
USB et dans la carte SD/MS/MMC avant la connexion.
En mode DVD, appuyer sur la touche DVD/TV de l’appareil pendant plusieurs secondes
de manière répétée pour passer du mode DVD au mode DVB, et des modes
SD/MS/MMC au mode USB si la carte SD/MS/MMC est insérée et le dispositif USB
connecté. L'état par défaut est la lecture du disque. Voir la figure ci-dessous:
1 Appuyer sur la touche pour sélectionner le dossier, puis appuyer sur OK pour
confirmer.
2 Appuyer sur la touche pour sélectionner la piste souhaitée. Ensuite, appuyer
sur la touche (Play) pour démarrer la lecture.
3 Appuyer sur la touche pour arrêter la lecture. Ensuite, appuyer sur la touche
pour reprendre la piste en cours.
Remarque :
La visualisation à l’écran varie selon les différents disques ou cartes.
Quitter le mode USB ou le mode carte SD/MS/MMC directement après la lecture des
fichiers. Ensuite, l'appareil se trouve à nouveau dans l'état lecture du disque.
00:00 00:00
001/002
BAK
JPEG
21
Page 58

Suivre les étapes suivantes pour modifier les réglages par défaut de l'appareil, si nécessaire.
1. En mode DVD, appuyer sur la touche DVD SETUP pour entrer dans le mode
menu de configuration.
2. Appuyer sur la touche pour sélectionner un menu.
3. Appuyer sur la touche pour sélectionner l'élément à régler dans le menu.
Règlage du système
DVD
Page General Setup
Les éléments contenus dans ce menu sont
représentés sur la vue à gauche.
Appuyer sur la touche pour mettre en
surbrillance l’élément.
Appuyer sur la touche pour entrer.
Appuyer sur la touche pour choisir la sélection
appropriée.
Appuyer sur la touche OK pour confirmer, puis
TV Display
Sélectionner Normal/PS ou Normal/LB lorsqu’un TV 4 :3 est connecté.
Sélectionnez WIDE lors de l'utilisation d'une largeur d’écran 16:9 sur l'appareil.
Indication d’angle
On : L'écran affiche les symboles d'angle, lorsqu’un DVD multi-angle est en cours d'exécution.
Off : Le symbole «angle» ne s'affiche pas.
Langue de l’OSD (affichage à l’écran)
Utilisé pour sélectionner la langue d'affichage sur l'écran.
Economiseur d'écran
On : L'écran affiche un certain nombre d’images pour protéger l'écran à partir du
moment où l’appareil n’est plus sollicité pendant plusieurs minutes.
Off : Cette fonction est désactivée.
Dernière Mémoire
Utiliser les touches de direction pour sélectionner “On” pour reprendre la lecture à
partir du point où elle s'était arrêtée, la dernière fois, ou bien sélectionner “Off” pou
rannuler la function et retourner à l'écran précédent.
appuyer sur la touche pour quitter.
22
Page 59

Règlage du système
DVD
Page Speaker Setup (réglage haut-parleurs)
Les éléments contenus dans ce menu sont
représentés sur la vue à gauche.
Appuyer sur la touche pour mettre en
surbrillance l’élément.
Appuyer sur la touche pour entrer.
Appuyer sur la touche pour choisir la sélection
appropriée.
Appuyer sur la touche OK pour confirmer, puis
Downmix
LT/RT : Sortie audio mixée au format prévu par Dolby.
Stereo : Signal de sortie stéréo.
appuyer sur la touche pour quitter.
Dolby Digital Setup (Règlage Dolby)
Les éléments contenus dans ce menu sont représentés sur la vue à gauche.
Appuyer sur la touche pour mettre en
surbrillance l’élément.
Appuyer sur la touche pour entrer.
Appuyer sur la touche pour choisir la
sélection appropriée.
Appuyer sur la touche ENTER pour confirmer,
Dual Mono
Stereo : Sortie des sons stéréo.
L-Mono : Sortie des sons de la voie gauche (L + L).
R-Mono : Sortie des sons de la voie droite (R + R).
Mix-Mono : Sortie des sons de la voie gauche et de la voie droite (L + R).
Dynamique
Utilisé pour régler le taux de compression dynamique linéaire pour obtenir différents
effets de compression du signal.
Le taux de compression est plus grand, la différence entre alto et bourdon est plus
faible.
Utile uniquement pour les sons numériques de plateau.
appuyer la touche pour quitter.
23
Page 60

Règlage du système
DVD
Page Préférence
Les éléments contenus dans ce menu sont
représentés sur la vue à gauche.
Appuyer sur la touche pour mettre en
surbrillance l’élément.
Appuyer sur la touche pour entrer.
Appuyer sur la touche pour choisir la sélection
appropriée.
Appuyer sur la touche OK pour confirmer, appuyer
sur la touche pour quitter.
Ce menu apparaît et peut être réglé uniquement lorsque la lecture est en
position d’arrêt complet ou s’il n'y a pas de disque dans l'appareil.
Type TV
Utilisez pour sélectionner le type de TV.
Audio, sous-titre, menu disque
Ces réglages permettent d'entendre ou de lire les langues d'un DVD en choisissant
l'anglais, le français, l’espagnol, etc. si le disque contient la fonction multi-langues.
Contrôle parental
La fonction parentale s’applique aux disques DVD qui sont munis d’une fonction de
verrouillage enfant. Au moyen du verrouillage parental, la lecture du disque peut être
verrouillée.
Accéder au contrôle parental en appuyant sur les touches ▲ CH + ou CH-▼ puis
appuyer sur la touche OK pour confirmer. Le mot de passe par défaut est 123456.
Réglage par défaut
Utilisez cette fonction pour réinitialiser tous les réglages.
Certains disques ne supportent pas ces fonctions.
24
Page 61

Règlage du système
DVD
Page de configuration du mot de passe
Les éléments contenus dans ce menu sont
représentés sur la vue à gauche.
Appuyer sur la touche pour mettre en
surbrillance l’élément.
Appuyer sur la touche pour entrer.
Appuyer sur la touche pour choisir la sélection
appropriée.
Appuyer sur la touche OK pour confirmer, puis
appuyer sur la touche pour quitter.
Mot de passe
Sélectionner «On» active la fonction mot de passe.
Sélectionner «Off»: La fonction mot de passe est indisponible.
Mot de passe
Utiliser pour fixer le mot de passe, le mot de passe par défaut est 123456.
25
Page 62

Règlage du système
DVD
1 En mode DVB, appuyer sur la touche DVD SETUP pour ouvrir le menu de
configuration DVD.
2 Appuyer sur la touche pour sélectionner le menu de configuration DVB-T.
3 Appuyer de nouveau sur la touche DVD SETUP pour quitter le menu de
configuration DVB.
Page de configuration DVB-T
Zone
Utiliser pour sélectionner le pays.
Les éléments contenus dans ce menu sont
représentés sur la vue à gauche.
Appuyer sur la touche pour mettre en
surbrillance l’élément.
Appuyer sur la touche pour entrer.
Appuyer sur la touche pour choisir la sélection
appropriée.
Appuyer sur la touche OK pour confirmer, puis
appuyer sur la touche pour quitter.
Le canal DVB peut être trouvé uniquement si le pays correct est choisi dans
le menu.
Fuseau horaire
Utiliser pour sélectionner le fuseau horaire.
Réglage du canal
Appuyer sur cet élément pour entrer dans le menu de réglage du canal illustré ci-dessous:
26
Page 63

Règlage du système
1 Recherche automatique
Appuyer sur la touche OK pour entrer dans le menu, appuyer sur les touches
pour sélectionner "OK" pour démarrer le balayage des canaux ou sélectionner
«Cancel» (Annuler) pour réinitialiser. L’auto-balayage prend quelques minutes,
lorsque la syntonisation est terminée, l’appareil quitte ce mode et mémorise
automatiquement les programmes dans l’ordre.
Au cours de la syntonisation (balayage), appuyer sur la touche STOP pour
quitter le mode de balayage automatique (auto-scan).
2 Recherche manuelle
Dans le menu, appuyer sur la touche pour rechercher le canal souhaité. Au
cours de la syntonisation (balayage), appuyer sur la touche STOP pour revenir
au menu précédent.
3 Configuration des chaînes (Adjust Channel)
Appuyer sur la touche pour sélectionner le canal réglé, puis appuyer sur la
touche OK pour entrer dans le menu. Dans le menu, appuyer sur la touche 1 de la
télécommande pour sélectionner le canal dans la liste des canaux favoris, appuyer
sur la touche 2 de la télécommande pour supprimer le programme, appuyer sur la
touche 3 de la télécommande pour entrer le mot de passe pour définir le
programme protégé. Le mot de passe par défaut est 123456. Appuyer sur la
touche pour sélectionner EXIT et appuyer sur la touche OK pour quitter le
menu.
4 Réorganisation des chaînes (Channel Remap)
Appuyer sur la touche pour sélectionner le canal remappé. Dans le menu,
appuyer sur la touche OK pour remapper le canal souhaité.
DVD
27
Page 64

Appuyer sur la touche TV/LCD SETUP (Règlage LCD/TV) pour accéder au menu de
configuration. Appuyer sur la touche
FUNCTION (fonction). Appuyer de nouveau sur la touche TV/LCD SETUP pour quitter.
Menu SETUP PICTURE (configuration d’image)
Appuyer sur la touche
Appuyer sur la touche
Le menu SETUP PICTURE (configuration d’image) disparaît automatiquement si
aucune opération n’est effectuée pendant plusieurs secondes.
pour mettre en surbrillance l’élément souhaité.
pour régler la valeur.
pour passer du menu PICTURE (image) au menu
Configuration d'image
Luminosité 30
Contraste 30
Couleur 30
FUNCTION MENU (menu fonction)
Langue Anglais
Fond bleu On
Arrêt automatique Off
Par Défaut
Fonction
Appuyer sur la touche pour mettre en surbrillance l’élément souhaité.
Appuyer sur les touches
Langue: Permet de changer la langue de l'OSD (Visualisation sur l’écran).
BLUESCREEN: (fond bleu)
Fonction disponible uniquement en l’absence de signal d’entrée.
Appuyer sur la touche pour activer ou désactiver la fonction.
Time Off: (arrêt automatique)
Choisir la durée d'attente pour entrer en mode veille, outre les sélections 15, 30, 45,
60,75, et 90,105, 120 mn ou OFF (L’état OFF désactive cette fonction).
Default: (par défaut): Après confirmation de cette sélection, le réglage reprend la
valeur initiale par défaut.
pour modifier le réglage.
Règlage LCD/TV
28
Page 65

V
Fonctionnement de base
Brancher l'antenne à la prise jack d’antenne du panneau arrière. Après le raccordement
de l'antenne, brancher le cordon d'alimentation. Si le lecteur est en mode veille,
appuyer sur la touche POWER de l’appareil pour mettre l'appareil sous tension.
Appuyer sur la touche TV de la télécommande pour passer en mode TV.
Appuyer sur les touches de direction ou appuyer sur les touches numériques de la
télécommande pour sélectionner le canal souhaité.
Certaines préférences peuvent être préréglées:
Configuration du système de télévision
Appuyer sur la touche TV/LCD SETUP pour accéder au menu de configuration
PICTURE (image) puis appuyer sur la touche , le menu de configuration du système
de télévision apparaît:
Appuyer sur la touche
Appuyer sur les touches
1. Canal
2. Permutation de canal
Fonction TV
Configuration T
Canal 001
Permutation de canal 001
Passe OFF
Système SECAM L’/L
Réglage fin 105.25
Balayage auto
pour mettre en surbrillance l’élément souhaité.
pour modifier le réglage.
Appuyer sur la touche pour passer d’un canal à l’autre.
Utiliser la touche ▲ CH + ou CH-▼ pour sélectionner SWAP, appuyer sur la
touche pour sélectionner le numéro de canal, puis la chaîne de télévision est
permutée sur le canal sélectionné.
29
Page 66

3. Passe
Utiliser la touche ▲ CH + ou CH-▼ pour sélectionner Skip, appuyer sur la touche
pour sélectionner On ou Off (activer ou désactiver).
On : Lorsque la touche de direction est utilisée pour activer la fonction (ON), le
canal en cours est "passé" lors de l'utilisation de la touche ▲ CH + ou CH-▼ pour
sélectionner les chaînes de télévision.
Off : Lorsque la touche de direction est utilisée pour désactiver la fonction (OFF),
l’appareil lit les canaux dans l'ordre lors de la sélection dans des conditions
normales de lecture, sans en passer.
4. SYSTEME
Utiliser la touche de direction ◄ ou ► pour sélectionner le type de système de
télévision.
5. REGLAGE FIN
Utiliser la touche ▲ CH + ou CH-▼ pour sélectionner Fine Tuning (réglage fin)
lorsque le rendu d’une chaîne (comme l'image et le son, etc.) est mauvais, puis
appuyer sur la touche de direction ► ou ◄ pour effectuer le réglage fin de la
chaîne de télévision en avant ou en arrière du canal en cours d'utilisation.
6. Recherche automatique
Utiliser la touche ▲ CH + ou CH-▼ pour sélectionner Auto Scan, appuyer sur la
touche OK ou ► pour entrer dans le mode balayage automatique. Le processus
de recherche de chaînes de télévision prend quelques minutes. L'appareil
recherche à partir du canal de fréquence la plus basse à celui de fréquence la plus
élevée dans la liste des canaux standards.
Au cours de la recherche, appuyer sur la touche pour quitter le mode balayage.
Lorsque les opérations de recherche sont terminées, l'appareil mémorise les
chaînes recherchées dans l’ordre et quitte automatiquement le mode mémoire.
Utiliser la touche ▲ CH + ou CH-▼ pour sélectionner la chaîne souhaitée parmi
celles entrées en mémoire.
NO SIGNAL (pas de signal) s'affiche sur l'écran, si l'appareil ne trouve pas de
chaîne de télévision disponible.
30
Fonction TV
Page 67

A
Diagnostic des pannes
En cas de problème avec cet appareil, l’arrêter immédiatement, puis débrancher le
connecteur du cordon d’alimentation. Prendre les mesures indiquées dans les tableaux
suivants pour résoudre des problèmes simples avant de contacter le service après
vente. Ne jamais tenter de réparer l'appareil vous-même en raison du danger encouru.
L'appareil ne
fonctionne pas.
PROBLEM
CAUSE POSSIBLE
La lentille a peut-être été
mouillée.
Le disque n'a peut-être pas
été placé correctement.
Il n'y a peut-être pas de
disque dans le lecteur.
SOLUTION POSSIBLE
Retirer le disque et ne pas
utiliser l'appareil pendant au
moins deux heures.
Placer le disque avec
l'étiquette sur le dessus.
Insérer un DVD dans le
lecteur.
Le code de zone de l'appareil
n'est peut-être pas le même
que le code de zone du DVD.
Vérifier que le code de zone
de l'appareil est le même que
le code de zone du DVD.
Il n'y a pas de son.
Les haut-parleurs ne sont
peut-être pas allumés.
Le son du DVD n'est peutêtre pas réglé correctement.
Le système n'est peut-être
pas connecté correctement.
Le DVD est peut-être sale ou
voilé.
llumer les haut-parleurs.
Régler correctement le son
du DVD.
Connecter le système
correctement.
Nettoyer ou changer le
disque.
31
Page 68

pp
PROBLEM
CAUSE POSSIBLE
Il n'y a pas d'image
Le système n'est peut-être
pas connecté correctement.
L'appareil n'est peut-être pas
en mode AV correct.
Le LCD n'est peut-être pas en
mode vidéo correct.
Le DVD est peut-être sale ou
voilé.
La télécommande ne
fonctionne pas.
Il y a peut-être un obstacle
entre la télécommande et
l'appareil.
La télécommande n'est
peut-être pas pointée vers
areil.
l'a
La pile de la télécommande
n'est peut-être pas placée
La pile de la télécommande
est peut-être usée ou vide.
Autres possibilités:
Les charges électrostatiques ou autres interférences sont susceptibles d’entraîner un
fonctionnement anormal de l’appareil. De manière à rétablir un état normal de
fonctionnement, débrancher le cordon d'alimentation, puis brancher le de nouveau pour
réinitialiser l'appareil. Si les problèmes persistent, couper l'alimentation et consulter le
centre de maintenance agrée ou un technicien qualifié.
Diagnostic des pannes
SOLUTION POSSIBLE
Connecter le système
correctement.
Vérifier le mode AV.
Choisissez le mode vidéo
correct.
Nettoyer ou changer le
disque.
Oter les obstacles entre la
télécommande et l'appareil.
Pointer la télécommande
directement vers l'appareil.
Vérifier les polarités de la pile
dans le compartiment.
Remplacer la pile.
32
Page 69

Spécifications
Taille de l'écran TFT 10,2 pouces (16:9) soit 26 cm
Résolution de l'écran 800x480
Longueur d'onde laser 780/650 nm
Standards TV
Réponse en fréquence 20 Hz à 20 kHz ± 2,5 dB
Rapport Signal/Bruit (S/N) audio ≥ 85 dB
Distorsion audio + bruit ≤-70 dB (à 1 kHz)
Séparation des canaux ≥ 70 dB (à 1 kHz)
Gamme dynamique ≥ 80 dB (à 1 kHz)
Sortie audio Niveau de sortie 1,5 V ±
Sortie vidéo
Puissance
Dimensions
Poids Poids approximatif : 1,65 kg
CONCEPTION ET CARACTERISTIQUES SUJETTES A MO DIFICATION SANS PREA VIS
PAL B/G, PAL D/K, PAL I, ou SECAM B/G,
SECAM D/K SECAM L '/L
Niveau de sortie 1V crête à crête ± 0,2,
charge 75 Ω
Asymétrique négatif
Alimentation 100 VCA à 240 VCA (50/60 Hz)
ou 12V CC
286 mm X 220 mm X 48 mm
0.5
0.3
, charge 10 kΩ
“Dolby” et le symbole du double D sont des marques déposées de Dolby Laboratories.
Travaux confidentiels non publiés.
Fabriqué sous licence de Dolby Laboratories.
© 1992 -1997 Dolby Laboratories, Inc.
Tous droits réservés.
33
Page 70

Texte de garantie FR
Cher client,
Nous vous remercions d'avoir acheté ce produit AKIRA™ et de faire confiance à notre société. Ce
produit répond aux normes de sécurité en vigueur et a été soumis à des tests rigoureux durant sa
fabrication.
Toutefois, dans l'éventualité d'un défaut, le produit ou sa(ses) pièce(s) défectueuse(s) (excepté des
accessoires et les consommables) seront réparés gratuitement (pièces, main d'œuvre et expédition
dans les pays mentionnés ci-dessous) ou, à la discrétion de AKIRA™, remplacés par un item
similaire, à condition qu'ils aient été renvoyés dans les 24 (vingt quatre) mois qui suivent la date du
premier achat (date de réception), qu'ils présentent un défaut matériel et/ou de main d'œuvre et
qu'ils aient été achetés dans l'un des pays suivants : France (métropolitaine), Espagne, Italie,
Portugal, Belgique (territoire) ou dans une boutique détaxée
Cette garantie n'est accordée que sur présentation de la facture ou du bon de caisse original
indiquant la date d'achat et le nom du revendeur, et de la présente carte de garantie portant
mention du type de produit et de son numéro de série. Le bénéfice de cette garantie pourra être
refusé si la facture, le bon de caisse ou la carte de garantie a été modifié d'une manière
quelconque, effacé ou rendu illisible après l'achat original.
Enregistrement en ligne
Pour valider votre garantie, veuillez enregistrer votre produit AKIRA™ dans les 30 jours qui suivent
son achat sur http://www.akiraeurope.com
La présente garantie ne s'applique pas aux cas suivants :
1. Dommages d'origine accidentelle y compris, mais sans exclusive, la foudre, l'incendie,
l'eau.
2. Produit endommagé par suite d'une négligence, d'une mauvaise utilisation, d'une utilisation
contraire aux instructions du mode d'emploi, d'une réparation et/ou d'une installation mal
exécutée (liste non exhaustive). En particulier, un écran brûlé par l'affichage excessivement
prolongé d'une image fixe telle qu'un écran d'ordinateur ou des logos, comme décrit dans
le mode d'emploi, n'est pas couvert par la garantie.
3. Modifications, adaptations ou altérations du produit dans le but de l'utiliser dans un autre
pays que ceux pour lesquels il a été conçu et fabriqué, ou tout dommage résultant de telles
modifications.
4. Utilisation différente de l'usage normal par un particulier dans le cadre domestique.
5. Défectuosité des pixels individuels lorsque le nombre de pixels défectueux est inférieur aux
nombres suivants : Pixel sombre : 7 Pixel brillant ou scintillant : 3
Nombre total de pixels défectueux : 8
Ces déclarations n'affectent pas vos droits statutaires en tant que consommateur dans le cadre de
la législation nationale en vigueur, ni vos droits de consommateur vis-à-vis du revendeur auquel
vous avez acheté le produit.
Si vous avez un problème technique, qu'il soit couvert ou non par la garantie, veuillez en parler au
revendeur qui vous a vendu le produit.
Dans votre propre intérêt, nous vous recommandons de lire attentivement le mode d'emploi de votre
produit AKIRA™ avant de prendre contact avec votre revendeur ou un centre de dépannage.
Page 71

Si vous avez des questions auxquelles votre revendeur n'est pas en mesure de répondre, veuillez
appeler la hotline AKIRA (numéro international gratuit : 00 800 800 25 472).
AKIRA™ est une marque déposée de TT International, Inc.
Page 72

y
PRECAUCIÓN: EL USO DE CONTROLES, AJUSTES O LA EJECUCIÓN DE
PROCEDIMIENTOS DIFERENTES DE LOS ESPECIFICADOS EN ESTE MANUAL PUEDEN
TENER COMO CONSECUENCIA LA EXPOSICIÓN A RADIACIÓN PELIGROSA.
Instrucciones de
Seguridad Importantes
El símbolo del rayo con punta de flecha, dentro de un triángulo equilátero tiene
la finalidad de alertar al usuario de la presencia de “Tensión peligrosa" sin aislar
en el interior del producto, que puede ser de una magnitud suficiente para
constituir un riesgo de descarga eléctrica para las personas.
La marca de exclamación con un triángulo equilátero tiene la intención de
alertar al usuario de la presencia de instrucciones de manejo
mantenimiento importantes en la documentación que acompaña al aparato.
PRECAUCIÓN: Presencia de radiación láser cuando se
abre. No dirigir la vista directamente hacia el haz.
PRECAUCIÓN
1. El producto contiene un dispositivo láser de baja potencia. Para mantener la
seguridad del dispositivo láser, no desmonte ninguna tapa ni intente reparar la
unidad. Si se necesita cualquier reparación, póngase en contacto con el
distribuidor o su concesionario técnico.
2. Para reducir el riesgo de shock eléctrico, no desmonte la tapa (ni la parte trasera).
No hay piezas reparables por el usuario en el interior. Remita las reparaciones al
servicio técnico especializado. Desenchufe el producto de la toma de corriente
antes de efectuar cualquier mantenimiento o cuando la unidad vaya a permanecer
sin utilizarse durante un largo periodo de tiempo.
3. El fabricante no asumirá ninguna responsabilidad por las averías causadas como
consecuencia de sustituciones y modificaciones del producto sin su autorización o
de la unidad autorizada.
4. Peligro de explosión si las pilas se sustituyen incorrectamente. Sustituir solamente
por el mismo tipo o equivalente.
ADVERTENCIA
No se expondrá el aparato a goteo o salpicaduras de líquidos, ni se colocarán objetos
llenos de líquido, como jarrones, sobre él.
Las imágenes contenidas en este manual han sido incluidas a modo de
referencia y pueden ser diferentes de las reales.
1
Page 73

Instrucciones de
Seguridad Importantes
NOTAS
1. Leer estas instrucciones.
2. Conservar estas instrucciones.
3. Prestar atención a todas las
Advertencias.
4. Seguir todas las instrucciones.
5. No utilizar este aparato cerca del
agua.
6. Limpiar solamente con un paño
seco.
7. No obstruir ninguna abertura de
ventilación. Mantener buenas
condiciones de ventilación
alrededor del aparato. No colocar el producto sobre la cama, sofá o cualquier otra
superficie que obstruya la ventilación. Instalar de acuerdo con las instrucciones
del fabricante.
8. No instalar cerca de ninguna fuente de calor como radiadores, rejillas de calefacción,
hornos u otros aparatos (incluyendo amplificadores) que producen calor.
9. Leer, prestar atención y seguir todas las instrucciones para asegurar una
instalación e interconexión segura y adecuada del aparato.
10. No se expondrá el aparato a goteo o salpicaduras de líquidos, ni se colocarán
objetos llenos de líquido, como jarrones, sobre él.
11. La toma de conexión eléctrica de la red deberá estar instalada cerca del aparato y
el conector debe permanecer fácilmente accesible para su uso.
12. Proteger el cable de alimentación contra pisotones o pinchazos, especialmente en
los enchufes, tomas de corriente, y el punto de salida del aparato.
13. Utilizar solamente accesorios especificados por el fabricante.
14. Utilizar solamente con el carrito, pedestal, trípode, soporte o mesa especificados
por el fabricante, o vendidos con el aparato. Cuando se utilice un carrito, tener
precaución cuando se esté moviendo la combinación carrito/aparato para evitar
lesiones que se pueden producir por vuelcos.
15. Desenchufe el aparato durante tormentas con descargas eléctricas o cuando no
se utilice durante largos periodos de tiempo.
16. Remita las reparaciones al servicio técnico especializado. Cuando el aparato haya
sufrido cualquier daño es necesario repararlo, como cuando el cable de
alimentación o el enchufe estén dañados, se haya derramado líquido o se hayan
caído objetos en el interior del aparato, el aparato haya sido expuesto a los
efectos de la lluvia o humedad, no funcione normalmente, o se haya caído.
Nota: No tocar la pantalla LCD TFT directamente c on las manos.
Protección de Copyright
Este producto incorpora tecnología de protección de derechos de autor protegida por
patentes y otros derechos de propiedad intelectual de los EE.UU. El uso de esta
tecnología de protección de derechos de autor debe ser autorizada por Macrovision
Corporation, y está dirigida solamente a usos de visualización doméstica y otras
visualizaciones limitadas a menos que Macrovision Corporation autorice lo contrario. Se
prohíbe la ingeniería inversa y el desensamblaje.
INFORMACIÓN IMPORTANTE PARA
PRODUCTOS LÁSER
1. PRODUCTO LÁSER DE CLASE 1
2. PELIGRO: Radiación láser visible cuando el
producto está abierto y los dispositivos de
bloqueo defectuosos o anulados. Evitar la
exposición directa al haz.
3. PRECAUCIÓN: No abrir la tapa superior. No
existen piezas reparables por el usuario en
el interior de la unidad. Todas las
reparaciones deben ser efectuadas por
personal técnico cualificad;
2
Page 74

Accesorios
ÍTEM NOMBRE CANT
Mando a distancia 1
Pila para el mando a distancia 1
Adaptador AC 1
Cable de Audio / Vídeo 1
Adaptador para coche 1
Antena 1
Manual de operación 1
Nota:
Los accesorios y sus números de pieza están sujetos a cambios sin previo aviso.
3
Page 75

Instrucciones de seguridad importantes. ……………………………………...……
Accesorios…………………………………………………………………………………
Vista de la unidad………………………………………………………………….....….
Mando a distancia………………………………………………………………...………
Conexiones del sistema…………………………………………………………………
Pila recargable………………………………………………………..…………………..
Notas acerca de los discos…………………………………..…………………………
Reproducción………………………………………………..……………………………
Reproducción de DVD. ……………………………………………………………
Reproducción de CDs……………………………………………………………..
Reproducción de archivos JPEG………………………………………..……….
Función USB y tarjetas SD/MMC/MS………………………….………………………
Configuración del DVD............................................................................................
Configuración del DVB…….....................................................................................
Configuración de TV/LCD …………………………….…………………..……...…….
Función TV…………………………………………………………………………………
Resolución de problemas……………………………………………………………….
Especificaciones………………………………………………………………………….
Índice de Contenido
4
1
3
5
8
11
14
15
16
16
18
19
21
22
26
28
29
31
33
Page 76

Vista de la unidad
Vista delantera
5
Page 77

1. Antena
2. Pantalla LDC
3. Indicador de carga
La luz está en rojo durante la carga; y se pone verde cuando la Pila está
completamente cargada.
4. Indicador POWER (ENCENDIDO)
La luz se enciende en modo standby.
5. Botón DVD/TV
Púlselo una vez para cambiar entre el modo DVD y TV, pulse y manténgalo pulsado
durante varios segundos para cambiar entre modos DVD, DVB, SD y USB.
6. Botón LCD SETUP (CONFIGURACIÓN DE LCD)
Pulse para acceder o salir del menú LCD SETUP (CONFIGURACIÓN DE LCD).
Cambia la relación de presentación entre 16:9 y 4:3 (Pulse y mantenga pulsado
durante un momento).
7. Botón DVD SETUP (CONFIGURACIÓN DE DVD)
Pulse para acceder o salir del menú DVD SETUP (CONFIGURACIÓN DE DVD).
8. Botón ∨ CH ∧
Selección de canales.
Se utilizan los botones de dirección arriba y abajo para seleccionar la opción;
pulse para cambiar las páginas de la lista del teletexto del modo DVB.
9. Botón OK
Confirma la selección.
10. < > Botón
Pulse para ajustar el nivel de volumen en modo volumen.
Se utiliza como los botones de dirección izquierda y derecha.
11. Botón VOL
Pulse para acceder al menú de volumen.
12.
Botón
Pulse para reproducir o hacer una pausa en modo DVD.
13. Botón
Detiene la reproducción, y si pulsa el botón
reproducción normal en modo DVD; púlselo para salir del modo de búsqueda en
modo DVB.
14. Botón
Expulsa el disco en modo DVD.
15. Sensor remoto
Vista de la unidad
a continuación, volverá al modo de
6
Page 78

Vista de la unidad
Vista Izquierda
1. Puerto de conexión USB
Conecta con el dispositivo USB.
2. Ranura de tarjetas SD/MS/MMC
Se usa para insertar tarjetas SD/MS/MMC.
3. entrada / salida AV)
Cambie a “IN” para entrada de señal externa;
cambie a “OUT” para reproducir un disco o para
salida de señal de AV.
4. Clavija de conexión de Entrada/Salida de Vídeo
Conecta un dispositivo de vídeo externo.
5. Clavija de conexión de Entrada/Salida de Audio
Conecta un dispositivo de audio externo.
6. Clavija de conexión de auriculares
7. Clavija de entrada de CC de 12V
Conecta el adaptador suministrado.
8. Interruptor de Encendido / Apagado)
9. Soporte
Vista Derecha
1. Ranura de la bandeja del disco
Se utiliza para cargar el disco.
7
Page 79

1. Botón POWER (ENCENDIDO)
Pulse para acceder o salir del
modo standby.
2. Botón DVD/DVB
Pulse para cambiar entre modo
DVD, DVB, SD y USB.
3. Botón TV
Pulse para cambiar a modo TV.
4. Botón MENU
Pulse para acceder al menú de
volumen.
5. Botón SLOW (LENTO)
Pulse para activar la función
lenta.
6. Botón TV/LCD SETUP
(CONFIGURACIÓN DE TV/LCD)
Pulse para acceder o salir del
menú TV/LCD SETUP (menú de
CONFIGURACIÓN DE TV/LCD).
7. Botón /+ -
: Selección de opción.
+ -: Ajusta el valor del volumen.
8. Botón OK
Confirma la selección.
9. Botón DVD SETUP
(CONFIGURACIÓN DE DVD)
Pulse para acceder o salir del menú DVD setup (configuración de DVD).
10. Botón /CH+ CH-
: Selección de la opción deseada del menú; pulse para cambiar las páginas
en la lista de teletexto del modo DVB.
CH+/CH-: Selección de canales.
11. Botón (PLAY) (INICIO DE REPRODUCCIÓN)
Comienza la reproducción.
12. Botón
Hace una pausa en la reproducción.
13. / Botón
Pulse para reproducir con retroceso / avance rápido en modo DVD.
14. Botón EPG
Pulse para acceder a la lista EPG en modo DVB.
8
Mando a distancia
Page 80

Mando a distancia
15. Botón FAV
Pulse para cambiar los programas favoritos en modo DVB.
16. Botón PR-LIST
Pulse para acceder a la lista
de programas en modo DVB.
17. Botón LANG
Pulse para seleccionar el
idioma de audio en modo DVB.
18. Botón TITLE (TÍTULO)
Durante la reproducción de un
DVD, pulse este botón para ir
al menú de títulos y mostrar
los contenidos del disco.
19. Botón PP
Pulse para cambiar el modo
de imagen actual entre SOFT,
STANDARD, LIGHT y
MEMORY.
20. Botones 0-9 /10+
Selección de números.
21.
Botón
Pulse para expulsar el disco
en modo DVD.
22. Botón AUDIO
Selección de idioma de audio
si el disco DVD incluye
idiomas de audio múltiples de
reproducción. En modo DVB,
pulse para seleccionar la pista
de audio.
23. Botón SUBTITLE (SUBTÍTULOS)
Selección de idioma de subtítulos si el disco incluye idiomas de subtítulos
múltiples.
Selección de idioma de subtítulos si el canal contiene idiomas de subtítulos
múltiples en DVB.
24. Botón A-B
Repetición de una sección de la reproducción desde el punto A hasta el punto B.
25. Botón REPEAT (REPETIR)
Repite un capítulo, título o todo en modo DVD.
9
Page 81

26. Botón MUTE (SILENCIO)
Pulse para activar o desactivar la salida de los altavoces.
27. Botón VOL
Pulse para abrir el modo VOL,
a continuación pulse el botón
CH +/- para aumentar o
reducir el nivel de volumen.
28. Botón ZOOM
Aumento/reducción de la
imagen en la pantalla.
29. Botón
Detiene la reproducción en
modo DVD; púlselo para salir
del modo de búsqueda en
modo DVB.
30. / Botón
Va a la lista, pista o capítulo
anterior/siguiente en modo
DVD.
31. Botón TVR
Cambia entre TV y radio en
modo DVB.
32. Botón TTX
Muestra la lista de teletexto en
modo DVB.
33. Botón RETURN (RETORNO)
Retorna hasta el último canal
visto en modo DVB.
34. Botón SEARCH (BÚSQUEDA)
Pulse para acceder a la columna de búsqueda cuando se selecciona el Área
derecha en modo DVB.
35. Botón SYS
Cambia entre SECAM B/G, D/K. L’/L, y PAL B/G, I, D/K en modo TV.
36. Botón INFO
Muestra la información detallada durante la reproducción.
37. Botón GOTO (IR A)
10
Mando a distancia
Page 82

Selección del título, capítulo o tiempo de reproducción del disco, etc.
Mando a distancia
Preparación
Siga los pasos que se indican a continuación para instalar la pila.
1. Retire el soporte de la pila del mando a distancia siguiendo la dirección de la flecha.
2. Cargue una pila nueva adecuadamente con el (+) hacia arriba.
3. Inserte el soporte de la pila de nuevo en el mando a distancia.
Tipo de pila: CR2025 3V
Duración de la pila: aproximadamente 1 año en condiciones de uso normales (a
temperatura ambiente).
Uso del mando a distancia
Oriente el mando a distancia hacia el sensor remoto dentro de una distancia de 5
metros y de un ángulo de 60 grados, y sin que haya obstáculos entre el mando a
distancia y el sensor remoto.
Nota:
El uso inadecuado de la pila puede
causar sobrecalentamiento, explosión o
ignición, que puede tener como
consecuencias lesiones o incendios.
Las fugas en la pila pueden averiar el
mando a distancia.
No exponga el mando a distancia a la
luz directa del sol.
No recargue, desarme, deforme o
caliente la pila.
No arroje las pilas al fuego o al agua.
Sustituya inmediatamente la pila
cuando se agote.
Saque la pila cuando del mando
cuando éste no se vaya a usar durante
un largo periodo de tiempo.
11
Page 83

r
• No conecte la fuente de alimentación hasta que se hayan realizado todas las
conexiones.
• Asegúrese de que tiene en cuenta los colores de los cables cuando vaya a
conectar cables de audio y vídeo.
Conexión del TV
Conexiones de los
sistemas
Conexión del Amplificado
Conexión de señal AV Externa
Después de la conexión, cambie AV
IN/OUT a AV IN.
Nota: Puede haber ruido si hay una
entrada de señal de audio externa
durante la reproducción de un disco
DVD. Desenchufe el cable de audio
para suprimir el ruido.
Conexión de auriculares
Cuando estén conectados los
auriculares, los altavoces se
desconectarán automáticamente.
Nota: El volumen excesivamente alto
podría causar lesiones en sus oídos.
Baje el volumen antes de conectar los
auriculares, y luego suba el volumen
hasta un nivel confortable.
12
Page 84

Conexiones de los
Conexión a una antena externa
sistemas
Uso de Adaptador AC Uso de un Adaptador de coche
Nota:
Apague la alimentación de la
unidad antes de
desenchufarla.
Si utiliza el adaptador, la
pantalla LCD estará más
brillante que si utiliza la pila
recargable.
Nota:
Desconecte la unidad del adaptador
del coche al arrancar el vehículo.
No opera la unidad ni vea programas
mientras conduce un vehículo.
Quite el pack de pilas cuando utilice el
adaptador AC o del coche como
fuente de alimentación.
Coloque la unidad en una posición
adecuada para la vista.
No extraiga la pila de polímeros de litio
incorporada.
13
Page 85

Acerca del pack de pilas recargables
La unidad se entrega con una pila recargable de polímeros de litio que se instala en la
unidad. Cargue la pila completamente antes del primer uso. El tiempo de carga
normalmente es de 4 horas aproximadamente. Una pila completamente cargada
permite un uso de 2,5 horas aproximadamente, pero el tiempo de reproducción varía
dependiendo del disco. Si la pila no se va a utilizar durante un largo periodo de tiempo,
cárguela completamente antes de su almacenamiento.
Condiciones de funcionamiento y precauciones para la pila recargable:
La pila nueva debe cargarse completamente antes del primer uso.
La pila solamente se debe utilizar y cargar cuando la temperatura esté entre 10 – 40º C.
Nunca arroje las pilas al fuego o al agua.
No exponga la pila a altas temperaturas ni la almacene en lugares muy calientes
o soleados.
Pila recargable
Mantenga buenas condiciones de ventilación alrededor del aparato para evitar
sobrecalentamientos. No colocar el producto sobre una cama, sofá o cualquier
otra superficie que obstruya la ventilación.
No ponga los terminales de la pila en corto.
Cuando la pila tenga poca carga, aparecerá el indicador de baja carga en la
pantalla LCD. La unidad se apagará automáticamente varios minutos después.
No permita que la unidad esté en modo Standby durante mucho tiempo si no usa
el adaptador CA para evitar el consumo de la energía de la pila.
Le sugerimos que ponga el interruptor de Encendido (Power) en "Off" ("Apagado")
si no se va a usar la pila durante un largo periodo de tiempo.
14
Page 86

Observaciones sobre
Discos
Formatos de discos compatibles
DVD
CD
LOGO DEL
DISCO
DIÁMETRO
12cm
12cm
TIEMPO DE REPRODUCCIÓN/
LADOS REPRODUCIBLES
12cm
12cm
12cm
12cm
74min
JPEG
El fabricante del software especifica métodos de operación para algunos discos DVD.
Por favor, siga las instrucciones del disco.
12cm
Cuidado de los discos
Como coger los discos
Cuando esté cargando o extrayendo discos, trate de no tocar sus
superficies de reproducción, como se indica en la figura de la derecha.
Limpieza
Las huellas dactilares o manchas en el disco pueden afectar a la calidad del
sonido y de la imagen. Para limpiar sus discos, utilice un paño suave limpio.
Si es necesario, humedezca un paño suave con detergente neutro diluido
para eliminar la suciedad o huellas dactilares persistentes.
No frote con movimiento circular como se indica en la figura central de la
derecha (los arañazos concéntricos sobre los surcos del disco tienden a
causar ruido). Frote suavemente desde el centro del disco hacia el borde
exterior, como se indica en la figura de la derecha.
15
Page 87

LEA LAS INSTRUCCIONES SIGUIENTES DETENIDAMENTE ANTES DE UTILIZAR
SU EQUIPO POR PRIMERA VEZ.
ADVERTENCIA: No reproduzca discos de baja calidad para evitar dañar las lentes.
Preparación
1. Conecte la unidad a la fuente de alimentación
a través del adaptador suministrado.
2. Ponga el interruptor POWER ON/OFF en
la posición ON para encender la unidad.
3. Pulse el botón EJECT (EXPULSAR)
para expulsar el disco.
4. La unidad buscará el disco y entrará en el estado de búsqueda de disco.
5. Ajuste el volumen con el Botón VOLUME hasta el nivel deseado.
6. Para apagar la unidad, ponga el interruptor POWER ON/OFF en OFF.
Reproducción de DVD
Código de región
Las unidades y discos de DVD tienen códigos de región. Si el número de región
descrito en el disco DVD no se corresponde con el número de región de este producto,
el disco no se puede reproducir. El código de región de esta unidad es el 2.
Play (Reproducción)
Después de cargar un disco DVD, la pantalla mostrará un menú. Pulse los botones
para seleccionar la opción y pulse el botón OK para iniciar la reproducción.
Pause (Pausa)
Durante la reproducción, pulse el botón
para hacer una pausa en la reproducción, y pulse el botón
reanudar la reproducción normal.
Stop (Parada)
Durante la reproducción normal, pulse el botón una vez para detener la reproducción
y pulse (Play) para volver a la reproducción normal. Pulse el botón dos veces
repetidamente para detener la reproducción completamente.
del panel o el botón del mando a distancia
16
Reproducción
de nuevo o (Play) para
Page 88

Anterior y Siguiente
Durante la reproducción, pulse el botón para ir al capítulo anterior; pulse para ir al
capítulo siguiente.
Reproducción rápida
Durante la reproducción, pulse el botón (y manténgalo durante varios segundos)
para comenzar la reproducción con retroceso rápido; pulse el botón (y manténgalo
durante varios segundos) para comenzar la reproducción con avance rápido. Púlselo (y
manténgalo pulsado durante varios segundos) repetidamente para reproducción rápida
a velocidad de 2X, 4X, 8X, 16X, 32X y normal en secuencia. Pulse (Play) para
volver a la reproducción normal durante la reproducción rápida.
LENTO)
Durante la reproducción, pulse el botón SLOW (LENTO) para reproducción con avance
o rebobinado lento a velocidad de 1/2 – 1/4 – 1/8 – 1/16. Pulse (Play) para volver a la
reproducción normal durante la reproducción lenta.
ZOOM
Durante la reproducción, pulse el botón ZOOM repetidamente para cambiar entre 2x 3x - 4x - 1/2 - 1/3 - ¼ - con tamaño normal en la secuencia.
A-B
Durante la reproducción, pulse el botón A-B para seleccionar el segmento que desee
repetir. Pulse una vez para seleccionar el punto de comienzo A, pulse de Nuevo para
seleccionar el punto de finalización B y la unidad reproducirá el segmento entre A-B
continuamente. Pulse el botón A-B por tercera vez para anular la repetición.
MENU
Durante la reproducción, pulse el botón MENU para que se muestre el menú raíz en la
pantalla. En el menú, pulse el botón para seleccionar la opción y pulse el botón OK
para confirmar. O pulse los botones 0-9 y +10 para seleccionar la opción directamente.
TITLE (TÍTULOS)
En general, el contenido de un disco DVD se puede dividir en varios títulos, y también
hay varios menús en un título.
Durante la reproducción, pulse el botón TITLE (TÍTULO) para mostrar el menú de
títulos en la pantalla. En el menú, pulse el botón para seleccionar el título y
pulse el botón OK para confirmar. O pulse los botones 0-9 y +10 para seleccionar la
opción directamente.
Reproducción
17
Page 89

REPEAT (REPETIR)
Púlselo varias veces para repetir un Capítulo, Título, Todo o anular la repetición, en
esta secuencia.
Algunos discos no permiten la función de repetición.
AUDIO
Pulse para seleccionar el idioma de audio si el disco incluye idiomas de audio múltiples.
SUBTITLE (SUBTÍTULOS)
Pulse para seleccionar el idioma de subtítulos o desactivar los subtítulos si el disco
contiene idiomas de subtítulos múltiples.
INFO
Pulse para abrir o cerrar la presentación de la información detallada de la reproducción
en curso.
GOTO (IR A)
Durante la reproducción, pulse el botón GOTO (IR A ) para acceder al menú y
seleccionar el título, capítulo o tiempo, etc., de reproducción de deseado. En el menú,
pulse el botón para seleccionar la opción y pulse el botón OK para acceder. Utilice
el botón de números o el botón para seleccionar y el botón OK para confirmar.
Pulse otra vez el botón GOTO (IR A) para salir.
Algunos discos DVD no permiten la función de búsqueda.
Reproducción de CDs
El reproductor reproducirá todas las pistas de un disco CD de forma predeterminada.
Puede usar los botones y , o los botones numéricos para seleccionar una pista.
Pause (Pausa)
Durante la reproducción, pulse el botón
para hacer una pausa en la reproducción, y pulse el botón
reanudar la reproducción normal.
Stop (Parada)
Durante la reproducción normal, pulse el botón una vez para detener la reproducción
y pulse (Play) para volver a la reproducción normal. Pulse el botón dos veces
repetidamente para detener la reproducción completamente.
Anterior y Siguiente
Durante la reproducción, pulse el botón para ir a la pista anterior; pulse para ir a
la pista siguiente.
del panel o el botón del mando a distancia
Reproducción
de nuevo o (Play) para
18
Page 90

Reproducción rápida
Durante la reproducción, pulse el botón (y manténgalo pulsado durante varios
segundos) para comenzar la reproducción con retroceso rápido; pulse el botón (y
manténgalo pulsado durante varios segundos) para comenzar la reproducción con
avance rápido. Púlselo (y manténgalo pulsado durante varios segundos) repetidamente
para reproducción rápida a velocidad de 2X, 4X, 8X, 16X, 32X y normal, en esta
secuencia. Durante la reproducción rápida, pulse el botón (Play)
reproducción normal.
REPEAT (REPETIR)
Púlselo varias veces para repetir una Pista, Todas o anular la repetición, en esta secuencia.
INFO
Pulse el botón INFO para abrir o cerrar la presentación de la información detallada de
la reproducción en curso.
AUDIO
Pulse el botón AUDIO repetidamente para seleccionar la pista de sonido como se
indica a continuación:
Mono Left (Mono Izquierdo)
Mono)
GOTO (IR A)
Durante la reproducción, pulse el botón GOTO (IR A) repetidamente para acceder al
tiempo de reproducción, tiempo de pista o pista deseada del disco. En cada menú,
utilice los botones 0-9 y el botón +10 para introducir el número y la unidad se
desplazará directamente a ese número.
Reproducción de archivos JPEG
Después de cargar un disco con ficheros JPEG, la pantalla muestra la carpeta raíz.
Pulse para seleccionar una carpeta, y pulse el botón OK para confirmar. En el
menú, pulse para seleccionar los ficheros y pulse el botón (Play) para reproducir;
pulse para volver a la carpeta anterior.
Pause (Pausa)
Durante la reproducción, pulse el botón
para hacer una pausa en la reproducción, y pulse el botón
reanudar la reproducción normal.
Stop (Parada)
Durante la reproducción, pulse el botón para acceder al modo de visión previa de
imágenes. Pulse los botones para seleccionar una imagen, y pulse el botón
OK para reproducirla.
Reproducción
para volver a la
Mono Right (Mono Derecho) Mix-Mono (Mezcla-
Stereo (Estéreo)
del panel o el botón del mando a distancia
de nuevo o (Play) para
19
Page 91

Anterior y Siguiente
Durante la reproducción, pulse el botón para ir a la imagen anterior; pulse para ir
a la imagen siguiente.
ZOOM
Durante la reproducción, pulse el botón ZOOM primero y luego pulse el botón para
aumentar la imagen como se indica a continuación. 50%-200%; pulse el botón para
reducir la imagen como se indica a continuación: 200%-50%.
MENU
Durante la reproducción, pulse el botón MENU para volver al modo de carpetas. Pulse
el botón OK para volver a la reproducción normal.
REPEAT (REPETIR)
Púlselo varias veces y el modo de repetición cambiará en la secuencia siguiente:
Shuffle (Mezclada)
repetición)
GOTO (IR A)
Durante la reproducción, pulse el botón GOTO (IR A) y pulse los botones 0-9 para
seleccionar y mostrar la imagen deseada.
En modo de carpetas, púlselo para seleccionar el número de carpeta, pulse los
botones 0-9 para introducir el número y acceder a la deseada.
Girar la imagen
Durante la presentación de una imagen, pulse el botón para girar la imagen.
Durante la reproducción, pulse el botón para girar la imagen que se está presentando en
el sentido de las agujas del reloj.
Durante la reproducción, pulse el botón para girar la imagen que se está presentando en
el sentido contrario a las agujas del reloj.
Random (Aleatoria) Single (Solo una) Repeat On (Activar
Repeat All(Repetir todo) Repeat Off (Desactivar repetición)
Reproducción
20
Page 92

Funcionamiento de USB
y Tarjetas SD/MS/MMC
Preparación:
1 Conecte la unidad a la alimentación eléctrica.
2 Ponga el interruptor de encendido / apagado (POWER) en
ON (Encendido).
3 Pulse el botón DVD/DVB del mando a distancia o el botón
DVD/TV del panel para cambiar al modo DVD.
4 Inserte el dispositivo USB en el conector USB de la unidad, o
inserte la tarjeta SD/MS/MMC en la ranura de tarjetas
SD/MS/MMC. Véase la figura de la derecha:
Asegúrese de que los ficheros están almacenados en el
dispositivo USB y la tarjeta SD/MS/MMC antes de la conexión.
En modo DVD, pulse repetidamente el botón DVD/TV del panel durante varios
segundos para cambiar entre los modos DVD, DVB, SD/MS/MMC y USB si se ha
insertado la tarjeta SD/MS/MMC y el dispositivo USB. El estado predeterminado es de
reproducción de disco. Véase la figura siguiente:
1 Pulse para seleccionar la carpeta, y pulse el botón OK para acceder.
2 Pulse para seleccionar la pista deseada. Luego, pulse el botón (Play) para
comenzar la reproducción.
3 Pulse para detener la reproducción. Luego, pulse el botón (Play) para
reanudar la reproducción de pista actual.
Nota:
La presentación en la pantalla variará según los diferentes discos o tarjetas.
Extraiga el dispositivo USB o la tarjeta SD/MS/MMC directamente después de la
reproducción de los ficheros. A continuación, la unidad estará en el estado de
reproducción de discos de nuevo.
00:00 00:00
BAK
JPEG
21
Page 93

Siga los pasos siguientes para cambiar la configuración predeterminada de la unidad si
es necesario.
1. En modo DVD, pulse el botón DVD SETUP (CONFIGURACIÓN DEL DVD) para
2. Pulse el botón para seleccionar un menú.
3. Pulse el botón para seleccionar una opción de configuración del menú.
acceder al modo del menú de configuración.
Página General Setup (Configuración general)
Las opciones incluidas en este menú se muestran
como se ilustra en la imagen de la izquierda.
Pulse para seleccionar esta opción.
Pulse para acceder.
Pulse el botón para hacer la selección adecuada.
Pulse el botón OK para confirmar y pulse para salir.
Pantalla de TV
Seleccione Normal/PS o Normal/LB cuando se haya conectado una TV 4:3.
Seleccione WIDE (PANORÁMICA) cuando se esté utilizando una pantalla panorámica
16:9 con la unidad.
Angle mark (Marca de ángulo)
On (Activar): La pantalla mostrará símbolos de ángulo cuando se esté reproduciendo
un DVD con ángulos múltiples.
Off (Desactivar): El símbolo de ángulo no se mostrará.
OSD Lang (Idioma para presentación en pantalla)
Se utiliza para seccionar el idioma de presentación en pantalla.
Screen saver (Salvapantallas)
On (Activar): Se mostrarán algunas imágenes para proteger la pantalla si no se realiza
ninguna operación en la unidad durante varios minutos.
Off (Desactivar): Se desactiva esta función.
Last Memory (Último punto memorizado)
Utilice los botones de dirección para seleccionar “On” y reanudar la reproducción
desde el punto que en el que usted
se detuvo la última vez; o seleccione “Off” para anular la función y volver.
Configuración del DVD
22
Page 94

Configuración del DVD
Speaker Setup Page (Página de configuración de altavoces)
Las opciones incluidas en este menú se muestran
como se ilustra en la imagen de la izquierda.
Pulse para seleccionar esta opción.
Pulse para acceder.
Pulse el botón para hacer la selección adecuada.
Pulse el botón OK para confirmar y pulse para
salir.
Downmix (Mezclador)
LT/RT (TI/TD): Salida de audio mezclado en el formato ofrecido por Dolby.
Stereo (Estéreo): Salida de señal estéreo.
Digital Dolby Setup (Configuración Dolby Digital)
Las opciones incluidas en este menú se muestran como se ilustra en la imagen de la izquierda.
Pulse para seleccionar esta opción.
Pulse para acceder.
Pulse el botón para hacer la selección
adecuada.
Pulse el botón ENTER (INTRO) para confirmar y
pulse para salir.
Dual Mono
Stereo (Estéreo): Salida de sonido en estéreo.
L-Mono (Mono-I): Salida de sonido desde la pista izquierda (L+L) (I+I).
R-Mono (Mono-D): Salida de sonido desde la pista derecha (R+R) (D+D).
Mix-Mono (Mono-mezcla): Salida de sonido desde la pista izquierda y la pista derecha
(L+R) (I+D).
Dynamic (Dinámico)
Se utiliza para ajustar la tasa de compresión dinámica lineal y obtener diferentes
efectos de compresión de la señal.
La tasa de compresión es más grande; la diferencia entre los altos y los graves es más
pequeña.
Solamente es útil para sonidos digitales dolby.
23
Page 95

Preference Page (Página de Preferencias)
Las opciones incluidas en este menú se muestran
como se ilustra en la imagen de la izquierda.
Pulse para seleccionar esta opción.
Pulse para acceder.
Pulse el botón para hacer la selección adecuada.
Pulse OK para confirmar y pulse para salir.
Este menú puede aparecer y configurarse solamente cuando la
reproducción se encuentra en una posición de parada completa o no hay
ningún disco en la unidad.
Tv Type (Tipo de TV)
Se utiliza para la selección del tipo de TV.
Audio, Subtitle y Disc menu (Audio, Subtítulos y Menú del disco)
Estas opciones de configuración le permiten escuchar o leer los idiomas de un DVD a
su elección entre inglés, francés, español, etc., si el disco contiene varios idiomas.
Parental (Control paterno)
La aplicación del control paterno es posible con discos DVD que hayan sido equipados
con la función de control de bloqueo para niños. Por medio del control de bloqueo
paterno, se pueden bloquear los sentidos o reproducciones seleccionadas del disco.
Para acceder al control paterno, pulse el botón de dirección ▲CH+ o ▼CH- y luego
pulse el botón OK para acceder. La Contraseña Predeterminada es 123456.
Default (Predeterminado)
Utilice esta función para reiniciar todas las configuraciones a los valores
predeterminados.
Puede que algunos discos no permitan estas funciones.
Configuración del DVD
24
Page 96

Configuración del DVD
Speaker Setup Page (Página de configuración de altavoces)
Las opciones incluidas en este menú se muestran
como se ilustra en la imagen de la izquierda.
Pulse para seleccionar esta opción.
Pulse para acceder.
Pulse el botón para hacer la selección adecuada.
Pulse el botón OK para confirmar y pulse para
salir.
Password Mode (Modo Contraseña)
Seleccione On (Activar): Activa la función de contraseña.
Seleccione Off (Desactivar): La función de contraseña no puede encontrarse disponible.
Password (Contraseña)
Utilícela para establecer la contraseña; la contraseña predeterminada es 123456.
25
Page 97

1 En modo DVD, pulse el botón DVD SETUP (CONFIGURACIÓN DEL DVD) para
acceder al menú de configuración del DVD.
2 Pulse el botón para seleccionar el menú de configuración DVB-T.
3 Pulse el botón DVD SETUP (CONFIGURACIÓN DE DVD) otra vez para salir del
menú de configuración de DVB.
Página DVB-T Setup (Configuración del DVB-T)
Las opciones incluidas en este menú se muestran
como se ilustra en la imagen de la izquierda.
Pulse para seleccionar esta opción.
Pulse para acceder.
Pulse el botón para hacer la selección
adecuada.
Pulse el botón OK para confirmar y pulse para
salir.
Área
Se utiliza para seleccionar el país.
El canal de DVB solamente se puede encontrar si se selecciona el país
correcto en el menú.
Time Zone (Huso horario)
Se utiliza para establecer el huso horario.
Channel Setup (Configuración de canales)
Pulse esta opción para acceder al menú Channel Setup (Configuración de canales) que
se muestra a continuación.
Configuración del DVB
26
Page 98

Configuración del DVB
1 Auto Scan (Auto Búsqueda)
Pulse el botón OK para acceder al menú, pulse los botones para seleccionar
“OK” y comenzar la búsqueda, o seleccione "Cancel" ("Anular") para volver. La
auto búsqueda tardará unos minutos, hasta que
hasta que la operación de sintonía; la unidad saldrá y memorizará los programas
en la secuencia automática.
Durante la sintonía, pulse el botón STOP (PARADA) para salir del modo de auto
búsqueda.
2 Manual Scan (Búsqueda Manual)
En el menú, pulse el botón para buscar el canal deseado. Durante la sintonía,
pulse el botón STOP (PARADA) para volver al menú anterior.
3 Adjust Channel (Ajuste de Canal)
Pulse el botón para seleccionar Adjust channel (Ajuste de canal) y pulse el
botón OK para acceder al menú. En el menú, pulse el botón Número 1 del mando
a distancia para seleccionar su canal favorito de la lista; pulse el botón Número 2
del mando a distancia para borrar el programa; pulse el botón Número 3 del
mando a distancia para introducir la contraseña y proteger el programa. La
contraseña predeterminada es 123456. Pulse el botón para seleccionar EXIT
(SALIR) y pulse el botón OK para salir del menú.
4 Channel Remap (Reordenación de canales)
Pulse el botón para seleccionar Channel Remap (reordenación de canales).
En el menú, pulse el botón OK para reordenar el canal deseado.
27
Page 99

Pulse el botón TV / LCD SETUP (CONFIGURACIÓN TV / LCD) para acceder al menú
de configuración. Pulse el botón para cambiar entre el menú PICTURE (IMAGEN)
y FUNCTION (FUNTIÓN). Pulse otra vez el botón TV / LCD SETUP
(CONFIGURACIÓN TV / LCD) para salir.
Menú PICTURE SETUP (CONFIGURACIÓN DE IMAGEN)
Pulse el botón para seleccionar la opción deseada.
Pulse el botón para ajustar el valor deseado.
El menú PICTURE setup (configuración de IMAGEN) desaparecerá
automáticamente si no realiza ninguna operación durante unos segundos.
Bright
Contrast
Color
Picture Setup
Menú FUNCTION (FUNCIÓN)
Language English
Bluescreen On
Time Off Off
Default
Function
Pulse el botón para seleccionar la opción deseada.
Pulse el botón
Language (Idioma): Se utiliza para cambiar el idioma de OSD (Presentación en
pantalla).
Bluescreen (Pantalla azul):
Esta función solamente se encuentra disponible cuando no hay señal de entrada.
Pulse el botón para activar o desactivar la función.
Time Off (Tiempo de espera):
Seleccione el periodo de tiempo de espera para acceder al modo de standby, las selecciones
al lado de 15,30,45, 60,75, y 90,105,120 u
Default (Predeterminado): Después de confirmar esta selección, la configuración
volverá al valor predeterminado original.
para cambiar la configuración.
OFF (El estado OFF desactiva esta función).
Configuración de LCD/TV
30
30
30
28
Page 100

f
K
Manejo básico
Conecte la antena a la clavija de conexión situada en el panel trasero. Después de
conectar la antena, conecte el cable de la fuente de alimentación. Si el reproductor está
en modo standby, pulse el botón POWER (ALIMENTACION) situado en el panel
delantero para encender la alimentación.
Pulse el botón TV del mando a distancia para cambiar al modo TV.
Pulse los botones de dirección o pulse los botones numéricos del mando a
distancia para seleccionar el canal deseado.
Se pueden preestablecer algunas preferencias.
TV System Setup (Configuración del Sistema de TV)
Pulse el botón TV / LCD SETUP (CONFIGURACIÓN DE TV / LCD) para acceder al
menú de configuración PICTURE (IMAGEN), y luego pulse el botón ; aparecerá el
menú de configuración del sistema de TV:
Pulse el botón para seleccionar la opción deseada.
Pulse el botón para cambiar la configuración.
1. Channel (Canal)
2. Channel Swap (Intercambio de canales)
Función TV
TV Setup
Channel 001
Channel
Channel Swap 001
Channel Swap
Skip OFF
Skip
System PAL D/K
System
Fine 152.25
Fine
Auto Scan
Auto Scan
Pulse el botón para cambiar los canales.
Utilice el botón ▲CH+ o ▼CH- para seleccionar SWAP (INTERCAMBIO), pulse el
botón para seleccionar el número de canal, y a continuación el canal de TV
TV Setup
Off
SECAM L’/L
001
001
Of
PAL D/
105.25
105.25
001
001
29
 Loading...