


User Manual
Brave 4 ACTION CAMERA
AKASO Action Camera
Please read this manual before operating your action camera, |
18 |
and keep it for further reference. |

01-07 |
08-14 |
|
|
|
|
|
|
|
15-21 |
22-28 |
|
|
|
|
29-35 |
36-42 |

English
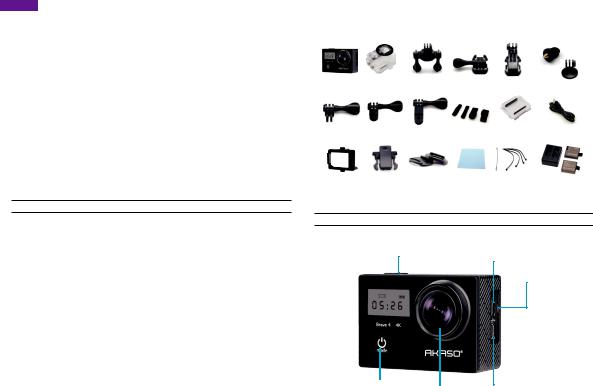
Included Accessories in the Box
Brave 4 |
Waterproof |
Handle Bar/ |
|
|
Mount 3 |
housing |
Pole Mount |
Mount 1 |
Mount 2 |
||
Mount 4 |
Mount 5 |
Mount 6 |
Bandages |
Protective |
USB Cable |
Backdoor |
|||||
|
|
|
|
|
|
Clip 1 |
Clip 2 |
Helmet Mounts |
Lens Cloth |
Tethers |
Battery & Charger |
|
|
|
|
|
|
Buttons & Functions
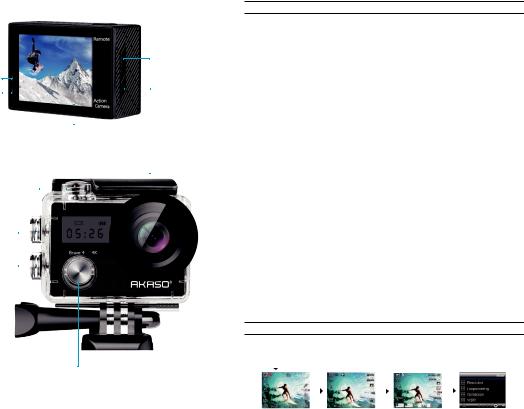
Shutter / Select Button |
Micro USB Port |
|
MicroSD Slot
Up / WiFi Button
Working Indicator
Charging Indicator |
|
|
|
|
|
|
|
|
Down |
||
|
|
|
|
|
|
|
|
||||
|
|
|
|
|
|
|
|
|
|||
|
|
|
|
|
|
|
|
|
|
|
|
|
|
|
|
|
|
|
|
|
|
|
|
|
|
|
|
|
|
|
|
Screen |
|||
|
|
|
|
|
|
|
|
|
|
|
|
Waterproof Case |
|
|
|
|
|
||||||
|
|
|
|
|
|
|
|
|
Latch |
||
Shutter / Select Button |
|
|
|
|
|
||||||
|
|
|
|
|
|||||||
|
|
|
|
|
|||||||
Up / WiFi Button |
|
|
|
|
|
|
|
|
|
||
|
|
|
|
|
|
|
|||||
Down |
|
|
|
|
|
|
|
||||
|
|
|
|
|
|
||||||
|
|
|
|
|
|
|
|
|
|
|
|
|
|
|
|
|
|
|
|
|
|
|
|
|
|
|
|
|
|
|
|
|
|
|
|
|
|
|
|
|
|
|
|
|
|
|
|
Power / Mode Button |
|
|
|
|
Power / Mode Button |
||
|
Lens |
Micro HDMI Port |
|
|
|||
1 |
2 |
Instructions
Welcome to use your AKASO Barave 4 Action Camera. To record or take pictures, Micro SD card (not included) is a must.
Micro SD card specifications:
MicroSD / Micro SDHC / Micro SDXC Class 10 / UHS-I
up to 64GB
Format the SD card in this camera before using.
Method 1. Insert your micro SD card totally into the camera first, regarless of the warning in the screen "PLEASE INSERT SD CARD", click "mode" button, go to setting mode, find "format" setting in page 9, click OK to format the sd card.
Method 2. Format the sd card in your computer, choose FAT32 format mode.
Please be noticed that the recorded data may be damaged when you disconnect power supply or take the memory card out during recording, deleting (formatting) or playing.
Battery Charging
Method 1. Use the included charger to charger the batteries. The RED light shows that the battery is charging, Blue light shows that the battery is full charged or no battery in charging.
Method 2. Connect the camera to a computer or USB power supply if you haven't taken the charger with you. When it's charging, the light remains ON. When batteries are fully charged, the light will turn OFF.
Power ON/ Power OFF your Brave 4
To power ON, press the Power/Mode Button; To power OFF, press and hold the Power/Mode Button.
Overview of Basic Functions
There are 4 main modes: Video, Photo, Playback, Settings. To adjust camera specifics for video, photo, exposure, language, go to Settings to set up.
|
|
|
|
|
|
|
|
Video |
|
Photo |
|
Play Back |
|
Settings |
|
|
|
|
|||||
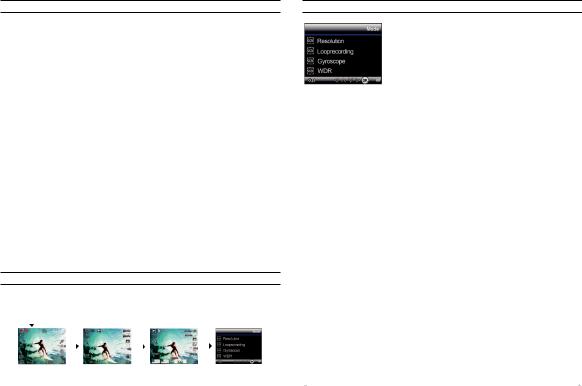
Settings
In setings / there are 9 pages with 36 specific setting options.
Press the Up or Down Button to cycle through the various options.
Press the Shutter/Select Button to select the desired option.
When finished with the specific setting, press the Poweer / Mode Button once, it will exit from the current setting. Then press the button again, it will switch to video mode.
Resolution: 4K 24FPS / 2K 30FPS / 1080 60FPS / 1080 30FPS / 720 120FPS / 720 60FPS / 720 30FPS
Loop recording: Off / 3 Minutes / 5 Minutes / 10 Minutes
Gyroscope: Off / On
WDR: Off / On
Time-lapse Record: Off / 100 ms / 200 ms / 500 ms / 1s / 5s
Motion Detection: Off / On Record Audio: Off / On Date Stamp: Off / On
Angle: 170° / 140° / 110°/ 70°
Diving mode: Off / On
Special Effects: Off / Night Scene / Portrait / Lightpainting Timer: Single / 2S Timer / 5S Timer / 10S Timer
Image Size: 20M / 16M / 12M / 10M / 8M / 5M / 3M / VGA Burst: Off / Burst 3 / Burst 5 / Burst 10
Image Quality: Fine / Normal / Economy Sharpness: High / Normal / Medium
White Balance: Auto / Daylight / Cloudy / Tungsten / Fluorescent Color: Natural / Black& White / Sepia
ISO: Auto / 100 / 200 / 400
Exposure Value: +2.0 / +1.7 / +1.3 / +1.0 / +0.7 / +0.3 / 0 / -0.3 / -0.7 / -1.0 / -1.3 / -1.7 / -2.0
Anti-Shaking: Off/On
Protect: Lock Current / Unlock Current / Lock All / Unlock All WiFi: Off / On
Date / Time: MM / DD / YY
Auto Power Off: Off / 1 Minute / 3 Minutes / 5 Minutes / 10 Minutes
Beep Sound: Off / On
Voice Prompt: Off / On
OSD: Off / On
CAR ACC: Off / On
Language: English / Francais / Deutsch / Espanol / Italiano / Portugues / Japanese / Chinese / Polski / Russian / Korean
Screen Save: Off / 30s / 1 Min / 3 Min
Frequency: 50 Hz / 60 Hz
Format: SD Card deleted / cancel / OK
Default Setting: Return menu setting to defaults / Cancel / OK Version
3 |
4 |

Video Mode
Video Mode is the default mode after camera power on. To record Video, verify the camera is in Video Mode. If the Video icon in your camera's LCD screen doesn't show, press Power/Mode Button repeatedly until it appears.
Loop recording: In Menu Settings Mode, choose recording time (3/5/10 mins). If the time is set to be 3 mins, press OK Button to record, the video will automatically be saved as a file after 3 mins. Then the camera continues next video recording. The recording time on LCD starts at zero. When the memory is full, the first video would be covered, and so on.
Time-lapse Record: Off / 100 ms / 200 ms / 500 ms / 1s / 5s
Motion detection: In Menu Settings Mode, set Motion Detection “ON” (make sure to set Loop Recording and Auto Power off to off). The camera starts recording after detecting motions and stops recording after no motion of 10s.
To stop recording: Press the OK Button.
When recording starts, to switch modes is not available. To switch mode, please stop recording first. This camera automatically stops recording when battery is out of power. Your video will be saved automatically? before the camera powers OFF.
Photo Mode
Press Power / Mode key repeatedly to switch to Photo Mode Shooting photo: in Photo Mode, press OK Button to shoot photos;
Burst: To use this function, go to Settings Mode first, set the burst times (3/5/10). Then in Photo Mode, press OK Button to burst. Set Burst to off, the camera would be in normal shooting mode;
Pretty Pictures: In Menu Settings Mode, set Pretty Pictures on (Night Scene / Portrait / Lightpainting).
When Pretty Pictures is set to on, burst does not work. (Note: If Lightpainting is chosen, it takes 10s to shoot one image);
Zoom: In Photo Mode, press Up / Down key to zoom in/out;
Playback Mode
Press Power / Mode key repeatedly to switch to Playback Mode
Press Up and Down key to choose videos/photos to view.
Press OK to start playing the video and press OK one more time to stop playing.
In playing the video, press Up key to speed up the video. Press Down key to rewind the video. Long press the Shutter and Select Button to overview all the pictures.
When in Playback mode, long press the OK button, you will go to the overview of all photos and videos. Press Up / Down button to view your desired one.
To delete photos / videos: In Playback mode, long press the Up button or Dowm button, the delate window will pop out. Choose the one as you desire.
Camera App
Before using the WiFi function, please install the App CamKing in your mobile device first.
1.Download the App CamKing from Google Play or Apple Store.
2.Power on the camera, press Up key to open WIFI (or set WIFI on in Menu Settings Mode). After the WIFI is set to on, the screen shows WIFI name and password.
3.Find the WiFi named 'AKASO' on the mobile devices. Connect it with the password: 1234567890
4.After successful connection, the camera screen would turn off to save power. Press any key to turn on the screen.
5.Open the APP CamKing on the mobile devices. The APP shows what the camera captures. Video recording / Photo shooting / Playback / Download / Delete / Share could be done on the APP. Press OK to close WIFI and disconnect the camera with mobile devices.
Connect to PC
1.Power on the camera, connect the camera to PC with USB cable. After connection, the screen shows Mass Storage/ PC Camera;
2.Press Up / Down key to choose Mass Storage, press OK to confirm. After successful connection, there would appear a new driver named mass storage on the computer. Photos and videos can be found in “Novatek” in the mass storage and can be copied to the computer.
3.The camera can also be used as a computer camera when it's needed. While connecting, choose camera. Be sure you download a software to drive the camera on your computer. (eg. PC-Camera_amcap)
Camera Maintenance
-When the camera is in idle, please keep it in dry shady place.
-Use protective cases to avoid the scratches to lens and LCD.
-If lens is needed to be cleaned, firstly blow away the dust on the surface, then use cloth or paper suitable for optical devices to clean. Detergent could be used if necessary.
-Please don’t use organic solvent to clean.
-Please do not touch the lens by fingers.
-Please do not put the camera in moist or dusty place. Electricity leakage may cause fire.
-Keep the camera away from drops and bumps. It may cause damage to the parts inside.
-Keep the camera away from long time high temperature and strong sunshine to avoid being damaged. Please note that the camera will get hot after using it for a long time. It is normal.
Troubleshooting
Q: Video files couldn't be played on computers
A: The software doesn't support H.264 code. Or the computer doesn't support 4K display
Q: Wi-Fi Network Can't be Found in Phone / Tablet
A:1. Turn off / on the phone / tablet's Wi-Fi.
2.Power the camera ON.
5 |
6 |
English
3.In the camera's Wi-Fi settings, turn on the WiFi.
4.Open up the Wireless Settings on your device and try to connect to the Wi-Fi network with the phone / tablet.
5.If the network is not present in the phone/tablet's list, try another phone/table if possible.
6.If all the above steps don't work, please contact the seller support with detailed description of the problem. They will be happy to answer any questions and help out moving forward.
Q:Camera Footage is Distorted or Has Poor Quality
A:1. Camera Housing May Have Condensation. Try to put the camera under sunshine for 1 hour or two.
2.Camera Lens May Be Faulty. Camera lens may have scratches or cracks causing videos and photos to appear distorted. Inspect the lens for cracks and scratches.
3.Camera Sensor May Be Faulty. If photos and videos are corrupted or distorted your camera's sensor may be faulty.
Q: Camera Will Not Work With My Memory Card.
A:1. Make sure your sd card is class 10 max 64gb micro sd card.
2.Insert the card into your camera, go to setting mode, find the setting"format" to format the card before using.
Contact US
For any inquiries, issues or comments concerining our products, please send E-mail to the address below or call us. We will respond as soon as possible.
E-mail: cs@akasotech.com
US customer service line: (301)670-7335
|
|
|
|
|
|
|
Deutsch |
||
|
|
|
|
|
|
|
|
|
|
In der Schachtel enthaltenes Zubehör |
|
|
|
|
|
||||
|
|
|
|
|
|
|
|
|
|
|
Brave 4 |
Wasserfestes |
Lenker / |
Halterung 1 |
Halterung 2 |
Halterung 3 |
|
|
|
|
Gehäuse |
Masthalterung |
|
|
|||||
|
|
|
|||||||
|
Halterung 4 |
Halterung 5 |
Halterung 6 |
Bandagen |
Schützende |
USB Kabel |
|
|
|
|
Hintertür |
|
|||||||
|
|
|
|
|
|
|
|
|
|
|
Klemme 1 |
Klemme 2 |
Helm - |
Linsenreini- |
Halteseil |
Batterie & |
|
||
|
Halterungen |
gungstuch |
Ladegerät |
|
|
||||
|
|
|
|
||||||
Tasten & Funktionen
Verschluss / Auswahl-Taste |
Mikro USB Anschluss |
|
MikroSD Anschluss
Ein-Aus / Modus-Taste |
Mikro HDMI Anschluss |
Linse |
7 |
8 |
Aufwärts / WLAN-Taste
Betriebs-Anzeige
Lade-Anzeige |
|
|
|
|
|
|
|
|
|
|
Lautsprecher |
|
|
|
|
|
|
|
|
|
|
||
|
|
|
|
|
|
|
|
|
|
|
|
|
|
|
|
|
|
|
|
|
|
|
|
|
|
|
|
|
|
|
|
|
|
|
|
|
|
|
|
|
|
|
Bildschirm |
||||
|
|
|
|
|
|
|
|
|
|
|
|
Wasserfestes Gehäuse |
|
|
|
|
|
||||||
|
|
|
|
|
|
|
|
|
|
Drücker |
|
Verschluss / Auswahl-Taste |
|
|
|
|
|
||||||
|
|
|
|
|
|||||||
|
|
|
|
|
|||||||
Aufwärts / WLAN-Taste |
|
|
|
|
|
|
|
|
|
||
|
|
|
|
|
|
|
|||||
Abwärts |
|
|
|
|
|
|
|
||||
|
|
|
|
|
|
||||||
Ein-Aus / Modus-Taste
Anleitungen
Willkommen beim Gebrauch Ihrer AKASO Brave 4 Aktions-Kamera. Zum Aufnehmen oder Fotografieren von Bildern muss eine Mikro-SD-Karte (nicht im Lieferumfang enthalten) hinein sein.
Mikro SD-Karten-Eigenschaften:
MikroSD / Mikro SDHC / Mikro SDXC Klasse 10 / UHS-I
bis zu 64 GB
Formatieren Sie die SD-Karte in dieser Kamera, bevor Sie sie verwenden. Methode 1. Setzen Sie Ihre micro SD-Karte zuerst vollständig in die Kamera ein. Bitte
ignorieren Sie die Warnung im Bildschirm "Bitte SD-KARTE EINLEGEN", einfach klicken auf "Modus", gehen Sie dann in den Einstellungsmodus, finden Sie "Format" Einstellung auf Seite 9, klicken Sie auf OK um die SD-Karte zu formatieren.
Methode 2. Formatieren Sie die SD-Karte in Ihrem Computer, wählen Sie den FAT32-Formatmodus.
Bitte beachten Sie, dass die aufgezeichneten Daten beschädigt werden können, wenn Sie die Stromversorgung unterbrechen oder die Speicherkarte während der Aufnahme, beim Löschen (Formatieren) oder bei der Wiedergabe herausnehmen.
Batterie Aufladen
Bitte stellen Sie sicher,dass der Akku bei der ersten Verwendung voll ist.
Methode 1: Verwenden Sie das mitgelieferte Ladegerät,um die Batterien aufzuladen. Das ROTE Licht zeigt an, dass der Akku geladen wird. Blaues Licht zeigt an, dass der Akku voll geladen ist oder dass kein Akku geladen wird.
Methode 2: Oder schließen Sie die Kamera an einen Computer oder ein USB-Netzteil an, wenn Sie das Ladegerät nicht mitgenommen haben. Beim Laden bleibt das Licht eingeschaltet. Wenn die Batterien vollständig geladen sind, schaltet sich das Licht aus.
EINSCHALTEN/ AUSSCHALTEN Ihres Brave 4. Schalten Sie Ihren Brave 4 ein / aus
Drücken Sie zum Einschalten den Ein-Aus / Modus-Taste. Zum Ausschalten drücken und halten Sie den Ein-Aus / Modus-Taste.
Überblick über die Basis-Funktionen
Es gibt 4 Hauptmodi: Video, Foto, Wiedergabe, Einstellungen. Um die Kameraeinstellungen für Video, Foto, Belichtung und Sprache anzupassen, gehen Sie zu Settings (Einstellungen).
|
|
|
|
|
|
|
|
|
|
|
|
|
|
|
|
|
|
|
|
|
|
|
|
|
|
|
Auflösung |
||
|
|
|
|
|
|
|
Loop-Aufnahme |
|
|
|
|
|
|
|
|
|
Gyroscope |
|
|
|
|
|
|
|
|
|
WDR |
|
|
Video |
|
Foto |
|
Wiedergabe |
|
Einstellungen |
|||
9 |
10 |
 Loading...