


USER MANUAL
D2000 CAR DASH CAMERA
Please read this manual before operating your car dash camera, and keep it for further reference.
23

01-06 |
07-12 |
|
|
|
|
|
|
|
13-18 |
19-24 |
|
|
|
|
25-30 |
31-36 |

English
Introduction
Thank you for choosing AKASO Dash Cam. This FHD 1080P Dash Cam is designed for recording real time video and audio while driving. To better use it, please read this manual carefully.
Features
•170 degree wide angle
•Full HD: 1920*1080@30fps; HD: 1280*720@60fps
•H.264 video compression format
•Automatic file lock triggered by G-sensor
•Motion detection
•WDR (Wide Dynamic Range)
•3 inches HD LCD display
•Built-in Lithium Polymer battery
•Support microSD/TF card up to 32GB
What’s in the box?
•1 x Dash Cam
•1 x Car Charger
•1 x Suction Cup
•1x 3M Adhesive Mount
•1x Hardwire Kit
•1 x USB Cable
•1 x User Manual
Product Overview
|
|
|
|
|
12 |
|
|
|
|
|
5 |
6 |
7 |
|
|
|
|
1 |
|
|
|
8 |
12 |
|
|
2 |
|
|
OK |
9 |
1415 |
|
|
|
|
|
|||
|
|
3 |
|
|
M |
10 |
|
|
|
4 |
|
|
|
11 |
|
|
|
|
13 |
|
|
|
|
1. TF Card Slot |
2. UP |
3. Menu |
4. Down |
|
|||
5. HD Interface |
6. Stand Base |
|
7. DC Power/USB Interface |
||||
8. Video/OK |
9. Mode |
10. Emergency Save |
|
|
|||
11. Power |
12. Lens |
13. Display |
14. MIC |
15. Reset Hole |
|||
Buttons: |
|
|
|
|
|
|
|
Up |
Down |
MENU – Press to enter and exit Settings Mode |
|||||
|
|
|
|
|
|
1 |
|
OK • Press to navigate UP through options in Settings Mode
• Recording Mode Hot Key: Record(Press to start / stop recording)
M MODE Select – Press to toggle between Recording / Photo / Playback modes  Current video file locked
 POWER – Press and hold to turn the device on or off
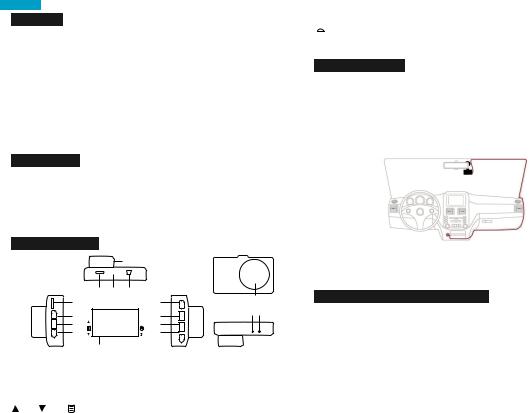
Product Installment
•Insert microSD/TF card to card slot of dash cam
•Select a spot on windshield to locate the suction cup near the rearview mirror
•Attach the cam to the bracket
•Connect the DC power/USB interface of the cam to the car cigarette lighter by the power cable
•Adjust the cam to the position with best shooting range, then fix the position of bracket
•Once engine starts, the cam will start to work automatically
Attention:
•Please use Class 10 microSD/TF card or above
•Insert the microSD/TF card into the slot in the right direction
•To remove the microSD/TF card, please gently press the card
Use your DashCam
Once engine starts, the cam will start to record video automatically
•Turn On/Off
Short press Power button to turn on; Long press Power button to turn off
•Video shooting settings
-Please press OK first before entering the video shooting settings
-Press Menu button once to start video shooting mode settings. Press Up and Down buttons to select each setting, and press OK to confirm.
-Resolution: 1920*1080; 1280*720; 848*480; 640*480; (Default: 1920*1080)
-Loop recording: off/1/3/5 minutes (Default: 3 minutes)
-WDR: off/on (Default: on)
-Exposure:+2;+5/3;+4/3;+1;+2/3;+1/3;+0;-1/3;-2/3;-1;-4/3;-5/3;-2; (Default: +0)
-Motion Detection: off/on (Default: off)
2

-Record Audio: off/on (Default: on)
-Date Stamp: off/on (Default: on)
-G Sensor: off/low/medium/high (Default: medium)
-After setting, please press OK again to be back to video shooting mode.
•System settings
-Please press OK first before entering system settings
-Press Menu button twice to start system settings. Press Up and Down buttons to select each setting, and press OK to confirm.
-Date/Time
-Plate Number: Enable this feature to enter your vehicle plate number for video recording. The plate number will stamp in the video.
-Auto Power Off: off/1 minute/3 minutes/5 minutes
-Parking Monitor:off/on (default: off)
Enabling this feature will activate the camera if your car is bumped or moved to automatically record hit-and-runs and automatically lock and save any video file that was recorded.
-Beep Sound: off/on (default: on)
This setting allows you to turn the device's button sound effect on or off.
-Language
-Frequency
-Backlight: off/1 minute/3 minutes/5 minutes
-Format: to format your Micro SD card
-Default setting
-Version
-After setting, please press OK again to be back to video shooting mode.
•Set Emergency Save
-Press Emergency Save button, and press the button again to quit Emergency Save.
•Picture Taking
-Press Mode button to enter Picture Taking Mode
-Press OK to take pictures
•Video and picture Playback
-Please press OK first before entering video and picture playback
-Press Mode button to enter Playback Mode
-Use Up and Down buttons to browse files, and press OK to watch.
-Press Menu button to lock and unlock current file, and long press Menu button to delete the files.
-After setting, select video shooting mode and press OK again to be back to video shooting.
•Data backup and download
-Connect the camera to the computer through USB cable. You can download the files in removable disk appearing in “My Computer” of your personal computer.
3
-You also can insert the Micro SD card into a card reader to download files into your personal computer.
•Battery Indicator
-The battery indicator is located at the right end corner of the screen. If the red cross sign comes up, please charge your dash cam immediately.
 Precaution
AKASO Dash Cam is not intended to be modified, or calibrated while
operating a vehicle. AKASO is not responsible for any damages resulting from the user's misuse of the camera.
Use only manufacturer-approved chargers, accessories, and supplies.
AKASO cannot be responsible for the user’s safety when using accessories or supplies that are not approved by AKASO.
Do not store your device in excessively hot, cold, damp or dry locations.
Doing so may cause the screen to malfunction, result in damage to the device, or cause the battery to explode. Your device is recommended for use within a temperature range of -4º to 131º F (-10º to 55º C), and a humidity range of 10% to 80%.
If your device becomes overheated, allow it to cool down before use.
Prolonged exposure of skin to an overheated device may cause low-temperature burn symptoms, such as red spots or areas of darker pigmentation.
Do not touch the car charger with wet hands or disconnect the charger by pulling the cord. Doing so may result in electrocution.
Do not use damaged power cords or plugs, or loose electrical sockets.
Faulty connections can cause electric shock or fire.
Do not touch your device with wet hands.
Doing so may cause electric shock.
Do not remove the SD card from the product during data recording, which may cause an Error.
Always keep the camera lens clean, and ensure that the lens is not blocked by any object or placed near any reflective material.
If the car’s windshield is tinted with a dark coating, recording quality may be affected.
General Troubleshooting
Problem: All buttons are not responding
Solution:
1.Press the RESET button to restart the camera
2.Reformat Micro SD card or replace with a new card
4

3. Press the buttons firmly, or hold them in; it will not always respond to a quick hit.
Problem: The captured image is not stored
Solution:
1.Reformat memory card or replace with a new one
2.Make sure to stop recording before shutting down Problem: Device will not turn on
Solution: Please make sure Dash Cam is well charged. Make sure unit is off while charging.
Problem: Menu Button Not responding
Solution: Press OK button to stop recording so you can access the menu
Problem: Micro SD card Not Recognized
Solution:
1.Format Micro SD card
2.Use a different Micro SD card
Problem: Screen powers off unexpectedly
Solution:
1.Disable Screen Saver feature
2.Charge the battery
3.Restore to default settings
Problem: Unable to record videos
Solution:
1.Check remaining space on memory card and delete files if necessary
2.Reformat your memory card; if issue persists, replace with a new one Restore to Default Settings
3.Make sure to hold the OK button in until the red light is blinking
Problem: Stops Recording after 20-40 minutes
Solution: Turn Loop Recording on
Problem: "File error" is encountered when trying to play back pictures or video Solution: Format Micro SD card
Contact US
For any inquiries, issues or comments concerning our products, please send E-mail to the address below, and we will respond as soon as possible.
E-mail: cs@akasotech.com
US customer service line: (301)670-7335
English
Disclaimer
Some content and services accessible through this device belong to third parties and are protected by copyright, patent, trademark and/or other intellectual property laws. Such content and services are provided solely for your personal non-commercial use.
You may not use any content or services in a manner that has not been authorized by the content owner or service provider. Without limiting the foregoing, unless expressly authorized by the applicable content owner or service provider, you may not modify, copy, republish, upload, post, transmit, translate, sell, create derivative works, exploit, or distribute in any manner or medium any content or services displayed through this device.
“THIRD PARTY CONTENT AND SERVICES ARE PROVIDED “AS IS.” AKASO DOES NOT WARRANT CONTENT OR SERVICES SO PROVIDED, EITHER EXPRESSLY OR IMPLIEDLY, FOR ANY PURPOSE. AKASO EXPRESSLY DISCLAIMS ANY IMPLIED WARRANTIES, INCLUDING BUT NOT LIMITED TO, WARRANTIES OF MERCHANTABILITY OR FITNESS FOR A PARTICULAR PURPOSE. AKASO DOES NOT GUARANTEE THE ACCURACY, VALIDITY, TIMELINESS, LEGALITY, OR COMPLETENESS OF ANY CONTENT OR SERVICE MADE AVAILABLE THROUGH THIS DEVICE AND UNDER NO CIRCUMSTANCES, INCLUDING NEGLIGENCE, SHALL AKASO BE LIABLE, WHETHER IN CONTRACT OR TORT, FOR ANY DIRECT, INDIRECT, INCIDENTAL, SPECIAL OR CONSEQUENTIAL DAMAGES, ATTORNEY FEES, EXPENSES, OR ANY OTHER DAMAGES ARISING OUT OF, OR IN CONNECTION WITH, ANY INFORMATION CONTAINED IN, OR AS A RESULT OF THE USE OF ANY CONTENT OR SERVICE BY YOU OR ANY THIRD PARTY, EVEN IF ADVISED OF THE POSSIBILITY OF SUCH DAMAGES.”
5 |
6 |
Deutsch
Einleitung
Vielen Dank, dass Sie sich für die AKASO Dash Kamera entschieden haben. Diese FHD 1080P Dash Kamera wurde zur Aufnahme von Echtzeitvideos und Ton während der Autofahrt entworfen. Für eine optimale Verwendung lesen Sie bitte dieses Handbuch sorgfältig durch.
Produktinformationen
•170 Grad Weitwinkel(objektiv)
•Volle HD: 1920*1080@30fps; HD: 1280*720@60fps
•H.264 Videokompression
•Automatische Dateisperrung ausgelöst durch G-Sensor.
•Bewegungsmelder
•WDR (Wide Dynamic Range, großer Kontrastumfang)
•3 Zoll HD LCD Bildschirm
•Integrierter Lithium-Polymer-Akku
•Unterstützt MikroSD/TF-Karte bis zu 32GB
Lieferumfang
•1 × Autoarmaturen-Kamera
•1 × Autoladegerät
•1 × Saugnapf
•1 × 3M Haftungs-Halterung
•1 × Hardware-Ausstattung
•1 × USB Kabel
•1 × Benutzerhandbuch
Produktübersicht
|
|
|
|
|
|
|
12 |
|
|
|
|
|
|
|
5 |
6 |
7 |
|
|
|
|
|
1 |
|
|
|
|
8 |
12 |
|
|
|
2 |
|
|
|
OK |
9 |
1415 |
|
|
|
|
|
|
|
|||
|
|
|
3 |
|
|
|
M |
10 |
|
|
|
|
4 |
|
|
|
|
11 |
|
|
|
|
|
|
13 |
|
|
|
|
1. |
TF-Kartensteckplatz |
|
2. Auf |
|
3. Menü |
4. Ab |
|
||
5. |
HD Schnittstelle |
6. Standfuß |
7. DC Strom/USB Schnittstelle |
||||||
8. |
Video/OK |
9. Modus |
10. Notfall-Sicherung |
|
|||||
11. Power |
|
12. Linse |
|
13. Bildschirm |
14. Mikrofon |
15. Rücksetz-Öffnung |
|||
Tasten: |
|
|
|
|
|
|
|
|
|
|
Auf |
Ab |
MENÜDrücken um den Einstellungsmodus zu öffnen und zu verlassen. |
||||||
OK • Drücken, um im Einstellungsmodus mit Optionen nach OBEN zu navigieren.
• Aufnahmemodus Hotkey: Aufnahme (Drücken um Aufnahme zu starten/stoppen) 7
MMODUS-Auswahl – Drücken, um zwischen Aufnahme / Foto / Wiedergabe Modi zu umzuschalten.
 Derzeitiges Video-Dokument ist gesperrt
 Power – Drücken und halten um das Gerät abzuschalten
Produktinstallation
•Setzen Sie eine MikroSD/TF-Karte in den Kartensteckplatz der Armaturen-Kamera ein.
•Wählen Sie eine Stelle auf der Windschutzscheibe in der Nähe des Rückspiegels, um den Saugnapf zu platzieren.
•Befestigen Sie die Kamera an der Halterung
•Verbinden Sie die DC-Strom/USB-Schnittstelle der Kamera mit dem Auto Zigarettenanzünder über das Stromkabel.
•Passen Sie die Position der Kamera für einen optimalen Aufnahmewinkel an, dann fixieren Sie die Position der Halterung.
•Sobald Sie den Motor starten, beginnt die Kamera automatisch zu laufen.
Achtung:
•Bitte verwenden Sie eine MikroSD/TF-Karte der Klasse 10 oder darüber,
•Stellen Sie sicher, dass Sie die MikroSD/TF-Karte in korrekter Richtung in den Kartensteckplatz einsetzen.
•Um die MikroSD/TF-Karte zu entfernen, drücken Sie bitte leicht auf die Karte.
Verwendung Ihrer Armaturen-Kamera
Sobald der Motor gestartet wird, beginnt die Kamera automatische mit der Aufnahme.
•Einschalten/Ausschalten
Drücken Sie die Power-Taste kurz, um das Gerät einzuschalten; Die Power-Taste lange drücken, um das Gerät auszuschalten.
•Videoaufnahme Einstellungen
-Bitte drücken Sie zuerst OK, bevor Sie die Videoaufnahme Einstellungen öffnen.
-Drücken Sie die Menü-Taste einmal, um die Videoaufnahme Modus Einstellungen zu starten. Drücken Sie Auf und Ab, um jede Einstellung auszuwählen, und drücken Sie OK, um zu bestätigen.
-Auflösung: 1920*1080; 1280*720; 848*480; 640*480; (Standard 1920*1080)
-Schlaufen-Aufnahme: aus/1/3/5 Minuten (Standard: 3 Minuten)
-WDR: aus/an (Standard an)
-Belichtung: +2;+5/3;+4/3;+l;+2/3;+l/3;+0;-l/3;-2/3;-l;-4/3;-5/3;-2; (Standard: +0)
-´Bewegungsmelder: aus/an (Standard: aus)
8
 Loading...