


User Manual
TC04 Trail Camera
AKASO Trail Camera
Please read this manual before operating your trail camera, |
35 |
and keep it for further reference. |

01 - 12 |
13 - 24 |
|
|
|
|
|
|
|
25 - 36 |
37 - 48 |
|
|
|
|
49 - 60

English
What's in The Box
• 1 x Wildlife Camera |
• 1 x Connector |
• 1 x Mounting belt |
• 3 x Screws |
• 1 x USB cable |
• 3 x Expansion screws |
• 1 x Mount |
• 1 x Instruction manual |
Before using the camera
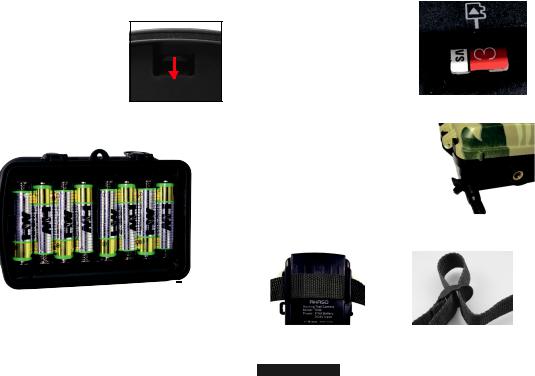
Remove the protective foil from the camera lens by pulling the protruding tab.
Safety Guidelines
Incorrect use of the camera and accessories can be dangerous for you and others and can damage or destroy the camera. Therefore please read the following guidelines first before using your camera.
-This camera is intended for taking digital photos and video clips. It is designed for private use. It is not suitable for commercial purposes.
-The camera, accessory and packaging are not toys for children. These should therefore always be kept away from children. Danger of electrocution, poisoning and suffocation.
-The camera and accessory may not be used by children and persons with limited abilities. The camera may only be operated by persons physically and mentally able to operate it safely.
-If a foreign body or liquid penetrates into the camera, switch off the camera and remove the batteries immediately in case of fire danger or electrocution danger. Dry all the parts thoroughly.
-Do not drop or crash the camera. If it happens or the housing is damaged, switch it off and remove the batteries. Otherwise danger of fire and electrocution.
-The camera may not be dismantled, modified or repaired. Otherwise danger of fire and electrocution.
-Only use a power adaptor (not supplied) with the mains voltage specified on the rating plate (6V). Otherwise danger of fire or electrocution. Disconnect the power by pulling the power adaptor out of the socket.
-A plugged in power adaptor (not supplied) can continue to use power and therefore represents a hazard source.
-The power supply may not be used during thunderstorms. Otherwise danger of electrocution.
-Do not leave the camera in places that are susceptible to increases dramatically in temperature (e.g. a vehicle). The housing and internal parts may be damaged, which in turn could cause a fire.
-Do not wrap up camera or place it on textiles. This could produce a build up of heat in the camera that can cause deformation of the housing and may lead to a fire hazard.
-Only place the camera on sturdy surfaces. The camera could otherwise fall or topple over, causing damage or injury.
-Do not operate the camera whilst running or driving. You could fall or cause a traffic accident.
-Only use a mains adaptor (not supplied) for the camera, having the input voltage specified on the rating plate (6V). We do not accept any liability for damage caused by the use of an incorrect mains adaptor.
1
-The 230V socket used for the mains adaptor (not supplied) must not be covered and accessible at all times so that the mains adaptor can be quickly disconnected from the mains, when required.
-Ensure adequate ventilation and do not cover the mains adaptor (not supplied) to avoid overheating.
-Do not place any open ignition sources, such as lit candles onto or close to the device.
-Do not subject the LCD monitor to impact or pressure. This could damage the glass of the monitor or the liquid could leak from the inside. In case of contact with eyes or skin, rinse immediately with clear water. In case of contact with eyes contact a doctor immediately.
-Damage to the electronics, the monitor or the lens caused by external influences such as impacts, falls or other are not covered by the warranty and must be paid for repair.
-Do not drop or bump the camera and always handle it carefully. Otherwise the camera can be damaged.
Instructions for using the memory card
In case of using a new memory card for the first time, or data available in the memory card unrecognized by the camera or image captured by other cameras, please ensure that you format the memory card before use.
-Before plugging in or out the memory card, please disconnect power supply of the Camera first.
-After using for many times, the performance of the memory card will be lower. In case of low performance, a new memory card is needed.
-The memory card is a precise electronic device. Please don’t bend it and keep it away from falling down.
-Don’t expose the memory card to any strong electromagnetic or magnetic or magnetic field, like placing near speaker or TV receiver.
-Don’t use or keep the memory card in high or low temperatures.
-Keep the memory card clean and away from any sort of liquid. In case of contacting liquid, please dry it with soft cloth.
-In case of keeping the memory card idle, place it into the card sleeve.
-Please note that the memory card will get hot after long-term use, and this is normal.
-Don’t use a memory card that has been used on other digital cameras. If so you need to format the memory card on the camera.
-Don’t use the memory card having formatted on other camera or card reader.
-In case of any of the followings actions with the memory card, the recorded data may be damaged:
Improper use of the memory card.
Disconnect power supply or take the memory card out during recording, deleting (formatting) or reading files.
Areas of application
•Camera trap for hunting.
•Animal or incident observation.
•Motion triggered security camera for domestic, office or public use.
•Any internal and external surveillance, where evidence of an infringement has to be provided.
2

Camera Overview
LED infrared Light
Locking Bracket
Indicator
Lens
PIR Motion Sensor
Locking Bracket
Display Screen
Hole for Locking
Operating Buttons
Speaker
|
|
|
|
Mode Switch |
Micro SD Slot |
AV |
Jack Micro |
USB |
(ON/SETUP/OFF) |
|
3 |
|
|
|
Locking Bracket
Locking Hole
for Lock
Battery Compartment
Locking Bracket
6V DC Connection 
•The LCD screen only lights on in the SETUP mode, or when changing menu settings or viewing existing photos in ON mode.
•Using the operating buttons, menu settings can be changed in the test mode or existing photos can be played back.
•An Micro SD memory card (not included) must have been inserted into the memory card slot in order to save photos and videos.
•To download photos and videos, connect the camera to a computer via the mini USB cable.
•There are 3 modes, which could be switched by the mode button.
•8 x LR6 (AA) batteries( not included) are needed to power the camera.
•An external power supply can be provided via the DC connection (input 6 V, at least 1.5 A. Mains adaptor is not included.)
Steps to use the camera
1. Open and close the camera
To open the camera, undo the two lateral locking brackets as shown in Fig. 1.
To lock the camera again, engage metal hoops of locking brackets into mount and press down plastic tab of bracket (Fig. 2).
4
A fixing for a padlock is provided between the two locking brackets, allowing the camera to be securely locked.
2. Insert batteries
•Open the camera as described in part 6.1 to insert the batteries. The battery compartment is housed in the right, rear part of the camera. Now open the protective cover of the battery compartment by pulling the clamping closure at the top slightly inwards before lifting off the cover.
•Insert 8 fully batteries as shown in the below figure. When inserting batteries ensure correct position as marked for each battery in the battery compartment.
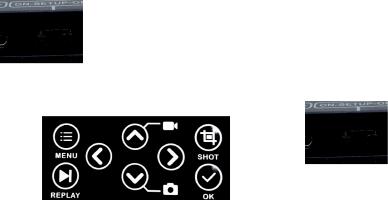
Insert the memory card as shown in the illustration. Push the memory card into compartment until it clicks into place.
To remove the memory card push card in again until it is partly ejected.
Note: Micro SD memory cards up to 32 GB are supported.
4. External power supply
The camera can be powered with an external power supply
(not included). A 6V power supply (with a connector) ≥1.5 A, together with a 3.5 mm external and 1.35 mm internal diameter connector is required.
Note: Rechargeable batteries cannot be recharged in the camera with an external power supply.
Remove any existing batteries from the battery compartment when the camera powered with an external power supply.
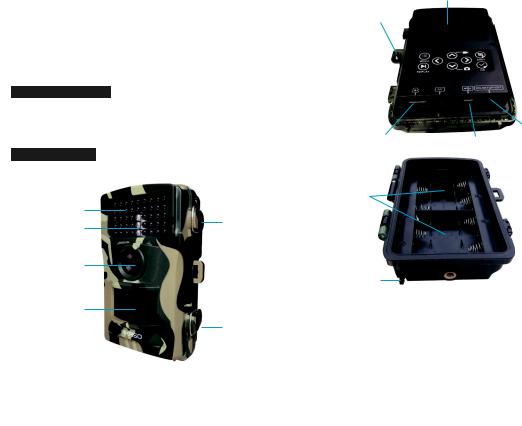
Install the camera with a strap
Use the incluede securing strap to attach the camera to a tree or other object. The illustrations below demonstrate how to fasten the securing strap.
•Close the battery compartment again with the protective cover.
Note:
-Instead of type LR6 (AA) batteries, rechargeable batteries with the same specification (with 2000 mAh or higher) may be used. We recommend NiMh batteries with low self discharge (not supplied).
-There will be an alarm if battery is low in power.
3. Insert memory card
In order to save photos and videos, you must insert a Micro SD memory card to the slot before turning on the camera.
If the camera displays "Card protected", remove the memory crd and change the position of the memory protection.
5
Position your camera as desired and pull the loose end of the securing strap tight until the camera is firmly secured. To release the securing strap again, pull at the tab of the securing strap.
Using the camera
Prior to setting up the camera for surveillance, it must be set up for the respective purpose. For this purpose, there is a setup mode available. In addition to changing settings, photos and videos can be taken and existing photos can be viewed in this mode.
6
1. Mode switch
Open the camera as described in part 7.1. The Mode switch is located at the bottom edge on the right inside. 3 modes can be selected:
OFF: The camera is completely switched off in the OFF mode. SETUP: Select SETUP mode to adjust settings and make or
playback photos and videos.
ON: The camera is activated to take photos automatically.
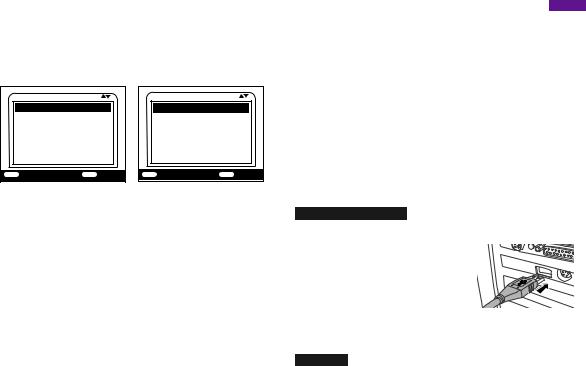
2. Operating buttons
Set the mode switch to SETUP and the camera and monitor are switched on.
Using the operating buttons different functions can now be activated and settings can be changed. For this purpose, the following operating buttons are provided on the display panel:
Functions of operating buttons in recording mode
Below, the operating buttons are described in the recording mode with non activated menu. MENU: Open the Settings menu using the MENU button.
REPLAY: Press this button to start the replay mode.
 : Change to the manual recording mode for video recordings.
 : Change to the manual recording mode for taking photos.
SHOT: Manually take a video or photo depending on the set recording mode. Video recordings are also ended by pressing the SHOT button.
OK, : No function (in recording mode).
Functions of operating buttons in replay mode
Below, the operating buttons are described in the replay mode with non activated menu MENU: Select the Replay menu using the MENU button.
REPLAY: Press the button to return to recording mode.  : View existing pictures backwards.
 : View existing pictures forwards.
SHOT: Enlarge photos in increments (up to 8 times). Press MENU to return original size. OK, : No function (in replay mode).
Functions of operating buttons in menu
Below, the operating buttons are described in the replay mode with activated menu. (Recording and Replay mode).
MENU: Close the Main menu or any sub menu by pressing the MENU button. REPLAY: Press the button to return to recording mode.
 : Move up one menu point or increase value by 1.
 : Move down one menu point or decrease value by 1.
SHOT: Enlarge photos in increments (up to 8 times). Press MENU to return original size. OK: Open selected options or accept selected settings.
 : No function
Confirm each change to a setting by pressing OK. If the change is not confirmed by pressing the OK button, the new settings are lost when leaving the menu.
3. Settings
Prior to using the Wildlife Camera, change the settings as required.
Slide the mode switch of the Wildlife Camera to the SETUP position to start the test mode. In the Photo or Video mode press the MENU button to call up the menu.
All menu options of the Wildlife Camera and possible setting values for the recording mode are listed below. The standard setting is always highlighted in bold.
• Mode: Photo , Video, Photo + Video
Select whether photos or videos should be taken when motion is detected. When in the "Photo
+Video" mode, the camera first takes a set number of photos prior to recording a video.
•Photo resolution: 14MP, 12MP, 8MP, 5MP, 3MP, 1MP
Select the desired resolution for photos. A higher resolution produces a somewhat better photo quality but results in larger files requiring more space on the memory card.
• Video resolution: 1080p, 720P, 480P, VGA
Select the required video resolution. A higher resolution produces higher quality videos but results in larger files requiring more space on the memory card. Videos are recorded in AVI format which can be played back on most video equipment.
• Photo series: 1 photo, 2 photos, 3 photos
Select the number of photos to be taken in succession when the camera is triggered in the Photo mode. Please also observe the parameter Interval!
•Photo + Video : In Photo+ Video mode, the camera takes a photo first and then starts filming video.
•Video length: The video length is optional between 1-60seconds or 1-10 minutes. The longer the recording time selected, the shorter the standby time is. The default video length is 5 seconds.
7 |
8 |

• Shot lag: 30seconds, optional from 5 seconds to 60 minutes
Select the shortest period for the camera to wait before it reacts to the successive triggering of the main sensor after an animal has first been detected. The camera does not record any images or videos during the selected interval. This prevents the memory card from being filled with unnecessary shots.
• Sensitivity of the motion sensors
The sensitivity of the main motion sensor is set here. For interior areas and environments with little interference, select “High”. Select “Medium” for exterior areas and environment with a normal amount of interference, and select “Low” for environment with a high level of interference.
• Target recording time
Press "MENU" to find “Target recording time”. Press "OK", and then select "ON"to set the starting working and ending working time. After finishing setting, the camera only works during the set time every day. Beyond the period, the camera is in standby.
• Time lapse: Off/On
When "On" has been selected, the camera automatically takes photos or videos in the selected time interval, irrespective of whether or not the PIR sensor has detected a motion or not. Select “ON” to set the time interval, and set the values of Hr, Min and Sec. For example, if the process of flowers blooming has to be recorded, time lapse can be used. The camera automatically takes pictures in every set time intervals.
• Language: Select the desired menu language
The following languages are available: English, Deutsch, Dansk, Suomi, Svenska, Espanol, Francais, Italiano, Nederlands, Portugues, Japanese, Chinese.
• Endless Capture
-Here to set Endless Capture. Set “Endless Capture” to “ON”, then return to Mode, select video mode and press OK Button to record, the video will automatically be saved as a file(depends on the chosen video and video length). Then recording time on LCD screen starts at zero. When the memory is full, the first video would be covered and continue recording.
-When recording starts, to switch modes is not available. To switch modem please stop recording first.
-When the battery runs out, the camera will stop working. But the video will be saved automatically.
• Photo stamp: On/Off (only available for photos, not for videos)
Select "ON" to print the date, time, temperature and moon phase on each photo. Otherwise select "Off".
• Password protections
After selecting "On" enter a four digit password to protect your camera against unauthorized access. Press “OK”, and then select “ON” to set the password of the camera. The password is a 4-digit number selected between 0-9. If the password is lost, press MENU and REPLAY key at the same time, and slide the operating mode selector switch from OFF to SETUP position. The camera is unlocked.
9
• Time & date
Set the time and date according to current time. Press Left/Right key to choose the number and change the value by pressing Up/Down key. Confirm the changes with OK key.
Time format: 12/24hr
Date format: dd/mm/yyyy, yyyy/mm/dd, mm/dd/yyyy
Settings |
|
|
Settings Set time date |
|
|
Time |
Time format |
|
Time |
Date format |
|
La |
|
|
Ti |
|
|
Ph |
|
|
MENU Back |
OK |
Select |
Settings |
|
|
Settings |
dd/mm/yyyy |
|
|
|
|
Time |
yyyy/mm/dd01/11/2017 |
|
Time |
mm/dd/yyyy12:10 |
|
La |
|
|
Ti |
|
|
Ph |
|
|
MENU Back |
OK |
Select |
• Format memory card
All files are deleted by formatting the memory card. Press OK button and confirm formatting by selecting "Yes".
We recommend formatting the memory card if it has already been used in other devices or if it is a new card.
Caution: Ensure that files still required have been backed up prior to formatting!
• Serial NO. : Off/On (can only be used for photos not for videos)
Select "On" to assign a serial number to the camera. As soon as "On" has been confirmed by pressing the OK button, the individual serial number can be inserted. The serial number is 4-digit number selected between 0-9.
4. Replay
-Take down the camera from where it’s fixed. Slide the operating mode selector switch to“SETUP” position. Press replay key and Up/Down key to review the photos/videos.
-While reviewing photos, press Up/Down key to page up/down. While reviewing videos, press OK key to start playing, press OK one more time to stop. Press replay key to return into standby.
• Delete selection
You can use this function to delete individual recordings from the memory card. Press MENU key under the mode of playback, move the select bar to “Delete current file” and press OK to delete the selected recording.
• Delete all recordings
-You can use this function to delete all recordings from the memory card. Press MENU
-key under the mode of playback, move the selection bar to “Delete all files” and press OK to delete all recordings.
10
• Write protection
-This function can be used to protect individual recordings of all saved recordings from accidental deletion.
-Select “Write-protect current file” to protect the currently selected recording from accidental deletion.
-Select “Write-protect all files” to protect all saved recordings from accidental deletion.
-Select “Unlock current file” to remove the write protection for the currently selected recording.
-Select “Unlock all files” to remove the write protection for all saved recordings.
Settings |
|
|
Delete current file |
|
|
Delete all files |
|
|
Activate slide show |
|
|
Write protect |
|
|
MENU Back |
OK |
Select |
Settings |
|
|
De Write-protect current fil |
|
|
De Write-protect all files |
|
|
Ac |
Unlock current file |
|
Wu |
Unlock all files |
|
MENU Back |
OK |
Select |
5. Aligning the camera
In test mode you can work out the optimum exposure angle and the range of the motion sensor.During alignment consider whether the use of the side motion sensors may be is useful for attaining the desired observation results.
Align the camera as follows:
Fasten the camera to a tree or similar object at a height of 1-2 meters and align the camera in the desired direction. Then move slowly from one side of the target area to the other side. While doing this, monitor the motion display.
-If it lights up in red, you have been detected by the motion sensor. In this case, youcan work out the best alignment for the camera.
-The motion display only lights up when operating mode selector switch is in the SETUP position and one of the motion sensors has detected movement. During normal operation, there will be no LED display in this area.
-To ensure that the camera doesn’t make unwanted recordings of irrelevant movements, it should not be set up in a sunny location or close to branches. The detecting range of the sensors is 110°. And the recording angle of the camera is about 100°.
6. Normal working mode
-In this mode, recordings are triggered via the motion sensors.
-To set live mode, slide the operating mode selector switch to the “ON” position. After 15 seconds, the LED of motion display will go off.
-Then the camera will start to operate independently and will go into standby mode. As soon as any wild animals or similar object enter the detecting range of the side motion sensors, the camera will be activated and detect the motion. If the wild animals keeps moving to the detecting range of the central sensor zone, the camera will start capturing photo sand/or videos (depending on the configuration).
-After the wild animal moves out of the detecting range of side motion sensors, the camera switches off and goes back into standby mode.
11
English
7. Night working mode
-During night exposures the infrared LEDs on the front of the camera provide the required light for taking pictures. The range of the LEDs makes the camera starting shooting, you have been detected by one of the activated side motion pictures within 3m-20m.However, reflective objects can cause overexposure.
-Please note that pictures taken in night exposures are black and white. When recording video for a long time, the low voltage may have great influence on the stability of the camera. So in case of the low voltage, it better not to record in the evening.
Note: When using the camera at night, the electric current would increase because of the working of infrared lamps. If the camera is in low battery, it would not shoot photos or filming videos at night. Meanwhile once daylight is available, the camera works normally even in low battery.
8. Videos/photos/dates output
• TV connections
The camera can transfer the video signal to an external monitor or the video input of a television set. Please also follow the instructions of the respective playback device.
-Turn on your TV, connect the TV with the camera through 3.5mmm cable
-Turn on the camera, and slide the operating mode selector to “SETUP”
-After connecting, the camera enters the mode of playback and the LCD turns off, the camera recordings would be shown on the TV.
Connecting to computer
The Wildlife Camera can be connected to a computer using the supplied USB a to view existing photos/videos.
1.Connect the camera to your computer using the USB cable.
2.The camera switches on automatically in the USB mode, irrespective of the selection on the mode switch.
3.The camera installs itself on the computer as an additional
drive under the name "Removable storage device".
4. Double click on the device to detect the folder "DCIM".
5.The photos and videos are located in the sub folders of the "DCIM" folder.
6.You can copy or move photo and video files on the computer.
Alternatively you can insert the memory card in a card reader on the computer.
Note: Mac computers show an "Unknown" drive on the desktop. When clicking on this drive, the program "iPhoto" is automatically started.
Contact US
For any inquiries, issues or comments concerining our products, please send E-mail to the address below or call us. We will respond as soon as possible.
E-mail: cs@akasotech.com
US customer service line: (301)670-7335
12

Deutsch
Im Lieferumfang enthalten
• 1 x Wildkamera |
• 1 x Verbindung |
• 1 x Halterungsgurt |
• 3 x Schrauben |
• 1 x USB-Kabel |
• 3 x Dehnschrauben |
• 1 x Halterung |
• 1 x Benutzerhandbuch |
Vor der Verwendung der Kamera
Entfernen Sie die Schutzfolie vom Kameraobjektiv, indem Sie an der hervorstehenden Lasche ziehen
Sicherheitsrichtlinien
Eine falsche Verwendung der Kamera und des Zubehörs kann für Sie und andere gefährlich sein und die Kamera beschädigen oder zerstören. Lesen Sie deshalb zuerst die folgenden Richtlinien sorgfältig durch, bevor Sie die Kamera benutzen.
-Diese Kamera ist für die Aufnahme von digitalen Fotos und Videoclips bestimmt. Sie ist für den privaten Gebrauch konzipiert und nicht für kommerzielle Zwecke geeignet.
-Kamera, Zubehör und Verpackung sind kein Spielzeug für Kinder und sollten daher immer von Kindern ferngehalten werden. Gefahr von Stromschlag, Vergiftung und Erstickung.
-Kamera und Zubehör dürfen nicht von Kindern und Personen mit eingeschränkten Fähigkeiten verwendet werden. Die Kamera darf nur von Personen bedient werden, die körperlich und geistig in der Lage sind, sie sicher zu bedienen.
-Falls ein Fremdkörper oder eine Flüssigkeit in die Kamera eindringt, schalten Sie die Kamera aus und entfernen Sie die Batterien sofort, wenn eine Brandgefahr oder Stromschlaggefahr besteht. Trocknen Sie alle Teile gründlich ab.
-Lassen Sie die Kamera nicht fallen oder anstoßen. Falls dies passiert oder das Gehäuse beschädigt ist, schalten Sie die Kamera aus und entfernen Sie die Batterien. Andernfalls besteht Gefahr von Brandund Stromschlag.
-Die Kamera darf nicht demontiert, modifiziert oder repariert werden. Andernfalls besteht die Gefahr von Brandund Stromschlag.
-Verwenden Sie nur ein Netzteil (nicht mitgeliefert) mit der auf dem Typenschild (6V) angegebenen Netzspannung. Andernfalls besteht Brandoder Stromschlaggefahr. Trennen Sie die Stromversorgung, indem Sie den Netzadapter aus der Steckdose ziehen.
-Ein eingestecktes Netzteil (nicht mitgeliefert) kann weiterhin Strom verbrauchen und stellt somit eine Gefahrenquelle dar.
-Das Netzteil darf nicht während Gewittern verwendet werden, da ansonsten die Gefahr von Stromschlägen besteht.
-Lassen Sie die Kamera nicht an Orten liegen, an denen die Temperatur stark ansteigen kann (z.B. in einem Fahrzeug). Das Gehäuse und die Innenteile können beschädigt werden, was wiederum einen Brand verursachen könnte.
-Packen Sie die Kamera nicht ein oder lassen Sie sie auf Textilien legen. Dadurch kann sich in. der Kamera Wärme stauen, die eine Verformung des Gehäuses verursachen und zu Brandgefahr führen kann.
-Stellen Sie die Kamera nur auf stabilen Oberflächen auf. Die Kamera könnte sonst umkippen
oder herunterfallen und Schäden oder Verletzungen verursachen. 13
-Verwenden Sie die Kamera nicht während des Laufens oder Fahrens. Sie könnten stürzen oder einen Verkehrsunfall verursachen.
-Verwenden Sie für die Kamera nur einen Netzadapter (nicht mitgeliefert) mit der auf dem Typenschild (6V) angegebenen Eingangsspannung. Für Schäden, die durch die Verwendung eines falschen Netzteils verursacht werden, wird keine Haftung übernommen.
-Die für den Netzadapter (nicht mitgeliefert) verwendete 230-V-Steckdose darf nicht ständig abgedeckt und muss zugänglich sein, damit der Netzadapter bei Bedarf schnell vom Stromnetz getrennt werden kann.
-Sorgen Sie für ausreichende Belüftung und verdecken Sie nicht den Netzadapter (nicht mitgeliefert), um Überhitzung zu vermeiden.
-Stellen Sie keine offenen Zündquellen, wie z. B. brennende Kerzen, auf oder in der Nähe des Geräts ab.
-Setzen Sie dem LCD-Monitor keine Stöße oder Druck aus. Dies könnte das Monitorglas beschädigen oder die Flüssigkeit könnte von innen austreten. Bei Berührung mit Augen oder Haut sofort mit klarem Wasser ausspülen. Bei Berührung mit den Augen sofort einen Arzt aufsuchen.
-Schäden an der Elektronik, am Monitor oder an der Linse, die durch äußere Einflüsse wie Stöße, Fehlfunktionen oder andere verursacht werden, sind nicht von der Garantie abgedeckt und müssen für die Reparatur bezahlt werden.
-Lassen Sie die Kamera nicht fallen oder stoßen Sie sie nicht und gehen Sie immer vorsichtig damit um. Andernfalls kann die Kamera beschädigt werden.
Anweisungen zur Verwendung der Speicherkarte
Wenn Sie eine neue Speicherkarte zum ersten Mal verwenden oder Daten auf der Speicherkarte nicht von der Kamera erkannt werden oder von anderen Kameras aufgenommen wurden, stellen Sie sicher, dass Sie die Speicherkarte vor der Verwendung formatieren.
-Bevor Sie die Speicherkarte einoder ausstecken, trennen Sie bitte zuerst die Kamera von der Stromversorgung.
-Nach mehrmaliger Verwendung ist die Leistung der Speicherkarte geringer. Bei geringer Leistung wird eine neue Speicherkarte benötigt.
-Die Speicherkarte ist ein präzises elektronisches Gerät. Bitte schützen Sie sie vor dem Herunterfallen oder Verbiegen.
-Setzen Sie die Speicherkarte keinem starken elektromagnetischen oder magnetischen Feld aus, wie z. B. in der Nähe von Lautsprechern oder Fernsehempfängern.
-Verwenden oder bewahren Sie die Speicherkarte nicht bei hohen oder niedrigen Temperaturen auf.
-Halten Sie die Speicherkarte sauber und frei von Flüssigkeiten. Im Falle eines Kontaktes mit Flüssigkeit trocknen Sie diese bitte mit einem weichen Tuch.
-Wenn die Speicherkarte nicht verwendet wird, legen Sie sie in die Kartenhülle.
-Bitte beachten Sie, dass die Speicherkarte nach längerem Gebrauch heiß wird, dies ist normal.
14
-Verwenden Sie keine Speicherkarte, die in anderen Digitalkameras verwendet wurde. Wenn dies der Fall ist, müssen Sie die Speicherkarte in der Kamera formatieren.
-Verwenden Sie keine Speicherkarte, die mit einer anderen Kamera oder einem Kartenleser formatiert wurde.
-Bei einer der folgenden Aktionen mit der Speicherkarte können die aufgezeichneten Daten beschädigt werden:
Unsachgemäße Verwendung der Speicherkarte,
Trennen der Stromversorgung oder Entnahme der Speicherkarte während der Aufnahme, löschen (formatieren) oder lesen von Dateien.
Anwendungsbereiche
•Kamerafalle für die Jagd.
•Tieroder Ereignisbeobachtung.
•Bewegungsgesteuerte Sicherheitskamera für Haus-, Bürooder öffentlichen Gebrauch.
•Jede interne und externe Überwachung, bei der ein Verstoß nachgewiesen werden muss.
Kamera-Übersicht
LED Infrarot-Licht
Verriegelungsbügel
Indikator
Linse
PIR Bewegungssensor
Verriegelungsbügel
15
Bildschirm
Öffnung für Verschluss
|
|
|
|
|
|
|
|
|
|
|
Bedientasten |
|
|
|
|
|
|
|
|
|
|
||
|
|
|
|
|
|
|
|
|
|
|
Lautsprecher |
|
|
|
|
|
|
|
|
|
|
||
|
|
|
|
|
|
|
|
Modus Taste |
|||
|
|
|
|
|
|
|
|
||||
Mikro-SD-Steckplatz AV Buchse Mikro-USB |
|
(EIN/SETUP/AUS) |
|||||||||
|
|
|
|
|
|
|
Verriegelungsbügel |
||||
|
|
|
|
|
|
|
|||||
Batteriefach |
|
|
|
Öffnung für |
|||||||
|
|
Verschluss |
|||||||||
|
|
|
|
|
|
|
|
|
|
|
Verriegelungsbügel |
|
|
|
|
|
|
|
|
|
|
|
|
6V DC Verbindung
•Der LCD-Bildschirm leuchtet nur im SETUP-Modus oder wenn Sie Menüeinstellungen ändern oder vorhandene Fotos im AN-Modus anzeigen.
•Mit den Bedientasten können Menüeinstellungen im Testmodus geändert oder vorhandene Fotos angezeigt werden.
•Eine Mikro-SD-Speicherkarte (nicht im Lieferumfang enthalten) muss in den Speicherkartensteckplatz eingelegt sein, um Fotos und Videos zu speichern.
•Um Fotos und Videos herunterzuladen, verbinden Sie die Kamera über das Mikro-USB-Kabel mit einem Computer.
•Es gibt 3 Modi, die mit der Modus-Taste umgeschaltet werden können.
•8 x LR6 (AA) Batterien (nicht im Lieferumfang enthalten) werden benötigt, um die Kamera mit Strom zu versorgen.
•Eine externe Stromversorgung kann über den DC-Anschluss bereitgestellt werden (Eingang 6V, mindestens 1,5 A. Netzteil ist nicht im Lieferumfang enthalten).
16
 Loading...