


USER
MANUAL
V50 Pro Action Camera
AKASO Action Camera
Please read this manual before operating your action camera, and keep it for further reference.

CONTENTS
01 - 12 |
13 - 24 |
|
|
|
|
|
|
|
25 - 36 |
37 - 48 |
|
|
|
|
49 - 60 |
61 - 72 |
English
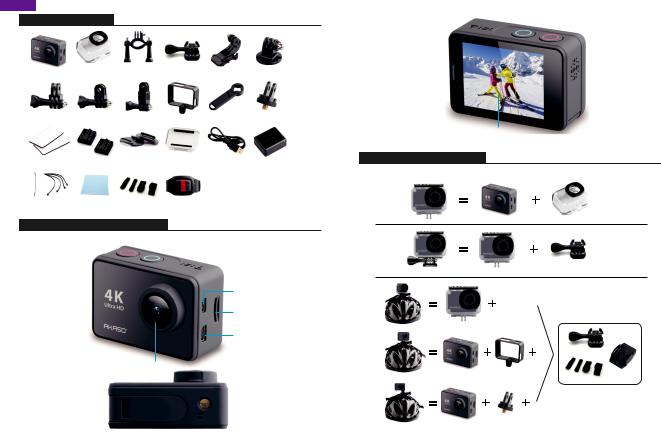
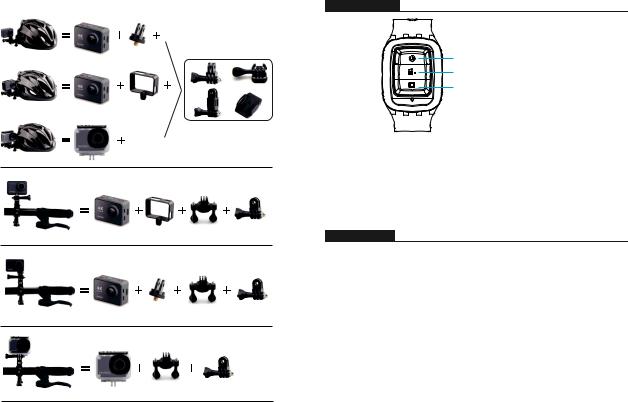
WHAT'S IN THE BOX
V50 Pro |
Waterproof |
Handele Bar/ |
Mount 1 |
Mount 2 |
Mount 3 |
Housing |
Pole Mount |
||||
Mount 4 |
Mount 5 |
Mount 6 |
Mount 7 |
Mount 8 |
Mount 9 |
Mount 10 |
Battery |
Helmet |
Protective |
USB Cable |
Changer |
Mounts |
Backdoor |
||||
Tethers |
Lens Cloth |
Bandages |
Remote |
|
|
|
|
|
|
|
|
CAMERA BUTTONS & FUNCTIONS
Power / Mode Button |
|
|
|
Shutter / Select Button |
|||||
|
|
|
|
|
|
|
MIC |
||
|
|
|
|
|
|
|
|
|
Wi-Fi Indicator |
Micro HDMI Slot
Micro SD Slot
Mini USB Slot
Lens
Battery Door |
|
|
|
Tripod Hole |
|
|
|
||
|
Operating Indicator |
|
|
|
Speaker |
|
||||
|
|
Touch Screen
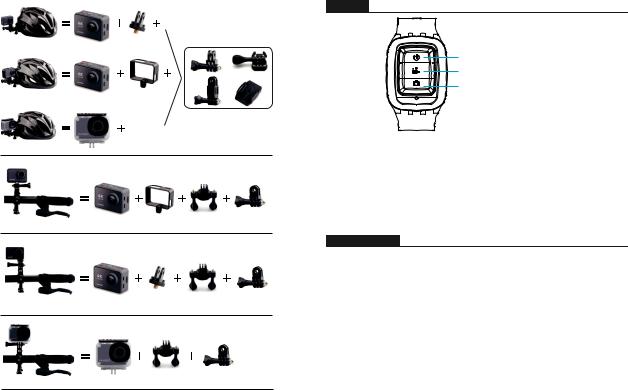
MOUNTING YOUR CAMERA
Attach your camera to helmets, gear and equipment.
1 |
2 |
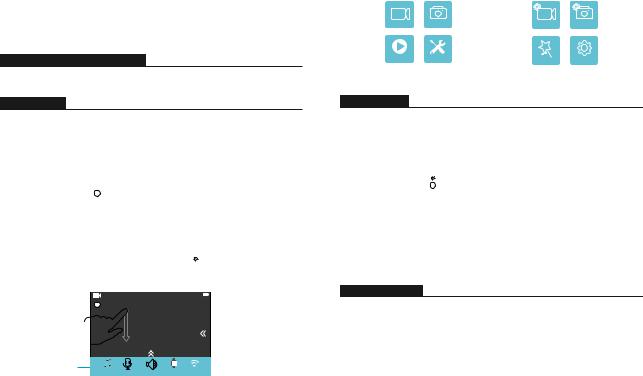
REMOTE
Power Button
Video Button
Photo Button
Splashproof only, not waterproof
Power Button
Press the Power Button for 3s to turn on / off the remote.
How to Connect the Remote to Camera?
1.Press Power / Mode Button to turn on the camera.
2.Enter Setup→General, turn on the RF.
3.Turn on the remote.
INSTRUCTIONS
Welcome to use your AKASO Action Camera. To record or take pictures, Micro SD card (not included) is a must.
Micro SD card specifications:
MicroSD / Micro SDHC / Micro SDXC
Class 10 / UHS-I
Up to 64GB (FAT32)
Format the SD card first on this camera before using. Regularly formating the SD card will maintain the card in good working condition. Before formatting, be sure to back up all the files in your SD card.
Battery
Please make sure the battery is full of power when use it for the first time.
3 |
4 |
Charge the battery: Connect the camera to a computer or USB power supply. When it's charging, the light remains ON. When fully charged, the light will turn OFF.
Power ON / Power OFF
To power ON, Press the Power / Mode Button, To power OFF, press and hold the Power / Mode Button.
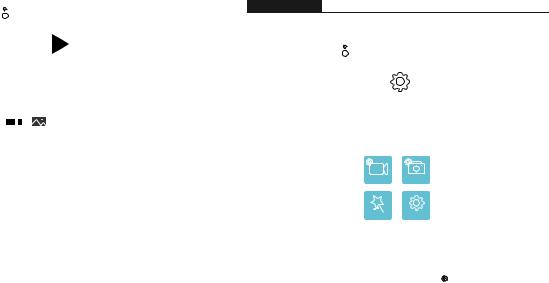
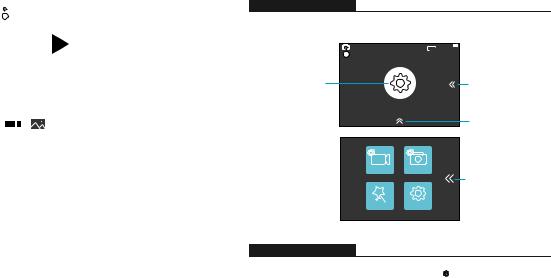
OVERVIEW OF BASIC FUNCTIONS
There are 4 modes: Video, Photo, Playback and Setting.
VIDEO MODE
Video Mode is the default mode after camera power on.
Press the Shutter / Select Button, the camera will start to record video.
Meamwhile the status light will flash and one beep will be emitted by the camera. Press the Shutter / Select Button to end video recording.
Video Mode |
|
|
|
|
|
|
|
|
|
Battery Capacity |
|
|
M |
|
|
|
|
|
|
|
|||
|
|
|
|
|
|||||||
|
|
|
|
|
|
|
|
|
|
|
|
|
|
|
|
|
|
|
|
|
|
|
Mode Shift |
|
|
|
|
|
|
|
|
|
|
||
Video Resolution |
|
4K/30fps |
|
|
|
|
|
|
|
Image Stabilization |
|
|
|
|
|
|
|
|
|
|
|
|
|
|
|
|
|
Shotcut |
|
Key |
|||||
|
|
|
|
|
|||||||
|
|
|
|
|
|
|
|
|
|
|
|
|
|
|
M |
|
|
|
|
|
|
|
|
Menu |
Beep Mic |
Speaker RF Wi-Fi |
Swipe down from the top of the screen with your fingers to access to Menu.
|
Mode |
|
|
|
Setup |
Video |
Photo |
|
Exit / |
Video |
Photo |
|
|
|
|
|
|
Playback |
Setup |
|
Back |
Effect |
General |
|
|
||||
|
|
|
|
|
|
PHOTO MODE
Press Power / Mode Button repeatedly to switch to Photo Mode.
Shooting photo: In Photo Mode, press Shutter / Select Button to shoot photos. The camera will emit camera shutter sound if it has been turned on in Settings.
|
|
|
|
|
|
|
|
|
Photo Resolution |
Photo Mode |
|
|
|
|
|
|
|
|
Battery Capacity |
|
|
14m |
|
|
|
||||
|
|
M |
|
|
|
|
|||
|
|
|
|
|
|
|
|
|
Mode Shift |
|
|
|
|
|
|
|
|
|
|
|
|
|
|
|
|
|
|
Shotcut Key |
|
|
|
|
|
|
|
|
|
|
|
PLAYBACK MODE
•To review videos on the camera, press Power / Mode Button repeatedly to switch to Playback Mode.
•Press Shutter / Select Button to playback the desired one.
•To delete videos, press the Shutter / Select Button for 5s. The menu for deleting will show up. Then Press Shutter / Select Button to delete the videos you want.
5 |
6 |
|
|
|
|
|
|
|
|
|
14m |
|
|
|
|
|
|
|
|
M |
|
|
|
|
|
||||||
Playback |
|
|
|
|
|
|
|
|
|
|
|
|
|
Mode Shift |
|
|
|
|
|
|
|
|
|
|
|
|
|||
|
|
|
|
|
|
|
|
|
|
|
|
|
|
Shotcut Key |
Photo file |
|
|
|
|
|
|
|
|
|
|
Delete |
|||
|
|
|
|
|
|
|
|
|
|
|||||
Video file |
|
|
|
0/0 |
|
|
|
|
|
|||||
|
|
|
|
|
|
|
|
|
Video file |
|
|
Exit / Back |
||
|
|
|
|
|
|
|
|
|
|
|
|
|||
|
|
|
|
|
|
|
|
|
|
|
|
|||
|
|
|
|
|
|
|
|
|
|
|
|
|
|
|
How to delete video? (2 methods)
1.Touch video file icon and select the video you want to delete, then touch delete icon and select “Yes”;
2.Touch video file icon and delete icon to select the video you want to delete, then touch delete icon and select “Yes”.
How to delete photo? (2 methods)
1.Touch photo file icon and select the photo you want to delete, then touch delete icon and select “Yes”;
2.Touch photo icon and delete icon, select the photo you want to delete, then touch delete icon and select “Yes”.
SETTING MODE
Touch setting icon, you will enter to Video Setting, Photo Setting, Effect Setting and General Setting.
|
|
|
|
|
|
|
|
14m |
|
|
|||
|
|
|
M |
|
|
|
|
|
|
|
|||
Setting |
|
|
|
|
|
|
|
|
|
Mode Shift |
|
||
|
|
|
|
|
|
|
|
|
|
||||
|
|
|
|
|
|
|
|
|
|
|
|
|
|
|
|
|
Shotcut |
|
Key |
|
|
|
|
|
|
||
|
|
|
|
|
|
|
|
|
|
||||
|
|
|
|
|
|
|
|
|
|
|
|
|
|
|
|
|
|
Setup |
|
|
|
|
|
|
|
||
|
|
|
Video |
Photo |
|
|
|
Exit / Back |
|
||||
|
|
|
Effect |
General |
|
|
|
|
|||||
|
|
|
|
|
|
|
|||||||
|
|
|
|
|
|
|
|
|
|||||
|
|
|
|
|
|
|
|
|
|
|
|
|
|
|
|
|
|
|
|
|
|
|
|
|
|
|
|
VIDEOSETTING |
|
|
|
|
|
|
|
||||||
Video Resolution: 4K / 30fps, 2.7K / 30fps, |
|
|
|
|
|
|
|
||||||
|
VideoSetting |
|
|
||||||||||
1080P / 60fps, 720P / 120fps |
|
|
|||||||||||
|
|
|
|
|
|
||||||||
Codec: H.264 / H.265 |
|
Video Resolution |
|
||||||||||
Image Stabilization: On / Off |
|
Codec |
|
||||||||||
Video File Length: Unlimited / 1 Min / 5 Min |
|
|
|||||||||||
|
|
|
|
|
|
|
|||||||
|
Image Stabilization |
|
|||||||||||
Time Lapse Internal: Off / 1 Sec / 3 Sec / 5 Sec / |
|
||||||||||||
|
10 Sec / 30 Sec / 1 Min |
|
|
|
|
|
|
|
|||||
|
|
|
|
|
|
|
|
||||||
Time Lapse Duration: Unlimited / 5 Min / 10 Min / 15 Min / 20 Min / 30 Min / 60 Min
Slow Motion Movie: On / Off
Fast Motion Movie: Off / 2x / 4x / 6x / 10x / 15x
Wind Noise Reduction: On / Off
Scene Mode: Manual / Water / Riding / Winter / Diving / Night
7 |
8 |

Date Stamp: Off / Date / Date&Time
Auto Low Light: On/Off
Note: 1. If you want to use Slow Motion Movie, Please turn off Image Stabilization first, then choose 720P / 120fps under Video Resolution.
2.If you want to set Time Lapse Duration, please turn on Time Lapse Internal first.
3.If you want to choose 720P / 120fps, please turn off Image Stabilization first.
PHOTOSETTING
Resolution: 20MP/ 16MP/ 14MP/ 10MP/ 8MP/ |
PhotoSetting |
|
|
5MP/ 2MP |
|
|
|
|
|
|
|
Time Lapse Internal: Off / 3 Sec / 5 Sec / 10 Sec |
Resolution |
|
|
/ 30 Sec / 1 Min |
Time Lapse Interval |
|
|
Time Lapse Duration: Unlimited / 5 Min / |
|
||
|
|
|
|
Time Lapse Duration |
|
||
10 Min / 15 Min / 20 Min |
|
||
|
|
|
|
/ 30 Min / 60 Min |
|
|
|
Photo Burst: Off / 3 shots / 1s / 7 shots / 2s / 15 shots / 4s / 30 shots / 8s |
|||
Delay Timer: Off / Delay 2s / Delay 10s |
|
|
|
Date Stamp: Off / Date / Date&Time |
|
|
|
Scene Mode: Manual / Outdoor / Indoor / Portrait / Landscape / Night |
|||
Picture Quality: S-Fine / Fine / Normal |
|
|
|
Long Exposure: Off / 1 Second / 2 Second / 5 Second / 8 Second / 30 Second / 60 Second |
|||
EFFECT
AE Meter: Center / Average / Spot |
|
|
|
EffectSetting |
|
||
FILTER: None / Black&White / Sepia / Vivid / |
|
||
|
|
||
Natural / Negative / Warm/ Cool / Red |
AE Meter |
||
/ Green / Blue |
FIL TER |
||
White Balance: Auto / Daylight / Shade / |
|||
|
|
||
Tungsten Light / White Fluorescent |
White Balance |
||
EV: -2.0 / -1.0 / +0.0 / +1.0 / +2.0 |
|
|
|
|
|
||
ISO: Auto / 50 / 100 / 200 / 400 / 800 / 1600 |
|
|
|
GENERAL
Control: Mic / Speaker / Brightness |
|
|
|
CameraSetting |
|
||
Sounds: Shutter: ON / OFF |
|
||
|
|
||
Boot-up: ON / OFF |
Control |
||
Beep: ON / OFF |
Sounds |
||
Distortion Calibration: OFF / ON |
|||
|
|
||
Angle: Super Wide / Wide / Medium / Narrow |
Distortion Calibration |
||
Power Frequency: 50Hz / 60Hz |
|
|
|
|
|
||
Diving Mode: ON / OFF |
Note: If you want to use Distortion |
||
WiFi: ON / OFF |
Calibration, please turn off |
||
RF: ON / OFF (Remote) |
Image Stabilization first. |
||
Date & Time: MM / DD / YY / HH / MM |
|
|
|
Screen Saver: OFF / 1Min / 3Min / 5Min |
|
|
|
Auto Power Off: OFF / 1Min / 3Min / 5Min |
|
|
|
Quick Record: OFF / ON |
|
|
|
USB: Storage / PC Camera |
|
|
|
Reset WiFi Setting: Yes / No |
|
|
|
Language: English / German / French / Italian / Spanish / Japanese
Format Card: Yes / No
System:
FactoryReset: Yes / No
System Info: AKASO_V50Pro_xxxxxx
Card Info
CAMERA APP
Before using the WiFi function, please intall the app iSmart Pro+ in your mobile device first.
1.Download the iSmart Pro+ from Google Play or Apple Store.
2.Turn on the camera, touch Shotcut key to turn on WiFi.
After the WiFi is turned on, the screen shows message ‘Waiting for WiFi Connection...’.
3.Find the WiFi named ‘AKASO_V50Pro_XXXXX’ on the mobile devices. Connect it with the password: 1234567890
4.Open the App iSmart Pro+ on the mobile devices.
5.To turn off WiFi, please press Shutter Button for 3 secs.
9 |
10 |

CAMERA MAINTENANCE
•When the camera is in idle, please keep it in a dry shady place.
•Use protective cases to avoid scratches to the lens and IPS.
•Flens needs to be cleaned, firstly blow away the dust on the surface, then use cloth or paper suitabe for optical devices to clean. Detergent could be used if necessary.
•Please don’t use organic solvent to clean.
•Please do not touch the lens by fingers.
•Please do not put the camera in moist or dusty place. Electricity leakage may cause fire.
•Keep the camera away from drops and bumps. It may cause damage to the parts inside.
•Keep the camera away from long time high temperature and strong sunshine to avoid being damaged.
•Please note that the camera will get hot after using it for a long time. It is normal.
FAQ
Q: Video files couldn’t be played on computers.
A: The media player does not support 4K display.
Q: WiFi Network Can’t be Found in Phone / Tablet.
A:1, Turn OFF / ON the Phone / Tablet’s WiFi. 2, Power the camera ON.
3, In the camera’s WiFi setting, turn on the WiFi.
4, Open up the Wireless Settings on your device and tryto connect to the WiFi network with the Phone / Tablet.
5, If the network does not exist in the Phone / Tablet’s list, try another Phone / Tablet if possible.
6, If all the steps above don’t work, please contact the seller support with detailed description of the problem. They will be happy to answer any questions and help out moving forward.
Q: Camera Footage is Distorted or Has Poor Quality.
A: 1, Camera Housing May Have Condensation. Try to put the camera under sunshine for 1 hour or two.
2, Camera Lens May Be Faulty. Camera lens may have scratches or cracks which makes videos and photos distorted. Inspect the lens for cracks and scratches.
English
3, Camera Sensor May Be Faulty. If photos and videos are corrupted or distorted your camera’s sensor may be faulty.
Q: Camera does not work with my memory Card.
A: 1, Try to use the memory card in other devices. If it doesn’t work, the memory card may be faulty.
If it works on other device, make sure it is a Class 10 Micro SD card.
2, If the steps above prove that the memory card is functional. then the memory card slot might be faulty. Please conact seller support for resolution.
CONTACT US
For any inquiries, issues or comments concerining our products, please send E-mail to the address below or call us. We will respond as soon as possible.
E-mail: cs@akasotech.com
US customer service line: (301)670-7335
11 |
12 |

Deutsch
WAS IST ENTHALTEN
V50 Pro |
Wassergeschütztes |
Griff / |
Befestigung 1 |
Befestigung 2 |
Befestigung 3 |
Gehäuse |
Halterung |
||||
Befestigung 4 |
Befestigung 5 |
Befestigung 6 |
Befestigung 7 |
Befestigung 8 |
Befestigung 9 |
Befestigung 10 |
Batterie |
Helmbefestigung |
Schutzgehäuse |
USB-Kabel |
Ladegerät |
Anbindungen |
Tuch für Linse |
Binden |
Fernbedienung |
|
|
|
|
|
|
|
|
KAMERATASTEN & FUNKTIONEN
Strom- / Modus-Taste |
|
|
|
|
Auslöser / Auswahltaste |
|||||||||
|
|
|
||||||||||||
|
|
|
|
|
|
|
|
Mikrofon |
||||||
|
|
|
|
|
|
|
|
|
|
|
|
WLAN-Anzeige |
||
|
|
|
|
|
|
|
|
|
|
|
|
|
|
Micro HDMI Slot |
|
|
|
|
|
|
|
|
|
|
|
|
|
|
|
|
|
|
|
|
|
|
|
|
|
|
|
|
|
Micro SD Slot |
|
|
|
|
|
|
|
|
|
|
|
|
|
|
|
|
|
|
|
|
|
|
|
|
|
|
|
|
|
|
|
|
|
|
|
|
|
|
|
|
|
|
|
|
Mini USB Slot |
|
|
|
|
|
|
|
|
|
|
|
|
|
|
|
|
|
|
|
|
|
|
|
|
|
|
|
|
|
|
|
|
|
|
|
|
|
|
|
|
|||||
|
|
|
|
Linse |
||||||||||
Batteriefach |
|
|
|
|
|
|
|
|
|
|
|
|
Stativloch |
|
|
|
|
|
|
|
|
|
|
|
|
|
|||
|
|
|||||||||||||
Bedienungsanzeige |
|
|
|
Lautsprecher |
|
||||
|
|
Touchscreen
BEFESTIGEN IHRE KAMERA
Befestigen Sie Ihre Kamera an Helmen, Ausrüstung und Geräte.
13 |
14 |
Fernbedienung
Stromtaste
Videotaste
Fototaste
Nur spritzwassergeschützt, nicht wasserdicht
Stromtaste
Drücken Sie die Stromtaste für 3s, um die Fernbedienung ein-/auszuschalten. So verbinden Sie die Fernbedienung mit der Kamera
1.Drücken Sie die Strom- / Modus-Taste, um die Kamera einzuschalten.
2.Rufen Sie Einstellungen→Allgemein auf und schalten Sie RF ein.
3.Schalten Sie die Fernbedienung ein.
ANWEISUNGE
Willkommen zum Verwenden ihrer AKASO Action Kamera. Zum Filmen oder Aufnehmen von Bildern ist eine Micro SD-Karte (nicht im Lieferumfang enthalten) erforderlich.
Micro SD-Kartenspezifikationen:
MicroSD / Micro SDHC / Micro SDXC
Klasse 10 / UHS-I
Bis zu 64GB (FAT32)
Formatieren Sie zuerst die SD-Karte auf dieser Kamera, bevor Sie sie verwenden. Durch regelmäßige Formatierung der SD-Karte bleibt die Karte in einwandfreiem Zustand. Stellen Sie vor dem Formatieren sicher, dass Sie alle Dateien auf Ihrer SD-Karte sichern.
Batterie
Bitte stellen Sie sicher, dass der Akku bei der ersten Verwendung voll ist.
15 |
16 |
Laden Sie den Akku auf: Schließen Sie die Kamera an einen Computer oder eine USB-
Stromversorgung an. Beim Laden bleibt das Licht eingeschaltet. Bei voller Ladung wird das Licht ausgeschaltet.
Ein- / Ausschalten
Zum Einschalten drücken Sie die Strom- / Modus-Taste. Zum Ausschalten drücken und halten Sie die Strom- / Modus-Taste.
ÜBERBLICK ÜBER GRUNDLEGENDE FUNKTIONEN
Es gibt 4 Modi: Video, Foto, Wiedergabe und Einstellung.
VIDEOMODUS
Videomodus ist der Standardmodus nach dem Einschalten der Kamera.
Drücken Sie den Auslöser / Auswahltaste, die Kamera beginnt mit der Videoaufnahme.
Währenddessen blinkt das Statuslicht und ein Piepton wird von der Kamera ausgegeben.
Drücken Sie den Auslöser / Auswahltaste, um die Videoaufnahme zu beenden.
Videomodus 


 Batteriekapazität
M

 Moduswechsel
Videoauflösung |
4K/30fps |
Bildstabilisierung |
Shortcut-Taste
Menü
Beep |
Mic |
Speaker |
RF |
Wi-Fi |
Ziehen Sie mit den Fingern vom oberen Bildschirmrand nach unten durch, um auf das Menü zuzugreifen
|
Modus |
|
|
Einstellungen |
||
Video |
Foto |
|
Zurück |
Video |
Foto |
|
|
|
|
|
Effekt |
Allgemein |
|
Wiedergabe |
Einstellungen |
|
||||
|
|
|||||
|
|
|
|
|
|
|
FOTOMODUS
Drücken Sie die Strom / Modus-Taste wiederholt, um zum Fotomodus zu wechseln.
Foto aufnehmen: Drücken Sie im Fotomodus die Auslöser / Auswahltaste, um Fotos aufzunehmen. Die Kamera gibt ein Kamerageräusch von sich, wenn Sie es im
Einstellungsmodus eingeschaltet haben.
|
|
|
|
|
|
|
|
|
Fotoauflösung |
Fotomodus |
|
|
|
|
|
|
|
|
Batteriekapazität |
|
|
14m |
|
|
|||||
|
|
M |
|
|
|
|
|||
|
|
|
|
|
|
|
|
|
Moduswechsel |
|
|
|
|
|
|
|
|
||
|
|
|
|
|
|
|
|
|
Shortcut-Taste |
|
|
|
|
|
|
|
|
|
|
WIEDERGABEMODUS
•Um Videos auf der Kamera zu überprüfen, drücken Sie wiederholt die Strom- / ModusTaste, um zum Wiedergabemodus zu wechseln.
•Drücken Sie die Auslöser / Auswahltaste, um die gewünschte Wiedergabe zu starten.
•Um Videos zu löschen, drücken Sie den Auslöser 5 Sekunden lang. Das Menü zum Löschen wird angezeigt.
•Drücken Sie dann die Auslöser / Auswahltaste, um die gewünschten Videos zu löschen.
17 |
18 |
|
|
|
|
|
|
|
|
|
14m |
|
|
|
|
|
|
M |
|
|
|
||||||
Wiedergabe |
|
|
|
|
|
|
|
|
|
|
|
Moduswechsel |
|
|
|
|
|
|
|
|
|
|
|
||
|
|
|
|
|
|
|
|
|
|
|
|
Shortcut-Taste |
Fotodatei |
|
|
|
|
|
|
|
|
|
|
Löschen |
|
|
|
|
|
|
|
|
|
|
|
|||
Videoodatei |
|
|
|
0/0 |
|
|
|
|||||
|
|
|
|
|
|
|
|
|
Video file |
|
|
Verlassen / Zurück |
|
|
|
|
|
|
|
|
|
|
|
|
|
|
|
|
|
|
|
|
|
|
|
|
|
|
|
|
|
|
|
|
|
|
|
|
|
|
|
So löschen Sie ein Video (2 Methoden)?
1.Berühren Sie das Videodatei-Symbol und wählen Sie das Video aus, das Sie löschen möchten. Berühren Sie dann das Löschen-Symbol und wählen Sie „Ja“.
2.Berühren Sie das Videodateiund das Löschen-Symbol, um das Video auszuwählen, das Sie löschen möchten. Berühren Sie dann das Löschen-Symbol und wählen Sie „Ja“.
So löschen Sie ein Foto (2 Methoden)?
1.Berühren Sie das Fotodatei-Symbol und wählen Sie das Video aus, das Sie löschen möchte., Berühren Sie dann das Löschen-Symbol und wählen Sie „Ja“.
2.Berühren Sie das Fotodateiund das Löschen-Symbol, um das Video auszuwählen, das Sie löschen möchten. Berühren Sie dann das Löschen-Symbol und wählen Sie „Ja“.
EINSTELLUNGSMODUS
Berühren Sie das Einstellungssymbol, Sie gelangen zu Videoeinstellungen, Fotoeinstellungen, Effekteinstellungen und Allgemeine Einstellungen.
|
14m |
M |
|
Einstellungen |
Moduswechsel |
|
Shortcut-Taste |
|
Setup |
Video |
Foto |
|
Verlassen / Zurück |
Effekt |
Allgemein |
VIDEOEINSTELLUNGEN
Videoauflösung: 4K / 30fps, 2.7K / 30fps, |
|
|
|
Videoeinstellungen |
|
||
1080P / 60fps, 720P / 120fps |
|
||
|
|
||
Codec: H.264 / H.265 |
Videoauflösung |
||
Bildstabilisierung: Ein / Aus |
Codec |
||
Länge der Videodatei: Unbegrenzt/ 1 Min/ 5 Min |
|||
|
|
||
Bildstabilisierung |
|||
Zeitrafferintervall: Aus / 1 Sek / 3 Sek / 5 Sek / |
|||
10 Sek / 30 Sek / 1 Min |
|
|
|
|
|
||
Zeitrafferdauer: Unbegrenzt / 5 Min / 10 Min / 15 Min / 20 Min / 30 Min / 60 Min
Zeitlupenfilm: Ein / Aus
Zeitrafferfilm: Aus / 2x / 4x / 6x / 10x / 15x
Windgeräuschreduzierung: Ein / Aus
Szenenmodus: Manuell / Wasser / Reiten / Winter / Tauchen / Nacht Datumsstempel: Aus / Datum / Datum&Zeit
19 |
20 |
 Loading...