

Page 1

REFERENCE PRODUCTION MONITOR
QUICKSTART GUIDE
ENGLISH (1)
GUÍA DE INICIO RÁPIDO
ESPAÑOL (2)
GUIDE D'UTILISATION RAPIDE
FRANÇAIS (3)
GUIDA RAPIDA
ITALIANO (4)
KURZANLEITUNG
DEUTSCH (5)
WWW.AKAIPRO.COM
Page 2

Page 3
BOX CONTENTS
y RPM8 Speaker y Quickstart Guide
y Power cable y Safety Instructions & Warranty Information
QUICK SETUP
1. Turn the rear panel INPUT LEVEL CONTROL KNOB to the Minimum position.
2. Connect the power cable to the speaker.
3. Connect the audio source’s output to the speaker's XLR / 1/4" LINE INPUT with a 1/4" or XLR
connector.
4. Turn on the audio source.
5. Turn on the RPM8.
6. With the audio source material playing, gradually turn up the INPUT LEVEL CONTROL KNOB until the
speaker is playing the audio material at a comfortable level.
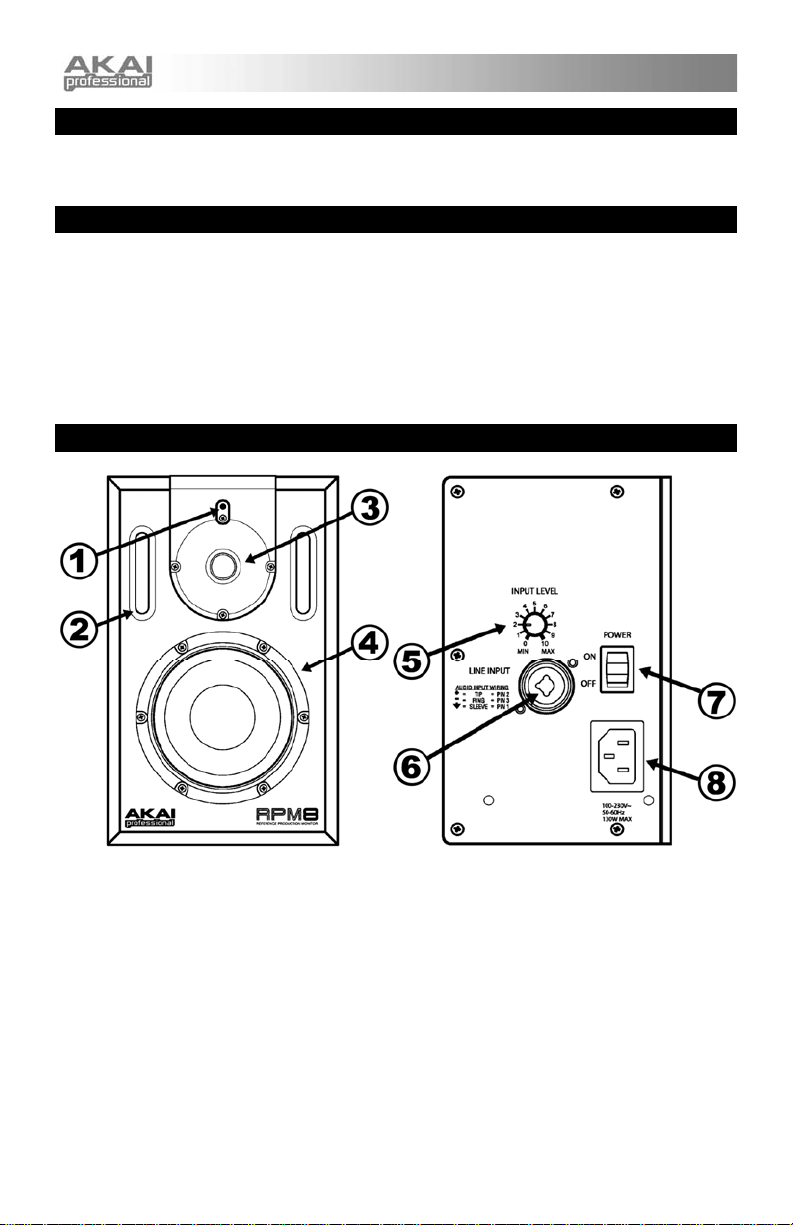
TOP PANEL OVERVIEW
1. POWER / CLIP LED – This LED will be green when the monitor is on. The LED will flash red if the
signal is clipping. If this happens, decrease the setting of the INPUT LEVEL CONTROL KNOB.
2. PRECISION-TUNED BASS PORT – Enhances the bass response of the monitor.
3. SILK DOME TWEETER – The monitor's high-frequency driver.
4. KEVLAR WOOFER – The monitor's low-frequency driver.
5. INPUT LEVEL CONTROL KNOB – Adjusts the strength of the signal being sent to the monitor. This
allows all types of audio sources to be used, from stand-alone CD players to professional mix e rs.
6. XLR / 1/4" LINE INPUT – Connect your audio source to this input using an XLR or 1/4" (TS or TRS)
cable.
7. POWER SWITCH – Turns the monitor on or off.
8. IEC POWER CONNECTOR – Provides power from a 100-230 V, 50-60 Hz AC power source.
1
Page 4

CONTENIDO DE LA CAJA
y Altavoz RPM8 y Guía de inicio rápido
y Cable de alimentación y Instrucciones de seguridad e información sobre la garantía
INSTALACIÓN RÁPIDA
1. Gire la PERILLA DE CONTROL DE NIVEL DE ENTRADA del panel trasero hacia la posición mínima.
2. Conecte el cable de alimentación al altavoz.
3. Conecte la salida de la fuente de audio a la ENTRADA DE LÍNEA XLR / DE 1/4" del altavoz con un
conector de 1/4" o XLR.
4. Encienda la fuente de audio.
5. Encienda el RPM8.
6. Mientras reproduce el material de la fuente de audio, gire la PERILLA DE CONTROL DE NIVEL DE
ENTRADA en forma gradual para aumentar el volumen hasta que el altavoz reproduzca el material de
audio a un nivel adecuado.
VISTA DEL PANEL SUPERIOR
1. LED DE ENCENDIDO / RECORTE – Este LED se ilumina con luz verde cuando el monitor está
encendido. En cambio, destella con luz roja si la señal se está recortando. Si esto sucede, disminuya
el ajuste de la PERILLA DE CONTROL DE NIVEL DE ENTRADA.
2. PUERTO PARA GRAVES CON AFINACIÓN DE PRECISIÓN – Mejora la respuesta del monitor a los
graves.
3. TWEETER CON DOMO DE SEDA – Driver de alta frecuencia del monitor.
4. WOOFER DE KEVLAR – Driver de baja frecuencia del monitor.
5. PERILLA DE CONTROL DE NIVEL DE ENTRADA – Ajusta la intensidad de la señal que se envía al
monitor. Esto permite la utilización de todo tipo de fuentes de audio, desde reproductores de CD
autónomos hasta mezcladores profesionales.
6. ENTR ADA DE LÍNEA XLR / DE 1/4 " – Conecte a esta entrada su fuente de audio con un cable (TS o
TRS) XLR o de 1/4".
7. INTERRUPTOR DE ENCENDIDO – Enciende y apaga el monitor.
8. CONECTOR DE ALIMENTACIÓN IEC – Proporciona alimentación desde un suministro eléctrico de
CA de 100-230 V, 50-60 Hz.
2
Page 5

CONTENU DE LA BOÎTE
y Enceinte RPM8 y Guide d’utilisation simplifié
y Câble d’alimentation y Consignes de sécurité et information concernant la garantie
GUIDE D’INSTALLATION RAPIDE
1. Régler le niveau du bouton de réglage du niveau d'entrée (INPUT LEVEL) du panneau arrière au
minimum.
2. Brancher le câble d'alimentation à l'enceinte.
3. Branchez la sortie audio de la source audio à l'entrée LINE INPUT à l’aide d’un connecteur 1/4 po ou
XLR.
4. Mettre la source audio sous tension.
5. Mettre le RPM8 sous tension.
6. Une fois que la lecture du matériel de la source audio a débuté, augmentez le niveau d'entrée avec le
bouton de réglage du niveau d'entrée (INPUT LEVEL) jusqu'à ce que le niveau sonore de l'enceinte
soit au niveau désiré.
CARACTÉRISTIQUES DU PANNEAU SUPÉRIEUR
1. DEL D’ALIMENTATION – Il devient vert lorsque l’enceinte est sous tension. En présence
d'écrêtage, le voyant DEL clignote. Pour remédier à l’écrêtage, diminuez le réglage du bouton de
réglage du niveau d'entrée (INPUT LEVEL).
2. ÉVENT DES GRAVES – Permet d’étendre la réponse en grave de l’enceinte.
3. HAUT-PARLEUR D'AIGUS À DÔME EN SOIE – Permet d’assurer la réponse en aigus de l'enceinte.
4. HAUT-PARLEUR EN KEVLAR – Permet d’assurer la réponse en grave de l'enceinte.
5. BOUTON INPUT LEVEL – Permet d'ajuster la puissance du signal acheminé à l’enceinte. Ceci permet
l'utilisation de tous types de sources audio telles que platines CD autonomes et consoles de mixage
professionnelles.
6. LINE INPUT – Permet de brancher une source audio à l’aide d’un câble stéréo XLR ou ¼ po (TS ou
TRS).
7. L'INTERRUPTEUR D'ALIMENTATION (POWER) – Met l’appareil sous et hors tension.
8. ENTRÉE D'ALIMENTATION (IEC) – Connecteur pour câble d’alimentation 100-230 V CA, 50/60 Hz.
3
Page 6

CONTENUTI DELLA CONFEZIONE
y Altoparlante RPM8 y Guida rapida
y Cavo di alimentazione y Istruzioni di sicurezza e garanzia
IMPOSTAZIONE RAPIDA
1. Impostare sul minimo la MANOPOLA DI CONTROLLO LIVELLO D’INGRESSO posta sul pannello
posteriore.
2. Collegare il cavo di alimentazione alla cassa.
3. Collegare l’uscita della sorgente audio all’INGRESSO DI LINEA XLR / 1/4" della cassa servendosi di un
connettore da 1/4" o XLR.
4. Accendere la sorgente audio.
5. Accendere l’RPM8.
6. Durante la riproduzione del materiale audio, alzare gradualmente la MANOPOLA DI CONTROLLO
DEL LIVELLO DI INGRESSO fino a quando la cassa non riproduce l’audio ad un volume adeguato.
PANORAMICA PANNELLO SUPERIORE
1. LED DI ALIMENTAZIONE / CLIP – Quando il monitor è acceso, questo LED è verde. Il LED lampeggia
rosso se il segnale salta. Se ciò dovesse accadere, diminuire l’impostazione della MANOPOLA DI
CONTROLLO DEL LIVELLO DI INGRESSO.
2. PORTA CON SINTONIA DI PRECISIONE PER BASSI – Migliora la risposta dei bassi del monitor.
3. TWEETER SILK DOME – Il driver ad alta frequenza del monitor.
4. WOOFER IN KEVLAR – Il driver a bassa frequenza del monitor.
5. MANOPOLA DI CONTROLLO DEL LIVELLO DI INGRESSO – Regola la forza del segnale inviato al
monitor. Consente l’utilizzo di tutti i tipi di sorgenti audio, da lettori CD singoli a mixer professionali.
6. INGRESSO DI LINEA XLR / 1/4" – Collegare la sorgente audio a questo ingresso servendosi di un
cavo XLR o da 1/4" ( T S o TRS).
7. INTERRUTTORE DI ALIMENTAZIONE (POWER) – Accende e spegne il monitor.
8. CONNETTORE DI ALIMENTAZIONE IEC – Fornisce l’alimentazione a partire da una fonte da 100-230
V, 50-60 Hz AC.
4
Page 7

SCHACHTELINHALT
y RPM8Lautsprecher y Schnellanleitung
y Netzkabel y Sicherheits- und Garantiehinweise
SCHNELLAUFBAU
1. Den an der Geräterückseite befindlichen INPUT LEVEL CONTROL REGLER ganz zurückdrehen.
2. Netzkabel an Lautsprecher anschließen.
3. Ausgang der Tonquelle mit einem 6,35 mm oder XLR-Stecker an den XLR / 6,35 mm LINE EINGANG
des Lautsprechers anschließen.
4. Tonquelle einschalten.
5. RPM8 einschalten.
6. Beim Abspielen des Tonmaterials den INPUT LEVEL CONTROL REGLER soweit aufdrehen, bis der
Lautsprecher das Tonmaterial in einer angenehmen Lautstärke wiedergibt..
GERÄTEOBERSEITE
1. NETZ / CLIP LED – Diese LED leuchtet grün auf, wenn der Monitor eingeschaltet ist und blinkt rot,
wenn das Signal abgeschnitten wird. Kommt dies vor, muss der INPUT LEVEL CONTROL REGLER
heruntergedreht werden.
2. PRÄZISIONS-BASS PORT – Verbessert die Basswiedergabe des Monitors.
3. SILK DOME TWEETER – Der Hochfrequenztreiber des Monitors.
4. KEVLAR WOOFER – Der Niedrigfrequenztreiber des Monitors.
5. INPUT LEVEL CONTROL REGLER – Zur Einstellung der Signallautstärke, die an den Monitor gesandt
wird. Dies ermöglicht die Verwendung aller Arten von Tonquellen, von einzelnen CD-Playern bis hin zu
professionellen Mischpulten.
6. XLR / 6,35 MM LINE EINGANG – Hier wird die jeweilige Tonquelle mit einem XLR oder 6,35 mm (TS
oder TRS)-Kabel angeschlossen.
7. NETZSCHALTER – Dient zum Ein- und Ausschalten des Monitors.
8. NETZANSCHLUSS (GEMÄß IEC) – Zum Anschluss einer100-230 V, 50-60 Hz Wechselstromquelle.
5
Page 8

SPECIFICATIONS
INPUTS
Nominal input level: +4 dBu (1.23 V rms)
Maximum input level: +20 dBu (7.75 V rms)
Input impedance: 10 kΩ
OUTPUT
Low frequency (LF) power: 80 W rms (130 W Peak)
High frequency (HF) power: 40 W rms (130 W Peak)
Max peak SPL per pair: ~113 dBSPL (1m / max input below clipping)
Frequency response: 45 Hz – 20 kHz ±1.5 dB
Bass level: -3 dB @ 39 Hz typical
POWER REQUIREMENTS
Input voltage: 100 V AC – 230 V AC
Input frequency: 47 – 63 Hz
Power consumption: 20 W idle (150 W peak)
ENVIRONMENTAL REQUIREMENTS
Temperature range: 0-40º C
Relative humidity: 30-85%
(non-condensing)
CABLING REQUIREMENTS
Source to speaker: Balanced or unbalanced, shielded; XLR or 1/4" TRS connector
MECHANICAL
Size (H x W x D): 17.5" x 11" x 13.5" (445 mm x 280 mm x 345 mm)
Weight: 33 lbs (15 kg)
6
Page 9

Page 10

A
7-51-0297-
WWW.AKAIPRO.COM
 Loading...