

Page 1

M
AirLive WMM-3000PCM
IMO-G Wireless PCM Adapter
Page 2
g
Table of Contents
List of Languages
English
Polski
Español
Deutsch
Česky
Русский
...............
.................
..............
...........
................
...........
WMM-3000PCM
1
7
12
17
22
27
Portu
日本語
uês
...........
................
32
37
Page 3
Declaration of Conformity
We, Manufacturer/Importer
5F., NO.6, Lane 130, Min-Chuan Rd., Hsin-Tien City, Taipei County, Taiwan
In accordance with 89/336 EEC-EMC Directive and 1999/5 EC-R & TTE Directive
Clause Description
■ EN 300 328 V1.6.1 Electromagnetic compatibility and Radio spectrum Matters (ERM); Wideband transmission equipment operating in the 2.4GHz ISM
(2004) band and using spread spectrum modulation techniques; Part 1:Technical characteristics and test conditions Part2:Harmonized EN
covering essential requirements under article 3.2 of the R&TTE Directive
■ EN 301 489-1 V1.4.1 Electromagnetic compatibility and Radio spectrum Matters (ERM); Electromagnetic compatibility (EMC) standard for radio equipment
(2002) and Services; Part 17:Specific conditions for wideband data and HIPERLAN equipment
■ EN 301 489-17 V1.2.1
(2002)
■ EN 50385:2002 Product standard to demonstrate the Compliance of radio base stations and fixed terminal stations for wireless Telecommunication
System with the Basic restrictions or the reference levels related to human exposure to radio Frequency electromagnetic fields
( 110 MHz – 40 GHz ) - General public
■ EN 60950-1: 2001 Safety for information technology equipment including electrical business equipment
■ CE marking
Signature: ______________
Name: Albert Yeh
Position/Title: Vice President
Date: 2007/1/4
WMM-3000PCM
OvisLink Corp.
Declare that the product
MIMO 802.11g PCM Adapter
AirLive WMM-3000PCM
is in conformity with
Manufacturer/Importer
English
English
1
Page 4

English
2
Note on the FCC standard
This equipment has been tested and found to comply with the limits for a Class B digital device pursuant to Part
15 of the FCC Rules. These limits are designed to provide reasonable protection against harmful interferences
when the equipment is operating in a commercial area. This equipment generates, uses and may radiate radio
frequency energy, and if not installed in accordance with the user guide, may cause interference in the
transmission of radio communications. If operating in a residential area, it is probable this equipment will cause
harmful interference, in which case the user will be required to try to correct this interference using his own
means.
Note on CE Marking
This is a Class B product. In a residential area this product may cause radio interference, in which case the user
can be required to take the appropriate measures. OvisLink Corp. hereby declares that AirLive WMM-3000PCM
meets the basic requisites of directive 99/05/CE, and is therefore liable for the accuracy of these data:
OvisLink Corp.
5F, No.6 Lane 130,
Min-Chuan Rd, Hsin-Tien City,
Taipei, Taiwan
Warranties
This product has undergone various quality controls to ensure proper operation.
This product is covered by a two-year warranty for countries inside European Union. For other countries, the
warranty period is one year only. In the event of any manufacturing fault or breakdown, it will be repaired by
OvisLink Corp. Please contact your supplier for details on the procedure to follow. This warranty shall not be
applicable in the event of damage caused by improper use of the product, accidents, faulty handling or
manipulation nor any future incompatibility with third party products.
2
English
TEL: +886-2-2218-6888
WMM-3000PCM
Page 5
English
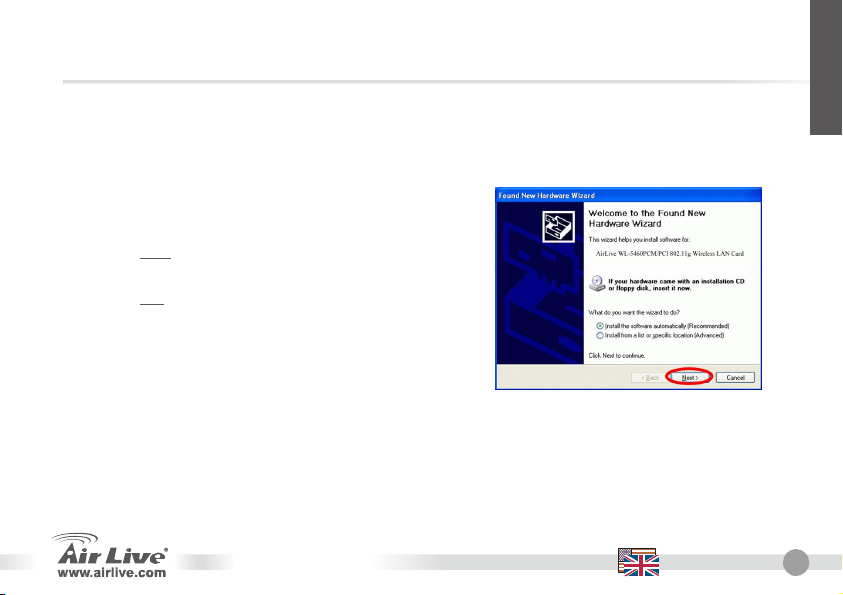
Driver Installation
Please install the driver and utility first before plugging in the wireless adapter. If you have plugged in the
wireless adapter already, please read the “Alternative Installation Method” section for details.
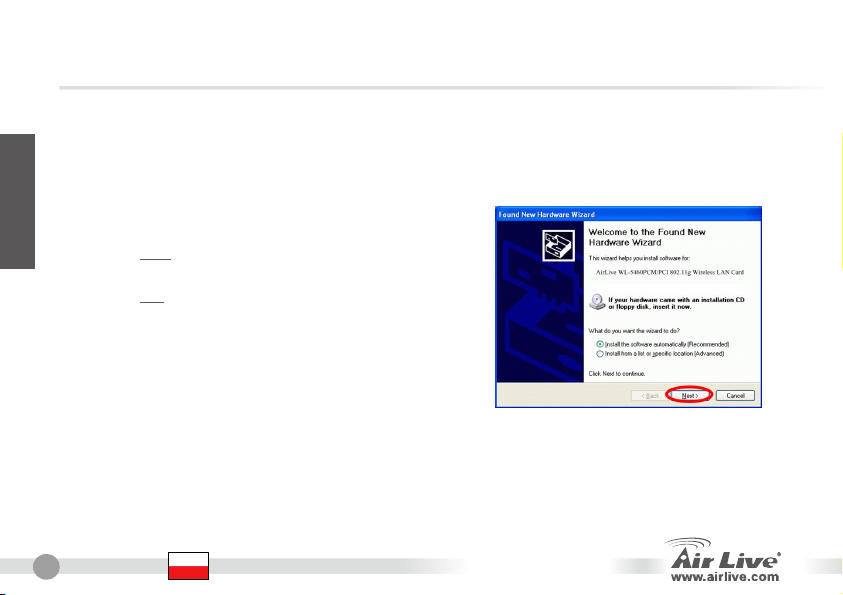
1. Insert the driver CD into the computer, select Utility to begin software Installation.
2. Now, please follow the instruction below to install the
hardware
PCM: Please connect the adapter into computer’s
¾¾
CardBus slot.
PCI: Please connect the adapter into computer’s
¾¾
PCI slot.
3. After inserting the PCM/PCI adapter, the computer
will automatically detect the hardware and the setup
wizard will appear.
4. Click on Next and Continue Anyway all the way until the installation is finished. The computer should
automatically find and install the correct driver.
5. The following screen should appear on the right hand corner of the Windows task bar to indicate the wireless
adapter is online.
You can right click on the icon and click Launch the Config Utilities
WMM-3000PCM
English
3
Page 6
English
4
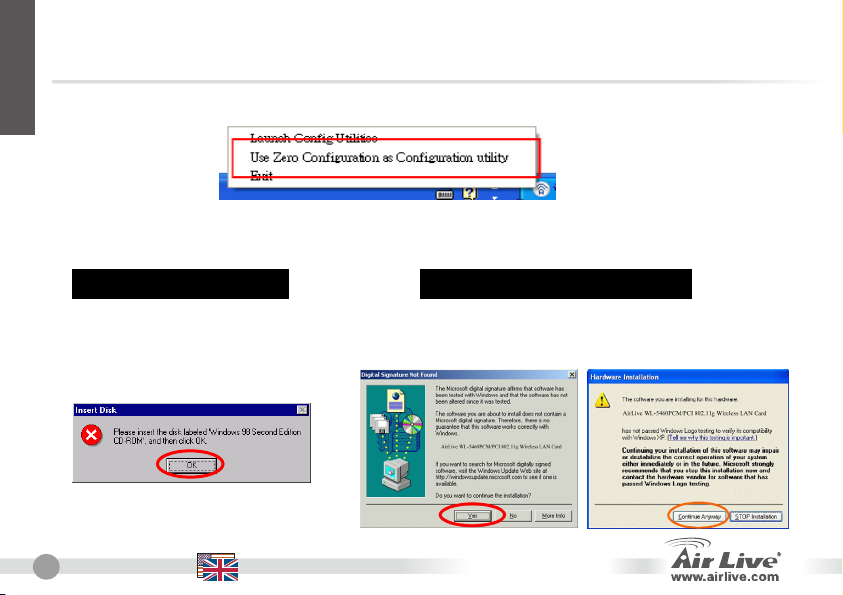
6. If you want to configure your MIMO Wireless LAN Card with “Wireless Zero Configure”
supported by XP, you should choose “Use Zero Configuration as Configuration utility”.
If the icon doesn’t appear automatically, go to Start -> Programs
-> AirLive Wireless -> AirLive MIMO-G Wireless Utility
It will appear in the task bar.
Installation Note for Win2000/WinXPInstallation Note for Win98
Before installation of the device, make
sure you have your operating system
CD-ROM at hand. You may be asked to
insert the OS CD-ROM in order to
download specific drivers.
4
English
When the Digital Signature Not Found
message appears, click Yes or
Continue Anywhere.
WMM-3000PCM
Page 7
English
Alternative Installation Method
Please use this installation method only If you have plug in the wireless adapter before installing the
software.
1. If you have plugged in the wireless adapter before installing the driver, Windows will detect the
device and start the setup wizard.
2. Click Next to start installation of driver.
3. When asked for the location of your driver. Please insert the AirLive Driver CD into your
CD-ROM driver.
4. Click Browse and select the CD’s Utility directory.
5. Click Next and Windows will copy all the necessary files.
6. Win98
When Windows prompt for files, insert the Windows 98 CD
7. Win2000
In “Digital Signature Not Found” window, click Yes to continue
8. WinME/XP
Click Continue anyway to proceed.
9. You might need to reboot your machine after finish driver installation.
10. To Install the Utility, please browse the AirLive CD. Go to the Utility directory, and run the
“setup” program. Follow the instruction to finish utility setup.
WEP & WPA Configuration
WEP encodes all the data to increase the security. There are 2 encryption levels (key length): 64-bit or
128-bit. All wireless devices in the network must use the same WEP settings (same level, same keys).
Please enable the WEP in AP/Wireless Router first before turning on the WEP in the wireless adapters.
For details, please refer to the user’s manual
WMM-3000PCM
English
5
Page 8
English
6
Channel
The standard of 802.11b/g is able to support channels 1-14. The following table shows the
available channels in the various countries, which is based upon local constraints.
Countries Allowable Channel
USA (FCC) Channel 1~11
Canada (IC) Channel 1~11
Europe (ETSI) Channel 1~13
SPAIN Channel 10~11
France Channel 10~13
Japan Channel 1~14
6
English
WMM-3000PCM
Page 9

Ostrzeżenie FCC
Ten produkt został przetestowany i uzyskał potwierdzenie zgodności z rozporządzeniami na temat urządzeń
cyfrowych należących do Klasy B (Class B), według części 15 Reguł FCC. Ograniczenia te zostały
zaprojektowane w celu zapewnienia uzasadnionej ochrony przed szkodliwymi interferencjami, które mogą
powstać podczas użytkowania produktu w środowisku miejskim. Urządzenie wytwarza, używa i może
promieniować energię w postaci fal radiowych, o ile nie zostało zainstalowane i nie jest używane zgodnie z
podręcznikiem użytkownika. Może wtedy spowodować powstanie szkodliwych interferencji i zakłócać łączność
radiową. Jeśli używanie tego produktu w terenie zamieszkałym spowoduje szkodliwe interferencje, użytkownik
może spotkać się z wymaganiem usunięcia tych interferencji na własny koszt.
Ostrzeżenie CE
To urządzenie Klasy B (Class B). W środowisku zabudowanym może ono spowodować powstanie szkodliwych
interferencji radiowych. W takim przypadku obowiązkiem jego użytkownika jest wykonanie odpowiednich
poprawek w celu wyeliminowania problemu. OvisLink Corp. niniejszym oświadcza, że urządzenie
AirLive WMM-3000PCM spełnia podstawowe wymagania dyrektywy 99/05/CE. Podaje też swoje dokładne
dane:
Gwarancje
Niniejszy produkt przeszedł szczegółową kontrolę jakości, która zweryfikowała jego właściwe działanie.
Urządzenie objęte jest dwuletnią gwarancją na terenie wszystkich krajów Unii Europejskiej. W innych krajach
okres gwarancji wynosi jeden rok. W przypadku jakichkolwiek uszkodzeń lub błędów producenta, będzie
naprawione na koszt OvisLink Corp. Prosimy o kontakt ze sprzedawcą w celu uzyskania dokładnych informacji o
przebiegu procedury gwarancyjnej. Gwarancja nie obejmuje uszkodzeń spowodowanych przez niewłaściwe
użytkowanie produktu, wypadków losowych, a także błędów spowodowanych samodzielną próbą zmian
parametrów produktu oraz niekompatybilności z urządzeniami innych producentów.
WMM-3000PCM
OvisLink Corp.
5F, No.6 Lane 130,
Min-Chuan Rd, Hsin-Tien City,
Taipei, Taiwan
TEL: +886-2-2218-6888
Polski
Polski
7
Page 10
8
Instalacja sterowników
Zainstaluj dołączone oprogramowanie przed podłączeniem urządzenia. Jeżeli podłączyłeś urządzenie przed
dokonaniem instalacji sterowników, przejdź do rozdziału „Alternatywna metoda instalacji”
Polski
1. Włóż dołączoną płytę CD do napędu CD-ROM, wybierz opcję Install Software.
2. Postępuj zgodnie z pojawiającymi się komunikatami.
PCM: Podłącz kartę sieciową do gniazda PCMCIA
¾¾
w Twoim komputrze przenośnym
PCI: Zainstaluj kartę w wolnym gnieździe PCI w
¾¾
Twoim komputerze.
3. Po podłączeniu karty, komputer automatycznie
rozpozna zainstalowany sprzęt i poprosi o
wskazanie lokalizacji z wymaganym
oprogramowaniem.
4. Naciśnij przycisk Dalej, potwierdź chęć kontunuowania instalacji przyciskiem Kontynuuj mimo to.
Wymagane pliki zostaną skopiowane.
5. Poniższy rysunek powinien pojawić się w prawym dolnym rogu ekranu. Ikona na pasku zadań systemu
Windows wskazuje stan połączenia. Klikając prawym klawiszem myszy na ikonie uruchomisz program
konfiguracyjny karty
Polski
WMM-3000PCM
Page 11

6. Jeżeli chcesz skonfigurować kartę za pośrednictwem wbudowanego manadżera Windows
XP, zaznacz opcję „Wybierz systemu Windows do konfiguracji ustawień sieci
bezprzewodowej”
Jeżeli po instalacji nie pojawiła się ikona, wybierz
Start->Programy->AirLive Wireless-> AirLive MIMO-G Wireless Utility.
Ikona powinna pojawić się na pasku zadań.
Instalacja w systemie Windows 98
Przed rozpoczęciem instalacji upewnij się,
że posiadasz płytę CD z systemem
Windows 98. Podczas instalacji zostaniesz
poproszony o włożenie płyty do napędu
CD-ROM.
Instalacja w systemie Windows2000/WinXP
Podczas sprawdzania podpisów
cyfrowych sterownika, zignoruj
ostrzeżenie i kontynuuj instalację.
Polski
WMM-3000PCM
Polski
9
Page 12
10
Polski
Alternatywna metoda instalcji
Postępuj zgodnie z zamieszczonymi poniżej wskazówkami jeżeli przed instalacją oprogramowania
podłączyłeś kartę do komputera.
1. Po podłączeniu karty do komputera, system Windows automatycznie rozpocznie instalację
sterowanika.
2. Kliknij „Dalej” w celu kontynuacji instalacji.
3. Zostaniesz poproszony o podanie lokalizacji sterowanika. Wybierz AitLive Dirver CD, oznaczoną
literką Twojego napędu CD-ROM.
4. Wybierz „Przeglądaj” i przejdź do katalogu „Utility” znajdującego się w głównym katalogu.
5. Kliknij „Dalej”, system Windows skopiuje wymagane pliki.
6. Win98
Zostaniesz poproszony o włożenie do napędu CD-ROM płyty CD z systemem Win98.
7. Win2000
Podczas sprawdzania podpisów cyfrowych sterownika, zignoruj ostrzeżenie I kontynuuj instalację.
8. WinME/XP
Potwierdź chęć kontunuowania instalacji przyciskiem „Kontynuuj mimo to..”.
9. W celu zainstalowanie oprogramowania konfiguracyjnego karty przejdź do katalogu „Utility”
znajdującego się na dołączonej płycie CD i uruchom aplikację setup.
Polski
WMM-3000PCM
Page 13
Szyfrowanie WEP & WPA
Szyfrowanie WEP zapewnia bezpieczną transmisję w sieciach bezprzewodowych. Udostępnione są
dwie długości kluczy za pomocą których szyfrowane są dane: 64-bit i 128-bit. Wszystkie urządzenia w
sieci powinny używać takich samych ustawień szyfrowania WEP. W pierszej kolejności należy włączyć
szyfrowanie na punkcie dostępowym, potem na kartach.
Więcej informacji dostępnych w rozszerzonej instrukcji obsługi.
Kanał
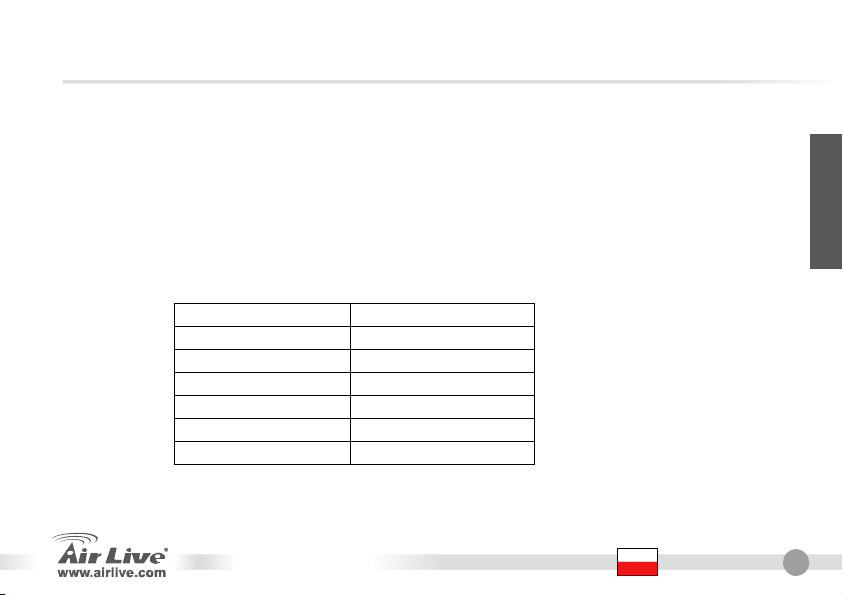
Standardowo standart 802.11b/g obsługuje 1-14 kanałów radiowych. Poniża tabela zawiera
informację dotyczących dostępnych kanałów transmisji WiFi w poszczególnych krajach.
Polski
Countries Allowable Channel
USA (FCC) Channel 1~11
Canada (IC) Channel 1~11
Europe (ETSI) Channel 1~13
SPAIN Channel 10~11
France Channel 10~13
Japan Channel 1~14
WMM-3000PCM
Polski
11
Page 14

Español
12
Nota sobre el estándar FCC
Este equipo ha sido probado y funciona completamente bajo las regulaciones para los equipos digitales Clase
B, coincidentemente con la parte 15 de las reglas de FCC. Estos limites se diseñan para proporcionar
protección razonable contra la interferencia dañosa cuando el equipo opera en un ambiente comercial. Este
equipo usa y puede generar frecuencia de radio y, si no se instala y usa de acuerdo con la guía del usuario,
puede causar interferencia dañosa para otros transmisores de radio. Es probable que el funcionamiento de este
equipo en una área residencial cause interferencia, en ese caso el usuario tendrá que corregir la interferencia
por su propios medios.
Nota sobre CE Marking
Este es un producto Clase B, en un ambiente domestico puede causar interferencia de radio, in este caso el
usuario puede ser que requiera tomar mediadas adecuadas. OvisLink S.A. declara por la presente que el
AirLive WMM-3000PCM cumple con los requisitos básicos de las directivas 99/05/CE, y es por consiguiente
responsable por la exactitud de estos datos:
Garantías
Este producto ha sido sometido a varios controles para asegurar el funcionamiento apropiado.
Este producto esta cubierto por dos anos de garantía para los países que componen la Unión Europea. Por
otros países, el periodo de garantía es de un ano. En el caso de un falla de fabricación o rotura, sera reparado
por Ovislink Corp. Por favor contáctese con su distribuidor para mayor información de este procedimiento. Esta
garantía no será aplicable en caso de daño causado por el uso impropio del producto, accidentes, manejo
defectuoso o manipulación ni cualquier incompatibilidad futura con terceros productos.
OvisLink Corp.
5F, No.6 Lane 130,
Min-Chuan Rd, Hsin-Tien City,
Taipei, Taiwan
TEL: +886-2-2218-6888
Español
WMM-3000PCM
Page 15

Español
Driver Installation
Please install the driver and utility first before plugging in the wireless adapter. If you have plugged in the
wireless adapter already, please read the “Alternative Installation Method” section for details.
1. Insert the driver CD into the computer, select Utility to begin software Installation.
2. Now, please follow the instruction below to install the
hardware
PCM: Please connect the adapter into computer’s
¾¾
CardBus slot.
PCI: Please connect the adapter into computer’s
¾¾
PCI slot.
3. After inserting the PCM/PCI adapter, the computer
will automatically detect the hardware and the setup
wizard will appear.
4. Click on Next and Continue Anyway all the way until the installation is finished. The computer should
automatically find and install the correct driver.
5. The following screen should appear on the right hand corner of the Windows task bar to indicate the wireless
adapter is online.
You can right click on the icon and click Launch the Config Utilities
WMM-3000PCM
Español
13
Page 16

Español
14
6. If you want to configure your MIMO Wireless LAN Card with “Wireless Zero Configure”
supported by XP, you should choose “Use Zero Configuration as Configuration utility”.
If the icon doesn’t appear automatically, go to Start -> Programs
-> AirLive Wireless -> AirLive MIMO-G Wireless Utility
It will appear in the task bar.
Installation Note for Win2000/WinXPInstallation Note for Win98
Before installation of the device, make
sure you have your operating system
CD-ROM at hand. You may be asked to
insert the OS CD-ROM in order to
download specific drivers.
When the Digital Signature Not Found
message appears, click Yes or
Continue Anywhere.
Español
WMM-3000PCM
Page 17

Español
Alternative Installation Method
Please use this installation method only If you have plug in the wireless adapter before installing the
software.
1. If you have plugged in the wireless adapter before installing the driver, Windows will detect the
device and start the setup wizard.
2. Click Next to start installation of driver.
3. When asked for the location of your driver. Please insert the AirLive Driver CD into your
CD-ROM driver.
4. Click Browse and select the CD’s Utility directory.
5. Click Next and Windows will copy all the necessary files.
6. Win98
When Windows prompt for files, insert the Windows 98 CD
7. Win2000
In “Digital Signature Not Found” window, click Yes to continue
8. WinME/XP
Click Continue anyway to proceed.
9. You might need to reboot your machine after finish driver installation.
10. To Install the Utility, please browse the AirLive CD. Go to the Utility directory, and run the
“setup” program. Follow the instruction to finish utility setup.
WEP & WPA Configuration
WEP encodes all the data to increase the security. There are 2 encryption levels (key length): 64-bit or
128-bit. All wireless devices in the network must use the same WEP settings (same level, same keys).
Please enable the WEP in AP/Wireless Router first before turning on the WEP in the wireless adapters.
For details, please refer to the user’s manual
WMM-3000PCM
Español
15
Page 18

Español
16
Channel
The standard of 802.11b/g is able to support channels 1-14. The following table shows the
available channels in the various countries, which is based upon local constraints.
Countries Allowable Channel
USA (FCC) Channel 1~11
Canada (IC) Channel 1~11
Europe (ETSI) Channel 1~13
SPAIN Channel 10~11
France Channel 10~13
Japan Channel 1~14
Español
WMM-3000PCM
Page 19

Anmerkungen zum FCC-Standard
Dieses Produkt wurde getestet und ist anerkannt worden, mit den Richtlinien der FCC, Teil 15 für digitale Geräte
der Kategorie B übereinzustimmen. Diese Beschränkungen sind dafür bestimmt, einen angemessenen Schutz
gegen schädliche Störungen zu bieten wenn die Produkte in einer gewerblichen Umgebung verwendet werden.
Diese Produkte erzeugen und benutzten Radiofrequenzen und können darüber hinaus solche ausstrahlen. Bei
einer Installation und Nutzung, die sich nicht nach dieser Bedienungsanleitung richtet kann zudem eine
schädliche Störung des Funkverkehrs auftreten. Beim Betrieb dieser Produkte im Wohnbereich sind solche
Störungen nicht unwahrscheinlich. In diesem Fall wird der Benutzer dazu aufgefordert, die Störungen auf eigene
Kosten zu beseitigen.
Anmerkungen zum CE-Zeichen
Hier handelt es sich um ein Produkt der Kategorie B. In häuslicher Umgebung können solche Produkte
Funkstörungen hervorrufen. In diesem Fall kann der Benutzer aufgefordert werden, entsprechende Maßnahmen
zu treffen. Die Firma OvisLink erklärt hiermit, dass der AirLive WMM-3000PCM die Basisanforderungen der
CE-Direktive 99/05/CE erfüllt und ist somit verantwortlich für die Verlässlichkeit dieser Angaben:
Garantiebestimmungen
Um einen sicheren Betrieb zu gewährleisten wurde dieses Produkt verschiedenen Qualitätskontrollen
unterzogen. Für dieses Produkt werden innerhalb der Europäischen Union zwei Jahre Garantie gewährt. In
anderen Ländern beträgt die Garantiedauer nur 1 Jahr. Im Falle eines Herstellungsfehlers oder Defektes wird
das Gerät durch Ovislink repariert. Bitte fragen Sie in einem solchen Fall Ihren Händler nach weiteren Details.
Diese Garantie gilt nicht im Falle eines Schadens durch unsachgemäße Benutzung, Unfallschäden,
Transportschäden oder einer Manipulation des Gerätes, sowie auch nicht bei zukünftigen Inkompatibilitäten mit
Produkten eines Dritten
WMM-3000PCM
OvisLink Corp.
5F, No.6 Lane 130,
Min-Chuan Rd, Hsin-Tien City,
Taipei, Taiwan
TEL: +886-2-2218-6888
Deutsch
Deutsch
17
Page 20

18
Installation des Treibers
Installieren Sie bitte zuerst den Treiber und das Utility bevor Sie den Wireless-Adapter einstecken. Falls Sie
den Wireless-Adapter schon vorher eingesteckt haben, so entnehmen Sie bitte weitere Details dem Abschnitt
“Alternative Installationsmethode”.
Deutsch
1. Legen Sie die Treiber-CD ins CDROM-Laufwerk Ihres Computers und wählen Sie Install Software
um die Installation zu beginnen.
2. Installieren Sie jetzt bitte die Hardware gemäß den
folgenden Instruktionen.
PCM: Schieben Sie die Karte bitte in den
¾¾
CardBus-Slot.
PCI: Befestigen Sie die Karte bitte in einem freien
¾¾
PCI-Slot Ihres PCs.
3. Nachdem Sie die PCM/PCI-Karte eingesteckt haben
wird Ihr Computer die neue Hardware automatisch
erkennen und den Setup-Wizard starten.
4. Klicken Sie auf Weiter und Trotzdem fortfahren bis die Installation abgeschlossen ist. Der Computer sollte
dabei den Treiber automatisch finden und installieren.
5. Auf der rechten Seite der Windows-Systemleiste finden Sie nun ein kleines Icon, das anzeigt, ob die
Wireless-Karte online ist. Nach einem Rechtsklick darauf können Sie durch eine Klick auf “Launch the
Config Utilities” das Konfigurationsprogramm starten.
Deutsch
WMM-3000PCM
Page 21

A
6. Falls Sie die Konfiguraton Ihrer MIMO Wireless LAN Card mit der von XP unterstützten
“Wireless Zero Configuration” vornehmen wollen, so wählen Sie bitte “Use Zero
Configuration as Configuration utility”.
Falls das Icon nicht automatisch erscheint, so gehen Sie bitte auf Start ->
Programme
-> AirLive Wireless -> AirLive MIMO-G Wireless Utility
Daraufhin erscheint es in der Systemleiste.
Installationshinweise für Win98
Legen Sie bitte vor der Installation die
CD-ROM Ihres Betriebssystems bereit.
Sie werden vielleicht dazu aufgefordert,
diese einzulegen um bestimmte Treiber zu
installieren.
nmerkungen zu Installation unter Win2000/WinXP
Wenn die Nachricht „Digitale Signatur
nicht gefunden” erscheint, so klicken
Sie bitte auf Ja oder Trotzdem
Deutsch
WMM-3000PCM
Deutsch
19
Page 22

20
Deutsch
Alternative Installationsmethode
Benutzen Sie diese Methode bitte nur falls Sie den Wireless-Adapter schon vor der Installation der
Software angeschlossen haben.
1. Wenn Sie den Wireless-Adapter vor der Installation der Treiber angeschlossen haben, so wird
Windows das Gerät erkennen und den Setup-Wizard starten.
2. Klicken Sie auf “Next” um die Installation der Treiber zu starten.
3. Wenn Sie nach dem Ort für den Treiber gefragt werden, so legen Sie bitte die AirLive-Treiber-CD
in das CD-ROM-Laufwerk.
4. Klicken Sie auf “Auswählen” und wählen Sie das “Utility”-Verzeichnis der CD.
5. Klicken Sie auf “Weiter” damit Windows alle notwenigen Dateien kopiert.
6. Win98
Wenn Sie nach Dateinen gefragt werden, so legen Sie bitte Ihre Windows-98-CD ein.
7. Win2000
Im Fenster “Digitale Signatur nicht gefunden” klicken Sie bitte um fortzufahren auf “Ja”.
8. WinME/XP
Klicken Sie auf “Trotzdem weitermachen” um fortzufahren.
9. Um die Installation abzuschließen müssen Sie eventuell Ihren PC neu starten.
10. Öffnen Sie bitte mit einem Dateimanager das Utility-Verzeichnis der AirLive-CD, um das Utility zu
installieren. Starten Sie dort das “Setup-Programm”. Gehen Sie nun bitte gemäß den
Anweisungen vor.
Deutsch
WMM-3000PCM
Page 23

Konfiguraton von WEP & WPA
Zur Erhöhung der Sicherheit verschlüsselt WEP die übertragenen Daten. In Abhängigkeit von der
Schlüssellänge (64 Bit oder 128 Bit) gibt es 2 unterschiedliche Stärken der Verschlüsselung. Sämtliche
Wireless-Geräte im Netzwerk müssen die gleichen WEP-Einstellungen benutzen (gleiche
Schlüssellänge, gleicher Schlüssel. Aktivieren Sie WEP bitte zuerst an Ihrem AP/Wireless-Router und
erst dann an den Steckkarten/PCs.
Weitere Details hierzu finden Sie im Benutzerhandbuch.
Kanal
Der Standard 802.11b/g unterstützt die Kanäle 1 bis 14. Welche davon in einem Land
zugelassen sind hängt von den örtlichen Bestimmungen ab. Die folgende Tabelle zeigt die
verfügbaren Kanäle in verschiedenen Ländern.
Länder Allowable Channel
USA (FCC) Kanal 1 bis 11
Kanada (IC) Kanal 1 bis 11
Europa (ETSI) Kanal 1 bis 13
Spanien Kanal 10 bis 11
Frankreich Kanal 10 bis 13
Japan Kanal 1 bis 14
WMM-3000PCM
Deutsch
21
Page 24

Česky
22
FCC Standard - upozornění
Toto zařízení bylo testováno a vyhovuje předpisům třídy B pro digitální zařízení, na základě odstavce 15, FCC
pravidel. Tyto limity jsou vytvořeny po poskytování účinné ochrany před škodlivými vlivy zařízení pracující
v komerční sféře. Toto zařízení vyzařuje radiové vlny a pokud není instalováno a používáno v souladu s touto
uživatelskou příručkou, tak může vykazovat rušení okolní radiové komunikace. Provoz tohoto zařízení
v osídlených oblastech bude pravděpodobně příčinou nežádoucího rušení. V tomto případě by měl uživatel
přijmout opatření, která povedou ke korekci rušení.
CE Marking - upozornění
Toto zařízení odpovídá třídě B. V domácím prostředí může způsobovat radiové rušení. V tomto případě by měl
uživatel přijmout odpovídající opatření. Společnost OvisLink Corp. takto deklaruje, že AirLive WMM-3000PCM
splňuje základní pravidla norem 99/05/CE, a je proto odpovědná za správnost všech údajů:
Záruka
Tento produkt byl podrobený rozličným kontrolám kvality k zajištění všech funkcí.
Tento produkt podléhá dvouleté záruce v krajinách Evropské Unie. V ostatních krajinách je záruční doba
stanovena na jeden rok. V případě výrobních závad nebo nefunkčnosti bude zařízení opraveno společností
OvisLink Corp. Prosím kontaktujte svého dodavatele, který vám sdělí detailní informace. Záruka nebude uznána
pokud dojde k poškození zařízení vlivem nestandardního užívání, např.: fyzické poničení následkem pádu,
nesprávná manipulace, neautorizované zásahy, provoz v extremních podmínkách atd.
OvisLink Corp.
5F, No.6 Lane 130,
Min-Chuan Rd, Hsin-Tien City,
Taipei, Taiwan
TEL: +886-2-2218-6888
Česky
WMM-3000PCM
Page 25

Instalace ovladačů
Nainstalujte prosím ovladače a utility dříve než připojíte bezdrátový adaptér. Pokud jste již adaptér připojili,
přečtěte si pokyny v sekci “Alternativní instalace”
1. Vložte do mechaniky CD s ovladači a vyberte volbu Install Software.
2. Nyní prosím postupujte podle následujících instrukcí:
PCM: zasuňte kartu do CardBus slotu
¾¾
PCI: zasuňte kartu do PCI slotu
¾¾
3. Po vložení PCM/PCI karty, váš počítač automaticky
detekuje hardware a začne instalac
4. Stiskněte tlačítko Next a Continue Anyway, instalace proběhne automaticky. Váš počítač najde a
nainstaluje potřebné ovladače.
5. V pravém rohu Windows se objeví ikona a indikuje zda je bezdrátový adaptét připravený. Poklepáním
na ikonu spustíte konfigurační utilitu
Česky
WMM-3000PCM
Česky
23
Page 26

Česky
y
24
6. Pokud chcete konfigurovat bezdrátový adaptér pomocí konfigurační utility ve Windows,
zvolte možnost “Používám Zero Configuration jako konfigurační utilitu”
Před zahájením instalace se ujistěte zda
máte připraveno CD s intstalačními
soubory operačního systému. Během
instalace můžete být vyzváni k jeho
vložení.
Pokud se ikona neobjeví automaticky, tak stiskněte START – Programy –
AirLive Wireless – AirLive MIMO-G Wireless Utility
Ikona se násleně objeví ve stavovém řádku
Instalační doporučení pro Win2000/WinXPInstalační doporučení pro Win98
Pokud se objeví chybové hlášení, že nebyl
nalezen digitální podpis, pokračujte stiskem
YES nebo Continue Anywa
Česky
WMM-3000PCM
Page 27

Česky
Alternativní instalace
Tyto instalační instrukce používejte pouze tehdy pokud zapojíte adaptér před instalací ovladačů
1. Pokud zapojíte adaptér před instalací ovladačů, tak systém zdetekuje zařízení a spustí
instalační okno.
2. Stiskem Next zahájíte instalaci.
3. Zadejte cestu k instalačnímu CD.
4. Zvolte adresář “Utility” na CD.
5. Stiskem Next naistalujete potřebné soubory.
6. Pouze Win98
Pokud bude operační vyžadovat instalační soubory, vložte instalační CD operačního
systému.
7. Pouze Win2000
Při upozornění “Chybí digitální podpis”, pokračujte stiskem Yes.
8. Pouze WinME/XP
Pokračujte stiskem “Continue anyway”.
9. Pravděpodobně budete vyzváni k restartu vašeho počítače po dokončení instalace.
10. Instalační soubory utilit najdete na AirLive CD. Otevřete adresář “Utility” a spusťte program
Konfigurace WEP & WPA
Šifrování WEP zvyšuje bezpečnost vašich dat. Můžete využívat délku klíče 64 nebo 128 bitů. Všechna
bezdrátová zařízení v síti musí mít stejné nastavení WEP šifrování (stejný klíč, stejný kanál atd.)
Pro podrobnější informace čtěte prosím manuál
WMM-3000PCM
Česky
25
Page 28

Česky
26
Kanály
Standard 802.11b/g podporuje kanály 1 – 14. Následující tabulka uvádí dostupné kanály pro
konkretní země.
Země Dostupné kanály
USA (FCC) Kanál 1~11
Kanada (IC) Kanál 1~11
Evropa (ETSI) Kanál 1~13
Španělsko Kanál 10~11
Francie Kanál l 10~13
Japonsko Kanál 1~14
Česky
WMM-3000PCM
Page 29

Установка драйвера
Прежде, чем устанавливать драйвер и программу настройки, подключите адаптер БЛВС.
1. Чтобы начать процедуру установки, вставьте в привод оптических дисков
компьютера компакт-диск с драйвером и выберите пункт Install Software
(Установить ПО).
2. Далее при настройке руководствуйтесь
нижеследующими указаниями по установке новых
устройств.
PCM: вставьте адаптер в гнездо CardBus на
¾¾
корпусе компьютера.
PCI
: установите адаптер в разъём PCI
¾¾
материнской платы ПК.
3. После подключения адаптера PCM или PCI компьютер
автоматически обнаружит новое устройство, и вы
увидите окно Setup Wizard (Мастер установки).
4. Далее до самого завершения процедуры подключения нажимайте кнопки Next (Далее) и Continue
Anyway (Все равно продолжить). Компьютер при этом должен автоматически найти и установить
подходящий драйвер.
5. Появление в системном лотке Windows изображённого ниже значка означает, что беспроводной
сетевой адаптер находится в рабочем режиме. Щёлкните правой кнопкой мыши по этому значку и
выберите пункт Launch the Config Utilities (Запустить программу настройки).
WMM-3000PCM
Русский
Русский
27
Page 30

28
Русский
6. Если предполагается настраивать беспроводной сетевой адаптер MIMO, опираясь на
функцию Wireless Zero Configuration (Беспроводная настройка) Windows XP, выберите
вариант Use Zero Configuration as Configuration utility (Используйте вместо программы
настройки функцию «Беспроводная настройка»).
Если значок не появился автоматически, в меню запуска последовательно
выберите Start ->Programs ->AirLive Wireless -> AirLive MIMO-G Wireless Utility
После этого значок должен появиться в системном лотке.
Обратите внимание: настройка под управлением ОС Windows 98
Перед подключением удостоверьтесь, что установочный оптический
диск операционной системы находится под рукой. При необходимости
установить некоторые драйверы система может предложить вставить
установочный компакт-диск вашей ОС.
Русский
WMM-3000PCM
Page 31

Обратите внимание:
настройка под управлением ОС Windows 2000/Windows XP
При появлении системного сообщения Digital Signature Not Found (Цифровая
подпись не найдена) нажмите кнопку Yes (Да) или Continue Anyway (Все равно
продолжить).
Русский
WMM-3000PCM
Русский
29
Page 32

30
Русский
Альтернативный способ настройки
Этот способ настройки следует использовать лишь в том случае, если беспроводной сетевой
адаптер был подключен уже после установки ПО.
1. Если вы подключили беспроводной сетевой адаптер до установки драйвера, Windows
обнаружит устройство и запустит Setup Wizard (Мастер настройки).
2. Чтобы начать установку драйвера, нажмите кнопку Next (Далее).
3. Когда система предложить указать местонахождение драйвера, вставьте оптический диск
с драйверами AirLive в соответствующий привод компьютера.
4. Нажмите кнопку Browse (Просмотр) и укажите подкаталог Utility, который находится на
этом диске.
5. Нажмите кнопку Next (Далее), и Windows начнёт копирование необходимых файлов.
6. ОС Windows 98
Когда Windows предложит указать местонахождение необходимых файлов, вставьте
установочный оптический диск Windows 98.
7. ОС Windows 2000
При появлении системного сообщения Digital Signature Not Found (Цифровая подпись не
найдена) нажмите кнопку Yes (Да).
8. ОС Windows ME / Windows XP
Чтобы продолжить установку, нажмите кнопку Continue Anyway (Всё равно продолжить).
9. По завершении установки драйвера вам, возможно, потребуется перезагрузить
компьютер.
10. Чтобы установить программу настройки, просмотрите содержимое оптического диска
AirLive. Перейдите в подкаталог Utility и запустите файл setup. До завершения установки
служебной программы следуйте инструкциям.
Русский
WMM-3000PCM
Page 33

Настройка WEP и WPA
Протокол WEP усиливает защиту данных посредством их шифрования. Существует два уровня
шифрования (длины ключей):64 бита и 128 бит. Все беспроводные устройства в сети должны
иметь одни и те же параметры WEP (один и тот же уровень, одинаковые ключи). Прежде, чем
разрешить использование протокола WEP в адаптерах БЛВС, разрешите его использование на
ТД / маршрутизаторе..
Подробное описание этих процедур содержится в руководстве по эксплуатации.
Стандартом 802.11b/g предусмотрено использование каналов 1-14. В приведенной ниже
таблице в соответствии с национальными ограничениями перечислены доступные в
разных странах каналы.
Страны Разрешены каналы
США (ФКС) Каналы 1–11
Canada (IC) Каналы 1–11
Европа (ЕТСИ) Каналы 1–13
Испания Каналы 10–11
Франция Каналы 10–13
Япония Каналы 1–14
WMM-3000PCM
Русский
Русский
31
Page 34

32
Nota sobre o padrão FCC
Este equipamento foi testado e concluiu-se que cumpre os limites para um dispositivo digital de Classe B de
acordo com a Parte 15 das Normas FCC. Estes limites destinam-se a proporcionar protecção contra
interferências prejudiciais quando o equipamento está a funcionar numa área comercial. Este equipamento
gera, utiliza e pode emitir energia de rádio frequência e se não for instalado de acordo com o manual de
utilizador, pode causar interferências na transmissão de comunicações via rádio. Se está a ser utilizado em
área residencial, é provável que este equipamento cause interferências prejudiciais, e nesse caso o utilizador
deverá tentar corrigir esta interferência usando os seus próprios meios.
Nota sobre a Etiqueta CE
Este é um produto de Classe B. Numa área residencial este produto pode causar rádio interferência, e nesse
caso o utilizador deverá tomar as devidas medidas para a corrigir. A OvisLink Corp. declara para os devidos
efeitos que o AirLive WMM-3000PCM cumpre os requisitos básicos da Directiva 99/05/CE e é por conseguinte
Português
responsável pela precisão destes dados:
OvisLink Corp.
5F, No.6 Lane 130,
Min-Chuan Rd, Hsin-Tien City,
Garantias
Este produto sofre vários controlos de qualidade para assegurar o funcionamento adequado.
Este produto está coberto por uma garantia de dois anos para os países da União Europeia. Para outros países,
o período de garantia é de um ano. Em caso de algum defeito de fabrico ou falha, será reparado pela OvisLink
Corp. Contacte o seu fornecedor relativamente aos detalhes do procedimento para este efeito. Esta garantia
não se aplica em caso de avaria causada por utilização imprópria do produto, acidentes, manuseamento faltoso
ou manipulação nem por quaisquer incompatibilidades futuras com outros produtos.
Taipei, Taiwan
TEL: +886-2-2218-6888
Português
32
WMM-3000PCM
Page 35

q
Instalação de Driver
Instale o driver e o utility antes de ligar o adaptador sem fios. Se já ligou o adaptador, leia a secção “Método
Alternativo de Instalação” para mais detalhes.
1. Insira o CD do driver no computador, seleccione Install Software para iniciar a
instalação do mesmo.
2. Agora, siga as instruções abaixo para instalar o
hardware:
PCM: Ligue o adaptador no slot Cardbus do
¾¾
computador.
PCI: Ligue o adaptador no slot PCI do
¾¾
computador.
3. Após inserir o adaptador PCM/PCI, o computador
detecta automaticamente o hardware e irá surgir o
Setup Wizard.
4. Clique em Next e Continue Anyway até a instalação estar terminada. O computador deverá encontrar e
instalar automaticamente o driver correcto.
5. Pode aparecer o ecrã seguinte no canto superior direito da barra de ferramentas do Windows para lhe
indicar
ue o adaptador está online. Pode fazer clique direita no icon e em “Launch the Config Utilities”.
WMM-3000PCM
Português
Português
33
Page 36

34
6. Se pretende configurar a sua Placa LAN MIMO Sem Fios com “Wireless Zero Configure”
suportado por XP, deverá escolher “Use Zero Configuration as Configuration Utility”.
Português
Antes de instalar o dispositivo,
certifique-se que possui o CD do sistema
operativo à disposição. Pode ser-lhe
solicitado que o introduza para transferir
determinados drivers.
Se o icon não aparecer automaticamente, vá para Start …….
Irá aparecer na barra de ferramentas.
Nota de Instalação para Win2000/Win XPNota de Instalação para Win98
Quando aparece a mensagem de
Assinatura Digital Não Encontrada,
clique em Yes ou Continue Anywhere.
Português
34
WMM-3000PCM
Page 37

Método Alternativo de Instalação
Use este método de instalação somente se já tiver ligou o adaptador sem fios e ainda não instalou
o software de instalação.
1. Se ligou o adaptador sem fios antes de instalar o driver, o Windows irá detectar o dispositivo e
iniciar o Setup Wizard.
2. Clique em “Next” para iniciar a instalação do driver.
3. Quando solicitada a localização do driver, insira o CD do driver AirLive na drive CD-ROM.
4. Clique em “Browse” e seleccione no CD o directório “Utility”.
5. Clique em “Next” e o Windows irá copiar todos os ficheiros necessários.
6. WIN98
Quando o Windows pedir os ficheiros, insira o CD Windows 98.
7. WIN2000
Na janela “Digital Signature Not Found” clique em “Yes” para continuar.
8. WINME/XP
Clique em “Continue Anyway” para prosseguir.
9. Poderá ter que voltar a fazer o arranque da sua máquina após terminar a instalação do driver.
10. Para instalar o Utility, faça um browse no CD. Vá para o directório “Utility” e corra o
programa “setup”. Siga as instruções para terminar a instalação do utility.
Configuração WEP & WPA
WEP codifica todos os dados para aumentar a segurança. Existem 2 níveis de encriptação
(comprimento de chave): 64-bit ou 128-bit. Todos os dispositivos sem fios na rede devem usar as
mesmas definições WEP (mesmo nível, mesmas chaves). Active o WEP em AP/Router Sem Fios antes
de ligar o WEP nos dispositivos sem fios.
Para mais detalhes, consulte o manual de utilizador.
WMM-3000PCM
Português
Português
35
Page 38

36
Português
Canal
O padrão 802.11b/g pode suportar canal 1-14. A tabela seguinte mostra os canais disponíveis
em vários países, que se baseia em limitações locais.
Países Canais Permitidos
EUA (FCC) Canal 1~11
Canadá (IC) Canal 1~11
Europa (ETS) Canal 1~13
Espanha Canal 10~11
França Canal 10~13
Japão Canal 1~14
Português
36
WMM-3000PCM
Page 39

選択
ドライバー・インストール
無線アダプターをプラグ・インの前にドライバーとユーティリィティをインストールしてください。もし、
あなたは既に無線アダプターにプラグ・インしたなら、詳細のために「代替のインストール方法」セクシ
ョンを読んでください。
1. コンピューターにドライバーCD を挿入する、ソフトウェア設置を始めるためにソフトウェアをイ
ンストール Install Software と
2. さて、以下での指示に従って、ハードウェアをインスト
ールしてください。
PCM: アダプターをコンピュータのCardBusスロ
¾¾
ットに接続してください。
PCI: アダプターをコンピュータのPCIスロットに
¾¾
接続してください。
3. PCM/PCI アダプターを挿入した後に、コンピュータは自
動的にハードウェアを検出するでしょう、そして、セッ
トアップウィザードは現れるでしょう。
4. 最後にインストールが終わるまで、Next と Continue Anyway をクリックします。コンピュータは、
自動的に正しいドライバーに見つけて、インストールするべきです。
5. 次のスクリーンが無線アダプターがオンラインであることを示すために、ウインドウズ・タスクバー
の右手角に現われるはずです。アイコンを右クリックし、「Launch the Config Utilities」をクリック
します。
WMM-3000PCM
します。
日本語
日本語
37
Page 40

日本語
38
6. あなたがMIMO無線LANカードを構成したい場合、で「Wireless Zero Configure」XPに支援
されて、「Use Zero Configuration as Configuration utility」に決めるべきです。
Win98 のためのインストー
デバイスのインストールの前に、オペレー
ティングシステム CD-ROM を持ってくだ
さい。あなたが特定のドライバーをダウン
ロードするために OS CD-ROM を挿入す
るように頼まれるかもしれません。
アイコンが自動的に現われない場合は、Start->Programs ->AirLive
MIMO-G Wireless Utilityそれがタスクバーに現われるでしょう。
Win2000/WinXP のためのインストール・ノート
Digital Signature Not Found メッセージ
が現れるときYes かContinue Anywhere
をクリックしてください。
日本語
WMM-3000PCM
Page 41

日本語
代替のインストールメソッド
もしあなたは、ソフトウェアをインストールする前に無線アダプターをプラグ・インしたなら、こ
のインストールメソッドだけを使用してください。
1. ドライバーをインストールする前にあなたが無線アダプターのプラグを差し込んだな
ら、Windows は、装置を検知して、セットアップウィザードを始めるでしょう。
2. ドライバーの設置を始めるために「Next」をクリックしてください。
3. あなたのドライバーのロケーションを求めるとき。 AirLive ドライバー CD を
CD-ROM ドライバーに挿入してください。
4. 「ブラウズ Browse」をクリックしてください、そして、「ユーティリティ Utility」と
いう CD のディレクトリを選択します。
5. 「Next」をクリックしてください。そうすれば、ウインドウズは必要なファイルをすべ
てコピーするでしょう。
6. Win98
ウンドウがファイルのためにプロンプト、Windows98
CD を挿入してください。
7. Win2000
「Digital Signature Not Found」ウィンドウでは、続くように「Yes」をクリックしてくだ
さい。
8. WinME/XP
「Continue anyway」をクリックしてください。
9. ドライバ・インストール終了の後に、リブートする必要があるかもしれません。
10. ユーティリィティをインストールするために、AirLive な CD をブラウザして、「Utility」
ディレクトリーに行って、「setup」プログラムを実行してください。ユーティリィティ・
セットアップを終了する指示に従ってください。
日本語
WMM-3000PCM
39
Page 42

日本語
40
WEP & WPA コンフィギュレーショ
WEP は、セキュリティを増強するためにすべてのデータをコード化します。 2つの暗号化レベル(キー
長): 64 ビットか 128 ビットです。ネットワーク中のワイヤレス・デバイスはすべて同じ WEP セッティ
ング(同じレベル、同じキー)を使用しなければなりません。無線アダプター中の WEP をつける前にAP/
無線通信ルーター中の WEP を有効にしてください。
詳細について、ユーザマニュアルを参照してください。
チャネル
802.11b/g の標準はチャンネル1-14 を支援できます。
次の表は様々な国々で利用可能なチャンネルを案内されます。それはローカルの制約に基づき
ます。
国 許しえるチャンネル
USA (FCC) チャンネル 1~11
Canada (IC) チャンネル 1~11
Europe (ETSI) チャンネル 1~13
SPAIN チャンネル 10~11
France チャンネル 10~13
Japan チャンネル 1~14
日本語
WMM-3000PCM
Page 43

EN PT
OvisLink Corporation declares that this device is in
compliance with the essential requirements and
other relevant provisions of directive 1999/5/EC
.
A OvisLink Corporation declara que este dispositivo
está em conformidade com os requisitos essenciais
e outras solicitações relevantes da Directiva
1999/5/EC.
DE
OvisLink Corporation erklärt hiermit, dass dieses
Gerät den grundlegenden Vorschriften und
anderen relevanten Bestimmungen der
EG-Richtlinie 1995/5/EC entspricht.
RU
ƒƶƴƷƨƵưLJ OvisLink Corporation ƯƨLJƪƳLJƭƺ, ƿƺƶ Džƺƶ
ƻƹƺƸƶƱƹƺƪƶ ƶƺƪƭƿƨƭƺ ƶƹƵƶƪƵǃƴ ƺƸƭƩƶƪƨƵưLJƴ ư
ƷƸƶƿưƴ ƸƶƬƹƺƪƭƵƵǃƴ ƻƹƳƶƪưLJƴ, ưƯƳƶƮƭƵƵǃƴ ƪ
ƬưƸƭƲƺưƪƭ 1999/5/EC.
SK
OvisLink Corporation potvrdzuje, že toto
zariadenie vyhovuje požiadavkám a Đalším
predpisom smernice 1999/5/EC.
FR
OvisLink Corporation déclare, par le biais de ce
document, que ce dispositif est conforme aux
conditions essentielles de la directive 99/05/CE
et, par conséquent, assume la responsabilité de
la véracité des informations suivantes.
This equipment may be used in AT, BE, CY, CZ, DK, EE, FI, FR, DE, GR, HU, IE, IT, LV, LT, LU, MT,
NL,PL,PT, SK, SI, ES, SE, GB, IS, LI, NO, CH, BG, RO, TR
OvisLink Corp.
5F, NO.6, LANE 130, MIN CHUAN RD.,
HSIN-TIEN CITY, TAIPEI COUNTY, TAIWAN
ES
OvisLink Corporation declara que el dispositivo
cumple con los requerimientos básicos y otras
facilidades relevantes de la directriz 1999/5/EC
PL
OvisLink deklaruje zgodnoħĄ swoich urzĎdzeĝ z
istotnymi wymaganiami oraz innymi istotnymi
przepisami dyrektywy 1999/5/E
JP
ߎߩⵝ⟎߇ᜰዉ⊛ߥ1999/5/EC ߩᔅⷐߥ᧦ઙߘߒ
ߡઁߩ㑐ㅪߒߚḰߦᓥߞߡࠆߣOvisLink
Corporation ߪት⸒ߔࠆ
OvisLink Corporation declares that this device is in
compliance with the essential requirements and
other relevant provisions of directive 1999/5/EC.
C.
㨫
HU
Az OvisLink Corporation kijelenti, hogy ez a
berendezés megfelel az 1999/05/CE irányelv
alapvetġ követelményeinek és egyéb vonatkozó
.
rendelkezéseinek.
CZ
Ovislink Corporation deklaruje, že toto zaĥízení
vyhovuje základním požadavkĭm a dalším
závazným ustanovením z naĥízení 1999/5/EC
GR
ņ ŢůŞŦŬŜŞ OvisLink šŤŨŹũŢŦ ŷůŦ Ť ŮŰŮŧŢŰś ŞŰůś
ŢŜũŞŦ ŮŸűŴũŤ Ţ ůŦŭ ūŰŮŦŞŮůŦŧŚŭ ŞŞŦůśŮŢŦŭ ŧŞŦ
ůŦŭ ŰŷŨūŦŢŭ ŮŲŢůŦŧŚŭ šŦŞůřŪŢŦŭ ůŤŭ ūšŤŠŜŞŭ
1999/5/EC
.
Tested To Comply
With FCC Standards.
FOR HOME OR OFFICE USE
.
 Loading...