

Page 1
Page 2

Contents
Specifications
Notice
Bundled Accessories
Your Camera
Battery Installation
Using a SD Card
Strap and Tripod Use
Using your Camera
LCD Display
Focus
Taking Pictures
Still pictures
Taking AVI Movies
Erase
For Best Results
Bundled Software
1
2
PenCam SD Manager Installation
3
4
5
6
7
8
9
10
Software Installation
Hardware Installation
Launching PenCam SD Manager
Mode Selecting
DSC Mode
LIVE Mode
TWAIN Manager
Troubleshooting
11
AIPTEK Service
12
14
15
16
17
18
19
20
21
22
23
28
31
32
35
Contents
Page 3

System Requirements
Microsoft Windows 98SE / 2000 / ME / XP
Pentium II 266MHz ( or equivalent )
32MB RAM (64MB recommended)
Video Card with 4 MB of RAM
4 X speed CD-ROM
An available
Direct X 8.0 or above
RAM
USB port
Specifications
Sensor Type 1.3M CMOS
Memory 64 Mbits Built-in SDRAM
Effective pixels 1.3M (1280 x 960 pixels)
External SD Card Slot / Support SD Card up to
128 MB/ compatible with MMC
Main Functions
- Digital Camera :
SXGA (1280 x 960 pixels): 10 3 pictures
VGA (640 x 480 pixels): 40 10 pictures
Specifications
Specifications
+
+
1
- Digital Camcorder :
High resolution (640 x 480 pixels) / 6-8fps
Normal resolution (320 x 240 pixels) /8-10fps
- PC Camera :
High resolution (640 x 480 pixels) / 20fps
Normal resolution (320 x 240 pixels) / 20fps
Focus Macro 12"(30cm) / Normal
39"(100cm) to infinity
Auto Exposure Auto White-Balance
Self Timer 10 - second Self Timer
Power Saving Auto power off if idle over 60
seconds
Battery: AAA x 2 ( Alkaline) .
USB port
Dimension : 3.9" x 1.7" x 1.4"
Weight: 51.2 g
This package doesn't include SD Card/MMC.
Page 4
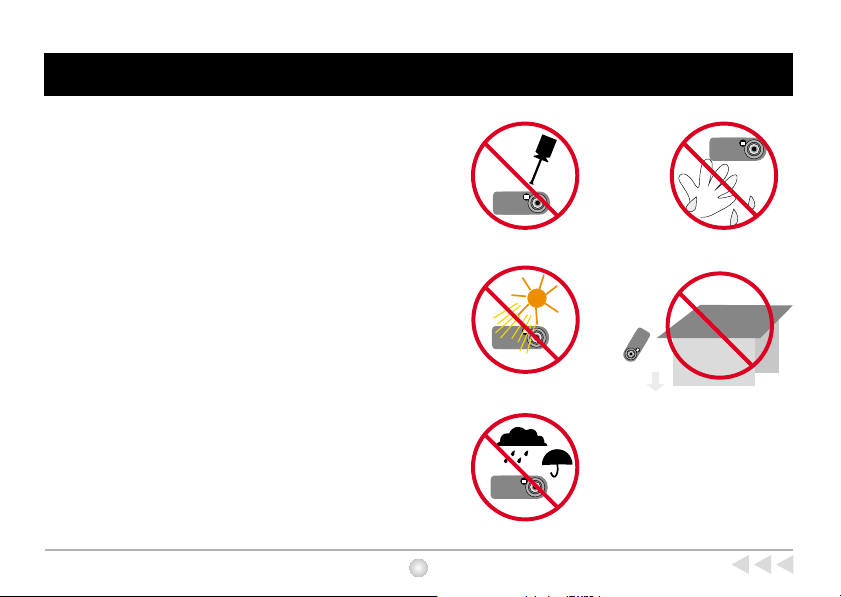
1. Do not drop, puncture or disassemble the camera.
2. Remove batteries during long periods between use.
3. Avoid using batteries of different brands at the same
time.
4. Avoid using leaking or distorted batteries.
5. Avoid all contact with water and dry hands before
using.
6. Do not expose the camera to high temperature or
leave it in direct sunlight.
7. Avoid pressing hard on the camera body.
Notice
2
Notice
Page 5
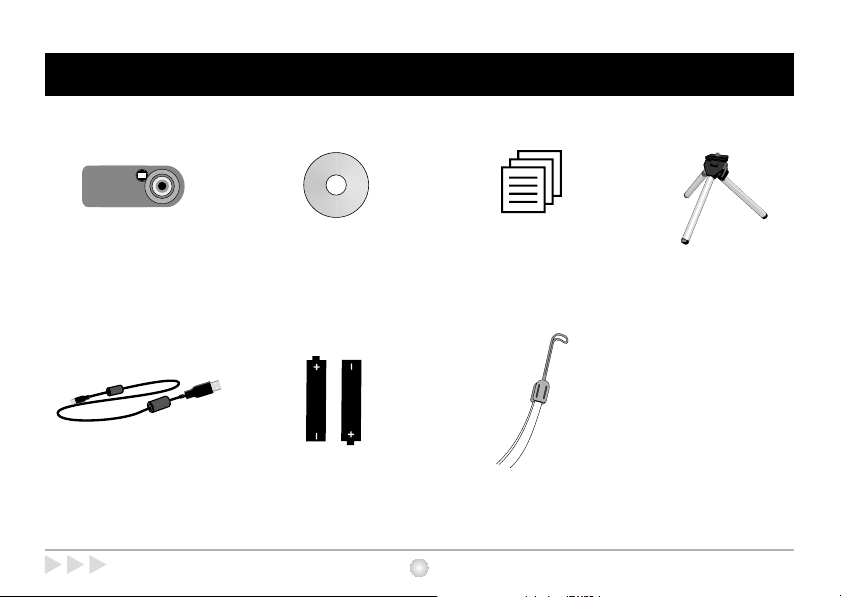
Bundled Accessories
Camera
USB cable
Bundled Accessories
CD driver
2 x AAA Alkaline batteries
3
User guide
Strap
Tripod
Page 6
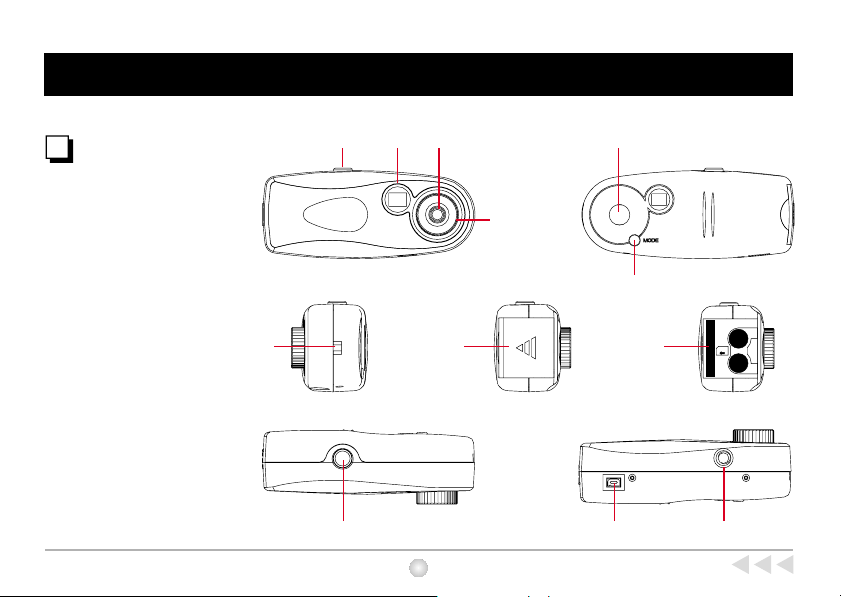
Your Camera
Camera Parts
(1) Shutter
(2) View finder
(3) Lens
(4) Focus
(5) LCD display
(6) Mode button
(7) Strap-holder
(8) Battery cover
(9) SD Card slot
(10) USB port
(11) Tripod port
(1) (2) (3)
(4)
(7) (9)
(1)
(8)
4
(5)
(6)
(10)
SD
(11)
Your Camera
Page 7
Battery Installation
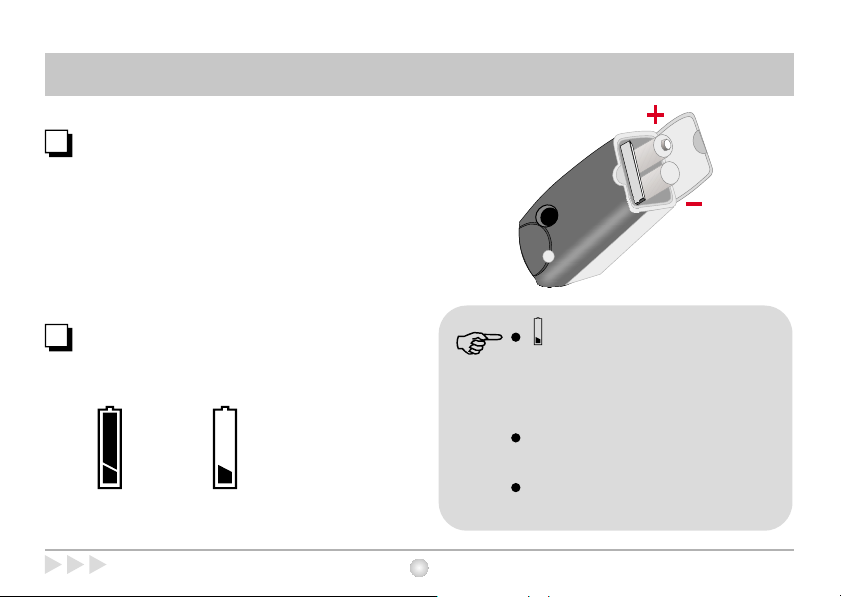
Battery Installation
Your camera runs on two AAA alkaline batteries.
High performance batteries are for this camera.
Battery Indicators
Full Low
Battery Installation
on the LCD display indicates low battery.
Transfer data from SDRAM to your PC
immediately to avoid data loss. All SDRAM
data will be lost when the camera loses power
from battery exhaustion or removal.
When not using your camera for extended
periods, we suggest you remove the batteries.
Make sure that you've downloaded data to PC
before removing the battery cover.
5
Page 8
Using a SD Card/ MMC
External Memory/ SD Card
Memory Card) (MultiMediaCard)
/ MMC Card
(Secure Digital
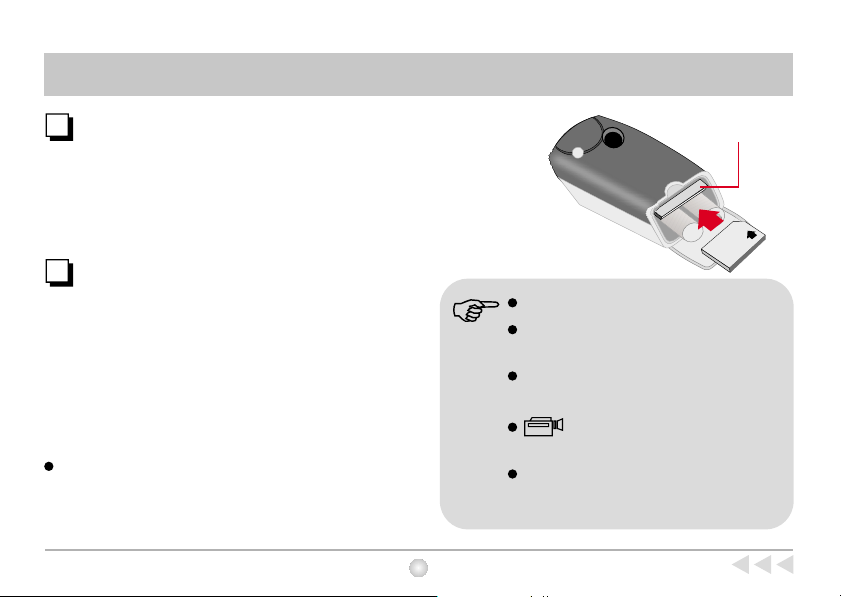
In addition to 64Mbits SDRAM, your camera can store
data on SD Cards /MMC. Data will be automatically
stored on the SD card/ MMC until it is full, with additional
data stored on SDRAM. Insert your card as shown.
Format SD Card / MMC
" Err" message appears on LCD display as you confront
the following two conditions:
(1) The camera can't read FAT 32 or NTFS format. If your card
is already designated as FAT 32 or NTFS format by your
card reader, please format your card by the camera.
(2) When the memory card is full of data from other devices:
Please transfer data to your card reader or format your card.
Format Steps
1. Press and hold the mode button for five seconds until the
LCD shows the " " icon.
2. Then press the shutter button to format SD Card/ MMC.
FOR
SD Card Slot
SD CARD
This package doesn't include SD card or MMC.
To store data on the built-in memory, please
take out SD Card or MMC.
NOTE: Formatting SD card or MMC will erase
all of your images
( AVI Movies ) functions only when SD
Card/ MMC is inserted.
If your have any problems with your memory
card, please refer to the user guide of your SD
Card/MMC.
6
Using a SD Card/MMC
Page 9
Strap and Tripod Use
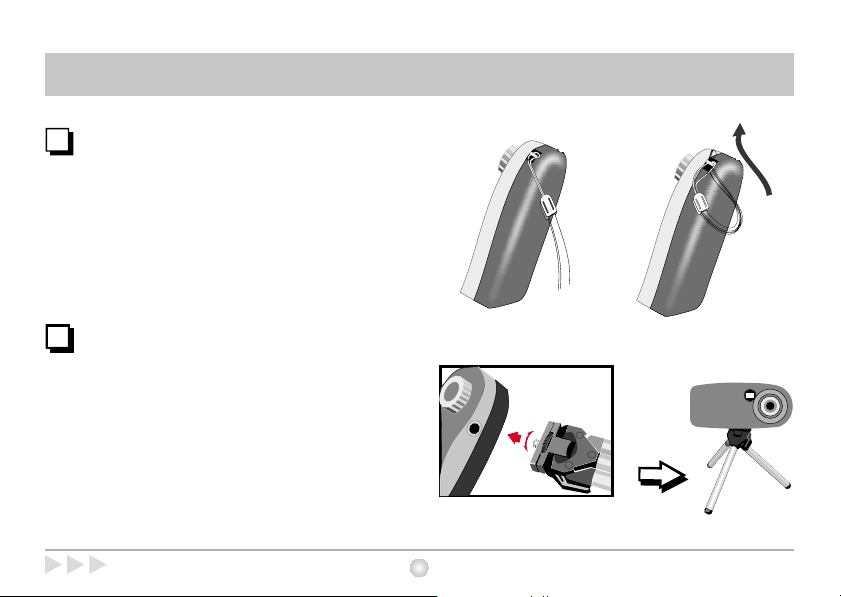
Strap
Attach the carrying strap for convenience and
safety.
Tripod
Use a tripod to minimize camera movement and
ensure optimal image quality, especially while
shooting longer movies, self-portraits or video
conferencing.
Tight
Loose
Strap and Tripod Use
7
Page 10

Using your Camera
Turning on your camera
Press the Mode button for 2 seconds to turn
on your camera.
Manual shut-off: press the mode button and
shutter button simultaneously for 2 seconds.
Auto shut-off: your camera will automatically
shut off after 60 seconds of inactivity.
8
Using your Camera
Page 11
LCD Display
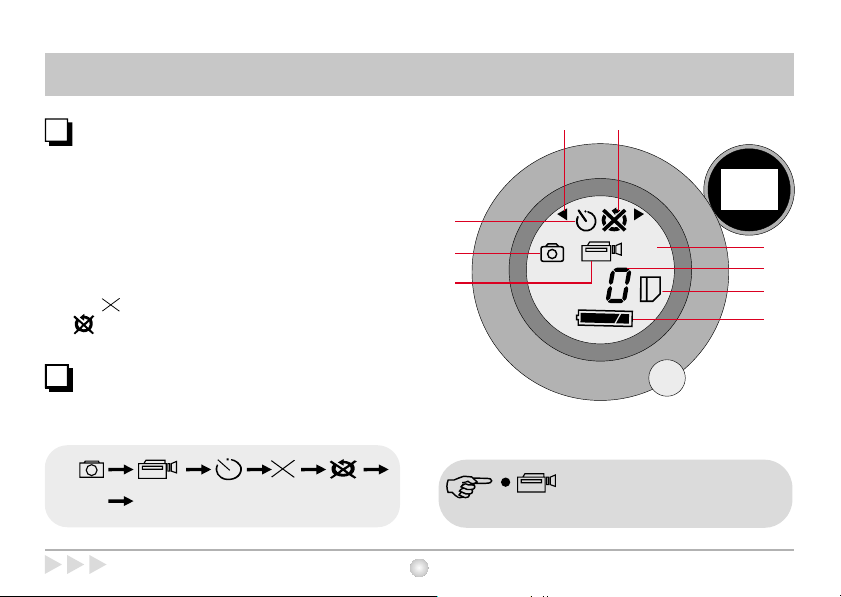
LCD Display
(9)
(4)
(1)
Still picture
(2)
AVI-Movies
(3)
Self-Timer
(4)
Erase
Note: The icon signifies delete last image or video.
The signifies erase all.
(5)
Resolution
(6)
Counter
SD card inserted
(7)
Battery indicator
(8)
Plug-in USB Cable(9)
Mode Selecting
Press Mode button to shift between functions on the LCD
display. Press the Shutter button to select a function.
HL
LCD Display
(3)
(1)
(2)
H
(5)
(6)
(7)
(8)
functions only when SD Card/ MMC is
inserted.
9
Page 12
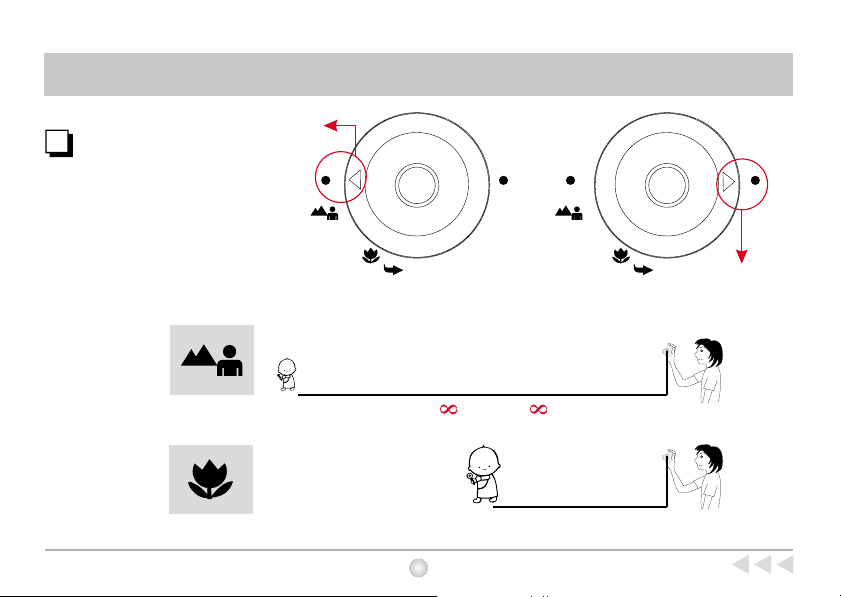
Focus
Set focus before taking pictures.
Normal
Close-up
Focus
Normal
Close-up
39"~ (100cm~ )
12"~39" (30cm~100cm)
10
Focus
Page 13

Taking Pictures
Set flicker setting
Your camera has default flicker setting. The
default setting usually corresponds to the flicker
setting standard of each nation. If you use the
camera outside your country or you find pictures
appear unnatural flickering noise, please select
50Hz or 60Hz until flickering noise stops.
Steps:
(1) Use Mode button to select .
(2) Press Mode button for 5 seconds.
(3) Press the shutter to select 50 Hz or 60 Hz.
(4) Press Mode button to leave flicker setting mode.
Taking Pictures
H
Country
Setting
Country
Setting
11
England
Germany
France
Italy
Spain
50Hz 50Hz 50Hz60Hz50Hz 50Hz
Portugal
Taiwan
China
50Hz60Hz60Hz50Hz
Japan
50/
60Hz
Nether-
lands
KoreaAmerica
60Hz
Page 14

Still Pictures
Still pictures
Images taken in Still picture mode are stored as JPEG
files.
Steps:
(1) Use Mode button to select .
(2) Select image resolution see below)
(3) Center the target in the viewfinder.
(4) Press the shutter button.
H
HL
Two kinds of resolution are available for still image:
(1.3 mega pixels and VGA .
HL
Steps
(1) Press Mode button to select .
(2) flashes.
H
(3) Press Shutter button to switch to or .
(4) Press Mode button again to confirm resolution.
Image resolution
H
H
L
Icon
Resolution
& Quality
12
HL
1.3 Mega
Pixels
(1280x960) (640x480)
VGA
Still Pictures
Page 15

Still Pictures
Pictures Storage Capacity
Pictures storage capacity depends
on SD Card storage capacity and
your SDRAM memory. See the table
to your right for more information
Resolution
32MB Memory
( Example )
Note
Self-timer
Steps:
(1) Press Mode button to select .
(2) Press shutter button.
(3) The counter will count down from ten and
automatically release the shutter.
Still Pictures
Icon
Quality
This table is for your reference. Actual number of pictures taken
by different resolution and quality will vary, depending on color
saturation.
H
1280x1024 pixels
(1.3M pixels)
High quality
100 pictures 200 pictures
30%
640x480 pixels
VGA
Normal
30%
H
13
L
Page 16

Recording AVI Movies
Your movies are stored as AVI files. Image size is
640x480 pixels (high resolution) and 320x240
pixels (low resolution), with frame rate 6-10 fps.
Maximum recording time is determined by the
capacity of your SD Card.
To Record:
(1) Press Mode button to select .
(2) Center the target in the viewfinder
(3) Press the shutter button.
(4) Length of movie is recorded in counter.
(5) Press the shutter button again to stop recording.
( AVI Movies ) functions only when SD
Card/ MMC is inserted.
SD Card Storage
Capacity
32MB
H
Movie (640x480) Movie (320x240)
about 80 seconds
about 320 seconds
14
Recording AVI Movies
Page 17

Erase Last
The last saved file (AVI or JPEG) will be deleted.
Steps:
(1) Use Mode button to select .
(2) Press the shutter button twice to erase last
pictures or AVI Movie.
(3) Use Mode button to leave Erase mode.
Erase All
All files saved in both SD Card and internal
(AVI or JPEG)
memory will be deleted.
Steps:
(1) Use Mode button to select .
(2) Press the shutter button twice to erase all
pictures or AVI Movie.
(3) Use Mode button to leave Erase mode.
Erase
H
Erase
15
Page 18

For Best Results
Keep the focus set to except for extreme
close-ups.
Make sure your subject is well lit from the front.
Keep the camera level and steady when
releasing the shutter.
Make sure you have adequate light when taking
still pictures or movies, especially indoors.
For best quality video, move the camera slowly
5
during filming.
Make sure you have adequate
light
16
For Best Results
Page 19

Bundled Software
PenCam SD Manager and other
bundled software packages
PenCam SD Manager is your camera's driver as well as basic
operating software. Your camera also comes bundled with the
following video and image processing software. For more
information, see each application's help file or visit the supplier's
website.
NetMeeting
Http://www.microsoft.com/windows/netmeeting/default.asp
Video MailLive
Http://www.goCyberlink.com
Photo Explorer
Http://www.ulead.com/pex/runme.htm
Photo Express SE
Http://www.ulead.com/pe/
Acrobat Reader
Http://www.adobe.com/products/acrobat/readstep2.html
Cool 360
Http://www.ulead.com/cool360/runme.htm
Bundled Software
Applications
(1) PenCam SD
Manager
(3) VideoLive
Mail
(4) Photo Explorer
(5) Photo Express
SE
(6) Acrobat Reader
(7) Cool 360
17
Main Feature
PenCam SD Manager configuration
software
Video & Audio Conferencing(2) NetMeeting
Desktop videomail software
Visual file management software
Edit and create exciting illustrations
& photos
Lets you view and print Adobe
Portable Document Format (PDF)
files
Photo Panorama Software
Page 20

PenCam SD Manager Installation
PenCam SD Manager features
The PenCam SD Manager allows you to:
Download pictures and AVI movies to your
PC.
View pictures and AVI movies on screen.
Transfer pictures and AVI movies to customized
albums.
18
PenCam SD Manager Installation
Page 21

Software Installation
Installing the PenCam SD Manager
(1) Insert the CD-ROM in your CD drive. The
installation menu should open automatically.
(2) Click to start PenCam SD Manager
installation.
(3) Follow the onscreen instructions to complete
Installation.
(4) Click " Yes" to install Direct X 8.1. This will
restart your PC.
(5) icon will appear on PC desktop after
installation.
Click on " Finish" to complete installation.
Software Installation
19
Page 22

USB
Software installation must be
!
completed before hardware
installation.
Hardware Installation
Connect the smaller end of the USB cable to
the USB port of your camera.
Plug the larger end of the USB
cable to the USB port of your PC.
20
Hardware Installation
Page 23

Launching PenCam SD Manager
Follow the following two ways to launch PenCam
SD Manager
Click the " " icon on the Desktop to
execute the program where you can begin to
use your camera.
Click on the "Start" menu and go up to
"Programs". Then go to the folder named "
PenCam SD Manager" and select it.
To uninstall PenCam SD Manager,
select " Uninstall Pen "Cam SD Manager
Reinstall Pen to
uninstall Pen
OR
OR
Cam SD Manager
Cam SD Manager.
Launching PenCam SD Manager
21
Page 24

Mode Selecting
==Press the "Live View" button to change the
camera to PC Camera mode.
Press the "DSC Function" button to change the
camera to DSC mode.
DSC Function
(DSC Mode)
Live View
(PC Camera Mode)
22
Mode Selecting
Page 25

(1) DSC Function (DSC Mode)
(2) Transfer images to the work area
(3) Transfer images to the album
(4) Create AVI file
(5) Send Mail
(6) Select All
(7) Delete
(8) Album Manager
(9) Album
(10) Delete
(11) Select All
(12) Image
(13) Work area
(14) Minimize
(15) Exit
DSC Mode
(1)
(2)
(3)
(4)
(5)
(6)
(7)
(10)
(12)
(11)
(8) (9)
(13)
(14)
(15)
DSC Mode
23
Page 26

DSC Mode
Downloading pictures and movies
1. Make sure your camera is connected to your PC
via the USB cable.
2. Set the PenCam SD Manager to DSC mode.
(Note: This is the default mode when you open the
PenCam SD Manager).
3. Click to download your pictures to the
work area.
4. Highlight the images you want to transfer.
Download pictures in 2.1
Mega pixel fromat
Download images
Select resolution
5. Apply format to choose high(1280x960) or
normal (640x480) resolution.
6. Check " Enhanced " to enhance your images to 2.1
Mega pixels. This enhanced format offers higher
quality images, but also require more disk space.
Preview images
24
DSC Mode
Page 27

Viewing pictures
DSC Mode
Double-click any picture or movie to launch the
viewer.
Viewing movies
Double-click any AVI movie to automatically
launch the movie in your default media player.
DSC Mode
Next picture
Previous picture
Slide Show
Exit
25
Page 28

DSC Mode
Album Manager
1. Highlight a picture on the work area and
click to transfer to the Photo Album.
2. Click the Album Manager to create a
new Photo Album.
3. Key in a new album name.
4. Click to designate a path where the album
5. Click " Update" to confirm the new album
6. Click to enter the new created album.
4
will be stored.
55
is created.
6
2
Album Manager
3
26
55
4
6
DSC Mode
Page 29

DSC Mode
Creating AVI files
1. Select jpg / bmp images from the work area.
2. Click to load the images to the AVI File
Manager.
3. Order the image sequence, and adust the frame
rate.
DSC Mode
27
Page 30

Record live video
Capture live still image
LIVE Mode
Preview
Window
Set image size
Advanced settings (default settings
recommended)
Select video source (if you have more
than one image import device installed)
Steps
1. Press
2. Adjust recording speed
and time.
3. Press " Start to Record "
28
LIVE Mode
Page 31

Set Image Size
Color Space
Select one of the following functions when you
have different needs.
- RGB 24: better image quality
- I420: faster speed
Output Size
Setting output size can change the size of the
preview window. The default size is 320x240.
Choose larger pixels when you need a larger
preview window.
160 x 120
320 x 240
640 x 480
LIVE Mode
LIVE Mode
29
Page 32

LIVE Mode
Advanced settings
Video Setting
- Banding Filter:
When your PC screen flickers, please change the
banding filter in Video Setting. The refresh rate (the
number of times the screen is redrawn per second) is the
most likely cause of flicker. Select 50Hz or 60Hz until
your PC screen stops flickering.
Custom Video Pro Amp
You can use the default setting or change settings
( brightness, contrast, saturation, sharpness, and hue )
on your own.
30
LIVE Mode
Page 33

TWAIN Manager
The Manager allows you to directly download your
photos to any image editing software.
Steps:
1. Under " File", Select Device".
2. Choose "Data Source " and click "OK".
3. Under " File ", select " Acquire Image ".
(1) DSC Mode
(2) Live View
(3) Transfer
(4) Transfer All
(5) Save AVI
(6) Snapshot
(7) Setting
(1)
(2)
(3) (4) (5) (6) (7)
TWAIN Manager
31
Page 34

Troubleshooting
Symptom Actions
1. When installation step missed:
2. When conflict with another camera driver
capture device:
3. When unable to install driver: When installing camera driver under Windows
Please remove the camera driver and other related
software and follow each installation step to reinstall
the camera.
If you have any other camera installed on your
computer, completely remove the camera and it's
driver from your system to avoid a driver conflict
with another camera or capture device.
98SE, you'll be asked to insert a 98SE CD-ROM.
Please follow the command to complete the
installation.
32
Troubleshooting
Page 35

Troubleshooting
Symptom Actions
4. When unable to download images Please re-plug the camera to download images.
5. Adjust VGA card when image color is not
fully saturated:
6. Please adjust the acceleration function of
VGA card when unable to play images in
Video Conferencing mode or in AVI mode.
Troubleshooting
Please follow the operation steps
Go to control panel Double - click " Display "
Click on " Settings " Click on " Colors " Choose
" High Color " or " True Color ".
Please follow the operation steps
Go to control panel Double - click " Display "
Click on " Settings " Click on " Advanced "
Click on " Performance " or " Troubleshooting "
Set the " Hardware acceleration " from " Full " to "
None ".
33
Page 36

Troubleshooting
Symptom Actions
7. Noise appears on PC screen while camera
used as a video conferencing camera.
8. Images are blurred.
9. Images are too dark.
10. AVI files can't be played back
Change Band Filter to 50 Hz or 60 Hz.
Adjust focus.
Take pictures while there is adequate light.
Use editing tools such as Photoshop or
PhotoImpact to adjust image brightness.
Install Direct X 8.0 or above.
34
Troubleshooting
Page 37

AIPTEK Service
If you have any problems, please contact AIPTEK office to which your country is assigned. Please
note: If you reside outside of the United States or Germany, please contact AIPTEK Intl Inc.
AIPTEK, Inc.
51 Discovery, Suite 100
Irvine, CA 92618, USA
TEL: 949-585-9600
FAX: 949-585-9345
http://www.aiptek.com
Hours: 8 a.m. to 5 p.m. Pacific Time
Online registration website:
http://www.com/registration/registration.htm
( Online registration entitles you to special services,
downloads and promotions. )
AIPTEK Service
AIPTEK International GmbH
HalskestraBe 6
47877 Willich, Germany
TEL +49 21 54 - 92 35 50
Fax +49 21 54 - 92 35 68
http://www.aiptek.de
AIPTEK Int'l., Inc.
No. 5-1 Innovation Road I
Science-Based Industrial Park
Hsin-Chu 300
Taiwan, R.O.C.
Tel: 886-3-5678138
Fax: 886-3-5678569
http://www.aiptek.com.tw
35
Page 38

Page 39

82-152-90010v1.1
 Loading...