

Page 1

User’s Manual
Care and Safety Information
1. Keep the device and packaging materials out of the reach of infants and
hildre
c
2.
Avoid subjecting the power adapter and other contacts to dripping or splashing
water and dry your hands before you use it. Do not place objects filled wi
liq
3.
Make sure that the used power outlet is always readily available and never
hidden. In case of emergency, use the power adapter to separate the device
from the power network.
Keep your device away from all flames such as candles and do not set them
4.
in th
5. Keep the unit at least 10 cm away from other objects. Make sure the ventilation
is
n.
uids such as vases, etc. on or near the device
e vicinity of the device.
not covered by newspapers, tablecloths, curtains, etc.
.
th
up
6.
For your own safety, do not use the projector during thunderstorms or lightnin
7.
Relative Humidity is 5~35°C, 80% (Max.), non-condens
8
. The battery is integrated with the device. Do not dissemble and modify. The battery
should be replaced by qualified service staff only
9.
Ensure that the ambient room temperature is within -10~5
10. During the operation, this product may heat lightly, which is normal.
Wait before using if the device has been moved from a cold location int
11.
warm one. Any condensation that has formed may in certain circumstances
destroy the device. As soon as the device has reached room temperature it c
be us
Handle the product with care. Avoid contact with sharp objects. Keep device
12.
away from metallic objects.
13. Place the projector on a flat surface. Any collision or falling to the ground is
likely to damage the produc
Do not drop or disassemble the product otherwise the warranty voids. Opening
14.
or removing covers may expose you to dangerous voltage or other hazards.
Ref
15. Use only the accessories supplied by the
m
ed without risk
er all servicing to qualified service personne
anufacturer
.
.
t.
.
l.
ing.
5°C
o a
g.
an
16.
Both product and user’s manual are subjec
f
urther improvement or supplement withou
urther notic
f
17.
Avoid facing directly into the projector’s lens
e.
t to
t
.
I
Page 2
User’s Manual
FCC Compliance Statement:
This device complies with Part 15 of the FCC Rules.
Operation is subjected to the following two conditions: (1)
this device may not cause harmful interference, and (2) this
device must accept any interference received, including
interference that may cause undesired operation.
This equipment has been tested and found to comply with limits for a Class B
digital device, pursuant to Part 15 of the FCC rules. These limits are designed to
provide reasonable protection against harmful interference in residential
installations. This equipment generates, uses, and can radiate radio frequency
energy, and if not installed and used in accordance with the instructions, may
cause harmful interference to radio communications.
However, there is no guarantee that interference will not occur in a particular
installation. If this equipment does cause interference to radio or television
equipment reception, which can be determined by turning the equipment off and on,
the user is encouraged to try to correct the interference by one or more of the
following measures:
- Reorient or relocate the receiving anten
Move the equipment away from the receiver
-
Plug the equipment into an outlet on a circuit different from that to which the
-
receiver is connec
Consult the dealer or an experienced radio/television technician for addition
-
s
uggestions
.
ted.
na.
.
al
ou are cautioned that any change or modifications to the equipment not expressly
Y
approved by the party responsible for compliance could void your authority to
operate such equipment.
(EN)
If the time arises to throw away your
product, please recycle all the
components possible.
Batteries and rechargeable batteries are
not to be disposed in your domestic
waste! Please recycle them at your local
recycling point.
Together we can help to protect the
environment.
IV
Page 3
User’s Manual
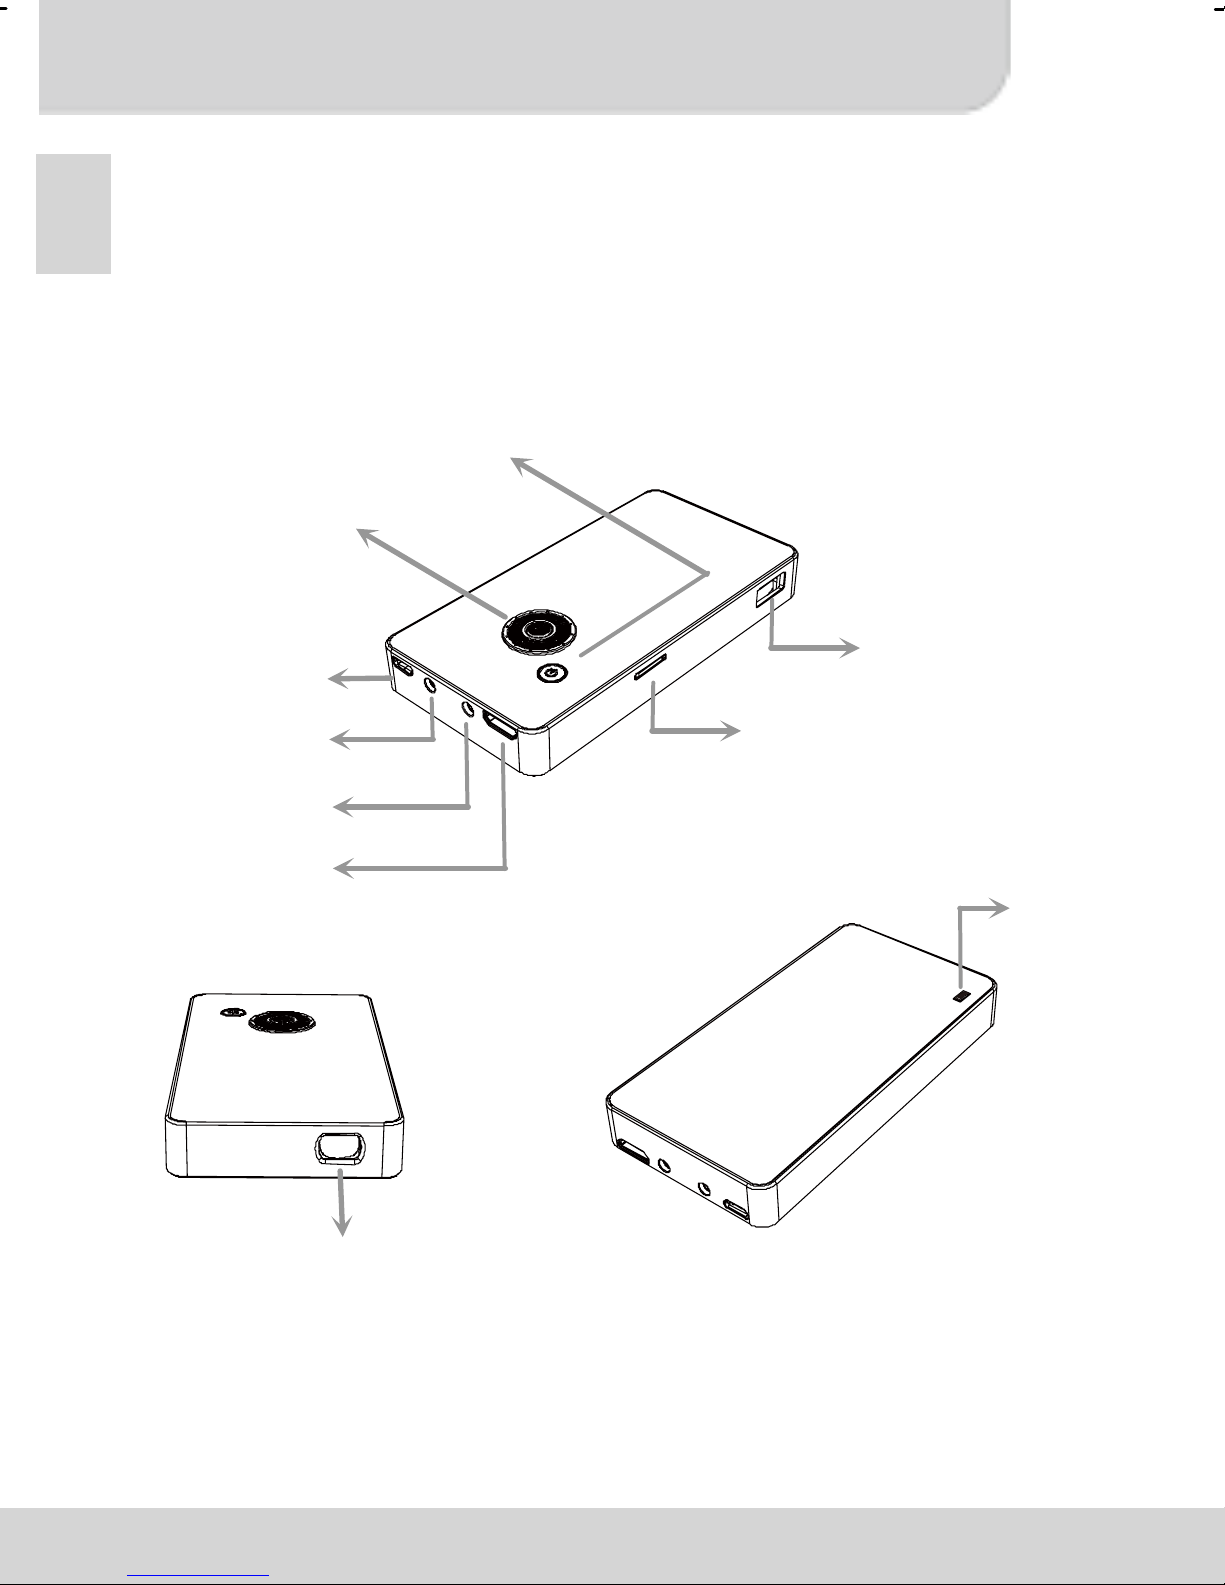
USB port
MicroSD card slot
Product Overview
EN
5-way function button
Power/Setting/
Exit button
Micro USB port
AV in port
Audio out port
Mini HDMI port
Focus
wheel
Projection Lens
1
Page 4
User’s Manual
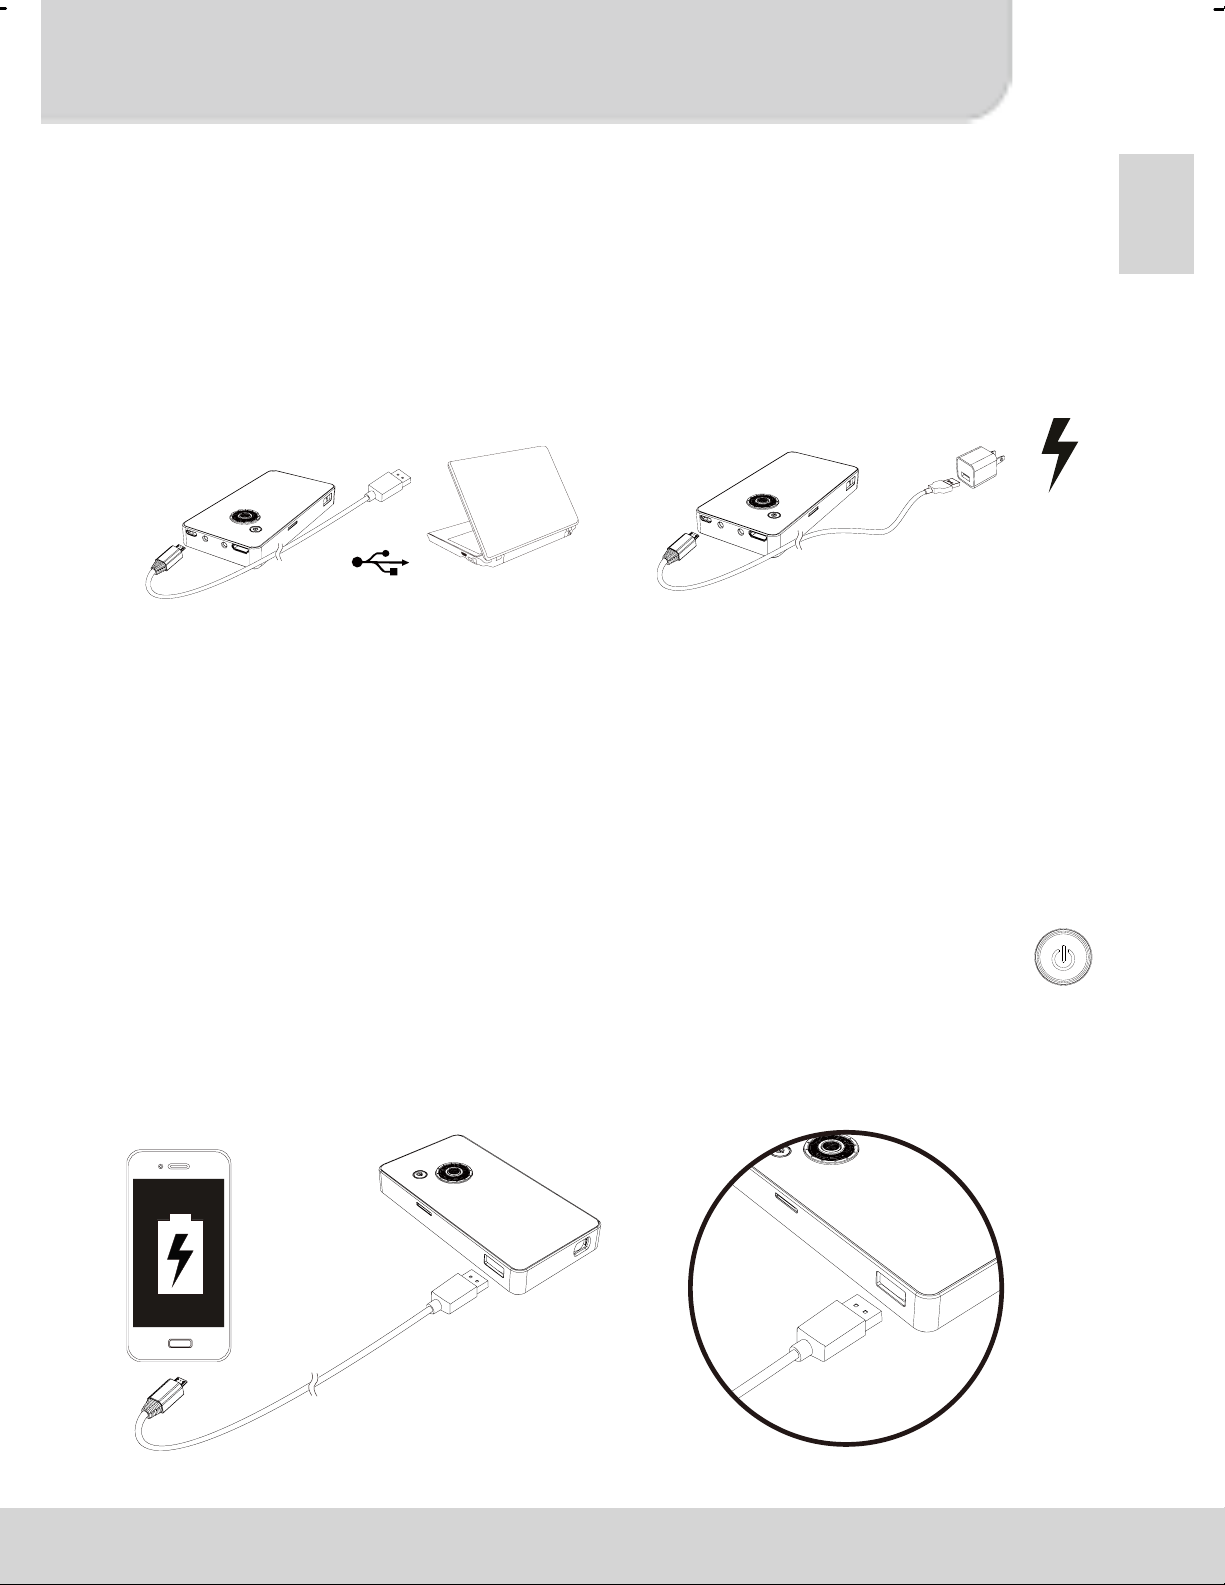
Charging the product
Connect one end of the bundled USB cable to the micro
USB port of the product and the other end to PC /
Notebook or Mobile phone power adapter for charging.
** The Product can be fully charged around 5 hrs from
empty
OR
EN
Charging the mobile phone (Power bank
function)
Connect one micro USB end of the mobile phone USB
cable to the mobile phone and the other USB plug end to
the product USB port on the side and press power key ,
then the mobile phone battery will be charged
automatically.
2
Page 5

User’s Manual
Turning on/off the Projector
EN
Press the power key for 3 sec., and wait for around
6 sec., the projector will be turned on then
Press the power key for 3 second in operation, the
projector will be turned off.
Adjusting the Focus
Adjust the focus by using the focus wheel on the bottom
side to get a sharper image.
Setting language
Press the power button shortly, it will pop-up menu
setting, then select “language” item and use the direction
key to select the wanted language, press the center
“enter” button to confirm.
3
Page 6

User’s Manual
Project the files from microSD (TF) card
Insert the microSD card into the card slot as below
illustration indication,, then use the left/right button
to switch the photo/music/video/text, 4 kinds of mode in the
main menu screen to access the file category you want to
project. Press the “enter” key to enter the mode, then
use the direction button to navigate the thumbnails
and select the file you the file you want to project.
EN
Main screen
4
Page 7

User’s Manual
Projecting the files from PC/NB or other media
EN
devices
A) Connect PC/NB, or other media source devices via
H
DMI cable or AV cable
HDMI cable A to C type (mini type) connection
between the source device and projector:
AV out and AV in cables connection between the
source device and projector:
* HDMI cable and AV in cable are optional accessories
B) Connect the USB drive
Insert the USB drive into
the USB port:
5
Page 8

User’s Manual
C) To make projection from the mentioned source device:
(1) Connect the source device as above (A) or (B)
instruction.
EN
(2) In the main screen of projector, press the powe
b
utton once, it will enter the language setting
first, then press again, it will enter the source
setting menu.
(3) Use the direction up/down button to select th
i
nterface you are connecting, then press “enter”
button to confirm.
r
e
Note:
(1) If connect to Notebook PC, you need to switch th
otebook PC screen to the external screen first
N
while connecting projector.
(2) You could adjust the volume by using the directio
down button .
up/
6
e
n
Page 9

User’s Manual
Projecting media files from external memory
EN
(microSD card, USB drive)
Enter the file list page to select the files you want to
project by using direction key and then press “enter”
button to enter the single file.
Operation instruction in single file display
Button Result
Display previous or next file
Adust volume level
Return
Pop up menu bar for the other
operation
Button operation during menu setting:
Move the setting item
Confirm
Close the menu bar
7
Page 10

User’s Manual
Troubleshooting
Symptom Check Point
EN
The projector still can’t be
turned on after 10
seconds of waiting.
The projecting image is
too blurry.
The temperature of the
projector’s surface is
warm.
The projector does not
work when connecting to
Ensure the battery is fully
charged.
1. Adjust the focus by using
focus
2. Check if the projection lens
is clean or not, clean it if
dirty.
It is normal for this projector to
generate moderate heat
during operation.
1. Check if the HDMI cable is
plugged correctly.
wheel.
a notebook PC.
2. Make sure the PC has be
itched to projector
sw
display.
en
8
Page 11

User’s Manual
Product specifications
EN
Item Description
Optical Technology LCOS
Light Source RGB LED
Resolution 960 x 540 Pixels (Q1080p)
Luminous Flux Effective 12 lumens
Projection Image Size 12.7 cm ~ 127 cm (5” ~ 50” Diagonal)
Projection Distance 10.7 cm ~ 167 cm
Projection Source microSD card, USB drive, HDMI, AV in
Playback format Photo: JPEG, BMP
Video: MP4, AVI, RMVB
Music: MP3, WMA
Text: TXT
Power Input 5V / 1A
Power Output 5V / 1A
Battery Type Embedded 1850 mAh, Li-polymer
rechargeable battery
Battery Life Up to 90 min
Power Consumption 4.5W
Operation Temperature 5 °C ~ 35 °C
Dimension (L x W x H) 112 mm x 58 mm x 16 mm
Weight 180 g
Package Content Pico Projector, USB cable, User
Manual
* All specifications are subject to change without notice.
9
 Loading...