

Page 1
User Manual
ENGLISH
Page 2

Table of contents
Getting started
The parts
Hook up the power
Basic operation
How to use mode button
How to use control button
Snapshot
Taking Still Pictures
Viewfinder
Zoom
Self-Timer
Recording AVI Movies
Play
Play the still pictures and AVI Movies
Delete the still pictures and AVI Movies
View the pictures on PC
Install the driver and camera program (Slim 3000)
View the pictures saved in Camera through
Windows
Picture's positions and picture files
Use PC camera to capture pictures on Windows
2
3
4
5
6
7
8
9
10
11
14
15
Advanced operation
Change setup
Camera program (Slim 3000)
Album mode
PC camera mode
Troubleshooting
16
17
19
24
27
~1~
Page 3
Getting started
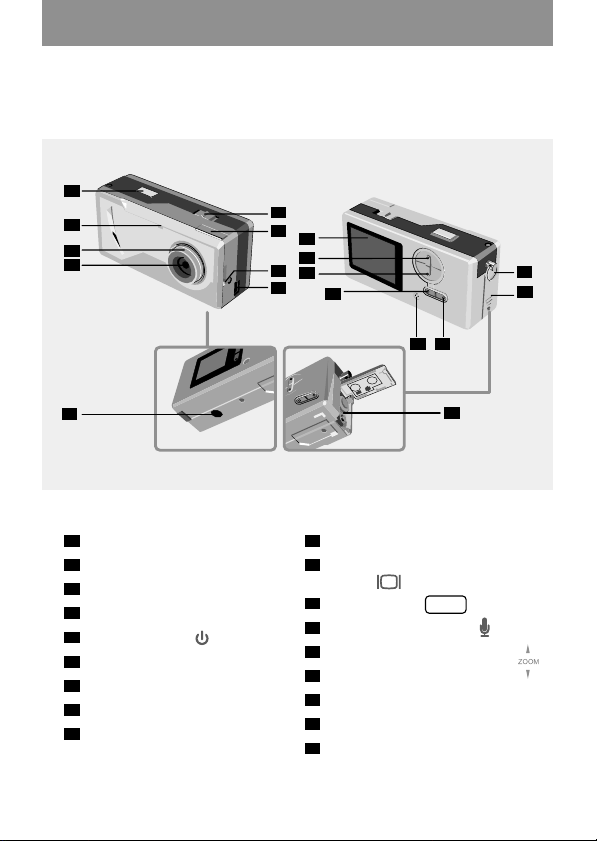
The parts
For detailed operation information, please refer to the page number in
the bracket.
1
2
3
4
5
6
10
15
7
14
8
11
13
12
16
17
9
1
Shutter
2
LED Indicator
3
Focus (5)
4
Lens
5
Power switch (5)
6
Viewfinder
7
Viewfinder ( Eject button)
8
USB port (13, 15)
9
Stand hole
10
LCD display
11
LCD status and backlight
button (6)
12
Mode button (6)
13
Built-in microphone
14
Control button (Zoom-in)
15
Control button (Zoom-out)
16
Strip hookStrap holder
17
Battery cover (3)
18
Battery compartment (3)
~2~
18
MODE
(4,6)
Page 4
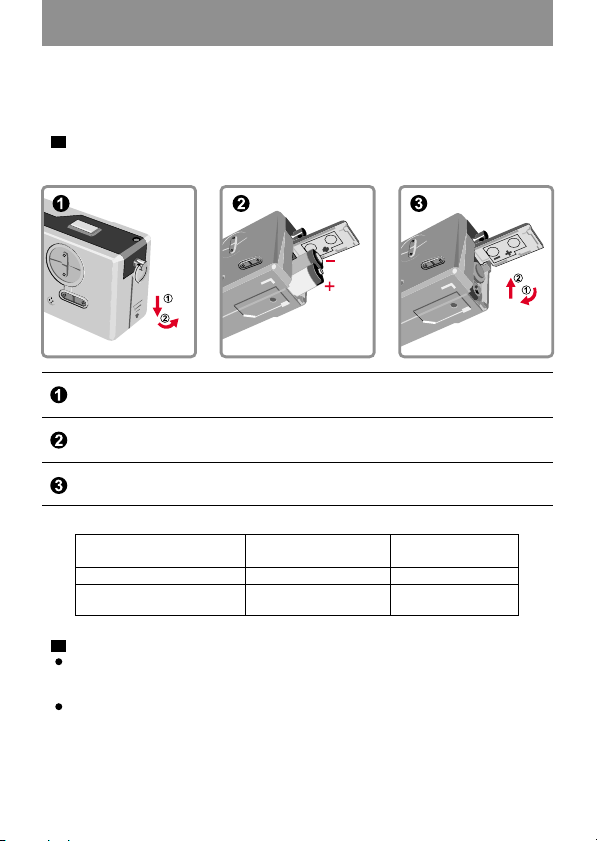
Hook up the power
Please use two AAA 1.5V batteries
!
We recommend you use alkaline batteries
Open the battery cover
Insert two AAA batteries
Follow the battery installation as shown.
Close the battery cover
Battery Life
Taking Still Pictures
Use LCD ON
Use viewfinder (LCD OFF)
*Above data is for using alkaline batteries and in 25 C, pictures are taken every four seconds./
!
Notes:
Battery life will be shorter in the following conditions.
~ Taking snapshot at low temperature.
~ Turn on/off power repeatedly.
The above table is for reference only.
Battery Life
(minutes)
Approximately 60-70
Approximately 100-120
Number of pictures
Approximately 650
Approximately 950
~3~
Page 5

Basic operation
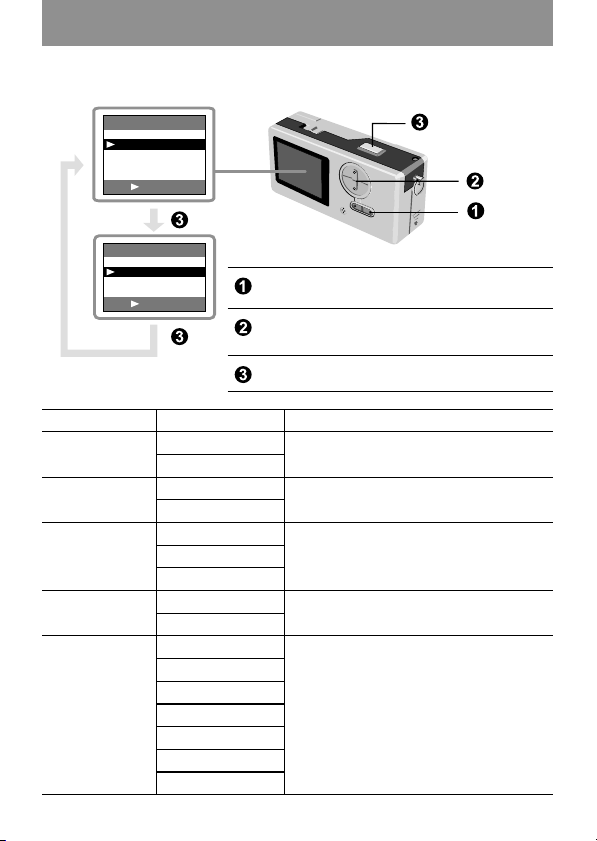
How to use MODE button
You can use the MODE button to take and playback pictures or shift
between all modes.
Mode Sequence
Still Picture mode
Preview mode
AVI Movie mode
Self-Timer mode
SETUP
SETUP mode
!
Press and hold the mode button for two seconds in any mode. Your camera will automatically
change to Still Picture mode.
How to use the CONTROL button
Still Picture mode or Self-Timer mode
You can use the CONTROL button to focus the picture. Press the upper
button to zoom in and press the lower button to zoom out.
!
Please see [Focus] in [Taking Sill Picture] for details.
SETUP Mode
SETUP
Use CONTROL buttons
SETUP
DELETE ALL
FORMAT
QUALITY
FLICKER
LANGUAGE
OK SHUTTER
FORMAT
NO
YES
OK SHUTTER
OK
Move up and down
Change to
SETUP mode
~4~
Page 6
Snapshot
Taking Still Pictures
Still pictures are stored as JPEG file.
41
x1.0
Still picture mode
!
icon stands for 1600x1200 pixels. For detailed information on setting, please refer to
SETUP mode.
Before you take still pictures, please power on your camera.
Make sure your camera is in Still Picture mode.
Press the shutter button.
The sound generated by the shutter tells you that the screen has been closed and opened.
You can take the next snapshot.
!
Focus for snapshot of near objects ( 30 - 100cm)
Before you take snapshot of objects less than 100cm to you, please adjust the focus to ;
and return to before you take snapshot normally.
Remaining pictures
* The number is only
for reference.
Resolution
!
Automatic power shutoff
If your camera is motionless for 60 seconds when you take snapshot or play the pictures,
the camera will be turned off to save energy.
Please turn on power when you use your camera again.
The automatic power shutoff works only when you use batteries. If you plug connector
into USB hole, the automatic power shutoff does not work.
100cm~infinitive distance
~5~
30cm~100cm
Page 7
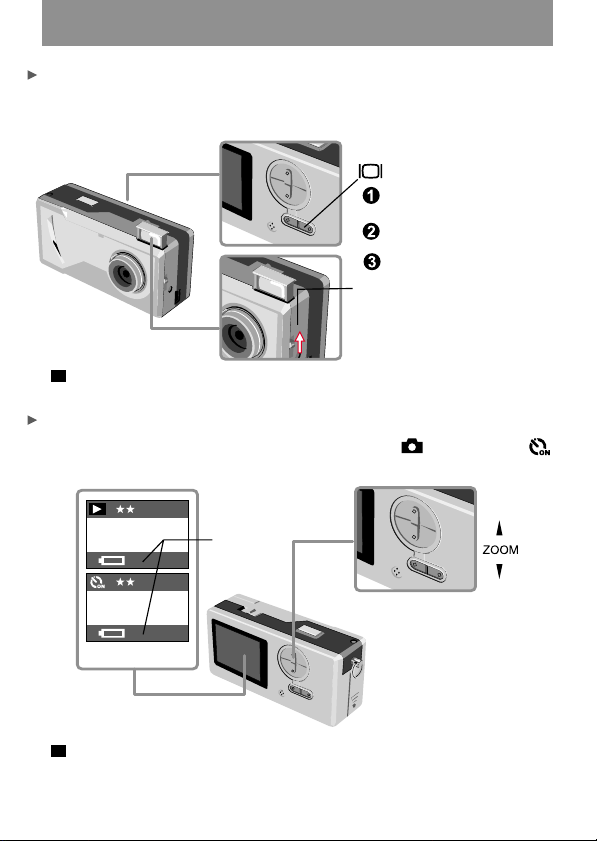
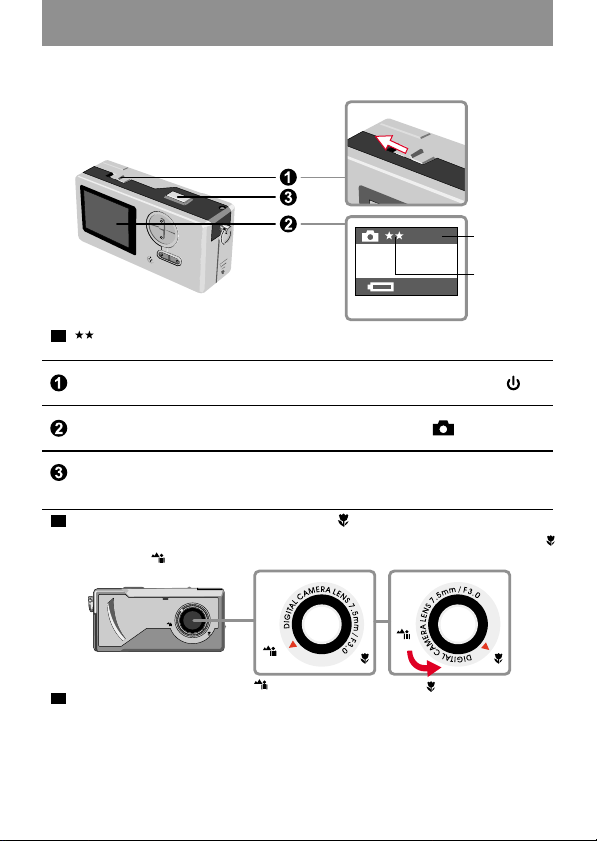
Viewfinder
To save the energy of batteries, you can turn off the backlight of LCD and
take snapshot through viewfinder.
The sequence of motions:
Activate status display / turn on
backlight
Inactivate status display / turn
on backlight
Turn off LCD backlight
Follow the arrow sign to
open the viewfinder
!
Your viewfinder is designed in a special manner. To watch the viewfinder, you should keep
your eyes 30 - 45 cm to the viewfinder.
Zoom
You can use the zoom when you take still pictures and self-timer .s
01
Zoom
x1.0
01
You can adjust the CONTROL button
for zoom. Press upward for zoom-in,
x1.0
Still picture /
self-timer mode
and downward for zoom-out.
!
You can adjust the zoom digitally in 5 sections ranging from 1.0X - 4.0X.
~6~
Page 8

Self-timer
When you use self-timer, you can take the snapshot of the objects 10
seconds after you press the shutter.
Turn on power.
Press the MODE button and switch to self-timer mode.
Press shutter.
The LED indicator flashes for about 10 seconds. The snapshot is taken as soon as the
LED indicator goes out.
Please remember, you cannot cancel the self-timer after the shutter is pressed.
41
x1.0
Still picture mode
LED Indicator flashes about 10 seconds.
~7~
Page 9
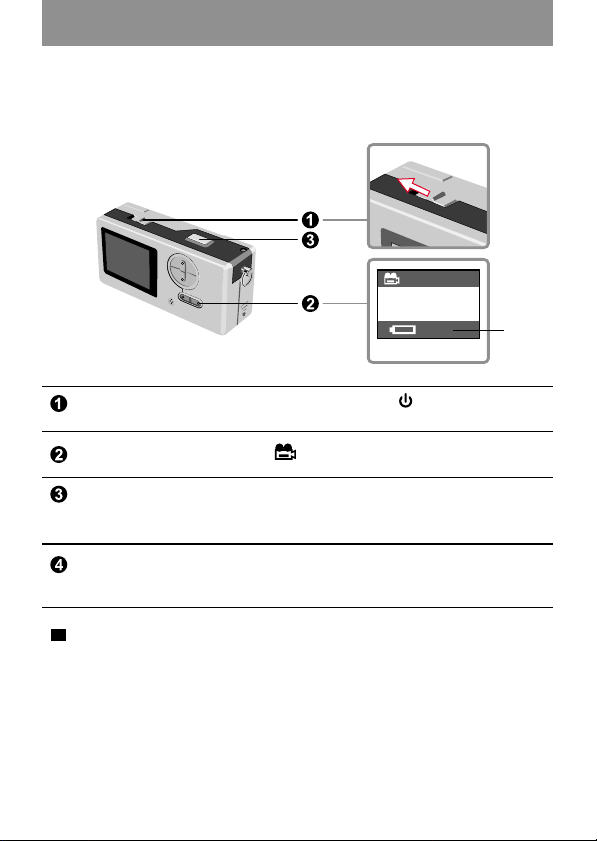
Recording AVI movies
Movies with sound are stored in AVI format.
00:30
AVI movie mode
Please follow the arrow sign to turn on power before recording
AVI movie.
Switch to AVI movie mode.
Press shutter to start the recording:
The AVI movies will be taken when the shutter key is pressed and will be saved every
30 seconds. The length of the movie depends on camera memory capacity.
Press shutter again to stop the recording:
Press the shutter key again will stop the recording.
!
The resolution of AVI movie is 320 X 240.
~8~
Seconds
display
Page 10
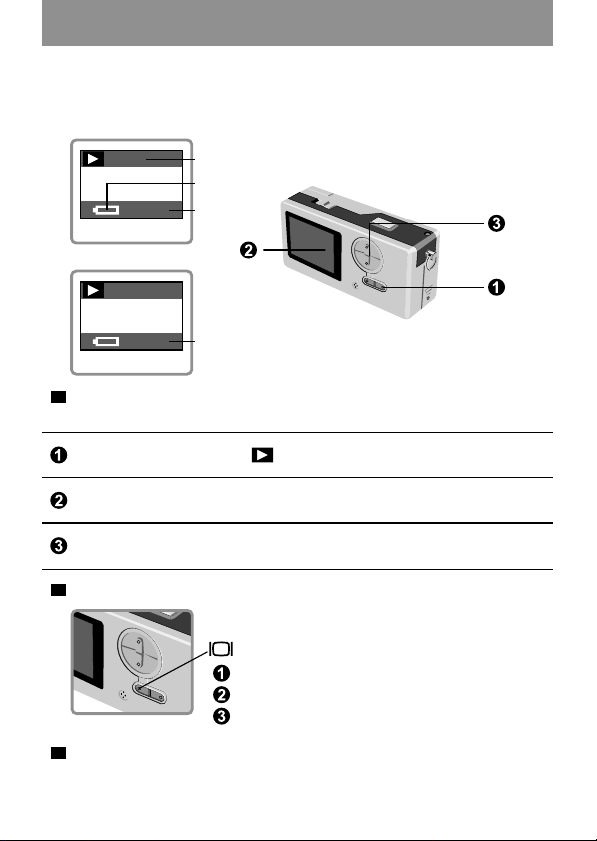
Play
Play the still pictures and AVI Movies
01
File No.
Battery status
No. of pictures
taken
Counter
JPG-0001
Still picture
AVI-0002
00:00
AVI movies
!
Switch from preview to AVI movies, your camera starts playing if you do not press other
button in 1 second.
Switch to preview mode.
The last taken still picture or AVI movie appears on the screen.
Press Up (Down) button to preview the still picture or AVI Movies
forwardly (or reversibly).
!
You can turn off the status display to increase the size of visible area on the LCD.
Sequence of motions:
Activate status display / turn on backlight
Inactivate status display / turn on backlight
Turn off LCD backlight
1. When AVI Movies are downloaded to PC, the sounds of the movie will be played.
!
2. When AVI Movies are played on the camera, the sound will not be played.
~9~
Page 11
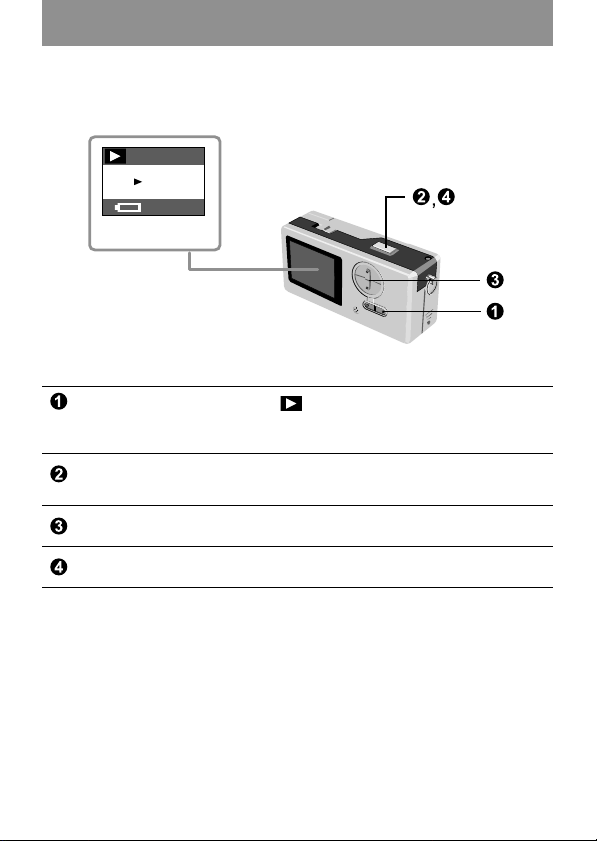
Delete the still pictures and AVI movies
JPG-0001
ERASE?
NO
YES
Dialogue box for
confirmation of deletion
Switch to the preview mode
The last taken still picture or AVI movie appears on the screen.
Press Up (Down) button to preview the still picture or dynamic picture forwardly (or reversibly).
Press shutter, you will see the dialogue box for confirmation of deletion
on the screen.
Press Down (Up) button to select YES or NO.
Press shutter again to confirm and the picture will be deleted.
01
~10~
Page 12

View the pictures on PC
You can view the pictures and films taken by your camera on your PC. You can use the applied
software for modification. You can also attach the pictures to e-mails.
Caution: be sure you have installed the driver before you connect your camera to your
!
PC. If you connect USB cable first, you will not be able to install the driver.
Install the driver and camera programs for SlimCam 3000.
Turn on PC.
Place the CD in the CD-ROM.
The title appears on the screen in a
few seconds.
If no title appears on screen
Double-click the icon "My computer".
Double-click the icon CD-ROM ("Slim 3000 (E:)*")
*The drive of CD varies, depending on how your PC is set up.
Move mouse to "Slim 3000 " and single-click left key of mouse.
Single-click the left key of mouse
at "Slim 3000 ".
Start installing driver and camera
program. The "InstallShield Wizard"
picture appears.
~11~
Page 13
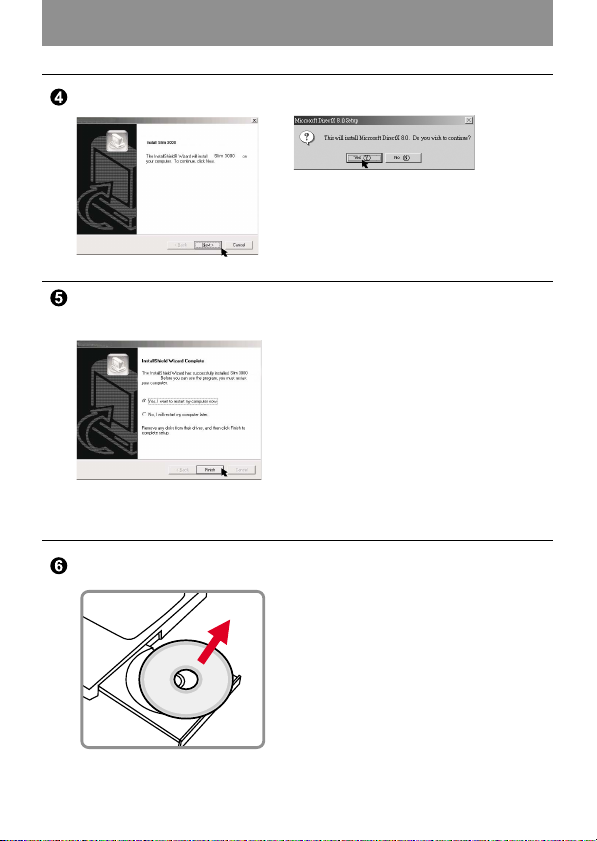
Click the left key of mouse at "NEXT"
Installation begins. Follow the instructions shown
on the picture to install DirectX8.0 driver step by step.
Follow the instructions shown on the screen to quit the installation
program.
Installation begins. You will see the picture of
completion as soon as installation is completed.
The album driver is available for use after your PC is restarted.
CD-ROM pops out from your PC. Take the CD out.
~12~
Page 14
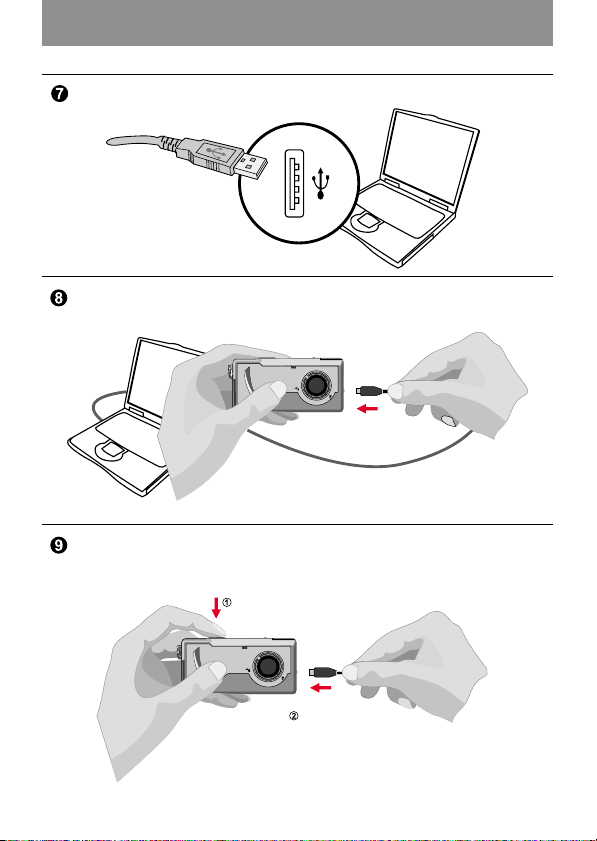
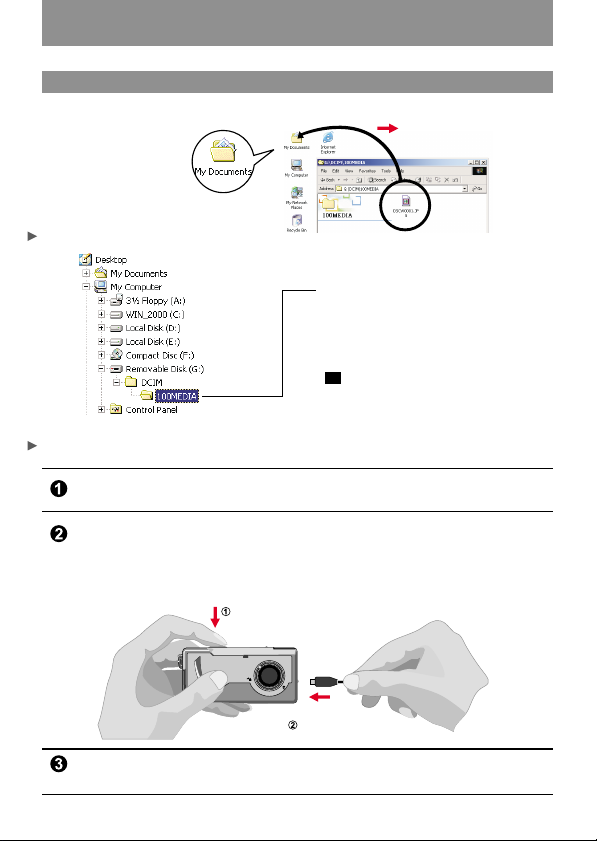
Connect USB cable to the USB receptacle of PC.
Connect the other end of USB cable to camera to complete the
installation of "Removable Disk".
Slim1.3
Hold the shutter and connect USB cable to camera again to complete
the installation of PC camera driver.
Hold the shutter.
Connect USB
cable to camera.
~13~
Page 15
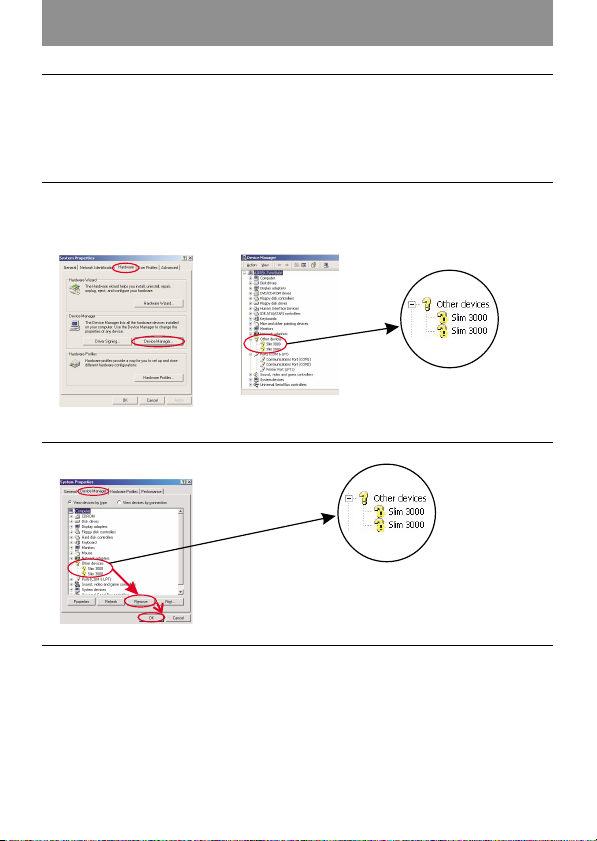
NOTICE:
Please follow the steps to reinstall Slim 3000 if you connect the
camera and PC via USB cable without installing Slim 3000 first.
1. Please click Start -> Setting -> Control Panel -> System.
2. Select Hardware tab under System list -> Device Manager.
A. For Windows XP / 2000 User:
Please select the icon ?! Slim 3000 and remove it.
B. For Windows 98SE / ME User:
Please select ?! Slim 3000 and remove.
3. Unplug the USB cable from PC.
4. Place the Slim 3000 drive disk into your CD-ROM to install Slim
3000.
5. After the installation is completed, connect the USB cable to PC
again and start to use the camera.
~14~
Page 16
View the pictures saved in Camera through Windows
Turn on PC and activate Windows.
Connect USB cable to the USB receptacle of PC.
Connect the other end of USB cable to the camera.
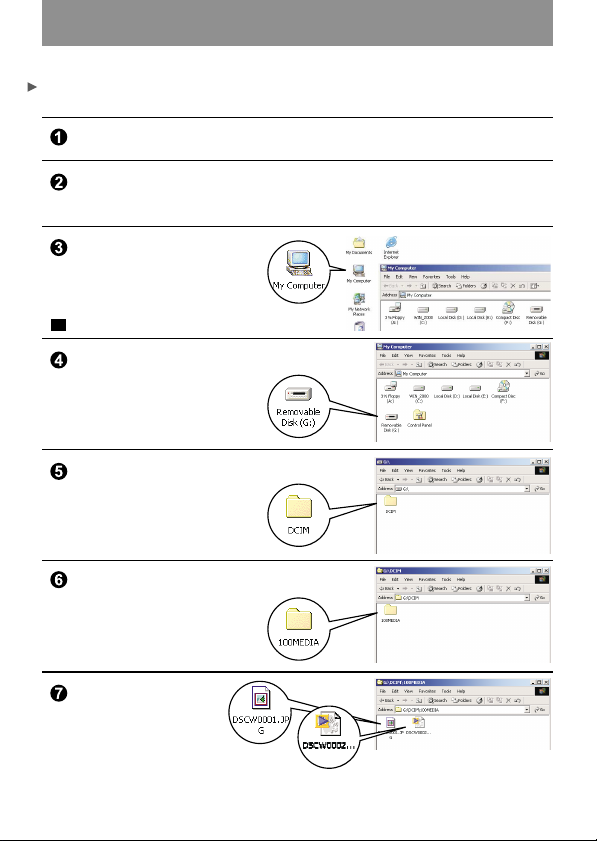
Double-click the icon
of "My computer".
You can also use Cam Manager to view the
!
pictures saved in PC.
Double-click mouse to identify the
new "Removable Disk".
Double-click "DCIM" file holder.
Double-click "100MEDIA" file holder.
Double-click picture
or AVI.
To playAVI dynamic picture, you need to install Windows Media Player (recommended)
and DirectX8 driver.
~15~
Page 17
Copy pictures to your PC
Drag the picture to "My Documents"
Copy pictures
to "My Documents"
Picture's positions and picture files
Including the files of still pictures and dynamic
pictures
Static pictures are recorded as DSCWXXXX.jpg.
Dynamic pictures are recorded as
DSCWXXXX.jpg.
XXXX is the automatic numbering system;
!
and will be replaced by 0001, 0002, etc.
After the memory is formatted.
Use PC camera to capture pictures on Windows
Turn on PC and activate Windows.
Connect USB cable to the USB receptacle of PC. Hold the shutter
and connect the other end of USB cable to the camera and enter
into PC Camera mode.
1. Hold the shutter
Connect USB cable
to the camera
Activate Slim 3000 or other visual software
to view Live Video.
~16~
Page 18
Advanced operation
Change the setup
SETUP
DELETE ALL
FORMAT
QUALITY
FLICKER
LANGUAGE
OK SHUTTER
DELETE ALL
NO
YES
OK SHUTTER
Press the mode button and switch to Setup mode.
Use the up & down button to move the mouse
to the desirable item.
Press shutter to confirm your choice.
Item
DELETE ALL
FORMAT
QUALITY
FLICKER
LANGUAGE
Setup
NO
YES
NO
YES
2048x1536
1600x1200
1024x768
50HZ
60HZ
ENGLISH
FRANCIAS
ESPANOL
DEUTSCH
NEDERLANDS
ITALIANO
PORTUGUES
Description
Delete all still and dynamic pictures from your
camera.
Format the memory of camera and clear all
data from the memory.
The camera supports 3 resolutions
2048x1536 is enhanced mode.
Set up AC frequency and synchronize with
fluorescent.
Multi-lingual LCD supports English, French,
Spanish, German, Dutch, Italian and Portuguese.
~17~
Page 19
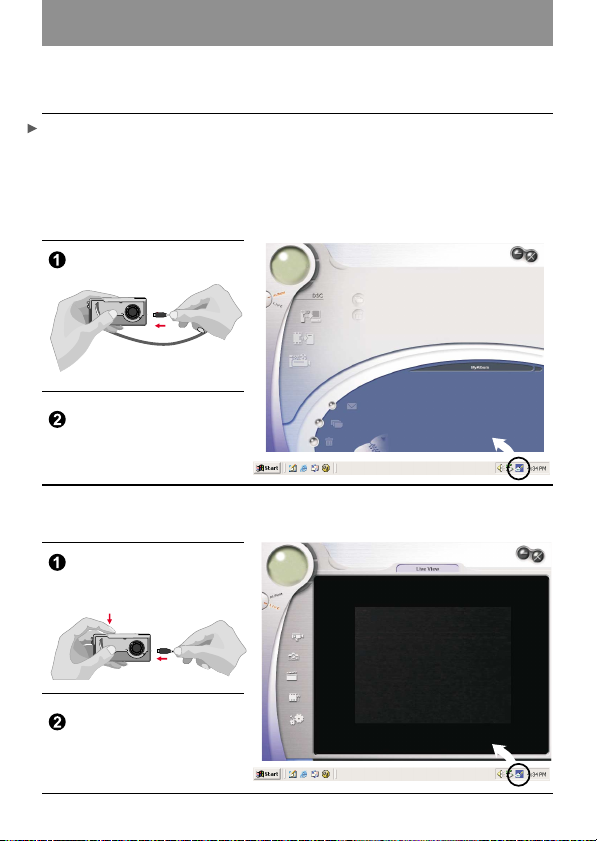
Camera program (Slim 3000)
Activate Slim 3000
When USB is connected to the camera, the Monitor icon shown
on Windows row automatically activates the camera program according
to the types of modes.
Album Mode
Connect USB to camera.
Slim1.3
Slim 3000 appears on the center
of the screen and asks you if you
want to download the pictures saved
in the camera.
PC Camera mode
Hold the shutter and connect
USB to camera.
Hold the shutter.
The Live View program of
Slim 3000 appears on the center
of the screen.
~18~
Page 20
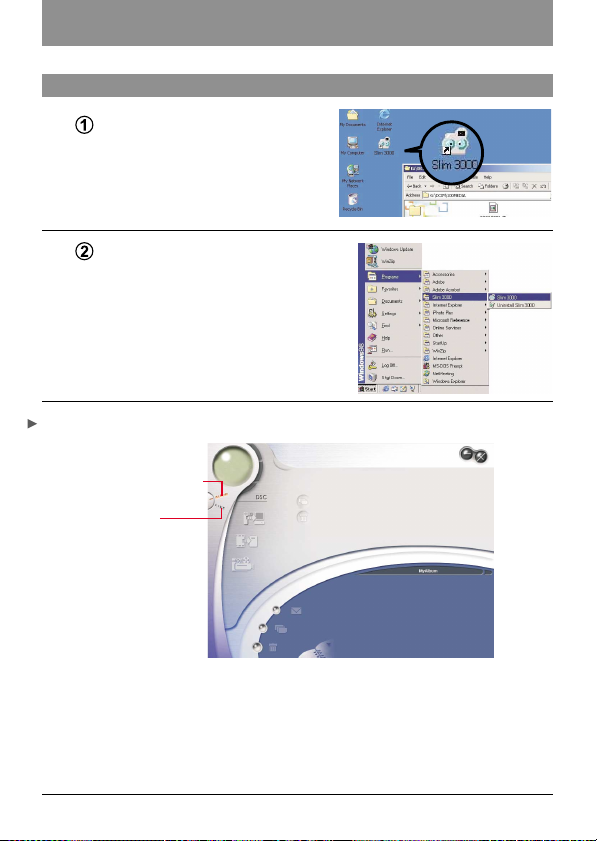
If not activated
Click the Slim 3000 icon
on the Desktop to execute the
program where you can begin to
use your camera.
Click on the "Start" menu and go
up to "Programs". Then go to the
folder named " Slim 3000" and
select it.
Mode Selecting
Album Function
(DSC Mode)
Live View
(PC Camera Mode)
==Press the "Live View" button to change the camera to PC Camera
mode.
Press the "Album Function" button to change the camera to DSC
mode.
~19~
Page 21

Album Mode
1
2
3
4
5
6
7
15
12
11
10
13
14
1
DSC Function (DSC Mode)
2
Transfer images to the work area
3
Transfer images to the album
4
Create AVI file
5
Send Mail
6
Select All
7
Delete
8
Album Manager
~20~
9
Album
Delete
Select All
Image
Work area
Minimize
Exit
9
8
10
11
12
13
14
15
Page 22
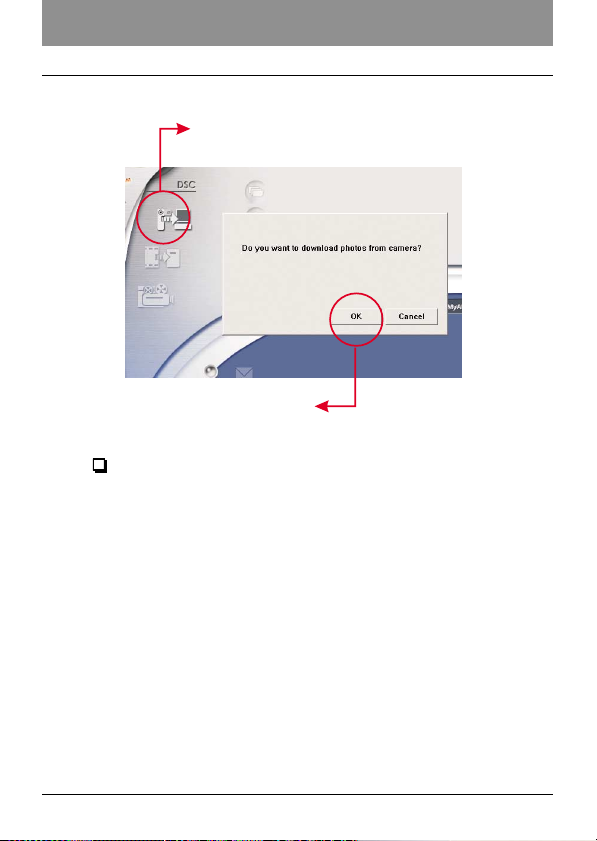
Click this button to launch the dialogue box
Click OK
Downloading pictures and movies
1. Make sure your camera is connected to your PC
via the USB cable.
2. Set the Slim 3000 to Ablum mode.
3. A dialogue box will pop up and ask if you want
to download photos from your camera.
~21~
Page 23
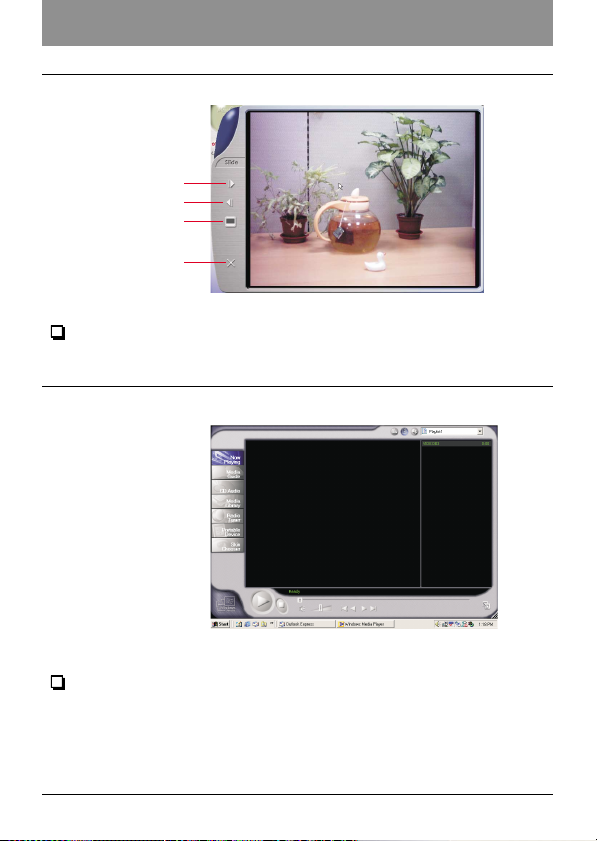
Next picture
Previous picture
Slide Show
Exit
Viewing pictures
Double-click any picture or movie to launch the viewer.
Viewing movies
Double-click any AVI movie to automatically launch the movie in
your default media player.
~22~
Page 24

Album Manager
Highlight a picture on the work area and click to transfer
to the Photo Album.
Click the Album Manager to create a new Photo Album.
Key in a new album name.
Click "new" to designate a path where the album will be stored.
Click " Update" to confirm the new album is created.
Click " " to enter the new created album.
~23~
Page 25
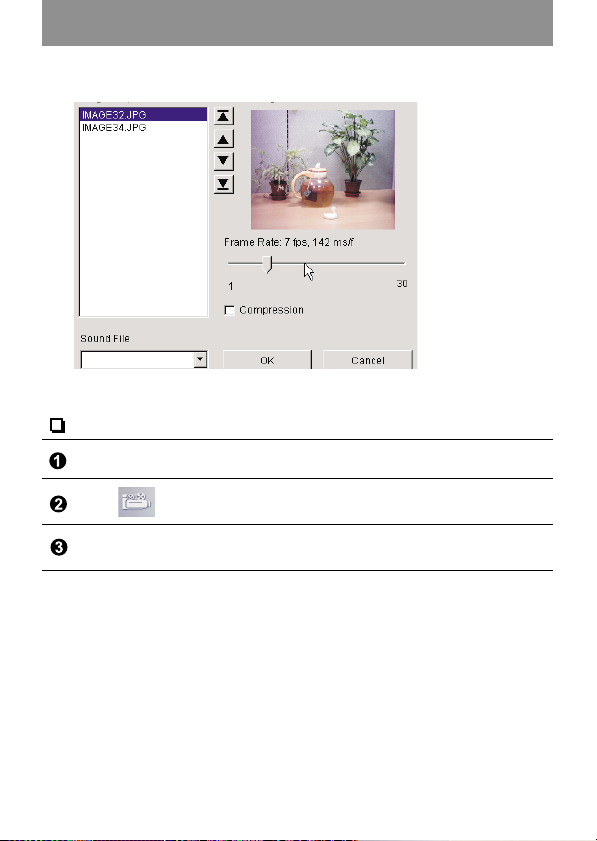
Creating AVI files
Select jpg / bmp images from the work area.
Click to load the images to the AVI File Manager.
Order the image sequence, and adust the frame rate.
~24~
Page 26
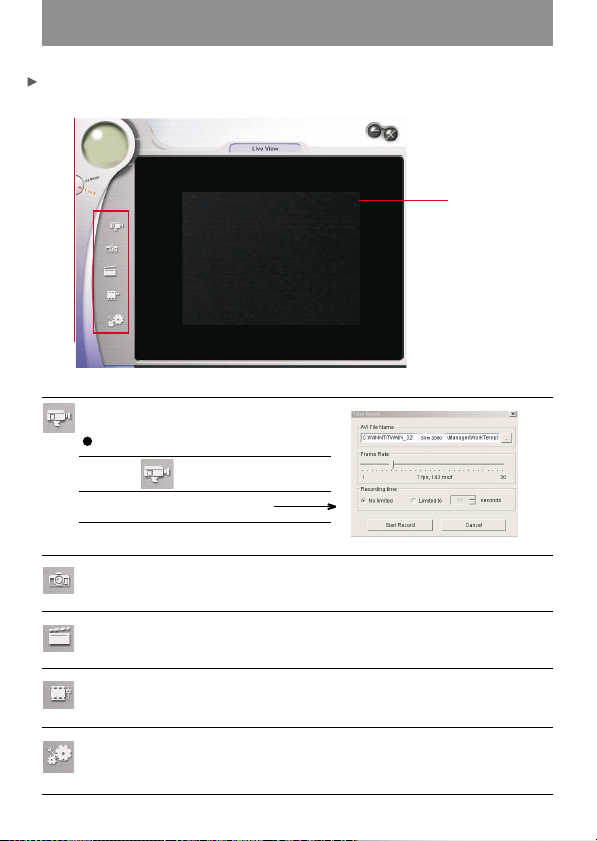
PC Camera Mode
Record live video
Steps
1. Press
2. Adjust recording speed and time.
3. Press " Start to Record "
Capture live still image
Set image size
Preview
Window
Advanced settings (default settings recommended)
Select video source
(if you have more than one image import device installed)
~25~
Page 27

1
2
Set Image Size
1
Color Space
Select one of the following functions when you have different
needs.
- RGB 24: better image quality
- I420: faster speed
2
Output Size
Setting output size can change the size of the preview window. The
default size is 320x240. Choose larger pixels when you need a
larger preview window.
320 x 240
640 x 480
~26~
Page 28
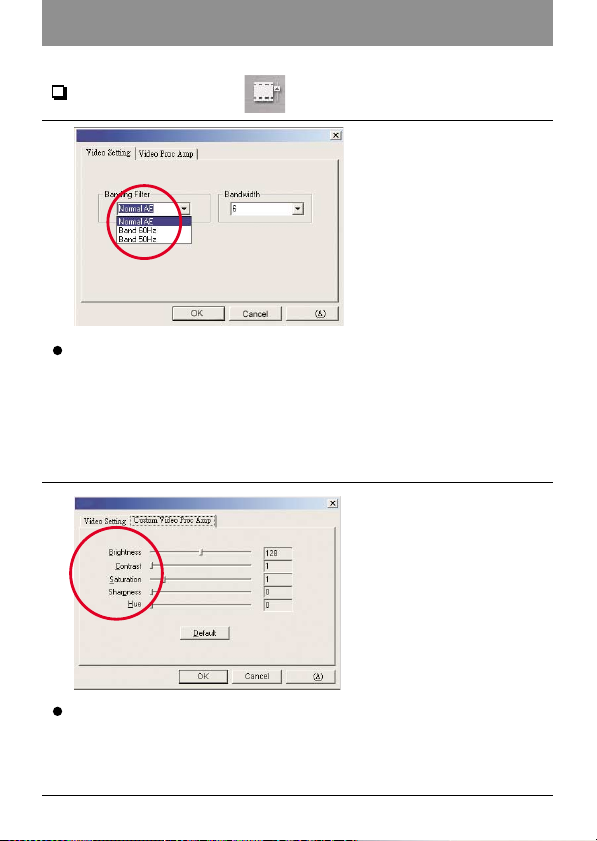
Advanced settings
Video Setting
- Banding Filter:
When your PC screen flickers, please change the banding filter in Video
Setting. The refresh rate (the number of times the screen is redrawn per
second) is the most likely cause of flicker. Select 50Hz or 60Hz until your PC
screen stops flickering.
Custom Video Pro Amp
You can use the default setting or change settings ( brightness, contrast,
saturation, sharpness, and hue ) on your own.
~27~
Page 29

Troubleshooting
Symptom
1. When installation step missed:
2. When conflict with another camera
driver capture device:
3. When unable to install driver:
4. When unable to download images:
5. Adjust VGA card when image color is
not fully saturated:
6. Please adjust the acceleration
function of VGA card when unable to
play images in Video Conferencing
mode or in AVI mode.
7. Noise appears on PC screen while
camera used as a video conferencing
camera.
8. Images are blurred.
9. Images are too dark.
Actions
Please remove the camera driver and other
related software and follow each installation step
to reinstall the camera.
If you have any other camera installed on your
computer, completely remove the camera and it's
driver from your system to avoid a driver conflict
with another camera or capture device.
When installing camera driver under Windows
98SE, you'll be asked to insert a 98SE CD-ROM.
Please follow the command to complete the
installation. Please re-plug the camera to
download images.
Please follow the operation steps:
Go to control panel Double - click " Display "
Click on " Settings " Click on " Colors " Choose "
High Color " or " True Color ".
Please follow the operation steps:
Go to control panel Double - click " Display "
Click on " Settings " Click on " Advanced " Click
on " Performance " or " Troubleshooting " Set the
" Hardware acceleration " from " Full " to " None ".
Change Band Filter to 50 Hz or 60 Hz.
Adjust focus.
Take pictures while there is adequate light.
10. AVI files can't be played back
Use editing tools such as Photoshop or
PhotoImpact to adjust image brightness. Install
Direct X 8.0 or above.
~28~
Page 30

Benutzerhandbuch
Deutsch
Page 31

Inhaltsverzeichnis
Inbetriebnahme
Die Komponenten
Stromversorgung
Grundbedienung
Verwenden des MODE-Knopfes
Verwenden des Steuerungsknopfes
Aufnahme
Aufnahmen von Fotos
Sucher
Zoomen
Selbstauslöser
Aufnehmen von AVI-Videoclips
Wiedergabe
Wiedergeben von Fotos und AVI-Videoclips
Löschen der Fotos und AVI-Videoclips
Anschauen der Bilder am PC
Installieren des Treibers und Kameraprogramms
(Slim 3000)
Anschauen der in der Kamera gespeicherten
Bilder unter Windows
Bildpositionen und Bilddateien
Verwenden als PC-Kamera unter Windows
2
3
4
5
6
7
8
9
10
11
14
15
Weitere Bedienung
Ändern der Einstellungen
Kameraprogramm (Slim 3000)
Albummodus
PC-Kameramodus
Fehlerbehebung
16
17
19
24
27
~1~
Page 32

Inbetriebnahme
Die Komponenten
Beziehen Sie sich bitte auf die Seitennummer in den Klammern für
detaillierte Bedienungsinformationen.
1
2
3
4
5
6
10
15
7
14
8
11
13
12
16
17
9
1
Auslöser
2
LED-Anzeige
3
Fokus (5)
4
Linse
5
Stromschalter (5)
6
Sucher
7
Sucher (Schalter)
8
USB-Anschluss (13,15)
9
Ständerhalterung
10
LCD-Bildschirm
11
LCD-Status und
Hintergrundlichtschalter (6)
12
MODE-Knopf (6)
13
Integrierte Mikrofon
14
Steuerungsknopf
MODE
(Einzoomen)
15
Steuerungsknopf
(Auszoomen)
16
Trageriemenhalterung
17
Deckel des Batteriefachs (3)
18
Batteriefach (3)
~2~
18
(4,6)
Page 33

Stromversorgung
Verwenden Sie bitte zwei AAA 1,5V Batterien
!
Wir empfehlen Ihnen alkalische Batterien zu verwenden.
Öffnen Sie den Deckel des Batteriefachs.
Legen Sie zwei AAA Batterien ein.
Folgen Sie bitte den oben angezeigten Anweisungen.
Schließen Sie den Deckel des Batteriefachs.
Batterielebensdauer
Fotoaufnahme
LCD ein
Mit Hilfe des Suchers
(LCD aus)
*Die obigen Daten sind unter den Bedingungen gültig, dass alkalische Batterien bei 25°C
verwendet wurden und alle vier Sekunden ein Bild aufgenommen wurde.
!
Anmerkungen:
Die Batterielebensdauer wird kürzer unter den folgenden Umständen:
~ Aufnehmen von Bildern bei einer niedrigen Temperatur.
~ Ständiges Ein- und Ausschalten der Kamera.
Die obige Tabelle gilt nur als Referenz.
Batterielebensdauer
(Minuten)
Ca. 60-70
Ca. 100-120
Bildanzahl
Ca. 650
Ca. 950
~3~
Page 34

Grundbedienung
Verwenden des MODE-Knopfes
Mit dem MODE-Knopf können Sie den gewünschten Modus wie z.B.
Aufnahme- oder Vorschaumodus usw. auswählen.
Modusanzeigereihenfolge
Fotomodus
Vorschaumodus
AVI-Videomodus
Selbstauslösermodus
Setupmodus
SETUP
!
Die Kamera geht automatisch in den Fotomodus, wenn der MODE-Knopf für zwei
Sekunden in jedem Modus gedrückt gehalten wurde.
Verwenden des Steuerungsknopfes
Fotomodus oder Selbstauslösermodus
Mit Hilfe des Steuerungsknopfes können Sie Ihr Objekt scharf stellen.
Drücken Sie zum Einzoomen den oberen Teil des Knopfes und zum
Auszoomen den unteren Teil.
!
Einzelheiten hierzu siehe Abschnitt "Fokus" unter "Aufnehmen von Fotos".
Setupmodus
Verwenden Sie die verschiedenen Steuerelemente.
SETUP
SETUP
DELETE ALL
FORMAT
QUALITY
FLICKER
LANGUAGE
OK SHUTTER
FORMAT
NO
YES
OK SHUTTER
In Setupmodus
ändern
~4~
OK
Nach oben oder
unten gehen
Page 35

Aufnahme
Aufnehmen von Fotos
Fotos werden als JPEG-Dateien
gespeichert.
41
x1.0
Fotomodus
!
Das -Symbol steht für 1280x1024 Pixel. Ausführliche Informationen über Einstellungen
finden Sie im Abschnitt "Setupmodus".
Schalten Sie bitte die Kamera ein, um Fotos aufzunehmen.
Stellen Sie sicher, dass die Kamera im Fotomodus ist.
Drücken Sie den Auslöser.
Das Geräusch, das der Auslöser macht, weist hin, dass ein Bild aufgenommen wurde.
Sie können den nächsten Schnappschuss machen.
!
Fokus für Nahaufnahmen
Stellen Sie bitte den Fokus auf , wenn Sie eine Nahaufnahme von einem Objekt, das
weniger als 100 cm von Ihnen entfernt ist, machen möchten. Stellen Sie bitte den Fokus
wieder auf , wenn Sie normale Aufnahmen machen möchten.
( 30-100cm)
verbleibende
Bildanzahl
*Diese nummer ist nur
für Referenz
Auflösung
!
Automatisches Ausschalten
Wenn die Kamera während der Bildaufnahme oder Bildwiedergabe innerhalb von 30
Sekunden nicht betätigt wurde, dann wird sie automatisch ausgeschaltet, um Energie zu sparen.
Schalten Sie die Kamera ein, wenn Sie die Kamera wieder brauchen.
Die automatische Ausschaltfunktion wirkt nur, wenn die Kamera mit Batteriestrom betrieben
wird. Diese Funktion wirkt nicht, wenn die Kamera über das USB-Kabel mit dem Computer
verbunden ist.
100cm~unendlicher Abstand
~5~
30cm~100cm
Page 36

Sucher
Um die Batterieenergie zu sparen, können Sie das Hintergrundlicht des
LCD-Bildschirms ausschalten und Schnappschüsse mit Hilfe des
Suchers machen.
Die Funktionsreihenfolge:
Statusanzeige aktiviert /
Hintergrundlicht ein
Statusanzeige deaktiviert /
Hintergrundlicht ein
Hintergrundlicht aus
Folgen Sie bitte dem
Pfeilzeichen, um den
Sucher zu öffnen.
!
Der Sucher hat ein besonderes Design. Sie sollten Ihre Augen 30 - 45 cm von dem
Sucher fernhalten, wenn Sie den Sucher verwenden.
Zoomen
Sie können im Foto-Modus und Selbstauslöser-Modus die
Zoomfunktion verwenden.
01
Zoomen
x1.0
01
Verwenden Sie zum Zoomen den
Steuerungsknopf. Drücken Sie zum
x1.0
Still picture /
self-timer mode
Einzoomen den Knopf nach oben und
zum Auszoomen nach unten.
!
Sie können 5 Stufen von 1,0X bis 4,0X digital zoomen.
~6~
Page 37

Selbstauslöser
Die Selbstauslöserfunktion nimmt automatisch ein Bild nach 10
Sekunden auf, nachdem der Auslöser gedrückt wurde.
Schalten Sie die Kamera ein.
Drücken Sie den MODE-Knopf und aktivieren den
Selbstauslösermodus.
Drücken Sie den Auslöser.
Die LED-Anzeige blinkt für ca. 10 Sekunden. Ein Bild wird aufgenommen, sobald
die LED-Leuchte erlischt.
Denken Sie bitte daran, dass die Selbstauslöserfunktion nicht mehr abgebrochen wird,
nachdem der Auslöser gedrückt wurde.
41
x1.0
Fotomodus
Die LED-Anzeige blinkt für ca. 10 Sekunden.
~7~
Page 38

Aufnahmen von AVI-Videoclips
Videoclips mit Tönen werden im AVI-Format gespeichert.
00:30
AVI-Videomodus
Sekundenanzeige
Folgen Sie bitte dem Pfeilzeichen, um die Kamera für
Videoaufnahmen einzuschalten.
Aktivieren Sie den AVI-Videomodus.
Auslöser zum Starten der Aufnahme drücken:
AVI-Videoclips werden aufgenommen und alle 30 Sekunden gespeichert, nachdem der
Auslöser gedrückt wurde. Die Gesamtlänge des Videos hängt von der
Speicherkapazität der Kamera ab.
Auslöser zum Stoppen der Aufnahme drücken:
Drücken Sie noch einmal den Auslöser, um dieAufnahme zu stoppen.
!
Die Auflösung des AVI-Videos ist 320x240.
~8~
Page 39

Wiedergabe
Wiedergeben von Fotos und AVI-Videoclips
01
Datei-Nr.
Batteriezustand
Bildanzahl
Counter
JPG-0001
Still picture
AVI-0002
00:00
AVI movies
!
Wenn Sie die Kamera vom Vorschaumodus auf AVI-Videomodus umgeschaltet und keinen
anderen Knopf innerhalb 1 Sekunde gedrückt haben, wird die Wiedergabe automatisch
gestartet.
Aktivieren Sie den Vorschaumodus.
Das zuletzt aufgenommene Foto oder AVI-Videoclip erscheint auf
dem Bildschirm.
Drücken Sie den Steuerungsknopf nach oben bzw. unten, um das
nächste bzw. vorherige Foto oder Videoclip anzuschauen.
Sie können die Statusanzeige ausschalten, um die Bildanzeigefläche auf dem LCD-Bildschirm
!
zu vergrößern.
Die Funktionsreihenfolge:
Statusanzeige aktiviert / Hintergrundlicht ein
Statusanzeige deaktiviert / Hintergrundlicht ein
Hintergrundlicht aus
~9~
Page 40

Löschen der Fotos und AVI-Videoclips
JPG-0001
ERASE?
NO
YES
Dialogue box for
confirmation of deletion
Aktivieren Sie den Vorschaumodus.
Das zuletzt aufgenommene Foto oder AVI-Videoclip erscheint daraufhin auf dem Bildschirm.
Drücken Sie den Steuerungsknopf nach oben bzw. unten, um das nächste bzw. Vorherige
Foto oder Videoclip anzuschauen.
Drücken Sie den Auslöser. Daraufhin erscheint ein Dialogfenster,
das die Bestätigung des Löschbefehls fordert.
Drücken Sie den Ab- oder Auf-Knopf, um YES oder NO zu wählen.
Drücken Sie noch einmal den Auslöser, um Ihre Auswahl zu bestätigen.
01
~10~
Page 41

Anschauen der Bilder am PC
Sie können die aufgenommenen Fotos und Videoclips am PC anschauen. Sie können die beigefügte
Software verwenden, um die Bilder zu bearbeiten. Sie können auch die Bilder Ihren E-Mails
anhängen.
!
Achtung: Installieren Sie unbedingt zuerst den Treiber, bevor Sie
die Kamera an Ihren PC anschließen. Wenn das USB-Kabel
zuerst angeschlossen wird, kann der Treiber nicht installiert werden.
Installieren des Treibers und Kameraprogramms für Slim 3000
Schalten Sie den PC ein und fahren Windows hoch.
Schließen Sie die Kamera noch nicht an den PC an.
Schließen Sie die ausgeführten Anwendungsprogramme auf Ihrem PC.
Legen Sie die CD in das CD-Laufwerk ein.
Das Bild erscheint auf dem Bildschirm
innerhalb von ein paar Sekunden.
Falls das Bild nicht auf dem Bildschirm erscheint
Klicken Sie doppelt auf das "Arbeitsplatz"-Symbol
Klicken Sie doppelt auf das CD-Laufwerksymbol ["Slim 3000 (E:)*"].
*Der CD-Laufwerkbuchstabe hängt von der Konfiguration Ihres PCs ab.
Klicken Sie auf "Slim 3000".
"Slim 3000" anklicken
Die Installation des Treibers und
Kameraprogramms starten. Das
“InstallShield Wizard"-Fenster erscheint.
~11~
Page 42

Klicken Sie auf "Next".
Die Installation beginnt. Folgen Sie den
Anweisungen auf dem Bildschirm, um DirectX
8.0 zu installieren.
Folgen Sie den Anweisungen auf dem Bildschirm, um die Installation
zu vervollständigen.
Die Installation beginnt. Ein Abschlussfenster
erscheint, wenn die Installation abgeschlossen wurde.
Der Kameratreiber wird aktiviert, nachdem der PC neu gestartet wird.
Das CD-Fach wird automatisch ausgeworfen. Nehmen Sie
die CD heraus.
~12~
Page 43

Stecken Sie das USB-Kabel in den USB-Anschluss des Pcs.
Stecken Sie das andere Ende des USB-Kabels in die Kamera,
um die Installation des "Wechseldatenträger" zu vervollständigen.
Slim1.3
Halten Sie den Auslöser gedrückt und verbinden noch einmal das
USB-Kabel mit der Kamera, um die Installation des PC-Kameratreibers
zu vervollständigen.
Den Auslöser gedrückt halten
Das USB-Kabel
mit der Kamera verbinden
~13~
Page 44

HINWEIS:
Wenn Sie die Kamera vor der Installation der Slim 3000 über das USBKabel an den PC angeschlossen haben, dann folgen Sie bitte den
nachstehenden Schritten zum Neuinstallieren der Slim 3000.
1. Klicken Sie auf Start -> Einstellungen -> Systemsteuerung -> System.
2. Wählen Sie den Hardware-Registerreiter im System-Fenster und wählen dann
den Geräte-Manager.
A. Windws XP/2000:
Angezeigt wird, dann wählen und entfernen Sie bitten dieses Element.
B. Windows 98SE/ME:
Angezeigt wird, dann wählen und entfernen Sie bitten dieses Element.
3. Ziehen Sie das USB-Kabel aus dem PC heraus.
4. Legen Sie die Slim 3000-Treiberdisc in Ihr CD-ROM-Laufwerk, um Slim 3000
zu installieren.
5. Stecken Sie nach dem Vervollständigen der Installation das USB-Kabel wieder
in den PC ein. Nun können Sie die Kamera verwenden.
~14~
Page 45

Anschauen der in der Kamera gespeicherten Bilder unter Windows
Schalten Sie den PC ein und fahren Windows hoch.
Verbinden Sie das USB-Kabel mit dem USB-Anschluss am PC und
das andere Ende mit der Kamera.
Klicken Sie doppelt auf das
“Arbeitsplatz"-Symbol.
Sie können über den Cam Manager die im PC
!
gespeicherten Bilder anschauen.
Klicken Sie doppelt auf den neuen
“Wechseldatenträger".
Klicken Sie doppelt auf den
“DCIM"-Dateiordner.
Klicken Sie doppelt auf den
“100MEDIA"-Dateiordner.
Klicken Sie doppelt
auf eine Fotodatei
oder AVI-Videodatei.
Um die AVI-Videoclips anzuschauen, müssen Sie Windows Media Player (empfohlen)
und DirectX8 installieren.
~15~
Page 46

Kopieren der Bilder zu Ihrem PC
Ziehen Sie das gewünschte Bild zu "Arbeitsplatz".
Bilder zu "Arbeitsplatz" kopieren
Bildpositionen und Bilddateien
Beinhaltet die Fotos- und Videodateien.
Fotos wurden als DSCWXXXX.jpg-Dateien
aufgenommen.
Videoclips wurden als
DSCWXXXX.avi-Dateien aufgenommen.
XXXX steht für die Zahl, die das
!
automatische Nummerierungssystem
gegeben hat, wie z.B. 0001, 0002 usw.
Verwenden als PC-Kamera unter Windows
Schalten Sie den PC ein und fahren Windows hoch.
Verbinden Sie das USB-Kabel mit dem USB-Anschluss am PC.
Halten Sie den Auslöser gedrückt und verbinden das andere Ende
des USB-Kabels mit der Kamera. Aktivieren Sie anschließend den
PC-Kameramodus.
1. Den Auslöser gedrückt halten
Das USB-Kabel mit
der Kamera verbinden
Starten Sie das Slim 3000-Kameraprogramm oder andere
Bildbearbeitungssoftware, um ein Live-Video anzuschauen.
~16~
Page 47

Weitere Bedienung
Ändern der Einstellungen
SETUP
DELETE ALL
FORMAT
QUALITY
FLICKER
LANGUAGE
OK SHUTTER
DELETE ALL
NO
YES
OK SHUTTER
Drücken Sie den MODE-Knopf und aktivieren den
Setupmodus.
Drücken Sie den Steuerungsknopf nach oben oder
unten, um zur gewünschten Funktion zu gehen.
Drücken Sie den Auslöser, um Ihre Auswahl zu
bestätigen.
Funktion
DELETE ALL
FORMAT
QUALITY
FLICKER
LANGUAGE
Optionen
Nein
Ja
Nein
Ja
2048x1536
1600x1200
1024x768
50HZ
60HZ
ENGLISH
FRANÇAIS
ESPAÑOL
DEUTSCH
NEDERLANDS
ITALIANO
PORTUGUÊS
Beschreibung
Löscht alle Fotos und Videoclips auf der Kamera.
Formatiert den Speicher der Kamera und löscht
alle Dateien auf dem Speicher.
Die Kamera unterstützt 3 verschiedene
Auflösungen: (2048x1536) ist ein verstärkter Modus.
Legt die Wechselstromfrequenz fest und
synchronisiert mit dem Leuchtstofflampenlicht.
Die mehrsprachige LCD-Anzeige unterstützt
Englisch, Französisch, Spanisch, Deutsch,
Holländisch, Italienisch und Portugiesisch.
~17~
Page 48

Kameraprogramm (Slim 3000)
Starten des Slim 3000-Kameraprogramms
Wenn Sie die Kamera über das USB-Kabel an den PC anschließen,
startet der Slim 3000 Monitor (sein Symbol erscheint auf der
Windows-Taskleiste) automatisch das entsprechende Kameraprogramm
nach dem Kameramodus.
Albummodus
Stecken Sie das USB-Kabel in
die Kamera ein.
Slim1.3
Das Slim 3000Kameraprogramm erscheint
auf dem Bildschirm und fragt Sie,
ob Sie die Bilder auf der Kamera
herunterladen möchten.
PC-Kameramodus
Halten Sie den Auslöser gedrückt
und stecken das USB-Kabel in die
Kamera ein.
Den Auslöser gedrückt
halten
Das Live View-Programm vom
Slim 3000 erscheint
daraufhin auf dem Bildschirm.
~18~
Page 49

Falls das Programm nicht gestartet wurde:
Klicken Sie auf das "Slim 3000”Symbol auf dem Desktop, um das
Programm, unter dem Sie Ihre
Kamera verwenden können,
zu starten.
Klicken Sie auf das Startmenü und
gehen zu "Programme". Gehen Sie
zu dem Ordner "Slim 3000"
und wählen das Programm.
Modusauswahl
Albumfunktion
(DSC-Modus)
Live View
(PC-Kameramodus)
==Drücken Sie den Live-Knopf, um die Kamera auf den PC-
Kameramodus zu stellen.
Drücken Sie den DSC-Knopf, um die Kamera auf den DSC-Modus
(Albummodus) zu stellen.
~19~
Page 50

Albummodus
1
2
3
4
5
6
7
15
12
11
10
13
14
8
1
DSC-Funktion (DSC-Modus)
2
Bilder zu Ihrer Arbeitsfläche übertragen
3
Bilder zum Album übertragen
4
AVI-Datei erstellen
5
E-Mail senden
6
Alles wählen
7
Löschen
8
Album-Manager
~20~
9
9
Album
10
Löschen
11
Alles wählen
12
Bild
13
Arbeitsfläche
14
Minimieren
15
Beenden
Page 51

Click this button to launch the dialogue box= Diese
Schaltfläche anklicken, um das Dialogfenster aufzurufen.
OK anklicken
Herunterladen der Bilder und Videoclips
1. Stellen Sie sicher, dass die Kamera über das USB-Kabel mit dem
PC verbunden ist.
2. Stellen Sie die Slim 3000 auf den Albummodus.
3. Ein Dialogfenster erscheint und fragt Sie, ob Sie die Fotos von
Ihrer Kamera herunterladen möchten.
~21~
Page 52

Next Nächstes Bild
Vorheriges Bild
Diashow
Beenden
Anschauen der Bilder
Klicken Sie doppelt auf ein beliebiges Bild oder Video, um das
Ansichtsfenster aufzurufen.
Anschauen der Videos
Klicken Sie doppelt auf eine beliebige AVI-Datei, um Ihr Video mit
Hilfe Ihres Standard-Videowiedergabeprogramms anzuschauen.
~22~
Page 53

Album-Manager
Heben Sie ein Bild im Arbeitsbereich hervor und klicken Sie auf um
es in das Fotoalbum zu übertragen.
Klicken Sie auf den Album-Manager um ein neues Fotoalbum z
erstellen.
Geben Sie den Namen eines neuen Albums ein.
Klicken Sie auf um einen Speicherpfad für das Album anzugeben.
Klicken Sie auf "Aktualisieren" um die Erstellung des neuen Albums zu
4
55
bestätigen.
Klicken Sie auf um das neu erstellte Album aufzurufen.created album.
6
~23~
Page 54

Erstellen der AVI-Dateien
Wählen Sie jpg- oder bmp-Bilddateien aus der Arbeitsfläche.
Klicken Sie auf , um diese Bilder zum AVI File Manager zu
laden.
Ordnen Sie die Reihenfolge der Bilder und stellen die
Bildrahmenrate ein.
~24~
Page 55

PC-Kameramodus
Live-Video aufnehmen
Schritte
1. Klicken Sie auf .
2. Stellen Sie die Aufnahmerate und
Zeit ein.
3. Klicken Sie auf "Start to Record".
Live-Foto aufnehmen
Bildgröße einstellen
Vorschaufenster
Erweiterte Einstellungen
(Standardeinstellungen sind empfohlen)
Videoquelle wählen (wenn Sie mehr als
ein Bildimportgerät installiert haben)
~25~
Page 56

1
2
Bildgröße einstellen
1
Farbtiefe
Wählen Sie eine der nachstehenden Optionen entsprechend Ihrem
Anwendungszweck aus.
- RGB 24: bessere Bildqualität
- I420: Schnellere Geschwindigkeit
Ausgabegröße
2
Durch Einstellen der Ausgabegröße können Sie die Größe des
Vorschaufensters ändern. Die Standardgröße ist 320x240. Wählen
Sie eine höhere Pixelzahl, wenn Sie ein größeres Vorschaufenster
brauchen.
320 x 240
640 x 480
~26~
Page 57

Erweiterte Einstellungen
Videoeinstellung
- Bandfilter:
Ändern Sie bitte den Bandfilter in der Videoeinstellung, wenn Ihr PC-Bildschirm
flimmert. Die Bildwiederholfrequenz (die Häufigkeit, mit der die Anzeige neu
aufgebaut wird) ist am wahrscheinlichsten die Ursache des Flimmerproblems.
Wählen Sie 50Hz oder 60Hz, damit Ihr PC-Bildschirm nicht mehr flimmert.
Custom Video Pro Amp
Sie können die Standardeinstellung verwenden oder die Einstellung (Helligkeit,
Kontrast, Sättigung, Schärfe und Farbton) nach Bedürfnissen ändern.
~27~
Page 58

Fehlerbehebung
Symptom Lösungen
1. Wenn Installationsschritte fehlen:
2. Wenn ein Konflikt mit dem
Kameratreiber eines anderen
Aufzeichnungsgeräts vorliegt:
3. Wenn Sie den Treiber nicht
installieren können:
Entfernen Sie den Kameratreiber und andere
dazugehörige Software, und beachten Sie jeden
einzelnen Installationsschritt, um die Kamera neu zu
installieren.
Wenn eine andere Kamera auf Ihrem Computer
installiert ist, müssen Sie die Kamera und ihrenTreiber
komplett aus Ihrem System entfernen, damit kein
Konflikt mit dem Treiber einer anderen Kamera oder
eines Aufzeichnungsgeräts auftreten kann.
Wenn Sie den Kameratreiber unter Windows 98SE
installieren, werden Sie aufgefordert, die 98SE CD-ROM
einzulegen. Befolgen Sie den Befehl, um die
Installation fertigzustellen.
4. Wenn Sie keine Bilder
herunterladen können:
5. Nehmen Sie Einstellungen an der
Grafikkarte vor, wenn die Bildfarbe
nicht satt genug ist:
6. Wenn Sie Bildfolgen nicht im
Videokonferenz- oder im AVI-Modus
wiedergeben können, müssen \
Sie die Beschleunigung der
Grafikkarte einstellen.
7. Rausch erscheint auf dem PC
Bildschirm, wenn die Kamera für die
Videokonferenz verwendet wird.
8. Die Bilder sind unklar.
9. Die Bilder sind zu dunkel.
10. Die AVI-Dateien können nicht
wiedergegeben werden.
Verbinden Sie erneut die Kamera, und laden Sie
dann die Bilder herunter.
Beachten Sie die folgenden Schritte:
Wechseln Sie zur Systemsteuerung Doppelklicken Sie
auf »Anzeige« Klicken Sie auf »Einstellungen«
Klicken Sie auf »Farben« Wählen Sie »High Color«
oder »True Color«.
Beachten Sie die folgenden Schritte:
Wechseln Sie zur Systemsteuerung Doppelklicken Sie
auf »Anzeige« Klicken Sie auf »Einstellungen«
Klicken Sie auf »Erweitert« Klicken Sie auf
»Leistung« oder auf »Problembehandlung« Setzen
Sie die »Hardwarebeschleunigung« von »Voll« auf
»Keine«.
Ändern Sie den Bandfilter in 50Hz oder 60Hz.
Stellen Sie den Fokus ein.
- Achten Sie auf die Umgebungsbelichtung, wenn Sie
Bilder aufnehmen.
- Ändern Sie mit Hilfe der Bildbearbeitungssoftware wie
z.B. Photoshop oder PhotoImpact die Bildhelligkeit.
Installieren Sie Direct X 8.0 oder den Nachfolger.
~28~
Page 59

Manuel Utilisateur
Français
Page 60

Table des Matières
Débuter
Composants
Mise en marche
Fonctionnement de base
Comment utiliser le bouton Mode
Comment utiliser le bouton Contrôle
Prise de Vue
Prendre des photos fixes
Viseur
Zoom
Retardateur
Enregistrer des Vidéos AVI
Lecture
Visualiser des photos fixes et vidéos AVI
Effacer des photos fixes et vidéos AVI
Visualiser des photos sur l'ordinateur
Installer le pilote et le programme de l'appareil
photo (Slim 3000)
Visualiser les photos enregistrées dans l'appareil
photo sous Windows
Chemin d'accès d'images et Fichiers image
Utiliser le Mode Caméra PC pour capturer des
photos sous Windows
Fonctionnement Avancé
Changer de Réglage
Logiciel de l'appareil photo (Slim 3000)
Mode Album
Mode Caméra PC
Dépannage
2
3
4
5
6
7
8
9
10
11
14
15
16
17
19
24
27
~1~
Page 61

Débuter
Composants
Pour des informations détaillées sur le fonctionnement, veuillez vous
référer au numéro de page indiqué entre parenthèses.
1
2
3
4
5
6
10
15
7
14
8
11
13
12
16
17
9
1
Déclencheur
2
DEL Témoin
3
Mise au point (5)
4
Objectif
5
Interrupteur d'alimentation (5)
6
Viseur
7
Viseur (Bouton d'Ejection)
8
Port USB (13,15)
9
Support pour pied
18
10
Ecran LCD
11
Bouton Etat et rétro-éclairage de
l'écran LCD (6)
12
Bouton Mode (6)
13
Microphone intégré
14
Bouton Contrôle (Zoom avant)
15
Bouton Contrôle (Zoom arrière)
16
Œillet pour la dragonne
17
Couvercle des piles (3)
18
Compartiment des piles (3)
~2~
MODE
(4,6)
Page 62

Mise en marche
Veuillez utiliser deux piles 1.5V AAA.
!
Nous vous recommandons d'utiliser des piles alcalines.
Ouvrez le couvercle des piles
Insérez deux piles AAA
Respectez l'installation des piles illustrée.
Fermez le couvercle des piles
Durée de vie des piles
Prendre des photos fixes
En utilisant l'écran LCD (allumé)
En utilisant le viseur (l'écran
LCD éteint)
*Les données ci-dessus sont données pour une utilisation avec des piles alcalines et à une
température de 25 C, et avec des photos prises toutes les quatre secondes.
!
Remarques:
La durée de vie des piles peut diminuer dans les conditions suivantes:
~ Prise de photos à une température basse.
~ Mise en marche et arrêt de l'appareil photo répétitifs.
Le tableau ci-dessus est donné uniquement à titre indicatif.
o
Durée de vie des piles
(en minutes)
Environ 60-70
Environ 100-120
Nombre de photos
Environ 650
Environ 950
~3~
Page 63

Fonctionnement de Base
Comment Utiliser le bouton MODE
Vous pouvez utiliser le bouton Mode pour prendre des photos et les
visualiser ou vous déplacer dans tous les modes.
Séquence des Modes
Mode Photo Fixe
Mode Aperçu
Mode Vidéo AVI
Mode Retardateur
SETUP
Mode REGLAGE
!
Pressez et maintenez appuyé le bouton Mode pendant deux secondes dans n'importe
quel mode, de cette manière votre appareil photo passera automatiquement en mode
Photo Fixe.
Comment Utiliser le bouton CONTROLE
Mode Photo Fixe ou Mode Retardateur
Vous pouvez utiliser le bouton CONTROLE pour effectuer la mise au
point de l'image. Pressez le bouton supérieur pour obtenir un zoom avant
ou alors pressez le bouton inférieur pour obtenir un zoom arrière.
!
Veuillez vous référer à l'item Mise au point dans la section Prendre des Photos Fixes, pour
obtenir plus de détails.
Mode REGLAGE
Utilisez le bouton CONTROLE
SETUP
SETUP
DELETE ALL
FORMAT
QUALITY
FLICKER
LANGUAGE
OK SHUTTER
FORMAT
NO
YES
OK SHUTTER
Passer en mode
REGLAGE
~4~
OK
Déplacer vers le
haut et le bas
Page 64

Prise de Vue
Prendre des Photos Fixes
Les photos fixes prises sont enregistrées
au format JPEG.
41
x1.0
Mode Photo Fixe
!
L'icône correspond à 1280x1024 pixels. Pour des informations plus détaillées sur le
réglage, veuillez vous référer au Mode REGLAGE.
Avant de prendre des photos fixes, veuillez allumer votre
appareil photo.
Assurez-vous que votre appareil photo est en mode Photo Fixe.
Pressez le déclencheur.
Le son émis par le déclencheur vous indique que l'écran a été fermé et ouvert. Vous
pouvez prendre la photo suivante.
!
Mise au point pour les prises de vue de sujets rapprochés
( 30-100cm)
Avant de prendre en photo des sujets à moins d'1 mètre de vous, veuillez régler la mise au
point sur l'icône , revenez ensuite sur l'icône avant de prendre des photos normales.
Photos restantes
*Ce numéro-ci est
uniquement pour
référence
Résolution
!
Arrêt Automatique
Si votre appareil photo reste inactif pendant 30 secondes lorsque vous prenez des photos
ou que vous visualisez des images, il s'éteindra pour économiser son énergie.
Veuillez rallumer l'appareil photo pour le réutiliser.
L'arrêt automatique fonctionne uniquement si vous utilisez des piles. Si vous branchez un
connecteur sur le port USB, l'arrêt automatiquement ne fonctionnera pas.
100cm~distance infinie
~5~
30cm~100cm
Page 65

Viseur
Pour économiser la puissance des piles, vous pouvez éteindre le rétroéclairage de l'écran LCD et prendre des photos à l'aide du viseur.
Description des
manipulations
Activer l'affichage d'état /
allumer le rétro-éclairage
Désactiver l'affichage d'état /
allumer le rétro-éclairage
Eteindre le rétro-éclairage de
l'écran LCD
Suivez le symbole de flèche
pour ouvrir le viseur.
!
Le viseur est conçu d'une manière spéciale. Pour regarder dans le viseur, vous devez garder
vos yeux à une distance de 30 - 45 cm du viseur.
Zoom
Vous pouvez utiliser la fonction Zoom lorsque vous prenez des photos
fixes ou lorsque vous utilisez le retardateur .
01
Zoom
x1.0
01
Vous pouvez régler le bouton
CONTROLE pour obtenir un zoom
x1.0
Still picture /
self-timer mode
adapté. Pressez le bouton vers le
haut pour obtenir un zoom avant et
pressez-le vers le bas pour obtenir
un zoom arrière.
!
Vous pouvez régler le zoom numérique sur 5 sections limitées de 1.0X - 4.0X.
~6~
Page 66

Retardateur
Lorsque vous utilisez le retardateur, votre sujet sera pris en photo 10
secondes après avoir pressé le déclencheur.
Allumez l'appareil photo.
Pressez le bouton MODE et passez en mode Retardateur.
Pressez le déclencheur.
La DEL témoin clignote pendant 10 secondes. Une photo sera prise aussitôt que la DEL
sera éteinte.
Veuillez bien noter que vous ne pourrez pas annuler le retardateur une fois le déclencheur
pressé.
41
x1.0
Still picture mode
La DEL témoin clignote pendant 10 secondes.
~7~
Page 67

Enregistrer des vidéos AVI
Des vidéos avec son, sont enregistrées au format AVI.
00:30
Mode vidéo AVI
Indication en
secondes
Veuillez suivre le symbole flèche pour allumer l'appareil photo
avant d'enregistrer des vidéos AVI.
Passez en mode Vidéo AVI.
Pressez le déclencheur pour débuter l'enregistrement :
Les vidéos AVI seront prises une fois que le déclencheur sera pressé et elles seront
enregistrées toutes les 30 secondes. La longueur de la vidéo dépendra de la capacité
mémoire de l'appareil photo.
Pressez de nouveau le déclencheur pour arrêter l'enregistrement :
Presser de nouveau le déclencheur arrêtera l'enregistrement.
!
La résolution des vidéos AVI est de 320 x 240.
~8~
Page 68

Lecture
Visualiser des photos fixes et vidéos AVI
01
N° de Fichier
Etat des piles
Nombre de
photos prises
Counter
JPG-0001
Photo fixe
AVI-0002
00:00
Vidéo AVI
!
Passez du mode aperçu au mode Vidéos AVI, votre appareil photo débutera la lecture (10
secondes) si aucun bouton n'est pressé pendant une seconde.
Passez en mode Aperçu.
La dernière photo fixe ou vidéo AVI prise apparaîtra à l'écran.
Pressez le bouton Haut(Bas) pour obtenir un aperçu de la photo fixe
ou de la vidéo en avançant (ou en reculant).
!
Vous pouvez éteindre l'affichage de l'état pour augmenter la taille de la zone de vision sur
l'écran LCD.
Description des manipulations:
Activer l'affichage d'état / allumer le rétro-éclairage
Désactiver l'affichage d'état / allumer le rétro-éclairage
Eteindre le rétro-éclairage de l'écran LCD
~9~
Page 69

Effacer des photos fixes et vidéos AVI
JPG-0001
ERASE?
NO
YES
Boîte de dialogue pour a
confirmation de suppression
Passez en mode Aperçu.
La dernière photo fixe ou vidéo AVI prise apparaîtra à l'écran. Pressez le bouton Haut(Bas)
pour obtenir un aperçu de la photo fixe ou de l'image animée en avançant (ou en reculant)
Pressez le déclencheur, vous verrez la boîte de dialogue de la
confirmation de suppression à l'écran.
Pressez les boutons Haut ou Bas pour sélectionner OUI ou NON.
Pressez de nouveau le déclencheur pour confirmer et la photo sera
supprimée.
01
~10~
Page 70

Visualiser des photos sur l'ordinateur
Vous pouvez visualiser les photos et vidéos prises par votre appareil photo sur votre ordinateur.
Vous pouvez utiliser le logiciel fourni pour retoucher des images. Vous pouvez également joindre
des photos aux courriers électroniques.
!
Mise en garde : Assurez-vous de bien avoir installé le pilote avant
de connecter votre appareil photo à votre ordinateur. Si vous
connectez d'abord le câble USB, vous ne pourrez pas installer le
pilote.
Installer le pilote et le programme de l'appareil photo (Slim 3000)
Allumez l'ordinateur et connectez-vous à Windows.
Ne connectez pas votre câble USB à l'ablum à cette étape.
Fermez les applications en cours sur votre ordinateur.
Insérez le CD dans le lecteur de CD-ROM.
Le titre illustré apparaîtra à l'écran au
bout de quelques secondes.
Si aucun titre n'apparaît à l'écran
Double-cliquez sur l'icône " Poste de travail ".
Double-cliquez sur l'icône " Slim 3000 (E :)* ")
*TLa lettre du lecteur de CD-ROM peut varier en fonction de la configuration de votre
ordinateur.
Déplacez la souris sur " Slim 3000 " et cliquez dessus.
Cliquez sur " Slim 3000 ".
L'installation du pilote et du programme
pour l'appareil photo débutera. L'écran
d'assistant " InstallShield Wizard "
apparaîtra.
~11~
Page 71

Cliquez sur " Suivant ".
L'installation débutera. Suivez les instructions à
l'écran pour installer pas à pas le pilote DirectX8.0.
Suivez les instructions à l'écran pour quitter le programme
d'installation.
L'installation débutera. Vous verrez l'écran de
fin une fois l'installation terminée.
Le pilote de l'album sera disponible une fois que votre PC aura
redémarré.
Le CD-ROM s'éjecte du lecteur de CD-ROM, retirez-le.
~12~
Page 72

Connectez le câble USB au port USB de l'ordinateur.
Connectez l'autre extrémité du câble USB à l'appareil photo pour
terminer l'installation du " Disque amovible ".
Slim1.3
Maintenez appuyé le déclencheur et connectez de nouveau le câble
USB à l'appareil photo pour terminer l'installation du pilote de
Caméra PC.
Maintenez appuyé le déclencheur.
Connectez le câble
USB à l'appareil photo.
~13~
Page 73

REMARQUE :
Veuillez suivre les étapes ci-dessous pour réinstaller le Slim 3000 si
vous avez connecté l'appareil photo à l'ordinateur à l'aide du câble
USB sans avoir installé préalablement le Slim 3000.
1. Veuillez cliquer sur Démarrer -> Paramètres -> Panneau de configuration ->
Système.
2. Sélectionnez l'onglet Matériel dans la liste Système -> Gestionnaire de
périphériques.
A : Pour les utilisateurs de Windows XP/2000 :
Veuillez le sélectionner et le supprimez.
B : Pour les utilisateurs de Windows 98SE / ME :
Veuillez le sélectionner et le supprimez.
3. Débranchez le câble USB de l'ordinateur.
4. Insérez le CD du pilote Slim3000 dans votre lecteur de CD-ROM pour installer
le Slim 3000.
5. Une fois l'installation terminée, connectez à nouveau le câble USB à
l'ordinateur et vous pourrez commencer à utiliser l'appareil photo.
~14~
Page 74

Visualiser les photos enregistrées dans l'appareil photo sous Windows
Allumez l'ordinateur et connectez-vous à Windows.
Connectez le câble USB au port USB de l'ordinateur.
Connectez l'autre extrémité du câble USB à l'appareil photo.
Double-cliquez sur l'icône
“ Poste de travail ".
Vous pouvez également utiliser Cam Manager pour
!
visualiser les photos enregistrées sur l'ordinateur.
Double-cliquez sur l'icône
" Disque amovible (G:) "
pour identifier le nouveau
" Disque Amovible ".
Double-cliquez sur le dossier
“ DCIM ".
Double-cliquez sur le dossier
“ 100MEDIA ".
Double-cliquez sur
l'image ou la vidéo
AVI.
Pour visualiser les images animées de la vidéo AVI, vous devez installer le Lecteur de
Média Windows (recommandé) et le pilote DirectX8.
~15~
Page 75

Copier des photos vers votre ordinateur
Glissez et déposez l'image vers " Mes documents ".
Copier des photos vers
“ Mes Documents ".
Chemin d'accès d'images et Fichiers image
Comporte des fichiers d'images fixes et de vidéos
Les images fixes sont enregistrées au format
DSCWXXXX.jpg.
Les vidéos sont enregistrées au format
DSCWXXXX.jpg.
" XXXX " est le système de numérotage
!
automatique et sera remplacé par 0001,
0002, etc. une fois la mémoire formatée.
Utiliser le mode Caméra PC pour capturer des photos sous Windows
Allumez l'ordinateur et connectez-vous à Windows.
Connectez le câble USB au port USB de l'ordinateur. Maintenez
appuyé le déclencheur et connectez l'autre extrémité du câble USB
à l'appareil photo et passez en mode Caméra PC.
Maintenez appuyé le déclencheur.
Connectez le câble
USB à l'appareil photo.
Lancez le logiciel d'appareil photo Slim 3000 ou un autre
logiciel d'image pour visualiser la vidéo en direct.
~16~
Page 76

Fonctionnement avancé
Changer de Réglage
SETUP
DELETE ALL
FORMAT
QUALITY
FLICKER
LANGUAGE
OK SHUTTER
DELETE ALL
NO
YES
OK SHUTTER
Pressez le bouton Mode et passez en mode
Réglage.
Utilisez les boutons haut et bas pour déplacer
le curseur sur l'item désiré.
Pressez le déclencheur pour confirmer votre
choix.
Item
DELETE ALL
FORMAT
QUALITY
FLICKER
LANGUAGE
Réglage
NON
OUI
NON
OUI
2048x1536
1600x1200
1024x768
50HZ
60HZ
ENGLISH
FRANÇAIS
ESPAÑOL
DEUTSCH
NEDERLANDS
ITALIANO
PORTUGUÊS
Description
Efface toutes les vidéos et les photos fixes de
votre appareil photo.
Formate la mémoire de l'appareil photo et efface
toutes les données de la mémoire.
L'appareil photo fonctionne avec 3 types de
résolution : (2048x1536) est le mode renforcé.
Règle la fréquence CA et la synchronise avec
l'éclairage fluorescent.
L'écran LCD multi-langues supporte Anglais,
Français, Espagnol, Allemand, Hollandais, Italien
et Portugais.
~17~
Page 77

Logiciel de l'appareil photo (Slim 3000)
Activer le logiciel de l'appareil photo Slim 3000
Lorsque le câble USB est connecté à l'appareil photo, l'icône Moniteur
Slim 3000 affichée sur la barre de Windows activera
automatiquement le logiciel de l'appareil photo en fonction des types de
modes.
Mode Album
Connectez le câble à l'appareil
photo.
Slim1.3
Le programme de l'appareil photo
Slim 3000 apparaîtra au
centre de l'écran vous demandant
si vous voulez télécharger les
photos stockées dans l'appareil
photo.
Mode Caméra PC
Maintenez appuyé le déclencheur
et connectez le câble USB à
l'appareil photo.
Maintenez appuyé le
déclencheur.
Le programme Live View du
Slim 3000 apparaîtra au
centre de l'écran.
~18~
Page 78

Si le programme n'est pas activé
Cliquez sur l'icône " Slim 3000
" sur le bureau pour
exécuter le programme avec
lequel vous pourrez commencer
à utiliser votre appareil photo.
Cliquez sur le menu " Démarrer " et
allez sur " Programmes ". Ensuite
allez sur le dossier intitulé
" Slim 3000 " et sélectionnezle.
Sélection de Mode
Fonction Album
(Mode DSC)
Visualisation en direct
(Live View)
(Mode Caméra PC)
==Pressez le bouton " Visualisation en direct " pour passer l'appareil
photo en mode Caméra PC.
Pressez le bouton " Fonction Album " pour passer l'appareil photo
en mode DSC.
~19~
Page 79

Mode Album
1
2
3
4
5
6
7
15
12
11
10
13
14
1
Fonction DSC (Mode
2
DSC)Transférer les images vers
la zone de traitement
3
Transférer les images vers
l'album
Créer le fichier AVI
4
Envoyer des courriers
5
Sélectionner tout
6
Supprimer
7
Gestionnaire d'Album
8
~20~
8
10
11
12
13
14
15
9
9
Album
Supprimer
Sélectionner tout
Image
Zone de traitement
Minimiser
Quitter
Page 80

Cliquez sur ce bouton pour lancer la boîte de dialogue.
Cliquez sur OK.
Télécharger les photos et les vidéos
1. Assurez-vous de bien avoir connecté votre appareil photo à votre
PC à l'aide du câble USB..
2. Réglez le Slim 3000 en mode Album..
3. Une boîte de dialogue apparaîtra vous demandant si vous voulez
télécharger les photos depuis votre appareil photo.
~21~
Page 81

Image suivante
Image Précédente
Panorama
Quitter
Visualiser les images
Double-cliquez sur n'importe quelle image ou vidéo pour lancer la
visualisation.
Visualiser les vidéos
Double-cliquez sur n'importe quelle vidéo au format AVI pour lancer
automatiquement la vidéo dans votre lecteur de média par défaut.
~22~
Page 82

Album Manager
Mettez en évidence une image dans la zone de travail et cliquez sur
pour la transférer vers Photo Album.
Cliquez sur l'icône Album Manager pour créer un nouvel Album
Photo.
Entrez un nouveau nom d'album.
Cliquez sur pour sélectionner le chemin d'accès où l'album sera
4
enregistré.
Cliquez sur " Mettre à Jour pour confirmer la création du nouvel album.
Cliquez sur pour accéder au nouvel album créé.
6
55
~23~
Page 83

Créer les fichiers AVI
Sélectionnez les images au format jpg ou bmp dans la zone de
traitement.
Cliquez sur l'icône pour charger les images vers le
Gestionnaire de Fichier AVI.
Organisez la séquence d'images puis réglez le taux d'image.
~24~
Page 84

Mode "Appareil pour PC"
Enregistrer la vidéo en direct
Etapes
1. Pressez l'icône
2. Réglez la vitesse et la durée
d'enregistrement.
3. Pressez "Commencer à Enregistrer".
Capturer les images fixes en direct
Régler la taille d'image
Fenêtre
d'aperçu
Réglages avancés (réglages par défaut recommandés)
Sélectionner la source vidéo ( dans le cas où vous posséderiez plus d'un
périphérique d'import d'image)
~25~
Page 85

1
2
Régler la Taille d'Image
Taille des couleurs
1
Sélectionnez l'une des fonctions suivantes en fonction de vos
différents besoins.
- RGB 24 : meilleure qualité d'image
- I420 : vitesse plus rapide
2
Taille de Sortie
Régler la taille de sortie changera la taille de la fenêtre de
visualisation. La taille par défaut est de 320x240. Choisissez des
pixels plus importants si vous avez besoin d'une fenêtre de
visualisation plus large.
320 x 240
640 x 480
~26~
Page 86

Réglages Avancés
Réglage Vidéo
- Bande du filtre :
Lorsque l'écran de votre ordinateur clignote, veuillez changer la Bande du
filtre dans le réglage vidéo. Le taux de rafraîchissement (le nombre de fois
où l'écran est redessiné par seconde) est la cause la plus probable du
phénomène de clignotement. Sélectionnez 50Hz ou 60Hz jusqu'à ce que votre
ordinateur s'arrête de clignoter.
Personnaliser Video Pro Amp
Vous pouvez utiliser le réglage par défaut ou changer les paramètres ( la
luminosité, le contraste, la saturation, la netteté et la nuance) en fonction de
vos propres choix.
~27~
Page 87

Dépannage
Symptôme
1. En cas de problème avec une
étape d'installation :
2. En cas de conflit avec un autre
périphérique de capture de
caméra :
3. En cas de problème
d'installation du pilote :
En installant le pilote de caméra
4. En cas de problèmes de
Téléchargement d'images :
5. Ajustez la carte VGAquand les
couleurs des images ne sont pas
complètement saturées :
6. Ajustez la fonction
d'accélération de la carte VGA en
cas de problème de lecture
d'images Dans les modes de
vidéoconférence ou AVI.
7. Des parasites se produisent sur
l'écran d'ordinateur lorsque l'appareil
photo est utilisé comme une caméra
pour visioconférence :
8. Les images sont floues :
9. Les images sont trop sombres.
Solutions
Retirez le pilote de caméra et les autres logiciels
et exécutez toutes les étapes d'installation pour
réinstaller la caméra.
Si une autre caméra est installée sur votre
ordinateur, retirez son pilote complètement
devotre système pour éviter un conflit de pilote
avec un autre périphérique de caméra ou de
capture.
sous Windows98SE, vous serez invité à insérer le
CD de 98SE. Veuillez procéder pour
compléterl'installation.
Rebranchez la caméra pour télécharger des
images.
Suivez les étapes d'opération :
Ouvrez le Panneau de configuration Cliquez
deux fois sur « Affichage » Cliquez sur «
Paramètres » Cliquezsur «Couleurs »
Choisissez « 65536 couleurs » ou « Couleurs
vraies ».
Suivez les étapes d'opération :
Ouvrez le Panneau de configuration Cliquez
deux fois sur « Affichage » Cliquez sur «
Paramètres » Cliquezsur «Avancé » Cliquez
sur « Performance » ou « Dépannage »
Configurez « Accélération matérielle » sur «
Complète » ou « Aucune ».
Changez la Bande du Filtre à 50Hz ou 60Hz.
Réglez la mise au point.
Prenez des photos avec un éclairage adapté.
Utilisez des outils d'édition comme Photoshop ou
PhotoImpact pour régler la luminosité de l'image.
10. Impossible de lire les fichiers AVI.
Installez Direct X8.0 ou supérieur.
~28~
Page 88

Manuale utente
Italiano
Page 89

Indice
Per iniziare
Le parti
Alimentazione
Operazioni di base
Come utilizzare il tasto Modalità
Come utilizzare il tasto Controllo
Istantanea
Fotografare
Mirino
Zoom
Autoscatto
Registrazione di filmati AVI
Esecuzione
Esecuzione di fotografie e filmati AVI
Eliminazione di fotografie e filmati AVI
Visualizzare le immagini sul PC
Installazione del driver e del programma macchina
fotografica (Slim 3000)
Visualizzazione con Windows delle fotografie
archiviate
Posizioni delle immagini e file
Impiego della funzione PC camera per acquisire
immagini con Windows
Operazioni avanzate
Modifica della configurazione
Programma macchina fotografica (Slim 3000)
Modalità Album
Modalità PC camera
Risoluzione dei problemi
2
3
4
5
6
7
8
9
10
11
14
15
16
17
19
24
27
~1~
Page 90

Per iniziare
Le parti
Per informazioni dettagliate sul funzionamento, si prega di fare
riferimento al numero di pagina racchiusa tra le parentesi.
1
2
3
4
5
6
10
15
7
14
8
11
13
12
16
17
9
1
Otturatore
2
Indicatore LED
3
Fuoco (5)
4
Obiettivo
5
Interruttore alimentazione
(5)
6
Mirino
7
Mirino (tasto espulsione)
8
Porta USB (13, 15)
9
Connettore treppiede
18
10
Schermo LCD
11
Tasto stato LCD e luce posteriore
(6)
12
MTasto Modalità (6)
13
Microfono incorporato
14
Tasto Controllo
MODE
(ingrandimento)
15
Tasto Controllo (riduzione)
16
Gancio nastro Passante cinghietta
17
Coperchio scomparto batterie (3)
18
Scomparto batterie (3)
~2~
(4,6)
Page 91

Alimentazione
Impiegare due batterie AAA da 1.5V
!
Si raccomanda di utilizzare batterie alcaline
Aprire il coperchio scomparto batterie
Inserire due batterie alcaline AAA.
Inserire le batterie come mostrato.
Chiudere il coperchio scomparto batterie
Durata delle batterie
Fotografare
Con schermo LCD attivo
Con mirino
(schermo LCD disattivo)
*I dati sopra riportati si riferiscono a batterie alcaline utilizzate ad una temperatura di 25°C;
le immagini sono acquisite ogni quattro secondi.
!
Nota:
La durata della batteria diminuisce nelle seguenti condizioni.
~ Acquisizione d'immagini a basse temperature.
~ Accensione e spegnimento ripetuto.
La tavola sopra riportata è solo per riferimento.
Durata delle batterie
(minuti)
Approssimativamente 60-70
Approssimativamente
100-120
Numero di fotografie
Approssimativamente 650
Approssimativamente 950
~3~
Page 92

Operazioni di base
Come utilizzare il tasto Modalità
Il tasto Modalità può essere utilizzato per fotografare e per rivedere le
immagini, oppure per spostarsi tra tutte le modalità.
Sequenza delle modalità
Fotografia
Anteprima
Filmati AVI
Autoscatto
SETUP
Configurazione
!
Premere e mantenere premuto il tasto Modalità per due secondi in qualsiasi modalità. La
macchina fotografica passerà automaticamente alla modalità Fotografia.
Come utilizzare il tasto Controllo
Modalità Fotografia o Autoscatto
Il tasto Controllo può essere utilizzato per mettere a fuoco l'immagine.
Premere la parte superiore per ingrandire e quella inferiore per ridurre.
!
Fare riferimento al paragrafo Fuoco della sezione Fotografare per dettagli.
Modalità Configurazione SETUP
Utilizzare i tasti di controllo
SETUP
DELETE ALL
FORMAT
QUALITY
FLICKER
LANGUAGE
OK SHUTTER
FORMAT
NO
YES
OK SHUTTER
SETUP
Cambia a
modalità Configurazione
OK
Sposta verso
l'alto o il basso.
~4~
Page 93

Istantanea
Fotografare
Le fotografie sono salvate come file JPEG.
41
x1.0
Modalità Fotografia
!
L'icona sta per 1280 x 1024 pixel. Per informazioni dettagliate sull'impostazione,
fare riferimento alla modalità Configurazione.
Accendere la macchina fotografica prima di scattare le fotografie.
Assicurarsi che la macchina fotografica sia in modalità Fotografia.
Premere il tasto otturatore.
Il suono generato dall'otturatore indica che il diaframma è stato chiuso ed aperto. Ora si
può scattare la prossima fotografia.
!
Messa a fuoco per fotografie di soggetti vicini ( 30 - 100cm)
Prima di scattare fotografie di soggetti che si trovano ad una distanza inferiore di 100 cm,
regolare il fuoco su ; riportarlo su prima di scattare fotografie normali.
Immagini restanti
*Il numero è solo come
riferimento
Risoluzione
!
Spegnimento automatico
La macchina fotografica si spegne automaticamente quando è lasciata inattiva per
30 secondi.
Accendere macchina fotografica quando la si vuole riutilizzare.
Lo spegnimento automatico funziona solamente quando si impiega l'energia delle batterie.
Quando si collega il connettore alla presa USB, lo spegnimento automatici non funziona.
100cm~infinito
~5~
30cm~100cm
Page 94

Mirino
Per conservare l'energia delle batterie spegnere la luce dello schermo
LCD ed inquadrare le fotografie tramite il mirino.
Sequenza di operazioni:
Attivare lo stato dello
schermo LCD / accendere
la luce posteriore
Disattivare lo stato dello
schermo LCD / accendere la
luce posteriore
Spegnere la luce posteriore.
Seguire la direzione della
freccia per aprire il mirino
!
Il mirino è progettato in modo speciale. Per guardare nel mirino è necessario tenere gli
occhi ad una distanza di 30 - 45 cm.
Zoom
Lo zoom può essere utilizzato quando si scattano fotografie ed
autoritratti .
01
Zoom
x1.0
01
Per zoomare regolare il tasto Controllo
Premere verso l'alto per ingrandire,
x1.0
Still picture /
self-timer mode
verso il basso per ridurre.
!
Lo zoom può essere regolato in modo digitale in 5 sezioni che vanno da 1.0X a 4.0X.
~6~
Page 95

Autoscatto
Quando si utilizza l'autoscatto, si possono scattare fotografie dei soggetti
10 secondi dopo avere premuto il tasto otturatore.
Accendere l'alimentazione .
Premere il tasto Modalità e spostarsi a modalità Autoscatto.
Premere il tasto otturatore.
Il LED lampeggia per circa 10 secondi. La fotografia è scattata quando il LED si spegne.
Ricordarsi che l'autoscatto non può essere annullato dopo che è stato premuto il tasto
otturatore.
41
x1.0
Modalità Fotografia
Il LED lampeggia per circa 10 secondi.
~7~
Page 96

Registrazione di filmati AVI
I filmati con audio sono salvati in formato AVI.
00:30
Modalità filmato AVI
Seguire l'indicazione della freccia per attivare l'alimentazione
prima di registrare un filmato AVI.
Portarsi alla modalità filmato AVI.
Premere il tasto otturatore per avviare la registrazione:
I filmati AVI saranno ripresi quando è premuto il tasto otturatore e saranno salvati ogni
30 secondi. La lunghezza del filmato dipende dalla capacità di memoria della
videocamera.
Premere di nuovo il tasto otturatore per terminare la registrazione:
Premere di nuovo il tasto otturatore per terminare la registrazione.
!
La risoluzione dei filmati AVI è di 320 X 240.
~8~
Visualizzazione
secondi (conto
alla rovescia)
Page 97

Esecuzione
Esecuzione di fotografie e filmati AVI
01
Numero file
Stato batterie
Numero
d'immagini
scattate
Counter
JPG-0001
Fotografie
AVI-0002
00:00
Filmati AVI
!
Passando da Anteprima a Filmato AVI, la macchina fotografica inizia a riprodurlo (10 secondi)
se non si preme alcun altro tasto entro 1 secondo.
Portarsi alla modalità Anteprima.
L'ultima immagine o filmato AVI appare sullo schermo.
Premere il tasto Su (Giù) per vedere in anteprima l'immagine o il
filmato in sequenza di ripresa (o in sequenza inversa).
!
Si può spegnere lo stato dello schermo LCD per aumentare le dimensioni dell'area visibile
sullo schermo LCD.
Sequenza di operazioni:
Attivare lo stato dello schermo LCD / accendere la luce posteriore
Disattivare lo stato dello schermo LCD / accendere la luce
posteriore
Spegnere la luce posteriore.
~9~
Page 98

Eliminazione di fotografie e filmati AVI
JPG-0001
ERASE?
NO
YES
Finestra di dialogo per
la conferma dell'eliminazione
Portarsi alla modalità Anteprima
L'ultima immagine o filmato AVI appare sullo schermo.
Premere il tasto Su (Giù) per vedere in anteprima l'immagine o il filmato in sequenza
di ripresa (o in sequenza inversa).
Premere il tasto otturatore, sullo schermo si vedrà la finestra di
dialogo per la conferma dell'eliminazione.
Premere il tasto Giù (Su) e portare il cursore su SÌ o NO.
Premere di nuovo il tasto otturatore per confermare e l'immagine sarà
eliminata.
01
~10~
Page 99

Visualizzare le immagini sul PC
Le immagini ed i filmati ripresi con la macchina fotografica possono essere visti sul PC. Il software
fornito può essere utilizzato per l'elaborazione. Inoltre le immagini possono essere allegate a
messaggi di posta elettronica.
!
Cautela: assicurarsi di avere installato il driver prima di collegare la
macchina fotografica al PC. Se il cavo USB è collegato prima
dell'installazione, non si sarà in grado di installare il driver.
Installazione del driver e dei programmi per Slim 3000
Accendere il PC ed avviare Windows.
Non collegare il cavo USB a questo punto dell'installazione.
Chiudere tutte le applicazioni in esecuzione sul PC.
Inserire il CD nell'unità CD-ROM.
Il titolo appare sullo schermo entro
pochi secondi.
Se il titolo non appare sullo schermo
Fare doppio clic sull'icona "Risorse del computer".
Fare doppio clic sull'icona CD-ROM ("Slim 3000 (E:) *")
*La lettera dell'unità CD-ROM varia secondo la configurazione del PC.
Selezionare "Slim 3000" e fare clic col tasto destro del mouse.
Immagine dell'esecuzione
automatica
Iniziare ad installare il driver ed i
programmi della macchina fotografica.
Appare l'immagine dell'"Installazione
guidata".
~11~
Page 100

Selezionare "AVANTI".
L'installazione ha inizio. Seguire le istruzioni su
schermi per installare, seguendo tutti i passaggi,
DirectX8.0.
Seguire le istruzioni su schermo per uscire dal programma
d'installazione.
L'installazione ha inizio. Al completamento
dell'installazione apparirà la schermata relativa.
Il driver è disponibile all'uso dopo avere riavviato il PC.
Il CD è espulso dal PC. Estrarre il CD.
~12~
 Loading...