

Page 1

User’s Manual
Welcome
Thank you very much for purchasing this product. Before you start, you are
recommended to read this manual step by step to obtain the best results with your
new Pico projector. We wish you enjoy it.
About the product
This is the latest generation of Pico projector with DLP technology inside. Known for
great cinema projectors, the DLP technology provides rich colours and enhances the
contrast of the image. The Pico projector offers versatile connection options including
HDMI, MHL and VGA port and projecting the images up to 120’’ (300 cm) in size. This
Pico projector is the best solution for mobile use in business and entertainment.
Safety Notice
1. Keep the device and packaging materials out of the reach of infants and children.
2. Avoid subjecting the power adapter and other contacts to dripping or splashing
water and dry your hands before you use it. Do not place objects filled with liquids
such as vases, etc. on or near the device.
3. Make sure that the used power outlet is always readily available and never hidden.
In case of emergency, use the power adapter to separate the device from the power
network.
4. Keep your device away from all flames such as candles and do not set them up in
the vicinity of the device.
5. Keep the unit at least 10 cm away from other objects. Make sure the ventilation is
not covered by newspapers, tablecloths, curtains, etc.
6. For your own safety, do not use the projector during thunderstorms or lightning.
7. Relative Humidity is 20% ~ 80%, non-condensing.
8. The battery is integrated with the device. Do not dissemble and modify. The battery
should be replaced by an authorized service center only.
9. Ensure that the ambient room temperature is within 5 ~ 35°C
10. Wait before using if the device has been moved from a cold location into a warm one.
Any condensation that has formed may in certain circumstances destroy the device.
As soon as the device has reached room temperature it can be used without risk.
11. Handle the product with care. Avoid contact with sharp objects. Keep device away
from metallic objects.
12. Place the projector on a flat surface. Any collision or falling to the ground is likely to
damage the product.
13. Do not drop or disassemble the product otherwise the warranty voids. Opening or
removing covers may expose you to dangerous voltage or other hazards. Refer all
servicing to an authorized service center.
14. Use only the accessories supplied by the manufacturer.
EN
Page 1
Page 2
User’s Manual
15. Both product and user’s manual are subject to further improvement or supplement
without further notice.
EN
Care and Safety Information for Pico Projectors
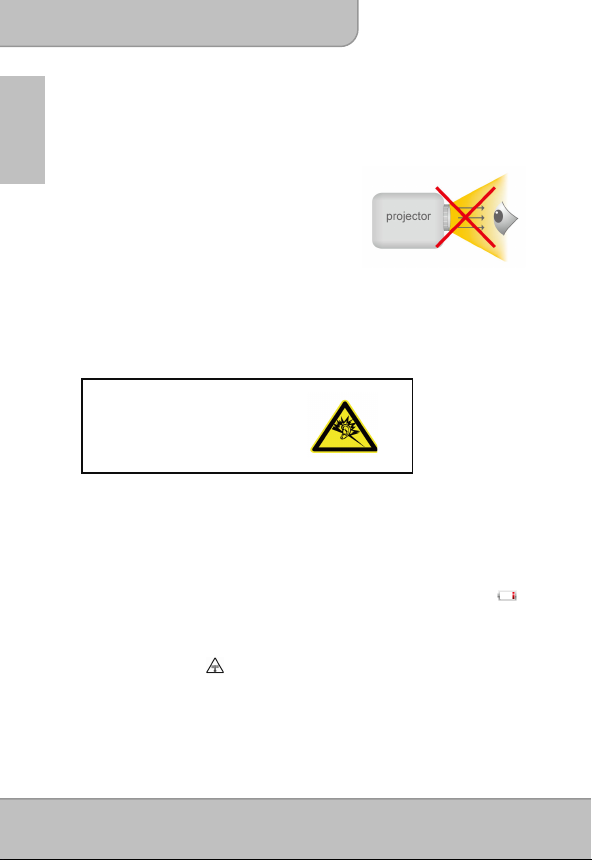
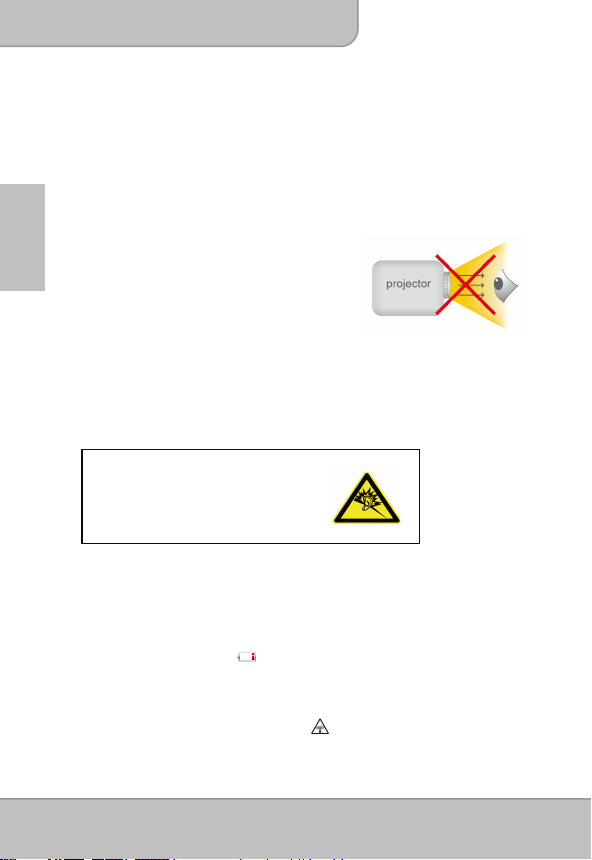
1. Avoid facing directly into the projector’s lens.
2. During the operation, this product may heat
lightly, which is normal.
3. The device should not be used in a very dusty
environment. Dust particles and other foreign
objects may damage the unit.
4. Do not expose the device to extreme vibrations. It
may damage the internal components.
5. Use the enclosed power adapter (see technical data):
Check whether the mains voltage of the power supply matches the mains voltage
available at the setup location. This equipment complies with the voltage type
specified on the unit.
Avoid Hearing Damage:
Listening at high volume for a long
period of time could cause damage
to your ears.
Notice for Long-time Projection
The built-in battery supports approximately 150 mins of projection. For long time
projection, you are recommended to use AC adapter.
When the battery is too weak to stay in operation, the low battery capacity icon ( )
will flash. You need to charge the product while the icon showed.
It’s normal that the projector will feel warm with continuous use due to its high
performance. If the projector runs for a long time and over-heated, the
High-Temperature icon ( ) will appear on the screen. The system will automatically
enter the standby mode.
Page 2
Page 3
User’s Manual
FCC Compliance Statement:
This device complies with Part 15 of the FCC Rules. Operation is
subjected to the following two conditions: (1) this device may not
cause harmful interference, and (2) this device must accept any
interference received, including interference that may cause
undesired operation.
This equipment has been tested and found to comply with limits for a Class B digital
device, pursuant to Part 15 of the FCC rules. These limits are designed to provide
reasonable protection against harmful interference in residential installations. This
equipment generates, uses, and can radiate radio frequency energy, and if not installed
and used in accordance with the instructions, may cause harmful interference to radio
communications.
However, there is no guarantee that interference will not occur in a particular installation.
If this equipment does cause interference to radio or television equipment reception,
which can be determined by turning the equipment off and on, the user is encouraged to
try to correct the interference by one or more of the following measures:
- Reorient or relocate the receiving antenna.
- Move the equipment away from the receiver.
- Plug the equipment into an outlet on a circuit different from that to which the receiver
is connected.
- Consult the dealer or an experienced radio/television technician for additional
suggestions.
You are cautioned that any change or modifications to the equipment not expressly
approved by the party responsible for compliance could void your authority to operate
such equipment.
If the time arises to throw away your
product, please recycle all the
components possible. Batteries and
rechargeable batteries are not to be
disposed in your domestic waste!
Please recycle them at your local
recycling point.
Together we can help to protect the
environment.
EN
Page 3
Page 4

User’s Manual
Table of Content
EN
About the Product, Safety Notice
Package Content
Knowing Your Device
Getting Started
Projecting from External Video Input Source
HDMI, VGA
Smartphone & Tablets
Charging the external mobile devices
Trouble Shooting
Specifications
Package Content
Please check if the following items are located in your packaging:
Pico Projector
Power Adapter
Exchangeable Power Plug
Remote Control
HDMI Cable (A to A type)
MHL Cable (HDMI A to USB D type)
Carry Bag
User’s Manual
1
4
5
7
8
9
12
12
13
14
Page 4
Page 5
User’s Manual
g)
r
(
)
/
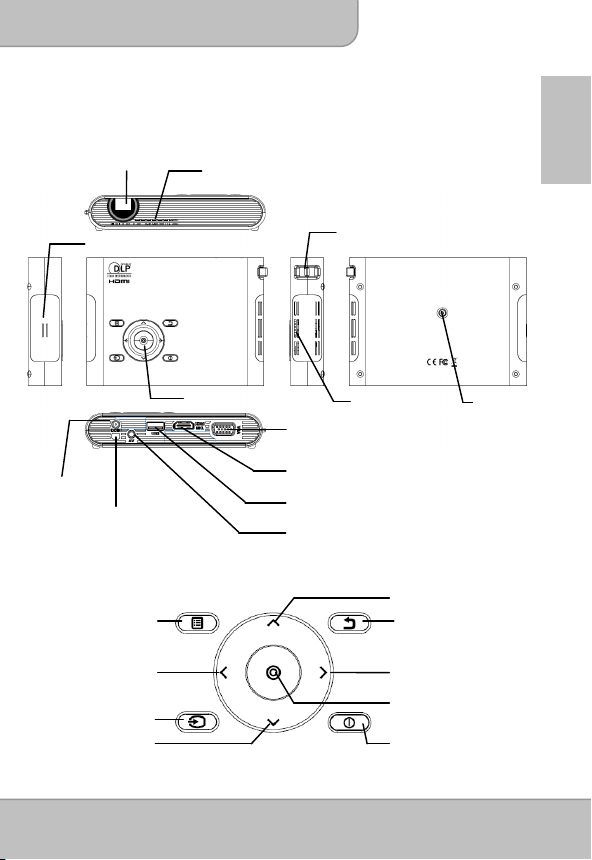
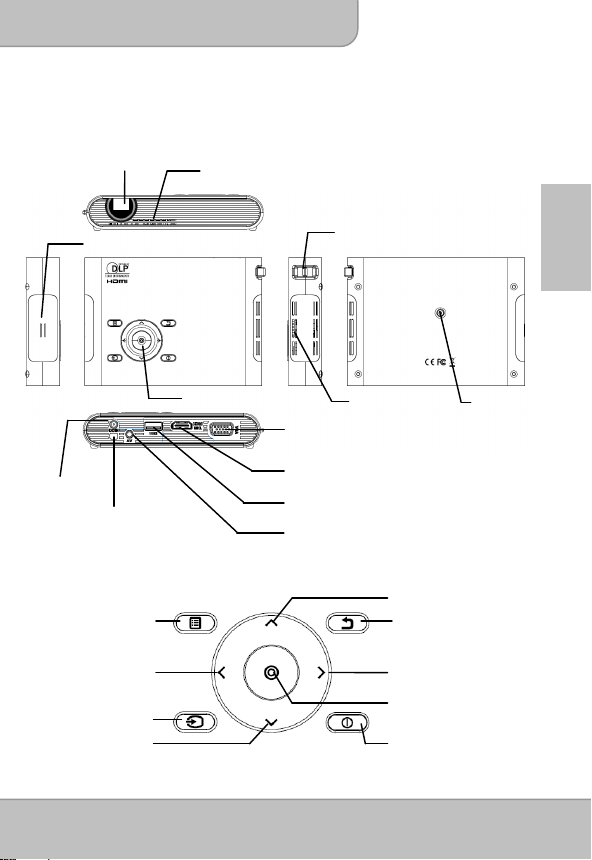
Knowing your Device
Projector
Projection Lens
Speaker
DC IN
Infrared Receiver
Control Panel
Menu
External video input
Left
Aspect ratio
Source
Down
Ventilation
Keypad
Focus Lever
Ventilation
VGA Port
Tripod Socket
HDMI / MHL Connector
USB Connector (for Mobile Chargin
Speaker Connector
Up
Exit
Right /
Scene mode
OK
Powe
EN
Page 5
Page 6
K
User’s Manual
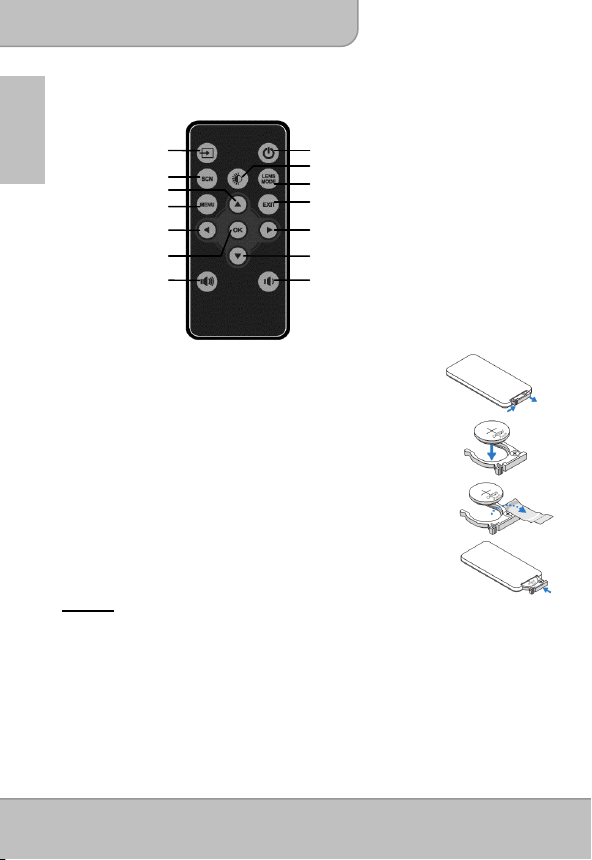
Remote Control
EN
Installing the Remote Control Battery
1. Remove the battery holder by holding down the side
2. Insert a CR2025 coin cell battery and align the polarity correctly
3. Insert the battery holder.
Warning:
Improper use of the battery may cause overheating, explosion or ignition, which can
result in an injury or a fire. Battery leakage may damage the remote controller.
Do not expose the remote controller unit to direct sunlight.
Do not expose the battery to fire or water.
Immediately replace the exhausted battery.
Take out battery when the remote is not in use for a long time.
Source
Scene mode
Up
Menu
Left/ Aspect ratio
O
Volume Up
releasefirmly and pulling out the battery holder.
according to the marking in the battery holder.
Note: When you use the remote control for the first time, there is
a plastic sheet between the battery and its contact.
Remove the sheet before use.
Power
Brightness
Lens mode
Exit
Right/ Scene mode
Down
Volume Down
Page 6
Page 7
User’s Manual
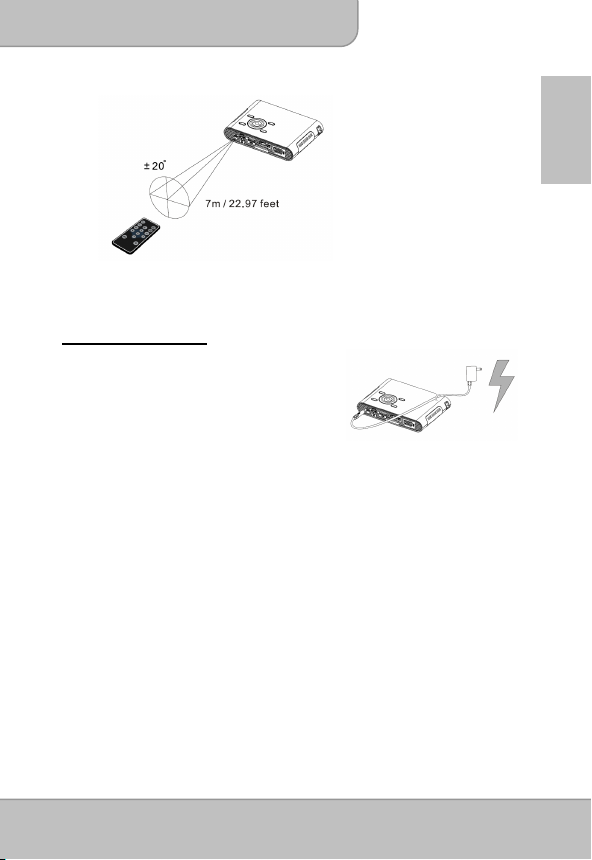
Operating Range with Remote Control
Note: Actual operating range may slightly differ from the diagram. Additionally, a weak
battery reduces or eliminates the operating range of the remote control.
Getting Started
Charging the product
The projector is built in a Li-Polymer battery for
mobile use. Please charge the projector for 8
hours prior to its first use. Repeat charging will
take around 4 hours. The battery will be charged
only when the projector is not in use (Power off). Connect one end of the supplied AC
adapter to DC IN jack and the other end to a power outlet to start charging.
Exchange the plug (EU, US and etc.) of AC adapter that accommodates the type of
power outlet in your country if it’s different.
Charging LED Indicator
During charging, the LED on Power button turns Orange. It turns to Green when the
battery is fully charged.
Turn On / Off the Projector
Push the Power button for 2 seconds to turn on the projector.
To turn off the projector, push the Power button downward for 2 seconds.
Standby mode: Push the Power button for 1 second to turn on/ off the projector lamp
for a short break to save the battery and system reboot time. (The LED
on buttons are still on when the projector is in standby mode.)
EN
Page 7
Page 8
User’s Manual
Adjusting the Focus according to distance
Place the projector on a flat surface and
toward a wall or a projection screen. The
EN
projectional distance and projectional size are:
Distance : 50 cm ~ 425 cm (20 ” ~ 167 ”)
Image size: 36 cm ~ 305 cm (14 ” ~ 120 ”)
Adjust the focus by turning the Focus Lever
upward or downward to get a sharp and clear
picture.
Note: Use a tripod (not included) to increase the height of the projectional image when
necessary. The tripod socket is located under the projector.
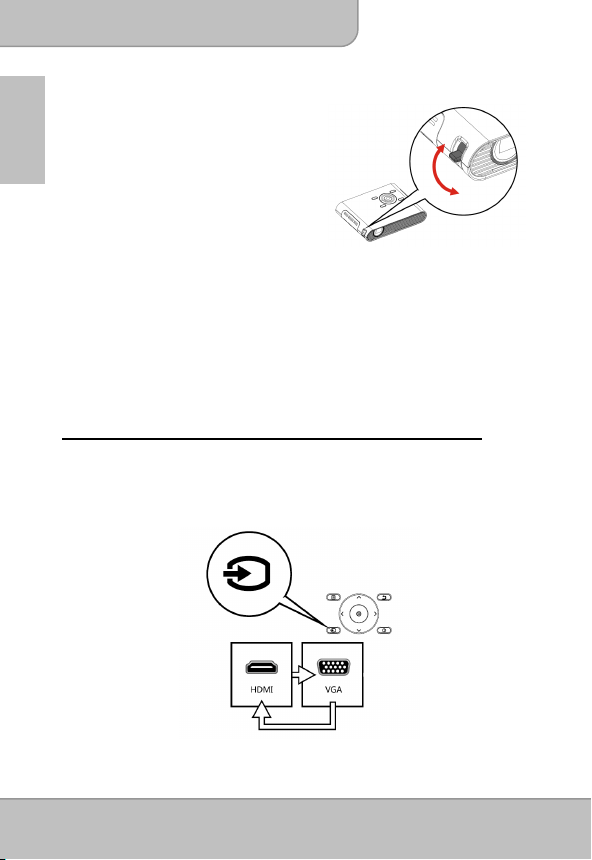
Projecting from External Video Input Source
The projector has built-in multiple interface on the rear side. You can connect your
external video Input source to the projector by using the appropriate cable and press
the Source key on the control panel of the projector to select the input source.
Page 8
Page 9

User’s Manual
HDMI
Use the HDMI cable to connect the HDMI port
on the rear panel of the projector to the external
HDMI signal source. After connected, the
screen switches to HDMI source automatically.
VGA
Use a VGA cable to connect the VGA port on
the rear panel of the projector to the external
VGA signal source. After connected, press the
Source button on the remote control or control
panel to select VGA source.
VGA cable is not included in standard package.
Note:
EN
Page 9
Page 10
User’s Manual
Changing Playback Setting for External Video Source
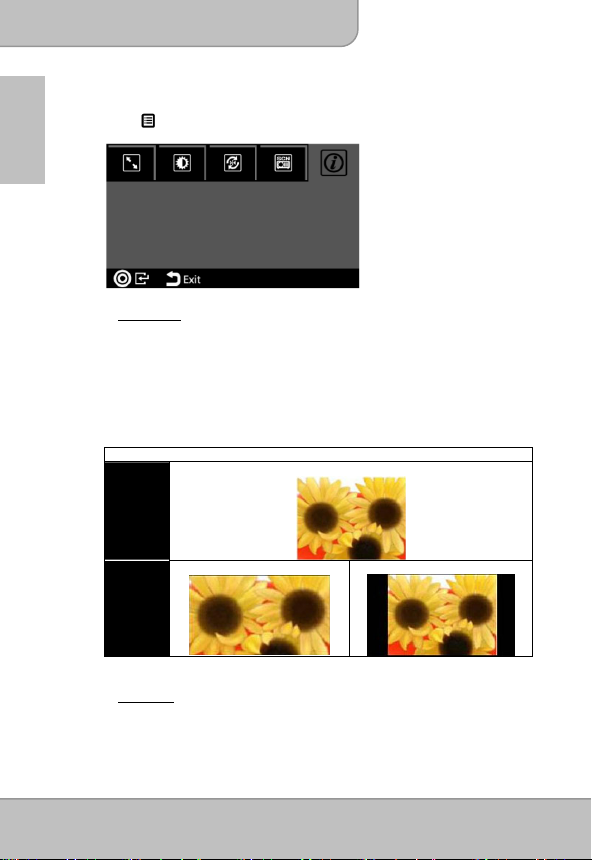
Press /Menu on control panel or remote control to enter the playback setting.
EN
1. Aspect ratio
When the video file is in 4:3 aspect ratio, this function allows you to adjust
how the image should appear on the 16: 9 screen.
Press ◎/OK to display the options.
1) Pan & Scan: the image is scaled up to fit to 16:9 screen.
2) Letterbox: the image is displayed by original aspect ratio.
Illustration for the Aspect ratio setting:
4:3 Aspect Ratio
Source
Screen
Pan & Scan (16:9)
Projection
Screen
2. Brightness
It allows you to change the brightness according to the environment and the
power consumption.
Page 10
Letterbox (16:9)
Page 11
User’s Manual
1) Enhanced: Select this mode when external power supply is available to
2) Normal: The default mode for optimizing the projection performance and
3) Eco: This mode is recommended when the projector is operated under
Note:
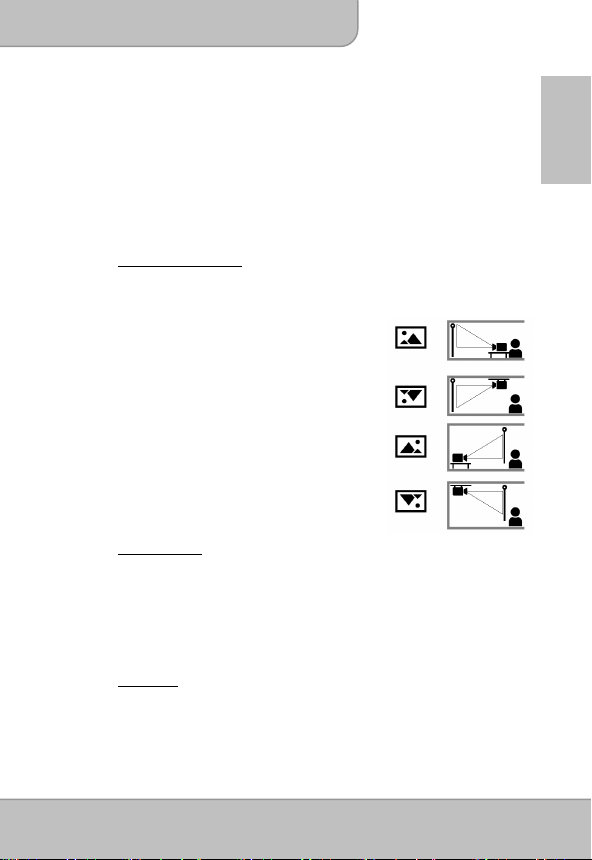
3. Projection (Lens) mode
It allows you to select the projection mode, depending upon how the projector
is mounted.
Front: This is the most common way to
Front Ceiling: The projector turns the image upside
Rear: The projector reverses the image so
Rear Ceiling: The projector reverses and turns the
4. Scene selection
It allows you to select the ideal mode for watching movie, photo slideshow, or
reading the text with balanced brightness, color, and contrast.
.
Cinema: ideal for watching movie
Normal: ideal for photo slideshow
Text: ideal for image with text
5. Information
Shows firmware version: Txxxx
maximize the performance.
battery capacity.
battery mode to save power.
The projector is automatically switched to Enhanced mode when It’s
powered by the power adapter.
position the projector for quick setup
and portability.
down for ceiling-mounted projection.
that it can project from behind a
translucent screen.
image upside down. It can project
from behind a translucent screen in
the ceiling-mounted position.
EN
Page 11
Page 12
User’s Manual
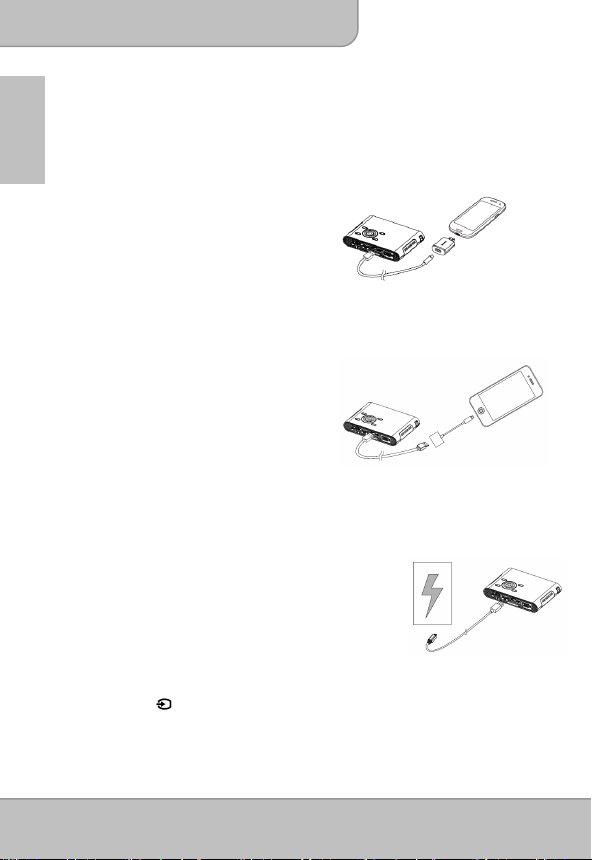
Projecting from Smartphones or Tablets
1. Connect smartphones supported MHL (Mobile High-Definition Link) for
EN
projection.
Connect Samsung Galaxy S2, Note;
new HTC one, one X+, one X, one S; or
Sony Xperia Z with the projector via MHL
(A to USB D type HDMI) cable.
Connect Samsung Galaxy S4, Note II
with the projector via MHL (A to USB D
type HDMI) cable and Samsung 5 to 11
pin MHL converter (as illustration shows)
for projection.
Note: It’s normal that the projector is automatically charging the smartphones
Charging the External Mobile Device
or tablets when connected with the MHL cable for projection.
2. Connect iPhone 5 for Mirror projection
(with Lightning connector)
Connect iPhone 5, iPad 4th, iPad mini and
iPod touch 5th with the projector via Apple
Lightning Digital AV adapter and A-to-A
type HDMI cable.
iPhone 4S, 4, New iPad, iPad 2, and iPod
touch (4th) can connect with projector with Apple 30-pin digital AV adapter and
A-to-A type HDMI cable
The internal battery of the projector cannot only be
used for projection, but also charge your mobile device.
1. Connect your mobile device to the projector via the
USB cable with the end of Type A connector
plugged into the USB port on the rear side of
projector.
2. When the projector is powered on, the device will be
charged automatically.
3. When the projector is powered off, please press the Source
button ( ) to start or stop charging.
Note: The projector provides 5V/500mA output power for charging the mobile
devices.
Page 12
Page 13
User’s Manual
Troubleshooting
If your projector does not seem to be functioning properly, check the items below before
you contact an authorized service center.
Symptom Check Point
The projector does not
work when connecting
to a notebook or PC
with cable.
The projected image is
too dark.
1. Check if the HDMI cable is plugged correctly.
2. Make sure the PC has been switched to
projectordisplay.
1. Use the projector in a darker environment.
2. Increase the brightness by using the AC power adapter.
3. Scale down the projectional image size.
EN
The projected image is
blurred.
The surface
temperature of projector
is high.
Recovering from
abnormality
1. Adjust the focus. Please refer to “Adjusting the Focus”.
2. Check if the lens is dirty.
Because of the high-luminance LED, it is normal that this
projector generates heat in long-time use. It will not affect
the performance of the projector. Always keep the
ventilation slots free of dirt or obstructions and operate the
projector in a properly ventilated environment.
This can be useful when the projector is freezing,
crashing or locking up during the operation. Press the
Power button for 8 seconds to reboot your projector.
Page 13
Page 14
User’s Manual
Specifications
EN
Throw Ratio
(Diagonal: Distance)
Item Description
Optical Technology
Light Source
Aspect ratio 16:9
Resolution 854 x 480 Pixels (WVGA)
Contrast Ratio 1000:1
Projection Image Size 36 cm ~ 305 cm (14” ~ 120”)
Projection Distance 50 cm ~ 425 cm (20” ~ 167”)
Brightness Up to 100 Lumens
Focus Manual
Offset 100%
Connections
Internal Speaker Mono
Power Supply Input: 100 ~ 240V AC
Battery Type Embedded 7.4V/2000 mAh Li-polymer battery
Battery Life Enhanced mode : 90 min
Power Consumption AC mode: 10.5 W
Dimensions ( L x W x H ) 132 x 95 x 25 mm
Weight 270 g
Humidity 20 – 80%, 80% (Max.), non-condensing.
Operating Temperature
DLP
RGB LED
1.6 (Projection Distance/Width of Image)
HDMI / MHL: Comply with HDMI v1.3 and MHL v2.0
VGA: Mini D-sub 15-pin
AV port: Audio out: 3,5mm mini jack
USB port: Charging the mobile devices
Output: 12V, 2A DC
Normal mode: 120 min
Eco mode: 150 min
Battery mode: 6.5 W ~ 10.5 W
5°C – 35°C.
Page 14
Page 15

Benutzerhandbuch
Willkommen
Vielen Dank für den Kauf dieses Produktes. Bevor Sie beginnen, empfehlen wir
Ihnen das schrittweise Lesen dieses Handbuchs, um die besten Ergebnisse mit
Ihrem neuen Pico Projektor zu erzielen. Wir wünschen Ihnen damit viel Freude.
Über das Produkt
Dies ist die neueste Generation der Pico Projektoren mit integrierter DLP
Technologie. Die DLP Technologie, die bei großen Kinoprojektoren eingesetzt wird,
bietet kräftigere Farben und einen hohen Kontrast. Der Pico Projektor bietet
vielfältige Anschlussoptionen wie HDMI, MHL und VGA-Port und projiziert Bilder bis
zu einer Größe von 120” (300 cm). Dieser Pico Projektor ist die ideale Lösung für
die geschäftliche und private mobile Nutzung.
Sicherheitshinweise
1. Das Gerät und das Verpackungsmaterial außerhalb der Reichweite von Kindern
halten.
2. Das Netzteil nicht in Kontakt mit tropfendem oder fließendem Wasser kommen
lassen und Hände vor der Benutzung abtrocknen. Keine mit Flüssigkeiten gefüllten
Gegenstände, wie z.B. Vasen usw. auf oder in die Nähe des Gerätes stellen.
3. Stellen Sie sicher, dass die verwendete Steckdose immer verfügbar und niemals
blockiert ist. Verwenden Sie im Notfall das Netzteil, um das Gerät vom Stromnetz zu
trennen.
4. Das Gerät von Flammen, wie z.B. Kerzen fernhalten und diese nicht in der Nähe
des Gerätes aufstellen.
5. Das Gerät mindestens 10 cm von anderen Gegenständen entfernt halten. Stellen
Sie sicher, dass die Lüftungsschlitze nicht durch Zeitungen, Tischdecken, Vorhänge
usw. blockiert werden.
6. Den Projektor zu Ihrer eigenen Sicherheit nicht während eines Gewitters oder
Blitzschlages verwenden.
7. Relative Luftfeuchtigkeit liegt bei 20% ~ 80%, nicht-kondensierend.
8. Der Akku ist im Gerät integriert. Nicht auseinander nehmen oder ändern. Der Akku
sollte nur von einer Fachkraft ausgetauscht werden.
9. Stellen Sie sicher, dass die Raumtemperatur zwischen 5 ~ 35°C liegt.
10. Warten Sie mit der Verwendung des Geräts etwas, wenn es von einem kalten an
einen warmen Ort gebracht wurde. Kondenswasser kann das Gerät unter
bestimmten Umständen zerstören. Sobald das Gerät Raumtemperatur erreicht hat,
kann es ohne Risiko verwendet werden.
11. Produkt mit Vorsicht handhaben. Kontakt mit scharfen Gegenständen vermeiden.
Von Gegenständen aus Metall fernhalten.
12. Den Projektor auf eine flache Unterlage stellen. Stöße oder ein Herunterfallen auf
den Boden führt wahrscheinlich zu Schäden des Produktes.
DE
Seite 1
Page 16
Benutzerhandbuch
13. Das Produkt nicht fallen lassen oder auseinander nehmen, da sonst die
Gewährleistung erlischt. Das Öffnen oder Entfernen von Abdeckungen kann Sie
gefährlichen Spannungen und anderen Risiken aussetzen. Alle Wartungsarbeiten
von Fachpersonal durchführen lassen.
14. Verwenden Sie ausschließlich vom Hersteller angebotenes Zubehör.
15. Sowohl das Produkt als auch das Benutzerhandbuch unterliegen fortlaufenden
Verbesserungen oder Ergänzungen ohne vorherige Mitteilung.
Pflege- und Sicherheitshinweise für Pico Projektoren
1. Nicht direkt in das Objektiv des Projektors sehen.
DE
2. Dieses Produkt kann während des Betriebes etwas
warm werden, was normal ist.
3. Das Gerät nicht in einer sehr staubigen
Umgebung verwenden. Staubpartikel und
andere Fremdgegenstände können das Gerät
beschädigen.
4. Das Gerät keinen starken Vibrationen aussetzen.
Dies könnte die internen Bauteile beschädigen.
5. Verwenden Sie das beiliegende Netzteil (siehe Technische Daten):
Prüfen Sie, ob die Spannung der Stromversorgung der verfügbaren Spannung am
Einsatzort entspricht. Dieses Gerät entspricht dem angegebenen Spannungstyp.
Vermeiden von Hörschäden:
Das Anhören mit einer hohen Lautstärke
über einen längeren Zeitraum kann Ihre
Ohren schädigen.
Hinweis für längere Projektion
Der interne Akku unterstützt ungefähr 150 Min. Projektion. Wenn Sie länger
projizieren möchten, wird die Nutzung des Netzteils empfohlen.
Wenn der Akku zu schwach ist, um weiter betrieben werden zu können, wird die
Anzeige für schwachen Akku ( ) anfangen zu blinken. Sie müssen das Produkt
aufladen, wenn das Symbol angezeigt wird.
Es ist normal, dass der Projektor wegen seiner hohen Leistung während des
Betriebes warm wird. Wenn der Projektor längere Zeit läuft und zu heiß wird,
erscheint das Symbol für hohe Temperatur ( ) auf dem Display. Das System wird
automatisch den Standbymodus aufrufen.
Seite 2
Page 17
Benutzerhandbuch
FCC Konformitätserklärung:
Dieses Gerät erfüllt die Anforderungen gemäß Abschnitt 15 der
FCC-Bestimmungen. Für den Betrieb sind folgende Bedingungen
zu beachten: (1) das Gerät darf keine schädlichen Interferenzen
erzeugen und muss (2) empfangene Interferenzen aufnehmen,
obwohl diese zu Betriebsstörungen führen können.
Dieses Gerät wurde getestet und entspricht den Grenzwerten digitaler Geräte der
Klasse B (siehe Abschnitt 15 der FCC-Bestimmungen). Diese Grenzwerte bieten einen
ausreichenden Schutz gegen Interferenzen bei häuslichen Installationen. Das Gerät
erzeugt und verwendet hochfrequente Schwingungen und kann sie ausstrahlen. Wenn
es nicht nach den Anweisungen des Herstellers aufgestellt und betrieben wird, können
Störungen im Radio- und Fernsehempfang auftreten.
In Ausnahmefällen können bestimmte Installationen aber dennoch Störungen
verursachen. Sollte der Radio- und Fernsehempfang beeinträchtigt sein, was durch Einund Ausschalten des Gerätes festgestellt werden kann, empfiehlt sich die Behebung der
Störung durch eine oder mehrere der folgenden Maßnahmen:
- Richten Sie die Empfangsantenne neu aus.
- Vergrößern Sie den Abstand zwischen Gerät und Empfänger.
- Stecken Sie den Netzstecker des Geräts in eine andere Steckdose, damit das Gerät
und der Empfänger an verschiedene Stromkreise angeschlossen sind.
- Bitten Sie Ihren Händler oder einen erfahrenen Radio- bzw. Fernsehtechniker um
Hilfe.
Sie werden darauf hingewiesen, dass Geräte, an denen nicht von der für die Einhaltung
verantwortlichen Stelle ausdrücklich gebilligte Änderungen vorgenommen wurden, vom
Benutzer möglicherweise nicht betrieben werden dürfen.
Wenn die Zeit gekommen ist, Ihr
Produkt wegzuwerfen, recyceln Sie bitte
so viele Komponenten wie möglich.
Batterien und Akkus dürfen nicht
zusammen mit dem Hausmüll entsorgt
werden! Bitte geben Sie sie an einer
Recyclingstelle in Ihrer Nähe ab.
Zusammen leisten wir einen wertvollen
Beitrag zum Schutz unserer Umwelt.
DE
Seite 3
Page 18
Benutzerhandbuch
Inhalt
Über das Produkt, Sicherheitshinweise
Paketinhalt
Produktübersicht
Erste Schritte
DE
Projektion von einer externen
Videoeingangsquelle
HDMI, VGA
Smartphone & Tablets
Aufladen von externen Mobilgeräten
Fehlerbehebung
Technische Daten
Paketinhalt
Bitte überprüfen Sie, ob sich die folgenden Artikel im Paket befinden:
Pico Projektor
Netzteil
Abnehmbarer Stromstecker
Fernbedienung
HDMI Kabel (A auf A Typ)
MHL Kabel (HDMI A auf USB D Typ)
Tragetasche
Benutzerhandbuch
1
4
5
7
8
9
12
12
13
14
Seite 4
Page 19
Benutzerhandbuch
/
t
Produktübersicht
Projektor
Projektionsobjektiv
Lautsprecher
DC IN
Infrarotempfänger
Systemsteuerung
Menü
Links
Anzeigeforma
Quelle
(Externer Videoeingang)
Unten
Lüftungsschlitze
Tastenfeld
Fokushebel
Lüftungsschlitze
VGA-Anschluss
HDMI/MHL-Anschluss
USB Anschluss (für Aufladung von
Mobilgeräten)
Lautsprecheranschluss
Stativgewinde
Hoch
Beenden
Rechts/
Scene-Modus
OK
Stromversorgung
DE
Seite 5
Page 20

K
Benutzerhandbuch
Fernbedienung
DE
Quelle
Scene-Modus
Hoch
Menü
Links/Anzeigeformat
Lautstärke erhöhen
Stromversorgung
Helligkeit
Objektivmodus
Beenden
O
Rechts/Scene-Modus
Unten
Lautstärke verringern
Einlegen der Batterien in die Fernbedienung
1. Entfernen Sie die Batteriehalterung, indem Sie den seitlichen
Auslöser fest herunterdrücken und die Batteriehalterung
herausziehen.
2. Legen Sie eine CR2025 Knopfzellenbatterie unter Beachtung der
Polarität ein, wie sie in der Batteriehalterung angegeben ist.
Anmerkung: Wenn Sie die Fernbedienung das erste Mal
3. Legen Sie die Batteriehalterung ein.
Warnung:
Eine unsachgemäße Nutzung der Batterie kann zu einer Überhitzung, Explosion oder
Entzündung führen, was Verletzungen oder ein Feuer zur Folge haben könnte. Ein
Auslaufen der Batterie kann die Fernbedienung beschädigen.
Die Fernbedienung nicht dem direkten Sonnenlicht aussetzen.
Die Batterie keinem Feuer oder Wasser aussetzen.
Eine leere Batterie sofort austauschen.
Entnehmen Sie die Batterie, wenn die Fernbedienung über einen längeren Zeitraum
nicht verwendet wird.
verwenden, befindet sich eine Plastikfolie zwischen
der Batterie und ihren Kontakten. Entfernen Sie die
Folie vor der Benutzung.
Seite 6
Page 21

Benutzerhandbuch
Betriebsreichweite mit der Fernbedienung
Ft.
DE
Anmerkung: Die tatsächliche Betriebsreichweite kann vom Diagramm etwas
abweichen. Zudem verringert eine schwache Batterie die
Betriebsreichweite der Fernbedienung.
Erste Schritte
Aufladen des Produktes
Der Projektor verfügt über einen Li-Polymer Akku
für die mobile Nutzung. Bitte laden Sie den
Projektor vor der ersten Nutzung 8 Stunden lang
auf. Die weiteren Aufladevorgänge dauern etwa 4
Stunden. Der Akku wird nur geladen, wenn der
Projektor nicht verwendet wird (Gerät aus). Verbinden Sie ein Ende des beiliegenden
Netzteils mit der DC IN Buchse und das andere Ende mit einer Steckdose, um mit
dem Aufladen zu beginnen.
Tauschen Sie den Stecker (EU, USA, usw.) des Netzteils aus, damit er der
Steckdose Ihres Landes entspricht, falls er unterschiedlich sein sollte.
LED Ladeanzeige
Während des Ladens leuchtet die LED der Ein/Aus-Taste orange. Sie wird grün
leuchten, wenn der Akku vollständig geladen ist.
Den Projektor ein-/ausschalten
Drücken Sie den Ein/Aus-Schalter 2 Sekunden lang, um den Projektor einzuschalten.
Drücken Sie den Ein/Aus-Schalter 2 Sekunden lang nach unten, um den Projektor
auszuschalten.
Stand-by-Modus: Drücken Sie die Ein/Aus-Taste 1 Sekunde lang, um die
Projektorlampe kurz auszuschalten, um Akkustrom und Zeit beim
Systemstart zu sparen. (Die LED an Tasten werden weiterhin
leuchten, wenn sich der Projektor im Standbymodus befindet.)
Seite 7
Page 22

Benutzerhandbuch
Fokus abhängig vom Abstand anpassen
Stellen Sie den Projektor auf eine flache
Unterlage und gegenüber einer Wand oder
Projektionsleinwand. Der Projektionsabstand
und die Projektionsgrößen sind:
Entfernung: 50 cm ~ 425 cm (20” ~ 167”)
Bildgröße: 36 cm ~ 305 cm (14” ~ 120”)
DE
Stellen Sie den Fokus durch Drehen des
Fokushebels nach oben oder unten ein, um
ein scharfes Bild zu erhalten.
Anmerkung:
Verwenden Sie ein Stativ (nicht enthalten), um ggf. die Höhe des
Projektionsbildes zu steigern. Das Stativgewinde befindet sich an der
Unterseite des Projektors.
Projektion von einer externen Videoeingangsquelle
Der Projektor verfügt ein mehrere Anschlüsse an der Unterseite. Sie können Ihre
externe Videoeingangsquelle über das entsprechende Kabel an den Projektor
anschließen auf die Quelle Taste auf dem Bedienfeld des Projektors drücken, um die
Eingangsquelle auszuwählen.
Seite 8
Page 23

Benutzerhandbuch
HDMI
Verwenden Sie das HDMI Kabel, um den HDMI
Anschluss an der Rückseite des Projektors mit der
externen HDMI Signalquelle zu verbinden. Nach dem
Anschluss wird das Display automatisch zur
HDMI-Quelle wechseln.
VGA
Verwenden Sie das VGA Kabel, um den VGA
Anschluss an der Rückseite des Projektors mit der
externen VGA Signalquelle zu verbinden. Drücken
Sie nach dem Anschluss auf die Quelle Taste auf der
Fernbedienung oder dem Bedienfeld, um die VGA
Quelle auszuwählen.
Anmerkung:
Das VGA Kabel ist nicht im Standardlieferumfang enthalten.
DE
Seite 9
Page 24

Benutzerhandbuch
Wiedergabeeinstellung für externe Videoquelle ändern
Drücken Sie auf /Menü an Bedienfeld auf der Fernbedienung, um die
Wiedergabeeinstellung aufzurufen.
DE
1. Anzeigeformat
Wenn die Videodatei im Seitenverhältnis 4:3 vorliegt, ermöglicht Ihnen diese
Funktion die Anpassung, wie das Bild auf einem 16:9 Bildschirm aussehen
soll.
Drücken Sie auf ◎/OK, um die Optionen anzuzeigen.
1) Schwenken & Scannen: das Bild wird zur Anpassung an einen 16:9
Bildschirm hochskaliert.
2) Letterbox: das Bild wird mit dem ursprünglichen Seitenverhältnis
angezeigt.
Abbildung for die Seitenverhältniseinstellung:
4:3 Anzeigeformat
Quellbildschirm
Pan & Scan (16:9)
Projektionsanzeige
2. Helligkeit
Ermöglicht Ihnen die Änderung der Helligkeit je nach Umgebung und
Stromverbrauch.
Seite 10
Letterbox (16:9)
Page 25

Benutzerhandbuch
1) Erweitert: Wählen Sie diesen Modus, wenn eine externe Stromversorgung
2) Normal: Der Standardmodus für die Optimierung der Projektionsleistung
3) Öko: Dieser Modus wird empfohlen, wenn der Projektor im Akkumodus
Anmerkung:
3. Projektionsmodus (Linse)
Ermöglicht Ihnen die Auswahl des Projektionsmodus in Abhängigkeit davon,
wie der Projektor angebracht ist.
Vorderseite: Dies ist die herkömmliche
Decke vorn: Der Projektor stellt das Bild für
Rückseite: Der Projektor dreht das Bild um,
Rückseite: Der Projektor wird umgedreht
4. Szenenauswahl
Ermöglicht Ihnen die Auswahl des idealen Modus zum Ansehen von Filmen,
Foto-Diashows oder Lesen von Text mit ausgeglichener Helligkeit, Farbe und
Kontrast.
.
Kino: ideal zum Ansehen von Filmen
Normal: ideal für Foto-Diashows
Text: ideal für Bilder mit Text
5. Informationen
Zeigt Firmware Version: Txxxx
verfügbar ist, um die Leistung zu maximieren.
und Akkukapazität.
verwendet wird, um Strom zu sparen.
Der Projektor wird automatisch in Erweiterten Modus
wechseln, wenn er mit dem Netzteil betrieben wird.
Methode, den Projektor für eine
schnelle Einrichtung und
Mobilität aufzustellen.
eine Projektion von der Decke
auf den Kopf.
so dass er hinter einer
durchlässigen Leinwand
projizieren kann.
und stellt das Bild auf den Kopf.
Er kann damit hinter einer durchlässigen Leinwand bei
Montage an einer Decke projizieren.
DE
Seite 11
Page 26

Benutzerhandbuch
Projektion von Smartphones oder Tablets
1. Verbinden Sie Smartphones für die Projektion, die MHL (Mobile High-Definition
Link) unterstützen.
Verbinden SieSamsung Galaxy S2, Note;
das neue HTC one, one X+, one X, one S;
oder Sony Xperia Z über ein MHL (A zu
USB D Typ HDMI) Kabel mit dem
Projektor.
DE
Verbinden Sie Samsung Galaxy S4, Note
II über ein MHL (A zu USB D Typ HDMI)
Kabel und Samsung 5 zu 11 Pin MHL
Konverter (wie Abbildung) für die
Projektion.
Anmerkung: Es ist normal, dass der Projektor die Smartphones oder Tablets
2. Verbinden Sie das iPhone 5 für eine
Spiegelprojektion (mit Lightning Anschluss)
Verbinden Sie das iPhone 5, iPad 4, iPad
mini und iPod touch 5 über einen Lightning
Digital AV Adapter und einem A-zu-A Typ
HDMI Kabel mit dem Projektor.
iPhone 4S, 4, Neues iPad, iPad 2 und iPod
touch (4) können mit dem Apple 30-Pin Digital AV Adapter und einem
A-zu-A Typ HDMI Kabel verbunden werden
Aufladen von externen Mobilgeräten
Der interne Akku des Projektors kann nicht nur für
die Projektion verwendet werden, sondern auch
um Mobilgerät aufzuladen.
1. Verbinden Sie Ihr Mobilgerät über das
USB-Kabel, indem Sie den Typ A Stecker in
den USB-Port an der Rückseite des Projektors
stecken.
2. Nach dem Einschalten des Projektors wird das Gerät
automatisch aufgeladen.
3. Wenn der Projektor ausgeschaltet ist, drücken Sie bitte auf
die Quellen-Taste ( ), um mit der Aufladung zu beginnen
oder sie anzuhalten.
Anmerkung: Der Projektor stellt 5V/500 mA Ausgangsleistung für die Aufladung von
automatisch lädt, wenn Sie mit dem MHL-Kabel für die Projektion
verbunden sind.
Mobilgeräten bereit.
Seite 12
Page 27

Benutzerhandbuch
Fehlerbehebung
Falls Ihr Projektor nicht richtig zu funktionieren scheint, prüfen Sie die folgenden Punkte,
bevor Sie sich mit einem autorisierten Servicezentrum in Verbindung setzen.
Symptom Zu prüfende Punkte
Der Projektor
funktioniert nicht, wenn
er mit einem Kabel an
ein Notebook oder PC
angeschlossen wird.
Das projizierte Bild ist
zu dunkel.
1. Prüfen Sie, dass das HDMI-Kabel richtig
angeschlossen ist.
2. Stellen Sie sicher, dass der PC auf die Projektoranzeige
gestellt wurde.
1. Nutzen Sie den Projektor in einer dunkleren Umgebung.
2. Erhöhen Sie die Helligkeit, indem Sie das Netzteil
benutzen.
3. Scale down the projectional image size.
DE
Das projizierte Bild ist
verschwommen.
Die Temperatur des
Projektors ist zu hoch.
Zurücksetzen von
Unregelmäßigkeiten
1. Stellen Sie den Fokus ein. Lesen Sie bitte „Den Fokus
einstellen”.
2. Prüfen Sie, ob das Objektiv verschmutzt ist.
Aufgrund der integrierten Hochleistungs-LED ist es
normal, dass dieser Projektor während des längeren
Betriebes warm wird. Dies hat keinen Einfluss auf die
Leistung des Projektors. Halten Sie die Lüftungsschlitze
immer frei von Schmutz und Blockierungen und
verwenden Sie den Projektor in einer gut belüfteten
Umgebung.
Dies kann hilfreich sein, wenn der Projektor einfriert,
abstürzt oder während des Betriebs hängt. Drücken Sie 8
Sekunden lang auf die Ein/Aus-Taste, um den Projektor
neu zu starten.
Seite 13
Page 28

Benutzerhandbuch
Technische Daten
Element Beschreibung
Optische Technologie DLP
Lichtquelle
Anzeigeformat 16:9
Auflösung 854 x 480 Pixel (WVGA)
Kontrastverhältnis 1000:1
DE
Projizierte Bildgröße 36 cm ~ 305 cm (14” ~ 120”)
Projektionsabstand 50 cm ~ 425 cm (20” ~ 167”)
Projektionsverhältnis
(Diagonale: Entfernung)
Helligkeit Bis zu 100 Lumen
Fokus Manuell
Versatz 100%
Anschlüsse
Interner Lautsprecher Mono
Stromversorgung Eingang: 100 ~ 240 V AC
Akkutyp Integrierter 7,4 V/2000 mAh Li-Polymer Akku
Akku Betriebszeit Erweiterter Modus: 90 min
Stromverbrauch AC Modus: 10,5 W
Abmessungen (L x B x H) 132 x 95 x 25 mm
Gewicht 270 g
Feuchtigkeit 20 ~ 80%, 80% (Max.), nicht-kondensierend.
Betriebstemperatur 5°C bis 35°C.
RGB LED
1,6 (Projektionsabstand/Bildbreite)
HDMI/MHL: Kompatibel mit HDMI v1.3 und MHL v2.0
VGA: Mini D-Sub 15-Pin
AV-Anschluss: Audioausgang: 3,5 mm Mini Buchse
USB-Anschluss: Aufladen von Mobilgeräten
Ausgang: 12 V, 2 A DC
Modus Normal: 120 min
Ökomodus: 150 min
Akkumodus: 6,5 W ~ 10,5 W
Seite 14
Page 29

Guide de l’utilisateur
Bienvenue
Merci beaucoup d’avoir acheté ce produit. Avant de commencer, nous vous
conseillons de lire ce manuel étape par étape pour obtenir les meilleurs résultats avec
votre nouveau Pico projecteur. Nous vous souhaitons beaucoup de plaisir.
A propos du produit
Il s’agit de la toute dernière génération de pico projecteur avec à l’intérieur la
technologie DLP. Connu pour de super projecteurs de cinéma, la technologie DLP
offre des couleurs riches et améliore le contraste de l’image. Le pico projecteur offre
des options de connexion polyvalentes, y compris HDMI, MHL et un port VGA et la
projection d’images de taille jusqu’à 120” (300 cm). Ce Pico projecteur est la meilleure
solution pour une utilisation mobile dans les affaires et le divertissement.
Notice de sécurité
1. Gardez l’appareil et les matériaux d’emballage hors de la portée des nourrissons et
des enfants.
2. Évitez de soumettre l’adaptateur secteur et autres contacts électriques à des
éclaboussures de liquides et séchez vos mains avant de l’utiliser. Ne placez pas
d’objets remplis de liquide tels que des vases, etc. sur ou à proximité de l’appareil.
3. Assurez-vous que la prise de courant électrique utilisée est toujours facilement
accessibles et jamais cachée. En cas d’urgence, utilisez l’adaptateur secteur pour
séparer l’appareil du réseau électrique.
4. Maintenez votre appareil loin de toute flamme tels que des bougies et ne pas les
mettre en place à proximité de l’appareil.
5. Maintenez l’appareil à au moins 10 cm de distance de tout autre objet.
Assurez-vous que la ventilation n’est pas couverte par des journaux, nappes,
rideaux, etc.
6. Pour votre propre sécurité, n’utilisez pas le projecteur pendant un orage ou les
éclairs de foudre.
7. L’humidité relative est de 20% ~ 80%, sans condensation.
8. La batterie est intégré à l’appareil. Ne pas désassembler et modifier. La batterie doit
être remplacée par un centre de service autorisé.
9. Assurez-vous que la température ambiante est comprise entre 5 ~ 35°C.
10. Attendez avant d’utiliser l’appareil s’il a été déplacé d’un endroit froid à une pièce
chaude. Toute condensation qui s’est formée peut, dans certaines circonstances,
détruire l’appareil. Dès que l’appareil ait atteint la température ambiante, il peut être
utilisé sans risque.
11. Manipulez l’appareil avec soin. Evitez le contact avec des objets pointus. Se tenir
éloigné des objets métalliques.
12. Placez le projecteur sur une surface plane. Toute collision ou chute sur le sol est
susceptible d’endommager l’appareil.
FR
Page 1
Page 30

É
Guide de l’utilisateur
13. Ne laissez pas tomber l’appareil ou le désassembler sinon la garantie est annulée.
Ouvrir ou retirer les couvercles peut vous exposer à des tensions électriques
dangereuses ou autres dangers. Confiez toute réparation à un centre de service
autorisé.
14. Utiliser exclusivement les accessoires fournis par le fabricant.
15. Le produit et le manuel de l’utilisateur sont soumis à de nouvelles améliorations ou
suppléments sans préavis.
Entretien et Informations de sécurité pour Projecteurs Pico
1. Évitez de faire face directement à l’objectif du
projecteur.
2. Pendant l’opération, ce produit peut chauffer
légèrement, ce qui est normal.
3. L’appareil ne doit pas être utilisé dans un
environnement très poussiéreux. Les particules
de poussière et autres corps étrangers peuvent
FR
l’endommager.
4. Ne pas exposer l’appareil à des vibrations extrêmes. Cela peut endommager les
composants internes.
5. Utilisez l’adaptateur secteur fourni (voir données techniques) :
Vérifiez si la tension de l’alimentation électrique correspond à la tension du réseau
disponible à l’emplacement de l’installation. Cet équipement est conforme avec le
type de tension indiquée sur l’appareil.
viter tous dommages auditifs :
L’écoute à un volume élevé pendant une
longue période de temps peut occasionner
des dommages à vos oreilles.
Notification pour projection de longue durée
La batterie intégrée prend en charge environ 150 minutes de projection. Pour la
projection longtemps, il est recommandé d’utiliser l’adaptateur secteur C.A..
Lorsque la batterie est trop faible pour rester en activité, l’icône de faible capacité
de la batterie ( ) se met à clignoter. Vous devez charger l’appareil pendant que
l’icône a montré.
Il est normal que le projecteur s’échauffe lors d’une utilisation continue en raison de
sa haute performance. Si le projecteur fonctionne pendant une longue période et
surchauffe, l’icône de haute température ( ) apparaît sur l’écran. Le système
entrera alors automatiquement en mode veille.
Page 2
Page 31

Guide de l’utilisateur
Attestation de conformité FCC :
Cet appareil est en conformité avec la partie 15 des règles FCC. Le
fonctionnement est soumis aux deux conditions suivantes : (1) cet
appareil ne peut causer d’interférences nuisibles et (2) cet appareil
doit accepter toute interférence reçue, dont l’interférence qui peut
causer un fonctionnement involontaire.
Ce matériel a été testé et trouvé en conformité avec les limites d’un appareil digital de
Classe B, conformément à la partie 15 des règles FCC. Ces limites ont été mises en
place pour offrir une protection raisonnable contre les interférences nuisibles dans les
installations résidentielles. Ce matériel génère, utilise, et peut émettre une énergie de
fréquence radio et si non installé et utilisé en conformité avec les instructions, peut
causer une interférence radio nuisible aux communications radio.
Cependant, il n’y a aucune garantie que l’interférence se produira dans une installation
particulière. Si ce matériel causait une interférence à la réception de radio ou de
télévision, ce qui peut être déterminé en arrêtant et en mettant en marche le matériel, il
est suggéré à l’utilisateur d’essayer de corriger l’interférence en appliquant une mesure
de plus parmi celles figurants ci-dessous :
- Réorientez ou déplacez l’antenne réceptrice.
- Déplacez l’équipement du récepteur.
- Branchez l’équipement dans une prise sur un circuit différent de celui où le
récepteur est connecté.
- Consultez le vendeur ou un technicien de radio/télévision expérimenté pour des
suggestions additionnelles.
Vous êtes averti que tout changement ou modification de l’équipement non
expressément approuvé par la partie responsable.
Si le temps est arrivé de vous
débarrasser de votre produit, veuillez s’il
vous plaît recycler tous les composants
possibles. Batteries et piles
rechargeables ne doivent pas être jetés
avec les ordures ménagères ! Veuillez
s’il vous plaît les recycler à votre point
de recyclage local.
Ensemble nous pouvons aider à
protéger l’environnement.
FR
Page 3
Page 32

Guide de l’utilisateur
Table des matières
A propos du produit, instructions de sécurité
Contenu de l’emballage
Connaître votre appareil
Pour commencer
Projection à partir de Source d’entrée vidéo externe
HDMI, VGA
Téléphone Intelligent et Tablette
Charger les appareils mobiles externes
Dépannage
FR
Spécifications
Contenu de l’emballage
Veuillez vérifier que les éléments suivants se trouvent dans votre
emballage :
Pico projecteur
Adaptateur d’alimentation
Prise d’alimentation échangeables
Télécommande
Câble HDMI (Type A à A)
Câble MHL (Type HDMI A à USB D)
Sac de transport
Guide de l’utilisateur
1
4
5
7
8
9
12
12
13
14
Page 4
Page 33

Guide de l’utilisateur
(p
)
(
)
/
Connaître votre appareil
Projecteur
Objectif de projection
Haut-parleur
ENTRÉE DC
Récepteur infrarouge
Panneau de configuration
Menu
Gauche
Format d’écran
Source
entrée vidéo externe
Bas
Ventilation
Clavier
Levier de mise au point
Ventilation
Port VGA
Connecteur HDMI/MHL
Connecteur USB
our la charge du tél. portable
Connecteur Haut-parleur
Haut
Quitter
Droit /
Mode Scène
OK
Puissance électrique
FR
Interface trépied
Page 5
Page 34

K
t
t
Guide de l’utilisateur
Télécommande
Source
Mode Scène
Hau
Menu
Gauche / Format d’écran
FR
Installation de la pile de la télécommande
1. Retirez le support de la batterie en appuyant sur le côté du
libération fermement et en tirant sur le support de batterie.
2. Insérez une pile plate CR2025 et alignez correctement la polarité
selon le marquage dans le support de batterie.
Remarque : Lorsque vous utilisez la télécommande pour la
3. Insérez le porte-pile.
Attention :
Une utilisation incorrecte de la batterie peut provoquer une surchauffe, explosion ou
ignition, ce qui peut entraîner des blessures ou un incendie. Fuite des piles peut
endommager la télécommande.
Ne pas exposer l’unité de télécommande à la lumière directe.
N’exposez pas la batterie au feu ou dans l’eau.
Remplacez immédiatement la pile épuisée.
Retirez la batterie lorsque la télécommande n’est pas utilisée pendant une longue
période.
O
Volume hau
première fois, il ya une feuille de plastique de
protection entre la batterie et son contact.
Retirez la feuille avant utilisation.
Puissance électrique
Luminosité
Mode Objectif
Quitter
Droit / Mode Scène
Bas
Volume bas
Page 6
Page 35

Guide de l’utilisateur
Portée de fonctionnement avec la télécommande
7 m / 22.97
ft.
Remarque : La portée réelle peut différer légèrement de l’illustration. En outre, une
batterie faible réduit ou élimine la rayon d’action de la télécommande.
Pour commencer
Charger l’appareil
Le projecteur est construit avec une batterie
Li-Polymer intégrée, pour une utilisation mobile.
Veuillez charger le projecteur pendant 8 heures
avant sa première utilisation. Le rechargement dure
environ 4 heures. La batterie se recharge que lorsque le projecteur n’est pas utilisé
(Power off). Branchez une extrémité de l’adaptateur électrique fourni dans la prise DC
IN (entrée DC) et l’autre extrémité à une prise électrique pour commencer à charger.
Remplacez le prise (UE, Etats-Unis, etc) de l’adaptateur AC qui reçoit le type de prise
de courant dans votre pays s’il est différent.
Indicateur de charge LED
Pendant le chargement, la DEL sur le bouton d’alimentation devient orange. Il tourne
au vert lorsque la batterie est complètement chargée.
Activer / Eteindre le Projecteur
Pressez sur le bouton d’alimentation pendant 2 secondes pour allumer le projecteur.
Pour éteindre le projecteur, pressez le bouton d’alimentation vers le bas pendant 2
secondes.
Mode Veille
Pressez sur le bouton d’alimentation 1 seconde pour allumer / éteindre
:
la lampe du projecteur pour une courte pause pour sauvegarder la
batterie et le temps de redémarrage du système. (Le voyant LED sur les
boutons est toujours allumé lorsque le projecteur est en mode veille.)
Page 7
FR
Page 36

Guide de l’utilisateur
Réglage de la mise au point en fonction de la distance
Placer le projecteur sur une surface plane et
en direction d’une paroi ou un écran de
projection. La distance de projection et la taille
de projection sont:
Distance : 50 cm ~ 425 cm (20” ~ 167”)
Taille d’Image : 36 cm ~ 305 cm (14” ~ 120”)
Réglez la mise au point en tournant le levier de
mise au point vers le haut ou vers le bas pour
obtenir une image nette et claire.
Note : Utilisez un trépied (non fourni) pour augmenter la hauteur de l’image de
projection, en cas de besoin. Le filetage du pied se trouve sous le projecteur.
FR
Projection à partir de Source d’entrée vidéo
externe
Le projecteur est équipé d’une interface multiple intégré sur le côté arrière. Vous
pouvez connecter votre source d’entrée vidéo externe au projecteur en utilisant le
câble approprié et presser la touche Source sur le panneau de commande du
projecteur pour sélectionner la source d’entrée.
Page 8
Page 37

Guide de l’utilisateur
HDMI
Utilisez le câble HDMI pour connecter le port
HDMI sur le panneau arrière du projecteur sur la
source HDMI signal externe. Une fois connecté,
l’écran passe automatiquement à la source
HDMI.
VGA
Utilisez un câble VGA pour connecter le port
VGA sur la face arrière du projecteur à la source
de signal VGA externe. Une fois connecté,
pressez sur la touche Source sur la
télécommande ou le panneau de contrôle pour
sélectionner la source VGA.
Le câble VGA n’est pas inclus dans l’emballage standard.
Note :
FR
Page 9
Page 38

Guide de l’utilisateur
Modification des paramètres de lecture pour source vidéo externe
Pressez / Menu sur le panneau de commande ou sur la télécommande pour
entrer le réglage de lecture.
1. Format d’écran
FR
Lorsque le fichier vidéo est au format 4:3, cette fonction vous permet de régler
la façon dont l’image doit apparaître sur l’écran 16:9.
Pressez ◎/OK pour afficher les options.
1) Panoramique et Scan : l’image est agrandie pour s’adapter à l’écran 16:9.
2) Boîte aux lettres : l’image est affichée en format original.
Illustration pour le réglage du format d’image :
Format d’image 4:3
Source
Écran
Panoramique et Scan (16:9)
Écran de
projection
2. Luminosité
Ceci vous permet de modifier la luminosité en fonction de l’environnement et
de la consommation électrique.
Page 10
Boîte aux lettres (16:9)
Page 39

Guide de l’utilisateur
1) Amélioré : Sélectionnez ce mode lorsque l’alimentation externe est
2) Normal : Le mode par défaut pour l’optimisation des performances de
3) Éco : Ce mode est recommandé lorsque le projecteur est utilisé en mode
Note :
3. Mode de projection (Lentille)
Ceci vous permet de sélectionner le mode de projection, selon la façon dont
le projecteur est monté.
Frontal: Il s’agit de la façon la plus courante
Plafond avant: Le projecteur renverse l’image
Arrière : Le projecteur inverse l’image de
Plafond arrière : Le projecteur inverse l’image à
4. Sélection de scène
Ceci vous permet de sélectionner le mode idéal pour regarder un film,
diaporama de photos ou de lire le texte avec une luminosité équilibrée, la
couleur et le contraste.
Cinéma: idéal pour regarder un film
Normal : idéal pour la photo diaporama
Texte: idéal pour image avec texte
5. Informations
Affiche la version du micrologiciel : Txxxx
disponible pour optimiser les performances.
projection et de la capacité de la batterie.
batterie pour économiser l’énergie.
Le projecteur se met automatiquement en mode Amélioré lorsqu’il est
alimenté par l’adaptateur secteur.
pour positionner le projecteur pour
une installation rapide et la
portabilité.
pour une projection montée au
plafond.
sorte qu’elle puisse projeter
derrière un écran translucide.
l’envers. Cela permet de projeter
derrière un écran translucide en
position plafond.
FR
Page 11
Page 40

Guide de l’utilisateur
Projection à partir de téléphones intelligents ou tablettes
1. Connectez téléphones intelligents supportés MHL (interface mobile
haute-définition) pour la projection.
Connectez Samsung Galaxy S2, Note,
nouveau HTC un, un X +, un X, One S,
ou Sony Xperia Z avec le projecteur via
câble MHL (A à USB D de type HDMI).
Connectez Samsung Galaxy S4, Note II
avec le projecteur via MHL câble (A à
USB D de type HDMI) et Samsung 5 à 11
broches convertisseur MHL (comme
montre l’illustration) pour la projection.
Note : Il est normal que le projecteur charge automatiquement les téléphones
intelligents ou tablettes lorsqu’il est connecté avec le câble MHL pour la
FR
Charger un appareil externe portable
projection.
2. Connecte iPhone 5 pour une projection
miroir (with Lightning connector)
Connecte iPhone 5, iPad 4, iPad mini et
iPod 5ème avec le projecteur via
l’adaptateur Apple Lightning Digital AV et
à un câble HDMI de type A à A.
iPhone 4S, 4, nouvel iPad, iPad 2, et iPod
touche (4e) peuvent se connecter avec le projecteur avec l’adaptateur Apple AV
numérique 30 broches et un câble HDMI- de type A à A
La batterie interne du projecteur peut non
seulement être utilisé pour la projection, mais
aussi re/charger vos appareils mobiles.
1. Connectez votre appareil mobile au projecteur
via le câble USB à l’extrémité de connecteur de
type A branché sur le port USB situé à l’arrière
du projecteur.
2. Lorsque le projecteur est allumé, l’appareil sera
chargé automatiquement.
3. Lorsque le projecteur est éteint, appuyez sur le bouton
Source ( ) pour démarrer ou arrêter la charge.
Note : Le projecteur est équipé d’une puissance de sortie de 5 V / 500 mA pour
la charge des dispositifs mobiles.
Page 12
Page 41

Guide de l’utilisateur
Dépannage
Si votre projecteur ne semble pas fonctionner correctement, vérifiez les éléments
ci-dessous avant de contacter un centre de service après vente agréé.
Symptôme Point de contrôle
Le projecteur ne
fonctionne pas lors de la
connexion à un portable
ou a un PC avec un
câble.
L’image projetée est
trop sombre.
L’image projetée est
floue.
La température de la
surface du projecteur
est haute.
Reprise après une
anomaly
1. Vérifiez si le câble HDMI est correctement branché.
2. Assurez-vous que le PC soit prêt pour l’affichage de
projecteur.
1. Utilisez le projecteur dans un environnement plus
sombre.
2. Augmentez la luminosité en utilisant l’adaptateur pour
alimentation CA.
3. Réduisez la taille de l’image projectionnel.
1. Ajustez la mise au point. Veuillez vous reporter à
« Ajuster la mise au point ».
2. Vérifiez si la lentille est sale.
En raison de la forte luminance-LED, il est normal que ce
projecteur génère de la chaleur en utilisation prolongée.
Cela n’affectera pas les performances du projecteur.
Toujours garder les ouvertures de ventilation exempts de
saletés ou obstructions et utiliser le projecteur dans un
environnement bien aéré.
Cela peut être utile lorsque le projecteur gèle, se block ou
se verrouille au cours d’une opération. Pressez le bouton
d’alimentation pendant 8 secondes pour redémarrer votre
projecteur.
FR
Page 13
Page 42

Guide de l’utilisateur
Spécifications
Elément Description
Technologie optique
Source lumineuse
Format d’écran 16:9
Résolution 854 x 480 Pixels (WVGA)
Taux de contraste 1000:1
Dimension de l’image
projetée
Distance de projection 50 cm ~ 425 cm (20” ~ 167”)
Taux de Jet
(diagonale : distance)
Luminosité Jusqu’à 100 Lumens
FR
Mise au point Manuel
Décalé 100%
Connexions
Internal Speaker Mono
Alimentation Entrée : 100 ~ 240 V CA
Type de batterie Batterie intégrée 7,4 V/2000 mAh Li-polymère
Durée de vie de la batterie Mode amélioré : 90 min
Consommation électrique Mode CA : 10,5 W
Dimensions (L x W x H) 132 x 95 x 25 mm
Poids 270 g
Humidité 20 ~ 80%, 80% (Max.), sans condensation.
Température de
fonctionnement
DLP
RVB DEL
36 cm ~ 305 cm (14” ~ 120”)
1,6 (Distance de projection / Largeur de l’image)
HDMI/MHL : Conforme à HDMI v1.3 et v2.0 MHL
VGA : Mini D-sub 15 broches
Port AV : Audio out : 3,5 mm mini-jack/fiche
Port USB : Charger les appareils mobiles
Sortie : 12 V, 2 A DC
Normal : 120 min
Mode Eco : 150 min
Mode batterie : 6,5 W ~ 10,5 W
5°C ~ 35°C.
Page 14
Page 43

Руководство пользователя
Уважаемый пользователь!
Благодарим вас за покупку этого устройства. Перед началом использования
этого изделия рекомендуемся подробно изучить это руководство, чтобы
использовать ваш новый пикопроектор максимально эффективно. Желаем вам
множества приятных впечатлений!
Об этом устройстве
Данное устройство — это пикопроектор новейшего поколения на основе
технологии DLP. DLP-технология, применяемая в высококлассных
кинопроекторах, обеспечивает богатство цветовой гаммы и высокую
контрастность изображения. Пикопроектор поддерживает разнообразные
интерфейсы, включая HDMI, MHL и VGA, и позволяет проецировать
изображения с диагональю до 120 дюймов (300 см). Этот пикопроектор очень
удобен для мобильного использования — как для деловых, так и для
развлекательных целей.
Примечания относительно безопасности
1. Храните это устройство и упаковочные материалы вне досягаемости детей и
младенцев.
2. Не допускайте попадания воды на контакты устройства, адаптера питания и другого
оборудования, сушите руки перед их использованием. Не ставьте на устройство и
рядом с ним вазы и другие емкости с жидкостью.
3. Сетевая розетка должна быть всегда легко доступна
предметами. В экстренных случаях отсоединяйте адаптер питания от электросети для
отключения устройства.
4. Не допускайте наличия открытого огня вблизи устройства, не ставьте рядом с ним
горящие свечи.
5. Держите устройство на расстоянии, по меньшей мере, 10 см от других объектов. Не
допускайте перекрытия вентиляционных отверстий газетами, скатертями,
занавесками и
6. Для вашей собственной безопасности не ис- пользуйте проектор во время бури или
грозы.
7. Относительная влажность должна быть в пределах 20% ~ 80%, без конденсации.
8. Батарея является составной частью устройства. Разбирать или изменять
конфигурацию устройства запрещается. Замена батареи должна проводиться только
авторизованными сервисными центрами.
9. Следите, чтобы окружающая температура была в
10. Прежде, чем включать устройство после его перемещения из холодного места в
теплое, подождите, пока оно нагреется. Конденсация влаги внутри устройства может,
при определенных условиях, вывести устройство из строя. Когда устройство
нагреется до комнатной температуры, его можно безопасно использовать.
11. Обращайтесь с изделием бережно. Не допускайте его контакта с острыми
предметами
12. Устанавливайте проектор на ровной поверхности. Любые удары, или падение на
землю, могут легко повредить изделие.
т.п.
. Оберегайте устройство от контакта с металлическими предметами.
и не загорожена другими
пределах 5 ~ 35°C.
RU
Страница 1
Page 44

Руководство пользователя
13. Не вскрывайте устройство и не допускайте его падения, иначе гарантия на изделие
будет аннулирована. Вскрытие корпуса или снятие крышек и защитных панелей
может привести к поражению опасными уровнями напряжений и другим опасным
ситуациям. Обслуживание изделия должно проводиться только авторизованными
сервисными центрами.
14. Используйте только принадлежности, поставляемые производителем.
15. Данное изделие и
предварительного уведомления в целях их дальнейшего улучшения или внесения
дополнений.
руководство пользователя могут быть изменены без
Правила безопасной эксплуатации пикопроектора
Не смотрите прямо в объектив проектора.
1.
2. Во время работы это устройство может немного
нагреваться, что является нормальным явлением.
3. Запрещается применять устройство в слишком
пыльных условиях. Частицы пыли и другие
инородные предметы могут повредить устройство.
4. Оберегайте устройство от воздействия сильных
вибраций. Это может повредить внутренние компоненты устройства.
5. Применяйте только прилагаемый
Убедитесь, что характеристики напряжения электросети на месте установки отвечают
требованиям к сетевому напряжению для данного устройства. Требования к типу
напряжения указаны на корпусе устройства.
RU
Берегитесь поражения слуха:
Длительное прослушивание звука при
высокой громкости может привести к
повреждению слуха.
адаптер питания (см. технические данные):
Сведения о длительном проецировании
Встроенная батарея обеспечивает около 150 мин проецирования. Для
длительного проецирования рекомендуется использовать адаптер питания.
Когда заряд батареи слишком мал для обеспечения работы проектора, на
экране начинает мигать значок низкого заряда батареи ( ). При появлении
этого значка устройство следует зарядить.
Проектор при длительной и интенсивной эксплуатации может нагреваться. Это
нормальное явление. В случае перегрева проектора при длительном
проецировании, на экране появляется значок перегрева ( ). Система
автоматически переходит в ждущий режим.
Страница 2
Page 45

Руководство пользователя
Д
Cоответствие требованиям FCC:
Данное устройство отвечает требованиям части 15 правил CFR
47 FCC. Эксплуатация возможна при соблюдении следующих
двух условий: (1) это устройство не должно создавать помех,
отрицательно влияющих на другие устройства и (2) это
устройство должно иметь защиту от помех, способных вызвать
сбои в его работе.
Это устройство испытано и признано соответствующим ограничениям для
цифровых устройств класса В
должны обеспечить разумную защиту от вредных помех при эксплуатации
оборудования в жилых районах. Данное оборудование создает, использует и
может излучать радиоволны, и если оно установлено или эксплуатируется с
нарушением инструкций производителя, оно может создавать помехи для средств
радиосвязи.
Однако нет гарантии, что помехи не возникнут в отдельных случаях установки
данного оборудования. Если это оборудование станет причиной нежелательных
помех в работе теле- и радиоустройств, что можно определить, выключив и снова
включив устройство, рекомендуется попытаться устранить помехи следующим
образом:
- Перенаправьте или переместите приемную антенну.
- Уберите устройство от теле- или радиоприемника.
- Подключите устройство к другой розетке так, чтобы оно и приемник питались
от разных цепей.
- Обратитесь за помощью к торговому представителю или к специалисту по
теле/радиооборудованию.
Вы предупреждены, что любые изменения или модификации, официально не
одобренные уполномоченной стороной могут лишить вас права использовать это
устройство.
согласно части 15 Правил FCC. Эти ограничения
По окончании срока службы этого
изделия следует утилизировать все
его компоненты. Батареи и
перезаряжаемые аккумуляторы
запрещается выбрасывать вместе с
бытовыми отходами! Утилизируйте их
в ближайшем пункте утилизации.
авайте вместе участвовать в защите
нашей природы.
RU
Страница 3
Page 46

Руководство пользователя
Содержание
Об этом устройстве. Правила безопасной
эксплуатации
Содержимое упаковки
Знакомство с устройством
Начало работы
Проецирование от внешнего видеоисточника
HDMI, VGA
Смартфоны и планшетные ПК
Зарядка внешних мобильных устройств
Устранение неполадок
Характеристики
RU
Содержимое упаковки
Убедитесь, что упаковка содержит следующие компоненты:
Пикопроектор
От адаптера питания
Сменная вилка питания
Пульт
Кабель HDMI (типа A — A)
Кабель MHL (типа HDMI A — USB D)
Футляр для переноски
Руководство пользователя
1
4
5
7
8
9
12
12
13
14
Страница 4
Page 47

Руководство пользователя
к
(
)
/
Знакомство с устройством
Проектор
Проекционный объектив
Динамик
Вход DC IN
ИК-приемник
Панель управления
Клавиатура
Меню
Влево
Формат кадра
Источни
внешний видеовход
Вниз
Вентиляция
Регулятор фокуса
Вентиляция
Порт VGA
Гнездо штатива
Разъем HDMI/MHL
Разъем USB (для зарядки мобильного
устройства)
Разъем внешнего динамика
Вверх
Выход
Вправо/
Сюжетный режим
OK
Питание
RU
Страница 5
Page 48

K
Руководство пользователя
Пульт
Питание
Источник
Сюжетный режим
Вверх
Меню
Влево/Формат кадра
Установка батареи в пульт ДУ
1. Выньте держатель батареи — сожмите фиксатор с боков
и вытяните держатель батареи.
2. Вставьте плоскую кнопочную батарею CR2025 с
RU
соблюдением полярности контактов (в соответствии с
маркировкой внутри держателя батареи).
Примечание: При первом использовании пульта между
3. Вставьте держатель батареи.
Предупреждение:
Некорректное использование батарей может привести к их перегреву, взрыву или
воспламенению и, как следствие, к травме или пожару. Утечка электролита из
батареи может вызвать повреждение пульта.
Не допускайте воздействия на пульт прямых солнечных лучей.
Оберегайте батарею от воздействия огня или влаги.
Севшую батарею следует немедленно заменить.
Вынимайте батарею из пульта, если он долгое время не будет использоваться.
O
Громче
батареей и контактами имеется
вложенная пластиковая прокладка.
Удалите пластиковую прокладку перед
использованием.
Яркость
Режим объектива
Выход
Вправо/Сюжетный режим
Вниз
Тише
Страница 6
Page 49

Руководство пользователя
Зона действия пульта
Ft.
Примечание: Реальная зона действия пульта может немного отличаться от
показанной на рисунке. Кроме того, дальность действия пульта
уменьшается, когда разряжается батарея.
Начало работы
Зарядка устройства
Мобильность проектора обеспечивается
встроенной литий-полимерной батареей.
Перед первым использованием проектора
следует выполнить зарядку батареи в течение
8 часов. Для последующих зарядок требуется
около 4 часов. Батарея может заряжаться, только когда проектор не работает
(выключен). Чтобы начать зарядку, подсоедините адаптер сетевого питания к
гнезду DC-IN устройства, и вставьте адаптер в электророзетку.
Если вилка адаптера питания не соответствует типу электророзетки,
применяемой в вашей стране (ЕС, США и т.д.), следует заменить ее на
соответствующую сменную вилку.
СД-индикатор зарядки
Во время зарядки СД-индикатор на кнопки питания горит оранжевым светом.
Когда батарея полностью заряжена, он загорается зеленым.
Включение/выключение проектора
Прижмите кнопку питания на 2 секунды, чтобы включить проектор.
Для выключения проектора снова прижмите кнопку питания на 2 секунды.
Ждущий режим: Прижмите кнопку питания на 1 секунду для временного
отключения лампы с целью экономии времени, затрачиваемого
на загрузку системы, и энергии батареи. (Светодиоды на
кнопках в ждущем режиме продолжают светиться.)
Страница 7
RU
Page 50

Руководство пользователя
Регулировка фокуса в зависимости от дальности проецирования
Разместите проектор на ровной
поверхности в направлении стены или
проекционного экрана. Проекционное
расстояние и размер изображения
выбираются в следующем диапазоне:
Расстояние: 50 ~ 425 см (20” ~ 167”)
Размер изображения: 36 ~ 305 см (14” ~
120”)
Отрегулируйте фокус поворотом
регулятора фокуса вверх или вниз до
получения четкого и резкого изображения.
Примечание: Если требуется увеличить высоту проецирования изображения,
используйте треногу (не прилагается). Гнездо для треноги
находится снизу проектора.
Проецирование от внешнего видеоисточника
RU
Панель ввода/вывода сигналов находится с задней стороны проектора.
Подсоедините внешний видеоисточник к проектору с помощью
соответствующего кабеля и кнопкой Source (Источник) на панели управления
выберите источник входного сигнала.
Страница 8
Page 51

Руководство пользователя
HDMI
Подсоедините порт HDMI на задней панели
проектора к внешнему источнику сигнала
HDMI через кабель HDMI. После
подключения экран автоматически
переключится на источник сигнала HDMI.
VGA
Подсоедините порт VGA на задней панели
проектора к внешнему источнику сигнала
VGA через кабель VGA. После подключения
выберите источник VGA кнопкой Source
(Источник) на панели управления.
Примечание:
Кабель VGA не входит в стандартный комплект поставки.
RU
Страница 9
Page 52

Руководство пользователя
Настройка воспроизведения внешнего видеосигнала
Кнопкой /Menu на пульте или панели управления откройте меню
настройки воспроизведения.
1. Формат кадра
Если видеофайл имеет формат кадра 4:3, эта функция позволяет
выбрать вид представления изображения на экране с форматом 16:9.
Нажмите ◎/OK для отображения вариантов настройки.
1) Pan & Scan: вписывает изображение в размеры экрана 16:9.
2) Letterbox: изображение отображается в исходном формате кадра.
RU
Иллюстрация вариантов настройки формата изображения:
Формат кадра 4:3
Экран
источника
Pan & Scan (16:9)
Проекционный
экран
2. Яркость
Позволяет настроить яркость в соответствии с окружающим освещением
и уровнем энергопотребления.
Страница 10
Letterbox (16:9)
Page 53

Руководство пользователя
1) Яркий: Выбирайте этот режим при питании от внешнего источника,
2) Обычный: Стандартный режим с оптимизацией яркости и
3) Эко: Этот режим рекомендуется для экономии электроэнергии,
Примечание:
3. Режим проецирования (объектива)
Позволяет выбрать режим проецирования в зависимости от типа
установки проектора.
Спереди: Стандартный способ установки,
Спереди (потолок): Проектор переворачивает
Сзади: Проектор зеркально разворачивает
Сзади (потолок): Проектор зеркально
4. Выбор сюжетного режима
Позволяет выбрать оптимальный режим балансировки яркости,
цветности и контраста для просмотра кинофильмов, фотографий или
чтения текста.
.
Кино: оптимальный режим для просмотра фильмов
Обычный: оптимальный режим для просмотра фотографий
Текст: оптимальный режим для просмотра текстовых изображений
5. Информация
Отображение версии микропрограммы: Txxxx
чтобы обеспечить максимальную яркость.
батарейного питания.
когда проектор работает в батарейном режиме.
Проектор автоматически переключается в режим «Яркий»,
когда питание подается от адаптера питания.
удобен для настройки и
перемещения проектора.
изображение вверх ногами
для проецирования при его
потолочном креплении.
изображение для проецирования с
задней стороны прозрачного экрана.
разворачивает и
переворачивает изображение
вверх ногами. Это позволяет
проецировать изображение с
задней стороны прозрачного
экрана при потолочном
креплении проектора.
RU
Страница 11
Page 54

Руководство пользователя
Проецирование со смарфонов и планшетных ПК
1. Подключение смарфонов с поддержкой стандарта MHL (Мобильный канал
высокой четкости) для проецирования изображения.
Подключите смарфон Samsung
Galaxy S2, Note, новый смарфон HTC
One, One X+, One X, One S или Sony
Xperia Z к проектору с помощью
кабеля MHL (HDMI типа «A—USB-D»).
Подключите смарфон Samsung
Galaxy S4 и Note II к проектору с
помощью кабеля MHL (HDMI типа
«A—USB-D»), а смартфон Samsung
5 — с помощью 11-контактного
MHL-адаптера (см. рисунок).
Примечание: При подключении к проектору смарфонов или планшетных
2. Подключение устройств iPhone 5 для
зеркального проецирования (с
помощью кабеля Lightning)
Подключите iPhone 5, iPad 4, iPad Mini
или iPod Touch 5 к проектору с
помощью кабеля HDMI типа «A—A»
через адаптер Apple Lightning Digital AV.
RU
Устройства iPhone 4S, 4, New iPad,
iPad2 и iPod Touch (4) можно подключить к проектору с помощью кабеля
HDMI типа «A—A» через 30-контактный адаптер Apple Digital AV.
Зарядка внешнего мобильного устройства
Внутренняя батарея проектора может
использоваться не только для проецирования, но и
для зарядки мобильных устройств.
1. Подключите мобильное устройство к проектору
с помощью переходного USB-кабеля, вставив
разъем USB-A в порт USB с задней стороны
проектора.
2. Когда проектор включен, зарядка устройства
осуществляется автоматически.
3. Когда проектор выключен, для включения или
выключения зарядки следует нажать кнопку Source
( ).
Примечание: Проектор обеспечивает подачу выходного питания
ПК автоматически осуществляется их зарядка. Это
нормальное явление.
5В/500мА для зарядки мобильных устройств.
Страница 12
Page 55

Руководство пользователя
Устранение неполадок
Если в работе проектора наблюдаются неполадки, попытайтесь устранить их с
помощью следующей таблицы, прежде чем обращаться в сервисный центр.
Неисправность Проверка
Проектор не работает
при подключении к
ноутбуку или ПК с
помощью кабеля.
Изображение слишком
темное.
1. Проверьте, правильно ли подключен кабель HDMI.
2. Убедитесь, что компьютер переключен в режим
видеовывода на проектор.
1. Используйте проектор в более темном помещении.
2. Для повышения яркости используйте адаптер
питания.
3. Уменьшите размер проецируемого изображения.
Проецируемое
изображение
нечеткое.
Поверхность
проектора
нагревается.
Восстановление после
сбоя
1. Отрегулируйте фокусировку. См. «Регулировка
фокуса».
2. Проверьте, не грязен ли объектив.
Из-за сверхъярких светодиодов проектор при долгом
использовании нагревается; это нормально. Это не
влияет на работоспособность проектора. Не
допускайте загрязнения или перекрытия
вентиляционных отверстий и применяйте проектор в
хорошо вентилируемых местах.
Эта функция может использоваться, если во время
проецирования проектор зависает, перестает
работать или блокируется. Для перезагрузки системы
проектора прижмите кнопку питания на 8 секунд.
Страница 13
RU
Page 56

Руководство пользователя
Характеристики
Характеристика Описание
Оптическая технология
Источник света
Формат кадра
Разрешение
Контрастность
Размер проецируемого
изображения
Проекционное расстояние
Проекционное отношение
(Диагональ: Расстояние)
Яркость
Фокусировка
Смещение
Соединения
Встроенный динамик
RU
Электропитание
Тип батареи
Время работы батареи
Энергопотребление
Размеры (Д x Ш x В)
Вес
Влажность
Температура эксплуатации
DLP
RGB-светодиод
16:9
854 x 480 пикселов (WVGA)
1000:1
36 cm ~ 305 cm (14” ~ 120”)
50 cm ~ 425 cm (20” ~ 167”)
1,6 (Проекционное расстояние/Ширина кадра)
До 100 люмен
Ручной
100%
HDMI/MHL: Соответствуют стандартам HDMI v1.3 и MHL
VGA: 15-конт. Mini D-Sub
Порт AV: Аудиовыход: Миниджек стерео 3,5 мм
Порт USB: Для зарядки мобильных устройств
v2.0
Моно
Вход: 100 ~ 240 В (пер.тока)
Выход: 12 В, 2 А (пост.тока)
Встроенная литий-полимерная батарея 7,4В/2000мАч
Яркий режим: 90 мин
Обычный режим: 120 мин
Экономичный режим: 150 мин
Режим питания от адаптера: 10,5 Вт
Батарейный режим: 6,5 Вт ~ 10,5 Вт
132 x 95 x 25 mm
270 g
20% ~ 80% (макс. 80%), без конденсации.
5°C ~ 35°C.
Страница 14
Page 57

ﻞﻴﻟدمﺪﺨﺘﺴﻤﻟا
ﺎ ﺒﺣﺮﻣ
ﺞﺘﻨﻤﻟا ءاﺬه ءاﺮﺷ ﻲﻠﻋ ﺎ ﻠﻳﺰﺟ ا ﺮﻜﺷ. ﻞﻀﻓأ ﻲﻠﻋ لﻮﺼﺤﻠﻟ ﺞﺘﻨﻤﻟا ﻞﻴﻐﺸﺗ ﻲﻓ ءﺪﻴﻟا ﻞﺒﻗ ﺔﻳﺎﻨﻌﺑ ﻞﻴﻟﺪﻟا اﺬه ةءاﺮﻘﺑ ﻢﻜﺤﺼﻨﻧ
رﻮﺘﻜﻴﺟوﺮﺑ ﻊﻣ ﺞﺋﺎﺘﻨﻟاPicoﻚﺑ صﺎﺨﻟا ﺪﻳﺪﺠﻟا .ﺎ ﻌﺘﻤﻣ ﺎ ﻣاﺪﺨﺘﺳا ﻚﻟ ﻲﻨﻤﺘﻧ.
ﺞﺘﻨﻤﻟا لﻮﺣ
ﺔﻴﻤﻗﺮﻟا ءﻮﻀﻟا ﺔﺠﻟﺎﻌﻣ ﺎﻴﺟﻮﻟﻮﻨﻜﺗ نأ ﺚﻴﺣ ﺔﻴﺋﺎﻤﻨﻴﺴﻟا ضﺮﻌﻟا ةﺰﻬﺟأ ﺎﻬﺑ ﺮﻬﺘﺸﺗ ﻲﺘﻟاDLP ﻦﻳﺎﺒﺗ زﺰﻌﺗو ﺔﻴﻨﻏ ناﻮﻟأ مﺪﻘﺗ
رﻮﺘﻜﻴﺟوﺮﺑ ﻦﻣ ﻦﻣ ﺮﻴﺧﻷا ﻞﻴﺠﻟا ﻮه ﺞﺘﻨﻤﻟا اﺬه ﺪﻌ ﻳ Picoا ﺔﻴﻤﻗﺮﻟا ءﻮﻀﻟا ﺔﺠﻟﺎﻌﻣ ﺎﻴﺟﻮﻟﻮﻨﻜﺘﺑ د وﺰﻤﻟDLP ،ﻞﺧاﺪﻟﺎﺑ
ةرﻮﺼﻟا . ﺮﻓﻮﻳرﻮﺘﻜﻴﺟوﺮﺑ Pico ﻦﻤﻀﺘﺗ ةدﺪﻌﺘﻣ لﺎﺼﺗا تارﺎﻴﺧ HDMI و MHL ﺬﻔﻨﻣو VGA رﻮﺼﻟا ضﺮﻋو
ﻞﺼﻳ ﻲﺘﻟا ﻲﻟإ ﺎﻬﻤﺠﺣ 120) "300ﻢﺳ .( ﺪﻌ ﻳ رﻮﺘﻜﻴﺟوﺮﺑ Pico ﻞﻤﻌﻟا ﻲﻓ لﻮﻤﺤﻤﻟا ماﺪﺨﺘﺳﻼﻟ ﻞﺜﻣﻷا ﻞﺤﻟا ﻮه
ﻪﻴﻓﺮﺘﻟاو .
AR
ﺔﻣﻼﺴﻟﺎﺑ صﺎﺧ رﺎﻌﺷإ
.1 رﺎﻐﺼﻟاو ﻊﺿﺮﻟا لﺎﻔﻃﻷا لوﺎﻨﺘﻣ ﻦﻋ ا ﺪﻴﻌﺑ ﻒﻴﻠﻐﺘﻟا داﻮﻣو زﺎﻬﺠﻟﺎﺑ ﻆﻔﺘﺣا.
زﺎﻬﺠﻟا ﻦﻣ بﺮﻘﻟﺎﺑ وأ ﻰﻠﻋ ﺎهﺮﻴﻏو تﺎﻳﺮهﺰﻟا ﻞﺜﻣ ﻞﺋاﻮﺴﻟﺎﺑ ةءﻮﻠﻤﻣ مﺎﺴﺟأ ﻊﺿو عﻮﻨﻤﻣو ،ﻪﻣاﺪﺨﺘﺳا.
زﺎﻬﺠﻟا ﻞﺼﻔﻟﻲﺋﺎﺑﺮﻬﻜﻟا رﺎﻴﺘﻟا ﺔﻜﺒﺷ ﻦﻣ .
ﺎهﺮﻴﻏ وأ ﺮﺋﺎﺘﺴﻟا وأ شرﺎﻔﻤﻟا.
ﺔﻨﻴﻌﻣ فوﺮﻇ ﻲﻓ .ةﺮﻃﺎﺨﻣ نود ﻪﻣاﺪﺨﺘﺳا ﻚﻨﻜﻤﻳ ،ﺔﻓﺮﻐﻟا ةراﺮﺣ ﺔﺟرد ﻰﻟإ زﺎﻬﺠﻟا ﻞﺼﻳ نأ دﺮﺠﻤﺑو.
ىﺮﺧأ رﺎﻄﺧأ وأ .ﺔﻧﺎﻴﺼﻟا لﺎﻤﻋأ ﻊﻴﻤﺠﺑ مﺎﻴﻘﻠﻟ ﺪﻤﺘﻌﻣ ﺔﻧﺎﻴﺻ ﺰآﺮﻤﺑ ﺔﻧﺎﻌﺘﺳﻻا ﺐﺠﻳو.
.2 ﻟا ﻲﻓ ﺲﻤﻐﻟا ﻰﻟإ ىﺮﺧﻷا ﻞﻴﺻﻮﺘﻟا ﻞﺋﺎﺳوو ﺊﻳﺎﻬﻤﻟا ﺾﻳﺮﻌﺗ ﺐﻨﺠﺗ ﻞﺒﻗ كﺪﻳ ﻒﻴﻔﺠﺗ مﺰﻠﻳو ﺎﻬﻴﻠﻋ ءﺎﻤﻟا بﺎﻜﺴﻧا وأ ءﺎﻤ
.3 ءﺎﺑﺮﻬﻜﻟا ﺊﻳﺎﻬﻣ مﺪﺨﺘﺳا ئراﻮﻄﻟا تﻻﺎﺣ ﻲﻓو ،ﻪﺋﺎﻔﺧإ مﺪﻋو ﺎ ﻣود ﺔﻌﻳﺮﺳ ةرﻮﺼﺑ مﺪﺨﺘﺴﻤﻟا ءﺎﺑﺮﻬﻜﻟا ﺬﺧﺄﻣ ﺔﺣﺎﺗإ ﻦﻣ ﺪآﺄﺗ
.4 زﺎﻬﺠﻟا ﻦﻣ بﺮﻘﻟﺎﺑ ﺎﻬﻌﺿو مﺪﻋ مﺰﻠﻳو عﻮﻤﺸﻟا ﻞﺜﻣ ﺐﻬﻠﻟا ردﺎﺼﻣ ﻊﻴﻤﺟ ﻦﻋ ا ﺪﻴﻌﺑ زﺎﻬﺠﻟﺎﺑ ﻆﻔﺘﺣا.
.5 ﺪﻌﺑ ﻰﻠﻋ زﺎﻬﺠﻟﺎﺑ ﻆﻔﺘﺣا10ىﺮﺧﻷا مﺎﺴﺟﻷا ﻦﻣ ﻞﻗﻷا ﻰﻠﻋ ﻢﺳ . وأ ﺪﺋاﺮﺠﻟﺎﺑ ﺔﻳﻮﻬﺘﻟا تﺎﺤﺘﻓ ﺔﻴﻄﻐﺗ مﺪﻋ ﻰﻠﻋ صﺮﺣاو
.6 ﻣوقﺮﺒﻟا وأ ﺔﻳﺪﻋﺮﻟا ﻒﺻاﻮﻌﻟا ءﺎﻨﺛأ رﻮﺘﻜﻴﺟوﺮﺒﻟا مﺪﺨﺘﺴﺗ ﻻ ،ﻚﺘﻣﻼﺳ ﻞﺟأ ﻦ.
.7 ـﺑ ﺔﻴﺒﺴﻨﻟا ﺔﺑﻮﻃﺮﻟا رﺪﻘ ﺗ20 %~ 80%ﻒﺛﺎﻜﺗ نوﺪﺑ ،.
.8 ﺎﻬﻠﻳﺪﻌﺗو ﺎﻬﻜﻔﺑ ﻢﻘﺗ ﻼﻓ ،زﺎﻬﺠﻟا ﻲﻓ ﺔﺠﻣﺪﻣ ﺔﻳرﺎﻄﺒﻟا .ﻂﻘﻓ ﺪﻤﺘﻌﻣ ﺔﻧﺎﻴﺻ ﺰآﺮﻣ ﺔﻄﺳاﻮﺑ ﺔﻳرﺎﻄﺒﻟا لاﺪﺒﺘﺳا مﺰﻠﻳو.
.9 ﺔﻓﺮﻐﻟا ةراﺮﺣ ﺔﺟرد نأ ﻦﻣ ﺪآﺄﺗ ﻦﻴﺑ ﺎﻣ ﺔﻄﻴﺤﻤﻟا 5و 35ﺔﻳﻮﺌﻣ ﺔﺟرد .
.10 زﺎﻬﺠﻟا ﺮﻴﻣﺪﺗ ﻰﻟإ نﻮﻜﻤﻟا ﻒﺜﻜﺘﻟا يدﺆﻳ ﺪﻘﻓ ،ﺊﻓاد نﺎﻜﻣ ﻰﻟإ درﺎﺑ نﺎﻜﻣ ﻦﻣ ﻪﻠﻘﻧ لﺎﺣ ﻲﻓ زﺎﻬﺠﻟا ماﺪﺨﺘﺳا ﻞﺒﻗ ةﺮﺘﻓ ﺮﻈﺘﻧا
.11 ﺑ ﺞﺘﻨﻤﻟا ﻊﻣ ﻞﻣﺎﻌﺗﺔﻳﺎﻨﻌ .ﺔﻴﻧﺪﻌﻤﻟا ءﺎﻴﺷﻷا ﻦﻋ ا ﺪﻴﻌﺑ زﺎﻬﺠﻟﺎﺑ ﻆﻔﺘﺣاو ،ةدﺎﺤﻟا مﺎﺴﺟﻷﺎﺑ ﻪﺴﻣﻼﺗ ﺐﻨﺠﺗو.
.12 زﺎﻬﺠﻟا ﻒﻠﺗ ﻰﻟإ ضرﻷا ﻰﻠﻋ ﻪﻃﻮﻘﺳ وأ ﻪﻣﺎﻄﺗرا يدﺆﻳ ﺪﻘﻓ ،يﻮﺘﺴﻣ ﺢﻄﺳ ﻰﻠﻋ زﺎﻬﺠﻟا ﻊﺿ.
.13 نﺎﻤﻀﻟا ﻞﻄﺒﻳ ﻻإو ﻪﺋاﺰﺟأ ﻚﻓ وأ ﺞﺘﻨﻤﻟا طﺎﻘﺳإ مﺪﻋ ﺐﺠﻳ .ﺨﻤﻟ ﻚﺿﺮﻌﻳ ﺔﻴﻄﻏﻷا ﺔﻟازإ وأ ﺢﺘﻔﺑ مﺎﻴﻘﻟاو ﺔﻴﻟﺎﻌﻟا ﺔﻴﺘﻟﻮﻔﻟا ﺮﻃﺎ
.14 ﻊ ﻨﺼ ﻤﻟا ﻞﺒﻗ ﻦﻣ ﻂﻘﻓ ةﺮﻓﻮﺘﻤﻟا تﺎﻘﺤﻠﻤﻟا مﺪﺨﺘﺳا.
.15 ﺮﺧﺁ رﺎﻌﺷإ نود ىﺮﺧأ تﺎﻓﺎﺿإ وأ تاﺮﻴﻴﻐﺘﻟ مﺪﺨﺘﺴﻤﻟا ﻞﻴﻟدو ﺞﺘﻨﻤﻟا ﻦﻣ ﻞآ ﻊﻀﺨﻳ.
ﺔﺤﻔﺻ 1
Page 58

ﺗ
مﺪﺨﺘﺴﻤﻟا ﻞﻴﻟد
AR
ةﺰﻬﺟﺄﺑ ﺔﻳﺎﻨﻌﻟاو ﺔﻣﻼﺴﻟا تﺎﻣﻮﻠﻌﻣرﻮﺘﻜﻴﺟوﺮﺑ ﻮﻜﻴﺑ
.1 رﻮﺘﻜﻴﺟوﺮﺒﻟا تﺎﺳﺪﻌﻟ ةﺮﺷﺎﺒﻤﻟا ﺔﻬﺟاﻮﻤﻟا ﺐﻨﺠﺗو.
.2 ﻲﻌﻴﺒﻃ ﺮﻣأ ﻮهو ﻼﻴﻠﻗ ﻞﻴﻐﺸﺘﻟا ءﺎﻨﺛأ ﺞﺘﻨﻤﻟا اﺬه ﻦﺨﺴﻳ ﺪﻗ.
زﺎﻬﺠﻟا ﻒﻠﺗ ﻰﻟإ ىﺮﺧﻷا ﺔﺒﻳﺮﻐﻟا مﺎﺴﺟﻷاو رﺎﺒﻐﻟا تﺎﺌﻳﺰﺟ.
داﺪﻋﻹا نﺎﻜﻣ ﻲﻓ حﺎﺘﻤﻟا ﻲﺑﺮﻬﻜﻟا ﺪﻬﺠﻟا ﻊﻣ ﻖﻓاﻮﺘﻳ ﺔﻗﺎﻄﻟا دوﺰﻤﻟ ﻲﺑﺮﻬﻜﻟا ﺪﻬﺠﻟا . ﺪﻬﺠﻟا عﻮﻧ ﻊﻣ زﺎﻬﺠﻟا اﺬه ﻖﻓاﻮﺘﻳ
ةﺮﺘﻔﻟ ﺔﻌﻔﺗﺮﻤﻟا تاﻮﺻﻷا ﻰﻟإ عﺎﻤﺘﺳﻻا ﺐﺒﺴﺘﻳ ﺪﻗ
ﻚﻳﺪﻟ ﻊﻤﺴﻟا ﺔﺳﺎﺣ فﻼﺗإ ﻲﻓ ﺖﻗﻮﻟا ﻦﻣ ﺔﻠﻳﻮﻃ.
ةﺪﺣﻮﻟا ﻲﻠﻋ دﺪﺤﻤﻟا ﻲﺑﺮﻬﻜﻟا .
ﻊﻤﺴﻟا ﺔﺳﺎﺣ فﻼﺗإ ﺐﻨﺠ
:
ﺔﻠﻳﻮﻃ ةﺮﺘﻔﻟ ضﺮﻌﻟﺎﺑ صﺎﺧ رﺎﻌﺷإ
ﻮﺤﻧ موﺪﺗ ضﺮﻋ ةﺮﺘﻓ زﺎﻬﺠﻟﺎﺑ ﺔﻨﻤﻀﻤﻟا ﺔﻳرﺎﻄﺒﻟا ﻢﻋﺪﺗ150ﺔﻘﻴﻗد . رﺎﻴﺘﻠﻟ ﺊﻳﺎﻬﻣ ماﺪﺨﺘﺳﺎﺑ ﺢﺼﻨﻳ ،ﺔﻠﻳﻮﻃ ةﺮﺘﻔﻟ ضﺮﻌﻠﻟ
ﺔﻳرﺎﻄﺒﻟا ﻒﻌﺿ ﻰﻠﻋ ﺔﻟاﺪﻟا ﺔﻧﻮﻘﻳﻷا ﺾﻣﻮﺗ فﻮﺳ ،ﻞﻴﻐﺸﺘﻟا ﺔﻠﺻاﻮﻤﻟ ﺔﻔﻴﻌﺿ ﺔﻳرﺎﻄﺒﻟا ﺔﻗﺎﻃ نﻮﻜﺗ ﺎﻣﺪﻨﻋ) .( مﺰﻠﻳ
ﻊﻔﺗﺮﻤﻟا ﻪﺋادأ ﺐﺒﺴﺑ ﺮﻤﺘﺴﻤﻟا ماﺪﺨﺘﺳﻻا ﻊﻣ رﻮﺘﻜﻴﺟوﺮﺒﻟا ﻦﺨﺴﻳ نأ ﻲﻌﻴﺒﻄﻟا ﻦﻣ . ﺔﻠﻳﻮﻃ ةﺮﺘﻔﻟ رﻮﺘﻜﻴﺟوﺮﺒﻟا ﻞﻴﻐﺸﺗ ﺔﻟﺎﺣ ﻲﻓو
ةراﺮﺤﻟا ﺔﺟرد عﺎﻔﺗرا ﺔﻧﻮﻘﻳأ ﺮﻬﻈﺗ فﻮﺳ ،ةﺪﺋاﺰﻟا ﺔﻧﻮﺨﺴﻠﻟ ضﺮﻌﺘﻟاو) (ﺔﺷﺎﺸﻟا ﻰﻠﻋ . ﻊﺿو ﻲﻓ مﺎﻈﻨﻟا ﻞﺧﺪﻳو
.3 يدﺆﺗ ﺪﻘﻓ ،ةﺪﻳﺪﺸﻟا ﺔﺑﺮﺗﻷﺎﺑ ﻢﺴﺘﺗ ﺔﺌﻴﺑ ﻲﻓ زﺎﻬﺠﻟا ماﺪﺨﺘﺳا مﺪﻋ ﺐﺠﻳ
.4 ﻟا ضﺮﻌﺗ ﻻﺔﻴﻠﺧاﺪﻟا تﺎﻧﻮﻜﻤﻟا ﻒﻠﺘﺗ ﺪﻘﻓ ةﺪﻳﺪﺷ تازاﺰﺘها ﻰﻟإ زﺎﻬﺠ.
.5 ﻖﻓﺮﻤﻟا ﺔﻗﺎﻄﻟا لﻮﺤﻣ مﺪﺨﺘﺳا)ﺔﻴﻨﻔﻟا تﺎﻧﺎﻴﺒﻟا ﺮﻈﻧا :( نﺎآ اذإ ﺎﻣ ﻖﻘﺤﺗ
ددﺮﺘﻤﻟا.
ﺷﺔﻧﻮﻘﻳﻷا رﻮﻬﻇ ءﺎﻨﺛأ ﺞﺘﻨﻤﻟا ﻦﺤ.
ﻴﺋﺎﻘﻠﺗ داﺪﻌﺘﺳﻻاﺎ.
ﺔﺤﻔﺻ 2
Page 59

ﻞﻴﻟدمﺪﺨﺘﺴﻤﻟا
ﺔﻴﻟارﺪﻔﻟا تﻻﺎﺼﺗﻻا ﺔﻨﺠﻟ ﺪﻋاﻮﻘﻟ ﺔﻘﺑﺎﻄﻤﻟا نﺎﻴﺑ)FCC:(
ﻢﻗر ﺪﻨﺒﻟا ﻊﻣ زﺎﻬﺠﻟا اﺬه ﻖﺑﺎﻄﺘﻳ15 ﺔﻴﻟارﺪﻔﻟا تﻻﺎﺼﺗﻻا ﺔﻨﺠﻟ ﺪﻋاﻮﻗ ﻦﻣ )FCC .( ﻪﻠﻴﻐﺸﺗ ﻊﻀﺨﻳو
ﻦﻴﻴﻟﺎﺘﻟا ﻦﻴﻃﺮﺸﻠﻟ) :1 ( ،رﺎﺿ ﻞﺧاﺪﺗ ثوﺪﺣ ﻲﻓ زﺎﻬﺠﻟا اﺬه ﺐﺒﺴﺘﻳ ﻻأ)2 ( زﺎﻬﺠﻟا اﺬه ﻞﺒﻘﻳ نأ ﺐﺠﻳ
ﺒﻘﺘﺳا ﻢﺘﻳ ﻞﺧاﺪﺗ يأﻪﻴﻓ بﻮﻏﺮﻤﻟا ﺮﻴﻏ ﻞﻴﻐﺸﺘﻟا ﻲﻓ ﺐﺒﺴﺘﻳ ﺪﻗ يﺬﻟا ﻞﺧاﺪﺘﻟا ﻚﻟذ ﻲﻓ ﺎﻤﺑ ،ﻪﻟﺎ.
ﺔﻋﻮﻤﺤﻤﻟا ﻦﻣ ﻲﻤﻗﺮﻟا زﺎﻬﺠﻟا دوﺪﺤﻟ ﻊﻀﺨﻳ ﻪﻧأ ﺢﻀﺗاو زﺎﻬﺠﻟا اﺬه رﺎﺒﺘﺧا ﻢﺗ ﺪﻗB ءﺰﺠﻟا ﺐﺟﻮﻤﺑ ،
ﻮﻳداﺮﻟا تﻻﺎﺼﺗﻻ رﺎﺿ ﻞﺧﺪﺗ ثوﺪﺣ ﻲﻓ ﺐﺒﺴﺘﻳ ﺪﻘﻓ.
ﺔﻟوﺎﺤﻤﺑ مﺪﺨﺘﺴﻤﻟا ﺢﺼﻨﻨﻓ ،ﻪﻠﻴﻐﺸﺗ فﺎﻘﻳإو زﺎﻬﺠﻟا ﻞﻴﻐﺸﺗ ﻖﻳﺮﻃ ﻦﻋ ﻩﺪﻳﺪﺤﺗ ﻦﻜﻤﻳ يﺬﻟاو ،نﻮﻳﺰﻔﻴﻠﺘﻟا وأ ﻮﻳداﺮﻟا زﺎﻬﺟ لﺎﺒﻘﺘﺳا
ﺔﻨﻴﻌﻣ ةﺄﺸﻨﻣ ﻲﻓ ﻞﺧاﺪﺗ ثوﺪﺣ مﺪﻋ نﺄﺸﺑ نﺎﻤﺿ ﺪﺟﻮﻳ ﻼﻓ ،ﻚﻟذ ﻊﻣو .ﻟﺎﺑ زﺎﻬﺠﻟا اﺬه ﺐﺒﺴﺗ اذإو ﻊﻣ ﻞﺧاﺪﺗ ثوﺪﺣ ﻲﻓ ﻞﻌﻔ
ﺔﻴﻟﺎﺘﻟا تاءاﺮﺟﻹا ﻦﻣ ﺮﺜآأ وأ ﺪﺣاو ذﺎﺨﺗا ﺮﺒﻋ ﻞﺧاﺪﺘﻟا ﺢﻴﺤﺼﺗ:
ﺮﻴﻏ زﺎﻬﺠﻟا ﻲﻓ ﻢﺘﻳ ﻞﻳﺪﻌﺗ وأ ﺮﻴﻴﻐﺗ يأ نﺄﺑ كﺮﻳﺬﺤﺗ ﻢﺗ ﺪﻘﻟ ﻞﻄﺒﻳ ﺪﻗ زﺎﻬﺠﻟا ﻖﻓاﻮﺗ ﻦﻋ لوﺆﺴﻤﻟا فﺮﻄﻟا ﻞﺒﻗ ﻦﻣ ﺔﺣاﺮﺻ ﺪﻤﺘﻌﻣ
ةدﺎﻋﺈﺑ مﺎﻴﻘﻟا ﻰﺟﺮﻳ ،ﺞﺘﻨﻤﻟا ﻦﻣ ﺺﻠﺨﺘﻟا ﺖﻗو نﺎﺣ اذإ
ﺔﻴﻠﺤﻤﻟا تﺎﻴﻓﺎﻨﻟا ﻲﻓ ﻦﺤﺸﻠﻟ ﺔﻠﺑﺎﻘﻟا تﺎﻳرﺎﻄﺒﻟاو تﺎﻳرﺎﻄﺒﻟا !
زﺎﻬﺠﻟا اﺬه ﻞﻴﻐﺸﺗ ﻲﻓ ﻚﺘﻄﻠﺳ.
ﺔﻨﻜﻤﻤﻟا تﺎﻧﻮﻜﻤﻟا ﺔﻓﺎآ ﺮﻳوﺪﺗ . ﻦﻣ ﺺﻠﺨﺘﻟا ﻢﺘﻳ ﻻأ ﺐﺠﻳ
ﺔﺌﻴﺒﻟا ﺔﻳﺎﻤﺣ ﻲﻓ ةﺪﻋﺎﺴﻤﻟا ﺎﻨﻨﻜﻤﻳ ﺎ ﻌﻣ.
لﺰﻨﻤﻟا ﻞﺧاد. ،تﺎﻤﻴﻠﻌﺘﻠﻟ ﺎ ﻘﺒﻃ مﺪﺨﺘﺳاو ﻪﺒﻴآﺮﺗ ﻢﺘﻳ ﻢﻟ اذإو ،ﻮﻳداﺮﻟا ددﺮﺗ ﺔﻗﺎﻃ عﺎﻌﺷإو ماﺪﺨﺘﺳاو ﺪﻴﻟﻮﺗ ﻰﻠﻋ زﺎﻬﺠﻟا اﺬه ﻞﻤﻌﻳ
دﺎﻋإ ﻰﺟﺮﻳﺔﻴﻠﺤﻤﻟا ﺮﻳوﺪﺘﻟا ةدﺎﻋإ ﺔﻄﻘﻧ ﻲﻓ ﺎهﺮﻳوﺪﺗ ة.
15ﺔﻴﻟارﺪﻔﻟا دﺎﺤﺗﻻا ﺔﻨﺠﻟ ﺪﻋاﻮﻗ ﻦﻣ . ﻻﺎﺣ ﻲﻓ رﺎﻀﻟا ﻞﺧﺪﺘﻟا ﻦﻣ ﺔﻟﻮﻘﻌﻤﻟا ﺔﻳﺎﻤﺤﻟا ﺮﻴﻓﻮﺘﻟ دوﺪﺤﻟا ﻩﺬه ﻢﻴﻤﺼﺗ ﻢﺗ ﺐﻴآﺮﺘﻟا ت
AR
- لﺎﺒﻘﺘﺳﻻا ﻲﺋاﻮه نﺎﻜﻣ ﺮﻴﻴﻐﺗ وأ ﻪﻴﺟﻮﺗ ةدﺎﻋإ.
- ﻌﺑ زﺎﻬﺠﻟا ﻚﻳﺮﺤﺗلﺎﺒﻘﺘﺳﻻا زﺎﻬﺟ ﻦﻋ ا ﺪﻴ.
- ﺎﻬﺑ لﺎﺒﻘﺘﺳﻻا زﺎﻬﺟ ﻞﻴﺻﻮﺗ ﻢﺗ ﻲﺘﻟا ﻚﻠﺗ ﻦﻋ ﺔﻔﻠﺘﺨﻣ ﺔﻴﺋﺎﺑﺮﻬآ ةﺮﺋاﺪﺑ ﻞﺻﻮﻣ ﻲﺟرﺎﺧ ﺔﻗﺎﻃ ﺬﻔﻨﻤﺑ زﺎﻬﺠﻟا ﻞﺻو.
- نﻮﻳﺰﻔﻴﻠﺗ ﺔﻧﺎﻴﺻ ﻲﻨﻓ وأ ﻞﻴآﻮﻟا ﺮﺸﺘﺳا/ﺔﻴﻓﺎﺿإ تﺎﺣاﺮﺘﻗا ﻰﻠﻋ لﻮﺼﺤﻠﻟ ةﺮﺒﺧ يذ ﻮﻳدار.
ﺔﺤﻔﺻ 3
Page 60

AR
مﺪﺨﺘﺴﻤﻟا ﻞﻴﻟد
1
4
5
7
8
9
12
12
13
14
تﺎﻳﻮﺘﺤﻤﻟا لوﺪﺟ
ﺔﻳﺎﻤﺤﻟا رﺎﻌﺷإ ،ﺞﺘﻨﻤﻟا لﻮﺣ
ﻮﻳﺪﻴﻔﻟا تﻼﺧﺪﻤﻟ ﻲﺟرﺎﺧ رﺪﺼﻣ ﻦﻣ ضﺮﻌﻟا
HDMI, VGA
ةﻮﺒﻌﻟا ﻲﻓ ﺔﻴﻟﺎﺘﻟا ﺮﺻﺎﻨﻌﻟا دﻮﺟو ﻦﻣ ﺪآﺄﺘﻟا ﻰﺟﺮﻳ:
ﺟﻷاو ﻲآﺬﻟا ﻒﺗﺎﻬﻟا ﺔﻴﺣﻮﻠﻟا ةﻮﻬ
ﺔﻴﺟرﺎﺨﻟا لﻮﻤﺤﻤﻟا ةﺰﻬﺟأ ﻦﺤﺷ
ﺎﻬﻠﺣ ﺔﻟوﺎﺤﻣو لﺎﻄﻋﻷا فﺎﺸﺘآا
ةﻮﺒﻌﻟا تﺎﻳﻮﺘﺤﻣ
زﺎﻬﺠﻟا ﻰﻠﻋ فﺮﻌﺘﻟا
ﻞﻤﻌﻟا ﻲﻓ عوﺮﺸﻟا
ةﻮﺒﻌﻟا تﺎﻳﻮﺘﺤﻣ
تﺎﻔﺻاﻮﻤﻟا
رﻮﺘﻜﻴﺟوﺮﺑ Pico
ﺔﻗﺎﻄﻟا لﻮﺤﻣ
لاﺪﺒﺘﺳﻼﻟ ﻞﺑﺎﻗ ءﺎﺑﺮﻬآ ﺲﺑﺎﻗ
ﺪﻌ ﺑ ﻦﻋ ﻢﻜﺤﺘﻟا ةﺪﺣو
ﻞﺒآHDMI) ﻨﻟا ﻦﻣ عﻮA ﻰﻟإ A(
ﻞﺑﺎآMHL) زاﺮﻃHDMI A ﻲﻟإ USB D (
ﻞﻤﺣ ﺔﺒﻴﻘﺣ
مﺪﺨﺘﺴﻤﻟا ﻞﻴﻟد
ﺔﺤﻔﺻ 4
Page 61

ﺔ
ﻖﻓاﻮﻣ
)
(
ﺔ
ﻞﻴﻟدمﺪﺨﺘﺴﻤﻟا
زﺎﻬﺠﻟا ﻰﻠﻋ فﺮﻌﺘﻟا
رﻮﺘﻜﻴﺟوﺮﺒﻟا ﺔﺳﺪﻋ
ﺔﻳﻮﻬﺘﻟا
ضﺮﻌﻟا زﺎﻬﺟ
تﻮﺻ ﺮﺒﻜﻣ
ﺮﻤﺘﺴﻤﻟا رﺎﻴﺘﻟا ﻞﺧد
ﺖﺤﺗ ﺔﻌﺷﻷﺎﺑ ﻞﺼﺘﻳ لﺎﺒﻘﺘﺳا زﺎﻬﺟ
ﺰﻴآﺮﺗ عارذ
ﺢﻴﺗﺎﻔﻤﻟا ﺔﺣﻮﻟ
ءاﺮﻤﺤﻟا
ﻤﺋﺎﻘﻟا
رﺎﺴﻳ / عﺎﻔﺗرﻻا ﻲﻟإ ضﺮﻌﻟا ﺔﺒﺴﻧ ﻦﻴﻤﻳ / ﺪﻬﺸﻤﻟا ﻂﻤﻧ
رﺪﺼﻤﻟا)رﺎﺧ ﻮﻳﺪﻴﻓ ﻞﺧﺪﻣﻲﺟ(
ﻞﻔﺳأ
ﺔﻳﻮﻬﺘﻟا
ﺬﻔﻨﻣVGA
ﻞﺻﻮﻣHDMI/MHL
ﺔﻠﺻاوUSB
تﺎﻋﺎﻤﺳ ﺔﻠﺻو
ﻰﻠﻋأ
جوﺮﺨﻟا
ﻗﺎﻄﻟا
ﻢﺋاﻮﻘﻟا ﻲﺛﻼﺛ ﺲﺒﻘﻣ
ﻒﺗﺎﻬﻟا ﻦﺤﺸﻟلﻮﻤﺤﻤﻟا
ﻢﻜﺤﺘﻟا ﺔﺣﻮﻟ
AR
ﺔﺤﻔﺻ 5
Page 62

مﺪﺨﺘﺴﻤﻟا ﻞﻴﻟد
ﺪﻌ ﺑ ﻦﻋ ﻢﻜﺤﺘﻟا ةﺪﺣو
ﺔﻗﺎﻄﻟا
عﻮﻄﺴﻟا
تﺎﺳﺪﻌﻟا
جوﺮﺨﻟا
ﻞﻔﺳأ
تﻮﺼﻟا ﺾﻔﺧ رز
ﻦﻴﻤﻳ / ﺪﻬﺸﻤﻟا ﻂﻤﻧ
AR
رﺪﺼﻤﻟا
ﺪﻬﺸﻤﻟا ﻂﻤﻧ
ﺔﻤﺋﺎﻘﻟا
رﺎﺴﻳ / عﺎﻔﺗرﻻا ﻲﻟإ ضﺮﻌﻟا ﺔﺒﺴﻧ
ﻖﻓاﻮﻣ
تﻮﺼﻟا ﻊﻓر رز
ﻰﻠﻋأ
ﺪﻌﺑ ﻦﻋ ﻢﻜﺤﺘﻟا ﺔﻳرﺎﻄﺑ ﺐﻴآﺮﺗ
ﺔﻳرﺎﻄﺒﻟا ﻞﻣﺎﺣ ﻞﺧدأ.
بﺮﺴﺗ يدﺆﻳو ،ﻖﻳﺮﺣ وأ ﺔﺑﺎﺻإ ﺐﺒﺴﻳ ﺎﻤﻣ لﺎﻌﺘﺷﻻا وأ رﺎﺠﻔﻧﻻا وأ ةﺪﺋاﺰﻟا ﺔﻧﻮﺨﺴﻟا ﻰﻟإ ﺔﻳرﺎﻄﺒﻠﻟ ﻢﻴﻠﺴﻟا ماﺪﺨﺘﺳﻻا مﺪﻋ يدﺆﻳ
ةﺮﺷﺎﺒﻤﻟا ﺲﻤﺸﻟا ﺔﻌﺷأ ﻰﻟإ ﺪﻌﺑ ﻦﻋ ﻢﻜﺤﺘﻟا ةﺪﺣو ضﺮﻌﺗ ﻻ.
ﺔﻠﻳﻮﻃ ةﺮﺘﻔﻟ ﺪﻌﺑ ﻦﻋ ﻢﻜﺤﺘﻟا ةﺪﺣو ماﺪﺨﺘﺳا مﺪﻋ ﺪﻨﻋ ﺔﻳرﺎﻄﺒﻟا عﺰﻧا.
.1 ﻣﺎﺣ ﻞﻣﺎﺣ ﺔﻟازﺈﺑ ﻢﻗﻞﻣﺎﺣ ﺐﺤﺳو مﺰﻌﺑ قﻼﻃﻹا ﺐﻧﺎﺣ ﻲﻠﻋ راﺮﻤﺘﺳﻻﺎﺑ ﻂﻐﻀﻟﺎﺑ ﺔﻳرﺎﻄﺒﻟا ﻞ
ﺔﻳرﺎﻄﺒﻟا .
.2 ﺔﻴﻠﺧ ﺔﻳرﺎﻄﺑ ﻞﺧدأ ﺔﻴﻧﺪﻌﻤﻟا ﺔﻳﻮﻠﺨﻟاCR2025 ﺎ ﻘﻓو ﺢﻴﺤﺻ ﻞﻜﺸﺑ ﺔﻴﺒﻄﻘﻟا ةاذﺎﺤﻤﺑ ﻢﻗو
ﺔﻳرﺎﻄﺒﻟا ﻞﻣﺎﺣ ﻲﻠﻋ ةدﻮﺟﻮﻤﻟا تﺎﻣﻼﻌﻟا.
ﺔﻈﺣﻼﻣ: ،ﻲﻟوﻷا ةﺮﻤﻠﻟ ﺪﻌﺑ ﻦﻋ ﻢﻜﺤﺘﻟا ﺔﻴﺻﺎﺧ ﻚﻣاﺪﺨﺘﺳا ﺪﻨﻋ رو ﺪﺟﻮﻳﺔﻳرﺎﻄﺒﻟا ﻦﻴﺑ ﺔﻴﻜﻴﺘﺳﻼﺑ ﺔﻗ
ﻞﺻﻮﻤﻟا ﺎﻬﻓﺮﻃو .ماﺪﺨﺘﺳﻻا ﻞﺒﻗ ﺔﻗرﻮﻟا ﺔﻟازﺈﺑ ﻢﻗ .
.3
ﻜﺤﺘﻟا ةﺪﺣو ﻒﻠﺗ ﻰﻟإ ﺔﻳرﺎﻄﺒﻟاﺪﻌﺑ ﻦﻋ ﻢ.
ءﺎﻤﻟا وأ ﻖﻳﺮﺤﻟا ﻰﻟإ ﺔﻳرﺎﻄﺒﻟا ضﺮﻌﺗ ﻻو.
رﻮﻔﻟا ﻰﻠﻋ ﺔﻏرﺎﻔﻟا ﺔﻳرﺎﻄﺒﻟا لاﺪﺒﺘﺳا ﺐﺠﻳو.
:
ﺮﻳﺬﺤﺗ
ﺔﺤﻔﺻ 6
Page 63

ﻞﻴﻟدمﺪﺨﺘﺴﻤﻟا
ﺪﻌﺑ ﻦﻋ ﻢﻜﺤﺘﻟا زﺎﻬﺠﺑ دوﺰﻣ ﻞﻴﻐﺸﺘﻟا قﺎﻄﻧ
FT
ﺎ ﻔﻠﺘﺨﻣ نﺎآ اذإ ﻚﺘﻟود.
ةﺮﻣ لوﻷ ﺎﻬﻣاﺪﺨﺘﺳا . ﻦﻣ بﺮﻘﻳ ﺎﻣ ﻦﺤﺸﻟا راﺮﻜﺗ قﺮﻐﺘﺴﻴﺳ4
مﺪﺨﺘﺴﻣ ﺮﻴﻏ)ﺔﻗﺎﻄﻟا ﻞﻴﻐﺸﺗ فﺎﻘﻳإ .( لﻮﺤﻣ ﻦﻣ فﺮﻃ ﻞﻴﺻﻮﺘﺑ ﻢﻗAC ﺲﺒﻘﻣ ﻲﻟإ دوﺰﻤﻟا DC IN جﺮﺨﻤﻟ ﺮﺧﻵا فﺮﻄﻟاو
ﻦﺤﺸﻟا ءﺪﺒﻟ ﺔﻗﺎﻃ.
ﺲﺑﺎﻗ لاﺪﺒﺘﺳا)ﻻاﺎهﺮﻴﻏو ةﺪﺤﺘﻤﻟا تﺎﻳﻻﻮﻟاو ﻲﺑوروﻷا دﺎﺤﺗ ( ﻲﻓ ﺔﻗﺎﻄﻟا جﺮﺨﻣ عﻮﻧ ﻊﻣ ﻖﻓاﻮﺘﻳ يﺬﻟا ددﺮﺘﻤﻟا رﺎﻴﺘﻟا لﻮﺤﻣ
داﺪﻌﺘﺳﻻا ﻊﺿو: ﻞﻴﻐﺸﺘﻟ ةﺪﺣاو ﺔﻴﻧﺎﺛ ةﺪﻤﻟ ﺔﻗﺎﻄﻟا رز ﻲﻠﻋ ﻂﻐﺿا / ﺔﺣاﺮﺘﺳا ةﺮﺘﻔﻟ ضﺮﻌﻟا زﺎﻬﺟ حﺎﺒﺼﻣ ﻞﻴﻐﺸﺗ فﺎﻘﻳﻹ
ﺔﻇﻮﺤﻠﻣ: ﻲﻄﻴﻄﺨﺘﻟا ﻢﺳﺮﻟا ﻦﻋ ﺎ ﻠﻴﻠﻗ ﻲﻠﻌﻔﻟا ﻞﻴﻐﺸﺘﻟا قﺎﻄﻧ ﻒﻠﺘﺨﻳ ﺪﻗ . ﺪﻌﺒﺘﺴﺗ وأ ﺔﻔﻴﻌﻀﻟا ﺔﻳرﺎﻄﺒﻟا ﻞﻠﻘﺗ ،ﻚﻟذ ﻲﻠﻋ ةوﻼﻋ
ﺞﺘﻨﻤﻟا ﻦﺤﺷ
لﻮﻤﺤﻤﻟا .ضﺮﻌﻟا زﺎﻬﺟ ﻦﺤﺷ ءﺎﺟﺮﺑ ةﺪﻤﻟ 8 ﻞﺒﻗ تﺎﻋﺎﺳ
تﺎﻋﺎﺳ . ضﺮﻌﻟا زﺎﻬﺟ نﻮﻜﻳ ﺎﻣﺪﻨﻋ ﻂﻘﻓ ﺔﻳرﺎﻄﺒﻟا ﻦﺤﺷ ﻢﺘﻴﺳ
ﻦﺤﺸﻟا.
ﺪﻌﺑ ﻦﻋ ﻢﻜﺤﺘﻟا زﺎﻬﺟ ﻦﻣ ﻞﻴﻐﺸﺘﻟا قﺎﻄﻧ .
ﻞﻤﻌﻟا ﻲﻓ عوﺮﺸﻟا
ماﺪﺨﺘﺳﻼﻟ ضﺮﻌﻟا زﺎﻬﺟ ﻲﻓ ﺔﺠﻣﺪﻣ ﺮﻤﻴﻟﻮﺑ مﻮﻴﺜﻴﻟ ﺔﻳرﺎﻄﺑ ﺪﺟﻮﺗ
ﻲﺋﻮﻀﻟا ﺮﺷﺆﻤﻟا ﻦﺤﺷ
ﺔﻠﻤﺘﻜﻣ ﺔﻳرﺎﻄﺒﻟا نﻮﻜﺗ ﺎﻣﺪﻨﻋ ﺮﻀﺧﻷا ﻰﻟإ لﻮﺤﺘﻳو ﻲﻟﺎﻘﺗﺮﺒﻟا نﻮﻠﻟﺎﺑ ﻞﻴﻐﺸﺘﻟا رز ﻰﻠﻋ ﻲﺋﻮﻀﻟا ﺮﺷﺆﻤﻟا ءﻲﻀﻳ ،ﻦﺤﺸﻟا ءﺎﻨﺛأ
ﻦﻴﺘﻳﺎﺛ ةﺪﻤﻟ ﻞﻔﺳﻸﻟ ﺔﻗﺎﻄﻟا ﻞﻳﺪﺒﺗ حﺎﺘﻔﻣ ﻰﻠﻋ ﻂﻐﺿا ،ضﺮﻌﻟا زﺎﻬﺟ ﻞﻴﻐﺸﺗ فﺎﻘﻳﻹ.
ضﺮﻌﻟا زﺎﻬﺟ ﻞﻴﻐﺸﺘﻟ ﻦﻴﺘﻴﻧﺎﺛ ةﺪﻤﻟ ﺔﻗﺎﻄﻟا رز ﻰﻠﻋ ﻂﻐﺿا.
مﺎﻈﻨﻟا ﺪﻴﻬﻤﺗ ةدﺎﻋإ ﺖﻗوو ﺔﻳرﺎﻄﺒﻟا ﻲﻠﻋ ظﺎﻔﺤﻠﻟ ةﺮﻴﺼﻗ) .ءﻮﻀﻠﻟ ﺚﻋﺎﺒﻟا ﻲﺋﺎﻨﺜﻟا مﺎﻤﺼﻟا ﻲﻘﺒﻳ LED ﺪﻴﻗ
داﺪﻌﺘﺳﻻا ﻊﺿو ﻲﻓ ضﺮﻌﻟا زﺎﻬﺟ نﻮﻜﻳ ﺎﻣﺪﻨﻋ ﻞﻴﻐﺸﺘﻟا(.
AR
ﻐﺸﺗﻞﻴ/رﻮﺘﻜﻴﺟوﺮﺒﻟا ﻞﻴﻐﺸﺗ فﺎﻘﻳإ
ﺔﺤﻔﺻ 7
Page 64

مﺪﺨﺘﺴﻤﻟا ﻞﻴﻟد
AR
ﻓﺎﺴﻤﻠﻟ ﺎ ﻘﻓو ةرﺆﺒﻟا ﻂﺒﺿ ﺔ
راﺪﺟ ﻮﺤﻧ ﻪﻬﻴﺟﻮﺗ ﻊﻣ يﻮﺘﺴﻣ ﺢﻄﺳ ﻲﻠﻋ ضﺮﻌﻟا زﺎﻬﺟ ﻊﺿﻮﺑ ﻢﻗ
ﻔﺳﻷ وأ ﻰﻠﻋﻷ ةرﺆﺒﻟا ﺔﻠﺠﻋ عارز ﺮﻳوﺪﺗ ﻖﻳﺮﻃ ﻦﻋ ةرﺆﺒﻟا ﻂﺒﺿا ﻞ
ﺔﻌﻃﺎﺳو ﺔﺤﺿاو ةرﻮﺻ ﻰﻠﻋ لﻮﺼﺤﻠﻟ.
ضﺮﻌﻟا زﺎﻬﺟ ﺖﺤﺗ ﻢﺋاﻮﻘﻟا ﻲﺛﻼﺜﻟا .
ضﺮﻋ ﺔﺷﺎﺷ وأ .ﻲﻠﻳ ﺎﻤآ ﻲﺿﺮﻌﻟا ﻢﺠﺤﻟاوﺔﻴﺿﺮﻌﻟا ﺔﻓﺎﺴﻤﻟا نﻮﻜﺗ :
ﺔﻓﺎﺴﻤﻟا :50 ﻢﺳ ~ 425ﻢﺳ ) 20" ~ 167" (
ةرﻮﺼﻟا ﻢﺠﺣ :36 ﻢﺳ ~ 305 ﻢﺳ )14" ~ 120"(
ﺔﻇﻮﺤﻠﻣ : ﻞﺟرﻷا ﻲﺛﻼﺛ ﻞﻣﺎﺣ ماﺪﺨﺘﺳا)ﻦﻤﻀﺘﻣ ﺮﻴﻏ (ﺮﻣﻷا مﺰﻠﻳ ﺎﻣﺪﻨﻋ ﺔﺿوﺮﻌﻤﻟا ةرﻮﺼﻟا عﺎﻔﺗرا ةدﺎﻳﺰﻟ . ﺲﺒﻘﻤﻟا ﺪﺟﻮﻳ
ﻮﻳﺪﻴﻔﻟا تﻼﺧﺪﻤﻟ ﻲﺟرﺎﺧ رﺪﺼﻣ ﻦﻣ ضﺮﻌﻟا
ﻞﺧﺪﻤﻟا رﺪﺼﻣ رﺎﻴﺘﺧﻻ ضﺮﻌﻟا زﺎﻬﺠﺑ رﺪﺼﻤﻟا حﺎﺘﻔﻣ ﻲﻠﻋ ﻂﻐﺿاو ﺐﺳﺎﻨﻤﻟا ﻞﺑﺎﻜﻟا ماﺪﺨﺘﺳﺎﺑ ضﺮﻌﻟا .
ﻠﻋ ضﺮﻌﻟا زﺎﻬﺟ ﻲﻓ ﺔﻨﻤﻀﻣ ةدﺪﻌﺘﻣ ﺔﻬﺟاو ﺪﺟﻮﻳﻲﻔﻠﺨﻟا ﺐﻧﺎﺠﻟا ﻲ . زﺎﻬﺟ ﻲﻟإ ﻲﺟرﺎﺨﻟا ﻮﻳﺪﻴﻔﻟا ﻞﺧﺪﻣ رﺪﺼﻣ ﻞﻴﺻﻮﺗ ﻚﻨﻜﻤﻳ
ﺔﺤﻔﺻ 8
Page 65

ﻞﻴﻟدمﺪﺨﺘﺴﻤﻟا
HDMI
ةرﺎﺷﻹا رﺪﺼﻤﺑ ضﺮﻌﻟا زﺎﻬﺠﺑHDMIﻲﺟرﺎﺨﻟا . ﻰﻟإ ﺔﺷﺎﺸﻟا ﺮﻴﻐﺘﺗ
ﻞﺑﺎآ مﺪﺨﺘﺳاHDMI ﺬﻔﻨﻣ ﻞﻴﺻﻮﺘﻟ HDMI ﺔﻴﻔﻠﺨﻟا ﺔﺣﻮﻠﻟا ﻰﻠﻋ
رﺪﺼﻣHDMIﻞﻴﺻﻮﺘﻟا ﺪﻌﺑ ﺎ ﻴﺋﺎﻘﻠﺗ .
AR
VGA
ﻢﻜﺤﺘﻟا ﺔﺣﻮﻟ وأ ﺪﻌﺑ ﻦﻋ ﻢﻜﺤﺘﻟا زﺎﻬﺟ ﻲﻠﻋ رﺪﺼﻤﻟا رز ﻲﻠﻋ ﻂﻐﺿا
ةرﺎﺷإ رﺪﺼﻣ ﻲﻟإ ضﺮﻌﻟا زﺎﻬﺟVGAﻲﺟﺎﺨﻟا . ،ﻞﻴﺻﻮﺘﻟا ﺪﻌﺑ
ﻞﺑﺎآ مﺪﺨﺘﺳاVGA ﺬﻔﻨﻣ ﻞﻴﺻﻮﺘﻟ VGA ﻦﻣ ﺔﻴﻔﻠﺨﻟا ﺔﺣﻮﻠﻟا ﻲﻠﻋ
رﺪﺼﻣ رﺎﻴﺘﺧﻻVGA .
VGAﺔﻴﺳﺎﻴﻘﻟا ﺔﻋﻮﻤﺠﻤﻟا ﻲﻓ ﻦﻤﻀﺘﻣ ﺮﻴﻏ .
ﺔﻈﺣﻮﻠﻣ : ﻞﺑﺎآ
ﺔﺤﻔﺻ 9
Page 66

مﺪﺨﺘﺴﻤﻟا ﻞﻴﻟد
AR
ﻂﻐﺿا ﻖﻓاﻮﻣ ﺮﻌﻟ ◎ ض تارﺎﻴﺨﻟا.
ﺔﻤﺋﺎﻗ ﻲﻠﻋ ﻂﻐﺿإ/ﻞﻴﻐﺸﺘﻟا تاداﺪﻋإ ﻲﻠﻋ لﻮﺧﺪﻠﻟ ﺪﻌﺑ ﻦﻋ ﻢﻜﺤﺘﻟا زﺎﻬﺟ وأ ﻢﻜﺤﺘﻟا ﺔﺣﻮﻟ ﻲﻠﻋ .
.1 عﺎﻔﺗرﻻا ﻰﻟإ ضﺮﻌﻟا ﺔﺒﺴﻧ
ﻖﻴﺴﻨﺗPan & Scan : ﺔﺷﺎﺷ ﺐﺳﺎﻨﺘﻟ ةرﻮﺼﻟا ﻢﻴﺠﺤﺗ ﻢﺘﻳ16:9 .
ﺔﺒﺴﻨﺑ16:9ﺔﺷﺎﺸﻟا ﻲﻠﻋ .
ﻂﻐﺿا◎/تارﺎﻴﺨﻟا ضﺮﻌﻟ ﻖﻓاﻮﻣ .
ﺔﺷﺎﺷ
رﺪﺼﻤﻟا
ﺔﺷﺎﺷ
ضﺮﻌﻟا
(1
(2 ﻖﻴﺴﻨﺗLetterbox :ﺔﻴﻠﺻﻷا عﺎﻔﺗرﻻا ﻲﻟإ ضﺮﻌﻟا ﺔﺒﺴﻨﺑ ةرﻮﺼﻟا ضﺮﻋ ﻢﺘﻳ .
عﺎﻔﺗرا ﻲﻟإ ضﺮﻋ ﺔﺒﺴﻨﺑ ﻮﻳﺪﻴﻔﻟا ﻒﻠﻣ نﻮﻜﻳ ﺎﻣﺪﻨﻋ 4:3 ﺔﻔﻴﻇﻮﻟا ﻩﺬه ﻚﻨﻜﻤﺘﺳ ، ةرﻮﺼﻟا رﻮﻬﻇ ﺔﻴﻔﻴآ ﻞﻳﺪﻌﺗ ﻦﻣ
عﺎﻔﺗرﻻا ﻰﻟإ ضﺮﻌﻟا ﺔﺒﺴﻧ4:3
ﻞﺋﺎﺳﺮﻟا)16:9(
ﻲﺋﻮﺿ ﺢﺴﻣو ﻚﻳﺮﺤﺗ(16:9)
ﺔﺒﺴﻧ تاداﺪﻋﻹ ﺢﻴﺿﻮﺗعﺎﻔﺗرﻻا ﻲﻟإ ضﺮﻌﻟا :
.2 عﻮﻄﺴﻟا
ﺔﻗﺎﻄﻟا كﻼﻬﺘﺳاو ﺔﺌﻴﺒﻠﻟ ﺎ ﻘﻓو عﻮﻄﺴﻟا ﺔﺟرد ﺮﻴﻴﻐﺘﺑ ﻚﻟ ﺢﻤﺴﻳ .
ﺔﺤﻔﺻ 10
Page 67

ﻦﻳﺎﺒﺗو نﻮﻟ و عﻮﻄﺳ ﻊﻣ ﺺﻨﻟا ةءاﺮﻗ وأ ،رﻮﺻ ﺢﺋاﺮﺷ ضﺮﻋ ،ﻢﻠﻴﻓ ةﺪهﺎﺸﻤﻟ ﻲﻟﺎﺜﻣ ﻊﺿﻮﻟا ﺪﻳﺪﺤﺗ ﻚﻟ ﺢﻴﺘﺗ
ﻞﻴﻟدمﺪﺨﺘﺴﻤﻟا
ﺔﻗﺎﻄﻟا ﻲﻠﻋ .
ﺔﻗﺎﻄﻟا لﻮﺤﻤﺑ ﻪﻠﻴﻐﺸﺗ ﻢﺘﻳ ﺎﻣﺪﻨﻋ ﻦ ﺴﺤ ﻤﻟا ﻊﺿﻮﻟا ﻲﻟإ ﺄ ﻴﺋﺎﻘﻠﺗ رﻮﺘﻜﻴﺟوﺮﺒﻟا لﻮﺤﺘﻳ.
رﻮﺘﻜﻴﺟوﺮﺒﻟا ﺎﻬﺑ ﻞﻤﺤﻤﻟا ﺔﻘﻳﺮﻄﻟا ﺐﺴﺣ طﺎﻘﺳﻹا ﻊﺿو رﺎﻴﺘﺧا ﻚﻟ ﺢﻴﺘﻳ.
ﺔﻴﻣﺎﻣﻷا ﺔﻬﺟاﻮﻟا : رﻮﺘﻜﻴﺟوﺮﺒﻟا ﻊﺿﻮﻟ ا رﺎﺸﺘﻧا قﺮﻄﻟا ﺮﺜآأ ﻩﺬه ﺪﻌ ﺗ
ﺮﺴﻟا داﺪﻋﻺﻟﻞﻘﻨﻟا ﺔﻴﻧﺎﻜﻣإو ﻊﻳ ..
ﻲﻣﺎﻣﻷا ﻲﻠﻋﻷا ﺪﺤﻟا : ﻞﻤﺤﻣ طﺎﻘﺳﻹ ﺔﺑﻮﻠﻘﻣ ةرﻮﺼﻟا رﻮﺘﻜﻴﺟوﺮﺒﻟا لﻮﺤﻳ
ﻲﻠﻋﻷا ﺪﺤﻠﻟ .
ﺔﻓﺎﻔﺷ ﺔﺷﺎﺷ ﻒﻠﺧ .
ﻲﻠﻋﻷا ﺪﺤﻟا ﻲﻠﻋ ﻞﻤﺤﻣ ﻊﺿو ﻲﻓ ﺔﻓﺎﻔﺷ ﺔﺷﺎﺷ .
ﺔﻴﻔﻠﺨﻟا ﺔﻬﺠﻟا : ﻦﻣ ﺎﻬﺿﺮﻋ ﻦﻜﻤﻳ ﻲﺘﺣ ةرﻮﺼﻟا رﻮﺘﻜﻴﺟوﺮﺒﻟا ﺲﻜﻌﻳ
ﻲﻔﻠﺨﻟا ﻲﻠﻋﻷا ﺪﺤﻟا : ﻲﻠﻋ ﺎ ﺳأر ةرﻮﺼﻟا لﻮﺤﻳو رﻮﺘﻜﻴﺟوﺮﺒﻟا ﺲﻜﻌﻳ
ﺐﻘﻋ .ﻜﻴﺟوﺮﺒﻟا نﺎﻜﻣﺈﺑ ﻒﻠﺧ ﻦﻣ ضﺮﻌﻟا رﻮﺘ
ﺔﺘﺑﺎﺜﻟا ﺞﻣاﺮﺒﻟا رﺎﻬﻇإ ﺢﺿﻮﻳ :Txxxx
(1ﻦ ﺴﺤ ﻣ :ءادﻷا ﻦﻣ ﻲﺼﻗﻷا ﺪﺤﻟا ﻖﻴﻘﺤﺘﻟ حﺎﺘﻣ ﻲﺟرﺎﺨﻟا ﺔﻗﺎﻄﻟا دوﺰﻣ نﻮﻜﻳ ﺎﻣﺪﻨﻋ ﻊﺿﻮﻟا اﺬه ﺮﺘﺧا.
(2يدﺎﻋ :ﺔﻳرﺎﻄﺒﻟا ةرﺪﻗو رﻮﺘﻜﻴﺟوﺮﺒﻟا ءادأ ﻦﻴﺴﺤﺘﻟ ﻲﺿاﺮﺘﻓﻻا ﻊﺿﻮﻟا .
(3يدﺎﺼﺘﻗﻻا : ظﺎﻔﺤﻠﻟ ﺔﻳرﺎﻄﺑ ﻊﺿو ﺖﺤﺗ رﻮﺘﻜﻴﺟوﺮﺒﻟا ﻞﻴﻐﺸﺗ ﻢﺘﻳ ﺎﻣﺪﻨﻋ ﻊﺿﻮﻟا اﺬه ﻞﻴﻐﺸﺗ ﻦﺴﺤﺘﺴﻤﻟا ﻦﻣ
ﺔﻇﻮﺤﻠﻣ :
نزاﻮﺘﻣ.
ﺎﻤﻨﻴﺴﻟا : ﻢﻠﻴﻓ ةﺪهﺎﺸﻤﻟ ﻲﻟﺎﺜﻤﻟا ﻊﺿﻮﻟا
يدﺎﻋ : رﻮﺼﻟا ﻦﻣ ﺢﺋاﺮﺷ ضﺮﻌﻟ ﻲﻟﺎﺜﻤﻟا ﻊﺿﻮﻟا
3 .ضوs طﺎﻘﺳﻹا ع)ﺔﺳﺪﻌﻟا(
.4 ﺪﻬﺸﻤﻟا ﺪﻳﺪﺤﺗ
اﺺﻨﻟ : ﺺﻧ ﻊﻣ ةرﻮﺼﻟ ﻲﻟﺎﺜﻤﻟا ﻊﺿﻮﻟا
.5 تﺎﻣﻮﻠﻌﻣ
AR
ﺔﺤﻔﺻ 11
Page 68

AR
مﺪﺨﺘﺴﻤﻟا ﻞﻴﻟد
ﺔﻴﺣﻮﻟ ةﺰﻬﺟأ وأ ﺔﻴآﺬﻟا ﻒﺗاﻮﻬﻟا ﻦﻣ ةرﻮﺻ طﺎﻘﺳإ
1. ـﺑ ﺔﻤﻋﺪﻣ ﺔﻴآذ ﻒﺗاﻮه ﻞﻴﺻﻮﺗMHL )ةدﻮﺠﻟا ﺔﻴﻟﺎﻋ لﻮﻤﺤﻣ ﻒﺗﺎه ﺔﻠﺻو(طﺎﻘﺳﻺﻟ .
ﻞﻴﺻﻮﺘﺑ ﻢﻗSamsung Galaxy S2ﺔﻇﻮﺤﻠﻣ ،:
new HTC one ،one X+ ،one X ،one S وأ
Sony Xperia Z ﻞﺑﺎآ ﺔﻄﺳاﻮﺑ رﻮﺘﻜﻴﺟوﺮﺒﻟا ﻊﻣ
MHL) A ﻲﻟإ USB Dزاﺮﻃ HDMI .(
ﻞﺑﺎآ ﻖﻳﺮﻃ ﻦﻋ رﻮﺘﻜﻴﺟوﺮﺒﻟا ﻊﻣMHL )A ﻲﻟإ USB D
لﻮﻤﺤﻤﻟا زﺎﻬﺠﻟا ﻦﺤﺸﻟ ﺎ ﻀﻳأ ﻦﻜﻟو ، ﻂﻘﻓ طﺎﻘﺳﻺﻟ.
ﻞﺑﺎآ ﻖﻳﺮﻃ ﻦﻋ رﻮﺘﻜﻴﺟوﺮﺒﻟاUSB ﺔﻳﺎﻬﻧ ﻊﻣ
رﻮﺘﻜﻴﺟوﺮﺒﻟا ﻦﻣ ﻲﻔﻠﺨﻟا ﺐﻧﺎﺠﻟا .
ﻞﻴﺻﻮﺘﺑ ﻢﻗSamsung Galaxy S4، ﺔﻇﻮﺤﻠﻣ2
زاﺮﻃHDMI( و Samsung 5 لﻮﺤﻣ ﻲﻟإ MHL 11
ﺖﻴﺒﺜﺗ)ﺢﻴﺿﻮﺘﻟا ﺮﻬﻈﻳ ﺎﻤآ (طﺎﻘﺳﻺﻟ .
ﺔﻇﻮﺤﻠﻣ: ﺎﻬﻠﻴﺻﻮﺗ ﻢﺘﻳ ﺎﻣﺪﻨﻋ ﺔﻟﻮﻤﺤﻤﻟا حاﻮﻟﻷا وأ ﺔﻴآﺬﻟا ﻒﺗاﻮﻬﻟا ﻦﺤﺴﺑ ﺎ ﻴﺋﺎﻘﻠﺗ رﻮﺘﻜﻴﺟوﺮﺒﻟا مﻮﻘﻳ نأ ﻲﻌﻴﺒﻄﻟا ﻦﻣ
ﻞﺑﺎﻜﺑMHLطﺎﻘﺳﻺﻟ .
iPad mini ،iPod touch 5th ﻊﻣ
ﺔﻴﻤﻗﺮﻟا ةءﺎﺿﻺﻟAVزاﺮﻃ ﻞﺑﺎآ و A-to-A
ﻞﻴﺻﻮﺗ ﻢﺘﻳ نأ ﻦﻜﻤﻳiPhone 4S ،4،New iPad ،
ﻲﺟرﺎﺨﻟا لﻮﺤﻤﻟا زﺎﻬﺟ ﻦﺤﺷ
ﺒﻟا مﺪﺨﺘﺳا ﻦﻜﻤﻳ ﻻ رﻮﺘﻜﻴﺟوﺮﺒﻟا زﺎﻬﺠﻟ ﺔﻴﻠﺧاﺪﻟا ﺔﻳرﺎﻄ
ﻞﺻﻮﻣType A ﺬﻔﻨﻤﺑ لﻮﺻﻮﻣUSB ﻲﻠﻋ
ﻦﺤﺸﻟا فﺎﻘﻳﻹ وأ.
2. ﻞﻴﺻﻮﺘﺑ ﻢﻗiPhone 5 ﺲﻜﻌﻨﻤﻟا طﺎﻘﺳﻺﻟ
)ةءﺎﺿإ ﻞﺻﻮﻣ ﻊﻣ (
ﻞﻴﺻﻮﺘﺑ ﻢﻗiPhone 5 ،iPad 4th ،
رﻮﺘﻜﻴﺟوﺮﺒﻟا لﻮﺤﻣ ﻖﻳﺮﻃ ﻦﻋ Apple
type HDMI .
iPad 2 و iPod touch (4th) ﻊﻣ رﻮﺘﻜﻴﺟوﺮﺒﻟا ﻊﻣ
لﻮﺤﻣAVﺖﻴﺒﺜﺗ ﻲﻤﻗر -30 Apple ﻞﺑﺎآ و HDMI
زاﺮﻃ A-to-A
1. ﻲﻟإ ﻚﺑ صﺎﺨﻟا لﻮﻤﺤﻤﻟا زﺎﻬﺟ ﻞﻴﺻﻮﺘﺑ ﻢﻗ
2. ﻢﺘﻴﺳ ،رﻮﺘﻜﻴﺟوﺮﺒﻟا ﻞﻴﻐﺸﺗ ﻢﺘﻳ ﺎﻣﺪﻨﻋﺎ ﻴﺋﺎﻘﻠﺗ زﺎﻬﺠﻟا ﻦﺤﺷ .
3. رﺪﺼﻤﻟا رز ﻲﻠﻋ ﻂﻐﻀﻟا ءﺎﺟﺮﺑ ،رﻮﺘﻜﻴﺟوﺮﺒﻟا ﻞﻴﻐﺸﺗ فﺎﻘﻳإ ﻢﺘﻳ ﺎﻣﺪﻨﻋ( ) ءﺪﺒﻟ
ﺔﻇﻮﺤﻠﻣ:رﻮﺘﻜﻴﺟوﺮﺒﻟا ﺮﻓﻮﻳ 5ﺖﻟﻮﻓ /500ﺔﻟﻮﻤﺤﻤﻟا ﻒﺗاﻮﻬﻟا ةﺰﻬﺟأ ﻦﺤﺸﻟ ﺔﻗﺎﻄﻟا جاﺮﺧا ﻦﻣ ﺮﻴﺒﻣأ ﻲﻠﻠﻣ .
ﺔﺤﻔﺻ 12
Page 69

ﻞﻴﻟدمﺪﺨﺘﺴﻤﻟا
رﻮﺘﻜﻴﺟوﺮﺒﻟا ﻦﻋ ﺞﺘﻨﻳ نأ ﻲﻌﻴﺒﻄﻟا ﻦﻤﻓ ،ةءﺎﺿﻹا ﻊﻔﺗﺮﻣ ﻲﺋﻮﻀﻟا ﺮﺷﺆﻤﻟا ﺐﺒﺴﺑ
ثوﺪﺣ وأ ﺪﻤﺠﺘﻟا ﻊﺿو ﻲﻓ رﻮﺘﻜﻴﺟوﺮﺒﻟا نﻮﻜﻳ ﺎﻣﺪﻨﻋ ا ﺪﻴﻔﻣ ﻚﻟذ نﻮﻜﻳ نأ ﻦﻜﻤﻳ
ﺔﻠﻳﻮﻃ ةﺮﺘﻔﻟ ماﺪﺨﺘﺳﻻا ءﺎﻨﺛأ ةراﺮﺣ .رﻮﺘﻜﻴﺟوﺮﺒﻟا ءادأ ﻰﻠﻋ اﺬه ﺮﺛﺆﻳ ﻦﻟو . مﺰﻠﻳ
ﺔﻳﻮﻬﺘﻟا ةﺪﻴﺟ ﺔﺌﻴﺑ ﻲﻓ رﻮﺘﻜﻴﺟوﺮﺒﻟا.
ﺔﻈﻓﺎﺤﻤﻟا ﻞﻴﻐﺸﺗو ﻖﺋاﻮﻌﻟا وأ خﺎﺳوﻷا ﻦﻣ ﺔﻳﻮﻬﺘﻟا تﺎﺤﺘﻓ لﻮﺧ ﻰﻠﻋ ﺎ ﻣود
ﻦﻴﻣﺄﺘﻠﻟ ﻖﻠﻏ وأ ﻞﻄﻋ . ةﺪﻤﻟ ﺔﻗﺎﻄﻟا رز ﻲﻠﻋ ﻂﻐﺿا8 ﻞﻴﻐﺸﺗ ةدﺎﻋﻹ ﻲﻧاﻮﺛ
ﺘﻜﻴﺟوﺮﺒﻟارﻮ .
ﺎﻬﻠﺣ ﺔﻟوﺎﺤﻣو لﺎﻄﻋﻷا فﺎﺸﺘآا
1. ﻞﺑﺎﻜﻟا ﻞﻴﺻﻮﺗ ﺔﺤﺻ ﻦﻣ ﻖﻘﺤﺗHDMI .
2. ضﺮﻋ ﻰﻟإ ﻲﺼﺨﺸﻟا ﺮﺗﻮﻴﺒﻤﻜﻟا ﻞﻳﻮﺤﺗ ﻦﻣ ﺪآﺄﺗرﻮﺘﻜﻴﺟوﺮﺒﻟا.
1. ﺔﻤﺘﻋ ﺮﺜآأ ﺔﺌﻴﺑ ﻲﻓ رﻮﺘﻜﻴﺟوﺮﺒﻟا مﺪﺨﺘﺳا.
2. ددﺮﺘﻤﻟا رﺎﻴﺘﻟا ﺔﻗﺎﻃ ﺊﻳﺎﻬﻣ ماﺪﺨﺘﺳﺎﺑ عﻮﻄﺴﻟا ﺔﺟرد ةدﺎﻳﺰﺑ ﻢﻗ.
3. رﻮﺘﻜﻴﺟوﺮﺒﻟا ﻰﻠﻋ ﺔﺿوﺮﻌﻤﻟا ةرﻮﺼﻟا ﻢﺠﺣ ﺾﻔﺨﺑ ﻢﻗ.
1. ةرﺆﺒﻟا ﻂﺒﺿا .ﺮﻳ ﻢﺴﻘﻟا ﻰﻟإ عﻮﺟﺮﻟا ﻰﺟ"ةرﺆﺒﻟا ﻂﺒﺿ."
2. ﺔﺨﺴﺘﻣ ﺔﺳﺪﻌﻟا ﺖﻧﺎآ اذإ ﺎﻣ ﺪآﺄﺗ.
ض ﺮ ﻌﻟا ﺺﺤﻔﻟا ﺔﻄﻘﻧ
ﻪﻠﻴﺻﻮﺗ ﺪﻨﻋ ﻞﻤﻌﻳ ﻻ رﻮﺘﻜﻴﺟوﺮﺒﻟا
ﺮﺗﻮﻴﺒﻤآ وأ لﻮﻤﺤﻣ ﺮﺗﻮﻴﺒﻤﻜﺑ
ﻰﻠﻋ ﺔﺿوﺮﻌﻤﻟا ةرﻮﺼﻟا
ﺔﻳﺎﻐﻠﻟ ﺔﻤﺘﻌﻣ رﻮﺘﻜﻴﺟوﺮﺒﻟا.
ﺔﺤﺿاو ﺮﻴﻏ ﺔﺿوﺮﻌﻤﻟا ةرﻮﺼﻟا.
ﺢﻄﺳ ةراﺮﺣ ﺔﺟرد ﺖﻌﻔﺗرا
ﻞﻠﺨﻟا ﻦﻣ دادﺮﺘﺳﻻا
ﺘﻜﻴﺟوﺮﺒﻟا نﺎآ اذإﺪﻤﺘﻌﻤﻟا ﺔﻣﺪﺨﻟا ﺰآﺮﻤﺑ لﺎﺼﺗﻻا ﻞﺒﻗ ﻩﺎﻧدأ ةدراﻮﻟا ﺮﺻﺎﻨﻌﻟا ﺺﺤﻓﺎﻓ ،ﺐﺳﺎﻨﻤﻟا ﻞﻜﺸﻟﺎﺑ ﻞﻤﻌﻳ ﻻ رﻮ.
ﻞﺑﺎﻜﺑ ﻲﺼﺨﺷ.
AR
رﻮﺘﻜﻴﺟوﺮﺒﻟا.
ﺔﺤﻔﺻ 13
Page 70

AR
مﺪﺨﺘﺴﻤﻟا ﻞﻴﻟد
تﺎﻔﺻاﻮﻤﻟا
ﺮﺼﻨﻌﻟا ﻒﺻو
عﺎﻔﺗرﻻا ﻰﻟإ ضﺮﻌﻟا ﺔﺒﺴﻧ 16:9
ﺔﻳرﺎﻄﺒﻠﻟ ﻲﺿاﺮﺘﻓﻻا ﺮﻤﻌﻟا ﻦﺴﺤﻤﻟا ﻊﺿﻮﻟا :90ﺔﻘﻴﻗد
ﺔﺿوﺮﻌﻤﻟا ةرﻮﺼﻟا ﻢﺠﺣ 36 cm ~ 305 cm (14” ~ 120”)
ﻞﻴﻐﺸﺘﻟا ة راﺮﺣ ﺔﺟرد ﻦﻣ5 ﻰﻟإ ﺔﻳﻮﺌﻣ ﺔﺟرد 35ﺔﻳﻮﺌﻣ ﺔﺟرد .
ﺔﻳﺮﺼﺒﻟا ﺔﻴﻨﻘﺘﻟا
ءﻮﻀﻟا رﺪﺼﻣ
ضﺮﻌﻟا ﺔﻗد 854 x 480 ﻞﺴﻜﻴﺑ (WVGA)
ﻦﻳﺎﺒﺘﻟا ﺔﺒﺴﻧ 1000:1
ضﺮﻌﻟا ﺔﻓﺎﺴﻣ 50 cm ~ 425 cm (20” ~ 167”)
ءﺎﻘﻟﻹا ﺔﺒﺴﻧ
تﻼﻴﺻﻮﺘﻟا
ﺔﻴﻠﺧاد ﺔﻋﺎﻤﺳ يدﺎﺣأ
ﺔﻗﺎﻄﻟا رﺪﺼﻣ ﻞﺧﺪﻟا :100 ~ 240ﺮﻤﺘﺴﻣ رﺎﻴﺗ ﺖﻟﻮﻓ
ﺔﻳرﺎﻄﺒﻟا عﻮﻧ ﺮﻤﻴﻟﻮﺑ مﻮﻴﺜﻴﻟ ﺔﻳرﺎﻄﺑ ﻦﻤﻀﻣ7.4 V/2000 mAh
ﺔﻗﺎﻄﻟا كﻼﻬﺘﺳا ﻊﺿوAC :10.5 طاو
)يﺮﻄﻗ :ﺔﻓﺎﺴﻣ(
عﻮﻄﺴﻟا ﻲﻟإ ﻞﺼﻳ100 ﺔﻌﻤﺷ
ةرﺆﺒﻟا يوﺪﻳ
ﺔﺣازإ 100%
دﺎﻌﺑأ) لﻮﻄﻟا×ضﺮﻌﻟا×عﺎﻔﺗرﻻا( 132 x 95 x 25 mm
نزﻮﻟا 270 g
ﺔﺑﻮﻃﺮﻟا 20 - 80% ،80) %ﻰﺼﻗﻷا ﺪﺤﻟا(ﺔﻔﺜﻜﻣ ﺮﻴﻏ ،.
DLP
ﺢﻴﺑﺎﺼﻣLED RGB
1.6)ضﺮﻌﻟا ﺔﻓﺎﺴﻣ/ةرﻮﺼﻟا ضﺮﻋ(
HDMI/MHL : ﻊﻣ ﻖﻓاﻮﺘﺗHDMI v1.3 و MHL v2.0
VGA : D-sub ﺮﻴﻐﺻ15ﺎ ﻨﺳ
ﺬﻔﻨﻣAV :تﻮﺼﻟا جوﺮﺧ : ﺮﻴﻐﺻ ﺲﺒﻘﻣ3.5 ﻢﻠﻣ
ﺬﻔﻨﻣUSB :اﻮﻬﻟا ةﺰﻬﺟأ ﻦﺤﺷﺔﻟﻮﻤﺤﻤﻟا ﻒﺗ
جﺮﺨﻟا :12 ،ﺖﻟﻮﻓ2ددﺮﺘﻣ رﺎﻴﺗ ﺮﻴﺒﻣأ
يدﺎﻌﻟا ﻊﺿﻮﻟا :120ﺔﻘﻴﻗد
يدﺎﺼﺘﻗﻻا ﻊﺿﻮﻟا: 150ﺔﻘﻴﻗد
ﺔﻳرﺎﻄﺒﻟا ﻊﺿو :6.5 طاو ~ 10.5 طاو
ﺔﺤﻔﺻ 14
 Loading...