

Page 1
Page 2

Welcome:
Dear user, thanks for purchasing this product.
Much investment in time and effort has gone into its development, and it is our hope
that it will give you many years of trouble-free service.
Safety Notice:
1. Do not drop, puncture or disassemble the camera; otherwise the warranty will be voided.
2. Avoid all contact with water, and dry hands before using.
3. Do not expose the camera to high temperature or leave it in direct sunlight. Doing so may
damage the camera.
4. Use the camera with care. Avoid pressing hard on the camera body.
5. For your own safety, avoid using the camera when there is a storm or lightning.
6. Do not use batteries of different specications. Doing so may lead to the potential for serious
damage.
7. Remove the battery during long periods between usage, as a deteriorated battery may affect
the functionality of the camera.
8. Remove the battery if it shows signs of leaking or distortion.
9. Use only the accessories supplied by the manufacturer.
10. Keep the camera out of the reach of infants.
11. Risk of explosion if battery is replaced by an incorrect type.
12. Dispose of used batteries according to the instructions.
FCC Compliance Statement:
This device complies with Part 15 of the FCC Rules. Operation is
subjected to the following two conditions: (1) this device may not cause
harmful interference, and (2) this device must accept any interference
received, including interference that may cause undesired operation.
This equipment has been tested and found to comply with limits for a
Class B digital device, pursuant to Part 15 of the FCC rules. These limits
are designed to provide reasonable protection against harmful interference in residential
installations. This equipment generates, uses, and can radiate radio frequency energy, and if
not installed and used in accordance with the instructions, may cause harmful interference to
radio communications.
However, there is no guarantee that interference will not occur in a particular installation. If this
equipment does cause interference to radio or television equipment reception, which can be
determined by turning the equipment off and on, the user is encouraged to try to correct the
interference by one or more of the following measures:
-Reorient or relocate the receiving antenna.
-Move the equipment away from the receiver.
-Plug the equipment into an outlet on a circuit different from that to which the receiver is
connected.
-Consult the dealer or an experienced radio/television technician for additional suggestions.
You are cautioned that any change or modications to the equipment not expressly approved
by the party responsible for compliance could void Your authority to operate such equipment.
If the time arises to throw away your product, please
recycle all the components possible.
Batteries and rechargeable batteries are not to be
disposed in your domestic waste! Please recycle
them at your local recycling point.
Together we can help to protect the environment.
Page 3
Getting Started
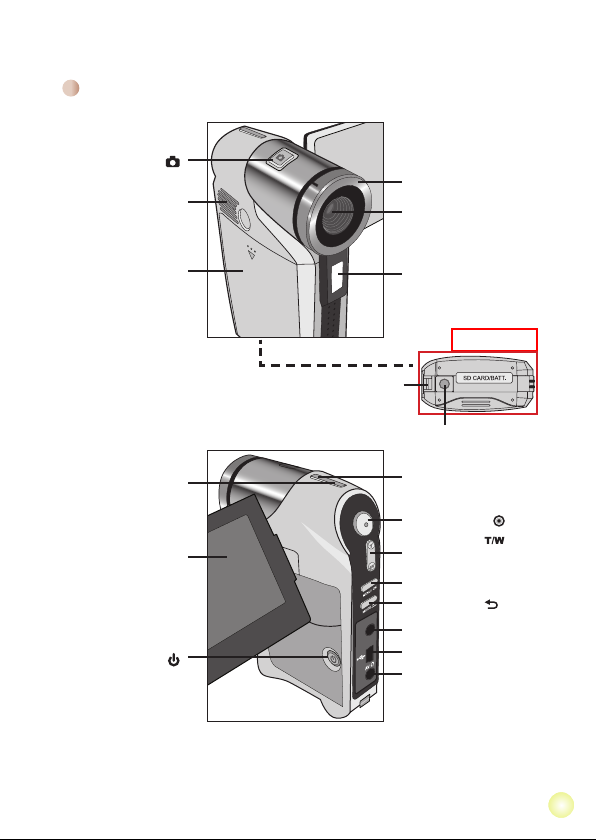
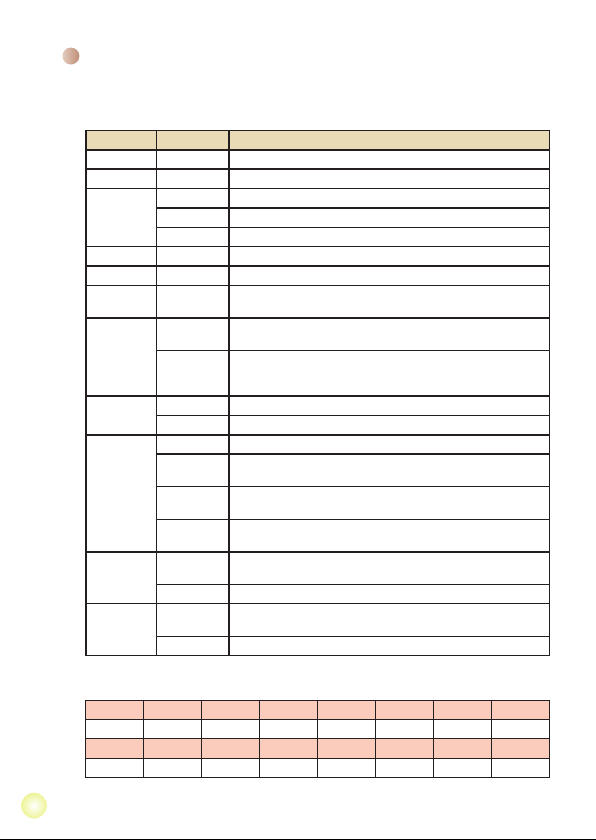
Knowing your camcorder parts
Shutter button ( )
Speaker
Focus switch
Lens
Battery compartment /
SD/MMC card slot
Indicator light
LCD display
Power button ( )
Strap holder
Flash Strobe
Bottom view
Tripod socket
Microphone
Record button ( )
Zoom button ( )-
T: Zoom in / Volume up
W: Zoom out / Volume down
Menu/OK button
Mode/Return ( ) button
HD OUT
USB connector
AV OUT connector
/Earphone
1
Page 4

2
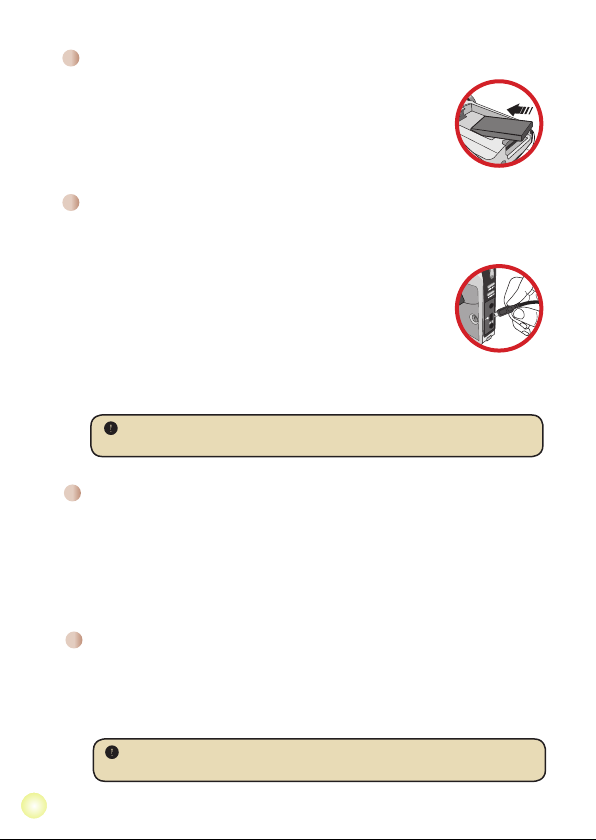
Installing the battery
1. Slide the battery cover open.
2. Place the accessory Li-Ion battery into the compartment. Note
that the metallic contacts must be aligned with the contacts in the
compartment.
3. After the battery is properly installed, replace the battery cover.
Charging the battery
Please charge the battery at least 8 hours for rst time use.
1. Connect the cable.
Connect one end of the supplied AC adapter to the USB port of the
camcorder and the other end to a wall outlet.
OR
Connect one end of the supplied USB cable to the USB port of
the camcorder and the other end to a powered PC. Make sure the
camcorder is powered off.
2. The charging LED turns red and the charge starts.
3. When the charging is interrupted or the battery pack is fully charged, the charging LED
will turn green.
When using a PC to charge the battery, do not power on the camcorder, or
the charge will stop.
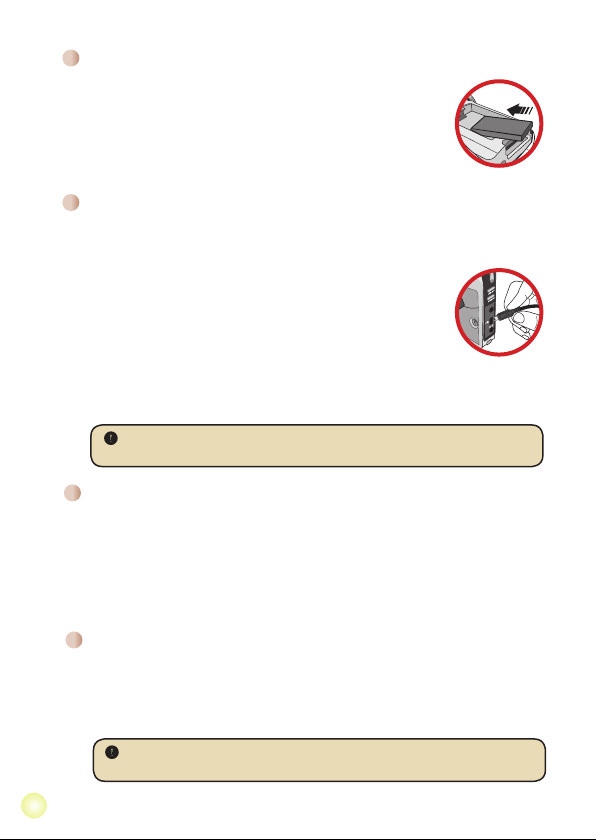
Inserting a memory card (optional)
To insert a memory card, do the followings:
(1) Open the battery cover.
(2) Gently push the card as indicated until the card reaches the bottom of the slot.
To remove the memory card, gently push the card and it will pop up. Then pull the card
out of the slot.
Turning on/off your camcorder
Open the LCD monitor or press and hold down the Power button for 1 second to turn
on the camcorder.
To turn off the camcorder, press and hold down the Power button for 1 ~ 3 seconds or
close the LCD monitor.
If the camcorder stays inactive for a long period of time, it may automatically
shut down due to the Auto-Off setting.
Page 5

Setting language
1
00:06:40
00:00:05
1. Power on the camcorder.
2. Press the MODE key to enter the MODE menu.
3. Use the Zoom button to select the Setting mode and press OK to enter the menu
screen.
4. Use the Zoom button to select the Language item, and then Press OK to conrm.
5. Move the Zoom button up/down to select a language.
6. When done, press OK to conrm the setting.
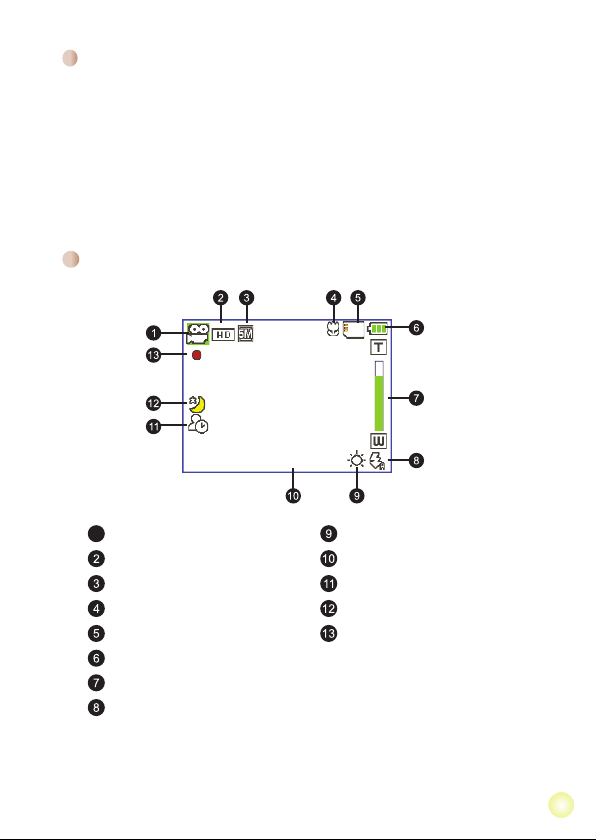
Reading LCD indicators
Mode icon White Balance mode
Video resolution Remaining recordable time
Picture resolution Selftimer mode
Macro mode NightShot mode
SD card inserted Recording time
Battery life
Zoom ratio indicator
Flash mode
3
Page 6
44
Basic Operations
Recording a video clip / Taking a still picture
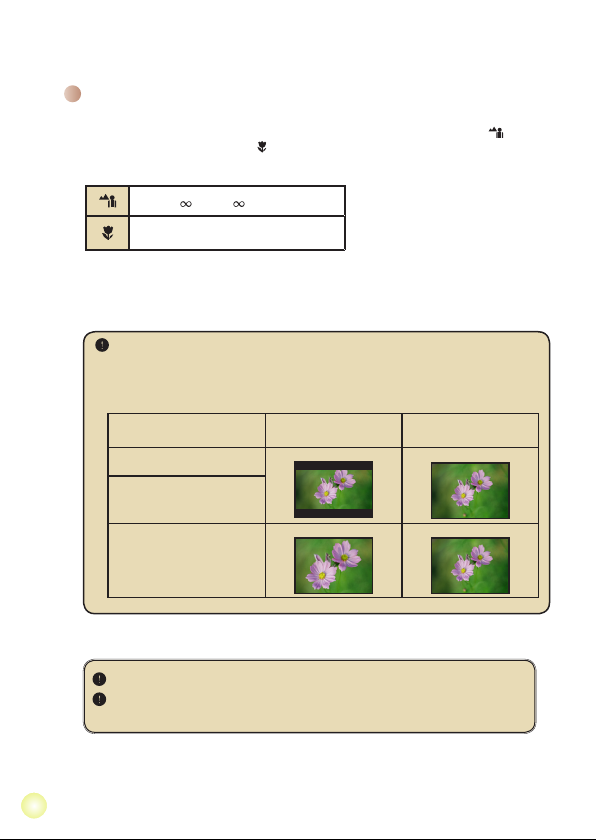
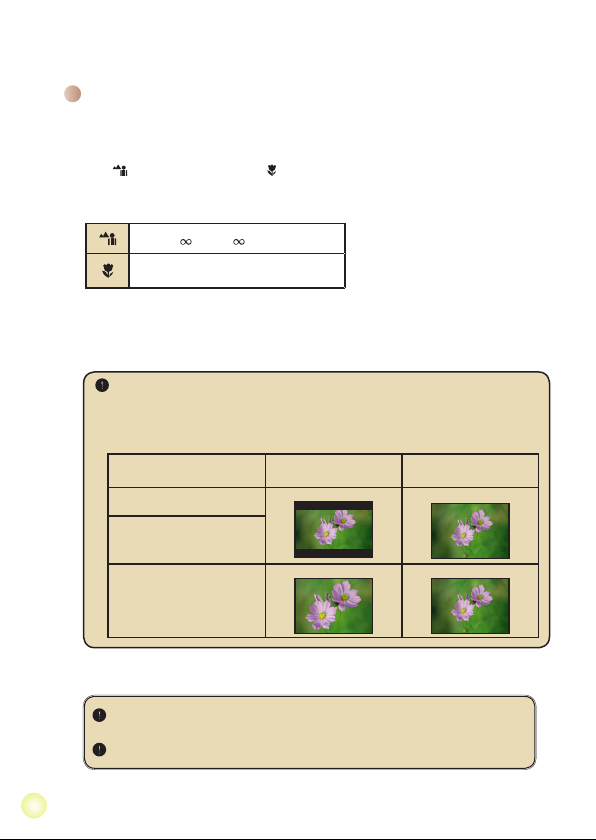
1. Set the focus to an appropriate setting. Normally, you may set the focus to ( ) for
most lming conditions. Select ( ) only for close-ups.
Note: Please make sure your memory card is inserted before recording.
50cm ~ (20” ~ )
30cm ~ 50cm (12” ~ 20”)
2. Zooming:
Move the Zoom button up or down to zoom in or zoom out the screen.
3. Press the Record button to start recording. Or press the Shutter button to take a still
picture.
Due to the sensor capture feature, the LCD preview and ratio of still picture
capture will vary depending upon different video resolution settings.
The image capture of the camera is set where as video resolutions are different.
* Please refer to the package printing for resolution specication.
Video resolution Preview Taking pictures
HD (1280x720)
WVGA 60f(848x480)
QVGA 30f(320x240)
16:9 ratio
4:3 ratio 4:3 ratio
4:3 ratio
4. Press the Record button again to stop recording.
The zoom function is also available during recording (except in macro mode).
It’s normal that the camcorder will feel slightly warm with continuous use /
recording due to its high performance.
Page 7
Recording a voice clip
1. Power on the camcorder.
2. Press the MODE key to enter the MODE menu.
3. Use the Zoom button to select the Voice Recorder mode and press OK to enter the
menu screen.
4. Press the Record button to start recording
5. Press the Record button again to stop recording.
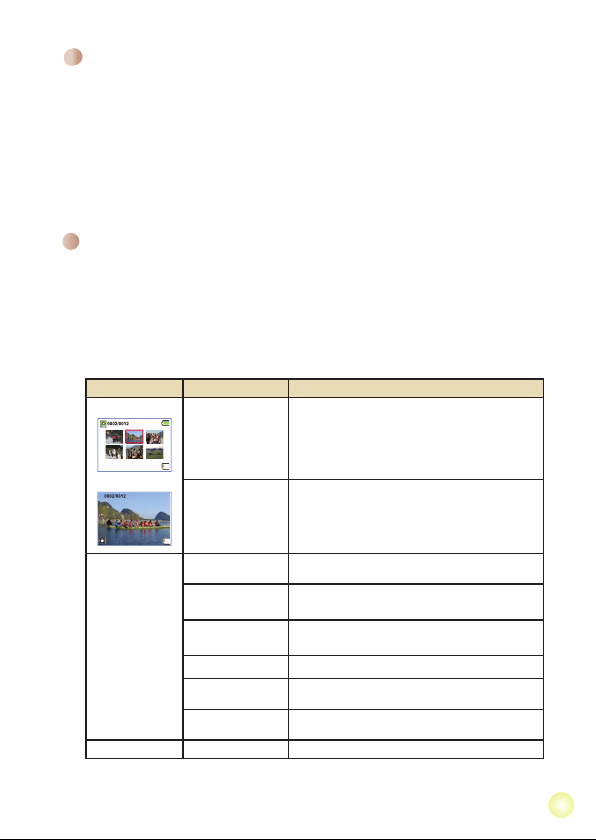
Playing back your recordings
1. Press the MODE button and use the Zoom button to switch to “My Works” mode.
2. There are three folders below My Works: Video, Picture, and Voice. Select Video,
Picture or Voice, and then press the OK key to enter the index mode.
3. Operations in My Works mode:
File type How to... Action
Index mode
Full-screen mode
Video & Audio
Picture Browse the picture Use the Zoom button to browse the picture.
Shift between Index
mode and Fullscreen mode
Shift between les
Start playing
Pause/Resume
playing
Adjust the volume
level
Stop playing During playing, press the Mode/Return button.
Select the next le
Select the previous
le
In Index mode, press the OK key to switch to
Full-screen mode. In Full-screen mode, press the
Mode/Return button to switch to Index mode.
1. In Index mode: Use the Zoom button to move the
highlight box.
2. In Full-screen mode: Use the Zoom button to
switch le.
When selected (in full-screen mode), the le
automatically starts playing.
During playing/While paused, press the OK key.
During playing, use the Zoom button to move up or
down.
Return to previous view and use the Zoom button (W)
to select the next le.
Return to previous view and use the Zoom button (T)
to select the previous le.
55
Page 8
66
Playing back your recordings on PC
Installing software
Please notice that the recorded videos are .mov format. So you need some special
programs to view the recordings on PC. For rst time use, please make sure you
have QuickTime 7.0 (or above) player on your PC. If not, please download the
QuickTime player from the website. Or install the software on the bundled CD.
Connecting PC and Saving les
1. Turn on the camcorder.
2. Connect the camcorder (with SD card inserted) to your computer with the USB cable.
3. A dialogue window will appear automatically. Please select the item “Open folder to
view les” and click “OK”.
4. If the dialogue window does not appear automatically, you may double click on “My
computer” and open the “Removable Drive”.
5. Double-click on the DCIM le folder.
6. Double-click on the 100MEDIA le folder.
7. Copy the les you wish to keep and save them to the desired location on your
computer.
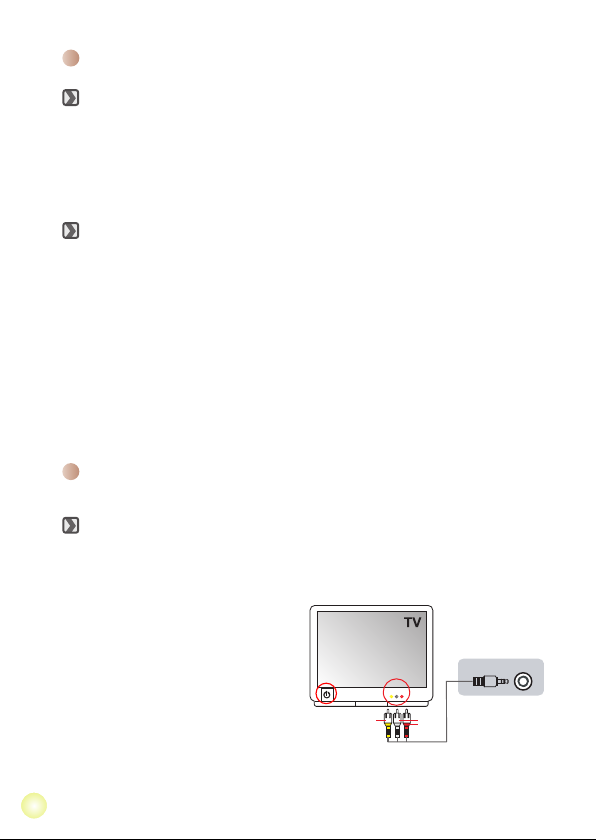
Connecting the camcorder to TV
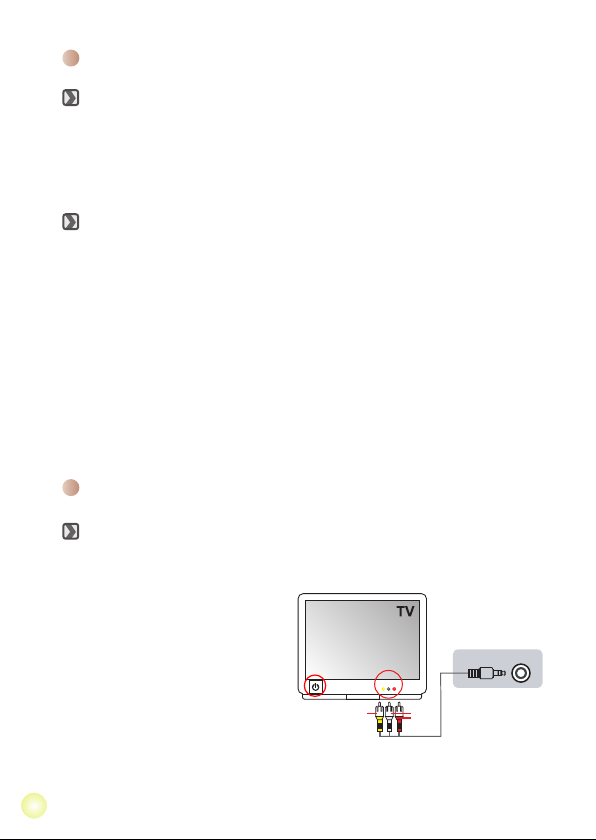
Connecting the camcorder to Standard TV
TV : Traditional CRT TV
1. Power on your TV and switch the TV
to AV mode.
2. Connect the audio and video ends of
the AV cable (yellow/white/red color)
to the TV “AV-IN” jacks.
3. Power on the camcorder.
4. Connect the other end of the AV
cable to the “AV out” port on your
camcorder. When the pop-up
message appears on the screen,
please select “AV-Out”.
AV mode
Video
AV Out
AV-IN
Audio
AV cable
Page 9
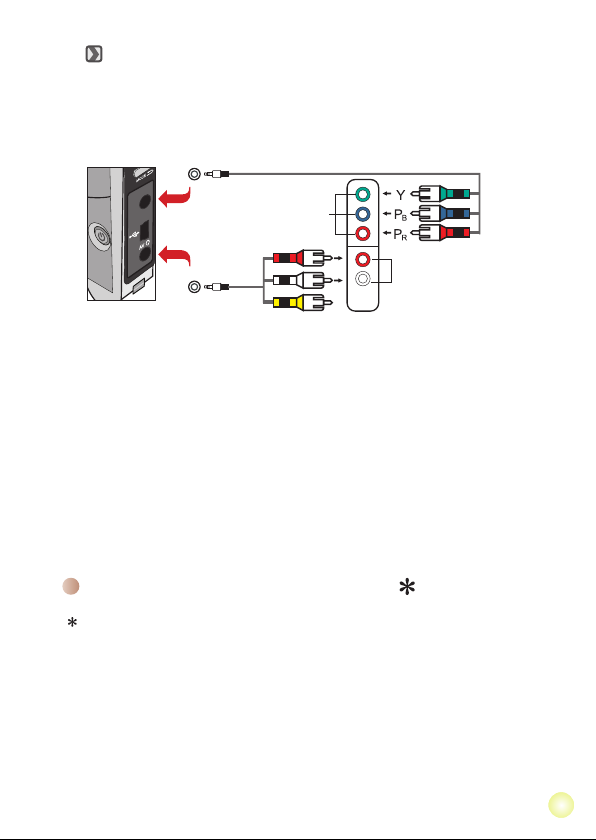
AV OUT
HD OUT
HD TV
Component Audio in
Component Video in
<Component Video cable>
<AV cable>
(red)
(yellow)
(white)
(green)
(red)
(blue)
(Do not plug in Yellow Cable)
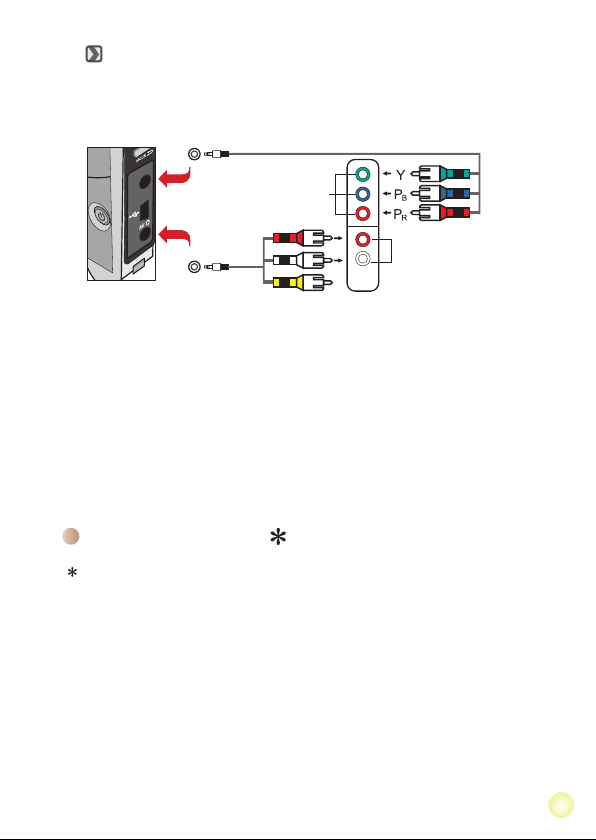
Connecting the camcorder to HDTV
HD TV hereby means the HDTV built-in component input ports, thus being able to
perform HD high resolution quality while connected.
1. Turn on your HD TV.
2. Turn on the Camcorder.
3. Plug one end of the component video cable into the (Component Video IN) port on
the HDTV and the other end into the (HD OUT) port on the Camcorder.
4. Plug one end of the other AV cable into the (Component Audio IN) port on the HDTV
and the other end into the (AV OUT) port on the Camcorder. (Please do not plug in
the yellow connector to HDTV’s AV-IN.)
5. Press the input switch mode on HD TV and select “Component Input”.
Play MP3 music
For select model only. Please refer to the package printing for detailed
specications.
1. Turn on the camera, and connect the camera to a PC using the USB cable.
2. Copy les to the camera:
After the camera is connected to the PC, double-click on “My Computer” and you will
nd a removable disk. Copy MP3 les into the “Music” folder for playing.
3. Press the Mode button and use the Direction buttons to select the Music Player
mode. Then press the OK button to enter.
77
Page 10
8
Advanced Operations
Menu operation
The menu items provide several options for you to ne-tune your camera functions.
The following table gives details on menu operations.
How to... Action
Bring up the menu Press the MENU button.
Move the highlight bar Use the Zoom button to move up or down.
Enter sub-menu/Conrm an item Press the OK key.
Exit menu/Go back to upper
menu
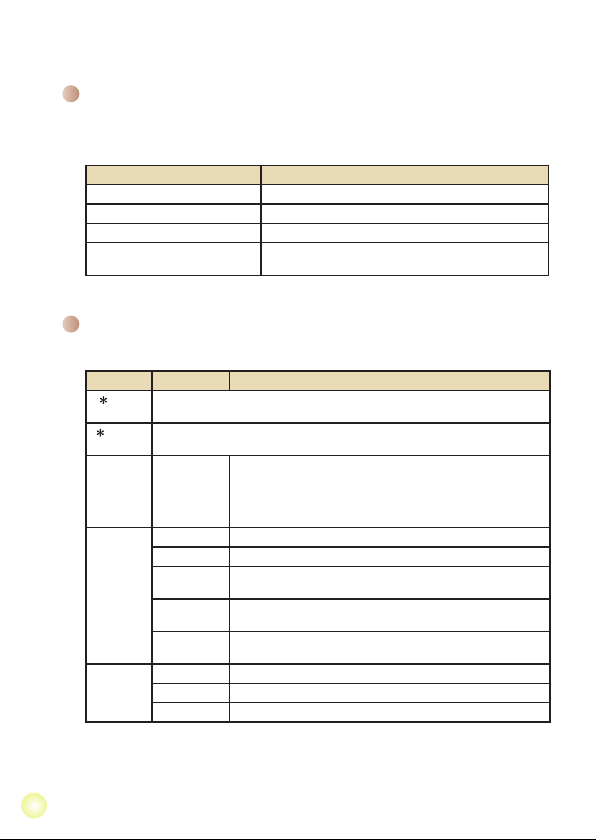
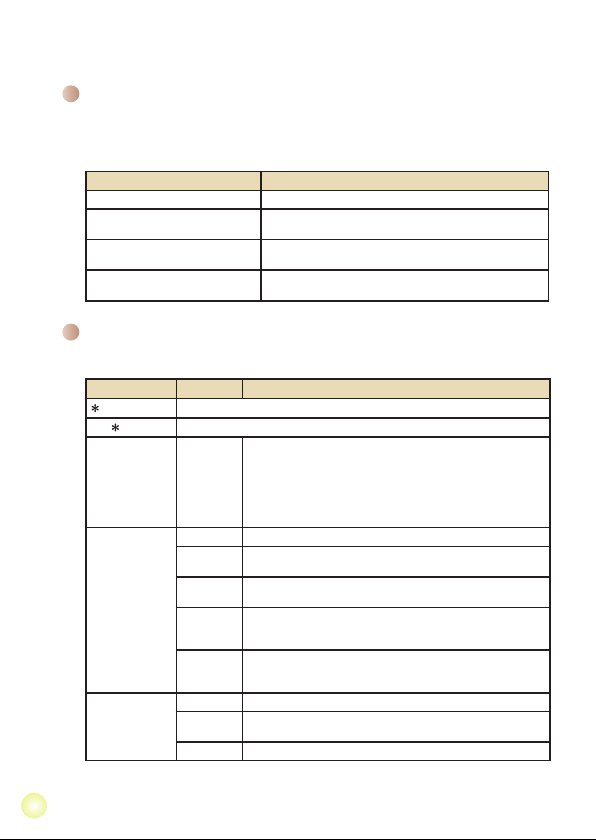
Menu items in Camera mode
Power-on → Press the Menu button.
Item Option Description
Video
resolution
resolution
NightShot
Flashlight
Please refer to the package printing for resolution specication.
Picture
Please refer to the package printing for resolution specication.
On/Off
Auto The camera automatically adjusts white balance.
Sunny This setting is suitable for outdoor recording in sunny weather.
WB
Cloudy
Fluorescent
Tungsten
On The ash is forced to re in every shot.
Auto The ash automatically res when the lighting is insufcient.
Off The ash is disabled.
Press the Mode/Return button (when in sub-menu).
Enabling this setting allows you to take a photograph with a
dark background. Since the shutter speed will slow down when
taking photographs at a dark place, we recommend using a
tripod to eliminate blurring from hand shake.
Warning: Noise increases when NightShot is enabled.
This setting is suitable for recording in cloudy weather or shady
environments.
This setting is suitable for indoor recording with uorescent
lamp lighting, or environments with high color temperature.
This setting is suitable for indoor recording with incandescent
lamp lighting, or environments with low color temperature.
Page 11
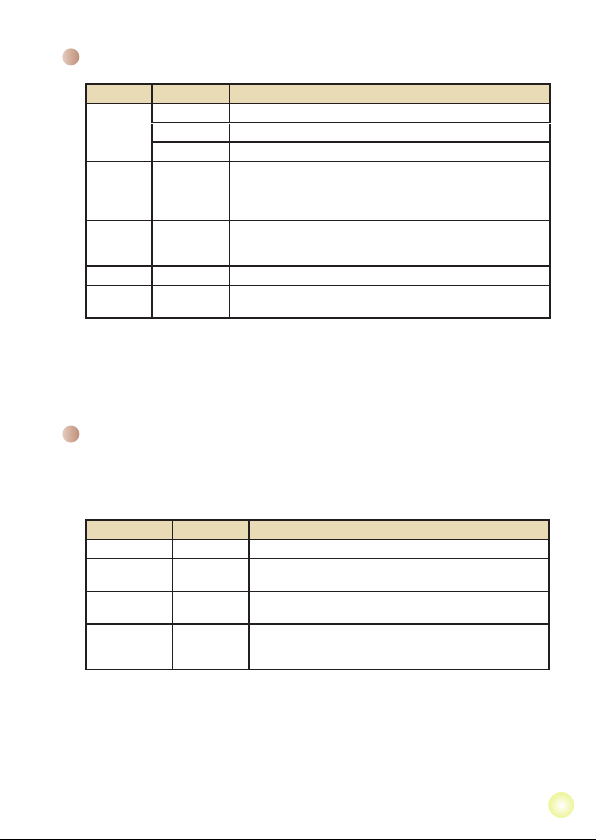
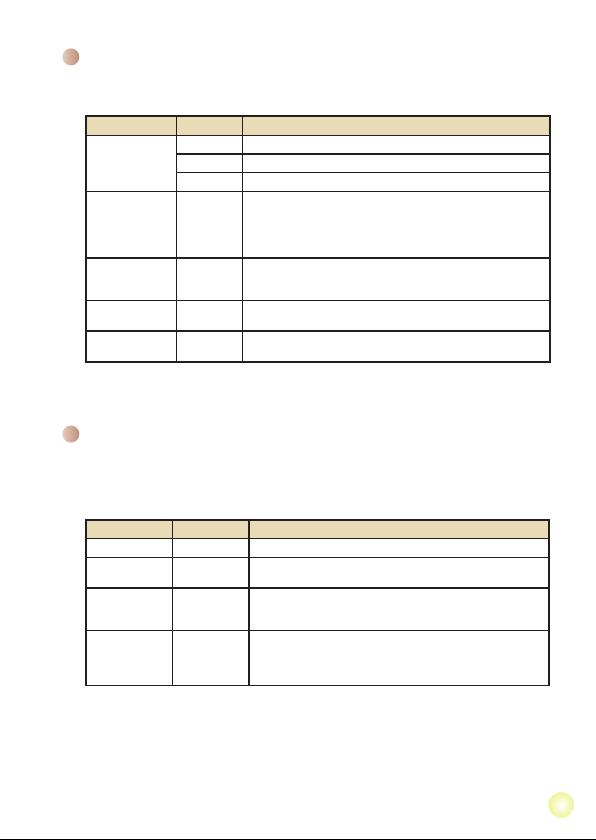
Menu items in Camera mode (continued)
Item Option Description
Effect
Exposure -2~+2
Selftimer On/Off
Histogram On/Off Enable/Disable image histogram display on the screen.
Icon On/Off
Normal Make recordings in natural color.
B&W Make recordings in black and white.
Classic Make recordings in sepia-toned color.
Manually adjust the exposure to gain better effect when the
preview image appears too bright or too dark. A positive value
indicates the image will be brighter than usual; while a negative
value makes the image dimmer.
Enable/Disable the selftimer. After the selftimer is turned on,
the camera will have ten seconds delay before recording when
the Shutter button is pressed.
Enable/Disable OSD (on screen display) icons to display on
the screen.
Menu items in My Works mode
Power-on → Press the MODE button → Use the Zoom button to switch to My Works
mode → Select Video, Picture or Voice folder→ Press the OK button → Press the
Shutter button.
Item Option Description
Delete One Yes/No Delete current le.
Delete All
Slide Show/
Video Play
Lock
* If there are no les in the camera, no items will be seen.
Delete all pictures and video/audio les stored in the
Yes/No
memory.
The camera displays images/video clips in sequence. You
can press the OK key to stop the slide show/video play.
Single, multiple, or all les can be locked. A locked le
Yes/No
cannot be erased by a delete function. However, the format
function will erase all locked/unlocked les.
9
Page 12
10
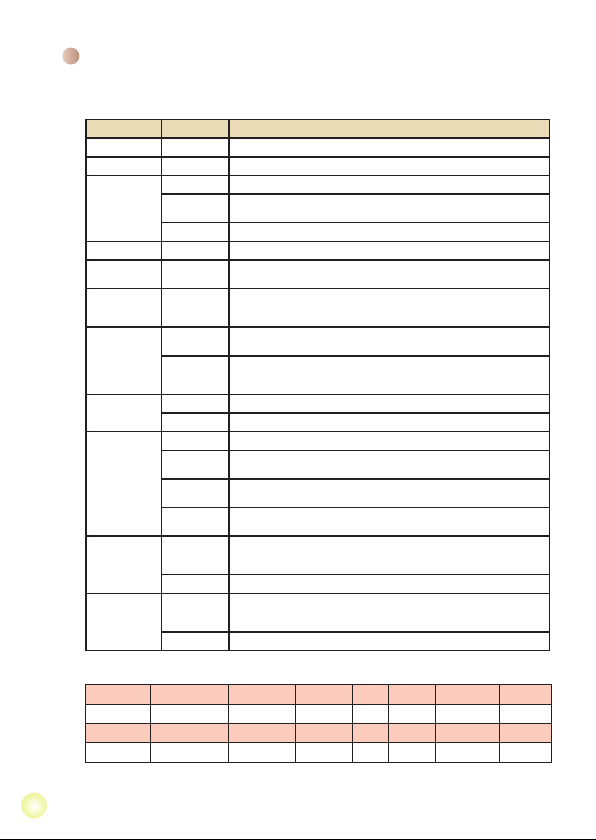
Menu items in Setting mode
Power-on → Press the MODE button → Select the Setting mode → Press the OK
button.
Item Option Description
Date & Time -
Language
Beep
Start Image
LCD Bright
TV System
Flicker
Auto Off
Format
Reset
Default
* Flicker settings table:
Region England Germany France Italy Spain
Setting 50Hz 50Hz 50Hz 50Hz 50Hz 50Hz 50Hz
Region Portugal America Taiwan China Japan Korea Thailand
Setting 50Hz 60Hz 60Hz 50Hz 50/60Hz 60Hz 50Hz
Shutter On
Icon
Set date and time.
-
Lets you select the language used for OSD.
On
Enable beep sound.
Disable beep sound, but keep Shutter sound.
Off
Disable beep sound.
On/Off
Sets the start image.
On/Off
Enable/Disable OSD icons to display on the screen.
Set LCD brightness. A positive value makes the LCD brighter;
-2~+2
while a negative value makes the LCD dimmer.
Set TV system compatibility to NTSC. This option is suitable for
NTSC
America, Taiwan, Japan, and Korea areas.
Set TV system compatibility to PAL. This option is suitable
PAL
for Germany, England, Italy, Netherlands, China, Japan, and
Hong Kong.
50Hz
Set icker frequency to 50Hz*.
60Hz
Set icker frequency to 60Hz*.
Off
Disable Auto-off function.
The camera automatically shuts down when staying inactive
1 min
for over 1 minute.
The camera automatically shuts down when staying inactive for
3 min
over 3 minutes.
The camera automatically shuts down when staying inactive for
5 min
over 5 minutes.
Format the storage medium. Note that all les stored in the
Yes
medium will be gone.
No
Cancel action.
Restore factory defaults. Note that your current settings will be
On
overridden.
Off
Cancel action.
Netherlands
Russia
Page 13
Appendix
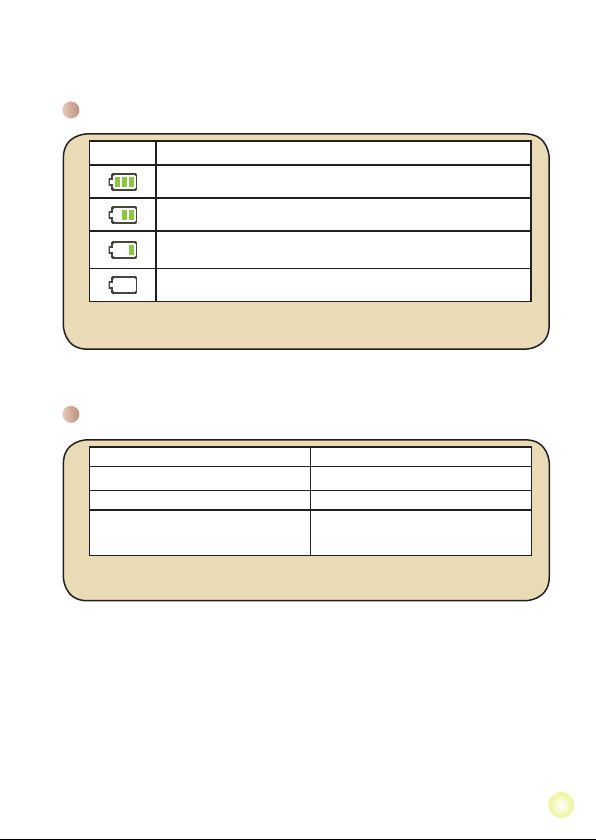
Battery Life Indicator
Icon Description
Full battery life
Moderate battery life
Low battery life
* The ash strobe and the LED lights will be disabled.
Empty battery life
Note: To avoid sudden outage of power supply, you are recommended to replace the battery
when the icon indicates low battery life.
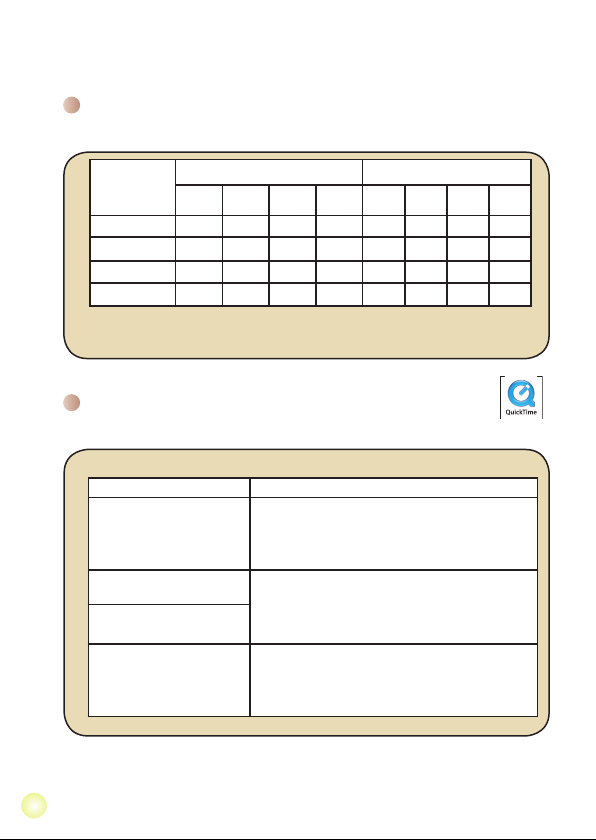
Battery Life
Still picture Video clip
Number of shots Recording time (minute)
* shoot every 30 seconds
** ash is off
*** resolution is set to 5M (2592x1944)
Note: This table is for your reference only. The actual battery life depends on your battery
type and recharge level.
200 90
* resolution is set to HD 30f (1280x720 )
11
Page 14
Appendix
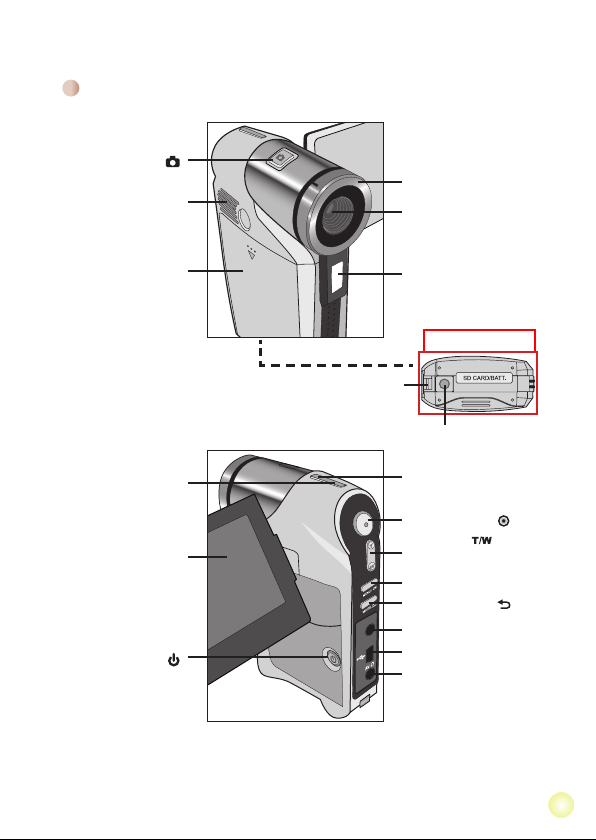
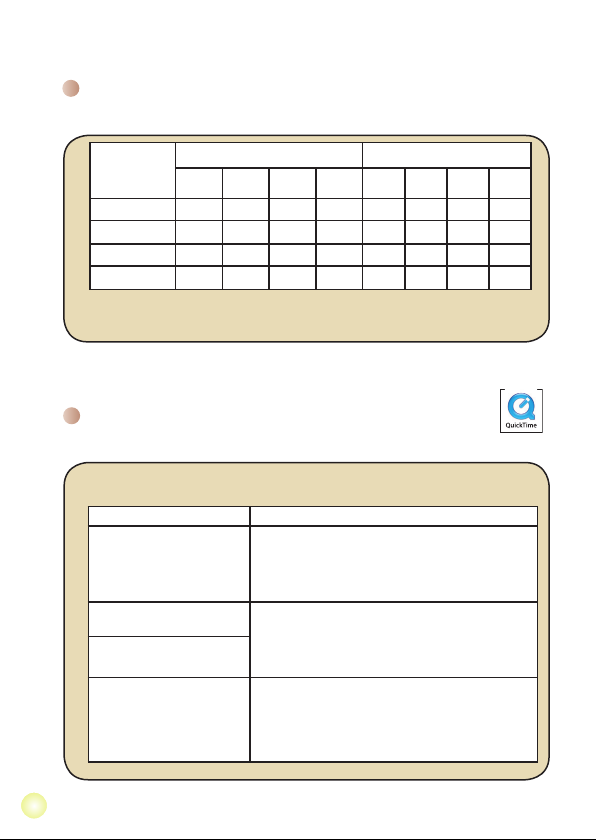
Storage Capacity
* Please refer to the package printing for the specication of your model.
Memory
SD card (1GB) 15 30 30 160 380 580 920 1840
SD card (2GB) 30 60 60 320 770 1160 1840 3680
SD card (4GB) 60 120 120 640 1540 2320 3680 7360
SD card (8GB) 120 240 240 1280 3080 4640 7360 14720
Note: The actual value of capacity may vary (up to ± 30%) depending on the color saturation
and complexity of your subject and surroundings.
HD 60f HD 30f
Video (min.) Still picture
WVGA
QVGA
60f
8M 5M 3M 1M
30f
System Requirements
* Please refer to the package printing for the specication of your model.
System requirements are different in different video resolution settings:
Video Resolution PC system requirements
HD 60f (1280x720) @60fps
HD 30f (1280x720) @30fps
WVGA 60f (848x480) @60fps
QVGA 30f (320x240) @30fps
OS = Windows XP SP2, Vista or above
CPU = Pentium 4 3.2GHz, Core 2 Duo or above
System RAM = 1GB (2GB recommended)
Display card = 256MB of RAM
OS = Windows XP SP2, Vista or above
CPU = Pentium 4 3.2GHz or above
System RAM = 1GB (2GB recommended)
Display card = 256MB of RAM
OS = Windows XP, Vista or above
CPU = Pentium 4 1.5GHz or above
System RAM = 256MB (512MB or above recommended)
Display card = 64MB (128MB or above recommended)
12
Page 15

Herzlich willkommen!
Lieber Benutzer, vielen Dank für den Kauf dieses Produkts.
In die Entwicklung dieses Geräts wurde viel Zeit und Mühe investiert, und wir hoffen, es
wird Ihnen viele Jahre störungsfreien Betrieb und Freude bescheren
Sicherheitshinweise:
1. Sie die Kamera nicht fallen und beschädigen und zerlegen Sie die Kamera nicht,
andernfalls erlischt die Gewährleistung.
2. Vermeiden Sie jeglichen Kontakt des Geräts mit Wasser und trocknen Sie sich die Hände
ab, bevor Sie es verwenden
3. Setzen Sie die Kamera keinen hohen Temperaturen aus und lassen Sie das Gerät nicht in
direkter Sonneneinstrahlung liegen. Andernfalls könnten Schäden an der Kamera auftreten.
4. Verwenden Sie die Kamera behutsam. Vermeiden Sie es, starken Druck auf das
Kameragehäuse auszuüben.
5. Verwenden Sie die Kamera zu Ihrer eigenen Sicherheit nicht bei Gewittern oder
Blitzschlag.
6. VerwendenSiekeineBatterienmitanderenSpezikationen.Andernfallskönnenunter
Umständen schwere Schäden am Gerät entstehen.
7. Entfernen Sie die Batterie, wenn Sie das Gerät längere Zeit nicht verwenden, da
mängelbehaftete Batterien die Funktionalität der Kamera beeinträchtigen können.
8. Entfernen Sie die Batterie, falls diese Anzeichen gibt auszulaufen oder Verformungen
aufweist.
9. Verwenden Sie ausschließlich vom Hersteller angebotenes Zubehör.
10. Bewahren Sie die Kamera außerhalb der Reichweite von Kindern auf.
11. Es besteht ein Explosionsrisiko, wenn die Batterie durch einen falschen Typ ersetzt wird.
12. Entsorgen Sie gebrauchte Batterien nach den Anweisungen.
Wenn die Lebensdauer des Produkts zu Ende
kommt, lassen Sie bitte möglichst alle Komponenten
recyceln.
Batterien und Akkus dürfen nicht mit Hausmüll
zusammen entsorgt werden! Bitte entsorgen Sie sie
bei einer lokalen Recyclingstelle.
Zusammen leisten wir einen wertvollen Beitrag zum
Schutz unserer Umwelt.
Page 16
Erste Schritte
Die Komponenten des Camcorders
Auslöser ( )
Fokusregler
Lautsprecher
Objektiv
Akkufach / SD-/MMC-
Kartensteckplatz
Anzeigelicht
LCD-Anzeige
Stromschalter ( )
Riemenhalter
Blitz
Ansicht von
Stativgewinde
Mikrofon
Aufnahmetaste ( )
Zoomtaste ( )-
T: Einzoomen/ Lauter
W: Auszoomen/ Leiser
Menü/OK-Taste
Modus-/Zurück ( )-Taste
HD-Ausgang
USB-Anschluss
AV-Ausgang / Ohrhörer
unten
1
Page 17
2
Einlegen des Akkus
1. Schieben Sie den Akkufachdeckel auf.
2. Legen Sie den mitgelieferten Lithium-Ionen-Akku in das Akkufach
ein. Bitte beachten Sie, dass die Metallkontakte auf die Kontakte im
Akkufach auszurichten sind.
3. Bringen Sie den Akkufachdeckel nach dem ordnungsgemäßen
Einlegen des Akkus wieder an.
Auaden des Akkus
Laden Sie den Akku vor dem ersten Gebrauch mindestens 8 Stunden lang auf.
1. Schließen Sie das Kabel an.
Verbinden Sie ein Ende des mitgelieferten Netzteils mit dem USBAnschluss und das andere Ende mit einer Wandsteckdose.
ODER
Verbinden Sie ein Ende des mitgelieferten USB-Kabels mit dem
USB-Anschluss am Camcorder und das andere Ende mit einem
eingeschalteten PC. Der Camcorder muss dabei ausgeschaltet
sein.
2. Die Lade-LED leuchtet rot und der Ladevorgang beginnt.
3. Wenn der Ladevorgang unterbrochen wurde oder der Akku voll geladen ist, leuchtet die
Lade-LED grün.
WennSiedenAkkuübereinenPCauaden,dürfenSiedenCamcorder
nicht einschalten, da sonst der Ladevorgang stoppt.
Einstecken einer Speicherkarte (optional)
Gehen Sie wie folgt vor, um eine Speicherkarte einzustecken:
(1) Öffnen Sie den Akkufachdeckel.
(2) Drücken Sie die Karte behutsam wie gezeigt hinein, bis sie das Ende des
Steckplatzes erreicht.
Um die Speicherkarte zu entnehmen, drücken Sie behutsam auf die Karte, woraufhin
sie ein Stück herausspringt. Ziehen Sie die Karte anschließend aus dem Steckplatz
heraus.
Ein-/Ausschalten des Camcorders
Klappen Sie den LCD-Bildschirm auf oder drücken und halten Sie den Stromschalter 1
Sekunde lang, um den Camcorder einzuschalten.
Um den Camcorder auszuschalten, drücken und halten Sie den Stromschalter 1 bis 3
Sekunden lang oder klappen den LCD-Bildschirm zu.
Wenn der Camcorder längere Zeit inaktiv ist, veranlasst die Einstellung der
Funktion “Autom. aus” das automatische Ausschalten des Gerätes.
Page 18
Einstellen der Sprache
1
00:06:40
00:00:05
1. Schalten Sie den Camcorder ein.
2. Rufen Sie das Modus-Menü mit der Taste MODE auf.
3. Wählen Sie den Modus Einstellung mit der Zoomtaste aus. Drücken Sie auf OK, um
das Menü zu öffnen.
4. Wählen Sie mit der Zoomtaste die Option Sprache. Drücken Sie zur Bestätigung auf OK.
5. Wählen Sie durch Auf- oder Abwärtsbewegungen der Zoomtaste eine Sprache aus.
6. Zum Abschluss bestätigen Sie die Einstellung mit der Taste OK.
Ablesen der LCD-Anzeigen
Modussymbol Weißabgleichmodus
Videoauösung Verbleibende Aufnahmezeit
Bildauösung Selbstauslösermodus
Makromodus Nachtaufnahmemodus
SD-Karte eingesteckt Aufnahmezeit
Akkuladestand
Zoomanzeige
Blitzmodus
3
Page 19
44
Grundfunktionen
Aufzeichnen eines Videoclips / Aufnehmen eines Bildes
1. Stellen Sie den Fokus richtig ein. Für die meisten Filmaufnahmen sollten Sie den Fokus
auf ( ) einstellen. Wählen Sie ( ) nur für Nahaufnahmen.
Hinweis: Bitte achten Sie darauf, eine Speicherkarte einzustecken, ehe Sie mit
der Aufnahme beginnen.
50cm ~ (20” ~ )
30cm ~ 50cm (12” ~ 20”)
2. Zoomen:
Bewegen Sie zum Vergrößern oder Verkleinern die Zoom-Taste nach oben oder unten.
3. Drücken Sie die Aufnahmetaste, um die Aufzeichnung zu starten. Drücken Sie nun
zum Aufnehmen des Fotos den Auslöser.
JenacheingestellterVideoauösungkanndasBildseitenverhältnisvonFotos
in der LCD-Vorschau variieren.
DasFormaterfassterBilderwirdnichtdurchdieVideoauösungbeeinusst.
* Detaillierte Auösungsspezikationen nden Sie auf der Verpackung.
Videoauösung Vorschau Bildaufnahme
HD (1280x720)
WVGA 60f(848x480)
QVGA 30f(320x240)
Bildseitenverhältnis 16:9
Bildseitenverhältnis 4:3 Bildseitenverhältnis 4:3
Bildseitenverhältnis 4:3
4. Drücken Sie die Aufnahmetaste erneut, um die Aufzeichnung zu beenden.
Die Zoomfunktion steht auch während des Aufzeichnens zur Verfügung
(außer im Makromodus).
Eine Erwärmung des Camcorders nach längerem Betrieb ist völlig normal.
Page 20

Aufzeichnen eines Audioclips
1. Schalten Sie den Camcorder ein.
2. Rufen Sie das Modus-Menü mit der Taste MODE auf.
3. Wählen Sie den Modus Dictaphone mit der Zoomtaste aus. Drücken Sie auf OK, um
das Menü zu öffnen.
4. Drücken Sie die Aufnahmetaste, um mit der Aufzeichnung zu beginnen.
5. Drücken Sie die Aufnahmetaste erneut, um die Aufzeichnung zu beenden.
Wiedergeben der Aufzeichnungen
1. Drücken Sie die Taste MODE. Wählen Sie dann mit der Zoomtaste den Modus Meine
Dateien.
2. Unter Meine DateienbendensichdreiOrdner:Video,BilderundSprache.Wählen
Sie Video, Bilder oder Sprache aus. Wechseln Sie dann mit der OK-Taste in den
Indexmodus.
3. Funktionen im Modus Meine Dateien:
Dateityp Funktion... Bedienschritte
Indexmodus
Vollbildansicht
Video & Audio
Foto
Umschalten
zwischen
Indexmodus und
Vollbildmodus
Wechseln zwischen
Dateien
Starten der
Wiedergabe
Anhalten/Fortsetzen
der Wiedergabe
Einstellen der
Lautstärke
Beenden der
Wiedergabe
Wählen der
nächsten Datei
Wählen der
vorherigen Datei
Durchsuchen des
Fotos
Drücken Sie im Indexmodus die Taste OK, um zur
Vollbildansicht zu wechseln. Drücken Sie in der
Vollbildansicht die Taste Mode/Zurück, um zum
Indexmodus zu wechseln.
1. Im Indexmodus: Verwenden Sie die Zoomtaste, um
den Markierungsrahmen zu verschieben.
2. In der Vollbildansicht: Mit der Zoomtaste wechseln
Sie zwischen Dateien hin und her.
Wenn (im Vollbildmodus) eine Datei gewählt wird,
beginnt ihre Wiedergabe automatisch.
Drücken Sie während der Wiedergabe/Pause die
Taste OK.
Bewegen Sie während der Wiedergabe die Zoomtaste
nach oben oder unten.
Drücken Sie während der Wiedergabe die Taste
Mode/Zurück.
Kehren Sie zur vorherigen Ansicht zurück und
verwenden die Zoomtaste (W), um die nächste Datei
zu wählen.
Kehren Sie zur vorherigen Ansicht zurück und
verwenden die Zoomtaste (T), um die vorherige Datei
zu wählen.
Verwenden Sie die Zoomtaste, um das Foto
durchzusuchen.
55
Page 21
66
Wiedergeben der Aufnahmen auf dem PC
Installieren der Software
Bitte beachten Sie, dass die Videos im MOV-Format aufgezeichnet werden. Daher
brauchen Sie spezielle Programme, um die Aufnahmen auf dem PC wiederzugeben.
Wenn Sie diese Möglichkeit zum ersten Mal nutzen, achten Sie bitte darauf, dass der
Quicktime 7.0-Player (oder aktueller) auf Ihrem PC installiert ist. Falls nicht, laden Sie
den QuickTime-Player aus dem Internet herunter. Oder installieren Sie die Software
von der mitgelieferten CD.
Verbinden mit einem PC und Speichern der
Dateien
1. Schalten Sie den Camcorder ein.
2. Verbinden Sie den Camcorder (mit eingesteckter SD-Karte) über das USB-Kabel mit
Ihrem Computer.
3. Ein Dialogfenster öffnet sich automatisch. Bitte wählen Sie die Option “Ordner
öffnen, um Dateien anzuzeigen”. Klicken Sie anschließend auf OK.
4. Falls das Dialogfenster nicht automatisch erscheint, klicken Sie bitte auf Arbeitsplatz
und öffnen den Wechseldatenträger.
5. Doppelklicken Sie auf den Dateiordner DCIM.
6. Doppelklicken Sie auf den Dateiordner 100MEDIA.
7. Kopieren Sie wichtige Dateien und speichern Sie diese an einem beliebigen Ort in
Ihrem Computer.
Verbinden des Camcorders mit einem Fernsehgerät
Verbinden des Camcorders mit einem
normalen Fernsehgerät
TV: Normales Röhrenfernsehgerät
1. Schalten Sie das Fernsehgerät ein und schalten es in den AV-Modus.
2. Verbinden Sie die Audio- und
Videostecker des AV-Kabels (gelb,
weiß, rot) mit den AV-Eingängen
(“AV IN”) des Fernsehgerätes.
3. Schalten Sie den Camcorder ein.
4. Schließen Sie das andere Ende des
AV-Kabels an den AV-Ausgang (AV
OUT) des Camcorders an. Wenn
eine Meldung auf dem Bildschirm
eingeblendet wird, wählen Sie bitte “AV Out”.
AV-Modus
AV-Eingang
Video
Audio
AV-Kabel
AV-Ausgang
Page 22
AV-Ausgang
HD-Ausgang
HD TV
Component-Audioeingang
Component-Videoeingang
<Component-Videokabel>
<AV-Kabel>
(rot)
(gelb)
(weiß)
(grün)
(rot)
(blau)
(Schließen Sie das
gelbe Kabel nicht an.)
Verbinden des Camcorders mit einem
HDTV-Fernsehgerät
Ein HDTV-Fernsehgerät verfügt über Component-Eingänge und ermöglicht eine
DarstellunginhoherAuösung.
1. Schalten Sie Ihr HD-Fernsehgerät ein.
2. Schalten Sie den Camcorder ein.
3. Verbinden Sie ein Ende des Component-Videokabels mit dem
Component-Eingang am HDTV-Gerät. Verbinden Sie das andere Ende
mit dem HD-Ausgang des Camcorders.
4. Verbinden Sie ein Ende des weiteren AV-Kabels mit dem ComponentAudioeingang am HDTV-Gerät. Verbinden Sie das andere Ende mit dem
AV-Ausgang des Camcorders. (Schließen Sie das gelbe Kabel nicht an
den AV-Eingang des HDTV-Gerätes an.)
5. Schalten Sie das HD-Fernsehgerät auf den Component-Eingang um.
Wiedergabe von MP3-Musik
Nur bei bestimmten Modellen. Detaillierte Spezikationen nden Sie auf der
Verpackung.
1. Schalten Sie die Kamera ein und schließen Sie die Kamera mit dem USB-Kabel an
einen PC an.
2. Kopieren von Dateien auf die Kamera: Doppelklicken Sie nach dem Anschließen
der Kamera an den PC auf “Arbeitsplatz”. Ein Wechseldatenträger wird angezeigt.
Kopieren Sie MP3-Dateien in den Ordner “Musik” zur Wiedergabe.
3. Drücken Sie die Modustaste und verwenden die Richtungstasten, um den
Wiedergabemodus zu wählen. Drücken Sie anschließend die Taste OK, um den
Modus aufzurufen.
77
Page 23
8
Erweiterte Funktionen
Menübedienung
Die Menüs bieten einige Optionen, mit denen Sie Feineinstellungen der Funktionen
Ihrer Kamera vornehmen können. Die nachstehende Tabelle enthält Einzelheiten über
die Menübedienung.
Funktion... Bedienschritte
Aufrufen des Menüs Drücken Sie die Taste MENU.
Verschieben des
Markierungsrahmens
Aufrufen von Untermenüs /
Bestätigen einer Eingabe
Beenden des Menüs / Rückkehr
zum übergeordneten Menü
Menüelemente im Kameramodus
Einschalten→DieTasteMENÜdrücken.
Element Optionen Beschreibung
Videoauösung
Größe
Nachtaufn Ein/Aus
Weißabgleich
Blitz
DetaillierteAuösungsspezikationenndenSieaufderVerpackung.
DetaillierteAuösungsspezikationenndenSieaufderVerpackung.
Auto Die Kamera passt den Weißabgleich automatisch an.
Sonnig
Wolkig
Fluores.
Wolfram
Ein Der Blitz wird bei jeder Aufnahme ausgelöst.
Auto
Aus Der Blitz ist deaktiviert.
Navigieren Sie mit der Zoomtaste nach oben oder unten.
Drücken Sie die Taste OK.
Drücken Sie die Taste Mode/ Zurück (vom Untermenü aus).
Ist diese Einstellung aktiviert, können Sie Fotos bei einem dunklen
Hintergrund machen. Da die Verschlusszeit beim Aufnehmen von
Fotos in dunkler Umgebung wesentlich länger ist, empfehlen wir
die Verwendung eines Stativs, um Unschärfen durch Verwackeln
zu vermeiden.
Warnung: Das Bildrauschen nimmt zu, wenn Nachtaufnahme
aktiviert ist.
Diese Einstellung eignet sich für Außenaufnahmen bei
Sonnenschein.
Diese Einstellung eignet sich für Außenaufnahmen bei Bewölkung
oder in schattiger Umgebung.
Diese Einstellung eignet sich für Aufnahmen in Räumen, die mit
Leuchtstoffröhren ausgeleuchtet sind, oder in Umgebungen mit
hoher Farbtemperatur.
Diese Einstellung eignet sich für Aufnahmen in Räumen, die mit
Glühlampen ausgeleuchtet sind, oder in Umgebungen mit geringer
Farbtemperatur.
Der Blitz wird bei unzureichender Beleuchtung automatisch
ausgelöst.
Page 24
Menüelemente im Kameramodus (Fortsetzung)
Element Optionen Beschreibung
Effekt
Belichtung -2~+2
Selbstauslöser Ein/Aus
Histogramm Ein/Aus
Symbol Ein/Aus
Normal Für Aufnahmen mit natürlichen Farben.
S&W Für Aufnahmen in Schwarzweiß.
Klassisch Für Aufnahmen in Brauntönen.
Sie können die Belichtung manuell einstellen, um eine bessere
Einstellung zu erzielen, wenn das Vorschaubild zu hell oder zu
dunkel wirkt. Ein positiver Wert bedeutet, dass das Bild heller
als gewöhnlich wird; ein negativer Wert lässt das Bild dunkler
erscheinen.
Hier aktivieren/deaktivieren Sie den Selbstauslöser. Wenn der
Selbstauslöser aktiviert ist, wartet die Kamera nach dem Drücken
der Auslösertaste zehn Sekunden, bis die Aufnahme erfolgt.
Hier aktivieren/deaktivieren Sie die Bildhistogrammanzeige auf
dem Bildschirm.
Hier aktivieren/deaktivieren Sie die Anzeige der Bildschirmsymbole
(OSD).
Menüfunktionen im Modus Meine Dateien
Einschalten→DieTasteMODEdrücken→MitderZoomtaste zu Meine Dateien
umschalten→DenOrdnerVideo, Bilder oder Spracheauswählen→DieTasteOK
drücken→DenAuslöser drücken.
Element Optionen Beschreibung
Eines löschen Ja/Nein Damit löschen Sie die vorliegende Datei.
Alles löschen
Diavorführung/
Video spielen
Sperren
*FallssichkeineDateieninderKamerabenden,werdenkeineElementeangezeigt.
Damit löschen Sie alle Fotos und Video-/Audiodateien, die sich
Ja/Nein
imSpeicherbenden.
Die Kamera zeigt Fotos oder Videoclips nacheinander an.
-
Durch Drücken der Taste OK können Sie die Diashow oder
Videowiedergabe stoppen.
Sie können einzelne, mehrere oder alle Dateien vor dem
Löschen schützen. Eine gesperrte Datei kann nicht über die
Ja/Nein
Löschen-Funktion entfernt werden. Beim Formatieren jedoch
werden sämtliche Dateien entfernt; auch gesperrte Dateien.
9
Page 25
10
Menüelemente im Einstellungsmodus
Einschalten→DieTasteMODEdrücken→DenModusEinstellungwählen→Auf
OK drücken
Element Optionen Beschreibung
Datum und Zeit -
Sprache
Pieper
Startbild
Symbol
Helligkeit
TV System
Flimmer
Auto-Aus
Formatieren
Standard
* Tabelle mit Frequenzeinstellungen:
Auslöser Ein
Region Großbritannien Deutschland Frankreich Italien Spanien Niederlande Russland
Einstellung 50Hz 50Hz 50Hz 50Hz 50Hz 50Hz 50Hz
Region Portugal Amerika Taiwan China Japan Korea Thailand
Einstellung 50Hz 60Hz 60Hz 50Hz 50/60Hz 60Hz 50Hz
Hier stellen Sie das Datum und die Uhrzeit ein.
-
Hier können Sie die Menüsprache auswählen.
Ein
Das Tonsignal wird aktiviert.
Das Tonsignal der Tasten wird abgeschaltet, aber das Tonsignal des
Auslösers bleibt aktiviert.
Aus
Das Tonsignal wird deaktiviert.
Ein/Aus
Hier stellen Sie das Startbild ein.
Hier aktivieren/deaktivieren Sie die Anzeige der OSD-Symbole auf
Ein/Aus
dem Bildschirm.
Hier stellen Sie die LCD-Helligkeit ein. Durch einen positiven Wert
-2~+2
wird der LCD-Bildschirm heller; durch einen negativen Wert wird der
LCD-Bildschirm dunkler.
Damit stellen Sie die TV-Systemkompatibilität auf NTSC ein. Diese
NTSC
Option eignet sich für Taiwan, Japan, Korea und Amerika.
Damit stellen Sie die TV-Systemkompatibilität auf PAL ein. Diese
PAL
Option eignet sich für Deutschland, Italien, die Niederlande, China,
Japan, Hongkong und Großbritannien.
50Hz
Die Flimmerfrequenz wird auf 50 Hz eingestellt*.
60Hz
Die Flimmerfrequenz wird auf 60 Hz eingestellt*.
Aus
Die automatische Abschaltfunktion wird deaktiviert.
Die Kamera schaltet sich automatisch aus, wenn sie länger als 1
1 Min
Minute inaktiv ist.
Die Kamera schaltet sich automatisch aus, wenn sie länger als 3
3 Min
Minuten inaktiv ist.
Die Kamera schaltet sich automatisch aus, wenn sie länger als 5
5 Min
Minuten inaktiv ist.
Hier formatieren Sie das Speichermedium. Bitte nehmen Sie zur
Ja
Kenntnis, dass sämtliche auf dem Medium gespeicherten Dateien
unwiederbringlich gelöscht werden.
Nein
Damit brechen Sie den Vorgang ab.
Hier stellen Sie die werkseitigen Standardeinstellungen wieder her.
Ein
Bitte beachten Sie, dass dadurch alle von Ihnen vorgenommenen
Einstellungen zurückgesetzt werden.
Aus
Damit brechen Sie den Vorgang ab.
Page 26
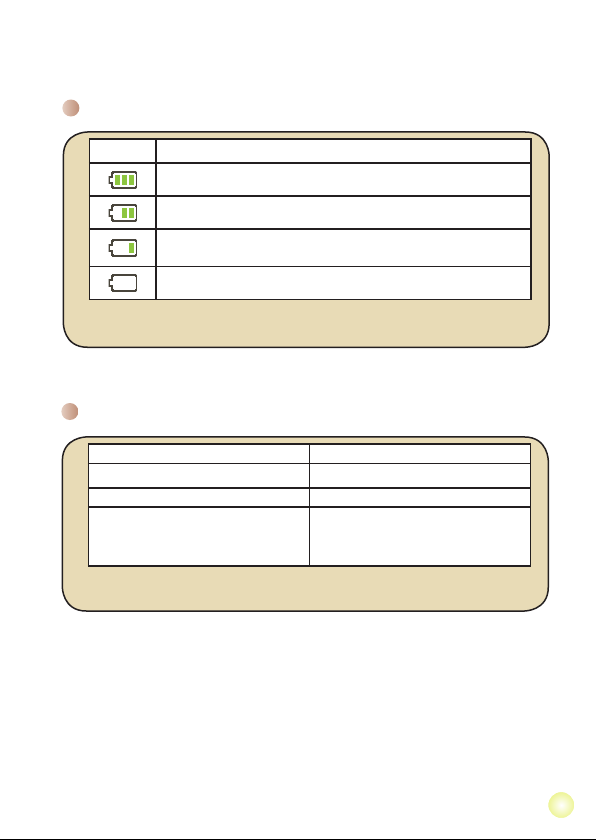
Foto Video
Anzahl der Aufnahmen Aufnahmezeit (Minuten)
200 90
* Aufnahme alle 30 Sekunden
** Der Blitz ist ausgeschaltet
***DieAuösungistauf5M(2592x1944)
eingestellt
*DieAuösungistaufHD30f
(1280 x 720) eingestellt.
Hinweis: DieseTabelledientlediglichalsÜbersicht.DietatsächlicheAkkubetriebsdauer
hängt vom jeweiligen Akkutyp und vom Ladestand ab.
Akkulaufzeit
Symbol Beschreibung
Akku voll geladen
Akku halb voll
Akku fast leer
* Blitz und LED-Beleuchtung werden deaktiviert.
Akku ist leer
Hinweis: Um einen plötzlichen Ausfall der Stromversorgung zu vermeiden, wird empfohlen,
den Akku zu wechseln, sobald ein geringer Akkuladestand angezeigt wird.
Akkuladestandanzeige
Anhang
11
Page 27
Speicherkapazität
Speicher
Video (Min.) Foto
HD 60f HD 30f
WVGA
60f
QVGA
30f
8M 5M 3M 1M
SD-Karte (1GB) 15 30 30 160 380 580 920 1840
SD-Karte (2GB) 30 60 60 320 770 1160 1840 3680
SD-Karte (4GB) 60 120 120 640 1540 2320 3680 7360
SD-Karte (8GB) 120 240 240 1280 3080 4640 7360 14720
Hinweis: Die tatsächliche Kapazität kann je nach Farbsättigung und Komplexität Ihres
Aufnahmeobjekts und der Umgebung variieren (bis zu ± 30 %).
DieSystemvoraussetzungensindbeiverschiedenenVideoauösungen
unterschiedlich:
Videoauösung PC-Systemvoraussetzungen
HD 60f (1280x720) @60fps
Betriebssystem: Windows XP SP2, Vista oder Nachfolger
CPU: CPU: Pentium 4 3,2GHz, Core 2 Duo oder noch
höhere Klasse
System-RAM: 1GB (2 GB empfohlen)
Grakkarte:256MBRAM
HD 30f (1280x720) @30fps
Betriebssystem: Windows XP SP2, Vista oder Nachfolger
CPU: CPU: Pentium 4 3,2GHz oder noch höhere
Klasse
System-RAM: 1GB (2 GB empfohlen)
Grakkarte:256MBRAM
WVGA 60f (848x480) @60fps
QVGA 30f (320x240) @30fps
Betriebssystem: Windows XP, Vista oder Nachfolger
CPU: CPU: Pentium 4 1,5GHz oder noch höhere
Klasse
System-RAM: 256 MB (512 MB oder mehr empfohlen)
Grakkarte:64MB(128MBodermehrempfohlen)
Systemvoraussetzungen
* Detaillierte Spezikationen des Produktmodells nden Sie auf der Verpackung.
* Detaillierte Spezikationen des Produktmodells nden Sie auf der Verpackung.
Anhang
12
Page 28

Bienvenue:
Cher utilisateur, nous vous remercions pour l’achat de ce produit.
Beaucoup d’investissements en temps et en efforts ont été réalisés pour son
développement, et nous espérons qu’il vous procurera des années de bons et loyaux
services.
Instructions de sécurité:
1. Ne faites pas tomber, ne perforez pas et ne démontez pas le caméscope ; autrement la
garantie serait annulée.
2. Évitez tout contact avec l’eau, et séchez-vous les mains avant de l’utiliser.
3. N’exposez pas le caméscope à des températures élevées et ne le laissez pas sous la
lumière directe du soleil. Ceci pourrait endommager le caméscope.
4. Utilisez le caméscope avec soin. Évitez d’exercer de trop fortes pressions sur le boîtier de
la caméra.
5. Pour votre propre sécurité, évitez d’utiliser le caméscope quand il y a un orage ou du
tonnerre.
6. N’utilisezpasdebatteriesdespécicationsdifférentes.Cecipourraitpotentiellement
conduire à des dégâts sérieux.
7. Enlevez la batterie pendant les longues périodes de non-utilisation, car une batterie
détériorée peut affecter le fonctionnement du caméscope.
8. Enlevez la batterie si elle présente des signes de fuite ou d’altération.
9. Utilisez seulement les accessoires fournis par le fabricant.
10. Tenez le caméscope hors de portée des enfants en bas âge.
11. Risque d’explosion si la batterie est remplacée par un type incorrect.
12. Mettez au rebut les batteries usages en respectant les instructions.
Le moment venu, pour mettre au rebut votre produit,
veuillez recycler tous les composants possibles.
Les batteries et les accumulateurs ne doivent pas
être éliminés avec vos déchets ménagers ! Veuillez
les recycler à votre point de collecte local.
Ensemble nous pouvons aider à protéger
l’environnement.
Page 29

Démarrage
Connaître les parties de votre caméscope
Déclencheur ( )
Haut-parleur
Logement piles / Fente
pour carte SD/MMC
Témoin lumineux
Afchage LCD
Interrupteur
d’alimentation ( )
Attache pour
dragonne
Sélecteur de mise
au point
Objectif
Flash
Vue de dessous
Embase pour
trépied
Microphone
Bouton d’enregistrement
( )
Bouton de zoom ( )T: Zoom avant /
Volume plus
W: Zoom arrière /
Volume moins
Bouton Menu/OK
Bouton Mode/Retour ( )
Sortie HD OUT
Connecteur USB
Connecteur de sortie
AV OUT /Écouteurs
1
Page 30
2
Installer la batterie
1. Faites coulisser le capot batterie pour l’ouvrir.
2. Placez la le accessoire Li-Ion dans batterie logement. Notez que les
contacts métalliques doivent être alignés avec ceux du logement.
3. Une fois la batterie correctement installée, remettez en place le capot
batterie.
Charger la batterie
Veuillez charger la batterie pendant au moins 8 heures avant la première utilisation.
1. Branchez le câble.
Branchez une extrémité de l’adaptateur AC fourni sur le port USB du
caméscope et l’autre extrémité sur la prise secteur.
OU
Branchez une extrémité du câble USB fourni sur le port USB du
caméscope et l’autre extrémité sur un PC sous tension. Assurezvous que le caméscope est éteint.
2. La LED de charge devient rouge et la charge démarre.
3. Lorsque la charge est interrompue ou que le pack batterie est complément chargé, la
LED de charge devient verte.
Lorsque vous utilisez un PC pour charger la batterie, n’alimentez pas le
caméscope, sinon la charge s’arrête.
Insérer une carte mémoire (facultatif)
Pour insérer une carte mémoire, procédez comme suit:
(1) Ouvrir le logement à batterie.
(2) Poussez doucement la carte comme indiqué jusqu’à ce qu’elle atteigne le fond de
la fente.
Pour enlever la carte mémoire, enfoncez doucement la carte jusqu’elle sorte. Retirez
ensuite la carte de la fente.
Allumer/éteindre le caméscope
Ouvrez le moniteur LCD et maintenez enfoncé le bouton d’Alimentation pendant 1
seconde pour allumer le caméscope.
Pour éteindre le caméscope, maintenez enfoncé le bouton d’Alimentation pendant 1~3
secondes ou fermez le moniteur LCD.
Si le caméscope reste inactif pendant une période prolongée, il peut
s’éteindre automatiquement en raison du réglage d’arrêt auto.
Page 31

Régler la langue
1
00:06:40
00:00:05
1. Allumez le caméscope.
2. Appuyez sur le bouton MODE pour ouvrir le menu MODE.
3. Utilisez le Zoom pour sélectionner le mode Réglages et appuyez sur OK pour ouvrir
l’écran de menu.
4. Utilisez le bouton de Zoom pour sélectionner l’élément Langue et appuyez sur le
bouton OKpourconrmer.
5. Déplacez le bouton de Zoom vers le haut/bas pour choisir une langue.
6. Lorsque vous avez terminé, appuyez sur le bouton OKpourconrmerleréglage.
Lire les indicateurs LCD
Icône de mode
Résolution vidéo Durée d’enregistrement restante
Résolution image Mode retardateur
Mode macro Mode photos de nuit
Carte SD insérée Durée d’enregistrement
Autonomie de la batterie
Indicateur de taux de zoom
Modedeash
Mode balance des blancs
(Bal. Blancs)
3
Page 32

44
Utilisation de base
Enregistrer un clip vidéo / Prendre une photo
1. Ajustez la mise au point sur une position appropriée. Normalement, vous pouvez régler
la mise au point sur ( ) pour la plupart des conditions de tournage. Sélectionnez
( ) seulement pour les gros plans.
Remarque: Veuillez vous assurer que votre carte mémoire est insérée avant de
faire des enregistrements.
50cm ~ (20” ~ )
30cm ~ 50cm (12” ~ 20”)
2. Changez le zoom:
Utilisez les boutons de Zoom vers le haut ou vers le bas pour zoomer ou dézoomer
l’écran.
3. Appuyez sur le bouton Enregistrer pour commencer l’enregistrement. Ou appuyez sur
le déclencheur pour prendre une photo.
En raison de la fonction de capture du capteur, la prévisualisation LCD et le ratio
de la capture d’image varient selon les différents réglages de résolution vidéo.
Lacaptured’imagedelacaméraestxealorsquelesrésolutionsvidéosont
différentes.
* Reportez-vous aux inscriptions de la boîte pour les caractéristiques de
résolution.
Résolution vidéo Aperçu Prendre des photos
HD (1280x720)
WVGA60f(848x480)
QVGA30f(320x240)
ratio 16:9
ratio 4:3 ratio 4:3
ratio 4:3
4. Appuyez de nouveau sur le bouton Enregistrer pour arrêter l’enregistrement.
La fonction de zoom est également disponible pendant l’enregistrement (sauf
en mode macro).
Il est normal que le caméscope soit légèrement chaud en utilisation /
enregistrement continu en raison de ses performances élevées.
Page 33

Enregistrement d’un clip audio
1. Allumez le caméscope.
2. Appuyez sur le bouton MODE pour ouvrir le menu MODE.
3. Utilisez le bouton de Zoom pour sélectionner le mode Dictaphone et appuyez sur OK
pour ouvrir l’écran de menu.
4. Appuyez sur le bouton Enregistrer pour commencer l’enregistrement
5. Appuyez de nouveau sur le bouton Enregistrer pour arrêter l’enregistrement.
Lire vos enregistrements
1. Appuyez sur le bouton MODE et utilisez le bouton de Zoom pour sélectionner le mode
“Mes travaux”.
2. Il y a trois dossiers sous Mes travaux : Vidéo, Bilder et Enreg vocal. Sélectionnez
Vidéo, Image ou Vocal puis appuyez sur le bouton OK pour ouvrir le mode index.
3. Opérations du mode Mes travaux :
Type de chier Comment... Action
Mode index
Mode plein écran
Vidéo & Audio
Bilder
Basculer entre le
mode index et le
mode plein écran
Basculer entre les
chiers
Commencer la
lecture
Pause/Reprendre la
lecture
Régler le niveau du
volume
Arrêter la lecture
Sélectionner le
chiersuivant
Sélectionner le
chierprécédent
Naviguer dans
l’image
En mode Index, appuyez plain la touche sur OK
basculer en mode pour écran. En mode plein écran,
appuyez sur le bouton de Mode/Retour pour basculer
en mode in index.
1. En mode index: Utilisez le bouton de Zoom pour
déplacer la boîte de sélection.
2. En mode Plein écran : Utilisez le bouton de Zoom
pourbasculerentreleschiers.
Une fois sélectionné (en mode plein écran), la lecture
duchierdémarreautomatiquement.
Pendant la lecture/en pause, appuyez sur la touche
OK.
Pendant la lecture, utilisez le bouton de Zoom pour
vous déplacer vers le haut ou le bas.
Pendant la lecture, appuyez sur le bouton Mode/
Retour.
Retournez à la vue précédente et utilisez le bouton de
Zoom(W)pourchoisirlechiersuivant.
Retournez à la vue précédente et utilisez le bouton de
Zoom(T)pourchoisirlechierprécédent.
Utilisez le bouton de Zoom pour naviguer dans
l’image.
55
Page 34

66
Lire vos enregistrements sur PC
Installation du logiciel
Veuillez noter que les vidéos sont enregistrées au format .mov. Il vous faut donc
unprogrammespéciquepourlirelesenregistrementssurPC.Pourlapremière
utilisation,veuillezvousassurerquevousavezleplayerQuickTime7.0(ou
supérieur)survotrePC.VeuilleztéléchargerleplayerQuickTimedepuislesiteWeb.
Ou veuillez installer le logiciel du CD fourni.
Connecter au PC et enregistrer des chiers
1. Allumez le caméscope.
2. Connectez le caméscope (avec la carte SD insérée) à votre ordinateur avec le câble
USB.
3. Une fenêtre de dialogue apparaît automatiquement. Veuillez sélectionner “Ouvrir le
dossier pour visualiser les chiers” et cliquez sur “OK”.
4. Si la fenêtre de dialogue n’apparaît pas automatiquement, vous pouvez doublecliquer sur “Mon ordinateur” et ouvrir le “Disque amovible”.
5. DoublecliquezsurledossierdechiersDCIM.
6. Doublecliquezsurledossierdechiers100MEDIA.
7. Copiezleschiersquevousvoulezgarderetenregistrez-lesàl’emplacement
souhaitée sur votre ordinateur.
Relier le caméscope à un téléviseur
Relier le caméscope à un téléviseur standard
TV : Téléviseur cathodique (CRT) traditionnel
1. Allumez votre téléviseur et basculez-le en mode AV.
2. Branchez les extrémités audio
et vidéo du câble AV (couleurs
jaune/blanche/rouge) sur les ports
“ENTRÉE AV” du téléviseur.
3. Allumez le caméscope.
4. Branchez l’autre extrémité du
câble AV sur le port “SORTIE AV”
de votre caméscope. Lorsqu’un
messages’afchesurl’écran,
veuillez sélectionner “SORTIE AV”.
Mode AV
Vidéo
Entrée
AV-IN
Audio
Câble AV
Sortie
AV OUT
Page 35

HD TV fait ici référence aux ports d’entrée composants intégrés du HDTV et peut
Sortie AV OUT
Sortie HD OUT
HD TV
Entrée audio composante
Entrée vidéo composante
<Câble vidéo composante>
<Câble AV>
(Rouge)
(Jaune)
(blanche)
(Verte)
(Rouge)
(Bleue)
(Ne branchez pas le câble Jaune)
donc obtenir une qualité de haute résolution HD une fois connecté.
1. Allumez votre HD TV.
2. Allumez le caméscope.
3. Branchez une extrémité du câble vidéo composante sur le port
(ENTRÉE vidéo composante) du téléviseur HD et l’autre extrémité sur le
port (SORTIE HD) du caméscope.
4. Branchez une extrémité de l’autre câble AV sur le port (ENTRÉE audio
composante) du téléviseur HD et l’autre extrémité sur le port (sortie
AV) du caméscope. (Veuillez ne pas branchez le connecteur jaune sur
l’entrée AV-IN du HDTV.)
5. Appuyez sur le sélecteur de mode d’entrée du téléviseur HD et
sélectionnez “Entrée composante”.
Lecture de musique MP3
Certains modèles seulement. Reportez-vous aux inscriptions de la boîte pour
les caractéristiques détaillées.
1. Allumez la caméra, et connectez la caméra au PC câble l’aide du à USB.
2. Copiezleschiersverslacaméra:UnefoislacaméraconnectéeauPC,double
cliquezsur“Postedetravail”pourytrouverledisqueamovible.Copiezleschiers
MP3 dans le dossier “Music” pour la lecture.
3. Appuyez le bouton de mode et sur les boutons directionnels pour sélectionner le
mode Lecteur de musique. Appuyez ensuite sur le bouton OK pour entrer.
Relier le caméscope à un téléviseur HDTV
77
Page 36

8
Utilisation avancée
Utilisation du Menu
Lesélémentsdemenuoffrentplusieursoptionspourafnerlesfonctionsdevotre
caméra. Le tableau suivant donne les détails de l’utilisation des menus.
Comment... Action
Afcherlemenu Appuyez sur le bouton de MENU.
Déplacer la barre de sélection
Entrer dans le sous-menu ou la
conrmationd’unélément
Quitterlemenu/Reveniraumenu
supérieur
Les éléments de menu du mode caméra
Mettezenmarche→AppuyezsurleboutondeMenu.
Élément Option Description
Résolution vidéo
Résolution
Mode nuit Marche/Arrêt
BB
Flash
Reportez-vous aux inscriptions de la boîte pour les caractéristiques de
résolution.
Reportez-vous aux inscriptions de la boîte pour les caractéristiques de résolution.
Ensoleillé
Nuageux
Fluorescent
Tungstène
Marche Leashestforcéàsedéclencheràchaqueprisedevue.
Utilisez le bouton de Zoom pour vous déplacer vers le haut
ou le vers bas.
Appuyez sur la touche OK.
Appuyez sur le bouton de Mode/Retour (quand vous êtes
dans un sous menu).
Activer ce réglage vous permet de prendre une photo sur
un fond sombre. Étant donné que la vitesse d’obturation
diminue lors de la prise de vue dans un lieu sombre, nous
recommandonsl’utilisationd’untrépiedpouréliminerlesous
de bougé.
Avertissement: Les interférences augmentent lorsque
Mode nuit est activé.
Auto Le caméscope règle automatiquement la balance des blancs.
Ce réglage temps pour les enregistrements convient en par
extérieur ensoleillé.
Ce réglage convient pour les enregistrements en extérieur par
temps nuageux ou dans des environnements ombragés.
Ce réglage convient pour les enregistrements en intérieur
souséclairageuorescent,oudansdesenvironnementsà
température de couleurs élevée.
Ce réglage convient pour les enregistrements en intérieur
sous éclairage incandescent, ou dans des environnements à
température de couleurs faible.
Leashsedéclencheautomatiquementlorsquel’éclairage
Auto
estinsufsant.
Arrêt Leashestdésactivé.
Page 37

Les éléments de menu du mode caméra (suite)
Élément Option Description
Effets
Exposition -2~+2
Retardateur Marche/Arrêt
Histogramme Marche/Arrêt Active/désactivel’afchagedel’histogrammeimageàl’écran.
Icône Marche/Arrêt
Normal Effectue les enregistrements en couleurs naturelles.
N&B Effectue les enregistrements en noir et blanc.
Classique Effectue les enregistrements en couleurs de tonalité sépia.
Règle manuellement l’exposition pour obtenir un meilleur effet
lorsque l’image prévisualisée apparaît trop sombre ou trop
claire. Une valeur positive indique que l’image sera plus claire
que de normale tandis qu’une valeur négative rendra l’image
plus sombre.
Active/désactive le retardateur. Une fois le retardateur activé,
la caméra attend dix secondes avant d’enregistrer lorsque le
déclencheur est enfoncé.
Active/désactivel’afchageàl’écrandesicônesdel’OSD(on
screen display).
Éléments de Menu en mode Mes travaux
Mettezenmarche→AppuyezsurleboutondeMODE→UtilisezleboutondeZoom
pour basculer vers le mode Mes travaux→SélectionnezledossierVidéo, Bilder ou
Enreg vocal→AppuyezsurleboutonOK→Appuyezsurledéclencheur.
Élément Option Description
Supprimer Oui/Non Supprimelechierencours.
Supprimer tout
Diaporama /
Lecture vidéo
Verrouiller
Oui/Non
Oui/Non
*S’iln’yaaucunchierdanslacaméra,aucunélémentnes’afche.
Supprimetouteslesimagesetchiersvidéo/audiostockésdans
la mémoire.
Lecaméscopeafchelesimages/clipsvidéodansl’ordre.
-
Appuyez sur le bouton OK pour arrêter le diaporama / la lecture
vidéo.
Unchier,plusieursoutousleschierspeuventêtreverrouillés.
Unchierverrouillénepeutpasêtreeffacéparlafonctionde
suppression. Cependant la fonction de formatage efface tous les
chiersverrouillés/déverrouillés.
9
Page 38

10
Les éléments de menu du mode réglage
Allumez→AppuyezsurleboutonMODE→ChoisissezlemodeRéglage→Appuyez
sur le bouton OK.
Élément Option Description
Date & Heure -
Langue
Déclencheur
Bip
Image de
démarrage
Luminosité
Système TV
Fréquence
Arrêt auto
Formater
Réinitialiser
par défaut
* Tableau des réglages de fréquence:
Icône
LCD
Marche/Arrêt
Marche/Arrêt
Zone Angleterre Allemagne France Italie Espagne Hollande Russie
Réglage 50Hz 50Hz 50Hz 50Hz 50Hz 50Hz 50Hz
Zone Portugal États-Unis Taiwan Chine Japon Corée Thaïlande
Réglage 50Hz 60Hz 60Hz 50Hz 50/60Hz 60Hz 50Hz
Règle la date et l’heure.
-
Vous laisse choisir la langue utilisée par l’OSD.
Marche
Active le bip sonore.
Désactive le bip sonore, mais conserve le son d’obturation.
Marche
Arrêt
Désactive le bip sonore.
Dénitl’imagededémarrage.
Active/désactivel’afchagedesicônesdel’OSDàl’écran.
Règle la luminosité du LCD. Une valeur positive rend le LCD plus
-2~+2
brillant, alors qu’une valeur négative le rend plus sombre.
Règle la compatibilité avec le standard TV NTSC. Cette option
NTSC
convient pour les zones États-Unis, Taiwan, Japon, et Corée.
Règle la compatibilité avec le standard TV PAL. Cette option convient
PAL
pour l’Allemagne, l’Angleterre, l’Italie, les Pays Bas, la Chine, le
Japon et Hongkong.
50Hz
Règle la fréquence de scintillement sur 50Hz*.
60Hz
Règle la fréquence de scintillement sur 60Hz*.
Arrêt
Désactive la fonction Arrêt auto.
1 min
La caméra s’arrête automatiquement au bout d’1 minute d’inactivité.
La caméra s’arrête automatiquement au bout de 3 minutes
3 min
d’inactivité.
La caméra s’arrête automatiquement après plus de 5 minutes
5 min
d’inactivité.
Formatelesupportdestockage.Notezquetousleschiersstockés
Oui
sur le support sont supprimés.
Non
Annule l’action.
Restaure les réglages d’usine par défaut. Notez que vos réglages
Marche
actuels sont écrasés.
Arrêt
Annule l’action.
Page 39

Appendice
Indicateur de niveau des piles
Icône Description
Batterie à pleine charge
Batterie en charge moyenne
Batterie faible
*LeashetlesvoyantsDELserontdésactivés.
Batterie vide
Remarque: Pour éviter une panne subite d’alimentation, il vous est recommandé de
Remarque: Ce tableau n’est donné qu’à titre indicatif. La véritable autonomie de la batterie
remplacer la batterie lorsque l’icône indique une batterie faible.
Autonomie de la batterie
Photo Clip vidéo
Nombre de clichés Durée d’enregistrement (minutes)
* cliché toutes les 30 secondes
**leashestéteint
*** résolution réglée sur 5M (2592x1944)
200 90
* résolution réglée sur HD 30f (1280x720)
dépend du type de votre batterie et de son niveau de charge.
11
Page 40

Appendice
Capacité de stockage
* Veuillez vous reporter aux inscriptions de la boîte pour les caractéristiques de
votre modèle.
Mémoire
Carte SD (1Go) 15 30 30 160 380 580 920 1840
Carte SD (2Go) 30 60 60 320 770 1160 1840 3680
Carte SD (4Go) 60 120 120 640 1540 2320 3680 7360
Carte SD (8Go) 120 240 240 1280 3080 4640 7360 14720
Remarque: La valeur réelle de capacité peut varier (jusqu’à ± 30%) selon la saturation des
HD 60f HD 30f
couleurs et la complexité de votre sujet et de son environnement.
Vidéo (min.) Photo
WVGA
QVGA
60f
8M 5M 3M 1M
30f
Conguration système requise
* Veuillez vous reporter aux inscriptions de la boîte pour les caractéristiques de
votre modèle.
Lescongurationssystèmesrequisesvarientselonlesréglagesderésolutionvidéo:
Résolution vidéo Conguration PC requise
HD 60f (1280x720) @60fps
HD 30f (1280x720) @30fps
WVGA60f(848x480)@60fps
QVGA30f(320x240)@30fps
OS = Windows XP SP2, Vista ou supérieur
CPU=Pentium43,2GHz,Core2Duoousupérieur
RAMsystème=1GB(2GBrecommandés)
Carted’afchage=256MBdeRAM
OS = Windows XP SP2, Vista ou supérieur
CPU=Pentium43,2GHzousupérieur
RAMsystème=1GB(2GBrecommandés)
Carted’afchage=256MBdeRAM
OS = Windows XP, Vista ou supérieur
CPU=Pentium41,5GHzousupérieur
RAM système = 256Mo (512Mo ou plus recommandés)
Carte graphique = 64Mo (128Mo ou supérieur
recommandés)
12
Page 41

Benvenuto:
Vi ringraziano per avere acquistato questo prodotto.
Abbiamo investito molto tempo ed energie in questo progetto e speriamo che vi procuri
molti anni di servizio senza problemi.
Avviso per la sicurezza:
1. Non far cadere, forare o smontare la videocamera diversamente si annullerà la garanzia.
2. Evitare il contatto con l’acqua ed asciugarsi le mani prima dell’uso.
3. Non esporre la videocamera ad alte temperature o lasciarla alla luce diretta del sole.
Diversamente si danneggia la videocamera.
4. Maneggiare la videocamera con cura. Evitare di esercitare pressioni sul corpo della
videocamera.
5. Per la propria sicurezza evitare di utilizzare la videocamera durante i temporali.
6. Non usare batterie diverse da quelle specicate. Diversamente si può creare il potenziale
di seri danni.
7. Rimuovere la batteria quando la videocamera non è utilizzata per periodi prolungati poiché
le batterie deteriorate inuiscono sulla funzionalità della videocamera.
8. Rimuovere le batterie se mostrano segni di perdita di liquido o distorsione.
9. Utilizzare solamente gli accessori forniti dal produttore.
10. Tenere la videocamera fuori della portata dei bambini.
11. Rischio di esplosione in caso di sostituzione della batteria con una di tipo non corretto.
12. Smaltire le batterie usate secondo le istruzioni.
Al momento dello smaltimento del prodotto, riciclare
più componenti possibile.
Le batterie e le batterie ricaricabili non devono essere
smaltite con i riuti domestici! Portarle press il centro
di smaltimento locale.
Insieme possiamo aiutare a proteggere l’ambiente.
Page 42

Preparazione
Conoscere la parti della videocamera
Tasto otturatore ( )
Interruttore messa a
Altoparlante
fuoco
Obiettivo
alloggio scheda SD/
MMC/scomparto batteria
Luce indicatore
Display LCD
Tasto alimentazione ( )
Aggancio cinghietta
Flash
Veduta inferiore
Aggancio treppiede
Microfono
Tasto Registrazione ( )
Tasto Zoom ( )-
T: Ingrandisci/volume su
W: Riduci/volume giù
Tasto Menu/OK
Tasto
Modalità/Ritorna ( )
Uscita HD
Connettore USB
Connettore uscita AV /
cufe
1
Page 43

2
Inserimento della batteria
1. Aprire il coperchio dello scomparto batterie facendolo scorrere.
2. Inserire nello scomparto la batteria agli ioni di litio in dotazione.
Notare che i contatti metallici devono essere allineati con i contatti
nello scomparto.
3. Dopo avere inserito la batteria in modo appropriato, rimettere il
coperchio dello scomparto batterie.
Caricamento della batteria
Caricare la batteria almeno 8 ore prima dell’uso iniziale.
1. Collegare il cavo.
Collegare una estremità dell’adattatore CA fornito in dotazione alla
porta USB della videocamera, e l’altra estremità ad una presa a
muro.
OPPURE
Collegare una estremità del cavo USB fornito in dotazione alla
porta USB della videocamera, e l’altra estremità ad un PC acceso.
Assicurarsi che la videocamera sia spenta.
2. Il LED di carica diventa di colore rosso e la ricarica si avvia.
3. Quando il caricamento è interrotto, oppure il pacco batteria è completamente carico, il
LED di carica diventa di colore verde.
Non accendere la videocamera quando si usa il PC per caricare la batteria,
diversamente la procedura sarà arrestata.
Inserimento di una scheda memoria (optional)
Fare come segue per inserire la scheda memoria:
(1) Aprire il coperchio della batteria.
(2) Spingere con delicatezza la scheda, come mostrato, nché raggiunge il fondo
dell’alloggiamento.
Per rimuovere la scheda memoria, spingerla con delicatezza ed uscirà . Quindi estrarre
la scheda dall’alloggio.
Accendere e spegnere la videocamera
Per accendere la videocamera aprire il display LCD, oppure tenere premuto per 1
secondo il tasto Alimentazione.
Per spegnere la videocamera chiudere il display LCD, oppure tenere premuto per 1-3
secondi il tasto Alimentazione.
Se la videocamera resta inattiva per un periodo prolungato, potrebbe
spegnersi automaticamente in seguito all’impostazione della funzione di
Spegnimento automatico.
Page 44

Impostazione della lingua
1
00:06:40
00:00:05
1. Accendere la videocamera.
2. Premere il tasto Modalità per accedere al menu Modalità.
3. Usare il tasto Zoom per selezionare la modalità Impostazione e premere OK per
accedere alla schermata del menu.
4. Usare il tasto Zoom per selezionare la voce Lingua e poi premere OK per confermare.
5. Spostare il tasto Zoom verso l’alto/il basso per selezionare una lingua.
6. Al termine, premere OK per confermare l’impostazione.
Lettura degli indicatori del display LCD
Icona della modalità Modalità Bilanciamento del bianco
Risoluzione video Tempo di registrazione disponibile
Risoluzione immagine Modalità Autoscatto
Modalità Macro Modalità Scatto notturno
Scheda SD inserita Durata registrazione
Durata della batteria
Indicatore Zoom
Modalità Flash
3
Page 45

44
Operazioni di base
Registrare una clip video / scattare una foto
1. Impostare il fuoco in maniera appropriata. Di norma, è possibile impostare il fuoco su
( ) per la maggior parte delle condizioni di ripresa. Selezionare ( ) solo per primi
piani.
Nota: Assicurarsi di avere inserito la scheda di memoria prima della registrazione.
50cm ~ (20” ~ )
30cm ~ 50cm (12” ~ 20”)
2. Zoomare:
Spostare il tasto Zoom verso l’alto o il basso per ingrandire o ridurre la schermata.
3. Premere il tasto Registrazione per avviare la registrazione. Premere il tasto
dell’otturatore per scattare una fotograa.
A causa della funzione d’acquisizione del sensore, l’anteprima LCD ed il
rapporto della fotograa varieranno in base alle diverse impostazioni della
risoluzione video.
L’acquisizione immagine della videocamera viene impostata quando le
risoluzioni video sono differenti.
* Fare riferimento alla stampa sulla confezione per le speciche sulla
risoluzione.
Risoluzione video Anteprima Fotograe
HD (1280x720)
WVGA 60f(848x480)
QVGA 30f(320x240)
Rapporto 16:9
Rapporto 4:3 Rapporto 4:3
Rapporto 4:3
4. Premere di nuovo il tasto Registrazione per terminare la registrazione.
La funzione zoom è disponibile anche durante la registrazione (fatta
eccezione per la modalità Macro).
È normale che la videocamera diventi leggermente calda con un utilizzo / una
registrazione continua, a causa delle sue alte prestazioni.
Page 46

Registrazione di una sequenza audio
1. Accendere la videocamera.
2. Premere il tasto Modalità per accedere al menu Modalità.
3. Usare il tasto Zoom per selezionare la modalità Registr. Voce e premere OK per
accedere alla schermata del menu.
4. Premere il tasto Registrazione per avviare la registrazione.
5. Premere di nuovo il tasto Registrazione per terminare la registrazione.
Riproduzione delle registrazioni
1. Premere il tasto Modalità ed usare il tasto Zoom per passare alla modalità ”Mio
lavoro”.
2. Sotto Mio lavoro ci sono tre cartelle: Video, Foto e Voce. Selezionare Video,Foto o
Voce e poi premere il tasto OK per accedere alla modalità Indice.
3. Operazioni in modalità Mio lavoro:
Tipo di le Come fare per... Azione
Modalità Indice
ModalitÃ
Schermo intero
Passare dalla
modalità Indice alla
modalità Schermo
intero
Passare tra i vari le
In modalità Indice, premere il tasto OK per passare alla
modalità Schermo intero. In modalità Schermo intero,
premere il tasto Modalità/indietro per passare alla
modalità Indice.
1. In modalità Indice: Usare il tasto Zoom per spostare
l’evidenziatore.
2. In modalità Schermo intero: usare il tasto Zoom per
cambiare le.
Avviare l’esecuzione
Mettere in pausa
/ riprendere
l’esecuzione
Regolazione del
Video e Audio
Foto Scorrere l’immagine Usare il tasto Zoom per scorrere l’immagine.
volume
Terminare
l’esecuzione
Selezionare il le
successivo
Selezionare il le
precedente
L’esecuzione è avviata automaticamente quando il le è
selezionato (in modalità Schermo intero).
Premere il tasto OK durante l’esecuzione / durante
la pausa.
Usare il tasto Zoom per spostarsi in alto o in basso
durante l’esecuzione.
Premere il tasto Modalità/indietro durante
l’esecuzione.
Tornare alla schermata precedente e usare il tasto
Zoom (W) per selezionare il le successivo.
Tornare alla schermata precedente e usare il tasto
Zoom (T) per selezionare il le precedente.
55
Page 47

66
Riproduzione delle registrazioni sul PC
Installazione del software
Si prega di notare che i video registrati sono in formato .mov. Quindi, sono necessari
dei programmi speciali per visualizzare le registrazioni sul PC. Al primo utilizzo,
assicurarsi di avere QuickTime 7.0 (o superiore) sul PC. In caso contrario, scaricare
il lettore QuickTime dal sito web. Oppure installare il software presente nel CD in
dotazione.
Collegamento al PC e salvataggio dei le
1. Accendere la videocamera.
2. Collegare la videocamera (con la scheda SD inserita) al computer usando il cavo
USB.
3. Apparirà automaticamente una nestra di dialogo. Selezionare la voce “Apri cartella
per visualizzare i le” e fare clic su “OK”.
4. Se la nestra di dialogo non appare automaticamente, fare doppio clic su “Risorse
del computer” e aprire “Disco rimovibile”.
5. Fare doppio clic sulla cartella DCIM.
6. Fare doppio clic sulla cartella 100MEDIA.
7. Copiare i le che si desidera conservare e salvarli nella posizione desiderata nel
proprio computer.
Collegamento della videocamera al televisore
Collegamento della videocamera al normale
televisore
TV: TV CRT tradizionale
1. Accendere il televisore e impostarlo sulla modalità AV.
2. Collegare le estremità audio
e video del cavo AV (di colore
giallo/bianco/rosso) al jack “AV-IN”
del televisore.
3. Accendere la videocamera.
4. Collegare l’altra estremità
cavo AV alla porta “Uscita AV”
della videocamera. Quando
è visualizzato il messaggio,
selezionare “Uscita AV”.
Modalità AV
Connettore AV-IN
(Ingresso AV)
Video
Audio
Cavo AV
Uscita AV
Page 48

Uscita AV
Uscita HD
HDTV
Input audio componente
Input video componente
<Cavo video componente>
<Cavo AV>
(Rosso)
(Giallo)
(Bianco)
(Verde)
(Rosso)
(Blu)
(Non inserire il cavo giallo)
Collegamento della videocamera al
televisore HDTV
Per HD TV qui si intendono le porte di ingresso integrate della TV che consentono
la risoluzione ad alta qualità HD quando è eseguito il collegamento.
1. Accendere il televisore HDTV.
2. Accendere la videocamera.
3. Inserire una estremità del cavo video component nella porta (Input video
componente) sulla HDTV e l’altra estremità nella porta (Uscita HD) della
videocamera.
4. Collegare una estremità del cavo AV alla porta (Input audio componente)
del televisore HDTV e l’altra estremità alla porta (Uscita AV) della
videocamera. (Non collegare il connettore giallo alla porta AV-IN del
televisore HDTV.)
5. Premere l’interruttore modalità televisore HDTV e selezionare “Input
Componente”.
Riproduzione di musica MP3
Solo per i modelli selezionati. Fare riferimento a quanto stampato sulla
confezione per le speciche dettagliate.
1. Accendere la videocamera e connetterla al PC usando il cavo USB.
2. Copiare i le sulla videocamera: una volta connessa al PC, fare doppio clic su
“Computer” e sarà possibile trovare un disco rimovibile. Copiare i le MP3 nella
cartella “Musica” per la riproduzione.
3. Premere il pulsante Modalità e usare i tasti freccia per selezionare la modalità
riproduttore musica. Poi premere il tasto OK per accedere:
77
Page 49

8
Operazioni avanzate
Funzionamento dei menu
Le voci del menu forniscono varie opzioni che permettono di sintonizzare con
precisione le funzioni della videocamera.
La tavola che segue illustra i dettagli sulle operazioni dei menu.
Come fare per... Azione
Fare apparire il menu Premere il tasto MENU.
Spostare l’evidenziatore Usare il tasto Zoom per spostarsi verso l’alto o il basso.
Accedere ai menu secondari /
Confermare una voce
Uscire dal menu / tornare al menu
precedente
Voci del menu in modalità Fotocamera
Accendere → Premere il tasto Menu.
Voce Opzione Descrizione
Risoluzione video
Risoluz.
Scatto notte Attivo/Disattivo
BB
Flash
Fare riferimento alla stampa sulla confezione per le speciche sulla risoluzione.
Fare riferimento alla stampa sulla confezione per le speciche sulla risoluzione.
Automatico
Nuvoloso
Fluorescente
Tungsteno
Automatico
Disattivo Il ash è disabilitato.
Premere il tasto OK.
Premere il tasto Modalità/indietro (quando si è in un
sottomenu).
Questa impostazione consente di scattare fotograe con uno
sfondo scuro. Poiché la velocità dell’otturatore diminuisce
quando si fotografa in ambienti bui, si raccomanda di usare
un treppiede per eliminare sfocature provocate dal movimento
delle mani.
Avviso: I disturbi aumentano quando è abilitata la
funzione Scatto notturno.
La macchina regola automaticamente il bilanciamento del
bianco.
Questa impostazione è adatta per registrazione in esterni con
Sole
tempo soleggiato.
Questa impostazione è adatta per registrazione in esterni con
condizioni di tempo nuvoloso o in zone d’ombra.
Questa impostazione è adatta per registrazione in interni con
illuminazione a lampade uorescenti, oppure in ambienti con
temperatura colore alta.
Questa impostazione è adatta per registrazione in interni con
illuminazione a lampade incandescenti, oppure in ambienti
con temperatura colore bassa.
Attivo Il ash è attivato forzatamente ad ogni scatto.
Il ash si attiva automaticamente quando la luce è
insufciente.
Page 50

Voci del menu in modalità Fotocamera (segue)
Voce Opzione Descrizione
Effetto
Esposizione -2~+2
Autoscatto Attivo/Disattivo
Istogramma Attivo/Disattivo
Icona Attivo/Disattivo
Normale Acquisisce le registrazioni con i colori naturali.
B/N Acquisisce le registrazioni in bianco e nero.
Classico Acquisisce le registrazioni con colori nei toni seppia.
Regolare manuale dell’esposizione per ottenere effetti migliori
quando l’immagine precedente appare troppo chiara o troppo
scura. Un valore positivo indica che l’immagine apparirà
più chiara del normale, mentre un valore negativo indica
l’opposto.
Abilita/disabilita l’autoscatto. Dopo avere attivato l’autoscatto,
ed avere premuto il tasto Otturatore, la videocamera
attenderà dieci secondi prima di registrare.
Abilita/disabilita la visualizzazione su schermo
dell’istogramma.
Abilita/disabilita la visualizzazione delle icone OSD (On
Screen Display) sullo schermo.
Voci del menu in modalità Mio lavoro
Accendere → Premere il tasto Modalità → Usare il tasto Zoom per passare alla
modalità Mio lavoro → Selezionare la cartella Video, Foto o Voce → Premere il tasto
OK → Premere il tasto Otturatore.
Voce Opzione Descrizione
Elimina uno Sì/No Elimina il le corrente.
Elimina tutto Sì/No
Presentazione/
Riproduzione video
Blocca Sì/No
* Se nella videocamera non ci sono le, non sarà visualizzata alcuna voce.
Elimina tutte le immagini e i le video/audio archiviati nella
memoria.
La videocamera visualizza le immagini/i lmati in sequenza.
Premere il tasto OK per terminare la presentazione/il lmato.
Possono essere bloccati le singoli multipli oppure tutti i le. Un
le bloccato non può essere cancellato usando le funzioni di
eliminazione. Tuttavia, la funzione di formattazione cancellerà
tutti i le bloccati e non bloccati.
9
Page 51

10
Voci del menu in modalità Impostazioni
Accendere → Premere il tasto Modalità → Selezionare la modalità Impostazione →
Premere il tasto OK.
Voce Opzione Descrizione
Data e ora -
Lingua
Avviso son
immagine
Luminosità
Modalità TV
Frequenza
Disatt. autom.
Formattazione
Reimposta
predenito
* Tabella d’impostazione della frequenza:
Avvia
Icona
LCD
Otturatore On
Attivo/Disattivo
Attivo/Disattivo
Zona Inghilterra Germania Francia Italia Spagna Olanda Russia
Impostazione 50Hz 50Hz 50Hz 50Hz 50Hz 50Hz 50Hz
Zona Portogallo America Taiwan Cina Giappone Corea Tailandia
Impostazione 50Hz 60Hz 60Hz 50Hz 50/60Hz 60Hz 50Hz
Imposta data e ora.
-
Permette di selezionare la lingua usata per il menu OSD.
Attivo
Abilita l’avviso sonoro.
Disabilita l’avviso acustico, ma mantiene il suono dell’otturatore.
Disattivo
Disabilita l’avviso sonoro.
Imposta l’immagine di avvio.
Abilita/disabilita la visualizzazione delle icone OSD sullo schermo.
Imposta la luminosità del display LCD. Un valore positivo rende
-2~+2
più luminoso il display LCD; un valore negativo rende più scuro il
display LCD.
Imposta la compatibilità del sistema TV su NTSC. Questa opzione è
NTSC
adatta per le zone dell’America, Taiwan, Giappone e Corea.
Imposta la compatibilità del sistema TV su PAL. Questa opzione è
PAL
adatta per le zone della Germania, Inghilterra, Italia, Olanda, Cina,
Giappone ed Hong Kong.
50Hz
Imposta la frequenza su 50Hz*.
60Hz
Imposta la frequenza su 60Hz*.
Disattivo
Disabilita la funzione di Spegnimento automatico.
La videocamera si spegne automaticamente quando resta inattiva
1 minuti
per più di 1 minuto.
La videocamera si spegne automaticamente quando resta inattiva
3 minuti
per più di 3 minuti.
La videocamera si spegne automaticamente quando resta inattiva
5 minuti
per più di 5 minuti.
Formatta il supporto d’archiviazione. Notare che tutti i le archiviati
Sì
nel supporto saranno eliminati in modo irrecuperabile.
No Annulla l’azione.
Ripristina le impostazioni predenite. Notare che le impostazioni
Attivo
correnti saranno sovrascritte.
Disattivo
Annulla l’azione.
Page 52

Appendice
Indicatore di carica della batteria
Icona Descrizione
Batteria completamente carica
Durata media della batteria
Batteria scarica
* Il ash e le luci LED saranno disabilitate.
Batteria esaurita
Nota: per evitare l’ammanco improvviso di alimentazione, si raccomanda di sostituire la
batteria quando l’icona indica che la batteria è scarica.
Durata della batteria
Fotograa Sequenza video
Numero di scatti Tempo di ripresa (minuti)
* Scatto ogni 30 secondi
** Il ash è disattivo
*** La risoluzione è impostata su 5M
(2592x1944)
Nota: Questa tavola è solo per riferimento. La durata effettiva della batteria dipende dal tipo
di batteria e dal livello di carica.
200 90
* La risoluzione è impostata su HD 30f
(1280 x 720 pixel)
11
Page 53

Appendice
Capacità d’archiviazione
* Fare riferimento alla stampa sulla confezione per le speciche dettagliate sul
modello.
Memoria
Scheda SD (1GB) 15 30 30 160 380 580 920 1840
Scheda SD (2GB) 30 60 60 320 770 1160 1840 3680
Scheda SD (4GB) 60 120 120 640 1540 2320 3680 7360
Scheda SD (8GB) 120 240 240 1280 3080 4640 7360 14720
Nota: Il valore attuale della capacità può variare (no al ± 30%) in base alla saturazione del
colore ed alla complessità del soggetto e di ciò che lo circonda.
Video (min.) Fotograa
WVGA
HD 60f HD 30f
QVGA
60f
8M 5M 3M 1M
30f
Requisiti del sistema
* Fare riferimento alla stampa sulla confezione per le speciche dettagliate sul
modello.
I requisiti del sistema sono diversi in base alle varie impostazioni di risoluzione
video:
Risoluzione videon Requisiti del sistema PC
HD 60f (1280x720) @60fps
HD 30f (1280x720) @30fps
WVGA 60f (848x480) @60fps
QVGA 30f (320x240) @30fps
SO = Windows XP SP2, Vista o superiore
CPU: Pentium 4 3,2GHz, Core 2 Duo o superiore
RAM di sistema: 1GB (2GB raccomandato)
Scheda video = 256MB di RAM
SO = Windows XP SP2, Vista o superiore
CPU: Pentium 4 3,2GHz o superiore
RAM di sistema: 1GB (2GB raccomandato)
Scheda video = 256MB di RAM
SO = Windows XP, Vista o superiore
CPU: Pentium 4 1,5GHz o superiore
RAM di sistema: 256MB (512MB o più raccomandati)
Scheda video: 64MB (128MB o più raccomandati)
12
Page 54

Bienvenido:
Querido usuario, gracias por adquirir este producto.
Se ha invertido una gran cantidad de tiempo y mucho esfuerzo en desarrollar este
producto, por lo que esperamos que lo pueda disfrutar durante muchos años.
Aviso de seguridad:
1. No deje caer, perfore ni desmonte la cámara; si lo hace, la garantía quedará invalidada.
2. Evite que entre en contacto con el agua y séquese las manos antes de utilizar el producto.
3. No exponga la cámara a altas temperaturas ni la deje donde incida sobre ella la luz directa
del sol. Si lo hace, la cámara puede resultar dañada.
4. Utilice la cámara con cuidado. No ejerza mucha presión en el cuerpo de la cámara.
5. Por su propia seguridad, no utilice la cámara cuando haya tormenta o rayos.
6. Noutilicebateríasconespecicacionesdiferentes.Silohace,lavideocámarapodríasufrir
daños irreparables.
7. Quite la batería si no va a utilizar la cámara durante un prolongado período de tiempo, ya
que una batería deteriorada puede afectar a la funcionalidad de la misma.
8. Quite la batería si muestra signos de fuga o deformación.
9. Utiliceúnicamenteaccesoriosespecicadosporelfabricante.
10. Mantenga la cámara fuera del alcance de los niños.
11. Hay riesgo de explosión si la batería se reemplaza por otra cuyo tipo no es el correcto.
12. Deshágase de las baterías usadas conforme a las instrucciones.
Si ha llegado la hora de deshacerse del producto,
recicle todos los componentes que pueda.
Las pilas y baterías recargables no se deben
desechar junto con la basura doméstica! Recíclelas
en el punto limpio local.
Juntos podemos ayudar a proteger el medio
ambiente.
Page 55

Procedimientos iniciales
Introducción a las partes de la videocámara
Disparador ( )
Selector de enfoque
Altavoz
Objetivo
Compartimento de la
batería / Ranura para
tarjetas SD y MMC
Luz del indicador
Pantalla LCD
Botón de encendido ( )
Gancho para la correa
Flash
Vista inferior
Toma para trípode
Micrófono
Botón Grabar ( )
Botón Zoom ( )-
T: Ampliar / Subir volumen
W: Reducir / Bajar volumen
Botón Menú/Aceptar
Botón Modo/Volver ( )
SALIDA DE HD
Conector USB
Conector SALIDA DE
AV/Auriculares
1
Page 56

2
Instalar la batería
1. Desplace la tapa de la batería.
2. Coloque la batería de ión-litio en el compartimento. Tenga en cuenta
que los contactos metálicos deben estar alineados con los del
compartimento.
3. Tras instalar la batería correctamente, vuelva a colocar su tapa
Cargar la batería
Cargue la batería al menos durante 8 horas la primera vez que la utilice.
1. Conecte el cable.
Conecte un extremo del adaptador de CA proporcionado al puerto
USB de la videocámara y el otro extremo a una toma de corriente
eléctrica.
O BIEN
Conecte un extremo del cable USB proporcionado al puerto USB
de la videocámara y el otro extremo a un equipo conectado a la
alimentación. Asegúrese de que la videocámara está apagada.
2. El indicador LED de carga se iluminará en color rojo y la carga se iniciará.
3. Cuando la carga se interrumpa o la batería esté completamente cargada, el LED de
carga se iluminará en color verde.
Si utiliza su PC para cargar la batería, no proporcione alimentación a la
videocámara. Si lo hace, la carga se detendrá.
Insertar una tarjeta de memoria (opcional)
Para insertar la tarjeta de memoria, realice el siguiente procedimiento:
(1) Abra la tapa de la batería.
(2) Empuje suavemente la tarjeta tal y como se indica hasta que alcance la parte
inferior de la ranura.
Para extraer la tarjeta de memoria, empújela suavemente y ella misma saltará hacia
fuera. A continuación, tire de la tarjera hacia fuera de la ranura.
Encender y apagar la videocámara
Abra el monitor LCD o mantenga presionado el botón Encendido durante 1 segundo
para encender la cámara.
Para apagar la videocámara, mantenga presionado el botón Encendido entre 1 y 3
segundos o cierre el monitor LCD.
Si la videocámara permanece inactiva durante un largo período de tiempo,
puede apagarse automáticamente por la función de apagado automático.
Page 57

Establecer el idioma
1
00:06:40
00:00:05
1. Encienda la videocámara.
2. Presione el botón MODO para entrar en el menú MODO.
3. Utilice el botón Zoom para seleccionar el modo Conguración y presione OK para
entrar en la pantalla de menús.
4. Utilice el botón Zoom para seleccionar el elemento Idioma y, a continuación, presione
OKparaconrmarlaselección.
5. Mueva el botón Zoom hacia arriba o hacia abajo para seleccionar un idioma.
6. Cuando haya terminado, presione OKparaconrmarlaconguración.
Leer los indicadores LCD
Icono de modo Modo Balance de blanco
Resolución vídeo Tiempo de grabación restante
Resolución de la imagen Modo de disparador automático
Modo de macro Modo de fotografía nocturna
Tarjeta SD insertada Tiempo de grabación
Carga de la batería
Indicador de la relación de zoom
Mododeash
3
Page 58

44
Funcionamiento básico
Grabar un clip de vídeo y capturar una imagen estática
1. Establezca el enfoque en un valor adecuado. Por lo general, el enfoque se puede
establecer en ( ) para la mayoría de las condiciones de grabación. Seleccione la
opción ( ) solamente para primeros planos.
Nota: asegúrese de que la tarjeta de memoria está insertada antes de grabar.
50cm ~ (20” ~ )
30cm ~ 50cm (12” ~ 20”)
2. Zoom:
Mueva el botón Zoom hacia arriba o hacia abajo para acercar o alejar la pantalla.
3. Presione el botón Grabar para iniciar la grabación. O bien, presione el botón
Disparador para capturar una imagen estática.
Debido a la función de captura del sensor, la vista previa de la pantalla LCD
ylarelacióndecapturadeimágenesjasvariaráenfuncióndelasdiferentes
resoluciones de vídeo.
La captura de imágenes de la cámara se establece cuando las resoluciones de
vídeo son diferentes.
* Por favor, consulte el texto impreso en la caja para obtener
especicaciones sobre la resolución.
Resolución vídeo Vista previa Captura de imágenes
HD (1280x720)
WVGA 60f(848x480)
QVGA 30f(320x240)
Relación 16:9
Relación 4:3 Relación 4:3
Relación 4:3
4. Presione de nuevo el botón Grabar para detener la grabación.
La función de zoom también está disponible durante la grabación (excepto en
el modo Macro).
Es normal que la videocámara se caliente cuando se utiliza o graba durante
un prolongado período de tiempo debido a su alto rendimiento.
Page 59

Grabar un clip de voz
1. Encienda la videocámara.
2. Presione el botón MODO para entrar en el menú MODO.
3. Utilice el botón Zoom para seleccionar el modo Grabador de voz y presione OK para
entrar en la pantalla de menús.
4. Presione el botón Grabar para iniciar la grabación.
5. Presione de nuevo el botón Grabar para detener la grabación.
Reproducir las grabaciones
1. Presione el botón MODO y utilice el botón Zoom para pasar al modo “Mis trabajos”.
2. Hay tres carpetas bajo Mis trabajos: Vídeo, Foto y Voz. Seleccione una de estas
carpetas y, a continuación, presione el botón OK para entrar en el modo de índice.
3. Operaciones en el modo Mis trabajos:
Tipo de archivo Cómo... Acción
Modo de índice
Modo de pantalla
completa
Cambiar entre el
modo de índice y el
modo de pantalla
completa
Cambiar de archivo
En el modo de índice, presione el botón OK para
cambiar al modo de pantalla completa. En el modo de
índice, presione el botón Modo/Volver para cambiar
al modo de índice.
1. En el modo de índice: utilice el botón Zoom para
mover el cuadro de resalte.
2. En el modo de pantalla completa: use el botón
Zoom para cambiar de archivo.
Iniciar la
reproducción
Pausar/Reanudar la
reproducción
Ajustar el nivel de
Vídeo y audio
Foto Examinar la imagen Use el botón Zoom para examinar la imagen.
volumen
Detener la
reproducción
Seleccionar el
archivo siguiente
Seleccionar el
archivo anterior
Cuando se selecciona (en el modo de pantalla
completa), el archivo inicia automáticamente la
reproducción.
Durante la reproducción o cuando ésta está en pausa,
presione el botón OK.
Durante a reproducción, utilice el botón Zoom para
subir o bajar.
Durante la reproducción, presione el botón Modo/
Volver.
Volver a la vista anterior y usar el botón Zoom (W)
para seleccionar el archivo siguiente.
Volver a la vista anterior y usar el botón Zoom (T) para
seleccionar el archivo anterior.
55
Page 60

66
Reproducir las grabaciones en PC
Instalar el software
Tenga en cuenta que el formato de los archivos grabados es .mov. Por tanto,
necesitará programas especiales para ver las grabaciones en su PC. Para el primer
uso, asegúrese de que tiene el reproductor QuickTime 7.0 (o anterior) instalado en
su PC. Si no lo tiene, descargue el reproductor QuickTime del sitio Web. O bien,
instale el software incluido en el CD proporcionado.
Conectar su PC y guardar archivos
1. Encienda la videocámara.
2. Conecte la videocámara (con una tarjeta SD insertada) en su PC mediante el cable
USB.
3. Aparecerá la ventana de diálogo automáticamente. Seleccione el elemento “Abrir la
carpeta para ver los archivos” y haga clic en “OK”.
4. Si la ventana de diálogo no aparece automáticamente, puede hacer doble clic en “Mi
PC” y abrir el disco “Unidad extraíble”.
5. Haga doble clic en la carpeta DCIM.
6. Haga doble clic en la carpeta 100MEDIA.
7. Copie los archivos que desea conservar y guárdelos en la ubicación que desee en
su PC.
Conectar la videocámara a un televisor
Conectar la videocámara a un televisor estándar
TV : TV CRT tradicional
1. 1. Encienda el televisor y seleccione el modo TV a AV.
2. Enchufe los terminales de audio
y vídeo del cable de AV (color
amarillo, blanco y rojo) a los
conectores “ENTRADA DE AV” del
televisor.
3. Encienda la videocámara.
4. Conecte el otro extremo del cable
AV al puerto “Salida de AV” de la
videocámara. Cuando el mensaje
emergente aparezca en pantalla,
seleccione “Salida de AV”.
Modo AV
ENTRADA DE AV
Vídeo
Salida de AV
Audio
Cable de AV
Page 61

Conectar la videocámara a un equipo
SALIDA DE AV
SALIDA DE HD
TV HD
Entrada de audio de
componentes
Entrada de vídeo de componentes
<Cable de vídeo de componentes>
<Cable de AV>
(rojo)
(amarillo)
(blanco)
(verde)
(rojo)
(azul)
(No enchufar el cable amarillo)
HDTV
En este caso, el televisor HD cuenta con puertos de entrada de componentes
integrados HDTV, por lo que puede conseguir calidad de alta resolución HD
mientras está conectado.
1. Encienda su televisor HD.
2. Encienda la videocámara.
3. Enchufe un extremo del cable de vídeo de componentes en el puerto
(ENTRADA de vídeo de componentes) del aparato HDTV y el otro
extremo en el puerto (SALIDA DE HD) de la videocámara.
4. Enchufe un extremo del cable de AV en el puerto (ENTRADA de audio
de componentes) del aparato HDTV y el otro extremo en el puerto
(SALIDA DE AV) de la videocámara. (No enchufe el conector amarillo en
el puerto ENTRADA DE AV del aparato HDTV.)
5. Presione conmutador de modo de entrada del televisor HD y seleccione
“Entrada de componentes”.
Reproducir música MP3
Sólo para modelos seleccionados. Por favor, consulte el texto impreso en la
caja para obtener especicaciones más detalladas.
1. Encienda la cámara y conéctela a su PC mediante el cable USB.
2. Copie archivos MP3 en la cámara. Una vez conectada la cámara a su PC, haga
doble clic en “Mi PC”. Encontrará una unidad de disco extraíble. Copie los archivos
MP3 en la carpeta “Música”.
3. Presione el botón Modo y utilice los botones de dirección para seleccionar el modo
Reproductor musical. A continuación presione el botón OK para entrar.
77
Page 62

8
Funcionamiento avanzado
Uso de los menús
Los elementos del menú proporcionan varias opciones para ajustar con precisión las
funciones de la cámara.
La tabla siguiente ofrece detalles acerca de las operaciones de los menús.
Mostrar el menú. Presione el botón MENÚ.
Mover la barra de resalte.
Entrarenunsubmenúoconrmar
un elemento
Salir del menú o retroceder al menú
de nivel superior
Cómo... Acción
Utilice el botón Zoom para desplazarse hacia arriba o hacia
abajo.
Presione el botón OK.
Presione el botón Modo/Volver (cuando esté en un
submenú).
Elementos de menú en el modo Cámara
Enciendalaalimentación→PresioneelbotónMenú.
Elemento Opción Descripción
Resolución vídeo
Resolución
Foto noche
Bal. blanco
Flash
Porfavor,consulteeltextoimpresoenlacajaparaobtenerespecicaciones
sobre la resolución.
Porfavor,consulteeltextoimpresoenlacajaparaobtenerespecicaciones
sobre la resolución.
Encender/
Apagar
Automático La cámara ajusta automáticamente el balance de blanco.
Soleado
Nublado
Fluorescente
Tungsteno
Encender Elashsedisparasiempreencadadisparo.
Automático
Apagar Elashestádeshabilitado.
Sihabilitaestaconguraciónpodrátomarunafotografía
con un fondo oscuro. Dado que la velocidad del
obturador disminuirá al tomar fotos en un lugar oscuro, es
recomendable utilizar un trípode para eliminar la borrosidad
causada por el temblor de las manos.
Advertencia: el ruido se incrementa cuando la función
Foto noche está habilitada.
Estaconguraciónesadecuadaparagrabacionesen
exteriores en un día soleado.
Estaconguraciónesadecuadaparagrabacionesendías
nublados o entornos sombríos.
Estaconguraciónesadecuadaparagrabacionesen
interioresconiluminaciónuorescenteoentornosconuna
temperatura de color alta.
Estaconguraciónesadecuadaparagrabacionesen
interiores con iluminación incandescente o entornos con una
temperatura de color baja.
Elashsedisparaautomáticamentecuandolailuminación
esinsuciente.
Page 63

Elementos de menú en el modo Cámara (continuación)
Elemento Opción Descripción
Efecto
Exposición -2~+2
Temp. automá.
Histograma
Icono
Normal Realiza grabaciones con un color natural.
ByN Realiza grabaciones en blanco y negro.
Clásico Realiza grabaciones en un color con tono sepia.
Encender/
Apagar
Encender/
Apagar
Encender/
Apagar
Ajusta manualmente la exposición para obtener un mejor
efecto cuando la vista previa de la imagen aparece muy
brillante o muy oscura. Un valor positivo indica que la
imagen será más brillante que lo habitual, mientras que un
valor negativo hará que la imagen aparezca más oscura.
Habilita y deshabilita el temporizador del disparador
automático. Una vez activado este temporizador, la cámara
comenzará a grabar al cabo de 10 segundos después de
presionar el botón Disparador.
Habilita y deshabilita la visualización del histograma en la
pantalla.
Habilita y deshabilita los iconos OSD para que se muestren
o desaparezcan de la pantalla.
Elementos de menú del modo Mis trabajos
Enciendalaalimentación→PresioneelbotónMODO→UtiliceelbotónZoom para
pasar al modo Mis trabajos→SeleccionelacarpetaVídeo, Foto o Voz→Presione
el botón OK→PresioneelbotónMENÚ.
Elemento Opción Descripción
Eliminar Sí/No Elimina el archivo actual.
Borrar todo Sí/No
Presentación/
Reproducir vídeo
Bloquear Sí/No
* Si no hay archivos en el cámara, se verá ningún elemento.
Elimina todas las imágenes y todos los archivos de audio y vídeo
almacenados en la memoria.
La cámara muestra las imágenes y los clips de vídeo en
-
secuencia. Puede presionar el botón OK para detener la
presentación de diapositivas o la reproducción del vídeo.
Puede bloquear uno, varios o todos los archivos. La función de
eliminación no puede borrar un archivo bloqueado. Sin embargo,
la función de formato borrará tanto los archivos bloqueados
como los no bloqueados.
9
Page 64

10
Elementos de menú en el modo
Conguración
Enciendalaalimentación→PresioneelbotónMODO→Seleccioneelmodo
Conguración→PresioneelbotónOK.
Elemento Opción Descripción
Fecha y hora -
Idioma
Pitido
Imagen de
inicio
Icono
Brillo
Modo TV
Parpadeo
Apag.
Autom.
Formatear
Predenido
*Tabladeconguracióndefrecuencias:
Región Inglaterra Alemania Francia Italia España Países Bajos Rusia
Conguración 50Hz 50Hz 50Hz 50Hz 50Hz 50Hz 50Hz
Región Portugal América Taiwán China Japón Corea Tailandia
Conguración 50Hz 60Hz 60Hz 50Hz 50/60Hz 60Hz 50Hz
Establece la fecha y hora.
-
Permite seleccionar el idioma en el que se mostrarán los menús OSD.
Encender
Habilita el sonido de un pitido.
Disparador
Deshabilita el sonido de un pitido pero mantiene el sonido del
activado
disparador.
Apagar
Deshabilita el sonido de un pitido.
Encender/
Establece la imagen de inicio.
Apagar
Encender/
Habilita y deshabilita la aparición de los iconos OSD en la pantalla.
Apagar
Establece el brillo de la pantalla LCD. Un valor positivo hace que
-2~+2
la pantalla LCD sea más brillante, mientras que un valor negativo
oscurece dicha pantalla.
Establece la compatibilidad del sistema de TV en NTSC. Esta opción es
NTSC
adecuada para las regiones de América, Taiwán, Japón y Corea.
Establece la compatibilidad del sistema de TV en PAL. Esta opción
PAL
es adecuada para las regiones de Alemania, Inglaterra, Italia, Países
Bajos, China, Japón y Hong Kong.
50Hz
Establece la frecuencia de oscilación en 50 Hz*.
60Hz
Establece la frecuencia de oscilación en 60 Hz*.
Apagar
Deshabilita la función Apagado automático.
La cámara se apaga automáticamente cuando permanece inactiva
1 min
durante más de 1 minuto.
La cámara se apaga automáticamente cuando permanece inactiva
3 min
durante más de 3 minutos.
La cámara se apaga automáticamente cuando permanece inactiva
5 min
durante más de 5 minutos.
Da formato al medio de almacenamiento. Tenga en cuenta que todos
Sí
los archivos almacenados en el medio se perderán.
No
Anula la acción.
Restaura los valores predeterminados de fábrica. Tenga en cuenta que
Encender
sesobrescribirálaconguraciónactual.
Apagar
Anula la acción.
Page 65

Apéndice
Indicador de carga de la batería
Icono Descripción
Batería totalmente cargada
Batería con bastante carga
Batería con poca carga
*ElashylosindicadoreslucesLEDsedeshabilitarán.
Batería agotada
Nota: para no quedarse sin energía en la cámara, se recomienda reemplazar la batería
cuando el icono indique que queda poca carga.
Duración de la batería
Imagen estática Clip de vídeo
Número de disparos Tiempo de grabación (minutos)
* disparo cada 30 segundos
**ashapagado
*** resolución establecida en 5 M
(2592x1944)
Nota: esta tabla solamente debe utilizarse como referencia La vida real de la batería
depende de del tipo de ésta y del nivel de recarga.
200 90
* resolución establecida en HD 30f
(1280x720).
11
Page 66

Apéndice
Capacidad de almacenamiento
* Consulte el texto impreso en la caja para obtener información acerca las
especicaciones del modelo.
Memoria
Tarjeta SD (1 GB) 15 30 30 160 380 580 920 1840
Tarjeta SD (2 GB) 30 60 60 320 770 1160 1840 3680
Tarjeta SD (4 GB) 60 120 120 640 1540 2320 3680 7360
Tarjeta SD (8 MB) 120 240 240 1280 3080 4640 7360 14720
Nota: el valor real de la capacidad puede variar (hasta ± 30%) dependiendo de la saturación
delcolorylacomplejidaddeloquedeseafotograarograbarydelentorno.
HD 60f HD 30f
Vídeo (min) Imagen estática
WVGA
QVGA
60f
8M 5M 3M 1M
30f
Requisitos del sistema
* Consulte el texto impreso en la caja para obtener información acerca las
especicaciones del modelo.
Losrequisitosdelsistemavaríanenfuncióndelaconguracióndelaresolución
de vídeo:
Video Resolution PC system requirements
HD 60f (1280x720) @60fps
HD 30f (1280x720) @30fps
WVGA 60f (848x480) @60fps
QVGA 30f (320x240) @30fps
12
Sistema operativo = Windows XP SP2, Vista o posterior
Procesador = Pentium 4 a 3,2 GHz, Core 2 Duo o
superior
RAM del sistema = 1 GB (se recomiendan 2 GB)
Tarjeta de visualización = 256 MB de memoria RAM
Sistema operativo = Windows XP SP2, Vista o posterior
Procesador = Pentium 4 a 3,2 GHz o superior
RAM del sistema = 1 GB (se recomiendan 2 GB)
Tarjeta de visualización = 256 MB de memoria RAM
Sistema operativo = Windows XP, Vista o posterior
Procesador = Pentium 4 a 1,5 GHz o superior
RAM del sistema = 256 MB (se recomiendan 512 MB
como mínimo)
Tarjeta de vídeo = 64 MB (se recomiendan 128 MB
como mínimo)
Page 67

Welkom:
Beste gebruiker, bedankt voor de aankoop van dit product.
We hebben heel wat tijd en moeite gestopt in de ontwikkeling ervan en we hopen dat u
jarenlang zorgeloos zult kunnen genieten van uw nieuwe aankoop.
Veiligheidsrichtlijnen:
1. Laat de camera niet vallen, prik er geen gaten in of demonteer het toestel niet, anders
vervalt de garantie.
2. Vermijd elk contact met water en droog uw handen voordat u de camera gebruikt.
3. Stel de camera niet bloot aan hoge temperaturen of direct zonlicht. Dit kan schade
veroorzaken aan de camera.
4. Ga voorzichtig om met uw camera. Druk niet te hard op de behuizing van de camera.
5. Voor uw veiligheid is het afgeraden de camera te gebruiken bij stormweer of bliksem.
6. Gebruikgeenbatterijenmetverschillendespecicaties.Ditkanernstigeschade
veroorzaken.
7. Verwijder de batterijen als u de camera langere tijd niet gebruikt. Een versleten batterij kan
de functionaliteit van de camera beïnvloeden.
8. Verwijder de batterij als deze tekenen van lekkage of vervorming vertoont.
9. Gebruik uitsluitend accessoires die door de fabrikant worden geleverd.
10. Houd de camera buiten het bereik van kleine kinderen.
11. Explosiegevaar als de batterij wordt vervangen door een onjuist type.
12. Gooi de gebruikte batterijen weg volgens de instructies.
Als het einde van de levensduur van het product is
bereikt, moet u alle mogelijke componenten recyclen.
Batterijen en oplaadbare batterijen mogen niet bij het
huishoudelijke afval worden gegooid. Lever ze af bij
uw lokale dienst voor recycling.
Samen kunnen we helpen bij de bescherming van
het milieu.
Page 68

Aan de slag
Kennismaken met de onderdelen van uw camcorder
Ontspanknop ( )
Scherpstelschakelaar
Luidspreker
Lens
Batterijvak / SD/MMC-
kaartsleuf
Indicatorlampje
LCD-scherm
Voedingsknop ( )
Riemhouder
Flits
Onderaanzicht
Statiefbevestiging
Microfoon
Opnameknop ( )
Zoomknop ( )-
T: Inzoomen / Volume hoger
W: Uitzoomen / Volume lager
Knop Menu/OK
Knop Modus/Vorige ( )
HD-UITGANG
USB-aansluiting
AV OUT-aansluiting /
oortelefoon
1
Page 69

2
De batterij plaatsen
1. Schuif het batterijklepje open.
2. Plaats de bijgeleverde li-ion-batterij in het batterijvak. Zorg ervoor dat
de metalen contacten uitgelijnd zijn op de contacten in het batterijvak.
3. Sluit de klep van het batterijvak nadat u de batterijen correct hebt
geïnstalleerd.
De batterij opladen
Laat de batterij gedurende minstens 8 uur opladen voordat u deze voor de eerste keer
gebruikt.
1. De kabel aansluiten.
Sluit het ene uiteinde van de bijgeleverde wisselstroomadapter aan
op de USB-poort van de camcorder en het andere uiteinde op het
stopcontact.
OF
Sluit het ene uiteinde van de bijgeleverde USB-kabel aan op
de USB-poort van de camcorder en het andere uiteinde op een
ingeschakelde pc. Zorg ervoor dat de camcorder is uitgeschakeld.
2. De ladings-LED licht rood op en het opladen wordt gestart.
3. Wanneer het opladen wordt onderbroken of de batterijdoos volledig is opgeladen, wordt
de laad-LED groen.
Als u een pc gebruikt om de batterij op te laden, mag u de camcorder niet
inschakelen, anders wordt het opladen gestopt.
Een geheugenkaart plaatsen (optioneel)
Om een geheugenkaart te plaatsen, gaat u als volgt te werk:
(1) Open de batterijklep.
(2) Duw de kaart zoals aangegeven voorzichtig naar binnen tot de kaart de onderkant
van de sleuf bereikt.
Om de geheugenkaart te verwijderen, duwt u voorzichtig tegen de kaart tot deze uit de
sleuf springt. Trek vervolgens de kaart uit de sleuf.
Uw camera in-/uitschakelen
Open het LCD-scherm of houd de voedingsknop gedurende 1 seconde ingedrukt om
de camcorder in te schakelen.
Houd de voedingsknop gedurende 1 tot 3 seconden ingedrukt of sluit het LCD-scherm
om de camcorder uit te schakelen.
Als de camcorder gedurende een langere periode inactief blijft, kan het
toestel automatisch uitschakelen door de instelling voor het Automatisch
uitschakelen.
Page 70

De taal instellen
1
00:06:40
00:00:05
1. Schakel de camcorder in.
2. Druk op de knop MODE om het menu MODE te openen.
3. Gebruik de Zoom-knop om de modus Instelling te selecteren en druk op OK om het
menuscherm te openen.
4. Gebruik de Zoom-knop om het item Taal te selecteren en druk vervolgens op OK om
te bevestigen.
5. Beweeg de Zoom-knop omhoog of omlaag om een taal te selecteren.
6. Druk op OK wanneer u klaar bent om de instelling te bevestigen.
LCD-indicators aezen
Moduspictogram Modus Witbalans
Videoresolutie Resterende opnameduur
Beeldresolutie Zelfontspannermodus
Macrostand Nachtopnamemodus
SD-kaart geplaatst Opnameduur
Levensduur batterij
Indicator zoomverhouding
Flitserstand
3
Page 71

44
Basisbewerkingen
Een videoclip opnemen / een foto maken
1. Stel de scherpstelling in op de gewenste instelling. Voor de meeste
opnameomstandigheden stelt u de scherpstelling normaal in op ( ) Selecteer alleen
( ) voor close-ups.
Opmerking: zorg ervoor dat uw geheugenkaart is geplaatst voordat u de opname
2. Zoomen:
Verplaats de knop Zoom omhoog of omlaag om in of uit te zoomen op het scherm.
3. Druk op de Opnameknop om de opname te starten. Of druk op de Ontspanknop om
een foto te maken.
start.
50cm ~ (20” ~ )
30cm ~ 50cm (12” ~ 20”)
Door de sensoropnamefunctie, zullen het LCD-voorbeeld en de hoogte-
breedteverhouding van foto’s verschillen afhankelijk van de verschillende
videoresolutie-instellingen.
De beeldopname van de camera is ingesteld, terwijl de videoresoluties
verschillen.
* Raadpleeg de informatie op de verpakking voor de specicaties van de
resolutie.
Videoresolutie Voorbeeld Foto’s maken
HD (1280x720)
WVGA 60f(848x480)
QVGA 30f(320x240)
Verhouding 16:9
Verhouding 4:3 Verhouding 4:3
Verhouding 4:3
4. Druk opnieuw op de Opnameknop om de opname te stoppen.
De zoomfunctie is ook beschikbaar tijdens de opname (behalve in de
macromodus).
Het is normaal dat de camcorder iets warmer aanvoelt na doorlopend gebruik /
langdurige opnamen. Dit is te wijten aan de hoge prestaties.
Page 72

Een spraakopname maken
1. Schakel de camcorder in.
2. Druk op de knop MODE om het menu MODE te openen.
3. Gebruik de Zoom-knop om de modus Spraak Opname te selecteren en druk op OK
om het menuscherm te openen.
4. Druk op de Opnameknop om de opname te starten
5. Druk opnieuw op de Opnameknop om de opname te stoppen.
Uw opnamen afspelen
1. Druk op de knop MODE en gebruik de Zoom-knop om te schakelen naar de modus
“Mij Bestande”.
2. Er zijn drie mappen onder Mij Bestande: Video, Beelder en Spraak. Selecteer Video,
Beelder of Spraak en druk vervolgens op de knop OK om de indexmodus te openen.
3. Bediening in de modus Mij Bestande:
Bestandstype Hoe kan ik... Actie
Indexmodus
Volledige
schermweergave
Schakelen tussen de
miniatuurweergave
en volledige
schermweergave
Schakelen tussen
bestanden.
Druk in de indexmodus op de knop OK om te
schakelen naar de volledige schermweergave. Druk
in de volledige schermweergave op de knop Mode/
Return om te schakelen naar de miniatuurweergave.
1. In de indexmodus: Gebruik de Zoom-knop om het
selectievenster te verplaatsen.
2. In volledige schermweergave: Gebruik de Zoom-
knop om tussen bestanden te schakelen.
Het afspelen starten
Het afspelen
pauzeren/hervatten.
Het volumeniveau
Video & Audio
Beelder De foto zoeken Gebruik de Zoom-knop om de foto te zoeken.
regelen.
Het afspelen
stoppen
Het volgende
bestand selecteren
Het vorige bestand
selecteren
Wanneer deze actie wordt geselecteerd (in volledige
schermweergave), wordt het afspelen van het bestand
automatisch gestart.
Druk op OK tijdens de weergave/tijdens de pauze.
Gebruik de Zoom-knop tijdens het afspelen om
omhoog of omlaag te verplaatsen.
Druk tijdens de weergave op de knop Mode/Return.
Hiermee kunt u terugkeren naar de vorige weergave
en de Zoom-knop (W) gebruiken om het volgende
bestand te selecteren.
Hiermee kunt u terugkeren naar de vorige weergave
en de Zoom-knop (T) gebruiken om het volgende
bestand te selecteren.
55
Page 73

66
Uw opnamen afspelen op een pc
De software installeren
Opgenomen video’s krijgen de indeling .mov. U hebt dus enkele speciale
programma’s nodig om de opnamen op uw pc te bekijken. Controleer of QuickTime
7.0 (of hoger) op uw pc is geïnstalleerd voordat u het afspelen start. Indien dat niet
het geval is, moet u QuickTime player downloaden van de website: Of installeer de
software van de bijgeleverde cd.
De pc aansluiten en bestanden opslaan
1. Schakel de camcorder in.
2. Sluit de camcorder (met geplaatste SD-kaart) aan op uw computer via de USB-kabel.
3. Er wordt onmiddellijk een dialoogvenster weergegeven. Selecteer het item “Map
openen om bestanden weer te geven” en klik op “OK”.
4. Als het dialoogvenster niet automatisch wordt geopend, kunt u dubbelklikken op
“Deze computer” en “Verwisselbaar station” openen.
5. Dubbelklik op de bestandsmap DCIM.
6. Dubbelklik op de bestandsmap 100MEDIA.
7. Kopieer de bestanden die u wilt bewaren en sla ze op naar de gewenste locatie op
uw computer.
De camcorder aansluiten op een tv
De camcorder aansluiten op een standaard tv
TV: traditionele CRT-tv
1. Zet uw tv aan en schakel de tv naar de AV-modus.
2. Sluit de audio- en video-uiteinden
van de AV-kabel (geel/wit/rood)
aan op de “AV-IN”-aansluitingen
op de tv.
3. Schakel de camcorder in.
4. Sluit het andere uiteinde van de
AV-kabel aan op de “AV-uitgang”
op uw camcorder. Wanneer het
pop-upbericht op het scherm
verschijnt, selecteert u “AV-OUT”.
AV-modus
AV-ingang
Video
AV-uitgang
Audio
AV-kabel
Page 74

AV-UITGANG
HD-UITGANG
HD TV
Component audio-ingang
Component video-ingang
<Component video-kabel>
<AV-kabel>
(rood)
(geel)
(wit)
(groen)
(rood)
(blauw)
(Sluit de gele kabel niet aan)
De camcorder aansluiten op HDTV
Met HD TV worden de ingebouwde componentingangen van de tv bedoeld, zodat
beelden kunnen worden weergegeven met een hoge resolutie van HD wanneer
ze zijn aangesloten.
1. Schakel uw HD TV in.
2. Schakel de camcorder in.
3. Sluit het ene uiteinde van de component video-kabel aan op de poort
(Component video-ingang) op de HDTV en het andere uiteinde op de
poort (HD-UITGANG) op de camcorder.
4. Sluit het ene uiteinde van de andere AV-kabel aan op de poort
(Component audio-ingang) op de HDTV en het andere uiteinde op de
poort (AV-UITGANG) op de camcorder. (Sluit de gele connector niet aan
op de AV-ingang van de HDTV.)
5. Druk op de ingangsschakelaar op de HD TV en selecteer
“Componentingang”.
MP3-muziek afspelen
Alleen voor bepaalde modellen. Raadpleeg de informatie op de verpakking
voor meer details.
1. Schakel de camera in en sluit deze aan op uw pc met de USB-kabel.
2. Kopieer de bestanden naar de camera. Dubbelklik, nadat u de camera hebt
aangesloten op de pc, op “Deze computer” Een verwisselbare schijf wordt
weergegeven. Kopieer de MP3-bestanden naar de map “Muziek” om ze af te spelen.
3. Druk op de Modusknop en gebruik de richtingsknoppen om de modus Muziekspeler
te selecteren. Druk vervolgens op OK om uw keuze te bevestigen.
77
Page 75

8
Geavanceerde bewerkingen
Menubediening
Demenu-onderdelenbiedenuverschillendeoptieswaarmeeudecamerafunctiesjn
kunt afstellen.
In de volgende tabel vindt u details over het gebruik van het menu.
Hoe kan ik... Actie
Het menu openen Druk op de knop MENU.
De selectiebalk verplaatsen
Het submenu openen/een item
bevestigen
Menu Afsluiten/terugkeren naar het
bovenliggende menu
Menu-items in de cameramodus
Inschakelen→DrukopdeknopMenu.
Item Optie Beschrijving
Videoresolutie
Beeldresolutie
Nachtopname Aan/uit
Witbalans
Flits
Raadpleegdeinformatieopdeverpakkingvoordespecicatiesvanderesolutie.
Raadpleegdeinformatieopdeverpakkingvoordespecicatiesvanderesolutie.
Auto De camera past de witbalans automatisch aan.
Zonnig
Bewolkt
TL
Gloeilamp
Aan Deitserzalaltijdbijelkeopnamegeforceerdwordengebruikt.
Auto
Uit Deitserisuitgeschakeld.
Gebruik de Zoom-knop om de balk omhoog of omlaag te
verplaatsen.
Druk op de knop OK.
Druk op de knop Mode/Return (wanneer u in het submenu
bent)
Wanneer u deze instelling inschakelt, kunt u een foto maken
met een donkere achtergrond. Aangezien de ontspansnelheid
zal vertragen wanneer u foto’s maakt in een donkere ruimte. Wij
raden u aan een statief te gebruiken om wazige foto’s door het
schudden van de hand te vermijden.
Waarschuwing: De ruis vermeerdert wanneer Nachtopname
is ingeschakeld.
Deze instelling is geschikt voor opnamen buitenshuis bij zonnig
weer.
Deze instelling is geschikt voor opnamen bij bewolkt weer of in
schaduwrijke omgevingen.
Deze instelling is geschikt voor opnamen binnenshuis bij TLverlichting of in omgevingen met een hoge kleurtemperatuur.
Deze instelling is geschikt voor opnamen binnenshuis
bij gloeilampverlichting of in omgevingen met een lage
kleurtemperatuur.
Deitsergaatautomatischafwanneerdebelichtingonvoldoende
is.
Page 76

Menu-items in de camerastand (vervolg)
Item Optie Beschrijving
Effect
Belichting -2~+2
Zelfontspanner Aan/uit
Histogram Aan/uit
Symbool Aan/uit
Normaal Opnamen maken in natuurlijke kleuren.
ZWART-WIT Opnamen maken in zwart-wit.
Klassiek Opnamen maken in sepiatinten.
U kunt de belichting handmatig aanpassen voor een beter
effect wanneer de beeldweergave te helder of te donker is. Een
positieve waarde geeft aan dat het beeld helderder zal zijn dan
normaal, terwijl een negatieve waarde het beeld donkerder
maakt.
Schakel de zelfontspanner in/uit. Nadat de zelfontspanner is
ingeschakeld, zal de camera tien seconden wachten voordat de
ontspanknop wordt ingedrukt.
De weergave van het beeldhistogram op het scherm inschakelen/
uitschakelen.
De OSD (on screen display)-pictogrammen in-/uitschakelen voor
weergave op het scherm.
Menu-items in de modus Mij Bestande
Inschakelen→DrukopdeknopMODE→GebruikdeZoom-knop om naar de modus
Mij Bestandeteschakelen→SelecteerdemapVideo, Beelder of Spraak→Drukop
de knop OK→Drukopdeontspanknop.
Item Optie Beschrijving
Eén wissen Ja/Nee Huidig bestand wissen
Wissen alles Ja/Nee
Diavoorstelling /
videoweergave
Beveiligen Ja/Nee
* Als er geen bestanden in de camera zijn, worden geen items weergegeven.
Alle foto’s en video-/audiobestanden die in het geheugen zijn
opgeslagen, wissen.
De camera geeft de foto’s/videoclips achtereenvolgens
-
weer. U kunt op de knop OK drukken om de diavoorstelling/
videoweergave te stoppen.
U kunt één, meerdere of alle bestanden vergrendelen. Een
vergrendeld bestand kan niet worden verwijderd met de functie
Wissen. De functie Formatteren zal echter alle vergrendelde/
ontgrendelde bestanden wissen.
9
Page 77

10
Menu-items in de instellingsstand
Inschakelen→DrukopdeknopMODE→SelecteerdemodusInstelling→Drukop
de knop OK.
Item Optie Beschrijving
Datum & tijd -
Taal
Ontspanknop
Piep
Startbeeld
Symbool
Helderheid
TV Systeem
Schitteren
Auto-uit
Formaat
Standaard
*Tabelikkerinstellingen:
Regio Engeland Duitsland Frankrijk Italië Spain Nederland Rusland
Instelling 50Hz 50Hz 50Hz 50Hz 50Hz 50Hz 50Hz
Regio Portugal Amerika Taiwan China Japan Korea Thailand
Instelling 50Hz 60Hz 60Hz 50Hz 50/60Hz 60Hz 50Hz
Hiermee stelt u de datum en tijd in.
-
Hiermee kunt u de taal voor het OSD-menu selecteren.
Aan
Pieptonen inschakelen.
De pieptoon uitschakelen, maar het geluid van de ontspanknop
Aan
behouden.
Uit
Pieptoon uitschakelen.
Aan/uit
stelt het startbeeld in.
Aan/uit
Schakel de OSD-pictogrammen in/uit voor weergave op het scherm.
Stel de LCD-helderheid in. Een positieve waarde maakt het LCD-
-2~+2
scherm helderder, terwijl een negatieve waarde het LCD-scherm
donkerder maakt.
Stel de compatibiliteit van het tv-systeem in op NTSC. Deze optie is
NTSC
geschikt voor Amerika, Taiwan, Japan en Korea.
Stel de compatibiliteit van het tv-systeem in op PAL. Deze optie is
PAL
geschikt voor Duitsland, Engeland, Italië, Nederland, China, Japan
en Hongkong.
50Hz
Steldeikkerfrequentieinop50Hz*.
60Hz
Steldeikkerfrequentieinop60Hz*.
Uit
De functie Auto-uit uitschakelen.
De camera wordt automatisch uitgeschakeld na een inactiviteit van
1 min
meer dan 1 minuut.
De camera wordt automatisch uitgeschakeld na een inactiviteit van
3 min
meer dan 3 minuten.
De camera wordt automatisch uitgeschakeld na een inactiviteit van
5 min
meer dan 5 minuten.
Het opslagmedium formatteren. Houd ermee rekening dat alle
Ja
bestanden in het medium zullen verloren gaan.
Nee
De actie annuleren.
Fabrieksinstellingen herstellen. Denk eraan dat uw huidige
Aan
instellingen hiermee worden overschreven.
Uit
De actie annuleren.
Page 78

Bijlage
Indicator levensduur batterij
Pictogram Beschrijving
Volledig batterijvermogen
Gemiddeld batterijvermogen
Laag batterijvermogen
*DeitserlampendeLED-lampenwordenuitgeschakeld.
Lege batterij
Opmerking: Om te vermijden dat de voeding plotseling uitvalt, raden wij u aan de batterij te
Levensduur batterij
Opmerking: Deze tabel is uitsluitend bedoeld voor uw referentie. De werkelijke levensduur
vervangen wanneer het pictogram een laag batterijvermogen aangeeft.
Foto Videoclip
Aantal foto’s Opnameduur (minuten)
* opname elke 30 seconden
**deitserisuit
*** de resolutie is ingesteld op 5M
(2592x1944)
200 90
van de batterij is afhankelijk van uw batterijtype en het laadniveau.
* de resolutie is ingesteld op HD 30f
(1280x720)
11
Page 79

Bijlage
Opslagcapaciteit
* Raadpleeg de informatie op de verpakking voor de specicaties van uw model.
Geheugen
SD-kaart (1GB) 15 30 30 160 380 580 920 1840
SD-kaart (2GB) 30 60 60 320 770 1160 1840 3680
SD-kaart (4GB) 60 120 120 640 1540 2320 3680 7360
SD-kaart (8GB) 120 240 240 1280 3080 4640 7360 14720
Opmerking : De werkelijke waarde van de capaciteit kan variëren (tot ± 30%) afhankelijk van
HD 60f HD 30f
de kleurverzadiging en de complexiteit van uw onderwerp en de omgeving.
Video (min.) Foto
WVGA
QVGA
60f
8M 5M 3M 1M
30f
Systeemvereisten
* Raadpleeg de informatie op de verpakking voor de specicaties van uw model.
De systeemvereisten verschillen afhankelijk van de verschillende videoresolutieinstellingen:
Video Resolution PC system requirements
HD 60f (1280x720) @60fps
HD 30f (1280x720) @30fps
WVGA 60f (848x480) @60fps
QVGA 30f (320x240) @30fps
Besturingssysteem = Windows XP SP2, Vista of hoger
CPU = Pentium 4 3,2 GHz, Core 2 Duo of hoger
Systeem-RAM= 1GB (2GB aanbevolen)
Beeldschermkaart = 256MB RAM
Besturingssysteem = Windows XP SP2, Vista of hoger
CPU = Pentium 4 3,2 GHz of hoger
Systeem-RAM= 1GB (2GB aanbevolen)
Beeldschermkaart = 256MB RAM
Besturingssysteem = Windows XP, Vista of hoger
CPU = Pentium 4 1,5GHz of hoger
Systeem-RAM= 256 MB (512MB of meer aanbevolen)
Graschekaart=64MB(128MBofmeeraanbevolen)
12
Page 80

Bem-vindo:
Caro utilizador, obrigado por ter comprado este produto.
Investimos muito tempo e esforço no seu desenvolvimento e esperamos que o mesmo
o sirva durante muitos anos sem problemas.
Normas de Segurança:
1. Não deixe a câmara cair e não a fure ou desmonte; caso contrário a garantia perde a
validade.
2. Evite todo o contacto com a água e seque as mãos antes de utilizar a câmara.
3. Não exponha a câmara a temperaturas elevadas e não a deixe exposta à luz solar directa.
Se o zer, pode danicar a câmara.
4. Utilize a câmara com cuidado. Evite exercer pressão sobre o corpo da mesma.
5. Para sua segurança, evite utilizar a câmara durante tempestades ou trovoadas.
6. Não utilize baterias com especicações diferentes. Se o zer, corre o risco de danicar
seriamente a câmara.
7. Remova a bateria da câmara quando esta não for utilizada por longos períodos de tempo,
uma vez que uma bateria deteriorada pode afectar a funcionalidade da câmara.
8. Remova a bateria se esta mostrar sinais de fuga de líquido ou de corrosão.
9. Utilize apenas os acessórios fornecidos pelo fabricante.
10. Mantenha a câmara fora do alcance das crianças.
11. Existe o risco de explosão se a bateria for substituída por outra de tipo incorrecto.
12. Elimine a bateria usada seguindo as instruções.
Quando desejar desfazer-se do produto, por favor
recicle todos os componentes possíveis.
As baterias e pilhas recarregáveis não devem ser colocadas juntamente com o lixo doméstico! Por favor
recicle-as num ponto de recolha de reciclagem.
Juntos, podemos ajudar a proteger o ambiente.
Page 81

Introdução
Conheça as peças que compõem a sua câmara
Botão do obturador ( )
Comutador de focagem
Altifalante
Lente
Compartimento da
bateria / Ranhura para
cartões de memória
SD/MMC
Luz indicadora
Ecrã LCD
Botão de
Alimentação ( )
Fixação da correia
Flash
Parte de baixo
Entrada do tripé
Microfone
Botão de Gravação ( )
Botão de zoom ( )-
T: Mais Zoom/Aumentar
Volume
W: Menos Zoom/Diminuir
Volume
Botão Menu/OK
Botão Modo/Retorno ( )
Saída HD
Conector USB
Conector de saída AV /
auricular
1
Page 82

2
Colocação da bateria
1. Faça deslizar a tampa do compartimento da bateria.
2. Coloque a bateria de iões de lítio no compartimento. Tenha em
atenção que os contactos metálicos devem car alinhados com os
contactos existentes no compartimento.
3. Após a correcta colocação da bateria, reponha a tampa do
compartimento da mesma.
Carregamento da bateria
Carregue a bateria durante pelo menos 8 horas aquando da primeira utilização.
1. Ligue o cabo.
Ligue uma das extremidades do cabo do transformador a.c.
fornecido à porta USB da câmara e ligue a outra extremidade à
tomada eléctrica.
OU
Ligue uma das extremidades do cabo USB fornecido à porta USB
da câmara e a outra extremidade a um PC ligado. Certique-se de
que a câmara está desligada.
2. O LED indicador do carregamento ca vermelho e o carregamento é iniciado.
3. Quando o carregamento é interrompido ou a bateria está já completamente carregada
o LED de carregamento ca verde.
Quando utilizar um PC para carregar a bateria, não ligue a câmara pois se o
zer o carregamento será interrompido.
Introdução de um cartão de memória (opcional)
Para introduzir um cartão de memória, faça o seguinte:
(1) Abra a tampa do compartimento da bateria.
(2) Com cuidado, empurre o cartão de memória, tal como indicado, até o cartão atingir
o m da ranhura.
Para remover o cartão de memória, exerça uma ligeira pressão sobre o cartão para
que este seja ejectado. De seguida, puxe o cartão de memória para fora da ranhura.
Ligar/desligar a câmara
Abra o ecrã LCD ou mantenha premido o botão de alimentação durante 1 segundo
para ligar a câmara.
Para desligar a câmara, mantenha premido o botão de alimentação entre 1 ~ 3
segundos ou feche o ecrã LCD.
Se a câmara permanecer inactiva durante um longo período de tempo, esta
pode desligar-se automaticamente devido à denição Desl. Autom.
Page 83

Denição do idioma
1
00:06:40
00:00:05
1. Ligue a câmara.
2. Prima o botão MODO para aceder ao menu MODO.
3. Utilize o botão de Zoom para escolher a opção Denição e prima o botão OK para
aceder ao menu.
4. Utilize o botão de Zoom para seleccionar o item Idioma e prima o botão OK para
conrmar.
5. Utilize o botão de Zoom para se deslocar para cima/para baixo para escolher um
idioma.
6. Quando terminar, prima o botão OK para conrmar a denição.
Signicado dos ícones apresentados no
ecrã LCD
Ícone de modo Modo de balanço de brancos
Resolução vídeo Tempo restante para gravação
Resolução Modo Temp. autom.
Modo macro Modo nocturno
Cartão de memória SD introduzido Duração da gravação
Duração da bateria
Indicador da taxa de zoom
Modo do ash
3
Page 84

44
Operações básicas
Gravar um clip de vídeo / Tirar uma fotograa
1. Dena a focagem para a denição pretendida. Normalmente, pode denir a focagem
para ( ) a maioria das condições de gravação. Seleccione ( ) apenas para
grandes planos.
Nota: Verique se instalou o cartão de memória antes de começar a gravar.
50cm ~ (20” ~ )
30cm ~ 50cm (12” ~ 20”)
2. Aplicação de zoom:
Mova o botão de Zoom para cima ou para baixo para aplicar mais ou menos zoom ao
nível do ecrã.
3. Prima o botão de Gravar para iniciar a gravação. Prima o botão do Obturador para
capturar uma imagem xa.
Devido às características do sensor, a pré-visualização no ecrã LCD e
o número de fotos que é possível capturar variam conforme as diferentes
resoluções escolhidas.
A captura de imagens pela câmara está denida enquanto as resoluções de
vídeo podem variar.
* Consulte a embalagem para a especicação da resolução.
Resolução vídeo Pré-visualizar Tirar fotograas
HD (1280x720)
WVGA 60f(848x480)
QVGA 30f(320x240)
16:9
4:3 4:3
4:3
4. Prima novamente o botão de Gravar para parar a gravação.
A função de zoom está também disponível durante a gravação (excepto no
modo macro).
Devido ao seu alto desempenho, é normal a câmara aquecer ligeiramente
devido a uma utilização/gravação contínua.
Page 85

Gravação de um cheiro de voz
1. Ligue a câmara.
2. Prima o botão MODO para aceder ao menu MODO.
3. Utilize o botão de Zoom para escolher a opção Registrador de voz e prima o botão
OK para aceder ao menu.
4. Prima o botão de Gravar para iniciar a gravação.
5. Prima novamente o botão de Gravar para parar a gravação.
Reprodução das suas gravações
1. Prima o botão MODO e utilize o botão de Zoom para seleccionar o modo “Meus
trabalhos”.
2. Existem três pastas na opção Meus trabalhos: Vídeo, Foto e Voz. Seleccione uma
destas pastas e prima o botão OK para ver o índice.
3. Operações no modo Meus Trabalhos:
Tipo de cheiro Como… Acção
Modo de índice
Modo de ecrã
inteiro
Alternar entre o modo
de índice e de ecrã
inteiro
Alternar entre
cheiros.
No modo de índice, prima o botão OK para passar ao
modo de ecrã inteiro. No modo de ecrã inteiro, prima o
botão Modo/Retorno para passar ao modo de índice.
1. No modo de índice: Utilize o botão de Zoom para
mover a caixa de selecção.
2. No modo de ecrã inteiro: Utilize o botão de Zoom
para mudar de cheiro.
Iniciar a reprodução
Fazer uma pausa/
resumo a reprodução
Ajustar o nível do
Vídeo e áudio
Foto Navegar na imagem Utilize o botão Zoom para navegar na imagem.
volume
Parar a reprodução Durante a reprodução, prima o botão Modo/Retorno.
Seleccionar o cheiro
seguinte
Seleccionar o cheiro
anterior
O cheiro é automaticamente reproduzido aquando da
respectiva selecção (no modo de ecrã inteiro).
Durante a reprodução/pausa, prima o botão OK.
Utilize o botão Zoom para se deslocar para cima ou
para baixo.
Volte ao ecrã anterior e utilize o botão Zoom (W) para
seleccionar o cheiro seguinte.
Volte ao ecrã anterior e utilize o botão Zoom (T) para
seleccionar o cheiro anterior.
55
Page 86

66
Reprodução das suas gravações no PC
Instalação do software
Tenha em atenção que os clips de vídeo gravados apresentam o formato .mov.
Assim, necessita de programas especiais para poder ver estes clips de vídeo no
PC. Aquando da primeira utilização, certique-se de que tem o QuickTime 7.0 (ou
acima) instalado no PC. Se for caso disso, transra o QuickTime a partir do web site
seguinte: Instale o software incluído no CD fornecido.
Ligar ao PC e guardar cheiros
1. Ligue a câmara.
2. Ligue a câmara (com o cartão de memória SD introduzido) ao computador através
do cabo USB.
3. Uma caixa de diálogo é automaticamente apresentada. Seleccione o item “Abrir
pasta para visualizar cheiros” e clique em “OK”.
4. Se a caixa de diálogo não aparecer automaticamente, faça um duplo clique sobre a
opção “O meu computador” e abra a unidade amovível.
5. Faça um duplo clique sobre a pasta de cheiros DCIM.
6. Faça um duplo clique sobre a pasta de cheiros 100MEDIA.
7. Copie os cheiros que pretende manter e guarde-os no local pretendido no seu
computador.
Ligação da câmara a um televisor
Ligação da câmara a um televisor normal
TV: TV CRT tradicional
1. Ligue o seu televisor e dena-o para o modo AV.
2. Ligue as extremidades de áudio
e de vídeo do cabo AV (de cor
amarela/branca/vermelha) às
tomadas de entrada AV existentes
no televisor.
3. Ligue a câmara.
4. Introduza a outra extremidade
do cabo AV na porta de saída AV
da sua câmara. Quando vir uma
mensagem de contexto no ecrã,
seleccione a opção Saída AV.
Modo AV
Vídeo
Entrada
AV
Áudio
Cabo AV
Saída AV
Page 87

Ligação da câmara a um televisor de alta
SAÍDA AV
Saída HD
Televisor de
alta definição
Entrada de sinal de áudio componente
Entrada de sinal de vídeo componente
<Cabo de vídeo componente>
<Cabo AV>
(vermelho)
(amarelo)
(branco)
(verde)
(vermelho)
(azul)
(Não ligue o cabo amarelo)
denição
Para ligar a câmara a um televisor de alta denição tem de usar as portas de
entrada incluídas no televisor para poder desfrutar de uma resolução HD durante
a ligação destes dois dispositivos um ao outro.
1. Ligue o seu televisor de alta denição.
2. Ligue a câmara.
3. Ligue uma das extremidades do cabo de sinal de vídeo componente à
porta de entrada de sinal de vídeo componente existente no televisor de
alta denição e ligue a outra extremidade do cabo à porta de saída de
alta denição da câmara.
4. Ligue uma das extremidades do outro cabo AV à porta de entrada do
sinal de áudio componente existente no televisor de alta denição e
ligue a outra extremidade do cabo à porta de saída AV da câmara. (Não
ligue o conector amarelo à porta de entrada AV do televisor de alta
denição.)
5. Prima o comutador de modo do televisor de alta denição e escolha a
opção Entrada de sinal componente.
Apenas nos modelos seleccionados. Consulte a embalagem para uma
descrição mais detalhada.
1. Ligue a câmara e de seguida ligue-a ao PC utilizando o cabo USB.
2. Copie os cheiros para a câmara: Após a ligação da câmara ao PC faça duplo clique
em “O meu computador” e verá um disco amovível. Copie os cheiros MP3 para a
pasta “Música” para os reproduzir.
3. Prima o botão Modo e utilize os botões de direcção para seleccionar o modo Leitor
de música. Depois prima o botão OK para conrmar.
Reprodução de música MP3
77
Page 88

8
Operações avançadas
Funcionamento dos menus
Os itens do menu proporcionam-lhe várias opções para que possa proceder à
sintonização na das funções da sua câmara.
A tabela seguinte fornece mais informações sobre as operações dos menus.
Aceder ao menu. Prima o botão MENU.
Deslocar a caixa de selecção
Aceder ao submenu/Conrmar
um item
Sair do menu/Voltar ao menu
anterior
Como… Acção
Utilize os botões de Zoom para se deslocar para cima ou
para baixo.
Prima o botão OK.
Prima o botão Modo/Retorno (quando estiver no submenu).
Itens do menu no modo Câmara
Ligue a câmara → Prima o botão Menu.
Item Opção Descrição
Resolução vídeo
Resolução
Nocturno
Bal. Brancos
Flash
Consulte a embalagem para a especicação da resolução.
Consulte a embalagem para a especicação da resolução.
Ligado/
Desligado
Com sol
Com nuvens
Fluorescente
Tungsténio
Desligado O ash é desactivado.
A activação desta denição permite-lhe tirar fotos contra um
fundo escuro. Uma vez que a velocidade do obturador é
reduzida durante a captura de imagens em locais escuros,
recomendamos a utilização de um tripé para eliminar a
desfocagem resultante do tremer das mãos.
Aviso: O ruído aumenta quando o modo Nocturno é
activado.
Auto A câmara ajusta o balanço de brancos automaticamente.
Esta denição é adequada para gravação no exterior quando
há sol.
Esta denição é adequada para gravação em tempo nublado
ou em ambientes com sombras.
Esta denição é adequada para gravação no interior com
luz uorescente, ou em ambientes com cores de alta
temperatura.
Esta denição é adequada para gravação no interior com
luz incandescente, ou em ambientes com cores de baixa
temperatura.
Ligado O ash é forçado a disparar sempre que é tirada uma foto.
O ash dispara automaticamente quando a iluminação é
Auto
insuciente.
Page 89

Itens do menu no modo Câmara (continuação)
Item Opção Descrição
Efeito
Exposição -2~+2
Temp. autom.
Histograma
Ícone
Normal As gravações são feitas com cores naturais.
P&B As gravações são feitas a preto e branco.
Clássico As gravações são feitas com tons sépia.
Ligado/
Desligado
Ligado/
Desligado
Ligado/
Desligado
Pode ajustar manualmente a exposição de forma a obter
melhores resultados quando a imagem de pré-visualização
parecer estar demasiado clara ou escura. Um valor positivo
indica que a imagem gravada será mais clara que o habitual;
enquanto um valor negativo faz com que a imagem seja
mais escura.
Activa/desactiva o temporizador. Após activação do
temporizador, a câmara dispõe de dez segundos até o botão
do obturador ser premido e a câmara começar a gravar.
Esta opção activa/desactiva a apresentação do histograma
no ecrã.
Activa/desactiva a apresentação dos ícones no ecrã.
Itens do menu no modo Meus Trabalhos
Ligue a câmara → Prima o botão MODE → Utilize o botão de direcção para aceder ao
modo Meus trabalhos → Seleccione a pasta Vídeo, Foto ou Voz → Prima o botão
OK → Prima o botão MENU.
Item Opção Descrição
Eliminar um Sim/Não Elimina o cheiro actual.
Eliminar Tudo Sim/Não
Reproduzir
apresentação
de diapositivos/
clips de vídeo
Bloquear Sim/Não
* Se não existirem cheiros na câmara, não serão apresentados quaisquer itens.
Elimina todos os cheiros de imagem e de vídeo/áudio
armazenados na memória.
A câmara apresenta as imagens/clips de vídeo sequencialmente.
-
Pode premir o botão OK para parar a reprodução dos
diapositivos/ clips de vídeo.
É possível bloquear apenas um, vários ou todos os cheiros.
Um cheiro bloqueado não pode ser eliminado pela função de
eliminação. Contudo, a função de formatação irá eliminar todos
os cheiros quer estes estejam bloqueados ou não.
9
Page 90

10
Itens do menu no modo Denição
Ligue a câmara → Prima o botão MODO → Aceda ao modo Denição → Prima o
botão OK.
Item Opção Descrição
Data e hora -
Idioma
Bip
Imagem de
início
Ícone
Brilho LCD
Sistema
de TV
Cintilação
Desl.
Autom.
Formatação
Repor
Origem
* Tabela de denições da cintilação:
Região Inglaterra Alemanha França Itália Espanha
Denição 50Hz 50Hz 50Hz 50Hz 50Hz 50Hz 50Hz
Região Portugal América Taiwan China Japão Coreia Tailândia
Denição 50Hz 60Hz 60Hz 50Hz 50/60Hz 60Hz 50Hz
Dene a data e a hora.
-
Permite-lhe seleccionar o idioma das opções apresentadas no ecrã.
Ligado
Activa o bip.
Obturador
Desactiva o aviso sonoro mas mantém o som do obturador.
activado
Desligado
Desactiva o aviso sonoro.
Ligado/
Dene a imagem de início
Desligado
Ligado/
Activa/desactiva a apresentação dos ícones no ecrã.
Desligado
Dene o brilho do ecrã LCD. Um valor positivo torna o ecrã LCD mais
-2~+2
claro; enquanto que um valor negativo torna o ecrã LCD mais escuro.
Dene o sistema de TV para NTSC. Esta opção aplica-se aos Estados
NTSC
Unidos da América, a Taiwan, ao Japão e à Coreia.
Dene o sistema de TV para PAL. Esta opção aplica-se à Alemanha, à
PAL
Inglaterra, à Itália, aos Países Baixos, à China, ao Japão e a Hong Kong.
50Hz
Dene a cintilação para 50 Hz*.
60Hz
Dene a cintilação para 60 Hz*.
Desligado
Desactiva a função para desligar automaticamente.
A câmara desliga-se automaticamente após um período de inactividade
1 min
de mais de 1 minuto.
A câmara desliga-se automaticamente após um período de inactividade
3 min
de mais de 3 minutos.
A câmara desliga-se automaticamente após um período de inactividade
5 min
de mais de 5 minutos.
Formata o suporte de armazenamento. Tenha em atenção que todos os
Sim
cheiros existentes no suporte de armazenamento serão eliminados.
Não
Cancela a acção.
Repõe as predenições de fábrica. Tenha em atenção que as denições
Ligado
actuais serão substituídas.
Desligado
Cancela a acção.
Países
Baixos
Rússia
Page 91

Apêndice
Indicador de carga da bateria
Ícone Descrição
Bateria com carga completa
Bateria com meia carga
Bateria fraca
* O ash e os LEDS de iluminação são desactivados.
Bateria sem carga
Nota: Para evitar car sem energia de um momento para o outro, recomendamos-lhe que
substitua a bateria quando o ícone de bateria fraca aparecer.
Duração da bateria
Fotograas Clips de vídeo
Número de fotos Duração da gravação (minutos)
* captura de uma imagem de 30 em 30
segundos
** ash desligado.
*** resolução denida para 5M
(2592x1944)
Nota: Esta tabela serve apenas como referência. A duração real da bateria depende do tipo
de bateria e do nível de carregamento.
200 90
* resolução denida para alta denição 30f
(1280x720 pixéis).
11
Page 92

Apêndice
Capacidade de armazenamento
* Consulte a embalagem para saber as especicações do seu modelo.
Memória
Cartão de memória SD (1 GB) 15 30 30 160 380 580 920 1840
Cartão de memória SD (2 GB) 30 60 60 320 770 1160 1840 3680
Cartão de memória SD (8GB) 60 120 120 640 1540 2320 3680 7360
Cartão de memória SD (8GB) 120 240 240 1280 3080 4640 7360 14720
Nota: A capacidade de armazenamento pode variar (até ± 30%) dependendo da saturação
da cor e da complexidade do objecto e ambiente em redor.
Vídeo (min.) Fotograas
WVGA
HD 60f HD 30f
QVGA
60f
8M 5M 3M 1M
30f
Requisitos do sistema
* Consulte a embalagem para saber as especicações do seu modelo.
Os requisitos do sistema variam conforme as denições relativas à resolução
de vídeo:
Video Resolution PC system requirements
HD 60f (1280x720) @60fps
HD 30f (1280x720) @30fps
WVGA 60f (848x480) @60fps
QVGA 30f (320x240) @30fps
OS = Windows XP SP2, Vista ou posterior
CPU = Pentium 4 de 3,2GHz, Core 2 Duo ou superior
RAM do sistema = 1 GB (2 GB recomendado)
Placa gráca = 256 MB de RAM
OS = Windows XP SP2, Vista ou posterior
CPU = Pentium 4 de 3,2GHz ou superior
RAM do sistema = 1 GB (2 GB recomendado)
Placa gráca = 256 MB de RAM
OS = Windows XP, Vista ou posterior
CPU = Pentium 4 de 1,5GHz ou superior
RAM do sistema = 256 (512 MB ou acima
recomendado)
Placa de vídeo = 64 MB (128 MB ou acima
recomendado)
12
Page 93

Witamy:
Szanowny użytkowniku, dziękujemy za zakupienie tego produktu.
Poświęciliśmy wiele czasu i wysiłków na rozwój tego produktu i mamy nadzieję, że
będzie on służył bezawaryjnie przez wiele lat.
Uwaga dotycząca bezpieczeństwa:
1. Nie należy upuszczać, dziurawić lub rozbierać kamery, w przeciwnym razie nastąpi
unieważnienie gwarancji.
2. Należy unikać kontaktu z wodą i przed użyciem należy wysuszyć ręce.
3. Nie należy narażać kamery na wysoką temperaturę lub pozostawiać jej bezpośrednio na
słońcu. Może to spowodować uszkodzenie kamery.
4. Kamerę należy używać z zachowaniem ostrożności. Nie należy mocno naciskać obudowy
kamery.
5. Dla własnego bezpieczeństwa należy unikać używania kamery podczas burzy lub
wyładowań atmosferycznych.
6. Nie należy używać baterii o różnych specykacjach. Może to spowodować poważne
uszkodzenie.
7. Baterię należy wyjąć przy długich okresach nieużywania, ponieważ jej uszkodzenie może
uniemożliwić działanie kamery.
8. Baterię należy wyjąć, gdy wykazuje oznaki przeciekania lub odkształcenia.
9. Należy używać wyłącznie akcesoriów dostarczonych przez producenta.
10. Kamerę należy trzymać poza zasięgiem dzieci.
11. Wymiana baterii na baterię nieprawidłowego typu może spowodować eksplozję.
12. Zużyte baterie należy usuwać zgodnie z instrukcjami.
Aby usunąć zużyty produkt należy poddać
recyklingowi wszystkie możliwe komponenty.
Baterii i akumulatorów nie należy wyrzucać ze
śmieciami domowymi! Należy go przekazać do
lokalnego punktu recyklingu.
Takie postępowanie pomaga w ochronie środowiska
naturalnego.
Page 94

Wprowadzenie
Poznanie części kamery
Przycisk migawki ( )
Głośnik
Przełącznik ostrości
Obiektyw
Wnęka baterii/
gniazdo karty SD/MMC
Wskaźnik światła
Wyświetlacz LCD
Przycisk zasilania ( )
Uchwyt na pasek
Lampa błyskowa
Widok z dołu
Gniazdo statywu
Mikrofon
Przycisk nagrywania ( )
Przycisk Zoom ( )-
T: Powiększenie /
Zwiększenie głośności
W: Zmniejszenie /
Zmniejszenie głośności
Przycisk Menu/OK
Przycisk trybu/
powrotu ( )
Wyjście HD
Złącze USB
Złącze Wyjście AV/
Słuchawki
1
Page 95

2
Instalacja baterii
1. Przesuń pokrywę baterii do pozycji otwarcia.
2. Włóż baterię litowo-jonową do wnęki baterii. Pamiętaj, że metalowe
styki muszą być wyrównane ze stykami we wnęce.
3. Po prawidłowym zainstalowaniu baterii, załóż z powrotem pokrywę
baterii.
Ładowanie baterii
Przed pierwszym użyciem baterię należy ładować, przez co najmniej 8 godzin.
1. Podłącz kabel.
Podłącz jeden koniec dostarczonego adaptera prądu zmiennego do
portu USB kamery, a drugi do gniazda ściennego.
LUB
Podłącz jeden koniec dostarczonego adaptera prądu zmiennego
do portu USB kamkordera, a drugi do gniazda ściennego. Upewnij
się, że kamera jest odłączona od zasilania.
2. Dioda LED ładowania zmieni kolor na czerwony i rozpocznie się ładowanie.
3. Po przerwaniu ładowania lub po pełnym naładowaniu zestawu baterii, dioda LED
ładowania zmieni kolor na zielony.
Podczas wykorzystywania komputera do ładowania baterii, nie należy
włączać kamery lub zatrzymane zostanie ładowanie.
Wkładanie karty pamięci (opcjonalna)
Aby włożyć kartę pamięci należy wykonać następujące czynności:
(1) Otwórz pokrywę baterii.
(2) Delikatnie pchnij kartę zgodnie z oznaczeniem, aż karta dojdzie do końca gniazda.
Aby wyjąć kartę pamięci, naciśnij ją delikatnie, co spowoduje, że karta wyskoczy.
Następnie wyciągnij kartę z gniazda.
Włączanie/wyłączanie kamery
Otwórz monitor LCD lub naciśnij i przytrzymaj przez 1 sekundę przycisk Zasilanie
(Power) w celu włączenia kamery.
Aby wyłączyć kamerę, naciśnij i przytrzymaj przycisk Zasilanie (Power) na 1 ~ 3
sekund lub zamknij monitor LCD.
Jeśli kamera będzie przez dłuższy okres czasu nieaktywna, może zostać
automatycznie wyłączony z powodu ustawienia Auto-Off (Automatyczne
wyłączenie).
Page 96

Ustawianie języka
1
00:06:40
00:00:05
1. Włącz zasilanie kamery.
2. Naciśnij przycisk Tryb (MODE), aby przejść do menu Tryb (MODE).
3. Użyj przycisku Zoom do wybrania trybu Ustawienie (Setting) i naciśnij OK, aby
przejść do ekranu menu.
4. Użyj przycisku Zoom do wybrania pozycji Język (Language), a następnie naciśnij OK
w celu potwierdzenia.
5. Przesuń przycisk Zoom w górę/w dół, aby wybrać język.
6. Po zakończeniu, naciśnij OK, aby potwierdzić ustawienie.
Odczytywanie wskaźników panelu LCD
Ikona Tryb Tryb Balans bieli
Rozdzielczość video Pozostały czas na nagranie
Rozdzielczość obrazu Tryb Samowyzwalacz
Tryb Makro Tryb Zdjęcia nocne
Włożona karta SD Czas nagrywania
Żywotność baterii
Wskaźnik współczynnika zoom
Tryb lampy błyskowej
3
Page 97

44
Podstawowe czynności
Nagrywanie klipu video / Wykonywanie zdjęcia
1. Ustaw właściwą ostrość. Zwykle dla większości warunków nagrywania można wybrać
ustawienie ostrości ( ). Ustawienie ( ) należy wybierać wyłącznie do zbliżeń.
Uwaga: Przed rozpoczęciem nagrywania należy sprawdzić, czy włożona jest karta
pamięci.
50cm ~ (20” ~ )
30cm ~ 50cm (12” ~ 20”)
2. Powiększanie:
Użyj przycisku Zoom w górę lub w dół w celu powiększenia i zmniejszenia ekranu.
3. Naciśnij przycisk Nagrywaj (Record), aby rozpocząć nagrywanie. Lub naciśnij przycisk
Migawka (Shutter), aby wykonać zdjęcie.
Ze względu na funkcję przechwytywania sensora, podgląd LCD i współczynnik
proporcji zdjęć zależy od różnych ustawień rozdzielczości video.
Gdy rozdzielczości video są inne ustawiane jest zdjęcie aparatu.
* Szczegółowe informacje dotyczące rozdzielczości zawiera nadruk na
opakowaniu.
Rozdzielczość video Podgląd Wykonywanie zdjęć
HD(1280x720)
WVGA 60f(848x480)
QVGA 30f(320x240)
Współczynnik 16:9
Współczynnik 4:3 Współczynnik 4:3
Współczynnik 4:3
4. Naciśnij ponownie przycisk Nagrywaj (Record), aby zatrzymać nagrywanie.
Funkcja zoom jest także dostępna podczas nagrywania (za wyjątkiem trybu
makro).
Lekkie nagrzewanie się kamery podczas długotrwałego używania/nagrywania
jest zjawiskiem normalnym, spowodowanym wysoką wydajnością.
Page 98

Nagrywanie klipu głosowego
1. Włącz zasilanie kamery.
2. Naciśnij przycisk Tryb (MODE), aby przejść do menu Tryb (MODE).
3. Użyj przycisku Zoom do wybrania trybu Dyktafon (Voice Recorder) i naciśnij OK, aby
przejść do ekranu menu.
4. Naciśnij przycisk Nagrywaj (Record), aby rozpocząć nagrywanie
5. Naciśnij ponownie przycisk Nagrywaj (Record), aby zatrzymać nagrywanie.
Odtwarzanie nagrań
1. Naciśnij przycisk Tryb (MODE) i użyj przycisku Zoom w celu przełączenia do trybu
“Moje prace” (My Works).
2. Poniżej trybu Moje prace (My Works) znajdują się trzy foldery: Video, Obraz (Picture)
oraz Głos (Voice). Wybierz Video, Obraz (Picture) lub Głos (Voice), a następnie
naciśnij przycisk OK, aby przejść do trybu indeksu.
3. Operacje w trybie Moje prace (My Works):
Typ pliku Jak… Czynność
Tryb Indeks (Index)
Tryb Pełnego
ekranu
(Full-screen)
Przełączenie pomiędzy
trybem Indeks (Index) i
trybem pełnoekranowym
Przełączanie pomiędzy
plikami
W trybie Indeks (Index), naciśnij przycisk OK, aby
przełączyć do trybu Pełny ekran (Full-screen). W
trybie Pełny ekran (Full-screen), naciśnij przycisk
Tryb/Powrót (Mode/Return), aby przełączyć do
trybu Indeks (Index).
1. W trybie ndeks (Index): Użyj przycisku Zoom do
przesunięcia podświetlenia.
2. W trybie Pełny ekran (Full-screen): Użyj
przycisku Zoom do przełączenia pliku.
Rozpoczęcie odtwarzania
Wstrzymanie/wznowienie
odtwarzania
Regulacja poziomu
Video i audio
(Video & Audio)
Obraz (Picture) Przeglądanie obrazów Użyj przycisku Zoom do przeglądania obrazu.
głośności
Zatrzymanie odtwarzania
Wybór następnego pliku
Wybór poprzedniego
pliku
Po wybraniu (w trybie pełnego ekranu),
automatycznie rozpoczyna się odtwarzanie.
Naciśnij OK podczas odtwarzania/pauzy.
Podczas odtwarzania, użyj przycisku Zoom do
przesunięcia w górę lub w dół.
Podczas odtwarzania, naciśnij przycisk Tryb/
Powrót (Mode/Return).
Powróć do poprzedniego widoku i użyj przycisku
Zoom (W) do wyboru następnego pliku.
Powróć do poprzedniego widoku i użyj przycisku
Zoom (T) do wyboru poprzedniego pliku.
55
Page 99

66
Odtwarzanie nagrań na komputerze
Instalacja oprogramowania
Należy pamiętać, że pliki video są nagrywane w formacie .mov. Dlatego do oglądania
nagrań na komputerze wymagane są specjalne programy. Przed pierwszym użyciem
powinien zostać zainstalowany w komputerze odtwarzacz QuickTime 7.0 (lub wersja
wyższa). Jeśli nie jest zainstalowany należy pobrać odtwarzacz QuickTime ze strony
sieci web. Lub zainstaluj oprogramowanie z pakietu programów na dysku CD.
Podłączanie komputera i zapisywanie
plików
1. Włącz kamerę.
2. Podłącz kamerę (z włożoną kartą SD) do komputera poprzez kabel USB.
3. Pojawi się automatycznie okno dialogowe. Wybierz element “Otwórz folder, aby
oglądać pliki” i kliknij “OK”.
4. Jeśli okno dialogowe nie pojawi się automatycznie, można kliknąć dwukrotnie “Mój
komputer” i otworzyć “Napęd wymienny”.
5. Kliknij dwukrotnie folder DCIM.
6. Kliknij dwukrotnie folder 100MEDIA.
7. Skopiuj pliki, które mają zostać zachowane i zapisz je do wybranym miejscu w
komputerze.
Podłączanie kamery do telewizora
Podłączanie kamery do standardowego
telewizora
Telewizor: Tradycyjny telewizor CRT
1. Włącz zasilanie telewizora i przełącz go do trybu AV.
2. Podłącz złącza audio i video kabla
AV (żółte/białe/czerwone) do
gniazd telewizora “Wejście AV”.
3. Włącz zasilanie kamery.
4. Podłącz drugi koniec kabla AV
do portu “Wyjście AV” kamery.
Po wyświetleniu na ekranie
komunikatu pomocniczego,
wybierz “Wyjście AV”.
Tryb AV
Video
Wejście
AV
Audio
Kabel AV
Wyjście AV
Page 100

Podłączanie kamery do HDTV
Wyjście AV
Wyjście HD
HD TV
Wejście Component Audio
Wejście Component Video
<Kabel Component Video>
<Kabel AV>
(czerwony)
(żółty)
(biały)
(zielony)
(czerwony)
(niebieski)
(Nie należy podłączać żółtego kabla)
Telewizja HD oznacza wbudowane porty wejścia HDTV, co umożliwia
wyświetlanie po połączeniu w wysokiej rozdzielczości HD.
1. Włącz HD TV.
2. Włącz kamerę.
3. Podłącz jeden koniec kabla component video do portu (Wejście
Component Video) HDTV, a drugi koniec do portu (Wyjście HD) kamery.
4. Podłącz jeden koniec kabla AV do portu (Wejście Component Audio)
HDTV, a drugi koniec do portu (Wyjście HD) kamery. (Nie należy
podłączać żółtego złącza do wejścia Wejście AV HDTV).
5. Naciśnij przełącznik trybu wejścia telewizora HD TV i wybierz “Wejście
Component”.
Odtwarzanie plików muzycznych MP3
Wyłącznie dla wybranych modeli. Szczegółowe informacje dotyczące
specykacji zawiera nadruk na opakowaniu.
1. Włącz kamerę i podłącz ją do komputera przy użyciu kabla USB.
2. Skopiuj pliki do aparatu: Po podłączeniu aparatu do komputera PC, kliknij dwukrotnie
“Mój komputer” po czym będzie widoczny dysk wymienny. Skopiuj pliki MP3 do
foldera “Music” w celu odtworzenia.
3. Naciśnij przycisk Tryb (Mode) i użyj przycisków kierunkowych w celu wybrania trybu
Odtwarzacz muzyki (Music Player). Naciśnij przycisk OK, aby przejść do tej opcji.
77
 Loading...