

Page 1

English
User’s Manual
High Definition Camcorder
Page 2

If the time arises to throw away your product, please
recycle all the components possible.
Batteries and rechargeable batteries are not to be
disposed in your domestic waste! Please recycle
them at your local recycling point.
Together we can help to protect the environment.
Welcome:
Dear user, thank you for purchasing this product.
Much investment in time and effort has gone into its development, and it is our hope
that itwill give you many years of trouble-free service.
Safety Notice:
1. Do not drop, puncture or disassemble the camera; otherwise the warranty will be voided.
2. Avoid all contact with water, and dry hands before using.
3. Do not expose the camera to high temperature or leave it in direct sunlight. Doing so
maydamage the camera.
4. Use the camera with care. Avoid pressing hard on the camera body.
5. For your own safety, avoid using the camera when there is a storm or lightning.
6. Do not use batteries of different specifi cations. Doing so may lead to the potential for
serious damage.
7. Remove the battery during long periods between usage, as a deteriorated battery may affect
the functionality of the camera.
8. Remove the battery if it shows signs of leaking or distortion.
9. Use only the accessories supplied by the manufacturer.
10. Keep the camera out of the reach of infants.
11. Risk of explosion if battery is replaced by an incorrect type.
12. Dispose of used batteries according to the instructions.
FCC Compliance Statement:
This device complies with Part 15 of the FCC Rules. Operation is
subjected to the following two conditions: (1) this device may not cause
harmful interference, and (2) this device must accept any interference
received, including interference that may cause undesired operation.
This equipment has been tested and found to comply with limits
for a Class B digital device, pursuant to Part 15 of the FCC rules. These
limits are designed to provide reasonable protection against harmful interference in residential
installations. This equipment generates, uses, and can radiate radio frequency energy,
and if not installed and used in accordance with the instructions, may cause harmful
interference to radio communications.
However, there is no guarantee that interference will not occur in a particular installation. If this
equipment does cause interference to radio or television equipment reception, which can be
determined by turning the equipment off and on, the user is encouraged to try to correct the
interference by one or more of the following measures:
-Reorient or relocate the receiving antenna.
-Move the equipment away from the receiver.
-Plug the equipment into an outlet on a circuit different from that to which the receiver is
connected.
-Consult the dealer or an experienced radio/television technician for additional suggestions.
You are cautioned that any change or modifi cations to the equipment not expressly approved
bythe party responsible for compliance could void Your authority to operate such equipment.
If the time arises to throw away your product
Page 3
1
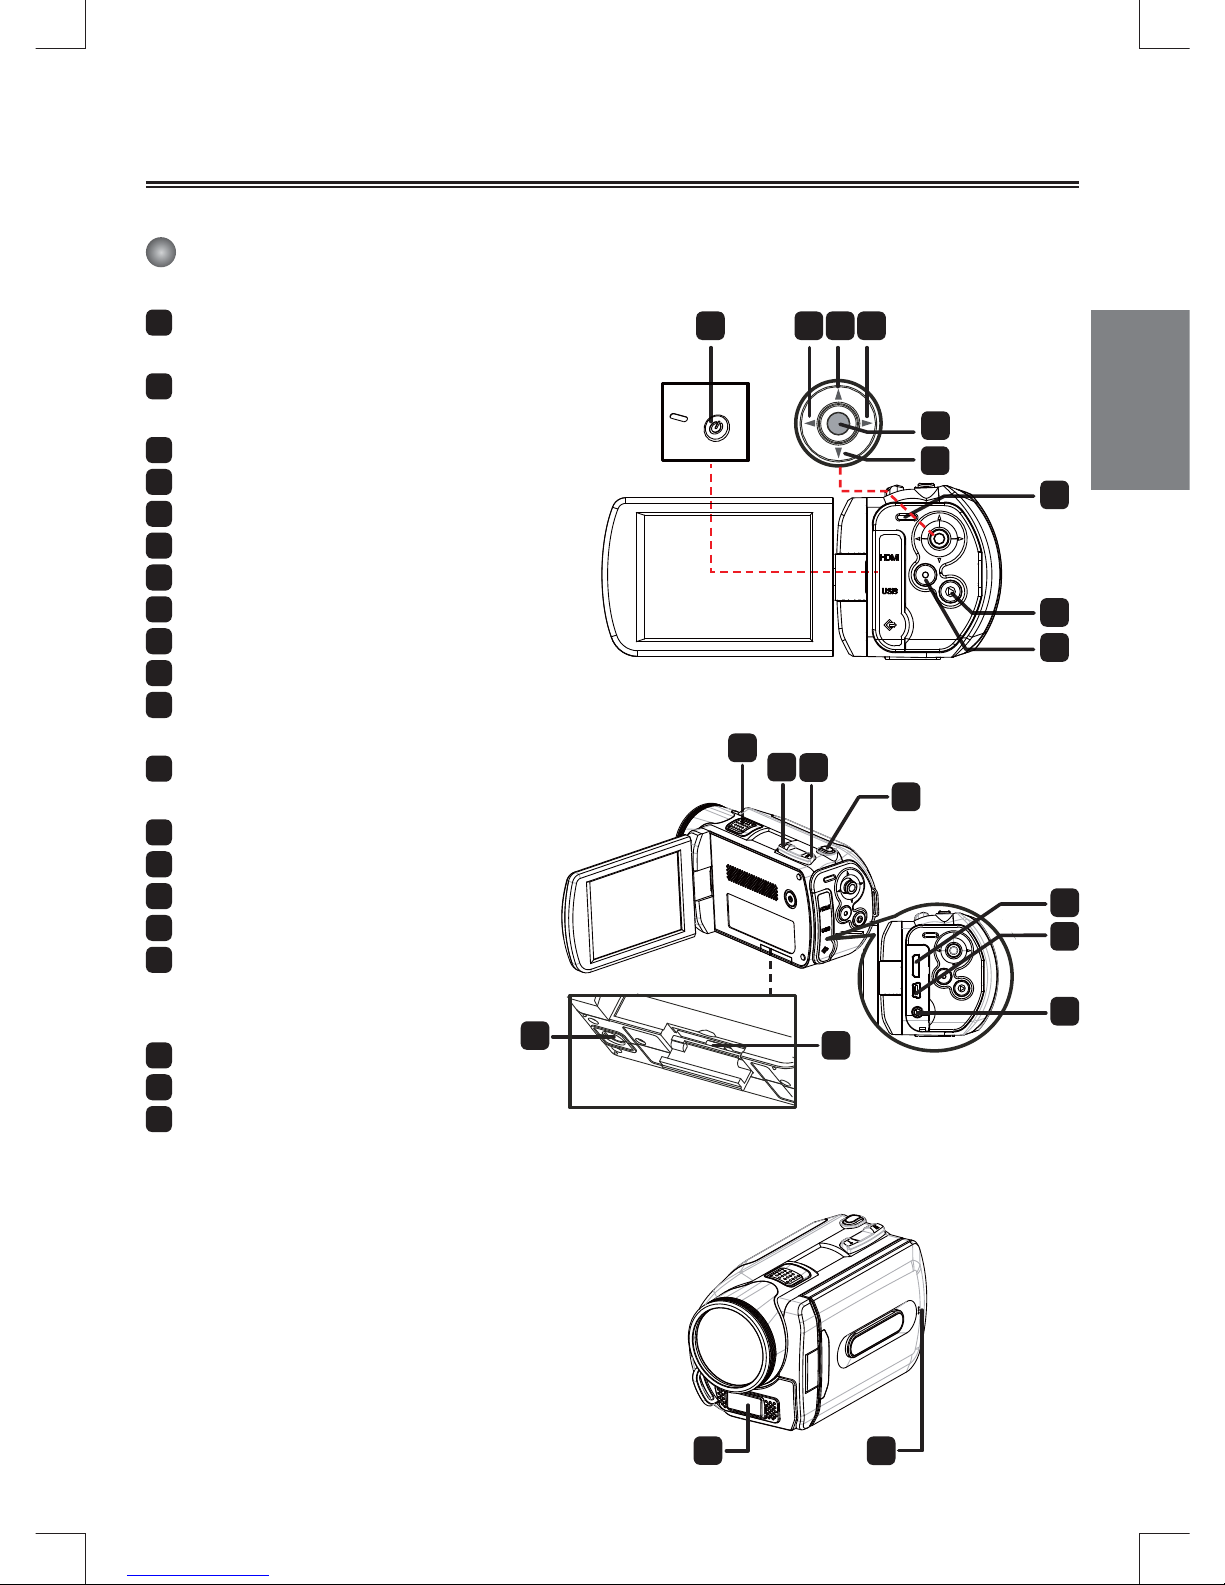
Preparing the camcorder
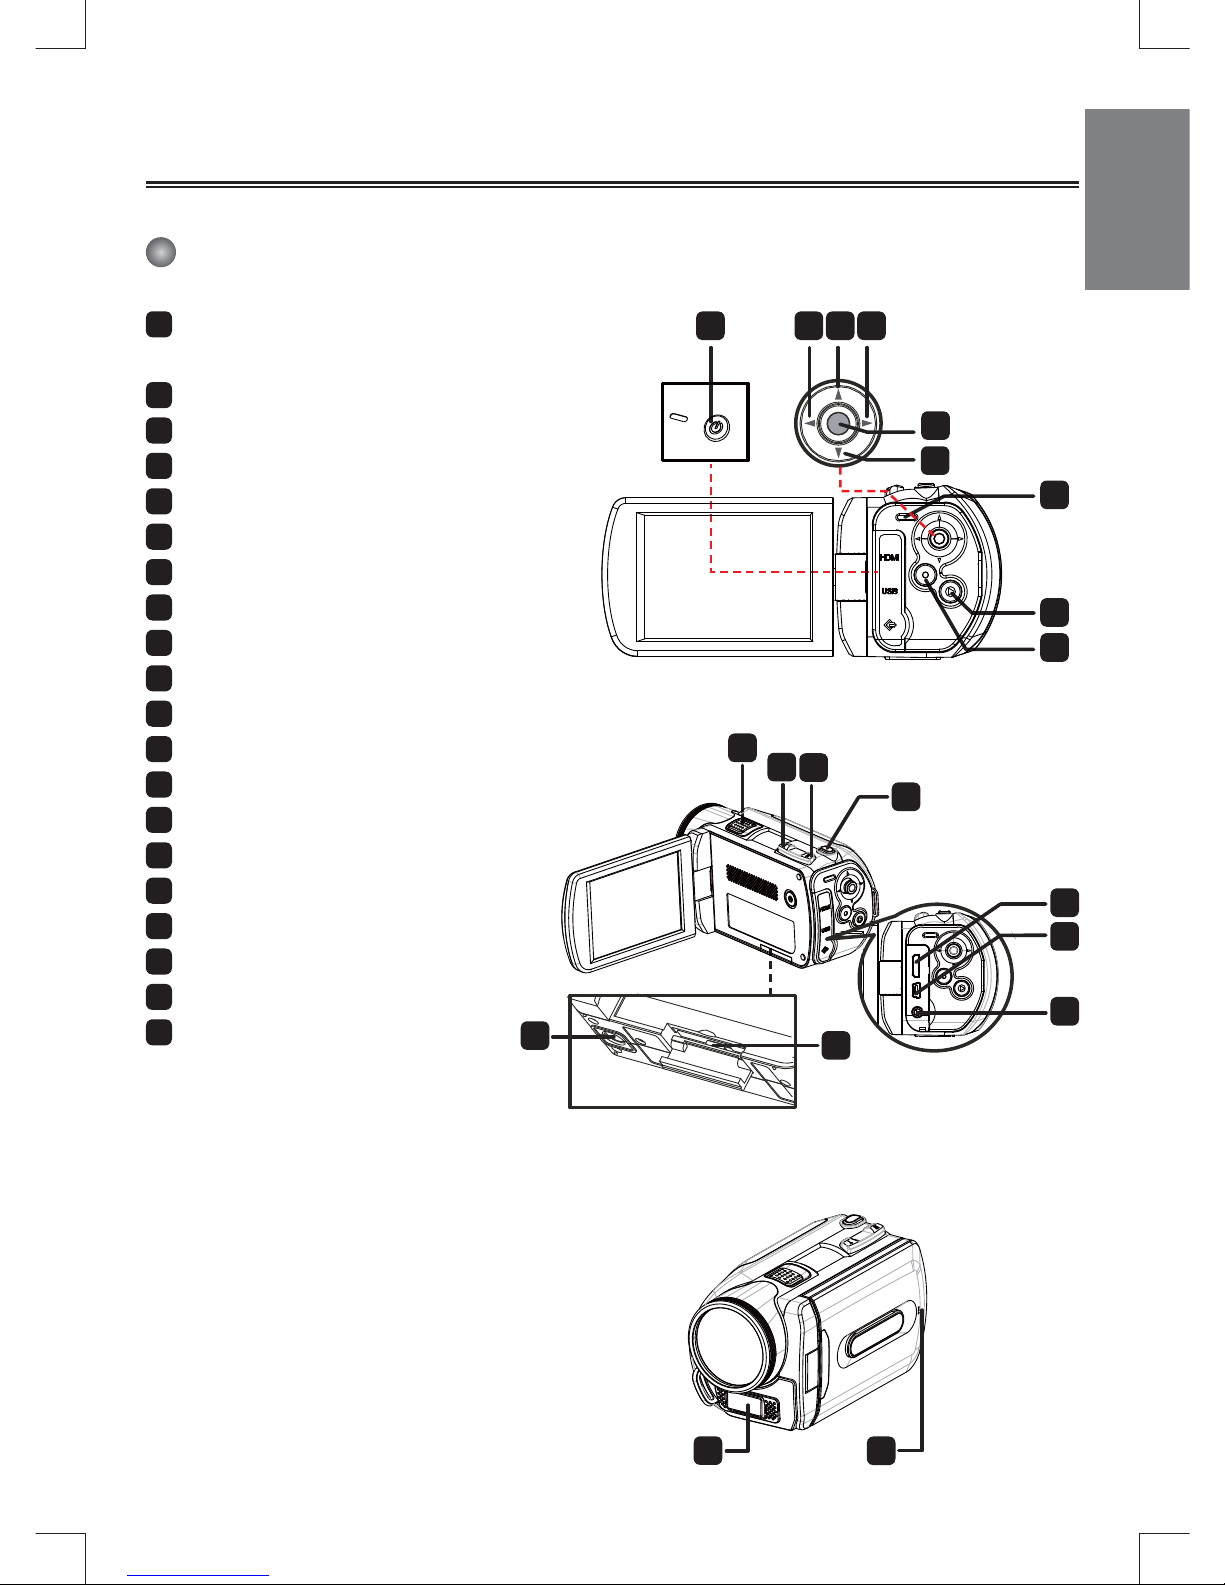
Knowing the camcorder parts
1
Power button
Directional button:
2
Joystick Left/Mode/Exit
3
Joystick Up/AF
4
Joystick Right/Menu/OK
5
Flashlight hot key
6
Joystick Down/Focus
7
LED indicator
8
Playback
9
Video record
10
Speaker
11
Zoom in/Volume up
12
Zoom out/Volume down
13
Shutter
14
HDMI output
15
USB port
16
TV-out connector/earphone
17
SD/MMC card slot
18
Tripod socket
19
Flash strobe
20
Microphone
1 2
4
5
6
3
7
8
9
10
11
12
13
16
14
15
18
17
19
20
Page 4

2
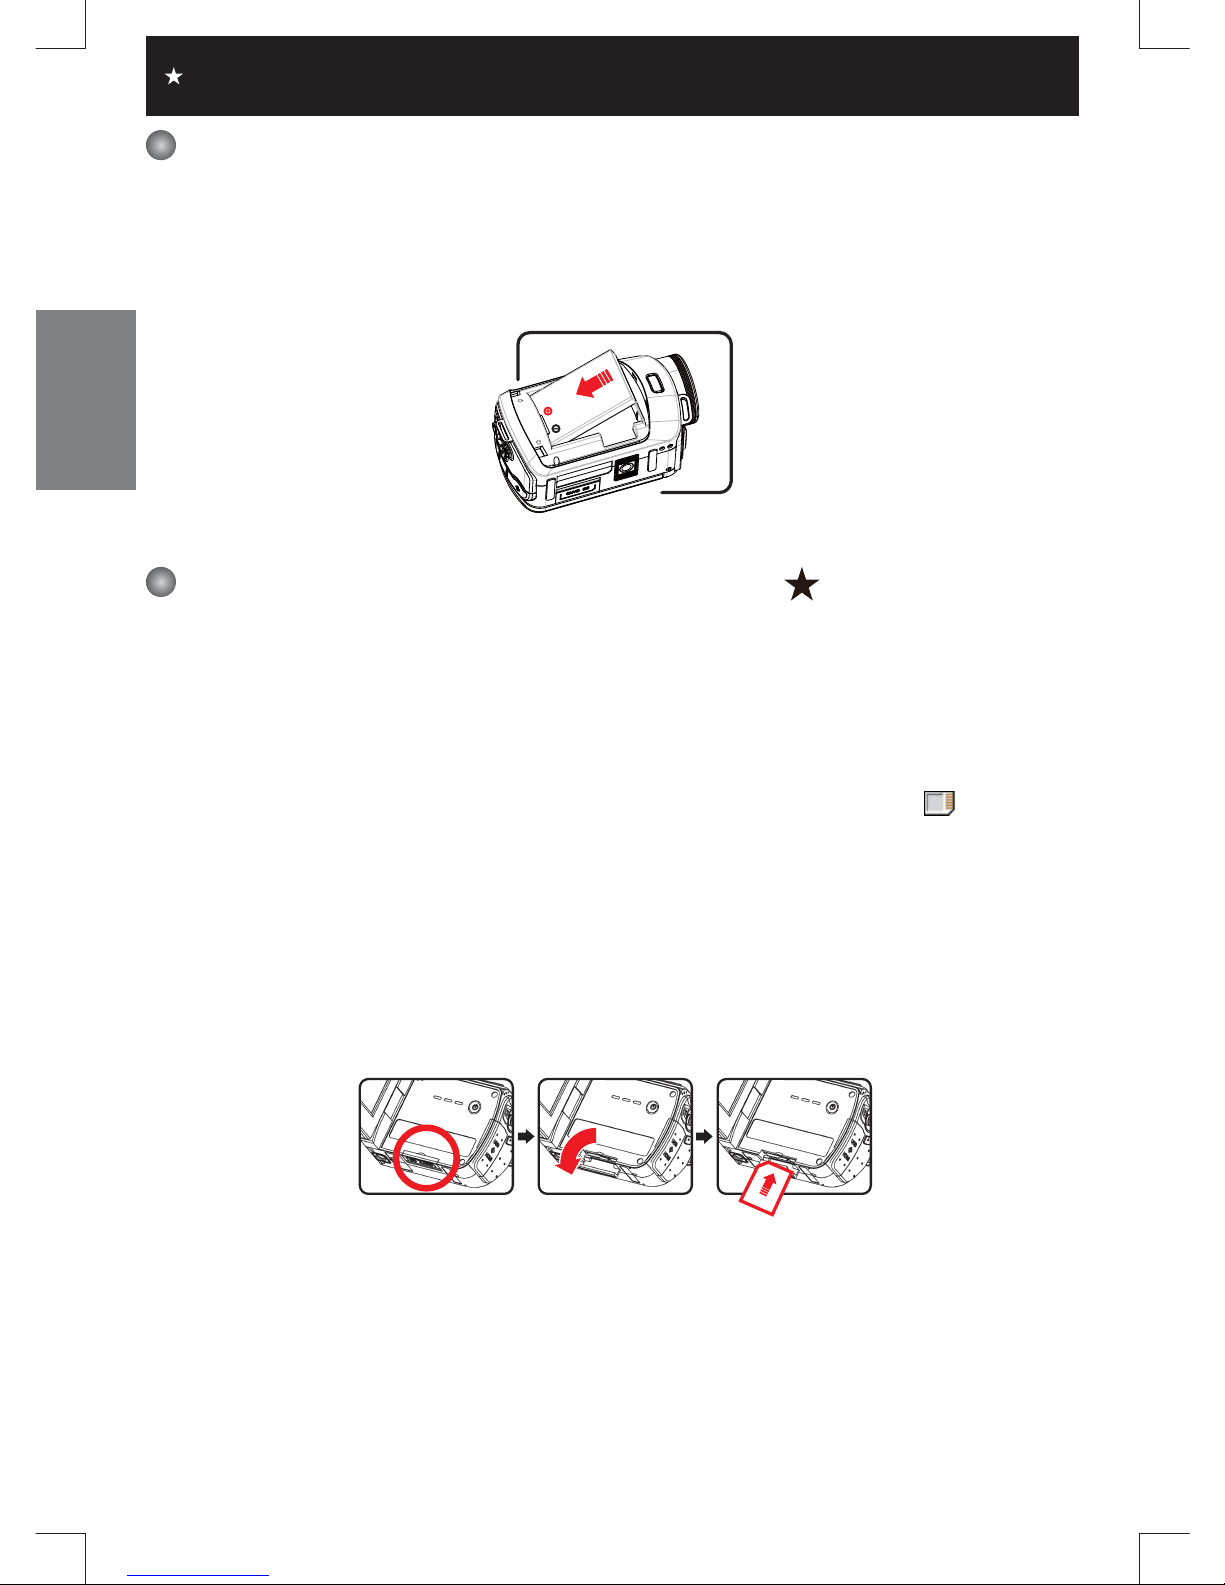
Loading the battery
Camcorder supplied with a lithium battery
Slide in the connector end of the lithium battery as the direction of the arrow shown and make
sure that the metallic contacts are aligned with the contacts in the compartment.
Inserting the SD/MMC card ( )
The camcorder has built-in internal memory for storage, but you can insert a SD/SDHC/MMC/MMC
2.0 memory card to expand your camcorder's memory capacity.
1. Lift the memory card cover as shown.
2. Insert the card as the direction of indication until it reaches the end of the slot.
3. When the card is inserted successfully, the icon (
) will appear on screen and the internal
memory will become inaccessible.
To remove the card, push the card to release it and then pull it out gently.
4. Put the cover back.
* When using a brand new memory card, you are recommended to format the card with the
camcorder or other devices.
* The camcorder will use the inserted memory card as the main storage medium. Only when the
inserted card is removed will the fi les stored in the built-in memory become accessible.
For select model only. Please refer to the package printing for detailed speci cation.
Page 5

3
Charging the battery
Connect one end of the adaptor to the camcorder and the other end to a power outlet.
Please charge the battery at least 8 hours for fi rst time use.
1. Connect one end of the supplied AC adapter to the USB port of the camcorder and the other
end to a wall outlet.
OR
Connect one end of the supplied USB cable to the USB port of the camcorder and the other end
to a powered PC. Make sure the camcorder is powered off.
2. The charging LED turns red and the charge starts.
3. When the charging is interrupted or the battery pack is fully charged, the charging LED will turn
off.
When using a PC to charge the battery, do not power on the camcorder, or the charge
will stop.
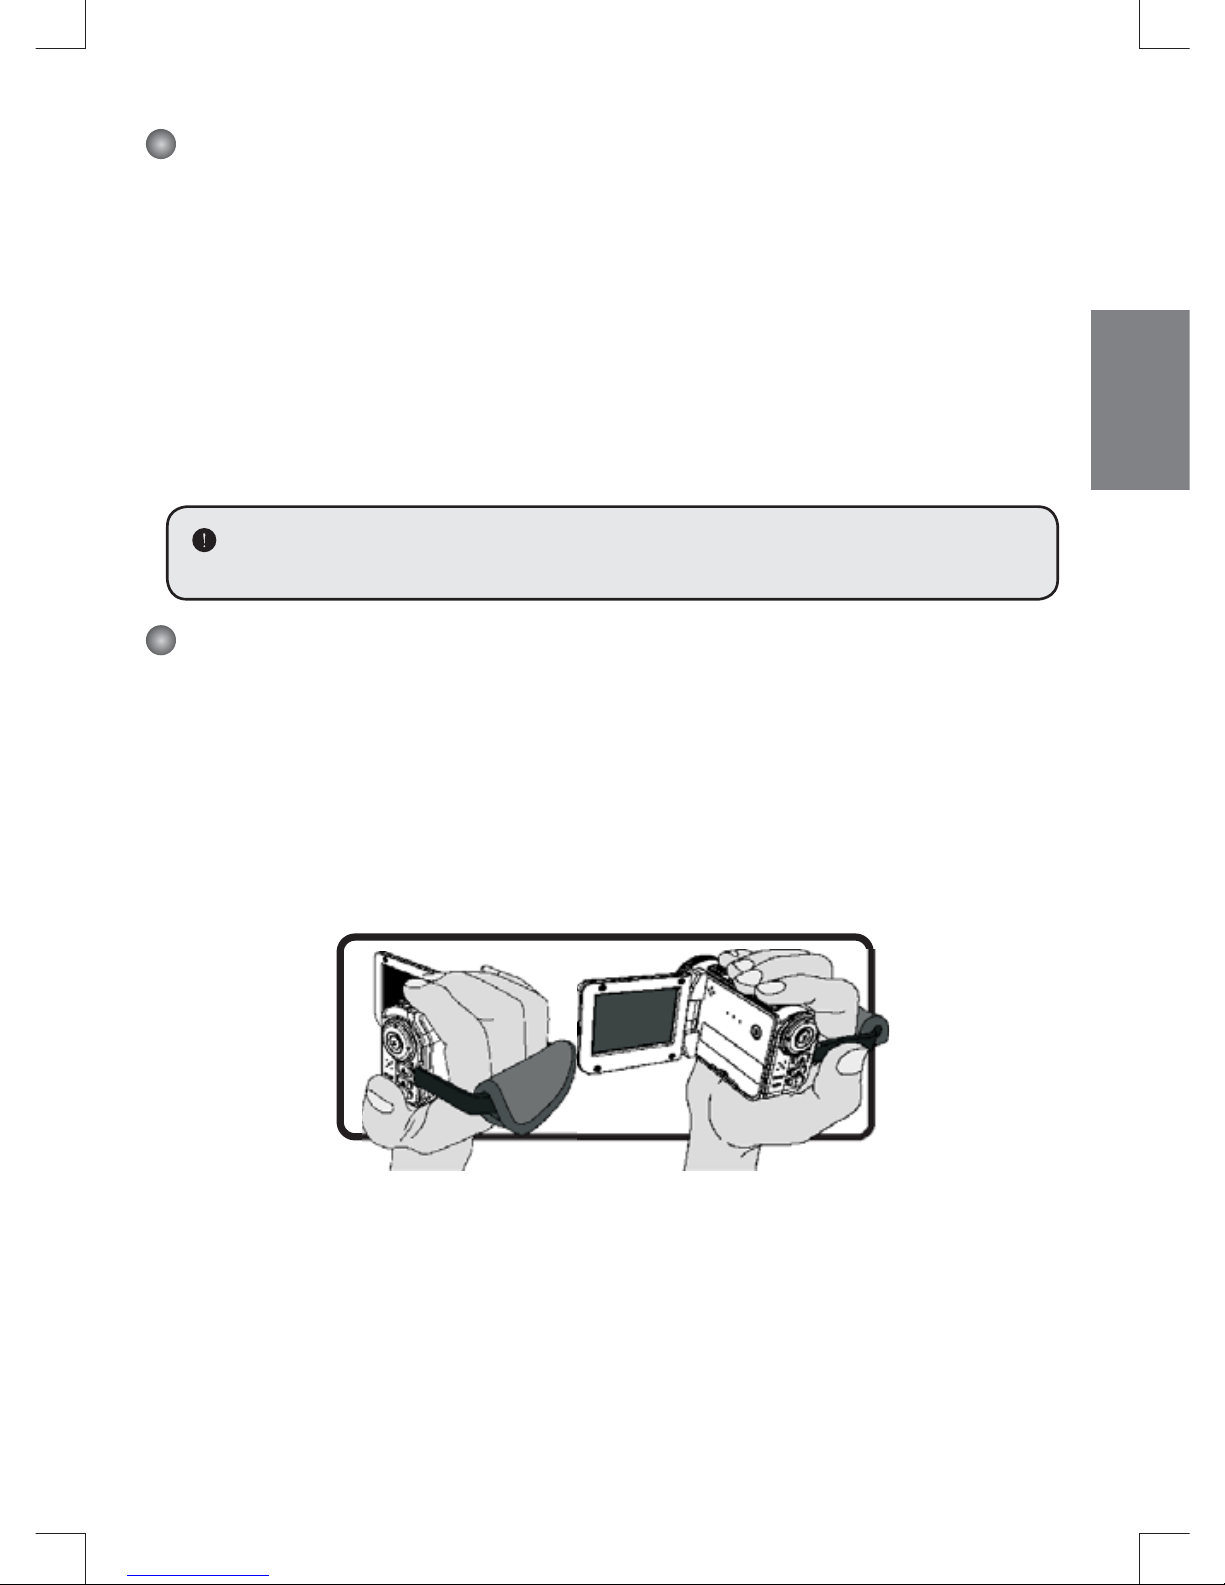
Attaching and adjusting the wrist strap
Attach the strap to the strap holder on the front of the camcorder, then attach the other end to the
strap holder on the back of the camcorder, as shown in the illustration.
1. Open the cloth of the wrist strap.
2. Adjust the length of the strap according to your palm size.
3. Close and affi x the cloth of the wrist strap.
Page 6
4
Getting started
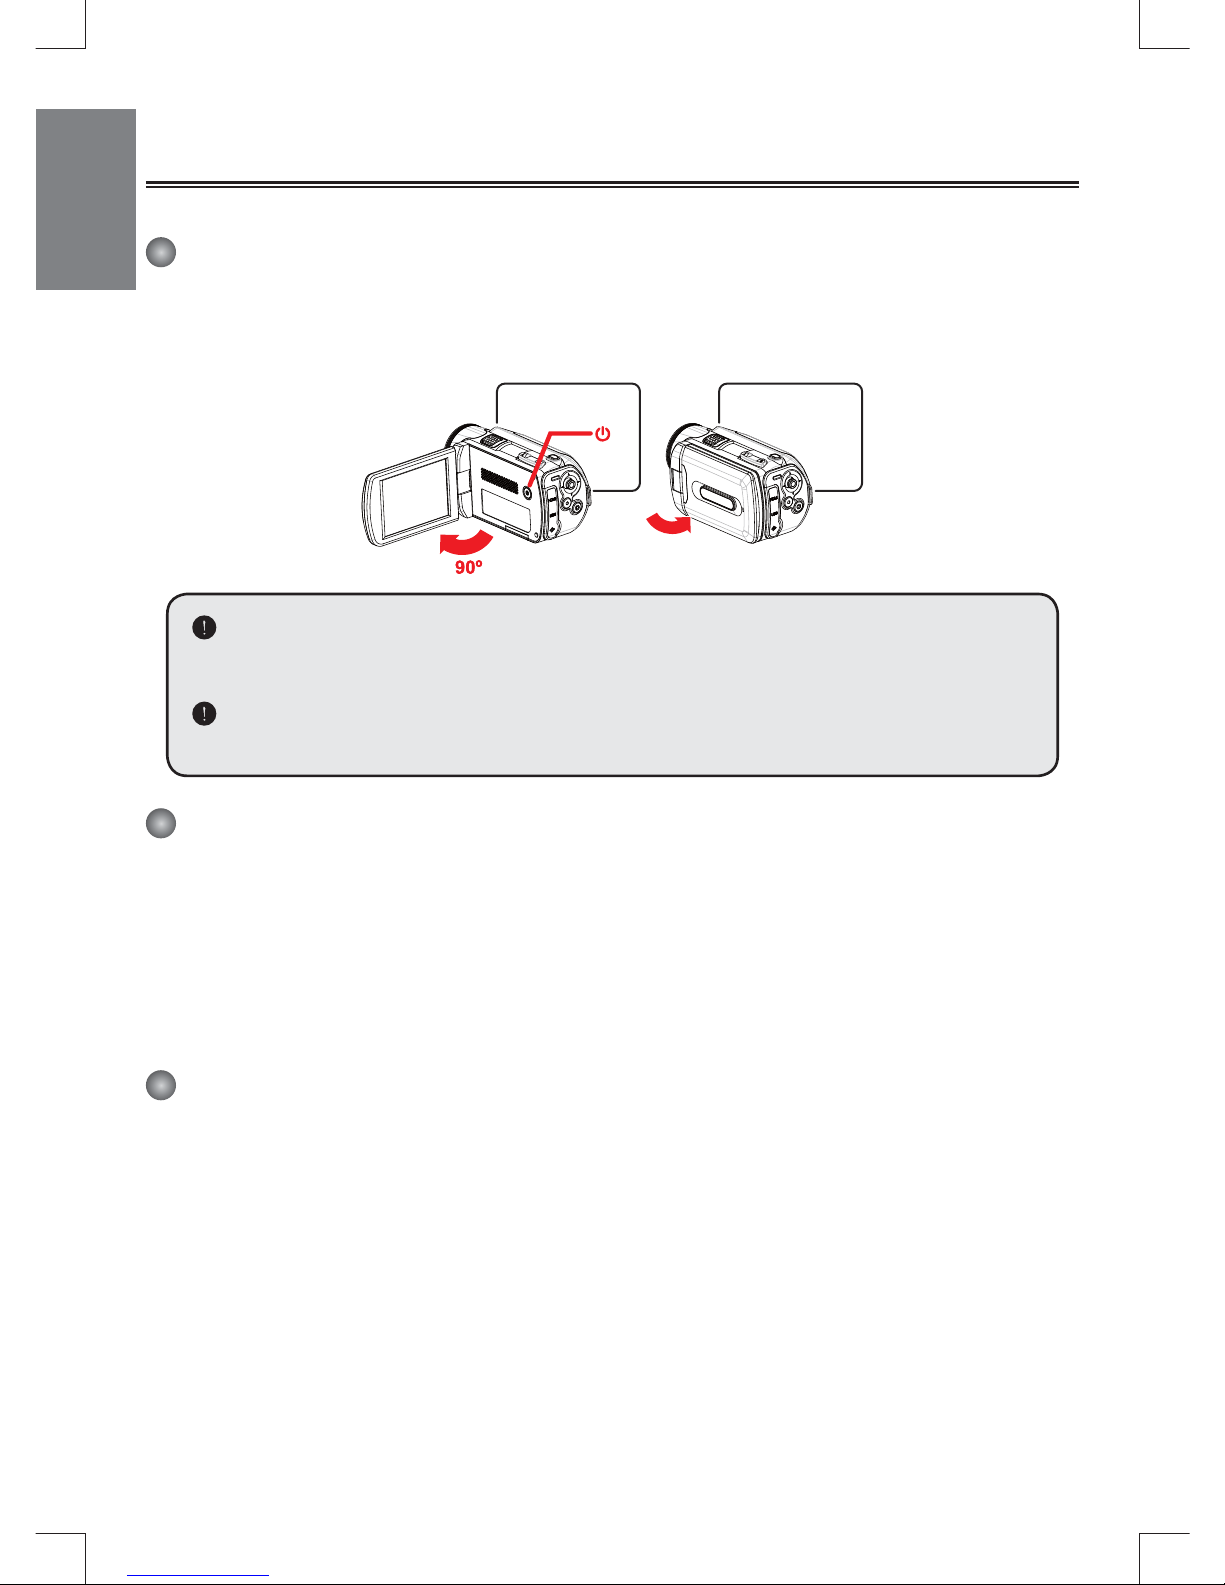
Turning the power on/off
To turn on the camcorder, either open the LCD panel or press the Power button.
To turn off the camcorder, either close the LCD panel or press the Power button.
If the power is not turned on after you have completed the above procedures, please
check the following have been done correctly: Battery is correctly loaded.
The loaded battery has enough power.
The [Auto Off] setting may cause the camcorder to turn off after it is idle for a period
of time.
Mode selection
1. Use the Joystick Left to enter the Mode menu.
2. Use the Joystick Up or Down to select the desired item.
3. Use the Joystick Right to confi rm.
4. Use the Joystick Left to exit.
Choosing the screen language
Power-on → enter Setting mode → select the Language item → use the Joystick Up or Down to
select the language → use the Joystick Right to confi rm.
Setting the date and time
Power-on → enter Setting mode → select the Clock item → use the Joystick Up or Down to
select numbers for the YY/MM/DD and HH:MM fi elds → use the Joystick Right to confi rm each
fi eld → use the Joystick Left to exit.
Page 7

5
Realizing the battery life indicator
Icon Description
Full battery life
Moderate battery life
Low battery life
* The fl ash strobe will be disabled.
Empty battery life
Note: To avoid sudden outage of power supply, you are recommended to replace the battery
when the icon indicates low battery life.
Comprehending icons on the screen
Camera mode:
1
Mode icon (camera mode)
2
Number of recordings
3
AF
4
Exposure
5
Flash mode
6
Still resolution
7
Video resolution
8
Memory card inserted
9
Battery life
10
Stabilizer( )
11
Focus type
12
Effect
13
White balance
14
Snapshot mode
1 2 4 5 6 7 8 9
10111213
14
For select model only. Please refer to the package printing for detailed speci cation.
3
Page 8
6
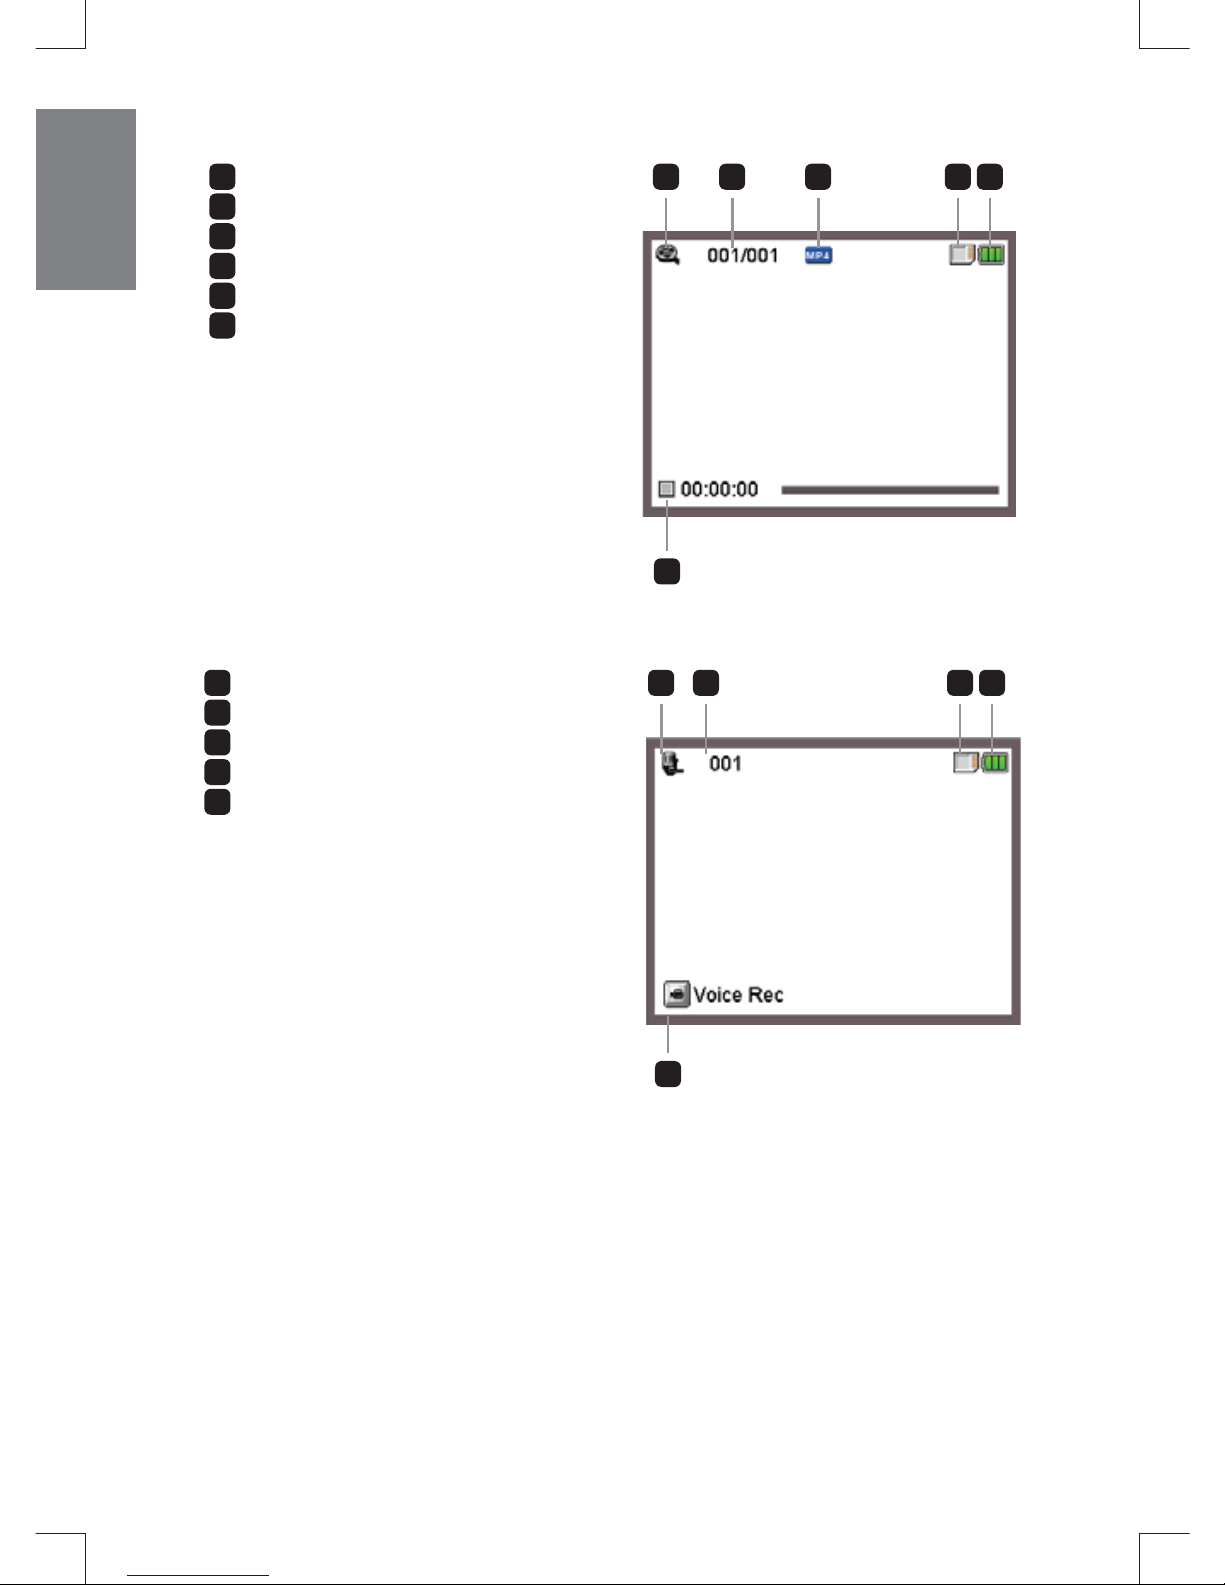
Playback mode:
1
Mode icon (play mode)
2
Current / total recordings
3
File format
4
Memory card inserted
5
Battery life
6
Recording time
1 2 3 4 5
6
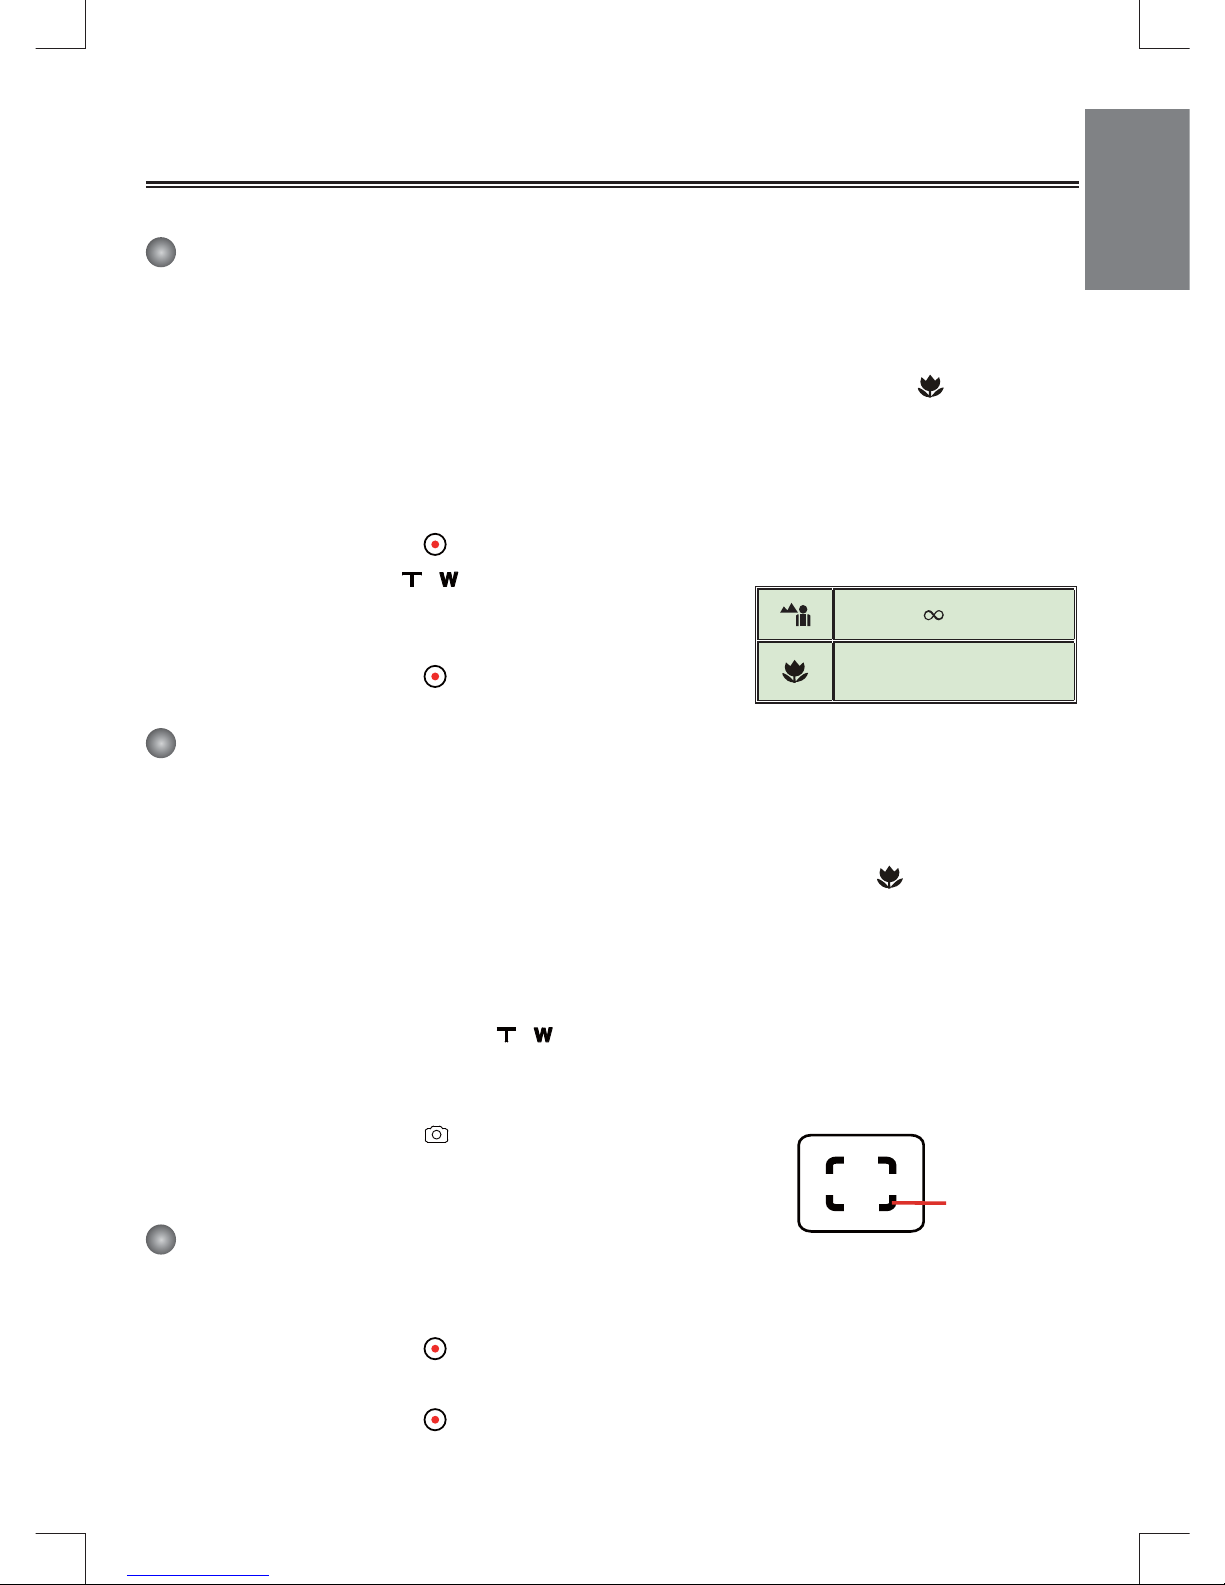
Voice mode:
1
Mode icon (voice mode)
2
Number of recordings
3
Memory card inserted
4
Battery life
5
Voice recorder
1 2 3 4
5
Page 9
7
Basic operations
Recording a video clip
1. Adjust the focus:
Normally the camcorder can auto focus without adjusting focus. If you want to take closeup
pictures, you can push the Joystick button () down to switch to Macro mode (
).
2. AF:
When recording in one spot without zooming in / zooming out or moving around, you can
activate the AF lock function by moving the Joystick up (). To disable this function, move the
Joystick up again.
3. Press the Record button (
) to start recording.
4. Use the Zoom buttons (
/ ) to zoom in or zoom out
the screen.
5. Use the Joystick Right to Pause, and Left to resume.
6. Press the Record button (
) again to stop recording.
Taking a still picture
1. Adjust the focus:
Normally the camcorder can auto focus without adjusting focus. If you want to take closeup
pictures, you can push the Joystick button down to switch to Macro mode (
).
2. AF:
When recording in one spot without zooming in / zooming out or moving around, you can
activate the AF lock function by moving the Joystick up (). To disable this function, move the
Joystick up again.
3. Zooming: Use the Zoom buttons (
/ ) to zoom in or zoom out the screen.
4. For better image quality, it is recommended that you hold the LCD panel steadily to avoid the
image from blurring caused by hand shake.
5. Press the Shutter button (
) half way down, focus frame turns
yellow to auto focus. When the focus frame turns green, press the
button fully down to take a still picture.
Recording an audio clip
1. Enter Voice mode.
2. Press the Record button (
) to start recording.
3. Use the Joystick Right to Pause, and Left to resume.
4. Press the Record button (
) again to stop recording.
80cm ~
1cm ~ 80cm
Focus frame
Page 10

8
Playing-back
1. Enter Playback ( ) mode.
2. The last recorded picture, video clip, or audio clip starts playing.
3. Use the Joystick Up or Down to shift between fi les.
4. The fi le you go to is displayed or automatically begins playing.
For select model only. Please refer to the package printing for detailed speci cation.
Page 11
9
Advanced settings
Setting menu options
The menu items provide several options for you to fi ne-tune your camcorder functions.
The following table gives details on menu operations:
How to... Action
Bring up the menu in Camera/
Playback mode
Use the Joystick Right.
Move the highlight bar Use the Joystick Up or Down.
Confi rm an item Use the Joystick Right.
Exit menu/Go back to previous menu Use the Joystick Left.
Menu options in Camcorder mode
Power on → enter Camera mode → Use the Joystick Right.
Item Option Description
Video
Resolution
Please refer to the package printing for resolution specifi cation.
Still
Resolution
Please refer to the package printing for resolution specifi cation.
Stabilizer On/Off
Enable/Disable stabilizer function. Stabilizer function can prevent
the image from blurring causing by hand shake.
Night Mode
On/Off
Allows you to take a photograph with a dark background. Since
the shutter speed will slow down when taking photographs at a
dark place, we recommend using a tripod to eliminate blurring from
hand shake. Warning: Noise increases when NightShot is enabled.
Warning: The stabilizer function is disabled when NightShot is
enabled.
AF On/Off Enable/Disable Auto Focus function.
Focus
Normal Take pictures in original distance.
Macro Select Macro mode to take closeup pictures.
Flash Strobe
Auto The fl ash automatically fi res when the lighting is insuffi cient.
Force The fl ash is forced to fi re in every shot.
Off The fl ash is disabled.
For select model only. Please refer to the package printing for detailed speci cation.
Page 12
10
Item Option Description
Snap Mode
Single
The camcorder will take a single shot when the Shutter button is
pressed.
Self-Timer
The camcorder will have ten seconds delay before taking a shot
when the Shutter button is pressed.
Continuous
The camcorder will take a sequence of shots when the Shutter
button is pressed.
Exposure -2~+2
Manually adjust the exposure to gain better effect when the preview
image appears too bright or too dark. A positive value indicates the
image will be brighter than usual; while a negative value makes the
image dimmer.
Flicker 50Hz/60Hz
Set fl icker frequency to 50Hz or 60Hz. For more information, please
refer to the "Flicker Settings reference" table in the Appendix.
Date Stamp On/Off Enable this feature to print a date mark on each picture.
White
Balance
Auto The camcorder automatically adjusts white balance.
Sunny This setting is suitable for outdoor recording in sunny weather.
Cloudy
This setting is suitable for recording in cloudy weather or shady
environments.
Fluorescent
This setting is suitable for indoor recording with fl uorescent lamp
lighting, or environments with high color temperature.
Tungsten
This setting is suitable for indoor recording with incandescent lamp
lighting, or environments with low color temperature.
Effect
Normal Make recordings in natural color.
Black&White Make recordings in black and white.
Classic Make recordings in sepia-toned color.
The “Video resolution” and “Still resolution” menu items are model-dependent. Please
refer to the package printing for detailed specifi cations.
Page 13
11
Menu options in Playback mode
Power on → enter Playback mode → Use the Joystick Right.
Item Option Description
File Info -
View the file's title, saved date and time, size, and length of
recording.
Slide show On/Off Start picture slideshow. / Repeat playing all video clips.
Delete One Yes/No Delete current fi le.
Delete All Yes/No Deletes all fi les.
Menu options in Setting mode
Power on → enter Setting mode → Use the Joystick Right.
Item Option Description
Beep On/Off Enable beep sound on/off.
Start Up
Menu Use the default start screen.
Camera Use Camera mode as the start screen.
Auto Off
Off
1min/3min
/5min
Set how long the camcorder will automatically shut down when
staying inactive. Setting to [Off] will make the camcorder stay
powered on until it runs out of power.
AV Mode
Menu Allows you select through Earphone or AV Out function.
Earphone Play sound through your earphones.
AV Out Connecting to a TV.
TV System
NTSC
Set TV system compatibility to NTSC. This option is suitable for
America, Taiwan, Japan, and Korea areas.
PAL
Set TV system compatibility to PAL. This option is suitable for
Europe, China, Japan, and Hong Kong.
USB Mode Disk
When connected to a PC, the camcorder automatically enters
Disk (removable disk) mode.
Language - Allows you select the language used for OSD.
Clock - Set date and time.
Page 14

12
Item Option Description
Format Yes/No
Format the storage medium. Note that all files stored in the
medium will be gone.
Reset Default Yes/No
Restore factory defaults. Note that your current settings will be
overwritten.
Page 15
13
Appendix
Flicker settings reference
Area England Germany France Italy Spain Russia
Setting 50Hz 50Hz 50Hz 50Hz 50Hz 50Hz
Area Portugal America Taiwan China Japan Korea
Setting 50Hz 60Hz 60Hz 50Hz 50/60Hz 60Hz
Note: The fl icker setting is based on the frequency standard of your local power supply.
System Requirements
For Windows:
• Operating System: Windows XP SP2 / Vista / Win7
• CPU: AMD or Intel CPU with 3.2Ghz or multi core CPU
• System RAM: 1GB (2GB recommended)
• Graphic Card: 256MB memory
• CD-ROM Speed: 4X and above
• Software: H.264 decoder (Quick Time Player 7.4.1 or above)
• Other: 1 free USB port, Optical drive
Note: The specifi cation might be modifi ed without notice.
Page 16
14
Specifi cations
Model 5 Mega-pixels camera
Image sensor 5 Mega (2592x1944 pixels)
Resolution
Still image:
2M(1600x1200); 5M(2560x1920); 8M(3200x2400);
12M(4000x3000);16M(4608x3456)
Video recording:
1920x1080, up to 30fps (FULL HD 30f)
1280x720, up to 30fps (HD 30f)
640x480, up to 30fps (VGA 30f)
320x240, up to 30fps (QVGA 30f)
Lens 5X Optical Zoom Lens (6.8 - 34mm /F3.5-3.7)
File format MP4(H.264), JPEG, WAV
External memory SD/MMC card (up to 32GB SDHC)
LCD display 7.6 cm LCD (3” LCD DISPLAY)
Digital zoom 4X
TV out HDTV HDMI out; Composite AV-out (NTSC / PAL)
Interface USB 2.0 High Speed (1.1 compatible)
Voice recorder Yes
Microphone Ye s
Speaker Yes
Battery NP60 compatible Li-ion rechargeable battery
DC Input 5V,1A
Operating
condition
Temperature: 0~45°C
Humidity: 65 ± 20% RH
Note: Specifi cations are subject to change without notifi cation.
Page 17
Deutsch
HD Camcorder
Bedienungsanleitung
Page 18

Wenn die Lebensdauer des Produkts zu Ende
kommt, lassen Sie bitte möglichst alle Komponenten recyceln. Batterien und Akkus dürfen
nicht mit Hausmül zusammen entsorgt werden!
Bitte entsorgen
Sie sie an der lokalen Recyclingstelle. Zusammen leisten wir einen wertvollen Beitrag zum
Schutz unserer Umwelt.
Willkommen
Vielen Dank, dass Sie sich für unser Produkt entschieden haben.
Lesen Sie sich die folgenden Hinweise sorgfältig durch, bevor Sie das Gerät benutzen.
Sicherheitshinweise
1. Lassen Sie den Camcorder nicht herunterfallen, führen Sie keine Fremdkörper ein, und nehmen
Sie ihn nicht auseinander, da Ihnen anderenfalls die Garantieansprüche verloren gehen können.
2. Vermeiden Sie, dass das Gerät mit Wasser in Kontakt kommt, und trocknen Sie sich vor dem
Benutzen die Hände sorgfältig ab.
3. Setzen Sie den Camcorder nicht hohen Temperaturen aus, und lassen Sie ihn nicht in direktem
Sonnenlicht liegen. Anderenfalls kann der Camcorder beschädigt werden.
4. Gehen Sie vorsichtig mit dem Camcorder um. Drücken Sie nicht zu stark auf das Gehäuse des
Camcorders.
5. Benutzen Sie den Camcorder zu Ihrer eigenen Sicherheit nicht bei Gewitter.
6. Verwenden Sie nur Batterien mit den angegebenen Spezifi kationen. Anderenfalls kann das Gerät
stark beschädigt werden.
7. Nehmen Sie die Batterien heraus, wenn Sie das Gerät über einen längeren Zeitraum nicht
benutzen werden, da entladene Batterien die Funktionsfähigkeit des Camcorders beeinträchtigen
können.
8. Nehmen Sie die Batterien heraus, wenn sie sich verformt haben oder auslaufen.
9. Verwenden Sie nur das Zubehör, das vom Hersteller zur Verfügung gestellt wird.
10. Achten Sie darauf, dass der Camcorder nicht in Kinderhände gelangt.
11. Wenn ein falscher Batterietyp verwendet wird, besteht Explosionsgefahr.
12. Entsorgen Sie verbrauchte Batterien entsprechend den Vorschriften.
Page 19
1
Vorbereiten des Camcorders
Der Camcorder im Überblick
1
Ein/Aus-Taste
Richtungstasten:
2
Navigation Links/Modus/
Beenden
3
Navigation
4
Navigation Rechts/Menü/OK
5
Hotkey für Blitzmodus
6
Navigation Unten/Fokus
7
Statusanzeige-LED
8
Wiedergabe-Taste
9
Videoaufnahme
10
Lautsprecher
11
Vergrößern-/Lautstärke-
erhöhen-Taste
12
Verkleinern-/Lautstärke-
verringern-Taste
13
Foto Auslöser-Taste
14
HDMI-Ausgang
15
USB-Anschluss
16
TV-Ausgang/Kopfhörer
17
Abdeckung des
Speicherkartenfachs/
SD/MMC-Kartensteckplatz
18
Fassung für Dreibeinstativ
19
Blitz
20
Mikrofon
1 2
4
5
6
3
7
8
9
10
11
12
13
16
14
15
18
17
19
20
Page 20
2
Einsetzen der Batterie
Camcorder mit Lithiumbatterie
Setzen Sie die Lithiumbatterie mit dem Anschluss in der angezeigten Pfeilrichtung in das
Fach ein, und stellen Sie sicher, dass die Metallkontakte mit den Kontakten im Batteriefach in
Berührung kommen.
Einsetzen der SD/MMC-Karte( )
Der Camcorder verfügt über einen internen Speicher, Sie können jedoch den Speicher des
Camcorders durch eine SD/SDHC/MMC/MMC 2.0-Speicherkarte erweitern.
1. Klappen Sie die Abdeckung des Speicherkartenfachs wie abgebildet hoch.
2. Setzen Sie die Karte in der angezeigten Richtung so weit wie möglich in den Steckplatz ein.
3. Wenn die Karte richtig eingesetzt ist, erscheint auf dem Bildschirm das Symbol (
), und der
interne Speicher wird deaktiviert.
Um die Karte wieder herauszunehmen, drücken Sie sie vorsichtig hinein, bis sie ausgeworfen
wird. Ziehen Sie sie dann ganz heraus.
4. Schließen Sie das Speicherkartenfach.
* Wenn Sie eine ganz neue Speicherkarte verwenden, wird empfohlen, die Karte zunächst mit
dem Camcorder oder einem anderen Gerät zu formatieren.
* Der Camcorder verwendet als Hauptspeichermedium die Speicherkarte. Nur wenn sich keine
Karte im Camcorder befi ndet, wird der interne Speicher verwendet.
Nur bei bestimmten Modellen. Detaillierte Angaben nden Sie auf der Produktverpackung.
Page 21
3
Akku Iaden
Schließen Sie das eine Ende des Adapters an den Camcorder und das andere Ende an eine
Netzsteckdose an.
Laden Sie den Akku vor dem ersten Gebrauch mindestens 8 Stunden lang auf.
1. Verbinden Sie ein Ende des mitgelieferten Netzteils mit dem USB-Anschluss und das andere
Ende mit einer Wandsteckdose.
ODER
Verbinden Sie ein Ende des mitgelieferten USB Kabels mit dem USB-Anschluss am Camcorder
und das andere Ende mit einem eingeschalteten PC. Der Camcorder muss dabei ausgeschaltet
sein.
2. Die Lade-LED leuchtet rot, der Ladevorgang beginnt.
3. Wenn der Ladevorgang unterbrochen wird oder der Akku voll geladen ist, erlischt die Lade LED.
Wenn Sie den Akku über einen PC aufl aden, dürfen Sie den Camcorder nicht
einschalten, da sonst der Ladevorgang stoppt.
Befestigen und Anpassen des
Handgelenkbands
Befestigen Sie das Handgelenkband an der dazugehörigen Halterung an der Vorderseite des
Camcorders, befestigen Sie dann das andere Ende des Bands an der Rückseite des Camcorders
(siehe Abbildung).
1. Öffnen Sie die Ummantelung des Handgelenkbands.
2. Passen Sie die Länge des Bands Ihrer Handgröße an.
3. Schließen Sie die Ummantelung des Handgelenkbands wieder.
Page 22

4
Erste Schritte
Ein-/Ausschalten
Um den Camcorder einzuschalten, öffnen Sie entweder den LCD-Bildschirm oder drücken Sie auf
die Ein/Aus-Taste.
Um den Camcorder auszuschalten, schließen Sie entweder den LCD-Bildschirm oder drücken Sie
auf die Ein/Aus-Taste.
Wenn sich der Camcorder nicht wie oben beschrieben einschalten lässt, prüfen Sie
Folgendes: Ob die Batterien richtig eingelegt wurden.
Ob die Batterie noch ausreichend geladen sind.
Bei der Einstellung [Auto Off] (Automatisch aus) schaltet sich der Camcorder nach
Ablauf der Leerlaufzeit automatisch aus.
Modusausw ahl
1. Verwenden Sie den Joystick nach Links, um ins Menü zu gelangen.
2. Verwenden Sie den Joystick nach Oben oder Unten.
3. Verwenden Sie den Joystick nach Rechts, um zu bestätigen.
4. Verwenden Sie den Joystick nach
Links, um das Menü zu verlassen.
Einstellen der Menüsprache
Einschalten → Modus Setting (Einstellungen) aufrufen → Eintrag Language (Sprache) wählen
→ Navigieren Sie mit dem Joystick nach oben oder nach unten die Sprache auswählen →
Navigieren Sie mit dem Joystick nach rechts, um die Einstellung zu bestätigen.
Einstellen von Datum und Uhrzeit
Einschalten → Modus Setting (Einstellungen) aufrufen → Eintrag Clock (Datum/Zeit) wählen
→ Navigieren Sie mit dem Joystick nach oben oder nach die Werte für die Felder YY/MM/DD (JJ/
MM/TT) und HH:MM wählen → Navigieren Sie mit dem Joystick nach rechts, um die Einstellung
in jedem Feld zu bestätigen → Navigieren Sie mit dem Joystick nach links, um die Funktion zu
beenden.
Page 23

5
Ladestatusanzeige der Batterie
Symbol Beschreibung
Batterie voll
Batterie halbvoll
Batterie fast leer
* Blitz wird deaktiviert.
Batterie leer
Hinweis: Um einen plötzlichen Ausfall des Geräts zu vermeiden, sollten Sie die Batterie
auswechseln, wenn die Batterie fast leer ist.
Bedeutung der Symbole
Kameramodus:
1
Modussymbol (Kameramodus)
2
Anzahl der Aufnahmen
3
AF
4
Exposure (Belichtung)
5
Blitzmodus
6
Bildaufl ösung
7
Videoaufl ösung
8
Speicherkarte eingesetzt
9
Batterieladestand
10
Stabilisator( )
11
Fokuseinstellung
12
Bildeffekt
13
Weißabgleich
14
Aufnahmemodus
1 2 4 5 6 7 8 9
101112
13
14
3
Nur bei bestimmten Modellen. Detaillierte Angaben nden Sie auf der Produktverpackung.
Page 24

6
Wiedergabemodus:
1
Modussymbol
(Wiedergabemodus)
2
Aktuelle Aufnahme/Gesamtzahl
der Aufnahmen
3
Dateiformat
4
Speicherkarte eingesetzt
5
Batterieladestand
6
Aufnahmedauer
1 2 3 4 5
6
Sprachmodus:
1
Modussymbol (Tonmodus)
2
Anzahl der Aufnahmen
3
Speicherkarte eingesetzt
4
Batterieladestand
5
Sprachaufnahme
1 2 3 4
5
Page 25

7
Bedienungsgrundlagen
Aufnehmen eines Videoclips
1. Wählen Sie eine geeignete Fokuseinstellung. Normalerweise werden Sie für die meisten
Filmsituationen die Einstellung ( ) wählen. Die Option ( ) wird nur für Nahaufnahmen
verwendet.
AF:
Bei Aufnahme einer Stelle ohne Vergrößerung/Verkleinerung oder Bewegung können Sie die
AF-Sperrfunktion durch Drücken der Navigationstaste nach oben () aktivieren. Um diese
Funktion zu deaktivieren, drücken Sie die Navigationstaste erneut nach oben.
2. Drücken Sie auf die Aufnahme-Taste (
), um die Aufnahme zu starten.
3. Mit den Zoom-Tasten (
/ ) wird das Bild vergrößert oder verkleinert.
4. Verwenden Sie den Joystick nach rechts Pause, und links
für Wiedergabe.
5. Drücken Sie erneut auf die Aufnahme-Taste (
), um die
Aufnahme zu stoppen.
Aufnehmen von Fotos
1. Scharfstellen:
Normalerweise stellt der Camcorder die Schärfe (den Fokus) automatisch ein. Wenn Sie jedoch
Nahaufnahmen aufnehmen möchten, wechseln Sie in den Makromodus
( ), indem Sie den Joystick nach abwärts drücken.
2. AF:
Wenn Sie eine Aufzeichnung an einer festen Stelle machen, ohne die Ein-/Auszoomfunktion
zu verwenden oder sich umher zu bewegen, dann können Sie die AF-Verriegelungsfunktion
aktivieren, indem Sie den Joystick nach oben () bewegen. Bewegen Sie noch einmal den
Joystick nach oben, um diese Funktion zu deaktivieren.
3. Zoomen: Mit den Zoom-Tasten ( / ) wird das Bild vergrößert oder verkleinert.
4. Damit Sie stets gute und scharfe Bilder erzielen, sollten Sie das Gerät in jeder
Aufnahmesituation möglichst ruhig halten, damit Ihre Bilder nicht verwackeln.
5. Drücken Sie den Auslöser (
) halb herunter , fokusrahmen
gelb, um die Objekte,und warten Sie, bis der Camcorder den
fokus automatisch einstellt. Wenn sich der Fokusrahmen grün
färbt,drücken Sie den Auslöser zur aufnahme des Fotos ganz
hinab.
80 cm bis
1 cm bis 80 cm
Fokusrahmen
Page 26

8
Aufnehmen eines Audioclips
1. Rufen Sie den Modus Voice (Sprachaufnahme) auf.
2. Drücken Sie auf die Aufnahme-Taste (
), um die Aufnahme zu starten.
3. Verwenden Sie den Joystick nach rechts Pause, und links für Wiedergabe.
4. Drücken Sie erneut auf die Aufnahme-Taste (
), um die Aufnahme zu stoppen.
Wiedergabe
1. Rufen Sie den Modus Playback (Wiedergabe) ( ) auf.
2. Die Wiedergabe beginnt mit dem zuletzt aufgenommenen Foto, dem letzten Video- oder
Audioclip.
3. Verwenden Sie den Joystick nach oben oder unten, um zwischen den auszuwählen.
4. Die gewählte Datei wird angezeigt oder die Wiedergabe wird automatisch gestartet.
Nur bei bestimmten Modellen. Detaillierte Angaben nden Sie auf der Produktverpackung.
Page 27

9
Erweiterte Einstellungen
Einstellen von Menüoptionen
Die Menüs bieten verschiedene Optionen, mit denen Sie die Camcorder-Funktionen
konfi gurieren können.
In der folgenden Tabelle fi nden Sie ausführliche Informationen zu den Menüoptionen:
Funktion Aktion
Aufrufen des Menüs im Kamera-/
Wiedergabemodus
Drücken Sie auf die Rechts-Taste.
Bewegen des Cursors Drücken Sie auf die Auf- oder Ab-Taste.
Bestätigen einer Auswahl Drücken Sie auf die Rechts-Taste.
Beenden des Menüs/Wechseln zum
vorhergehenden Menü
Drücken Sie auf die Links-Taste.
Menüoptionen im Kameramodus
Einschalten → Modus Camera (Kamera) aufrufen → Verwenden Sie den
Joystick nach Rechts.
Eintrag Option Beschreibung
Video Resolution
(Videoaufl ösung)
Die Spezifi kation der Videoaufl ösung ist auf der Verpackung
angegeben.
Still Resolution
(Bildaufl ösung)
Die Spezifi kation der Videoaufl ösung ist auf der Verpackung
angegeben.
Stabilisator Ein/Aus
Hier aktivieren/deaktivieren Sie die Funktion des
Stabilisators. Der Stabilisator kann durch Verwackeln
entstandene Unschärfen vermeiden.
Nachtaufnahme
Ein/Aus
Ist diese Einstellung aktiviert, können Sie Fotos in einer dunklen
Umgebung machen. Da die Verschlusszeit beim
Aufnehmen von Fotos in dunkler Umgebung wesentlich
länger ist, empfehlen wir die Verwendung eines Stativs, um
Unschärfen durch Verwackeln zu vermeiden. Warnung: Das
Bildrauschen nimmt zu, wenn Nachtaufnahme aktiviert ist.
Warnung: Die Stabilisatorfunktion wird deaktiviert, wenn die
Nachtaufnahmefunktion aktiviert ist.
AF(Auto fokus)
On/Off
(Ein/Aus)
Schaltet den Autofokus ein und aus.
Fokus
Normal Machen Sie Fotos im ursprünglichen Abstand.
Makro
Wählen Sie Makromodus vor, um Nahaufnahmephotos zu
machen.
Nur bei bestimmten Modellen. Detaillierte Angaben nden Sie auf der Produktverpackung.
Page 28

10
Eintrag Option Beschreibung
Flash Strobe (Blitz)
Auto
(Automatisch)
Der Blitz wird automatisch ausgelöst, wenn die
Lichtbedingungen für die Aufnahme zu schlecht sind.
Force
(Ein)
Der Blitz wird bei jeder Aufnahme ausgelöst.
Off (Aus) Der Blitz ist immer ausgeschaltet.
Schnappschuss
Single (Einzeln)
Beim Drücken des Auslösers wird eine einzelne
Aufnahme gemacht.
Self-Timer
(Selbstauslöser)
Nach dem Drücken des Auslösers folgt eine Verzögerung
von zehn Sekunden, bis die Aufnahme gemacht wird.
Continuous (Serie)
Beim Drücken des Auslösers wird eine Serie von
Aufnahmen gemacht.
Exposure
(Belichtung)
-2 bis +2
Die Belichtung kann manuell eingestellt werden, wenn
die Aufnahme bei der Vorschau zu hell oder zu dunkel
erscheint. Bei einem positiven Wert wird das Bild heller
als normal, bei einem negativen Wert dunkler.
Flicker (Flimmer) 50Hz/60Hz
Stellen Sie die Flimmerfrequenz auf 50 oder 60 Hz ein.
Weitere Informationen dazu fi nden Sie im Anhang in der
Tabelle "Einstellung der Flimmerfrequenz".
Date Stamp
(Datumsaufdruck)
On/Off
(Ein/Aus)
Wenn Sie diese Funktion aktivieren, erscheint auf jedem
Bild das Aufnahmedatum.
White Balance
(Weißabgleich)
Auto
(Automatisch)
Der Camcorder stellt den Weißabgleich automatisch ein.
Sunny (Sonning)
Diese Einstellung ist geeignet für Aufnahmen im Freien
bei sonnigem Wetter.
Cloudy (Wolkig)
Diese Einstellung ist geeignet für Aufnahmen im Freien
bei bewölktem Wetter und in schattigen Umgebungen.
Fluorescent
(Fluoreszierend)
Diese Einstellung ist geeignet für Aufnahmen in Räumen
mit Leuchtstofflicht und in Umgebungen mit hoher
Farbtemperatur.
Tungsten
(Mischlicht)
Diese Einstellung ist geeignet für Aufnahmen in
Räumen mit Glühlicht und in Umgebungen mit niedriger
Farbtemperatur.
Effect (Bildeffekt)
Normal (Normal) Für Aufnahmen in natürlichen Farben.
Black&White
(Schwarz Weiß)
Für Schwarzweißaufnahmen.
Classic (Sepia) Für Aufnahmen in Sepiatönen.
Die Menüeinträge “Video resolution” (Videoaufl ösung) und “Still resolution”
(Bildaufl ösung) sind modellabhängig. Die Spezifi kation der Videoaufl ösung ist auf der
Verpackung angegeben.
Page 29

11
Menüoptionen im Wiedergabemodus
Einschalten → Modus Playback (Wiedergabe) aufrufen → Verwenden Sie den
Joystick nach Rechts.
Eintrag Option Beschreibung
File Info
(Dateiinformationen)
-
Aufrufen von Dateititel, Aufnahmedatum, Uhrzeit, Größe
und Aufnahmedauer.
Slide show
(Diaschau)
On/Off
(Ein/Aus)
Starten der Diaschau. /Wiederholen der Wiedergabe aller
Videoclips.
Delete One
(Datei löschen)
Yes/No (Ja/
Nein)
Die aktuelle Datei wird gelöscht.
Delete All
(Alle löschen)
Yes/No (Ja/
Nein)
Löscht alle Dateien.
Menüoptionen im Einstellungsmodus
Einschalten → Modus Setting (Einstellungen) aufrufen → Verwenden Sie den
Joystick nach Rechts.
Eintrag Option Beschreibung
Beep (Signalton)
On/Off
(Ein/Aus)
Aktivieren/Deaktivieren des Signaltons.
Start Up (Start)
Menu (Menü) Verwendet das Standardstartfenster.
Camera
(Kamera)
Verwendet den Kameramodus als Startfenster.
Auto Off
(Auto-Aus)
Off (Aus)
1min/3min/
5min
Festlegen der Inaktivitätsdauer, nach der der
Camcorder automatisch ausgeschaltet wird. Bei [Off]
(Aus) bleibt der Camcorder so lange eingeschaltet, bis
er nicht mehr mit Strom versorgt wird.
AV Mode (AV Modus)
Menu (Menü)
Erlaubt Sie vorwählen durch Kopfhörer, oder AV
Ausgang funktion.
Earphone
(Kopfhörer)
Wiedergabe des Tons über die Kopfhörer.
AV Out (AV
Ausgang)
Verwendet den AV Out Ausgang als anlogen TV
Ausgang zum anschließen an einen Fernseher.
Page 30

12
Eintrag Option Beschreibung
TV System
(TV System)
NTSC
(NTSC)
Einstellen der TV-Systemkompatibilität auf NTSC.
Diese Option gilt für Amerika, Taiwan, Japan und
Korea.
PAL (PAL)
Einstellen der TV-Systemkompatibilität auf PAL.
Diese Option gilt für Deutschland, England, Italien, die
Niederlande, China, Japan und Hongkong.
USB Mode (USB Modus) Disk (Disk)
Wenn der Camcorder an einen PC angeschlossen
wird, wechselt er automatisch in den Diskmodus
(Wechseldatenträger).
Language (Sprache) - Auswählen der Sprache des Camcorders.
Clock (Datum/Zeit) - Einstellen von Datum und Uhrzeit.
Format (Formatieren)
Yes/No (Ja/
Nein)
Formatieren des Speicherkarte. Beachten Sie, dass
dabei alle auf dem Speicherkarte gespeicherten
Dateien unwiederbringlich gelöscht werden.
Reset Default (Reset )
Yes/No (Ja/
Nein)
Die Standardeinstellungen werden wiederhergestellt.
Alle bisherigen Einstellungen werden aufgehoben.
Page 31

13
Anhang
Einstellung der Flimmerfrequenz
Bereich England Deutschland Frankreich Italien Spanien Russland
Einstellung 50 Hz 50 Hz 50 Hz 50 Hz 50 Hz 50 Hz
Bereich Portugal Amerika Taiwan China Japan Korea
Einstellung 50 Hz 60 Hz 60 Hz 50 Hz 50/60 Hz 60 Hz
Hinweis: Die Einstellung der Flimmerfrequenz basiert auf dem Frequenzstandard der
regionalen Stromversorgung.
Systemvoraussetzungen
Windows:
• Betriebssystem: Windows XP SP2 / Vista / Win7
• CPU: AMD oder Intel CPU mit 3,2 GHz oder Mehrkernprozessor
• System RAM: 1 GB (2 GB empfohlen)
• Grafi kkarte: 256 MB Speicher
• CD-ROM Geschwindigkeit: 4 x und höher
• Software: H.264 Decoder (Quick Time Player 7.4.1 oder höher)
• Anderes: 1 freier USB Anschluss, Optisches Laufwerk
Hinweis: Die Spezifi kationen können jederzeit ohne Ankündigung geändert werden.
Page 32

14
Technisc he Da ten
Modell 5 Megapixel-Kamera
Bildsensor 5 Megapixel (2592x1944 Pixel)
Au ösung
Foto:
2M(1600x1200); 5M(2560x1920); 8M(3200x2400);
12M(4000x3000);16M(4608x3456)
Video:
1920x1080, bis zu 30 fps (FULL HD 30f)
1280 x 720 bis zu 30 fps (HD 30f)
640x480 bis zu 30 fps (VGA 30f)
320x240 bis zu 30 fps(QVGA 30f)
Objektiv 5X optischen Zoom-Objektiv (6.8 - 34mm /F3.6-6.7)
Dateiformate MP4(H.264), JPEG, WAV
Externer Speicher SD/MMC-Karte (bis zu 32 GB SDHC)
LCD-Anzeige 7.6 cm LCD-Bildschirm(3” LCD-Bildschirm)
Digitaler Zoom 4X
TV-Ausgang HDTV-HDMI-Ausgang; AV-Ausgang (NTSC / PAL)
Schnittstelle USB 2.0
Videorekorder Ja
Mikrofon Ja
Sprachaufnahmefunktion
Ja
Akku NP60-kompatibler Lithium-Ionen-Akku
DC Input 5V,1A
Betriebsbedingungen Temperatur: 0~45°C
Feuchtigkeit: 65 ± 20% RF
Hinweis: Die technischen Daten können ohne Ankündigung geändert werden.
Page 33

Français
Caméscope Haute Défi nition
Manuel de l'utilisateur
Page 34

Le moment venu, pour mettre au rebut
votre produit, veuillez recycler tous les
composants possibles. Les batteries et
les accumulateurs ne doivent pas être
éliminés avec vos déchets ménagers
! Veuillez les- recycler à votre point de
collecte local. Ensemble nous pouvons
aider à protéger l’environnement.
Bienvenue
Nous sommes honorés que vous ayez choisi notre produit.
Avant utilisation, veuillez lire soigneusement les déclarations suivantes.
Avertissement de sécurité
1. Ne faites pas tomber, ne crevez pas, ne désassemblez pas le caméscope; sinon la
garantie sera nulle et non avenue.
2. Evitez tout contact avec l’eau, et séchez vos mains avant utilisation.
3. N’exposez pas le caméscope à des températures élevées ni aux rayons directs du soleil.
Cela pourrait endommager le caméscope.
4. Utilisez la caméscope avec soin. Evitez d’appuyez avec force sur le corps du caméscope.
5. Pour votre propre sécurité, évitez d’utiliser le caméscope quand il y a un orage ou des
éclairs.
6. N’utilisez pas des piles de spécifi cations différentes. Cela peut entraîner de sérieux
dommages.
7. Retirez la batterie pendant des longues périodes d’inutilisation, car une batterie détériorée
peut affecter l’opérabilité du caméscope.
8. Retirez la batterie si elle présente des signes de fuite ou de déformation.
9. Utilisez uniquement les accessoires fournis par le fabricant.
10. Gardez le caméscope hors d’atteinte des nourrissons.
11. Risque d’explosion si la batterie est remplacée par un mauvais type de batterie.
12. Débarrassez-vous des piles usagées conformément aux instructions.
Page 35

1
Préparer le caméscope
Connaître les parties du caméscope
1
Bouton (d'alimentation)
Touches directionnelles :
2
Touche Gauche/Mode/Quitter
3
Touche Haut/AF
4
Touche Droite/Menu/OK
5
Touche de raccourci Flash
6
Touche Bas/Focus
7
Indicateur LED
8
Lecture
9
Enregistrement vidéo
10
Haut-parleur
11
Bouton Zoom avant / Volume +
12
Zoom arrière / Volume -
13
Déclencheur Obturateur
14
Connecteur de sortie HDMI
15
Port USB
16
Connecteur TV-out/écouteur
17
Couvercle carte mémoire /
fente carte SD/MMC
18
Interface trépied
19
Flash
20
Microphone
1 2
4
5
6
3
7
8
9
10
11
12
13
16
14
15
18
17
19
20
Page 36

2
Chargement de la batterie
Caméscope alimenté par une batterie au lithium
Insérez l’extrémité du connecteur de la batterie au lithium dans la direction indiquée par la fl èche
et assurez-vous que les contacts métalliques sont alignés avec les contacts du compartiment.
Insertion de la carte SD/MMC ( )
Le caméscope a une mémoire intégrée pour le stockage, mais vous pouvez insérer une carte
mémoire SD/SDHC/MMC/MMC 2.0 pour augmenter la capacité de stockage du caméscope.
1. Soulevez le couvercle de la carte mémoire comme indiqué.
2. Insérez la carte dans la direction indiquée jusqu’à ce qu’elle atteigne le fond du logement.
3. Lorsque la carte est correctement insérée, l’icône (
) apparaîtra à l’écran et la mémoire
interne deviendra inaccessible.
Pour retirer la carte, appuyez sur la carte pour la libérer puis sortez-la doucement.
4. Remettez le couvercle.
* Lorsque vous utilisez une nouvelle carte mémoire, il est recommandé de formater la carte
avec le caméscope ou d’autres appareils.
* Le caméscope utilisera la carte mémoire comme support de stockage principal. Seulement
lorsque la carte est retirée, les fi chiers stockés dans la mémoire intégrée deviendront
accessibles.
Certains modèles seulement. Reportez-vous aux inscriptions de la boîte pour les
caractéristiques techniques.
Page 37

3
Charger la batterie
Connectez une extrémité de l’adaptateur au caméscope et l’autre extrémité à une prise de courant
électrique.
Veuillez charger la batterie pendant au moins 8 heures avant la première utilisation.
1. Branchez une extrémité de l’adaptateur secteur fourni sur le port USB du caméscope et l’autre
extrémité sur une prise de courant.
OU
Branchez une extrémité du câble USB fourni sur le port USB du caméscope et l’autre extrémité
sur un PC allumé. Assurez vous que le caméscope est éteint.
2. Le voyant LED de chargement devient rouge et le chargement démarre.
3. Lorsque la charge est interrompue ou que la batterie est complètement chargée, le voyant LED
de chargement s’éteint.
Lorsque vous utilisez un PC pour charger la batterie, n’allumez pas le caméscope ;
autrement la charge s’arrêtera.
Attacher et ajuster la dragonne
Attachez la dragonne au point d’attache à l’avant du caméscope, puis attachez l’autre extrémité au
point d’attache à l’arrière du caméscope, comme montré sur l’illustration.
1. Ouvrez le strap de la dragonne.
2. Ajustez la longueur de la dragonne en fonction de la taille de votre paume.
3. Refi xez le strap de la dragonne.
Page 38

4
Pour commencer
Marche/arrêt
Pour allumer le caméscope, ouvrez l’écran LCD ou appuyez sur le bouton Alimentation.
Pour éteindre le caméscope, fermez l’écran LCD ou appuyez sur le bouton Alimentation.
Si l’alimentation ne s’allume pas une fois que les procédures ci-dessus ont été
complétées, veuillez vérifi er que ce qui suit a été correctement fait: Les piles sont
correctement chargées.
La batterie chargée ont suffi samment d’énergie.
La confi guration de [Auto Off] (Arrêt auto) peut faire que le caméscope s’arrête
après une durée d’inactivité défi nie.
Sélection du mode
1. Utilisez le joystick Gauche pour entrer dans le menu Mode.
2. Utilisez le joystick vers le Haut ou vers le Bas pour sélectionner l’élément désiré.
3. Utilisez la manette vers la Droite pour confi rmer.
4. Utilisez le joystick Gauche pour sortir.
Choisir la langue d’affi chage
Allumer → accéder au mode (Con guration) → sélectionner la (Langue) → Utilisez le Joystick
pour vous déplacer vers le haut ou vers le bas pour sélectionner la langue → Utilisez le joystick
droit pour confi rmer.
Con gurer la date et l’heure
Allumer → accéder au mode (Con guration) → sélectionner (Date/Heure) → Utilisez le Joystick
pour vous déplacer vers le haut ou vers le bas. pour sélectionner les valeurs des champs AA/
MM/JJ et HH:MM → Utilisez le joystick droit pour confi rmer chaque champ → Utilisez le joystick
Gauche pour quitter.
Page 39

5
Comprendre l’indicateur d’autonomie de la
batterie
Icône Description
Batterie pleine
Batterie modereé
Batterie faible
* Le fl ash seront désactivés.
Batterie vide
Remarque: Pour éviter l'arrêt soudain de l'alimentation, il est recommandé de remplacer la
batterie quand l'icône indique que la batterie est faible.
Comprendre les icônes à l’écran
Mode Camera (Appareil photo):
1
Icône de mode (mode appareil
photo)
2
Nombre d'enregistrements
3
AF(mise au point automatique)
4
Exposition
5
Mode Flash
6
Résolution photo
7
Résolution vidéo
8
Carte mémoire insérée
9
Autonomie de la batterie
10
Stabilisateur( )
11
Indicateur mise au point
12
Effet
13
Balance des blancs
14
Mode instantané
1 2 4 5 6 7 8 9
101112
13
14
Certains modèles seulement. Reportez-vous aux inscriptions de la boîte pour les
caractéristiques techniques.
3
Page 40

6
Mode Lecture:
1
Icône de mode (mode lecture)
2
Enregistrements actuels / totals
3
Format fi chier
4
Carte mémoire insérée
5
Autonomie de la batterie
6
Durée d'enregistrement
1 2 3 4 5
6
Mode Vocal:
1
Icône de mode (mode vocal)
2
Nombre d'enregistrements
3
Carte mémoire insérée
4
Autonomie de la batterie
5
Enregistreur vocal
1 2 3 4
5
Page 41

7
Fonctions élémentaires
Enregistrement d’un clip vidéo
1. Confi gurez la mise au point de manière appropriée. Généralement, vous pouvez confi gurer
la mise au point sur ( ) pour la plupart des conditions de tournage. Sélectionnez ( )
uniquement pour les gros plans.
AF :
Lorsque vous tournez une scène sans faire de zoom avant ou arrière ou sans bouger le
caméscope, vous pouvez activer la fonction de verrouillage AF en appuyant sur la touche Haut
(). Pour désactiver cette fonction appuyez encore une fois sur la touche Haut.
2. Appuyez sur le bouton Record (Enregistrer) (
) pour commencer l’enregistrement.
3. Utilisez les boutons Zoom (
/ ) pour zoomer avant/arrière.
4. Utilisez le Joystick Droit de faire une pause, et à Gauche
pour continuer.
5. Appuyez de nouveau sur le bouton Record (Enregistrer)
(
) pour stopper l’enregistrement.
Prendre une photo
1. Réglez la mise au point :
Le caméscope peut normalement faire la mise au point automatiquement sans réglage.Si vous
voulez faire des gros plans, vous pouvez pousser le Joystick vers le bas pour basculer en mode
macro ( ).
2. AF(mise au point automatique):
Lorsque vous faites une prise de vue sans faire un zoom avant/arrière ou vous déplacer, vous
pouvez activer la fonction de verrouillage AF en poussant la manette vers le haut (). Pour
désactiver cette fonction, poussez de nouveau la manette vers le haut.
3. Changez le zoom :
Utilisez les boutons Zoom ( / ) pour zoomer avant/arrière.
4. Pour une meilleure qualité d’image, il est recommandé de tenir
fermement le panneau LCD sans trembler pour éviter une image
fl oue.
5. Enfoncez le bouton Déclencheur ( ) à mi-course, le cadre
de mise au point devient jaune à saisir les objets,et maintenez
le dans cette position pour que le caméscope fasse la mise au
point. Lorsque le cadre de mise au point devient vert, enfoncez
complètement le bouton pour prendre une photo.
80cm ~
1cm ~ 80cm
Cadre de
mise au point
Page 42

8
Enregistrer un clip audio
1. Passez en mode Voice (Vocal).
2. Appuyez sur le bouton Record (Enregistrer) (
) pour commencer l’enregistrement.
3. Utilisez le Joystick Droit de faire une pause, et à Gauche pour continuer.
4. Appuyez de nouveau sur le bouton Record (Enregistrer) (
) pour stopper l'enregistrement.
Lecture
1. Passez en mode Lecture ( ).
2. La lecture du dernier enregistrement photo, clip vidéo, ou clip audio commence.
3. Utilisez le Joystick vers le Haut ou vers le Bas pour passer d’un fi chier à un autre.
4. L’affi chage ou la lecture du fi chier auquel vous accédez commence automatiquement.
Certains modèles seulement. Reportez-vous aux inscriptions de la boîte pour les
caractéristiques techniques.
Page 43

9
Paramètres avancés
Confi guration des options de menu
Les éléments du menu offrent plusieurs options pour que vous puissiez ajuster avec fi nesse, les
fonctions du caméscope.
Le tableau suivant fournit les détails à propos des opérations de menu:
Comment faire pour... Action
Faire apparaître le menu en mode
Camera (Appareil photo)/
Playback (Lecture)
Appuyez sur le bouton (Droit).
Déplacer la barre de sélection Appuyez sur le bouton Up (Haut) ou Down (Bas).
Confi rmer un élément Appuyez sur le bouton (Droit).
Quitter le menu/Revenir au menu
précédent
Appuyez sur le bouton (Gauche).
Les options de menu en mode Camera
(Appareil photo)
Allumer → passez en mode Camera (Appareil photo) → Utilisez le Joystick
Droit.
Elément Option Description
Résolution
vidéo
Veuillez vous référer à l’emballage pour les spécifi cations détaillées.
Résolution
photo
Veuillez vous référer à l’emballage pour les spécifi cations détaillées.
Stabilisateur
Marche/Arrêt
Activater/désactiver la fonction Stabilisateur. La fonction
Stabilisateur permet d'éviter les flous provoqués par les
mouvement de la main.
Mode de nuit
Marche/Arrêt
Activer ce réglage vous permet de prendre une photo sur un fond
sombre. Étant donné que la vitesse d'obturation diminue lors de la
prise de vue dans un lieu sombre, nous recommandons l'utilisation d'un
trépied pour éviter les fl ous provoqués par le mouvement de vos mains.
Avertissement : Les interférences augmentent lorsque le Mode nuit est
activé. Avertissement : La fonction stabilisateur est désactivée lorsque
le mode Nocturne est activé.
AF
(mise au point
automatique)
Marche/Arrêt Activation/désactivation de mise au point automatique.
Certains modèles seulement. Reportez-vous aux inscriptions de la boîte pour les
caractéristiques techniques.
Page 44

10
Elément Option Description
Mise au point
Normal Prenez les photos dans la distance originale.
Macro
Choisissez le macro mode pour prendre des photos de plan
rapproché.
Flash
Auto
Le fl ash se déclenche automatiquement lorsque la lumière est
insuffi sante.
Marche Le fl ash est forcé pour se déclencher à chaque prise.
Arrêt Le fl ash est désactivé.
Mode
instantané
Unique
Le caméscope prendra une seule photo quand le bouton
obturateur sera appuyé.
Decléncheur
Auto
Le caméscope aura dix secondes de retard avant la prise d'une
photo quand le bouton obturateur est appuyé.
Continu
Le caméscope prendra une seule photo quand le bouton
obturateur sera appuyé.
Exposition -2~+2
Réglez manuellement l'exposition pour obtenir un meilleur effet lorsque
l'image prévisualisée apparaît trop lumineuse ou trop sombre. Une
valeur positive indique que l'image sera plus lumineuse que d'habitude;
alors qu'une valeur négative rendra l'image plus terne.
Fréquence 50Hz/60Hz
Défi nissez la fréquence d'oscillation sur 50Hz ou 60Hz. Pour plus
d'informations, veuillez consulter le tableau « Référence des
paramètres d'oscillation » dans l'appendice.
Impr. Date Marche/Arrêt
Activez cette fonction pour imprimer un marquage de date sur
chaque photo.
Balencement
de Blancs
Auto Le caméscope règle automatiquement l'équilibre des blancs.
Ensoleillé
Cette confi guration est adaptée pour un enregistrement en
extérieur par temps ensoleillé.
Nuageux
Cette confi guration est adaptée pour un enregistrement par
temps ensoleillé ou dans un environnement ombrageux.
Fluorescent
Cette confi guration est adaptée pour un enregistrement en
intérieur avec un éclairage de lampe fl uorescente, ou des
environnements avec une température de couleur élevée.
Tungstène
Cette confi guration est adaptée pour un enregistrement en
intérieur avec un éclairage de lampe incandescent, ou des
environnements avec une température de couleur faible.
Effets
Normal Effectuez des enregistrements avec des couleurs naturels.
Noir&Blanc
(N&B)
Effectuez des enregistrements en noir et blanc.
Classique Effectuez des enregistrements en couleur de tonalité sépia.
Les éléments du menu « Video resolution » (« Résolution vidéo ») et « Picture
resolution » (« Résolution photo ») sont en fonction du modèle. Veuillez vous référer
à l’emballage pour les spécifi cations détaillées.
Page 45

11
Les options de menu en mode Playblack
(Lecture)
Allumer → passez en mode (Lecture) → Utilisez le Joystick Droit.
Elément Option Description
Info Fichier -
Affichez le titre du fichier, la date et l'heure enregistrées, la
taille, et la durée de l'enregistrement.
Diaporama
Activé/
Désactivé
Démarre le diaporama de photo. / Répète la lecture de tous les
clips vidéo.
Supprimer un Oui/Non Supprime le fi chier en cours.
Supprimer tout Oui/Non efface tous les fi chiers.
Les options de menu en mode Setting
(Confi guration)
Allumer → passez en mode Setting (Con guration) → Utilisez le Joystick Droit.
Elément Option Description
Bip Marche/Arrêt Active/désactive le bip sonore.
Démarrer
Menu Utilise l'écran de démarrage par défaut.
Appareil
photo
Utilisez le mode Camera (Appareil photo) comme écran de
démarrage.
Arrêt Auto
Arrêt
1min/3min/
5min
Défi nissez la durée avant que le caméscope ne s'éteigne
automatiquement quand il est inactif. La confi guration sur [Off]
([Désactivé]) gardera le caméscope allumé jusqu'à ce que sa
source d'alimentation soit vide.
Mode AV
Menu
Vous permet de sélectionner par le biais des Ecouteurs ou de
la fonction Sortie AV.
Ecouteurs Ecoute à l'aide de vos écouteurs.
Sortie AV Connexion à un téléviseur.
TV System
(Système TV)
NTSC
Défi nissez la compatibilité du système TV sur NTSC. Cette
option est adaptée pour les Etats-Unis, Taiwan, le Japon, et la
Corée.
PAL
Défi nissez la compatibilité du système TV sur PAL. Cette
option est adaptée pour l'Allemagne, l'Angleterre, l'Italie, les
Pays-Bas, la Chine, le Japon, et Hong Kong.
Mode USB Disque
Quand connecté à un PC, le caméscope passe
automatiquement en mode Disk (Disque) (Caméra PC).
Langue - Vous permet de sélectionner la langue utilisée pour l'OSD.
Date/Heure - Défi nissez la date et l'heure.
Page 46

12
Elément Option Description
Formater Oui/Non
Formatez le support de stockage. Notez que tous les fi chiers
stockés dans le support auront disparu.
Défaut Oui/Non
Restaurez aux paramètres d'usine par défaut. Notez que les
paramètres actuels seront annulés.
Page 47

13
Appendice
Référence des paramètres d'oscillation
Zone Angleterre Allemagne France Italie Espagne Russie
Con guration 50Hz 50Hz 50Hz 50Hz 50Hz 50Hz
Zone Portugal Etats-Unis Taiwan Chine Japon Corée
Con guration 50Hz 60Hz 60Hz 50Hz 50/60Hz 60Hz
Remarque: La confi guration de l'oscillation est en fonction de la norme de la fréquence de votre
source d'alimentation locale.
Spécifi cations du système
Pour Windows:
• Système d’exploitation : Windows XP SP2 / Vista / Win7
• CPU : CPU AMD ou Intel à au moins 3.2Ghz ou CPU multi-coeur
• RAM : 1Go (2Go recommandé)
• Carte graphique : 256Mo de mémoire
• CD-ROM : 4x et plus
• Logiciel : décodeur H.264 (Quick Time Player 7.4.1 ou ultérieur)
• Autre : 1 port USB libre, lecteur optique
Remarque: Les spécifi cations peuvent être modifi ées sans préavis.
Page 48

14
Spécifi cations
Modèle Caméra 5 Méga pixels
Capteur d’image 5 Méga (2592x1944 pixels)
Résolution
Photos:
2M(1600x1200); 5M(2560x1920); 8M(3200x2400);
12M(4000x3000);16M(4608x3456)
Vidéo:
1920x1080, jusqu’à 30fps (FULL HD 30f)
1280x720, jusqu’à 30 im/s (HD 30f)
640x480, jusqu’à 30 im/s (VGA 30f)
320x240, jusqu’à 30 im/s (QVGA 30f)
Objectif Objectif zoom optique 5X (6.8 - 34mm /F3.5-3.7)
Format de chier MP4(H.264), JPEG, WAV
Mémoire externe Carte SD/MMC (jusqu’à 32 Go SDHC)
Af chage LCD LCD 7.6 cm (3” LCD)
Zoom numérique 4X
Sortie TV Sortie télévision HD HDMI; Sortie AV (NTSC / PAL)
Interface USB 2.0 High Speed (1.1 compatible)
Dictaphone Oui
Microphone Oui
Haut-parleur Oui
Batterie Batterie rechargeable Li-ion compatible NP60
DC Input 5V,1A
Condition
d’utilisation
Température : 0~45°C
Humidité : 65 ± 20% RH
Remarque : Les spécifi cations sont sujettes à modifi cation sans préavis.
Page 49

Italiano
Videocamera ad alta definizione
Manuale dell’utente
Page 50

Benvenuti!
Vi ringraziamo per l’acquisto di questo prodotto.
Per il suo sviluppo ci siamo impegnati molto e a lungo e speriamo che il nostro lavoro vi garantisca
anni di utilizzo senza problemi.
Avviso di sicurezza:
1. Non lasciar cadere, forare o smontare il dispositivo; in caso contrario, la garanzia non sarà più
valida.
2. Evitare il contatto con l’acqua e maneggiare il dispositivo con mani asciutte.
3. Non esporre l’apparecchio ad alte temperature o a luce solare diretta. Ciò potrebbe provocare
danni al dispositivo.
4. Maneggiare con cura. Evitare forti pressioni sul corpo del dispostivo.
5 Per la propria incolumità, evitare di utilizzare l’apparecchio durante temporali o bufere.
6. Non usare batterie di tipo diverso da quello specifi cato. L’impiego di batterie errate potrebbe
portare a danni seri.
7. Nel caso in cui il dispositivo resti inutilizzato per lunghi periodi di tempo, rimuovere la batteria, in
quanto una batteria deteriorata può compromettere la funzionalità del dispositivo stesso.
8. In presenza di perdite di liquido o distorsioni, rimuovere la batteria.
9. Utilizzare esclusivamente accessori forniti dal produttore.
10. Tenere il dispositivo fuori dalla portata dei bambini.
11. Rischio di esplosione se la batteria viene sostituita con una di tipo errato.
12. Smaltire le batterie usate secondo le istruzioni.
Le batterie e le batterie ricaricabili non devono
essere smaltite insieme ai rifi uti domestici!
Riciclarle presso il centro di raccolta differenziata
più vicino. Insieme, potremo contribuire a
proteggere l’ambiente.
Page 51

1
Preparazione della videocamera
Conoscere le parti della videocamera
1
Pulsante d’alimentazione
Tasto direzionale:
2
Joystick Sinistra / Mode / Esci
3
Joystick su / AF
4
joystick Diritto / Menu / OK
5
Tasto scelta rapida luce ash
6
Joystick Down / messa a fuoco
7
Indicatore LED
8
Riproduzione
9
Video Recording
10
Altoparlante
11
Ingrandisci/Aumenta volume
12
Riduci/Abbassa volume
13
Otturatore
14
Uscita HDMI
15
Porta USB
16
Connettore uscita TV/cuf a
17
Slot scheda SD/MMC
18
Attacco treppiede
19
Strobo ash
20
Microfono
1 2
4
5
6
3
7
8
9
10
11
12
13
16
14
15
18
17
19
20
Page 52

2
Inserire la batteria
Videocamera con batteria al litio inclusa
Far scivolare l’estremità del connettore della batteria al litio come indicato dalla direzione della
freccia ed assicurarsi che i contatti metallici siano allineati con quelli dell’alloggiamento.
Inserire la scheda di memoria SD/MMC( )
La videocamera è dotata di una memoria interna, ma è possibile inserire schede di memoria SD/
MMC addizionali per espandere la capacità della sua memoria.
1. Sollevare il coperchio della scheda di memoria come indicato.
2. Inserire la scheda sencondo la direzione indicata fi no a quando non raggiunge la fi ne dello slot.
3. Una volta inserita con successo la scheda, apparirà sullo schermo l’icona (
) e la memoria
interna divverrà inaccessibile.
Per rimuovere la scheda, premerla e rilasciarla e poi estrarla delicatamente.
4. Chiudere il coperchio.
* Quando si usa una scheda nuova, consigliamo di formattarla con la videocamera o altri
dispositivi.
* La videocamera utilizzerà la scheda di memoria inserita come supporto di memorizzazione
principale. I fi le memorizzati sulla memoria interna saranno disponibili solo una volta rimossa
la scheda di memoria inserita.
Solo per il modello selezionato. Per i dettagli fare riferimento alla documentazione acclusa alla confezione.
Page 53

3
Caricamento della batteria
Connettere un’estremità dell’adattatore alla videocamera e l’altra estremità a una presa di corrente.
Una volta inserito correttamente l’adattatore USB, si verifi cheranno le seguenti circostanze a
seconda delle specifi che della videocamera:
Videocamera con batteria al litio inclusa
Caricare la batteria per almeno 8 ore se è al suo primo utilizzo.
1. Connettere un’estremità dell’adattatore CA fornito in dotazione alla porta USB della
videocamera e l’altra estremità a una presa di corrente.
OPPURE
Connettere un’estremità del cavo USB fornito in dotazione alla porta USB della videocamera e
l’altra estremità a un PC acceso. Assicurarsi che la videocamera sia spenta.
2. Il LED di ricarica diventa rosso e ha inizio la fase di ricarica.
3. In caso d’interruzione della ricarica o quando la ricarica del gruppo batterie è completata, il LED
si spegne .
In caso d’utilizzo di un PC per caricare la batteria, non accendere la videocamera o la
ricarica verrà interrotta.
Regolare e fi ssare la cinghia
Fissare la cinghia all’apposito aggancio sul lato anteriore della videocamera e poi fi ssare l’altra
estremità sull’aggancio del retro della videocamera come illustrato in fi gura.
1. Aprire la stoffa della cinghia.
2. Regolare la lunghezza della cinghia in base alle dimensioni della mano.
3. Chiudere e fi ssare la stoffa della cinghia.
Page 54

4
Operazioni preliminari
Accensione/spegnimento del dispositivo
Per accendere la videocamera, aprire il pannello LCD o premere il pulsante di alimentazione .
Per spegnere la videocamera, chiudere il pannello LCD o premere il pulsante di alimentazione .
Se, una volta completate le procedure descritte sopra, la videocamera non si accende, verifi care che
i seguenti passaggi siano stati effettuati correttamente: Le batterie sono inserite correttamente. La
batteria o la batteria sono suffi cientemente cariche.
L’impostazione [Auto Off] può far sì che la videocamera si spenga automaticamente se inutilizzata per
un certo periodo di tempo.
Selezione della modalità
1. Utilizzare il pulsante Sinistra per accedere al menu Mode (modalità).
2. Utilizzare i pulsanti Su o Giù per selezionare la voce desiderata.
3. Utilizzare il pulsante Destra per confermare.
4. Utilizzare il pulsante Sinistra per uscire.
Scegliere la lingua dello schermo
Accendere → entrare in modalità Impostazione → selezionare la voce Lingua → utilizzare i
pulsanti Su o Giù tper selezionare la lingua → utilizzare il pulsante Destra per confermare.
Impostare data e ora
Accendere → entrare in modalità Impostazione →selezionare la voce Orologio →utilizzare i
pulsanti Su o Giù per selezionare i numeri per i campi YY/MM/DD e HH:MM → utilizzare il pulsante
Destra per confermare ciascun campo → utilizzare il pulsante Sinistra per uscire.
Page 55

5
Interpretare l’indicatore di durata della batteria
Icona Descrizione
Carica competa
Carica media
Carica quasi esaurita
* Il fl ash sarà disabilitato.
Carica esaurita
Nota: onde evitare improvvisi spegnimenti per mancanza di corrente, consigliamo di sostituire
la batteria quando l’icona indica carica quasi esaurita.
Interpretare le icone sullo schermo
Modalità fotocamera:
1
Icona Modalità (modalità
fotocamera)
2
Numero di registrazioni
3
AF
4
Esposizione
5
Modalità fl ash
6
Risoluzione foto
7
Risoluzione video
8
Scheda di memoria inserita
9
Durata della batteria
10
Stabilizzatore( )
11
Tipo di messa a fuoco
12
Effetto
13
Bilanciamento del bianco
14
Modalità istantanea
1
2 4 5 6 7 8 9
11
12
13
14
10
3
Solo per il modello selezionato. Per i dettagli fare riferimento alla documentazione acclusa alla confezione.
Page 56

6
Modalità riproduzione:
1
Icona Modalità (modalità
riproduzione)
2
Registrazione corrente/totale
3
Formato fi le
4
Scheda di memoria inserita
5
Durata della batteria
6
Tempo di registrazione
1 2 3 4 5
6
Modalità vocale:
1
Icona Modalità (modalità voce)
2
Numero di registrazioni
3
Scheda di memoria inserita
4
Durata della batteria
5
Registrazione vocale
1
2 3 4
5
Page 57

7
Funzionamento di base
Registrazione di un videoclip
1. Regolazione della messa a fuoco
Di solito la videocamera è in grado di mettere a fuoco automaticamente senza alcuna regolazione. Se
desiderate scattare foto ravvicinate, premete il pulsante Giù per passare il modalità Macro (
).
2. AF:
Quando si registra in un posto senza lo zoom in / zoom out o muoversi, è possibile attivare la funzione
di blocco AF muovendo il joystick in su
(). Per disabilitare questa funzione, spostare il joystick in su
ancora.
3. Premere il pulsante Record (Registra) (
) per avviare la registrazione.
4. Uitlizzare i pulsanti di Zoom (
/ ) per ingrandire o ridurre l’immagine a schermo.
5. Premere il pulsante Destra per mettere in pausa e Sinistra per
riprendere.
6. Per interrompere la registrazione, premere nuovamente il pulsante
Record (
).
Scattare una fotografi a
1. Regolazione della messa a fuoco:
Di solito la videocamera è in grado di mettere a fuoco automaticamente senza alcuna regolazione. Se
desiderate scattare foto ravvicinate, premete il pulsante Giù per passare in modalità Macro (
).
2. AF:
Quando si riprende in un punto senza utilizzare lo zoom e senza spostarsi, è possibile attivare la
funzione di blocco della messa a fuoco automatica premendo il pulsante Su
(). Per disabilitare questa
funzione, premere nuovamente il pulsante Su.
3. Zooming:
Uitlizzare i pulsanti di Zoom (
/ ) per ingrandire o ridurre l’immagine a schermo.
4. Per una migliore qualità, si consiglia di tenere fermo il pannello LCD onde evitare che l’immagini risulti
sfocata a causa del tremolio della mano.
5. Premere il pulsante Shutter (otturatore) (
) a metà corsa, il riquadro
di messa a fuoco diventa giallo attivando la messa fuoco automatica.
Quando il riquadro diventa verde, premere a fondo il pulsnate per
scattare la foto.
Registrare un clip audio
1. Entrare in modalità Voice (vocale).
2. Premere il pulsante Record (Registra)
( ) per avviare la registrazione.
3. Premere il pulsante Destra per mettere in pausa e Sinistra per riprendere.
4. Per interrompere la registrazione, premere nuovamente il pulsante Record
( ).
80cm ~
1cm ~ 80cm
Focus frame
Page 58

8
Riproduzione
1. Entrare in modalità Playback (riproduzione) ( ) .
2. Inizierà la riproduzione dell’ultima foto, video clip o clip audio registrato.
3. Utilizzare i pulsanti Su o Giù per passare da un fi le all’altro.
4. Il fi le selezionato verrà automaticamente visualizzato o riprodotto.
Solo per il modello selezionato. Per i dettagli fare riferimento alla documentazione acclusa alla confezione.
Page 59

9
Impostazioni avanzate
Impostazione delle opzioni di MENU
Le voci di menu offrono diverse opzioni per regolare in maniera precisa le funzioni della
videocamera. La seguente tabella illustra i dettagli delle operazioni di menu:
Come fare per… Azione
Aprire il menu in modalità Camera/
Riprodoziore
Utilizzare il pulsante Destra.
Muovere la barra di evidenziazione Utilizzare i pulsanti Su o Giù
Confermare una voce Utilizzare il pulsante Destra.
Uscire da un menu/Tornare al menu
precedente
Utilizzare il pulsante Sinistra.
Opzioni di menu in modalità videocamera
Accendere → entrare in modalità Camera →Utilizzare il pulsante Destra.
Voce Opzione Descrizione
Video
Resolution
(Risoluzione
video)
Per le specifi che sulla risoluzione, fare riferimento alla documentazione
acclusa alla confezione.
Still
Resolution
(Risoluzione
foto)
Per le specifi che sulla risoluzione, fare riferimento alla documentazione
acclusa alla confezione.
Stabilizer
(Stabilizzatore)
On/Off (Attivo/
Disattivo)
Abilita/Disabilità la funzione di stabilizzazione dell’immagine. La
funzione di stabilizzazione può evitare che l’immagine risulti sfocata
a causa del tremolio della mano.
Night
Mode
(Modalità
notturna)
On/Off (Attivo/
Disattivo)
Consente di scattare una fotografia al buio. Dato che la velocità
dell’otturatore rallenterà quando si scattano foto in un luogo buio,
consigliamo di utilizzare un treppiede onde evitare la sfocatura
dovuta al tremolio della mano. Attenzione: I disturbi all’immagine
aumentano quando NightShot è abilitato. Attenzione: Lo
stabilizzatore è disabilitato quando NightShot è abilitato.
AF
On/Off (Attivo/
Disattivo)
Abilita/Disabilita la funzione di messa a fuoco automatica.
Focus
(Messa a
fuoco)
Normale Scatta fotografi a a distanza normale.
Macro Selezionare la modalità Macro per scattare foto da motto vizino.
Solo per il modello selezionato. Per i dettagli fare riferimento alla documentazione acclusa alla confezione.
Page 60

10
Voce Opzione Descrizione
Flash (Flash
Auto
Il fl ash si attiverà automaticamente in caso di illluminazione
insuffi ciente.
Force
(Disattivo)
Si forza il fl ash ad attivarsi ad ogni scatto.
Off (Disattivo) Il fl ash è disabilitato.
Snap Mode
(Modalità
istantanea)
Single
(Singolo)
La videocamera effettuerà un singolo scatto quando viene premuto
il pulsante dell’otturatore.
Self-Timer
(Autoscatto)
La videocamera effettuerà uno scatto con dieci secondi di ritardo
quando viene premuto il pulsante dell’otturatore.
Continuous
(Continuo)
La videocamera effettuerà una sequenza di scatti quando viene
premuto il pulsante dell’otturatore.
Exposure
(Esposizione)
-2~+2
Regolare manualmente l’esposizione per ottenere un migliore
effetto quando l’anteprima dell’immagine appare troppo chiara o
troppo scura. Un valore positivo indica che l’immagine sarà più
chiara del normale, mentre un valore negativo indica che l’immagine
sarà più scura.
Flicker
(Sfarfallio)
50Hz/60Hz
Impostare la frequenza di sfarfallio a 50Hz o 60Hz. Per ulteriori
informazioni, fare riferimento alla tabella "Impostazioni di
riferimento per lo sfarfallio" nell'Appendice.
Date Stamp
(Data
impressa)
On/Off (Attivo/
Disattivo)
Abilitare questa funzione per imprimere la data su ciascuna
immagine.
White Balance
(Bilanciamento
del bianco)
Auto
(Automatico)
La videocamerà effettuerà la regolazione automatica del
bilanciamento del bianco.
Sunny
(Soleggiato)
Impostazione adatta per la registrazione all’esterno con cielo
sereno.
Cloudy
(Nuvoloso)
Impostazione adatta per la registrazione all’esterno con cielo
coperto o ambienti umbratili.
Fluorescent
(Fluorescente)
Impostazione adatta per riprese di interni con illuminazione
fl uorescente o ambienti con alta temperatura del colore.
Tungsten
(Tungsteno)
Impostazione adatta per riprese di interni con illuminazione
incandescente o ambienti con bassa temperatura del colore.
Effect
(Effetto)
Normal
(Normale)
Effettua registrazioni con colori naturali.
Black&White
(Bianco e nero)
Effettua registrazioni in bianco e nero.
Classic
(Classico)
Effettua registrazioni con colori in tono seppia.
Le voci di menu “Video resouzion” e “Risolione Foto” dipendono dal modello. Per i
dettagli fare riferimento alla documentazione acclusa alla confezione.
Page 61

11
Opzioni di menu in modalità riproduzione
Accendere → entrare in modalità Riproduzione → Utilizzare il pulsante Destra.
Voce Opzione Descrizione
File Info (Info
fi le)
-
Visualizza il nome del fi le, la data e ora di registrazione, le
dimensioni e la durata.
Slide show
(Presentazione)
On/Off (Attivo/
Disattivo)
Avvia la presentazione d’immagini. / Ripete la riproduzione di
tutti i clip video.
Delete One
(Elimina uno)
Yes/No
(Sì/No)
Elimina il fi le corrente.
Delete All
(Elimina tutti)
Yes/No
(Sì/No)
Elimina tutti i fi le
Opzioni di menu in modalità impostazioni
Accendere entrare in modalità Impostazione → Utilizzare il pulsante Destra.
Voce Opzione Descrizione
Beep (Bip) On/Off Abilita/Disabilita il bip
Start Up(Avvio)
Menu Utilizzare la schermata d’avvio predefi nita.
Camera Utilizzare la modalità Camera come schermata d’avvio.
Auto Off
(Spegnimento
automatico)
Off
1min/3min/
5min
Imposta entro quanto tempo la videocamera si spegnerà
automaticamente se non utilizzata. L’impostazione su [Off] farà sì
che la videocamera rimanga accesa fi no a quando è alimentata.
AV Mode
(Modalità
AV)
Menu Consente di selezionare tra Cuffi a e Uscita AV.
Earphone
(Cuffi e)
Riproduce l’audio attraverso le cuffi e.
AV Out
(Uscita AV)
Collegamento ad un televisore.
TV System
(Modalità TV)
NTSC
Imposta il sistema TV su NTSC. Questa opzione funziona in
America, Taiwan, Giappone e Corea.
PAL
Imposta il sistema TV su PAL. Questa opzione funziona in
Europa, Cina, Giappone e Hong Kong.
Page 62

12
Voce Opzione Descrizione
USB Mode
(Modalità
USB)
Disk
(Disco)
Quando è connessa a un PC, la videocamera automaticamente
entra in modalità Disk (disco rimovibile).
Lingua - Consente di selezionare la lingua utilizzata per l’OSD.
Clock (Orologio) - Imposta data e ora.
Format
(Formatta)
Yes/No
Formatta il supporto di memorizzazione. Da notare che tutti ifi le
memorizzati sul supporto verranno cancellati.
Reset Default
(Predefi nito)
Yes/No
Ripristina i valori predefi niti di fabbrica. Da notare che le
impostazioni attuali saranno sovrascritte.
Page 63

13
Appendice
Impostazioni di riferimento per lo sfarfallio
Area
England Germany France Italy Spain Russia
Impostazione
50Hz 50Hz 50Hz 50Hz 50Hz 50Hz
Area
Portugal America Taiwan China Japan Korea
Impostazione
50Hz 60Hz 60Hz 50Hz 50/60Hz 60Hz
Note: l’impostazione dello sfarfallio è basata sulla frequenza standard dell’alimentazione di
zona.
Requisiti del sistema
Per Windows:
• Sistema operativo: Windows XP SP2 / Vista / Win7
• CPU: AMD o Intel CPU con core a 3,2 GHz o più
• RAM di sistema: 1 GB (2 GB consigliati)
• Scheda Grafi ca: 256 MB di memoria
• CD-ROM velocità di 4x o superiore
• Software: decoder H.264 (Quick Time Player 7.4.1 o superiore)
• Altro: 1 porta USB, unità ottica
Note: le specifi che possono variare senza preavviso.
Page 64

14
Specifi che tecniche
Modello Videocamera da 5 mega pixel
Sensore
immagine
5 Mega (2592x1944 pixels)
Risoluzione
Fotografi a:
2M(1600x1200); 5M(2560x1920); 8M(3200x2400);
12M(4000x3000);16M(4608x3456)
Registrazione video:
1920x1080, fi no a 30fps (FULL HD 30f)
1280x720, fi no a 30fps (HD 30f)
640x480, fi no a 30fps (VGA 30f)
320x240, fi no a 30fps (QVGA 30f)
Obiettivo Zoom ottico 5X (6.8 - 34mm /F3.5-3.7)
Formato File MP4(H.264), JPEG, WAV
Memoria esterna Scheda SD/MMC (fi no a 32GB SDHC)
Schermo LCD 7.6 cm LCD (3” LCD DISPLAY)
Zoom digitale 4X
Uscita TV Uscita HDTV HDMI; uscita AV composito (NTSC/PAL)
Interfaccia USB 2.0 ad alta velocità (compatibile 1.1)
Registrazione
vocale
Sì
Microfono Sì
Altoparlante Sì
Batteria batteria ricaricabile agli ioni litio compatibile NP60
Entrata CC: 5V,1A
Condizioni di
funzionamento
Temperatura: 0 ~ 45 °C
Umidità: 65 ± 20% RH
Nota: Le specifi che tecniche sono soggette a modifi ca senza preavviso.
Page 65

Español
Videocámara de alta defi nición
Manual del usuario
Page 66

Si ha llegado la hora de deshacerse del
producto, recicle todos los componentes que pueda. ¡Las pilas y baterías
recargables no se deben desechar junto
con la basura doméstica! Recíclelas en
el punto limpio local. Juntos podemos
ayudar a proteger el medio ambiente.
Bienvenido
Nos complace que haya elegido nuestro producto.
Antes de utilizarlo, lea con atención la siguiente información.
Aviso de seguridad
1. No deje caer, golpee ni desmonte la videocámara; de lo contrario podría anular la
garantía.
2. Evite todo contacto con el agua y séquese bien las manos antes de utilizarla.
3. No exponga la videocámara a temperaturas altas ni la deje a la luz directa del sol. Si lo
hace podría dañarla.
4. Utilice la videocámara con cuidado. Evite presionar fuerte el cuerpo de la videocámara.
5. Por su propia seguridad, evite utilizar la videocámara cuando hay una tormenta o
relámpagos.
6. No utilice pilas con especifi caciones distintas. Si lo hace podría provocar daños serios.
7. Quite la batería si no va a usarla durante mucho tiempo, pues las baterías deterioradas
pueden afectar al funcionamiento de la videocámara.
8. Quite la batería si muestra señas de derrames o deformación.
9. Utilice sólo los accesorios suministrados por el fabricante.
10. Mantenga la videocámara fuera del alcance de los niños.
11. Riesgo de explosión si las pilas se cambian por otra incorrecta.
12. Deseche las pilas usadas según las instrucciones.
Page 67

1
Preparar la videocámara
Conocer los componentes de la cámara
1
Botón de encendido
Botón direccional:
2
Botón izqdo. del mando/Modo/
Salir
3
Botón Arriba del mando/AF
4
Botón Dcho. del mando/Menú/
Aceptar
5
Tecla directa de la luz del
ash
6
Botón Abajo del mando/
Enfocar
7
Indicador LED de estado
8
Botón Reproducir
9
Grabar vídeo
10
Altavoz
11
Botón Acercar/Subir volumen
12
Botón Alejar/Bajar volumen
13
Botón del obturador
14
Conector de salida HDMI
15
Puerto USB
16
Conector salida TV/
auriculares
17
Tapa de la tarjeta de memoria
/ ranura de la tarjeta SD/MMC
18
Ranura para trípode
19
Luz del Flash
20
Micrófono
1 2
4
5
6
3
7
8
9
10
11
12
13
16
14
15
18
17
19
20
Page 68

2
Colocar la batería
Videocámara con batería de litio
Deslice el extremo del conector de la batería de litio según la dirección de la fl echa
mostrada y asegúrese de que los contactos metálicos están alineados con los contactos del
compartimiento.
Insertar la tarjeta SD/MMC ( )
La videocámara tiene memoria interna para el almacenamiento, pero puede insertar una tarjeta de
memoria SD/SDHC/MMC/MMC 2.0 para ampliar su capacidad de memoria.
1. Levante la tapa de la tarjeta de memoria como se muestra.
2. Inserte la tarjeta según la dirección indicada hasta que alcance el extremo de la ranura.
3. Cuando la tarjeta esté insertada correctamente, aparecerá el icono (
) en la pantalla y no se
podrá acceder a la memoria interna.
Para sacar la tarjeta, presiónela para liberarla y tire de ella suavemente.
4. Coloque la tapa de nuevo.
* Cuando utilice una tarjeta de memoria nueva, se recomienda que la formatee con la
videocámara o con otros dispositivos.
* La videocámara utilizará la tarjeta de memoria insertada como medio de almacenamiento
principal. Sólo cuando saque la tarjeta insertada podrá tener acceso a los archivos de la
memoria interna.
Solo en ciertos modelos. Consulte el texto impreso en el paquete para obtener las
especi caciones detalladas.
Page 69

3
Cargar la batería
Conecte un extremo del adaptador a la videocámara y el otro extremo a una toma de corriente.
Cargue la batería al menos durante 8 horas la primera vez que la utilice.
1. Conecte un extremo del adaptador de CA proporcionado al puerto USB de la videocámara y el
otro extremo a una toma de corriente eléctrica.
O BIEN
Conecte un extremo del cable USB proporcionado al puerto USB de la videocámara y el
otro extremo a un equipo conectado a la alimentación. Asegúrese de que la videocámara está
apagada.
2. El indicador LED de carga se iluminará en color rojo y la carga se iniciará.
3. Cuando la carga se interrumpe o la batería está completamente cargada, el indicador de carga
se apagará
Si utiliza su PC para cargar la batería, no proporcione alimentación a la videocámara.
Si lo hace, la carga se detendrá.
Colocar y ajustar la correa muñequera
Coloque la correa en el soporte para la correa en la parte frontal de la videocámara, luego coloque
el otro extremo en el soporte para la correa de la parte posterior de la videocámara, como se
muestra en la ilustración.
1. Abra el protector de la correa muñequera.
2. Ajuste la longitud de la correa según el tamaño de su mano.
3. Cierre y fi je el protector de la correa muñequera.
Page 70

4
Primeros pasos
Encender y apagar la alimentación
Para encender la videocámara, abra la pantalla LCD o presione el botón Power.
Para apagar la videocámara, cierre la pantalla LCD o presione el botón Power.
Si no se enciende la alimentación tras haber completado los procedimientos
anteriores: Las pilas están correctamente colocadas.
La batería insertada tiene/n energía sufi ciente.
La confi guración [Auto Off] (Apagado automático) puede hacer que la videocámara
se apague automáticamente tras estar inactiva durante un tiempo determinado.
Selección del modo
1. Utilizar el Joystick Left (Izquierdo) para entrar en el menú de modo
2. Utilizar el Joystick hacia arriba o abajo para seleccionar el elemento deseado.
3. Utilice el Joystick hacia la Right (Derecho) para confi rmar.
4. Utilice el joystick hacia la Left (Izquierdo) para salir.
Elegir el idioma de la pantalla
Encienda → entre en el modo Setting (Con guración) → seleccione la opción Language
(Idioma) → utilice el Joystick Up (Arriba) o Down (Abajo) para seleccionar el Idioma→ utilice el
Joystick hacia la Right (Derecho) para confi rmar.
Ajustar la fecha y la hora
Encienda → entre en el modo Setting (Con guración) → seleccione la opción Clock (Hora) →
utilice el Joystick Up (Arriba) o Down (Abajo) para seleccionar los números para los campos AA/
MM/DD y HH:MM → utilice el Joystick hacia la Right (Derecho) para confi rmar cada campo →
utilice el Joystick hacia la Left (Izquierdo) para salir.
Page 71

5
Indicador de duración de la batería
Icono Descripción
Batería llena
Batería media
Batería baja
* El luz del Flash se deshabilitarán.
Batería vacía
Nota: Para evitar que la cámara se quede sin energía de repente, se recomienda que cambie
las pilas cuando el icono indique batería baja.
Indicación de iconos en la pantalla
Modo cámara:
1
Icono de modo (modo cámara)
2
Número de grabaciones
3
AF (Enfoque Automático)
4
Exposición
5
Modo fl ash
6
Resolución de instantánea
7
Resolución de vídeo
8
Tarjeta de memoria insertada
9
Duración de la batería
10
Estabilizador( )
11
Cinta de enfoque
12
Efecto
13
Balance de blancos
14
Modo instantánea
1 2 4 5 6 7 8 9
10111213
14
Solo en ciertos modelos. Consulte el texto impreso en el paquete para obtener las
especi caciones detalladas.
3
Page 72

6
Modo reproducir:
1
Icono de modo (modo
reproducir)
2
Actual / grabaciones totales
3
Formato de archivo
4
Tarjeta de memoria insertada
5
Duración de la batería
6
Tiempo de grabación
1 2 3 4 5
6
Modo voz:
1
Icono de modo (modo voz)
2
Número de grabaciones
3
Tarjeta de memoria insertada
4
Duración de la batería
5
Grabar Voz
1 2 3 4
5
Page 73

7
Funciones básicas
Grabar un vídeo
1. Ajuste el enfoque a una confi guración apropiada. Normalmente puede ajustar el enfoque a
( ) para la mayoría de condiciones de grabación. Seleccione ( ) sólo para escenas de
cerca.
AF:
Cuando esté grabando en una ubicación sin acercar/alejar el enfoque o sin moverse del mismo
sitio, puede activar la función de bloqueo AF moviendo el botón del mando hacia arriba ().
Pasa desactivar esta función, mueva el botón del mando hacia arriba de nuevo.
2. Presione el botón Record (Grabar) (
) para iniciar la grabación.
3. Utilice los botones del Zoom (
/ ) para acercar o alejar la imagen en pantalla.
4. Utilice el Joystick Right (Derecho) de pausa y reanudar
la Left (Izquierdo).
5. Presione el botón Record (Grabar) (
) de nuevo para
detener la grabación.
Capturar una imagen fi ja
1. Ajuste el enfoque:
Normalmente la videocámara puede enfocar automáticamente sin ajustar el foco. Si desea
sacar fotografías de primeros planos, puede presionar el botón del Joystick hacia abajo para
pasar al modo Macro
( ).
2. AF (Enfoque Automático)
Cuando graba un anuncio sin ampliación o reducción o con cambio de posición, puede activar
la función de bloqueo AF el joystick hacia arriba (). Para deshabilitar esta función, desplace el
joystick hacia arriba de nuevo.
3. Zoom:
Utilice los botones del Zoom (
/ ) para acercar o alejar la
imagen en pantalla.
4. Para obtener una mejor calidad de imagen, es recomendable sujetar
el panel LCD fi rmemente para evitar que la imagen aparezca borrosa
a causa de las vibraciones de la mano.
5. Presione el botón Obturador (
) hasta la mitad de su recorrido, marco de enfoque se vuelve
amarillo para capturar los objetos, y manténgalo en esa posición para que la videocámara
enfoque automáticamente. Cuando el color del marco de enfoque sea verde, presione el botón
completamente para tomar una imagen estática.
80cm ~
1 cm ~ 80cm
cuadro de
enfoque
Page 74

8
Grabar un archivo de audio
1. Entre en el modo Voice (Voz).
2. Presione el botón Record (Grabar) (
) para iniciar la grabación.
3. Utilice el Joystick Right (Derecho) de pausa y reanudar la Left (Izquierdo).
4. Presione el botón Record (Grabar) (
) de nuevo para detener la grabación.
Reproducir
1. Entre en el modo Playback (Reproducir) ( ).
2. Comenzará la reproducción del último archivo de imagen, vídeo o audio grabado.
3. Utilice el Joystick hacia Up (Arriba) o Down (Abajo) para cambiar entre los archivos.
4. El archivo al que va aparece o comienza a reproducirse automáticamente.
Solo en ciertos modelos. Consulte el texto impreso en el paquete para obtener las
especi caciones detalladas.
Page 75

9
Confi guración avanzada
Ajustar las opciones del menú
Los elementos del menú ofrecen varias opciones para que pueda realizar un ajuste fi no de las
funciones de su videocámara.
La siguiente tabla le ofrece detalles sobre las operaciones del menú:
Cómo... Acción
Abrir el menú en el modo Camera
(Cámara)/ Playback (Reproducir)
Presione el botón Right (Derecho).
Mueva la barra resaltada Presione el botón Up (Arriba) o Down (Abajo).
Confi rme una opción Presione el botón Right (Derecho).
Salir del menú/Regresa al menú
anterior
Presione el botón Left (Izquierdo).
Opciones del menú en el modo Cámara
Encienda → entre en el modo Camera (Cámara) → Utilice el Joystick hacia la Right
(Derecho)
Elemento Opción Descripción
Video
Resolution
(Resolución
vídeo)
Consulte la rotulación del paquete para las especifi caciones de la
resolución.
Still Resolution
(Resolución)
Consulte la rotulación del paquete para las especifi caciones de la
resolución.
Estabilizador Encender/
Apagar
Habilita y deshabilita la función de estabilizador. Esta función
puede evitar que las imágenes aparezcan borrosas a causa de
la vibración de las manos.
Foto noche Encender/
Apagar
Si habilita esta confi guración podrá tomar una fotografía con un fondo
oscuro. Dado que la velocidad del obturador disminuirá al tomar fotos
en un lugar oscuro, es recomendable utilizar un trípode para eliminar
la borrosidad causada por el temblor de las manos.Advertencia: el
ruido se incrementa cuando la función Foto noche está habilitada.
Advertencia: la función de estabilizador se deshabilita cuando la
función de disparo nocturno está habilitada.
AF (Enfoque
Automático)
Encender/
Apagar
Habilita y deshabilita la función de enfoque automático.
Enfoque
Normal Tome los cuadros en distancia original.
Macro Seleccione el modo macro para tomar cuadros en primer plano.
Solo en ciertos modelos. Consulte el texto impreso en el paquete para obtener las
especi caciones detalladas.
Page 76

10
Elemento Opción Descripción
Flash
Auto
(Automático)
El fl ash se activará automáticamente cuando la luz es
insufi ciente.
Force
(Encender)
El fl ash es forzado a saltar en todas las fotos.
Off (Apagar) El fl ash es desactivado.
Snap Mode
(Modo
instantánea)
Uno
La videocámara capturará una única imagen cuando presione el
botón del obturador.
Self-Timer
(Temp.automa.)
La videocámara tardará diez segundos en tomar la siguiente
foto cuando presione el botón del obturador.
Continuous
(Continuo)
La videocámara capturará una secuencia de imágenes cuando
presione el botón del obturador.
Exposure
(Exposición)
-2~+2
Ajusta manualmente la exposición para obtener un mejor efecto
cuando la imagen previsualizada aparezca demasiado brillante
u oscura. Un valor positivo indica que la imagen será más
brillante de lo normal, mientras que un valor negativo oscurece
la imagen.
Flicker
(Parpadeo)
50Hz/60Hz
Ajuste la frecuencia de parpadeo a 50Hz o 60Hz. Para más
información, consulte la tabla "Valores de con guración de
parpadeo".
Date Stamp
(Sello fecha)
Encender/
Apaga
Active esta característica para dejar la fecha marcada en cada
foto.
White Balance
(Balance de
blanco)
Auto
(Automático)
La videocámara ajustará automáticamente el balance de
blancos.
Sunny (Soleado)
Esta confi guración es apropiada para la grabación en el exterior
con sol.
Cloudy
(Nublado)
Esta configuración es apropiada para la grabación en días
nublados o lugares con sombra.
Fluorescent
(Fluorescente)
Esta confi guración es apropiada para la grabación en interiores
con iluminación fl uorescente o entornos con una temperatura
del color alta.
Tungsten
(Tungsteno)
Esta confi guración es apropiada para la grabación en interiores
con iluminación incandescente o entornos con una temperatura
del color baja.
Efecto
Normal Realiza las grabaciones a color natural.
Black&White
(B y N)
Realiza las grabaciones en blanco y negro.
Classic (Clásico) Realiza las grabaciones en color con tono sepia.
Las opciones del menú “Video resolution (Resolución vídeo)” y “Still resolution
(Resolución)” dependen del modelo. Consulte la rotulación del paquete para
especifi caciones detalladas.
Page 77

11
Opciones del menú en el modo Reproducir
Encienda → entre en el modo Playback (Reproducir) → Utilice el Joystick hacia la
Right (Derecho).
Elemento Opción Descripción
File Info
(Info Archivo)
-
Visualiza el título, fecha y hora de grabación, tamaño y
longitud de grabación del archivo.
Slide show
(Presentación)
On/Off
(Encender/
Apagar)
Inicia la presentación de la imagen. / Repite la reproducción
de todos los vídeos.
Delete One
(Eliminar uno)
Yes/No (Sí/No) Eliminar archivo actual.
Eliminar todo Yes/No (Sí/No) Elimina todos los archivos.
Opciones del menú en el modo
Confi guración
Encienda → entre en el modo Setting (Con guración) → Utilice el Joystick hacia la
Right (Derecho).
Elemento Opción Descripción
Beep (Pitido)
On/Off
(Encender/
Apagar)
Activa o desactiva el sonido bip.
Start Up (Inicio)
Menu (Menú) Utilice la pantalla de inicio predeterminada.
Camera
(Cámara)
Utilice el modo Camera (Cámara) como pantalla de inicio.
Auto Off
(Apagado
Automático)
Off(Apagar)
1min/3min/
5min
Ajusta el tiempo de inactividad que ha de transcurrir para que
la cámara se apague automáticamente. Si lo ajusta a [Off]
(Desat.) la cámara permanecerá encendida hasta que se
quede sin batería.
AV Mode
(Modo AV)
Menu (Menú)
Le permite seleccionan a través del Auricular o Salida AV
función.
Earphone
(Auricular)
Reproduce un sonido por los auriculares.
AV Out
(Salida AV)
Conexión a un televisor.
Page 78

12
Elemento Opción Descripción
TV System
(Modo TV)
NTSC
Ajusta el sistema de TV para que sea compatible con NTSC.
Esta opción es válida para América, Taiwán, Japón y Corea.
PAL
Ajusta el sistema de TV para que sea compatible con PAL.
Esta opción es válida para Alemania, Inglaterra, Italia,
Holanda, China, Japón y Hong Kong.
Modo USB Disk (Disco)
Cuando se conecta a un PC, la cámara entrará
automáticamente en el modo Disco (disco extraíble).
Language
(Idioma)
- Le permite seleccionar el idioma usado para el OSD.
Clock (Hora) - Ajusta la fecha y la hora.
Format
(Formatear)
Yes/No (Sí/
No)
Formatea el medio de almacenamiento. Tenga en cuenta
que se borrarán todos los archivos guardados en el medio.
Reset Default
(Predeterminado)
Yes/No (Sí/
No)
Restaura los valores predeterminados de fábrica. Tenga en
cuenta que su confi guración actual será borrada.
Page 79

13
Apéndice
Valores de con guración de parpadeo
Área Inglaterra Alemania Francia Italia España Rusia
Con guración 50Hz 50Hz 50Hz 50Hz 50Hz 50Hz
Área Portugal América Taiwán China Japón Corea
Con guración 50Hz 60Hz 60Hz 50Hz 50/60Hz 60Hz
Nota: La confi guración del parpadeo está basada en la frecuencia estándar de su suministro
de corriente local.
Requisitos del sistema
Para Windows:
• Sistema Operativo: Windows XP SP2/Vista/Win7
• CPU: AMD o Intel CPU con 3.2Ghz o multi core CPU
• RAM del sistema: 1GB (Se recomiendan 2GB)
• Tarjeta Gráfi ca: Memoria de 256MB
• Velocidad del CD-ROM: 4X y superior
• Software: Decodifi cador H.264 (Quick Time Player 7.4.1 o superior)
• Otros: 1 puerto USB disponible, Unidad Óptica
Nota: Las especifi caciones pueden ser modifi cadas sin previo aviso.
Page 80

14
Especifi caciones
Modelo Cámara de 5 megapíxeles
Sensor de
imagen
5 megapíxeles (2592x1944 píxeles)
Resolución
Imagen fi ja:
2M(1600x1200); 5M(2560x1920); 8M(3200x2400);
12M(4000x3000);16M(4608x3456)
Video:
1920x1080 hasta 30fps (30f de Alta Defi nición Completa)
1280x720, hasta 30 fps (HD 30f)
640x480, hasta 30 fps (VGA 30f)
320x240, hasta 30 fps (QVGA 30f)
Objetivo Lente con zoom óptico 5X (6.8 - 34mm /F3.5-3.7)
Formato de
archivo
MP4(H.264), JPEG, WAV
Memoria externa Tarjeta SD/MMC (SDHC de hasta 32 GB)
Pantalla LCD Pantalla LCD de 7.6cm (Pantalla LCD de 3”)
Zoom digital 4X
Salida de TV Salida HDMI HDTV; Salida AV (NTSC y PAL)
Interfaz USB 2.0
Grabación de
audio
Sí
Micrófono Sí
Altavoz Sí
Batería Batería recargable de ion-litio compatible NP60
DC Input 5V,1A
Condiciones de
funcionamiento
Temperatura: 0 – 45º C
Humedad: 65 ± 20% HR
Nota: las especifi caciones están sujetas a cambios sin previo aviso.
 Loading...