

Page 1
X792263MG0
EN USER MANUAL
DE GEBRAUCHSANLEITUNG
FR MANUEL D’UTILISATIO
NL GEBRUIKSAANWIJZING
ES MANUAL DE USO
PT LIVRO DE INSTRUÇÕES PARA
UTILIZAÇÃO
IT LIBRETTO DI USO
SV ANVÄNDNINGSHANDBOK
NO BRUKSVEILEDNING
FI KÄYTTÖOHJEET
DA BRUGSVEJLEDNING
3
7
11
15
19
23
27
31
35
39
43
Page 2

EN USER MANUAL .....................................................................................................................3
DE GEBRAUCHSANLEITUNG
FR MANUEL D’UTILISATION
NL GEBRUIKSAANWIJZING
ES MANUAL DE USO
PT LIVRO DE INSTRUÇÕES PARA UTILIZAÇÃO
IT LIBRETTO DI USO
SV ANVÄNDNINGSHANDBOK
NO BRUKSVEILEDNING
FI KÄYTTÖOHJEET
DA BRUGSVEJLEDNING
..........................................................................................
..........................................................................................
..........................................................................................
....................................................................................................
...................................................................................................
.......................................................................................
................................................................................................
.....................................................................................................
...............................................................................................
............................................................
11
15
19
23
27
31
35
39
43
7
Page 3
FOR PERFECT RESULTS
Thank you for choosing this AEG product. We have created it to give you
impeccable performance for many years, with innovative technologies that help
make life simpler – features you might not nd on ordinary appliances. Please
spend a few minutes reading to get the very best from it.
ACCESSORIES AND CONSUMABLES
In the AEG webshop, you’ll nd everything you need to keep all your AEG
appliances looking spotless and working perfectly. Along with a wide range of
accessories designed and built to the high quality standards you would expect,
from specialist cookware to cutlery baskets, from bottle holders to delicate laundry
bags…
Visit the webshop at:
www.aeg.com/shop
ENVIRONMENT CONCERNS
ENGLISH
3
Recycle the materials with the symbol Put the packaging in applicable
containersto recycle it.
Help protect the environment and human health and to recycle waste of
electricaland electronic appliances. Do not dispose appliances marked with the
symbol with the household waste. Return the product to your local recycling
facility orcontact your municipal ofce.
CUSTOMER CARE AND SERVICE
We recommend the use of original spare parts.
When contacting Service, ensure that you have the following data available
The information can be found on the rating plate.
Model ___________________________
PNC ____________________________
Serial Number ____________________
Page 4

4
W
Z
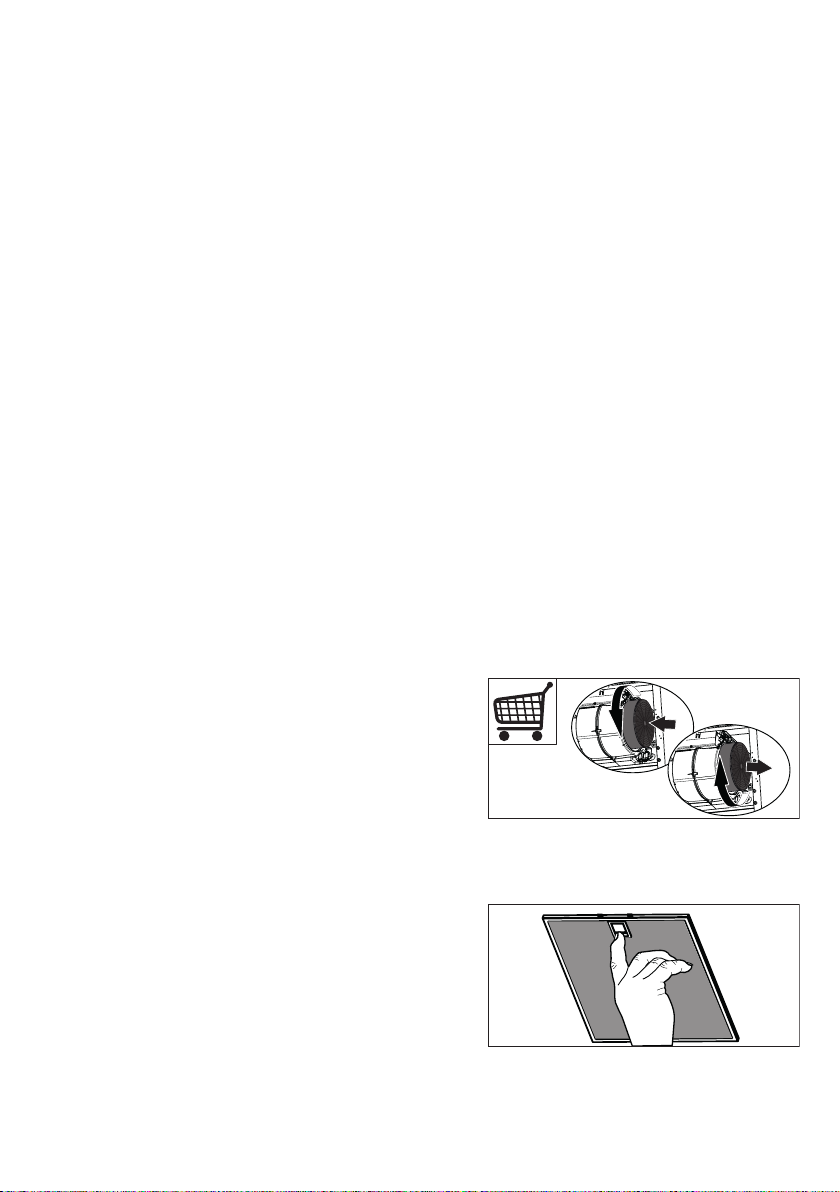
1. RECOMMENDATIONS AND
SUGGESTIONS
• The Instructions for Use apply to several versions of this appliance. Accordingly, you may
nd descriptions of individual features that do
not apply to your specic appliance.
• The manufacturer will not be held liable for
any damages resulting from incorrect or
improper installation.
• The minimum safety distance between the
cooker top and the extractor hood is 650 mm
(some models can be installed at a lower
height, please refer to the paragraphs on
working dimensions and installation).
• Check that the mains voltage corresponds to
that indicated on the rating plate xed to the
inside of the hood.
• For Class I appliances, check that the
domestic power supply guarantees adequate
earthing.
• Connect the extractor to the exhaust ue
through a pipe of minimum diameter 120
mm. The route of the ue must be as short as
possible.
• Do not connect the extractor hood to exhaust
ducts carrying combustion fumes (boilers,
replaces, etc.).
• If the extractor is used in conjunction with
non-electrical appliances (e.g. gas burning
appliances), a sufcient degree of aeration
must be guaranteed in the room in order to
prevent the backow of exhaust gas. The
kitchen must have an opening communicating directly with the open air in order to
guarantee the entry of clean air. When the
cooker hood is used in conjunction with
appliances supplied with energy other than
electric, the negative pressure in the room
must not exceed 0,04 mbar to prevent fumes
being drawn back into the room by the cooker
hood.
• In the event of damage to the power cable, it
must be replaced by the manufacturer or by
the technical service department, in order to
prevent any risks.
• Connect the hood to the mains through a
two-pole switch having a contact gap of at
least 3 mm.
• If the instructions for installation for the gas
hob specify a greater distance specied
above, this has to be taken into account.
Regulations concerning the discharge of air
have to be fullled.
for which it has been designed.
• Never leave high naked ames under the
hood when it is in operation.
• Adjust the ame intensity to direct it onto the
bottom of the pan only, making sure that it
does not engulf the sides.
• Deep fat fryers must be continuously monitored during use: overheated oil can burst into
ames.
• Do not ambè under the range hood; risk of
re.
• This appliance is not intended for use by
persons (including children) with reduced
physical, sensory or mental capabilities, or
lack of experience and knowledge, unless
they have been given supervision or instruction concerning use of the appliance by a
person responsible for their safety.
• Children should be supervised to ensure that
they do not play with the appliance.
• “ CAUTION: Accessible parts may become
hot when used with cooking ap-pliances”.
3. MAINTENANCE
• 1. Switch off or unplug the appliance from
the mains supply before carrying out any
maintenance work.
• Clean and/or replace the Filters after the
specied time period (Fire hazard).
- Activated charcoal lter W These lters are
not washable and cannot be regenerated,
and must be replaced approximately every
4 months of operation, or more frequently
with heavy usage.
- Grease lters Z The lters must be cleaned
every 2 months of operation, or more
frequently for particularly heavy usage, and
can be washed in a dishwasher.
2. USE
• The extractor hood has been designed exclu-
• Never use the hood for purposes other than
sively for domestic use to eliminate kitchen
smells.
- Control lights, if present.
• Clean the hood using a damp cloth and a
neutral liquid detergent.
Page 5
ENGLISH
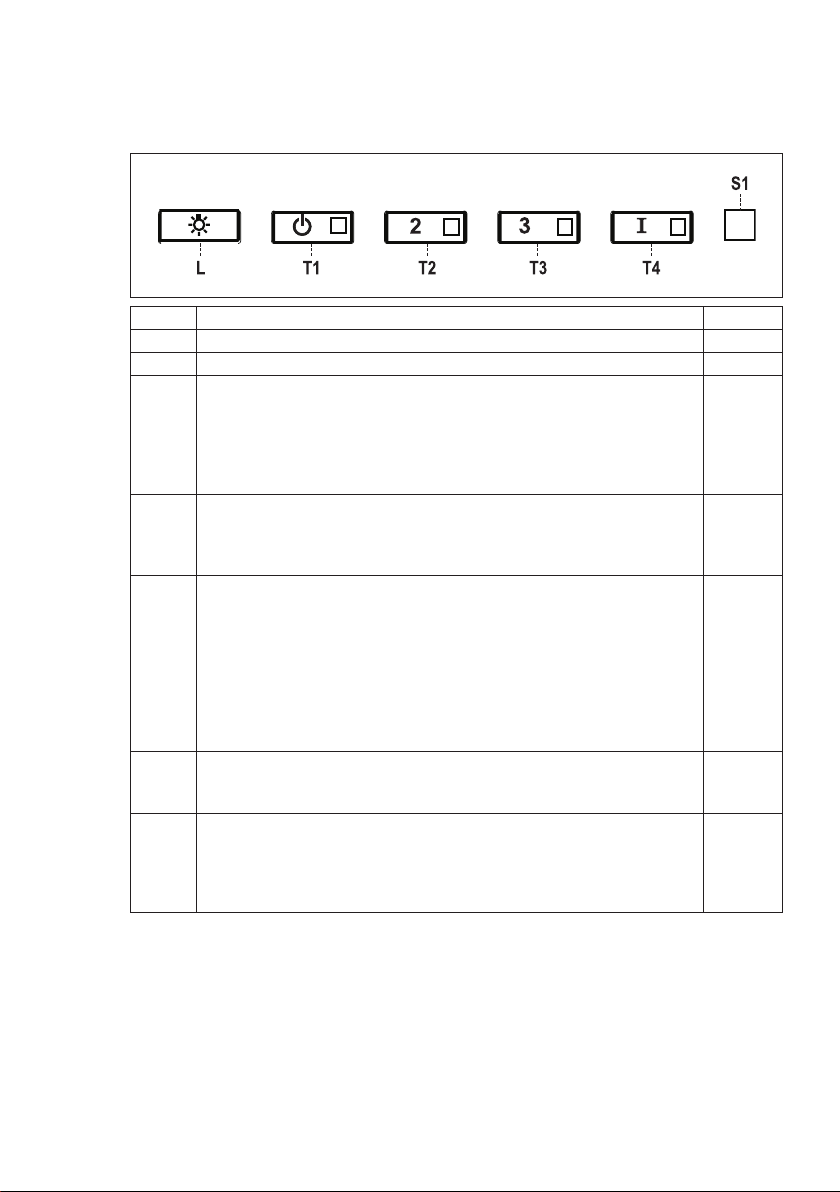
4.
CONTROLS
Button Function Led
L Turns the lights on/off at maximum strength. -
T1 Turns the motor on/off at speed one. Fixed.
T2 Turns the Motor on at speed two.
Press and hold the button for approximately 3 seconds, with all the
loads turned off (Motor and Lights), to turn the Activated Charcoal
Filter alarm on. The relevant LED ashes twice to conrm.
To turn the alarm off, press the button again and hold for at least
3 seconds. The relevant LED ashes once.
T3 Turns the Motor on at speed three.
Press and hold the button for approximately 3 seconds, with all the
loads turned off (Motor and Lights), to perform a reset. The LED
S1 ashes three times.
T4 Turns the Motor on at INTENSIVE Speed.
This speed is timed to run for 10 minutes. At the end of this time,
the system returns automatically to the speed that was set before.
If it is activated with the motor turned off, the hood will switch to
OFF at the end of the time.
Press and hold for 3 seconds to enable the remote control,
indicated by the LED ashing twice.
Press and hold for 3 seconds to disable the remote control,
indicated by the LED ashing just once.
S1 Signals the Metal Grease Filter saturation alarm, indicating that it
is necessary to wash the lters. The alarm is triggered after the
Hood has been in operation for 100 working hours.
When this is activated, it signals the Activated Charcoal Filter
saturation alarm, indicating that the lter must be changed; the
Metal Grease Filters must also be washed. The Activated Charcoal
Filter saturation alarm comes into operation after the Hood has
been working for 200 hours.
5
Fixed.
Fixed.
Fixed.
Fixed.
Flashing.
Page 6
6
5.
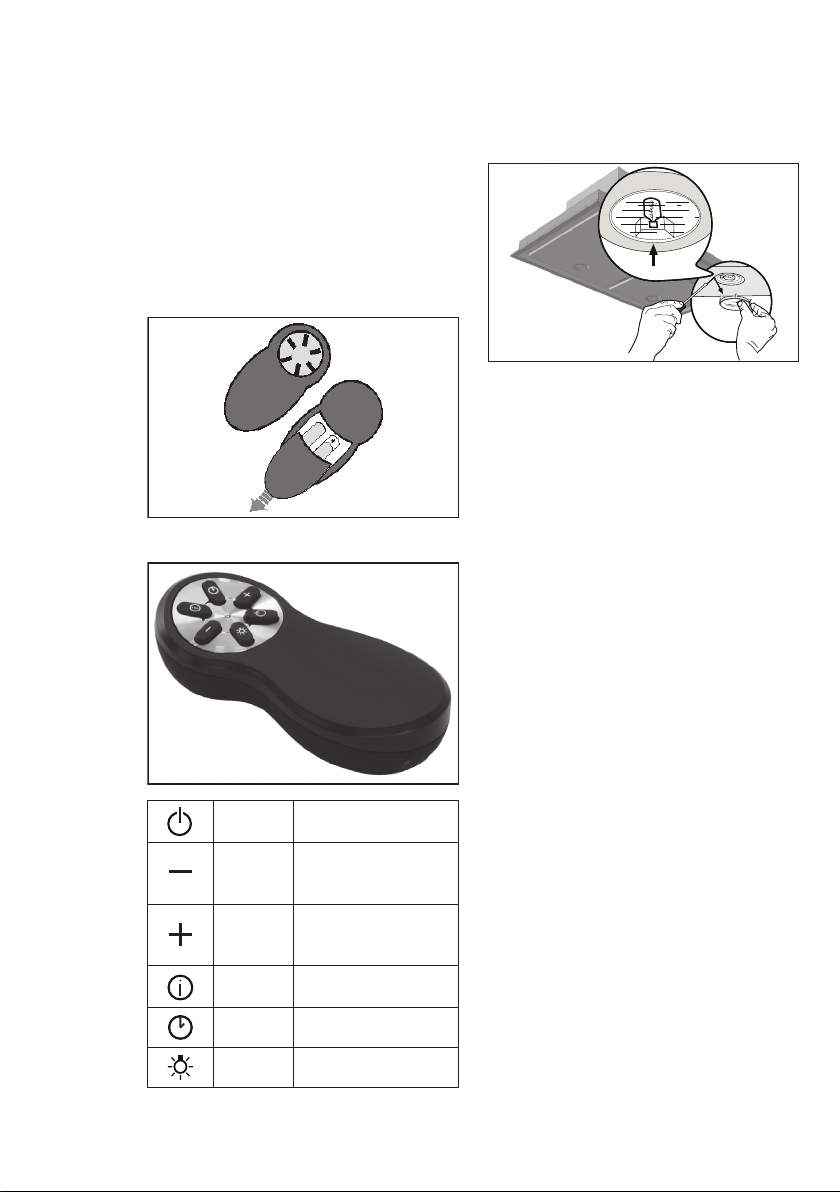
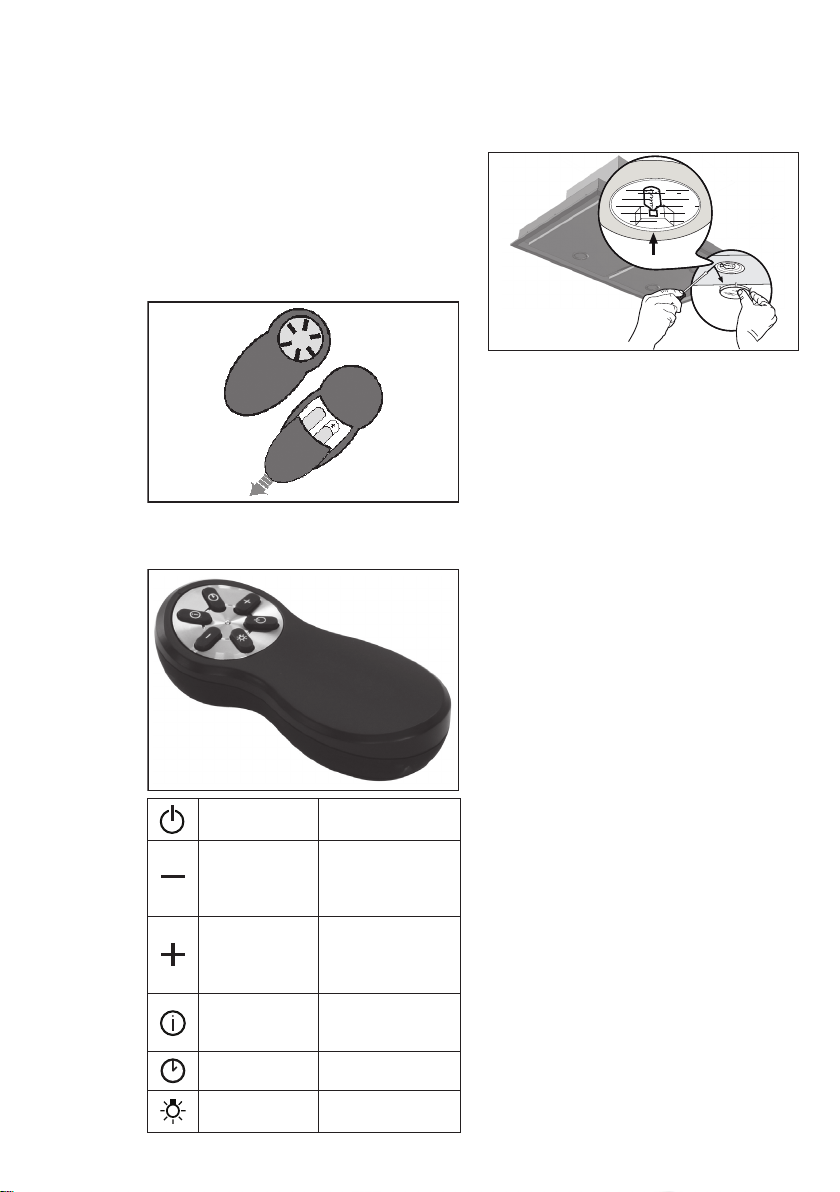
REMOTE CONTROL
The appliance can be controlled using a
remote control powered by a 1.5 V carbon-
zinc alkaline batteries of the standard LR03-
AAA type (not included).
• Do not place the remote control near to
heat sources.
• Used batteries must be disposed of in the
proper manner.
6.
REMOTE CONTROL PANEL
7.
LIGHTING
Motor Motor On / Off
Decreases the
-
working speed each
time it is pressed.
Increases the
-
working speed each
time it is pressed.
Intensive
Light Lights On / Off
Activates the
Intensive function
- -
Page 7
FÜR PERFEKTE ERGEBNISSE
Danke, dass Sie sich für dieses AEG Produkt entschieden haben. Wir haben es
geschaffen, damit Sie viele Jahre von seiner ausgezeichneten Leistung und den
innovativen Technologien, die Ihnen das Leben erleichtern, protieren können.
Es ist mit Funktionen ausgestattet, die in gewöhnlichen Geräten nicht vorhanden
sind. Nehmen Sie sich ein paar Minuten Zeit zum Lesen, um seine Vorzüge
kennen zu lernen.
ZUBEHÖR UND VERBRAUCHSMATERIALIEN
Im AEG Webshop nden Sie alles, was Sie für ein makelloses Aussehen und
perfektes Funktionieren Ihrer AEG Geräte benötigen. Wir bieten auch ein
umfangreiches Zubehörsortiment, das Ihre höchsten Qualitätsansprüche erfüllt,
vom Pro-Kochgeschirr bis zu Besteckkörben, von Flaschenhaltern bis hin zu
Wäschebeuteln für empndliche Wäsche...
Besuchen Sie den Webshop unter:
www.aeg.com/shop
GERMAN
7
UMWELTTIPPS
Recyceln Sie Materialien mit dem Symbol . Entsorgen Sie die Verpackung in
den entsprechenden Recyclingbehältern.
Recyceln Sie zum Umwelt- und Gesundheitsschutz elektrische und elektronische
Geräte. Entsorgen Sie Geräte mit diesem Symbol nicht mit dem Hausmüll.
Bringen Sie das Gerät zu Ihrer örtlichen Sammelstelle oder wenden Sie sich an
Ihr Gemeindeamt.
KUNDENDIENST UND -BETREUUNG
Wir empfehlen die Verwendung von Originalersatzteilen.
Halten Sie folgende Angaben bereit, wenn Sie sich an den Kundendienst wenden.
Die Informationen nden Sie auf dem Typenschild.
Modell ___________________________
Produkt-Nummer PNC ______________
Seriennummer ____________________
Page 8
8
Z
1. EMPFEHLUNGEN
UND HINWEISE
• Diese Gebrauchsanleitung gilt für mehrere
Geräte-Ausführungen. Es ist möglich, dass
einzelne Ausstattungsmerkmale beschrieben
sind, die nicht auf Ihr Gerät zutreffen.
• Der Hersteller haftet nicht für Schäden, die auf
eine fehlerhafte und unsachgemäße Montage
zurückzuführen sind.
• Der minimale Sicherheitsabstand zwischen
Kochmulde und Haube muss 650 mm betragen
(einige Modelle können an einer geringeren
Höhe installiert werden, beziehen Sie sich dazu
auf den Absatz Raumbedarf und Installation).
• Prüfen, ob die Netzspannung mit dem Wert auf
dem im Haubeninneren angebrachten Schild
übereinstimmt.
• Bei Geräten der Klasse I ist sicherzustellen, dass
die elektrische Anlage des Wohnhauses über
eine vorschriftsmäßige Erdung verfügt.
• Das Anschlussrohr der Haube zur Luftaustrittsöffnung muss einen Durchmesser von 120 mm
oder darüber aufweisen. Der Rohrverlauf muss
so kurz wie möglich sein.
• Die Haube darf an keine Entlüftungsschächte
angeschlossen werden, in die Verbrennungsga-
se (Heizkessel, Kamine usw.) geleitet werden.
• Werden im Raum außer der Dunstabzugshaube andere, nicht elektrisch betriebene (z.B.
gasbetriebene) Geräte verwendet, muss für eine
ausreichende Belüftung gesorgt werden. Sollte
die Küche diesbezüglich nicht entsprechen, ist
an einer Aussenwand eine Öffnung anzubringen, die Frischluftzufuhr gewährleistet. Der
Gebrauch ist dann sachgemäß und sicher, wenn
der max. Unterdruck des Raums nicht mehr als
0,04 mbar beträgt.
• Ein schadhaftes Kabel muss vom Hersteller oder
vom technischen Kundendienst ausgewechselt
werden, damit jedes Risiko vermieden wird.
• Bei Anschluss der Haube an das Stromnetz
muss ein zweipoliger Schalter mit einem Öffnungsweg von mindestens 3 mm zwischenge-
schaltet werden.
• Wenn die Anweisungen für die Installation für die
Gaskochgeräts einen größeren Abstand oben
angegeben, muss dies berücksichtigt werden.
Vorschriften über die Entlastung der Luft müssen
erfüllt sein.
• Frittiergeräte müssen während des Gebrauchs
stets beaufsichtigt werden: überhitztes Öl kann
sich entzünden.
• Keine ambierten Speisen unter der Abzugshaube zubereiten: Brandgefahr.
• Dieses Gerät darf nicht von Personen, auch
Kindern, mit verminderten psychi-schen, sensori-
schen und geistigern Fähigkeiten, oder von Personen ohne Erfahrung und Kenntnisse benutzt
werden, sofern sie nicht von für ihre Sicherheit
verantwortlichen Personen beaufsichtigt und
beim Gebrauch des Geräts angeleitet werden.
• Kinder dürfen sich nicht unbeaufsichtigt in der
Nähe des Geräts aufhalten und auf keinen Fall
mit dem Gerät spielen.
• “ACHTUNG: Die zugänglichen Teile können
sehr heiß werden, wenn sie mit Kochgeräten
eingesetzt werden.”
3. WARTUNG
• Bevor Wartungsarbeiten durchgeführt werden,
muss die Stromzufuhr zur Haube unterbrochen
werden, indem der Stecker gezogen oder der
Hauptschalter abgeschaltet wird.
• Bei der Filterwartung müssen die vom Hersteller
empfohlenen Zeiträume zum Austauschen
der Filter genauestens eingehalten werden
(Brandgefahr).
- Geruchslter W Sie können weder gewa-
schen noch wiederverwendet werden und
sind alle 4 Betriebsmonate bzw. bei starkem
Einsatz auch häuger auszutauschen.
W
- Fettlter Z Sie müssen nach 2-monatigem
Betrieb bzw. bei starkem Einsatz auch häu-
ger gereinigt werden, was im Geschirrspüler
möglich ist.
2. BEDIENUNG
• Die Dunstabzugshaube ist ausschließlich zum
Einsatz im privaten Haushalt und zur Beseitigung von Küchengerüchen vorgesehen.
• Unsachgemäßer Einsatz der Haube ist zu
unterlassen.
• Große Flammen bei eingeschalteter Haube
niemals unbedeckt lassen.
• Die Intensivität der Flamme ist so zu regulieren,
dass sie den Topfboden nicht überragt.
- Kontrolllampen der Steuerungen, wo vorhanden.
• Zur Reinigung der Haubenächen Wir empfeh-
len ein feuchtes Tuch und ein mildes Flüssigrei-
nigungsmittel.
Page 9

GERMAN
4.
BEDIENELEMENTE
Taste Funktion LED
L Schaltet die Beleuchtung bei maximaler Intensität ein/aus. -
T1 Schaltet den Motor bei der ersten Betriebsgeschwindigkeit ein/aus. Bleibend.
T2 Schaltet den Motor bei der zweiten Betriebsgeschwindigkeit ein.
Mit zirka 3 Sekunden langem Gedrückthalten der Taste bei
abgeschalteten Verbrauchern (Motor+Licht) wird der Alarm für aktive
Aktivkohlelter aktiviert und die entsprechende LED blinkt zweimal.
Zum Abstellen die Taste erneut 3 Sekunden lang drücken, die
entsprechende LED blinkt ein Mal.
T3 Schaltet den Motor bei der dritten Betriebsgeschwindigkeit ein.
Mit zirka 3 Sekunden langem Gedrückthalten der Taste bei
abgeschalteten Verbrauchern (Motor+Licht) erfolgt ein Reset und
die LED S1 blinkt drei Mal.
T4 Schaltet den Motor bei Intensivgeschwindigkeit ein.
Diese Geschwindigkeit ist auf 10 Minuten zeitgeregelt. Nach
Ablauf dieser Zeit kehrt das System zu der zuvor eingestellten
Geschwindigkeit zurück. Wird sie bei abgestelltem Motor aktiviert,
wird nach Ablauf der Zeit zum Betriebsmodus OFF übergegangen.
Mit 3 Sekunden langem Drücken wird die Fernbedienung aktiviert
und die entsprechende LED blinkt zwei Mal.
Mit 3 Sekunden langem Drücken wird die Fernbedienung deaktiviert
und die entsprechende LED blinkt nur ein Mal.
S1 Meldet den Alarm für Sättigung der Metallfettlter und die
Notwendigkeit, diese zu waschen. Dieser Alarm wird nach 100
effektiven Betriebsstunden der Abzugshaube ausgelöst.
Meldet, sofern aktiviert, den Alarm für Sättigung des
Aktivkohlelters, der ausgewechselt werden muss; auch die
Metallfettlter müssen gewaschen werden. Der Alarm für Sättigung
des Aktivkohlelters wird nach 200 effektiven Betriebsstunden der
Abzugshaube ausgelöst.
Bleibend.
Bleibend.
Bleibend.
Bleibend.
Blinkend
9
Page 10
10
5.
FERNBEDIENUNG
Dieses Gerät kann mit einer Fernbedienung
gesteuert werden, welche mit alkalischen
Zink-Kohle-Batterien 1,5 V des Standardtyps
LR03-AAA versorgt wird (nicht mitgeliefert).
• Die Fernbedienung nicht in die Nähe von
Hitzequellen legen.
• Batterien müssen vorschriftsmäßig
entsorgt werden.
6.
BEDIENFELD DER
7.
BELEUCHTUNG
FERNBEDIENUNG
Motor On / Off Motor
Vermindert bei
-
-
Intensiv-
geschwindigkeit
- -
Licht
jedem Drücken die
Betriebsgeschwindigkeit.
Erhöht bei jedem
Drücken die
Betriebsgeschwindigkeit.
Aktiviert die
Intensivgeschwindigkeit.
On / Off Beleuchtung
Page 11
POUR DES RÉSULTATS PARFAITS
Merci d’avoir choisi ce produit AEG. Nous l’avons conçu pour qu’il vous offre
des performances irréprochables pour longtemps, en intégrant des technologies
innovantes qui vous simplient la vie grâce à des caractéristiques que vous ne
trouverez pas forcément sur des appareils ordinaires. Veuillez prendre quelques
instants pour lire cette notice an d’utiliser au mieux votre appareil.
ACCESSOIRES ET CONSOMMABLES
Dans la boutique en ligne d’AEG, vous trouverez tout ce qu’il vous faut pour que
vos appareils AEG soient toujours impeccables et fonctionnent parfaitement, sans
oublier une vaste gamme d’accessoires conçus et fabriqués selon les critères
de qualité les plus élevés qui soient, des ustensiles de cuisine spécialisés aux
range-couverts, des porte-bouteilles aux sacs à linge délicats...
Visitez notre boutique en ligne
www.aeg.com/shop
FRENCH
11
EN MATIÈRE DE PROTECTION DE L’ENVIRONNEMENT
Recyclez les matériaux portant le symbole . Déposez les emballages dans les
conteneurs prévus à cet effet.
Contribuez à la protection de l’environnement et à votre sécurité, recyclez
vos produits électriques et électroniques. Ne jetez pas les appareils portant le
symbole avec les ordures ménagères. Emmenez un tel produit dans votre
centre local de recyclage ou contactez vos services municipaux.
SERVICE APRÈS-VENTE
N’utilisez que des pièces de rechange d’origine.
Avant de contacter le service, assurez-vous de disposer des informations suivantes:
Vous trouverez ces informations sur la plaque signalétique.
Modèle __________________________
PNC ____________________________
Numéro de série ___________________
Page 12
12
W
1. CONSEILS ET
SUGGESTIONS
• La présente notice d’emploi vaut pour
plusieurs versions de l’appareil. Elle peut
contenir des descriptions d’accessoires ne
gurant pas dans votre appareil.
• Le fabricant décline toute responsabilité en
cas de dommage dû à une installation non
correcte ou non conforme aux règles de l’art.
• La distance minimale de sécurité entre le
plan de cuisson et la hotte doit être de 650
mm au moins.
• Vérier que la tension du secteur correspond
à la valeur qui gure sur la plaquette apposée
à l’intérieur de la hotte.
• Pour les Appareils appartenant à Ia Ière
Classe, veiller à ce que la mise à la terre de
l’installation électrique domestique ait été
effectuée conformément aux normes en
vigueur.
• Connecter la hotte à la sortie d’air aspiré à
l’aide d’une tuyauterie d’un diamètre égal
ou supérieur à 120 mm. Le parcours de la
tuyauterie doit être le plus court possible.
• Ne pas connecter la hotte à des conduites
d’évacuation de fumées issues d’une com-
bustion tel que (Chaudière, cheminée, etc…).
• Si vous utilisez des appareils qui ne
fonctionnent pas à l’électricité dans la pièce
ou est installée la hotte (par exemple: des
appareils fonctionnant au gaz), vous devez
prévoir une aération sufsante du milieu. Si
la cuisine en est dépourvue, pratiquez une
ouverture qui communique avec l’extérieur
pour garantir l’inltration de l’air pur. Pour un
emploi correct et sans risque, la dépression
maximum dans la pièce ne doit pas dépasser
0,04 mbar.
• En cas d’endommagement du cordon
d’alimentation, faites-le remplacer par le
constructeur ou par le service après-vente,
an de prévenir tout risque.
• Brancher la hotte sur le secteur en interposant un interrupteur bipolaire avec ouverture
des contacts d’au moins 3 mm.
• Si les instructions de montage pour la plaque
de cuisson au gaz spécient une plus grande
distance indiquée ci-dessus, cela doit être
pris en compte. Règlement concernant l’évacuation d’air doivent être remplies.
éviter toute sortie latérale de ces dernières
par rapport au fond des marmites.
• Contrôler les friteuses lors de l’utilisation car
l’huile surchauffée pourrait s’enammer.
• Ne pas préparer d’aliments ambés sous la
hotte de cuisine : risque d’incendie.
• Cet appareil ne doit pas être utilisé par des
personnes (y compris les enfants) ayant
des capacités psychiques, sensorielles ou
mentales réduites, ni par des personnes
n’ayant pas l’expérience et la connaissance
de ce type d’appareils, à moins d’être sous
le contrôle et la formation de personnes
responsables de leur sécurité.
• Les enfants doivent être surveillés pour
s’assurer qu’ils ne jouent pas avec l’appareil.
• “ATTENTION : Les parties accessibles
peuvent devenir très chaudes si utilisées
avec des appareils de cuisson.”
3. ENTRETIEN
• Avant de procéder à toute opération d’entre-
tien, débrancher la hotte en retirant la che
ou en actionnant l’interrupteur général.
• Effectuer un entretien scrupuleux et en
temps dû des Filtres, à la cadence conseillée
(Risque d’incendie).
- Filtre anti-odeur W Il ne sont pas lavables
ni régénérables, il faut les remplacer au
moins tous les 4 mois d’emploi ou plus
fréquemment en cas d’emploi particulière-
ment intense.
- Filtres anti-graisse Z Lavables au lavevaisselle, ils doivent être lavés environ tous
les 2 mois d’emploi ou plus fréquemment
en cas d’emploi particulièrement intense.
2. UTILISATION
• La hotte a été conçue exclusivement pour
l’usage domestique, dans le but d’éliminer les
odeurs de la cuisine.
• Ne jamais utiliser abusivement la hotte.
• Ne pas laisser les ammes libres à forte
• Toujours régler les ammes de manière à
intensité quand la hotte est en service.
Z
- Voyants commandes si présents.
• Pour le nettoyage des surfaces de la hotte,
il suft d’utiliser un chiffon humide et détersif
liquide neutre.
Page 13
4.
COMMANDES
Touche Fonction Led
L Allume/Éteint les lumières à la luminosité maximum. -
T1 Démarre/Coupe le moteur à la première vitesse. Fixe
T2 Démarre le moteur à la deuxième vitesse.
Garder la touche appuyée pendant environ 3 secondes, lorsque
toutes les charges sont éteintes (Moteur + Éclairage), l’alarme
des ltres au charbon actif s’active et la led correspondante
clignotera 2 fois.
Pour la désactiver, appuyer de nouveau sur la touche pendant
3 secondes. La led correspondante clignotera 1 fois.
T3 Démarre le moteur à la troisième vitesse.
Garder la touche appuyée pendant environ 3 secondes, lorsque
toutes les charges sont éteintes (Moteur+ Éclairage), le reset
est effectué et la led S1 correspondante clignotera 3 fois.
T4 Démarre le moteur à la vitesse INTENSIVE.
Cette vitesse est temporisée à 10 minutes. Après ce délai, Le
système retourne automatiquement à la vitesse sélectionnée.
Si activée avec le moteur à l’arrêt, à la n du délai le système
passe en mode OFF.
Garder la touche appuyée pendant environ 3 secondes pour
valider la télécommande. La led correspondante clignotera 2
fois.
Garder la touche appuyée pendant 3 secondes pour invalider
la télécommande. La led correspondante clignotera 1 seule fois
S1 Signale l’alarme saturation ltres à graisse métalliques et la
nécessité de les laver. L’alarme entre en fonction après 100
heures de travail effectif de la hotte.
Lorsque l’alarme de saturation du ltre anti-odeur est activée,
c’est l’indice que le ltre doit être remplacé. Laver aussi les
ltres à graisse métalliques. L’alarme de saturation ltre antiodeur au charbon actif entre en fonction après 200 heures de
travail effectif de la hotte.
FRENCH
Fixe.
Fixe.
Fixe.
Fixe.
Clignotante.
13
Page 14
14
5. TELECOMMANDE
Il est possible de commander cet appareil au
moyen d’une télécommande, alimentée avec
des piles alcalines zinc-charbon 1,5 V du
type standard LR03-AAA25 (ne fournis pas).
• Ne pas ranger la télécommande à
proximité de sources de chaleur.
• Ne pas jeter les piles; il faut les
déposer dans les ré-cipients de récolte
spécialement prévus à cet effet.
6. TABLEAU COMMANDES
TÉLÉCOMMANDE
7. ÉCLAIRAGE
Moteur On / Off Moteur
Diminue la vitesse
-
de fonctionnement à
chaque appui.
Augmente la vitesse
-
de fonctionnement à
chaque appui.
Intensive
Éclairage On / Off Éclairage
Active la fonction
Intensive
- -
Page 15
VOOR PERFECTE RESULTATEN
Bedankt dat u voor dit AEG product heeft gekozen. Dit apparaat is ontworpen
om vele jaren uitstekend te presteren, met innovatieve technologieën die het
leven gemakkelijker helpen maken – functies die gewone apparaten wellicht niet
hebben. Neem een paar minuten de tijd om het door te lezen zodat u er optimaal
van kunt proteren.
ACCESSOIRES EN VERBRUIKSARTIKELEN
In de AEG webshop vindt u alles wat u nodig heeft om al uw apparaten van AEG
mooi te houden en perfect te laten functioneren. Ook vindt u hier een groot aantal
accessoires die zijn ontworpen en gebouwd volgens de hoge kwaliteitsnormen
die u verwacht, van speciaal kookgerei tot bestekmandjes en van essenhouders
tot waszakken…
Bezoek de webshop op:
www.aeg.com/shop
DUTCH
15
MILIEUBESCHERMING
Recycle de materialen met het symbool . Gooi de verpakking in een geschikte
verzamelcontainer om het te recyclen.
Help om het milieu en de volksgezondheid te beschermen en recycle het afval
van elektrische en elektronische apparaten. Gooi apparaten gemarkeerd met
het symbool niet weg met het huishoudelijk afval. Breng het product naar het
milieustation bij u in de buurt of neem contact op met de gemeente.
KLANTENSERVICE
Wij raden altijd het gebruik van originele onderdelen aan.
Zorg er als u contact opneemt met de klantenservice voor dat u de volgende
gegevens bij de hand hebt.
De informatie staat op het typeplaatje.
Model ___________________________
PRODUCTNUMMER _______________
Serienummer _____________________
Page 16

16
W
Z
1. ADVIEZEN EN SUGGESTIES
• Deze gebruiksaanwijzing geldt voor verschil-
lende uitvoeringen van het apparaat. Het is
mogelijk dat er een aantal kenmerken worden
beschreven die niet van toepassing zijn op uw
apparaat.
• De fabrikant aanvaardt geen enkele aansprakelijkheid voor schade die voortkomt uit onjuiste
of niet overeenkomstig de regels der kunst
uitgevoerde installaties.
• De minimale veiligheidsafstand tussen de
kookplaat en de wasemkap bedraagt 650 mm
(sommige modellen kunnen lager worden geïnstalleerd, raadpleeg de paragrafen afmetingen
en installatie).
• Controleer of de netspanning correspondeert
met de spanning die aangegeven is op het
plaatje aan de binnenkant van de wasemkap.
• Voor apparaten van klasse I dient u zich ervan
te verzekeren dat het elektriciteitsnet in uw huis
over een goede aarding beschikt.
• Verbind de wasemkap met de luchtuitlaat door
middel van een leiding met een diameter van
120 mm of groter. De leiding moet een zo kort
mogelijke route aeggen.
• Sluit de wasemkap niet aan op afvoerpijpen
van rook die geproduceerd is door verbranding
(verwarmingsketels, open haarden etc.).
• Als er in het vertrek zowel de wasemkap als
apparaten die niet op elektriciteit werken (bijvoorbeeld gasapparaten) worden gebruikt, moet
ervoor worden gezorgd dat het vertrek voldoende geventileerd wordt. Indien de keuken geen
gat in de buitenmuur heeft om de aanvoer van
schone lucht te garanderen, dient dit gemaakt te
worden. Een juist gebruik zonder gevaren wordt
verkregen wanneer de maximale onderdruk in
het vertrek niet hoger is dan 0,04 mbar.
• Om elk risico te voorkomen moet een beschadigde voedingskabel door de fabrikant of door
de technische servicedienst worden vervangen.
• Sluit de wasemkap aan op de netspanning met
een tweepolige schakelaar ertussen met een
opening tussen de contacten van tenminste
3 mm.
• Als de instructies voor installaties voor de
gaskooktoestel een grotere afstand boven aangegeven, moet rekening worden gehouden. Alle
voorschriften betreffende de afvoer van lucht
moeten in acht worden genomen.
• Controleer frituurpannen tijdens het gebruik: de
oververhitte olie zou vlam kunnen vatten.
• Er mag niet onder de afzuigkap geambeerd
worden; brandgevaar
• Dit apparaat mag niet worden gebruikt door
personen (inclusief kinderen) met beperkte
psychische, sensorische en geestelijke ver-
mogens, of door personen zonder ervaring en
kennis, tenzij ze onder toezicht staan of worden
geïnstrueerd over het gebruik van het apparaat
door personen die verantwoordelijk zijn voor
hun veiligheid.
• Kinderen moeten worden gecontroleerd om er
zeker van te zijn dat ze niet met het apparaat
spelen.
• “LET OP: de toegankelijke onderdelen kunnen
erg warm worden als ze met kookap paraten
worden gebruikt.”
3. ONDERHOUD
• Alvorens onderhoudswerkzaamheden uit te
voeren, moet de wasemkap uitgeschakeld worden door de stekker uit het stopcontact te halen
of de hoofdschakelaar om te zetten.
• Voer het onderhoud van de lters altijd tijdig en
nauwgezet uit,volgens de aanbevolen interval-
len (Brandgevaar).
- 4Geurlter W De lters kunnen niet gewas-
sen en niet geregenereerd worden en dienen
bij gebruik van de kap tenminste eens in de
4 maanden of, bij bijzonder intensief gebruik,
vaker te worden vervangen.
- Vetlters Z De lters moeten eens in de 2
maanden of, bij bijzonder intensief gebruik,
vaker gereinigd worden, en kunnen ook in de
vaatwasmachine worden gewassen.
2. GEBRUIK
• De wasemkap is uitsluitend ontworpen voor
huishoudelijk gebruik, voor het elimineren van
kookgeuren. Gebruik de kap nooit op oneigen-
lijke wijze.
• Laat geen hoog brandende branders onbedekt
onder de wasemkapterwijl deze in werking is.
• Regel de vlammen altijd zo dat ze niet langs de
pannen omhoogkomen.
- Lampjes bedieningen, indien aanwezig.
• Om de oppervlakken van de kap schoon te
maken is het voldoende een vochtige doek en
een neutraal reinigingsmiddel te gebruiken.
Page 17

4.
BEDIENINGSELEMENTEN
Toets Functie Led
L Schakelt de lichten op de hoogste lichtsterkte in/uit. -
T1 Schakelt de motor op de eerste snelheid in/uit. Vast.
T2 Schakelt de motor op de tweede snelheid in.
Als de toets ongeveer 3 seconden ingedrukt wordt gehouden als
alle belastingen (motor+lamp) uitgeschakeld zijn, dan wordt het
alarm van de actieve koolstoflters ingeschakeld en knippert de
bijbehorende led twee keer.
Houd de toets nog eens 3 seconden ingedrukt om het alarm uit
te schakelen. De bijbehorende led knippert één keer.
T3 Schakelt de motor op de derde snelheid in.
Als de toets ongeveer 3 seconden ingedrukt wordt gehouden
als alle belastingen uit zijn (motor+lamp), dan wordt de reset
uitgevoerd. De led S1 knippert drie keer.
T4 Schakelt de motor op de HOGE snelheid in.
Deze snelheid is ingesteld op 10 minuten. Na deze periode keert
het systeem automatisch terug naar de eerder gekozen snelheid.
Als deze functie bij uitgeschakelde motor wordt geactiveerd, wordt
de afzuigkap na deze periode in de OFF-stand gezet.
Door deze toets 3 seconden ingedrukt te houden wordt de
afstandsbediening ingeschakeld. De led knippert twee keer.
Als de toets 3 seconden ingedrukt wordt gehouden, wordt de
afstandsbediening uitgeschakeld. De bijbehorende led knippert
slechts één keer.
S1 Signaleert de verzadiging van de metalen vetlters en het feit
dat ze gewassen moeten worden. Het alarm wordt na 100
bedrijfsuren van de afzuigkap ingeschakeld.
Indien actief, signaleert deze led het alarm van de verzadiging
van het geurlter met actieve koolstof dat moet worden vervangen
en ook de metalen vetlters moeten worden gewassen. Het alarm
van de verzadiging van het geurlter met actieve koolstof wordt
na 200 effectieve werkuren van de afzuigkap ingeschakeld.
DUTCH
Vast.
Vast.
Vast.
Vast.
Knipperend.
17
Page 18

18
7.
5.
AFSTANDSBEDIENING
Dit apparaat kan met behulp van een
afstandsbediening worden bestuurd. Deze
werkt op alkaline zinkkoolstof batterijen van
1,5 V van het standaardtype LR03-AAA
(niet inbegrepen).
• Bewaar de afstandsbediening niet in de
buurt van warmtebronnen.
• De batterijen mogen na gebruik niet in
het milieu terechtkomen, gooi ze in de
hiervoor bestemde afvalbakken.
6.
BEDIENINGSPANEEL VAN
VERLICHTING
DE AFSTANDSBEDIENING
Motor aan/uit motor
Verlaagt de
-
werkingssnelheid bij
elke druk.
Verhoogt de
-
werkingssnelheid bij
elke druk.
Hoogste
snelheid
Verlichting aan/uit verlichting
Schakelt de functie
van de hoge snelheid
in
- -
Page 19

PARA OBTENER RESULTADOS PERFECTOS
Gracias por escoger este producto AEG. Lo hemos creado para ofrecerle un
rendimiento impecable durante muchos años, con tecnologías innovadoras
que le facilitarán la vida: características que probablemente no encontrará en
electrodomésticos corrientes. Lea durante algunos minutos este documento para
aprovechar al máximo este electrodoméstico..
ACCESORIOS Y CONSUMIBLES
En la página web de AEG, encontrará todo lo necesario para la perfecta limpieza
y funcionamiento de todos sus electrodomésticos AEG. Junto con una amplia
gama de accesorios diseñados y fabricados conforme a los elevados estándares
de calidad característicos de la marca, desde utensilios de cocina especializados
a cestos de cubiertos, desde portabotellas a bolsas para el lavado de prendas
delicadas...
Visite la tienda virtual en:
www.aeg.com/shop
SPANISH
19
ASPECTOS MEDIOAMBIENTALES
Recicle los materiales con el símbolo . Coloque el material de embalaje en los
contenedores adecuados para su reciclaje.
Ayude a proteger el medio ambiente y la salud pública, así como a reciclar
residuos de aparatos eléctricos y electrónicos. No deseche los aparatos
marcados con el símbolo junto con los residuos domésticos. Lleve el producto
a su centro de reciclaje local o póngase en contacto con su ocina municipal.
ATENCIÓN Y SERVICIO AL CLIENTE
Le recomendamos que utilice recambios originales.
Al contactar con Servicio, cerciórese de tener la siguiente información a la mano.
La información se puede encontrar en la placa de datos técnicos.
Modelo __________________________
Número de producto (PNC) __________
Número de serie ___________________
Page 20

20
W
Z
1. CONSEJOS Y SUGERENCIAS
• Las presentes instrucciones de servicio son
válidas para diferentes modelos de aparato;
por ello puede ser posible que se describan
detalles y características de equipamiento que
no concuerden íntegramente con las de su
aparato concreto.
• El fabricante declina cualquier responsabilidad debida a los daños provocados por una
instalación incorrecta o no conforme con las
reglas.
• La distancia mínima de seguridad entre la
encimera y la campana debe ser de 650mm
(algunos modelos pueden ser instalados a
una altura por debajo, se reeren al párrafo
huella y la instalación).
• Comprobar que la tensión de red corresponda
a la indicada en la placa situada en el interior
de la campana.
• Para los aparatos Clase I asegurarse de que
la instalación eléctrica doméstica posea una
toma de tierra ecaz.
• Conectar la campana a la salida del aire de
aspiración mediante un tubo de 120mm de
diámetro como mínimo. El recorrido del tubo
debe ser lo más corto posible.
• No conectar la campana a tubos de descarga
de humos producidos por combustión (calderas, chimeneas, etc.).
• En el caso que en la cocina se utilice de
manera silmultánea la campana y otros
aparatos no eléctricos (por ejemplo aparatos
de gas), debe existir un sistema de ventilación
suciente para todo el ambiente. Si la cocina
no posee un oricio que comunique con el
exterior, hay que realizarlo para garantizar el
recambio del aire. Un uso propio y sin riesgos
se obtiene cuando la depresión máxima del
local no supera los 0,04 mBar.
• En el caso se dañe el cable de alimentación,
éste debe ser sustituido por el constructor
o por el servicio de asistencia técnica, para
prevenir cualquier riesgo.
• Conectar la campana a la red de alimentación
eléctrica instalando un interruptor bipolar con
apertura de los con-tactos de 3 mm como
mínimo.
• Si las instrucciones de instalación del dispositivo de cocción de gas sugieren la necesidad
de una distancia mayor que la indicada anteriormente, es necesario tenerlas en cuenta.
Es necesario respetar todas las normativas
relativas al conducto de descarga del aire.
• No dejar llamas libres de fuerte intensidad
mientras la campana esté funcionando.
• Regular siempre las llamas de manera que
éstas no sobresalgan lateralmente con respecto al fondo de las ollas.
• Controlar las freídoras durante su uso: el
aceite muy caliente se puede inamar.
• No ambear bajo la campana extractora.
• Este aparato no tiene que ser utilizado por
personas (niños incluídos) con capacidades
psíquicas, sensoriales o mentales reducidas, o bien por personas sin experiencia y
conocimientos en la materia, a menos que
no lo hagan bajo el control, o instruídos, por
personas responsables de su seguridad.
• Controlar que los niños no jueguen con el
aparato.
• “ATENCIÓN: Las partes accesibles pueden
calentarse mucho si utilizadas con aparatos
de cocción.”
3. MANTENIMIENTO
• Antes de efectuar cualquier operación de
mantenimiento, desenchufar la campana de
la red eléctrica o apagar el interruptor general.
• Efectuar un mantenimiento escrupuloso e
inmediato de los ltros, según los intervalos
de tiempo aconsejados (riesgo de incendio).
- Filtros antiolor W No se pueden lavar ni
regenerar, se deben cambiar cada 4 meses
o más a menudo si su uso es muy intenso.
- Filtros antigrasa Z Se pueden lavar en el
lavavajillas y requieren un lavado cada 2
meses aproximadamente o más a menudo
si su uso es muy intenso.
2. USO
• La campana ha sido concebida exclusivamente para un uso doméstico, para eliminar
los olores de la cocina. No utilizarla de manera inadecuada.
- Luces testigo mandos donde estén
presentes.
• Para limpiar las supercies de la campana es
suciente utilizar un trapo mojado y detergente líquido neutro.
Page 21

SPANISH
4.
MANDOS
Tecla Función Led
L Enciende/Apaga las luces a la máxima velocidad. -
T1 Enciende/Apaga el motor a la primera velocidad Fijo.
T2 Enciende el motor a la segunda velocidad.
Manteniendo presionada la tecla por aproximadamente 3
segundos, cuando todas las cargas están apagadas (Motor+Luz)
se activa la alarma de los ltros al carbono activo visualizando
un doble parpadeo del led correspondiente.
Para desactivarlo, se presiona de nuevo la tecla por otros
3 segundos visualizando un parpadeo simple del led
correspondiente.
T3 Enciende el motor a la tercera velocidad.
Manteniendo presionada la tecla por aproximadamente 3
segundos, cuando todas las cargas están apagadas (Motor+Luz)
se efectúa el reset visualizando el triple parpadeo del led S1.
T4 Enciende el motor a la velocidad INTENSIVA.
Esta velocidad está temporizada en 10 minutos. Una vez
terminado el tiempo, el sistema vuelve automáticamente a la
velocidad seleccionada precedentemente. Si se activa desde
motor apagado una vez terminado el tiempo pasa a la modalidad
OFF.
Manteniendo presionada por 3 segundos se habilita el telemando
visualizando un doble parpadeo del mismo led.
Manteniendo presionada la tecla por 3 segundos se deshabilita el
telemando visualizando el parpadeo del led correspondiente una
sola vez.
S1 Señala la alarma de saturación ltros antigrasa metálicos y la
necesidad de lavarlos. La alarma entra en función después de
100 horas de trabajo efectivo de la campana
Señala, cuando está activada, la alarma de saturación ltro
antiolor al carbono activo que debe ser sustituido;deben lavarse
además los ltros antigrasa metálicos. La alarma de saturación
ltro antiolor al carbono activo entra en función después de 200
horas de trabajo efectivo de la campana
21
Fijo.
Fijo.
Fijo.
Fijo.
Intermitente.
Page 22

22
5.
MANDO A DISTANCIA
El aparato puede comandarse con un
mando a distancia que funciona con pilas
alcalinas zinkcarbón de 1,5 V del tipo
standard LR03-AAA (no includo).
• No dejar el mando a distancia cerca de
una fuente de calor.
• Tirar las pilas, cuando se hayan
agotado, en los contenedores especiales
colocados con dicho n.
6.
TABLERO DE MANDOS
7.
ILUMINACIÓN
Motor On /Off motor
Decrementa la
-
velocidad de ejercicio
a cada presión.
Incrementa la
-
velocidad de ejercicio
a cada presión.
Intensiva
Luz On /Off luces.
Activa la función
Intensiva
- -
Page 23

PARA RESULTADOS PERFEITOS
Obrigado por escolher este produto AEG. Criámo-lo para lhe oferecer um
desempenho impecável durante vários anos, com tecnologias inovadoras que
tornam a sua vida mais fácil – funcionalidades que poderá não encontrar em
aparelhos comuns. Continue a ler durante alguns minutos para tirar o máximo
partido do produto.
ACESSÓRIOS E CONSUMÍVEIS
Na loja da AEG na Internet, encontrará tudo aquilo de que necessita para manter
os seus aparelhos AEG a funcionarem na perfeição. A par de uma vasta gama
de acessórios projectados e concebidos de acordo com os padrões de elevada
qualidade que esperaria, de tachos especiais a cestos de talheres, de suportes
para garrafas a delicados sacos para roupa...
Visite a loja na Internet em:
www.aeg.com/shop
PORTUGUESE
23
PREOCUPAÇÕES AMBIENTAIS
Recicle os materiais que apresentem o símbolo . Coloque a embalagem nos
contentores indicados para reciclagem.
Ajude a proteger o ambiente e a saúde pública através da reciclagem de aparelhos
eléctricos e electrónicos. Não elimine os aparelhos que tenham o símbolo
juntamente com os resíduos domésticos. Coloque o produto num ponto de recolha
para reciclagem local ou contacte as suas autoridades municipais.
APOIO AO CLIENTE E ASSISTÊNCIA
Recomendamos a utilização de peças originais.
Quando contactar a Assistência, certique-se de que tem os seguintes dados
disponíveis.
A informação encontra-se na placa de características.
Modelo __________________________
PNC ____________________________
Número de série ___________________
Page 24

24
W
Z
1. CONSELHOS E SUGESTÕES
• Estas instruções de serviço aplicam-se a vários
modelos de aparelhos. É por isso, possível que
se encontrem descritas várias características
de equipamento que não dizem respeito ao seu
aparelho.
• O fabricante declina toda e qualquer responsabilidade pelos danos decorrentes de uma instalação
não correcta ou feita não em conformidade com
as normas da boa técnica.
• A distância mínima de segurança entre a placa
de cozedura e o exaustor deve ser de 650 mm
(alguns modelos podem ser instalados a uma
altura inferior, números referem-se a pegada e
instalação).
• Verique se a tensão da rede coincide com a
indicada na placa de características aplicada no
interior do exaustor.
• Para os aparelhos de Classe Ia, certique-se de
que a instalação doméstica garanta uma descar-
ga correcta à terra.
• Ligue o exaustor à saída do ar aspirado utilizando
um tubo de diâmetro igual ou superior a 120
mm. O percurso do tubo deve ser o mais breve
possível.
• Não ligue o exaustor a tubos de descarga de
fumaça produzida porcombustão (caldeiras,
lareiras, etc...).
• Caso no mesmo local sejam utilizados quer o
exaustor, quer aparelhos não accionados pela
corrente eléctrica (por exemplo, aparelhos alimentados a gás), será preciso providenciar uma
ventilação suciente do aposento. Se a cozinha
não possuir uma abertura que comunique com o
exterior, providencie a sua realização para garantir
a entrada de ar limpo. Para um emprego apropriado e sem riscos é necessário que a depressão
máxima do local não ultrapase 0,04 mBar.
• No caso de danos no cabo de alimentação, é
necessário mandá-lo substituir ao fabricante ou ao
serviço de assistência técnica, a m de prevenir
quaisquer riscos.
• Ligue o exaustor à rede de alimentação eléctrica
intercalando um interruptor bipolar com abertura
mínima entre os contactos de 3 mm.
• Se as instruções de instalação do dispositivo de
cozedura gás sugerem a necessidade de uma
distância maior do que o indicado acima, é neces-
sário ter em conta. É necessário respeitar todas
as normas referentes às descargas de ar.
sobressaiam do fundo das panelas.
• Mantenha as frigideiras sob controlo durante
o uso: o óleo excessivamente aquecido pode
inamar-se.
• No prepare alimentos amejados sob o exaustor.
Perigo de incêndio!
• Este aparelho não deve ser utilizado por pessoas
(incluindo crianças) diminuídas psíquica, sensorial ou mentalmente nem por indivíduos sem
experiência e conhecimento, salvo se vigiados ou
instruídos para utilização do aparelho por pessoas
responsáveis pela respectiva segurança.
• As crianças devem ser vigiadas no sentido de
assegurar que não brinquem com o aparelho.
• “ATENÇÃO! As partes acessíveis podem aquecer
muito, se forem utilizadas com aparelhos de
cozedura”.
3. MANUTENÇÃO
• Antes de efectuar qualquer operação de manuten-
ção, desligue o exaustor tirando a cha da tomada
de corrente ou desligando o interruptor geral.
• Faça uma manutenção atenta e rápida dos ltros,
respeitando os intervalos aconselhados (risco de
incêndio).
- Filtro anti-odor W Não pode ser lavado e não
é regenerável, devendo ser substituído de 4
em 4 meses de utilização ou com maior frequência, se o aparelho for utilizado com muita
intensidade.
- Filtros antigordura Z Podem ser lavados em
máquinas de lavar louça. A operação de
lavagem deve ser feita de 2 em 2 meses de
utilização, aproximadamente; com maior frequência se o aparelho for utilizado com muita
intensidade.
2. USO
• O exaustor foi projectado para ser utilizado
exclusivamente em ambientes domésticos, sendo
a sua nalidade a de reduzir os odores de cozedura. Não utilize o aparelho de maneira imprópria.
• As chamas de forte intensidade não devem
car descobertas enquanto o exaustor estiver a
funcionar.
• Regule sempre as chamas de maneira que não
- Indicadores luminosos, onde disponíveis.
• Para limpar as superfícies do exaustor, é sucien-
te utilizar um pano húmido e detergente líquido
neutro.
Page 25

PORTUGUESE
4.
COMANDOS
Tecla Função Led
L Acende/Apaga a luzes no máximo de intensidade. -
T1 Liga/desliga o motor com velocidade I. Fixo.
T2 Liga o motor com velocidade II.
Se mantida pressionada durante cerca de 3 segundos, quando
todas as cargas estão desligadas (Motor+Luz), o alarme dos
ltros de carvão activo activa-se e o respectivo Led e pisca duas
vezes.
Para o desactivar, pressiona-se de novo a tecla durante 3
segundos e observar-se-á uma piscadela do respectivo Led.
T3 Liga o motor com velocidade III.
Se mantida pressionada durante cerca de 3 segundos, quando
todas as cargas estão desligadas (Motor+Luz), o sistema fará o
reset e o Led S1 piscará três vezes.
T4 Liga o motor com velocidade INTENSIVA.
Esta velocidade é temporizada a 10 min.: Decorrido o referido
tempo, o sistema regressará automaticamente à velocidade
seleccionada anteriormente. Se for activada com o motor
desligado, no m do tempo de funcionamento desta função, o
motor desliga-se.
Se mantida pressionada durante cerca de 3 segundos, o
telecomando activar-se-á e o led em questão piscará duas vezes.
Se mantida pressionada durante cerca de 3 segundos, o
telecomando desactivar-se-á e o led em questão piscará só uma
vez.
S1 Sinaliza o alarme de saturação dos ltros de metal antigordura
e a necessidade de os lavar. O alarme dispara ao m de 100
horas efectivas de funcionamento do exaustor.
Sinaliza que está activado o alarme de saturação do ltro anti-
odores de carvão activo e que é, portanto, necessário substituí-
lo. Devem lavar-se também, nesta altura, os ltros de metal
antigordura. O alarme de saturação do ltro anti-odores de carvão
activo dispara ao m de 200 horas de funcionamento efectivo do
exaustor.
25
Fixo.
Fixo.
Fixo.
Fixo.
Intermitente.
Page 26

26
5.
CONTROLE REMOTO
É importante utilizar no controle remoto
pilhas alcalinas de zinco-carvão de 1,5 V no
formato padrão LR03-AAA (não incluído).
• Não coloque o controle remoto perto de
fontes de calor.
• Não abandone as pilhas usadas no meio
ambiente; essas devem ser depositadas
em recipientes apropriados.
6.
QUADRO DE COMANDOS
7.
ILUMINAÇÃO
TELECOMANDO
Motor Motor On/Off
Diminui a velocidade
de funcionamento
-
cada vez que é
premida.
Aumenta a
velocidade de
funcionamento cada
vez que é premida.
Intensiva
Luz Luzes On / Off
Activa a função
Intensiva
- -
Page 27

PER RISULTATI PERFETTI
Grazie per aver scelto di acquistare questo prodotto AEG. Lo abbiamo creato per
fornirvi prestazioni impeccabili per molti anni, grazie a tecnologie innovative che vi
semplicheranno la vita - funzioni che non troverete sui normali elettrodomestici.
Vi invitiamo di dedicare qualche minuto alla lettura per sapere come trarre il
massimo dal vostro elettrodomestico.
ACCESSORI E PRODOTTI DI CONSUMO
All’interno del webshop AEG troverete tutto ciò che vi serve per fare in modo
che i vostri elettrodomestici AEG siano sempre perfettamente puliti e funzionanti.
Non mancano inoltre una vasta gamma di accessori studiati e realizzati
conformemente agli elevati standard qualitativi che vi aspettate: pentole,
scolaposate, portabottiglie e sacchi biancheria delicati...
Visitate il webshop all’indirizzo:
www.aeg.com/shop
ITALIAN
27
CONSIDERAZIONI AMBIENTALI
Riciclare i materiali con il simbolo . Buttare l’imballaggio negli appositi
contenitori per il riciclaggio.
Aiutare a proteggere l’ambiente e la salute umana e a riciclare riuti derivanti da
apparecchiature elettriche ed elettroniche. Non smaltire le apparecchiature che
riportano il simbolo insieme ai normali riuti domestici. Portare il prodotto al
punto di riciclaggio più vicino o contattare il comune di residenza.
ASSISTENZA
Consigliamo sempre l’impiego di ricambi originali.
Prima di contattare il centro di assistenza, assicurarsi di avere a portata di mano i
seguenti dati.
Le informazioni sono riportate sulla targhetta.
Modello __________________________
PNC ____________________________
Numero di serie ___________________
Page 28

28
W
Z
1. AVVERTENZE
E SUGGERIMENTI
• Questo libretto di istruzioni per l’uso è previsto
per più versioni dell’ apparecchio. É possibile
che siano descritti singoli particolari della
dotazione, che non riguardano il Vostro
apparecchio.
• Il produttore declina qualsiasi responsabilità
per danni dovuti ad installazione non corretta
o non conforme alle regole dell’arte.
• La distanza minima di sicurezza tra il Piano
di cottura e la Cappa deve essere di 650
mm, (alcuni modelli possono essere installati
ad un’altezza inferiore, fare riferimento ai
paragra ingombro e installazione).
• Vericare che la tensione di rete corrisponda
a quella riportata nella targhetta posta all’interno della Cappa.
• Per Apparecchi in Classe Ia accertarsi che
l’impianto elettrico domestico garantisca un
corretto scarico a terra.
• Collegare la Cappa all’uscita dell’aria aspirata
con tubazione di diametro pari o superiore
a 120 mm. Il percorso della tubazione deve
essere il più breve possibile.
• Non collegare la Cappa a condotti di scarico
dei fumi prodotti da combustione (caldaie,
caminetti, ecc.).
• Nel caso in cui nella stanza vengano utilizzati
sia la Cappa che apparec-chi non azionati
da energia elettrica (ad esempio apparecchi
utilizzatori di gas), si deve provvedere ad una
aerazione sufciente dell’ambiente. Se la cu-
cina ne fosse sprovvista, praticare un’apertura che comunichi con l’esterno, per garantire
il richiamo d’aria pulita. Un uso proprio e
senza rischi si ottiene quando la depressione
massima del locale non supera i 0,04 mBar.
• In caso di danneggiamento del cavo alimen-
tazione, esso deve essere sostituito dal costruttore o dal servizio di assistenza tecnica,
in modo da prevenire ogni rischio.
• Collegare la Cappa all’Alimentazione di Rete
interponendo un Interruttore bipolare con
apertura dei contatti di almeno 3 mm.
• Se le istruzioni di installazione del dispositivo
di cottura a gas indicano che è necessaria
una distanza maggiore di quella indicato
sopra, è necessario tenerne conto. Bisogna
rispettare tutte le normative relative allo
scarico dell’aria.
• Regolare sempre le amme in modo da
evitare una evidente fuoriuscita laterale delle
stesse rispetto al fondo delle pentole.
• Controllare le friggitrici durante l’uso: l’olio
surriscaldato potrebbe inammarsi.
• Non preparare alimenti ambè sotto la cappa
da cucina; pericolo d’incendio.
• Questo apparecchio non deve essere utilizza-
to da persone (bambini inclusi) con ridotte
capacità psichiche, sensoriali o mentali,
oppure da persone senza esperienza e
conoscenza, a meno che non siano controllati
o istruiti all’uso dell’apparecchio da persone
responsabili della loro sicurezza.
• I bambini devono essere supervisionati per
assicurarsi che non giochino con l’apparecchio.
• “ATTENZIONE: Le parti accessibili possono
diventare molto calde se utilizzate con degli
apparecchi di cottura.”
3. MANUTENZIONE
• Prima di procedere a qualsiasi operazione di
manutenzione, disinserire la Cappa togliendo
la spina elettrica o spegnendo l’interruttore
generale.
• Effettuare una scrupolosa e tempestiva
manutenzione dei Filtri secondo gli intervalli
consigliati (Rischio di incendio).
- W Il Filtro antiodore al Carbone attivo non
è lavabile e non è rigenerabile, va sostituito
ogni 4 mesi circa di utilizzo o più frequente-
mente, per un uso particolarmente intenso.
- Filtri antigrasso Z Sono lavabili anche in
lavastoviglie, e necessitano di essere lavati
ogni 2 mesi circa di utilizzo o più frequente-
mente, per un uso particolarmente intenso.
2. USO
• La Cappa è stata progettata esclusivamente
per uso domestico, per ab-battere gli odori
della cucina.
• Non fare mai uso improprio della Cappa.
• Non lasciare amme libere a forte intensità
sotto la Cappa in funzione.
- Spie comandi ove presenti.
• Per la pulizia delle superci della Cappa è
sufciente utilizzare un panno umido e deter-
sivo liquido neutro.
Page 29

4. COMANDI
Tasto Funzione Led
L Accende/Spegne le luci alla massima luminosità.. -
T1 Accende/Spegne il motore alla prima velocità. Fisso.
T2 Accende il motore alla seconda velocità.
Tenendo il tasto premuto per circa 3 secondi, quando tutti i
carichi sono spenti (Motore+Luce), si attiva l’allarme dei Filtri al
Carbone attivo visualizzando un doppio lampeggio del relativo
Led.
Per disattivarlo, si preme di nuovo il tasto per altri 3 secondi
visualizzando un lampeggio singolo del relativo Led.
T3 Accende il motore alla terza velocità.
Tenendo premuto il tasto per circa 3 secondi, quando tutti
i carichi sono spenti (Motore+Luce), si effettua il reset
dell’allarme saturazione Filtri visualizzando il triplo lampeggio
del Led S1.
T4 Accende il motore alla velocità INTENSIVA.
Questa velocità è temporizzata a 10 minuti. Terminato il
tempo, il sistema ritorna automaticamente alla velocità
precedentemente selezionata. Se attivata da motore spento
una volta nito il tempo passa alla modalità OFF.
Tenendo premuto per 3 secondi si abilità il telecomando
visualizzando un doppio lampeggio del medesimo led.
Tenendo il tasto premuto per 3 secondi si disabilita il
telecomando visualizzando il lampeggio del rispettivo led una
sola volta.
S1 Segnala l’allarme saturazione Filtri Antigrasso Metallici e la
necessità di lavarli. L’allarme entra in funzione dopo 100 ore di
lavoro effettivo della Cappa.
Segnala, quando è attivato, l’allarme saturazione Filtro
Antiodore al Carbone Attivo, che deve essere sostituito;
devono anche essere lavati i Filtri Antigrasso Metallici.
L’allarme saturazione Filtro Antiodore al Carbone Attivo entra in
funzione dopo 200 ore di lavoro effettivo della Cappa.
ITALIAN
Fisso.
Fisso.
Fisso.
Fisso.
Lampeggiante
29
Page 30

30
5. TELECOMANDO
Questo apparecchio può essere comandato
per mezzo di un telecomando, alimentato
con pile alcaline zinco-carbone da 1,5 V del
tipo standard LR03-AAA (non incluse).
• Non riporre il telecomando in prossimità
di fonti di calore.
• Non disperdere le pile nell’ambiente,
depositarle negli appositi contenitori.
6. QUADRO COMANDI
TELECOMANDO
7. ILLUMINAZIONE
Motore On/Off Motore
Decrementa la
-
velocità di esercizio
ad ogni pressione.
Incrementa la
-
velocità di esercizio
ad ogni pressione.
Intensiva
Luce On / Off Luci
Attiva la funzione
Intensiva
- -
Page 31

FÖR PERFEKT RESULTAT
Tack för att du valt denna produkt från AEG. Vi har skapat den så att du ska
kunna få felfritt resultat i många år, med innovativa tekniker som gör livet enklare
– funktioner som du inte skulle hitta hos vanliga produkter. Varsågod att ägna
några minuter åt att läsa detta för att få ut så mycket som möjligt av produkten.
TILLBEHÖR OCH RESERVDELAR
I AEG:s webbutik nner du allting som du behöver för att hålla dina AEGprodukter snygga och i perfekt skick. Du hittar ett brett sortiment av tillbehör
som utformats och tillverkats med de högsta kvalitetskrav man kan förvänta sig:
från köksredskap för specialister till bestickkorgar, från askställ till tvättpåsar för
ömtåliga plagg...
Besök webbshopen på:
www.aeg.com/shop
SWEDISH
31
MILJÖSKYDD
Återvinn material med symbolen . Återvinn förpackningen genom att placera
den i lämpligt kärl.
Bidra till att skydda vår miljö och vår hälsa genom att återvinna avfall från
elektriska och elektroniska produkter. Släng inte produkter märkta med symbolen
med hushållsavfallet. Lämna in produkten på närmaste återvinningsstation eller
kontakta kommunkontoret.
KUNDTJÄNST OCH SERVICE
Vi rekommenderar att originalreservdelar används.
Ha följande uppgifter till hands när du kontaktar serviceavdelningen.
Informationen nns på typskylten.
Modell ___________________________
PNC (produktnr) ___________________
Serienummer _____________________
Page 32

32
1. REKOMMENDATIONER
OCH TIPS
• Denna bruksanvisning är förutsedd för
era versioner av apparaten Det är möjligt att vissa enskilda utrustningsdetaljer,
inte berör din apparat.
• Tillverkaren åtar sig inget ansvar för
fel som beror på felaktig eller olämplig
installation.
• Minsta tillåtna avstånd mellan spishäll
och köksäkt är 650 mm (vissa modeller kan installeras på en lägre höjd, se
avsnitten mått och installation).
• Kontrollera att matningsnätets spänning
motsvarar den som anges på märkskylten inuti köksäkten.
• För Klass I-apparater, kontrollera att
matningsnätet ger effektiv jordning.
• Anslut äkten till frånluftkanalen via ett
rör med en diameter på minst 120 mm.
Anslutningsröret skall hållas så kort som
möjligt.
• Anslut inte köksäkten till frånluftkanaler
som leder förbränningsgaser (från pannor, eldstäder etc.).
• Om äkten används tillsammans med
icke-elektriska spisar (t.ex. gasspisar)
måste tillräcklig ventilation garanteras
i lokalen för att förhindra backöde av
förbränningsgaser. Köket måste ha ett
tilluftdon med direkt anslutning mot ytter-
luft för att garantera inöde av friskluft.
Korrekt är riskfri användning säkerställas
när det maximala undertryck i lokalen
inte överstiger 0,04 mbar
• I händelse av skada på kabeln, måste
den bytas av tillverkaren eller av den
tekniska serviceavdelning, för att undvika
risker.
• Anslut köksäkten till eluttaget och instal-
lera en tvåpolig brytare med en öppning
på minst 3 mm emellan kon-takterna.
• Om installationsanvisningarna för matlagningsanordningen med gas anger att
ett större avstånd än det ovan angivna
är nödvändigt måste det beaktas. Man
måste följa alla regler om luftutsläpp.
2. ANVÄNDNING
• Köksäkten är uteslutande avsedd för
hemanvändning, för att eliminera köksos.
• Använd aldrig köksäkten för andra
ändamål än det avsedda.
• Undvik höga ammor under köksäkten
medan äkten är i drift.
• Justera gaslågan så att ammorna endast berör kokkärlets undersida och inte
tränger upp längs dess sidor.
• Fritöser måste övervakas kontinuerligt
under användning: Överhettad olja kan
fatta eld.
• Köksäkten skall inte användas av barn
eller personer som inte är insatta i korrekt
användning.
• Apparaten är inte avsedd att användas
av barn eller handikappade personer
utan övervakning.
• Tillaga inga amberade maträtter under
köksäkten, då det nns risk för eldsvåda
• Denna apparat får inte användas av
personer (inklusive barn) med nedsatta
fysiska, sensoriska eller mentala förmågor, eller av personer utan erfarenhet
och kunskap, om inte de är kontrollerade
eller instruerade om användningen av
apparaten av personer ansvariga för
deras säkerhet.
• Barn ska övervakas för att säkerställa att
de inte leker med apparaten.
• “VARNING: De åtkomliga delarna kan
bli mycket varma om de används med
matlagningsapparater.”
3. UNDERHÅLL
• Stäng av apparaten eller skilj den från
matningsnätet innan något underhållsarbete utförs.
• Rengör och/eller byt ltren med angivet
intervall (Risk för eldsvåda).
- W Luktltret med aktivt kol kan inte
diskas eller regenereras, det ska
bytas efter 4 månaders användning
cirka eller oftare vid speciellt intensiv
användning.
W
- Fettltren Z kan även diskas i diskmaskin, de ska diskas varannan
månad eller oftare vid speciellt intensiv
användning.
Z
- Kontrollampor där sådan nns.
• Rengör köksäkten med en fuktig trasa
och neutralt ytande diskmedel.
Page 33

SWEDISH
4. KOMMANDON
Knapp Funktion Lysdiod
L Tänder och släcker belysningen med max. intensitet. -
T1 Slår på/stänger av utsugningsmotorn på den första
hastigheten.
T2 Slår på motorn på den andra hastigheten.
Genom att hålla knappen intryckt i cirka 3 sekunder, när alla
belastningar är avstängda (Motor+Belysning), aktiveras larmet
för lter med aktivt kol med dubbel blinkning.
För avaktivera det, trycker man på nytt på knappen i
ytterligare 3 sekunder tills en enkel blinkning av tillhörande
lysdiod.
T3 Slår på motorn på den tredje hastigheten.
Genom att hålla knappen intryckt i cirka 3 sekunder, när
alla belastningar är avstängda (Motor+Belysning), utförs
nollställningen genom att visa en tredubbel blinkning av
lysdioden S1.
T4 Slår på utsugningsmotorn på den INTENSIVA hastigheten.
Denna hastighet är tidsinställd på 10 minuter. Efter föruten
tid, återgår systemet automatiskt till den tidigare valda
hastigheten. Om den har aktiverats med avstängd motor när
tiden förutet går den till läget OFF.
Genom att hålla den intryckt i 3 sekunder aktiveras
fjärrkontrollen genom att visa en dubbel blinkning av samma
lysdiod.
Genom att hålla den intryckt i 3 sekunder avaktiveras
fjärrkontrollen och visar enbart en blinkning av tillhörande
lysdiod.
S1 Signalerar mättnaden av metallfettltren och nödvändigheten
att diska dem. Larmet träder i funktion efter 100 timmar av
effektivt arbete av köksäkten.
Signalerar, när det är aktiverat, larmet för mättat luktlter
med aktivt kol, att det måste bytas; även metallfettltren ska
diskas. Larmet för mättat luktlter med aktivt kol träder i
funktion efter 200 timmar av effektivt arbete av köksäkten.
Fast.
Fast.
Fast.
Fast.
Fast.
Blinkande.
33
Page 34

34
5. FJÄRRKONTROLL
Den här apparaten kan kontrolleras med en
fjärrkontroll, driven med alkaliska zink-kol
batterier på 1,5 V av standardtyp LR03-AAA
(medföljer ej).
• Lägg inte fjärrkontrollen i närheten av
värmekällor.
• Kasta inte batterier i naturen, lägg dem i
de speciella behållarna.
6. FJÄRRKONTROLLENS
KONTROLLPANEL
7. BELYSNING
Motor On / Off motor
Sänker
-
motorhastigheten vid
varje tryck.
Ökar
-
motorhastigheten vid
varje tryck.
Intensiv
Belysning On / Off belysning
Aktiverar
intensivfunktionen
- -
Page 35

FOR PERFEKTE RESULTATER
Takk for at du har valgt dette AEG-produktet. Vi har konstruert det for å gi deg
perfekt ytelse i mange år, med innovativ teknologi som bidrar til å gjøre livet
enklere - egenskaper som du kanskje ikke nner i ordinære produkter. Vi vil be
deg bruke noen øyeblikk til å lese denne, for å få mest mulig ut av produktet.
TILBEHØR OG FORBRUKSVARER
I AEG-nettbutikken, nner du alt du trenger for at AEG-produktene skal vare lenge
og fungere perfekt. I tillegg til et vidt spekter av tilbehør designet og utviklet etter
høye kvalitetsstandarder, fra spesialkasseroller til bestikk-kurver, fra askeholdere
til poser til ømntlige tekstiler…
Besøk nettbutikken på:
www.aeg.com/shop
MILJØVERN
NORWEGIAN
35
Resirkuler materialer som er merket med symbolet . Legg emballasjen i riktige
beholdere for å resirkulere det.
Bidrar til å beskytte miljøet, menneskers helse og for å resirkulere avfall av
elektriske og elektroniske produkter. Ikke kast produkter som er merket med
symbolet sammen med husholdningsavfallet. Produktet kan leveres der
hvor tilsvarende produkt selges eller på miljøstasjonen i kommunen. Kontakt
kommunen for nærmere opplysninger.
KUNDESTØTTE OG SERVICE
Vi anbefaler at du bruker originale reservedeler.
Når du kontakter kundeservice, sørge for at du har følgende informasjon
tilgjengelige.
Informasjonen nner du på typeskiltet.
Modell ___________________________
PNC (produktnummer) ______________
Serienummer _____________________
Page 36

36
W
1. ANBEFALINGER OG
FORSLAG
• Denne bruksanvisningen gjelder for ere
maskinutgaver. Det kan nnes beskrivelser av enkelte deler som ikke gjelder din
maskin.
• Produsenten skal ikke kunne holdes
ansvarlig for eventuelle skader som
oppstår som følge av feil eller ufullstendig
montering.
• Minimum sikkerhetsavstand mellom komfyrtoppen og viftehetten er 650 med mer
(noen modeller kan installeres lavere, se
avsnittene Mål og Installasjon).
• Kontroller at nettspenningen er i overensstemmelse med spenningen som er
angitt på merkeplaten på innsiden av
hetten.
• For utstyr i klasse I må det kontrolleres at
strømforsyningen garanterer tilstrekkelig
jording.
• Koble sugeviften til avtrekkskanalen gjen-
nom et rør med en minimumsdiameter på
120 mm. Trekkanalens rute må være så
kort som mulig.
• Ikke koble viftehetten til avtrekkskanaler
med forbrenningsgasser (kjeler, ildsteder
osv.).
• Hvis sugeviften brukes sammen med
ikke-elektriske apparater (f.eks. gassap-
parater), må det sørges for tilstrekkelig
lufting i rommet for å hindre tilbakestrømning av avgass. Kjøkkenet må ha en
direkte åpning til fri luft for å garantere
tilførsel av ren luft. Apparatet er sikkert
i bruk når undertrykket i rommet er på
maks 0,04 mBar.
• Hvis nettkabelen ødelegges, må den byttes ut av produsenten eller kundeservice
for å unngå enhver fare.
• Fest panseret til strømnettet imellem en
bryter i bipolar-kontakt dekning på minst
3 mm.
• Hvis installasjonsinstruksjonene for
gasskomfyren spesiserer en større avstand, må du overholde dette. Følg alltid
gjeldende normer for luftutslipp.
under bruk: overopphetet olje kan ta fyr.
• Hetten må ikke brukes av barn eller
personer som ikke har fått opplæring i
korrekt bruk.
• Utstyret er ikke beregnet for bruk av unge
barn eller sykelige personer uten tilsyn.
• Ikke ambér under kjøkkenviften pga.
brannfaren.
• Dette apparatet må ikke brukes av personer (inkl. barn) med reduserte psykiske
evner og ferdigheter, eller av uerfarne
personer uten kjennskap til apparatet,
hvis de ikke er under oppsyn eller opp-
læring av personer ansvarlige for deres
sikkerhet.
• Barn må holdes under oppsyn for å garantere at de ikke leker med apparatet.
• “ADVARSEL: De tilgjengelige delene kan
bli veldige varme når platetopper/komfyrer er i bruk.”
3. VEDLIKEHOLD
• Slå av eller koble apparatet fra strømnet-
tet før det utføres vedlikeholdsarbeid.
• Rengjør og/eller skrift ut ltrene etter
angitt tid (Brannrisiko).
- Det aktive kullltre W kan verken
vaskes eller gjenbrukes, og må derfor
skiftes ut ca. hver 4. måned eller oftere
hvis apparatet brukes svært mye.
- Fettltre Z kan også vaskes i oppvaskmaskin, og må rengjøres ca. hver
2. måned eller oftere hvis apparatet
brukes svært mye.
2. BRUK
• Viftehetten er utviklet utelukkende for
hjemmebruk for å motvirke lukter på
kjøkkenet.
• Bruk aldri hetten til andre formål enn den
er beregnet for.
• Tillat aldri høye, åpne ammer under
• Juster ammestyrken slik at bare bunnen
• Frityrkokere må overvåkes kontinuerlig
hetten når den er i bruk.
av gryten omsluttes, og ikke sidene.
Z
- Kontrollamper hvis installert.
• Rengjør hetten med en fuktig klut og et
nøytralt, ytende rensemiddel.
Page 37

NORWEGIAN
4.
KONTROLLER
Knapp Funksjon Led
L Slår belysningen på/av ved maks styrke. -
T1 Slår motoren på/av ved den første hastigheten. Tent konstant.
T2 Slår motoren på ved den andre hastigheten.
Hvis du trykker på knappen i ca. 3 sekunder når motoren er
stanset og belysningen er slått av, aktiveres alarmen for de
aktive kullltrene, og tilhørende LED blinker to ganger.
For å deaktivere alarmen, trykk på knappen igjen i 3 sekunder
til LEDen kun blinker én gang.
T3 Slår motoren på ved den tredje hastigheten.
Hvis du trykker på knappen i ca. 3 sekunder når motoren er
stanset og belysningen er slått av, tilbakestilles alarmen for
mettede lter, og LEDen S1 blinker 3 ganger.
T4 Slår motoren på ved den INTENSIVE hastigheten.
Kjøkkenviften fungerer med den intensive hastigheten i 10
minutter. Når tiden er utløpt, går kjøkkenviften automatisk
tilbake til den tidligere valgte hastigheten. Hvis denne
hastigheten aktiveres mens motoren er stanset, slås
kjøkkenviften av når tiden er utløpt.
Hvis du trykker på knappen i 3 sekunder, aktiveres
fjernkontrollen og tilhørende LED blinker to ganger.
Hvis du trykker på knappen i 3 sekunder, deaktiveres
fjernkontrollen og tilhørende LED blinker kun én gang.
S1 Signalerer at de metalliske fettltrene er mettet og må vaskes.
Alarmsignalet gis etter at kjøkkenviften har fungert i 100 timer.
Når den er aktivert, signalerer den at det aktive kulllteret er
mettet og må byttes ut. Samtidig må de metalliske fettltrene
vaskes. Alarmsignalet for mettet aktivt kulllter gis etter at
kjøkkenviften har fungert i 200 timer.
Tent konstant.
Tent konstant.
Tent konstant.
Tent konstant.
Blinker.
37
Page 38

38
5.
FJERNKONTROLL
Dette apparatet kan styres med en
fjernkontroll med alkaliske sink-kull batterier
på 1,5 V av standardtypen LR03-AAA
(følger ikke med).
• Ikke plasser fjernkontrollen i nærheten av
varmekilder.
• Ikke kast batteriene i naturen, men
kasser dem i de dertil bestemte
beholderne.
6.
KONTROLLPANEL -
7.
BELYSNING
FJERNKONTROLL
Motor
-
-
Intensiv
- -
Lys
Motoren startes eller
stanses.
Reduserer driftshastigheten
hver gang det trykkes på
knappen.
Øker driftshastigheten
hver gang det trykkes på
knappen.
Aktiverer
intensivfunksjonen.
Belysningen slås på eller
av.
Page 39

TÄYDELLISTEN TULOSTEN SAAVUTTAMISEKSI
Kiitämme teitä tämän AEG-tuotteen valitsemisesta. Olemme kehittäneet tämän
tuotteen tarjotaksemme teille huipputason suorituskyvyn moneksi vuodeksi.
Laitteen innovatiiviset teknologiat tekevät elämästänne yksinkertaisempaa –
kyseisiä ominaisuuksia ei välttämättä löydy tavallisista laitteista. Käyttäkää
muutama minuutti lukemiseen, jotta voitte hyödyntää laitteen ominaisuudet
parhaalla mahdollisella tavalla.
LISÄVARUSTEET JA KULUTUSHYÖDYKKEET
AEG-verkkomyymälästä löydätte kaiken tarvitsemanne kaikkien AEGlaitteidenne ulkonäön ja toiminnan säilyttämiseksi huippukunnossa. Korkeiden
laatustandardien mukaan suunniteltujen ja valmistettujen lisävarusteiden lisäksi
löydätte myymälästämme erityisiä keittoastioita, ruokailuvälinekoreja, pullon
pidikkeitä, erityisiä pyykinpesupusseja, jne...
Vieraile verkkomyymälässämme sivulla:
www.aeg.com/shop
FINNISH
39
YMPÄRISTÖNSUOJELU
Kierrätä materiaalit, jotka on merkitty merkillä . Kierrätä pakkaus laittamalla se
asianmukaiseen kierrätysastiaan.
Suojele ympäristöä ja ihmisten terveyttä kierrättämällä sähkö- ja elektroniikkaromut.
Älä hävitä merkillä merkittyjä kodinkoneita kotitalousjätteen mukana. Palauta
tuote paikalliseen kierrätyskeskukseen tai ota yhteyttä paikalliseen viranomaiseen.
KULUTTAJANEUVONTA JA HUOLTO
Suosittelemme alkuperäisten varaosien käyttöä.
Pidä seuraavat tiedot saatavilla ottaessasi yhteyttä valtuutettuun
huoltoliikkeeseen.
Kyseiset tiedot löytyvät laitteen arvokilvestä.
Malli ____________________________
Tuotenumero _____________________
Sarjanumero ______________________
Page 40

40
W
1. OHJEET JA SUOSITUKSET
• Nämä käyttöohjeet koskevat useita tuu-
letintyyppejä. On mahdollista, että teksti
käsittelee yksityiskohtia, jotka eivät kuulu
valitsemaanne tuulettimeen.
• Valmistaja ei vastaa virheellisestä tai
huolimattomasta asennuksesta aiheutuvista
vahingoista
• Pienin sallittu turvaetäisyys liesitason ja
liesikuvun välillä on 650 mm (jotkut mallit
voidaan asentaa alemmas, katso mittoja ja
asennusta koskevia kappaleita).
• Tarkista, että käytettävän sähköverkon jän-
nite vastaa liesikuvun sisäpuolella olevaan
arvokilpeen merkittyä jännitettä.
• Kytke laite vain maadoitettuun pistorasiaan.
• Yhdistä liesituuletin hormiin putkella, jonka
halkaisija on vähintään 120 mm. Hormiin
menevän putken on oltava mahdollisimman
lyhyt.
• Älä yhdistä liesituuletinta savuhormiin (läm-
mityskattilat, tulisijat, jne.).
• Mikäli liesituuletinta käytetään muiden kuin
sähkölaitteiden (esim. kaasuhella) yhteydessä, on huolehdittava työskentelytilan
riittävästä tuuletuksesta, etteivät poistettavat
kaasut pääse virtaamaan takaisin työskentelytilaan. Keittiössä on oltava ilman-
vaihtoaukko puhdasta tuloilmaa varten.
Käyttö tapahtuu oikein ja vaaratta kun tilan
enimmäispaine ei ylitä arvoa 0,04 mBar.
• Jos virtajohto vahingoittuu, sen saa vaihtaa
vain valmistaja tai tekninen huoltopalvelu,
näin vältetään kaikki riskit.
• Liitä liesituuletin säh-köverkkoon asenta-
malla kaksinapainen kytkin, jonka kosketti-
mien väli on vähintään 3 mm.
• Jos kaasukäyttöisen keittolaitteen asennusohjeet määräävät, että etäisyyden on
oltava yllä mainittua suurempi, ohjeita on
noudatettava. Kaikkia ilmanpoistoa koske-
via määräyksiä on noudatettava.
laitteen oikeaan käyttöön, eivät saa käyttää
liesituuletinta.
• Liesikuvun alla ei saa valmistaa liekitettäviä
ruokia: tulipalon vaara
• Laitetta eivät saa käyttää henkilöt (lapset
mukaan lukien), joiden psyykkinen, aistien
tai mielen terveys on heikentynyt, tai
henkilöt, joilla ei ole tarpeellista kokemusta
tai taitoa, ellei heidän turvallisuudestaan
vastaava henkilö ole valmentanut heitä
laitteen käyttöön tai valvo sitä.
• Valvo, etteivät lapset pääse leikkimään
laitteella.
• “HUOMIO: Kosketettavissa olevat osat voi-
vat tulla hyvin kuumiksi jos niitä käytetään
keittolaitteiden kanssa.”
3. HUOLTO
• Sulje laite tai irrota sen pistoke pistorasiasta
ennen hoitoa.
• Puhdista ja/tai vaihda suodattimet annetun
ajan kuluttua (Tulipalovaara).
- Aktiivihiilisuodattimet W Aktiivihiilihaju-
suodattimia ei voi pestä eikä uudistaa, ne
täytyy vaihtaa noin 4 käyttökuukauden
välein tai useammin, jos liesituuletinta
käytetään hyvin paljon.
- Rasvasuodattimet Z Voidaan pestä myös
astianpesukoneessa ja ne on pestävä noin
2 käyttökuukauden välein tai useammin,
jos liesituuletinta käytetään hyvin paljon.
2. KÄYTTÖ
• Liesituuletin on tarkoitettu vain kotitalous-
käyttöön.
• Älä koskaan käytä liesituuletinta muuhun
tarkoitukseen kuin, mihin se on suunniteltu.
• Älä koskaan jätä avotulta liesituulettimen
alle liesituulettimen ollessa käynnissä.
• Säädä liekin teho siten, että liekki kohdistuu
vain astian pohjaan eikä sen reunoille.
• Syviä paistinpannuja on paiston aikana
• Lapset tai henkilöt, joita ei ole opastettu
koko ajan pidettävä silmällä, sillä ylikuumentunut öljy voi leimahtaa tuleen.
Z
- Kytkimien merkkivalot, mallikohtaiset.
• Puhdista liesituuletin kostealla kankaalla
ja miedolla, nestemäisellä pesuaineella.
Page 41

FINNISH
4.
OHJAIMET
Painike Toiminto Merkkivalo
L Sytyttää /sammuttaa valon suurimmalla kirkkaudella. -
T1 Käynnistää/sammuttaa moottorin ensimmäisellä nopeudella. Kiinteä.
T2 Käynnistää moottorin toisella nopeudella.
Jos pidät painiketta painettuna noin 3 sekuntia kun kaikki
toiminnot (moottori ja valo) on sammutettu, aktivoituu
aktiivihiilisuodattimen hälytys ja vastaava merkkivalo vilkkuu
kaksi kertaa.
Se poistetaan käytöstä painamalla painiketta uudelleen 3
sekunnin ajan, vastaava merkkivalo vilkkuu kerran.
T3 Käynnistää moottorin kolmannella nopeudella.
Jos pidät painiketta painettua noin 3 sekuntia kun kaikki
toiminnot (moottori ja valo) on sammutettu, tapahtuu
suodattimien täyttymisen hälytyksen kuittaus ja merkkivalo S1
vilkkuu kolme kertaa.
T4 Käynnistää moottorin TEHONOPEUDELLA.
Nopeus on ajastettu 10 minuutin ajaksi. Kun aika on kulunut,
järjestelmä palaa automaattisesti aikaisemmin valitulle
nopeudelle. Jos käynnistät toiminnon moottorin ollessa
sammutettu, määrätyn ajan kuluttua laite palaa tapaan OFF.
Jos pidät painiketta painettuna 3 sekunnin ajan, kaukosäädin
aktivoituu ja sen merkkivalo vilkkuu kaksi kertaa.
Jos pidät painiketta painettuna 3 sekunnin ajan, kaukosäädin
poistuu käytöstä ja sen merkkivalo vilkkuu vain kerran.
S1 Osoittaa metallisten rasvasuodattimien täyttymisen hälytyksen.
Suodattimet täytyy pestä. Hälytys käynnistyy liesituulettimen 100
käyttötunnin jälkeen.
Osoittaa aktivoituessaan aktiivihiilihajusuodattimen
täyttymisen hälytyksen. Suodatin täytyy vaihtaa ja metalliset
rasvasuodattimet täytyy pestä. Aktiivihiilihajusuodattimen
täyttymisen hälytys käynnistyy liesituulettimen 200 käyttötunnin
jälkeen.
Kiinteä.
Kiinteä.
Kiinteä.
Kiinteä.
Vilkkuva.
41
Page 42

42
5.
KAUKOSÄÄDIN
Tätä laitetta voidaan ohjata kaukosäätimellä
joka toimii alkali/sinkki-hiiliparistoilla 1,5
V tyyppi standard LR03-AAA (eivät kuulu
toimitukseen).
• Älä laita kaukosäädintä lämmönlähteiden
lähelle.
• Älä jätä paristoja luontoon, vaan laita ne
asianmukaiseen ke-räysastiaan.
7.
VALAISTUS
6. OHJAUSPANEELI
KAUKOSÄÄDIN
Moottori Moottori On/Off
Alentaa
käyttönopeutta
jokaisella
painalluksella.
Lisää käyttönopeutta
-
jokaisella
painalluksella.
Teho Aktivoi tehonopeuden
- -
Valo Valo On/Off
Page 43

FOR PERFEKTE RESULTATER
Tak fordi du valgte dette produkt fra AEG. Vi har skabt det, så du kan nyde en
ulastelig funktionsevne i mange år med nyskabende teknologi, der gør livet lettere
– funktioner, som du ikke nder i almindelige apparater. Brug et par minutter på at
læse mere – så du kan få det bedste ud af det.
TILBEHØR OG FORBRUGSVARER
I AEG’s webbutik kan du nde alt, hvad du har brug for, til at holde alle dine AEGapparater otte og perfekt fungerende. Sammen med et stort udvalg af tilbehør,
der er designet og udviklet til de høje kvalitetsstandarder, du ville forvente – fra
specialkogegrej og bestikkurve til askeholdere og ne vaskeposer ...
Besøg webbutikken på:
www.aeg.com/shop
MILJØHENSYN
DANISH
43
Genbrug materialer med symbolet . Anbring emballagematerialet i passende
beholdere til genbrug.
Hjælp med at beskytte miljøet og menneskelig sundhed samt at genbruge affald
af elektriske og elektroniske apparater. Kasser ikke apparater, der er mærket med
symbolet , sammen med husholdningsaffaldet. Lever produktet tilbage til din
lokale genbrugsplads eller kontakt din kommune.
KUNDEPLEJE OG SERVICE
Vi anbefaler brugen af originale reservedele.
Sørg for at have følgende data tilgængelig, når du kontakter service.
Du nder oplysningerne på maskinens typeskilt.
Model ___________________________
PRODUKTNR. (PNC) _______________
Serienummer _____________________
Page 44

44
W
1. RÅD OG ANVISNINGER
• Denne brugervejledning gælder for ere ver-
sioner af apparatet. Der fremstilles muligvis
enkelte dele af tilbehøret, der ikke vedrører
jeres apparat.
• Producenten kan ikke holdes ansvarlig for
eventuelle skader, der skyldes ukorrekt eller
forkert installation.
• Den mindst tilladelige sikkerhedsafstand
mellem komfurets top og emhættens underside er 650 mm (nogle modeller kan instal-
leres lavere, jævnfør afsnittene vedrørende
ydre mål og installation).
• Kontrollér, at lysnetspændingen er den
samme som den spænding, der er angivet
mærkepladen, der sidder på inde i emhæt-
ten.
• For Klasse I apparater skal det også kontrol-
leres, at elforsyningen er forsynet med jord.
• Emhætten kobles til aftrækskanalen ved
hjælp af et rør med en min.-diameter på 120
mm. Afstanden fra emhætten til kanalen skal
være så kort som mulig.
• Emhætten må ikke tilsluttes en kanal, der
fører forbrændingsgasser ud i det fri (oliefyr,
brændeovne etc.).
• Hvis emhætten skal anvendes i forbindel-
se med ikke-elektriske apparater (f.eks.
gaskomfur, gaskogeblus), skal det sikres, at
lufttilgangen til rummet er tilstrækkelig, så
aftræksgasserne ikke slår tilbage. Køkkenet
skal have en åbning, der har direkte forbindelse til det fri, så der er sikret en tilstrækkelig mængde ren luft. Der opnås en korrekt,
risikofri anvendelse, når det maksimale un-
dertryk i rummet ikke overstiger 0,04 mBar.
• Hvis forsyningskablet er defekt, skal det
erstattes af fabrikanten eller af det tekniske
servicecenter for at forebygge enhver risiko.
• Tilslut emhætten til elnettet, idet der indsæt-
tes en topolet afbryder med en kontaktaf-
stand på mindst 3 mm.
• Hvis der i gaskogepladens installationsvej-
ledning er angivet en større afstand end den
ovenstående, skal der tages højde for dette.
Overhold alle lovbestemmelser vedrørende
luftudledning.
konstant opsyn: kogende varm olie kan
sprøjte ind i ammerne.
• Emhætten må ikke anvendes af børn
og personer, som ikke ved, hvordan den
betjenes.
• Apparatet er ikke beregnet til at skulle
anvendes af mindre børn eller svækkede
personer uden opsyn.
• Undlad at ambere retter under emhætten;
der opstår ellers brandfare.
• Dette apparat må ikke anvendes af personer
(derunder børn) med nedsatte psykiske,
sensoriske eller sindsmæssige evner, eller
personer uden erfaring eller tilstrækkeligt
kendskab, med mindre de overvåges eller
oplæres i brug af apparatet af personer, der
er ansvarlige for deres sikkerhed.
• Børn skal overvåges for at undgå, at de
leger med apparatet.
• ”GIV AGT: De tilgængelige dele kan blive
meget varme, hvis de anvendes med kogeapparater.”
3. VEDLIGEHOLDELSE
• Inden apparatet skal vedligeholdes eller ren-
gøres, skal der slukkes for det eller stikket
skal tages ud af stikkontakten.
• Rengør og/eller udskift ltrene iht. det angiv-
ne tidinterval (Brandbare).
- Lugtltret med aktivt kul W kan ikke
vaskes eller gendannes, det skal udskiftes
ca. hver 4. måned, dog oftere ved særlig
intensiv anvendelse.
- Fedtltrene Z kan også vaskes i opvaske-
maskine, de skal renses ca. hver anden
måned, dog oftere ved særlig intensiv
anvendelse.
2. ANVENDELSE
• Emhætten er udelukkende beregnet til
at fjerne em og lugte i køkkener i private
husholdninger.
• Emhætten må kun anvendes til det formål,
hvortil den er konstrueret.
• Der må ikke forekomme høj åben ild under
emhætten, mens den anvendes.
• Justér brænderen, så ammerne er rettet
• Frituregryder skal under brug holdes under
direkte mod bunden af panden/gryden – de
må ikke nå ud over kanten af bunden.
Z
- Eventuelle kontrollamper.
• Rengør emhætten ved hjælp af en fugtig
klud og et neutralt ydende rengøringsmiddel.
Page 45

DANISH
4.
BETJENING
Tast Funktion Led
L Tænder og slukker lysene ved maksimal styrke. -
T1 Tænder motoren ved 1. hastighed/slukker motoren. Konstant.
T2 Tænder motoren ved 2. hastighed.
Alarmen for ltrene med aktivt kul aktiveres ved at trykke og
holde tasten trykket nede i ca. 3 sekunder, når alle anordninger er
slukket (motor + lys). Den konkrete LED blinker to gange.
Alarmen inaktiveres ved at trykke og holde tasten trykket nede i
yderligere 3 sekunder. Den konkrete LED blinker da én gang.
T3 Tænder motoren ved 3. hastighed.
Tilbagestillingen udføres ved at trykke og holde tasten trykket nede i
ca. 3 sekunder, når alle anordninger er slukket (motor + lys).
LED’en S1 blinker tre gange.
T4 Tænder motoren ved den INTENSIVE hastighed.
Denne hastigheds varighed er indstillet til 10 minutter, hvorefter
systemet automatisk går tilbage til den foregående hastighed. Hvis
den aktiveres, når motoren er slukket, overgår systemet til OFF,
når tiden er forløbet.
Fjernstyringen aktiveres ved at trykke og holde tasten trykket nede
i 3 sekunder. Den konkrete LED blinker to gange.
Fjernstyringen inaktiveres ved at trykke og holde tasten trykket
nede i 3 sekunder. Den konkrete LED blinker da én gang.
S1 LED’en giver besked om alarmen vedrørende mætning af
fedtltrene af metal, samt om at de skal skylles. Alarmen går i
gang, når emhætten har været i funktion i 100 timer.
Når alarmen er aktiveret, giver LED’en besked om, at lugtltret
med aktivt kul er mættet og skal udskiftes, samt om at fedtltrene
af metal skal skylles. Alarmen vedrørende mætning af lugtltret
med aktivt kul går i gang, når emhætten har været i funktion i 200
timer.
Konstant.
Konstant.
Konstant.
Konstant.
Blinkende.
45
Page 46

46
5.
FJERNBETJENING
Denne emhætte kan styres ved hjælp
af en fjernbetjener, der fungerer med
1,5V alkaliske carbon-zink batterier af
standardtypen LR03-AAA (ikke medleveret).
• Fjernbetjeningen må ikke anbringes i
nærheden af varmekilder.
• Batterierne må ikke bortskaffes i naturen,
men skal lægges i de specielle beholdere.
6.
BETJENINGSPANEL –
7.
BELYSNING
FJERNSTYRING
Motor
Intensiv
Tænder/slukker
motoren.
Hvert tryk reducerer
driftshastigheden.
Hvert tryk øger
driftshastigheden.
Aktiverer Intensiv
funktionen.
- -
Lys Tænder/slukker lyset.
Page 47

Page 48

www.aeg.com/shop
991.0344.311_01 - 140912
 Loading...