

Page 1
PX71-265WT
USER
MANUAL
EN User Manual
Air conditioner
Gebruikershandleiding
NL
Airconditioner
Manuel d’utilisation
FR
Climatiseur
Benutzerhandbuch
DE
Klimagerät
2
24
48
72
Page 2
www.aeg.com2
CONTENTS
SAFETY INFORMATION ..............................................................................................3
1.
SAFETY INSTRUCTION ...............................................................................................6
2.
UNIT DESCRIPTION ...................................................................................................10
3.
ACCESSORIES INCLUDED .......................................................................................10
4.
INSTALLATION INSTRUCTIONS ...............................................................................11
5.
AIR CONDITIONER FEATURES ................................................................................13
6.
OPERATING INSTRUCTIONS ...................................................................................14
7.
CARE & CLEANING ....................................................................................................17
8.
TROUBLE SHOOTING ...............................................................................................17
9.
ADDITIONAL INFORMATION .....................................................................................18
10.
ENVIRONMENTAL CONCERNS ................................................................................23
11.
FOR PERFECT RESULTS
Thank you for choosing this AEG product. We have created it to give you impeccable
performance for many years, with innovative technologies that help make life simpler
– features you might not find on ordinary appliances. Please spend a few minutes
reading to get the very best from it.
Visit our website for:
Get usage advice, brochures, trouble shooter, service information:
www.aeg.com
Register your product for better service:
www.registeraeg.com
Buy Accessories, Consumables and Original spare parts for your appliance:
www.aeg.com/shop
CUSTOMER CARE AND SERVICE
We recommend the use of original spare parts.
When contacting Service, ensure that you have the following data available.
The information can be found on the rating plate. Model, PNC, Serial Number.
Warning / Caution-Safety information.
General information and tips.
Environmental information.
Subject to change without notice.
Page 3
3
ENGLISH
1.
SAFETY INFORMATION
WARNING!
• This appliance can be used by children aged from
8 years and above and persons with reduced
physical, sensory or mental capabilities or lack
of experience and knowledge if they have been
given supervision or instruction concerning use
of the appliance in a safe way and understand
the hazards involved.
• Children shall not play with the appliance.
• If the supply cord is damaged, it must be replaced
by the manufacturer, its service agent or similarly
qualied persons in order to avoid a hazard.
This manual explains the proper use of your new air
conditioner. Please read this manual carefully before
using the product. This manual should be kept in a safe
place for handy reference.
CAUTION!
• Contact authorised service technician for repair or
maintenance of this unit.
• Contact the installer for installation of this unit.
• The air conditioner is not intended for use by young
children of inrmed persons without supervision.
• Young children should be supervised to ensure
that they do not play with the air conditioner.
• There are local council rules regarding maximum
allowable noise levels emitted by air conditioners.
• If the power cord is to be replaced, replacement work
shall be performed by authorised personnel only.
• Installation work must be performed in accordance
with the national wiring standards by authorised
personnel only(if applicable). Incorrect connection
can cause overheating and re.
• Take care not to catch ngers on fan when
adjusting horizontal louvres.
Page 4

4
www.aeg.com
Important notes
1.1
1. Do not operate unit without the air lter.
2. Do not operate unit near any heat source or open re.
3. Do not expose the unit to direct sunlight.
4. Always store or move the unit in an upright position.
5. Do not cover the appliance when in operation
or immediately after use.
6. Always ensure that when the water pump drain hose
is tted that the hose is run to an eective drain point.
7. Always drain condensate before storing unit.
Point to Keep in Mind When Using Your
1.2
Air Conditioner
CAUTION!
Warnings for use
• Do not modify any part of this product.
• Do not insert anything into any part of the unit.
• Ensure the power supply used has an appropriate
voltage rating. Only use a 220V - 240V, 50Hz, 10A
mains electricity supply. Use of a power supply with
an improper voltage rating can result in damage
to the unit an possibly re.
• Always use a circuit breaker or fuse with the proper
amp rating. Do not, under any circumstances, use
wire, pins or other objects in place of a proper fuse.
• In the event of any abnormality with the air
conditioner (eg. a burning smell), turn it o
immediately and disconnect the power supply.
CAUTION!
Warning for power supply cord
• This power plug must only be plugged into an
appropriate wall socket. Do not use in conjunction
with any extension cords.
• Push the power plug securely into the socket and
make sure it is not loose.
Page 5

ENGLISH
• Do not pull, deform. or modify the power supply
Plug
Grounding tab
cord, or immerse it in water. Pulling or misuse of
the power supply cord can result in damage to the
unit and cause electrical shock.
• If the supply cord is damaged, it must be replaced
by the manufacturer or its service agent or a
similarly qualied person in order to avoid a
hazard. Use only the manufacturer specied power
cord for replacement.
• This appliance must be earthed. This appliance
is equipped with a cord having an earth wire. The
plug must be plugged into an outlet that is properly
installed and earthed.
5
• This appliance is equipped with a cord that has a
earthed wire connected to an earthed pin. The plug
must be plugged into a socket that is properly installed
and earthed. Do not under qny circumstances ccut or
remove the square earthed pin from this plug.
Square earthed pin
Plug
(only for UK)
Usage cautions
1.3
• Be sure to turn the unit o and disconnect the power
supply cord before performing any maintenance or
cleaning.
• Do not splash or pour water directly onto the unit. Water
can cause electrical shock or equipment damage.
• Drainage should be performed whenever moving the
air conditioner (see page 14). If any water remains in
the tank, it may spill out while being moved.
Page 6

6
www.aeg.com
• To ensure proper drainage, the drainage hose must
have no kinks and must not be elevated during
dehumidicatioin mode. If not, the drained water may
spill out into the room.
• The temperature around the drainage hose must not
be below freezing point when used. Drained water may
freeze inside the hose, causing water inside the unit to
overow into the room.
• Do not block the exhaust air outlet with obstacles. Cooling
performance may be reduced or stop completely.
• Provide a residual current device (ROD) in order to
protect against electric shock in accordance with British
Standard and Wiring Rules.
• Exposure to direct airow for an extended period of
time could be hazardous to your health. Do not expose
occupants, pets, or plants to direct airow for extended
periods of time.
• Do not use this air conditioner for non-specied special
purposes (e.g. preserving precision devices, food, pets,
plants, and art objects). Usage in such a manner could
harm such property.
2.
SAFETY INSTRUCTION
2.1 Notes on Operation
• Allow 3 minutes for the compressor
to restart cooling. If you turn the air
conditioner o and immediately restart
it, allow 3 minutes for the compressor
to restart cooling. There is an electronic
device in the unit that keeps the
compressor turned o for 3 minutes
for safety.
• In the event of a power failure during
use, allow 3 minutes before restarting
the unit. After power is reinstated,
restart the air conditioner. If the power
was o for less than three minutes,
be sure to wait at least three minutes
before restarting the unit. if you
restart the air conditioner within three
minutes, a protective device in the unit
may cause the compressor to shut o.
This protective device will prevent
cooling for about 5 minutes. Any
previous setting will be cancelled and
the unit will return to its initial setting.
• Low temperature operation: Is your
unit freezing up? Freezing may occur
when the unit is set close to 18°C in
low ambient temperature conditions,
especially at night. In these conditions,
a further temperature drop may cause
the unit to freeze. Setting the unit to a
higher temperature will prevent it from
freezing.
• Dehumidication mode increases
room temperature. The unit generates
heat during dehumidication mode
and the room temperature will rise.
Warm air will be blown out from the
exhaust air outlet, but this is normal
and does not indicate a problem with
the unit.
• This air conditioner blows the warm air
generated by the unit outside the room
Page 7
7
ENGLISH
via the exhaust hose while in cool mode.
In the mean time, the same amount
of air will enter the room from outside
through any openings of the room.
• Do not use means to accelerate the
defrosting process or to clean, other
than those recommended by the
manufacturer.
• The appliance shall be stored in a
room without continuously operating
ignition sources (for example: open
ames, an operating gas appliance
or an operating electric heater).
• Do not pierce or burn.
• Appliance should be installed,
operated and stored in a room
with a oor area larger than 12 m2.
• Compliance with national gas
regulations shall be observed.
• Keep ventilation openings clear
of obstruction.
• The appliance shall be stored in a
well-ventilated area where the room
size larger than 12 m
2
.
• Any person who is involved with
working on or breaking into a refrigerant
circuit should hold a current valid
certicate from an industry-accredited
assessment authority, which authorises
their competence to handle refrigerants
safely in accordance with an industry
recognised assessment specication.
• Servicing shall only be performed
as recommended by the equipment
manufacturer. Maintenance and repair
requiring the assistance of other skilled
personnel shall be carried out under the
supervision of the person competent in
the use of ammable refrigerants.
• This product contains a lithium button/
coin cell battery. If a new or used lithium
button/coin cell battery is swallowed or
enters the body, it can cause severe
internal burns and can lead to death in
as little as 2 hours. Always completely
secure the battery compartment. If
the battery compartment does not
close securely, stop using the product,
remove the batteries, and keep it away
from children. If you think batteries
might have been swallowed or placed
inside any part of the body, seek
immediate medical attention.
To prevent injury to the user or other
people and property damage, the
following instructions must be followed.
Incorrect operation due to ignoring
instructions may cause harm or damage.
The seriousness is classied by the
following indications:
WARNING!
This symbol indicates the possibility of death or serious injury.
CAUTION!
This symbol indicates the possibility of injury or damage to property.
Meanings of symbols used in this manual
are shown below:
This symbol indicates never
to do this.
This symbol indicates always
do this.
2.2 Warning during usage
WARNING!
Warning during usage
Page 8
8
www.aeg.com
Warning Meaning
Plug in power plug properly Otherwise, it may cause electric shock
or re due to excess heat generation
Do not operate or stop the unit by inserting
or pulling out Die power plug
Do not damage or use an unspecied
power cord
It may cause electric shock or re due
to heat generation
It may cause electric shook or re.
If the power cord is damaged, it must
be replaced by the manufacturer or an
authorised service centre or a similarly
qualied person in order to avoid a hazard
Do not modify power cord length or share
the outlet with other appliances
Do not operate with wet hands or in damp
It may cause electric shock or re due to
heat generation
It may cause electric shock
environment
Do not direct airow at room occupants This could harm your health
Always ensure eective earthing Incorrect earthing may cause electric shock
Do not allow water to run into electric parts It may cause failure of unit or electric shock
Always install circuit breaker and a
dedicated power circuit
Unplug the unit if strange sounds, smell, or
Incorrect installation may cause Are and
electric shock
It may cause re and electric shock
smoke comes from it
Do not use the socket if it is loose or
It may cause re and electric shock
damaged
Do not open the unit during operation It may cause re and electric shock
Keep rearms away It may cause re
Do not use the power cord close to heating
It may cause re and electric shock
appliances
Do not use the power cord near ammable
It may cause an explosion or re
gas or combustibles, such as gasoline,
benzene, thinner, etc.
Ventilate room before operating air
It may cause explosion, re and burns
conditioner if there is a gas leakage from
another appliance
Do not disassemble or modify unit It may cause failure and electric shock
Page 9

ENGLISH
CAUTION!
Caution Meaning
When the air lter is to be removed, do not
It may cause an injury
touch the metal parts of the unit
Do not clean the air conditioner with water Water may enter the unit and degrade the
insulation. It may cause an electric shock
Ventilate the room well when used together
An oxygen shortage may occur
with a stove, etc.
When the unit is to be cleaned, switch o,
and turn o the circuit breaker
Do not clean unit when power is on as it
may cause re and electric shock, it may
cause an injury
Do not place a pet or house plant where
This could injure the pet or plant
it will be exposed to direct air ow
Do not use for special purposes Do not use this air conditioner to
preserve precision devices, food, pets,
plants, and art objects. It may cause
deterioration of quality, etc.
Stop operation and close the window in
storm or cyclone
Operation with windows opened may cause
wetting of indoor and soaking of household
furniture
Hold the plug by the head of the power plug
It may cause electric shock and damage
when taking it out
Turn o the main power switch when not
It may cause failure of product or re
using the unit for a long time
Do not place obstacles around air-inlets
It may cause failure of appliance or accident
or inside of air-outlet
Always insert the lters securely. Clean
Operation without lters may cause failure
lter once every two weeks
Do not use strong detergent such as wax
or thinner - use a soft cloth
Appearance may be deteriorated due to
change of product colour or scratching of
its surface
Do not place heavy object on the power
There is danger of re or electric shock
cord and ensure that the cord is not
compressed
Do not drink water drained from air
conditioner
It contains contaminants and could make
you sick
Use caution when unpacking and installing Sharp edges could cause injury
If water enters the unit, turn the unit o at
It could cause electric shock and damage
the power outlet and switch o the circuit
breaker. Isolate supply by taking the power-
plug out and contact a qualied service
technician
9
Page 10
10
www.aeg.com
UNIT DESCRIPTION
3.
1
6
5
1
Room air discharge
2
Control panel
3
Room air inlet
4
Castor
5
Remote control
ACCESSORIES INCLUDED
4.
PARTS PARTS NAME: QUANTITY:
1
2
3
4
5
6
7
8
Fig. 2
•
Check all the accessories are included in the package and please refer to the
installation instructions for their usage.
Exhaust hose
Window Sliding Kit
Spared Extend Rod
Drain Hose & Adaptor
3/8" Screw
Decoration lm
Fixing Strap
Remote Control 1 pcs
2
7
8
3
9
4
6
Carrying handle(both sides)
7
Filter
8
Exhaust air outlet
9
Drain outlet
10
Bottom tray drain outlet
10
Fig. 1
1 pcs
1 pcs
1 pcs
1 pcs
2 pcs
1 pcs
1 set
Page 11
ENGLISH
INSTALLATION INSTRUCTIONS
Fig. 4
Fig. 6
Fig. 7
5.
5.1 Exhausting hot air
In the COOLING Mode the appliance
must be placed close to a window or
opening so that the warm exhaust air
can be ducted outside. First position unit
on a at oor and make sure there’s a
minimum of 30cm clearance around the
unit, and is within the vicinity of a single
circuit outlet power source.
Extend either side of the hose (Fig. 3).
1.
Fig. 3
Slide the adaptor A into the exchange
2.
hole of the unit as shown on Fig. 4.
Window Slider Kit
Minimum: 56cm
Maxmum: 112cm
Refer to “
a casement window” about
how to install the window kit.
The hose can be extended from
its original length of 38cm up to
150cm, but it is the best to keep
the length to minimum required.
Also make sure that the hose
does not have any sharp bends
or sags. (Fig. 7)
Installation in
5.2
11
Install the window kit on the window
3.
and slide the adaptor B into the
window slider kit and seal. (Fig. 5 & 6)
Fig. 5
5.2 Installation in a casement
window
Open the window sash and lift the
1.
locking lever of the window slider
kit (Fig. 9)
B
Fig. 9
B: Locking lever
Page 12

12
www.aeg.com
Place the window slider kit on the
2.
window. Adjust the length of the
window slider kit according to the
height of window (Fig. 10).
Fig. 10
The telescopic rod can be
extended, if the window is
too high.
To do that, rst take out the
telescopic rod completely
(Fig.11 A). Then align the 3 hooks
on the extending rod (sold
separately) to the 3 slots on the
end of the telescopic rod and slide
the 3 hooks into the slots, then
press down the extending rod to
lock the slots (Fig.11 B). After that
slide the combined telescopic rod
back into the window kit (Fig.11 C).
Press back the locking lever to x
3.
the length of the window slider kit,
then close the window and pinch
the window kit between the window
and the window frame, to secure the
window kit, peel o the protect lm
in the back of the tabs of the anchor
and attach on the window frame,
then fasten the strap (Fig. 12).
Fig. 12
Cut the decoration lm to an
4.
appropriate length and stick
on the extend rod (Fig. 13).
C
Fig. 11 A
Fig. 13
C: Decoration lm
Fig. 11 B
Fig. 11 C
Page 13
AIR CONDITIONER FEATURES
1
2
3
4
5
2
8
3
4567
6.
6.1 CONTROL PANEL
13ENGLISH
1
1
Displays temperature
2
Filter reset button (hold 3 secs to reset)
3
Sets fan speed
4
Increase temperature
6.2 Remote Control
1
Press to select modes
2
3
Press to increase temperature setting
4
Press to select fan speeds
5
Press to decrease temperature setting
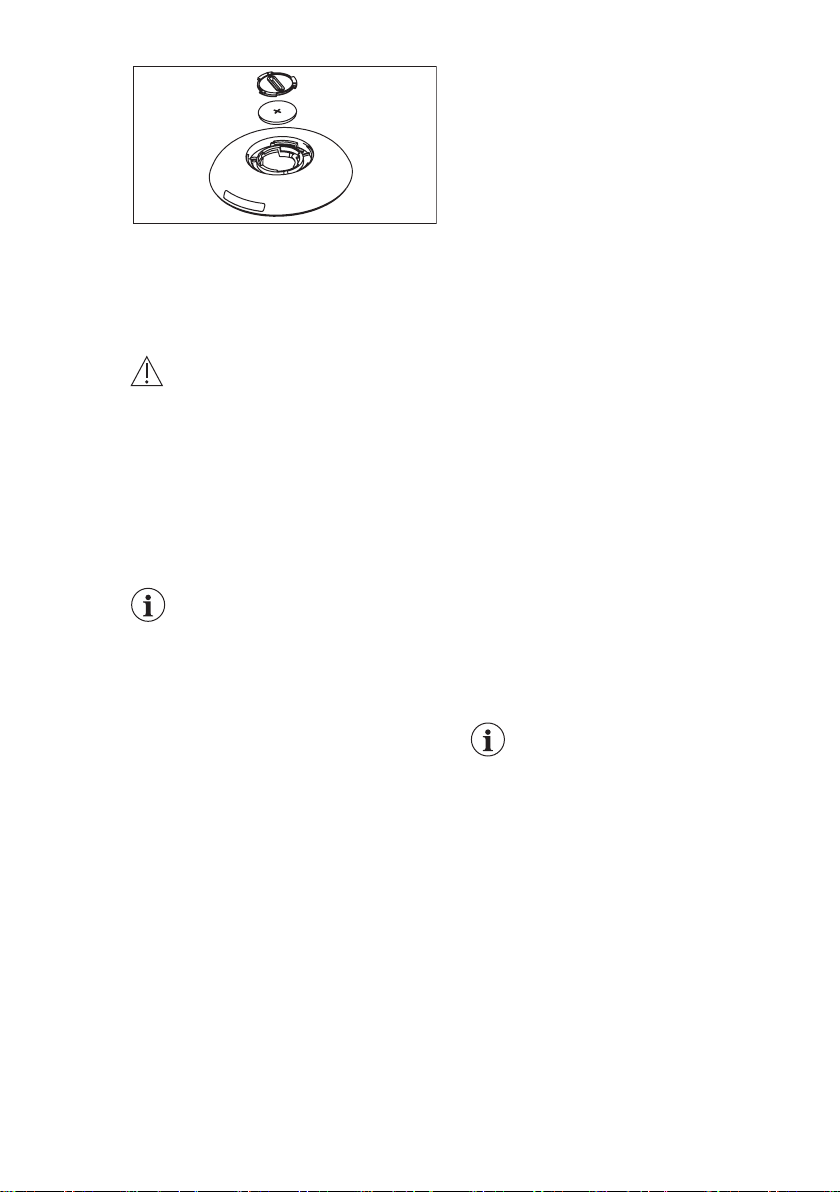
Open the back covers and
to activate the remote control,
To replace the battery
Turn over the remote control. In the
1.
button of the remote control there
is a slot.
5
Decrease temperature
6
Sets mode
7
8
Use a coin or something like that to
2.
rotate the back cover anti-clockwise
to open it. (Fig. 20 & 21)
Fig. 20
Fig. 21
Use the same way to open the
3.
protecting cover inside and take
out the battery. (Fig. 22)
Page 14
14
www.aeg.com
Fig. 22
Replace the battery and reinstall
4.
the inside cover and back cover.
Battery Type: RG15D/E-ELL
(Rated Voltage: 3VDC)
WARNING!
Please use the battery
appropriately
Chemical Burn Hazard. Keep
1.
batteries away from children.
Be sure the batteries are inserted
2.
properly.
OPERATING INSTRUCTIONS
7.
Do not use batteries other than the
3.
type specied.
Do not use old batteries with new
4.
ones.
Do not dispose of batteries in re.
5.
Batteries may explode or leak.
The cells shall be disposed of
6.
properly, including keeping them
away from children and even used
cells may cause injury.
To prevent damage, remove the
7.
batteries when not being used for
a long time.
This device complies with Part 15 of
8.
the FCC Rules. Operation is subject
to the following two conditions: (1)
This device may not cause harmful
interference, and (2) this device must
accept any interference received,
including interference that may cause
undesired operation.
Some of the following instructions
can only be used by using the
Control Panel.
7.1 Usage of the Control Panel
Heating mode (on some models)
In this mode the exhaust adaptor hose
MUST be used.
Press the “Modes” button until the
1.
“Heat” indicator is lit.
Press the “ - ” & “ + ” Temp buttons
2.
for desired setting.
Press the “fan speed” button for
3.
desired fan speed.
Connected drain hose.
4.
See 7.3 Drainage section.
Cooling mode
In this mode the exhaust adaptor hose
MUST be used.
Press the “Modes” button until the
1.
“Cool” indicator lights.
Press the “ - ” & “ + ” Temp buttons
2.
for desired setting.
Press the “Fan speed” button for
3.
desired fan speed.
It is not necessary to use the
drainage hose in the “cool” mode.
Fan mode
In this mode there is no need to use the
exhaust hose or drainage hose.
Press the “Modes” button until the
1.
“Fan” indicator is lit.
Press the “Fan speed” button to
2.
choose the desired fan speed.
The fan will run at the selected speed
3.
and the display will show the room
temperature.
Page 15
Dry mode DEACTIVATE WIFI MODULE:
In this mode you do not need to use the
exhaust adaptor hose, BUT the water
collected must be discharged. See 7.3
Drainage Section.
Press the “Modes” button until the
1.
“Dry” indicator is lit.
The fan will run at low speed and
2.
the display will show the room
temperature.
Keep doors & windows closed
3.
for
Connected drain hose. See Drainage
4.
section.
Auto mode
Always have the exhaust hose attached
in this mode.
When you set the air conditioner in Auto
mode, it will automatically select cooling,
heating (inapplicable for cooling only
models), or fan only operation depending
on what temperature you have selected
and the room temperature. The air
conditioner will control room temperature
automatically round the temperature
point set by you.
Under AUTO mode, you can not select
the fan speed.
1. Press the “Modes” button until the
“Auto mode” indicator lights.
After the “Auto mode” is selected the unit
will run automatically according to the
actual room air temperature.
holding the “Connect button” and “ - ”
synchronously 3 seconds. Press the
“Connect button” again to activate the
10 seconds for the module to initiate again.
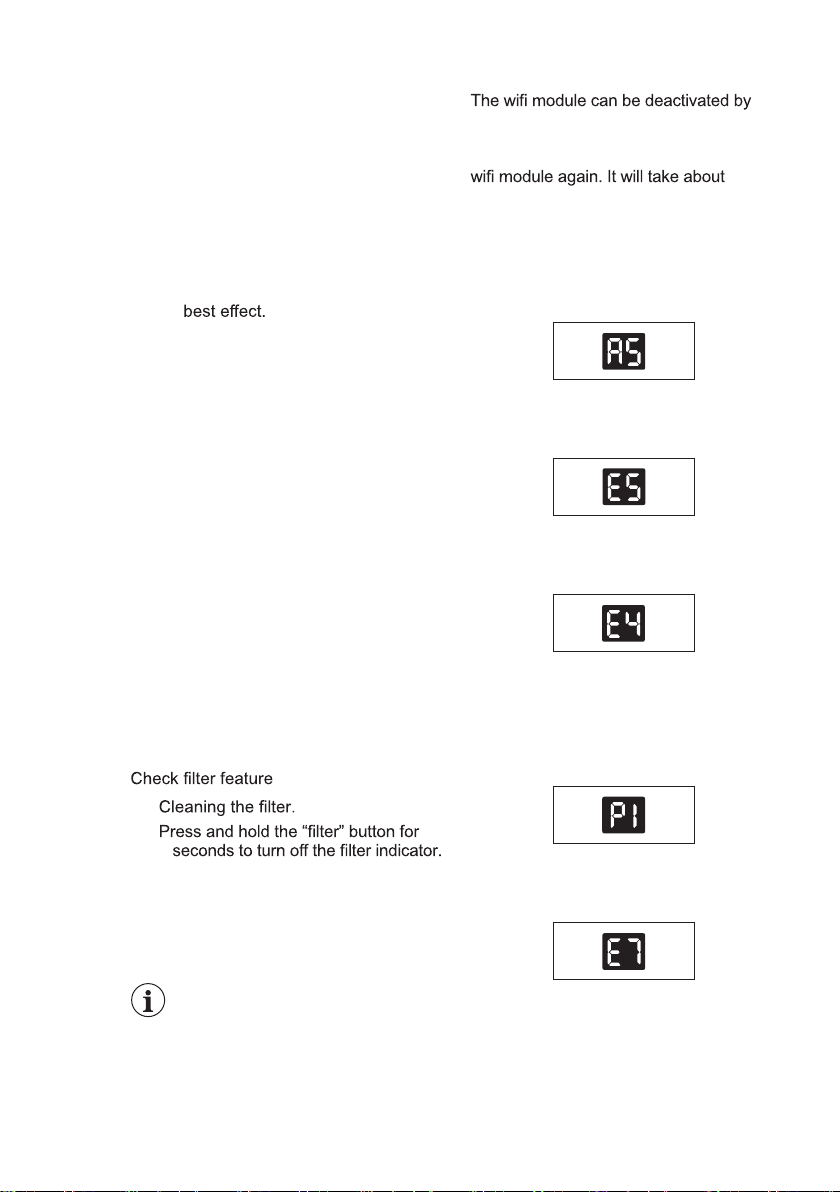
7.2 Fault code
If the display reads “A5”, the room
temperature sensor has failed. Contact
your Authorized AEG Service Centre.
If the display reads “E5”, the evaporator
temperature sensor has failed. Contact
your Authorized AEG Service Centre.
If the display reads “E4”, the display panel
communication has failed. Contact your
Authorized AEG Service Centre.
If the display reads “P1”, bottom tray is full.
Carefully move the unit to a drain location,
remove the bottom drain plug and let the
water drain away. Restart the machine
until the “P1” symbol disappears. If error
repeats, call for service.
15ENGLISH
1.
2.
3
Selecting fan speed
You can select the desired fan speed, by
pressing the “Fan speed” button. The fan
speed will change in the sequence: “Auto
Fan”, “High”, “Mid”, “Low”.
After choosing the fan speed as
“Auto Fan”, “High”, “Mid” or “Low”,
the corresponding fan speed
indicator light will illuminate.
Under Auto and Dry mode, you
can not select the fan speed.
If the display reads “E7”, the indoor motor
has failed. Contact your Authorized
AEG Service Center.
Page 16

16
www.aeg.com
7.3 Drainage 7.4 Operation Tips
During the Heat and dry mode, you need
to connect the drain hose to the drain
outlet in the back of the unit to drain the
condensate from the unit. Otherwise,
the unit may not function normally and
display show “P1”.
A. Discharge into a drain that is lower
than the unit.
B. The unit have a pump to drain the
condensate.
Fig. 23
If necessary you can extend the drain
hose by adapting the drain hose adpator
in the end of the drain hose, then use
a 8-9mm hose to extend.(Fig. 24)
Connect a 8-9mm hose here
to extend the draining hose
Fig. 24
During cooling mode, please replace the
rubber stopper to the hose connector to
reach the maximum performance.
Now that you have mastered the
operating procedure, here are more
features in your control that you should
become familiar with.
•
The “Cool” circuit has an automatic
3 minutes time delayed start if the
unit is turned o and on quickly.
This prevents overheating of the
compressor and possible circuit
breaker tripping. The fan will continue
to run during this time.
•
Temperature can be set between
16°C and 32°C.
•
The control is capable of displaying
temperature in degrees Fahrenheit or
degrees Celsius. To convert from one
to the other and back, press and hold
the “TEMP” Up ( + ) and Down ( - )
buttons together for 3 seconds.
•
There is a 2-Second delay for the
compressor shutting down when
selecting Fan. This is to cover the
possibility of having to roll through
to select another mode.
•
After a power outage, the unit will
memorize the last setting and return
the unit to the same setting once
power is restored.
•
Indoor operating temperature range
for this product is 16°C to 35°C.
•
During normal operation, the unit's
display will show room temperature
but when the room temperature is
over 37°C the display will show “HI”.
•
After 60 seconds of control inactivity
the display and indicator lights will
turn o. Press any button on the
control panel or remote control
and the display will resume.
Page 17
ENGLISH
CARE & CLEANING
8.
17
Clean your air conditioner regularly to
keep it looking new.
8.1 Air lter cleaning
Be sure to unplug the unit before cleaning
to prevent shock or re hazards.
Enter the context of your task here
(optional).
Grasp the lters tab and pull o the
1.
4 lters on the back of the unit one
by one.
Wash the lter using liquid dishwashing
2.
detergent and warm water. Rinse lter
thoroughly. Gently shake excess water
from the lter. Or, instead of washing
you may vacuum the lter clean.
Be sure lter is thoroughly dry
before replacing.
Put back the lter after the lter is dry.
3.
8.2 Cabinet Cleaning
Be sure to unplug the air conditioner
to prevent shock or re hazard.
TROUBLE SHOOTING
9.
Before calling for service, review this list.
It may save you time and expense. This
list includes common occurrences that are
not the result of defective workmanship
or materials in this appliance.
Air conditioner will not operate.
•
Wall plug disconnected. Push plug
rmly into wall outlet.
•
House fuse blown or circuit breaker
tripped. Replace fuse with time delay
type or reset circuit breaker.
•
Control is OFF. Turn Control ON and
set to desired setting.
•
P1 appears in the display window.
Drain water as described in 7.3
Drainage Section.
•
Room Temperature lower than the set
temperature (Cool Mode). Reset the
temperature.
The cabinet and front may be dusted with
an oil-free cloth or washed with a cloth
dampened in a solution of warm water
and mild liquid dishwashing detergent.
Rinse thoroughly and wipe dry.
Caution when cleaning the unit.
•
Never use harsh cleaners, wax
or polish on the cabinet front.
•
Be sure to wring excess water from
the cloth before wiping around the
controls. Excess water in or around
the controls may cause damage
to the air conditioner.
8.3 Winter Storage
If you plan to store the appliance during
the winter, cover it with plastic or return
it to its carton box.
Air from unit does not feel cold
enough.
•
Room temperature below 16°C.
Cooling may not occur until room
temperature rises above 16°C.
•
Reset to a lower temperature.
•
Compressor shut-o by changing
modes. Wait approximately 3 minutes
and listen for compressor to restart
when set in the COOL mode.
Air conditioner cooling, but room is
too warm - NO ice forming on cooling
coil behind decorative front.
•
Outdoor temperature below 16°C.
To defrost the coil, set Fan mode.
•
Air lter may be dirty. Clean lter.
Refer to 8. Care and Cleaning section.
To defrost, set to Fan mode.
•
Temperature is set too low for nighttime
cooling. To defrost the coil, set to Fan
Page 18

18
www.aeg.com
mode. Then, set temperature to a higher
setting.
•
Exhaust duct not connected or blocked.
See 5.1 Exhausting hot air Section.
Air conditioner cooling, but room is
too warm - ice forming on cooling coil
behind decorative front
•
Dirty air lter - air restricted. Clean air
lter. Refer to 8. Care and Cleaning
section.
•
Temperature is set too high. Set
temperature to a lower setting.
•
Air directional louvers positioned
improperly. Position louvers for
better air distribution.
•
Front of unit is blocked by drapes,
blinds, furniture, etc. - restricts air
distribution. Clear blockage in front
of unit.
ADDITIONAL INFORMATION
10.
•
Doors, windows, registers, etc.
open - cool air escapes. Close doors,
windows, registers, etc.
•
Unit recently turned on in hot room.
Allow additional time to remove
“stored heat” from walls, ceiling,
oor and furniture.
Air conditioner turns on and o rapidly.
•
Dirty air lter - air restricted. Clean air
lter.
•
Outside temperature extremely hot.
Set FAN speed to a faster setting to
bring air through cooling coils more
frequently.
Room too cold.
•
Set temperature too low. Increase set
temperature.
Transport of equipment containing
ammable refrigerants
See transport regulations
Marking of equipment using signs
See local regulations
Disposal of equipment using
ammable refrigerants
See national regulations.
Storage of equipment/appliances
The storage of equipment should be
in accordance with the manufacturer’s
instructions.
Storage of packed (unsold) equipment
Storage package protection should be
constructed such that mechanical damage
to the equipment inside the package will
not cause a leak of the refrigerant charge.
The maximum number of pieces of
equipment permitted to be stored together
will be determined by local regulations.
Information on servicing
Checks to the area. Prior to beginning
1.
work on systems containing ammable
refrigerants, safety checks are
necessary to ensure that the risk of
ignition is minimised. For repair to
the refrigerating system, the following
precautions shall be complied with
prior to conducting work on the
system.
Work procedure. Work shall be
2.
undertaken under a controlled
procedure so as to minimise the
risk of a ammable gas or vapour
being present while the work is being
performed.
General work area. All maintenance
3.
sta and others working in the local
area shall be instructed on the nature
of work being carried out. Work in
conned spaces shall be avoided.
The area around the workspace shall
be sectioned o. Ensure that the
conditions within the area have been
made safe by control of ammable
material.
Checking for presence of refrigerant.
4.
The area shall be checked with an
appropriate refrigerant detector prior
to and during work, to ensure the
technician is aware of potentially
ammable atmospheres. Ensure that
the leak detection equipment being
used is suitable for use with ammable
refrigerants, i.e. nonsparking,
adequately sealed or intrinsically safe.
Page 19

19
ENGLISH
Presence of re extinguisher. If
5.
any hot work is to be conducted on
the refrigeration equipment or any
associated parts, appropriate re
extinguishing equipment shall be
available to hand. Have a dry powder
or CO2 re extinguisher adjacent to
the charging area.
No ignition sources. No person carrying
6.
out work in relation to a refrigeration
system which involves exposing
any pipe work that contains or has
contained ammable refrigerant shall
use any sources of ignition in such a
manner that it may lead to the risk of
re or explosion. All possible ignition
sources, including cigarette smoking,
should be kept suciently far away
from the site of installation, repairing,
removing and disposal, during which
ammable refrigerant can possibly
be released to the surrounding
space. Prior to work taking place, the
area around the equipment is to be
surveyed to make sure that there are
no ammable hazards or ignition risks.
“No Smoking” signs shall be displayed.
Ventilated area. Ensure that the area
7.
is in the open or that it is adequately
ventilated before breaking into
the system or conducting any hot
work. A degree of ventilation shall
continue during the period that the
work is carried out. The ventilation
should safely disperse any released
refrigerant and preferably expel it
externally into the atmosphere.
Checks to the refrigeration equipment.
8.
Where electrical components are
being changed, they shall be t for the
purpose and to the correct specication.
At all times the manufacturer’s
maintenance and service guidelines
shall be followed. If in doubt consult the
manufacturer’s technical department
for assistance. The following checks
shall be applied to installations using
ammable refrigerants:
– The charge size is in accordance
with the room size within which
the refrigerant containing parts
are installed;
– The ventilation machinery and
outlets are operating adequately
and are not obstructed;
– If an indirect refrigerating circuit is
being used, the secondary circuit
shall be checked for the presence
of refrigerant;
– Marking to the equipment
continues to be visible and legible.
Markings and signs that are
illegible shall be corrected;
– Refrigeration pipe or components
are installed in a position where
theyare unlikely to be exposed to
any substance which may corrode
refrigerant containing components,
unless the components are
constructed of materials which
are inherently resistant to being
corroded or are suitably protected
against being so corroded.
Checks to electrical devices. Repair
9.
and maintenance to electrical
components shall include initial safety
checks and component inspection
procedures. If a fault exists that could
compromise safety, then no electrical
supply shall be connected to the
circuit until it is satisfactorily dealt
with. If the fault cannot be corrected
immediately but it is necessary to
continue operation, an adequate
temporary solution shall be used.
This shall be reported to the owner
of the equipment so all parties are
advised.
Initial safety checks shall include:
• That capacitors are discharged: this
shall be done in a safe manner to
avoid possibility of sparking;
• That there no live electrical
components and wiring are exposed
while charging, recovering or purging
the system;
• That there is continuity of earth
bonding.
Repairs to sealed components
During repairs to sealed components,
1.
all electrical supplies shall be
disconnected from the equipment
being worked upon prior to any
removal of sealed covers, etc. If
it is absolutely necessary to have
an electrical supply to equipment
during servicing, then a permanently
operating form of leak detection shall
Page 20

20
www.aeg.com
be located at the most critical point
to warn of a potentially hazardous
situation.
Particular attention shall be paid to the
2.
following to ensure that by working on
electrical components, the casing is
not altered in such a way that the level
of protection is aected. This shall
include damage to cables, excessive
number of connections, terminals not
made to original specication, damage
to seals, incorrect tting of glands,
etc. Ensure that apparatus is mounted
securely. Ensure that seals or sealing
materials have not degraded such
that they no longer serve the purpose
of preventing the ingress of ammable
atmospheres. Replacement parts
shall be in accordance with the
manufacturer’s specications.
NOTE: The use of silicon sealant may
inhibit the eectiveness of some types
of leak detection equipment. Intrinsically
safe components do not have to be
isolated prior to working on them.
Repair to intrinsically safe components
Do not apply any permanent inductive or
capacitance loads to the circuit without
ensuring that this will not exceed the
permissible voltage and current permitted
for the equipment in use.
Intrinsically safe components are the only
types that can be worked on while live in
the presence of a ammable atmosphere.
The test apparatus shall be at the correct
rating. Replace components only with
parts specied by the manufacturer.
Other parts may result in the ignition of
refrigerant in the atmosphere from a leak.
Cabling
Check that cabling will not be subject
to wear, corrosion, excessive pressure,
vibration, sharp edges or any other
adverse environmental eects. The check
shall also take into account the eects of
aging or continual vibration from sources
such as compressors or fans.
Detection of ammable refrigerants
Under no circumstances shall potential
sources of ignition be used in the searching
for or detection of refrigerant leaks. A
halide torch (or any other detector using a
naked ame) shall not be used.
Leak detection methods
The following leak detection methods
are deemed acceptable for systems
containing ammable refrigerants.
Electronic leak detectors shall be used
to detect ammable refrigerants, but the
sensitivity may not be adequate, or may
need re-calibration. (Detection equipment
shall be calibrated in a refrigerant-free
area.) Ensure that the detector is not a
potential source of ignition and is suitable
for the refrigerant used. Leak detection
equipment shall be set at a percentage
of the LFL of the refrigerant and shall be
calibrated to the refrigerant employed and
the appropriate percentage of gas (25%
maximum) is conrmed.
Leak detection uids are suitable for
use with most refrigerants but the use
of detergents containing chlorine shall
be avoided as the chlorine may react
with the refrigerant and corrode the
copper pipe-work.
If a leak is suspected, all naked ames
shall be removed/ extinguished.
If a leakage of refrigerant is found which
requires brazing, all of the refrigerant
shall be recovered from the system, or
isolated (by means of shut o valves)
in a part of the system remote from the
leak. Oxygen free nitrogen (OFN) shall
then be purged through the system both
before and during the brazing process.
Removal and evacuation
When breaking into the refrigerant
circuit to make repairs – or for any other
purpose – conventional procedures
shall be used. However, it is important
that best practice is followed since
ammability is a consideration. The
following procedure shall be adhered to:
•
Remove refrigerant;
•
Purge the circuit with inert gas;
•
Evacuate;
•
Purge again with inert gas;
•
Open the circuit by cutting or brazing.
The refrigerant charge shall be recovered
into the correct recovery cylinders. The
system shall be “ushed” with OFN to
render the unit safe. This process may
need to be repeated several times.
Compressed air or oxygen shall not
be used for this task. Flushing shall be
Page 21

ENGLISH
achieved by breaking the vacuum in the
system with OFN and continuing to ll
until the working pressure is achieved,
then venting to atmosphere, and nally
pulling down to a vacuum. This process
shall be repeated until no refrigerant is
within the system. When the nal OFN
charge is used, the system shall be
vented down to atmospheric pressure to
enable work to take place. This operation
is absolutely vital if brazing operations on
the pipework are to take place.
Ensure that the outlet for the vacuum
pump is not close to any ignition sources
and there is ventilation available.
Charging procedures
In addition to conventional charging
procedures, the following requirements
shall be followed.
•
Ensure that contamination of dierent
refrigerants does not occur when
using charging equipment. Hoses or
lines shall be as short as possible to
minimise the amount of refrigerant
contained in them.
•
Cylinders shall be kept upright.
•
Ensure that the refrigeration system is
earthed prior to charging the system
with refrigerant.
•
Label the system when charging is
complete (if not already).
•
Extreme care shall be taken not to
overll the refrigeration system.
Prior to recharging the system it shall be
pressure tested with OFN. The system
shall be leak tested on completion of
charging but prior to commissioning.
A follow up leak test shall be carried
out prior to leaving the site.
Decommissioning
Before carrying out this procedure, it is
essential that the technician is completely
familiar with the equipment and all its
detail. It is recommended good practice
that all refrigerants are recovered safely.
Prior to the task being carried out, an oil
and refrigerant sample shall be taken in
case analysis is required prior to re-use
of reclaimed refrigerant. It is essential
that electrical power is available before
the task is commenced.
21
Become familiar with the equipment
1.
and its operation.
Isolate system electrically.
2.
Before attempting the procedure
3.
ensure that:
• Mechanical handling equipment is
available, if required, for handling
refrigerant cylinders;
• All personal protective equipment is
available and being used correctly;
• The recovery process is supervised
at all times by a competent person;
• Recovery equipment and cylinders
conform to the appropriate
standards.
Pump down refrigerant system,
4.
if possible.
If a vacuum is not possible, make
5.
a manifold so that refrigerant can
be removed from various parts of
the system.
Make sure that cylinder is situated
6.
on the scales before recovery takes
place.
Start the recovery machine and
7.
operate in accordance with
manufacturer's instructions.
Do not overll cylinders. (No more
8.
than 80% volume liquid charge).
Do not exceed the maximum working
9.
pressure of the cylinder, even
temporarily.
When the cylinders have been lled
10.
correctly and the process completed,
make sure that the cylinders and
the equipment are removed from
site promptly and all isolation valves
on the equipment are closed o.
Recovered refrigerant shall not be
11.
charged into another refrigeration
system unless it has been cleaned
and checked.
Labelling
Equipment shall be labelled stating that it
has been de-commissioned and emptied
of refrigerant. The label shall be dated
and signed. Ensure that there are labels
on the equipment stating the equipment
contains ammable refrigerant.
Page 22

22
www.aeg.com
Recovery
When removing refrigerant from a system,
either for servicing or decommissioning,
it is recommended good practice that all
refrigerants are removed safely.
When transferring refrigerant into cylinders,
ensure that only appropriate refrigerant
recovery cylinders are employed. Ensure
that the correct number of cylinders
for holding the total system charge is
available. All cylinders to be used are
designated for the recovered refrigerant
and labelled for that refrigerant (i.e. special
cylinders for the recovery of refrigerant).
Cylinders shall be complete with pressure
relief valve and associated shut-o valves
in good working order. Empty recovery
cylinders are evacuated and, if possible,
cooled before recovery occurs.
The recovery equipment shall be in good
working order with a set of instructions
concerning the equipment that is at
hand and shall be suitable for the
recovery of ammable refrigerants. In
addition, a set of calibrated weighing
scales shall be available and in good
working order. Hoses shall be complete
with leak-free disconnect couplings
and in good condition. Before using
the recovery machine, check that it
is in satisfactory working order, has
been properly maintained and that
any associated electrical components
are sealed to prevent ignition in the
event of a refrigerant release. Consult
manufacturer if in doubt.
The recovered refrigerant shall be
returned to the refrigerant supplier in
the correct recovery cylinder, and the
relevant Waste Transfer Note arranged.
Do not mix refrigerants in recovery units
and especially not in cylinders.
If compressors or compressor oils are
to be removed, ensure that they have
been evacuated to an acceptable level to
make certain that ammable refrigerant
does not remain within the lubricant.
The evacuation process shall be carried
out prior to returning the compressor to
the suppliers. Only electric heating to
the compressor body shall be employed
to accelerate this process. When oil is
drained from a system, it shall be carried
out safely.
WARNING!
•
Do not use means to accelerate the
defrosting process or to clean, other
than those recommended by the
manufacturer.
•
The appliance shall be stored in a
room without continuously operating,
ignition sources (for example: open
ames, an operating gas appliance
or an operating electric heater).
•
Do not pierce or burn.
•
Be aware that the refrigerants may not
contain an odour.
•
Appliance should be installed,
operated and stored in a room with
a oor area larger than 12 m2.
•
The appliance shall be stored so as
to prevent mechanical damage from
occurring a warning that the appliance
shall be stored in a well-ventilated
area where the room size corresponds
to the room area as specied for
operation.
•
Any person who is involved with
working on or breaking into a
refrigerant circuit should hold a
current valid certicate from an
industry-accredited assessment
authority, which authorises their
competence to handle refrigerants
safely in accordance with an industry
recognised assessment specication.
•
Servicing shall only be performed
as recommended by the equipment
manufacturer. Maintenance and repair
requiring the assistance of other
skilled personnel shall be carried out
under the supervision of the person
competent in the use of ammable
refrigerants.
Page 23

ENGLISH
ENVIRONMENTAL CONCERNS
11.
23
Recycle the materials with the symbol.
Put the packaging in applicable
containers to recycle it. Help protect the
environment and human health and to
recycle waste of electrical and electronic
appliances. Do not dispose appliances
marked with the symbol with the
household waste. Return the product
to your local recycling facility or contact
your municipal oce.
Page 24

www.aeg.com24
INHOUD
VEILIGHEIDSINFORMATIE ........................................................................................25
1.
VEILIGHEIDSINSTRUCTIES ......................................................................................29
2.
OMSCHRIJVING .........................................................................................................33
3.
MEEGELEVERDE ACCESSOIRES ............................................................................33
4.
INSTALLATIE-INSTRUCTIES .....................................................................................34
5.
KENMERKEN VAN DE AIRCONDITIONER ...............................................................36
6.
BEDIENINGSINSTRUCTIES ......................................................................................37
7.
ONDERHOUD & REINIGING ......................................................................................40
8.
PROBLEEMOPLOSSING ...........................................................................................40
9.
EXTRA INFORMATIE .................................................................................................41
10.
MILIEUBESCHERMING ..............................................................................................46
11.
VOOR PERFECTE RESULTATEN
Bedankt dat u voor dit AEG-product heeft gekozen. Dit apparaat is ontworpen
om vele jaren uitstekend te presteren, met innovatieve technologieën die het
leven gemakkelijker helpen maken met functies die gewone apparaten wellicht
niet hebben. Neem een paar minuten de tijd om het door te lezen zodat u er
optimaal van kunt profiteren.
Ga naar onze website voor:
Advies over gebruik, brochures, het oplossen van problemen
en onderhoudsinformatie:
www.aeg.com
Registreer uw product voor een betere service:
www.registeraeg.com
Koop accessoires, verbruiksartikelen en originele reserveonderdelen voor
uw apparaat:
www.aeg.com/shop
KLANTENSERVICE
Gebruik altijd originele onderdelen.
Als u contact opneemt met de klantenservice zorg dat u de volgende gegevens bij
de hand hebt: model, productnummer, serienummer.
Deze informatie wordt vermeld op het typeplaatje.
Waarschuwing - Belangrijke veiligheidsinformatie.
Algemene informatie en tips.
Milieu-informatie.
Wijzigingen voorbehouden.
Page 25
25
NEDERLANDS
1.
VEILIGHEIDSINFORMATIE
WAARSCHUWING!
• Dit apparaat mag worden gebruikt door kinderen
vanaf 8 jaar oud en door personen met beperkte
lichamelijke, zintuiglijke of mentale capaciteiten
of een ontoereikende ervaring en kennis, als dit
gebeurt onder toezicht of als ze hiervoor instructies
hebben gekregen met betrekking tot het veilige
gebruik van het apparaat, en als ze begrijpen
welke risico's hieraan zijn verbonden.
• Kinderen mogen niet met het apparaat spelen.
• Als de voedingskabel beschadigd is, moet
de fabrikant of diens technische dienst of
een gekwaliceerd persoon deze vervangen
teneinde gevaarlijke situaties te voorkomen.
Deze handleiding bevat informatie m.b.t. het juiste
gebruik van uw nieuwe airconditioner. Lees deze
handleiding zorgvuldig door alvorens het product
te gebruiken. Deze handleiding moet op een veilige
plaats bewaard worden.
OPGELET!
• Voor reparatie of onderhoud van dit systeem altijd
beroep doen op een erkend monteur.
• Neem contact met de installateur voor montage
van dit systeem.
• Deze airconditioner is niet bedoeld voor gebruik
door jonge kinderen of verstandelijk gehandicapten
zonder toezicht.
• Houd jonge kinderen uit de buurt om te voorkomen
dat ze met de airconditioner spelen.
• Er bestaan plaatselijke richtlijnen m.b.t. maximaal
toelaatbare geluidsniveaus van airconditioners.
• Als het netsnoer moet worden vervangen, mag
deze vervanging enkel gebeuren door bevoegd
personeel.
Page 26
26
www.aeg.com
• Montagewerkzaamheden moeten door bevoegd
personeel worden uitgevoerd in overeenstemming
met de nationale bedradingsnormen (indien van
toepassing). Onjuiste aansluiting kan oververhitting
en brand veroorzaken.
• Zorg ervoor dat uw vingers tijdens het verstellen
van de horizontale lamellen niet gekneld raken
tussen de ventilator.
Belangrijke opmerkingen
1.1
1. Stel het systeem niet in werking zonder het luchtlter.
2. Stel het systeem niet in werking in de nabijheid van
een warmtebron of open vuur.
3. Stel het systeem niet bloot aan direct zonlicht.
4. Bewaar of verplaats het systeem altijd rechtop.
5. Tijdens de werking of net erna het apparaat niet
bedekken.
6. Zorg er altijd voor dat, wanneer er een
waterpompafvoerslang is aangesloten, deze slang
naar een goedwerkende afvoer wordt geleid.
7. Zorg voor opslag altijd dat al het condensatiewater uit
het systeem verwijderd is.
Belangrijke zaken bij het gebruik van
1.2
uw airconditioningsysteem
OPGELET!
Waarschuwingen voor gebruik
• Wijzig geen enkel onderdeel van dit product.
• Steek niets in onderdelen van dit systeem.
• Zorg ervoor dat de stroomtoevoer de gepaste
spanning heeft. Gebruik uitsluitend netstroom van
220 V - 240 V, 50 Hz,10 A. Het gebruik van netstroom
met een onjuiste spanning kan leiden tot schade aan
het apparaat en mogelijk brandgevaar opleveren.
• Gebruik altijd een stroomonderbreker of zekering
met de juiste spanningswaarde. Gebruik in geen
geval draad, pennen of andere objecten in plaats
van een geschikte zekering.
Page 27

NEDERLANDS
• In geval van abnormale werking van het
Stekker
Aarding
airconditioningsysteem (bijvoorbeeld een
brandgeur), schakel het onmiddellijk uit en koppel
het systeem los van het stroomnet.
OPGELET!
Waarschuwing m.b.t. het netsnoer
• Deze stekker mag uitsluitend in een geschikt
wandstopcontact gestoken worden. Niet gebruiken
in combinatie met verlengsnoeren.
• Duw de stekker stevig in het stopcontact en zorg
ervoor dat deze niet los zit.
• Het netsnoer niet vervormen of wijzigen en er niet
aan trekken of het onderdompelen in water. Door
aan het netsnoer te trekken of het niet juist te
gebruiken kan er schade aan het apparaat optreden
en kunnen er elektrische schokken optreden.
• Als het netsnoer beschadigd is, moet de fabrikant
of diens technische dienst of een gekwaliceerd
persoon dit vervangen teneinde gevaarlijke situaties
te voorkomen. Gebruik uitsluitend door de fabrikant
gespeciceerde netsnoeren als vervanging.
• Dit apparaat moet geaard worden Dit apparaat
is uitgerust met een netsnoer met aardingskabel.
De stekker moet verbonden worden met een
stopcontact dat correct gemonteerd en geaard is.
27
• Dit apparaat is uitgerust met een netsnoer met een
geaarde draad die verbonden is met een geaarde
pen. De stekker moet verbonden worden met een
stopcontact dat correct gemonteerd en geaard is.
De vierkante aardingspen van deze stekker mag
in geen geval afgeknipt of verwijderd worden.
Page 28

28
www.aeg.com
Stekker
Vierkante aardingspen
1.3
• Zorg ervoor dat het systeem is uitgeschakeld en
• Gooi of giet geen water rechtstreeks op het apparaat.
• Bij het verplaatsen van het airconditioningsysteem
• Voor een goede afvoer mag de afvoerslang niet geknikt
• Tijdens het gebruik mag de temperatuur rond de
• Blokkeer de luchtuitlaat niet met objecten. De
• Voorzie een lekstroomapparaat (ROD) ter bescherming
• Langdurige blootstelling aan een directe luchtstroming
• Gebruik dit airconditioningsysteem niet voor onbeoogde
(uitsluitend
voor het VK)
Veiligheidsinstructies voor gebruik
losgekoppeld van het stroomnet alvorens enige
onderhoudswerkzaamheden of reiniging worden
uitgevoerd.
Water kan elektrische schokken of schade aan het
apparaat veroorzaken.
moet het water uit het systeem worden afgevoerd
(zie pagina 14). Als er water in het reservoir blijft, kan
dit tijdens het verplaatsen uit het apparaat stromen.
zijn of opgetild worden tijdens de dehumidicatie-
modus. Als dit wel gebeurt, kan er water uit het
apparaat stromen.
afvoerslang niet onder het vriespunt liggen. Afvoerwater
kan dan bevriezen in de slang, waardoor het water in
het systeem uit het apparaat stroomt.
koelingprestaties kunnen dan verminderen of geheel
stoppen.
tegen elektrische schokken, in overeenstemming met
de Britse norm en bedradingsrichtlijnen.
kan schadelijk zijn voor uw gezondheid. Stel bewoners,
huisdieren of planten niet langdurig bloot aan directe
luchtstromen.
bijzondere doeleinden (bijvoorbeeld het bewaren van
precisie-instrumenten, voedsel, huisdieren, planten
en kunstobjecten). Dit kan schadelijk zijn voor zulke
eigendommen.
Page 29

NEDERLANDS
VEILIGHEIDSINSTRUCTIES
2.
29
2.1 Opmerkingen m.b.t.
de bediening/werking
• Wacht 3 minuten tot de compressor
opnieuw start met koelen. Als u het
airconditioningsysteem uitschakelt en
onmiddellijk opnieuw herstart, wacht
dan 3 minuten tot de compressor
de koeling opnieuw inschakelt.
Het airconditioningsysteem bevat
een elektronisch toestel dat, uit
veiligheidsoverwegingen, de
compressor 3 minuten inactief houdt.
• In geval van een stroomstoring tijdens
gebruik, wacht 3 minuten alvorens
het systeem te herstarten. Nadat
de stroom opnieuw is ingeschakeld,
herstart het airconditioningsysteem.
Indien de stroomtoevoer minder dan
drie minuten uitgeschakeld was, wacht
dan ten minste drie minuten alvorens
het systeem opnieuw te herstarten.
Als u het airconditioningsysteem
sneller herstart, zorgt een
beveiligingsapparaat in het
systeem er mogelijk voor dat de
compressor wordt uitgeschakeld. Dit
beveiligingsapparaat zal de koeling
ongeveer 5 minuten verhinderen.
Alle eerdere instelling zullen worden
geannuleerd en het systeem keert
terug naar de startinstellingen.
• Werking bij lage temperaturen:
Bevriest uw systeem? Dit kan
gebeuren wanneer het systeem
bij lage omgevingstemperaturen
wordt ingesteld op een temperatuur
rond 18 °C, met name 's nachts.
In dat geval zal een verdere
temperatuurdaling ervoor zorgen dat
het systeem bevriest. Stel het systeem
in op een hogere temperatuur om te
voorkomen dat het bevriest.
• De dehumicatie-modus verhoogt
de kamertemperatuur. Het
systeem genereert warmte tijdens
de dehumidicatie-modus en de
kamertemperatuur zal stijgen. Er zal
warme lucht uit de luchtuitlaat komen,
maar dat is normaal en wijst niet op
een probleem met het systeem.
• In de afkoelingsmodus blaast het
airconditioningsysteem de warme lucht
die het systeem genereert uit de kamer
via de afvoerslang. Ondertussen
komt dezelfde hoeveelheid lucht van
buitenaf door eventuele openingen in
de kamer binnen.
• Gebruik geen middelen die
het ontdooien versnellen of
reinigingsmiddelen anders dan de
middelen die door de fabrikant worden
aanbevolen.
• Het apparaat moet in een kamer
worden opgeslagen zonder continu te
werken en zonder ontstekingsbronnen
(bijvoorbeeld: open vlammen,
een werkend apparaat op gas
of een werkende elektrische
warmteopwekker).
• Niet doorboren of verbranden.
• Apparaat moet worden geïnstalleerd,
bediend en opgeslagen in een kamer
met een vloeroppervlakte van meer
dan 12 m
• U moet de nationale gasvoorschriften
naleven.
• Houd de ventilatie-openingen altijd vrij
van obstructies.
• Het apparaat moet worden
opgeslagen in een goed-geventileerde
ruimte die groter is dan 12 m
• Enige persoon die is betrokken
bij werken aan of ingebruikstelling
van een koelcircuit moet een
actueel, geldig certicaat van een
in de industrie geaccrediteerde
beoordelingsinstantie bezitten, die zijn/
haar competentie in het veilig hanteren
van koelmiddel in overeenstemming
met een in de industrie erkende
beoordelingsspecicatie autoriseert.
• Onderhoud mag uitsluitend worden
uitgevoerd zoals aanbevolen door
de fabrikant van de apparatuur.
Onderhoud en reparaties waarvoor
de assistentie van ander deskundig
personeel nodig is, moet worden
uitgevoerd onder toezicht van
de persoon die competent is in
het gebruik van ontvlambare
koelmiddelen.
• Dit product bevat een lithium
knoop-/muntcelbatterij. Als een
2
.
2
.
Page 30

30
www.aeg.com
nieuwe of gebruikte lithium knoop-/
muntcelbatterij wordt doorgeslikt
of het lichaam binnenkomt, kan dit
ernstige inwendige brandwonden
veroorzaken en in slechts 2 uur
al leiden tot de dood. Maak het
batterijcompartiment altijd goed vast.
Als het batterijcompartiment niet goed
Om letsel bij de gebruiker of andere
personen en schade aan eigendommen
te vermijden, moeten volgende instructies
strikt worden nageleefd.
Onjuiste werking/bediening wegens het
negeren van instructies kan letsels of
schade veroorzaken.
De ernst hiervan wordt aangeduid d.m.v.
volgende indicaties:
WAARSCHUWING!
Dit symbool duidt op de mogelijkheid van dood of ernstig letsel.
OPGELET!
Dit symbool duidt op een gevaar
voor letsels of schade aan
eigendommen
wordt vastgemaakt, houdt u op met
het gebruik van het product, verwijdert
u de batterijen en houdt u ze uit
de buurt van kinderen. Als u denkt
dat batterijen zijn ingeslikt of in een
deel van het lichaam zijn geplaatst,
raadpleegt u onmiddellijk een arts.
Betekenis van de symbolen in deze handleiding wordt hieronder weergegeven:
Dit symbool geeft aan dit nooit
te doen.
Dit symbool betekent dat u dit
altijd moet doen.
2.2 Waarschuwing tijdens
gebruik
WAARSCHUWING!
Waarschuwing tijdens gebruik
Page 31

NEDERLANDS
Waarschuwing Betekenis
Steek de stekker correct in het stopcontact Gevaar voor elektrische schokken of brand
door oververhitting
Het systeem nooit starten of stoppen door
de stekker in of uit te trekken
Beschadig het netsnoer niet en gebruik
geen onbekende/andere netsnoeren
Gevaar voor elektrische schokken of brand
door oververhitting
Gevaar voor elektrische schokken of brand.
Als de voedingskabel beschadigd is,
moet de fabrikant of diens technische
dienst of een gekwaliceerd persoon deze
vervangen teneinde gevaarlijke situaties te
voorkomen
Pas de lengte van het netsnoer niet aan
en sluit geen andere apparaten aan op
Gevaar voor elektrische schokken of brand
door oververhitting
hetzelfde stopcontact
Gebruik het systeem niet met natte handen
Dit kan een elektrische schok veroorzaken
of in een vochtige omgeving
Richt de luchtstroom niet naar personen Dit kan de gezondheid schaden
Zorg altijd voor een correcte aarding Onjuiste aarding kan leiden tot een
elektrische schok.
Laat geen water in elektrische onderdelen
Dit kan leiden tot storingen of elektrocutie
stromen
Monteer altijd een stroomonderbreker
en een afzonderlijk stroomcircuit
Haal het systeem uit het stopcontact als
er geluiden, geur of rook uit komt
Gebruik het stopcontact niet als dit los
of beschadigd blijkt
Onjuiste montage kan leiden tot brand
en een elektrische schok
Het kan brand en een elektrische schok
veroorzaken
Het kan brand en een elektrische schok
veroorzaken
Open het systeem niet tijdens de werking Het kan brand en een elektrische schok
veroorzaken
Houd vuurwapens uit de buurt Deze kunnen brand veroorzaken
Gebruik het netsnoer niet in de nabijheid
van verwarmingstoestellen
Gebruik het netsnoer niet in de nabijheid
Het kan brand en een elektrische schok
veroorzaken
Gevaar voor elektrische schokken of brand
van brandbare gassen of explosieven,
zoals benzine, benzeen, thinner, enz.
Als er een gaslek is van een ander
apparaat, verlucht de kamer alvorens
Gevaar voor explosie, brand en
brandwonden
de airconditioner in te schakelen
Het systeem nooit demonteren of wijzigen Het kan brand en een elektrische schok
veroorzaken
31
Page 32

32
www.aeg.com
OPGELET!
Waarschuwing Betekenis
Als het luchtlter verwijderd moet worden,
Dit kan letsel veroorzaken
raak dan de metalen onderdelen van het
systeem niet aan
Reinig de airconditioner niet met water Water kan in het systeem terechtkomen
en de isolatie beschadigen. Het kan een
elektrische schok veroorzaken
Verlucht de kamer goed indien het systeem
Er kan een tekort aan zuurstof optreden
gebruikt wordt in combinatie met een
kachel, enz.
Als het systeem moet gereinigd worden,
schakel het uit en zet de stroomonderbreker uit
Reinig de eenheid niet wanneer de
stroom ingeschakeld is; dit kan brand
en elektrische schokken veroorzaken,
alsook letsel
Plaats een huisdier of plant nooit op een
plaats waar ze blootgesteld zijn aan directe
Dit kan schadelijk zijn voor uw huisdier
of planten
luchtstroom
Niet gebruiken voor bijzondere doeleinden Gebruik deze airconditioner niet om
precisie-instrumenten, voedsel, huisdieren,
planten en kunstobjecten te bewaren.
Dit kan nadelig zijn voor de kwaliteit, enz.
Stop onmiddellijk de werking en sluit het
venster bij storm of cyclonen
Neem de stekker op de kop vast wanneer
u deze uit het stopcontact haalt
Schakel de hoofdschakelaar uit wanneer
Het gebruik met geopende vensters zorgt
mogelijk voor een nat interieur of meubilair
Gevaar voor elektrische schokken en
lichamelijk letsel
Er kunnen storingen of brand ontstaan
u het systeem lange tijd niet gebruikt
Plaats geen objecten rond luchtinlaten of
in de luchtafvoer
Plaats de lters altijd stevig terug. Reinig
het lter elke twee weken
Gebruik geen sterke reinigingsmiddelen
zoals was of verdunners - gebruik een
Dit kan schade aan het apparaat of
ongevallen veroorzaken
Werking/bediening zonder lters kan
storingen veroorzaken
De kleuren kunnen verbleken of er kunnen
krassen op het oppervlak ontstaan
zachte doek
Plaats geen zware objecten op het netsnoer
en zorg dat het snoer niet wordt ingedrukt
Drink geen water dat uit de airconditioner
afkomstig is
Wees zorgvuldig bij het uitpakken
Er is gevaar voor brand of elektrische
schokken
Het bevat contaminanten die u ziek kunnen
maken
Scherpe randen kunnen letsels veroorzaken
en monteren
Indien er water in het systeem terecht komt,
schakelt u het systeem uit via de stekker en
Gevaar voor elektrische schokken
en schade
schakelt u de stroomonderbreker uit. Isoleer
de stroomtoevoer door de stekker uit het
stopcontact te halen en neem contact met
een bevoegd monteur
Page 33

NEDERLANDS
OMSCHRIJVING
3.
1
33
6
2
3
5
4
1
Kamerluchtafvoer
2
Controlepaneel
3
Kamerluchttoevoer
4
Zwenkwiel
5
Afstandsbediening
MEEGELEVERDE ACCESSOIRES
4.
ONDERDELEN NAAM VAN HET ONDERDEEL:
1
2
3
4
5
6
7
8
Afb. 2
•
Controleer of alle accessoires in de verpakking zitten en raadpleeg de montageinstructies voor het gebruik ervan.
Uitlaatslang
Vensterschuifkit
Reserveonderdeel uitschuifbare slang
Afvoerslang & adapter
3/8" schroef
Sierfolie
Bevestigingsband
Afstandsbediening 1 stuks
7
6
Handgrepen (beide zijden)
7
Filter
8
Afvoerluchtuitlaat
9
Afvoeruitlaat
10
Afvoerlade onderaan
8
9
10
Afb. 1
HOEVEELHEID:
1 stuks
1 stuks
1 stuks
1 stuks
2 stuks
1 stuks
1 set
Page 34

34
www.aeg.com
Afb. 4
Afb. 6
Afb. 7
INSTALLATIE-INSTRUCTIES
5.
5.1 Warme lucht afvoeren
In de KOEL-modus moet het apparaat
dicht bij een venster of opening worden
geplaatst zodat de warme luchtafvoer
naar buiten kan worden geleid. Plaats
het systeem eerst op een vlakke vloer en
zorg ervoor dat er minimaal 30 cm speling
is rond het systeem, en dat het zich in de
nabijheid van een stopcontact bevindt.
Schuif een van de uiteinden van de
1.
slang uit (afb. 3).
Afb. 3
Schuif de adapter A in het
2.
uitwisselingsgat van de eenheid
(zie afbeelding 4).
Vensterschuifkit
Minimaal: 56 cm
Maximaal: 112 cm
Raadpleeg “
een openslaand raam” voor
informatie over het installeren
van de raamset.
De slang is oorspronkelijk
38 cm lang maar kan verlengd
worden tot 150 cm. Het is echter
aanbevolen om ze niet langer
te maken dan nodig. Zorg er ook
voor dat de slang geen scherpe
bochten maakt. (Afb. 7)
Installatie in
5.2
Installeer de raamset op het raam,
3.
schuif adapter B in de vensterschuifkit
en sluit dit af (afb. 5 & 6).
Afb. 5
5.2 Installatie op een
openslaand raam
Open het raam en hef de
1.
vergrendelingshendel van
de vensterschuifkit op (afb. 9).
B
B: Vergrendelingshendel
Afb. 9
Page 35

35
NEDERLANDS
Plaats de vensterschuifkit op
2.
het raam. Pas de lengte van de
vensterschuifkit aan volgens de
hoogte van het venster (afb. 10).
De uitschuifbare stang kan worden
verlengd als het raam te hoog is.
Verwijder de uitschuifbare
stang hiertoe eerst helemaal
(afb. 11 A). Lijn vervolgens de
3 haken op de uitschuifbare
stang (afzonderlijk verkrijgbaar)
uit met de 3 sleuven op het
uiteinde van de uitschuifbare
stang en schuif de 3 haken in de
sleuven. Druk vervolgens op de
uitschuifbare stang om de sleuven
te vergrendelen (afb. 11 B).
Schuif daarna de gecombineerde
uitschuifbare stang terug in de
raamset (afb. 11 C).
Afb. 10
Duw de vergrendelingshendel terug
3.
om de vensterschuifkit op de juiste
lengte af te stellen, sluit het raam en
knijp de raamset tussen het raam en
het venster om de raamset goed vast
te maken. Pel de beschermfolie aan
de achterkant van de ankertabs af
en bevestig dit op het venster. Maak
vervolgens het bandje vast (afb. 12).
Afb. 12
Knip de sierfolie op de bijpassende
4.
lengte en plak dit op de uitschuifbare
stang (afb. 13).
C
Afb. 11 A
Afb. 11 B
Afb. 11 C
Afb. 13
C: Sierfolie
Page 36

36 www.aeg.com
1
2
3
4
5
2
8
3
4567
KENMERKEN VAN DE AIRCONDITIONER
6.
6.1 BEDIENINGSPANEEL
1
Geeft de temperatuur weer
1
Filterresettoets (3 sec. indrukken
2
om te resetten)
Stelt de ventilatorsnelheid in
3
Temperatuur verhogen
4
6.2 Afstandsbediening
1
Indrukken om modes te selecteren
Indrukken om de eenheid in of uit
2
te schakelen
Indrukken om de temperatuurinstelling
3
te verhogen
Indrukken om ventilatiesnelheden
4
te selecteren
Indrukken om de temperatuurinstelling
5
te verlagen
Open de achterkleppen en
verwijder de beschermfolie
om de afstandsbediening te
activeren wanneer u deze
voor het eerst gebruikt.
Temperatuur verlagen
5
Stelt modus in
6
Schakelt eenheid in of uit
7
WiFi-knop
8
De batterij vervangen
Draai de afstandsbediening om. In
1.
de knop van de afstandsbediening
bevindt zich een sleuf.
Gebruik een muntje of iets dergelijks
2.
om de achterklep linksom te openen.
(afb.20 & 21)
Afb. 20
Afb. 21
Gebruik dezelfde manier om het
3.
beschermdeksel aan de binnenkant
te openen en verwijder de batterij.
(afb. 22)
Page 37

NEDERLANDS
Vervang de batterij en breng de
Afb. 22
4.
binnenklep en achterklep weer aan.
Batterijtype: RG15D/E-ELL (Voltage
op het naamplaatje: 3 VDC)
WAARSCHUWING!
Gebruik de batterij op passende
wijze
Gevaar voor chemische brandwonden.
1.
Houd batterijen uit de buurt van
kinderen.
Zorg dat de batterijen op de juiste
2.
wijze worden geplaatst.
Gebruik alleen batterijen van het
3.
gespeciceerde type.
Combineer geen oude en nieuwe
4.
batterijen.
Gooi batterijen nooit in een vuur.
5.
Batterijen kunnen exploderen of
lekken.
De cellen moeten op gepaste wijze
6.
worden weggegooid en moeten uit de
buurt van kinderen worden gehouden.
Zelfs gebruikte cellen kunnen letsel
veroorzaken.
Om schade te voorkomen, verwijdert
7.
u de batterijen wanneer u de
afstandsbediening gedurende langere
tijd niet zult gebruiken.
Dit apparaat voldoet aan Deel 15 van
8.
de FCC-voorschriften. De werking
is onderhevig aan de volgende
twee voorwaarden: (1) Dit apparaat
mag geen schadelijke interferentie
veroorzaken, en (2) dit apparaat moet
eventuele ontvangen interferentie
accepteren, inclusief interferentie
die een ongewenste werking kan
veroorzaken.
37
7.
BEDIENINGSINSTRUCTIES
Sommige van de volgende
instructies kunnen uitsluitend
worden gebruikt door gebruik te
maken van het bedieningspaneel.
7.1 Gebruik van het
bedieningspaneel
Verwarmingsmode (op sommige modellen)
In deze modus MOET de
uitlaatadapterslang worden gebruikt.
Druk op de “Modes” -toets tot het
1.
indicatielampje “Heat” brandt.
Druk op de temperatuurtoetsen “ - ”
2.
& “ + ” om de juiste temperatuur in te
stellen.
Druk op de “Fan speed”-toets voor
3.
de gewenste ventilatorsnelheid.
Aangesloten afvoerslang. Raadpleeg
4.
hoofdstuk 7.3 Afvoer.
Koelmodus
In deze modus MOET de
uitlaatadapterslang worden gebruikt.
Druk op de “Modes”-toets tot het
1.
indicatielampje “Cool” brandt.
Druk op de temperatuurtoetsen “ - ”
2.
& “ + ” om de juiste temperatuur in te
stellen.
Druk op de “Fan speed”-toets voor
3.
de gewenste ventilatorsnelheid.
Het is niet nodig om de
afvoerslang in de mode
“cool” te gebruiken.
Fan mode
In deze modus moet u de uitlaat- of
afvoerslang niet gebruiken.
Druk op de “Modes”-toets tot het
1.
indicatielampje “Fan” brandt.
Druk op de “Fan speed”-toets voor
2.
de gewenste ventilatorsnelheid.
De ventilator werkt op de
3.
geselecteerde snelheid en het display
geeft de kamertemperatuur weer.
Page 38

38 www.aeg.com
Droogmodus DEACTIVEREN WIFI-MODULE:
In deze modus moet u de uitlaatadapter-
slang niet gebruiken, MAAR het verzamelde water moet worden afgevoerd.
Raadpleeg hoofdstuk 7.3 Afvoer.
Druk op de “Modes” -toets tot het
1.
indicatielampje “Dry” brandt.
De ventilator werkt op lage
2.
snelheid en het display geeft de
kamertemperatuur weer.
Houd deuren en ramen gesloten voor
3.
het beste resultaat.
Aangesloten afvoerslang. Raadpleeg
4.
het hoofdstuk Afvoer.
Automatische modus
In deze modus moet de uitlaatslang altijd
aangesloten zijn.
Wanneer u de airconditioner in de Automodus zet, zal deze automatisch koeling,
verwarming (niet van toepassing bij
modellen die uitsluitend koelen) of ventilatie,
afhankelijk van de temperatuur die u
selecteerde en de temperatuur in de kamer.
De airconditioner zal de kamertemperatuur
automatisch regelen volgens het door u
ingestelde temperatuurinstelpunt.
In de AUTO-modus kunt u de
ventilatorsnelheid niet kiezen.
1. Druk op de '“Modes”-toets tot het
indicatielampje “Auto mode” brandt.
Als de “Auto mode” is geselecteerd,
werkt de eenheid automatisch in
overeenstemming met de werkelijke
temperatuur van de lucht in de kamer.
De WiFi-module kan worden
gedeactiveerd door de knop “Verbinden”
en “ - ” tegelijkertijd 3 seconden in te
drukken. Druk op nogmaals op de
toets “Verbinden” om de WiFi-module
nogmaals te activeren. Het zal ongeveer
10 seconden duren voordat de module
opnieuw wordt opgestart.
7.2 Storingscode
Als het display “A5” weergeeft, dan is de
kamertemperatuursensor defect. Neem
contact op met uw erkende AEGservicecentrum.
Als het display “E5” weergeeft, dan is
de verdampertemperatuursensor defect.
Neem contact op met uw erkende
AEG-servicecentrum.
Als het display “E4” weergeeft, dan is
de communicatie van het displaypaneel
defect. Neem contact op met uw erkende
AEG-servicecentrum.
1.
2.
schakelen.
Een ventilatorsnelheid selecteren
U kunt de gewenste ventilatorsnelheid
selecteren door op de “Fan speed”toets te drukken. De ventilatorsnelheid
verandert in deze volgorde: “Auto Fan”,
“High”, “Mid”, “Low”.
Nadat u de ventilatorsnelheid
“Auto Fan”, “High”, “Mid” of
“Low” hebt gekozen, gaat het
bijbehorende indicatielampje
branden.
In de modus Auto en Dry kunt
u geen ventilatorsnelheid kiezen.
Als het display “P1” weergeeft, dan is de
onderste lade vol. Verplaats het systeem
dan voorzichtig naar een afvoerlocatie,
verwijder de onderste afvoerdop en
laat het water wegstromen. Herstart de
machine tot het symbool “P1” verdwijnt.
Als de storing aanhoudt, neemt u contact
op met de klantendienst.
Als het display “E7” weergeeft, dan is er
een storing in de inwendige motor. Neem
contact op met uw erkende AEGservicecentrum.
Page 39

NEDERLANDS
7.3 Afvoer 7.4 Bedieningstips
Tijdens de modus Heat en Dry moet u
de afvoerslang op de afvoeruitlaat op de
achterkant van de eenheid aansluiten
om het condensaat uit de eenheid af
te voeren. Anders werkt de eenheid
mogelijk niet normaal en wordt “P1”
op het display weergegeven.
A. Afvoeren in een uitlaat die zich lager
dan de eenheid bevindt.
B. De eenheid beschikt over een pomp
die het condensaat afvoert.
Afb. 23
U kunt de afvoerslang zo nodig verlengen
door de afvoerslangadapter op het
uiteinde van de afvoerslang aan te
brengen en vervolgens een 8-9 mm slang
te gebruiken om te verlengen (afb. 24).
Sluit een 8-9 mm-slang hier aan
om de afvoerslang te verlengen
Afb. 24
Tijdens de koelmodus vervangt u de
rubberstopper op de slangconnector
om maximale prestaties te bereiken.
Nu u vertrouwd bent met de bediening
van het toestel zijn er nog meer functies
die u moet leren kennen.
•
Het koelcircuit beschikt over een
automatische uitgestelde start van
3 minuten indien het systeem snel aan
en uit wordt geschakeld. Dit voorkomt
oververhitting van de compressor
en een mogelijk activering van de
stroomonderbreker. De ventilator zal
op dat moment wel blijven draaien.
•
De temperatuur kan worden
aangepast tussen 16 °C en 32 °C.
•
Het regelsysteem kan de temperatuur
weergeven in graden Fahrenheit of
graden Celsius. Om tussen de twee
temperatuureenheden te schakelen,
druk gedurende 3 seconden tegelijk
op de toetsen “TEMP” omhoog (+)
en “TEMP” omlaag (-).
•
Wanneer u de ventilator selecteert,
duurt het 2 seconden voordat de
compressor wordt uitgeschakeld. De
reden hiervoor is de mogelijkheid dat
u slechts doorbladert om een andere
mode te selecteren.
•
Na een stroomstoring zal het systeem
de laatste instelling onthouden en het
systeem naar dezelfde instellingen
terugstellen na het herstellen van
de stroomtoevoer.
•
Het bedrijfsbereik voor de
binnentemperatuur van dit product
is 16 °C tot 35 °C.
•
Tijdens normale bediening toont
het display van de eenheid
kamertemperatuur, maar als de
kamertemperatuur boven 37 °C is,
toont het display “HI”.
•
Na 60 seconden inactiviteit op
het bedieningspaneel gaan het
display en indicatielampjes uit.
Druk op een willekeurige toets
van het bedieningspaneel of de
afstandsbediening om het display
weer in te schakelen.
39
Page 40

40
www.aeg.com
ONDERHOUD & REINIGING
8.
Reinig uw airconditioner regelmatig zodat
deze er als nieuw blijft uitzien.
8.1 Reinigen van het luchtlter
Zorg ervoor dat u het systeem van het
stroomnet loskoppelt alvorens het te
reinigen.
Voer de context van uw taak hier in
(optioneel).
Pak de lterstab vast en trek
1.
de 4 lters op de achterkant van
de eenheid er een voor een af.
Reinig het lter d.m.v. vloeibaar
2.
vaatwasmiddel en warm water. Spoel
het lter grondig. Schud overtollig water
voorzichtig uit het lter. Of, i.p.v. het lter
te wassen, kunt u het ook stofzuigen.
Zorg ervoor dat het lter grondig
droog is alvorens het terug te
plaatsen.
Breng de lters weer aan als ze
3.
droog zijn.
8.2 Reinigen van de kast
Zorg ervoor dat u het systeem van het
PROBLEEMOPLOSSING
9.
stroomnet loskoppelt om gevaar voor
schokken of brand te vermijden.
De kast en de voorzijde mogen worden
afgestoft met een olievrije doek of worden
gewassen met een doek dat bevochtigd
is met warm water en een zacht vloeibaar
vaatwasmiddel. Spoel en droog grondig.
Let op bij het reinigen van
de eenheid.
•
Gebruik nooit agressieve
reinigingsmiddelen, was of polijstmiddel
op de voorzijde van de kast.
•
Zorg ervoor dat het bedieningspaneel
afgeveegd wordt met een droge
doek. Overtollig water in of rond
het bedieningspaneel kan schade
veroorzaken.
8.3 Opslag tijdens
de wintermaanden
Als u het apparaat tijdens de
wintermaanden wenst op te slaan, bedek
het dan met plastic of bewaar het in de
oorspronkelijke verpakking.
Voordat u om onderhoud vraagt,
controleert u eerst deze lijst. Dit kan
u tijd en geld besparen. De lijst omvat
veelvoorkomende problemen die
niet worden veroorzaakt door defect
vakmanschap of materialen in dit apparaat.
De airconditioner werkt niet.
•
Stekker zit los. Steek de stekker stevig
in het stopcontact.
•
Zekering doorgebrand of
stroomonderbreker geactiveerd.
Vervang de zekering of reset de
stroomonderbreker.
•
Regelsysteem staat UIT. Schakel
regelsysteem AAN en stel in op
gewenste instelling.
•
P1 verschijnt op het display. Water
afvoeren zoals beschreven in
hoofdstuk 7.3 Afvoer.
•
Kamertemperatuur lager dan
de ingestelde temperatuur
(Koelmodus). Reset de temperatuur.
Lucht uit systeem voelt niet koud
genoeg aan.
•
Kamertemperatuur lager dan 16 °C.
De koeling wordt niet gestart tot de
kamertemperatuur boven 16 °C stijgt.
•
Stel in op een lagere temperatuur.
•
Compressor uitgeschakeld bij het
wijzigen van modi. Wacht ongeveer
3 minuten tot de compressor herstart als
het systeem in de COOL-modus staat.
Airconditioner koelt, maar de kamer
is te warm - GEEN ijsvorming op de
koelingspoel achter het decoratieve
voorpaneel.
•
Buitentemperatuur lager dan 16 °C.
Om de spoel te ontdooien, stelt u de
Fan-modus (ventilator) in.
•
Luchtlter is mogelijk vuil. Maak het
lter schoon. Raadpleeg 8. Onderhoud
en reiniging. Om te ontdooien, stelt u
de Fan-modus (ventilator) in.
Page 41

41
NEDERLANDS
•
Temperatuur is te laag ingesteld voor
nachtelijke koeling. Om de spoel
te ontdooien, stelt u de Fan-modus
(ventilator) in. Stel dan de temperatuur
hoger in.
•
Uitlaatleiding niet aangesloten of
geblokkeerd. Raadpleeg hoofdstuk
5.1 Afvoer van warme lucht.
Airconditioner koelt, maar de kamer is
te warm - ijsvorming op de koelingspoel
achter het decoratieve voorpaneel.
•
Vuil luchtlter - luchtstroom
geblokkeerd. Reinig de luchtlter.
Raadpleeg 8. Onderhoud en reiniging.
•
Temperatuur is te hoog ingesteld. Stel
de temperatuur lager in.
•
Lamellen voor luchtstroom onjuist
gepositioneerd. Verplaats de lamellen
voor een betere luchtverdeling.
•
Voorzijde van het systeem is
geblokkeerd door gordijnen,
rolgordijnen, enz. - beperkte
luchtverdeling. Verwijder de blokkade.
EXTRA INFORMATIE
10.
Transport van apparatuur dat
ontvlambaar koelmiddel bevat
Zie de transportvoorschriften
Markeren van apparatuur met behulp
van signalisatie
Zie de lokale voorschriften
Wegdoen van apparatuur dat
ontvlambaar koelmiddel bevat
Zie de nationale voorschriften
Opslag van apparatuur/apparaten
De opslag van apparaten moet gebeuren
in overeenstemming met de instructies
van de fabrikant.
Opslag van verpakte (onverkochte)
apparatuur
De bescherming van de opslagverpakking
moet zodanig worden geconstrueerd dat
mechanische schade aan de apparatuur
binnen de verpakking geen lekkage van
het koelmiddel zal veroorzaken. Het
maximale aantal stuks apparatuur dat bij
elkaar mag worden opgeborgen, wordt
bepaald door de lokale voorschriften.
•
Deuren, vensters, enz. open - koude
lucht ontsnapt. Sluit deuren, vensters,
enz.
•
Systeem recent ingeschakeld in warme
kamer. Laat meer tijd om 'opgeslagen'
warmte uit muren, plafond, vloer en
meubels te verwijderen.
Airconditioner schakelt snel aan
en uit.
•
Vuil luchtlter - luchtstroom
geblokkeerd. Reinig de luchtlter.
•
Buitentemperatuur extreem hoog. Stel
de ventilatorsnelheid hoger in om lucht
door de koelingspoelen te leiden.
Kamer te koud.
•
Temperatuur te laag ingesteld.
Verhoog de temperatuurinstelling.
Informatie over onderhoud
Controles van de ruimte. Voordat
1.
u werkzaamheden aanvangt
aan systemen die ontvlambare
koelmiddelen bevatten, moeten
er veiligheidscontroles worden
uitgevoerd om te zorgen dat het risico
op ontsteking wordt geminimaliseerd.
Voor reparatie aan het koelsysteem
moet u zich aan de volgende
voorzorgsmaatregelen houden
voordat u werkzaamheden aan
het systeem gaat uitvoeren.
Werkprocedure Het werk moet
2.
worden uitgevoerd volgens een
gereguleerde procedure, zodat
het risico op de aanwezigheid van
ontvlambaar gas of damp tijdens
het uitvoeren van het werk wordt
geminimaliseerd.
Algemeen werkgebied. Alle
3.
onderhoudspersoneel en anderen
die in de omgeving werken, moet
op de hoogte worden gebracht van
de aard van de werkzaamheden die
worden uitgevoerd. Werk in beperkte
ruimten moet worden vermeden.
Page 42

42
www.aeg.com
De ruimte rondom de werkruimte
moet worden afgescheiden. Zorg dat
de omstandigheden binnen de ruimte
veilig zijn gemaakt door beheersing
van ontvlambaar materiaal.
Controleren op aanwezigheid van
4.
koelmiddel. De ruimte moet met
een gepaste koelmiddeldetector
worden gecontroleerd voorafgaande
aan en tijdens de werkzaamheden,
om te verzekeren dat de monteur
zich bewust is van mogelijk
ontvlambare atmosferen. Zorg dat de
lekkagedetectieapparatuur die wordt
gebruikt, geschikt is voor gebruik met
ontvlambare koelmiddelen, d.w.z.
geen vonken, voldoende afgesloten
of intrinsiek veilig.
Aanwezigheid van een brandblusser.
5.
Als er heet werk aan de koelapparatuur
of eventuele bijbehorende onderdelen
moet worden uitgevoerd, moet
bijbehorende brandblussende
apparatuur bijdehand zijn. Zorg dat er
een droogpoederblusser of een CO2brandblusser naast het oplaadgebied
aanwezig is.
Geen ontstekingsbronnen. Geen
6.
enkele persoon die werk uitvoert in
verband met een koelsysteem dat
betrekking heeft op het blootstellen
van pijpleidingen die ontvlambaar
koelmiddel bevatten of hebben bevat,
mag enige ontstekingsbronnen
gebruiken op een zodanige manier
dat dit kan leiden tot het risico op
brand of een explosie. Alle mogelijke
ontstekingsbronnen, inclusief het
roken van sigaretten, moeten
voldoende uit de buurt worden
gehouden van de plaats van installatie,
reparatie, verwijdering en wegdoen,
gedurende de periode waarin er
mogelijk ontvlambaar koelmiddel in
de omgeving kan worden vrijgegeven.
Voordat de werkzaamheden
plaatsvinden, moet de ruimte rondom
de apparatuur worden geïnspecteerd
om te zorgen dat er geen ontvlambare
gevaren of ontstekingsrisico's bestaan.
Er moeten 'Niet-roken'-borden worden
weergegeven.
Geventileerde ruimte. Zorg dat
7.
de ruimte open is of voldoende
wordt geventileerd voordat u het
systeem in gebruik stelt of hete
werkzaamheden uitvoert. Gedurende
de periode dat de werkzaamheden
worden uitgevoerd, moet er een mate
van ventilatie gaande zijn. De ventilatie
moet eventueel vrijkomend koelmiddel
veilig verspreiden en bij voorkeur
extern in de atmosfeer uitvoeren.
Controles aan de
8.
koelmiddelapparatuur. Als er
elektrische componenten worden
verwisseld, moeten ze worden
aangebracht voor dat doel en
conform de correcte specicaties.
De onderhouds- en reparatierichtlijnen
van de fabrikant moeten te allen
tijde worden opgevolgd. Bij twijfel
vraagt u de technische afdeling van
de fabrikant om hulp. De volgende
controles moeten worden toegepast
op installaties die gebruik maken van
ontvlambare koelmiddelen:
- De laadgrootte is in
overeenstemming met de grootte
van de ruimte waarbinnen de
onderdelen die koelmiddel
bevatten, worden geïnstalleerd;
- De ventilatie-apparatuur en
-uitgangen werken adequaat
en worden niet belemmerd;
- Als er een indirect
koelmiddelcircuit wordt gebruikt,
moet het secundaire circuit worden
gecontroleerd op aanwezigheid
van koelmiddel;
- De markering van het apparaat
blijft zichtbaar en goed leesbaar.
Markeringen en signalisatie die
onleesbaar zijn, moeten worden
gecorrigeerd;
- Koelmiddelleidingen of
-componenten worden
geïnstalleerd op een positie waarin
ze naar alle waarschijnlijkheid
niet worden blootgesteld aan
een substantie die corrosie kan
veroorzaken in de componenten
die koelmiddel bevatten, tenzij de
componenten zijn geconstrueerd
uit materialen die inherent bestand
zijn tegen corrosie of die op
geschikte wijze worden beschermd
tegen corrosie.
Controles van elektrische
9.
apparaten. Reparatie en onderhoud
aan elektrische componenten
moet onder meer bestaan uit
initiële veiligheidscontroles en
componentinspectieprocedures.
Page 43

43
NEDERLANDS
Als er een storing aanwezig is die
de veiligheid in gevaar kan brengen,
dan mag er geen elektrische
stroomvoorziening op het circuit
worden aangesloten totdat de storing
naar tevredenheid is opgelost. Als de
storing niet onmiddellijk kan worden
gecorrigeerd, maar het wel nodig is
om de werking te continueren, moet
er een adequate tijdelijke oplossing
worden gebruikt. Dit moet aan de
eigenaar van de apparatuur worden
gerapporteerd, zodat alle partijen op
de hoogte zijn.
Initiële veiligheidscontroles bestaan onder
meer uit:
• Dat condensatoren worden ontladen:
dit moet op een veilige manier worden
gedaan om de mogelijkheid van
vonken te vermijden;
• Dat er geen live elektrische
componenten en bedrading wordt
blootgesteld tijdens het opladen,
terugwinnen of zuiveren van het
systeem;
• Dat er doorlopend contact met de
aarde bestaat.
Reparaties aan afgedichte
componenten
Tijdens reparaties aan afgedichte
1.
componenten, moeten alle
elektrische stroomvoorzieningen
van de apparatuur waaraan
wordt gewerkt worden ontkoppeld
voorafgaande aan de verwijdering
van afgedichte afdekkingen, etc.
Als het absoluut noodzakelijk is om
tijdens reparaties een elektrische
stroomvoorziening naar het
apparaat te laten lopen, dan moet
een permanent werkende vorm
van lekkagedetectie op het meest
kritieke punt worden geplaatst om
te waarschuwen tegen een mogelijk
gevaarlijke situatie.
Er moet met name goed op het
2.
volgende worden gelet om te
waarborgen dat de behuizing
door de werkzaamheden aan de
elektrische componenten niet op
zodanige manier wordt gewijzigd
dat het beschermingsniveau wordt
beïnvloed. Dit bestaat onder meer
uit schade aan kabels, buitengewone
hoeveelheden aansluitingen,
terminals niet aangesloten volgens
de oorspronkelijke specicatie,
schade aan afdichtingen, onjuiste
montage van dichtingen, etc.
Zorg dat het apparaat goed is
gemonteerd. Zorg dat afdichtingen
of afdichtingsmaterialen niet zodanig
zijn verslechterd, dat ze niet langer
hun doel dienen of de binnendringing
van ontvlambare atmosferen
voorkomen. Vervangingsonderdelen
moeten in overeenstemming zijn met
de specicaties van de fabrikant.
OPMERKING: Het gebruik van siliconen
afdichtmiddel belemmert mogelijk
de eectiviteit van bepaalde soorten
lekkagedetectieapparatuur. Intrinsiek
veilige componenten hoeven niet te worden
geïsoleerd voordat eraan wordt gewerkt.
Reparatie van intrinsiek veilige
componenten
Breng geen permanent inductieve of
capaciteitsladingen op het circuit aan
zonder te zorgen dat het toelaatbare
voltage en de toelaatbare stroom voor de
gebruikte apparatuur hiermee niet wordt
overschreden.
Intrinsiek veilige componenten zijn
de enige types waaraan live in de
aanwezigheid van een ontvlambare
atmosfeer kan worden gewerkt. Het
testapparaat moet de juiste spanning
hebben. Vervang componenten
uitsluitend door onderdelen die door
de fabrikant worden gespeciceerd.
Andere onderdelen kunnen leiden tot
de ontsteking van koelmiddel in de
atmosfeer door een lekkage.
Kabels
Controleer of kabels niet onderhevig zijn
aan slijtage, corrosie, bovenmatige druk,
vibratie, scherpe randen of enige andere
nadelige milieueecten. De controle
moet ook rekening houden met de
gevolgen van ouderdom of doorlopende
trillingen uit bronnen als compressoren
of ventilatoren.
Detectie van ontvlambare
koelmiddelen
Onder geen enkele omstandigheden
mogen mogelijke ontstekingsbronnen
worden gebruikt bij het zoeken naar
of detecteren van koelmiddellekkages.
Er mag geen halogenide lamp (of enige
andere detector die gebruik maakt van
een naakte vlam) worden gebruikt.
Page 44

44
www.aeg.com
•
Lekkagedetectiemethoden
De volgende lekkagedetectiemethoden
worden aanvaardbaar geacht voor
systemen die ontvlambare koelmiddelen
bevatten.
Elektronische lekkagedetectors mogen
worden gebruikt voor het detecteren
van ontvlambare koelmiddelen. De
gevoeligheid kan echter onvoldoende
zijn of moet mogelijk opnieuw worden
gekalibreerd. (Detectie-apparatuur moet
in een koelmiddelvrije ruimte worden
gekalibreerd.) Zorg dat de detector
geen mogelijke ontstekingsbron is en
geschikt is voor het gebruikte koelmiddel.
Lekkagedetectieapparatuur moet
worden ingesteld op een percentage
van de LFL van het koelmiddel en moet
worden gekalibreerd ten opzichte van
het koelmiddel dat wordt gebruikt en
nadat het bijbehorende gaspercentage
(maximaal 25%) is bevestigd.
Lekkagedetectievloeistoen zijn
geschikt voor gebruik met de meeste
koelmiddelen, maar het gebruik van
schoonmaakmiddelen met chloor moet
worden vermeden, aangezien de chloor
kan reageren met het koelmiddel en
corrosie van de koperen leidingen kan
veroorzaken.
Als er een lek wordt vermoed, moeten
alle naakte vlammen worden verwijderd/
gedoofd.
Als er een koelmiddellekkage wordt
gevonden waarvoor soldering nodig
is, moet al het koelmiddel uit het
systeem worden teruggewonnen of
worden geïsoleerd (door middel van
uitschakelkleppen) in een deel van het
systeem dat ver van het lek is verwijderd.
Zuurstofvrije stikstof (OFN) moet
vervolgens door het systeem worden
gevoerd, zowel voor als tijdens het
soldeerproces.
Verwijdering en evacuatie
Wanneer een koelcircuit moet worden
geopend om reparaties uit te voeren,
of voor enig ander doeleinde, moeten
er conventionele procedures worden
gebruikt. Het is echter belangrijk dat
best practice wordt gevolgd, aangezien
er rekening moet worden gehouden met
ontvlambaarheid. U moet zich aan de
volgende procedure houden:
Koelmiddel verwijderen;
•
Het circuit zuiveren met inert gas;
•
Evacueren;
•
Nogmaals zuiveren met inert gas;
•
Het circuit openen door snijden
of solderen.
De koelmiddellading moet worden
teruggewonnen in de correcte
terugwinningscilinders. Het systeem
moet worden 'gespoeld' met OFN om de
eenheid veilig te stellen. Dit proces moet
mogelijk meerdere keren worden herhaald.
Er mag geen perslucht of zuurstof voor
deze taak worden gebruikt. Het spoelen
moet worden bereikt door het verbreken
van het vacuüm in het systeem met
OFN, met OFN blijven vullen totdat de
werkdruk is bereikt, vervolgens de OFN in
de atmosfeer af laten zuigen en ten slotte
weer een vacuüm tot stand brengen. Dit
proces moet herhaald worden totdat er
zich geen koelmiddel meer in het systeem
bevindt. Wanneer de laatste OFN-lading
is gebruikt, moet het systeem tot de
atmosferische druk worden geventileerd
om werkzaamheden mogelijk te maken.
Deze verrichting is absoluut cruciaal als er
in de pijpleidingen zal worden gesoldeerd.
Zorg dat de uitlaat voor de vacuümpomp
zich niet in de buurt van ontstekingsbronnen bevindt en dat er ventilatie beschikbaar is.
Oplaadprocedures
Naast conventionele laadprocedures moet
aan de volgende vereisten worden voldaan.
•
Zorg bij het gebruik van
laadapparatuur dat er geen
verontreiniging van verschillende
koelmiddelen optreedt. Slangen of
leidingen moeten zo kort mogelijk
worden gehouden om de hoeveelheid
koelmiddel erin te minimaliseren.
•
Cilinders moeten rechtop staan.
•
Zorg dat het koelmiddelsysteem
voorafgaande aan het laden van
koelmiddel in het systeem is geaard.
•
Voorzie het systeem van een label
wanneer het laden is voltooid (als dat
nog niet het geval is).
•
Er moet extreem goed worden opgelet
dat er niet teveel koelmiddel in het
systeem wordt aangebracht.
Page 45

45
NEDERLANDS
Voordat u het systeem opnieuw oplaadt,
moet er met OFN een druktest worden
uitgevoerd. Als het opladen is afgerond,
maar voorafgaande aan ingebruikneming
moet het systeem op lekkage worden
getest. Voordat u de locatie verlaat moet
er een opvolgende lekkagetest worden
uitgevoerd.
Buitengebruikstelling
Voordat deze procedure wordt uitgevoerd, is het essentieel dat de monteur
volledig bekend is met de apparatuur en
alle details ervan. Het is een aanbevolen
best practice dat alle koelmiddelen veilig
worden teruggewonnen. Voordat de taak
wordt uitgevoerd, moet er een olie- en
koelmiddelmonster worden genomen, voor
het geval er een analyse nodig is voordat
het teruggewonnen koelmiddel opnieuw
kan worden gebruikt. Het is van essentieel
belang dat er elektriciteit beschikbaar is
voordat met de taak wordt begonnen.
Zorg dat u bekend bent met de
1.
apparatuur en de bediening ervan.
Isoleer het systeem elektrisch.
2.
Zorg voordat u met de procedure
3.
begint dat:
• Er zo nodig mechanische verwerkingsapparatuur beschikbaar is
voor de verwerking van koelmiddelcilinders;
• Alle persoonlijke beschermingsmiddelen beschikbaar zijn en op
de juiste wijze worden gebruikt;
• Het terugwinningsproces te
allen tijde onder toezicht van
een competente persoon wordt
uitgevoerd;
• Terugwinningsapparatuur
en -cilinders voldoen aan de
bijbehorende standaarden.
Draineer het koelmiddelsysteem
4.
zo mogelijk.
Als een vacuüm niet mogelijk is,
5.
maakt u een zodanig spruitstuk dat
het koelmiddel uit de verschillende
delen van het systeem kan worden
verwijderd.
Zorg dat de cilinder op de weegschaal
6.
staat voordat u met de terugwinning
start.
Start de terugwinningsmachine en
7.
bedien deze in overeenstemming
met de instructies van de fabrikant.
Zorg dat er niet teveel koelmiddel
8.
in de cilinders wordt gevuld. (Niet
meer dan een volume van 80%
aan vloeibare lading.)
De maximale werkdruk van de cilinder
9.
mag niet worden overschreden (zelfs
niet tijdelijk).
Wanneer de cilinders op de juiste
10.
wijze zijn gevuld en het proces
is voltooid, moet u zorgen dat de
cilinders en de apparatuur meteen uit
de vestiging worden verwijderd en dat
alle isolatiekleppen op de apparatuur
zijn afgesloten.
Teruggewonnen koelmiddel mag
11.
pas in een ander koelmiddelsysteem
worden geladen als het is gereinigd
en is gecontroleerd.
Etikettering
De apparatuur moet van een label
worden voorzien waarop staat dat het
buiten gebruik is gesteld en dat het
koelmiddel eruit is verwijderd. Het label
moet worden gedateerd en ondertekend.
Zorg dat er labels op de apparatuur
worden aangebracht waarop staat dat de
apparatuur ontvlambaar koelmiddel bevat.
Terugwinning
Wanneer er koelmiddel uit een systeem
wordt verwijderd, voor reparaties of
buitengebruikstelling, wordt het als best
practice aanbevolen om alle koelmiddelen
op veilige wijze te verwijderen.
Wanneer het koelmiddel wordt
overgebracht naar cilinders, moet
u zorgen dat er uitsluitend gepaste
cilinders voor de terugwinning van
koelmiddel worden gebruikt. Zorg dat
het juiste aantal cilinders voor de totale
koelmiddellading van het systeem
beschikbaar is. Alle cilinders die
zullen worden gebruikt, zijn speciaal
aangewezen voor het teruggewonnen
koelmiddel en bevatten een label voor
dat koelmiddel (d.w.z. speciale cilinders
voor de terugwinning van koelmiddel). De
cilinders moeten een drukontluchtingsklep
bevatten, evenals de bijbehorende
uitschakelkleppen, alle in goed werkende
staat. Lege terugwinningscilinders worden
Page 46

46
www.aeg.com
geëvacueerd en zo mogelijk gekoeld
voordat de terugwinning wordt uitgevoerd.
De terugwinningsapparatuur moet in
goede werkende staat zijn, met een set
instructies in verband met de apparatuur.
Tevens moet de apparatuur geschikt zijn
voor de terugwinning van ontvlambare
koelmiddelen. Bovendien moet er
een set gekalibreerde weegschalen,
in goede werkende staat, beschikbaar
zijn. Slangen moeten volledig zijn,
met lekkagevrije ontkoppelingen
en in goede staat. Voordat u een
terugwinningsapparaat gebruikt,
controleert u of deze in goede werkende
staat is, op de juiste wijze is onderhouden
en dat eventuele bijbehorende elektrische
componenten zijn afgedicht om in geval
van vrijgifte van koelmiddel ontsteking te
voorkomen. Bij twijfel neemt u contact op
met de fabrikant.
Het teruggewonnen koelmiddel moet
in de correcte terugwinningscilinder
worden geretourneerd aan de
koelmiddelleverancier en de relevante
aantekening voor afvaloverdracht
moet worden afgesproken. Meng geen
koelmiddelen in terugwinningseenheden,
vooral niet in cilinders.
Als compressoren of compressorolieën
moeten worden verwijderd, moet
u zorgen dat ze zijn geëvacueerd tot
een aanvaardbaar niveau om te zorgen
dat er geen ontvlambaar koelmiddel
in het smeermiddel achterblijft.
Het evacuatieproces moet worden
uitgevoerd voordat u de compressor
aan de leveranciers retourneert. Alleen
de elektrische verwarming van het
hoofdgedeelte van de compressor
mag worden gebruikt om dit proces te
versnellen. Wanneer de olie uit het een
systeem is afgevoerd, moet dat op veilige
wijze gebeuren.
WAARSCHUWING!
•
Gebruik geen middelen die
het ontdooien versnellen of
reinigingsmiddelen anders dan de
middelen die door de fabrikant worden
aanbevolen.
•
Het apparaat moet in een kamer
worden opgeslagen zonder continu te
werken en zonder ontstekingsbronnen
(bijvoorbeeld: open vlammen, een
werkend apparaat op gas of een
werkende elektrische warmteopwekker).
•
Niet doorboren of verbranden.
•
Wees u ervan bewust dat
koelmiddelen geen geur afgeven.
•
Apparaat moet worden geïnstalleerd,
bediend en opgeslagen in een kamer
met een vloeroppervlakte van meer
dan 12 m
•
Het apparaat moet zodanig worden
opgeslagen dat mechanische schade
wordt voorkomen. Wij waarschuwen
u dat het apparaat moet worden
opgeslagen in een goed-geventileerde
ruimte, waarbij de grootte van de
ruimte overeenkomt met de ruimte die
voor de werking wordt gespeciceerd.
•
Enige persoon die is betrokken
bij werken aan of ingebruikstelling
van een koelcircuit moet een
actueel, geldig certicaat van een
in de industrie geaccrediteerde
beoordelingsinstantie bezitten, die zijn/
haar competentie in het veilig hanteren
van koelmiddel in overeenstemming
met een in de industrie erkende
beoordelingsspecicatie autoriseert.
•
Onderhoud mag uitsluitend worden
uitgevoerd zoals aanbevolen door
de fabrikant van de apparatuur.
Onderhoud en reparaties waarvoor
de assistentie van ander deskundig
personeel nodig is, moet worden
uitgevoerd onder toezicht van de
persoon die competent is in het gebruik
van ontvlambare koelmiddelen.
2
.
11.
MILIEUBESCHERMING
Recycle de materialen met het symbool.
Gooi de verpakking in een
geschikte verzamelcontainer om het
te recyclen. Help om het milieu en de
volksgezondheid te beschermen en
recycle het afval van elektrische en
elektronische apparaten. Gooi apparaten
gemarkeerd met het symbool niet
weg met het huishoudelijk afval. Breng
het product naar het milieustation bij u
in de buurt of neem contact op met de
gemeente.
Page 47

47
NEDERLANDS
Page 48

www.aeg.com48
SOMMAIRE
CONSIGNES DE SÉCURITÉ ......................................................................................49
1.
CONSIGNES DE SÉCURITÉ ......................................................................................53
2.
DESCRIPTION DE L’APPAREIL .................................................................................56
3.
ACCESSOIRES INCLUS .............................................................................................57
4.
INSTRUCTIONS D’INSTALLATION ............................................................................57
5.
CARACTÉRISTIQUES DU CLIMATISEUR .................................................................59
6.
NOTICE D’UTILISATION .............................................................................................61
7.
ENTRETIEN & NETTOYAGE ......................................................................................63
8.
CHARTE DE DÉPANNAGE ........................................................................................64
9.
INFORMATIONS SUPPLÉMENTAIRES .....................................................................64
10.
11.
POUR DES RÉSULTATS PARFAITS
Merci d'avoir choisi ce produit AEG. Nous l'avons conçu pour qu'il vous offre des
performances irréprochables pour longtemps, en intégrant des technologies
innovantes qui vous simplifient la vie grâce à des caractéristiques que vous ne
trouverez pas forcément sur des appareils ordinaires. Veuillez prendre quelques
instants pour lire cette notice afin d'utiliser au mieux votre appareil.
Visitez notre site Internet pour :
Obtenir des conseils d’utilisation, des brochures, de l’aide, des informations :
www.aeg.com
56....................................... TNEMENNORIVNE’L ED NOITCETORP ED ERÈITAM NE
Enregistrez votre produit pour obtenir un meilleur service :
www.registeraeg.com
Acheter des accessoires, consommables et pièces de rechange d’origine
pour votre appareil :
www.aeg.com/shop
SERVICE APRÈS-VENTE
Utilisez toujours des pièces d’origine.
Avant de contacter le service après-vente, assurez-vous de disposer des informations
suivantes : Modèle, PNC, numéro de série.
Vous trouverez ces informations sur la plaque signalétique.
Avertissement/Attention : informations relatives à la sécurité.
Informations générales et conseils.
Informations en matière de protection de l’environnement.
Page 49

49
FRANÇAISE
1.
CONSIGNES DE SÉCURITÉ
ATTENTION !
• Cet appareil n’est pas destiné à être utilisé par
des enfants ou des personnes dont les capacités
physiques, sensorielles ou mentales, ou le manque
d’expérience et de connaissance les empêchent
d’utiliser l’appareil sans risque lorsqu’ils sont sans
surveillance ou en l’absence d’instruction d’une
personne responsable qui puisse leur assurer une
utilisation de l’appareil sans danger.
• Ne laissez pas les enfants jouer avec l’appareil.
• Si le câble d’alimentation est endommagé, il doit être
remplacé par le fabricant, son atelier d’entretien ou
un technicien qualié an d’éviter tout danger.
Ce manuel vous explique comment bien utiliser votre
nouveau climatiseur. Veuillez lire attentivement ce manuel
avant d'utiliser le produit. Conservez ce manuel dans un
endroit sûr pour pouvoir le consulter facilement.
ATTENTION !
• Les opérations de maintenance et les réparations
ne doivent être eectuées que par un technicien
de maintenance agréé.
• Contactez un installateur pour l’installation de cet
appareil.
• Ce climatiseur n’est pas prévu pour être utilisé par
de jeunes enfants ou des personnes inrmes sans
surveillance.
• Empêchez les enfants de jouer avec le climatiseur.
• Certaines réglementations locales s’appliquent
concernant les niveaux sonores maximaux
pouvant être émis par les climatiseurs.
• Si le câble d’alimentation doit être remplacé, il ne
doit être remplacé que par un réparateur agréé.
• L’installation doit être eectuée en accord avec les
normes nationales de câblage, par un technicien
agréé uniquement (le cas échéant). Un mauvais
branchement peut provoquer une surchaue et
un incendie.
Page 50

50
www.aeg.com
• Faites attention de ne pas toucher le ventilateur avec les
doigts lorsque vous ajustez les volets horizontaux.
Remarques importantes
1.1
1. N’utilisez jamais l’appareil sans ltre à air.
2. Ne faites jamais fonctionner l’appareil près d’une
source de chaleur ou d’une amme nue.
3. N’exposez pas l’appareil aux rayons directs du soleil.
4. Rangez ou déplacez toujours l’appareil en position
debout.
5. Ne pas couvrir l’appareil pendant son fonctionnement ou
immédiatement après chaque utilisation de l’appareil.
6. Veillez toujours à ce que, lorsque installé, le tuyau
de vidange soit monté de la pompe à eau jusqu’à un
point de vidange ecace.
7. Vidangez toujours l’eau de condensation avant de
ranger l’appareil.
Point à garder en mémoire lors de l’utilisation
1.2
de votre climatiseur
ATTENTION !
Avertissements d’utilisation
• Ne modiez aucun élément de ce produit.
• N’insérez aucun objet dans les éléments de l’appareil.
• Assurez-vous que la tension nominale de
l’alimentation secteur est adaptée. Utilisez
uniquement une alimentation électrique de 220 V 240 V, 50 Hz, 10 A. L’utilisation d’une alimentation
électrique ayant une tension nominale inadaptée
peut entraîner des dégâts sur l’appareil, ainsi qu’un
incendie.
• Utilisez toujours un disjoncteur ou des fusibles d’un
ampérage adapté. N’utilisez sous aucun prétexte
des ls, des épingles ou d’autres objets à la place d’un
fusible adapté.
• En cas d’anomalie du climatiseur (par exemple
une odeur de brûlé), éteignez-le immédiatement
et débranchez-le de l’alimentation électrique.
Page 51

FRANÇAISE
ATTENTION !
Fiche
Languette
de mise
à la terre
Fiche
Goujon carré de terre
Avertissement pour le cordon d’alimentation
• Cette che électrique ne doit être branchée qu’à
une prise murale adaptée. N’utilisez pas de rallonge
électrique.
• Enfoncez la che avec précautions dans la prise
murale et assurez-vous qu’elle n’a pas de jeu.
• Ne tirez, déformez ou modiez pas le cordon
d’alimentation, et ne le plongez jamais dans l’eau.
Le fait de tirer sur le cordon d’alimentation ou une
utilisation non conforme peuvent entraîner des
dégâts à l’appareil et provoquer un choc électrique.
• Si le câble d’alimentation est endommagé, il doit
être remplacé par le fabricant, son service après-
vente ou un technicien qualié an d’éviter tout
danger. En cas de remplacement, utilisez uniquement
le câble d’alimentation spécié par le fabricant.
• Cet appareil doit être relié à la terre. Cet appareil
dispose d’un cordon doté d’un l de mise à la
terre. La che doit être branchée dans une prise
correctement installée et mise à la terre.
51
• Cet appareil dispose d’un cordon doté d’un l de
mise à la terre relié à une borne de terre. La che
doit être branchée dans une prise correctement
installée et mise à la terre. Ne coupez ou retirez en
aucun cas la borne de terre carrée de cette prise.
(uniquement pour
le Royaume-Uni)
Page 52

52
www.aeg.com
Précautions d’utilisation
1.3
• Assurez-vous que l’appareil est éteint et débranché
de la prise secteur avant d’entreprendre toute
opération de maintenance ou de nettoyage.
• Ne pas éclabousser ou verser de l ‘eau directement sur
l’ appareil. L ‘eau peut provoquer des chocs électriques
ou des dommages matériels.
• Il est nécessaire de vidanger le climatiseur avant
de le déplacer (voir page 14). S’il reste de l’eau dans
le réservoir, elle risque de se renverser durant le
déplacement.
• Pour vous assurer que la vidange est bien eectuée, le
tuyau de vidange ne doit pas être tordu, et il ne doit pas
être surélevé durant le mode déshumidication. Sinon,
l’eau vidangée pourrait se répandre dans la pièce.
• La température autour du tuyau de vidange ne doit
pas être en-dessous de 0°C en cours d’utilisation.
L’eau vidangée pourrait geler à l’intérieur du tuyau,
ce qui provoquerait un débordement d’eau à l’intérieur
de la pièce.
• Ne bloquez pas la sortie d’échappement de l’air.
Les performances de refroidissement pourraient être
réduites ou complètement arrêtées.
• Utilisez un dispositif diérentiel résiduel (DDR) par
mesure de protection contre les chocs électriques,
conformément aux normes britanniques et aux
réglementations relatives aux câblages.
• L’exposition prolongée au ux d’air direct du climatiseur
pourrait être dangereux pour votre santé. N’exposez pas
les personnes, les animaux ou les plantes au ux d’air
direct de l’appareil pendant une période prolongée.
• N’utilisez pas ce climatiseur à des ns particulières
non spéciées (par exemple, pour entreposer des
dispositifs de précision, des aliments, des animaux
domestiques, des plantes ou des objets d’art).
Une telle utilisation pourrait leur être préjudiciable.
Page 53

FRANÇAISE
CONSIGNES DE SÉCURITÉ
2.
2.1 Remarques concernant l’utilisation
• Laissez 3 minutes au compresseur
pour redémarrer le refroidissement.
Si vous éteignez le climatiseur et
que vous le rallumez immédiatement
après, laissez 3 minutes au
compresseur pour redémarrer le
refroidissement. L’appareil dispose
d’un dispositif électronique qui
maintient le compresseur éteint
pendant 3 minutes par sécurité.
• Dans le cas d’une panne de courant
durant l’utilisation, attendez 3 minutes
avant de redémarrer l’appareil. Une
fois le courant revenu, rallumez le
climatiseur. En cas d’interruption de
l’alimentation électrique de moins
de trois minutes, veillez à attendre
au moins trois minutes avant de
redémarrer l’appareil. Si vous
redémarrez le climatiseur avant que
trois minutes se soient écoulées, un
dispositif de protection de l’appareil
peut provoquer l’arrêt du compresseur.
Ce dispositif de protection empêchera
le refroidissement pendant environ
5 minutes. Tous les anciens réglages
seront annulés et l’appareil repassera
aux réglages initiaux.
• Fonctionnement basse température :
Votre appareil se bloque-t-il ? L’appareil
peut se bloquer lorsqu’il est réglé à
environ 18 °C et que la température
ambiante est basse, particulièrement
la nuit. Dans ce cas, une baisse
supplémentaire de la température peut
causer un blocage de l’appareil. Un
réglage à une température plus élevée
l’empêchera de se bloquer.
• Le mode de déshumidication
augmente la température de la pièce.
Durant le mode déshumidication,
l’appareil génère de la chaleur et la
température de la pièce augmente.
De l’air chaud est soué par la sortie
d’échappement de l’air, mais cela
est normal et n’est pas signe d’un
problème de l’appareil.
• En mode refroidissement, le
climatiseur soue l’air chaud généré
par l’élément à l’extérieur de la pièce,
à l’aide un tuyau d’échappement.
Pendant ce temps, la même quantité
d’air entre dans la pièce de l’extérieur
par toutes les ouvertures de la pièce.
• N’utilisez pas de moyens autres que
ceux recommandés par le fabricant
pour accélérer le processus de
dégivrage ou de nettoyage.
53
• L’appareil doit être stocké dans
une pièce sans fonctionnement
continu, sources de ammes (par
exemple : ammes nues, un appareil
à gaz fonctionnant ou un chauage
électrique fonctionnant).
• Ne pas percer ni brûler.
• L’appareil doit être installé, utilisé
et entreposé dans une pièce d’une
supercie supérieure à 12 m2.
• La conformité aux réglementations
nationales concernant le gaz doit être
respectée.
• Les orices de ventilation ne doivent
pas être obstrués.
• L’appareil doit être entreposé dans
une pièce bien ventilée et de taille
supérieure à 12 m2.
• Toute personne travaillant ou
intervenant sur un circuit de uide
frigorigène doit être titulaire d’un
certicat valide délivré par un
organisme d’évaluation accrédité par
l’industrie qui autorise sa compétence
à la manipulation des frigorigènes
en toute sécurité conformément à
un cahier des charges reconnu par
l’industrie.
• L’entretien ne doit être eectué que
conformément aux recommandations
du fabricant de l’équipement. Les
travaux d ‘entretien et de réparation
nécessitant l’assistance d’autres
personnes qualiées doivent être
eectués sous la supervision de la
personne qualiée pour l’utilisation
de uides frigorigènes inammables.
• Ce produit contient une pile-bouton
au lithium. Si une pile-bouton au
lithium neuve ou usagée est avalée
ou pénètre dans l’organisme, elle peut
causer de graves brûlures internes et
peut entraîner la mort en non moins
de 2 heures. Toujours complètement
refermer le compartiment des piles.
Si le compartiment des piles ne se
ferme pas correctement, cesser
d’utiliser le produit, retirer les piles et
maintenir l’appareil hors de portée des
enfants. Si vous pensez que les piles
ont pu être avalées ou insérées à
l’intérieur de n’importe quelle partie du
corps, consultez immédiatement un
médecin.
Page 54

54
www.aeg.com
Pour éviter les blessures corporelles et
les dommages sur l’appareil, suivez les
Signication des symboles utilisés dans
le manuel :
instructions suivantes.
Une mauvaise utilisation de l’appareil
en raison d’un manquement à ces
instructions pourrait entraîner des
blessures corporelles ou endommager
l’appareil.
Les instructions sont classées selon
les indications suivantes :
ATTENTION !
Ce symbole indique le risque
de mort ou de blessure grave.
2.2 Avertissements au cours
de l’utilisation
ATTENTION !
Ce symbole indique le risque
de blessures ou de dommage
à la propriété.
Attention Signication
Insérez correctement la che
d’alimentation.
Ne mettez pas l’appareil en marche ou à
l’arrêt en branchant ou débranchant la che
de la prise de courant.
N’endommagez ou utilisez pas un câble
d’alimentation non spécique
Ne modiez pas la longueur du cordon
d’alimentation et ne partagez pas la prise
avec d’autres appareils
Ne faites pas fonctionner l’appareil avec les
mains mouillées ou dans un environnement
humide
Ne dirigez pas le ux d’air sur les
occupants de la pièce
Une mauvaise réparation peut provoquer
un choc électrique ou un incendie en raison
d’une génération excessive de chaleur.
Cela peut provoquer un choc électrique
ou un incendie en raison d’une génération
de chaleur.
Cela peut provoquer un choc électrique
ou un incendie.
Si le câble d’alimentation est endommagé,
il doit être remplacé par le fabricant, son
atelier d’entretien ou un technicien qualié
an d’éviter tout danger.
Cela peut provoquer un choc électrique
ou un incendie en raison d’une génération
de chaleur.
Cela peut provoquer un choc électrique.
Cela pourrait nuire à votre santé.
Le symbole ci-contre indique une
action à ne jamais entreprendre.
Le symbole ci-contre indique
une action qui doit toujours
être respectée.
ATTENTION !
Avertissements au cours
de l’utilisation
Page 55

FRANÇAISE
Attention Signication
Veillez toujours à avoir une bonne mise
à la terre
Ne laissez pas d’eau s’écouler sur les
composants électriques
Installez toujours un disjoncteur et un circuit
d’alimentation réservé
Débranchez l’appareil si vous entendez un
bruit étrange, sentez une odeur inhabituelle
Un mauvais raccordement à la terre peut
causer un choc électrique.
Cela pourrait provoquer une panne
de l’appareil ou un choc électrique.
Une mauvaise installation peut provoquer
un incendie ou un choc électrique.
Cela peut provoquer un incendie et un choc
électrique.
ou voyez de la fumée en sortir
N’utilisez pas la prise si elle est desserrée
ou endommagée
N’ouvrez pas l’appareil durant son
fonctionnement
Cela peut provoquer un incendie et un choc
électrique.
Cela peut provoquer un incendie et un choc
électrique.
Tenez les armes à feu éloignées Cela peut provoquer un incendie.
N’utilisez pas le câble d’alimentation près
d’appareils émettant de la chaleur
N’utilisez pas le câble d’alimentation près
de gaz inammables ou de combustibles
Cela peut provoquer un incendie et un choc
électrique.
Cela peut provoquer une explosion
ou un incendie.
comme de l’essence, du benzène, des
diluants, etc.
Aérez la pièce avant de faire fonctionner le
climatiseur si du gaz s’échappe d’un autre
Cela pourrait provoquer une explosion,
un incendie et des brûlures.
appareil
Ne démontez ou modiez pas l’appareil Cela peut provoquer une panne et un choc
électrique.
55
ATTENTION !
Attention Signication
Lors du retrait du ltre à air, ne touchez pas
Cela peut entraîner des blessures.
les parties métalliques de l’appareil
Ne nettoyez pas le climatiseur avec
de l’eau.
Veillez à bien ventiler la pièce lorsque vous
dans l’appareil et dégrader l’isolation Cela
peut provoquer un choc électrique.
Une pénurie d’oxygène peut se produire.
utilisez l’appareil en même temps qu’une
cuisinière, etc.
Lorsque l’appareil doit être nettoyé,
éteignez-le et coupez le disjoncteur de
courant
Ne pas nettoyer l’appareil lorsque celui-ci
est sous tension, car cela peut provoquer
un incendie, un choc électrique et des
blessures.
Ne pas placer un animal de compagnie ou
une plante d’intérieur où ceux-ci seraient
Cela pourrait blesser l’animal ou
endommager la plante.
exposés au ux d’air direct
Ne pas utiliser l’appareil à des ns
spéciales
N’utilisez pas ce climatiseur pour entreposer
des dispositifs de précision, des aliments,
des animaux domestiques, des plantes ou
des objets d’art). Cela pourrait entraîner une
détérioration de leur qualité, etc.
Éteignez l’appareil et fermez la fenêtre en
cas de tempête ou cyclone
Faire fonctionner l’appareil avec les fenêtres
ouvertes pourrait mouiller votre intérieur
et votre mobilier.
Page 56

56
www.aeg.com
Attention Signication
Tenez la che d’alimentation par sa tête
lorsque vous la retirez
Éteignez l’interrupteur principal lorsque
vous n’utilisez pas l’appareil pendant
période prolongée
Ne placez pas d’obstacles autour des
entrées d’air ou à l’intérieur de la sortie d’air
Insérez toujours le ltre solidement.
Nettoyez le ltre à air toutes les deux
semaines
N’utilisez pas de détergent puissant tel que
de la cire ou du diluant ; utilisez un chion
doux
Ne placez pas d’objets lourds sur le cordon
d’alimentation et assurez-vous que le
cordon n’est pas comprimé
Ne pas boire l’eau évacuée du climatiseur Elle contient des substances contaminantes
Faites attention lorsque vous déballez
et installez l’appareil
Si de l’eau pénètre dans l’appareil, éteignez
l’appareil à la prise de courant et coupez le
courant au disjoncteur. Isolez l’alimentation
en débranchant le cordon d’alimentation et
contactez un technicien qualié
Il y a un risque de choc électrique ou
de dommages.
Cela peut provoquer une panne de
l’appareil ou un incendie.
Cela pourrait provoquer une panne
de l’appareil ou un accident.
Faire fonctionner l’appareil en l’absence
de ltre peut entraîner une panne.
L’apparence du produit peut être détériorée
en raison du changement de sa couleur ou
de l’abrasion de sa surface.
Il existe un risque d’incendie ou de choc
électrique.
pouvant vous rendre malade.
Ses bords coupants peuvent vous blesser.
Il existe un risque de choc électrique et
de dommages.
3.
DESCRIPTION DE L’APPAREIL
1
6
5
1
Évacuation de l’air de la pièce
2
Bandeau de commande
3
Entrée d’air de la pièce
4
Roulette
5
Contrôle à distance
2
3
4
6
7
8
9
10
7
8
9
10
Fig. 1
Poignée de transport (des deux côtés)
En mode recyclage
Température d’évacuation de l’air :
Sortie d’évacuation
Sortie de vidange du bac inférieur
Page 57

FRANÇAISE
ACCESSOIRES INCLUS
Fig. 4
4.
COMPOSANTS NOM DES COMPOSANTS : QUANTITÉ :
1
2
3
4
5
Tuyau d’échappement 1 morceau
Kit de coulissage de la fenêtre 1 morceau
Tige extensible de rechange 1 morceau
Tuyau de vidange et adaptateur 1 morceau
Vis 3/8" 2 morceaux
57
6
7
8
Fig. 2
•
Vériez que tous les accessoires sont inclus dans l’emballage et reportez-vous aux
instructions d’installation pour savoir comment les utiliser.
INSTRUCTIONS D’INSTALLATION
5.
Film décoratif 1 morceau
Sangle d’attache 1 kit
Télécommande 1 morceau
5.1 Air chaud d’évacuation
En mode COOLING (refroidissement),
l’appareil doit être placé à proximité
d’une fenêtre ou d’une ouverture an
que l’air chaud puisse être conduit vers
l’extérieur. Placez d’abord l’appareil sur
un sol plat en vous assurant qu’aucun
obstacle ne se trouve à moins de
30 cm autour de l’appareil, et qu’il est
à proximité d’une source d’alimentation
à circuit unique.
Déployer une des extrémités du
1.
tuyau (Fig. 3).
Installez le kit de fenêtre sur la
3.
fenêtre et faites glisser l’adaptateur
B dans le kit de glissière de fenêtre,
puis sceller. (Fig. 5 et 6)
Fig. 3
Faites glisser l’adaptateur A dans le
2.
trou d’échange de l’appareil, comme
illustré dans la Fig. 4.
Fig. 5
Page 58

58
www.aeg.com
Fig. 6
Fig. 7
Placez le kit de glissière de fenêtre
2.
sur la fenêtre. Ajustez la longueur
du kit de glissière de fenêtre selon la
hauteur de la fenêtre (Fig. 10).
Kit de glissière de fenêtre
Minimum : 56 cm
Maximum : 112 cm
Reportez-vous à «
Installation
5.2
dans une fenêtre à battants »
pour savoir comment installer
le kit de fenêtre.
Le tuyau peut être allongé
de sa longueur d’origine de
38 cm à 150 cm, mais il est
préférable de lui donner une
longueur minimale. Assurezvous également que le tuyau n’a
pas de pliure ou d’aaissement
aigus. (Fig. 7)
La tige télescopique peut être
allongée si la fenêtre est trop
haute.
Pour ce faire, retirez d’abord
complètement la tige
télescopique (Fig. 11 A). Ensuite,
alignez les 3 crochets de la tige
extensible (vendue séparément)
avec les 3 fentes sur l’extrémité
de la tige télescopique et
insérez les 3 crochets dans
les fentes, puis appuyez sur la
Fig. 10
tige extensible pour verrouiller
les fentes (Fig. 11 B). Ensuite,
réinsérez la tige télescopique
combinée dans le kit de fenêtre
(Fig. 11 C).
5.2 Installation dans une
fenêtre à battants
Ouvrez le châssis de la fenêtre et
1.
soulevez le levier de verrouillage du
kit de glissière de fenêtre (Fig. 9)
B
B : Levier de verrouillage
Fig. 11 A
Fig. 11 B
Fig. 11 C
Fig. 9
Page 59

59FRANÇAISE
2
8
3
4567
Appuyez de nouveau sur le levier de
3.
kit de glissière de fenêtre, puis fermez
la fenêtre et coincez le kit de fenêtre
entre la fenêtre et l’encadrement
à l’arrière des onglets de l’ancrage
4.
longueur appropriée et collez-le sur
la tige extensible (Fig. 13).
C : Film décoratif
Fig. 12
CARACTÉRISTIQUES DU CLIMATISEUR
6.
6.1 BANDEAU DE COMMANDE
C
Fig. 13
1
2
(maintenir enfoncé 3 secondes
pour réinitialiser)
3
4
Augmente la température
1
5
Diminuer la température
6
7
Allume ou éteint l’appareil
8
Page 60

60
www.aeg.com
Fig. 22
1
2
3
4
5
Procédez de la même manière pour
6.2 Télécommande
Appuyer ici pour sélectionner les
1
modes
Appuyer ici pour allumer ou éteindre
2
l’appareil
Appuyer ici pour augmenter la
3
température
Appuyer ici pour sélectionner la
4
vitesse du ventilateur
Appuyer ici pour diminuer la
5
température
Lorsque vous l’utilisez pour
la première fois, ouvrez les
couvercles arrière et retirez le
lm protecteur pour activer la
télécommande.
Remplacement de la pile
Retournez la télécommande. Dans le
1.
bouton de la télécommande se trouve
une fente.
Utilisez une pièce de monnaie ou
2.
un objet similaire pour faire tourner
le couvercle arrière dans le sens
antihoraire pour l’ouvrir. (Fig. 20 & 21)
Fig. 20
3.
ouvrir le couvercle de protection
intérieur et retirez la pile. (Fig. 22)
Remplacez la pile et réinstallez le
4.
couvercle intérieur, puis le couvercle
arrière.
Type de batterie : RG15D/E-ELL
(Tension nominale : 3 VCC)
ATTENTION !
Veuillez utiliser la pile de manière
correcte
Risque de brûlure chimique. Tenez
1.
les piles hors de portée des enfants.
Assurez-vous que les piles sont
2.
correctement insérées.
N’utilisez pas de piles autres que
3.
celles spéciées.
Ne mélangez pas des piles usagées
4.
et des piles neuves.
Ne jetez pas les piles au feu. Les
5.
piles peuvent exploser ou fuir.
Les piles-bouton doivent être
6.
éliminées correctement, et doivent
être tenues hors de portée des
enfants ; même les piles usagées
peuvent causer des blessures.
Pour éviter tout dommage, retirez
7.
les piles lorsque l’appareil n’est pas
utilisé pendant une longue période.
Cet appareil est conforme à l’article
8.
15 des réglementations de la FCC.
L’utilisation est soumis aux deux
conditions suivantes : (1) Cet appareil
ne doit pas causer d ‘interférences
nuisibles et (2) cet appareil doit
accepter toute interférence reçue, y
compris les interférences susceptibles
de provoquer un fonctionnement
indésirable.
Fig. 21
Page 61

FRANÇAISE
NOTICE D’UTILISATION
7.
61
Certaines des instructions
suivantes ne peuvent être
suivies qu’en utilisant le
panneau de commandes.
7.1 Utilisation du panneau
de commandes
Mode chauage (sur certains modèles)
Dans ce mode, vous DEVEZ utiliser
l’adaptateur du tuyau d’échappement.
Appuyez sur le bouton « Modes »
1.
jusqu’à ce que le voyant « Heat »
(Chauage) s’ache.
Appuyez sur les boutons « - » et
2.
« + » jusqu’au réglage souhaité.
Appuyez sur la touche « Fan
3.
speed » (Vitesse du ventilateur) pour
sélectionner la vitesse du ventilateur
souhaitée.
Tuyau de vidange raccordé. Voir le
4.
paragraphe 7.3 « Vidange ».
Fonction de refroidissement
Dans ce mode, vous DEVEZ utiliser
l’adaptateur du tuyau d’échappement.
Appuyez sur le bouton « Modes »
1.
jusqu’à ce que le voyant « Cool »
s’ache.
Appuyez sur les boutons « - » et
2.
« + » jusqu’au réglage souhaité.
Appuyez sur la touche « Fan
3.
speed » (Vitesse du ventilateur) pour
sélectionner la vitesse du ventilateur
souhaitée.
Il n’est pas nécessaire d’utiliser
le tuyau de vidange en mode
« Cool » (refroidissement).
Mode « Fan » (ventilateur)
Pour ce mode, vous n’avez pas besoin
du tuyau d’échappement, ni du tuyau
de vidange.
Appuyez sur le bouton « Modes »
1.
jusqu’à ce que le voyant « Dry »
(Séchage) s’ache.
Appuyez sur le bouton « Fan speed »
2.
(vitesse du ventilateur) pour sélectionner
la vitesse du ventilateur souhaitée.
Le ventilateur fonctionnera à la vitesse
3.
sélectionnée et la température de la
pièce s’achera.
Mode Séchage
Vous n’avez pas besoin de l’adaptateur du
tuyau d’échappement avec ce mode, MAIS
l’eau recueillie doit être évacuée. Voir le
paragraphe 7.3 « Vidange ».
Appuyez sur le bouton « Modes »
1.
jusqu’à ce que le voyant « Dry »
(Séchage) s’ache.
Le ventilateur fonctionnera à vitesse
2.
réduite et la température de la pièce
s’achera.
Pour de meilleurs résultats, laissez
3.
les portes et les fenêtres fermées.
Tuyau de vidange raccordé. Voir le
4.
paragraphe « Vidange ».
Mode automatique :
Laissez toujours le tuyau d’échappement
attaché avec ce mode.
Lorsque vous réglez le mode Auto
pour le climatiseur, il sélectionnera
automatiquement le mode « cooling »
[refroidissement], « heating »
[chauage] (non applicable aux
modèles à refroidissement uniquement)
ou « fan only » (ventilateur seul),
selon la température que vous avez
sélectionnée et la température
ambiante. Le climatiseur contrôlera
automatiquement la température
ambiante, aux alentours de la
température que vous avez
sélectionnée.
En mode AUTO, vous ne pouvez pas
sélectionner la vitesse du ventilateur.
1. Appuyez sur le bouton « Modes »
jusqu’à ce que le voyant « Auto mode »
(mode automatique) s’ache.
Une fois le mode « Auto mode »
sélectionné, l’appareil fonctionne
automatiquement en fonction de la
température réelle de l’air ambiant.
Vériez l’état du ltre
Nettoyage du ltre.
1.
Appuyez sur le bouton «lter » (ltre)
2.
et maintenez-le enfoncé pendant
3 secondes pour éteindre le voyant
du ltre.
Page 62

62 www.aeg.com
Sélection de la vitesse du ventilateur
Vous pouvez sélectionner la vitesse
de ventilateur voulue en appuyant sur
le bouton « Fan speed » (vitesse du
ventilateur). La vitesse du ventilateur
change dans l’ordre suivant : « Auto
Fan » (ventilateur automatique), « High »
(élevé), « Mid » (moyen), « Low » (bas).
Après avoir sélectionné une
vitesse de ventilateur (« Auto
Fan », « High », « Mid »,
« Low »), le voyant de vitesse
du ventilateur correspondant
s’allume.
En modes « Auto » (automatique)
et « Dry » (séchage), vous ne
pouvez pas sélectionner la
vitesse du ventilateur.
DÉSACTIVEZ LE MODULE WI-FI :
maintenant la touche « Connexion »
et « - » en même temps pendant
3 secondes. Appuyez sur la touche
« Connexion » une nouvelle fois pour
environ 10 secondes pour que le module
s’initialise.
7.2 Code d’erreur
Si « A5
de température de la pièce s’est produite.
Contactez votre service après-vente
AEG agréé.
Si « P1
plein. Déplacez doucement l’appareil
vers un point de vidange, retirez l’embout
de vidange inférieur et laissez l’eau
s’écouler. Redémarrez l’appareil jusqu’à
ce que le symbole « P1 » disparaisse. Si
l’erreur se produit à nouveau, contactez
le service de dépannage.
Si « E7
intérieur est en panne. Contactez votre
service après-vente AEG agréé.
7.3 Vidange
il faut raccorder le tuyau de vidange à
la sortie de vidange située à l’arrière de
l’appareil de manière à vider le condensat
de l’appareil. Sinon, l’appareil pourrait ne
pas fonctionner normalement avec l’écran
P1 ».
A. Vidanger dans une évacuation située
plus bas que l’appareil.
B. L’appareil comporte une pompe pour
purger le condensat.
Si « E5
capteur de température de l’évaporateur
s’est produite. Contactez votre service
après-vente AEG agréé.
Si « E4
communication du panneau de
commandes s’est produite. Contactez
votre service après-vente AEG agréé.
Fig. 23
Si nécessaire, vous pouvez allonger
le tuyau de vidange en adaptant
l’adaptateur de tuyau de vidange situé
au bout du tuyau, puis en utilisant un
tuyau de 8 à 9 mm (Fig. 24).
Page 63

FRANÇAISE
Connecter un flexible de 8-9 mm
ici pour rallonger le flexible de vidange
Fig. 24
Pendant le mode de refroidissement,
remplacez le bouchon en caoutchouc
située sur le raccord du tuyau pour
atteindre la performance maximale.
7.4 Conseils d’utilisation
Maintenant que vous maîtrisez la
procédure de fonctionnement, voici
d’autres fonctions que vous pouvez
utiliser.
•
Le circuit « Cool » dispose d’un départ
diéré automatique de 3 minutes
si l’appareil est éteint puis rallumé
rapidement. Ceci permet d’éviter
la surchaue du compresseur et
le déclenchement possible du
disjoncteur. Le ventilateur continuera
de fonctionner durant ce temps.
•
La température peut être réglée
de 16 °C à 32 °C.
•
La commande peut acher la
température en degrés Fahrenheit
ou en degrés Celsius. Pour passer de
l’un à l’autre et vice versa, maintenez
les boutons « TEMP » Haut ( + ) et
Bas ( - ) enfoncées ensemble pendant
3 secondes.
•
Il y a une attente de 2 secondes avant
l’arrêt du compresseur lors de la
sélection de Ventilateur. Cela laisse
le temps nécessaire pour tourner le
sélecteur si l’on souhaite sélectionner
un autre mode.
•
Après une panne de courant, l’appareil
mémorisera le dernier réglage ;
une fois la panne passée, l’appareil
recommence à fonctionner selon ce
réglage.
•
La température de fonctionnement de
ce produit à l’intérieur de l’habitat est
de 16 °C à 35 °C.
•
En fonctionnement normal, l’achage
de l’appareil indique la température
ambiante, mais lorsque la température
ambiante est supérieure à 37 °C,
l’achage indique « HI ».
•
Après 60 secondes d’inactivité de
la commande, l’achage et les
voyants s’éteignent. Appuyez sur
n’importe quel bouton du panneau de
commande ou de la télécommande et
l’achage reprendra.
63
8.
ENTRETIEN & NETTOYAGE
Nettoyez régulièrement votre climatiseur
pour qu’il conserve son aspect neuf.
8.1 Nettoyage du ltre à air
Veillez à bien débrancher l’appareil avant
de le nettoyer an d’éviter tout risque de
choc électrique ou d’incendie.
Inscrivez ici le contexte de votre tâche
(facultatif).
Prenez la patte des ltres et retirez
1.
un par un les 4 ltres situés à l’arrière
de l’appareil.
Nettoyez le ltre à l’aide avec du
2.
liquide vaisselle et de l’eau chaude.
Rincez soigneusement le ltre.
Secouez doucement le ltre pour
retirer l’excédent d’eau. Vous pouvez
également aspirer la saleté du ltre
au lieu de le laver.
Assurez-vous que le ltre est
parfaitement sec avant de le
remettre en place.
Remettez le ltre en place une fois
3.
que celui-ci est sec.
8.2 Nettoyage de l’enveloppe
Veillez à bien débrancher le climatiseur
an d’éviter tout risque de choc électrique
ou d’incendie.
Vous pouvez éliminer la poussière de
l’enveloppe et de l’avant de l’appareil
en utilisant un chion sans huile ou les
nettoyer avec un chion humidié d’eau
chaude et de liquide vaisselle doux.
Rincez et essuyez soigneusement.
Page 64

64
www.aeg.com
9.
Usez de précautions lors du
nettoyage de l’appareil.
•
N’utilisez jamais de nettoyants
abrasifs, de cire ou de lustrant sur
l’enveloppe de l’appareil.
•
Veillez à bien éliminer l’excédent
d’eau du chion que vous allez utiliser
pour essuyer le contour des touches.
CHARTE DE DÉPANNAGE
Avant de faire appel au service après
vente, étudiez cette liste. Cela peut
vous permettre d’économiser su temps
et de l’argent. Cette liste répertorie les
problèmes courants qui ne sont pas le
résultat de défauts des pièces ou de la
fabrication de cet appareil.
Le climatiseur ne fonctionne pas.
•
La prise murale est débranchée.
Enfoncez fermement la prise dans
a prise murale.
•
Fusible de l’installation domestique
grillé ou disjoncteur déclenché.
Remplacez le fusible par un modèle
temporisé ou réinitialisez le disjoncteur.
•
La commande est sur « OFF »
(éteint). Mettez sur « ON » (allumé)
et sélectionnez le réglage souhaité.
•
P1 s’ache dans la fenêtre
d’achage. Vidangez l’eau comme
décrit dans le chapitre « Vidange ».
•
La température de la pièce est
plus basse que la température
sélectionnée (Mode Cool). Réinitialiser
la température.
L’air sortant de l’appareil n’est pas
assez froid.
•
La température ambiante est audessous de 16 ° C. Le refroidissement
peut ne pas avoir lieu tant que la
température ambiante ne dépasse pas
16 ° C.
•
Sélectionnez une température plus
basse.
•
Le compresseur s’éteint en changeant
de mode. Attendez environ 3 minutes
et écoutez si le compresseur
redémarre en mode COOL.
Le climatiseur fonctionne, mais la
pièce est toujours trop chaude - il
n’y a PAS de formation de givre sur
la bobine de refroidissement derrière
le panneau décoratif.
L’excédent d’eau sur ou autour
des touches peut endommager
le climatiseur.
8.3 Rangement en hiver
Si vous devez ranger votre appareil
en hiver, couvrez-le de plastique ou
remettez-le dans son carton d’emballage.
•
La température extérieure est
inférieure à 16 °C. Pour dégivrer la
bobine, sélectionnez le mode « Fan »
(ventilateur).
•
Le ltre à air est peut-être sale.
Nettoyez le ltre. Reportez-vous au
chapitre 8, « Entretien et nettoyage ».
Pour dégivrer, sélectionnez le mode
« Fan » (ventilateur).
•
La température sélectionnée pour le
refroidissement de nuit est trop basse.
Pour dégivrer la bobine, sélectionnez
le mode « Fan » (ventilateur). Puis
sélectionnez une température plus
élevée.
•
Le conduit d’échappement n’est pas
raccordé ou est bloqué. Reportezvous au paragraphe 5.1 « Air chaud
d’évacuation ».
Le climatiseur fonctionne, mais la pièce
est toujours trop chaude - du givre se
forme sur la bobine de refroidissement
derrière le panneau décoratif.
•
Filtre à air sale - air bloqué. Nettoyez
le ltre à air. Reportez-vous au
chapitre 8, « Entretien et nettoyage ».
•
La température est trop élevée. Sélectionnez une température plus basse.
•
Les volets d’air directionnels sont mal
positionnés. Repositionnez les volets
pour une meilleure distribution de l’air.
•
L’avant de l’appareil est bloqué par des
rideaux, des stores, des meubles, etc. ;
la distribution d’air est bloquée. Retirez
l’obstruction de l’avant de l’appareil.
•
Portes, fenêtres, aérations, etc.
ouvertes - points d’échappement
de l’air froid. Fermez les portes, les
fenêtres, les aérations, etc.
•
L’appareil a récemment été allumé
dans une pièce chaude. Laissez
un peu de temps pour évacuer la
« chaleur emmagasinée » dans les
murs, le plafond, le sol et les meubles.
Page 65

65
FRANÇAISE
10.
Le climatiseur s’allume puis s’éteint
rapidement.
•
Filtre à air sale - air bloqué. Nettoyez
le ltre à air.
•
La température extérieure est
extrêmement chaude. Sélectionnez
une vitesse du VENTILATEUR plus
rapide pour apporter plus d’air dans
les bobines de refroidissement.
La pièce est trop froide.
•
Vous avez sélectionné une température
trop basse. Augmentez la température.
INFORMATIONS SUPPLÉMENTAIRES
Transport d’équipements contenant
des réfrigérants inammables
Voir les réglementations concernant le
transport
Marquage de l’équipement par des
panneaux
Voir les réglementations locales
Élimination des équipements utilisant
des uides frigorigènes inammables
Voir les réglementations nationales.
Stockage des équipements / appareils
Le stockage de l’équipement doit être
conforme aux instructions du fabricant.
Stockage d’équipements emballés
(invendus)
La protection assurée par l’emballage
de stockage doit être conçue de telle
sorte que des dommages mécaniques à
l’équipement à l’intérieur de l’emballage
ne puissent pas causer de fuites de
la charge de réfrigérant. La quantité
maximale d’équipements autorisés à être
stockés ensemble sera déterminé par les
réglementations locales.
Informations relatives à l’entretien
Contrôles de l’aire de travail. Avant
1.
de commencer les travaux sur les
systèmes contenant des réfrigérants
inammables, des contrôles de
sécurité sont nécessaires pour
garantir que le risque d’inammation
est minimisé. Pour les réparations
au système de réfrigération, les
précautions suivantes doivent être
respectées avant d’eectuer des
interventions sur le système.
Procédure de travail. Les travaux
2.
doivent être eectués selon une
procédure contrôlée an de minimiser
le risque de présence de gaz ou de va-
peur inammable pendant l’intervention.
Aire de travail générale. Tout le
3.
personnel de maintenance et les
autres personnes travaillant dans
l’aire de travail doivent être informés
de la nature du travail eectué.
Les travaux dans des espaces
connés doivent être évités. La
zone autour de l’espace de travail
doit être cloisonnée. S’assurer que
les conditions dans la zone ont été
sécurisées par le contrôle du matériel
inammable.
Vérication de la présence de
4.
réfrigérant. La zone doit être vériée
avec un détecteur de frigorigène
approprié avant et pendant
l’intervention, pour s’assurer que
le technicien est au courant des
atmosphères potentiellement
inammables. Veiller à ce que
l’équipement de détection des
fuites utilisé soit approprié pour
une utilisation avec des réfrigérants
inammables, c’est-à-dire sans
étincelles, correctement étanchéiés
ou à sécurité intrinsèque.
Présence d’un extincteur. Si des
5.
travaux à chaud doivent être eectués
sur l’équipement de réfrigération ou
les pièces connexes, un équipement
approprié d’extinction d’incendie doit
être disponible à portée de main.
Disposer d’un extincteur à poudre
sèche ou CO2 à proximité de la zone
de charge.
Absence de sources d’ignition. Pour
6.
toute personne eectuant un travail
dans le cadre d’un système de
réfrigération impliquant l’exposition
de tuyauteries contenant ou ayant
contenu du uide frigorigène
inammable, il est interdit d’utiliser
toute source d’ignition susceptible
d’entraîner un risque d’incendie ou
d’explosion. Toutes sources d’ignition
possibles, y compris les cigarettes,
doivent être tenues susamment
à l’écart du site d’installation,
Page 66

66
www.aeg.com
de réparation, d’élimination et
d’élimination, au cours desquels le
réfrigérant inammable risque d’être
libéré dans l’espace environnant.
Avant l’intervention, le périmètre de
l’équipement doit être inspecté pour
assurer qu’aucun risque d’inammation
ou d’ignition n’est présent. Des
panneaux « Ne pas fumer » doivent
être achés.
Zone ventilée. Veiller à ce que la
7.
zone de travail soit en plein air ou
susamment ventilée avant d’ouvrir le
système ou d’eectuer toute opération
de travail à chaud. Une ventilation
continuelle doit être assurée pendant
la durée de l’intervention. La ventilation
doit disperser tout réfrigérant libéré
en toute sécurité, de préférence, en
l’expulsant à l’extérieur dans l’atmosphère.
Contrôles de l’équipement frigorique.
8.
Lorsque du remplacement de
composants électriques, ceux-ci
doivent être adaptés aux nalités et
spécications correctes. Les consignes
d’entretien et de maintenance du
fabricant doivent être respectées en
tout temps. En cas de doute, consultez
le service technique du fabricant
pour obtenir de l’aide. Les contrôles
suivants doivent être eectués sur les
installations mettant en œuvre des
uides frigorigènes inammables :
– La taille de la charge varie en
fonction de la taille de la pièce
dans laquelle les pièces contenant
le réfrigérant sont installées ;
– Les appareils et évacuations de
ventilation fonctionnent correctement et ne sont pas obstrués ;
– Si un circuit frigorique indirect est
mis en œuvre, le circuit secondaire
doit être contrôlé pour détecter
toute présence de frigorigène ;
– Le marquage de l’équipement
reste visible et lisible. Les
marquages et symboles illisibles
doivent être corrigés ;
– Les tuyaux ou composants de
réfrigération sont installés de
manière à ne pas risquer d’être
exposés à toute substance
susceptible de corroder des
composants contenant du
frigorigène, à moins que ces
composants ne soient faits
de matériaux intrinsèquement
résistants à la corrosion ou qu’ils
soient convenablement protégés
contre une telle corrosion.
Contrôles des appareils électriques.
9.
La réparation et l’entretien des
composants électriques doivent
comprendre des contrôles de sécurité
initiaux et des procédures d’inspection
des composants. S’il existe un
défaut susceptible de compromettre
la sécurité, aucune alimentation
électrique ne doit être connectée au
circuit tant que ce problème n’est pas
résolu. Si le défaut ne peut pas être
corrigé immédiatement, mais qu’il
est nécessaire de continuer à faire
fonctionner l’appareil, une solution
temporaire adéquate doit être utilisée.
Ce problème doit être signalé au
propriétaire de l’équipement an que
toutes les parties soient avisées.
Les contrôles de sécurité initiaux incluent :
• Que les condensateurs sont
déchargés : ceci doit être fait de
manière sûre pour éviter la possibilité
d’étincelles ;
• Vérier qu’aucun composant ni
câblage électrique n’est sous tension
pendant la charge, la récupération ou
la vidange du système ;
• Vérier la continuité jusqu’au point de
mise à la terre.
Réparation des composants scellés
Lors de la réparation des composants
1.
scellés, toutes les alimentations
électriques doivent être débranchées
de l’équipement en cours d’entretien
avant tout retrait des couvercles
scellés, etc. S’il est absolument
nécessaire de fournir une alimentation
électrique à l’équipement pendant
l’entretien, un système de détection
de fuite permanent doit être situé au
point le plus critique pour avertir d’une
situation potentiellement dangereuse.
Une attention particulière doit être
2.
accordée à ce qui suit pour veiller
à ce que, lors d’une opération
d’entretien sur des composants
électriques, le boîtier ne soit pas
modié de manière à aecter
le niveau de protection. Cela
comprend la détection de : câblages
endommagés, un nombre excessif
de raccord, bornes non conformes
aux spécications d’origine,
dommages au niveau des joints, un
montage incorrect des manchons
de raccordement, etc. Assurez-vous
que l’appareil est installé de manière
sécurisée. S’assurer que les joints ou
Page 67

67
FRANÇAISE
les matériaux d’étanchéité ne se sont
pas dégradés au point de ne plus
empêcher l’entrée d’atmosphères
inammables. Les pièces de
rechange doivent être conformes aux
spécications du fabricant.
NOTE : L’utilisation d’un produit
d’étanchéité à base de silicone peut
inhiber l’ecacité de certains types
d’équipements de détection des fuites.
Les composants à sécurité intrinsèque
n’ont pas besoin d’être isolés avant une
intervention sur ces derniers.
Réparation de composants à sécurité
intrinsèque
N’appliquer aucune charge inductive ni
capacitive permanente sur le circuit sans
s’assurer d’abord que cela provoquera
pas un dépassement de la tension et
du courant autorisés pour l’équipement
utilisé.
Les composants intrinsèquement sûrs
sont les seuls types de composants sur
lesquels on peut intervenir à chaud en
présence d’une atmosphère inammable.
L’appareillage de test doit être à la bonne
puissance électrique. Remplacer les
composants uniquement par des pièces
spéciées par le fabricant. L’utilisation
d’autres pièces peut entraîner l’ignition
du réfrigérant dans l’atmosphère à partir
d’une fuite.
Câblage
Vériez que le câblage ne sera pas
soumis à l’usure, à la corrosion, à une
pression excessive, à des vibrations, à
des rebords coupants ou à tout autre
eet environnemental indésirable. Le
contrôle doit également tenir compte des
eets du vieillissement ou des vibrations
continues provenant de sources telles
que les compresseurs ou les ventilateurs.
Détection de frigorigènes inammables
En aucun cas des sources potentielles
d’inammation ne doivent être utilisées
pour rechercher ou détecter des fuites
de uide frigorigène. Ne pas utiliser un
chalumeau à halogénure (ou tout autre
détecteur utilisant une amme nue).
Méthodes de détection des fuites
Les méthodes de détection de fuite
suivantes sont jugées acceptables pour
les systèmes contenant des réfrigérants
inammables.
Des détecteurs électroniques de fuites
doivent être utilisés pour détecter les
réfrigérants inammables, mais leur
sensibilité peut ne pas être adéquate, ou
ils peuvent nécessiter un réétalonnage.
(Les équipements de détection doivent
être étalonnés dans une zone exempte
de réfrigérant.) S’assurer que le
détecteur ne constitue pas une source
potentielle d’ignition et qu’il est adapté au
réfrigérant utilisé. Les équipements de
détection des fuites doivent être réglés à
un pourcentage de la LLI du réfrigérant
et doivent être calibrés pour le réfrigérant
utilisé et le pourcentage approprié de gaz
(25 % maximum) qui doit être conrmé.
Les liquides de détection de fuites sont
appropriés pour une utilisation avec la
plupart des frigorigènes, mais l’utilisation
de détergents contenant du chlore doit
être évitée, car le chlore peut réagir avec
le uide frigorigène et corroder les tuyaux
en cuivre.
Si une fuite est soupçonnée, toutes
les ammes nues doivent être
éliminées / éteintes.
Si l’on constate une fuite de réfrigérant
nécessitant un brasage, la totalité du
réfrigérant doit être récupérée du système
ou isolée (au moyen de soupapes d’arrêt)
dans une partie du système éloignée de
la fuite. L’azote sans oxygène (OFN) doit
ensuite être purgé à travers le système
avant et pendant le brasage.
Retrait et évacuation
Lors d’une intervention dans le
circuit de réfrigérant pour eectuer des
réparations, ou à toute autre n, les
procédures conventionnelles doivent être
utilisées. Cependant, il est important que
les meilleures pratiques soient suivies
puisqu’il faut tenir compte du risque
d’inammabilité. La procédure suivante
doit être suivie : Évacuer le réfrigérant ;
•
Purger le circuit avec du gaz inerte ;
•
Évacuer ;
•
Purger à nouveau avec du gaz inerte ;
•
Ouvrir le circuit en coupant ou en
brasant.
La charge de réfrigérant doit être récupérée
dans des cylindres de récupération
appropriés. Le système doit être « rincé »
avec de l’OFN an de sécuriser l’appareil.
Ce processus pourra devoir être répété
plusieurs fois. Ne pas employer de l’air
comprimé ou de l’oxygène pour cette tâche.
Le rinçage doit être réalisé en brisant le
vide dans le système avec de l’OFN et
en continuant à remplir jusqu’à ce que
la pression de service soit atteinte, puis
en le dispersant ans l’atmosphère pour
Page 68

68
www.aeg.com
nalement établir le vide. Ce processus
doit être répété jusqu’à ce qu’il n’y ait plus
de réfrigérant dans le système. Lorsque
la charge d’OFN nale est utilisée, le
système doit être amené à la pression
atmosphérique pour permettre la mise en
service. Cette opération est absolument
vitale si des opérations de brasage sur la
tuyauterie doivent être eectuées.
Veillez à ce que la sortie de la pompe à vide
ne soit pas à proximité de sources d’ignition
et qu’une ventilation soit disponible.
Procédures de charge
En plus des procédures de charge
conventionnelles, les exigences suivantes
doivent être suivies.
•
Veiller à ce qu’il n’y ait pas de
contamination de diérents uides
frigorigènes lors de l’utilisation de
l’équipement de charge. Les tuyaux ou
conduites doivent être aussi courts que
possible an de minimiser la quantité
de réfrigérant qu’ils contiennent.
•
Les cylindres doivent être tenues
debout.
•
Veiller à ce que le système de
réfrigération soit mis à la terre avant
de charger le système avec du uide
frigorigène.
•
Étiquetez le système lorsque la charge
est terminée (si ce n’est pas déjà fait).
•
Faire très attention de ne pas remplir
excessivement le système de
réfrigération.
Avant de recharger le système, celui-ci
doit être soumis à des essais de pression
à l’OFN. Le système doit être soumis à un
essai d’étanchéité à la n de la charge,
mais avant la mise en service. Un essai
d’étanchéité de suivi doit être eectué
avant que l’appareil ne quitte le site.
Mise hors service
Avant d’eectuer cette procédure, il est
essentiel que le technicien ait une parfaite
connaissance de l’équipement et de
tous ses détails techniques. Les bonnes
pratiques recommandent d’eectuer
la récupération sécuritaire de tous les
réfrigérants. Avant l’exécution de la tâche,
un échantillon d’huile et de réfrigérant
doit être prélevé au cas où une analyse
serait nécessaire avant la réutilisation du
réfrigérant récupéré. Il est essentiel que
l’alimentation électrique soit disponible
avant que la tâche ne commence.
Se familiariser avec l’équipement et
1.
son fonctionnement.
Isoler le système électriquement.
2.
Avant d’essayer la procédure,
3.
s’assurer que :
•
L’équipement de manutention
mécanique est disponible, si
nécessaire, pour la manipulation
des cylindres de réfrigérant ;
•
Tous les équipements de
protection individuelle sont
disponibles et sont utilisés
correctement ;
•
Le processus de récupération est
supervisé en tout temps par une
personne compétente ;
•
L’équipement de récupération et
les cylindres sont conformes aux
normes concernées.
Si possible, pomper le système
4.
de réfrigération.
S’il n’est pas possible d’établir le
5.
vide, créer un collecteur de sorte
que le réfrigérant peut être extrait
de diverses parties du système.
S’assurer que le cylindre est posé
6.
sur la balance avant la récupération.
Démarrez la machine de récupération
7.
et opérez selon les instructions du
fabricant.
Ne remplissez pas les cylindre de
8.
façon excessive. (La charge liquide en
volume ne doit pas dépasser 80 %).
Ne pas dépasser la pression de
9.
service maximale du cylindre, même
temporairement.
Lorsque les cylindres ont été remplies
10.
correctement et que le processus est
terminé, veiller à retirer rapidement
les cylindres et l’équipement du
site et à ce que tous les robinets
d’isolation de l’équipement soient
fermées.
Le réfrigérant récupéré ne doit pas
11.
être chargé dans un autre système
de réfrigération, à moins d’avoir été
nettoyé et vérié.
Étiquetage
L’équipement doit porter une étiquette
indiquant qu’il a été mis hors service
et que son réfrigérant a été purgé.
L’étiquette doit être datée et signée.
Assurez-vous que l’équipement est muni
d’étiquettes indiquant qu’il contient du
uide frigorigène inammable.
Page 69

69
FRANÇAISE
Récupération
Lors de l’élimination du uide frigorigène
d’un système, que ce soit pour l’entretien
ou la mise hors service, les bonnes
pratiques recommandent que tous les
réfrigérants soient purgés en respectant
les consignes de sécurité.
Lors du transfert de uide frigorigène
dans des cylindres, veiller à n’utiliser
que des cylindres de récupération de
réfrigérant appropriés. Assurez-vous
d’avoir à disponibilité une quantité
susante de cylindres pour contenir
la charge totale du système. Tous les
cylindres à utiliser doivent être désignés
pour le réfrigérant récupéré et étiquetés
pour ce réfrigérant (c’est-à-dire, des
cylindres spéciaux pour la récupération
de réfrigérant). Les cylindres doivent
être équipés d’une soupape de sûreté
et de vannes de fermeture en bon état
de fonctionnement. Les cylindres de
récupération vides sont évacués et, si
possible, refroidis avant la récupération.
L’équipement de récupération doit être en
bon état de fonctionnement, accompagné
d’un ensemble d’instructions concernant
l’équipement à portée de main et doit
être adapté à la récupération de uides
frigorigènes inammables. En outre,
une balance calibrée doit être disponible
et en bon état de fonctionnement. Les
exibles doivent être équipés de raccords
de déconnexion étanches et en bon
état de fonctionnement. Avant d’utiliser
l’équipement de récupération, vériez
qu’il est en bon état de fonctionnement,
qu’il a été correctement entretenu et
que tous les composants électriques
connexes sont scellés pour éviter
une ignition accidentelle en cas de
dégagement de réfrigérant. Consulter le
fabricant en cas de doute.
Le réfrigérant récupéré doit être renvoyé
au fournisseur de réfrigérant dans un
cylindre de récupération appropriée,
accompagné du bordereau de transfert
des déchets correspondant. Ne pas
mélanger diérents réfrigérants dans les
unités de récupération, surtout pas dans
les cylindres.
Si des compresseurs ou des huiles
de compresseur doivent être retirés,
s’assurer qu’ils ont été purgés à un
niveau acceptable de manière à
assurer qu’il ne reste pas du réfrigérant
inammable dans le lubriant. Le
processus d’évacuation doit être eectué
avant le retour du compresseur au
fournisseur. Seul un chauage électrique
du corps du compresseur doit être utilisé
pour accélérer ce processus. La purge
de l’huile d’un système doit être eectuée
en respectant les consignes de sécurité.
ATTENTION !
•
N’utilisez pas de moyens autres que
ceux recommandés par le fabricant
pour accélérer le processus de
dégivrage ou de nettoyage.
•
L’appareil doit être stocké dans une
pièce sans fonctionnement continu,
sources de ammes (par exemple :
ammes nues, un appareil à gaz
fonctionnant ou un chauage
électrique fonctionnant).
•
Ne pas percer ni brûler.
•
Être conscient qu’un réfrigérant n’est
pas toujours odorant.
•
L’appareil doit être installé, utilisé
et entreposé dans une pièce d’une
supercie supérieure à 12 m2.
•
L’appareil doit être entreposé de
manière à éviter que des dommages
mécaniques ne se produisent et
accompagné d’un avertissement
indiquant que l’appareil doit être
entreposé dans une zone bien
ventilée dont la taille correspondant
à la supercie du local indiquée pour
son fonctionnement.
•
Toute personne travaillant ou
intervenant sur un circuit de uide
frigorigène doit être titulaire d’un
certicat valide délivré par un
organisme d’évaluation accrédité par
l’industrie qui autorise sa compétence
à la manipulation des frigorigènes
en toute sécurité conformément à
un cahier des charges reconnu par
l’industrie.
•
L’entretien ne doit être eectué que
conformément aux recommandations
du fabricant de l’équipement. Les
travaux d ‘entretien et de réparation
nécessitant l’assistance d’autres
personnes qualiées doivent être
eectués sous la supervision de la
personne qualiée pour l’utilisation
de uides frigorigènes inammables.
Page 70

70
www.aeg.com
EN MATIÈRE DE PROTECTION
11.
DE L’ENVIRONNEMENT
Recyclez les matériaux portant le symbole
Déposez les emballages dans
les bacs de recyclage prévus à cet
eet. Contribuez à la protection de
l’environnement et à votre sécurité,
recyclez vos produits électriques et
électroniques. Ne jetez pas les appareils
portant le symbole avec les ordures
ménagères. Apportez ce produit à votre
centre de recyclage local ou contactez
votre administration municipale.
Page 71

71
FRANÇAISE
Page 72

www.aeg.com72
INHALT
SICHERHEITSHINWEISE ...........................................................................................7
1.
SICHERHEITSANWEISUNGEN .................................................................................7
2.
GERÄTEBESCHREIBUNG .........................................................................................81
3.
MITGELIEFERTES ZUBEHÖR ...................................................................................81
4.
MONTAGEANWEISUNG ............................................................................................82
5.
FUNKTIONEN DES KLIMAGERÄTS ..........................................................................84
6.
BEDIENUNGSANLEITUNG ........................................................................................85
7.
REINIGUNG UND PFLEGE ........................................................................................88
8.
FEHLERSUCHE ..........................................................................................................89
9.
ZUSÄTZLICHE INFORMATIONEN .............................................................................90
10.
UMWELTTIPPS ...........................................................................................................95
11.
FÜR PERFEKTE ERGEBNISSE
Danke, dass Sie sich für dieses AEG Produkt entschieden haben. Wir haben es
geschaffen, damit Sie viele Jahre von seiner ausgezeichneten Leistung und den
innovativen Technologien, die Ihnen das Leben erleichtern, profitieren können.
Es ist mit Funktionen ausgestattet, die in gewöhnlichen Geräten nicht vorhanden
sind. Nehmen Sie sich ein paar Minuten Zeit zum Lesen, um seine Vorzüge
kennen zu lernen.
Besuchen Sie uns auf unserer Website und:
Holen Sie sich Ratschläge, Broschüren, Problemlösungen
und Serviceinformationen:
www.aeg.com
Registrieren Sie Ihr Produkt für einen besseren Service:
www.registeraeg.com
3
7
Bestellen Sie Zubehör, Verbrauchsmaterialien und Original-Ersatzteile
für Ihr Gerät:
www.aeg.com/shop
REPARATUR- UND KUNDENDIENST
Bitte verwenden Sie ausschließlich Original-Ersatzteile.
Halten Sie folgende Angaben bereit, wenn Sie sich an den Kundendienst wenden:
Modell, Produktnummer (PNC), Seriennummer.
Warnungs-/ Sicherheitshinweise.
Allgemeine Informationen und Empfehlungen.
Informationen zum Umweltschutz.
Änderungen vorbehalten.
Page 73

73
DEUTSCH
1.
SICHERHEITSHINWEISE
ACHTUNG!
• Das Gerät darf von Kindern ab 8 Jahren und
Personen mit eingeschränkten physischen,
sensorischen oder geistigen Fähigkeiten oder
mit mangelnder Erfahrung und/oder mangelndem
Wissen nur dann verwendet werden, wenn sie
durch eine für ihre Sicherheit zuständige Person
beaufsichtigt werden oder in die sichere Verwendung
des Geräts eingewiesen wurden und die mit dem
Gerät verbundenen Gefahren verstanden haben.
• Kinder dürfen nicht mit dem Gerät spielen.
• Lassen Sie zur Vermeidung von Unfallrisiken ein
beschädigtes Netzkabel nur vom Hersteller, vom
Kundendienst oder einer gleichwertig qualizierten
Fachkraft auswechseln.
In diesem Handbuch wird die ordnungsgemäße
Verwendung Ihres Klimageräts beschrieben. Lesen
Sie das Handbuch sorgfältig durch, bevor Sie das Gerät
verwenden. Das Handbuch muss an einem sicheren
und schnell zugänglichen Ort aufbewahrt werden.
VORSICHT!
• Lassen Sie das Gerät von einem autorisierten
Kundendienst-Techniker reparieren oder warten.
• Lassen Sie dieses Gerät von einem autorisierten
Techniker montieren.
• Das Klimagerät darf ohne Aufsicht nicht von
kleinen Kindern oder gebrechlichen Personen
bedient werden.
• Kleine Kinder müssen beaufsichtigt werden, um
zu garantieren, dass sie nicht mit dem Klimagerät
spielen können.
• Es bestehen lokale Vorschriften hinsichtlich
des maximal zulässigen Geräuschpegels,
den Klimageräte aufweisen dürfen.
Page 74

74
www.aeg.com
• Wenn das Netzkabel ausgetauscht werden muss,
darf dieser Austausch nur von autorisiertem
Personal durchgeführt werden.
• Installationsarbeiten dürfen nur von autorisiertem
Personal (falls zutreend) in Übereinstimmung mit
den nationalen elektrotechnischen Normen und
Standards durchgeführt werden. Ein unsachgemäß
durchgeführter Anschluss führt möglicherweise zu
Überhitzung und Feuer.
• Stellen Sie sicher, dass Sie mit Ihren Fingern nicht
in den Lüfter geraten, wenn Sie die horizontalen
Lamellen einstellen.
Wichtige Hinweise
1.1
1. Betreiben Sie das Gerät nicht ohne Luftlter.
2. Betreiben Sie das Gerät nicht in der Nähe von
Wärmequellen oder oenem Feuer.
3. Setzen Sie das Gerät nicht direktem Sonnenlicht aus.
4. Lagern oder Versetzen Sie das Gerät immer in
aufrechter Position.
5. Bedecken Sie das Gerät nicht während des Betriebs
oder unmittelbar nach dem Gebrauch.
6. Stellen Sie bei der Montage des
Wasserpumpenablaufschlauches sicher, dass der
Schlauch zu einem geeigneten Abuss geführt wird.
7. Lassen Sie immer das Kondenswasser ab, bevor Sie
das Gerät einlagern.
Bei der Verwendung des Klimageräts
1.2
zu beachtende Punkte
VORSICHT!
Sicherheitshinweise für die Nutzung
• Ändern Sie keine Teile dieses Produkts.
• Führen Sie keine Objekte in jegliche Teile des
Geräts ein.
• Stellen Sie sicher, dass die verwendete
Spannungsversorgung den Spezikationen
entspricht. Verwenden Sie ausschließlich eine
Page 75

75
DEUTSCH
Netzspannung mit 220 - 240 V, 50 Hz und 10 A.
Wird eine Spannungsversorgung mit abweichenden
Werten verwendet, wird das Gerät möglicherweise
beschädigt und kann in Brand geraten.
• Verwenden Sie immer einen Leistungsschalter
oder eine Sicherung mit passendem
Bemessungsstrom. Verwenden Sie auf keinen Fall
Drähte, Stifte oder andere Objekte anstelle einer
geeigneten Sicherung.
• Schalten Sie das Klimagerät bei jeglichen
Auälligkeiten (z. B. Brandgeruch) umgehend aus,
und trennen Sie es vom Netz.
VORSICHT!
Sicherheitshinweise zum Netzkabel
• Der Netzstecker darf ausschließlich in eine
geeignete Wandsteckdose gesteckt werden.
Verwenden Sie auf keinen Fall Verlängerungskabel
oder Verteilersteckdosen.
• Stecken Sie den Netzstecker fest in die Steckdose,
und vergewissern Sie sich, dass er nicht locker ist.
• Ziehen Sie nicht am Netzkabel, verändern Sie es
nicht, und tauchen Sie es nicht in Wasser. Wenn
Sie am Netzkabel ziehen oder es unsachgemäß
verwenden, wird das Gerät möglicherweise
beschädigt oder Sie erleiden einen elektrischen
Schlag.
• Lassen Sie zur Vermeidung von Unfallrisiken ein
beschädigtes Netzkabel nur vom Hersteller, vom
Kundendienst oder einer gleichwertig qualizierten
Fachkraft auswechseln. Verwenden Sie zum
Ersetzen ausschließlich ein vom Hersteller
zugelassenes Netzkabel.
• Die Erdung des Gerätes ist gesetzlich
vorgeschrieben: Das Netzkabel des Geräts verfügt
über eine Erdungsleiter. Der Stecker muss in
eine ordnungsgemäß montierte und geerdete
Steckdose gesteckt werden.
Page 76

76
www.aeg.com
Netzstecker
Schutzkontakt
• Das Netzkabel des Geräts verfügt über eine
Erdungsleiter, der an einen Schutzkontakt
angeschlossen ist. Der Stecker muss in eine
ordnungsgemäß montierte und geerdete Steckdose
gesteckt werden. Entfernen Sie auf keinen Fall den
rechteckigen Schutzkontakt vom Netzstecker.
Rechteckiger
Schutzkontakt
Netzstecker
Sicherheitsmaßnahmen bei der Verwendung
1.3
(nur für Vereinigtes
Königreich)
• Schalten Sie das Gerät vor jeder Wartung oder Reinigung
aus, und ziehen Sie den Netzstecker aus der Steckdose.
• Spritzen oder schütten Sie kein Wasser direkt auf das
Gerät. Wasser kann einen Stromschlag verursachen
und das Gerät beschädigen.
• Vor jedem Umsetzen des Klimageräts muss das
Kondenswasser abgelassen werden (siehe Seite 14).
Wenn sich Wasser im Auangbehälter bendet, tritt es
beim Umsetzen des Geräts möglicherweise aus.
• Um ein ordnungsgemäßes Ablassen des Kondenswassers
zu gewährleisten, darf der Ablaufschlauch nicht geknickt
sein und während des Entfeuchtungsmodus nicht erhöht
gelagert sein. Andernfalls tritt das Kondenswasser
möglicherweise in den Raum aus.
• Die Umgebungstemperatur im Bereich des
Ablaufschlauchs darf während der Verwendung nicht
unterhalb des Gefrierpunkts liegen. Andernfalls gefriert
möglicherweise das Wasser im Schlauch, was
zum Überlaufen des Wassers im Gerät und zum
Wasseraustritt in den Raum führt.
Page 77

DEUTSCH
• Sorgen Sie dafür, dass der Abluftauslass nicht durch
Objekte blockiert wird. Andernfalls wird die Kühlleistung
beeinträchtigt oder vollständig aufgehoben.
• Sorgen Sie für eine geeignete FehlerstromSchutzeinrichtung zum Schutz gegen elektrischen
Schlag, die den lokalen Vorschriften entspricht.
• Wenn Sie dem direkten Luftstrom aus dem Klimagerät
über einen längeren Zeitraum hinweg ausgesetzt sind,
wird Ihre Gesundheit möglicherweise beeinträchtigt.
Setzen Sie in der Nähe bendliche Personen,
Haustiere oder Panzen nicht über einen längeren
Zeitraum hinweg dem direkten Luftstrom aus.
• Verwenden Sie das Klimagerät nicht für
Spezialanwendungen, für die es nicht ausgelegt
ist (z. B. zur Klimatisierung von Präzisionsgeräten,
Lebensmitteln, Haustieren, Panzen oder
Kunstobjekten). Andernfalls werden die
entsprechenden Güter möglicherweise beschädigt.
77
SICHERHEITSANWEISUNGEN
2.
2.1 Hinweise zum Betrieb
• Es dauert 3 Minuten, bis der Kompressor
die Kühlung wieder aufgenommen hat.
Wenn Sie das Klimagerät ausschalten
und sofort wieder einschalten, müssen
Sie 3 Minuten warten, bevor der
Kompressor wieder mit dem Kühlen
beginnt. In dem Gerät bendet sich eine
Elektronik, die aus Sicherheitsgründen
ein Wiedereinschalten des Kompressors
für 3 Minuten verhindert.
• Warten Sie nach einem
Spannungsausfall 3 Minuten ab,
bevor Sie das Gerät wieder einschalten.
Wenn die Spannungsversorgung
wiederhergestellt wurde, schalten
Sie das Klimagerät wieder ein. War
der Stromausfall kürzer als drei
Minuten, warten Sie mindestens drei
Minuten, bevor Sie das Gerät wieder
einschalten. Wenn Sie das Klimagerät
vor Ablauf der drei Minuten einschalten,
kann eine Schutzvorrichtung im
Gerät den Kompressor ausschalten.
Diese Schutzvorrichtung verhindert
die Kühlfunktion für ca. 5 Minuten.
Jegliche Einstellungen werden
verworfen und das Gerät wird auf die
Anfangseinstellungen zurückgesetzt.
• Niedertemperaturbetrieb: Friert Ihr Gerät
ein? Das Gerät kann einfrieren, wenn es
bei niedrigen Umgebungstemperaturen,
insbesondere nachts, auf 18 °C
eingestellt ist. Unter diesen
Bedingungen führt ein weiterer
Temperaturabfall zum Einfrieren des
Geräts. Wenn Sie das Gerät in diesem
Fall auf eine höhere Temperatur
einstellen, wird ein Einfrieren verhindert.
• Im Entfeuchtungsmodus steigt die
Raumtemperatur. Das Gerät erzeugt
Wärme im Entfeuchtungsmodus,
wodurch die Raumtemperatur steigt.
Dabei wird warme Luft aus dem
Abluftauslass geblasen. Dies ist
normal und ist kein Anzeichen für
eine Fehlfunktion des Geräts.
• Im Kühlmodus bläst das Klimagerät
die erzeugte Warmluft über den
Abluftschlauch aus dem Raum
heraus. Währenddessen tritt dieselbe
Menge Luft durch die Raumönungen
von außen in den Raum ein.
Page 78

78
www.aeg.com
• Versuchen Sie nicht, den Abtauprozess
durch andere als vom Hersteller
empfohlene Hilfsmittel zu beschleunigen.
• Das Gerät muss in einem Raum
aufbewahrt werden, in dem keine
permanent betriebenen Zündquellen
vorhanden sind (zum Beispiel: oene
Flammen, ein eingeschaltetes Gasgerät
oder eine laufende Elektroheizung).
• Nicht durchstechen oder verbrennen.
• Das Gerät muss in einem Raum mit
einer Bodenäche von mindestens
12 m2 installiert, betrieben oder
aufbewahrt werden.
• Es muss auf die Einhaltung der
nationalen Gasverordnungen geachtet
werden.
• Die Belüftungsönungen müssen
immer frei zugänglich sein.
• Das Gerät muss in einem gut
belüftetem Bereich und in einem Raum
mit einer Bodenäche größer als 12 m
aufbewahrt werden.
• Alle Personen, die an einem
Kältemittelkreislauf arbeiten oder
in ihn eingreifen, müssen im Besitz
eines gültigen Zertikats von einer
anerkannten Prüfstelle sein, die
ihnen bestätigt, dass sie sicher im
Umgang mit Kältemitteln gemäß der
anerkannten Spezikationen sind.
• Wartungsarbeiten dürfen nur wie
vom Gerätehersteller empfohlen
durchgeführt werden. Wartungs- und
Reparaturarbeiten, bei denen weitere
Fachkräfte assistieren müssen, müssen
unter der Aufsicht der Person, die in der
Verwendung von brennbaren Kältemitteln
geschult ist, durchgeführt werden.
• Das Gerät enthält eine LithiumKnopfzellenbatterie. Wird eine neue
oder leere Lithium-Knopfzellenbatterie
verschluckt oder gelangt sie in den
Körper, kann sie schwere innere
Verbrennungen verursachen und
innerhalb von nur 2 Stunden zum Tod
führen. Schließen Sie das Batteriefach
stets vollkommen sicher. Schließt das
Batteriefach nicht sicher, verwenden
Sie das Gerät nicht, entnehmen Sie
2
die Batterien und halten Sie es von
Kindern fern. Wenn Sie glauben, dass
die Batterien verschluckt wurden oder
in ein anderes Körperteil gelangt sind,
begeben Sie sich sofort in ärztliche
Behandlung.
Um Verletzungen des Benutzers oder
anderer Personen sowie Sachschäden zu
vermeiden, müssen die unten aufgeführten
Anweisungen befolgt werden.
Ein unsachgemäßer Betrieb aufgrund der
Missachtung von Anweisungen kann zu
Personen- oder Sachschäden führen.
Der Schweregrad der möglichen Folgen
wird wie folgt abgegrenzt:
ACHTUNG!
Dieses Symbol weist auf mögliche
Lebensgefahr oder Gefahr einer
schweren Verletzung hin.
VORSICHT!
Dieses Symbol weist auf die
Gefahr von Verletzungen oder
Sachschäden hin.
In dem vorliegenden Handbuch werden
folgende Symbole verwendet:
Dieses Zeichen steht für
„absolut verboten“.
Dieses Zeichen steht für
„Anweisung stets befolgen“.
2.2 Warnung während der
Verwendung
ACHTUNG!
Warnung während der
Verwendung
Page 79

DEUTSCH
Warnung Bedeutung
Stecken Sie den Netzstecker
ordnungsgemäß in die Steckdose
Andernfalls besteht die Gefahr eines
elektrischen Schlags oder von Bränden
aufgrund von Überhitzung
Schalten Sie das Gerät nicht ein oder aus,
indem Sie den Netzstecker einstecken oder
herausziehen
Verwenden Sie kein Netzkabel, das nicht
vom Hersteller zugelassen ist
Es besteht die Gefahr eines elektrischen
Schlags oder von Bränden aufgrund von
Überhitzung
Es besteht die Gefahr eines elektrischen
Schlags oder von Bränden.
Lassen Sie zur Vermeidung von
Unfallrisiken ein beschädigtes Netzkabel
nur vom Hersteller, vom Kundendienst oder
einer gleichwertig qualizierten Fachkraft
auswechseln
Ändern Sie nicht die Länge des Netzkabels,
und verwenden Sie die Steckdose nicht
gemeinsam mit anderen Geräten
Betreiben Sie das Gerät nicht mit nassen
Händen oder in einer feuchten Umgebung
Setzen Sie Anwesende im Raum nicht dem
Es besteht die Gefahr eines elektrischen
Schlags oder von Bränden aufgrund von
Überhitzung
Es besteht die Gefahr eines elektrischen
Schlags
Dies kann die Gesundheit beeinträchtigen
direkten Luftstrom aus
Sorgen Sie stets für eine vorschriftsmäßige
Erdung
Bei unsachgemäßer Erdung besteht
die Gefahr eines elektrischen
Schlags
Verhindern Sie, dass Wasser an die
elektrischen Teile gelangt
Installieren Sie stets einen Leistungsschalter und einen separaten Stromkreis
Ziehen Sie den Netzstecker heraus, wenn
Sie auällige Geräusche, Gerüche oder
Es besteht die Gefahr eines Geräteausfalls
oder eines elektrischen Schlags
Bei unsachgemäßer Installation besteht
die Gefahr eines elektrischen Schlags
Es besteht die Gefahr eines elektrischen
Schlags und von Bränden
Rauch an dem Gerät feststellen
Stecken Sie den Netzstecker nicht in
die Steckdose, wenn diese locker oder
Es besteht die Gefahr eines elektrischen
Schlags und von Bränden
beschädigt ist
Önen Sie das Gerät nie während des
Betriebs
Es besteht die Gefahr eines elektrischen
Schlags und von Bränden
Halten Sie Schusswaen von dem Gerät fern Es besteht Brandgefahr
Verlegen Sie das Netzkabel nicht
in der Nähe von Heizgeräten
Verlegen Sie das Netzkabel nicht in
Es besteht die Gefahr eines elektrischen
Schlags und von Bränden
Es besteht Brand- und Explosionsgefahr
der Nähe von entammbaren Gasen
oder Brennstoen wie Benzin, Benzol,
Verdünnern usw.
Lüften Sie den Raum, bevor Sie das
Klimagerät einschalten, für den Fall dass an
Es besteht Explosions-, Brand- und
Verbrennungsgefahr
einem anderen Gerät Gaslecks vorhanden
sind
Zerlegen Sie das Gerät nicht, und nehmen
Sie keine Änderungen an dem Gerät vor
Es besteht die Gefahr eines Geräteausfalls
und eines elektrischen Schlags
79
Page 80

80
www.aeg.com
VORSICHT!
Vorsicht Bedeutung
Wenn der Luftlter entnommen werden
Es besteht Verletzungsgefahr
muss, berühren Sie nicht die Metallteile
des Geräts
Reinigen Sie das Klimagerät nicht mit
Wasser
Wasser kann in das Gerät eindringen und
die Isolierung beeinträchtigen. Es besteht
die Gefahr eines elektrischen Schlags.
Lüften Sie den Raum regelmäßig, wenn
das Klimagerät zusammen mit einem Ofen
Es kann zu einem Sauerstomangel
kommen
o. ä. verwendet wird
Muss das Gerät gereinigt werden, schalten
Sie das Gerät und den Leistungsschalter
aus
Reinigen Sie das Gerät nicht, wenn es
eingeschaltet ist, da dies einen Brand,
Stromschlag oder eine Verletzung zur
Folge haben könnte
Setzen Sie Haustiere oder Panzen nicht
dem direkten Luftstrom aus
Benutzen Sie das Gerät nicht für
Spezialanwendungen
Dadurch kann das Haustier verletzt oder
die Panze beschädigt werden
Verwenden Sie das Klimagerät nicht
für die Kühlung von Präzisionsgeräten,
Lebensmitteln, Haustieren, Panzen und
Kunstobjekten. Es besteht die Gefahr einer
Qualitätseinbuße usw.
Schalten Sie das Gerät bei Sturm oder
Unwetter aus und schließen Sie das
Fenster
Wenn das Gerät bei oenem Fenster
betrieben wird, führt dies möglicherweise
zu einer Durchnässung des Innenraums
und der Möbel
Halten Sie den Stecker am Steckerkopf,
wenn sie ihn aus der Steckdose ziehen
Schalten Sie den Hauptschalter aus, wenn
Sie das Gerät längere Zeit nicht benutzen
Legen Sie keine Gegenstände um
die Lufteinlassönungen oder in den
Es besteht die Gefahr eines elektrischen
Schlags oder von Schäden
Anderenfalls kann es zu einem Ausfall oder
Brand kommen
Anderenfalls kann es zu einem Ausfall
des Geräts oder einem Unfall kommen
Luftauslass
Setzen Sie die Filters stets ordnungsgemäß
ein. Reinigen Sie den Filter alle zwei Wochen.
Verwenden Sie keine starken
Reinigungsmittel wie Wachs oder
Verdünner, sondern ein weiches Tuch
Stellen Sie keinen schweren Gegenstände
auf das Netzkabel und stellen Sie sicher,
Der Betrieb ohne Filter kann einen
Geräteausfall zur Folge haben
Das Erscheinungsbild kann durch
Farbveränderungen oder Verkratzen
der Oberäche beeinträchtigt werden
Es besteht die Gefahr eines Brands oder
elektrischen Schlags
dass das Netzkabel nicht eingeklemmt ist
Trinken Sie kein Wasser aus der
Klimaanlage
Es enthält Schadstoe und könnte
Sie krank machen
Vorsicht beim Auspacken und Einbauen Scharfe Kanten können Verletzungen
verursachen
Sollte Wasser in das Gerät eindringen,
schalten Sie es aus und schalten Sie auch
Es besteht die Gefahr eines elektrischen
Schlags oder einer Beschädigung
den Leistungsschalter aus. Unterbrechen Sie
die Stromversorgung durch Herausziehen
des Steckers und wenden Sie sich an einen
qualizierten Servicetechniker.
Page 81

DEUTSCH
GERÄTEBESCHREIBUNG
3.
1
81
6
5
1
Luftaustritt in den Raum
2
Bedienfeld
3
Raumlufteinlass
4
Laufrolle
5
Fernbedienung
MITGELIEFERTES ZUBEHÖR
4.
TEILE TEILEBEZEICHNUNG MENGE:
1
2
3
4
5
6
7
8
Abb. 2
•
Überprüfen Sie, ob alle Zubehörteile im Paket enthalten sind, und halten Sie sich
für deren ordnungsgemäße Verwendung an die Montageanweisungen.
Abluftschlauch 1 Stk.
Ausziehbare Fensterleiste 1 Stk.
Ersatz-Verlängerungsstange 1 Stk.
Ablaufschlauch und Adapter 1 Stk.
3/8-Zoll-Schraube 2 Stk.
Dekorfolie 1 Stk.
Befestigungsband 1 Satz
Fernbedienung 1 Stk.
2
7
8
3
9
4
6
Tragegri (beidseitig)
7
Filter
8
Abluftauslass
9
Ablassönung
10
Ablassönung der Auangwanne
10
Abb. 1
Page 82

82
www.aeg.com
Abb. 4
Abb. 6
Abb. 7
MONTAGEANWEISUNG
5.
5.1 Warmluftauslass
Im Kühlmodus muss das Gerät in der
Nähe eines Fensters oder einer sonstigen
Raumönung aufgestellt werden, um die
Warmluft nach außen leiten zu können.
Stellen Sie das Gerät zunächst auf einer
ebenen Fläche auf, und sorgen Sie
dafür, dass das Gerät einen Abstand
von mindestens 30 cm zu umliegenden
Objekten hat. Vergewissern Sie sich
auch, dass sich eine Steckdose in der
Nähe bendet, die an einen einzelnen
Stromkreis angeschlossen ist.
Ziehen Sie den Schlauch auf einer
1.
beliebigen Seite aus (Abb. 3).
Abb. 5
Abb. 3
Schieben Sie den Adapter A in die
2.
Wechselönung des Geräts, siehe
Abb. 4.
Bringen Sie das Fenster-Set am
3.
Fenster an, schieben Sie den Adapter
B in die ausziehbare Fensterleiste
und dichten Sie ihn ab. (Abb. 5 und 6)
Ausziehbare Fensterleiste
Minimum: 56 cm
Maximum: 112 cm
Siehe „
Flügelfenster“ bezüglich der
Montage des Fenster-Sets.
Der Schlauch kann von seiner
ursprünglichen Länge von 38 cm
auf bis zu 150 cm ausgezogen
werden. Allerdings wird
empfohlen, die Schlauchlänge
so kurz wie möglich zu halten.
Stellen Sie auch sicher, dass der
Schlauch nicht zu stark gebogen
wird oder durchhängt. (Abb. 7)
Einbau in ein
5.2
Page 83

DEUTSCH
5.2 Einbau in ein Flügelfenster
Önen Sie den Fensterügel und
1.
heben Sie den Verriegelungshebel der
ausziehbaren Fensterleiste an (Abb. 9)
B
Abb. 9
B: Sperrhebel
Setzen Sie die ausziehbare
2.
Fensterleiste in das Fenster. Passen
Sie die Länge der ausziehbaren
Fensterleiste entsprechend der
Fensterhöhe an (Abb. 10).
Abb. 11 B
Abb. 11 C
Drücken Sie den Verriegelungshebel
3.
nach hinten, um die Länge der
ausziehbaren Fensterleiste zu xieren.
Schließen Sie dann das Fenster und
klemmen Sie dabei das FensterSet zwischen dem Fenster und
dem Rahmen ein, um das FensterSet festzumachen. Ziehen Sie die
Schutzfolie auf der Rückseite der
Verankerungslasche ab, bringen Sie
sie auf dem Fensterrahmen an und
befestigen Sie das Band (Abb. 12).
83
Die Teleskopstange kann
ausgefahren werden, wenn
das Fenster zu hoch ist.
Ziehen Sie hierzu die
Teleskopstange vollständig
heraus (Abb. 11 A). Richten
Sie dann die 3 Haken an der
Verlängerungsstange (getrennt
erhältlich) auf die 3 Önungen
am Ende der Teleskopstange aus
und schieben Sie die 3 Haken
in die Önungen. Drücken Sie
dann die Verlängerungsstange
nach unten, um die Schlitze zu
verriegeln (Abb. 11 B). Schieben
Sie dann die zusammengesetzte
Teleskopstange wieder in das
Fenster-Set (Abb. 11 C).
Abb. 11 A
Abb. 10
Schneiden Sie die Dekorfolie auf
4.
die richtige Länge zu und kleben
Sie sie auf die Verlängerungsstange
(Abb. 13).
C
C: Dekorfolie
Abb. 12
Abb. 13
Page 84

84 www.aeg.com
1
2
3
4
5
2
8
3
4567
FUNKTIONEN DES KLIMAGERÄTS
6.
6.1 BEDIENFELD
1
1
Temperaturanzeige
2
Taste zum Zurücksetzen des Filters
(3 Sek. gedrückt halten)
3
Einstellen der Lüfterdrehzahl
4
Erhöhen der Temperatur
6.2 Fernbedienung
1
Drücken, um Modi auszuwählen
2
Drücken, um das Gerät ein- oder
auszuschalten
3
Drücken, um die
Temperatureinstellung zu erhöhen
4
Drücken, um die
Lüftergeschwindigkeit auszuwählen
5
Drücken, um die
Temperatureinstellung zu verringern
5
Verringern der Temperatur
6
Einstellen der Modi
7
Ein- oder Ausschalten des Geräts
8
WLAN-Taste
Austauschen der Batterie
Drehen Sie die Fernbedienung
1.
um. Unten auf der Fernbedienung
Drehen Sie die hintere Abdeckung
2.
mit einer Münze oder einem
ähnlichen Gegenstand gegen den
(Abb. 20 und 21)
Abb. 20
Verwendung die hinteren
Abdeckungen und entfernen
Sie die Schutzfolie, um die
Fernbedienung zu aktivieren.
Abb. 21
Page 85

DEUTSCH
Önen Sie den Innendecken auf
Abb. 22
3.
dieselbe Weise und entnehmen
Sie die Batterie. (Abb. 22)
Ersetzen Sie die Batterie und schließen
4.
Sie die innere und äußere Abdeckung.
Batterietyp: RG15D/E-ELL
(Nennspannung: 3 V DC)
ACHTUNG!
Handhaben Sie die Batterien richtig
1.
Gefahr einer chemischen
Verätzung. Halten Sie Batterien
von Kindern fern.
2.
Setzen Sie die Batterien richtig ein.
3.
Verwenden Sie ausschließlich den
angegebenen Batterietyp.
4.
Verwenden Sie keine verbrauchten
Batterien mit neuen Batterien.
5.
Entsorgen Sie Batterien nicht,
indem Sie sie verbrennen. Die
Batterien können explodieren oder
auslaufen.
6.
Die Zellen müssen ordnungsgemäß
entsorgt und von Kindern
ferngehalten werden. Selbst leere
Batterien können Verletzungen
verursachen.
7.
Um Schäden zu vermeiden,
nehmen Sie die Batterien aus dem
Gerät, wenn Sie es längere Zeit
nicht benutzen.
8.
Dieses Gerät erfüllt Teil 15
der FCC-Bestimmungen. Der
Betrieb unterliegt folgenden
beiden Bedingungen: (1) Dieses
Gerät darf keine schädlichen
Interferenzen verursachen, und (2)
dieses Gerät muss empfangene
Interferenzen aufnehmen können,
auch Interferenzen, die eventuell
einen unerwünschten Betrieb
verursachen.
85
BEDIENUNGSANLEITUNG
7.
Einige der folgenden Anweisungen
können nur über das Bedienfeld
ausgeführt werden.
7.1 Verwenden des Bedienfelds
Heizmodus (in einigen Modellen)
In diesem Modus MUSS der
Abluftschlauch verwendet werden.
Drücken Sie die Taste „Modes“
1.
(Modus), bis die Kontrolllampe
„Heat“ (Heizen) leuchtet.
Drücken Sie die Tasten Temp „-“ und
2.
„+“, um die gewünschte Einstellung
auszuwählen.
Drücken Sie die Taste „Fan speed“
3.
(Lüftergeschwindigkeit), um die
gewünschte Lüftergeschwindigkeit
einzustellen.
Schließen Sie den Ablaufschlauch
4.
an. Siehe Abschnitt 7.3 Ablassen des
Kondenswassers.
Kühlbetrieb
In diesem Modus MUSS der
Abluftschlauch verwendet werden.
Drücken Sie die Taste „Modes“
1.
(Modus), bis die Kontrolllampe
„Cool“ (Kühlen) aueuchtet.
Drücken Sie die Tasten Temp „-“ und
2.
„+“, um die gewünschte Einstellung
auszuwählen.
Drücken Sie die Taste „Fan speed“
3.
(Lüftergeschwindigkeit), um die
gewünschte Lüftergeschwindigkeit
einzustellen.
Im Modus „Cool“ (Kühlen) ist der
Ablaufschlauch nicht erforderlich.
Lüftermodus
In diesem Modus muss kein
Abluftschlauch oder Wasserablaufschlauch
angeschlossen sein.
Page 86

86 www.aeg.com
Drücken Sie die Taste „Modes“
1.
(Modus), bis die Kontrolllampe
„Fan“ (Lüfter) leuchtet.
Drücken Sie die Taste „Fan speed“
2.
(Lüftergeschwindigkeit), um die
gewünschte Lüftergeschwindigkeit
einzustellen.
Der Lüfter läuft daraufhin mit der
3.
ausgewählten Geschwindigkeit
und auf dem Display wird die
Raumtemperatur angezeigt.
Trockenmodus
In diesem Modus muss der
Abluftschlauch nicht verwendet werden,
ABER das aufgefangene Wasser muss
abgelassen werden. Siehe Abschnitt 7.3
Ablassen des Kondenswassers.
Drücken Sie die Taste „Modes“
1.
(Modus), bis die Kontrolllampe
„Dry“ (Trocken) leuchtet.
Der Lüfter läuft daraufhin mit geringer
2.
Geschwindigkeit und auf dem Display
wird die Raumtemperatur angezeigt.
Halten Sie für größtmögliche
3.
geschlossen.
Schließen Sie den Ablaufschlauch
4.
an. Siehe Abschnitt Ablassen des
Kondenswassers.
Automatikmodus
In diesem Modus muss der Abluftschlauch
immer angeschlossen sein.
Wenn Sie das Klimagerät auf
Automatikmodus einstellen, wechselt es
abhängig von der eingestellten Temperatur
und der vorhandenen Raumtemperatur
automatisch in den Kühl-, Heiz(nur bei Modellen mit Heizfunktion)
oder Lüfterbetrieb. Dabei sorgt das
Klimagerät automatisch dafür, dass
die Raumtemperatur mit der von Ihnen
eingestellten Temperatur übereinstimmt.
Im Automatikmodus können Sie die
Lüftergeschwindigkeit nicht einstellen.
1. Drücken Sie die Taste „Modes“ (Modus),
bis die Kontrolllampe „Auto mode“
(Automatik) leuchtet.
Nach Auswahl des „Auto mode“
(Automatik) schaltet sich das
Gerät entsprechend der aktuellen
Raumtemperatur ein.
Funktion Filter reinigen
Reinigen des Filters.
1.
Halten Sie die Taste „Filter“ 3
2.
Sekunden gedrückt, um die Filter-
Kontrolllampe auszuschalten.
Auswählen der Lüfterdrehzahl
Sie können die gewünschte
Lüfterdrehzahl durch Drücken der Taste
„Fan speed“ (Lüftergeschwindigkeit)
auswählen. Die Lüftergeschwindigkeit
ändert sich in der Reihenfolge: „Auto Fan“
(Automatik), „High (Hoch)“, „Mid (Mittel)“,
„Low (Niedrig)“.
Nach Auswahl der Lüftergeschwindigkeit „Auto Fan“
(Automatik), „High (Hoch)“,
„Mid (Mittel)“ oder „Low (Niedrig)“
leuchtet die entsprechende
Kontrolllampe.
Im Automatik- und
Trockenmodus können Sie
die Lüftergeschwindigkeit
nicht auswählen.
WL-MODUL DEAKTIVIEREN:
Das WLAN-Modul kann deaktiviert
werden, indem man die Taste „Connect‟
(Verbinden) und „-‟ gleichzeitig
3 Sekunden gedrückt hält. Drücken
Sie die Taste „Connect‟ (Verbinden)
erneut, um das WLAN-Modul wieder zu
aktivieren. Es dauert etwa 10 Sekunden,
bis das Modul wieder gestartet wird.
7.2 Fehlercode
Wenn auf dem Display „A5“ angezeigt
wird, ist der Raumtemperatursensor
ausgefallen. Wenden Sie sich an Ihren
autorisierten AEG Kundendienst.
Wenn auf dem Display „E5“ angezeigt
wird, ist der Temperatursensor des
Verdampfers ausgefallen. Wenden Sie
sich an Ihren autorisierten AEG
Kundendienst.
Page 87

Wenn auf dem Display „E4“ angezeigt
wird, ist die Kommunikation über das
Bedienfeld ausgefallen. Wenden Sie
sich an Ihren autorisierten AEG
Kundendienst.
Wenn auf dem Display „P1“ angezeigt wird,
ist die Auffangwanne voll. Versetzen Sie
das Gerät vorsichtig an einen geeigneten
Ort zum Ablassen des Wassers, drehen
Sie die Ablassschraube heraus, und
lassen Sie das Kondenswasser ab.
Schalten Sie das Gerät wieder ein, und
stellen Sie sicher, dass „P1“ nicht mehr
angezeigt wird. Wenn der Fehlercode
wieder angezeigt wird, wenden Sie sich
an den Kundendienst.
87DEUTSCH
Abb. 23
Bei Bedarf können Sie den
Ablaufschlauch durch Aufsetzen
des Ablaufschlauchadapters auf das
Schlauchende verlängern. Verlängern
Sie ihn dann mit einem 8 - 9 mm
Schlauch (Abb. 24).
Wenn auf dem Display „E7“ angezeigt
wird, ist der Innenraummotor ausgefallen.
Wenden Sie sich an Ihren autorisierten
AEG Kundendienst.
7.3 Kondensat ablassen
Während des Heiz- und Trockenmodus
muss der Wasserablaufschlauch an den
Anschluss auf der Rückseite des Geräts
angeschlossen sein, um das Kondensat
abzulassen. Anderenfalls funktioniert das
Gerät möglicherweise nicht korrekt und
das Display zeigt „P1“ an.
A. Leiten Sie das Kondensat in einen
Abfluss, der tiefer gelegen ist, als das
Klimagerät.
B. Das Gerät verfügt über eine Pumpe,
um das Kondensat abzulassen.
Hier 8-9 mm Verlängerungsschlauch für Ablauf anschließen
Abb. 24
Setzen Sie während des Kühlmodus den
Gummistopfen in den Schlauchanschluss,
um beste Leistung zu erzielen.
7.4 Hinweise zum Betrieb
Nun da Sie mit dem Betrieb des
Klimageräts vertraut sind, werden im
Folgenden einige Zusatzfunktionen in
der Steuerung beschrieben, die Sie
kennen sollten.
•
Der Kühlkreislauf verfügt über eine
automatische Einschaltverzögerung
von 3 Minuten, wenn das Gerät schnell
aus- und wieder eingeschaltet wird.
Dadurch wird ein Überhitzen des
Kompressors und ein Auslösen des
Leistungsschalters verhindert. In dieser
Zeit ist der Lüfter weiterhin in Betrieb.
•
Die Temperatur kann zwischen 16 °C
und 32 °C eingestellt werden.
•
Die Temperatur kann in °F oder °C
angezeigt werden. Um die jeweils
Page 88

88
www.aeg.com
angezeigte Einheit zu ändern, halten
Sie die Tasten „TEMP“ nach oben
(+), nach unten (-) 3 Sekunden lang
gleichzeitig gedrückt.
•
Wird Lüfter gewählt, schaltet sich der
Kompressor nach einer Verzögerung
von 2 Sekunden aus. So können Sie
einen anderen Modus auswählen.
•
Nach einem Spannungsausfall
speichert das Gerät die letzte
Einstellung und setzt das Gerät beim
Wiedereinschalten der Spannung
entsprechend auf diese Einstellung
zurück.
Reinigung und Pege
8.
•
Im Inneren von Gebäuden beträgt der
Betriebstemperaturbereich 16 °C bis
35 °C.
•
Während des normalen Betriebs, zeigt
das Display die Raumtemperatur an.
Wenn diese höher als 37 °C ist, zeigt
das Display „HI“ (Hoch) an.
•
Wenn das Gerät länger als
60 Sekunden nicht bedient wird,
schalten sich das Display und die
Kontrolllampen aus. Drücken Sie eine
beliebige Taste des Bedienfelds oder
der Fernbedienung, um das Display
wieder einzuschalten.
Reinigen Sie das Klimagerät regelmäßig,
damit es stets wie neu aussieht.
8.1 Reinigen des Luftlters
Ziehen Sie vor dem Reinigen den
Netzstecker aus der Steckdose, um
einen elektrischen Schlag oder einen
Brand zu vermeiden.
Geben Sie den Kontext Ihrer Aufgabe
hier ein (optional).
Fassen Sie die Lasche der Filter an
1.
und ziehen Sie die 4 Filter auf der
Geräterückseite nacheinander heraus.
Waschen Sie den Filter mit
2.
Geschirrspülmittel und warmem
Wasser aus. Spülen Sie den
Filter gründlich aus. Schütteln Sie
vorsichtig überschüssiges Wasser
aus dem Filter. Anstatt den Filter zu
waschen können Sie ihn auch mit
einem Staubsauger reinigen.
Stellen Sie vor dem Wiedereinsetzen des Filters sicher, dass
dieser vollständig trocken ist.
Setzen Sie den Filter wieder ein,
3.
wenn er trocken ist.
8.2 Reinigen des Gehäuses
Ziehen Sie vor dem Reinigen des
Klimageräts den Netzstecker aus der
Steckdose, um einen elektrischen Schlag
oder einen Brand zu vermeiden.
Das Gehäuse und die Front können mit
einem ölfreien Tuch abgestaubt werden
oder mit einem in einer Lösung aus
warmem Wasser und Geschirrspülmittel
angefeuchteten Tuch feucht abgewischt
werden. Sorgen Sie anschließend dafür,
dass das Gerät frei von Geschirrspülmittel
ist, und reiben Sie es trocknen.
Vorsichtsmaßnahmen bei
der Reinigung des Geräts.
•
Verwenden Sie niemals aggressive
Reinigungsmittel, Wachs oder Politur,
um die Gehäusefront zu reinigen.
•
Wringen Sie das Tuch so aus, dass
es kein überschüssiges Wasser mehr
enthält, bevor Sie den Bereich des
Bedienfelds abwischen. Wird das
Gerät im Bereich des Bedienfelds
mit zu viel Wasser gereinigt, kann
das Klimagerät beschädigt werden.
8.3 Wintereinlagerung
Wenn Sie das Gerät im Winter einlagern
möchten, decken Sie es mit einer
Kunststoplane ab, oder lagern Sie
es in der Verpackung.
Page 89

DEUTSCH
FEHLERSUCHE
9.
89
Überprüfen Sie die Liste, bevor Sie einen
Techniker rufen. So sparen Sie Zeit und
Geld. Die Liste enthält häug auftretende
Störungen, die nicht auf Verarbeitungsoder Materialfehler zurückzuführen sind.
Das Klimagerät lässt sich nicht
einschalten.
•
Netzstecker nicht eingesteckt.
Stecken Sie den Netzstecker fest
in die Steckdose.
•
Eine Sicherung ist durchgebrannt, oder
ein Leistungsschalter wurde ausgelöst.
Ersetzen Sie die Sicherung durch eine
träge Sicherung, oder setzen Sie den
Leistungsschalter zurück.
•
Die Steuerung ist ausgeschaltet.
Schalten Sie die Steuerung ein, und
stellen Sie sie wie gewünscht ein.
•
Im Display wird P1 angezeigt.
Lassen Sie das Wasser ab, wie
im Abschnitt 7.3 Ablassen des
Kondenswassers beschrieben.
•
Raumtemperatur liegt unterhalb der
eingestellten Temperatur (Kühlmodus).
Setzen Sie die Temperatur zurück.
Vom Gerät abgegebene Luft fühlt sich
nicht kalt genug an.
•
Die Raumtemperatur liegt unter 16 °C.
Die Kühlung setzt erst ein, wenn die
Raumtemperatur über 16 °C steigt.
•
Setzen Sie das Gerät auf eine
niedrigere Temperatur zurück.
•
Abschalten des Kompressors beim
Ändern des Betriebsmodus. Warten
Sie etwa 3 Minuten, und hören Sie,
ob der Kompressor beim Einstellen
des Kühlmodus wieder anläuft.
Das Klimagerät kühlt, aber der Raum
ist zu warm - KEINE Eisbildung an der
Kühlschlange hinter der Dekorfront.
•
Die Außentemperatur ist niedriger als
16 °C. Stellen Sie zum Abtauen der
Kühlschlange den Lüftermodus ein
•
Der Luftlter ist möglicherweise
verschmutzt. Reinigen Sie den Filter.
Siehe Abschnitt 8. Reinigung und
Pege. Stellen Sie zum Abtauen den
Lüftermodus ein.
•
Die Temperatur ist für eine Kühlung
in der Nachtzeit zu niedrig eingestellt.
Stellen Sie den Lüftermodus ein, um
die Kühlschlange abzutauen. Stellen
Sie die Temperatur dann auf einen
höheren Wert ein.
•
Abluftschlauch nicht angeschlossen
oder verstopft. Siehe Abschnitt 5.1
Warmluftauslass.
Klimagerät kühlt, aber Raum ist zu
warm – Eisbildung an Kühlschlange
hinter Zierblende.
•
Verschmutzter Luftlter – Luftzufuhr
beeinträchtigt. Reinigen Sie den
Luftlter. Siehe Abschnitt 8. Reinigung
und Pege.
•
Die Temperatur ist zu hoch eingestellt.
Stellen Sie eine niedrigere Temperatur
ein.
•
Die Luftleitlamellen sind falsch
ausgerichtet. Stellen Sie die
Lamellen so ein, dass eine bessere
Luftverteilung gewährleistet ist.
•
Die Front des Geräts ist durch
Gardinen, Rollos, Möbel usw.
verdeckt – die Luftverteilung ist
beeinträchtigt. Beseitigen Sie die
Hindernisse vor dem Gerät.
•
Türen, Fenster, Lüftungsgitter usw.
sind geönet – kühle Luft entweicht.
Schließen Sie Türen, Fenster,
Lüftungsgitter usw.
•
Das Gerät wurde erst kürzlich in einem
warmen Raum eingeschaltet. Warten
Sie etwas, bis die „gespeicherte
Wärme“ aus Wänden, Decke,
Fußboden und Möbeln abgeführt
wurde.
Das Klimagerät schaltet in kurzen
Intervallen ein und aus.
•
Verschmutzter Luftlter – Luftzufuhr
beeinträchtigt. Reinigen Sie den
Luftlter.
•
Außentemperatur extrem
warm. Stellen Sie eine höhere
Lüftergeschwindigkeit ein, um mehr
Luft durch die Kühlschlangen zu
transportieren.
Der Raum ist zu kalt.
•
Die eingestellte Temperatur
ist zu niedrig. Stellen Sie eine
höhere Temperatur ein.
Page 90

90
www.aeg.com
ZUSÄTZLICHE INFORMATIONEN
10.
Transport von Geräten, die
entammbare Kältemittel enthalten
Siehe Transportbestimmungen
Kennzeichnen des Geräts mit Schildern
Siehe lokale Vorschriften
Entsorgen von Geräten, die
entammbare Kältemittel enthalten
Siehe nationale Verordnungen
Lagern von Anlagen/Geräten
Das Gerät muss gemäß den
Anweisungen des Herstellers gelagert
werden.
Lagern von verpackten (unverkauften)
Geräten
Die Verpackung muss so konstruiert
sein, dass im Fall eines mechanischen
Schadens des Geräts in der Verpackung
kein Kältemittel auslaufen kann. Die
maximale Anzahl der Geräte, die
zusammen gelagert werden dürfen,
ist durch lokale Regelungen festgelegt.
Hinweise zu Wartungsarbeiten
Überprüfung des Bereichs. Vor
1.
der Ausführung von Arbeiten an
Systemen, die entammbare Kältemittel enthalten, müssen Sicherheitsprüfungen durchgeführt werden,
um sicherzustellen, dass das Risiko
einer Zündung minimiert wird. Vor
der Ausführung von Reparaturarbeiten am System, müssen folgende
Vorsichtsmaßnahmen getroen
werden.
Arbeitsverfahren. Die Arbeiten müssen
2.
unter kontrollierten Bedingungen
ausgeführt werden, um sicherzustellen,
dass während der Ausführung kein
brennbares Gas oder entammbare
Dämpfe vorhanden sind.
Allgemeiner Arbeitsbereich.
3.
Das Wartungspersonal und
andere Personen, die in diesem
Bereich arbeiten, müssen in die
auszuführenden Arbeiten eingewiesen
werden. Arbeiten in engen Räumen
müssen vermieden werden. Der
Bereich um den Arbeitsplatz muss
abgesperrt werden. Stellen Sie durch
die Überprüfung des entammbaren
Materials sicher, dass in diesem
Bereich sichere Bedingungen
herrschen.
Überprüfung auf das Vorhandensein
4.
von Kältemittel. Der Bereich muss
vor und während der Arbeiten mit
einem geeigneten Kältemitteldetektor
überprüft werden, um sicherzustellen,
dass der Techniker sich einer
potenziell entammbaren Atmosphäre
bewusst ist. Stellen Sie sicher, dass
das Leckerkennungssystem für
entammbare Kältemittel geeignet ist.
Es muss funkensicher, angemessen
abgedichtet und eigensicher sein.
Vorhandensein eines Feuerlöschers.
5.
Müssen Arbeiten mit oener Flamme
an der Kühlanlage oder Teilen von
ihr durchgeführt werden, muss
eine geeignete Feuerlöschanlage
vorhanden sein. Stellen Sie sicher,
dass sich ein Pulver- oder CO2Löscher in der Nähe des Füllbereichs
bendet.
Keine Zündquellen. Keine Person,
6.
die Arbeiten an einer Kühlanlage
durchführen, bei denen Rohre, die
entammbares Kältemittel enthalten
oder enthalten haben, freigelegt
werden, darf Zündquellen so
verwenden, dass das Risiko eines
Brands oder einer Explosion besteht.
Sämtliche Zündquellen müssen sich
in ausreichender Entfernung zum
Installationsort benden. Dies gilt auch
für die Reparatur, die Entfernung und
Entsorgung bei denen entammbares
Kältemittel in die Umgebung freigesetzt
werden kann. Außerdem ist Rauchen
verboten. Vor Ausführung der Arbeiten,
muss der Bereich um die Anlage
überwacht werden, um sicherzustellen,
dass keine Risiken durch Zündungen
bestehen. Es müssen „Rauchen
verboten“-Schilder angebracht werden.
Belüfteter Bereich. Stellen Sie sicher,
7.
dass der Bereich im Freien liegt oder
angemessen belüftet ist, bevor Sie in
das System eingreifen oder Arbeiten
mit oener Flamme durchführen.
Die Belüftung muss auch während
der Arbeiten sichergestellt sein.
Die Belüftung muss freigesetztes
Kältemittel sicher verteilen und es
Page 91

91
DEUTSCH
vorzugsweise nach draußen in die
Atmosphäre abführen.
Überprüfung der Kühlanlage. Müssen
8.
elektrische Bauteile ausgetauscht
werden, müssen sie durch geeignete
Teile mit der richtigen Spezikation
ersetzt werden. Die Wartungs- und
Reparaturhinweise des Herstellers
müssen jederzeit befolgt werden.
Wenden Sie sich im Zweifelsfall
an die technische Abteilung des
Herstellers, um Unterstützung zu
erhalten. Folgende Überprüfungen
müssen an Installationen, die mit
entammbaren Kältemitteln betrieben
werden, durchgeführt werden:
– Entspricht die Füllmenge dem
Volumen des Raumes, in dem die
kältemittelhaltigen Teile eingebaut
sind?
– Funktionieren die Lüftungsanlage
und -auslässe einwandfrei und
sind nicht verstopft?
– Falls ein indirekter
Kühlkreislauf verwendet wird,
ist der Sekundärkreislauf auf
Vorhandensein von Kältemittel
überprüft worden?
– Sind die Kennzeichnungen am
Gerät weiterhin sichtbar und lesbar?
Unlesbare Kennzeichnungen und
Schilder müssen ausgetauscht
werden.
– Wurden Kältemittelleitungen
oder -komponenten an einer
Stelle installiert, an der es
unwahrscheinlich ist, dass sie
mit Substanzen in Berührung
kommen, die zu Korrosion von
kältemittelhaltigen Komponenten
führen können, es sei denn,
die Komponenten bestehen
aus Werkstoen, die inhärent
korrosionsbeständig oder
ausreichend vor Korrosion
geschützt sind?
Überprüfungen der elektrischen
9.
Vorrichtungen. Vor der Reparatur
und Wartung elektrischer
Bauteile müssen Sicherheits- und
Bauteileüberprüfungen durchgeführt
werden. Sind Defekte vorhanden,
die die Sicherheit beeinträchtigen
können, darf keine Spannung an den
Schaltkreis gelegt werden, bis sie
zufrieden stellend beseitigt wurden.
Kann der Defekt nicht umgehend
beseitigt werden und muss der
Betrieb fortgeführt werden, muss eine
angemessene vorübergehende Lösung
gefunden werden. Diese muss dem
Besitzer der Anlage mitgeteilt werden,
damit alle Parteien informiert sind.
Die Sicherheitsüberprüfungen müssen
folgende Tests umfassen:
• Sind die Kondensatoren entladen?
Dies wird auf eine sichere Weise
überprüft, um eine Funkenbildung
zu vermeiden.
• Sind spannungsführende Bauteile
und freiliegende Drähte während
der Befüllung, Rückgewinnung und
Spülung des System vorhanden?
• Besitzt die Erdverbindung einen
Durchgang?
Reparatur abgedichteter Bauteile
Vor dem Entfernen von
1.
abgedichteten Verkleidungen usw.
sind bei Reparaturen an versiegelten
Bauteilen alle elektrischen
Versorgungsleitungen vom zu
bearbeitenden Gerät zu trennen.
Ist während der Wartung eine
elektrische Versorgung der Geräte
zwingend erforderlich, so muss an
der kritischsten Stelle ein permanent
betriebsbereiter Leckdetektor
angebracht sein, um vor einer
potenziell gefährlichen Situation
zu warnen.
Besonders muss auf folgende Punkte
2.
geachtet werden: Bei Arbeiten an
elektrischen Bauteilen muss geprüft
werden, ob das Gehäuse nicht
so verändert wurde, dass es die
Sicherheit beeinträchtigt. Weiterhin
muss auf defekte Kabel, übermäßig
viele Anschlüsse, Klemmen, die nicht
der Originalspezikation entsprechen,
defekte Dichtungen, falsch
angebrachte Schlauchanschlüsse
usw. geachtet werden. Stellen Sie
sicher, dass das Gerät sicher montiert
ist. Stellen Sie sicher, dass Dichtungen
oder Dichtungsmaterialien sich nicht
zersetzt haben und den Eintritt von
entammbaren Atmosphären nicht
mehr verhindern. Verwenden Sie
nur die vom Hersteller angegebenen
Ersatzteile.
Page 92

92
www.aeg.com
HINWEIS: Silikondichtstoe
können die Wirksamkeit einiger
Leckerkennungsdetektoren
beeinträchtigen. Eigensichere Bauteile
müssen vor ihrer Verwendung nicht
isoliert werden.
Reparatur eigensicherer Bauteile
Legen Sie keine permanent induktiven
oder kapazitiven Lasten an den
Schaltkreis an, ohne sicherzustellen,
dass die zulässige Spannungs- und
Strombelastung nicht überschritten wird.
Eigensichere Bauteile sind die einzigen
Teile, die auch beim Vorhandensein einer
entammbaren Atmosphäre eingeschaltet
werden können. Das Testgerät muss
auf dir richtige Belastung gestellt sein.
Ersetzten Sie die Bauteile nur durch vom
Hersteller empfohlene Teile. Andere Teile
können zur Entzündung des Kältemittels
in der Atmosphäre durch ein Leck führen.
Verkabelung
Vergewissern Sie sich, dass die
Verkabelung keinem Verschleiß,
Korrosion, übermäßigem Druck,
Vibrationen, scharfen Kanten oder
anderen schädlichen Umwelteinüssen
ausgesetzt ist. Bei der Überprüfung
muss auch auf die Alterung oder
ständige Vibrationen von Quellen wie
Kompressoren oder Lüfter geachtet
werden.
Detektion entammbarer Kältemittel
Auf keinen Fall dürfen potenzielle
Zündquellen bei der Suche nach
Kältemittellecks eingesetzt werden.
Es dürfen keine Halogenlampe oder
andere Detektoren mit oener Flamme
verwendet werden.
Leckerkennungsmethoden
Die folgenden Leckerkennungsmethoden
sind bei Systemen, die entammbare
Kältemittel enthalten, akzeptabel.
Elektronische Leckdetektoren können
für entammbare Kältemittel verwendet
werden, aber möglicherweise ist
die Empndlichkeit nicht geeignet
oder muss neu kalibriert werden.
(Das Detektionsgerät muss in einer
kältemittelfreien Umgebung kalibriert
werden.) Stellen Sie sicher, dass
der Detektor keine potenzielle
Zündquelle darstellt und für das
verwendete Kältemittel geeignet ist.
Das Detektionsgerät muss auf einen
Prozentsatz der unteren Flammgrenze
des Kältemittels gestellt und für das
verwendete Kältemittel und den Gasanteil
(max. 25 %) kalibriert werden.
Flüssigkeiten für die Leckerkennung
sind für die meisten Kältemittel geeignet,
es muss aber die Verwendung von
chlorhaltigen Reinigungsmitteln vermieden
werden, da das Chlor mit dem Kältemittel
reagieren und die Kupferleitung
korrodieren kann.
Wird ein Leck vermutet, müssen alle
oenen Flammen entfernt/gelöscht
werden.
Wird eine Leckage des Kältemittels
festgestellt, die eine Hartlötung erfordert,
muss das gesamte Kältemittel aus dem
System zurückgewonnen oder (mittels
Absperrventilen) in einem von der Leckage
entfernten Teil des Systems isoliert werden.
Dann muss das System vor und während
der Lötarbeiten mit sauerstofreiem
Sticksto durchgespült werden.
Beseitigung und Evakuierung
Beim Eingri in den Kältekreislauf zur
Reparatur – oder zu einem anderen
Zweck – sind herkömmliche Verfahren
anzuwenden. Es ist wichtig bewährte
Methoden anzuwenden, da die
Möglichkeit einer Entammung besteht.
Die folgenden Verfahren sind einzuhalten:
•
Kältemittel entfernen
•
Kreislauf mit inertem Gas spülen
•
Evakuieren
•
Erneut mit inertem Gas spülen
•
Kreislauf durch Aufschneiden oder
Löten önen
Das Kältemittel muss in geeigneten
Rückgewinnungsbehältern aufgefangen
werden. Das System muss mit
sauerstofreiem Sticksto durchgespült
werden, damit es wieder sicher
funktioniert. Dieser Vorgang muss
eventuell mehrmals wiederholt werden.
Für diesen Vorgang darf keine Druckluft
und kein Sauersto verwendet werden.
Die Spülung wird durch das Aufheben
des Vakuums im System durch die
Befüllung mit sauerstofreiem Sticksto
bis zum Erreichen des Arbeitsdrucks
durchgeführt. Anschließend erfolgt
die Entlüftung in die Atmosphäre und
Page 93

93
DEUTSCH
die Herstellung des Vakuums. Dieser
Vorgang muss so oft wiederholt werden,
bis sich kein Kältemittel mehr im System
bendet. Wenn die letzte Befüllung mit
sauerstofreiem Sticksto erfolgt, muss
das System auf atmosphärischen Druck
gebracht werden, damit die Arbeiten
durchgeführt werden können. Dieser
Vorgang ist absolut notwendig, wenn
Rohrleitungen gelötet werden müssen.
Stellen Sie sicher, dass sich der Auslass
der Vakuumpumpe nicht in der Nähe
von Zündquellen bendet und eine gute
Belüftung vorhanden ist.
Kältemittelfüllung
Zusätzlich zu den herkömmlichen
Füllmethoden müssen folgende
Anforderungen befolgt werden.
•
Stellen Sie sicher, dass es bei der
Verwendung von Füllgeräten nicht zu
Verunreinigungen durch verschiedene
Kältemittel kommt. Halten Sie
Schläuche oder Leitungen sind so kurz
wie möglich, um den Kältemittelanteil
darin so gering wie möglich zu halten.
•
Die Zylinder müssen aufrecht stehen.
•
Vergewissern Sie sich, dass das
Kühlsystem vor dem Befüllen der
Anlage mit Kältemittel geerdet ist.
•
Kennzeichnen Sie das System nach
Abschluss des Füllvorgangs (falls
noch nicht geschehen).
•
Achten Sie besonders darauf, dass
das Kühlsystem nicht überfüllt wird.
Vor der Befüllung des Systems muss
der Druck mit sauerstofreiem Sticksto
geprüft werden. Nach der Befüllung aber
vor der Inbetriebnahme muss das System
auf Lecks geprüft werden. Vor Verlassen
des Standorts muss eine erneute
Überprüfung auf Lecks stattnden.
Außerbetriebnahme
Vor der Ausführung dieses Verfahrens
muss der Techniker mit der kompletten
Anlage vertraut sein. Die Kältemittel
müssen sicher zurückgewonnen
werden. Vor Ausführung dieser Aufgabe
muss eine Öl- und Kältemittelprobe
entnommen werden, falls eine
Analyse vor der Wiederverwendung
des Kältemittels notwendig ist. Vor
Ausführung der Aufgabe muss eine
Spannungsversorgung vorhanden sein.
Machen Sie sich mit der Anlage und
1.
ihrer Bedienung vertraut.
Isolieren Sie das System elektrisch.
2.
Stellen Sie vor Ausführung des
3.
Vorgangs sicher, dass:
• Mechanische
Handhabungseinrichtungen
für die Handhabung der
Kältemittelzylinder vorhanden sind
• Persönliche Schutzausrüstungen
vorhanden sind und richtig
verwendet werden
• Der Rückgewinnungsvorgang
zu jeder Zeit von einer Fachkraft
überwacht wird
• Die Rückgewinnungsausrüstung
und Zylinder den Standards
entsprechen
Das Kältemittelsystem, wenn möglich,
1.
abpumpen.
Lässt sich das Vakuum nicht
2.
herstellen, einen Mehrfachverteiler
verwenden, damit das Kältemittel aus
verschiedenen Teilen des Systems
entfernt werden kann.
Stellen Sie sicher, dass sich der
3.
Zylinder vor der Rückgewinnung auf
der Waage bendet.
Schalten Sie das
4.
Rückgewinnungsgerät ein und
bedienen Sie es gemäß den
Anweisungen des Herstellers.
Überfüllen Sie die Zylinder nicht.
5.
(Nicht mehr als 80 % der zulässigen
Menge.)
Überschreiten Sie auch
6.
vorübergehend nicht den maximalen
Arbeitsdruck der Zylinder.
Stellen Sie nach dem korrekten
7.
Befüllen der Zylinder und dem
Abschluss des Vorgangs sicher,
dass die Zylinder und die Ausrüstung
unverzüglich vom Einsatzort entfernt
werden und alle Absperrventile an
der Anlage geschlossen sind.
Das zurückgewonnene Kältemittel
8.
darf nur nach der Reinigung
und Überprüfung in ein anderes
Kältemittelsystem gefüllt werden.
Kennzeichnung
Die Anlage muss gekennzeichnet werden
und es muss vermerkt werden, dass sie
außer Betrieb genommen wurde und kein
Page 94

94
www.aeg.com
Kältemittel enthält. Das Etikett muss mit
dem Datum versehen und unterschrieben
werden. Sicherstellen, dass sich auf der
Anlage Etiketten benden, die anzeigen,
dass die Anlage entammbares
Kältemittel enthält.
Rückgewinnung
Wird Kältemittel für die Außerbetriebnahme
oder Wartungsarbeiten aus einem System
entnommen, müssen alle Kältemittel sicher
entfernt werden.
Bei der Einleitung des Kältemittels in
Zylinder, muss sichergestellt werden, dass
nur geeignete Rückgewinnungsbehälter
verwendet werden. Stellen Sie sicher,
dass die richtige Anzahl von Zylindern
für die gesamte Füllmenge vorhanden
ist. Alle zu verwendenden Zylinder
sind für das zurückgewonnene
Kältemittel bestimmt und entsprechend
gekennzeichnet (z. B. Spezialzylinder für
die Rückgewinnung des Kältemittels).
Die Zylinder sind mit Druckbegrenzungsund Absperrventilen ausgestattet, die
sich in einem guten Zustand benden.
Leere Rückgewinnungsbehälter wurden
evakuiert, und wenn möglich vor der
Rückgewinnung gekühlt.
Die Rückgewinnungsausrüstung bendet
sich in einem guten Zustand. Die Anleitung
ist vorhanden und die Anlage eignet sich
für die Rückgewinnung von entammbaren
Kältemitteln. Es sind kalibrierte Waagen
vorhanden, die sich in einem guten
Zustand benden. Die Schläuche besitzen
Anschlüsse ohne Lecks, die sich in
einem guten Zustand benden. Vor
Verwendung des Rückgewinnungsgeräts
muss überprüft werden, ob es sich in
einem guten Zustand bendet, es korrekt
gewartet wurde, die elektrischen Bauteile
versiegelt sind, um eine Zündung im
Falle einer Freisetzung von Kältemittel
zu verhindern. Wenden Sie sich im
Zweifelsfall an den Hersteller.
Das rückgewonnene Kältemittel muss im
korrekten Rückgewinnungsbehälter an
den Kältemittellieferanten zurückgegeben
werden und der Entsorgungsnachweis
muss vorhanden sein. Die Kältemittel in den
Rückgewinnungsanlagen und besonders in
den Zylindern nicht vermischen.
Müssen Kompressoren oder
Kompressoröle entfernt werden,
sicherstellen, dass sie angemessen
evakuiert wurden, um zu gewährleisten,
dass das Schmiermittel kein
entammbares Kältemittel enthält. Die
Evakuierung muss vor der Rückgabe
des Kompressors an den Lieferanten
durchgeführt werden. Um diesen
Vorgang zu beschleunigen, darf nur das
Kompressorgehäuse elektrisch erwärmt
werden. Wird aus einem System Öl
abgelassen, muss dieser Vorgang sicher
ausgeführt werden.
ACHTUNG!
•
Versuchen Sie nicht, den
Abtauprozess durch andere als vom
Hersteller empfohlene Hilfsmittel zu
beschleunigen.
•
Das Gerät muss in einem Raum
aufbewahrt werden, in dem keine
permanent betriebenen Zündquellen
vorhanden sind (zum Beispiel:
oene Flammen, ein eingeschaltetes
Gasgerät oder eine laufende
Elektroheizung).
•
Nicht durchstechen oder verbrennen.
•
Seien Sie sich bewusst, dass
Kältemittel möglicherweise nicht
riechen.
•
Das Gerät muss in einem Raum mit
einer Bodenäche von mindestens
12 m2 installiert, betrieben oder
aufbewahrt werden.
•
Das Gerät ist in einem gut belüfteten
Bereich aufzubewahren, in dem die
Raumgröße dem für den Betrieb
vorgesehenen Platzbedarf entspricht
und mechanische Beschädigungen
am Gerät ausgeschlossen ist.
•
Alle Personen, die an einem
Kältemittelkreislauf arbeiten oder
in ihn eingreifen, müssen im Besitz
eines gültigen Zertikats von einer
anerkannten Prüfstelle sein, die
ihnen bestätigt, dass sie sicher im
Umgang mit Kältemitteln gemäß der
anerkannten Spezikationen sind.
•
Wartungsarbeiten dürfen nur wie
vom Gerätehersteller empfohlen
durchgeführt werden. Wartungs- und
Reparaturarbeiten, bei denen weitere
Fachkräfte assistieren müssen,
müssen unter der Aufsicht der
Person, die in der Verwendung von
brennbaren Kältemitteln geschult ist,
durchgeführt werden.
Page 95

DEUTSCH
UMWELTTIPPS
11.
95
Recyceln Sie Materialien mit dem Symbol.
Entsorgen Sie die Verpackung in den
entsprechenden Recyclingbehältern.
Recyceln Sie zum Schutz der Umweltund Gesundheit elektrische und
elektronische Geräte. Entsorgen Sie
Geräte mit diesem Symbol nicht mit
dem Hausmüll. Bringen Sie das Gerät zu
Ihrer örtlichen Sammelstelle oder wenden
Sie sich an Ihr Gemeindeamt.
Page 96

 Loading...