

AEG OKO LAVAMAT 1480 User Manual

OKO_LAVAMAT 1480
TURBO sensortronic
The ecological washer-dryer
AEG
mm.
User Instruction Book
-vt-
uif*' ' ,*» •
,. .-r'^V.,- .. , ■';•
-..•';-v-'.-..:,*T';--.-''

Allow me to introduce myself

Contents
Warnings 4
Before installing 4
Warnings (washing) 4
Warnings (drying)
The AEG Öko-System / Ecological hints 7
Installation instructions
Removing the transit devices 9
Positioning
Connection 12
Electrical connection
Connection to the mains water supply 13
Water drainage
Brief instructions
Preliminary operations for washing
Sorting and selecting garments
Pre-treatment
Precautions
Load sizes
Selecting the programme
Programme selector/switching on
Programme phase indicator
Option buttons and functions
Detergents
Choice of detergent
Amount of detergent
Preliminary water softening
Using the detergent
Programme chart (washing)
End of programme
Special rinse
Preliminary operations for tumble drying
Protect the environment
Preparation for tumble drying
Items not suitable for tumble drying
Drying code symbols
Selecting the drying programme
Drying only
Automatic washing and drying
Drying time chart
Maintenance and cleaning
Detergent dispenser drawer
Cleaning the filter/Emergency emptying
Other
How to deal with problems...
Customer service
Technical specifications
10
12
14
15
16
16
16
17
17
18
18
19
20
23
23
24
24
25
26
28
28
29
29
29
30
30
31
31
33
34
36
36
37
38
39
42
43
5
9

Warnings
Before “ Follow the instructions for installation and electrical connection.
installing... _ qq connect the appliance it it is damaged (for example dur
ing transport).
- Any water found in the detergent dispenser drawer is there as a
result of factory testing.
- To remove any manufacturing residues from the drum and
detergent dispenser drawer, carry out a wash cycle without any
laundry, with the machine set on the 60°C coloureds pro
gramme and with 1/2 a measure of detergent.
Warnings AEG household electrical appliances comply with general techni-
(washing) cal safety manufacturing standards and with all safety regulations
on the use of electrical appliances. However, the manufacturer is
obliged to bring the following safety points to the attention of the
user:
- Before using the appliance, make sure that the voltage and type
of current indicated on its rating plate correspond to the mains
voltage and type of current in the place where it is to be
installed. The rating plate also gives details of the electrical pro
tection required.
- If the appliance is installed in a location which is not insulated
against frost, the emergency emptying procedure (see “Emer
gency emptying”) should be used whenever there is any risk of
the temperature dropping below zero.
- Always disconnect the appliance before cleaning it or carrying
out any maintenance. To be absolutely safe, check that the plug
is removed from the socket or that the mains switch or safety
circuit breaker are in the OFF position (see instructions for
installation and electrical connection).
- Avoid spraying the appliance with water.
- Never remove the plug from the socket by pulling the cable;
always take hold of the plug itself!
- Never start the appliance if:
■ the power supply cable is damaged
■ there are obvious signs of damage in the control panel area,
to the top or along the base.
- Repairs must only be carried out by qualified persons.
Inexperienced repairs can seriously endanger the user.
Always contact the Service Centre or an authorized dealer. Only
genuine AEG spares comply with all standards!

■ If the appliance is to be installed under a worktop in a fitted
kitchen or laundry room, the appliance cover must first be
removed and a protective plate must then be fitted, as
described in the installation instructions.
Do not allow children to play with the appliance and keep pets
well away from it.
For safety, when disposing of the appliance make sure that the
door catch is inoperative and cut off the power supply cable.
The Manufacturer accepts no liability for damage caused by
incorrect or improper use of the appliance for purposes for
which it was not originaiiy designed.
Never put your hands in the drum whilst it is stiii rotating.
Never touch the glass in the porthole door when the appliance
is being used on a high-temperature programme; the glass gets
very hot and can cause burns.
There is a danger of scalding if the porthole door or filter cover
are opened during operation.
The water drain hose must be properly fixed to avoid any risk of
scalding or flooding.
In the event of a fault, close the mains water taps and discon
nect the appliance from the power supply by pulling out the
plug or switching the safety circuit breaker (or breakers) to the
OFF position.
Keep packaging materials away from children, especially cello
phane which is particularly dangerous.
If washing garments which have previously been dry cleaned,
first make sure that any remaining inflammable solvents have
completely evaporated.
If the applianoe is to be connected to a rainwater or other simi
lar source of water instead of the mains water supply, follow the
Water Board regulations.
If the machine is overfilled (more than 2,75 Kg for cottons/linens and 2 kg for easy cares) there is danger of fire.
The appliance must oniy be used to tumble dry normal house
hold laundry.
Dry only laundry which has previously been washed in water.
■ It is quite normal for the sides of the appliance to get hot during
drying. Avoid touching themi
Warnings
(drying)

Never tumble dry quilted garments containing foam rubber or
similar materials; they could catch fire.
Never tumble dry fabrics stained with hair lacquer, nail varnish
remover or other similar substances which would give off toxic
fumes.
Laundry dried in a tumble dryer comes out soft to the touch.
This means you can help protect the environment by using less
fabric softener in the wash.
If so-called “ecological” or “perfume-free" detergents are used,
tumble-dried laundry may not have the typical “smell of fresh
ness”. This is not due to a fault in your appliance, but simply to
the natural smell of the fabric which is not neutralised during
washing because the detergent contains no deodorants.
The Manufacturer accepts no responsibility for accidents
resulting from failure to observe the above safety recom
mendations.

The AEG OKO-System / Ecological hints
This new machine is part of AEG’s OKO-System range, which
meets ali requirements for modern handiing of iaundry with
reduced consumption of water, energy and detergent.
This is a rinsing and spinning process deveioped by AEG which
ensures the best washing resuits with reduced water consump
tion.
The automatie metering device automaticaliy regulates the
amount of water used acoording to the size of ioad and type of
fabric.
The drum is fitted with special paddles which keep the water
moving upwards. In this way, the laundry is soaked more evenly
and faster.
Preliminary softening of the water, achieved by means of a twostage device for dispensing the softener and detergent, ensures
ecological operation even in very hard water areas.
All the materials used for packaging are non-polluting! They may
be disposed of quite safely.
Plastic materials can be recycled and are marked with the follow
ing symbols:
>PE< polyethylene
>PS< polystyrene
>PP< polypropylene
Senso rtronic
Automatic
metering
Drum paddies
Preiiminary
water softening
Packaging
information
You are advised to dispose of all cardboard packaging in special
paper collection containers so that it can be recycled.

Ecological
suggestions for
economical
washing
For medium soiling, use programmes without prewash. This
will save detergent and water.
Make full use of all the advantages offered by two-part deter
gents.
Always wash full loads for maximum savings.
Use the “ENERGY SAVING” (Economy) programme for nor
mally or lightly soiled cottons and coloureds.
For best results, even at low temperatures, remove individual
stains from laundry before washing.
Use minimum amounts of detergent. Follow the instructions
on the pack.

Installation instructions
All transit devices must be removed before installing and
connecting the appliance.
Proceed as follows:
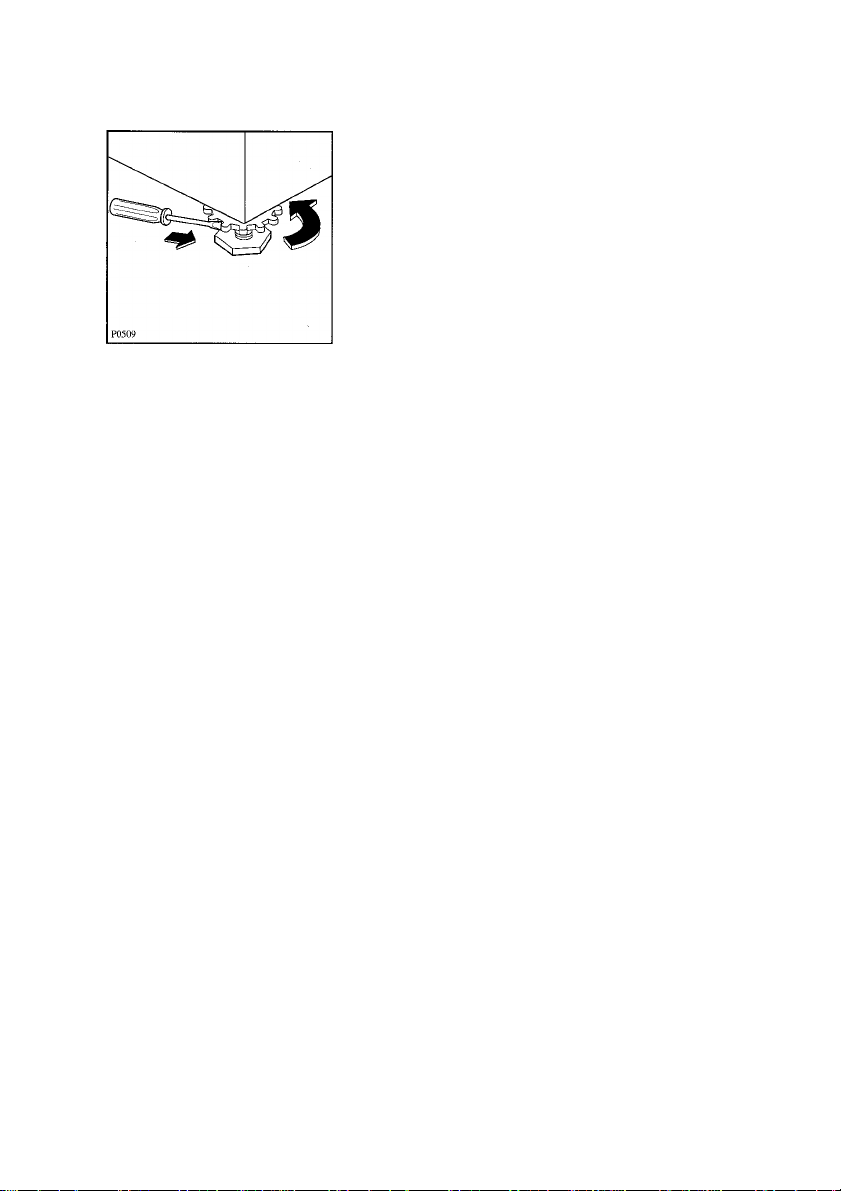
Using a spanner, remove the bolt on the right at the back of the
machine.
Gentiy iay the machine on its back, taking care not to squash the
hoses.
This can be done more easiiy by placing one of the corner pack
ing pieces between the machine and the floor.
Remove the polystyrene packing piece.
Removing the
transit devices
Peel off the adhesive strip and carefully remove the right-hand
polythene bag (1), then the left-hand bag (2) by pulling both
towards the centre of the machine.

Set the machine upright and unscrew the remaining two bolts on
the back.
Remove the three plastic pins from the holes in which the bolts
were fitted.
Blank off the holes with the plastic plugs supplied, which you will
find in the bag with the instruction book.
Positioning
10
Hint:
Keep all transit devices for re-use in case you move house.
The machine stands on four adjustable rubber feet which can be
used to compensate any unevenness in the floor or to adjust the
machine to the correct height.
Lock the feet in position by fully tightening up the iocknuts.
The appliance must be level and resting on ail four feet. It must
not tilt when pressure is exerted on one side only. If necessary,
use a spirit level to check that it is perfectly level.
The floor must be clean, dry and free of any wax residue or other
polish to prevent any risk of sliding. Never use viscous substances
to move the appliance by sliding it across the floor!
It is inadvisable to stand the appliance on long pile carpet or rugs
or on layers of foam rubber, as this could make it unstable. Place
a rubber mat beneath the appliance if the floor is made of very
small tiles.
If the appliance is to be placed on non-solid flooring, especially
made of wooden joists and flexible boards, a waterproof wood
panel, 15 mm thick, must be secured with screws to at least two
of the floor joists. If possible, the machine should be placed in a
corner of the room, as this is where the joists are most firmly fixed
and have less tendency to flex.
Never use wedges of wood, cardboard or other similar materials
to compensate for unevenness in the floor.
If space is tight and you cannot avoid placing the machine next to
a gas oven or coal burning stove, a sheet of insulating material
(85 x 57 cm), covered with aluminium foil on the side facing the
oven or stove, must be fitted between the two appliances.
Before building the machine in under a fitted kitchen worktop,
remove the cover and install a special protective plate, which is
available from your local Service Centre, part number 645 426 133.
11
Connection
Electrical Details of the mains voltage, type of current and protection
connection required are given on the appliance rating plate which can be
found on the frame, after opening the porthole door.
WARNING: THIS APPLIANCE MUST BE EARTHED.
The manufacturer declines any liability should this safety
measure not be observed.
If the plug that is fitted to your appliance is not suitable for your
socket outlet, it must be cut off and the appropriate plug fitted.
, Remove the fuse from the cut off plug.
The cut off plug should then be disposed of to prevent the hazard
of shocks in case it should be plugged into a 13amp socket in
another part of your home.
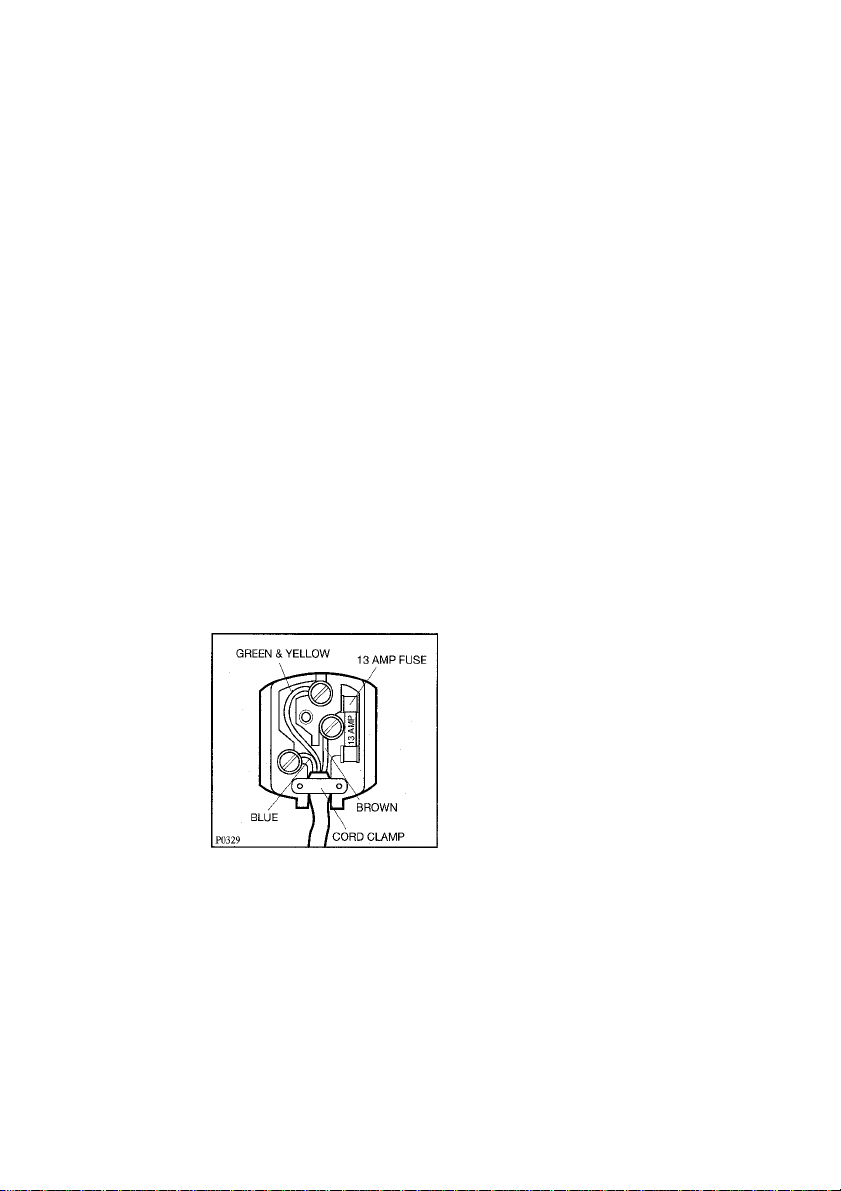
IMPORTANT
The wires in the mains lead are coloured in accordance with the
following code:
Green and Yellow - Earth
Blue - Neutral
Brown - Live
If you fit your own plug, the colours of the wires in the mains lead
of your appliance may not correspond with the markings identify
ing the terminals in your plug, proceed as follows:
Connect the Green and Yellow (earth) wire to the terminal in the
plug which is marked with the letter «E» or the earth symbol © ,
or coloured green and yellow.
Connect the blue (neutral) wire to the terminal in the plug which is
marked with the letter «N» or coloured black.
Connect the brown (live) wire to the terminal in the plug which is
marked with the letter «L» or coloured red.
The plug moulded onto the lead incorporates a fuse. For replace
ment, use a 13amp BS1362 fuse. Only ASTA or BSI approved
fuses should be used.
The plug must not be used if the fuse cover/carrier is lost. The cover/
carrier is indicated by the coloured insert at the base of the plug.
12
A replacement cover/carrier must be obtained from your local
AEG Service Centre.
C € This appliance complies with the following E.E.C. Directives:
73/23/EEC and 89/336/EEC.’
If the appliance is to be permanently connected to the power
supply you must install a circuit breaker with a gap of at least
3 mm between the contacts, which enables the appliance to be
completely isolated from the mains supply.
The mains supply cable must not be extended. If it is not long
enough, replace it with a new, longer cable or move the appliance
closer to the power socket.
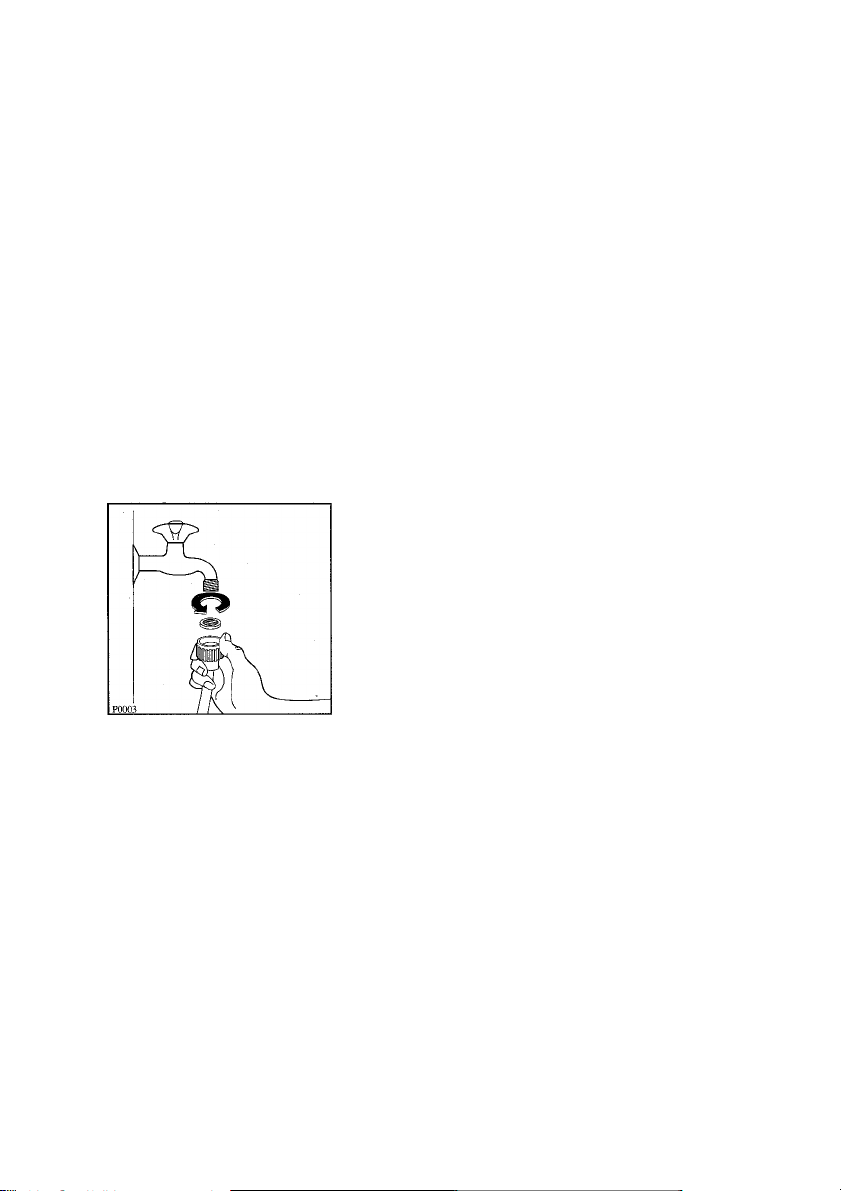
The, appliance has two inlet valves, hot and cold, with female 3/4"
BSP thread cohnectors. The water inlets on the back of the
machine are colour coded, blue for cold and red for hot. Before
connecting the hoses be sure to fit the mesh filters supplied.
If only a cold water supply is available, connect the two hoses to a
cold water outlet by means of a «Y» connection piece.
Installation should comply with local water authority and building
regulations’ requirements.
The appliance must be given a separate cold Water suppiy and
not be connected to a mixer tap, a single outlet water heater or a
booster pump. A minimum water pressure of 7psi is required for
safe operation of the appliance.
If you cannot make the cold water connection direct from the ris
ing mains, you may be able to operate the appliance from your
cold water storage system.
There should be a minimum distance of 5.02m (16 V2 ft) between
the appliance’s inlet and the bottom of the tank.
There will be sufficient pressure for fhe hot water supply from the
hot water cylinder if the height between the appliance’s inlet and
the bottom of the cold water storage cistern (not between the
appliance and hot water cylinder) is at least 2.74m (9ft).
Connection to
the mains
water suppiy
13
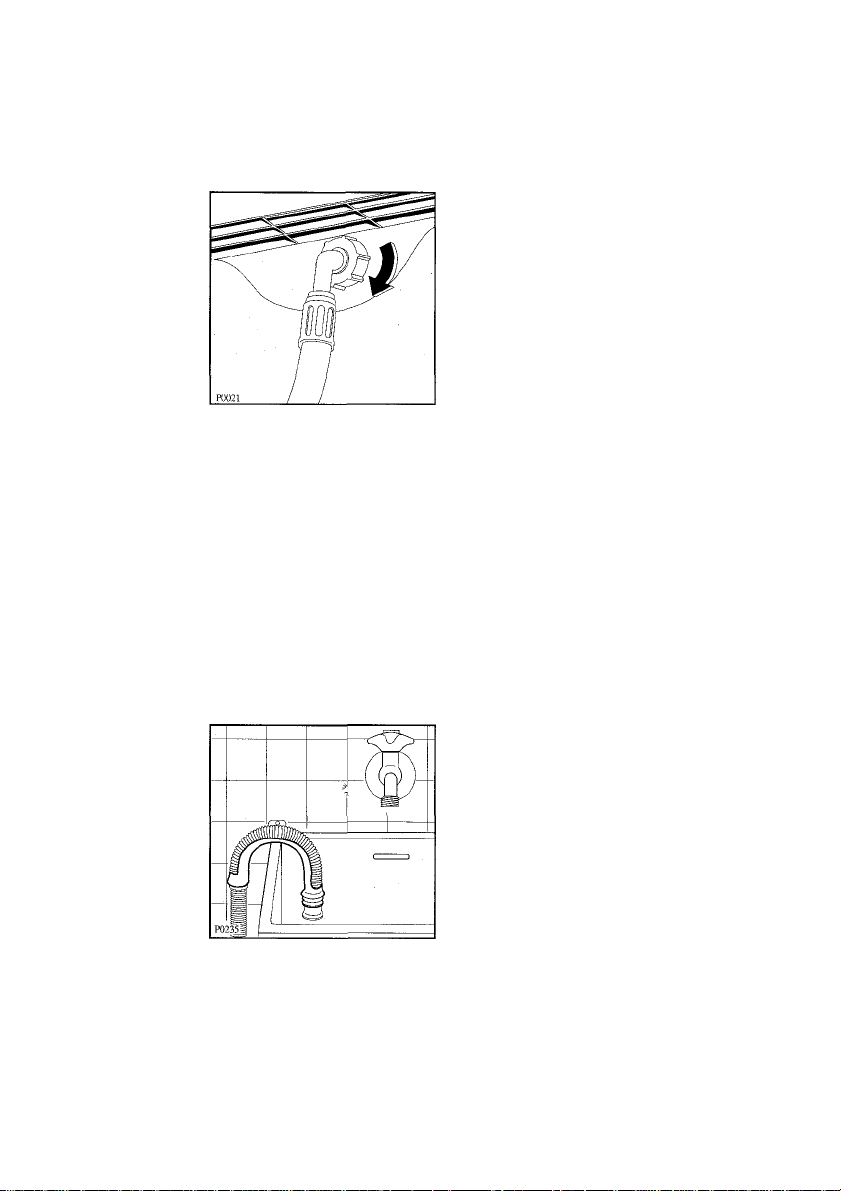
The end of the hose connected to the back of the machine can
be turned in any direction. Simply slacken the connector fitting,
position the hose as required and fully tighten the connector to
avoid leakage of water.
Water drainage
Every appliance is fitted with a pump for discharging the wash
and rinse water. This pump is controlled by the programme selec
tor mechanism and is capable of pumping water through the
drain hose to a height of up to 1 m above the surface on which
the machine is standing.
The curved end of the drain hose can be positioned in two ways:
Hooked over the edge of the sink. In view of the speed with
which the water comes out during the discharge phase, it is
important to ensure that the curved end of the hose cannot slip
off the edge of the sink. It should therefore be tied to the tap with
a piece of string or secured to the wall with a hook, by inserting
the hook into the hole provided in the curved part of the hose.
Joined into a branch of the sink waste pipe. The branch
must be above the sink trap and at least 60 cm above the floor.
The drain hose may be extended up to a maximum length of
180 cm. Use an extension with an internal diameter the same as
that of the original hose. Use a suitable connector.
The hose extension must rest on the floor and only the part near
the drainage point must be raised.
14
 Loading...