

Page 1

KM 4.. Assistent
Stand-/Handmixer
Food processor/hand mixer
Mixer sur socle et à main
Batidora de pie / manual
Batedeira de pé / manual
Bords-/handmixer
Pöytä-/käsivatkain
Stolní / ruèní mixér
Mikser stoj¹cy / rêczny
Asztali / Kézi mixer
Gebrauchsanweisung
Operating instructions
Mode d’emploi
Instrucciones para el uso
Instruções de utilização
Bruksanvisning
Käyttöohje
Návod k použití
Instrukcja obs³ugi
Használati útmutató
Page 2

CD
B
A
E
O
F
L
G
M
N
K
H
J
P
1
32
2
Page 3
4
5
D
C
B
6
7
3
Page 4

g
Dear customer,
g
Please read these operating instructions through carefully.
Above all please follow the safety
instructions on the first few pages of
these operating instructions! Please
keep the operating instructions for
future reference. If applicable pass these
instructions on to the next owner of the
appliance.
With the warning triangle and/or by
1
means of key words (Danger!, Caution!, Attention!), information is
emphasized which is important for
your safety or the correct functioning
of the appliance. It is essential that this
information is observed.
0 This symbol guides you step by step
through the operating procedure for
your appliance.
After this symbol you receive supple-
3
mentary information on the practical
application and use of the appliance.
Tips and information about the eco-
2
nomical and environmentally friendly
use of the appliance are marked with
the clover.
Description of the
applian
A Accessory release button
B ON/OFF switch
C Speed range selector switch
D Pulse button
E Mixer
F Raise/lower button
G Lock release
H Mixing bowl speed selector switch
J Processor stand
K Plastic mixing bowl (KM 400 only)
L Whisks
M Dough hooks
N Dough scraper
O Stainless steel mixing bowl with lid
(KM 450 only)
P Type plate (on bottom of processor
stand and bottom of mixer)
ce (Figure 3)
1 Safety instructions
The safety standards of AEG electric
appliances are in keeping with the recognised rules of technology and the
law governing the safety of appliances.
Nevertheless as a manufacturer we are
committed to familiarise you with the
following safety instructions:
General safety
• The appliance may only be connected
to a power supply whose voltage and
frequency comply with the specifications on the rating plate!
• Never pick up the appliance if
– the lead is damaged,
– the housing is damaged.
• Never use the lead to pull the plug out
from the socket.
• In order to avoid danger, if the connection lead of this appliance is damaged,
it must be replaced by the manufacturer, its customer service department
or a similarly qualified person.
9
Page 5

g
• Repairs to the appliance may only be
carried out by trained personnel. As a
result of incorrect repairs considerable
dangers for the user may result. Please
contact the AEG customer service
department or your dealer in the event
of repairs being necessary.
Safety of children
• Never leave the appliance unattended
when on and supervise particularly
carefully if young children are around!
When using your appliance
• Never release the accessories while the
processor/mixer is running.
• Ensure fingers are kept away from
moving whisks and dough hooks. This
could result in injury!
• Never use the mixer if you have wet
hands.
• Plastic parts may not be placed on or
directly near to heaters.
• Do not use this appliance to stir paints
(lacquers, polyesters etc.) This could
result in an explosion!
• The appliance should be switched off
and unplugged before any cleaning or
maintenance work is done on it.
• Never clean the appliance under running water or submerge it in washingup water.
• The manufacturer is not liable for any
damages which are caused by using the
appliance for any other purpose than
that intended or incorrect use.
Installation, connection and initial use
• The attachments are only to be
inserted into or removed from the
appliance when it is switched off.
• The hand mixer can be used to mix
food in any suitable bowl. You are
advised, however, to use the supplied
mixing bowls.
• Never switch on the appliance until the
working attachments are in the mixing
bowl with the ingredients to be processed. Always wait until the attachments stop before you remove the
bowl.
• Do not hold any hard objects (e.g. a
spoon, knife or whisk) against the
moving attachments and do not touch
them with your hand. This could
result in injury!
• When you have finished working with
the appliance, switch it off and unplug
it from the electricity supply.
2 Disposal
Dispose of the packaging!
Do not simply throw away the packaging. Please observe the following
instructions:
Packaging can be put to the old paper
collection.
Polyethylene plastic bags (PE) can be
given to the PE collection points for
recycling. Padding of expanded polystyrene (PS) is CFC free and can be
given to the relevant collection points
(recycling depot). Please contact your
recycling depot through your municipal authorities.
Dispose of your old appliance!
When you eventually stop using your
appliance please bring it to the nearest
recycling centre or to your dealer who
will take it back for a small fee.
10
Page 6

g
Operation
You can use the processor/hand mixer
to mix, knead and whisk food. The
mixer and mixing bowl are each driven
separately by their own motors, and
the speeds of the mixer and mixing
bowl can be individually adjusted.
However the mixer/processor has a single ON/OFF switch.
The mixer can be easily removed from
the processor stand in a moment and
used as a standard hand mixer. When
used in this way, move the hand mixer
in a smooth circular motion around the
inside of the bowl containing the
ingredients.
3 The dough hooks (Figure 1/M) are used
for heavy doughs, such as yeast dough,
short crust pastry, potato batters and
cake mixes.
The whisk (Figure 1/L) is suitable for
light cake mixes, egg white, cream,
mayonnaise, purées and for stirring
sauces and dessert powders.
• KM 400 models are supplied with a
plastic mixing bowl.
• KM 450 models are supplied with a
stainless steel mixing bowl with lid.
Preparing for use
Fitting the mixer to/removing
from the processor stand
(Figure 2)
Before fitting or removing the mixer,
1
switch off the processor/mixer and
remove the plug from the mains
socket!
0 To fit, push the mixer on to the proces-
sor stand (the two latches on the processor stand engage in the mixer) and
press down to lock.
0 To remove, press the lock release (Fig-
ure 1/G) and pull the mixer upwards.
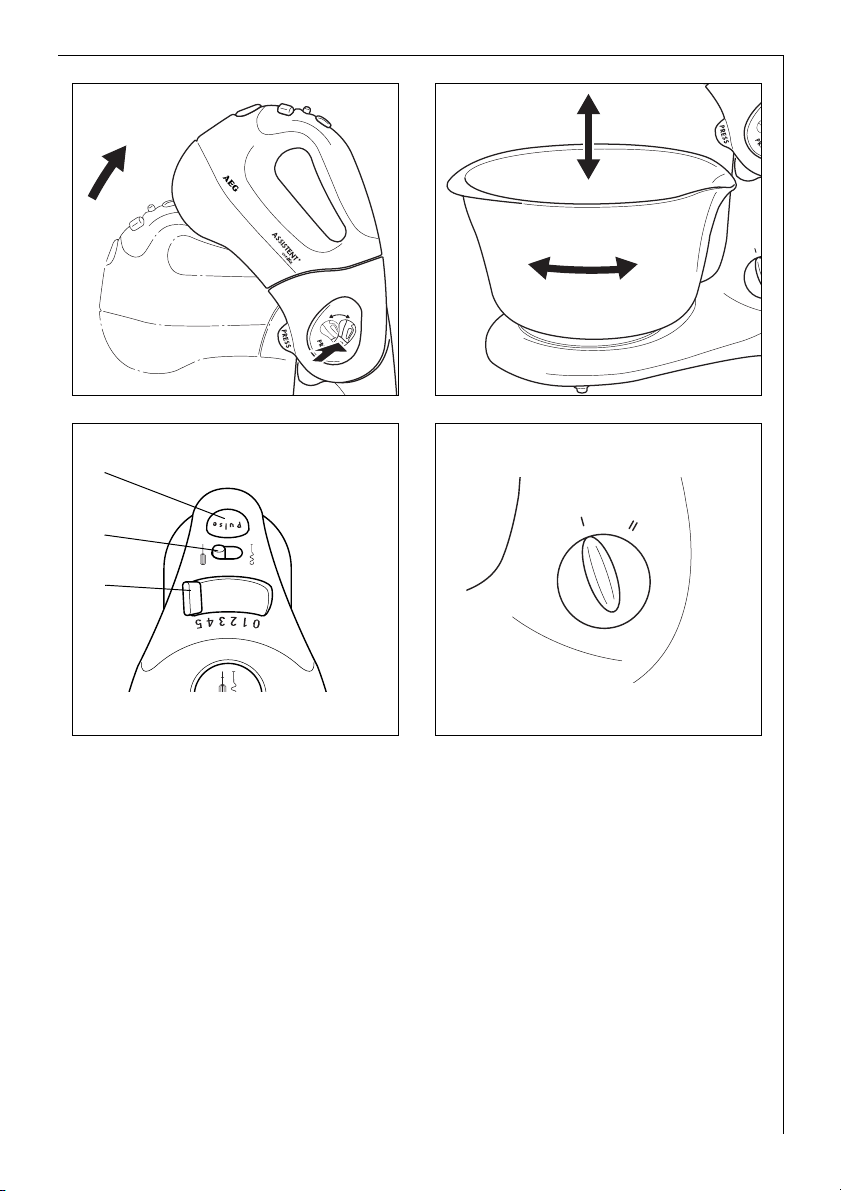
Inserting/removing accessories
(Figure 3)
Before releasing the accessories, switch
1
off the mixer and remove the plug
from the mains socket!
0 Push the whisks or dough hooks into
the accessory slots on the underside of
the mixers, until they click into place.
The two dough hooks have different
1
plug shapes and must be pushed into
the correct slots. Insertion the wrong
way round would lead to the dough
being transported upwards!
0 One of the dough hooks has an
additional small ring near the collar
on the shaft. This dough hook will
only fit in the slot for which it
is intended. This is identified by a
symbol.
0 To remove the accessories, hold firmly
with one hand, while pressing the
accessory release button (Figure 1/A).
Raising/lowering the mixer
(Figure 4)
Ensure that the mixer is switched off
1
before raising/lowering!
0 Press the raise/lower button (Figure
1/F) and swing the mixer up or down,
until it clicks in place.
With the mixer raised, the accessories
3
can be easily changed and the mixing
bowl located on the processor stand or
removed.
Locating/removing the mixing
bowl (Figure 5)
0 Locate the mixing bowl on the guide
on the base and latch in place by
gently turning clockwise.
0 To remove the mixing bowl, turn anti-
clockwise to unlatch.
It may be necessary to hold the base to
3
prevent it rotating.
The off-centre position of the mixer
makes it easy to add ingredients while
the processor is in operation.
11
Page 7

g
Working with the mixer/
processor
When the mixer is attached to the
1
processor stand, the mixing bowl is
automatically switched on when the
mixer is switched on.
The mixer must not be run continu-
1
ously for more than 10 minutes at a
time. After this time, allow to cool for
at least 20 minutes before re-using.
Maximum processing quantities:
1
Processing in the mixing bowl must not
exceed 1.5 kg solid or 1.75 l liquid
foodstuffs.
Switching the mixer ON
(Figure 6)
0 Select the speed range with the speed
range selector switch (Figure 1+6/C):
low speeds, or
high speeds.
0 The ON/OFF switch (Figure 1+6/B) is
used to:
– switch the mixer ON and OFF,
– control the mixer speed (5 speed set-
0 As long as the Pulse button (Figure
1+6/D) is pressed and held when the
appliance is in operation, the mixer
operates at its maximum speed.
Selecting the mixing bowl speed
(Figure 7)
The mixing bowl has two speed settings.
0 The mixing bowl speed selector switch
(Figure 1/H) is used to select the mixing
bowl speed:
I= low speed
II = high speed
Switching the mixer OFF
0 Slide the ON/OFF switch (Figure 1+6/B)
to "0".
– The mixer and mixing bowl are
Selecting the correct settings
The following notes can be used as a guide.
Mixer speed
Speed range selector switch
(Figure 1+6/C)
• Kneading, Mixing:
• Folding in: 3, 4
tings) in the pre-selected speed
range.
switched off.
ON/OFF switch
(Figure 1+6/B)
start with 1 or 2,
than speed up to 5
• Stirring:
• Whisking, Frothing: 4 or 5
or button (Figure 1+6/D)
Start all types of processing at a low speed. This will avoid powdery foods and liquids
3
spraying out.
start with 2 or 3,
than speed up
12
Page 8

g
Mixing bowl speed
Use speed "II" for whisking egg white,
cream and light cake mixtures. Use
speed "I" for heavy dough and large
quantities.
Cleaning and care
Residues of carrot and red cabbage
3
juice can be removed from the plastic
parts with cooking oil before the appliance is cleaned.
Mixer and processor stand
Remove the plug from the mains
1
socket before cleaning.
Ensure that no water penetrates into
the inside of the appliance! Never
clean the appliance under running
water and never immerse in water.
0 Wipe the mixer and processor stand
with a damp cloth.
Accessories
Whisks and dough hooks
0 Clean the whisks and dough hooks
with a brush or a cloth under running
water or in the dishwasher!
Storage
Store the dough hooks and whisks in
the mixing bowl located on the processor base. This will protect them from
damage.
Technical data
Mains voltage: 230 - 240 V
Power consumption: 380 W
Maximum continuous operating time:
10 minutes
This appliance complies with the fol-
;
lowing EC directives:
• 73/23/EEC of 19/2/1973 "Low voltage directive", including the modification directive 93/68/EEC.
• 89/336/EEC of 3/5/1989 "EMC directive", including the modification
directive 92/31/EEC.
Customer service
The highest quality standards apply for
our appliances. If nevertheless a disturbance should arise, for which you can
find no solution in the operating
instructions, please contact your
retailer or the AEG customer service.
Stainless steel mixing bowl
(KM 450 only)
0 The stainless steel mixing bowl (not the
lid!) can be washed in the dishwasher.
The lid of the stainless steel mixing
1
bowl must not be washed in the dishwasher.
Plastic mixing bowl
(KM 400 only)
Wash the plastic mixing bowl in water
with washing-up liquid.
If you wish to wash the plastic mixing
1
bowl in the dishwasher, it must be
placed in the upper basket.
13
Page 9

Garantiebedingungen
AEG Kundendienst in Deutschland
AEG Kundendienst in Europa
Sollte dieses AEG Gerät wider Erwarten nicht
funktionieren, wenden Sie sich bitte an unseren
Service. Wir werden die Abholung und
Instandsetzung durch unsere Werkstatt veranlassen.
AEG Kleingeräte-Zentralwerkstatt
Firma Trepesch GmbH
Steinstraße 500
90419 Nürnberg
In Deutschland stehen wir Ihnen für Fragen,
Anregungen oder bei Problemen rund um unsere
Kleingeräte und Raumpflegegeräte
montags bis freitags von 8 bis 18 Uhr
zur Verfügung.
AEG-Serviceline: 01805-30 60 80
(Deutsche Telekom 0,12 Euro/Min.)
Fax: 0911/ 3 23-49 19 30
service.kleingeraete@aeg-hausgeraete.de
E-Mail:
Der Endabnehmer dieses Geräts (Verbraucher) hat bei einem
Kauf dieses Geräts von einem Unternehmer (Händler) in
Deutschland im Rahmen der Vorschriften über den Verbrauchsgüterkauf gesetzliche Rechte, die durch diese Garantie
nicht eingeschränkt werden. Diese Garantie räumt dem Verbraucher also zusätzliche Rechte ein. Dies vorausgeschickt, leisten wir, AEG Hausgeräte GmbH, gegenüber dem Verbraucher
Garantie für dieses Gerät für den Zeitraum von 24 Monaten ab Übergabe zu den folgenden Bedingungen:
1. Mit dieser Garantie haften wir dafür, dass dieses neu hergestellte Gerät im Zeitpunkt der Übergabe vom Händler an
den Verbraucher die in unserer Produktbeschreibung für
dieses Gerät aufgeführten Eigenschaften aufweist. Ein
Mangel liegt nur dann vor, wenn der Wert oder die Gebrauchstauglichkeit dieses Geräts erheblich gemindert ist.
Zeigt sich der Mangel nach Ablauf von sechs (6) Monaten
ab dem Übergabezeitpunkt, so hat der Verbraucher nachzuweisen, dass das Gerät bereits im Übergabezeitpunkt
mangelhaft war. Nicht unter diese Garantie fallen Schäden
oder Mängel aus nicht vorschriftsmäßiger Handhabung sowie Nichtbeachtung der Gebrauchsanweisungen.
2. Dieses Gerät fällt nur dann unter diese Garantie, wenn es
in einem der Mitgliedsstaaten der Europäischen Union gekauft wurde, es bei Auftreten des Mangels in Deutschland
betrieben wird und Garantieleistungen auch in Deutschland erbracht werden können. Mängel müssen uns inner-
In diesen Ländern gelten die Garantiebedingungen der örtlichen
Vertriebsorganisationen. Diese können dort eingesehen werden.
In these countries our AEG sales organisations own guarantee
conditions are applicable. Please obtain further details direct.
Österreich, 4010 Linz, 0732 / 770101 - 30
Belgique/België, 1502 Lembeek, 02/363.04.44
Czech Republic, Hanusova ul., Praha 4, 02/6112 6112
Danmark, 7000 Fredericia, 70 11 74 00
España, Madrid, 1-885-2700
France, 60307 Senlis, 03-44 62 24 24
Great Britain, Service Force 08705 929 929
Hellas, 18346 MOÓXATO, 01/4822646
Island, Reykjavik (Bræóurnir Ormsson hf), 91-3 88 20
Italia, 33080 Porcia (PN), 0434 39 41
Kroatien, 10000 Zagreb, 385 1 6323 333
Luxembourg, 1273 Luxembourg-Hamm, 4 24 31-443
Magyarország, 1142 Budapest, 36-1-252-1773
Nederland, 2400 AC Alphen aan den Rijn, 0172-468 300
Norge, 0516 Oslo, 22 72 58 00
Poland, 02-034 Warszawa, 022 874 33 33
Portugal, 2635-445 Rio de Mouro, (21) 926 75 75
Romania, Bucuresti, B-dul Timisoara 90, 01-444-25-81
Russia, 129090 Moscow, +7 095 956 2917, 937 7893
Slovakia, 81105 Bratislava, 07/4333 9757
Slovenija, Tražaška 132, 1000 Ljubljana, 01 24 25 730
Schweiz/Svizzera, 5506 Mägenwil, 062/889 93 00
Suomi, Porissa, puh. (02) 622 3300
Sverige, 10545 Stockholm, 08-672 53 60
Turkey, Tarlabasi cad no:35 Taksim/Istanbul-0, 262-7249420
halb von zwei (2) Monaten nach dessen Kenntnis angezeigt
werden.
3. Mängel dieses Geräts werden wir innerhalb angemessener
Frist nach Mitteilung des Mangels unentgeltlich beseitigen; die zu diesem Zweck erforderlichen Aufwendungen,
insbesondere Arbeits- und Materialkosten werden von uns
getragen. Über diese Nachbesserung hinausgehende Ansprüche werden durch diese Garantie dem Verbraucher
nicht eingeräumt.
4. Im Garantiefall ist das Gerät vom Verbraucher an die für
seinen Wohnort zuständige AEG-Zentralwerkstatt zu versenden, wobei das Gerät gut zu verpacken ist und die vollständige Anschrift des Verbrauchers zusammen mit einer
kurzen Fehlerbeschreibung in das Paket zu legen ist. Zum
Nachweis des Garantie-Anspruchs ist der Sendung der Original-Kaufbeleg (Kassenzettel, Rechnung) beizufügen.
5. Garantieleistungen bewirken weder eine Verlängerung
noch einen Neubeginn der Garantiezeit für dieses Gerät;
ausgewechselte Teile gehen in unser Eigentum über.
6. Mängelansprüche aus dieser Garantie verjähren in zwei (2)
Jahren ab dem Zeitpunkt der Übergabe des Geräts vom
Händler an den Verbraucher, der durch den Original-Kaufbeleg (Kassenzettel, Rechnung) zu belegen ist; wenn dieses
Gerät gewerblich genutzt wird, beträgt die Verjährungs-
frist sechs (6) Monate.
AEG Hausgeräte GmbH, D-90429 Nürnberg, Muggenhofer Straße 135 Änderungen vorbehalten
Page 10

AEG Hausgeräte GmbH
Postfach 1036
D-90327 Nürnberg
http://www.aeg.hausgeraete.de
© Copyright by AEG
822 949 233 - 0303
 Loading...