

AEG EHET96CS, EHET66CS User Manual
user manual
Ceramic glass hob
EHET66CS, EHET96CS
2 electrolux
Electrolux. Thinking of you.
Share more of our thinking at www.electrolux.com
Contents
Safety instructions .................................. |
2 |
|
Description of the Appliance ................... |
3 |
|
Operating the appliance ........................ |
6 |
|
Tips on cooking and frying .................... |
10 |
|
Cleaning and Care ................................ |
11 |
|
What to do if ... |
..................................... 12 |
|
Technical data ...................................... |
13 |
Disposal ............................................... |
13 |
Installation Instructions ......................... |
14 |
Assembly ............................................. |
15 |
Warranty .............................................. |
16 |
Service ................................................. |
18 |
Subject to change without notice |
|
Safety instructions
 Warning! Please comply with these instructions. If you do not, any damage resulting is not covered by the warranty.
Correct use
•This appliance is not intended for use by persons (including children) with reduced physical, sensory or mental capabilities, or lack of experience and knowledge, unless they have been given supervision or instruction concerning use of the appliance by a person responsible for their safety.
•Do not leave the appliance unattended during operation.
•This appliance should be used only for normal domestic cooking and frying of food.
•The appliance must not be used as a work surface or as a storage surface.
•Additions or modifications to the appliance are not permitted.
•Do not place or store flammable liquids, highly inflammable materials or fusible objects (e.g. plastic film, plastic, aluminium) on or near the appliance.
Children's safety
•The cooking zones will become hot when you cook. Therefore, always keep small children away from the appliance.
•The appliance is not intended for use by young children or infirm persons without supervision.
•Children should be supervised to ensure that they do not play with the appliance.
 Warning! Accessible parts will become hot during use. To avoid burns young children should be kept away
General Safety
•The appliance may only be installed and connected by trained, registered service engineers.
•Built-in appliances may only be used after they have been built into suitable built-in units and work surfaces that meet standards.
•In the event of faults with the appliance or damage to the glass ceramic (cracks, scratches or splits), the appliance must be switched off and disconnected from the electrical supply, to prevent the possibility of an electric shock.
•Repairs to the appliance must only be carried out by trained registered service engineers.
Safety during use
•Remove stickers and film from the glass ceramic.
•There is the risk of burns from the appliance if used carelessly.
•Cables from electrical appliances must not touch the hot surface of the appliance or hot cookware.
•Overheated fats and oils can ignite very quickly. Warning! Fire hazard!
•Switch the cooking zones off after each use.
 Warning! If the surface is cracked, switch off the appliance to avoid possibility of electric shock.
Safety when cleaning
•For cleaning, the appliance must be switched off and cooled down.
•For safety reasons, the cleaning of the appliance with steam jet or high pressure cleaning equipment is not permitted.
How to avoid damage to the appliance
•The glass ceramic can be damaged by objects falling onto it.
•The edge of the glass ceramic can be damaged by being knocked by the cookware.
electrolux 3
•Cookware made of cast iron, cast aluminium or with damaged bottoms can scratch the glass ceramic if pushed across the surface.
•Before spillage can become burnt on to the cooking surface, remove it with a damp cloth.
•To avoid damaging cookware and glass ceramics, do not allow saucepans or frying pans to boil dry.
•Do not use the cooking zones with empty cookware or without cookware.
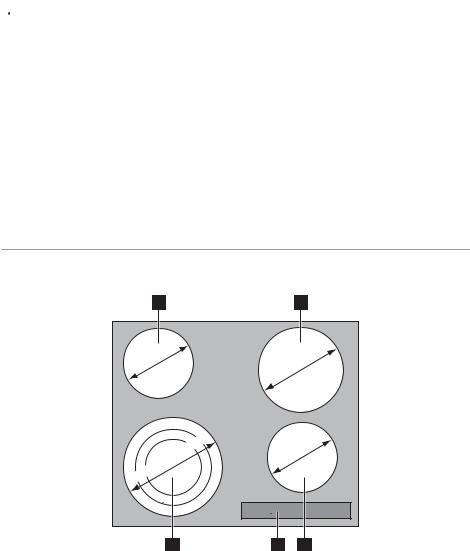
Description of the Appliance
Cooking surface layout
|
|
EHET66CS |
|
|
|
|
1 |
|
|
2 |
|
145 |
mm |
|
|
mm |
|
|
|
180 |
|||
|
|
|
|
||
|
|
|
|
|
|
120/175/210 |
mm |
145 |
mm |
||
|
|
||||
|
|
|
|
||
|
5 |
|
4 |
|
3 |
1 |
Single cooking zone 1200W |
4 |
Control panel |
|
Single cooking zone 1800W |
|
Triple cooking zone 2300/1600/800W |
2 |
5 |
||
|
Single cooking zone 1200W |
|
|
3 |
|
|

4 electrolux
|
|
|
EHET96CS |
|
|
|
|
1 |
|
|
|
|
|
|
145 |
mm |
|
|
mm 265 mm |
|
|
|
|
170 |
|
||
|
|
|
|
|
||
120/175/210 |
mm |
|
|
|
|
|
|
|
|
|
180 |
mm |
|
|
|
|
|
|
||
|
|
|
|
|
|
|
5 |
|
|
4 |
|
|
3 |
1 |
Single cooking zone 1200W |
4 |
Control panel |
|
Multi-purpose cooking zone |
|
Triple cooking zone 2300/1600/800W |
2 |
5 |
||
|
2200/1400W |
|
|
|
Single cooking zone 1800W |
|
|
3 |
|
|
Control panel layout
EHET66CS
6
|
|
|
|
|
|
|
|
|
|
|
|
|
|
|
|
|
|
|
|
|
|
|
|
|
|
|
|
|
|
|
|
|
|
|
|
|
|
|
|
|
|
|
|
|
|
|
|
|
|
|
|
|
|
|
|
|
|
|
|
|
|
|
|
|
|
|
|
|
|
|
|
|
|
|
|
|
|
|
|
|
|
|
|
|
|
|
|
|
|
|
|
|
|
|
|
|
|
|
|
|
|
|
|
|
|
|
|
|
|
|
|
|
|
|
|
|
|
|
|
|
|
|
|
|
|
|
|
|
|
|
|
|
|
|
|
|
|
|
|
|
|
|
|
|
|
|
|
|
|
|
|
|
|
|
|
|
|
|
|
|
|
|
|
|
|
|
|
|
|
|
|
|
|
|
|
|
|
|
|
|
|
|
|
|
|
|
|
|
|
|
|
|
|
|
|
|
|
|
|
|
|
|
|
|
|
|
|
|
|
|
|
|
|
|
|
|
|
|
|
|
|
|
|
|
|
|
|
|
|
|
|
|
|
|
|
|
|
|
|
|
|
|
|
|
|
|
|
|
|
|
|
|
|
|
|
|
|
|
|
|
|
|
|
|
|
|
|
|
|
|
|
|
|
|
|
|
|
|
|
|
|
|
|
|
|
|
|
|
|
|
|
|
|
|
|
|
|
|
|
|
|
|
|
|
|
|
|
|
|
|
|
|
|
|
|
|
|
|
|
|
|
|
|
|
|
|
|
|
|
|
|
|
|
|
|
|
|
|
|
|
|
|
|
|
|
|
|
|
|
|
|
|
|
|
|
|
|
|
|
|
|
|
|
|
|
|
|
|
|
|
|
|
|
|
|
|
|
|
|
|
|
|
|
|
|
|
|
|
|
|
|
|
|
|
|
|
|
|
|
|
|
|
|
|
|
|
|
|
|
|
|
|
|
|
|
|
|
|
|
|
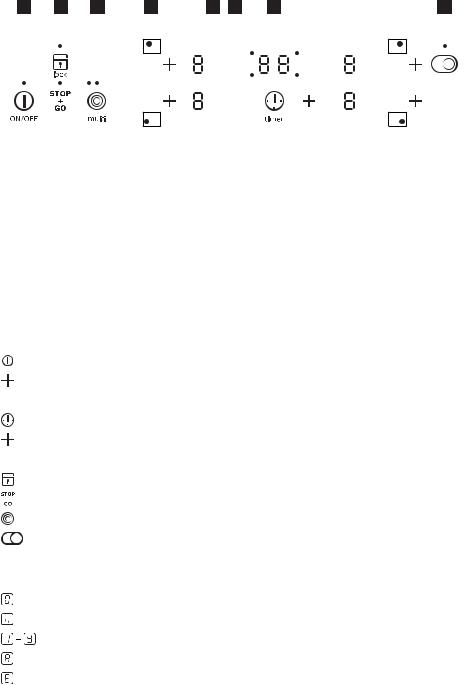
1 |
On/Off with power indicator |
|
6 |
|
Cooking zone indicators Timer function |
|||||||||||||||||||||||
|
|
Lock with pilot light |
|
|
|
Timer display |
|||||||||||||||||||||||
|
2 |
7 |
|
||||||||||||||||||||||||||
|
|
A triple ring cooking zone |
|
|
|
Timer |
|||||||||||||||||||||||
|
3 |
8 |
|
||||||||||||||||||||||||||
|
|
Heat setting selection |
|
|
|
Zone selection indicator |
|||||||||||||||||||||||
|
4 |
9 |
|
||||||||||||||||||||||||||
|
|
Display |
|
|
Stop+Go function |
||||||||||||||||||||||||
|
5 |
10 |
|||||||||||||||||||||||||||
electrolux 5
EHET96CS
6
|
|
|
|
|
|
|
|
|
|
|
|
|
|
|
|
|
|
|
|
|
|
|
|
|
|
|
|
|
|
|
|
|
|
|
|
|
|
|
|
|
|
|
|
|
|
|
|
|
|
|
|
|
|
|
|
|
|
|
|
|
|
|
|
|
|
|
|
|
|
|
|
|
|
|
|
|
|
|
|
|
|
|
|
|
|
|
|
|
|
|
|
|
|
|
|
|
|
|
|
|
|
|
|
|
|
|
|
|
|
|
|
|
|
|
|
|
|
|
|
|
|
|
|
|
|
|
|
|
|
|
|
|
|
|
|
|
|
|
|
|
|
|
|
|
|
|
|
|
|
|
|
|
|
|
|
|
|
|
|
|
|
|
|
|
|
|
|
|
|
|
|
|
|
|
|
|
|
|
|
|
|
|
|
|
|
|
|
|
|
|
|
|
|
|
|
|
|
|
|
|
|
|
|
|
|
|
|
|
|
|
|
|
|
|
|
|
|
|
|
|
|
|
|
|
|
|
|
|
|
|
|
|
|
|
|
|
|
|
|
|
|
|
|
|
|
|
|
|
|
|
|
|
|
|
|
|
|
|
|
|
|
|
|
|
|
|
|
|
|
|
|
|
|
|
|
|
|
|
|
|
|
|
|
|
|
|
|
|
|
|
|
|
|
|
|
|
|
|
|
|
|
|
|
|
|
|
|
|
|
|
|
|
|
|
|
|
|
|
|
|
|
|
|
|
|
|
|
|
|
|
|
|
|
|
|
|
|
|
|
|
|
|
|
|
|
|
|
|
|
|
|
|
|
|
|
|
|
|
|
|
|
|
|
|
|
|
|
|
|
|
|
|
|
|
|
|
|
|
|
|
|
|
|
|
|
|
|
|
|
|
|
|
|
|
|
|
|
|
|
|
|
|
|
|
|
|
|
|
|
|
|
|
|
|
|
|
|
|
|
|
1 |
On/Off with power indicator |
7 |
Timer display |
|||||||||||||||||||||||
|
|
Lock with pilot light |
|
Multipurpose cooking zone |
|||||||||||||||||||||||
|
2 |
8 |
|||||||||||||||||||||||||
|
|
A triple ring cooking zone |
|
Timer |
|||||||||||||||||||||||
|
3 |
9 |
|||||||||||||||||||||||||
|
|
Heat setting selection |
|
Zone selection indicator |
|||||||||||||||||||||||
|
4 |
10 |
|||||||||||||||||||||||||
|
|
Display |
|
Stop+Go function |
|||||||||||||||||||||||
|
5 |
11 |
|||||||||||||||||||||||||
|
|
Cooking zone indicators Timer function |
|
|
|
|
|
|
|
|
|
|
|
|
|||||||||||||
|
6 |
|
|
|
|
|
|
|
|
|
|
|
|
||||||||||||||
Touch Control sensor fields
The appliance is operated using Touch Control sensor fields. Functions are controlled by touching sensor fields and confirmed by displays and acoustic signals. Touch the sensor fields from below, without covering other sensor fields.
|
|
|
Sensor field |
Function |
|
|
|
On / Off |
To switch the appliance on and off |
|
|
|
|
|
|
|
|
Increase settings |
To increase heat settings |
|
|
|
|
|
|
|
|
Reduce settings |
To reduce heat settings |
|
|
|
||
|
|
|
|
|
|
|
|
Timer |
To select timer settings |
|
|
|
|
|
|
|
|
Increase settings |
To increase Timer time |
|
|
|
|
|
|
|
|
Reduce settings |
To reduce Timer time |
|
|
|
||
|
|
|
|
|
|
|
|
Lock |
To lock/unlock the control panel |
|
|
|
|
|
|
|
|
Stop+Go |
To switch the Keep Warm setting on/ off |
|
|
|
|
|
|
|
|
Triple ring switch |
To switch outer rings on and off |
|
|
|
|
|
|
|
|
Multi-purpose zone switch |
To switch the outside ring on and off |
|
|
|
|
|
Displays
|
Display |
Description |
|
|
Cooking zone is switched off |
|
|
|
|
Keep warm setting |
Keep warm setting is set |
|
|
|
|
Heat settings |
Heat setting is set |
|
|
|
|
Automatic warm up function |
Automatic warm-up function is activated |
|
|
|
|
Error |
Malfunction has occurred |
|
|
|
6 electrolux |
|
|
|
|
|
|
Display |
Description |
|
Residual heat |
Cooking zone is still hot |
|
|
|
|
Child safety device |
Lock/child safety device is activated |
|
|
|
|
Automatic switch off |
Switch off is active |
|
|
|
Residual heat indicator
 Warning! Risk of burns from residual heat. After being switched off, the cooking zones need some time to cool down. Look at the residual heat indicator.
Important! Residual heat can be used for melting and keeping food warm.
Operating the appliance
Switching the appliance on and off
|
|
Control panel |
Display |
Pilot light |
|
Switch on |
|
Touch |
for 2 seconds |
/ |
lights up |
Switch off |
|
Touch |
for 1 second |
/ none |
goes out |
|
|
|
|
|
|
Important! After switching on, within approx. 10 seconds a heat setting or a function must be set, otherwise the appliance automatically switches itself off.
Setting the heat setting
|
|
|
Control panel |
Indicator |
||
To increase |
Touch |
|
|
|
|
to |
To decrease |
Touch |
|
|
|
|
to |
|
|
|
|
|||
To switch off |
Touch |
|
and |
|
at the same time |
|
|
|
|
||||
|
|
|
|
|
|
|
 The keep warm setting
  lies between
  and
and  . It is used to keep food warm.
Switching the outside ring on and off
By switching the outside rings on or off, the effective heating surface can be matched to the size of the cookware.
Before an outside ring can be switched on, the inside ring must be switched on
Triple cooking zone |
|
Sensor panel |
To switch on the middle ring |
Touch |
for 1-2 seconds. |
To switch on the outside ring |
Touch |
for 1-2 seconds. |
To switch off the outside ring |
Touch |
for 1-2 seconds. |
|
|
|
To switch off the middle ring |
Touch |
for 1-2 seconds. |
|
|
|
Multi-purpose zone |
|
Sensor field |
To switch on outside ring |
Touch |
for 1-2 seconds |
|
|
|
Power indicator
One power indicator is lit.
Two power indicators are lit.
Second power indicator goes out.
First power indicator goes out.
Pilot light
is lit
 Loading...