

Page 1

Operating Instructions
^ feo J)
Built-in Electric Oven
B60D
AEG
Page 2

Please read and follow the instructions in this booklet
Contents page
Figures (unfold pages for easy reference) 3-5
Features 6
Before using the cooker for the first time 6
Getting to know your oven 7
How to select the different cooking
methods 8/9
Defrosting with Ventitherm 10
Preserving with Ventitherm 11
Clock, minute minder, time controlled
cooking 12/13
Cleaning and maintenance 14/15
Optional extras 16
If you think your cooker Is not working
properly 17
Service 17
Page 3
Page 4
Page 5
10
11
Page 6

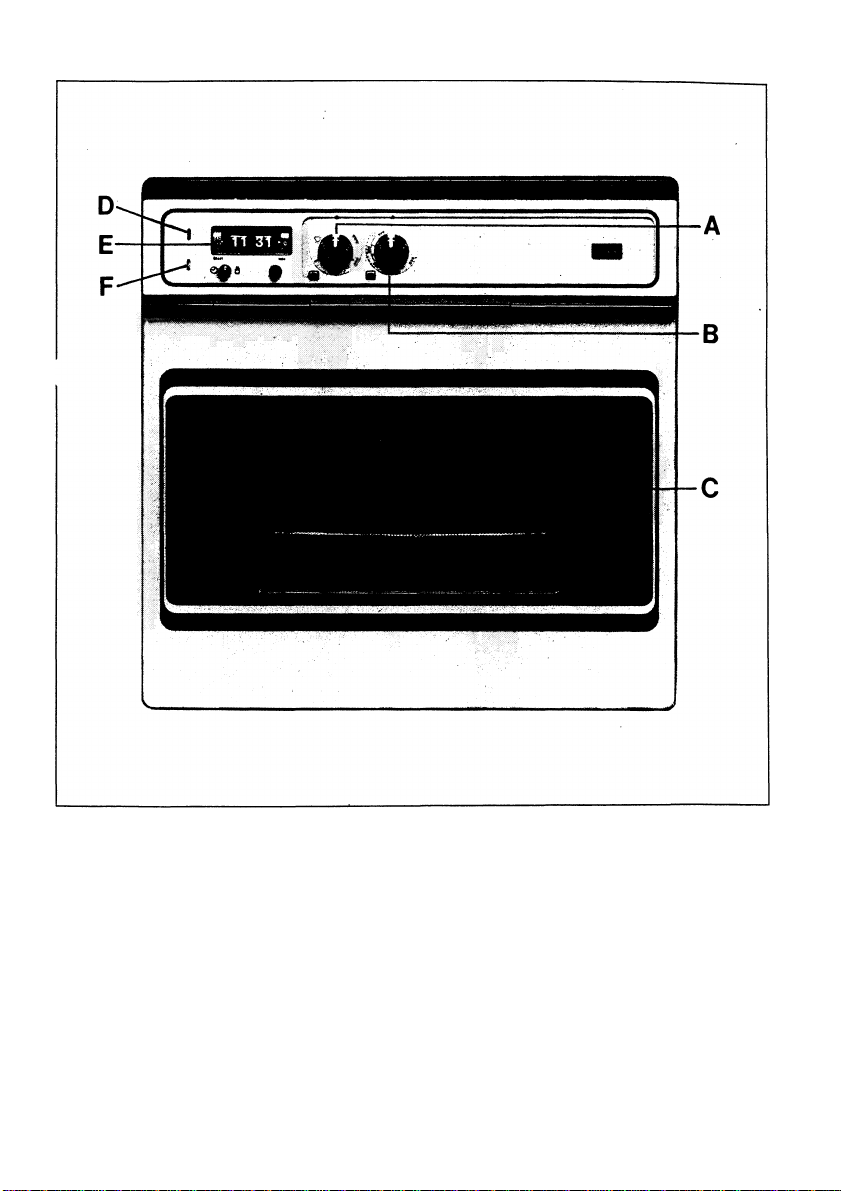
Features
Figure 1
A Cooking method selector for: Ventitherm,
Conventional, Grilling, Infra-therm grilling
B Temperature control knob
C Oven with interior light and grill element
D Red thermostat light for the oven
E 24 hour digital clock with automatic STOP
and START/STOP cooking and minute
minder
F Yellow pilot light
Before using the cooker for the first time
To switch on the oven
Remove all oven accessories and clean with
hot water and washing-up liquid. Switch on the
empty oven by selecting symbol Q on the
cooking method selector (fig. 1/A) and 250 °C
on the temperature control (fig. 1/B) and leave
for 30 minutes to burn off the bonding agent
incorporated in the oven insulation. During this
time there will be an unpleasant odour which is
unavoidable. When the oven has cooled down
clean It with hot water and washing-up liquid.
Important
The surface of the oven get hot during
operation. Take care and always keep small
children away from cooking appliances.
Page 7

Getting to know your oven
General
Your oven incorporates five cooking methods
from which you can choose;
1. Ventitherm fan cooking
2. Conventional cooking
3. Infra-therm grilling
4. Hot air grilling
5. Traditional grilling
Important
' Do not line the oven or any part thereof with
luminium foil. This tends to trap heat
resulting in poor cooking performance and
damage to the enamelled interior.
■ The vitreous enamel in your oven is very
durable. However vitreous enamel is
adversely affected by fruit acids (rhubarb,
lemon etc.) and tea which will discolour and
dull the enamel. The performance of the
oven is not affected. To prevent spillage of
the above coming in contact with the
enamel, place the cooking container on a
baking sheet.
■ Clean the oven after every use to prevent a
build-up of soilage. To aid cleaning of the
oven a 3-piece catalytic liner set is available
as an optional extra, (see page 16 “optional
extras”).
For roasting, stewing, and baking choose
either the fan or the conventional cooking
method depending on your personal
preference. Consult your AEG recipe book for
details. For batch baking and complete meal
cooking choose the Ventitherm cooking
method as you can cook on several levels
simultaneously. This will save time and energy.
It is quite normal for some steam or
condensation to develop when cooking
foods with high moisture content or large
quantities of food.
The oven is equipped with an advance
cooling system to keep temperatures in
oven housing units to a minimum. A short
while after the oven has been switched on
the ventilator of the cooling system switches
on and remains in operation during cooking
and for some time aftenA/ards. It will switch
off automatically.
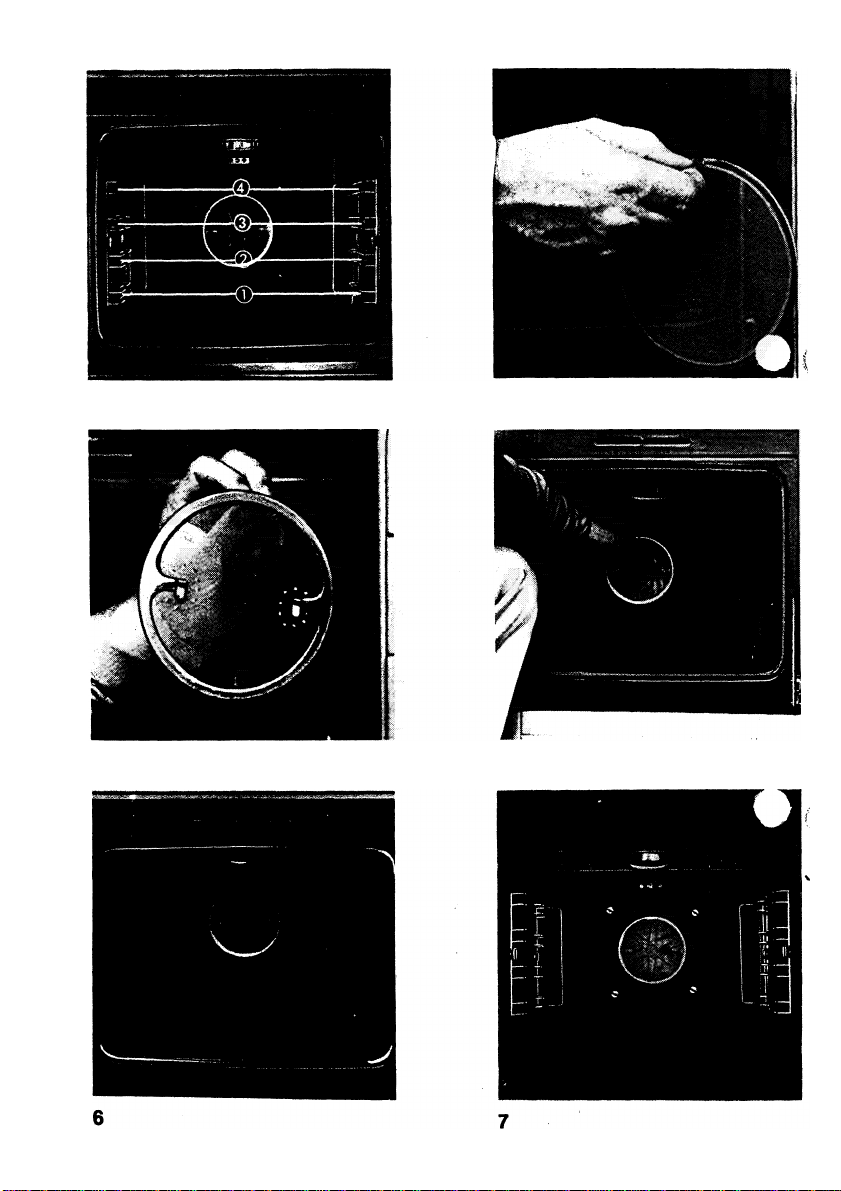
Shelf positions
Fig. 2
Your oven has 4 shelf positions. Consult your
oe book AEG for details.
Insert the fat filter
Fig.3
The fat filter is used for open roasting and
grilling of any kind. The fat filter absorbs
airborne fat preventing it from reaching the fan.
How to insert the fat filter
Hold the fat filter by the small handle (fig. 3)
and insert the 2 clips (fig. 4) into the slots in
the back panel over the fan (fig. 5). Make sure
that the fat filter covers the fan opening
completely (fig. 6).
Page 8

How to select the different cooking methods
1. Venthherm Ian cooking
Select (51 on the selector switch
(fig. 1/A) and the required
temperature on the oven tempera
ture control (fig. 1/B) if you want
to use the oven as a Ventitherm.
For detailed information on the
Ventitherm cooking method
consult your AEG recipe book.
2. Conventional electric cooking
If you want to use the oven as a
conventional electric oven select Q
on the selector switch (fig. 1/A) and
the required temperature on the oven
temperature control (fig. 1/B). For
further information consult your AEG
recipe book.
Grilling
You can choose from 3 different
methods of grilling.
Traditional grilling with a radiant
grill element (fig. 7).
Insert the fat filter.
Insert the deflector plate in the slot
provided just above the oven
(fig. 7 arrow).
Select n on the cooking method
selector (fig. 1/A) and 6 on the
oven temperature control (fig. 1/B).
Pre-heat grill for 3-5 minutes on
this setting. To lower the heat
select any setting between 1 and 6.
Place the food on the reversible
wire shelf In the enamelled pan.
Position the pan on the required
runner. Close the oven door up to
the resting position (fig. 8).
Engage the grill pan handle from
either end of the pan and slide
it to the centre (fig. 9). If you
wish to leave the handle on during
grilling the door has to be left
completely open.
Page 9

How to select the different cooking methods
Infra-therm grilling
This replaces the rôtisserie in your
oven and is suitable for joints and
poultry, weighing 1 kg (2 lb) or more.
Insert the fat filter.
Select O on the cooking method
selector (fig. 1/A) and the required
temperature on the oven temperature
control (fig. 1/B).
The enamelled pan collects juices
and fat released during cooking and
is positioned on the 1st runner from
the bottom.
The wire shelf is located 2nd from
the bottom (except for fillet of beef 3rd).
Hot air grilling
This method is ideal for grilling
toasted snacks, chicken portions,
chops, steaks, kebabs etc. without
turning the food.
Insert the fat filter.
Select (5 on the cooking method
selector (fig. 1/A) and between
200-250 °C on the oven temperature
(fig. 1/B).
control
Food is placed directly in the
enamelled pan or on the reversible
wire shelf in the pan.
For cooking times and
temperatures consult your
recipe book AEG.
The oven door Is closed during
Infra-therm grilling.
The baking sheets available as
an optional extra are also well
suited for this type of grilling If
you want to grill on 2 or 3
levels simultaneously.
For easy cleaning the baking
sheets can be lined with non
stick parchment. For further
details consult your AEG recipe
book. The oven door is closed
during hot air grilling.
To switch off the oven
n the cooking method selector (fig. 1/A) and
oven temperature control (fig. 1/B) anti
clockwise to the “off” position.
Page 10

Defrosting with Ventitherm
Containers
Use ovenproof containers covered with a lid or
foil.
Shelf position
Use 2nd from bottom and place containers
either in the enamelled pan or on a wire shelf.
Temperatures and Times
Ready-made meals are thawed and heated
through on 200 °C.
Ready-to-cook frozen foods are thawed and
cooked between 170-200 °C depending on the
type of food.
To switch on the oven
Turn the cooking method selector
(fig. 1/A) to symbol (X| and the oven
temperature control (fig. 1/B) to the required
temperature.
Times depend on the type of food to be
thawed and the temperature selected. The I
values given In the chart are guidelines only
and may have to be adjusted accordingly.
Food
Ready-made meals (1-4 portions)
Small cakes without cream fillings
or toppings (In foil)
Large cakes without cream
fillings or toppings (in foil)
Unsllced bread In foil
(approx. 450 g/1 lb)
Bread rolls
Fruit, eg. 300 g strawberries,
raspberries (in covered container)
Ready-to-cook foods (e. g. pizza, pies)
Uncooked joints (e.g. IV2 kg)
Temperature
X
200
200
200
200
200
200
200
180-200 2.00-3.00
Time
hours/mins.
0.40-0.50
0.15-0.20 ready to serve
0.30-0.45
0.15+0.30
at room
temperature
0.15+0.30
at room
temperature
0.15+0.15
at room
temperature
0.45-1.00 ready to serve
depending on
type of meat
thawing and heating
ready to sen/e
ready to serve
ready to serve ^
ready to serve
ready to sen/e
thawed and cooked
Page 11

Preserving with Ventithemn
Important
Use only bottling jars with rubber seals and
glass lids.
Do not use jars with screw tops, bayonet clips
or tins. For best results hygienic handling and
good quality fresh foods are essential.
Up to six 1-11/2 litre jars can be placed in the
oven.
^nelf position
Slide the enamelled pan onto the 2nd runner
from the bottom and place jars, leaving a
space between each, onto it.
The jars should be of the same size and
should be filled with the same amount and
contents. Make sure that the tops are firmly
clipped to the jars. Stand a cup of hot water in
the pan to maintain the necessary moisture in
the oven.
Close the oven door.
To switch on the oven
Select symbol ^ on the cooking method
selector (fig. 1/A) and 160 °C on the oven
temperature control (fig. 1/B).
Fruit
Watch the contents of the jars until bubbles
form in the first jar (approx. 35-45 minutes for
1 litre jars, approx. 45-60 minutes for V/2 litre
jars).
Switch off the oven and leave the jars in the
closed oven for a further 30 minutes. For soft
fruit, eg. strawberries, allow only 15 minutes.
11
Page 12

Digitale clock and minute minder
(J) (5
?
12 45
@
The clock 1 on your cooker shows you the
correct time of day.
Setting the dock
To set the clock, e.g. when using the cooker
for the first time or after a power cut, proceed
as follows:
1. Pull out knob 2 the digits will rotate in a
speeded up fashion.
2. When the correct time appears push in
button 2.
Setting the minute minder
The clock Incorporates a minute minder with a
buzzer to remind you that a selected cooking
time has elapsed. The minute minder is set as
follows:
1. Set the change-over button 3 to \!!!l .
2. Press button 2 until the minute dial 4 shows
the required time against the marker. The
buzzer will sound at the end of the pre-set
cooking time. It will switch off automatically
after several minutes.
You can switch this off manually by
pressing button 2 until “0” of the dial
appears against the marker.
The kg-values on dial 4 do not apply in
the UK.
12
Page 13

Automatic STOP and START/STOP
12 45
@ @
Important note
After time controlled cooking always re-set the
timer to the manual symbol 0 .
Setting the automatic STOP
1. If the green line on the starting dial 5 Is not
visible, turn the change-over button 3 to Q
and press until the starting dial 5 stops.
It will then show the same time as the
adjacent digital clock 1. A green line
appears on the starting dial when the
change-over button is released.
2. Leave the change-over button 3 on Q.
3. Press button 2 until the minute dial 4 shows
the required cooking time against the
marker.
4. Switch on the oven.
Setting the automatic START/STOP
The automatic START/STOP facility enables the
oven to switch on and off automatically within a
24 hour period.
1. Turn the change-over button 3 to the
0 symbol.
2. Press button 2 until the minute dial 4 shows
the required cooking time against the
marker.
3. Deduct the cooking time from the required
end, this gives you the starting time for the
automatic START/STOP.
4. Press change-over button 3 until the star
ting dial 5 shows the required starting time
against the marker.
5. Switch on the oven.
After completion of the time controlled cooking
please return the change-over switch 3 to 0 ,
and set the control knobs to “0”.
13
Page 14

Cleaning and maintenance
Cleaning of tfie oven
Before cleaning switch off the oven and allow it
to cool down. For best results the oven should
be cleaned after each use as food deposits will
dry or bake on when the oven is used again.
Never use an abrasive such as wire wool, or
scouring powder. The following can be used
depending on the degree of soilage:
1. A damp cloth and mild detergent.
2. Cream cleaners such as “JIf” and a cloth or
nylon scourer such as “Scotchbrite”.
3. Oven cleaners such as “Ovenpad” or
“Kleenoff”. Do follow the manufacturers
instructions on the cleaning materials you
use carefully. For cleaning of painted
surfaces, glass, plastic and catalytic liners
use mild detergents only.
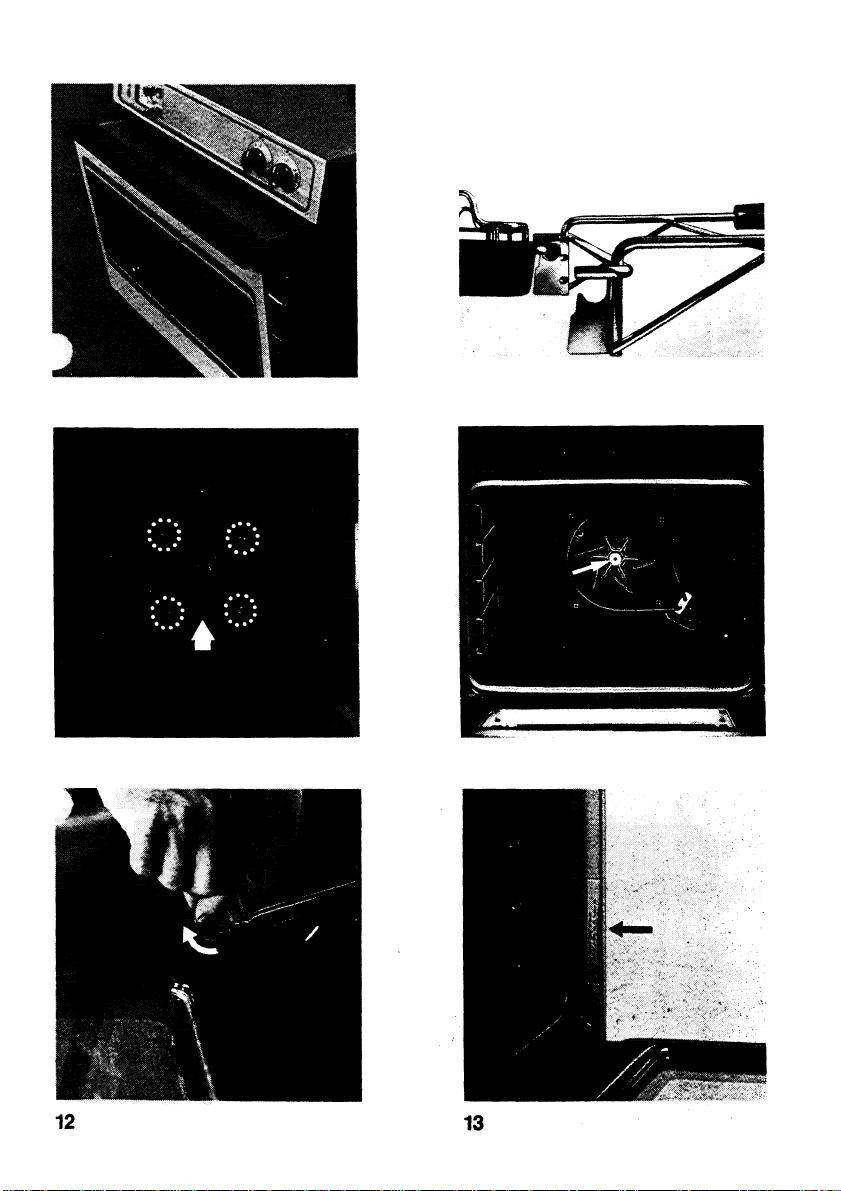
Removal of the oven door
For thorough cleaning the oven door should be
removed. Proceed as follows:
1. Open the door and unlock safety catches
on both sides of the door. Using a coin
(fig. 12) give the locks holding the catches
a quarter turn (90 degrees) in clockwise
direction.
2. Close the door approximately halfway to the
stop position.
3. Press the door slightly forward and lift off.
Do not lift door by the handle.
4. To replace the door, reverse this sequence.
Remember to lock the safety catches by
returning them to their original position
(quarter turn anti-clockwise).
Oven interior light
During cleaning, the oven interior can be illumi
nated. To switch on the oven light turn the
cooking method selector to the symbol {ft .
Fat filter
The fat filter should be cleaned after use. Hold
the filter by the handle and lift upwards. Boil
the fat filter In hot water with some automatic
washing powder added. See page 7 for details
on how to insert the fat filter.
14
Page 15

Cleaning and maintenance
Removing the shelf supports
Remove oven accessories
1 Loosen both nuts at the rear on the left and
right of the oven.
2 Unscrew both nuts at the front on the left
and right of the oven.
3 Remove the shelf supports.
Re-assemble in reverse order.
To remove the rear panel
The rear panel (fig. 10) of the oven can be
removed for cleaning. Proceed as follows:
1. Unscrew the four nuts.
2. Clean the panel as in the case of all
enamelled surfaces.
To remove the fan
Having removed the rear panel you will gain
access to the fan (fig. 11) which Is held on the
motor shaft by a nut (left-hand thread). Loosen
this nut by turning it clockwise and remove the
3. Re-assemble in reverse order.
When replacing the rear panel, make sure that
it is correctly placed.
fan. Clean the fan with hot soapy water.
Replace the fan and remember to fasten the
nut by turning it anti-clockwise.
Page 16

Optional extras
Optional catalytic set KS 9 E-No. 611 899 405
An optional catalytic set is available consisting
of two side panels and one rear panel which
replaces the existing one.
The two catalytic side panels are fastened (as
Illustrated) behind the shelf supports with two
nuts each side. Make sure that the catalytic
coating faces the interior of the oven.
These liners help to keep the oven cleaner as
they clean themselves to a great extent during
roasting and baking at temperatures above
200 °C.
As cleaning may be Improved by exposure to a
higher temperature it may be necessary to run
the oven at 250 X for 1 or 2 hours per week.
Before carrying out such a heat cycle remove
all oven equipment and make sure that you
have cleaned the unllned surfaces to prevent
any soil from baking on.
For isolated stubborn stains use a soft brush
and very hot soapy water. Never use abrasive
cleaners or scouring powders.
Baking i
E-No. 611 899 359
16
Reversible wire shelf E-No. 611 899 360
Page 17

If you think your cooker is not working property
The indicator lights do not work
The oven does not heat up
■ Check whether the operating sequence has
been fully carried out.
■ Check whether the fuses in the fuse box
are in good working order.
The oven does not work
■ Did you forget to turn the change over
button of the automatic timer back to the
manual symbol 0 after time controlled
cooking? See also pages 12 and 13.
Important
Please make sure that you are not able to
rectify the fault yourself prior to calling a
service engineer in connection with one of the
aforementioned problems, as the cost involved
Service
Should you be unable to locate the cause of a
problem in spite of the above check-list please
contact your AEG Service Department, quoting
the following details:
The oven interior light has failed
1. Disconnect the fuses in the fuse box
2. Turn protective cover for the oven light on
oven roof anti-clockwise
3. Replace bulb (40 W heat-resistant to 300 °C)
will have to be passed on even during the
warranty period. Therefore, follow the
instructions and recommendations in this
booklet carefully.
' E-No.:
F-No.:................................
You will find these details on the rating plate of
your oven (fig. 13). We would recommend that
you transfer the numbers to the space
provided for easy reference.
This appliance complies with the Radio
Interference requirements of EEC Directive
76/889/EEC.
17
Page 18

Page 19

Page 20

H 261 204 540 - 068301.2/02 -
Subject to change without notice
AEG
 Loading...